
Red Hat Training
A Red Hat training course is available for Red Hat JBoss Web Server
HTTP Connectors Load Balancing Guide
HTTP load balancing for JBoss Enterprise Application Platform and Red Hat JBoss Web Server 2.0.1
Edition 2
Abstract
Preface
1. File Name Conventions
- JBOSS_EAP_DIST
- The installation root of the JBoss Enterprise Application Platform instance. This folder contains the main folders that comprise the server such as
/jboss-as,/seam, and/resteasy. - JBOSS_EwP_DIST
- The installation root of the JBoss Enterprise Web Platform instance. This folder contains the main folders that comprise the server such as
/jboss-as-web,/seam, and/resteasy. - JBOSS_EWS_DIST
- The installation root of the JBoss Enterprise Web Server instance. This folder contains the main folders that comprise the server such as
/extras,/httpd, and the/tomcat6folders. - NATIVE
- The installation root of the JBoss Native zip, extracted to the same directory level as JBOSS_EAP_DIST.
- SJWS
- The installation root of the Sun Java Web Server instance. The default file locations for this naming convention are:
- for Solaris 10 x86 or SPARC 64:
/opt/SUNWwbsrv70/
- HTTPD_DIST
- The installation root of the Apache httpd Server. This folder contains the main folders that comprise the server such as
/conf,/webapps, and/bin. The JBoss Enterprise Web Server JBOSS_EWS_DIST directory contains the root installation of HTTPD_DIST.
Part I. Apache Tomcat Connector
Chapter 1. Overview
Chapter 2. Download and Install
mod_jk is included in the native installation binaries for JBoss Enterprise Application Platform and JBoss Enterprise Web Server.
Chapter 3. Configure Load Balancing Using Apache and mod_jk
Procedure 3.1. Configure Apache to Load mod_jk
- Open
HTTPD_DIST/conf/httpd.confand add a single line at the end of the file.# Include mod_jk's specific configuration file Include conf/mod-jk.conf
- Create a new file named
HTTPD_DIST/conf/mod-jk.conf - Add the following configuration to the
mod-jk.conffile.Important
TheLoadModuledirective must reference the mod_jk library directory location applicable to the native binary you installed.Note
TheJkMountdirective specifies which URLs Apache should forward to the mod_jk module. Based on the directive's configuration, mod_jk forwards the received URL onto the correct Servlet containers.To enable Apache to serve static content (or PHP content) directly, and only use the load balancer for Java applications, the suggested configuration specifies all requests with URL path/application/*are sent to the mod_jk load-balancer.If you only use mod_jk as a load balancer, forward all URLs to mod_jk by specifying/*in the directive.# Load mod_jk module # Specify the filename of the mod_jk lib LoadModule jk_module modules/mod_jk.so # Where to find workers.properties JkWorkersFile conf/workers.properties # Where to put jk logs JkLogFile logs/mod_jk.log # Set the jk log level [debug/error/info] JkLogLevel info # Select the log format JkLogStampFormat "[%a %b %d %H:%M:%S %Y]" # JkOptions indicates to send SSK KEY SIZE JkOptions +ForwardKeySize +ForwardURICompat -ForwardDirectories # JkRequestLogFormat JkRequestLogFormat "%w %V %T" # Mount your applications JkMount /application/* loadbalancer # Add shared memory. # This directive is present with 1.2.10 and # later versions of mod_jk, and is needed for # for load balancing to work properly JkShmFile logs/jk.shm # Add jkstatus for managing runtime data <Location /jkstatus/> JkMount status Order deny,allow Deny from all Allow from 127.0.0.1 </Location> Optional: JKMountFile Directive
In addition to theJkMountdirective, you can use theJkMountFiledirective to specify a mount points configuration file. The configuration file contains multiple Tomcat forwarding URL mappings.- Navigate to
HTTPD_DIST/conf. - Create a file named
uriworkermap.properties. - Specify the URL to forward and the worker name using the following syntax example as a guide.The example block will configure mod_jk to forward requests to
/jmx-consoleand/web-consoleto Apache.The syntax required takes the form/url=worker_name.# Simple worker configuration file # Mount the Servlet context to the ajp13 worker /jmx-console=loadbalancer /jmx-console/*=loadbalancer /web-console=loadbalancer /web-console/*=loadbalancer
- In
HTTPD_DIST/conf/mod-jk.conf, append the following directive.# You can use external file for mount points. # It will be checked for updates each 60 seconds. # The format of the file is: /url=worker # /examples/*=loadbalancer JkMountFile conf/uriworkermap.properties
3.1. Configuring Worker Nodes in mod_jk
Procedure 3.2. Configure mod_jk Worker Nodes
workers.properties directives, as specified in Appendix A, workers.properties Reference and configure mod_jk (refer to Procedure 3.1, “Configure Apache to Load mod_jk ”).
- Navigate to
HTTPD_DIST/conf/. - Create a file named
workers.properties. - Append the following information into the
workers.propertiesfile.# Define list of workers that will be used # for mapping requests worker.list=loadbalancer,status # Define Node1 # modify the host as your host IP or DNS name. worker.node1.port=8009 worker.node1.host=node1.mydomain.com worker.node1.type=ajp13 worker.node1.ping_mode=A worker.node1.lbfactor=1 # Define Node2 # modify the host as your host IP or DNS name. worker.node2.port=8009 worker.node2.host=node2.mydomain.com worker.node2.type=ajp13 worker.node2.ping_mode=A worker.node2.lbfactor=1 # Load-balancing behavior worker.loadbalancer.type=lb worker.loadbalancer.balance_workers=node1,node2 worker.loadbalancer.sticky_session=1 # Status worker for managing load balancer worker.status.type=status
3.2. Configuring JBoss Enterprise Application Platform to Work with mod_jk
3.2.1. Configuring the Web Subsystem
- The Basic Configuration
- Connector Configuration
- Virtual Server Configuration
3.2.1.1. Basic Configuration
Procedure 3.3. Basic Configuration for a Web Subsystem
Configure the Required Extension
Add an entry to the configuration file to add the required extension, as follows:<extension module="org.jboss.as.web" />
Configure the Subsystem
Configure the basic information for your subsystem. The following is a sample subsystem configuration:<subsystem xmlns="urn:jboss:domain:web:1.0" default-virtual-server="default-host"> <connector name="http" scheme="http" protocol="HTTP/1.1" socket-binding="http"/> <virtual-server name="default-host" enable-welcome-root="true"> <alias name="localhost" /> <alias name="example.com" /> </virtual-server> </subsystem>
3.2.1.2. Configuring Connectors
- HTTP Connectors.
- HTTPS Connectors.
- AJP Connectors.
- Native Connectors.
connector attributes, refer to the connectors page.
3.2.1.2.1. Configuring HTTP Connectors
8080.
Procedure 3.4. Configure HTTP Connectors
Create a New Socket Binding
Use the following configuration to create a new socket binding to use when creating a HTTP connector:[standalone@localhost:9999 /] /socket-binding-group=standard-sockets/socket-binding=custom:add(port=8181)
Configure the HTTP Connector
The following is an example of a HTTP connector configuration:[standalone@localhost:9999 /] /subsystem=web/connector=test-connector:add(socket-binding=custom,scheme=http,protocol="HTTP/1.1",enabled=true)
3.2.1.2.2. Configuring HTTPS Connectors
Procedure 3.5. Configure HTTPS Connectors
Create a New Socket Binding
Use the following configuration to create a new socket binding to use when creating a HTTPS connector:[standalone@localhost:9999 /] /socket-binding-group=standard-sockets/socket-binding=https:add(port=8443)
Use the Socket Binding to Create a New HTTPS Connector
Use the following configuration to create a new HTTPS connector with an unused socket binding:[standalone@localhost:9999 /] /subsystem=web/connector=test-connector:add(socket-binding=https, scheme=https, protocol="HTTP/1.1", enabled=false, secure = true)
Add the SSL Configuration
Use the following configuration to add the SSL configuration for a HTTP connector:/subsystem=web/connector=test-connector/configuration=ssl:add
Note
The specified configuration uses the default SSL configuration. For JSSE, use the key stored in the location${user.home}/.keystoreand the default passwordchangeit. No default configuration is available for OpenSSL. As a result, theconfiguration=sslelement must be configured correctly for use with OpenSSL. For further information, refer to the SSL documentation.Enable the Connector
Use the following configuration to enable the connector:/subsystem=web/connector=test-connector:write-attribute(name=enabled, value=true)
Activate the New Configuration
Use the following command to reload the server and activate the new configuration::reload
3.2.1.2.3. Further Information About mod_jk
3.2.1.2.4. Configuring AJP Connectors
Procedure 3.6. Configure AJP Connectors
Create a New Socket Binding
Use the following configuration to create a new socket binding to use when creating an AJP connector:[standalone@localhost:9999 /] /socket-binding-group=standard-sockets/socket-binding=ajp:add(port=8009)
Use a Socket Binding to Create a New AJP Connector
Use the following configuration to create a new AJP connector with an unused socket binding:[standalone@localhost:9999 /] /subsystem=web/connector=ajp:add(socket-binding=ajp, protocol="AJP/1.3", enabled=true, scheme="http")
Configure the AJP Connector
The following is an example of an AJP connector configuration:[standalone@localhost:9999 /] /subsystem=web:read-children-names(child-type=connector) { "outcome" => "success", "result" => [ "ajp", "http" ] } [standalone@localhost:9999 /] /subsystem=web/connector=ajp:read-resource(recursive=true) { "outcome" => "success", "result" => { "enable-lookups" => false, "enabled" => true, "max-post-size" => 2097152, "max-save-post-size" => 4096, "protocol" => "AJP/1.3", "redirect-port" => 8443, "scheme" => "http", "secure" => false, "socket-binding" => "ajp", "ssl" => undefined, "virtual-server" => undefined } }
3.2.1.2.5. Configuring Native Connectors
Procedure 3.7. Configure Native Connectors
Configure the Native Connector
The following is an example of a native connector configuration:[standalone@localhost:9999 /] /subsystem=web/connector=https:read-resource(recursive=true) { "outcome" => "success", "result" => { "protocol" => "HTTP/1.1", "scheme" => "https", "secure" => true, "socket-binding" => "https", "ssl" => { "certificate-file" => "/home/jfclere/CERTS/SERVER/newcert.pem", "certificate-key-file" => "/home/jfclere/CERTS/SERVER/newkey.pem", "password" => "xxxxxxx" }, "virtual-server" => undefined } }Configure the SSL Information
In the provided example, configure the SSL information required.
3.2.1.3. Configuring Virtual Servers
A virtual-server can be declared using the default :add() operation, as follows:
[standalone@localhost:9999 /] /subsystem=web/virtual-server=example.com:add
A virtual-server can be declared using the default :remove() operation, as follows:
[standalone@localhost:9999 /] /subsystem=web/virtual-server=example.com:remove
The following is a sample configuration for the virtual-server element:
[standalone@localhost:9999 /] /subsystem=web:read-children-names(child-type=virtual-server)
{
    "outcome" => "success",
    "result" => ["localhost"]
}

[standalone@localhost:9999 /] /subsystem=web/virtual-server=default-host:read-resource
{
    "outcome" => "success",
    "result" => {
        "access-log" => undefined,
        "alias" => ["example.com"],
        "default-web-module" => undefined,
        "enable-welcome-root" => true,
        "rewrite" => undefined
    }
}virtual-server configuration attributes, refer to the virtual-server page.
3.2.1.4. Querying Connectors
The following is an example of a query that seeks the bytesSent and requestCount attributes:
[standalone@localhost:9999 /] /subsystem=web/connector=http:read-attribute(name=bytesSent, name=requestCount)
{
    "outcome" => "success",
    "result" => "3"
}name in the above configuration to one of the listed connector attributes to query connectors for specific information.
The following table is a list of the connector attributes that can be queried.
Table 3.1. Connector Attributes
| Value | Description |
|---|---|
| bytesSent | The number of bytes sent by the connector. |
| bytesreceived | The number of bytes received by the connector (POST data). |
| processingTime | The processing time used by the connector in milliseconds. |
| errorCount | The number of errors that occur when requests sent by the connector are being processed. |
| maxTime | The maximum amount of time to process a request. |
| requestCount | The number of requests processed by the connector. |
3.3. Configuring Apache Tomcat to Work with mod_jk
conf/server.xml file, which contains the following code for this purpose:
<connector port="8009" protocol="AJP/1.3" redirectPort="8443" />
jvmRoute attribute at your engine as follows:
<Engine name="Catalina" jvmRoute="node1" >
jvmRoute attribute value must match the worker name set in workers.properties.
Part II. JBoss HTTP Connector
Chapter 4. Overview
4.1. Key Features
- Apache HTTP Server-based
- The JBoss HTTP Connector mod_cluster uses Apache as the proxy server.
- Real-time load-balancing calculation
- The JBoss HTTP Connector mod_cluster creates a feedback network between the worker nodes and the proxy server. The mod_cluster service is deployed on each of the worker nodes. This service feeds real-time load information to the proxy server. The proxy server then makes intelligent decisions on where to allocate work, based on the current load on each worker node. This real-time adaptive load distribution results in increased optimization of resources.The information that is reported by the worker nodes and the load-balancing policy used by the proxy are both customizable.
- Routing based on real-time application life cycle
- The JBoss HTTP Connector mod_cluster service deployed on the worker nodes relays application lifecycle events to the proxy server. This allows the server to dynamically update its routing table. When an application is undeployed on a node, the proxy server no longer routes traffic for that application to that node.
- Automatic Proxy Discovery
- The proxy server can be configured to announce its presence via UDP multicast. New worker nodes discover the proxy server and add themselves to the load-balancing cluster automatically. This greatly reduces the configuration and maintenance needed. When UDP multicast is not available or is undesirable, worker nodes are configured with a static list of proxies.
- Multiple Protocol Support
- The JBoss HTTP Connector mod_cluster can use HTTP, HTTPS, or Apache JServ Protocol (AJP) for communication between the proxy and the worker nodes.
4.2. Components
Proxy Server
- Shared Memory Manager:
mod_slotmem.so - The Shared Memory Manager module, mod_slotmem, makes the real-time worker node information available to multiple Apache server processes.
- Cluster Manager Module:
mod_manager.so - The Cluster Manager module, mod_manager, receives and acknowledges messages from nodes, including worker node registrations, worker node load data, and worker node application life cycle events.
- Proxy Balancer Module:
mod_proxy_cluster.so - The Proxy Balancer Module, mod_proxy_cluster, handles the routing of requests to cluster nodes. The Proxy Balancer selects the appropriate node to forward the request to, based on application location in the cluster, current state of each of the cluster nodes, and the Session ID (if a request is part of an established session).
- Proxy Advertisement Module:
mod_advertise.so - The Proxy Advertisement Module, mod_advertise.so, broadcasts the existence of the proxy server via UDP multicast messages. The server advertisement messages contain the IP address and port number where the proxy is listening for responses from nodes that wish to join the load-balancing cluster.
Note
Worker Node Components
- Worker Node Service
- The
mod_clustermodule is a part of the JBoss Enterprise Web Server 2.0 libraries and is already installed in Tomcats and httpd.For further information about themod_clustersubsystem, refer to the JBoss Enterprise Application Platform 6 Administration and Configuration Guide
4.3. Limitations
mod_cluster uses shared memory to keep the nodes description, the shared memory is created at the startup of httpd and the structure of each item is fixed. Therefore, when defining proxy server and worker node properties, make sure to follow these character limits:
- Maximum Alias length: 100 characters (Alias corresponds to the network name of the respective virtual host; the name is defined in the Host element)
- Maximum context length: 80 characters (for example, if
myapp.waris deployed in/myapp, then/myappis the context) - Maximum balancer name length: 40 characters (the balancer property in mbean)
- Maximum JVMRoute string length: 80 character (JVMRoute in the <Engine> element)
- Maximum domain name length: 20 characters (the domain property in mbean)
- Maximum hostname length for a node: 64 characters (hostname address in the <Connector> element)
- Maximum port length for a node: 7 characters (8009 is 4 characters, the port property in the <Connector> element)
- Maximum scheme length for a node: 6 characters (possible values are
http,https,ajp, the protocol of the connector) - Maximum cookie name length: 30 characters (the header cookie name for session ID default value:
JSESSIONIDfromorg.apache.catalina.Globals.SESSION_COOKIE_NAME) - Maximum path name length: 30 characters (the parameter name for the session ID default value:
JSESSIONIDfromorg.apache.catalina.Globals.SESSION_PARAMETER_NAME) - Maximum length of a session ID: 128 characters (session ID resembles the following:
BE81FAA969BF64C8EC2B6600457EAAAA.node01)
Chapter 5. Proxy Server Components
5.1. Apache Modules
5.1.1. mod_manager.so
LoadModule manager_module modules/mod_manager.so
<VirtualHost> element:
- EnableMCPMReceive
- Allows the
VirtualHostto receive the mod_cluster Protocol Message (MCPM) from nodes. Add oneEnableMCPMRecieveattribute to the httpd configuration to allowmod_clusterto operate correctly.EnableMCPMRecievemust be added in theVirtualHostconfiguration, at the location whereadvertiseis configured. - MaxMCMPMaxMessSize
- Defines the maximum size of mod_cluster Management Protocol (MCMP) messages. The default value for this is calculate from other
Maxdirectives. The minumum value for this is1024. - AllowDisplay
- Toggles the additional display on the
mod_cluster-managermain page. The default value isoffwhich causes only the versions to display on themod_cluster-managermain page. - AllowCmd
- Toggles permissions for commands using
mod_cluster-managerURL. The default value ison, which allows commands. - ReduceDisplay
- Toggles the reduction of information displayed on the
mod_cluster-managerpage. Reducing the information allows more nodes to display on the page. The default value isoffwhich allows all the available information to display. - MemManagerFile
- Defines the location for the files in which mod_manager stores configuration details. mod_manager also uses this location for generated keys for shared memory and lock files. This must be an absolute path name. It is recommended that this path be on a local drive, and not a NFS share. The default value is
$server_root/logs/. - Maxcontext
- The maximum number of contexts JBoss mod_cluster will use. The default value is
100. - Maxnode
- The maximum number of worker nodes JBoss mod_cluster will use. The default value is
20. - Maxhost
- The maximum number of hosts (aliases) JBoss mod_cluster will use. This is also the maximum number of load balancers. The default value is
10. - Maxsessionid
- The maximum number of active session identifiers stored. A session is considered inactive when no information is received from that session within five minutes. The default value is
0, which disables this logic. - ManagerBalancerName
- The name of the load balancer to use when the worker node does not provide a load balancer name. The default value is
mycluster. - PersistSlots
- When set to
on, nodes, aliases and contexts are persisted in files. The default value isoff. - CheckNonce
- When set to
on, session identifiers are checked to ensure that they are unique, and have not occurred before. The default ison.Warning
Setting this directive tooffcan leave your server vulnerable to replay attacks. - SetHandler mod_cluster-manager
- Defines a handler to display information about worker nodes in the cluster. This is defined in the
Locationelement:<Location $LOCATION> SetHandler mod_cluster-manager Order deny,allow Deny from all Allow from 127.0.0.1 </Location>
When accessing the $LOCATION defined in theLocationelement in your browser, you will see something like the following. (In this case, $LOCATION was also defined asmod_cluster-handler.)
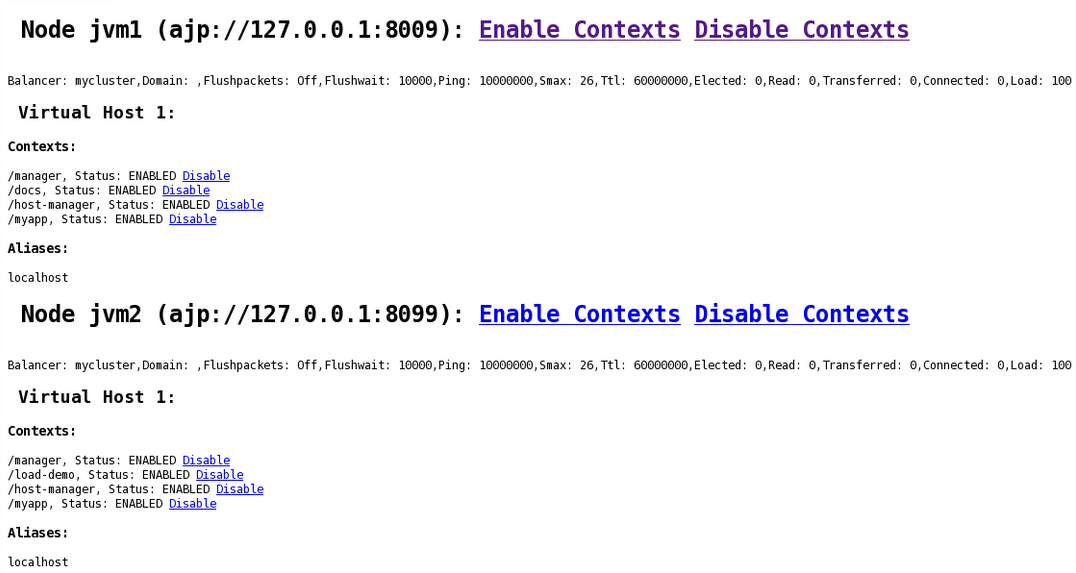
Maxsessionid is 0.
5.1.2. mod_proxy_cluster.so
LoadModule proxy_cluster_module modules/mod_proxy_cluster.so
<VirtualHost> element to change load balancing behavior.
mod_proxy_cluster directives
- CreateBalancers
- Defines how load balancers are created in the Apache HTTP Server virtual hosts. The following values are valid in
CreateBalancers:- 0
- Create load balancers in all virtual hosts defined in Apache HTTP Server. Remember to configure the load balancers in the
ProxyPassdirective. - 1
- Do not create balancers. When using this value, you must also define the load balancer name in the
ProxyPassorProxyPassMatch. - 2
- Create only the main server. This is the default value for
CreateBalancers.
- UseAlias
- Defines whether to check that the defined
Aliascorresponds to theServerName. The following values are valid forUseAlias:- 0
- Ignore Alias information from worker nodes. This is the default value for
UseAlias. - 1
- Verify that the defined alias corresponds to a worker node's server name.
- LBstatusRecalTime
- Defines the interval in seconds between the proxy calculating the status of a worker node. The default interval is 5 seconds.
- ProxyPassMatch; ProxyPass
ProxyPassmaps remote servers into the local server namespace. If the local server has an addresshttp://local.com/, then the followingProxyPassdirective would convert a local request forhttp://local.com/requested/file1into a proxy request forhttp://worker.local.com/file1.ProxyPass /requested/ http://worker.local.com/
ProxyPassMatchuses Regular Expressions to match local paths to which the proxied URL should apply.For either directive,!indicates that a specified path is local, and a request for that path should not be routed to a remote server. For example, the following directive specifies that.giffiles should be served locally.ProxyPassMatch ^(/.*\.gif)$ !
5.1.3. mod_advertise.so
VirtualHost element. Its identifier in the following code snippet is advertise_module.
LoadModule advertise_module modules/mod_advertise.so
- ServerAdvertise
- Defines how the advertising mechanism is used.When set to
On, the advertising mechanism is used to tell worker nodes to send status information to this proxy. You can also specify a hostname and port with the following syntax:ServerAdvertise On http://hostname:port/. This is only required when using a name-based virtual host, or when a virtual host is not defined.The default value isOff. When set tooff, the proxy does not advertise its location. If an Advertise directive in aVirtualHostis used then the ServerAdvertise value is set toOnfor thatVirtualHost. - AdvertiseGroup
- Defines the multicast address to advertise on. The syntax is
AdvertiseGroup address:port, where address should correspond toAdvertiseGroupAddress, and port should correspond toAdvertisePortin your worker nodes.If your worker node is JBoss Enterprise Application Platform-based, and the-uswitch is used at startup, the defaultAdvertiseGroupAddressis the value passed via the-uswitch.The default value is224.0.1.105:23364. - AdvertiseFrequency
- The interval (in seconds and milliseconds, where the latter is represented by a decimal point before the value) between multicast messages advertising the IP address and port. The default value is
10. - AdvertiseSecurityKey
- Defines a string used to identify the JBoss HTTP Connector mod_cluster in JBoss Web. By default this directive is not set and no information is sent.
- AdvertiseManagerUrl
- Defines the URL that the worker node should use to send information to the proxy server. By default this directive is not set and no information is sent.
- AdvertiseBindAddress
- Defines the address and port over which to send multicast messages. The syntax is
AdvertiseBindAddress address:port. This allows an address to be specified on machines with multiple IP addresses. The default value is0.0.0.0:23364.
5.1.4. mod_proxy.so
proxy_module.
Mod_proxy directives such as ProxyIOBufferSize are used to configure mod_cluster.
5.1.5. mod_proxy_ajp.so
Mod_proxy.so is required to use this module.
5.1.6. mod_slotmem.so
Mod_slotmem does not require any configuration directives.
5.2. Proxy Server Components Installation and Default Configuration
Chapter 6. Configure Basic Proxy Server
6.1. Basic Proxy Configuration Overview
- Configure a Proxy Server listener to receive worker node connection requests and worker node feedback.
- Optional: Disable server advertisement.
The proxy server can advertise itself using UDP multicast. When UDP multicast is available on the network between the proxy server and the worker nodes Server Advertisement allows you to add worker nodes with no further configuration required on the proxy server, and minimal configuration on the worker nodes.
6.2. Configure a Load-balancing Proxy Using the HTTP Connector
The only prerequisite required for this procedure is a JBoss Enterprise Web Server 2 installation. Refer to the JBoss Enterprise Web Server Installation Guide for installation instructions.
Procedure 6.1. Configure a Load-balancing Proxy Using the HTTP Connector
Create a Listen Directive for the Proxy Server
Edit the configuration fileJBOSS_EWS_DIST/httpd/conf.d/mod_cluster.confand add the following:Listen IP_ADDRESS:PORT_NUMBER
Where IP_ADDRESS is the IP address of a server network interface to communicate with the worker nodes, and PORT_NUMBER is the port on that interface to listen on.Note
The port PORT_NUMBER must be open on the server firewall for incoming TCP connections.Example 6.1. Example Listen Directive
Listen 10.33.144.3:6666
Create Virtual Host
Add the following to the fileJBOSS_EWS_DIST/httpd/conf.d/mod_cluster.conf:<VirtualHost IP_ADDRESS:PORT_NUMBER> <Directory /> Order deny,allow Deny from all Allow from 10.33.144. </Directory> KeepAliveTimeout 60 MaxKeepAliveRequests 0 ManagerBalancerName mycluster AdvertiseFrequency 5 EnableMCPMReceive On <Location /mod_cluster-manager> SetHandler mod_cluster-manager Order deny,allow Deny from all Allow from 10.33.144. </Location> </VirtualHost>Where IP_ADDRESS and PORT_NUMBER are the values from the Listen directive.Optional: Disable Server Advertisement
The presence of theAdvertiseFrequencydirective, which is set to five seconds here, causes the server to periodically send server advertisement messages via UDP multicast.These server advertisement messages contain the IP_ADDRESS and PORT_NUMBER specified in the VirtualHost definition. Worker nodes that are configured to respond to server advertisements use this information to register themselves with the proxy server.To disable server advertisement, add the following directive to theVirtualHostdefinition:ServerAdvertise Off
If server advertisements are disabled, or UDP multicast is not available on the network between the proxy server and the worker nodes, you must configure worker nodes with a static list of proxy servers. Refer to Section 8.1, “Static Proxy Configuration” for directions.Restart the JBoss Enterprise Web Server Apache service
Refer to the JBoss Enterprise Web Server documentation for detailed directions.
Chapter 7. Install Node with Basic Configuration
7.1. Worker Node Requirements
Supported Worker Node types
- JBoss Enterprise Platform 6 JBoss Web component
- JBoss Enterprise Platform 5 JBoss Web component
- JBoss Enterprise Web Server Tomcat service
Note
JBoss HTTP Connector Enterprise Web Server Node Limitations
- Non-clustered mode only.
- Only one load metric can be used at a time when calculating the load balance factor.
7.2. Install and Configure a Worker Node
7.2.1. Configure a JBoss Enterprise Application Server 6 Worker Node
mod_cluster subsystem. Each worker node is configured separately, so repeat this procedure for each node you wish to add to the cluster.
Worker Node Configuration
- If you use a standalone server, it must be started with the
standalone-haprofile. - If you use a managed domain, your server group must use the
haorfull-haprofile, and theha-socketsorfull-ha-socketssocket binding group. JBoss Enterprise Application Platform ships with a cluster-enabled server group calledother-server-groupwhich meets these requirements.
Note
/profile=full-ha portion of the commands.
Procedure 7.1. Configure a Worker Node
Configure the network interfaces.
By default, the network interfaces all default to127.0.0.1. Every physical host which hosts either a standalone server or one or more servers in a server group needs its interfaces to be configured to use its public IP address, which the other servers can see.To change the IP address of a JBoss Enterprise Application Platform host, you need to shut it down and edit its configuration file directly. This is because the Management API which drives the Management Console and Management CLI relies on a stable management address.Follow these steps to change the IP address on each server in your cluster to the master's public IP address.- Shut down the server completely.
- Edit either the
host.xml, which is inEAP_HOME/domain/configuration/for a managed domain, or thestandalone-ha.xmlfile, which is inEAP_HOME/standalone/configuration/for a standalone server. - Locate the
<interfaces>element. Three interfaces are configured,management,public, andunsecured. For each of these, change the value127.0.0.1to the external IP address of the host. - For hosts that participate in a managed domain but are not the master, locate the
<hostelement. Note that it does not have the closing>symbol, because it contains attributes. Change the value of its name attribute frommasterto a unique name, a different one per slave. This name will also be used for the slave to identify to the cluster, so make a note of it. Optional Step
For newly-configured hosts which need to join a managed domain, find the<domain-controller>element. Comment out or remove the<local />element, and add the following line, changing the IP address (X.X.X.X) to the address of the domain controller. This step does not apply for a standalone server.<remote host="X.X.X.X" port="${jboss.domain.master.port:9999}" security-realm="ManagementRealm"/>- Save the file and exit.
Configure authentication for each slave server.
Each slave server needs a username and password created in the domain controller's or standalone master'sManagementRealm. On the domain controller or standalone master, run theEAP_HOME/add-user.shcommand. Add a user with the same username as the slave, to theManagementRealm. When asked if this user will need to authenticate to an external JBoss AS instance, answeryes. An example of the input and output of the command is below, for a slave calledslave1, with passwordchangeme.user:bin user$ ./add-user.sh What type of user do you wish to add? a) Management User (mgmt-users.properties) b) Application User (application-users.properties) (a):
aEnter the details of the new user to add. Realm (ManagementRealm) : Username :slave1Password :changemeRe-enter Password :changemeAbout to add user 'slave1' for realm 'ManagementRealm' Is this correct yes/no?yesAdded user 'slave1' to file '/home/user/jboss-eap-6.0/standalone/configuration/mgmt-users.properties' Added user 'slave1' to file '/home/user/jboss-eap-6.0/domain/configuration/mgmt-users.properties' Is this new user going to be used for one AS process to connect to another AS process e.g. slave domain controller? yes/no? yes To represent the user add the following to the server-identities definition <secret value="Y2hhbmdlbWU=" />Copy the
<secret>element from theadd-user.shoutput.Copy the value from the last line of theadd-user.shoutput. You need to add this value to your slave's configuration file in the next step.Modify the slave host's security realm to use the new authentication.
Re-open the slave host'shost.xmlorstandalone-ha.xmlfile and locate the<security-realms>element. Add the following block of XML code directly below the<security-realm name="ManagementRealm">line, replacing the<secret value="Y2hhbmdlbWU="/>line with the one from the previous step.<server-identities> <secret value="Y2hhbmdlbWU="/> </server-identities>Save and exit the file.Restart the server.
The slave will now authenticate to the master using the its host name as the username and the encrypted string as its password.
Your standalone server, or servers within a server group of a managed domain, are now configured as mod_cluster worker nodes. If you deploy a clustered application, its sessions are replicated to all cluster nodes for failover, and it can accept requests from an external HTTPD server or load balancer. Each node of the cluster discovers the other nodes using automatic discovery, by default.
7.2.2. Configure a Tomcat Worker Node
Note
The following is a list of prerequisites for this task:
- Install a supported JBoss Enterprise Web Server.
- Understand the Proxy Configuration parameters discussed in Appendix B: Java Properties Reference.
Procedure 7.2. Configure a Worker Node for Tomcat
Add a Listener to Tomcat
Add the followingListenerelement beneath the other Listener elements inJBOSS_EWS_DIST/tomcat6/conf/server.xml.<Listener className="org.jboss.modcluster.container.catalina.standalone.ModClusterListener" advertise="true" stickySession="true" stickySessionForce="false" stickySessionRemove="true" />
Give the Worker a Unique Identity
EditJBOSS_EWS_DIST/tomcat6/conf/server.xmland add ajvmRouteattribute and value to theEngineelement, as shown:<Engine name="Catalina" defaultHost="localhost" jvmRoute="worker01">
Optional Step: Configure Firewall for Proxy Server Advertisements
A proxy server using the JBoss HTTP Connector can advertise itself via UDP multicast. To receive these multicast messages, open port 23364 for UDP connections on the worker node's firewall.For Linux Users/sbin/iptables -A INPUT -m state --state NEW -m udp -p udp --dport 23364 -j ACCEPT -m comment -comment "receive mod_cluster proxy server advertisements"
If you are not using Automatic Proxy Discovery, configure worker nodes with a static list of proxies. In this case you can safely ignore the following warning message:[warning] mod_advertise: ServerAdvertise Address or Port not defined, Advertise disabled!!!
Chapter 8. Advanced Configuration
8.1. Static Proxy Configuration
Procedure 8.1. Configure Application Platform Worker Node with Static Proxy List
Disable Dynamic Proxy Discovery
Edit thestandalone/configuration/standalone-ha.xmlfile and set theadvertiseproperty to false as follows:<mod-cluster-config advertise='false" connector="ajp" proxy-list="${jboss.modcluster.proxyList:}">- Choose and implement one of the following static proxy options:
Option 1: Create a Static Proxy Server List
Edit the filestandalone/configuration/standalone-ha.xmland add a comma separated list of proxies in the form of IP_ADDRESS:PORT in theproxyListproperty.Example 8.1. Example Static Proxy List
<mod-cluster-config advertise="false" connector="ajp" proxy-list="10.33.144.3:6666,10.33.144.1:6666">
Option 2: Start the Worker Node with a Static Proxy List as a Parameter
- Edit
standalone/configuration/standalone-ha.xml. - Add the following line:
<mod-cluster-config advertise="false" connector="ajp" proxy-list="${jboss.modcluster.proxyList:}"> - Add a comma separated list of proxies in the form of IP_ADDRESS:PORT as the
jboss.modcluster.proxyListparameter when starting the node.Example 8.2. Example Static Proxy List Parameter
-Djboss.modcluster.proxyList=10.33.144.3:6666,10.33.144.1:6666
Procedure 8.2. Configure Web Server Worker Node with Static Proxy List
Disable dynamic proxy discovery
Edit the fileJBOSS_EWS_DIST/tomcat6/conf/server.xml. and set theadvertiseproperty of the ModClusterListener to false:Define a mod_cluster listener
Add a <Listener> element to theserver.xmlfile .<Listener className="org.jboss.modcluster.container.catalina.standalone.ModClusterListener" advertise="false" stickySession="true" stickySessionForce="false" stickySessionRemove="true"/>
Create a static proxy server list
Add a comma separated list of proxies in the form of IP_ADDRESS:PORT as theproxyListproperty of the ModClusterListener <Listener> element.Example 8.3. Example Static Proxy List
<Listener className="org.jboss.modcluster.container.catalina.standalone.ModClusterListener" advertise="false" stickySession="true" stickySessionForce="false" stickySessionRemove="true" proxyList="10.33.144.3:6666,10.33.144.1:6666"/>
Part III. Using Jsvc with JBoss Enterprise Web Server
Chapter 9. Jsvc
9.1. About Jsvc
9.2. Use Jsvc with Tomcat 7
9.2.1. Run Jsvc with Tomcat 7
/opt/jboss-ews-2.0/share/tomcat7/bin/daemon.sh start
9.2.2. Configure Jsvc with Tomcat 7
daemon.sh script to run Jsvc:
Table 9.1. Jsvc Configuration Parameters for Tomcat 7
| Parameter Name | Environment Variable | Default Value | Description |
|---|---|---|---|
--java-home | JAVA_HOME | Based on the value of the PATH variable. | The Java home directory location. |
--catalina-home | CATALINA_HOME | Determined by the location of the script. | The Tomcat installation directory location. |
--catalina-base | CATALINA_BASE | Based on the value of the PATH variable. | The directory that contains the specific configuration and set up information if multiple servers are using the same installation. |
--catalina-pid | - | $CATALINA_BASE/logs/catalina-daemon.pid | The file where the process ID (PID) for the running instance of Tomcat is stored. |
--tomcat-user | - | tomcat | The user Tomcat uses. |
9.3. Use Jsvc with Tomcat 6
Table 9.2. Jsvc Configuration Variables for Tomcat 6
| Options | Default Value | Description |
|---|---|---|
-home | /home2/java/j2sdk{version} | The Java home directory location. Tomcat 6 requires JDK version 1.6 or later. |
-Dcatalina.home | /opt/jboss-ews-2.0/tomcat6 | The Tomcat installation directory. |
-user | tomcat | The user Tomcat uses. |
-Djava.io.tmpdir | /var/tmp | The temporary directory used by Tomcat 6. |
-pidfile | /var/run/jsvc.pid | The file where the process ID (PID) for the running instance of Tomcat is stored. |
-Dcatalina.base | /opt/jboss-ews-2.0/tomcat6 | The directory that contains the specific configuration and set up information if multiple servers are using the same installation. |
-outfile | stdout | The file where the stdout output of the embedded Java Virtual Machine is redirected. |
-errfile | stderr | The file where the stderr output of the Java Virtual Machine is redirected. |
-stop | - | Stops Jsvc cleanly. The PID file location set with the -pidfile parameter contains information created when Jsvc starts. This file and its information is used to stop the Jsvc instance. |
-D) are used by the embedded Java Virtual Machine that is started by Jsvc. The following is an example of how such parameters are used:
-Djava.library.path=/opt/jboss-ews-2.0/tomcat6
-cp. The following example illustrates a sample classpath option that starts org.apache.catalina.startup.Bootstrap:
-cp $JAVA_HOME/lib/tools.jar:$CATALINA_HOME/bin/commons-daemon.jar:$CATALINA_HOME/bin/bootstrap.jar
Chapter 10. Working Examples
10.1. Complete Working Example
A proxy server listening on localhost:
LoadModule slotmem_module modules/mod_slotmem.so
LoadModule manager_module modules/mod_manager.so
LoadModule proxy_cluster_module modules/mod_proxy_cluster.so
LoadModule advertise_module modules/mod_advertise.so

Listen 127.0.0.1:6666
<VirtualHost 127.0.0.1:6666>

    <Directory />
        Order deny,allow
        Deny from all
        Allow from 127.0.0.1
    </Directory>

    KeepAliveTimeout 60
    MaxKeepAliveRequests 0

    ManagerBalancerName mycluster
    ServerAdvertise On
    AdvertiseFrequency 5
    EnableMCPMReceive On

<Location /mod_cluster-manager>
    SetHandler mod_cluster-manager
    Order deny,allow
    Deny from all
    Allow from 127.0.0.1
</Location>

</VirtualHost>
Edit the $CATALINA_HOME/conf/server.xml file and add the following listener element to configure the worker for Tomcat:
<Listener className="org.jboss.modcluster.container.catalina.standalone.ModClusterListener" advertise="true"/>
Following are a set of example firewall rules using iptables, for a cluster node on the 192.168.1.0/24 subnet.
/sbin/iptables -I INPUT 5 -p udp -d 224.0.1.0/24 -j ACCEPT -m comment --comment "mod_cluster traffic"
/sbin/iptables -I INPUT 6 -p udp -d 224.0.0.0/4 -j ACCEPT -m comment --comment "JBoss Cluster traffic"
/etc/init.d/iptables save
10.2. mod_auth_kerb Example
10.2.1. mod_auth_kerb Example Prerequisites
- Install mod_auth_kerb on Red Hat Enterprise Linux.
- Install curl with GSS-negotiate support.
- Configure and run a LDAP/Kerberos server (for example ApacheDS) on the same host as your JBoss Enterprise Web Server.
Warning
Using an ApacheDS as a LDAP/Kerberos server is not supported by Red Hat. This should not be implemented in a production environment and is mentioned here as a test. - Create the following LDAP users:
- Create the user
krbtgt:dn: uid=krbtgt,ou=Users,dc=example,dc=com objectClass: top objectClass: person objectClass: inetOrgPerson objectClass: krb5principal objectClass: krb5kdcentry cn: KDC Service sn: Service uid: krbtgt userPassword: secret krb5PrincipalName: krbtgt/EXAMPLE.COM@EXAMPLE.COM krb5KeyVersionNumber: 0
- Create the user
ldap:dn: uid=ldap,ou=Users,dc=example,dc=com objectClass: top objectClass: person objectClass: inetOrgPerson objectClass: krb5principal objectClass: krb5kdcentry cn: LDAP sn: Service uid: ldap userPassword: randall krb5PrincipalName: ldap/localhost@EXAMPLE.COM krb5KeyVersionNumber: 0
- Create the user
HTTP:dn: uid=HTTP,ou=Users,dc=example,dc=com objectClass: top objectClass: person objectClass: inetOrgPerson objectClass: krb5principal objectClass: krb5kdcentry cn: HTTP sn: Service uid: HTTP userPassword: secretpwd krb5PrincipalName: HTTP/localhost@EXAMPLE.COM krb5KeyVersionNumber: 0
- Create user
hnelson(test user):dn: uid=hnelson,ou=Users,dc=example,dc=com objectClass: top objectClass: person objectClass: inetOrgPerson objectClass: krb5principal objectClass: krb5kdcentry cn: Horatio Nelson sn: Nelson uid: hnelson userPassword: secret krb5PrincipalName: hnelson@EXAMPLE.COM krb5KeyVersionNumber: 0
10.2.2. Configure the Kerberos Client
Procedure 10.1. Configure the Kerberos Client
Create the Kerberos Configuration File
Create thekrb5.confconfiguration file in the/etcdirectory and add the following to the file:[logging] default = FILE:/var/log/krb5libs.log kdc = FILE:/var/log/krb5kdc.log admin_server = FILE:/var/log/kadmind.log [libdefaults] default_realm = EXAMPLE.COM default_tgs_enctypes = des-cbc-md5,des3-cbc-sha1-kd default_tkt_enctypes = des-cbc-md5,des3-cbc-sha1-kd dns_lookup_realm = false dns_lookup_kdc = false allow_weak_crypto = yes ticket_lifetime = 24h renew_lifetime = 7d forwardable = yes [realms] EXAMPLE.COM = { kdc = localhost:60088 admin_server = localhost:60088 } [domain_realm] .example.com = EXAMPLE.COM example.com = EXAMPLE.COMCreate a Key Tab
Create a key tab in the/etc/httpdfolder with the following contents:ktutil ktutil: addent -password -p HTTP/localhost@EXAMPLE.COM -k 0 -e des-cbc-md5 Password for HTTP/localhost@EXAMPLE.COM: secretpwd ktutil: list slot KVNO Principal ---- ---- --------------------------------------------------------------------- 1 0 HTTP/localhost@EXAMPLE.COM ktutil: wkt krb5.keytab ktutil: quit Under root user: chgrp apache /etc/httpd/krb5.keytab chmod 640 /etc/httpd/krb5.keytab
Check the Hosts File
Ensure that the following host configuration is included in the/etc/hostsfile:127.0.0.1 localhost
10.2.3. Configure mod_auth_kerb
Procedure 10.2. Configure mod_auth_kerb
- Create the
auth_kerb.confconfiguration file in the/etc/httpd/conf.d/folder and add the following information to the file:# # The mod_auth_kerb module implements Kerberos authentication over # HTTP, following the "Negotiate" protocol. # LoadModule auth_kerb_module modules/mod_auth_kerb.so <Location /kerberostest> # SSLRequireSSL AuthType Kerberos AuthName "Kerberos Login" KrbMethodNegotiate On KrbMethodK5Passwd Off KrbAuthRealms EXAMPLE.COM KrbServiceName HTTP Krb5KeyTab /etc/httpd/krb5.keytab require valid-user </Location>
10.2.4. Test the Kerberos Authentication
Procedure 10.3. Test the Kerberos Authentication
Create a Test Page
Create a test page namedauth_kerb_page.htmlin the$JBOSS_EWS_DIST/httpd/www/html/kerberostest/.Add the Contents of the Test Page
Add the following contents to the test page (auth_kerb_page.html):<html> <body> <h1>mod_auth_kerb successfully authenticated!</h1> </body> </html>Optional: Set LogLevel
Optionally, set the LogLevel debug for httpd debugging in the$JBOSS_EWS_DIST/httpd/conf/httpd.conffile.Start httpd
As the root user, start the JBoss Enterprise Web Server httpd as follows:# $JBOSS_EWS_DIST/httpd/sbin/apachectl start
Test Authentication
Test the authentication as follows:- Initiate Kerberos authentication for the test user
hnelson:$ kinit hnelson
- View the details for the test user
hnelson:$ klist
A result similar to the following appears:Ticket cache: FILE:/tmp/krb5cc_18602 Default principal: hnelson@EXAMPLE.COM Valid starting Expires Service principal 06/03/13 14:21:13 06/04/13 14:21:13 krbtgt/EXAMPLE.COM@EXAMPLE.COM renew until 06/10/13 14:21:13 Testing httpd Kerberos Authentication
Test httpd Kerberos authentication as follows:$ curl --negotiate -u : http://localhost/kerberostest/auth_kerb_page.html
If working correctly, the following result appears:<html> <body> <h1>mod_auth_kerb successfully authenticated!</h1> </body> </html>
Appendix A. workers.properties Reference
HTTPD_DIST/conf/workers.properties. This file specifies where the different Servlet containers are located, and how calls should be load-balanced across them.
workers.properties file contains two sections:
- Global Properties
- This section contains directives that apply to all workers.
- Worker Properties
- This section contains directives that apply to each individual worker.
worker.worker_name.directive
- worker
- The constant prefix for all worker properties.
- worker_name
- The arbitrary name given to the worker. For example: node1, node_01, Node_1.
- directive
- The specific directive required.
Note
worker.properties configuration directives, refer directly to the Apache Tomcat Connector - Reference Guide
worker.properties Global Directives
- worker.list
- Specifies the list of worker names used by mod_jk. The workers in this list are available to map requests to.
Note
A single node configuration, which is not managed by a load balancer, must be set toworker.list=[worker name].
workers.properties Mandatory Directives
- type
- Specifies the type of worker, which determines the directives applicable to the worker. The default value is
ajp13, which is the preferred worker type to select for communication between the web server and Apache httpd Server.Other values includeajp14,lb,status.For detailed information about ajp13, refer to The Apache Tomcat Connector - AJP Protocol Reference
workers.properties Connection Directives
- host
- The hostname or IP address of the worker. The worker node must support the ajp13 protocol stack. The default value is
localhost.You can specify theportdirective as part of the host directive by appending the port number after the hostname or IP address. For example:worker.node1.host=192.168.2.1:8009orworker.node1.host=node1.example.com:8009 - port
- The port number of the remote server instance listening for defined protocol requests. The default value is
8009, which is the default listen port for AJP13 workers. If you are using AJP14 workers, this value must be set to8011. - ping_mode
- Specifies the conditions under which connections are probed for their current network health.The probe uses an empty AJP13 packet for the CPing, and expects a CPong in return, within a specified timeout.You specify the conditions by using a combination of the directive flags. The flags are not comma-separated. For example, a correct directive flag set is
worker.node1.ping_mode=CI- C (connect)
- Specifies the connection is probed once after connecting to the server. You specify the timeout using the
connect_timeoutdirective, otherwise the value forping_timeoutis used. - P (prepost)
- Specifies the connection is probed before sending each request to the server. You specify the timeout using the
prepost_timeoutdirective, otherwise the value forping_timeoutis used. - I (interval)
- Specifies the connection is probed during regular internal maintenance cycles. You specify the idle time between each interval using the
connection_ping_intervaldirective, otherwise the value forping_timeoutis used. - A (all)
- The most common setting, which specifies all directive flags are applied. For information about the
*_timeoutadvanced directives, refer directly to Apache Tomcat Connector - Reference Guide.
- ping_timeout
- Specifies the time to wait for CPong answers to a CPing connection probe (refer to
ping_mode). The default value is 10000 (milliseconds).
worker.properties Load Balancing Directives
- lbfactor
- Specifies the load-balancing factor for an individual worker, and is only specified for a member worker of a load balancer.This directive defines the relative amount of HTTP request load distributed to the worker compared to other workers in the cluster.A common example where this directive applies is where you want to differentiate servers with greater processing power than others in the cluster. For example, if you require a worker to take three times the load than other workers, specify
worker.worker name.lbfactor=3 - balance_workers
- Specifies the worker nodes that the load balancer must manage. The directive can be used multiple times for the same load balancer, and consists of a comma-separated list of worker names as specified in the workers.properties file.
- sticky_session
- Specifies whether requests for workers with SESSION IDs are routed back to the same worker. The default is
0(false). When set to1(true), load balancer persistence is enabled.For example, if you specifyworker.loadbalancer.sticky_session=0, each request is load balanced between each node in the cluster. In other words, different requests for the same session will go to different servers based on server load.Ifworker.loadbalancer.sticky_session=1, each session is persisted (locked) to one server until the session is terminated, providing that server is available.
Appendix B. Java Properties Reference
B.1. Proxy Configuration
- During server startup
- When a proxy is detected through the advertise mechanism
- During error recovery, when a proxy's configuration is reset.
Important
Table B.1. Proxy Configuration Values for Tomcat
| Value | Default | Description |
|---|---|---|
| stickySession | true | Specifies whether subsequent requests for a given session should be routed to the same node, if possible. |
| stickySessionRemove | false | Specifies whether the httpd proxy should remove session stickiness if the balancer is unable to route a request to the node to which it is stuck. This property is ignored if stickySession is false. |
| stickySessionFalse | true | Specifies whether the httpd proxy should return an error if the balancer is unable to route a request to the node to which it is stuck. This property is ignored if stickySession is false. |
| workerTimeout | -1 | Specifies the number of seconds to wait for a worker to become available to handle a request. When none of the workers of a balancer are unusable, mod_cluster retries after an interval (the interval value is the result of dividing the value of workerTimeout by 100) to find an usable worker. A value of -1 indicates that the httpd will not wait for a worker to be available and will return an error if no workers are available. |
| maxAttempts | 1 | Specifies the number of times the httpd proxy will attempt to send a given request to a worker before aborting. The minimum value is 1: try once before aborting. |
| flushPackets | false | Specifies whether packet flushing is enabled or disabled. |
| flushWait | -1 | Specifies the time to wait before flushing packets. A value of -1 means wait forever. |
| ping | 10 | Time to wait (in seconds) for a pong answer to a ping. |
| smax | - | Specifies the soft maximum idle connection count. The maximum value is determined by the httpd thread configuration (ThreadsPerChild or 1). |
| ttl | 60 | Specifies the time (in seconds) idle connections persist, above the smax threshold. |
| nodeTimeout | -1 | Specifies the time (in seconds) mod_cluster waits for the back-end server response before returning an error. mod_cluster always uses a cping/cpong before forwarding a request. The connectiontimeout value used by mod_cluster is the ping value. |
| balancer | mycluster | Specifies the name of the load-balancer. |
| loadBalancingGroup | - | Optional parameter, which specifies how load is balanced across jvmRoutes within the same load balancing group. loadBalancingGroup is used in conjunction with partitioned session replication (for example, buddy replication). |
Table B.2. Proxy Configuration Values for JBoss Enterprise Application Platform 6
| Attribute | Property | Default | Description |
|---|---|---|---|
| sticky-session | stickySession | true | Specifies whether subsequent requests for a given session should be routed to the same node, if possible. |
| sticky-session-remove | stickySessionRemove | false | Specifies whether the httpd proxy should remove session stickiness if the balancer is unable to route a request to the node to which it is stuck. This property is ignored if stickySession is false. |
| sticky-session-force | stickySessionForce | true | Specifies whether the httpd proxy should return an error if the balancer is unable to route a request to the node to which it is stuck. This property is ignored if stickySession is false. |
| node-timeout | workerTimeout | -1 | Specifies the number of seconds to wait for a worker to become available to handle a request. When all the workers of a balancer are usable, mod_cluster will retry after a while (workerTimeout/100) to find an usable worker. A value of -1 indicates that the httpd will not wait for a worker to be available and will return an error if no workers are available. |
| max-attempts | maxAttempts | 1 | Specifies the number of times the httpd proxy will attempt to send a given request to a worker before aborting. The minimum value is 1: try once before aborting. |
| flush-packets | flushPackets | false | Specifies whether packet flushing is enabled or disabled. |
| flush-wait | flushWait | -1 | Specifies the time to wait before flushing packets. A value of -1 means wait forever. |
| ping | ping | 10 | Time to wait (in seconds) for a pong answer to a ping. |
| smax | smax | -1 | Specifies the soft maximum idle connection count. The maximum value is determined by the httpd thread configuration (ThreadsPerChild or 1). |
| ttl | ttl | -1 | Specifies the time (in seconds) idle connections persist, above the smax threshold. |
| load-balancing-group | loadBalancingGroup | - | Optional parameter, which specifies how load is balanced across jvmRoutes within the same load balancing group. loadBalancingGroup is used in conjunction with partitioned session replication (for example, buddy replication). |
B.2. mod_cluster Proxy and Proxy Discovery Configuration Attributes
Table B.3. mod_cluster Proxy Discovery Configuration Attributes
| Attribute | Property | Default Value |
|---|---|---|
| proxy-list | proxyList | - |
| proxy-url | proxyURL | - |
| advertise | advertise | true |
| advertise-security-key | advertiseSecurityKey | - |
| excluded-contexts | excludedContexts | - |
| auto-enable-contexts | autoEnableContexts | true |
| stop-context-timeout | stopContextTimeout | 10 seconds (in seconds) |
| socket-timeout | nodeTimeout | 20 seconds (in milliseconds) |
Table B.4. mod_cluster Proxy Configuration Attributes
| Attribute | Property | Default Value |
|---|---|---|
| sticky-session | stickySession | true |
| sticky-session-remove | stickySessionRemove | false |
| sticky-session-force | stickySessionForce | true |
| node-timeout | workerTimeout | -1 |
| max-attempts | maxAttempts | 1 |
| flush-packets | flushPackets | false |
| flush-wait | flushWait | -1 |
| ping | ping | 10 |
| smax | smax | -1 (uses the default value) |
| ttl | ttl | -1 (uses the default value) |
| domain | loadBalancingGroup | - |
| load-balancing-group | loadBalancingGroup | - |
B.3. Load Configuration
mod_cluster is configured with Tomcat:
Table B.5. Load Configuration for Tomcat
| Attribute | Default Value | Description |
|---|---|---|
| loadMetricClass | Please see note. | This is the class name of an object that is implementing org.jboss.load.metric.LoadMetric. |
| loadMetricCapacity | 1 | This is the capacity of the load metric defined via the loadMetricClass property. |
| loadHistory | 9 | This is the number of historic load values that must be considered in the load balance factor computation. |
| loadDecayFactor | 2 | This is the factor by which the historic load values decrease in significance. |
Important
loadMetricClass is org.jboss.modcluster.load.metric.impl.BusyConnectorsLoadMetric.
Appendix C. Revision History
| Revision History | |||
|---|---|---|---|
| Revision 3.0.1-10.1 | Wed Feb 11 2015 | ||
| |||
| Revision 3.0.1-10 | Mon Jun 17 2013 | ||
| |||
| Revision 3.0.1-9 | Wed Jun 05 2013 | ||
| |||
| Revision 3.0.1-8 | Wed Jun 05 2013 | ||
| |||
| Revision 3.0.1-7 | Wed Jun 05 2013 | ||
| |||
| Revision 3.0.1-6 | Wed Jun 05 2013 | ||
| |||
| Revision 2.0.1-13 | Friday Oct 26 2012 | ||
| |||