
Red Hat Training
A Red Hat training course is available for Red Hat Fuse
Chapter 7. To Deploy a Camel Project to a fabric profile
Abstract
This tutorial walks you through the process of deploying a camel project into a fabric profile in Fuse Integration perspective. It assumes that you have an instance of Red Hat JBoss Fuse installed on the same machine on which you are running the Red Hat JBoss Fuse Tooling.
Goals
In this tutorial you will:
- create a fabric in JBoss Fuse 6.x Server
- connect to the JBoss Fuse 6.x Server
- connect to the fabric
- create a new fabric profile
- deploy your project to the new fabric profile
Prerequisites
To complete this tutorial you will need:
- access to Red Hat JBoss Fuse
- a user with admin privileges configured in JBoss Fuse's installDir
/etc/users.propertiesfile, as described in Starting up Red Hat JBoss Fuse 6.x Server starting at Step 8. - the simple-route project you updated in Chapter 3, To Add a Content-Based Router
Creating a fabric in Red Hat JBoss Fuse
To create a fabric in Red Hat JBoss Fuse:
- Open a terminal and
cdto the JBoss Fuse server's installDir. - Enter
./bin/fuseto start up a standalone instance ofjboss-fuse-6.x.x.redhat-xxx.Wait a few seconds for the JBoss Fuse 6.x server to start up. - At the JBoss Fuse console command line, enter
fabric:createand pressEnterto create a fabric.JBossFuse:karaf@root> fabric:create Waiting for container: root Using specified zookeeper password:admin It may take a couple of seconds for the container to provision... You can use the --wait-for-provisioning option, if you want this command to block until the container is provisioned. JBossFuse:karaf@root>
You can use thefabric:statuscommand to check whether the fabric has been created and provisioned.JBossFuse:karaf@root> fabric:status [profile] [instances] [health] fabric 1 100% fabric-ensemble-0000-1 1 100% jboss-fuse-full 1 100% JBossFuse:karaf@root>
- Once the fabric is running, enter
fabric:container-listand pressEnterto list the new fabric's default container (root*) and its status.JBossFuse:karaf@root> fabric:container-list [id] [version] [alive] [profiles] [provision status] root* 1.0 true fabric,fabric-ensemble-0000-1,jboss-fuse-full success JBossFuse:karaf@root>
Connecting to the JBoss Fuse server
To connect the Fuse Tooling to the JBoss Fuse server:
- If necessary, reopen Fuse Integration perspective.
- In Fabric Explorer, right-click Fabrics to open the context menu, and then click Add Fabric details to open the Fabric Details wizard.
Figure 7.1. Fabric Details wizard
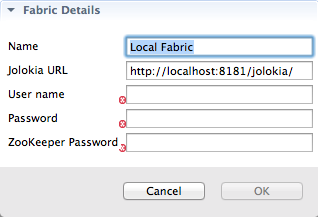
- In Name, enter the name of the fabric to which you want to connect. The name you enter identifies the fabric whose location you specify in Jolokia URL, and this name will appear in Fabric Explorer.The default Name is Local Fabric.
- In Jolokia URL, enter the url, in the form
http://hostname:port/jolokia/, of the fabric to which you want to connect. This URL specifies the location of a fabric registry agent, whose default port is 8181.The default URL is http://localhost:8181/jolokia. - In User name, enter the name used to log into the specified fabric.This is the user name specified when the fabric was created, has
adminprivileges, and is stored in Red Hat JBoss Fuse's installDir/etc/users.propertiesfile. In that file, user information is specified using this format:user=password,role(for example,admin=admin,admin).You can also discover the user name by issuing the commandJBossFuse:karaf@root>jaas:users, if the Jaas realm has been selected for the fabric. - In Password, enter the password required for User name to log into the specified fabric.This is the password specified for User name when the fabric was created and is stored in Red Hat JBoss Fuse's installDir
/etc/users.propertiesfile. - In Zookeeper Password, enter the password required for logging into the specified fabric's zookeeper registry.This is the password that was specified when the fabric was created, or it is the password of the first user defined in Red Hat JBoss Fuse's installDir
/etc/users.propertiesfile.You can also discover the Zookeeper password by issuing the commandJBossFuse:karaf@root>fabric:ensemble-password. - Click OK.The fabric's name appears in Fabric Explorer as a node beneath Fabrics.
Connecting to the fabric
In Fabric Explorer, right-click Local Fabric to open the context menu, and then click Connect to connect to the new fabric.
Now you're ready to create a new fabric profile into which you'll deploy your camel project.
Creating a new fabric profile
To create a new fabric profile:
- In Fabric Explorer, expand → → to reveal the fabric's top-level profiles.
- Further expand the profiles tree to find the
example-quickstarts-jmsprofile nested underdefault/karaf/feature-camel/feature-camel-jms/. - Right-click
example-quickstarts-jmsto open the context menu, and then click . - In Profile name, enter
myCamelRoute, and then click OK.The new profilemyCamelRouteappears under its parent profile,example-quickstarts-jms, in Fabric Explorer. - Click the
myCamelRouteprofile to populate the Details tab's Profiles page with its information. - In the Parents pane, you can see that
example-quickstarts-jmsis the new profile's immediate parent. Leaveexample-quickstarts-jmsselected.Now you're ready to deploy your camel project to the profilemyCamelRoute.
Deploying your camel project to the new fabric profile
To deploy your camel project to the new
myCamelRoute fabric profile:
- From Project Explorer, drag the
simple-routeroot project over to Fabric Explorer and drop it on → → → → → → → → .NoteThe tool provides an alternative to the drag and drop method of deployment. For details, see Deploying a Project to a Fabric Container in Red Hat JBoss Fuse Tooling: JBoss Fuse Tooling User Guide.Console view chronicles the process as the tooling builds thesimple-routeproject, runs the tests, installs the project as a bundle in themyCamelRouteprofile, and then uploads the profile to the fabric's internal Maven repository. - In Fabric Explorer, click the
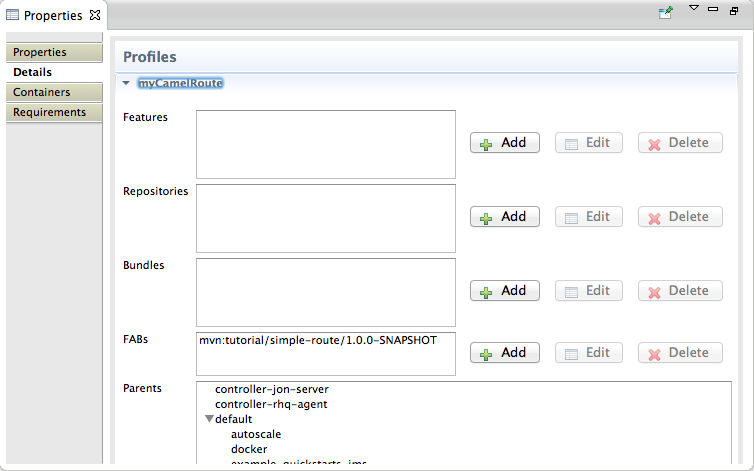
myCamelRouteprofile to populate Properties view with its properties and profile information.NoteIt can take some time for the tooling to build the project, run the tests, and install the project bundle. The simple-route bundle will appear in the FABs field on the Profiles page only when the process has finished. You can use Fabric Explorer's button to trigger an update of the Profiles page. - On the Profiles page, check that the simple-route bundle appears in the FABs field, as shown in Figure 7.2, “simple-route bundle deployed”.
Figure 7.2. simple-route bundle deployed
 Now you can deploy your camel project to the fabric by creating one or more containers on the fabric and assigning the
myCamelRouteprofile to them. Once the containers are started, you can start tracing on the deployed projects, as described in Chapter 4, To Trace a Message Through a Route.
Further reading
To learn more about deploying applications to a fabric, see in Deploying a Project to a Fabric Container in Red Hat JBoss Fuse: Tooling User Guide on the Red Hat Customer Portal:
- Deploying Projects to a Container
- Working with Fabric Containers
- Working with Fabric Profiles
- Working with Versions