
Chapter 14. Using Red Hat JBoss Developer Studio to Create and Test Processes
The Red Hat JBoss BPM Suite plug-in provides an environment for editing and testing processes, and enables integration with your application. The following features are provided:
- Wizards for creating Red Hat JBoss BPM Suite projects and BPMN2 processes.
- A Red Hat JBoss BPM Suite perspective showing the most commonly used views in a predefined layout.
14.1. Red Hat JBoss BPM Suite Runtime
14.1.1. Red Hat JBoss BPM Suite Runtime
A Red Hat JBoss BPM Suite runtime is a collection of JAR files that represent one specific release of the Red Hat JBoss BPM Suite project. Follow the steps described in the next section to create and configure a runtime. It is required to specify a default runtime for your Red Hat JBoss Developer Studio workspace, however, each project can override the default setting and therefore can have a specific runtime.
14.1.2. Setting the Red Hat JBoss BPM Suite Runtime
To use the Red Hat JBoss BPM Suite plug-in with Red Hat JBoss Developer Studio, it is necessary to set up the runtime.
Download the Red Hat JBoss BPM Suite 6.4.0 Core Engine archive from the Red Hat Customer Portal. The JAR files that form the runtime are located in the jboss-bpmsuite-VERSION-engine.zip archive.
Make sure you have the JBoss Business Process and Rule Development feature installed before configuring the Red Hat JBoss BPM Suite runtime. See chapter Red Hat JBoss Developer Studio of Red Hat JBoss BPM Suite Getting Started Guide for more information.
Procedure: Configuring jBPM Runtime
- In the Red Hat JBoss Developer Studio, click Window → Preferences.
- Click jBPM → Installed jBPM Runtimes.
- Click Add….
- Provide a name for the new runtime and click Browse to navigate to the directory where the runtime is located. Click OK.
Select the new runtime and click OK.
Red Hat JBoss Developer Studio prompts you to update the runtime if you have any existing projects.
14.1.3. Configuring Red Hat JBoss BPM Suite Server
Red Hat JBoss Developer Studio can be configured to run the Red Hat JBoss BPM Suite server.
Procedure: Configuring Red Hat JBoss BPM Suite Server
- Click Window → Perspective → Open Perspective → Other… and select jBPM.
- To add the Servers view, click Window → Show View → Other… and select Server → Servers.
- Right click the empty space in the Servers view at the bottom of the Red Hat JBoss Developer Studio and choose New → Server.
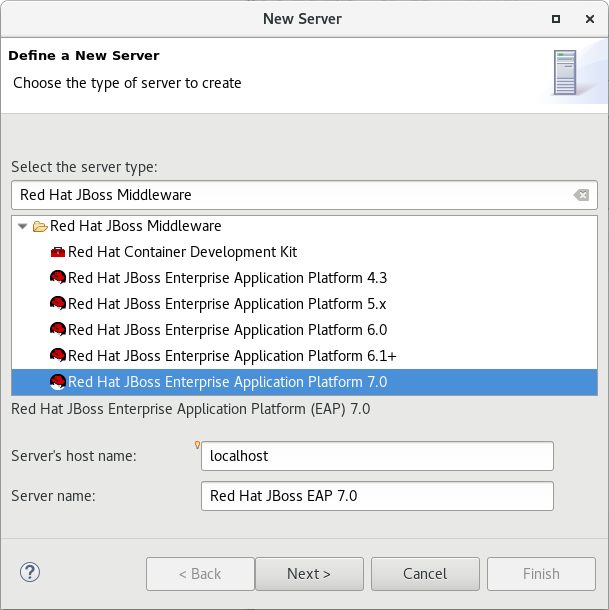
Select the server type. Find Red Hat JBoss Middleware → Red Hat JBoss Enterprise Application Platform 7 and provide a name for the server and a server’s host name. Click Next.
Figure 14.1. Setting Server Type
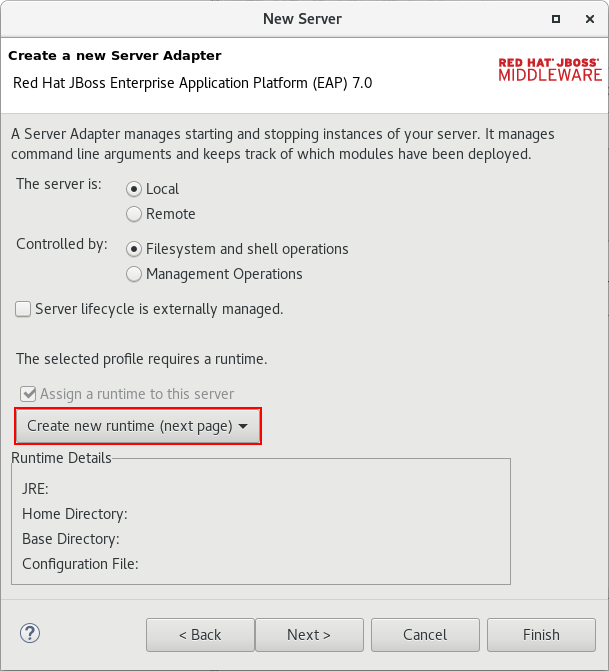
In the Create a new Server Adapter step, choose Create new runtime (next page) and click Next.
Figure 14.2. Creating New Server Adapter
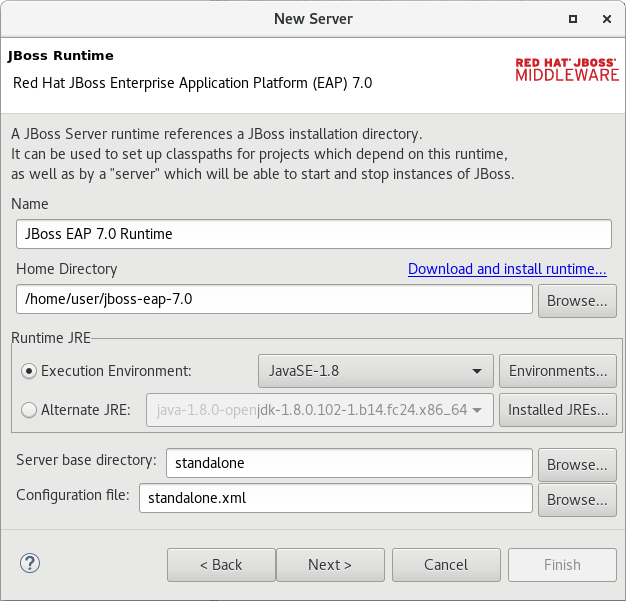
In the next step, set the Home Directory: click Browse… and select the Red Hat JBoss EAP directory which has Red Hat JBoss BPM Suite installed. Also, make sure that correct JRE is set. Red Hat JBoss EAP 7 requires Java 8, while earlier versions can use Java 7. Click Next.
Figure 14.3. Referencing JBoss Installation Directory
- Click Finish.
14.2. Importing And Cloning Projects from Git Repository into Red Hat JBoss Developer Studio
Red Hat JBoss Developer Studio can be configured to connect to a central Git repository, which stores rules, models, functions, and processes.
You can either clone a remote Git repository or import a local Git repository.
Procedure: Cloning Remote Git Repository
- In Red Hat JBoss Developer Studio, click File → Import… and select Git → Projects from Git. Click Next.
- Select Clone URI to connect to a remote repository. Click Next.
- Enter the details of the Git repository. You can use both the HTTPS or SSH protocol. Click Next.
- In the Branch Selection step, select the branch you want to import and click Next.
- To define a local storage for this project, enter an empty directory, make any configuration changes necessary, and click Next.
- Select Import as general project and click Next.
- Name the project and click Finish.
Procedure: Importing Local Git Repository
- In Red Hat JBoss Developer Studio, click File → Import… and select Git → Projects from Git. Click Next.
- Select the repository source as Existing local repository and click Next.
- From the list of available repositories, select the repository you want to import and click Next.
- In the Select a wizard to use for importing projects step, select Import as general project and click Next.
- Name the project and click Finish.
14.3. Components of Red Hat JBoss BPM Suite Application
A Red Hat JBoss BPM Suite application consists of the following components:
- A set of Java classes that become process variables or facts in rules.
- A set of services accessed from service tasks in a business process model.
- A business process model definition file in BPMN2 format.
- Rules assets (optional).
- A Java class that drives the application, including creation of a knowledge session, starting processes, and firing rules.
When you create a BPM Suite project in Red Hat JBoss Developer Studio, the following directories are generated:
-
src/main/java: stores class files (facts). -
src/main/resources: stores.drlfiles (rules) and.bpmn2files (processes).
14.4. Creating Red Hat JBoss BPM Suite Project
To create a Red Hat JBoss BPM Suite project in Red Hat JBoss Developer Studio:
- Click File → New → Project and select jBPM → jBPM Project. Click Next.
- Select the initial project contents: an empty project, a project populated with examples to help you get started quickly, or an example project from an online repository. Click Next.
Specify the name of the project and select one of the two building options, Java and jBPM Runtime classes or Maven.
Furthermore, if you decided in the second step to create a project populated with examples, Red Hat JBoss Developer Studio enables you to add either a sample Hello World process, or a more advanced process including Human Tasks and persistence. Select the corresponding radio button to choose between these two options.
- Click Finish.
To test a non-empty project:
-
Right-click the file that contains the main method: by default the
ProcessMain.javafile located atPROJECT_NAME/src/main/java/in thecom.samplepackage. Select Run As → Java Application.
The output is displayed in the Console tab.
The project contains the kmodule.xml configuration file under the src/main/resources/META-INF directory. The file defines which resources, such as processes and rules, will be loaded as a part of your project. By default, the file defines a knowledge base, called kbase, that loads resources located in the com.sample package. The default kmodule.xml file looks like follows:
<kmodule xmlns="http://jboss.org/kie/6.0.0/kmodule">
  <kbase name="kbase" packages="com.sample"/>
</kmodule>
If you selected Maven as a building option, the project contains the pom.xml file. By default, two dependencies are specified: kie-api and jbpm-test. Add more dependencies as required by your project.
14.5. Converting Existing Java Project to Red Hat JBoss BPM Suite Project
To convert an existing Java project to a BPM Suite project:
- Open the Java project in Red Hat JBoss Developer Studio.
- Right-click the project and under the Configure category, select Convert to jBPM Project.
This converts your Java project to BPM Suite project and adds the jBPM Library to your project’s classpath.
14.6. Creating Processes in Red Hat JBoss Developer Studio
To create a new process:
- Click File → New → Other and select jBPM → jBPM Process Diagram. Click Next.
- Specify the name and the package of the process, the file name, and the container. The container is the parent folder of the process.
Click Finish.
Process Editor with the newly created process opens and a start node appears on the canvas. Add more nodes and connections to further model the process.
14.7. Modeling and Validating Processes in Red Hat JBoss Developer Studio
To model a process:
- Follow the steps described in Section 14.6, “Creating Processes in Red Hat JBoss Developer Studio” to create a process.
-
In the Project Explorer panel on the left, double-click the corresponding
.bpmn2file to open the process in the BPMN2 Diagram Editor. To open the process in a different editor, right-click the.bpmn2file, click Open With, and select an editor. - By default, a newly created process contains a start node. To add more nodes to the process, drag and drop them on the canvas from the Palette panel on the right. Add an end node to finish the process.
- Connect the nodes: in the Palette panel, select Connections → Sequence Flow and then click the nodes you want to connect.
To edit properties of a node, click the node to open the corresponding Properties tab at the lower right corner of Red Hat JBoss Developer Studio. In case the Properties tab does not open, click Window → Show View → Properties.
Alternatively, double-click a node to open the Edit Task dialog window.
- Save the process.
To validate a process, right-click the process .bpmn2 file and select Validate.
If the validation completes successfully, a dialogue window that states The validation completed with no errors or warnings opens. If the validation is unsuccessful, the found errors display in the Problems tab. Fix the errors and rerun the validation.
14.8. Audit View
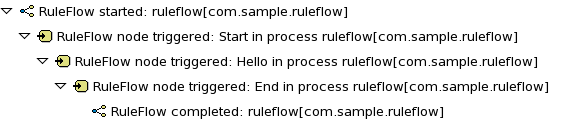
The audit view in Red Hat JBoss Developer Studio shows the audit log, which is a log of all events that were logged from a session. To open the audit view, click Window → Show View → Other and select Drools → Audit.
To open an audit tree in the audit view, click
 and select the log file from the file system, or drag the file into the audit view. A tree-based view is generated based on the audit log. An event is shown as a subnode of another event if the child event is directly caused by the parent event.
For more information about log files, see the following Section 14.8.1, “File Logger”.
14.8.1. File Logger
A file logger logs events from a session into a file. To create a logger, use KnowledgeRuntimeLoggerFactory and add it to a session.
Using a threaded file logger causes the audit log to be saved to the file system in regular intervals. The audit viewer is then able to show the latest state.
See the following example of a threaded file logger with a specified audit log file and interval in milliseconds:
Example 14.1. Threaded File Logger
KnowledgeRuntimeLogger logger = KnowledgeRuntimeLoggerFactory
  .newThreadedFileLogger(ksession, "logdir/mylogfile", 1000);

// Work with the session here.

logger.close();
14.9. Synchronizing Red Hat JBoss Developer Studio Workspace with Business Central Repositories
Red Hat JBoss BPM Suite allows you to synchronize your local workspace with one or more repositories that are managed inside Business Central with the help of Eclipse tooling for Git. Git is a popular distributed source code version control system. You can use any Git tool of your choice.
When you create and execute processes inside Red Hat JBoss Developer Studio, they get created on your local file system. Alternatively, you can import an existing repository from Business Central, apply changes and push these changes back into the Business Central repositories. This synchronization enables collaboration between developers using Red Hat JBoss Developer Studio and business analysts or end users using Business Central.
14.9.1. Importing Business Central Repository
- In Red Hat JBoss Developer Studio, click File → Import and select Git → Projects from Git. Click Next.
- Select Clone URI to connect to a repository managed by Business Central. Click Next.
In the URI field, provide the URI of the repository to be imported in the following format:
ssh://HOST_NAME:8001/REPOSITORY_NAME
For example, if you are running Business Central on localhost, use the following URI to import the
jbpm-playgroundrepository:ssh://localhost:8001/jbpm-playground
You can change the port used by the server to provide SSH access to the Git repository if necessary, using the system property
org.uberfire.nio.git.ssh.port.- Enter the user name and the password used for logging in to Business Central. Click Next.
- Select branches to be cloned from the remote repository and click Next.
- To define a local storage for this project, enter a path to an empty directory, make any configuration changes necessary, and click Next.
- Select Import as general project and click Next.
- Provide a name for the repository and click Finish.
14.9.2. Committing Changes to Business Central
To commit and push your local changes back to the Business Central repositories:
- Open your repository project in Red Hat JBoss Developer Studio.
Right-click on your repository project and select Team → Commit ….
A new dialog box open showing all the changes you have on your local file system.
Select the files you want to commit, provide an appropriate commit message, and click Commit.
You can double-click each file to get an overview of the changes you did for that file.
- Right-click your project again, and select Team → Push to Upstream.
14.9.3. Retrieving Changes from Business Central Repository
To retrieve the latest changes from the Business Central repository:
- Open your repository project in Red Hat JBoss Developer Studio.
Right-click your repository project and select Team → Fetch from Upstream.
This action fetches all the changes from the Business Central repository.
Right-click your project again and select Team → Merge.
A Merge 'master' dialog appears.
-
In the Merge 'master' dialog box, select
origin/masterbranch under Remote Tracking. - Click Merge.
This merges all the changes from the original repository in Business Central.
It is possible that you have committed and/or conflicting changes in your local version, you might have to resolve these conflicts and commit the merge results before you will be able to complete the merge successfully. It is recommended to update regularly, before you start updating a file locally, to avoid merge conflicts being detected when trying to commit changes.
14.9.4. Importing Individual Projects from Repository
When you import a repository, all the projects inside that repository are downloaded. It is however useful to mount one specific project as a separate Java project. Red Hat JBoss Developer Studio is then able to:
-
Interpret the information in the project’s
pom.xmlfile. - Download and include any specified dependencies.
- Compile any Java class located in the project.
To import a project as a separate Java project:
- In the Package Explorer on the right side of Red Hat JBoss Developer Studio, right-click on one of the projects and click Import….
Select Maven → Existing Maven Projects and click Next.
The Import Maven Projects dialog window opens with the project’s
pom.xmlfile displayed.- Click Finish.
14.9.5. Adding Red Hat JBoss BPM Suite Libraries to Project Class Path
To ensure your project compiles and executes correctly, add the Red Hat JBoss BPM Suite libraries to the project’s class path. To do so, right-click the project and select Configure → Convert to jBPM Project.
This converts the project into a Red Hat JBoss BPM Suite project and adds the Red Hat JBoss BPM Suite library to the project’s class path.