
Deploy Red Hat Quay on OpenShift with the Quay Operator
Deploy Red Hat Quay on OpenShift with Quay Operator
Abstract
Preface
Red Hat Quay is an enterprise-quality container registry. Use Red Hat Quay to build and store container images, then make them available to deploy across your enterprise.
The Red Hat Quay Operator provides a simple method to deploy and manage a Red Hat Quay cluster. This is the preferred procedure for deploying Red Hat Quay on OpenShift and is covered in this guide.
Note that this version of the Red Hat Quay Operator has been completely rewritten and differs substantially from earlier versions. Please review this documentation carefully.
Chapter 1. Prerequisites for Red Hat Quay on OpenShift
Here are a few things you need to know before you begin the Red Hat Quay Operator on OpenShift deployment:
- OpenShift cluster: You need a privileged account to an OpenShift 4.5 or later cluster on which to deploy the Red Hat Quay Operator. That account must have the ability to create namespaces at the cluster scope.
Resource Requirements: Each Red Hat Quay application pod has the following resource requirements:
- 8Gi of memory
- 2000 millicores of CPU.
The Red Hat Quay Operator will create at least one application pod per Red Hat Quay deployment it manages. Ensure your OpenShift cluster has sufficient compute resources for these requirements.
Object Storage: By default, the Red Hat Quay Operator uses the
ObjectBucketClaimKubernetes API to provision object storage. Consuming this API decouples the Operator from any vendor-specific implementation. OpenShift Container Storage provides this API via its NooBaa component, which will be used in this example. Otherwise, Red Hat Quay can be manually configured to use any of the following supported cloud storage options:- Amazon S3 (see S3 IAM Bucket Policy for details on configuring an S3 bucket policy for Red Hat Quay)
- Azure Blob Storage
- Google Cloud Storage
- Ceph Object Gateway (RADOS)
- OpenStack Swift
- CloudFront + S3
Chapter 2. Installing the Quay Operator
2.1. Differences from Earlier Versions
As of Red Hat Quay 3.4.0, the Operator has been completely re-written to provide an improved out of the box experience as well as support for more Day 2 operations. As a result the new Operator is simpler to use and is more opinionated. The key differences from earlier versions of the Operator are:
-
The
QuayEcosystemcustom resource has been replaced with theQuayRegistrycustom resource - The default installation options produces a fully supported Quay environment with all managed dependencies (database, caches, object storage, etc) supported for production use (some components may not be highly available)
- A new robust validation library for Quay’s configuration which is shared by the Quay application and config tool for consistency
-
Object storage can now be managed by the Operator using the
ObjectBucketClaimKubernetes API (Red Hat OpenShift Data Foundations can be used to provide a supported implementation of this API on OpenShift) - Customization of the container images used by deployed pods for testing and development scenarios
2.2. Before Installing the Quay Operator
2.2.1. Deciding On a Storage Solution
If you want the Operator to manage object storage for Quay, your cluster needs to be capable of providing object storage via the ObjectBucketClaim API. Using the Red Hat OpenShift Data Foundations (ODF) Operator, there are two supported options available:
A standalone instance of the Multi-Cloud Object Gateway backed by a local Kubernetes
PersistentVolumestorage- Not highly available
- Included in the Quay subscription
- Does not require a separate subscription for ODF
A production deployment of ODF with scale-out Object Service and Ceph
- Highly available
- Requires a separate subscription for ODF
To use the standalone instance option, continue reading below. For production deployment of ODF, please refer to the official documentation.
If you already have object storage available via the ObjectBucketClaim API or using an external S3-compatible object storage service (e.g. from a cloud provider), skip to Installing the Operator.
2.2.2. About The Standalone Object Gateway
As part of a Red Hat Quay subscription, users are entitled to use the Multi-Cloud Object Gateway (MCG) component of the Red Hat OpenShift Data Foundations Operator (formerly known as OpenShift Container Storage Operator). This gateway component allows you to provide an S3-compatible object storage interface to Quay backed by Kubernetes PersistentVolume-based block storage. The usage is limited to a Quay deployment managed by the Operator and to the exact specifications of the MCG instance as documented below.
Since Red Hat Quay does not support local filesystem storage, users can leverage the gateway in combination with Kubernetes PersistentVolume storage instead, to provide a supported deployment. A PersistentVolume is directly mounted on the gateway instance as a backing store for object storage and any block-based StorageClass is supported.
By the nature of PersistentVolume, this is not a scale-out, highly available solution and does not replace a scale-out storage system like Red Hat OpenShift Data Foundations (ODF). Only a single instance of the gateway is running. If the the pod running the gateway becomes unavailable due to rescheduling, updates or unplanned downtime, this will cause temporary degradation of the connected Quay instances.
2.2.3. Create A Standalone Object Gateway
To install the ODF (formerly known as OpenShift Container Storage) Operator and configure a single instance Multi-Cloud Gateway service, follow these steps:
- Open the OpenShift console and select Operators → OperatorHub, then select the OpenShift Container Storage Operator.
- Select Install. Accept all default options and select Install again.
-
Within a minute, the Operator will install and create a namespace
openshift-storage. You can confirm it has completed when theStatuscolumn is markedSucceeded. Create NooBaa object storage. Save the following YAML to a file called
noobaa.yaml.apiVersion: noobaa.io/v1alpha1 kind: NooBaa metadata: name: noobaa namespace: openshift-storage spec: dbResources: requests: cpu: '0.1' memory: 1Gi dbType: postgres coreResources: requests: cpu: '0.1' memory: 1GiThis will create a single instance deployment of the Multi-cloud Object Gateway.
Apply the configuration with the following command:
$ oc create -n openshift-storage -f noobaa.yaml
noobaa.noobaa.io/noobaa created
After a couple of minutes, you should see that the MCG instance has finished provisioning (
PHASEcolumn will be set toReady):$ oc get -n openshift-storage noobaas noobaa -w NAME MGMT-ENDPOINTS S3-ENDPOINTS IMAGE PHASE AGE noobaa [https://10.0.32.3:30318] [https://10.0.32.3:31958] registry.redhat.io/ocs4/mcg-core-rhel8@sha256:56624aa7dd4ca178c1887343c7445a9425a841600b1309f6deace37ce6b8678d Ready 3d18h
Next, configure a backing store for the gateway. Save the following YAML to a file called
noobaa-pv-backing-store.yaml.noobaa-pv-backing-store.yaml
apiVersion: noobaa.io/v1alpha1 kind: BackingStore metadata: finalizers: - noobaa.io/finalizer labels: app: noobaa name: noobaa-pv-backing-store namespace: openshift-storage spec: pvPool: numVolumes: 1 resources: requests: storage: 50Gi 1 storageClass: STORAGE-CLASS-NAME 2 type: pv-poolApply the configuration with the following command:
$ oc create -f noobaa-pv-backing-store.yaml
backingstore.noobaa.io/noobaa-pv-backing-store created
This creates the backing store configuration for the gateway. All images in Quay will be stored as objects through the gateway in a
PersistentVolumecreated by the above configuration.Finally, run the following command to make the
PersistentVolumebacking store the default for allObjectBucketClaimsissued by the Operator.$ oc patch bucketclass noobaa-default-bucket-class --patch '{"spec":{"placementPolicy":{"tiers":[{"backingStores":["noobaa-pv-backing-store"]}]}}}' --type merge -n openshift-storage
This concludes the setup of the Multi-Cloud Object Gateway instance for Red Hat Quay. Note that this configuration cannot be run in parallel on a cluster with Red Hat OpenShift Data Foundations installed.
2.3. Installing the Operator from OperatorHub
- Using the OpenShift console, Select Operators → OperatorHub, then select the Quay Operator. If there is more than one, be sure to use the Red Hat certified Operator and not the community version.
- Select Install. The Operator Subscription page appears.
Choose the following then select Subscribe:
Installation Mode: Choose either 'All namespaces' or 'A specific namespace' depending on whether you want the Operator to be available cluster-wide or only within a single namespace (all-namespaces recommended)
If you choose to install in a single namespace, you must set the monitoring component to
false:spec: components: - kind: monitoring managed: false- Update Channel: Choose the update channel (only one may be available)
- Approval Strategy: Choose to approve automatic or manual updates
- Select Install.
- After a minute you will see the Operator installed successfully in the Installed Operators page.
Chapter 3. High Level Concepts
3.1. QuayRegistry API
The Quay Operator provides the QuayRegistry custom resource API to declaratively manage Quay container registries on the cluster. Use either the OpenShift UI or a command-line tool to interact with this API.
-
Creating a
QuayRegistrywill result in the Operator deploying and configuring all necessary resources needed to run Quay on the cluster. -
Editing a
QuayRegistrywill result in the Operator reconciling the changes and creating/updating/deleting objects to match the desired configuration. -
Deleting a
QuayRegistrywill result in garbage collection of all previously created resources and theQuaycontainer registry will no longer be available.
The QuayRegistry API is fairly simple, and the fields are outlined in the following sections.
3.2. Quay components
Quay is a powerful container registry platform and as a result, requires a decent number of dependencies. These include a database, object storage, Redis, and others. The Quay Operator manages an opinionated deployment of Quay and its dependencies on Kubernetes. These dependencies are treated as components and are configured through the QuayRegistry API.
In the QuayRegistry custom resource, the spec.components field configures components. Each component contains two fields: kind - the name of the component, and managed - boolean whether the component lifecycle is handled by the Operator. By default (omitting this field), all components are managed and will be autofilled upon reconciliation for visibility:
spec:
  components:
    - managed: true
      kind: clair
    - managed: true
      kind: postgres
    - managed: true
      kind: objectstorage
    - managed: true
      kind: redis
    - managed: true
      kind: horizontalpodautoscaler
    - managed: true
      kind: route
    - managed: true
      kind: mirror
    - managed: true
      kind: monitoring
Unless your QuayRegistry custom resource specifies otherwise, the Operator will use defaults for the following managed components:
-
postgresStores the registry metadata. Uses a version of Postgres 10 from the Software Collections. -
redisHandles Quay builder coordination and some internal logging. -
objectstorageStores image layer blobs. Utilizes theObjectBucketClaimKubernetes API which is provided by Noobaa/RHOCS. -
clairProvides image vulnerability scanning. -
horizontalpodautoscalerAdjusts the number of Quay pods depending on memory/cpu consumption. -
mirrorConfigures a repository mirror worker (to support optional repository mirroring). -
routeProvides an external entrypoint to the Quay registry from outside of OpenShift. -
monitoringFeatures include a Grafana dashboard, access to individual metrics, and alerting to notify for frequently restarting Quay pods.
3.3. Using managed components
While the Operator will handle any required configuration and installation work needed for Red Hat Quay to use the managed components, there are several considerations to keep in mind.
If you choose to install the Quay Operator in a single namespace, then you must set the monitoring component to
false:spec: components: - kind: monitoring managed: false- Database backups should be performed regularly using either the supplied tools on the Postgres image or your own backup infrastructure. The Operator does not currently ensure the Postgres database is backed up.
-
Restoring the Postgres database from a backup must be done using Postgres tools and procedures. Be aware that your Quay
Podsshould not be running while the database restore is in progress. - Database disk space is allocated automatically by the Operator with 50 GiB. This number represents a usable amount of storage for most small to medium Red Hat Quay installations but may not be sufficient for your use cases. Resizing the database volume is currently not handled by the Operator.
- Object storage disk space is allocated automatically by the Operator with 50 GiB. This number represents a usable amount of storage for most small to medium Red Hat Quay installations but may not be sufficient for your use cases. Resizing the RHOCS volume is currently not handled by the Operator. See the section below on resizing managed storage for more details.
-
The Operator will deploy an OpenShift
Routeas the default entrypoint to the registry. If you prefer a different entrypoint (e.g.Ingressor directServiceaccess that configuration will need to be done manually).
If any of these considerations are unacceptable for your environment, it would be suggested to provide the Operator with unmanaged resources or overrides as described in the following sections.
3.4. Using unmanaged components for dependencies
If you have existing components such as Postgres, Redis or object storage that you would like to use with Quay, you first configure them within the Quay configuration bundle (config.yaml) and then reference the bundle in your QuayRegistry (as a Kubernetes Secret) while indicating which components are unmanaged.
The Quay config editor can also be used to create or modify an existing config bundle and simplify the process of updating the Kubernetes Secret, especially for multiple changes. When Quay’s configuration is changed via the config editor and sent to the Operator, the Quay deployment will be updated to reflect the new configuration.
3.4.1. Using an existing Postgres database
Create a configuration file
config.yamlwith the necessary database fields:config.yaml:
DB_URI: postgresql://test-quay-database:postgres@test-quay-database:5432/test-quay-database
Create a Secret using the configuration file:
$ kubectl create secret generic --from-file config.yaml=./config.yaml config-bundle-secret
Create a QuayRegistry YAML file
quayregistry.yamlwhich marks postgres component as unmanaged and references the created Secret:quayregistry.yaml
apiVersion: quay.redhat.com/v1
kind: QuayRegistry
metadata:
  name: test
spec:
  configBundleSecret: config-bundle-secret
  components:
    - kind: postgres
      managed: false
Create the QuayRegistry:
$ oc create -f quayregistry.yaml
The deployed Quay application will now use the external database.
3.4.2. Unmanaged storage
The following example uses NooBaa storage, but can be applied to other image storage options such as Azure, S3, etc.
- Create a NooBaa Object Bucket Claim in the console at Storage → Object Bucket Claims.
- Retrieve the Object Bucket Claim Data details including the Access Key, Bucket Name, Endpoint (hostname) and Secret Key.
Create a
config.yamlconfiguration file, using the information for the Object Bucket Claim:DISTRIBUTED_STORAGE_CONFIG: default: - RHOCSStorage - access_key: WmrXtSGk8B3nABCDEFGH bucket_name: my-noobaa-bucket-claim-8b844191-dc6c-444e-9ea4-87ece0abcdef hostname: s3.openshift-storage.svc is_secure: true port: "443" secret_key: X9P5SDGJtmSuHFCMSLMbdNCMfUABCDEFGH+C5QD storage_path: /datastorage/registry DISTRIBUTED_STORAGE_DEFAULT_LOCATIONS: [] DISTRIBUTED_STORAGE_PREFERENCE: - defaultCreate a Secret using the configuration file:
$ kubectl create secret generic --from-file config.yaml=./config.yaml config-bundle-secret
Create a QuayRegistry YAML file
quayregistry.yamlwhich marks storage component as unmanaged and references the created Secret:quayregistry.yaml
apiVersion: quay.redhat.com/v1
kind: QuayRegistry
metadata:
  name: test
spec:
  configBundleSecret: config-bundle-secret
  components:
    - kind: storage
      managed: false
Create the QuayRegistry:
oc create -f quayregistry.yaml
The deployed Quay application will now use the created storage.
3.4.3. Disabling the Horizontal Pod Autoscaler
If you wish to disable autoscaling or create your own HorizontalPodAutoscaler, simply specify the component as unmanaged in the QuayRegistry instance:
apiVersion: quay.redhat.com/v1
kind: QuayRegistry
metadata:
  name: some-quay
spec:
  components:
    - kind: horizontalpodautoscaler
      managed: false
3.5. Config bundle secret
The spec.configBundleSecret field is a reference to the metadata.name of a Secret in the same namespace as the QuayRegistry. This Secret must contain a config.yaml key/value pair. This config.yaml file is a Quay config YAML file. This field is optional, and will be auto-filled by the Operator if not provided. If provided, it serves as the base set of config fields which are later merged with other fields from any managed components to form a final output Secret, which is then mounted into the Quay application pods.
3.6. QuayRegistry Status
Lifecycle observability for a given Quay deployment is reported in the status section of the corresponding QuayRegistry object. The Operator constantly updates this section, and this should be the first place to look for any problems or state changes in Quay or its managed dependencies.
3.6.1. Registry Endpoint
Once Quay is ready to be used, the status.registryEndpoint field will be populated with the publicly available hostname of the registry.
3.6.2. Config Editor Endpoint
Access Quay’s UI-based config editor using status.configEditorEndpoint.
3.6.3. Config Editor Credentials Secret
The username/password for the config editor UI will be stored in a Secret in the same namespace as the QuayRegistry referenced by status.configEditorCredentialsSecret.
3.6.4. Current Version
The current version of Quay that is running will be reported in status.currentVersion.
3.6.5. Conditions
Certain conditions will be reported in status.conditions.
Chapter 4. Deploying Quay using the Quay Operator
4.1. Creating a Quay Registry
The default configuration tells the Operator to manage all of Quay’s dependencies (database, Redis, object storage, etc).
4.1.1. OpenShift Console
- Select Operators → Installed Operators, then select the Quay Operator to navigate to the Operator detail view.
- Click 'Create Instance' on the 'Quay Registry' tile under 'Provided APIs'.
-
Optionally change the 'Name' of the
QuayRegistry. This will affect the hostname of the registry. All other fields have been populated with defaults. -
Click 'Create' to submit the
QuayRegistryto be deployed by the Quay Operator. -
You should be redirected to the
QuayRegistrylist view. Click on theQuayRegistryyou just created to see the detail view. - Once the 'Registry Endpoint' has a value, click it to access your new Quay registry via the UI. You can now select 'Create Account' to create a user and sign in.
4.1.2. Command Line
The same result can be achieved using the CLI.
Create the following
QuayRegistrycustom resource in a file calledquay.yaml.quay.yaml:
apiVersion: quay.redhat.com/v1
kind: QuayRegistry
metadata:
  name: my-registry
Create the
QuayRegistryin your namespace:$ oc create -n <your-namespace> -f quay.yaml
Wait until the
status.registryEndpointis populated.$ oc get -n <your-namespace> quayregistry my-registry -o jsonpath="{.status.registryEndpoint}" -w-
Once the
status.registryEndpointhas a value, navigate to it using your web browser to access your new Quay registry via the UI. You can now select 'Create Account' to create a user and sign in.
4.2. Deploying Quay on infrastructure nodes
By default, Quay-related pods are placed on arbitrary worker nodes when using the Operator to deploy the registry. The OpenShift Container Platform documentation shows how to use machine sets to configure nodes to only host infrastructure components (see https://docs.openshift.com/container-platform/4.7/machine_management/creating-infrastructure-machinesets.html).
If you are not using OCP MachineSet resources to deploy infra nodes, this section shows you how to manually label and taint nodes for infrastructure purposes.
Once you have your configured your infrastructure nodes, either manually or using machine sets, you can then control the placement of Quay pods on these nodes using node selectors and tolerations.
4.2.1. Label and taint nodes for infrastructure use
In the cluster used in this example, there are three master nodes and six worker nodes:
$ oc get nodes
NAME                                               STATUS   ROLES    AGE     VERSION
user1-jcnp6-master-0.c.quay-devel.internal         Ready    master   3h30m   v1.20.0+ba45583
user1-jcnp6-master-1.c.quay-devel.internal         Ready    master   3h30m   v1.20.0+ba45583
user1-jcnp6-master-2.c.quay-devel.internal         Ready    master   3h30m   v1.20.0+ba45583
user1-jcnp6-worker-b-65plj.c.quay-devel.internal   Ready    worker   3h21m   v1.20.0+ba45583
user1-jcnp6-worker-b-jr7hc.c.quay-devel.internal   Ready    worker   3h21m   v1.20.0+ba45583
user1-jcnp6-worker-c-jrq4v.c.quay-devel.internal   Ready    worker   3h21m   v1.20.0+ba45583
user1-jcnp6-worker-c-pwxfp.c.quay-devel.internal   Ready    worker   3h21m   v1.20.0+ba45583
user1-jcnp6-worker-d-h5tv2.c.quay-devel.internal   Ready    worker   3h22m   v1.20.0+ba45583
user1-jcnp6-worker-d-m9gg4.c.quay-devel.internal   Ready    worker   3h21m   v1.20.0+ba45583
Label the final three worker nodes for infrastructure use:
$ oc label node --overwrite user1-jcnp6-worker-c-pwxfp.c.quay-devel.internal node-role.kubernetes.io/infra=
$ oc label node --overwrite user1-jcnp6-worker-d-h5tv2.c.quay-devel.internal node-role.kubernetes.io/infra=
$ oc label node --overwrite user1-jcnp6-worker-d-m9gg4.c.quay-devel.internal node-role.kubernetes.io/infra=
Now, when you list the nodes in the cluster, the last 3 worker nodes will have an added role of infra:
$ oc get nodes
NAME                                               STATUS   ROLES          AGE     VERSION
user1-jcnp6-master-0.c.quay-devel.internal         Ready    master         4h14m   v1.20.0+ba45583
user1-jcnp6-master-1.c.quay-devel.internal         Ready    master         4h15m   v1.20.0+ba45583
user1-jcnp6-master-2.c.quay-devel.internal         Ready    master         4h14m   v1.20.0+ba45583
user1-jcnp6-worker-b-65plj.c.quay-devel.internal   Ready    worker         4h6m    v1.20.0+ba45583
user1-jcnp6-worker-b-jr7hc.c.quay-devel.internal   Ready    worker         4h5m    v1.20.0+ba45583
user1-jcnp6-worker-c-jrq4v.c.quay-devel.internal   Ready    worker         4h5m    v1.20.0+ba45583
user1-jcnp6-worker-c-pwxfp.c.quay-devel.internal   Ready    infra,worker   4h6m    v1.20.0+ba45583
user1-jcnp6-worker-d-h5tv2.c.quay-devel.internal   Ready    infra,worker   4h6m    v1.20.0+ba45583
user1-jcnp6-worker-d-m9gg4.c.quay-devel.internal   Ready    infra,worker   4h6m    v1.20.0+ba45583
With an infra node being assigned as a worker, there is a chance that user workloads could get inadvertently assigned to an infra node. To avoid this, you can apply a taint to the infra node and then add tolerations for the pods you want to control.
$ oc adm taint nodes user1-jcnp6-worker-c-pwxfp.c.quay-devel.internal node-role.kubernetes.io/infra:NoSchedule
$ oc adm taint nodes user1-jcnp6-worker-d-h5tv2.c.quay-devel.internal node-role.kubernetes.io/infra:NoSchedule
$ oc adm taint nodes user1-jcnp6-worker-d-m9gg4.c.quay-devel.internal node-role.kubernetes.io/infra:NoSchedule
4.2.2. Create a Project with node selector and toleration
If you have already deployed Quay using the Quay Operator, remove the installed operator and any specific namespace(s) you created for the deployment.
Create a Project resource, specifying a node selector and toleration as shown in the following example:
quay-registry.yaml
kind: Project
apiVersion: project.openshift.io/v1
metadata:
  name: quay-registry
  annotations:
    openshift.io/node-selector: 'node-role.kubernetes.io/infra='
    scheduler.alpha.kubernetes.io/defaultTolerations: >-
      [{"operator": "Exists", "effect": "NoSchedule", "key":
      "node-role.kubernetes.io/infra"}
      ]
Use the oc apply command to create the project:
$ oc apply -f quay-registry.yaml
project.project.openshift.io/quay-registry created
Any subsequent resources created in the quay-registry namespace should now be scheduled on the dedicated infrastructure nodes.
4.2.3. Install the Quay Operator in the namespace
When installing the Quay Operator, specify the appropriate project namespace explicitly, in this case quay-registry. This will result in the operator pod itself landing on one of the three infrastructure nodes:
$ oc get pods -n quay-registry -o wide
NAME                                    READY   STATUS    RESTARTS   AGE   IP            NODE
quay-operator.v3.4.1-6f6597d8d8-bd4dp   1/1     Running   0          30s   10.131.0.16   user1-jcnp6-worker-d-h5tv2.c.quay-devel.internal
4.2.4. Create the registry
Create the registry as explained earlier, and then wait for the deployment to be ready. When you list the Quay pods, you should now see that they have only been scheduled on the three nodes that you have labelled for infrastructure purposes:
$ oc get pods -n quay-registry -o wide
NAME                                                   READY   STATUS      RESTARTS   AGE     IP            NODE
example-registry-clair-app-789d6d984d-gpbwd            1/1     Running     1          5m57s   10.130.2.80   user1-jcnp6-worker-d-m9gg4.c.quay-devel.internal
example-registry-clair-postgres-7c8697f5-zkzht         1/1     Running     0          4m53s   10.129.2.19   user1-jcnp6-worker-c-pwxfp.c.quay-devel.internal
example-registry-quay-app-56dd755b6d-glbf7             1/1     Running     1          5m57s   10.129.2.17   user1-jcnp6-worker-c-pwxfp.c.quay-devel.internal
example-registry-quay-config-editor-7bf9bccc7b-dpc6d   1/1     Running     0          5m57s   10.131.0.23   user1-jcnp6-worker-d-h5tv2.c.quay-devel.internal
example-registry-quay-database-8dc7cfd69-dr2cc         1/1     Running     0          5m43s   10.129.2.18   user1-jcnp6-worker-c-pwxfp.c.quay-devel.internal
example-registry-quay-mirror-78df886bcc-v75p9          1/1     Running     0          5m16s   10.131.0.24   user1-jcnp6-worker-d-h5tv2.c.quay-devel.internal
example-registry-quay-postgres-init-8s8g9              0/1     Completed   0          5m54s   10.130.2.79   user1-jcnp6-worker-d-m9gg4.c.quay-devel.internal
example-registry-quay-redis-5688ddcdb6-ndp4t           1/1     Running     0          5m56s   10.130.2.78   user1-jcnp6-worker-d-m9gg4.c.quay-devel.internal
quay-operator.v3.4.1-6f6597d8d8-bd4dp                  1/1     Running     0          22m     10.131.0.16   user1-jcnp6-worker-d-h5tv2.c.quay-devel.internal
Chapter 5. Upgrading Quay using the Quay Operator
The Quay Operator follows a synchronized versioning scheme, which means that each version of the Operator is tied to the version of Quay and its components which it manages. There is no field on the QuayRegistry custom resource which sets the version of Quay to deploy; the Operator only knows how to deploy a single version of all components. This scheme was chosen to ensure that all components work well together and to reduce the complexity of the Operator needing to know how to manage the lifecycles of many different versions of Quay on Kubernetes.
5.1. Operator Lifecycle Manager
The Quay Operator should be installed and upgraded using the Operator Lifecycle Manager (OLM). When creating a Subscription with the default approvalStrategy: Automatic, OLM will automatically upgrade the Quay Operator whenever a new version becomes available.
When the Quay Operator is installed via Operator Lifecycle Manager it may be configured to support automatic or manual upgrades. This option is shown on the Operator Hub page for the Quay Operator during installation. It can also be found in the Quay Operator Subscription object via the approvalStrategy field. Choosing Automatic means that your Quay Operator will automatically be upgraded whenever a new Operator version is released. If this is not desireable, then the Manual approval strategy should be selected.
5.2. Upgrading Quay by upgrading the Quay Operator
The general approach for upgrading installed Operators on OpenShift is documented at Upgrading installed Operators.
5.2.1. Upgrading Quay
From a Red Hat Quay point of view, to update from one minor version to the next, for example, 3.4 → 3.5, you need to actively change the update channel for the Quay Operator.
For z stream upgrades, for example, 3.4.2 → 3.4.3, updates are released in the major-minor channel that the user initially selected during install. The procedure to perform a z stream upgrade depends on the approvalStrategy as outlined above. If the approval strategy is set to Automatic, the Operator will upgrade automatically to the newest z stream, resulting in automatic, rolling Quay updates to newer z streams with little to no downtime. Otherwise, the update must be manually approved before installation can begin.
5.2.2. Changing the update channel for an Operator
The subscription of an installed Operator specifies an update channel, which is used to track and receive updates for the Operator. To upgrade the Quay Operator to start tracking and receiving updates from a newer channel, change the update channel in the Subscription tab for the installed Quay Operator. For subscriptions with an Automatic approval strategy, the upgrade begins automatically and can be monitored on the page that lists the Installed Operators.
5.2.3. Manually approving a pending Operator upgrade
If an installed Operator has the approval strategy in its subscription set to Manual, when new updates are released in its current update channel, the update must be manually approved before installation can begin. If the Quay Operator has a pending upgrade, this status will be displayed in the list of Installed Operators. In the Subscription tab for the Quay Operator, you can preview the install plan and review the resources that are listed as available for upgrade. If satisfied, click Approve and return to the page that lists Installed Operators to monitor the progress of the upgrade.
The following image shows the Subscription tab in the UI, including the update Channel, the Approval strategy, the Upgrade status and the InstallPlan:

The list of Installed Operators provides a high-level summary of the current Quay installation:

5.3. Upgrading a QuayRegistry
When the Quay Operator starts up, it immediately looks for any QuayRegistries it can find in the namespace(s) it is configured to watch. When it finds one, the following logic is used:
-
If
status.currentVersionis unset, reconcile as normal. -
If
status.currentVersionequals the Operator version, reconcile as normal. -
If
status.currentVersiondoes not equal the Operator version, check if it can be upgraded. If it can, perform upgrade tasks and set thestatus.currentVersionto the Operator’s version once complete. If it cannot be upgraded, return an error and leave theQuayRegistryand its deployed Kubernetes objects alone.
5.4. Enabling new features in Quay 3.5
5.4.1. Console monitoring and alerting
The support for monitoring of Quay 3.5 in the OpenShift console requires that the Operator is installed in all namespaces. If you previously installed the Operator in a specific namespace, delete the Operator itself and re-install it for all namespaces, once the upgrade has taken place.
5.4.2. OCI and Helm support
Support for Helm and OCI artifacts is now enabled by default in Red Hat Quay 3.5. If you want to explicitly enable the feature, for example, if you are upgrading from a version where it is not enabled by default, you need to reconfigure your Quay deployment to enable the use of OCI artifacts using the following properties:
FEATURE_GENERAL_OCI_SUPPORT: true
FEATURE_HELM_OCI_SUPPORT: true
5.5. Upgrading a QuayEcosystem
Upgrades are supported from previous versions of the Operator which used the QuayEcosystem API for a limited set of configurations. To ensure that migrations do not happen unexpectedly, a special label needs to be applied to the QuayEcosystem for it to be migrated. A new QuayRegistry will be created for the Operator to manage, but the old QuayEcosystem will remain until manually deleted to ensure that you can roll back and still access Quay in case anything goes wrong. To migrate an existing QuayEcosystem to a new QuayRegistry, follow these steps:
Add
"quay-operator/migrate": "true"to themetadata.labelsof theQuayEcosystem.$ oc edit quayecosystem <quayecosystemname>
metadata: labels: quay-operator/migrate: "true"-
Wait for a
QuayRegistryto be created with the samemetadata.nameas yourQuayEcosystem. TheQuayEcosystemwill be marked with the label"quay-operator/migration-complete": "true". -
Once the
status.registryEndpointof the newQuayRegistryis set, access Quay and confirm all data and settings were migrated successfully. -
When you are confident everything worked correctly, you may delete the
QuayEcosystemand Kubernetes garbage collection will clean up all old resources.
5.5.1. Reverting QuayEcosystem Upgrade
If something goes wrong during the automatic upgrade from QuayEcosystem to QuayRegistry, follow these steps to revert back to using the QuayEcosystem:
Delete the
QuayRegistryusing either the UI orkubectl:$ kubectl delete -n <namespace> quayregistry <quayecosystem-name>
-
If external access was provided using a
Route, change theRouteto point back to the originalServiceusing the UI orkubectl.
If your QuayEcosystem was managing the Postgres database, the upgrade process will migrate your data to a new Postgres database managed by the upgraded Operator. Your old database will not be changed or removed but Quay will no longer use it once the migration is complete. If there are issues during the data migration, the upgrade process will exit and it is recommended that you continue with your database as an unmanaged component.
5.5.2. Supported QuayEcosystem Configurations for Upgrades
The Quay Operator will report errors in its logs and in status.conditions if migrating a QuayEcosystem component fails or is unsupported. All unmanaged components should migrate successfully because no Kubernetes resources need to be adopted and all the necessary values are already provided in Quay’s config.yaml.
Database
Ephemeral database not supported (volumeSize field must be set).
Redis
Nothing special needed.
External Access
Only passthrough Route access supported for automatic migration. Manual migration required for other methods.
-
LoadBalancerwithout custom hostname: After theQuayEcosystemis marked with label"quay-operator/migration-complete": "true", delete themetadata.ownerReferencesfield from existingServicebefore deleting theQuayEcosystemto prevent Kubernetes from garbage collecting theServiceand removing the load balancer. A newServicewill be created withmetadata.nameformat<QuayEcosystem-name>-quay-app. Edit thespec.selectorof the existingServiceto match thespec.selectorof the newServiceso traffic to the old load balancer endpoint will now be directed to the new pods. You are now responsible for the oldService; the Quay Operator will not manage it. -
LoadBalancer/NodePort/Ingresswith custom hostname: A newServiceof typeLoadBalancerwill be created withmetadata.nameformat<QuayEcosystem-name>-quay-app. Change your DNS settings to point to thestatus.loadBalancerendpoint provided by the newService.
Clair
Nothing special needed.
Object Storage
QuayEcosystem did not have a managed object storage component, so object storage will always be marked as unmanaged. Local storage is not supported.
Repository Mirroring
Nothing special needed.
Chapter 6. Quay Operator features
6.1. Helm OCI Support and Red Hat Quay
Container registries such as Red Hat Quay were originally designed to support container images in the Docker image format. To promote the use of additional runtimes apart from Docker, the Open Container Initiative (OCI) was created to provide a standardization surrounding container runtimes and image formats. Most container registries support the OCI standardization as it is based on the Docker image manifest V2, Schema 2 format.
In addition to container images, a variety of artifacts have emerged that support not just individual applications, but the Kubernetes platform as a whole. These range from Open Policy Agent (OPA) policies for security and governance to Helm charts and Operators to aid in application deployment.
Red Hat Quay is a private container registry that not only stores container images, but supports an entire ecosystem of tooling to aid in the management of containers. With the release of Red Hat Quay 3.5, support for the use of OCI based artifacts, and specifically Helm Charts, has graduated from Technical Preview (TP) and now has General Availability (GA) status.
When Red Hat Quay 3.5 is deployed using the OpenShift Operator, support for Helm and OCI artifacts is now enabled by default. If you need to explicitly enable the feature, for example, if it has previously been disabled or if you have upgraded from a version where it is not enabled by default, see the section Explicitly enabling OCI and Helm support.
6.1.1. Helm and OCI prerequisites
Trusted certificates: Communication between the Helm client and Quay is facilitated over HTTPS and as of Helm 3.5, support is only available for registries communicating over HTTPS with trusted certificates. In addition, the operating system must trust the certificates exposed by the registry. Support in future Helm releases will allow for communicating with remote registries insecurely. With that in mind, ensure that your operating system has been configured to trust the certificates used by Quay, for example:
$ sudo cp rootCA.pem   /etc/pki/ca-trust/source/anchors/
$ sudo update-ca-trust extract
-
Experimental feature: Many of the commands for interacting with Helm and OCI registries make use of the
helm chartsubcommand. At the time of writing, OCI support in Helm is still marked as an “experimental” feature and must be enabled explicitly. This is accomplished by setting the environment variableHELM_EXPERIMENTAL_OCI=1. Install Helm client: Download your desired version from https://github.com/helm/helm/releases, for example, https://get.helm.sh/helm-v3.5.3-linux-amd64.tar.gz. Unpack it and move the helm binary to its desired destination:
$ tar -zxvf helm-v3.5.3-linux-amd64.tar.gz
$ mv linux-amd64/helm /usr/local/bin/helm
-
Create organization in Quay: Create a new organization for storing the Helm charts, using the Quay registry UI. For example, create an organization named
helm.
6.1.2. Using Helm charts with Quay
Helm, as a graduated project of the Cloud Native Computing Foundation (CNCF), has become the de facto package manager for Kubernetes as it simplifies how applications are packaged and deployed. Helm uses a packaging format called Charts which contain the Kubernetes resources representing an application. Charts can be made available for general distribution and consumption in repositories. A Helm repository is an HTTP server that serves an index.yaml metadata file and optionally a set of packaged charts. Beginning with Helm version 3, support was made available for distributing charts in OCI registries as an alternative to a traditional repository. To demonstrate how Quay can be used as a registry for Helm charts, an existing chart from a Helm repository will be used to showcase the interaction with OCI registries for chart developers and users.
In the following example, a sample etherpad chart is downloaded from from the Red Community of Practice (CoP) repository and pushed to a local Red Hat Quay repository using the following steps:
- Add the appropriate repository
- Update the repository with the latest metadata
-
Download and untar the chart to create a local directory called
etherpad
For example:
$ helm repo add redhat-cop https://redhat-cop.github.io/helm-charts
$ helm repo update
$ helm pull redhat-cop/etherpad --version=0.0.4 --untar
Tagging the chart requires use of the helm chart save command - this corresponds to using podman tag for tagging images.
$ helm chart save ./etherpad example-registry-quay-quay-enterprise.apps.user1.example.com/helm/etherpad:0.0.4

ref:     example-registry-quay-quay-enterprise.apps.user1.example.com/helm/etherpad:0.0.4
digest:  6850d9b21dd4b87cf20ad49f2e2c7def9655c52ea573e1ddb9d1464eeb6a46a6
size:    3.5 KiB
name:    etherpad
version: 0.0.4
0.0.4: saved
Use the helm chart list command to see the local instance of the chart:
helm chart list

REF                                                                               NAME     VERSION DIGEST SIZE   CREATED
example-registry-quay-quay-enterprise.apps.user1.example.com/helm/etherpad:0.0.4 etherpad 0.0.4   ce0233f 3.5 KiB 23 seconds
Before pushing the chart, log in to the repository using the helm registry login command:
$ helm registry login example-registry-quay-quay-enterprise.apps.user1.example.com
Username: quayadmin
Password:
Login succeeded
Push the chart to your local Quay repository using the helm chart push command:
$ helm chart push example-registry-quay-quay-enterprise.apps.user1.example.com/helm/etherpad:0.0.4

The push refers to repository [example-registry-quay-quay-enterprise.apps.user1.example.com/helm/etherpad]
ref:     example-registry-quay-quay-enterprise.apps.user1.example.com/helm/etherpad:0.0.4
digest:  ce0233fd014992b8e27cc648cdabbebd4dd6850aca8fb8e50f7eef6f2f49833d
size:    3.5 KiB
name:    etherpad
version: 0.0.4
0.0.4: pushed to remote (1 layer, 3.5 KiB total)
To test that the push worked, delete the local copy and then pull the chart from the repository:
$ helm chart rm example-registry-quay-quay-enterprise.apps.user1.example.com/helm/etherpad:0.0.4
$ rm -rf etherpad
$ helm chart pull example-registry-quay-quay-enterprise.apps.user1.example.com/helm/etherpad:0.0.4

0.0.4: Pulling from example-registry-quay-quay-enterprise.apps.user1.example.com/helm/etherpad
ref:     example-registry-quay-quay-enterprise.apps.user1.example.com/helm/etherpad:0.0.4
digest:  6850d9b21dd4b87cf20ad49f2e2c7def9655c52ea573e1ddb9d1464eeb6a46a6
size:    3.5 KiB
name:    etherpad
version: 0.0.4
Status: Downloaded newer chart for example-registry-quay-quay-enterprise.apps.user1.example.com/helm/etherpad:0.0.4
Use the helm chart export command to extract the chart files:
$ helm chart export example-registry-quay-quay-enterprise.apps.user1.example.com/helm/etherpad:0.0.4

ref:     example-registry-quay-quay-enterprise.apps.user1.example.com/helm/etherpad:0.0.4
digest:  ce0233fd014992b8e27cc648cdabbebd4dd6850aca8fb8e50f7eef6f2f49833d
size:    3.5 KiB
name:    etherpad
version: 0.0.4
Exported chart to etherpad/
6.1.3. OCI and Helm configuration
Support for Helm and OCI artifacts is now enabled by default in Red Hat Quay 3.5. If you need to explicitly enable the feature, for example, if it has previously been disabled or if you have upgraded from a version where it is not enabled by default, you need to add two properties in the Quay configuration to enable the use of OCI artifacts:
FEATURE_GENERAL_OCI_SUPPORT: true
FEATURE_HELM_OCI_SUPPORT: true
Table 6.1. OCI and Helm configuration
| Field | Type | Description |
|---|---|---|
| FEATURE_GENERAL_OCI_SUPPORT | Boolean |
Enable support for OCI artifacts |
| FEATURE_HELM_OCI_SUPPORT | Boolean |
Enable support for Helm artifacts |
6.1.4. Configuring OCI and Helm with the Operator
Customizations to the configuration of Quay can be provided in a secret containing the configuration bundle. Execute the following command which will create a new secret called quay-config-bundle, in the appropriate namespace, containing the necessary properties to enable OCI support.
quay-config-bundle.yaml
apiVersion: v1
stringData:
  config.yaml: |
    FEATURE_GENERAL_OCI_SUPPORT: true
    FEATURE_HELM_OCI_SUPPORT: true
kind: Secret
metadata:
  name: quay-config-bundle
  namespace: quay-enterprise
type: Opaque
Create the secret in the appropriate namespace, in this example quay-enterprise:
$ oc create -n quay-enterprise -f quay-config-bundle.yaml
Specify the secret for the spec.configBundleSecret field:
quay-registry.yaml
apiVersion: quay.redhat.com/v1
kind: QuayRegistry
metadata:
  name: example-registry
  namespace: quay-enterprise
spec:
  configBundleSecret: quay-config-bundle
Create the registry with the specified configuration:
$ oc create -n quay-enterprise -f quay-registry.yaml
6.2. Console monitoring and alerting
Red Hat Quay 3.5 provides support for monitoring Quay instances that were deployed using the Operator, from inside the OpenShift console. The new monitoring features include a Grafana dashboard, access to individual metrics, and alerting to notify for frequently restarting Quay pods.
To automatically enable the monitoring features, the Operator must be installed in "all namespaces" mode.
If the Operator is installed in a single namespace, the monitoring component must be set to unmanaged. In this instance, you will need to enable monitoring in OpenShift Container Platform (OCP) for the specific namespace. For more information, see the OCP documentation at https://docs.openshift.com/container-platform/4.7/monitoring/enabling-monitoring-for-user-defined-projects.html
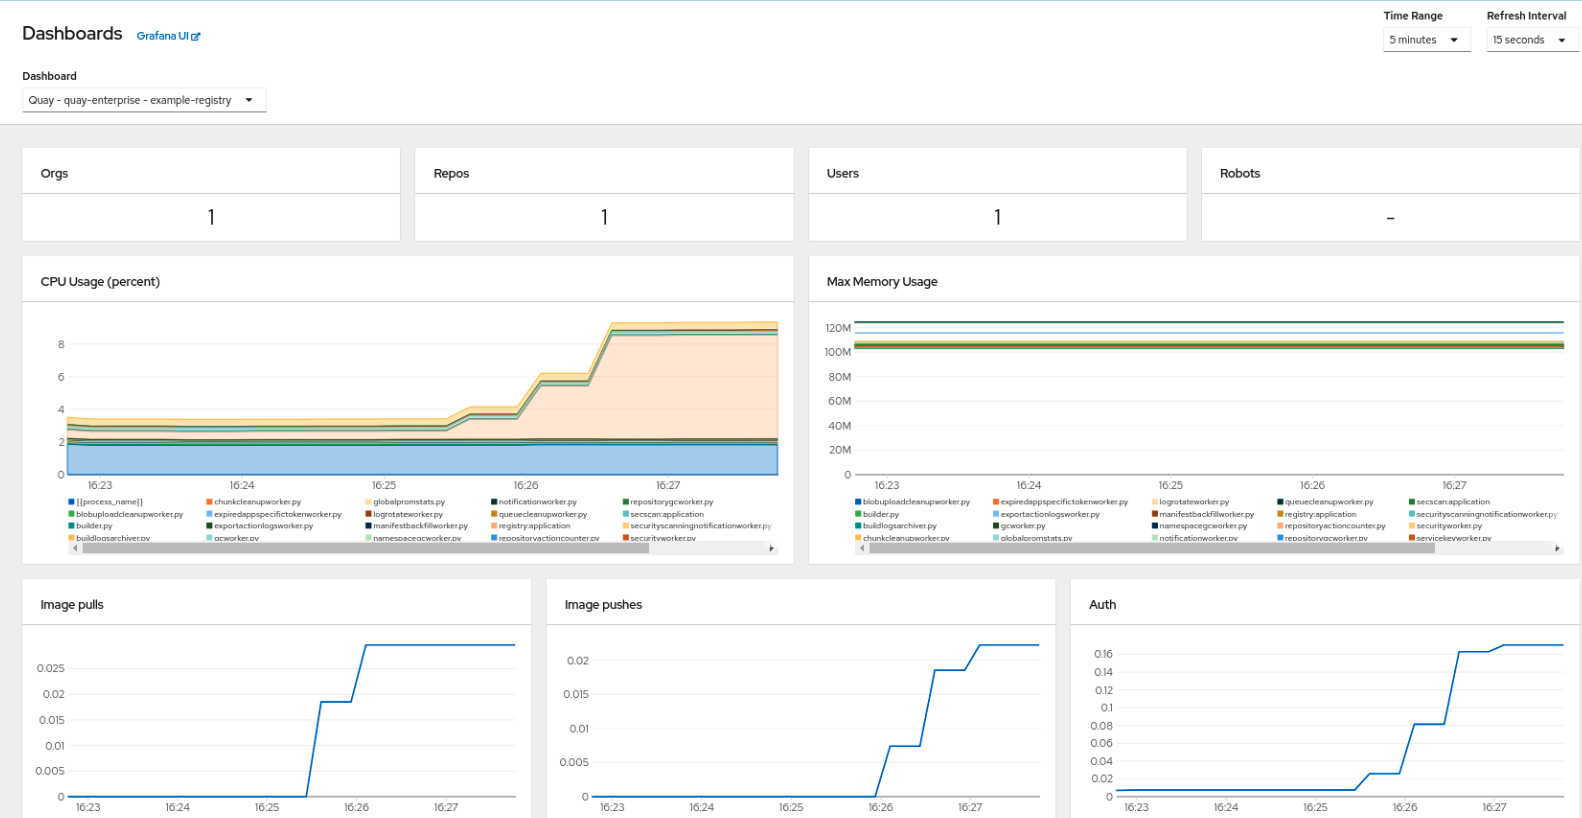
6.2.1. Dashboard
In the OpenShift console, navigate to Monitoring → Dashboards and search for the dashboard of your desired Quay registry instance:
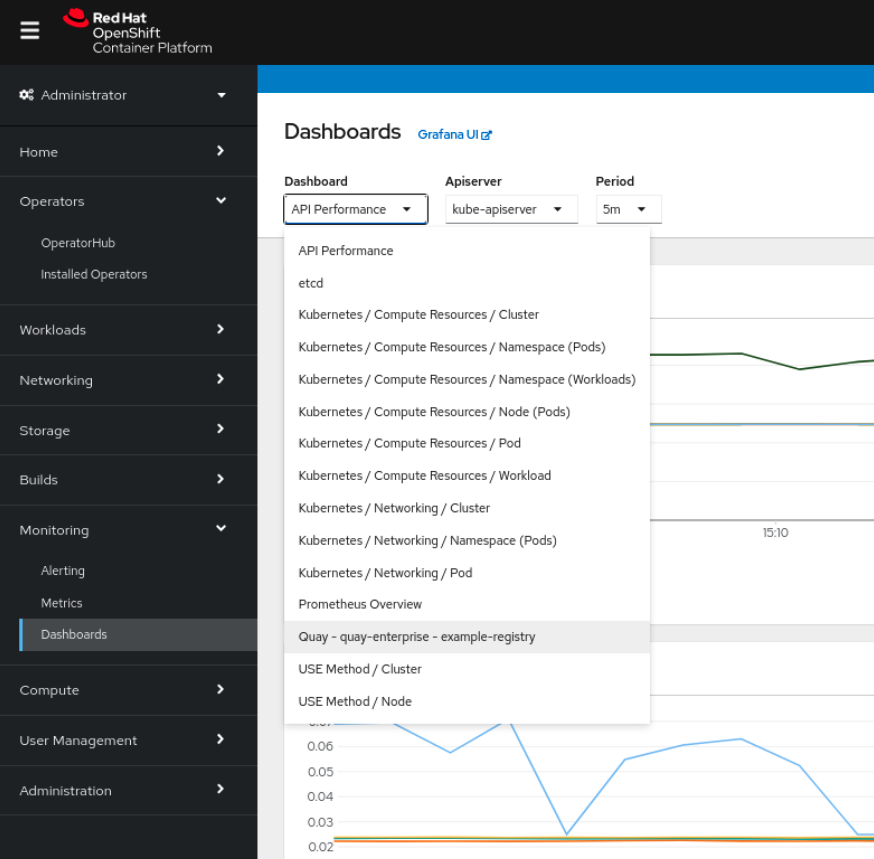
The dashboard shows various statistics including:
- The number of Organizations, Repositories, Users and Robot accounts
- CPU Usage and Max Memory Usage
- Rates of Image Pulls and Pushes, and Authentication requests
- API request rate
- Latencies
6.2.2. Metrics
You can see the underlying metrics behind the Quay dashboard, by accessing Monitoring → Metrics in the UI. In the Expression field, enter the text quay_ to see the list of metrics available:
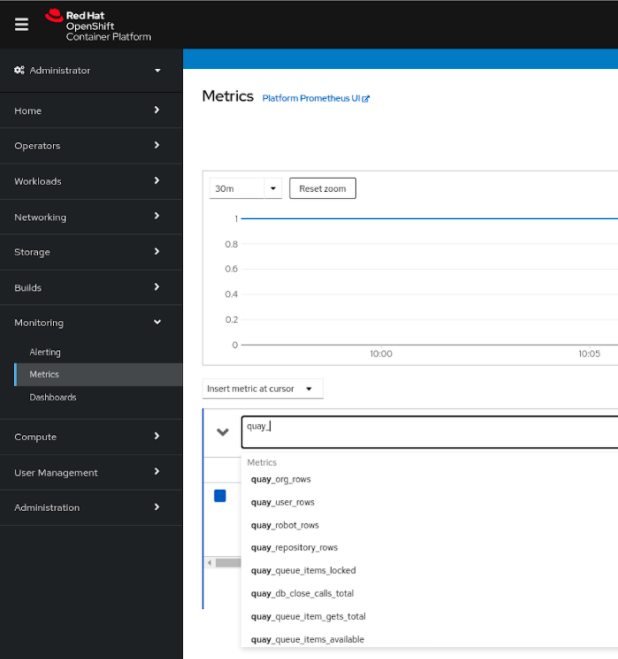
Select a sample metric, for example, quay_org_rows:

This metric shows the number of organizations in the registry, and it is directly surfaced in the dashboard as well.
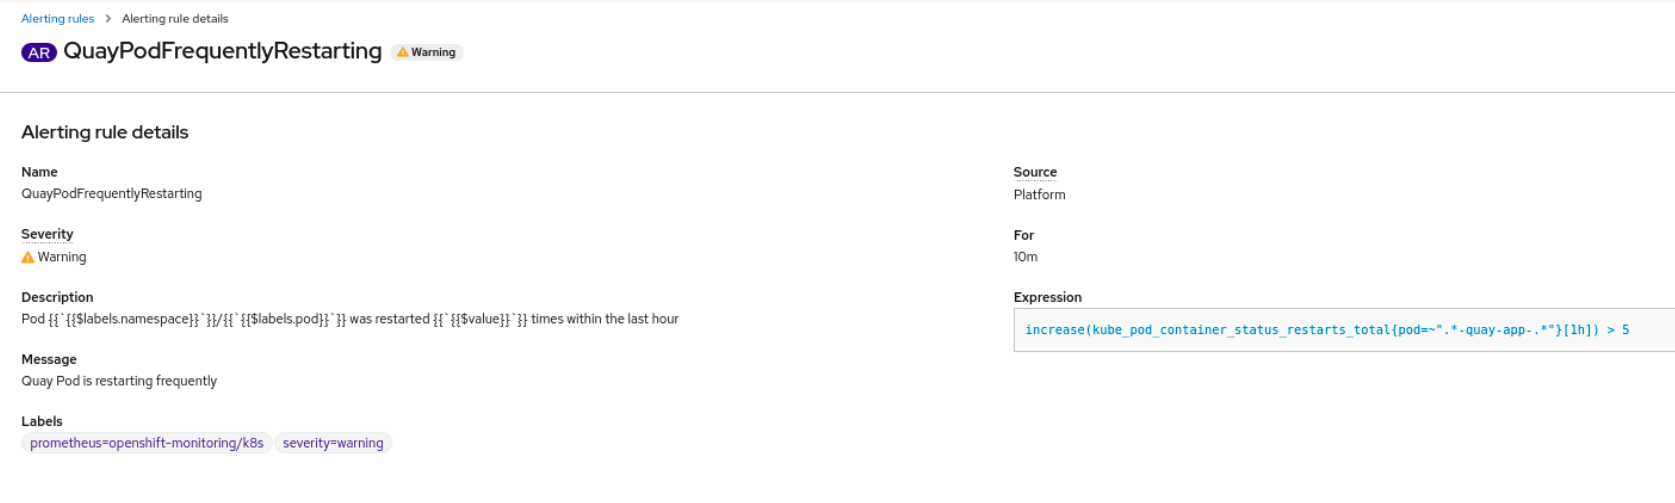
6.2.3. Alerting
An alert is raised if the Quay pods restart too often. The alert can be configured by accessing the Alerting rules tab from Monitoring → Alerting in the consol UI and searching for the Quay-specific alert:
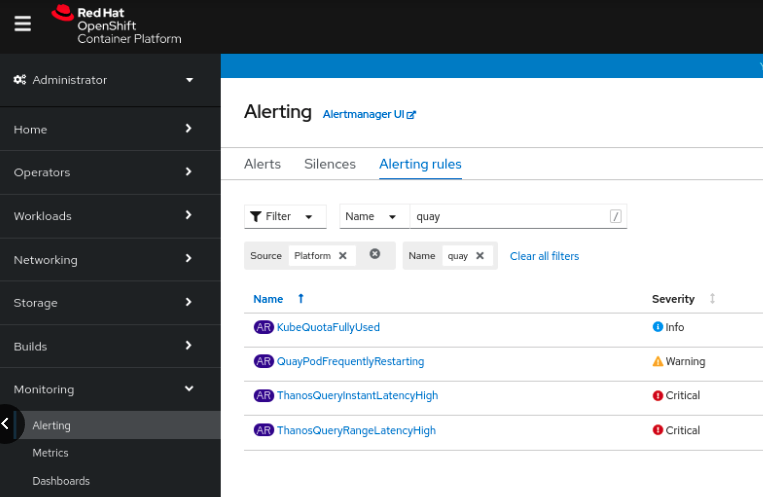
Select the QuayPodFrequentlyRestarting rule detail to configure the alert:
6.3. Manually updating the vulnerability databases for Clair in an air-gapped OpenShift cluster
Clair utilizes packages called updaters that encapsulate the logic of fetching and parsing different vulnerability databases. Clair supports running updaters in a different environment and importing the results. This is aimed at supporting installations that disallow the Clair cluster from talking to the Internet directly.
To manually update the vulnerability databases for Clair in an air-gapped OpenShift cluster, use the following steps:
-
Obtain the
clairctlprogram - Retrieve the Clair config
-
Use
clairctlto export the updaters bundle from a Clair instance that has access to the internet - Update the Clair config in the air-gapped OpenShift cluster to allow access to the Clair database
- Transfer the updaters bundle from the system with internet access, to make it available inside the air-gapped environment
-
Use
clairctlto import the updaters bundle into the Clair instance for the air-gapped OpenShift cluster
6.3.1. Obtaining clairctl
To obtain the clairctl program from a Clair deployment in an OpenShift cluster, use the oc cp command, for example:
$ oc -n quay-enterprise cp example-registry-clair-app-64dd48f866-6ptgw:/usr/bin/clairctl ./clairctl
$ chmod u+x ./clairctl
For a standalone Clair deployment, use the podman cp command, for example:
$ sudo podman cp clairv4:/usr/bin/clairctl ./clairctl
$ chmod u+x ./clairctl
6.3.2. Retrieving the Clair config
6.3.2.1. Clair on OpenShift config
To retrieve the configuration file for a Clair instance deployed using the OpenShift Operator, retrieve and decode the config secret using the appropriate namespace, and save it to file, for example:
$ kubectl get secret -n quay-enterprise example-registry-clair-config-secret -o "jsonpath={$.data['config\.yaml']}" | base64 -d > clair-config.yamlAn excerpt from a Clair configuration file is shown below:
clair-config.yaml
http_listen_addr: :8080
introspection_addr: ""
log_level: info
indexer:
    connstring: host=example-registry-clair-postgres port=5432 dbname=postgres user=postgres password=postgres sslmode=disable
    scanlock_retry: 10
    layer_scan_concurrency: 5
    migrations: true
    scanner:
        package: {}
        dist: {}
        repo: {}
    airgap: false
matcher:
    connstring: host=example-registry-clair-postgres port=5432 dbname=postgres user=postgres password=postgres sslmode=disable
    max_conn_pool: 100
    indexer_addr: ""
    migrations: true
    period: null
    disable_updaters: false
notifier:
    connstring: host=example-registry-clair-postgres port=5432 dbname=postgres user=postgres password=postgres sslmode=disable
    migrations: true
    indexer_addr: ""
    matcher_addr: ""
    poll_interval: 5m
    delivery_interval: 1m
    ...
6.3.2.2. Standalone Clair config
For standalone Clair deployments, the config file is the one specified in CLAIR_CONF environment variable in the podman run command, for example:
sudo podman run -d --rm --name clairv4 \
  -p 8081:8081 -p 8089:8089 \
  -e CLAIR_CONF=/clair/config.yaml -e CLAIR_MODE=combo \
  -v /etc/clairv4/config:/clair:Z \
  registry.redhat.io/quay/clair-rhel8:v3.5.7
6.3.3. Exporting the updaters bundle
From a Clair instance that has access to the internet, use clairctl with the appropriate configuration file to export the updaters bundle:
$ ./clairctl --config ./config.yaml export-updaters updates.gz
6.3.4. Configuring access to the Clair database in the air-gapped OpenShift cluster
Use
kubectlto determine the Clair database service:$ kubectl get svc -n quay-enterprise NAME TYPE CLUSTER-IP EXTERNAL-IP PORT(S) AGE example-registry-clair-app ClusterIP 172.30.224.93 <none> 80/TCP,8089/TCP 4d21h example-registry-clair-postgres ClusterIP 172.30.246.88 <none> 5432/TCP 4d21h ...
Forward the Clair database port so that it is accessible from the local machine, for example:
$ kubectl port-forward -n quay-enterprise service/example-registry-clair-postgres 5432:5432
Update the Clair configuration file, replacing the value of the
hostin the multipleconnstringfields withlocalhost, for example:clair-config.yaml
    ...
    connstring: host=localhost port=5432 dbname=postgres user=postgres password=postgres sslmode=disable
    ...
As an alternative to using kubectl port-forward, you can use kubefwd instead. With this method, there is no need to modify the connstring field in the Clair configuration file to use localhost.
6.3.5. Importing the updaters bundle into the air-gapped environment
After transferring the updaters bundle to the air-gapped environment, use clairctl to import the bundle into the Clair database deployed by the OpenShift Operator:
$ ./clairctl --config ./clair-config.yaml import-updaters updates.gz
6.4. FIPS readiness and compliance
FIPS (the Federal Information Processing Standard developed by the National Institute of Standards and Technology, NIST) is regarded as the gold standard for securing and encrypting sensitive data, particularly in heavily regulated areas such as banking, healthcare and the public sector. Red Hat Enterprise Linux and Red Hat OpenShift Container Platform support this standard by providing a FIPS mode in which the system would only allow usage of certain, FIPS-validated cryptographic modules, like openssl. This ensures FIPS compliance.
Red Hat Quay supports running on RHEL and OCP in FIPS mode in production since version 3.5. Furthermore, Red Hat Quay itself also commits to exclusively using cryptography libraries that are validated or are in the process of being validated by NIST. Red Hat Quay 3.5 has pending FIPS 140-2 validation based on the RHEL 8.3 cryptography libraries. As soon as that validation is finalized, Red Hat Quay will be officially FIPS compliant.
Chapter 7. Advanced Concepts
7.1. Customizing the Quay Deployment
The Quay Operator takes an opinionated strategy towards deploying Quay and its dependencies, however there are places where the Quay deployment can be customized.
7.1.1. Quay Application Configuration
Once deployed, the Quay application itself can be configured as normal using the config editor UI or by modifying the Secret containing the Quay configuration bundle. The Operator uses the Secret named in the spec.configBundleSecret field but does not watch this resource for changes. It is recommended that configuration changes be made to a new Secret resource and the spec.configBundleSecret field be updated to reflect the change. In the event there are issues with the new configuration, it is simple to revert the value of spec.configBundleSecret to the older Secret.
7.1.2. Customizing External Access to the Registry
When running on OpenShift, the Routes API is available and will automatically be used as a managed component. After creating the QuayRegistry, the external access point can be found in the status block of the QuayRegistry:
status:
  registryEndpoint: some-quay.my-namespace.apps.mycluster.com
When running on native Kubernetes, the Operator creates a Service of type: ClusterIP for your registry. You are then responsible for external access (like Ingress).
$ kubectl get services -n <namespace>
NAME                    TYPE        CLUSTER-IP       EXTERNAL-IP          PORT(S)             AGE
some-quay               ClusterIP   172.30.143.199   <none>               443/TCP,9091/TCP    23h
7.1.2.1. Using a Custom Hostname and TLS
By default, a Route will be created with the default generated hostname and a certificate/key pair will be generated for TLS. If you want to access Red Hat Quay using a custom hostname and bring your own TLS certificate/key pair, follow these steps.
If FEATURE_BUILD_SUPPORT: true, then make sure the certificate/key pair is also valid for the BUILDMAN_HOSTNAME.
If the given cert/key pair is invalid for the above hostnames, then the Quay Operator will reject your provided certificate/key pair and generate one to be used by Red Hat Quay.
Next, create a Secret with the following content:
apiVersion: v1
kind: Secret
metadata:
  name: my-config-bundle
data:
  config.yaml: <must include SERVER_HOSTNAME field with your custom hostname>
  ssl.cert: <your TLS certificate>
  ssl.key: <your TLS key>
Then, create a QuayRegistry which references the created Secret:
apiVersion: quay.redhat.com/v1
kind: QuayRegistry
metadata:
  name: some-quay
spec:
  configBundleSecret: my-config-bundle
7.1.2.2. Using OpenShift Provided TLS Certificate
It is preferred to have TLS terminated in the Quay app container. Therefore, to use the OpenShift provided TLS, you must create a Route with type "reencrypt", which will use the OpenShift provided TLS at the edge, and Quay Operator-generated TLS within the cluster. This is achieved by marking the route component as unmanaged, and creating your own Route which reencrypts TLS using the Operator-generated CA certificate.
Create a Secret with a config.yaml key containing the SERVER_HOSTNAME field of value <route-name>-<namespace>.apps.<cluster-domain> (the Route with this hostname will be created in a later step).
apiVersion: v1
kind: Secret
metadata:
  name: my-config-bundle
data:
  config.yaml: <must include SERVER_HOSTNAME field with your custom hostname>
Create a QuayRegistry referencing the above Secret and with the route component unmanaged:
apiVersion: quay.redhat.com/v1
kind: QuayRegistry
metadata:
  name: some-quay
spec:
  configBundleSecret: my-config-bundle
  components:
  - kind: route
    managed: false
Wait for the QuayRegistry to be fully reconciled by the Quay Operator. Then, acquire the generated TLS certificate by finding the Secret being mounted into the Quay app pods and copying the tls.cert value.
Create a Route with TLS reencryption and the destination CA certificate you copied above:
apiVersion: v1
kind: Route
metadata:
  name: registry
  namespace: <namespace>
spec:
  to:
    kind: Service
    name: <quay-service-name>
  tls:
    termination: reencrypt
    destinationCACertificate:
      -----BEGIN CERTIFICATE-----
      [...]
      -----END CERTIFICATE-----
You can now access your Quay registry using the created Route.
7.1.3. Disabling Route Component
To prevent the Operator from creating a Route, mark the component as unmanaged in the QuayRegistry:
apiVersion: quay.redhat.com/v1
kind: QuayRegistry
metadata:
  name: some-quay
spec:
  components:
    - kind: route
      managed: false
Disabling the default Route means you are now responsible for creating a Route, Service, or Ingress in order to access the Quay instance and that whatever DNS you use must match the SERVER_HOSTNAME in the Quay config.
7.1.4. Resizing Managed Storage
The Quay Operator creates default object storage using the defaults provided by RHOCS when creating a NooBaa object (50 Gib). There are two ways to extend this storage; you can resize an existing PVC or add more PVCs to a new storage pool.
7.1.4.1. Resize Noobaa PVC
-
Log into the OpenShift console and select
Storage→Persistent Volume Claims. -
Select the
PersistentVolumeClaimnamed likenoobaa-default-backing-store-noobaa-pvc-*. -
From the Action menu, select
Expand PVC. -
Enter the new size of the Persistent Volume Claim and select
Expand.
After a few minutes (depending on the size of the PVC), the expanded size should reflect in the PVC’s Capacity field.
Expanding CSI volumes is a Technology Preview feature only. For more information, see https://access.redhat.com/documentation/en-us/openshift_container_platform/4.6/html/storage/expanding-persistent-volumes.
7.1.4.2. Add Another Storage Pool
-
Log into the OpenShift console and select
Networking→Routes. Make sure theopenshift-storageproject is selected. -
Click on the
Locationfield for thenoobaa-mgmtRoute. - Log into the Noobaa Management Console.
-
On the main dashboard, under
Storage Resources, selectAdd Storage Resources. -
Select
Deploy Kubernetes Pool -
Enter a new pool name. Click
Next. -
Choose the number of Pods to manage the pool and set the size per node. Click
Next. -
Click
Deploy.
After a few minutes, the additional storage pool will be added to the Noobaa resources and available for use by Red Hat Quay.
7.1.5. Customizing Default Operator Images
Using this mechanism is not supported for production Quay environments and is strongly encouraged only for development/testing purposes. There is no guarantee your deployment will work correctly when using non-default images with the Quay Operator.
In certain circumstances, it may be useful to override the default images used by the Operator. This can be done by setting one or more environment variables in the Quay Operator ClusterServiceVersion.
7.1.5.1. Environment Variables
The following environment variables are used in the Operator to override component images:
| Environment Variable | Component |
|
|
|
|
|
|
|
|
|
|
|
|
Override images must be referenced by manifest (@sha256:), not by tag (:latest).
7.1.5.2. Applying Overrides to a Running Operator
When the Quay Operator is installed in a cluster via the Operator Lifecycle Manager (OLM), the managed component container images can be easily overridden by modifying the ClusterServiceVersion object, which is OLM’s representation of a running Operator in the cluster. Find the Quay Operator’s ClusterServiceVersion either by using a Kubernetes UI or kubectl/oc:
$ oc get clusterserviceversions -n <your-namespace>
Using the UI, oc edit, or any other method, modify the Quay ClusterServiceVersion to include the environment variables outlined above to point to the override images:
JSONPath: spec.install.spec.deployments[0].spec.template.spec.containers[0].env
- name: RELATED_IMAGE_COMPONENT_QUAY
  value: quay.io/projectquay/quay@sha256:c35f5af964431673f4ff5c9e90bdf45f19e38b8742b5903d41c10cc7f6339a6d
- name: RELATED_IMAGE_COMPONENT_CLAIR
  value: quay.io/projectquay/clair@sha256:70c99feceb4c0973540d22e740659cd8d616775d3ad1c1698ddf71d0221f3ce6
- name: RELATED_IMAGE_COMPONENT_POSTGRES
  value: centos/postgresql-10-centos7@sha256:de1560cb35e5ec643e7b3a772ebaac8e3a7a2a8e8271d9e91ff023539b4dfb33
- name: RELATED_IMAGE_COMPONENT_REDIS
  value: centos/redis-32-centos7@sha256:06dbb609484330ec6be6090109f1fa16e936afcf975d1cbc5fff3e6c7cae7542
Note that this is done at the Operator level, so every QuayRegistry will be deployed using these same overrides.
7.1.6. AWS S3 CloudFront
If you use AWS S3 CloudFront for backend registry storage, specify the private key as shown in the following example:
$ oc create secret generic --from-file config.yaml=./config_awss3cloudfront.yaml --from-file default-cloudfront-signing-key.pem=./default-cloudfront-signing-key.pem test-config-bundle
Chapter 8. Backing up and restoring Red Hat Quay on an OpenShift Container Platform deployment
Use the content within this section to back up and restore Red Hat Quay on an OpenShift Container Platform deployment.
8.1. Backing up Red Hat Quay
This procedure is exclusively for OpenShift Container Platform and NooBaa deployments.
Prerequisites
- A Red Hat Quay deployment on OpenShift Container Platform.
Procedure
Backup the
QuayRegistrycustom resource by exporting it:$ oc get quayregistry <quay-registry-name> -n <quay-namespace> -o yaml > quay-registry.yaml
Edit the resulting
quayregistry.yamland remove the status section and the following metadata fields:metadata.creationTimestamp metadata.finalizers metadata.generation metadata.resourceVersion metadata.uid
Backup the managed keys secret:
NoteIf you are running a version older than Red Hat Quay 3.7.0, this step can be skipped. Some secrets are automatically generated while deploying Quay for the first time. These are stored in a secret called
<quay-registry-name>-quay-registry-managed-secret-keysin the QuayRegistry namespace.$ oc get secret -n <quay-namespace> <quay-registry-name>-quay-registry-managed-secret-keys -o yaml > managed-secret-keys.yaml
Edit the the resulting
managed-secret-keys.yamlfile and remove all owner references. Yourmanaged-secret-keys.yamlfile should look similar to the following:apiVersion: v1 kind: Secret type: Opaque metadata: name: <quayname>-quay-registry-managed-secret-keys namespace: <quay-namespace> data: CONFIG_EDITOR_PW: <redacted> DATABASE_SECRET_KEY: <redacted> DB_ROOT_PW: <redacted> DB_URI: <redacted> SECRET_KEY: <redacted> SECURITY_SCANNER_V4_PSK: <redacted>
All information under the
dataproperty should remain the same.Backup the current Quay configuration:
$ oc get secret -n <quay-namespace> $(oc get quayregistry <quay-registry-name> -n <quay-namespace> -o jsonpath='{.spec.configBundleSecret}') -o yaml > config-bundle.yamlBackup the
/conf/stack/config.yamlfile mounted inside of the Quay pods:$ oc exec -it quay-pod-name -- cat /conf/stack/config.yaml > quay-config.yaml
Scale down the Quay the Quay Operator:
$ oc scale --replicas=0 deployment $(oc get deployment -n <quay-operator-namespace> |awk '/^quay-operator/ {print $1}') -n <quay-operator-namespace>Scale down the Quay namespace:
$ oc scale --replicas=0 deployment $(oc get deployment -n <quay-namespace> -l quay-component=quay -o jsonpath='{.items[0].metadata.name}') -n <quay-namespace>Wait for the
registry-quay-apppods to disappear. You can check their status by running the following command:$ oc get pods -n <quay-namespace>
Example output:
registry-quay-config-editor-77847fc4f5-nsbbv   1/1     Running            0          9m1s
registry-quay-database-66969cd859-n2ssm        1/1     Running            0          6d1h
registry-quay-mirror-758fc68ff7-5wxlp          1/1     Running            0          8m29s
registry-quay-mirror-758fc68ff7-lbl82          1/1     Running            0          8m29s
registry-quay-redis-7cc5f6c977-956g8           1/1     Running            0          5d21h
Identify the Quay PostgreSQL pod name:
$ oc get pod -l quay-component=postgres -n <quay-namespace> -o jsonpath='{.items[0].metadata.name}'Exampe output:
quayregistry-quay-database-59f54bb7-58xs7
Obtain the Quay database name:
$ oc -n <quay-namespace> rsh $(oc get pod -l app=quay -o NAME -n <quay-namespace> |head -n 1) cat /conf/stack/config.yaml|awk -F"/" '/^DB_URI/ {print $4}'
quayregistry-quay-database
Download a backup database:
$ oc exec quayregistry-quay-database-59f54bb7-58xs7 -- /usr/bin/pg_dump -C quayregistry-quay-database > backup.sql
Decode and export the
AWS_ACCESS_KEY_ID:$ export AWS_ACCESS_KEY_ID=$(oc get secret -l app=noobaa -n <quay-namespace> -o jsonpath='{.items[0].data.AWS_ACCESS_KEY_ID}' |base64 -d)Decode and export the
AWS_SECRET_ACCESS_KEY_ID:$ export AWS_SECRET_ACCESS_KEY=$(oc get secret -l app=noobaa -n <quay-namespace> -o jsonpath='{.items[0].data.AWS_SECRET_ACCESS_KEY}' |base64 -d)Create a new directory and copy all blobs to it:
$ mkdir blobs
$ aws s3 sync --no-verify-ssl --endpoint https://$(oc get route s3 -n openshift-storage -o jsonpath='{.spec.host}') s3://$(oc get cm -l app=noobaa -n <quay-namespace> -o jsonpath='{.items[0].data.BUCKET_NAME}') ./blobs
Scale up the Quay the Quay Operator:
$ oc scale --replicas=1 deployment $(oc get deployment -n <quay-operator-namespace> |awk '/^quay-operator/ {print $1}') -n <quay-operator-namespace>Scale up the Quay namespace:
$ oc scale --replicas=1 deployment $(oc get deployment -n <quay-namespace> -l quay-component=quay -o jsonpath='{.items[0].metadata.name}') -n <quay-namespace>Check the status of the Operator:
$ oc get quayregistry <quay-registry-name> -n <quay-namespace> -o yaml
Example output:
apiVersion: quay.redhat.com/v1
kind: QuayRegistry
metadata:
  ...
  name: example-registry
  namespace: <quay-namespace>
  ...
spec:
  components:
  - kind: quay
    managed: true
  ...
  - kind: clairpostgres
    managed: true
  configBundleSecret: init-config-bundle-secret
status:
  configEditorCredentialsSecret: example-registry-quay-config-editor-credentials-fg2gdgtm24
  configEditorEndpoint: https://example-registry-quay-config-editor-quay-enterprise.apps.docs.gcp.quaydev.org
  currentVersion: 3.7.0
  lastUpdated: 2022-05-11 13:28:38.199476938 +0000 UTC
  registryEndpoint: https://example-registry-quay-quay-enterprise.apps.docs.gcp.quaydev.org
     0          5d21h
8.2. Restoring Red Hat Quay
This procedure is used to restore Red Hat Quay when the Red Hat Quay Operator manages the database. It should be performed after a backup of your Quay registry has been performed.
Prerequisites
- Red Hat Quay is deployed on OpenShift Container Platform using the Quay Operator.
- Your Red Hat Quay database has been backed up.
Procedure
Restore the backed up Quay configuration and the randomly generated keys:
$ oc create -f ./config-bundle.yaml
$ oc create -f ./managed-secret-keys.yaml
NoteIf you receive the error
Error from server (AlreadyExists): error when creating "./config-bundle.yaml": secrets "config-bundle-secret" already exists, you must delete your exist resource with$ oc delete Secret config-bundle-secret -n <quay-namespace>and recreate it with$ oc create -f ./config-bundle.yaml.Restore the QuayRegistry custom resource:
$ oc create -f ./quay-registry.yaml
Scale down the Quay the Quay Operator:
$ oc scale --replicas=0 deployment $(oc get deployment -n <quay-operator-namespace> |awk '/^quay-operator/ {print $1}') -n <quay-operator-namespace>Scale down the Quay namespace:
$ oc scale --replicas=0 deployment $(oc get deployment -n <quay-namespace> -l quay-component=quay -o jsonpath='{.items[0].metadata.name}') -n <quay-namespace>Identify your Quay database pod:
$ oc get pod -l quay-component=postgres -n <quay-namespace> -o jsonpath='{.items[0].metadata.name}'Example output:
quayregistry-quay-database-59f54bb7-58xs7
Upload the backup by copying it from the local environment and into the pod:
$ oc cp ./backup.sql -n <quay-namespace> registry-quay-database-66969cd859-n2ssm:/tmp/backup.sql
Open a remote terminal to the database:
$ oc rsh -n <quay-namespace> registry-quay-database-66969cd859-n2ssm
Enter psql:
bash-4.4$ psql
You can list the database by running the following command:
postgres=# \l
Example output:
                                                  List of databases
           Name            |           Owner            | Encoding |  Collate   |   Ctype    |   Access privileges
----------------------------+----------------------------+----------+------------+------------+-----------------------
postgres                   | postgres                   | UTF8     | en_US.utf8 | en_US.utf8 |
quayregistry-quay-database | quayregistry-quay-database | UTF8     | en_US.utf8 | en_US.utf8 |
Drop the database:
postgres=# DROP DATABASE "quayregistry-quay-database";
Example output:
DROP DATABASE
Exit the postgres CLI to re-enter bash-4.4:
\q
Redirect your PostgreSQL database to your backup database:
sh-4.4$ psql < /tmp/backup.sql
Exit bash:
sh-4.4$ exit
Export the
AWS_ACCESS_KEY_ID:$ export AWS_ACCESS_KEY_ID=$(oc get secret -l app=noobaa -n <quay-namespace> -o jsonpath='{.items[0].data.AWS_ACCESS_KEY_ID}' |base64 -d)Export the
AWS_SECRET_ACCESS_KEY:$ export AWS_SECRET_ACCESS_KEY=$(oc get secret -l app=noobaa -n <quay-namespace> -o jsonpath='{.items[0].data.AWS_SECRET_ACCESS_KEY}' |base64 -d)Upload all blobs to the bucket by running the following command:
$ aws s3 sync --no-verify-ssl --endpoint https://$(oc get route s3 -n openshift-storage -o jsonpath='{.spec.host}') ./blobs s3://$(oc get cm -l app=noobaa -n <quay-namespace> -o jsonpath='{.items[0].data.BUCKET_NAME}')Scale up the Quay the Quay Operator:
$ oc scale --replicas=1 deployment $(oc get deployment -n <quay-operator-namespace> |awk '/^quay-operator/ {print $1}') -n <quay-operator-namespace>Scale up the Quay namespace:
$ oc scale --replicas=1 deployment $(oc get deployment -n <quay-namespace> -l quay-component=quay -o jsonpath='{.items[0].metadata.name}') -n <quay-namespace>Check the status of the Operator and ensure it has come back online:
$ oc get quayregistry -n <quay-namespace> <registry-name> -o yaml
Example output:
apiVersion: quay.redhat.com/v1
kind: QuayRegistry
metadata:
  ...
  name: example-registry
  namespace: quay-enterprise
  ...
spec:
  components:
  - kind: quay
    managed: true
  ...
  - kind: clairpostgres
    managed: true
  configBundleSecret: init-config-bundle-secret
status:
  configEditorCredentialsSecret: example-registry-quay-config-editor-credentials-fg2gdgtm24
  configEditorEndpoint: https://example-registry-quay-config-editor-quay-enterprise.apps.docs.gcp.quaydev.org
  currentVersion: 3.7.0
  lastUpdated: 2022-05-11 13:28:38.199476938 +0000 UTC
  registryEndpoint: https://example-registry-quay-quay-enterprise.apps.docs.gcp.quaydev.org
     0          5d21h
Additional resources
- For more details on the Red Hat Quay Operator, see the upstream quay-operator project.