
Red Hat Training
A Red Hat training course is available for Red Hat OpenStack Platform
Red Hat OpenDaylight Installation and Configuration Guide
Install and Configure OpenDaylight using Red Hat OpenStack Platform
Abstract
Preface
This document describes how to deploy Red Hat OpenStack Platform 12 to use the OpenDaylight software-defined network (SDN) controller. The OpenDaylight controller is used as a drop-in replacement for the neutron ML2/OVS plug-in and its L2 and L3 agents, and provides network virtualization within the Red Hat OpenStack environment.
Chapter 1. Overview
Red Hat OpenStack Platform 12 introduces a technology preview of the OpenDaylight software-defined networking (SDN) controller, integrated into the platform. OpenDaylight is an open, flexible, and modular SDN platform that can be used for various tasks in your Red Hat OpenStack environment.
This feature is available in this release as a Technology Preview, and therefore is not fully supported by Red Hat. It should only be used for testing, and should not be deployed in a production environment. For more information about Technology Preview features, see Scope of Coverage Details.
1.1. What is OpenDaylight?
The OpenDaylight platform is a programmable SDN controller written in Java that can be used for network virtualization for OpenStack environments. The controller architecture consists of separated northbound and southbound interfaces. For OpenStack integration purposes, the main northbound interface uses the NeutronNorthbound project, which communicates with neutron, the OpenStack Networking service. The southbound OpenDaylight projects, the OVSDB and the OpenFlow plug-ins, are used to communicate with the Open vSwitch (OVS) control and the data plane. The main OpenDaylight project that translates the neutron configuration into network virtualization is the NetVirt project.
1.2. How does OpenDaylight work with OpenStack?
1.2.1. The default neutron architecture
The neutron reference architecture uses a series of agents to manage networks within OpenStack. These agents are provided to neutron as different plug-ins. The core plug-ins are used to manage the Layer 2 overlay technologies and data plane types. The service plug-ins are used to manage network operations for Layer 3 or higher in the OSI model, such as firewall, DHCP, routing and NAT.
By default, Red Hat OpenStack Platform uses the Modular Layer 2 (ML2) core plug-in with the OVS mechanism driver, that provides an agent to configure OVS on each Compute and Controller node. The service plug-ins, the DHCP agent, the metadata agent, along with the L3 agent, run on controllers.
1.2.2. Networking architecture based on OpenDaylight
OpenDaylight integrates with the ML2 core plug-in by providing its own driver called networking-odl. This eliminates the necessity to use the OVS agent on every node. OpenDaylight is able to program each OVS instance across the environment directly, without any agents needed on individual nodes. For Layer 3 services, neutron is configured to use the OpenDaylight L3 plug-in. This approach reduces the number of agents on multiple nodes that handle routing and network address translation (NAT), because OpenDaylight can handle the distributed virtual routing functionality by programming the data plane directly. The neutron DHCP and metadata agents are still used for managing DHCP and metadata (cloud-init) requests.
OpenDaylight is able to provide DHCP services. However, when deploying the current Red Hat OpenStack Platform director architecture, using the neutron DHCP agent provides High Availability (HA) and support for the virtual machine (VM) instance metadata (cloud-init), and therefore Red Hat recommends you deploy the neutron DHCP agent rather than rely on OpenDaylight for such functionality.
1.3. What is Red Hat OpenStack Platform director and how is it designed?
The Red Hat OpenStack Platform director is a toolset for installing and managing a complete OpenStack environment. It is primarily based on the OpenStack TripleO (OpenStack-On-OpenStack) project.
The project uses OpenStack components to install a fully operational OpenStack environment. It also includes new OpenStack components that provision and control bare metal systems to work as OpenStack nodes. With this approach, you can install a complete Red Hat OpenStack Platform environment, that is both lean and robust.
The Red Hat OpenStack Platform director uses two main concepts: an undercloud and an overcloud. The undercloud installs and configures the overcloud. For more information about the Red Hat OpenStack Platform director architecture, see the Director Installation and Usage guide.
Figure 1.1. Red Hat OpenStack Platform director — undercloud and overcloud

1.3.1. Red Hat OpenStack Platform director and OpenDaylight
Red Hat OpenStack Platform director introduces the concept of composable services and custom roles. They form isolated resources, that can be included and enabled per role, when they are needed. Custom roles enable users to create their own roles, independent from the default Controller and Compute roles. In other words, users now have the option to choose which OpenStack services they will deploy, and which node will host them.
Two services have been added in order to integrate OpenDaylight with director:
- The OpenDaylightApi service for running the OpenDaylight SDN controller, and
- The OpenDaylightOvs service for configuring OVS on each node to properly communicate with OpenDaylight.
By default, the OpenDaylightApi service is configured to run on the Controller role, while the OpenDaylightOvs service is configured to run on Controller and Compute roles. OpenDaylight offers High Availability (HA) by scaling the number of OpenDaylightApi service instances from the number of three. By default, scaling the number of Controllers to three or more will automatically enable HA. For more information on the OpenDaylight HA architecture, see High Availability and Clustering with OpenDaylight.
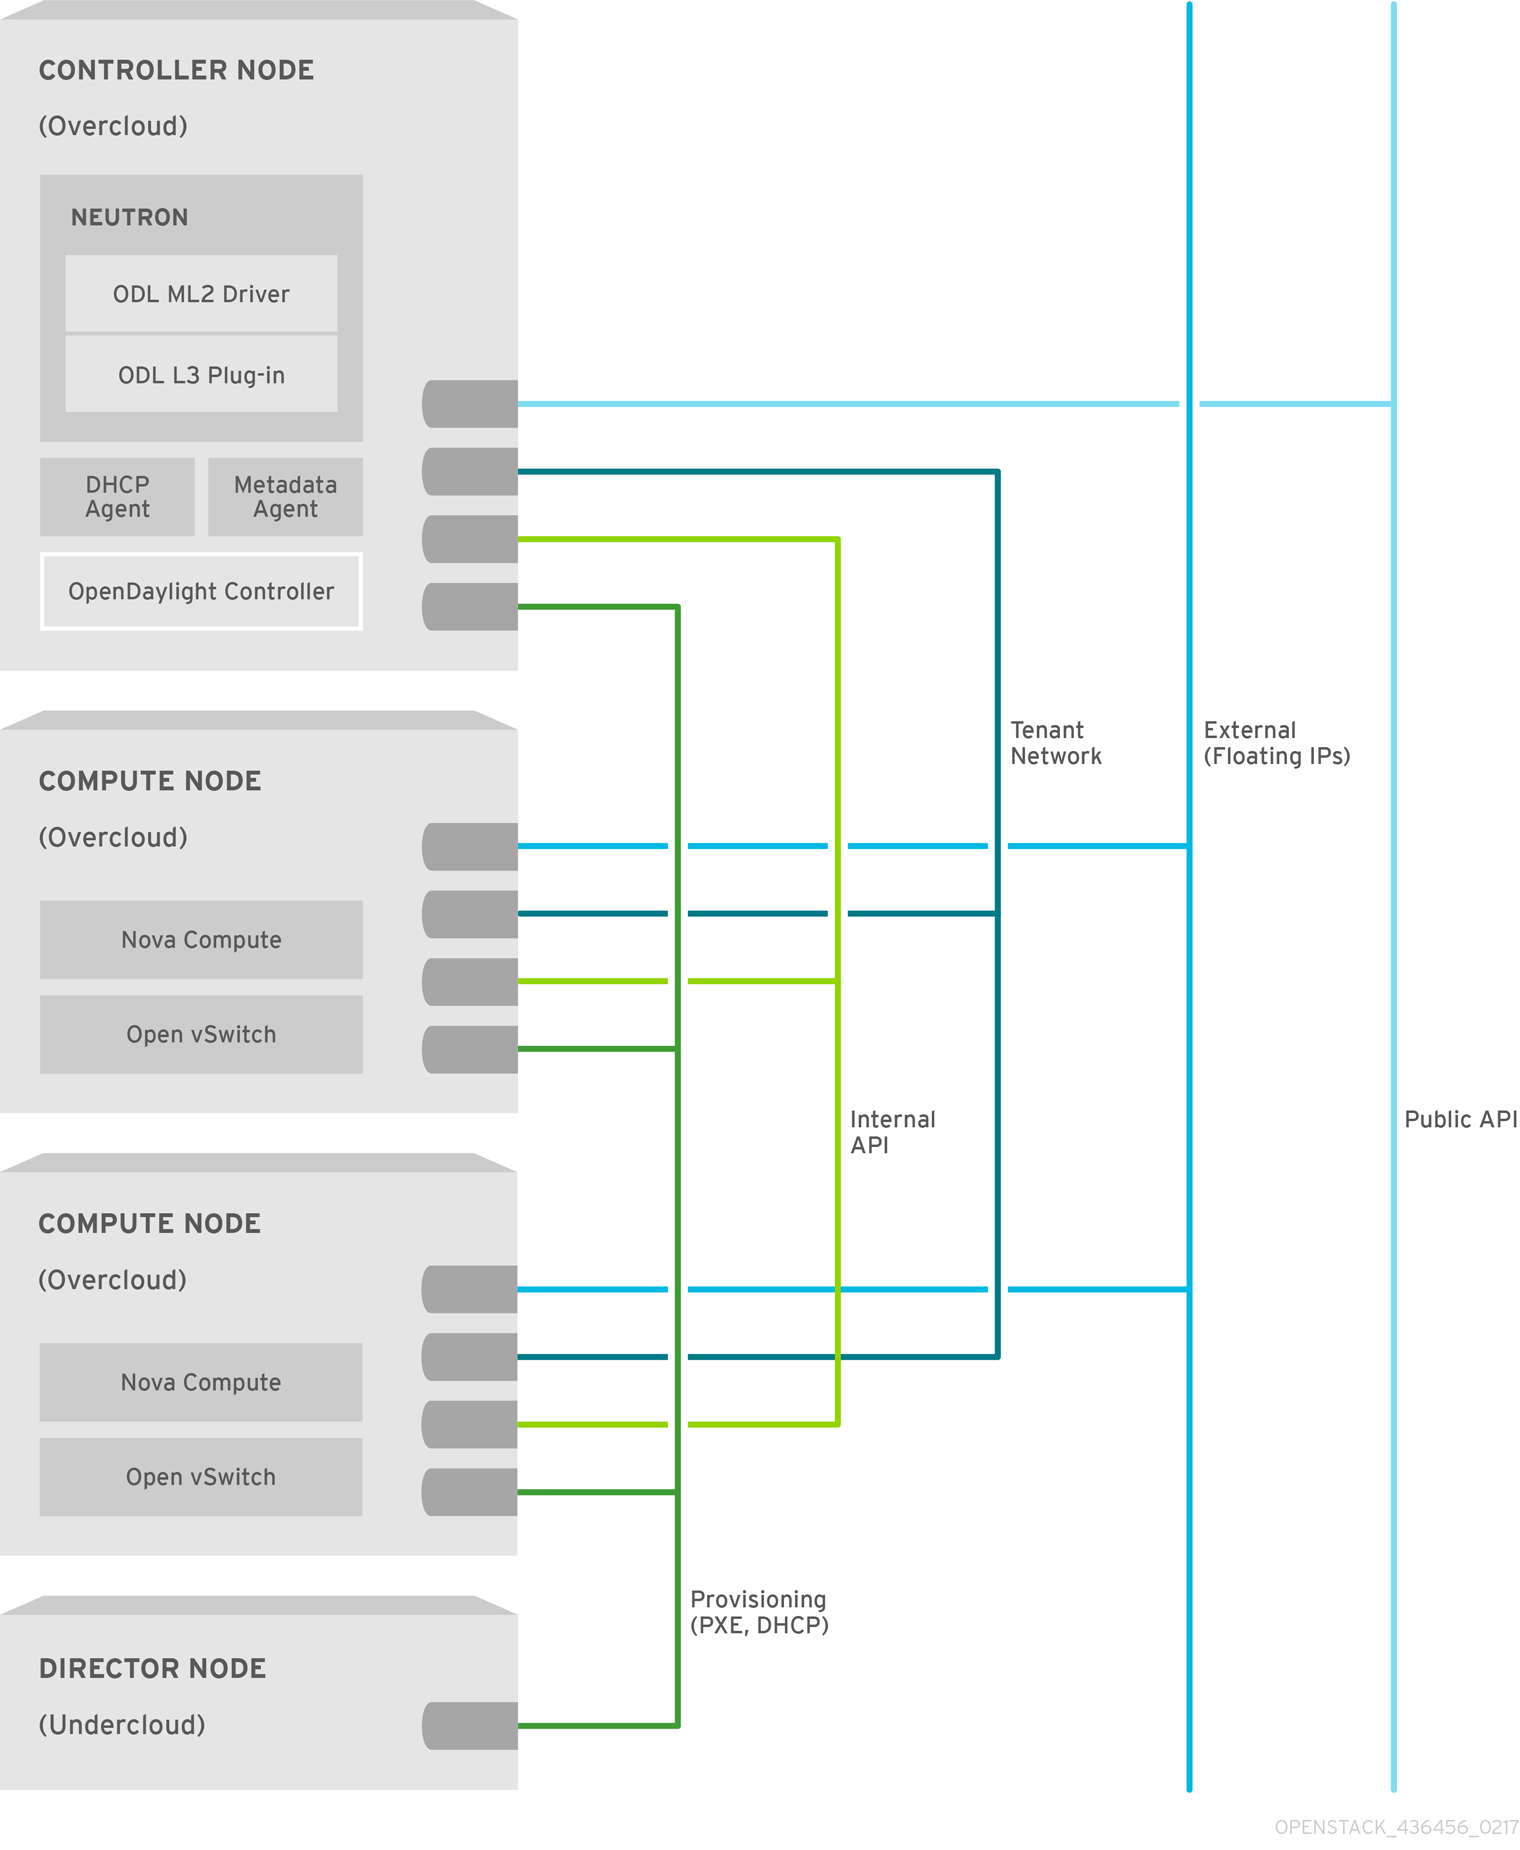
Figure 1.2. OpenDaylight and OpenStack — base architecture

1.3.2. Network isolation in Red Hat OpenStack Platform director
Red Hat OpenStack Platform director is capable of configuring individual services to specific, predefined network types. These network traffic types include:
| IPMI | The network used for the power management of nodes. This network must be set up before the installation of the undercloud. |
| Provisioning (ctlplane) | The director uses this network traffic type to deploy new nodes over the DHCP and PXE boot and orchestrates the installation of OpenStack Platform on the overcloud bare metal servers. The network must be set up before the installation of the undercloud. Alternatively, operating system images can be deployed directly by ironic. In that case, the PXE boot is not necessary. |
| Internal API (internal_api) | The Internal API network is used for communication between the OpenStack services using API communication, RPC messages, and database communication, as well as for internal communication behind the load balancer. |
| Tenant (tenant) | neutron provides each tenant with their own networks using either VLANs (where each tenant network is a network VLAN), or overlay tunnels. Network traffic is isolated within each tenant network. If tunneling is used, multiple tenant networks can use the same IP address range without any conflicts. |
While both Generic Routing Encapsulation (GRE) and Virtual eXtensible Local Area Network (VXLAN) are available in the codebase, VXLAN is the recommended tunneling protocol to use with OpenDaylight. VXLAN is defined in RFC 7348. The rest of this document is focused on VXLAN whenever tunneling is used.
| Storage (storage) | Block Storage, NFS, iSCSI, and others. Ideally, this would be isolated to an entirely separate switch fabric for performance reasons. |
| Storage Management (storage_mgmt) | OpenStack Object Storage (swift) uses this network to synchronize data objects between participating the replica nodes. The proxy service acts as an intermediary interface between user requests and the underlying storage layer. The proxy receives incoming requests and locates the necessary replica to retrieve the requested data. Services that use a Ceph back end connect over the Storage Management Network, since they do not interact with Ceph directly but rather use the front-end service. Note that the RBD driver is an exception, as this traffic connects directly to Ceph. |
| External/Public API | This API hosts the OpenStack Dashboard (horizon) for graphical system management, the public APIs for OpenStack services, and performs SNAT for incoming traffic going to the instances. If the external network uses private IP addresses (as per RFC-1918), then further NAT must be performed for any traffic coming in from the internet. |
| Floating IPs | Allows incoming traffic to reach instances using one-to-one IPv4 address mapping between the floating IP address and the fixed IP address, assigned to the instance in the tenant network. A common configuration is to combine the external and the floating IPs network instead of maintaining a separate one. |
| Management | Provides access for system administration functions such as SSH access, DNS traffic, and NTP traffic. This network also acts as a gateway for nodes that are not controllers. |
In a typical Red Hat OpenStack Platform installation, the number of network types often exceeds the number of physical network links. In order to connect all the networks to the proper hosts, the overcloud may use the 802.1q VLAN tagging to deliver more than one network per interface. Most of the networks are isolated subnets but some require a Layer 3 gateway to provide routing for Internet access or infrastructure network connectivity.
For OpenDaylight, the relevant networks include Internal API, Tenant, and External services, that are mapped to each network inside of the ServiceNetMap. By default, the ServiceNetMap maps the OpenDaylightApi network to the Internal API network. This configuration means that northbound traffic to neutron as well as southbound traffic to OVS are isolated to the Internal API network.
As OpenDaylight uses a distributed routing architecture, each Compute node should be connected to the Floating IP network. By default, Red Hat OpenStack Platform director assumes that the External network will run on the physical neutron network datacentre, which is mapped to the OVS bridge br-ex. Therefore, you must include the br-ex bridge in the default configuration of the Compute node NIC templates.
Figure 1.3. OpenDaylight and OpenStack — Network isolation example
1.3.3. Network and firewall configuration
On some deployments, such as those where restrictive firewalls are in place, you might need to configure the firewall manually in order to enable OpenStack and OpenDaylight service traffic.
By default, OpenDaylight Northbound uses the 8080 and 8181 ports. In order not to conflict with the swift service, that also uses the 8080 port, the OpenDaylight ports are set to 8081 and 8181 when installed with Red Hat OpenStack Platform director. The Southbound, in Red Hat OpenDaylight solution, is configured to listen on ports 6640 and 6653, that the OVS instances usually connect to.
In OpenStack, each service typically has its own virtual IP address (VIP) and OpenDaylight behaves the same way. HAProxy is configured to open the 8081 port to the public and control the plane’s VIPs that are already present in OpenStack. The VIP and the port are presented to the ML2 plug-in and neutron sends all communication through it. The OVS instances connect directly to the physical IP of the node where OpenDaylight is running for Southbound.
| Service | Protocol | Default Ports | Network |
|---|---|---|---|
| OpenStack Neutron API | TCP | 9696 | Internal API |
| OpenStack Neutron API (SSL) | TCP | 13696 | Internal API |
| OpenDaylight Northbound | TCP | 8081, 8181 | Internal API |
| OpenDaylight Southbound: OVSDB | TCP | 6640 | Internal API |
| OpenDaylight Southbound: OpenFlow | TCP | 6653 | Internal API |
| OpenDaylight High Availability | TCP | 2550 | Internal API |
| OpenDaylight HA: Akka | TCP | 2550 | Internal API |
| VXLAN | UDP | 4789 | Tenant |
Table 1: Network and Firewall configuration
The above section focuses on the services and protocols relevant to the OpenDaylight integration and is not exhaustive. For a complete list of network ports required for services running on Red Hat OpenStack, see the Firewall Rules for Red Hat OpenStack Platform guide.
Chapter 2. What do you need to run OpenDaylight?
The following section lists the requirements needed to deploy the overcloud with OpenDaylight. To correctly install and run Red Hat OpenDaylight, you should have enough computer resources. The following are the minimum requirements.
2.1. Compute Node Requirements
Compute nodes are responsible for running virtual machine instances after they are launched. All Compute nodes must support hardware virtualization. They also must have enough memory and disk space to support the requirements of the virtual machine instances they host.
| Processor | 64-bit processor with support for the Intel 64 or AMD64 CPU extensions, and the AMD-V or Intel VT hardware virtualization extensions enabled. It is recommended this processor has a minimum of 4 cores. |
| Memory | A minimum of 6 GB of RAM. Add additional RAM to this requirement based on the amount of memory that you intend to make available to virtual machine instances. |
| Disk Space | A minimum of 40 GB of available disk space. |
| Network Interface Cards | A minimum of one 1 Gbps Network Interface Cards, although it is recommended to use at least two NICs in a production environment. Use additional network interface cards for bonded interfaces or to delegate tagged VLAN traffic. Here, you can find a list of supported NICs in the Red Hat OpenStack Platform. |
| Power Management | Each Controller node requires a supported power management interface, such as an Intelligent Platform Management Interface (IPMI) functionality, on the server’s motherboard. |
2.2. Controller Node Requirements
Controller nodes are responsible for hosting the core services in a Red Hat OpenStack Platform environment, such as the horizon dashboard, the back-end database server, keystone authentication, and High Availability services.
| Processor | A 64-bit processor with support for the Intel 64 or AMD64 CPU extensions. |
| Memory | Minimum amount of memory is 20 GB. However, the amount of recommended memory depends on the number of CPU cores. Use the following calculations as guidance: Controller RAM minimum calculation: Use 1.5 GB of memory per core. For example, a machine with 48 cores should have 72 GB of RAM. Controller RAM recommended calculation: Use 3 GB of memory per core. For example, a machine with 48 cores should have 144 GB of RAM. For more information on measuring memory requirements, see Red Hat OpenStack Platform Hardware Requirements for Highly Available Controllers on the Red Hat Customer Portal. |
| Disk Space | A minimum of 40 GB of available disk space. |
| Network Interface Cards | A minimum of 2 x 1 Gbps Network Interface Cards. Use additional network interface cards for bonded interfaces or to delegate tagged VLAN traffic. |
| Power Management | Each Controller node requires a supported power management interface, such as an Intelligent Platform Management Interface (IPMI) functionality, on the server’s motherboard. |
Chapter 3. Install OpenDaylight on the overcloud
This document only focuses on OpenDaylight installation. Before you can deploy OpenDaylight, you must make sure that you have a working undercloud environment and that the overcloud nodes are connected to the physical network.
See Installing the Undercloud and Configuring Basic Overcloud Requirements with the CLI Tools of the Director Installation and Usage guide, which describes the necessary procedures to deploy the undercloud and overcloud.
There are several methods to install OpenDaylight in Red Hat OpenStack platform. The following chapter introduces the most useful scenarios of OpenDaylight and how to install them.
3.1. Understand default configuration and customizing settings
The recommended approach to installing OpenDaylight is to use the default environment file neutron-opendaylight.yaml and pass it as an argument to the deployment command on the undercloud. This will deploy the default installation of OpenDaylight.
Other OpenDaylight installation and configuration scenarios are based on this installation method. Basically, you can deploy OpenDaylight with various different scenarios just by providing specific environment files to the deployment command.
3.1.1. Understand the default environment file
The default environment file is called neutron-opendaylight.yaml and you can find it in the /usr/share/openstack-tripleo-heat-templates/environments/services-docker/ directory. The file enables or disables services that the OpenDaylight will support and use. It also can define necessary parameters, that will be set by the director during the deployment.
The following is an example neutron-opendaylight.yaml file that can be used for a Docker based deployment:
# A Heat environment that can be used to deploy OpenDaylight with L3 DVR using Docker containers
resource_registry:
  OS::TripleO::Services::NeutronOvsAgent: OS::Heat::None
  OS::TripleO::Services::ComputeNeutronOvsAgent: OS::Heat::None
  OS::TripleO::Services::ComputeNeutronCorePlugin: OS::Heat::None
  OS::TripleO::Services::OpenDaylightApi: ../../docker/services/opendaylight-api.yaml
  OS::TripleO::Services::OpenDaylightOvs: ../../puppet/services/opendaylight-ovs.yaml
  OS::TripleO::Services::NeutronL3Agent: OS::Heat::None
  OS::TripleO::Docker::NeutronMl2PluginBase: ../../puppet/services/neutron-plugin-ml2-odl.yaml

parameter_defaults:
  NeutronEnableForceMetadata: true
  NeutronPluginExtensions: 'port_security'
  NeutronMechanismDrivers: 'opendaylight_v2'
  NeutronServicePlugins: 'odl-router_v2,trunk'
In Red Hat OpenStack Platform director, the resource_registry is used to map resources for a deployment to the corresponding resource definition yaml file. Services are one type of resource that can be mapped. If you want to disable a particular service, set the value to the OS::Heat::None option and that service will not be used in your OpenDaylight environment. In the default file, the OpenDaylightApi and OpenDaylightOvs services are enabled, while default neutron agents are explicitly disabled as their functionality is taken over by OpenDaylight.
Heat parameters are used in order to configure settings for a deployment with director. You can override their default values by using the parameter_defaults section of the environment file.
In the example above, the NeutronEnableForceMetadata, NeutronMechanismDrivers, and NeutronServicePlugins parameters are set to enable OpenDaylight.
The list of other services and their configuration options are provided further in the text.
3.1.2. Configuring the OpenDaylight API Service
You can configure the OpenDaylight API service to suit your needs by changing the default values stored in the opendaylight-api.yaml file, located in the /usr/share/openstack-tripleo-heat-templates/puppet/services directory. However, you should never overwrite the settings in this file directly. It is wise to keep the file as a fallback solution and preferably create a new copy of the file and set the required values in the parameter_defaults section of this newly created environment file. This one you will later pass to the deployment command.
In the deployment command, all settings made in the environment files mentioned earlier will be replaced by settings in those mentioned later. Thus, the order of the environment files matters and you should pay attention to it.
3.1.2.1. Configurable Options
When configuring the OpenDaylight API Service, you can set several parameters:
|
|
Sets the port used for Northbound communication. Defaults to |
|
|
Sets the login user name for OpenDaylight. Defaults to |
|
|
Sets the login password for OpenDaylight. Defaults to |
|
|
Enables OpenDaylight to act as the DHCP service. Defaults to |
|
|
Comma-delimited list of features to boot in OpenDaylight. Defaults to |
|
|
Sets the L7 protocol used for REST access. Defaults to |
|
|
Sets whether to manage the OpenDaylight repository. Defaults to |
|
|
Sets the SNAT mechanism to be used by OpenDaylight. You can choose between |
3.1.3. Configuring the OpenDaylight OVS Service
You can configure the OpenDaylight OVS service by referencing the parameters and their default values in the opendaylight-ovs.yaml file, located in the /usr/share/openstack-tripleo-heat-templates/puppet/services directory. However, you should never overwrite the settings in this file directly. It is wise to keep the file as a fallback solution and preferably create a new copy of the file and set the required values in the parameter_defaults section of this newly created environment file. This one you will later pass to the deployment command.
In the deployment command, all settings made in the environment files mentioned earlier will be replaced by settings in those mentioned later. Thus, the order of the environment files matters and you should pay attention to it.
3.1.3.1. Configurable options
When configuring the OpenDaylight OVS Service, you can set several parameters:
|
|
Sets the port used for Northbound communication to OpenDaylight. Defaults to |
|
|
Layer 7 protocol used for REST access. Defaults to |
|
|
The URL to use to verify OpenDaylight is fully up before OVS connects. Defaults to |
|
|
Comma-delimited list of mappings between logical networks and physical interfaces. This setting is required for VLAN deployments. Defaults to |
|
| Allows to set up a custom username for the OpenDaylight OVS service. |
|
| Allows to set up a custom password for the OpenDaylight OVS service. |
|
|
Defines allowed tenant network types for this OVS host. They can vary per host or role to constrain which hosts nova instances and networks are scheduled to. The default is |
|
|
Chooses whether to configure enable DPDK in OVS. The default values is |
|
|
Specifies the mode for OVS with vhostuser port creation. In client mode, the hypervisor will be responsible for creating vhostuser sockets. In server mode, OVS will create them. The default value is |
|
|
Specifies the directory to use for vhostuser sockets. The default value is |
3.1.4. Using neutron metadata service with OpenDaylight
The OpenStack Compute service allows virtual machines to query metadata associated with them by making a web request to a special address, 169.254.169.254 The OpenStack Networking proxies such requests to the nova-api, even when the requests come from isolated or multiple networks with overlapping IP addresses.
The Metadata service uses either the neutron L3 agent router to serve the metadata requests or the DHCP agent instance. Deploying OpenDaylight with the Layer 3 routing plug-in enabled disables the neutron L3 agent. Therefore Metadata must be configured to flow through the DHCP instance, even when a router exists in a tenant network. This functionality is enabled in the default environment file neutron-opendaylight.yaml. To disable it, set the NeutronEnableForceMetadata to false.
VM instances will have a static host route installed, using the DHCP option 121, for 169.254.169.254/32. With this static route in place, Metadata requests to 169.254.169.254:80 will go to the Metadata name server proxy in the DHCP network namespace. The namespace proxy then adds the HTTP headers with the instance’s IP to the request, and connects it to the Metadata agent through the Unix domain socket. The Metadata agent queries neutron for the instance ID that corresponds to the source IP and the network ID and proxies it to the nova Metadata service. The additional HTTP headers are required to maintain isolation between tenants and allow overlapping IP support.
3.1.5. Understanding the network configuration and NIC template
In Red Hat OpenStack Platform director, the physical neutron network datacenter is mapped to an OVS bridge called br-ex by default. It is consistently the same with the OpenDaylight integration. If you use the default OpenDaylightProviderMappings and plan to create a flat or VLAN _External network, you have to configure the OVS br-ex bridge in the NIC template for Compute nodes. Since the Layer 3 plug-in uses distributed routing to these nodes, it is not necessary to configure br-ex on the controller role NIC template any more.
The br-ex bridge can be mapped to any network in network isolation, but it is typically mapped to the External network as you can see in the example.
type: ovs_bridge
  name: {get_input: bridge_name}
  use_dhcp: false
  members:
    -
      type: interface
      name: nic3
      # force the MAC address of the bridge to this interface
      primary: true
  dns_servers: {get_param: DnsServers}
  addresses:
    -
      ip_netmask: {get_param: ExternalIpSubnet}
  routes:
    -
      default: true
      ip_netmask: 0.0.0.0/0
      next_hop: {get_param: ExternalInterfaceDefaultRoute}
With the DPDK, you have to create another OVS bridge, that is most typically called br-phy and provide it with the ovs-dpdk-port. The IP address of the bridge is configured for VXLAN overlay network tunnels.
type: ovs_user_bridge
      name: br-phy
      use_dhcp: false
      addresses:
          -
              ip_netmask: {get_param: TenantIpSubnet}
              members:
                  -
                      type: ovs_dpdk_port
                      name: dpdk0
                      driver: uio_pci_generic
                      members:
                          -
                              type: interface
                              name: nic1
                              # force the MAC address of the bridge to this interface
primary: trueWhen using network isolation, you do not have to place an IP address, or a default route, in this bridge on Compute nodes.
Alternatively, it is possible to configure external network access without using the br-ex bridge completely. To use the method, you must know the interface name of the overcloud Compute node in advance. For example, if eth3 is the deterministic name of the third interface on the Compute node, then you can use it to specify an interface in the NIC template for the Compute node.
-
  type: interface
  name: eth3
  use_dhcp: false
3.2. Basic installation of OpenDaylight
This section shows how to deploy OpenDaylight using the standard environment files.
3.2.1. Prepare the OpenDaylight environment files for overcloud
Before you start
- Install the undercloud (see Installing the undercloud).
- Optionally, create a local registry with the container images that will be used during the overcloud and OpenDaylight installation. To create it follow the Configuring registry details in the Director installation and usage guide.
Procedure
Log onto the undercloud and load the admin credentials.
$ source ~/stackrc
Create a remote docker registry file
odl-images.yamlwhich contains references to docker container images need for the OpenStack and OpenDaylight installation.$ openstack overcloud container image prepare --namespace registry.access.redhat.com/rhosp12 \ --prefix=openstack- --suffix=-docker --tag latest \ -e /usr/share/openstack-tripleo-heat-templates/environments/services-docker/neutron-opendaylight.yaml \ --output-env-file /home/stack/templates/odl-images.yaml
- You have now succesfully prepared the environment to deploy overcloud and you are now ready to start the installation described in Section 3.2.2, “Install overcloud with OpenDaylight”.
More information
The openstack overcloud image prepare command prepares the container images environment files for the installation of overcloud and OpenDaylight. It uses the following options:
- -e
- specifies the service environment file to add specific container images required by that environment, such as OpenDaylight, OVS, and so on
- --env-file
- creates a new container image environment file with a list of container images that will be used for the installation
- --pull-source
- sets the location of the Docker containers registry
- --namespace
- sets the version of the Docker containers
- --prefix
- adds a prefix to the image name
- --suffix
- adds a suffix to the image name
- --tag
- defines the release of the images
3.2.2. Install overcloud with OpenDaylight
Before you start
- Follow the Prepare the OpenDaylight environment files for overcloud procedure to create the necessary environment files for the deployment.
Procedure
Log onto the undercloud and load the admin credentials.
$ source ~/stackrc
Deploy the overcloud using previously created environment files.
$ openstack overcloud deploy --templates /usr/share/openstack-tripleo-heat-templates \
 -e /usr/share/openstack-tripleo-heat-templates/environments/services-docker/neutron-opendaylight.yaml \
 -e /home/stack/templates/odl-images.yaml
 -e <other needed environment files>
When the same parameters are mentioned in more environment files, any later environment file overrides the earlier settings. It is necessary that you pay attention to the order of the environment files to avoid parameters being incorrectly set.
You can easily override some of the parameters by creating a minimal environment file that only sets the parameters you want to change and combining it with the default environment files.
More information
The openstack overcloud deploy command above that deploys the overcloud and OpenDaylight uses the following options:
- --templates
- defines path to the directory where the heat templates are stored
- -e
- specifies the environment file to load
3.3. Install OpenDaylight in custom role
Installing OpenDaylight in a custom role results in an isolated OpenDaylightApi service that runs on a designated OpenDaylight node, different from the controller node.
If you want to use a custom role for OpenDaylight, you have to create a role file where you configure the layout of the nodes and their functions.
3.3.1. Customize the role file based on default roles.
OpenStack offers the option of deploying with a user-defined list of roles, each running a user defined list of services (where “role” means group of nodes, e.g “Controller”, and “service” refers to the individual services or configurations e.g “nova API”). Example roles are provided in openstack-tripleo-heat-templates.
You can use these roles to generate a roles_data.yaml file that contains the roles they you want for the overcloud nodes. You can also create your personal custom roles by creating individual files in a directory and use them to generate a new roles_data.yaml.
To create customized environment files that would only install certain OpenStack roles, follow this procedure.
Procedure
Load the admin credentials.
$ source ~/stackrc
List the default roles that you can use to generate the
roles_data.yamlfile that you will use for the later deployment.$ openstack overcloud role list
If you want to use all these roles, generate the
roles_data.yamlfile by using the following command:$ openstack overcloud roles generate -o roles_data.yaml
If you want to customize the role file to only include some of the roles, you can pass the names of the roles as arguments to the above mentioned command. To create the
roles_data.yamlfile with the Controller, Compute and Telemetry roles, use:$ openstack overcloud roles generate - roles_data.yaml Controller Compute Telemetry
3.3.2. Create a custom role for OpenDaylight
Creating a custom role requires you to make a new role file where you define the role. Then you place the in the directory with other role files and then you generate the roles_data.yaml file which will include the newly created role. For each custom role, you will need a specific role file, that will only include the specific role. The name of the file should match the role name.
Minimally, the file must define these parameters:
Name:defines the name of the role. The name must always be a non-empty unique string.- Name: Custom_role
ServicesDefault:lists the services used in this role. The variable can remain empty, if there are no services used. The example format looks like this:ServicesDefault: - OS::TripleO::Services::AuditD - OS::TripleO::Services::CACerts - OS::TripleO::Services::CertmongerUser - OS::TripleO::Services::Collectd - OS::TripleO::Services::Docker
Besides the required parameters, you can also define further settings:
CountDefault:defines the default number of nodes. If empty, it defaults to zero.CountDefault: 1
HostnameFormatDefault:defines the format string for a host name. The value is optional.HostnameFormatDefault: '%stackname%-computeovsdpdk-%index%'
Description:describes the role and adds information about it.Description: Compute OvS DPDK Role
Procedure
Copy the default role files into a new directory and keep the original files as a fallback solution.
$ mkdir ~/roles
$ cp /usr/share/openstack-tripleo-heat-templates/roles/* ~/roles
Switch off the OpenDaylightAPI service on the controller node. To do so, modify the default controller role in the
Controller.yamlfile in~/rolesand remove theOpenDaylightApiline from the file:- name: Controller CountDefault: 1 ServicesDefault: - OS::TripleO::Services::TripleoFirewall - OS::TripleO::Services::OpenDaylightApi #<--Remove this - OS::TripleO::Services::OpenDaylightOvsCreate a new
OpenDaylight.yamlfile in the~/rolesdirectory and add the OpenDaylight role description:- name: OpenDaylight CountDefault: 1 ServicesDefault: - OS::TripleO::Services::Kernel - OS::TripleO::Services::Ntp - OS::TripleO::Services::OpenDaylightApi - OS::TripleO::Services::TripleoPackages - OS::TripleO::Services::TripleoFirewall - OS::TripleO::Services::Docker - OS::TripleO::Services::Sshd- Save the file.
Generate the new role file that you will use for the deployment of the OpenStack overcloud with OpenDaylight in the custom role.
$ openstack overcloud roles generate --roles-path ~/roles -o ~/roles_data.yaml Controller Compute OpenDaylight
3.3.3. Install OverCloud with OpenDaylight in the custom role
Before you start
- Install the undercloud (see Installing the undercloud).
- Create environment files with links to overcloud container images (see Preparing the installation of overcloud with OpenDaylight).
- Prepare the role file to configure OpenDaylight in the custom role (see Create a custom role for OpenDaylight).
Procedure
Run the deployment command with the -r argument to override the default role definitions. This option tells the deployment command to use another
roles_data.yamlwhere the customized roles have been set up. In this example, there are three ironic nodes in total, from which one is reserved for the custom OpenDaylight role:$ openstack overcloud deploy --templates /usr/share/openstack-tripleo-heat-templates -e /usr/share/openstack-tripleo-heat-templates/environments/docker.yaml -e /usr/share/openstack-tripleo-heat-templates/environments/services-docker/neutron-opendaylight.yaml -e network-environment.yaml --compute-scale 1 --ntp-server 0.se.pool.ntp.org --control-flavor control --compute-flavor compute -r ~/roles_data.yaml -e /home/stack/templates/docker-images.yaml -e /home/stack/templates/odl-images.yaml
The parameters in the latter environment files override those set in previous environment files. It is necessary that you pay attention to the order of the environment files to avoid parameters being accidentally overwritten.
You can easily override some of the parameters by creating a minimal environment file that only sets the parameters you want to change and combining it with the default environment files.
More information
This argument is used to override the role definitions within Red Hat OpenStack Platform director at installation time:
-r <roles_data>.yaml
- Using a custom role requires an extra ironic node that will be used for the custom role during the installation.
3.3.4. Verify the installation of OpenDaylight in custom role
Before you start
- Install the Overcloud with OpenDaylight in the custom role (see Install Overcloud with OpenDaylight in custom role).
Procedure
List the existing instances:
$ openstack server list
Check the outcome and verify that the new OpenDaylight role is dedicated as an instance:
+--------------------------------------+--------------------------+--------+------------+-------------+--------------------+
| ID                                   | Name                     | Status | Task State | Power State | Networks           |
+--------------------------------------+--------------------------+--------+------------+-------------+--------------------+
| 360fb1a6-b5f0-4385-b68a-ff19bcf11bc9 | overcloud-controller-0   | BUILD  | spawning   | NOSTATE     | ctlplane=192.0.2.4 |
| e38dde02-82da-4ba2-b5ad-d329a6ceaef1 | overcloud-novacompute-0  | BUILD  | spawning   | NOSTATE     | ctlplane=192.0.2.5 |
| c85ca64a-77f7-4c2c-a22e-b71d849a72e8 | overcloud-opendaylight-0 | BUILD  | spawning   | NOSTATE     | ctlplane=192.0.2.8 |
+--------------------------------------+--------------------------+--------+------------+-------------+--------------------+
3.4. Install OpenDaylight with SR-IOV support
OpenDaylight may be deployed with compute nodes that support the Single Root Input/Output Virtualization (SR-IOV). In this deployment, compute nodes must operate as dedicated SR-IOV only nodes and should not be mixed with nova instances based on OVS. It is possible to deploy both OVS and SR-IOV compute nodes in a single OpenDaylight deployment.
This section follows the above scenario and makes use of a custom SR-IOV compute role in order to accomplish this kind of deployment.
The SR-IOV deployment requires to use the neutron SR-IOV agent in order to configure the virtual functions (VFs) which are directly passed to the Compute instance when it is deployed where they serve as a network port. The VFs are derived from a host NIC on the Compute node, and therefore some information about the host interface is required before you start the deployment.
3.4.1. Prepare the SR-IOV compute role
Following the same methodology as shown in Install of OpenDaylight In Custom Role, it is necessary to create a custom role for the SR-IOV compute nodes to allow creation of the SR-IOV based instances, while the default compute role will serve the OVS based nova instances.
Before you start
- Study the chapter Install of OpenDaylight In Custom Role
Procedure
Copy the default role files into a new directory and keep the original files as a fallback solution.
$ mkdir ~/roles
$ cp /usr/share/openstack-tripleo-heat-templates/roles/* ~/roles
Create a new
ComputeSriov.yamlfile in the~/rolesdirectory and add the role description:- name: ComputeSRIOV CountDefault: 1 ServicesDefault: - OS::TripleO::Services::Kernel - OS::TripleO::Services::Ntp - OS::TripleO::Services::NeutronSriovHostConfig - OS::TripleO::Services::NeutronSriovAgent - OS::TripleO::Services::TripleoPackages - OS::TripleO::Services::TripleoFirewall - OS::TripleO::Services::Sshd - OS::TripleO::Services::NovaCompute - OS::TripleO::Services::NovaLibvirt - OS::TripleO::Services::NovaMigrationTarget - OS::TripleO::Services::Timezone - OS::TripleO::Services::ComputeNeutronCorePlugin - OS::TripleO::Services::Securetty- Save the file.
Remove the
NeutronSriovAgentandNeutronSriovHostConfigservices from the default Compute role and save the corresponding role file.- OS::TripleO::Services::NeutronSriovHostConfig - OS::TripleO::Services::NeutronSriovAgentGenerate the new role file that you will use for the deployment of the OpenStack overcloud with OpenDaylight compute SR-IOV support.
$ openstack overcloud roles generate --roles-path ~/roles -o ~/roles_data.yaml Controller Compute ComputeSriov
3.4.2. Configuring the SR-IOV agent service
In order to deploy OpenDaylight with the SR-IOV support, you must override the default parameters that are set in the neutron-opendaylight.yaml file. You can use a standard SR-IOV environment file that resides in /usr/share/openstack-tripleo-heat-templates. However, it is a good practice not to edit the original files. Therefore, you should create a new copy of the original environmental file and modify the required parameters in that copy.
Alternatively, you can create a new environment file in which you only provide those parameters you want to change and use both of the files for deployment. To deploy the customized OpenDaylight, you pass both files to the deployment command. Since later environment files override any previous settings, you have to use them in the correct order, that is neutron-opendaylight.yaml first, and then the neutron-opendaylight-sriov.yaml file.
If you want to deploy OpenDaylight and SR-IOV with the default settings, you can use the neutron-opendaylight-sriov.yaml that is provided by Red Hat. If you need to change or add parameters, make a copy of the default SR-IOV environment file and edit the newly created file.
The following is an illustrative example of a customized neutron-opendaylight-sriov.yaml file:
# A Heat environment that can be used to deploy OpenDaylight with SRIOV
resource_registry:
  OS::TripleO::Services::NeutronOvsAgent: OS::Heat::None
  OS::TripleO::Services::ComputeNeutronOvsAgent: OS::Heat::None
  OS::TripleO::Services::ComputeNeutronCorePlugin: ../puppet/services/neutron-plugin-ml2.yaml
  OS::TripleO::Services::NeutronCorePlugin: ../puppet/services/neutron-plugin-ml2-odl.yaml
  OS::TripleO::Services::OpenDaylightApi: ../docker/services/opendaylight-api.yaml
  OS::TripleO::Services::OpenDaylightOvs: ../puppet/services/opendaylight-ovs.yaml
  OS::TripleO::Services::NeutronSriovAgent: ../puppet/services/neutron-sriov-agent.yaml
  OS::TripleO::Services::NeutronL3Agent: OS::Heat::None

parameter_defaults:
  NeutronEnableForceMetadata: true
  NeutronPluginExtensions: 'port_security'
  NeutronMechanismDrivers: ['sriovnicswitch','opendaylight_v2']
  NeutronServicePlugins: 'odl-router_v2,trunk'

  # Add PciPassthroughFilter to the scheduler default filters
  #NovaSchedulerDefaultFilters: ['RetryFilter','AvailabilityZoneFilter','RamFilter','ComputeFilter','ComputeCapabilitiesFilter',         'ImagePropertiesFilter','ServerGroupAntiAffinityFilter','ServerGroupAffinityFilter','PciPassthroughFilter']
  #NovaSchedulerAvailableFilters: ["nova.scheduler.filters.all_filters","nova.scheduler.filters.pci_passthrough_filter.PciPassthroughFilter"]

  #NeutronPhysicalDevMappings: "datacentre:ens20f2"

  # Number of VFs that needs to be configured for a physical interface
  #NeutronSriovNumVFs: "ens20f2:5"

  #NovaPCIPassthrough:
  #  - devname: "ens20f2"
  #    physical_network: "datacentre"
More information
The following options can be configured in the above mentioned yaml file. The table describes individual options and mentions the required settings to enable the SRIOV functionality:
|
|
Allows the use of PCI Passthrough for SR-IOV. This must be uncommented in the environment file and include |
|
|
Enables specifying PCI Passthrough Filter for Nova Default filters. Must be set and include |
|
| Maps the logical neutron network to a host network interface. This must be specified so that neutron is able to bind the virtual network to a physical port. |
|
|
Number of VFs to create for a host network interface. Syntax: |
|
| Configures the whitelist of allowed PCI devices in nova to be used for PCI Passthrough in a list format, for example: NovaPCIPassthrough:
- vendor_id: "8086"
product_id: "154c"
address: "0000:05:00.0"
physical_network: "datacentre"
It can also simply use logical device name rather than specific hardware attributes: NovaPCIPassthrough:
- devname: "ens20f2"
physical_network: "datacentre"
|
3.4.3. Install OpenDaylight with SR-IOV
Before you start
- Install the undercloud (see Installing the undercloud).
- Create environment files with links to overcloud container images (see Preparing the installation of overcloud with OpenDaylight).
- Prepare the role file to configure OpenDaylight in the custom role with the SR-IOV support (see Prepare the SR-IOV compute role).
Procedure
Run the deployment command using the
-rargument to include your customized role file and the necessary environment files to set up the SR-IOV functionality with OpenDaylight.$ openstack overcloud deploy --templates /usr/share/openstack-tripleo-heat-templates -e /usr/share/openstack-tripleo-heat-templates/environments/docker.yaml -e /usr/share/openstack-tripleo-heat-templates/environments/services-docker/neutron-opendaylight.yaml -e /usr/share/openstack-tripleo-heat-templates/environments/services-docker/neutron-opendaylight-sriov.yaml -e network-environment.yaml --compute-scale 1 --ntp-server 0.se.pool.ntp.org --control-flavor control --compute-flavor compute -r my_roles_data.yaml -e /home/stack/templates/docker-images.yaml -e /home/stack/templates/odl-images.yaml -e <other needed environment files>
The parameters in the latter environment files override those set in previous environment files. It is necessary that you pay attention to the order of the environment files to avoid parameters being accidentally overwritten.
You can easily override some of the parameters by creating a minimal environment file that only sets the parameters you want to change and combining it with the default environment files.
More information
The
-roption is used to override the role definitions at installation time.-r <roles_data>.yaml
- Using a custom role requires an extra ironic node that will be used for the custom role during the installation.
3.5. Install OpenDaylight with OVS-DPDK support
OpenDaylight may be deployed with Open vSwitch Data Plane Development Kit (DPDK) acceleration with director. This deployment offers higher dataplane performance as packets are processed in user space rather than in the kernel. Deploying with OVS-DPDK requires knowledge of the hardware physical layout for each compute node in order to take advantage of potential performance gains.
You especially should consider:
- that the network interface on the host supports DPDK
- the NUMA node topology of the compute node (number of sockets, CPU cores, and memory per socket)
- DPDK NIC PCI bus proximity to each NUMA node
- amount of RAM available on the compute node
- consulting the Network Functions Virtualization Planning and Configuration Guide.
3.5.1. Prepare the OVS-DPDK deployment files
In order to deploy OVS-DPDK, you will use a different environment file. The file will override some of the parameters set by the neutron-opendaylight.yaml file that is located in /usr/share/openstack-tripleo-heat-templates/environments/services-docker directory. However, you should not change the original file. Rather, you can create a new environment file, for example neutron-opendaylight-dpdk.yaml where you set up the necessary parameters.
If you want to deploy OpenDaylight with OVS-DPDK with the default settings, you can use the neutron-opendaylight-dpdk.yaml that is provided by Red Hat and you will find it in the /usr/share/openstack-tripleo-heat-templates/environments/services-docker directory.
The default file contains these values:
# A Heat environment that can be used to deploy OpenDaylight with L3 DVR and DPDK.
# This file is to be used with neutron-opendaylight.yaml

parameter_defaults:
  NovaSchedulerDefaultFilters: "RamFilter,ComputeFilter,AvailabilityZoneFilter,ComputeCapabilitiesFilter,ImagePropertiesFilter,NUMATopologyFilter"
  OpenDaylightSNATMechanism: 'controller'

  ComputeOvsDpdkParameters:
    OvsEnableDpdk: True

    ## Host configuration Parameters
    #TunedProfileName: "cpu-partitioning"
    #IsolCpusList: ""               # Logical CPUs list to be isolated from the host process (applied via cpu-partitioning tuned).
                                    # It is mandatory to provide isolated cpus for tuned to achive optimal performance.
                                    # Example: "3-8,12-15,18"
    #KernelArgs: ""                 # Space separated kernel args to configure hugepage and IOMMU.
                                    # Deploying DPDK requires enabling hugepages for the overcloud compute nodes.
                                    # It also requires enabling IOMMU when using the VFIO (vfio-pci) OvsDpdkDriverType.
                                    # This should be done by configuring parameters via host-config-and-reboot.yaml environment file.

    ## Attempting to deploy DPDK without appropriate values for the below parameters may lead to unstable deployments
    ## due to CPU contention of DPDK PMD threads.
    ## It is highly recommended to to enable isolcpus (via KernelArgs) on compute overcloud nodes and set the following parameters:
    #OvsDpdkSocketMemory: ""       # Sets the amount of hugepage memory to assign per NUMA node.
                                   # It is recommended to use the socket closest to the PCIe slot used for the
                                   # desired DPDK NIC.  Format should be comma separated per socket string such as:
                                   # "<socket 0 mem MB>,<socket 1 mem MB>", for example: "1024,0".
    #OvsDpdkDriverType: "vfio-pci" # Ensure the Overcloud NIC to be used for DPDK supports this UIO/PMD driver.
    #OvsPmdCoreList: ""            # List or range of CPU cores for PMD threads to be pinned to.  Note, NIC
                                   # location to cores on socket, number of hyper-threaded logical cores, and
                                   # desired number of PMD threads can all play a role in configuring this setting.
                                   # These cores should be on the same socket where OvsDpdkSocketMemory is assigned.
                                   # If using hyperthreading then specify both logical cores that would equal the
                                   # physical core.  Also, specifying more than one core will trigger multiple PMD
                                   # threads to be spawned, which may improve dataplane performance.
    #NovaVcpuPinSet: ""            # Cores to pin Nova instances to.  For maximum performance, select cores
                                   # on the same NUMA node(s) selected for previous settings.
3.5.2. Configuring the OVS-DPDK deployment
You can configure the OVS-DPDK service by changing the values in neutron-opendaylight-dpdk.yaml.
|
|
Enables pinning of IRQs in order to isolate them from the CPU cores to be used with OVS-DPDK. Default profile: |
|
|
Specifies a list of CPU cores to prevent the kernel scheduler from using these cores that can instead be assigned and dedicated to OVS-DPDK. The format takes a comma separated list of individual or a range of cores, for example |
|
|
Lists arguments to be passed to the kernel at boot time. For OVS-DPDK, it is required to enable
---- Note the amount of RAM for specified above is 60 GB for hugepages. It is important to consider the available amount of RAM on compute nodes when setting this value. |
|
| Specifies the amount of hugepage memory (in MB) to assign to each NUMA node. For maximum performance, assign memory to the socket closest to the DPDK NIC. List format of memory per socket: ---- "<socket 0 mem MB>,<socket 1 mem MB>" ---- For example: "1024,0" |
|
|
Specifies the UIO driver type to use with PMD threads. The DPDK NIC must support the driver specified. Red Hat OpenStack Platform deployments support the driver type |
|
|
Lists single cores or ranges of cores for PMD threads to be pinned to. The cores specified here should be on the same NUMA node where memory was assigned with the |
|
| Specifies the number of memory channels per socket. |
|
| Cores to pin nova instances to with libvirtd. For best performance use cores on the same socket where OVS PMD Cores have been pinned to. |
3.5.3. Install OpenDaylight with OVS-DPDK
Before you start
- Install the undercloud (see Installing the undercloud).
- Create environment files with links to overcloud container images (see Preparing the installation of overcloud with OpenDaylight).
- Prepare the role file to configure OpenDaylight in the custom role with the SR-IOV support (see Prepare the OVS-DPDK deployment files).
Procedure
- Run the deployment command using the necessary environment files to set up the DPDK functionality with OpenDaylight.
$ openstack overcloud deploy --templates /usr/share/openstack-tripleo-heat-templates
-e /usr/share/openstack-tripleo-heat-templates/environments/docker.yaml
-e /usr/share/openstack-tripleo-heat-templates/environments/services-docker/neutron-opendaylight.yaml
-e /usr/share/openstack-tripleo-heat-templates/environments/services-docker/neutron-opendaylight-dpdk.yaml
-e network-environment.yaml --compute-scale 1 --ntp-server 0.se.pool.ntp.org --control-flavor control --compute-flavor compute -r my_roles_data.yaml
-e /home/stack/templates/docker-images.yaml
-e /home/stack/templates/odl-images.yaml
-e <other environmental files>
The parameters in the latter environment files override those set in previous environment files. It is necessary that you pay attention to the order of the environment files to avoid parameters being accidentally overwritten.
You can easily override some of the parameters by creating a minimal environment file that only sets the parameters you want to change and combining it with the default environment files.
3.6. Install OpenDaylight with L2GW support
Layer 2 gateway services allow a tenant’s virtual network to be bridged to a physical network. This integration provides users with the capability to access resources on a physical server through a layer 2 network connection rather than through a routed layer 3 connection, that means extending the layer 2 broadcast domain instead of going through L3 or Floating IPs.
3.6.1. Prepare L2GW deployment files
In order to deploy OpenDaylight with L2GW support, you will use the neutron-l2gw-opendaylight.yaml file that is located in /usr/share/openstack-tripleo-heat-templates/environments directory. If you need to change the settings in that file, you can do it by creating a new copy of the environment file, where you will set up the necessary parameters.
If you want to deploy OpenDaylight and L2GW with the default settings, you can use the neutron-l2gw-opendaylight.yaml that is provided by Red Hat and resides in /usr/share/openstack-tripleo-heat-templates/environments/services-docker directory.
The default file contains these values:
# A Heat environment file that can be used to deploy Neutron L2 Gateway service
#
# Currently there are only two service provider for Neutron L2 Gateway
# This file enables L2GW service with OpenDaylight as driver.
#
# - OpenDaylight: L2GW:OpenDaylight:networking_odl.l2gateway.driver.OpenDaylightL2gwDriver:default
resource_registry:
  OS::TripleO::Services::NeutronL2gwApi: ../puppet/services/neutron-l2gw-api.yaml

parameter_defaults:
  NeutronServicePlugins: "networking_l2gw.services.l2gateway.plugin.L2GatewayPlugin"
  L2gwServiceProvider: ['L2GW:OpenDaylight:networking_odl.l2gateway.driver.OpenDaylightL2gwDriver:default']

  # Optional
  # L2gwServiceDefaultInterfaceName: "FortyGigE1/0/1"
  # L2gwServiceDefaultDeviceName: "Switch1"
  # L2gwServiceQuotaL2Gateway: 10
  # L2gwServicePeriodicMonitoringInterval: 5
3.6.2. Configuring OpenDaylight L2GW deployment
You can configure the service by changing the values in the neutron-l2gw-opendaylight.yaml file:
|
|
Comma-separated list of service plugin entrypoints to be loaded from the |
|
|
Defines the provider that should be used to provide this service. Defaults to |
|
| Sets the name of the default interface. |
|
| Sets the name of the default device. |
|
|
Specifies the service quota for the L2 gateway. Defaults to |
|
| Specifies the monitoring interval for the L2GW service. |
3.6.3. Install OpenDaylight with L2GW
Before you start
- Install the undercloud (see Installing the undercloud).
- Create environment files with links to overcloud container images (see Preparing the installation of overcloud with OpenDaylight).
- Prepare the role file to configure OpenDaylight in the custom role with the SR-IOV support (see Prepare the L2GW deployment files).
Procedure
- Run the deployment command using the necessary environment files to set up the L2GW functionality with OpenDaylight.
$ openstack overcloud deploy --templates /usr/share/openstack-tripleo-heat-templates
-e /usr/share/openstack-tripleo-heat-templates/environments/docker.yaml
-e /usr/share/openstack-tripleo-heat-templates/environments/services-docker/neutron-opendaylight.yaml
-e /usr/share/openstack-tripleo-heat-templates/environments/services-docker/neutron-l2gw-opendaylight.yaml
-e /home/stack/templates/docker-images.yaml
-e /home/stack/templates/odl-images.yaml
-e <other environmental files>
The parameters in the latter environment files override those set in previous environment files. It is necessary that you pay attention to the order of the environment files to avoid parameters being accidentally overwritten.
You can easily override some of the parameters by creating a minimal environment file that only sets the parameters you want to change and combining it with the default environment files.
Chapter 4. Test the deployment
4.1. Perform a basic test
The basic test will verify that instances are able to ping each other. It will also check the Floating IP SSH access. This example describes how you can perform the test from the undercloud.
This procedure requires you to follow a large number of individual steps; for convenience, the procedure was divided into smaller parts. However, the steps must be followed in the given order.
In this setup, a flat network is used to create the _External_ network, and _VXLAN_ is used for the _Tenant_ networks. _VLAN External_ networks and _VLAN Tenant_ networks are also supported, depending on the desired deployment.
4.1.1. Create a new network for testing
Source the credentials to access the overcloud:
$ source /home/stack/overcloudrc
Create an external neutron network that will be used to access the instance from outside of the overcloud:
$ openstack network create --external --project service --external --provider-network-type flat --provider-physical-network datacentre
Create the corresponding neutron subnet for the new external network (created in the previous step):
$ openstack subnet create --project service --no-dhcp --network external --gateway 192.168.37.1 --allocation-pool start=192.168.37.200,end=192.168.37.220 --subnet-range 192.168.37.0/24 external-subnet
Download the cirros image to be used for creating overcloud instances:
$ wget http://download.cirros-cloud.net/0.3.4/cirros-0.3.4-x86_64-disk.img
Upload the cirros image into glance on the overcloud:
$ openstack image create cirros --public --file ./cirros-0.3.4-x86_64-disk.img --disk-format qcow2 --container-format bare
Create a
tinyflavor to use for overcloud instances:$ openstack flavor create m1.tiny --ram 512 --disk 1 --public
Create a tenant network based on VXLAN to host the instances:
$ openstack network create net_test --provider-network-type=vxlan --provider-segment 100
Create a subnet for the tenant network (created in the previous step):
$ openstack subnet create --network net_test --subnet-range 123.123.123.0/24 test
Find and store the ID of the tenant network:
$ net_mgmt_id=$(openstack network list | grep net_test | awk '{print $2}')Create an instance called
cirros1and attach it to thenet_testnetwork:$ openstack server create --flavor m1.tiny --image cirros --nic net-id=$net_mgmt_id cirros1
Create a second instance called
cirros2, also attached to thenet_testnetwork:$ openstack server create --flavor m1.tiny --image cirros --nic net-id=$net_mgmt_id cirros2
4.1.2. Set up networking in the test environment
Find and store the ID of the admin project:
$ admin_project_id=$(openstack project list | grep admin | awk '{print $2}')Find and store the admin project’s default security group:
$ admin_sec_group_id=$(openstack security group list | grep $admin_project_id | awk '{print $2}')Add a rule to the admin default security group to allow ICMP traffic ingress:
$ openstack security group rule create $admin_sec_group_id --protocol icmp --ingress
Add a rule to the admin default security group to allow ICMP traffic egress:
$ openstack security group rule create $admin_sec_group_id --protocol icmp --egress
Add a rule to the admin default security group to allow SSH traffic ingress:
$ openstack security group rule create $admin_sec_group_id --protocol tcp --dst-port 22 --ingress
Add a rule to the admin default security group to allow SSH traffic egress:
$ openstack security group rule create $admin_sec_group_id --protocol tcp --dst-port 22 --egress
4.1.3. Test the connectivity
-
From horizon, you should be able to access the novnc console for an instance. Use the password from overcloudrc to login to horizon as admin. The default login for cirros images is the user name
cirros, andcubswin:)as the password. From the novnc console, verify that the instance received a DHCP address:
$ ip addr show
NoteAnother method of doing this is by using the
nova console-log <instance id>from the undercloud, which will show if a DHCP lease was obtained.- Now repeat the steps 1 and 2 for all other instances.
- From one instance, attempt to ping the other instances. This will validate the basic Tenant network connectivity in the overcloud.
- Verify that you can reach other instances by using a Floating IP.
4.1.4. Create devices
Create a floating IP on the external network to be associated with
cirros1instance:$ openstack floating ip create external
Create a router which will be used to handle NAT between the floating IP and
cirros1tenant IP:$ openstack router create test
Set the gateway of the router to be the external network:
$ openstack router set test --external-gateway external
Add and interface to the router attached to the tenant network:
$ openstack router add subnet test test
Find and store the floating IP created in Step 23:
$ floating_ip=$(openstack floating ip list | head -n -1 | grep -Eo '[0-9]+\.[0-9]+\.[0-9]+\.[0-9]+')
Associate the floating IP with the
cirros1instance:$ openstack server add floating ip cirros1 $floating_ip
From a node that has external network access, attempt to login to the instance:
$ ssh cirros@$floating_ip
4.2. Perform advanced tests
Several components of the OpenDaylight configuration and deployment may be checked post deployment. To test specific parts of the installation, you need to follow several procedures. Each procedure is described separately.
The procedures are to be performed on the overcloud nodes.
4.2.1. Connect to overcloud nodes
This procedure lets you connect to the overcloud nodes and test that they are up and running.
Procedure
- Login onto the undercloud.
Enter the following command to start the process:
$ source /home/stack/stackrc
List all instances:
$ openstack server list
- Choose the required instance and note its IP address in the list.
Connect to the machine. You will use the IP address from the list above:
$ ssh heat-admin@<IP from step 4>
Switch to superuser:
$ sudo -i
4.2.2. Test OpenDaylight
To test that OpenDaylight is working, you have to verify that the service is up and that the particular features are correctly loaded.
Procedure
- As a superuser, login to the overcloud node running OpenDaylight or an OpenDaylight node running in custom role.
Verify that the OpenDaylight controller is running on all controller nodes:
# docker ps | grep opendaylight
2363a99d514a        192.168.24.1:8787/rhosp12/openstack-opendaylight:latest         "kolla_start"            4 hours ago         Up 4 hours (healthy)                       opendaylight_api
Verify that HAProxy is properly configured to listen on port 8081:
# docker exec -it haproxy-bundle-docker-0 grep -A7 opendaylight /etc/haproxy/haproxy.cfg
listen opendaylight
  bind 172.17.0.10:8081 transparent
  bind 192.168.24.10:8081 transparent
  mode http
  balance source
  server overcloud-controller-0.internalapi.localdomain 172.17.0.22:8081 check fall 5 inter 2000 rise 2
  server overcloud-controller-1.internalapi.localdomain 172.17.0.12:8081 check fall 5 inter 2000 rise 2
  server overcloud-controller-2.internalapi.localdomain 172.17.0.13:8081 check fall 5 inter 2000 rise 2
Use HAproxy IP to connect the karaf account:
# ssh -p 8101 karaf@localhost
List the installed features.
# feature:list -i | grep odl-netvirt-openstack
If there is an
xin the third column of the list, as generated during the procedure, then the feature is correctly installed.Verify that the API is up and running.
# web:list | grep neutron
This API endpoint is set in
/etc/neutron/plugins/ml2/ml2_conf.iniand used by the neutron to communicate with OpenDaylight.Verify that VXLAN tunnels between the nodes are up.
# vxlan:show
To test that the REST API is responding correctly, you can list the modules that are using it.
# curl -u "admin:admin" http://localhost:8181/restconf/modules
The output will be similar (the example has been shortened).
{"modules":{"module":[{"name":"netty-event-executor","revision":"2013-11-12","namespace":"urn:opendaylight:params:xml:ns:yang:controller:netty:eventexecutor"},{"name" ...List the REST streams using the host internal_API IP.
# curl -u "admin:admin" http://localhost:8181/restconf/streams
You get a similar output:
{"streams":{}}Enter the following command using host internal_API IP to verify that NetVirt is ready and running:
# curl -u "admin:admin" http://localhost:8181/restconf/operational/network-topology:network-topology/topology/netvirt:1
The following output confirms it.
{"topology":[{"topology-id":"netvirt:1"}]}
4.2.3. Test Open vSwitch
In order to validate Open vSwitch, connect to one of the Compute nodes and verify that it is properly configured and connected to OpenDaylight.
Procedure
- Connect to one of the Compute nodes in the overcloud as a superuser.
List the Open vSwitch settings.
# ovs-vsctl show
Notice multiple Managers in the output (lines 2 and 3 in the example).
6b003705-48fc-4534-855f-344327d36f2a Manager "ptcp:6639:127.0.0.1" Manager "tcp:172.17.1.16:6640" is_connected: true Bridge br-ex fail_mode: standalone Port br-ex-int-patch Interface br-ex-int-patch type: patch options: {peer=br-ex-patch} Port br-ex Interface br-ex type: internal Port "eth2" Interface "eth2" Bridge br-isolated fail_mode: standalone Port "eth1" Interface "eth1" Port "vlan50" tag: 50 Interface "vlan50" type: internal Port "vlan30" tag: 30 Interface "vlan30" type: internal Port br-isolated Interface br-isolated type: internal Port "vlan20" tag: 20 Interface "vlan20" type: internal Bridge br-int Controller "tcp:172.17.1.16:6653" is_connected: true fail_mode: secure Port br-ex-patch Interface br-ex-patch type: patch options: {peer=br-ex-int-patch} Port "tun02d236d8248" Interface "tun02d236d8248" type: vxlan options: {key=flow, local_ip="172.17.2.18", remote_ip="172.17.2.20"} Port br-int Interface br-int type: internal Port "tap1712898f-15" Interface "tap1712898f-15" ovs_version: "2.7.0"-
Verify that the
tcpmanager points to the IP of the node where OpenDaylight is running. -
Verify that the Managers show
is_connected: trueto ensure that connectivity to OpenDaylight from OVS is established and uses the OVSDB protocol. - Verify that each bridge (other than br-int) exists and matches the NIC template used for deployment with the Compute role.
- Verify that the tcp connection corresponds to the IP where the OpenDaylight service is running.
-
Verify that the bridge br-int shows
is_connected: trueand an OpenFlow protocol connection to OpenDaylight is established.
More information
- The br-int bridge is created automatically by OpenDaylight.
4.2.4. Verify the Open vSwitch configuration on Compute nodes.
- Connect to a Compute node as a superuser.
List the Open vSwitch configuration settings.
# ovs-vsctl list open_vswitch
Read the output. It will be similar to this example.
_uuid : 4b624d8f-a7af-4f0f-b56a-b8cfabf7635d bridges : [11127421-3bcc-4f9a-9040-ff8b88486508, 350135a4-4627-4e1b-8bef-56a1e4249bef] cur_cfg : 7 datapath_types : [netdev, system] db_version : "7.12.1" external_ids : {system-id="b8d16d0b-a40a-47c8-a767-e118fe22759e"} iface_types : [geneve, gre, internal, ipsec_gre, lisp, patch, stt, system, tap, vxlan] manager_options : [c66f2e87-4724-448a-b9df-837d56b9f4a9, defec179-720e-458e-8875-ea763a0d8909] next_cfg : 7 other_config : {local_ip="11.0.0.30", provider_mappings="datacentre:br-ex"} ovs_version : "2.7.0" ssl : [] statistics : {} system_type : RedHatEnterpriseServer system_version : "7.4-Maipo"-
Verify that the value of the
other_configoption has the correctlocal_ipset for the local interface that connects to the Tenant network through VXLAN tunnels. -
Verify that the
provider_mappingsvalue under theother_configoption matches the value given in the OpenDaylightProviderMappings heat template parameter. This configuration maps the neutron logical networks to corresponding physical interfaces.
4.2.5. Verify neutron configuration
Procedure
- Connect to the superuser account on one of the controller role nodes.
-
Make sure that the file
/etc/neutron/neutron.confcontainsservice_plugins=odl-router_v2,trunk. Check that the file
/etc/neutron/plugin.inicontains the following ml2 configuration:[ml2] mechanism_drivers=opendaylight_v2 [ml2_odl] password=admin username=admin url=http://192.0.2.9:8081/controller/nb/v2/neutron
On one of the overcloud controllers, verify that neutron agents are running properly.
# openstack network agent list
Verify that both the Metadata and DHCP agents are in the up state (the
admin_state_upoption isTrue):+--------------------------------------+----------------+--------------------------+-------------------+-------+----------------+------------------------+ | id | agent_type | host | availability_zone | alive | admin_state_up | binary | +--------------------------------------+----------------+--------------------------+-------------------+-------+----------------+------------------------+ | 3be198c5-b3aa-4d0e-abb4-51b29db3af47 | Metadata agent | controller-0.localdomain | | :-) | True | neutron-metadata-agent | | 79579d47-dd7d-4ef3-9614-cd2f736043f3 | DHCP agent | controller-0.localdomain | nova | :-) | True | neutron-dhcp-agent | +--------------------------------------+----------------+--------------------------+-------------------+-------+----------------+------------------------+
More information
-
The IP in the
plugin.ini, mentioned in step 3, should be the InternalAPI Virtual IP Address (VIP). - Note, that there is no Open vSwitch agent, nor L3 agent, listed in output of step 5, which is a desired state, as both are now managed by OpenDaylight.
Chapter 5. Debugging
5.1. Locate the logs
5.1.1. Access OpenDaylight logs
The OpenDaylight logs are stored on all OpenDaylight nodes, where you can find them in the /opt/opendaylight/data/log/ directory. OpenDaylight stores its logs in the karaf.log file.
The latest log is named karaf.log, while any older logs are numbered, such as karaf.log.1, and so on.
5.1.2. Access OpenDaylight logs through Karaf shell
Another way to access the logs is to login to the Karaf shell on the OpenDaylight node and display the log files.
Connect to the Karaf account:
$ ssh -p 8101 karaf@localhost
Enable trace level logging on NetVirt.
$ log set TRACE org.opendaylight.netvirt
If you need to tail the logs inside of the Karaf shell, use
$ log:tail
More information
- The Karaf shell helps users enable different logging levels for any OpenDaylight feature. You can choose from FATAL, ERROR, WARN, INFO, DEBUG and TRACE levels.
- If you enable TRACE, you will receive an extremely big amount of logging information.
5.1.3. Access OpenStack Networking logs
When OpenStack commands that are related to the networking fail, you should first examine the neutron logs. These logs are stored in server.log, located on each neutron node in the /var/log/neutron directory.
The server.log file also includes errors about the communication with OpenDaylight. If the neutron error originates from interacting with OpenDaylight, it is necessary to examine the OpenDaylight logs as well, to locate the cause of the failure.
5.2. Debug networking errors
If you experience network error (for example, there is no instance connectivity), but no errors are reported when issuing OpenStack commands or in the neutron logs, then it may be useful to inspect the OVS nodes for network traffic and OpenFlow flows:
- Login (as the superuser) to the affected node where the network error has occurred.
Display the information about the br-int switch.
# ovs-ofctl -O openflow13 show br-int
Examine the output. It will be similar to this example:
OFPT_FEATURES_REPLY (OF1.3) (xid=0x2): dpid:0000e4c153bdb306
n_tables:254, n_buffers:256
capabilities: FLOW_STATS TABLE_STATS PORT_STATS GROUP_STATS QUEUE_STATS
OFPST_PORT_DESC reply (OF1.3) (xid=0x3):
 1(br-ex-patch): addr:ae:38:01:09:66:5b
     config:     0
     state:      0
     speed: 0 Mbps now, 0 Mbps max
 2(tap1f0f610c-8e): addr:00:00:00:00:00:00
     config:     PORT_DOWN
     state:      LINK_DOWN
     speed: 0 Mbps now, 0 Mbps max
 3(tun1147c81b59c): addr:66:e3:d2:b3:b8:e3
     config:     0
     state:      0
     speed: 0 Mbps now, 0 Mbps max
 LOCAL(br-int): addr:e4:c1:53:bd:b3:06
     config:     PORT_DOWN
     state:      LINK_DOWN
     speed: 0 Mbps now, 0 Mbps max
OFPT_GET_CONFIG_REPLY (OF1.3) (xid=0x5): frags=normal miss_send_len=0
List the statistics for the br-int switch.
# ovs-ofctl -O openflow13 dump-ports br-int
Examine the output. It will be similar to this example:
OFPST_PORT reply (OF1.3) (xid=0x2): 4 ports
  port LOCAL: rx pkts=101215, bytes=6680190, drop=0, errs=0, frame=0, over=0, crc=0
           tx pkts=0, bytes=0, drop=0, errs=0, coll=0
           duration=90117.708s
  port  1: rx pkts=126887, bytes=8970074, drop=0, errs=0, frame=0, over=0, crc=0
           tx pkts=18764, bytes=2067792, drop=0, errs=0, coll=0
           duration=90117.418s
  port  2: rx pkts=1171, bytes=70800, drop=0, errs=0, frame=0, over=0, crc=0
           tx pkts=473, bytes=44448, drop=0, errs=0, coll=0
           duration=88644.819s
  port  3: rx pkts=120197, bytes=8776126, drop=0, errs=0, frame=0, over=0, crc=0
           tx pkts=119408, bytes=8727254, drop=0, errs=0, coll=0
           duration=88632.426s
More information
- In Step 3, you can see that there are three ports created on this OVS node. The first is a patch port going to the bridge br-ex, which in this scenario is used for External network connectivity. The second port is a tap port which connects to a DHCP agent instance (we know this because the host is a controller, otherwise on a Compute role it would be an instance), while the third port is a VXLAN tunnel port created for the tenant traffic.
- When you know what each port is, you can examine the port statistics to verify that the port is indeed receiving/sending traffic (see Step 4).
- From the output in Step 5, you can see that each port is receiving (rx pkts) and sending packets (tx pkts).
5.2.1. Advanced debugging using OpenFlow flows
For advanced users who are familiar with OpenFlow, the next level of debugging is to examine the flows on the switch in order to detect where traffic is being dropped.
To list the flows, and to see how many packets have hit them, enter the following command:
# ovs-ofctl -O openflow13 dump-flows br-int
Examine the output of the command to get the necessary information:
OFPST_FLOW reply (OF1.3) (xid=0x2):
 cookie=0x8000000, duration=90071.665s, table=0, n_packets=126816, n_bytes=8964820, priority=1,in_port=1 actions=write_metadata:0x20000000001/0xffffff0000000001,goto_table:17
 cookie=0x8000000, duration=88967.292s, table=0, n_packets=473, n_bytes=44448, priority=4,in_port=2 actions=write_metadata:0x40000000000/0xffffff0000000001,goto_table:17
 cookie=0x8000001, duration=88954.901s, table=0, n_packets=120636, n_bytes=8807869, priority=5,in_port=3 actions=write_metadata:0x70000000001/0x1fffff0000000001,goto_table:36
 cookie=0x8000001, duration=90069.534s, table=17, n_packets=126814, n_bytes=8964712, priority=5,metadata=0x20000000000/0xffffff0000000000 actions=write_metadata:0xc0000200000222e0/0xfffffffffffff
ffe,goto_table:19
 cookie=0x8040000, duration=90069.533s, table=17, n_packets=126813, n_bytes=8964658, priority=6,metadata=0xc000020000000000/0xffffff0000000000 actions=write_metadata:0xe00002138a000000/0xffffffff
fffffffe,goto_table:48
 cookie=0x8040000, duration=88932.689s, table=17, n_packets=396, n_bytes=36425, priority=6,metadata=0xc000040000000000/0xffffff0000000000 actions=write_metadata:0xe00004138b000000/0xfffffffffffff
ffe,goto_table:48
The above output has been edited for length.
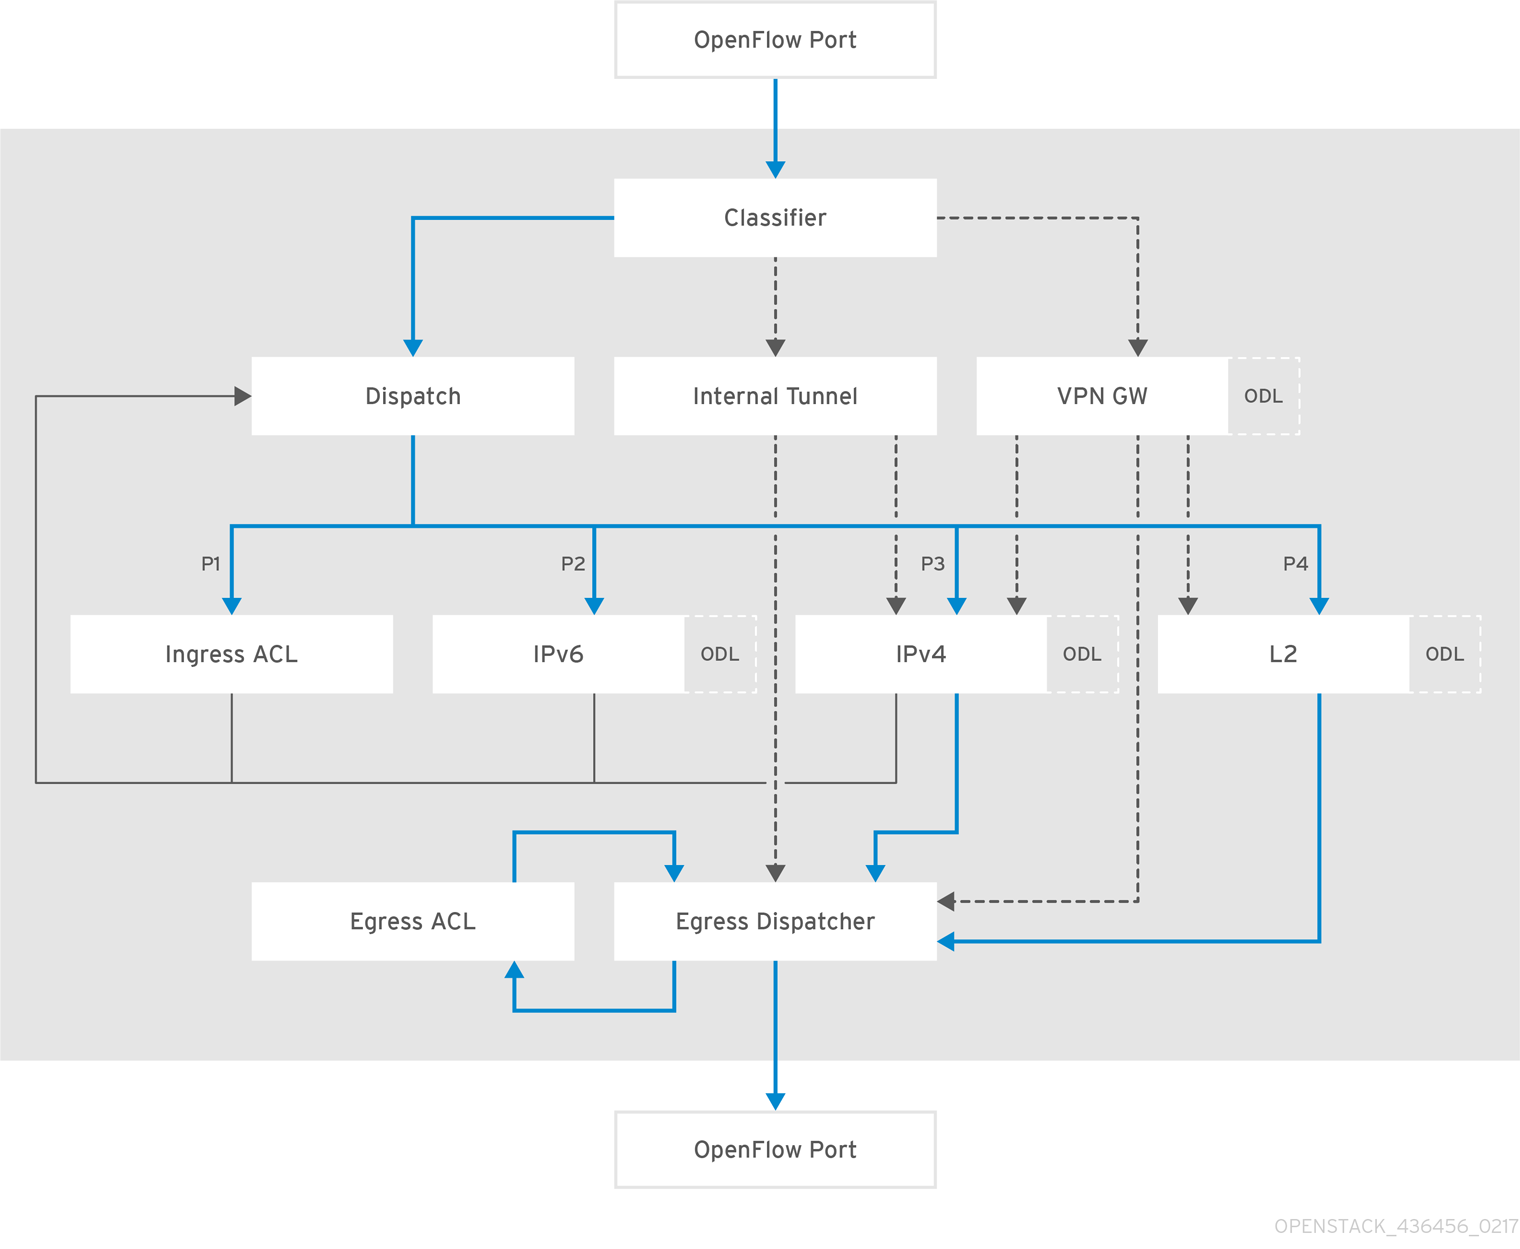
5.2.2. Packet traverse in OpenFlow
The important things to understand are that the network functions performed on a packet are broken into different OpenFlow tables, and packets traverse those tables in order, starting from zero. An incoming packet lands in table 0, and then progresses through the OpenFlow Pipeline until it is sent out of a port, to the OpenDaylight Controller, or dropped. A packet may skip one or more tables depending on which network function it may need to go to. The full diagram of tables and how they correspond to network functions is shown below:
Figure 5.1. OpenDaylight NetVirt OpenFlow Pipeline
Chapter 6. Deployment examples
6.1. Model installation scenario using tenant network
In this part you will explore an example of OpenDaylight installation using OpenStack in a production environment. In this scenario, tunneling (VXLAN) is used for tenant traffic separation.
6.1.1. Physical Topology
The topology of this scenario consists of six nodes:
- 1 x director undercloud node
- 3 x OpenStack overcloud controllers with the OpenDaylight SDN controller installed in addition to other OpenStack services
- 2 x OpenStack overcloud Compute nodes
6.1.2. Planning Physical Network Environment
The overcloud controller nodes use three network interface cards (NICs) each:
| Name | Purpose |
|---|---|
| nic1 | Management network (e.g accessing the node through SSH) |
| nic2 | Tenant (VXLAN) carrier, provisioning (PXE, DHCP), and Internal API networks |
| nic3 | Public API network access |
The overcloud Compute nodes are equipped with three NICs:
| Name | Purpose |
|---|---|
| nic1 | Management network |
| nic2 | Tenant carrier, provisioning, and Internal API networks |
| nic3 | External (Floating IPs) network |
The undercloud node is equipped with two NICs:
| Name | Purpose |
|---|---|
| nic1 | Used for the Management network |
| nic2 | Used for the Provisioning network |
6.1.3. Planning NIC Connectivity
In this case, the environment files use abstracted numbered interfaces (nic1, nic2) and not the actual device names presented on the host operating system (like eth0 or eno2). The hosts that belong to the same role do not require identical network interface device names. There is no problem if one host uses the em1 and em2 interfaces, while the other uses eno1 and eno2. Each of the NIC will be referred to as nic1 and nic2.
The abstracted NIC scheme only relies on interfaces that are alive and connected. In cases where the hosts have a different number of interfaces, it is enough to use the minimal number of interfaces that you need to connect the hosts. For example, if there are four physical interfaces on one host and six on the other, you should only use nic1, nic2, nic3, and nic4 and plug in four cables on both hosts.
6.1.4. Planning Networks, VLANs and IPs
In this scenario, network isolation is used to separate the Management, Provisioning, Internal API, Tenant, Public API, and Floating IPs network traffic.
Figure 6.1. Detailed network topology used in this scenario
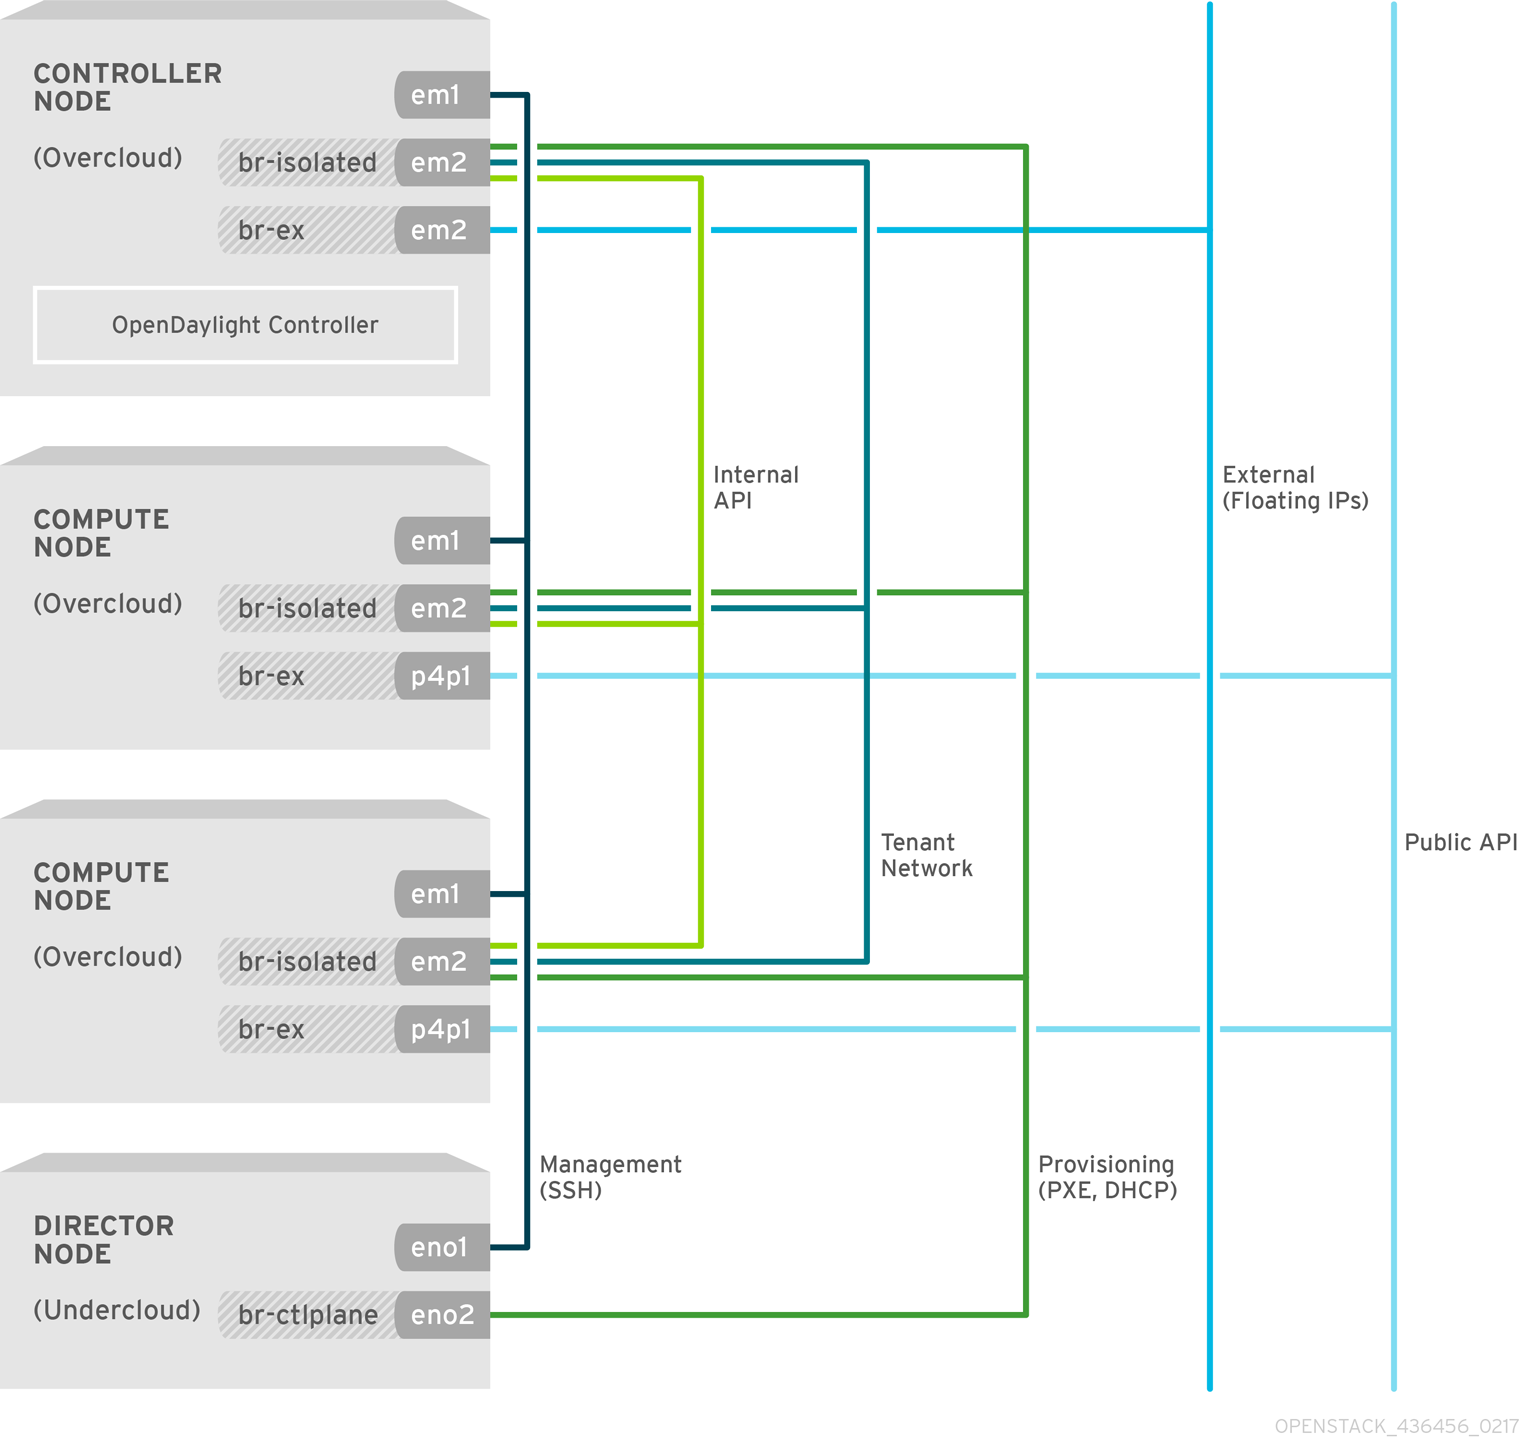
The table shows the VLAN ID and IP subnet associated with each network:
| Network | VLAN ID | IP Subnet |
|---|---|---|
| Provisioning | Native | 192.0.5.0/24 |
| Internal API | 600 | 172.17.0.0/24 |
| Tenant | 603 | 172.16.0.0/24 |
| Public API | 411 | 10.35.184.144/28 |
| Floating IP | 412 | 10.35.186.146/28 |
The OpenStack Platform director creates the br-isolated OVS bridge and adds the VLAN interfaces for each network as defined in the network configurations files. The br-ex bridge, too, is created automatically by the director with the relevant network interface attached to it.
Make sure, that your physical network switches that provide connectivity between the hosts are properly configured to carry those VLAN IDs. You must configure all switch ports facing the hosts as "trunks" with the above mentioned VLANs. The term "trunk" is used here to describe a port that allows multiple VLAN IDs to traverse through the same port.
Configuration guidance for the physical switches is outside the scope of this document.
The TenantNetworkVlanID in network-environment.yaml is where a VLAN tag can be defined for Tenant network when using VXLAN tunneling (i.e VXLAN tenant traffic transported over a VLAN tagged underlay network). This value may also be empty if the Tenant network is desired to run over the native VLAN. Also note, that when using VLAN tenant type networks, VLAN tags other than the value provided for TenantNetworkVlanID may be used.
6.1.5. OpenDaylight configuration files used in this scenario
To deploy this scenario of OpenStack and OpenDaylight, the following deployment command was entered on the undercloud node:
$ openstack overcloud deploy --debug \
  --templates \
  --environment-file "$HOME/extra_env.yaml" \
  --libvirt-type kvm \
  -e /home/stack/baremetal-vlan/network-environment.yaml \
  -e /usr/share/openstack-tripleo-heat-templates/environments/neutron-opendaylight.yaml \
  --log-file overcloud_install.log &> overcloud_install.log
Further, this guide will show the configuration files used in this scenario, their content, and it will also provide explanation on the setting used.
6.1.5.1. The extra_env.yaml file.
The file has only one parameter.
 parameter_defaults:
    OpenDaylightProviderMappings: 'datacentre:br-ex,tenant:br-isolated'
These are the mappings that each node, controlled by OpenDaylight, will use. The physical network datacenter will be mapped to the br-ex OVS bridge and the tenant network traffic will be mapped to the br-isolated OVS bridge.
6.1.5.2. The undercloud.conf file
This file is located in the /home/stack/baremetal-vlan/ directory.
The file path points to customized versions of the configuration files.
  [DEFAULT]
  local_ip = 192.0.5.1/24
  network_gateway = 192.0.5.1
  undercloud_public_vip = 192.0.5.2
  undercloud_admin_vip = 192.0.5.3
  local_interface = eno2
  network_cidr = 192.0.5.0/24
  masquerade_network = 192.0.5.0/24
  dhcp_start = 192.0.5.5
  dhcp_end = 192.0.5.24
  inspection_iprange = 192.0.5.100,192.0.5.120
In this example, the 192.0.5.0/24 subnet for the Provisioning network is used. Note that the physical interface eno2 is used on the undercloud node for provisioning.
6.1.5.3. The network-environment.yaml file
This is the main file for configuring the network. It is located in the /home/stack/baremetal-vlan/ directory. In the following file, the VLAN IDs and IP subnets are specified for the different networks, as well as the provider mappings. The two files in the nic-configs directory controller.yaml and compute.yaml are used for specifying the network configuration for the controller and Compute nodes.
The number of controller nodes (3) and Compute nodes (2) is specified in the example.
resource_registry:
  # Specify the relative/absolute path to the config files you want to use for
  # override the default.
  OS1::TripleO::Compute::Net::SoftwareConfig: nic-configs/compute.yaml
  OS::TripleO::Controller::Net::SoftwareConfig: nic-configs/controller.yaml

  # Network isolation configuration
  # Service section
  # If some service should be disable, use the following example
  # OS::TripleO::Network::Management: OS::Heat::None
    OS::TripleO::Network::External: /usr/share/openstack-tripleo-heat-templates/network/external.yaml
    OS::TripleO::Network::InternalApi: /usr/share/openstack-tripleo-heat-templates/network/internal_api.yaml
    OS::TripleO::Network::Tenant: /usr/share/openstack-tripleo-heat-templates/network/tenant.yaml
    OS::TripleO::Network::Management: OS::Heat::None
    OS::TripleO::Network::StorageMgmt: OS::Heat::None
    OS::TripleO::Network::Storage: OS::Heat::None

  # Port assignments for the VIP addresses
    OS::TripleO::Network::Ports::ExternalVipPort: /usr/share/openstack-tripleo-heat-templates/network/ports/external.yaml
    OS::TripleO::Network::Ports::InternalApiVipPort: /usr/share/openstack-tripleo-heat-templates/network/ports/internal_api.yaml
    OS::TripleO::Network::Ports::RedisVipPort: /usr/share/openstack-tripleo-heat-templates/network/ports/vip.yaml
    OS::TripleO::Network::Ports::StorageVipPort: /usr/share/openstack-tripleo-heat-templates/network/ports/noop.yaml
    OS::TripleO::Network::Ports::StorageMgmtVipPort: /usr/share/openstack-tripleo-heat-templates/network/ports/noop.yaml

  # Port assignments for the controller role
    OS::TripleO::Controller::Ports::ExternalPort: /usr/share/openstack-tripleo-heat-templates/network/ports/external.yaml
    OS::TripleO::Controller::Ports::InternalApiPort: /usr/share/openstack-tripleo-heat-templates/network/ports/internal_api.yaml
    OS::TripleO::Controller::Ports::TenantPort: /usr/share/openstack-tripleo-heat-templates/network/ports/tenant.yaml
    OS::TripleO::Controller::Ports::ManagementPort: /usr/share/openstack-tripleo-heat-templates/network/ports/noop.yaml
    OS::TripleO::Controller::Ports::StoragePort: /usr/share/openstack-tripleo-heat-templates/network/ports/noop.yaml
    OS::TripleO::Controller::Ports::StorageMgmtPort: /usr/share/openstack-tripleo-heat-templates/network/ports/noop.yaml

  # Port assignments for the Compute role
    OS::TripleO::Compute::Ports::ExternalPort: /usr/share/openstack-tripleo-heat-templates/network/ports/external.yaml
    OS::TripleO::Compute::Ports::InternalApiPort: /usr/share/openstack-tripleo-heat-templates/network/ports/internal_api.yaml
    OS::TripleO::Compute::Ports::TenantPort: /usr/share/openstack-tripleo-heat-templates/network/ports/tenant.yaml
    OS::TripleO::Compute::Ports::ManagementPort: /usr/share/openstack-tripleo-heat-templates/network/ports/noop.yaml
    OS::TripleO::Compute::Ports::StoragePort: /usr/share/openstack-tripleo-heat-templates/network/ports/noop.yaml
    OS::TripleO::Compute::Ports::StorageMgmtPort: /usr/share/openstack-tripleo-heat-templates/network/ports/noop.yaml

  # Port assignments for service virtual IP addresses for the controller role
    OS::TripleO::Controller::Ports::RedisVipPort: /usr/share/openstack-tripleo-heat-templates/network/ports/vip.yaml

parameter_defaults:
  # Customize all these values to match the local environment
  InternalApiNetCidr: 172.17.0.0/24
  TenantNetCidr: 172.16.0.0/24
  ExternalNetCidr: 10.35.184.144/28
  # CIDR subnet mask length for provisioning network
  ControlPlaneSubnetCidr: '24'
  InternalApiAllocationPools: [{'start': '172.17.0.10', 'end': '172.17.0.200'}]
  TenantAllocationPools: [{'start': '172.16.0.100', 'end': '172.16.0.200'}]
  # Use an External allocation pool which will leave room for floating IP addresses
  ExternalAllocationPools: [{'start': '10.35.184.146', 'end': '10.35.184.157'}]
  # Set to the router gateway on the external network
  ExternalInterfaceDefaultRoute: 10.35.184.158
  # Gateway router for the provisioning network (or Undercloud IP)
  ControlPlaneDefaultRoute: 192.0.5.254
  # Generally the IP of the Undercloud
  EC2MetadataIp: 192.0.5.1
  InternalApiNetworkVlanID: 600
  TenantNetworkVlanID: 603
  ExternalNetworkVlanID: 411
  # Define the DNS servers (maximum 2) for the overcloud nodes
  DnsServers: ["10.35.28.28","8.8.8.8"]
  # May set to br-ex if using floating IP addresses only on native VLAN on bridge br-ex
  NeutronExternalNetworkBridge: "''"
  # The tunnel type for the tenant network (vxlan or gre). Set to '' to disable tunneling.
  NeutronTunnelTypes: ''
  # The tenant network type for Neutron (vlan or vxlan).
  NeutronNetworkType: 'vxlan'
  # The OVS logical->physical bridge mappings to use.
  # NeutronBridgeMappings: 'datacentre:br-ex,tenant:br-isolated'
  # The Neutron ML2 and OpenVSwitch vlan mapping range to support.
  NeutronNetworkVLANRanges: 'datacentre:412:412'
  # Nova flavor to use.
  OvercloudControlFlavor: baremetal
  OvercloudComputeFlavor: baremetal
  # Number of nodes to deploy.
  ControllerCount: 3
  ComputeCount: 2

  # Sets overcloud nodes custom names
  # http://docs.openstack.org/developer/tripleo-docs/advanced_deployment/node_placement.html#custom-hostnames
  ControllerHostnameFormat: 'controller-%index%'
  ComputeHostnameFormat: 'compute-%index%'
  CephStorageHostnameFormat: 'ceph-%index%'
  ObjectStorageHostnameFormat: 'swift-%index%'
6.1.5.4. The controller.yaml file
The file is located in the /home/stack/baremetal-vlan/nic-configs/ directory. In this example, you are defining two switches: br-isolated and br-ex. nic2 will be under br-isolated and nic3 under br-ex:
heat_template_version: pike

description: >
  Software Config to drive os-net-config to configure VLANs for the
  controller role.

parameters:
  ControlPlaneIp:
    default: ''
    description: IP address/subnet on the ctlplane network
    type: string
  ExternalIpSubnet:
    default: ''
    description: IP address/subnet on the external network
    type: string
  InternalApiIpSubnet:
    default: ''
    description: IP address/subnet on the internal API network
    type: string
  StorageIpSubnet:
    default: ''
    description: IP address/subnet on the storage network
    type: string
  StorageMgmtIpSubnet:
    default: ''
    description: IP address/subnet on the storage mgmt network
    type: string
  TenantIpSubnet:
    default: ''
    description: IP address/subnet on the tenant network
    type: string
  ManagementIpSubnet: # Only populated when including environments/network-management.yaml
    default: ''
    description: IP address/subnet on the management network
    type: string
  ExternalNetworkVlanID:
    default: ''
    description: Vlan ID for the external network traffic.
    type: number
  InternalApiNetworkVlanID:
    default: ''
    description: Vlan ID for the internal_api network traffic.
    type: number
  TenantNetworkVlanID:
    default: ''
    description: Vlan ID for the tenant network traffic.
    type: number
  ManagementNetworkVlanID:
    default: 23
    description: Vlan ID for the management network traffic.
    type: number
  ExternalInterfaceDefaultRoute:
    default: ''
    description: default route for the external network
    type: string
  ControlPlaneSubnetCidr: # Override this with parameter_defaults
    default: '24'
    description: The subnet CIDR of the control plane network.
    type: string
  DnsServers: # Override this with parameter_defaults
    default: []
    description: A list of DNS servers (2 max for some implementations) that will be added to resolv.conf.
    type: comma_delimited_list
  EC2MetadataIp: # Override this with parameter_defaults
    description: The IP address of the EC2 metadata server.
    type: string

resources:
  OsNetConfigImpl:
    type: OS::Heat::StructuredConfig
    properties:
      group: os-apply-config
      config:
        os_net_config:
          network_config:
            -
              type: ovs_bridge
              name: br-isolated
              use_dhcp: false
              dns_servers: {get_param: DnsServers}
              addresses:
                -
                  ip_netmask:
                    list_join:
                      - '/'
                      - - {get_param: ControlPlaneIp}
                        - {get_param: ControlPlaneSubnetCidr}
              routes:
                -
                  ip_netmask: 169.254.169.254/32
                  next_hop: {get_param: EC2MetadataIp}
              members:
                -
                  type: interface
                  name: nic2
                  # force the MAC address of the bridge to this interface
                  primary: true
                -
                  type: vlan
                  vlan_id: {get_param: InternalApiNetworkVlanID}
                  addresses:
                    -
                      ip_netmask: {get_param: InternalApiIpSubnet}
                -
                  type: vlan
                  vlan_id: {get_param: TenantNetworkVlanID}
                  addresses:
                    -
                      ip_netmask: {get_param: TenantIpSubnet}
            -
              type: ovs_bridge
              name: br-ex
              use_dhcp: false
              dns_servers: {get_param: DnsServers}
              members:
                -
                  type: interface
                  name: nic3
                  # force the MAC address of the bridge to this interface
                -
                  type: vlan
                  vlan_id: {get_param: ExternalNetworkVlanID}
                  addresses:
                  -
                    ip_netmask: {get_param: ExternalIpSubnet}
                  routes:
                    -
                      default: true
                      next_hop: {get_param: ExternalInterfaceDefaultRoute}

outputs:
  OS::stack_id:
    description: The OsNetConfigImpl resource.
    value: {get_resource: OsNetConfigImpl}
6.1.5.5. The compute.yaml file
The file is located in the /home/stack/baremetal-vlan/nic-configs/ directory. Most of the options in the Compute configuration are the same as in the Controller configuration. In this example, nic3 is under br-ex to be used for External connectivity (Floating IP network )
heat_template_version: pike

description: >
  Software Config to drive os-net-config to configure VLANs for the
  Compute role.

parameters:
  ControlPlaneIp:
    default: ''
    description: IP address/subnet on the ctlplane network
    type: string
  ExternalIpSubnet:
    default: ''
    description: IP address/subnet on the external network
    type: string
  InternalApiIpSubnet:
    default: ''
    description: IP address/subnet on the internal API network
    type: string
  TenantIpSubnet:
    default: ''
    description: IP address/subnet on the tenant network
    type: string
  ManagementIpSubnet: # Only populated when including environments/network-management.yaml
    default: ''
    description: IP address/subnet on the management network
    type: string
  InternalApiNetworkVlanID:
    default: ''
    description: Vlan ID for the internal_api network traffic.
    type: number
  TenantNetworkVlanID:
    default: ''
    description: Vlan ID for the tenant network traffic.
    type: number
  ManagementNetworkVlanID:
    default: 23
    description: Vlan ID for the management network traffic.
    type: number
  StorageIpSubnet:
    default: ''
    description: IP address/subnet on the storage network
    type: string
  StorageMgmtIpSubnet:
    default: ''
    description: IP address/subnet on the storage mgmt network
    type: string
  ControlPlaneSubnetCidr: # Override this with parameter_defaults
    default: '24'
    description: The subnet CIDR of the control plane network.
    type: string
  ControlPlaneDefaultRoute: # Override this with parameter_defaults
    description: The default route of the control plane network.
    type: string
  DnsServers: # Override this with parameter_defaults
    default: []
    description: A list of DNS servers (2 max for some implementations) that will be added to resolv.conf.
    type: comma_delimited_list
  EC2MetadataIp: # Override this with parameter_defaults
    description: The IP address of the EC2 metadata server.
    type: string
  ExternalInterfaceDefaultRoute:
    default: ''
    description: default route for the external network
    type: string

resources:
  OsNetConfigImpl:
    type: OS::Heat::StructuredConfig
    properties:
      group: os-apply-config
      config:
        os_net_config:
          network_config:
            -
              type: ovs_bridge
              name: br-isolated
              use_dhcp: false
              dns_servers: {get_param: DnsServers}
              addresses:
               -
                 ip_netmask:
                   list_join:
                     - '/'
                     - - {get_param: ControlPlaneIp}
                       - {get_param: ControlPlaneSubnetCidr}
              routes:
               -
                 ip_netmask: 169.254.169.254/32
                 next_hop: {get_param: EC2MetadataIp}
               -
                 next_hop: {get_param: ControlPlaneDefaultRoute}
              members:
                -
                  type: interface
                  name: nic2
                  # force the MAC address of the bridge to this interface
                  primary: true
                -
                  type: vlan
                  vlan_id: {get_param: InternalApiNetworkVlanID}
                  addresses:
                    -
                      ip_netmask: {get_param: InternalApiIpSubnet}
                -
                  type: vlan
                  vlan_id: {get_param: TenantNetworkVlanID}
                  addresses:
                    -
                      ip_netmask: {get_param: TenantIpSubnet}
            -
              type: ovs_bridge
              name: br-ex
              use_dhcp: false
              members:
                -
                  type: interface
                  name: nic3

outputs:
  OS::stack_id:
    description: The OsNetConfigImpl resource.
    value: {get_resource: OsNetConfigImpl}
6.1.6. Red Hat OpenStack Platform director configuration files used in this scenario
6.1.6.1. The neutron.conf file
This file is located in the /etc/neutron/ directory and should contain the following information:
[DEFAULT]
service_plugins=odl-router_v2,trunk
6.1.6.2. The ml2_conf.ini file
This file is located in the /etc/neutron/plugins/ml2/ directory and should contain the following information:
[ml2]
type_drivers = vxlan,vlan,flat,gre
tenant_network_types = vxlan
mechanism_drivers = opendaylight_v2

[ml2_type_vlan]
network_vlan_ranges = datacentre:412:412

[ml2_odl]
password = admin
username = admin
url = http://172.17.1.18:8081/controller/nb/v2/neutron
- Under the [ml2] section note that VXLAN is used as the networks’ type and so is the opendaylight_v2 mechanism driver.
- Under [ml2_type_vlan], the same mappings as configured in network-environment.yaml file, should be set.
- Under [ml2_odl], you should see the configuration accessing the OpenDaylightController.
You can use the above details to check that the access to OpenDaylight controller works:
$ curl -H "Content-Type:application/json" -u admin:admin http://172.17.1.18:8081/controller/nb/v2/neutron/networks
6.2. Model installation scenario using provider networks
This installation scenario shows an example of OpenStack and OpenDaylight using provider networks instead of tenant networks. An external neutron provider network bridges VM instances to a physical network infrastructure that provides Layer-3 (L3) and other network services. In most cases, provider networks implement Layer-2 (L2) segmentation using the VLAN IDs. A provider network maps to a provider bridge on each compute node that supports launching VM instances on the provider network.
6.2.1. Physical Topology
The topology of this scenario consists of six nodes:
- 1 x director undercloud node
- 3 x OpenStack overcloud controllers with the OpenDaylight SDN controller installed in addition to other OpenStack services
- 2 x OpenStack overcloud Compute nodes
6.2.2. Planning Physical Network Environment
The overcloud Controller nodes use four network interface cards (NICs) each:
| Name | Purpose |
|---|---|
| nic1 | Management network (e.g accessing the node through SSH) |
| nic2 | Provisioning (PXE, DHCP), and Internal API networks |
| nic3 | Tenant network |
| nic4 | Public API network, Floating IP network |
The overcloud Compute nodes are equipped with four NICs:
| Name | Purpose |
|---|---|
| nic1 | Management network |
| nic2 | Provisioning, and Internal API networks |
| nic3 | Tenant network |
| nic4 | Floating IP network |
The undercloud node is equipped with two NICs:
| Name | Purpose |
|---|---|
| nic1 | Used for the Management network |
| nic2 | Used for the Provisioning network |
6.2.3. Planning NIC Connectivity
In this case, the environment files use abstracted numbered interfaces (nic1, nic2) and not the actual device names presented on the host operating system (like eth0 or eno2). The hosts that belong to the same role do not require identical network interface device names. There is no problem if one host uses the em1 and em2 interfaces, while the other uses eno1 and eno2. Each of the NIC will be referred to as nic1 and nic2.
The abstracted NIC scheme only relies on interfaces that are alive and connected. In cases where the hosts have a different number of interfaces, it is enough to use the minimal number of interfaces that you need to connect the hosts. For example, if there are four physical interfaces on one host and six on the other, you should only use nic1, nic2, nic3, and nic4 and plug in four cables on both hosts.
6.2.4. Planning Networks, VLANs and IPs
In this scenario, network isolation is used to separate the Management, Provisioning, Internal API, Tenant, Public API, and Floating IPs network traffic.
Figure 6.2. Detailed network topology used in this scenario
The table shows the VLAN ID and IP subnet associated with each network:
| Network | VLAN ID | IP Subnet |
|---|---|---|
| Provisioning | Native | 192.0.5.0/24 |
| Internal API | 600 | 172.17.0.0/24 |
| Tenant | 554,555-601 | 172.16.0.0/24 |
| Public API | 552 | 192.168.210.0/24 |
| Floating IP | 553 | 10.35.186.146/28 |
The OpenStack Platform director creates the br-isolated OVS bridge and adds the VLAN interfaces for each network as defined in the network configurations files. The br-ex bridge, is created automatically by the director with the relevant network interface attached to it.
Make sure, that your physical network switches that provide connectivity between the hosts are properly configured to carry those VLAN IDs. You must configure all switch ports facing the hosts as trunks with the above mentioned VLANs. The term "trunk" is used here to describe a port that allows multiple VLAN IDs to traverse through the same port.
Configuration guidance for the physical switches is outside the scope of this document.
The TenantNetworkVlanID in network-environment.yaml is where a VLAN tag can be defined for Tenant network when using VXLAN tunneling (i.e VXLAN tenant traffic transported over a VLAN tagged underlay network). This value may also be empty if the Tenant network is desired to run over the native VLAN. Also note, that when using VLAN tenant type networks, VLAN tags other than the value provided for TenantNetworkVlanID may be used.
6.2.5. OpenDaylight configuration files used in this scenario
To deploy this scenario of OpenStack and OpenDaylight, the following deployment command was entered on the undercloud node:
$ openstack overcloud deploy --debug \
  --templates \
  --environment-file "$HOME/extra_env.yaml" \
  --libvirt-type kvm \
  -e /home/stack/baremetal-vlan/network-environment.yaml \
  -e /usr/share/openstack-tripleo-heat-templates/environments/neutron-opendaylight.yaml \
  --log-file overcloud_install.log &> overcloud_install.log
Further, this guide will show the configuration files used in this scenario, their content, and it will also provide explanation on the setting used.
6.2.5.1. The extra_env.yaml file.
The file has only one parameter.
 parameter_defaults:
    OpenDaylightProviderMappings: 'datacentre:br-ex,tenant:br-vlan'
These are the mappings that each node, controlled by OpenDaylight, will use. The physical network datacenter will be mapped to the br-ex OVS bridge and the tenant network traffic will be mapped to the br-vlan OVS bridge.
6.2.5.2. The undercloud.conf file
This file is located in the /home/stack/ directory.
The file path points to customized versions of the configuration files.
  [DEFAULT]
  local_ip = 192.0.5.1/24
  network_gateway = 192.0.5.1
  undercloud_public_vip = 192.0.5.2
  undercloud_admin_vip = 192.0.5.3
  local_interface = eno2
  network_cidr = 192.0.5.0/24
  masquerade_network = 192.0.5.0/24
  dhcp_start = 192.0.5.5
  dhcp_end = 192.0.5.24
  inspection_iprange = 192.0.5.100,192.0.5.120
In this example, the 192.0.5.0/24 subnet for the Provisioning network is used. Note that the physical interface eno2 is used on the undercloud node for provisioning.
6.2.5.3. The network-environment.yaml file
This is the main file for configuring the network. It is located in the /home/stack/baremetal-vlan/ directory. In the following file, the VLAN IDs and IP subnets are specified for the different networks, as well as the provider mappings. The two files in the nic-configs directory controller.yaml and compute.yaml are used for specifying the network configuration for the controller and Compute nodes.
The number of Controller nodes (3) and Compute nodes (2) is specified in the example.
resource_registry:
  # Specify the relative/absolute path to the config files you want to use for override the default.
  OS::TripleO::Compute::Net::SoftwareConfig: nic-configs/compute.yaml
  OS::TripleO::Controller::Net::SoftwareConfig: nic-configs/controller.yaml

  # Network isolation configuration
  # Service section
  # If some service should be disabled, use the following example
  # OS::TripleO::Network::Management: OS::Heat::None
  OS::TripleO::Network::External: /usr/share/openstack-tripleo-heat-templates/network/external.yaml
  OS::TripleO::Network::InternalApi: /usr/share/openstack-tripleo-heat-templates/network/internal_api.yaml
  OS::TripleO::Network::Tenant: /usr/share/openstack-tripleo-heat-templates/network/tenant.yaml
  OS::TripleO::Network::Management: OS::Heat::None
  OS::TripleO::Network::StorageMgmt: OS::Heat::None
  OS::TripleO::Network::Storage: OS::Heat::None

  # Port assignments for the VIPs
  OS::TripleO::Network::Ports::ExternalVipPort: /usr/share/openstack-tripleo-heat-templates/network/ports/external.yaml
  OS::TripleO::Network::Ports::InternalApiVipPort: /usr/share/openstack-tripleo-heat-templates/network/ports/internal_api.yaml
  OS::TripleO::Network::Ports::RedisVipPort: /usr/share/openstack-tripleo-heat-templates/network/ports/vip.yaml
  OS::TripleO::Network::Ports::StorageVipPort: /usr/share/openstack-tripleo-heat-templates/network/ports/noop.yaml
  OS::TripleO::Network::Ports::StorageMgmtVipPort: /usr/share/openstack-tripleo-heat-templates/network/ports/noop.yaml

  # Port assignments for the controller role
  OS::TripleO::Controller::Ports::ExternalPort: /usr/share/openstack-tripleo-heat-templates/network/ports/external.yaml
  OS::TripleO::Controller::Ports::InternalApiPort: /usr/share/openstack-tripleo-heat-templates/network/ports/internal_api.yaml
  OS::TripleO::Controller::Ports::TenantPort: /usr/share/openstack-tripleo-heat-templates/network/ports/tenant.yaml
  OS::TripleO::Controller::Ports::ManagementPort: /usr/share/openstack-tripleo-heat-templates/network/ports/noop.yaml
  OS::TripleO::Controller::Ports::StoragePort: /usr/share/openstack-tripleo-heat-templates/network/ports/noop.yaml
  OS::TripleO::Controller::Ports::StorageMgmtPort: /usr/share/openstack-tripleo-heat-templates/network/ports/noop.yaml

  # Port assignments for the compute role
  OS::TripleO::Compute::Ports::ExternalPort: /usr/share/openstack-tripleo-heat-templates/network/ports/external.yaml
  OS::TripleO::Compute::Ports::InternalApiPort: /usr/share/openstack-tripleo-heat-templates/network/ports/internal_api.yaml
  OS::TripleO::Compute::Ports::TenantPort: /usr/share/openstack-tripleo-heat-templates/network/ports/tenant.yaml
  OS::TripleO::Compute::Ports::ManagementPort: /usr/share/openstack-tripleo-heat-templates/network/ports/noop.yaml
  OS::TripleO::Compute::Ports::StoragePort: /usr/share/openstack-tripleo-heat-templates/network/ports/noop.yaml
  OS::TripleO::Compute::Ports::StorageMgmtPort: /usr/share/openstack-tripleo-heat-templates/network/ports/noop.yaml

  # Port assignments for service virtual IPs for the controller role
  OS::TripleO::Controller::Ports::RedisVipPort: /usr/share/openstack-tripleo-heat-templates/network/ports/vip.yaml
  OS::TripleO::NodeUserData: /home/stack/baremetal-vlan/firstboot-config.yaml

parameter_defaults:
  # Customize all these values to match the local environment
  InternalApiNetCidr: 172.17.0.0/24
  TenantNetCidr: 172.16.0.0/24
  ExternalNetCidr: 192.168.210.0/24
  # CIDR subnet mask length for provisioning network
  ControlPlaneSubnetCidr: '24'
  InternalApiAllocationPools: [{'start': '172.17.0.10', 'end': '172.17.0.200'}]
  TenantAllocationPools: [{'start': '172.16.0.100', 'end': '172.16.0.200'}]
  # Use an External allocation pool which will leave room for floating IPs
  ExternalAllocationPools: [{'start': '192.168.210.2', 'end': '192.168.210.12'}]
  # Set to the router gateway on the external network
  ExternalInterfaceDefaultRoute: 192.168.210.1
  # Gateway router for the provisioning network (or Undercloud IP)
  ControlPlaneDefaultRoute: 192.0.5.1
  # Generally the IP of the Undercloud
  EC2MetadataIp: 192.0.5.1
  InternalApiNetworkVlanID: 600
  TenantNetworkVlanID: 554
  ExternalNetworkVlanID: 552
  # Define the DNS servers (maximum 2) for the overcloud nodes
  DnsServers: ["10.35.28.28","8.8.8.8"]
  # May set to br-ex if using floating IPs only on native VLAN on bridge br-ex
  NeutronExternalNetworkBridge: "''"
  # The tunnel type for the tenant network (vxlan or gre). Set to '' to disable tunneling.
  NeutronTunnelTypes: ''
  # The tenant network type for Neutron (vlan or vxlan).
  NeutronNetworkType: 'vlan'
  # The OVS logical->physical bridge mappings to use.
  #  NeutronBridgeMappings: 'datacentre:br-ex,tenant:br-isolated'
  # The Neutron ML2 and OpenVSwitch vlan mapping range to support.
  NeutronNetworkVLANRanges: 'datacentre:552:553,tenant:555:601'
  # Nova flavor to use.
  OvercloudControlFlavor: baremetal
  OvercloudComputeFlavor: baremetal
  # Number of nodes to deploy.
  ControllerCount: 3
  ComputeCount: 2

  # Sets overcloud nodes custom names
  # http://docs.openstack.org/developer/tripleo-docs/advanced_deployment/node_placement.html#custom-hostnames
  ControllerHostnameFormat: 'controller-%index%'
  ComputeHostnameFormat: 'compute-%index%'
  CephStorageHostnameFormat: 'ceph-%index%'
  ObjectStorageHostnameFormat: 'swift-%index%'
6.2.5.4. The controller.yaml file
The file is located in the /home/stack/baremetal-vlan/nic-configs/ directory. In this example, you are defining two switches: br-isolated, br-vlan, and br-ex. nic2 will be under br-isolated and nic3 under br-ex:
heat_template_version: pike

description: >
  Software Config to drive os-net-config to configure VLANs for the
  controller role.

parameters:
  ControlPlaneIp:
    default: ''
    description: IP address/subnet on the ctlplane network
    type: string
  ExternalIpSubnet:
    default: ''
    description: IP address/subnet on the external network
    type: string
  InternalApiIpSubnet:
    default: ''
    description: IP address/subnet on the internal API network
    type: string
  StorageIpSubnet:
    default: ''
    description: IP address/subnet on the storage network
    type: string
  StorageMgmtIpSubnet:
    default: ''
    description: IP address/subnet on the storage mgmt network
    type: string
  TenantIpSubnet:
    default: ''
    description: IP address/subnet on the tenant network
    type: string
  ManagementIpSubnet: # Only populated when including environments/network-management.yaml
    default: ''
    description: IP address/subnet on the management network
    type: string
  ExternalNetworkVlanID:
    default: ''
    description: Vlan ID for the external network traffic.
    type: number
  InternalApiNetworkVlanID:
    default: ''
    description: Vlan ID for the internal_api network traffic.
    type: number
  TenantNetworkVlanID:
    default: ''
    description: Vlan ID for the tenant network traffic.
    type: number
  ManagementNetworkVlanID:
    default: 23
    description: Vlan ID for the management network traffic.
    type: number
  ExternalInterfaceDefaultRoute:
    default: ''
    description: default route for the external network
    type: string
  ControlPlaneSubnetCidr: # Override this with parameter_defaults
    default: '24'
    description: The subnet CIDR of the control plane network.
    type: string
  DnsServers: # Override this with parameter_defaults
    default: []
    description: A list of DNS servers (2 max for some implementations) that will be added to resolv.conf.
    type: comma_delimited_list
  EC2MetadataIp: # Override this with parameter_defaults
    description: The IP address of the EC2 metadata server.
    type: string

resources:
  OsNetConfigImpl:
    type: OS::Heat::StructuredConfig
    properties:
      group: os-apply-config
      config:
        os_net_config:
          network_config:
            -
              type: interface
              name: nic1
              use_dhcp: false
            -
              type: ovs_bridge
              name: br-isolated
              use_dhcp: false
              dns_servers: {get_param: DnsServers}
              addresses:
                -
                  ip_netmask:
                    list_join:
                      - '/'
                      - - {get_param: ControlPlaneIp}
                        - {get_param: ControlPlaneSubnetCidr}
              routes:
                -
                  ip_netmask: 169.254.169.254/32
                  next_hop: {get_param: EC2MetadataIp}
              members:
                -
                  type: interface
                  name: nic2
                  # force the MAC address of the bridge to this interface
                  primary: true
                -
                  type: vlan
                  vlan_id: {get_param: InternalApiNetworkVlanID}
                  addresses:
                    -
                      ip_netmask: {get_param: InternalApiIpSubnet}
            -
              type: ovs_bridge
              name: br-ex
              use_dhcp: false
              dns_servers: {get_param: DnsServers}
              members:
                -
                  type: interface
                  name: nic4
                  # force the MAC address of the bridge to this interface
                -
                  type: vlan
                  vlan_id: {get_param: ExternalNetworkVlanID}
                  addresses:
                  -
                    ip_netmask: {get_param: ExternalIpSubnet}
                  routes:
                    -
                      default: true
                      next_hop: {get_param: ExternalInterfaceDefaultRoute}
            -
              type: ovs_bridge
              name: br-vlan
              use_dhcp: false
              dns_servers: {get_param: DnsServers}
              members:
                -
                  type: interface
                  name: nic3
                -
                  type: vlan
                  vlan_id: {get_param: TenantNetworkVlanID}
                  addresses:
                    -
                      ip_netmask: {get_param: TenantIpSubnet}

outputs:
  OS::stack_id:
    description: The OsNetConfigImpl resource.
    value: {get_resource: OsNetConfigImpl}
6.2.5.5. The compute.yaml file
The file is located in the /home/stack/baremetal-vlan/nic-configs/ directory. Most of the options in the Compute configuration are the same as in the Controller configuration. In this example, nic4 is under br-ex to be used for External connectivity (Floating IP network )
heat_template_version: pike

description: >
  Software Config to drive os-net-config to configure VLANs for the
  compute role.

parameters:
  ControlPlaneIp:
    default: ''
    description: IP address/subnet on the ctlplane network
    type: string
  ExternalIpSubnet:
    default: ''
    description: IP address/subnet on the external network
    type: string
  InternalApiIpSubnet:
    default: ''
    description: IP address/subnet on the internal API network
    type: string
  TenantIpSubnet:
    default: ''
    description: IP address/subnet on the tenant network
    type: string
  ManagementIpSubnet: # Only populated when including environments/network-management.yaml
    default: ''
    description: IP address/subnet on the management network
    type: string
  InternalApiNetworkVlanID:
    default: ''
    description: Vlan ID for the internal_api network traffic.
    type: number
  TenantNetworkVlanID:
    default: ''
    description: Vlan ID for the tenant network traffic.
    type: number
  ManagementNetworkVlanID:
    default: 23
    description: Vlan ID for the management network traffic.
    type: number
  StorageIpSubnet:
    default: ''
    description: IP address/subnet on the storage network
    type: string
  StorageMgmtIpSubnet:
    default: ''
    description: IP address/subnet on the storage mgmt network
    type: string
  ControlPlaneSubnetCidr: # Override this with parameter_defaults
    default: '24'
    description: The subnet CIDR of the control plane network.
    type: string
  ControlPlaneDefaultRoute: # Override this with parameter_defaults
    description: The default route of the control plane network.
    type: string
  DnsServers: # Override this with parameter_defaults
    default: []
    description: A list of DNS servers (2 max for some implementations) that will be added to resolv.conf.
    type: comma_delimited_list
  EC2MetadataIp: # Override this with parameter_defaults
    description: The IP address of the EC2 metadata server.
    type: string
  ExternalInterfaceDefaultRoute:
    default: ''
    description: default route for the external network
    type: string

resources:
  OsNetConfigImpl:
    type: OS::Heat::StructuredConfig
    properties:
      group: os-apply-config
      config:
        os_net_config:
          network_config:
            -
              type: interface
              name: nic1
              use_dhcp: false
            -
              type: ovs_bridge
              name: br-isolated
              use_dhcp: false
              dns_servers: {get_param: DnsServers}
              addresses:
               -
                 ip_netmask:
                   list_join:
                     - '/'
                     - - {get_param: ControlPlaneIp}
                       - {get_param: ControlPlaneSubnetCidr}
              routes:
               -
                 ip_netmask: 169.254.169.254/32
                 next_hop: {get_param: EC2MetadataIp}
               -
                 next_hop: {get_param: ControlPlaneDefaultRoute}
                 default: true
              members:
                -
                  type: interface
                  name: nic2
                  # force the MAC address of the bridge to this interface
                  primary: true
                -
                  type: vlan
                  vlan_id: {get_param: InternalApiNetworkVlanID}
                  addresses:
                    -
                      ip_netmask: {get_param: InternalApiIpSubnet}
            -
              type: ovs_bridge
              name: br-ex
              use_dhcp: false
              members:
                -
                  type: interface
                  name: nic4
            -
              type: ovs_bridge
              name: br-vlan
              use_dhcp: false
              dns_servers: {get_param: DnsServers}
              members:
                -
                  type: interface
                  name: nic3
                -
                  type: vlan
                  vlan_id: {get_param: TenantNetworkVlanID}
                  addresses:
                    -
                      ip_netmask: {get_param: TenantIpSubnet}


outputs:
  OS::stack_id:
    description: The OsNetConfigImpl resource.
    value: {get_resource: OsNetConfigImpl}
6.2.6. Red Hat OpenStack Platform director configuration files used in this scenario
6.2.6.1. The neutron.conf file
This file is located in the /etc/neutron/ directory and should contain the following information:
[DEFAULT]
service_plugins=odl-router_v2,trunk
6.2.6.2. The ml2_conf.ini file
This file is located in the /etc/neutron/plugins/ml2/ directory and should contain the following information:
[DEFAULT]
[ml2]
type_drivers = vxlan,vlan,flat,gre
tenant_network_types = vlan
mechanism_drivers = opendaylight_v2
extension_drivers = qos,port_security
path_mtu = 0

[ml2_type_flat]
flat_networks = datacentre

[ml2_type_geneve]
[ml2_type_gre]
tunnel_id_ranges = 1:4094

[ml2_type_vlan]
network_vlan_ranges = datacentre:552:553,tenant:555:601

[ml2_type_vxlan]
vni_ranges = 1:4094
vxlan_group = 224.0.0.1

[securitygroup]
[ml2_odl]
password=<PASSWORD>
username=<USER>
url=http://172.17.0.10:8081/controller/nb/v2/neutron
-
Under the [ml2] section note that VXLAN is used as the networks’ type and so is the
opendaylight_v2mechanism driver. -
Under [ml2_type_vlan], the same mappings as configured in
network-environment.yamlfile, should be set. - Under [ml2_odl], you should see the configuration accessing the OpenDaylightController.
You can use the above details to check that the access to OpenDaylight controller works:
$ curl -H "Content-Type:application/json" -u admin:admin http://172.17.1.18:8081/controller/nb/v2/neutron/networks
Chapter 7. High availability and clustering with OpenDaylight
Red Hat OpenStack Platform 12 supports High Availability clustering for both neutron and the OpenDaylight controller. The table below shows the recommended architecture that is able to run the high availability cluster:
| Node type | Number of nodes | Node mode |
|---|---|---|
| Neutron | 3 | active/active/active |
| OpenDaylight | 3 | active/active/active |
| Compute nodes (nova or OVS) | any |
The OpenDaylight role is composable, so it can be deployed on the same nodes as the neutron nodes, or on separate nodes. The setup is an all-active setup. All nodes can handle requests. If the receiving node cannot handle them, it forwards them to another appropriate node. All nodes keep in synchronisation with each other. In Open_vSwitch database schema (OVSDB) Southbound, available controller nodes share the Open vSwitches, so that each switch is handled by a specific node in the cluster.
7.1. Configuring OpenDaylight for high availability and clustering
Since the Red Hat OpenStack Platform director deploys the OpenDaylight controller nodes, it has all the information required to configure clustering for OpenDaylight. Each OpenDaylight node needs an akka.conf configuration file that identifies the node’s role (its name in the cluster) and lists at least some of the other nodes in the cluster, the seed nodes. The nodes also needs a module-shards.conf file that describes how data is replicated in the cluster. The Red Hat OpenStack Platform director makes the correct settings based on the selected deployment configuration. The akka.conf file depends on the nodes, while the module-shards.conf file depends on the nodes and the installed datastores (and hence the installed features, which we control to a large extent).
An example of the akka.conf can look like this:
odl-cluster-data {
  akka {
    remote {
      netty.tcp {
        hostname = "192.0.2.1"
      }
    },
    cluster {
      seed-nodes = [
        "akka.tcp://opendaylight-cluster-data@192.0.2.1:2550",
        "akka.tcp://opendaylight-cluster-data@192.0.2.2:2550",
        "akka.tcp://opendaylight-cluster-data@192.0.2.3:2550"],
      roles = [ "member-1" ]
    }
  }
}
The nodes listed above are seed nodes. They do not have to reflect the current cluster setup as a whole. As long as one of the real nodes in the current cluster is reachable using the list of seed nodes, a starting-up node will then be able to join the cluster. In the configuration file, you can use names instead of IP addresses.
An example of module-shards.conf file:
module-shards = [
{
  name = "default"
  shards = [{
    name="default"
    replicas = [
      "member-1",
      "member-2",
      "member-3"
    ]
  }]
},
{
  name = "topology"
  shards = [{
    name="topology"
    replicas = [
      "member-1",
      "member-2",
      "member-3"
    ]
  }]
}]
Additional sections can be added if other datastores need to be configured, for “inventory” typically. This is not absolutely required, the default configuration will be used for shards with no explicit configuration, and will work fine in most cases. In this scenario, only the default shard is configured:
module-shards = [
{
  name = "default"
  shards = [{
    name="default"
    replicas = [
      "member-1",
      "member-2",
      "member-3"
    ]
  }]
}]
7.2. Cluster behaviour
The cluster is not defined dynamically, which means that it does not adjust automatically. It is not possible to start a new node and connect it to an existing cluster by configuring the new node only. The cluster needs to be informed about nodes' additions and removals through the cluster administration RPCs.
The cluster is based on a leader/followers model. One of the active nodes is elected as the leader, and the remaining active nodes become followers. Reasoning about the cluster mostly involves reasoning about persistence, which is handled according to the Raft consensus-based model. Following this principle, a transaction is only committed if the majority of the nodes in the cluster agree.
In OpenDaylight, if a node loses its connection with the cluster, its local transactions will no longer make forward progress. Eventually they will timeout (10 minutes by default) and the front-end actor will stop. All this applies per shard, so different shards can have different leaders. The behaviour results in one of the following:
- Lack of communication for less than ten minutes results in the minority nodes reconnecting with the majority leader. All the transactions are rolled back and the majority transactions are replayed.
- Lack of communication for more than ten minutes results in the minority nodes stopping working and recording the information into log messages. Read-only requests should still complete, but no changes persist and the nodes are not able to re-join the cluster on their own.
This means that users have to monitor the nodes on their own. They have to check for availability and cluster synchronisation and restart them if they get desynchronised for too long. For monitoring the nodes, users can use the Jolokia REST service (see Monitoring with Jolokia for more information).
7.3. Cluster requirements
There are no specific networking requirements to support the cluster, such as bonding, MTUs, and so on. The cluster communications do not support high latencies, but latencies on the order of data-centre level are acceptable.
7.4. Open vSwitch configuration
Each switch is configured with all the controllers by the Red Hat OpenStack Platform director which has all the information needed to do it automatically. The OVSDB supports sharing switches among the cluster nodes, to allow some level of load-balancing. However, each switch contacts all the nodes in the cluster and picks the one that answers first and makes it the master switch by default. This behaviour leads to clustering of the controller assignments when the fastest answering node ends up handling most of the switches.
7.5. Cluster monitoring
7.5.1. Monitoring with Jolokia
To monitor the status of the cluster, you must enable the Jolokia support in OpenDaylight. You can obtain a datastore clustering report from the Jolokia address (http://192.0.2.1:8181/jolokia/read/org.opendaylight.controller:Category=Shards,name=member-1-shard-inventory-config,type=DistributedConfigDatastore). The report is in form of a JSON document.
You have to change the IP address and the member-1 values to match your environment. The IP address can point to a VIP, if there is no preference in which node will respond. However, addressing specific controllers provides more relevant results.
This description must indicate the same leader on each node.
The cluster can also be monitored by the Cluster Monitor Tool that is being developed by the upstream OpenDaylight team. You can find it in the product’s Github repository.
The tool is not a part of the Red Hat OpenStack Platform 12 and as such is not supported or provided by Red Hat.
7.6. Understanding OpenDaylight ports
The official list of all OpenDaylight ports is available on the OpenDaylight wiki page. The ports relevant for this scenario are:
| Port number | Used for |
|---|---|
| 2550 | clustering |
| 6653 | OpenFlow |
| 6640, 6641 | OVSDB |
| 8087 | neutron |
| 8181 | RESTCONF, Jolokia |
Blocking traffic to these ports on the controller has the following effects:
- Clustering
- The clustered nodes will not be able to communicate. When running in clustered mode, each node needs to have at least one peer. If all traffic is blocked, the controller will stop (see cluster behaviour description above).
- OpenFlow
- The switches will not be able to reach the controller.
- OVSDB
- Open vSwitch will not be able to reach the controller. The controller will be able to initiate an active OVS connection, but any pings from the switch to the controller will fail and the switch will finally fail over to another controller.
- neutron
- Neutron will not be able to reach the controller.
- RESTCONF
- External tools using the REST endpoints will not be able to reach the controller. In this scenario, it only should affect the monitoring tools.
On the OpenDaylight side, the logs would only show blocked traffic for clustering, nothing else (since the other ports are used to talk to the ODL controller). The ports that currently are opened via the Red Hat OpenStack Platform director are listed in https://github.com/openstack/tripleo-heat-templates/blob/master/puppet/services/opendaylight-api.yaml#L72.
Blocking traffic to these ports on the target devices has the following effects:
- Clustering
- Same as above.
- OpenFlow
- The controller will not be able to push flows.
- OVSDB
- The controller will not be able to reach the switch (the controller will be able to respond to passive OVS connections).
In all cases in the latter situation, since OpenDaylight maintains its configuration and its operational status in distinct trees, the configuration will still point to the unreachable devices, and the controller will continue trying to connect to them.
7.7. Understanding OpenDaylight flows
| Flow | Explanation |
|---|---|
| Neutron → ODL | Neutron to HA Proxy to ODL (see Apex). PaceMaker manages the VIP (with three backing PIPs). The driver tries to keep TCP sessions open which may have an impact (https://review.openstack.org/#/c/440866/). |
| ODL → Neutron | There are no ODL-initiated communications. |
| ODL → ODL | ODL nodes communicate with each other on port 2550 (configurable). |
| ODL → OVS | ODL communicates with switches using OVSDB (ports 6640 and 6641) and OpenFlow (port 6633). There is no VIP involved, ODL knows every switch’s IP address and each ODL node knows about every switch. |
| OVS → ODL | ODL communicates with switches using OVSDB (ports 6640 and 6641) and OpenFlow (port 6633). There is no VIP involved, ODL configures every switch so that it knows about all the controllers. Notifications from the switches to the controller are sent to all nodes. |
7.8. Neutron DHCP agent HA
The default setup runs the DHCP agent on all neutron nodes, along with the OVS agent. The roles are composable though, so the agents can be separated from the controllers. The DHCP agent is only important for HA during the port bringing-up phase and during lease renewal. On port creation, neutron assigns IP and MAC addresses and configures all the DHCP agents appropriately, before the port comes up. During this phase, all DHCP agents answer the resulting DHCP requests.
To maximise the dataplane availability in the case of a DHCP agent failure, the leases are configured with long lease times, and the nodes are configured with short renewal delays. Thus, the DHCP agents are seldom needed, but when they are, the requesting nodes will quickly fail an unavailable DHCP agent and issue a broadcast request, picking up any remaining DHCP agent automatically.
The agents have their own process monitors. systemd starts the agents, and they create their namespaces and start the processes inside them. If an agent dies, the namespace stays up, systemd restarts the agent without terminating or restarting any other processes (it does not own them).Then the agent re-attaches to the namespace and re-uses it together with all running processes.
7.9. Neutron Metadata agent HA
In the reference implementation, the metadata services run on the controllers, that are combined with the network nodes, in the same namespace as the corresponding DHCP agent. A metadata proxy listens on port 80, and a static route redirects the traffic from the virtual machines to the proxy using the well-known metadata address. The proxy uses a Unix socket to talk to the metadata service, which is on the same node, and the latter talks to nova. With Unix sockets, we do not need to be able to route IP between the proxy and the service, so the metadata service is available even if the node is not routed. HA is handled using keepalive and VRRP elections. Failover time is 2-5s. The agents are handled in the same way as DHCP agents (with systemd and namespaces).
The metadata service in Red Hat OpenStack Platform 11 is a custom Python script while in Red Hat OpenStack Platform 12 it is HAProxy, which lowers the memory usage by 30. This is particularly significant because many users run one proxy per router, and hundreds if not thousands of routers per controller.
Chapter 8. Where can I find more information about Red Hat OpenStack Platform and OpenDaylight?
| Component | Reference |
|---|---|
| OpenDaylight | For further information that is not covered in this document, see the OpenDaylight Carbon documentation. |
| Red Hat OpenDaylight Product Guide | For more information about the Red Hat OpenDaylight and its relation to the Red Hat OpenStack Platform, see the Red Hat OpenDaylight Product Guide. |
| Red Hat Enterprise Linux | Red Hat OpenStack Platform is supported on Red Hat Enterprise Linux 7.4. For information on installing Red Hat Enterprise Linux, see the corresponding installation guide at Red Hat Enterprise Linux Installation Guide. |
| Red Hat OpenStack Platform | To install OpenStack components and their dependencies, use the Red Hat OpenStack Platform director. The director uses a basic OpenStack undercloud, which is then used to provision and manage the OpenStack nodes in the final overcloud. Be aware that you will need one extra host machine for the installation of the undercloud, in addition to the environment necessary for the deployed overcloud. For detailed instructions, see Director Installation and Usage. For information on configuring advanced features for a Red Hat OpenStack Platform enterprise environment using the Red Hat OpenStack Platform director such as network isolation, storage configuration, SSL communication, and general configuration method, see Advanced Overcloud Customization. |
| NFV Documentation | For more details on planning your Red Hat OpenStack Platform deployment with NFV, see Network Functions Virtualization Planning and Configuration Guide. |