
Chapter 4. Working with tags
An image tag refers to a label or identifier assigned to a specific version or variant of a container image. Container images are typically composed of multiple layers that represent different parts of the image. Image tags are used to differentiate between different versions of an image or to provide additional information about the image.
Image tags have the following benefits:
- Versioning and Releases: Image tags allow you to denote different versions or releases of an application or software. For example, you might have an image tagged as v1.0 to represent the initial release and v1.1 for an updated version. This helps in maintaining a clear record of image versions.
- Rollbacks and Testing: If you encounter issues with a new image version, you can easily revert to a previous version by specifying its tag. This is particularly helpful during debugging and testing phases.
- Development Environments: Image tags are beneficial when working with different environments. You might use a dev tag for a development version, qa for quality assurance testing, and prod for production, each with their respective features and configurations.
- Continuous Integration/Continuous Deployment (CI/CD): CI/CD pipelines often utilize image tags to automate the deployment process. New code changes can trigger the creation of a new image with a specific tag, enabling seamless updates.
- Feature Branches: When multiple developers are working on different features or bug fixes, they can create distinct image tags for their changes. This helps in isolating and testing individual features.
- Customization: You can use image tags to customize images with different configurations, dependencies, or optimizations, while keeping track of each variant.
- Security and Patching: When security vulnerabilities are discovered, you can create patched versions of images with updated tags, ensuring that your systems are using the latest secure versions.
- Dockerfile Changes: If you modify the Dockerfile or build process, you can use image tags to differentiate between images built from the previous and updated Dockerfiles.
Overall, image tags provide a structured way to manage and organize container images, enabling efficient development, deployment, and maintenance workflows.
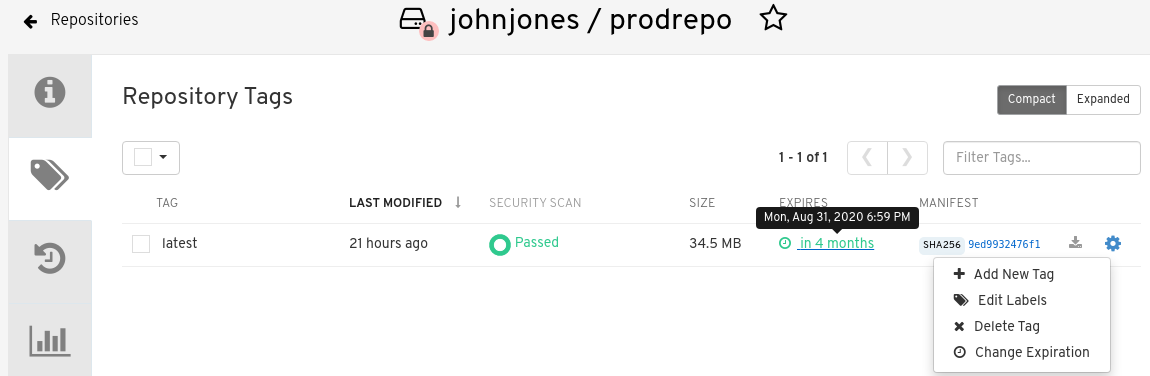
4.1. Viewing and modifying tags
To view image tags on Red Hat Quay, navigate to a repository and click on the Tags tab. For example:
View and modify tags from your repository

4.1.1. Adding a new image tag to an image
You can add a new tag to an image in Red Hat Quay.
Procedure
- Click the Settings, or gear, icon next to the tag and clicking Add New Tag.
Enter a name for the tag, then, click Create Tag.
The new tag is now listed on the Repository Tags page.
4.1.2. Moving an image tag
You can move a tag to a different image if desired.
Procedure
- Click the Settings, or gear, icon next to the tag and clicking Add New Tag and enter an existing tag name. Red Hat Quay confirms that you want the tag moved instead of added.
4.1.3. Deleting an image tag
Deleting an image tag effectively removes that specific version of the image from the registry.
To delete an image tag, use the following procedure.
Procedure
- Navigate to the Tags page of a repository.
Click Delete Tag. This deletes the tag and any images unique to it.
NoteDeleting an image tag can be reverted based on the amount of time allotted assigned to the time machine feature. For more information, see "Reverting tag changes".
4.1.3.1. Viewing tag history
Red Hat Quay offers a comprehensive history of images and their respective image tags.
Procedure
- Navigate to the Tag History page of a repository to view the image tag history.
4.1.3.2. Reverting tag changes
Red Hat Quay offers a comprehensive time machine feature that allows older images tags to remain in the repository for set periods of time so that they can revert changes made to tags. This feature allows users to revert tag changes, like tag deletions.
Procedure
- Navigate to the Tag History page of a repository.
- Find the point in the timeline at which image tags were changed or removed. Next, click the option under Revert to restore a tag to its image, or click the option under Permanently Delete to permanently delete the image tag.
4.1.4. Fetching an image by tag or digest
Red Hat Quay offers multiple ways of pulling images using Docker and Podman clients.
Procedure
- Navigate to the Tags page of a repository.
- Under Manifest, click the Fetch Tag icon.
When the popup box appears, users are presented with the following options:
- Podman Pull (by tag)
- Docker Pull (by tag)
- Podman Pull (by digest)
Docker Pull (by digest)
Selecting any one of the four options returns a command for the respective client that allows users to pull the image.
Click Copy Command to copy the command, which can be used on the command-line interface (CLI). For example:
$ podman pull quay-server.example.com/quayadmin/busybox:test2
4.2. Tag Expiration
Images can be set to expire from a Red Hat Quay repository at a chosen date and time using the tag expiration feature. This feature includes the following characteristics:
- When an image tag expires, it is deleted from the repository. If it is the last tag for a specific image, the image is also set to be deleted.
- Expiration is set on a per-tag basis. It is not set for a repository as a whole.
- After a tag is expired or deleted, it is not immediately removed from the registry. This is contingent upon the allotted time designed in the time machine feature, which defines when the tag is permanently deleted, or garbage collected. By default, this value is set at 14 days, however the administrator can adjust this time to one of multiple options. Up until the point that garbage collection occurs, tags changes can be reverted.
The Red Hat Quay superuser has no special privilege related to deleting expired images from user repositories. There is no central mechanism for the superuser to gather information and act on user repositories. It is up to the owners of each repository to manage expiration and the deletion of their images.
Tag expiration can be set up in one of two ways:
-
By setting the
quay.expires-after=LABEL in the Dockerfile when the image is created. This sets a time to expire from when the image is built. By selecting an expiration date on the Red Hat Quay UI. For example:
4.2.1. Setting tag expiration from a Dockerfile
Adding a label, for example, quay.expires-after=20h by using the docker label command causes a tag to automatically expire after the time indicated. The following values for hours, days, or weeks are accepted:
-
1h -
2d -
3w
Expiration begins from the time that the image is pushed to the registry.
4.2.2. Setting tag expiration from the repository
Tag expiration can be set on the Red Hat Quay UI.
Procedure
- Navigate to a repository and click Tags in the navigation pane.
- Click the Settings, or gear icon, for an image tag and select Change Expiration.
- Select the date and time when prompted, and select Change Expiration. The tag is set to be deleted from the repository when the expiration time is reached.
4.3. Viewing Clair security scans
Clair security scanner is not enabled for Red Hat Quay by default. To enable Clair, see Clair on Red Hat Quay.
Procedure
- Navigate to a repository and click Tags in the navigation pane. This page shows the results of the security scan.
- To reveal more information about multi-architecture images, click See Child Manifests to see the list of manifests in extended view.
- Click a relevant link under See Child Manifests, for example, 1 Unknown to be redirected to the Security Scanner page.
- The Security Scanner page provides information for the tag, such as which CVEs the image is susceptible to, and what remediation options you might have available.
Image scanning only lists vulnerabilities found by Clair security scanner. What users do about the vulnerabilities are uncovered is up to said user. Red Hat Quay superusers do not act on found vulnerabilities.