
Chapter 6. Working with Helm charts
6.1. Understanding Helm
Helm is a software package manager that simplifies deployment of applications and services to OpenShift Dedicated clusters.
Helm uses a packaging format called charts. A Helm chart is a collection of files that describes the OpenShift Dedicated resources.
Creating a chart in a cluster creates a running instance of the chart known as a release.
Each time a chart is created, or a release is upgraded or rolled back, an incremental revision is created.
6.1.1. Key features
Helm provides the ability to:
- Search through a large collection of charts stored in the chart repository.
- Modify existing charts.
- Create your own charts with OpenShift Dedicated or Kubernetes resources.
- Package and share your applications as charts.
6.1.2. Red Hat Certification of Helm charts for OpenShift
You can choose to verify and certify your Helm charts by Red Hat for all the components you will be deploying on the Red Hat OpenShift Dedicated. Charts go through an automated Red Hat OpenShift certification workflow that guarantees security compliance as well as best integration and experience with the platform. Certification assures the integrity of the chart and ensures that the Helm chart works seamlessly on Red Hat OpenShift clusters.
6.1.3. Additional resources
- For more information on how to certify your Helm charts as a Red Hat partner, see Red Hat Certification of Helm charts for OpenShift.
- For more information on OpenShift and Container certification guides for Red Hat partners, see Partner Guide for OpenShift and Container Certification.
-
For a list of the charts, see the Red Hat
Helm indexfile. - You can view the available charts at the Red Hat Marketplace. For more information, see Using the Red Hat Marketplace.
6.2. Installing Helm
The following section describes how to install Helm on different platforms using the CLI.
You can also find the URL to the latest binaries from the OpenShift Dedicated web console by clicking the ? icon in the upper-right corner and selecting Command Line Tools.
Prerequisites
- You have installed Go, version 1.13 or higher.
6.2.1. On Linux
Download the Linux x86_64 or Linux amd64 Helm binary and add it to your path:
# curl -L https://mirror.openshift.com/pub/openshift-v4/clients/helm/latest/helm-linux-amd64 -o /usr/local/bin/helm
Make the binary file executable:
# chmod +x /usr/local/bin/helm
Check the installed version:
$ helm version
Example output
version.BuildInfo{Version:"v3.0", GitCommit:"b31719aab7963acf4887a1c1e6d5e53378e34d93", GitTreeState:"clean", GoVersion:"go1.13.4"}
6.2.2. On Windows 7/8
-
Download the latest
.exefile and put in a directory of your preference. - Right click Start and click Control Panel.
- Select System and Security and then click System.
- From the menu on the left, select Advanced systems settings and click Environment Variables at the bottom.
- Select Path from the Variable section and click Edit.
-
Click New and type the path to the folder with the
.exefile into the field or click Browse and select the directory, and click OK.
6.2.3. On Windows 10
-
Download the latest
.exefile and put in a directory of your preference. -
Click Search and type
envorenvironment. - Select Edit environment variables for your account.
- Select Path from the Variable section and click Edit.
- Click New and type the path to the directory with the exe file into the field or click Browse and select the directory, and click OK.
6.2.4. On MacOS
Download the Helm binary and add it to your path:
# curl -L https://mirror.openshift.com/pub/openshift-v4/clients/helm/latest/helm-darwin-amd64 -o /usr/local/bin/helm
Make the binary file executable:
# chmod +x /usr/local/bin/helm
Check the installed version:
$ helm version
Example output
version.BuildInfo{Version:"v3.0", GitCommit:"b31719aab7963acf4887a1c1e6d5e53378e34d93", GitTreeState:"clean", GoVersion:"go1.13.4"}
6.3. Configuring custom Helm chart repositories
The Developer Catalog, in the Developer perspective of the web console, displays the Helm charts available in the cluster. By default, it lists the Helm charts from the Red Hat OpenShift Helm chart repository. For a list of the charts, see the Red Hat Helm index file.
As a cluster administrator, you can add multiple cluster-scoped and namespace-scoped Helm chart repositories, separate from the default cluster-scoped Helm repository, and display the Helm charts from these repositories in the Developer Catalog.
As a regular user or project member with the appropriate role-based access control (RBAC) permissions, you can add multiple namespace-scoped Helm chart repositories, apart from the default cluster-scoped Helm repository, and display the Helm charts from these repositories in the Developer Catalog.
In the Developer perspective of the web console, you can use the Helm page to:
- Create Helm Releases and Repositories using the Create button.
- Create, update, or delete a cluster-scoped or namespace-scoped Helm chart repository.
- View the list of the existing Helm chart repositories in the Repositories tab, which can also be easily distinguished as either cluster scoped or namespace scoped.
6.3.1. Creating Helm releases using the Developer perspective
You can use either the Developer perspective in the web console or the CLI to select and create a release from the Helm charts listed in the Developer Catalog. You can create Helm releases by installing Helm charts and see them in the Developer perspective of the web console.
Prerequisites
- You have logged in to the web console and have switched to the Developer perspective.
Procedure
To create Helm releases from the Helm charts provided in the Developer Catalog:
- In the Developer perspective, navigate to the +Add view and select a project. Then click Helm Chart option to see all the Helm Charts in the Developer Catalog.
- Select a chart and read the description, README, and other details about the chart.
Click Create.
Figure 6.1. Helm charts in developer catalog

In the Create Helm Release page:
- Enter a unique name for the release in the Release Name field.
- Select the required chart version from the Chart Version drop-down list.
Configure your Helm chart by using the Form View or the YAML View.
NoteWhere available, you can switch between the YAML View and Form View. The data is persisted when switching between the views.
Click Create to create a Helm release. The web console displays the new release in the Topology view.
If a Helm chart has release notes, the web console displays them.
If a Helm chart creates workloads, the web console displays them on the Topology or Helm release details page. The workloads are
DaemonSet,CronJob,Pod,Deployment, andDeploymentConfig.- View the newly created Helm release in the Helm Releases page.
You can upgrade, rollback, or delete a Helm release by using the Actions button on the side panel or by right-clicking a Helm release.
6.3.2. Using Helm in the web terminal
You can use Helm by Accessing the web terminal in the Developer perspective of the web console.
6.3.3. Creating a custom Helm chart on OpenShift Dedicated
Procedure
Create a new project:
$ oc new-project nodejs-ex-k
Download an example Node.js chart that contains OpenShift Dedicated objects:
$ git clone https://github.com/redhat-developer/redhat-helm-charts
Go to the directory with the sample chart:
$ cd redhat-helm-charts/alpha/nodejs-ex-k/
Edit the
Chart.yamlfile and add a description of your chart:apiVersion: v2 1 name: nodejs-ex-k 2 description: A Helm chart for OpenShift 3 icon: https://static.redhat.com/libs/redhat/brand-assets/latest/corp/logo.svg 4 version: 0.2.1 5
Verify that the chart is formatted properly:
$ helm lint
Example output
[INFO] Chart.yaml: icon is recommended

1 chart(s) linted, 0 chart(s) failed
Navigate to the previous directory level:
$ cd ..
Install the chart:
$ helm install nodejs-chart nodejs-ex-k
Verify that the chart has installed successfully:
$ helm list
Example output
NAME NAMESPACE REVISION UPDATED STATUS CHART APP VERSION
nodejs-chart nodejs-ex-k 1 2019-12-05 15:06:51.379134163 -0500 EST deployed nodejs-0.1.0  1.16.0
6.3.4. Filtering Helm Charts by their certification level
You can filter Helm charts based on their certification level in the Developer Catalog.
Procedure
- In the Developer perspective, navigate to the +Add view and select a project.
- From the Developer Catalog tile, select the Helm Chart option to see all the Helm charts in the Developer Catalog.
Use the filters to the left of the list of Helm charts to filter the required charts:
- Use the Chart Repositories filter to filter charts provided by Red Hat Certification Charts or OpenShift Helm Charts.
-
Use the Source filter to filter charts sourced from Partners, Community, or Red Hat. Certified charts are indicated with the (
 ) icon.
The Source filter will not be visible when there is only one provider type.
You can now select the required chart and install it.
6.4. Working with Helm releases
You can use the Developer perspective in the web console to update, rollback, or delete a Helm release.
6.4.1. Prerequisites
- You have logged in to the web console and have switched to the Developer perspective.
6.4.2. Upgrading a Helm release
You can upgrade a Helm release to upgrade to a new chart version or update your release configuration.
Procedure
- In the Topology view, select the Helm release to see the side panel.
- Click Actions → Upgrade Helm Release.
- In the Upgrade Helm Release page, select the Chart Version you want to upgrade to, and then click Upgrade to create another Helm release. The Helm Releases page displays the two revisions.
6.4.3. Rolling back a Helm release
If a release fails, you can rollback the Helm release to a previous version.
Procedure
To rollback a release using the Helm view:
- In the Developer perspective, navigate to the Helm view to see the Helm Releases in the namespace.
-
Click the Options menu
 adjoining the listed release, and select Rollback.
- In the Rollback Helm Release page, select the Revision you want to rollback to and click Rollback.
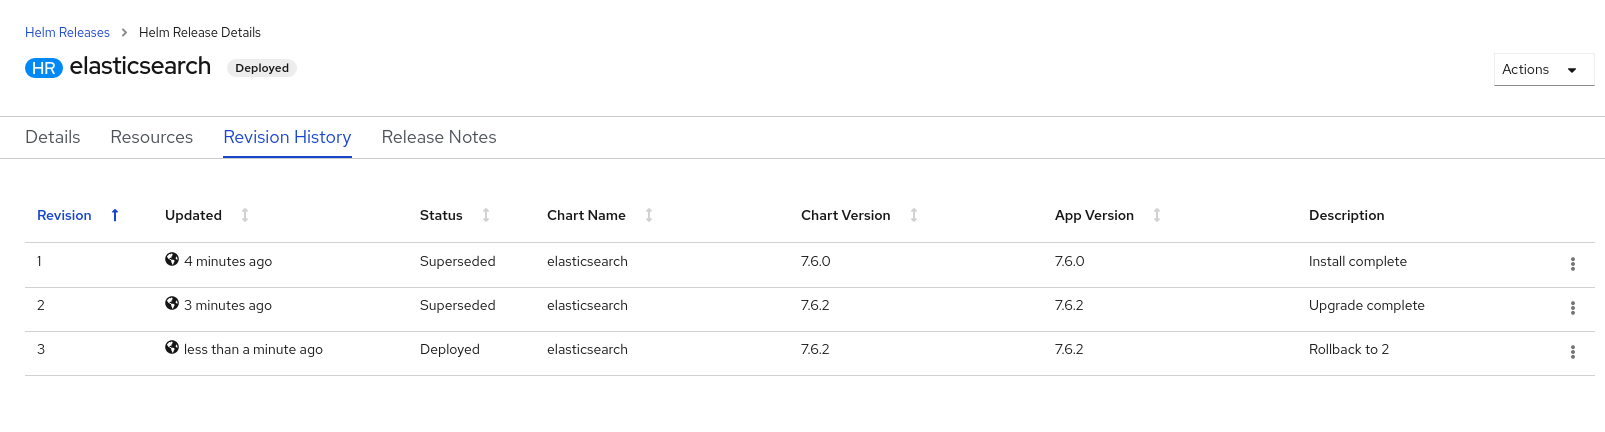
- In the Helm Releases page, click on the chart to see the details and resources for that release.
Go to the Revision History tab to see all the revisions for the chart.
Figure 6.2. Helm revision history
-
If required, you can further use the Options menu
adjoining a particular revision and select the revision to rollback to.
6.4.4. Deleting a Helm release
Procedure
- In the Topology view, right-click the Helm release and select Delete Helm Release.
- In the confirmation prompt, enter the name of the chart and click Delete.