Chapter 9. Examples
Use the following examples to understand how to launch a compute instance post-deployment with various network configurations.
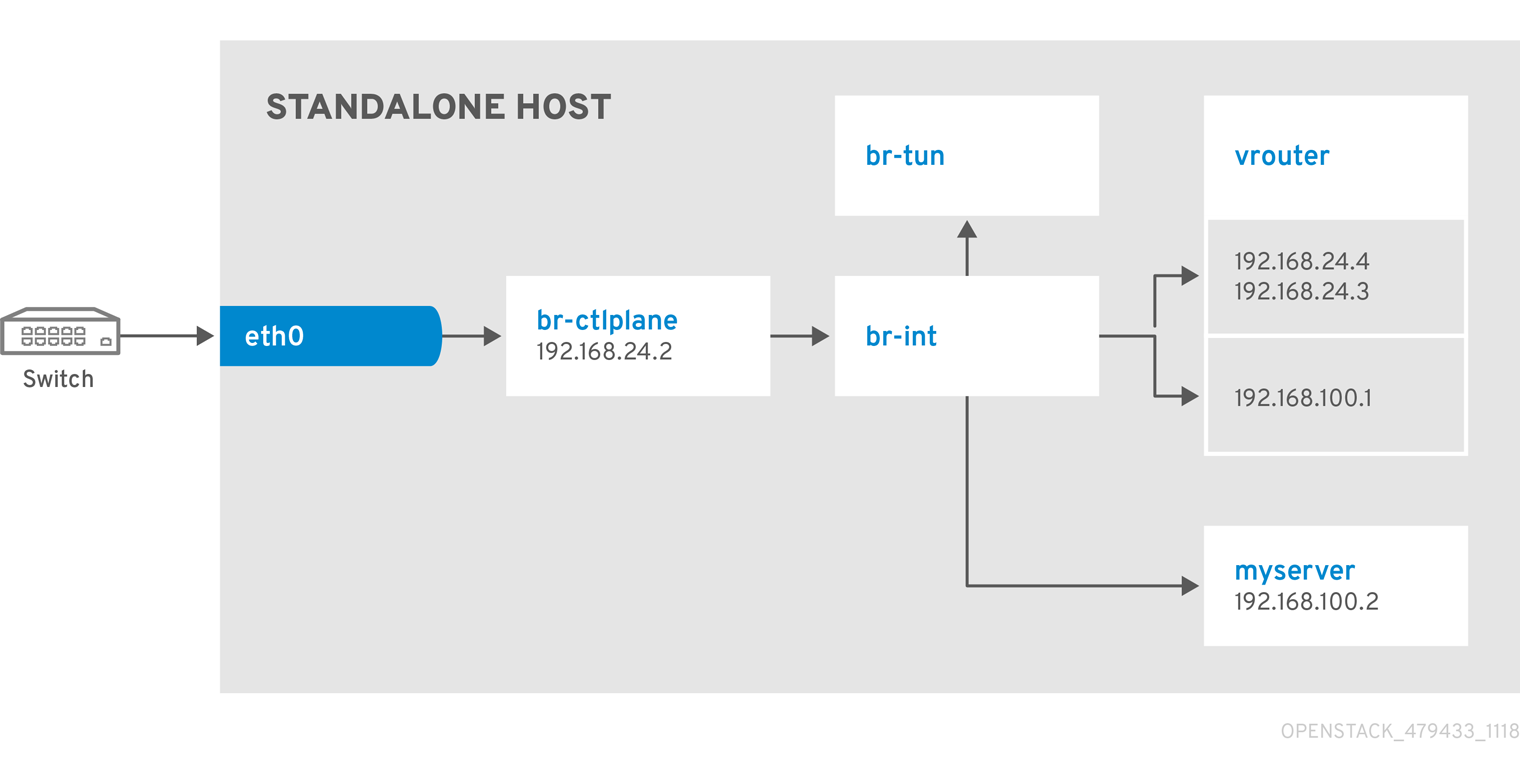
9.1. Example 1: Launching a Compute node with one NIC on the project and provider networks
Use this example to understand how to launch a Compute node with the private project network and the provider network after you deploy the all-in-one Red Hat OpenStack Platform environment. This example is based on a single NIC configuration and requires at least three IP addresses.
Prerequisites
To complete this example successfully, you must have the following IP addresses available in your environment:
- One IP address for the OpenStack services.
- One IP address for the virtual router to provide connectivity to the project network. This IP address is assigned automatically in this example.
- At least one IP address for floating IPs on the provider network.
Procedure
Create configuration helper variables:
# standalone with project networking and provider networking
export OS_CLOUD=standalone
export GATEWAY=192.168.24.1
export STANDALONE_HOST=192.168.24.2
export PUBLIC_NETWORK_CIDR=192.168.24.0/24
export PRIVATE_NETWORK_CIDR=192.168.100.0/24
export PUBLIC_NET_START=192.168.24.4
export PUBLIC_NET_END=192.168.24.5
export DNS_SERVER=1.1.1.1
Create a basic flavor:
$ openstack flavor create --ram 512 --disk 1 --vcpu 1 --public tiny
Download CirrOS and create an OpenStack image:
$ wget https://download.cirros-cloud.net/0.4.0/cirros-0.4.0-x86_64-disk.img
$ openstack image create cirros --container-format bare --disk-format qcow2 --public --file cirros-0.4.0-x86_64-disk.img
Configure SSH:
$ ssh-keygen
$ openstack keypair create --public-key ~/.ssh/id_rsa.pub default
Create a simple network security group:
$ openstack security group create basic
Configure the new network security group:
Enable SSH:
$ openstack security group rule create basic --protocol tcp --dst-port 22:22 --remote-ip 0.0.0.0/0
Enable ping:
$ openstack security group rule create --protocol icmp basic
Enable DNS:
$ openstack security group rule create --protocol udp --dst-port 53:53 basic
Create Neutron networks:
$ openstack network create --external --provider-physical-network datacentre --provider-network-type flat public
$ openstack network create --internal private
$ openstack subnet create public-net \
    --subnet-range $PUBLIC_NETWORK_CIDR \
    --no-dhcp \
    --gateway $GATEWAY \
    --allocation-pool start=$PUBLIC_NET_START,end=$PUBLIC_NET_END \
    --network public
$ openstack subnet create private-net \
    --subnet-range $PRIVATE_NETWORK_CIDR \
    --network private
Create a virtual router:
# NOTE: In this case an IP will be automatically assigned
# from the allocation pool for the subnet.
$ openstack router create vrouter
$ openstack router set vrouter --external-gateway public
$ openstack router add subnet vrouter private-net
Create a floating IP:
$ openstack floating ip create public
Launch the instance:
$ openstack server create --flavor tiny --image cirros --key-name default --network private --security-group basic myserver
Assign the floating IP:
$ openstack server add floating ip myserver <FLOATING_IP>
Replace
FLOATING_IPwith the address of the floating IP that you create in a previous step.Test SSH:
ssh cirros@<FLOATING_IP>
Replace
FLOATING_IPwith the address of the floating IP that you create in a previous step.
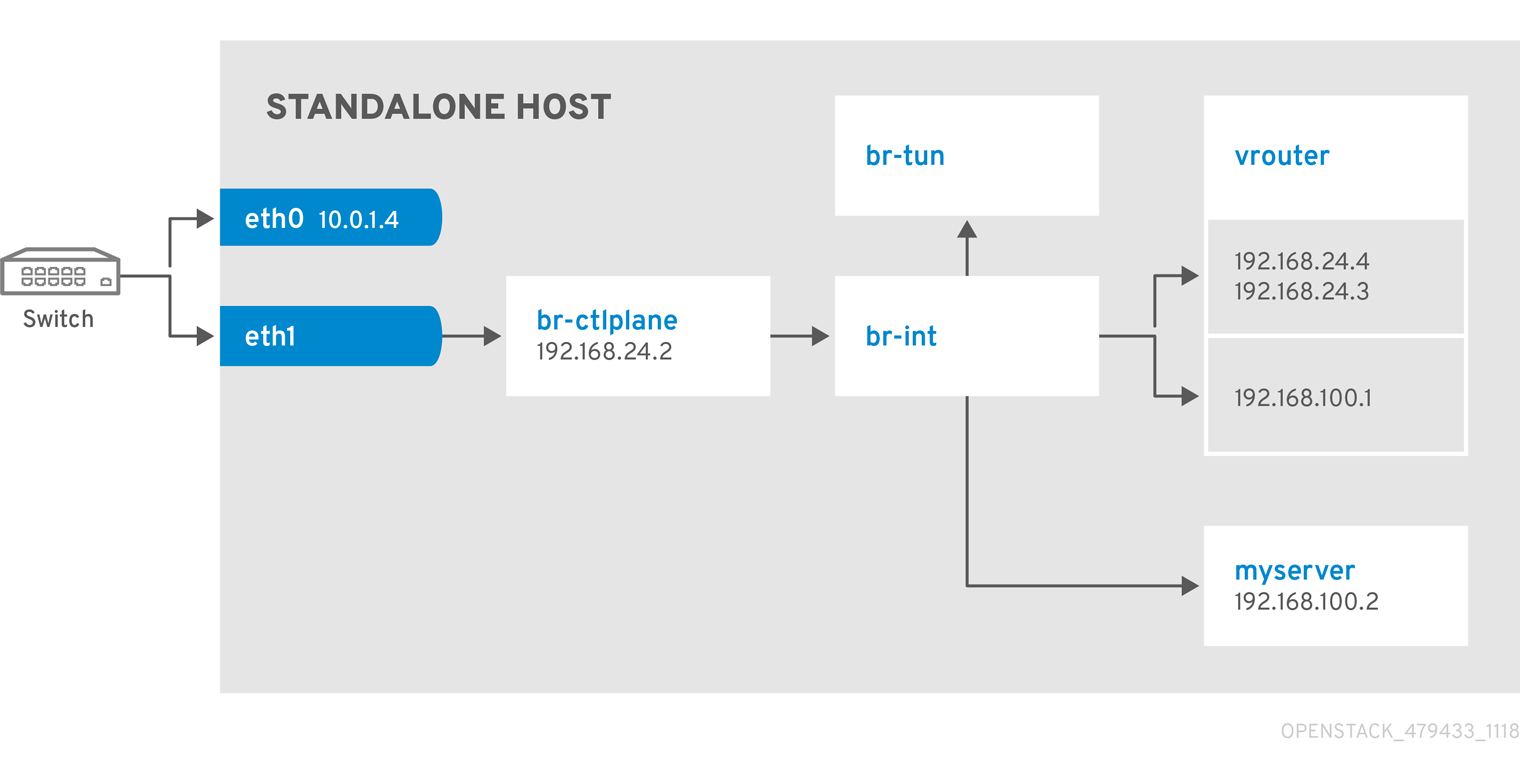
Network Architecture
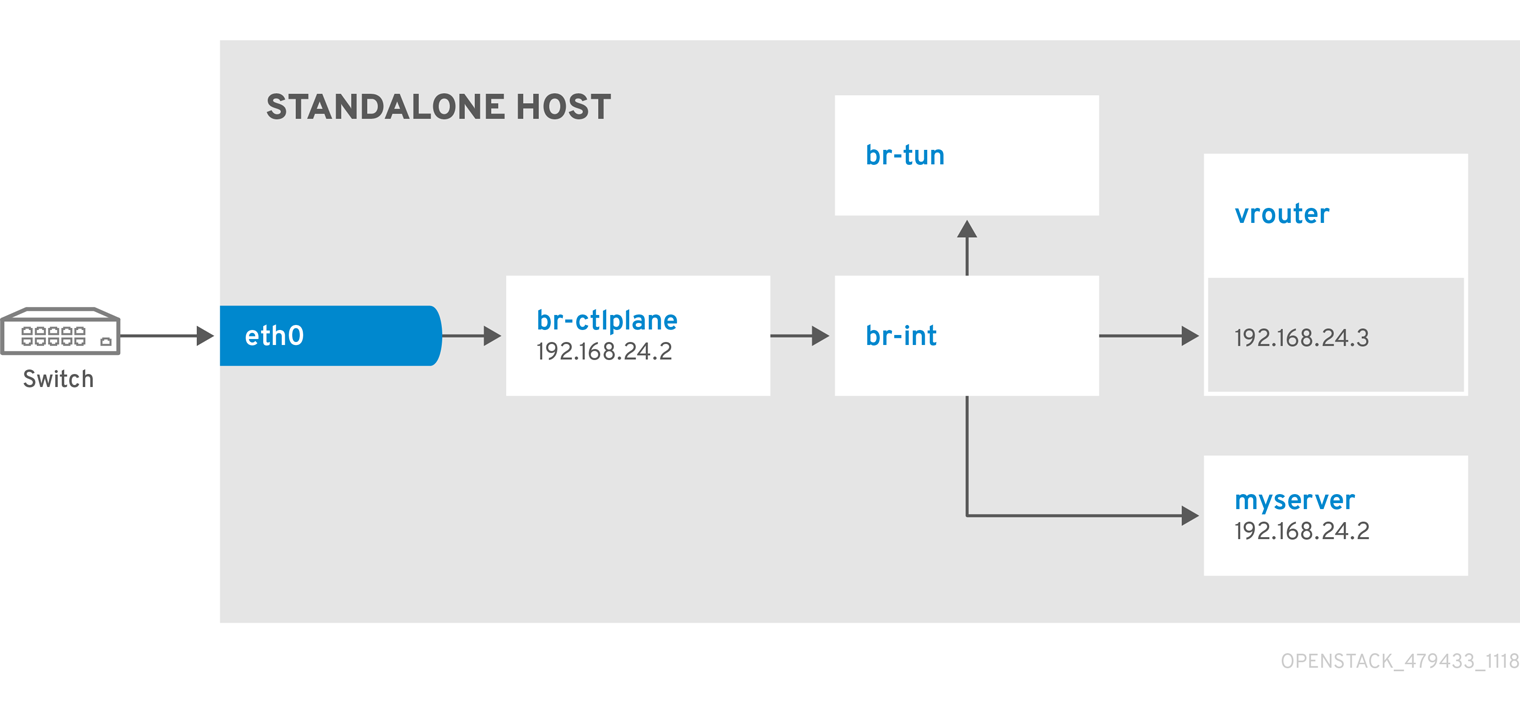
9.2. Example 2: Launching a Compute node with one NIC on the provider network
Use this example to understand how to launch a Compute node with the provider network after you deploy the all-in-one Red Hat OpenStack Platform environment. This example is based on a single NIC configuration and requires at least four IP addresses.
Prerequisites
To complete this example successfully, you must have the following IP addresses available in your environment:
- One IP address for the OpenStack services.
- One IP address for the virtual router to provide connectivity to the project network. This IP address is assigned automatically in this example.
- One IP address for DHCP on the provider network.
- At least one IP address for floating IPs on the provider network.
Procedure
Create configuration helper variables:
# standalone with project networking and provider networking
export OS_CLOUD=standalone
export GATEWAY=192.168.24.1
export STANDALONE_HOST=192.168.24.2
export VROUTER_IP=192.168.24.3
export PUBLIC_NETWORK_CIDR=192.168.24.0/24
export PUBLIC_NET_START=192.168.24.4
export PUBLIC_NET_END=192.168.24.5
export DNS_SERVER=1.1.1.1
Create a basic flavor:
$ openstack flavor create --ram 512 --disk 1 --vcpu 1 --public tiny
Download CirrOS and create an OpenStack image:
$ wget https://download.cirros-cloud.net/0.4.0/cirros-0.4.0-x86_64-disk.img
$ openstack image create cirros --container-format bare --disk-format qcow2 --public --file cirros-0.4.0-x86_64-disk.img
Configure SSH:
$ ssh-keygen
$ openstack keypair create --public-key ~/.ssh/id_rsa.pub default
Create a simple network security group:
$ openstack security group create basic
Configure the new network security group:
Enable SSH:
$ openstack security group rule create basic --protocol tcp --dst-port 22:22 --remote-ip 0.0.0.0/0
Enable ping:
$ openstack security group rule create --protocol icmp basic
Enable DNS:
$ openstack security group rule create --protocol udp --dst-port 53:53 basic
Create Neutron networks:
$ openstack network create --external --provider-physical-network datacentre --provider-network-type flat public
$ openstack network create --internal private
$ openstack subnet create public-net \
    --subnet-range $PUBLIC_NETWORK_CIDR \
    --gateway $GATEWAY \
    --allocation-pool start=$PUBLIC_NET_START,end=$PUBLIC_NET_END \
    --network public \
    --host-route destination=169.254.169.254/32,gateway=$VROUTER_IP \
    --host-route destination=0.0.0.0/0,gateway=$GATEWAY \
    --dns-nameserver $DNS_SERVER
Create a virtual router:
# NOTE: In this case an IP will be automatically assigned
# from the allocation pool for the subnet.
$ openstack router create vrouter
$ openstack port create --network public --fixed-ip subnet=public-net,ip-address=$VROUTER_IP vrouter-port
$ openstack router add port vrouter vrouter-port
Launch the instance:
$ openstack server create --flavor tiny --image cirros --key-name default --network public --security-group basic myserver
Test SSH:
ssh cirros@<VM_IP>
Replace
VM_IPwith the address of the virtual machine that you create in the previous step.
Network Architecture
9.3. Example 3: Launching a Compute node with two NICs on the project and provider networks
Use this example to understand how to launch a Compute node with the private project network and the provider network after you deploy the all-in-one Red Hat OpenStack Platform environment. This example is based on a dual NIC configuration and requires at least three IP addresses on the provider network.
Prerequisites
- One IP address for a gateway on the provider network.
- One IP address for OpenStack endpoints.
- One IP address for the virtual router to provide connectivity to the project network. This IP address is assigned automatically in this example.
- At least one IP address for floating IPs on the provider network.
Procedure
Create configuration helper variables:
# standalone with project networking and provider networking
export OS_CLOUD=standalone
export GATEWAY=192.168.24.1
export STANDALONE_HOST=192.168.0.2
export PUBLIC_NETWORK_CIDR=192.168.24.0/24
export PRIVATE_NETWORK_CIDR=192.168.100.0/24
export PUBLIC_NET_START=192.168.0.3
export PUBLIC_NET_END=192.168.24.254
export DNS_SERVER=1.1.1.1
Create a basic flavor:
$ openstack flavor create --ram 512 --disk 1 --vcpu 1 --public tiny
Download CirrOS and create an OpenStack image:
$ wget https://download.cirros-cloud.net/0.4.0/cirros-0.4.0-x86_64-disk.img
$ openstack image create cirros --container-format bare --disk-format qcow2 --public --file cirros-0.4.0-x86_64-disk.img
Configure SSH:
$ ssh-keygen
$ openstack keypair create --public-key ~/.ssh/id_rsa.pub default
Create a simple network security group:
$ openstack security group create basic
Configure the new network security group:
Enable SSH:
$ openstack security group rule create basic --protocol tcp --dst-port 22:22 --remote-ip 0.0.0.0/0
Enable ping:
$ openstack security group rule create --protocol icmp basic
Enable DNS:
$ openstack security group rule create --protocol udp --dst-port 53:53 basic
Create Neutron networks:
$ openstack network create --external --provider-physical-network datacentre --provider-network-type flat public
$ openstack network create --internal private
$ openstack subnet create public-net \
    --subnet-range $PUBLIC_NETWORK_CIDR \
    --no-dhcp \
    --gateway $GATEWAY \
    --allocation-pool start=$PUBLIC_NET_START,end=$PUBLIC_NET_END \
    --network public
$ openstack subnet create private-net \
    --subnet-range $PRIVATE_NETWORK_CIDR \
    --network private
Create a virtual router:
# NOTE: In this case an IP will be automatically assigned
# from the allocation pool for the subnet.
$ openstack router create vrouter
$ openstack router set vrouter --external-gateway public
$ openstack router add subnet vrouter private-net
Create a floating IP:
$ openstack floating ip create public
Launch the instance:
$ openstack server create --flavor tiny --image cirros --key-name default --network private --security-group basic myserver
Assign the floating IP:
$ openstack server add floating ip myserver <FLOATING_IP>
Replace
FLOATING_IPwith the address of the floating IP that you create in a previous step.Test SSH:
ssh cirros@<FLOATING_IP>
Replace
FLOATING_IPwith the address of the floating IP that you create in a previous step.
Network Architecture