
Red Hat Training
A Red Hat training course is available for Red Hat OpenStack Platform
Chapter 8. Troubleshoot Provider Networks
A deployment of virtual routers and switches, also known as software-defined networking (SDN), may seem to introduce complexity at first glance. However, the diagnostic process of troubleshooting network connectivity in OpenStack Networking is similar to that of physical networks. If using VLANs, the virtual infrastructure can be considered a trunked extension of the physical network, rather than a wholly separate environment.
8.1. Topics covered
- Basic ping testing
- Troubleshooting VLAN networks
- Troubleshooting from within tenant networks
8.2. Basic ping testing
The ping command is a useful tool for analyzing network connectivity problems. The results serve as a basic indicator of network connectivity, but might not entirely exclude all connectivity issues, such as a firewall blocking the actual application traffic. The ping command works by sending traffic to specified destinations, and then reports back whether the attempts were successful.
The ping command expects that ICMP traffic is allowed to traverse any intermediary firewalls.
Ping tests are most useful when run from the machine experiencing network issues, so it may be necessary to connect to the command line via the VNC management console if the machine seems to be completely offline.
For example, the ping test command below needs to validate multiple layers of network infrastructure in order to succeed; name resolution, IP routing, and network switching will all need to be functioning correctly:
$ ping www.redhat.com

PING e1890.b.akamaiedge.net (125.56.247.214) 56(84) bytes of data.
64 bytes from a125-56.247-214.deploy.akamaitechnologies.com (125.56.247.214): icmp_seq=1 ttl=54 time=13.4 ms
64 bytes from a125-56.247-214.deploy.akamaitechnologies.com (125.56.247.214): icmp_seq=2 ttl=54 time=13.5 ms
64 bytes from a125-56.247-214.deploy.akamaitechnologies.com (125.56.247.214): icmp_seq=3 ttl=54 time=13.4 ms
^C
You can terminate the ping command with Ctrl-c, after which a summary of the results is presented. Zero packet loss indicates that the connection was timeous and stable:
--- e1890.b.akamaiedge.net ping statistics ---
3 packets transmitted, 3 received, 0% packet loss, time 2003ms
rtt min/avg/max/mdev = 13.461/13.498/13.541/0.100 ms
In addition, the results of a ping test can be very revealing, depending on which destination gets tested. For example, in the following diagram VM1 is experiencing some form of connectivity issue. The possible destinations are numbered in blue, and the conclusions drawn from a successful or failed result are presented:
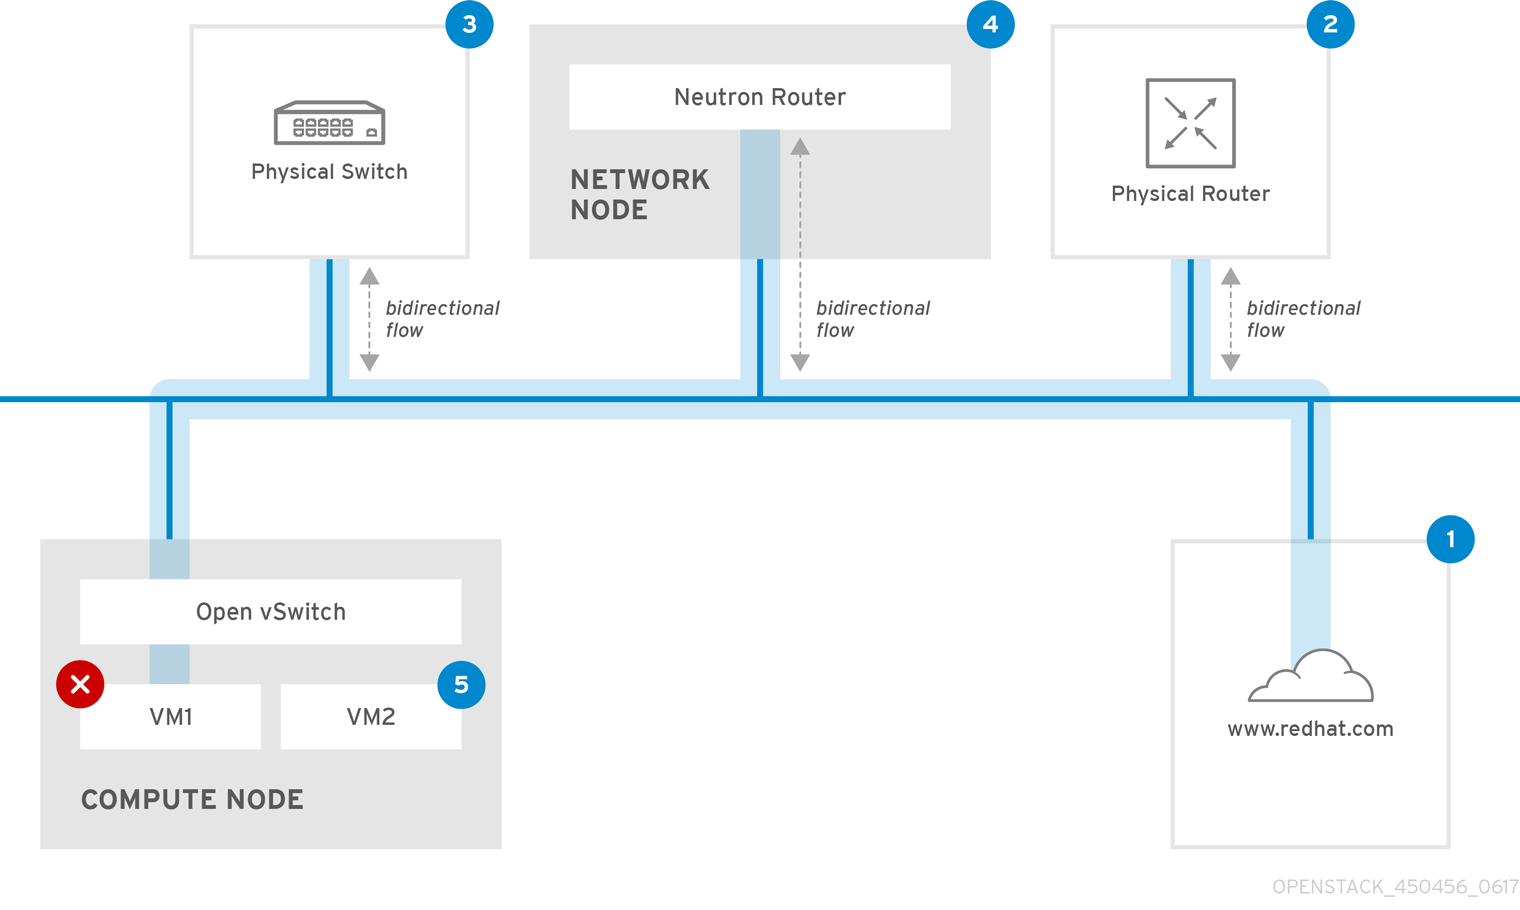
1. The internet - a common first step is to send a ping test to an internet location, such as www.redhat.com.
- Success: This test indicates that all the various network points in between are working as expected. This includes the virtual and physical network infrastructure.
- Failure: There are various ways in which a ping test to a distant internet location can fail. If other machines on your network are able to successfully ping the internet, that proves the internet connection is working, and it’s time to bring the troubleshooting closer to home.
2. Physical router - This is the router interface designated by the network administrator to direct traffic onward to external destinations.
- Success: Ping tests to the physical router can determine whether the local network and underlying switches are functioning. These packets don’t traverse the router, so they do not prove whether there is a routing issue present on the default gateway.
- Failure: This indicates that the problem lies between VM1 and the default gateway. The router/switches might be down, or you may be using an incorrect default gateway. Compare the configuration with that on another server that is known to be working. Try pinging another server on the local network.
3. Neutron router - This is the virtual SDN (Software-defined Networking) router used by Red Hat OpenStack Platform to direct the traffic of virtual machines.
- Success: Firewall is allowing ICMP traffic, the Networking node is online.
- Failure: Confirm whether ICMP traffic is permitted in the instance’s security group. Check that the Networking node is online, confirm that all the required services are running, and review the L3 agent log (/var/log/neutron/l3-agent.log).
4. Physical switch - The physical switch’s role is to manage traffic between nodes on the same physical network.
- Success: Traffic sent by a VM to the physical switch will need to pass through the virtual network infrastructure, indicating that this segment is functioning as expected.
- Failure: Is the physical switch port configured to trunk the required VLANs?
5. VM2 - Attempt to ping a VM on the same subnet, on the same Compute node.
- Success: The NIC driver and basic IP configuration on VM1 are functional.
- Failure: Validate the network configuration on VM1. Or, VM2’s firewall might simply be blocking ping traffic. In addition, confirm that the virtual switching is set up correctly, and review the Open vSwitch (or Linux Bridge) log files.
8.3. Troubleshooting VLAN networks
OpenStack Networking is able to trunk VLAN networks through to the SDN switches. Support for VLAN-tagged provider networks means that virtual instances are able to integrate with server subnets in the physical network.
To troubleshoot connectivity to a VLAN Provider network, attempt to ping the gateway IP designated when the network was created. For example, if you created the network with these commands:
# neutron net-create provider --provider:network_type=vlan --provider:physical_network=phy-eno1 --provider:segmentation_id=120
# neutron subnet-create "provider" --allocation-pool start=192.168.120.1,end=192.168.120.253 --disable-dhcp --gateway 192.168.120.254 192.168.120.0/24
Then you’ll want to attempt to ping the defined gateway IP of 192.168.120.254
If that fails, confirm that you have network flow for the associated VLAN (as defined during network creation). In the example above, OpenStack Networking is configured to trunk VLAN 120 to the provider network. This option is set using the parameter --provider:segmentation_id=120.
Confirm the VLAN flow on the bridge interface, in this case it’s named br-ex:
# ovs-ofctl dump-flows br-ex

 NXST_FLOW reply (xid=0x4):
  cookie=0x0, duration=987.521s, table=0, n_packets=67897, n_bytes=14065247, idle_age=0, priority=1 actions=NORMAL
  cookie=0x0, duration=986.979s, table=0, n_packets=8, n_bytes=648, idle_age=977, priority=2,in_port=12 actions=drop
8.3.1. Review the VLAN configuration and log files
- OpenStack Networking (neutron) agents - Use the neutron command to verify that all agents are up and registered with the correct names:
# neutron agent-list
+--------------------------------------+--------------------+-----------------------+-------+----------------+
| id                                   | agent_type         | host                  | alive | admin_state_up |
+--------------------------------------+--------------------+-----------------------+-------+----------------+
| a08397a8-6600-437d-9013-b2c5b3730c0c | Metadata agent     | rhelosp.example.com   | :-)   | True           |
| a5153cd2-5881-4fc8-b0ad-be0c97734e6a | L3 agent           | rhelosp.example.com   | :-)   | True           |
| b54f0be7-c555-43da-ad19-5593a075ddf0 | DHCP agent         | rhelosp.example.com   | :-)   | True           |
| d2be3cb0-4010-4458-b459-c5eb0d4d354b | Open vSwitch agent | rhelosp.example.com   | :-)   | True           |
+--------------------------------------+--------------------+-----------------------+-------+----------------+
- Review /var/log/neutron/openvswitch-agent.log - this log should provide confirmation that the creation process used the ovs-ofctl command to configure VLAN trunking.
-
Validate external_network_bridge in the /etc/neutron/l3_agent.ini file. A hardcoded value here won’t allow you to use a provider network via the L3-agent, and won’t create the necessary flows. As a result, this value should look like this:
external_network_bridge = "" - Check network_vlan_ranges in the /etc/neutron/plugin.ini file. You don’t need to specify the numeric VLAN ID if it’s a provider network. The only time you need to specify the ID(s) here is if you’re using VLAN isolated tenant networks.
-
Validate the OVS agent configuration file bridge mappings, confirm that the bridge mapped to
phy-eno1exists and is properly connected toeno1.
8.4. Troubleshooting from within tenant networks
In OpenStack Networking, all tenant traffic is contained within network namespaces. This allows tenants to configure networks without interfering with each other. For example, network namespaces allow different tenants to have the same subnet range of 192.168.1.1/24 without resulting in any interference between them.
To begin troubleshooting a tenant network, first determine which network namespace contains the network:
1. List all the tenant networks using the neutron command:
# neutron net-list
+--------------------------------------+-------------+-------------------------------------------------------+
| id                                   | name        | subnets                                               |
+--------------------------------------+-------------+-------------------------------------------------------+
| 9cb32fe0-d7fb-432c-b116-f483c6497b08 | web-servers | 453d6769-fcde-4796-a205-66ee01680bba 192.168.212.0/24 |
| a0cc8cdd-575f-4788-a3e3-5df8c6d0dd81 | private     | c1e58160-707f-44a7-bf94-8694f29e74d3 10.0.0.0/24      |
| baadd774-87e9-4e97-a055-326bb422b29b | private     | 340c58e1-7fe7-4cf2-96a7-96a0a4ff3231 192.168.200.0/24 |
| 24ba3a36-5645-4f46-be47-f6af2a7d8af2 | public      | 35f3d2cb-6e4b-4527-a932-952a395c4bb3 172.24.4.224/28  |
+--------------------------------------+-------------+-------------------------------------------------------+
In this example, we’ll be examining the web-servers network. Make a note of the id value in the web-server row (in this case, its 9cb32fe0-d7fb-432c-b116-f483c6497b08). This value is appended to the network namespace, which will help you identify in the next step.
2. List all the network namespaces using the ip command:
# ip netns list
qdhcp-9cb32fe0-d7fb-432c-b116-f483c6497b08
qrouter-31680a1c-9b3e-4906-bd69-cb39ed5faa01
qrouter-62ed467e-abae-4ab4-87f4-13a9937fbd6b
qdhcp-a0cc8cdd-575f-4788-a3e3-5df8c6d0dd81
qrouter-e9281608-52a6-4576-86a6-92955df46f56
In the result there is a namespace that matches the web-server network id. In this example it’s presented as qdhcp-9cb32fe0-d7fb-432c-b116-f483c6497b08.
3. Examine the configuration of the web-servers network by running commands within the namespace. This is done by prefixing the troubleshooting commands with ip netns exec (namespace). For example:
a) View the routing table of the web-servers network:
# ip netns exec qrouter-62ed467e-abae-4ab4-87f4-13a9937fbd6b route -n

Kernel IP routing table
Destination     Gateway         Genmask         Flags Metric Ref    Use Iface
0.0.0.0         172.24.4.225    0.0.0.0         UG    0      0        0 qg-8d128f89-87
172.24.4.224    0.0.0.0         255.255.255.240 U     0      0        0 qg-8d128f89-87
192.168.200.0   0.0.0.0         255.255.255.0   U     0      0        0 qr-8efd6357-96
b) View the routing table of the web-servers network:
# ip netns exec qrouter-62ed467e-abae-4ab4-87f4-13a9937fbd6b route -n

Kernel IP routing table
Destination     Gateway         Genmask         Flags Metric Ref    Use Iface
0.0.0.0         172.24.4.225    0.0.0.0         UG    0      0        0 qg-8d128f89-87
172.24.4.224    0.0.0.0         255.255.255.240 U     0      0        0 qg-8d128f89-87
192.168.200.0   0.0.0.0         255.255.255.0   U     0      0        0 qr-8efd6357-96
8.4.1. Perform advanced ICMP testing within the namespace
1. Capture ICMP traffic using the tcpdump command.
# ip netns exec qrouter-62ed467e-abae-4ab4-87f4-13a9937fbd6b tcpdump -qnntpi any icmp
There may not be any output until you perform the next step:
2. In a separate command line window, perform a ping test to an external network:
# ip netns exec qrouter-62ed467e-abae-4ab4-87f4-13a9937fbd6b ping www.redhat.com
3. In the terminal running the tcpdump session, you will observe detailed results of the ping test.
tcpdump: listening on any, link-type LINUX_SLL (Linux cooked), capture size 65535 bytes
IP (tos 0xc0, ttl 64, id 55447, offset 0, flags [none], proto ICMP (1), length 88)
    172.24.4.228 > 172.24.4.228: ICMP host 192.168.200.20 unreachable, length 68
	IP (tos 0x0, ttl 64, id 22976, offset 0, flags [DF], proto UDP (17), length 60)
172.24.4.228.40278 > 192.168.200.21: [bad udp cksum 0xfa7b -> 0xe235!] UDP, length 32When performing a tcpdump analysis of traffic, you might observe the responding packets heading to the router interface rather than the instance. This is expected behaviour, as the qrouter performs DNAT on the return packets.