
Red Hat Training
A Red Hat training course is available for Red Hat OpenStack Platform
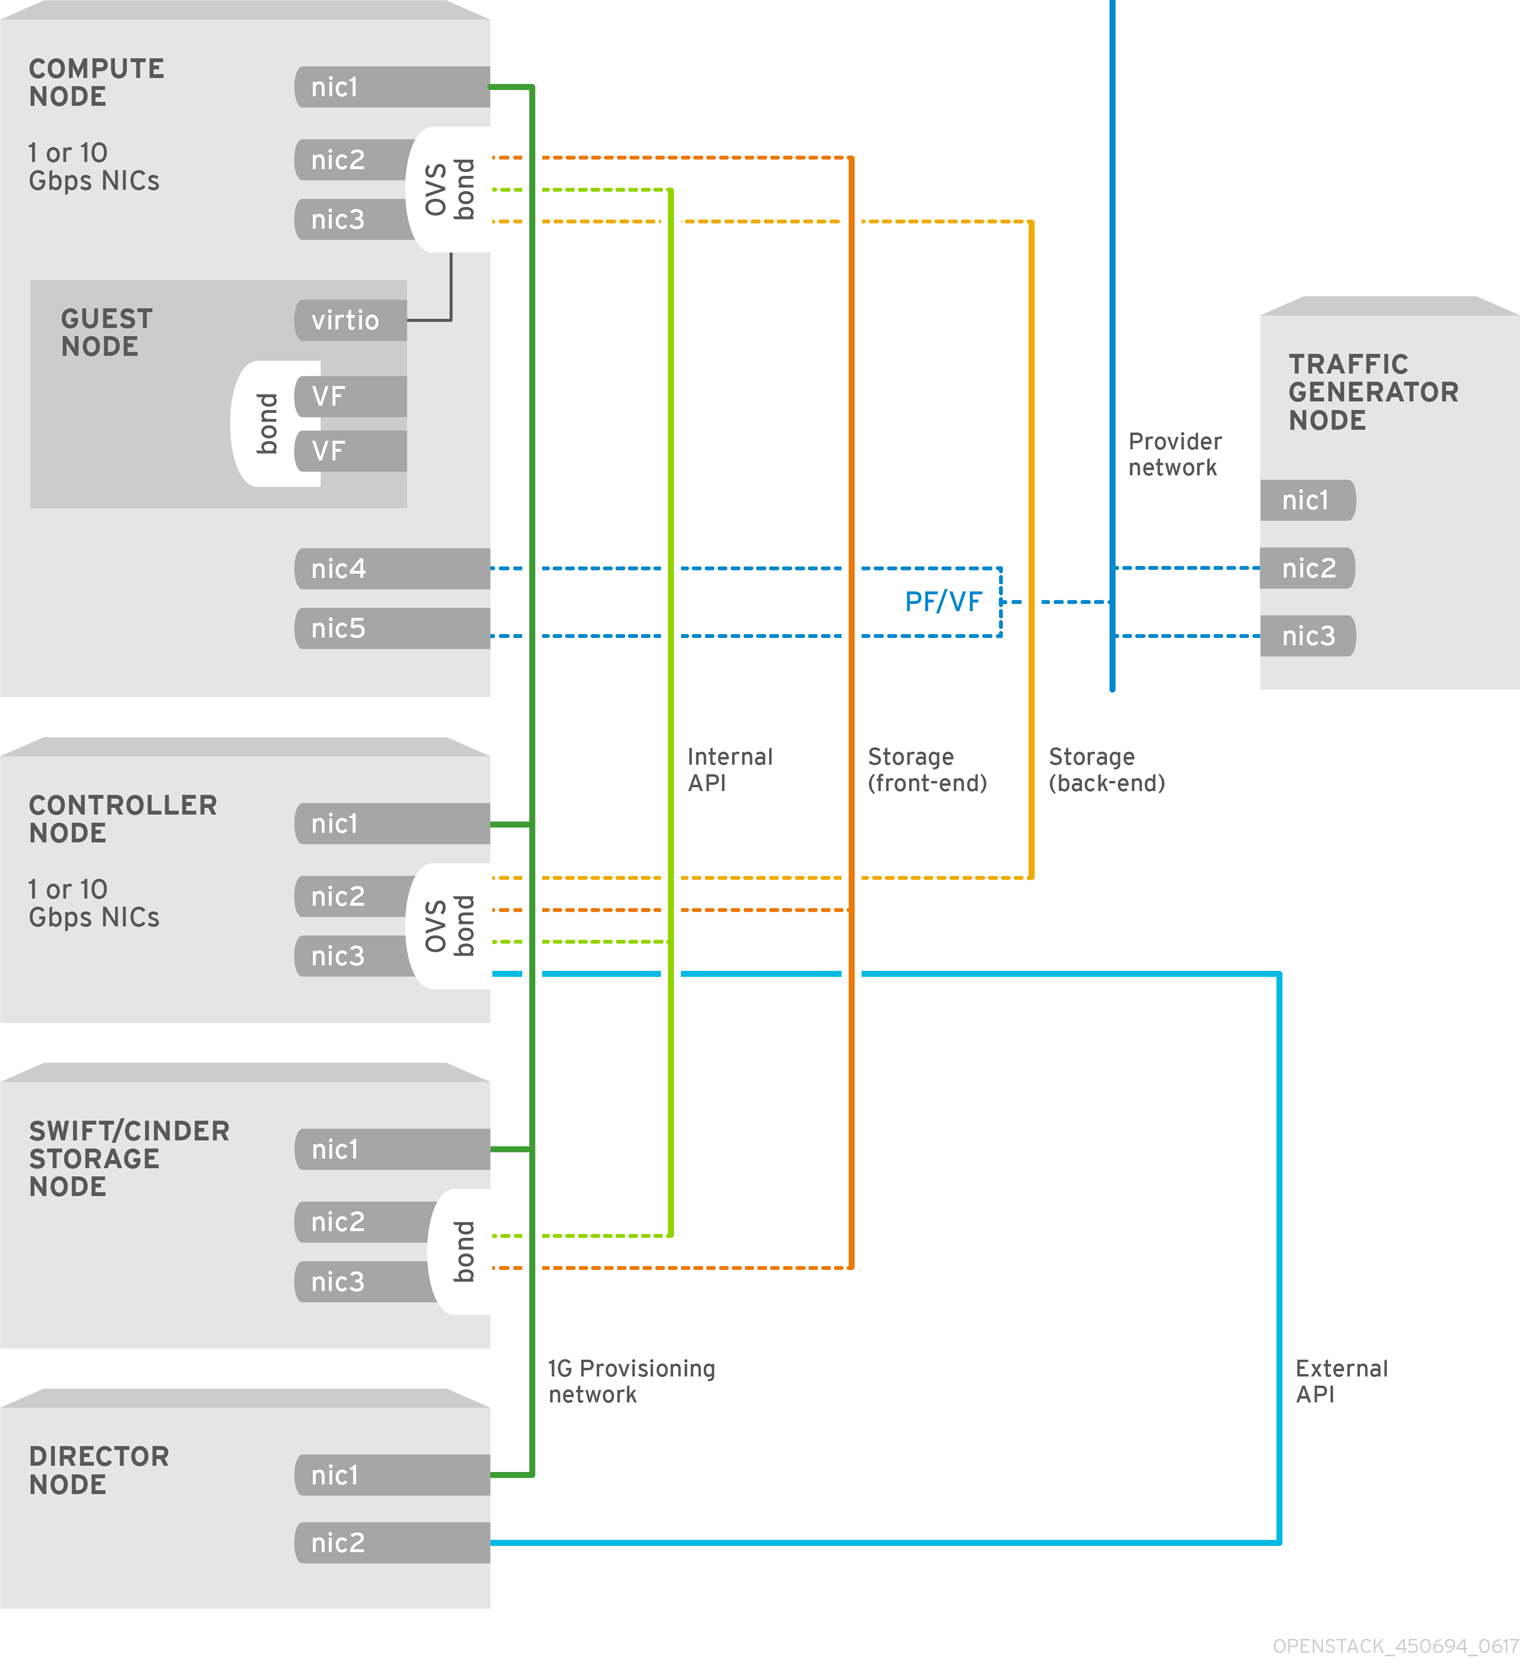
Chapter 3. Configure SR-IOV Support for Virtual Networking
This chapter covers the configuration of Single Root Input/Output Virtualization (SR-IOV) within the Red Hat OpenStack Platform 10 environment using the director.
This guide provides examples for CPU assignments, memory allocation, and NIC configurations that may vary from your topology and use case. See the Network Functions Virtualization Product Guide and the Network Functions Virtualization Planning Guide to understand the hardware and configuration options.
Do not edit or change isolated_cores or other values in etc/tuned/cpu-partitioning-variables.conf that are modified by these director heat templates.
In the following procedure, you need to update the network-environment.yaml file to include parameters for kernel arguments, SR-IOV driver, PCI passthrough and so on. You must also update the compute.yaml file to include the SR-IOV interface parameters, and run the overcloud_deploy.sh script to deploy the overcloud with the SR-IOV parameters.
3.1. Configure Two-port SR-IOV with VLAN Tunnelling
This section describes the YAML files you need to modify to configure SR-IOV with two ports that use VLAN tunnelling for your OpenStack environment.
3.1.1. Modify first-boot.yaml
If you have included the following lines in the first-boot.yaml file in a previous deployment, remove these lines for Red Hat OpenStack Platform 10 with Open vSwitch 2.9.
ovs_service_path="/usr/lib/systemd/system/ovs-vswitchd.service"
grep -q "RuntimeDirectoryMode=.*" $ovs_service_path

if [ "$?" -eq 0 ]; then
    sed -i 's/RuntimeDirectoryMode=.*/RuntimeDirectoryMode=0775/' $ovs_service_path
else
    echo "RuntimeDirectoryMode=0775" >> $ovs_service_path
fi

grep -Fxq "Group=qemu" $ovs_service_path

if [ ! "$?" -eq 0 ]; then
    echo "Group=qemu" >> $ovs_service_path
fi

grep -Fxq "UMask=0002" $ovs_service_path

if [ ! "$?" -eq 0 ]; then
    echo "UMask=0002" >> $ovs_service_path
fi

ovs_ctl_path='/usr/share/openvswitch/scripts/ovs-ctl'
grep -q "umask 0002 \&\& start_daemon \"\$OVS_VSWITCHD_PRIORITY\"" $ovs_ctl_path

if [ ! "$?" -eq 0 ]; then
    sed -i 's/start_daemon \"\$OVS_VSWITCHD_PRIORITY.*/umask 0002 \&\& start_daemon \"$OVS_VSWITCHD_PRIORITY\" \"$OVS_VSWITCHD_WRAPPER\" \"$@\"/' $ovs_ctl_path
fi
Set the
tunedconfiguration to enable CPU affinity.install_tuned: type: OS::Heat::SoftwareConfig properties: config: str_replace: template: | #!/bin/bash FORMAT=$COMPUTE_HOSTNAME_FORMAT if [[ -z $FORMAT ]] ; then FORMAT="compute" ; else # Assumption: only %index% and %stackname% are the variables in Host name format FORMAT=$(echo $FORMAT | sed 's/\%index\%//g' | sed 's/\%stackname\%//g') ; fi if [[ $(hostname) == *$FORMAT* ]] ; then # Install the tuned package yum install -y tuned-profiles-cpu-partitioning tuned_conf_path="/etc/tuned/cpu-partitioning-variables.conf" if [ -n "$TUNED_CORES" ]; then grep -q "^isolated_cores" $tuned_conf_path if [ "$?" -eq 0 ]; then sed -i 's/^isolated_cores=.*/isolated_cores=$TUNED_CORES/' $tuned_conf_path else echo "isolated_cores=$TUNED_CORES" >> $tuned_conf_path fi tuned-adm profile cpu-partitioning fi fi params: $COMPUTE_HOSTNAME_FORMAT: {get_param: ComputeHostnameFormat} $TUNED_CORES: {get_param: HostIsolatedCoreList}Set the Kernel arguments:
  compute_kernel_args:
    type: OS::Heat::SoftwareConfig
    properties:
      config:
        str_replace:
          template: |
            #!/bin/bash
            set -x
            FORMAT=$COMPUTE_HOSTNAME_FORMAT
            if [[ -z $FORMAT ]] ; then
              FORMAT="compute" ;
            else
              # Assumption: only %index% and %stackname% are the variables in Host name format
              FORMAT=$(echo $FORMAT | sed  's/\%index\%//g' | sed 's/\%stackname\%//g') ;
            fi
            if [[ $(hostname) == *$FORMAT* ]] ; then
              sed 's/^\(GRUB_CMDLINE_LINUX=".*\)"/\1 $KERNEL_ARGS"/g' -i /etc/default/grub ;
              grub2-mkconfig -o /etc/grub2.cfg

              sleep 5
              reboot
            fi
          params:
            $KERNEL_ARGS: {get_param: ComputeKernelArgs}
            $COMPUTE_HOSTNAME_FORMAT: {get_param: ComputeHostnameFormat}
3.1.2. Modify network-environment.yaml
Add
first-boot.yamlunderresource_registryto set the CPU tuning.resource_registry: # Specify the relative/absolute path to the config files you want to use for override the default. OS::TripleO::Compute::Net::SoftwareConfig: nic-configs/compute.yaml OS::TripleO::Controller::Net::SoftwareConfig: nic-configs/controller.yaml # First boot and Kernel Args OS::TripleO::NodeUserData: first-boot.yamlUnder
parameter_defaults, disable the tunnel type (set the value to""), and set network type tovlan.NeutronTunnelTypes: '' NeutronNetworkType: 'vlan'
Under
parameter_defaults, map the Open vSwitch physical network to the bridge.NeutronBridgeMappings: 'tenant:br-link0'
Under
parameter_defaults, set the OpenStack Networking ML2 and Open vSwitch VLAN mapping range.NeutronNetworkVLANRanges: 'tenant:22:22,tenant:25:25'
Under
parameter_defaults, set the SR-IOV configuration parameters.Enable the SR-IOV mechanism driver (
sriovnicswitch).NeutronMechanismDrivers: "openvswitch,sriovnicswitch"
Configure the Compute
pci_passthrough_whitelistparameter, and setdevnamefor the SR-IOV interface. The whitelist sets the PCI devices available to instances.NovaPCIPassthrough: - devname: "p7p1" physical_network: "tenant" - devname: "p7p2" physical_network: "tenant"Specify the physical network and SR-IOV interface in the format -
PHYSICAL_NETWORK:PHYSICAL DEVICE.All physical networks listed in the
network_vlan_rangeson the server should have mappings to the appropriate interfaces on each agent.NeutronPhysicalDevMappings: "tenant:p7p1,tenant:p7p2"
Provide the number of Virtual Functions (VFs) to be reserved for each SR-IOV interface.
Red Hat OpenStack Platform supports the number of VFs supported by the NIC vendor. See Deployment Limits for Red Hat OpenStack Platform for other related details. This example reserves 5 VFs for each of the SR-IOV interfaces:
NeutronSriovNumVFs: "p7p1:5,p7p2:5"
NoteChanging the
NeutronSriovNumVFsparameter within a running environment is known to cause a permanent outage for all running instances which have an SR-IOV port on that PF. Unless you hard reboot these instances, the SR-IOV PCI device will not be visible to the instance.
Under
parameter_defaults, reserve the RAM for the host processes.NovaReservedHostMemory: 4096
Under
parameter_defaults, set a comma-separated list or range of physical CPU cores to reserve for virtual machine processes.NovaVcpuPinSet: "1-19,21-39"
Under
parameter_defaults, list the the applicable filters.Nova scheduler applies these filters in the order they are listed. List the most restrictive filters first to make the filtering process for the nodes more efficient.
  NovaSchedulerDefaultFilters:
    - "RetryFilter"
    - "AvailabilityZoneFilter"
    - "RamFilter"
    - "ComputeFilter"
    - "ComputeCapabilitiesFilter"
    - "ImagePropertiesFilter"
    - "ServerGroupAntiAffinityFilter"
    - "ServerGroupAffinityFilter"
    - "PciPassthroughFilter"
    - "NUMATopologyFilter"
    - "AggregateInstanceExtraSpecsFilter"
Under
parameter_defaults, define theComputeKernelArgsparameters to be included in the defaultgrubfile at first boot.ComputeKernelArgs: "default_hugepagesz=1GB hugepagesz=1G hugepages=12 intel_iommu=on iommu=pt"
NoteYou need to add
hw:mem_page_size=1GBto the flavor you associate with the DPDK instance. If you do not do this, the instance does not get a DHCP allocation.Under
parameter_defaults, set a list or range of physical CPU cores to be tuned.The given argument is appended to the tuned
cpu-partitioningprofile.HostIsolatedCoreList: "1-19,21-39"
3.1.3. Modify controller.yaml
Create the Linux bond for an isolated network.
  -
    type: linux_bond
    name: bond_api
    bonding_options: "mode=active-backup"
    use_dhcp: false
    dns_servers: {get_param: DnsServers}
    members:
      -
        type: interface
        name: nic3
        primary: true
      -
        type: interface
        name: nic4
Assign VLANs to this Linux bond.
  -
    type: vlan
    vlan_id: {get_param: InternalApiNetworkVlanID}
    device: bond_api
    addresses:
      -
        ip_netmask: {get_param: InternalApiIpSubnet}
  -
    type: vlan
    vlan_id: {get_param: TenantNetworkVlanID}
    device: bond_api
    addresses:
      -
        ip_netmask: {get_param: TenantIpSubnet}
  -
    type: vlan
    vlan_id: {get_param: StorageNetworkVlanID}
    device: bond_api
    addresses:
      -
        ip_netmask: {get_param: StorageIpSubnet}
  -
    type: vlan
    vlan_id: {get_param: StorageMgmtNetworkVlanID}
    device: bond_api
    addresses:
      -
        ip_netmask: {get_param: StorageMgmtIpSubnet}
  -
    type: vlan
    vlan_id: {get_param: ExternalNetworkVlanID}
    device: bond_api
    addresses:
    -
      ip_netmask: {get_param: ExternalIpSubnet}
    routes:
      -
        default: true
        next_hop: {get_param: ExternalInterfaceDefaultRoute}
Create the OVS bridge for access to neutron-dhcp-agent and neutron-metadata-agent services.
  -
    type: ovs_bridge
    name: br-link0
    use_dhcp: false
    mtu: 9000
    members:
      -
        type: ovs_bond
        name: bond0
        use_dhcp: true
        members:
          -
            type: interface
            name: nic7
            mtu: 9000
          -
            type: interface
            name: nic8
            mtu: 9000
3.1.4. Modify compute.yaml
Create the Linux bond for an isolated network.
  -
    type: linux_bond
    name: bond_api
    bonding_options: "mode=active-backup"
    use_dhcp: false
    dns_servers: {get_param: DnsServers}
    members:
      -
        type: interface
        name: nic3
        # force the MAC address of the bridge to this interface
        primary: true
      -
        type: interface
        name: nic4
Assign VLANs to this Linux bond.
  -
    type: vlan
    vlan_id: {get_param: InternalApiNetworkVlanID}
    device: bond_api
    addresses:
      -
        ip_netmask: {get_param: InternalApiIpSubnet}
  -
    type: vlan
    vlan_id: {get_param: TenantNetworkVlanID}
    device: bond_api
    addresses:
      -
        ip_netmask: {get_param: TenantIpSubnet}
  -
    type: vlan
    vlan_id: {get_param: StorageNetworkVlanID}
    device: bond_api
    addresses:
      -
        ip_netmask: {get_param: StorageIpSubnet}
Set the two SR-IOV interfaces by adding the following to the
compute.yamlfile.- type: interface name: p7p1 mtu: 9000 use_dhcp: false defroute: false nm_controlled: true hotplug: true - type: interface name: p7p2 mtu: 9000 use_dhcp: false defroute: false nm_controlled: true hotplug: true
3.1.5. Run the overcloud_deploy.sh Script
The following example defines the openstack overcloud deploy command for the VLAN environment.
openstack overcloud deploy \
--templates \
-e /usr/share/openstack-tripleo-heat-templates/environments/network-isolation.yaml \
-e /usr/share/openstack-tripleo-heat-templates/environments/neutron-sriov.yaml \
-e /home/stack/ospd-10-vlan-sriov-two-ports-ctlplane-bonding/network-environment.yaml \
--log-file overcloud_install.log &> overcloud_install.log
-
/usr/share/openstack-tripleo-heat-templates/environments/neutron-sriov.yamlis the location of the defaultneutron-sriov.yamlfile, which enables the SR-IOV parameters in the Compute node. -
/home/stack/<relative-directory>/network-environment.yamlis the path for thenetwork-environment.yamlfile. The defaultneutron-sriov.yamlvalues can be overridden innetwork-environment.yamlfile.
3.2. Create a Flavor and Deploy an Instance for SR-IOV
After you have completed configuring SR-IOV for your Red Hat OpenStack Platform deployment with NFV, you need to create a flavor and deploy an instance by performing the following steps.
Create an aggregate group and add a host to it for SR-IOV. Define metadata, for example,
"aggregate_instance_extra_specs:sriov"="true", that matches flavor metadata.# openstack aggregate create sriov_group # openstack aggregate set --property \ "aggregate_instance_extra_specs:sriov"="true" sriov_group # openstack aggregate add host sriov compute-sriov-0.localdomain
Create a flavor.
# openstack flavor create <flavor> --ram <MB> --disk <GB> --vcpus <#>
Set additional flavor properties. Note that the defined metadata,
"aggregate_instance_extra_specs:sriov"="true", matches the defined metadata on the SR-IOV aggregate.# openstack flavor set --property "aggregate_instance_extra_specs:sriov"="true" \ --property hw:cpu_policy=dedicated \ --property hw:mem_page_size=large <flavor>
Create the network.
# openstack network create net1 --provider-physical-network tenant --provider-network-type vlan --provider-segment <VLAN-ID>
Create the subnet.
# openstack subnet create subnet1 --network net1 --subnet-range 192.0.2.0/24 --dhcp
Create the port.
Use
vnic-typedirect to create an SR-IOV VF port.# openstack port create --network net1 --vnic-type direct sriov_port
Use
vnic-typedirect-physical to create an SR-IOV PF port.# openstack port create --network net1 --vnic-type direct-physical sriov_port
Deploy an instance.
# openstack server create --flavor <flavor> --image <glance_image> --nic port-id=sriov_port <name>
You have now deployed an instance for the SR-IOV with NFV use case.