
Securing OpenShift Pipelines
Security features of OpenShift Pipelines
Abstract
Chapter 1. Using Tekton Chains for OpenShift Pipelines supply chain security
Tekton Chains is a Kubernetes Custom Resource Definition (CRD) controller. You can use it to manage the supply chain security of the tasks and pipelines created using Red Hat OpenShift Pipelines.
By default, Tekton Chains observes all task run executions in your OpenShift Container Platform cluster. When the task runs complete, Tekton Chains takes a snapshot of the task runs. It then converts the snapshot to one or more standard payload formats, and finally signs and stores all artifacts.
To capture information about task runs, Tekton Chains uses Result objects. When the objects are unavailable, Tekton Chains the URLs and qualified digests of the OCI images.
1.1. Key features
-
You can sign task runs, task run results, and OCI registry images with cryptographic keys that are generated by tools such as
cosignandskopeo. -
You can use attestation formats such as
in-toto. - You can securely store signatures and signed artifacts using OCI repository as a storage backend.
1.2. Configuring Tekton Chains
The Red Hat OpenShift Pipelines Operator installs Tekton Chains by default. You can configure Tekton Chains by modifying the TektonConfig custom resource; the Operator automatically applies the changes that you make in this custom resource.
To edit the custom resource, use the following command:
$ oc edit TektonConfig config
The custom resource includes a chain: array. You can add any supported configuration parameters to this array, as shown in the following example:
apiVersion: operator.tekton.dev/v1alpha1
kind: TektonConfig
metadata:
  name: config
spec:
  addon: {}
  chain:
    artifacts.taskrun.format: tekton
  config: {}
1.2.1. Supported parameters for Tekton Chains configuration
Cluster administrators can use various supported parameter keys and values to configure specifications about task runs, OCI images, and storage.
1.2.1.1. Supported parameters for task run artifacts
Table 1.1. Chains configuration: Supported parameters for task run artifacts
| Key | Description | Supported values | Default value |
|---|---|---|---|
|
| The format for storing task run payloads. |
|
|
|
|
The storage backend for task run signatures. You can specify multiple backends as a comma-separated list, such as |
|
|
|
| The signature backend for signing task run payloads. |
|
|
slsa/v1 is an alias of in-toto for backwards compatibility.
1.2.1.2. Supported parameters for pipeline run artifacts
Table 1.2. Chains configuration: Supported parameters for pipeline run artifacts
| Parameter | Description | Supported values | Default value |
|---|---|---|---|
|
| The format for storing pipeline run payloads. |
|
|
|
|
The storage backend for storing pipeline run signatures. You can specify multiple backends as a comma-separated list, such as |
|
|
|
| The signature backend for signing pipeline run payloads. |
|
|
-
slsa/v1is an alias ofin-totofor backwards compatibility. -
For the
grafeasstorage backend, only Container Analysis is supported. You can not configure thegrafeasserver address in the current version of Tekton Chains.
1.2.1.3. Supported parameters for OCI artifacts
Table 1.3. Chains configuration: Supported parameters for OCI artifacts
| Parameter | Description | Supported values | Default value |
|---|---|---|---|
|
| The format for storing OCI payloads. |
|
|
|
|
The storage backend for storing OCI signatures. You can specify multiple backends as a comma-separated list, such as |
|
|
|
| The signature backend for signing OCI payloads. |
|
|
1.2.1.4. Supported parameters for KMS signers
Table 1.4. Chains configuration: Supported parameters for KMS signers
| Parameter | Description | Supported values | Default value |
|---|---|---|---|
|
|
The URI reference to a KMS service to use in |
Supported schemes: |
1.2.1.5. Supported parameters for storage
Table 1.5. Chains configuration: Supported parameters for storage
| Parameter | Description | Supported values | Default value |
|---|---|---|---|
|
| The GCS bucket for storage | ||
|
| The OCI repository for storing OCI signatures and attestation. |
If you configure one of the artifact storage backends to | |
|
| The builder ID to set for in-toto attestations |
|
If you enable the docdb storage method is for any artifacts, configure docstore storage options. For more information about the go-cloud docstore URI format, see the docstore package documentation. Red Hat OpenShift Pipelines supports the following docstore services:
-
firestore -
dynamodb
Table 1.6. Chains configuration: Supported parameters for docstore storage
| Parameter | Description | Supported values | Default value |
|---|---|---|---|
|
|
The go-cloud URI reference to a |
|
If you enable the grafeas storage method for any artifacts, configure Grafeas storage options. For more information about Grafeas notes and occurrences, see Grafeas concepts.
To create occurrences, Red Hat OpenShift Pipelines must first create notes that are used to link occurrences. Red Hat OpenShift Pipelines creates two types of occurrences: ATTESTATION Occurrence and BUILD Occurrence.
Red Hat OpenShift Pipelines uses the configurable noteid as the prefix of the note name. It appends the suffix -simplesigning for the ATTESTATION note and the suffix -intoto for the BUILD note. If the noteid field is not configured, Red Hat OpenShift Pipelines uses tekton-<NAMESPACE> as the prefix.
Table 1.7. Chains configuration: Supported parameters for Grafeas storage
| Parameter | Description | Supported values | Default value |
|---|---|---|---|
|
| The OpenShift Container Platform project in which the Grafeas server for storing occurrences is located. | ||
|
| Optional: the prefix to use for the name of all created notes. | A string without spaces. | |
|
|
Optional: the |
|
Optionally, you can enable additional uploads of binary transparency attestations.
Table 1.8. Chains configuration: Supported parameters for transparency attestation storage
| Parameter | Description | Supported values | Default value |
|---|---|---|---|
|
| Enable or disable automatic binary transparency uploads. |
|
|
|
| The URL for uploading binary transparency attestations, if enabled. |
|
If you set transparency.enabled to manual, only task runs and pipeline runs with the following annotation are uploaded to the transparency log:
chains.tekton.dev/transparency-upload: "true"
If you configure the x509 signature backend, you can optionally enable keyless signing with Fulcio.
Table 1.9. Chains configuration: Supported parameters for x509 keyless signing with Fulcio
| Parameter | Description | Supported values | Default value |
|---|---|---|---|
|
| Enable or disable requesting automatic certificates from Fulcio. |
|
|
|
| The Fulcio address for requesting certificates, if enabled. |
| |
|
| The expected OIDC issuer. |
| |
|
| The provider from which to request the ID Token. |
| Red Hat OpenShift Pipelines attempts to use every provider |
|
| Path to the file containing the ID Token. | ||
|
|
The URL for the TUF server. |
|
If you configure the kms signature backend, set the KMS configuration, including OIDC and Spire, as necessary.
Table 1.10. Chains configuration: Supported parameters for KMS signing
| Parameter | Description | Supported values | Default value |
|---|---|---|---|
|
|
URI of the KMS server (the value of |
|
Authentication token for the KMS server (the value of |
|
|
The path for OIDC authentication (for example, |
| The role for OIDC authentication. |
|
|
The URI of the Spire socket for the KMS token (for example, |
| The audience for requesting a SVID from Spire. |
1.3. Secrets for signing data in Tekton Chains
Cluster administrators can generate a key pair and use Tekton Chains to sign artifacts using a Kubernetes secret. For Tekton Chains to work, a private key and a password for encrypted keys must exist as part of the signing-secrets secret in the openshift-pipelines namespace.
Currently, Tekton Chains supports the x509 and cosign signature schemes.
Use only one of the supported signature schemes.
To use the x509 signing scheme with Tekton Chains, store the x509.pem private key of the ed25519 or ecdsa type in the signing-secrets Kubernetes secret.
1.3.1. Signing using cosign
You can use the cosign signing scheme with Tekton Chains using the cosign tool.
Prerequisites
- You installed the cosign tool.
Procedure
Generate the
cosign.keyandcosign.pubkey pairs by running the following command:$ cosign generate-key-pair k8s://openshift-pipelines/signing-secrets
Cosign prompts you for a password and then creates a Kubernetes secret.
-
Store the encrypted
cosign.keyprivate key and thecosign.passworddecryption password in thesigning-secretsKubernetes secret. Ensure that the private key is stored as an encrypted PEM file of theENCRYPTED COSIGN PRIVATE KEYtype.
1.3.2. Signing using skopeo
You can generate keys using the skopeo tool and use them in the cosign signing scheme with Tekton Chains.
Prerequisites
- You installed the skopeo tool.
Procedure
Generate a public/private key pair by running the following command:
$ skopeo generate-sigstore-key --output-prefix <mykey> 1- 1
- Replace
<mykey>with a key name of your choice.
Skopeo prompts you for a passphrase for the private key and then creates the key files named
<mykey>.privateand<mykey>.pub.Encode the
<mykey>.pubfile using thebase64tool by running the following command:$ base64 -w 0 <mykey>.pub > b64.pub
Encode the
<mykey>.privatefile using thebase64tool by running the following command:$ base64 -w 0 <mykey>.private > b64.private
Encode the passhprase using the
base64tool by running the following command:$ echo -n '<passphrase>' | base64 -w 0 > b64.passphrase 1- 1
- Replace
<passphrase>with the passphrase that you used for the key pair.
Create the
signing-secretssecret in theopenshift-pipelinesnamespace by running the following command:$ oc create secret generic signing-secrets -n openshift-pipelines
Edit the
signing-secretssecret by running the following command:$ oc edit secret -n openshift-pipelines signing-secrets
Add the encoded keys in the data of the secret in the following way:
apiVersion: v1
data:
  cosign.key: <Encoded <mykey>.private> 1
  cosign.password: <Encoded passphrase> 2
  cosign.pub: <Encoded <mykey>.pub> 3
immutable: true
kind: Secret
metadata:
  name: signing-secrets
# ...
type: Opaque
1.3.3. Resolving the "secret already exists" error
If the signing-secret secret is already populated, the command to create this secret might output the following error message:
Error from server (AlreadyExists): secrets "signing-secrets" already exists
You can resolve this error by deleting the secret.
Procedure
Delete the
signing-secretsecret by running the following command:$ oc delete secret signing-secrets -n openshift-pipelines
- Re-create the key pairs and store them in the secret using your preferred signing scheme.
1.4. Authenticating to an OCI registry
Before pushing signatures to an OCI registry, cluster administrators must configure Tekton Chains to authenticate with the registry. The Tekton Chains controller uses the same service account under which the task runs execute. To set up a service account with the necessary credentials for pushing signatures to an OCI registry, perform the following steps:
Procedure
Set the namespace and name of the Kubernetes service account.
$ export NAMESPACE=<namespace> 1
$ export SERVICE_ACCOUNT_NAME=<service_account> 2
Create a Kubernetes secret.
$ oc create secret registry-credentials \ --from-file=.dockerconfigjson \ 1 --type=kubernetes.io/dockerconfigjson \ -n $NAMESPACE- 1
- Substitute with the path to your Docker config file. Default path is
~/.docker/config.json.
Give the service account access to the secret.
$ oc patch serviceaccount $SERVICE_ACCOUNT_NAME \
  -p "{\"imagePullSecrets\": [{\"name\": \"registry-credentials\"}]}" -n $NAMESPACE
If you patch the default
pipelineservice account that Red Hat OpenShift Pipelines assigns to all task runs, the Red Hat OpenShift Pipelines Operator will override the service account. As a best practice, you can perform the following steps:Create a separate service account to assign to user’s task runs.
$ oc create serviceaccount <service_account_name>
Associate the service account to the task runs by setting the value of the
serviceaccountnamefield in the task run template.apiVersion: tekton.dev/v1 kind: TaskRun metadata: name: build-push-task-run-2 spec: taskRunTemplate: serviceAccountName: build-bot 1 taskRef: name: build-push ...- 1
- Substitute with the name of the newly created service account.
1.5. Creating and verifying task run signatures without any additional authentication
To verify signatures of task runs using Tekton Chains with any additional authentication, perform the following tasks:
- Create an encrypted x509 key pair and save it as a Kubernetes secret.
- Configure the Tekton Chains backend storage.
- Create a task run, sign it, and store the signature and the payload as annotations on the task run itself.
- Retrieve the signature and payload from the signed task run.
- Verify the signature of the task run.
Prerequisites
Ensure that the following components are installed on the cluster:
- Red Hat OpenShift Pipelines Operator
- Tekton Chains
- Cosign
Procedure
- Create an encrypted x509 key pair and save it as a Kubernetes secret. For more information about creating a key pair and saving it as a secret, see "Signing secrets in Tekton Chains".
In the Tekton Chains configuration, disable the OCI storage, and set the task run storage and format to
tekton. In theTektonConfigcustom resource set the following values:apiVersion: operator.tekton.dev/v1alpha1 kind: TektonConfig metadata: name: config spec: # ... chain: artifacts.oci.storage: "" artifacts.taskrun.format: tekton artifacts.taskrun.storage: tekton # ...For more information about configuring Tekton Chains using the
TektonConfigcustom resource, see "Configuring Tekton Chains".To restart the Tekton Chains controller to ensure that the modified configuration is applied, enter the following command:
$ oc delete po -n openshift-pipelines -l app=tekton-chains-controller
Create a task run by entering the following command:
$ oc create -f https://raw.githubusercontent.com/tektoncd/chains/main/examples/taskruns/task-output-image.yaml 1- 1
- Replace the example URI with the URI or file path pointing to your task run.
Example output
taskrun.tekton.dev/build-push-run-output-image-qbjvh created
Check the status of the steps by entering the following command. Wait until the process finishes.
$ tkn tr describe --last
Example output
[...truncated output...]
NAME                            STATUS
∙ create-dir-builtimage-9467f   Completed
∙ git-source-sourcerepo-p2sk8   Completed
∙ build-and-push                Completed
∙ echo                          Completed
∙ image-digest-exporter-xlkn7   Completed
To retrieve the signature from the object stored as
base64encoded annotations, enter the following commands:$ tkn tr describe --last -o jsonpath="{.metadata.annotations.chains\.tekton\.dev/signature-taskrun-$TASKRUN_UID}" | base64 -d > sig$ export TASKRUN_UID=$(tkn tr describe --last -o jsonpath='{.metadata.uid}')- To verify the signature using the public key that you created, enter the following command:
$ cosign verify-blob-attestation --insecure-ignore-tlog --key path/to/cosign.pub --signature sig --type slsaprovenance --check-claims=false /dev/null 1- 1
- Replace
path/to/cosign.pubwith the path name of the public key file.Example output
Verified OK
1.5.1. Additional resources
1.6. Using Tekton Chains to sign and verify image and provenance
Cluster administrators can use Tekton Chains to sign and verify images and provenances, by performing the following tasks:
- Create an encrypted x509 key pair and save it as a Kubernetes secret.
- Set up authentication for the OCI registry to store images, image signatures, and signed image attestations.
- Configure Tekton Chains to generate and sign provenance.
- Create an image with Kaniko in a task run.
- Verify the signed image and the signed provenance.
Prerequisites
Ensure that the following are installed on the cluster:
Procedure
Create an encrypted x509 key pair and save it as a Kubernetes secret:
$ cosign generate-key-pair k8s://openshift-pipelines/signing-secrets
Provide a password when prompted. Cosign stores the resulting private key as part of the
signing-secretsKubernetes secret in theopenshift-pipelinesnamespace, and writes the public key to thecosign.publocal file.Configure authentication for the image registry.
- To configure the Tekton Chains controller for pushing signature to an OCI registry, use the credentials associated with the service account of the task run. For detailed information, see the "Authenticating to an OCI registry" section.
To configure authentication for a Kaniko task that builds and pushes image to the registry, create a Kubernetes secret of the docker
config.jsonfile containing the required credentials.$ oc create secret generic <docker_config_secret_name> \ 1 --from-file <path_to_config.json> 2
Configure Tekton Chains by setting the
artifacts.taskrun.format,artifacts.taskrun.storage, andtransparency.enabledparameters in thechains-configobject:$ oc patch configmap chains-config -n openshift-pipelines -p='{"data":{"artifacts.taskrun.format": "in-toto"}}' $ oc patch configmap chains-config -n openshift-pipelines -p='{"data":{"artifacts.taskrun.storage": "oci"}}' $ oc patch configmap chains-config -n openshift-pipelines -p='{"data":{"transparency.enabled": "true"}}'Start the Kaniko task.
Apply the Kaniko task to the cluster.
$ oc apply -f examples/kaniko/kaniko.yaml 1- 1
- Substitute with the URI or file path to your Kaniko task.
Set the appropriate environment variables.
$ export REGISTRY=<url_of_registry> 1

$ export DOCKERCONFIG_SECRET_NAME=<name_of_the_secret_in_docker_config_json> 2
Start the Kaniko task.
$ tkn task start --param IMAGE=$REGISTRY/kaniko-chains --use-param-defaults --workspace name=source,emptyDir="" --workspace name=dockerconfig,secret=$DOCKERCONFIG_SECRET_NAME kaniko-chains
Observe the logs of this task until all steps are complete. On successful authentication, the final image will be pushed to
$REGISTRY/kaniko-chains.
Wait for a minute to allow Tekton Chains to generate the provenance and sign it, and then check the availability of the
chains.tekton.dev/signed=trueannotation on the task run.$ oc get tr <task_run_name> \ 1 -o json | jq -r .metadata.annotations { "chains.tekton.dev/signed": "true", ... }- 1
- Substitute with the name of the task run.
Verify the image and the attestation.
$ cosign verify --key cosign.pub $REGISTRY/kaniko-chains

$ cosign verify-attestation --key cosign.pub $REGISTRY/kaniko-chains
Find the provenance for the image in Rekor.
- Get the digest of the $REGISTRY/kaniko-chains image. You can search for it ing the task run, or pull the image to extract the digest.
Search Rekor to find all entries that match the
sha256digest of the image.$ rekor-cli search --sha <image_digest> 1 <uuid_1> 2 <uuid_2> 3 ...
The search result displays UUIDs of the matching entries. One of those UUIDs holds the attestation.
Check the attestation.
$ rekor-cli get --uuid <uuid> --format json | jq -r .Attestation | base64 --decode | jq
1.7. Additional resources
Chapter 2. Setting up OpenShift Pipelines in the web console to view Software Supply Chain Security elements
Use the Developer or Administrator perspective to create or modify a pipeline and view key Software Supply Chain Security elements within a project.
Set up OpenShift Pipelines to view:
- Project vulnerabilities: Visual representation of identified vulnerabilities within a project.
- Software Bill of Materials (SBOMs): Download or view detailed listing of PipelineRun components.
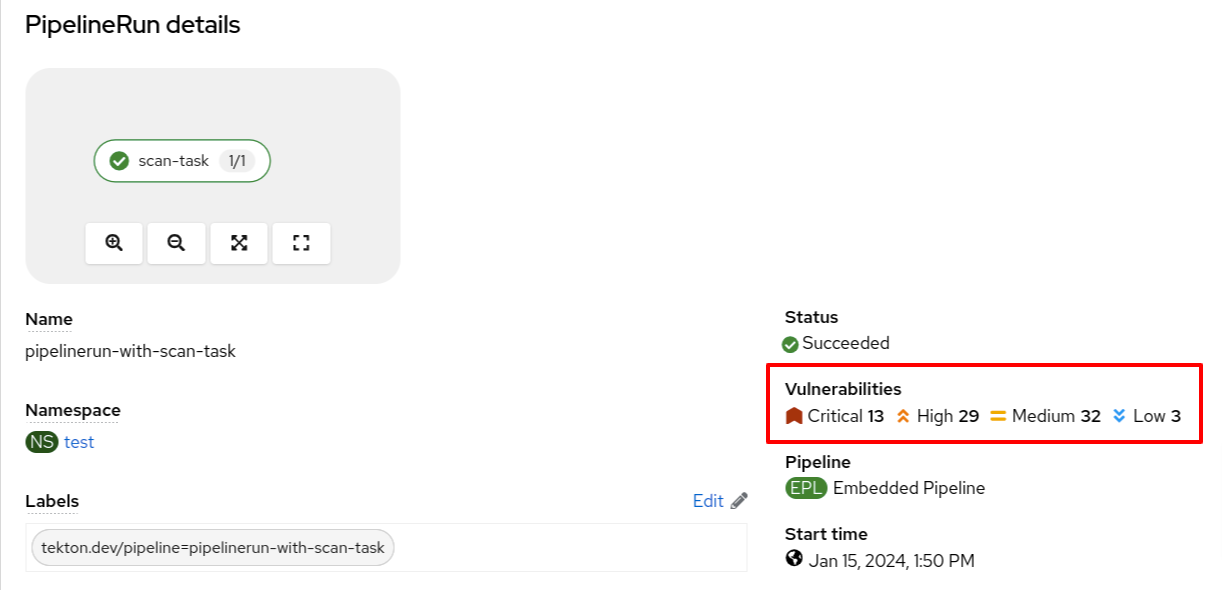
Additionally, PipelineRuns that meet Tekton Chains requirement displays signed badges next to their names. This badge indicates that the pipeline run execution results are cryptographically signed and stored securely, for example within an OCI image.
Figure 2.1. The signed badge
The PipelineRun displays the signed badge next to its name only if you have configured Tekton Chains. For information on configuring Tekton Chains, see Using Tekton Chains for OpenShift Pipelines supply chain security.
2.1. Setting up OpenShift Pipelines to view project vulnerabilities
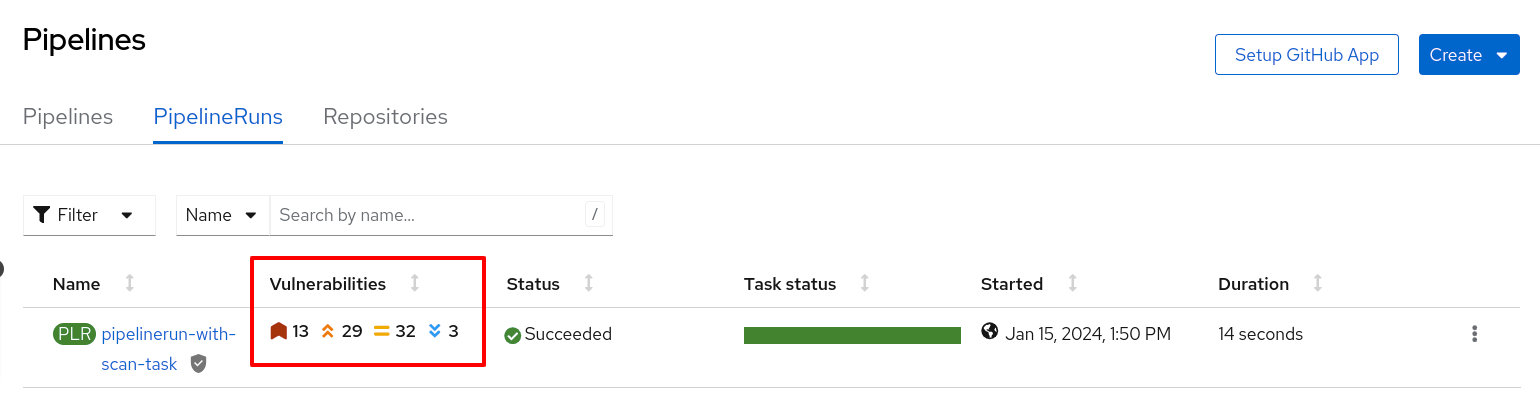
The PipelineRun details page provides a visual representation of identified vulnerabilities, categorized by the severity (critical, high, medium, and low). This streamlined view facilitates prioritization and remediation efforts.
Figure 2.2. Viewing vulnerabilities on the PipelineRun details page
You can also review the vulnerabilities in the Vulnerabilities column in the pipeline run list view page.
Figure 2.3. Viewing vulnerabilities on the PipelineRun list view
Prerequisites
- You have logged in to the web console.
- You have the appropriate roles and permissions in a project to create applications and other workloads in OpenShift Container Platform.
- You have an existing vulnerability scan task.
Procedures
- In the Developer or Administrator perspective, switch to the relevant project where you want a visual representation of vulnerabilities.
Update your existing vulnerability scan task to ensure that it stores the output in the .json file and then extracts the vulnerability summary in the following format:
# The format to extract vulnerability summary (adjust the jq command for different JSON structures). jq -rce \ '{vulnerabilities:{ critical: (.result.summary.CRITICAL), high: (.result.summary.IMPORTANT), medium: (.result.summary.MODERATE), low: (.result.summary.LOW) }}' scan_output.json | tee $(results.SCAN_OUTPUT.path)NoteYou might need to adjust the jq command for different JSON structures.
(Optional) If you do not have a vulnerability scan task, create one in the following format:
Example vulnerability scan task using Roxctl
apiVersion: tekton.dev/v1
kind: Task
metadata:
  name: vulnerability-scan  1
  annotations:
    task.output.location: results  2
    task.results.format: application/json
    task.results.key: SCAN_OUTPUT  3
spec:
  results:
    - description: CVE result format  4
      name: SCAN_OUTPUT
      type: string
  steps:
    - name: roxctl  5
      image: quay.io/roxctl-tool-image  6
      env:
        - name: ENV_VAR_NAME_1  7
          valueFrom:
            secretKeyRef:
              key: secret_key_1
              name: secret_name_1
      env:
        - name: ENV_VAR_NAME_2
          valueFrom:
            secretKeyRef:
              key: secret_key_2
              name: secret_name_2
      script: | 8
        #!/bin/sh
        # Sample shell script
        echo "ENV_VAR_NAME_1: " $ENV_VAR_NAME_1
        echo "ENV_VAR_NAME_2: " $ENV_VAR_NAME_2
        jq --version (adjust the jq command for different JSON structures)
        curl -k -L -H "Authorization: Bearer $ENV_VAR_NAME_1" https://$ENV_VAR_NAME_2/api/cli/download/roxctl-linux --output ./roxctl
        chmod +x ./roxctl
        echo "roxctl version"
        ./roxctl version
        echo "image from pipeline: "

        # Replace the following line with your dynamic image logic
        DYNAMIC_IMAGE=$(get_dynamic_image_logic_here)
        echo "Dynamic image: $DYNAMIC_IMAGE"
        ./roxctl image scan --insecure-skip-tls-verify -e $ENV_VAR_NAME_2 --image $DYNAMIC_IMAGE --output json  > roxctl_output.json
        more roxctl_output.json
        jq -rce \  9
          '{vulnerabilities:{
          critical: (.result.summary.CRITICAL),
          high: (.result.summary.IMPORTANT),
          medium: (.result.summary.MODERATE),
          low: (.result.summary.LOW)
            }}' scan_output.json | tee $(results.SCAN_OUTPUT.path)
- 1
- The name of your task.
- 2
- The location for storing the task outputs.
- 3
- The naming convention of the scan task result. A valid naming convention must end with the
SCAN_OUTPUTstring. For example, SCAN_OUTPUT, MY_CUSTOM_SCAN_OUTPUT, or ACS_SCAN_OUTPUT. - 4
- The description of the result.
- 5
- The name of the vulnerability scanning tool that you have used.
- 6
- The location of the actual image containing the scan tool.
- 7
- The tool-specific environment variables.
- 8
- The shell script to be executed with json output. For example, scan_output.json.
- 9
- The format to extract vulnerability summary (adjust
jqcommand for different JSON structures).
Update an appropriate Pipeline to add vulnerabilities specifications in the following format:
...
spec:
  results:
    - description: The common vulnerabilities and exposures (CVE) result
      name: SCAN_OUTPUT
      type: $(tasks.vulnerability-scan.results.SCAN_OUTPUT)
Verification
-
Navigate to the
PipelineRundetails page and review the Vulnerabilities row for a visual representation of identified vulnerabilities. -
Alternatively, you can navigate to the
PipelineRunlist view page, and review the Vulnerabilities column.
2.2. Setting up OpenShift Pipelines to download or view SBOMs
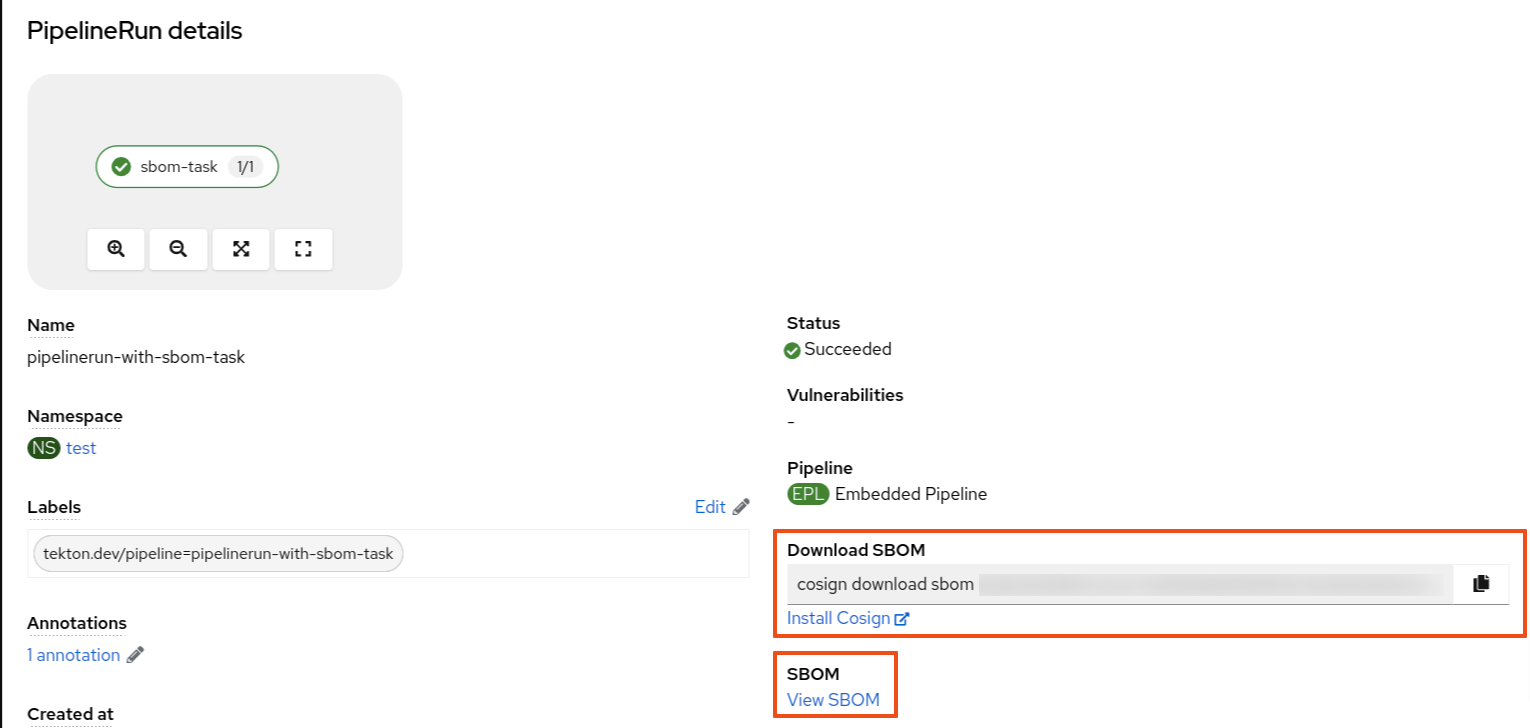
The PipelineRun details page provides an option to download or view Software Bill of Materials (SBOMs), enhancing transparency and control within your supply chain. SBOMs lists all the software libraries that a component uses. Those libraries can enable specific functionality or facilitate development.
You can use an SBOM to better understand the composition of your software, identify vulnerabilities, and assess the potential impact of any security issues that might arise.
Figure 2.4. Options to download or view SBOMs
Prerequisites
- You have logged in to the web console.
- You have the appropriate roles and permissions in a project to create applications and other workloads in OpenShift Container Platform.
Procedure
- In the Developer or Administrator perspective, switch to the relevant project where you want a visual representation of SBOMs.
Add a task in the following format to view or download the SBOM information:
Example SBOM task
apiVersion: tekton.dev/v1
kind: Task
metadata:
  name: sbom-task 1
  annotations:
    task.output.location: results  2
    task.results.format: application/text
    task.results.key: LINK_TO_SBOM  3
    task.results.type: external-link  4
spec:
  results:
    - description: Contains the SBOM link  5
      name: LINK_TO_SBOM
  steps:
    - name: print-sbom-results
      image: quay.io/image  6
      script: | 7
        #!/bin/sh
        syft version
        syft quay.io/<username>/quarkus-demo:v2 --output cyclonedx-json=sbom-image.json
        echo 'BEGIN SBOM'
        cat sbom-image.json
        echo 'END SBOM'
        echo 'quay.io/user/workloads/<namespace>/node-express/node-express:build-8e536-1692702836' | tee $(results.LINK_TO_SBOM.path) 8
- 1
- The name of your task.
- 2
- The location for storing the task outputs.
- 3
- The SBOM task result name. Do not change the name of the SBOM result task.
- 4
- (Optional) Set to open the SBOM in a new tab.
- 5
- The description of the result.
- 6
- The image that generates the SBOM.
- 7
- The script that generates the SBOM image.
- 8
- The SBOM image along with the path name.
Update the Pipeline to reference the newly created SBOM task.
... spec: tasks: - name: sbom-task taskRef: name: sbom-task 1 results: - name: IMAGE_URL 2 description: url value: <oci_image_registry_url> 3- Rerun the affected OpenShift Pipeline.
2.2.1. Viewing an SBOM in the web UI
Prerequisites
- You have set up OpenShift Pipelines to download or view SBOMs.
Procedure
- Navigate to the Activity → PipelineRuns tab.
- For the project whose SBOM you want to view, select its most recent pipeline run.
On the
PipelineRundetails page, select View SBOM.-
You can use your web browser to immediately search the SBOM for terms that indicate vulnerabilities in your software supply chain. For example, try searching for
log4j. - You can select Download to download the SBOM, or Expand to view it full-screen.
-
You can use your web browser to immediately search the SBOM for terms that indicate vulnerabilities in your software supply chain. For example, try searching for
2.2.2. Downloading an SBOM in the CLI
Prerequisites
- You have installed the Cosign CLI tool.
- You have set up OpenShift Pipelines to download or view SBOMs.
Procedure
- Open terminal, log in to Developer or Administrator perspective, and then switch to the relevant project.
From the OpenShift web console, copy the
download sbomcommand and run it on your terminal.Example cosign command
$ cosign download sbom quay.io/<workspace>/user-workload@sha256
(Optional) To view the full SBOM in a searchable format, run the following command to redirect the output:
Example cosign command
$ cosign download sbom quay.io/<workspace>/user-workload@sha256 > sbom.txt
2.2.3. Reading the SBOM
In the SBOM, as the following sample excerpt shows, you can see four characteristics of each library that a project uses:
- Its author or publisher
- Its name
- Its version
- Its licenses
This information helps you verify that individual libraries are safely-sourced, updated, and compliant.
Example SBOM
{
    "bomFormat": "CycloneDX",
    "specVersion": "1.4",
    "serialNumber": "urn:uuid:89146fc4-342f-496b-9cc9-07a6a1554220",
    "version": 1,
    "metadata": {
        ...
    },
    "components": [
        {
            "bom-ref": "pkg:pypi/flask@2.1.0?package-id=d6ad7ed5aac04a8",
            "type": "library",
            "author": "Armin Ronacher <armin.ronacher@active-4.com>",
            "name": "Flask",
            "version": "2.1.0",
            "licenses": [
                {
                    "license": {
                        "id": "BSD-3-Clause"
                    }
                }
            ],
            "cpe": "cpe:2.3:a:armin-ronacher:python-Flask:2.1.0:*:*:*:*:*:*:*",
            "purl": "pkg:pypi/Flask@2.1.0",
            "properties": [
                {
                    "name": "syft:package:foundBy",
                    "value": "python-package-cataloger"
                    ...
2.3. Additional resources
Chapter 3. Configuring the security context for pods
The default service account for pods that OpenShift Pipelines starts is pipeline. The security context constraint (SCC) associated with the pipeline service account is pipelines-scc. The pipelines-scc SCC is based the anyuid SCC, with minor differences as defined in the following YAML specification:
Example pipelines-scc.yaml snippet
apiVersion: security.openshift.io/v1
kind: SecurityContextConstraints
# ...
allowedCapabilities:
  - SETFCAP
# ...
fsGroup:
  type: MustRunAs
# ...
In addition, the Buildah cluster task, shipped as part of OpenShift Pipelines, uses vfs as the default storage driver.
You can configure the security context for pods that OpenShift Pipelines creates for pipeline runs and task runs. You can make the following changes:
- Change the default and maximum SCC for all pods
- Change the default SCC for pods created for pipeline runs and task runs in a particular namespace
- Configure a particular pipeline run or task run to use a custom SCC and service account
The simplest way to run buildah that ensures all images can build is to run it as root in a pod with the privileged SCC. For instructions about running buildah with more restrictive security settings, see Building of container images using Buildah as a non-root user.
3.1. Configuring the default and maximum SCC for pods that OpenShift Pipelines creates
You can configure the default security context constraint (SCC) for all pods that OpenShift Pipelines creates for task runs and pipeline runs. You can also configure the maximum SCC, which is the least restrictive SCC that can be configured for these pods in any namespace.
Procedure
Edit the
TektonConfigcustom resource (CR) by entering the following command:$ oc edit TektonConfig config
Set the default and maximum SCC in the spec, as in the following example:
apiVersion: operator.tekton.dev/v1alpha1 kind: TektonConfig metadata: name: config spec: # ... platforms: openshift: scc: default: "restricted-v2" 1 maxAllowed: "privileged" 2- 1
spec.platforms.openshift.scc.defaultspecifies the default SCC that OpenShift Pipelines attaches to the service account (SA) used for workloads, which is, by default, thepipelineSA. This SCC is used for all pipeline run and task run pods.- 2
spec.platforms.openshift.scc.maxAllowedspecifies the least restrictive SCC that you can configure for pipeline run and task run pods in any namespace. This setting does not apply when you configure a custom SA and SCC in a particular pipeline run or task run.
Additional resources
3.2. Configuring the SCC for pods in a namespace
You can configure the security context constraint (SCC) for all pods that OpenShift Pipelines creates for pipeline runs and task runs that you create in a particular namespace. This SCC must not be less restrictive than the maximum SCC that you configured using the TektonConfig CR, in the spec.platforms.openshift.scc.maxAllowed spec.
Procedure
Set the
operator.tekton.dev/sccannotation for the namespace to the name of the SCC.Example namespace annotation for configuring the SCC for OpenShift Pipelines pods
apiVersion: v1
kind: Namespace
metadata:
  name: test-namespace
  annotations:
    operator.tekton.dev/scc: nonroot
3.3. Running pipeline run and task run by using a custom SCC and a custom service account
When using the pipelines-scc security context constraint (SCC) associated with the default pipelines service account, the pipeline run and task run pods might face timeouts. This happens because in the default pipelines-scc SCC, the fsGroup.type parameter is set to MustRunAs.
For more information about pod timeouts, see BZ#1995779.
To avoid pod timeouts, you can create a custom SCC with the fsGroup.type parameter set to RunAsAny, and associate it with a custom service account.
As a best practice, use a custom SCC and a custom service account for pipeline runs and task runs. This approach allows greater flexibility and does not break the runs when the defaults are modified during an upgrade.
Procedure
Define a custom SCC with the
fsGroup.typeparameter set toRunAsAny:Example: Custom SCC
apiVersion: security.openshift.io/v1
kind: SecurityContextConstraints
metadata:
  annotations:
    kubernetes.io/description: my-scc is a close replica of anyuid scc. pipelines-scc has fsGroup - RunAsAny.
  name: my-scc
allowHostDirVolumePlugin: false
allowHostIPC: false
allowHostNetwork: false
allowHostPID: false
allowHostPorts: false
allowPrivilegeEscalation: true
allowPrivilegedContainer: false
allowedCapabilities: null
defaultAddCapabilities: null
fsGroup:
  type: RunAsAny
groups:
- system:cluster-admins
priority: 10
readOnlyRootFilesystem: false
requiredDropCapabilities:
- MKNOD
runAsUser:
  type: RunAsAny
seLinuxContext:
  type: MustRunAs
supplementalGroups:
  type: RunAsAny
volumes:
- configMap
- downwardAPI
- emptyDir
- persistentVolumeClaim
- projected
- secret
Create the custom SCC:
Example: Create the
my-sccSCC$ oc create -f my-scc.yaml
Create a custom service account:
Example: Create a
fsgroup-runasanyservice account$ oc create serviceaccount fsgroup-runasany
Associate the custom SCC with the custom service account:
Example: Associate the
my-sccSCC with thefsgroup-runasanyservice account$ oc adm policy add-scc-to-user my-scc -z fsgroup-runasany
If you want to use the custom service account for privileged tasks, you can associate the
privilegedSCC with the custom service account by running the following command:Example: Associate the
privilegedSCC with thefsgroup-runasanyservice account$ oc adm policy add-scc-to-user privileged -z fsgroup-runasany
Use the custom service account in the pipeline run and task run:
Example: Pipeline run YAML with
fsgroup-runasanycustom service accountapiVersion: tekton.dev/v1 kind: PipelineRun metadata: name: <pipeline-run-name> spec: pipelineRef: name: <pipeline-cluster-task-name> taskRunTemplate: serviceAccountName: 'fsgroup-runasany'Example: Task run YAML with
fsgroup-runasanycustom service accountapiVersion: tekton.dev/v1 kind: TaskRun metadata: name: <task-run-name> spec: taskRef: name: <cluster-task-name> taskRunTemplate: serviceAccountName: 'fsgroup-runasany'
3.4. Additional resources
Chapter 4. Securing webhooks with event listeners
As an administrator, you can secure webhooks with event listeners. After creating a namespace, you enable HTTPS for the Eventlistener resource by adding the operator.tekton.dev/enable-annotation=enabled label to the namespace. Then, you create a Trigger resource and a secured route using the re-encrypted TLS termination.
Triggers in Red Hat OpenShift Pipelines support insecure HTTP and secure HTTPS connections to the Eventlistener resource. HTTPS secures connections within and outside the cluster.
Red Hat OpenShift Pipelines runs a tekton-operator-proxy-webhook pod that watches for the labels in the namespace. When you add the label to the namespace, the webhook sets the service.beta.openshift.io/serving-cert-secret-name=<secret_name> annotation on the EventListener object. This, in turn, creates secrets and the required certificates.
service.beta.openshift.io/serving-cert-secret-name=<secret_name>
In addition, you can mount the created secret into the Eventlistener pod to secure the request.
4.1. Providing secure connection with OpenShift routes
To create a route with the re-encrypted TLS termination, run:
$ oc create route reencrypt --service=<svc-name> --cert=tls.crt --key=tls.key --ca-cert=ca.crt --hostname=<hostname>
Alternatively, you can create a re-encrypted TLS termination YAML file to create a secure route.
Example re-encrypt TLS termination YAML to create a secure route
apiVersion: route.openshift.io/v1
kind: Route
metadata:
  name: route-passthrough-secured  1
spec:
  host: <hostname>
  to:
    kind: Service
    name: frontend 2
  tls:
    termination: reencrypt 3
    key: [as in edge termination]
    certificate: [as in edge termination]
    caCertificate: [as in edge termination]
    destinationCACertificate: |- 4
      -----BEGIN CERTIFICATE-----
      [...]
      -----END CERTIFICATE-----
- 1 2
- The name of the object, which is limited to only 63 characters.
- 3
- The termination field is set to
reencrypt. This is the only required TLS field. - 4
- This is required for re-encryption. The
destinationCACertificatefield specifies a CA certificate to validate the endpoint certificate, thus securing the connection from the router to the destination pods. You can omit this field in either of the following scenarios:- The service uses a service signing certificate.
- The administrator specifies a default CA certificate for the router, and the service has a certificate signed by that CA.
You can run the oc create route reencrypt --help command to display more options.
4.2. Creating a sample EventListener resource using a secure HTTPS connection
This section uses the pipelines-tutorial example to demonstrate creation of a sample EventListener resource using a secure HTTPS connection.
Procedure
Create the
TriggerBindingresource from the YAML file available in the pipelines-tutorial repository:$ oc create -f https://raw.githubusercontent.com/openshift/pipelines-tutorial/master/03_triggers/01_binding.yaml
Create the
TriggerTemplateresource from the YAML file available in the pipelines-tutorial repository:$ oc create -f https://raw.githubusercontent.com/openshift/pipelines-tutorial/master/03_triggers/02_template.yaml
Create the
Triggerresource directly from the pipelines-tutorial repository:$ oc create -f https://raw.githubusercontent.com/openshift/pipelines-tutorial/master/03_triggers/03_trigger.yaml
Create an
EventListenerresource using a secure HTTPS connection:Add a label to enable the secure HTTPS connection to the
Eventlistenerresource:$ oc label namespace <ns-name> operator.tekton.dev/enable-annotation=enabled
Create the
EventListenerresource from the YAML file available in the pipelines-tutorial repository:$ oc create -f https://raw.githubusercontent.com/openshift/pipelines-tutorial/master/03_triggers/04_event_listener.yaml
Create a route with the re-encrypted TLS termination:
$ oc create route reencrypt --service=<svc-name> --cert=tls.crt --key=tls.key --ca-cert=ca.crt --hostname=<hostname>
Chapter 5. Authenticating pipelines using git secret
A Git secret consists of credentials to securely interact with a Git repository, and is often used to automate authentication. In Red Hat OpenShift Pipelines, you can use Git secrets to authenticate pipeline runs and task runs that interact with a Git repository during execution.
A pipeline run or a task run gains access to the secrets through the associated service account. OpenShift Pipelines support the use of Git secrets as annotations (key-value pairs) for basic authentication and SSH-based authentication.
5.1. Credential selection
A pipeline run or task run might require multiple authentications to access different Git repositories. Annotate each secret with the domains where OpenShift Pipelines can use its credentials.
A credential annotation key for Git secrets must begin with tekton.dev/git-, and its value is the URL of the host for which you want OpenShift Pipelines to use that credential.
In the following example, OpenShift Pipelines uses a basic-auth secret, which relies on a username and password, to access repositories at github.com and gitlab.com.
Example: Multiple credentials for basic authentication
apiVersion: v1
kind: Secret
metadata:
  annotations:
    tekton.dev/git-0: github.com
    tekton.dev/git-1: gitlab.com
type: kubernetes.io/basic-auth
stringData:
  username: <username> 1
  password: <password> 2
You can also use an ssh-auth secret (private key) to access a Git repository.
Example: Private key for SSH based authentication
apiVersion: v1
kind: Secret
metadata:
  annotations:
    tekton.dev/git-0: https://github.com
type: kubernetes.io/ssh-auth
stringData:
  ssh-privatekey: 1
- 1
- The content of the SSH private key file.
5.2. Configuring basic authentication for Git
For a pipeline to retrieve resources from password-protected repositories, you must configure the basic authentication for that pipeline.
To configure basic authentication for a pipeline, update the secret.yaml, serviceaccount.yaml, and run.yaml files with the credentials from the Git secret for the specified repository. When you complete this process, OpenShift Pipelines can use that information to retrieve the specified pipeline resources.
For GitHub, authentication using plain password is deprecated. Instead, use a personal access token.
Procedure
In the
secret.yamlfile, specify the username and password or GitHub personal access token to access the target Git repository.apiVersion: v1 kind: Secret metadata: name: basic-user-pass 1 annotations: tekton.dev/git-0: https://github.com type: kubernetes.io/basic-auth stringData: username: <username> 2 password: <password> 3
In the
serviceaccount.yamlfile, associate the secret with the appropriate service account.apiVersion: v1 kind: ServiceAccount metadata: name: build-bot 1 secrets: - name: basic-user-pass 2
In the
run.yamlfile, associate the service account with a task run or a pipeline run.Associate the service account with a task run:
apiVersion: tekton.dev/v1
kind: TaskRun
metadata:
  name: build-push-task-run-2 1
spec:
  taskRunTemplate:
    serviceAccountName: build-bot 2
  taskRef:
    name: build-push 3
Associate the service account with a
PipelineRunresource:apiVersion: tekton.dev/v1 kind: PipelineRun metadata: name: demo-pipeline 1 namespace: default spec: taskRunTemplate: serviceAccountName: build-bot 2 pipelineRef: name: demo-pipeline 3
Apply the changes.
$ oc apply --filename secret.yaml,serviceaccount.yaml,run.yaml
5.3. Configuring SSH authentication for Git
For a pipeline to retrieve resources from repositories configured with SSH keys, you must configure the SSH-based authentication for that pipeline.
To configure SSH-based authentication for a pipeline, update the secret.yaml, serviceaccount.yaml, and run.yaml files with the credentials from the SSH private key for the specified repository. When you complete this process, OpenShift Pipelines can use that information to retrieve the specified pipeline resources.
Consider using SSH-based authentication rather than basic authentication.
Procedure
-
Generate an SSH private key, or copy an existing private key, which is usually available in the
~/.ssh/id_rsafile. In the
secret.yamlfile, set the value ofssh-privatekeyto the content of the SSH private key file, and set the value ofknown_hoststo the content of the known hosts file.apiVersion: v1 kind: Secret metadata: name: ssh-key 1 annotations: tekton.dev/git-0: github.com type: kubernetes.io/ssh-auth stringData: ssh-privatekey: 2 known_hosts: 3
CautionIf you omit the private key, OpenShift Pipelines accepts the public key of any server.
-
Optional: To specify a custom SSH port, add
:<port number>to the end of theannotationvalue. For example,tekton.dev/git-0: github.com:2222. In the
serviceaccount.yamlfile, associate thessh-keysecret with thebuild-botservice account.apiVersion: v1 kind: ServiceAccount metadata: name: build-bot 1 secrets: - name: ssh-key 2
In the
run.yamlfile, associate the service account with a task run or a pipeline run.Associate the service account with a task run:
apiVersion: tekton.dev/v1 kind: TaskRun metadata: name: build-push-task-run-2 1 spec: taskRunTemplate: serviceAccountName: build-bot 2 taskRef: name: build-push 3
Associate the service account with a pipeline run:
apiVersion: tekton.dev/v1
kind: PipelineRun
metadata:
  name: demo-pipeline 1
  namespace: default
spec:
  taskRunTemplate:
    serviceAccountName: build-bot 2
  pipelineRef:
    name: demo-pipeline 3
Apply the changes.
$ oc apply --filename secret.yaml,serviceaccount.yaml,run.yaml
5.4. Using SSH authentication in git type tasks
When invoking Git commands, you can use SSH authentication directly in the steps of a task. SSH authentication ignores the $HOME variable and only uses the user’s home directory specified in the /etc/passwd file. So each step in a task must symlink the /tekton/home/.ssh directory to the home directory of the associated user.
However, explicit symlinks are not necessary when you use a pipeline resource of the git type, or the git-clone task available in the Tekton catalog.
As an example of using SSH authentication in git type tasks, refer to authenticating-git-commands.yaml.
5.5. Using secrets as a non-root user
You might need to use secrets as a non-root user in certain scenarios, such as:
- The users and groups that the containers use to execute runs are randomized by the platform.
- The steps in a task define a non-root security context.
- A task specifies a global non-root security context, which applies to all steps in a task.
In such scenarios, consider the following aspects of executing task runs and pipeline runs as a non-root user:
-
SSH authentication for Git requires the user to have a valid home directory configured in the
/etc/passwddirectory. Specifying a UID that has no valid home directory results in authentication failure. -
SSH authentication ignores the
$HOMEenvironment variable. So you must or symlink the appropriate secret files from the$HOMEdirectory defined by OpenShift Pipelines (/tekton/home), to the non-root user’s valid home directory.
In addition, to configure SSH authentication in a non-root security context, refer to the example for authenticating git commands.
5.6. Limiting secret access to specific steps
By default, the secrets for OpenShift Pipelines are stored in the $HOME/tekton/home directory, and are available for all the steps in a task.
To limit a secret to specific steps, use the secret definition to specify a volume, and mount the volume in specific steps.
Chapter 6. Building of container images using Buildah as a non-root user
Running OpenShift Pipelines as the root user on a container can expose the container processes and the host to other potentially malicious resources. You can reduce this type of exposure by running the workload as a specific non-root user in the container. To run builds of container images using Buildah as a non-root user, you can perform the following steps:
- Define custom service account (SA) and security context constraint (SCC).
-
Configure Buildah to use the
builduser with id1000. - Start a task run with a custom config map, or integrate it with a pipeline run.
6.1. Configuring custom service account and security context constraint
The default pipeline SA allows using a user id outside of the namespace range. To reduce dependency on the default SA, you can define a custom SA and SCC with necessary cluster role and role bindings for the build user with user id 1000.
At this time, enabling the allowPrivilegeEscalation setting is required for Buildah to run successfully in the container. With this setting, Buildah can leverage SETUID and SETGID capabilities when running as a non-root user.
Procedure
Create a custom SA and SCC with necessary cluster role and role bindings.
Example: Custom SA and SCC for used id
1000apiVersion: v1 kind: ServiceAccount metadata: name: pipelines-sa-userid-1000 1 --- kind: SecurityContextConstraints metadata: annotations: name: pipelines-scc-userid-1000 2 allowHostDirVolumePlugin: false allowHostIPC: false allowHostNetwork: false allowHostPID: false allowHostPorts: false allowPrivilegeEscalation: true 3 allowPrivilegedContainer: false allowedCapabilities: null apiVersion: security.openshift.io/v1 defaultAddCapabilities: null fsGroup: type: MustRunAs groups: - system:cluster-admins priority: 10 readOnlyRootFilesystem: false requiredDropCapabilities: - MKNOD - KILL runAsUser: 4 type: MustRunAs uid: 1000 seLinuxContext: type: MustRunAs supplementalGroups: type: RunAsAny users: [] volumes: - configMap - downwardAPI - emptyDir - persistentVolumeClaim - projected - secret --- apiVersion: rbac.authorization.k8s.io/v1 kind: ClusterRole metadata: name: pipelines-scc-userid-1000-clusterrole 5 rules: - apiGroups: - security.openshift.io resourceNames: - pipelines-scc-userid-1000 resources: - securitycontextconstraints verbs: - use --- apiVersion: rbac.authorization.k8s.io/v1 kind: RoleBinding metadata: name: pipelines-scc-userid-1000-rolebinding 6 roleRef: apiGroup: rbac.authorization.k8s.io kind: ClusterRole name: pipelines-scc-userid-1000-clusterrole subjects: - kind: ServiceAccount name: pipelines-sa-userid-1000
- 1
- Define a custom SA.
- 2
- Define a custom SCC created based on restricted privileges, with modified
runAsUserfield. - 3
- At this time, enabling the
allowPrivilegeEscalationsetting is required for Buildah to run successfully in the container. With this setting, Buildah can leverageSETUIDandSETGIDcapabilities when running as a non-root user. - 4
- Restrict any pod that gets attached with the custom SCC through the custom SA to run as user id
1000. - 5
- Define a cluster role that uses the custom SCC.
- 6
- Bind the cluster role that uses the custom SCC to the custom SA.
6.2. Configuring Buildah to use build user
You can define a Buildah task to use the build user with user id 1000.
Procedure
Create a copy of the
buildahcluster task as an ordinary task.$ oc get clustertask buildah -o yaml | yq '. |= (del .metadata |= with_entries(select(.key == "name" )))' | yq '.kind="Task"' | yq '.metadata.name="buildah-as-user"' | oc create -f -
Edit the copied
buildahtask.$ oc edit task buildah-as-user
Example: Modified Buildah task with
builduserapiVersion: tekton.dev/v1 kind: Task metadata: name: buildah-as-user spec: description: >- Buildah task builds source into a container image and then pushes it to a container registry. Buildah Task builds source into a container image using Project Atomic's Buildah build tool.It uses Buildah's support for building from Dockerfiles, using its buildah bud command.This command executes the directives in the Dockerfile to assemble a container image, then pushes that image to a container registry. params: - name: IMAGE description: Reference of the image buildah will produce. - name: BUILDER_IMAGE description: The location of the buildah builder image. default: registry.redhat.io/rhel8/buildah@sha256:99cae35f40c7ec050fed3765b2b27e0b8bbea2aa2da7c16408e2ca13c60ff8ee - name: STORAGE_DRIVER description: Set buildah storage driver default: vfs - name: DOCKERFILE description: Path to the Dockerfile to build. default: ./Dockerfile - name: CONTEXT description: Path to the directory to use as context. default: . - name: TLSVERIFY description: Verify the TLS on the registry endpoint (for push/pull to a non-TLS registry) default: "true" - name: FORMAT description: The format of the built container, oci or docker default: "oci" - name: BUILD_EXTRA_ARGS description: Extra parameters passed for the build command when building images. default: "" - description: Extra parameters passed for the push command when pushing images. name: PUSH_EXTRA_ARGS type: string default: "" - description: Skip pushing the built image name: SKIP_PUSH type: string default: "false" results: - description: Digest of the image just built. name: IMAGE_DIGEST type: string workspaces: - name: source steps: - name: build securityContext: runAsUser: 1000 1 image: $(params.BUILDER_IMAGE) workingDir: $(workspaces.source.path) script: | echo "Running as USER ID `id`" 2 buildah --storage-driver=$(params.STORAGE_DRIVER) bud \ $(params.BUILD_EXTRA_ARGS) --format=$(params.FORMAT) \ --tls-verify=$(params.TLSVERIFY) --no-cache \ -f $(params.DOCKERFILE) -t $(params.IMAGE) $(params.CONTEXT) [[ "$(params.SKIP_PUSH)" == "true" ]] && echo "Push skipped" && exit 0 buildah --storage-driver=$(params.STORAGE_DRIVER) push \ $(params.PUSH_EXTRA_ARGS) --tls-verify=$(params.TLSVERIFY) \ --digestfile $(workspaces.source.path)/image-digest $(params.IMAGE) \ docker://$(params.IMAGE) cat $(workspaces.source.path)/image-digest | tee /tekton/results/IMAGE_DIGEST volumeMounts: - name: varlibcontainers mountPath: /home/build/.local/share/containers 3 volumes: - name: varlibcontainers emptyDir: {}
6.3. Starting a task run with custom config map, or a pipeline run
After defining the custom Buildah cluster task, you can create a TaskRun object that builds an image as a build user with user id 1000. In addition, you can integrate the TaskRun object as part of a PipelineRun object.
Procedure
Create a
TaskRunobject with a customConfigMapandDockerfileobjects.Example: A task run that runs Buildah as user id
1000apiVersion: v1 data: Dockerfile: | ARG BASE_IMG=registry.access.redhat.com/ubi9/ubi FROM $BASE_IMG AS buildah-runner RUN dnf -y update && \ dnf -y install git && \ dnf clean all CMD git kind: ConfigMap metadata: name: dockerfile 1 --- apiVersion: tekton.dev/v1 kind: TaskRun metadata: name: buildah-as-user-1000 spec: taskRunTemplate: serviceAccountName: pipelines-sa-userid-1000 2 params: - name: IMAGE value: image-registry.openshift-image-registry.svc:5000/test/buildahuser taskRef: kind: Task name: buildah-as-user workspaces: - configMap: name: dockerfile 3 name: source(Optional) Create a pipeline and a corresponding pipeline run.
Example: A pipeline and corresponding pipeline run
apiVersion: tekton.dev/v1 kind: Pipeline metadata: name: pipeline-buildah-as-user-1000 spec: params: - name: IMAGE - name: URL workspaces: - name: shared-workspace - name: sslcertdir optional: true tasks: - name: fetch-repository 1 taskRef: name: git-clone kind: ClusterTask workspaces: - name: output workspace: shared-workspace params: - name: url value: $(params.URL) - name: subdirectory value: "" - name: deleteExisting value: "true" - name: buildah taskRef: name: buildah-as-user 2 runAfter: - fetch-repository workspaces: - name: source workspace: shared-workspace - name: sslcertdir workspace: sslcertdir params: - name: IMAGE value: $(params.IMAGE) --- apiVersion: tekton.dev/v1 kind: PipelineRun metadata: name: pipelinerun-buildah-as-user-1000 spec: taskRunSpecs: - pipelineTaskName: buildah taskServiceAccountName: pipelines-sa-userid-1000 3 params: - name: URL value: https://github.com/openshift/pipelines-vote-api - name: IMAGE value: image-registry.openshift-image-registry.svc:5000/test/buildahuser pipelineRef: name: pipeline-buildah-as-user-1000 workspaces: - name: shared-workspace 4 volumeClaimTemplate: spec: accessModes: - ReadWriteOnce resources: requests: storage: 100Mi- 1
- Use the
git-clonecluster task to fetch the source containing a Dockerfile and build it using the modified Buildah task. - 2
- Refer to the modified Buildah task.
- 3
- Use the service account that you created for the Buildah task.
- 4
- Share data between the
git-clonetask and the modified Buildah task using a persistent volume claim (PVC) created automatically by the controller.
- Start the task run or the pipeline run.
6.4. Limitations of unprivileged builds
The process for unprivileged builds works with most Dockerfile objects. However, there are some known limitations might cause a build to fail:
-
Using the
--mount=type=cacheoption might fail due to lack of necessay permissions issues. For more information, see this article. -
Using the
--mount=type=secretoption fails because mounting resources requires additionnal capabilities that are not provided by the custom SCC.
Additional resources