
Red Hat Training
A Red Hat training course is available for Red Hat Fuse
Chapter 2. To Create a New Route
Abstract
This tutorial walks you through the process of creating a new Fuse project, adding a route to it, and adding two endpoints to the route. It assumes that you have already set up your workspace and that Red Hat JBoss Fuse Tooling is running inside Red Hat JBoss Developer Studio.
Goals
In this tutorial you will:
- create a Fuse project
- create a new routing context
- create a route
- add endpoints to the route
- connect the endpoints
- configure the endpoints
- create a folder in your project to store test messages that you create for your route
- create the test messages
Prerequisites
Note
You can use Fuse Integration perspective to work through all of the tutorials in this guide. However, because JBoss perspective provides more room for the route editor's canvas to expand as you build the routing context, this and other tutorials use JBoss perspective.
As you proceed through the remaining tutorials, you may find that you prefer using Fuse Integration perspective exclusively.
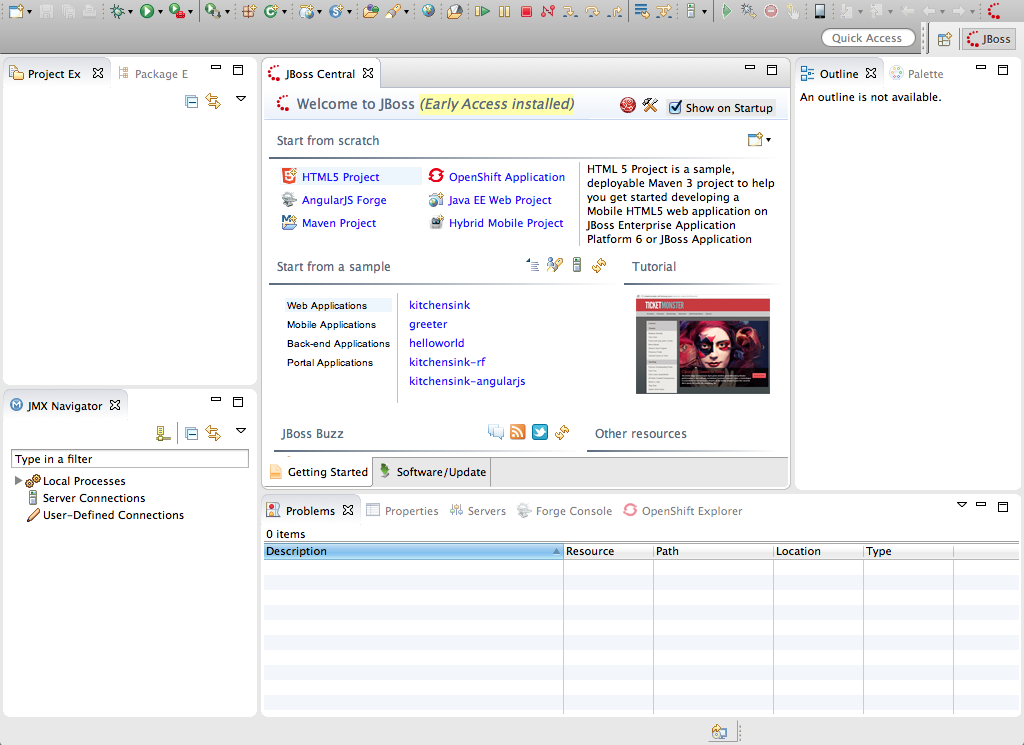
When you first start up JBoss Developer Studio, it opens in JBoss perspective, as shown in Figure 2.1, “JBoss View on initial startup”.
Figure 2.1. JBoss View on initial startup
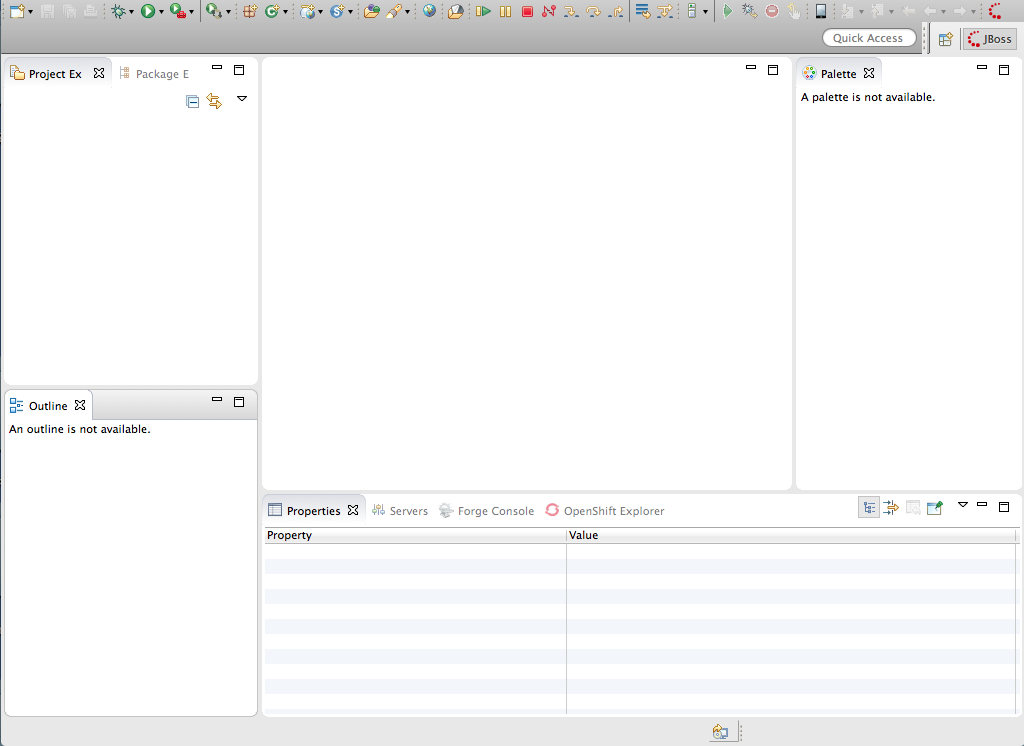
To provide more space for the canvas to expand as you build your projects:
- Close the JBoss Central tab.NoteYou can reopen a view whenever you need it. You can also drag the border of a view or panel to increase or decrease the space it occupies in the workspace.
- Close the JMX Navigator view at bottom, left of the workspace.
- Drag Outline view from top, right of the workspace, and drop it in the spot previously occupied by the JMX Navigator view.
Your JBoss perspective should now look like that shown in Figure 2.2, “JBoss View rearranged ”:
Figure 2.2. JBoss View rearranged
Note
You can restore an open perspective to its original, default layout at any time by right-clicking the perspective's icon on the menubar to open its context menu, and then clicking .
Creating the Fuse project
To create a Fuse project, in JBoss perspective:
- On the Toolbar, select → → to open the New Fuse project wizard, as shown in Figure 2.3.
Figure 2.3. New Fuse project location page

- Enter
CBRroutein the Project Name field. - Click to open the New Fuse Project details page, as shown in Figure 2.4.
Figure 2.4. New Fuse project details page
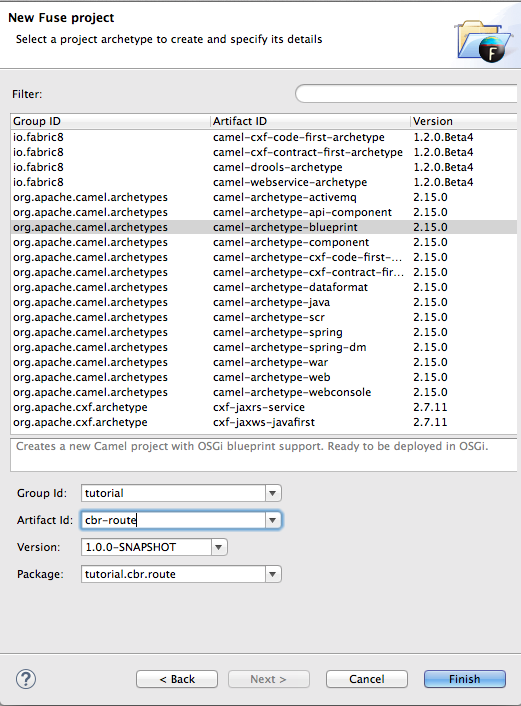
- Select
camel-archetype-blueprint. - Enter
tutorialin the Group Id: field. - Enter
cbr-routein the Artifact Id: field. - The Version: field defaults to
1.0.0-SNAPSHOT. To change it, enter a different version identifier. - The Package: field defaults to
tutorial.cbr.route, the name of the package that containscamel-archetype-blueprint. To include the route in a different package, enter the name of that package. - Click .NoteClick when the Open Associated Perspective? dialog asks whether you want to open the Fuse Integration perspective now.This procedure creates a Fuse project,
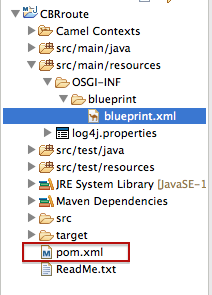
CBRroute, in Project Explorer that contains everything needed to create and run routes. As shown in Figure 2.5, the files generated forCBRrouteinclude:CBRroute/pom.xml(Maven project file)CBRroute/src/main/resources/OSGI-INF/blueprint/blueprint.xml(Blueprint XML file containing the routing rules)Figure 2.5. Generated project files
Note
When you create a new project, the Fuse Tooling downloads from the Maven repository all of the files it needs to build the project. This operation can take several minutes.
Creating the new routing context
To create the new routing context:
- In Project Explorer, locate
CBRroute/src/main/resources/OSGI-INF/blueprint/blueprint.xml. - Right-click it to open the context menu, then select Delete.You're going to replace the old
blueprint.xmlfile with your own to create a new route. - In the Delete dialog, click OK to confirm the operation.
- In Project Explorer, select
CBRroute/src/main/resources/OSGI-INF/blueprint. - Right-click it to open the context menu.
- Select → to open the Camel XML File wizard, as shown in Figure 2.6.
Figure 2.6. Camel XML File wizard
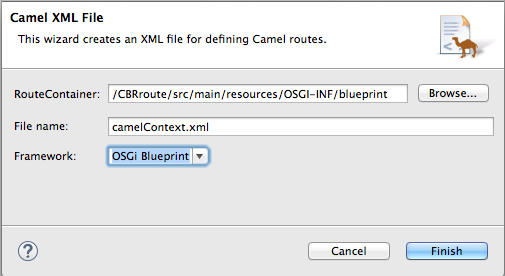
- Check that
/CBRroute/src/main/resources/OSGI-INF/blueprintappears in the Container: field. Otherwise enter it manually, or select it using the button.
NoteThe
button opens a dialog that displays the folders of all active projects, which you can browse to find and select the files you need.
button.
NoteThe
button opens a dialog that displays the folders of all active projects, which you can browse to find and select the files you need.
- Check that
camelContext.xmlappears in the File Name: field. Otherwise enter it manually. - Check that appears in the Framework field, or select it from the field's drop-down list.
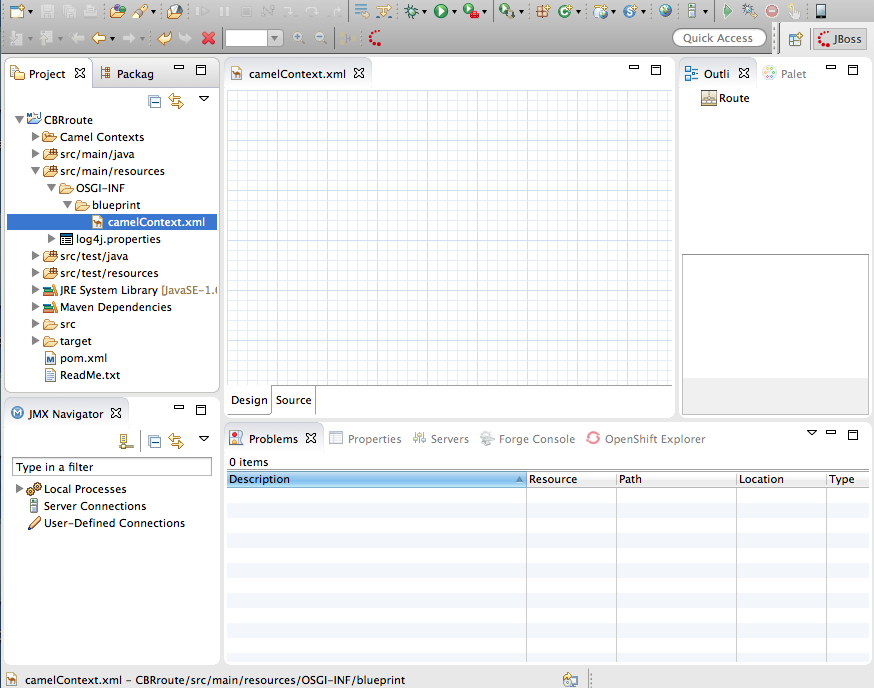
- Click .The camelContext.xml file opens in the route editor's Design view, displayed as an empty canvas, as shown in Figure 2.7.
Figure 2.7. New camelContext .xml file in Design view
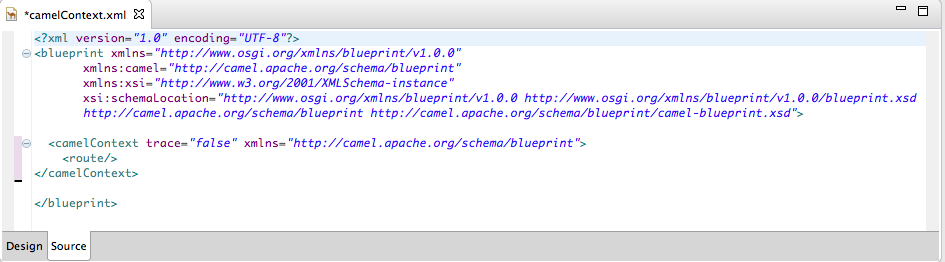
- Click the Source tab at the bottom, left of the canvas to open the new
camelContext.xmlfile in the route editor's Source view, as shown in Figure 2.8, “New camelContext file in source view”.Figure 2.8. New camelContext file in source view
Creating the route
To create the route:
- Click the Design tab at the bottom, left of the canvas to return to the route editor's Design view.
- Drag a File component (
 ) from the Palette's Components drawer to the canvas.
NoteThe File component changes to a file:directoryNam... node on the canvas.
) from the Palette's Components drawer to the canvas.
NoteThe File component changes to a file:directoryNam... node on the canvas. - Drag another File component from the Palette's Components drawer to the canvas.
- Select the first file:directoryName node you dragged onto the canvas.The Properties editor, located below the canvas, displays the node's property fields for editing.
- Select the Advanced tab, as shown in Figure 2.9.
Figure 2.9. File source property editor
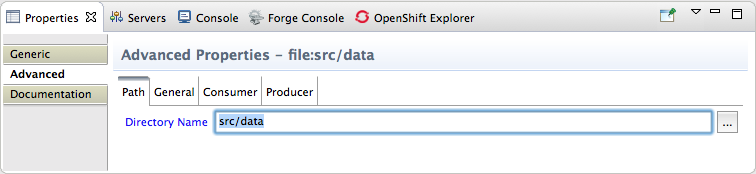
- On the Path tab, click the
 button next to the Directory Name field, to browse to the
 src/datafolder you previously created in your CBRroute project. - Click .The full path appears in the Directory Name field.
- Delete everything in the path string, except
src/data. - Click the Consumer tab, and enable the Noop option by clicking its check box.The Noop option prevents the message#.xml files being deleted from the
src/datafolder, and it enables idempotency to ensure that each message#.xml file is consumed only once. - Click the Generic tab to open the file node's Details page
Figure 2.10. File Details page
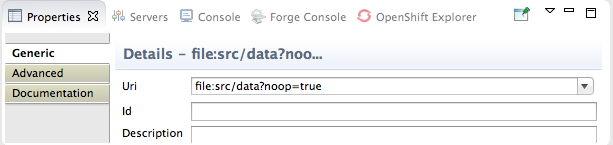 The tooling automatically populates the Uri field with the Directory name and Noop properties you configured on the Advanced tab.
 - Select the second file:directoryName node you dragged onto the canvas.
- In the Generic tab's Uri field, replace directoryName with
target/messages/others. Leave the other fields blank.Figure 2.11. File destination property editor
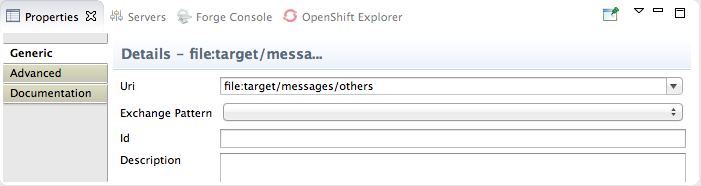 NoteThe
target/messages/othersfolder will be created at runtime. - On the canvas, select the first file: node (
file:src/data?noop=true), and drag it's connector arrow ( ) to the second file node (
file:target/messages/others), then release it.A segmented line connects the two endpoints, as shown in Figure 2.12.Figure 2.12. Completed route, diagram view
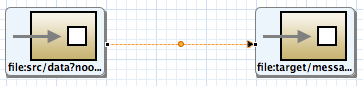 NoteYou can drag the line's bendpoint (orange dot) to change the angle of the line's segments. Doing so creates two new bendpoints, one on either side of the original. This behavior enables you to easily adjust your diagram to accommodate increasingly complex routes.
 - To quickly align the connected endpoints, right-click the canvas to open the context menu, and then select .
- Select → to save the route.
- Click the Source tab at bottom, left of the canvas.
Example 2.1. XML for CBRroute
<?xml version="1.0" encoding="UTF-8"?>
 <blueprint xmlns="http://www.osgi.org/xmlns/blueprint/v1.0.0"
       xmlns:camel="http://camel.apache.org/schema/blueprint"
       xmlns:xsi="http://www.w3.org/2001/XMLSchema-instance"
       xsi:schemaLocation="http://www.osgi.org/xmlns/blueprint/v1.0.0
           http://www.osgi.org/xmlns/blueprint/v1.0.0/blueprint.xsd
       http://camel.apache.org/schema/blueprint
           http://camel.apache.org/schema/blueprint/camel-blueprint.xsd">

   <camelContext trace="false" xmlns="http://camel.apache.org/schema/blueprint">
     <route>
        <from uri="file:src/data?noop=true"/>
        <to uri="file:target/messages/others"/>
     </route>
   </camelContext>

 </blueprint>
Creating test messages
Before you can run your route, you need to create test messages to send through it.
- In Project Explorer, right-click
CBRroute/srcto open the context menu. - Select → to open the New Folder wizard:
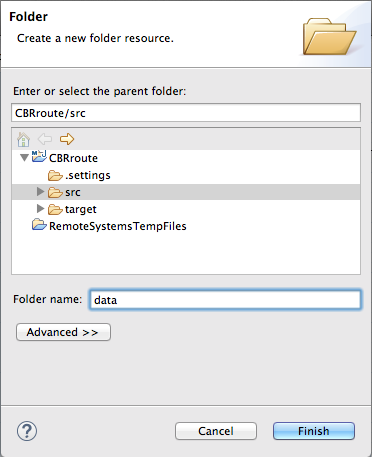
- Check that CBRroute/src appears in the Enter or select the parent folder: field. Otherwise enter it manually, or select it from the graphical representation of the project's hierarchy
- In the Folder name: field, enter data, and then click Finish.The new
datafolder appears in Project Explorer, under thesrcfolder:
- In Project Explorer, right-click
CBRrouteto open the context menu. - Click → to open the Fuse Message File wizard:

- Check that CBRroute/src/data appears in the Enter or select the parent folder field. Otherwise enter it manually, or select it from the graphical representation of the project's hierarchy.
- In , enter
message1.xml. - Click to open the test message,
message1.xml, in Design View: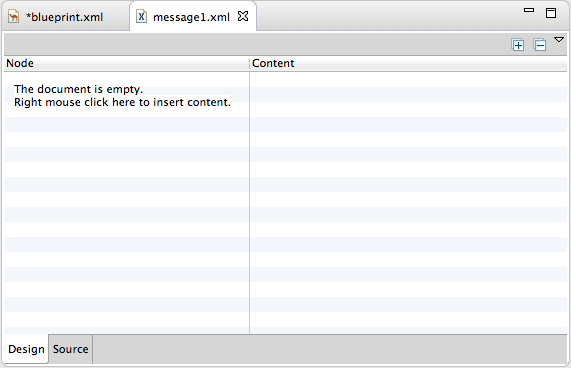
- Click the tab at the bottom, right of the canvas to switch to view:

- In view, enter this text:
<?xml version="1.0" encoding="UTF-8"?> <order> <customer> <name>Brooklyn Zoo</name> <city>Brooklyn</city> <country>USA</country> </customer> <orderline> <animal>wombat</animal> <quantity>15</quantity> <maxAllowed>25</maxAllowed> </orderline> </order> - Save the file.
- Click Messages.zip to download the five remaining preconstructed test message files (
message2.xmlthroughmessage6.xml), and then unpack them into theCBRroute/src/datafolder. You will use all six test messages in the remaining Fuse Tooling tutorials.Table 2.1 shows the contents of each preconstructed message file.Table 2.1. Preconstructed test messages
msg# <name> <city> <country> <animal> <quantity> <maxAllowed> 2 San Diego Zoo San Diego USA giraffe 3 2 3 London Zoo London Great Britain penguin 12 20 4 Bristol Zoo Bristol Great Britain emu 5 4 5 Paris Zoo Paris France giraffe 2 2 6 Hellabrunn Gardens Munich Germany penguin 18 20
Next steps
After you have created and designed your route, you can run it by deploying it into your local Apache Camel runtime, as described in Chapter 3, To Run a Route.
Further reading
To learn more about:
- using the editor, see Red Hat JBoss Fuse Tooling: JBoss Fuse Tooling User Guide at https://access.redhat.com/documentation/en-US/Red_Hat_JBoss_Fuse/6.2/html/Tooling_User_Guide/RiderEditRoute.html
- Apache Camel endpoints, see Red Hat JBoss Fuse: Component Reference.