
Red Hat Training
A Red Hat training course is available for Red Hat Decision Manager
Getting started with decision services
Abstract
Preface
As a business analyst or rules developer, you can use Decision Central in Red Hat Decision Manager to design a variety of decision services. In this tutorial, you will create and test a driver’s license suspension scenario.
Prerequisites
- Red Hat JBoss Enterprise Application Platform 7.1.0 is installed. For details, see Red Hat JBoss EAP 7.1.0 Installation Guide.
- Red Hat Decision Manager is installed and configured with Decision Server. For more information, see Installing and configuring Red Hat Decision Manager on Red Hat JBoss EAP 7.1.
-
Red Hat Decision Manager is running and you can log in to Decision Central with the
developerrole. For more information, see Planning a Red Hat Decision Manager installation.
Chapter 1. Creating the traffic violations project
A project is the container for assets such as data objects, guided decision tables, and guided rules. For this tutorial, you will create the Driver_department_traffic_violations project.
Procedure
- Log in to Decision Central.
Go to Menu → Design → Projects.
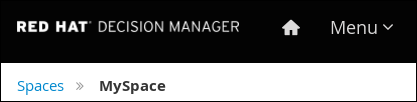
Tip: Red Hat Decision Manager provides a default space called MySpace, as shown in the following image. You can use the default space to create and test example projects.
Figure 1.1. Default spaces
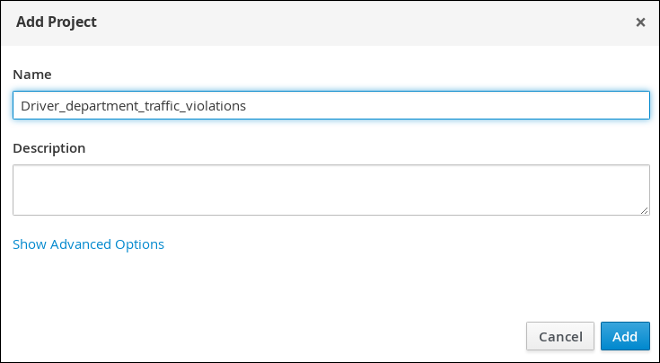
- Click Add Project.
-
Enter
Driver_department_traffic_violationsin the Name field. Click Add.
Figure 1.2. Add Project window
The Assets view of the project opens.
Chapter 2. Data objects
Data objects are the building blocks for the rule assets that you create. Data objects are custom data types implemented as Java objects in specified packages of your project. For example, you might create a Person object with data fields Name, Address, and DateOfBirth to specify personal details for loan application rules. These custom data types determine what data your assets and your decision services are based on.
The following tables show the Violation and Driver data objects that you will create in this tutorial.
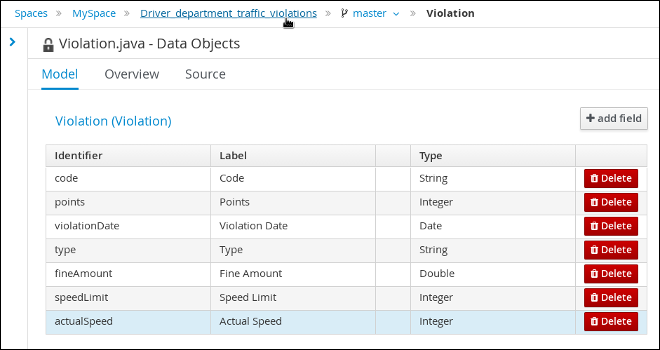
Table 2.1. Violation data object
| ID | Label | Type |
|---|---|---|
| code | Code | String |
| points | Points | Integer |
| violationDate | Violation Date | Date |
| type | Type | String |
| fineAmount | Fine Amount | Double |
| speedLimit | Speed Limit | Integer |
| actualSpeed | Actual Speed | Integer |
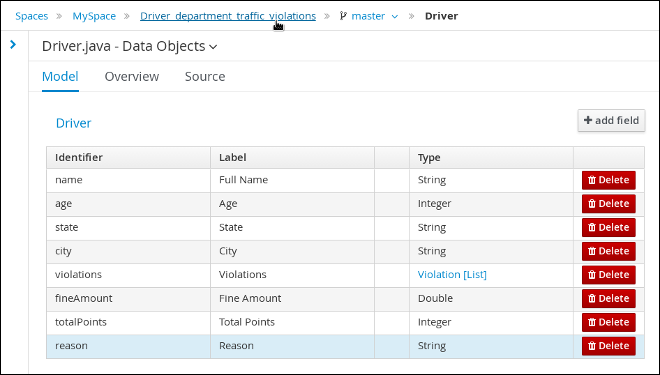
Table 2.2. Driver data object
| ID | Label | Type |
|---|---|---|
| name | Name | String |
| age | Age | Integer |
| state | State | String |
| city | City | String |
| violations | Violations | Violation (org.jboss.example.traffic_violations.Violation) Note: The violations field is set to "List" to hold multiple items for the given type. |
| fineAmount | Fine Amount | Double |
| totalPoints | Total Points | Integer |
| reason | Reason | String |
2.1. Creating the Violation data object
The Violation data object contains data fields based on violation details, such as Violation Date, Fine Amount, and Speed Limit.
Prerequisites
You have created the Driver_department_traffic_violations project.
Procedure
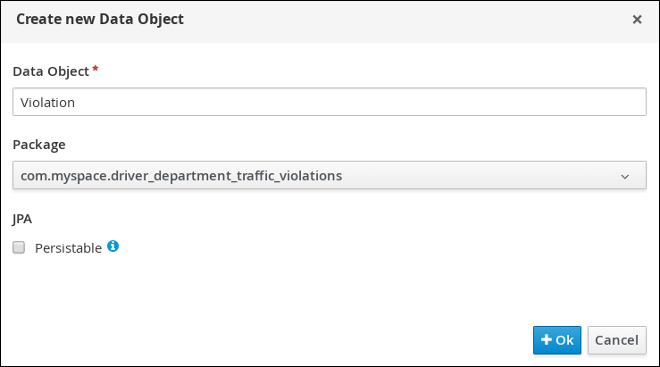
- Click Add Asset → Data Object.
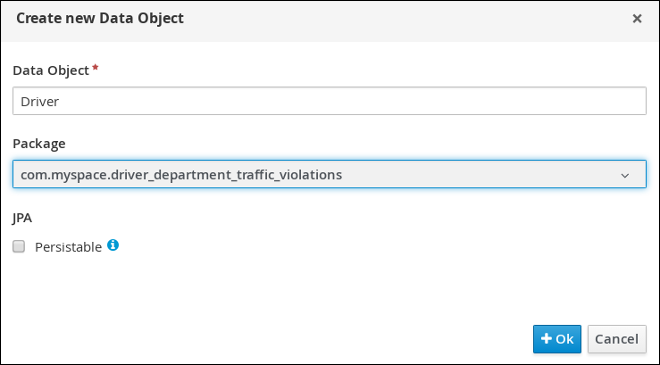
In the Create new Data Object wizard, enter the following values:
-
Data Object:
Violation -
Package: select
com.myspace.driver_department_traffic_violations
-
Data Object:
Click Ok.
Figure 2.1. Create new Data Object window
2.1.1. Adding the Violation data object constraints
Populate the Violation data object fields with the constraints that you will select when you define your rules.
Prerequisites
You have created the Violation data object.
Procedure
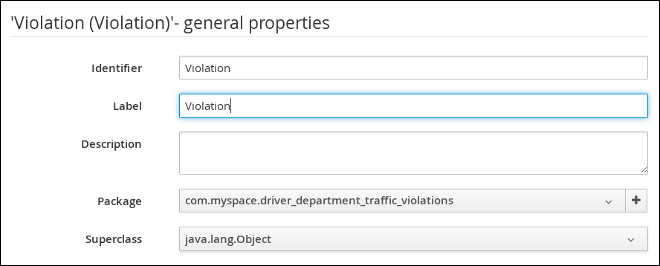
In the
'Violation'-general propertiessection, enter Violation in the Label field.Figure 2.2. General properties
- Click + add field.
Enter the following values:
-
Id:
code -
Label:
Code -
Type:
String
-
Id:
Click Create and continue, then enter the following values:
-
Id:
points -
Label:
Points -
Type:
Integer
-
Id:
Click Create and continue, then enter the following values:
-
Id:
violationDate -
Label:
Violation Date -
Type:
Date
-
Id:
Click Create and continue, then enter the following values:
-
Id:
type -
Label:
Type -
Type:
String
-
Id:
Click Create and continue, then enter the following values:
-
Id:
fineAmount -
Label:
Fine Amount -
Type:
Double
-
Id:
Click Create and continue, then enter the following values:
-
Id:
speedLimit -
Label:
Speed Limit -
Type:
Integer
-
Id:
Click Create and continue, then enter the following values:
-
Id:
actualSpeed -
Label:
Actual Speed -
Type:
Integer
-
Id:
- Click Create.
- Click Save, and then click Save to confirm your changes.
Click the Driver_department_traffic_violations label to return to the Assets view of the project.
Figure 2.3. Violation data object fields
2.2. Creating the Driver data object
The Driver data object contains data fields based on driver details, such as Name, Age, and Total Points.
Prerequisites
You have created the Driver_department_traffic_violations project.
Procedure
- Click Add Asset → Data Object.
In the Create new Data Object wizard, enter the following values:
-
Data Object:
Driver -
Package: select
com.myspace.driver_department_traffic_violations
-
Data Object:
Click Ok.
Figure 2.4. Create new Data Object window
2.2.1. Adding the Driver data object constraints
Populate the Driver data object fields with the constraints that you will select when you define your rules.
Prerequisites
You have created the Driver data object.
Procedure
-
In the
'Driver'-general propertiessection, enter Driver in the Label field. - Click + add field.
Enter the following values:
-
Id:
name -
Label:
Full Name -
Type:
String
-
Id:
Click Create and continue, then enter the following values:
-
Id:
age -
Label:
Age -
Type:
Integer
-
Id:
Click Create and continue, then enter the following values:
-
Id:
state -
Label:
State -
Type:
String
-
Id:
Click Create and continue, then enter the following values:
-
Id:
city -
Label:
City -
Type:
String
-
Id:
Click Create and continue, then enter the following values:
-
Id:
violations -
Label:
Violations -
Type:
Violation(com.myspace.driver_department_traffic_violations.Violation) - List: Select this check box to enable the field to hold multiple items for the specified type.
-
Id:
Click Create and continue, then enter the following values:
-
Id:
fineAmount -
Label:
Fine Amount -
Type:
Double
-
Id:
Click Create and continue, then enter the following values:
-
Id:
totalPoints -
Label:
Total Points -
Type:
Integer
-
Id:
Click Create and continue, then enter the following values:
-
Id:
reason -
Label:
Reason -
Type:
String
-
Id:
- Click Create.
- Click Save, and then click Save to confirm your changes.
Click the Driver_department_traffic_violations label to return to the Assets view of the project.
Figure 2.5. Driver data object fields
Chapter 3. Guided Rules
Guided Rules are business rules that you can create in a UI-based Guided Rules designer that leads you through the rule creation process. The rule designer provides fields and options for acceptable input based on the object model of the rule being edited. All data objects related to the rule must be in the same project package as the rule. Assets in the same package are imported by default. You can use the Data Objects tab of the rule designer to verify that all required data objects are listed or to import any other needed data objects.
Figure 3.1. The Guided Rule designer
3.1. Creating the Driver License Suspension rule
Create the Driver license suspension rule using the Guided Rule wizard.
Prerequisite
You have created both the Violation and Driver data objects.
Procedure
- Log in to Decision Central.
- Click Menu → Design → Projects, then Driver_department_traffic_violations.
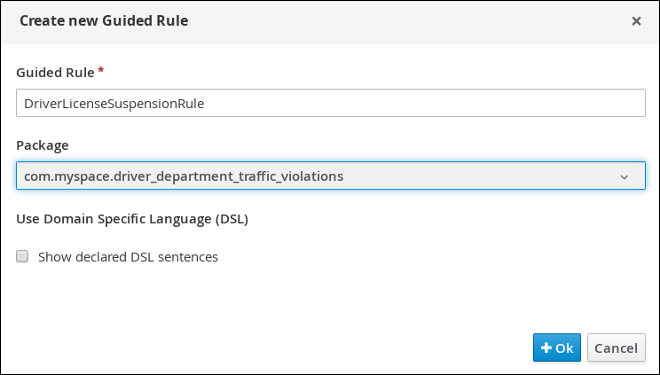
Click Add Asset → Guided Rule, then enter:
-
Guided Rule:
DriverLicenseSuspensionRule -
Package:
com.myspace.driver_department_traffic_violations
-
Guided Rule:
Click Ok to open the Guided Rule designer.
Figure 3.2. Create new Guided Rule window
3.2. Setting the Suspension rule conditions
Set the Suspension rule conditions that are used to determine the driver’s violation.
Prerequisite
You have created the Driver License Suspension rule.
Procedure
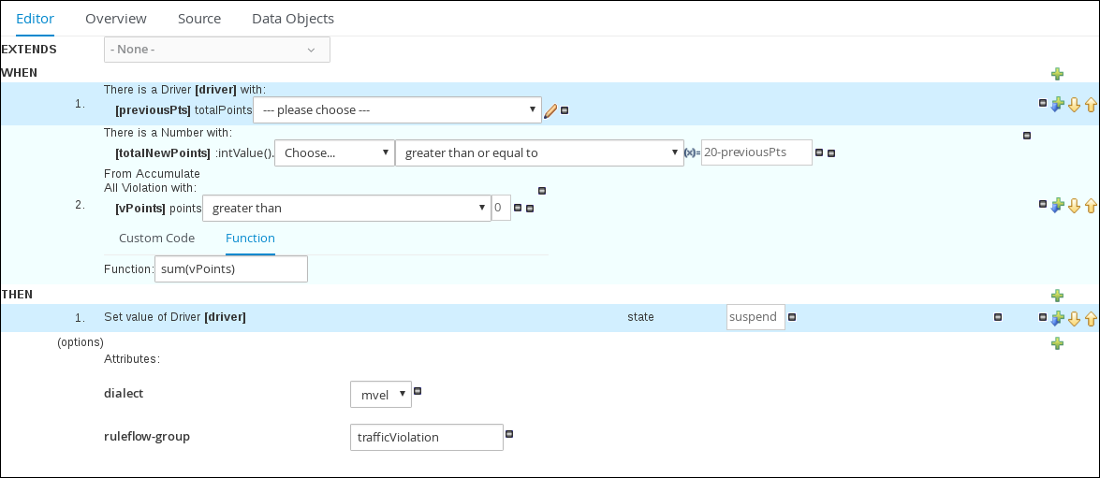
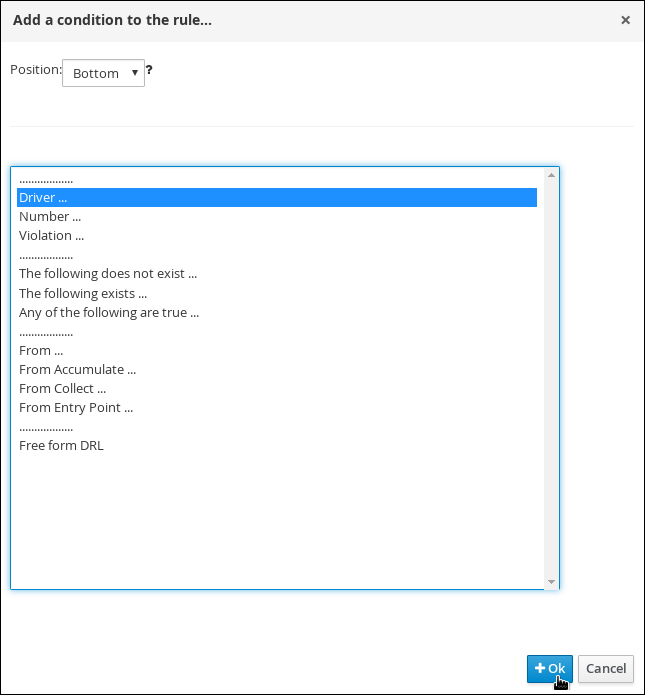
-
Click (
 ) next to the WHEN label to open the Add a condition to the rule window.
Select Driver and click Ok.
Figure 3.3. Create new Guided Rule window
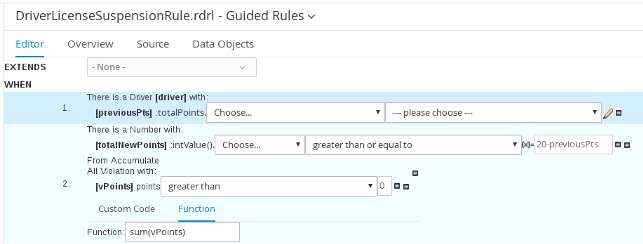
- Click the There is a Driver label to open the Modify constraints for Driver window.
-
Enter
driverin the Variable name field and click Set. - Click There is a Driver[driver] and click Expression editor.
- Click [not bound] to open the Expression editor.
-
In the Bind the Expression to a new variable field, enter:
previousPtsand click Set. - From the Choose menu, select totalPoints.
-
Click (
) next to line 1 (the previousPts label) to open the Add a condition to the rule window.
- Select From Accumulate and click Ok.
- Click click to add pattern above the From Accumulate label and select Number from the choose fact type menu.
- Click There is a number label to open the Modify contraints for Driver window.
- Click Expression editor and select intValue() from the [not bound]: Choose menu.
- Click [not bound] to open the Expression editor.
-
In the Bind the Expression to a new variable field, enter:
totalNewPointsand click Set. - Click click to add pattern and select Violation from the choose fact type menu.
- Click All Violation with: to open the Modify contraints for Violation window and select points from the Add a restriction on a field menu.
- Click please choose next to the points label and select greater than.
-
Click (
 ), and then click Literal value.
- Click the points label to open the Add a field window.
-
Enter
vPointsand click Set. -
In the Function field, enter
sum(vPoints). - Select greater than or equal to from the totalNewPoints → please choose menu.
-
Click (
), click New formula, and enter
20-previousPtsin the new field. - Click Save, and then click Save to confirm your changes.
Figure 3.4. Suspension Rule conditions
3.3. Setting the Suspension rule actions
Set the Suspension rule actions that are used to determine a driver’s resulting penalties, including points and fine amounts, based on the Suspension rule conditions.
Prerequisite
You have set the Suspension rule conditions.
Procedure
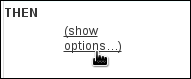
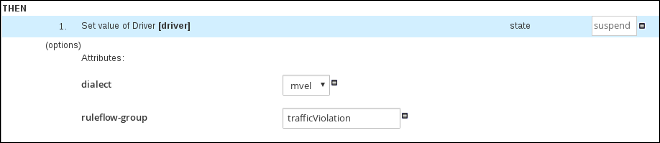
Click (show options…).
Figure 3.5. show options selection
-
Click (
) next to the THEN label and select Change field values of driver, and click Ok.
- Click the Set value of Driver [driver] field and select state from the Add field menu.
-
Click (
) next to state in the Set value of Driver [driver] section to open the Field value window.
Click Literal value and enter
suspendin the new field.Figure 3.6. New field

-
Click (
) next to the (options) label below the Set value of Driver [driver] section.
- From the Add an option to the rule window, select the ruleflow-group option from the Attribute menu.
-
Enter
trafficViolationin to the ruleflow-group field. Click Save, and then click Save to confirm your changes.
Figure 3.7. Suspension rule actions
Chapter 4. Guided decision tables
Guided decision tables are a wizard-led alternative to uploaded decision table spreadsheets for defining business rules in a tabular format. With guided decision tables, you are led by a UI-based wizard in Decision Central that helps you define rule attributes, metadata, conditions, and actions based on specified data objects in your project. After you create your guided decision tables, the rules you defined are compiled into Drools Rule Language (DRL) rules as with all other rule assets.
All data objects related to a guided decision table must be in the same project package as the guided decision table. Assets in the same package are imported by default. After you create the necessary data objects and the guided decision table, you can use the Data Objects tab of the guided decision tables designer to verify that all required data objects are listed or to import other existing data objects by adding a New item.
4.1. Creating a traffic violation guided decision table
Use the Guided Decision Table designer to create the traffic violation guided decision table, which specifies the driver’s specific violation and the resulting fine and points.
Prerequisite
You have created both the Violation and Driver data objects.
Procedure
- Log in to Decision Central.
- Click Menu → Design → Projects, then Driver_department_traffic_violations.
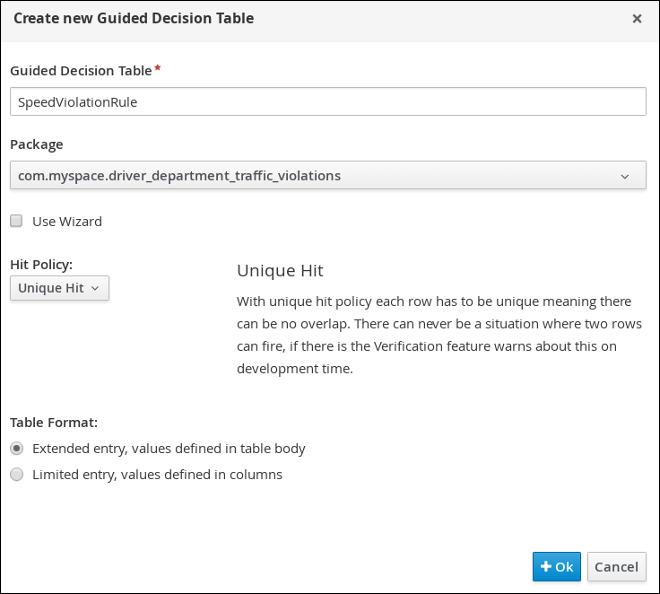
Click Add Asset → Guided Decision Table, then enter:
-
Guided Decision Table:
SpeedViolationRule -
Package:
com.myspace.driver_department_traffic_violations
-
Guided Decision Table:
- Select Unique Hit from the Hit Policy menu.
- Select Extended entry, values defined in table body in the Table format section.
Click Ok to open the Guided Decision Tables designer.
Figure 4.1. Guided Decision Tables designer
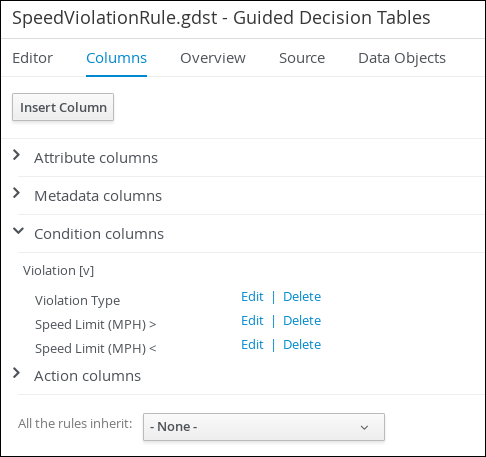
4.1.1. Inserting Violation Type columns
The Violation Type column contains the violation details such as the the driver’s speed and if the driver was under the influence of drugs or alcohol.
Prerequisite
You have created the traffic violation guided decision table.
Procedure
Click Columns → Insert Column and then select Include advanced options.
Figure 4.2. Column tab

Select Add an Attribute column and click Next.
Figure 4.3. Add a new column window
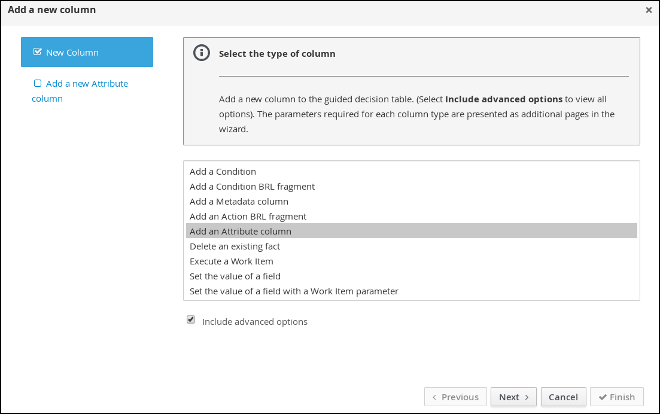
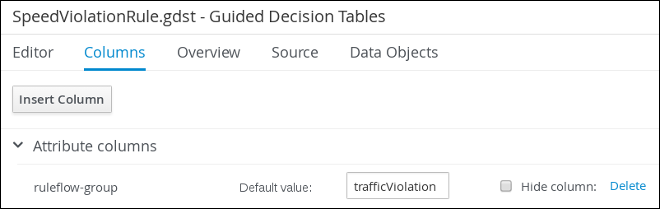
- Select Ruleflow-group and click Finish.
Expand Attribute columns and enter
trafficViolationin the Default value field.Figure 4.4. Attribute columns window
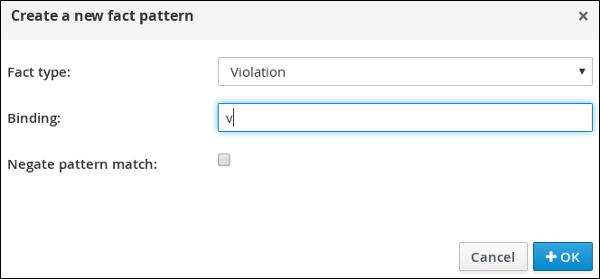
- Click Insert Column, select Add a Condition → Pattern → +Create a new Fact Pattern.
Select Violation from the Fact type menu, enter
vin the Binding field, and click OK.Figure 4.5. Create a new fact pattern window
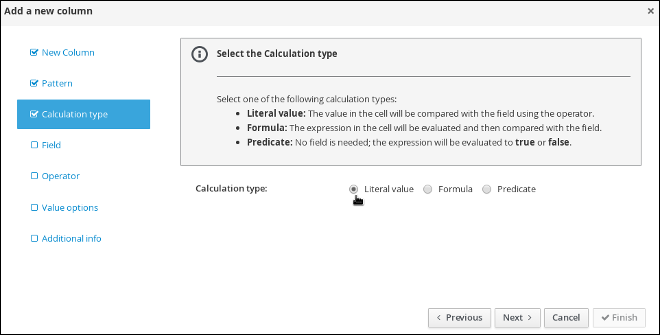
Select Calculation type → Literal value.
Figure 4.6. Calculation type options
- Select Field and then select type from the Field menu.
- Select Operator and then equal to from the Operator menu.
-
Select Value options and enter
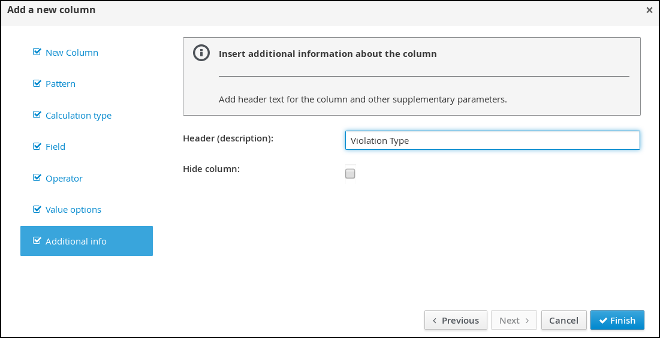
Speed,Driving while intoxicated,DWI=Driving while under the influence of drugsin the Value list (optional) field. Select Additional info, enter
Violation Typein the Header (description) field, and click Finish.Figure 4.7. Violation Type header
- Click Insert Column, select Add a Condition → Pattern, and select Violation[v] from the Pattern menu.
-
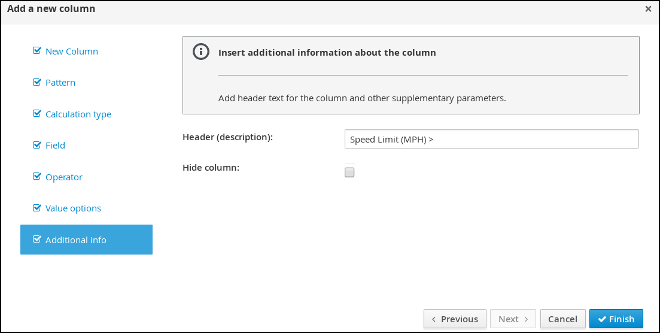
Select Calculation type → Predicate → Field and enter
actualSpeed-speedLimit > $param. -
Select Value options, then select Additional info and enter
Speed Limit (MPH) >in the Header (description) field. Click Finish.
Figure 4.8. Speed Limit (MPH) > header
- Click Insert Column, select Add a Condition → Pattern, and select Violation[v] from the Pattern menu.
- Select Calculation type → Predicate.
-
Select Field and enter
actualSpeed-speedLimit < $paramin the Field field. - Select Operator, select Value options, then select Additional info.
Enter
Speed Limit (MPH) <in the Header (description) field and click Finish.Figure 4.9. Condition columns
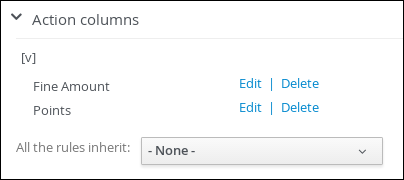
4.1.2. Inserting Fine Amount and Points columns
The Fine Amount* and Points columns contain the fines and points based on the corresponding Violation Type field values.
Prerequisite
You have inserted the Violation Type column in to the traffic violation guided decision table.
Procedure
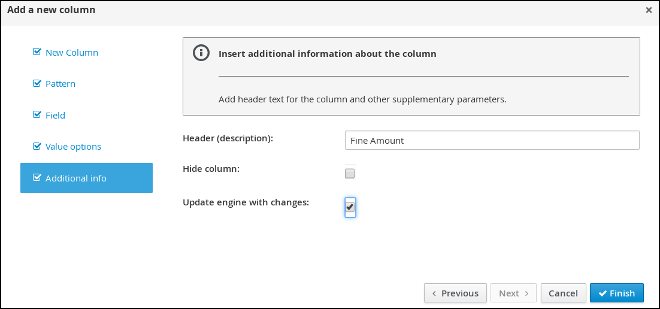
- Click Insert Column, select Set the value of a field → Pattern, and select Violation[v] from the Pattern menu.
- Select Field and then fineAmount from the Field menu.
-
Select Value options, and then select Additional info, and enter
Fine Amountin the Header (description) field. Select the Update engine with changes option and click Finish.
Figure 4.10. Fine Amount header
- Click Insert Column, select Set the value of a field → Pattern, and select Violation[v] from the Pattern menu.
- Select Field and then points from the Field menu.
-
Select Value options, then select Additional info and enter
Pointsin the Header (description) field. Select the Update engine with changes option and click Finish.
Figure 4.11. Action columns
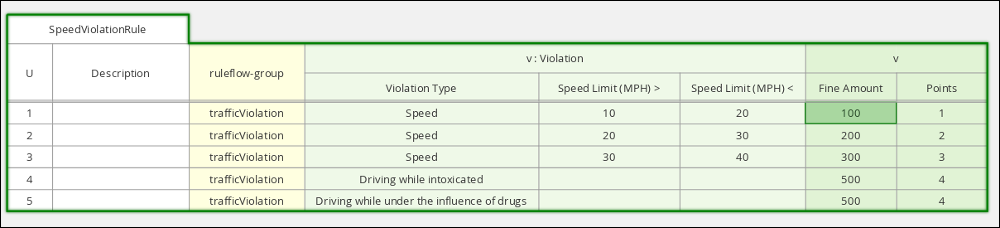
4.1.3. Inserting guided decision table rows
After you have created your columns in the guided decision table, you can add rows and define rules within the decision table designer.
Prerequisite
You have created the Violation Type, Fine Amount, and Points columns in the traffic violation guided decision table.
Procedure
- Click Editor → Insert → Append row. Repeat this step to add a total of five table rows.
Fill out the table as shown in the following example:
Figure 4.12. Populated data fields
- Click Save, and then click Save to confirm your changes.
Chapter 5. Test Scenarios
Test Scenarios in Red Hat Decision Manager enable you to validate the functionality of rules, models, and events before deploying them into production. A test scenario uses data for conditions that resemble an instance of your fact or project model. This data is matched against a specific set of rules and if the expected results match the actual results, the test is successful. If the expected results do not match the actual results, then the test fails.
After you run all test scenarios, the status of the scenarios is reported in a Reporting panel.
Test scenarios can be executed one at a time or as a group. The group execution contains all the scenarios from one package. Test scenarios are independent, so that one scenario cannot affect or modify the other.
5.1. Testing the speed limit scenario
Test the speed limit scenario using the data that you specified when you created the traffic violation guided decision table.
Prerequisites
- You have created the Driver_department_traffic_violations project.
- You have created the Violation and Driver data objects.
- You have created the speed violation guided decision table.
Procedure
- Log in to Decision Central.
- Click Menu → Design → Projects, then Driver_department_traffic_violations.
- Click Add Asset → Test Scenario.
In the Create new Test Scenario window wizard, enter the following values:
-
Test Scenario:
Speed limit 10-20. -
Package: select
com.myspace.driver_department_traffic_violations.
-
Test Scenario:
- Click Ok.
- Click +GIVEN to open the New input window.
- Select Violation from the Insert a new fact menu.
-
Enter
violationin the Fact name field and click Add. - Click Add a field located under Insert 'Violation'[violation] to open the Choose a field to add window.
- Select speedLimit from the Choose a field to add menu and click OK.
-
Click (
), and then click Literal value next to speedLimit.
-
Click Literal value in the Field value window, then enter
40in the speedLimit field. - Click Insert 'Violation'[violation].
- Select type from the Choose a field to add menu in the Choose a field to add window, and click OK.
-
Click (
), and then click Literal value next to Literal value.
-
Enter
Speedin the type field. - Click Insert 'Violation'[violation].
- Select actualSpeed from the Choose a field to add menu, and click OK.
-
Click (
), and then click Literal value next to Literal value.
-
Enter
55in the actualSpeed field. - Click +Expect to open the New expectation window.
- Expand the Rule menu, select Row 1 SpeedViolationRule, and click OK.
-
Click +GIVEN to open the New input window, enter
trafficViolationin the Activate rule flow group field, and click Add. - Click +Expect to open the New expectation window and click Add next to Fact value: violation.
- Click Violation 'violation' has values: to open the Choose a field to add window.
- Select fineAmount from the Choose a field to add menu and click OK.
-
Enter
100.0in the fineAmount: equals field. - Click Violation 'violation' has values: to open the Choose a field to add window.
- Select points from the Choose a field to add menu and click OK.
-
Enter
1in the points: equals field. - Click Save, and then click Save to confirm your changes.
Click Run scenario.
Figure 5.1. Speed test results screen
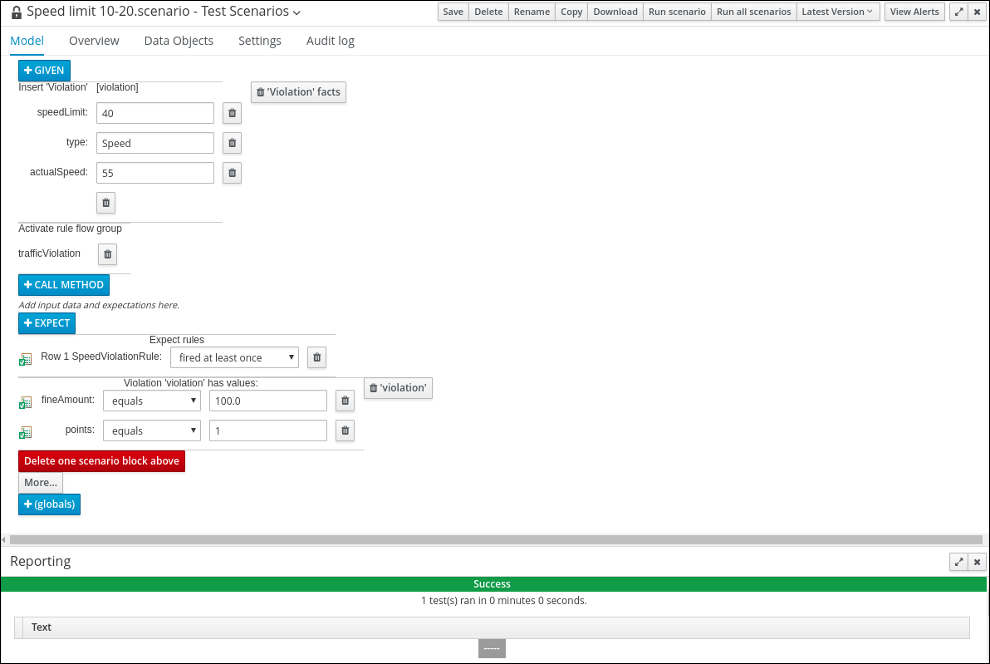
If the values and conditions set in the test scenario meet the requirements as specified in the speed violation guided decision table, the Reporting section at the bottom of the window displays a Success message.
5.2. Testing the driver license suspension scenario
Test the driver license suspension scenario using the data that you specified when you set the Driver License Suspension rules and actions.
Prerequisites
- You have created the Driver_department_traffic_violations project.
- You have created the Violation and Driver data objects.
- You have set the Driver License Suspension rules and actions.
Procedure
- Log in to Decision Central.
- Click Menu → Design → Projects, then Driver_department_traffic_violations.
- Click Add Asset → Test Scenario.
In the Create new Test Scenario window wizard, enter the following values:
-
Test Scenario:
Suspend due to total points. -
Package: select
com.myspace.driver_department_traffic_violations.
-
Test Scenario:
- Click Ok.
- Click +GIVEN to open the New input window.
- Select Driver from the Insert a new fact menu.
-
Enter
driverin the Fact name field and click Add. - Click Add a field located under 'Driver'[driver] to open the Choose a field to add window.
- Select totalPoints from the Choose a field to add menu and click OK.
-
Click (
) next to totalPoints, click Literal value, then enter
10in the totalPoints field. - Click +GIVEN to open the New input window.
- Select Violation from the Insert a new fact menu.
-
Enter
violationin the Fact name field and click Add. - Click Add a field located under Insert 'Violation'[violation] to open the Choose a field to add window.
- Select points from the Choose a field to add menu and click OK.
-
Click (
), and then click Literal value next to Literal value.
-
Enter
10in the points field. - Click +Expect to open the New expectation window.
- Expand the Rule menu, select DriverLicenseSuspensionRule, and click OK.
-
Click +GIVEN to open the New input window, enter
trafficViolationin the Activate rule flow group field, and click Add. - Click +Expect to open the New expectation window and click Add next to Fact value: driver.
- Click Driver 'driver' has values: to open the Choose a field to add window.
- Select state from the Choose a field to add menu and click OK.
-
Enter
suspendin the state: equals field. - Click Save, and then click Save to confirm your changes.
Click Run scenario.
Result
The rule is fired and the driver’s license is suspended because the total number of points is >= 20.
Figure 5.2. Suspension test results screen
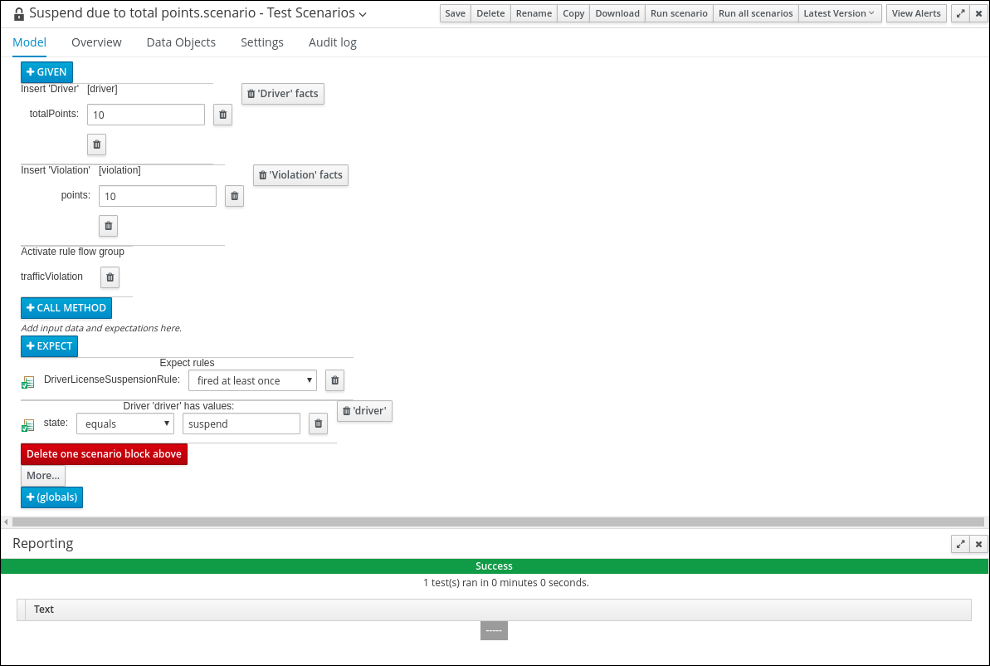
If the values and conditions set in the test scenario meet the requirements that you specified when you set the Driver License Suspension rules and actions, the Reporting section at the bottom of the window displays a Success message.
5.3. Testing the multiple violations scenario
Copy the Suspend due to total points asset and modify it to create the driver license suspension scenario for drivers with multiple violations using the data that you specified when you set the Driver License Suspension rules and actions.
Prerequisites
- You have created the Driver_department_traffic_violations project.
- You have created the Violation and Driver data objects.
- You have set the driver license suspension rules and actions.
Procedure
- Log in to Decision Central.
- Click Menu → Design → Projects, then Driver_department_traffic_violations.
-
Click Suspend due to total points → Copy, enter
Suspend due to multiple violationsin the New Asset Name field, and click Make a Copy. - Click Space → MySpace → Driver_department_traffic_violations, and then select the Suspend due to multiple violations Asset.
- Click +GIVEN to open the New input window.
- Select Violation from the Insert a new fact menu.
-
Enter
violation2in the Fact name field and click Add. -
Click (
) next to points, click Literal value, then enter
5in the points → violation2 field. -
In the totalPoints field, change the value from
10to5. - Click Save, and then click Save to confirm your changes.
Click Run scenario.
Figure 5.3. Suspension test results screen
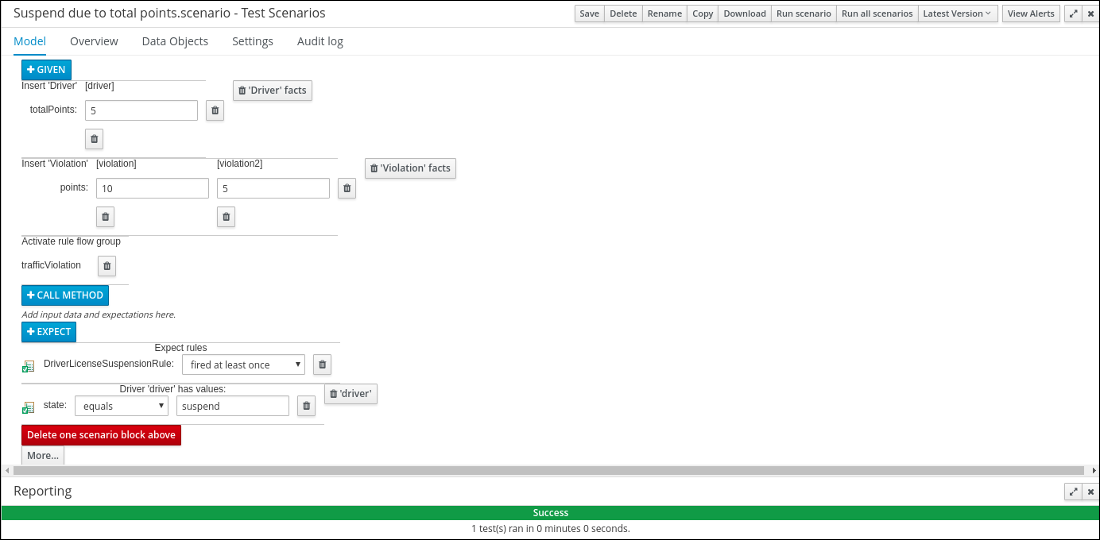
If the values and conditions set in the test scenario meet the requirements that you specified when you set the Driver License Suspension rules and actions, the Reporting section at the bottom of the window displays a Success message.
Appendix A. Versioning information
Documentation last updated on Friday, May 22, 2020.