
Chapter 39. Set Up Cross-Datacenter Replication
39.1. Cross-Datacenter Replication
In Red Hat JBoss Data Grid, Cross-Datacenter Replication allows the administrator to create data backups in multiple clusters. These clusters can be at the same physical location or different ones. JBoss Data Grid’s Cross-Site Replication implementation is based on JGroups' RELAY2 protocol.
Cross-Datacenter Replication ensures data redundancy across clusters. In addition to creating backups for data restoration, these datasets may also be used in an active-active mode. When configured in this manner systems in separate environments are able to handle sessions should one cluster fail. Ideally, each of these clusters should be in a different physical location than the others.
39.2. Cross-Datacenter Replication Operations
Red Hat JBoss Data Grid’s Cross-Datacenter Replication operation is explained through the use of an example, as follows:
Figure 39.1. Cross-Datacenter Replication Example
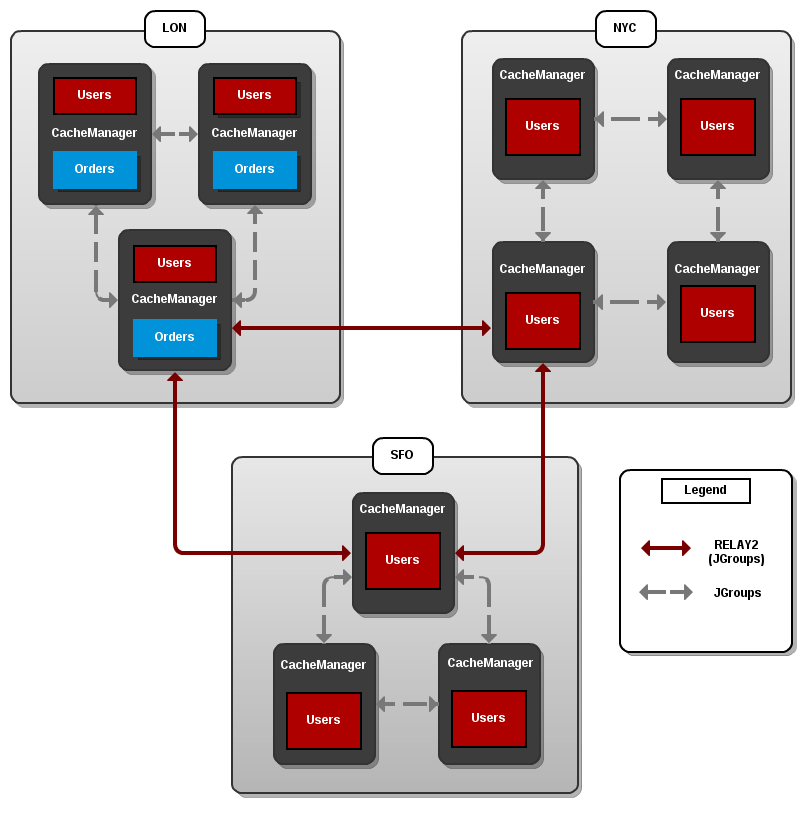
Three sites are configured in this example: LON, NYC and SFO. Each site hosts a running JBoss Data Grid cluster made up of three to four physical nodes.
The Users cache is active in all three sites - LON, NYC and SFO. Changes to the Users cache at the any one of these sites will be replicated to the other two as long as the cache defines the other two sites as its backups through configuration. The Orders cache, however, is only available locally at the LON site because it is not replicated to the other sites.
The Users cache can use different replication mechanisms each site. For example, it can back up data synchronously to SFO and asynchronously to NYC and LON.
The Users cache can also have a different configuration from one site to another. For example, it can be configured as a distributed cache with owners set to 2 in the LON site, as a replicated cache in the NYC site and as a distributed cache with owners set to 1 in the SFO site.
JGroups is used for communication within each site as well as inter-site communication. Specifically, a JGroups protocol called RELAY2 facilitates communication between sites. For more information, see About RELAY2.
39.3. Configure Cross-Datacenter Replication
39.3.1. Configure Cross-Datacenter Replication (Remote Client-Server Mode)
In Red Hat JBoss Data Grid’s Remote Client-Server mode, cross-datacenter replication is set up as follows:
Set Up Cross-Datacenter Replication
Set Up RELAY
Add the following configuration to the standalone.xml file to set up RELAY :
<subsystem xmlns="urn:infinispan:server:jgroups:8.0">
    <channels default="cluster">
        <channel name="cluster"/>
        <channel name="xsite" stack="tcp"/>
    </channels>
    <stacks default="udp">
        <stack name="udp">
            <transport type="UDP" socket-binding="jgroups-udp"/>
            <...other protocols...>
            <relay site="LON">
                <remote-site name="NYC" channel="xsite"/>
                <remote-site name="SFO" channel="xsite"/>
            </relay>
        </stack>
    </stacks>
</subsystem>
The RELAY protocol creates an additional stack (running parallel to the existing UDP stack) to communicate with the remote site. In the above example the
xsitechannel references the currenttcpstack. If a TCP based stack is used for the local cluster, two TCP based stack configurations are required: one for local communication and one to connect to the remote site. For an illustration, see Cross-Datacenter Replication Operations.Set Up Sites
Use the following configuration in the standalone.xml file to set up sites for each distributed cache in the cluster:
<distributed-cache name="namedCache">
     <!-- Additional configuration elements here -->
     <backups>
        <backup site="{FIRSTSITENAME}" strategy="{SYNC/ASYNC}" />
        <backup site="{SECONDSITENAME}" strategy="{SYNC/ASYNC}" />
     </backups>
</distributed-cache>
Configure the Transport
In our first step we indicated the remote datacenters would be connecting over TCP, via the
xsitechannel. Now the TCP stack is configured to point to the remote sites:<stack name="tcp"> <transport type="TCP" socket-binding="jgroups-tcp"/> <protocol type="TCPPING"> <property name="initial_hosts">lon.hostname[7600],nyc.hostname[7600],sfo.hostname[7600]"</property> <property name="ergonomics">false</property> </protocol> <!-- Additional configuration elements here --> </stack>Configure the Backup Sites
Repeat steps 1-3 for each site in this configuration, adjusting the site names in the RELAY configuration as appropriate.
A cross-datacenter example configuration file may be found at $JDG_SERVER/docs/examples/configs/clustered-xsite.xml .
39.3.2. Configure Cross-Datacenter Replication (Library Mode)
39.3.2.1. Configure Cross-Datacenter Replication Declaratively
When configuring Cross-Datacenter Replication, the relay.RELAY2 protocol creates an additional stack (running parallel to the existing TCP stack) to communicate with the remote site. If a TCP -based stack is used for the local cluster, two TCP based stack configurations are required: one for local communication and one to connect to the remote site.
In JBoss Data Grid’s Library mode, cross-datacenter replication is set up as follows:
Setting Up Cross-Datacenter Replication
Configure the Local Site
<infinispan xmlns:xsi="http://www.w3.org/2001/XMLSchema-instance" xsi:schemaLocation="urn:infinispan:config:8.4 http://www.infinispan.org/schemas/infinispan-config-8.4.xsd" xmlns="urn:infinispan:config:8.4"> <jgroups> <stack-file name="udp" path="jgroups-with-relay.xml"/> </jgroups> <cache-container default-cache="default"> <transport cluster="infinispan-cluster" lock-timeout="50000" stack="udp" node-name="node1" machine="machine1" rack="rack1" site="LON"/> <local-cache name="default"> <backups> <backup site="NYC" strategy="SYNC" failure-policy="IGNORE" timeout="12003"/> <backup site="SFO" strategy="ASYNC"/> </backups> </local-cache> <!-- Additional configuration information here --> </infinispan>-
Add the
siteattribute to thetransportelement to define the local site (in this example, the local site is namedLON). -
Cross-site replication requires a non-default JGroups configuration. Define the
jgroupselement and define a customstack-file, passing in the name of the file to be referenced and the location to this custom configuration. In this example, the JGroups configuration file is named jgroups-with-relay.xml . -
Configure the cache in site
LONto back up to the sitesNYCandSFO. Configure the back up caches:
Configure the cache in site
NYCto receive back up data fromLON:<local-cache name="backupNYC"> <backups/> <backup-for remote-cache="default" remote-site="LON"/> </local-cache>Configure the cache in site
SFOto receive back up data fromLON:<local-cache name="backupSFO"> <backups/> <backup-for remote-cache="default" remote-site="LON"/> </local-cache>
-
Add the
Add the Contents of the Configuration File
As a default, Red Hat JBoss Data Grid includes JGroups configuration files such as default-configs/default-jgroups-tcp.xml and default-configs/default-jgroups-udp.xml in the infinispan-embedded-{VERSION}.jar package.
Copy the JGroups configuration to a new file (in this example, it is named jgroups-with-relay.xml ) and add the provided configuration information to this file. Note that the relay.RELAY2 protocol configuration must be the last protocol in the configuration stack.
<config>
    ...
    <relay.RELAY2 site="LON"
              config="relay.xml"
              relay_multicasts="false" />
</config>
Configure the relay.xml File
Set up the relay.RELAY2 configuration in the relay.xml file. This file describes the global cluster configuration.
<RelayConfiguration>
    <sites>
        <site name="LON"
              id="0">
            <bridges>
                <bridge config="jgroups-global.xml"
                        name="global"/>
                </bridges>
        </site>
        <site name="NYC"
              id="1">
            <bridges>
                <bridge config="jgroups-global.xml"
                        name="global"/>
                </bridges>
        </site>
        <site name="SFO"
              id="2">
            <bridges>
                <bridge config="jgroups-global.xml"
                        name="global"/>
            </bridges>
        </site>
    </sites>
</RelayConfiguration>
Configure the Global Cluster
The file jgroups-global.xml referenced in relay.xml contains another JGroups configuration which is used for the global cluster: communication between sites.
The global cluster configuration is usually TCP -based and uses the TCPPING protocol (instead of PING or MPING ) to discover members. Copy the contents of default-configs/default-jgroups-tcp.xml into jgroups-global.xml and add the following configuration in order to configure TCPPING :
<config>
    <TCP bind_port="7800" ... />
    <TCPPING initial_hosts="lon.hostname[7800],nyc.hostname[7800],sfo.hostname[7800]"
             ergonomics="false" />
          <!-- Rest of the protocols -->
</config>
Replace the hostnames (or IP addresses) in
TCPPING.initial_hostswith those used for your site masters. The ports (7800in this example) must match theTCP.bind_port.For more information about the TCPPING protocol, see Using the TCPPing Protocol.
39.4. Taking a Site Offline
39.4.1. Taking a Site Offline
In Red Hat JBoss Data Grid’s Cross-datacenter replication configuration, if backing up to one site fails a certain number of times during a time interval, that site can be marked as offline automatically. This feature removes the need for manual intervention by an administrator to mark the site as offline.
It is possible to configure JBoss Data Grid to take down a site automatically when specified conditions are met, or for an administrator to manually take down a site:
Configure automatically taking a site offline:
- Declaratively in Remote Client-Server mode.
- Declaratively in Library mode.
- Using the programmatic method.
Manually taking a site offline:
- Using JBoss Operations Network (JON).
- Using the JBoss Data Grid Command Line Interface (CLI).
39.4.2. Taking a Site Offline
To take a site offline in either mode of Red Hat JBoss Data Grid’s add the take-offline element to the backup element. This will configure when a site is automatically taken offline.
Taking a Site Offline in Remote Client-Server Mode
<backup>
	<take-offline after-failures="${NUMBER}"
		      min-wait="${PERIOD}" />
</backup>
The take-offline element use the following parameters to configure when to take a site offline:
-
The
after-failuresparameter specifies the number of times attempts to contact a site can fail before the site is taken offline. -
The
min-waitparameter specifies the number (in milliseconds) to wait to mark an unresponsive site as offline. The site is offline when themin-waitperiod elapses after the first attempt, and the number of failed attempts specified in theafter-failuresparameter occur.
39.4.3. Taking a Site Offline via JBoss Operations Network (JON)
A site can be taken offline in Red Hat JBoss Data Grid using the JBoss Operations Network operations. For a list of the metrics, see JBoss Operations Network Plugin Operations.
39.4.4. Taking a Site Offline via the CLI
Use Red Hat JBoss Data Grid’s Command Line Interface (CLI) to manually take a site from a cross-datacenter replication configuration down if it is unresponsive using the site command.
The site command can be used to check the status of a site as follows:
[standalone@127.0.0.1:9990/MyCacheManager/namedCache] site --status ${SITENAME}
The result of this command would either be online or offline according to the current status of the named site.
The command can be used to bring a site online or offline by name as follows:
[standalone@127.0.0.1:9990/MyCacheManager/namedCache] site --offline ${SITENAME}[standalone@127.0.0.1:9990/MyCacheManager/namedCache] site --online ${SITENAME}
If the command is successful, the output ok displays after the command. As an alternate, the site can also be brought online using JMX (see Bring a Site Back Online for details).
For more information about the JBoss Data Grid CLI and its commands, see the Developer Guide 's chapter on the JBoss Data Grid Command Line Interface (CLI)
39.4.5. Bring a Site Back Online
After a site is taken offline, the site can be brought back online either using the JMX console to invoke the bringSiteOnline([replaceable]siteName) operation on the XSiteAdmin MBean (See XSiteAdmin for details) or using the CLI (see Taking a Site Offline via the CLI for details).
39.5. State Transfer Between Sites
39.5.1. State Transfer Between Sites
When an offline master site is back online, it is necessary to synchronize its state with the latest data from the backup site. State transfer allows state to be transferred from one site to another, meaning the master site is synchronized and made consistent with the backup site. Similarly, when a backup site becomes available, state transfer can be utilized to make it consistent with the master site.
Consider a scenario of two sites - Master site A and Backup site B. Clients can originally access only Master site A whereas Backup Site B acts as an invisible backup. Cross Site State Transfer can be pushed bidirectionally. When the new backup site B goes online, in order to synchronize its state with the master site A, a State Transfer can be initiated to push the state from the Master site A to the Backup site B.
Similarly, when the Master site A is brought back online, in order to synchronize it with the Backup site B, a State Transfer can be initiated to push the state from Backup site B to Master Site A.
The use cases applies for both Active-Passive and Active-Active State Transfer. The difference is that during Active-Active State Transfer we assume that cache operations can be performed in the site, which consumes state.
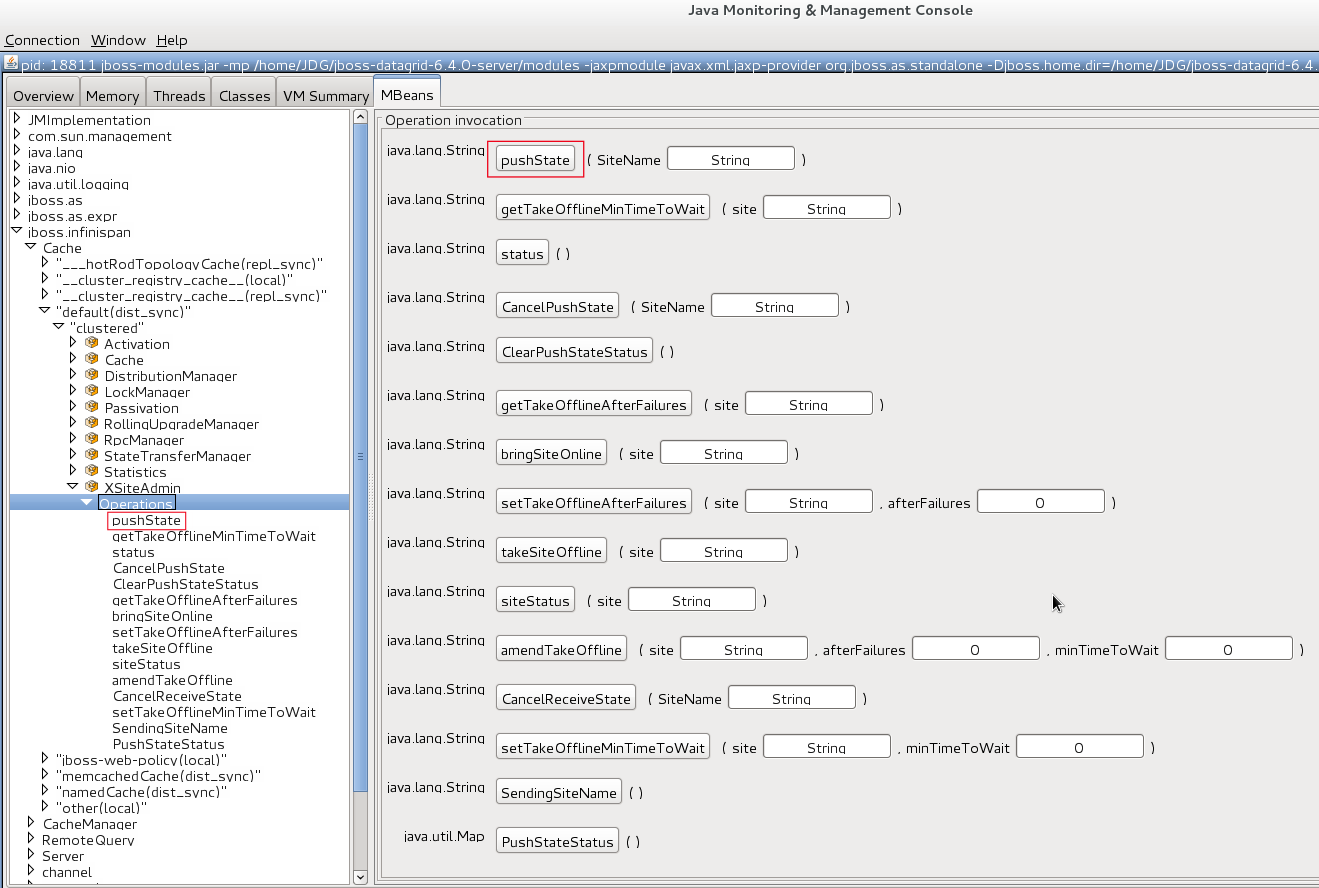
A system administrator or an authorized entity initiates the state transfer manually using JMX. The system administrator invokes the pushState(SiteName String) operation available in the XSiteAdminOperations MBean.
The following interface shows the pushState(SiteName String) operation in JConsole:
Figure 39.2. PushState Operation
State transfer is also invoked using the Command Line Interface (CLI) by the site push sitename command. For example, when the master site is brought back online, the system administrator invokes the state transfer operation in the backup site, specifying the master site name that is to receive the state.
The master site can be offline at the time of the push operation. On successful state transfer, the state data common to both the sites is overwritten on the master site. For example, if key A exists on the master site but not on the backup site, key A will not be deleted from the master site. Whereas, if key B exists on the backup as well as the master site, key B is overwritten on the master site.
Updates on keys performed after initiating state transfer are not overwritten by incoming state transfer.
Cross-site state transfer can be transactional and supports 1PC and 2PC transaction options. 1PC and 2PC options define whether data modified inside a transaction is backed up to a remote site in one or two phases. 2PC includes a prepare phase in which backup sites acknowledges that transaction has been successfully prepared. Both options are supported.
39.5.2. Active-Passive State Transfer
The active-passive state transfer is used when cross-site replication is used to back up the master site. The master site processes all the requests but if it goes offline, the backup site starts to handle them. When the master site is back online, it receives the state from the backup site and starts to handle the client requests. In Active-Passive state transfer mode, transactional writes happen concurrently with state transfer on the site which sends the state.
In active-passive state transfer mode, the client read-write requests occurs only on the backup site. The master site acts as an invisible backup until the client requests are switched to it when the state transfer is completed. The active-passive state transfer mode is fully supported in cross-datacenter replication.
When an Active-Passive State Transfer is interrupted by a network failure, the System Administrator invokes the JMX operation manually to resume the state transfer. To transfer the state, for example from Master site A to Backup site B, invoke the JMX operation on Master site A. Similarly, to transfer state from Backup site B to Master site A, invoke the JMX operation on the Backup site B.
The JMX operation is invoked on the site from which the state is transferred to the other site that is online to synchronize the states.
For example, there is a running backup site and the system administrator wants to bring back the master site online. To use active-passive state transfer, the system administrator will perform the following steps.
- Boot the Red Hat JBoss Data Grid cluster in the master site.
- Command the backup site to push state to the master site.
- Wait until the state transfer is complete.
- Make the clients aware that the master site is available to process the requests.
39.5.3. Active-Active State Transfer
In active-active state transfer mode, the client requests occur concurrently in both the sites while the state transfer is in progress. The current implementation supports handling requests in the new site while the state transfer is in progress, which may break the data consistency.
Active-active state transfer mode is not fully supported, as it may lead to data inconsistencies.
In active-active state transfer mode, both the sites, the master and the backup sites share the same role. There is no clear distinction between the master and backup sites in the active-active state transfer mode
For example, there is a running site and the system administrator wants to bring a new site online. To use active-active state transfer, the system administrator must perform the following steps.
- Boot the Red Hat JBoss Data Grid cluster in the new site.
- Command the running site to push state to the new site.
- Make the clients aware that the new site is available to process the requests.
39.5.4. State Transfer Configuration
State transfer between sites is not enabled or disabled but it allows to tune some parameters. The only configuration is done by the system administrator while configuring the load balancer to switch the request to the master site during or after the state transfer. The implementation handles a case in which a key is updated by a client before it receives the state, ignoring when it is delivered.
The following are default parameter values:
<backups>
  <backup site="NYC"
	  strategy="SYNC"
	  failure-policy="FAIL">
    <state-transfer chunk-size="512"
		    timeout="1200000"
		    max-retries="30"
		    wait-time="2000" />
	</backup>
</backups>
39.6. Configure Multiple Site Masters
39.6.1. Configure Multiple Site Masters
A standard Red Hat JBoss Data Grid cross-datacenter replication configuration includes one master node for each site. The master node is a gateway for other nodes to communicate with the master nodes at other sites.
This standard configuration works for a simple cross-datacenter replication configuration. However, with a larger volume of traffic between the sites, passing traffic through a single master node can create a bottleneck, which slows communication across nodes.
In JBoss Data Grid, configure multiple master nodes for each site to optimize traffic across multiple sites.
39.6.2. Multiple Site Master Operations
When multiple site masters are enabled and configured, the master nodes in each site joins the local cluster (i.e. the local site) as well as the global cluster (which includes nodes that are members of multiple sites).
Each node that acts as a site master and maintains a routing table that consists of a list of target sites and site masters. When a message arrives, a random master node for the destination site is selected. The message is then forwarded to the random master node, where it is sent to the destination node (unless the randomly selected node was the destination).
39.6.3. Configure Multiple Site Masters (Remote Client-Server Mode)
Prerequisites
Configure Cross-Datacenter Replication for Red Hat JBoss Data Grid’s Remote Client-Server Mode.
Set Multiple Site Masters in Remote Client-Server Mode
<relay site="LON">
	<remote-site name="NYC" stack="tcp" cluster="global"/>
	<remote-site name="SFO" stack="tcp" cluster="global"/>
	<property name="relay_multicasts">false</property>
	<property name="max_site_masters">16</property>
	<property name="can_become_site_master">true</property>
</relay>
Locate the Target Configuration
Locate the target site’s configuration in the clustered-xsite.xml example configuration file. The sample configuration looks like example provided above.
Configure Maximum Sites
Use the
max_site_mastersproperty to determine the maximum number of master nodes within the site. Set this value to the number of nodes in the site to make every node a master.Configure Site Master
Use the
can_become_site_masterproperty to allow the node to become the site master. This flag is set totrueas a default. Setting this flag tofalseprevents the node from becoming a site master. This is required in situations where the node does not have a network interface connected to the external network.
39.6.4. Configure Multiple Site Masters (Library Mode)
To configure multiple site masters in Red Hat JBoss Data Grid’s Library Mode:
Configure Multiple Site Masters (Library Mode)
Configure Cross-Datacenter Replication
Configure Cross-Datacenter Replication in JBoss Data Grid. Use the instructions in Configure Cross-Datacenter Replication Declaratively for an XML configuration. For instructions on a programmatic configuration refer to the JBoss Data Grid Developer Guide.
Add the Contents of the Configuration File
Add the
can_become_site_masterandmax_site_mastersparameters to the configuration as follows:<config> <!-- Additional configuration information here --> <relay.RELAY2 site="LON" config="relay.xml" relay_multicasts="false" can_become_site_master="true" max_site_masters="16"/> </config>Set the
max_site_mastersvalue to the number of nodes in the cluster to make all nodes masters.
39.7. Cross-Datacenter Replication Concerns
When using Cross-Datacenter Replication in active-active mode, where each site is using the other as an active backup, there may be issues if the same key is written to both locations simultaneously.
Consider the following image:
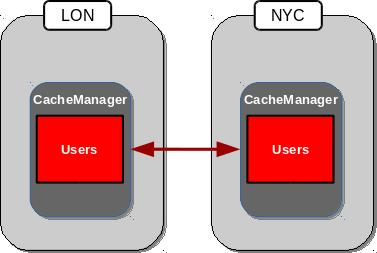
In this scenario both LON and NYC are backing up the Users cache to the other location. If the same entry were edited in both locations simultaneously, each site would update their local copy and then replicate this copy to the other site. This replication would overwrite the local copy’s value with the newly received, replicated, copy, resulting in LON and NYC swapping the expected value. The following example demonstrates this:
- Both LON and NYC have an entry in the Users cache with a key of 1 and a value of Smith.
- LON updates the value to Johnson.
- NYC updates the value to Williams.
- The cache is replicated to its backups, resulting in LON containing a value of Williams, and NYC containing a value of Johnson.