
10.2. Automated Enrollment
In automated enrollment, an end-entity enrollment request is processed as soon as the user successfully authenticates by the method set in the authentication plug-in module; no agent approval is necessary. The following authentication plug-in modules are provided:
- Directory-based enrollment. End entities are authenticated against an LDAP directory using their user ID and password or their DN and password. See Section 10.2.1, “Setting up Directory-Based Authentication”.
- PIN-based enrollment. End entities are authenticated against an LDAP directory using their user ID, password, and a PIN set in their directory entry. See Section 10.2.2, “Setting up PIN-Based Enrollment”.
- Certificate-based authentication. Entities of some kind — both end users and other entities, like servers or tokens — are authenticated to the CA using a certificate issued by the CA which proves their identity. This is most commonly used for renewal, where the original certificate is presented to authenticate the renewal process. See Section 10.2.3, “Using Certificate-Based Authentication”.
- AgentCertAuth. This method automatically approves a certificate request if the entity submitting the request is authenticated as a subsystem agent. A user authenticates as an agent by presenting an agent certificate. If the presented certificate is recognized by the subsystem as an agent certificate, then the CA automatically processes the certificate request.This form of automatic authentication can be associated with the certificate profile for enrolling for server certificates.This plug-in is enabled by default and has no parameters.
- Flat file-based enrollment. Used exclusively for router (SCEP) enrollments, a text file is used which contains a list of IP addresses, hostnames, or other identifier and a password, which is usually a random PIN. A router authenticates to the CA using its ID and PIN, and then the CA compares the presented credentials to the list of identities in the text file. See Section 10.2.4, “Configuring Flat File Authentication”.
10.2.1. Setting up Directory-Based Authentication
The
UidPwdDirAuth and the UdnPwdDirAuth plug-in modules implement directory-based authentication. End users enroll for a certificate by providing their user IDs or DN and password to authenticate to an LDAP directory.
- Create an instance of either the
UidPwdDirAuthorUdnPwdDirAuthauthentication plug-in module and configure the instance.- Open the CA Console.
pkiconsole https://server.example.com:8443/ca
- In the Configuration tab, select Authentication in the navigation tree.The right pane shows the Authentication Instance tab, which lists the currently configured authentication instances.
Note
TheUidPwdDirAuthplug-in is enabled by default. - Click .The Select Authentication Plug-in Implementation window appears.
- Select
UidPwdDirAuthfor user ID and password authentication, or selectUdnPwdDirAuthfor DN and password authentication. - Fill in the following fields in the Authentication Instance Editor window:
- Authentication Instance ID. Accept the default instance name, or enter a new name.
- dnpattern. Specifies a string representing a subject name pattern to formulate from the directory attributes and entry DN.
- ldapStringAttributes. Specifies the list of LDAP string attributes that should be considered authentic for the end entity. If specified, the values corresponding to these attributes are copied from the authentication directory into the authentication token and used by the certificate profile to generate the subject name. Entering values for this parameter is optional.
- ldapByteAttributes. Specifies the list of LDAP byte (binary) attributes that should be considered authentic for the end entity. If specified, the values corresponding to these attributes will be copied from the authentication directory into the authentication token for use by other modules, such as adding additional information to users' certificates.Entering values for this parameter is optional.
- ldap.ldapconn.host. Specifies the fully-qualified DNS hostname of the authentication directory.
- ldap.ldapconn.port. Specifies the TCP/IP port on which the authentication directory listens to requests; if the ldap.ldapconn.secureConn. checkbox is selected, this should be the SSL port number.
- ldap.ldapconn.secureConn. Specifies the type, SSL or non-SSL, of the port on which the authentication directory listens to requests from the Certificate System. Select if this is an SSL port.
- ldap.ldapconn.version. Specifies the LDAP protocol version, either
2or3. The default is3, since all Directory Servers later than version 3.x are LDAPv3. - ldap.basedn. Specifies the base DN for searching the authentication directory. The server uses the value of the
uidfield from the HTTP input (what a user enters in the enrollment form) and the base DN to construct an LDAP search filter. - ldap.minConns. Specifies the minimum number of connections permitted to the authentication directory. The permissible values are
1to3. - ldap.maxConns. Specifies the maximum number of connections permitted to the authentication directory. The permissible values are
3to10.
- Click . The authentication instance is set up and enabled.
- Set the certificate profiles to use to enroll users by setting policies for specific certificates. Customize the enrollment forms by configuring the inputs in the certificate profiles, and include inputs for the information needed by the plug-in to authenticate the user. If the default inputs do not contain all of the information that needs to be collected, submit a request created with a third-party tool.For information on configuring the profiles, see Section 3.7.2, “Inserting LDAP Directory Attribute Values and Other Information into the Subject Alt Name”.
Note
pkiconsole is being deprecated.
Setting up Bound LDAP Connection
Some environments require disallowing an anonymous bind for the LDAP server that is used for authentication. To create a bound connection between a CA and the LDAP server, you need to make the following configuration changes:
- Set up directory-based authentication according to the following example in
CS.cfg:auths.instance.UserDirEnrollment.ldap.ldapBoundConn=true auths.instance.UserDirEnrollment.ldap.ldapauth.authtype=BasicAuth auths.instance.UserDirEnrollment.ldap.ldapauth.bindDN=cn=Directory Manager auths.instance.UserDirEnrollment.ldap.ldapauth.bindPWPrompt=externalLDAP externalLDAP.authPrefix=auths.instance.UserDirEnrollment cms.passwordlist=internaldb,replicationdb,externalLDAP
wherebindPWPromptis the tag or prompt that is used in thepassword.conffile; it is also the name used under thecms.passwordlistandauthPrefixoptions. - Add the tag or prompt from
CS.cfgwith its password inpassword.conf:externalLDAP=your_password
Setting up External Authorization
A directory-based authentication plug-in can also be configured to evaluate the group membership of the user for authentication. To set up the plug-in this way, the following options has to be configured in
CS.cfg:
groupsEnableis a boolean option that enables retrieval of groups. The default value isfalse.groupsBasednis the base DN of groups. It needs to be specified when it differs from the defaultbasedn.groupsis the DN component for groups. The default value isou=groups.groupObjectClassis one of the following group object classes:groupofuniquenames,groupofnames. The default value isgroupofuniquenames.groupUseridNameis the name of the user ID attribute in the group object member attribute. The default value iscn.useridNameis the name of the user ID DN component. The default value isuid.searchGroupUserByUserdnis a boolean option that determines whether to search the group object member attribute for theuserdnor${groupUserIdName}=${uid}attributes. The default value istrue.
For example:
auths.instance.UserDirEnrollment.pluginName=UidPwdDirAuth
auths.instance.UserDirEnrollment.ldap.basedn=cn=users,cn=accounts,dc=local
auths.instance.UserDirEnrollment.ldap.groupObjectClass=groupofnames
auths.instance.UserDirEnrollment.ldap.groups=cn=groups
auths.instance.UserDirEnrollment.ldap.groupsBasedn=cn=accounts,dc=local
auths.instance.UserDirEnrollment.ldap.groupsEnable=true
auths.instance.UserDirEnrollment.ldap.ldapconn.host=local
auths.instance.UserDirEnrollment.ldap.ldapconn.port=636
auths.instance.UserDirEnrollment.ldap.ldapconn.secureConn=true
Finally, you have to modify the
/instance_path/ca/profiles/ca/profile_id.cfg file to configure the profile to use the UserDirEnrollment auth instance defined in CS.cfg, and if appropriate, provide an ACL for authorization based on groups. For example:
auth.instance_id=UserDirEnrollment
auths.acl=group="cn=devlab-access,ou=engineering,dc=example,dc=com"
10.2.2. Setting up PIN-Based Enrollment
PIN-based authentication involves setting up PINs for each user in the LDAP directory, distributing those PINs to the users, and then having the users provide the PIN along with their user ID and password when filling out a certificate request. Users are then authenticated both against an LDAP directory using their user ID and password and against the PIN in their LDAP entry. When the user successfully authenticates, the request is automatically processed, and a new certificate is issued.
The Certificate System provides a tool,
setpin, that adds the necessary schema for PINs to the Directory Server and generates the PINs for each user.
The PIN tool performs the following functions:
- Adds the necessary schema for PINs to the LDAP directory.
- Adds a PIN manager user who has read-write permissions to the PINs that are set up.
- Sets up ACIs to allow for PIN removal once the PIN has been used, giving read-write permissions for PINs to the PIN manager, and preventing users from creating or changing PINs.
- Creates PINs in each user entry.
Note
This tool is documented in the Certificate System Command-Line Tools Guide.
- Use the PIN tool to add schema needed for PINs, add PINs to the user entries, and then distribute the PINs to users.
- Open the
/usr/share/pki/native-tools/directory. - Open the
setpin.conffile in a text editor. - Follow the instructions outlined in the file and make the appropriate changes.Usually, the parameters which need updated are the Directory Server's host name, Directory Manager's bind password, and PIN manager's password.
- Run the
setpincommand with itsoptfileoption pointing to thesetpin.conffile.setpin optfile=/usr/share/pki/native-tools/setpin.conf
The tool modifies the schema with a new attribute (by default,pin) and a new object class (by default,pinPerson), creates apinmanageruser, and sets the ACI to allow only thepinmanageruser to modify thepinattribute. - To generate PINs for specific user entries or to provide user-defined PINs, create an input file with the DNs of those entries listed. For ezample:
dn:uid=bjensen,ou=people,dc=example,dc=com
dn:uid=jsmith,ou=people,dc=example,dc=com
dn:jtyler,ou=people,dc=example,dc=com
...
For information on constructing an input file, see the PIN generator chapter in the Certificate System Command-Line Tools Guide. - Disable setup mode for the
setpincommand. Either comment out thesetupline or change the value to no.vim /usr/share/pki/native-tools/setpin.conf setup=no
Setup mode creates the required uers and object classes, but the tool will not generate PINs while in setup mode. - Run the
setpincommand to create PINs in the directory.Note
Test-run the tool first without thewriteoption to generate a list of PINs without actually changing the directory.For example:setpin host=yourhost port=9446 length=11 input=infile output=outfile write "binddn=cn=pinmanager,o=example.com" bindpw="password" basedn=o=example.com "filter=(uid=u*)" hash=sha256
Warning
Do not set thehashargument tonone. Running thesetpincommand withhash=noneresults in the pin being stored in the user LDAP entry as plain text. - Use the output file for delivering PINs to users after completing setting up the required authentication method.
- Set the policies for specific certificates in the certificate profiles to enroll users. See Chapter 3, Making Rules for Issuing Certificates (Certificate Profiles) for information about certificate profile policies.
- Create and configure an instance of the
UidPwdPinDirAuthauthentication plug-in.- Open the CA Console.
pkiconsole https://server.example.com:8443/ca
- In the Configuration tab, select Authentication in the navigation tree.
- Click .The Select Authentication Plug-in Implementation window appears.
- Select the
UidPwdPinDirAuthplug-in module. - Fill in the following fields in the Authentication Instance Editor window:
- Authentication Instance ID. Accept the default instance name or enter a new name.
- removePin. Sets whether to remove PINs from the authentication directory after end users successfully authenticate. Removing PINs from the directory restricts users from enrolling more than once, and thus prevents them from getting more than one certificate.
- pinAttr. Specifies the authentication directory attribute for PINs. The
PIN Generatorutility sets the attribute to the value of theobjectclassparameter in thesetpin.conffile; the default value for this parameter ispin. - dnpattern. Specifies a string representing a subject name pattern to formulate from the directory attributes and entry DN.
- ldapStringAttributes. Specifies the list of LDAP string attributes that should be considered authentic for the end entity. Entering values for this parameter is optional.
- ldapByteAttributes. Specifies the list of LDAP byte (binary) attributes that should be considered authentic for the end entity. If specified, the values corresponding to these attributes will be copied from the authentication directory into the authentication token for use by other modules, such as adding additional information to users' certificates.Entering values for this parameter is optional.
- ldap.ldapconn.host. Specifies the fully-qualified DNS host name of the authentication directory.
- ldap.ldapconn.port. Specifies the TCP/IP port on which the authentication directory listens to requests from the Certificate System.
- ldap.ldapconn.secureConn. Specifies the type, SSL or non-SSL, of the port on which the authentication directory listens to requests. Select if this is an SSL port.
- ldap.ldapconn.version. Specifies the LDAP protocol version, either
2or3. By default, this is3, since all Directory Server versions later than 3.x are LDAPv3. - ldap.ldapAuthentication.bindDN. Specifies the user entry as whom to bind when removing PINs from the authentication directory. Specify this parameter only if the removePin checkbox is selected. It is recommended that a separate user entry that has permission to modify only the PIN attribute in the directory be created and used. For example, do not use the Directory Manager's entry because it has privileges to modify the entire directory content.
- password. Gives the password associated with the DN specified by the
ldap.ldapauthbindDNparameter. When saving changes, the server stores the password in the single sign-on password cache and uses it for subsequent start ups. This parameter needs set only if the removePin checkbox is selected. - ldap.ldapAuthentication.clientCertNickname. Specifies the nickname of the certificate to use for SSL client authentication to the authentication directory to remove PINs. Make sure that the certificate is valid and has been signed by a CA that is trusted in the authentication directory's certificate database and that the authentication directory's
certmap.conffile has been configured to map the certificate correctly to a DN in the directory. This is needed for PIN removal only. - ldap.ldapAuthentication.authtype. Specifies the authentication type, basic authentication or SSL client authentication, required in order to remove PINs from the authentication directory.
- BasicAuth specifies basic authentication. With this option, enter the correct values for ldap.ldapAuthentication.bindDN and password parameters; the server uses the DN from the ldap.ldapAuthentication.bindDN attribute to bind to the directory.
- SslClientAuth specifies SSL client authentication. With this option, set the value of the ldap.ldapconn.secureConn parameter to
trueand the value of the ldap.ldapAuthentication.clientCertNickname parameter to the nickname of the certificate to use for SSL client authentication.
- ldap.basedn. Specifies the base DN for searching the authentication directory; the server uses the value of the
uidfield from the HTTP input (what a user enters in the enrollment form) and the base DN to construct an LDAP search filter. - ldap.minConns. Specifies the minimum number of connections permitted to the authentication directory. The permissible values are
1to3. - ldap.maxConns. Specifies the maximum number of connections permitted to the authentication directory. The permissible values are
3to10.
- Click .
- Customize the enrollment forms by configuring the inputs in the certificate profiles. Include the information that will be needed by the plug-in to authenticate the user. If the default inputs do not contain all of the information that needs to be collected, submit a request created with a third-party tool.
Note
pkiconsole is being deprecated.
10.2.3. Using Certificate-Based Authentication
Certificate-based authentication is when a certificate is presented that verifies the identity of the requester and automatically validates and authenticates the request being submitted. This is most commonly used for renewal processes, when the original certificate is presented by the user, server, and application and that certificate is used to authenticate the request.
There are other circumstances when it may be useful to use certificate-based authentication for initially requesting a certificate. For example, tokens may be bulk-loaded with generic certificates which are then used to authenticate the users when they enroll for their user certificates or, alternatively, users can be issued signing certificates which they then use to authenticate their requests for encryption certificates.
The certificate-based authentication module,
SSLclientCertAuth, is enabled by default, and this authentication method can be referenced in any custom certificate profile.
10.2.4. Configuring Flat File Authentication
A router certificate is enrolled and authenticated using a randomly-generated PIN. The CA uses the
flatFileAuth authentication module to process a text file which contains the router's authentication credentials.
10.2.4.1. Configuring the flatFileAuth Module
Flat file authentication is already configured for SCEP enrollments, but the location of the flat file and its authentication parameters can be edited.
- Open the CA Console.
pkiconsole https://server.example.com:8443/ca
- In the Configuration tab, select Authentication in the navigation tree.
- Select the flatFileAuth authentication module.
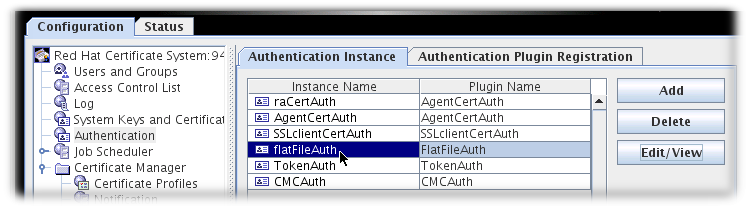
- Click .
- To change the file location and name, reset the fileName field.To change the authentication name parameter, reset the keyAttributes value to another value submitted in the SCEP enrollment form, like CN. It is also possible to use multiple name parameters by separating them by commas, like
UID,CN. To change the password parameter name, reset theauthAttributesfield.
- Save the edits.
Note
pkiconsole is being deprecated.
10.2.4.2. Editing flatfile.txt
The same
flatfile.txt file is used to authenticate every SCEP enrollment. This file must be manually updated every time a new PIN is issued to a router.
By default, this file is in
/var/lib/pki/pki-ca/ca/conf/ and specifies two parameters per authentication entry, the UID of the site (usually its IP address, either IPv4 or IPv6) and the PIN issued by the router.
UID:192.168.123.123
PIN:HU89dj
Each entry must be followed by a blank line. For example:
UID:192.168.123.123
PIN:HU89dj

UID:12.255.80.13
PIN:fiowIO89

UID:0.100.0.100
PIN:GRIOjisf
If the authentication entries are not separated by an empty line, then when the router attempts to authenticate to the CA, it will fail. For example:
... flatfile.txt entry ...
UID:192.168.123.123
PIN:HU89dj
UID:12.255.80.13
PIN:fiowIO89

... error log entry ...
[13/Jun/2020:13:03:09][http-9180-Processor24]: FlatFileAuth: authenticating user: finding user from key: 192.168.123.123
[13/Jun/2020:13:03:09][http-9180-Processor24]: FlatFileAuth: User not found in password file.