
Chapter 5. Customizing forms
Automatically generating forms saves time for basic form creation, but for most business processes, you will customize the forms to reflect exactly what you intend for the user to view and interact with.
Prerequisites
- You have automatically generated the forms. For more information, see Chapter 4, Generating forms.
5.1. Customizing the pizza order form
Customize the pizza order form to ensure ease of use by defining the field types and locations.
Procedure
- In Business Central, go to Menu → Design → Projects → pizzaPlace.
- Click the pizzaPlace.pizzaOrders-taskform form.
-
Click
 in the upper-right corner of the Price row and click Remove.
-
Click
in the upper-right corner of the ExtraIngredients row and click Edit.
- Select TextArea from the Field Type menu.
-
Change both the Label and PlaceHolder fields to
Extra Ingredients. - Click Ok.
Sort the remaining rows by dragging them to reflect the following order:
Figure 5.1. Sort the form rows
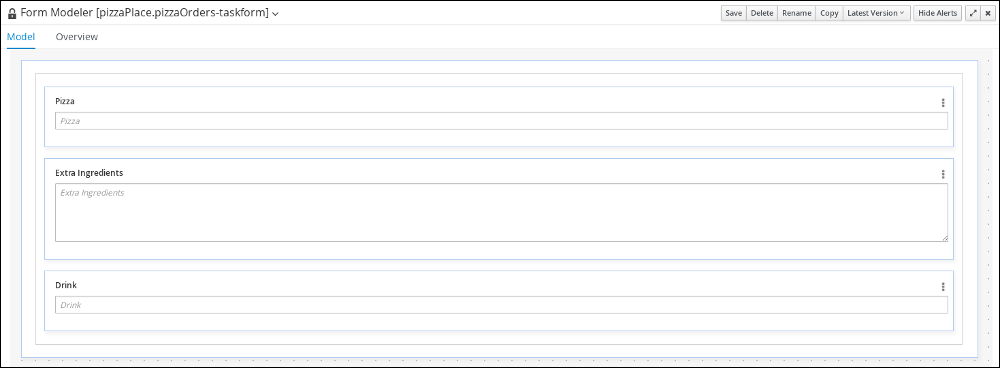
- Click Save, then Save, to confirm your changes.
5.2. Customizing the process order form
Customize the process order form to ensure ease of use by defining the field types and locations.
Procedure
- Click Menu → Design → Projects → pizzaPlace.
- Click the processOrder-taskform form.
-
Click
in the upper-right corner of the Inputs row, select Edit, and change Inputs: to Order Info:. Click Ok.
-
Click
in the upper-right corner of the Outputs: row and click Remove.
-
Click
in the upper-right corner of the ExtraIngredients row and select Edit.
- From the Field Type menu, select TextArea.
-
Change both the Label and PlaceHolder fields to
Extra Ingredients. - Click Ok.
Sort the remaining rows by dragging them to reflect the following order:
Figure 5.2. Sort the form rows
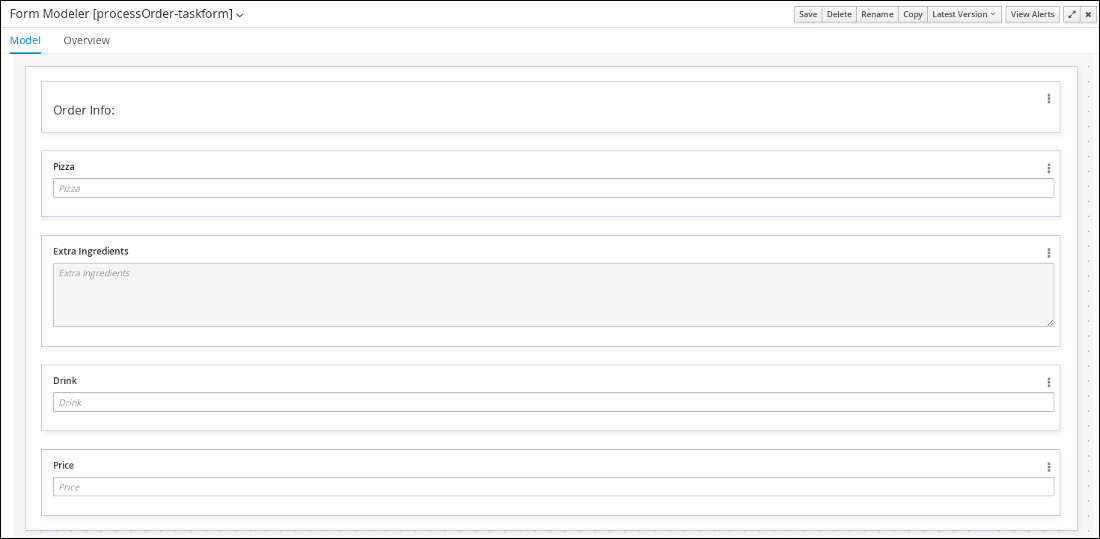
- Click Save, then Save, to confirm your changes.
5.3. Customizing the order confirmation form
Customize the order confirmation form to ensure ease of use by defining the field types and locations.
Procedure
- Click Menu → Design → Projects → pizzaPlace.
- Click the confirmation-taskform form.
-
Click
in the upper-right corner of the Inputs row, select Edit, and change Inputs: to Your Order Info:.
-
Click
in the upper-right corner of the ExtraIngredients row and select Edit.
- From the Field Type menu, select TextArea.
-
Change both the Label and PlaceHolder fields to
Extra Ingredients. Click Ok.
NoteConfirm that the Pizza, Extra Ingredients, Drink, and Price rows are marked as Read Only by clicking
in the upper-right corner of each and selecting Edit. The Read Only box should be selected. If not, select it and click Ok.
Sort the remaining rows by dragging them to reflect the following order:
Figure 5.3. Sort the form rows
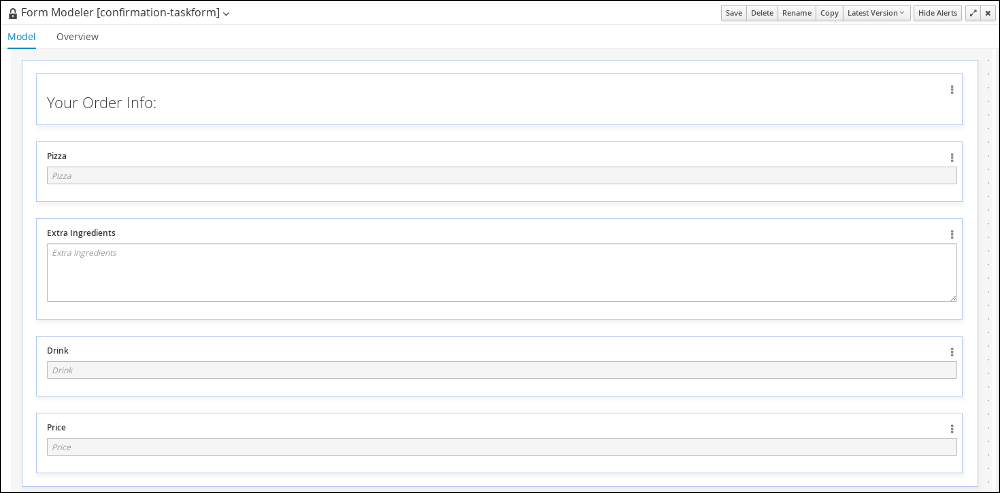
- Click Save, then Save, to confirm your changes.