
Integrations
Integrating OpenShift Serverless with Service Mesh and with the cost management service
Abstract
Chapter 1. Integrating Service Mesh with OpenShift Serverless
The OpenShift Serverless Operator provides Kourier as the default ingress for Knative. However, you can use Service Mesh with OpenShift Serverless whether Kourier is enabled or not. Integrating with Kourier disabled allows you to configure additional networking and routing options that the Kourier ingress does not support, such as mTLS functionality.
Note the following assumptions and limitations:
- All Knative internal components, as well as Knative Services, are part of the Service Mesh and have sidecars injection enabled. This means that strict mTLS is enforced within the whole mesh. All requests to Knative Services require an mTLS connection, with the client having to send its certificate, except calls coming from OpenShift Routing.
- OpenShift Serverless with Service Mesh integration can only target one service mesh. Multiple meshes can be present in the cluster, but OpenShift Serverless is only available on one of them.
-
Changing the target
ServiceMeshMemberRollthat OpenShift Serverless is part of, meaning moving OpenShift Serverless to another mesh, is not supported. The only way to change the targeted Service mesh is to uninstall and reinstall OpenShift Serverless.
1.1. Prerequisites
- You have access to an Red Hat OpenShift Serverless account with cluster administrator access.
-
You have installed the OpenShift CLI (
oc). - You have installed the Serverless Operator.
- You have installed the Red Hat OpenShift Service Mesh Operator.
The examples in the following procedures use the domain
example.com. The example certificate for this domain is used as a certificate authority (CA) that signs the subdomain certificate.To complete and verify these procedures in your deployment, you need either a certificate signed by a widely trusted public CA or a CA provided by your organization. Example commands must be adjusted according to your domain, subdomain, and CA.
-
You must configure the wildcard certificate to match the domain of your OpenShift Container Platform cluster. For example, if your OpenShift Container Platform console address is
https://console-openshift-console.apps.openshift.example.com, you must configure the wildcard certificate so that the domain is*.apps.openshift.example.com. For more information about configuring wildcard certificates, see the following topic about Creating a certificate to encrypt incoming external traffic. - If you want to use any domain name, including those which are not subdomains of the default OpenShift Container Platform cluster domain, you must set up domain mapping for those domains. For more information, see the OpenShift Serverless documentation about Creating a custom domain mapping.
OpenShift Serverless only supports the use of Red Hat OpenShift Service Mesh functionality that is explicitly documented in this guide, and does not support other undocumented features.
Using Serverless 1.31 with Service Mesh is only supported with Service Mesh version 2.2 or later. For details and information on versions other than 1.31, see the "Red Hat OpenShift Serverless Supported Configurations" page.
1.2. Additional resources
1.3. Creating a certificate to encrypt incoming external traffic
By default, the Service Mesh mTLS feature only secures traffic inside of the Service Mesh itself, between the ingress gateway and individual pods that have sidecars. To encrypt traffic as it flows into the OpenShift Container Platform cluster, you must generate a certificate before you enable the OpenShift Serverless and Service Mesh integration.
Prerequisites
- You have cluster administrator permissions on OpenShift Container Platform, or you have cluster or dedicated administrator permissions on Red Hat OpenShift Service on AWS or OpenShift Dedicated.
- You have installed the OpenShift Serverless Operator and Knative Serving.
-
Install the OpenShift CLI (
oc). - You have created a project or have access to a project with the appropriate roles and permissions to create applications and other workloads.
Procedure
Create a root certificate and private key that signs the certificates for your Knative services:
$ openssl req -x509 -sha256 -nodes -days 365 -newkey rsa:2048 \
    -subj '/O=Example Inc./CN=example.com' \
    -keyout root.key \
    -out root.crt
Create a wildcard certificate:
$ openssl req -nodes -newkey rsa:2048 \
    -subj "/CN=*.apps.openshift.example.com/O=Example Inc." \
    -keyout wildcard.key \
    -out wildcard.csr
Sign the wildcard certificate:
$ openssl x509 -req -days 365 -set_serial 0 \
    -CA root.crt \
    -CAkey root.key \
    -in wildcard.csr \
    -out wildcard.crt
Create a secret by using the wildcard certificate:
$ oc create -n istio-system secret tls wildcard-certs \
    --key=wildcard.key \
    --cert=wildcard.crt
This certificate is picked up by the gateways created when you integrate OpenShift Serverless with Service Mesh, so that the ingress gateway serves traffic with this certificate.
1.4. Integrating Service Mesh with OpenShift Serverless
1.4.1. Verifying installation prerequisites
Before installing and configuring the Service Mesh integration with Serverless, verify that the prerequisites have been met.
Procedure
Check for conflicting gateways:
Example command
$ oc get gateway -A -o jsonpath='{range .items[*]}{@.metadata.namespace}{"/"}{@.metadata.name}{" "}{@.spec.servers}{"\n"}{end}' | column -tExample output
knative-serving/knative-ingress-gateway  [{"hosts":["*"],"port":{"name":"https","number":443,"protocol":"HTTPS"},"tls":{"credentialName":"wildcard-certs","mode":"SIMPLE"}}]
knative-serving/knative-local-gateway    [{"hosts":["*"],"port":{"name":"http","number":8081,"protocol":"HTTP"}}]
This command should not return a
Gatewaythat bindsport: 443andhosts: ["*"], except theGatewaysinknative-servingandGatewaysthat are part of another Service Mesh instance.NoteThe mesh that Serverless is part of must be distinct and preferably reserved only for Serverless workloads. That is because additional configuration, such as
Gateways, might interfere with the Serverless gatewaysknative-local-gatewayandknative-ingress-gateway. Red Hat OpenShift Service Mesh only allows one Gateway to claim a wildcard host binding (hosts: ["*"]) on the same port (port: 443). If another Gateway is already binding this configuration, a separate mesh has to be created for Serverless workloads.Check whether Red Hat OpenShift Service Mesh
istio-ingressgatewayis exposed as typeNodePortorLoadBalancer:Example command
$ oc get svc -A | grep istio-ingressgateway
Example output
istio-system istio-ingressgateway ClusterIP 172.30.46.146 none> 15021/TCP,80/TCP,443/TCP 9m50s
This command should not return a
Serviceobject of typeNodePortorLoadBalancer.NoteCluster external Knative Services are expected to be called via OpenShift Ingress using OpenShift Routes. It is not supported to access Service Mesh directly, such as by exposing the
istio-ingressgatewayusing aServiceobject with typeNodePortorLoadBalancer.
1.4.2. Installing and configuring Service Mesh
To integrate Serverless with Service Mesh, you need to install Service Mesh with a specific configuration.
Procedure
Create a
ServiceMeshControlPlaneresource in theistio-systemnamespace with the following configuration:ImportantIf you have an existing
ServiceMeshControlPlaneobject, make sure that you have the same configuration applied.apiVersion: maistra.io/v2 kind: ServiceMeshControlPlane metadata: name: basic namespace: istio-system spec: profiles: - default security: dataPlane: mtls: true 1 techPreview: meshConfig: defaultConfig: terminationDrainDuration: 35s 2 gateways: ingress: service: metadata: labels: knative: ingressgateway 3 proxy: networking: trafficControl: inbound: excludedPorts: 4 - 8444 # metrics - 8022 # serving: wait-for-drain k8s pre-stop hook- 1
- Enforce strict mTLS in the mesh. Only calls using a valid client certificate are allowed.
- 2
- Serverless has a graceful termination for Knative Services of 30 seconds.
istio-proxyneeds to have a longer termination duration to make sure no requests are dropped. - 3
- Define a specific selector for the ingress gateway to target only the Knative gateway.
- 4
- These ports are called by Kubernetes and cluster monitoring, which are not part of the mesh and cannot be called using mTLS. Therefore, these ports are excluded from the mesh.
Add the namespaces that you would like to integrate with Service Mesh to the
ServiceMeshMemberRollobject as members:Example
servicemesh-member-roll.yamlconfiguration fileapiVersion: maistra.io/v1 kind: ServiceMeshMemberRoll metadata: name: default namespace: istio-system spec: members: 1 - knative-serving - knative-eventing - your-OpenShift-projects- 1
- A list of namespaces to be integrated with Service Mesh.
ImportantThis list of namespaces must include the
knative-servingandknative-eventingnamespaces.Apply the
ServiceMeshMemberRollresource:$ oc apply -f servicemesh-member-roll.yaml
Create the necessary gateways so that Service Mesh can accept traffic. The following example uses the
knative-local-gatewayobject with theISTIO_MUTUALmode (mTLS):Example
istio-knative-gateways.yamlconfiguration fileapiVersion: networking.istio.io/v1alpha3 kind: Gateway metadata: name: knative-ingress-gateway namespace: knative-serving spec: selector: knative: ingressgateway servers: - port: number: 443 name: https protocol: HTTPS hosts: - "*" tls: mode: SIMPLE credentialName: <wildcard_certs> 1 --- apiVersion: networking.istio.io/v1alpha3 kind: Gateway metadata: name: knative-local-gateway namespace: knative-serving spec: selector: knative: ingressgateway servers: - port: number: 8081 name: https protocol: HTTPS 2 tls: mode: ISTIO_MUTUAL 3 hosts: - "*" --- apiVersion: v1 kind: Service metadata: name: knative-local-gateway namespace: istio-system labels: experimental.istio.io/disable-gateway-port-translation: "true" spec: type: ClusterIP selector: istio: ingressgateway ports: - name: http2 port: 80 targetPort: 8081- 1
- Name of the secret containing the wildcard certificate.
- 2 3
- The
knative-local-gatewayobject serves HTTPS traffic and expects all clients to send requests using mTLS. This means that only traffic coming from within Service Mesh is possible. Workloads from outside the Service Mesh must use the external domain via OpenShift Routing.
Apply the
Gatewayresources:$ oc apply -f istio-knative-gateways.yaml
1.4.3. Installing and configuring Serverless
After installing Service Mesh, you need to install Serverless with a specific configuration.
Procedure
Install Knative Serving with the following
KnativeServingcustom resource, which enables the Istio integration:Example
knative-serving-config.yamlconfiguration fileapiVersion: operator.knative.dev/v1beta1 kind: KnativeServing metadata: name: knative-serving namespace: knative-serving spec: ingress: istio: enabled: true 1 deployments: 2 - name: activator annotations: "sidecar.istio.io/inject": "true" "sidecar.istio.io/rewriteAppHTTPProbers": "true" - name: autoscaler annotations: "sidecar.istio.io/inject": "true" "sidecar.istio.io/rewriteAppHTTPProbers": "true" config: istio: 3 gateway.knative-serving.knative-ingress-gateway: istio-ingressgateway.<your-istio-namespace>.svc.cluster.local local-gateway.knative-serving.knative-local-gateway: knative-local-gateway.<your-istio-namespace>.svc.cluster.localApply the
KnativeServingresource:$ oc apply -f knative-serving-config.yaml
Install Knative Eventing with the following
KnativeEventingobject, which enables the Istio integration:Example
knative-eventing-config.yamlconfiguration fileapiVersion: operator.knative.dev/v1beta1 kind: KnativeEventing metadata: name: knative-eventing namespace: knative-eventing spec: config: features: istio: enabled 1 workloads: 2 - name: pingsource-mt-adapter annotations: "sidecar.istio.io/inject": "true" "sidecar.istio.io/rewriteAppHTTPProbers": "true" - name: imc-dispatcher annotations: "sidecar.istio.io/inject": "true" "sidecar.istio.io/rewriteAppHTTPProbers": "true" - name: mt-broker-ingress annotations: "sidecar.istio.io/inject": "true" "sidecar.istio.io/rewriteAppHTTPProbers": "true" - name: mt-broker-filter annotations: "sidecar.istio.io/inject": "true" "sidecar.istio.io/rewriteAppHTTPProbers": "true"Apply the
KnativeEventingresource:$ oc apply -f knative-eventing-config.yaml
Install Knative Kafka with the following
KnativeKafkacustom resource, which enables the Istio integration:Example
knative-kafka-config.yamlconfiguration fileapiVersion: operator.serverless.openshift.io/v1alpha1 kind: KnativeKafka metadata: name: knative-kafka namespace: knative-eventing spec: channel: enabled: true bootstrapServers: <bootstrap_servers> 1 source: enabled: true broker: enabled: true defaultConfig: bootstrapServers: <bootstrap_servers> 2 numPartitions: <num_partitions> replicationFactor: <replication_factor> sink: enabled: true workloads: 3 - name: kafka-controller annotations: "sidecar.istio.io/inject": "true" "sidecar.istio.io/rewriteAppHTTPProbers": "true" - name: kafka-broker-receiver annotations: "sidecar.istio.io/inject": "true" "sidecar.istio.io/rewriteAppHTTPProbers": "true" - name: kafka-broker-dispatcher annotations: "sidecar.istio.io/inject": "true" "sidecar.istio.io/rewriteAppHTTPProbers": "true" - name: kafka-channel-receiver annotations: "sidecar.istio.io/inject": "true" "sidecar.istio.io/rewriteAppHTTPProbers": "true" - name: kafka-channel-dispatcher annotations: "sidecar.istio.io/inject": "true" "sidecar.istio.io/rewriteAppHTTPProbers": "true" - name: kafka-source-dispatcher annotations: "sidecar.istio.io/inject": "true" "sidecar.istio.io/rewriteAppHTTPProbers": "true" - name: kafka-sink-receiver annotations: "sidecar.istio.io/inject": "true" "sidecar.istio.io/rewriteAppHTTPProbers": "true"Apply the
KnativeEventingobject:$ oc apply -f knative-kafka-config.yaml
Install
ServiceEntryto inform Service Mesh of the communication betweenKnativeKafkacomponents and an Apache Kafka cluster:Example
kafka-cluster-serviceentry.yamlconfiguration fileapiVersion: networking.istio.io/v1alpha3 kind: ServiceEntry metadata: name: kafka-cluster namespace: knative-eventing spec: hosts: 1 - <bootstrap_servers_without_port> exportTo: - "." ports: 2 - number: 9092 name: tcp-plain protocol: TCP - number: 9093 name: tcp-tls protocol: TCP - number: 9094 name: tcp-sasl-tls protocol: TCP - number: 9095 name: tcp-sasl-tls protocol: TCP - number: 9096 name: tcp-tls protocol: TCP location: MESH_EXTERNAL resolution: NONE
NoteThe listed ports in
spec.portsare example TPC ports. The actual values depend on how the Apache Kafka cluster is configured.Apply the
ServiceEntryresource:$ oc apply -f kafka-cluster-serviceentry.yaml
1.4.4. Verifying the integration
After installing Service Mesh and Serverless with Istio enabled, you can verify that the integration works.
Procedure
Create a Knative Service that has sidecar injection enabled and uses a pass-through route:
Example
knative-service.yamlconfiguration fileapiVersion: serving.knative.dev/v1 kind: Service metadata: name: <service_name> namespace: <namespace> 1 annotations: serving.knative.openshift.io/enablePassthrough: "true" 2 spec: template: metadata: annotations: sidecar.istio.io/inject: "true" 3 sidecar.istio.io/rewriteAppHTTPProbers: "true" spec: containers: - image: <image_url>
ImportantAlways add the annotation from this example to all of your Knative Service to make them work with Service Mesh.
Apply the
Serviceresource:$ oc apply -f knative-service.yaml
Access your serverless application by using a secure connection that is now trusted by the CA:
$ curl --cacert root.crt <service_url>
For example, run:
Example command
$ curl --cacert root.crt https://hello-default.apps.openshift.example.com
Example output
Hello Openshift!
1.5. Enabling Knative Serving metrics when using Service Mesh with mTLS
If Service Mesh is enabled with mTLS, metrics for Knative Serving are disabled by default, because Service Mesh prevents Prometheus from scraping metrics. This section shows how to enable Knative Serving metrics when using Service Mesh and mTLS.
Prerequisites
- You have installed the OpenShift Serverless Operator and Knative Serving on your cluster.
- You have installed Red Hat OpenShift Service Mesh with the mTLS functionality enabled.
- You have cluster administrator permissions on OpenShift Container Platform, or you have cluster or dedicated administrator permissions on Red Hat OpenShift Service on AWS or OpenShift Dedicated.
-
Install the OpenShift CLI (
oc). - You have created a project or have access to a project with the appropriate roles and permissions to create applications and other workloads.
Procedure
Specify
prometheusas themetrics.backend-destinationin theobservabilityspec of the Knative Serving custom resource (CR):apiVersion: operator.knative.dev/v1beta1 kind: KnativeServing metadata: name: knative-serving spec: config: observability: metrics.backend-destination: "prometheus" ...This step prevents metrics from being disabled by default.
Apply the following network policy to allow traffic from the Prometheus namespace:
apiVersion: networking.k8s.io/v1
kind: NetworkPolicy
metadata:
  name: allow-from-openshift-monitoring-ns
  namespace: knative-serving
spec:
  ingress:
  - from:
    - namespaceSelector:
        matchLabels:
          name: "openshift-monitoring"
  podSelector: {}
...
Modify and reapply the default Service Mesh control plane in the
istio-systemnamespace, so that it includes the following spec:... spec: proxy: networking: trafficControl: inbound: excludedPorts: - 8444 ...
1.6. Integrating Service Mesh with OpenShift Serverless when Kourier is enabled
You can use Service Mesh with OpenShift Serverless even if Kourier is already enabled. This procedure might be useful if you have already installed Knative Serving with Kourier enabled, but decide to add a Service Mesh integration later.
Prerequisites
- You have cluster administrator permissions on OpenShift Container Platform, or you have cluster or dedicated administrator permissions on Red Hat OpenShift Service on AWS or OpenShift Dedicated.
- You have created a project or have access to a project with the appropriate roles and permissions to create applications and other workloads.
-
Install the OpenShift CLI (
oc). - Install the OpenShift Serverless Operator and Knative Serving on your cluster.
- Install Red Hat OpenShift Service Mesh. OpenShift Serverless with Service Mesh and Kourier is supported for use with both Red Hat OpenShift Service Mesh versions 1.x and 2.x.
Procedure
Add the namespaces that you would like to integrate with Service Mesh to the
ServiceMeshMemberRollobject as members:apiVersion: maistra.io/v1 kind: ServiceMeshMemberRoll metadata: name: default namespace: istio-system spec: members: - <namespace> 1 ...- 1
- A list of namespaces to be integrated with Service Mesh.
Apply the
ServiceMeshMemberRollresource:$ oc apply -f <filename>
Create a network policy that permits traffic flow from Knative system pods to Knative services:
For each namespace that you want to integrate with Service Mesh, create a
NetworkPolicyresource:apiVersion: networking.k8s.io/v1 kind: NetworkPolicy metadata: name: allow-from-serving-system-namespace namespace: <namespace> 1 spec: ingress: - from: - namespaceSelector: matchLabels: knative.openshift.io/part-of: "openshift-serverless" podSelector: {} policyTypes: - Ingress ...- 1
- Add the namespace that you want to integrate with Service Mesh.
NoteThe
knative.openshift.io/part-of: "openshift-serverless"label was added in OpenShift Serverless 1.22.0. If you are using OpenShift Serverless 1.21.1 or earlier, add theknative.openshift.io/part-oflabel to theknative-servingandknative-serving-ingressnamespaces.Add the label to the
knative-servingnamespace:$ oc label namespace knative-serving knative.openshift.io/part-of=openshift-serverless
Add the label to the
knative-serving-ingressnamespace:$ oc label namespace knative-serving-ingress knative.openshift.io/part-of=openshift-serverless
Apply the
NetworkPolicyresource:$ oc apply -f <filename>
1.7. Improving net-istio memory usage by using secret filtering for Service Mesh
By default, the informers implementation for the Kubernetes client-go library fetches all resources of a particular type. This can lead to a substantial overhead when many resources are available, which can cause the Knative net-istio ingress controller to fail on large clusters due to memory leaking. However, a filtering mechanism is available for the Knative net-istio ingress controller, which enables the controllers to only fetch Knative related secrets.
The secret filtering is enabled by default on the OpenShift Serverless Operator side. An environment variable, ENABLE_SECRET_INFORMER_FILTERING_BY_CERT_UID=true, is added by default to the net-istio controller pods.
If you enable secret filtering, you must label all of your secrets with networking.internal.knative.dev/certificate-uid: "<id>". Otherwise, Knative Serving does not detect them, which leads to failures. You must label both new and existing secrets.
Prerequisites
- You have cluster administrator permissions on OpenShift Container Platform, or you have cluster or dedicated administrator permissions on Red Hat OpenShift Service on AWS or OpenShift Dedicated.
- You have created a project or have access to a project with the appropriate roles and permissions to create applications and other workloads.
- Install Red Hat OpenShift Service Mesh. OpenShift Serverless with Service Mesh only is supported for use with Red Hat OpenShift Service Mesh version 2.0.5 or later.
- Install the OpenShift Serverless Operator and Knative Serving.
-
Install the OpenShift CLI (
oc).
You can disable the secret filtering by setting the ENABLE_SECRET_INFORMER_FILTERING_BY_CERT_UID variable to false by using the workloads field in the KnativeServing custom resource (CR).
Example KnativeServing CR
apiVersion: operator.knative.dev/v1beta1
kind: KnativeServing
metadata:
  name: knative-serving
  namespace: knative-serving
spec:
...
  workloads:
    - env:
        - container: controller
          envVars:
            - name: ENABLE_SECRET_INFORMER_FILTERING_BY_CERT_UID
              value: 'false'
      name: net-istio-controller
Chapter 2. Using Service Mesh to isolate network traffic with OpenShift Serverless
Using Service Mesh to isolate network traffic with OpenShift Serverless is a Technology Preview feature only. Technology Preview features are not supported with Red Hat production service level agreements (SLAs) and might not be functionally complete. Red Hat does not recommend using them in production. These features provide early access to upcoming product features, enabling customers to test functionality and provide feedback during the development process.
For more information about the support scope of Red Hat Technology Preview features, see Technology Preview Features Support Scope.
Service Mesh can be used to isolate network traffic between tenants on a shared Red Hat OpenShift Serverless cluster using Service Mesh AuthorizationPolicy resources. Serverless can also leverage this, using several Service Mesh resources. A tenant is a group of one or multiple projects that can access each other over the network on a shared cluster.
2.1. Prerequisites
- You have access to an Red Hat OpenShift Serverless account with cluster administrator access.
- You have set up the Service Mesh and Serverless integration.
- You have created one or more OpenShift projects for each tenant.
2.2. High-level architecture
The high-level architecture of Serverless traffic isolation provided by Service Mesh consists of AuthorizationPolicy objects in the knative-serving, knative-eventing, and the tenants' namespaces, with all the components being part of the Service Mesh. The injected Service Mesh sidecars enforce those rules to isolate network traffic between tenants.
2.3. Securing the Service Mesh
Authorization policies and mTLS allow you to secure Service Mesh.
Procedure
Make sure that all Red Hat OpenShift Serverless projects of your tenant are part of the same
ServiceMeshMemberRollobject as members:apiVersion: maistra.io/v1 kind: ServiceMeshMemberRoll metadata: name: default namespace: istio-system spec: members: - knative-serving # static value, needs to be here, see setup page - knative-eventing # static value, needs to be here, see setup page - team-alpha-1 # example OpenShift project that belongs to the team-alpha tenant - team-alpha-2 # example OpenShift project that belongs th the team-alpha tenant - team-bravo-1 # example OpenShift project that belongs to the team-bravo tenant - team-bravo-2 # example OpenShift project that belongs th the team-bravo tenant
All projects that are part of the mesh must enforce mTLS in strict mode. This forces Istio to only accept connections with a client-certificate present and allows the Service Mesh sidecar to validate the origin using an
AuthorizationPolicyobject.Create the configuration with
AuthorizationPolicyobjects in theknative-servingandknative-eventingnamespaces:Example
knative-default-authz-policies.yamlconfiguration fileapiVersion: security.istio.io/v1beta1 kind: AuthorizationPolicy metadata: name: deny-all-by-default namespace: knative-eventing spec: { } --- apiVersion: security.istio.io/v1beta1 kind: AuthorizationPolicy metadata: name: deny-all-by-default namespace: knative-serving spec: { } --- apiVersion: security.istio.io/v1beta1 kind: AuthorizationPolicy metadata: name: allow-mt-channel-based-broker-ingress-to-imc-dispatcher namespace: knative-eventing spec: action: ALLOW selector: matchLabels: app.kubernetes.io/component: "imc-dispatcher" rules: - from: - source: namespaces: [ "knative-eventing" ] principals: [ "cluster.local/ns/knative-eventing/sa/mt-broker-ingress" ] to: - operation: methods: [ "POST" ] --- apiVersion: security.istio.io/v1beta1 kind: AuthorizationPolicy metadata: name: allow-mt-channel-based-broker-ingress-to-kafka-channel namespace: knative-eventing spec: action: ALLOW selector: matchLabels: app.kubernetes.io/component: "kafka-channel-receiver" rules: - from: - source: namespaces: [ "knative-eventing" ] principals: [ "cluster.local/ns/knative-eventing/sa/mt-broker-ingress" ] to: - operation: methods: [ "POST" ] --- apiVersion: security.istio.io/v1beta1 kind: AuthorizationPolicy metadata: name: allow-kafka-channel-to-mt-channel-based-broker-filter namespace: knative-eventing spec: action: ALLOW selector: matchLabels: app.kubernetes.io/component: "broker-filter" rules: - from: - source: namespaces: [ "knative-eventing" ] principals: [ "cluster.local/ns/knative-eventing/sa/knative-kafka-channel-data-plane" ] to: - operation: methods: [ "POST" ] --- apiVersion: security.istio.io/v1beta1 kind: AuthorizationPolicy metadata: name: allow-imc-to-mt-channel-based-broker-filter namespace: knative-eventing spec: action: ALLOW selector: matchLabels: app.kubernetes.io/component: "broker-filter" rules: - from: - source: namespaces: [ "knative-eventing" ] principals: [ "cluster.local/ns/knative-eventing/sa/imc-dispatcher" ] to: - operation: methods: [ "POST" ] --- apiVersion: security.istio.io/v1beta1 kind: AuthorizationPolicy metadata: name: allow-probe-kafka-broker-receiver namespace: knative-eventing spec: action: ALLOW selector: matchLabels: app.kubernetes.io/component: "kafka-broker-receiver" rules: - from: - source: namespaces: [ "knative-eventing" ] principals: [ "cluster.local/ns/knative-eventing/sa/kafka-controller" ] to: - operation: methods: [ "GET" ] --- apiVersion: security.istio.io/v1beta1 kind: AuthorizationPolicy metadata: name: allow-probe-kafka-sink-receiver namespace: knative-eventing spec: action: ALLOW selector: matchLabels: app.kubernetes.io/component: "kafka-sink-receiver" rules: - from: - source: namespaces: [ "knative-eventing" ] principals: [ "cluster.local/ns/knative-eventing/sa/kafka-controller" ] to: - operation: methods: [ "GET" ] --- apiVersion: security.istio.io/v1beta1 kind: AuthorizationPolicy metadata: name: allow-probe-kafka-channel-receiver namespace: knative-eventing spec: action: ALLOW selector: matchLabels: app.kubernetes.io/component: "kafka-channel-receiver" rules: - from: - source: namespaces: [ "knative-eventing" ] principals: [ "cluster.local/ns/knative-eventing/sa/kafka-controller" ] to: - operation: methods: [ "GET" ] --- apiVersion: security.istio.io/v1beta1 kind: AuthorizationPolicy metadata: name: allow-traffic-to-activator namespace: knative-serving spec: selector: matchLabels: app: activator action: ALLOW rules: - from: - source: namespaces: [ "knative-serving", "istio-system" ] --- apiVersion: security.istio.io/v1beta1 kind: AuthorizationPolicy metadata: name: allow-traffic-to-autoscaler namespace: knative-serving spec: selector: matchLabels: app: autoscaler action: ALLOW rules: - from: - source: namespaces: [ "knative-serving" ]These policies restrict the access rules for the network communication between Serverless system components. Specifically, they enforce the following rules:
-
Deny all traffic that is not explicitly allowed in the
knative-servingandknative-eventingnamespaces -
Allow traffic from the
istio-systemandknative-servingnamespaces to activator -
Allow traffic from the
knative-servingnamespace to autoscaler -
Allow health probes for Apache Kafka components in the
knative-eventingnamespace -
Allow internal traffic for channel-based brokers in the
knative-eventingnamespace
-
Deny all traffic that is not explicitly allowed in the
Apply the authorization policy configuration:
$ oc apply -f knative-default-authz-policies.yaml
Define which OpenShift projects can communicate with each other. For this communication, every OpenShift project of a tenant requires the following:
-
One
AuthorizationPolicyobject limiting directly incoming traffic to the tenant’s project -
One
AuthorizationPolicyobject limiting incoming traffic using the activator component of Serverless that runs in theknative-servingproject -
One
AuthorizationPolicyobject allowing Kubernetes to callPreStopHookson Knative Services
Instead of creating these policies manually, install the
helmutility and create the necessary resources for each tenant:Installing the
helmutility$ helm repo add openshift-helm-charts https://charts.openshift.io/
Creating example configuration for
team alpha$ helm template openshift-helm-charts/redhat-knative-istio-authz --version 1.31.0 --set "name=team-alpha" --set "namespaces={team-alpha-1,team-alpha-2}" > team-alpha.yamlCreating example configuration for
team bravo$ helm template openshift-helm-charts/redhat-knative-istio-authz --version 1.31.0 --set "name=team-bravo" --set "namespaces={team-bravo-1,team-bravo-2}" > team-bravo.yaml-
One
Apply the authorization policy configuration:
$ oc apply -f team-alpha.yaml team-bravo.yaml
2.4. Verifying the configuration
You can use the curl command to verify the configuration for network traffic isolation.
The following examples assume having two tenants, each having one namespace, and all part of the ServiceMeshMemberRoll object, configured with the resources in the team-alpha.yaml and team-bravo.yaml files.
Procedure
Deploy Knative Services in the namespaces of both of the tenants:
Example command for
team-alpha$ kn service create test-webapp -n team-alpha-1 \ --annotation-service serving.knative.openshift.io/enablePassthrough=true \ --annotation-revision sidecar.istio.io/inject=true \ --env RESPONSE="Hello Serverless" \ --image docker.io/openshift/hello-openshiftExample command for
team-bravo$ kn service create test-webapp -n team-bravo-1 \ --annotation-service serving.knative.openshift.io/enablePassthrough=true \ --annotation-revision sidecar.istio.io/inject=true \ --env RESPONSE="Hello Serverless" \ --image docker.io/openshift/hello-openshiftAlternatively, use the following YAML configuration:
apiVersion: serving.knative.dev/v1
kind: Service
metadata:
  name: test-webapp
  namespace: team-alpha-1
  annotations:
    serving.knative.openshift.io/enablePassthrough: "true"
spec:
  template:
    metadata:
      annotations:
        sidecar.istio.io/inject: 'true'
    spec:
      containers:
        - image: docker.io/openshift/hello-openshift
          env:
            - name: RESPONSE
              value: "Hello Serverless!"
---
apiVersion: serving.knative.dev/v1
kind: Service
metadata:
  name: test-webapp
  namespace: team-bravo-1
  annotations:
    serving.knative.openshift.io/enablePassthrough: "true"
spec:
  template:
    metadata:
      annotations:
        sidecar.istio.io/inject: 'true'
    spec:
      containers:
        - image: docker.io/openshift/hello-openshift
          env:
            - name: RESPONSE
              value: "Hello Serverless!"
Deploy a
curlpod for testing the connections:$ cat <<EOF | oc apply -f - apiVersion: apps/v1 kind: Deployment metadata: name: curl namespace: team-alpha-1 labels: app: curl spec: replicas: 1 selector: matchLabels: app: curl template: metadata: labels: app: curl annotations: sidecar.istio.io/inject: 'true' spec: containers: - name: curl image: curlimages/curl command: - sleep - "3600" EOFVerify the configuration by using the
curlcommand.Test
team-alpha-1 → team-alpha-1through cluster local domain, which is allowed:Example command
$ oc exec deployment/curl -n team-alpha-1 -it -- curl -v http://test-webapp.team-alpha-1:80
Example output
HTTP/1.1 200 OK
content-length: 18
content-type: text/plain; charset=utf-8
date: Wed, 26 Jul 2023 12:49:59 GMT
server: envoy
x-envoy-upstream-service-time: 9

Hello Serverless!
Test the
team-alpha-1toteam-alpha-1connection through an external domain, which is allowed:Example command
$ EXTERNAL_URL=$(oc get ksvc -n team-alpha-1 test-webapp -o custom-columns=:.status.url --no-headers) && \
oc exec deployment/curl -n team-alpha-1 -it -- curl -ik $EXTERNAL_URL
Example output
HTTP/2 200
content-length: 18
content-type: text/plain; charset=utf-8
date: Wed, 26 Jul 2023 12:55:30 GMT
server: istio-envoy
x-envoy-upstream-service-time: 3629

Hello Serverless!
Test the
team-alpha-1toteam-bravo-1connection through the cluster’s local domain, which is not allowed:Example command
$ oc exec deployment/curl -n team-alpha-1 -it -- curl -v http://test-webapp.team-bravo-1:80
Example output
* processing: http://test-webapp.team-bravo-1:80
*   Trying 172.30.73.216:80...
* Connected to test-webapp.team-bravo-1 (172.30.73.216) port 80
> GET / HTTP/1.1
> Host: test-webapp.team-bravo-1
> User-Agent: curl/8.2.0
> Accept: */*
>
< HTTP/1.1 403 Forbidden
< content-length: 19
< content-type: text/plain
< date: Wed, 26 Jul 2023 12:55:49 GMT
< server: envoy
< x-envoy-upstream-service-time: 6
<
* Connection #0 to host test-webapp.team-bravo-1 left intact
RBAC: access denied
Test the
team-alpha-1toteam-bravo-1connection through an external domain, which is allowed:Example command
$ EXTERNAL_URL=$(oc get ksvc -n team-bravo-1 test-webapp -o custom-columns=:.status.url --no-headers) && \
oc exec deployment/curl -n team-alpha-1 -it -- curl -ik $EXTERNAL_URL
Example output
HTTP/2 200
content-length: 18
content-type: text/plain; charset=utf-8
date: Wed, 26 Jul 2023 12:56:22 GMT
server: istio-envoy
x-envoy-upstream-service-time: 2856

Hello Serverless!
Delete the resources that were created for verification:
$ oc delete deployment/curl -n team-alpha-1 && \
oc delete ksvc/test-webapp -n team-alpha-1 && \
oc delete ksvc/test-webapp -n team-bravo-1
Additional resources for OpenShift Container Platform
Chapter 3. Integrating Serverless with the cost management service
Cost management is an OpenShift Container Platform service that enables you to better understand and track costs for clouds and containers. It is based on the open source Koku project.
3.1. Prerequisites
- You have cluster administrator permissions.
- You have set up cost management and added an OpenShift Container Platform source.
3.2. Using labels for cost management queries
Labels, also known as tags in cost management, can be applied for nodes, namespaces or pods. Each label is a key and value pair. You can use a combination of multiple labels to generate reports. You can access reports about costs by using the Red Hat hybrid console.
Labels are inherited from nodes to namespaces, and from namespaces to pods. However, labels are not overridden if they already exist on a resource. For example, Knative services have a default app=<revision_name> label:
Example Knative service default label
apiVersion: serving.knative.dev/v1
kind: Service
metadata:
  name: showcase
spec:
...
      labels:
        app: <revision_name>
...
If you define a label for a namespace, such as app=my-domain, the cost management service does not take into account costs coming from a Knative service with the tag app=<revision_name> when querying the application using the app=my-domain tag. Costs for Knative services that have this tag must be queried under the app=<revision_name> tag.
3.3. Additional resources
Chapter 4. Integrating Serverless with OpenShift Pipelines
Integrating Serverless with OpenShift Pipelines enables CI/CD pipeline management for Serverless services. Using this integration, you can automate the deployment of your Serverless services.
4.1. Prerequisites
-
You have access to the cluster with
cluster-adminprivileges. - The OpenShift Serverless Operator and Knative Serving are installed on the cluster.
- You have installed the OpenShift Pipelines Operator on the cluster.
4.2. Creating a service deployed by OpenShift Pipelines
Using the OpenShift Container Platform web console, you can create a service that the OpenShift Pipelines deploys.
Procedure
In the OpenShift Container Platform web console Developer perspective, navigate to +Add and select the Import from Git option.
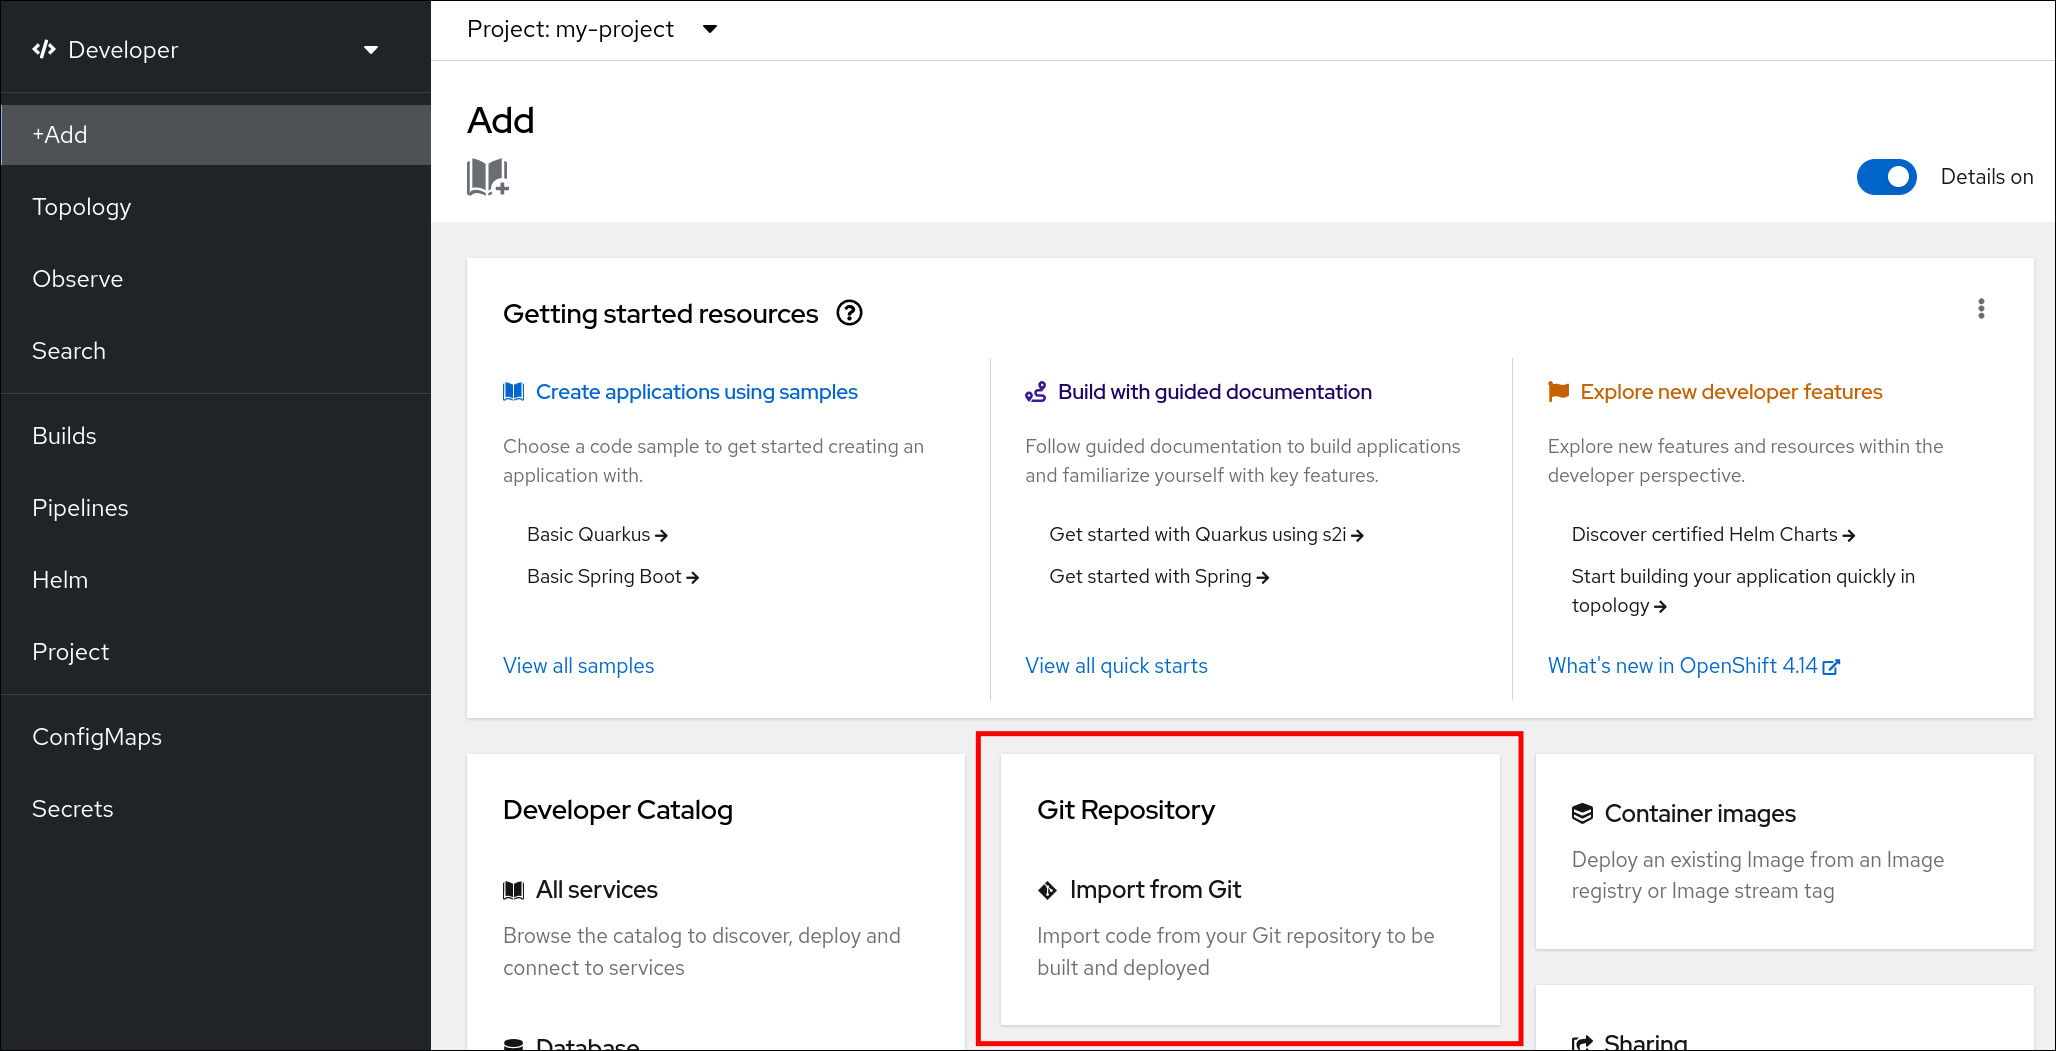
In the Import from Git dialog, specify project metadata by doing the following:
- Specify the Git repository URL.
- If necessary, specify the context directory. This is the subdirectory inside the repository that contains the root of application source code.
- Optional: Specify the application name. By default, the repository name is used.
- Select the Serverless Deployment resource type.
- Select the Add pipeline checkbox. The pipeline is automatically selected based on the source code and its visualization is shown on the scheme.
Specify any other relevant settings.
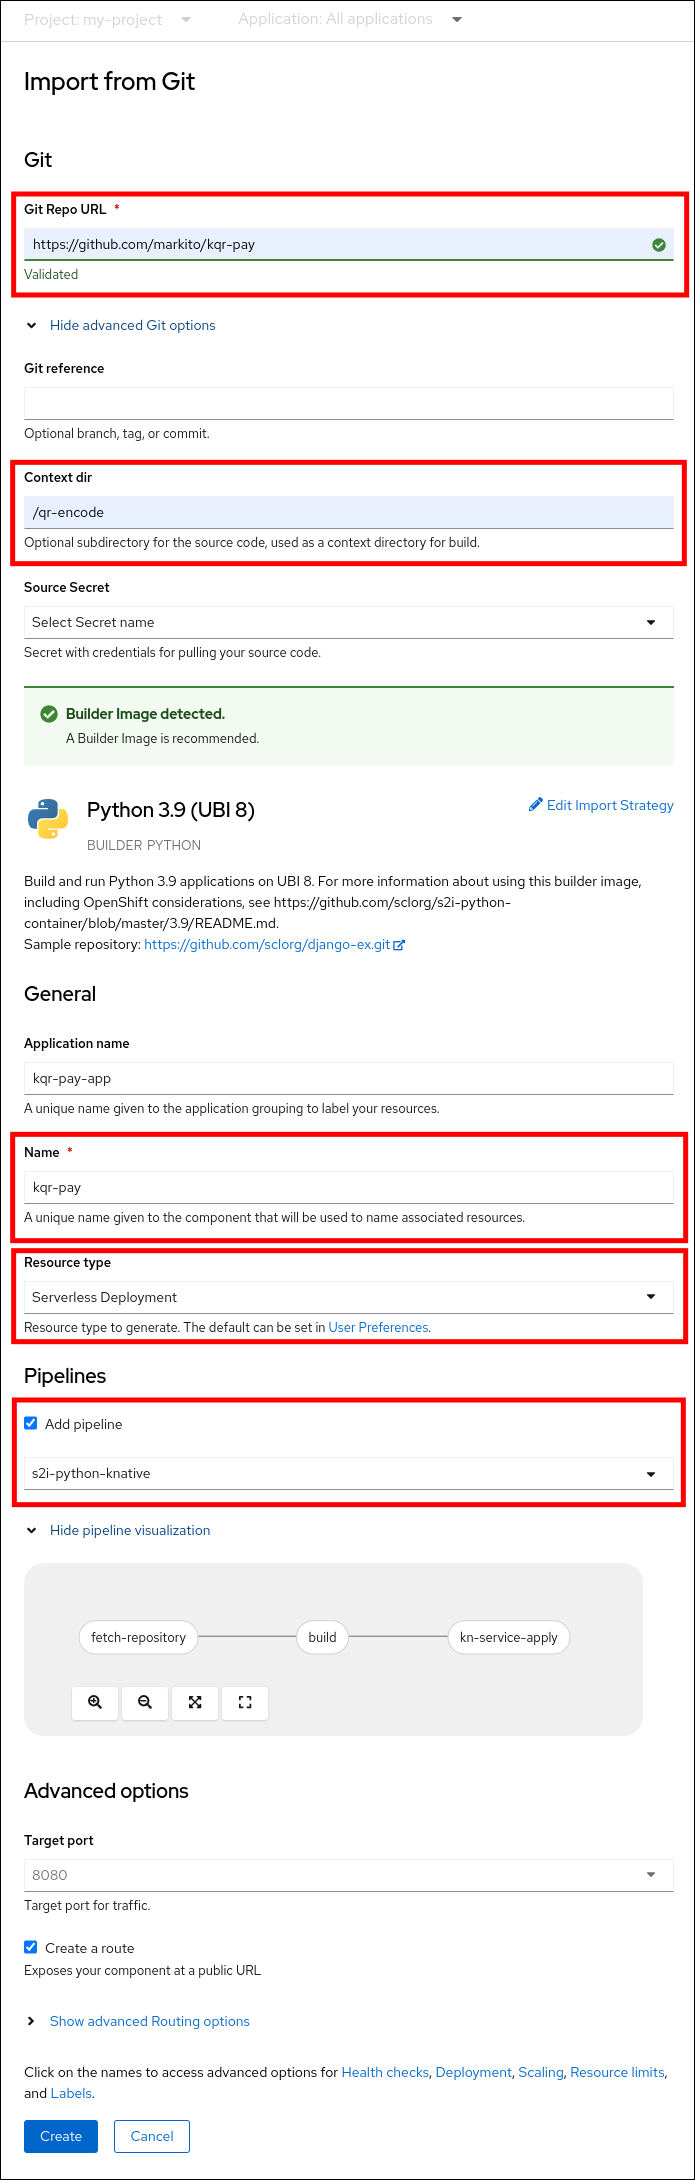
- Click Create to create the service.
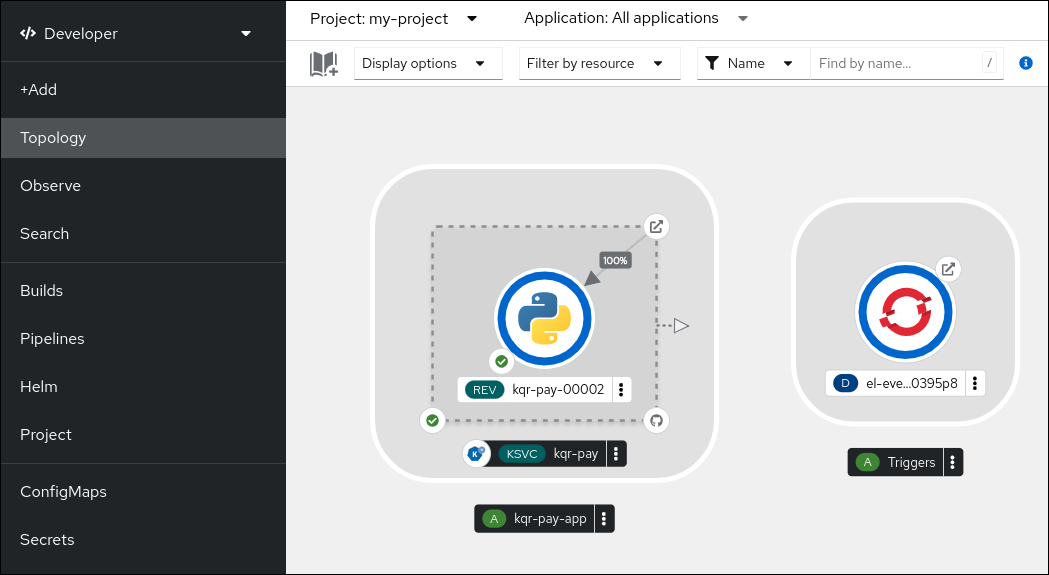
After the service creation starts, you are navigated to the Topology screen, where your service and the related trigger are visualized and where you can interact with them.
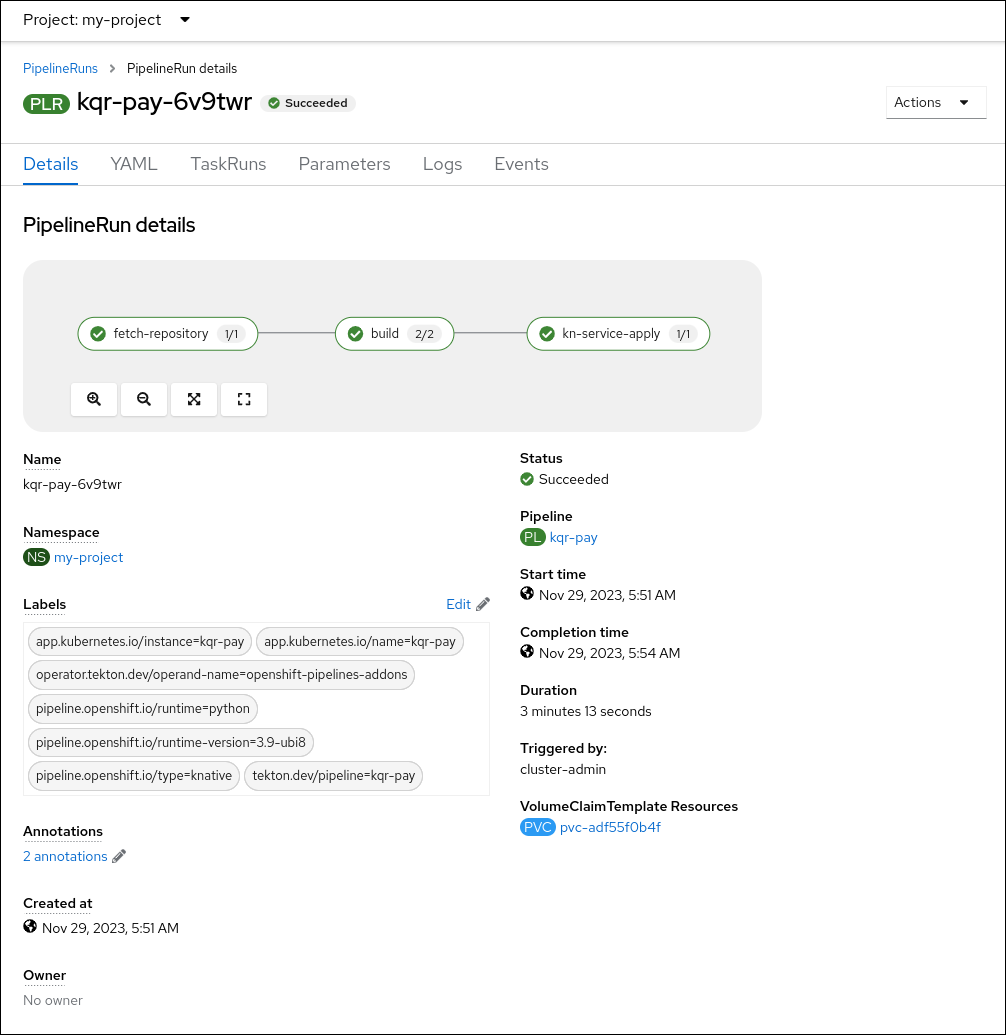
Optional: Verify that the pipeline has been created and that the service is being built and deployed by navigating to the Pipelines page:
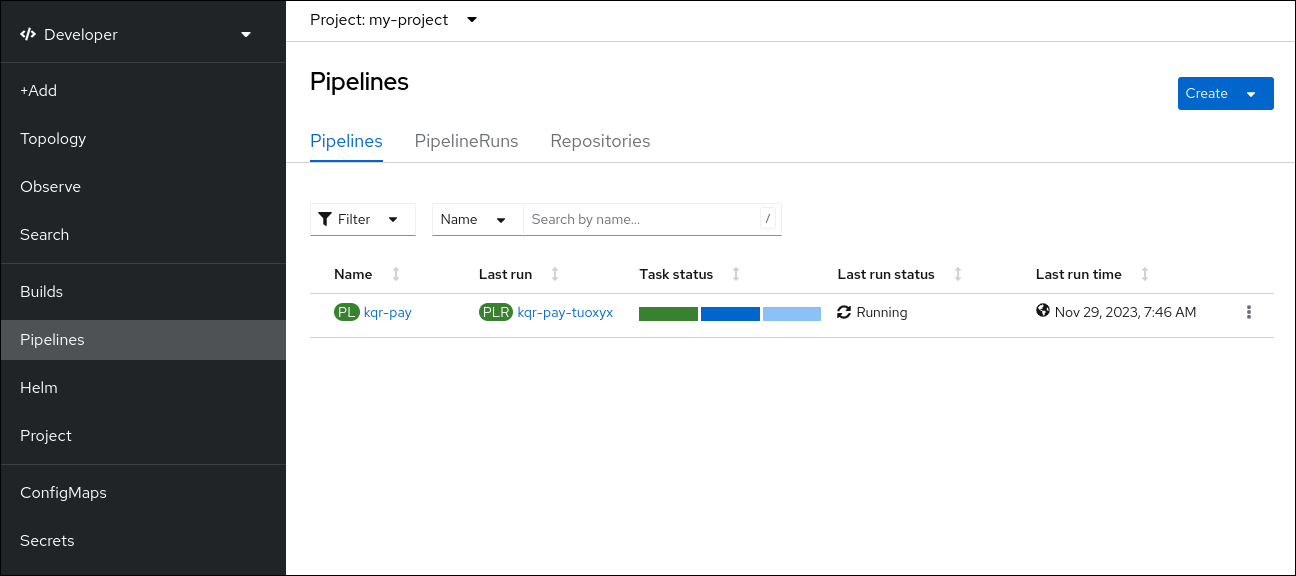
To see the details of the pipeline, click the pipeline on the Pipelines page.
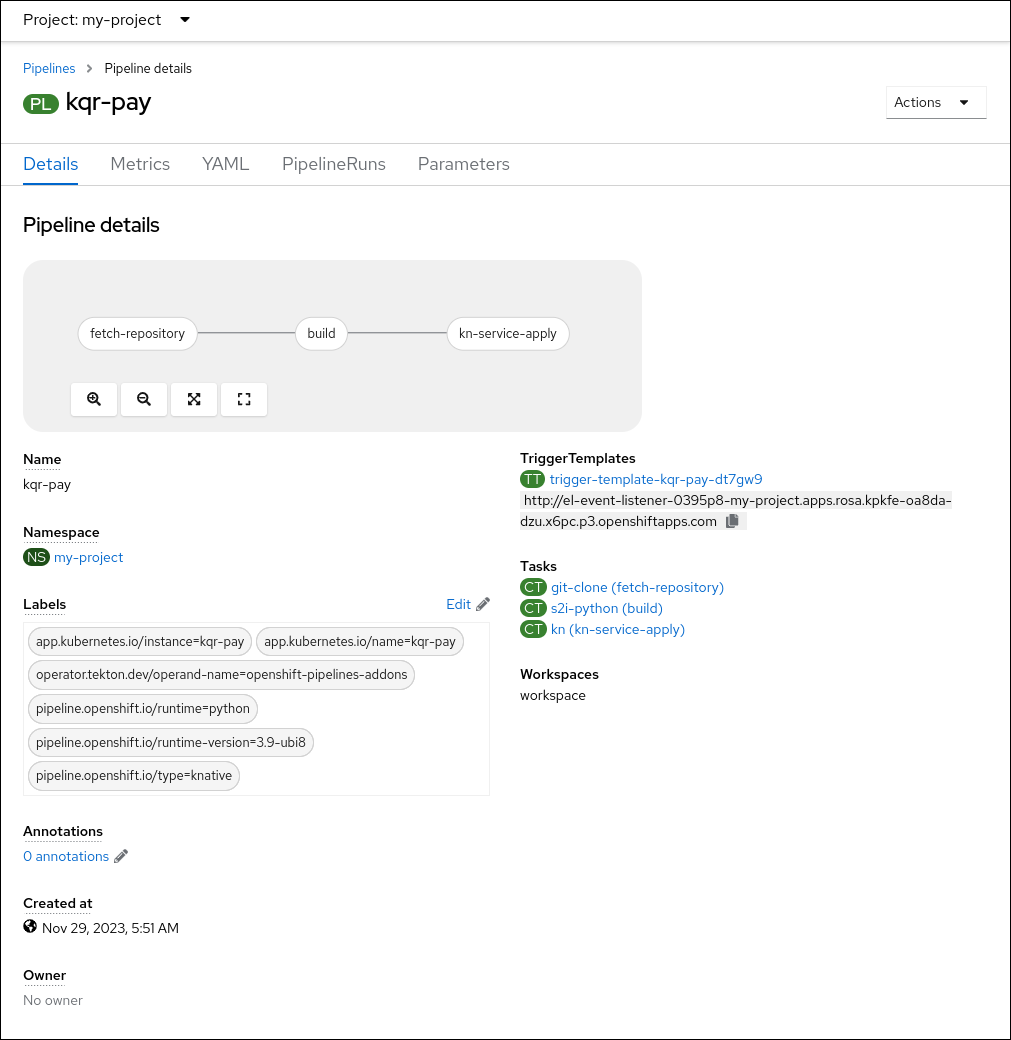
To see the details about the current pipeline run, click the name of the run on the Pipelines page.
4.3. Additional resources
Chapter 5. Using NVIDIA GPU resources with serverless applications
NVIDIA supports using GPU resources on OpenShift Container Platform. See GPU Operator on OpenShift for more information about setting up GPU resources on OpenShift Container Platform.
5.1. Specifying GPU requirements for a service
After GPU resources are enabled for your OpenShift Container Platform cluster, you can specify GPU requirements for a Knative service using the Knative (kn) CLI.
Prerequisites
- The OpenShift Serverless Operator, Knative Serving and Knative Eventing are installed on the cluster.
-
You have installed the Knative (
kn) CLI. - GPU resources are enabled for your OpenShift Container Platform cluster.
- You have created a project or have access to a project with the appropriate roles and permissions to create applications and other workloads in OpenShift Container Platform.
Using NVIDIA GPU resources is not supported for IBM zSystems and IBM Power on OpenShift Container Platform or OpenShift Dedicated.
Procedure
Create a Knative service and set the GPU resource requirement limit to
1by using the--limit nvidia.com/gpu=1flag:$ kn service create hello --image <service-image> --limit nvidia.com/gpu=1
A GPU resource requirement limit of
1means that the service has 1 GPU resource dedicated. Services do not share GPU resources. Any other services that require GPU resources must wait until the GPU resource is no longer in use.A limit of 1 GPU also means that applications exceeding usage of 1 GPU resource are restricted. If a service requests more than 1 GPU resource, it is deployed on a node where the GPU resource requirements can be met.
Optional. For an existing service, you can change the GPU resource requirement limit to
3by using the--limit nvidia.com/gpu=3flag:$ kn service update hello --limit nvidia.com/gpu=3