
Chapter 9. Scaling storage of IBM Power OpenShift Data Foundation cluster
To scale the storage capacity of your configured Red Hat OpenShift Data Foundation worker nodes on IBM Power cluster, you can increase the capacity by adding three disks at a time. Three disks are needed since OpenShift Data Foundation uses a replica count of 3 to maintain the high availability. So the amount of storage consumed is three times the usable space.
Usable space may vary when encryption is enabled or replica 2 pools are being used.
9.1. Scaling up storage by adding capacity to your OpenShift Data Foundation nodes on IBM Power infrastructure using local storage devices
In order to scale up an OpenShift Data Foundation cluster which was created using local storage devices, a new disk needs to be added to the storage node. It is recommended to have the new disks of the same size as used earlier during the deployment as OpenShift Data Foundation does not support heterogeneous disks/OSD’s.
You can add storage capacity (additional storage devices) to your configured local storage based OpenShift Data Foundation worker nodes on IBM Power infrastructures.
Flexible scaling features get enabled at the time of deployment and can not be enabled or disabled later on.
Prerequisites
- You must be logged into OpenShift Container Platform cluster.
You must have installed the local storage operator. Use the following procedure:
- You must have three OpenShift Container Platform worker nodes with the same storage type and size attached to each node (for example, 0.5TB SSD) as the original OpenShift Data Foundation StorageCluster was created with.
Procedure
To add storage capacity to OpenShift Container Platform nodes with OpenShift Data Foundation installed, you need to
Find the available devices that you want to add, that is, a minimum of one device per worker node. You can follow the procedure for finding available storage devices in the respective deployment guide.
NoteMake sure you perform this process for all the existing nodes (minimum of 3) for which you want to add storage.
Add the additional disks to the
LocalVolumecustom resource (CR).$ oc edit -n openshift-local-storage localvolume localblock
Example output:
spec:
  logLevel: Normal
  managementState: Managed
  nodeSelector:
    nodeSelectorTerms:
      - matchExpressions:
          - key: kubernetes.io/hostname
            operator: In
            values:
              - worker-0
              - worker-1
              - worker-2
  storageClassDevices:
    - devicePaths:
        - /dev/sda
        - /dev/sdx    # newly added device
      storageClassName: localblock
      volumeMode: Block
Make sure to save the changes after editing the CR.
Example output:
localvolume.local.storage.openshift.io/localblock edited
You can see in this CR that new devices are added.
-
sdx
-
Display the newly created Persistent Volumes (PVs) with the
storageclassname used in thelocalVolumeCR.$ oc get pv | grep localblock | grep Available
Example output:
local-pv-a04ffd8       500Gi      RWO      Delete       Available      localblock       24s
local-pv-a0ca996b      500Gi      RWO      Delete       Available      localblock       23s
local-pv-c171754a      500Gi      RWO      Delete       Available      localblock       23s
- Navigate to the OpenShift Web Console.
- Click Operators on the left navigation bar.
- Select Installed Operators.
- In the window, click OpenShift Data Foundation Operator.
In the top navigation bar, scroll right and click Storage System tab.
- Click the Action menu (⋮) next to the visible list to extend the options menu.
Select Add Capacity from the options menu.
From this dialog box, set the Storage Class name to the name used in the
localVolumeCR. Available Capacity displayed is based on the local disks available in storage class.- Click Add.
- To check the status, navigate to Storage → Data Foundation and verify that Storage System in the Status card has a green tick.
Verification steps
Verify the available Capacity.
- In the OpenShift Web Console, click Storage → Data Foundation.
-
Click the Storage Systems tab and then click on
ocs-storagecluster-storagesystem. Navigate to Overview → Block and File tab, then check the Raw Capacity card.
Note that the capacity increases based on your selections.
NoteThe raw capacity does not take replication into account and shows the full capacity.
Verify that the new OSDs and their corresponding new Persistent Volume Claims (PVCs) are created.
To view the state of the newly created OSDs:
- Click Workloads → Pods from the OpenShift Web Console.
Select
openshift-storagefrom the Project drop-down list.NoteIf the Show default projects option is disabled, use the toggle button to list all the default projects.
To view the state of the PVCs:
- Click Storage → Persistent Volume Claims from the OpenShift Web Console.
Select
openshift-storagefrom the Project drop-down list.NoteIf the Show default projects option is disabled, use the toggle button to list all the default projects.
Optional: If cluster-wide encryption is enabled on the cluster, verify that the new OSD devices are encrypted.
Identify the nodes where the new OSD pods are running.
$ oc get -n openshift-storage -o=custom-columns=NODE:.spec.nodeName pod/<OSD-pod-name><OSD-pod-name>Is the name of the OSD pod.
For example:
$ oc get -n openshift-storage -o=custom-columns=NODE:.spec.nodeName pod/rook-ceph-osd-0-544db49d7f-qrgqm
Example output:
NODE
compute-1
For each of the nodes identified in the previous step, do the following:
Create a debug pod and open a chroot environment for the selected host(s).
$ oc debug node/<node-name><node-name>Is the name of the node.
$ chroot /host
Check for the
cryptkeyword beside theocs-devicesetnames.$ lsblk
Cluster reduction is supported only with the Red Hat Support Team’s assistance.
9.2. Scaling out storage capacity on a IBM Power cluster
OpenShift Data Foundation is highly scalable. It can be scaled out by adding new nodes with required storage and enough hardware resources in terms of CPU and RAM. Practically there is no limit on the number of nodes which can be added but from the support perspective 2000 nodes is the limit for OpenShift Data Foundation.
Scaling out storage capacity can be broken down into two steps:
- Adding new node
- Scaling up the storage capacity
OpenShift Data Foundation does not support heterogeneous OSD/Disk sizes.
9.2.1. Adding a node using a local storage device on IBM Power
You can add nodes to increase the storage capacity when existing worker nodes are already running at their maximum supported OSDs or when there are not enough resources to add new OSDs on the existing nodes.
Add nodes in the multiple of 3, each of them in different failure domains. Though it is recommended to add nodes in multiples of 3 nodes, you have the flexibility to add one node at a time in flexible scaling deployment. See Knowledgebase article Verify if flexible scaling is enabled
OpenShift Data Foundation does not support heterogeneous disk size and types. The new nodes to be added should have the disk of the same type and size which was used during initial OpenShift Data Foundation deployment.
Prerequisites
- You must be logged into the OpenShift Container Platform cluster.
- You must have three OpenShift Container Platform worker nodes with the same storage type and size attached to each node (for example, 2TB SSD drive) as the original OpenShift Data Foundation StorageCluster was created with.
Procedure
- Get a new IBM Power machine with the required infrastructure. See Platform requirements.
Create a new OpenShift Container Platform node using the new IBM Power machine.
Check for certificate signing requests (CSRs) that are in
Pendingstate.$ oc get csr
Approve all the required CSRs for the new node.
$ oc adm certificate approve <Certificate_Name><Certificate_Name>- Is the name of the CSR.
- Click Compute → Nodes, confirm if the new node is in Ready state.
Apply the OpenShift Data Foundation label to the new node using any one of the following:
- From User interface
- For the new node, click Action Menu (⋮) → Edit Labels.
-
Add
cluster.ocs.openshift.io/openshift-storageand click Save.
- From Command line interface
Apply the OpenShift Data Foundation label to the new node.
$ oc label node <new_node_name> cluster.ocs.openshift.io/openshift-storage=""
<new_node_name>- Is the name of the new node.
Click Operators → Installed Operators from the OpenShift Web Console.
From the Project drop-down list, make sure to select the project where the Local Storage Operator is installed.
- Click Local Storage.
Click the Local Volume tab.
-
Beside the
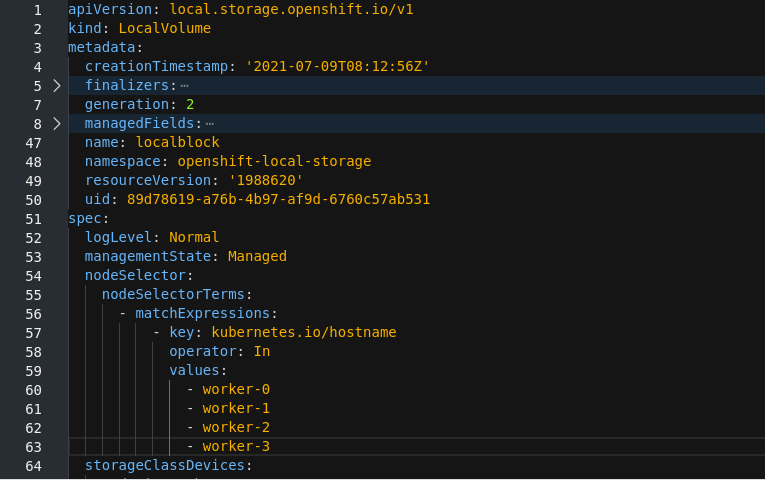
LocalVolume, click Action menu (⋮) → Edit Local Volume. In the YAML, add the hostname of the new node in the
valuesfield under thenode selector.Figure 9.1. YAML showing the addition of new hostnames
- Click Save.
-
Beside the
It is recommended to add 3 nodes, one each in different zones. You must add 3 nodes and perform this procedure for all of them.
Verification steps
Execute the following command the terminal and verify that the new node is present in the output:
$ oc get nodes --show-labels | grep cluster.ocs.openshift.io/openshift-storage= |cut -d' ' -f1
On the OpenShift web console, click Workloads → Pods, confirm that at least the following pods on the new node are in Running state:
-
csi-cephfsplugin-* -
csi-rbdplugin-*
-
9.2.2. Scaling up storage capacity
To scale up storage capacity, see Scaling up storage by adding capacity.