
Chapter 4. Install
Now that the basic configuration is done and IBM WebSphere Application Server is set to deploy Red Hat JBoss BRMS, you can upload the WAR deployables that were extracted earlier.
As noted previously, the Red Hat JBoss BRMS ZIP file for IBM WebSphere Application Server contains the deployable WAR files for both Business Central and Realtime Decision Server.
4.1. Installing Business Central
Business Central is uploaded as a web archive and can then be accessed at http://TARGET_SERVER:PORT/business-central. Start the deployment by installing the Business Central WAR as a WebSphere application.
In the main menu, go to Applications → Application Types → WebSphere Enterprise Applications.
This will show you all the existing applications in the system and allow you to install a new one.
- Click Install to start the installation process.
Upload the Business Central WAR file (
business-central.war) from the local file system. See Section 2.2, “Extracting Red Hat JBoss BRMS for IBM WebSphere Application Server” for more information.Figure 4.1. Preparing for Application Installation Wizard

Click Next. This process may take some time.
ImportantYou may encounter an error message similar to the following:
The EAR file could be corrupt and/or incomplete. Make sure that the application is at a compatible Java(TM) Platform, Enterprise Edition (Java EE) level for the current version of WebSphere(R) Application Server.
java.lang.NullPointerException
In that case, run
ulimit -nin the command line. If the result is1024, increase the number of open file descriptors. The recommended value is 100 000.- Select the Fast Path radio button and click Next.
-
Change the Application Name to
business-centralin the Select Installation Options step and click Next. - In the Map Modules to Servers step, map the Business Central modules to servers according to your requirements.
- In the Map Virtual Hosts for Web Modules step, leave the default values and click Next.
-
In the next step, set the context root to
business-central. - In the Metadata for Modules step, leave the default values and click Next.
- In the Summary page, click Finish to install Business Central. This process can take a while. Save the changes to the master configuration at the end of this process.
You will be returned to the WebSphere Enterprise Applications page where business-central will be listed as a new application. However, it will be stopped at this stage. Before you start the application, you need to map groups to roles, configure class loading, and enable the Bouncy Castle Crypto API.
Mapping Groups to Roles
-
Click on the
business-centralapplication to open the application configuration page. - Click Security Role to User/Group Mapping under the Detail Properties heading on the left.
-
Select the
adminrole and click Map Groups… at the top. Search for the
admingroup (or just click the Search button) and move it from the Available list to the Selected list. Click OK.This mapping gives the previously created administrator user access to the Business Central application.
-
Follow the same procedure for the
analystrole as well and save the configuration.
If you have other groups or users that should have access to Business Central, use the same steps to map them to the admin or analyst roles.
If you are also installing the Realtime Decision Server, give this user access to the kie-server role. Additionally, map appropriate REST API roles if you are going to use the REST API. For further information about API roles, see chapter Remote API of Red Hat JBoss BPM Suite Development Guide.
Class-Loading Configuration
Ensure correct class-loading configuration by following the steps below.
- In the main menu, go to Applications → Application Types → WebSphere Enterprise Applications.
-
Click
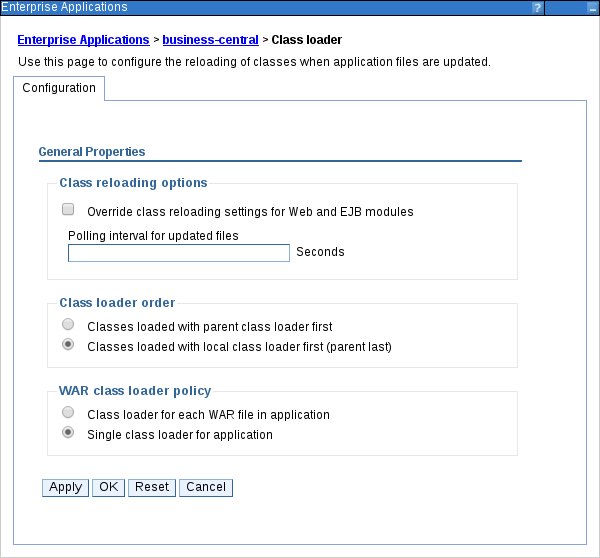
business-central. - Click Class Loading and Update Detection under the Detail Properties heading on the left.
Check the following options:
- Class Loader Order: Classes loaded with local class loader first (parent last)
- WAR Class Loader Policy: Single class loader for application
Figure 4.2. Configuring Class Loading
- Click OK, save the changes to the master configuration and restart the IBM WebSphere Application Server.
Enabling Bouncy Castle Crypto API
To enable Git SSH repository cloning and kie-config-cli from within Business Central, the Bouncy Castle Crypto API must be set up. Enable the API by following the steps below.
-
Set the
org.apache.sshd.registerBouncyCastleproperty totrueandorg.uberfire.domainproperty toWSLogin. See Section 3.7, “Adding Custom JVM Properties” for detailed instructions on how to set custom properties. Set up the Bouncy Castle API as a shared library referenced from Business Central using the appropriate version of Bouncy Castle:
- In the main menu on the left, navigate to Environment → Shared Libraries, select the appropriate scope and click New… to create a new library.
Give this library a name and set the class path to the Bouncy Castle library (
bcprov-jdk16-1.46.jar). Click OK and save the configuration.NoteFor more information about the
bcprov-jdk16-1.46.jarpackage, see the Maven Repository — Bouncy Castle Provider page.-
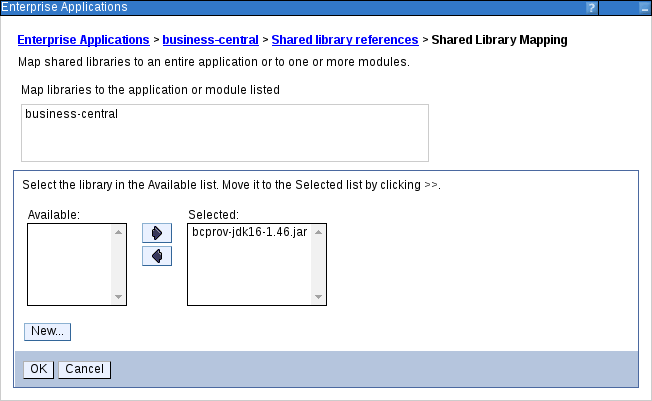
Go to Applications → Application Types → WebSphere Enterprise Applications and click
business-central. Click Shared Library References under the References heading on the left, select the web module, click on Reference Shared Libraries and move the Bouncy Castle library created in the previous step from the Available to the Selected list.
Figure 4.3. Mapping Shared Libraries
- Click OK and save the configuration.
You have now successfully installed Business Central on IBM WebSphere Application Server.
To start the application, go back to Applications → Application Types → WebSphere Enterprise Applications page and select the business-central checkbox before clicking Start.
To access the application, navigate to http://TARGET_SERVER:PORT/business-central in your web browser.
4.2. Installing Realtime Decision Server
The Realtime Decision Server is distributed as a web application archive file (kie-server.war) and is present in your Red Hat JBoss BRMS 6.4.0 Deployable for WebSphere 8.5 download.
It is assumed that you followed the steps described in Section 3.3, “Creating Users and Groups” to create the role kie-server required by the Realtime Decision Server. If you have not done so, revisit the respective sections in this guide.
In the main menu on the left, go to Applications → Application Types → WebSphere Enterprise Applications.
This will show you all the existing applications in the system and allow you to install a new one.
- Click Install to start the installation process.
-
Upload the Realtime Decision Server WAR file (
kie-server.war) from the local file system. Select the Fast Path radio button and click Next.
The Install New Application wizard opens.
-
Change the Application Name to
kie-serverin the first step and click Next. - In the next step, map the Realtime Decision Server modules to servers according to your requirements and click Next.
-
In the Bind Listeners for Message-Driven Beans step, select the Activation Specification radio button for both the beans. Enter
jms/activation/KIE.SERVER.EXECUTORas Target Resource JNDI Name for the KieExecutorMDB bean, andjms/activation/KIE.SERVER.REQUESTfor the KieServerMDB bean. -
In the next step, map resource references to actual resources. Enter the JNDI name for the
KIE.SERVER.REQUESTconnection factory that you created earlier:jms/conn/KIE.SERVER.REQUEST. - In the Map Virtual Hosts for Web Modules step, leave the default values and click Next.
-
In the next screen, set the context root to
kie-server. - In the Metadata for Modules step, leave the default values and click Next.
- Click Finish to install the Realtime Decision Server. Save the changes to the master configuration at the end of this process.
Class-Loading Configuration
Ensure correct class-loading configuration by following the steps below.
-
Navigate to Applications → Application Types → WebSphere Enterprise Applications and click
kie-server. - Click Class Loading and Update Detection under the Detail Properties heading on the left.
- In the properties, change Class Loader Order to Classes loaded with local class loader first (parent last) and WAR Class Loader Policy to Single class loader for application.
- Save the changes to the master configuration.
Mapping Groups to Roles
If you have already mapped the kie-server role to a user or a group, you can ignore this procedure. Otherwise, do the following:
-
Go back to the main configuration page for the newly installed
kie-serverapplication (Applications → Application Types → WebSphere Enterprise Applications). Click Security Role to User/Group Mapping under the Detail Properties heading on the left. -
Select the
kie-serverrole, click Map Groups… and search for thekie-servergroup in the next screen (or just click the Search button). - Move it from the Available list to the Selected list. Click OK.
This mapping gives the previously created administrator user access to the Realtime Decision Server.
You can now save the changes and start the kie-server application.
Check whether the Realtime Decision Server REST API works by sending a GET request at http://TARGET_SERVER:PORT/kie-server/services/rest/server.