
Red Hat Training
A Red Hat training course is available for Red Hat Virtualization
Chapter 1. Accessing the VM Portal
1.1. What is the VM Portal?
Desktop virtualization provides users with a desktop environment that is similar to a personal computer’s desktop environment. The VM Portal delivers Virtual Desktop Infrastructure to users. Users access the VM Portal through a web browser to display and access their assigned virtual desktops. The actions available to a user in the VM Portal are set by a system administrator. Standard users can start, stop, and use desktops that are assigned to them by the system administrator. Power users can perform some administrative actions. Both types of users access the VM Portal from the same URL, and are presented with options appropriate to their permission level on login.
- Standard User Access
- Standard users can power their virtual desktops on and off and connect to them through the VM Portal. Direct connection to virtual machines is facilitated with SPICE or VNC clients. Both protocols provide the user with an environment similar to a locally installed desktop. The administrator specifies the protocol used to connect to a virtual machine at the time of the virtual machine’s creation.
- Power User Access
System administrators can delegate some administration tasks by granting users power user access. In addition to the tasks that can be performed by standard users, power users can:
- Create, edit, and remove virtual machines
- Manage virtual disks and network interfaces
- Assign user permissions to virtual machines
- Create and use templates to rapidly deploy virtual machines
- Monitor resource usage and high-severity events
- Create and use snapshots to restore virtual machines to previous states
1.2. Browser Requirements
The following browser versions and operating systems can be used to access the Administration Portal and the VM Portal.
Browser support is divided into tiers:
- Tier 1: Browser and operating system combinations that are fully tested and fully supported. Red Hat Engineering is committed to fixing issues with browsers on this tier.
- Tier 2: Browser and operating system combinations that are partially tested, and are likely to work. Limited support is provided for this tier. Red Hat Engineering will attempt to fix issues with browsers on this tier.
- Tier 3: Browser and operating system combinations that are not tested, but may work. Minimal support is provided for this tier. Red Hat Engineering will attempt to fix only minor issues with browsers on this tier.
Table 1.1. Browser Requirements
| Support Tier | Operating System Family | Browser |
|---|---|---|
| Tier 1 | Red Hat Enterprise Linux | Mozilla Firefox Extended Support Release (ESR) version |
| Tier 2 | Windows | Internet Explorer 11 or later |
| Any | Most recent version of Google Chrome or Mozilla Firefox | |
| Tier 3 | Any | Earlier versions of Google Chrome or Mozilla Firefox |
| Any | Other browsers |
1.3. Client Requirements
Virtual machine consoles can only be accessed using supported Remote Viewer (virt-viewer) clients on Red Hat Enterprise Linux and Windows. To install virt-viewer, see Installing Supporting Components on Client Machines in the Virtual Machine Management Guide. Installing virt-viewer requires Administrator privileges.
Virtual machine consoles are accessed through the SPICE protocol. The QXL graphical driver can be installed in the guest operating system for improved/enhanced SPICE functionalities. SPICE currently supports a maximum resolution of 2560x1600 pixels.
Supported QXL drivers are available on Red Hat Enterprise Linux, Windows XP, and Windows 7.
SPICE support is divided into tiers:
- Tier 1: Operating systems on which Remote Viewer has been fully tested and is supported.
- Tier 2: Operating systems on which Remote Viewer is partially tested and is likely to work. Limited support is provided for this tier. Red Hat Engineering will attempt to fix issues with remote-viewer on this tier.
Table 1.2. Client Operating System SPICE Support
| Support Tier | Operating System |
|---|---|
| Tier 1 | Red Hat Enterprise Linux 7.2 and later |
| Microsoft Windows 7 | |
| Tier 2 | Microsoft Windows 8 |
| Microsoft Windows 10 |
1.4. Installing the CA certificate
The first time you access the VM Portal, you must install the certificate used by the Red Hat Virtualization Manager to avoid security warnings.
Installing the CA certificate in Firefox
- Go to the VM Portal URL.
- Click to open the Add Security Exception window.
- Select Permanently store this exception.
- Click .
Installing the CA certificate in Internet Explorer
- Go to the VM Portal certificate URL: https://[VM Portal URL]/ca.crt.
- Click Open in the File Download - Security Warning window to open the Certificate window.
- Click the button to open the Certificate Import Wizard window.
- Select the Place all certificates in the following store radio button and click to open the Select Certificate Store window.
- Select Trusted Root Certification Authorities from the list of certificate stores and click .
- Click to proceed to the Certificate Store screen.
- Click to proceed to the Completing the Certificate Import Wizard screen.
- Click to install the certificate.
If you are using Internet Explorer to access the VM Portal, you must also add the URL for the Red Hat Virtualization welcome page to the list of trusted sites to ensure that all security rules for trusted sites are applied to console resources such as console.vv mime files and Remote Desktop connection files.
Downloading the CA certificate
To download the CA certificate manually, click the CA Certificate link on the Manager’s welcome screen and save the ca.crt file.
1.5. Logging in to the VM Portal
Logging in to the VM Portal
- Enter the provided server address into the web browser to access the Manager welcome screen.
- Select the required language from the drop-down list.
- Click VM Portal. An SSO login page displays. SSO login enables you to log in to the VM Portal and the Administration Portal (if you have permission) at the same time.
- Enter your User Name and Password. Use the Profile drop-down list to select the correct domain.
- Click . The list of virtual machines and pools assigned to you displays.
To log out of the Portal, click your user name in the header bar and select Log out. You are logged out of all portals and the Manager welcome screen displays.
1.6. Graphical user interface elements
You can perform common virtual machine tasks, change log-in options, and view messages in the VM Portal screen.
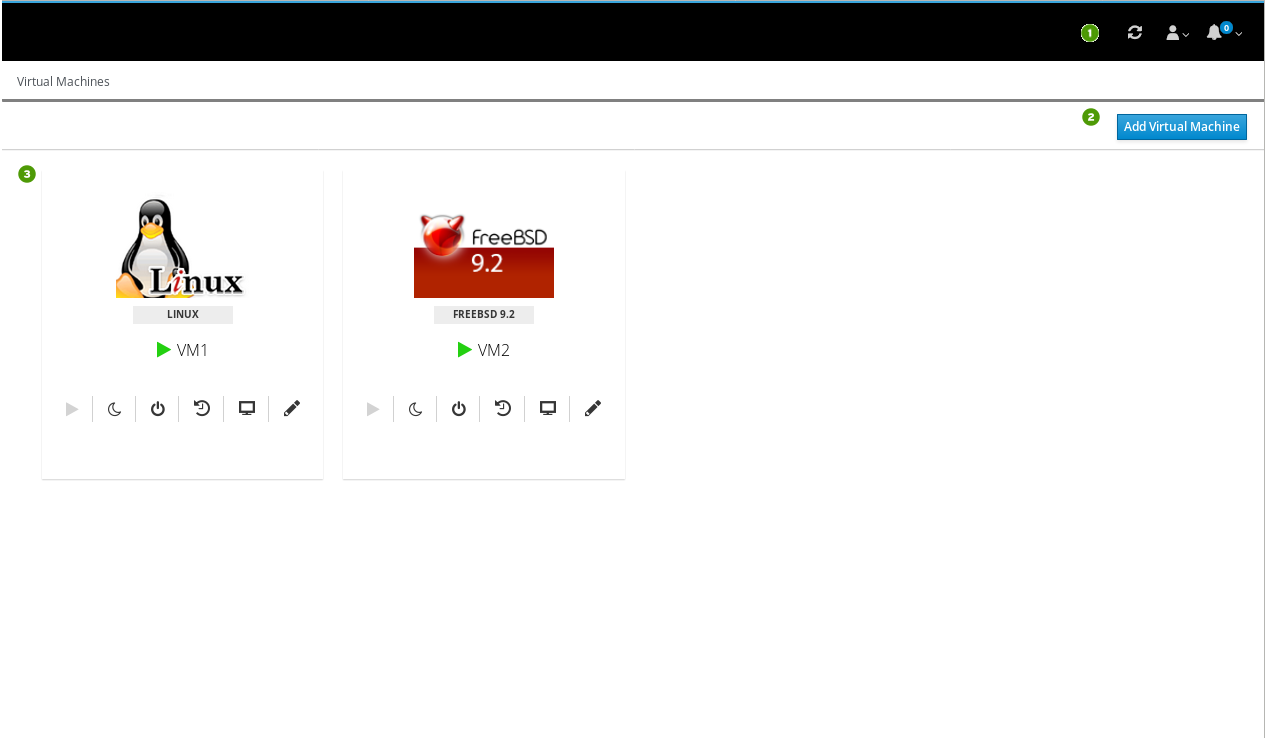
Key graphical user interface elements

Header barThe header bar contains the Refresh button, the drop-down button, and the drop-down button.
- The Refresh button refreshes the display.
The drop-down button displays the following list:
- Options: SSH key, for connecting via serial console to the VM Portal
- About: VM Portal release information
- Log out: To log out of the VM Portal
- The drop-down button displays messages from the system.

ToolbarThe toolbar contains buttons that allow you to perform additional actions.

Virtual machines paneThe virtual machines pane displays the icon, operating system, name, state, and management icons of each virtual machine and pooled virtual machine.