
Chapter 1. Users and organizations
Before creating repositories to contain your container images in Red Hat Quay, you should consider how these repositories will be structured. With Red Hat Quay, each repository requires a connection with either an Organization or a User. This affiliation defines ownership and access control for the repositories.
1.1. Tenancy model

- Organizations provide a way of sharing repositories under a common namespace that does not belong to a single user. Instead, these repositories belong to several users in a shared setting, such as a company.
- Teams provide a way for an Organization to delegate permissions. Permissions can be set at the global level (for example, across all repositories), or on specific repositories. They can also be set for specific sets, or groups, of users.
-
Users can log in to a registry through the web UI or a by using a client, such as Podman or Docker, using their respective login commands, for example,
$ podman login. Each user automatically gets a user namespace, for example,<quay-server.example.com>/<user>/<username>, orquay.io/<username>. - Superusers have enhanced access and privileges through the Super User Admin Panel in the user interface. Superuser API calls are also available, which are not visible or accessible to normal users.
- Robot accounts provide automated access to repositories for non-human users like pipeline tools. Robot accounts are similar to OpenShift Container Platform Service Accounts. Permissions can be granted to a robot account in a repository by adding that account like you would another user or team.
1.2. Creating user accounts
A user account for Red Hat Quay represents an individual with authenticated access to the platform’s features and functionalities. Through this account, you gain the capability to create and manage repositories, upload and retrieve container images, and control access permissions for these resources. This account is pivotal for organizing and overseeing your container image management within Red Hat Quay.
Use the following procedure to create a new user for your Red Hat Quay repository.
Prerequisites
-
You have configured a superuser in your
config.yamlfile. For more information, see Configuring a Red Hat Quay superuser.
Procedure
- Log in to your Red Hat Quay repository as the superuser.
- In the navigation pane, select your account name, and then click Super User Admin Panel.
- Click the Users icon in the column.
- Click the Create User button.
- Enter the new user’s Username and Email address, and then click the Create User button.
You are redirected to the Users page, where there is now another Red Hat Quay user.
NoteYou might need to refresh the Users page to show the additional user.
On the Users page, click the Options cogwheel associated with the new user. A drop-down menu appears, as shown in the following figure:
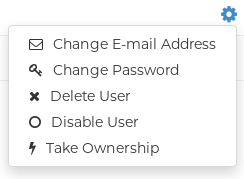
- Click Change Password.
Add the new password, and then click Change User Password.
The new user can now use that username and password to log in using the web UI or through their preferred container client, like Docker or Podman.
1.3. Deleting a Red Hat Quay user from the command line
When accessing the Users tab in the Superuser Admin panel of the Red Hat Quay UI, you might encounter a situation where no users are listed. Instead, a message appears, indicating that Red Hat Quay is configured to use external authentication, and users can only be created in that system.
This error occurs for one of two reasons:
- The web UI times out when loading users. When this happens, users are not accessible to perform any operations on.
- On LDAP authentication. When a userID is changed but the associated email is not. Currently, Red Hat Quay does not allow the creation of a new user with an old email address.
Use the following procedure to delete a user from Red Hat Quay when facing this issue.
Procedure
Enter the following
curlcommand to delete a user from the command line:$ curl -X DELETE -H "Authorization: Bearer <insert token here>" https://<quay_hostname>/api/v1/superuser/users/<name_of_user>
NoteAfter deleting the user, any repositories that this user had in his private account become unavailable.
1.4. Creating organization accounts
Any user can create their own organization to share repositories of container images. To create a new organization:
- While logged in as any user, select the plus sign (+) from the upper right corner of the home page and choose New Organization.
- Type the name of the organization. The name must be alphanumeric, all lower case, and between 2 and 255 characters long
Select Create Organization. The new organization appears, ready for you to begin adding repositories, teams, robot accounts and other features from icons on the left column. The following figure shows an example of the new organization’s page with the settings tab selected.
