
Chapter 6. Getting Started with Rules and Facts
To create business rules, an appropriate fact model on which the business rules operate must be present. A fact is an instance of an application object represented as POJO. Rules that contain the business logic can then be authored by using either the Business Central web user interface or Red Hat JBoss Developer Studio.
The structure of a rule is as follows:
rule "NAME"
when
  RULE CONDITIONS
then
  RULE CONSEQUENCES
end
Conditions inside the when clause of a rule query for fact combinations that match the criteria. If such a fact combination is found, consequences specified in the then clause are executed. These actions can assert a fact, retract a fact, or update a fact within the rule engine. As a result, other rules can be fired as well.
Rules Processing Steps
-
BRMS parses all
.drlrule files into the knowledge base. - Each fact is asserted into the working memory. As the facts are being asserted, BRMS uses the PHREAK or ReteOO algorithm to infer how the facts relate to the rules. After that, the working memory contains copies of the parsed rules and a reference to the facts.
-
The
fireAllRules()method is called. All rules and facts are evaluated by the rule engine and rule-facts pairs are created, based on which rules match against which set of facts. - All the rule-facts combinations are queued within a data construct called an agenda.
- Finally, activations are processed one by one from the agenda, calling the rule consequences on the facts. Note that executing an activation can modify the contents of the agenda before the next activation is performed. The PHREAK and ReteOO algorithms handle such situations efficiently.
6.1. Creating and Executing Rules
In this section, procedures describing how to create and execute rules using plain Java, Maven, Red Hat JBoss Developer Studio, and Business Central in Red Hat JBoss BPM Suite are provided.
6.1.1. Creating and Executing Rules Using Plain Java
Create a fact model.
Create a Plain old Java object (POJO) on which a rule will operate. In this example, a
Person.javafile in a directorymy-projectis created. ThePersonclass contains getter and setter methods to set and retrieve the first name, last name, hourly rate, and the wage of a person:import org.kie.api.KieServices; import org.kie.api.runtime.KieContainer; import org.kie.api.runtime.KieSession; public class Person { private String firstName; private String lastName; private Integer hourlyRate; private Integer wage; public String getFirstName() { return firstName; } public void setFirstName(String firstName) { this.firstName = firstName; } public String getLastName() { return lastName; } public void setLastName(String lastName) { this.lastName = lastName; } public Integer getHourlyRate() { return hourlyRate; } public void setHourlyRate(Integer hourlyRate) { this.hourlyRate = hourlyRate; } public Integer getWage(){ return wage; } public void setWage(Integer wage){ this.wage = wage; } }Create a rule.
Create a rule file in the
.drlformat under themy-projectdirectory. The followingPerson.drlrule calculates the wage and hourly rate values and displays a message based on the result afterwards.dialect "java" rule "Wage" when Person(hourlyRate * wage > 100) Person(name : firstName, surname : lastName) then System.out.println("Hello" + " " + name + " " + surname + "!"); System.out.println("You are rich!"); endCreate a main class.
Create a main class and save it to the same directory as the POJO created earlier. The main class will load the knowledge base and fire rules. In the following example, a main class
DroolsTest.javais created.In the main class:
Add the following
importstatements to import KIE services, a KIE container, and a KIE session:import org.kie.api.KieServices; import org.kie.api.runtime.KieContainer; import org.kie.api.runtime.KieSession;
Load the knowledge base, insert facts, and fire the rule from the
main()method which passes the fact model to the rule:public class DroolsTest { public static final void main(String[] args) { try { // Load the knowledge base: KieServices ks = KieServices.Factory.get(); KieContainer kContainer = ks.getKieClasspathContainer(); KieSession kSession = kContainer.newKieSession(); // Go! Person p = new Person(); p.setWage(12); p.setFirstName("Tom"); p.setLastName("Summers"); p.setHourlyRate(10); kSession.insert(p); kSession.fireAllRules(); } catch (Throwable t) { t.printStackTrace(); } } }
-
Download the Red Hat JBoss BRMS 6.4 Core Engine ZIP file from the Red Hat Customer Portal and extract it under
my-project/BRMS-engine-jars/. In the
my-project/META-INFdirectory, create akmodule.xmlmetadata file with the following content:<?xml version="1.0" encoding="UTF-8"?> <kmodule xmlns="http://www.drools.org/xsd/kmodule"> </kmodule>
Build the example.
To compile and build your Java files, navigate to the
my-projectdirectory on the command line and run the following command:javac -classpath "./BRMS-engine-jars/*:." DroolsTest.java
Run the example.
If there are no compilation errors, run the following command to execute the rule:
java -classpath "./BRMS-engine-jars/*:." DroolsTest
The expected output looks similar to the following:
Hello Tom Summers! You are rich!
6.1.2. Creating and Executing Rules Using Maven
Create a basic Maven archetype.
Navigate to a directory where you want to create a Maven archetype and run the following command:
mvn archetype:generate -DgroupId=com.sample.app -DartifactId=my-app -DarchetypeArtifactId=maven-archetype-quickstart -DinteractiveMode=false
This creates a directory
my-appwith the following structure:my-app |-- pom.xml `-- src |-- main | `-- java | `-- com | `-- mycompany | `-- app | `-- App.java `-- test `-- java `-- com `-- mycompany `-- app `-- AppTest.javaThe
my-appdirectory contains:-
A
src/maindirectory for storing the application’s sources. -
A
src/testdirectory for storing the test sources. -
A
pom.xmlfile with the project’s configuration.
-
A
Create a fact model.
A fact model is a POJO, based on which a rule will operate. Create a
Person.javafile under themy-app/src/main/java/com/mycompany/appdirectory. ThePersonclass contains getter and setter methods to set and retrieve the first name, last name, hourly rate, and the wage of a person.package com.mycompany.app; public class Person { private String firstName; private String lastName; private Integer hourlyRate; private Integer wage; public String getFirstName() { return firstName; } public void setFirstName(String firstName) { this.firstName = firstName; } public String getLastName() { return lastName; } public void setLastName(String lastName) { this.lastName = lastName; } public Integer getHourlyRate() { return hourlyRate; } public void setHourlyRate(Integer hourlyRate) { this.hourlyRate = hourlyRate; } public Integer getWage(){ return wage; } public void setWage(Integer wage){ this.wage = wage; } }Create a rule.
Create a rule file in the
.drlformat under themy-app/src/main/resources/rulesdirectory. See the following example with a simple rulePerson.drlwhich imports thePersonclass:package com.mycompany.app; import com.mycompany.app.Person; dialect "java" rule "Wage" when Person(hourlyRate * wage > 100) Person(name : firstName, surname : lastName) then System.out.println("Hello " + name + " " + surname + "!"); System.out.println("You are rich!"); endThe rule above calculates the wage and hourly rate values and displays a message based on the result afterwards.
In the
my-app/src/main/resources/META-INFdirectory, create a metadata filekmodule.xmlwith the following content:<?xml version="1.0" encoding="UTF-8"?> <kmodule xmlns="http://www.drools.org/xsd/kmodule"> </kmodule>
Set project dependencies.
Specify the libraries your application requires in the
my-app/pom.xmlconfiguration file. Provide the Red Hat JBoss BRMS dependencies as well as the group ID, artifact ID, and version (GAV) of your application as shown below:<?xml version="1.0" encoding="UTF-8"?> <project xmlns="http://maven.apache.org/POM/4.0.0" xmlns:xsi="http://www.w3.org/2001/XMLSchema-instance" xsi:schemaLocation="http://maven.apache.org/POM/4.0.0 http://maven.apache.org/xsd/maven-4.0.0.xsd"> <modelVersion>4.0.0</modelVersion> <groupId>com.mycompany.app</groupId> <artifactId>my-app</artifactId> <version>1.0.0</version> <repositories> <repository> <id>jboss-ga-repository</id> <url>http://maven.repository.redhat.com/ga/</url> </repository> </repositories> <dependencies> <dependency> <groupId>org.drools</groupId> <artifactId>drools-compiler</artifactId> <version>VERSION</version> </dependency> <dependency> <groupId>org.kie</groupId> <artifactId>kie-api</artifactId> <version>VERSION</version> </dependency> <dependency> <groupId>junit</groupId> <artifactId>junit</artifactId> <version>4.11</version> <scope>test</scope> </dependency> </dependencies> </project>For the supported Maven artifact version, see section Supported Component Versions of the Red Hat JBoss BPM Suite Installation Guide.
Test the example.
Use the
testAppmethod inmy-app/src/test/java/com/mycompany/app/AppTest.javato test the rule. TheAppTest.javafile is created by Maven by default.In the
AppTest.javafile:Add the following
importstatements to import KIE services, a KIE container, and a KIE session:import org.kie.api.KieServices; import org.kie.api.runtime.KieContainer; import org.kie.api.runtime.KieSession;
Load the knowledge base, insert facts, and fire the rule from the
testApp()method which passes the fact model to the rule:public void testApp() { // Load the knowledge base: KieServices ks = KieServices.Factory.get(); KieContainer kContainer = ks.getKieClasspathContainer(); KieSession kSession = kContainer.newKieSession(); // Set up the fact model: Person p = new Person(); p.setWage(12); p.setFirstName("Tom"); p.setLastName("Summers"); p.setHourlyRate(10); // Insert the person into the session: kSession.insert(p); // Fire all rules: kSession.fireAllRules(); }
Build the example.
On the command line, navigate to the
my-appdirectory and run the following command:mvn clean install
Note that executing this command for the first time may take a while.
The expected output looks similar to the following:
Hello Tom Summers! You are rich! Tests run: 1, Failures: 0, Errors: 0, Skipped: 0, Time elapsed: 1.194 sec Results : Tests run: 1, Failures: 0, Errors: 0, Skipped: 0 [INFO] ... [INFO] -------------------------------------------------------------- [INFO] BUILD SUCCESS [INFO] -------------------------------------------------------------- [INFO] Total time: 6.393 s ... [INFO] --------------------------------------------------------------
6.1.3. Creating and Executing Rules Using Red Hat JBoss Developer Studio
Make sure you have Red Hat JBoss Developer Studio properly set before proceeding further. See chapter Red Hat JBoss Developer Studio of Red Hat JBoss BPM Suite Installation Guide for more information.
Create a BRMS project.
To create a BRMS project in Red Hat JBoss Developer Studio:
- Start Red Hat JBoss Developer Studio and click File → New → Project.
- In the New Project dialog window that opens, select Drools → Drools Project and click Next.
- Click on the second icon to create a project and populate it with some example files to help you get started quickly. Click Next.
Enter a name of the project a select the Maven radio button as the project building option. Specify the GAV values which form the project’s fully qualified name, for example:
-
Group ID:
com.mycompany.app -
Artifact ID:
my-app -
Version:
1.0.0
-
Group ID:
- Click Finish.
This configuration sets up a basic project structure, class path, and sample rules. The project structure is as follows:
My-Project `-- src/main/java | `-- com.sample | `-- DecisionTable.java | `-- DroolsTest.java | `-- ProcessTest.java | `-- src/main/resources | `-- dtables | `-- Sample.xls | `-- process | `-- sample.bpmn | `-- rules | `-- Sample.drl | `-- META-INF | `-- JRE System Library | `-- Maven Dependencies | `-- Drools Library | `-- src | `-- target | `-- pom.xmlNotice the following:
-
A
Sample.drlrule file in thesrc/main/resourcesdirectory, containing an exampleHello WorldandGoodByerules. -
A
DroolsTest.javafile under thesrc/main/javadirectory in thecom.samplepackage. TheDroolsTestclass can be used to execute rules. -
The
Drools Librarydirectory which acts as a custom class path containing JAR files necessary for execution.
Create a fact model.
The
DroolsTest.javafile contains a sample POJOMessagewith getter and setter methods. You can edit this class or create a different POJO. In this example, a classPersoncontaining methods to set and retrieve the first name, last name, hourly rate, and wage of a person is used.public static class Person { private String firstName; private String lastName; private Integer hourlyRate; private Integer wage; public String getFirstName() { return firstName; } public void setFirstName(String firstName) { this.firstName = firstName; } public String getLastName() { return lastName; } public void setLastName(String lastName) { this.lastName = lastName; } public Integer getHourlyRate() { return hourlyRate; } public void setHourlyRate(Integer hourlyRate) { this.hourlyRate = hourlyRate; } public Integer getWage(){ return wage; } public void setWage(Integer wage){ this.wage = wage; } }Update the
main()method.The
DroolsTest.javafile contains amain()method that loads the knowledge base, inserts facts, and fires rules. Update the method to pass the objectPersonto a rule:public static final void main(String[] args) { try { // Load the knowledge base: KieServices ks = KieServices.Factory.get(); KieContainer kContainer = ks.getKieClasspathContainer(); KieSession kSession = kContainer.newKieSession("ksession-rules"); // Go! Person p = new Person(); p.setWage(12); p.setFirstName("Tom"); p.setLastName("Summers"); p.setHourlyRate(10); kSession.insert(p); kSession.fireAllRules(); } catch (Throwable t) { t.printStackTrace(); } }To load the knowledge base, get a
KieServicesinstance and a class-path-basedKieContainerand build theKieSessionwith theKieContainer. In the example above, a sessionksession-rulesmatching the one defined inkmodule.xmlfile is passed.Create a rule.
The rule file
Sample.drlcontains an example of two rules. Edit this file or create a new one. In your rule file:Specify the package name:
package com.sample
Import facts:
import com.sample.DroolsTest.Person;
Write the rule:
dialect "java"

rule "Wage"
  when
    Person(hourlyRate * wage > 100)
    Person(name : firstName, surname : lastName)
  then
    System.out.println("Hello" + " " + name + " " + surname + "!");
    System.out.println("You are rich!");
end
Test the rule.
Right-click the
DroolsTest.javafile and select Run As → Java Application.The expected output looks similar to the following:
Hello Tom Summers!
You are rich!
6.1.4. Creating and Executing Rules Using Business Central
Make sure you have Red Hat JBoss BPM Suite successfully installed before proceeding further.
- Start the server and log in to Business Central. For more information how to do so, see sections Starting Server and Logging into Business Central of Red Hat JBoss BPM Suite Installation Guide.
Create a repository structure and a project.
- In Business Central, click Authoring → Administration.
- Click Organizational Units → Manage Organizational Units.
- In the displayed Organizational Unit Manager, click Add.
In the Add New Organizational Unit dialog window, define the unit properties. For example:
-
Name:
EmployeeWage -
Owner:
Employee
-
Name:
- Click Ok.
- Click Repositories → New repository.
In the New Repository dialog window, define the repository properties. For example:
-
Repository Name:
EmployeeRepo -
In Organizational Unit:
EmployeeWage
-
Repository Name:
- Click Finish.
- In the main menu, click Authoring → Project Authoring.
-
In Project Explorer, navigate to the
EmployeeWageorganizational unit and theEmployeeReporepository. - Click New Item → Project.
In the New Project dialog window, enter a name of the project, for example
MyProject, and specify project’s Maven properties. For example:-
Group ID:
org.bpms -
Artifact ID:
MyProject -
Version:
1.0.0
-
Group ID:
- Click Finish.
Create a fact model.
- Click New Item → Data Object.
In the Create new Data Object dialog window, enter the object’s name and specify a package. For example:
-
Data Object:
Person -
Package:
org.bpms.myproject
-
Data Object:
- Click Ok.
In the Editor than opens, click Add field and create four fields with the following values by clicking Create and continue:
-
Id:
firstName, Type: String -
Id:
lastName, Type: String -
Id:
hourlyRate, Type: Integer -
Id:
wage, Type: Integer
-
Id:
- Save the project.
Create a rule.
- Click New Item → DRL file.
In the Create new DRL file dialog window, enter a name of the rule and specify a package. For example:
-
DRL file:
MyRule -
Package:
org.bpms.myproject
-
DRL file:
- Click Ok.
Paste the definition of a rule shown below into the DRL Editor or create your own rule.
package org.bpms.myproject; rule "MyRule" ruleflow-group "MyProjectGroup" when Person(hourlyRate * wage > 100) Person(name : firstName, surname : lastName) then System.out.println("Hello" + " " + name + " " + surname + "!"); System.out.println("You are rich!"); end- Click Save.
Create a business process with a business rule task.
- Click New Item → Business Process.
In the Create new Business Process dialog window, enter a name of the business process and specify a package. For example:
-
Business Process:
MyProcess -
Package:
org.bpms.myproject
-
Business Process:
- Click Ok. The Business Process Editor opens with a Start Event element on the canvas.
- Expand the Object Library palette on the left and drag and drop a Business Rule task (Tasks → Business Rule) on the canvas.
- Click on an empty space on the canvas and open the Properties panel on the right. Click on the Value text field of the Variable Definitions property. Click on the arrow that appears on the right to open the Editor for Variable Definitions dialog window.
Click Add Variable and define the following variable:
-
Name:
person -
Defined Types:
Person [org.bpms.myproject]
-
Name:
- Click Ok.
-
Click on the Business Rule task on the canvas and in the Properties panel on the right, set the Name of the task, for example
My_Rule. -
Click on the Value text field of the Ruleflow Group property. Click on the arrow that appears on the right to open the Editor for RuleFlow Groups dialog window. Select
MyProjectGroupand click Save. Click on the Value text field of the Assignments property. Click on the arrow that appears on the right to open the My_Rule Data I/O dialog window and click Add next to the Data Inputs and Assignments option to add the following:
-
Name:
Person -
Data Type:
Person [org.bpms.myproject] -
Source:
person
-
Name:
Click Save.
You have now successfully created an object that maps to the variables you set before in your fact model. Your business process passes this object as an input to the rule.
- Add an End Event and connect all events on the canvas to complete the process.
-
Click
 and select Generate all Forms.
- Save the process.
Build and deploy the rule.
Click Open Project Editor on the left, change the version of the project and click Build → Build & Deploy.
A notification appears in the upper part of the screen informing you that the project has been built successfully.
- Click Process Management → Process Definitions.
- Click Start next to the newly built process.
In the opened MyProcess dialog window, provide the following values of the variables defined in your fact model and click Submit:
-
firstName:
Tom -
lastName:
Summers -
hourlyRate:
12 -
wage:
10
As these values satisfy the rule condition, the expected output looks similar to the following:
16:19:58,479 INFO  [org.jbpm.kie.services.impl.store.DeploymentSynchronizer] (http-/127.0.0.1:8080-1) Deployment unit org.bpms:MyProject:1.0 stored successfully
16:26:56,119 INFO  [stdout] (http-/127.0.0.1:8080-5) Hello Tom Summers!
16:26:56,119 INFO  [stdout] (http-/127.0.0.1:8080-5) You are rich!
-
firstName:
6.2. Execution of Rules
6.2.1. Agenda
The Agenda is a Rete feature. During actions on the WorkingMemory, rules may become fully matched and eligible for execution. A single Working Memory Action can result in multiple eligible rules. When a rule is fully matched an Activation is created, referencing the rule and the matched facts, and placed onto the Agenda. The Agenda controls the execution order of these Activations using a Conflict Resolution strategy.
6.2.2. Agenda Processing
The engine cycles repeatedly through two phases:
-
Working Memory Actions. This is where most of the work takes place, either in the Consequence (the RHS itself) or the main Java application process. Once the Consequence has finished or the main Java application process calls
fireAllRules()the engine switches to the Agenda Evaluation phase. - Agenda Evaluation. This attempts to select a rule to fire. If no rule is found it exits, otherwise it fires the found rule, switching the phase back to Working Memory Actions.
The process repeats until the agenda is clear, in which case control returns to the calling application. When Working Memory Actions are taking place, no rules are being fired.
6.2.3. Conflict Resolution
Conflict resolution is required when there are multiple rules on the agenda. As firing a rule may have side effects on the working memory, the rule engine needs to know in what order the rules should fire (for instance, firing ruleA may cause ruleB to be removed from the agenda).
6.2.4. AgendaGroup
Agenda groups are a way to partition rules on the agenda. At any one time, only one group has "focus" which means that activations for rules in that group only will take effect. You can also have rules with "auto focus" which means that the focus is taken for its agenda group when that rule’s conditions are true.
Agenda groups are known as "modules" in CLIPS terminology. Agenda groups provide a way to create a "flow" between grouped rules. You can switch the group which has focus either from within the rule engine, or via the API. If your rules have a clear need for multiple "phases" or "sequences" of processing, consider using agenda-groups for this purpose.
6.2.5. setFocus()
Each time setFocus() is called it pushes the specified Agenda Group onto a stack. When the focus group is empty it is popped from the stack and the focus group that is now on top evaluates. An Agenda Group can appear in multiple locations on the stack. The default Agenda Group is "MAIN", with all rules which do not specify an Agenda Group being in this group. It is also always the first group on the stack, given focus initially, by default.
The setFocus() method call looks like follows:
ksession.getAgenda().getAgendaGroup("Group A").setFocus();6.2.6. ActivationGroup
An activation group is a set of rules bound together by the same activation-group rule attribute. In this group only one rule can fire, and after that rule has fired all the other rules are cancelled from the agenda. The clear() method can be called at any time, which cancels all of the activations before one has had a chance to fire.
An activation group looks like follows:
ksession.getAgenda().getActivationGroup("Group B").clear();6.3. Inference
6.3.1. The Inference Engine
The inference engine is the part of the Red Hat JBoss BRMS engine which matches production facts and data to rules. It is often called the brain of a Production Rules System as it is able to scale to a large number of rules and facts. It makes inferences based on its existing knowledge and performs the actions based on what it infers from the information.
The rules are stored in the production memory and the facts that the inference engine matches against, are stored in the working memory. Facts are asserted into the working memory where they may get modified or retracted. A system with a large number of rules and facts may result in many rules being true for the same fact assertion. Such conflicting rules are managed using a conflict resolution strategy. This strategy determines the order of execution of the rules by assigning a priority level to each rule.
Inferences can be forward chaining or backward chaining. In a forward chaining inference mechanism, when some data gets inserted into the working memory, the related rules are triggered and if the data satisfies the rule conditions, corresponding actions are taken. These actions may insert new data into the working memory and therefore trigger more rules and so on. Thus, the forward chaining inference is data driven. On the contrary, the backward chaining inference is goal driven. In this case, the system looks for a particular goal, which the engine tries to satisfy. If it cannot do so it searches for sub-goals, that is, conclusions that will complete part of the current goal. It continues this process until either the initial conclusion is satisfied or there are no more unsatisfied sub-goals. Correct use of inference can create agile and less error prone business rules, which are easier to maintain.
6.3.2. Inference Example
The following example illustrates how an inference is made about whether a person is eligible to have a bus pass based on the rule conditions. Here is a rule that provides the age policy for a person to hold a bus pass:
rule "Infer Adult"
when
  $p : Person(age >= 18)
then
  insert(new IsAdult($p))
end
Based on this rule, a rule engine infers whether a person is an adult or a child and act on it. Every person who is 18 years or above will have an instance of IsAdult inserted for them in the working memory. This inferred relation of age and bus pass can be inferred in any rule, such as:
$p : Person()
IsAdult(person == $p)
6.4. Truth Maintenance
The inference engine is responsible for logical decisions on assertions and retractions of facts. After regular insertions, facts are generally retracted explicitly. However, in case of logical assertions, the facts that were asserted are automatically retracted when the conditions that asserted the facts in the first place are no longer true. In other words, the facts are retracted when there is no single condition that supports the logical assertion.
The inference engine uses a mechanism of truth maintenance to efficiently handle the inferred information from rules. A Truth Maintenance System (TMS) refers to an inference engine’s ability to enforce truthfulness when applying rules. It provides justified reasoning for each and every action taken by the inference engine and validates the conclusions of the engine. If the inference engine asserts data as a result of firing a rule, the engine uses the truth maintenance to justify the assertion.
A Truth Maintenance System also helps to identify inconsistencies and handle contradictions. For example, if there are two rules to be fired, each resulting in a contradictory action, the Truth Maintenance System enables the inference engine to decide its actions based on assumptions and derivations of previously calculated conclusions.
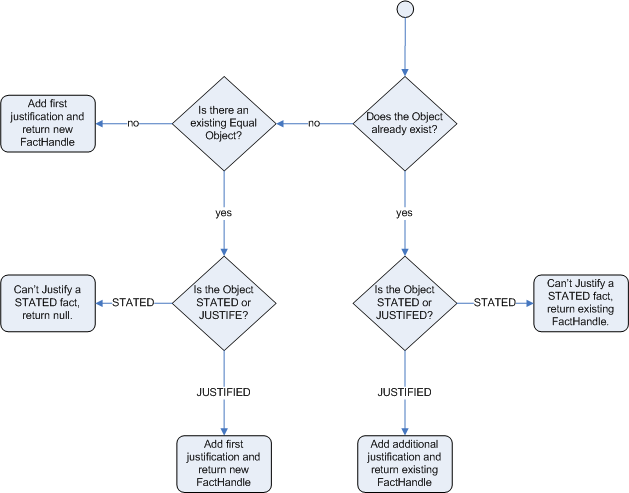
The usual insertion of facts, referred to as stated insertions, are straightforward and do not need a reasoning. However, the logical assertions need to be justified. If the inference engine tries to logically insert an object when there is an equal stated object, it fails as it cannot justify a stated fact. If the inference engine tries for a stated insertion of an existing equal object that is justified, then it overrides the justified insertion, and removes the justifications.
The following flowcharts illustrate the lifecycle of stated and logical insertions:
Figure 6.1. Stated Assertion
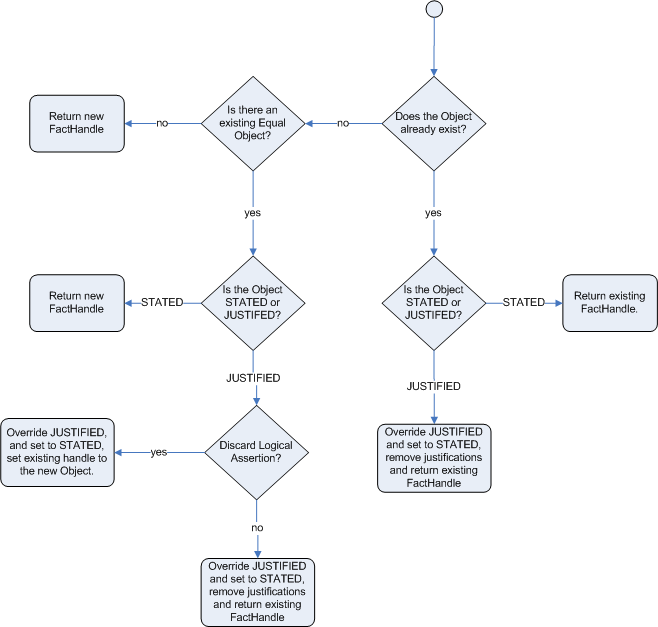
Figure 6.2. Logical Assertion
For the Truth Maintenance System and logical assertions to work, your fact objects (POJOs) must override the equals and hashCode methods from java.lang.Object as per the Java standard. Two objects are equal if and only if their equals methods return true for each other and if their hashCode methods return the same values. For more information, see the Java API documentation.
The following example illustrates how the Truth Maintenance System helps in the inference mechanism. The rules in the example provide information on basic policies on issuing child and adult bus passes.
rule "Issue Child Bus Pass"
when
  $p : Person(age < 16)
then
  insert(new ChildBusPass($p));
end

rule "Issue Adult Bus Pass"
when
  $p : Person(age >= 16)
then
  insert(new AdultBusPass($p));
end
These rules are monolithic and provide poor separation of concerns. The truth maintenance mechanism in an inference engine makes the system become more robust and have a clear separation of concerns. For example, the following rule uses logical insertion of facts, which makes the fact dependent on the truth of the when clause:
rule "Infer Child"
when
  $p : Person(age < 16)
then
  insertLogical(new IsChild($p))
end

rule "Infer Adult"
when
  $p : Person(age >= 16)
then
  insertLogical(new IsAdult($p))
end
When the condition in the rule is false, the fact is automatically retracted. This works particularly well as the two rules are mutually exclusive. In the above rules, if the person is under 16 years, it inserts an IsChild fact. Once the person is 16 years or above, the IsChild fact is automatically retracted and the IsAdult fact inserted.
Now the two rules for issuing child and adult bus pass can logically insert the ChildBusPass and AdultBusPass facts, as the Truth Maintenance System supports chaining of logical insertions for a cascading set of retracts.
rule "Issue Child Bus Pass"
when
  $p : Person()
    IsChild(person == $p)
then
  insertLogical(new ChildBusPass($p));
end

rule "Issue Adult Bus Pass"
when
  $p : Person(age >= 16)
    IsAdult(person =$p)
then
  insertLogical(new AdultBusPass($p));
end
When a person turns 16 years old, the IsChild fact as well as the person’s ChildBusPass fact is retracted. To these set of conditions, you can relate another rule which states that a person must return the child pass after turning 16 years old. When the Truth Maintenance System automatically retracts the ChildBusPass object, this rule triggers and sends a request to the person:
rule "Return ChildBusPass Request"
when
  $p : Person()
    not(ChildBusPass(person == $p))
then
  requestChildBusPass($p);
end
6.5. Using Decision Tables in Spreadsheets
Decision tables are a way of representing conditional logic in a precise manner, and are well suited to business-level rules.
Red Hat JBoss BRMS supports managing rules in a spreadsheet format. Since two formats are currently supported, XLS and CSV, a variety of spreadsheet programs, such as Microsoft Excel, Apache OpenOffice Calc, and LibreOffice Calc, can be utilized.
Use the XLS format if you are building and uploading decision tables using Business Central. Business Central does not support decision tables in the CSV format.
6.5.1. OpenOffice Example
Figure 6.3. OpenOffice Screenshot

In the above examples, the technical aspects of the decision table have been collapsed away (using a standard spreadsheet feature).
The rules start from row 17, with each row resulting in a rule. The conditions are in columns C, D, E, and the actions are off-screen. The values' meanings are indicated by the headers in Row 16. Column B is just a description.
Although the decision tables look like they process top down, this is not necessarily the case. Ideally, rules are authored without regard for the order of rows. This makes maintenance easier, as rows will not need to be shifted around all the time.
6.5.2. Rules and Spreadsheets
- Rules Inserted into Rows
- As each row is a rule, the same principles apply as with written code. As the rule engine processes the facts, any rules that match may fire.
- Agendas
- It is possible to clear the agenda when a rule fires and simulate a very simple decision table where only the first match effects an action.
- Multiple Tables
- You can have multiple tables on one spreadsheet. This way, rules can be grouped where they share common templates, but are still all combined into one rule package.
6.5.3. The RuleTable Keyword
When using decision tables, the spreadsheet searches for the RuleTable keyword to indicate the start of a rule table (both the starting row and column).
Keywords should all be in the same column.
6.5.4. The RuleSet Keyword
The RuleSet keyword indicates the name to be used in the rule package that will encompass all the rules. This name is optional, using a default, but it must have the RuleSet keyword in the cell immediately to the right.
6.5.5. Data-Defining Cells
There are two types of rectangular areas defining data that is used for generating a DRL file. One, marked by a cell labelled RuleSet, defines all DRL items except rules. The other one may occur repeatedly and is to the right and below a cell whose contents begin with RuleTable. These areas represent the actual decision tables, each area resulting in a set of rules of similar structure.
A Rule Set area may contain cell pairs, one below the RuleSet cell and containing a keyword designating the kind of value contained in the other one that follows in the same row.
6.5.6. Rule Table Columns
The columns of a Rule Table area define patterns and constraints for the left hand sides of the rules derived from it, actions for the consequences of the rules, and the values of individual rule attributes. A Rule Table area should contain one or more columns, both for conditions and actions, and an arbitrary selection of columns for rule attributes, at most one column for each of these. The first four rows following the row with the cell marked with RuleTable are earmarked as header area, mostly used for the definition of code to construct the rules. It is any additional row below these four header rows that spawns another rule, with its data providing for variations in the code defined in the Rule Table header.
All keywords are case insensitive.
Only the first worksheet is examined for decision tables.
6.5.7. Rule Set Entries
Entries in a Rule Set area may define DRL constructs (except rules), and specify rule attributes. While entries for constructs may be used repeatedly, each rule attribute may be given at most once, and it applies to all rules unless it is overruled by the same attribute being defined within the Rule Table area.
Entries must be given in a vertically stacked sequence of cell pairs. The first one contains a keyword and the one to its right the value. This sequence of cell pairs may be interrupted by blank rows or even a Rule Table, as long as the column marked by RuleSet is upheld as the one containing the keyword.
Table 6.1. Entries in the Rule Set area
| Keyword | Value | Usage |
|---|---|---|
|
|
The package name for the generated DRL file. Optional, the default is | Must be the first entry. |
|
|
| Optional, at most once. If omitted, no firing order is imposed. |
|
|
| Optional, at most once. If omitted, quotation marks are escaped. |
|
| A comma-separated list of Java classes to import. | Optional, may be used repeatedly. |
|
| Declarations of DRL globals, for example a type followed by a variable name. Multiple global definitions must be separated with a comma. | Optional, may be used repeatedly. |
|
| One or more function definitions, according to DRL syntax. | Optional, may be used repeatedly. |
|
| One or more query definitions, according to DRL syntax. | Optional, may be used repeatedly. |
|
| One or more declarative types, according to DRL syntax. | Optional, may be used repeatedly. |
6.5.8. Rule Attribute Entries in Rule Set Area
Rule attributes specified in a Rule Set area will affect all rule assets in the same package (not only in the spreadsheet). Unless you are sure that the spreadsheet is the only one rule asset in the package, the recommendation is to specify rule attributes not in a Rule Set area but in a Rule Table columns for each rule instead.
Table 6.2. Rule Attribute Entries in Rule Set Area
| Keyword | Initial | Value |
|---|---|---|
|
| P | An integer defining the "salience" value for the rule. Overridden by the "Sequential" flag. |
|
| D | A long integer value defining the "duration" value for the rule. |
|
| T | A timer definition. See Section 8.10.2, “Timers”. |
|
| E | A calendars definition. See Section 8.10.4, “Calendars”. |
|
| U |
A Boolean value. |
|
| L |
A Boolean value. |
|
| F |
A Boolean value. |
|
| X | A string identifying an activation (or XOR) group. Only one rule within an activation group will fire, for example the first one to fire cancels any existing activations of other rules within the same group. |
|
| G | A string identifying an agenda group, which has to be activated by giving it the "focus", which is one way of controlling the flow between groups of rules. |
|
| R | A string identifying a rule-flow group. |
|
| V |
A string containing a date and time definition. A rule can only activate if the current date and time is after |
|
| Z |
A string containing a date and time definition. A rule cannot activate if the current date and time is after the |
6.5.9. The RuleTable Cell
All Rule Tables begin with a cell containing RuleTable, optionally followed by a string within the same cell. The string is used as the initial part of the name for all rules derived from this Rule Table, with the row number appended for distinction. This automatic naming can be overridden by using a NAME column. All other cells defining rules of this Rule Table are below and to the right of this cell.
6.5.10. Column Types
The next row after the RuleTable cell defines the column type. Each column results in a part of the condition or the consequence, or provides some rule attribute, the rule name or a comment. Each attribute column may be used at most once.
Table 6.3. Column Headers in the Rule Table
| Keyword | Initial | Value | Usage |
|---|---|---|---|
|
| N | Provides the name for the rule generated from that row. The default is constructed from the text following the RuleTable tag and the row number. | At most one column. |
|
| I | A text, resulting in a comment within the generated rule. | At most one column. |
|
| C | Code snippet and interpolated values for constructing a constraint within a pattern in a condition. | At least one per rule table. |
|
| A | Code snippet and interpolated values for constructing an action for the consequence of the rule. | At least one per rule table. |
|
| @ | Code snippet and interpolated values for constructing a metadata entry for the rule. | Optional, any number of columns. |
6.5.11. Conditional Elements
Given a column headed CONDITION, the cells in successive lines result in a conditional element.
Text in the first cell below
CONDITIONdevelops into a pattern for the rule condition, with the snippet in the next line becoming a constraint. If the cell is merged with one or more neighbours, a single pattern with multiple constraints is formed: all constraints are combined into a parenthesized list and appended to the text in this cell. The cell may be left blank, which means that the code snippet in the next row must result in a valid conditional element on its own.To include a pattern without constraints, you can write the pattern in front of the text for another pattern.
The pattern may be written with or without an empty pair of parentheses. A "from" clause may be appended to the pattern.
If the pattern ends with "eval", code snippets are supposed to produce boolean expressions for inclusion into a pair of parentheses after "eval".
Text in the second cell below
CONDITIONis processed in two steps.The code snippet in this cell is modified by interpolating values from cells farther down in the column. If you want to create a constraint consisting of a comparison using "==" with the value from the cells below, the field selector alone is sufficient. Any other comparison operator must be specified as the last item within the snippet, and the value from the cells below is appended. For all other constraint forms, you must mark the position for including the contents of a cell with the symbol
$param. Multiple insertions are possible by using the symbols$1,$2, etc., and a comma-separated list of values in the cells below.A text according to the pattern
forall(DELIMITER){SNIPPET}is expanded by repeating theSNIPPETonce for each of the values of the comma-separated list of values in each of the cells below, inserting the value in place of the symbol$and by joining these expansions by the givenDELIMITER. Note that the forall construct may be surrounded by other text.If the cell in the preceding row is not empty, the completed code snippet is added to the conditional element from that cell. A pair of parentheses is provided automatically, as well as a separating comma if multiple constraints are added to a pattern in a merged cell.
If the cell above is empty, the interpolated result is used as is.
-
Text in the third cell below
CONDITIONis for documentation only. It should be used to indicate the column’s purpose to a human reader. - From the fourth row on, non-blank entries provide data for interpolation as described above. A blank cell results in the omission of the conditional element or constraint for this rule.
6.5.12. Action Statements
Given a column headed ACTION, the cells in successive lines result in an action statement:
-
Text in the first cell below
ACTIONis optional. If present, it is interpreted as an object reference. Text in the second cell below
ACTIONis processed in two steps.The code snippet in this cell is modified by interpolating values from cells farther down in the column. For a singular insertion, mark the position for including the contents of a cell with the symbol
$param. Multiple insertions are possible by using the symbols$1,$2, etc., and a comma-separated list of values in the cells below.A method call without interpolation can be achieved by a text without any marker symbols. In this case, use any non-blank entry in a row below to include the statement.
The
forallconstruct is available here, too.If the first cell is not empty, its text, followed by a period, the text in the second cell and a terminating semicolon are stringed together, resulting in a method call which is added as an action statement for the consequence.
If the cell above is empty, the interpolated result is used as is.
-
Text in the third cell below
ACTIONis for documentation only. It should be used to indicate the column’s purpose to a human reader. - From the fourth row on, non-blank entries provide data for interpolation as described above. A blank cell results in the omission of the action statement for this rule.
Using $1 instead of $param will fail if the replacement text contains a comma.
6.5.13. Metadata Statements
Given a column headed METADATA, the cells in successive lines result in a metadata annotation for the generated rules:
-
Text in the first cell below
METADATAis ignored. -
Text in the second cell below
METADATAis subject to interpolation, as described above, using values from the cells in the rule rows. The metadata marker character@is prefixed automatically, and should not be included in the text for this cell. -
Text in the third cell below
METADATAis for documentation only. It should be used to indicate the column’s purpose to a human reader. - From the fourth row on, non-blank entries provide data for interpolation as described above. A blank cell results in the omission of the metadata annotation for this rule.
6.5.14. Interpolating Cell Data Example
-
If the template is
Foo(bar == $param)and the cell is42, then the result isFoo(bar == 42). -
If the template is
Foo(bar < $1, baz == $2)and the cell contains42,43, the result will beFoo(bar < 42, baz ==43). -
The template
forall(&&){bar != $}with a cell containing42,43results inbar != 42 && bar != 43.
6.5.15. Tips for Working Within Cells
- Multiple package names within the same cell must be comma-separated.
- Pairs of type and variable names must be comma-separated.
-
Functions must be written as they appear in a DRL file. This should appear in the same column as the
RuleSetkeyword. It can be above, between or below all the rule rows. - You can use Import, Variables, Functions and Queries repeatedly instead of packing several definitions into a single cell.
- Trailing insertion markers can be omitted.
- You can provide the definition of a binding variable.
- Anything can be placed in the object type row. Apart from the definition of a binding variable, it could also be an additional pattern that is to be inserted literally.
-
The cell below the
ACTIONheader can be left blank. Using this style, anything can be placed in the consequence, not just a single method call. The same technique is applicable within aCONDITIONcolumn.
6.5.16. The SpreadsheetCompiler Class
The SpreadsheetCompiler class is the main class used with API spreadsheet-based decision tables in the drools-decisiontables module. This class takes spreadsheets in various formats and generates rules in DRL.
The SpreadsheetCompiler can be used to generate partial rule files and assemble them into a complete rule package after the fact. This allows the separation of technical and non-technical aspects of the rules if needed.
6.5.17. Using Spreadsheet-Based Decision Tables
Procedure: Task
- Generate a sample spreadsheet that you can use as the base.
- If the Red Hat JBoss BRMS plug-in is being used, use the wizard to generate a spreadsheet from a template.
- Use an XSL-compatible spreadsheet editor to modify the XSL.
6.5.18. Lists
In Excel, you can create lists of values. These can be stored in other worksheets to provide valid lists of values for cells.
6.5.19. Revision Control
When changes are being made to rules over time, older versions are archived. Some applications in Red Hat JBoss BRMS provide a limited ability to keep a history of changes, but it is recommended to use an alternative means of revision control.
6.5.20. Tabular Data Sources
A tabular data source can be used as a source of rule data. It can populate a template to generate many rules. This can allow both for more flexible spreadsheets, but also rules in existing databases for instance (at the cost of developing the template up front to generate the rules).
6.6. Dependency Management for Guided Decision Tables, Scorecards, and Rule Templates
When you build your own application with the embedded Drools or jBPM engine, that uses guided decision tables, guided scorecards, or guided templates, you need to add the drools-workbench-models-guided-dtable, drools-workbench-models-guided-scorecard, and drools-workbench-models-guided-template dependencies respectively, on the class path.
If you want to use a kJAR in the Intelligent Process server, you do not need to add these dependencies, as the server already has them.
When using Maven, declare the dependencies in the pom.xml file as shown below:
<dependency>
  <groupId>org.drools</groupId>
  <artifactId>drools-workbench-models-guided-dtable</artifactId>
</dependency>

<dependency>
  <groupId>org.drools</groupId>
  <artifactId>drools-workbench-models-guided-scorecard</artifactId>
</dependency>

<dependency>
  <groupId>org.drools</groupId>
  <artifactId>drools-workbench-models-guided-template</artifactId>
</dependency>
6.7. Logging
The logging feature enables you to investigate what the Rule Engine does at the back-end. The rule engine uses Java logging API SLF4J for logging. The underlying logging back-end can be Logback, Apache Commons Logging, Log4j, or java.util.logging. You can add a dependency to the logging adaptor for your logging framework of choice.
Here is an example of how to use Logback by adding a Maven dependency:
<dependency>
  <groupId>ch.qos.logback</groupId>
  <artifactId>logback-classic</artifactId>
  <version>1.x</version>
</dependency>
If you are developing for an ultra light environment, use slf4j-nop or slf4j-simple.
6.7.1. Configuring Logging Level
Here is an example of how you can configure the logging level on the package org.drools in your logback.xml file when you are using Logback:
<configuration>
  <logger name="org.drools" level="debug"/>
  ...
  ...
<configuration>
Here is an example of how you can configure the logging level in your log4j.xml file when you are using Log4J:
<log4j:configuration xmlns:log4j="http://jakarta.apache.org/log4j/">
  <category name="org.drools">
    <priority value="debug" />
  </category>
  ...
</log4j:configuration>