
Chapter 19. Configuring network settings by using the RHEL system role
Administrators can automate network-related configuration and management tasks by using the network RHEL system role.
19.1. Configuring an Ethernet connection with a static IP address by using the network RHEL system role with an interface name
You can remotely configure an Ethernet connection by using the network RHEL system role.
Prerequisites
- You have prepared the control node and the managed nodes.
- You are logged in to the control node as a user who can run playbooks on the managed nodes.
-
The account you use to connect to the managed nodes has
sudopermissions on them. - A physical or virtual Ethernet device exists in the server’s configuration.
- The managed nodes use NetworkManager to configure the network.
Procedure
Create a playbook file, for example
~/playbook.yml, with the following content:--- - name: Configure the network hosts: managed-node-01.example.com tasks: - name: Configure an Ethernet connection with static IP ansible.builtin.include_role: name: rhel-system-roles.network vars: network_connections: - name: enp1s0 interface_name: enp1s0 type: ethernet autoconnect: yes ip: address: - 192.0.2.1/24 - 2001:db8:1::1/64 gateway4: 192.0.2.254 gateway6: 2001:db8:1::fffe dns: - 192.0.2.200 - 2001:db8:1::ffbb dns_search: - example.com state: upThese settings define an Ethernet connection profile for the
enp1s0device with the following settings:-
A static IPv4 address -
192.0.2.1with a/24subnet mask -
A static IPv6 address -
2001:db8:1::1with a/64subnet mask -
An IPv4 default gateway -
192.0.2.254 -
An IPv6 default gateway -
2001:db8:1::fffe -
An IPv4 DNS server -
192.0.2.200 -
An IPv6 DNS server -
2001:db8:1::ffbb -
A DNS search domain -
example.com
-
A static IPv4 address -
Validate the playbook syntax:
$ ansible-playbook --syntax-check ~/playbook.ymlNote that this command only validates the syntax and does not protect against a wrong but valid configuration.
Run the playbook:
$ ansible-playbook ~/playbook.yml
Additional resources
-
/usr/share/ansible/roles/rhel-system-roles.network/README.mdfile -
/usr/share/doc/rhel-system-roles/network/directory
19.2. Configuring an Ethernet connection with a static IP address by using the network RHEL system role with a device path
You can remotely configure an Ethernet connection using the network RHEL system role.
You can identify the device path with the following command:
# udevadm info /sys/class/net/<device_name> | grep ID_PATH=Prerequisites
- You have prepared the control node and the managed nodes.
- You are logged in to the control node as a user who can run playbooks on the managed nodes.
-
The account you use to connect to the managed nodes has
sudopermissions on them. - A physical or virtual Ethernet device exists in the server’s configuration.
- The managed nodes use NetworkManager to configure the network.
Procedure
Create a playbook file, for example
~/playbook.yml, with the following content:--- - name: Configure the network hosts: managed-node-01.example.com tasks: - name: Configure an Ethernet connection with static IP ansible.builtin.include_role: name: rhel-system-roles.network vars: network_connections: - name: example match: path: - pci-0000:00:0[1-3].0 - &!pci-0000:00:02.0 type: ethernet autoconnect: yes ip: address: - 192.0.2.1/24 - 2001:db8:1::1/64 gateway4: 192.0.2.254 gateway6: 2001:db8:1::fffe dns: - 192.0.2.200 - 2001:db8:1::ffbb dns_search: - example.com state: upThese settings define an Ethernet connection profile with the following settings:
-
A static IPv4 address -
192.0.2.1with a/24subnet mask -
A static IPv6 address -
2001:db8:1::1with a/64subnet mask -
An IPv4 default gateway -
192.0.2.254 -
An IPv6 default gateway -
2001:db8:1::fffe -
An IPv4 DNS server -
192.0.2.200 -
An IPv6 DNS server -
2001:db8:1::ffbb A DNS search domain -
example.comThe
matchparameter in this example defines that Ansible applies the play to devices that match PCI ID0000:00:0[1-3].0, but not0000:00:02.0. For further details about special modifiers and wild cards you can use, see thematchparameter description in the/usr/share/ansible/roles/rhel-system-roles.network/README.mdfile.
-
A static IPv4 address -
Validate the playbook syntax:
$ ansible-playbook --syntax-check ~/playbook.ymlNote that this command only validates the syntax and does not protect against a wrong but valid configuration.
Run the playbook:
$ ansible-playbook ~/playbook.yml
Additional resources
-
/usr/share/ansible/roles/rhel-system-roles.network/README.mdfile -
/usr/share/doc/rhel-system-roles/network/directory
19.3. Configuring an Ethernet connection with a dynamic IP address by using the network RHEL system role with an interface name
You can remotely configure an Ethernet connection using the network RHEL system role. For connections with dynamic IP address settings, NetworkManager requests the IP settings for the connection from a DHCP server.
Prerequisites
- You have prepared the control node and the managed nodes.
- You are logged in to the control node as a user who can run playbooks on the managed nodes.
-
The account you use to connect to the managed nodes has
sudopermissions on them. - A physical or virtual Ethernet device exists in the server’s configuration.
- A DHCP server is available in the network
- The managed nodes use NetworkManager to configure the network.
Procedure
Create a playbook file, for example
~/playbook.yml, with the following content:--- - name: Configure the network hosts: managed-node-01.example.com tasks: - name: Configure an Ethernet connection with dynamic IP ansible.builtin.include_role: name: rhel-system-roles.network vars: network_connections: - name: enp1s0 interface_name: enp1s0 type: ethernet autoconnect: yes ip: dhcp4: yes auto6: yes state: upThese settings define an Ethernet connection profile for the
enp1s0device. The connection retrieves IPv4 addresses, IPv6 addresses, default gateway, routes, DNS servers, and search domains from a DHCP server and IPv6 stateless address autoconfiguration (SLAAC).Validate the playbook syntax:
$ ansible-playbook --syntax-check ~/playbook.ymlNote that this command only validates the syntax and does not protect against a wrong but valid configuration.
Run the playbook:
$ ansible-playbook ~/playbook.yml
Additional resources
-
/usr/share/ansible/roles/rhel-system-roles.network/README.mdfile -
/usr/share/doc/rhel-system-roles/network/directory
19.4. Configuring an Ethernet connection with a dynamic IP address by using the network RHEL system role with a device path
You can remotely configure an Ethernet connection using the network RHEL system role. For connections with dynamic IP address settings, NetworkManager requests the IP settings for the connection from a DHCP server.
You can identify the device path with the following command:
# udevadm info /sys/class/net/<device_name> | grep ID_PATH=Prerequisites
- You have prepared the control node and the managed nodes.
- You are logged in to the control node as a user who can run playbooks on the managed nodes.
-
The account you use to connect to the managed nodes has
sudopermissions on them. - A physical or virtual Ethernet device exists in the server’s configuration.
- A DHCP server is available in the network.
- The managed hosts use NetworkManager to configure the network.
Procedure
Create a playbook file, for example
~/playbook.yml, with the following content:--- - name: Configure the network hosts: managed-node-01.example.com tasks: - name: Configure an Ethernet connection with dynamic IP ansible.builtin.include_role: name: rhel-system-roles.network vars: network_connections: - name: example match: path: - pci-0000:00:0[1-3].0 - &!pci-0000:00:02.0 type: ethernet autoconnect: yes ip: dhcp4: yes auto6: yes state: upThese settings define an Ethernet connection profile. The connection retrieves IPv4 addresses, IPv6 addresses, default gateway, routes, DNS servers, and search domains from a DHCP server and IPv6 stateless address autoconfiguration (SLAAC).
The
matchparameter defines that Ansible applies the play to devices that match PCI ID0000:00:0[1-3].0, but not0000:00:02.0.Validate the playbook syntax:
$ ansible-playbook --syntax-check ~/playbook.ymlNote that this command only validates the syntax and does not protect against a wrong but valid configuration.
Run the playbook:
$ ansible-playbook ~/playbook.yml
Additional resources
-
/usr/share/ansible/roles/rhel-system-roles.network/README.mdfile -
/usr/share/doc/rhel-system-roles/network/directory
19.5. Configuring VLAN tagging by using the network RHEL system role
You can use the network RHEL system role to configure VLAN tagging. This example adds an Ethernet connection and a VLAN with ID 10 on top of this Ethernet connection. As the child device, the VLAN connection contains the IP, default gateway, and DNS configurations.
Depending on your environment, adjust the play accordingly. For example:
-
To use the VLAN as a port in other connections, such as a bond, omit the
ipattribute, and set the IP configuration in the child configuration. -
To use team, bridge, or bond devices in the VLAN, adapt the
interface_nameandtypeattributes of the ports you use in the VLAN.
Prerequisites
- You have prepared the control node and the managed nodes.
- You are logged in to the control node as a user who can run playbooks on the managed nodes.
-
The account you use to connect to the managed nodes has
sudopermissions on them.
Procedure
Create a playbook file, for example
~/playbook.yml, with the following content:--- - name: Configure the network hosts: managed-node-01.example.com tasks: - name: Configure a VLAN that uses an Ethernet connection ansible.builtin.include_role: name: rhel-system-roles.network vars: network_connections: # Add an Ethernet profile for the underlying device of the VLAN - name: enp1s0 type: ethernet interface_name: enp1s0 autoconnect: yes state: up ip: dhcp4: no auto6: no # Define the VLAN profile - name: enp1s0.10 type: vlan ip: address: - "192.0.2.1/24" - "2001:db8:1::1/64" gateway4: 192.0.2.254 gateway6: 2001:db8:1::fffe dns: - 192.0.2.200 - 2001:db8:1::ffbb dns_search: - example.com vlan_id: 10 parent: enp1s0 state: upThese settings define a VLAN to operate on top of the
enp1s0device. The VLAN interface has the following settings:-
A static IPv4 address -
192.0.2.1with a/24subnet mask -
A static IPv6 address -
2001:db8:1::1with a/64subnet mask -
An IPv4 default gateway -
192.0.2.254 -
An IPv6 default gateway -
2001:db8:1::fffe -
An IPv4 DNS server -
192.0.2.200 -
An IPv6 DNS server -
2001:db8:1::ffbb -
A DNS search domain -
example.com VLAN ID -
10The
parentattribute in the VLAN profile configures the VLAN to operate on top of theenp1s0device. As the child device, the VLAN connection contains the IP, default gateway, and DNS configurations.
-
A static IPv4 address -
Validate the playbook syntax:
$ ansible-playbook --syntax-check ~/playbook.ymlNote that this command only validates the syntax and does not protect against a wrong but valid configuration.
Run the playbook:
$ ansible-playbook ~/playbook.yml
Additional resources
-
/usr/share/ansible/roles/rhel-system-roles.network/README.mdfile -
/usr/share/doc/rhel-system-roles/network/directory
19.6. Configuring a network bridge by using the network RHEL system role
You can remotely configure a network bridge by using the network RHEL system role.
Prerequisites
- You have prepared the control node and the managed nodes.
- You are logged in to the control node as a user who can run playbooks on the managed nodes.
-
The account you use to connect to the managed nodes has
sudopermissions on them. - Two or more physical or virtual network devices are installed on the server.
Procedure
Create a playbook file, for example
~/playbook.yml, with the following content:--- - name: Configure the network hosts: managed-node-01.example.com tasks: - name: Configure a network bridge that uses two Ethernet ports ansible.builtin.include_role: name: rhel-system-roles.network vars: network_connections: # Define the bridge profile - name: bridge0 type: bridge interface_name: bridge0 ip: address: - "192.0.2.1/24" - "2001:db8:1::1/64" gateway4: 192.0.2.254 gateway6: 2001:db8:1::fffe dns: - 192.0.2.200 - 2001:db8:1::ffbb dns_search: - example.com state: up # Add an Ethernet profile to the bridge - name: bridge0-port1 interface_name: enp7s0 type: ethernet controller: bridge0 port_type: bridge state: up # Add a second Ethernet profile to the bridge - name: bridge0-port2 interface_name: enp8s0 type: ethernet controller: bridge0 port_type: bridge state: upThese settings define a network bridge with the following settings:
-
A static IPv4 address -
192.0.2.1with a/24subnet mask -
A static IPv6 address -
2001:db8:1::1with a/64subnet mask -
An IPv4 default gateway -
192.0.2.254 -
An IPv6 default gateway -
2001:db8:1::fffe -
An IPv4 DNS server -
192.0.2.200 -
An IPv6 DNS server -
2001:db8:1::ffbb -
A DNS search domain -
example.com Ports of the bridge -
enp7s0andenp8s0NoteSet the IP configuration on the bridge and not on the ports of the Linux bridge.
-
A static IPv4 address -
Validate the playbook syntax:
$ ansible-playbook --syntax-check ~/playbook.ymlNote that this command only validates the syntax and does not protect against a wrong but valid configuration.
Run the playbook:
$ ansible-playbook ~/playbook.yml
Additional resources
-
/usr/share/ansible/roles/rhel-system-roles.network/README.mdfile -
/usr/share/doc/rhel-system-roles/network/directory
19.7. Configuring a network bond by using the network RHEL system role
You can remotely configure a network bond by using the network RHEL system role.
Prerequisites
- You have prepared the control node and the managed nodes.
- You are logged in to the control node as a user who can run playbooks on the managed nodes.
-
The account you use to connect to the managed nodes has
sudopermissions on them. - Two or more physical or virtual network devices are installed on the server.
Procedure
Create a playbook file, for example
~/playbook.yml, with the following content:--- - name: Configure the network hosts: managed-node-01.example.com tasks: - name: Configure a network bond that uses two Ethernet ports ansible.builtin.include_role: name: rhel-system-roles.network vars: network_connections: # Define the bond profile - name: bond0 type: bond interface_name: bond0 ip: address: - "192.0.2.1/24" - "2001:db8:1::1/64" gateway4: 192.0.2.254 gateway6: 2001:db8:1::fffe dns: - 192.0.2.200 - 2001:db8:1::ffbb dns_search: - example.com bond: mode: active-backup state: up # Add an Ethernet profile to the bond - name: bond0-port1 interface_name: enp7s0 type: ethernet controller: bond0 state: up # Add a second Ethernet profile to the bond - name: bond0-port2 interface_name: enp8s0 type: ethernet controller: bond0 state: upThese settings define a network bond with the following settings:
-
A static IPv4 address -
192.0.2.1with a/24subnet mask -
A static IPv6 address -
2001:db8:1::1with a/64subnet mask -
An IPv4 default gateway -
192.0.2.254 -
An IPv6 default gateway -
2001:db8:1::fffe -
An IPv4 DNS server -
192.0.2.200 -
An IPv6 DNS server -
2001:db8:1::ffbb -
A DNS search domain -
example.com -
Ports of the bond -
enp7s0andenp8s0 Bond mode -
active-backupNoteSet the IP configuration on the bond and not on the ports of the Linux bond.
-
A static IPv4 address -
Validate the playbook syntax:
$ ansible-playbook --syntax-check ~/playbook.ymlNote that this command only validates the syntax and does not protect against a wrong but valid configuration.
Run the playbook:
$ ansible-playbook ~/playbook.yml
Additional resources
-
/usr/share/ansible/roles/rhel-system-roles.network/README.mdfile -
/usr/share/doc/rhel-system-roles/network/directory
19.8. Configuring an IPoIB connection by using the network RHEL system role
You can use the network RHEL system role to remotely create NetworkManager connection profiles for IP over InfiniBand (IPoIB) devices. For example, remotely add an InfiniBand connection for the mlx4_ib0 interface with the following settings by running an Ansible playbook:
-
An IPoIB device -
mlx4_ib0.8002 -
A partition key
p_key-0x8002 -
A static
IPv4address -192.0.2.1with a/24subnet mask -
A static
IPv6address -2001:db8:1::1with a/64subnet mask
Perform this procedure on the Ansible control node.
Prerequisites
- You have prepared the control node and the managed nodes.
- You are logged in to the control node as a user who can run playbooks on the managed nodes.
-
The account you use to connect to the managed nodes has
sudopermissions on them. -
An InfiniBand device named
mlx4_ib0is installed in the managed nodes. - The managed nodes use NetworkManager to configure the network.
Procedure
Create a playbook file, for example
~/playbook.yml, with the following content:--- - name: Configure the network hosts: managed-node-01.example.com tasks: - name: Configure IPoIB ansible.builtin.include_role: name: rhel-system-roles.network vars: network_connections: # InfiniBand connection mlx4_ib0 - name: mlx4_ib0 interface_name: mlx4_ib0 type: infiniband # IPoIB device mlx4_ib0.8002 on top of mlx4_ib0 - name: mlx4_ib0.8002 type: infiniband autoconnect: yes infiniband: p_key: 0x8002 transport_mode: datagram parent: mlx4_ib0 ip: address: - 192.0.2.1/24 - 2001:db8:1::1/64 state: upIf you set a
p_keyparameter as in this example, do not set aninterface_nameparameter on the IPoIB device.Validate the playbook syntax:
$ ansible-playbook --syntax-check ~/playbook.ymlNote that this command only validates the syntax and does not protect against a wrong but valid configuration.
Run the playbook:
$ ansible-playbook ~/playbook.yml
Verification
On the
managed-node-01.example.comhost, display the IP settings of themlx4_ib0.8002device:# ip address show mlx4_ib0.8002 ... inet 192.0.2.1/24 brd 192.0.2.255 scope global noprefixroute ib0.8002 valid_lft forever preferred_lft forever inet6 2001:db8:1::1/64 scope link tentative noprefixroute valid_lft forever preferred_lft forever
Display the partition key (P_Key) of the
mlx4_ib0.8002device:# cat /sys/class/net/mlx4_ib0.8002/pkey 0x8002Display the mode of the
mlx4_ib0.8002device:# cat /sys/class/net/mlx4_ib0.8002/mode datagram
Additional resources
-
/usr/share/ansible/roles/rhel-system-roles.network/README.mdfile -
/usr/share/doc/rhel-system-roles/network/directory
19.9. Routing traffic from a specific subnet to a different default gateway by using the network RHEL system role
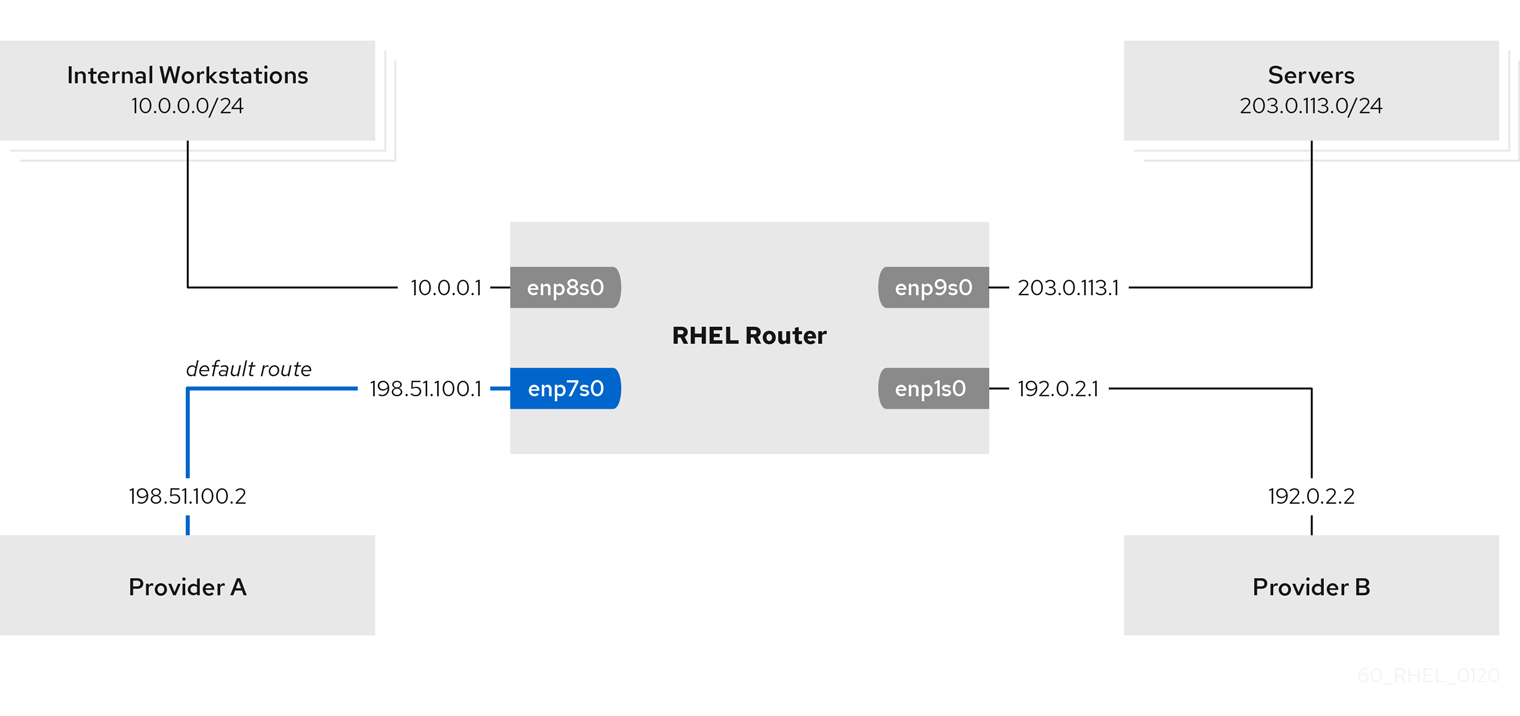
You can use policy-based routing to configure a different default gateway for traffic from certain subnets. For example, you can configure RHEL as a router that, by default, routes all traffic to internet provider A using the default route. However, traffic received from the internal workstations subnet is routed to provider B.
To configure policy-based routing remotely and on multiple nodes, you can use the network RHEL system role.
This procedure assumes the following network topology:
Prerequisites
- You have prepared the control node and the managed nodes.
- You are logged in to the control node as a user who can run playbooks on the managed nodes.
-
The account you use to connect to the managed nodes has
sudopermissions on them. -
The managed nodes uses the
NetworkManagerandfirewalldservices. The managed nodes you want to configure has four network interfaces:
-
The
enp7s0interface is connected to the network of provider A. The gateway IP in the provider’s network is198.51.100.2, and the network uses a/30network mask. -
The
enp1s0interface is connected to the network of provider B. The gateway IP in the provider’s network is192.0.2.2, and the network uses a/30network mask. -
The
enp8s0interface is connected to the10.0.0.0/24subnet with internal workstations. -
The
enp9s0interface is connected to the203.0.113.0/24subnet with the company’s servers.
-
The
-
Hosts in the internal workstations subnet use
10.0.0.1as the default gateway. In the procedure, you assign this IP address to theenp8s0network interface of the router. -
Hosts in the server subnet use
203.0.113.1as the default gateway. In the procedure, you assign this IP address to theenp9s0network interface of the router.
Procedure
Create a playbook file, for example
~/playbook.yml, with the following content:--- - name: Configuring policy-based routing hosts: managed-node-01.example.com tasks: - name: Routing traffic from a specific subnet to a different default gateway ansible.builtin.include_role: name: rhel-system-roles.network vars: network_connections: - name: Provider-A interface_name: enp7s0 type: ethernet autoconnect: True ip: address: - 198.51.100.1/30 gateway4: 198.51.100.2 dns: - 198.51.100.200 state: up zone: external - name: Provider-B interface_name: enp1s0 type: ethernet autoconnect: True ip: address: - 192.0.2.1/30 route: - network: 0.0.0.0 prefix: 0 gateway: 192.0.2.2 table: 5000 state: up zone: external - name: Internal-Workstations interface_name: enp8s0 type: ethernet autoconnect: True ip: address: - 10.0.0.1/24 route: - network: 10.0.0.0 prefix: 24 table: 5000 routing_rule: - priority: 5 from: 10.0.0.0/24 table: 5000 state: up zone: trusted - name: Servers interface_name: enp9s0 type: ethernet autoconnect: True ip: address: - 203.0.113.1/24 state: up zone: trustedValidate the playbook syntax:
$ ansible-playbook --syntax-check ~/playbook.ymlNote that this command only validates the syntax and does not protect against a wrong but valid configuration.
Run the playbook:
$ ansible-playbook ~/playbook.yml
Verification
On a RHEL host in the internal workstation subnet:
Install the
traceroutepackage:# dnf install tracerouteUse the
tracerouteutility to display the route to a host on the internet:# traceroute redhat.com traceroute to redhat.com (209.132.183.105), 30 hops max, 60 byte packets 1 10.0.0.1 (10.0.0.1) 0.337 ms 0.260 ms 0.223 ms 2 192.0.2.1 (192.0.2.1) 0.884 ms 1.066 ms 1.248 ms ...The output of the command displays that the router sends packets over
192.0.2.1, which is the network of provider B.
On a RHEL host in the server subnet:
Install the
traceroutepackage:# dnf install tracerouteUse the
tracerouteutility to display the route to a host on the internet:# traceroute redhat.com traceroute to redhat.com (209.132.183.105), 30 hops max, 60 byte packets 1 203.0.113.1 (203.0.113.1) 2.179 ms 2.073 ms 1.944 ms 2 198.51.100.2 (198.51.100.2) 1.868 ms 1.798 ms 1.549 ms ...The output of the command displays that the router sends packets over
198.51.100.2, which is the network of provider A.
On the RHEL router that you configured using the RHEL system role:
Display the rule list:
# ip rule list
0:      from all lookup local
5:    from 10.0.0.0/24 lookup 5000
32766:  from all lookup main
32767:  from all lookup default
By default, RHEL contains rules for the tables
local,main, anddefault.Display the routes in table
5000:# ip route list table 5000 0.0.0.0/0 via 192.0.2.2 dev enp1s0 proto static metric 100 10.0.0.0/24 dev enp8s0 proto static scope link src 192.0.2.1 metric 102Display the interfaces and firewall zones:
# firewall-cmd --get-active-zones
external
  interfaces: enp1s0 enp7s0
trusted
  interfaces: enp8s0 enp9s0
Verify that the
externalzone has masquerading enabled:# firewall-cmd --info-zone=external external (active) target: default icmp-block-inversion: no interfaces: enp1s0 enp7s0 sources: services: ssh ports: protocols: masquerade: yes ...
Additional resources
-
/usr/share/ansible/roles/rhel-system-roles.network/README.mdfile -
/usr/share/doc/rhel-system-roles/network/directory
19.10. Configuring a static Ethernet connection with 802.1X network authentication by using the network RHEL system role
You can remotely configure an Ethernet connection with 802.1X network authentication by using the network RHEL system role.
Prerequisites
- You have prepared the control node and the managed nodes.
- You are logged in to the control node as a user who can run playbooks on the managed nodes.
-
The account you use to connect to the managed nodes has
sudopermissions on them. - The network supports 802.1X network authentication.
- The managed nodes uses NetworkManager.
The following files required for TLS authentication exist on the control node:
-
The client key is stored in the
/srv/data/client.keyfile. -
The client certificate is stored in the
/srv/data/client.crtfile. -
The Certificate Authority (CA) certificate is stored in the
/srv/data/ca.crtfile.
-
The client key is stored in the
Procedure
Create a playbook file, for example
~/playbook.yml, with the following content:--- - name: Configure an Ethernet connection with 802.1X authentication hosts: managed-node-01.example.com tasks: - name: Copy client key for 802.1X authentication ansible.builtin.copy: src: "/srv/data/client.key" dest: "/etc/pki/tls/private/client.key" mode: 0600 - name: Copy client certificate for 802.1X authentication ansible.builtin.copy: src: "/srv/data/client.crt" dest: "/etc/pki/tls/certs/client.crt" - name: Copy CA certificate for 802.1X authentication ansible.builtin.copy: src: "/srv/data/ca.crt" dest: "/etc/pki/ca-trust/source/anchors/ca.crt" - name: Configure connection ansible.builtin.include_role: name: rhel-system-roles.network vars: network_connections: - name: enp1s0 type: ethernet autoconnect: yes ip: address: - 192.0.2.1/24 - 2001:db8:1::1/64 gateway4: 192.0.2.254 gateway6: 2001:db8:1::fffe dns: - 192.0.2.200 - 2001:db8:1::ffbb dns_search: - example.com ieee802_1x: identity: user_name eap: tls private_key: "/etc/pki/tls/private/client.key" private_key_password: "password" client_cert: "/etc/pki/tls/certs/client.crt" ca_cert: "/etc/pki/ca-trust/source/anchors/ca.crt" domain_suffix_match: example.com state: upThese settings define an Ethernet connection profile for the
enp1s0device with the following settings:-
A static IPv4 address -
192.0.2.1with a/24subnet mask -
A static IPv6 address -
2001:db8:1::1with a/64subnet mask -
An IPv4 default gateway -
192.0.2.254 -
An IPv6 default gateway -
2001:db8:1::fffe -
An IPv4 DNS server -
192.0.2.200 -
An IPv6 DNS server -
2001:db8:1::ffbb -
A DNS search domain -
example.com -
802.1X network authentication using the
TLSExtensible Authentication Protocol (EAP)
-
A static IPv4 address -
Validate the playbook syntax:
$ ansible-playbook --syntax-check ~/playbook.ymlNote that this command only validates the syntax and does not protect against a wrong but valid configuration.
Run the playbook:
$ ansible-playbook ~/playbook.yml
Additional resources
-
/usr/share/ansible/roles/rhel-system-roles.network/README.mdfile -
/usr/share/doc/rhel-system-roles/network/directory
19.11. Configuring a wifi connection with 802.1X network authentication by using the network RHEL system role
Using RHEL system role, you can automate the creation of a wifi connection. For example, you can remotely add a wireless connection profile for the wlp1s0 interface using an Ansible Playbook. The created profile uses the 802.1X standard to authenticate the client to a wifi network. The playbook configures the connection profile to use DHCP. To configure static IP settings, adapt the parameters in the ip dictionary accordingly.
Prerequisites
- You have prepared the control node and the managed nodes.
- You are logged in to the control node as a user who can run playbooks on the managed nodes.
-
The account you use to connect to the managed nodes has
sudopermissions on them. - The network supports 802.1X network authentication.
-
You installed the
wpa_supplicantpackage on the managed node. - DHCP is available in the network of the managed node.
The following files required for TLS authentication exist on the control node:
-
The client key is stored in the
/srv/data/client.keyfile. -
The client certificate is stored in the
/srv/data/client.crtfile. -
The CA certificate is stored in the
/srv/data/ca.crtfile.
-
The client key is stored in the
Procedure
Create a playbook file, for example
~/playbook.yml, with the following content:--- - name: Configure a wifi connection with 802.1X authentication hosts: managed-node-01.example.com tasks: - name: Copy client key for 802.1X authentication ansible.builtin.copy: src: "/srv/data/client.key" dest: "/etc/pki/tls/private/client.key" mode: 0400 - name: Copy client certificate for 802.1X authentication ansible.builtin.copy: src: "/srv/data/client.crt" dest: "/etc/pki/tls/certs/client.crt" - name: Copy CA certificate for 802.1X authentication ansible.builtin.copy: src: "/srv/data/ca.crt" dest: "/etc/pki/ca-trust/source/anchors/ca.crt" - block: - ansible.builtin.import_role: name: rhel-system-roles.network vars: network_connections: - name: Configure the Example-wifi profile interface_name: wlp1s0 state: up type: wireless autoconnect: yes ip: dhcp4: true auto6: true wireless: ssid: "Example-wifi" key_mgmt: "wpa-eap" ieee802_1x: identity: "user_name" eap: tls private_key: "/etc/pki/tls/client.key" private_key_password: "password" private_key_password_flags: none client_cert: "/etc/pki/tls/client.pem" ca_cert: "/etc/pki/tls/cacert.pem" domain_suffix_match: "example.com"These settings define a wifi connection profile for the
wlp1s0interface. The profile uses 802.1X standard to authenticate the client to the wifi network. The connection retrieves IPv4 addresses, IPv6 addresses, default gateway, routes, DNS servers, and search domains from a DHCP server and IPv6 stateless address autoconfiguration (SLAAC).Validate the playbook syntax:
$ ansible-playbook --syntax-check ~/playbook.ymlNote that this command only validates the syntax and does not protect against a wrong but valid configuration.
Run the playbook:
$ ansible-playbook ~/playbook.yml
Additional resources
-
/usr/share/ansible/roles/rhel-system-roles.network/README.mdfile -
/usr/share/doc/rhel-system-roles/network/directory
19.12. Setting the default gateway on an existing connection by using the network RHEL system role
In most situations, administrators set the default gateway when they create a connection. However, you can also set or update the default gateway setting on a previously created connection by using the network RHEL system role to set the default gateway.
When you run a play that uses the network RHEL system role and if the setting values do not match the values specified in the play, the role overrides the existing connection profile with the same name. To prevent resetting these values to their defaults, always specify the whole configuration of the network connection profile in the play, even if the configuration, for example the IP configuration, already exists.
Depending on whether it already exists, the procedure creates or updates the enp1s0 connection profile with the following settings:
-
A static IPv4 address -
198.51.100.20with a/24subnet mask -
A static IPv6 address -
2001:db8:1::1with a/64subnet mask -
An IPv4 default gateway -
198.51.100.254 -
An IPv6 default gateway -
2001:db8:1::fffe -
An IPv4 DNS server -
198.51.100.200 -
An IPv6 DNS server -
2001:db8:1::ffbb -
A DNS search domain -
example.com
Prerequisites
- You have prepared the control node and the managed nodes.
- You are logged in to the control node as a user who can run playbooks on the managed nodes.
-
The account you use to connect to the managed nodes has
sudopermissions on them.
Procedure
Create a playbook file, for example
~/playbook.yml, with the following content:--- - name: Configure the network hosts: managed-node-01.example.com tasks: - name: Configure an Ethernet connection with static IP and default gateway ansible.builtin.include_role: name: rhel-system-roles.network vars: network_connections: - name: enp1s0 type: ethernet autoconnect: yes ip: address: - 198.51.100.20/24 - 2001:db8:1::1/64 gateway4: 198.51.100.254 gateway6: 2001:db8:1::fffe dns: - 198.51.100.200 - 2001:db8:1::ffbb dns_search: - example.com state: upValidate the playbook syntax:
$ ansible-playbook --syntax-check ~/playbook.ymlNote that this command only validates the syntax and does not protect against a wrong but valid configuration.
Run the playbook:
$ ansible-playbook ~/playbook.yml
Additional resources
-
/usr/share/ansible/roles/rhel-system-roles.network/README.mdfile -
/usr/share/doc/rhel-system-roles/network/directory
19.13. Configuring a static route by using the network RHEL system role
You can use the network RHEL system role to configure static routes.
When you run a play that uses the network RHEL system role and if the setting values do not match the values specified in the play, the role overrides the existing connection profile with the same name. To prevent resetting these values to their defaults, always specify the whole configuration of the network connection profile in the play, even if the configuration, for example the IP configuration, already exists.
Prerequisites
- You have prepared the control node and the managed nodes.
- You are logged in to the control node as a user who can run playbooks on the managed nodes.
-
The account you use to connect to the managed nodes has
sudopermissions on them.
Procedure
Create a playbook file, for example
~/playbook.yml, with the following content:--- - name: Configure the network hosts: managed-node-01.example.com tasks: - name: Configure an Ethernet connection with static IP and additional routes ansible.builtin.include_role: name: rhel-system-roles.network vars: network_connections: - name: enp7s0 type: ethernet autoconnect: yes ip: address: - 192.0.2.1/24 - 2001:db8:1::1/64 gateway4: 192.0.2.254 gateway6: 2001:db8:1::fffe dns: - 192.0.2.200 - 2001:db8:1::ffbb dns_search: - example.com route: - network: 198.51.100.0 prefix: 24 gateway: 192.0.2.10 - network: 2001:db8:2:: prefix: 64 gateway: 2001:db8:1::10 state: upDepending on whether it already exists, the procedure creates or updates the
enp7s0connection profile with the following settings:-
A static IPv4 address -
192.0.2.1with a/24subnet mask -
A static IPv6 address -
2001:db8:1::1with a/64subnet mask -
An IPv4 default gateway -
192.0.2.254 -
An IPv6 default gateway -
2001:db8:1::fffe -
An IPv4 DNS server -
192.0.2.200 -
An IPv6 DNS server -
2001:db8:1::ffbb -
A DNS search domain -
example.com Static routes:
-
198.51.100.0/24with gateway192.0.2.10 -
2001:db8:2::/64with gateway2001:db8:1::10
-
-
A static IPv4 address -
Validate the playbook syntax:
$ ansible-playbook --syntax-check ~/playbook.ymlNote that this command only validates the syntax and does not protect against a wrong but valid configuration.
Run the playbook:
$ ansible-playbook ~/playbook.yml
Verification
On the managed nodes:
Display the IPv4 routes:
# ip -4 route
...
198.51.100.0/24 via 192.0.2.10 dev enp7s0
Display the IPv6 routes:
# ip -6 route
...
2001:db8:2::/64 via 2001:db8:1::10 dev enp7s0 metric 1024 pref medium
Additional resources
-
/usr/share/ansible/roles/rhel-system-roles.network/README.mdfile -
/usr/share/doc/rhel-system-roles/network/directory
19.14. Configuring an ethtool offload feature by using the network RHEL system role
You can use the network RHEL system role to configure ethtool features of a NetworkManager connection.
When you run a play that uses the network RHEL system role and if the setting values do not match the values specified in the play, the role overrides the existing connection profile with the same name. To prevent resetting these values to their defaults, always specify the whole configuration of the network connection profile in the play, even if the configuration, for example the IP configuration, already exists.
Prerequisites
- You have prepared the control node and the managed nodes.
- You are logged in to the control node as a user who can run playbooks on the managed nodes.
-
The account you use to connect to the managed nodes has
sudopermissions on them.
Procedure
Create a playbook file, for example
~/playbook.yml, with the following content:--- - name: Configure the network hosts: managed-node-01.example.com tasks: - name: Configure an Ethernet connection with ethtool features ansible.builtin.include_role: name: rhel-system-roles.network vars: network_connections: - name: enp1s0 type: ethernet autoconnect: yes ip: address: - 198.51.100.20/24 - 2001:db8:1::1/64 gateway4: 198.51.100.254 gateway6: 2001:db8:1::fffe dns: - 198.51.100.200 - 2001:db8:1::ffbb dns_search: - example.com ethtool: features: gro: "no" gso: "yes" tx_sctp_segmentation: "no" state: upThis playbook creates the
enp1s0connection profile with the following settings, or updates it if the profile already exists:-
A static
IPv4address -198.51.100.20with a/24subnet mask -
A static
IPv6address -2001:db8:1::1with a/64subnet mask -
An
IPv4default gateway -198.51.100.254 -
An
IPv6default gateway -2001:db8:1::fffe -
An
IPv4DNS server -198.51.100.200 -
An
IPv6DNS server -2001:db8:1::ffbb -
A DNS search domain -
example.com ethtoolfeatures:- Generic receive offload (GRO): disabled
- Generic segmentation offload (GSO): enabled
- TX stream control transmission protocol (SCTP) segmentation: disabled
-
A static
Validate the playbook syntax:
$ ansible-playbook --syntax-check ~/playbook.ymlNote that this command only validates the syntax and does not protect against a wrong but valid configuration.
Run the playbook:
$ ansible-playbook ~/playbook.yml
Additional resources
-
/usr/share/ansible/roles/rhel-system-roles.network/README.mdfile -
/usr/share/doc/rhel-system-roles/network/directory
19.15. Configuring an ethtool coalesce settings by using the network RHEL system role
You can use the network RHEL system role to configure ethtool coalesce settings of a NetworkManager connection.
When you run a play that uses the network RHEL system role and if the setting values do not match the values specified in the play, the role overrides the existing connection profile with the same name. To prevent resetting these values to their defaults, always specify the whole configuration of the network connection profile in the play, even if the configuration, for example the IP configuration, already exists.
Prerequisites
- You have prepared the control node and the managed nodes.
- You are logged in to the control node as a user who can run playbooks on the managed nodes.
-
The account you use to connect to the managed nodes has
sudopermissions on them.
Procedure
Create a playbook file, for example
~/playbook.yml, with the following content:--- - name: Configure the network hosts: managed-node-01.example.com tasks: - name: Configure an Ethernet connection with ethtool coalesce settings ansible.builtin.include_role: name: rhel-system-roles.network vars: network_connections: - name: enp1s0 type: ethernet autoconnect: yes ip: address: - 198.51.100.20/24 - 2001:db8:1::1/64 gateway4: 198.51.100.254 gateway6: 2001:db8:1::fffe dns: - 198.51.100.200 - 2001:db8:1::ffbb dns_search: - example.com ethtool: coalesce: rx_frames: 128 tx_frames: 128 state: upThis playbook creates the
enp1s0connection profile with the following settings, or updates it if the profile already exists:-
A static IPv4 address -
198.51.100.20with a/24subnet mask -
A static IPv6 address -
2001:db8:1::1with a/64subnet mask -
An IPv4 default gateway -
198.51.100.254 -
An IPv6 default gateway -
2001:db8:1::fffe -
An IPv4 DNS server -
198.51.100.200 -
An IPv6 DNS server -
2001:db8:1::ffbb -
A DNS search domain -
example.com ethtoolcoalesce settings:-
RX frames:
128 -
TX frames:
128
-
RX frames:
-
A static IPv4 address -
Validate the playbook syntax:
$ ansible-playbook --syntax-check ~/playbook.ymlNote that this command only validates the syntax and does not protect against a wrong but valid configuration.
Run the playbook:
$ ansible-playbook ~/playbook.yml
Additional resources
-
/usr/share/ansible/roles/rhel-system-roles.network/README.mdfile -
/usr/share/doc/rhel-system-roles/network/directory
19.16. Increasing the ring buffer size to reduce a high packet drop rate by using the network RHEL system role
Increase the size of an Ethernet device’s ring buffers if the packet drop rate causes applications to report a loss of data, timeouts, or other issues.
Ring buffers are circular buffers where an overflow overwrites existing data. The network card assigns a transmit (TX) and receive (RX) ring buffer. Receive ring buffers are shared between the device driver and the network interface controller (NIC). Data can move from NIC to the kernel through either hardware interrupts or software interrupts, also called SoftIRQs.
The kernel uses the RX ring buffer to store incoming packets until the device driver can process them. The device driver drains the RX ring, typically by using SoftIRQs, which puts the incoming packets into a kernel data structure called an sk_buff or skb to begin its journey through the kernel and up to the application that owns the relevant socket.
The kernel uses the TX ring buffer to hold outgoing packets which should be sent to the network. These ring buffers reside at the bottom of the stack and are a crucial point at which packet drop can occur, which in turn will adversely affect network performance.
When you run a play that uses the network RHEL system role and if the setting values do not match the values specified in the play, the role overrides the existing connection profile with the same name. To prevent resetting these values to their defaults, always specify the whole configuration of the network connection profile in the play, even if the configuration, for example the IP configuration, already exists.
Prerequisites
- You have prepared the control node and the managed nodes.
- You are logged in to the control node as a user who can run playbooks on the managed nodes.
-
The account you use to connect to the managed nodes has
sudopermissions on them. - You know the maximum ring buffer sizes that the device supports.
Procedure
Create a playbook file, for example
~/playbook.yml, with the following content:--- - name: Configure the network hosts: managed-node-01.example.com tasks: - name: Configure an Ethernet connection with increased ring buffer sizes ansible.builtin.include_role: name: rhel-system-roles.network vars: network_connections: - name: enp1s0 type: ethernet autoconnect: yes ip: address: - 198.51.100.20/24 - 2001:db8:1::1/64 gateway4: 198.51.100.254 gateway6: 2001:db8:1::fffe dns: - 198.51.100.200 - 2001:db8:1::ffbb dns_search: - example.com ethtool: ring: rx: 4096 tx: 4096 state: upThis playbook creates the
enp1s0connection profile with the following settings, or updates it if the profile already exists:-
A static
IPv4address -198.51.100.20with a/24subnet mask -
A static
IPv6address -2001:db8:1::1with a/64subnet mask -
An
IPv4default gateway -198.51.100.254 -
An
IPv6default gateway -2001:db8:1::fffe -
An
IPv4DNS server -198.51.100.200 -
An
IPv6DNS server -2001:db8:1::ffbb -
A DNS search domain -
example.com Maximum number of ring buffer entries:
- Receive (RX): 4096
- Transmit (TX): 4096
-
A static
Validate the playbook syntax:
$ ansible-playbook --syntax-check ~/playbook.ymlNote that this command only validates the syntax and does not protect against a wrong but valid configuration.
Run the playbook:
$ ansible-playbook ~/playbook.yml
Additional resources
-
/usr/share/ansible/roles/rhel-system-roles.network/README.mdfile -
/usr/share/doc/rhel-system-roles/network/directory
19.17. Network states for the network RHEL System role
The network RHEL system role supports state configurations in playbooks to configure the devices. For this, use the network_state variable followed by the state configurations.
Benefits of using the network_state variable in a playbook:
- Using the declarative method with the state configurations, you can configure interfaces, and the NetworkManager creates a profile for these interfaces in the background.
-
With the
network_statevariable, you can specify the options that you require to change, and all the other options will remain the same as they are. However, with thenetwork_connectionsvariable, you must specify all settings to change the network connection profile.
For example, to create an Ethernet connection with dynamic IP address settings, use the following vars block in your playbook:
| Playbook with state configurations | Regular playbook |
vars:
  network_state:
    interfaces:
    - name: enp7s0
      type: ethernet
      state: up
      ipv4:
        enabled: true
        auto-dns: true
        auto-gateway: true
        auto-routes: true
        dhcp: true
      ipv6:
        enabled: true
        auto-dns: true
        auto-gateway: true
        auto-routes: true
        autoconf: true
        dhcp: true
|
vars:
  network_connections:
    - name: enp7s0
      interface_name: enp7s0
      type: ethernet
      autoconnect: yes
      ip:
        dhcp4: yes
        auto6: yes
      state: up
|
For example, to only change the connection status of dynamic IP address settings that you created as above, use the following vars block in your playbook:
| Playbook with state configurations | Regular playbook |
vars:
  network_state:
    interfaces:
    - name: enp7s0
      type: ethernet
      state: down
|
vars:
  network_connections:
    - name: enp7s0
      interface_name: enp7s0
      type: ethernet
      autoconnect: yes
      ip:
        dhcp4: yes
        auto6: yes
      state: down
|
Additional resources
-
/usr/share/ansible/roles/rhel-system-roles.network/README.mdfile -
/usr/share/doc/rhel-system-roles/network/directory