
Chapter 10. Configuration consistency across multi Ansible Automation Platform deployments
10.1. Why configuration as code?
Traditionally, when we think about having consistency across multiple Ansible Automation Platform deployment sites, we think of using database replication to copy the data from one Ansible Automation Platform environment and importing that data to another Ansible Automation Platform site.
This could be done with scripts, specialized software, manual export of the database followed by an import the Ansible Automation Platform database to the new site, or even running custom Ansible playbooks that do something similar.
While there are many different methods, typically, these methods have cons associated with them.
For example, database replication requires investments in storage infrastructure and concurrency could be hard to achieve without the right expertise.
10.2. What is configuration as code?
Configuration as code is defined as the practice of managing configuration files in a repository. In the case of Ansible Automation Platform, these configuration files establish the settings we wish to apply across our Ansible Automation Platform environments.
By storing and managing Ansible Automation Platform configuration files as code, we can:
- standardize the settings being applied to all our Ansible Automation Platform environments
- inherit the benefits of version control of our configurations
- easily scale additional Ansible Automation Platform deployments to use the same configuration settings
- easily track changes of the configuration settings making fixing issues easier
While configuration as code provides numerous benefits and best practices that can be applied across an Ansible Automation Platform environment, in order to streamline and automate the delivery of the configurations to our multiple Ansible Automation Platform sites automatically, immediately and consistently, we must pair our configuration as code solution with Git webhooks.
10.3. What are Git webhooks?
Git webhooks are defined as a method for notifications to be delivered to an external web server whenever certain actions occur on a repository or organization.
For example, when a repository is updated, this could trigger an event that could trigger CI builds, deploy an environment, or in our case, update configurations to our Ansible Automation Platform environments.
With the solution of configuration as code and Git webhooks, we can setup a Ansible Automation Platform work flow that immediately updates all of our Ansible Automation Platform sites simultaneously with the exact configurations across all the platforms.
In effect, removing the overhead of having to maintain database backups or enable an expensive database replication solution while achieving the pros of those solutions.
With this methodology in mind, the following sections focus on how an admin can take advantage of configuration as code to ensure consistency across multiple Ansible Automation Platform environments using Git webhooks.
10.4. Working with webhooks
A webhook provides the ability to execute specified commands between apps over the web. Ansible automation controller currently provides webhook integration with GitHub and GitLab. This reference environment describes the procedure for setting up a webhook in automation controller using GitHub.
10.4.1. GitHub webhook setup
Automation controller has the ability to run jobs based on a triggered webhook event. The following provides the step-by-step for that setup.
Create a GitHub personal access token
Generate a personal access token (PAT) for use with automation controller.
- In the profile settings of your GitHub account, click Settings.
Below the Personal settings, click Developer Settings.

- In the Developer settings, click Personal access tokens.
- From the Personal access tokens screen, click Generate new token button.
- When prompted, enter your GitHub account password to continue.
- In the Note field, enter a brief description about what this PAT will be used for.
- In the Expiration drop down, select No expiration.
In the Scope fields, automation controller webhook only needs repo scope access, with the exception of invites. For information about other scopes, click the link right above the table to access the docs.
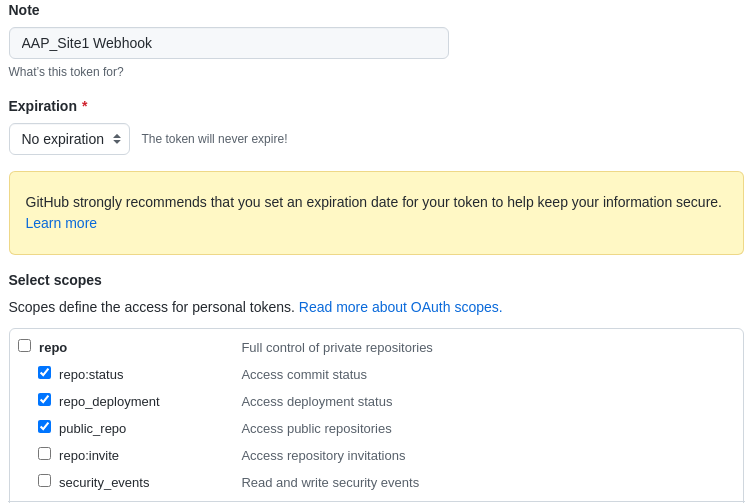
Click the Generate Token button at the bottom of the page.
WarningOnce the token is generated, make sure you copy the PAT, as it will be used by Ansible Automation Platform automation controller cluster in a later step. You will not be able to access this token again in GitHub.
Create a GitHub repository
Once we have our PAT in place, the next step is to create a Git repository that will be triggered by our GitHub webhooks when changes are made to the repository.
Since the focus is to be able to easily update or modify our automation controller configurations, this reference environment takes advantage of an Ansible collection named redhat_cop.controller_configuration.
This Ansible collection allows for easy interaction with Ansible controller servers via Ansible roles using the controller collection modules.
With the help of this collection, we can use these pre-existing roles to modify or update our automation controller environments across all our sites.
The redhat_cop.controller_configuration collection is a community project and officially not supported by Red Hat.
In GitHub, create a new repository.
Ensure to select the appropriate Owner and provide a Repository name.
- This reference environment uses the repository name aap_refarch.
- Provide an optional description to describe your repository.
Set your repository to public or private.
- This reference environment sets the repository to Public.
- Initialize the repository with an Add a README file.
- Click on the create repository button.
Within the newly created GitHub repository, three files are created.
- playbook.yml - A playbook with all the appropriate roles to update or modify our automation controller.
- requirements.yml - A requirements.yml file with all the collections required to run the playbook.
- group_vars/all.yml - An all.yml file containing all the variables we wish to modify for a specific configuration (role).
The purpose of these three files is to provide a method that when the group_vars/all.yml is modified and updated to the repository, this will kick off a job template within our Ansible Automation Platform automation controller cluster to make the appropriate change or update.
A sample of these three files can be found within the Appendix C, Supplemental section of this guide or https://github.com/ansible/aap_refarch
Setting up resource credentials within Ansible Automation Platform automation controller cluster
Prior to using our repository as configuration as code, setup the appropriate credential resources within our Ansible Automation Platform sites.
This ensures that as new projects, work flows and job templates are created, we can easily attach those credentials to those resources.
The following steps show how to create our two required credentials.
One credential associated with the GitHub (PAT) token we created previously.
The other credential associated with the Ansible Automation Platform site that will get updated. Each Ansible Automation Platform site will get updated by its own environment, e.g. site1 gets updated by site1.
On each Ansible Automation Platform site:
- Login to your Ansible Automation Platform automation controller dashboard
Under Resources→ Credentials click the blue Add button.
- Provide a Name, e.g. GitHub PAT
- Select GitHub Personal Access Token as the Credential Type .
- Within Type Details, add the secret using the previously generated token from GitHub.
Click Save.
NoteMake note of the name of this credential, as it will be used in the job template that posts back to GitHub.
With the GitHub PAT credential set, create a second credential for the the existing Ansible Automation Platform environment.
Under Resources→ Credentials click the blue Add button.
- Provide a Name, e.g. AAP_Site1
- Provide Red Hat Ansible Automation Platform as the Credential Type .
Within Type Details, add the appropriate details
- Red Hat Ansible Automation Platform, e.g. controlplane-cluster.site1.example.com
- Username, e.g. admin
- Password, e.g. redhat
- If the SSL certificate is signed, ensure to select Verify SSL within Options.
- Click Save.
Repeat this section on Ansible Automation Platform site two.
controlplane-cluster.site1.example.com is used as this reference environment takes advantage of a load balancer. Setup of a load balancer is out of scope for this reference environment.
Creating the configuration as code project
The purpose of the configuration as code project is to create a work flow that contains a job template that automatically runs every time an update to the configuration as code repository takes place.
This ensures that as you make changes such as setting variables, the Git repository playbook runs the appropriate roles for the numerous automation controller configurations.
This section creates a project, work flow and job template to achieve the above.
Within your Ansible Automation Platform site one dashboard,
- Under Resources→ Projects click the blue Add button.
- Provide a Name, e.g. Configuration as Code Project
- Select Default as the Organization
- Select Default execution environment as the Execution Environment
- Select Git as the Source Control Credential Type
Within Type Details,
- Add the Source Control URL (your GitHub repository)
Within Options
- Select Clean, Delete, Update Revision on Launch
- Click Save.
Next, create a work flow template.
- Under Resources→ Templates click the blue Add → Add workflow template.
- Provide a Name, e.g. Configuration as Code Workflow
Within Options, checkmark Enable Webhook.
- Within Webhook details, select GitHub as the Webhook Service.
- Within Webhook details, select your GitHub PAT token previously created as the Webhook Credential, e.g. GitHub PAT
- Click Save.
- Within the Please click the Start button to begin window, click the Save at the top right corner.
- Copy the Webhook URL and the Webhook Key as they will be used later.
Repeat the above process on Ansible Automation Platform site two.
Enabling GitHub Webhooks for the Repository
With our Ansible Automation Platform Workflow template created and our GitHub repository with the required files in place, the next step is to enable webhooks for our repository, e.g. aap_refarch.
- At the homepage of your GitHub repository, select the Settings tab.
Within the Settings tab, select Webhooks.
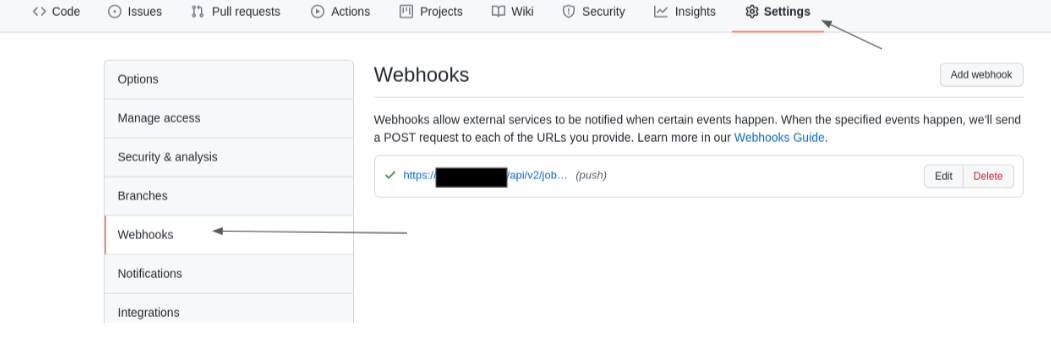
- Within the Webhooks section, select the Add webhook button.
- Enter the Payload URL (Webhook URL of the workflow).
- Change the Content type drop down to application/json.
- Enter the Secret (Webhook key of the workflow).
Leave the defaults to use push events, and click the button Add webhook.
WarningBy default, GitHub verifies SSL certificates when delivering payloads. If your automation controller SSL certificates are not signed, ensure to disableSSL verfication.
Repeat the above process on Ansible Automation Platform site two.
Creating the configuration as code job template
The job template to be created for our configuration as code project runs the playbook.yml file automatically every time an update to the Git repository takes places.
This ensures as configuration changes are desired, we can use the Ansible Automation Platform controller API to make those changes appropriately. When we combine the same methodology across all our Ansible Automation Platform sites, all the changes become global across the configured sites.
- Under Resources→ Templates click the blue Add → Add job template.
- Provide a Name, e.g. Configuration as Code Job
- Select Run as the Job Type
- Select Demo Inventory as the Inventory
- Select Configuration as Code Project as the Project
- Select Default execution environment as the Execution Environment
- Select playbook.yml as the Playbook
- Select Credentials and switch the category from Machine to Red Hat Ansible Automation Platform
- Select the appropriate credential for the Ansible Automation Platform site, e.g. AAP_Site1
- Within Options, select Enable webhook.
- Select GitHub as the Webhook Service.
- Select your GitHub PAT token previously created as the Webhook Credential, e.g. GitHub PAT
- Click Save.
Repeat the above process on Ansible Automation Platform site two.
Updating the created Configuration as Code Workflow
Previously, the Configuration as Code workflow was created. The purpose of this workflow is to ensure that the Configuration as Code Project is always in sync and that the Configuration as Code Job runs the configuration as code playbook whenever changes are made to the repository.
- Under Resources→ Templates, select your template. e.g Configuration as Code Workflow
- Within the Details section, select the Visualizer tab and click the green Start.
- For Node Type select Project Sync and select the appropriate project, e.g. Configuration as Code Project and click Save.
- Hover over the Configuration as Code Project and select the plus "+" symbol.
- Within the Add Node window, select Always as to when this node should be executed and click Next.
- Select the Configuration as Code Job as the Node Type and click Save.
- Once brought back to the Visualizer, select the Save button at the top right corner.
Verifying Configuration as Code setup
With many of the roles already included in the redhat_cop.controller_configuration, a simple method to verify if everything is working as expected is to create a user by updating the group_vars/all.yml file with the appropriate yaml.
If we wanted to create a user, we would take a closer look at the users role documentation to further see all the variables at our disposable.
After further review, we notice creating a non-admin user, named John would look as follows:
group_vars/all.yml
---
controller_user_accounts:
  - user: "john"
    is_superuser: false
    password: "redhat"
Once the group_vars/all.yml file is updated with the above and pushed to the Git repository, a job within Ansible Automation Platform automation controller should start.
This can be verified by selecting Jobs under the Views section within the automation controller dashboard. The job in reference should have the number of the job followed by the job name. For this reference environment, you’d see something similar to 8-Configuration as Code Job with the TypePlaybook Run

Once the job is complete, it will have a status of Successful.
Logging out as admin and relogging in as the user john with the password redhat should confirm that the job was successful.
If you followed this entire chapter and set the webhooks appropriately for each Ansible Automation Platform site, you will notice that the user john was created simultaneously by the corresponding Ansible Automation Platform platform.
While this example is a simplified one, many of the configurations (roles) that allow for the configuration of Ansible Automation Platform automation controller are provided within the redhat_cop.controller_configuration.
Additional examples may be found at: Example configs.
While the Ansible collection has many of the key roles you’ll ever need, you are not limited to only what can be found within this Ansible collection. New roles can be implemented or created by your organization to further enhance your capabilities.