
Configure Red Hat JBoss Developer Studio for use with JBoss EAP and JBoss Web Framework Kit
This article provides details for new and existing JBoss Developer Studio users who need to configure a fresh install of JBoss Developer Studio or upgrade the versions of Red Hat JBoss Enterprise Application Platform or JBoss Web Framework Kit in use.
JBoss Developer Studio supports application development and deployment with JBoss EAP and JBoss Web Framework Kit only after you configure JBoss Developer Studio for use with JBoss EAP and JBoss Web Framework Kit. This configuration is essential for using the enterprise versions of the example Maven projects provided in JBoss Central. These projects are intended for deployment to JBoss EAP and necessitate IDE access to the JBoss EAP and JBoss Web Framework Kit Maven repositories.
Instructions are provided for the following tasks:
-
Set up JBoss EAP for use in JBoss Developer Studio in one of three different ways
-
Configure Maven for JBoss EAP and JBoss Web Framework Kit Maven repositories
1. Set Up JBoss EAP
To set up JBoss EAP for use in JBoss Developer Studio, you must direct the IDE to the local or remote runtime servers. This establishes a communication channel between the IDE and the JBoss EAP server for efficient deployment and server management workflows.
Depending on your circumstance, you can set up the JBoss EAP server in one of the following three ways:
A. If you are installing a new instance of JBoss Developer Studio, you can use the combined installer to download, install, and set up JBoss Developer Studio and JBoss EAP.
B. If JBoss Developer Studio is already installed but JBoss EAP is not, you can download, install, and set up JBoss EAP from within the IDE.
C. If JBoss Developer Studio and JBoss EAP are already installed, you can use runtime detection to set up JBoss EAP from within the IDE.
A. Download, Install and Set Up JBoss Developer Studio and JBoss EAP Using a Single Installer
If you are installing a new instance of JBoss Developer Studio, you can use the combined installer to download, install, and set up JBoss Developer Studio and JBoss EAP. A specific JBoss EAP version is packaged in the installer; for details of the JBoss EAP version see https://access.redhat.com/site/articles/427493.
Note: If you want to install a different version of JBoss EAP, you can either download it from within the IDE (see download, install, and set up JBoss EAP from within the IDE) or install it separately and then follow the instructions in C, use runtime detection to set up JBoss EAP from within the IDE.
To install JBoss Developer Studio and JBoss EAP using a single installer:
-
Log onto the Red Hat Customer Portal at https://access.redhat.com.
-
Locate the downloads for versions of JBoss Developer Studio greater than or equal to 9.x.
-
Download the Red Hat JBoss Developer Studio 9.x Installer With EAP.jar file.
-
On the command line, navigate to the downloaded installer .jar file and enter:
java -jar jboss-devstudio-version-installer-eap.jar
where version is the version of the .jar file. -
In the Red Hat JBoss Developer Studio wizard, click Next.
-
In the End User License Agreement window, read the terms of the End User License Agreement, click I accept the terms of this license agreement, and then click Next.
-
In the Select Target Folder window, click Browse to select the location where you want to install JBoss Developer Studio and click Next.
-
When you are prompted about the specified location being created (or overwritten), review the message and, if satisfied, click OK (or Yes).
-
In the Select Java VM window, select the appropriate option for your Java VM preference and then click Next:
- To select the default Java VM that is listed in the disabled field below, click Default Java VM.
- To select a different Java VM, click Specific Java VM and then click Browse to locate the Java VM.
-
In the Select Platforms and Servers window, with reference to installing JBoss EAP, click Yes, and have it ready for use in JBoss Developer Studio and click Next.

-
Review the information in the Summary Information window and click Next.
-
The Installation window opens showing the installation progress. Once the installation is complete click Next.
-
In the Setup Shortcuts window, click the desired shortcut options and click Next.
-
In the Finish window, click Done to complete the installation. JBoss Developer Studio starts.
-
In the Workspace Launcher window, in the Workspace field type the path for a new or existing workspace or click Browse to navigate to a workspace and click OK.
-
When prompted to allow Red Hat to receive anonymous usage statistics, select the appropriate option.
-
Click Get started with JBoss Central to begin working with JBoss Developer Studio.
Result: The server is listed in the Servers view in stopped mode.
B. Download, Install and Set Up JBoss EAP from within JBoss Developer Studio
If JBoss Developer Studio is already installed, you can download, install, and set up JBoss EAP from within the IDE. With this option, you can choose from a range of supported JBoss EAP versions; for details of supported JBoss EAP versions see https://access.redhat.com/site/articles/427493.
To download, install and set up JBoss EAP from within JBoss Developer Studio:
-
Start JBoss Developer Studio.
-
Click Window > Preferences, expand JBoss Tools, and then click JBoss Runtime Detection.
-
In the Paths pane, click Download.
-
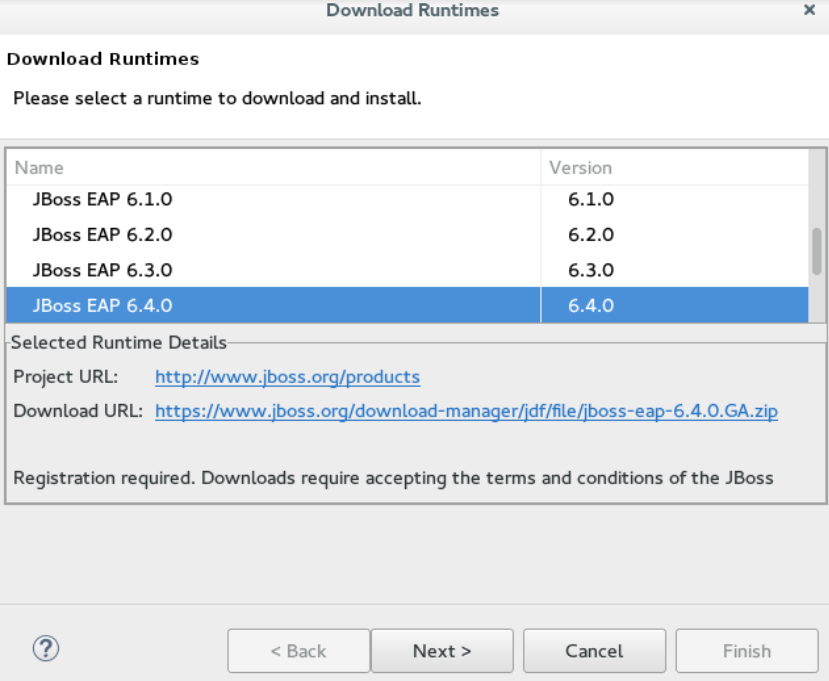
In the Download Runtimes window, from the Download Runtimes table select the JBoss EAP version that you want to download and click Next.
Note: For JBoss EAP 6.1.x and later, continue to follow the steps given here. For JBoss EAP 6.0.x and earlier, follow the on-screen instructions for downloading JBoss EAP from the Red Hat Customer Portal and after JBoss EAP is installed continue to use runtime detection to set up JBoss EAP from within JBoss Developer Studio.
-
In the JBoss.org Credentials window, in the Domain field, type jboss.org and then click Add next to the Username field. Note that if you do not have a JBoss.org account, you must click the link to sign up.
-
In the Add a Credential window, Username field, type your username and in the Password field, type the password and click OK.
-
In the Download Runtimes window, click Next.
-
In the JBoss.org Terms and Conditions window, read the terms and conditions, from the Please choose the country of use list, select your country of use, and then click Accept Now. If you have previously accepted the terms and conditions in JBoss Developer Studio or through the jboss.org website, this window is skipped.
-
Click Next.
-
Read the General Public License, click I accept the terms of the license agreement, and then click Next.
-
For the Install Folder field, click Browse and choose a location in which to install JBoss EAP and click Finish.
-
Click Apply and click OK to close the Preferences window. The download and installation starts and may take some time to complete.
Result: The server is listed in the Servers view in stopped mode.
C. Use Runtime Detection to Set Up JBoss EAP from within JBoss Developer Studio
If JBoss Developer Studio and JBoss EAP are already installed, you can use runtime detection to set up JBoss EAP from within the IDE. The runtime detection feature automatically identifies the JBoss EAP instance installed on your local system and generates a corresponding default server setup for use in JBoss Developer Studio. This feature makes getting started with a default JBoss EAP server very quick.
Note: Specific JBoss EAP versions are supported by each JBoss Developer Studio release; for details of supported JBoss EAP versions see https://access.redhat.com/site/articles/427493.
To use runtime detection to set up JBoss EAP for use in JBoss Developer Studio:
-
Start JBoss Developer Studio.
-
Click Window > Preferences, expand JBoss Tools, and then select JBoss Runtime Detection.
-
Click Add.
-
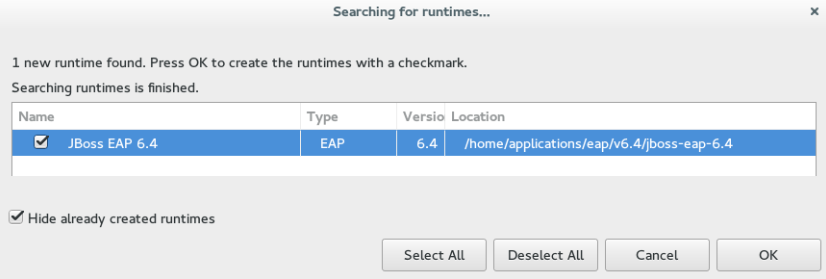
Navigate to path/to/jboss-eap and click OK. JBoss Server Tools recursively scans the path searching for installed servers and displays a list of those it finds.
-
Ensure the jboss-eap-version check box is selected, where version denotes the JBoss EAP version, and click OK.
-
Click Apply and click OK to close the Preferences window.
Result: The server is listed in the Servers view in stopped mode.
2. Configure Maven for JBoss EAP and JBoss Web Framework Kit Maven Repositories
To configure Maven to use the JBoss EAP and JBoss Web Framework Kit Maven repositories when working inside JBoss Developer Studio, you must ensure that the IDE knows the location of your Maven configuration settings.xml file and that the necessary profiles for the JBoss EAP and JBoss Web Framework Kit Maven repositories are contained in that file. This ensures that Maven knows where to search for project dependencies when it is called to build Maven projects from within the IDE.
Specify Maven settings.xml File Location
If you have multiple Maven settings.xml files or you are using a shared settings.xml file, then this file may not be in the default location expected by JBoss Developer Studio. In this case, you must inform the IDE of the file location.
To specify the Maven settings.xml file location:
-
Start JBoss Developer Studio.
-
Click Window > Preferences, expand Maven, and then click User Settings.
-
For the User Settings field, click Browse and locate the settings.xml file.
-
Click Update Settings.
-
Click Apply and then click OK.
Use JBoss EAP and JBoss Web Framework Kit Maven Repositories
You can either download the JBoss EAP and JBoss Web Framework Kit Maven repositories from the Red Hat Customer Portal or use the online Maven repository located at https://maven.repository.redhat.com/ga.
Use the Offline Maven Repositories
If you have not previously used these versions of JBoss EAP and JBoss Web Framework Kit, you must configure your Maven settings.xml file to use the associated product Maven repositories. You can manually edit your settings.xml file in a text editor or use the JBoss Developer Studio Maven integration feature to automatically detect the JBoss repositories and appropriately edit your settings.xml file.
Note: The JBoss EAP and JBoss Web Framework Kit Maven repositories must be already obtained from the Red Hat Customer Portal and located on a system that you can access.
To specify the JBoss EAP and JBoss Web Framework Kit Maven repositories locations using JBoss Developer Studio:
-
Start JBoss Developer Studio.
-
Click Window > Preferences, expand JBoss Tools, and then click JBoss Maven Integration.
-
Click Configure Maven Repositories.
-
Click Add Repository.
-
Click Recognize JBoss Maven Enterprise Repositories.
-
Navigate to path/to/jboss-eap-maven-repository and click OK. JBoss Maven Tools recursively scans the path searching for a Maven repository.
-
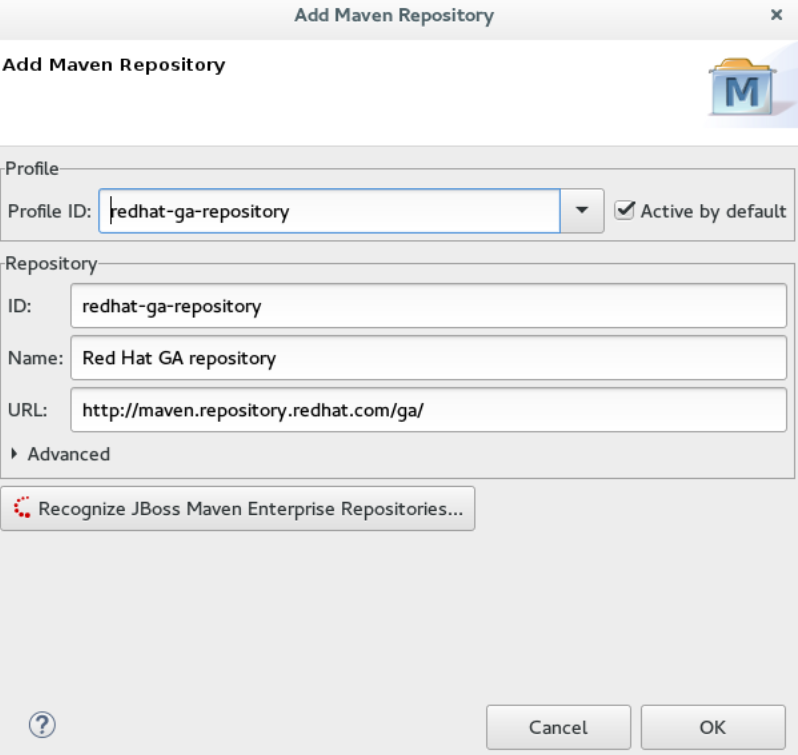
Modify the information in the ID and Name fields as desired, ensure the Active by default check box is selected, and then click OK.

-
Click Add Repository.
-
Click Recognize JBoss Maven Enterprise Repositories.
-
Navigate to path/to/jboss-wfk-maven-repository and click OK. JBoss Maven Tools recursively scans the path searching for a Maven repository.
-
Modify the information in the ID and Name fields as desired, ensure the Active by default check box is selected, and then click OK.
-
Click Finish and at the prompt asking if you are sure you want to update the Maven configuration file click Yes. If the specified configuration file does not exist, JBoss Maven Tools creates it.
-
Click Apply and click OK to close the Preferences window.
Use the Online Maven Repositories
Adding the online repository to Jboss Developer Studio, adds https://maven.repository.redhat.com/ga to your settings.xml , which takes care of all the dependencies.
To use the online Maven repositories:
-
Start JBoss Developer Studio.
-
Click Window > Preferences, expand JBoss Tools, and then click JBoss Maven Integration.
-
Click Configure Maven Repositories.
-
Click Add Repository.
-
In the Profile ID drop-down list, select redhat-ga-repository.
-
Click OK.
-
In the Configure Maven Repositories window, click Finish.
-
Click Apply and then click OK to close the Preferences window.
Comments