
Upgrade Red Hat Quay
Chapter 1. Upgrade overview
The upgrade procedure for Red Hat Quay depends on the type of installation you are using.
The Red Hat Quay Operator provides a simple method to deploy and manage a Red Hat Quay cluster. This is the preferred procedure for deploying Red Hat Quay on OpenShift.
The Red Hat Quay Operator should be upgraded using the Operator Lifecycle Manager (OLM) as described in the section "Upgrading Quay using the Quay Operator".
The procedure for upgrading a proof-of-concept or highly available installation of Red Hat Quay and Clair is documented in the section "Standalone upgrade".
Chapter 2. Upgrading the Red Hat Quay Operator Overview
The Red Hat Quay Operator follows a synchronized versioning scheme, which means that each version of the Operator is tied to the version of Red Hat Quay and the components that it manages. There is no field on the QuayRegistry custom resource which sets the version of Red Hat Quay to deploy; the Operator can only deploy a single version of all components. This scheme was chosen to ensure that all components work well together and to reduce the complexity of the Operator needing to know how to manage the lifecycles of many different versions of Red Hat Quay on Kubernetes.
2.1. Operator Lifecycle Manager
The Red Hat Quay Operator should be installed and upgraded using the Operator Lifecycle Manager (OLM). When creating a Subscription with the default approvalStrategy: Automatic, OLM will automatically upgrade the Red Hat Quay Operator whenever a new version becomes available.
When the Red Hat Quay Operator is installed by Operator Lifecycle Manager, it might be configured to support automatic or manual upgrades. This option is shown on the OperatorHub page for the Red Hat Quay Operator during installation. It can also be found in the Red Hat Quay Operator Subscription object by the approvalStrategy field. Choosing Automatic means that your Red Hat Quay Operator will automatically be upgraded whenever a new Operator version is released. If this is not desirable, then the Manual approval strategy should be selected.
2.2. Upgrading the Red Hat Quay Operator
The standard approach for upgrading installed Operators on OpenShift Container Platform is documented at Upgrading installed Operators.
In general, Red Hat Quay supports upgrades from a prior (N-1) minor version only. For example, upgrading directly from Red Hat Quay 3.0.5 to the latest version of 3.5 is not supported. Instead, users would have to upgrade as follows:
- 3.0.5 → 3.1.3
- 3.1.3 → 3.2.2
- 3.2.2 → 3.3.4
- 3.3.4 → 3.4.z
- 3.4.z → 3.5.z
This is required to ensure that any necessary database migrations are done correctly and in the right order during the upgrade.
In some cases, Red Hat Quay supports direct, single-step upgrades from prior (N-2, N-3) minor versions. This simplifies the upgrade procedure for customers on older releases. The following upgrade paths are supported for Red Hat Quay 3:
- 3.9.z → 3.11.z
- 3.10.z → 3.11.z
Upgrading from 3.8.z to 3.11 is unsupported. Users must first upgrade to 3.9 or 3.10, and then upgrade to 3.11.
The Red Hat Quay Operator can be upgraded from 3.10.X for IBM Power and IBM Z.
For users on standalone deployments of Red Hat Quay wanting to upgrade to 3.11, see the Standalone upgrade guide.
2.2.1. Upgrading Red Hat Quay
To update Red Hat Quay from one minor version to the next, for example, 3.10 → 3.11, you must change the update channel for the Red Hat Quay Operator.
For z stream upgrades, for example, 3.10.1 → 3.10.2, updates are released in the major-minor channel that the user initially selected during install. The procedure to perform a z stream upgrade depends on the approvalStrategy as outlined above. If the approval strategy is set to Automatic, the Red Hat Quay Operator upgrades automatically to the newest z stream. This results in automatic, rolling Red Hat Quay updates to newer z streams with little to no downtime. Otherwise, the update must be manually approved before installation can begin.
2.2.2. Changing the update channel for the Red Hat Quay Operator
The subscription of an installed Operator specifies an update channel, which is used to track and receive updates for the Operator. To upgrade the Red Hat Quay Operator to start tracking and receiving updates from a newer channel, change the update channel in the Subscription tab for the installed Red Hat Quay Operator. For subscriptions with an Automatic approval strategy, the upgrade begins automatically and can be monitored on the page that lists the Installed Operators.
2.2.3. Manually approving a pending Operator upgrade
If an installed Operator has the approval strategy in its subscription set to Manual, when new updates are released in its current update channel, the update must be manually approved before installation can begin. If the Red Hat Quay Operator has a pending upgrade, this status will be displayed in the list of Installed Operators. In the Subscription tab for the Red Hat Quay Operator, you can preview the install plan and review the resources that are listed as available for upgrade. If satisfied, click Approve and return to the page that lists Installed Operators to monitor the progress of the upgrade.
The following image shows the Subscription tab in the UI, including the update Channel, the Approval strategy, the Upgrade status and the InstallPlan:
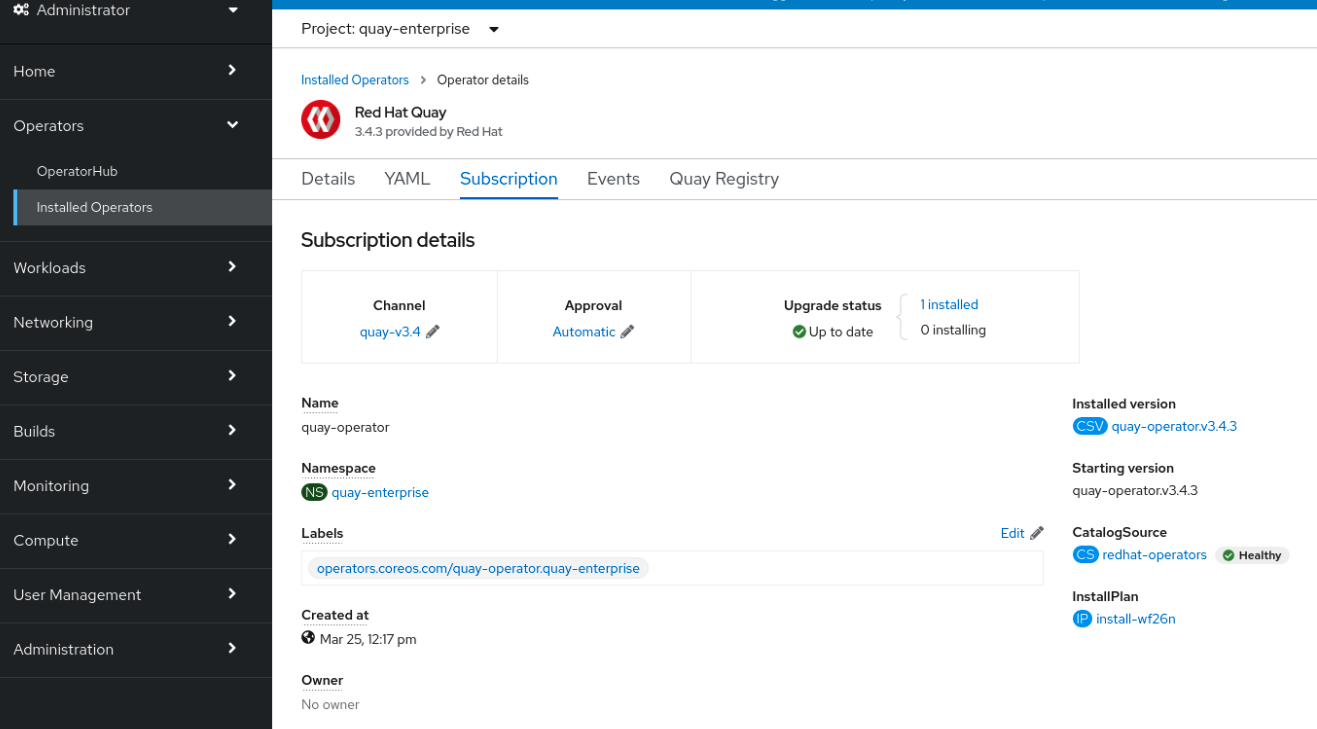
The list of Installed Operators provides a high-level summary of the current Quay installation:

2.3. Upgrading a QuayRegistry resource
When the Red Hat Quay Operator starts, it immediately looks for any QuayRegistries it can find in the namespace(s) it is configured to watch. When it finds one, the following logic is used:
-
If
status.currentVersionis unset, reconcile as normal. -
If
status.currentVersionequals the Operator version, reconcile as normal. -
If
status.currentVersiondoes not equal the Operator version, check if it can be upgraded. If it can, perform upgrade tasks and set thestatus.currentVersionto the Operator’s version once complete. If it cannot be upgraded, return an error and leave theQuayRegistryand its deployed Kubernetes objects alone.
2.4. Upgrading a QuayEcosystem
Upgrades are supported from previous versions of the Operator which used the QuayEcosystem API for a limited set of configurations. To ensure that migrations do not happen unexpectedly, a special label needs to be applied to the QuayEcosystem for it to be migrated. A new QuayRegistry will be created for the Operator to manage, but the old QuayEcosystem will remain until manually deleted to ensure that you can roll back and still access Quay in case anything goes wrong. To migrate an existing QuayEcosystem to a new QuayRegistry, use the following procedure.
Procedure
Add
"quay-operator/migrate": "true"to themetadata.labelsof theQuayEcosystem.$ oc edit quayecosystem <quayecosystemname>
metadata: labels: quay-operator/migrate: "true"-
Wait for a
QuayRegistryto be created with the samemetadata.nameas yourQuayEcosystem. TheQuayEcosystemwill be marked with the label"quay-operator/migration-complete": "true". -
After the
status.registryEndpointof the newQuayRegistryis set, access Red Hat Quay and confirm that all data and settings were migrated successfully. -
If everything works correctly, you can delete the
QuayEcosystemand Kubernetes garbage collection will clean up all old resources.
2.4.1. Reverting QuayEcosystem Upgrade
If something goes wrong during the automatic upgrade from QuayEcosystem to QuayRegistry, follow these steps to revert back to using the QuayEcosystem:
Procedure
Delete the
QuayRegistryusing either the UI orkubectl:$ kubectl delete -n <namespace> quayregistry <quayecosystem-name>
-
If external access was provided using a
Route, change theRouteto point back to the originalServiceusing the UI orkubectl.
If your QuayEcosystem was managing the PostgreSQL database, the upgrade process will migrate your data to a new PostgreSQL database managed by the upgraded Operator. Your old database will not be changed or removed but Red Hat Quay will no longer use it once the migration is complete. If there are issues during the data migration, the upgrade process will exit and it is recommended that you continue with your database as an unmanaged component.
2.4.2. Supported QuayEcosystem Configurations for Upgrades
The Red Hat Quay Operator reports errors in its logs and in status.conditions if migrating a QuayEcosystem component fails or is unsupported. All unmanaged components should migrate successfully because no Kubernetes resources need to be adopted and all the necessary values are already provided in Red Hat Quay’s config.yaml file.
Database
Ephemeral database not supported (volumeSize field must be set).
Redis
Nothing special needed.
External Access
Only passthrough Route access is supported for automatic migration. Manual migration required for other methods.
-
LoadBalancerwithout custom hostname: After theQuayEcosystemis marked with label"quay-operator/migration-complete": "true", delete themetadata.ownerReferencesfield from existingServicebefore deleting theQuayEcosystemto prevent Kubernetes from garbage collecting theServiceand removing the load balancer. A newServicewill be created withmetadata.nameformat<QuayEcosystem-name>-quay-app. Edit thespec.selectorof the existingServiceto match thespec.selectorof the newServiceso traffic to the old load balancer endpoint will now be directed to the new pods. You are now responsible for the oldService; the Quay Operator will not manage it. -
LoadBalancer/NodePort/Ingresswith custom hostname: A newServiceof typeLoadBalancerwill be created withmetadata.nameformat<QuayEcosystem-name>-quay-app. Change your DNS settings to point to thestatus.loadBalancerendpoint provided by the newService.
Clair
Nothing special needed.
Object Storage
QuayEcosystem did not have a managed object storage component, so object storage will always be marked as unmanaged. Local storage is not supported.
Repository Mirroring
Nothing special needed.
Chapter 3. Standalone upgrade
In general, Red Hat Quay supports upgrades from a prior (N-1) minor version only. For example, upgrading directly from Red Hat Quay 3.0.5 to the latest version of 3.5 is not supported. Instead, users would have to upgrade as follows:
- 3.0.5 → 3.1.3
- 3.1.3 → 3.2.2
- 3.2.2 → 3.3.4
- 3.3.4 → 3.4.z
- 3.4.z → 3.5.z
This is required to ensure that any necessary database migrations are done correctly and in the right order during the upgrade.
In some cases, Red Hat Quay supports direct, single-step upgrades from prior (N-2, N-3) minor versions. This exception to the normal, prior minor version-only, upgrade simplifies the upgrade procedure for customers on older releases. The following upgrade paths are supported for Red Hat Quay 3:
- 3.9.z → 3.11.z
- 3.10.z → 3.11.z
Upgrading from 3.8.z to 3.11 is unsupported. Users must first upgrade to 3.9 or 3.10, and then upgrade to 3.11.
For users wanting to upgrade the Red Hat Quay Operator, see Upgrading the Red Hat Quay Operator Overview.
This document describes the steps needed to perform each individual upgrade. Determine your current version and then follow the steps in sequential order, starting with your current version and working up to your desired target version.
See the Red Hat Quay Release Notes for information on features for individual releases.
The general procedure for a manual upgrade consists of the following steps:
- Stop the Quay and Clair containers.
- Backup the database and image storage (optional but recommended).
- Start Clair using the new version of the image.
- Wait until Clair is ready to accept connections before starting the new version of Quay.
3.1. Accessing images
Red Hat Quay image from version 3.4.0 and later are available from registry.redhat.io and registry.access.redhat.com, with authentication set up as described in Red Hat Container Registry Authentication.
3.2. Upgrade to 3.11.z from 3.10.z
3.2.1. Target images
- Quay: registry.redhat.io/quay/quay-rhel8:v3.11.0
- Clair: registry.redhat.io/quay/clair-rhel8:v3.11.0
- PostgreSQL: registry.redhat.io/rhel8/postgresql-13:1-109
- Redis: registry.redhat.io/rhel8/redis-6:1-110
3.3. Upgrade to 3.11.z from 3.9.z
3.3.1. Target images
- Quay: registry.redhat.io/quay/quay-rhel8:v3.11.0
- Clair: registry.redhat.io/quay/clair-rhel8:v3.11.0
- PostgreSQL: registry.redhat.io/rhel8/postgresql-13:1-109
- Redis: registry.redhat.io/rhel8/redis-6:1-110
3.4. Upgrade to 3.10.z from 3.9.z
3.4.1. Target images
- Quay: registry.redhat.io/quay/quay-rhel8:v3.10.0
- Clair: registry.redhat.io/quay/clair-rhel8:v3.10.0
- PostgreSQL: registry.redhat.io/rhel8/postgresql-13:1-109
- Redis: registry.redhat.io/rhel8/redis-6:1-110
3.5. Upgrade to 3.10.z from 3.8.z
3.5.1. Target images
- Quay: registry.redhat.io/quay/quay-rhel8:v3.10.0
- Clair: registry.redhat.io/quay/clair-rhel8:v3.10.0
- PostgreSQL: registry.redhat.io/rhel8/postgresql-13:1-109
- Redis: registry.redhat.io/rhel8/redis-6:1-110
3.6. Upgrade to 3.10.z from 3.7.z
3.6.1. Target images
- Quay: registry.redhat.io/quay/quay-rhel8:v3.10.0
- Clair: registry.redhat.io/quay/clair-rhel8:v3.10.0
- PostgreSQL: registry.redhat.io/rhel8/postgresql-13:1-109
- Redis: registry.redhat.io/rhel8/redis-6:1-110
3.7. Upgrading a geo-replication deployment of Red Hat Quay on OpenShift Container Platform
Use the following procedure to upgrade your geo-replication Red Hat Quay deployment.
- When upgrading geo-replication Red Hat Quay deployments to the next y-stream release (for example, Red Hat Quay 3.7 → Red Hat Quay 3.8), or geo-replication deployments, you must stop operations before upgrading.
- There is intermittent downtime down upgrading from one y-stream release to the next.
- It is highly recommended to back up your Red Hat Quay deployment before upgrading.
Prerequisites
-
You have logged into
registry.redhat.io
This procedure assumes that you are running Red Hat Quay services on three (or more) systems. For more information, see Preparing for Red Hat Quay high availability.
Obtain a list of all Red Hat Quay instances on each system running a Red Hat Quay instance.
Enter the following command on System A to reveal the Red Hat Quay instances:
$ sudo podman ps
Example output
CONTAINER ID  IMAGE                                      COMMAND         CREATED        STATUS            PORTS                                        NAMES
ec16ece208c0  registry.redhat.io/quay/quay-rhel8:v3.7.0  registry        6 minutes ago  Up 6 minutes ago  0.0.0.0:80->8080/tcp, 0.0.0.0:443->8443/tcp  quay01
Enter the following command on System B to reveal the Red Hat Quay instances:
$ sudo podman ps
Example output
CONTAINER ID  IMAGE                                      COMMAND         CREATED        STATUS            PORTS                                        NAMES
7ae0c9a8b37d  registry.redhat.io/quay/quay-rhel8:v3.7.0  registry        5 minutes ago   Up 2 seconds ago   0.0.0.0:82->8080/tcp, 0.0.0.0:445->8443/tcp  quay02
Enter the following command on System C to reveal the Red Hat Quay instances:
$ sudo podman ps
Example output
CONTAINER ID  IMAGE                                      COMMAND         CREATED        STATUS            PORTS                                        NAMES
e75c4aebfee9  registry.redhat.io/quay/quay-rhel8:v3.7.0  registry        4 seconds ago   Up 4 seconds ago   0.0.0.0:84->8080/tcp, 0.0.0.0:447->8443/tcp  quay03
Temporarily shut down all Red Hat Quay instances on each system.
Enter the following command on System A to shut down the Red Hat Quay instance:
$ sudo podman stop ec16ece208c0
Enter the following command on System B to shut down the Red Hat Quay instance:
$ sudo podman stop 7ae0c9a8b37d
Enter the following command on System C to shut down the Red Hat Quay instance:
$ sudo podman stop e75c4aebfee9
Obtain the latest Red Hat Quay version, for example, Red Hat Quay 3, on each system.
Enter the following command on System A to obtain the latest Red Hat Quay version:
$ sudo podman pull registry.redhat.io/quay/quay-rhel8:v3.8.0
Enter the following command on System B to obtain the latest Red Hat Quay version:
$ sudo podman pull registry.redhat.io/quay/quay-rhel8:v3.8.0
Enter the following command on System C to obtain the latest Red Hat Quay version:
$ sudo podman pull registry.redhat.io/quay/quay-rhel8:v3.8.0
On System A of your highly available Red Hat Quay deployment, run the new image version, for example, Red Hat Quay 3:
# sudo podman run --restart=always -p 443:8443 -p 80:8080 \
   --sysctl net.core.somaxconn=4096 \
   --name=quay01 \
   -v /mnt/quay/config:/conf/stack:Z \
   -v /mnt/quay/storage:/datastorage:Z \
   -d registry.redhat.io/quay/quay-rhel8:v3.8.0
Wait for the new Red Hat Quay container to become fully operational on System A. You can check the status of the container by entering the following command:
$ sudo podman ps
Example output
CONTAINER ID  IMAGE                                      COMMAND         CREATED        STATUS            PORTS                                        NAMES
70b9f38c3fb4  registry.redhat.io/quay/quay-rhel8:v3.8.0  registry        2 seconds ago   Up 2 seconds ago   0.0.0.0:82->8080/tcp, 0.0.0.0:445->8443/tcp  quay01
- Optional: Ensure that Red Hat Quay is fully operation by navigating to the Red Hat Quay UI.
After ensuring that Red Hat Quay on System A is fully operational, run the new image versions on System B and on System C.
On System B of your highly available Red Hat Quay deployment, run the new image version, for example, Red Hat Quay 3:
# sudo podman run --restart=always -p 443:8443 -p 80:8080 \
   --sysctl net.core.somaxconn=4096 \
   --name=quay02 \
   -v /mnt/quay/config:/conf/stack:Z \
   -v /mnt/quay/storage:/datastorage:Z \
   -d registry.redhat.io/quay/quay-rhel8:v3.8.0
On System C of your highly available Red Hat Quay deployment, run the new image version, for example, Red Hat Quay 3:
# sudo podman run --restart=always -p 443:8443 -p 80:8080 \
   --sysctl net.core.somaxconn=4096 \
   --name=quay03 \
   -v /mnt/quay/config:/conf/stack:Z \
   -v /mnt/quay/storage:/datastorage:Z \
   -d registry.redhat.io/quay/quay-rhel8:v3.8.0
You can check the status of the containers on System B and on System C by entering the following command:
$ sudo podman ps
Chapter 4. Upgrade Quay Bridge Operator
To upgrade the Quay Bridge Operator (QBO), change the Channel Subscription update channel in the Subscription tab to the desired channel.
When upgrading QBO from version 3.5 to 3.7, a number of extra steps are required:
You need to create a new
QuayIntegrationcustom resource. This can be completed in the Web Console or from the command line.upgrade-quay-integration.yaml
- apiVersion: quay.redhat.com/v1 kind: QuayIntegration metadata: name: example-quayintegration-new spec: clusterID: openshift 1 credentialsSecret: name: quay-integration namespace: openshift-operators insecureRegistry: false quayHostname: https://registry-quay-quay35.router-default.apps.cluster.openshift.com- 1
- Make sure that the
clusterIDmatches the value for the existingQuayIntegrationresource.
Create the new
QuayIntegrationcustom resource:$ oc create -f upgrade-quay-integration.yaml
-
Delete the old
QuayIntegrationcustom resource. Delete the old
mutatingwebhookconfigurations:$ oc delete mutatingwebhookconfigurations.admissionregistration.k8s.io quay-bridge-operator
4.1. Upgrading a geo-replication deployment of Red Hat Quay on OpenShift Container Platform
Use the following procedure to upgrade your geo-replicated Red Hat Quay on OpenShift Container Platform deployment.
- When upgrading geo-replicated Red Hat Quay on OpenShift Container Platform deployment to the next y-stream release (for example, Red Hat Quay 3.7 → Red Hat Quay 3.8), you must stop operations before upgrading.
- There is intermittent downtime down upgrading from one y-stream release to the next.
- It is highly recommended to back up your Red Hat Quay on OpenShift Container Platform deployment before upgrading.
This procedure assumes that you are running the Red Hat Quay registry on three or more systems. For this procedure, we will assume three systems named System A, System B, and System C. System A will serve as the primary system in which the Red Hat Quay Operator is deployed.
On System B and System C, scale down your Red Hat Quay registry. This is done by disabling auto scaling and overriding the replica county for Red Hat Quay, mirror workers, and Clair if it is managed. Use the following
quayregistry.yamlfile as a reference:apiVersion: quay.redhat.com/v1 kind: QuayRegistry metadata: name: registry namespace: ns spec: components: … - kind: horizontalpodautoscaler managed: false 1 - kind: quay managed: true overrides: 2 replicas: 0 - kind: clair managed: true overrides: replicas: 0 - kind: mirror managed: true overrides: replicas: 0 …NoteYou must keep the Red Hat Quay registry running on System A. Do not update the
quayregistry.yamlfile on System A.Wait for the
registry-quay-app,registry-quay-mirror, andregistry-clair-apppods to disappear. Enter the following command to check their status:oc get pods -n <quay-namespace>
Example output
quay-operator.v3.7.1-6f9d859bd-p5ftc               1/1     Running     0             12m
quayregistry-clair-postgres-7487f5bd86-xnxpr       1/1     Running     1 (12m ago)   12m
quayregistry-quay-app-upgrade-xq2v6                0/1     Completed   0             12m
quayregistry-quay-redis-84f888776f-hhgms           1/1     Running     0             12m
- On System A, initiate a Red Hat Quay upgrade to the latest y-stream version. This is a manual process. For more information about upgrading installed Operators, see Upgrading installed Operators. For more information about Red Hat Quay upgrade paths, see Upgrading the Red Hat Quay Operator.
-
After the new Red Hat Quay registry is installed, the necessary upgrades on the cluster are automatically completed. Afterwards, new Red Hat Quay pods are started with the latest y-stream version. Additionally, new
Quaypods are scheduled and started. Confirm that the update has properly worked by navigating to the Red Hat Quay UI:
In the OpenShift console, navigate to Operators → Installed Operators, and click the Registry Endpoint link.
ImportantDo not execute the following step until the Red Hat Quay UI is available. Do not upgrade the Red Hat Quay registry on System B and on System C until the UI is available on System A.
Confirm that the update has properly worked on System A, initiate the Red Hat Quay upgrade on System B and on System C. The Operator upgrade results in an upgraded Red Hat Quay installation, and the pods are restarted.
NoteBecause the database schema is correct for the new y-stream installation, the new pods on System B and on System C should quickly start.
After updating, revert the changes made in step 1 of this procedure by removing
overridesfor the components. For example:apiVersion: quay.redhat.com/v1 kind: QuayRegistry metadata: name: registry namespace: ns spec: components: … - kind: horizontalpodautoscaler managed: true 1 - kind: quay managed: true - kind: clair managed: true - kind: mirror managed: true …- 1
- If the
horizontalpodautoscalerresource was set totruebefore the upgrade procedure, or if you want Red Hat Quay to scale in case of a resource shortage, set it totrue.
Chapter 5. Downgrading Red Hat Quay
Red Hat Quay only supports rolling back, or downgrading, to previous z-stream versions, for example, 3.7.2 → 3.7.1. Rolling back to previous y-stream versions (3.7.0 → 3.6.0) is not supported. This is because Red Hat Quay updates might contain database schema upgrades that are applied when upgrading to a new version of Red Hat Quay. Database schema upgrades are not considered backwards compatible.
Downgrading to previous z-streams is neither recommended nor supported by either Operator based deployments or virtual machine based deployments. Downgrading should only be done in extreme circumstances. The decision to rollback your Red Hat Quay deployment must be made in conjunction with the Red Hat Quay support and development teams. For more information, contact Red Hat Quay support.