
8.2. Set-up a Directory Server and Browser
Overview
In this stage of the tutorial you will install an X.500 directory server and browser client from the Apache Directory project. These applications will be used throughout the rest of this tutorial.
Install Apache Directory Studio
To install Apache Directory Studio:
- Download the Apache Directory Studio RCP Application (Eclipse-based, standalone executable) for your platform:
- Follow the Installation instructions on the relevant download page.
- Start Apache Directory Studio by double-clicking the relevant icon to launch the application.
Create an embedded Directory Server instance
Apache Directory Studio is able to create embedded Directory Server instances. This is a convenient way to access a Directory Server for the purpose of running examples and tutorials. To create an embedded Directory Server instance:
- Start up Apache Directory Studio.
- In the lower left corner of the screen, click on the LDAP Server tab to access the LDAP Server view.

- While hovering your mouse over the LDAP Server view, open the context menu and select New | New Server. The Create an LDAP Server dialog opens, as shown. Select Apache 2.0.0 and click Finish.

- To start the new Directory Server instance, select Apache 2.0.0 in the LDAP Server view and click the Run icon
 (or select Run from the context menu).

Connect the LDAP browser to the server
To connect the LDAP browser to the LDAP server:
- Right-click inside the Connections view.
- Select to open the New LDAP Connection wizard on the Network Parameter page.
Figure 8.1. Network Parameter
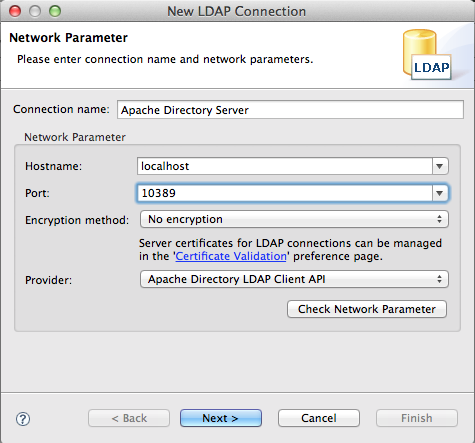
- In the Connection name field, enter
Apache Directory Server. - In the Hostname field enter
localhost. - In the Port field, enter
10389. - Click Next to open the Authentication page.
Figure 8.2. Authentication Step of New LDAP Connection
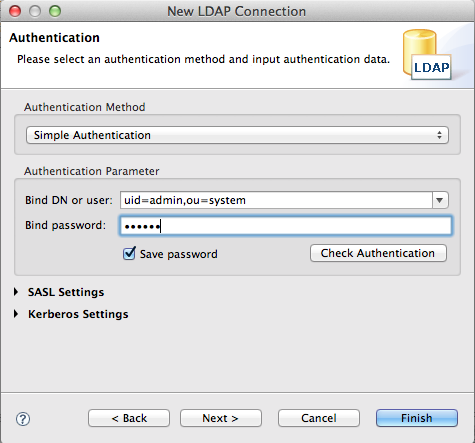
- In the Bind DN or user field, enter
uid=admin,ou=system). - In the Bind password field, enter
secret). - Click Finish.
If the connection is successfully established, an outline of the Directory Information Tree (DIT) appears in the LDAP Browser view.