
Configuring dynamic routing in Red Hat OpenStack Platform
Configuring FRRouting and the OVN BGP agent using director to achieve dynamic routing in Red Hat OpenStack Platform
Abstract
Making open source more inclusive
Red Hat is committed to replacing problematic language in our code, documentation, and web properties. We are beginning with these four terms: master, slave, blacklist, and whitelist. Because of the enormity of this endeavor, these changes will be implemented gradually over several upcoming releases. For more details, see our CTO Chris Wright’s message.
Providing feedback on Red Hat documentation
We appreciate your input on our documentation. Tell us how we can make it better.
Providing documentation feedback in Jira
Use the Create Issue form to provide feedback on the documentation. The Jira issue will be created in the Red Hat OpenStack Platform Jira project, where you can track the progress of your feedback.
- Ensure that you are logged in to Jira. If you do not have a Jira account, create an account to submit feedback.
- Click the following link to open a the Create Issue page: Create Issue
- Complete the Summary and Description fields. In the Description field, include the documentation URL, chapter or section number, and a detailed description of the issue. Do not modify any other fields in the form.
- Click Create.
Chapter 1. Introduction to RHOSP dynamic routing
Red Hat OpenStack Platform (RHOSP) supports dynamic routing with border gateway protocol (BGP).
The topics included in this section are:
1.1. About RHOSP dynamic routing
Red Hat OpenStack Platform (RHOSP) supports ML2/OVN dynamic routing with border gateway protocol (BGP) in the control and data planes. Deploying clusters in a pure Layer 3 (L3) data center overcomes the scaling issues of traditional Layer 2 (L2) infrastructures such as large failure domains, high volume broadcast traffic, or long convergence times during failure recoveries.
RHOSP dynamic routing provides a mechanism for load balancing and high availability which differs from the traditional approaches employed by most internet service providers today. With RHOSP dynamic routing you improve high availability by using L3 routing for shared VIPs on Controller nodes. On control plane servers that you deploy across availability zones, you maintain separate L2 segments, physical sites, and power circuits.
With RHOSP dynamic routing you can expose IP addresses for VMs and load balancers on provider networks during creation and startup or whenever they are associated with a floating IP address. The same functionality is available on project networks, when a special flag is set.
RHOSP dynamic routing also provides these benefits:
- Improved management of data plane traffic.
- Simplified configuration with fewer differences between roles.
- Distributed L2 provider VLANs and floating IP (FIP) subnets across L3 boundaries with no requirement to span VLANs across racks for non-overlapping CIDRs only.
- Distributed Controllers across racks and L3 boundaries in data centers and at edge sites.
- Failover of the whole subnet for public provider IPs or FIPs from one site to another.
- Next-generation data center and hyperscale fabric support.
1.2. BGP components used in RHOSP dynamic routing
Red Hat OpenStack Platform (RHOSP) relies on several components to provide dynamic routing to the Layer 3 data center.
Figure 1.1. RHOSP dynamic routing components
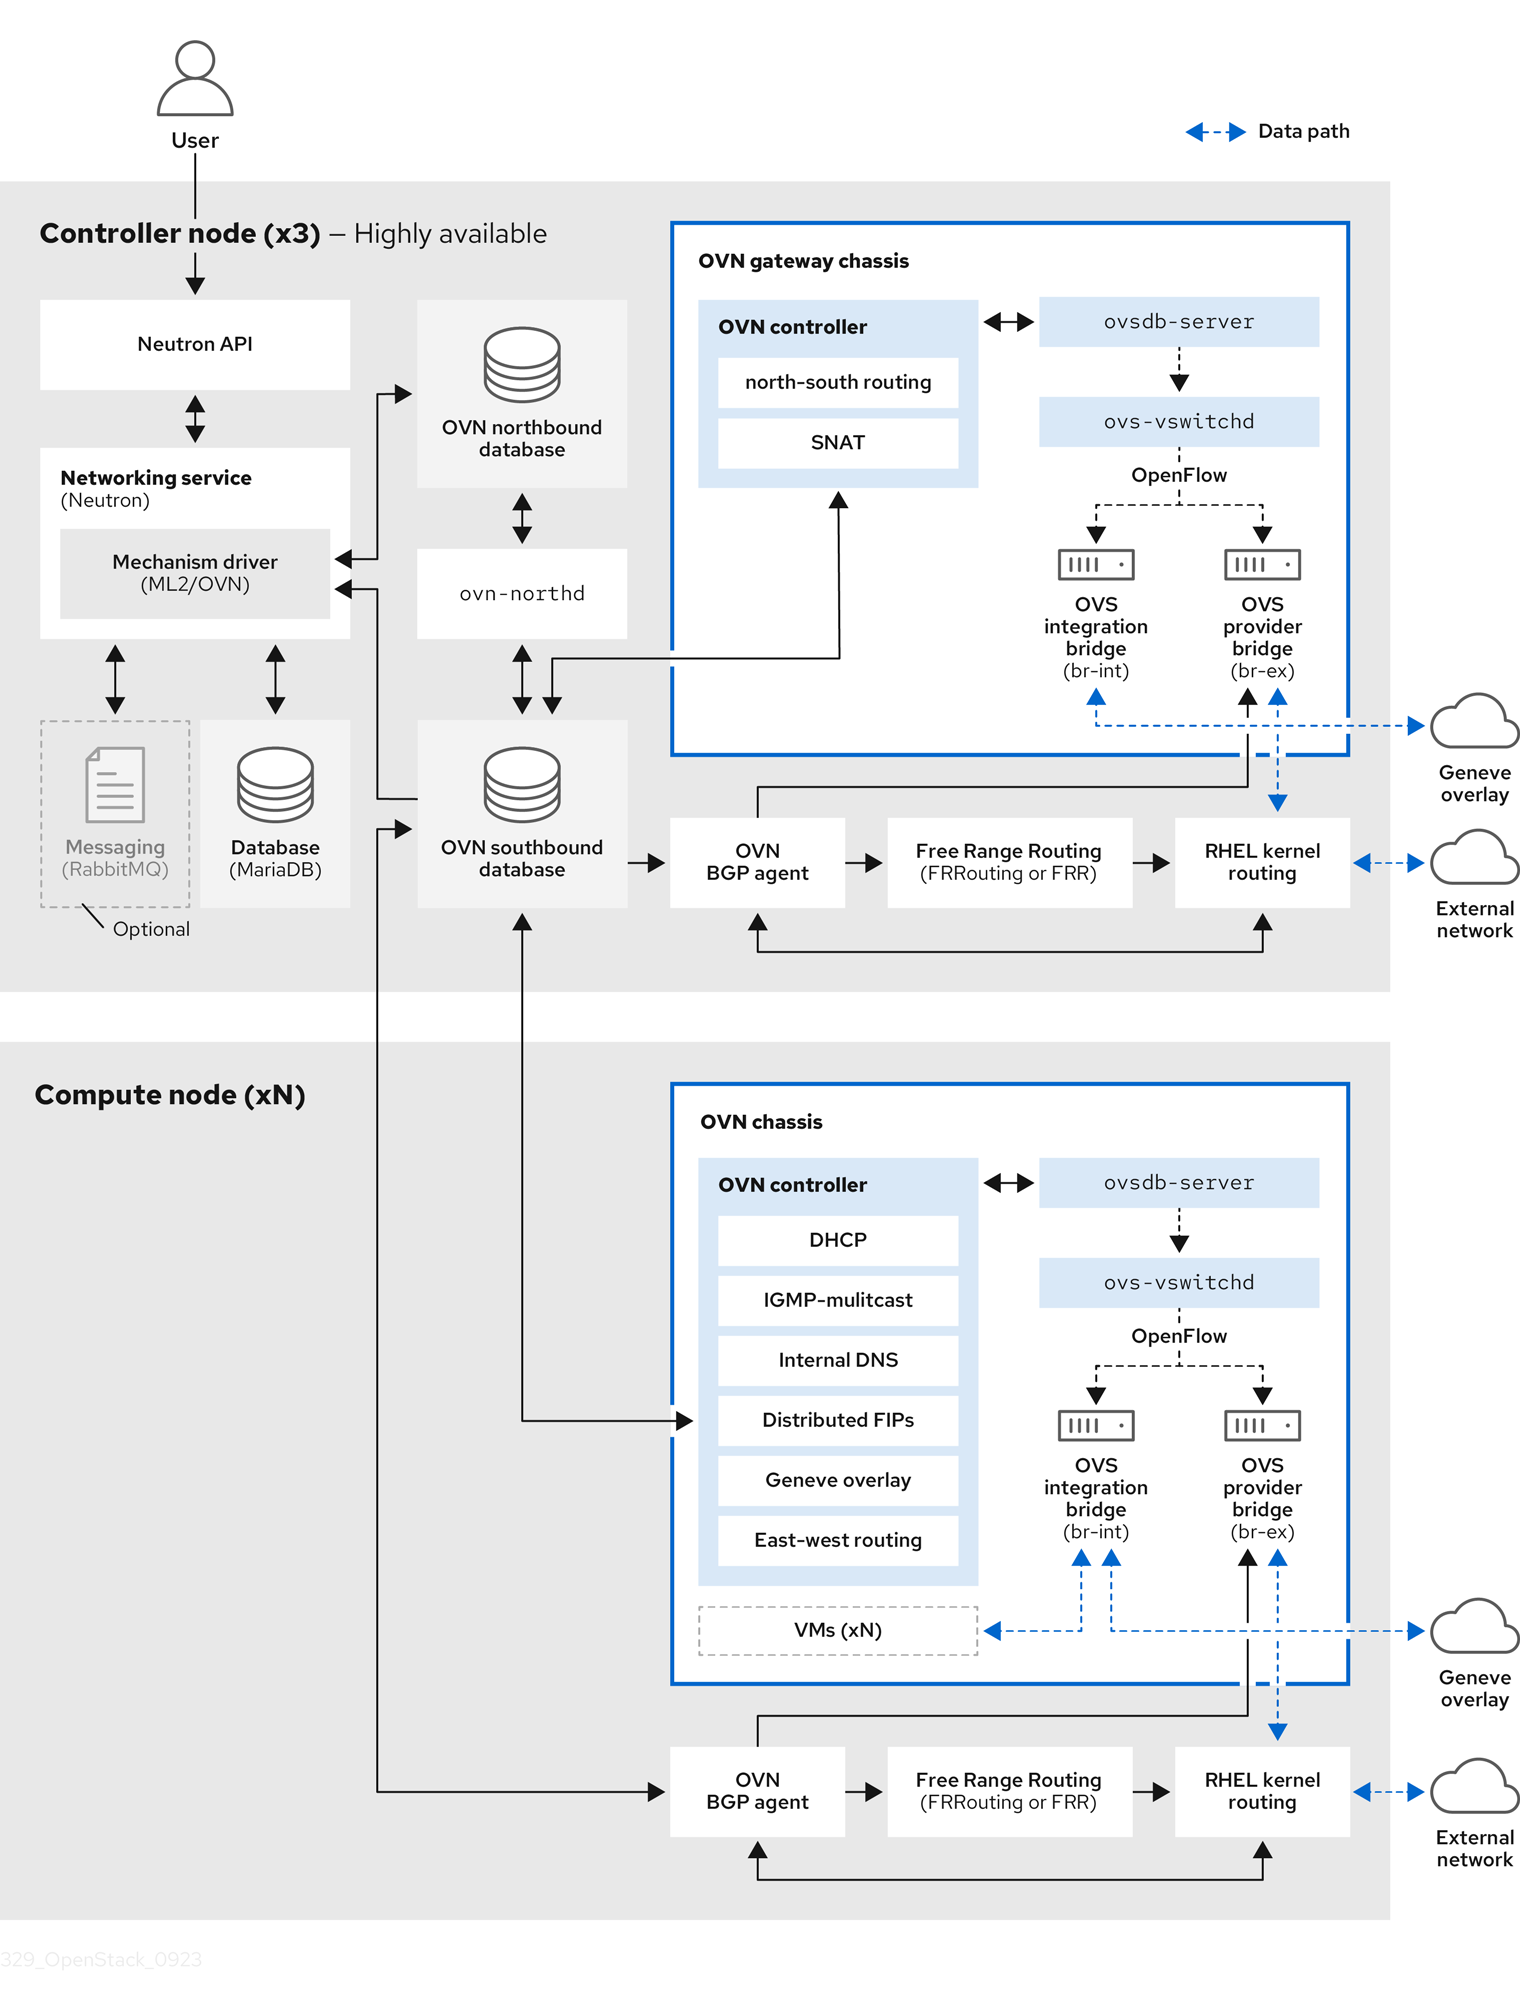
- OVN BGP agent (
ovn-bgp-agentcontainer) -
A Python-based daemon that runs in the
ovn-controllercontainer on each RHOSP Controller and Compute nodes. The agent monitors the Open Virtual Network (OVN) southbound database for certain VM and floating IP (FIP) events. When these events occur, the agent notifies the FRR BGP daemon (bgpd) to advertise the IP address or FIP associated with the VM. The agent also triggers actions that route the external traffic to the OVN overlay. Because the agent uses a multi-driver implementation, you can configure the agent for the specific infrastructure that runs on top of OVN, such as RHOSP or Red Hat OpenShift Platform. - Free Range Routing (FRRouting, or FRR) (
frrcontainer) -
An IP routing protocol suite of daemons that run in the
frrcontainer on all composable roles and work together to build the routing table. FRR supports equal-cost multi-path routing (ECMP), although each protocol daemon uses different methods to manage ECMP policy. The FRR suite, supplied with Red Hat Enterprise Linux (RHEL), provides several daemons. RHOSP primarily uses the FRRbgpd,bfdd, and Zebra daemons. - BGP daemon (
frrcontainer) -
A daemon (
bgpd) that runs in thefrrcontainer to implement version 4 of Border Gateway Protocol (BGP). Thebgpddaemon uses capability negotiation to detect the remote peer’s capabilities. If a peer is exclusively configured as an IPv4 unicast neighbor,bgpddoes not send capability negotiation packets. The BGP daemon communicates with the kernel routing table through the Zebra daemon. - BFD daemon (
frrcontainer) -
A daemon (
bfdd) in the FRR suite that implements Bidirectional Forwarding Detection (BFD). This protocol provides failure detection between adjacent forwarding engines. - Zebra daemon (
frrcontainer) - A daemon that coordinates information from the various FRR daemons, and communicates routing decisions directly to the kernel routing table.
- VTY shell (
frrcontainer) -
A shell for FRR daemons, VTY shell (
vtysh) aggregates all the CLI commands defined in each of the daemons and presents them in a single shell.
Additional resources
1.3. BGP advertisement and traffic redirection
In deployments that use Red Hat OpenStack Platform (RHOSP) dynamic routing, network traffic flows to and from VMs, load balancers, and floating IPs (FIPs) using advertised routes. After the traffic arrives at the node, the OVN BGP agent adds the IP rules, routes, and OVS flow rules to redirect traffic to the OVS provider bridge (br-ex) by using Red Hat Enterprise Linux (RHEL) kernel networking.
The process of advertising a network route begins with the OVN BGP agent triggering Free Range Routing (FRRouting, or FRR) to advertise and withdraw directly connected routes. The OVN BGP agent performs these steps to properly configure FRR to ensure that IP addresses are advertised whenever they are added to the bgp-nic interface:
FRR launches VTY shell to connect to the FRR socket:
$ vtysh --vty_socket -c <command_file>
VTY shell passes a file that contains the following commands:
LEAK_VRF_TEMPLATE = '''
router bgp {{ bgp_as }}
  address-family ipv4 unicast
    import vrf {{ vrf_name }}
  exit-address-family

  address-family ipv6 unicast
    import vrf {{ vrf_name }}
  exit-address-family

router bgp {{ bgp_as }} vrf {{ vrf_name }}
  bgp router-id {{ bgp_router_id }}
  address-family ipv4 unicast
    redistribute connected
  exit-address-family

  address-family ipv6 unicast
    redistribute connected
  exit-address-family
...
The commands that VTY shell pass, do the following:
-
Create a VRF named
bgp_vrfby default. Associate a dummy interface type with the VRF.
By default, the dummy interface is named,
bgp-nic.- Add an IP address to the OVS provider bridges to ensure that Address Resolution Protocol (ARP) and Neighbor Discovery Protocol (NDP) is enabled.
-
Create a VRF named
The Zebra daemon monitors IP addresses for VMs and load balancers as they are added and deleted on any local interface, and Zebra advertises and withdraws the route.
Because FRR is configured with the
redistribute connectedoption enabled, advertising and withdrawing routes merely consists of exposing or removing the route from the dummy interface,bgp-nic.NoteExposing VMs connected to tenant networks is disabled by default. If it is enabled in the RHOSP configuration, the OVN BGP agent exposes the neutron router gateway port. The OVN BGP agent injects traffic that flows to VMs on tenant networks into the OVN overlay through the node that hosts the
chassisredirectlogical router ports (CR-LRP).- FRR exposes the IP address on either the node hosting the VM or the load balancer or on the node containing the OVN router gateway port.
The OVN BGP agent performs the necessary configuration to redirect traffic to and from the OVN overlay by using RHEL kernel networking and OVS, and then FRR exposes the IP address on the proper node.
When the OVN BGP agent starts, it does the following actions:
- Adds an IP address to the OVS provider bridges to enable ARP and NDP.
Adds an entry to the routing table for each OVS provider bridge in
/etc/iproute2/rt_tables.NoteIn the RHEL kernel the maximum number of routing tables is 252. This limits the number of provider networks to 252.
- Connects a VLAN device to the bridge and enables ARP and NDP (on VLAN provider networks only).
- Cleans up any extra OVS flows at the OVS provider bridges.
During regular resync events or during start-up, the OVN BGP agent performs the following actions:
Adds an IP address rule to apply specific routes to the routing table.
In the following example, this rule is associated with the OVS provider bridge:
$ ip rule

0:      from all lookup local
1000:   from all lookup [l3mdev-table]
*32000:  from all to IP lookup br-ex*  # br-ex is the OVS provider bridge
*32000:  from all to CIDR lookup br-ex*  # for VMs in tenant networks
32766:  from all lookup main
32767:  from all lookup default
Adds an IP address route to the OVS provider bridge routing table to route traffic to the OVS provider bridge device:
$ ip route show table br-ex

default dev br-ex scope link
*CIDR via CR-LRP_IP dev br-ex*  # for VMs in tenant networks
*CR-LRP_IP dev br-ex scope link*  # for the VM in tenant network redirection
*IP dev br-ex scope link*  # IPs on provider or FIPs
Routes traffic to OVN through the OVS provider bridge (
br-ex), using one of the following methods depending on whether IPv4 or IPv6 is used:For IPv4, adds a static ARP entry for the OVN router gateway ports,
CR-LRP, because OVN does not reply to ARP requests outside its L2 network:$ ip nei ... CR-LRP_IP dev br-ex lladdr CR-LRP_MAC PERMANENT ...
For IPv6, adds an NDP proxy:
$ ip -6 nei add proxy CR-LRP_IP dev br-ex
Sends the traffic from the OVN overlay to kernel networking by adding a new flow at the OVS provider bridges so that the destination MAC address changes to the MAC address of the OVS provider bridge (
actions=mod_dl_dst:OVN_PROVIDER_BRIDGE_MAC,NORMAL):$ sudo ovs-ofctl dump-flows br-ex cookie=0x3e7, duration=77.949s, table=0, n_packets=0, n_bytes=0, priority= 900,ip,in_port="patch-provnet-1" actions=mod_dl_dst:3a:f7:e9:54:e8:4d,NORMAL cookie=0x3e7, duration=77.937s, table=0, n_packets=0, n_bytes=0, priority= 900,ipv6,in_port="patch-provnet-1" actions=mod_dl_dst:3a:f7:e9:54:e8:4d,NORMAL
Chapter 2. Planning a deployment that uses RHOSP dynamic routing
As you plan to implement dynamic routing in your Red Hat OpenStack Platform environment, evaluate the supported features, dependencies, constraints, and necessary network topologies.
The topics included in this section are:
2.1. RHOSP dynamic routing support matrix
The following table lists dynamic routing features supported in Red Hat OpenStack Platform (RHOSP) 17.1.
If the feature is not listed, then RHOSP 17.1 does not support the feature.
Table 2.1. RHOSP dynamic routing feature support matrix
| Feature | Supported in RHOSP 17.1? |
|---|---|
| Kernel routing | Yes |
| IPv6 | Yes |
| EVPN | No |
| OVS-DPDK routing | No |
| SR-IOV routing | No |
| Overlapping CIDRs | No |
| Selective exposure for floating IPs | No |
2.2. Requirements for RHOSP dynamic routing
Dynamic routing Red Hat OpenStack Platform (RHOSP) requires the following network topology and software:
- A spine-leaf network topology.
An environment that runs RHOSP version 17.0 or later with:
- ML2/OVN mechanism driver.
- Border Gateway Protocol (BGP) and VIPs configured on the RHOSP undercloud on a loopback interface.
- OVN BGP agent deployed on the RHOSP overcloud.
- The network devices that peer with BGP must have an implementation of BGP installed. BGP is standard on most devices, and provided by the device vendor.
2.3. Constraints for RHOSP dynamic routing
When planning for dynamic routing in your Red Hat OpenStack Platform (RHOSP) environment, consider the following constraints:
-
You cannot control which VMs and load balancers (LBs) are exposed. All VMs and LBs on that are on provider networks or haveFloating IPs are exposed. In addition, if the
expose_tenant_networkflag is enabled, the VMs in project networks are exposed. - You must use address scopes and subnet pools because there is no support for overlapping CIDRs.
- BGP steers network traffic by using kernel routing through IP routes and rules. For this reason, OVS-DPDK, which does not use the kernel space, is not supported.
In RHOSP networking, for the router connecting the load-balancer members to the provider network, the north-south traffic to OVN-octavia VIPs on the provider or the FIPs associated with the VIPs on project networks must go through the networking nodes that host the neutron router gateway.
NoteThe ports on these nodes are referred to as the
chassisredirectlogical router ports (cr-lrp).For this reason, the entry point into the OVN overlay needs to be one of those networking nodes, and consequently the VIPs and the FIPs to VIPs are exposed through these nodes. From the networking nodes, the traffic follows the normal tunneled path (Geneve tunnel) to the RHOSP Compute node where the selected member is located.
- There is currently a known issue where forwarding to ports on floating IP (FIP) addresses fail. Instead, the network traffic intended for the FIPs is being forwarded to a tenant port IP address that is contained on the list of ports configured to perform the port forwarding. The cause for this failure is that the OVN BGP agent is not exposing routes to FIPs. Currently, there is no workaround. For more information, see BZ 2160481.
- There is currently a known issue where the Red Hat OpenStack Platform Compute service cannot route packets sent to a multicast IP address destination. Therefore, VM instances subscribed to a multicast group fail to receive the packets sent to them. The cause is that BGP multicast routing is not properly configured on the overcloud nodes. Currently, there is no workaround. For more information, see BZ 2163477.
During updates between two RHOSP 17.1 versions there is connectivity downtime because the FRR component on every node must be restarted, and the following events occur:
- Each node reestablishes the BGP session with its peer routers, which affects both control plane and data plane traffic.
- After the BGP session is reestablished, FRR obtains and re-advertises the routes to and from the node, which means that the routes are unavailable for a few seconds.
-
Finally, the
ovn-bgp-agentadds the VRF configuration to the running FRR service to advertise routes for data plane traffic by using BGP.
- When adding storage nodes to a RHOSP dynamic environment, you must use the provisioning network. RHOSP director requires Red Hat Ceph Storage to be present before the routers that establish connectivity are created.
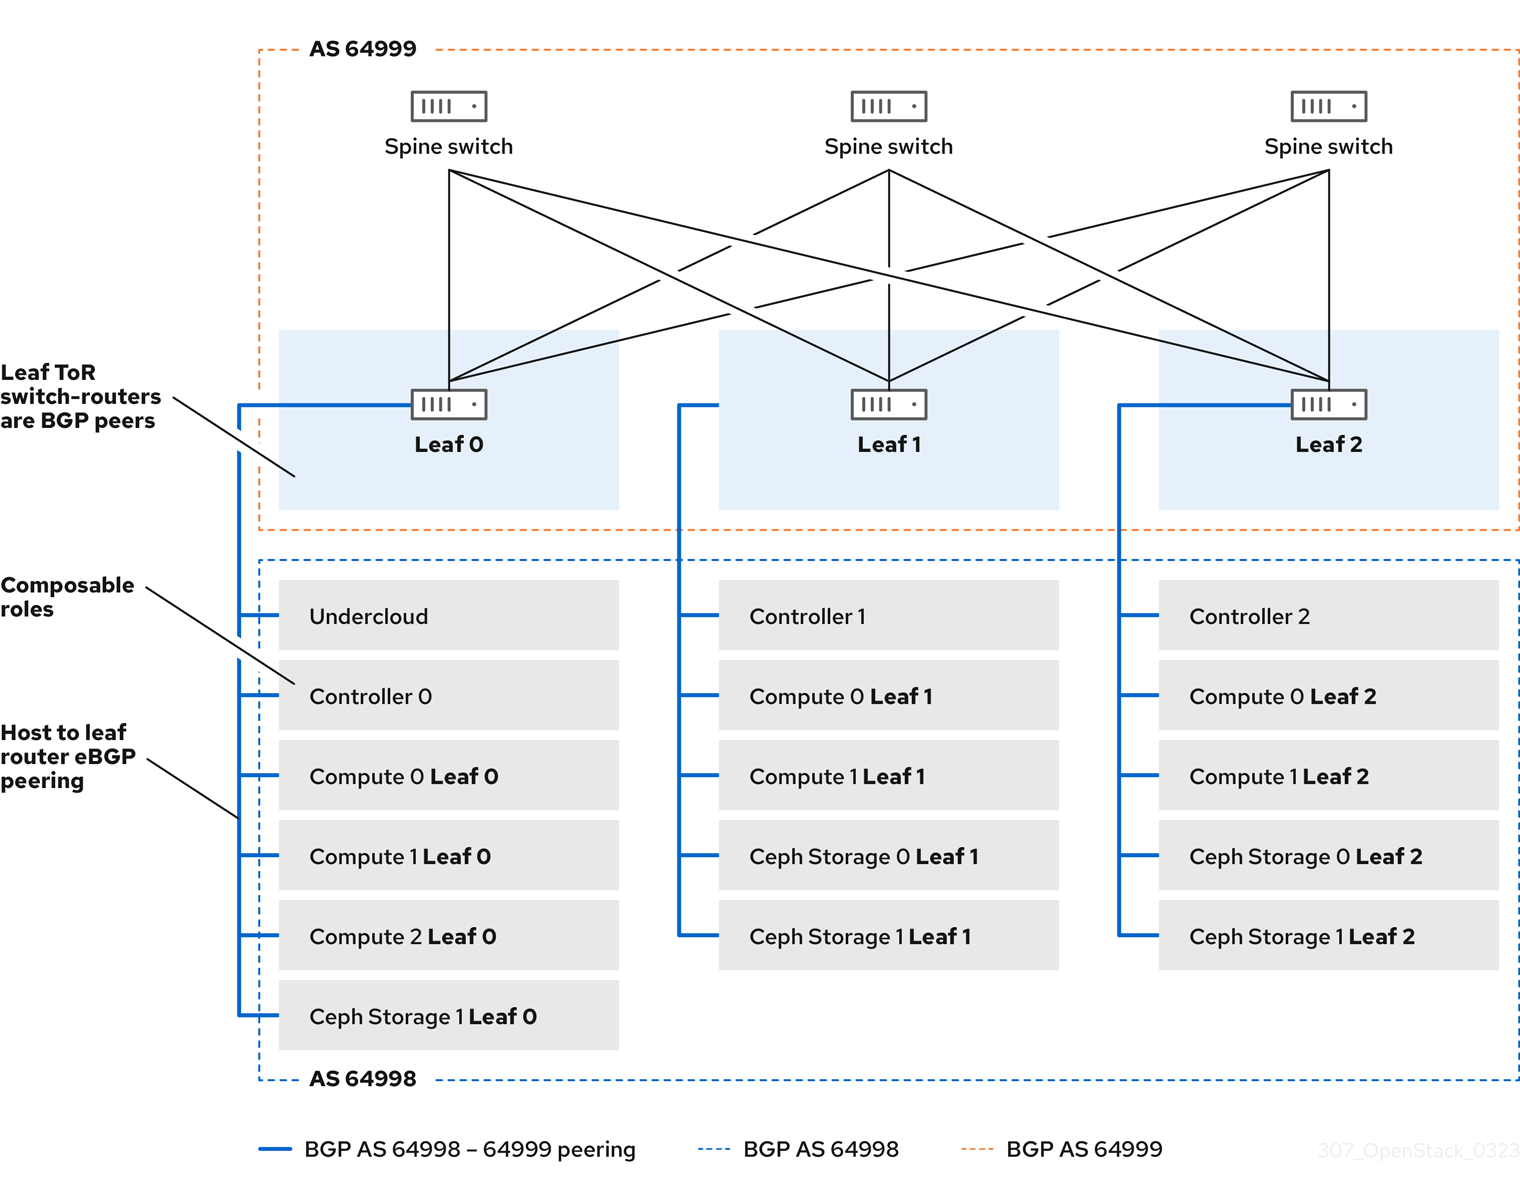
2.4. Sample RHOSP dynamic routing topology
The following diagram illustrates a sample network topology that uses dynamic routing in a Red Hat OpenStack Platform (RHOSP) ML2/OVN environment.
This sample network topology shows a spine with three leaves. The top of rack switch-routers are BGP peers with the switches on the spine.
Figure 2.1. BGP peering of overcloud hosts to leaf routers
Chapter 3. Deploying the undercloud for RHOSP dynamic routing
The undercloud is the node that controls the configuration, installation, and management of your final Red Hat OpenStack Platform (RHOSP) environment, which is called the overcloud. The undercloud uses OpenStack Platform component services, including the OVN BGP agent, that run in containers. These containerized services comprise a tool called RHOSP director, which you use to create and manage your overcloud.
The topic included in this section is:
3.1. Installing and configuring the undercloud for RHOSP dynamic routing
You use Red Hat OpenStack Platform (RHOSP) director to install and configure dynamic routing in the RHOSP undercloud. The high-level steps are:
-
(Optional) Set BGP configuration values for the undercloud in
frr-parameters.yaml. -
Set spine-leaf network topology configuration values for the undercloud in
undercloud.conf. -
Run the
openstack undercloud installcommand.
Procedure
-
Log in to the undercloud host as the
stackuser. Source the
stackrcundercloud credentials file:$ source ~/stackrc
If you plan to use BGP to reach the other racks and overcloud nodes, then configure FRRouting (FRR) to be installed on the undercloud by adding the following parameters to a custom heat environment file,
/home/stack/templates/frr-parameters.yaml.NoteRemember this path. You need it in a later step.
Example
parameter_defaults:
  ContainerFrrImage: registry.redhat.io/rhosp-17.1/openstack-frr-rhel9:17.1.1
  FrrBfdEnabled: true
  FrrBgpEnabled: true
  FrrBgpAsn: 64999
  FrrBgpUplinks: ['nic2', 'nic3']
  FrrBgpUplinksScope: internal
  FrrLogLevel: debugging
  FrrBgpRouterID: 172.30.4.1
  FrrBgpIpv4SrcIp: 172.30.4.1
  FrrBgpIpv6SrcIp: fe80::5054:ff:fe74:73ce
TipFor more information, see Networking (neutron) Parameters in the Overcloud parameters guide.
FrrBfdEnabled-
When
true, enable Bidirectional Forwarding Detection (BFD). The default isfalse. FrrBgpEnabled-
When
true, enable Border Gateway Protocol (BGP). The default istrue. FrrBgpAsn-
The default ASN to be used within FRRouting. The default is
65000.FrrBgpAsncan be set to a different value for each role that is used. FrrBgpUplinks-
A comma-delimited list of uplink network interfaces. The default is
['nic1', 'nic2']. FrrBgpUplinksScope-
Either peer with internal (iBGP) or external (eBGP) neighbors. The default is
internal. FrrLogLevel-
Specifies the FRR log level using the set of values:
emergencies,alerts,critical,errors,warnings,notifications,informational,debugging. The default isinformational. FrrBgpRouterID-
The BGP
router_idto be used by FRR. FrrBgpIpv4SrcIp- The source IP address for IPv4 network traffic.
FrrBgpIpv6SrcIp- The source IP address for IPv6 network traffic.
tripleo_frr_bgp_peers- A role-specific parameter used to specify a list of IPs addresses or hostnames for Free Range Routing (FRR) to peer with.
tripleo_frr_ovn_bgp_agent_enable-
A role-specific parameter used to enable or disable the OVN BGP agent on RHOSP nodes where no data plane routes are exposed. The default value is
true.
If you do not already have an
undercloud.conffile, copy the sample template file:$ cp /usr/share/python-tripleoclient/undercloud.conf.sample \ ~/templates/undercloud.conf
In the
[DEFAULT]section, set the following general parameter values.Example
[DEFAULT] # General cleanup = false container_images_file=/home/stack/templates/ \containers-prepare-parameter.yaml overcloud_domain_name = {{ cloud_domain }} undercloud_timezone = UTC undercloud_hostname = undercloud-0.{{ cloud_domain }} # BGP on undercloud ... # TLS-e ... # Networking ... # Subnets ...TipFor more information, see Director configuration parameters in the Installing and managing Red Hat OpenStack Platform with director guide.
overcloud_domain_name-
Specifies the DNS domain name that you want to use when you deploy the overcloud. In a subsequent step, you must ensure that this value matches the value of the overcloud
CloudDomainparameter. cleanup-
Delete temporary files. Set this to
falseto retain the temporary files used during deployment. The temporary files can help you debug the deployment if errors occur. container_images_file- Specifies the Heat environment file with container image information.
container_insecure_registries-
A list of insecure registries for
podmanto use. Use this parameter if you want to pull images from another source, such as a private container registry. custom_env_files- Additional environment files that you want to add to the undercloud installation.
undercloud_hostname- Defines the fully qualified host name for the undercloud. If set, the undercloud installation configures all system host name settings. If left unset, the undercloud uses the current host name, but you must configure all system host name settings appropriately.
undercloud_timezone- Host timezone for the undercloud. If you do not specify a timezone, director uses the existing timezone configuration.
If want to install BGP on the undercloud, then in the
[DEFAULT]section, enable FRR on the undercloud, and point to the custom environment file where you set the FRR parameter values in an earlier step.Example
[DEFAULT]
# General
...

# BGP on undercloud
enable_frr=true
custom_env_files=/home/stack/templates/frr-parameters.yaml

# TLS-e
...

# Networking
...

# Subnets
...
If you are using TLS-everywhere, then in the
[DEFAULT]section, set the following TLS-everywhere parameter values:Example
[DEFAULT] # General ... # BGP on undercloud ... # TLS-e enable_novajoin = False undercloud_nameservers = {{ freeipa_ip }} generate_service_certificate = True ipa_otp = {{ undercloud_otp }} # Networking ... # Subnets ...TipFor more information, see Director configuration parameters in the Installing and managing Red Hat OpenStack Platform with director guide.
enable_novajoin-
When
true, enables the novajoin service to deploy TLS. undercloud_nameservers-
Specifies the current IP addresses of the DNS servers for the undercloud nameserver. You can find this information in
/etc/resolv.conf. generate_service_certificate-
Defines whether to generate an SSL/TLS certificate during the undercloud installation, which is used for the
undercloud_service_certificateparameter. ipa_otp- Set FreeIPA OTP fact.
In the
[DEFAULT]section, set the following networking parameter values:Example
[DEFAULT] # General ... # BGP on undercloud ... # TLS-e ... # Networking local_interface = eth0 local_ip = {{ undercloud_ctlplane }}/24 undercloud_public_host = {{ undercloud_public_host }} undercloud_admin_host = {{ undercloud_admin_host }} # Subnets ...TipFor more information, see Director configuration parameters in the Installing and managing Red Hat OpenStack Platform with director guide.
local_interface- Interface to bridge for the local network.
local_ip-
IP address for the undercloud on
leaf0. undercloud_public_host- Externally facing IP address of the undercloud.
undercloud_admin_host- Administration IP address of the undercloud. This IP address is usually on leaf0.
Create a new section for each subnet that you defined earlier in the
subnetsparameter.ImportantDirector cannot change the IP addresses for a subnet after director creates the subnet.
Example
[DEFAULT] # General ... # BGP on undercloud ... # TLS-e ... # Networking ... # Subnets [r1] # This subnet is used for overcloud nodes deployed on rack1. cidr = 192.168.1.0/24 dhcp_start = 192.168.1.150 dhcp_end = 192.168.1.170 inspection_iprange = 192.168.1.171,192.168.1.185 gateway = 192.168.1.1 masquerade = False [r2] # This subnet is used for overcloud nodes deployed on rack2. cidr = 192.168.2.0/24 dhcp_start = 192.168.2.150 dhcp_end = 192.168.2.170 inspection_iprange = 192.168.2.171,192.168.2.185 gateway = 192.168.2.1 masquerade = False [r3] # This subnet is used for overcloud nodes deployed on rack3. cidr = 192.168.3.0/24 dhcp_start = 192.168.3.150 dhcp_end = 192.168.3.170 inspection_iprange = 192.168.3.171,192.168.3.185 gateway = 192.168.3.1 masquerade = False [r4] # This subnet is used for the underloud node and potentially FreeIPA # that are deployed on rack4. cidr = 192.168.4.0/24 dhcp_start = {{ undercloud_dhcp_start }} dhcp_end = 192.168.4.170 inspection_iprange = 192.168.4.171,192.168.4.185 gateway = 192.168.4.1 masquerade = FalseTipFor more information, see Subnets in the Installing and managing Red Hat OpenStack Platform with director guide.
cidr-
The network that director uses to manage overcloud instances. This is the Provisioning network, which the undercloud
neutronservice manages. Leave this as the default192.168.24.0/24unless you use a different subnet for the Provisioning network. masqueradeDefines whether to masquerade the network defined in the
cidrfor external access. This provides the Provisioning network with network address translation (NAT) so that the Provisioning network has external access through director.NoteThe director configuration also enables IP forwarding automatically using the relevant sysctl kernel parameter.
dhcp_startanddhcp_end- The start and end of the DHCP allocation range for overcloud nodes. Ensure that this range contains enough IP addresses to allocate your nodes.
dhcp_exclude- IP addresses to exclude in the DHCP allocation range.
dns_nameservers-
DNS nameservers specific to the subnet. If no nameservers are defined for the subnet, the subnet uses nameservers defined in the
undercloud_nameserversparameter. gateway-
The gateway for the overcloud instances. This is the undercloud host, which forwards traffic to the External network. Leave this as the default
192.168.24.1unless you use a different IP address for director or want to use an external gateway directly.
Run the install command.
$ openstack undercloud install
Ensure that your undercloud has the correct network configuration including any additional network routes to reach each leaf and rack.
For more information, see Director configuration parameters in the Installing and managing Red Hat OpenStack Platform with director guide.
Verification
The director configuration script starts all of the services automatically. Confirm that the RHOSP service containers are running:
$ sudo podman ps -a --format "{{.Names}} {{.Status}}"Sample output
You should see output similar to the following that indicates that the RHOSP service containers are
Up:memcached Up 3 hours (healthy) haproxy Up 3 hours rabbitmq Up 3 hours (healthy) mysql Up 3 hours (healthy) iscsid Up 3 hours (healthy) keystone Up 3 hours (healthy) keystone_cron Up 3 hours (healthy) neutron_api Up 3 hours (healthy) logrotate_crond Up 3 hours (healthy) neutron_dhcp Up 3 hours (healthy) neutron_l3_agent Up 3 hours (healthy) neutron_ovs_agent Up 3 hours (healthy) ironic_api Up 3 hours (healthy) ironic_conductor Up 3 hours (healthy) ironic_neutron_agent Up 3 hours (healthy) ironic_pxe_tftp Up 3 hours (healthy) ironic_pxe_http Up 3 hours (unhealthy) ironic_inspector Up 3 hours (healthy) ironic_inspector_dnsmasq Up 3 hours (healthy) neutron-dnsmasq-qdhcp-30d628e6-45e6-499d-8003-28c0bc066487 Up 3 hours ...
Confirm that you can initialize the
stackuser to use the command line tools:$ source ~/stackrc
If the prompt displays
(undercloud), this indicates that OpenStack commands authenticate and execute against the undercloud:Sample output
(undercloud) [stack@director ~]$
The director installation is complete. You can now use the director command line tools.
Additional resources
- Director configuration parameters in the Installing and managing Red Hat OpenStack Platform with director guide.
- Subnets in the Installing and managing Red Hat OpenStack Platform with director guide
- Networking (neutron) Parameters in the Overcloud parameters guide.
- Deployment command options in the Installing and managing Red Hat OpenStack Platform with director guide
Chapter 4. Deploying the overcloud for RHOSP dynamic routing
Use Red Hat OpenStack Platform (RHOSP) director to install and configure RHOSP dynamic routing in the overcloud. The high-level steps are:
- Define the overcloud networks for each leaf.
- Create a composable role—including the Free Range Routing (FRR) role—for each leaf and attach the composable network to each respective role.
- Create a unique NIC configuration for each role.
- Change the bridge mappings so that each leaf routes traffic through the specific bridge or VLAN on that leaf.
- Define virtual IPs (VIPs), if applicable, for your overcloud endpoints, and identify the subnet for each VIP.
- Provision your overcloud networks and overcloud VIPs.
Register the bare metal nodes in your overcloud.
NoteSkip steps 7, 8, and 9 if you are using pre-provisioned bare metal nodes.
- Introspect the bare metal nodes in your overcloud.
- Provision bare metal nodes.
- Deploy Ceph in your dynamic routing environment.
- Deploy your overcloud using the configuration you set in the earlier steps.
4.1. Defining the leaf networks
The Red Hat OpenStack Platform (RHOSP) director creates the overcloud leaf networks from a YAML-formatted, custom network definition file that you construct. This custom network definition file lists each composable network and its attributes and also defines the subnets needed for each leaf.
Complete the following steps to create a YAML-formatted, custom network definition file that contains the specifications for your spine-leaf network on the overcloud. Later, the provisioning process creates a heat environment file from your network definition file that you include when you deploy your RHOSP overcloud.
Prerequisites
-
Access to the undercloud host and credentials for the
stackuser.
Procedure
-
Log in to the undercloud host as the
stackuser. Source the
stackrcundercloud credentials file:$ source ~/stackrc
Create a
templatesdirectory under/home/stack:$ mkdir /home/stack/templates
Copy the default network definition template,
routed-networks.yaml, to your customtemplatesdirectory:Example
$ cp /usr/share/openstack-tripleo-heat-templates/network-data-samples/\
routed-networks.yaml \
/home/stack/templates/spine-leaf-networks-data.yaml
Edit your copy of the network definition template to define each base network and each of the associated leaf subnets as a composable network item.
TipFor information, see Network definition file configuration options in the Installing and managing Red Hat OpenStack Platform with director guide.
Example
The following example demonstrates how to define the Internal API network and its leaf networks:
- name: InternalApi
  name_lower: internal_api
  vip: true
  mtu: 1500
  subnets:
    internal_api_subnet:
      ip_subnet: 172.16.32.0/24
      gateway_ip: 172.16.32.1
      allocation_pools:
        - start: 172.16.32.4
          end: 172.16.32.250
      vlan: 20
    internal_api_leaf1_subnet:
      ip_subnet: 172.16.33.0/24
      gateway_ip: 172.16.33.1
      allocation_pools:
        - start: 172.16.33.4
          end: 172.16.33.250
      vlan: 30
    internal_api_leaf2_subnet:
      ip_subnet: 172.16.34.0/24
      gateway_ip: 172.16.34.1
      allocation_pools:
        - start: 172.16.34.4
          end: 172.16.34.250
      vlan: 40
You do not define the Control Plane networks in your custom network definition template, because the undercloud has already created these networks. However, you must set the parameters manually so that the overcloud can configure the NICs accordingly. For more information, see Deploying the undercloud for RHOSP dynamic routing.
RHOSP does not perform automatic validation of the network subnet and allocation_pools values. Ensure that you define these values consistently and that they do not conflict with existing networks.
Add the vip parameter and set the value to true for the networks that host the Controller-based services. In this example, the InternalApi network contains these services.
Next steps
- Note the path and file name of the custom network definition file that you have created. You need this information later when you provision your networks for the RHOSP overcloud.
- Proceed to the next step Defining leaf roles and attaching networks.
Additional resources
- Network definition file configuration options in the Installing and managing Red Hat OpenStack Platform with director guide
4.2. Defining leaf roles and attaching networks
The Red Hat OpenStack Platform (RHOSP) director creates a composable role for each leaf and attaches the composable network to each respective role from a roles template that you construct. Start by copying the default Controller, Compute, and Ceph Storage roles from the director core templates, and modifying these to meet your environment’s needs. After you have created all of the individual roles, you run the openstack overcloud roles generate command to concatenate them into one large custom roles data file.
Prerequisites
-
Access to the undercloud host and credentials for the
stackuser.
Procedure
-
Log in to the undercloud host as the
stackuser. Source the
stackrcundercloud credentials file:$ source ~/stackrc
Copy the default roles for Controller, Compute, and Ceph Storage roles that ship with RHOSP to the home directory of the
stackuser. Rename the files to indicate that they are leaf 0:$ cp /usr/share/openstack-tripleo-heat-templates/roles/Controller.yaml \ ~/roles/Controller0.yaml $ cp /usr/share/openstack-tripleo-heat-templates/roles/Compute.yaml \ ~/roles/Compute0.yaml $ cp /usr/share/openstack-tripleo-heat-templates/roles/CephStorage.yaml \ ~/roles/CephStorage0.yaml
Copy the leaf 0 files to create your leaf 1 and leaf 2 files:
$ cp ~/roles/Controller0.yaml ~/roles/Controller1.yaml
$ cp ~/roles/Controller0.yaml ~/roles/Controller2.yaml
$ cp ~/roles/Compute0.yaml ~/roles/Compute1.yaml
$ cp ~/roles/Compute0.yaml ~/roles/Compute2.yaml
$ cp ~/roles/CephStorage0.yaml ~/roles/CephStorage1.yaml
$ cp ~/roles/CephStorage0.yaml ~/roles/CephStorage2.yaml
Edit the parameters in each file to align with their respective leaf parameters.
TipFor information about the various parameters in a roles data template, see Examining role parameters in the Installing and managing Red Hat OpenStack Platform with director guide.
Example - ComputeLeaf0
- name: ComputeLeaf0
  HostnameFormatDefault: '%stackname%-compute-leaf0-%index%'
Example - CephStorageLeaf0
- name: CephStorageLeaf0
  HostnameFormatDefault: '%stackname%-cephstorage-leaf0-%index%'
Edit the
networkparameter in the leaf 1 and leaf 2 files so that they align with the respective leaf network parameters.Example - ComputeLeaf1
- name: ComputeLeaf1
  networks:
    InternalApi:
      subnet: internal_api_leaf1
    Tenant:
      subnet: tenant_leaf1
    Storage:
      subnet: storage_leaf1
Example - CephStorageLeaf1
- name: CephStorageLeaf1 networks: Storage: subnet: storage_leaf1 StorageMgmt: subnet: storage_mgmt_leaf1NoteThis applies only to leaf 1 and leaf 2. The
networkparameter for leaf 0 retains the base subnet values, which are the lowercase names of each subnet combined with a_subnetsuffix. For example, the Internal API for leaf 0 isinternal_api_subnet.In each Controller, Compute, and (if present) Networker role file, add the OVN BGP agent to the list of services under the
ServicesDefaultparameter:Example
- name: ControllerRack1
  ...
  ServicesDefault:
    ...
    - OS::TripleO::Services::Frr
    - OS::TripleO::Services::OVNBgpAgent
    ...
When your role configuration is complete, run the
overcloud roles generatecommand to generate the full roles data file.Example
$ openstack overcloud roles generate --roles-path ~/roles \
-o spine-leaf-roles-data.yaml Controller Compute Compute1 Compute2 \
CephStorage CephStorage1 CephStorage2
This creates one custom roles data file that includes all of the custom roles for each respective leaf network.
Next steps
-
Note the path and file name of the custom roles data file created by the
overcloud roles generatecommand. You use this path later when you deploy your overcloud. - Proceed to the next step Creating a custom NIC configuration for leaf roles.
Additional resources
- Examining role parameters in the Installing and managing Red Hat OpenStack Platform with director guide
4.3. Creating a custom NIC configuration for leaf roles
Each role that the Red Hat OpenStack Platform (RHOSP) director creates requires a unique NIC configuration. Complete the following steps to create a custom set of NIC templates and a custom environment file that maps the custom templates to the respective role.
Prerequisites
-
Access to the undercloud host and credentials for the
stackuser. - You have a custom network definition file.
- You have a custom roles data file.
Procedure
-
Log in to the undercloud host as the
stackuser. Source the
stackrcundercloud credentials file:$ source ~/stackrc
Copy the content from one of the default NIC templates to create a custom template for your NIC configuration.
Example
In this example, the
single-nic-vlansNIC template is copied to use for a custom template for your NIC configuration:$ cp -r /usr/share/ansible/roles/tripleo_network_config/\ templates/single-nic-vlans/* /home/stack/templates/spine-leaf-nics/.
In each of the NIC templates that you created in the earlier step, change the NIC configuration to match the specifics for your spine-leaf topology.
Example
{% set mtu_list = [ctlplane_mtu] %} {% for network in role_networks %} {{ mtu_list.append(lookup('vars', networks_lower[network] ~ '_mtu')) }} {%- endfor %} {% set min_viable_mtu = mtu_list | max %} network_config: - type: ovs_bridge name: {{ neutron_physical_bridge_name }} mtu: {{ min_viable_mtu }} use_dhcp: false dns_servers: {{ ctlplane_dns_nameservers }} domain: {{ dns_search_domains }} addresses: - ip_netmask: {{ ctlplane_ip }}/{{ ctlplane_subnet_cidr }} routes: {{ ctlplane_host_routes }} members: - type: interface name: nic1 mtu: {{ min_viable_mtu }} # force the MAC address of the bridge to this interface primary: true {% for network in role_networks %} - type: vlan mtu: {{ lookup('vars', networks_lower[network] ~ '_mtu') }} vlan_id: {{ lookup('vars', networks_lower[network] ~ '_vlan_id') }} addresses: - ip_netmask: {{ lookup('vars', networks_lower[network] ~ '_ip') }}/{{ lookup('vars', networks_lower[network] ~ '_cidr') }} routes: {{ lookup('vars', networks_lower[network] ~ '_host_routes') }} {% endfor %}TipFor more information, see Custom network interface templates in the Installing and managing Red Hat OpenStack Platform with director guide.
Create a custom environment file, such as
spine-leaf-nic-roles-map.yaml, that contains aparameter_defaultssection that maps the custom NIC templates to each custom role.parameter_defaults: %%ROLE%%NetworkConfigTemplate: <path_to_ansible_jinja2_nic_config_file>
Example
parameter_defaults:
  Controller0NetworkConfigTemplate: '/home/stack/templates/spine-leaf-nics/single-nic-vlans.j2'
  Controller1NetworkConfigTemplate: '/home/stack/templates/spine-leaf-nics/single-nic-vlans.j2'
  Controller2NetworkConfigTemplate: '/home/stack/templates/spine-leaf-nics/single-nic-vlans.j2'
  ComputeLeaf0NetworkConfigTemplate: '/home/stack/templates/spine-leaf-nics/single-nic-vlans.j2'
  ComputeLeaf1NetworkConfigTemplate: '/home/stack/templates/spine-leaf-nics/single-nic-vlans.j2'
  ComputeLeaf2NetworkConfigTemplate: '/home/stack/templates/spine-leaf-nics/single-nic-vlans.j2'
  CephStorage0NetworkConfigTemplate: '/home/stack/templates/spine-leaf-nics/single-nic-vlans.j2'
  CephStorage1NetworkConfigTemplate: '/home/stack/templates/spine-leaf-nics/single-nic-vlans.j2'
  CephStorage2NetworkConfigTemplate: '/home/stack/templates/spine-leaf-nics/single-nic-vlans.j2'
Next steps
- Note the path and file name of your custom NIC templates and the custom environment file that maps the custom NIC templates to each custom role. You use this path later when you deploy your overcloud.
- Proceed to the next step Configuring the leaf networks.
Additional resources
- Custom network interface templates in the Installing and managing Red Hat OpenStack Platform with director guide
4.4. Configuring the leaf networks
In a spine leaf architecture, each leaf routes traffic through the specific bridge or VLAN on that leaf, which is often the case with edge computing scenarios. So, you must change the default mappings where the Red Hat OpenStack Platform (RHOSP) Controller and Compute network configurations use an OVS provider bridge (br-ex).
The RHOSP director creates the control plane network during undercloud creation. However, the overcloud requires access to the control plane for each leaf. To enable this access, you must define additional parameters in your deployment.
You must set some basic FRRouting and OVN BGP agent configurations.
Complete the following steps to create a custom network environment file that contains the separate network mappings and sets access to the control plane networks for the overcloud.
Prerequisites
-
You must be the
stackuser with access to the RHOSP undercloud. - The undercloud is installed.
Procedure
-
Log in to the undercloud host as the
stackuser. Source the
stackrcundercloud credentials file:$ source ~/stackrc
In a new custom environment file, such as
spine-leaf-ctlplane.yaml, create aparameter_defaultssection and set theNeutronBridgeMappingsparameter for each leaf that uses the default OVS provider bridge (br-ex).ImportantThe name of the custom environment file that you create to contain your network definition must end in either
.yamlor.template.Example
parameter_defaults: NeutronFlatNetworks: provider1 ControllerRack1Parameters: NeutronBridgeMappings: ["provider1:br-ex", "provider2:br-vlan"] ControllerRack2Parameters: NeutronBridgeMappings: ["provider1:br-ex", "provider2:br-vlan"] ControllerRack3Parameters: NeutronBridgeMappings: ["provider1:br-ex", "provider2:br-vlan"] ComputeRack1Parameters: NeutronBridgeMappings: ["provider1:br-ex", "provider2:br-vlan"] ComputeRack2Parameters: NeutronBridgeMappings: ["provider1:br-ex", "provider2:br-vlan"] ComputeRack3Parameters: NeutronBridgeMappings: ["provider1:br-ex", "provider2:br-vlan"]TipFor more information, see Chapter 17. Networking (neutron) Parameters in the Overcloud parameters guide.
For VLAN network mappings, add
vlantoNeutronNetworkType, and by usingNeutronNetworkVLANRanges, map VLANs for the leaf networks:Example
parameter_defaults: NeutronNetworkType: 'geneve,vlan' NeutronNetworkVLANRanges: 'provider2:1:1000' ControllerRack1Parameters: NeutronBridgeMappings: ["provider1:br-ex", "provider2:br-vlan"] ControllerRack2Parameters: NeutronBridgeMappings: ["provider1:br-ex", "provider2:br-vlan"] ControllerRack3Parameters: NeutronBridgeMappings: ["provider1:br-ex", "provider2:br-vlan"] ComputeRack1Parameters: NeutronBridgeMappings: ["provider1:br-ex", "provider2:br-vlan"] ComputeRack2Parameters: NeutronBridgeMappings: ["provider1:br-ex", "provider2:br-vlan"] ComputeRack3Parameters: NeutronBridgeMappings: ["provider1:br-ex", "provider2:br-vlan"]NoteYou can use both flat networks and VLANs in your spine-leaf topology.
Add the control plane subnet mapping for each spine-leaf network by using the
<role>ControlPlaneSubnetparameter:Example
parameter_defaults:
  NeutronNetworkType: 'geneve,vlan'
  NeutronNetworkVLANRanges: 'provider2:1:1000'

  ControllerRack1Parameters:
    NeutronBridgeMappings: ["provider1:br-ex", "provider2:br-vlan"]
    ControlPlaneSubnet: r1

  ControllerRack2Parameters:
    NeutronBridgeMappings: ["provider1:br-ex", "provider2:br-vlan"]
    ControlPlaneSubnet: r2

  ControllerRack3Parameters:
    NeutronBridgeMappings: ["provider1:br-ex", "provider2:br-vlan"]
    ControlPlaneSubnet: r3

  ComputeRack1Parameters:
    NeutronBridgeMappings: ["provider1:br-ex", "provider2:br-vlan"]

  ComputeRack2Parameters:
    NeutronBridgeMappings: ["provider1:br-ex", "provider2:br-vlan"]

  ComputeRack3Parameters:
    NeutronBridgeMappings: ["provider1:br-ex", "provider2:br-vlan"]
Set the OVN BGP agent, FRRouting, and CMS options for each leaf.
NoteThe FRR service runs on all the RHOSP nodes to provide connectivity between the control plane and services running on different nodes across the data plane. However, you must run the OVN BGP agent only on all Compute nodes and on nodes configured with
enable-chassis-as-gw.For RHOSP nodes where no data plane routes are exposed, disable the OVN BGP agent for these roles by setting the
tripleo_frr_ovn_bgp_agent_enableparameter tofalse. The default istrue.Example
parameter_defaults:
  DatabaseRack1ExtraGroupVars:
    tripleo_frr_ovn_bgp_agent_enable: false
Example
parameter_defaults: NeutronNetworkType: 'geneve,vlan' NeutronNetworkVLANRanges: 'provider2:1:1000' ControllerRack1Parameters: NeutronBridgeMappings: ["provider1:br-ex", "provider2:br-vlan"] ControlPlaneSubnet: r1 FrrOvnBgpAgentDriver: 'ovn_bgp_driver' FrrOvnBgpAgentExposeTenantNetworks: True OVNCMSOptions: "enable-chassis-as-gw" ControllerRack2Parameters: NeutronBridgeMappings: ["provider1:br-ex", "provider2:br-vlan"] ControlPlaneSubnet: r2 FrrOvnBgpAgentDriver: 'ovn_bgp_driver' FrrOvnBgpAgentExposeTenantNetworks: True OVNCMSOptions: "enable-chassis-as-gw" ControllerRack3Parameters: NeutronBridgeMappings: ["provider1:br-ex", "provider2:br-vlan"] ControlPlaneSubnet: r3 FrrOvnBgpAgentDriver: 'ovn_bgp_driver' FrrOvnBgpAgentExposeTenantNetworks: True OVNCMSOptions: "enable-chassis-as-gw" ComputeRack1Parameters: NeutronBridgeMappings: ["provider1:br-ex", "provider2:br-vlan"] FrrOvnBgpAgentDriver: 'ovn_bgp_driver' ComputeRack2Parameters: NeutronBridgeMappings: ["provider1:br-ex", "provider2:br-vlan"] FrrOvnBgpAgentDriver: 'ovn_bgp_driver' ComputeRack3Parameters: NeutronBridgeMappings: ["provider1:br-ex", "provider2:br-vlan"] FrrOvnBgpAgentDriver: 'ovn_bgp_driver'TipFor more information, see Chapter 17. Networking (neutron) Parameters in the Overcloud parameters guide.
OVNCMSOptions- The CMS options to configure in OVSDB.
FrrOvnBgpAgentReconcileInterval- Defines how frequently to check the status, to ensure that only the correct IPs are exposed on the correct locations. Default: 120.
FrrOvnBgpAgentOvsdbConnection-
The connection string for the native OVSDB backend. Use
tcp:<IP_address>:<port>for TCP connection. Default: tcp:127.0.0.1:6640. FrrOvnBgpAgentExposeTenantNetworks- Exposes VM IPs on tenant networks via MP-BGP IPv4 and IPv6 unicast. Requires the BGP driver (see THT parameter FrrOvnBgpAgentDriver). Default: false.
FrrOvnBgpAgentDriver-
Configures how VM IPs are advertised via BGP. EVPN driver exposes VM IPs on provider networks and FIPs associated to VMs on tenant networks via MP-BGP IPv4 and IPv6 unicast. BGP driver exposes VM IPs on the tenant networks via MP-BGP EVPN VXLAN. Default:
ovn_evpn_driver. FrrOvnBgpAgentAsn-
Autonomous system number (ASN) to be used by the agent when running in BGP mode. Default: 64999.
FrrOvnBgpAgentAsncan be set to a different value for each role that is used. FrrLogLevel- Log level. Default: informational.
FrrBgpAsn-
Default ASN to be used within FRR. Default: 65000.
FrrBgpAsncan be set to a different value for each role that is used.
Next steps
- Note the path and file name of the custom network environment file that you have created. You need this path later when you deploy your overcloud.
- Proceed to the next step Setting the subnet for virtual IP addresses.
Additional resources
- Chapter 17. Networking (neutron) Parameters in the Overcloud parameters guide
4.5. Setting the subnet for virtual IP addresses
By default, the Red Hat Openstack Platform (RHOSP) Controller role hosts virtual IP (VIP) addresses for each network. The RHOSP overcloud takes the VIPs from the base subnet of each network except for the control plane. The control plane uses ctlplane-subnet, which is the default subnet name created during a standard undercloud installation.
In the spine-leaf examples used in this document, the default base provisioning network is leaf0 instead of ctlplane-subnet. This means that you must add the value pair subnet: leaf0 to the network:ctlplane parameter to map the subnet to leaf0.
Complete the following steps to create a YAML-formatted, custom network VIP definition file that contains the overrides for your VIPs on the overcloud. Later, the provisioning process creates a heat environment file from your network VIP definition file that you include when you deploy your RHOSP overcloud.
Prerequisites
-
Access to the undercloud host and credentials for the
stackuser.
Procedure
-
Log in to the undercloud host as the
stackuser. Source the
stackrcundercloud credentials file:$ source ~/stackrc
In a new custom network VIP definition template, such as
spine-leaf-vip-data.yaml, list the virtual IP addresses that need to be created on the specific subnet used by controller nodes.Example
- network: storage_mgmt
  subnet: storage_mgmt_subnet_leaf1
- network: internal_api
  subnet: internal_api_subnet_leaf1
- network: storage
  subnet: storage_subnet_leaf1
- network: external
  subnet: external_subnet_leaf1
  ip_address: 172.20.11.50
- network: ctlplane
  subnet: leaf0
- network: oc_provisioning
  subnet: oc_provisioning_subnet_leaf1
- network: storage_nfs
  subnet: storage_nfs_subnet_leaf1
You can use the following parameters in your
spine-leaf-vip-data.yamlfile:network- Sets the neutron network name. This is the only required parameter.
ip_address- Sets the IP address of the VIP.
subnet- Sets the neutron subnet name. Use to specify the subnet when creating the virtual IP neutron port. This parameter is required when your deployment uses routed networks.
dns_name- Sets the FQDN (Fully Qualified Domain Name).
nameSets the virtual IP name.
TipFor more information, see Adding a composable network in the Installing and managing Red Hat OpenStack Platform with director guide.
Next steps
- Note the path and file name of the custom network VIP definition template that you have created. You use this path later when you provision your network VIPs for the RHOSP overcloud.
- Proceed to the next step Provisioning networks and VIPs for the overcloud.
4.6. Provisioning networks and VIPs for the overcloud
The Red Hat OpenStack Platform (RHOSP) provisioning process uses your network definition file to create a new heat environment file that contains your network specifications. If your deployment uses VIPs, RHOSP creates a new heat environment file from your VIP definition file. After you provision your networks and VIPs, you have two heat environment files that you use later to deploy your overcloud.
Prerequisites
-
Access to the undercloud host and credentials for the
stackuser. - You have a network configuration template.
- If you are using VIPs, you have a VIP definition template.
Procedure
-
Log in to the undercloud host as the
stackuser. Source the
stackrcundercloud credentials file:$ source ~/stackrc
Provision your overcloud networks.
Use the
overcloud network provisioncommand, and provide the path to the network definition file that you created earlier.TipFor more information, see Configuring and provisioning overcloud network definitions in the Installing and managing Red Hat OpenStack Platform with director guide.
Example
In this example, the path is
/home/stack/templates/spine-leaf-networks-data.yaml. Use the--outputargument to name the file created by the command.$ openstack overcloud network provision \ --output spine-leaf-networks-provisioned.yaml \ /home/stack/templates/spine-leaf-networks-data.yaml
ImportantThe name of the output file that you specify must end in either
.yamlor.template.Provision your overcloud VIPs.
Use the
overcloud network vip provisioncommand, with the--stackargument to name the VIP definition file that you created earlier. Use the--outputargument to name the file created by the command.TipFor more information, see Configuring and provisioning network VIPs for the overcloud in the Installing and managing Red Hat OpenStack Platform with director guide.
$ openstack overcloud network vip provision \
  --stack spine-leaf-overcloud \
 --output spine-leaf-vips-provisioned.yaml \
 /home/stack/templates/spine-leaf-vip-data.yaml
ImportantThe name of the output file that you specify must end in either
.yamlor.template.- Note the path and file names of the generated output files. You use this information later when you deploy your overcloud.
Verification
You can use the following commands to confirm that the command created your overcloud networks and subnets:
$ openstack network list
$ openstack subnet list
$ openstack network show <network>
$ openstack subnet show <subnet>
$ openstack port list
$ openstack port show <port>
Replace <network>, <subnet>, and <port> with the name or UUID of the network, subnet, and port that you want to check.
Next steps
- If you are using pre-provisioned nodes, skip to Running the overcloud deployment command.
- Otherwise, proceed to the next step Registering bare metal nodes on the overcloud.
Additional resources
- Configuring and provisioning overcloud network definitions in the Installing and managing Red Hat OpenStack Platform with director guide
- Configuring and provisioning network VIPs for the overcloud in the Installing and managing Red Hat OpenStack Platform with director guide
- overcloud network provision in the Command line interface reference
- overcloud network vip provision in the Command line interface reference
4.7. Registering bare metal nodes on the overcloud
Red Hat OpenStack Platform (RHOSP) director requires a custom node definition template that specifies the hardware and power management details of your physical machines. You can create this template in JSON or YAML formats. After you register your physical machines as bare metal nodes, you introspect them, and then you finally provision them.
If you are using pre-provisioned bare metal nodes then you can skip registering, introspecting, and provisioning bare metal nodes, and go to Deploying a spine-leaf enabled overcloud.
Prerequisites
-
Access to the undercloud host and credentials for the
stackuser.
Procedure
-
Log in to the undercloud host as the
stackuser. Source the
stackrcundercloud credentials file:$ source ~/stackrc
Create a new node definition template, such as
barematal-nodes.yaml. Add a list of your physical machines that includes their hardware and power management details.Example
nodes: - name: "node01" ports: - address: "aa:aa:aa:aa:aa:aa" physical_network: ctlplane local_link_connection: switch_id: 52:54:00:00:00:00 port_id: p0 cpu: 4 memory: 6144 disk: 40 arch: "x86_64" pm_type: "ipmi" pm_user: "admin" pm_password: "p@55w0rd!" pm_addr: "192.168.24.205" - name: "node02" ports: - address: "bb:bb:bb:bb:bb:bb" physical_network: ctlplane local_link_connection: switch_id: 52:54:00:00:00:00 port_id: p0 cpu: 4 memory: 6144 disk: 40 arch: "x86_64" pm_type: "ipmi" pm_user: "admin" pm_password: "p@55w0rd!" pm_addr: "192.168.24.206"TipFor more information about template parameter values and for a JSON example, see Registering nodes for the overcloud in the Installing and managing Red Hat OpenStack Platform with director guide.
Verify the template formatting and syntax.
Example
$ openstack overcloud node import --validate-only ~/templates/\
baremetal-nodes.yaml
- Correct any errors and save your node definition template.
Import your node definition template to RHOSP director to register each node from your template into director:
Example
$ openstack overcloud node import ~/baremetal-nodes.yaml
Verification
When the node registration and configuration is complete, confirm that director has successfully registered the nodes:
$ openstack baremetal node list
The
baremetal node listcommand should include the imported nodes and the status should bemanageable.
Next steps
- Proceed to the next step, Introspecting bare metal nodes on the overcloud.
Additional resources
- Registering nodes for the overcloud in the Installing and managing Red Hat OpenStack Platform with director guide.
- overcloud node import in the Command line interface reference
4.8. Introspecting bare metal nodes on the overcloud
After you register a physical machine as a bare metal node, you can use OpenStack Platform (RHOSP) director introspection to automatically add then node’s hardware details and create ports for each of its Ethernet MAC addresses. After you perform introspection on your bare metal nodes, the final step is to provision them.
If you are using pre-provisioned bare metal nodes then you can skip introspecting and introspecting bare metal nodes and go to Deploying a spine-leaf enabled overcloud.
Prerequisites
-
Access to the undercloud host and credentials for the
stackuser. - You have registered your bare metal nodes for your overcloud with RHOSP.
Procedure
-
Log in to the undercloud host as the
stackuser. Source the
stackrcundercloud credentials file:$ source ~/stackrc
Run the pre-introspection validation group to check the introspection requirements:
$ validation run --group pre-introspection
- Review the results of the validation report.
(Optional) Review detailed output from a specific validation:
$ validation history get --full <UUID>
Replace <UUID> with the UUID of the specific validation from the report that you want to review.
ImportantA
FAILEDvalidation does not prevent you from deploying or running RHOSP. However, aFAILEDvalidation can indicate a potential issue with a production environment.Inspect the hardware attributes of all nodes:
$ openstack overcloud node introspect --all-manageable --provide
TipFor more information, see Using director introspection to collect bare metal node hardware information in the Installing and managing Red Hat OpenStack Platform with director guide.
Monitor the introspection progress logs in a separate terminal window:
$ sudo tail -f /var/log/containers/ironic-inspector/ironic-inspector.log
Verification
- After the introspection completes, all nodes change to an available state.
Next steps
- Proceed to the next step, Provisioning bare metal nodes for the overcloud.
Additional resources
- Using director introspection to collect bare metal node hardware information in the Installing and managing Red Hat OpenStack Platform with director guide
- overcloud node introspect in the Command line interface reference
4.9. Provisioning bare metal nodes for the overcloud
To provision your bare metal nodes for Red Hat OpenStack Platform (RHOSP), you define the quantity and attributes of the bare metal nodes that you want to deploy and assign overcloud roles to these nodes. You also define the network layout of the nodes. You add all of this information in a node definition file in YAML format.
The provisioning process creates a heat environment file from your node definition file. This heat environment file contains the node specifications you configured in your node definition file, including node count, predictive node placement, custom images, and custom NICs. When you deploy your overcloud, include this heat environment file in the deployment command. The provisioning process also provisions the port resources for all networks defined for each node or role in the node definition file.
If you are using pre-provisioned bare metal nodes then you can skip provisioning bare metal nodes and go to Deploying a spine-leaf enabled overcloud.
Prerequisites
-
Access to the undercloud host and credentials for the
stackuser. - The bare metal nodes are registered, introspected, and available for provisioning and deployment.
Procedure
-
Log in to the undercloud host as the
stackuser. Source the
stackrcundercloud credentials file:$ source ~/stackrc
Create a bare metal nodes definition file, such as
spine-leaf-baremetal-nodes.yaml, and define the node count for each role that you want to provision.Example
- name: ControllerRack1 count: 1 hostname_format: ctrl-1-%index% defaults: network_config: default_route_network: - ctlplane template: /home/stack/tht/nics_r1.yaml networks: - network: ctlplane vif: true - network: left_network - network: right_network1 - network: main_network - network: main_network_ipv6 instances: - hostname: ctrl-1-0 name: ctrl-1-0 capabilities: node: ctrl-1-0 networks: - network: ctlplane vif: true - network: left_network fixed_ip: 100.65.1.2 subnet: left_network_r1 - network: right_network1 fixed_ip: 100.64.0.2 subnet: right_network1_sub - network: main_network fixed_ip: 172.30.1.1 subnet: main_network_r1 - network: main_network_ipv6 fixed_ip: f00d:f00d:f00d:f00d:f00d:f00d:f00d:0001 subnet: main_network_ipv6_r1 - name: ComputeRack1 count: 2 hostname_format: cmp-1-%index% defaults: network_config: default_route_network: - ctlplane template: /home/stack/tht/nics_r1.yaml networks: - network: ctlplane vif: true - network: left_network - network: right_network1 - network: main_network - network: main_network_ipv6 instances: - hostname: cmp-1-0 name: cmp-1-0 capabilities: node: cmp-1-0 networks: - network: ctlplane vif: true - network: left_network fixed_ip: 100.65.1.6 subnet: left_network_r1 - network: right_network1 fixed_ip: 100.64.0.6 subnet: right_network1_sub - network: main_network fixed_ip: 172.30.1.2 subnet: main_network_r1 - network: main_network_ipv6 fixed_ip: f00d:f00d:f00d:f00d:f00d:f00d:f00d:0004 subnet: main_network_ipv6_r1 - hostname: cmp-1-1 name: cmp-1-1 capabilities: node: cmp-1-1 networks: - network: ctlplane vif: true - network: left_network fixed_ip: 100.65.1.10 subnet: left_network_r1 - network: right_network1 fixed_ip: 100.64.0.10 subnet: right_network1_sub - network: main_network fixed_ip: 172.30.1.3 subnet: main_network_r1 - network: main_network_ipv6 fixed_ip: f00d:f00d:f00d:f00d:f00d:f00d:f00d:0005 subnet: main_network_ipv6_r1 - name: ControllerRack2 count: 1 hostname_format: ctrl-2-%index% defaults: network_config: default_route_network: - ctlplane template: /home/stack/tht/nics_r2.yaml networks: - network: ctlplane vif: true - network: left_network - network: right_network2 - network: main_network - network: main_network_ipv6 instances: - hostname: ctrl-2-0 name: ctrl-2-0 capabilities: node: ctrl-2-0 networks: - network: ctlplane vif: true - network: left_network fixed_ip: 100.65.2.2 subnet: left_network_r2 - network: right_network2 fixed_ip: 100.64.0.2 subnet: right_network2_sub - network: main_network fixed_ip: 172.30.2.1 subnet: main_network_r2 - network: main_network_ipv6 fixed_ip: f00d:f00d:f00d:f00d:f00d:f00d:f00d:0002 subnet: main_network_ipv6_r1 - name: ComputeRack2 count: 2 hostname_format: cmp-2-%index% defaults: network_config: default_route_network: - ctlplane template: /home/stack/tht/nics_r2.yaml networks: - network: ctlplane vif: true - network: left_network - network: right_network2 - network: main_network - network: main_network_ipv6 instances: - hostname: cmp-2-0 name: cmp-2-0 capabilities: node: cmp-2-0 networks: - network: ctlplane vif: true - network: left_network fixed_ip: 100.65.2.6 subnet: left_network_r2 - network: right_network2 fixed_ip: 100.64.0.6 subnet: right_network2_sub - network: main_network fixed_ip: 172.30.2.2 subnet: main_network_r2 - network: main_network_ipv6 fixed_ip: f00d:f00d:f00d:f00d:f00d:f00d:f00d:0006 subnet: main_network_ipv6_r1 - hostname: cmp-2-1 name: cmp-2-1 capabilities: node: cmp-2-1 networks: - network: ctlplane vif: true - network: left_network fixed_ip: 100.65.2.10 subnet: left_network_r2 - network: right_network2 fixed_ip: 100.64.0.10 subnet: right_network2_sub - network: main_network fixed_ip: 172.30.2.3 subnet: main_network_r2 - network: main_network_ipv6 fixed_ip: f00d:f00d:f00d:f00d:f00d:f00d:f00d:0007 subnet: main_network_ipv6_r1 - name: ControllerRack3 count: 1 hostname_format: ctrl-3-%index% defaults: network_config: default_route_network: - ctlplane template: /home/stack/tht/nics_r3.yaml networks: - network: ctlplane vif: true - network: left_network - network: right_network3 - network: main_network - network: main_network_ipv6 instances: - hostname: ctrl-3-0 name: ctrl-3-0 capabilities: node: ctrl-3-0 networks: - network: ctlplane vif: true - network: left_network fixed_ip: 100.65.3.2 subnet: left_network_r3 - network: right_network3 fixed_ip: 100.64.0.2 subnet: right_network3_sub - network: main_network fixed_ip: 172.30.3.1 subnet: main_network_r3 - network: main_network_ipv6 fixed_ip: f00d:f00d:f00d:f00d:f00d:f00d:f00d:0003 subnet: main_network_ipv6_r1 - name: ComputeRack3 count: 2 hostname_format: cmp-3-%index% defaults: network_config: default_route_network: - ctlplane template: /home/stack/tht/nics_r3.yaml networks: - network: ctlplane vif: true - network: left_network - network: right_network3 - network: main_network - network: main_network_ipv6 instances: - hostname: cmp-3-0 name: cmp-3-0 capabilities: node: cmp-3-0 networks: - network: ctlplane vif: true - network: left_network fixed_ip: 100.65.3.6 subnet: left_network_r3 - network: right_network3 fixed_ip: 100.64.0.6 subnet: right_network3_sub - network: main_network fixed_ip: 172.30.3.2 subnet: main_network_r3 - network: main_network_ipv6 fixed_ip: f00d:f00d:f00d:f00d:f00d:f00d:f00d:0008 subnet: main_network_ipv6_r1 - hostname: cmp-3-1 name: cmp-3-1 capabilities: node: cmp-3-1 networks: - network: ctlplane vif: true - network: left_network fixed_ip: 100.65.3.10 subnet: left_networ10_r3 - network: right_network3 fixed_ip: 100.64.0.10 subnet: right_network3_sub - network: main_network fixed_ip: 172.30.3.3 subnet: main_network_r3 - network: main_network_ipv6 fixed_ip: f00d:f00d:f00d:f00d:f00d:f00d:f00d:0009 subnet: main_network_ipv6_r1TipFor more information about the properties that you can set bare metal node definition file, see Provisioning bare metal nodes for the overcloud in the Installing and managing Red Hat OpenStack Platform with director guide.
Provision the overcloud bare metal nodes, using the
overcloud node provisioncommand.Example
$ openstack overcloud node provision \
 --stack spine_leaf_overcloud \
 --network-config \
 --output spine-leaf-baremetal-nodes-provisioned.yaml \
 /home/stack/templates/spine-leaf-baremetal-nodes.yaml
ImportantThe name of the output file that you specify must end in either
.yamlor.template.Monitor the provisioning progress in a separate terminal. When provisioning is successful, the node state changes from
availabletoactive:$ watch openstack baremetal node list
Use the
metalsmithtool to obtain a unified view of your nodes, including allocations and ports:$ metalsmith list
- Note the path and file name of the generated output file. You need this path later when you deploy your overcloud.
Verification
Confirm the association of nodes to hostnames:
$ openstack baremetal allocation list
Next steps
- Proceed to the next step Deploying Ceph in your dynamic routing environment.
Additional resources
- Provisioning bare metal nodes for the overcloud in the Installing and managing Red Hat OpenStack Platform with director guide
4.10. Deploying Ceph in your dynamic routing environment
With some adjustments to your normal configuration, you can deploy Red Hat Ceph Storage in a Red Hat OpenStack Platform (RHOSP) environment that uses dynamic routing.
When you install Red Hat Ceph Storage in a Red Hat OpenStack Platform environment that uses dynamic routing, you must install Ceph before you deploy the overcloud. In the following example configuration, you use the provisioning network to deploy Ceph. For optimal performance, we recommend that you use dedicated NICs and network hardware when you deploy Ceph Storage in a RHOSP dynamic routing environment.
Procedure
- Follow the instructions for how to install Red Hat Ceph Storage in Deploying Red Hat Ceph Storage and Red Hat OpenStack Platform together with director. At the step where you configure the Ceph Storage cluster, follow these additional steps:
Create the Ceph configuration file and add a section named
[global].Example
In this example, the Ceph configuration file is named,
initial-ceph.conf:$ echo "[global]" > initial-ceph.conf
In the
[global]section, include thepublic_networkandcluster_networkparameters, and add to each, the subnet CIDRs that are listed in theundercloud.conffile. Only include the subnet CIDRs that correspond to the overcloud nodes.TipThe subnet CIDRs to add are the ones that are described in, Installing and configuring the undercloud for RHOSP dynamic routing.
Example
In this example, the subnets in the
undercloud.conffile that correspond to the overcloud nodes are added to thepublic_networkand thecluster_networkparameters:[global] public_network="192.168.1.0/24,192.168.2.0/24,192.168.3.0/24" cluster_network="192.168.1.0/24,192.168.2.0/24,192.168.3.0/24"
When you are ready to deploy Ceph, ensure that you include
initial-ceph.confin theovercloud ceph deploycommand.Example
$ openstack overcloud ceph deploy --config initial-ceph.conf \
<other_arguments> \
/home/stack/templates/overcloud-baremetal-deployed.yaml
ImportantDynamic routing is not available yet. Therefore, if Ceph nodes require routing to reach NTP servers, then NTP configuration for Ceph nodes might be delayed.
If your site uses NTP servers, add
--skip-ntpto theopenstack overcloud ceph deploycommand.Do not put the Ceph cluster into production until the BGP routes are established so that Ceph can reach the NTP servers that it requires. Until the overcloud is deployed and NTP configured, a Ceph cluster without NTP can lead to a number of anomalies such as daemons ignoring received messages, outdated timestamps, and timeouts triggered too soon or too late when a message isn’t received in time.
-
Note the path and file name of the generated output file from running the
overcloud ceph deploycommand. In this example,/home/stack/templates/overcloud-baremetal-deployed.yaml. You need this information later when you deploy your overcloud.
Next steps
- Proceed to the next step Deploying a spine-leaf enabled overcloud.
Additional resources
4.11. Deploying a spine-leaf enabled overcloud
The last step in deploying your Red Hat OpenStack Platform (RHOSP) overcloud is to run the overcloud deploy command. Inputs to the command include all of the various overcloud templates and environment files that you constructed. RHOSP director uses these templates and files as a plan for how to install and configure your overcloud.
Prerequisites
-
Access to the undercloud host and credentials for the
stackuser. -
You have performed all of the steps listed in the earlier procedures in this section and have assembled all of the various heat templates and environment files to use as inputs for the
overcloud deploycommand.
Procedure
-
Log in to the undercloud host as the
stackuser. Source the
stackrcundercloud credentials file:$ source ~/stackrc
Collate the custom environment files and custom templates that you need for your overcloud environment. This list includes the unedited heat template files provided with your director installation and the custom files you created. Ensure that you have the paths to the following files:
Your custom network definition file that contains the specifications for your spine-leaf network on the overcloud, for example,
spine-leaf-networks-data.yaml.For more information, see Defining the leaf networks.
Your custom roles data file that defines a role for each leaf.
Example:
spine-leaf-roles.yaml.For more information, see Defining leaf roles and attaching networks
Your custom environment file that contains the roles and the custom NIC template mappings for each role.
Example:
spine-leaf-nic-roles-map.yaml.For more information, see Creating a custom NIC configuration for leaf roles.
Your custom network environment file that contains the separate network mappings and sets access to the control plane networks for the overcloud.
Example:
spine-leaf-ctlplane.yamlFor more information, see Configuring the leaf networks.
The output file from provisioning your overcloud networks.
Example:
spine-leaf-networks-provisioned.yamlFor more information, see Provisioning networks and VIPs for the overcloud.
The output file from provisioning your overcloud VIPs.
Example:
spine-leaf-vips-provisioned.yamlFor more information, see Provisioning networks and VIPs for the overcloud.
If you are not using pre-provisioned nodes, the output file from provisioning bare-metal nodes.
Example:
spine-leaf-baremetal-nodes-provisioned.yaml.For more information, see Provisioning bare metal nodes for the overcloud.
The output file from the
overcloud ceph deploycommand.Example:
overcloud-baremetal-deployed.yaml.For more information, see Deploying Ceph in your dynamic routing environment.
- Any other custom environment files.
Enter the
overcloud deploycommand by carefully ordering the custom environment files and custom templates that are inputs to the command.The general rule is to specify any unedited heat template files first, followed by your custom environment files and custom templates that contain custom configurations, such as overrides to the default properties.
Follow this order for listing the inputs to the
overcloud deploycommand:Include your custom environment file that contains your custom NIC templates mapped to each role.
Example:
spine-leaf-nic-roles-map.yaml, afternetwork-environment.yaml.The
network-environment.yamlfile provides the default network configuration for composable network parameters, that your mapping file overrides. Note that the director renders this file from thenetwork-environment.j2.yamlJinja2 template.- If you created any other spine leaf network environment files, include these environment files after the roles-NIC templates mapping file.
Add any additional environment files. For example, an environment file with your container image locations or Ceph cluster configuration.
Example
This excerpt from a sample
overcloud deploycommand demonstrates the proper ordering of the command’s inputs:$ openstack overcloud deploy --templates \ -n /home/stack/templates/spine-leaf-networks-data.yaml \ -e /usr/share/openstack-tripleo-heat-templates/environments/network-environment.yaml \ -e /usr/share/openstack-tripleo-heat-templates/environments/services/frr.yaml \ -e /usr/share/openstack-tripleo-heat-templates/environments/services/ovn-bgp-agent.yaml \ -e /home/stack/templates/spine-leaf-nic-roles-map.yaml \ -e /home/stack/templates/spine-leaf-ctlplane.yaml \ -e /home/stack/templates/spine-leaf-baremetal-provisioned.yaml \ -e /home/stack/templates/spine-leaf-networks-provisioned.yaml \ -e /home/stack/templates/spine-leaf-vips-provisioned.yaml \ -e /home/stack/templates/overcloud-baremetal-deployed.yaml \ -e /home/stack/containers-prepare-parameter.yaml \ -e /home/stack/inject-trust-anchor-hiera.yaml \ -r /home/stack/templates/spine-leaf-roles-data.yaml ...
TipFor more information, see Creating your overcloud in the Installing and managing Red Hat OpenStack Platform with director guide.
Run the
overcloud deploycommand.When the overcloud creation is finished, the RHOSP director provides details to help you access your overcloud.
Verification
- Perform the steps in Validating your overcloud deployment in the Installing and managing Red Hat OpenStack Platform with director guide.
Additional resources
- Creating your overcloud in the Installing and managing Red Hat OpenStack Platform with director guide
- overcloud deploy in the Command line interface reference
Chapter 5. Troubleshooting RHOSP dynamic routing
Diagnosing problems in a Red Hat OpenStack Platform (RHOSP) environment that uses dynamic routing begins with examining the appropriate logs and querying the various FRRouting components with VTY shell.
The topics included in this section are:
5.1. OVN BGP agent and FRRouting logs
The Red Hat OpenStack Platform (RHOSP) OVN BGP agent writes its logs on the Compute and Networker nodes at this location: /var/log/containers/stdouts/ovn_bgp_agent.log.
The Free Range Routing (FRRouting, or FRR) components such as the BGP, BFD, and Zebra daemons write their logs on all RHOSP nodes at this location: /var/log/containers/frr/frr.log
5.2. Using VTY shell commands for troubleshooting BGP
You can use the shell for Virtual Terminal Interface (VTY shell) to interact with the Free Range Routing (FRRouting, or FRR) daemons. In Red Hat OpenStack Platform, FRR daemons like bgpd run inside a container. Using the VTY shell can help you troubleshoot BGP routing issues.
Prerequisites
- You must have sudo privileges on the host where you want to run VTY shell commands.
Procedure
-
Log in to the host where you want to troubleshoot the BGP daemon,
bgpd. Typically,bgpdruns on all of the overcloud nodes. Enter the FRR container.
$ sudo podman exec -it frr bash
You have two options for running VTY shell commands:
Interactive mode
Type
sudo vtyshonce to enter interactive mode to run multiple VTY shell commands.Example
$ sudo vtysh
> show bgp summary
Direct mode
Preface each VTY shell command with
sudo vtysh -c.Example
$ sudo vtysh -c 'show bgp summary'
Here are several VTY shell BGP daemon troubleshooting commands:
TipOmit the
ipargument when you are using IPv6.Display a particular routing table or all routing tables:
> show ip bgp <IPv4_address> | all
> show bgp <IPv6_address> | all
Output routes advertised to a BGP peer
> show ip bgp neighbors <router-ID> <advertised-routes>
Output routes received from a BGP peer
> show ip bgp neighbors <router-ID> <received-routes>
Additional resources
- Displaying BGP Information in the FRRouting User Guide