
Securing Red Hat Directory Server
Improving the security of Directory Server
Abstract
Providing feedback on Red Hat documentation
We appreciate your input on our documentation. Please let us know how we could make it better. To do so:
For submitting feedback through Jira (account required):
- Log in to the Jira website.
- Click Create in the top navigation bar
- Enter a descriptive title in the Summary field.
- Enter your suggestion for improvement in the Description field. Include links to the relevant parts of the documentation.
- Click Create at the bottom of the dialogue.
For submitting feedback through Bugzilla (account required):
- Go to the Bugzilla website.
- As the Component, use Documentation.
- Fill in the Description field with your suggestion for improvement. Include a link to the relevant part(s) of documentation.
- Click Submit Bug.
Chapter 1. Enabling TLS-encrypted connections to Directory Server
By default, Red Hat Directory Server provides the LDAP service without encryption. To improve the security, you can configure TLS in Directory Server to enable your clients or other hosts in a replication environment to use encrypted connections. They can then use the STARTTLS command on port 389 or the LDAPS protocol on port 636 for secure connections.
You can use TLS with simple authentication using a bind Distinguished Name (DN) and password, or using certificate-based authentication.
Directory Server’s cryptographic services are provided by Mozilla network security services (NSS), a library of TLS and base cryptographic functions. NSS includes a software-based cryptographic token which is Federal Information Processing Standard (FIPS) 140-2 certified.
1.1. The different options for encrypted connections to Directory Server
To connect to Directory Server with an encrypted connection, you can use the following protocols and framework:
- LDAPS
-
When you use the LDAPS protocol, the connection starts using encryption and either succeeds or fails. However, no unencrypted data is ever sent over the network. For this reason, prefer LDAPS instead of using
STARTTLSover unencrypted LDAP. - STARTTLS over LDAP
Clients establish an unencrypted connection over the LDAP protocol and then send the
STARTTLScommand. If the command succeeds, all further communication is encrypted.WarningIf the
STARTTLScommand fails and the client does not cancel the connection, all further data, including authentication information, is sent unencrypted over the network.- SASL
- The Simple Authentication and Security Layer (SASL) framework enables you to authenticate a user using external authentication methods, such as Kerberos.
1.2. How Directory Server unlocks the NSS database
Directory Server stores certificate signing requests (CSR), private keys, and certificates in a network security services (NSS) database. When you install a new instance, the installer automatically creates the NSS database and protects it with a random password. The installer stores this password in the following files:
-
/etc/dirsrv/slapd-instance_name/pwdfile.txt: Thedsconf tlscommand uses this file to access the NSS database. /etc/dirsrv/slapd-instance_name/pin.txt: This file contains the token and password to automatically unlock the NSS database when Directory Server starts.- If you want Directory Server to prompt for the NSS database password each time you start the instance, remove this file.
- If you want the instance to start automatically without prompting for the password, keep this file and update it when you change the NSS database password.
If the /etc/dirsrv/slapd-instance_name/pin.txt file does not exist, you start Directory Server with encryption enabled and set a password on the NSS database, the the behavior is as follows:
If the
systemctlordsctlutilities start thens-slapdDirectory Server process, thesystemdservice prompts for the password and automatically passes the input to thesystemd-tty-ask-password-agentutility:#
dsctl instance_name startEnter PIN for Internal (Software) Token: (press TAB for no echo)In rare cases, when the
ns-slapdDirectory Server process is not started by thesystemctlordsctlutilities, and the process is detached from the terminal,ns-slapdsends a message to all terminals using thewallcommand:Broadcast message from root@server (Fri 2021-01-01 06:00:00 CET): Password entry required for 'Enter PIN for Internal (Software) Token:' (PID 1234). Please enter password with the systemd-tty-ask-password-agent tool!
To enter the password:
#
systemd-tty-ask-password-agentEnter PIN for Internal (Software) Token:
Additional resources
1.3. Enabling TLS-encrypted connections to Directory Server using the command line
To use TLS encryption or certificate-based authentication, you must manage the certificates in a network security services (NSS) database. When you created the instance, the dscreate utility automatically created this database in the /etc/dirsrv/slapd-instance_name/ directory and protected it with a strong password.
Procedure
Create a private key and a certificate signing request (CSR). Skip this step if you want to create them using an external utility.
If your host is reachable only by one name, enter:
#
dsctl instance_name tls generate-server-cert-csr -s "CN=server.example.com,O=example_organization"If your host is reachable by multiple names:
#
dsctl instance_name tls generate-server-cert-csr -s "CN=server.example.com,O=example_organization" server.example.com server.example.netIf you specify the host names as the last parameter, the command adds the Subject Alternative Name (SAN) extension with the
DNS:server.example.com, DNS:server.example.netentries to the CSR.
The string specified in the
-s subjectparameter must be a valid subject name according to RFC 1485. TheCNfield in the subject is required, and you must set it to one of the fully-qualified domain names (FQDN) of the server. The command stores the CSR in the/etc/dirsrv/slapd-instance_name/Server-Cert.csrfile.- Submit the CSR to the certificate authority (CA) to get a certificate issued. For further details, see your CA’s documentation.
Import the server certificate issued by the CA to the NSS database:
If you created the private key using the
dsctl tls generate-server-cert-csrcommand, enter:#
dsconf -D "cn=Directory Manager" ldap://server.example.com security certificate add --file /root/instance_name.crt --name "server-cert" --primary-certRemember the name of the certificate you set in the
--name _certificate_nicknameparameter. You require it in a later step.If you created the private key using an external utility, import the server certificate and the private key:
#
dsctl instance_name tls import-server-key-cert /root/server.crt /root/server.keyNote that the command requires you to specify the path to the server certificate first and then the path to the private key. This method always sets the nickname of the certificate to
Server-Cert.
Import the CA certificate to the NSS database:
#
dsconf -D "cn=Directory Manager" ldap://server.example.com security ca-certificate add --file /root/ca.crt --name "Example CA"Set the trust flags of the CA certificate:
#
dsconf -D "cn=Directory Manager" ldap://server.example.com security ca-certificate set-trust-flags "Example CA" --flags "CT,,"This configures Directory Server to trust the CA for TLS encryption and certificate-based authentication.
Enable TLS and set the LDAPS port:
#
dsconf -D "cn=Directory Manager" ldap://server.example.com config replace nsslapd-securePort=636 nsslapd-security=onOpen the LDAPS port in the
firewalldservice:#
firewall-cmd --permanent --add-port=636/tcp#firewall-cmd --reloadEnable the RSA cipher family, set the NSS database security device, and the server certificate name:
#
dsconf -D "cn=Directory Manager" ldap://server.example.com security rsa set --tls-allow-rsa-certificates on --nss-token "internal (software)" --nss-cert-name Server-CertBy default, the name of the security device in the NSS database is
internal (software)Optional: Disable the plain text LDAP port:
#
dsconf inst security disable_plain_portRestart the instance
#
dsctl instance_name restart
Verification
Establish a connection to Directory Server using the LDAPS protocol. For example, run a query:
#
ldapsearch -H ldaps://server.example.com:636 -D "cn=Directory Manager" -W -b "dc=example,dc=com" -x -s baseIf the command fails, with an
ldap_sasl_bind(SIMPLE): Can’t contact LDAP server (-1)error, re-run the command with debug level 1:#
ldapsearch -H ldaps://server.example.com:636 -D "cn=Directory Manager" -W -b "dc=example,dc=com" -x -s base -d 1
Next steps
Additional resources
1.4. Enabling TLS-encrypted connections to Directory Server using the web console
You can configure TLS encryption using the web console.
Prerequisites
- You are logged in to the instance in the web console.
Procedure
- Navigate to → → → , and click .
Set a name for certificate signing request (CSR), common name (CN), and organization (O):
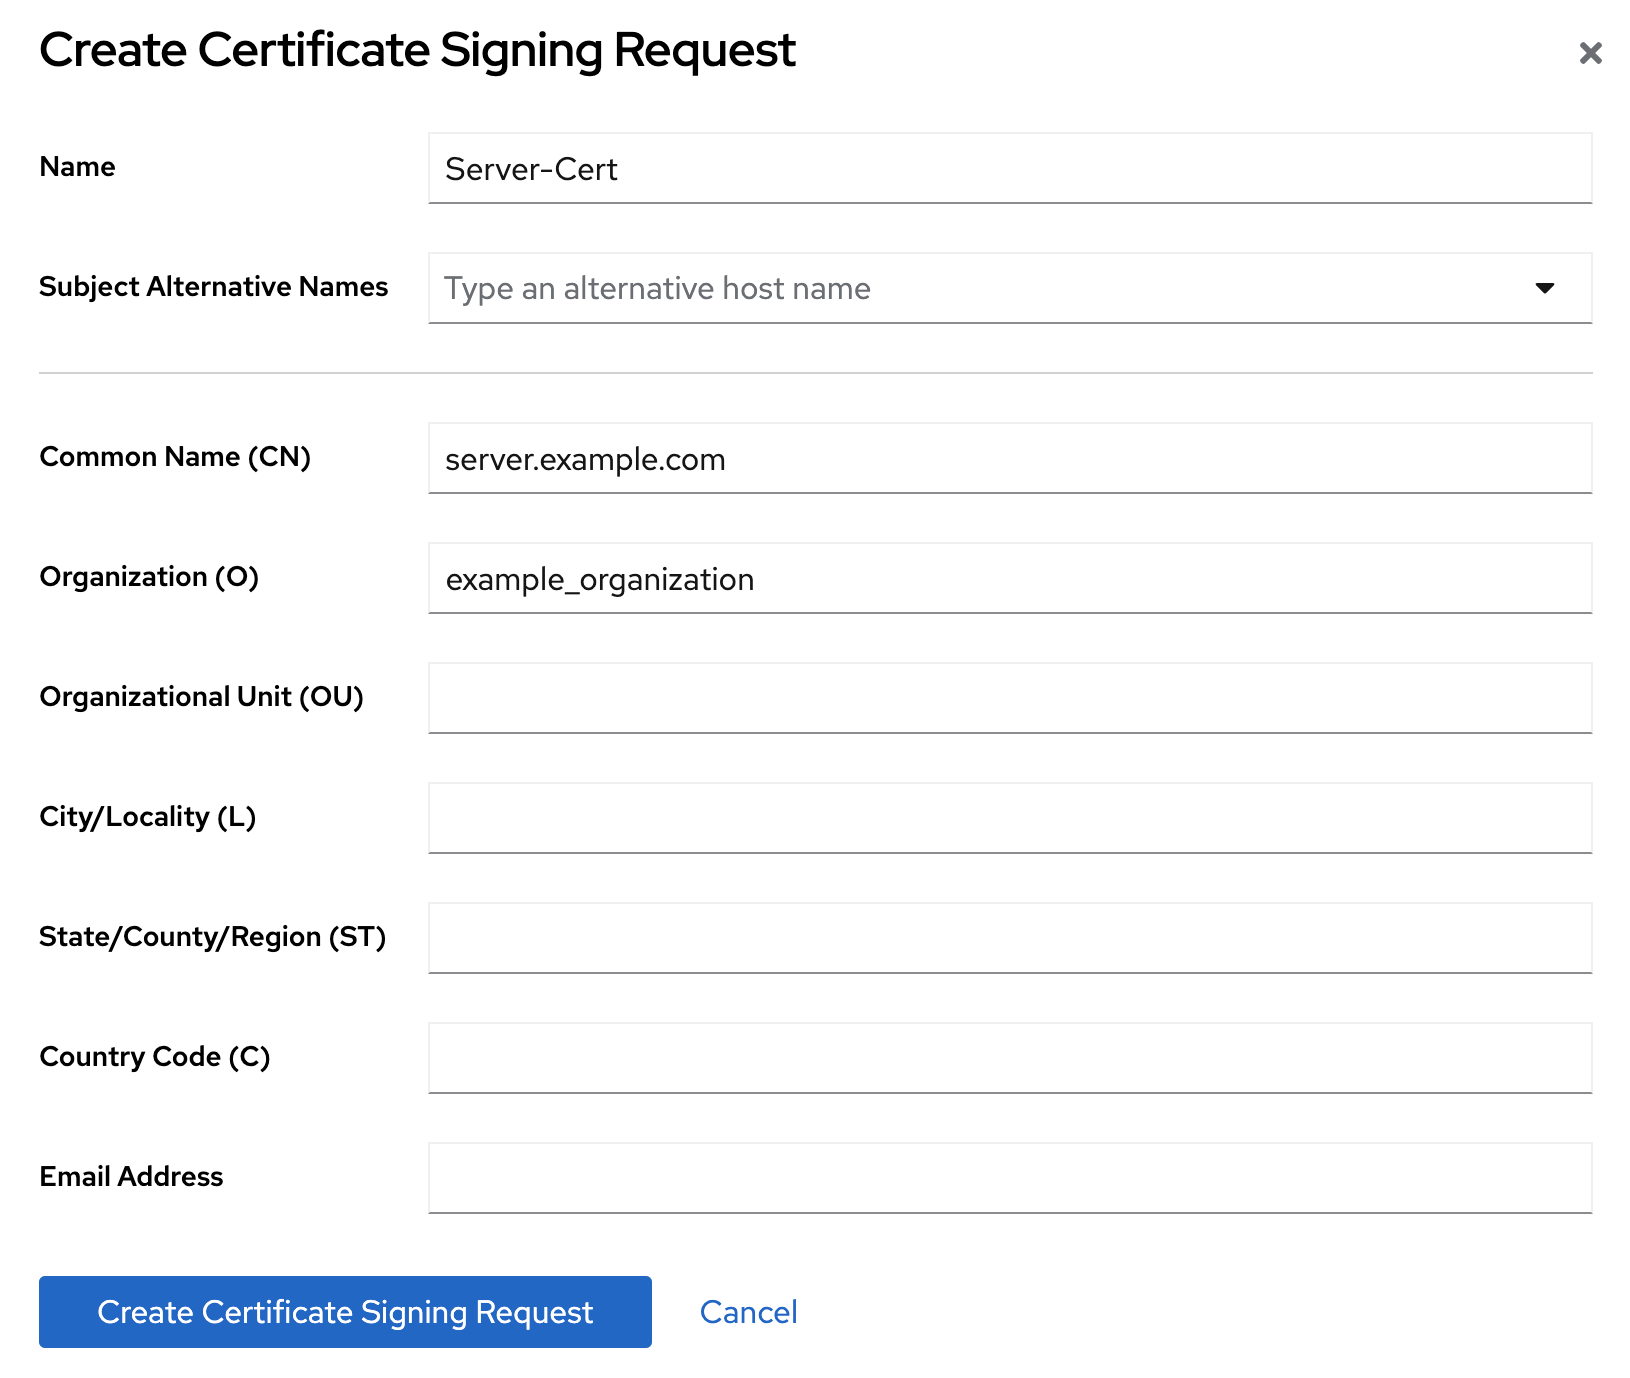
If your host is reachable by multiple names, set the alternative names in the Subject Alternative Names filed.
- Click .
View the CSR text and copy it:
- Click Node options icon for the CSR you want to view and select View CSR.
- Copy the CSR content.
- Submit the CSR file to the certificate authority (CA) to get a certificate issued. For further details, see your CA’s documentation.
- When you get the certificate from your CA, navigate to → → → , and click .
Set a unique nickname for the server certificate, upload the issued certificate, and click .
Remember the certificate nickname, because a later step requires it.
- Navigate to → → → , and click .
- Set a unique nickname for the CA certificate, upload the CA certificate file, and click .
Optional: If you did not enable TLS encryption during the Directory Server instance installation, enable it:
- Navigate to → , and enable the security switch.
- On the pop-up window, click .
- Click on the Security Setting page.
Configure the Server Certificate Name on the Security Configuration page:
- Navigate to → → .
- Select the server certificate nickname in the Server Certificate Name drop-down list, and click .
- Optional: If you do not see the certificate nickname in the drop-down list, refresh the Security Settings page and perform the previous step again.
-
Optional: If you want to use an LDAPS port other than
636, navigate to the → , set the LDAPS port, and click . Open the LDAPS port in the
firewalldservice:#
firewall-cmd --permanent --add-port=636/tcp#firewall-cmd --reloadOptional: Navigate to → → , check Require Secure Connections checkbox, and click .
Directory Server disables the plain text LDAP port.
- Click in the top right corner, and select Restart Instance.
1.5. Managing how Directory Server behaves if the certificate has expired
By default, if encryption is enabled and the certificate has expired, Directory Server logs a warning and the service starts. To change this behavior, set the nsslapd-validate-cert parameter. You can set it to the following values:
-
warn: Directory Server starts and logs a warning about the expired certificate into the/var/log/dirsrv/slapd-instance_name/errorlog file. This is the default setting. -
on: Directory Server validates the certificate. If the certificate has expired, the instance fails to start. -
off: Directory Server does not validate the certificate expiration date. The instance starts and no warning will be logged.
Prerequisites
- You configured TLS encryption.
Procedure
Use the following command to change the
nsslapd-validate-certparameter:#
dsconf -D "cn=Directory Manager" ldap://server.example.com config replace nsslapd-validate-cert=<value>
1.6. Changing the password of the NSS database
You can change the password of the network security services (NSS) database. For example, change it when the password becomes known to unauthorized persons.
Prerequisites
You know the current NSS database password.
If you use a password file to automatically unlock the database when Directory Server starts, the password is stored non-encrypted in plain text in the
/etc/dirsrv/slapd-instance_name/pin.txtfile.
Procedure
Use the following command to change the NSS database password:
#
certutil -d /etc/dirsrv/slapd-instance_name/ -WEnter Password or Pin for "NSS Certificate DB": Enter a password which will be used to encrypt your keys. The password should be at least 8 characters long, and should contain at least one non-alphabetic character. Enter new password: Re-enter password: Password changed successfully.If you use a password file to start Directory Server automatically without prompting for the NSS database password, replace the old password with the new one in the
/etc/dirsrv/slapd-instance_name/pin.txt:If you use the NSS software cryptography module, which is the default:
Internal (Software) Token:passwordIf you use a Hardware Security Module (HSM):
name_of_the_token:password
Verification
Perform an operation on the NSS database that requires entering the password. For example, list the private keys of your instance:
#
certutil -d /etc/dirsrv/slapd-instance_name/ -Kcertutil: Checking token "NSS Certificate DB" in slot "NSS User Private Key and Certificate Services" Enter Password or Pin for "NSS Certificate DB": < 0> rsa 72cb03f87381abfbb6b9e78234e2e4502ad1bfc0 NSS Certificate DB:Server-CertIf the command displays the expected output after you entered the new password, changing the password was successful.
Additional resources
1.7. Creating a password file to start an instance without being prompted for the NSS database password
When you create a new instance, the installer automatically creates the /etc/dirsrv/slapd-instance_name/pin.txt file to enable Directory Server to start without prompting for the network security services (NSS) password. However, if you remove this file, you can recreate it.
The password is stored in plain text. Do not use a password file if the server is running in an unsecured environment.
Prerequisites
- You know the NSS database password.
Procedure
Create the
/etc/dirsrv/slapd-instance_name/pin.txtfile with the following content:If you use the NSS software cryptography module, which is the default:
Internal (Software) Token:passwordIf you use a Hardware Security Module (HSM):
name_of_the_token:password
Set the file permissions:
#
chown dirsrv:root /etc/dirsrv/slapd-instance_name/pin.txt#chmod 400 /etc/dirsrv/slapd-instance_name/pin.txt
Verification
Restart the instance:
#
dsctl instance_name restartIf the system does not prompt for the NSS database password, Directory Server uses the password file.
Additional resources
1.8. Adding the CA certificate used by Directory Server to the trust store of Red Hat Enterprise Linux
When you enable TLS encryption in Directory Server, you configure the instance to use a certificate issued by a CA. If a client now establishes a connection to the server using the LDAPS protocol or the STARTTLS command over LDAP, Directory Server uses this certificate to encrypt the connection. Client utilities use the CA certificate to verify if the server’s certificate is valid. By default, these utilities cancel the connection if they do not trust the certificate of the server.
Example 1.1. Possible connection errors if client utilities do not use the CA certificate
dsconf#
dsconf -D "cn=Directory Manager" ldaps://server.example.com:636 config getError: {'desc': "Can't contact LDAP server", 'info': 'error:1416F086:SSL routines:tls_process_server_certificate:certificate verify failed (self signed certificate in certificate chain)'}ldapsearch#
ldapsearch -H ldaps://server.example.com:636 -D "cn=Directory Manager" -W -b "dc=example,dc=com" -xEnter LDAP Password: ldap_sasl_bind(SIMPLE): Can't contact LDAP server (-1)
To enable client utilities on Red Hat Enterprise Linux to verify the certificate Directory Server uses, add the CA certificate to the trust store of the operating system.
Prerequisites
You know the password of the network security services (NSS) database.
If you still use the password that was generated during the installation of the Directory Server instance, you find this password in plain text in the
/etc/dirsrv/slapd-instance_name/pwdfile.txtfile.
Procedure
If you do not have a local copy of the CA certificate used by Directory Server:
List the certificates in the server’s network security services (NSS) database:
#
certutil -d /etc/dirsrv/slapd-instance_name/ -LCertificate Nickname Trust Attributes SSL,S/MIME,JAR/XPI Example CA C,, Server-Cert u,u,uUse the nickname of the CA certificate in the NSS database to export the CA certificate:
#
certutil -d /etc/dirsrv/slapd-instance_name/ -L -n "Example CA" -a > /tmp/ds-ca.crt
Copy the CA certificate to the
/etc/pki/ca-trust/source/anchors/directory:#
cp /tmp/ds-ca.crt /etc/pki/ca-trust/source/anchors/Rebuild the CA trust database:
#
update-ca-trust
Verification
Establish a connection to Directory Server using the LDAPS protocol. For example, run a query:
#
ldapsearch -H ldaps://server.example.com:636 -D "cn=Directory Manager" -W -b "dc=example,dc=com" -x -s base
Additional resources
-
The
update-ca-trust(8)man page
Chapter 2. Configuring the supported TLS protocol versions
In Red Hat Enterprise Linux 9, all system-wide crypto policy profiles define TLS 1.2 as the minimum. Therefore, this TLS version is also the minimum in Directory Server. However, if you only have clients which support a newer TLS version, you can set a higher protocol version as minimum to increase the security.
2.1. Setting the minimum and maximum TLS protocol versions using the command line
You can set both the minimum and maximum TLS protocol using the command line.
Do not set a maximum TLS protocol. If you do so, your clients might have to use a weaker TLS protocol than their default standard. If you do not set a maximum TLS version, Directory Server always uses the strongest version that is supported.
Prerequisites
- You enabled TLS encryption in Directory Server.
Procedure
Optional: Display the TLS protocols that are currently enabled in Directory Server:
# dsconf -D "cn=Directory Manager" ldap://server.example.com security get | egrep -i "sslVersionMin|sslVersionMax"
sslversionmin: TLS1.2
sslversionmax: TLS1.3
Set the minimum TLS protocol. For example, to set it to TLS 1.3, enter:
# dsconf -D "cn=Directory Manager" ldap://server.example.com security set --tls-protocol-min="TLS1.3"Note that you cannot set the parameter to a value lower than TLS 1.2, which is the minimum of all RHEL system-wide crypto policy profiles.
Not recommended: Set the highest supported TLS protocol:
# dsconf -D "cn=Directory Manager" ldap://server.example.com security set --tls-protocol-max="TLS1.3"If you set
--tls-protocol-maxto a value lower than in--tls-protocol-min, then Directory Server sets the maximum protocol to the same value as the minimum.To always use the strongest supported encryption protocol as the maximum supported TLS version, do not set
--tls-protocol-max.Restart the instance:
# dsctl instance_name restart
Verification
Display the supported TLS protocols:
# dsconf -D "cn=Directory Manager" ldap://server.example.com security get | egrep -i "sslVersionMin|sslVersionMax"
sslversionmin: TLS1.3
sslversionmax: TLS1.3
Use the
opensslutility to establish a secure client connection using a specific TLS protocol:# echo | openssl s_client -connect server.example.com:636 -tls1_3 ... New, TLSv1.3, Cipher is TLS_AES_128_GCM_SHA256 ...
2.2. Setting the minimum and maximum TLS protocol versions using the web console
You can set both the minimum and maximum TLS protocol using the web console
Do not set a maximum TLS protocol. If you do so, your clients might have to use a weaker TLS protocol than their default standard. If you do not set a maximum TLS version, Directory Server always uses the strongest version that is supported.
Prerequisites
- You enabled TLS encryption in Directory Server.
- You are logged in to the Directory Server instance in the web console.
Procedure
- Navigate to → .
-
Set the minimum TLS protocol in the
Minimum TLS Versionfield. -
Not recommended: Set the highest supported TLS protocol in the
Maximum TLS Versionfield. - Click .
-
Click in the top right corner, and select
Restart Instance.
Verification
Use the
opensslutility to establish a secure client connection using a specific TLS protocol:# echo | openssl s_client -connect server.example.com:636 -tls1_3 ... New, TLSv1.3, Cipher is TLS_AES_128_GCM_SHA256 ...
Chapter 3. Requiring LDAPS or STARTTLS for encrypted connections
To prevent sending unencrypted passwords over the network, you can configure Directory Server to require users to use LDAPS or STARTTLS encryption when connecting to the server.
3.1. Configuring Directory Server using the command line to accept only connections encrypted with LDAPS or STARTTLS
By default, Directory Server allows authentication using a bind DN and a password over unencrypted connections, which is a security risk. Suppose you cannot use an alternative secure mechanism, such as certificate-based authentication or SASL. In that case, you can configure Directory Server to require an encrypted connection when authenticating to the server using TLS or STARTTLS.
Requiring a secure connection for bind operations only applies to authenticated binds. Bind operations without a password, such as anonymous and unauthenticated binds, can proceed over standard connections.
Prerequisites
- You configured existing server-to-server connections, such as replication agreements, to use secure binds.
Procedure
Set the
nsslapd-require-secure-bindsconfiguration parameter toon:# dsconf -D "cn=Directory Manager" ldap://server.example.com config replace nsslapd-require-secure-binds=onOptional: If you want to use LDAPS, disable the plain text LDAP port:
# dsconf -D "cn=Directory Manager" ldap://server.example.com security disable_plain_portRestart the instance:
# dsctl instance_name restart
When you enable this feature, it is required for all connections. For example, this includes replication agreements, synchronization, and database chaining.
Additional resources
3.2. Configuring Directory Server using the web console to accept only connections encrypted with LDAPS or STARTTLS
By default, Directory Server allows authentication using a bind DN and a password over unencrypted connections, which is a security risk. Suppose you cannot use an alternative secure mechanism, such as certificate-based authentication or SASL. In that case, you can configure Directory Server to require an encrypted connection when authenticating to the server using TLS or STARTTLS.
Requiring a secure connection for bind operations only applies to authenticated binds. Bind operations without a password, such as anonymous and unauthenticated binds, can proceed over standard connections.
Prerequisites
- You configured existing server-to-server connections, such as replication agreements, to use secure binds.
- You are logged in to the instance in the web console.
Procedure
-
Navigate to → → , select the
Require Secure Connectionsoption, and click . -
Optional: If you want to use LDAPS, navigate to → → , and set
LDAP Portto0to disable the plain text LDAP port. Click . -
Click in the top right corner, and select
Restart Instance.
When you enable this feature, it is required for all connections. For example, this includes replication agreements, synchronization, and database chaining.
Additional resources
Chapter 4. Updating the list of ciphers Directory Server supports
To establish an encrypted connection, both Directory Server and the client need at least one common cipher. For example, if a legacy application requires a cipher that is not enabled by default in Directory Server, you can enable it.
4.1. The difference between default ciphers and available ciphers
Instead of listing individual ciphers in the configuration, you can use one of the following keywords in the nsSSL3Ciphers parameter:
default: Refers to the default ciphers enabled in the network security services (NSS). To display the list, enter:# /usr/lib64/nss/unsupported-tools/listsuites | grep -B1 --no-group-separator "Enabled"The
defaultkeyword is the default value of thensSSL3Ciphersparameter.all: Refers to all supported ciphers in Directory Server. To display the list, enter:# dsconf -D "cn=Directory Manager" ldap://server.example.com security ciphers list --supportedUse the
allkeyword when you want to enable only specific ciphers. For example, settingnsSSL3Ciphersto-all,+TLS_ECDHE_ECDSA_WITH_AES_256_GCM_SHA384configures Directory Server to disable all ciphers and enable onlyTLS_ECDHE_ECDSA_WITH_AES_256_GCM_SHA384.
4.2. Weak ciphers
By default, Directory Server rejects weak ciphers and you must configure Directory Server to support them.
Ciphers are considered weak, if:
They are exportable.
Exportable ciphers are labeled
EXPORTin the cipher name. For example, inTLS_RSA_EXPORT_WITH_RC4_40_MD5.They are symmetrical and weaker than the
3DESalgorithm.Symmetrical ciphers use the same cryptographic keys for both encryption and decryption.
- The key length is shorter than 128 bits.
4.3. Setting ciphers Directory Server supports using the command line
To update the list of supported ciphers in Directory Server, update the nsSSL3Ciphers parameter.
Prerequisites
- You enabled TLS encryption in Directory Server.
Procedure
Display the list of enabled ciphers:
# dsconf -D "cn=Directory Manager" ldap://server.example.com security ciphers list
default
The
defaultkeyword indicates that only the ciphers enabled in the network security services (NSS) are enabled.If you need to enable weak ciphers, enter:
# dsconf -D "cn=Directory Manager" ldap://server.example.com security set --allow-insecure-ciphers onUpdate the
nsSSL3Ciphersparameter. For example, to enable only theTLS_ECDHE_ECDSA_WITH_AES_256_CBC_SHA384andTLS_ECDHE_RSA_WITH_AES_256_GCM_SHA384ciphers, enter:# dsconf -D "cn=Directory Manager" ldap://server.example.com security ciphers set -- "-all,+TLS_ECDHE_ECDSA_WITH_AES_256_CBC_SHA384,+TLS_ECDHE_RSA_WITH_AES_256_GCM_SHA384"Use
--to avoid that the shell interprets the-character in-allas an option to the command. Do not use a\character to escape-allbecause it can create an error and this results in a different cipher selection.Restart the instance:
# dsctl instance_name restart
Verification
Display the list of enabled ciphers:
# dsconf -D "cn=Directory Manager" ldap://server.example.com security ciphers list
default
+TLS_ECDHE_ECDSA_WITH_AES_256_CBC_SHA384
+TLS_ECDHE_RSA_WITH_AES_256_GCM_SHA384
Additional resources
4.4. Setting ciphers Directory Server supports using the web console
You can configure the cipher settings in the Cipher Preferences menu of the Directory Server web console.
Prerequisites
- You enabled TLS encryption in Directory Server.
- You are logged in to the instance in the web console.
Procedure
If you need to enable weak ciphers:
- Navigate to → → .
-
Select
Allow Weak Ciphers. -
Click
Save Settings.
- Navigate to → → .
Update the cipher settings. For example, to enable only the
TLS_ECDHE_ECDSA_WITH_AES_256_CBC_SHA384andTLS_ECDHE_RSA_WITH_AES_256_GCM_SHA384ciphers:-
Select
No Ciphersin theCipher Suitefield. -
Enter
TLS_ECDHE_ECDSA_WITH_AES_256_CBC_SHA384in theAllow Specific Ciphersfield.
-
Select
- Click .
- Click → .
Verification
-
Navigate to → → . The
Enabled Cipherslist displays the ciphers that are enabled.
Chapter 5. Changing the CA trust flags
The certificate authority (CA) trust flags define for which scenarios Directory Server trusts a CA certificate. For example, you set the flags to trust the certificate for TLS connections to the server and for certificate-based authentication.
5.1. Changing the CA trust flags using the command line
You can set the following trust flags on a certificate authority (CA) certificate:
-
C: Trusted CA -
T: Trusted CA client authentication -
c: Valid CA -
P: Trusted peer -
p: Valid peer -
u: Private key
You specify the trust flags comma-separated in three categories: TLS, email, object signing
For example, to trust the CA for TLS encryption and certificate-based authentication, set the trust flags to CT,,.
Prerequisites
- You imported a CA certificate to the network security services (NSS) database.
Procedure
Use the following command to change the trust flags of a CA certificate:
# dsconf -D "cn=Directory Manager" ldap://server.example.com security ca-certificate set-trust-flags "Example CA" --flags "trust_flags"
Verification
Display all certificates in the NSS database:
#
certutil -d /etc/dirsrv/slapd-instance_name/ -LCertificate Nickname Trust Attributes SSL,S/MIME,JAR/XPI Example CA CT,,
Additional resources
-
The
certutil(1)man page
5.2. Changing the CA trust flags using the web console
You can use the web console to change the CA trust flags.
Prerequisites
- You imported a CA certificate to the network security services (NSS) database.
Procedure
- Navigate to → → → .
-
Click icon next to the CA certificate, and select
Edit Trust Flags. Select the trust flags.

- Click
Verification
- Navigate to → → → .
- Click next to the CA certificate to display the trust flags.
Chapter 6. Renewing a TLS certificate
TLS certificates have an expiration date and time. To continuously provide secure connections, renew the server certificate in Directory Server before it expires.
6.1. Renewing a TLS certificate using the command line
Follow this procedure before the TLS server certificate expires to renew it.
Prerequisites
- Attribute encryption is not configured.
- The TLS certificate will expire in the near future.
Procedure
Create a private key and a certificate signing request (CSR). Skip this step if you want to create them using an external utility.
If your host is reachable only by one name, enter:
# dsctl instance_name tls generate-server-cert-csr -s "CN=server.example.com,O=example_organization"If your host is reachable by multiple names:
# dsctl instance_name tls generate-server-cert-csr -s "CN=server.example.com,O=example_organization" server.example.com server.example.netIf you specify the host names as the last parameter, the command adds the Subject Alternative Name (SAN) extension with the
DNS:server.example.com, DNS:server.example.netentries to the CSR.
The string specified in the
-s subjectparameter must be a valid subject name according to RFC 1485. TheCNfield in the subject is required, and you must set it to one of the fully-qualified domain names (FQDN) of the server. The command stores the CSR in the/etc/dirsrv/slapd-instance_name/Server-Cert.csrfile.- Submit the CSR to the certificate authority (CA) to get a certificate issued. For further details, see your CA’s documentation.
-
Store both the CA certificate and the server certificate in the
/root/directory. Import the server certificate issued by the CA to the NSS database, using one of the following options:
If you created the private key using the
dsctl tls generate-server-cert-csrcommand, enter:# dsconf -D "cn=Directory Manager" ldap://server.example.com security certificate add --file /root/instance_name.crt --name "server-cert" --primary-certRemember the name of the certificate you set in the
--name _certificate_nicknameparameter. You require it in a later step.If you created the private key using an external utility, import the server certificate and the private key:
# dsctl instance_name tls import-server-key-cert /root/server.crt /root/server.keyNote that the command requires you to specify the path to the server certificate first and then the path to the private key. This method always sets the nickname of the certificate to
Server-Cert.
Import the CA certificate to the NSS database:
# dsconf -D "cn=Directory Manager" ldap://server.example.com security ca-certificate add --file /root/ca.crt --name "Example CA"Set the trust flags of the CA certificate:
# dsconf -D "cn=Directory Manager" ldap://server.example.com security ca-certificate set-trust-flags "Example CA" --flags "CT,,"This configures Directory Server to trust the CA for TLS encryption and certificate-based authentication.
Stop the instance:
# dsctl instance_name stopEdit the
/etc/dirsrv/slapd-instance_name/dse.ldiffile, and remove the following entries including their attributes:-
cn=AES,cn=encrypted attribute keys,cn=database_name,cn=ldbm database,cn=plugins,cn=config -
cn=3DES,cn=encrypted attribute keys,cn=database_name,cn=ldbm database,cn=plugins,cn=config
ImportantRemove the entries for all databases. If any entry that contains the
nsSymmetricKeyattribute is left in the/etc/dirsrv/slapd-instance_name/dse.ldiffile, Directory Server will fail to start.-
Start the instance:
# dsctl instance_name start
Chapter 7. Configuring certificate-based authentication
Directory Server supports certificate-based authentication of LDAP clients and server-to-server connections, such as in replication topologies.
Depending on the configuration, clients can or must authenticate using a certificate. After verifying the certificate, based on the attributes in the subject field of the certificate, the server searches for the user in the directory. If the search return exactly one user entry, Directory Server uses this user for all further operations. Optionally, you can configure that the certificate used for authentication must match the Distinguished Encoding Rules (DER)-formatted certificate stored in the userCertificate attribute of the user entry.
Benefits of using certificate-based authentication:
- Improved efficiency: Authenticating with the certificate database password and then using that certificate for all subsequent bind or authentication operations is more efficient than repeatedly providing a bind distinguished name (DN) and password.
- Improved security: The use of certificate-based authentication is more secure than non-certificate bind operations because certificate-based authentication uses public-key cryptography. Attackers cannot intercept bind credentials across the network. If the certificate or device is lost, it is useless without the PIN, so it is immune to third-party interference such as phishing attacks.
7.1. Setting up certificate-based authentication
Prerequisites
- You enabled TLS encryption in Directory Server.
-
You set the
CTflags for the certificate authority (CA) certificate in the network security services (NSS) database.
Procedure
Create a
/etc/dirsrv/slapd-instance_name/certmap.conffile to map information from the certificate to Directory Server users:certmap default default default:DNComps dc default:FilterComps mail,cn default:VerifyCert on certmap example cn=Example CA example:DNComps
With this configuration, for certificates issued by
cn=Example CA, Directory Server does not generate a base DN from the subject of the certificate because theDNCompsparameter is set empty for this issuer. Additionally, the settings for theFilterCompsandVerifyCertare inherited from the default entry.Certificates that have a different issuer DN than
cn=Example CAwill use the settings from the default entry and generate the base DN based on the cn attributes in the subject of the certificate. This enables Directory Server to start the search under a specific DN, without searching the whole directory.For all certificates, Directory Server generates the search filter using the
mailand thecnattribute from the certificate’s subject. However, if themailattribute does not exist in the subject, Directory Server will automatically use the value of the certificate’s e attribute in the subject.Enable certificate-based authentication. For example, to configure certificate-based authentication as optional, enter:
# dsconf -D "cn=Directory Manager" ldap://server.example.com security set --tls-client-auth="allowed"Use the
--tls-client-auth=requiredoption to configure certificate-based authentication as mandatory.Optional: If you configured certificate-based authentication as required, enable the
nsslapd-require-secure-bindsparameter:# dsconf -D "cn=Directory Manager" ldap://server.example.com config replace nsslapd-require-secure-binds=onThis setting ensures that users cannot bypass the certificate-based authentication by using an unencrypted connection.
Optional: If Directory Server should use the identity from the certificate instead of the credentials in the bind request, configure Directory Server to use the
EXTERNALsimple authentication and security layer (SASL) mechanism:# dsconf -D "cn=Directory Manager" ldap://server.example.com config replace nsslapd-force-sasl-external=onWith this setting, Directory Server ignores any other bind method than the identity in the certificate.
Restart the instance:
# dsctl instance_name restart
Next steps:
-
If you have configured Directory Server so that the authenticating certificate must match the one stored in the
userCertificateattribute of the user, add the certificates to the user entries. For details, see Section 7.2, “Adding a certificate to a user”
Additional resources
- Enabling TLS-encrypted connections to Directory Server
- Changing the CA trust flags
-
certmap.conf(5)man page
7.2. Adding a certificate to a user
When you set up certificate-based authentication, you can configure the server so that the certificate used to authenticate must match the one stored in the userCertificate binary attribute of the user. If you enabled this feature, you must add the certificate of the affected users to their directory entry.
Prerequisites
- You enabled certificate-based authentication in Directory Server.
- You have a client certificate issued by a certificate authority (CA) that is trusted by the server.
- The client certificate is in distinguished encoding rules (DER)-formatted.
-
The client certificate meets the requirements set in
/etc/dirsrv/slapd-instance_name/certmap.confon the server.
Procedure
If the certificate is not in DER format, convert it. For example, to convert a certificate from privacy enhanced mail (PEM) to DER, enter:
# openssl x509 -in /home/user_name/certificate.pem -out /home/user_name/certificate.der -outform DERAdd the certificate to the user’s
userCertificateattribute:# ldapmodify -D "cn=Directory Manager" -W -H ldaps://server.example.com -x dn: uid=user_name,ou=People,dc=example,dc=com changetype: modify add: userCertificate userCertificate:< file:///home/user_name/example.der
Verification
Authenticate as the user using certificate-based authentication:
Set the following environment variables to the corresponding paths to the CA certificate, the user key, and the user certificate:
LDAPTLS_CACERT=/home/user_name/CA.crt
LDAPTLS_KEY=/home/user_name/user.key
LDAPTLS_CERT=/home/user_name/user.der
Alternatively, set the
TLS_CACERT,TLS_KEY, andTLS_CERTparameters in the~/.ldaprcfile of the current user.Connect to the server:
# ldapwhoami -H ldaps://server.example.com -Y EXTERNAL
dn: uid=example,ou=people,dc=example,dc=com
Additional resources
-
The
TLS OPTIONSsection in theldap.conf(5)man page
Chapter 8. Configuring multi-supplier replication with certificate-based authentication
When you set up replication between two Directory Server instances, you can use certificate-based authentication instead of using a bind DN and password to authenticate to a replication partner.
You can do so by adding a new server to the replication topology and setting up replication agreements between the new host and the existing server using certificate-based authentication.
Certificate-based authentication requires TLS-encrypted connections.
8.1. Preparing accounts and a bind group for the use in replication agreements with certificate-based authentication
To use certificate-based authentication in replication agreements, first prepare the accounts and store the client certificates in the userCertificate attributes of these accounts. Additionally, this procedure creates a bind group that you later use in the replication agreements.
Perform this procedure on the existing host server1.example.com.
Prerequisites
- You enabled TLS encryption in Directory Server.
You stored the client certificates in distinguished encoding rules (DER) format in the
/root/server1.derand/root/server2.derfiles.For details about client certificates and how to request them from your certificate authority (CA), see your CA’s documentation.
Procedure
Create the
ou=servicesentry if it does not exist:# ldapadd -D "cn=Directory Manager" -W -H ldaps://server1.example.com -x dn: ou=services,dc=example,dc=com objectClass: organizationalunit objectClass: top ou: services
Create accounts for both servers, such as
cn=server1,ou=services,dc=example,dc=comandcn=server1,ou=services,dc=example,dc=com:# ldapadd -D "cn=Directory Manager" -W -H ldaps://server1.example.com -x dn: cn=server1,ou=services,dc=example,dc=com objectClass: top objectClass: person objectClass: inetOrgPerson sn: server1 cn: server1 userPassword: password userCertificate:< file:///root/server1.der adding new entry "cn=server1,ou=services,dc=example,dc=com" dn: cn=server2,ou=services,dc=example,dc=com objectClass: top objectClass: person objectClass: inetOrgPerson sn: server2 cn: server2 userPassword: password userCertificate:< file:///root/server2.der adding new entry "cn=server2,ou=services,dc=example,dc=com"
Create a group, such as
cn=repl_servers,dc=groups,dc=example,dc=com:# dsidm -D "cn=Directory Manager" ldaps://server1.example.com -b "dc=example,dc=com" group create --cn "repl_servers"Add the two replication accounts as members to the group:
# dsidm -D "cn=Directory Manager" ldaps://server1.example.com -b "dc=example,dc=com" group add_member repl_servers "cn=server1,ou=services,dc=example,dc=com"

# dsidm -D "cn=Directory Manager" ldaps://server1.example.com -b "dc=example,dc=com" group add_member repl_servers "cn=server2,ou=services,dc=example,dc=com"
Additional resources
8.2. Initializing a new server using a temporary replication manager account
Certificate-based authentication uses the certificates stored in the directory. However, before you initialize a new server, the database on server2.example.com is empty and the accounts with the associated certificates do not exist. Therefore, replication using certificates is not possible before the database is initialized. You can overcome this problem by initializing server2.example.com with a temporary replication manager account.
Prerequisites
-
You installed the Directory Server instance on
server2.example.com. -
The database for the
dc=example,dc=comsuffix exists. -
You enabled TLS encryption in Directory Server on both servers,
server1.example.comandserver2.example.com.
Procedure
On
server2.example.com, enable replication for thedc=example,dc=comsuffix:# dsconf -D "cn=Directory Manager" ldaps://server2.example.com replication enable --suffix "dc=example,dc=com" --role "supplier" --replica-id 2 --bind-dn "cn=replication manager,cn=config" --bind-passwd "password"This command configures the
server2.example.comhost as a supplier for thedc=example,dc=comsuffix, and sets the replica ID of this host to2. Additionally, the command creates a temporarycn=replication manager,cn=configuser with the specified password and allows this account to replicate changes for the suffix to this host.The replica ID must be a unique integer between
1and65534for a suffix across all suppliers in the topology.On
server1.example.com:Enable replication:
# dsconf -D "cn=Directory Manager" ldaps://server1.example.com replication enable --suffix="dc=example,dc=com" --role="supplier" --replica-id="1"Create a temporary replication agreement which uses the temporary account from the previous step for authentication:
# dsconf -D "cn=Directory Manager" ldaps://server1.example.com repl-agmt create --suffix="dc=example,dc=com" --host="server1.example.com" --port=636 --conn-protocol=LDAPS --bind-dn="cn=Replication Manager,cn=config" --bind-passwd="password" --bind-method=SIMPLE --init temporary_agreement
Verification
Verify that the initialization was successful:
# dsconf -D "cn=Directory Manager" ldaps://server1.example.com repl-agmt init-status --suffix "dc=example,dc=com" temporary_agreement
Agreement successfully initialized.
8.3. Configuring multi-supplier replication with certificate-based authentication
In a multi-supplier replication environment with certificate-based authentication, the replicas authenticate each others using certificates.
Prerequisites
-
You set up certificate-based authentication on both hosts,
server1.example.comandserver2.example.com. - Directory Server trusts the certificate authority (CA) that issues the client certificates.
-
The client certificates meet the requirements set in
/etc/dirsrv/slapd-instance_name/certmap.confon the servers.
Procedure
On
server1.example.com:Remove the temporary replication agreement:
# dsconf -D "cn=Directory Manager" ldaps://server1.example.com repl-agmt delete --suffix="dc=example,dc=com" temporary_agreementAdd the
cn=repl_servers,dc=groups,dc=example,dc=combind group to the replication settings:# dsconf -D "cn=Directory Manager" ldaps://server1.example.com replication set --suffix="dc=example,dc=com" --repl-bind-group "cn=repl_servers,dc=groups,dc=example,dc=com"Configure Directory Server to automatically check for changes in the bind group:
# dsconf -D "cn=Directory Manager" ldaps://server1.example.com replication set --suffix="dc=example,dc=com" --repl-bind-group-interval=0
On
server2.example.com:Remove the temporary replication manager account:
# dsconf -D "cn=Directory Manager" ldaps://server2.example.com replication delete-manager --suffix="dc=example,dc=com" --name="Replication Manager"Add the
cn=repl_servers,dc=groups,dc=example,dc=combind group to the replication settings:# dsconf -D "cn=Directory Manager" ldaps://server2.example.com replication set --suffix="dc=example,dc=com" --repl-bind-group "cn=repl_servers,dc=groups,dc=example,dc=com"Configure Directory Server to automatically check for changes in the bind group:
# dsconf -D "cn=Directory Manager" ldap://server2.example.com replication set --suffix="dc=example,dc=com" --repl-bind-group-interval=0Create the replication agreement with certificate-based authentication:
dsconf -D "cn=Directory Manager" ldaps://server2.example.com repl-agmt create --suffix="dc=example,dc=com" --host="server1.example.com" --port=636 --conn-protocol=LDAPS --bind-method="SSLCLIENTAUTH" --init server2-to-server1
On
server1.example.com, create the replication agreement with certificate-based authentication:dsconf -D "cn=Directory Manager" ldaps://server1.example.com repl-agmt create --suffix="dc=example,dc=com" --host="server2.example.com" --port=636 --conn-protocol=LDAPS --bind-method="SSLCLIENTAUTH" --init server1-to-server2
Verification
Verify on each server that the initialization was successful:
# dsconf -D "cn=Directory Manager" ldaps://server1.example.com repl-agmt init-status --suffix "dc=example,dc=com" server1-to-server2
Agreement successfully initialized.

# dsconf -D "cn=Directory Manager" ldaps://server2.example.com repl-agmt init-status --suffix "dc=example,dc=com" server2-to-server1
Agreement successfully initialized.
Additional resources
Chapter 9. Encrypting the replication changelog
Encrypt the replication changelog to increase the security of your instance, in case that an attacker gains access to the file system of your server.
Changelog encryption uses the server’s TLS encryption key and the same PIN to unlock the key. You must either enter the PIN manually upon server startup or use a PIN file.
Directory Server uses randomly generated symmetric cipher keys to encrypt and decrypt the changelog. The server uses a separate key for each configured cipher. These keys are wrapped using the public key from the server’s TLS certificate, and the resulting wrapped key is stored within the server’s configuration files. The effective strength of the attribute encryption is the same as the strength of the server’s TLS key used for wrapping. Without access to the server’s private key and the PIN, it is not possible to recover the symmetric keys from the wrapped copies.
9.1. Encrypting the changelog using the command line
To increase the security in a replication topology, encrypt the changelog on suppliers and hubs. This procedure describes how to enable changelog encryption for the dc=example,dc=com suffix.
Prerequisites
- The server has TLS encryption enabled.
- The host is a supplier or hub in a replication topology.
Procedure
Export the changelog, for example, to the
/tmp/changelog.ldiffile:#
dsconf -D "cn=Directory Manager" ldap://server.example.com replication export-changelog to-ldif -o /tmp/changelog.ldif -r "dc=example,dc=com"Enable change log encryption for the
dc=example,dc=comsuffix:#
dsconf -D "cn=Directory Manager" ldap://server.example.com replication --suffix "dc=example,dc=com" --encryptImport the changelog from the
/tmp/changelog.ldiffile:#
dsconf -D "cn=Directory Manager" ldap://server.example.com replication import-changelog from-ldif -r "dc=example,dc=com" /tmp/changelog.ldifRestart the instance:
#
dsctl instance_name restart
Verification
- Make a change in the LDAP directory, such as updating an entry.
Stop the instance:
#
dsctl instance_name stopList the suffixes and their corresponding databases:
#
dsconf -D "cn=Directory Manager" ldap://server.example.com backend suffix listdc=example,dc=com (userroot)Note the name of the database for which you enabled changelog encryption.
Enter the following command to display parts of the changelog:
#
dbscan -f /var/lib/dirsrv/slapd-instance_name/db/userroot/replication_changelog.db | tail -50If the changelog is encrypted, you see only encrypted data.
Start the instance.
#
dsctl instance_name start
Additional resources
Chapter 10. Enabling members of a group to back up Directory Server and performing the backup as one of the group members
You can configure that members of a group have permissions to back up an instance and perform the backup. This increases the security because you no longer need to set the credentials of cn=Directory Manager in your backup script or cron jobs. Additionally, you can easily grant and revoke the backup permissions by modifying the group.
10.1. Enabling a group to back up Directory Server
Use this procedure to add the cn=backup_users,ou=groups,dc=example,dc=com group and enable members of this group to create backup tasks.
Prerequisites
-
The entry
ou=groups,dc=example,dc=comexists in the database.
Procedure
Create the
cn=backup_users,ou=groups,dc=example,dc=comgroup:#
dsidm -D "cn=Directory manager" ldap://server.example.com -b "dc=example,dc=com" group create --cn backup_usersAdd an access control instruction (ACI) that allows members of the
cn=backup_users,ou=groups,dc=example,dc=comgroup to create backup tasks:#
ldapadd -D "cn=Directory Manager" -W -H ldap://server.example.comdn: cn=config changetype: modify add: aci aci: (target = "ldap:///cn=backup,cn=tasks,cn=config")(targetattr="*") (version 3.0 ; acl "permission: Allow backup_users group to create backup tasks" ; allow (add, read, search) groupdn = "ldap:///cn=backup_users,ou=groups,dc=example,dc=com";) - add: aci aci: (target = "ldap:///cn=config")(targetattr = "nsslapd-bakdir || objectClass") (version 3.0 ; acl "permission: Allow backup_users group to access bakdir attribute" ; allow (read,search) groupdn = "ldap:///cn=backup_users,ou=groups,dc=example,dc=com";)Create a user:
Create a user account:
#
dsidm -D "cn=Directory manager" ldap://server.example.com -b "dc=example,dc=com" user create --uid="example" --cn="example" --uidNumber="1000" --gidNumber="1000" --homeDirectory="/home/example/" --displayName="Example User"Set a password on the user account:
#
dsidm -D "cn=Directory manager" ldap://server.example.com -b "dc=example,dc=com" account reset_password "uid=example,ou=People,dc=example,dc=com" "password"
Add the
uid=example,ou=People,dc=example,dc=comuser to thecn=backup_users,ou=groups,dc=example,dc=comgroup:#
dsidm -D "cn=Directory manager" ldap://server.example.com -b "dc=example,dc=com" group add_member backup_users uid=example,ou=People,dc=example,dc=com
Verification
Display the ACIs set on the
cn=configentry:#
ldapsearch -o ldif-wrap=no -LLLx -D "cn=directory manager" -W -H ldap://server.example.com -b cn=config aci=* aci -s basedn: cn=config aci: (target = "ldap:///cn=backup,cn=tasks,cn=config")(targetattr="*")(version 3.0 ; acl "permission: Allow backup_users group to create backup tasks" ; allow (add, read, search) groupdn = "ldap:///cn=backup_users,ou=groups,dc=example,dc=com";) aci: (target = "ldap:///cn=config")(targetattr = "nsslapd-bakdir || objectClass")(version 3.0 ; acl "permission: Allow backup_users group to access bakdir attribute" ; allow (read,search) groupdn = "ldap:///cn=backup_users,ou=groups,dc=example,dc=com";) ...
10.2. Performing a backup as a regular user
You can perform backups as a regular user instead of cn=Directory Manager.
Prerequisites
-
You enabled members of the
cn=backup_users,ou=groups,dc=example,dc=comgroup to perform backups. -
The user you use to perform the backup is a member of the
cn=backup_users,ou=groups,dc=example,dc=comgroup.
Procedure
Create a backup task using one of the following methods:
Using the
dsconf backup createcommand:#
dsconf -D "uid=example,ou=People,dc=example,dc=com" ldap://server.example.com backup createBy manually creating the task:
#
ldapadd -D "uid=example,ou=People,dc=example,dc=com" -W -H ldap://server.example.comdn: cn=backup-2021_07_23_12:55_00,cn=backup,cn=tasks,cn=config changetype: add objectClass: extensibleObject nsarchivedir: /var/lib/dirsrv/slapd-instance_name/bak/backup-2021_07_23_12:55_00 nsdatabasetype: ldbm database cn: backup-2021_07_23_12:55_00
Verification
Verify that the backup was created:
#
ls -l /var/lib/dirsrv/slapd-instance_name/bak/total 0 drwx------. 3 dirsrv dirsrv 108 Jul 23 12:55 backup-2021_07_23_12_55_00 ...
Additional resources
Chapter 11. Enabling members of a group to export data and performing the export as one of the group members
You can configure that members of a group have permissions to export data. This increases the security because you no longer need to set the credentials of cn=Directory Manager in your scripts. Additionally, you can easily grant and revoke the export permissions by modifying the group.
11.1. Enabling a group to export data
Use this procedure to add the cn=export_users,ou=groups,dc=example,dc=com group and enable members of this group to create export tasks.
Procedure
Create the
cn=export_users,ou=groups,dc=example,dc=comgroup:#
dsidm -D "cn=Directory manager" ldap://server.example.com -b "dc=example,dc=com" group create --cn export_usersAdd an access control instruction (ACI) that allows members of the
cn=export_users,ou=groups,dc=example,dc=comgroup to create export tasks:#
ldapadd -D "cn=Directory Manager" -W -H ldap://server.example.comdn: cn=config changetype: modify add: aci aci: (target = "ldap:///cn=export,cn=tasks,cn=config") (targetattr="*") (version 3.0 ; acl "permission: Allow export_users group to export data" ; allow (add, read, search) groupdn = "ldap:///cn=export_users,ou=groups,dc=example,dc=com";) - add: aci aci: (target = "ldap:///cn=config")(targetattr = "objectclass || cn || nsslapd-suffix || nsslapd-ldifdir") (version 3.0 ; acl "permission: Allow export_users group to access ldifdir attribute" ; allow (read,search) groupdn = "ldap:///cn=export_users,ou=groups,dc=example,dc=com";)Create a user:
Create a user account:
#
dsidm -D "cn=Directory manager" ldap://server.example.com -b "dc=example,dc=com" user create --uid="example" --cn="example" --uidNumber="1000" --gidNumber="1000" --homeDirectory="/home/example/" --displayName="Example User"Set a password on the user account:
#
dsidm -D "cn=Directory manager" ldap://server.example.com -b "dc=example,dc=com" account reset_password "uid=example,ou=People,dc=example,dc=com" "password"
Add the
uid=example,ou=People,dc=example,dc=comuser to thecn=export_users,ou=groups,dc=example,dc=comgroup:#
dsidm -D "cn=Directory manager" ldap://server.example.com -b "dc=example,dc=com" group add_member export_users uid=example,ou=People,dc=example,dc=com
Verification
Display the ACIs set on the
cn=configentry:#
ldapsearch -o ldif-wrap=no -LLLx -D "cn=directory manager" -W -H ldap://server.example.com -b cn=config aci=* aci -s basedn: cn=config aci: (target = "ldap:///cn=export,cn=tasks,cn=config")(targetattr="*")(version 3.0 ; acl "permission: Allow export_users group to export data" ; allow (add, read, search) groupdn = "ldap:///cn=export_users,ou=groups,dc=example,dc=com";) aci: (target = "ldap:///cn=config")(targetattr = "objectclass || cn || nsslapd-suffix || nsslapd-ldifdir")(version 3.0 ; acl "permission: Allow export_users group to access ldifdir attribute" ; allow (read,search) groupdn = "ldap:///cn=export_users,ou=groups,dc=example,dc=com";) ...
11.2. Performing an export as a regular user
You can perform exports as a regular user instead of cn=Directory Manager.
Prerequisites
-
You enabled members of the
cn=export_users,ou=groups,dc=example,dc=comgroup to export data. -
The user you use to perform the export is a member of the
cn=export_users,ou=groups,dc=example,dc=comgroup.
Procedure
Create a export task using one of the following methods:
Using the
dsconf backend exportcommand:#
dsconf -D "uid=example,ou=People,dc=example,dc=com" ldap://server.example.com backend export userRootBy manually creating the task:
#
ldapadd -D "uid=example,ou=People,dc=example,dc=com" -W -H ldap://server.example.comdn: cn=userRoot-2021_07_23_12:55_00,cn=export,cn=tasks,cn=config changetype: add objectClass: extensibleObject nsFilename: /var/lib/dirsrv/slapd-instance_name/ldif/None-userroot-2021_07_23_12:55_00.ldif nsInstance: userRoot cn: export-2021_07_23_12:55_00
Verification
Verify that the backup was created:
#
ls -l /var/lib/dirsrv/slapd-instance_name/ldif/*.ldiftotal 0 -rw-------. 1 dirsrv dirsrv 10306 Jul 23 12:55 None-userroot-2021_07_23_12_55_00.ldif ...
Additional resources
Chapter 12. Managing access control instructions
When Directory Server receives a request, it uses the authentication information provided by the user in the bind operation and the access control instructions (ACI) defined in the directory to allow or deny access to the requested entry or attribute. The server can allow or deny permissions for actions, such as read, write, search, and compare. The permission level granted to a user depends on the authentication information provided.
Access control in Directory Server enables you to set precise rules on when the ACIs are applicable:
- For the entire directory, a subtree, or specific entries
- For a specific user, all users belonging to a specific group or role, or all users in the directory
For a specific location, such as an IP address, an IP range, or a DNS name.
Note that load balancers can affect location-specific rules.
Complex ACIs are difficult to read and understand. Instead of one complex ACI, you can write multiple simple rules to achieve the same effect. However, a higher number of ACIs also increases the costs of ACI processing.
12.1. ACI placement
Directory Server stores access control instruction (ACI) in the multi-valued aci operational attribute in directory entries. To set an ACI, add the aci attribute to the corresponding directory entry. Directory Server applies the ACIs:
Only to the entry that contains the ACI, if it does not have any child entries. For example, if a client requires access to the
uid=user_name,ou=People,dc=example,dc=comobject, and an ACI is only set ondc=example,dc=comand not on any child entries, only this ACI is applied.NoteACIs with
addpermissions also apply to child entries created in future.To the entry that contains the ACI and to all entries below it, if it has child entries. As a direct consequence, when the server evaluates access permissions to any given entry, it verifies the ACIs for every entry between the one requested and the directory suffix, as well as the ACIs on the entry itself.
For example, ACIs are set on the
dc=example,dc=comand theou=People,dc=example,dc=comentry: If a client wants to access theuid=user_name,ou=People,dc=example,dc=comobject, which has no ACI set, Directory Server first validates the ACI on theou=People,dc=example,dc=comentry. If this ACI grants access, evaluation stops and grants access. If not, Directory Server verifies the ACI onou=People,dc=example,dc=com. If this ACI successfully authorizes the client, it can access the object.
ACIs set in the rootDSE entry apply only to this entry.
An ACI created on an entry can be set not to apply directly to that entry but rather to some or all of the entries in the subtree below. The advantage of this approach is that general ACIs can be placed higher in the directory tree to have effect on entries located lower in the tree. For example, an ACI that targets entries that include the inetOrgPerson object class can be created at the level of an organizationalUnit entry or a locality entry.
Minimize the number of ACIs in the directory tree by placing general rules at high level branch points. To limit the scope of more specific rules, place them to leaf entries as closely as possible.
12.2. The structure of an ACI
The aci attribute uses the following syntax:
(target_rule) (version 3.0; acl "ACL_name"; permission_rule bind_rules;)
-
target_rulespecifies the entry, attributes, or set of entries and attributes for which to control access. -
version 3.0is a required string which identifies the access control instructions (ACI) version. -
acl "ACL name"sets a name or string that describes the ACI. -
permission_rulesets what rights, such asreadorwrite, are allowed or denied. -
bind_rulesspecifies which rules must match during the bind to allow or deny access.
The permission and the bind rule pair are called an access control rule.
To efficiently set multiple access controls for a given target, you can set multiple access control rules for each target:
(target_rule)(version 3.0; acl "ACL_name"; permission_rule bind_rules; permission_rule bind_rules; ... ;)
12.3. ACI evaluation
To evaluate the access rights to a particular entry, the server creates a list of the access control instructions (ACI) present on the entry itself and on the parent entries back up to the top level entry stored in Directory Server. ACIs are evaluated across all databases for a particular instance but not across different instances.
Directory Server evaluates this list of ACIs based on the semantics of the ACIs, not on their placement in the directory tree. This means that ACIs that are close to the root of the directory tree do not take precedence over ACIs that are closer to the leaves of the directory tree.
In Directory Server, the deny permission in ACIs take precedence over the allow permission. For example, if you deny write permission at the directory’s root level, none of the users can write to the directory, regardless if an other ACI grants this permission. To grant a specific user write permissions to the directory, you have to add an exception to the original denying rule to allow the user to write in that directory.
For improved ACIs, use fine-grained allow rules instead of deny rules.
12.4. Limitations of ACIs
When you set access control instructions (ACI), the following restrictions apply:
If your directory database is distributed over multiple servers, the following restrictions apply to the keywords you can use in ACIs:
ACIs depending on group entries using the
groupdnkeyword must be located on the same server as the group entry.If the group is dynamic, all members of the group must have an entry on the server. Member entries of static groups can be located on the remote server.
-
ACIs depending on role definitions using the
rolednkeyword, must be located on the same server as the role definition entry. Every entry that is intended to have the role must also be located on the same server.
However, you can match values stored in the target entry with values stored in the entry of the bind user by, for example, using the
userattrkeyword. In this case, access is evaluated normally even if the bind user does not have an entry on the server that stores the ACI.You cannot use virtual attributes, such as Class of Service (CoS) attributes, in the following ACI keywords:
-
targetfilter -
targattrfilters -
userattr
-
- Access control rules are evaluated only on the local server. For example, if you specify the host name of a server in LDAP URLs in ACI keywords, the URL will be ignored.
12.5. How Directory Server handles ACIs in a replication topology
Access control instructions (ACI) are stored in aci attributes of entries. Therefore, if an entry containing ACIs is part of a replicated database, the ACIs are replicated.
ACIs are always evaluated on the server that resolves the incoming LDAP requests. When a consumer server receives an update request, it returns a referral to the supplier server before evaluating whether the request can be serviced on the supplier.
12.6. Displaying, adding, deleting, and updating ACIs
You can use the ldapsearch utility to search, and the ldapmodify utility to add, delete, and update Access Control Instructions (ACI).
Displaying ACIs:
For example, to display the ACIs set on dc=example,dc=com and sub-entries, enter:
# ldapsearch -D "cn=Directory Manager" -W -H ldap://server.example.com -x -b "dc=example,dc=com" -s sub '(aci=*)' aci
Adding an ACI
For example, to add an ACI to the ou=People,dc=example,dc=com entry, enter:
# ldapmodify -D "cn=Directory Manager" -W -H ldap://server.example.com -x

dn: ou=People,dc=example,dc=com
changetype: modify
add: aci
aci: (targetattr="userPassword") (version 3.0; acl
  "Allow users updating their password";
  allow (write) userdn= "ldap:///self";)
Deleting an ACI
To delete an ACI:
If only one
aciattribute is set on the entry or you want to remove all ACIs from the entry:#
ldapmodify -D "cn=Directory Manager" -W -H ldap://server.example.com -xdn: ou=People,dc=example,dc=com changetype: delete delete: aciIf multiple ACIs exist on the entry and you want to delete a specific ACI, specify the exact ACI:
#
ldapmodify -D "cn=Directory Manager" -W -H ldap://server.example.com -xdn: ou=People,dc=example,dc=com changetype: modify delete: aci aci: (targetattr="userPassword") (version 3.0; acl "Allow users updating their password"; allow (write) userdn= "ldap:///self";)
Updating an ACI
To update an ACI:
- Delete the existing ACI.
- Add a new ACI with the updated settings.
12.7. Defining ACI targets
Target rules in an access control instruction (ACI) define to which entries Directory Server applies the ACI. If you do not set a target, the ACI applies to the entry containing the aci attribute and to entries below.
In an ACI, the following highlighted part is the target rule:
(target_rule)(version 3.0; acl "ACL_name"; permission_rule bind_rules;)
For complex ACIs, Directory Server supports multiple target rules with different keywords in an ACI:
(target_rule_1)(target_rule_2)(...)(version 3.0; acl "ACL_name"; permission_rule bind_rules;)
If you specify multiple target rules, the order is not relevant. Note that you can use each of the following keywords only once in an ACI:
-
target -
targetattr -
targetattrfilters -
targetfilter -
target_from -
target_to
12.7.1. The syntax of target rules
The general syntax of a target rule is:
(keyword comparison_operator "expression")
-
keyword: Sets the type of the target. comparison_operator: Valid values are=and!=and indicate whether or not the target is the object specified in the expression.WarningFor security reasons, Red Hat recommends not using the
!=operator, because it allows the specified operation on all other entries or attributes. For example:(targetattr != "userPassword");(version 3.0; acl "example"); allow (write) ... );
The previous example allows users to set, update, or delete any attribute except the
userPasswordattribute under the Distinguished Name (DN) you set the ACI. However, also this enables users, for example, to add an additionalaciattribute that allows write access to this attribute as well.-
expression: Sets the target and must be surrounded by quotation marks. The expression itself depends on the keyword you use.
12.7.2. Targeting a directory entry
To control access based on a Distinguished Name (DN) and the entries below it, use the target keyword in the access control instruction (ACI). A target rule which uses the target keyword takes a DN as expression:
(target comparison_operator "ldap:///distinguished_name")
You must set the ACI with the target keyword on the DN you are targeting or a higher-level DN of it. For example, if you target ou=People,dc=example,dc=com, you must either set the ACI on ou=People,dc=example,dc=com or dc=example,dc=com.
Example 12.1. Using the target keyword
To enable users that are stored in the ou=People,dc=example,dc=com entry to search and display all attributes in their own entry:
# ldapmodify -D "cn=Directory Manager" -W -H ldap://server.example.com -x

dn: ou=People,dc=example,dc=com
changetype: modify
add: aci
aci: (target = "ldap:///ou=People,dc=example,dc=com") (version 3.0;
 acl "Allow users to read and search attributes of own entry"; allow (search, read)
 (userdn = "ldap:///self");)
Using wildcards with the target keyword
You can use the * wildcard character target multiple entries.
The following target rule example matches all entries in ou=People,dc=example,dc=com whose uid attribute is set to a value that starts with the letter a:
(target = "ldap:///uid=a*,ou=People,dc=example,dc=com")
Depending on the position of the wildcard, the rule not only applies to attribute values, but also to the full DN. Therefore, you can use the wildcard as a substitute for portions of the DN.
Example 12.2. Targeting a directory entries using wildcards
The following rule targets all entries in the dc=example,dc=com tree with a matching uid attribute and not only entries which are stored in the dc=example,dc=com entry itself:
(target = "ldap:///uid=user_name*,dc=example,dc=com")
The previous target rule matches multiple entries, such as:
-
uid=user_name,dc=example,dc=com -
uid=user_name,ou=People,dc=example,dc=com -
uid=user_name2,dc=example,dc=com
Directory Serverdoes not support wildcards in the suffix part of a DN. For example, if your directory’s suffix is dc=example,dc=com, you cannot use a target with a wildcard in this suffix, such as (target = "ldap:///dc=*.com").
12.7.3. Targeting attributes
To limit access in an access control instruction (ACI) to certain attributes, use the targetattr keyword. For example, this keyword defines:
- In a read operation, what attributes will be returned to a client
- In a search operation, what attributes will be searched
- In a write operation, what attributes can be written to an object
- In an add operation, what attributes can be added when creating a new object
In certain situations, you can use the targetattr keyword to secure ACIs by combining other target keywords with targetattr. See Advanced usage of target rules.
In read and search operations, the default targets no attribute. An ACI without a targetattr keyword is only useful for ACIs with rights affecting a complete entry, such as add or delete.
To separate multiple attributes in a target rule that uses the targetattr keyword, use ||:
(targetattr comparison_operator "attribute_1 || attribute_2 || ...")
The attributes set in the expression must be defined in the schema.
The attributes specified in the expression apply to the entry on which you create the ACI and to all entries below it if not restricted by further target rules.
Example 12.3. Using the targetattr keyword
To enable users stored in dc=example,dc=com and all subentries to update the userPassword attribute in their own entry, enter:
# ldapmodify -D "cn=Directory Manager" -W -H ldap::server.example.com -x

dn: dc=example,dc=com
changetype: modify
add: aci
aci: (targetattr = "userPassword") (version 3.0;
 acl "Allow users updating own userPassword";
 allow (write) (userdn = "ldap:///self");)
Using wildcards with the targetattr keyword
Using the * wildcard character, you can, for example, target all attributes:
(targetattr = "*")
For security reasons, do not use wildcards with the targetattr, because it allows access to all attributes, including operational attributes. For example, if users can add or modify all attributes, users might create additional ACIs and increase their own permissions.
12.7.4. Targeting entries and attributes using LDAP filters
To target a group of entries that match a certain criteria, use the targetfilter keyword with an LDAP filter:
(targetfilter comparison_operator "LDAP_filter")
The filter expression is a standard LDAP search filter.
Example 12.4. Using the targetfilter keyword
To grant permissions to members of the cn=Human Resources,dc=example,dc.com group to modify all entries having the department attribute set to Engineering or Sales:
# ldapmodify -D "cn=Directory Manager" -W -H ldap://server.example.com -x

dn: dc=example,dc=com
changetype: modify
add: aci
aci: (targetfilter = "(|(department=Engineering)(department=Sales)")
 (version 3.0; acl "Allow HR updating engineering and sales entries";
 allow (write) (groupdn = "ldap:///cn=Human Resources,dc=example,dc.com");)
The targetfilter keyword targets whole entries. If you combine it with the targetattr keyword, the access control instruction (ACI) applies only to a subset of attributes of the targeted entries. See Targeting certain attributes of entries matching a filter.
Using LDAP filters is useful when targeting entries and attributes that are spread across the directory. However, the results are sometimes unpredictable because filters do not directly name the object for which you are managing access. The set of entries targeted by a filtered ACI is likely to change as attributes are added or deleted. Therefore, if you use LDAP filters in ACIs, verify that they target the correct entries and attributes by using the same filter, for example, in an ldapsearch operation.
Using wildcards with the targetfilter keyword
The targetfilter keyword supports wildcards similarly to standard LDAP filters. For example, to target all uid attributes whose value starts with adm, use:
(targetfilter = "(uid=adm*) ...)
12.7.5. Targeting attribute values using LDAP filters
You can use access control to target specific values of attributes. This means that you can grant or deny permissions on an attribute if that attribute’s value meets the criteria that is defined in the access control instruction (ACI). An ACI that grants or denies access based on an attribute’s value is called a value-based ACI. This applies only to ADD and DEL operations. You cannot limit search rights by specific values.
To create a value-based ACI, use the targattrfilters keyword with the following syntax:
For one operation with one attribute and filter combination:
(targattrfilters="operation=attribute:filter")
For one operation with multiple attribute and filter combinations:
(targattrfilters="operation=attribute_1:filter_1 && attribute_2:filter_2 ... && attribute_m:filter_m")
For two operations, each with multiple attribute and filter combinations:
(targattrfilters="operation_1=attribute_1_1:filter_1_1 && attribute_1_2:filter_1_2 ... && attribute_1_m:filter_1_m , operation_2=attribute_2_1:filter_2_1 && attribute_2_2:filter_2_2 ... & attribute_2_n:filter_2_n ")
In the previous syntax examples, you can set the operations either to add or del. The attribute:filter combination sets the filter and the attribute the filter is applied to.
The following describes how filter must match:
- When creating an entry and a filter applies to an attribute in the new entry, then each instance of that attribute must match the filter.
- When deleting an entry and a filter applies to an attribute in the entry, then each instance of that attribute must also match the filter.
-
When modifying an entry and the operation adds an attribute, then the
addfilter that applies to that attribute must match. -
If the operation deletes an attribute, then the
delfilter that applies to that attribute must match. If the individual values of an attribute already present in the entry are replaced, then both theaddanddelfilters must match.
Example 12.5. Using the targattrfilters keyword
To create an ACI that enables users to add any role to their own entry, except the Admin role, and to add the telephone attribute, as long as the value begins with the 123 prefix, enter:
# ldapmodify -D "cn=Directory Manager" -W -H ldap::server.example.com -x

dn: dc=example,dc=com
changetype: modify
add: aci
aci: (targattrfilters="add=nsroledn:(!(nsroledn=cn=Admin)) &&
 telephoneNumber:(telephoneNumber=123*)") (version 3.0;
 acl "Allow adding roles and telephone";
 allow (add) (userdn = "ldap:///self");)
12.7.6. Targeting source and destination DNs
In certain situations, administrators want to allow users to move directory entries. Using the target_from and target_to keywords in an access control instruction (ACI), you can specify the source and destination of the operation, however, without enabling the user:
- To move entries from a different source as set in the ACI.
- To move entries to a different destination as set in the ACI.
- To delete existing entries from the source Distinguished Name (DN).
- To add new entries to the destination DN.
Example 12.6. Using the target_from and target_to keywords
To enable the uid=user,dc=example,dc=com account to move user accounts from the cn=staging,dc=example,dc=com entry to cn=people,dc=example,dc=com, enter:
# ldapmodify -D "cn=Directory Manager" -W -H ldap:server.example.com -x

dn: dc=example,dc=com
changetype: modify
add: aci
aci: (target_from="ldap:///uid=*,cn=staging,dc=example,dc=com")
 (target_to="ldap:///cn=People,dc=example,dc=com")
 (version 3.0; acl "MODDN from"; allow (moddn))
 userdn="ldap:///uid=user,dc=example,dc=com";)
ACIs apply only to the subtree where they are defined. In the previous example, the ACI is applied only to the dc=example,dc=com subtree.
If the target_from or target_to keyword is not set, the ACI matches any source or destination.
12.8. Advanced usage of target rules
By combining multiple keywords, you can create complex target rules. This section provides examples of the advanced usage of target rules.
12.8.1. Delegating permissions to create and maintain groups
In certain situations, administrators want to delegate permissions to other accounts or groups. By combining target keywords, you can create secure access control instructions (ACI) that solve this request.
Example 12.7. Delegating permissions to create and maintain groups
To enable the uid=user,ou=People,dc=example,dc=com" account to create and update groups in the ou=groups,dc=example,dc=com entry:
# ldapmodify -D "cn=Directory Manager" -W -H ldap://server.example.com -x

dn: dc=example,dc=com
changetype: modify
add: aci
aci: (target = "ldap:///cn=*,ou=Groups,dc=example,dc=com")
 (targattrfilters="add=objectclass:(|(objectclas=top)(objectclass=groupOfUniqueNames)))
 (targetattr="cn || uniqueMember || objectClass")
 (version 3.0; acl "example"; allow (read, search, write, add)
 (userdn = "ldap:///uid=test,ou=People,dc=example,dc=com");)
For security reasons, the previous example adds certain limitations. The uid=test,ou=People,dc=example,dc=com user:
-
Can create objects that must contain the
topandgroupOfUniqueNamesobject classes. -
Cannot add additional object classes, such as
account. For example, this prevents if you use Directory Server accounts for local authentication, to create new users with an invalid user ID, such as0for therootuser.
The targetfilter rule ensures that the ACI entry applies only to entries with the groupofuniquenames object class and the targetattrfilter rule ensures that no other object class can be added.
12.8.2. Targeting both an entry and attributes
The target controls access based on a distinguished name (DN). However, if you use it in combination with a wildcard and the targetattr keyword, you can target both entries and attributes.
Example 12.8. Targeting both an entry and attributes
To enable the uid=user,ou=People,dc=example,dc.com user to read and search members of groups in all organizational units in the dc=example,dc=com subtree:
# ldapmodify -D "cn=Directory Manager" -W -H ldap://server.example.com -x

dn: dc=example,dc=com
changetype: modify
add: aci
aci: (target="ldap:///cn=*,dc=example,dc=com")(targetattr="member" || "cn") (version 3.0;
 acl "Allow uid=user to search and read members of groups";
 allow (read, search) (userdn = "ldap:///uid=user,ou=People,dc=example,dc.com");)
12.8.3. Targeting certain attributes of entries matching a filter
If you combine the targetattr and targetfilter keywords in two target rules, you can target certain attributes in entries that match a filter.
Example 12.9. Targeting certain attributes of entries matching a filter
To allow members of the cn=Engineering Admins,dc=example,dc=com group to modify the jpegPhoto and manager attributes of all entries having the department attribute set to Engineering, enter:
# ldapmodify -D "cn=Directory Manager" -W -H ldap://server.example.com -x

dn: dc=example,dc=com
changetype: modify
add: aci
aci: (targetattr = "jpegPhoto || manager")
 (targetfilter = "(department=Engineering)") (version 3.0;
 acl "Allow engineering admins updating jpegPhoto and manager of department members";
 allow (write) (groupdn = "ldap:///cn=Engineering Admins,dc=example,dc.com");)
12.8.4. Targeting a single directory entry
To target a single directory entry, combine the targetattr and targetfilter keywords.
Example 12.10. Targeting a single directory entry
To enable the uid=user,ou=People,dc=example,dc=com user to read and search the ou and cn attributes in the ou=Engineering,dc=example,dc=com entry:
# ldapmodify -D "cn=Directory Manager" -W -H ldap://server.example.com -x

dn: ou=Engineering,dc=example,dc=com
changetype: modify
add: aci
aci: (targetattr = "ou || cn")
 (targetfilter = "(ou=Engineering)") (version 3.0;
 acl "Allow uid=user to search and read engineering attributes";
 allow (read, search) (userdn = "ldap:///uid=user,ou=People,dc=example,dc.com");)
To enable the previous example to target only the ou=Engineering,dc=example,dc=com entry, sub-entries in ou=Engineering,dc=example,dc=com must not have the ou attribute set to Engineering.
These kinds of ACIs can fail if the structure of your directory changes.
Alternatively, you can create a bind rule that matches the user input in the bind request with an attribute value that is stored in the targeted entry. See Defining access based on value matching.
12.9. Defining ACI permissions
Permission rules define the rights that are associated with the access control instruction (ACI) and whether access is allowed or denied.
In an ACI, the following highlighted part is the permission rule:
(target_rule) (version 3.0; acl "ACL_name"; permission_rule bind_rules;)
12.9.1. The syntax of permission rules
The general syntax of a permission rule is:
permission (rights)
-
permission: Sets if the access control instruction (ACI) allows or denies permission. -
rights: Sets the rights which the ACI allows or denies. See User rights in permission rules.
Example 12.11. Defining permissions
To enable users stored in the ou=People,dc=example,dc=com entry to search and display all attributes in their own entry:
# ldapmodify -D "cn=Directory Manager" -W -H ldap://server.example.com -x

dn: ou=People,dc=example,dc=com
changetype: modify
add: aci
aci: (target = "ldap:///ou=People,dc=example,dc=com") (version 3.0;
 acl "Allow users to read and search attributes of own entry"; allow (search, read)
 (userdn = "ldap:///self");)
12.9.2. User rights in permission rules
The rights in a permission rule define what operations are granted or denied. In an ACI, you can set one or multiple of the following rights:
Table 12.1. User rights
| Right | Description |
|---|---|
|
| Sets whether users can read directory data. This permission applies only to search operations in LDAP. |
|
|
Sets whether users can modify an entry by adding, modifying, or deleting attributes. This permission applies to the |
|
|
Sets whether users can create an entry. This permission applies only to the |
|
|
Sets whether users can delete an entry. This permission applies only to the |
|
|
Sets whether users can search for directory data. To view data returned as part of a search result, assign |
|
|
Sets whether the users can compare data they supply with data stored in the directory. With |
|
| Sets whether users can add or delete their own distinguished name (DN) from a group. This right is used only for group management. |
|
|
Sets whether the specified DN can access the target with the rights of another entry. The |
|
|
Sets all of the rights, except |
12.9.3. Rights required for LDAP operations
This section describes the rights you must grant to users depending on the type of LDAP operation you want to authorize them to perform.
Adding an entry:
-
Grant
addpermission on the entry that you want to add. -
Grant
writepermission on the value of each attribute in the entry. This right is granted by default but can be restricted using thetargattrfilterskeyword.
-
Grant
Deleting an entry:
-
Grant
deletepermission on the entry that you want to delete. -
Grant
writepermission on the value of each attribute in the entry. This right is granted by default but can be restricted using thetargattrfilterskeyword.
-
Grant
Modifying an attribute in an entry:
-
Grant
writepermission on the attribute type. -
Grant
writepermission on the value of each attribute type. This right is granted by default but can be restricted using thetargattrfilterskeyword.
-
Grant
Modifying the RDN of an entry:
-
Grant
writepermission on the entry. -
Grant
writepermission on the attribute type that is used in the new RDN. -
Grant
writepermission on the attribute type that is used in the old RDN, if you want to grant the right to delete the old RDN. -
Grant
writepermission on the value of attribute type that is used in the new RDN. This right is granted by default but can be restricted using thetargattrfilterskeyword.
-
Grant
Comparing the value of an attribute:
-
Grant
comparepermission on the attribute type.
-
Grant
Searching for entries:
-
Grant
searchpermission on each attribute type used in the search filter. -
Grant
readpermission on attribute types used in the entry.
-
Grant
12.10. Defining ACI bind rules
The bind rules in an access control instruction (ACI) define the required bind parameters that must meet so that Directory Server applies the ACI. For example, you can set bind rules based on:
- DNs
- Group memberships or assigned roles
- Locations from which an entry must bind
- Types of authentication that must be in use during the bind
- Times or days on which the bind occurs
In an ACI, the following highlighted part is the bind rule:
(target_rule) (version 3.0; acl "ACL_name"; permission_rule bind_rules;)
12.10.1. The syntax of bind rules
The general syntax of a bind rule is:
keyword comparison_operator "expression"
-
keyword: Sets the type of the bind operation. -
comparison_operator: Valid values are=and!=and indicate whether or not the target is the object specified in the expression. If a keyword supports additional comparison operators, it is mentioned in the corresponding section. -
expression: Sets the expression and must be surrounded by quotation marks. The expression itself depends on the keyword you use.
12.10.2. Defining user-based access
The userdn keyword enables you to grant or deny access based on one or multiple DNs and uses the following syntax:
userdn comparison_operator "ldap:///distinguished_name || ldap:///distinguished_name || ..."
Set the DN in the expression to:
- A DN: See Using a DN with the userdn keyword.
- An LDAP filter: See Using the userdn keyword with an LDAP filter.
-
The
anyonealias: See Granting anonymous access. -
The
allalias: See Granting access to authenticated users. -
The
selfalias: See Enabling users to access their own entries. -
The
parentalias: See Setting access for child entries of a user.
Do not specify a host name or port number within the LDAP URL. The URL always applies to the local server.
Using a DN with the userdn keyword
Set the userdn keyword to a distinguished name (DN) to apply the ACI only to the matching entry. To match multiple entries, use the * wildcard in the DN.
Using the userdn keyword with a DN must match the following syntax:
userdn comparison_operator ldap:///distinguished_name
Example 12.12. Using a DN with the userdn keyword
To enable the uid=admin,ou=People,dc=example,dc=com user to read the manager attribute of all other users in the ou=People,dc=example,dc=com entry:
# ldapmodify -D "cn=Directory Manager" -W -H ldap://server.example.com -x

dn: ou=People,dc=example,dc=com
changetype: modify
add: aci
aci: (targetattr="manager") (version 3.0; acl "Allow uid=admin reading manager attribute";
 allow (search, read) userdn = "ldap:///uid=admin,ou=People,dc=example,dc=com";)
Using the userdn keyword with an LDAP filter
If you want to dynamically allow or deny permissions to users, use the userdn keyword with an LDAP filter:
userdn comparison_operator "ldap:///distinguished_name??scope?(filter)"
The LDAP filter supports the * wildcard.
Example 12.13. Using the userdn keyword with an LDAP filter
To enable users who have the department attribute set to Human Resources to update the homePostalAddress attribute of users in the ou=People,dc=example,dc=com entry:
# ldapmodify -D "cn=Directory Manager" -W -H ldap://server.example.com -x

dn: ou=People,dc=example,dc=com
changetype: modify
add: aci
aci: (targetattr="homePostalAddress") (version 3.0;
 acl "Allow HR setting homePostalAddress"; allow (write)
 userdn = "ldap:///ou=People,dc=example,dc=com??sub?(department=Human Resources)";)
Granting anonymous access
In certain situations, administrators want to configure anonymous access to data in the directory. Anonymous access means that it is possible to bind to the directory by providing:
- No bind DN and password
- A valid bind DN and password
To configure anonymous access, use the ldap:///anyone expression with the userdn keyword in a bind rule:
userdn comparison_operator "ldap:///anyone"Example 12.14. Granting anonymous access
To enable anyone without authentication to read and search the sn, givenName, and telephoneNumber attributes in the ou=People,dc=example,dc=com entry:
# ldapmodify -D "cn=Directory Manager" -W -H __ldap://server.example.com -x`
dn: ou=People,dc=example,dc=com
changetype: modify
add: aci
aci: (targetattr="sn" || targetattr="givenName" || targetattr = "telephoneNumber")
 (version 3.0; acl "Anonymous read, search for names and phone numbers";
 allow (read, search) userdn = "ldap:///anyone")
Granting access to authenticated users
In certain situations, administrators want to grant permission to any user who is able to successfully bind to Directory Server, except anonymous binds. To configure this feature, use the ldap:///all expression with the userdn keyword in a bind rule:
userdn comparison_operator "ldap:///all"Example 12.15. Granting access to authenticated users
To enable authenticated users to add and remove themselves as a member to or from the ou=example,ou=groups,dc=example,dc=com group:
# ldapmodify -D "cn=Directory Manager" -W -H ldap://server.example.com -x

dn: ou=example,ou=Groups,dc=example,dc=com
changetype: modify
add: aci
aci: (targetattr="member") (version 3.0;
 acl "Allow users to add/remove themselves from example group";
 allow (selfwrite) userdn = "ldap:///all")
Enabling users to access their own entries
To set ACI which allow or deny access to users to their own entry, use the ldap:///self expression with the userdn keyword in a bind rule:
userdn comparison_operator "ldap:///self"Example 12.16. Enabling users to access their own entries
To enable users in the ou=People,dc=example,dc=com entry to update their own userPassword attribute:
# ldapmodify -D "cn=Directory Manager" -W -H ldap://server.example.com -x

dn: ou=People,dc=example,dc=com
changetype: modify
add: aci
aci: (targetattr="userPassword") (version 3.0;
 acl "Allow users updating their password";
 allow (write) userdn = "ldap:///self")
Setting access for child entries of a user
To specify that users are granted or denied access to an entry only if their bind DN is the parent of the targeted entry, use the self:///parent expression with the userdn keyword in a bind rule:
userdn comparison_operator "ldap:///parent"Example 12.17. Setting access for child entries of a user
To enable the cn=user,ou=People,dc=example,dc=com user to update the manager attribute of its own sub-entries, such as cn=example,cn=user,ou=People,dc=example,dc=com:
# ldapmodify -D "cn=Directory Manager" -W -H ldap://server.example.com -x
dn: cn=user,ou=People,dc=example,dc=com
changetype: modify
add: aci
aci: (targetattr="manager") (version 3.0;
 acl "Allow cn=user to update manager attributes";
 allow (write) userdn = "ldap:///parent")
12.10.3. Defining group-based access
Group-based access control instructions (ACI) enable you to manage access by adding or removing users to or from a group. To configure an ACI that is based on a group membership, use the groupdn keyword. If the user is a member of one or multiple of the specified groups, the ACI matches.
When using the groupdn keyword, Directory Server verifies the group membership based on the following attributes:
- member
- uniqueMember
- memberURL
- memberCertificateDescription
Bind rules with the groupdn keyword use the following syntax:
groupdn comparison_operator "ldap:///distinguished_name || ldap:///distinguished_name || ..."
Set the distinguished name (DN) in the expression to:
- A DN. See Using a DN with the groupdn keyword.
- An LDAP filter. See Using the groupdn keyword with an LDAP filter
If you set multiple DNs in one bind rule, Directory Server applies the ACI if the authenticated user is a member of one of these groups. To set the user as a member of multiple groups, use multiple groupdn keywords and combine them using the Boolean and operator. For details, see Combining Bind Rules Using Boolean Operators.
Do not specify a host name or port number within the LDAP URL. The URL always applies to the local server.
Using a DN with the groupdn keyword
To apply an ACI to members of a group, set the groupdn keyword to the group’s DN.
The groupdn keyword set to a DN uses the following syntax:
groupdn comparison_operator ldap:///distinguished_name
Example 12.18. Using a DN with the groupdn Keyword
To enable members of the cn=example,ou=Groups,dc=example,dc=com group to search and read the manager attribute of entries in ou=People,dc=example,dc=com:
# ldapmodify -D "cn=Directory Manager" -W -H ldap://server.example.com -x

dn: ou=People,dc=example,dc=com
changetype: modify
add: aci
aci: (targetattr="manager") (version 3.0;
 acl "Allow example group to read manager attribute";
 allow (search, read) groupdn = "ldap:///cn=example,ou=Groups,dc=example,dc=com";)
Using The groupdn keyword with an LDAP filter
Using an LDAP filter with the groupdn keyword, you can define that the authenticated user must be a member of at least one of the groups that the filter search returns, to match the ACI.
The groupdn keyword with an LDAP filter uses the following syntax:
groupdn comparison_operator "ldap:///distinguished_name??scope?(filter)"
The LDAP filter supports the * wildcard.
Example 12.19. Using the groupdn keyword with an LDAP filter
To enable members of groups in dc=example,dc=com and subtrees, which have the manager attribute set to example, update the homePostalAddress of entries in ou=People,dc=example,dc=com:
# ldapmodify -D "cn=Directory Manager" -W -H ldap://server.example.com -x
dn: ou=People,dc=example,dc=com
changetype: modify
add: aci
aci: (targetattr="homePostalAddress") (version 3.0;
 acl "Allow manager=example setting homePostalAddress"; allow (write)
 userdn = "ldap:///dc=example,dc=com??sub?(manager=example)";)
12.10.4. Defining access based on value matching
Use the userattr keyword in a bind rule to specify which attribute must match between the entry used to bind to the directory and the targeted entry.
The userattr keyword uses the following syntax:
userattr comparison_operator "attribute_name#bind_type_or_attribute_value
For further details, see:
By default, Directory Server evaluates access rights on the entry they are created. However, to prevent user objects on the same level, Directory Server does not grant add permissions to the entry where you set the access control instructions (ACI), when using the userattr keyword. To configure this behavior, use the userattr keyword in conjunction with the parent keyword and grant the permission additionally on level 0.
For details about inheritance, see Defining access based on value matching.
Using the USERDN bind type
To apply an ACI when the binding user distinguished name (DN) matches the DN stored in an attribute, use the USERDN bind type.
The userattr keyword with the USERDN bind type requires the following syntax:
userattr comparison_operator "attribute_name#USERDN"
Example 12.20. Using the USERDN bind type
To grant a manager all permissions to the telephoneNumber attribute of its own associates:
# ldapmodify -D "cn=Directory Manager" -W -H ldap://server.example.com -x

dn: ou=People,dc=example,dc=com
changetype: modify
add: aci
aci: (targetattr = "telephoneNumber")
 (version 3.0; acl "Manager: telephoneNumber";
 allow (all) userattr = "manager#USERDN";)
The previous ACI is evaluated to be true if the DN of the user who performs the operation on an entry in ou=People,dc=example,dc=com, matches the DN stored in the manager attribute of this entry.
Using the GROUPDN bind type
To apply an ACI when the binding user DN is a member of a group set in an attribute, use the GROUPDN bind type.
The userattr keyword with the GROUPDN bind type requires the following syntax:
userattr comparison_operator "attribute_name#GROUPDN"
Example 12.21. Using the GROUPDN bind type
To grant users the permission to delete a group entry which they own under the ou=Social Committee,ou=Groups,dc=example,dc=com entry:
# ldapmodify -D "cn=Directory Manager" -W -H ldap://server.example.com -x

dn: ou=Social Committee,ou=Groups,dc=example,dc=com
changetype: modify
add: aci
aci: (target="ou=Social Committee,ou=Groups,dc=example,dc=com)
 (targattrfilters="del=objectClass:(objectClass=groupOfNames)")
 (version 3.0; acl "Delete Group";
 allow (delete) userattr = "owner#GROUPDN";)
The previous ACI is evaluated to be true if the DN of the user who performs the operation is a member of the group specified in the owner attribute.
The specified group can be a dynamic group, and the DN of the group can be under any suffix in the database. However, the evaluation of this type of ACI by the server is very resource-intensive.
If you are using static groups that are under the same suffix as the targeted entry, use the following expression for better performance:
userattr comparison_operator "ldap:///distinguished_name?attribute_name#GROUPDN"
Using the ROLEDN bind type
To apply an ACI when the binding user belongs to a role specified in an attribute, use the ROLEDN bind type.
The userattr keyword with the ROLEDN bind type requires the following syntax:
userattr comparison_operator "attribute_name#ROLEDN"
Example 12.22. Using the ROLEDN bind type
To enable users with the cn=Administrators,dc=example,dc=com role to search and read the manager attribute of entries in ou=People,dc=example,dc=com:
# ldapmodify -D "cn=Directory Manager" -W -H ldap://server.example.com -x

dn: ou=People,dc=example,dc=com
changetype: modify
add: aci
aci: (version 3.0; acl "Allow example role owners to read manager attribute";
 allow (search, read) userattr = manager#ROLEDN;)
The specified role can be under any suffix in the database. If you are also using filtered roles, the evaluation of this type of ACI uses a lot of resources on the server.
If you are using a static role definition and the role entry is under the same suffix as the targeted entry, use the following expression for better performance:
Using the SELFDN bind type
The SELFDN bind type enables you to grant permissions, when the bound user’s DN is set in a single-value attribute of the entry.
The userattr keyword with the SELFDN bind type requires the following syntax:
userattr comparison_operator "attribute_name#SELFDN"
Example 12.23. Using the SELFDN bind type
To enable a user to add ipatokenuniqueid=*,cn=otp,dc=example,dc=com entries that have the bind user’s DN set in the ipatokenOwner attribute:
# ldapmodify -D "cn=Directory Manager" -W -H ldap://server.example.com -x

dn: ou=otp,dc=example,dc=com
changetype: modify
add: aci
aci: (target = "ldap:///ipatokenuniqueid=*,cn=otp,dc=example,dc=com")
 (targetfilter = "(objectClass=ipaToken)")(version 3.0;
 acl "token-add-delete"; allow (add) userattr = "ipatokenOwner#SELFDN";)
Using the LDAPURL bind type
To apply an ACL when the bind DN matches the filter specified in an attribute of the targeted entry, use the LDAPURL bind type.
The userattr keyword with the LDAPURL bind type requires the following syntax:
userattr comparison_operator "attribute_name#LDAPURL"
Example 12.24. Using the LDAPURL bind type
To grant read and search permissions to user objects which contain the aciurl attribute set to ldap:///ou=People,dc=example,dc=com??one?(uid=user*):
# ldapmodify -D "cn=Directory Manager" -W -H ldap://server.example.com -x
dn: ou=People,dc=example,dc=com
changetype: modify
add: aci
aci: (targetattr = "*")
 (version 3.0; acl "Allow read,search "; allow (read,search)
 (userattr = "aciurl#LDAPURL);)
Using the userattr keyword with inheritance
When you use the userattr keyword to associate the entry used to bind with the target entry, the ACI applies only to the target specified and not to the entries below it. In certain situations, administrators want to extend the application of the ACI several levels below the targeted entry. This is possible by using the parent keyword and specifying the number of levels below the target that should inherit the ACI.
When using the userattr keyword with the parent keyword, the syntax is as follows:
userattr comparison_operator "parent[inheritance_level].attribute_name#bind_type_or_attribute_value
-
inheritance_level: Comma-separated list that indicates how many levels below the target inherit the ACI. You can include five levels (0,1,2,3,4) below the targeted entry. Zero (0) indicates the targeted entry. -
attribute_name: The attribute targeted by theuserattrorgroupattrkeyword. -
bind_type_or_attribute_value: Sets the attribute value or a bind type, such asUSERDN.
For example:
userattr = "parent[0,1].manager#USERDN"
This bind rule is evaluated to be true if the bind DN matches the manager attribute of the targeted entry. The permissions granted when the bind rule is evaluated to be true apply to the target entry and to all entries immediately below it.
Example 12.25. Using the userattr keyword with inheritance
To enable a user to read and search the cn=Profiles,dc=example,dc=com entry where the user’s DN is set in the owner attribute, as well as the first level of child entries which includes cn=mail,cn=Profiles,dc=example,dc=com and cn=news,cn=Profiles,dc=example,dc=com:
# ldapmodify -D "cn=Directory Manager" -W -H ldap://server.example.com -x`

dn: cn=Profiles,dc=example,dc=com
changetype: modify
add: aci
aci: (targetattr="*") (version 3.0; acl "Profile access",
 allow (read,search) userattr="parent[0,1].owner#USERDN" ;)
12.10.5. Defining access from specific IP addresses or ranges
The ip keyword in a bind rule enables you to grant or deny access from a specific IP address or a range of IP addresses.
Bind rules with the ip keyword use the following syntax:
ip comparison_operator "IP_address_or_range"
Example 12.26. Using IPv4 address ranges in bind rules
To deny access from the 192.0.2.0/24 network to the dc=example,dc=com entry:
# ldapmodify -D "cn=Directory Manager" -W -H ldap://server.example.com -x

dn: dc=example,dc=com
changetype: modify
add: aci
aci: (targetattr = "*") (version 3.0;acl "Deny 192.0.2.0/24"; deny (all)
 (userdn = "ldap:///anyone") and (ip != "192.0.2.");)
Example 12.27. Using IPv6 address ranges in bind rules
To deny access from the 2001:db8::/64 network to the dc=example,dc=com entry:
# ldapmodify -D "cn=Directory Manager" -W -H ldap://server.example.com -x

dn: dc=example,dc=com
changetype: modify
add: aci
aci: (targetattr = "*") (version 3.0;acl "Deny 2001:db8::/64"; deny (all)
 (userdn = "ldap:///anyone") and (ip != "2001:db8::");)
12.10.6. Defining access from a specific host or domain
The dns keyword in a bind rule enables you to grant or deny access from a specific host or domain.
If Directory Server cannot resolve a connecting IP address to its fully qualified domain name (FQDN) using DNS, the server does not apply access control instructions (ACI) with the dns bind rule for this client.
If client IP addresses are not resolvable using DNS, use the ip keyword and IP addresses instead. See Defining access from specific IP addresses or ranges.
Bind rules with the dns keyword use the following syntax:
dns comparison_operator "host_name_or_domain_name"
Example 12.28. Defining access from a specific host
To deny access from the client.example.com host to the dc=example,dc=com entry:
# ldapmodify -D "cn=Directory Manager" -W -H ldap://server.example.com -x

dn: dc=example,dc=com
changetype: modify
add: aci
aci: (targetattr = "*") (version 3.0;acl "Deny client.example.com"; deny (all)
 (userdn = "ldap:///anyone") and (dns != "client.example.com");)
Example 12.29. Defining access from a specific domain
To deny access from all hosts within the example.com domain to the dc=example,dc=com entry:
# ldapmodify -D "cn=Directory Manager" -W -H ldap://server.example.com -x

dn: dc=example,dc=com
changetype: modify
add: aci
aci: (targetattr = "") (version 3.0;acl "Deny example.com"; deny (all) (userdn = "ldap:///anyone") and (dns != ".example.com");)
12.10.7. Requiring a certain level of security in connections
The security of a connection is determined by its security strength factor (SSF), which sets the minimum key strength required to process operations. Using the ssf keyword in a bind rule, you can set that a connection must use a certain level of security. This enables you to force operations, for example password changes, to be performed over an encrypted connection.
The value for the SSF for any operation is the higher of the values between a TLS connection and a SASL bind. This means that if a server is configured to run over TLS and a replication agreement is configured for SASL/GSSAPI, the SSF for the operation is whichever available encryption type is more secure.
Bind rules with the ssf keyword use the following syntax:
ssf comparison_operator key_strength
You can use the following comparison operators:
-
=(equal to) -
!(not equal to) -
<(less than) -
>(greater than) -
⇐(less than or equal to) -
>=(greater than or equal to)
If the key_strength parameter is set to 0, no secure operation is required for the LDAP operation.
Example 12.30. Requiring a certain level of security in connections
To configure that users in the dc=example,dc=com entry can only update their userPassword attribute when the SSF is 128 or higher:
# ldapmodify -D "cn=Directory Manager" -W -H ldap://server.example.com -x

dn: dc=example,dc=com
changetype: modify
add: aci
aci: (targetattr = "userPassword") (version 3.0;
 acl "Allow users updating own userPassword";
 allow (write) (userdn = "ldap:///self") and (ssf >= "128");)
12.10.8. Defining access at a specific day of the week
The dayofweek keyword in a bind rule enables you to grant or deny access based on the day of the week.
Directory Server uses the time on the server to evaluate the access control instruction (ACI); not the time on the client.
Bind rules with the dayofweek keyword use the following syntax:
dayofweek comparison_operator "comma-separated_list_of_days"
Example 12.31. Granting access on specific days of the week
To deny access for the uid=user,ou=People,dc=example,dc=com user entry to bind to the server on Saturdays and Sundays:
# ldapmodify -D "cn=Directory Manager" -W -H ldap://server.example.com -x

dn: ou=People,dc=example,dc=com
changetype: modify
add: aci
aci: (version 3.0; acl "Deny access on Saturdays and Sundays";
 deny (all)
 (userdn = "ldap:///uid=user,ou=People,dc=example,dc=com") and
 (dayofweek = "Sun,Sat");)
12.10.9. Defining access at a specific time of day
The timeofday keyword in a bind rule enables you to grant or deny access based on the time of day.
Directory Server uses the time on the server to evaluate the access control instructions (ACI); not the time on the client.
Bind rules with the timeofday keyword use the following syntax:
timeofday comparison_operator "time"
You can use the following comparison operators:
-
=(equal to) -
!(not equal to) -
<(less than) -
>(greater than) -
⇐(less than or equal to) -
>=(greater than or equal to)
The timeofday keyword requires that you specify the time in 24-hour format.
Example 12.32. Defining access at a specific time of a day
To deny access for the uid=user,ou=People,dc=example,dc=com user entry to bind to the server between 6pm and 0am:
# ldapmodify -D "cn=Directory Manager" -W -H ldap://server.example.com -x

dn: ou=People,dc=example,dc=com
changetype: modify
add: aci
 aci: (version 3.0; acl "Deny access between 6pm and 0am";
 deny (all)
 (userdn = "ldap:///uid=user,ou=People,dc=example,dc=com") and
 (timeofday >= "1800" and timeofday < "2400");)
12.10.10. Defining access based on the authentication method
The authmethod keyword in a bind rule sets what authentication method a client must use when connecting to the server, to apply the access control instruction (ACI).
Bind rules with the authmethod keyword use the following syntax:
authmethod comparison_operator "authentication_method"
You can set the following authentication methods:
-
none: Authentication is not required and represents anonymous access. This is the default. -
simple: The client must provide a user name and password to bind to the directory. -
SSL: The client must bind to the directory using a TLS certificate either in a database, smart card, or other device. For details about certificate-based authentication, see Defining access based on the authentication method. -
SASL: The client must bind to the directory over a Simple Authentication and Security Layer (SASL) connection. When you use this authentication method in a bind rule, additionally specify the SASL mechanism, such asEXTERNAL.
Example 12.33. Enabling access only for connections using the EXTERNAL SASL authentication method
To deny access to the server if the connection does not use a certificate-based authentication method or SASL:
# ldapmodify -D "cn=Directory Manager" -W -H ldap://server.example.com -x`

dn: ou=People,dc=example,dc=com
changetype: modify
add: aci
aci: (version 3.0; acl "Deny all access without certificate"; deny (all)
 (authmethod = "none" or authmethod = "simple");)
12.10.11. Defining access based on roles
The roledn keyword in a bind rule enables you to grant or deny access to users having one or multiple role sets.
Red Hat recommends using groups instead of roles.
Bind rules with the roledn keyword use the following syntax:
roledn comparison_operator "ldap:///distinguished_name || ldap:///distinguished_name || ..."
If a distinguished name (DN) contains a comma, escape the comma with a backslash.
Example 12.34. Defining access based on roles
To enable users that have the cn=Human Resources,ou=People,dc=example,dc=com role set in the nsRole attribute to search and read the manager attribute of entries in ou=People,dc=example,dc=com:
# ldapmodify -D "cn=Directory Manager" -W -H ldap://server.example.com -x

dn: ou=People,dc=example,dc=com
changetype: modify
add: aci
aci: (targetattr="manager") (version 3.0;
 acl "Allow manager role to update manager attribute";
 allow (search, read) roledn = "ldap:///cn=Human Resources,ou=People,dc=example,dc=com";)
12.10.12. Combining bind rules using Boolean operators
When creating complex bind rules, the AND, OR, and NOT Boolean operators enable you to combine multiple keywords.
Bind rules combined with Boolean operators have the following syntax:
bind_rule_1 boolean_operator bind_rule_2...
Example 12.35. Combining bind rules using Boolean operators
To configure that users which are member of both the cn=Administrators,ou=Groups,dc=example,com and cn=Operators,ou=Groups,dc=example,com] group can [command]`read, search, add, update, and delete entries in ou=People,dc=example,dc=com:
# ldapmodify -D "cn=Directory Manager" -W -H ldap://server.example.com -x

dn: ou=People,dc=example,dc=com
changetype: modify
add: aci
aci: (target="ldap:///ou=People,dc=example,dc=com") (version 3.0;
 acl "Allow members of administrators and operators group to manage users";
 allow (read, search, add, write, delete)
 groupdn = "ldap:///cn=Administrators,ou=Groups,dc=example,com" AND
 groupdn = "ldap:///cn=Operators,ou=Groups,dc=example,com";)
How Directory Server evaluates boolean operators
Directory Server evaluates Boolean operators by using the following rules:
All expressions from left to right.
In the following example,
bind_rule_1is evaluated first:(bind_rule_1) OR (bind_rule_2)
From innermost to outermost parenthetical expressions first.
In the following example,
bind_rule_2is evaluated first andbind_rule_3second:(bind_rule_1) OR ((bind_rule_2) AND (bind_rule_3))
NOTbeforeANDorORoperators.In the following example, bind_rule_2 is evaluated first:
(bind_rule_1) AND NOT (bind_rule_2)
The
ANDandORoperators have no order of precedence.
Chapter 13. Running Directory Server in FIPS mode
Directory Server fully supports the Federal Information Processing Standard (FIPS) 140-2. When you run Directory Server run in FIPS mode, security-related settings change. For example, SSL is automatically disabled and only TLS 1.2 and 1.3 encryption is used.
13.1. Enabling the FIPS mode
To use Directory Server in Federal Information Processing Standard (FIPS) mode, enable the mode in RHEL and Directory Server.
Prerequisites
- You enabled the FIPS mode in RHEL.
Procedure
Enable the FIPS mode for the network security services (NSS) database:
# modutil -dbdir /etc/dirsrv/slapd-instance_name/ -fips trueRestart the instance:
#
dsctl instance_name restart
Verification
Verify that FIPS mode is enabled for the NSS database:
# modutil -dbdir /etc/dirsrv/slapd-instance_name/ -chkfips true
FIPS mode enabled.
The command returns
FIPS mode enabled, if the module is in FIPS mode.
13.2. Additional resources
Chapter 14. Configuring a password-based account lockout policy
A password-based account lockout policy prevents attackers from repeatedly trying to guess a user’s password. You can configure the account lockout policy to lock a user account after a specified number of failed attempts to bind.
If a password-based account lockout policy is configured, Directory Server maintains the lockout information in the following attributes of the user entries:
-
passwordRetryCount: Stores the number of failed bind attempts. Directory Server resets the value if the user successfully binds to the directory later than the time inretryCountResetTime. This attribute is present after a user fails to bind for the first time. -
retryCountResetTime: Stores the time after which thepasswordRetryCountattribute is reset. This attribute is present after a user fails to bind for the first time. -
accountUnlockTime: Stores the time after which the user account is unlocked. This attribute is present after the account was locked for the first time.
14.1. Configuring whether to lock accounts when reaching or exceeding the configured maximum attempts
Administrators can configure one of the following behaviors when Directory Server locks accounts on failed login attempts:
The server locks accounts if the limit has been exceeded. For example, if the limit is set to 3 attempts, the lockout happens after the fourth failed attempt (
n+1). This also means that, if the fourth attempt succeeds, Directory Server does not lock the account.By default, Directory Server uses this legacy password policy that is often expected by traditional LDAP clients.
The server locks accounts if the limit has been reached. For example, if the limit is set to 3 attempts, the server locks the account after the third failed attempt (
n).Modern LDAP clients often expect this behavior.
This procedure describes how to disable the legacy password policy. After changing the policy, Directory Server blocks login attempts for a user that reached the configured limit.
Prerequisites
- You configured an account lockout policy.
Procedure
To disable the legacy password policy and lock accounts if the limit has been reached, enter:
#
dsconf -D "cn=Directory Manager" ldap://server.example.com config replace passwordLegacyPolicy=off
Verification
Display the value of the
passwordmaxfailuresetting:#
dsconf -D "cn=Directory Manager" ldap://server.example.com pwpolicy get passwordmaxfailurepasswordmaxfailure: 2Attempt to bind using an invalid password one more time than the value set in
passwordmaxfailure:#
ldapsearch -H ldap://server.example.com -D "uid=example,ou=People,dc=example,dc=com" -w invalid-password -b "dc=example,dc=com" -xldap_bind: Invalid credentials (49) #ldapsearch -H ldap://server.example.com -D "uid=example,ou=People,dc=example,dc=com" -w invalid-password -b "dc=example,dc=com" -xldap_bind: Invalid credentials (49) #ldapsearch -H ldap://server.example.com -D "uid=example,ou=People,dc=example,dc=com" -w invalid-password -b "dc=example,dc=com" -xldap_bind: Constraint violation (19) additional info: Exceed password retry limit. Please try later.With legacy passwords disabled, Directory Server locked the account after the second attempt, and further tries are blocked with an
ldap_bind: Constraint violation (19)error.
Additional resources
14.2. Configuring a password-based account lockout policy using the command line
To block login recurring bind attempts with invalid passwords, configure a password-based account lockout policy.
The behavior whether Directory Server locks accounts when reaching or exceeding the configured maximum attempts depends on the legacy password policy setting.
Procedure
Optional: Identify whether the legacy password policy is enabled or disabled:
#
dsconf -D "cn=Directory Manager" ldap://server.example.com config get passwordLegacyPolicypasswordLegacyPolicy: onEnable the password lockout policy and set the maximum number of failures to
2:#
[command]`dsconf -D "cn=Directory Manager" ldap://server.example.com pwpolicy set --pwdlockout on --pwdmaxfailures=2With the legacy password policy enabled, Directory Server will lock accounts after the third failed attempt to bind (value of the
--pwdmaxfailuresparameter + 1).The
dsconf pwpolicy setcommand supports the following parameters:-
--pwdlockout: Enables or disables the account lockout feature. Default:off. --pwdmaxfailures: Sets the maximum number of allowed failed bind attempts before Directory Server locks the account. Default:3.Note that this lockout happens one attempt later if the legacy password policy setting is enabled. Default:
3.-
--pwdresetfailcount: Sets the time in seconds before Directory Server resets thepasswordRetryCountattribute in the user’s entry. Default:600seconds (10 minutes). -
--pwdlockoutduration: Sets the time of accounts being locked in seconds. This parameter is ignored if you set the--pwdunlockparameter tooff. Default:3600seconds (1 hour). -
--pwdunlock: Enables or disables whether locked accounts should be unlocked after a certain amount of time or stay disabled until an administrator manually unlocks them. Default:on.
-
Verification
Attempt to bind using an invalid password two more times than the value you set in the
--pwdmaxfailuresparameter:#
ldapsearch -H ldap://server.example.com -D "uid=example,ou=People,dc=example,dc=com" -w invalid-password -b "dc=example,dc=com" -xldap_bind: Invalid credentials (49) #ldapsearch -H ldap://server.example.com -D "uid=example,ou=People,dc=example,dc=com" -w invalid-password -b "dc=example,dc=com" -xldap_bind: Invalid credentials (49) #ldapsearch -H ldap://server.example.com -D "uid=example,ou=People,dc=example,dc=com" -w invalid-password -b "dc=example,dc=com" -xldap_bind: Invalid credentials (49) #ldapsearch -H ldap://server.example.com -D "uid=example,ou=People,dc=example,dc=com" -w invalid-password -b "dc=example,dc=com" -xldap_bind: Constraint violation (19) additional info: Exceed password retry limit. Please try later.With legacy passwords enabled, Directory Server locked the account after the limit has exceeded, and further tries are blocked with an
ldap_bind: Constraint violation (19)error.
Additional resources
14.3. Configuring a password-based account lockout policy using the web console
To block login recurring bind attempts with invalid passwords, configure a password-based account lockout policy.
The behavior whether Directory Server locks accounts when reaching or exceeding the configured maximum attempts depends on the legacy password policy setting.
Prerequisites
- You are logged in to the instance in the web console.
Procedure
Optional: Identify whether the legacy password policy is enabled or disabled:
#
dsconf -D "cn=Directory Manager" ldap://server.example.com config get passwordLegacyPolicypasswordLegacyPolicy: onThis setting is not available in the web console.
- Navigate to → → → .
-
Select
Enable Account Lockout. Configure the lockout settings:
-
Number of Failed Logins That Locks out Account: Sets the maximum number of allowed failed bind attempts before Directory Server locks the account. -
Time Until Failure Count Resets: Sets the time in seconds before Directory Server resets thepasswordRetryCountattribute in the user’s entry. -
Time Until Account Unlocked: Sets the time of accounts beging locked in seconds. This parameter is ignored if you disableDo Not Lockout Account Forever. -
Do Not Lockout Account Forever: Enables or disables whether locked accounts should be unlocked after a certain amount of time or stay disabled until an administrator manually unlocks them.
-
- Click .
Verification
Attempt to bind using an invalid password two more times than the value you set in
Number of Failed Logins That Locks out Account:#
ldapsearch -H ldap://server.example.com -D "uid=example,ou=People,dc=example,dc=com" -w invalid-password -b "dc=example,dc=com" -xldap_bind: Invalid credentials (49) #ldapsearch -H ldap://server.example.com -D "uid=example,ou=People,dc=example,dc=com" -w invalid-password -b "dc=example,dc=com" -xldap_bind: Invalid credentials (49) #ldapsearch -H ldap://server.example.com -D "uid=example,ou=People,dc=example,dc=com" -w invalid-password -b "dc=example,dc=com" -xldap_bind: Invalid credentials (49) #ldapsearch -H ldap://server.example.com -D "uid=example,ou=People,dc=example,dc=com" -w invalid-password -b "dc=example,dc=com" -xldap_bind: Constraint violation (19) additional info: Exceed password retry limit. Please try later.With legacy passwords enabled, Directory Server locked the account after the limit has exceeded, and further tries are blocked with an
ldap_bind: Constraint violation (19)error.
Additional resources
Chapter 15. Disabling anonymous binds
If a user attempts to connect to Directory Server without supplying any credentials, this operation is called anonymous bind. Anonymous binds simplify searches and read operations, such as finding a phone number in the directory by not requiring users to authenticate first. However, anonymous binds can also be a security risk, because users without an account are able to access the data.
By default, anonymous binds are enabled in Directory Server for search and read operations. This allows unauthorized access to user entries as well as configuration entries, such as the root directory server entry (DSE).
15.1. Disabling anonymous binds using the command line
To increase the security, you can disable anonymous binds.
Procedure
Set the
nsslapd-allow-anonymous-accessconfiguration parameter tooff:#
dsconf -D "cn=Directory Manager" ldap://server.example.com config replace nsslapd-allow-anonymous-access=off
Verification
Run a search without specifying a user account:
#
ldapsearch -H ldap://server.example.com -b "dc=example,dc=com" -xldap_bind: Inappropriate authentication (48) additional info: Anonymous access is not allowed
15.2. Disabling anonymous binds using the web console
To increase the security, you can disable anonymous binds.
Prerequisites
- You are logged in to the instance in the web console.
Procedure
- Navigate to → → .
-
Set the
Allow Anonymous Accessparameter tooff. - Click .
Verification
Run a search without specifying a user account:
#
ldapsearch -H ldap://server.example.com -b "dc=example,dc=com" -xldap_bind: Inappropriate authentication (48) additional info: Anonymous access is not allowed
Chapter 16. Synchronizing account lockout attributes across all servers in a replication environment
Directory Server stores account lockout attributes locally. In an environment with multiple servers, configure replication for these attributes to prevent attackers from attempting to log in to one server until the account lockout count is reached and then continue on other servers.
16.1. How Directory Server handles password and account lockout policies in a replication environment
Directory Server enforces password and account lockout policies as follows:
- Password policies are enforced on the data supplier
- Account lockout policies are enforced on all servers in a replication topology
Directory Server replicates the following password policy attributes:
-
passwordMinAge -
passwordMaxAge -
passwordExp -
passwordWarning
However, by default, Directory Server does not replicate the general account lockout attributes:
-
passwordRetryCount -
retryCountResetTime -
accountUnlockTime
To prevent attackers from attempting to log in to one server until the account lockout count is reached and then continue on other servers, replicate these account lockout attributes.
Additional resources
16.2. Configuring Directory Server to replicate account lockout attributes
If you use an account lockout policy or password policy that updates the passwordRetryCount, retryCountResetTime, or accountUnlockTime attributes, configure Directory Server to replicate these attributes so that their values are the same across all servers.
Perform this procedure on all suppliers in the replication topology.
Prerequisites
- You configured an account lockout policy or a password policy that updates one or more of the mentioned attributes.
- You use Directory Server in a replication environment.
Procedure
Enable replication of password policy attributes:
#
dsconf -D "cn=Directory Manager" ldap://server.example.com pwpolicy set --pwdisglobal="on"If you use fractional replication, display the list of attributes that are excluded from replication:
#
dsconf -D "cn=Directory Manager" ldap://server.example.com repl-agmt get --suffix "dc=example,dc=com" example-agreement | grep "nsDS5ReplicatedAttributeList"Using the default settings, no output is shown, and Directory Server replicates the account lockout attributes. However, if the command returns a list of excluded attributes, such as in the following example, verify the attribute list:
nsDS5ReplicatedAttributeList: (objectclass=*) $ EXCLUDE accountUnlockTime passwordRetryCount retryCountResetTime example1 example2
In this example, the
accountUnlockTime,passwordRetryCount, andretryCountResetTimelockout policy attributes are excluded from replication, along with two other attributes.If the output of the previous command lists any of the account lockout attributes, update the fractional replication settings to only include attributes other than the lockout policy attributes:
#
dsconf -D "cn=Directory Manager" ldap://server.example.com repl-agmt set --suffix "dc=example,dc=com" --frac-list "example1 example2" example-agreement
Verification
Attempt to perform a search as a user using an invalid password:
#
ldapsearch -H ldap://server.example.com -D "uid=example,ou=People,dc=example,dc=com" -w "invalid-password" -b "dc=example,dc=com" -xldap_bind: Invalid credentials (49)Display the
passwordRetryCountattribute of the user:#
ldapsearch -H ldap://server.example.com -D "cn=Directory Manager" -W -b "uid=example,ou=People,dc=example,dc=com" -x passwordRetryCount... dn: uid=example,ou=People,dc=example,dc=com passwordRetryCount: 1-
Run the previous command on a different server in the replication topology. If the value of the
passwordRetryCountattribute is the same, Directory Server replicated the attribute.
Additional resources
Chapter 17. Configuring time-based account lockout policies
You can use the Account Policy plug-in to configure different time-based lockout policies, such as:
- Automatically disabling accounts a certain amount of time the last successful login
- Automatically disabling accounts a certain amount of time after you created them
- Automatically disabling accounts a certain amount of time after password expiry
- Automatically disabling account on both account inactivity and password expiration
17.1. Automatically disabling accounts a certain amount of time the last successful login
Follow this procedure to configure a time-based lockout policy that inactivates users under the dc=example,dc=com entry who do not log in for more than 21 days.
This the account inactivity feature to ensure, for example if an employee left the company and the administrator forgets to delete the account, that Directory Server inactivates the account after a certain amount of time.
Procedure
Enable the Account Policy plug-in:
#
dsconf -D "cn=Directory Manager" ldap://server.example.com plugin account-policy enableConfigure the plug-in configuration entry:
#
dsconf -D "cn=Directory Manager" ldap://server.example.com plugin account-policy config-entry set "cn=config,cn=Account Policy Plugin,cn=plugins,cn=config" --always-record-login yes --state-attr lastLoginTime --alt-state-attr 1.1 --spec-attr acctPolicySubentry --limit-attr accountInactivityLimitThis command uses the following options:
-
--always-record-login yes: Enables logging of the login time. This is required to use Class of Service (CoS) or roles with account policies, even if it does not have theacctPolicySubentryattribute set. -
--state-attr lastLoginTime: Configures that the Account Policy plug-in stores the last login time in thelastLoginTimeattribute of users. -
--alt-state-attr 1.1: Disables using an alternative attribute to check if the primary one does not exist. By default, Directory Server uses thecreateTimestampattribute as alternative. However, this causes that Directory Server logs out existing users automatically if their account do not have thelastLoginTimeattribute set andcreateTimestampis older than the configured inactivity period. Disabling the alternative attribute causes that Directory Server automatically adds thelastLoginTimeattribute to user entries when they log in the next time. -
--spec-attr acctPolicySubentry: Configures Directory Server to apply the policy to entries that have theacctPolicySubentryattribute set. You configure this attribute in the CoS entry. -
--limit-attr accountInactivityLimit: Configures that theaccountInactivityLimitattribute in the account inactivation policy entry stores the inactivity time.
-
Restart the instance:
#
dsctl instance_name restartCreate the account inactivation policy entry:
#
ldapadd -D "cn=Directory Manager" -W -H ldap://server.example.com -xdn: cn=Account Inactivation Policy,dc=example,dc=com objectClass: top objectClass: ldapsubentry objectClass: extensibleObject objectClass: accountpolicy accountInactivityLimit: 1814400 cn: Account Inactivation PolicyThe value in the
accountInactivityLimitattribute configures that Directory Server inactivates accounts1814400seconds (21 days) after the last log in.Create the CoS template entry:
#
ldapadd -D "cn=Directory Manager" -W -H ldap://server.example.com -xdn: cn=TemplateCoS,dc=example,dc=com objectClass: top objectClass: ldapsubentry objectClass: extensibleObject objectClass: cosTemplate acctPolicySubentry: cn=Account Inactivation Policy,dc=example,dc=comThis template entry references the account inactivation policy.
Create the CoS definition entry:
#
ldapadd -D "cn=Directory Manager" -W -H ldap://server.example.com -xdn: cn=DefinitionCoS,dc=example,dc=com objectClass: top objectClass: ldapsubentry objectclass: cosSuperDefinition objectclass: cosPointerDefinition cosTemplateDn: cn=TemplateCoS,dc=example,dc=com cosAttribute: acctPolicySubentry default operational-defaultThis definition entry references the CoS template entry and causes that the
acctPolicySubentryattribute appears in each user entry with a value set tocn=Account Inactivation Policy,dc=example,dc=com.
Verification
Set the
lastLoginTimeattribute of a user to a value that is older than the inactivity time you configured:#
ldapmodify -H ldap://server.example.com -x -D "cn=Directory Manager" -Wdn: uid=example,ou=People,dc=example,dc=com changetype: modify replace: lastLoginTime lastLoginTime: 20210101000000ZTry to connect to the directory as a this user:
#
ldapsearch -H ldap://server.example.com -x -D "uid=example,ou=People,dc=example,dc=com" -W -b "dc=example,dc=com"ldap_bind: Constraint violation (19) additional info: Account inactivity limit exceeded. Contact system administrator to reset.If Directory Server denies access and returns this error, account inactivity works.
Additional resources
17.2. Automatically disabling accounts a certain amount of time after you created them
Follow this procedure to configure that accounts in the dc=example,dc=com entry expire 60 days after the administrator created them.
Use the account expiration feature, for example, to ensure that accounts for external workers are locked a certain amount of time after they have been created.
Procedure
Enable the Account Policy plug-in:
#
dsconf -D "cn=Directory Manager" ldap://server.example.com plugin account-policy enableConfigure the plug-in configuration entry:
#
dsconf -D "cn=Directory Manager" ldap://server.example.com plugin account-policy config-entry set "cn=config,cn=Account Policy Plugin,cn=plugins,cn=config" --always-record-login yes --state-attr createTimestamp --alt-state-attr 1.1 --spec-attr acctPolicySubentry --limit-attr accountInactivityLimitThis command uses the following options:
-
--always-record-login yes: Enables logging of the login time. This is required to use Class of Service (CoS) or roles with account policies, even if it does not have theacctPolicySubentryattribute set. -
--state-attr createTimestamp: Configures that the Account Policy plug-in uses the value of thecreateTimestampattribute to calculate whether an account is expired. -
--alt-state-attr 1.1: Disables using an alternative attribute to check if the primary one does not exist. -
--spec-attr acctPolicySubentry: Configures Directory Server to apply the policy to entries that have theacctPolicySubentryattribute set. You configure this attribute in the CoS entry. -
--limit-attr accountInactivityLimit: Configures that theaccountInactivityLimitattribute in the account expiration policy entry stores the maximum age.
-
Restart the instance:
#
dsctl instance_name restartCreate the account expiration policy entry:
#
ldapadd -D "cn=Directory Manager" -W -H ldap://server.example.com -xdn: cn=Account Expiration Policy,dc=example,dc=com objectClass: top objectClass: ldapsubentry objectClass: extensibleObject objectClass: accountpolicy accountInactivityLimit: 5184000 cn: Account Expiration PolicyThe value in the
accountInactivityLimitattribute configures that accounts expire5184000seconds (60 days) after they have been created.Create the CoS template entry:
#
ldapadd -D "cn=Directory Manager" -W -H ldap://server.example.com -xdn: cn=TemplateCoS,dc=example,dc=com objectClass: top objectClass: ldapsubentry objectClass: extensibleObject objectClass: cosTemplate acctPolicySubentry: cn=Account Expiration Policy,dc=example,dc=comThis template entry references the account expiration policy.
Create the CoS definition entry:
#
ldapadd -D "cn=Directory Manager" -W -H ldap://server.example.com -xdn: cn=DefinitionCoS,dc=example,dc=com objectClass: top objectClass: ldapsubentry objectclass: cosSuperDefinition objectclass: cosPointerDefinition cosTemplateDn: cn=TemplateCoS,dc=example,dc=com cosAttribute: acctPolicySubentry default operational-defaultThis definition entry references the CoS template entry and causes that the
acctPolicySubentryattribute appears in each user entry with a value set tocn=Account Expiration Policy,dc=example,dc=com.
Verification
Try to connect to the directory as a user stored in the
dc=example,dc=comentry whosecreateTimestampattribute is set to a value more than 60 days ago:#
ldapsearch -H ldap://server.example.com -x -D "uid=example,dc=example,dc=com" -W -b "dc=example,dc=com"ldap_bind: Constraint violation (19) additional info: Account inactivity limit exceeded. Contact system administrator to reset.If Directory Server denies access and returns this error, account expiration works.
Additional resources
17.3. Automatically disabling accounts a certain amount of time after password expiry
Follow this procedure to configure a time-based lockout policy that inactivates users under the dc=example,dc=com entry who do not change their password for more than 28 days.
Prerequisites
-
Users must have the
passwordExpirationTimeattribute set in their entry.
Procedure
Enable the password expiration feature:
#
dsconf -D "cn=Directory Manager" ldap://server.example.com config replace passwordExp=onEnable the Account Policy plug-in:
#
dsconf -D "cn=Directory Manager" ldap://server.example.com plugin account-policy enableConfigure the plug-in configuration entry:
#
dsconf -D "cn=Directory Manager" ldap://server.example.com plugin account-policy config-entry set "cn=config,cn=Account Policy Plugin,cn=plugins,cn=config" --always-record-login yes --always-record-login-attr lastLoginTime --state-attr non_existent_attribute --alt-state-attr passwordExpirationTime --spec-attr acctPolicySubentry --limit-attr accountInactivityLimitThis command uses the following options:
-
--always-record-login yes: Enables logging of the login time. This is required to use Class of Service (CoS) or roles with account policies, even if it does not have theacctPolicySubentryattribute set. -
--always-record-login-attr lastLoginTime: Configures that the Account Policy plug-in stores the last login time in thelastLoginTimeattribute of users. -
--state-attr non_existent_attribute: Sets the primary time attribute used to evaluate an account policy to a non-existent dummy attribute name. -
--alt-state-attr `passwordExpirationTime: Configures the plug-in to use thepasswordExpirationTimeattribute as the alternative attribute to check. -
--spec-attr acctPolicySubentry: Configures Directory Server to apply the policy to entries that have theacctPolicySubentryattribute set. You configure this attribute in the CoS entry. -
--limit-attr accountInactivityLimit: Configures that theaccountInactivityLimitattribute in the account policy entry stores the time when accounts are inactivated after their last password change.
-
Restart the instance:
#
dsctl instance_name restartCreate the account inactivation policy entry:
#
ldapadd -D "cn=Directory Manager" -W -H ldap://server.example.com -xdn: cn=Account Inactivation Policy,dc=example,dc=com objectClass: top objectClass: ldapsubentry objectClass: extensibleObject objectClass: accountpolicy accountInactivityLimit: 2419200 cn: Account Inactivation PolicyThe value in the
accountInactivityLimitattribute configures that Directory Server inactivates accounts2419200seconds (28 days) after the password was changed.Create the CoS template entry:
#
ldapadd -D "cn=Directory Manager" -W -H ldap://server.example.com -xdn: cn=TemplateCoS,dc=example,dc=com objectClass: top objectClass: ldapsubentry objectClass: extensibleObject objectClass: cosTemplate acctPolicySubentry: cn=Account Inactivation Policy,dc=example,dc=comThis template entry references the account inactivation policy.
Create the CoS definition entry:
#
ldapadd -D "cn=Directory Manager" -W -H ldap://server.example.com -xdn: cn=DefinitionCoS,dc=example,dc=com objectClass: top objectClass: ldapsubentry objectclass: cosSuperDefinition objectclass: cosPointerDefinition cosTemplateDn: cn=TemplateCoS,dc=example,dc=com cosAttribute: acctPolicySubentry default operational-defaultThis definition entry references the CoS template entry and causes that the
acctPolicySubentryattribute appears in each user entry with a value set tocn=Account Inactivation Policy,dc=example,dc=com.
Verification
Set the
passwordExpirationTimeattribute of a user to a value that is older than the inactivity time you configured:#
ldapmodify -H ldap://server.example.com -x -D "cn=Directory Manager" -Wdn: uid=example,ou=People,dc=example,dc=com changetype: modify replace: passwordExpirationTime passwordExpirationTime: 20210101000000ZTry to connect to the directory as a this user:
#
ldapsearch -H ldap://server.example.com -x -D "uid=example,ou=People,dc=example,dc=com" -W -b "dc=example,dc=com"ldap_bind: Constraint violation (19) additional info: Account inactivity limit exceeded. Contact system administrator to reset.If Directory Server denies access and returns this error, account inactivity works.
Additional resources
17.4. Automatically disabling account on both account inactivity and password expiration
You can apply both account inactivity and password expiration when a user authenticates by using the checkAllStateAttrs setting. By default, when checkAllStateAttrs is not present in the plug-in configuration entry, or when you set this parameter to no, the plug-in checks for the state attribute lastLoginTime. If the attribute is not present in the entry, the plug-in checks the alternate state attribute.
You can set the main state attribute to a non-existent attribute and set the alternate state attribute to passwordExpirationtime when you want the plug-in to handle expiration based on the passwordExpirationtime attribute. When you enable this parameter it check’s the main state attribute and if the account is fine it then check’s the alternate state attribute.
This differs from the password policy’s password expiration, in that the account policy plug-in completely disables the account if the passwordExpirationtime exceeds the inactivity limit. While with the password policy expiration the user can still log in and change their password. The account policy plug-in completely blocks the user from doing anything and an administrator must reset the account.
Procedure
Create the plug-in configuration entry and enable the setting:
#
dsconf -D "cn=Directory Manager" ldap://server.example.com plugin account-policy config-entry set "cn=config,cn=Account Policy Plugin,cn=plugins,cn=config" --always-record-login yes --state-attr lastLoginTime --alt-state-attr 1.1 --spec-attr acctPolicySubentry --limit-attr accountInactivityLimit --check-all-state-attrs yesRestart the server to load the new plug-in configuration:
#
dsctl instance_name restartWarningThe
checkAllStateAttrssetting is designed to only work when the alternate state attribute is set topasswordExpiratontime. Setting it tocreateTimestampcan cause undesired results and entries might get locked out.
Chapter 18. Re-enabling accounts that reached the inactivity limit
If Directory Server inactivated an account because it reached the inactivity limit, an administrator can re-enable the account.
18.1. Re-enabling accounts inactivated by the Account Policy plug-in
You can re-enable accounts using the dsconf account unlock command or by manually updating the lastLoginTime attribute of the inactivated user.
Prerequisites
- An inactivated user account.
Procedure
Reactivate the account using one of the following methods:
Using the
dsconf account unlockcommand:#
dsidm -D "cn=Directory manager" ldap://server.example.com -b "dc=example,dc=com" account unlock "uid=example,ou=People,dc=example,dc=com"By setting the
lastLoginTimeattribute of the user to a recent time stamp:#
ldapmodify -H ldap://server.example.com -x -D "cn=Directory Manager" -Wdn: uid=example,ou=People,dc=example,dc=com changetype: modify replace: lastLoginTime lastLoginTime: 20210901000000Z
Verification
Authenticate as the user that you have reactivated. For example, perform a search:
#
ldapsearch -H ldap://server.example.com -x -D "uid=example,ou=People,dc=example,dc=com" -W -b "dc=example,dc=com -s base"If the user can successfully authenticate, the account was reactivated.
Chapter 19. Tracking the last login time without setting a lockout policy
You can use the Account Policy plug-in to track user login times without setting an expiration time or inactivity period. In this case, the plug-in adds the lastLoginTime attribute to user entries.
19.1. Configuring the Account Policy plug-in to record the last login time
Follow this procedure to record the last login time of users in the lastLoginTime attribute of user entries.
Procedure
Enable the Account Policy plug-in:
#
dsconf -D "cn=Directory Manager" ldap://server.example.com plugin account-policy enableCreate the plug-in configuration entry to record login times:
#
dsconf -D "cn=Directory Manager" ldap://server.example.com plugin account-policy config-entry set "cn=config,cn=Account Policy Plugin,cn=plugins,cn=config" --always-record-login yes --state-attr lastLoginTimeThis command uses the following options:
-
--always-record-login yes: Enables logging of the log in time. -
--state-attr lastLoginTime: Configures that the Account Policy plug-in stores the last log in time in thelastLoginTimeattribute of users.
-
Restart the instance:
#
dsctl instance_name restart
Verification
Log in to Directory Server as a user. For example, run a search:
#
ldapsearch -H ldap://server.example.com -x -D "uid=example,ou=People,dc=example,dc=com" -W -b "dc=example,dc=com"Display the
lastLoginTimeattribute of the user you used in the previous step:#
ldapsearch -H ldap://server.example.com -x -D "cn=Directory Manager" -W -b "uid=example,ou=people,dc=example,dc=com" lastLoginTime... dn: uid=example,ou=People,dc=example,dc=com lastLoginTime: 20210913091435ZIf the
lastLoginTimeattribute exists and Directory Server updated its value, recording of the last login time works.
Chapter 20. Setting access control on the Directory Manager account
Having an unconstrained administrative user makes sense from a maintenance perspective. The Directory Manager requires a high level of access in order to perform maintenance tasks and to respond to incidents.
However, because of the power of the Directory Manager user, a certain level of access control can be advisable to prevent damages from attacks being performed as the administrative user.
20.1. About access controls on the Directory Manager account
Directory Server applies regular access control instructions only to the directory tree. The privileges of the Directory Manager account are hard-coded, and you cannot use this account in bind rules. To limit access to the Directory Manager account, use the RootDN Access Control plug-in.
This plug-in’s features are different from standard access control instructions (ACI). For example, certain information, such as the target (the Directory Manager entry) and the allowed permissions (all of them) is implied. The purpose of the RootDN Access Control plug-in is to provide a level of security by limiting who can log in as Directory Manager based on their location or time, not to restrict what this user can do.
For this reason, the settings of the plug-in only support:
- Time-based access controls, to allow or deny access on certain days and specific time ranges
- IP address rules, to allow or deny access from defined IP addresses, subnets, and domains
- Host access rules, to allow or deny access from specific hosts, domains, and subdomains
There is only one access control rule you can set for the Directory Manager. It is in the plug-in entry, and it applies to the entire directory.
Same as in regular ACIs, deny rules have a higher priority than allow rules.
Ensure that the Directory Manager account has an appropriate level of access. This administrative user might need to perform maintenance operations in off-hours or to respond to failures. In this case, setting a too restrictive time or day rule can prevent the Directory Manager user from adequately manage the directory.
20.2. Configuring the RootDN access control plug-in using the command line
By default, the RootDN Access Control plug-in is disabled. To limit permissions of the Directory Manager account, enable and configure the plug-in.
Procedure
Enable the
RootDN Access Controlplug-in:# dsconf -D "cn=Directory Manager" ldap://server.example.com plugin root-dn enableSet the bind rules. For example, to allow the Directory Manager account to only log in between 6am and 9pm from the host with IP address
192.0.2.1, enter:# dsconf -D "cn=Directory Manager" ldap://server.example.com plugin root-dn set --open-time=0600 --close-time=2100 --allow-ip="192.0.2.1"For the full list of parameters you can set and their descriptions, enter:
# dsconf -D "cn=Directory Manager" ldap://server.example.com plugin root-dn set --helpRestart the instance:
#
dsctl instance_name restart
Verification
Perform a query as
cn=Directory Managerfrom a host that is not allowed or outside of the allowed time range:[user@192.0.2.2]$ ldapsearch -D "cn=Directory Manager" -W -H ldap://server.example.com -x -b "dc=example,dc=com" Enter LDAP Password: ldap_bind: Server is unwilling to perform (53) additional info: RootDN access control violationIf Directory Server denies access, the plug-in works as expected.
20.3. Configuring the RootDN access control plug-in using the web console
By default, the RootDN Access Control plug-in is disabled. To limit permissions of the Directory Manager account, enable and configure the plug-in.
Prerequisites
- You are logged in to the instance in the web console.
Procedure
- Navigate to → .
- Enable the plug-in.
Fill the fields according to your requirements.
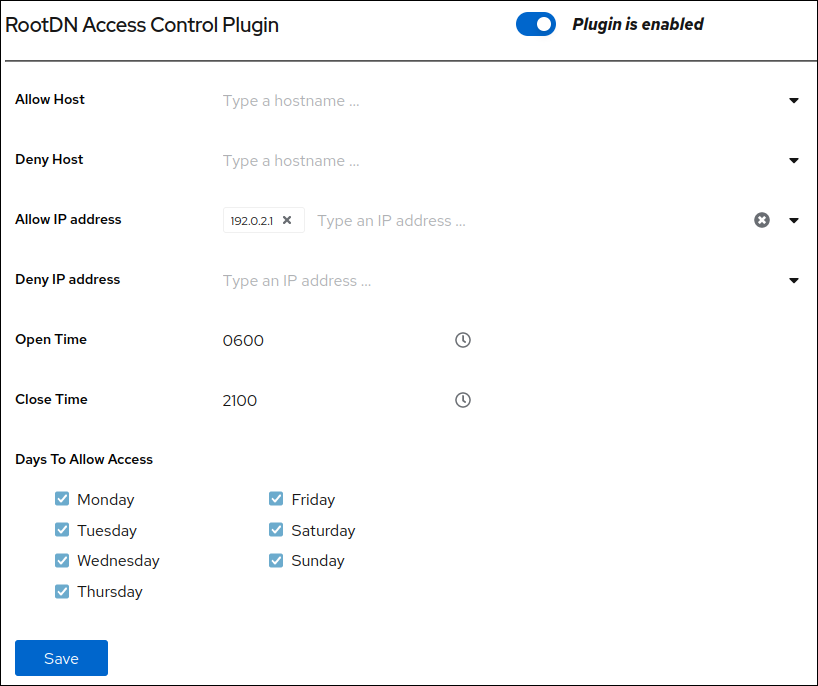
- Click .
-
Click in the top right corner, and select
Restart Instance.
Verification
Perform a query as
cn=Directory Managerfrom a host that is not allowed or outside of the allowed time range:[user@192.0.2.2]$ ldapsearch -D "cn=Directory Manager" -W -H ldap://server.example.com -x -b "dc=example,dc=com" Enter LDAP Password: ldap_bind: Server is unwilling to perform (53) additional info: RootDN access control violationIf Directory Server denies access, the plug-in works as expected.
Chapter 21. Managing attribute encryption
Directory Server offers a number of mechanisms to secure access to sensitive data in the directory. However, by default, the server stores data unencrypted in the database. For highly sensitive information, the potential risk that an attacker could gain access to the database, can be a significant risk.
The attribute encryption feature enables administrators to store specific attributes with sensitive data, such as government identification numbers, encrypted in the database. When enabled for a suffix, every instance of these attributes, even the index data, is encrypted for every entry stored in this attribute in the database. Note that you can enable attribute encryption for suffixes. To enable this feature for the whole server, you must enable attribute encryption for each suffix on the server. Attribute encryption is fully compatible with eq and pres indexing.
Any attribute you use within the entry distinguished name (DN) cannot be efficiently encrypted. For example, if you have configured to encrypt the uid attribute, the value is encrypted in the entry, but not in the DN:
dn: uid=demo_user,ou=People,dc=example,dc=com
...
uid::Sf04P9nJWGU1qiW9JJCGRg==
21.1. Keys Directory Server uses for attribute encryption
To use attribute encryption, you must configure encrypted connections using TLS. Directory Server uses the server’s TLS encryption key and the same PIN input methods for attribute encryption.
The server uses randomly generated symmetric cipher keys to encrypt and decrypt attribute data. The server wraps these keys using the public key from the server’s TLS certificate. As a consequence, the effective strength of the attribute encryption cannot be higher than the strength of the server’s TLS key.
Without access to the server’s private key, it is not possible to recover the symmetric keys from the wrapped copies. Therefore, back up the server’s certificate database regularly. If you lose the key, you will no longer be able to decrypt and encrypt data stored in the database.
21.2. Enabling attribute encryption using the command line
This procedure demonstrates how to enable attribute encryption for the telephoneNumber attribute in the userRoot database using the command line. After you perform the procedure, the server stores existing and new values of this attribute AES-encrypted.
Prerequisites
- You have enabled TLS encryption in Directory Server.
Procedure
Export the
userRootdatabase:# dsconf -D "cn=Directory Manager" ldap://server.example.com backend export -E userRootThe server stores the export in an LDIF file in the
/var/lib/dirsrv/slapd-instance_name/ldif/directory. The-Eoption decrypts attributes that are already encrypted during the export.Enable AES encryption for the
telephoneNumberattribute:# dsconf -D "cn=Directory Manager" ldap://server.example.com backend attr-encrypt --add-attr telephoneNumber dc=example,dc=comStop the instance:
# dsctl instance_name stopImport the LDIF file:
# dsctl instance_name ldif2db --encrypted userRoot /var/lib/dirsrv/slapd-instance_name/ldif/None-userroot-2022_01_24_10_28_27.ldifThe
--encryptedparameter enables the script to encrypt attributes configured for encryption during the import.Start the instance:
# dsctl instance_name start
Additional resources
21.3. Enabling attribute encryption using the web console
This procedure demonstrates how to enable attribute encryption for the telephoneNumber attribute in the userRoot database using the web console. After you perform the procedure, the server stores existing and new values of this attribute AES-encrypted.
Note that the export and import features in the web console do not support encrypted attributes. Therefore, you must perform these steps on the command line.
Prerequisites
- You have enabled TLS encryption in Directory Server.
- You are logged in to the instance in the web console.
Procedure
Export the
userRootdatabase:# dsconf -D "cn=Directory Manager" ldap://server.example.com backend export -E userRootThe server stores the export in an LDIF file in the
/var/lib/dirsrv/slapd-instance_name/ldif/directory. The-Eoption decrypts attributes that are already encrypted during the export.- In the web console, navigate to → → → .
- Enter the attribute to encrypt, and click .
-
In the menu, select
Stop Instance. On the command line, import the LDIF file:
# dsctl instance_name ldif2db --encrypted userRoot /var/lib/dirsrv/slapd-instance_name/ldif/None-userroot-2022_01_24_10_28_27.ldifThe
--encryptedparameter enables the script to encrypt attributes configured for encryption during the import.-
In the web console, open the menu, and select
Start Instance.
Additional resources
21.4. General considerations after enabling attribute encryption
Consider the following points after you have enabled encryption for data that is already in the database:
Unencrypted data can persist in the server’s database page pool backing file. To remove this data:
Stop the instance:
# dsctl instance_name stopRemove the
/var/lib/dirsrv/slapd-instance_name/db/guardianfile:# **rm /var/lib/dirsrv/slapd-instance_name/db/guardian``Start the instance:
# dsctl instance_name start
- After you enabled have encryption and successfully imported the data, delete the LDIF file with the unencrypted data.
- Directory Server does not encrypt the replication log file. To protect this data, store the replication log on an encrypted disk.
- Data in the server’s memory (RAM) is unencrypted and can be temporarily stored in swap partitions. To protect this data, configure encrypted swap space.
Even if you delete files that contain unencrypted data, this data can be restored under certain circumstances.
21.5. Updating the TLS certificates used for attribute encryption
Attribute encryption is based on the TLS certificate of the server. Follow this procedure to prevent that attribute encryption fails after renewing or replacing the TLS certificate.
Prerequisites
- You configured attribute encryption.
- The TLS certificate will expire in the near future.
Procedure
Export the
userRootdatabase:# dsconf -D "cn=Directory Manager" ldap://server.example.com backend export -E userRootThe server stores the export in an LDIF file in the
/var/lib/dirsrv/slapd-instance_name/ldif/directory. The-Eoption decrypts attributes that are already encrypted during the export.Create a private key and a certificate signing request (CSR). Skip this step if you want to create them using an external utility.
If your host is reachable only by one name, enter:
# dsctl instance_name tls generate-server-cert-csr -s "CN=server.example.com,O=example_organization"If your host is reachable by multiple names:
# dsctl instance_name tls generate-server-cert-csr -s "CN=server.example.com,O=example_organization" server.example.com server.example.netIf you specify the host names as the last parameter, the command adds the Subject Alternative Name (SAN) extension with the
DNS:server.example.com, DNS:server.example.netentries to the CSR.
The string specified in the
-s subjectparameter must be a valid subject name according to RFC 1485. TheCNfield in the subject is required, and you must set it to one of the fully-qualified domain names (FQDN) of the server. The command stores the CSR in the/etc/dirsrv/slapd-instance_name/Server-Cert.csrfile.- Submit the CSR to the certificate authority (CA) to get a certificate issued. For further details, see your CA’s documentation.
Import the server certificate issued by the CA to the NSS database:
If you created the private key using the
dsctl tls generate-server-cert-csrcommand, enter:# dsconf -D "cn=Directory Manager" ldap://server.example.com security certificate add --file /root/instance_name.crt --name "server-cert" --primary-certRemember the name of the certificate you set in the
--name _certificate_nicknameparameter. You require it in a later step.If you created the private key using an external utility, import the server certificate and the private key:
# dsctl instance_name tls import-server-key-cert /root/server.crt /root/server.keyNote that the command requires you to specify the path to the server certificate first and then the path to the private key. This method always sets the nickname of the certificate to
Server-Cert.
Import the CA certificate to the NSS database:
# dsconf -D "cn=Directory Manager" ldap://server.example.com security ca-certificate add --file /root/ca.crt --name "Example CA"Set the trust flags of the CA certificate:
# dsconf -D "cn=Directory Manager" ldap://server.example.com security ca-certificate set-trust-flags "Example CA" --flags "CT,,"This configures Directory Server to trust the CA for TLS encryption and certificate-based authentication.
Stop the instance:
# dsctl instance_name stopEdit the
/etc/dirsrv/slapd-instance_name/dse.ldiffile, and remove the following entries including their attributes:-
cn=AES,cn=encrypted attribute keys,cn=database_name,cn=ldbm database,cn=plugins,cn=config -
cn=3DES,cn=encrypted attribute keys,cn=database_name,cn=ldbm database,cn=plugins,cn=config
ImportantRemove the entries for all databases. If any entry that contains the
nsSymmetricKeyattribute is left in the `/etc/dirsrv/slapd-instance_name/dse.ldif file, Directory Server will fail to start.-
Import the LDIF file:
# dsctl instance_name ldif2db --encrypted userRoot /var/lib/dirsrv/slapd-instance_name/ldif/None-userroot-2022_01_24_10_28_27.ldifThe
--encryptedparameter enables the script to encrypt attributes configured for encryption during the import.Start the instance:
# dsctl instance_name start