
Assessing and Monitoring Security Vulnerabilities on RHEL Systems
Understanding your Environmental Exposure to Potential Security Threats
Abstract
Chapter 1. Overview of the Insights for RHEL vulnerability service
The vulnerability service enables quick assessment and comprehensive monitoring of the exposure of your RHEL infrastructure to Common Vulnerabilities and Exposures (CVEs) so you can better understand your most critical issues and systems and effectively manage remediations.
With your data uploaded to the vulnerability service, you can filter and sort groups of systems and CVEs to refine and optimize your views. You can also add context to individual CVEs when they pose an extraordinary risk to systems. After gaining an understanding of your risk exposure, report on the status of the CVEs to appropriate stakeholders, then create Ansible Playbooks to remediate issues to secure your organization.
Prerequisites
The vulnerability service is available for all supported versions of RHEL 6, 7, 8 and 9. The following conditions must be met before you can use the vulnerability service:
- Each system has the Insights client installed and registered to the Insights for Red Hat Enterprise Linux application. Follow the Red Hat Insights for Red Hat Enterprise Linux, Get Started instructions to install the client and register your system(s).
- The vulnerability service is fully supported for RHEL systems managed by Red Hat Subscription Management (RHSM) and Satellite 6 and later. Using any other means to obtain package updates, other than Satellite 6 with RHSM or RHSM registered with subscription.redhat.com (Customer Portal), can lead to misleading results.
- Vulnerability service remediations are not fully supported and may not work properly on Satellite 5 and Spacewalk-hosted RHEL systems.
- Some features require special privileges provided by your organization administrator. Specifically, the ability to view Red Hat Security Advisories (RHSAs) associated with certain CVEs and systems, and to view and patch those vulnerabilities in the Red Hat Insights for Red Hat Enterprise Linux patch service, requires permissions granted through user access.
Additional resources
1.1. How the vulnerability service works
The vulnerability service uses the Insights client to gather information about your RHEL systems. The client gathers information about the systems and uploads it to the vulnerability service.
The vulnerability service then assesses the data against the Red Hat CVE database and security bulletins to determine if there are any outstanding CVEs that could affect the systems, and provides the results of those comparisons.
Once the data has been analyzed, you can view and sort the displayed results, assess the risks and priorities of the vulnerabilities, report their status, and create and deploy Ansible Playbooks to remediate them. The goal of the vulnerability service is to enable a repeatable process that protects against security weaknesses in your RHEL infrastructure.
1.2. User Access considerations
An Organization Administrator on your account configures settings in User Access to control access to Red Hat Insights for Red Hat Enterprise Linux features. All users on your account have access to most of the data in Insights for Red Hat Enterprise Linux. However, performing some actions requires users to have elevated access.
Access is granted in User Access in the Red Hat Hybrid Cloud Console. To grant or change access, an Organization Administrator or User Access administrator must add you to a User Access group with the required roles in Red Hat Hybrid Cloud Console > the Settings icon (⚙) > Identity & Access Management > User Access > Users.
In this documentation, prerequisites for procedures declare whether you need elevated access to perform the procedure.
Important predefined groups and roles relevant to understanding User Access are:
- Default access group
- Default admin access group
- Organization Administrator role
Brief overview about some predefined groups and roles
The following predefined groups and roles are relevant to access:
- Default access group. All users on the account are members of the Default access group. Members of the Default access group have read-only access, which allows you to view most information in Insights for Red Hat Enterprise Linux.
- Default admin access group. All users on the account who are Organization Administrators are members of this group. Users cannot modify the roles in the Red Hat-managed Default admin access group. Members of the Default admin access group have read-write access, which allows you to view and perform other actions in Insights for Red Hat Enterprise Linux.
- Organization Administrator role. All users on the account who are Organization Administrators can create and modify User Access groups and grant access to other account users. To find out whether you are an Organization Administrator, click your name in the Red Hat Hybrid Cloud Console header, in the upper right of your screen, and see whether the words “Org. Administrator” show under your username.
Requesting elevated access If you do not have access to features that you need, you can:
Contact Customer Service to get Organization Administrator details for your account.
- Provide your account number when you send the request.
Contact the Organization Administrator and ask for access, providing the following information:
- The name of the role you need access to, for example, Remediations administrator
- A link to full User Access documentation, to help inform the Organization Administrator about how to give you access.
1.2.1. User Access roles for vulnerability-service users
The following roles enable standard or enhanced access to vulnerability service features in Insights for Red Hat Enterprise Linux:
- Vulnerability viewer. Read any vulnerability-service resource.
- Vulnerability administrator. Perform any available operation against any vulnerability-service resource.
Chapter 2. Common Vulnerabilities and Exposures (CVEs)
Common Vulnerabilities and Exposures (CVEs) are security vulnerabilities identified in publicly released software packages. CVEs are identified and listed by the National Cybersecurity FFRDC (NCF), the federally funded research and development center operated by the Mitre Corporation, with funding from the National Cyber Security Division of the United States Department of Homeland Security. The complete list of CVEs is available at https://cve.mitre.org.
By highlighting CVEs with publicly known exploits and security rules associated with CVEs, the vulnerability service surfaces enhanced threat intelligence to aid in determining which CVEs pose the greatest potential risk to RHEL environments, enabling our users to effectively prioritize and address their most critical issues first.
The vulnerability service does not contain every CVE included in the list of entries at https://cve.mitre.org. Only Red Hat CVEs, those CVEs for which Red Hat issues security advisories (RHSAs), are included in the vulnerability service.
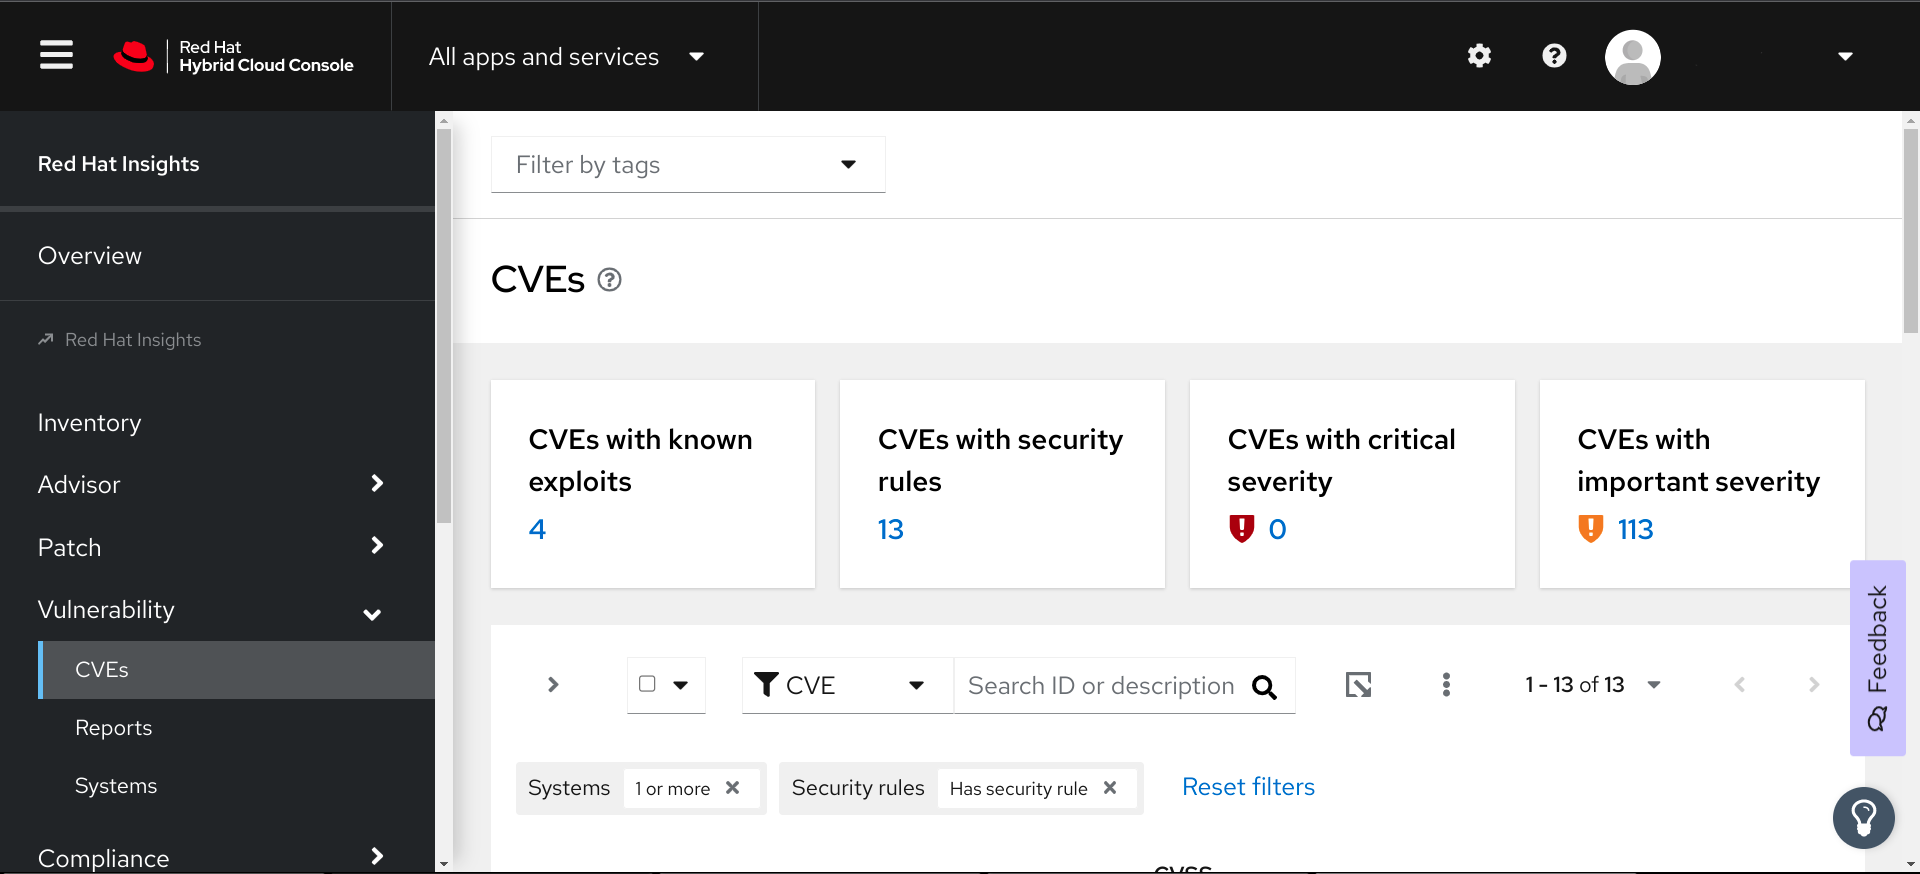
The vulnerability service identifies CVEs impacting your RHEL systems, indicates the severity and enables you to efficiently triage the exposures that are most critical to resolve. The dashbar will alert you to the following types of CVEs:
- Known exploits
- Security rules
- Critical severity
- Important severity
2.1. Red Hat Security Advisories (RHSAs)
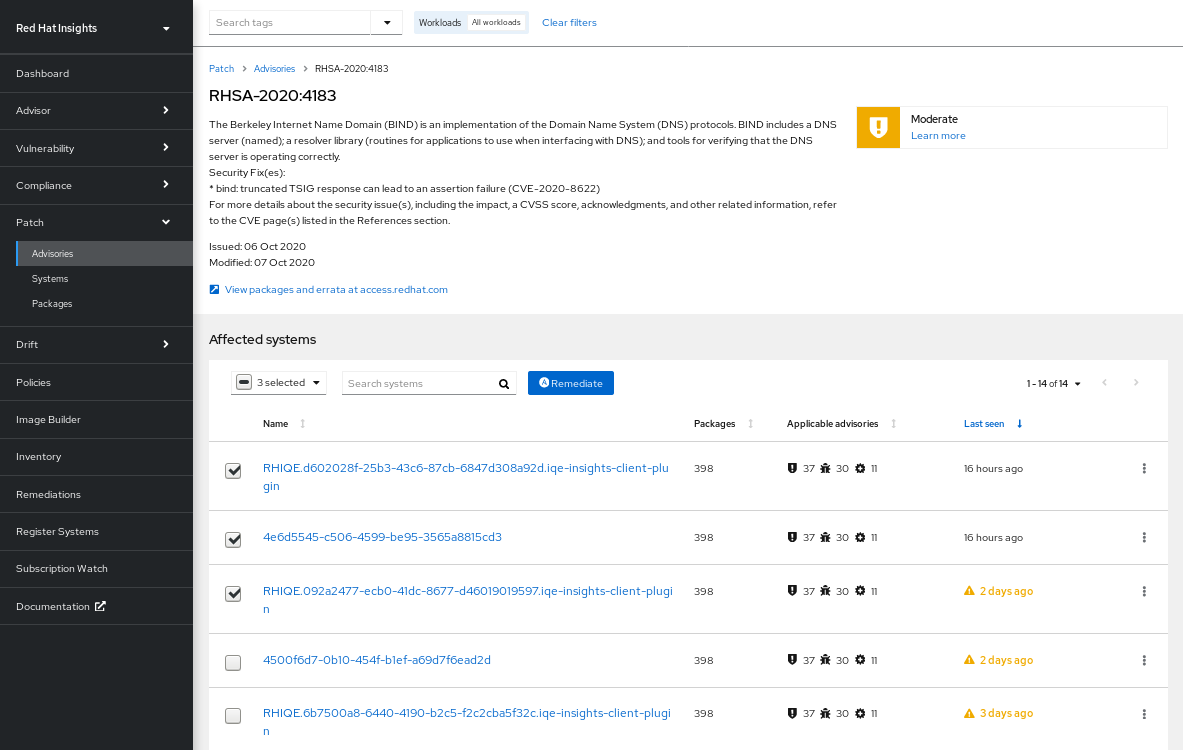
Red Hat Security Advisory (RHSA) errata document security vulnerabilities in Red Hat products for which there are remediations or mitigations available. The Red Hat Insights for Red Hat Enterprise Linux vulnerability service displays the advisory identifier tied to each system exposed to a CVE.
View this information by selecting a CVE and selecting the Filter by affected systems link in the security rule card. If an advisory exists for the system, the RHSA ID is visible as a link next to the system in the Exposed systems list, Advisory column. When there are no such advisories, the Advisory column is not visible, or will show “Not available.”
When an advisory exists for a system, users can view more information about the RHSA, including a list of affected systems. In the patch service, users can select systems to create an Ansible Playbook to apply the remediation.
2.2. Security rules
Security rules are CVEs given additional visibility due to the elevated risk and exposure associated with them. These are security flaws that may receive significant media coverage and have been scrutinized by the Red Hat Product Security team, using the Product Security Incident Response Plan workflow to help determine your RHEL environment exposure. These security rules enable you to take the appropriate action to protect your organization.
Security rules provide deep threat intelligence, beyond analyzing the version of RHEL running on a system. Security rules are manually curated to determine whether you are susceptible to a security threat by analyzing system metadata collected by the Insights client. If the vulnerability service identifies a system as exposed to a security rule, there is the potential for elevated security risk and issues should be addressed with urgency.
Addressing security rules on exposed systems should be your highest priority.
Finally, not all systems exposed to a CVE are also exposed to a security rule associated with that CVE. Even though you may be running a vulnerable version of software, other environmental conditions may mitigate the threat; for example, a specific port is closed or if you are running SELinux.
2.2.1. Identifying security rules in the Insights for RHEL dashboard
Use the following steps to view your infrastructure exposure to security rules.
Procedure
Navigate to the Red Hat Insights for Red Hat Enterprise Linux dashboard.
NoteFor simplicity, panels for services not related to security vulnerability assessment are minimized in the following screenshot.
:
View the Latest critical notifications on your systems panel. These are security rules with an elevated severity rating of “Important” or “Critical.” These are potentially your most critical issues and should be prioritized for remediation.
To the right of each notification, click the Expand button to see associated CVEs and the number of systems exposed in your infrastructure.
NoteYou may see security rules in your critical notifications but have zero systems exposed. In this case, even though the CVE is present in your infrastructure, the security rule conditions may not exist.
- Below the name of the security rule, and under Associated CVEs, click the CVE ID link.
- View which of your systems is impacted by the security rule CVE and optionally select exposed systems to create playbooks.
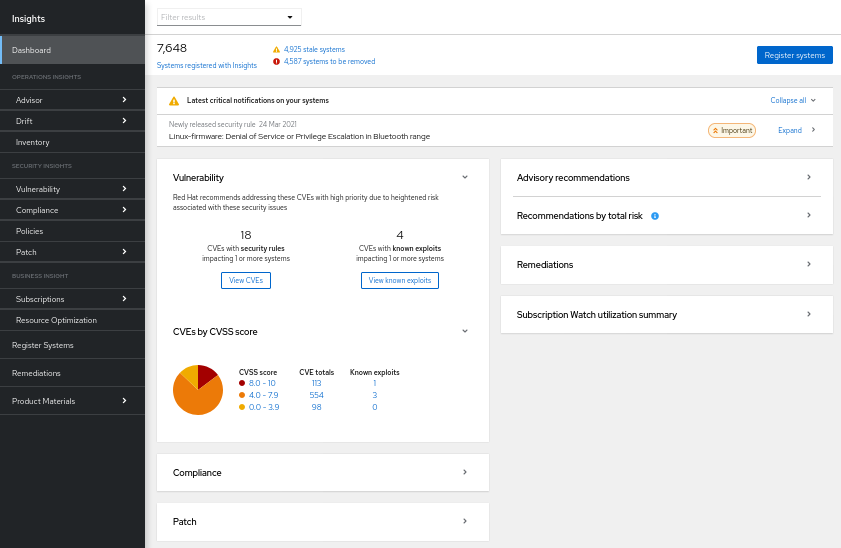
Next, view the information in the vulnerability card.
Note the number of “CVEs with security rules impacting systems.” This number includes security rules of any severity impacting at least one system.
- Click View CVEs. Consider lesser-severity security rules your second highest priority for remediation, following high-severity security rules.
2.3. Known exploits
Red Hat analyzes Metasploit data to determine whether code exists publicly to exploit a CVE, or a CVE has already been exploited publicly. The vulnerability service applies the “Known exploits” label to CVEs that meet that criteria.
This enhanced threat assessment can help users identify and address those CVEs that pose the most critical risks first. Red Hat recommends users review any CVEs with the “Known exploit” label with high priority and work towards remediating those issues.
The vulnerability service makes you aware that the known-exploit CVE exists on systems in your infrastructure. The “Known exploits” label does not mean that the vulnerability was exploited on your RHEL systems; the vulnerability service does not make that determination.
2.4. Common Vulnerabilities and Exposures provide deep threat intelligence with triage feature
The vulnerability service provides you with data about individual Common Vulnerabilities and Exposures (CVEs) and their effect on your systems registered to Insights. CVEs are categorized as vulnerable or affected but not vulnerable. This level of threat intelligence is available for CVEs that have the Security Rule label or for those that have gone through Red Hat Product Security’s rigorous analysis.
This increased threat intelligence enables you to triage issues and address the most urgent ones first. When managing a large fleet of servers, this translates into expedited protection and significant efficiencies.
An affected but not vulnerable CVE status indicates that you are running software that has a vulnerability in it but is not currently exploitable. This system will need remediation but does not require immediate attention.
A vulnerable CVE status indicates flawed code with an open path to exploitation. An open path could be a port or an OS version that permits one of the following: confidential information to be leaked, the integrity of the system to be compromised or availability of the system to be hindered.
Let us look at an example of a vulnerable server versus an affected but not vulnerable server:
Suppose that Server A is running vulnerable software that allows root access to the system. Server A would be considered vulnerable and require immediate patching.
In contrast, suppose that Server B’s current configuration prevents the vulnerability from manifesting, even when present in the affected code. Server B would be considered affected but not vulnerable. This would mean that Server B could be relegated to the to-do list, so that the more immediate threat, Server A could be remediated.
You should patch Server B once Server A has been addressed since it is running potentially vulnerable code. Version updates and other events could render it vulnerable in the future.
2.4.1. Identifying known-exploit CVEs in the Red Hat Insights for RHEL dashboard
Use the following steps to identify known-exploit CVEs in the Insights for Red Hat Enterprise Linux dashboard vulnerability card.
Procedure
Navigate to the Red Hat Insights for Red Hat Enterprise Linux dashboard.
NoteFor simplicity, panels for services not related to security vulnerability assessment are minimized in the following screenshot.
:
- On the Vulnerability card, note the CVEs with Known exploits impacting 1 or more systems and the number displayed.
- Click View Known exploits.
- View the filtered list of Known-exploit CVEs in the CVEs list.
Chapter 3. Refining vulnerability-service results
Whether reporting results to stakeholders or prioritizing systems for remediation, the vulnerability service enables many ways to refine the views of your data, helping you and others focus on your most critical systems, workloads, or issues. The following sections describe the organization of your data and the sorting, filtering, and contextual features you can use to refine and enrich your results.
3.1. CVE-list and systems-list filters
Filtering narrows the visible list of CVEs and associated systems, helping you focus on specific issues. Apply filters to the CVEs list to focus on CVEs by criticality or business risk, for example. After selecting an individual CVE, apply filters to the resulting list of affected systems to focus on those of a specific RHEL major or minor version, for example.
Filters are activated by selecting a primary filter from the drop down list of filters on the left, and then selecting a secondary subfilter from the filter options drop down list on the right. Selected filters are visible below the Filters menu and can be deactivated by clicking the X next to each one.
CVEs list filters
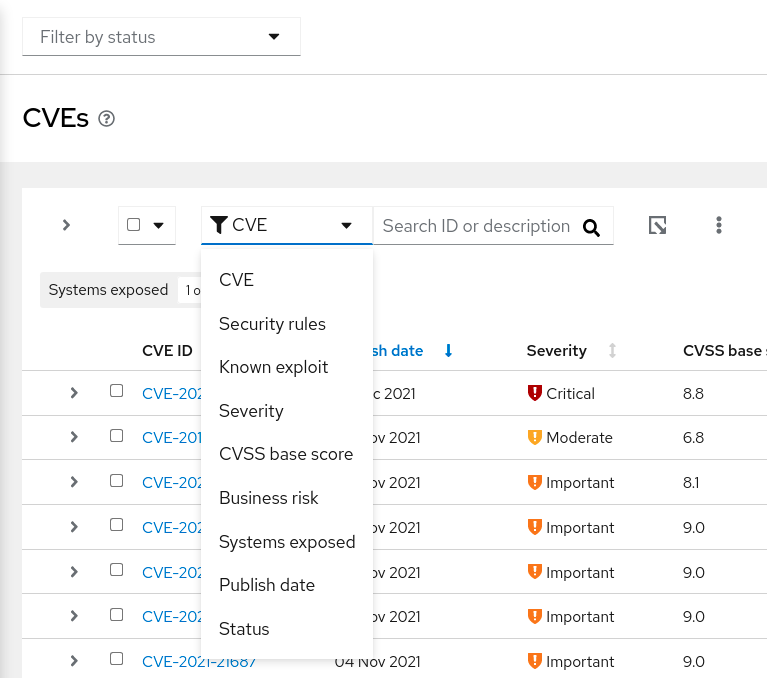
The following primary filters are accessible from the CVEs page. Select the primary filter, then define a parameter in the subfilter:
- CVE. Search ID or description.
- Security rules. Show only CVEs with the "Security rule" label.
- Known exploit. Show only CVEs with the "Known exploit" label.
- Severity. Select one or more values: Critical, Important, Moderate, Low, or Unknown.
- CVSS base score. Select one or more ranges: All, 0.0-3.9, 4.0-7.9, 8.0-10.0, N/A (not applicable)
- Business risk. Select one or more values: High, Medium, Low, Not defined.
- Systems exposed . Select to only show CVEs with systems currently affected, or with no systems affected.
- Publish date. Select from All, Last 7 days, Last 30 days, Last 90 days, Last year, or More than 1 year ago.
- Status. Select one or more values: Not reviewed, In review, On-hold, Scheduled for patch, Resolved, No action - risk accepted, Resolved via mitigation.
Systems list filters
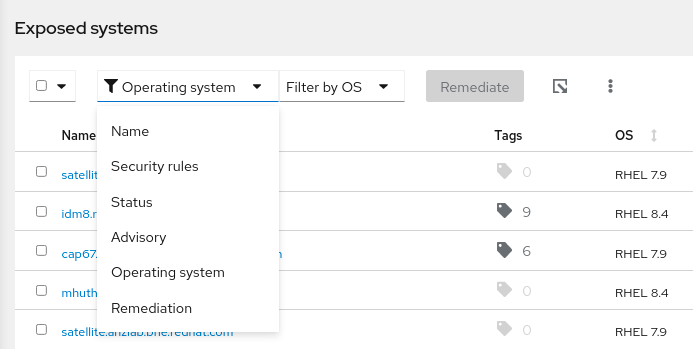
The following primary filters are accessible from the top of the list of systems on the CVE details page:
- Name. Find a specific CVE by entering the CVE ID.
- Security rules. If the CVE has a security rule associated with it, filter by other systems vulnerable to the same security rule, or show systems not affected by the security rule.
- Status. Show systems in specific status or workflow categories.
- Advisory. Show systems to which a Red Hat advisory applies for this CVE.
- Operating system. Show systems running specific RHEL (minor) versions.
- Remediation. Show systems included in an Ansible Playbook, a manual remediation, or that are not included in a current remediation plan.
3.1.1. Filtering security-rule CVEs
Security rules, especially high-severity security rules, pose the greatest potential threat to your infrastructure and should be considered the highest priority for identification and remediation. Use the following procedure to view only high-severity security-rule CVEs in the CVEs list and identify affected systems.
Not all systems exposed to a CVE are also exposed to a security rule associated with that CVE. Even though you may be running a vulnerable version of software, other environmental conditions may mitigate the threat; for example, a specific port is closed or SELinux is enabled.
Procedure
- Navigate to Security > Vulnerability > CVEs in Red Hat Insights for Red Hat Enterprise Linux.
Click the filters dropdown list in the toolbar.
- Apply the Security rules filter.
- Apply the Has security rule subfilter.
- Scroll down to view security-rule CVEs. CVEs with security rules display the security-rule label located immediately below the CVE ID.
3.1.2. Remediating vulnerabilities with security rules on RHEL Systems
CVEs with security rules are CVEs prioritized by Red Hat because they focus on issues that have elevated risk to your systems. Remediating these issues helps support a security posture that prioritizes the most important issues for your organization. Using the vulnerability service and the remediations service, you can prioritize and remediate some of the most important threats to your systems by:
- Focusing on CVEs that have security rules. For more information about security rules, see Security rules, and Filtering lists of systems exposed to security rules.
- Remediating CVEs. For more information about remediating CVEs, see the Red Hat Insights Remediations Guide.
3.1.3. Filtering known-exploit CVEs
CVEs with the “Known exploit” label are determined by Red Hat to have exploits that exist in the wild; either the code exists publicly to exploit the CVE, or an exploit is known publicly to have already happened. For these reasons, known-exploit CVEs should be prioritized for identification and remediation.
Red Hat does not determine whether any of your registered systems have been exploited. We are simply identifying CVEs that may pose an extraordinary risk.
Use the following steps to filter known-exploit CVEs in the CVEs list:
Procedure
- Navigate to Security > Vulnerability > CVEs in Red Hat Insights for Red Hat Enterprise Linux.
Click the filters drop-down list in the toolbar.
- Apply the Known exploit filter.
- Apply the Has a known exploit subfilter.
- Scroll down to view the list of known-exploit CVEs.
3.1.4. Filtering CVEs without associated advisories
Some CVEs do not have associated advisories, also called errata. This might happen for any of the following reasons:
- No fix is available for the CVE
- Product Security analysis determines that the CVE affects your environment, but has no errata available for your environment (although the same CVE can have errata in other environments)
- Your system is no longer under support
CVE information is currently available for RHEL 6, 7, 8, and 9. No information is available for RHEL 5 systems.
Being able to identify the CVEs without advisories enables you to take measures to protect your organization from exposures associated with those vulnerabilities, so that you can take the necessary steps to address the issues.
If your version of RHEL does not have a fix available and is listed as “Will not fix,” consider the following criteria:
- The impact of the vulnerability (severity)
- The life cycle phase of your version of RHEL
If you decide that a fix is necessary for a CVE without an associated advisory, the following options are available:
- Accept the risk
- Upgrade to a supported product version that includes a fix for this vulnerability, if available (recommended)
- Apply a mitigation (if one exists)
Additional resources
For more information about CVEs, see Common Vulnerabilities and Exposures (CVES).
For more information about the severity ratings for vulnerabilities, see Understanding severity ratings.
For more information about product life cycles, see Life cycle and update policies.
To open a support case in the Customer Portal, see Customer support.
3.1.4.1. Enabling CVEs without advisories
Enabling CVEs without advisories allows you to access systems affected by CVEs without advisories in Insights.
This feature is enabled by default, but CVEs without advisories are hidden by default in the main view. This means that you must use filters to display and view CVEs without advisories.
Red Hat’s policy requires Insights for Red Hat Enterprise Linux to display all high priority, critical, and important CVEs, regardless of whether those CVEs have associated advisories.
Prerequisites
- Vulnerability administrator access to your environment in Red Hat Insights
Procedure
- From the Red Hat Insights for RHEL dashboard, navigate to Security > Vulnerability > CVEs.
- Click the More options icon (⋮) and select Show CVEs without Advisories. The list of advisories includes CVEs without advisories.
3.1.4.2. Disabling CVEs without advisories
To disable CVEs without advisories feature, deselect the Show CVEs without Advisories option.
The CVEs without advisories option is enabled by default, but the default view hides CVEs without advisories.
Red Hat’s policy requires Insights for Red Hat Enterprise Linux to display all high priority, critical, and important CVEs, regardless of whether those CVEs have associated advisories.
Prerequisites
- Vulnerability administrator access to your environment in Red Hat Insights
- The list of advisories includes CVEs without advisories
Procedure
- From the Red Hat Insights for RHEL dashboard, navigate to Security > Vulnerability > CVEs.
- Click the More options icon (⋮) and select Hide CVEs without Advisories.
3.1.4.3. Viewing CVEs without advisories
The Show CVEs without Advisories option enables or disables CVEs without advisories. To view CVEs without advisories, the Show CVEs without Advisories option must be enabled.
Prerequisites
- The Organization Administrator has enabled the CVEs without advisories option.
Procedure
- From the Red Hat Insights for RHEL dashboard, navigate to Security > Vulnerability > CVEs.
- From the filter drop-down, select Advisory.
- From the Filter by Advisory drop-down, select Not Available. The list of advisories shows all CVEs without advisories.
3.1.4.4. Identifying systems affected by a CVE without advisories
The CVE details page displays the list of all systems affected by the selected CVE. You can filter the list of systems to display the systems affected by the CVE where an advisory is not present.
Prerequisites
- The Organization Administrator has enabled the CVEs without advisories option.
Procedure
- Identify a CVE without advisories for which you want to see systems that it affects. For more information about identifying CVEs without advisories, refer to Identifying systems with CVEs without Advisories.
Select the identified CVE to navigate to the CVE details page. The CVE details page for that CVE displays. The page lists all the systems affected by that CVE.
- If you apply the Filter by Advisory filter and Not Available option when you select a CVE, these filters persist to the CVE details page.
- Otherwise, when you navigate to the CVE details page, select Advisory from the filters at the top of the page, and then Select Filter by Advisory, and click the Not Available checkbox. The list of systems updates to show only systems affected by that CVE without advisories. The Advisory column shows Not Available for each system in the list.
- Optional: To view details for the system, select the name of the system you want to view. The details page for the system displays.
3.1.4.5. Viewing CVEs without advisories in system details
The system details page displays the list of all CVEs that affect the selected system. You can filter the list of CVEs to display the CVEs without advisories.
Prerequisites
- The Organization Administrator has enabled the CVEs without advisories option.
Procedure
- From the Red Hat Insights for RHEL dashboard, navigate to Security > Vulnerability > Systems. The Vulnerability systems page displays.
- Select a system ID from the list. The system details page for that system displays. The page lists all the CVEs that affect the selected system.
- Select Advisory from the filters at the top of the page.
- Select Filter by Advisory, and select the Not Available checkbox. The list of CVEs updates to show only CVEs without advisories. The Advisory column shows Not Available for each CVE in the list.
- Optional: To view details for the CVE, select the CVE ID for the CVE you want to view. The details page for the CVE displays.
3.2. Filtering lists of systems exposed to security rules
After filtering the list of CVEs to view only your most critical potential threats, select an individual CVE to view the list of exposed systems and apply a filter to the list.
Procedure
- After selecting a security-rule CVE, scroll down to the Exposed systems list. Not every system in the list has the security rule conditions present for the CVE to be a security rule. Apply the following filter to see only the systems with security rule conditions present.
- Select the Security rules filter from the primary filter dropdown list.
- Check the Has security rule box in the secondary subfilter dropdown list.
- View the systems with exposure to that CVE that also have the conditions present for the security rules.
3.3. Insights for RHEL group filters
The ability to filter vulnerability service results by groups of systems or workloads enables users to view only those systems tagged as belonging to a specific group. These can be systems running SAP workloads (or by SAP ID), by Satellite host groups, or by custom tags added to the Insights client configuration file.
Group filtering can be set globally in Insights for Red Hat Enterprise Linux using the Filter results box located at the top of the page throughout the Insights for Red Hat Enterprise Linux application. Group selection persists when changing from service to service and page to page. However, the functionality varies within the different Insights for Red Hat Enterprise Linux services.
Group filtering works in the vulnerability Dashboard and vulnerability service CVEs and Systems lists.
Learn more about group tags and configuring custom tags in Tags and system groups section of this document.
3.3.1. Filtering Dashboard, CVEs, and Systems lists by group
Use the following procedure to filter vulnerability service CVE and Systems lists by group.
Procedure
- Navigate to Red Hat Hybrid Cloud Console and log in.
- Open the Red Hat Insights for Red Hat Enterprise Linux application.
- Click the down arrow on the Filter results box located at the top of any page in the Insights application.
Select a group by which to filter your systems.
Search or scroll to view available tags. To browse the full list of available tags, scroll to the bottom of the list and click View more.
Optionally,
- Select SAP workloads.
- Select systems by specific SAP IDs.
- Select Satellite host collections.
Select systems identified by custom group tags.
To learn more about creating custom tags, see section, Custom system tagging, in this document.
- Navigate to the service and view only systems or CVEs that belong to your selected group or groups.
3.4. Defining a business risk for a CVE
The vulnerability service allows you to define the business risk of a CVE with the following options: High, Medium, Low, or Not Defined (default).
While the list of CVEs shows the severity of each CVE, assigning a business risk lets you rank CVEs based on the impact they could have on your organization. This can give you more control in managing your risk efficiently in a large environment, and enable you to make better operational decisions.
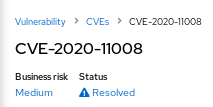
By default, the business risk field for a specific CVE is set to Not Defined. After you set the business risk, it is visible in the Security > Vulnerability > CVEs list, in the CVE row.

Business risk is also visible on the details card for each CVE, which shows more information and lists affected systems.
3.4.1. Setting a business risk for a single CVE
Complete the following steps to set the business risk for a single CVE:
The business risk for that CVE will be the same on all systems impacted by it.
- Navigate to the Security > Vulnerability > CVEs page and log in if necessary.
- Identify a CVE for which to set a business risk.
Click the more-actions icon (three vertical dots) on the right end of the CVE row and click Edit business risk.

- Set a business risk value to the appropriate level and, optionally, add a justification for your risk assessment.
- Click Save.
3.4.2. Setting a business risk for multiple CVEs
Complete the following steps to set the same business risk on multiple CVEs that you select:
- Navigate to Security > Vulnerability > CVEs and log in if necessary.
- Check the boxes for the CVEs for which you want to set a business risk.
Perform the following steps to set a business risk:
- Click the more-actions icon (three vertical dots) to the right of the Filters dropdown menu in the toolbar and click Edit business risk.
- Set an appropriate business risk value and, optionally, add a justification for your risk assessment.
- Click Save.
3.5. Excluding systems from vulnerability service analysis
The vulnerability service allows you to exclude specific systems from vulnerability analysis. This can save you the time and attention required to review and re-review issues on systems that are not relevant to your organization’s goals.
As an example, if you have the following category of servers: QA, Dev, and Production, you may not care to review the vulnerabilities for your QA servers and therefore want to exclude these systems from the analysis performed by the vulnerability service.
When you exclude systems from vulnerability analysis, the Insights client still runs per schedule on the system, but the results for the system are not visible in the vulnerability service. The continued operations of the client ensure that other Red Hat Insights for Red Hat Enterprise Linux services can still upload the data they need. It also means that you can still view results for those systems using filtering.
Complete the following steps to exclude selected RHEL systems from vulnerability service analysis:
Procedure
- Navigate to the Security > Vulnerability > Systems tab and log in if necessary.
- Check the box for each system you want to exclude from vulnerability analysis.
Click the more-actions icon in the toolbar, at the top of the list of systems, and select Exclude systems from vulnerability analysis.
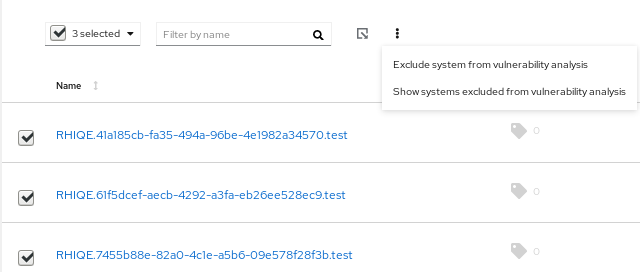
Optionally, you can exclude a single system by clicking the more-actions icon in the system row and selecting Exclude system from vulnerability analysis.

3.6. Showing previously excluded systems
Complete the following steps to show a previously excluded system:
Procedure
- Navigate to the Security > Vulnerability > Systems tab and log in if necessary.
- Click the more-actions icon in the toolbar, at the top of the list of systems, and select Show systems excluded from analysis.
- See systems excluded from vulnerability analysis. This can be verified by the value of Excluded in the Applicable CVEs column.
3.7. Resuming vulnerability analysis for a system
Complete the following steps to resume vulnerability analysis for a system:
Procedure
- Navigate to the Security > Vulnerability > Systems tab and log in if necessary.
- Click the more-actions icon in the toolbar, at the top of the list of systems, and select Show systems excluded from analysis.
- In the list of results, check the box for each system for which you want to resume vulnerability analysis.
- Click the more-actions icon again and select Resume analysis for system.
3.8. CVE status
Another method of managing CVEs impacting your systems is by setting a status for CVEs. The vulnerability service enables the following ways of setting a status for a CVE:
- Set a status for a CVE for all systems.
- Set a status for a specific CVE + system pair.
Status values are preset and include the following options:
- Not reviewed (default)
- In-review
- On-hold
- Scheduled for patch
- Resolved
- No action - risk accepted
- Resolved via mitigation
Setting a status for a CVE can facilitate better triaging through its life-cycle, from becoming aware of it to remediating it. Defining a status allows your organization to keep better tabs on where the most critical CVEs are in their life-cycle and where you should focus your efforts to address the most critical issues per your business need. The status for a CVE is visible in all CVE tables in the vulnerability service and in individual CVE views.
3.8.1. Setting a status for a CVE on all affected systems
Complete the following steps to set a status for a CVE and have that status apply to that CVE on all of the systems it impacts:
Procedure
- Navigate to the Security > Vulnerability > CVEs tab and log in if necessary.
- Click the more-actions icon located on the right end of the CVE row and select Edit status.
- Select the appropriate status and, optionally, enter a rationale for your decision in the Justification text box.
- Check Do not overwrite individual system status if there are statuses set for this CVE on individual systems and that you want to preserve. Otherwise, leave the box unchecked to apply this status to all of the systems it is impacting.
- Click Save.
3.8.2. Setting a status for a CVE and system pair
Complete the following steps to set a status on a CVE and system pair:
Procedure
- Navigate to the Security > Vulnerability > Systems tab and log in if necessary.
- Identify the system and click the system name to open it.
- Select a CVE from the list and check the box next to the CVE ID.
Click the more-options icon in the toolbar and select Edit status.

In the popup card, take the following actions:
Set a status for the CVE and system pair.
NoteIf the box to Use overall CVE status is checked, you cannot set a status for the pair.
- Optionally, enter a justification for your status determination.
- Click Save.
- Locate the CVE in the list and verify the status is set.
3.9. Using the Search box
The search function in the vulnerability service works in the context of the page you are viewing.
CVEs page. The search box is located in the toolbar at the top of the CVEs list. With the CVE filter set, search CVE IDs and descriptions.

Systems page. The search box is located in the toolbar at the top of the list. Search for system name or UUID.
3.10. Sorting CVE list data
The sorting functions in the vulnerability service differ based on the context of the page you are viewing.
Procedure
In the CVEs tab, you can apply sorting to the following columns:
- CVE ID
- Publish date
- Severity
- CVSS base score
- Systems exposed
- Business risk
- Status
In the Systems tab, the following column can be sorted:
- Name
- Applicable CVEs
- Last seen
After selecting a system in the Systems tab, the system-specific list of CVEs allows the following sorting options:
- CVE ID
- Publish date
- Impact
- CVSS base score
- Business risk
- Status
Chapter 4. System tags and groups
Red Hat Insights for Red Hat Enterprise Linux enables administrators to filter groups of systems in inventory and in individual services using group tags. Groups are identified by the method of system data ingestion to Insights for Red Hat Enterprise Linux. Insights for Red Hat Enterprise Linux enables filtering groups of systems by those running SAP workloads, by Satellite host group, by Microsoft SQL Server workload, and by custom tags that are defined by system administrators with root access to configure the Insights client on the system.
As of Spring 2022, inventory, advisor, compliance, vulnerability, patch, drift, and policies enable filtering by groups and tags. Other services will follow.
Unlike the other services that enable tagging, the compliance service sets tags within lists of systems in the compliance service UI. For more information, see the following section Group and tag filters in the compliance service.
Use the global, Filter results box to filter by SAP workloads, Satellite host groups, MS SQL Server workloads, or by custom tags added to the Insights client configuration file.
Prerequisites
The following prerequisites and conditions must be met to use the tagging features in Red Hat Insights for Red Hat Enterprise Linux:
- The Red Hat Insights client is installed and registered on each system.
-
You must have root permissions, or their equivalent, to create custom tags or change the
/etc/insights-client/tags.yamlfile.
4.1. Group and tag filters in the compliance service
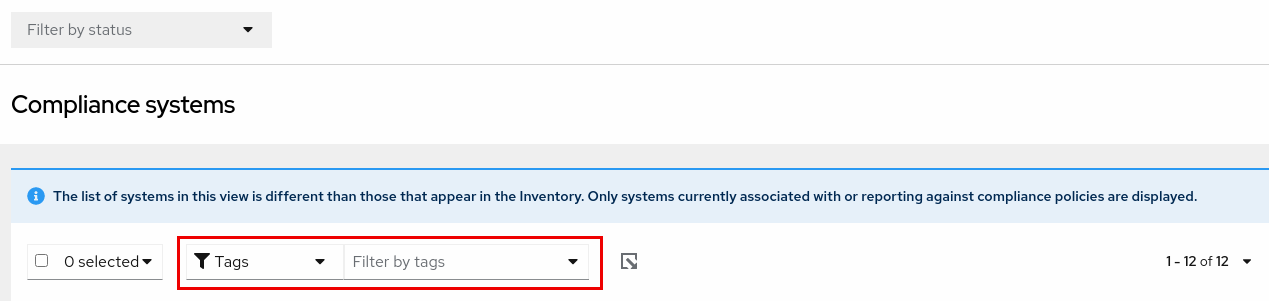
The compliance service enables users to apply tag and group filters to systems reporting compliance data; however, they are not set using the Filter by status dropdown. Unlike most of the other services in the Insights for Red Hat Enterprise Linux application, the compliance service only shows data for systems under the following conditions:
- The system is associated with a compliance service security policy.
-
The system is reporting compliance data to insights using the
insights-client --compliancecommand.
Because of those conditions, compliance-service users have to set tag and group filters using the primary and secondary filters located above lists of systems in the compliance service UI.
Tag and group filters above systems list in the compliance service
4.2. SAP workloads
As Linux becomes the mandatory operating system for SAP ERP workloads in 2025, Red Hat Enterprise Linux and Red Hat Insights for Red Hat Enterprise Linux are working to make Insights for Red Hat Enterprise Linux the management tool of choice for SAP administrators.
As part of this ongoing effort, Insights for Red Hat Enterprise Linux automatically tags systems running SAP workloads and by SAP ID (SID), without any customization needed by administrators. Users can easily filter those workloads throughout the Insights for Red Hat Enterprise Linux application by using the global Filter by tags drop-down menu.
4.3. Satellite host groups
Satellite host groups are configured in Satellite and recognized automatically by Insights for Red Hat Enterprise Linux.
4.4. Microsoft SQL Server workloads
Using the global Filter by tags feature, Red Hat Insights for Red Hat Enterprise Linux users can select groups of systems running Microsoft SQL Server workloads.
In May of 2019, the Red Hat Insights team introduced a new set of Insights for Red Hat Enterprise Linux recommendations for Microsoft SQL Server running on Red Hat Enterprise Linux (RHEL). These rules alert administrators to operating system level configurations that do not conform to the documented recommendations from Microsoft and Red Hat.
A limitation of these rules was that they primarily analyzed the operating system and not the database itself. The latest release of Insights for Red Hat Enterprise Linux and RHEL 8.5, introduces Microsoft SQL Assessment API. The SQL Assessment API provides a mechanism to evaluate the database configuration of MS SQL Server for best practices. The API is delivered with a rule set containing best practice rules suggested by the Microsoft SQL Server Team. While this rule set is enhanced with the release of new versions, the API is built with the intent to give a highly customizable and extensible solution, which enables users to tune the default rules and create their own.
The SQL Assessment API is supported by PowerShell for Linux (available from Microsoft), and Microsoft has developed a PowerShell script that can be used to call the API and store its results as a JSON formatted file. With RHEL 8.5, the Insights client now uploads this JSON file and presents the results in an easy-to-understand format in the Insights for Red Hat Enterprise Linux UI.
For more information about SQL Server assessment in Insights for Red Hat Enterprise Linux, see SQL Server database best practices now available through Red Hat Insights.
4.4.1. Setting up SQL Server assessments
To configure the Microsoft SQL Assessment API to provide information to Red Hat Insights, the database administrator needs to take the following steps.
Procedure
In the database you wish to assess, create a login for SQL Server assessments using SQL Authentication. The following Transact-SQL creates a login. Replace <*PASSWORD*> with a strong password:
USE [master]
GO
CREATE LOGIN [assessmentLogin] with PASSWORD= N'<*PASSWORD*>’
ALTER SERVER ROLE [sysadmin] ADD MEMBER [assessmentLogin]
GO
Store the credentials for login on the system as follows, again replacing <*PASSWORD*> with the password you used in step 1.
# echo "assessmentLogin" > /var/opt/mssql/secrets/assessment
# echo "<*PASSWORD*>" >> /var/opt/mssql/secrets/assessment
Secure the credentials used by the assessment tool by ensuring that only the mssql user can access the credentials.
# chmod 0600 /var/opt/mssql/secrets/assessment
# chown mssql:mssql /var/opt/mssql/secrets/assessment
Download PowerShell from the microsoft-tools repository. This is the same repository you configured when you installed the
mssql-toolsandmssqlodbc17packages as part of SQL Server installation.# yum -y install powershell
Install the SQLServer module for PowerShell. This module includes the assessment API.
# su mssql -c "/usr/bin/pwsh -Command Install-Module SqlServer"
Download the runassessment script from the Microsoft examples GitHub repository. Ensure it is owned and executable by mssql.
# /bin/curl -LJ0 -o /opt/mssql/bin/runassessment.ps1 https://raw.githubusercontent.com/microsoft/sql-server-samples/master/samples/manage/sql-assessment-api/RHEL/runassessment.ps1
# chown mssql:mssql /opt/mssql/bin/runassessment.ps1
# chmod 0700 /opt/mssql/bin/runassessment.ps1
Create the directory that will store the log file used by Red Hat Insights. Again, make sure it is owned and executable by mssql.
# mkdir /var/opt/mssql/log/assessments/
# chown mssql:mssql /var/opt/mssql/log/assessments/
# chmod 0700 /var/opt/mssql/log/assessments/
You can now create your first assessment, but be sure to do so as the user mssql so that subsequent assessments can be run automatically via cron or systemd more securely as the mssql user.
# su mssql -c "pwsh -File /opt/mssql/bin/runassessment.ps1"
Insights for Red Hat Enterprise Linux will automatically include the assessment next time it runs, or you can initiate Insights client by running this command:
# insights-client
4.4.1.1. Setting up the SQL Assessment on a timer
Because SQL Server Assessments can take 10 minutes or more to complete, it may or may not make sense for you to run the assessment process automatically every day. If you would like to run them automatically, the Red Hat SQL Server community has created systemd service and timer files to use with the assessment tool.
Procedure
Download the following files from Red Hat public SQL Server Community of Practice GitHub site.
-
mssql-runassessment.service -
mssql-runassessment.timer
-
Install both files in the directory
/etc/systemd/system/:# cp mssql-runassessment.service /etc/systemd/system/ # cp mssql-runassessment.timer /etc/systemd/system/ # chmod 644 /etc/systemd/system/
Enable the timer with:
# systemctl enable --now mssql-runassessment.timer
4.5. Custom system tagging
By applying custom grouping and tagging to your systems, you can add contextual markers to individual systems, filter by those tags in the Insights for Red Hat Enterprise Linux application, and more easily focus on related systems. This functionality can be especially valuable when deploying Insights for Red Hat Enterprise Linux at scale, with many hundreds or thousands of systems under management.
In addition to the ability to add custom tags to several Insights for Red Hat Enterprise Linux services, you can add predefined tags. The advisor service can use those tags to create targeted recommendations for your systems that might require more attention, such as those systems that require a higher level of security.
To create custom and predefined tags, you must have root permissions, or their equivalent, to add to, or change the /etc/insights-client/tags.yaml file.
4.5.1. Tag structure
Tags use a namespace/key=value paired structure.
-
Namespace. The namespace is the name of the ingestion point, insights-client, and cannot be changed. The
tags.yamlfile is abstracted from the namespace, which is injected by the Insights client before upload. - Key. The key can be a user-chosen key or a predefined key from the system. You can use a mix of capitalization, letters, numbers, symbols and whitespace.
- Value. Define your own descriptive string value. You can use a mix of capitalization, letters, numbers, symbols and whitespace.
The advisor service includes Red Hat-supported predefined tags.
4.5.2. Creating a tags.yaml file and adding a custom group
Create and add tags to /etc/insights-client/tags.yaml simply by using insights-client --group=<name-you-choose>, which performs the following actions:
-
Creates the
etc/insights-client/tags.yamlfile -
Adds the
group=key and<name-you-choose>value totags.yaml - Uploads a fresh archive from the system to the Insights for Red Hat Enterprise Linux application so the new tag is immediately visible along with your latest results
After creating the initial group tag, add additional tags as needed by editing the /etc/insights-client/tags.yaml file.
The following procedure shows how to create the /etc/insights-client/tags.yaml file and the initial group, then verify the tag exists in the Insights for Red Hat Enterprise Linux inventory.
Procedure to create new group
Run the following command as root, adding your custom group name after
--group=:[root@server ~]# insights-client --group=<name-you-choose>
Example of tags.yaml format
The following example of a tags.yaml file shows an example of file format and additional tags added for the new group:
# tags
---
group: eastern-sap
name: Jane Example
contact: jexample@corporate.com
Zone: eastern time zone
Location:
- gray_rack
- basement
Application: SAP
Procedure to verify your custom group was created
- Navigate to Red Hat Insights > RHEL > Inventory and log in if necessary.
- Click the Filter results dropdown menu.
- Scroll through the list or use the search function to locate the tag.
- Click the tag to filter by it.
- Verify that your system is among the results on the advisor systems list.
Procedure to verify that the system is tagged
- Navigate to Red Hat Insights > RHEL > Inventory and log in if necessary.
- Activate the Name filter and begin typing the system name until you see your system, then select it.
- Verify that, next to the system name, the tag symbol is darkened and shows a number representing the correct number of tags applied.
4.5.3. Editing tags.yaml to add or change tags
After creating the group filter, edit the contents of /etc/insights-client/tags.yaml as needed to add or modify tags.
Procedure
Using the command line, open the tag configuration file for editing.
[root@server ~]# vi /etc/insights-client/tags.yamlEdit content or add additional values as needed. The following example shows how you can organize
tags.yamlwhen adding multiple tags to a system.# tags --- group: eastern-sap location: Boston description: - RHEL8 - SAP key 4: value
NoteAdd as many key=value pairs as you need. Use a mix of capitalization, letters, numbers, symbols, and whitespace.
- Save your changes and close the editor.
Optionally, generate an upload to Insights for Red Hat Enterprise Linux.
# insights-client
4.5.4. Using predefined system tags to get more accurate Red Hat Insights advisor service recommendations and enhanced security
Red Hat Insights advisor service recommendations treat every system equally. However, some systems might require more security than others, or require different networking performance levels. In addition to the ability to add custom tags, Red Hat Insights for Red Hat Enterprise Linux provides predefined tags that the advisor service can use to create targeted recommendations for your systems that might require more attention.
To opt in and get the extended security hardening and enhanced detection and remediation capabilities offered by predefined tags, you need to configure the tags. After configuration, the advisor service provides recommendations based on tailored severity levels, and preferred network performance that apply to your systems.
To configure the tags, use the /etc/insights-client/tags.yaml file to tag systems with predefined tags in a similar way that you might use it to tag systems in the inventory service. The predefined tags are configured using the same key=value structure used to create custom tags. Details about the Red Hat-predefined tags are in the following table.
Table 4.1. List of Supported Predefined Tags
| Key | Value | Note |
|---|---|---|
| security |
|
With the |
|
|
| The preferred network performance (either latency or throughput according to your business requirement) would affect the severity of an advisor service recommendation to a system. |
The predefined tag keys names are reserved. If you already use the key security, with a value that differs from one of the predefined values, you will not see a change in your recommendations. You will only see a change in recommendations if your existing key=value is the same as one of the predefined keys. For example, if you have a key=value of security: high, your recommendations will not change because of the Red Hat-predefined tags. If you currently have a key=value pair of security: strict, you will see a change in the recommendations for your systems.
4.5.5. Configuring predefined tags
You can use the Red Hat Insights for Red Hat Enterprise Linux advisor service’s predefined tags to adjust the behavior of recommendations for your systems to gain extended security hardening and enhanced detection and remediation capabilities. You can configure the predefined tags by following this procedure.
Prerequisites
- You have root-level access to your system
- You have Insights client installed
- You have systems registered within the Insights client
-
You have already created the
tags.yamlfile. See Creating a tags.yaml file and adding a custom group
Procedure
Using the command line, and your preferred editor, open
/etc/insights-client/tags.yaml. (The following example uses Vim.)[root@server ~]# vi /etc/insights-client/tags.yaml
Edit the
/etc/insights-client/tags.yamlfile to add the predefinedkey=valuepair for the tags. This example shows how to addsecurity: strictandnetwork_performance: latencytags.# cat /etc/insights-client/tags.yaml group: redhat location: Brisbane/Australia description: - RHEL8 - SAP security: strict network_performance: latency
- Save your changes.
- Close the editor.
Optional: Run the
insights-clientcommand to generate an upload to Red Hat Insights for Red Hat Enterprise Linux, or wait until the next scheduled Red Hat Insights upload.[root@server ~]# insights-client
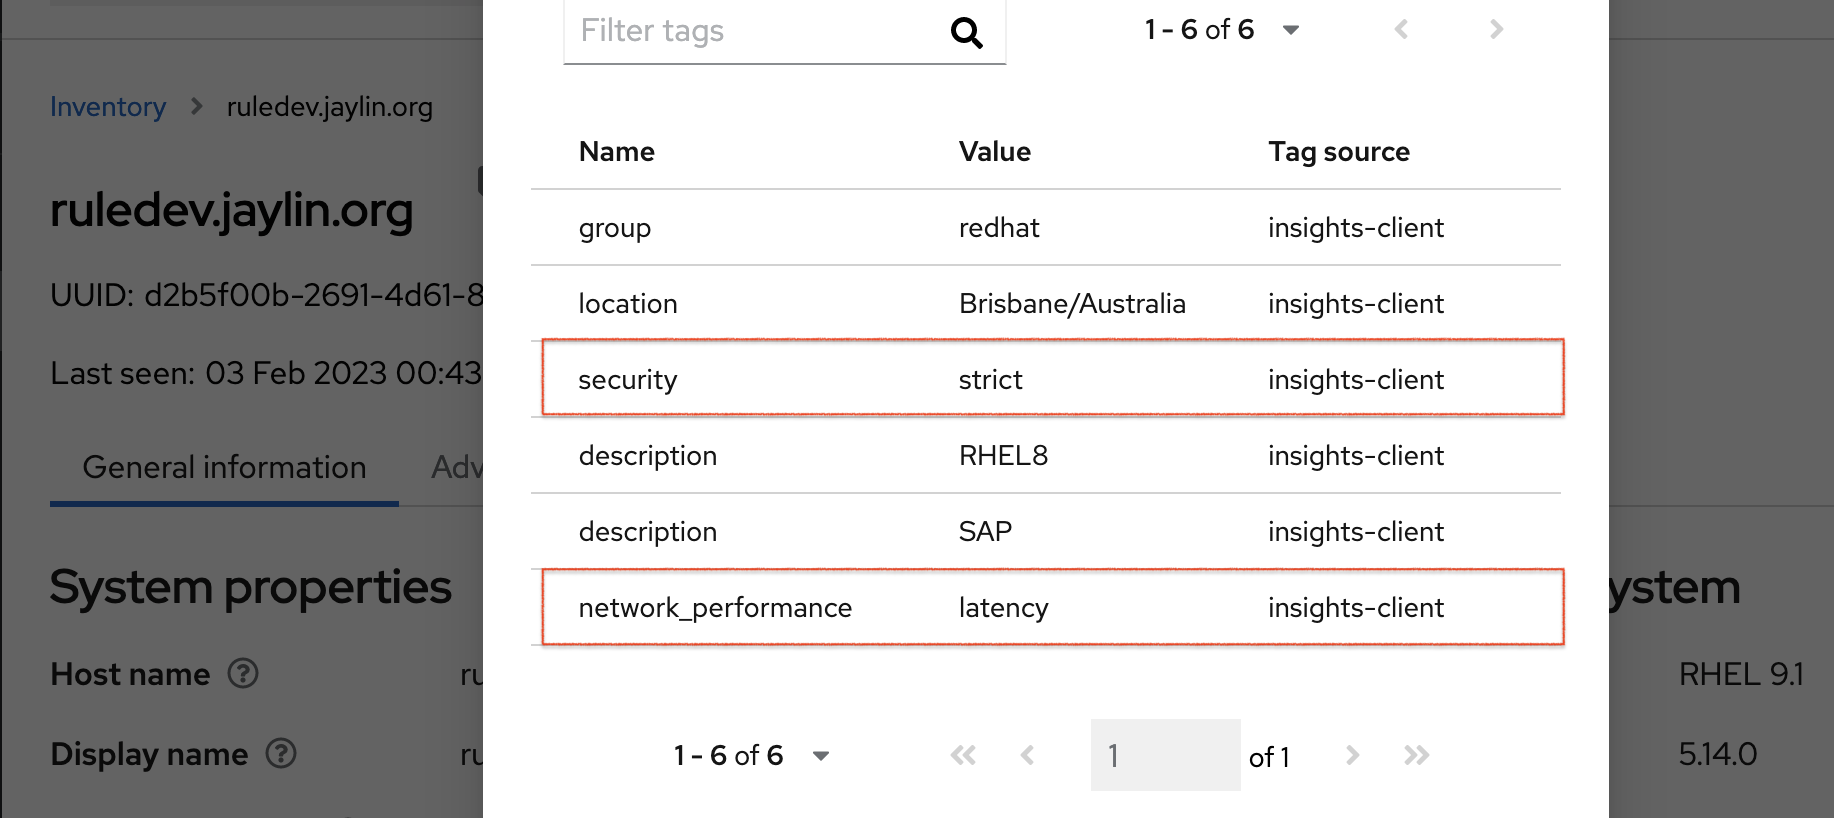
Confirming that predefined tags are in your production area
After generating an upload to Red Hat Insights (or waiting for the next scheduled Insights upload), you can find out whether the tags are in the production environment by accessing Red Hat Insights > RHEL > Inventory. Find your system and look for the newly created tags. You see a table that shows:
- Name
- Value
- Tag Source (for example, insights-client).
The following image shows an example of what you see in inventory after creating the tag.
Example of recommendations after applying a predefined tag
The following image of the advisor service shows a system with the network_performance: latency tag configured.
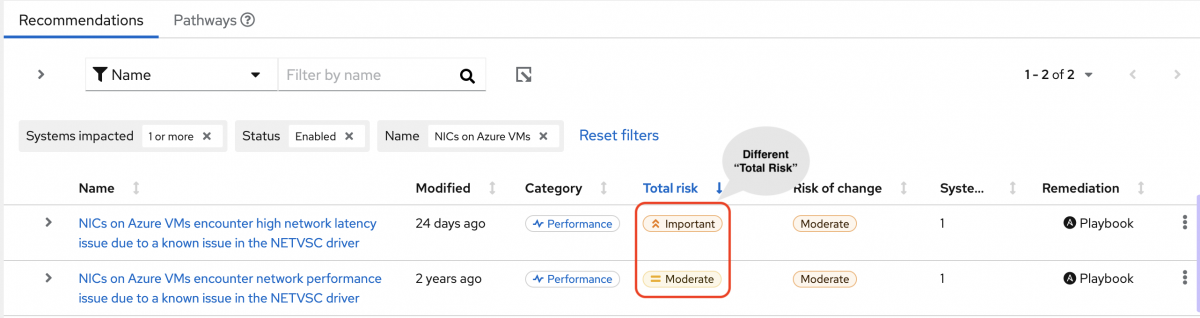
The system shows a recommendation with a higher Total Risk level of Important. The system without the network_performance: latency tag has a Total Risk of Moderate. You can make decisions about prioritizing the system with higher Total Risk.
Chapter 5. References
See the following references materials to learn more.
5.1. Reference materials
To learn more about the vulnerability service, see the following resources:
Providing feedback on Red Hat documentation
We appreciate and prioritize your feedback regarding our documentation. Provide as much detail as possible, so that your request can be quickly addressed.
Prerequisites
- You are logged in to the Red Hat Customer Portal.
Procedure
To provide feedback, perform the following steps:
- Click the following link: Create Issue
- Describe the issue or enhancement in the Summary text box.
- Provide details about the issue or requested enhancement in the Description text box.
- Type your name in the Reporter text box.
- Click the Create button.
This action creates a documentation ticket and routes it to the appropriate documentation team. Thank you for taking the time to provide feedback.