
Getting started with automation controller
Getting started guide for automation controller
Abstract
Preface
To begin, install Ansible Automation Platform and select a target system where you can deploy an initial playbook (provided by automation controller). This first playbook executes simple Ansible tasks, while teaching you how to use the controller and properly set it up. You can use any sort of system manageable by Ansible, as described in the Managed nodes section of the Ansible documentation. For further instructions, see the Red Hat Ansible Automation Platform Installation Guide.
Ansible Automation Platform is offered on a subscription basis. These subscriptions vary in price and support-levels. For more information about subscriptions and features, see Subscription Types.
Making open source more inclusive
Red Hat is committed to replacing problematic language in our code, documentation, and web properties. We are beginning with these four terms: master, slave, blacklist, and whitelist. Because of the enormity of this endeavor, these changes will be implemented gradually over several upcoming releases. For more details, see our CTO Chris Wright’s message.
Providing feedback on Red Hat documentation
If you have a suggestion to improve this documentation, or find an error, please contact technical support at https://access.redhat.com to create an issue on the Ansible Automation Platform Jira project using the docs-product component.
Chapter 1. Logging into the automation controller dashboard after installation
After you install automation controller, you must log in to the Dashboard.
Procedure
- With the login information provided after your installation completed, open a web browser and log in to the automation controller by navigating to its server URL at: https://<CONTROLLER_SERVER_NAME>/
Use the credentials specified during the installation process to login:
- The default username is admin.
- The password for admin is the value specified.
- Click the icon ⋮ next to the desired user.
- Click .
- Edit the required details and click .
Chapter 2. Managing your Ansible automation controller subscription
Before you can use automation controller, you must have a valid subscription, which authorizes its use.
2.1. Obtaining an authorized Ansible automation controller subscription
If you already have a subscription to a Red Hat product, you can acquire an automation controller subscription through that subscription. If you do not have a subscription to Red Hat Ansible Automation Platform and Red Hat Satellite, you can request a trial subscription.
Procedure
- If you have a Red Hat Ansible Automation Platform subscription, use your Red Hat customer credentials when you launch the automation controller to access your subscription information. See Importing a subscription.
If you have a non-Ansible Red Hat or Satellite subscription, access automation controller with one of these methods:
- Enter your username and password on the license page.
- Obtain a subscriptions manifest from the Subscription Allocations page on the Red Hat Customer Portal. For more information, see Obtaining a subscriptions manifest in the Automation controller User Guide.
- If you do not have a Red Hat Ansible Automation Platform subscription, go to Try Red Hat Ansible Automation Platform and request a trial subscription.
Additional resources
To understand what is supported with your subscription, see Automation controller licensing, updates and support. * If you have issues with your subscription, contact your Sales Account Manager or Red Hat Customer Service at: https://access.redhat.com/support/contact/customerService/.
2.2. Importing a subscription
After you have obtained an authorized Ansible Automation Platform subscription, you must import it into the automation controller system before you can use automation controller. .Prerequisites
- You have obtained a subscriptions manifest. For more information, see Obtaining a subscriptions manifest.
Procedure
Launch automation controller for the first time. The Subscription Management screen displays.
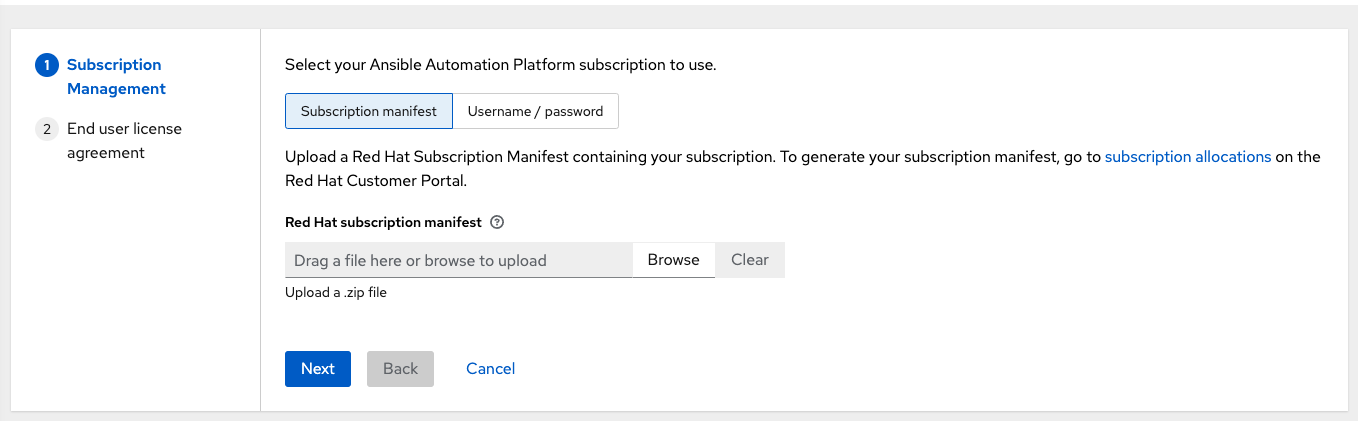
Retrieve and import your subscription by completing either of the following steps:
If you have obtained a subscription manifest, upload it by navigating to the location where the file is saved. The subscription manifest is the complete
.zipfile, and not only its component parts.NoteIf the Browse option in the Subscription manifest option is disabled, clear the username and password fields to enable it.
The subscription metadata is then retrieved from the RHSM/Satellite API, or from the manifest provided. If many subscription counts were applied in a single installation, automation controller combines the counts but uses the earliest expiration date as the expiry (at which point you must refresh your subscription).
If you are using your Red Hat customer credentials, enter your username and password on the license page. Use your Satellite username or password if your automation controller cluster nodes are registered to Satellite with Subscription Manager. After you enter your credentials, click .
Automation controller retrieves your configured subscription service. Then, it prompts you to select the subscription that you want to run and applies that metadata to automation controller. You can log in over time and retrieve new subscriptions if you have renewed.
Click to proceed to the Tracking and Insights page.
Tracking and insights collect data to help Red Hat improve the product and deliver a better user experience. For more information about data collection, see Usability Analytics and Data Collection of the Automation controller Administration Guide.
This option is checked by default, but you can opt out of any of the following:
- User analytics. Collects data from the controller UI.
Insights Analytics. Provides a high level analysis of your automation with automation controller. It helps you to identify trends and anomalous use of the controller. For opt-in of Automation Analytics to be effective, your instance of automation controller must be running on Red Hat Enterprise Linux. For more information, see the Automation Analytics section.
NoteYou can change your analytics data collection preferences at any time.
- After you have specified your tracking and Insights preferences, click to proceed to the End User Agreement.
Review and check the I agree to the End User License Agreement checkbox and click .
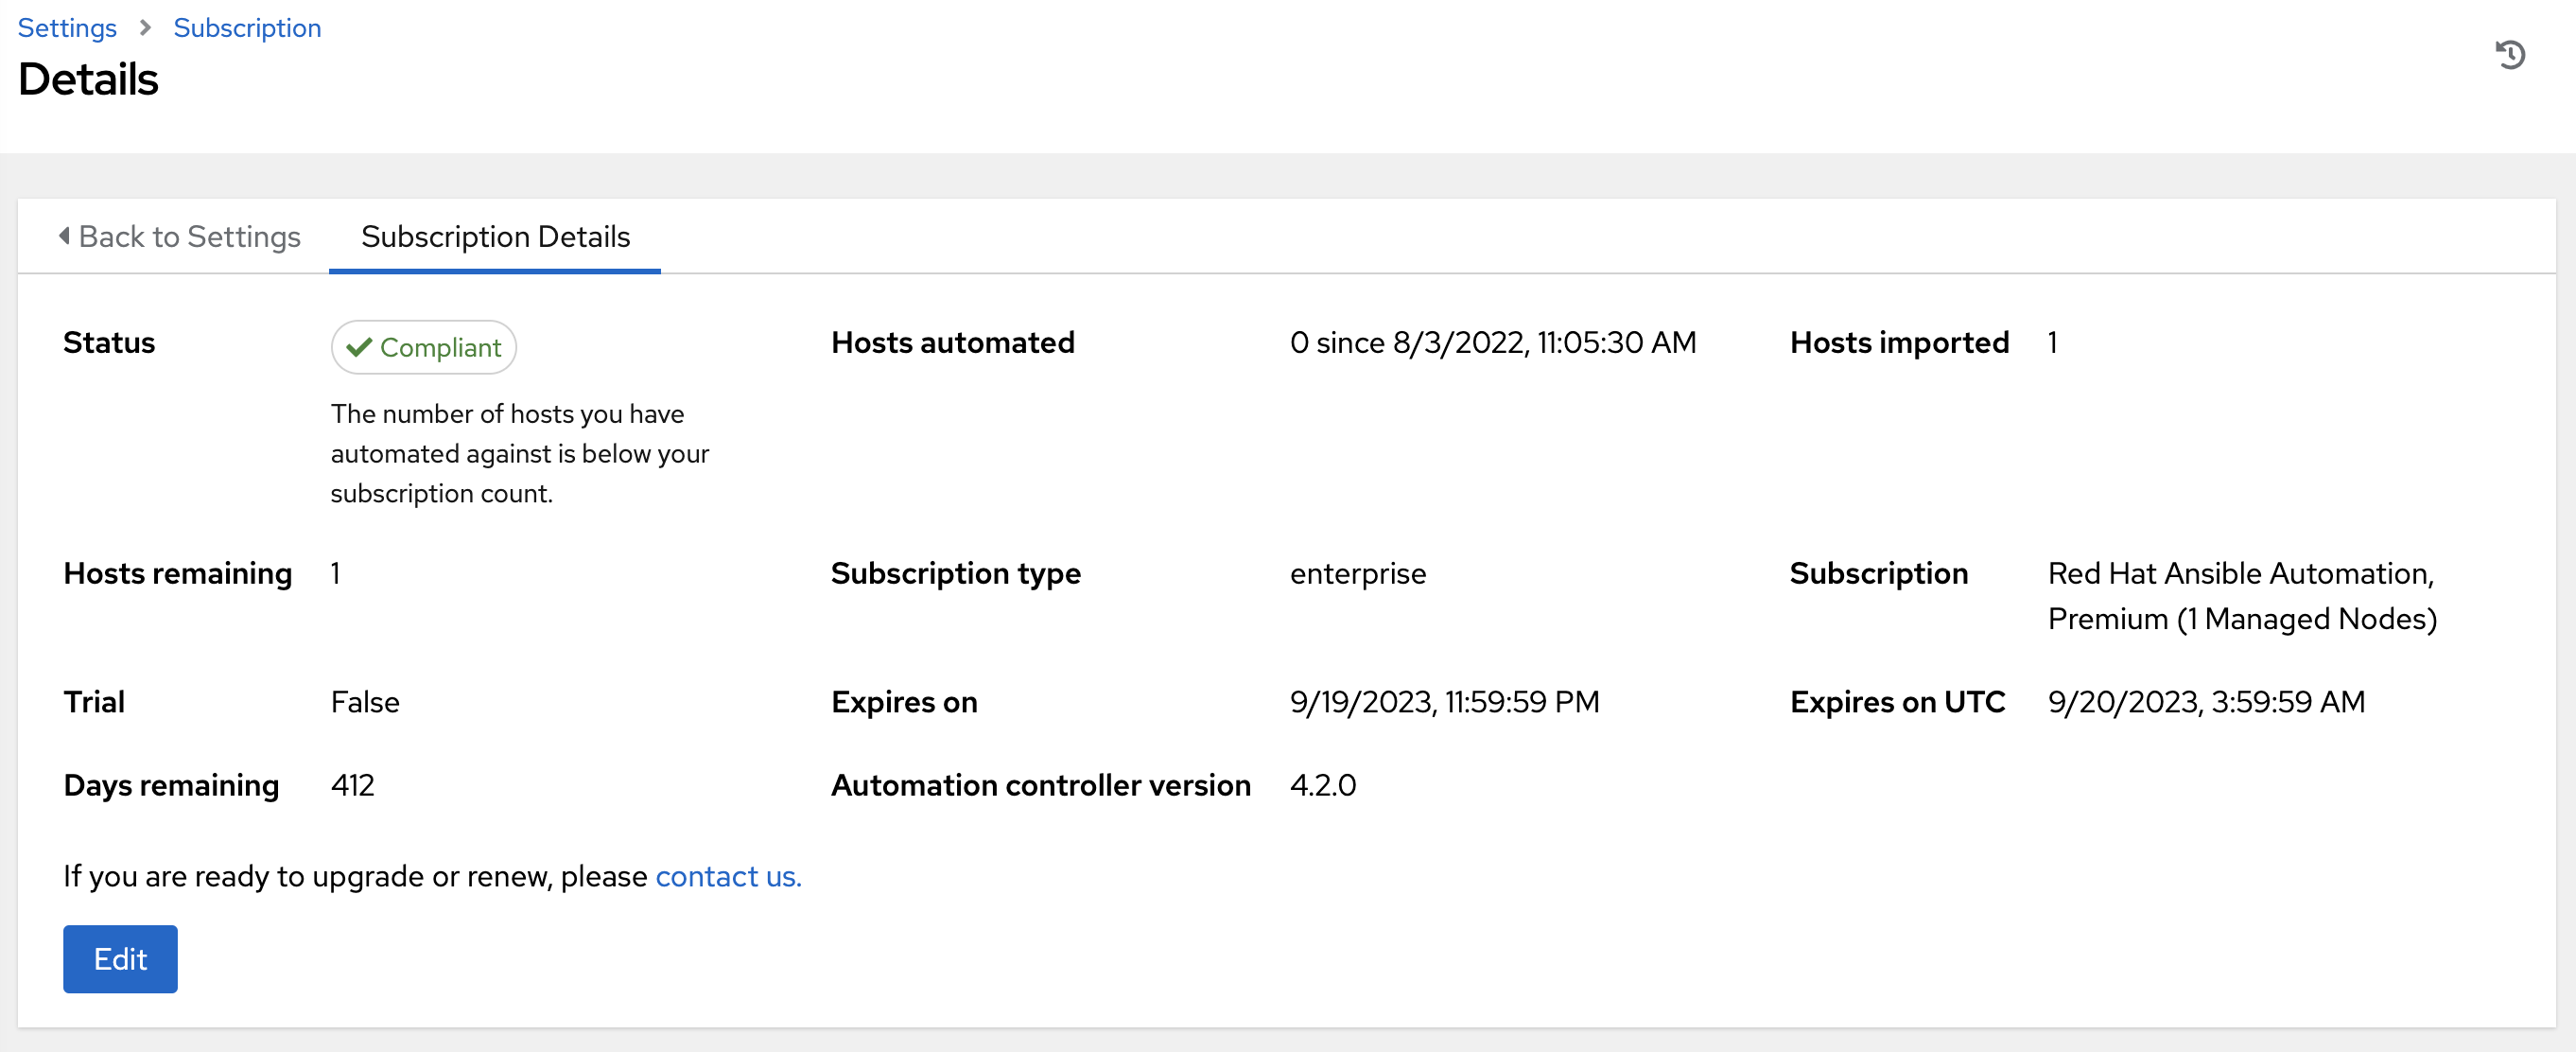
After your subscription is accepted, automation controller displays the subscription details and opens the Dashboard. To return to the Subscription settings screen from the Dashboard, select → from the option in the navigation panel.
Optional: To return to the Subscription settings screen from the Dashboard, select → option in the navigation panel.
Troubleshooting your subscription
When your subscription expires (you can check this in the Subscription details of the Subscription settings window), you must renew it in automation controller. You can do this by either importing a new subscription, or setting up a new subscription.
If you meet the "Error fetching licenses" message, check that you have the proper permissions required for the Satellite user. The automation controller administrator requires this to apply a subscription.
The Satellite username and password is used to query the Satellite API for existing subscriptions. From the Satellite API, the automation controller receives metadata about those subscriptions, then filters through to find valid subscriptions that you can apply. These are then displayed as valid subscription options in the UI.
The following Satellite roles grant proper access:
-
Custom with
view_subscriptionsandview_organizationsfilter - Viewer
- Administrator
- Organization Administrator
- Manager
Use the Custom role for your automation controller integration, as it is the most restrictive. For more information, see the Satellite documentation on managing users and roles.
The System Administrator role is not equal to the Administrator user checkbox, and does not offer enough permissions to access the subscriptions API page.
2.3. Troubleshooting: Keep your subscription in compliance
Your subscription has two possible statuses:
- Compliant: Indicates that your subscription is appropriate for the number of hosts that you have automated within your subscription count.
- Out of compliance: Indicates that you have exceeded the number of hosts in your subscription.
For more information, see Troubleshooting: Keeping your subscription in compliance in the Automation controller User Guide.
2.4. Host metric utilities
Automation controller provides a way to generate a CSV output of the host metric data and host metric summary through the Command Line Interface (CLI). You can also soft delete hosts in bulk through the API.
For more information, see the Host metrics utilities section of the Automation controller User Guide.
Chapter 3. Using the automation controller Dashboard for IT orchestration
The Dashboard offers a graphical framework for your IT orchestration needs. Use the navigation menu to complete the following tasks:
- Display different views
- Go to your resources
- Grant users access
- Administer automation controller features in the UI
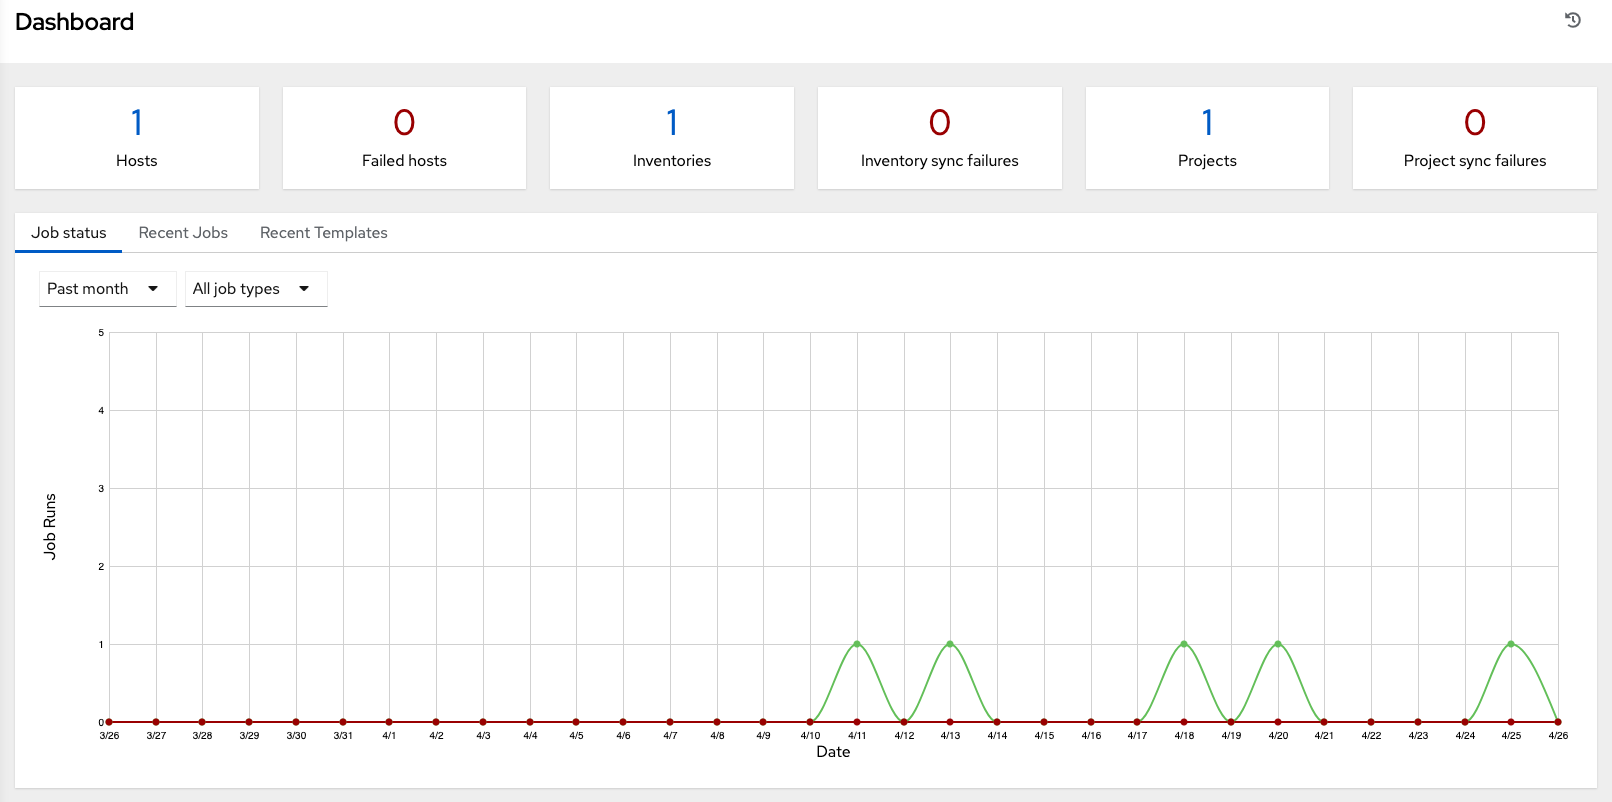
3.1. Viewing the Dashboard
Procedure
Click the Menu icon to hide or display the navigation panel.
- On the main dashboard, a summary appears listing your current Job status.
- You can filter the job status within a period of time or by job type.
- You can view summaries of Recent Jobs and Recent Templates in their respective tabs.
The last item in the navigation panel is Settings, which provides access to automation controller configuration settings.
The Settings page allows administrators to configure the following settings:
- Authentication
- Jobs
- System-level attributes
- Customize the UI, and product license information
For more information, see Automation controller Configuration in the Automation controller Administration Guide.
To launch a simple playbook, you must set up a number of configuration options. Completing the getting started configuration tasks now ensures that automation controller is configured properly and permits easier executions of more involved playbooks later on.
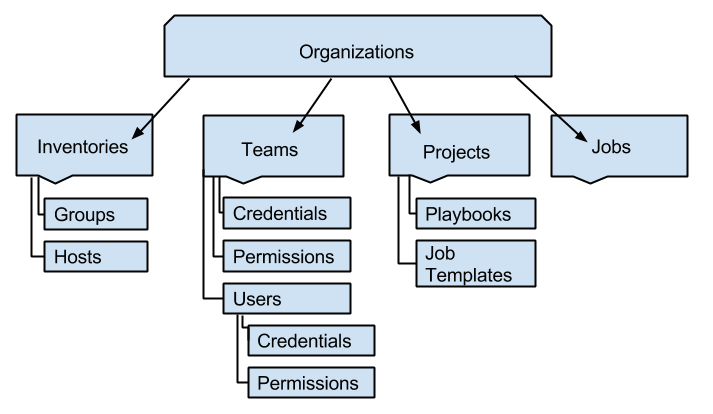
Chapter 4. Managing organizations in automation controller
An organization is a logical collection of users, teams, projects, and inventories. It is the highest level object in the controller object hierarchy. After you have created an organization, automation controller displays the organization details. You can then manage access and execution environments for the organization.
4.1. Reviewing the organization
The Organizations page displays the existing organizations for your installation.
Procedure
From the navigation panel, select Organizations.
NoteAutomation controller automatically creates a default organization. If you have a Self-support level license, you have only the default organization available and must not delete it.
You can use the default organization as it is initially set up and edit it later.
NoteOnly Enterprise or Premium licenses can add new organizations.
Enterprise and Premium license users who want to add a new organization should see the Organizations section in the Automation controller User Guide.
4.2. Editing an organization
During initial setup, you can leave the default organization as it is, but you can edit it later.
Procedure
Edit the organization by using one of these methods:
- Go to → .
- From the navigation panel, select → next to the organization name and edit the appropriate details.
- Save your changes.
Chapter 5. User roles in automation controller
Users associated with an organization are shown in the Access tab of the organization.
A default administrator user with the role of System Administrator is automatically created and is available to all users of automation controller. You can use it as it is or edit it later. Other users can be added to an organization, including a Normal User, System Auditor, or System Administrator, but they must be created first.
For more information, see the Users section in the Automation Controller User Guide.
For the purpose of the getting started guide, leave the default user as it is.
Chapter 6. Inventories
An inventory is a collection of hosts managed by automation controller. Organizations are assigned to inventories, while permissions to launch playbooks against inventories are controlled at the user or team level.
For more information, see the following documentation:
6.1. Creating a new Inventory
The Inventories window displays a list of the inventories that are currently available. You can sort the inventory list by name and searched type, organization, description, owners and modifiers of the inventory, or additional criteria.
Procedure
To view existing inventories, select Inventories from the navigation panel.
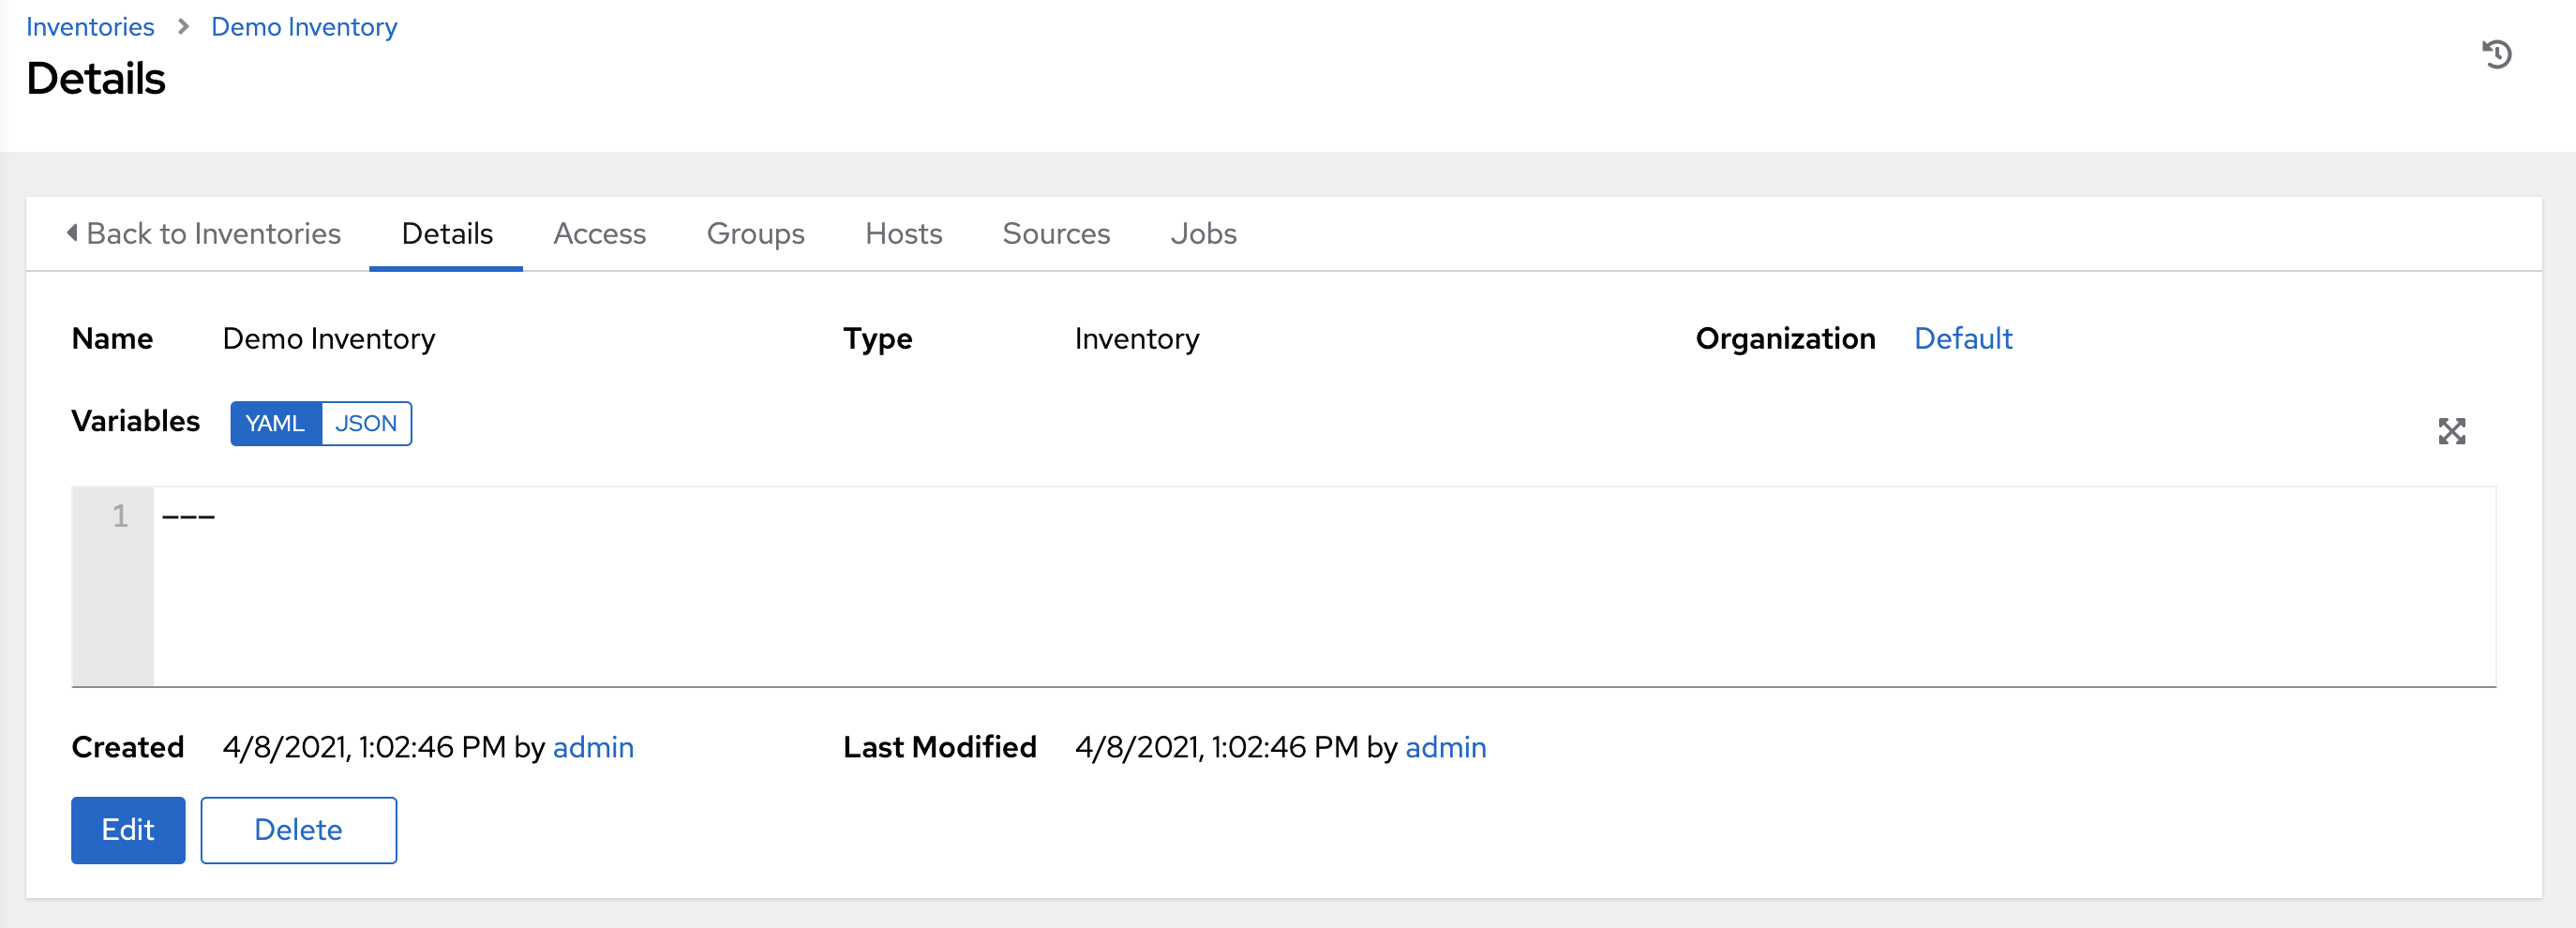
- Automation controller provides a demonstration inventory for you to use as you learn how the controller works. You can use it as it is or edit it later. You can create another inventory, if necessary.
- To add another inventory, see Add a new inventory in the Automation controller User Guide for more information.
- Click to view its details.
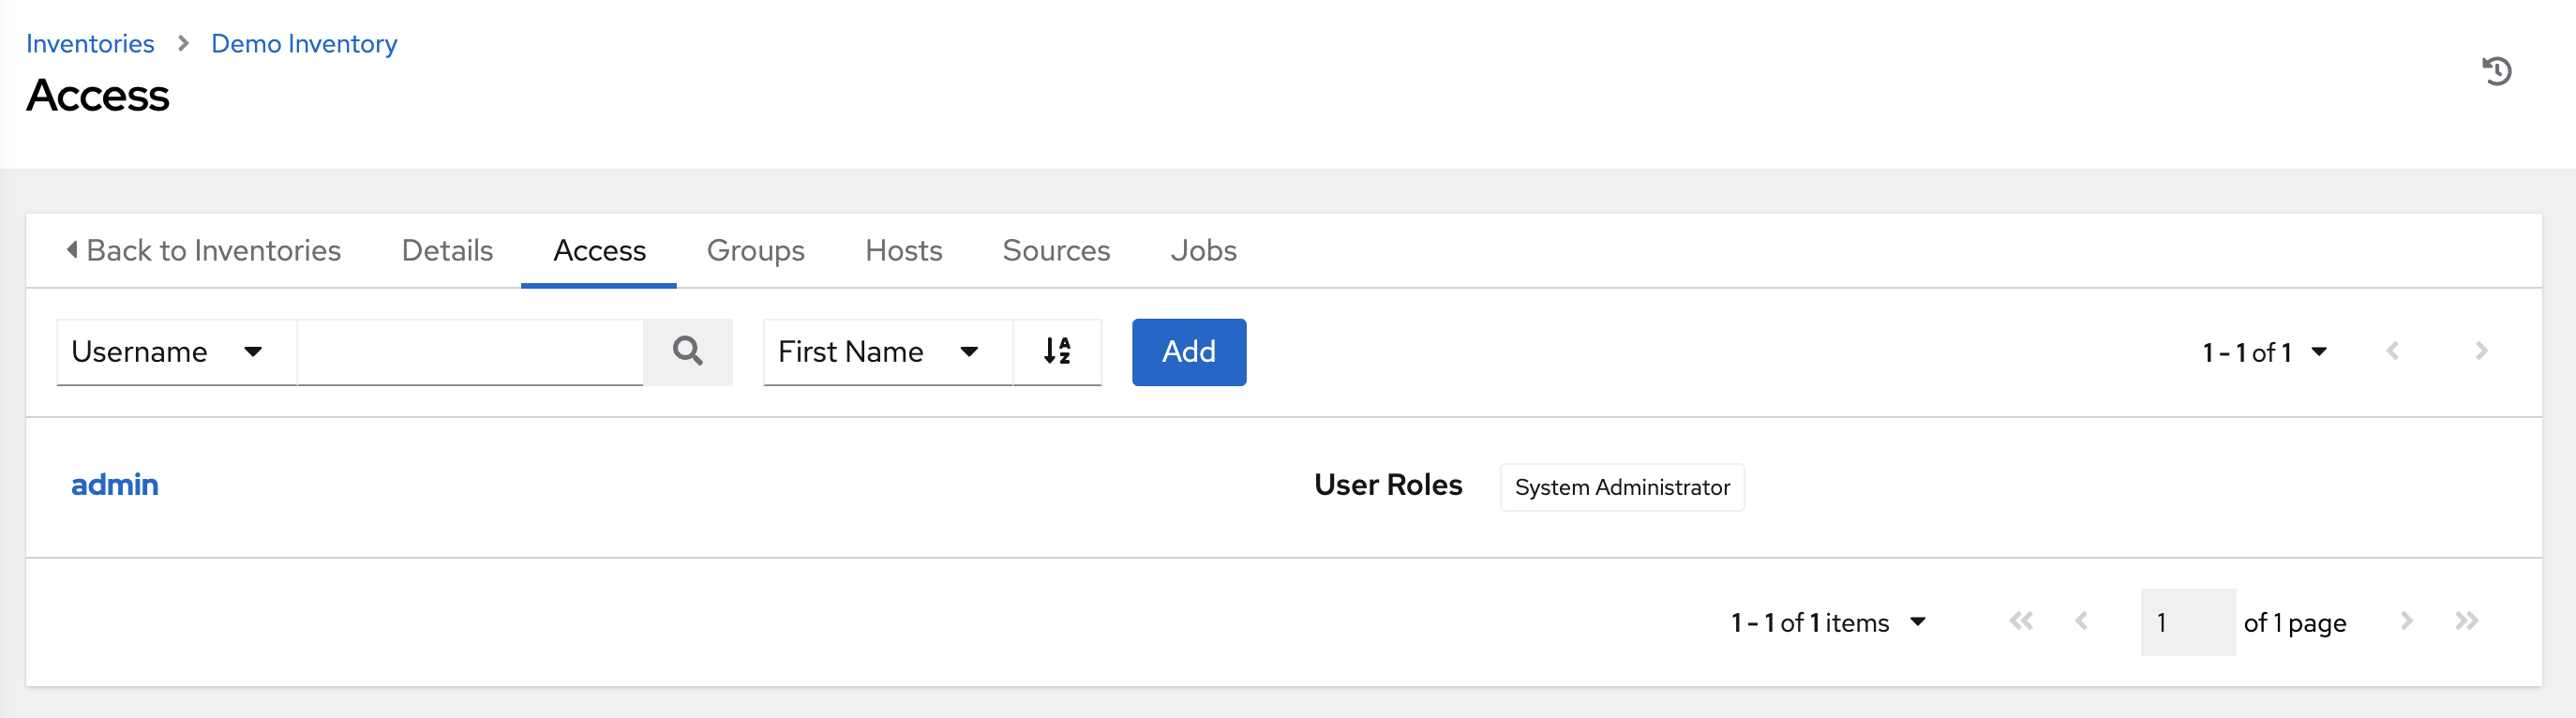
As with organizations, inventories also have associated users and teams that you can view through the Access tab. For more information, see Inventories in the Automation controller User Guide.
A user with the role of System Administrator has been automatically populated for this.
6.2. Managing groups and hosts
Inventories are divided into groups and hosts. Groups can represent a particular environment (such as a "Datacenter 1" or "Stage Testing"), a server type (such as "Application Servers" or "DB Servers"), or any other representation of your environment. The groups and hosts that belong to the Demo inventory are shown in the Groups and Hosts tabs.
6.2.1. Adding new groups and hosts
Groups are only applicable to standard inventories and are not configurable directly through a Smart Inventory. You can associate an existing group through hosts that are used with standard inventories. For more information, see Adding groups to inventories in the Automation controller User Guide.
Procedure
- To add new groups, select → .
- To add new hosts to groups, select → .
As part of the initial setup and to test that automation controller is set up properly, a local host is added for your use.
Example
If the organization that you created has a group of web server hosts supporting a particular application, complete the following steps:
- Create a group and add the web server hosts, to add these hosts to the inventory.
- Click (if you made no changes) or use the breadcrumb navigational links at the top of the automation controller browser to return to the Inventories list view. Clicking does not exit the Details dialog.
Chapter 7. Managing credentials
Credentials authenticate the controller user to launch Ansible playbooks. The passwords and SSH keys are used to authenticate against inventory hosts. By using the credentials feature of automation controller, you can require the automation controller user to enter a password or key phrase when a playbook launches.
7.1. Creating new credentials
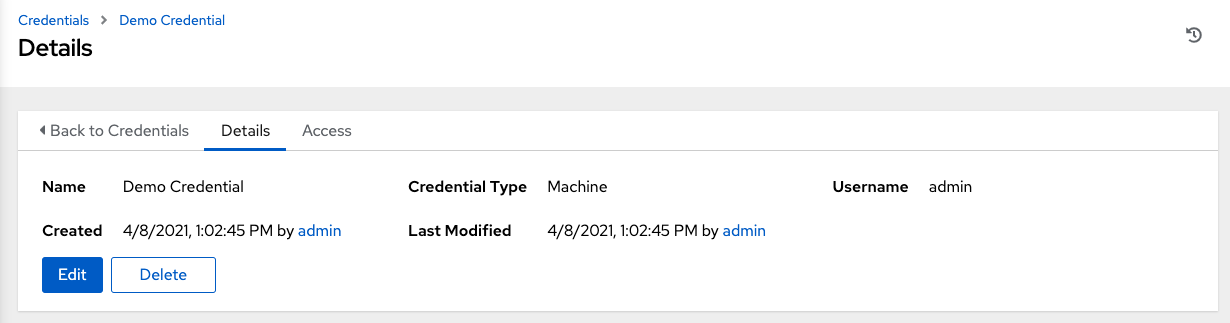
As part of the initial setup, a demonstration credential and a Galaxy credential have been created for your use. Use the Galaxy credential as a template. It can be copied, but not edited. You can add more credentials as necessary.
Procedure
- From the navigation panel, select → .
To add a new credential, see Creating a credential in the Automation controller User Guide.
NoteWhen you set up additional credentials, the user you assign must have root access or be able to use SSH to connect to the host machine.
- Click to view its details.
7.2. Editing a credential
As part of the initial setup, you can leave the default Demo Credential as it is, and you can edit it later.
Procedure
Edit the credential by using one of these methods:
- Go to → .
- From the navigation panel, select → next to the credential name and edit the appropriate details.
- Save your changes.
Chapter 8. Managing projects
A Project is a logical collection of Ansible playbooks, represented in automation controller. You can manage playbooks and playbook directories different ways:
- By placing them manually under the Project Base Path on your automation controller server.
- By placing your playbooks into a source code management (SCM) system supported by the automation controller. These include Git, Subversion, and Mercurial.
This Getting Started Guide uses lightweight examples to get you up and running. But for production purposes, you must use source control to manage your playbooks. The best practice is to treat your infrastructure as code which is in line with DevOps ideals.
8.1. Setting up a project
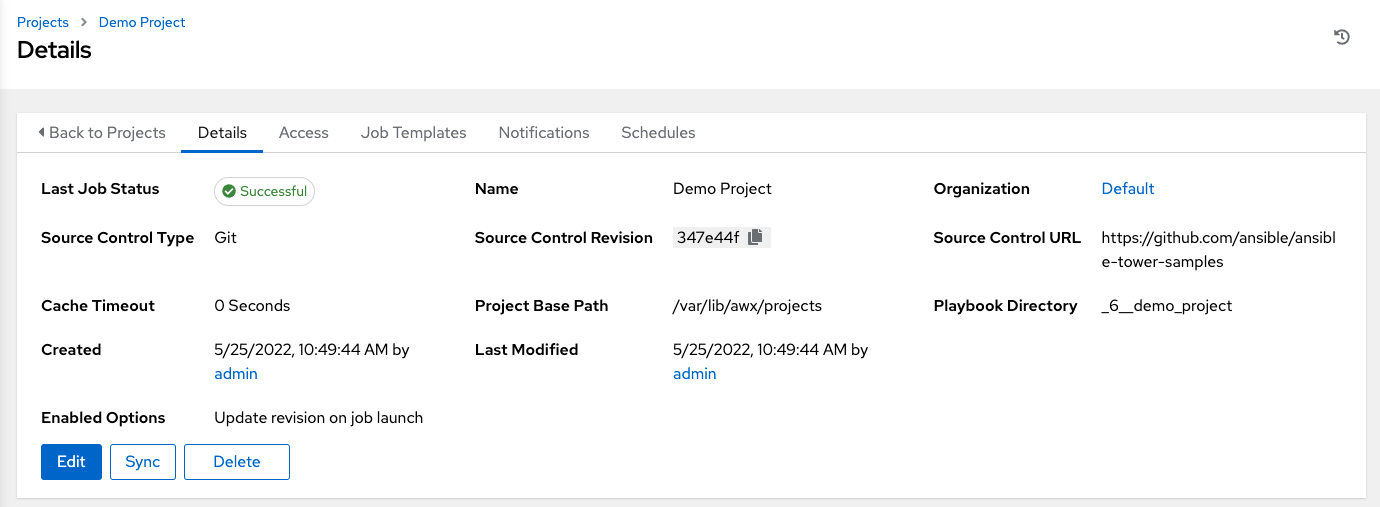
Automation controller simplifies the startup process by providing you with a Demo Project that you can work with initially.
Procedure
- To review existing projects, select Projects from the navigation panel.
- Click to view its details.
8.2. Editing a project
As part of the initial setup you can leave the default Demo Project as it is. You can edit it later.
Procedure
Open the project to edit it by using one of these methods:
- Go to → .
- From the navigation panel, select → next to the project name and edit the appropriate details.
- Save your changes
8.3. Syncing a project
If you want to fetch the latest changes in a project, you can manually start an SCM sync for this project.
Procedure
Open the project to update the SCM-based demo project by using one of these methods:
- Go to → .
- From the navigation panel, select → .
When you add a project set up to use source control, a "sync" starts. This fetches the project details from the configured source control.
Chapter 9. Working with job templates
A job template combines an Ansible playbook from a project and the settings required to launch it. Job templates are useful to run the same job many times. Job templates also encourage the reuse of Ansible playbook content and collaboration between teams. For more information, see Job Templates in the Automation controller User Guide.
9.1. Getting started with job templates
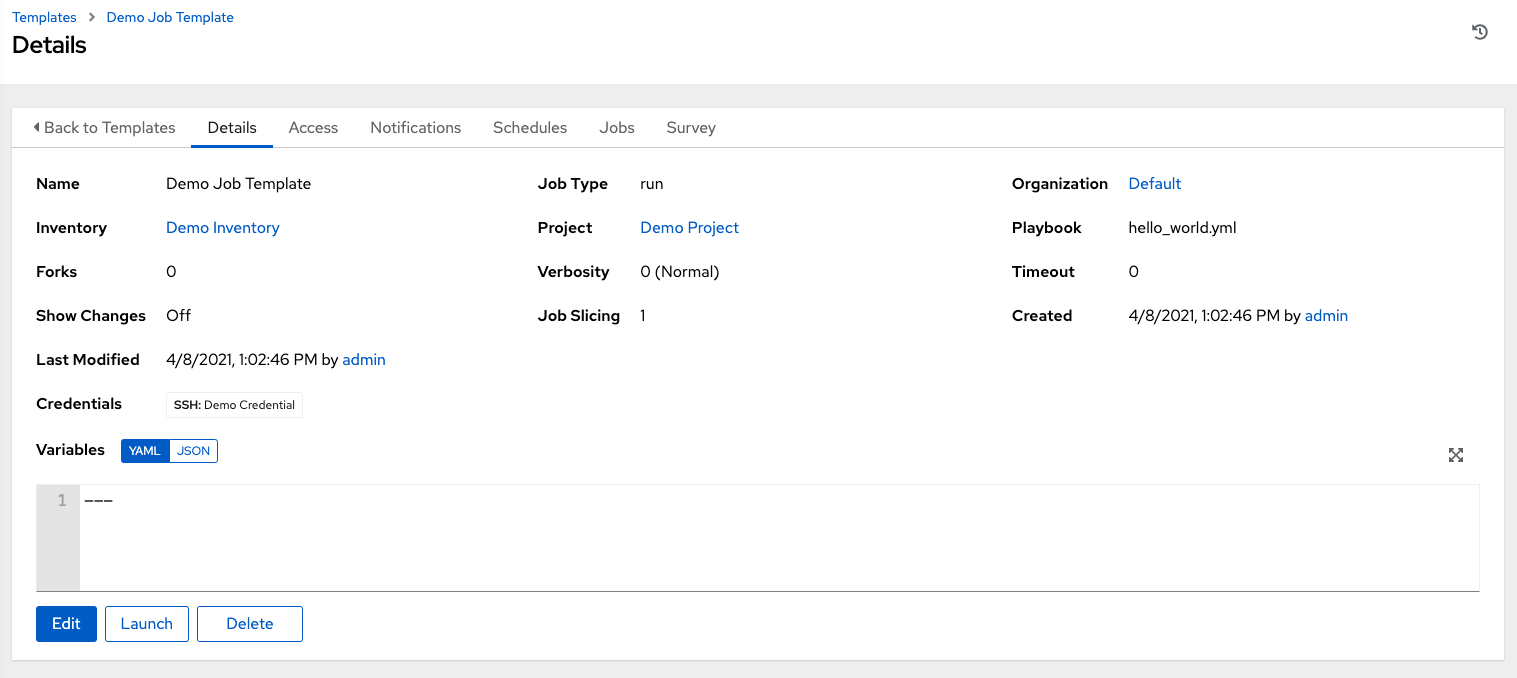
As part of the initial setup, a Demo Job Template is created for you.
Procedure
- To review existing templates, select Templates from the navigation panel.
- Click to view its details.
9.2. Editing a job template
As part of the initial setup, you can leave the default Demo Job Template as it is, but you can edit it later.
Procedure
Open the template to edit it by using one of these methods:
- Click → .
- From the navigation panel, select → next to the template name and edit the appropriate details.
Save your changes.
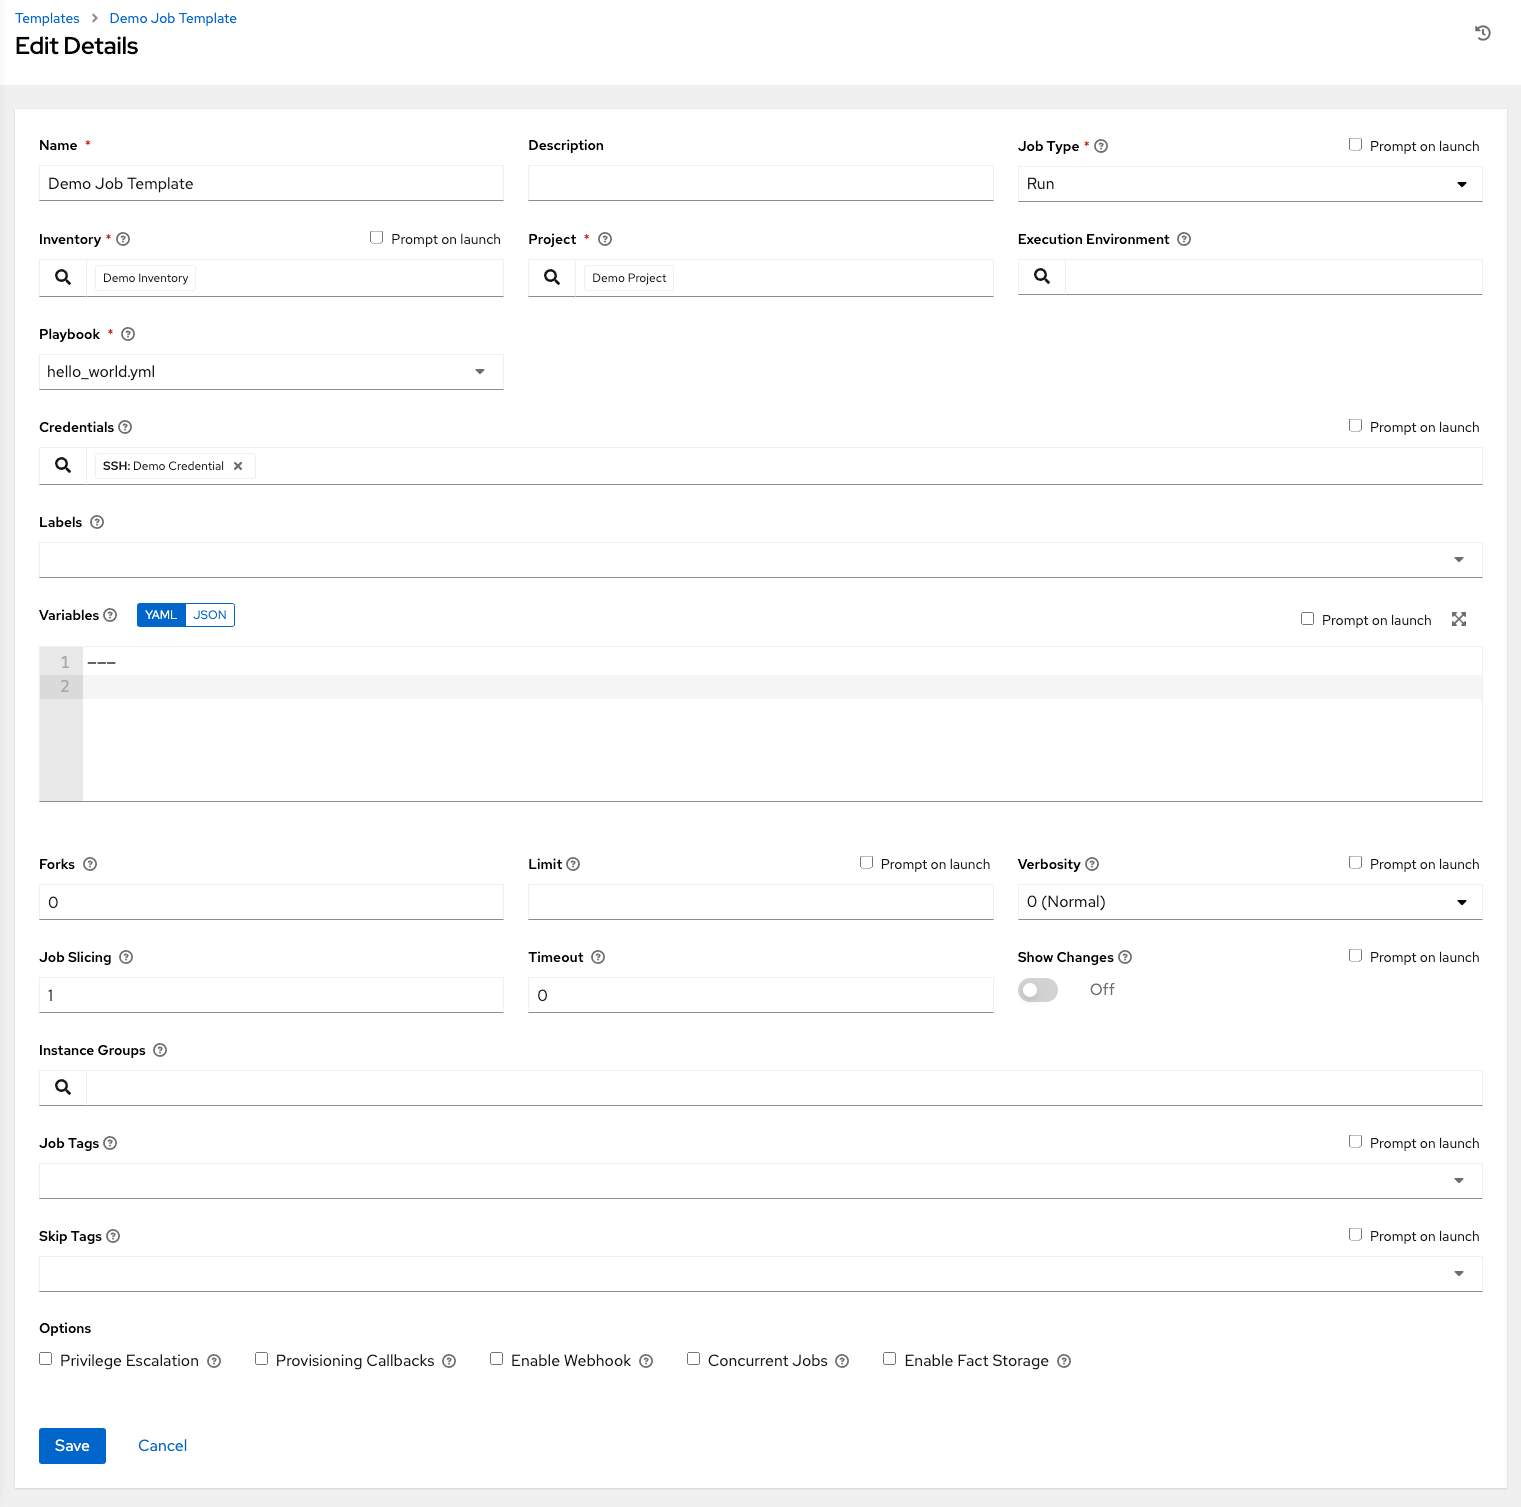
- To exit after saving and return to the Templates list view, use the breadcrumb navigation links or click . Clicking does not exit the Details dialog.
9.3. Running a job template
A benefit of automation controller is the push-button deployment of Ansible playbooks. You can configure a template to store all the parameters that you would normally pass to the Ansible playbook on the command line. In addition to the playbooks, the template passes the inventory, credentials, extra variables, and all options and settings that you can specify on the command line.
Procedure
- From the navigation panel, select → next to the job template.
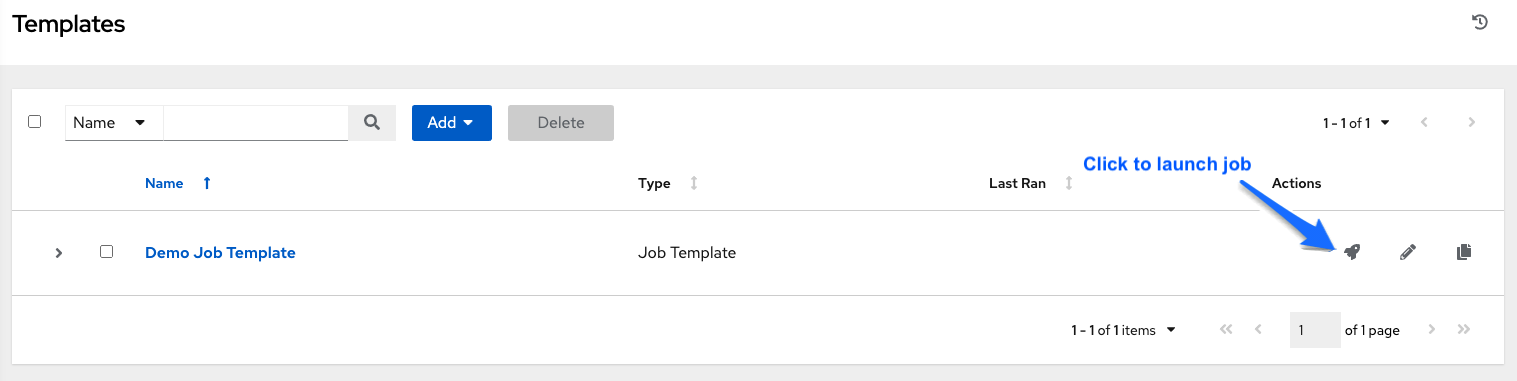
The initial job start generates a status page, which updates automatically by using automation controller’s Live Event feature, until the job is complete.
For more information about the job results, see Jobs in automation controller in the Automation controller User Guide.
Additional resources
To learn more about these automation controller features or to learn about administration tasks and the controller API, see the following documentation sets: