Installation and Configuration
OpenShift Container Platform 3.9 Installation and Configuration
Abstract
Chapter 1. Overview
OpenShift Container Platform Installation and Configuration topics cover the basics of installing and configuring OpenShift Container Platform in your environment. Configuration, management, and logging are also covered. Use these topics for the one-time tasks required to quickly set up your OpenShift Container Platform environment and configure it based on your organizational needs.
For day to day cluster administration tasks, see Cluster Administration.
Chapter 2. Installing a Cluster
2.1. Planning
2.1.1. Initial Planning
For production environments, several factors influence installation. Consider the following questions as you read through the documentation:
- Which installation method do you want to use? The Installation Methods section provides some information about the quick and advanced installation methods.
- How many pods are required in your cluster? The Sizing Considerations section provides limits for nodes and pods so you can calculate how large your environment needs to be.
- How many hosts do you require in the cluster? The Environment Scenarios section provides multiple examples of Single Master and Multiple Master configurations.
- Is high availability required? High availability is recommended for fault tolerance. In this situation, you might aim to use the Multiple Masters Using Native HA example as a basis for your environment.
- Which installation type do you want to use: RPM or containerized? Both installations provide a working OpenShift Container Platform environment, but you might have a preference for a particular method of installing, managing, and updating your services.
- Which identity provider do you use for authentication? If you already use a supported identity provider, it is a best practice to configure OpenShift Container Platform to use that identity provider during advanced installation.
- Is my installation supported if integrating with other technologies? See the OpenShift Container Platform Tested Integrations for a list of tested integrations.
2.1.2. Installation Methods
As of OpenShift Container Platform 3.9, the quick installation method is deprecated. In a future release, it will be removed completely. In addition, using the quick installer to upgrade from version 3.7 to 3.9 is not supported.
Both the quick and advanced installation methods are supported for development and production environments. If you want to quickly get OpenShift Container Platform up and running to try out for the first time, use the quick installer and let the interactive CLI guide you through the configuration options relevant to your environment.
For the most control over your cluster’s configuration, you can use the advanced installation method. This method is particularly suited if you are already familiar with Ansible. However, following along with the OpenShift Container Platform documentation should equip you with enough information to reliably deploy your cluster and continue to manage its configuration post-deployment using the provided Ansible playbooks directly.
If you install initially using the quick installer, you can always further tweak your cluster’s configuration and adjust the number of hosts in the cluster using the same installer tool. If you wanted to later switch to using the advanced method, you can create an inventory file for your configuration and carry on that way.
2.1.3. Sizing Considerations
Determine how many nodes and pods you require for your OpenShift Container Platform cluster. Cluster scalability correlates to the number of pods in a cluster environment. That number influences the other numbers in your setup. See Cluster Limits for the latest limits for objects in OpenShift Container Platform.
2.1.4. Environment Scenarios
This section outlines different examples of scenarios for your OpenShift Container Platform environment. Use these scenarios as a basis for planning your own OpenShift Container Platform cluster, based on your sizing needs.
Moving from a single master cluster to multiple masters after installation is not supported.
For information on updating labels, see Updating Labels on Nodes.
2.1.4.1. Single Master and Node on One System
OpenShift Container Platform can be installed on a single system for a development environment only. An all-in-one environment is not considered a production environment.
2.1.4.2. Single Master and Multiple Nodes
The following table describes an example environment for a single master (with etcd installed on the same host) and two nodes:
| Host Name | Infrastructure Component to Install |
|---|---|
| master.example.com | Master, etcd, and node |
| node1.example.com | Node |
| node2.example.com |
2.1.4.3. Single Master, Multiple etcd, and Multiple Nodes
The following table describes an example environment for a single master, three etcd hosts, and two nodes:
| Host Name | Infrastructure Component to Install |
|---|---|
| master.example.com | Master and node |
| etcd1.example.com | etcd |
| etcd2.example.com | |
| etcd3.example.com | |
| node1.example.com | Node |
| node2.example.com |
2.1.4.4. Multiple Masters Using Native HA with Co-located Clustered etcd
The following describes an example environment for three masters with co-located clustered etcd, one HAProxy load balancer, and two nodes using the native HA method:
| Host Name | Infrastructure Component to Install |
|---|---|
| master1.example.com | Master (clustered using native HA) and node and clustered etcd |
| master2.example.com | |
| master3.example.com | |
| lb.example.com | HAProxy to load balance API master endpoints |
| node1.example.com | Node |
| node2.example.com |
2.1.4.5. Multiple Masters Using Native HA with External Clustered etcd
The following describes an example environment for three masters, one HAProxy load balancer, three external clustered etcd hosts, and two nodes using the native HA method:
| Host Name | Infrastructure Component to Install |
|---|---|
| master1.example.com | Master (clustered using native HA) and node |
| master2.example.com | |
| master3.example.com | |
| lb.example.com | HAProxy to load balance API master endpoints |
| etcd1.example.com | Clustered etcd |
| etcd2.example.com | |
| etcd3.example.com | |
| node1.example.com | Node |
| node2.example.com |
2.1.4.6. Stand-alone Registry
You can also install OpenShift Container Platform to act as a stand-alone registry using the OpenShift Container Platform’s integrated registry. See Installing a Stand-alone Registry for details on this scenario.
2.1.5. RPM Versus Containerized
An RPM installation installs all services through package management and configures services to run within the same user space, while a containerized installation installs services using container images and runs separate services in individual containers.
See the Installing on Containerized Hosts topic for more details on configuring your installation to use containerized services.
2.2. Prerequisites
2.2.1. System Requirements
The following sections identify the hardware specifications and system-level requirements of all hosts within your OpenShift Container Platform environment.
2.2.1.1. Red Hat Subscriptions
You must have an active OpenShift Container Platform subscription on your Red Hat account to proceed. If you do not, contact your sales representative for more information.
2.2.1.2. Minimum Hardware Requirements
The system requirements vary per host type:
| |
| |
| External etcd Nodes |
|
| Ansible Controller | The host that you run the Ansible playbook on must have at least 75MiB of free memory per host in the inventory. |
 Meeting the /var/ file system sizing requirements in RHEL Atomic Host requires making changes to the default configuration. See Managing Storage with Docker-formatted Containers for instructions on configuring this during or after installation.
 The system’s temporary directory is determined according to the rules defined in the
 tempfile module in Python’s standard library.
OpenShift Container Platform only supports servers with x86_64 architecture.
You must configure storage for each system that runs a container daemon. For containerized installations, you need storage on masters. Also, by default, the web console is run in containers on masters, and storage is needed on masters to run the web console. Containers are run on nodes, so storage is always required on the nodes. The size of storage depends on workload, number of containers, the size of the containers being run, and the containers' storage requirements. Containerized etcd also needs container storage configured.
2.2.1.3. Production Level Hardware Requirements
Test or sample environments function with the minimum requirements. For production environments, the following recommendations apply:
- Master Hosts
- In a highly available OpenShift Container Platform cluster with external etcd, a master host should have, in addition to the minimum requirements in the table above, 1 CPU core and 1.5 GB of memory for each 1000 pods. Therefore, the recommended size of a master host in an OpenShift Container Platform cluster of 2000 pods would be the minimum requirements of 2 CPU cores and 16 GB of RAM, plus 2 CPU cores and 3 GB of RAM, totaling 4 CPU cores and 19 GB of RAM.
A minimum of three etcd hosts and a load-balancer between the master hosts are required.
See Recommended Practices for OpenShift Container Platform Master Hosts for performance guidance.
- Node Hosts
- The size of a node host depends on the expected size of its workload. As an OpenShift Container Platform cluster administrator, you will need to calculate the expected workload, then add about 10 percent for overhead. For production environments, allocate enough resources so that a node host failure does not affect your maximum capacity.
For more information, see Sizing Considerations and Cluster Limits.
Oversubscribing the physical resources on a node affects resource guarantees the Kubernetes scheduler makes during pod placement. Learn what measures you can take to avoid memory swapping.
2.2.1.4. Storage management
| Directory | Notes | Sizing | Expected Growth |
|---|---|---|---|
| /var/lib/openshift | Used for etcd storage only when in single master mode and etcd is embedded in the atomic-openshift-master process. | Less than 10GB. | Will grow slowly with the environment. Only storing metadata. |
| /var/lib/etcd | Used for etcd storage when in Multi-Master mode or when etcd is made standalone by an administrator. | Less than 20 GB. | Will grow slowly with the environment. Only storing metadata. |
| /var/lib/docker | When the run time is docker, this is the mount point. Storage used for active container runtimes (including pods) and storage of local images (not used for registry storage). Mount point should be managed by docker-storage rather than manually. | 50 GB for a Node with 16 GB memory. Additional 20-25 GB for every additional 8 GB of memory. | Growth is limited by the capacity for running containers. |
| /var/lib/containers | When the run time is CRI-O, this is the mount point. Storage used for active container runtimes (including pods) and storage of local images (not used for registry storage). | 50 GB for a Node with 16 GB memory. Additional 20-25 GB for every additional 8 GB of memory. | Growth limited by capacity for running containers |
| /var/lib/origin/openshift.local.volumes | Ephemeral volume storage for pods. This includes anything external that is mounted into a container at runtime. Includes environment variables, kube secrets, and data volumes not backed by persistent storage PVs. | Varies | Minimal if pods requiring storage are using persistent volumes. If using ephemeral storage, this can grow quickly. |
| /var/log | Log files for all components. | 10 to 30 GB. | Log files can grow quickly; size can be managed by growing disks or managed using log rotate. |
2.2.1.5. Red Hat Gluster Storage Hardware Requirements
Any nodes used in a Container-Native Storage or Container-Ready Storage cluster are considered storage nodes. Storage nodes can be grouped into distinct cluster groups, though a single node can not be in multiple groups. For each group of storage nodes:
- A minimum of three storage nodes per group is required.
Each storage node must have a minimum of 8 GB of RAM. This is to allow running the Red Hat Gluster Storage pods, as well as other applications and the underlying operating system.
- Each GlusterFS volume also consumes memory on every storage node in its storage cluster, which is about 30 MB. The total amount of RAM should be determined based on how many concurrent volumes are desired or anticipated.
Each storage node must have at least one raw block device with no present data or metadata. These block devices will be used in their entirety for GlusterFS storage. Make sure the following are not present:
- Partition tables (GPT or MSDOS)
- Filesystems or residual filesystem signatures
- LVM2 signatures of former Volume Groups and Logical Volumes
- LVM2 metadata of LVM2 physical volumes
If in doubt,
wipefs -a <device>should clear any of the above.
It is recommended to plan for two clusters: one dedicated to storage for infrastructure applications (such as an OpenShift Container Registry) and one dedicated to storage for general applications. This would require a total of six storage nodes. This recommendation is made to avoid potential impacts on performance in I/O and volume creation.
2.2.1.6. Optional: Configuring Core Usage
By default, OpenShift Container Platform masters and nodes use all available cores in the system they run on. You can choose the number of cores you want OpenShift Container Platform to use by setting the GOMAXPROCS environment variable. See the Go Language documentation for more information, including how the GOMAXPROCS environment variable works.
For example, run the following before starting the server to make OpenShift Container Platform only run on one core:
# export GOMAXPROCS=1
2.2.1.7. SELinux
Security-Enhanced Linux (SELinux) must be enabled on all of the servers before installing OpenShift Container Platform or the installer will fail. Also, configure SELINUX=enforcing and SELINUXTYPE=targeted in the /etc/selinux/config file:
# This file controls the state of SELinux on the system. # SELINUX= can take one of these three values: # enforcing - SELinux security policy is enforced. # permissive - SELinux prints warnings instead of enforcing. # disabled - No SELinux policy is loaded. SELINUX=enforcing # SELINUXTYPE= can take one of these three values: # targeted - Targeted processes are protected, # minimum - Modification of targeted policy. Only selected processes are protected. # mls - Multi Level Security protection. SELINUXTYPE=targeted
2.2.1.8. Red Hat Gluster Storage
To access GlusterFS volumes, the mount.glusterfs command must be available on all schedulable nodes. For RPM-based systems, the glusterfs-fuse package must be installed:
# yum install glusterfs-fuse
This package comes installed on every RHEL system. However, it is recommended to update to the latest available version from Red Hat Gluster Storage. To do this, the following RPM repository must be enabled:
# subscription-manager repos --enable=rh-gluster-3-client-for-rhel-7-server-rpms
If glusterfs-fuse is already installed on the nodes, ensure that the latest version is installed:
# yum update glusterfs-fuse
Optional: Using OverlayFS
OverlayFS is a union file system that allows you to overlay one file system on top of another.
As of Red Hat Enterprise Linux 7.4, you have the option to configure your OpenShift Container Platform environment to use OverlayFS. The overlay2 graph driver is fully supported in addition to the older overlay driver. However, Red Hat recommends using overlay2 instead of overlay, because of its speed and simple implementation.
Comparing the Overlay Versus Overlay2 Graph Drivers has more information about the overlay and overlay2 drivers.
See the Overlay Graph Driver section of the Atomic Host documentation for instructions on how to enable the overlay2 graph driver for the Docker service.
2.2.1.9. Security Warning
OpenShift Container Platform runs containers on hosts in the cluster, and in some cases, such as build operations and the registry service, it does so using privileged containers. Furthermore, those containers access the hosts' Docker daemon and perform docker build and docker push operations. As such, cluster administrators should be aware of the inherent security risks associated with performing docker run operations on arbitrary images as they effectively have root access. This is particularly relevant for docker build operations.
Exposure to harmful containers can be limited by assigning specific builds to nodes so that any exposure is limited to those nodes. To do this, see the Assigning Builds to Specific Nodes section of the Developer Guide. For cluster administrators, see the Configuring Global Build Defaults and Overrides section of the Installation and Configuration Guide.
You can also use security context constraints to control the actions that a pod can perform and what it has the ability to access. For instructions on how to enable images to run with USER in the Dockerfile, see Managing Security Context Constraints (requires a user with cluster-admin privileges).
For more information, see these articles:
2.2.2. Environment Requirements
The following section defines the requirements of the environment containing your OpenShift Container Platform configuration. This includes networking considerations and access to external services, such as Git repository access, storage, and cloud infrastructure providers.
2.2.2.1. DNS
OpenShift Container Platform requires a fully functional DNS server in the environment. This is ideally a separate host running DNS software and can provide name resolution to hosts and containers running on the platform.
Adding entries into the /etc/hosts file on each host is not enough. This file is not copied into containers running on the platform.
Key components of OpenShift Container Platform run themselves inside of containers and use the following process for name resolution:
- By default, containers receive their DNS configuration file (/etc/resolv.conf) from their host.
-
OpenShift Container Platform then inserts one DNS value into the pods (above the node’s nameserver values). That value is defined in the /etc/origin/node/node-config.yaml file by the
dnsIPparameter, which by default is set to the address of the host node because the host is using dnsmasq. -
If the
dnsIPparameter is omitted from the node-config.yaml file, then the value defaults to the kubernetes service IP, which is the first nameserver in the pod’s /etc/resolv.conf file.
As of OpenShift Container Platform 3.2, dnsmasq is automatically configured on all masters and nodes. The pods use the nodes as their DNS, and the nodes forward the requests. By default, dnsmasq is configured on the nodes to listen on port 53, therefore the nodes cannot run any other type of DNS application.
NetworkManager, a program for providing detection and configuration for systems to automatically connect to the network, is required on the nodes in order to populate dnsmasq with the DNS IP addresses.
NM_CONTROLLED is set to yes by default. If NM_CONTROLLED is set to no, then the NetworkManager dispatch script does not create the relevant origin-upstream-dns.conf dnsmasq file, and you would need to configure dnsmasq manually.
Similarly, if the PEERDNS parameter is set to no in the network script, for example, /etc/sysconfig/network-scripts/ifcfg-em1, then the dnsmasq files are not generated, and the Ansible install will fail. Ensure the PEERDNS setting is set to yes.
The following is an example set of DNS records:
master1 A 10.64.33.100 master2 A 10.64.33.103 node1 A 10.64.33.101 node2 A 10.64.33.102
If you do not have a properly functioning DNS environment, you could experience failure with:
- Product installation via the reference Ansible-based scripts
- Deployment of the infrastructure containers (registry, routers)
- Access to the OpenShift Container Platform web console, because it is not accessible via IP address alone
2.2.2.1.1. Configuring Hosts to Use DNS
Make sure each host in your environment is configured to resolve hostnames from your DNS server. The configuration for hosts' DNS resolution depend on whether DHCP is enabled. If DHCP is:
- Disabled, then configure your network interface to be static, and add DNS nameservers to NetworkManager.
Enabled, then the NetworkManager dispatch script automatically configures DNS based on the DHCP configuration. Optionally, you can add a value to
dnsIPin the node-config.yaml file to prepend the pod’s resolv.conf file. The second nameserver is then defined by the host’s first nameserver. By default, this will be the IP address of the node host.NoteFor most configurations, do not set the
openshift_dns_ipoption during the advanced installation of OpenShift Container Platform (using Ansible), because this option overrides the default IP address set bydnsIP.Instead, allow the installer to configure each node to use dnsmasq and forward requests to the external DNS provider or SkyDNS, the internal DNS service for cluster-wide DNS resolution of internal hostnames for services and pods. If you do set the
openshift_dns_ipoption, then it should be set either with a DNS IP that queries SkyDNS first, or to the SkyDNS service or endpoint IP (the Kubernetes service IP).
To verify that hosts can be resolved by your DNS server:
Check the contents of /etc/resolv.conf:
$ cat /etc/resolv.conf # Generated by NetworkManager search example.com nameserver 10.64.33.1 # nameserver updated by /etc/NetworkManager/dispatcher.d/99-origin-dns.sh
In this example, 10.64.33.1 is the address of our DNS server.
Test that the DNS servers listed in /etc/resolv.conf are able to resolve host names to the IP addresses of all masters and nodes in your OpenShift Container Platform environment:
$ dig <node_hostname> @<IP_address> +short
For example:
$ dig master.example.com @10.64.33.1 +short 10.64.33.100 $ dig node1.example.com @10.64.33.1 +short 10.64.33.101
2.2.2.1.2. Configuring a DNS Wildcard
Optionally, configure a wildcard for the router to use, so that you do not need to update your DNS configuration when new routes are added.
A wildcard for a DNS zone must ultimately resolve to the IP address of the OpenShift Container Platform router.
For example, create a wildcard DNS entry for cloudapps that has a low time-to-live value (TTL) and points to the public IP address of the host where the router will be deployed:
*.cloudapps.example.com. 300 IN A 192.168.133.2
In almost all cases, when referencing VMs you must use host names, and the host names that you use must match the output of the hostname -f command on each node.
In your /etc/resolv.conf file on each node host, ensure that the DNS server that has the wildcard entry is not listed as a nameserver or that the wildcard domain is not listed in the search list. Otherwise, containers managed by OpenShift Container Platform may fail to resolve host names properly.
2.2.2.2. Network Access
A shared network must exist between the master and node hosts. If you plan to configure multiple masters for high-availability using the advanced installation method, you must also select an IP to be configured as your virtual IP (VIP) during the installation process. The IP that you select must be routable between all of your nodes, and if you configure using a FQDN it should resolve on all nodes.
2.2.2.2.1. NetworkManager
NetworkManager, a program for providing detection and configuration for systems to automatically connect to the network, is required on the nodes in order to populate dnsmasq with the DNS IP addresses.
NM_CONTROLLED is set to yes by default. If NM_CONTROLLED is set to no, then the NetworkManager dispatch script does not create the relevant origin-upstream-dns.conf dnsmasq file, and you would need to configure dnsmasq manually.
2.2.2.2.2. Configuring firewalld as the firewall
While iptables is the default firewall, firewalld is recommended for new installations. You can enable firewalld by setting os_firewall_use_firewalld=true in the Ansible inventory file.
[OSEv3:vars] os_firewall_use_firewalld=True
Setting this variable to true opens the required ports and adds rules to the default zone, which ensure that firewalld is configured correctly.
Using the firewalld default configuration comes with limited configuration options, and cannot be overridden. For example, while you can set up a storage network with interfaces in multiple zones, the interface that nodes communicate on must be in the default zone.
2.2.2.2.3. Required Ports
The OpenShift Container Platform installation automatically creates a set of internal firewall rules on each host using iptables. However, if your network configuration uses an external firewall, such as a hardware-based firewall, you must ensure infrastructure components can communicate with each other through specific ports that act as communication endpoints for certain processes or services.
Ensure the following ports required by OpenShift Container Platform are open on your network and configured to allow access between hosts. Some ports are optional depending on your configuration and usage.
| 4789 | UDP | Required for SDN communication between pods on separate hosts. |
| 53 or 8053 | TCP/UDP | Required for DNS resolution of cluster services (SkyDNS). Installations prior to 3.2 or environments upgraded to 3.2 use port 53. New installations will use 8053 by default so that dnsmasq may be configured. |
| 4789 | UDP | Required for SDN communication between pods on separate hosts. |
| 443 or 8443 | TCP | Required for node hosts to communicate to the master API, for the node hosts to post back status, to receive tasks, and so on. |
| 4789 | UDP | Required for SDN communication between pods on separate hosts. |
| 10250 | TCP |
The master proxies to node hosts via the Kubelet for |
| 10010 | TCP |
If using CRI-O, open this port to allow |
| 53 or 8053 | TCP/UDP | Required for DNS resolution of cluster services (SkyDNS). Installations prior to 3.2 or environments upgraded to 3.2 use port 53. New installations will use 8053 by default so that dnsmasq may be configured. |
| 2049 | TCP/UDP | Required when provisioning an NFS host as part of the installer. |
| 2379 | TCP | Used for standalone etcd (clustered) to accept changes in state. |
| 2380 | TCP | etcd requires this port be open between masters for leader election and peering connections when using standalone etcd (clustered). |
| 4789 | UDP | Required for SDN communication between pods on separate hosts. |
| 9000 | TCP |
If you choose the |
| 443 or 8443 | TCP | Required for node hosts to communicate to the master API, for node hosts to post back status, to receive tasks, and so on. |
| 8444 | TCP |
Port that the |
| 22 | TCP | Required for SSH by the installer or system administrator. |
| 53 or 8053 | TCP/UDP | Required for DNS resolution of cluster services (SkyDNS). Installations prior to 3.2 or environments upgraded to 3.2 use port 53. New installations will use 8053 by default so that dnsmasq may be configured. Only required to be internally open on master hosts. |
| 80 or 443 | TCP | For HTTP/HTTPS use for the router. Required to be externally open on node hosts, especially on nodes running the router. |
| 1936 | TCP | (Optional) Required to be open when running the template router to access statistics. Can be open externally or internally to connections depending on if you want the statistics to be expressed publicly. Can require extra configuration to open. See the Notes section below for more information. |
| 2379 and 2380 | TCP | For standalone etcd use. Only required to be internally open on the master host. 2379 is for server-client connections. 2380 is for server-server connections, and is only required if you have clustered etcd. |
| 4789 | UDP | For VxLAN use (OpenShift SDN). Required only internally on node hosts. |
| 8443 | TCP | For use by the OpenShift Container Platform web console, shared with the API server. |
| 10250 | TCP | For use by the Kubelet. Required to be externally open on nodes. |
Notes
- In the above examples, port 4789 is used for User Datagram Protocol (UDP).
- When deployments are using the SDN, the pod network is accessed via a service proxy, unless it is accessing the registry from the same node the registry is deployed on.
-
OpenShift Container Platform internal DNS cannot be received over SDN. Depending on the detected values of
openshift_facts, or if theopenshift_ipandopenshift_public_ipvalues are overridden, it will be the computed value ofopenshift_ip. For non-cloud deployments, this will default to the IP address associated with the default route on the master host. For cloud deployments, it will default to the IP address associated with the first internal interface as defined by the cloud metadata. -
The master host uses port 10250 to reach the nodes and does not go over SDN. It depends on the target host of the deployment and uses the computed values of
openshift_hostnameandopenshift_public_hostname. Port 1936 can still be inaccessible due to your iptables rules. Use the following to configure iptables to open port 1936:
# iptables -A OS_FIREWALL_ALLOW -p tcp -m state --state NEW -m tcp \ --dport 1936 -j ACCEPT
| 9200 | TCP |
For Elasticsearch API use. Required to be internally open on any infrastructure nodes so Kibana is able to retrieve logs for display. It can be externally open for direct access to Elasticsearch by means of a route. The route can be created using |
| 9300 | TCP | For Elasticsearch inter-cluster use. Required to be internally open on any infrastructure node so the members of the Elasticsearch cluster can communicate with each other. |
| 9090 | TCP | For Prometheus API and web console use. |
| 9100 | TCP | For the Prometheus Node-Exporter, which exports hardware and operating system metrics. Port 9100 needs to be open on each OpenShift Container Platform host in order for the Prometheus server to scrape the metrics. |
| 8443 | TCP | For node hosts to communicate to the master API, for the node hosts to post back status, to receive tasks, and so on. This port needs to be allowed from masters and infra nodes to any master and node. |
| 10250 | TCP | For the Kubernetes cAdvisor, a container resource usage and performance analysis agent. This port must to be allowed from masters and infra nodes to any master and node. For metrics, the source must be the infra nodes. |
| 8444 | TCP | Port that the controller service listens on. Port 8444 needs to be open on each OpenShift Container Platform host |
| 1936 | TCP | (Optional) Required to be open when running the template router to access statistics. This port must be allowed from the infra nodes to any infra nodes hosting the routers if Prometheus metrics are enabled on routers. Can be open externally or internally to connections depending on if you want the statistics to be expressed publicly. Can require extra configuration to open. See the Notes section above for more information. |
Notes
2.2.2.3. Persistent Storage
The Kubernetes persistent volume framework allows you to provision an OpenShift Container Platform cluster with persistent storage using networked storage available in your environment. This can be done after completing the initial OpenShift Container Platform installation depending on your application needs, giving users a way to request those resources without having any knowledge of the underlying infrastructure.
The Installation and Configuration Guide provides instructions for cluster administrators on provisioning an OpenShift Container Platform cluster with persistent storage using NFS, GlusterFS, Ceph RBD, OpenStack Cinder, AWS Elastic Block Store (EBS), GCE Persistent Disks, and iSCSI.
2.2.2.4. Cloud Provider Considerations
There are certain aspects to take into consideration if installing OpenShift Container Platform on a cloud provider.
- For Amazon Web Services, see the Permissions and the Configuring a Security Group sections.
- For OpenStack, see the Permissions and the Configuring a Security Group sections.
2.2.2.4.1. Overriding Detected IP Addresses and Host Names
Some deployments require that the user override the detected host names and IP addresses for the hosts. To see the default values, run the openshift_facts playbook:
# ansible-playbook [-i /path/to/inventory] \
/usr/share/ansible/openshift-ansible/playbooks/byo/openshift_facts.ymlFor Amazon Web Services, see the Overriding Detected IP Addresses and Host Names section.
Now, verify the detected common settings. If they are not what you expect them to be, you can override them.
The Advanced Installation topic discusses the available Ansible variables in greater detail.
| Variable | Usage |
|---|---|
|
|
|
|
|
|
|
|
|
|
|
|
|
|
|
If openshift_hostname is set to a value other than the metadata-provided private-dns-name value, the native cloud integration for those providers will no longer work.
2.2.2.4.2. Post-Installation Configuration for Cloud Providers
Following the installation process, you can configure OpenShift Container Platform for AWS, OpenStack, or GCE.
2.3. Host Preparation
2.3.1. Setting PATH
The PATH for the root user on each host must contain the following directories:
- /bin
- /sbin
- /usr/bin
- /usr/sbin
These should all be included by default in a fresh RHEL 7.x installation.
2.3.2. Operating System Requirements
A base installation of 7.3 or later (with the latest packages from the Extras channel) or RHEL Atomic Host 7.4.2 or later is required for master and node hosts. See the following documentation for the respective installation instructions, if required:
2.3.3. Host Registration
Each host must be registered using Red Hat Subscription Manager (RHSM) and have an active OpenShift Container Platform subscription attached to access the required packages.
On each host, register with RHSM:
# subscription-manager register --username=<user_name> --password=<password>
Pull the latest subscription data from RHSM:
# subscription-manager refresh
List the available subscriptions:
# subscription-manager list --available --matches '*OpenShift*'
In the output for the previous command, find the pool ID for an OpenShift Container Platform subscription and attach it:
# subscription-manager attach --pool=<pool_id>
Disable all yum repositories:
Disable all the enabled RHSM repositories:
# subscription-manager repos --disable="*"
List the remaining yum repositories and note their names under
repo id, if any:# yum repolist
Use
yum-config-managerto disable the remaining yum repositories:# yum-config-manager --disable <repo_id>
Alternatively, disable all repositories:
yum-config-manager --disable \*
Note that this could take a few minutes if you have a large number of available repositories
Enable only the repositories required by OpenShift Container Platform 3.9:
# subscription-manager repos \ --enable="rhel-7-server-rpms" \ --enable="rhel-7-server-extras-rpms" \ --enable="rhel-7-server-ose-3.9-rpms" \ --enable="rhel-7-fast-datapath-rpms" \ --enable="rhel-7-server-ansible-2.4-rpms"NoteThe addition of the rhel-7-server-ansible-2.4-rpms repository is a new requirement as of OpenShift Container Platform 3.9.
2.3.4. Installing Base Packages
Once you have a working inventory file, you can use /usr/share/ansible/openshift-ansible/playbooks/prerequisites.yml to install container runtimes in their default configuration. If you require customization to the container runtime, follow the guidance in this topic.
For RHEL 7 systems:
Install the following base packages:
# yum install wget git net-tools bind-utils yum-utils iptables-services bridge-utils bash-completion kexec-tools sos psacct
Update the system to the latest packages:
# yum update # systemctl reboot
If you plan to use the RPM-based installer to run an advanced installation, you can skip this step. However, if you plan to use the containerized installer:
Install the atomic package:
# yum install atomic
- Skip to Installing Docker.
Install the following package, which provides RPM-based OpenShift Container Platform installer utilities and pulls in other tools required by the quick and advanced installation methods, such as Ansible and related configuration files:
# yum install atomic-openshift-utils
For RHEL Atomic Host 7 systems:
Ensure the host is up to date by upgrading to the latest Atomic tree if one is available:
# atomic host upgrade
After the upgrade is completed and prepared for the next boot, reboot the host:
# systemctl reboot
2.3.5. Installing Docker
At this point, you should install Docker on all master and node hosts. This allows you to configure your Docker storage options before installing OpenShift Container Platform.
For RHEL 7 systems, install Docker 1.13:
On RHEL Atomic Host 7 systems, Docker should already be installed, configured, and running by default.
# yum install docker-1.13.1
After the package installation is complete, verify that version 1.13 was installed:
# rpm -V docker-1.13.1 # docker version
The Advanced Installation method automatically changes /etc/sysconfig/docker.
2.3.6. Configuring Docker Storage
Containers and the images they are created from are stored in Docker’s storage back end. This storage is ephemeral and separate from any persistent storage allocated to meet the needs of your applications. With Ephemeral storage, container-saved data is lost when the container is removed. With persistent storage, container-saved data remains if the container is removed.
You must configure storage for each system that runs a container daemon. For containerized installations, you need storage on masters. Also, by default, the web console is run in containers on masters, and storage is needed on masters to run the web console. Containers are run on nodes, so storage is always required on the nodes. The size of storage depends on workload, number of containers, the size of the containers being run, and the containers' storage requirements. Containerized etcd also needs container storage configured.
Once you have a working inventory file, you can use /usr/share/ansible/openshift-ansible/playbooks/prerequisites.yml to install container runtimes in their default configuration. If you require customization to the container runtime, follow the guidance in this topic.
For RHEL Atomic Host
The default storage back end for Docker on RHEL Atomic Host is a thin pool logical volume, which is supported for production environments. You must ensure that enough space is allocated for this volume per the Docker storage requirements mentioned in System Requirements.
If you do not have enough allocated, see Managing Storage with Docker Formatted Containers for details on using docker-storage-setup and basic instructions on storage management in RHEL Atomic Host.
For RHEL
The default storage back end for Docker on RHEL 7 is a thin pool on loopback devices, which is not supported for production use and only appropriate for proof of concept environments. For production environments, you must create a thin pool logical volume and re-configure Docker to use that volume.
Docker stores images and containers in a graph driver, which is a pluggable storage technology, such as DeviceMapper, OverlayFS, and Btrfs. Each has advantages and disadvantages. For example, OverlayFS is faster than DeviceMapper at starting and stopping containers, but is not Portable Operating System Interface for Unix (POSIX) compliant because of the architectural limitations of a union file system and is not supported prior to Red Hat Enterprise Linux 7.2. See the Red Hat Enterprise Linux release notes for information on using OverlayFS with your version of RHEL.
For more information on the benefits and limitations of DeviceMapper and OverlayFS, see Choosing a Graph Driver.
2.3.6.1. Configuring OverlayFS
OverlayFS is a type of union file system. It allows you to overlay one file system on top of another. Changes are recorded in the upper file system, while the lower file system remains unmodified.
Comparing the Overlay Versus Overlay2 Graph Drivers has more information about the overlay and overlay2 drivers.
For information on enabling the OverlayFS storage driver for the Docker service, see the Red Hat Enterprise Linux Atomic Host documentation.
2.3.6.2. Configuring Thin Pool Storage
You can use the docker-storage-setup script included with Docker to create a thin pool device and configure Docker’s storage driver. This can be done after installing Docker and should be done before creating images or containers. The script reads configuration options from the /etc/sysconfig/docker-storage-setup file and supports three options for creating the logical volume:
- Option A) Use an additional block device.
- Option B) Use an existing, specified volume group.
- Option C) Use the remaining free space from the volume group where your root file system is located.
Option A is the most robust option, however it requires adding an additional block device to your host before configuring Docker storage. Options B and C both require leaving free space available when provisioning your host. Option C is known to cause issues with some applications, for example Red Hat Mobile Application Platform (RHMAP).
Create the docker-pool volume using one of the following three options:
Option A) Use an additional block device.
In /etc/sysconfig/docker-storage-setup, set DEVS to the path of the block device you wish to use. Set VG to the volume group name you wish to create; docker-vg is a reasonable choice. For example:
# cat <<EOF > /etc/sysconfig/docker-storage-setup DEVS=/dev/vdc VG=docker-vg EOF
Then run docker-storage-setup and review the output to ensure the docker-pool volume was created:
# docker-storage-setup [5/1868] 0 Checking that no-one is using this disk right now ... OK Disk /dev/vdc: 31207 cylinders, 16 heads, 63 sectors/track sfdisk: /dev/vdc: unrecognized partition table type Old situation: sfdisk: No partitions found New situation: Units: sectors of 512 bytes, counting from 0 Device Boot Start End #sectors Id System /dev/vdc1 2048 31457279 31455232 8e Linux LVM /dev/vdc2 0 - 0 0 Empty /dev/vdc3 0 - 0 0 Empty /dev/vdc4 0 - 0 0 Empty Warning: partition 1 does not start at a cylinder boundary Warning: partition 1 does not end at a cylinder boundary Warning: no primary partition is marked bootable (active) This does not matter for LILO, but the DOS MBR will not boot this disk. Successfully wrote the new partition table Re-reading the partition table ... If you created or changed a DOS partition, /dev/foo7, say, then use dd(1) to zero the first 512 bytes: dd if=/dev/zero of=/dev/foo7 bs=512 count=1 (See fdisk(8).) Physical volume "/dev/vdc1" successfully created Volume group "docker-vg" successfully created Rounding up size to full physical extent 16.00 MiB Logical volume "docker-poolmeta" created. Logical volume "docker-pool" created. WARNING: Converting logical volume docker-vg/docker-pool and docker-vg/docker-poolmeta to pool's data and metadata volumes. THIS WILL DESTROY CONTENT OF LOGICAL VOLUME (filesystem etc.) Converted docker-vg/docker-pool to thin pool. Logical volume "docker-pool" changed.
Option B) Use an existing, specified volume group.
In /etc/sysconfig/docker-storage-setup, set VG to the desired volume group. For example:
# cat <<EOF > /etc/sysconfig/docker-storage-setup VG=docker-vg EOF
Then run docker-storage-setup and review the output to ensure the docker-pool volume was created:
# docker-storage-setup Rounding up size to full physical extent 16.00 MiB Logical volume "docker-poolmeta" created. Logical volume "docker-pool" created. WARNING: Converting logical volume docker-vg/docker-pool and docker-vg/docker-poolmeta to pool's data and metadata volumes. THIS WILL DESTROY CONTENT OF LOGICAL VOLUME (filesystem etc.) Converted docker-vg/docker-pool to thin pool. Logical volume "docker-pool" changed.
Option C) Use the remaining free space from the volume group where your root file system is located.
Verify that the volume group where your root file system resides has the desired free space, then run docker-storage-setup and review the output to ensure the docker-pool volume was created:
# docker-storage-setup Rounding up size to full physical extent 32.00 MiB Logical volume "docker-poolmeta" created. Logical volume "docker-pool" created. WARNING: Converting logical volume rhel/docker-pool and rhel/docker-poolmeta to pool's data and metadata volumes. THIS WILL DESTROY CONTENT OF LOGICAL VOLUME (filesystem etc.) Converted rhel/docker-pool to thin pool. Logical volume "docker-pool" changed.
Verify your configuration. You should have a dm.thinpooldev value in the /etc/sysconfig/docker-storage file and a docker-pool logical volume:
# cat /etc/sysconfig/docker-storage DOCKER_STORAGE_OPTIONS="--storage-driver devicemapper --storage-opt dm.fs=xfs --storage-opt dm.thinpooldev=/dev/mapper/rhel-docker--pool --storage-opt dm.use_deferred_removal=true --storage-opt dm.use_deferred_deletion=true " # lvs LV VG Attr LSize Pool Origin Data% Meta% Move Log Cpy%Sync Convert docker-pool rhel twi-a-t--- 9.29g 0.00 0.12
ImportantBefore using Docker or OpenShift Container Platform, verify that the docker-pool logical volume is large enough to meet your needs. The docker-pool volume should be 60% of the available volume group and will grow to fill the volume group via LVM monitoring.
If Docker has not yet been started on the host, enable and start the service, then verify it is running:
# systemctl enable docker # systemctl start docker # systemctl is-active docker
If Docker is already running, re-initialize Docker:
WarningThis will destroy any containers or images currently on the host.
# systemctl stop docker # rm -rf /var/lib/docker/* # systemctl restart docker
If there is any content in /var/lib/docker/, it must be deleted. Files will be present if Docker has been used prior to the installation of OpenShift Container Platform.
2.3.6.3. Reconfiguring Docker Storage
Should you need to reconfigure Docker storage after having created the docker-pool, you should first remove the docker-pool logical volume. If you are using a dedicated volume group, you should also remove the volume group and any associated physical volumes before reconfiguring docker-storage-setup according to the instructions above.
See Logical Volume Manager Administration for more detailed information on LVM management.
2.3.6.4. Enabling Image Signature Support
OpenShift Container Platform is capable of cryptographically verifying images are from trusted sources. The Container Security Guide provides a high-level description of how image signing works.
You can configure image signature verification using the atomic command line interface (CLI), version 1.12.5 or greater. The atomic CLI is pre-installed on RHEL Atomic Host systems.
For more on the atomic CLI, see the Atomic CLI documentation.
Install the atomic package if it is not installed on the host system:
$ yum install atomic
The atomic trust sub-command manages trust configuration. The default configuration is to whitelist all registries. This means no signature verification is configured.
$ atomic trust show * (default) accept
A reasonable configuration might be to whitelist a particular registry or namespace, blacklist (reject) untrusted registries, and require signature verification on a vendor registry. The following set of commands performs this example configuration:
Example Atomic Trust Configuration
$ atomic trust add --type insecureAcceptAnything 172.30.1.1:5000 $ atomic trust add --sigstoretype atomic \ --pubkeys pub@example.com \ 172.30.1.1:5000/production $ atomic trust add --sigstoretype atomic \ --pubkeys /etc/pki/example.com.pub \ 172.30.1.1:5000/production $ atomic trust add --sigstoretype web \ --sigstore https://access.redhat.com/webassets/docker/content/sigstore \ --pubkeys /etc/pki/rpm-gpg/RPM-GPG-KEY-redhat-release \ registry.access.redhat.com # atomic trust show * (default) accept 172.30.1.1:5000 accept 172.30.1.1:5000/production signed security@example.com registry.access.redhat.com signed security@redhat.com,security@redhat.com
When all the signed sources are verified, nodes may be further hardened with a global reject default:
$ atomic trust default reject $ atomic trust show * (default) reject 172.30.1.1:5000 accept 172.30.1.1:5000/production signed security@example.com registry.access.redhat.com signed security@redhat.com,security@redhat.com
Use the atomic man page man atomic-trust for additional examples.
The following files and directories comprise the trust configuration of a host:
- /etc/containers/registries.d/*
- /etc/containers/policy.json
The trust configuration may be managed directly on each node or the generated files managed on a separate host and distributed to the appropriate nodes using Ansible, for example. See the Container Image Signing Integration Guide for an example of automating file distribution with Ansible.
2.3.6.5. Managing Container Logs
Sometimes a container’s log file (the /var/lib/docker/containers/<hash>/<hash>-json.log file on the node where the container is running) can increase to a problematic size. You can manage this by configuring Docker’s json-file logging driver to restrict the size and number of log files.
| Option | Purpose |
|---|---|
|
| Sets the size at which a new log file is created. |
|
| Sets the maximum number of log files to be kept per host. |
For example, to set the maximum file size to 1MB and always keep the last three log files, edit the /etc/sysconfig/docker file to configure max-size=1M and max-file=3, ensuring that the values maintain the single quotation mark formatting:
OPTIONS='--insecure-registry=172.30.0.0/16 --selinux-enabled --log-opt max-size=1M --log-opt max-file=3'
Next, restart the Docker service:
# systemctl restart docker
2.3.6.6. Viewing Available Container Logs
Container logs are stored in the /var/lib/docker/containers/<hash>/ directory on the node where the container is running. For example:
# ls -lh /var/lib/docker/containers/f088349cceac173305d3e2c2e4790051799efe363842fdab5732f51f5b001fd8/ total 2.6M -rw-r--r--. 1 root root 5.6K Nov 24 00:12 config.json -rw-r--r--. 1 root root 649K Nov 24 00:15 f088349cceac173305d3e2c2e4790051799efe363842fdab5732f51f5b001fd8-json.log -rw-r--r--. 1 root root 977K Nov 24 00:15 f088349cceac173305d3e2c2e4790051799efe363842fdab5732f51f5b001fd8-json.log.1 -rw-r--r--. 1 root root 977K Nov 24 00:15 f088349cceac173305d3e2c2e4790051799efe363842fdab5732f51f5b001fd8-json.log.2 -rw-r--r--. 1 root root 1.3K Nov 24 00:12 hostconfig.json drwx------. 2 root root 6 Nov 24 00:12 secrets
See Docker’s documentation for additional information on how to configure logging drivers.
2.3.6.7. Blocking Local Volume Usage
When a volume is provisioned using the VOLUME instruction in a Dockerfile or using the docker run -v <volumename> command, a host’s storage space is used. Using this storage can lead to an unexpected out of space issue and could bring down the host.
In OpenShift Container Platform, users trying to run their own images risk filling the entire storage space on a node host. One solution to this issue is to prevent users from running images with volumes. This way, the only storage a user has access to can be limited, and the cluster administrator can assign storage quota.
Using docker-novolume-plugin solves this issue by disallowing starting a container with local volumes defined. In particular, the plug-in blocks docker run commands that contain:
-
The
--volumes-fromoption -
Images that have
VOLUME(s) defined -
References to existing volumes that were provisioned with the
docker volumecommand
The plug-in does not block references to bind mounts.
To enable docker-novolume-plugin, perform the following steps on each node host:
Install the docker-novolume-plugin package:
$ yum install docker-novolume-plugin
Enable and start the docker-novolume-plugin service:
$ systemctl enable docker-novolume-plugin $ systemctl start docker-novolume-plugin
Edit the /etc/sysconfig/docker file and append the following to the
OPTIONSlist:--authorization-plugin=docker-novolume-plugin
Restart the docker service:
$ systemctl restart docker
After you enable this plug-in, containers with local volumes defined fail to start and show the following error message:
runContainer: API error (500): authorization denied by plugin docker-novolume-plugin: volumes are not allowed
2.3.7. Ensuring Host Access
The quick and advanced installation methods require a user that has access to all hosts. If you want to run the installer as a non-root user, passwordless sudo rights must be configured on each destination host.
For example, you can generate an SSH key on the host where you will invoke the installation process:
# ssh-keygen
Do not use a password.
An easy way to distribute your SSH keys is by using a bash loop:
# for host in master.example.com \ 1 node1.example.com \ 2 node2.example.com; \ 3 do ssh-copy-id -i ~/.ssh/id_rsa.pub $host; \ done
Modify the host names in the above command according to your configuration.
After you run the bash loop, confirm that you can access each host that is listed in the loop through SSH.
2.3.8. Setting Proxy Overrides
If the /etc/environment file on your nodes contains either an http_proxy or https_proxy value, you must also set a no_proxy value in that file to allow open communication between OpenShift Container Platform components.
The no_proxy parameter in /etc/environment file is not the same value as the global proxy values that you set in your inventory file. The global proxy values configure specific OpenShift Container Platform services with your proxy settings. See Configuring Global Proxy Options for details.
If the /etc/environment file contains proxy values, define the following values in the no_proxy parameter of that file on each node:
- Master and node host names or their domain suffix.
- Other internal host names or their domain suffix.
- Etcd IP addresses. You must provide IP addresses and not host names because etcd access is controlled by IP address.
-
Kubernetes IP address, by default
172.30.0.1. Must be the value set in theopenshift_portal_netparameter in your inventory file. -
Kubernetes internal domain suffix,
cluster.local. -
Kubernetes internal domain suffix,
.svc.
Because no_proxy does not support CIDR, you can use domain suffixes.
If you use either an http_proxy or https_proxy value, your no_proxy parameter value resembles the following example:
no_proxy=.internal.example.com,10.0.0.1,10.0.0.2,10.0.0.3,.cluster.local,.svc,localhost,127.0.0.1,172.30.0.1
2.3.9. What’s Next?
If you are interested in installing OpenShift Container Platform using the containerized method (optional for RHEL but required for RHEL Atomic Host), see Installing on Containerized Hosts to prepare your hosts.
When you are ready to proceed, you can install OpenShift Container Platform using the quick installation or advanced installation method.
As of OpenShift Container Platform 3.9, the quick installation method is deprecated. In a future release, it will be removed completely. In addition, using the quick installer to upgrade from version 3.7 to 3.9 is not supported.
If you are installing a stand-alone registry, continue with Installing a Stand-alone Registry.
2.4. Installing on Containerized Hosts
2.4.1. RPM Versus Containerized Installation
You can opt to install OpenShift Container Platform using the RPM or containerized package method. Either installation method results in a working environment, but the choice comes from the operating system and how you choose to update your hosts.
The default method for installing OpenShift Container Platform on Red Hat Enterprise Linux (RHEL) uses RPMs. When targeting a Red Hat Atomic Host system, the containerized method is the only available option, and is automatically selected for you based on the detection of the /run/ostree-booted file.
When using RPMs, all services are installed and updated by package management from an outside source. These modify a host’s existing configuration within the same user space. Alternatively, with containerized installs, each component of OpenShift Container Platform is shipped as a container (in a self-contained package) and leverages the host’s kernel to start and run. Any updated, newer containers replace any existing ones on your host. Choosing one method over the other depends on how you choose to update OpenShift Container Platform in the future.
The following table outlines further differences between the RPM and Containerized methods:
| RPM | Containerized | |
|---|---|---|
| Installation Method |
Packages via |
Container images via |
| Service Management |
|
|
| Operating System | Red Hat Enterprise Linux | Red Hat Enterprise Linux or Red Hat Atomic Host |
2.4.2. Install Methods for Containerized Hosts
As with the RPM installation, you can choose between the quick and advanced install methods for the containerized install.
For the quick installation method, you can choose between the RPM or containerized method on a per host basis during the interactive installation, or set the values manually in an installation configuration file.
For the advanced installation method, you can set the Ansible variable containerized=true in an inventory file on a cluster-wide or per host basis.
2.4.3. Required Images
Containerized installations make use of the following images:
- openshift3/ose
- openshift3/node
- openshift3/openvswitch
- registry.access.redhat.com/rhel7/etcd
By default, all of the above images are pulled from the Red Hat Registry at registry.access.redhat.com.
If you need to use a private registry to pull these images during the installation, you can specify the registry information ahead of time. For the advanced installation method, you can set the following Ansible variables in your inventory file, as required:
openshift_docker_additional_registries=<registry_hostname> openshift_docker_insecure_registries=<registry_hostname> openshift_docker_blocked_registries=<registry_hostname>
For the quick installation method, you can export the following environment variables on each target host:
# export OO_INSTALL_ADDITIONAL_REGISTRIES=<registry_hostname> # export OO_INSTALL_INSECURE_REGISTRIES=<registry_hostname>
Blocked Docker registries cannot currently be specified using the quick installation method.
The configuration of additional, insecure, and blocked Docker registries occurs at the beginning of the installation process to ensure that these settings are applied before attempting to pull any of the required images.
2.4.4. Starting and Stopping Containers
The installation process creates relevant systemd units which can be used to start, stop, and poll services using normal systemctl commands. For containerized installations, these unit names match those of an RPM installation, with the exception of the etcd service which is named etcd_container.
This change is necessary as currently RHEL Atomic Host ships with the etcd package installed as part of the operating system, so a containerized version is used for the OpenShift Container Platform installation instead. The installation process disables the default etcd service.
The etcd package is slated to be removed from RHEL Atomic Host in the future.
2.4.5. File Paths
All OpenShift Container Platform configuration files are placed in the same locations during containerized installation as RPM based installations and will survive os-tree upgrades.
However, the default image stream and template files are installed at /etc/origin/examples/ for containerized installations rather than the standard /usr/share/openshift/examples/, because that directory is read-only on RHEL Atomic Host.
2.4.6. Storage Requirements
RHEL Atomic Host installations normally have a very small root file system. However, the etcd, master, and node containers persist data in the /var/lib/ directory. Ensure that you have enough space on the root file system before installing OpenShift Container Platform. See the System Requirements section for details.
2.4.7. Open vSwitch SDN Initialization
OpenShift SDN initialization requires that the Docker bridge be reconfigured and that Docker is restarted. This complicates the situation when the node is running within a container. When using the Open vSwitch (OVS) SDN, you will see the node start, reconfigure Docker, restart Docker (which restarts all containers), and finally start successfully.
In this case, the node service may fail to start and be restarted a few times, because the master services are also restarted along with Docker. The current implementation uses a workaround which relies on setting the Restart=always parameter in the Docker based systemd units.
2.5. Quick Installation
2.5.1. Overview
As of OpenShift Container Platform 3.9, the quick installation method is deprecated. In a future release, it will be removed completely. In addition, using the quick installer to upgrade from version 3.7 to 3.9 is not supported. The advanced installation method will continue to be supported for new installations and cluster upgrades.
The quick installation method allows you to use an interactive CLI utility, the atomic-openshift-installer command, to install OpenShift Container Platform across a set of hosts. This installer can deploy OpenShift Container Platform components on targeted hosts by either installing RPMs or running containerized services.
While RHEL Atomic Host is supported for running containerized OpenShift Container Platform services, the installer is provided by an RPM and not available by default in RHEL Atomic Host. Therefore, it must be run from a Red Hat Enterprise Linux 7 system. The host initiating the installation does not need to be intended for inclusion in the OpenShift Container Platform cluster, but it can be.
This installation method is provided to make the installation experience easier by interactively gathering the data needed to run on each host. The installer is a self-contained wrapper intended for usage on a Red Hat Enterprise Linux (RHEL) 7 system.
In addition to running interactive installations from scratch, the atomic-openshift-installer command can also be run or re-run using a predefined installation configuration file. This file can be used with the installer to:
- run an unattended installation,
- add nodes to an existing cluster,
- upgrade your cluster, or
- reinstall the OpenShift Container Platform cluster completely.
To install OpenShift Container Platform as a stand-alone registry, see Installing a Stand-alone Registry.
2.5.2. Before You Begin
The installer allows you to install OpenShift Container Platform master and node components on a defined set of hosts.
By default, any hosts you designate as masters during the installation process are automatically also configured as nodes so that the masters are configured as part of the OpenShift Container Platform SDN.
See the OpenShift Container Platform 3.9 Release Notes for information on the following related notable technical changes:
Before installing OpenShift Container Platform, you must first satisfy the prerequisites on your hosts, which includes verifying system and environment requirements and properly installing and configuring Docker. You must also be prepared to provide or validate the following information for each of your targeted hosts during the course of the installation:
- User name on the target host that should run the Ansible-based installation (can be root or non-root)
- Host name
- Whether to install components for master, node, or both
- Whether to use the RPM or containerized method
- Internal and external IP addresses
If you are installing OpenShift Container Platform using the containerized method (optional for RHEL but required for RHEL Atomic Host), see the Installing on Containerized Hosts topic to ensure that you understand the differences between these methods, then return to this topic to continue.
After following the instructions in the Prerequisites topic and deciding between the RPM and containerized methods, you can continue to running an interactive or unattended installation.
2.5.3. Running an Interactive Installation
Ensure you have read through Before You Begin.
You can start the interactive installation by running:
$ atomic-openshift-installer install
Then follow the on-screen instructions to install a new OpenShift Container Platform cluster.
After it has finished, ensure that you back up the ~/.config/openshift/installer.cfg.ymlinstallation configuration file that is created, as it is required if you later want to re-run the installation, add hosts to the cluster, or upgrade your cluster. Then, verify the installation.
2.5.4. Defining an Installation Configuration File
The installer can use a predefined installation configuration file, which contains information about your installation, individual hosts, and cluster. When running an interactive installation, an installation configuration file based on your answers is created for you in ~/.config/openshift/installer.cfg.yml. The file is created if you are instructed to exit the installation to manually modify the configuration or when the installation completes. You can also create the configuration file manually from scratch to perform an unattended installation.
Installation Configuration File Specification
version: v2 1 variant: openshift-enterprise 2 variant_version: 3.9 3 ansible_log_path: /tmp/ansible.log 4 deployment: ansible_ssh_user: root 5 hosts: 6 - ip: 10.0.0.1 7 hostname: master-private.example.com 8 public_ip: 24.222.0.1 9 public_hostname: master.example.com 10 roles: 11 - master - node containerized: true 12 connect_to: 24.222.0.1 13 - ip: 10.0.0.2 hostname: node1-private.example.com public_ip: 24.222.0.2 public_hostname: node1.example.com node_labels: {'region': 'infra'} 14 roles: - node connect_to: 10.0.0.2 - ip: 10.0.0.3 hostname: node2-private.example.com public_ip: 24.222.0.3 public_hostname: node2.example.com roles: - node connect_to: 10.0.0.3 roles: 15 master: <variable_name1>: "<value1>" 16 <variable_name2>: "<value2>" node: <variable_name1>: "<value1>" 17
- 1
- The version of this installation configuration file. As of OpenShift Container Platform 3.3, the only valid version here is
v2. - 2
- The OpenShift Container Platform variant to install. For OpenShift Container Platform, set this to
openshift-enterprise. - 3
- A valid version of your selected variant:
3.9,3.7,3.6,3.5,3.4,3.3,3.2, or3.1. If not specified, this defaults to the latest version for the specified variant. - 4
- Defines where the Ansible logs are stored. By default, this is the /tmp/ansible.log file.
- 5
- Defines which user Ansible uses to SSH in to remote systems for gathering facts and for the installation. By default, this is the root user, but you can set it to any user that has sudo privileges.
- 6
- Defines a list of the hosts onto which you want to install the OpenShift Container Platform master and node components.
- 7 8
- Required. Allows the installer to connect to the system and gather facts before proceeding with the install.
- 9 10
- Required for unattended installations. If these details are not specified, then this information is pulled from the facts gathered by the installer, and you are asked to confirm the details. If undefined for an unattended installation, the installation fails.
- 11
- Determines the type of services that are installed. Specified as a list.
- 12
- If set to true, containerized OpenShift Container Platform services are run on target master and node hosts instead of installed using RPM packages. If set to false or unset, the default RPM method is used. RHEL Atomic Host requires the containerized method, and is automatically selected for you based on the detection of the /run/ostree-booted file. See Installing on Containerized Hosts for more details.
- 13
- The IP address that Ansible attempts to connect to when installing, upgrading, or uninstalling the systems. If the configuration file was auto-generated, then this is the value you first enter for the host during that interactive install process.
- 14
- Node labels can optionally be set per-host.
- 15
- Defines a dictionary of roles across the deployment.
- 16 17
- Any ansible variables that should only be applied to hosts assigned a role can be defined. For examples, see Configuring Ansible.
2.5.5. Running an Unattended Installation
Ensure you have read through the Before You Begin.
Unattended installations allow you to define your hosts and cluster configuration in an installation configuration file before running the installer so that you do not have to go through all of the interactive installation questions and answers. It also allows you to resume an interactive installation you may have left unfinished, and quickly get back to where you left off.
To run an unattended installation, first define an installation configuration file at ~/.config/openshift/installer.cfg.yml. Then, run the installer with the -u flag:
$ atomic-openshift-installer -u install
By default in interactive or unattended mode, the installer uses the configuration file located at ~/.config/openshift/installer.cfg.yml if the file exists. If it does not exist, attempting to start an unattended installation fails.
Alternatively, you can specify a different location for the configuration file using the -c option, but doing so will require you to specify the file location every time you run the installation:
$ atomic-openshift-installer -u -c </path/to/file> install
After the unattended installation finishes, ensure that you back up the ~/.config/openshift/installer.cfg.yml file that was used, as it is required if you later want to re-run the installation, add hosts to the cluster, or upgrade your cluster. Then, verify the installation.
2.5.6. Verifying the Installation
Verify that the master is started and nodes are registered and reporting in Ready status. On the master host, run the following as root:
# oc get nodes NAME STATUS ROLES AGE VERSION master.example.com Ready master 7h v1.9.1+a0ce1bc657 node1.example.com Ready compute 7h v1.9.1+a0ce1bc657 node2.example.com Ready compute 7h v1.9.1+a0ce1bc657
To verify that the web console is installed correctly, use the master host name and the web console port number to access the web console with a web browser.
For example, for a master host with a host name of
master.openshift.comand using the default port of8443, the web console would be found athttps://master.openshift.com:8443/console.- Then, see What’s Next for the next steps on configuring your OpenShift Container Platform cluster.
2.5.7. Uninstalling OpenShift Container Platform
You can uninstall OpenShift Container Platform from all hosts in your cluster using the installer’s uninstall command. By default, the installer uses the installation configuration file located at ~/.config/openshift/installer.cfg.yml if the file exists:
$ atomic-openshift-installer uninstall
Alternatively, you can specify a different location for the configuration file using the -c option:
$ atomic-openshift-installer -c </path/to/file> uninstall
See the advanced installation method for more options.
2.5.8. What’s Next?
Now that you have a working OpenShift Container Platform instance, you can:
- Configure authentication; by default, authentication is set to Deny All.
- Configure the automatically-deployed integrated Docker registry.
- Configure the automatically-deployed router.
2.6. Advanced Installation
2.6.1. Overview
A reference configuration implemented using Ansible playbooks is available as the advanced installation method for installing a OpenShift Container Platform cluster. Familiarity with Ansible is assumed, however you can use this configuration as a reference to create your own implementation using the configuration management tool of your choosing.
While RHEL Atomic Host is supported for running containerized OpenShift Container Platform services, the advanced installation method utilizes Ansible, which is not available in RHEL Atomic Host. The RPM-based installer must therefore be run from a RHEL 7 system. The host initiating the installation does not need to be intended for inclusion in the OpenShift Container Platform cluster, but it can be. Alternatively, a containerized version of the installer is available as a system container, which can be run from a RHEL Atomic Host system.
To install OpenShift Container Platform as a stand-alone registry, see Installing a Stand-alone Registry.
Running Ansible playbooks with the --tags or --check options is not supported by Red Hat.
2.6.2. Before You Begin
Before installing OpenShift Container Platform, you must first see the Prerequisites and Host Preparation topics to prepare your hosts. This includes verifying system and environment requirements per component type and properly installing and configuring Docker. It also includes installing Ansible version 2.4, as the advanced installation method is based on Ansible playbooks and as such requires directly invoking Ansible.
If you are interested in installing OpenShift Container Platform using the containerized method (optional for RHEL but required for RHEL Atomic Host), see Installing on Containerized Hosts to ensure that you understand the differences between these methods, then return to this topic to continue.
For large-scale installs, including suggestions for optimizing install time, see the Scaling and Performance Guide.
After following the instructions in the Prerequisites topic and deciding between the RPM and containerized methods, you can continue in this topic to Configuring Ansible Inventory Files.
2.6.3. Configuring Ansible Inventory Files
The /etc/ansible/hosts file is Ansible’s inventory file for the playbook used to install OpenShift Container Platform. The inventory file describes the configuration for your OpenShift Container Platform cluster. You must replace the default contents of the file with your desired configuration.
The following sections describe commonly-used variables to set in your inventory file during an advanced installation, followed by example inventory files you can use as a starting point for your installation.
Many of the Ansible variables described are optional. Accepting the default values should suffice for development environments, but for production environments, it is recommended you read through and become familiar with the various options available.
The example inventories describe various environment topographies, including using multiple masters for high availability. You can choose an example that matches your requirements, modify it to match your own environment, and use it as your inventory file when running the advanced installation.
Image Version Policy
Images require a version number policy in order to maintain updates. See the Image Version Tag Policy section in the Architecture Guide for more information.
2.6.3.1. Configuring Cluster Variables
To assign environment variables during the Ansible install that apply more globally to your OpenShift Container Platform cluster overall, indicate the desired variables in the /etc/ansible/hosts file on separate, single lines within the [OSEv3:vars] section. For example:
[OSEv3:vars]
openshift_master_identity_providers=[{'name': 'htpasswd_auth',
'login': 'true', 'challenge': 'true',
'kind': 'HTPasswdPasswordIdentityProvider',
'filename': '/etc/origin/master/htpasswd'}]
openshift_master_default_subdomain=apps.test.example.com
If a parameter value in the Ansible inventory file contains special characters, such as #, { or }, you must double-escape the value (that is enclose the value in both single and double quotation marks). For example, to use mypasswordwith###hashsigns as a value for the variable openshift_cloudprovider_openstack_password, declare it as openshift_cloudprovider_openstack_password='"mypasswordwith###hashsigns"' in the Ansible host inventory file.
The following tables describe variables for use with the Ansible installer that can be assigned cluster-wide:
| Variable | Purpose |
|---|---|
|
|
This variable sets the SSH user for the installer to use and defaults to |
|
|
If |
|
|
This variable sets which INFO messages are logged to the
For more information on debug log levels, see Configuring Logging Levels. |
|
|
If set to |
|
|
Whether to enable Network Time Protocol (NTP) on cluster nodes. Important To prevent masters and nodes in the cluster from going out of sync, do not change the default value of this parameter. |
|
| This variable sets the parameter and arbitrary JSON values as per the requirement in your inventory hosts file. For example: openshift_master_admission_plugin_config={"ClusterResourceOverride":{"configuration":{"apiVersion":"v1","kind":"ClusterResourceOverrideConfig","memoryRequestToLimitPercent":"25","cpuRequestToLimitPercent":"25","limitCPUToMemoryPercent":"200"}}}
|
|
| This variable enables API service auditing. See Audit Configuration for more information. |
|
| This variable overrides the host name for the cluster, which defaults to the host name of the master. |
|
| This variable overrides the public host name for the cluster, which defaults to the host name of the master. If you use an external load balancer, specify the address of the external load balancer. For example: openshift_master_cluster_public_hostname=openshift-ansible.public.example.com |
|
|
Optional. This variable defines the HA method when deploying multiple masters. Supports the |
|
|
This variable enables rolling restarts of HA masters (i.e., masters are taken down one at a time) when running the upgrade playbook directly. It defaults to |
|
| This variable sets the identity provider. The default value is Deny All. If you use a supported identity provider, configure OpenShift Container Platform to use it. |
|
| These variables are used to configure custom certificates which are deployed as part of the installation. See Configuring Custom Certificates for more information. |
|
| |
|
| Provide the location of the custom certificates for the hosted router. |
|
|
Validity of the auto-generated registry certificate in days. Defaults to |
|
|
Validity of the auto-generated CA certificate in days. Defaults to |
|
|
Validity of the auto-generated node certificate in days. Defaults to |
|
|
Validity of the auto-generated master certificate in days. Defaults to |
|
|
Validity of the auto-generated external etcd certificates in days. Controls validity for etcd CA, peer, server and client certificates. Defaults to |
|
|
Set to |
|
| These variables override defaults for session options in the OAuth configuration. See Configuring Session Options for more information. |
|
| |
|
| |
|
| |
|
|
This variable configures |
|
|
Sets |
|
| Default node selector for automatically deploying router pods. See Configuring Node Host Labels for details. |
|
| Default node selector for automatically deploying registry pods. See Configuring Node Host Labels for details. |
|
| This variable enables the template service broker by specifying one or more namespaces whose templates will be served by the broker. |
|
|
Default node selector for automatically deploying Ansible service broker pods, defaults |
|
|
Default node selector for automatically deploying template service broker pods, defaults |
|
|
This variable overrides the node selector that projects will use by default when placing pods, which is defined by the |
|
|
OpenShift Container Platform adds the specified additional registry or registries to the docker configuration. These are the registries to search. If the registry requires access to a port other than For example: openshift_docker_additional_registries=example.com:443 |
|
|
OpenShift Container Platform adds the specified additional insecure registry or registries to the docker configuration. For any of these registries, secure sockets layer (SSL) is not verified. Also, add these registries to |
|
|
OpenShift Container Platform adds the specified blocked registry or registries to the docker configuration. Block the listed registries. Setting this to |
|
|
This variable sets the host name for integration with the metrics console by overriding |
|
| This variable is a cluster identifier unique to the AWS Availability Zone. Using this avoids potential issues in Amazon Web Service (AWS) with multiple zones or multiple clusters. See Labeling Clusters for AWS for details. |
|
| Use this variable to specify a container image tag to install or configure. |
|
| Use this variable to specify an RPM version to install or configure. |
If you modify the openshift_image_tag or the openshift_pkg_version variables after the cluster is set up, then an upgrade can be triggered, resulting in downtime.
-
If
openshift_image_tagis set, its value is used for all hosts in containerized environments, even those that have another version installed. If -
openshift_pkg_versionis set, its value is used for all hosts in RPM-based environments, even those that have another version installed.
| Variable | Purpose |
|---|---|
|
| This variable overrides the default subdomain to use for exposed routes. |
|
|
This variable configures which OpenShift SDN plug-in to use for the pod network, which defaults to |
|
|
This variable overrides the SDN cluster network CIDR block. This is the network from which pod IPs are assigned. This network block should be a private block and must not conflict with existing network blocks in your infrastructure to which pods, nodes, or the master may require access. Defaults to |
|
|
This variable configures the subnet in which services will be created within the OpenShift Container Platform SDN. This network block should be private and must not conflict with any existing network blocks in your infrastructure to which pods, nodes, or the master may require access to, or the installation will fail. Defaults to |
|
|
This variable specifies the size of the per host subnet allocated for pod IPs by OpenShift Container Platform SDN. Defaults to |
|
|
This variable specifies the service proxy mode to use: either |
|
|
This variable enables flannel as an alternative networking layer instead of the default SDN. If enabling flannel, disable the default SDN with the |
|
|
Set to |
2.6.3.2. Configuring Deployment Type
Various defaults used throughout the playbooks and roles used by the installer are based on the deployment type configuration (usually defined in an Ansible inventory file).
Ensure the openshift_deployment_type parameter in your inventory file’s [OSEv3:vars] section is set to openshift-enterprise to install the OpenShift Container Platform variant:
[OSEv3:vars] openshift_deployment_type=openshift-enterprise
2.6.3.3. Configuring Host Variables
To assign environment variables to hosts during the Ansible installation, indicate the desired variables in the /etc/ansible/hosts file after the host entry in the [masters] or [nodes] sections. For example:
[masters] ec2-52-6-179-239.compute-1.amazonaws.com openshift_public_hostname=ose3-master.public.example.com
The following table describes variables for use with the Ansible installer that can be assigned to individual host entries:
| Variable | Purpose |
|---|---|
|
| This variable overrides the internal cluster host name for the system. Use this when the system’s default IP address does not resolve to the system host name. |
|
| This variable overrides the system’s public host name. Use this for cloud installations, or for hosts on networks using a network address translation (NAT). |
|
|
This variable overrides the cluster internal IP address for the system. Use this when using an interface that is not configured with the default route. |
|
| This variable overrides the system’s public IP address. Use this for cloud installations, or for hosts on networks using a network address translation (NAT). |
|
| If set to true, containerized OpenShift Container Platform services are run on the target master and node hosts instead of installed using RPM packages. If set to false or unset, the default RPM method is used. RHEL Atomic Host requires the containerized method, and is automatically selected for you based on the detection of the /run/ostree-booted file. See Installing on Containerized Hosts for more details. Containerized installations are supported starting in OpenShift Container Platform 3.1.1. |
|
| This variable adds labels to nodes during installation. See Configuring Node Host Labels for more details. |
|
|
This variable is used to configure |
|
|
This variable configures additional
To configure the log file, edit the OPTIONS='--log-driver json-file --insecure-registry=172.30.0.0/16 --selinux-enabled --log-opt max-size=1M --log-opt max-file=3'
Do not use when running |
|
| This variable configures whether the host is marked as a schedulable node, meaning that it is available for placement of new pods. See Configuring Schedulability on Masters. |
2.6.3.4. Configuring Project Parameters
To configure the default project settings, configure the following variables in the /etc/ansible/hosts file:
| Parameter | Description | Type | Default Value |
|---|---|---|---|
|
| The string presented to a user if they are unable to request a project via the projectrequest API endpoint. | String | null |
|
| The template to use for creating projects in response to a projectrequest. If you do not specify a value, the default template is used. |
String with the format | null |
|
|
Defines the range of MCS categories to assign to namespaces. If this value is changed after startup, new projects might receive labels that are already allocated to other projects. The prefix can be any valid SELinux set of terms, including user, role, and type. However, leaving the prefix at its default allows the server to set them automatically. For example, |
String with the format |
|
|
| Defines the number of labels to reserve per project. | Integer |
|
|
|
Defines the total set of Unix user IDs (UIDs) automatically allocated to projects and the size of the block that each namespace gets. For example, |
String in the format |
|
2.6.3.5. Configuring Master API Port
To configure the default ports used by the master API, configure the following variables in the /etc/ansible/hosts file:
| Variable | Purpose |
|---|---|
|
| This variable sets the port number to access the OpenShift Container Platform API. |
For example:
openshift_master_api_port=3443
The web console port setting (openshift_master_console_port) must match the API server port (openshift_master_api_port).
2.6.3.6. Configuring Cluster Pre-install Checks
Pre-install checks are a set of diagnostic tasks that run as part of the openshift_health_checker Ansible role. They run prior to an Ansible installation of OpenShift Container Platform, ensure that required inventory values are set, and identify potential issues on a host that can prevent or interfere with a successful installation.
The following table describes available pre-install checks that will run before every Ansible installation of OpenShift Container Platform:
| Check Name | Purpose |
|---|---|
|
|
This check ensures that a host has the recommended amount of memory for the specific deployment of OpenShift Container Platform. Default values have been derived from the latest installation documentation. A user-defined value for minimum memory requirements may be set by setting the |
|
|
This check only runs on etcd, master, and node hosts. It ensures that the mount path for an OpenShift Container Platform installation has sufficient disk space remaining. Recommended disk values are taken from the latest installation documentation. A user-defined value for minimum disk space requirements may be set by setting |
|
|
Only runs on hosts that depend on the docker daemon (nodes and containerized installations). Checks that docker's total usage does not exceed a user-defined limit. If no user-defined limit is set, docker's maximum usage threshold defaults to 90% of the total size available. The threshold limit for total percent usage can be set with a variable in your inventory file: |
|
|
Ensures that the docker daemon is using a storage driver supported by OpenShift Container Platform. If the |
|
| Attempts to ensure that images required by an OpenShift Container Platform installation are available either locally or in at least one of the configured container image registries on the host machine. |
|
|
Specifies the generic release of OpenShift Container Platform for containerized installations. For RPM installations, set a |
|
|
Runs on |
|
| Runs prior to non-containerized installations of OpenShift Container Platform. Ensures that RPM packages required for the current installation are available. |
|
|
Checks whether a |
To disable specific pre-install checks, include the variable openshift_disable_check with a comma-delimited list of check names in your inventory file. For example:
openshift_disable_check=memory_availability,disk_availability
A similar set of health checks meant to run for diagnostics on existing clusters can be found in Ansible-based Health Checks. Another set of checks for checking certificate expiration can be found in Redeploying Certificates.
2.6.3.7. Configuring System Containers
System containers provide a way to containerize services that need to run before the docker daemon is running. They are Docker-formatted containers that use:
System containers are therefore stored and run outside of the traditional docker service. For more details on system container technology, see Running System Containers in the Red Hat Enterprise Linux Atomic Host: Managing Containers documentation.
You can configure your OpenShift Container Platform installation to run certain components as system containers instead of their RPM or standard containerized methods. Currently, the docker and etcd components can be run as system containers in OpenShift Container Platform.
System containers are currently OS-specific because they require specific versions of atomic and systemd. For example, different system containers are created for RHEL, Fedora, or CentOS. Ensure that the system containers you are using match the OS of the host they will run on. OpenShift Container Platform only supports RHEL and RHEL Atomic as the host OS, so by default system containers built for RHEL are used.
2.6.3.7.1. Running Docker as a System Container
The traditional method for using docker in an OpenShift Container Platform cluster is an RPM package installation. For Red Hat Enterprise Linux (RHEL) systems, it must be specifically installed; for RHEL Atomic Host systems, it is provided by default.
However, you can configure your OpenShift Container Platform installation to alternatively run docker on node hosts as a system container. When using the system container method, the container-engine container image and systemd service is used on the host instead of the docker package and service.
To run docker as a system container:
Because the default storage back end for Docker on RHEL 7 is a thin pool on loopback devices, for any RHEL systems you must still configure a thin pool logical volume for
dockerto use before running the OpenShift Container Platform installation. You can skip these steps for any RHEL Atomic Host systems.For any RHEL systems, perform the steps described in the following sections:
After completing the storage configuration steps, you can leave the RPM installed.
Set the following cluster variable to
Truein your inventory file in the[OSEv3:vars]section:openshift_docker_use_system_container=True
When using the system container method, the following inventory variables for docker are ignored:
-
docker_version -
docker_upgrade
Further, the following inventory variable must not be used:
-
openshift_docker_options
You can also force docker in the system container to use a specific container registry and repository when pulling the container-engine image instead of from the default registry.access.redhat.com/openshift3/. To do so, set the following cluster variable in your inventory file in the [OSEv3:vars] section:
openshift_docker_systemcontainer_image_override="<registry>/<user>/<image>:<tag>"
2.6.3.7.2. Running etcd as a System Container
When using the RPM-based installation method for OpenShift Container Platform, etcd is installed using RPM packages on any RHEL systems. When using the containerized installation method, the rhel7/etcd image is used instead for RHEL or RHEL Atomic Hosts.
However, you can configure your OpenShift Container Platform installation to alternatively run etcd as a system container. Whereas the standard containerized method uses a systemd service named etcd_container, the system container method uses the service name etcd, same as the RPM-based method. The data directory for etcd using this method is /var/lib/etcd.
To run etcd as a system container, set the following cluster variable in your inventory file in the [OSEv3:vars] section:
openshift_use_etcd_system_container=True
2.6.3.8. Configuring a Registry Location
If you are using an image registry other than the default at registry.access.redhat.com, specify the desired registry within the /etc/ansible/hosts file.
oreg_url=example.com/openshift3/ose-${component}:${version}
openshift_examples_modify_imagestreams=true| Variable | Purpose |
|---|---|
|
|
Set to the alternate image location. Necessary if you are not using the default registry at |
|
|
Set to |
|
|
Specify the additional registry or registries. If the registry required to access the registry is other than |
|
|
Specify the URL and path to namespace where the registry-console image is located. Note that the value for this must end in |
|
| Specify the prefix for the web console images. |
|
| Specify the prefix for the service catalog component image. |
|
| Specify the prefix for the ansible service broker component image. |
|
| Specify the prefix for the template service broker component image. |
|
| A setting for if you are using CRI-O and if you are using an alternative CRI-O system container image from another registry. |
For example:
oreg_url=example.com/openshift3/ose-${component}:${version}
openshift_examples_modify_imagestreams=true
openshift_docker_additional_registries=example.com:443
+openshift_crio_systemcontainer_image_override=<registry>/<repo>/<image>:<tag>
openshift_cockpit_deployer_prefix='registry.example.com/openshift3/'
openshift_web_console_prefix='registry.example.com/openshift3/ose-
openshift_service_catalog_image_prefix='registry.example.com/openshift3/ose-'
ansible_service_broker_image_prefix='registry.example.com/openshift3/ose-'
template_service_broker_prefix='registry.example.com/openshift3/ose-'2.6.3.9. Configuring a Registry Route
To allow users to push and pull images to the internal Docker registry from outside of the OpenShift Container Platform cluster, configure the registry route in the /etc/ansible/hosts file. By default, the registry route is docker-registry-default.router.default.svc.cluster.local.
| Variable | Purpose |
|---|---|
|
|
Set to the value of the desired registry route. The route contains either a name that resolves to an infrastructure node where a router manages communication or the subdomain that you set as the default application subdomain wildcard value. For example, if you set the |
|
| Set the paths to the registry certificates. If you do not provide values for the certificate locations, certificates are generated. You can define locations for the following certificates:
|
|
| Set to one of the following values:
|
For example:
openshift_hosted_registry_routehost=<path>
openshift_hosted_registry_routetermination=reencrypt
openshift_hosted_registry_routecertificates= "{'certfile': '<path>/org-cert.pem', 'keyfile': '<path>/org-privkey.pem', 'cafile': '<path>/org-chain.pem'}"2.6.3.10. Configuring the Registry Console
If you are using a Cockpit registry console image other than the default or require a specific version of the console, specify the desired registry within the /etc/ansible/hosts file:
openshift_cockpit_deployer_prefix=<registry_name>/<namespace>/ openshift_cockpit_deployer_version=<cockpit_image_tag>
| Variable | Purpose |
|---|---|
|
| Specify the URL and path to the directory where the image is located. |
|
| Specify the Cockpit image version. |
For example: If your image is at registry.example.com/openshift3/registry-console and you require version 3.9.3, enter:
openshift_cockpit_deployer_prefix='registry.example.com/openshift3/' openshift_cockpit_deployer_version='3.9.3'
2.6.3.11. Configuring Router Sharding
Router sharding support is enabled by supplying the correct data to the inventory. The variable openshift_hosted_routers holds the data, which is in the form of a list. If no data is passed, then a default router is created. There are multiple combinations of router sharding. The following example supports routers on separate nodes:
openshift_hosted_routers=[{'name': 'router1', 'certificate': {'certfile': '/path/to/certificate/abc.crt',
'keyfile': '/path/to/certificate/abc.key', 'cafile':
'/path/to/certificate/ca.crt'}, 'replicas': 1, 'serviceaccount': 'router',
'namespace': 'default', 'stats_port': 1936, 'edits': [], 'images':
'openshift3/ose-${component}:${version}', 'selector': 'type=router1', 'ports':
['80:80', '443:443']},
{'name': 'router2', 'certificate': {'certfile': '/path/to/certificate/xyz.crt',
'keyfile': '/path/to/certificate/xyz.key', 'cafile':
'/path/to/certificate/ca.crt'}, 'replicas': 1, 'serviceaccount': 'router',
'namespace': 'default', 'stats_port': 1936, 'edits': [{'action': 'append',
'key': 'spec.template.spec.containers[0].env', 'value': {'name': 'ROUTE_LABELS',
'value': 'route=external'}}], 'images':
'openshift3/ose-${component}:${version}', 'selector': 'type=router2', 'ports':
['80:80', '443:443']}]2.6.3.12. Configuring Red Hat Gluster Storage Persistent Storage
Red Hat Gluster Storage can be configured to provide persistent storage and dynamic provisioning for OpenShift Container Platform. It can be used both containerized within OpenShift Container Platform (Container-Native Storage) and non-containerized on its own nodes (Container-Ready Storage).
Additional information and examples, including the ones below, can be found at Persistent Storage Using Red Hat Gluster Storage.
2.6.3.12.1. Configuring Container-Native Storage
See Container-Native Storage Considerations for specific host preparations and prerequisites.
In your inventory file, add
glusterfsin the[OSEv3:children]section to enable the[glusterfs]group:[OSEv3:children] masters nodes glusterfs
Add a
[glusterfs]section with entries for each storage node that will host the GlusterFS storage. For each node, setglusterfs_devicesto a list of raw block devices that will be completely managed as part of a GlusterFS cluster. There must be at least one device listed. Each device must be bare, with no partitions or LVM PVs. Specifying the variable takes the form:<hostname_or_ip> glusterfs_devices='[ "</path/to/device1/>", "</path/to/device2>", ... ]'
For example:
[glusterfs] node11.example.com glusterfs_devices='[ "/dev/xvdc", "/dev/xvdd" ]' node12.example.com glusterfs_devices='[ "/dev/xvdc", "/dev/xvdd" ]' node13.example.com glusterfs_devices='[ "/dev/xvdc", "/dev/xvdd" ]'
Add the hosts listed under
[glusterfs]to the[nodes]group:[nodes] ... node11.example.com openshift_schedulable=True node12.example.com openshift_schedulable=True node13.example.com openshift_schedulable=True
2.6.3.12.2. Configuring Container-Ready Storage
In your inventory file, add
glusterfsin the[OSEv3:children]section to enable the[glusterfs]group:[OSEv3:children] masters nodes glusterfs
Include the following variables in the
[OSEv3:vars]section, adjusting them as needed for your configuration:[OSEv3:vars] ... openshift_storage_glusterfs_is_native=false openshift_storage_glusterfs_storageclass=true openshift_storage_glusterfs_heketi_is_native=true openshift_storage_glusterfs_heketi_executor=ssh openshift_storage_glusterfs_heketi_ssh_port=22 openshift_storage_glusterfs_heketi_ssh_user=root openshift_storage_glusterfs_heketi_ssh_sudo=false openshift_storage_glusterfs_heketi_ssh_keyfile="/root/.ssh/id_rsa"
Add a
[glusterfs]section with entries for each storage node that will host the GlusterFS storage. For each node, setglusterfs_devicesto a list of raw block devices that will be completely managed as part of a GlusterFS cluster. There must be at least one device listed. Each device must be bare, with no partitions or LVM PVs. Also, setglusterfs_ipto the IP address of the node. Specifying the variable takes the form:<hostname_or_ip> glusterfs_ip=<ip_address> glusterfs_devices='[ "</path/to/device1/>", "</path/to/device2>", ... ]'
For example:
[glusterfs] gluster1.example.com glusterfs_ip=192.168.10.11 glusterfs_devices='[ "/dev/xvdc", "/dev/xvdd" ]' gluster2.example.com glusterfs_ip=192.168.10.12 glusterfs_devices='[ "/dev/xvdc", "/dev/xvdd" ]' gluster3.example.com glusterfs_ip=192.168.10.13 glusterfs_devices='[ "/dev/xvdc", "/dev/xvdd" ]'
2.6.3.13. Configuring an OpenShift Container Registry
An integrated OpenShift Container Registry can be deployed using the advanced installer.
2.6.3.13.1. Configuring Registry Storage
If no registry storage options are used, the default OpenShift Container Registry is ephemeral and all data will be lost when the pod no longer exists. There are several options for enabling registry storage when using the advanced installer:
Option A: NFS Host Group
The use of NFS for registry storage is not recommended in OpenShift Container Platform.
When the following variables are set, an NFS volume is created during an advanced install with the path <nfs_directory>/<volume_name> on the host within the [nfs] host group. For example, the volume path using these options would be /exports/registry:
[OSEv3:vars] openshift_hosted_registry_storage_kind=nfs openshift_hosted_registry_storage_access_modes=['ReadWriteMany'] openshift_hosted_registry_storage_nfs_directory=/exports openshift_hosted_registry_storage_nfs_options='*(rw,root_squash)' openshift_hosted_registry_storage_volume_name=registry openshift_hosted_registry_storage_volume_size=10Gi
Option B: External NFS Host
The use of NFS for registry storage is not recommended in OpenShift Container Platform.
To use an external NFS volume, one must already exist with a path of <nfs_directory>/<volume_name> on the storage host. The remote volume path using the following options would be nfs.example.com:/exports/registry.
[OSEv3:vars] openshift_hosted_registry_storage_kind=nfs openshift_hosted_registry_storage_access_modes=['ReadWriteMany'] openshift_hosted_registry_storage_host=nfs.example.com openshift_hosted_registry_storage_nfs_directory=/exports openshift_hosted_registry_storage_volume_name=registry openshift_hosted_registry_storage_volume_size=10Gi
Option C: OpenStack Platform
An OpenStack storage configuration must already exist.
[OSEv3:vars] openshift_hosted_registry_storage_kind=openstack openshift_hosted_registry_storage_access_modes=['ReadWriteOnce'] openshift_hosted_registry_storage_openstack_filesystem=ext4 openshift_hosted_registry_storage_openstack_volumeID=3a650b4f-c8c5-4e0a-8ca5-eaee11f16c57 openshift_hosted_registry_storage_volume_size=10Gi
Option D: AWS or Another S3 Storage Solution
The simple storage solution (S3) bucket must already exist.
[OSEv3:vars] #openshift_hosted_registry_storage_kind=object #openshift_hosted_registry_storage_provider=s3 #openshift_hosted_registry_storage_s3_accesskey=access_key_id #openshift_hosted_registry_storage_s3_secretkey=secret_access_key #openshift_hosted_registry_storage_s3_bucket=bucket_name #openshift_hosted_registry_storage_s3_region=bucket_region #openshift_hosted_registry_storage_s3_chunksize=26214400 #openshift_hosted_registry_storage_s3_rootdirectory=/registry #openshift_hosted_registry_pullthrough=true #openshift_hosted_registry_acceptschema2=true #openshift_hosted_registry_enforcequota=true
If you are using a different S3 service, such as Minio or ExoScale, also add the region endpoint parameter:
openshift_hosted_registry_storage_s3_regionendpoint=https://myendpoint.example.com/
Option E: Container-Native Storage
Similar to configuring Container-Native Storage, Red Hat Gluster Storage can be configured to provide storage for an OpenShift Container Registry during the initial installation of the cluster to offer redundant and reliable storage for the registry.
See Container-Native Storage Considerations for specific host preparations and prerequisites.
In your inventory file, set the following variable under
[OSEv3:vars]:[OSEv3:vars] ... openshift_hosted_registry_storage_kind=glusterfs
Add
glusterfs_registryin the[OSEv3:children]section to enable the[glusterfs_registry]group:[OSEv3:children] masters nodes glusterfs_registry
Add a
[glusterfs_registry]section with entries for each storage node that will host the GlusterFS storage. For each node, setglusterfs_devicesto a list of raw block devices that will be completely managed as part of a GlusterFS cluster. There must be at least one device listed. Each device must be bare, with no partitions or LVM PVs. Specifying the variable takes the form:<hostname_or_ip> glusterfs_devices='[ "</path/to/device1/>", "</path/to/device2>", ... ]'
For example:
[glusterfs_registry] node11.example.com glusterfs_devices='[ "/dev/xvdc", "/dev/xvdd" ]' node12.example.com glusterfs_devices='[ "/dev/xvdc", "/dev/xvdd" ]' node13.example.com glusterfs_devices='[ "/dev/xvdc", "/dev/xvdd" ]'
Add the hosts listed under
[glusterfs_registry]to the[nodes]group:[nodes] ... node11.example.com openshift_schedulable=True node12.example.com openshift_schedulable=True node13.example.com openshift_schedulable=True
Option F: Google Cloud Storage (GCS) bucket on Google Compute Engine (GCE)
A GCS bucket must already exist.
[OSEv3:vars] openshift_hosted_registry_storage_provider=gcs openshift_hosted_registry_storage_gcs_bucket=bucket01 openshift_hosted_registry_storage_gcs_keyfile=test.key openshift_hosted_registry_storage_gcs_rootdirectory=/registry
2.6.3.14. Configuring Global Proxy Options
If your hosts require use of a HTTP or HTTPS proxy in order to connect to external hosts, there are many components that must be configured to use the proxy, including masters, Docker, and builds. Node services only connect to the master API requiring no external access and therefore do not need to be configured to use a proxy.
In order to simplify this configuration, the following Ansible variables can be specified at a cluster or host level to apply these settings uniformly across your environment.
See Configuring Global Build Defaults and Overrides for more information on how the proxy environment is defined for builds.
| Variable | Purpose |
|---|---|
|
|
This variable specifies the |
|
|
This variable specifices the |
|
|
This variable is used to set the The host names that do not use the defined proxy include:
|
|
|
This boolean variable specifies whether or not the names of all defined OpenShift hosts and |
|
|
This variable defines the |
|
|
This variable defines the |
|
|
This variable defines the |
|
|
This variable defines the HTTP proxy used by |
|
|
This variable defines the HTTPS proxy used by |
2.6.3.15. Configuring the Firewall
- If you are changing the default firewall, ensure that each host in your cluster is using the same firewall type to prevent inconsistencies.
- Do not use firewalld with the OpenShift Container Platform installed on Atomic Host. firewalld is not supported on Atomic host.
While iptables is the default firewall, firewalld is recommended for new installations.
OpenShift Container Platform uses iptables as the default firewall, but you can configure your cluster to use firewalld during the install process.
Because iptables is the default firewall, OpenShift Container Platform is designed to have it configured automatically. However, iptables rules can break OpenShift Container Platform if not configured correctly. The advantages of firewalld include allowing multiple objects to safely share the firewall rules.
To use firewalld as the firewall for an OpenShift Container Platform installation, add the os_firewall_use_firewalld variable to the list of configuration variables in the Ansible host file at install:
[OSEv3:vars]
os_firewall_use_firewalld=True 1- 1
- Setting this variable to
trueopens the required ports and adds rules to the default zone, ensuring that firewalld is configured correctly.
Using the firewalld default configuration comes with limited configuration options, and cannot be overridden. For example, while you can set up a storage network with interfaces in multiple zones, the interface that nodes communicate on must be in the default zone.
2.6.3.16. Configuring Schedulability on Masters
Any hosts you designate as masters during the installation process should also be configured as nodes so that the masters are configured as part of the OpenShift SDN. You must do so by adding entries for these hosts to the [nodes] section:
[nodes] master.example.com
In previous versions of OpenShift Container Platform, master hosts were marked as unschedulable nodes by default by the installer, meaning that new pods could not be placed on the hosts. Starting with OpenShift Container Platform 3.9, however, masters are marked schedulable automatically during installation. This change is mainly so that the web console, which used to run as part of the master itself, can instead be run as a pod deployed to the master.
If you want to change the schedulability of a host post-installation, see Marking Nodes as Unschedulable or Schedulable.
2.6.3.17. Configuring Node Host Labels
You can assign labels to node hosts during the Ansible install by configuring the /etc/ansible/hosts file. Labels are useful for determining the placement of pods onto nodes using the scheduler. Other than region=infra (referred to as dedicated infrastructure nodes and discussed further in Configuring Dedicated Infrastructure Nodes), the actual label names and values are arbitrary and can be assigned however you see fit per your cluster’s requirements.
To assign labels to a node host during an Ansible install, use the openshift_node_labels variable with the desired labels added to the desired node host entry in the [nodes] section. In the following example, labels are set for a region called primary and a zone called east:
[nodes]
node1.example.com openshift_node_labels="{'region': 'primary', 'zone': 'east'}"
Starting in OpenShift Container Platform 3.9, masters are now marked as schedulable nodes by default. As a result, the default node selector (defined in the master configuration file’s projectConfig.defaultNodeSelector field to determine which node that projects will use by default when placing pods, and previously left blank by default) is now set by default during cluster installations. It is set to node-role.kubernetes.io/compute=true unless overridden using the osm_default_node_selector Ansible variable.
In addition, whether osm_default_node_selector is set or not, the following automatic labeling occurs for hosts defined in your inventory file during installation:
-
non-master, non-dedicated infrastructure nodes hosts (for example, the
node1.example.comhost shown above) are labeled withnode-role.kubernetes.io/compute=true -
master nodes are labeled
node-role.kubernetes.io/master=true
This ensures that the default node selector has available nodes to choose from when determining pod placement.
If you accept the default node selector of node-role.kubernetes.io/compute=true during installation, ensure that you do not only have dedicated infrastructure nodes as the non-master nodes defined in your cluster. In that scenario, application pods would fail to deploy because no nodes with the node-role.kubernetes.io/compute=true label would be available to match the default node selector when scheduling pods for projects.
See Setting the Cluster-wide Default Node Selector for steps on adjusting this setting post-installation if needed.
2.6.3.17.1. Configuring Dedicated Infrastructure Nodes
It is recommended for production environments that you maintain dedicated infrastructure nodes where the registry and router pods can run separately from pods used for user applications.
The openshift_router_selector and openshift_registry_selector Ansible settings determine the label selectors used when placing registry and router pods. They are set to region=infra by default:
# default selectors for router and registry services # openshift_router_selector='region=infra' # openshift_registry_selector='region=infra'
The registry and router are only able to run on node hosts with the region=infra label, which are then considered dedicated infrastructure nodes. Ensure that at least one node host in your OpenShift Container Platform environment has the region=infra label. For example:
[nodes]
infra-node1.example.com openshift_node_labels="{'region': 'infra','zone': 'default'}"
If there is not a node in the [nodes] section that matches the selector settings, the default router and registry will be deployed as failed with Pending status.
If you do not intend to use OpenShift Container Platform to manage the registry and router, configure the following Ansible settings:
openshift_hosted_manage_registry=false openshift_hosted_manage_router=false
If you are using an image registry other than the default registry.access.redhat.com, you need to specify the desired registry in the /etc/ansible/hosts file.
As described in Configuring Schedulability on Masters, master hosts are marked schedulable by default. If you label a master host with region=infra and have no other dedicated infrastructure nodes, the master hosts must also be marked as schedulable. Otherwise, the registry and router pods cannot be placed anywhere:
[nodes]
master.example.com openshift_node_labels="{'region': 'infra','zone': 'default'}" openshift_schedulable=true2.6.3.18. Configuring Session Options
Session options in the OAuth configuration are configurable in the inventory file. By default, Ansible populates a sessionSecretsFile with generated authentication and encryption secrets so that sessions generated by one master can be decoded by the others. The default location is /etc/origin/master/session-secrets.yaml, and this file will only be re-created if deleted on all masters.
You can set the session name and maximum number of seconds with openshift_master_session_name and openshift_master_session_max_seconds:
openshift_master_session_name=ssn openshift_master_session_max_seconds=3600
If provided, openshift_master_session_auth_secrets and openshift_master_encryption_secrets must be equal length.
For openshift_master_session_auth_secrets, used to authenticate sessions using HMAC, it is recommended to use secrets with 32 or 64 bytes:
openshift_master_session_auth_secrets=['DONT+USE+THIS+SECRET+b4NV+pmZNSO']
For openshift_master_encryption_secrets, used to encrypt sessions, secrets must be 16, 24, or 32 characters long, to select AES-128, AES-192, or AES-256:
openshift_master_session_encryption_secrets=['DONT+USE+THIS+SECRET+b4NV+pmZNSO']
2.6.3.19. Configuring Custom Certificates
Custom serving certificates for the public host names of the OpenShift Container Platform API and web console can be deployed during an advanced installation and are configurable in the inventory file.
Custom certificates should only be configured for the host name associated with the publicMasterURL which can be set using openshift_master_cluster_public_hostname. Using a custom serving certificate for the host name associated with the masterURL (openshift_master_cluster_hostname) will result in TLS errors as infrastructure components will attempt to contact the master API using the internal masterURL host.
Certificate and key file paths can be configured using the openshift_master_named_certificates cluster variable:
openshift_master_named_certificates=[{"certfile": "/path/to/custom1.crt", "keyfile": "/path/to/custom1.key", "cafile": "/path/to/custom-ca1.crt"}]File paths must be local to the system where Ansible will be run. Certificates are copied to master hosts and are deployed within the /etc/origin/master/named_certificates/ directory.
Ansible detects a certificate’s Common Name and Subject Alternative Names. Detected names can be overridden by providing the "names" key when setting openshift_master_named_certificates:
openshift_master_named_certificates=[{"certfile": "/path/to/custom1.crt", "keyfile": "/path/to/custom1.key", "names": ["public-master-host.com"], "cafile": "/path/to/custom-ca1.crt"}]
Certificates configured using openshift_master_named_certificates are cached on masters, meaning that each additional Ansible run with a different set of certificates results in all previously deployed certificates remaining in place on master hosts and within the master configuration file.
If you would like openshift_master_named_certificates to be overwritten with the provided value (or no value), specify the openshift_master_overwrite_named_certificates cluster variable:
openshift_master_overwrite_named_certificates=true
For a more complete example, consider the following cluster variables in an inventory file:
openshift_master_cluster_method=native openshift_master_cluster_hostname=lb-internal.openshift.com openshift_master_cluster_public_hostname=custom.openshift.com
To overwrite the certificates on a subsequent Ansible run, you could set the following:
openshift_master_named_certificates=[{"certfile": "/root/STAR.openshift.com.crt", "keyfile": "/root/STAR.openshift.com.key", "names": ["custom.openshift.com"]}]
openshift_master_overwrite_named_certificates=true2.6.3.20. Configuring Certificate Validity
By default, the certificates used to govern the etcd, master, and kubelet expire after two to five years. The validity (length in days until they expire) for the auto-generated registry, CA, node, and master certificates can be configured during installation using the following variables (default values shown):
[OSEv3:vars] openshift_hosted_registry_cert_expire_days=730 openshift_ca_cert_expire_days=1825 openshift_node_cert_expire_days=730 openshift_master_cert_expire_days=730 etcd_ca_default_days=1825
These values are also used when redeploying certificates via Ansible post-installation.
2.6.3.21. Configuring Cluster Metrics
Cluster metrics are not set to automatically deploy. Set the following to enable cluster metrics when using the advanced installation method:
[OSEv3:vars] openshift_metrics_install_metrics=true
The metrics public URL can be set during cluster installation using the openshift_metrics_hawkular_hostname Ansible variable, which defaults to:
https://hawkular-metrics.{{openshift_master_default_subdomain}}/hawkular/metrics
If you alter this variable, ensure the host name is accessible via your router.
openshift_metrics_hawkular_hostname=hawkular-metrics.{{openshift_master_default_subdomain}}
In accordance with upstream Kubernetes rules, metrics can be collected only on the default interface of eth0.
You must set an openshift_master_default_subdomain value to deploy metrics.
2.6.3.21.1. Configuring Metrics Storage
The openshift_metrics_cassandra_storage_type variable must be set in order to use persistent storage for metrics. If openshift_metrics_cassandra_storage_type is not set, then cluster metrics data is stored in an emptyDir volume, which will be deleted when the Cassandra pod terminates.
There are three options for enabling cluster metrics storage when using the advanced install:
Option A: Dynamic
If your OpenShift Container Platform environment supports dynamic volume provisioning for your cloud provider, use the following variable:
[OSEv3:vars] openshift_metrics_cassandra_storage_type=dynamic
If there are multiple default dynamically provisioned volume types, such as gluster-storage and glusterfs-storage-block, you can specify the provisioned volume type by variable. For example, openshift_metrics_cassandra_pvc_storage_class_name=glusterfs-storage-block.
Check Volume Configuration for more information on using DynamicProvisioningEnabled to enable or disable dynamic provisioning.
Option B: NFS Host Group
The use of NFS for metrics storage is not recommended in OpenShift Container Platform.
When the following variables are set, an NFS volume is created during an advanced install with path <nfs_directory>/<volume_name> on the host within the [nfs] host group. For example, the volume path using these options would be /exports/metrics:
[OSEv3:vars] openshift_metrics_storage_kind=nfs openshift_metrics_storage_access_modes=['ReadWriteOnce'] openshift_metrics_storage_nfs_directory=/exports openshift_metrics_storage_nfs_options='*(rw,root_squash)' openshift_metrics_storage_volume_name=metrics openshift_metrics_storage_volume_size=10Gi
Option C: External NFS Host
The use of NFS for metrics storage is not recommended in OpenShift Container Platform.
To use an external NFS volume, one must already exist with a path of <nfs_directory>/<volume_name> on the storage host.
[OSEv3:vars] openshift_metrics_storage_kind=nfs openshift_metrics_storage_access_modes=['ReadWriteOnce'] openshift_metrics_storage_host=nfs.example.com openshift_metrics_storage_nfs_directory=/exports openshift_metrics_storage_volume_name=metrics openshift_metrics_storage_volume_size=10Gi
The remote volume path using the following options would be nfs.example.com:/exports/metrics.
Upgrading or Installing OpenShift Container Platform with NFS
During testing, Red Hat has seen issues with NFS (on RHEL) when used as storage backend for Registry. Based on that, we do not recommend NFS (on RHEL) as storage backend for Registry.
Other NFS implementations in the marketplace might not have the issues that Red Hat testing found. Please contact the individual NFS implementation vendor for more information on any testing they may have performed.
2.6.3.22. Configuring Cluster Logging
Cluster logging is not set to automatically deploy by default. Set the following to enable cluster logging when using the advanced installation method:
[OSEv3:vars] openshift_logging_install_logging=true
2.6.3.22.1. Configuring Logging Storage
The openshift_logging_es_pvc_dynamic variable must be set in order to use persistent storage for logging. If openshift_logging_es_pvc_dynamic is not set, then cluster logging data is stored in an emptyDir volume, which will be deleted when the Elasticsearch pod terminates.
There are three options for enabling cluster logging storage when using the advanced install:
Option A: Dynamic
If your OpenShift Container Platform environment supports dynamic volume provisioning for your cloud provider, use the following variable:
[OSEv3:vars] openshift_logging_es_pvc_dynamic=true
If there are multiple default dynamically provisioned volume types, such as gluster-storage and glusterfs-storage-block, you can specify the provisioned volume type by variable. For example, openshift_logging_es_pvc_storage_class_name=glusterfs-storage-block.
Check Volume Configuration for more information on using DynamicProvisioningEnabled to enable or disable dynamic provisioning.
Option B: NFS Host Group
The use of NFS for logging storage is not recommended in OpenShift Container Platform.
When the following variables are set, an NFS volume is created during an advanced install with path <nfs_directory>/<volume_name> on the host within the [nfs] host group. For example, the volume path using these options would be /exports/logging:
[OSEv3:vars] openshift_logging_storage_kind=nfs openshift_logging_storage_access_modes=['ReadWriteOnce'] openshift_logging_storage_nfs_directory=/exports openshift_logging_storage_nfs_options='*(rw,root_squash)' openshift_logging_storage_volume_name=logging openshift_logging_storage_volume_size=10Gi
Option C: External NFS Host
The use of NFS for logging storage is not recommended in OpenShift Container Platform.
To use an external NFS volume, one must already exist with a path of <nfs_directory>/<volume_name> on the storage host.
[OSEv3:vars] openshift_logging_storage_kind=nfs openshift_logging_storage_access_modes=['ReadWriteOnce'] openshift_logging_storage_host=nfs.example.com openshift_logging_storage_nfs_directory=/exports openshift_logging_storage_volume_name=logging openshift_logging_storage_volume_size=10Gi
The remote volume path using the following options would be nfs.example.com:/exports/logging.
Upgrading or Installing OpenShift Container Platform with NFS
During testing, Red Hat has seen issues with NFS (on RHEL) when used as storage backend for Registry. Based on that, we do not recommend NFS (on RHEL) as storage backend for Registry.
Other NFS implementations in the marketplace might not have the issues that Red Hat testing found. Please contact the individual NFS implementation vendor for more information on any testing they may have performed.
2.6.3.23. Customizing Service Catalog Options
The service catalog is enabled by default during installation. Enabling the service broker allows you to register service brokers with the catalog. When the service catalog is enabled, the OpenShift Ansible broker and template service broker are both installed as well; see Configuring the OpenShift Ansible Broker and Configuring the Template Service Broker for more information. If you disable the service catalog, the OpenShift Ansible broker and template service broker are not installed.
To disable automatic deployment of the service catalog, set the following cluster variable in your inventory file:
openshift_enable_service_catalog=false
If you use your own registry, you must add:
-
openshift_service_catalog_image_prefix: When pulling the service catalog image, force the use of a specific prefix (for example,registry). You must provide the full registry name up to the image name. -
openshift_service_catalog_image_version: When pulling the service catalog image, force the use of a specific image version.
For example:
openshift_service_catalog_image="docker-registry.default.example.com/openshift/ose-service-catalog:${version}"
openshift_service_catalog_image_prefix="docker-registry-default.example.com/openshift/ose-"
openshift_service_catalog_image_version="v3.9.30"
template_service_broker_selector={"role":"infra"}When the service catalog is enabled, the OpenShift Ansible broker and template service broker are both enabled as well; see Configuring the OpenShift Ansible Broker and Configuring the Template Service Broker for more information.
2.6.3.23.1. Configuring the OpenShift Ansible Broker
The OpenShift Ansible broker (OAB) is enabled by default during installation.
If you do not want to install the OAB, set the ansible_service_broker_install parameter value to false in the inventory file:
ansible_service_broker_install=false
2.6.3.23.1.1. Configuring Persistent Storage for the OpenShift Ansible Broker
The OAB deploys its own etcd instance separate from the etcd used by the rest of the OpenShift Container Platform cluster. The OAB’s etcd instance requires separate storage using persistent volumes (PVs) to function. If no PV is available, etcd will wait until the PV can be satisfied. The OAB application will enter a CrashLoop state until its etcd instance is available.
You can use the installer with the following variables to configure persistent storage for the OAB using NFS.
| Variable | Purpose |
|---|---|
|
|
Storage type to use for the etcd PV. |
|
| Name of etcd PV. |
|
|
Defaults to |
|
|
Size of the etcd PV. Defaults to |
|
|
Labels to use for the etcd PV. Defaults to |
|
|
NFS options to use. Defaults to |
|
|
Directory for NFS exports. Defaults to |
Some Ansible playbook bundles (APBs) also require a PV for their own usage in order to deploy. For example, each of the database APBs have two plans: the Development plan uses ephemeral storage and does not require a PV, while the Production plan is persisted and does require a PV.
| APB | PV Required? |
|---|---|
| postgresql-apb | Yes, but only for the Production plan |
| mysql-apb | Yes, but only for the Production plan |
| mariadb-apb | Yes, but only for the Production plan |
| mediawiki-apb | Yes |
To configure persistent storage for the OAB:
In your inventory file, add
nfsto the[OSEv3:children]section to enable the[nfs]group:[OSEv3:children] masters nodes nfs
Add a
[nfs]group section and add the host name for the system that will be the NFS host:[nfs] master1.example.com
Add the following in the
[OSEv3:vars]section:openshift_hosted_etcd_storage_kind=nfs openshift_hosted_etcd_storage_nfs_options="*(rw,root_squash,sync,no_wdelay)" openshift_hosted_etcd_storage_nfs_directory=/opt/osev3-etcd 1 openshift_hosted_etcd_storage_volume_name=etcd-vol2 2 openshift_hosted_etcd_storage_access_modes=["ReadWriteOnce"] openshift_hosted_etcd_storage_volume_size=1G openshift_hosted_etcd_storage_labels={'storage': 'etcd'}
These settings create a persistent volume that is attached to the OAB’s etcd instance during cluster installation.
2.6.3.23.1.2. Configuring the OpenShift Ansible Broker for Local APB Development
In order to do APB development with the OpenShift Container Registry in conjunction with the OAB, a whitelist of images the OAB can access must be defined. If a whitelist is not defined, the broker will ignore APBs and users will not see any APBs available.
By default, the whitelist is empty so that a user cannot add APB images to the broker without a cluster administrator configuring the broker. To whitelist all images that end in -apb:
In your inventory file, add the following to the
[OSEv3:vars]section:ansible_service_broker_local_registry_whitelist=['.*-apb$']
2.6.3.23.2. Configuring the Template Service Broker
The template service broker (TSB) is enabled by default during installation.
If you do not want to install the TSB, set the template_service_broker_install parameter value to false:
template_service_broker_install=false
To configure the TSB, one or more projects must be defined as the broker’s source namespace(s) for loading templates and image streams into the service catalog. Set the desired projects by modifying the following in your inventory file’s [OSEv3:vars] section:
openshift_template_service_broker_namespaces=['openshift','myproject']
By default, the TSB will use the nodeselector {"region": "infra"} for deploying its pods. You can modify this by setting the desired nodeselector in your inventory file’s [OSEv3:vars] section:
template_service_broker_selector={"region": "infra"}2.6.3.24. Configuring Web Console Customization
The following Ansible variables set master configuration options for customizing the web console. See Customizing the Web Console for more details on these customization options.
| Variable | Purpose |
|---|---|
|
|
Determines whether to install the web console. Can be set to |
|
|
The prefix for the component images. For example, with |
|
|
The version for the component images. For example, with |
|
|
Sets |
|
|
Sets |
|
|
Sets |
|
|
Sets the OAuth template in the master configuration. See Customizing the Login Page for details. Example value: |
|
|
Sets |
|
|
Sets |
|
| Configurate the web console to log the user out automatically after a period of inactivity. Must be a whole number greater than or equal to 5, or 0 to disable the feature. Defaults to 0 (disabled). |
|
|
Boolean value indicating if the cluster is configured for overcommit. When |
2.6.4. Example Inventory Files
2.6.4.1. Single Master Examples
You can configure an environment with a single master and multiple nodes, and either a single or multiple number of external etcd hosts.
Moving from a single master cluster to multiple masters after installation is not supported.
Single Master, Single etcd, and Multiple Nodes
The following table describes an example environment for a single master (with a single etcd on the same host), two nodes for hosting user applications, and two nodes with the region=infra label for hosting dedicated infrastructure:
| Host Name | Infrastructure Component to Install |
|---|---|
| master.example.com | Master, etcd, and node |
| node1.example.com | Node |
| node2.example.com | |
| infra-node1.example.com |
Node (with |
| infra-node2.example.com |
You can see these example hosts present in the [masters], [etcd], and [nodes] sections of the following example inventory file:
Single Master, Single etcd, and Multiple Nodes Inventory File
# Create an OSEv3 group that contains the masters, nodes, and etcd groups
[OSEv3:children]
masters
nodes
etcd
# Set variables common for all OSEv3 hosts
[OSEv3:vars]
# SSH user, this user should allow ssh based auth without requiring a password
ansible_ssh_user=root
# If ansible_ssh_user is not root, ansible_become must be set to true
#ansible_become=true
openshift_deployment_type=openshift-enterprise
oreg_url=example.com/openshift3/ose-${component}:${version}
openshift_examples_modify_imagestreams=true
# uncomment the following to enable htpasswd authentication; defaults to DenyAllPasswordIdentityProvider
#openshift_master_identity_providers=[{'name': 'htpasswd_auth', 'login': 'true', 'challenge': 'true', 'kind': 'HTPasswdPasswordIdentityProvider', 'filename': '/etc/origin/master/htpasswd'}]
# host group for masters
[masters]
master.example.com
# host group for etcd
[etcd]
master.example.com
# host group for nodes, includes region info
[nodes]
master.example.com
node1.example.com openshift_node_labels="{'region': 'primary', 'zone': 'east'}"
node2.example.com openshift_node_labels="{'region': 'primary', 'zone': 'west'}"
infra-node1.example.com openshift_node_labels="{'region': 'infra', 'zone': 'default'}"
infra-node2.example.com openshift_node_labels="{'region': 'infra', 'zone': 'default'}"
See Configuring Node Host Labels to ensure you understand the default node selector requirements and node label considerations beginning in OpenShift Container Platform 3.9.
To use this example, modify the file to match your environment and specifications, and save it as /etc/ansible/hosts.
Single Master, Multiple etcd, and Multiple Nodes
The following table describes an example environment for a single master, three etcd hosts, two nodes for hosting user applications, and two nodes with the region=infra label for hosting dedicated infrastructure:
| Host Name | Infrastructure Component to Install |
|---|---|
| master.example.com | Master and node |
| etcd1.example.com | etcd |
| etcd2.example.com | |
| etcd3.example.com | |
| node1.example.com | Node |
| node2.example.com | |
| infra-node1.example.com |
Node (with |
| infra-node2.example.com |
You can see these example hosts present in the [masters], [nodes], and [etcd] sections of the following example inventory file:
Single Master, Multiple etcd, and Multiple Nodes Inventory File
# Create an OSEv3 group that contains the masters, nodes, and etcd groups
[OSEv3:children]
masters
nodes
etcd
# Set variables common for all OSEv3 hosts
[OSEv3:vars]
ansible_ssh_user=root
openshift_deployment_type=openshift-enterprise
oreg_url=example.com/openshift3/ose-${component}:${version}
openshift_examples_modify_imagestreams=true
# uncomment the following to enable htpasswd authentication; defaults to DenyAllPasswordIdentityProvider
#openshift_master_identity_providers=[{'name': 'htpasswd_auth', 'login': 'true', 'challenge': 'true', 'kind': 'HTPasswdPasswordIdentityProvider', 'filename': '/etc/origin/master/htpasswd'}]
# host group for masters
[masters]
master.example.com
# host group for etcd
[etcd]
etcd1.example.com
etcd2.example.com
etcd3.example.com
# host group for nodes, includes region info
[nodes]
master.example.com
node1.example.com openshift_node_labels="{'region': 'primary', 'zone': 'east'}"
node2.example.com openshift_node_labels="{'region': 'primary', 'zone': 'west'}"
infra-node1.example.com openshift_node_labels="{'region': 'infra', 'zone': 'default'}"
infra-node2.example.com openshift_node_labels="{'region': 'infra', 'zone': 'default'}"
See Configuring Node Host Labels to ensure you understand the default node selector requirements and node label considerations beginning in OpenShift Container Platform 3.9.
To use this example, modify the file to match your environment and specifications, and save it as /etc/ansible/hosts.
2.6.4.2. Multiple Masters Examples
You can configure an environment with multiple masters, multiple etcd hosts, and multiple nodes. Configuring multiple masters for high availability (HA) ensures that the cluster has no single point of failure.
Moving from a single master cluster to multiple masters after installation is not supported.
When configuring multiple masters, the advanced installation supports the native high availability (HA) method. This method leverages the native HA master capabilities built into OpenShift Container Platform and can be combined with any load balancing solution.
If a host is defined in the [lb] section of the inventory file, Ansible installs and configures HAProxy automatically as the load balancing solution. If no host is defined, it is assumed you have pre-configured an external load balancing solution of your choice to balance the master API (port 8443) on all master hosts.
This HAProxy load balancer is intended to demonstrate the API server’s HA mode and is not recommended for production environments. If you are deploying to a cloud provider, Red Hat recommends deploying a cloud-native TCP-based load balancer or take other steps to provide a highly available load balancer.
For an external load balancing solution, you must have:
- A pre-created load balancer virtual IP (VIP) configured for SSL passthrough.
-
A VIP listening on the port specified by the
openshift_master_api_portvalue (8443 by default) and proxying back to all master hosts on that port. A domain name for VIP registered in DNS.
-
The domain name will become the value of both
openshift_master_cluster_public_hostnameandopenshift_master_cluster_hostnamein the OpenShift Container Platform installer.
-
The domain name will become the value of both
See the External Load Balancer Integrations example in Github for more information. For more on the high availability master architecture, see Kubernetes Infrastructure.
The advanced installation method does not currently support multiple HAProxy load balancers in an active-passive setup. See the Load Balancer Administration documentation for post-installation amendments.
To configure multiple masters, refer to Multiple Masters with Multiple etcd
Multiple Masters Using Native HA with External Clustered etcd
The following describes an example environment for three masters using the native HA method:, one HAProxy load balancer, three etcd hosts, two nodes for hosting user applications, and two nodes with the region=infra label for hosting dedicated infrastructure:
| Host Name | Infrastructure Component to Install |
|---|---|
| master1.example.com | Master (clustered using native HA) and node |
| master2.example.com | |
| master3.example.com | |
| lb.example.com | HAProxy to load balance API master endpoints |
| etcd1.example.com | etcd |
| etcd2.example.com | |
| etcd3.example.com | |
| node1.example.com | Node |
| node2.example.com | |
| infra-node1.example.com |
Node (with |
| infra-node2.example.com |
You can see these example hosts present in the [masters], [etcd], [lb], and [nodes] sections of the following example inventory file:
Multiple Masters Using HAProxy Inventory File
# Create an OSEv3 group that contains the master, nodes, etcd, and lb groups.
# The lb group lets Ansible configure HAProxy as the load balancing solution.
# Comment lb out if your load balancer is pre-configured.
[OSEv3:children]
masters
nodes
etcd
lb
# Set variables common for all OSEv3 hosts
[OSEv3:vars]
ansible_ssh_user=root
openshift_deployment_type=openshift-enterprise
oreg_url=example.com/openshift3/ose-${component}:${version}
openshift_examples_modify_imagestreams=true
# Uncomment the following to enable htpasswd authentication; defaults to
# DenyAllPasswordIdentityProvider.
#openshift_master_identity_providers=[{'name': 'htpasswd_auth', 'login': 'true', 'challenge': 'true', 'kind': 'HTPasswdPasswordIdentityProvider', 'filename': '/etc/origin/master/htpasswd'}]
# Native high availbility cluster method with optional load balancer.
# If no lb group is defined installer assumes that a load balancer has
# been preconfigured. For installation the value of
# openshift_master_cluster_hostname must resolve to the load balancer
# or to one or all of the masters defined in the inventory if no load
# balancer is present.
openshift_master_cluster_method=native
openshift_master_cluster_hostname=openshift-internal.example.com
openshift_master_cluster_public_hostname=openshift-cluster.example.com
# apply updated node defaults
openshift_node_kubelet_args={'pods-per-core': ['10'], 'max-pods': ['250'], 'image-gc-high-threshold': ['90'], 'image-gc-low-threshold': ['80']}
# enable ntp on masters to ensure proper failover
openshift_clock_enabled=true
# host group for masters
[masters]
master1.example.com
master2.example.com
master3.example.com
# host group for etcd
[etcd]
etcd1.example.com
etcd2.example.com
etcd3.example.com
# Specify load balancer host
[lb]
lb.example.com
# host group for nodes, includes region info
[nodes]
master[1:3].example.com
node1.example.com openshift_node_labels="{'region': 'primary', 'zone': 'east'}"
node2.example.com openshift_node_labels="{'region': 'primary', 'zone': 'west'}"
infra-node1.example.com openshift_node_labels="{'region': 'infra', 'zone': 'default'}"
infra-node2.example.com openshift_node_labels="{'region': 'infra', 'zone': 'default'}"
See Configuring Node Host Labels to ensure you understand the default node selector requirements and node label considerations beginning in OpenShift Container Platform 3.9.
To use this example, modify the file to match your environment and specifications, and save it as /etc/ansible/hosts.
Multiple Masters Using Native HA with Co-located Clustered etcd
The following describes an example environment for three masters using the native HA method (with etcd on each host), one HAProxy load balancer, two nodes for hosting user applications, and two nodes with the region=infra label for hosting dedicated infrastructure:
| Host Name | Infrastructure Component to Install |
|---|---|
| master1.example.com | Master (clustered using native HA) and node with etcd on each host |
| master2.example.com | |
| master3.example.com | |
| lb.example.com | HAProxy to load balance API master endpoints |
| node1.example.com | Node |
| node2.example.com | |
| infra-node1.example.com |
Node (with |
| infra-node2.example.com |
You can see these example hosts present in the [masters], [etcd], [lb], and [nodes] sections of the following example inventory file:
# Create an OSEv3 group that contains the master, nodes, etcd, and lb groups.
# The lb group lets Ansible configure HAProxy as the load balancing solution.
# Comment lb out if your load balancer is pre-configured.
[OSEv3:children]
masters
nodes
etcd
lb
# Set variables common for all OSEv3 hosts
[OSEv3:vars]
ansible_ssh_user=root
openshift_deployment_type=openshift-enterprise
oreg_url=example.com/openshift3/ose-${component}:${version}
openshift_examples_modify_imagestreams=true
# Uncomment the following to enable htpasswd authentication; defaults to
# DenyAllPasswordIdentityProvider.
#openshift_master_identity_providers=[{'name': 'htpasswd_auth', 'login': 'true', 'challenge': 'true', 'kind': 'HTPasswdPasswordIdentityProvider', 'filename': '/etc/origin/master/htpasswd'}]
# Native high availability cluster method with optional load balancer.
# If no lb group is defined installer assumes that a load balancer has
# been preconfigured. For installation the value of
# openshift_master_cluster_hostname must resolve to the load balancer
# or to one or all of the masters defined in the inventory if no load
# balancer is present.
openshift_master_cluster_method=native
openshift_master_cluster_hostname=openshift-internal.example.com
openshift_master_cluster_public_hostname=openshift-cluster.example.com
# host group for masters
[masters]
master1.example.com
master2.example.com
master3.example.com
# host group for etcd
[etcd]
master1.example.com
master2.example.com
master3.example.com
# Specify load balancer host
[lb]
lb.example.com
# host group for nodes, includes region info
[nodes]
master[1:3].example.com
node1.example.com openshift_node_labels="{'region': 'primary', 'zone': 'east'}"
node2.example.com openshift_node_labels="{'region': 'primary', 'zone': 'west'}"
infra-node1.example.com openshift_node_labels="{'region': 'infra', 'zone': 'default'}"
infra-node2.example.com openshift_node_labels="{'region': 'infra', 'zone': 'default'}"See Configuring Node Host Labels to ensure you understand the default node selector requirements and node label considerations beginning in OpenShift Container Platform 3.9.
To use this example, modify the file to match your environment and specifications, and save it as /etc/ansible/hosts.
2.6.5. Running the Advanced Installation
After you have configured Ansible by defining an inventory file in /etc/ansible/hosts, you run the advanced installation playbook via Ansible.
The installer uses modularized playbooks allowing administrators to install specific components as needed. By breaking up the roles and playbooks, there is better targeting of ad hoc administration tasks. This results in an increased level of control during installations and results in time savings.
The playbooks and their ordering are detailed below in Running Individual Component Playbooks.
Due to a known issue, after running the installation, if NFS volumes are provisioned for any component, the following directories might be created whether their components are being deployed to NFS volumes or not:
- /exports/logging-es
- /exports/logging-es-ops/
- /exports/metrics/
- /exports/prometheus
- /exports/prometheus-alertbuffer/
- /exports/prometheus-alertmanager/
You can delete these directories after installation, as needed.
2.6.5.1. Running the RPM-based Installer
The RPM-based installer uses Ansible installed via RPM packages to run playbooks and configuration files available on the local host.
Do not run OpenShift Ansible playbooks under nohup. Using nohup with the playbooks causes file descriptors to be created and not closed. Therefore, the system can run out of files to open and the playbook will fail.
To run the RPM-based installer:
Run the prerequisites.yml playbook. This playbook installs required software packages, if any, and modifies the container runtimes. Unless you need to configure the container runtimes, run this playbook only once, before you deploy a cluster the first time:
# ansible-playbook [-i /path/to/inventory] \ 1 /usr/share/ansible/openshift-ansible/playbooks/prerequisites.yml- 1
- If your inventory file is not in the /etc/ansible/hosts directory, specify
-iand the path to the inventory file.
Run the deploy_cluster.yml playbook to initiate the cluster installation:
# ansible-playbook [-i /path/to/inventory] \ /usr/share/ansible/openshift-ansible/playbooks/deploy_cluster.yml
If for any reason the installation fails, before re-running the installer, see Known Issues to check for any specific instructions or workarounds.
The installer caches playbook configuration values for 10 minutes, by default. If you change any system, network, or inventory configuration, and then re-run the installer within that 10 minute period, the new values are not used, and the previous values are used instead. You can delete the contents of the cache, which is defined by the fact_caching_connection value in the /etc/ansible/ansible.cfg file. An example of this file is shown in Recommended Installation Practices.
2.6.5.2. Running the Containerized Installer
The openshift3/ose-ansible image is a containerized version of the OpenShift Container Platform installer. This installer image provides the same functionality as the RPM-based installer, but it runs in a containerized environment that provides all of its dependencies rather than being installed directly on the host. The only requirement to use it is the ability to run a container.
2.6.5.2.1. Running the Installer as a System Container
The installer image can be used as a system container. System containers are stored and run outside of the traditional docker service. This enables running the installer image from one of the target hosts without concern for the install restarting docker on the host.
To use the Atomic CLI to run the installer as a run-once system container, perform the following steps as the root user:
Run the prerequisites.yml playbook:
# atomic install --system \ --storage=ostree \ --set INVENTORY_FILE=/path/to/inventory \ 1 --set PLAYBOOK_FILE=/usr/share/ansible/openshift-ansible/playbooks/prerequisites.yml \ --set OPTS="-v" \ registry.access.redhat.com/openshift3/ose-ansible:v3.9- 1
- Specify the location on the local host for your inventory file.
This command runs a set of prerequiste tasks by using the inventory file specified and the
rootuser’s SSH configuration.Run the deploy_cluster.yml playbook:
# atomic install --system \ --storage=ostree \ --set INVENTORY_FILE=/path/to/inventory \ 1 --set PLAYBOOK_FILE=/usr/share/ansible/openshift-ansible/playbooks/deploy_cluster.yml \ --set OPTS="-v" \ registry.access.redhat.com/openshift3/ose-ansible:v3.9- 1
- Specify the location on the local host for your inventory file.
This command initiates the cluster installation by using the inventory file specified and the
rootuser’s SSH configuration. It logs the output on the terminal and also saves it in the /var/log/ansible.log file. The first time this command is run, the image is imported into OSTree storage (system containers use this rather than docker daemon storage). On subsequent runs, it reuses the stored image.If for any reason the installation fails, before re-running the installer, see Known Issues to check for any specific instructions or workarounds.
2.6.5.2.2. Running Other Playbooks
You can use the PLAYBOOK_FILE environment variable to specify other playbooks you want to run by using the containerized installer. The default value of the PLAYBOOK_FILE is /usr/share/ansible/openshift-ansible/playbooks/deploy_cluster.yml, which is the main cluster installation playbook, but you can set it to the path of another playbook inside the container.
For example, to run the pre-install checks playbook before installation, use the following command:
# atomic install --system \
--storage=ostree \
--set INVENTORY_FILE=/path/to/inventory \
--set PLAYBOOK_FILE=/usr/share/ansible/openshift-ansible/playbooks/openshift-checks/pre-install.yml \ 1
--set OPTS="-v" \ 2
registry.access.redhat.com/openshift3/ose-ansible:v3.92.6.5.2.3. Running the Installer as a Docker Container
The installer image can also run as a docker container anywhere that docker can run.
This method must not be used to run the installer on one of the hosts being configured, as the install may restart docker on the host, disrupting the installer container execution.
Although this method and the system container method above use the same image, they run with different entry points and contexts, so runtime parameters are not the same.
At a minimum, when running the installer as a docker container you must provide:
- SSH key(s), so that Ansible can reach your hosts.
- An Ansible inventory file.
- The location of the Ansible playbook to run against that inventory.
Here is an example of how to run an install via docker, which must be run by a non-root user with access to docker:
First, run the prerequisites.yml playbook:
$ docker run -t -u `id -u` \ 1 -v $HOME/.ssh/id_rsa:/opt/app-root/src/.ssh/id_rsa:Z \ 2 -v $HOME/ansible/hosts:/tmp/inventory:Z \ 3 -e INVENTORY_FILE=/tmp/inventory \ 4 -e PLAYBOOK_FILE=playbooks/prerequisites.yml \ 5 -e OPTS="-v" \ 6 registry.access.redhat.com/openshift3/ose-ansible:v3.9
- 1
-u `id -u`makes the container run with the same UID as the current user, which allows that user to use the SSH key inside the container (SSH private keys are expected to be readable only by their owner).- 2
-v $HOME/.ssh/id_rsa:/opt/app-root/src/.ssh/id_rsa:Zmounts your SSH key ($HOME/.ssh/id_rsa) under the container user’s$HOME/.ssh(/opt/app-root/src is the$HOMEof the user in the container). If you mount the SSH key into a non-standard location you can add an environment variable with-e ANSIBLE_PRIVATE_KEY_FILE=/the/mount/pointor setansible_ssh_private_key_file=/the/mount/pointas a variable in the inventory to point Ansible at it. Note that the SSH key is mounted with the:Zflag. This is required so that the container can read the SSH key under its restricted SELinux context. This also means that your original SSH key file will be re-labeled to something likesystem_u:object_r:container_file_t:s0:c113,c247. For more details about:Z, check thedocker-run(1)man page. Keep this in mind when providing these volume mount specifications because this might have unexpected consequences: for example, if you mount (and therefore re-label) your whole$HOME/.sshdirectory it will block the host’s sshd from accessing your public keys to login. For this reason you may want to use a separate copy of the SSH key (or directory), so that the original file labels remain untouched.- 3 4
-v $HOME/ansible/hosts:/tmp/inventory:Zand-e INVENTORY_FILE=/tmp/inventorymount a static Ansible inventory file into the container as /tmp/inventory and set the corresponding environment variable to point at it. As with the SSH key, the inventory file SELinux labels may need to be relabeled by using the:Zflag to allow reading in the container, depending on the existing label (for files in a user$HOMEdirectory this is likely to be needed). So again you may prefer to copy the inventory to a dedicated location before mounting it. The inventory file can also be downloaded from a web server if you specify theINVENTORY_URLenvironment variable, or generated dynamically usingDYNAMIC_SCRIPT_URLto specify an executable script that provides a dynamic inventory.- 5
-e PLAYBOOK_FILE=playbooks/prerequisites.ymlspecifies the playbook to run (in this example, the prereqsuites playbook) as a relative path from the top level directory of openshift-ansible content. The full path from the RPM can also be used, as well as the path to any other playbook file in the container.- 6
-e OPTS="-v"supplies arbitrary command line options (in this case,-vto increase verbosity) to theansible-playbookcommand that runs inside the container.
Next, run the deploy_cluster.yml playbook to initiate the cluster installation:
$ docker run -t -u `id -u` \ -v $HOME/.ssh/id_rsa:/opt/app-root/src/.ssh/id_rsa:Z \ -v $HOME/ansible/hosts:/tmp/inventory:Z \ -e INVENTORY_FILE=/tmp/inventory \ -e PLAYBOOK_FILE=playbooks/deploy_cluster.yml \ -e OPTS="-v" \ registry.access.redhat.com/openshift3/ose-ansible:v3.9
2.6.5.2.4. Running the Installation Playbook for OpenStack
The OpenStack installation playbook is a Technology Preview feature. Technology Preview features are not supported with Red Hat production service level agreements (SLAs), might not be functionally complete, and Red Hat does not recommend to use them for production. These features provide early access to upcoming product features, enabling customers to test functionality and provide feedback during the development process.
For more information on Red Hat Technology Preview features support scope, see https://access.redhat.com/support/offerings/techpreview/.
To install OpenShift Container Platform on an existing OpenStack installation, use the OpenStack playbook. For more information about the playbook, including detailed prerequisites, see the OpenStack Provisioning readme file.
To run the playbook, run the following command:
$ ansible-playbook --user openshift \ -i openshift-ansible/playbooks/openstack/inventory.py \ -i inventory \ openshift-ansible/playbooks/openstack/openshift-cluster/provision_install.yml
2.6.5.3. Running Individual Component Playbooks
The main installation playbook /usr/share/ansible/openshift-ansible/playbooks/deploy_cluster.yml runs a set of individual component playbooks in a specific order, and the installer reports back at the end what phases you have gone through. If the installation fails, you are notified which phase failed along with the errors from the Ansible run.
After you resolve the errors, you can continue installation:
- You can run the remaining individual installation playbooks.
- If you are installing in a new environment, you can run the deploy_cluster.yml playbook again.
If you want to run only the remaining playbooks, start by running the playbook for the phase that failed and then run each of the remaining playbooks in order:
# ansible-playbook [-i /path/to/inventory] <playbook_file_location>
The following table lists the playbooks in the order that they must run:
| Playbook Name | File Location |
|---|---|
| Health Check | /usr/share/ansible/openshift-ansible/playbooks/openshift-checks/pre-install.yml |
| etcd Install | /usr/share/ansible/openshift-ansible/playbooks/openshift-etcd/config.yml |
| NFS Install | /usr/share/ansible/openshift-ansible/playbooks/openshift-nfs/config.yml |
| Load Balancer Install | /usr/share/ansible/openshift-ansible/playbooks/openshift-loadbalancer/config.yml |
| Master Install | /usr/share/ansible/openshift-ansible/playbooks/openshift-master/config.yml |
| Master Additional Install | /usr/share/ansible/openshift-ansible/playbooks/openshift-master/additional_config.yml |
| Node Install | /usr/share/ansible/openshift-ansible/playbooks/openshift-node/config.yml |
| GlusterFS Install | /usr/share/ansible/openshift-ansible/playbooks/openshift-glusterfs/config.yml |
| Hosted Install | /usr/share/ansible/openshift-ansible/playbooks/openshift-hosted/config.yml |
| Web Console Install | /usr/share/ansible/openshift-ansible/playbooks/openshift-web-console/config.yml |
| Metrics Install | /usr/share/ansible/openshift-ansible/playbooks/openshift-metrics/config.yml |
| Logging Install | /usr/share/ansible/openshift-ansible/playbooks/openshift-logging/config.yml |
| Prometheus Install | /usr/share/ansible/openshift-ansible/playbooks/openshift-prometheus/config.yml |
| Service Catalog Install | /usr/share/ansible/openshift-ansible/playbooks/openshift-service-catalog/config.yml |
| Management Install | /usr/share/ansible/openshift-ansible/playbooks/openshift-management/config.yml |
2.6.6. Verifying the Installation
After the installation completes:
Verify that the master is started and nodes are registered and reporting in Ready status. On the master host, run the following as root:
# oc get nodes NAME STATUS ROLES AGE VERSION master.example.com Ready master 7h v1.9.1+a0ce1bc657 node1.example.com Ready compute 7h v1.9.1+a0ce1bc657 node2.example.com Ready compute 7h v1.9.1+a0ce1bc657
To verify that the web console is installed correctly, use the master host name and the web console port number to access the web console with a web browser.
For example, for a master host with a host name of
master.openshift.comand using the default port of8443, the web console would be found athttps://master.openshift.com:8443/console.
Verifying Multiple etcd Hosts
If you installed multiple etcd hosts:
First, verify that the etcd package, which provides the
etcdctlcommand, is installed:# yum install etcd
On a master host, verify the etcd cluster health, substituting for the FQDNs of your etcd hosts in the following:
# etcdctl -C \ https://etcd1.example.com:2379,https://etcd2.example.com:2379,https://etcd3.example.com:2379 \ --ca-file=/etc/origin/master/master.etcd-ca.crt \ --cert-file=/etc/origin/master/master.etcd-client.crt \ --key-file=/etc/origin/master/master.etcd-client.key cluster-healthAlso verify the member list is correct:
# etcdctl -C \ https://etcd1.example.com:2379,https://etcd2.example.com:2379,https://etcd3.example.com:2379 \ --ca-file=/etc/origin/master/master.etcd-ca.crt \ --cert-file=/etc/origin/master/master.etcd-client.crt \ --key-file=/etc/origin/master/master.etcd-client.key member list
Verifying Multiple Masters Using HAProxy
If you installed multiple masters using HAProxy as a load balancer, browse to the following URL according to your [lb] section definition and check HAProxy’s status:
http://<lb_hostname>:9000
You can verify your installation by consulting the HAProxy Configuration documentation.
2.6.7. Optionally Securing Builds
Running docker build is a privileged process, so the container has more access to the node than might be considered acceptable in some multi-tenant environments. If you do not trust your users, you can use a more secure option at the time of installation. Disable Docker builds on the cluster and require that users build images outside of the cluster. See Securing Builds by Strategy for more information on this optional process.
2.6.8. Uninstalling OpenShift Container Platform
You can uninstall OpenShift Container Platform hosts in your cluster by running the uninstall.yml playbook. This playbook deletes OpenShift Container Platform content installed by Ansible, including:
- Configuration
- Containers
- Default templates and image streams
- Images
- RPM packages
The playbook will delete content for any hosts defined in the inventory file that you specify when running the playbook.
Before you uninstall your cluster, review the following list of scenarios and make sure that uninstalling is the best option:
- If your installation process failed and you want to continue the process, you can retry the installation. The installation playbooks are designed so that if they fail to install your cluster, you can run them again without needing to uninstall the cluster.
- If you want to restart a failed installation from the beginning, you can uninstall the OpenShift Container Platform hosts in your cluster by running the uninstall.yml playbook, as described in the following section. This playbook only uninstalls the OpenShift Container Platform assets for the most recent version that you installed.
- If you must change the host names or certificate names, you must recreate your certificates before retrying installation by running the uninstall.yml playbook. Running the installation playbooks again will not recreate the certificates.
- If you want to repurpose hosts that you installed OpenShift Container Platform on earlier, such as with a proof-of-concept installation, or want to install a different minor or asynchronous version of OpenShift Container Platform you must reimage the hosts before you use them in a production cluster. After you run the uninstall.yml playbooks, some host assets might remain in an altered state.
If you want to uninstall OpenShift Container Platform across all hosts in your cluster, run the playbook using the inventory file you used when installing OpenShift Container Platform initially or ran most recently:
# ansible-playbook [-i /path/to/file] \
/usr/share/ansible/openshift-ansible/playbooks/adhoc/uninstall.yml2.6.8.1. Uninstalling Nodes
You can also uninstall node components from specific hosts using the uninstall.yml playbook while leaving the remaining hosts and cluster alone:
This method should only be used when attempting to uninstall specific node hosts and not for specific masters or etcd hosts, which would require further configuration changes within the cluster.
- First follow the steps in Deleting Nodes to remove the node object from the cluster, then continue with the remaining steps in this procedure.
Create a different inventory file that only references those hosts. For example, to only delete content from one node:
[OSEv3:children] nodes 1 [OSEv3:vars] ansible_ssh_user=root openshift_deployment_type=openshift-enterprise [nodes] node3.example.com openshift_node_labels="{'region': 'primary', 'zone': 'west'}" 2
Specify that new inventory file using the
-ioption when running the uninstall.yml playbook:# ansible-playbook -i /path/to/new/file \ /usr/share/ansible/openshift-ansible/playbooks/adhoc/uninstall.yml
When the playbook completes, all OpenShift Container Platform content should be removed from any specified hosts.
2.6.9. Known Issues
- On failover in multiple master clusters, it is possible for the controller manager to overcorrect, which causes the system to run more pods than what was intended. However, this is a transient event and the system does correct itself over time. See https://github.com/kubernetes/kubernetes/issues/10030 for details.
If the Ansible installer fails, you can still install OpenShift Container Platform:
- If you did not modify the SDN configuration or generate new certificates, run the deploy_cluster.yml playbook again.
- If you modified the SDN configuration, generated new certificates, or the installer fails again, you must either start over with a clean operating system installation or uninstall and install again.
- If you use virtual machines, start from a fresh image or uninstall and install again.
- If you use bare metal machines, uninstall and install again.
-
There is a known issue in the initial GA release of OpenShift Container Platform 3.9 that causes the installation and upgrade playbooks to consume more memory than previous releases. The node scale-up and installation Ansible playbooks may have consumed more memory on the control host (the system where you run the playbooks from) than expected due to the use of
include_tasksin several places. This issue has been addressed with the release of RHBA-2018:0600; the majority of these instances have now been converted toimport_taskscalls, which do not consume as much memory. After this change, memory consumption on the control host should be below 100MiB per host; for large environments (100+ hosts), a control host with at least 16GiB of memory is recommended. (BZ#1558672)
2.6.10. What’s Next?
Now that you have a working OpenShift Container Platform instance, you can:
- Deploy an integrated Docker registry.
- Deploy a router.
2.7. Disconnected Installation
2.7.1. Overview
Frequently, portions of a datacenter may not have access to the Internet, even via proxy servers. Installing OpenShift Container Platform in these environments is considered a disconnected installation.
An OpenShift Container Platform disconnected installation differs from a regular installation in two primary ways:
- The OpenShift Container Platform software channels and repositories are not available via Red Hat’s content distribution network.
- OpenShift Container Platform uses several containerized components. Normally, these images are pulled directly from Red Hat’s Docker registry. In a disconnected environment, this is not possible.
A disconnected installation ensures the OpenShift Container Platform software is made available to the relevant servers, then follows the same installation process as a standard connected installation. This topic additionally details how to manually download the container images and transport them onto the relevant servers.
Once installed, in order to use OpenShift Container Platform, you will need source code in a source control repository (for example, Git). This topic assumes that an internal Git repository is available that can host source code and this repository is accessible from the OpenShift Container Platform nodes. Installing the source control repository is outside the scope of this document.
Also, when building applications in OpenShift Container Platform, your build may have some external dependencies, such as a Maven Repository or Gem files for Ruby applications. For this reason, and because they might require certain tags, many of the Quickstart templates offered by OpenShift Container Platform may not work on a disconnected environment. However, while Red Hat container images try to reach out to external repositories by default, you can configure OpenShift Container Platform to use your own internal repositories. For the purposes of this document, we assume that such internal repositories already exist and are accessible from the OpenShift Container Platform nodes hosts. Installing such repositories is outside the scope of this document.
You can also have a Red Hat Satellite server that provides access to Red Hat content via an intranet or LAN. For environments with Satellite, you can synchronize the OpenShift Container Platform software onto the Satellite for use with the OpenShift Container Platform servers.
Red Hat Satellite 6.1 also introduces the ability to act as a Docker registry, and it can be used to host the OpenShift Container Platform containerized components. Doing so is outside of the scope of this document.
2.7.2. Prerequisites
This document assumes that you understand OpenShift Container Platform’s overall architecture and that you have already planned out what the topology of your environment will look like.
2.7.3. Required Software and Components
In order to pull down the required software repositories and container images, you will need a Red Hat Enterprise Linux (RHEL) 7 server with access to the Internet and at least 100GB of additional free space. All steps in this section should be performed on the Internet-connected server as the root system user.
2.7.3.1. Syncing Repositories
Before you sync with the required repositories, you may need to import the appropriate GPG key:
$ rpm --import /etc/pki/rpm-gpg/RPM-GPG-KEY-redhat-release
If the key is not imported, the indicated package is deleted after syncing the repository.
To sync the required repositories:
Register the server with the Red Hat Customer Portal. You must use the login and password associated with the account that has access to the OpenShift Container Platform subscriptions:
$ subscription-manager register
Pull the latest subscription data from RHSM:
$ subscription-manager refresh
Attach to a subscription that provides OpenShift Container Platform channels. You can find the list of available subscriptions using:
$ subscription-manager list --available --matches '*OpenShift*'
Then, find the pool ID for the subscription that provides OpenShift Container Platform, and attach it:
$ subscription-manager attach --pool=<pool_id> $ subscription-manager repos --disable="*" $ subscription-manager repos \ --enable="rhel-7-server-rpms" \ --enable="rhel-7-server-extras-rpms" \ --enable="rhel-7-fast-datapath-rpms" \ --enable="rhel-7-server-ansible-2.4-rpms" \ --enable="rhel-7-server-ose-3.9-rpms"The
yum-utilscommand provides the reposync utility, which lets you mirror yum repositories, andcreaterepocan create a usableyumrepository from a directory:$ sudo yum -y install yum-utils createrepo docker git
You will need up to 110GB of free space in order to sync the software. Depending on how restrictive your organization’s policies are, you could re-connect this server to the disconnected LAN and use it as the repository server. You could use USB-connected storage and transport the software to another server that will act as the repository server. This topic covers these options.
Make a path to where you want to sync the software (either locally or on your USB or other device):
$ mkdir -p </path/to/repos>
Sync the packages and create the repository for each of them. You will need to modify the command for the appropriate path you created above:
$ for repo in \ rhel-7-server-rpms \ rhel-7-server-extras-rpms \ rhel-7-fast-datapath-rpms \ rhel-7-server-ansible-2.4-rpms \ rhel-7-server-ose-3.9-rpms do reposync --gpgcheck -lm --repoid=${repo} --download_path=/path/to/repos createrepo -v </path/to/repos/>${repo} -o </path/to/repos/>${repo} done
2.7.3.2. Syncing Images
To sync the container images:
Start the Docker daemon:
$ systemctl start docker
If you are performing a containerized install, pull all of the required OpenShift Container Platform host component images. Replace
<tag>withv3.9.102for the latest version.# docker pull registry.access.redhat.com/rhel7/etcd # docker pull registry.access.redhat.com/openshift3/ose:<tag> # docker pull registry.access.redhat.com/openshift3/node:<tag> # docker pull registry.access.redhat.com/openshift3/openvswitch:<tag>
Pull all of the required OpenShift Container Platform infrastructure component images. Replace
<tag>withv3.9.102for the latest version.$ docker pull registry.access.redhat.com/openshift3/ose-ansible:<tag> $ docker pull registry.access.redhat.com/openshift3/ose-cluster-capacity:<tag> $ docker pull registry.access.redhat.com/openshift3/ose-deployer:<tag> $ docker pull registry.access.redhat.com/openshift3/ose-docker-builder:<tag> $ docker pull registry.access.redhat.com/openshift3/ose-docker-registry:<tag> $ docker pull registry.access.redhat.com/openshift3/registry-console:<tag> $ docker pull registry.access.redhat.com/openshift3/ose-egress-http-proxy:<tag> $ docker pull registry.access.redhat.com/openshift3/ose-egress-router:<tag> $ docker pull registry.access.redhat.com/openshift3/ose-f5-router:<tag> $ docker pull registry.access.redhat.com/openshift3/ose-haproxy-router:<tag> $ docker pull registry.access.redhat.com/openshift3/ose-keepalived-ipfailover:<tag> $ docker pull registry.access.redhat.com/openshift3/ose-pod:<tag> $ docker pull registry.access.redhat.com/openshift3/ose-sti-builder:<tag> $ docker pull registry.access.redhat.com/openshift3/ose-template-service-broker:<tag> $ docker pull registry.access.redhat.com/openshift3/ose-web-console:<tag> $ docker pull registry.access.redhat.com/openshift3/ose:<tag> $ docker pull registry.access.redhat.com/openshift3/container-engine:<tag> $ docker pull registry.access.redhat.com/openshift3/node:<tag> $ docker pull registry.access.redhat.com/openshift3/openvswitch:<tag> $ docker pull registry.access.redhat.com/rhel7/etcd
NoteIf you use NFS, you need the
ose-recyclerimage. Otherwise, the volumes will not recycle, potentially causing errors.The recycle reclaim policy is deprecated in favor of dynamic provisioning, and it will be removed in future releases.
Pull all of the required OpenShift Container Platform component images for the additional centralized log aggregation and metrics aggregation components. Replace
<tag>withv3.9.102for the latest version.$ docker pull registry.access.redhat.com/openshift3/logging-auth-proxy:<tag> $ docker pull registry.access.redhat.com/openshift3/logging-curator:<tag> $ docker pull registry.access.redhat.com/openshift3/logging-elasticsearch:<tag> $ docker pull registry.access.redhat.com/openshift3/logging-fluentd:<tag> $ docker pull registry.access.redhat.com/openshift3/logging-kibana:<tag> $ docker pull registry.access.redhat.com/openshift3/oauth-proxy:<tag> $ docker pull registry.access.redhat.com/openshift3/metrics-cassandra:<tag> $ docker pull registry.access.redhat.com/openshift3/metrics-hawkular-metrics:<tag> $ docker pull registry.access.redhat.com/openshift3/metrics-hawkular-openshift-agent:<tag> $ docker pull registry.access.redhat.com/openshift3/metrics-heapster:<tag> $ docker pull registry.access.redhat.com/openshift3/prometheus:<tag> $ docker pull registry.access.redhat.com/openshift3/prometheus-alert-buffer:<tag> $ docker pull registry.access.redhat.com/openshift3/prometheus-alertmanager:<tag> $ docker pull registry.access.redhat.com/openshift3/prometheus-node-exporter:<tag> $ docker pull registry.access.redhat.com/cloudforms46/cfme-openshift-postgresql $ docker pull registry.access.redhat.com/cloudforms46/cfme-openshift-memcached $ docker pull registry.access.redhat.com/cloudforms46/cfme-openshift-app-ui $ docker pull registry.access.redhat.com/cloudforms46/cfme-openshift-app $ docker pull registry.access.redhat.com/cloudforms46/cfme-openshift-embedded-ansible $ docker pull registry.access.redhat.com/cloudforms46/cfme-openshift-httpd $ docker pull registry.access.redhat.com/cloudforms46/cfme-httpd-configmap-generator $ docker pull registry.access.redhat.com/rhgs3/rhgs-server-rhel7 $ docker pull registry.access.redhat.com/rhgs3/rhgs-volmanager-rhel7 $ docker pull registry.access.redhat.com/rhgs3/rhgs-gluster-block-prov-rhel7 $ docker pull registry.access.redhat.com/rhgs3/rhgs-s3-server-rhel7
ImportantFor Red Hat support, a Container-Native Storage (CNS) subscription is required for
rhgs3/images.ImportantPrometheus on OpenShift Container Platform is a Technology Preview feature only. Technology Preview features are not supported with Red Hat production service level agreements (SLAs), might not be functionally complete, and Red Hat does not recommend to use them for production. These features provide early access to upcoming product features, enabling customers to test functionality and provide feedback during the development process.
For more information on Red Hat Technology Preview features support scope, see https://access.redhat.com/support/offerings/techpreview/.
For the service catalog, OpenShift Ansible broker, and template service broker features (as described in Advanced Installation), pull the following images. Replace
<tag>withv3.9.102for the latest version.$ docker pull registry.access.redhat.com/openshift3/ose-service-catalog:<tag> $ docker pull registry.access.redhat.com/openshift3/ose-ansible-service-broker:<tag> $ docker pull registry.access.redhat.com/openshift3/mediawiki-apb:<tag> $ docker pull registry.access.redhat.com/openshift3/postgresql-apb:<tag>
Pull the Red Hat-certified Source-to-Image (S2I) builder images that you intend to use in your OpenShift environment. You can pull the following images:
$ docker pull registry.access.redhat.com/jboss-amq-6/amq63-openshift $ docker pull registry.access.redhat.com/jboss-datagrid-7/datagrid71-openshift $ docker pull registry.access.redhat.com/jboss-datagrid-7/datagrid71-client-openshift $ docker pull registry.access.redhat.com/jboss-datavirt-6/datavirt63-openshift $ docker pull registry.access.redhat.com/jboss-datavirt-6/datavirt63-driver-openshift $ docker pull registry.access.redhat.com/jboss-decisionserver-6/decisionserver64-openshift $ docker pull registry.access.redhat.com/jboss-processserver-6/processserver64-openshift $ docker pull registry.access.redhat.com/jboss-eap-6/eap64-openshift $ docker pull registry.access.redhat.com/jboss-eap-7/eap70-openshift $ docker pull registry.access.redhat.com/jboss-webserver-3/webserver31-tomcat7-openshift $ docker pull registry.access.redhat.com/jboss-webserver-3/webserver31-tomcat8-openshift $ docker pull registry.access.redhat.com/openshift3/jenkins-1-rhel7 $ docker pull registry.access.redhat.com/openshift3/jenkins-2-rhel7 $ docker pull registry.access.redhat.com/openshift3/jenkins-slave-base-rhel7 $ docker pull registry.access.redhat.com/openshift3/jenkins-slave-maven-rhel7 $ docker pull registry.access.redhat.com/openshift3/jenkins-slave-nodejs-rhel7 $ docker pull registry.access.redhat.com/rhscl/mongodb-32-rhel7 $ docker pull registry.access.redhat.com/rhscl/mysql-57-rhel7 $ docker pull registry.access.redhat.com/rhscl/perl-524-rhel7 $ docker pull registry.access.redhat.com/rhscl/php-56-rhel7 $ docker pull registry.access.redhat.com/rhscl/postgresql-95-rhel7 $ docker pull registry.access.redhat.com/rhscl/python-35-rhel7 $ docker pull registry.access.redhat.com/redhat-sso-7/sso70-openshift $ docker pull registry.access.redhat.com/rhscl/ruby-24-rhel7 $ docker pull registry.access.redhat.com/redhat-openjdk-18/openjdk18-openshift $ docker pull registry.access.redhat.com/redhat-sso-7/sso71-openshift $ docker pull registry.access.redhat.com/rhscl/nodejs-6-rhel7 $ docker pull registry.access.redhat.com/rhscl/mariadb-101-rhel7
Make sure to indicate the correct tag specifying the desired version number. For example, to pull both the previous and latest version of the Tomcat image:
$ docker pull \ registry.access.redhat.com/jboss-webserver-3/webserver30-tomcat7-openshift:latest $ docker pull \ registry.access.redhat.com/jboss-webserver-3/webserver30-tomcat7-openshift:1.1
2.7.3.3. Preparing Images for Export
Container images can be exported from a system by first saving them to a tarball and then transporting them:
Make and change into a repository home directory:
$ mkdir </path/to/repos/images> $ cd </path/to/repos/images>
If you are performing a containerized install, export the OpenShift Container Platform host component images:
# docker save -o ose3-host-images.tar \ registry.access.redhat.com/rhel7/etcd \ registry.access.redhat.com/openshift3/ose \ registry.access.redhat.com/openshift3/node \ registry.access.redhat.com/openshift3/openvswitchExport the OpenShift Container Platform infrastructure component images:
$ docker save -o ose3-images.tar \ registry.access.redhat.com/openshift3/ose-ansible \ registry.access.redhat.com/openshift3/ose-ansible-service-broker \ registry.access.redhat.com/openshift3/ose-cluster-capacity \ registry.access.redhat.com/openshift3/ose-deployer \ registry.access.redhat.com/openshift3/ose-docker-builder \ registry.access.redhat.com/openshift3/ose-docker-registry \ registry.access.redhat.com/openshift3/registry-console \ registry.access.redhat.com/openshift3/ose-egress-http-proxy \ registry.access.redhat.com/openshift3/ose-egress-router \ registry.access.redhat.com/openshift3/ose-f5-router \ registry.access.redhat.com/openshift3/ose-haproxy-router \ registry.access.redhat.com/openshift3/ose-keepalived-ipfailover \ registry.access.redhat.com/openshift3/ose-pod \ registry.access.redhat.com/openshift3/ose-service-catalog \ registry.access.redhat.com/openshift3/ose-sti-builder \ registry.access.redhat.com/openshift3/ose-template-service-broker \ registry.access.redhat.com/openshift3/ose-web-console \ registry.access.redhat.com/openshift3/ose \ registry.access.redhat.com/openshift3/container-engine \ registry.access.redhat.com/openshift3/node \ registry.access.redhat.com/openshift3/openvswitch \ registry.access.redhat.com/openshift3/prometheus \ registry.access.redhat.com/openshift3/prometheus-alert-buffer \ registry.access.redhat.com/openshift3/prometheus-alertmanager \ registry.access.redhat.com/openshift3/prometheus-node-exporter \ registry.access.redhat.com/openshift3/mediawiki-apb \ registry.access.redhat.com/openshift3/postgresql-apb \ registry.access.redhat.com/cloudforms46/cfme-openshift-postgresql \ registry.access.redhat.com/cloudforms46/cfme-openshift-memcached \ registry.access.redhat.com/cloudforms46/cfme-openshift-app-ui \ registry.access.redhat.com/cloudforms46/cfme-openshift-app \ registry.access.redhat.com/cloudforms46/cfme-openshift-embedded-ansible \ registry.access.redhat.com/cloudforms46/cfme-openshift-httpd \ registry.access.redhat.com/cloudforms46/cfme-httpd-configmap-generator \ registry.access.redhat.com/rhgs3/rhgs-server-rhel7 \ registry.access.redhat.com/rhgs3/rhgs-volmanager-rhel7 \ registry.access.redhat.com/rhgs3/rhgs-gluster-block-prov-rhel7 \ registry.access.redhat.com/rhgs3/rhgs-s3-server-rhel7ImportantFor Red Hat support, a CNS subscription is required for
rhgs3/images.If you synchronized the metrics and log aggregation images, export them:
$ docker save -o ose3-logging-metrics-images.tar \ registry.access.redhat.com/openshift3/logging-auth-proxy \ registry.access.redhat.com/openshift3/logging-curator \ registry.access.redhat.com/openshift3/logging-elasticsearch \ registry.access.redhat.com/openshift3/logging-fluentd \ registry.access.redhat.com/openshift3/logging-kibana \ registry.access.redhat.com/openshift3/metrics-cassandra \ registry.access.redhat.com/openshift3/metrics-hawkular-metrics \ registry.access.redhat.com/openshift3/metrics-hawkular-openshift-agent \ registry.access.redhat.com/openshift3/metrics-heapsterExport the S2I builder images that you synced in the previous section. For example, if you synced only the Jenkins and Tomcat images:
$ docker save -o ose3-builder-images.tar \ registry.access.redhat.com/jboss-webserver-3/webserver30-tomcat7-openshift:latest \ registry.access.redhat.com/jboss-webserver-3/webserver30-tomcat7-openshift:1.1 \ registry.access.redhat.com/openshift3/jenkins-1-rhel7 \ registry.access.redhat.com/openshift3/jenkins-2-rhel7 \ registry.access.redhat.com/openshift3/jenkins-slave-base-rhel7 \ registry.access.redhat.com/openshift3/jenkins-slave-maven-rhel7 \ registry.access.redhat.com/openshift3/jenkins-slave-nodejs-rhel7
2.7.4. Repository Server
During the installation (and for later updates, should you so choose), you will need a webserver to host the repositories. RHEL 7 can provide the Apache webserver.
Option 1: Re-configuring as a Web server
If you can re-connect the server where you synchronized the software and images to your LAN, then you can simply install Apache on the server:
$ sudo yum install httpd
Skip to Placing the Software.
Option 2: Building a Repository Server
If you need to build a separate server to act as the repository server, install a new RHEL 7 system with at least 110GB of space. On this repository server during the installation, make sure you select the Basic Web Server option.
2.7.4.1. Placing the Software
If necessary, attach the external storage, and then copy the repository files into Apache’s root folder. Note that the below copy step (
cp -a) should be substituted with move (mv) if you are repurposing the server you used to sync:$ cp -a /path/to/repos /var/www/html/ $ chmod -R +r /var/www/html/repos $ restorecon -vR /var/www/html
Add the firewall rules:
$ sudo firewall-cmd --permanent --add-service=http $ sudo firewall-cmd --reload
Enable and start Apache for the changes to take effect:
$ systemctl enable httpd $ systemctl start httpd
2.7.5. OpenShift Container Platform Systems
2.7.5.1. Building Your Hosts
At this point you can perform the initial creation of the hosts that will be part of the OpenShift Container Platform environment. It is recommended to use the latest version of RHEL 7 and to perform a minimal installation. You will also want to pay attention to the other OpenShift Container Platform-specific prerequisites.
Once the hosts are initially built, the repositories can be set up.
2.7.5.2. Connecting the Repositories
On all of the relevant systems that will need OpenShift Container Platform software components, create the required repository definitions. Place the following text in the /etc/yum.repos.d/ose.repo file, replacing <server_IP> with the IP or host name of the Apache server hosting the software repositories:
[rhel-7-server-rpms] name=rhel-7-server-rpms baseurl=http://<server_IP>/repos/rhel-7-server-rpms enabled=1 gpgcheck=0 [rhel-7-server-extras-rpms] name=rhel-7-server-extras-rpms baseurl=http://<server_IP>/repos/rhel-7-server-extras-rpms enabled=1 gpgcheck=0 [rhel-7-fast-datapath-rpms] name=rhel-7-fast-datapath-rpms baseurl=http://<server_IP>/repos/rhel-7-fast-datapath-rpms enabled=1 gpgcheck=0 [rhel-7-server-ansible-2.4-rpms] name=rhel-7-server-ansible-2.4-rpms baseurl=http://<server_IP>/repos/rhel-7-server-ansible-2.4-rpms enabled=1 gpgcheck=0 [rhel-7-server-ose-3.9-rpms] name=rhel-7-server-ose-3.9-rpms baseurl=http://<server_IP>/repos/rhel-7-server-ose-3.9-rpms enabled=1 gpgcheck=0
2.7.5.3. Host Preparation
At this point, the systems are ready to continue to be prepared following the OpenShift Container Platform documentation.
Skip the section titled Host Registration and start with Installing Base Packages.
2.7.6. Installing OpenShift Container Platform
2.7.6.1. Importing OpenShift Container Platform Component Images
To import the relevant components, securely copy the images from the connected host to the individual OpenShift Container Platform hosts:
$ scp /var/www/html/repos/images/ose3-images.tar root@<openshift_host_name>: $ ssh root@<openshift_host_name> "docker load -i ose3-images.tar" $ scp /var/www/html/images/ose3-builder-images.tar root@<openshift_master_host_name>: $ ssh root@<openshift_master_host_name> "docker load -i ose3-builder-images.tar"
Perform the same steps for the host components if your install will be containerized. Perform the same steps for the metrics and logging images, if your cluster will use them.
If you prefer, you could use wget on each OpenShift Container Platform host to fetch the tar file, and then perform the Docker import command locally.
2.7.6.2. Running the OpenShift Container Platform Installer
You can now choose to follow the quick or advanced OpenShift Container Platform installation instructions in the documentation.
For containerized installations, to install the etcd container, you can set the Ansible variable osm_etcd_image to be the fully qualified name of the etcd image on your local registry, for example, registry.example.com/rhel7/etcd.
2.7.6.3. Creating the Internal Docker Registry
You now need to create the internal Docker registry.
If you want to install a stand-alone registry, you must pull the registry-console container image and set deployment_subtype=registry in the inventory file.
2.7.7. Post-Installation Changes
In one of the previous steps, the S2I images were imported into the Docker daemon running on one of the OpenShift Container Platform master hosts. In a connected installation, these images would be pulled from Red Hat’s registry on demand. Since the Internet is not available to do this, the images must be made available in another Docker registry.
OpenShift Container Platform provides an internal registry for storing the images that are built as a result of the S2I process, but it can also be used to hold the S2I builder images. The following steps assume you did not customize the service IP subnet (172.30.0.0/16) or the Docker registry port (5000).
2.7.7.1. Re-tagging S2I Builder Images
On the master host where you imported the S2I builder images, obtain the service address of your Docker registry that you installed on the master:
$ export REGISTRY=$(oc get service -n default \ docker-registry --output=go-template='{{.spec.clusterIP}}{{"\n"}}')Next, tag all of the builder images that you synced and exported before pushing them into the OpenShift Container Platform Docker registry. For example, if you synced and exported only the Tomcat image:
$ docker tag \ registry.access.redhat.com/jboss-webserver-3/webserver30-tomcat7-openshift:1.1 \ $REGISTRY:5000/openshift/webserver30-tomcat7-openshift:1.1 $ docker tag \ registry.access.redhat.com/jboss-webserver-3/webserver30-tomcat7-openshift:latest \ $REGISTRY:5000/openshift/webserver30-tomcat7-openshift:1.2 $ docker tag \ registry.access.redhat.com/jboss-webserver-3/webserver30-tomcat7-openshift:latest \ $REGISTRY:5000/openshift/webserver30-tomcat7-openshift:latest
2.7.7.2. Configuring a Registry Location
If you are using an image registry other than the default at registry.access.redhat.com, specify the desired registry within the /etc/ansible/hosts file.
oreg_url=example.com/openshift3/ose-${component}:${version}
openshift_examples_modify_imagestreams=trueDepending on your registry, you may need to configure:
openshift_docker_additional_registries=example.com openshift_docker_insecure_registries=example.com
You can also set the openshift_docker_insecure_registries variable to the IP address of the host. 0.0.0.0/0 is not a valid setting.
| Variable | Purpose |
|---|---|
|
|
Set to the alternate image location. Necessary if you are not using the default registry at |
|
|
Set to |
|
|
Set |
|
|
Set |
2.7.7.3. Creating an Administrative User
Pushing the container images into OpenShift Container Platform’s Docker registry requires a user with cluster-admin privileges. Because the default OpenShift Container Platform system administrator does not have a standard authorization token, they cannot be used to log in to the Docker registry.
To create an administrative user:
Create a new user account in the authentication system you are using with OpenShift Container Platform. For example, if you are using local
htpasswd-based authentication:$ htpasswd -b /etc/openshift/openshift-passwd <admin_username> <password>
The external authentication system now has a user account, but a user must log in to OpenShift Container Platform before an account is created in the internal database. Log in to OpenShift Container Platform for this account to be created. This assumes you are using the self-signed certificates generated by OpenShift Container Platform during the installation:
$ oc login --certificate-authority=/etc/origin/master/ca.crt \ -u <admin_username> https://<openshift_master_host>:8443Get the user’s authentication token:
$ MYTOKEN=$(oc whoami -t) $ echo $MYTOKEN iwo7hc4XilD2KOLL4V1O55ExH2VlPmLD-W2-JOd6Fko
2.7.7.4. Modifying the Security Policies
Using
oc loginswitches to the new user. Switch back to the OpenShift Container Platform system administrator in order to make policy changes:$ oc login -u system:admin
In order to push images into the OpenShift Container Platform Docker registry, an account must have the
image-buildersecurity role. Add this to your OpenShift Container Platform administrative user:$ oc adm policy add-role-to-user system:image-builder <admin_username>
Next, add the administrative role to the user in the openshift project. This allows the administrative user to edit the openshift project, and, in this case, push the container images:
$ oc adm policy add-role-to-user admin <admin_username> -n openshift
2.7.7.5. Editing the Image Stream Definitions
The openshift project is where all of the image streams for builder images are created by the installer. They are loaded by the installer from the /usr/share/openshift/examples directory. Change all of the definitions by deleting the image streams which had been loaded into OpenShift Container Platform’s database, then re-create them:
Delete the existing image streams:
$ oc delete is -n openshift --all
Make a backup of the files in /usr/share/openshift/examples/ if you desire. Next, edit the file image-streams-rhel7.json in the /usr/share/openshift/examples/image-streams folder. You will find an image stream section for each of the builder images. Edit the
specstanza to point to your internal Docker registry.For example, change:
"from": { "kind": "DockerImage", "name": "registry.access.redhat.com/rhscl/httpd-24-rhel7" }to:
"from": { "kind": "DockerImage", "name": "172.30.69.44:5000/openshift/httpd-24-rhel7" }In the above, the repository name was changed from rhscl to openshift. You will need to ensure the change, regardless of whether the repository is rhscl, openshift3, or another directory. Every definition should have the following format:
<registry_ip>:5000/openshift/<image_name>
Repeat this change for every image stream in the file. Ensure you use the correct IP address that you determined earlier. When you are finished, save and exit. Repeat the same process for the JBoss image streams in the /usr/share/openshift/examples/xpaas-streams/jboss-image-streams.json file.
2.7.7.6. Loading the Container Images
At this point the system is ready to load the container images.
Log in to the Docker registry using the token and registry service IP obtained earlier:
$ docker login -u adminuser -e mailto:adminuser@abc.com \ -p $MYTOKEN $REGISTRY:5000
Push the Docker images:
$ docker push $REGISTRY:5000/openshift/webserver30-tomcat7-openshift:1.1 $ docker push $REGISTRY:5000/openshift/webserver30-tomcat7-openshift:1.2 $ docker push $REGISTRY:5000/openshift/webserver30-tomcat7-openshift:latest
Load the updated image stream definitions:
$ oc create -f /usr/share/openshift/examples/image-streams/image-streams-rhel7.json -n openshift $ oc create -f /usr/share/openshift/examples/xpaas-streams/jboss-image-streams.json -n openshift
Verify that all the image streams now have the tags populated:
$ oc get imagestreams -n openshift NAME DOCKER REPO TAGS UPDATED jboss-webserver30-tomcat7-openshift $REGISTRY/jboss-webserver-3/webserver30-jboss-tomcat7-openshift 1.1,1.1-2,1.1-6 + 2 more... 2 weeks ago ...
2.7.8. Installing a Router
At this point, the OpenShift Container Platform environment is almost ready for use. It is likely that you will want to install and configure a router.
2.8. Installing a Stand-alone Deployment of OpenShift Container Registry
2.8.1. About OpenShift Container Registry
OpenShift Container Platform is a fully-featured enterprise solution that includes an integrated container registry called OpenShift Container Registry (OCR). Alternatively, instead of deploying OpenShift Container Platform as a full PaaS environment for developers, you can install OCR as a stand-alone container registry to run on-premise or in the cloud.
When installing a stand-alone deployment of OCR, a cluster of masters and nodes is still installed, similar to a typical OpenShift Container Platform installation. Then, the container registry is deployed to run on the cluster. This stand-alone deployment option is useful for administrators that want a container registry, but do not require the full OpenShift Container Platform environment that includes the developer-focused web console and application build and deployment tools.
OCR provides the following capabilities:
- A user-focused registry web console, Cockpit.
- Secured traffic by default, served via TLS.
- Global identity provider authentication.
- A project namespace model to enable teams to collaborate through role-based access control (RBAC) authorization.
- A Kubernetes-based cluster to manage services.
- An image abstraction called image streams to enhance image management.
Administrators may want to deploy a stand-alone OCR to manage a registry separately that supports multiple OpenShift Container Platform clusters. A stand-alone OCR also enables administrators to separate their registry to satisfy their own security or compliance requirements.
2.8.2. Minimum Hardware Requirements
Installing a stand-alone OCR has the following hardware requirements:
- Physical or virtual system, or an instance running on a public or private IaaS.
- Base OS: RHEL 7.3, 7.4, or 7.5 with the "Minimal" installation option and the latest packages from the RHEL 7 Extras channel, or RHEL Atomic Host 7.4.5 or later.
- NetworkManager 1.0 or later
- 2 vCPU.
- Minimum 16 GB RAM.
- Minimum 15 GB hard disk space for the file system containing /var/.
- An additional minimum 15 GB unallocated space to be used for Docker’s storage back end; see Configuring Docker Storage for details.
OpenShift Container Platform only supports servers with x86_64 architecture.
Meeting the /var/ file system sizing requirements in RHEL Atomic Host requires making changes to the default configuration. See Managing Storage in Red Hat Enterprise Linux Atomic Host for instructions on configuring this during or after installation.
2.8.3. Supported System Topologies
The following system topologies are supported for stand-alone OCR:
| All-in-one | A single host that includes the master, node, etcd, and registry components. |
| Multiple Masters (Highly-Available) | Three hosts with all components included on each (master, node, etcd, and registry), with the masters configured for native high-availability. |
2.8.4. Host Preparation
Before installing stand-alone OCR, all of the same steps detailed in the Host Preparation topic for installing a full OpenShift Container Platform PaaS must be performed. This includes registering and subscribing the host(s) to the proper repositories, installing or updating certain packages, and setting up Docker and its storage requirements.
Follow the steps in the Host Preparation topic, then continue to Stand-alone Registry Installation Methods.
2.8.5. Stand-alone Registry Installation Methods
To install a stand-alone registry, use either of the standard installation methods (quick or advanced) used to install any variant of OpenShift Container Platform.
2.8.5.1. Quick Installation for Stand-alone OpenShift Container Registry
As of OpenShift Container Platform 3.9, the quick installation method is deprecated. In a future release, it will be removed completely. In addition, using the quick installer to upgrade from version 3.7 to 3.9 is not supported.
The following shows the step-by-step process for running the quick install tool to install an OpenShift Container Registry, instead of the full OpenShift Container Platform install.
Start the interactive installation:
$ atomic-openshift-installer install
Follow the on-screen instructions to install a new registry. The installation questions will be largely the same as if you were installing a full OpenShift Container Platform PaaS. When you reach the following screen, choose
2to follow the registry installation path:Which variant would you like to install? (1) OpenShift Container Platform (2) Registry
Specify the hosts that make up your cluster:
Enter hostname or IP address: Will this host be an OpenShift master? [y/N]: Will this host be RPM or Container based (rpm/container)? [rpm]:
See the Installing on Containerized Hosts topic for information about RPM versus containerized hosts.
Change the cluster host name, if desired:
Enter hostname or IP address [None]:
Choose the host to act as the storage host (the master host by default):
Enter hostname or IP address [master.host.example.com]:
Change the default subdomain, if desired:
New default subdomain (ENTER for none) []:
NoteAll certificates and routes are created with this subdomain. Ensure this is set to the correct desired subdomain to avoid having to change the configuration after installation.
Specify a HTTP or HTTPS proxy, if needed:
Specify your http proxy ? (ENTER for none) []: Specify your https proxy ? (ENTER for none) []:
After the previous has been entered, the next page summarizes your install and starts to gather the host information.
For further usage details on the quick installer in general, including next steps, see the full topic at Quick Installation.
2.8.5.2. Advanced Installation for Stand-alone OpenShift Container Registry
When using the advanced installation method to install stand-alone OCR, use the same steps for installing a full OpenShift Container Platform PaaS using Ansible described in the full Advanced Installation topic. The main difference is that you must set deployment_subtype=registry in the inventory file within the [OSEv3:vars] section for the playbooks to follow the registry installation path.
See the following example inventory files for the different supported system topologies:
All-in-one Stand-alone OpenShift Container Registry Inventory File
# Create an OSEv3 group that contains the masters and nodes groups [OSEv3:children] masters nodes etcd # Set variables common for all OSEv3 hosts [OSEv3:vars] # SSH user, this user should allow ssh based auth without requiring a password ansible_ssh_user=root openshift_master_default_subdomain=apps.test.example.com # If ansible_ssh_user is not root, ansible_become must be set to true #ansible_become=true openshift_deployment_type=openshift-enterprise deployment_subtype=registry 1 openshift_hosted_infra_selector="" 2 # uncomment the following to enable htpasswd authentication; defaults to DenyAllPasswordIdentityProvider #openshift_master_identity_providers=[{'name': 'htpasswd_auth', 'login': 'true', 'challenge': 'true', 'kind': 'HTPasswdPasswordIdentityProvider', 'filename': '/etc/origin/master/htpasswd'}] # host group for masters [masters] registry.example.com # host group for etcd [etcd] registry.example.com # host group for nodes [nodes] registry.example.com
Multiple Masters (Highly-Available) Stand-alone OpenShift Container Registry Inventory File
# Create an OSEv3 group that contains the master, nodes, etcd, and lb groups.
# The lb group lets Ansible configure HAProxy as the load balancing solution.
# Comment lb out if your load balancer is pre-configured.
[OSEv3:children]
masters
nodes
etcd
lb
# Set variables common for all OSEv3 hosts
[OSEv3:vars]
ansible_ssh_user=root
openshift_deployment_type=openshift-enterprise
deployment_subtype=registry 1
openshift_master_default_subdomain=apps.test.example.com
# Uncomment the following to enable htpasswd authentication; defaults to
# DenyAllPasswordIdentityProvider.
#openshift_master_identity_providers=[{'name': 'htpasswd_auth', 'login': 'true', 'challenge': 'true', 'kind': 'HTPasswdPasswordIdentityProvider', 'filename': '/etc/origin/master/htpasswd'}]
# Native high availability cluster method with optional load balancer.
# If no lb group is defined installer assumes that a load balancer has
# been preconfigured. For installation the value of
# openshift_master_cluster_hostname must resolve to the load balancer
# or to one or all of the masters defined in the inventory if no load
# balancer is present.
openshift_master_cluster_method=native
openshift_master_cluster_hostname=openshift-internal.example.com
openshift_master_cluster_public_hostname=openshift-cluster.example.com
# apply updated node defaults
openshift_node_kubelet_args={'pods-per-core': ['10'], 'max-pods': ['250'], 'image-gc-high-threshold': ['90'], 'image-gc-low-threshold': ['80']}
# enable ntp on masters to ensure proper failover
openshift_clock_enabled=true
# host group for masters
[masters]
master1.example.com
master2.example.com
master3.example.com
# host group for etcd
[etcd]
etcd1.example.com
etcd2.example.com
etcd3.example.com
# Specify load balancer host
[lb]
lb.example.com
# host group for nodes, includes region info
[nodes]
master[1:3].example.com openshift_node_labels="{'region': 'infra', 'zone': 'default'}"
node1.example.com openshift_node_labels="{'region': 'primary', 'zone': 'east'}"
node2.example.com openshift_node_labels="{'region': 'primary', 'zone': 'west'}"
- 1
- Set
deployment_subtype=registryto ensure installation of stand-alone OCR and not a full OpenShift Container Platform environment.
After you have configured Ansible by defining an inventory file in /etc/ansible/hosts:
Run the prerequisites.yml playbook to configure base packages and Docker. This must be run only once before deploying a new cluster. Use the following command, specifying
-iif your inventory file located somewhere other than /etc/ansible/hosts:ImportantThe host that you run the Ansible playbook on must have at least 75MiB of free memory per host in the inventory.
# ansible-playbook [-i /path/to/inventory] \ /usr/share/ansible/openshift-ansible/playbooks/prerequisites.ymlRun the deploy_cluster.yml playbook to initiate the installation:
# ansible-playbook [-i /path/to/inventory] \ /usr/share/ansible/openshift-ansible/playbooks/deploy_cluster.yml
For more detailed usage information on the advanced installation method, including a comprehensive list of available Ansible variables, see the full topic at Advanced Installation.
Chapter 3. Setting up the Registry
3.1. Registry Overview
3.1.1. About the Registry
OpenShift Container Platform can build container images from your source code, deploy them, and manage their lifecycle. To enable this, OpenShift Container Platform provides an internal, integrated Docker registry that can be deployed in your OpenShift Container Platform environment to locally manage images.
3.1.2. Integrated or Stand-alone Registries
During an initial installation of a full OpenShift Container Platform cluster, it is likely that the registry was deployed automatically during the installation process. If it was not, or if you want to further customize the configuration of your registry, see Deploying a Registry on Existing Clusters.
While it can be deployed to run as an integrated part of your full OpenShift Container Platform cluster, the OpenShift Container Platform registry can alternatively be installed separately as a stand-alone container image registry.
To install a stand-alone registry, follow Installing a Stand-alone Registry. This installation path deploys an all-in-one cluster running a registry and specialized web console.
3.2. Deploying a Registry on Existing Clusters
3.2.1. Overview
If the integrated registry was not previously deployed automatically during the initial installation of your OpenShift Container Platform cluster, or if it is no longer running successfully and you need to redeploy it on your existing cluster, see the following sections for options on deploying a new registry.
This topic is not required if you installed a stand-alone registry.
3.2.2. Deploying the Registry
To deploy the integrated Docker registry, use the oc adm registry command as a user with cluster administrator privileges. For example:
$ oc adm registry --config=/etc/origin/master/admin.kubeconfig \1 --service-account=registry \2 --images='registry.access.redhat.com/openshift3/ose-${component}:${version}' 3
This creates a service and a deployment configuration, both called docker-registry. Once deployed successfully, a pod is created with a name similar to docker-registry-1-cpty9.
To see a full list of options that you can specify when creating the registry:
$ oc adm registry --help
The value for --fs-group must be permitted by the SCC used by the registry (typically, the restricted SCC).
3.2.3. Deploying the Registry as a DaemonSet
Use the oc adm registry command to deploy the registry as a DaemonSet with the --daemonset option.
Daemonsets ensure that when nodes are created, they contain copies of a specified pod. When the nodes are removed, the pods are garbage collected.
For more information on DaemonSets, see Using Daemonsets.
3.2.4. Registry Compute Resources
By default, the registry is created with no settings for compute resource requests or limits. For production, it is highly recommended that the deployment configuration for the registry be updated to set resource requests and limits for the registry pod. Otherwise, the registry pod will be considered a BestEffort pod.
See Compute Resources for more information on configuring requests and limits.
3.2.5. Storage for the Registry
The registry stores container images and metadata. If you simply deploy a pod with the registry, it uses an ephemeral volume that is destroyed if the pod exits. Any images anyone has built or pushed into the registry would disappear.
This section lists the supported registry storage drivers. See the Docker registry documentation for more information.
The following list includes storage drivers that need to be configured in the registry’s configuration file:
- Filesystem. Filesystem is the default and does not need to be configured.
- S3. See the CloudFront configuration documentation for more information.
- OpenStack Swift
- Google Cloud Storage (GCS)
- Microsoft Azure
- Aliyun OSS
General registry storage configuration options are supported. See the Docker registry documentation for more information.
The following storage options need to be configured through the filesystem driver:
For more information on supported persistent storage drivers, see Configuring Persistent Storage and Persistent Storage Examples.
3.2.5.1. Production Use
For production use, attach a remote volume or define and use the persistent storage method of your choice.
For example, to use an existing persistent volume claim:
$ oc volume deploymentconfigs/docker-registry --add --name=registry-storage -t pvc \
--claim-name=<pvc_name> --overwriteTesting shows issues with using the RHEL NFS server as a storage backend for the container image registry. This includes the OpenShift Container Registry and Quay. Therefore, using the RHEL NFS server to back PVs used by core services is not recommended.
Other NFS implementations on the marketplace might not have these issues. Contact the individual NFS implementation vendor for more information on any testing that was possibly completed against these OpenShift core components.
3.2.5.1.1. Use Amazon S3 as a Storage Back-end
There is also an option to use Amazon Simple Storage Service storage with the internal Docker registry. It is a secure cloud storage manageable through AWS Management Console. To use it, the registry’s configuration file must be manually edited and mounted to the registry pod. However, before you start with the configuration, look at upstream’s recommended steps.
Take a default YAML configuration file as a base and replace the filesystem entry in the storage section with s3 entry such as below. The resulting storage section may look like this:
storage:
cache:
layerinfo: inmemory
delete:
enabled: true
s3:
accesskey: awsaccesskey 1
secretkey: awssecretkey 2
region: us-west-1
regionendpoint: http://myobjects.local
bucket: bucketname
encrypt: true
keyid: mykeyid
secure: true
v4auth: false
chunksize: 5242880
rootdirectory: /s3/object/name/prefixAll of the s3 configuration options are documented in upstream’s driver reference documentation.
Overriding the registry configuration will take you through the additional steps on mounting the configuration file into pod.
When the registry runs on the S3 storage back-end, there are reported issues.
If you want to use a S3 region that is not supported by the integrated registry you are using, see S3 Driver Configuration.
3.2.5.2. Non-Production Use
For non-production use, you can use the --mount-host=<path> option to specify a directory for the registry to use for persistent storage. The registry volume is then created as a host-mount at the specified <path>.
The --mount-host option mounts a directory from the node on which the registry container lives. If you scale up the docker-registry deployment configuration, it is possible that your registry pods and containers will run on different nodes, which can result in two or more registry containers, each with its own local storage. This will lead to unpredictable behavior, as subsequent requests to pull the same image repeatedly may not always succeed, depending on which container the request ultimately goes to.
The --mount-host option requires that the registry container run in privileged mode. This is automatically enabled when you specify --mount-host. However, not all pods are allowed to run privileged containers by default. If you still want to use this option, create the registry and specify that it use the registry service account that was created during installation:
$ oc adm registry --service-account=registry \
--config=/etc/origin/master/admin.kubeconfig \
--images='registry.access.redhat.com/openshift3/ose-${component}:${version}' \
--mount-host=<path>The Docker registry pod runs as user 1001. This user must be able to write to the host directory. You may need to change directory ownership to user ID 1001 with this command:
$ sudo chown 1001:root <path>
3.2.6. Enabling the Registry Console
OpenShift Container Platform provides a web-based interface to the integrated registry. This registry console is an optional component for browsing and managing images. It is deployed as a stateless service running as a pod.
If you installed OpenShift Container Platform as a stand-alone registry, the registry console is already deployed and secured automatically during installation.
If Cockpit is already running, you’ll need to shut it down before proceeding in order to avoid a port conflict (9090 by default) with the registry console.
3.2.6.1. Deploying the Registry Console
You must first have exposed the registry.
Create a passthrough route in the default project. You will need this when creating the registry console application in the next step.
$ oc create route passthrough --service registry-console \ --port registry-console \ -n defaultDeploy the registry console application. Replace
<openshift_oauth_url>with the URL of the OpenShift Container Platform OAuth provider, which is typically the master.$ oc new-app -n default --template=registry-console \ -p OPENSHIFT_OAUTH_PROVIDER_URL="https://<openshift_oauth_url>:8443" \ -p REGISTRY_HOST=$(oc get route docker-registry -n default --template='{{ .spec.host }}') \ -p COCKPIT_KUBE_URL=$(oc get route registry-console -n default --template='https://{{ .spec.host }}')NoteIf the redirection URL is wrong when you are trying to log in to the registry console, check your OAuth client with
oc get oauthclients.- Finally, use a web browser to view the console using the route URI.
3.2.6.2. Securing the Registry Console
By default, the registry console generates self-signed TLS certificates if deployed manually per the steps in Deploying the Registry Console. See Troubleshooting the Registry Console for more information.
Use the following steps to add your organization’s signed certificates as a secret volume. This assumes your certificates are available on the oc client host.
Create a .cert file containing the certificate and key. Format the file with:
- One or more BEGIN CERTIFICATE blocks for the server certificate and the intermediate certificate authorities
A block containing a BEGIN PRIVATE KEY or similar for the key. The key must not be encrypted
For example:
-----BEGIN CERTIFICATE----- MIIDUzCCAjugAwIBAgIJAPXW+CuNYS6QMA0GCSqGSIb3DQEBCwUAMD8xKTAnBgNV BAoMIGI0OGE2NGNkNmMwNTQ1YThhZTgxOTEzZDE5YmJjMmRjMRIwEAYDVQQDDAls ... -----END CERTIFICATE----- -----BEGIN CERTIFICATE----- MIIDUzCCAjugAwIBAgIJAPXW+CuNYS6QMA0GCSqGSIb3DQEBCwUAMD8xKTAnBgNV BAoMIGI0OGE2NGNkNmMwNTQ1YThhZTgxOTEzZDE5YmJjMmRjMRIwEAYDVQQDDAls ... -----END CERTIFICATE----- -----BEGIN PRIVATE KEY----- MIIEvgIBADANBgkqhkiG9w0BAQEFAASCBKgwggSkAgEAAoIBAQCyOJ5garOYw0sm 8TBCDSqQ/H1awGMzDYdB11xuHHsxYS2VepPMzMzryHR137I4dGFLhvdTvJUH8lUS ... -----END PRIVATE KEY-----
The secured registry should contain the following Subject Alternative Names (SAN) list:
Two service hostnames.
For example:
docker-registry.default.svc.cluster.local docker-registry.default.svc
Service IP address.
For example:
172.30.124.220
Use the following command to get the Docker registry service IP address:
oc get service docker-registry --template='{{.spec.clusterIP}}'Public hostname.
For example:
docker-registry-default.apps.example.com
Use the following command to get the Docker registry public hostname:
oc get route docker-registry --template '{{.spec.host}}'For example, the server certificate should contain SAN details similar to the following:
X509v3 Subject Alternative Name: DNS:docker-registry-public.openshift.com, DNS:docker-registry.default.svc, DNS:docker-registry.default.svc.cluster.local, DNS:172.30.2.98, IP Address:172.30.2.98The registry console loads a certificate from the /etc/cockpit/ws-certs.d directory. It uses the last file with a .cert extension in alphabetical order. Therefore, the .cert file should contain at least two PEM blocks formatted in the OpenSSL style.
If no certificate is found, a self-signed certificate is created using the
opensslcommand and stored in the 0-self-signed.cert file.
Create the secret:
$ oc create secret generic console-secret \ --from-file=/path/to/console.certAdd the secrets to the registry-console deployment configuration:
$ oc volume dc/registry-console --add --type=secret \ --secret-name=console-secret -m /etc/cockpit/ws-certs.dThis triggers a new deployment of the registry console to include your signed certificates.
3.2.6.3. Troubleshooting the Registry Console
3.2.6.3.1. Debug Mode
The registry console debug mode is enabled using an environment variable. The following command redeploys the registry console in debug mode:
$ oc set env dc registry-console G_MESSAGES_DEBUG=cockpit-ws,cockpit-wrapper
Enabling debug mode allows more verbose logging to appear in the registry console’s pod logs.
3.2.6.3.2. Display SSL Certificate Path
To check which certificate the registry console is using, a command can be run from inside the console pod.
List the pods in the default project and find the registry console’s pod name:
$ oc get pods -n default NAME READY STATUS RESTARTS AGE registry-console-1-rssrw 1/1 Running 0 1d
Using the pod name from the previous command, get the certificate path that the cockpit-ws process is using. This example shows the console using the auto-generated certificate:
$ oc exec registry-console-1-rssrw remotectl certificate certificate: /etc/cockpit/ws-certs.d/0-self-signed.cert
3.3. Accessing the Registry
3.3.1. Viewing Logs
To view the logs for the Docker registry, use the oc logs command with the deployment configuration:
$ oc logs dc/docker-registry 2015-05-01T19:48:36.300593110Z time="2015-05-01T19:48:36Z" level=info msg="version=v2.0.0+unknown" 2015-05-01T19:48:36.303294724Z time="2015-05-01T19:48:36Z" level=info msg="redis not configured" instance.id=9ed6c43d-23ee-453f-9a4b-031fea646002 2015-05-01T19:48:36.303422845Z time="2015-05-01T19:48:36Z" level=info msg="using inmemory layerinfo cache" instance.id=9ed6c43d-23ee-453f-9a4b-031fea646002 2015-05-01T19:48:36.303433991Z time="2015-05-01T19:48:36Z" level=info msg="Using OpenShift Auth handler" 2015-05-01T19:48:36.303439084Z time="2015-05-01T19:48:36Z" level=info msg="listening on :5000" instance.id=9ed6c43d-23ee-453f-9a4b-031fea646002
3.3.2. File Storage
Tag and image metadata is stored in OpenShift Container Platform, but the registry stores layer and signature data in a volume that is mounted into the registry container at /registry. As oc exec does not work on privileged containers, to view a registry’s contents you must manually SSH into the node housing the registry pod’s container, then run docker exec on the container itself:
List the current pods to find the pod name of your Docker registry:
# oc get pods
Then, use
oc describeto find the host name for the node running the container:# oc describe pod <pod_name>
Log into the desired node:
# ssh node.example.com
List the running containers from the default project on the node host and identify the container ID for the Docker registry:
# docker ps --filter=name=registry_docker-registry.*_default_
List the registry contents using the
oc rshcommand:# oc rsh dc/docker-registry find /registry /registry/docker /registry/docker/registry /registry/docker/registry/v2 /registry/docker/registry/v2/blobs 1 /registry/docker/registry/v2/blobs/sha256 /registry/docker/registry/v2/blobs/sha256/ed /registry/docker/registry/v2/blobs/sha256/ed/ede17b139a271d6b1331ca3d83c648c24f92cece5f89d95ac6c34ce751111810 /registry/docker/registry/v2/blobs/sha256/ed/ede17b139a271d6b1331ca3d83c648c24f92cece5f89d95ac6c34ce751111810/data 2 /registry/docker/registry/v2/blobs/sha256/a3 /registry/docker/registry/v2/blobs/sha256/a3/a3ed95caeb02ffe68cdd9fd84406680ae93d633cb16422d00e8a7c22955b46d4 /registry/docker/registry/v2/blobs/sha256/a3/a3ed95caeb02ffe68cdd9fd84406680ae93d633cb16422d00e8a7c22955b46d4/data /registry/docker/registry/v2/blobs/sha256/f7 /registry/docker/registry/v2/blobs/sha256/f7/f72a00a23f01987b42cb26f259582bb33502bdb0fcf5011e03c60577c4284845 /registry/docker/registry/v2/blobs/sha256/f7/f72a00a23f01987b42cb26f259582bb33502bdb0fcf5011e03c60577c4284845/data /registry/docker/registry/v2/repositories 3 /registry/docker/registry/v2/repositories/p1 /registry/docker/registry/v2/repositories/p1/pause 4 /registry/docker/registry/v2/repositories/p1/pause/_manifests /registry/docker/registry/v2/repositories/p1/pause/_manifests/revisions /registry/docker/registry/v2/repositories/p1/pause/_manifests/revisions/sha256 /registry/docker/registry/v2/repositories/p1/pause/_manifests/revisions/sha256/e9a2ac6418981897b399d3709f1b4a6d2723cd38a4909215ce2752a5c068b1cf /registry/docker/registry/v2/repositories/p1/pause/_manifests/revisions/sha256/e9a2ac6418981897b399d3709f1b4a6d2723cd38a4909215ce2752a5c068b1cf/signatures 5 /registry/docker/registry/v2/repositories/p1/pause/_manifests/revisions/sha256/e9a2ac6418981897b399d3709f1b4a6d2723cd38a4909215ce2752a5c068b1cf/signatures/sha256 /registry/docker/registry/v2/repositories/p1/pause/_manifests/revisions/sha256/e9a2ac6418981897b399d3709f1b4a6d2723cd38a4909215ce2752a5c068b1cf/signatures/sha256/ede17b139a271d6b1331ca3d83c648c24f92cece5f89d95ac6c34ce751111810 /registry/docker/registry/v2/repositories/p1/pause/_manifests/revisions/sha256/e9a2ac6418981897b399d3709f1b4a6d2723cd38a4909215ce2752a5c068b1cf/signatures/sha256/ede17b139a271d6b1331ca3d83c648c24f92cece5f89d95ac6c34ce751111810/link 6 /registry/docker/registry/v2/repositories/p1/pause/_uploads 7 /registry/docker/registry/v2/repositories/p1/pause/_layers 8 /registry/docker/registry/v2/repositories/p1/pause/_layers/sha256 /registry/docker/registry/v2/repositories/p1/pause/_layers/sha256/a3ed95caeb02ffe68cdd9fd84406680ae93d633cb16422d00e8a7c22955b46d4 /registry/docker/registry/v2/repositories/p1/pause/_layers/sha256/a3ed95caeb02ffe68cdd9fd84406680ae93d633cb16422d00e8a7c22955b46d4/link 9 /registry/docker/registry/v2/repositories/p1/pause/_layers/sha256/f72a00a23f01987b42cb26f259582bb33502bdb0fcf5011e03c60577c4284845 /registry/docker/registry/v2/repositories/p1/pause/_layers/sha256/f72a00a23f01987b42cb26f259582bb33502bdb0fcf5011e03c60577c4284845/link
- 1
- This directory stores all layers and signatures as blobs.
- 2
- This file contains the blob’s contents.
- 3
- This directory stores all the image repositories.
- 4
- This directory is for a single image repository p1/pause.
- 5
- This directory contains signatures for a particular image manifest revision.
- 6
- This file contains a reference back to a blob (which contains the signature data).
- 7
- This directory contains any layers that are currently being uploaded and staged for the given repository.
- 8
- This directory contains links to all the layers this repository references.
- 9
- This file contains a reference to a specific layer that has been linked into this repository via an image.
3.3.3. Accessing the Registry Directly
For advanced usage, you can access the registry directly to invoke docker commands. This allows you to push images to or pull them from the integrated registry directly using operations like docker push or docker pull. To do so, you must be logged in to the registry using the docker login command. The operations you can perform depend on your user permissions, as described in the following sections.
3.3.3.1. User Prerequisites
To access the registry directly, the user that you use must satisfy the following, depending on your intended usage:
For any direct access, you must have a regular user for your preferred identity provider. A regular user can generate an access token required for logging in to the registry. System users, such as system:admin, cannot obtain access tokens and, therefore, cannot access the registry directly.
For example, if you are using
HTPASSWDauthentication, you can create one using the following command:# htpasswd /etc/origin/openshift-htpasswd <user_name>
For pulling images, for example when using the
docker pullcommand, the user must have the registry-viewer role. To add this role:$ oc policy add-role-to-user registry-viewer <user_name>
For writing or pushing images, for example when using the
docker pushcommand, the user must have the registry-editor role. To add this role:$ oc policy add-role-to-user registry-editor <user_name>
For more information on user permissions, see Managing Role Bindings.
3.3.3.2. Logging in to the Registry
Ensure your user satisfies the prerequisites for accessing the registry directly.
To log in to the registry directly:
Ensure you are logged in to OpenShift Container Platform as a regular user:
$ oc login
Log in to the Docker registry by using your access token:
docker login -u openshift -p $(oc whoami -t) <registry_ip>:<port>
You can pass any value for the username, the token contains all necessary information. Passing a username that contains colons will result in a login failure.
3.3.3.3. Pushing and Pulling Images
After logging in to the registry, you can perform docker pull and docker push operations against your registry.
You can pull arbitrary images, but if you have the system:registry role added, you can only push images to the registry in your project.
In the following examples, we use:
| Component | Value |
| <registry_ip> |
|
| <port> |
|
| <project> |
|
| <image> |
|
| <tag> |
omitted (defaults to |
Pull an arbitrary image:
$ docker pull docker.io/busybox
Tag the new image with the form
<registry_ip>:<port>/<project>/<image>. The project name must appear in this pull specification for OpenShift Container Platform to correctly place and later access the image in the registry.$ docker tag docker.io/busybox 172.30.124.220:5000/openshift/busybox
NoteYour regular user must have the system:image-builder role for the specified project, which allows the user to write or push an image. Otherwise, the
docker pushin the next step will fail. To test, you can create a new project to push the busybox image.Push the newly-tagged image to your registry:
$ docker push 172.30.124.220:5000/openshift/busybox ... cf2616975b4a: Image successfully pushed Digest: sha256:3662dd821983bc4326bee12caec61367e7fb6f6a3ee547cbaff98f77403cab55
3.3.4. Accessing Registry Metrics
The OpenShift Container Registry provides an endpoint for Prometheus metrics. Prometheus is a stand-alone, open source systems monitoring and alerting toolkit.
The metrics are exposed at the /extensions/v2/metrics path of the registry endpoint. However, this route must first be enabled; see Extended Registry Configuration for instructions.
The following is a simple example of a metrics query:
$ curl -s -u <user>:<secret> \ 1
http://172.30.30.30:5000/extensions/v2/metrics | grep openshift | head -n 10
# HELP openshift_build_info A metric with a constant '1' value labeled by major, minor, git commit & git version from which OpenShift was built.
# TYPE openshift_build_info gauge
openshift_build_info{gitCommit="67275e1",gitVersion="v3.6.0-alpha.1+67275e1-803",major="3",minor="6+"} 1
# HELP openshift_registry_request_duration_seconds Request latency summary in microseconds for each operation
# TYPE openshift_registry_request_duration_seconds summary
openshift_registry_request_duration_seconds{name="test/origin-pod",operation="blobstore.create",quantile="0.5"} 0
openshift_registry_request_duration_seconds{name="test/origin-pod",operation="blobstore.create",quantile="0.9"} 0
openshift_registry_request_duration_seconds{name="test/origin-pod",operation="blobstore.create",quantile="0.99"} 0
openshift_registry_request_duration_seconds_sum{name="test/origin-pod",operation="blobstore.create"} 0
openshift_registry_request_duration_seconds_count{name="test/origin-pod",operation="blobstore.create"} 5See the upstream Prometheus documentation for more advanced queries and recommended visualizers.
3.4. Securing and Exposing the Registry
3.4.1. Overview
By default, the OpenShift Container Platform registry is secured during cluster installation so that it serves traffic via TLS. A passthrough route is also created by default to expose the service externally.
If for any reason your registry has not been secured or exposed, see the following sections for steps on how to manually do so.
3.4.2. Manually Securing the Registry
To manually secure the registry to serve traffic via TLS:
- Deploy the registry.
Fetch the service IP and port of the registry:
$ oc get svc/docker-registry NAME LABELS SELECTOR IP(S) PORT(S) docker-registry docker-registry=default docker-registry=default 172.30.124.220 5000/TCP
You can use an existing server certificate, or create a key and server certificate valid for specified IPs and host names, signed by a specified CA. To create a server certificate for the registry service IP and the docker-registry.default.svc.cluster.local host name, run the following command from the first master listed in the Ansible host inventory file, by default /etc/ansible/hosts:
$ oc adm ca create-server-cert \ --signer-cert=/etc/origin/master/ca.crt \ --signer-key=/etc/origin/master/ca.key \ --signer-serial=/etc/origin/master/ca.serial.txt \ --hostnames='docker-registry.default.svc.cluster.local,docker-registry.default.svc,172.30.124.220' \ --cert=/etc/secrets/registry.crt \ --key=/etc/secrets/registry.keyIf the router will be exposed externally, add the public route host name in the
--hostnamesflag:--hostnames='mydocker-registry.example.com,docker-registry.default.svc.cluster.local,172.30.124.220 \
See Redeploying Registry and Router Certificates for additional details on updating the default certificate so that the route is externally accessible.
NoteThe
oc adm ca create-server-certcommand generates a certificate that is valid for two years. This can be altered with the--expire-daysoption, but for security reasons, it is recommended to not make it greater than this value.Create the secret for the registry certificates:
$ oc create secret generic registry-certificates \ --from-file=/etc/secrets/registry.crt \ --from-file=/etc/secrets/registry.keyAdd the secret to the registry pod’s service accounts (including the default service account):
$ oc secrets link registry registry-certificates $ oc secrets link default registry-certificates
NoteLimiting secrets to only the service accounts that reference them is disabled by default. This means that if
serviceAccountConfig.limitSecretReferencesis set tofalse(the default setting) in the master configuration file, linking secrets to a service is not required.Pause the
docker-registryservice:$ oc rollout pause dc/docker-registry
Add the secret volume to the registry deployment configuration:
$ oc volume dc/docker-registry --add --type=secret \ --secret-name=registry-certificates -m /etc/secretsEnable TLS by adding the following environment variables to the registry deployment configuration:
$ oc set env dc/docker-registry \ REGISTRY_HTTP_TLS_CERTIFICATE=/etc/secrets/registry.crt \ REGISTRY_HTTP_TLS_KEY=/etc/secrets/registry.keySee the Configuring a registry section of the Docker documentation for more information.
Update the scheme used for the registry’s liveness probe from HTTP to HTTPS:
$ oc patch dc/docker-registry -p '{"spec": {"template": {"spec": {"containers":[{ "name":"registry", "livenessProbe": {"httpGet": {"scheme":"HTTPS"}} }]}}}}'If your registry was initially deployed on OpenShift Container Platform 3.2 or later, update the scheme used for the registry’s readiness probe from HTTP to HTTPS:
$ oc patch dc/docker-registry -p '{"spec": {"template": {"spec": {"containers":[{ "name":"registry", "readinessProbe": {"httpGet": {"scheme":"HTTPS"}} }]}}}}'Resume the
docker-registryservice:$ oc rollout resume dc/docker-registry
Validate the registry is running in TLS mode. Wait until the latest docker-registry deployment completes and verify the Docker logs for the registry container. You should find an entry for
listening on :5000, tls.$ oc logs dc/docker-registry | grep tls time="2015-05-27T05:05:53Z" level=info msg="listening on :5000, tls" instance.id=deeba528-c478-41f5-b751-dc48e4935fc2
Copy the CA certificate to the Docker certificates directory. This must be done on all nodes in the cluster:
$ dcertsdir=/etc/docker/certs.d $ destdir_addr=$dcertsdir/172.30.124.220:5000 $ destdir_name=$dcertsdir/docker-registry.default.svc.cluster.local:5000 $ sudo mkdir -p $destdir_addr $destdir_name $ sudo cp ca.crt $destdir_addr 1 $ sudo cp ca.crt $destdir_name- 1
- The ca.crt file is a copy of /etc/origin/master/ca.crt on the master.
When using authentication, some versions of
dockeralso require you to configure your cluster to trust the certificate at the OS level.Copy the certificate:
$ cp /etc/origin/master/ca.crt /etc/pki/ca-trust/source/anchors/myregistrydomain.com.crt
Run:
$ update-ca-trust enable
Remove the
--insecure-registryoption only for this particular registry in the /etc/sysconfig/docker file. Then, reload the daemon and restart the docker service to reflect this configuration change:$ sudo systemctl daemon-reload $ sudo systemctl restart docker
Validate the
dockerclient connection. Runningdocker pushto the registry ordocker pullfrom the registry should succeed. Make sure you have logged into the registry.$ docker tag|push <registry/image> <internal_registry/project/image>
For example:
$ docker pull busybox $ docker tag docker.io/busybox 172.30.124.220:5000/openshift/busybox $ docker push 172.30.124.220:5000/openshift/busybox ... cf2616975b4a: Image successfully pushed Digest: sha256:3662dd821983bc4326bee12caec61367e7fb6f6a3ee547cbaff98f77403cab55
3.4.3. Manually Exposing a Secure Registry
Instead of logging in to the OpenShift Container Platform registry from within the OpenShift Container Platform cluster, you can gain external access to it by first securing the registry and then exposing it with a route. This allows you to log in to the registry from outside the cluster using the route address, and to tag and push images using the route host.
Each of the following prerequisite steps are performed by default during a typical cluster installation. If they have not been, perform them manually:
A passthrough route should have been created by default for the registry during the initial cluster installation:
Verify whether the route exists:
$ oc get route/docker-registry -o yaml apiVersion: v1 kind: Route metadata: name: docker-registry spec: host: <host> 1 to: kind: Service name: docker-registry 2 tls: termination: passthrough 3
NoteRe-encrypt routes are also supported for exposing the secure registry.
If it does not exist, create the route via the
oc create route passthroughcommand, specifying the registry as the route’s service. By default, the name of the created route is the same as the service name:Get the docker-registry service details:
$ oc get svc NAME CLUSTER_IP EXTERNAL_IP PORT(S) SELECTOR AGE docker-registry 172.30.69.167 <none> 5000/TCP docker-registry=default 4h kubernetes 172.30.0.1 <none> 443/TCP,53/UDP,53/TCP <none> 4h router 172.30.172.132 <none> 80/TCP router=router 4h
Create the route:
$ oc create route passthrough \ --service=docker-registry \1 --hostname=<host> route "docker-registry" created 2
Next, you must trust the certificates being used for the registry on your host system to allow the host to push and pull images. The certificates referenced were created when you secured your registry.
$ sudo mkdir -p /etc/docker/certs.d/<host> $ sudo cp <ca_certificate_file> /etc/docker/certs.d/<host> $ sudo systemctl restart docker
Log in to the registry using the information from securing the registry. However, this time point to the host name used in the route rather than your service IP. When logging in to a secured and exposed registry, make sure you specify the registry in the
docker logincommand:# docker login -e user@company.com \ -u f83j5h6 \ -p Ju1PeM47R0B92Lk3AZp-bWJSck2F7aGCiZ66aFGZrs2 \ <host>You can now tag and push images using the route host. For example, to tag and push a
busyboximage in a project calledtest:$ oc get imagestreams -n test NAME DOCKER REPO TAGS UPDATED $ docker pull busybox $ docker tag busybox <host>/test/busybox $ docker push <host>/test/busybox The push refers to a repository [<host>/test/busybox] (len: 1) 8c2e06607696: Image already exists 6ce2e90b0bc7: Image successfully pushed cf2616975b4a: Image successfully pushed Digest: sha256:6c7e676d76921031532d7d9c0394d0da7c2906f4cb4c049904c4031147d8ca31 $ docker pull <host>/test/busybox latest: Pulling from <host>/test/busybox cf2616975b4a: Already exists 6ce2e90b0bc7: Already exists 8c2e06607696: Already exists Digest: sha256:6c7e676d76921031532d7d9c0394d0da7c2906f4cb4c049904c4031147d8ca31 Status: Image is up to date for <host>/test/busybox:latest $ oc get imagestreams -n test NAME DOCKER REPO TAGS UPDATED busybox 172.30.11.215:5000/test/busybox latest 2 seconds ago
NoteYour image streams will have the IP address and port of the registry service, not the route name and port. See
oc get imagestreamsfor details.
3.4.4. Manually Exposing a Non-Secure Registry
Instead of securing the registry in order to expose the registry, you can simply expose a non-secure registry for non-production OpenShift Container Platform environments. This allows you to have an external route to the registry without using SSL certificates.
Only non-production environments should expose a non-secure registry to external access.
To expose a non-secure registry:
Expose the registry:
# oc expose service docker-registry --hostname=<hostname> -n default
This creates the following JSON file:
apiVersion: v1 kind: Route metadata: creationTimestamp: null labels: docker-registry: default name: docker-registry spec: host: registry.example.com port: targetPort: "5000" to: kind: Service name: docker-registry status: {}Verify that the route has been created successfully:
# oc get route NAME HOST/PORT PATH SERVICE LABELS INSECURE POLICY TLS TERMINATION docker-registry registry.example.com docker-registry docker-registry=default
Check the health of the registry:
$ curl -v http://registry.example.com/healthz
Expect an HTTP 200/OK message.
After exposing the registry, update your /etc/sysconfig/docker file by adding the port number to the
OPTIONSentry. For example:OPTIONS='--selinux-enabled --insecure-registry=172.30.0.0/16 --insecure-registry registry.example.com:80'
ImportantThe above options should be added on the client from which you are trying to log in.
Also, ensure that Docker is running on the client.
When logging in to the non-secured and exposed registry, make sure you specify the registry in the docker login command. For example:
# docker login -e user@company.com \
-u f83j5h6 \
-p Ju1PeM47R0B92Lk3AZp-bWJSck2F7aGCiZ66aFGZrs2 \
<host>3.5. Extended Registry Configuration
3.5.1. Maintaining the Registry IP Address
OpenShift Container Platform refers to the integrated registry by its service IP address, so if you decide to delete and recreate the docker-registry service, you can ensure a completely transparent transition by arranging to re-use the old IP address in the new service. If a new IP address cannot be avoided, you can minimize cluster disruption by rebooting only the masters.
- Re-using the Address
- To re-use the IP address, you must save the IP address of the old docker-registry service prior to deleting it, and arrange to replace the newly assigned IP address with the saved one in the new docker-registry service.
Make a note of the
clusterIPfor the service:$ oc get svc/docker-registry -o yaml | grep clusterIP:
Delete the service:
$ oc delete svc/docker-registry dc/docker-registry
Create the registry definition in registry.yaml, replacing
<options>with, for example, those used in step 3 of the instructions in the Non-Production Use section:$ oc adm registry <options> -o yaml > registry.yaml
-
Edit registry.yaml, find the
Servicethere, and change itsclusterIPto the address noted in step 1. Create the registry using the modified registry.yaml:
$ oc create -f registry.yaml
- Rebooting the Masters
If you are unable to re-use the IP address, any operation that uses a pull specification that includes the old IP address will fail. To minimize cluster disruption, you must reboot the masters:
# systemctl restart atomic-openshift-master-api atomic-openshift-master-controllers
This ensures that the old registry URL, which includes the old IP address, is cleared from the cache.
NoteWe recommend against rebooting the entire cluster because that incurs unnecessary downtime for pods and does not actually clear the cache.
3.5.2. Whitelisting Docker Registries
You can specify a whitelist of docker registries, allowing you to curate a set of images and templates that are available for download by OpenShift Container Platform users. This curated set can be placed in one or more docker registries, and then added to the whitelist. When using a whitelist, only the specified registries are accessible within OpenShift Container Platform, and all other registries are denied access by default.
To configure a whitelist:
Edit the /etc/sysconfig/docker file to block all registries:
BLOCK_REGISTRY='--block-registry=all'
You may need to uncomment the
BLOCK_REGISTRYline.In the same file, add registries to which you want to allow access:
ADD_REGISTRY='--add-registry=<registry1> --add-registry=<registry2>'
Allowing Access to Registries
ADD_REGISTRY='--add-registry=registry.access.redhat.com'
This example would restrict access to images available on the Red Hat Customer Portal.
Once the whitelist is configured, if a user tries to pull from a docker registry that is not on the whitelist, they will receive an error message stating that this registry is not allowed.
3.5.3. Setting the Registry Hostname
You can configure the hostname and port the registry is known by for both internal and external references. By doing this, image streams will provide hostname based push and pull specifications for images, allowing consumers of the images to be isolated from changes to the registry service ip and potentially allowing image streams and their references to be portable between clusters.
To set the hostname used to reference the registry from within the cluster, set the internalRegistryHostname in the imagePolicyConfig section of the master configuration file. The external hostname is controlled by setting the externalRegistryHostname value in the same location.
Image Policy Configuration
imagePolicyConfig: internalRegistryHostname: docker-registry.default.svc.cluster.local:5000 externalRegistryHostname: docker-registry.mycompany.com
The registry itself must be configured with the same internal hostname value. This can be accomplished by setting the REGISTRY_OPENSHIFT_SERVER_ADDR environment variable on the registry deployment configuration, or by setting the value in the OpenShift section of the registry configuration.
If you have enabled TLS for your registry the server certificate must include the hostnames by which you expect the registry to be referenced. See securing the registry for instructions on adding hostnames to the server certificate.
3.5.4. Overriding the Registry Configuration
You can override the integrated registry’s default configuration, found by default at /config.yml in a running registry’s container, with your own custom configuration.
Upstream configuration options in this file may also be overridden using environment variables. The middleware section is an exception as there are just a few options that can be overridden using environment variables. Learn how to override specific configuration options.
To enable management of the registry configuration file directly and deploy an updated configuration using a ConfigMap:
- Deploy the registry.
Edit the registry configuration file locally as needed. The initial YAML file deployed on the registry is provided below. Review supported options.
Registry Configuration File
version: 0.1 log: level: debug http: addr: :5000 storage: cache: blobdescriptor: inmemory filesystem: rootdirectory: /registry delete: enabled: true auth: openshift: realm: openshift middleware: registry: - name: openshift repository: - name: openshift options: acceptschema2: true pullthrough: true enforcequota: false projectcachettl: 1m blobrepositorycachettl: 10m storage: - name: openshift openshift: version: 1.0 metrics: enabled: false secret: <secret>Create a
ConfigMapholding the content of each file in this directory:$ oc create configmap registry-config \ --from-file=</path/to/custom/registry/config.yml>/Add the registry-config ConfigMap as a volume to the registry’s deployment configuration to mount the custom configuration file at /etc/docker/registry/:
$ oc volume dc/docker-registry --add --type=configmap \ --configmap-name=registry-config -m /etc/docker/registry/Update the registry to reference the configuration path from the previous step by adding the following environment variable to the registry’s deployment configuration:
$ oc set env dc/docker-registry \ REGISTRY_CONFIGURATION_PATH=/etc/docker/registry/config.yml
This may be performed as an iterative process to achieve the desired configuration. For example, during troubleshooting, the configuration may be temporarily updated to put it in debug mode.
To update an existing configuration:
This procedure will overwrite the currently deployed registry configuration.
- Edit the local registry configuration file, config.yml.
Delete the registry-config configmap:
$ oc delete configmap registry-config
Recreate the configmap to reference the updated configuration file:
$ oc create configmap registry-config\ --from-file=</path/to/custom/registry/config.yml>/Redeploy the registry to read the updated configuration:
$ oc rollout latest docker-registry
Maintain configuration files in a source control repository.
3.5.5. Registry Configuration Reference
There are many configuration options available in the upstream docker distribution library. Not all configuration options are supported or enabled. Use this section as a reference when overriding the registry configuration.
Upstream configuration options in this file may also be overridden using environment variables. However, the middleware section may not be overridden using environment variables. Learn how to override specific configuration options.
3.5.5.1. Log
Upstream options are supported.
Example:
log:
level: debug
formatter: text
fields:
service: registry
environment: staging3.5.5.2. Hooks
Mail hooks are not supported.
3.5.5.3. Storage
This section lists the supported registry storage drivers. See the Docker registry documentation for more information.
The following list includes storage drivers that need to be configured in the registry’s configuration file:
- Filesystem. Filesystem is the default and does not need to be configured.
- S3. See the CloudFront configuration documentation for more information.
- OpenStack Swift
- Google Cloud Storage (GCS)
- Microsoft Azure
- Aliyun OSS
General registry storage configuration options are supported. See the Docker registry documentation for more information.
The following storage options need to be configured through the filesystem driver:
For more information on supported persistent storage drivers, see Configuring Persistent Storage and Persistent Storage Examples.
General Storage Configuration Options
storage:
delete:
enabled: true 1
redirect:
disable: false
cache:
blobdescriptor: inmemory
maintenance:
uploadpurging:
enabled: true
age: 168h
interval: 24h
dryrun: false
readonly:
enabled: false
- 1
- This entry is mandatory for image pruning to work properly.
3.5.5.4. Auth
Auth options should not be altered. The openshift extension is the only supported option.
auth:
openshift:
realm: openshift3.5.5.5. Middleware
The repository middleware extension allows to configure OpenShift Container Platform middleware responsible for interaction with OpenShift Container Platform and image proxying.
middleware:
registry:
- name: openshift 1
repository:
- name: openshift 2
options:
acceptschema2: true 3
pullthrough: true 4
mirrorpullthrough: true 5
enforcequota: false 6
projectcachettl: 1m 7
blobrepositorycachettl: 10m 8
storage:
- name: openshift 9- 1 2 9
- These entries are mandatory. Their presence ensures required components are loaded. These values should not be changed.
- 3
- Allows you to store manifest schema v2 during a push to the registry. See below for more details.
- 4
- Allows the registry to act as a proxy for remote blobs. See below for more details.
- 5
- Allows the registry cache blobs to be served from remote registries for fast access later. The mirroring starts when the blob is accessed for the first time. The option has no effect if the pullthrough is disabled.
- 6
- Prevents blob uploads exceeding the size limit, which are defined in the targeted project.
- 7
- An expiration timeout for limits cached in the registry. The lower the value, the less time it takes for the limit changes to propagate to the registry. However, the registry will query limits from the server more frequently and, as a consequence, pushes will be slower.
- 8
- An expiration timeout for remembered associations between blob and repository. The higher the value, the higher probability of fast lookup and more efficient registry operation. On the other hand, memory usage will raise as well as a risk of serving image layer to user, who is no longer authorized to access it.
3.5.5.5.1. S3 Driver Configuration
If you want to use a S3 region that is not supported by the integrated registry you are using, then you can specify a regionendpoint to avoid the region validation error.
For more information about using Amazon Simple Storage Service storage, see Amazon S3 as a Storage Back-end.
For example:
version: 0.1
log:
level: debug
http:
addr: :5000
storage:
cache:
blobdescriptor: inmemory
delete:
enabled: true
s3:
accesskey: BJKMSZBRESWJQXRWMAEQ
secretkey: 5ah5I91SNXbeoUXXDasFtadRqOdy62JzlnOW1goS
bucket: docker.myregistry.com
region: eu-west-3
regionendpoint: https://s3.eu-west-3.amazonaws.com
auth:
openshift:
realm: openshift
middleware:
registry:
- name: openshift
repository:
- name: openshift
storage:
- name: openshift
Verify the region and regionendpoint fields are consistent between themselves. Otherwise the integrated registry will start, but it can not read or write anything to the S3 storage.
The regionendpoint can also be useful if you use a S3 storage different from the Amazon S3.
3.5.5.5.2. CloudFront Middleware
The CloudFront middleware extension can be added to support AWS, CloudFront CDN storage provider. CloudFront middleware speeds up distribution of image content internationally. The blobs are distributed to several edge locations around the world. The client is always directed to the edge with the lowest latency.
The CloudFront middleware extension can be only used with S3 storage. It is utilized only during blob serving. Therefore, only blob downloads can be speeded up, not uploads.
The following is an example of minimal configuration of S3 storage driver with a CloudFront middleware:
version: 0.1
log:
level: debug
http:
addr: :5000
storage:
cache:
blobdescriptor: inmemory
delete:
enabled: true
s3: 1
accesskey: BJKMSZBRESWJQXRWMAEQ
secretkey: 5ah5I91SNXbeoUXXDasFtadRqOdy62JzlnOW1goS
region: us-east-1
bucket: docker.myregistry.com
auth:
openshift:
realm: openshift
middleware:
registry:
- name: openshift
repository:
- name: openshift
storage:
- name: cloudfront 2
options:
baseurl: https://jrpbyn0k5k88bi.cloudfront.net/ 3
privatekey: /etc/docker/cloudfront-ABCEDFGHIJKLMNOPQRST.pem 4
keypairid: ABCEDFGHIJKLMNOPQRST 5
- name: openshift- 1
- The S3 storage must be configured the same way regardless of CloudFront middleware.
- 2
- The CloudFront storage middleware needs to be listed before OpenShift middleware.
- 3
- The CloudFront base URL. In the AWS management console, this is listed as Domain Name of CloudFront distribution.
- 4
- The location of your AWS private key on the filesystem. This must be not confused with Amazon EC2 key pair. See the AWS documentation on creating CloudFront key pairs for your trusted signers. The file needs to be mounted as a secret into the registry pod.
- 5
- The ID of your Cloudfront key pair.
3.5.5.5.3. Overriding Middleware Configuration Options
The middleware section cannot be overridden using environment variables. There are a few exceptions, however. For example:
middleware:
repository:
- name: openshift
options:
acceptschema2: true 1
pullthrough: true 2
mirrorpullthrough: true 3
enforcequota: false 4
projectcachettl: 1m 5
blobrepositorycachettl: 10m 6- 1
- A configuration option that can be overridden by the boolean environment variable
REGISTRY_MIDDLEWARE_REPOSITORY_OPENSHIFT_ACCEPTSCHEMA2, which allows for the ability to accept manifest schema v2 on manifest put requests. Recognized values aretrueandfalse(which applies to all the other boolean variables below). - 2
- A configuration option that can be overridden by the boolean environment variable
REGISTRY_MIDDLEWARE_REPOSITORY_OPENSHIFT_PULLTHROUGH, which enables a proxy mode for remote repositories. - 3
- A configuration option that can be overridden by the boolean environment variable
REGISTRY_MIDDLEWARE_REPOSITORY_OPENSHIFT_MIRRORPULLTHROUGH, which instructs registry to mirror blobs locally if serving remote blobs. - 4
- A configuration option that can be overridden by the boolean environment variable
REGISTRY_MIDDLEWARE_REPOSITORY_OPENSHIFT_ENFORCEQUOTA, which allows the ability to turn quota enforcement on or off. By default, quota enforcement is off. - 5
- A configuration option that can be overridden by the environment variable
REGISTRY_MIDDLEWARE_REPOSITORY_OPENSHIFT_PROJECTCACHETTL, specifying an eviction timeout for project quota objects. It takes a valid time duration string (for example,2m). If empty, you get the default timeout. If zero (0m), caching is disabled. - 6
- A configuration option that can be overridden by the environment variable
REGISTRY_MIDDLEWARE_REPOSITORY_OPENSHIFT_BLOBREPOSITORYCACHETTL, specifying an eviction timeout for associations between blob and containing repository. The format of the value is the same as inprojectcachettlcase.
3.5.5.5.4. Image Pullthrough
If enabled, the registry will attempt to fetch requested blob from a remote registry unless the blob exists locally. The remote candidates are calculated from DockerImage entries stored in status of the image stream, a client pulls from. All the unique remote registry references in such entries will be tried in turn until the blob is found.
Pullthrough will only occur if an image stream tag exists for the image being pulled. For example, if the image being pulled is docker-registry.default.svc:5000/yourproject/yourimage:prod then the registry will look for an image stream tag named yourimage:prod in the project yourproject. If it finds one, it will attempt to pull the image using the dockerImageReference associated with that image stream tag.
When performing pullthrough, the registry will use pull credentials found in the project associated with the image stream tag that is being referenced. This capability also makes it possible for you to pull images that reside on a registry they do not have credentials to access, as long as you have access to the image stream tag that references the image.
You must ensure that your registry has appropriate certificates to trust any external registries you do a pullthrough against. The certificates need to be placed in the /etc/pki/tls/certs directory on the pod. You can mount the certificates using a configuration map or secret. Note that the entire /etc/pki/tls/certs directory must be replaced. You must include the new certificates and replace the system certificates in your secret or configuration map that you mount.
Note that by default image stream tags use a reference policy type of Source which means that when the image stream reference is resolved to an image pull specification, the specification used will point to the source of the image. For images hosted on external registries, this will be the external registry and as a result the resource will reference and pull the image by the external registry. For example, registry.access.redhat.com/openshift3/jenkins-2-rhel7 and pullthrough will not apply. To ensure that resources referencing image streams use a pull specification that points to the internal registry, the image stream tag should use a reference policy type of Local. More information is available on Reference Policy.
This feature is on by default. However, it can be disabled using a configuration option.
By default, all the remote blobs served this way are stored locally for subsequent faster access unless mirrorpullthrough is disabled. The downside of this mirroring feature is an increased storage usage.
The mirroring starts when a client tries to fetch at least a single byte of the blob. To pre-fetch a particular image into integrated registry before it is actually needed, you can run the following command:
$ oc get imagestreamtag/${IS}:${TAG} -o jsonpath='{ .image.dockerImageLayers[*].name }' | \
xargs -n1 -I {} curl -H "Range: bytes=0-1" -u user:${TOKEN} \
http://${REGISTRY_IP}:${PORT}/v2/default/mysql/blobs/{}This OpenShift Container Platform mirroring feature should not be confused with the upstream registry pull through cache feature, which is a similar but distinct capability.
3.5.5.5.5. Manifest Schema v2 Support
Each image has a manifest describing its blobs, instructions for running it and additional metadata. The manifest is versioned, with each version having different structure and fields as it evolves over time. The same image can be represented by multiple manifest versions. Each version will have different digest though.
The registry currently supports manifest v2 schema 1 (schema1) and manifest v2 schema 2 (schema2). The former is being obsoleted but will be supported for an extended amount of time.
You should be wary of compatibility issues with various Docker clients:
- Docker clients of version 1.9 or older support only schema1. Any manifest this client pulls or pushes will be of this legacy schema.
- Docker clients of version 1.10 support both schema1 and schema2. And by default, it will push the latter to the registry if it supports newer schema.
The registry, storing an image with schema1 will always return it unchanged to the client. Schema2 will be transferred unchanged only to newer Docker client. For the older one, it will be converted on-the-fly to schema1.
This has significant consequences. For example an image pushed to the registry by a newer Docker client cannot be pulled by the older Docker by its digest. That’s because the stored image’s manifest is of schema2 and its digest can be used to pull only this version of manifest.
For this reason, the registry is configured by default not to store schema2. This ensures that any docker client will be able to pull from the registry any image pushed there regardless of client’s version.
Once you’re confident that all the registry clients support schema2, you’ll be safe to enable its support in the registry. See the middleware configuration reference above for particular option.
3.5.5.6. OpenShift
This section reviews the configuration of global settings for features specific to OpenShift Container Platform. In a future release, openshift-related settings in the Middleware section will be obsoleted.
Currently, this section allows you to configure registry metrics collection:
openshift: version: 1.0 1 server: addr: docker-registry.default.svc 2 metrics: enabled: false 3 secret: <secret> 4 requests: read: maxrunning: 10 5 maxinqueue: 10 6 maxwaitinqueue 2m 7 write: maxrunning: 10 8 maxinqueue: 10 9 maxwaitinqueue 2m 10
- 1
- A mandatory entry specifying configuration version of this section. The only supported value is
1.0. - 2
- The hostname of the registry. Should be set to the same value configured on the master. It can be overridden by the environment variable
REGISTRY_OPENSHIFT_SERVER_ADDR. - 3
- Can be set to
trueto enable metrics collection. It can be overridden by the boolean environment variableREGISTRY_OPENSHIFT_METRICS_ENABLED. - 4
- A secret used to authorize client requests. Metrics clients must use it as a bearer token in
Authorizationheader. It can be overridden by the environment variableREGISTRY_OPENSHIFT_METRICS_SECRET. - 5
- Maximum number of simultaneous pull requests. It can be overridden by the environment variable
REGISTRY_OPENSHIFT_REQUESTS_READ_MAXRUNNING. Zero indicates no limit. - 6
- Maximum number of queued pull requests. It can be overridden by the environment variable
REGISTRY_OPENSHIFT_REQUESTS_READ_MAXINQUEUE. Zero indicates no limit. - 7
- Maximum time a pull request can wait in the queue before being rejected. It can be overridden by the environment variable
REGISTRY_OPENSHIFT_REQUESTS_READ_MAXWAITINQUEUE. Zero indicates no limit. - 8
- Maximum number of simultaneous push requests. It can be overridden by the environment variable
REGISTRY_OPENSHIFT_REQUESTS_WRITE_MAXRUNNING. Zero indicates no limit. - 9
- Maximum number of queued push requests. It can be overridden by the environment variable
REGISTRY_OPENSHIFT_REQUESTS_WRITE_MAXINQUEUE. Zero indicates no limit. - 10
- Maximum time a push request can wait in the queue before being rejected. It can be overridden by the environment variable
REGISTRY_OPENSHIFT_REQUESTS_WRITE_MAXWAITINQUEUE. Zero indicates no limit.
See Accessing Registry Metrics for usage information.
3.5.5.7. Reporting
Reporting is unsupported.
3.5.5.8. HTTP
Upstream options are supported. Learn how to alter these settings via environment variables. Only the tls section should be altered. For example:
http:
addr: :5000
tls:
certificate: /etc/secrets/registry.crt
key: /etc/secrets/registry.key3.5.5.9. Notifications
Upstream options are supported. The REST API Reference provides more comprehensive integration options.
Example:
notifications:
endpoints:
- name: registry
disabled: false
url: https://url:port/path
headers:
Accept:
- text/plain
timeout: 500
threshold: 5
backoff: 10003.5.5.10. Redis
Redis is not supported.
3.5.5.11. Health
Upstream options are supported. The registry deployment configuration provides an integrated health check at /healthz.
3.5.5.12. Proxy
Proxy configuration should not be enabled. This functionality is provided by the OpenShift Container Platform repository middleware extension, pullthrough: true.
3.5.5.13. Cache
The integrated registry actively caches data to reduce the number of calls to slow external resources. There are two caches:
- The storage cache that is used to cache blobs metadata. This cache does not have an expiration time and the data is there until it is explicitly deleted.
- The application cache contains association between blobs and repositories. The data in this cache has an expiration time.
In order to completely turn off the cache, you need to change the configuration:
version: 0.1
log:
level: debug
http:
addr: :5000
storage:
cache: {} 1
openshift:
version: 1.0
cache:
disabled: true 2
blobrepositoryttl: 10m- 1
- Disables cache of metadata accessed in the storage backend. Without this cache, the registry server will constantly access the backend for metadata.
- 2
- Disables the cache in which contains the blob and repository associations. Without this cache, the registry server will continually re-query the data from the master API and recompute the associations.
3.6. Known Issues
3.6.1. Overview
The following are the known issues when deploying or using the integrated registry.
3.6.2. Image Push Errors with Scaled Registry Using Shared NFS Volume
When using a scaled registry with a shared NFS volume, you may see one of the following errors during the push of an image:
-
digest invalid: provided digest did not match uploaded content -
blob upload unknown -
blob upload invalid
These errors are returned by an internal registry service when Docker attempts to push the image. Its cause originates in the synchronization of file attributes across nodes. Factors such as NFS client side caching, network latency, and layer size can all contribute to potential errors that might occur when pushing an image using the default round-robin load balancing configuration.
You can perform the following steps to minimize the probability of such a failure:
Ensure that the
sessionAffinityof your docker-registry service is set toClientIP:$ oc get svc/docker-registry --template='{{.spec.sessionAffinity}}'This should return
ClientIP, which is the default in recent OpenShift Container Platform versions. If not, change it:$ oc patch svc/docker-registry -p '{"spec":{"sessionAffinity": "ClientIP"}}'-
Ensure that the NFS export line of your registry volume on your NFS server has the
no_wdelayoptions listed. Theno_wdelayoption prevents the server from delaying writes, which greatly improves read-after-write consistency, a requirement of the registry.
Testing shows issues with using the RHEL NFS server as a storage backend for the container image registry. This includes the OpenShift Container Registry and Quay. Therefore, using the RHEL NFS server to back PVs used by core services is not recommended.
Other NFS implementations on the marketplace might not have these issues. Contact the individual NFS implementation vendor for more information on any testing that was possibly completed against these OpenShift core components.
3.6.3. Pull of Internally Managed Image Fails with "not found" Error
This error occurs when the pulled image is pushed to an image stream different from the one it is being pulled from. This is caused by re-tagging a built image into an arbitrary image stream:
$ oc tag srcimagestream:latest anyproject/pullimagestream:latest
And subsequently pulling from it, using an image reference such as:
internal.registry.url:5000/anyproject/pullimagestream:latest
During a manual Docker pull, this will produce a similar error:
Error: image anyproject/pullimagestream:latest not found
To prevent this, avoid the tagging of internally managed images completely, or re-push the built image to the desired namespace manually.
3.6.4. Image Push Fails with "500 Internal Server Error" on S3 Storage
There are problems reported happening when the registry runs on S3 storage back-end. Pushing to a Docker registry occasionally fails with the following error:
Received unexpected HTTP status: 500 Internal Server Error
To debug this, you need to view the registry logs. In there, look for similar error messages occurring at the time of the failed push:
time="2016-03-30T15:01:21.22287816-04:00" level=error msg="unknown error completing upload: driver.Error{DriverName:\"s3\", Enclosed:(*url.Error)(0xc20901cea0)}" http.request.method=PUT
...
time="2016-03-30T15:01:21.493067808-04:00" level=error msg="response completed with error" err.code=UNKNOWN err.detail="s3: Put https://s3.amazonaws.com/oso-tsi-docker/registry/docker/registry/v2/blobs/sha256/ab/abe5af443833d60cf672e2ac57589410dddec060ed725d3e676f1865af63d2e2/data: EOF" err.message="unknown error" http.request.method=PUT
...
time="2016-04-02T07:01:46.056520049-04:00" level=error msg="error putting into main store: s3: The request signature we calculated does not match the signature you provided. Check your key and signing method." http.request.method=PUT
atestIf you see such errors, contact your Amazon S3 support. There may be a problem in your region or with your particular bucket.
3.6.5. Image Pruning Fails
If you encounter the following error when pruning images:
BLOB sha256:49638d540b2b62f3b01c388e9d8134c55493b1fa659ed84e97cb59b87a6b8e6c error deleting blob
And your registry log contains the following information:
error deleting blob \"sha256:49638d540b2b62f3b01c388e9d8134c55493b1fa659ed84e97cb59b87a6b8e6c\": operation unsupported
It means that your custom configuration file lacks mandatory entries in the storage section, namely storage:delete:enabled set to true. Add them, re-deploy the registry, and repeat your image pruning operation.
Chapter 4. Setting up a Router
4.1. Router Overview
4.1.1. About Routers
There are many ways to get traffic into the cluster. The most common approach is to use the OpenShift Container Platform router as the ingress point for external traffic destined for services in your OpenShift Container Platform installation.
OpenShift Container Platform provides and supports the following router plug-ins:
- The HAProxy template router is the default plug-in. It uses the openshift3/ose-haproxy-router image to run an HAProxy instance alongside the template router plug-in inside a container on OpenShift Container Platform. It currently supports HTTP(S) traffic and TLS-enabled traffic via SNI. The router’s container listens on the host network interface, unlike most containers that listen only on private IPs. The router proxies external requests for route names to the IPs of actual pods identified by the service associated with the route.
- The F5 router integrates with an existing F5 BIG-IP® system in your environment to synchronize routes. F5 BIG-IP® version 11.4 or newer is required in order to have the F5 iControl REST API.
The F5 router plug-in is available starting in OpenShift Container Platform 3.0.2.
4.1.2. Router Service Account
Before deploying an OpenShift Container Platform cluster, you must have a service account for the router. Starting in OpenShift Container Platform 3.1, a router service account is automatically created during a quick or advanced installation (previously, this required manual creation). This service account has permissions to a security context constraint (SCC) that allows it to specify host ports.
4.1.2.1. Permission to Access Labels
When namespace labels are used, for example in creating router shards, the service account for the router must have cluster-reader permission.
$ oc adm policy add-cluster-role-to-user \
cluster-reader \
system:serviceaccount:default:routerWith a service account in place, you can proceed to installing a default HAProxy Router, a customized HAProxy Router or F5 Router.
4.2. Using the Default HAProxy Router
4.2.1. Overview
The oc adm router command is provided with the administrator CLI to simplify the tasks of setting up routers in a new installation. If you followed the quick installation, then a default router was automatically created for you. The oc adm router command creates the service and deployment configuration objects. Use the --service-account option to specify the service account the router will use to contact the master.
The router service account can be created in advance or created by the oc adm router --service-account command.
Every form of communication between OpenShift Container Platform components is secured by TLS and uses various certificates and authentication methods. The --default-certificate .pem format file can be supplied or one is created by the oc adm router command. When routes are created, the user can provide route certificates that the router will use when handling the route.
When deleting a router, ensure the deployment configuration, service, and secret are deleted as well.
Routers are deployed on specific nodes. This makes it easier for the cluster administrator and external network manager to coordinate which IP address will run a router and which traffic the router will handle. The routers are deployed on specific nodes by using node selectors.
Routers use host networking by default, and they directly attach to port 80 and 443 on all interfaces on a host. Restrict routers to hosts where ports 80/443 are available and not being consumed by another service, and set this using node selectors and the scheduler configuration. As an example, you can achieve this by dedicating infrastructure nodes to run services such as routers.
It is recommended to use separate distinct openshift-router service account with your router. This can be provided using the --service-account flag to the oc adm router command.
$ oc adm router --dry-run --service-account=router 1
Router pods created using oc adm router have default resource requests that a node must satisfy for the router pod to be deployed. In an effort to increase the reliability of infrastructure components, the default resource requests are used to increase the QoS tier of the router pods above pods without resource requests. The default values represent the observed minimum resources required for a basic router to be deployed and can be edited in the routers deployment configuration and you may want to increase them based on the load of the router.
4.2.2. Creating a Router
The quick installation process automatically creates a default router. If the router does not exist, run the following to create a router:
$ oc adm router <router_name> --replicas=<number> --service-account=router
--replicas is usually 1 unless a high availability configuration is being created.
To find the host IP address of the router:
$ oc get po <router-pod> --template={{.status.hostIP}}You can also use router shards to ensure that the router is filtered to specific namespaces or routes, or set any environment variables after router creation. In this case create a router for each shard.
4.2.3. Other Basic Router Commands
- Checking the Default Router
- The default router service account, named router, is automatically created during quick and advanced installations. To verify that this account already exists:
$ oc adm router --dry-run --service-account=router
- Viewing the Default Router
- To see what the default router would look like if created:
$ oc adm router --dry-run -o yaml --service-account=router
- Deploying the Router to a Labeled Node
- To deploy the router to any node(s) that match a specified node label:
$ oc adm router <router_name> --replicas=<number> --selector=<label> \
--service-account=router
For example, if you want to create a router named router and have it placed on a node labeled with region=infra:
$ oc adm router router --replicas=1 --selector='region=infra' \ --service-account=router
During advanced installation, the openshift_router_selector and openshift_registry_selector Ansible settings are set to region=infra by default. The default router and registry will only be automatically deployed if a node exists that matches the region=infra label.
For information on updating labels, see Updating Labels on Nodes.
Multiple instances are created on different hosts according to the scheduler policy.
- Using a Different Router Image
- To use a different router image and view the router configuration that would be used:
$ oc adm router <router_name> -o <format> --images=<image> \
--service-account=routerFor example:
$ oc adm router region-west -o yaml --images=myrepo/somerouter:mytag \
--service-account=router4.2.4. Filtering Routes to Specific Routers
Using the ROUTE_LABELS environment variable, you can filter routes so that they are used only by specific routers.
For example, if you have multiple routers, and 100 routes, you can attach labels to the routes so that a portion of them are handled by one router, whereas the rest are handled by another.
After creating a router, use the
ROUTE_LABELSenvironment variable to tag the router:$ oc env dc/<router=name> ROUTE_LABELS="key=value"
Add the label to the desired routes:
oc label route <route=name> key=value
To verify that the label has been attached to the route, check the route configuration:
$ oc describe route/<route_name>
- Setting the Maximum Number of Concurrent Connections
-
The router can handle a maximum number of 20000 connections by default. You can change that limit depending on your needs. Having too few connections prevents the health check from working, which causes unnecessary restarts. You need to configure the system to support the maximum number of connections. The limits shown in
'sysctl fs.nr_open'and'sysctl fs.file-max'must be large enough. Otherwise, HAproxy will not start.
When the router is created, the --max-connections= option sets the desired limit:
$ oc adm router --max-connections=10000 ....
Edit the ROUTER_MAX_CONNECTIONS environment variable in the router’s deployment configuration to change the value. The router pods are restarted with the new value. If ROUTER_MAX_CONNECTIONS is not present, the default value of 20000, is used.
A connection includes the frontend and internal backend. This counts as two connections. Be sure to set ROUTER_MAX_CONNECTIONS to double than the number of connections you intend to create.
4.2.5. HAProxy Strict SNI
The HAProxy strict-sni can be controlled through the ROUTER_STRICT_SNI environment variable in the router’s deployment configuration. It can also be set when the router is created by using the --strict-sni command line option.
$ oc adm router --strict-sni
4.2.6. TLS Cipher Suites
Set the router cipher suite using the --ciphers option when creating a router:
$ oc adm router --ciphers=modern ....
The values are: modern, intermediate, or old, with intermediate as the default. Alternatively, a set of ":" separated ciphers can be provided. The ciphers must be from the set displayed by:
$ openssl ciphers
Alternatively, use the ROUTER_CIPHERS environment variable for an existing router.
4.2.7. Highly-Available Routers
You can set up a highly-available router on your OpenShift Container Platform cluster using IP failover. This setup has multiple replicas on different nodes so the failover software can switch to another replica if the current one fails.
4.2.8. Customizing the Router Service Ports
You can customize the service ports that a template router binds to by setting the environment variables ROUTER_SERVICE_HTTP_PORT and ROUTER_SERVICE_HTTPS_PORT. This can be done by creating a template router, then editing its deployment configuration.
The following example creates a router deployment with 0 replicas and customizes the router service HTTP and HTTPS ports, then scales it appropriately (to 1 replica).
$ oc adm router --replicas=0 --ports='10080:10080,10443:10443' 1
$ oc set env dc/router ROUTER_SERVICE_HTTP_PORT=10080 \
ROUTER_SERVICE_HTTPS_PORT=10443
$ oc scale dc/router --replicas=1- 1
- Ensures exposed ports are appropriately set for routers that use the container networking mode
--host-network=false.
If you do customize the template router service ports, you will also need to ensure that the nodes where the router pods run have those custom ports opened in the firewall (either via Ansible or iptables, or any other custom method that you use via firewall-cmd).
The following is an example using iptables to open the custom router service ports.
$ iptables -A INPUT -p tcp --dport 10080 -j ACCEPT $ iptables -A INPUT -p tcp --dport 10443 -j ACCEPT
4.2.9. Working With Multiple Routers
An administrator can create multiple routers with the same definition to serve the same set of routes. Each router will be on a different node and will have a different IP address. The network administrator will need to get the desired traffic to each node.
Multiple routers can be grouped to distribute routing load in the cluster and separate tenants to different routers or shards. Each router or shard in the group admits routes based on the selectors in the router. An administrator can create shards over the whole cluster using ROUTE_LABELS. A user can create shards over a namespace (project) by using NAMESPACE_LABELS.
4.2.10. Adding a Node Selector to a Deployment Configuration
Making specific routers deploy on specific nodes requires two steps:
Add a label to the desired node:
$ oc label node 10.254.254.28 "router=first"
Add a node selector to the router deployment configuration:
$ oc edit dc <deploymentConfigName>
Add the
template.spec.nodeSelectorfield with a key and value corresponding to the label:... template: metadata: creationTimestamp: null labels: router: router1 spec: nodeSelector: 1 router: "first" ...- 1
- The key and value are
routerandfirst, respectively, corresponding to therouter=firstlabel.
4.2.11. Using Router Shards
Router sharding uses NAMESPACE_LABELS and ROUTE_LABELS, to filter router namespaces and routes. This enables you to distribute subsets of routes over multiple router deployments. By using non-overlapping subsets, you can effectively partition the set of routes. Alternatively, you can define shards comprising overlapping subsets of routes.
By default, a router selects all routes from all projects (namespaces). Sharding involves adding labels to routes or namespaces and label selectors to routers. Each router shard comprises the routes that are selected by a specific set of label selectors or belong to the namespaces that are selected by a specific set of label selectors.
The router service account must have the [cluster reader] permission set to allow access to labels in other namespaces.
Router Sharding and DNS
Because an external DNS server is needed to route requests to the desired shard, the administrator is responsible for making a separate DNS entry for each router in a project. A router will not forward unknown routes to another router.
Consider the following example:
-
Router A lives on host 192.168.0.5 and has routes with
*.foo.com. -
Router B lives on host 192.168.1.9 and has routes with
*.example.com.
Separate DNS entries must resolve *.foo.com to the node hosting Router A and *.example.com to the node hosting Router B:
-
*.foo.com A IN 192.168.0.5 -
*.example.com A IN 192.168.1.9
Router Sharding Examples
This section describes router sharding using namespace and route labels.
Figure 4.1. Router Sharding Based on Namespace Labels
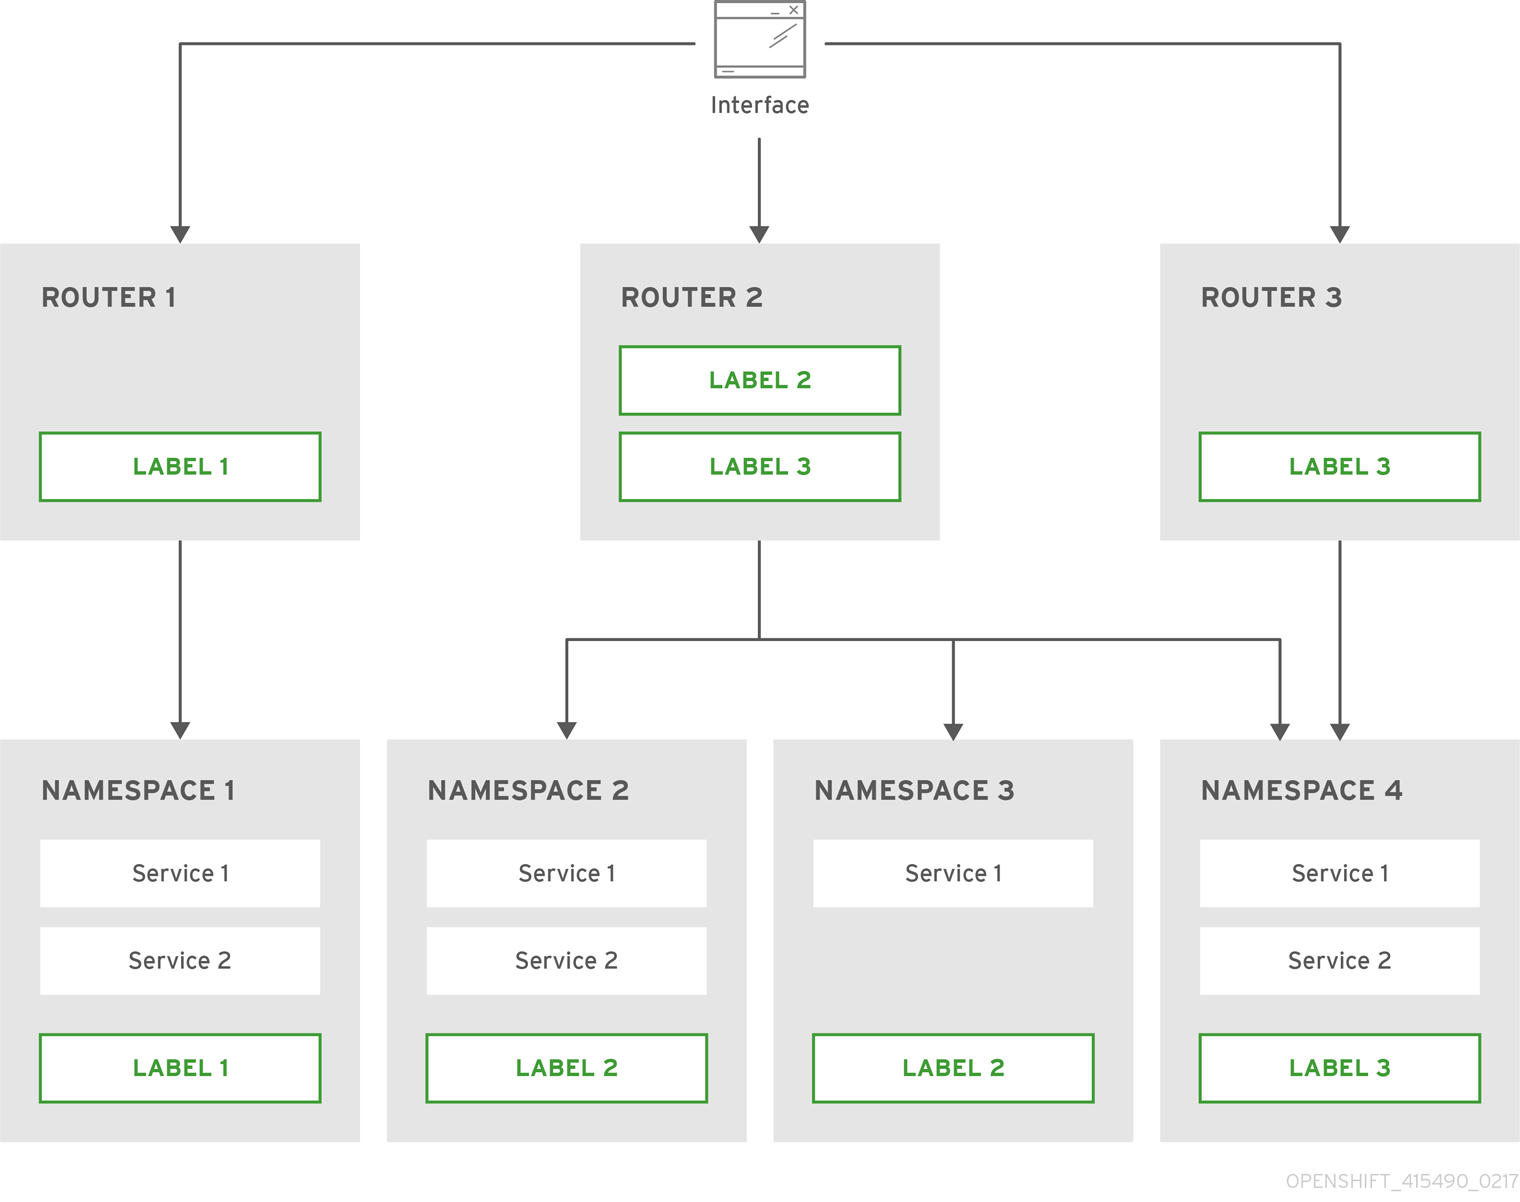
Configure a router with a namespace label selector:
$ oc set env dc/router NAMESPACE_LABELS="router=r1"
Because the router has a selector on the namespace, the router will handle routes only for matching namespaces. In order to make this selector match a namespace, label the namespace accordingly:
$ oc label namespace default "router=r1"
Now, if you create a route in the default namespace, the route is available in the default router:
$ oc create -f route1.yaml
Create a new project (namespace) and create a route,
route2:$ oc new-project p1 $ oc create -f route2.yaml
Notice the route is not available in your router.
Label namespace
p1withrouter=r1$ oc label namespace p1 "router=r1"
Adding this label makes the route available in the router.
- Example
A router deployment
finops-routeris configured with the label selectorNAMESPACE_LABELS="name in (finance, ops)", and a router deploymentdev-routeris configured with the label selectorNAMESPACE_LABELS="name=dev".If all routes are in namespaces labeled
name=finance,name=ops, andname=dev, then this configuration effectively distributes your routes between the two router deployments.In the above scenario, sharding becomes a special case of partitioning, with no overlapping subsets. Routes are divided between router shards.
The criteria for route selection govern how the routes are distributed. It is possible to have overlapping subsets of routes across router deployments.
- Example
In addition to
finops-routeranddev-routerin the example above, you also havedevops-router, which is configured with a label selectorNAMESPACE_LABELS="name in (dev, ops)".The routes in namespaces labeled
name=devorname=opsnow are serviced by two different router deployments. This becomes a case in which you have defined overlapping subsets of routes, as illustrated in the procedure in Router Sharding Based on Namespace Labels.In addition, this enables you to create more complex routing rules, allowing the diversion of higher priority traffic to the dedicated
finops-routerwhile sending lower priority traffic todevops-router.
Router Sharding Based on Route Labels
NAMESPACE_LABELS allows filtering of the projects to service and selecting all the routes from those projects, but you may want to partition routes based on other criteria associated with the routes themselves. The ROUTE_LABELS selector allows you to slice-and-dice the routes themselves.
- Example
A router deployment
prod-routeris configured with the label selectorROUTE_LABELS="mydeployment=prod", and a router deploymentdevtest-routeris configured with the label selectorROUTE_LABELS="mydeployment in (dev, test)".This configuration partitions routes between the two router deployments according to the routes' labels, irrespective of their namespaces.
The example assumes you have all the routes you want to be serviced tagged with a label
"mydeployment=<tag>".
4.2.11.1. Creating Router Shards
This section describes an advanced example of router sharding. Suppose there are 26 routes, named a — z, with various labels:
Possible labels on routes
sla=high geo=east hw=modest dept=finance sla=medium geo=west hw=strong dept=dev sla=low dept=ops
These labels express the concepts including service level agreement, geographical location, hardware requirements, and department. The routes can have at most one label from each column. Some routes may have other labels or no labels at all.
| Name(s) | SLA | Geo | HW | Dept | Other Labels |
|---|---|---|---|---|---|
|
|
|
|
|
|
|
|
|
|
|
| ||
|
|
|
|
| ||
|
|
|
|
| ||
|
|
|
|
| ||
|
|
|
|
Here is a convenience script mkshard that illustrates how oc adm router, oc set env, and oc scale can be used together to make a router shard.
#!/bin/bash # Usage: mkshard ID SELECTION-EXPRESSION id=$1 sel="$2" router=router-shard-$id 1 oc adm router $router --replicas=0 2 dc=dc/router-shard-$id 3 oc set env $dc ROUTE_LABELS="$sel" 4 oc scale $dc --replicas=3 5
Running mkshard several times creates several routers:
| Router | Selection Expression | Routes |
|---|---|---|
|
|
|
|
|
|
|
|
|
|
|
|
4.2.11.2. Modifying Router Shards
Because a router shard is a construct based on labels, you can modify either the labels (via oc label) or the selection expression (via oc set env).
This section extends the example started in the Creating Router Shards section, demonstrating how to change the selection expression.
Here is a convenience script modshard that modifies an existing router to use a new selection expression:
#!/bin/bash # Usage: modshard ID SELECTION-EXPRESSION... id=$1 shift router=router-shard-$id 1 dc=dc/$router 2 oc scale $dc --replicas=0 3 oc set env $dc "$@" 4 oc scale $dc --replicas=3 5
- 1
- The modified router has name
router-shard-<id>. - 2
- The deployment configuration where the modifications occur.
- 3
- Scale it down.
- 4
- Set the new selection expression using
oc set env. Unlikemkshardfrom the Creating Router Shards section, the selection expression specified as the non-IDarguments tomodshardmust include the environment variable name as well as its value. - 5
- Scale it back up.
In modshard, the oc scale commands are not necessary if the deployment strategy for router-shard-<id> is Rolling.
For example, to expand the department for router-shard-3 to include ops as well as dev:
$ modshard 3 ROUTE_LABELS='dept in (dev, ops)'
The result is that router-shard-3 now selects routes g — s (the combined sets of g — k and l — s).
This example takes into account that there are only three departments in this example scenario, and specifies a department to leave out of the shard, thus achieving the same result as the preceding example:
$ modshard 3 ROUTE_LABELS='dept != finance'
This example specifies three comma-separated qualities, and results in only route b being selected:
$ modshard 3 ROUTE_LABELS='hw=strong,type=dynamic,geo=west'
Similarly to ROUTE_LABELS, which involves a route’s labels, you can select routes based on the labels of the route’s namespace using the NAMESPACE_LABELS environment variable. This example modifies router-shard-3 to serve routes whose namespace has the label frequency=weekly:
$ modshard 3 NAMESPACE_LABELS='frequency=weekly'
The last example combines ROUTE_LABELS and NAMESPACE_LABELS to select routes with label sla=low and whose namespace has the label frequency=weekly:
$ modshard 3 \
NAMESPACE_LABELS='frequency=weekly' \
ROUTE_LABELS='sla=low'4.2.12. Finding the Host Name of the Router
When exposing a service, a user can use the same route from the DNS name that external users use to access the application. The network administrator of the external network must make sure the host name resolves to the name of a router that has admitted the route. The user can set up their DNS with a CNAME that points to this host name. However, the user may not know the host name of the router. When it is not known, the cluster administrator can provide it.
The cluster administrator can use the --router-canonical-hostname option with the router’s canonical host name when creating the router. For example:
# oc adm router myrouter --router-canonical-hostname="rtr.example.com"
This creates the ROUTER_CANONICAL_HOSTNAME environment variable in the router’s deployment configuration containing the host name of the router.
For routers that already exist, the cluster administrator can edit the router’s deployment configuration and add the ROUTER_CANONICAL_HOSTNAME environment variable:
spec:
template:
spec:
containers:
- env:
- name: ROUTER_CANONICAL_HOSTNAME
value: rtr.example.com
The ROUTER_CANONICAL_HOSTNAME value is displayed in the route status for all routers that have admitted the route. The route status is refreshed every time the router is reloaded.
When a user creates a route, all of the active routers evaluate the route and, if conditions are met, admit it. When a router that defines the ROUTER_CANONICAL_HOSTNAME environment variable admits the route, the router places the value in the routerCanonicalHostname field in the route status. The user can examine the route status to determine which, if any, routers have admitted the route, select a router from the list, and find the host name of the router to pass along to the network administrator.
status:
ingress:
conditions:
lastTransitionTime: 2016-12-07T15:20:57Z
status: "True"
type: Admitted
host: hello.in.mycloud.com
routerCanonicalHostname: rtr.example.com
routerName: myrouter
wildcardPolicy: None
oc describe inclues the host name when available:
$ oc describe route/hello-route3 ... Requested Host: hello.in.mycloud.com exposed on router myroute (host rtr.example.com) 12 minutes ago
Using the above information, the user can ask the DNS administrator to set up a CNAME from the route’s host, hello.in.mycloud.com, to the router’s canonical hostname, rtr.example.com. This results in any traffic to hello.in.mycloud.com reaching the user’s application.
4.2.13. Customizing the Default Routing Subdomain
You can customize the suffix used as the default routing subdomain for your environment by modifying the master configuration file (the /etc/origin/master/master-config.yaml file by default). Routes that do not specify a host name would have one generated using this default routing subdomain.
The following example shows how you can set the configured suffix to v3.openshift.test:
routingConfig: subdomain: v3.openshift.test
This change requires a restart of the master if it is running.
With the OpenShift Container Platform master(s) running the above configuration, the generated host name for the example of a route named no-route-hostname without a host name added to a namespace mynamespace would be:
no-route-hostname-mynamespace.v3.openshift.test
4.2.14. Forcing Route Host Names to a Custom Routing Subdomain
If an administrator wants to restrict all routes to a specific routing subdomain, they can pass the --force-subdomain option to the oc adm router command. This forces the router to override any host names specified in a route and generate one based on the template provided to the --force-subdomain option.
The following example runs a router, which overrides the route host names using a custom subdomain template ${name}-${namespace}.apps.example.com.
$ oc adm router --force-subdomain='${name}-${namespace}.apps.example.com'4.2.15. Using Wildcard Certificates
A TLS-enabled route that does not include a certificate uses the router’s default certificate instead. In most cases, this certificate should be provided by a trusted certificate authority, but for convenience you can use the OpenShift Container Platform CA to create the certificate. For example:
$ CA=/etc/origin/master
$ oc adm ca create-server-cert --signer-cert=$CA/ca.crt \
--signer-key=$CA/ca.key --signer-serial=$CA/ca.serial.txt \
--hostnames='*.cloudapps.example.com' \
--cert=cloudapps.crt --key=cloudapps.key
The oc adm ca create-server-cert command generates a certificate that is valid for two years. This can be altered with the --expire-days option, but for security reasons, it is recommended to not make it greater than this value.
Run oc adm commands only from the first master listed in the Ansible host inventory file, by default /etc/ansible/hosts.
The router expects the certificate and key to be in PEM format in a single file:
$ cat cloudapps.crt cloudapps.key $CA/ca.crt > cloudapps.router.pem
From there you can use the --default-cert flag:
$ oc adm router --default-cert=cloudapps.router.pem --service-account=router
Browsers only consider wildcards valid for subdomains one level deep. So in this example, the certificate would be valid for a.cloudapps.example.com but not for a.b.cloudapps.example.com.
4.2.16. Manually Redeploy Certificates
To manually redeploy the router certificates:
Check to see if a secret containing the default router certificate was added to the router:
$ oc volumes dc/router deploymentconfigs/router secret/router-certs as server-certificate mounted at /etc/pki/tls/privateIf the certificate is added, skip the following step and overwrite the secret.
Make sure that you have a default certificate directory set for the following variable
DEFAULT_CERTIFICATE_DIR:$ oc env dc/router --list DEFAULT_CERTIFICATE_DIR=/etc/pki/tls/private
If not, create the directory using the following command:
$ oc env dc/router DEFAULT_CERTIFICATE_DIR=/etc/pki/tls/private
Export the certificate to PEM format:
$ cat custom-router.key custom-router.crt custom-ca.crt > custom-router.crt
Overwrite or create a router certificate secret:
If the certificate secret was added to the router, overwrite the secret. If not, create a new secret.
To overwrite the secret, run the following command:
$ oc create secret generic router-certs --from-file=tls.crt=custom-router.crt --from-file=tls.key=custom-router.key --type=kubernetes.io/tls -o json --dry-run | oc replace -f -
To create a new secret, run the following commands:
$ oc create secret generic router-certs --from-file=tls.crt=custom-router.crt --from-file=tls.key=custom-router.key --type=kubernetes.io/tls $ oc volume dc/router --add --mount-path=/etc/pki/tls/private --secret-name='router-certs' --name router-certs
Deploy the router.
$ oc rollout latest dc/router
4.2.17. Using Secured Routes
Currently, password protected key files are not supported. HAProxy prompts for a password upon starting and does not have a way to automate this process. To remove a passphrase from a keyfile, you can run:
# openssl rsa -in <passwordProtectedKey.key> -out <new.key>
Here is an example of how to use a secure edge terminated route with TLS termination occurring on the router before traffic is proxied to the destination. The secure edge terminated route specifies the TLS certificate and key information. The TLS certificate is served by the router front end.
First, start up a router instance:
# oc adm router --replicas=1 --service-account=router
Next, create a private key, csr and certificate for our edge secured route. The instructions on how to do that would be specific to your certificate authority and provider. For a simple self-signed certificate for a domain named www.example.test, see the example shown below:
# sudo openssl genrsa -out example-test.key 2048
#
# sudo openssl req -new -key example-test.key -out example-test.csr \
-subj "/C=US/ST=CA/L=Mountain View/O=OS3/OU=Eng/CN=www.example.test"
#
# sudo openssl x509 -req -days 366 -in example-test.csr \
-signkey example-test.key -out example-test.crtGenerate a route using the above certificate and key.
$ oc create route edge --service=my-service \
--hostname=www.example.test \
--key=example-test.key --cert=example-test.crt
route "my-service" createdLook at its definition.
$ oc get route/my-service -o yaml
apiVersion: v1
kind: Route
metadata:
name: my-service
spec:
host: www.example.test
to:
kind: Service
name: my-service
tls:
termination: edge
key: |
-----BEGIN PRIVATE KEY-----
[...]
-----END PRIVATE KEY-----
certificate: |
-----BEGIN CERTIFICATE-----
[...]
-----END CERTIFICATE-----
Make sure your DNS entry for www.example.test points to your router instance(s) and the route to your domain should be available. The example below uses curl along with a local resolver to simulate the DNS lookup:
# routerip="4.1.1.1" # replace with IP address of one of your router instances. # curl -k --resolve www.example.test:443:$routerip https://www.example.test/
4.2.18. Using Wildcard Routes (for a Subdomain)
The HAProxy router has support for wildcard routes, which are enabled by setting the ROUTER_ALLOW_WILDCARD_ROUTES environment variable to true. Any routes with a wildcard policy of Subdomain that pass the router admission checks will be serviced by the HAProxy router. Then, the HAProxy router exposes the associated service (for the route) per the route’s wildcard policy.
To change a route’s wildcard policy, you must remove the route and recreate it with the updated wildcard policy. Editing only the route’s wildcard policy in a route’s .yaml file does not work.
$ oc adm router --replicas=0 ... $ oc set env dc/router ROUTER_ALLOW_WILDCARD_ROUTES=true $ oc scale dc/router --replicas=1
Learn how to configure the web console for wildcard routes.
Using a Secure Wildcard Edge Terminated Route
This example reflects TLS termination occurring on the router before traffic is proxied to the destination. Traffic sent to any hosts in the subdomain example.org (*.example.org) is proxied to the exposed service.
The secure edge terminated route specifies the TLS certificate and key information. The TLS certificate is served by the router front end for all hosts that match the subdomain (*.example.org).
Start up a router instance:
$ oc adm router --replicas=0 --service-account=router $ oc set env dc/router ROUTER_ALLOW_WILDCARD_ROUTES=true $ oc scale dc/router --replicas=1
Create a private key, certificate signing request (CSR), and certificate for the edge secured route.
The instructions on how to do this are specific to your certificate authority and provider. For a simple self-signed certificate for a domain named
*.example.test, see this example:# sudo openssl genrsa -out example-test.key 2048 # # sudo openssl req -new -key example-test.key -out example-test.csr \ -subj "/C=US/ST=CA/L=Mountain View/O=OS3/OU=Eng/CN=*.example.test" # # sudo openssl x509 -req -days 366 -in example-test.csr \ -signkey example-test.key -out example-test.crtGenerate a wildcard route using the above certificate and key:
$ cat > route.yaml <<REOF apiVersion: v1 kind: Route metadata: name: my-service spec: host: www.example.test wildcardPolicy: Subdomain to: kind: Service name: my-service tls: termination: edge key: "$(perl -pe 's/\n/\\n/' example-test.key)" certificate: "$(perl -pe 's/\n/\\n/' example-test.cert)" REOF $ oc create -f route.yamlEnsure your DNS entry for
*.example.testpoints to your router instance(s) and the route to your domain is available.This example uses
curlwith a local resolver to simulate the DNS lookup:# routerip="4.1.1.1" # replace with IP address of one of your router instances. # curl -k --resolve www.example.test:443:$routerip https://www.example.test/ # curl -k --resolve abc.example.test:443:$routerip https://abc.example.test/ # curl -k --resolve anyname.example.test:443:$routerip https://anyname.example.test/
For routers that allow wildcard routes (ROUTER_ALLOW_WILDCARD_ROUTES set to true), there are some caveats to the ownership of a subdomain associated with a wildcard route.
Prior to wildcard routes, ownership was based on the claims made for a host name with the namespace with the oldest route winning against any other claimants. For example, route r1 in namespace ns1 with a claim for one.example.test would win over another route r2 in namespace ns2 for the same host name one.example.test if route r1 was older than route r2.
In addition, routes in other namespaces were allowed to claim non-overlapping hostnames. For example, route rone in namespace ns1 could claim www.example.test and another route rtwo in namespace d2 could claim c3po.example.test.
This is still the case if there are no wildcard routes claiming that same subdomain (example.test in the above example).
However, a wildcard route needs to claim all of the host names within a subdomain (host names of the form \*.example.test). A wildcard route’s claim is allowed or denied based on whether or not the oldest route for that subdomain (example.test) is in the same namespace as the wildcard route. The oldest route can be either a regular route or a wildcard route.
For example, if there is already a route eldest that exists in the ns1 namespace that claimed a host named owner.example.test and, if at a later point in time, a new wildcard route wildthing requesting for routes in that subdomain (example.test) is added, the claim by the wildcard route will only be allowed if it is the same namespace (ns1) as the owning route.
The following examples illustrate various scenarios in which claims for wildcard routes will succeed or fail.
In the example below, a router that allows wildcard routes will allow non-overlapping claims for hosts in the subdomain example.test as long as a wildcard route has not claimed a subdomain.
$ oc adm router ... $ oc set env dc/router ROUTER_ALLOW_WILDCARD_ROUTES=true $ oc project ns1 $ oc expose service myservice --hostname=owner.example.test $ oc expose service myservice --hostname=aname.example.test $ oc expose service myservice --hostname=bname.example.test $ oc project ns2 $ oc expose service anotherservice --hostname=second.example.test $ oc expose service anotherservice --hostname=cname.example.test $ oc project otherns $ oc expose service thirdservice --hostname=emmy.example.test $ oc expose service thirdservice --hostname=webby.example.test
In the example below, a router that allows wildcard routes will not allow the claim for owner.example.test or aname.example.test to succeed since the owning namespace is ns1.
$ oc adm router ... $ oc set env dc/router ROUTER_ALLOW_WILDCARD_ROUTES=true $ oc project ns1 $ oc expose service myservice --hostname=owner.example.test $ oc expose service myservice --hostname=aname.example.test $ oc project ns2 $ oc expose service secondservice --hostname=bname.example.test $ oc expose service secondservice --hostname=cname.example.test $ # Router will not allow this claim with a different path name `/p1` as $ # namespace `ns1` has an older route claiming host `aname.example.test`. $ oc expose service secondservice --hostname=aname.example.test --path="/p1" $ # Router will not allow this claim as namespace `ns1` has an older route $ # claiming host name `owner.example.test`. $ oc expose service secondservice --hostname=owner.example.test $ oc project otherns $ # Router will not allow this claim as namespace `ns1` has an older route $ # claiming host name `aname.example.test`. $ oc expose service thirdservice --hostname=aname.example.test
In the example below, a router that allows wildcard routes will allow the claim for `\*.example.test to succeed since the owning namespace is ns1 and the wildcard route belongs to that same namespace.
$ oc adm router ... $ oc set env dc/router ROUTER_ALLOW_WILDCARD_ROUTES=true $ oc project ns1 $ oc expose service myservice --hostname=owner.example.test $ # Reusing the route.yaml from the previous example. $ # spec: $ # host: www.example.test $ # wildcardPolicy: Subdomain $ oc create -f route.yaml # router will allow this claim.
In the example below, a router that allows wildcard routes will not allow the claim for `\*.example.test to succeed since the owning namespace is ns1 and the wildcard route belongs to another namespace cyclone.
$ oc adm router ... $ oc set env dc/router ROUTER_ALLOW_WILDCARD_ROUTES=true $ oc project ns1 $ oc expose service myservice --hostname=owner.example.test $ # Switch to a different namespace/project. $ oc project cyclone $ # Reusing the route.yaml from a prior example. $ # spec: $ # host: www.example.test $ # wildcardPolicy: Subdomain $ oc create -f route.yaml # router will deny (_NOT_ allow) this claim.
Similarly, once a namespace with a wildcard route claims a subdomain, only routes within that namespace can claim any hosts in that same subdomain.
In the example below, once a route in namespace ns1 with a wildcard route claims subdomain example.test, only routes in the namespace ns1 are allowed to claim any hosts in that same subdomain.
$ oc adm router ... $ oc set env dc/router ROUTER_ALLOW_WILDCARD_ROUTES=true $ oc project ns1 $ oc expose service myservice --hostname=owner.example.test $ oc project otherns $ # namespace `otherns` is allowed to claim for other.example.test $ oc expose service otherservice --hostname=other.example.test $ oc project ns1 $ # Reusing the route.yaml from the previous example. $ # spec: $ # host: www.example.test $ # wildcardPolicy: Subdomain $ oc create -f route.yaml # Router will allow this claim. $ # In addition, route in namespace otherns will lose its claim to host $ # `other.example.test` due to the wildcard route claiming the subdomain. $ # namespace `ns1` is allowed to claim for deux.example.test $ oc expose service mysecondservice --hostname=deux.example.test $ # namespace `ns1` is allowed to claim for deux.example.test with path /p1 $ oc expose service mythirdservice --hostname=deux.example.test --path="/p1" $ oc project otherns $ # namespace `otherns` is not allowed to claim for deux.example.test $ # with a different path '/otherpath' $ oc expose service otherservice --hostname=deux.example.test --path="/otherpath" $ # namespace `otherns` is not allowed to claim for owner.example.test $ oc expose service yetanotherservice --hostname=owner.example.test $ # namespace `otherns` is not allowed to claim for unclaimed.example.test $ oc expose service yetanotherservice --hostname=unclaimed.example.test
In the example below, different scenarios are shown, in which the owner routes are deleted and ownership is passed within and across namespaces. While a route claiming host eldest.example.test in the namespace ns1 exists, wildcard routes in that namespace can claim subdomain example.test. When the route for host eldest.example.test is deleted, the next oldest route senior.example.test would become the oldest route and would not affect any other routes. Once the route for host senior.example.test is deleted, the next oldest route junior.example.test becomes the oldest route and block the wildcard route claimant.
$ oc adm router ... $ oc set env dc/router ROUTER_ALLOW_WILDCARD_ROUTES=true $ oc project ns1 $ oc expose service myservice --hostname=eldest.example.test $ oc expose service seniorservice --hostname=senior.example.test $ oc project otherns $ # namespace `otherns` is allowed to claim for other.example.test $ oc expose service juniorservice --hostname=junior.example.test $ oc project ns1 $ # Reusing the route.yaml from the previous example. $ # spec: $ # host: www.example.test $ # wildcardPolicy: Subdomain $ oc create -f route.yaml # Router will allow this claim. $ # In addition, route in namespace otherns will lose its claim to host $ # `junior.example.test` due to the wildcard route claiming the subdomain. $ # namespace `ns1` is allowed to claim for dos.example.test $ oc expose service mysecondservice --hostname=dos.example.test $ # Delete route for host `eldest.example.test`, the next oldest route is $ # the one claiming `senior.example.test`, so route claims are unaffacted. $ oc delete route myservice $ # Delete route for host `senior.example.test`, the next oldest route is $ # the one claiming `junior.example.test` in another namespace, so claims $ # for a wildcard route would be affected. The route for the host $ # `dos.example.test` would be unaffected as there are no other wildcard $ # claimants blocking it. $ oc delete route seniorservice
4.2.19. Using the Container Network Stack
The OpenShift Container Platform router runs inside a container and the default behavior is to use the network stack of the host (i.e., the node where the router container runs). This default behavior benefits performance because network traffic from remote clients does not need to take multiple hops through user space to reach the target service and container.
Additionally, this default behavior enables the router to get the actual source IP address of the remote connection rather than getting the node’s IP address. This is useful for defining ingress rules based on the originating IP, supporting sticky sessions, and monitoring traffic, among other uses.
This host network behavior is controlled by the --host-network router command line option, and the default behaviour is the equivalent of using --host-network=true. If you wish to run the router with the container network stack, use the --host-network=false option when creating the router. For example:
$ oc adm router --service-account=router --host-network=false
Internally, this means the router container must publish the 80 and 443 ports in order for the external network to communicate with the router.
Running with the container network stack means that the router sees the source IP address of a connection to be the NATed IP address of the node, rather than the actual remote IP address.
On OpenShift Container Platform clusters using multi-tenant network isolation, routers on a non-default namespace with the --host-network=false option will load all routes in the cluster, but routes across the namespaces will not be reachable due to network isolation. With the --host-network=true option, routes bypass the container network and it can access any pod in the cluster. If isolation is needed in this case, then do not add routes across the namespaces.
4.2.20. Exposing Router Metrics
The HAProxy router metrics are, by default, exposed or published in Prometheus format for consumption by external metrics collection and aggregation systems (e.g. Prometheus, statsd). Metrics are also available directly from the HAProxy router in its own HTML format for viewing in a browser or CSV download. These metrics include the HAProxy native metrics and some controller metrics.
When you create a router using the following command, OpenShift Container Platform makes metrics available in Prometheus format on the stats port, by default 1936.
$ oc adm router --service-account=router
To extract the raw statistics in Prometheus format run the following command:
curl <user>:<password>@<router_IP>:<STATS_PORT>
For example:
$ curl admin:sLzdR6SgDJ@10.254.254.35:1936/metrics
You can get the information you need to access the metrics from the router service annotations:
$ oc edit service <router-name> apiVersion: v1 kind: Service metadata: annotations: prometheus.io/port: "1936" prometheus.io/scrape: "true" prometheus.openshift.io/password: IImoDqON02 prometheus.openshift.io/username: adminThe
prometheus.io/portis the stats port, by default 1936. You might need to configure your firewall to permit access. Use the previous user name and password to access the metrics. The path is /metrics.$ curl <user>:<password>@<router_IP>:<STATS_PORT> for example: $ curl admin:sLzdR6SgDJ@10.254.254.35:1936/metrics ... # HELP haproxy_backend_connections_total Total number of connections. # TYPE haproxy_backend_connections_total gauge haproxy_backend_connections_total{backend="http",namespace="default",route="hello-route"} 0 haproxy_backend_connections_total{backend="http",namespace="default",route="hello-route-alt"} 0 haproxy_backend_connections_total{backend="http",namespace="default",route="hello-route01"} 0 ... # HELP haproxy_exporter_server_threshold Number of servers tracked and the current threshold value. # TYPE haproxy_exporter_server_threshold gauge haproxy_exporter_server_threshold{type="current"} 11 haproxy_exporter_server_threshold{type="limit"} 500 ... # HELP haproxy_frontend_bytes_in_total Current total of incoming bytes. # TYPE haproxy_frontend_bytes_in_total gauge haproxy_frontend_bytes_in_total{frontend="fe_no_sni"} 0 haproxy_frontend_bytes_in_total{frontend="fe_sni"} 0 haproxy_frontend_bytes_in_total{frontend="public"} 119070 ... # HELP haproxy_server_bytes_in_total Current total of incoming bytes. # TYPE haproxy_server_bytes_in_total gauge haproxy_server_bytes_in_total{namespace="",pod="",route="",server="fe_no_sni",service=""} 0 haproxy_server_bytes_in_total{namespace="",pod="",route="",server="fe_sni",service=""} 0 haproxy_server_bytes_in_total{namespace="default",pod="docker-registry-5-nk5fz",route="docker-registry",server="10.130.0.89:5000",service="docker-registry"} 0 haproxy_server_bytes_in_total{namespace="default",pod="hello-rc-vkjqx",route="hello-route",server="10.130.0.90:8080",service="hello-svc-1"} 0 ...To get metrics in a browser:
Delete the following environment variables from the router deployment configuration file:
$ oc edit dc router - name: ROUTER_LISTEN_ADDR value: 0.0.0.0:1936 - name: ROUTER_METRICS_TYPE value: haproxy
Launch the stats window using the following URL in a browser, where the
STATS_PORTvalue is1936by default:http://admin:<Password>@<router_IP>:<STATS_PORT>
You can get the stats in CSV format by adding
;csvto the URL:For example:
http://admin:<Password>@<router_IP>:1936;csv
To get the router IP, admin name, and password:
oc describe pod <router_pod>
To suppress metrics collection:
$ oc adm router --service-account=router --stats-port=0
4.2.21. ARP Cache Tuning for Large-scale Clusters
In OpenShift Container Platform clusters with large numbers of routes (greater than the value of net.ipv4.neigh.default.gc_thresh3, which is 65536 by default), you must increase the default values of sysctl variables on each node in the cluster running the router pod to allow more entries in the ARP cache.
When the problem is occuring, the kernel messages would be similar to the following:
[ 1738.811139] net_ratelimit: 1045 callbacks suppressed [ 1743.823136] net_ratelimit: 293 callbacks suppressed
When this issue occurs, the oc commands might start to fail with the following error:
Unable to connect to the server: dial tcp: lookup <hostname> on <ip>:<port>: write udp <ip>:<port>-><ip>:<port>: write: invalid argument
To verify the actual amount of ARP entries for IPv4, run the following:
# ip -4 neigh show nud all | wc -l
If the number begins to approach the net.ipv4.neigh.default.gc_thresh3 threshold, increase the values. Get the current value by running:
# sysctl net.ipv4.neigh.default.gc_thresh1 net.ipv4.neigh.default.gc_thresh1 = 128 # sysctl net.ipv4.neigh.default.gc_thresh2 net.ipv4.neigh.default.gc_thresh2 = 512 # sysctl net.ipv4.neigh.default.gc_thresh3 net.ipv4.neigh.default.gc_thresh3 = 1024
The following sysctl sets the variables to the OpenShift Container Platform current default values.
# sysctl net.ipv4.neigh.default.gc_thresh1=8192 # sysctl net.ipv4.neigh.default.gc_thresh2=32768 # sysctl net.ipv4.neigh.default.gc_thresh3=65536
To make these settings permanent, see this document.
4.2.22. Protecting Against DDoS Attacks
Add timeout http-request to the default HAProxy router image to protect the deployment against distributed denial-of-service (DDoS) attacks (for example, slowloris):
# and the haproxy stats socket is available at /var/run/haproxy.stats
global
stats socket ./haproxy.stats level admin
defaults
option http-server-close
mode http
timeout http-request 5s
timeout connect 5s 1
timeout server 10s
timeout client 30s- 1
- timeout http-request is set up to 5 seconds. HAProxy gives a client 5 seconds *to send its whole HTTP request. Otherwise, HAProxy shuts the connection with *an error.
Also, when the environment variable ROUTER_SLOWLORIS_TIMEOUT is set, it limits the amount of time a client has to send the whole HTTP request. Otherwise, HAProxy will shut down the connection.
Setting the environment variable allows information to be captured as part of the router’s deployment configuration and does not require manual modification of the template, whereas manually adding the HAProxy setting requires you to rebuild the router pod and maintain your router template file.
Using annotations implements basic DDoS protections in the HAProxy template router, including the ability to limit the:
- number of concurrent TCP connections
- rate at which a client can request TCP connections
- rate at which HTTP requests can be made
These are enabled on a per route basis because applications can have extremely different traffic patterns.
| Setting | Description |
|---|---|
|
| Enables the settings be configured (when set to true, for example). |
|
| The number of concurrent TCP connections that can be made by the same IP address on this route. |
|
| The number of TCP connections that can be opened by a client IP. |
|
| The number of HTTP requests that a client IP can make in a 3-second period. |
4.3. Deploying a Customized HAProxy Router
4.3.1. Overview
The default HAProxy router is intended to satisfy the needs of most users. However, it does not expose all of the capability of HAProxy. Therefore, users may need to modify the router for their own needs.
You may need to implement new features within the application back-ends, or modify the current operation. The router plug-in provides all the facilities necessary to make this customization.
The router pod uses a template file to create the needed HAProxy configuration file. The template file is a golang template. When processing the template, the router has access to OpenShift Container Platform information, including the router’s deployment configuration, the set of admitted routes, and some helper functions.
When the router pod starts, and every time it reloads, it creates an HAProxy configuration file, and then it starts HAProxy. The HAProxy configuration manual describes all of the features of HAProxy and how to construct a valid configuration file.
A configMap can be used to add the new template to the router pod. With this approach, the router deployment configuration is modified to mount the configMap as a volume in the router pod. The TEMPLATE_FILE environment variable is set to the full path name of the template file in the router pod.
Alternatively, you can build a custom router image and use it when deploying some or all of your routers. There is no need for all routers to run the same image. To do this, modify the haproxy-template.config file, and rebuild the router image. The new image is pushed to the cluster’s Docker repository, and the router’s deployment configuration image: field is updated with the new name. When the cluster is updated, the image needs to be rebuilt and pushed.
In either case, the router pod starts with the template file.
4.3.2. Obtaining the Router Configuration Template
The HAProxy template file is fairly large and complex. For some changes, it may be easier to modify the existing template rather than writing a complete replacement. You can obtain a haproxy-config.template file from a running router by running this on master, referencing the router pod:
# oc get po NAME READY STATUS RESTARTS AGE router-2-40fc3 1/1 Running 0 11d # oc rsh router-2-40fc3 cat haproxy-config.template > haproxy-config.template # oc rsh router-2-40fc3 cat haproxy.config > haproxy.config
Alternatively, you can log onto the node that is running the router:
# docker run --rm --interactive=true --tty --entrypoint=cat \
registry.access.redhat.com/openshift3/ose-haproxy-router:v3.7 haproxy-config.templateThe image name is from docker images.
Save this content to a file for use as the basis of your customized template. The saved haproxy.config shows what is actually running.
4.3.3. Modifying the Router Configuration Template
4.3.3.1. Background
The template is based on the golang template. It can reference any of the environment variables in the router’s deployment configuration, any configuration information that is described below, and router provided helper functions.
The structure of the template file mirrors the resulting HAProxy configuration file. As the template is processed, anything not surrounded by {{" something "}} is directly copied to the configuration file. Passages that are surrounded by {{" something "}} are evaluated. The resulting text, if any, is copied to the configuration file.
4.3.3.2. Go Template Actions
The define action names the file that will contain the processed template.
{{define "/var/lib/haproxy/conf/haproxy.config"}}pipeline{{end}}| Function | Meaning |
|---|---|
|
| Returns the list of valid endpoints. When action is "shuffle", the order of endpoints is randomized. |
|
| Tries to get the named environment variable from the pod. If it is not defined or empty, it returns the optional second argument. Otherwise, it returns an empty string. |
|
| The first argument is a string that contains the regular expression, the second argument is the variable to test. Returns a Boolean value indicating whether the regular expression provided as the first argument matches the string provided as the second argument. |
|
| Determines if a given variable is an integer. |
|
| Compares a given string to a list of allowed strings. Returns first match scanning left to right through the list. |
|
| Compares a given string to a list of allowed strings. Returns "true" if the string is an allowed value, otherwise returns false. |
|
| Generates a regular expression matching the route hosts (and paths). The first argument is the host name, the second is the path, and the third is a wildcard Boolean. |
|
| Generates host name to use for serving/matching certificates. First argument is the host name and the second is the wildcard Boolean. |
|
| Determines if a given variable contains "true". |
These functions are provided by the HAProxy template router plug-in.
4.3.3.3. Router Provided Information
This section reviews the OpenShift Container Platform information that the router makes available to the template. The router configuration parameters are the set of data that the HAProxy router plug-in is given. The fields are accessed by (dot) .Fieldname.
The tables below the Router Configuration Parameters expand on the definitions of the various fields. In particular, .State has the set of admitted routes.
| Field | Type | Description |
|---|---|---|
|
| string | The directory that files will be written to, defaults to /var/lib/containers/router |
|
|
| The routes. |
|
|
| The service lookup. |
|
| string | Full path name to the default certificate in pem format. |
|
|
| Peers. |
|
| string | User name to expose stats with (if the template supports it). |
|
| string | Password to expose stats with (if the template supports it). |
|
| int | Port to expose stats with (if the template supports it). |
|
| bool | Whether the router should bind the default ports. |
| Field | Type | Description |
|---|---|---|
|
| string | The user-specified name of the route. |
|
| string | The namespace of the route. |
|
| string |
The host name. For example, |
|
| string |
Optional path. For example, |
|
|
| The termination policy for this back-end; drives the mapping files and router configuration. |
|
|
| Certificates used for securing this back-end. Keyed by the certificate ID. |
|
|
| Indicates the status of configuration that needs to be persisted. |
|
| string | Indicates the port the user wants to expose. If empty, a port will be selected for the service. |
|
|
|
Indicates desired behavior for insecure connections to an edge-terminated route: |
|
| string | Hash of the route + namespace name used to obscure the cookie ID. |
|
| bool | Indicates this service unit needing wildcard support. |
|
|
| Annotations attached to this route. |
|
|
| Collection of services that support this route, keyed by service name and valued on the weight attached to it with respect to other entries in the map. |
|
| int |
Count of the |
The ServiceAliasConfig is a route for a service. Uniquely identified by host + path. The default template iterates over routes using {{range $cfgIdx, $cfg := .State }}. Within such a {{range}} block, the template can refer to any field of the current ServiceAliasConfig using $cfg.Field.
| Field | Type | Description |
|---|---|---|
|
| string |
Name corresponds to a service name + namespace. Uniquely identifies the |
|
|
| Endpoints that back the service. This translates into a final back-end implementation for routers. |
ServiceUnit is an encapsulation of a service, the endpoints that back that service, and the routes that point to the service. This is the data that drives the creation of the router configuration files
| Field | Type |
|---|---|
|
| string |
|
| string |
|
| string |
|
| string |
|
| string |
|
| string |
|
| bool |
Endpoint is an internal representation of a Kubernetes endpoint.
| Field | Type | Description |
|---|---|---|
|
| string |
Represents a public/private key pair. It is identified by an ID, which will become the file name. A CA certificate will not have a |
|
| string | Indicates that the necessary files for this configuration have been persisted to disk. Valid values: "saved", "". |
| Field | Type | Description |
|---|---|---|
| ID | string | |
| Contents | string | The certificate. |
| PrivateKey | string | The private key. |
| Field | Type | Description |
|---|---|---|
|
| string | Dictates where the secure communication will stop. |
|
| string | Indicates the desired behavior for insecure connections to a route. While each router may make its own decisions on which ports to expose, this is normally port 80. |
TLSTerminationType and InsecureEdgeTerminationPolicyType dictate where the secure communication will stop.
| Constant | Value | Meaning |
|---|---|---|
|
|
| Terminate encryption at the edge router. |
|
|
| Terminate encryption at the destination, the destination is responsible for decrypting traffic. |
|
|
| Terminate encryption at the edge router and re-encrypt it with a new certificate supplied by the destination. |
| Type | Meaning |
|---|---|
|
| Traffic is sent to the server on the insecure port (default). |
|
| No traffic is allowed on the insecure port. |
|
| Clients are redirected to the secure port. |
None ("") is the same as Disable.
4.3.3.4. Annotations
Each route can have annotations attached. Each annotation is just a name and a value.
apiVersion: v1
kind: Route
metadata:
annotations:
haproxy.router.openshift.io/timeout: 5500ms
[...]
The name can be anything that does not conflict with existing Annotations. The value is any string. The string can have multiple tokens separated by a space. For example, aa bb cc. The template uses {{index}} to extract the value of an annotation. For example:
{{$balanceAlgo := index $cfg.Annotations "haproxy.router.openshift.io/balance"}}This is an example of how this could be used for mutual client authorization.
{{ with $cnList := index $cfg.Annotations "whiteListCertCommonName" }}
{{ if ne $cnList "" }}
acl test ssl_c_s_dn(CN) -m str {{ $cnList }}
http-request deny if !test
{{ end }}
{{ end }}Then, you can handle the white-listed CNs with this command.
$ oc annotate route <route-name> --overwrite whiteListCertCommonName="CN1 CN2 CN3"
See Route-specific Annotations for more information.
4.3.3.5. Environment Variables
The template can use any environment variables that exist in the router pod. The environment variables can be set in the deployment configuration. New environment variables can be added.
They are referenced by the env function:
{{env "ROUTER_MAX_CONNECTIONS" "20000"}}
The first string is the variable, and the second string is the default when the variable is missing or nil. When ROUTER_MAX_CONNECTIONS is not set or is nil, 20000 is used. Environment variables are a map where the key is the environment variable name and the content is the value of the variable.
See Route-specific Environment variables for more information.
4.3.3.6. Example Usage
Here is a simple template based on the HAProxy template file.
Start with a comment:
{{/*
Here is a small example of how to work with templates
taken from the HAProxy template file.
*/}}
The template can create any number of output files. Use a define construct to create an output file. The file name is specified as an argument to define, and everything inside the define block up to the matching end is written as the contents of that file.
{{ define "/var/lib/haproxy/conf/haproxy.config" }}
global
{{ end }}
The above will copy global to the /var/lib/haproxy/conf/haproxy.config file, and then close the file.
Set up logging based on environment variables.
{{ with (env "ROUTER_SYSLOG_ADDRESS" "") }}
log {{.}} {{env "ROUTER_LOG_FACILITY" "local1"}} {{env "ROUTER_LOG_LEVEL" "warning"}}
{{ end }}
The env function extracts the value for the environment variable. If the environment variable is not defined or nil, the second argument is returned.
The with construct sets the value of "." (dot) within the with block to whatever value is provided as an argument to with. The with action tests Dot for nil. If not nil, the clause is processed up to the end. In the above, assume ROUTER_SYSLOG_ADDRESS contains /var/log/msg, ROUTER_LOG_FACILITY is not defined, and ROUTER_LOG_LEVEL contains info. The following will be copied to the output file:
log /var/log/msg local1 info
Each admitted route ends up generating lines in the configuration file. Use range to go through the admitted routes:
{{ range $cfgIdx, $cfg := .State }}
backend be_http_{{$cfgIdx}}
{{end}}
.State is a map of ServiceAliasConfig, where the key is the route name. range steps through the map and, for each pass, it sets $cfgIdx with the key, and sets `$cfg to point to the ServiceAliasConfig that describes the route. If there are two routes named myroute and hisroute, the above will copy the following to the output file:
backend be_http_myroute backend be_http_hisroute
Route Annotations, $cfg.Annotations, is also a map with the annotation name as the key and the content string as the value. The route can have as many annotations as desired and the use is defined by the template author. The user codes the annotation into the route and the template author customized the HAProxy template to handle the annotation.
The common usage is to index the annotation to get the value.
{{$balanceAlgo := index $cfg.Annotations "haproxy.router.openshift.io/balance"}}
The index extracts the value for the given annotation, if any. Therefore, `$balanceAlgo will contain the string associated with the annotation or nil. As above, you can test for a non-nil string and act on it with the with construct.
{{ with $balanceAlgo }}
balance $balanceAlgo
{{ end }}
Here when $balanceAlgo is not nil, balance $balanceAlgo is copied to the output file.
In a second example, you want to set a server timeout based on a timeout value set in an annotation.
$value := index $cfg.Annotations "haproxy.router.openshift.io/timeout"
The $value can now be evaluated to make sure it contains a properly constructed string. The matchPattern function accepts a regular expression and returns true if the argument satisfies the expression.
matchPattern "[1-9][0-9]*(us\|ms\|s\|m\|h\|d)?" $value
This would accept 5000ms but not 7y. The results can be used in a test.
{{if (matchPattern "[1-9][0-9]*(us\|ms\|s\|m\|h\|d)?" $value) }}
timeout server {{$value}}
{{ end }}It can also be used to match tokens:
matchPattern "roundrobin|leastconn|source" $balanceAlgo
Alternatively matchValues can be used to match tokens:
matchValues $balanceAlgo "roundrobin" "leastconn" "source"
4.3.4. Using a ConfigMap to Replace the Router Configuration Template
You can use a ConfigMap to customize the router instance without rebuilding the router image. The haproxy-config.template, reload-haproxy, and other scripts can be modified as well as creating and modifying router environment variables.
- Copy the haproxy-config.template that you want to modify as described above. Modify it as desired.
Create a ConfigMap:
$ oc create configmap customrouter --from-file=haproxy-config.template
The
customrouterConfigMap now contains a copy of the modified haproxy-config.template file.Modify the router deployment configuration to mount the ConfigMap as a file and point the
TEMPLATE_FILEenvironment variable to it. This can be done viaoc set envandoc volumecommands, or alternatively by editing the router deployment configuration.- Using
occommands $ oc volume dc/router --add --overwrite \ --name=config-volume \ --mount-path=/var/lib/haproxy/conf/custom \ --source='{"configMap": { "name": "customrouter"}}' $ oc set env dc/router \ TEMPLATE_FILE=/var/lib/haproxy/conf/custom/haproxy-config.template- Editing the Router Deployment Configuration
Use
oc edit dc routerto edit the router deployment configuration with a text editor.... - name: STATS_USERNAME value: admin - name: TEMPLATE_FILE 1 value: /var/lib/haproxy/conf/custom/haproxy-config.template image: openshift/origin-haproxy-routerp ... terminationMessagePath: /dev/termination-log volumeMounts: 2 - mountPath: /var/lib/haproxy/conf/custom name: config-volume dnsPolicy: ClusterFirst ... terminationGracePeriodSeconds: 30 volumes: 3 - configMap: name: customrouter name: config-volume ...Save the changes and exit the editor. This restarts the router.
- Using
4.3.5. Using Stick Tables
The following example customization can be used in a highly-available routing setup to use stick-tables that synchronize between peers.
Adding a Peer Section
In order to synchronize stick-tables amongst peers you must a define a peers section in your HAProxy configuration. This section determines how HAProxy will identify and connect to peers. The plug-in provides data to the template under the .PeerEndpoints variable to allow you to easily identify members of the router service. You may add a peer section to the haproxy-config.template file inside the router image by adding:
{{ if (len .PeerEndpoints) gt 0 }}
peers openshift_peers
{{ range $endpointID, $endpoint := .PeerEndpoints }}
peer {{$endpoint.TargetName}} {{$endpoint.IP}}:1937
{{ end }}
{{ end }}Changing the Reload Script
When using stick-tables, you have the option of telling HAProxy what it should consider the name of the local host in the peer section. When creating endpoints, the plug-in attempts to set the TargetName to the value of the endpoint’s TargetRef.Name. If TargetRef is not set, it will set the TargetName to the IP address. The TargetRef.Name corresponds with the Kubernetes host name, therefore you can add the -L option to the reload-haproxy script to identify the local host in the peer section.
peer_name=$HOSTNAME 1
if [ -n "$old_pid" ]; then
/usr/sbin/haproxy -f $config_file -p $pid_file -L $peer_name -sf $old_pid
else
/usr/sbin/haproxy -f $config_file -p $pid_file -L $peer_name
fi- 1
- Must match an endpoint target name that is used in the peer section.
Modifying Back Ends
Finally, to use the stick-tables within back ends, you can modify the HAProxy configuration to use the stick-tables and peer set. The following is an example of changing the existing back end for TCP connections to use stick-tables:
{{ if eq $cfg.TLSTermination "passthrough" }}
backend be_tcp_{{$cfgIdx}}
balance leastconn
timeout check 5000ms
stick-table type ip size 1m expire 5m{{ if (len $.PeerEndpoints) gt 0 }} peers openshift_peers {{ end }}
stick on src
{{ range $endpointID, $endpoint := $serviceUnit.EndpointTable }}
server {{$endpointID}} {{$endpoint.IP}}:{{$endpoint.Port}} check inter 5000ms
{{ end }}
{{ end }}After this modification, you can rebuild your router.
4.3.6. Rebuilding Your Router
In order to rebuild the router, you need copies of several files that are present on a running router. Make a work directory and copy the files from the router:
# mkdir - myrouter/conf # cd myrouter # oc get po NAME READY STATUS RESTARTS AGE router-2-40fc3 1/1 Running 0 11d # oc rsh router-2-40fc3 cat haproxy-config.template > conf/haproxy-config.template # oc rsh router-2-40fc3 cat error-page-503.http > conf/error-page-503.http # oc rsh router-2-40fc3 cat default_pub_keys.pem > conf/default_pub_keys.pem # oc rsh router-2-40fc3 cat ../Dockerfile > Dockerfile # oc rsh router-2-40fc3 cat ../reload-haproxy > reload-haproxy
You can edit or replace any of these files. However, conf/haproxy-config.template and reload-haproxy are the most likely to be modified.
After updating the files:
# docker build -t openshift/origin-haproxy-router-myversion . # docker tag openshift/origin-haproxy-router-myversion 172.30.243.98:5000/openshift/haproxy-router-myversion 1 # docker push 172.30.243.98:5000/openshift/origin-haproxy-router-pc:latest 2
To use the new router, edit the router deployment configuration either by changing the image: string or by adding the --images=<repo>/<image>:<tag> flag to the oc adm router command.
When debugging the changes, it is helpful to set imagePullPolicy: Always in the deployment configuration to force an image pull on each pod creation. When debugging is complete, you can change it back to imagePullPolicy: IfNotPresent to avoid the pull on each pod start.
4.4. Configuring the HAProxy Router to Use the PROXY Protocol
4.4.1. Overview
By default, the HAProxy router expects incoming connections to unsecure, edge, and re-encrypt routes to use HTTP. However, you can configure the router to expect incoming requests by using the PROXY protocol instead. This topic describes how to configure the HAProxy router and an external load balancer to use the PROXY protocol.
4.4.2. Why Use the PROXY Protocol?
When an intermediary service such as a proxy server or load balancer forwards an HTTP request, it appends the source address of the connection to the request’s "Forwarded" header in order to provide this information to subsequent intermediaries and to the back-end service to which the request is ultimately forwarded. However, if the connection is encrypted, intermediaries cannot modify the "Forwarded" header. In this case, the HTTP header will not accurately communicate the original source address when the request is forwarded.
To solve this problem, some load balancers encapsulate HTTP requests using the PROXY protocol as an alternative to simply forwarding HTTP. Encapsulation enables the load balancer to add information to the request without modifying the forwarded request itself. In particular, this means that the load balancer can communicate the source address even when forwarding an encrypted connection.
The HAProxy router can be configured to accept the PROXY protocol and decapsulate the HTTP request. Because the router terminates encryption for edge and re-encrypt routes, the router can then update the "Forwarded" HTTP header (and related HTTP headers) in the request, appending any source address that is communicated using the PROXY protocol.
The PROXY protocol and HTTP are incompatible and cannot be mixed. If you use a load balancer in front of the router, both must use either the PROXY protocol or HTTP. Configuring one to use one protocol and the other to use the other protocol will cause routing to fail.
4.4.3. Using the PROXY Protocol
By default, the HAProxy router does not use the PROXY protocol. The router can be configured using the ROUTER_USE_PROXY_PROTOCOL environment variable to expect the PROXY protocol for incoming connections:
Enable the PROXY Protocol
$ oc env dc/router ROUTER_USE_PROXY_PROTOCOL=true
Set the variable to any value other than true or TRUE to disable the PROXY protocol:
Disable the PROXY Protocol
$ oc env dc/router ROUTER_USE_PROXY_PROTOCOL=false
If you enable the PROXY protocol in the router, you must configure your load balancer in front of the router to use the PROXY protocol as well. Following is an example of configuring Amazon’s Elastic Load Balancer (ELB) service to use the PROXY protocol. This example assumes that ELB is forwarding ports 80 (HTTP), 443 (HTTPS), and 5000 (for the image registry) to the router running on one or more EC2 instances.
Configure Amazon ELB to Use the PROXY Protocol
To simplify subsequent steps, first set some shell variables:
$ lb='infra-lb' 1 $ instances=( 'i-079b4096c654f563c' ) 2 $ secgroups=( 'sg-e1760186' ) 3 $ subnets=( 'subnet-cf57c596' ) 4
Next, create the ELB with the appropriate listeners, security groups, and subnets.
NoteYou must configure all listeners to use the TCP protocol, not the HTTP protocol.
$ aws elb create-load-balancer --load-balancer-name "$lb" \ --listeners \ 'Protocol=TCP,LoadBalancerPort=80,InstanceProtocol=TCP,InstancePort=80' \ 'Protocol=TCP,LoadBalancerPort=443,InstanceProtocol=TCP,InstancePort=443' \ 'Protocol=TCP,LoadBalancerPort=5000,InstanceProtocol=TCP,InstancePort=5000' \ --security-groups $secgroups \ --subnets $subnets { "DNSName": "infra-lb-2006263232.us-east-1.elb.amazonaws.com" }Register your router instance or instances with the ELB:
$ aws elb register-instances-with-load-balancer --load-balancer-name "$lb" \ --instances $instances { "Instances": [ { "InstanceId": "i-079b4096c654f563c" } ] }Configure the ELB’s health check:
$ aws elb configure-health-check --load-balancer-name "$lb" \ --health-check 'Target=HTTP:1936/healthz,Interval=30,UnhealthyThreshold=2,HealthyThreshold=2,Timeout=5' { "HealthCheck": { "HealthyThreshold": 2, "Interval": 30, "Target": "HTTP:1936/healthz", "Timeout": 5, "UnhealthyThreshold": 2 } }Finally, create a load-balancer policy with the
ProxyProtocolattribute enabled, and configure it on the ELB’s TCP ports 80 and 443:$ aws elb create-load-balancer-policy --load-balancer-name "$lb" \ --policy-name "${lb}-ProxyProtocol-policy" \ --policy-type-name 'ProxyProtocolPolicyType' \ --policy-attributes 'AttributeName=ProxyProtocol,AttributeValue=true' $ for port in 80 443 do aws elb set-load-balancer-policies-for-backend-server \ --load-balancer-name "$lb" \ --instance-port "$port" \ --policy-names "${lb}-ProxyProtocol-policy" done
Verify the Configuration
You can examine the load balancer as follows to verify that the configuration is correct:
$ aws elb describe-load-balancers --load-balancer-name "$lb" |
jq '.LoadBalancerDescriptions| [.[]|.ListenerDescriptions]'
[
[
{
"Listener": {
"InstancePort": 80,
"LoadBalancerPort": 80,
"Protocol": "TCP",
"InstanceProtocol": "TCP"
},
"PolicyNames": ["infra-lb-ProxyProtocol-policy"] 1
},
{
"Listener": {
"InstancePort": 443,
"LoadBalancerPort": 443,
"Protocol": "TCP",
"InstanceProtocol": "TCP"
},
"PolicyNames": ["infra-lb-ProxyProtocol-policy"] 2
},
{
"Listener": {
"InstancePort": 5000,
"LoadBalancerPort": 5000,
"Protocol": "TCP",
"InstanceProtocol": "TCP"
},
"PolicyNames": [] 3
}
]
]Alternatively, if you already have an ELB configured, but it is not configured to use the PROXY protocol, you will need to change the existing listener for TCP port 80 to use the TCP protocol instead of HTTP (TCP port 443 should already be using the TCP protocol):
$ aws elb delete-load-balancer-listeners --load-balancer-name "$lb" \ --load-balancer-ports 80 $ aws elb create-load-balancer-listeners --load-balancer-name "$lb" \ --listeners 'Protocol=TCP,LoadBalancerPort=80,InstanceProtocol=TCP,InstancePort=80'
Verify the Protocol Updates
Verify that the protocol has been updated as follows:
$ aws elb describe-load-balancers --load-balancer-name "$lb" |
jq '[.LoadBalancerDescriptions[]|.ListenerDescriptions]'
[
[
{
"Listener": {
"InstancePort": 443,
"LoadBalancerPort": 443,
"Protocol": "TCP",
"InstanceProtocol": "TCP"
},
"PolicyNames": []
},
{
"Listener": {
"InstancePort": 5000,
"LoadBalancerPort": 5000,
"Protocol": "TCP",
"InstanceProtocol": "TCP"
},
"PolicyNames": []
},
{
"Listener": {
"InstancePort": 80,
"LoadBalancerPort": 80,
"Protocol": "TCP", 1
"InstanceProtocol": "TCP"
},
"PolicyNames": []
}
]
]- 1
- All listeners, including the listener for TCP port 80, should be using the TCP protocol.
Then, create a load-balancer policy and add it to the ELB as described in Step 5 above.
4.5. Using the F5 Router Plug-in
4.5.1. Overview
The F5 router plug-in is available starting in OpenShift Container Platform 3.0.2.
The F5 router plug-in is provided as a container image and run as a pod, just like the default HAProxy router.
Support relationships between F5 and Red Hat provide a full scope of support for F5 integration. F5 provides support for the F5 BIG-IP® product. Both F5 and Red Hat jointly support the integration with Red Hat OpenShift. While Red Hat helps with bug fixes and feature enhancements, all get communicated to F5 Networks where they are managed as part of their development cycles.
4.5.2. Prerequisites and Supportability
When deploying the F5 router plug-in, ensure you meet the following requirements:
A F5 host IP with:
- Credentials for API access
- SSH access via a private key
- An F5 user with Advanced Shell access
A virtual server for HTTP routes:
- HTTP profile must be http.
A virtual server with HTTP profile routes:
- HTTP profile must be http
- SSL Profile (client) must be clientssl
- SSL Profile (server) must be serverssl
For edge integration (not recommended):
- A working ramp node
- A working tunnel to the ramp node
For native integration:
- A host-internal IP capable of communicating with all nodes on the port 4789/UDP
- The sdn-services add-on license installed on the F5 host.
OpenShift Container Platform supports only the following F5 BIG-IP® versions:
- 11.x
- 12.x
The following features are not supported with F5 BIG-IP®:
- Wildcard routes together with re-encrypt routes - you must supply a certificate and a key in the route. If you provide a certificate, a key, and a certificate authority (CA), the CA is never used.
- A pool is created for all services, even for the ones with no associated route.
- Idling applications
-
Unencrypted HTTP traffic in redirect mode, with edge TLS termination. (
insecureEdgeTerminationPolicy: Redirect) -
Sharding, that is, having multiple
vserverson the F5. -
SSL cipher (
ROUTER_CIPHERS=modern/old) - Customizing the endpoint health checks for time-intervals and the type of checks.
- Serving F5 metrics by using a metrics server.
-
Specifying a different target port (
PreferPort/TargetPort) rather than the ones specified in the service. - Customizing the source IP whitelists, that is, allowing traffic for a route only from specific IP addresses.
-
Customizing timeout values, such as
max connect time, ortcp FIN timeout. - HA mode for the F5 BIG-IP®.
4.5.2.1. Configuring the Virtual Servers
As a prerequisite to working with the openshift-F5 integrated router, two virtual servers (one virtual server each for HTTP and HTTPS profiles, respectively) need to be set up in the F5 BIG-IP® appliance.
To set up a virtual server in the F5 BIG-IP® appliance, follow the instructions from F5.
While creating the virtual server, ensure the following settings are in place:
-
For the HTTP server, set the
ServicePortto'http'/80. -
For the HTTPS server, set the
ServicePortto'https'/443. - In the basic configuration, set the HTTP profile to /Common/http for both of the virtual servers.
For the HTTPS server, create a default client-ssl profile and select it for the SSL Profile (Client).
- To create the default client SSL profile, follow the instructions from F5, especially the Configuring the fallback (default) client SSL profile section, which discusses that the certificate/key pair is the default that will be served in the case that custom certificates are not provided for a route or server name.
4.5.3. Deploying the F5 Router
The F5 router must be run in privileged mode, because route certificates are copied using the scp command:
$ oc adm policy remove-scc-from-user hostnetwork -z router $ oc adm policy add-scc-to-user privileged -z router
Deploy the F5 router with the oc adm router command, but provide additional flags (or environment variables) specifying the following parameters for the F5 BIG-IP® host:
| Flag | Description |
|---|---|
|
|
Specifies that an F5 router should be launched (the default |
|
| Specifies the F5 BIG-IP® host’s management interface’s host name or IP address. |
|
| Specifies the F5 BIG-IP® user name (typically admin). The F5 BIG-IP user account must have access to the Advanced Shell (Bash) on the F5 BIG-IP system. |
|
| Specifies the F5 BIG-IP® password. |
|
| Specifies the name of the F5 virtual server for HTTP connections. This must be configured by the user prior to launching the router pod. |
|
| Specifies the name of the F5 virtual server for HTTPS connections. This must be configured by the user prior to launching the router pod. |
|
| Specifies the path to the SSH private key file for the F5 BIG-IP® host. Required to upload and delete key and certificate files for routes. |
|
| A Boolean flag that indicates that the F5 router should skip strict certificate verification with the F5 BIG-IP® host. |
|
| Specifies the F5 BIG-IP® partition path (the default is /Common). |
For example:
$ oc adm router \
--type=f5-router \
--external-host=10.0.0.2 \
--external-host-username=admin \
--external-host-password=mypassword \
--external-host-http-vserver=ose-vserver \
--external-host-https-vserver=https-ose-vserver \
--external-host-private-key=/path/to/key \
--host-network=false \
--service-account=router
As with the HAProxy router, the oc adm router command creates the service and deployment configuration objects, and thus the replication controllers and pod(s) in which the F5 router itself runs. The replication controller restarts the F5 router in case of crashes. Because the F5 router is watching routes, endpoints, and nodes and configuring F5 BIG-IP® accordingly, running the F5 router in this way, along with an appropriately configured F5 BIG-IP® deployment, should satisfy high-availability requirements.
4.5.4. F5 Router Partition Paths
Partition paths allow you to store your OpenShift Container Platform routing configuration in a custom F5 BIG-IP® administrative partition, instead of the default /Common partition. You can use custom administrative partitions to secure F5 BIG-IP® environments. This means that an OpenShift Container Platform-specific configuration stored in F5 BIG-IP® system objects reside within a logical container, allowing administrators to define access control policies on that specific administrative partition.
See the F5 BIG-IP® documentation for more information about administrative partitions.
To configure your OpenShift Container Platform for partition paths:
Optionally, perform some cleaning steps:
- Ensure F5 is configured to be able to switch to the /Common and /Custom paths.
-
Delete the static FDB of
vxlan5000. See the F5 BIG-IP® documentation for more information.
- Configure a virtual server for the custom partition.
Deploy the F5 router using the
--external-host-partition-pathflag to specify a partition path:$ oc adm router --external-host-partition-path=/OpenShift/zone1 ...
4.5.5. Setting Up F5 Native Integration
This section reviews how to set up F5 native integration with OpenShift Container Platform. The concepts of F5 appliance and OpenShift Container Platform connection and data flow of F5 native integration are discussed in the F5 Native Integration section of the Routes topic.
Only F5 BIG-IP® appliance version 12.x and above works with the native integration presented in this section. You also need sdn-services add-on license for the integration to work properly. For version 11.x, follow the instructions to set up a ramp node.
As of OpenShift Container Platform version 3.4, using native integration of F5 with OpenShift Container Platform does not require configuring a ramp node for F5 to be able to reach the pods on the overlay network as created by OpenShift SDN.
The F5 controller pod needs to be launched with enough information so that it can successfully directly connect to pods.
Create a ghost
hostsubneton the OpenShift Container Platform cluster:$ cat > f5-hostsubnet.yaml << EOF { "kind": "HostSubnet", "apiVersion": "v1", "metadata": { "name": "openshift-f5-node", "annotations": { "pod.network.openshift.io/assign-subnet": "true", "pod.network.openshift.io/fixed-vnid-host": "0" 1 } }, "host": "openshift-f5-node", "hostIP": "10.3.89.213" 2 } EOF $ oc create -f f5-hostsubnet.yamlDetermine the subnet allocated for the ghost
hostsubnetjust created:$ oc get hostsubnets NAME HOST HOST IP SUBNET openshift-f5-node openshift-f5-node 10.3.89.213 10.131.0.0/23 openshift-master-node openshift-master-node 172.17.0.2 10.129.0.0/23 openshift-node-1 openshift-node-1 172.17.0.3 10.128.0.0/23 openshift-node-2 openshift-node-2 172.17.0.4 10.130.0.0/23
-
Check the
SUBNETfor the newly createdhostsubnet. In this example,10.131.0.0/23. Get the entire pod network’s CIDR:
$ oc get clusternetwork
This value will be something like
10.128.0.0/14, noting the mask (14in this example).-
To construct the gateway address, pick any IP address from the
hostsubnet(for example,10.131.0.5). Use the mask of the pod network (14). The gateway address becomes:10.131.0.5/14. Launch the F5 controller pod, following these instructions. Additionally, allow the access to 'node' cluster resource for the service account and use the two new additional options for VXLAN native integration.
$ # Add policy to allow router to access nodes using the sdn-reader role $ oc adm policy add-cluster-role-to-user system:sdn-reader system:serviceaccount:default:router $ # Launch the router pod with vxlan-gw and F5's internal IP as extra arguments $ #--external-host-internal-ip=10.3.89.213 $ #--external-host-vxlan-gw=10.131.0.5/14 $ oc adm router \ --type=f5-router \ --external-host=10.3.89.90 \ --external-host-username=admin \ --external-host-password=mypassword \ --external-host-http-vserver=ose-vserver \ --external-host-https-vserver=https-ose-vserver \ --external-host-private-key=/path/to/key \ --service-account=router \ --host-network=false \ --external-host-internal-ip=10.3.89.213 \ --external-host-vxlan-gw=10.131.0.5/14NoteThe
external-host-usernameis a F5 BIG-IP user account with access to the Advanced Shell (Bash) on the F5 BIG-IP system.
The F5 setup is now ready, without the need to set up the ramp node.
Chapter 5. Deploying Red Hat CloudForms
5.1. Deploying {mgmt-app} on OpenShift Container Platform
5.1.1. Introduction
The OpenShift Container Platform installer includes the Ansible role openshift-management and playbooks for deploying Red Hat CloudForms 4.6 (CloudForms Management Engine 5.9, or CFME) on OpenShift Container Platform.
The current implementation is incompatible with the Technology Preview deployment process of Red Hat CloudForms 4.5 as described in OpenShift Container Platform 3.6 documentation.
When deploying Red Hat CloudForms on OpenShift Container Platform, there are two major decisions to make:
- Do you want an external or a containerized (also referred to as podified) PostgreSQL database?
- Which storage class will back your persistent volumes (PVs)?
For the first decision, you can deploy Red Hat CloudForms in one of two ways, depending on the location of the PostgreSQL database to be used by Red Hat CloudForms:
| Deployment Variant | Description |
|---|---|
| Fully containerized | All application services and the PostgreSQL database are run as pods on OpenShift Container Platform. |
| External database | The application utilizes an externally-hosted PostgreSQL database server, while all other services are ran as pods on OpenShift Container Platform. |
For the second decision, the openshift-management role provides customization options for overriding many default deployment parameters. This includes the following storage class options to back your PVs:
| Storage Class | Description |
|---|---|
| NFS (default) | Local, on cluster |
| NFS External | NFS somewhere else, like a storage appliance |
| Cloud Provider | Use automatic storage provisioning from your cloud provider (GCE or AWS) |
| Preconfigured (advanced) | Assumes you created everything ahead of time |
Topics in this guide include the requirements for running Red Hat CloudForms on OpenShift Container Platform, descriptions of the available configuration variables, and instructions on running the installer either during your initial OpenShift Container Platform installation or after your cluster has been provisioned.
5.2. Requirements for Red Hat CloudForms on OpenShift Container Platform
The default requirements are listed in the table below. These can be overridden by customizing template parameters.
The application performance will suffer, or possibly even fail to deploy, if these requirements are not satisfied.
| Item | Requirement | Description | Customization Parameter |
|---|---|---|---|
| Application Memory | ≥ 4.0 Gi | Minimum required memory for the application |
|
| Application Storage | ≥ 5.0 Gi | Minimum PV size required for the application |
|
| PostgreSQL Memory | ≥ 6.0 Gi | Minimum required memory for the database |
|
| PostgreSQL Storage | ≥ 15.0 Gi | Minimum PV size required for the database |
|
| Cluster Hosts | ≥ 3 | Number of hosts in your cluster | N/A |
To sum up these requirements:
- You must have several cluster nodes.
- Your cluster nodes must have lots of memory available.
- You must have several GiB’s of storage available, either locally or on your cloud provider.
- PV sizes can be changed by providing override values to template parameters.
5.3. Configuring Role Variables
5.3.1. Overview
The following sections describe role variables that may be used in your Ansible inventory file, which is used to control the behavior of the Red Hat CloudForms installation when running the installer.
5.3.2. General Variables
| Variable | Required | Default | Description |
|---|---|---|---|
|
| No |
|
Boolean, set to |
|
| Yes |
|
CFME 4.6 is currently available (not in beta), however this variable must be set to |
|
| Yes |
|
The deployment variant of Red Hat CloudForms to install. Currently, you must change it from the default |
|
| No |
| Namespace (project) for the Red Hat CloudForms installation. |
|
| No |
| Namespace (project) description. |
|
| No |
| Default management user name. Changing this value does not change the user name; only change this value if you have changed the name already and are running integration scripts (such as the script to add container providers). |
|
| No |
| Default management password. Changing this value does not change the password; only change this value if you have changed the password already and are running integration scripts (such as the script to add container providers). |
5.3.3. Customizing Template Parameters
You can use the openshift_management_template_parameters Ansible role variable to specify any template parameters you want to override in the application or PV templates.
For example, if you wanted to reduce the memory requirement of the PostgreSQL pod, then you could set the following:
openshift_management_template_parameters={'POSTGRESQL_MEM_REQ': '1Gi'}
When the Red Hat CloudForms template is processed, 1Gi will be used for the value of the POSTGRESQL_MEM_REQ template parameter.
Not all template parameters are present in both template variants (containerized or external database). For example, while the podified database template has a POSTGRESQL_MEM_REQ parameter, no such parameter is present in the external db template, as there is no need for this information due to there being no databases that require pods.
Therefore, be very careful if you are overriding template parameters. Including parameters not defined in a template will cause errors. If you do receive an error during the Ensure the Management App is created task, run the uninstall scripts first before running the installer again.
5.3.4. Database Variables
5.3.4.1. Containerized (Podified) Database
Any POSTGRES_* or DATABASE_* template parameters in the cfme-template.yaml file may be customized through the openshift_management_template_parameters hash in your inventory file..
5.3.4.2. External Database
Any POSTGRES_* or DATABASE_* template parameters in the cfme-template-ext-db.yaml file may be customized through the openshift_management_template_parameters hash in your inventory file..
External PostgreSQL databases require you to provide database connection parameters. You must set the required connection keys in the openshift_management_template_parameters parameter in your inventory. The following keys are required:
-
DATABASE_USER -
DATABASE_PASSWORD -
DATABASE_IP -
DATABASE_PORT(Most PostgreSQL servers run on port5432) -
DATABASE_NAME
Ensure your external database is running PostgreSQL 9.5 or you may not be able to deploy the CloudForms application successfully.
Your inventory would contain a line similar to:
[OSEv3:vars]
openshift_management_app_template=cfme-template-ext-db 1
openshift_management_template_parameters={'DATABASE_USER': 'root', 'DATABASE_PASSWORD': 'mypassword', 'DATABASE_IP': '10.10.10.10', 'DATABASE_PORT': '5432', 'DATABASE_NAME': 'cfme'}- 1
- Set
openshift_management_app_templateparameter tocfme-template-ext-db.
5.3.5. Storage Class Variables
| Variable | Required | Default | Description |
|---|---|---|---|
|
| No |
|
Storage type to use. Options are |
|
| No |
|
If you are using an external NFS server, such as a NetApp appliance, then you must set the host name here. Leave the value as |
|
| No |
| If you are using external NFS, then you can set the base path to the exports location here. For local NFS, you can also change this value if you want to change the default path used for local NFS exports. |
|
| No |
|
If you do not have an |
5.3.5.1. NFS (Default)
The NFS storage class is best suited for proof-of-concept and test deployments. It is also the default storage class for deployments. No additional configuration is required for this choice.
This storage class configures NFS on a cluster host (by default, the first master in the inventory file) to back the required PVs. The application requires a PV, and the database (which may be hosted externally) may require a second. PV minimum required sizes are 5GiB for the Red Hat CloudForms application, and 15GiB for the PostgreSQL database (20GiB minimum available space on a volume or partition if used specifically for NFS purposes).
Customization is provided through the following role variables:
-
openshift_management_storage_nfs_base_dir -
openshift_management_storage_nfs_local_hostname
5.3.5.2. NFS External
External NFS leans on pre-configured NFS servers to provide exports for the required PVs. For external NFS you must have a cfme-app and optionally a cfme-db (for containerized database) exports.
Configuration is provided through the following role variables:
-
openshift_management_storage_nfs_external_hostname -
openshift_management_storage_nfs_base_dir
The openshift_management_storage_nfs_external_hostname parameter must be set to the host name or IP of your external NFS server.
If /exports is not the parent directory to your exports then you must set the base directory via the openshift_management_storage_nfs_base_dir parameter.
For example, if your server export is /exports/hosted/prod/cfme-app, then you must set openshift_management_storage_nfs_base_dir=/exports/hosted/prod.
5.3.5.3. Cloud Provider
If you are using OpenShift Container Platform cloud provider integration for your storage class, Red Hat CloudForms can also use the cloud provider storage to back its required PVs. For this functionality to work, you must have configured the openshift_cloudprovider_kind variable (for AWS or GCE) and all associated parameters specific to your chosen cloud provider.
When the application is created using this storage class, the required PVs are automatically provisioned using the configured cloud provider storage integration.
There are no additional variables to configure the behavior of this storage class.
5.3.5.4. Preconfigured (Advanced)
The preconfigured storage class implies that you know exactly what you are doing and that all storage requirements have been taken care ahead of time. Typically this means that you have already created the correctly sized PVs. The installer will do nothing to modify any storage settings.
There are no additional variables to configure the behavior of this storage class.
5.4. Running the Installer
5.4.1. Deploying Red Hat CloudForms During or After OpenShift Container Platform Installation
You can choose to deploy Red Hat CloudForms either during initial OpenShift Container Platform installation or after the cluster has been provisioned:
Ensure the following are set in your inventory file under the
[OSEv3:vars]section:[OSEv3:vars] openshift_management_install_management=true openshift_management_install_beta=true 1- 1
- CFME 4.6 is currently available (not in beta), however this variable must be set to
trueto begin the installation. This requirement will be removed in an upcoming release. (BZ#1557909)
- Set any other Red Hat CloudForms role variables in your inventory file as described in Configuring Role Variables. Resources to assist in this are provided in Example Inventory Files.
Choose which playbook to run depending on whether OpenShift Container Platform is already provisioned:
- If you want to install Red Hat CloudForms at the same time you install your OpenShift Container Platform cluster, call the standard config.yml playbook as described in Running the Advanced Installation to begin the OpenShift Container Platform cluster and Red Hat CloudForms installation.
If you want to install Red Hat CloudForms on an already provisioned OpenShift Container Platform cluster, call the Red Hat CloudForms playbook directly to begin the installation:
# ansible-playbook -v [-i /path/to/inventory] \ /usr/share/ansible/openshift-ansible/playbooks/openshift-management/config.yml
5.4.2. Example Inventory Files
The following sections show example snippets of inventory files showing various configurations of Red Hat CloudForms on OpenShift Container Platform that can help you get started.
See Configuring Role Variables for complete variable descriptions.
5.4.2.1. All Defaults
This example is the simplest, using all of the default values and choices. This results in a fully-containerized (podified) Red Hat CloudForms installation. All application components, as well as the PostgreSQL database, are created as pods in OpenShift Container Platform:
[OSEv3:vars] openshift_management_app_template=cfme-template
5.4.2.2. External NFS Storage
This is as the previous example, except that instead of using local NFS services in the cluster, it uses an existing, external NFS server (such as a storage appliance). Note the two new parameters:
[OSEv3:vars] openshift_management_app_template=cfme-template openshift_management_storage_class=nfs_external 1 openshift_management_storage_nfs_external_hostname=nfs.example.com 2
If the external NFS host exports directories under a different parent directory, such as /exports/hosted/prod, add the following additional variable:
openshift_management_storage_nfs_base_dir=/exports/hosted/prod
5.4.2.3. Override PV Sizes
This example overrides the persistent volume (PV) sizes. PV sizes must be set via openshift_management_template_parameters, which ensures that the application and database are able to make claims on created PVs without interfering with each other:
[OSEv3:vars]
openshift_management_app_template=cfme-template
openshift_management_template_parameters={'APPLICATION_VOLUME_CAPACITY': '10Gi', 'DATABASE_VOLUME_CAPACITY': '25Gi'}5.4.2.4. Override Memory Requirements
In a test or proof-of-concept installation, you may need to reduce the application and database memory requirements to fit within your capacity. Note that reducing memory limits can result in reduced performance or a complete failure to initialize the application:
[OSEv3:vars]
openshift_management_app_template=cfme-template
openshift_management_template_parameters={'APPLICATION_MEM_REQ': '3000Mi', 'POSTGRESQL_MEM_REQ': '1Gi', 'ANSIBLE_MEM_REQ': '512Mi'}
This example instructs the installer to process the application template with the parameter APPLICATION_MEM_REQ set to 3000Mi, POSTGRESQL_MEM_REQ set to 1Gi, and ANSIBLE_MEM_REQ set to 512Mi.
These parameters can be combined with the parameters displayed in the previous example Override PV Sizes.
5.4.2.5. External PostgreSQL Database
To use an external database, you must change the openshift_management_app_template parameter value to cfme-template-ext-db.
Additionally, database connection information must be supplied using the openshift_management_template_parameters variable. See Configuring Role Variables for more details.
[OSEv3:vars]
openshift_management_app_template=cfme-template-ext-db
openshift_management_template_parameters={'DATABASE_USER': 'root', 'DATABASE_PASSWORD': 'mypassword', 'DATABASE_IP': '10.10.10.10', 'DATABASE_PORT': '5432', 'DATABASE_NAME': 'cfme'}Ensure your are running PostgreSQL 9.5 or you may not be able to deploy the application successfully.
5.5. Enabling Container Provider Integration
5.5.1. Adding a Single Container Provider
After deploying Red Hat CloudForms on OpenShift Container Platform as described in Running the Installer, there are two methods for enabling container provider integration. You can manually add OpenShift Container Platform as a container provider, or you can try the playbooks included with this role.
5.5.1.1. Adding Manually
See the following Red Hat CloudForms documentation for steps on manually adding your OpenShift Container Platform cluster as a container provider:
5.5.1.2. Adding Automatically
Automated container provider integration can be accomplished using the playbooks included with this role.
This playbook:
- Gathers the necessary authentication secrets.
- Finds the public routes to the Red Hat CloudForms application and the cluster API.
- Makes a REST call to add the OpenShift Container Platform cluster as a container provider.
To run the container provider playbook:
# ansible-playbook -v [-i /path/to/inventory] \
/usr/share/ansible/openshift-ansible/playbooks/openshift-management/add_container_provider.yml5.5.2. Multiple Container Providers
As well as providing playbooks to integrate your current OpenShift Container Platform cluster into your Red Hat CloudForms deployment, this role includes a script which allows you to add multiple container platforms as container providers in any arbitrary Red Hat CloudForms server. The container platforms can be OpenShift Container Platform or OpenShift Origin.
Using the multiple provider script requires manual configuration and setting an EXTRA_VARS parameter on the CLI when running the playbook.
5.5.2.1. Preparing the Script
To prepare the multiple provider script, complete the following manual configuration:
- Copy the /usr/share/ansible/openshift-ansible/roles/openshift_management/files/examples/container_providers.yml example somewhere, such as /tmp/cp.yml. You will be modifying this file.
-
If you changed your Red Hat CloudForms name or password, update the
hostname,user, andpasswordparameters in themanagement_serverkey in the container_providers.yml file that you copied. Fill in an entry under the
container_providerskey for each container platform cluster you want to add as container providers.The following parameters must be configured:
-
auth_key- This is the token of a service account that hascluster-adminprivileges. -
hostname- This is the host name that points to the cluster API. Each container provider must have a unique host name. -
name- This is the name of the cluster to be displayed in the Red Hat CloudForms server container providers overview page. This must be unique.
TipTo obtain the
auth_keybearer token from your clusters:$ oc serviceaccounts get-token -n management-infra management-admin
-
The following parameters may be optionally configured:
-
port- Update this key if your container platform cluster runs the API on a port other than8443. -
endpoint- You may enable SSL verification (verify_ssl) or change the validation setting tossl-with-validation. Support for custom trusted CA certificates is not currently available.
-
5.5.2.1.1. Example
As an example, consider the following scenario:
- You copied the container_providers.yml file to /tmp/cp.yml.
- You want to add two OpenShift Container Platform clusters.
-
Your Red Hat CloudForms server runs on
mgmt.example.com
For this scenario, you would customize /tmp/cp.yml as follows:
container_providers:
- connection_configurations:
- authentication: {auth_key: "<token>", authtype: bearer, type: AuthToken} 1
endpoint: {role: default, security_protocol: ssl-without-validation, verify_ssl: 0}
hostname: "<provider_hostname1>"
name: <display_name1>
port: 8443
type: "ManageIQ::Providers::Openshift::ContainerManager"
- connection_configurations:
- authentication: {auth_key: "<token>", authtype: bearer, type: AuthToken} 2
endpoint: {role: default, security_protocol: ssl-without-validation, verify_ssl: 0}
hostname: "<provider_hostname2>"
name: <display_name2>
port: 8443
type: "ManageIQ::Providers::Openshift::ContainerManager"
management_server:
hostname: "<hostname>"
user: <user_name>
password: <password>5.5.2.2. Running the Playbook
To run the multiple-providers integration script, you must provide the path to the container providers configuration file as an EXTRA_VARS parameter to the ansible-playbook command. Use the -e (or --extra-vars) parameter to set container_providers_config to the configuration file path:
# ansible-playbook -v [-i /path/to/inventory] \
-e container_providers_config=/tmp/cp.yml \
/usr/share/ansible/openshift-ansible/playbooks/openshift-management/add_many_container_providers.yml
After the playbook completes, you should find two new container providers in your Red Hat CloudForms service. Navigate to the Compute → Containers → Providers page to see an overview.
5.5.3. Refreshing Providers
After adding either a single or multiple container providers, the new provider(s) must be refreshed in Red Hat CloudForms to get all the latest data about the container provider and the containers being managed. This involves navigating to each provider in the Red Hat CloudForms web console and clicking a refresh button for each.
See the following Red Hat CloudForms documentation for steps:
5.6. Uninstalling Red Hat CloudForms
5.6.1. Running the Uninstall Playbook
You must upgrade your cluster to OpenShift Container Platform version 3.9.16 or later before you uninstall Red Hat CloudForms. If your use an earlier version, uninstalling Red Hat CloudForms will remove all PVs from your cluster.
To uninstall and erase a deployed Red Hat CloudForms installation from OpenShift Container Platform, run the following playbook:
# ansible-playbook -v [-i /path/to/inventory] \
/usr/share/ansible/openshift-ansible/playbooks/openshift-management/uninstall.ymlNFS export definitions and data stored on NFS exports are not automatically removed. You are urged to manually erase any data from old application or database deployments before attempting to initialize a new deployment.
5.6.2. Troubleshooting
Failure to erase old PostgreSQL data can result in cascading errors, causing the postgresql pod to enter a crashloopbackoff state. This blocks the cfme pod from ever starting. The cause of the crashloopbackoff is due to incorrect file permissions on the database NFS export created during a previous deployment.
To continue, erase all data from the PostgreSQL export and delete the pod (not the deployer pod). For example, if you had the following pods:
$ oc get pods NAME READY STATUS RESTARTS AGE httpd-1-cx7fk 1/1 Running 1 21h cfme-0 0/1 Running 1 21h memcached-1-vkc7p 1/1 Running 1 21h postgresql-1-deploy 1/1 Running 1 21h postgresql-1-6w2t4 0/1 CrashLoopBackOff 1 21h
Then you would:
- Erase the data from the database NFS export.
Run:
$ oc delete postgresql-1-6w2t4
The PostgreSQL deployer pod will try to scale up a new postgresql pod to replace the one you deleted. After the postgresql pod is running, the cfme pod will stop blocking and begin application initialization.
Chapter 6. Master and Node Configuration
The openshift start command and its subcommands (master to launch a master server and node to launch a node server) take a limited set of arguments that are sufficient for launching servers in a development or experimental environment.
However, these arguments are insufficient to describe and control the full set of configuration and security options that are necessary in a production environment. To provide those options, it is necessary to use the master and node configuration files:
- Master host files at /etc/origin/master/master-config.yaml
- Node host files at /etc/origin/node/node-config.yaml
These files define options including overriding the default plug-ins, connecting to etcd, automatically creating service accounts, building image names, customizing project requests, configuring volume plug-ins, and much more.
This topic covers the available options for customizing your OpenShift Container Platform master and node hosts, and shows you how to make changes to the configuration after installation.
These files are fully specified with no default values. Therefore, an empty value indicates that you want to start up with an empty value for that parameter. This makes it easy to reason about exactly what your configuration is, but it also makes it difficult to remember all of the options to specify. To make this easier, the configuration files can be created with the --write-config option and then used with the --config option.
6.1. Installation dependencies
For testing environments deployed via the quick install tool, one master should be sufficient. The quick installation method should not be used for production environments.
Production environments should be installed using the advanced install. In production environments, it is a good idea to use multiple masters for the purposes of high availability (HA). A cluster architecture of three masters is recommended, and HAproxy is the recommended solution for this.
If etcd is installed on the master hosts, you must configure your cluster to use at least three masters, because etcd would not be able to decide which one is authoritative. The only way to successfully run only two masters is if you install etcd on hosts other than the masters.
6.2. Configuring masters and nodes
The method you use to configure your master and node configuration files must match the method that was used to install your OpenShift Container Platform cluster. If you followed the:
- Advanced installation method using Ansible, then make your configuration changes in the Ansible playbook.
- Quick installation method, then make your changes manually in the configuration files themselves.
6.3. Making configuration changes using Ansible
For this section, familiarity with Ansible is assumed.
Only a portion of the available host configuration options are exposed to Ansible. After an OpenShift Container Platform install, Ansible creates an inventory file with some substituted values. Modifying this inventory file and re-running the Ansible installer playbook is how you customize your OpenShift Container Platform cluster.
While OpenShift Container Platform supports using Ansible as the advanced install method, using an Ansible playbook and inventory file, you can also use other management tools, such as Puppet, Chef, Salt).
Use Case: Configuring the cluster to use HTPasswd authentication
- This use case assumes you have already set up SSH keys to all the nodes referenced in the playbook.
The
htpasswdutility is in thehttpd-toolspackage:# yum install httpd-tools
To modify the Ansible inventory and make configuration changes:
Open the ./hosts inventory file:
Example 6.1. Sample inventory file:
[OSEv3:children] masters nodes [OSEv3:vars] ansible_ssh_user=cloud-user ansible_become=true openshift_deployment_type=openshift-enterprise [masters] ec2-52-6-179-239.compute-1.amazonaws.com openshift_ip=172.17.3.88 openshift_public_ip=52-6-179-239 openshift_hostname=master.example.com openshift_public_hostname=ose3-master.public.example.com containerized=True [nodes] ec2-52-6-179-239.compute-1.amazonaws.com openshift_ip=172.17.3.88 openshift_public_ip=52-6-179-239 openshift_hostname=master.example.com openshift_public_hostname=ose3-master.public.example.com containerized=True openshift_schedulable=False ec2-52-95-5-36.compute-1.amazonaws.com openshift_ip=172.17.3.89 openshift_public_ip=52.3.5.36 openshift_hostname=node.example.com openshift_public_hostname=ose3-node.public.example.com containerized=True
Add the following new variables to the
[OSEv3:vars]section of the file:# htpasswd auth openshift_master_identity_providers=[{'name': 'htpasswd_auth', 'login': 'true', 'challenge': 'true', 'kind': 'HTPasswdPasswordIdentityProvider', 'filename': '/etc/origin/master/htpasswd'}] # Defining htpasswd users openshift_master_htpasswd_users={'<name>': '<hashed-password>', '<name>': '<hashed-password>'} # or #openshift_master_htpasswd_file=<path/to/local/pre-generated/htpasswdfile>For HTPasswd authentication, you can use either the
openshift_master_htpasswd_usersvariable to create the specified user(s) and password(s) or theopenshift_master_htpasswd_filevariable to specify a pre-generated flat file (the htpasswd file) with the users and passwords already created.Because OpenShift Container Platform requires a hashed password to configure HTPasswd authentication, you can use the
htpasswdcommand, as shown in the following section, to generate the hashed password(s) for your user(s) or to create the flat file with the users and associated hashed passwords.The following example changes the authentication method from the default
deny allsetting tohtpasswdand use the specified file to generate user IDs and passwords for thejsmithandbloblawusers.# htpasswd auth openshift_master_identity_providers=[{'name': 'htpasswd_auth', 'login': 'true', 'challenge': 'true', 'kind': 'HTPasswdPasswordIdentityProvider', 'filename': '/etc/origin/master/htpasswd'}] # Defining htpasswd users openshift_master_htpasswd_users={'jsmith': '$apr1$wIwXkFLI$bAygtKGmPOqaJftB', 'bloblaw': '7IRJ$2ODmeLoxf4I6sUEKfiA$2aDJqLJe'} # or #openshift_master_htpasswd_file=<path/to/local/pre-generated/htpasswdfile>Re-run the ansible playbook for these modifications to take effect:
$ ansible-playbook -b -i ./hosts ~/src/openshift-ansible/playbooks/deploy_cluster.yml
The playbook updates the configuration, and restarts the OpenShift Container Platform master service to apply the changes.
You have now modified the master and node configuration files using Ansible, but this is just a simple use case. From here you can see which master and node configuration options are exposed to Ansible and customize your own Ansible inventory.
6.3.1. Using the htpasswd commmand
To configure the OpenShift Container Platform cluster to use HTPasswd authentication, you need at least one user with a hashed password to include in the inventory file.
You can:
- Generate the username and password to add directly to the ./hosts inventory file.
- Create a flat file to pass the credentials to the ./hosts inventory file.
To create a user and hashed password:
Run the following command to add the specified user:
$ htpasswd -n <user_name>
NoteYou can include the
-boption to supply the password on the command line:$ htpasswd -nb <user_name> <password>
Enter and confirm a clear-text password for the user.
For example:
$ htpasswd -n myuser New password: Re-type new password: myuser:$apr1$vdW.cI3j$WSKIOzUPs6Q
The command generates a hashed version of the password.
You can then use the hashed password when configuring HTPasswd authentication. The hashed password is the string after the :. In the above example,you would enter:
openshift_master_htpasswd_users={'myuser': '$apr1$wIwXkFLI$bAygtISk2eKGmqaJftB'}To create a flat file with a user name and hashed password:
Execute the following command:
$ htpasswd -c </path/to/users.htpasswd> <user_name>
NoteYou can include the
-boption to supply the password on the command line:$ htpasswd -c -b <user_name> <password>
Enter and confirm a clear-text password for the user.
For example:
htpasswd -c users.htpasswd user1 New password: Re-type new password: Adding password for user user1
The command generates a file that includes the user name and a hashed version of the user’s password.
You can then use the password file when configuring HTPasswd authentication.
For more information on the htpasswd command, see HTPasswd Identity Provider.
6.4. Making manual configuration changes
After installing OpenShift Container Platform using the quick install tool, you can make modifications to the master and node configuration files to customize your cluster.
Use Case: Configure the cluster to use HTPasswd authentication
To manually modify a configuration file:
- Open the configuration file you want to modify, which in this case is the /etc/origin/master/master-config.yaml file:
Add the following new variables to the
identityProvidersstanza of the file:oauthConfig: ... identityProviders: - name: my_htpasswd_provider challenge: true login: true mappingMethod: claim provider: apiVersion: v1 kind: HTPasswdPasswordIdentityProvider file: /path/to/users.htpasswd- Save your changes and close the file.
Restart the master for the changes to take effect:
$ systemctl restart atomic-openshift-master-api atomic-openshift-master-controllers
You have now manually modified the master and node configuration files, but this is just a simple use case. From here you can see all the master and node configuration options, and further customize your own cluster by making further modifications.
6.5. Master Configuration Files
This section reviews parameters mentioned in the master-config.yaml file.
You can create a new master configuration file to see the valid options for your installed version of OpenShift Container Platform.
Whenever you modify the master-config.yaml file, you must restart the master for the changes to take effect. See Restarting OpenShift Container Platform services.
6.5.1. Admission Control Configuration
| Parameter Name | Description |
|---|---|
|
| Contains the admission control plug-in configuration. OpenShift Container Platform has a configurable list of admission controller plug-ins that are triggered whenever API objects are created or modified. This option allows you to override the default list of plug-ins; for example, disabling some plug-ins, adding others, changing the ordering, and specifying configuration. Both the list of plug-ins and their configuration can be controlled from Ansible. |
|
|
Key-value pairs that will be passed directly to the Kube API server that match the API servers' command line arguments. These are not migrated, but if you reference a value that does not exist the server will not start. These values may override other settings in apiServerArguments: event-ttl: - "15m" |
|
|
Key-value pairs that will be passed directly to the Kube controller manager that match the controller manager’s command line arguments. These are not migrated, but if you reference a value that does not exist the server will not start. These values may override other settings in |
|
|
Used to enable or disable various admission plug-ins. When this type is present as the configuration object under |
|
| Allows specifying a configuration file per admission control plug-in. |
|
| A list of admission control plug-in names that will be installed on the master. Order is significant. If empty, a default list of plug-ins is used. |
|
|
Key-value pairs that will be passed directly to the Kube scheduler that match the scheduler’s command line arguments. These are not migrated, but if you reference a value that does not exist the server will not start. These values may override other settings in |
6.5.2. Asset Configuration
| Parameter Name | Description |
|---|---|
|
| If present, then the asset server starts based on the defined parameters. For example: assetConfig:
logoutURL: ""
masterPublicURL: https://master.ose32.example.com:8443
publicURL: https://master.ose32.example.com:8443/console/
servingInfo:
bindAddress: 0.0.0.0:8443
bindNetwork: tcp4
certFile: master.server.crt
clientCA: ""
keyFile: master.server.key
maxRequestsInFlight: 0
requestTimeoutSeconds: 0
|
|
|
To access the API server from a web application using a different host name, you must whitelist that host name by specifying |
|
| A list of features that should not be started. You will likely want to set this as null. It is very unlikely that anyone will want to manually disable features and that is not encouraged. |
|
| Files to serve from the asset server file system under a subcontext. |
|
| When set to true, tells the asset server to reload extension scripts and stylesheets for every request rather than only at startup. It lets you develop extensions without having to restart the server for every change. |
|
|
Key- (string) and value- (string) pairs that will be injected into the console under the global variable |
|
| File paths on the asset server files to load as scripts when the web console loads. |
|
| File paths on the asset server files to load as style sheets when the web console loads. |
|
| The public endpoint for logging (optional). |
|
| An optional, absolute URL to redirect web browsers to after logging out of the web console. If not specified, the built-in logout page is shown. |
|
| How the web console can access the OpenShift Container Platform server. |
|
| The public endpoint for metrics (optional). |
|
| URL of the asset server. |
6.5.3. Authentication and Authorization Configuration
| Parameter Name | Description |
|---|---|
|
| Holds authentication and authorization configuration options. |
|
| Indicates how many authentication results should be cached. If 0, the default cache size is used. |
|
| Indicates how long an authorization result should be cached. It takes a valid time duration string (e.g. "5m"). If empty, you get the default timeout. If zero (e.g. "0m"), caching is disabled. |
6.5.4. Controller Configuration
| Parameter Name | Description |
|---|---|
|
|
List of the controllers that should be started. If set to none, no controllers will start automatically. The default value is * which will start all controllers. When using *, you may exclude controllers by prepending a |
|
|
Enables controller election, instructing the master to attempt to acquire a lease before controllers start and renewing it within a number of seconds defined by this value. Setting this value non-negative forces |
|
| Instructs the master to not automatically start controllers, but instead to wait until a notification to the server is received before launching them. |
6.5.5. etcd Configuration
| Parameter Name | Description |
|---|---|
|
| The advertised host:port for client connections to etcd. |
|
| Contains information about how to connect to etcd. Specifies if etcd is run as embedded or non-embedded, and the hosts. The rest of the configuration is handled by the Ansible inventory. For example: etcdClientInfo: ca: ca.crt certFile: master.etcd-client.crt keyFile: master.etcd-client.key urls: - https://m1.aos.example.com:4001 |
|
| If present, then etcd starts based on the defined parameters. For example: etcdConfig:
address: master.ose32.example.com:4001
peerAddress: master.ose32.example.com:7001
peerServingInfo:
bindAddress: 0.0.0.0:7001
certFile: etcd.server.crt
clientCA: ca.crt
keyFile: etcd.server.key
servingInfo:
bindAddress: 0.0.0.0:4001
certFile: etcd.server.crt
clientCA: ca.crt
keyFile: etcd.server.key
storageDirectory: /var/lib/origin/openshift.local.etcd
|
|
| Contains information about how API resources are stored in etcd. These values are only relevant when etcd is the backing store for the cluster. |
|
| The path within etcd that the Kubernetes resources will be rooted under. This value, if changed, will mean existing objects in etcd will no longer be located. The default value is kubernetes.io. |
|
| The API version that Kubernetes resources in etcd should be serialized to. This value should not be advanced until all clients in the cluster that read from etcd have code that allows them to read the new version. |
|
| The path within etcd that the OpenShift Container Platform resources will be rooted under. This value, if changed, will mean existing objects in etcd will no longer be located. The default value is openshift.io. |
|
| API version that OS resources in etcd should be serialized to. This value should not be advanced until all clients in the cluster that read from etcd have code that allows them to read the new version. |
|
| The advertised host:port for peer connections to etcd. |
|
| Describes how to start serving the etcd peer. |
|
| Describes how to start serving. For example: servingInfo: bindAddress: 0.0.0.0:8443 bindNetwork: tcp4 certFile: master.server.crt clientCA: ca.crt keyFile: master.server.key maxRequestsInFlight: 500 requestTimeoutSeconds: 3600 |
|
| The path to the etcd storage directory. |
6.5.6. Grant Configuration
| Parameter Name | Description |
|---|---|
|
| Describes how to handle grants. |
|
| Auto-approves client authorization grant requests. |
|
| Auto-denies client authorization grant requests. |
|
| Prompts the user to approve new client authorization grant requests. |
|
| Determines the default strategy to use when an OAuth client requests a grant.This method will be used only if the specific OAuth client does not provide a strategy of their own. Valid grant handling methods are:
|
6.5.7. Image Configuration
| Parameter Name | Description |
|---|---|
|
| The format of the name to be built for the system component. |
|
| Determines if the latest tag will be pulled from the registry. |
6.5.8. Image Policy Configuration
| Parameter Name | Description |
|---|---|
|
| Allows scheduled background import of images to be disabled. |
|
| Controls the number of images that are imported when a user does a bulk import of a Docker repository. This number defaults to 5 to prevent users from importing large numbers of images accidentally. Set -1 for no limit. |
|
| The maximum number of scheduled image streams that will be imported in the background per minute. The default value is 60. |
|
| The minimum number of seconds that can elapse between when image streams scheduled for background import are checked against the upstream repository. The default value is 15 minutes. |
|
| Limits the docker registries that normal users may import images from. Set this list to the registries that you trust to contain valid Docker images and that you want applications to be able to import from. Users with permission to create Images or ImageStreamMappings via the API are not affected by this policy - typically only administrators or system integrations will have those permissions. |
|
|
Sets the hostname for the default internal image registry. The value must be in |
|
|
ExternalRegistryHostname sets the hostname for the default external image registry. The external hostname should be set only when the image registry is exposed externally. The value is used in |
6.5.9. Kubernetes Master Configuration
| Parameter Name | Description |
|---|---|
|
| A list of API levels that should be enabled on startup, v1 as examples. |
|
|
A map of groups to the versions (or |
|
| Contains information about how to connect to kubelets. |
|
| Contains information about how to connect to kubelet’s KubernetesMasterConfig. If present, then start the kubernetes master with this process. |
|
| The number of expected masters that should be running. This value defaults to 1 and may be set to a positive integer, or if set to -1, indicates this is part of a cluster. |
|
|
The public IP address of Kubernetes resources. If empty, the first result from |
|
| File name for the .kubeconfig file that describes how to connect this node to the master. |
|
| The range to use for assigning service public ports on a host. Default 30000-32767. |
|
| The subnet to use for assigning service IPs. |
|
| The list of nodes that are statically known. |
6.5.10. Network Configuration
Choose the CIDRs in the following parameters carefully, because the IPv4 address space is shared by all users of the nodes. OpenShift Container Platform reserves CIDRs from the IPv4 address space for its own use, and reserves CIDRs from the IPv4 address space for addresses that are shared between the external user and the cluster.
| Parameter Name | Description |
|---|---|
|
| The CIDR string to specify the global overlay network’s L3 space. This is reserved for the internal use of the cluster networking. |
|
|
Controls what values are acceptable for the service external IP field. If empty, no |
|
| The number of bits to allocate to each host’s subnet. For example, 8 would mean a /24 network on the host. |
|
|
Controls the range to assign ingress IPs from for services of type LoadBalancer on bare metal. It may contain a single CIDR that it will be allocated from. By default |
|
| The number of bits to allocate to each host’s subnet. For example, 8 would mean a /24 network on the host. |
|
| To be passed to the compiled-in-network plug-in. Many of the options here can be controlled in the Ansible inventory.
For Example: networkConfig:
clusterNetworks
- cidr: 10.3.0.0/16
hostSubnetLength: 8
networkPluginName: example/openshift-ovs-subnet
# serviceNetworkCIDR must match kubernetesMasterConfig.servicesSubnet
serviceNetworkCIDR: 179.29.0.0/16
|
|
| The name of the network plug-in to use. |
|
| The CIDR string to specify the service networks. |
6.5.11. OAuth Authentication Configuration
| Parameter Name | Description |
|---|---|
|
| Forces the provider selection page to render even when there is only a single provider. |
|
| Used for building valid client redirect URLs for external access. |
|
| A path to a file containing a go template used to render error pages during the authentication or grant flow If unspecified, the default error page is used. |
|
| Ordered list of ways for a user to identify themselves. |
|
| A path to a file containing a go template used to render the login page. If unspecified, the default login page is used. |
|
|
CA for verifying the TLS connection back to the |
|
| Used for building valid client redirect URLs for external access. |
|
| Used for making server-to-server calls to exchange authorization codes for access tokens. |
|
| If present, then the /oauth endpoint starts based on the defined parameters. For example: oauthConfig:
assetPublicURL: https://master.ose32.example.com:8443/console/
grantConfig:
method: auto
identityProviders:
- challenge: true
login: true
mappingMethod: claim
name: htpasswd_all
provider:
apiVersion: v1
kind: HTPasswdPasswordIdentityProvider
file: /etc/origin/openshift-passwd
masterCA: ca.crt
masterPublicURL: https://master.ose32.example.com:8443
masterURL: https://master.ose32.example.com:8443
sessionConfig:
sessionMaxAgeSeconds: 3600
sessionName: ssn
sessionSecretsFile: /etc/origin/master/session-secrets.yaml
tokenConfig:
accessTokenMaxAgeSeconds: 86400
authorizeTokenMaxAgeSeconds: 500
|
|
| Allows for customization of pages like the login page. |
|
| A path to a file containing a go template used to render the provider selection page. If unspecified, the default provider selection page is used. |
|
| Holds information about configuring sessions. |
|
| Allows you to customize pages like the login page. |
|
| Contains options for authorization and access tokens. |
6.5.12. Project Configuration
| Parameter Name | Description |
|---|---|
|
| Holds default project node label selector. |
|
| Holds information about project creation and defaults:
|
|
| The string presented to a user if they are unable to request a project via the project request API endpoint. |
|
| The template to use for creating projects in response to a projectrequest. It is in the format namespace/template and it is optional. If it is not specified, a default template is used. |
6.5.13. Scheduler Configuration
| Parameter Name | Description |
|---|---|
|
| Points to a file that describes how to set up the scheduler. If empty, you get the default scheduling rules |
6.5.14. Security Allocator Configuration
| Parameter Name | Description |
|---|---|
|
|
Defines the range of MCS categories that will be assigned to namespaces. The format is |
|
| Controls the automatic allocation of UIDs and MCS labels to a project. If nil, allocation is disabled. |
|
| Defines the total set of Unix user IDs (UIDs) that will be allocated to projects automatically, and the size of the block that each namespace gets. For example, 1000-1999/10 will allocate ten UIDs per namespace, and will be able to allocate up to 100 blocks before running out of space. The default is to allocate from 1 billion to 2 billion in 10k blocks (which is the expected size of the ranges container images will use once user namespaces are started). |
6.5.15. Service Account Configuration
| Parameter Name | Description |
|---|---|
|
| Controls whether or not to allow a service account to reference any secret in a namespace without explicitly referencing them. |
|
|
A list of service account names that will be auto-created in every namespace. If no names are specified, the |
|
| The CA for verifying the TLS connection back to the master. The service account controller will automatically inject the contents of this file into pods so they can verify connections to the master. |
|
|
A file containing a PEM-encoded private RSA key, used to sign service account tokens. If no private key is specified, the service account |
|
| A list of files, each containing a PEM-encoded public RSA key. If any file contains a private key, the public portion of the key is used. The list of public keys is used to verify presented service account tokens. Each key is tried in order until the list is exhausted or verification succeeds. If no keys are specified, no service account authentication will be available. |
|
| Holds options related to service accounts:
|
6.5.16. Serving Information Configuration
| Parameter Name | Description |
|---|---|
|
| Allows the DNS server on the master to answer queries recursively. Note that open resolvers can be used for DNS amplification attacks and the master DNS should not be made accessible to public networks. |
|
| The ip:port to serve on. |
|
| Controls limits and behavior for importing images. |
|
| A file containing a PEM-encoded certificate. |
|
| TLS cert information for serving secure traffic. |
|
| The certificate bundle for all the signers that you recognize for incoming client certificates. |
|
| If present, then start the DNS server based on the defined parameters. For example: dnsConfig: bindAddress: 0.0.0.0:8053 bindNetwork: tcp4 |
|
| Holds the domain suffix. |
|
| Holds the IP. |
|
|
A file containing a PEM-encoded private key for the certificate specified by |
|
| Provides overrides to the client connection used to connect to the master. This parameter is not supported. To set QPS and burst values, see Setting Node Queries per Second (QPS) Limits and Burst Values. |
|
| The number of concurrent requests allowed to the server. If zero, no limit. |
|
| A list of certificates to use to secure requests to specific host names. |
|
| The number of seconds before requests are timed out. The default is 60 minutes. If -1, there is no limit on requests. |
|
| The HTTP serving information for the assets. |
6.5.17. Volume Configuration
| Parameter Name | Description |
|---|---|
|
| A boolean to enable or disable dynamic provisioning. Default is true. |
| FSGroup |
Can be specified to enable a quota on local storage use per unique FSGroup ID. At present this is only implemented for emptyDir volumes, and if the underlying |
|
| Contains options for controlling local volume quota on the node. |
|
| Contains options for configuring volume plug-ins in the master node. |
|
| Contains options for configuring volumes on the node. |
|
| Contains options for configuring volume plug-ins in the node:
|
|
| The directory that volumes are stored under. |
6.5.18. Basic Audit
Audit provides a security-relevant chronological set of records documenting the sequence of activities that have affected system by individual users, administrators, or other components of the system.
Audit works at the API server level, logging all requests coming to the server. Each audit log contains two entries:
The request line containing:
- A Unique ID allowing to match the response line (see #2)
- The source IP of the request
- The HTTP method being invoked
- The original user invoking the operation
-
The impersonated user for the operation (
selfmeaning himself) -
The impersonated group for the operation (
lookupmeaning user’s group) - The namespace of the request or <none>
- The URI as requested
The response line containing:
- The unique ID from #1
- The response code
Example output for user admin asking for a list of pods:
AUDIT: id="5c3b8227-4af9-4322-8a71-542231c3887b" ip="127.0.0.1" method="GET" user="admin" as="<self>" asgroups="<lookup>" namespace="default" uri="/api/v1/namespaces/default/pods" AUDIT: id="5c3b8227-4af9-4322-8a71-542231c3887b" response="200"
The openshift_master_audit_config variable enables API service auditing. It takes an array of the following options:
| Parameter Name | Description |
|---|---|
|
|
A boolean to enable or disable audit logs. Default is |
|
| File path where the requests should be logged to. If not set, logs are printed to master logs. |
|
| Specifies maximum number of days to retain old audit log files based on the time stamp encoded in their filename. |
|
| Specifies the maximum number of old audit log files to retain. |
|
| Specifies maximum size in megabytes of the log file before it gets rotated. Defaults to 100MB. |
Example Audit Configuration
auditConfig: auditFilePath: "/var/lib/audit-ocp.log" enabled: true maximumFileRetentionDays: 10 maximumFileSizeMegabytes: 10 maximumRetainedFiles: 10
Advanced Setup for the Audit Log
If you want more advanced setup for the audit log, you can use:
openshift_master_audit_config={"enabled": true}
The directory in auditFilePath will be created if it does not exist.
openshift_master_audit_config={"enabled": true, "auditFilePath": "/var/lib/openpaas-oscp-audit/openpaas-oscp-audit.log", "maximumFileRetentionDays": 14, "maximumFileSizeMegabytes": 500, "maximumRetainedFiles": 5}6.5.19. Advanced Audit
The advanced audit feature provides several improvements over the basic audit functionality, including fine-grained events filtering and multiple output back ends.
To enable the advanced audit feature, provide the following values in the openshift_master_audit_config parameter
openshift_master_audit_config={"enabled": true, "auditFilePath": "/var/lib/oscp-audit/-oscp-audit.log", "maximumFileRetentionDays": 14, "maximumFileSizeMegabytes": 500, "maximumRetainedFiles": 5, "policyFile": "/etc/security/adv-audit.yaml", "logFormat":"json"}The policy file /etc/security/adv-audit.yaml must be available on each master node.
The following table contains additional options you can use.
| Parameter Name | Description |
|---|---|
|
| Path to the file that defines the audit policy configuration. |
|
| An embedded audit policy configuration. |
|
|
Specifies the format of the saved audit logs. Allowed values are |
|
|
Path to a |
|
|
Specifies the strategy for sending audit events. Allowed values are |
To enable the advanced audit feature, you must provide either policyFile orpolicyConfiguration describing the audit policy rules:
Sample Audit Policy Configuration
apiVersion: audit.k8s.io/v1beta1 kind: Policy rules: # Do not log watch requests by the "system:kube-proxy" on endpoints or services - level: None 1 users: ["system:kube-proxy"] 2 verbs: ["watch"] 3 resources: 4 - group: "" resources: ["endpoints", "services"] # Do not log authenticated requests to certain non-resource URL paths. - level: None userGroups: ["system:authenticated"] 5 nonResourceURLs: 6 - "/api*" # Wildcard matching. - "/version" # Log the request body of configmap changes in kube-system. - level: Request resources: - group: "" # core API group resources: ["configmaps"] # This rule only applies to resources in the "kube-system" namespace. # The empty string "" can be used to select non-namespaced resources. namespaces: ["kube-system"] 7 # Log configmap and secret changes in all other namespaces at the metadata level. - level: Metadata resources: - group: "" # core API group resources: ["secrets", "configmaps"] # Log all other resources in core and extensions at the request level. - level: Request resources: - group: "" # core API group - group: "extensions" # Version of group should NOT be included. # A catch-all rule to log all other requests at the Metadata level. - level: Metadata 8 # Log login failures from the web console or CLI. Review the logs and refine your policies. - level: Metadata nonResourceURLs: - /login* 9 - /oauth* 10
- 1 8
- There are four possible levels every event can be logged at:
-
None- Do not log events that match this rule. -
Metadata- Log request metadata (requesting user, time stamp, resource, verb, etc.), but not request or response body. This is the same level as the one used in basic audit. -
Request- Log event metadata and request body, but not response body. -
RequestResponse- Log event metadata, request, and response bodies.
-
- 2
- A list of users the rule applies to. An empty list implies every user.
- 3
- A list of verbs this rule applies to. An empty list implies every verb. This is Kubernetes verb associated with API requests (including
get,list,watch,create,update,patch,delete,deletecollection, andproxy). - 4
- A list of resources the rule applies to. An empty list implies every resource. Each resource is specified as a group it is assigned to (for example, an empty for Kubernetes core API, batch, build.openshift.io, etc.), and a resource list from that group.
- 5
- A list of groups the rule applies to. An empty list implies every group.
- 6
- A list of non-resources URLs the rule applies to.
- 7
- A list of namespaces the rule applies to. An empty list implies every namespace.
- 9
- Endpoint used by the web console.
- 10
- Endpoint used by the CLI.
For more information on advanced audit, see the Kubernetes documentation
6.5.20. Specifying TLS ciphers for etcd
You can specify the supported TLS ciphers to use in communication between the master and etcd servers.
On each etcd node, upgrade etcd:
# yum update etcd iptables-services
Confirm that your etcd version is 3.2.22 or later:
# etcd --version etcd Version: 3.2.22
On each master host, specify the ciphers to enable in the
/etc/origin/master/master-config.yamlfile:servingInfo: ... minTLSVersion: VersionTLS12 cipherSuites: - TLS_ECDHE_RSA_WITH_AES_128_GCM_SHA256 - TLS_RSA_WITH_AES_256_CBC_SHA - TLS_RSA_WITH_AES_128_CBC_SHA ...
On each master host, restart the master service:
# systemctl restart atomic-openshift-master-api atomic-openshift-master-controllers
Confirm that the cipher is applied. For example, for TLSv1.2 cipher
ECDHE-RSA-AES128-GCM-SHA256, run the following command:# openssl s_client -connect etcd1.example.com:2379 1 CONNECTED(00000003) depth=0 CN = etcd1.example.com verify error:num=20:unable to get local issuer certificate verify return:1 depth=0 CN = etcd1.example.com verify error:num=21:unable to verify the first certificate verify return:1 139905367488400:error:14094412:SSL routines:ssl3_read_bytes:sslv3 alert bad certificate:s3_pkt.c:1493:SSL alert number 42 139905367488400:error:140790E5:SSL routines:ssl23_write:ssl handshake failure:s23_lib.c:177: --- Certificate chain 0 s:/CN=etcd1.example.com i:/CN=etcd-signer@1529635004 --- Server certificate -----BEGIN CERTIFICATE----- MIIEkjCCAnqgAwIBAgIBATANBgkqhkiG9w0BAQsFADAhMR8wHQYDVQQDDBZldGNk ........ .... eif87qttt0Sl1vS8DG1KQO1oOBlNkg== -----END CERTIFICATE----- subject=/CN=etcd1.example.com issuer=/CN=etcd-signer@1529635004 --- Acceptable client certificate CA names /CN=etcd-signer@1529635004 Client Certificate Types: RSA sign, ECDSA sign Requested Signature Algorithms: RSA+SHA256:ECDSA+SHA256:RSA+SHA384:ECDSA+SHA384:RSA+SHA1:ECDSA+SHA1 Shared Requested Signature Algorithms: RSA+SHA256:ECDSA+SHA256:RSA+SHA384:ECDSA+SHA384:RSA+SHA1:ECDSA+SHA1 Peer signing digest: SHA384 Server Temp Key: ECDH, P-256, 256 bits --- SSL handshake has read 1666 bytes and written 138 bytes --- New, TLSv1/SSLv3, Cipher is ECDHE-RSA-AES128-GCM-SHA256 Server public key is 2048 bit Secure Renegotiation IS supported Compression: NONE Expansion: NONE No ALPN negotiated SSL-Session: Protocol : TLSv1.2 Cipher : ECDHE-RSA-AES128-GCM-SHA256 Session-ID: Session-ID-ctx: Master-Key: 1EFA00A91EE5FC5EDDCFC67C8ECD060D44FD3EB23D834EDED929E4B74536F273C0F9299935E5504B562CD56E76ED208D Key-Arg : None Krb5 Principal: None PSK identity: None PSK identity hint: None Start Time: 1529651744 Timeout : 300 (sec) Verify return code: 21 (unable to verify the first certificate)- 1
etcd1.example.comis the name of an etcd host.
6.6. Node Configuration Files
The following node-config.yaml file is a sample node configuration file that was generated with the default values as of writing. You can create a new node configuration file to see the valid options for your installed version of OpenShift Container Platform.
Example 6.2. Sample Node Configuration File
allowDisabledDocker: false apiVersion: v1 authConfig: authenticationCacheSize: 1000 authenticationCacheTTL: 5m authorizationCacheSize: 1000 authorizationCacheTTL: 5m dnsDomain: cluster.local dnsIP: 10.0.2.15 1 dockerConfig: execHandlerName: native imageConfig: format: openshift/origin-${component}:${version} latest: false iptablesSyncPeriod: 5s kind: NodeConfig masterKubeConfig: node.kubeconfig networkConfig: mtu: 1450 networkPluginName: "" nodeIP: "" nodeName: node1.example.com podManifestConfig: 2 path: "/path/to/pod-manifest-file" 3 fileCheckIntervalSeconds: 30 4 proxyArguments: proxy-mode: - iptables 5 volumeConfig: localQuota: perFSGroup: null6 servingInfo: bindAddress: 0.0.0.0:10250 bindNetwork: tcp4 certFile: server.crt clientCA: node-client-ca.crt keyFile: server.key namedCertificates: null volumeDirectory: /root/openshift.local.volumes
- 1
- Configures an IP address to be prepended to a pod’s /etc/resolv.conf by adding the address here.
- 2
- Allows pods to be placed directly on certain set of nodes, or on all nodes without going through the scheduler. You can then use pods to perform the same administrative tasks and support the same services on each node.
- 3
- Specifies the path for the pod manifest file or directory. If it is a directory, then it is expected to contain one or more manifest files. This is used by the Kubelet to create pods on the node.
- 4
- This is the interval (in seconds) for checking the manifest file for new data. The interval must be a positive value.
- 5
- The service proxy implementation to use.
- 6
- Preliminary support for local emptyDir volume quotas, set this value to a resource quantity representing the desired quota per FSGroup, per node. (i.e. 1Gi, 512Mi, etc) Currently requires that the volumeDirectory be on an XFS filesystem mounted with the 'gquota' option, and the matching security context contraint’s fsGroup type set to 'MustRunAs'.
The node configuration file determines the resources of a node. See the Allocating node resources section in the Cluster Administrator guide for more information.
6.6.1. Pod and Node Configuration
| Parameter Name | Description |
|---|---|
|
| The fully specified configuration starting an OpenShift Container Platform node. |
|
| Node may have multiple IPs, so this specifies the IP to use for pod traffic routing. If not specified, network parse/lookup on the nodeName is performed and the first non-loopback address is used. |
|
| The value used to identify this particular node in the cluster. If possible, this should be your fully qualified hostname. If you are describing a set of static nodes to the master, this value must match one of the values in the list. |
|
| Controls grace period for deleting pods on failed nodes. It takes valid time duration string. If empty, you get the default pod eviction timeout. |
|
| Specifies the client cert/key to use when proxying to pods. |
6.6.2. Docker Configuration
| Parameter Name | Description |
|---|---|
|
| If true, the kubelet will ignore errors from Docker. This means that a node can start on a machine that does not have docker started. |
|
| Holds Docker related configuration options |
|
| The handler to use for executing commands in Docker containers. |
6.6.3. Setting Node Queries per Second (QPS) Limits and Burst Values
The rate at which Kubelet talks to API server depends on Queries per Second (QPS) and burst values. The default values are good enough if there are limited pods running on each node. Provided there are enough CPU and memory resources on the node, the QPS and burst values can be tweaked in the /etc/origin/node/node-config.yaml file:
kubeletArguments: kube-api-qps: - "20" kube-api-burst: - "40"
Then restart OpenShift Container Platform node services.
The QPS and burst values above are defaults for OpenShift Container Platform.
6.6.4. Parallel Image Pulls with Docker 1.9+
If you are using Docker 1.9+, you may want to consider enabling parallel image pulling, as the default is to pull images one at a time.
There is a potential issue with data corruption prior to Docker 1.9. However, starting with 1.9, the corruption issue is resolved and it is safe to switch to parallel pulls.
kubeletArguments:
serialize-image-pulls:
- "false" 1- 1
- Change to true to disable parallel pulls. (This is the default config)
6.7. Passwords and Other Sensitive Data
For some authentication configurations, an LDAP bindPassword or OAuth clientSecret value is required. Instead of specifying these values directly in the master configuration file, these values may be provided as environment variables, external files, or in encrypted files.
Environment Variable Example
...
bindPassword:
env: BIND_PASSWORD_ENV_VAR_NAME
External File Example
...
bindPassword:
file: bindPassword.txt
Encrypted External File Example
...
bindPassword:
file: bindPassword.encrypted
keyFile: bindPassword.key
To create the encrypted file and key file for the above example:
$ oc adm ca encrypt --genkey=bindPassword.key --out=bindPassword.encrypted > Data to encrypt: B1ndPass0rd!
Run oc adm commands only from the first master listed in the Ansible host inventory file, by default /etc/ansible/hosts.
Encrypted data is only as secure as the decrypting key. Care should be taken to limit filesystem permissions and access to the key file.
6.8. Creating New Configuration Files
When defining an OpenShift Container Platform configuration from scratch, start by creating new configuration files.
For master host configuration files, use the openshift start command with the --write-config option to write the configuration files. For node hosts, use the oc adm create-node-config command to write the configuration files.
The following commands write the relevant launch configuration file(s), certificate files, and any other necessary files to the specified --write-config or --node-dir directory.
Generated certificate files are valid for two years, while the certification authority (CA) certificate is valid for five years. This can be altered with the --expire-days and --signer-expire-days options, but for security reasons, it is recommended to not make them greater than these values.
To create configuration files for an all-in-one server (a master and a node on the same host) in the specified directory:
$ openshift start --write-config=/openshift.local.config
To create a master configuration file and other required files in the specified directory:
$ openshift start master --write-config=/openshift.local.config/master
To create a node configuration file and other related files in the specified directory:
$ oc adm create-node-config \
--node-dir=/openshift.local.config/node-<node_hostname> \
--node=<node_hostname> \
--hostnames=<node_hostname>,<ip_address> \
--certificate-authority="/path/to/ca.crt" \
--signer-cert="/path/to/ca.crt" \
--signer-key="/path/to/ca.key"
--signer-serial="/path/to/ca.serial.txt"
--node-client-certificate-authority="/path/to/ca.crt"
When creating node configuration files, the --hostnames option accepts a comma-delimited list of every host name or IP address you want server certificates to be valid for.
6.9. Launching Servers Using Configuration Files
Once you have modified the master and/or node configuration files to your specifications, you can use them when launching servers by specifying them as an argument. Keep in mind that if you specify a configuration file, none of the other command line options you pass are respected.
To launch an all-in-one server using a master configuration and a node configuration file:
$ openshift start --master-config=/openshift.local.config/master/master-config.yaml --node-config=/openshift.local.config/node-<node_hostname>/node-config.yaml
To launch a master server using a master configuration file:
$ openshift start master --config=/openshift.local.config/master/master-config.yaml
To launch a node server using a node configuration file:
$ openshift start node --config=/openshift.local.config/node-<node_hostname>/node-config.yaml
6.10. Configuring Logging Levels
OpenShift Container Platform uses the systemd-journald.service to collect log messages for debugging.
The number of lines displayed in the web console is hard-coded at 5000 and cannot be changed. To see the entire log, use the CLI.
The logging uses five log message severities based on Kubernetes logging conventions, as follows:
The number of lines displayed in the web console is hard-coded at 5000 and cannot be changed. To see the entire log, use the CLI.
The logging uses five log message severities based on Kubernetes logging conventions, as follows:
| Option | Description |
|---|---|
| 0 | Errors and warnings only |
| 2 | Normal information |
| 4 | Debugging-level information |
| 6 | API-level debugging information (request / response) |
| 8 | Body-level API debugging information |
You can control which INFO messages are logged by setting the loglevel option in the in /etc/sysconfig/atomic-openshift-node, the /etc/sysconfig/atomic-openshift-master-api file and the /etc/sysconfig/atomic-openshift-master-controllers file. Configuring the logs to collect all messages can lead to large logs that are difficult to interpret and can take up excessive space. Collecting all messages should only be used in debug situations.
Messages with FATAL, ERROR, WARNING and some INFO severities appear in the logs regardless of the log configuration.
You can view logs for the master or the node system using the following command:
# journalctl -r -u <journal_name>
Use the -r option to show the newest entries first.
For example:
# journalctl -r -u atomic-openshift-master-controllers # journalctl -r -u atomic-openshift-master-api # journalctl -r -u atomic-openshift-node.service
To change the logging level:
- Edit the /etc/sysconfig/atomic-openshift-master file for the master or /etc/sysconfig/atomic-openshift-node file for the nodes.
Enter a value from the Log Level Options table above in the
OPTIONS=--loglevel=field.For example:
OPTIONS=--loglevel=4
- Restart the master or node host as appropriate. See Restarting OpenShift Container Platform services.
After the restart, all new log messages will conform to the new setting. Older messages do not change.
The default log level can be set using the Advanced Install. For more information, see Cluster Variables.
The following examples are excerpts from a master journald log at various log levels. Timestamps and system information have been removed from these examples.
Excerpt of journalctl -u atomic-openshift-master-controllers.service output at loglevel=0
4897 plugins.go:77] Registered admission plugin "NamespaceLifecycle"
4897 start_master.go:290] Warning: assetConfig.loggingPublicURL: Invalid value: "": required to view aggregated container logs in the console, master start will continue.
4897 start_master.go:290] Warning: assetConfig.metricsPublicURL: Invalid value: "": required to view cluster metrics in the console, master start will continue.
4897 start_master.go:290] Warning: aggregatorConfig.proxyClientInfo: Invalid value: "": if no client certificate is specified, the aggregator will be unable to proxy to remote servers,
4897 start_master.go:412] Starting controllers on 0.0.0.0:8444 (v3.7.14)
4897 start_master.go:416] Using images from "openshift3/ose-<component>:v3.7.14"
4897 standalone_apiserver.go:106] Started health checks at 0.0.0.0:8444
4897 plugins.go:77] Registered admission plugin "NamespaceLifecycle"
4897 configgetter.go:53] Initializing cache sizes based on 0MB limit
4897 leaderelection.go:105] Attempting to acquire openshift-master-controllers lease as master-bkr-hv03-guest44.dsal.lab.eng.bos.redhat.com-10.19.41.74-xtz6lbqb, renewing every 3s, hold
4897 leaderelection.go:179] attempting to acquire leader lease...
systemd[1]: Started Atomic OpenShift Master Controllers.
4897 leaderelection.go:189] successfully acquired lease kube-system/openshift-master-controllers
4897 event.go:218] Event(v1.ObjectReference{Kind:"ConfigMap", Namespace:"kube-system", Name:"openshift-master-controllers", UID:"aca86731-ffbe-11e7-8d33-525400c845a8", APIVersion:"v1",
4897 start_master.go:627] Started serviceaccount-token controller
4897 factory.go:351] Creating scheduler from configuration: {{ } [{NoVolumeZoneConflict <nil>} {MaxEBSVolumeCount <nil>} {MaxGCEPDVolumeCount <nil>} {MaxAzureDiskVolumeCount <nil>} {Mat
4897 factory.go:360] Registering predicate: NoVolumeZoneConflict
4897 plugins.go:145] Predicate type NoVolumeZoneConflict already registered, reusing.
4897 factory.go:360] Registering predicate: MaxEBSVolumeCount
4897 plugins.go:145] Predicate type MaxEBSVolumeCount already registered, reusing.
4897 factory.go:360] Registering predicate: MaxGCEPDVolumeCount
Excerpt of journalctl -u atomic-openshift-master-controllers.service output at loglevel=2
4897 master.go:47] Initializing SDN master of type "redhat/openshift-ovs-subnet" 4897 master.go:107] Created ClusterNetwork default (network: "10.128.0.0/14", hostSubnetBits: 9, serviceNetwork: "172.30.0.0/16", pluginName: "redhat/openshift-ovs-subnet") 4897 start_master.go:690] Started "openshift.io/sdn" 4897 start_master.go:680] Starting "openshift.io/service-serving-cert" 4897 controllermanager.go:466] Started "namespace" 4897 controllermanager.go:456] Starting "daemonset" 4897 controller_utils.go:1025] Waiting for caches to sync for namespace controller 4897 shared_informer.go:298] resyncPeriod 120000000000 is smaller than resyncCheckPeriod 600000000000 and the informer has already started. Changing it to 600000000000 4897 start_master.go:690] Started "openshift.io/service-serving-cert" 4897 start_master.go:680] Starting "openshift.io/image-signature-import" 4897 start_master.go:690] Started "openshift.io/image-signature-import" 4897 start_master.go:680] Starting "openshift.io/templateinstance" 4897 controllermanager.go:466] Started "daemonset" 4897 controllermanager.go:456] Starting "statefulset" 4897 daemoncontroller.go:222] Starting daemon sets controller 4897 controller_utils.go:1025] Waiting for caches to sync for daemon sets controller 4897 controllermanager.go:466] Started "statefulset" 4897 controllermanager.go:456] Starting "cronjob" 4897 stateful_set.go:147] Starting stateful set controller 4897 controller_utils.go:1025] Waiting for caches to sync for stateful set controller 4897 start_master.go:690] Started "openshift.io/templateinstance" 4897 start_master.go:680] Starting "openshift.io/horizontalpodautoscaling
Excerpt of journalctl -u atomic-openshift-master-controllers.service output at loglevel=4
4897 factory.go:366] Registering priority: Zone
4897 factory.go:401] Creating scheduler with fit predicates 'map[GeneralPredicates:{} CheckNodeMemoryPressure:{} CheckNodeDiskPressure:{} Region:{} NoVolumeZoneC
4897 controller_utils.go:1025] Waiting for caches to sync for tokens controller
4897 controllermanager.go:108] Version: v1.7.6+a08f5eeb62
4897 leaderelection.go:179] attempting to acquire leader lease...
4897 leaderelection.go:189] successfully acquired lease kube-system/kube-controller-manager
4897 event.go:218] Event(v1.ObjectReference{Kind:"ConfigMap", Namespace:"kube-system", Name:"kube-controller-manager", UID:"acb3e9c6-ffbe-11e7-8d33-525400c845a8", APIVersion:"v1", Resou
4897 controller_utils.go:1032] Caches are synced for tokens controller
4897 plugins.go:101] No cloud provider specified.
4897 controllermanager.go:481] "serviceaccount-token" is disabled
4897 controllermanager.go:450] "bootstrapsigner" is disabled
4897 controllermanager.go:450] "tokencleaner" is disabled
4897 controllermanager.go:456] Starting "garbagecollector"
4897 start_master.go:680] Starting "openshift.io/build"
4897 controllermanager.go:466] Started "garbagecollector"
4897 controllermanager.go:456] Starting "deployment"
4897 garbagecollector.go:126] Starting garbage collector controller
4897 controller_utils.go:1025] Waiting for caches to sync for garbage collector controller
4897 controllermanager.go:466] Started "deployment"
4897 controllermanager.go:450] "horizontalpodautoscaling" is disabled
4897 controllermanager.go:456] Starting "disruption"
4897 deployment_controller.go:152] Starting deployment controller
Excerpt of journalctl -u atomic-openshift-master-controllers.service output at loglevel=8
4897 plugins.go:77] Registered admission plugin "NamespaceLifecycle"
4897 start_master.go:290] Warning: assetConfig.loggingPublicURL: Invalid value: "": required to view aggregated container logs in the console, master start will continue.
4897 start_master.go:290] Warning: assetConfig.metricsPublicURL: Invalid value: "": required to view cluster metrics in the console, master start will continue.
4897 start_master.go:290] Warning: aggregatorConfig.proxyClientInfo: Invalid value: "": if no client certificate is specified, the aggregator will be unable to proxy to remote serv
4897 start_master.go:412] Starting controllers on 0.0.0.0:8444 (v3.7.14)
4897 start_master.go:416] Using images from "openshift3/ose-<component>:v3.7.14"
4897 standalone_apiserver.go:106] Started health checks at 0.0.0.0:8444
4897 plugins.go:77] Registered admission plugin "NamespaceLifecycle"
4897 configgetter.go:53] Initializing cache sizes based on 0MB limit
4897 leaderelection.go:105] Attempting to acquire openshift-master-controllers lease as master-bkr-hv03-guest44.dsal.lab.eng.bos.redhat.com-10.19.41.74-xtz6lbqb, renewing every 3s,
4897 leaderelection.go:179] attempting to acquire leader lease...
systemd[1]: Started Atomic OpenShift Master Controllers.
4897 leaderelection.go:189] successfully acquired lease kube-system/openshift-master-controllers
4897 event.go:218] Event(v1.ObjectReference{Kind:"ConfigMap", Namespace:"kube-system", Name:"openshift-master-controllers", UID:"aca86731-ffbe-11e7-8d33-525400c845a8", APIVersion:"
4897 start_master.go:627] Started serviceaccount-token controller
Excerpt of journalctl -u atomic-openshift-master-api.service output at loglevel=2
4613 plugins.go:77] Registered admission plugin "NamespaceLifecycle" 4613 master.go:320] Starting Web Console https://bkr-hv03-guest44.dsal.lab.eng.bos.redhat.com:8443/console/ 4613 master.go:329] Starting OAuth2 API at /oauth 4613 master.go:320] Starting Web Console https://bkr-hv03-guest44.dsal.lab.eng.bos.redhat.com:8443/console/ 4613 master.go:329] Starting OAuth2 API at /oauth 4613 master.go:320] Starting Web Console https://bkr-hv03-guest44.dsal.lab.eng.bos.redhat.com:8443/console/ 4613 master.go:329] Starting OAuth2 API at /oauth 4613 swagger.go:38] No API exists for predefined swagger description /oapi/v1 4613 swagger.go:38] No API exists for predefined swagger description /api/v1 [restful] 2018/01/22 16:53:14 log.go:33: [restful/swagger] listing is available at https://bkr-hv03-guest44.dsal.lab.eng.bos.redhat.com:8443/swaggerapi [restful] 2018/01/22 16:53:14 log.go:33: [restful/swagger] https://bkr-hv03-guest44.dsal.lab.eng.bos.redhat.com:8443/swaggerui/ is mapped to folder /swagger-ui/ 4613 master.go:320] Starting Web Console https://bkr-hv03-guest44.dsal.lab.eng.bos.redhat.com:8443/console/ 4613 master.go:329] Starting OAuth2 API at /oauth 4613 swagger.go:38] No API exists for predefined swagger description /oapi/v1 4613 swagger.go:38] No API exists for predefined swagger description /api/v1 [restful] 2018/01/22 16:53:14 log.go:33: [restful/swagger] listing is available at https://bkr-hv03-guest44.dsal.lab.eng.bos.redhat.com:8443/swaggerapi [restful] 2018/01/22 16:53:14 log.go:33: [restful/swagger] https://bkr-hv03-guest44.dsal.lab.eng.bos.redhat.com:8443/swaggerui/ is mapped to folder /swagger-ui/ Starting Web Console https://bkr-hv03-guest44.dsal.lab.eng.bos.redhat.com:8443/console/ Starting OAuth2 API at /oauth No API exists for predefined swagger description /oapi/v1 No API exists for predefined swagger description /api/v1
6.11. Restarting OpenShift Container Platform services
To apply configuration changes, you must restart OpenShift Container Platform services.
To restart master, run the command:
# systemctl restart atomic-openshift-master-api atomic-openshift-master-controllers
To restart node hosts, on each node, run the command:
# systemctl restart atomic-openshift-node
Chapter 7. OpenShift Ansible Broker Configuration
7.1. Overview
When the OpenShift Ansible broker (OAB) is deployed in a cluster, its behavior is largely dictated by the broker’s configuration file loaded on startup. The broker’s configuration is stored as a ConfigMap object in the broker’s namespace (openshift-ansible-service-broker by default).
Example OpenShift Ansible Broker Configuration File
registry: 1 - type: dockerhub name: docker url: https://registry.hub.docker.com org: <dockerhub_org> fail_on_error: false - type: rhcc name: rhcc url: https://registry.access.redhat.com fail_on_error: true white_list: - "^foo.*-apb$" - ".*-apb$" black_list: - "bar.*-apb$" - "^my-apb$" - type: local_openshift name: lo namespaces: - openshift white_list: - ".*-apb$" dao: 2 etcd_host: localhost etcd_port: 2379 log: 3 logfile: /var/log/ansible-service-broker/asb.log stdout: true level: debug color: true openshift: 4 host: "" ca_file: "" bearer_token_file: "" image_pull_policy: IfNotPresent sandbox_role: "edit" keep_namespace: false keep_namespace_on_error: true broker: 5 bootstrap_on_startup: true dev_broker: true launch_apb_on_bind: false recovery: true output_request: true ssl_cert_key: /path/to/key ssl_cert: /path/to/cert refresh_interval: "600s" auth: - type: basic enabled: true secrets: 6 - title: Database credentials secret: db_creds apb_name: dh-rhscl-postgresql-apb
- 1
- See Registry Configuration for details.
- 2
- See DAO Configuration for details.
- 3
- See Log Configuration for details.
- 4
- See OpenShift Configuration for details.
- 5
- See Broker Configuration for details.
- 6
- See Secrets Configuration for details.
7.2. Modifying the OpenShift Ansible Broker Configuration
To modify the OAB’s default broker configuration after it has been deployed:
Edit the broker-config ConfigMap object in the OAB’s namespace as a user with cluster-admin privileges:
$ oc edit configmap broker-config -n openshift-ansible-service-broker
After saving any updates, redeploy the OAB’s deployment configuration for the changes to take effect:
$ oc rollout latest dc/asb -n openshift-ansible-service-broker
7.3. Registry Configuration
The registry section allows you to define the registries that the broker should look at for APBs.
| Field | Description | Required |
|---|---|---|
|
| The name of the registry. Used by the broker to identify APBs from this registry. | Y |
|
|
The user name for authenticating to the registry. Not used when | N |
|
|
The password for authenticating to the registry. Not used when | N |
|
|
How the broker should read the registry credentials if they are not defined in the broker configuration via | N |
|
|
Name of the secret or file storing the registry credentials that should be read. Used when |
N, only required when |
|
| The namespace or organization that the image is contained in. | N |
|
|
The type of registry. Available adapters are | Y |
|
|
The list of namespaces to configure the | N |
|
|
The URL that is used to retrieve image information. Used extensively for RHCC while the | N |
|
| Should this registry fail, the bootstrap request if it fails. Will stop the execution of other registries loading. | N |
|
|
The list of regular expressions used to define which image names should be allowed through. Must have a white list to allow APBs to be added to the catalog. The most permissive regular expression that you can use is | N |
|
| The list of regular expressions used to define which images names should never be allowed through. See APB Filtering for more details. | N |
|
| The list of images to be used with an OpenShift Container Registry. | N |
7.3.1. Production or Development
A production broker configuration is designed to be pointed at a trusted container distribution registry, such as the Red Hat Container Catalog (RHCC):
registry:
- name: rhcc
type: rhcc
url: https://registry.access.redhat.com
tag: v3.9
white_list:
- ".*-apb$"
- type: local_openshift
name: localregistry
namespaces:
- openshift
white_list: []
However, a development broker configuration is primarily used by developers working on the broker. To enable developer settings, set the registry name to dev and the dev_broker field in the broker section to true:
registry: name: dev
broker: dev_broker: true
7.3.2. Storing Registry Credentials
The broker configuration determines how the broker should read any registry credentials. They can be read from the user and pass values in the registry section, for example:
registry:
- name: isv
type: openshift
url: https://registry.connect.redhat.com
user: <user>
pass: <password>
If you want to ensure these credentials are not publicly accessible, the auth_type field in the registry section can be set to the secret or file type. The secret type configures a registry to use a secret from the broker’s namespace, while the file type configures a registry to use a secret that has been mounted as a volume.
To use the secret or file type:
The associated secret should have the values
usernameandpassworddefined. When using a secret, you must ensure that theopenshift-ansible-service-brokernamespace exists, as this is where the secret will be read from.For example, create a reg-creds.yaml file:
$ cat reg-creds.yaml --- username: <username> password: <password>
Create a secret from this file in the
openshift-ansible-service-brokernamespace:$ oc create secret generic \ registry-credentials-secret \ --from-file reg-creds.yaml \ -n openshift-ansible-service-brokerChoose whether you want to use the
secretorfiletype:To use the
secrettype:In the broker configuration, set
auth_typetosecretandauth_nameto the name of the secret:registry: - name: isv type: openshift url: https://registry.connect.redhat.com auth_type: secret auth_name: registry-credentials-secretSet the namespace where the secret is located:
openshift: namespace: openshift-ansible-service-broker
To use the
filetype:Edit the
asbdeployment configuration to mount your file into /tmp/registry-credentials/reg-creds.yaml:$ oc edit dc/asb -n openshift-ansible-service-broker
In the
containers.volumeMountssection, add:volumeMounts: - mountPath: /tmp/registry-credentials name: reg-authIn the
volumessection, add:volumes: - name: reg-auth secret: defaultMode: 420 secretName: registry-credentials-secretIn the broker configuration, set
auth_typetofileandauth_typeto the location of the file:registry: - name: isv type: openshift url: https://registry.connect.redhat.com auth_type: file auth_name: /tmp/registry-credentials/reg-creds.yaml
7.3.3. Mock Registry
A mock registry is useful for reading local APB specs. Instead of going out to a registry to search for image specs, this uses a list of local specs. Set the name of the registry to mock to use the mock registry.
registry:
- name: mock
type: mock7.3.4. Dockerhub Registry
The dockerhub type allows you to load APBs from a specific organization in the DockerHub. For example, the ansibleplaybookbundle organization.
registry:
- name: dockerhub
type: dockerhub
org: ansibleplaybookbundle
user: <user>
pass: <password>
white_list:
- ".*-apb$"7.3.5. APB Filtering
APBs can be filtered out by their image name using a combination of the white_list or black_list parameters, set on a registry basis inside the broker’s configuration.
Both are optional lists of regular expressions that will be run over the total set of discovered APBs for a given registry to determine matches.
| Present | Allowed | Blocked |
|---|---|---|
| Only whitelist | Matches a regex in list. | Any APB that does not match. |
| Only blacklist | All APBs that do not match. | APBs that match a regex in list. |
| Both present | Matches regex in whitelist but not in blacklist. | APBs that match a regex in blacklist. |
| None | No APBs from the registry. | All APBs from that registry. |
For example:
Whitelist Only
white_list: - "foo.*-apb$" - "^my-apb$"
Anything matching on foo.*-apb$ and only my-apb will be allowed through in this case. All other APBs will be rejected.
Blacklist Only
black_list: - "bar.*-apb$" - "^foobar-apb$"
Anything matching on bar.*-apb$ and only foobar-apb will be blocked in this case. All other APBs will be allowed through.
Whitelist and Blacklist
white_list: - "foo.*-apb$" - "^my-apb$" black_list: - "^foo-rootkit-apb$"
Here, foo-rootkit-apb is specifically blocked by the blacklist despite its match in the whitelist because the whitelist match is overridden.
Otherwise, only those matching on foo.*-apb$ and my-apb will be allowed through.
Example Broker Configuration registry Section:
registry:
- type: dockerhub
name: dockerhub
url: https://registry.hub.docker.com
user: <user>
pass: <password>
org: <org>
white_list:
- "foo.*-apb$"
- "^my-apb$"
black_list:
- "bar.*-apb$"
- "^foobar-apb$"
7.3.6. Local OpenShift Container Registry
Using the local_openshift type will allow you to load APBs from the OpenShift Container Registry that is internal to the OpenShift Container Platform cluster. You can configure the namespaces in which you want to look for published APBs.
registry:
- type: local_openshift
name: lo
namespaces:
- openshift
white_list:
- ".*-apb$"7.3.7. Red Hat Container Catalog Registry
Using the rhcc type will allow you to load APBs that are published to the Red Hat Container Catalog (RHCC) registry.
registry:
- name: rhcc
type: rhcc
url: https://registry.access.redhat.com
white_list:
- ".*-apb$"7.3.8. ISV Registry
Using the openshift type allows you to load APBs that are published to the ISV container registry at registry.connect.redhat.com.
registry:
- name: isv
type: openshift
user: <user> 1
pass: <password>
url: https://registry.connect.redhat.com
images: 2
- <image_1>
- <image_2>
white_list:
- ".*-apb$"- 1
- See Storing Registry Credentials for other authentication options.
- 2
- Because the
openshifttype currently cannot search the configured registry, it is required that you configure the broker with a list of images you would like to source from for when the broker bootstraps. The image names must be the fully qualified name without the registry URL.
7.3.9. Multiple Registries
You can use more than one registry to separate APBs into logical organizations and be able to manage them from the same broker. The registries must have a unique, non-empty name. If there is no unique name, the service broker will fail to start with an error message alerting you to the problem.
registry:
- name: dockerhub
type: dockerhub
org: ansibleplaybookbundle
user: <user>
pass: <password>
white_list:
- ".*-apb$"
- name: rhcc
type: rhcc
url: <rhcc_url>
white_list:
- ".*-apb$"7.4. DAO Configuration
| Field | Description | Required |
|---|---|---|
|
| The URL of the etcd host. | Y |
|
|
The port to use when communicating with | Y |
7.5. Log Configuration
| Field | Description | Required |
|---|---|---|
|
| Where to write the broker’s logs. | Y |
|
| Write logs to stdout. | Y |
|
| Level of the log output. | Y |
|
| Color the logs. | Y |
7.6. OpenShift Configuration
| Field | Description | Required |
|---|---|---|
|
| OpenShift Container Platform host. | N |
|
| Location of the certificate authority file. | N |
|
| Location of bearer token to be used. | N |
|
| When to pull the image. | Y |
|
| The namespace that the broker has been deployed to. Important for things like passing parameter values via secret. | Y |
|
| Role to give to an APB sandbox environment. | Y |
|
| Always keep namespace after an APB execution. | N |
|
| Keep namespace after an APB execution has an error. | N |
7.7. Broker Configuration
The broker section tells the broker what functionality should be enabled and disabled. It will also tell the broker where to find files on disk that will enable the full functionality.
| Field | Description | Default Value | Required |
|---|---|---|---|
|
| Allow development routes to be accessible. |
| N |
|
| Allow bind to be a no-op. |
| N |
|
| Allow the broker attempt to bootstrap itself on start up. Will retrieve the APBs from configured registries. |
| N |
|
| Allow the broker to attempt to recover itself by dealing with pending jobs noted in etcd. |
| N |
|
| Allow the broker to output the requests to the log file as they come in for easier debugging. |
| N |
|
| Tells the broker where to find the TLS key file. If not set, the API server will attempt to create one. |
| N |
|
| Tells the broker where to find the TLS .crt file. If not set, the API server will attempt to create one. |
| N |
|
| The interval to query registries for new image specs. |
| N |
|
| Allows the broker to escalate the permissions of a user while running the APB. |
| N |
|
| Sets the prefix for the URL that the broker is expecting. |
| N |
Async bind and unbind is an experimental feature and is not supported or enabled by default. With the absence of async bind, setting launch_apb_on_bind to true can cause the bind action to timeout and will span a retry. The broker will handle this with "409 Conflicts" because it is the same bind request with different parameters.
7.8. Secrets Configuration
The secrets section creates associations between secrets in the broker’s namespace and APBs the broker runs. The broker uses these rules to mount secrets into running APBs, allowing the user to use secrets to pass parameters without exposing them to the catalog or users.
The section is a list where each entry has the following structure:
| Field | Description | Required |
|---|---|---|
|
| The title of the rule. This is just for display and output purposes. | Y |
|
|
The name of the APB to associate with the specified secret. This is the fully qualified name ( | Y |
|
| The name of the secret to pull parameters from. | Y |
You can download and use the create_broker_secret.py file to create and format this configuration section.
secrets: - title: Database credentials secret: db_creds apb_name: dh-rhscl-postgresql-apb
7.9. Running Behind a Proxy
When running the OAB inside of a proxied OpenShift Container Platform cluster, it is important to understand its core concepts and consider them within the context of a proxy used for external network access.
As an overview, the broker itself runs as a pod within the cluster. It has a requirement for external network access depending on how its registries have been configured.
7.9.1. Registry Adapter Whitelists
The broker’s configured registry adapters must be able to communicate with their external registries in order to bootstrap successfully and load remote APB manifests. These requests can be made via the proxy, however, the proxy must ensure that the required remote hosts are accessible.
Example required whitelisted hosts:
| Registry Adapter Type | Whitelisted Hosts |
|---|---|
|
|
|
|
|
|
7.9.2. Configuring the Broker Behind a Proxy Using Ansible
If during initial installation you configure your OpenShift Container Platform cluster to run behind a proxy (see Configuring Global Proxy Options), when the OAB is deployed it will:
- inherit those cluster-wide proxy settings automatically and
-
generate the required
NO_PROXYlist, including thecidrfields andserviceNetworkCIDR,
and no further configuration is needed.
7.9.3. Configuring the Broker Behind a Proxy Manually
If your cluster’s global proxy options were not configured during initial installation or prior to the broker being deployed, or if you have modified the global proxy settings, you must manually configure the broker for external access via proxy:
Before attempting to run the OAB behind a proxy, review Working with HTTP Proxies and ensure your cluster is configured accordingly to run behind a proxy.
In particular, the cluster must be configured to not proxy internal cluster requests. This is typically configured with a
NO_PROXYsetting of:.cluster.local,.svc,<serviceNetworkCIDR_value>,<master_IP>,<master_domain>,.default
in addition to any other desired
NO_PROXYsettings. See Configuring NO_PROXY for more details.NoteBrokers deploying unversioned, or v1 APBs must also add
172.30.0.1to theirNO_PROXYlist. APBs prior to v2 extracted their credentials from running APB pods via anexecHTTP request, rather than a secret exchange. Unless you are running a broker with experimental proxy support in a cluster prior to OpenShift Container Platform 3.9, you probably do not have to worry about this.Edit the broker’s
DeploymentConfigas a user with cluster-admin privileges:$ oc edit dc/asb -n openshift-ansible-service-broker
Set the following environment variables:
-
HTTP_PROXY -
HTTPS_PROXY -
NO_PROXY
NoteSee Setting Proxy Environment Variables in Pods for more information.
-
After saving any updates, redeploy the OAB’s deployment configuration for the changes to take effect:
$ oc rollout latest dc/asb -n openshift-ansible-service-broker
7.9.4. Setting Proxy Environment Variables in Pods
It is common that APB pods themselves may require external access via proxy as well. If the broker recognizes it has a proxy configuration, it will transparently apply these environment variables to the APB pods that it spawns. As long as the modules used within the APB respect proxy configuration via environment variable, the APB will also use these settings to perform its work.
Finally, it is possible the services spawned by the APB may also require external network access via proxy. The APB must be authored to set these environment variables explicitly if recognizes them in its own execution environment, or the cluster operator must manually modify the required services to inject them into their environments.
Chapter 8. Adding Hosts to an Existing Cluster
8.1. Overview
Depending on how your OpenShift Container Platform cluster was installed, you can add new hosts (either nodes or masters) to your installation by using the install tool for quick installations, or by using the scaleup.yml playbook for advanced installations.
8.2. Adding Hosts Using the Quick Installer Tool
If you used the quick install tool to install your OpenShift Container Platform cluster, you can use the quick install tool to add a new node host to your existing cluster.
Currently, you can not use the quick installer tool to add new master hosts. You must use the advanced installation method to do so.
If you used the installer in either interactive or unattended mode, you can re-run the installation as long as you have an installation configuration file at ~/.config/openshift/installer.cfg.yml (or specify a different location with the -c option).
See the cluster limits section for the recommended maximum number of nodes.
To add nodes to your installation:
Ensure you have the latest installer and playbooks by updating the atomic-openshift-utils package:
# yum update atomic-openshift-utils
Run the installer with the
scaleupsubcommand in interactive or unattended mode:# atomic-openshift-installer [-u] [-c </path/to/file>] scaleup
The installer detects your current environment and allows you to add additional nodes:
*** Installation Summary *** Hosts: - 100.100.1.1 - OpenShift master - OpenShift node - Etcd (Embedded) - Storage Total OpenShift masters: 1 Total OpenShift nodes: 1 --- We have detected this previously installed OpenShift environment. This tool will guide you through the process of adding additional nodes to your cluster. Are you ready to continue? [y/N]:
Choose (y) and follow the on-screen instructions to complete your desired task.
8.3. Adding hosts
You can add new hosts to your cluster by running the scaleup.yml playbook. This playbook queries the master, generates and distributes new certificates for the new hosts, and then runs the configuration playbooks on only the new hosts. Before running the scaleup.yml playbook, complete all prerequisite host preparation steps.
The scaleup.yml playbook configures only the new host. It does not update NO_PROXY in master services, and it does not restart master services.
You must have an existing inventory file,for example /etc/ansible/hosts, that is representative of your current cluster configuration in order to run the scaleup.yml playbook. If you previously used the atomic-openshift-installer command to run your installation, you can check ~/.config/openshift/hosts for the last inventory file that the installer generated and use that file as your inventory file. You can modify this file as required. You must then specify the file location with -i when you run the ansible-playbook.
See the cluster limits section for the recommended maximum number of nodes.
Procedure
Ensure you have the latest playbooks by updating the atomic-openshift-utils package:
# yum update atomic-openshift-utils
Edit your /etc/ansible/hosts file and add new_<host_type> to the [OSEv3:children] section:
For example, to add a new node host, add new_nodes:
[OSEv3:children] masters nodes new_nodes
To add new master hosts, add new_masters.
Create a [new_<host_type>] section to specify host information for the new hosts. Format this section like an existing section, as shown in the following example of adding a new node:
[nodes] master[1:3].example.com node1.example.com openshift_node_labels="{'region': 'primary', 'zone': 'east'}" node2.example.com openshift_node_labels="{'region': 'primary', 'zone': 'west'}" infra-node1.example.com openshift_node_labels="{'region': 'infra', 'zone': 'default'}" infra-node2.example.com openshift_node_labels="{'region': 'infra', 'zone': 'default'}" [new_nodes] node3.example.com openshift_node_labels="{'region': 'primary', 'zone': 'west'}"See Configuring Host Variables for more options.
When adding new masters, add hosts to both the [new_masters] section and the [new_nodes] section to ensure that the new master host is part of the OpenShift SDN.
[masters] master[1:2].example.com [new_masters] master3.example.com [nodes] master[1:2].example.com node1.example.com openshift_node_labels="{'region': 'primary', 'zone': 'east'}" node2.example.com openshift_node_labels="{'region': 'primary', 'zone': 'west'}" infra-node1.example.com openshift_node_labels="{'region': 'infra', 'zone': 'default'}" infra-node2.example.com openshift_node_labels="{'region': 'infra', 'zone': 'default'}" [new_nodes] master3.example.comImportantIf you label a master host with the
region=infralabel and have no other dedicated infrastructure nodes, you must also explicitly mark the host as schedulable by addingopenshift_schedulable=trueto the entry. Otherwise, the registry and router pods cannot be placed anywhere.Run the scaleup.yml playbook. If your inventory file is located somewhere other than the default of /etc/ansible/hosts, specify the location with the
-ioption.For additional nodes:
# ansible-playbook [-i /path/to/file] \ /usr/share/ansible/openshift-ansible/playbooks/openshift-node/scaleup.ymlFor additional masters:
# ansible-playbook [-i /path/to/file] \ /usr/share/ansible/openshift-ansible/playbooks/openshift-master/scaleup.yml
Set the node label to
logging-infra-fluentd: "true".# oc label node/new-node.example.com logging-infra-fluentd: "true"
- After the playbook runs, verify the installation.
Move any hosts that you defined in the [new_<host_type>] section to their appropriate section. By moving these hosts, subsequent playbook runs that use this inventory file treat the nodes correctly. You can keep the empty [new_<host_type>] section. For example, when adding new nodes:
[nodes] master[1:3].example.com node1.example.com openshift_node_labels="{'region': 'primary', 'zone': 'east'}" node2.example.com openshift_node_labels="{'region': 'primary', 'zone': 'west'}" node3.example.com openshift_node_labels="{'region': 'primary', 'zone': 'west'}" infra-node1.example.com openshift_node_labels="{'region': 'infra', 'zone': 'default'}" infra-node2.example.com openshift_node_labels="{'region': 'infra', 'zone': 'default'}" [new_nodes]
8.4. Adding etcd Hosts to existing cluster
You can add new etcd hosts to your cluster by running the etcd scaleup playbook. This playbook queries the master, generates and distributes new certificates for the new hosts, and then runs the configuration playbooks on the new hosts only. Before running the etcd scaleup.yml playbook, complete all prerequisite host preparation steps.
To add an etcd host to an existing cluster:
Ensure you have the latest playbooks by updating the atomic-openshift-utils package:
$ yum update atomic-openshift-utils
Edit your /etc/ansible/hosts file, add new_<host_type> to the [OSEv3:children] group and add hosts under the new_<host_type> group:
For example, to add a new etcd, add new_etcd:
[OSEv3:children] masters nodes etcd new_etcd [etcd] etcd1.example.com etcd2.example.com [new_etcd] etcd3.example.com
Run the etcd scaleup.yml playbook. If your inventory file is located somewhere other than the default of /etc/ansible/hosts, specify the location with the
-ioption.$ ansible-playbook [-i /path/to/file] \ /usr/share/ansible/openshift-ansible/playbooks/openshift-etcd/scaleup.yml
If you use the service catalog, you must update its list of etcd servers:
$ oc edit ds apiserver -n kube-service-catalog
Add the FQDN for the new etcd node to the
--etcd-serversargument. This argument contains a comma-separated list.- After the playbook completes successfully, verify the installation.
8.5. Replacing existing masters with etcd colocated
Follow these steps when you are migrating your machines to a different data center and the network and IPs assigned to it will change.
Back up the primary etcd and master nodes.
ImportantEnsure that you back up the /etc/etcd/ directory, as noted in the etcd backup instructions.
- Provision as many new machines as there are masters to replace.
Add or expand the cluster. for example, if you want to add 3 masters with etcd colocated, scale up 3 master nodes or 3 etcd nodes.
-
Add a master. In step 3 of that process, add the host of the new data center in
[new_masters]and[new_nodes]and run the master scaleup.yml playbook. - Put the same host in the etcd section and run the etcd scaleup.yml playbook.
Verify that the host was added:
# oc get nodes
Verify that the master host IP was added:
# oc get ep kubernetes
Verify that etcd was added. The value of
ETCDCTL_APIdepends on the version being used:# source /etc/etcd/etcd.conf # ETCDCTL_API=2 etcdctl --cert-file=$ETCD_PEER_CERT_FILE --key-file=$ETCD_PEER_KEY_FILE \ --ca-file=/etc/etcd/ca.crt --endpoints=$ETCD_LISTEN_CLIENT_URLS member list
- Copy /etc/origin/master/ca.serial.txt from the /etc/origin/master directory to the new master host that is listed first in your inventory file. By default, this is /etc/ansible/hosts.
-
Add a master. In step 3 of that process, add the host of the new data center in
Remove the etcd hosts.
- Copy the /etc/etcd/ca directory to the new etcd host that is listed first in your inventory file. By default, this is /etc/ansible/hosts.
Remove the old etcd clients from the master-config.yaml file:
# grep etcdClientInfo -A 11 /etc/origin/master/master-config.yaml
Restart the masters:
# systemctl restart atomic-openshift-master-*
Remove the old etcd members from the cluster. The value of
ETCDCTL_APIdepends on the version being used:# source /etc/etcd/etcd.conf # ETCDCTL_API=2 etcdctl --cert-file=$ETCD_PEER_CERT_FILE --key-file=$ETCD_PEER_KEY_FILE \ --ca-file=/etc/etcd/ca.crt --endpoints=$ETCD_LISTEN_CLIENT_URLS member list
Take the IDs from the output of the command above and remove the old members using the IDs:
# etcdctl --cert-file=$ETCD_PEER_CERT_FILE --key-file=$ETCD_PEER_KEY_FILE \ --ca-file=/etc/etcd/ca.crt --endpoints=$ETCD_LISTEN_CLIENT_URL member remove 1609b5a3a078c227
Stop and disable the etcd services on the old etcd hosts:
# systemctl stop etcd # systemctl disable etcd
Shut down old master API and controller services:
# systemctl stop atomic-openshift-master-api
- Remove the master nodes from the HA proxy configuration, which was installed as a load balancer by default during the native installation process.
Decommission the machine.
Stop the
atomic-openshift-nodeservice on the master to be removed:# systemctl stop atomic-openshift-node
Delete the node resource:
# oc delete node
8.6. Migrating the nodes
You can migrate nodes individually or in groups (of 2, 5, 10, and so on), depending on what you are comfortable with and how the services on the node are run and scaled.
- For the migration node or nodes, provision new VMs for the node’s use in the new data center.
- To add the new node, scale up the infrastructure. Ensure the labels for the new node are set properly and that your new API servers are added to your load balancer and successfully serving traffic.
Evaluate and scale down.
- Mark the current node (in the old data center) unscheduled.
- Evacuate the node, so that pods on it are scheduled to other nodes.
- Verify that the evacuated services are running on the new nodes.
Remove the node.
- Verify that the node is empty and does not have running processes.
- Stop the service or delete the node.
Chapter 9. Loading the Default Image Streams and Templates
9.1. Overview
Your OpenShift Container Platform installation includes useful sets of Red Hat-provided image streams and templates to make it easy for developers to create new applications. By default, the quick and advanced installation methods automatically create these sets in the openshift project, which is a default global project to which all users have view access.
9.2. Offerings by Subscription Type
Depending on the active subscriptions on your Red Hat account, the following sets of image streams and templates are provided and supported by Red Hat. Contact your Red Hat sales representative for further subscription details.
9.2.1. OpenShift Container Platform Subscription
The core set of image streams and templates are provided and supported with an active OpenShift Container Platform subscription. This includes the following technologies:
| Type | Technology |
|---|---|
| Languages & Frameworks | |
| Databases | |
| Middleware Services | |
| Other Services |
9.2.2. xPaaS Middleware Add-on Subscriptions
Support for xPaaS middleware images are provided by xPaaS Middleware add-on subscriptions, which are separate subscriptions for each xPaaS product. If the relevant subscription is active on your account, image streams and templates are provided and supported for the following technologies:
| Type | Technology |
|---|---|
| Middleware Services |
9.3. Before You Begin
Before you consider performing the tasks in this topic, confirm if these image streams and templates are already registered in your OpenShift Container Platform cluster by doing one of the following:
- Log into the web console and click Add to Project.
List them for the openshift project using the CLI:
$ oc get is -n openshift $ oc get templates -n openshift
If the default image streams and templates are ever removed or changed, you can follow this topic to create the default objects yourself. Otherwise, the following instructions are not necessary.
9.4. Prerequisites
Before you can create the default image streams and templates:
- The integrated Docker registry service must be deployed in your OpenShift Container Platform installation.
-
You must be able to run the
oc createcommand with cluster-admin privileges, because they operate on the default openshiftproject. - You must have installed the atomic-openshift-utils RPM package. See Software Prerequisites for instructions.
Define shell variables for the directories containing image streams and templates. This significantly shortens the commands in the following sections. To do this:
$ IMAGESTREAMDIR="/usr/share/ansible/openshift-ansible/roles/openshift_examples/files/examples/v3.9/image-streams"; \ XPAASSTREAMDIR="/usr/share/ansible/openshift-ansible/roles/openshift_examples/files/examples/v3.9/xpaas-streams"; \ XPAASTEMPLATES="/usr/share/ansible/openshift-ansible/roles/openshift_examples/files/examples/v3.9/xpaas-templates"; \ DBTEMPLATES="/usr/share/ansible/openshift-ansible/roles/openshift_examples/files/examples/v3.9/db-templates"; \ QSTEMPLATES="/usr/share/ansible/openshift-ansible/roles/openshift_examples/files/examples/v3.9/quickstart-templates"
9.5. Creating Image Streams for OpenShift Container Platform Images
If your node hosts are subscribed using Red Hat Subscription Manager and you want to use the core set of image streams that used Red Hat Enterprise Linux (RHEL) 7 based images:
$ oc create -f $IMAGESTREAMDIR/image-streams-rhel7.json -n openshift
Alternatively, to create the core set of image streams that use the CentOS 7 based images:
$ oc create -f $IMAGESTREAMDIR/image-streams-centos7.json -n openshift
Creating both the CentOS and RHEL sets of image streams is not possible, because they use the same names. To have both sets of image streams available to users, either create one set in a different project, or edit one of the files and modify the image stream names to make them unique.
9.6. Creating Image Streams for xPaaS Middleware Images
The xPaaS Middleware image streams provide images for JBoss EAP, JBoss JWS, JBoss A-MQ, JBoss Fuse Integration Services, Decision Server, JBoss Data Virtualization and JBoss Data Grid. They can be used to build applications for those platforms using the provided templates.
To create the xPaaS Middleware set of image streams:
$ oc create -f $XPAASSTREAMDIR/jboss-image-streams.json -n openshift
Access to the images referenced by these image streams requires the relevant xPaaS Middleware subscriptions.
9.7. Creating Database Service Templates
The database service templates make it easy to run a database image which can be utilized by other components. For each database (MongoDB, MySQL, and PostgreSQL), two templates are defined.
One template uses ephemeral storage in the container which means data stored will be lost if the container is restarted, for example if the pod moves. This template should be used for demonstration purposes only.
The other template defines a persistent volume for storage, however it requires your OpenShift Container Platform installation to have persistent volumes configured.
To create the core set of database templates:
$ oc create -f $DBTEMPLATES -n openshift
After creating the templates, users are able to easily instantiate the various templates, giving them quick access to a database deployment.
9.8. Creating Instant App and Quickstart Templates
The Instant App and Quickstart templates define a full set of objects for a running application. These include:
- Build configurations to build the application from source located in a GitHub public repository
- Deployment configurations to deploy the application image after it is built.
- Services to provide load balancing for the application pods.
- Routes to provide external access to the application.
Some of the templates also define a database deployment and service so the application can perform database operations.
The templates which define a database use ephemeral storage for the database content. These templates should be used for demonstration purposes only as all database data will be lost if the database pod restarts for any reason.
Using these templates, users are able to easily instantiate full applications using the various language images provided with OpenShift Container Platform. They can also customize the template parameters during instantiation so that it builds source from their own repository rather than the sample repository, so this provides a simple starting point for building new applications.
To create the core Instant App and Quickstart templates:
$ oc create -f $QSTEMPLATES -n openshift
There is also a set of templates for creating applications using various xPaaS Middleware products (JBoss EAP, JBoss JWS, JBoss A-MQ, JBoss Fuse Integration Services, Decision Server, and JBoss Data Grid), which can be registered by running:
$ oc create -f $XPAASTEMPLATES -n openshift
The xPaaS Middleware templates require the xPaaS Middleware image streams, which in turn require the relevant xPaaS Middleware subscriptions.
The templates which define a database use ephemeral storage for the database content. These templates should be used for demonstration purposes only as all database data will be lost if the database pod restarts for any reason.
9.9. What’s Next?
With these artifacts created, developers can now log into the web console and follow the flow for creating from a template. Any of the database or application templates can be selected to create a running database service or application in the current project. Note that some of the application templates define their own database services as well.
The example applications are all built out of GitHub repositories which are referenced in the templates by default, as seen in the SOURCE_REPOSITORY_URL parameter value. Those repositories can be forked, and the fork can be provided as the SOURCE_REPOSITORY_URL parameter value when creating from the templates. This allows developers to experiment with creating their own applications.
You can direct your developers to the Using the Instant App and Quickstart Templates section in the Developer Guide for these instructions.
Chapter 10. Configuring Custom Certificates
10.1. Overview
Administrators can configure custom serving certificates for the public host names of the OpenShift Container Platform API and web console. This can be done during an advanced installation or configured after installation.
10.2. Configuring a Certificate Chain
If a certificate chain is used, then all certificates must be manually concatenated into a single named certificate file. These certificates must be placed in the following order:
- OpenShift Container Platform master host certificate
- Intermediate CA certificate
- Root CA certificate
- Third party certificate
To create this certificate chain, concatenate the certificates into a common file. You must run this command for each certificate and ensure that they are in the previously defined order.
$ cat <certificate>.pem >> ca-chain.cert.pem
10.3. Configuring Custom Certificates During Installation
During advanced installations, custom certificates can be configured using the openshift_master_named_certificates and openshift_master_overwrite_named_certificates parameters, which are configurable in the inventory file. More details are available about configuring custom certificates with Ansible.
Custom Certificate Configuration Parameters
openshift_master_overwrite_named_certificates=true 1 openshift_master_named_certificates=[{"certfile": "/path/on/host/to/crt-file", "keyfile": "/path/on/host/to/key-file", "names": ["public-master-host.com"], "cafile": "/path/on/host/to/ca-file"}] 2 openshift_hosted_router_certificate={"certfile": "/path/on/host/to/app-crt-file", "keyfile": "/path/on/host/to/app-key-file", "cafile": "/path/on/host/to/app-ca-file"} 3
- 1
- If you provide a value for the
openshift_master_named_certificatesparameter, set this parameter totrue. - 2
- Provisions a master API certificate.
- 3
- Provisions a router wildcard certificate.
Example parameters for a master API certificate:
openshift_master_overwrite_named_certificates=true
openshift_master_named_certificates=[{"names": ["master.148.251.233.173.nip.io"], "certfile": "/home/cloud-user/master-bundle.cert.pem", "keyfile": "/home/cloud-user/master.148.251.233.173.nip.io.key.pem" ]Example parameters for a router wildcard certificate:
openshift_hosted_router_certificate={"certfile": "/home/cloud-user/star-apps.148.251.233.173.nip.io.cert.pem", "keyfile": "/home/cloud-user/star-apps.148.251.233.173.nip.io.key.pem", "cafile": "/home/cloud-user/ca-chain.cert.pem"}10.4. Configuring Custom Certificates for the Web Console or CLI
You can specify custom certificates for the web console and for the CLI through the servingInfo section of the master configuration file:
-
The
servingInfo.namedCertificatessection serves up custom certificates for the web console. -
The
servingInfosection serves up custom certificates for the CLI and other API calls.
You can configure multiple certificates this way, and each certificate can be associated with multiple host names, multiple routers, or the OpenShift Container Platform image registry.
A default certificate must be configured in the servingInfo.certFile and servingInfo.keyFile configuration sections in addition to namedCertificates.
The namedCertificates section should be configured only for the host name associated with the masterPublicURL and oauthConfig.assetPublicURL settings in the /etc/origin/master/master-config.yaml file. Using a custom serving certificate for the host name associated with the masterURL will result in TLS errors as infrastructure components will attempt to contact the master API using the internal masterURL host.
Custom Certificates Configuration
servingInfo: logoutURL: "" masterPublicURL: https://openshift.example.com:8443 publicURL: https://openshift.example.com:8443/console/ bindAddress: 0.0.0.0:8443 bindNetwork: tcp4 certFile: master.server.crt 1 clientCA: "" keyFile: master.server.key 2 maxRequestsInFlight: 0 requestTimeoutSeconds: 0 namedCertificates: - certFile: wildcard.example.com.crt 3 keyFile: wildcard.example.com.key 4 names: - "openshift.example.com" metricsPublicURL: "https://metrics.os.example.com/hawkular/metrics"
The openshift_master_cluster_public_hostname and openshift_master_cluster_hostname parameters in the Ansible inventory file, by default /etc/ansible/hosts, must be different. If they are the same, the named certificates will fail and you will need to re-install them.
# Native HA with External LB VIPs openshift_master_cluster_hostname=internal.paas.example.com openshift_master_cluster_public_hostname=external.paas.example.com
For more information on using DNS with OpenShift Container Platform, see the DNS installation prerequisites.
This approach allows you to take advantage of the self-signed certificates generated by OpenShift Container Platform and add custom trusted certificates to individual components as needed.
Note that the internal infrastructure certificates remain self-signed, which might be perceived as bad practice by some security or PKI teams. However, any risk here is minimal, as the only clients that trust these certificates are other components within the cluster. All external users and systems use custom trusted certificates.
Relative paths are resolved based on the location of the master configuration file. Restart the server to pick up the configuration changes.
10.5. Configuring a Custom Master Host Certificate
In order to facilitate trusted connections with external users of OpenShift Container Platform, you can provision a named certificate that matches the domain name provided in the openshift_master_cluster_public_hostname paramater in the Ansible inventory file, by default /etc/ansible/hosts.
You must place this certificate in a directory accessible to Ansible and add the path in the Ansible inventory file, as follows:
openshift_master_named_certificates=[{"certfile": "/path/to/console.ocp-c1.myorg.com.crt", "keyfile": "/path/to/console.ocp-c1.myorg.com.key", "names": ["console.ocp-c1.myorg.com"]}]Where the parameter values are:
- certfile is the path to the file that contains the OpenShift Container Platform custom master API certificate.
- keyfile is the path to the file that contains the OpenShift Container Platform custom master API certificate key.
- names is the cluster public hostname.
The file paths must be local to the system where Ansible runs. Certificates are copied to master hosts and are deployed within the /etc/origin/master directory.
When securing the registry, add the service hostnames and IP addresses to the server certificate for the registry. The Subject Alternative Names (SAN) must contain the following.
Two service hostnames:
docker-registry.default.svc.cluster.local docker-registry.default.svc
Service IP address.
For example:
172.30.252.46
Use the following command to get the Docker registry service IP address:
oc get service docker-registry --template='{{.spec.clusterIP}}'Public hostname.
docker-registry-default.apps.example.com
Use the following command to get the Docker registry public hostname:
oc get route docker-registry --template '{{.spec.host}}'
For example, the server certificate should contain SAN details similar to the following:
X509v3 Subject Alternative Name:
DNS:docker-registry-public.openshift.com, DNS:docker-registry.default.svc, DNS:docker-registry.default.svc.cluster.local, DNS:172.30.2.98, IP Address:172.30.2.9810.6. Configuring a Custom Wildcard Certificate for the Default Router
You can configure the OpenShift Container Platform default router with a default wildcard certificate. A default wildcard certificate provides a convenient way for applications that are deployed in OpenShift Container Platform to use default encryption without needing custom certificates.
Default wildcard certificates are recommended for non-production environments only.
To configure a default wildcard certificate, provision a certificate that is valid for *.<app_domain>, where <app_domain> is the value of openshift_master_default_subdomain in the Ansible inventory file, by default /etc/ansible/hosts. Once provisioned, place the certificate, key, and ca certificate files on your Ansible host, and add the following line to your Ansible inventory file.
openshift_hosted_router_certificate={"certfile": "/path/to/apps.c1-ocp.myorg.com.crt", "keyfile": "/path/to/apps.c1-ocp.myorg.com.key", "cafile": "/path/to/apps.c1-ocp.myorg.com.ca.crt"}For example:
openshift_hosted_router_certificate={"certfile": "/home/cloud-user/star-apps.148.251.233.173.nip.io.cert.pem", "keyfile": "/home/cloud-user/star-apps.148.251.233.173.nip.io.key.pem", "cafile": "/home/cloud-user/ca-chain.cert.pem"}Where the parameter values are:
- certfile is the path to the file that contains the OpenShift Container Platform router wildcard certificate.
- keyfile is the path to the file that contains the OpenShift Container Platform router wildcard certificate key.
- cafile is the path to the file that contains the root CA for this key and certificate. If an intermediate CA is in use, the file should contain both the intermediate and root CA.
If these certificate files are new to your OpenShift Container Platform cluster, run the Ansible deploy_router.yml playbook to add these files to the OpenShift Container Platform configuration files. The playbook adds the certificate files to the /etc/origin/master/ directory.
# ansible-playbook [-i /path/to/inventory] \
/usr/share/ansible/openshift-ansible/playbooks/openshift-hosted/deploy_router.ymlIf the certificates are not new, for example, you want to change existing certificates or replace expired certificates, run the following playbook:
ansible-playbook /usr/share/ansible/openshift-ansible/playbooks/redeploy-certificates.yml
For this playbook to run, the certificate names must not change. If the certificate names change, rerun the Ansible deploy_cluster.yml playbook as if the certificates were new.
10.7. Configuring a Custom Certificate for the Image Registry
The OpenShift Container Platform image registry is an internal service that facilitates builds and deployments. Most of the communication with the registry is handled by internal components in OpenShift Container Platform. As such, you should not need to replace the certificate used by the registry service itself.
However, by default, the registry uses routes to allow external systems and users to do pulls and pushes of images. You can use a re-encrypt route with a custom certificate that is presented to external users instead of using the internal, self-signed certificate.
To configure this, add the following lines of code to the [OSEv3:vars] section of the Ansible inventory file, by default /etc/ansible/hosts file. Specify the certificates to use with the registry route.
openshift_hosted_registry_routehost=registry.apps.c1-ocp.myorg.com 1 openshift_hosted_registry_routecertificates={"certfile": "/path/to/registry.apps.c1-ocp.myorg.com.crt", "keyfile": "/path/to/registry.apps.c1-ocp.myorg.com.key", "cafile": "/path/to/registry.apps.c1-ocp.myorg.com-ca.crt"} 2 openshift_hosted_registry_routetermination=reencrypt 3
- 1
- The host name of the registry.
- 2
- The locations of the cacert, cert, and key files.
- certfile is the path to the file that contains the OpenShift Container Platform registry certificate.
- keyfile is the path to the file that contains the OpenShift Container Platform registry certificate key.
- cafile is the path to the file that contains the root CA for this key and certificate. If an intermediate CA is in use, the file should contain both the intermediate and root CA.
- 3
- Specify where encryption is performed:
-
Set to
reencryptwith a re-encrypt route to terminate encryption at the edge router and re-encrypt it with a new certificate supplied by the destination. -
Set to
passthroughto terminate encryption at the destination. The destination is responsible for decrypting traffic.
-
Set to
10.8. Configuring a Custom Certificate for a Load Balancer
If your OpenShift Container Platform cluster uses the default load balancer or an enterprise-level load balancer, you can use custom certificates to make the web console and API available externally using a publicly-signed custom certificate. leaving the existing internal certificates for the internal endpoints.
To configure OpenShift Container Platform to use custom certificates in this way:
Edit the
servingInfosection of the master configuration file:servingInfo: logoutURL: "" masterPublicURL: https://openshift.example.com:8443 publicURL: https://openshift.example.com:8443/console/ bindAddress: 0.0.0.0:8443 bindNetwork: tcp4 certFile: master.server.crt clientCA: "" keyFile: master.server.key maxRequestsInFlight: 0 requestTimeoutSeconds: 0 namedCertificates: - certFile: wildcard.example.com.crt 1 keyFile: wildcard.example.com.key 2 names: - "openshift.example.com" metricsPublicURL: "https://metrics.os.example.com/hawkular/metrics"NoteConfigure the
namedCertificatessection for only the host name associated with themasterPublicURLandoauthConfig.assetPublicURLsettings. Using a custom serving certificate for the host name associated with themasterURLcauses in TLS errors as infrastructure components attempt to contact the master API using the internal masterURL host.Specify the
openshift_master_cluster_public_hostnameandopenshift_master_cluster_hostnameparamaters in the Ansible inventory file, by default /etc/ansible/hosts. These values must be different. If they are the same, the named certificates will fail.# Native HA with External LB VIPs openshift_master_cluster_hostname=paas.example.com 1 openshift_master_cluster_public_hostname=public.paas.example.com 2
For information specific to your load balancer environment, refer to the OpenShift Container Platform Reference Architecture for your provider and Custom Certificate SSL Termination (Production).
10.9. Retrofit Custom Certificates into a Cluster
You can retrofit custom master and custom router certificates into an existing OpenShift Container Platform cluster by editing the the Ansible inventory file, by default /etc/ansible/hosts, and running a playbook.
10.9.1. Retrofit Custom Master Certificates into a Cluster
To retrofit custom certificates:
-
Edit the Ansible inventory file to set the
openshift_master_overwrite_named_certificates=true. Specify the path to the certificate using the
openshift_master_named_certificatesparameter.openshift_master_overwrite_named_certificates=true openshift_master_named_certificates=[{"certfile": "/path/on/host/to/crt-file", "keyfile": "/path/on/host/to/key-file", "names": ["public-master-host.com"], "cafile": "/path/on/host/to/ca-file"}] 1- 1
- Path to a master API certificate.
Run the following playbook:
ansible-playbook /usr/share/ansible/openshift-ansible/playbooks/redeploy-certificates.yml
10.9.2. Retrofit Custom Router Certificates into a Cluster
To retrofit custom router certificates:
-
Edit the Ansible inventory file to set the
openshift_master_overwrite_named_certificates=true. Specify the path to the certificate using the
openshift_hosted_router_certificateparameter.openshift_master_overwrite_named_certificates=true openshift_hosted_router_certificate={"certfile": "/path/on/host/to/app-crt-file", "keyfile": "/path/on/host/to/app-key-file", "cafile": "/path/on/host/to/app-ca-file"} 1- 1
- Path to a router wildcard certificate.
Run the following playbook:
ansible-playbook /usr/share/ansible/openshift-ansible/playbooks/openshift-hosted/redeploy-router-certificates.yml
10.10. Using Custom Certificates with Other Components
For information on how other components, such as Logging & Metrics, use custom certificates, see Certificate Management.
Chapter 11. Redeploying Certificates
11.1. Overview
OpenShift Container Platform uses certificates to provide secure connections for the following components:
- masters (API server and controllers)
- etcd
- nodes
- registry
- router
You can use Ansible playbooks provided with the installer to automate checking expiration dates for cluster certificates. Playbooks are also provided to automate backing up and redeploying these certificates, which can fix common certificate errors.
Possible use cases for redeploying certificates include:
- The installer detected the wrong host names and the issue was identified too late.
- The certificates are expired and you need to update them.
- You have a new CA and want to create certificates using it instead.
11.2. Checking Certificate Expirations
You can use the installer to warn you about any certificates expiring within a configurable window of days and notify you about any certificates that have already expired. Certificate expiry playbooks use the Ansible role openshift_certificate_expiry.
Certificates examined by the role include:
- Master and node service certificates
- Router and registry service certificates from etcd secrets
- Master, node, router, registry, and kubeconfig files for cluster-admin users
- etcd certificates (including embedded)
11.2.1. Role Variables
The openshift_certificate_expiry role uses the following variables:
| Variable Name | Default Value | Description |
|---|---|---|
|
|
| Base OpenShift Container Platform configuration directory. |
|
|
| Flag certificates that will expire in this many days from now. |
|
|
| Include healthy (non-expired and non-warning) certificates in results. |
| Variable Name | Default Value | Description |
|---|---|---|
|
|
| Generate an HTML report of the expiry check results. |
|
|
| The full path for saving the HTML report. |
|
|
| Save expiry check results as a JSON file. |
|
|
| The full path for saving the JSON report. |
11.2.2. Running Certificate Expiration Playbooks
The OpenShift Container Platform installer provides a set of example certificate expiration playbooks, using different sets of configuration for the openshift_certificate_expiry role.
These playbooks must be used with an inventory file that is representative of the cluster. For best results, run ansible-playbook with the -v option.
Using the easy-mode.yaml example playbook, you can try the role out before tweaking it to your specifications as needed. This playbook:
- Produces JSON and stylized HTML reports in /tmp/.
- Sets the warning window very large, so you will almost always get results back.
- Includes all certificates (healthy or not) in the results.
easy-mode.yaml Playbook
- name: Check cert expirys
hosts: nodes:masters:etcd
become: yes
gather_facts: no
vars:
openshift_certificate_expiry_warning_days: 1500
openshift_certificate_expiry_save_json_results: yes
openshift_certificate_expiry_generate_html_report: yes
openshift_certificate_expiry_show_all: yes
roles:
- role: openshift_certificate_expiry
To run the easy-mode.yaml playbook:
$ ansible-playbook -v -i <inventory_file> \
/usr/share/ansible/openshift-ansible/playbooks/openshift-checks/certificate_expiry/easy-mode.yamlOther Example Playbooks
The other example playbooks are also available to run directly out of the /usr/share/ansible/openshift-ansible/playbooks/certificate_expiry/ directory.
| File Name | Usage |
|---|---|
| default.yaml |
Produces the default behavior of the |
| html_and_json_default_paths.yaml | Generates HTML and JSON artifacts in their default paths. |
| longer_warning_period.yaml | Changes the expiration warning window to 1500 days. |
| longer-warning-period-json-results.yaml | Changes the expiration warning window to 1500 days and saves the results as a JSON file. |
To run any of these example playbooks:
$ ansible-playbook -v -i <inventory_file> \
/usr/share/ansible/openshift-ansible/playbooks/openshift-checks/certificate_expiry/<playbook>11.2.3. Output Formats
As noted above, there are two ways to format your check report. In JSON format for machine parsing, or as a stylized HTML page for easy skimming.
HTML Report
An example of an HTML report is provided with the installer. You can open the following file in your browser to view it:
/usr/share/ansible/openshift-ansible/roles/openshift_certificate_expiry/examples/cert-expiry-report.html
JSON Report
There are two top-level keys in the saved JSON results: data and summary.
The data key is a hash where the keys are the names of each host examined and the values are the check results for the certificates identified on each respective host.
The summary key is a hash that summarizes the total number of certificates:
- examined on the entire cluster
- that are OK
- expiring within the configured warning window
- already expired
For an example of the full JSON report, see /usr/share/ansible/openshift-ansible/roles/openshift_certificate_expiry/examples/cert-expiry-report.json.
The summary from the JSON data can be easily checked for warnings or expirations using a variety of command-line tools. For example, using grep you can look for the word summary and print out the two lines after the match (-A2):
$ grep -A2 summary /tmp/cert-expiry-report.json
"summary": {
"warning": 16,
"expired": 0
If available, the jq tool can also be used to pick out specific values. The first two examples below show how to select just one value, either warning or expired. The third example shows how to select both values at once:
$ jq '.summary.warning' /tmp/cert-expiry-report.json 16 $ jq '.summary.expired' /tmp/cert-expiry-report.json 0 $ jq '.summary.warning,.summary.expired' /tmp/cert-expiry-report.json 16 0
11.3. Redeploying Certificates
Use the following playbooks to redeploy master, etcd, node, registry, and router certificates on all relevant hosts. You can redeploy all of them at once using the current CA, redeploy certificates for specific components only, or redeploy a newly generated or custom CA on its own.
Just like the certificate expiry playbooks, these playbooks must be run with an inventory file that is representative of the cluster.
In particular, the inventory must specify or override all host names and IP addresses set via the following variables such that they match the current cluster configuration:
-
openshift_hostname -
openshift_public_hostname -
openshift_ip -
openshift_public_ip -
openshift_master_cluster_hostname -
openshift_master_cluster_public_hostname
The playbooks you need are provided by:
# yum install atomic-openshift-utils
The validity (length in days until they expire) for any certificates auto-generated while redeploying can be configured via Ansible as well. See Configuring Certificate Validity.
OpenShift Container Platform CA and etcd certificates expire after five years. Signed OpenShift Container Platform certificates expire after two years.
11.3.1. Redeploying All Certificates Using the Current OpenShift Container Platform and etcd CA
The redeploy-certificates.yml playbook does not regenerate the OpenShift Container Platform CA certificate. New master, etcd, node, registry, and router certificates are created using the current CA certificate to sign new certificates.
This also includes serial restarts of:
- etcd
- master services
- node services
To redeploy master, etcd, and node certificates using the current OpenShift Container Platform CA, run this playbook, specifying your inventory file:
$ ansible-playbook -i <inventory_file> \
/usr/share/ansible/openshift-ansible/playbooks/redeploy-certificates.yml11.3.2. Redeploying a New or Custom OpenShift Container Platform CA
The openshift-master/redeploy-openshift-ca.yml playbook redeploys the OpenShift Container Platform CA certificate by generating a new CA certificate and distributing an updated bundle to all components including client kubeconfig files and the node’s database of trusted CAs (the CA-trust).
This also includes serial restarts of:
- master services
- node services
- docker
Additionally, you can specify a custom CA certificate when redeploying certificates instead of relying on a CA generated by OpenShift Container Platform.
When the master services are restarted, the registry and routers can continue to communicate with the master without being redeployed because the master’s serving certificate is the same, and the CA the registry and routers have are still valid.
To redeploy a newly generated or custom CA:
Optionally, specify a custom CA. The
certfilethat you specify as part of the custom CA parameter,openshift_master_ca_certificate, must contain only the single certificate that signs the OpenShift Container Platform certificates. If you have intermediate certificates in your chain, you must bundle them into a different file.To specify a CA without intermediate certificates, set the following variable in your inventory file:
# Configure custom ca certificate # NOTE: CA certificate will not be replaced with existing clusters. # This option may only be specified when creating a new cluster or # when redeploying cluster certificates with the redeploy-certificates # playbook. openshift_master_ca_certificate={'certfile': '</path/to/ca.crt>', 'keyfile': '</path/to/ca.key>'}To specify a CA certificate that is issued by an intermediate CA:
Create a bundled certificate that contains the full chain of intermediate and root certificates for the CA:
# cat intermediate/certs/<intermediate.cert.pem> \ certs/ca.cert.pem >> intermediate/certs/ca-chain.cert.pemSet the following variables in your inventory file:
# Configure custom ca certificate # NOTE: CA certificate will not be replaced with existing clusters. # This option may only be specified when creating a new cluster or # when redeploying cluster certificates with the redeploy-certificates # playbook. openshift_master_ca_certificate={'certfile': '</path/to/ca.crt>', 'keyfile': '</path/to/ca.key>'} openshift_additional_ca=intermediate/certs/ca-chain.cert.pem
Run the openshift-master/redeploy-openshift-ca.yml playbook, specifying your inventory file:
$ ansible-playbook -i <inventory_file> \ /usr/share/ansible/openshift-ansible/playbooks/openshift-master/redeploy-openshift-ca.yml
With the new OpenShift Container Platform CA in place, you can then use the openshift-master/redeploy-certificates.yml playbook at your discretion whenever you want to redeploy certificates signed by the new CA on all components.
11.3.3. Redeploying a New etcd CA
The openshift-etcd/redeploy-ca.yml playbook redeploys the etcd CA certificate by generating a new CA certificate and distributing an updated bundle to all etcd peers and master clients.
This also includes serial restarts of:
- etcd
- master services
To redeploy a newly generated etcd CA:
Run the openshift-etcd/redeploy-ca.yml playbook, specifying your inventory file:
$ ansible-playbook -i <inventory_file> \ /usr/share/ansible/openshift-ansible/playbooks/openshift-etcd/redeploy-ca.yml
With the new etcd CA in place, you can then use the openshift-etcd/redeploy-certificates.yml playbook at your discretion whenever you want to redeploy certificates signed by the new etcd CA on etcd peers and master clients. Alternatively, you can use the redeploy-certificates.yml playbook to redeploy certificates for OpenShift Container Platform components in addition to etcd peers and master clients.
The etcd certificate redeployment can result in copying the serial to all master hosts.
11.3.4. Redeploying Master Certificates Only
The openshift-master/redeploy-certificates.yml playbook only redeploys master certificates. This also includes serial restarts of master services.
To redeploy master certificates, run this playbook, specifying your inventory file:
$ ansible-playbook -i <inventory_file> \
/usr/share/ansible/openshift-ansible/playbooks/openshift-master/redeploy-certificates.ymlAfter running this playbook, you must regenerate any service signing certificate or key pairs by deleting existing secrets that contain service serving certificates or removing and re-adding annotations to appropriate services.
11.3.5. Redeploying etcd Certificates Only
The openshift-etcd/redeploy-certificates.yml playbook only redeploys etcd certificates including master client certificates.
This also include serial restarts of:
- etcd
- master services.
To redeploy etcd certificates, run this playbook, specifying your inventory file:
$ ansible-playbook -i <inventory_file> \
/usr/share/ansible/openshift-ansible/playbooks/openshift-etcd/redeploy-certificates.yml11.3.6. Redeploying Node Certificates Only
The openshift-node/redeploy-certificates.yml playbook only redeploys node certificates. This also include serial restarts of node services.
To redeploy node certificates, run this playbook, specifying your inventory file:
$ ansible-playbook -i <inventory_file> \
/usr/share/ansible/openshift-ansible/playbooks/openshift-node/redeploy-certificates.yml11.3.7. Redeploying Registry or Router Certificates Only
The openshift-hosted/redeploy-registry-certificates.yml and openshift-hosted/redeploy-router-certificates.yml playbooks replace installer-created certificates for the registry and router. If custom certificates are in use for these components, see Redeploying Custom Registry or Router Certificates to replace them manually.
11.3.7.1. Redeploying Registry Certificates Only
To redeploy registry certificates, run the following playbook, specifying your inventory file:
$ ansible-playbook -i <inventory_file> \
/usr/share/ansible/openshift-ansible/playbooks/openshift-hosted/redeploy-registry-certificates.yml11.3.7.2. Redeploying Router Certificates Only
To redeploy router certificates, run the following playbook, specifying your inventory file:
$ ansible-playbook -i <inventory_file> \
/usr/share/ansible/openshift-ansible/playbooks/openshift-hosted/redeploy-router-certificates.yml11.3.8. Redeploying Custom Registry or Router Certificates
When nodes are evacuated due to a redeployed CA, registry and router pods are restarted. If the registry and router certificates were not also redeployed with the new CA, this can cause outages because they cannot reach the masters using their old certificates.
The playbooks for redeploying certificates cannot redeploy custom registry or router certificates, so to address this issue, you can manually redeploy the registry and router certificates.
11.3.8.1. Redeploying Registry Certificates Manually
To redeploy registry certificates manually, you must add new registry certificates to a secret named registry-certificates, then redeploy the registry:
Switch to the
defaultproject for the remainder of these steps:$ oc project default
If your registry was initially created on OpenShift Container Platform 3.1 or earlier, it may still be using environment variables to store certificates (which has been deprecated in favor of using secrets).
Run the following and look for the
OPENSHIFT_CA_DATA,OPENSHIFT_CERT_DATA,OPENSHIFT_KEY_DATAenvironment variables:$ oc env dc/docker-registry --list
If they do not exist, skip this step. If they do, create the following
ClusterRoleBinding:$ cat <<EOF | apiVersion: v1 groupNames: null kind: ClusterRoleBinding metadata: creationTimestamp: null name: registry-registry-role roleRef: kind: ClusterRole name: system:registry subjects: - kind: ServiceAccount name: registry namespace: default userNames: - system:serviceaccount:default:registry EOF oc create -f -
Then, run the following to remove the environment variables:
$ oc env dc/docker-registry OPENSHIFT_CA_DATA- OPENSHIFT_CERT_DATA- OPENSHIFT_KEY_DATA- OPENSHIFT_MASTER-
Set the following environment variables locally to make later commands less complex:
$ REGISTRY_IP=`oc get service docker-registry -o jsonpath='{.spec.clusterIP}'` $ REGISTRY_HOSTNAME=`oc get route/docker-registry -o jsonpath='{.spec.host}'`Create new registry certificates:
$ oc adm ca create-server-cert \ --signer-cert=/etc/origin/master/ca.crt \ --signer-key=/etc/origin/master/ca.key \ --hostnames=$REGISTRY_IP,docker-registry.default.svc,docker-registry.default.svc.cluster.local,$REGISTRY_HOSTNAME \ --cert=/etc/origin/master/registry.crt \ --key=/etc/origin/master/registry.key \ --signer-serial=/etc/origin/master/ca.serial.txtRun
oc admcommands only from the first master listed in the Ansible host inventory file, by default /etc/ansible/hosts.Update the
registry-certificatessecret with the new registry certificates:$ oc create secret generic registry-certificates \ --from-file=/etc/origin/master/registry.crt,/etc/origin/master/registry.key \ -o json --dry-run | oc replace -f -Redeploy the registry:
$ oc rollout latest dc/docker-registry
11.3.8.2. Redeploying Router Certificates Manually
To redeploy router certificates manually, you must add new router certificates to a secret named router-certs, then redeploy the router:
Switch to the
defaultproject for the remainder of these steps:$ oc project default
If your router was initially created on OpenShift Container Platform 3.1 or earlier, it might still use environment variables to store certificates, which has been deprecated in favor of using service serving certificate secret.
Run the following command and look for the
OPENSHIFT_CA_DATA,OPENSHIFT_CERT_DATA,OPENSHIFT_KEY_DATAenvironment variables:$ oc env dc/router --list
If those variables exist, create the following
ClusterRoleBinding:$ cat <<EOF | apiVersion: v1 groupNames: null kind: ClusterRoleBinding metadata: creationTimestamp: null name: router-router-role roleRef: kind: ClusterRole name: system:router subjects: - kind: ServiceAccount name: router namespace: default userNames: - system:serviceaccount:default:router EOF oc create -f -
If those variables exist, run the following command to remove them:
$ oc env dc/router OPENSHIFT_CA_DATA- OPENSHIFT_CERT_DATA- OPENSHIFT_KEY_DATA- OPENSHIFT_MASTER-
Obtain a certificate.
- If you use an external Certificate Authority (CA) to sign your certificates, create a new certificate and provide it to OpenShift Container Platform by following your internal processes.
If you use the internal OpenShift Container Platform CA to sign certificates, run the following commands:
ImportantThe following commands generate a certificate that is internally signed. It will be trusted by only clients that trust the OpenShift Container Platform CA.
$ cd /root $ mkdir cert ; cd cert $ oc adm ca create-server-cert \ --signer-cert=/etc/origin/master/ca.crt \ --signer-key=/etc/origin/master/ca.key \ --signer-serial=/etc/origin/master/ca.serial.txt \ --hostnames='*.hostnames.for.the.certificate' \ --cert=router.crt \ --key=router.key \These commands generate the following files:
- A new certificate named router.crt.
- A copy of the signing CA certificate chain, /etc/origin/master/ca.crt. This chain can contain more than one certificate if you use intermediate CAs.
- A corresponding private key named router.key.
Create a new file that concatenates the generated certificates:
$ cat router.crt /etc/origin/master/ca.crt router.key > router.pem
NoteThis step is only valid if you are using a certificate signed by the OpenShift CA. If a custom certificate is used, a file with the correct CA chain should be used instead of
/etc/origin/master/ca.crt.Before you generate a new secret, back up the current one:
$ oc export secret router-certs > ~/old-router-certs-secret.yaml
Create a new secret to hold the new certificate and key, and replace the contents of the existing secret:
$ oc create secret tls router-certs --cert=router.pem \ 1 --key=router.key -o json --dry-run | \ oc replace -f -- 1
- router.pem is the file that contains the concatenation of the certificates that you generated.
Redeploy the router:
$ oc rollout latest dc/router
When routers are initially deployed, an annotation is added to the router’s service that automatically creates a service serving certificate secret named
router-metrics-tls.To redeploy
router-metrics-tlscertificates manually, that service serving certificate can be triggered to be recreated by deleting the secret, removing and re-adding annotations to the router service, then redeploying therouter-metrics-tlssecret:Remove the following annotations from the
routerservice:$ oc annotate service router \ service.alpha.openshift.io/serving-cert-secret-name- \ service.alpha.openshift.io/serving-cert-signed-by-Remove the existing
router-metrics-tlssecret.$ oc delete secret router-metrics-tls
Re-add the annotations:
$ oc annotate service router \ service.alpha.openshift.io/serving-cert-secret-name=router-metrics-tls
Chapter 12. Configuring authentication and user agent
12.1. Overview
The OpenShift Container Platform master includes a built-in OAuth server. Developers and administrators obtain OAuth access tokens to authenticate themselves to the API.
As an administrator, you can configure OAuth using the master configuration file to specify an identity provider. It is a best practice to configure your identity provider during advanced installation, but you can configure it after installation.
OpenShift Container Platform user names containing /, :, and % are not supported.
If you installed OpenShift Container Platform using the Quick Installation or Advanced Installation method, the Deny All identity provider is used by default, which denies access for all user names and passwords. To allow access, you must choose a different identity provider and configure the master configuration file appropriately (located at /etc/origin/master/master-config.yaml by default).
When you run a master without a configuration file, the Allow All identity provider is used by default, which allows any non-empty user name and password to log in. This is useful for testing purposes. To use other identity providers, or to modify any token, grant, or session options, you must run the master from a configuration file.
Roles need to be assigned to administer the setup with an external user.
After making changes to an identity provider, you must restart the master services for the changes to take effect:
# systemctl restart atomic-openshift-master-api atomic-openshift-master-controllers
12.2. Identity provider parameters
There are four parameters common to all identity providers:
| Parameter | Description |
|---|---|
|
| The provider name is prefixed to provider user names to form an identity name. |
|
|
When true, unauthenticated token requests from non-web clients (like the CLI) are sent a
To prevent cross-site request forgery (CSRF) attacks against browser clients Basic authentication challenges are only sent if a |
|
| When true, unauthenticated token requests from web clients (like the web console) are redirected to a login page backed by this provider. Not supported by all identity providers.
If you want users to be sent to a branded page before being redirected to the identity provider’s login, then set |
|
| Defines how new identities are mapped to users when they log in. Enter one of the following values:
|
When adding or changing identity providers, you can map identities from the new provider to existing users by setting the mappingMethod parameter to add.
12.3. Configuring identity providers
OpenShift Container Platform supports configuring only a single identity provider. However, you can extend the basic authentication for more complex configurations such as LDAP failover.
You can use these parameters to define the identity provider during installation or after installation.
12.3.1. Configuring identity providers with Ansible
For initial advanced installations, the Deny All identity provider is configured by default, though it can be overridden during installation using the openshift_master_identity_providers parameter, which is configurable in the inventory file. Session options in the OAuth configuration are also configurable in the inventory file.
Example 12.1. Example identity provider configuration with Ansible
# htpasswd auth
openshift_master_identity_providers=[{'name': 'htpasswd_auth', 'login': 'true', 'challenge': 'true', 'kind': 'HTPasswdPasswordIdentityProvider', 'filename': '/etc/origin/master/htpasswd'}]
# Defining htpasswd users
#openshift_master_htpasswd_users={'user1': '<pre-hashed password>', 'user2': '<pre-hashed password>'}
# or
#openshift_master_htpasswd_file=<path to local pre-generated htpasswd file>
# Allow all auth
#openshift_master_identity_providers=[{'name': 'allow_all', 'login': 'true', 'challenge': 'true', 'kind': 'AllowAllPasswordIdentityProvider'}]
# LDAP auth
#openshift_master_identity_providers=[{'name': 'my_ldap_provider', 'challenge': 'true', 'login': 'true', 'kind': 'LDAPPasswordIdentityProvider', 'attributes': {'id': ['dn'], 'email': ['mail'], 'name': ['cn'], 'preferredUsername': ['uid']}, 'bindDN': '', 'bindPassword': '', 'ca': '', 'insecure': 'false', 'url': 'ldap://ldap.example.com:389/ou=users,dc=example,dc=com?uid'}]
# Configuring the ldap ca certificate 1
#openshift_master_ldap_ca=<ca text>
# or
#openshift_master_ldap_ca_file=<path to local ca file to use>
# Available variables for configuring certificates for other identity providers:
#openshift_master_openid_ca
#openshift_master_openid_ca_file
#openshift_master_request_header_ca
#openshift_master_request_header_ca_file- 1
- If you specify your CA certificate location in the
openshift_master_identity_providersparameter, do not specify a certificate value in theopenshift_master_ldap_caparameter or path in theopenshift_master_ldap_ca_fileparameter.
12.3.2. Configuring identity providers in the master configuration file
You can configure the master host for authentication using your desired identity provider by modifying the master configuration file.
Example 12.2. Example identity provider configuration in the master configuration file
...
oauthConfig:
identityProviders:
- name: htpasswd_auth
challenge: true
login: true
mappingMethod: "claim"
...
When set to the default claim value, OAuth will fail if the identity is mapped to a previously-existing user name.
12.3.3. Configuring an identity provider or method
12.3.3.1. Manually provisioning a user when using the lookup mapping method
When using the lookup mapping method, user provisioning is done by an external system, via the API. Typically, identities are automatically mapped to users during login. The 'lookup' mapping method automatically disables this automatic mapping, which requires you to provision users manually.
For more information on identity objects, see the Identity user API obejct.
If you are using the lookup mapping method, use the following steps for each user after configuring the identity provider:
Create an OpenShift Container Platform User, if not created already:
$ oc create user <username>
For example, the following command creates a OpenShift Container Platform User
bob:$ oc create user bob
Create an OpenShift Container Platform Identity, if not created already. Use the name of the identity provider and the name that uniquely represents this identity in the scope of the identity provider:
$ oc create identity <identity-provider>:<user-id-from-identity-provider>
The
<identity-provider>is the name of the identity provider in the master configuration, as shown in the appropriate identity provider section below.For example, the following commands creates an Identity with identity provider
ldap_providerand the identity provider user namebob_s.$ oc create identity ldap_provider:bob_s
Create a user/identity mapping for the created user and identity:
$ oc create useridentitymapping <identity-provider>:<user-id-from-identity-provider> <username>
For example, the following command maps the identity to the user:
$ oc create useridentitymapping ldap_provider:bob_s bob
12.3.4. Allow all
Set AllowAllPasswordIdentityProvider in the identityProviders stanza to allow any non-empty user name and password to log in.
Example 12.3. Master Configuration Using AllowAllPasswordIdentityProvider
oauthConfig: ... identityProviders: - name: my_allow_provider 1 challenge: true 2 login: true 3 mappingMethod: claim 4 provider: apiVersion: v1 kind: AllowAllPasswordIdentityProvider
- 1
- This provider name is prefixed to provider user names to form an identity name.
- 2
- When true, unauthenticated token requests from non-web clients (like the CLI) are sent a
WWW-Authenticatechallenge header for this provider. - 3
- When true, unauthenticated token requests from web clients (like the web console) are redirected to a login page backed by this provider.
- 4
- Controls how mappings are established between this provider’s identities and user objects, as described above.
12.3.5. Deny all
Set DenyAllPasswordIdentityProvider in the identityProviders stanza to deny access for all user names and passwords.
Example 12.4. Master Configuration Using DenyAllPasswordIdentityProvider
oauthConfig: ... identityProviders: - name: my_deny_provider 1 challenge: true 2 login: true 3 mappingMethod: claim 4 provider: apiVersion: v1 kind: DenyAllPasswordIdentityProvider
- 1
- This provider name is prefixed to provider user names to form an identity name.
- 2
- When true, unauthenticated token requests from non-web clients (like the CLI) are sent a
WWW-Authenticatechallenge header for this provider. - 3
- When true, unauthenticated token requests from web clients (like the web console) are redirected to a login page backed by this provider.
- 4
- Controls how mappings are established between this provider’s identities and user objects, as described above.
12.3.6. HTPasswd
Set HTPasswdPasswordIdentityProvider in the identityProviders stanza to validate user names and passwords against a flat file generated using htpasswd.
The htpasswd utility is in the httpd-tools package:
# yum install httpd-tools
OpenShift Container Platform supports the Bcrypt, SHA-1, and MD5 cryptographic hash functions, and MD5 is the default for htpasswd. Plaintext, encrypted text, and other hash functions are not currently supported.
The flat file is reread if its modification time changes, without requiring a server restart.
To use the htpasswd command:
To create a flat file with a user name and hashed password, run:
$ htpasswd -c </path/to/users.htpasswd> <user_name>
Then, enter and confirm a clear-text password for the user. The command generates a hashed version of the password.
For example:
htpasswd -c users.htpasswd user1 New password: Re-type new password: Adding password for user user1
NoteYou can include the
-boption to supply the password on the command line:$ htpasswd -c -b <user_name> <password>
For example:
$ htpasswd -c -b file user1 MyPassword! Adding password for user user1
To add or update a login to the file, run:
$ htpasswd </path/to/users.htpasswd> <user_name>
To remove a login from the file, run:
$ htpasswd -D </path/to/users.htpasswd> <user_name>
Example 12.5. Master Configuration Using HTPasswdPasswordIdentityProvider
oauthConfig: ... identityProviders: - name: my_htpasswd_provider 1 challenge: true 2 login: true 3 mappingMethod: claim 4 provider: apiVersion: v1 kind: HTPasswdPasswordIdentityProvider file: /path/to/users.htpasswd 5
- 1
- This provider name is prefixed to provider user names to form an identity name.
- 2
- When true, unauthenticated token requests from non-web clients (like the CLI) are sent a
WWW-Authenticatechallenge header for this provider. - 3
- When true, unauthenticated token requests from web clients (like the web console) are redirected to a login page backed by this provider.
- 4
- Controls how mappings are established between this provider’s identities and user objects, as described above.
- 5
- File generated using
htpasswd.
12.3.7. Keystone
Keystone is an OpenStack project that provides identity, token, catalog, and policy services. You can integrate your OpenShift Container Platform cluster with Keystone to enable shared authentication with an OpenStack Keystone v3 server configured to store users in an internal database. Once configured, this configuration allows users to log in to OpenShift Container Platform with their Keystone credentials.
12.3.7.1. Configuring authentication on the master
If you have:
Already completed the installation of Openshift, then copy the /etc/origin/master/master-config.yaml file into a new directory; for example:
$ cd /etc/origin/master $ mkdir keystoneconfig; cp master-config.yaml keystoneconfig
Not yet installed OpenShift Container Platform, then start the OpenShift Container Platform API server, specifying the hostname of the (future) OpenShift Container Platform master and a directory to store the configuration file created by the start command:
$ openshift start master --public-master=<apiserver> --write-config=<directory>
For example:
$ openshift start master --public-master=https://myapiserver.com:8443 --write-config=keystoneconfig
NoteIf you are installing with Ansible, then you must add the
identityProviderconfiguration to the Ansible playbook. If you use the following steps to modify your configuration manually after installing with Ansible, then you will lose any modifications whenever you re-run the install tool or upgrade.
Edit the new keystoneconfig/master-config.yaml file’s
identityProvidersstanza, and copy the exampleKeystonePasswordIdentityProviderconfiguration and paste it to replace the existing stanza:oauthConfig: ... identityProviders: - name: my_keystone_provider 1 challenge: true 2 login: true 3 mappingMethod: claim 4 provider: apiVersion: v1 kind: KeystonePasswordIdentityProvider domainName: default 5 url: http://keystone.example.com:5000 6 ca: ca.pem 7 certFile: keystone.pem 8 keyFile: keystonekey.pem 9
- 1
- This provider name is prefixed to provider user names to form an identity name.
- 2
- When true, unauthenticated token requests from non-web clients (like the CLI) are sent a
WWW-Authenticatechallenge header for this provider. - 3
- When true, unauthenticated token requests from web clients (like the web console) are redirected to a login page backed by this provider.
- 4
- Controls how mappings are established between this provider’s identities and user objects, as described above.
- 5
- Keystone domain name. In Keystone, usernames are domain-specific. Only a single domain is supported.
- 6
- The URL to use to connect to the Keystone server (required).
- 7
- Optional: Certificate bundle to use to validate server certificates for the configured URL.
- 8
- Optional: Client certificate to present when making requests to the configured URL.
- 9
- Key for the client certificate. Required if
certFileis specified.
Make the following modifications to the
identityProvidersstanza:-
Change the provider
name("my_keystone_provider") to match your Keystone server. This name is prefixed to provider user names to form an identity name. -
If required, change
mappingMethodto control how mappings are established between the provider’s identities and user objects. -
Change the
domainNameto the domain name of your OpenStack Keystone server. In Keystone, user names are domain-specific. Only a single domain is supported. -
Specify the
urlto use to connect to your OpenStack Keystone server. -
Optionally, change the
cato the certificate bundle to use in order to validate server certificates for the configured URL. -
Optionally, change the
certFileto the client certificate to present when making requests to the configured URL. -
If
certFileis specified, then you must change thekeyFileto the key for the client certificate.
-
Change the provider
- Save your changes and close the file.
Start the OpenShift Container Platform API server, specifying the configuration file you just modified:
$ openshift start master --config=<path/to/modified/config>/master-config.yaml
Once configured, any user logging in to the OpenShift Container Platform web console will be prompted to log in using their Keystone credentials.
12.3.7.2. Creating Users with Keystone Authentication
You do not create users in OpenShift Container Platform when integrating with an external authentication provider, such as, in this case, Keystone. Keystone is the system of record, meaning that users are defined in a Keystone database, and any user with a valid Keystone user name for the configured authentication server can log in.
To add a user to OpenShift Container Platform, the user must exist in the Keystone database, and if required you must create a new Keystone account for the user.
12.3.7.3. Verifying Users
Once one or more users have logged in, you can run oc get users to view a list of users and verify that users were created successfully:
Example 12.6. Output of oc get users command
$ oc get users
NAME UID FULL NAME IDENTITIES
bobsmith a0c1d95c-1cb5-11e6-a04a-002186a28631 Bob Smith keystone:bobsmith 1- 1
- Identities in OpenShift Container Platform are comprised of the identity provider name prefixed to the Keystone user name.
From here, you might want to learn how to manage user roles.
12.3.8. LDAP authentication
Set LDAPPasswordIdentityProvider in the identityProviders stanza to validate user names and passwords against an LDAPv3 server, using simple bind authentication.
If you require failover for your LDAP server, instead of following these steps, extend the basic authentication method by configuring SSSD for LDAP failover.
During authentication, the LDAP directory is searched for an entry that matches the provided user name. If a single unique match is found, a simple bind is attempted using the distinguished name (DN) of the entry plus the provided password.
These are the steps taken:
-
Generate a search filter by combining the attribute and filter in the configured
urlwith the user-provided user name. - Search the directory using the generated filter. If the search does not return exactly one entry, deny access.
- Attempt to bind to the LDAP server using the DN of the entry retrieved from the search, and the user-provided password.
- If the bind is unsuccessful, deny access.
- If the bind is successful, build an identity using the configured attributes as the identity, email address, display name, and preferred user name.
The configured url is an RFC 2255 URL, which specifies the LDAP host and search parameters to use. The syntax of the URL is:
ldap://host:port/basedn?attribute?scope?filter
For the above example:
| URL Component | Description |
|---|---|
|
|
For regular LDAP, use the string |
|
|
The name and port of the LDAP server. Defaults to |
|
| The DN of the branch of the directory where all searches should start from. At the very least, this must be the top of your directory tree, but it could also specify a subtree in the directory. |
|
|
The attribute to search for. Although RFC 2255 allows a comma-separated list of attributes, only the first attribute will be used, no matter how many are provided. If no attributes are provided, the default is to use |
|
|
The scope of the search. Can be either |
|
|
A valid LDAP search filter. If not provided, defaults to |
When doing searches, the attribute, filter, and provided user name are combined to create a search filter that looks like:
(&(<filter>)(<attribute>=<username>))
For example, consider a URL of:
ldap://ldap.example.com/o=Acme?cn?sub?(enabled=true)
When a client attempts to connect using a user name of bob, the resulting search filter will be (&(enabled=true)(cn=bob)).
If the LDAP directory requires authentication to search, specify a bindDN and bindPassword to use to perform the entry search.
Master Configuration Using LDAPPasswordIdentityProvider
oauthConfig: ... identityProviders: - name: "my_ldap_provider" 1 challenge: true 2 login: true 3 mappingMethod: claim 4 provider: apiVersion: v1 kind: LDAPPasswordIdentityProvider attributes: id: 5 - dn email: 6 - mail name: 7 - cn preferredUsername: 8 - uid bindDN: "" 9 bindPassword: "" 10 ca: my-ldap-ca-bundle.crt 11 insecure: false 12 url: "ldap://ldap.example.com/ou=users,dc=acme,dc=com?uid" 13
- 1
- This provider name is prefixed to the returned user ID to form an identity name.
- 2
- When true, unauthenticated token requests from non-web clients (like the CLI) are sent a
WWW-Authenticatechallenge header for this provider. - 3
- When true, unauthenticated token requests from web clients (like the web console) are redirected to a login page backed by this provider.
- 4
- Controls how mappings are established between this provider’s identities and user objects, as described above.
- 5
- List of attributes to use as the identity. First non-empty attribute is used. At least one attribute is required. If none of the listed attribute have a value, authentication fails.
- 6
- List of attributes to use as the email address. First non-empty attribute is used.
- 7
- List of attributes to use as the display name. First non-empty attribute is used.
- 8
- List of attributes to use as the preferred user name when provisioning a user for this identity. First non-empty attribute is used.
- 9
- Optional DN to use to bind during the search phase.
- 10
- Optional password to use to bind during the search phase. This value may also be provided in an environment variable, external file, or encrypted file.
- 11
- Certificate bundle to use to validate server certificates for the configured URL. If empty, system trusted roots are used. Only applies if insecure: false.
- 12
- When true, no TLS connection is made to the server. When false,
ldaps://URLs connect using TLS, andldap://URLs are upgraded to TLS. - 13
- An RFC 2255 URL which specifies the LDAP host and search parameters to use, as described above.
To whitelist users for an LDAP integration, use the lookup mapping method. Before a login from LDAP would be allowed, a cluster administrator must create an identity and user object for each LDAP user.
12.3.9. Basic authentication (remote)
Basic Authentication is a generic backend integration mechanism that allows users to log in to OpenShift Container Platform with credentials validated against a remote identity provider.
Because basic authentication is generic, you can use this identity provider for advanced authentication configurations. You can configure LDAP failover or use the containerized basic authentication repository as a starting point for another advanced remote basic authentication configuration.
Basic authentication must use an HTTPS connection to the remote server to prevent potential snooping of the user ID and password and man-in-the-middle attacks.
With BasicAuthPasswordIdentityProvider configured, users send their user name and password to OpenShift Container Platform, which then validates those credentials against a remote server by making a server-to-server request, passing the credentials as a Basic Auth header. This requires users to send their credentials to OpenShift Container Platform during login.
This only works for user name/password login mechanisms, and OpenShift Container Platform must be able to make network requests to the remote authentication server.
Set BasicAuthPasswordIdentityProvider in the identityProviders stanza to validate user names and passwords against a remote server using a server-to-server Basic authentication request. User names and passwords are validated against a remote URL that is protected by Basic authentication and returns JSON.
A 401 response indicates failed authentication.
A non-200 status, or the presence of a non-empty "error" key, indicates an error:
{"error":"Error message"}
A 200 status with a sub (subject) key indicates success:
{"sub":"userid"} 1- 1
- The subject must be unique to the authenticated user and must not be able to be modified.
A successful response may optionally provide additional data, such as:
A display name using the
namekey. For example:{"sub":"userid", "name": "User Name", ...}An email address using the
emailkey. For example:{"sub":"userid", "email":"user@example.com", ...}A preferred user name using the
preferred_usernamekey. This is useful when the unique, unchangeable subject is a database key or UID, and a more human-readable name exists. This is used as a hint when provisioning the OpenShift Container Platform user for the authenticated identity. For example:{"sub":"014fbff9a07c", "preferred_username":"bob", ...}
12.3.9.1. Configuring authentication on the master
If you have:
Already completed the installation of Openshift, then copy the /etc/origin/master/master-config.yaml file into a new directory; for example:
$ mkdir basicauthconfig; cp master-config.yaml basicauthconfig
Not yet installed OpenShift Container Platform, then start the OpenShift Container Platform API server, specifying the hostname of the (future) OpenShift Container Platform master and a directory to store the configuration file created by the start command:
$ openshift start master --public-master=<apiserver> --write-config=<directory>
For example:
$ openshift start master --public-master=https://myapiserver.com:8443 --write-config=basicauthconfig
NoteIf you are installing with Ansible, then you must add the
identityProviderconfiguration to the Ansible playbook. If you use the following steps to modify your configuration manually after installing with Ansible, then you will lose any modifications whenever you re-run the install tool or upgrade.
Edit the new master-config.yaml file’s
identityProvidersstanza, and copy the exampleBasicAuthPasswordIdentityProviderconfiguration and paste it to replace the existing stanza:oauthConfig: ... identityProviders: - name: my_remote_basic_auth_provider 1 challenge: true 2 login: true 3 mappingMethod: claim 4 provider: apiVersion: v1 kind: BasicAuthPasswordIdentityProvider url: https://www.example.com/remote-idp 5 ca: /path/to/ca.file 6 certFile: /path/to/client.crt 7 keyFile: /path/to/client.key 8
- 1
- This provider name is prefixed to the returned user ID to form an identity name.
- 2
- When true, unauthenticated token requests from non-web clients (like the CLI) are sent a
WWW-Authenticatechallenge header for this provider. - 3
- When true, unauthenticated token requests from web clients (like the web console) are redirected to a login page backed by this provider.
- 4
- Controls how mappings are established between this provider’s identities and user objects, as described above.
- 5
- URL accepting credentials in Basic authentication headers.
- 6
- Optional: Certificate bundle to use to validate server certificates for the configured URL.
- 7
- Optional: Client certificate to present when making requests to the configured URL.
- 8
- Key for the client certificate. Required if
certFileis specified.
Make the following modifications to the
identityProvidersstanza:-
Set the provider
nameto something unique and relevant to your deployment. This name is prefixed to the returned user ID to form an identity name. -
If required, set
mappingMethodto control how mappings are established between the provider’s identities and user objects. -
Specify the HTTPS
urlto use to connect to a server that accepts credentials in Basic authentication headers. -
Optionally, set the
cato the certificate bundle to use in order to validate server certificates for the configured URL, or leave it empty to use the system-trusted roots. -
Optionally, remove or set the
certFileto the client certificate to present when making requests to the configured URL. -
If
certFileis specified, then you must set thekeyFileto the key for the client certificate.
- Save your changes and close the file.
Start the OpenShift Container Platform API server, specifying the configuration file you just modified:
$ openshift start master --config=<path/to/modified/config>/master-config.yaml
Once configured, any user logging in to the OpenShift Container Platform web console will be prompted to log in using their Basic authentication credentials.
12.3.9.2. Troubleshooting
The most common issue relates to network connectivity to the backend server. For simple debugging, run curl commands on the master. To test for a successful login, replace the <user> and <password> in the following example command with valid credentials. To test an invalid login, replace them with false credentials.
curl --cacert /path/to/ca.crt --cert /path/to/client.crt --key /path/to/client.key -u <user>:<password> -v https://www.example.com/remote-idp
Successful responses
A 200 status with a sub (subject) key indicates success:
{"sub":"userid"}The subject must be unique to the authenticated user, and must not be able to be modified.
A successful response may optionally provide additional data, such as:
A display name using the
namekey:{"sub":"userid", "name": "User Name", ...}An email address using the
emailkey:{"sub":"userid", "email":"user@example.com", ...}A preferred user name using the
preferred_usernamekey:{"sub":"014fbff9a07c", "preferred_username":"bob", ...}The
preferred_usernamekey is useful when the unique, unchangeable subject is a database key or UID, and a more human-readable name exists. This is used as a hint when provisioning the OpenShift Container Platform user for the authenticated identity.
Failed responses
-
A
401response indicates failed authentication. -
A non-
200status or the presence of a non-empty "error" key indicates an error:{"error":"Error message"}
12.3.10. Request header
Set RequestHeaderIdentityProvider in the identityProviders stanza to identify users from request header values, such as X-Remote-User. It is typically used in combination with an authenticating proxy, which sets the request header value. This is similar to how the remote user plug-in in OpenShift Enterprise 2 allowed administrators to provide Kerberos, LDAP, and many other forms of enterprise authentication.
You can also use the request header identity provider for advanced configurations such as the community-supported SAML authentication. Note that SAML authentication is not supported by Red Hat.
For users to authenticate using this identity provider, they must access https://<master>/oauth/authorize (and subpaths) via an authenticating proxy. To accomplish this, configure the OAuth server to redirect unauthenticated requests for OAuth tokens to the proxy endpoint that proxies to https://<master>/oauth/authorize.
To redirect unauthenticated requests from clients expecting browser-based login flows:
-
Set the
loginparameter to true. -
Set the
provider.loginURLparameter to the authenticating proxy URL that will authenticate interactive clients and then proxy the request tohttps://<master>/oauth/authorize.
To redirect unauthenticated requests from clients expecting WWW-Authenticate challenges:
-
Set the
challengeparameter to true. -
Set the
provider.challengeURLparameter to the authenticating proxy URL that will authenticate clients expectingWWW-Authenticatechallenges and then proxy the request tohttps://<master>/oauth/authorize.
The provider.challengeURL and provider.loginURL parameters can include the following tokens in the query portion of the URL:
${url}is replaced with the current URL, escaped to be safe in a query parameter.For example:
https://www.example.com/sso-login?then=${url}${query}is replaced with the current query string, unescaped.For example:
https://www.example.com/auth-proxy/oauth/authorize?${query}
If you expect unauthenticated requests to reach the OAuth server, a clientCA parameter MUST be set for this identity provider, so that incoming requests are checked for a valid client certificate before the request’s headers are checked for a user name. Otherwise, any direct request to the OAuth server can impersonate any identity from this provider, merely by setting a request header.
Example 12.7. Master Configuration Using RequestHeaderIdentityProvider
oauthConfig: ... identityProviders: - name: my_request_header_provider 1 challenge: true 2 login: true 3 mappingMethod: claim 4 provider: apiVersion: v1 kind: RequestHeaderIdentityProvider challengeURL: "https://www.example.com/challenging-proxy/oauth/authorize?${query}" 5 loginURL: "https://www.example.com/login-proxy/oauth/authorize?${query}" 6 clientCA: /path/to/client-ca.file 7 clientCommonNames: 8 - my-auth-proxy headers: 9 - X-Remote-User - SSO-User emailHeaders: 10 - X-Remote-User-Email nameHeaders: 11 - X-Remote-User-Display-Name preferredUsernameHeaders: 12 - X-Remote-User-Login
- 1
- This provider name is prefixed to the user name in the request header to form an identity name.
- 2
- RequestHeaderIdentityProvider can only respond to clients that request
WWW-Authenticatechallenges by redirecting to a configuredchallengeURL. The configured URL should respond with aWWW-Authenticatechallenge. - 3
- RequestHeaderIdentityProvider can only respond to clients requesting a login flow by redirecting to a configured
loginURL. The configured URL should respond with a login flow. - 4
- Controls how mappings are established between this provider’s identities and user objects, as described above.
- 5
- Optional: URL to redirect unauthenticated
/oauth/authorizerequests to, that will authenticate browser-based clients and then proxy their request tohttps://<master>/oauth/authorize. The URL that proxies tohttps://<master>/oauth/authorizemust end with/authorize(with no trailing slash), and also proxy subpaths, in order for OAuth approval flows to work properly.${url}is replaced with the current URL, escaped to be safe in a query parameter.${query}is replaced with the current query string. - 6
- Optional: URL to redirect unauthenticated
/oauth/authorizerequests to, that will authenticate clients which expectWWW-Authenticatechallenges, and then proxy them tohttps://<master>/oauth/authorize.${url}is replaced with the current URL, escaped to be safe in a query parameter.${query}is replaced with the current query string. - 7
- Optional: PEM-encoded certificate bundle. If set, a valid client certificate must be presented and validated against the certificate authorities in the specified file before the request headers are checked for user names.
- 8
- Optional: list of common names (
cn). If set, a valid client certificate with a Common Name (cn) in the specified list must be presented before the request headers are checked for user names. If empty, any Common Name is allowed. Can only be used in combination withclientCA. - 9
- Header names to check, in order, for the user identity. The first header containing a value is used as the identity. Required, case-insensitive.
- 10
- Header names to check, in order, for an email address. The first header containing a value is used as the email address. Optional, case-insensitive.
- 11
- Header names to check, in order, for a display name. The first header containing a value is used as the display name. Optional, case-insensitive.
- 12
- Header names to check, in order, for a preferred user name, if different than the immutable identity determined from the headers specified in
headers. The first header containing a value is used as the preferred user name when provisioning. Optional, case-insensitive.
Example 12.8. Apache Authentication Using RequestHeaderIdentityProvider
This example configures an authentication proxy on the same host as the master. Having the proxy and master on the same host is merely a convenience and may not be suitable for your environment. For example, if you were already running a router on the master, port 443 would not be available.
It is also important to note that while this reference configuration uses Apache’s mod_auth_gssapi, it is by no means required and other proxies can easily be used if the following requirements are met:
-
Block the
X-Remote-Userheader from client requests to prevent spoofing. - Enforce client certificate authentication in the RequestHeaderIdentityProvider configuration.
-
Require the
X-Csrf-Tokenheader be set for all authentication request using the challenge flow. -
Only the
/oauth/authorizeendpoint and its subpaths should be proxied, and redirects should not be rewritten to allow the backend server to send the client to the correct location. The URL that proxies to
https://<master>/oauth/authorizemust end with/authorize(with no trailing slash). For example:-
https://proxy.example.com/login-proxy/authorize?…→https://<master>/oauth/authorize?…
-
Subpaths of the URL that proxies to
https://<master>/oauth/authorizemust proxy to subpaths ofhttps://<master>/oauth/authorize. For example:-
https://proxy.example.com/login-proxy/authorize/approve?…→https://<master>/oauth/authorize/approve?…
-
Installing the Prerequisites
Obtain the mod_auth_gssapi module from the Optional channel. Install the following packages:
# yum install -y httpd mod_ssl mod_session apr-util-openssl mod_auth_gssapi
Generate a CA for validating requests that submit the trusted header. This CA should be used as the file name for clientCA in the master’s identity provider configuration.
# oc adm ca create-signer-cert \ --cert='/etc/origin/master/proxyca.crt' \ --key='/etc/origin/master/proxyca.key' \ --name='openshift-proxy-signer@1432232228' \ --serial='/etc/origin/master/proxyca.serial.txt'
The oc adm ca create-signer-cert command generates a certificate that is valid for five years. This can be altered with the --expire-days option, but for security reasons, it is recommended to not make it greater than this value.
Run oc adm commands only from the first master listed in the Ansible host inventory file, by default /etc/ansible/hosts.
Generate a client certificate for the proxy. This can be done using any x509 certificate tooling. For convenience, the oc adm CLI can be used:
# oc adm create-api-client-config \ --certificate-authority='/etc/origin/master/proxyca.crt' \ --client-dir='/etc/origin/master/proxy' \ --signer-cert='/etc/origin/master/proxyca.crt' \ --signer-key='/etc/origin/master/proxyca.key' \ --signer-serial='/etc/origin/master/proxyca.serial.txt' \ --user='system:proxy' 1 # pushd /etc/origin/master # cp master.server.crt /etc/pki/tls/certs/localhost.crt 2 # cp master.server.key /etc/pki/tls/private/localhost.key # cp ca.crt /etc/pki/CA/certs/ca.crt # cat proxy/system\:proxy.crt \ proxy/system\:proxy.key > \ /etc/pki/tls/certs/authproxy.pem # popd
- 1
- The user name can be anything, however it is useful to give it a descriptive name as it will appear in logs.
- 2
- When running the authentication proxy on a different host name than the master, it is important to generate a certificate that matches the host name instead of using the default master certificate as shown above. The value for
masterPublicURLin the /etc/origin/master/master-config.yaml file must be included in theX509v3 Subject Alternative Namein the certificate that is specified forSSLCertificateFile. If a new certificate needs to be created, theoc adm ca create-server-certcommand can be used.
The oc adm create-api-client-config command generates a certificate that is valid for two years. This can be altered with the --expire-days option, but for security reasons, it is recommended to not make it greater than this value. Run oc adm commands only from the first master listed in the Ansible host inventory file, by default /etc/ansible/hosts.
Configuring Apache
This proxy does not need to reside on the same host as the master. It uses a client certificate to connect to the master, which is configured to trust the X-Remote-User header.
-
Create the certificate for the Apache configuration. The certificate that you specify as the
SSLProxyMachineCertificateFileparameter value is the proxy’s client cert that is used to authenticate the proxy to the server. It must useTLS Web Client Authenticationas the extended key type. - Create the Apache configuration. Use the following template to provide your required settings and values:
Carefully review the template and customize its contents to fit your environment.
+
LoadModule request_module modules/mod_request.so
LoadModule auth_gssapi_module modules/mod_auth_gssapi.so
# Some Apache configurations might require these modules.
# LoadModule auth_form_module modules/mod_auth_form.so
# LoadModule session_module modules/mod_session.so
# Nothing needs to be served over HTTP. This virtual host simply redirects to
# HTTPS.
<VirtualHost *:80>
DocumentRoot /var/www/html
RewriteEngine On
RewriteRule ^(.*)$ https://%{HTTP_HOST}$1 [R,L]
</VirtualHost>
<VirtualHost *:443>
# This needs to match the certificates you generated. See the CN and X509v3
# Subject Alternative Name in the output of:
# openssl x509 -text -in /etc/pki/tls/certs/localhost.crt
ServerName www.example.com
DocumentRoot /var/www/html
SSLEngine on
SSLCertificateFile /etc/pki/tls/certs/localhost.crt
SSLCertificateKeyFile /etc/pki/tls/private/localhost.key
SSLCACertificateFile /etc/pki/CA/certs/ca.crt
SSLProxyEngine on
SSLProxyCACertificateFile /etc/pki/CA/certs/ca.crt
# It's critical to enforce client certificates on the Master. Otherwise
# requests could spoof the X-Remote-User header by accessing the Master's
# /oauth/authorize endpoint directly.
SSLProxyMachineCertificateFile /etc/pki/tls/certs/authproxy.pem
# Send all requests to the console
RewriteEngine On
RewriteRule ^/console(.*)$ https://%{HTTP_HOST}:8443/console$1 [R,L]
# In order to using the challenging-proxy an X-Csrf-Token must be present.
RewriteCond %{REQUEST_URI} ^/challenging-proxy
RewriteCond %{HTTP:X-Csrf-Token} ^$ [NC]
RewriteRule ^.* - [F,L]
<Location /challenging-proxy/oauth/authorize>
# Insert your backend server name/ip here.
ProxyPass https://[MASTER]:8443/oauth/authorize
AuthName "SSO Login"
# For Kerberos
AuthType GSSAPI
Require valid-user
RequestHeader set X-Remote-User %{REMOTE_USER}s
GssapiCredStore keytab:/etc/httpd/protected/auth-proxy.keytab
# Enable the following if you want to allow users to fallback
# to password based authntication when they do not have a client
# configured to perform kerberos authentication
GssapiBasicAuth On
# For ldap:
# AuthBasicProvider ldap
# AuthLDAPURL "ldap://ldap.example.com:389/ou=People,dc=my-domain,dc=com?uid?sub?(objectClass=*)"
# It's possible to remove the mod_auth_gssapi usage and replace it with
# something like mod_auth_mellon, which only supports the login flow.
</Location>
<Location /login-proxy/oauth/authorize>
# Insert your backend server name/ip here.
ProxyPass https://[MASTER]:8443/oauth/authorize
AuthName "SSO Login"
AuthType GSSAPI
Require valid-user
RequestHeader set X-Remote-User %{REMOTE_USER}s env=REMOTE_USER
GssapiCredStore keytab:/etc/httpd/protected/auth-proxy.keytab
# Enable the following if you want to allow users to fallback
# to password based authntication when they do not have a client
# configured to perform kerberos authentication
GssapiBasicAuth On
ErrorDocument 401 /login.html
</Location>
</VirtualHost>
RequestHeader unset X-Remote-User
The identityProviders stanza in the /etc/origin/master/master-config.yaml file must be updated as well:
identityProviders:
- name: requestheader
challenge: true
login: true
provider:
apiVersion: v1
kind: RequestHeaderIdentityProvider
challengeURL: "https://[MASTER]/challenging-proxy/oauth/authorize?${query}"
loginURL: "https://[MASTER]/login-proxy/oauth/authorize?${query}"
clientCA: /etc/origin/master/proxyca.crt
headers:
- X-Remote-UserRestarting Services
Finally, restart the following services:
# systemctl restart httpd # systemctl restart atomic-openshift-master-api atomic-openshift-master-controllers
Verifying the Configuration
Test by bypassing the proxy. You should be able to request a token if you supply the correct client certificate and header:
# curl -L -k -H "X-Remote-User: joe" \ --cert /etc/pki/tls/certs/authproxy.pem \ https://[MASTER]:8443/oauth/token/request
If you do not supply the client certificate, the request should be denied:
# curl -L -k -H "X-Remote-User: joe" \ https://[MASTER]:8443/oauth/token/request
This should show a redirect to the configured
challengeURL(with additional query parameters):# curl -k -v -H 'X-Csrf-Token: 1' \ '<masterPublicURL>/oauth/authorize?client_id=openshift-challenging-client&response_type=token'
This should show a 401 response with a
WWW-Authenticatebasic challenge, a negotiate challenge, or both challenges:# curl -k -v -H 'X-Csrf-Token: 1' \ '<redirected challengeURL from step 3 +query>'Test logging into the
occommand line with and without using a Kerberos ticket:If you generated a Kerberos ticket by using
kinit, destroy it:# kdestroy -c cache_name 1- 1
- Provide the name of your Kerberos cache.
Log in to the
occommand line by using your Kerberos credentials:# oc login
Enter your Kerberos user name and password at the prompt.
Log out of the
occommand line:# oc logout
Use your Kerberos credentials to get a ticket:
# kinit
Enter your Kerberos user name and password at the prompt.
Confirm that you can log in to the
occommand line:# oc login
If your configuration is correct, you are logged in without entering separate credentials.
12.3.11. GitHub
GitHub uses OAuth, and you can integrate your OpenShift Container Platform cluster to use that OAuth authentication. OAuth basically facilitates a token exchange flow.
Configuring GitHub authentication allows users to log in to OpenShift Container Platform with their GitHub credentials. To prevent anyone with any GitHub user ID from logging in to your OpenShift Container Platform cluster, you can restrict access to only those in specific GitHub organizations.
12.3.11.1. Registering the application on GitHub
- On GitHub, click Settings → Developer settings → Register a new application to navigate to the page to Register a new OAuth application.
-
Type an application name. For example:
My OpenShift Install -
Type a homepage URL. For example:
https://myapiserver.com:8443 - Optionally, type an application description.
Type the authorization callback URL, where the end of the URL contains the identity provider name (defined in the
identityProvidersstanza of the master configuration file, which you configure in the next section of this topic):<apiserver>/oauth2callback/<identityProviderName>
For example:
https://myapiserver.com:8443/oauth2callback/github/
- Click Register application. GitHub provides a Client ID and a Client Secret. Keep this window open so you can copy these values and paste them into the master configuration file.
12.3.11.2. Configuring authentication on the master
If you have:
Already completed the installation of Openshift, then copy the /etc/origin/master/master-config.yaml file into a new directory; for example:
$ cd /etc/origin/master $ mkdir githubconfig; cp master-config.yaml githubconfig
Not yet installed OpenShift Container Platform, then start the OpenShift Container Platform API server, specifying the hostname of the (future) OpenShift Container Platform master and a directory to store the configuration file created by the start command:
$ openshift start master --public-master=<apiserver> --write-config=<directory>
For example:
$ openshift start master --public-master=https://myapiserver.com:8443 --write-config=githubconfig
NoteIf you are installing with Ansible, then you must add the
identityProviderconfiguration to the Ansible playbook. If you use the following steps to modify your configuration manually after installing with Ansible, then you will lose any modifications whenever you re-run the install tool or upgrade.NoteUsing
openshift start masteron its own would auto-detect host names, but GitHub must be able to redirect to the exact host name that you specified when registering the application. For this reason, you cannot auto-detect the ID because it might redirect to the wrong address. Instead, you must specify the hostname that web browsers use to interact with your OpenShift Container Platform cluster.
Edit the new master-config.yaml file’s
identityProvidersstanza, and copy the exampleGitHubIdentityProviderconfiguration and paste it to replace the existing stanza:oauthConfig: ... identityProviders: - name: github 1 challenge: false 2 login: true 3 mappingMethod: claim 4 provider: apiVersion: v1 kind: GitHubIdentityProvider clientID: ... 5 clientSecret: ... 6 organizations: 7 - myorganization1 - myorganization2 teams: 8 - myorganization1/team-a - myorganization2/team-b
- 1
- This provider name is prefixed to the GitHub numeric user ID to form an identity name. It is also used to build the callback URL.
- 2
- GitHubIdentityProvider cannot be used to send
WWW-Authenticatechallenges. - 3
- When true, unauthenticated token requests from web clients (like the web console) are redirected to GitHub to log in.
- 4
- Controls how mappings are established between this provider’s identities and user objects, as described above.
- 5
- The client ID of a registered GitHub OAuth application. The application must be configured with a callback URL of
<master>/oauth2callback/<identityProviderName>. - 6
- The client secret issued by GitHub. This value may also be provided in an environment variable, external file, or encrypted file.
- 7
- Optional list of organizations. If specified, only GitHub users that are members of at least one of the listed organizations will be allowed to log in. If the GitHub OAuth application configured in clientID is not owned by the organization, an organization owner must grant third-party access in order to use this option. This can be done during the first GitHub login by the organization’s administrator, or from the GitHub organization settings. Cannot be used in combination with the
teamsfield. - 8
- Optional list of teams. If specified, only GitHub users that are members of at least one of the listed teams will be allowed to log in. If the GitHub OAuth application configured in clientID is not owned by the team’s organization, an organization owner must grant third-party access in order to use this option. This can be done during the first GitHub login by the organization’s administrator, or from the GitHub organization settings. Cannot be used in combination with the
organizationsfield.
Make the following modifications to the
identityProvidersstanza:Change the provider
nameto match the callback URL you configured on GitHub.For example, if you defined the callback URL as
https://myapiserver.com:8443/oauth2callback/github/then thenamemust begithub.-
Change
clientIDto the Client ID from GitHub that you registered previously. -
Change
clientSecretto the Client Secret from GitHub that you registered previously. -
Change
organizationsorteamsto include a list of one or more GitHub organizations or teams to which a user must have membership in order to authenticate. If specified, only GitHub users that are members of at least one of the listed organizations or teams will be allowed to log in. If this is not specified, then any person with a valid GitHub account can log in.
- Save your changes and close the file.
Start the OpenShift Container Platform API server, specifying the configuration file you just modified:
$ openshift start master --config=<path/to/modified/config>/master-config.yaml
Once configured, any user logging in to the OpenShift Container Platform web console will be prompted to log in using their GitHub credentials. On their first login, the user must click authorize application to permit GitHub to use their user name, password, and organization membership with OpenShift Container Platform. The user is then redirected back to the web console.
12.3.11.3. Creating users with GitHub authentication
You do not create users in OpenShift Container Platform when integrating with an external authentication provider, such as, in this case, GitHub. GitHub is the system of record, meaning that users are defined by GitHub, and any user belonging to a specified organization can log in.
To add a user to OpenShift Container Platform, you must add that user to an approved organization on GitHub, and if required create a new GitHub account for the user.
12.3.11.4. Verifying users
Once one or more users have logged in, you can run oc get users to view a list of users and verify that users were created successfully:
Example 12.9. Output of oc get users command
$ oc get users
NAME UID FULL NAME IDENTITIES
bobsmith 433b5641-066f-11e6-a6d8-acfc32c1ca87 Bob Smith github:873654 1- 1
- Identities in OpenShift Container Platform are comprised of the identity provider name and GitHub’s internal numeric user ID. This way, if a user changes their GitHub user name or e-mail they can still log in to OpenShift Container Platform instead of relying on the credentials attached to the GitHub account. This creates a stable login.
From here, you might want to learn how to control user roles.
12.3.12. GitLab
Set GitLabIdentityProvider in the identityProviders stanza to use GitLab.com or any other GitLab instance as an identity provider, using the OAuth integration. The OAuth provider feature requires GitLab version 7.7.0 or higher.
Example 12.10. Master Configuration Using GitLabIdentityProvider
oauthConfig: ... identityProviders: - name: gitlab 1 challenge: true 2 login: true 3 mappingMethod: claim 4 provider: apiVersion: v1 kind: GitLabIdentityProvider url: ... 5 clientID: ... 6 clientSecret: ... 7 ca: ... 8
- 1
- This provider name is prefixed to the GitLab numeric user ID to form an identity name. It is also used to build the callback URL.
- 2
- When true, unauthenticated token requests from non-web clients (like the CLI) are sent a
WWW-Authenticatechallenge header for this provider. This uses the Resource Owner Password Credentials grant flow to obtain an access token from GitLab. - 3
- When true, unauthenticated token requests from web clients (like the web console) are redirected to GitLab to log in.
- 4
- Controls how mappings are established between this provider’s identities and user objects, as described above.
- 5
- The host URL of a GitLab OAuth provider. This could either be
https://gitlab.com/or any other self hosted instance of GitLab. - 6
- The client ID of a registered GitLab OAuth application. The application must be configured with a callback URL of
<master>/oauth2callback/<identityProviderName>. - 7
- The client secret issued by GitLab. This value may also be provided in an environment variable, external file, or encrypted file.
- 8
- CA is an optional trusted certificate authority bundle to use when making requests to the GitLab instance. If empty, the default system roots are used.
12.3.13. Google
Set GoogleIdentityProvider in the identityProviders stanza to use Google as an identity provider, using Google’s OpenID Connect integration.
Using Google as an identity provider requires users to get a token using <master>/oauth/token/request to use with command-line tools.
Using Google as an identity provider allows any Google user to authenticate to your server. You can limit authentication to members of a specific hosted domain with the hostedDomain configuration attribute, as shown below.
Example 12.11. Master Configuration Using GoogleIdentityProvider
oauthConfig: ... identityProviders: - name: google 1 challenge: false 2 login: true 3 mappingMethod: claim 4 provider: apiVersion: v1 kind: GoogleIdentityProvider clientID: ... 5 clientSecret: ... 6 hostedDomain: "" 7
- 1
- This provider name is prefixed to the Google numeric user ID to form an identity name. It is also used to build the redirect URL.
- 2
- GoogleIdentityProvider cannot be used to send
WWW-Authenticatechallenges. - 3
- When true, unauthenticated token requests from web clients (like the web console) are redirected to Google to log in.
- 4
- Controls how mappings are established between this provider’s identities and user objects, as described above.
- 5
- The client ID of a registered Google project. The project must be configured with a redirect URI of
<master>/oauth2callback/<identityProviderName>. - 6
- The client secret issued by Google. This value may also be provided in an environment variable, external file, or encrypted file.
- 7
- Optional hosted domain to restrict sign-in accounts to. If empty, any Google account is allowed to authenticate.
12.3.14. OpenID connect
Set OpenIDIdentityProvider in the identityProviders stanza to integrate with an OpenID Connect identity provider using an Authorization Code Flow.
You can configure Red Hat Single Sign-On as an OpenID Connect identity provider for OpenShift Container Platform.
ID Token and UserInfo decryptions are not supported.
By default, the openid scope is requested. If required, extra scopes can be specified in the extraScopes field.
Claims are read from the JWT id_token returned from the OpenID identity provider and, if specified, from the JSON returned by the UserInfo URL.
At least one claim must be configured to use as the user’s identity. The standard identity claim is sub.
You can also indicate which claims to use as the user’s preferred user name, display name, and email address. If multiple claims are specified, the first one with a non-empty value is used. The standard claims are:
|
| Short for "subject identifier." The remote identity for the user at the issuer. |
|
|
The preferred user name when provisioning a user. A shorthand name that the user wants to be referred to as, such as |
|
| Email address. |
|
| Display name. |
See the OpenID claims documentation for more information.
Using an OpenID Connect identity provider requires users to get a token using <master>/oauth/token/request to use with command-line tools.
Standard Master Configuration Using OpenIDIdentityProvider
oauthConfig: ... identityProviders: - name: my_openid_connect 1 challenge: true 2 login: true 3 mappingMethod: claim 4 provider: apiVersion: v1 kind: OpenIDIdentityProvider clientID: ... 5 clientSecret: ... 6 claims: id: 7 - sub preferredUsername: - preferred_username name: - name email: - email urls: authorize: https://myidp.example.com/oauth2/authorize 8 token: https://myidp.example.com/oauth2/token 9
- 1
- This provider name is prefixed to the value of the identity claim to form an identity name. It is also used to build the redirect URL.
- 2
- When true, unauthenticated token requests from non-web clients (like the CLI) are sent a
WWW-Authenticatechallenge header for this provider. This requires the OpenID provider to support the Resource Owner Password Credentials grant flow. - 3
- When true, unauthenticated token requests from web clients (like the web console) are redirected to the authorize URL to log in.
- 4
- Controls how mappings are established between this provider’s identities and user objects, as described above.
- 5
- The client ID of a client registered with the OpenID provider. The client must be allowed to redirect to
<master>/oauth2callback/<identityProviderName>. - 6
- The client secret. This value may also be provided in an environment variable, external file, or encrypted file.
- 7
- List of claims to use as the identity. First non-empty claim is used. At least one claim is required. If none of the listed claims have a value, authentication fails. For example, this uses the value of the
subclaim in the returnedid_tokenas the user’s identity. - 8
- Authorization Endpoint described in the OpenID spec. Must use
https. - 9
- Token Endpoint described in the OpenID spec. Must use
https.
A custom certificate bundle, extra scopes, extra authorization request parameters, and userInfo URL can also be specified:
Example 12.12. Full Master Configuration Using OpenIDIdentityProvider
oauthConfig:
...
identityProviders:
- name: my_openid_connect
challenge: false
login: true
mappingMethod: claim
provider:
apiVersion: v1
kind: OpenIDIdentityProvider
clientID: ...
clientSecret: ...
ca: my-openid-ca-bundle.crt 1
extraScopes: 2
- email
- profile
extraAuthorizeParameters: 3
include_granted_scopes: "true"
claims:
id: 4
- custom_id_claim
- sub
preferredUsername: 5
- preferred_username
- email
name: 6
- nickname
- given_name
- name
email: 7
- custom_email_claim
- email
urls:
authorize: https://myidp.example.com/oauth2/authorize
token: https://myidp.example.com/oauth2/token
userInfo: https://myidp.example.com/oauth2/userinfo 8- 1
- Certificate bundle to use to validate server certificates for the configured URLs. If empty, system trusted roots are used.
- 2
- Optional list of scopes to request, in addition to the openid scope, during the authorization token request.
- 3
- Optional map of extra parameters to add to the authorization token request.
- 4
- List of claims to use as the identity. First non-empty claim is used. At least one claim is required. If none of the listed claims have a value, authentication fails.
- 5
- List of claims to use as the preferred user name when provisioning a user for this identity. First non-empty claim is used.
- 6
- List of claims to use as the display name. First non-empty claim is used.
- 7
- List of claims to use as the email address. First non-empty claim is used.
- 8
- UserInfo Endpoint described in the OpenID spec. Must use
https.
12.4. Token options
The OAuth server generates two kinds of tokens:
| Access tokens | Longer-lived tokens that grant access to the API. |
| Authorize codes | Short-lived tokens whose only use is to be exchanged for an access token. |
Use the tokenConfig stanza to set token options:
Example 12.13. Master Configuration Token Options
oauthConfig:
...
tokenConfig:
accessTokenMaxAgeSeconds: 86400 1
authorizeTokenMaxAgeSeconds: 300 2
You can override the accessTokenMaxAgeSeconds value through an OAuthClient object definition.
12.5. Grant options
When the OAuth server receives token requests for a client to which the user has not previously granted permission, the action that the OAuth server takes is dependent on the OAuth client’s grant strategy.
When the OAuth client requesting token does not provide its own grant strategy, the server-wide default strategy is used. To configure the default strategy, set the method value in the grantConfig stanza. Valid values for method are:
|
| Auto-approve the grant and retry the request. |
|
| Prompt the user to approve or deny the grant. |
|
| Auto-deny the grant and return a failure error to the client. |
Example 12.14. Master Configuration Grant Options
oauthConfig:
...
grantConfig:
method: auto12.6. Session options
The OAuth server uses a signed and encrypted cookie-based session during login and redirect flows.
Use the sessionConfig stanza to set session options:
Example 12.15. Master Configuration Session Options
oauthConfig:
...
sessionConfig:
sessionMaxAgeSeconds: 300 1
sessionName: ssn 2
sessionSecretsFile: "..." 3- 1
- Controls the maximum age of a session; sessions auto-expire once a token request is complete. If auto-grant is not enabled, sessions must last as long as the user is expected to take to approve or reject a client authorization request.
- 2
- Name of the cookie used to store the session.
- 3
- File name containing serialized
SessionSecretsobject. If empty, a random signing and encryption secret is generated at each server start.
If no sessionSecretsFile is specified, a random signing and encryption secret is generated at each start of the master server. This means that any logins in progress will have their sessions invalidated if the master is restarted. It also means they will not be able to decode sessions generated by one of the other masters.
To specify the signing and encryption secret to use, specify a sessionSecretsFile. This allows you separate secret values from the configuration file and keep the configuration file distributable, for example for debugging purposes.
Multiple secrets can be specified in the sessionSecretsFile to enable rotation. New sessions are signed and encrypted using the first secret in the list. Existing sessions are decrypted and authenticated by each secret until one succeeds.
Example 12.16. Session Secret Configuration:
apiVersion: v1 kind: SessionSecrets secrets: 1 - authentication: "..." 2 encryption: "..." 3 - authentication: "..." encryption: "..." ...
- 1
- List of secrets used to authenticate and encrypt cookie sessions. At least one secret must be specified. Each secret must set an authentication and encryption secret.
- 2
- Signing secret, used to authenticate sessions using HMAC. Recommended to use a secret with 32 or 64 bytes.
- 3
- Encrypting secret, used to encrypt sessions. Must be 16, 24, or 32 characters long, to select AES-128, AES-192, or AES-256.
12.7. Preventing CLI version mismatch with user agent
OpenShift Container Platform implements a user agent that can be used to prevent an application developer’s CLI accessing the OpenShift Container Platform API.
User agents for the OpenShift Container Platform CLI are constructed from a set of values within OpenShift Container Platform:
<command>/<version> (<platform>/<architecture>) <client>/<git_commit>
So, for example, when:
-
<command> =
oc -
<version> = The client version. For example,
v3.3.0. Requests made against the Kubernetes API at/apireceive the Kubernetes version, while requests made against the OpenShift Container Platform API at/oapireceive the OpenShift Container Platform version (as specified byoc version) -
<platform> =
linux -
<architecture> =
amd64 -
<client> =
openshift, orkubernetesdepending on if the request is made against the Kubernetes API at/api, or the OpenShift Container Platform API at/oapi -
<git_commit> = The Git commit of the client version (for example,
f034127)
the user agent will be:
oc/v3.3.0 (linux/amd64) openshift/f034127
As an OpenShift Container Platform administrator, you can prevent clients from accessing the API with the userAgentMatching configuration setting of a master configuration. So, if a client is using a particular library or binary, they will be prevented from accessing the API.
The following user agent example denies the Kubernetes 1.2 client binary, OpenShift Origin 1.1.3 binary, and the POST and PUT httpVerbs:
policyConfig:
userAgentMatchingConfig:
defaultRejectionMessage: "Your client is too old. Go to https://example.org to update it."
deniedClients:
- regex: '\w+/v(?:(?:1\.1\.1)|(?:1\.0\.1)) \(.+/.+\) openshift/\w{7}'
- regex: '\w+/v(?:1\.1\.3) \(.+/.+\) openshift/\w{7}'
httpVerbs:
- POST
- PUT
- regex: '\w+/v1\.2\.0 \(.+/.+\) kubernetes/\w{7}'
httpVerbs:
- POST
- PUT
requiredClients: nullAdministrators can also deny clients that do not exactly match the expected clients:
policyConfig:
userAgentMatchingConfig:
defaultRejectionMessage: "Your client is too old. Go to https://example.org to update it."
deniedClients: []
requiredClients:
- regex: '\w+/v1\.1\.3 \(.+/.+\) openshift/\w{7}'
- regex: '\w+/v1\.2\.0 \(.+/.+\) kubernetes/\w{7}'
httpVerbs:
- POST
- PUTWhen the client’s user agent mismatches the configuration, errors occur. To ensure that mutating requests match, enforce a whitelist. Rules are mapped to specific verbs, so you can ban mutating requests while allowing non-mutating requests.
Chapter 13. Syncing Groups With LDAP
13.1. Overview
As an OpenShift Container Platform administrator, you can use groups to manage users, change their permissions, and enhance collaboration. Your organization may have already created user groups and stored them in an LDAP server. OpenShift Container Platform can sync those LDAP records with internal OpenShift Container Platform records, enabling you to manage your groups in one place. OpenShift Container Platform currently supports group sync with LDAP servers using three common schemas for defining group membership: RFC 2307, Active Directory, and augmented Active Directory.
You must have cluster-admin privileges to sync groups.
13.2. Configuring LDAP Sync
Before you can run LDAP sync, you need a sync configuration file. This file contains LDAP client configuration details:
- Configuration for connecting to your LDAP server.
- Sync configuration options that are dependent on the schema used in your LDAP server.
A sync configuration file can also contain an administrator-defined list of name mappings that maps OpenShift Container Platform Group names to groups in your LDAP server.
13.2.1. LDAP Client Configuration
Example 13.1. LDAP Client Configuration
url: ldap://10.0.0.0:389 1 bindDN: cn=admin,dc=example,dc=com 2 bindPassword: password 3 insecure: false 4 ca: my-ldap-ca-bundle.crt 5
- 1
- The connection protocol, IP address of the LDAP server hosting your database, and the port to connect to, formatted as
scheme://host:port. - 2
- Optional distinguished name (DN) to use as the Bind DN. OpenShift Container Platform uses this if elevated privilege is required to retrieve entries for the sync operation.
- 3
- Optional password to use to bind. OpenShift Container Platform uses this if elevated privilege is necessary to retrieve entries for the sync operation. This value may also be provided in an environment variable, external file, or encrypted file.
- 4
- When
true, no TLS connection is made to the server. Whenfalse, secure LDAP (ldaps://) URLs connect using TLS, and insecure LDAP (ldap://) URLs are upgraded to TLS. - 5
- The certificate bundle to use for validating server certificates for the configured URL. If empty, OpenShift Container Platform uses system-trusted roots. This only applies if
insecureis set tofalse.
13.2.2. LDAP Query Definition
Sync configurations consist of LDAP query definitions for the entries that are required for synchronization. The specific definition of an LDAP query depends on the schema used to store membership information in the LDAP server.
Example 13.2. LDAP Query Definition
baseDN: ou=users,dc=example,dc=com 1 scope: sub 2 derefAliases: never 3 timeout: 0 4 filter: (objectClass=inetOrgPerson) 5 pageSize: 0 6
- 1
- The distinguished name (DN) of the branch of the directory where all searches will start from. It is required that you specify the top of your directory tree, but you can also specify a subtree in the directory.
- 2
- The scope of the search. Valid values are
base,one, orsub. If this is left undefined, then a scope ofsubis assumed. Descriptions of the scope options can be found in the table below. - 3
- The behavior of the search with respect to aliases in the LDAP tree. Valid values are
never,search,base, oralways. If this is left undefined, then the default is toalwaysdereference aliases. Descriptions of the dereferencing behaviors can be found in the table below. - 4
- The time limit allowed for the search by the client, in seconds. A value of 0 imposes no client-side limit.
- 5
- A valid LDAP search filter. If this is left undefined, then the default is
(objectClass=*). - 6
- The optional maximum size of response pages from the server, measured in LDAP entries. If set to 0, no size restrictions will be made on pages of responses. Setting paging sizes is necessary when queries return more entries than the client or server allow by default.
| LDAP Search Scope | Description |
|---|---|
|
| Only consider the object specified by the base DN given for the query. |
|
| Consider all of the objects on the same level in the tree as the base DN for the query. |
|
| Consider the entire subtree rooted at the base DN given for the query. |
| Dereferencing Behavior | Description |
|---|---|
|
| Never dereference any aliases found in the LDAP tree. |
|
| Only dereference aliases found while searching. |
|
| Only dereference aliases while finding the base object. |
|
| Always dereference all aliases found in the LDAP tree. |
13.2.3. User-Defined Name Mapping
A user-defined name mapping explicitly maps the names of OpenShift Container Platform Groups to unique identifiers that find groups on your LDAP server. The mapping uses normal YAML syntax. A user-defined mapping can contain an entry for every group in your LDAP server or only a subset of those groups. If there are groups on the LDAP server that do not have a user-defined name mapping, the default behavior during sync is to use the attribute specified as the Group’s name.
Example 13.3. User-Defined Name Mapping
groupUIDNameMapping: "cn=group1,ou=groups,dc=example,dc=com": firstgroup "cn=group2,ou=groups,dc=example,dc=com": secondgroup "cn=group3,ou=groups,dc=example,dc=com": thirdgroup
13.3. Running LDAP Sync
Once you have created a sync configuration file, then sync can begin. OpenShift Container Platform allows administrators to perform a number of different sync types with the same server.
By default, all group synchronization or pruning operations are dry-run, so you must set the --confirm flag on the sync-groups command in order to make changes to OpenShift Container Platform Group records.
To sync all groups from the LDAP server with OpenShift Container Platform:
$ oc adm groups sync --sync-config=config.yaml --confirm
To sync all Groups already in OpenShift Container Platform that correspond to groups in the LDAP server specified in the configuration file:
$ oc adm groups sync --type=openshift --sync-config=config.yaml --confirm
To sync a subset of LDAP groups with OpenShift Container Platform, you can use whitelist files, blacklist files, or both:
Any combination of blacklist files, whitelist files, or whitelist literals will work; whitelist literals can be included directly in the command itself. This applies to groups found on LDAP servers, as well as Groups already present in OpenShift Container Platform. Your files must contain one unique group identifier per line.
$ oc adm groups sync --whitelist=<whitelist_file> \
--sync-config=config.yaml \
--confirm
$ oc adm groups sync --blacklist=<blacklist_file> \
--sync-config=config.yaml \
--confirm
$ oc adm groups sync <group_unique_identifier> \
--sync-config=config.yaml \
--confirm
$ oc adm groups sync <group_unique_identifier> \
--whitelist=<whitelist_file> \
--blacklist=<blacklist_file> \
--sync-config=config.yaml \
--confirm
$ oc adm groups sync --type=openshift \
--whitelist=<whitelist_file> \
--sync-config=config.yaml \
--confirm13.4. Running a Group Pruning Job
An administrator can also choose to remove groups from OpenShift Container Platform records if the records on the LDAP server that created them are no longer present. The prune job will accept the same sync configuration file and white- or black-lists as used for the sync job.
For example, if groups had previously been synchronized from LDAP using some config.yaml file, and some of those groups no longer existed on the LDAP server, the following command would determine which Groups in OpenShift Container Platform corresponded to the deleted groups in LDAP and then remove them from OpenShift Container Platform:
$ oc adm groups prune --sync-config=config.yaml --confirm
13.5. Sync Examples
This section contains examples for the RFC 2307, Active Directory, and augmented Active Directory schemas. All of the following examples synchronize a group named admins that has two members: Jane and Jim. Each example explains:
- How the group and users are added to the LDAP server.
- What the LDAP sync configuration file looks like.
- What the resulting Group record in OpenShift Container Platform will be after synchronization.
These examples assume that all users are direct members of their respective groups. Specifically, no groups have other groups as members. See Nested Membership Sync Example for information on how to sync nested groups.
13.5.1. RFC 2307
In the RFC 2307 schema, both users (Jane and Jim) and groups exist on the LDAP server as first-class entries, and group membership is stored in attributes on the group. The following snippet of ldif defines the users and group for this schema:
Example 13.4. LDAP Entries Using RFC 2307 Schema: rfc2307.ldif
dn: ou=users,dc=example,dc=com objectClass: organizationalUnit ou: users dn: cn=Jane,ou=users,dc=example,dc=com objectClass: person objectClass: organizationalPerson objectClass: inetOrgPerson cn: Jane sn: Smith displayName: Jane Smith mail: jane.smith@example.com dn: cn=Jim,ou=users,dc=example,dc=com objectClass: person objectClass: organizationalPerson objectClass: inetOrgPerson cn: Jim sn: Adams displayName: Jim Adams mail: jim.adams@example.com dn: ou=groups,dc=example,dc=com objectClass: organizationalUnit ou: groups dn: cn=admins,ou=groups,dc=example,dc=com 1 objectClass: groupOfNames cn: admins owner: cn=admin,dc=example,dc=com description: System Administrators member: cn=Jane,ou=users,dc=example,dc=com 2 member: cn=Jim,ou=users,dc=example,dc=com
To sync this group, you must first create the configuration file. The RFC 2307 schema requires you to provide an LDAP query definition for both user and group entries, as well as the attributes with which to represent them in the internal OpenShift Container Platform records.
For clarity, the Group you create in OpenShift Container Platform should use attributes other than the distinguished name whenever possible for user- or administrator-facing fields. For example, identify the users of a Group by their e-mail, and use the name of the group as the common name. The following configuration file creates these relationships:
If using user-defined name mappings, your configuration file will differ.
Example 13.5. LDAP Sync Configuration Using RFC 2307 Schema: rfc2307_config.yaml
kind: LDAPSyncConfig apiVersion: v1 url: ldap://LDAP_SERVICE_IP:389 1 insecure: false 2 rfc2307: groupsQuery: baseDN: "ou=groups,dc=example,dc=com" scope: sub derefAliases: never pageSize: 0 groupUIDAttribute: dn 3 groupNameAttributes: [ cn ] 4 groupMembershipAttributes: [ member ] 5 usersQuery: baseDN: "ou=users,dc=example,dc=com" scope: sub derefAliases: never pageSize: 0 userUIDAttribute: dn 6 userNameAttributes: [ uid ] 7 tolerateMemberNotFoundErrors: false tolerateMemberOutOfScopeErrors: false
- 1
- The IP address and host of the LDAP server where this group’s record is stored.
- 2
- When
true, no TLS connection is made to the server. Whenfalse, secure LDAP (ldaps://) URLs connect using TLS, and insecure LDAP (ldap://) URLs are upgraded to TLS. - 3
- The attribute that uniquely identifies a group on the LDAP server. You cannot specify
groupsQueryfilters when using DN for groupUIDAttribute. For fine-grained filtering, use the whitelist / blacklist method. - 4
- The attribute to use as the name of the Group.
- 5
- The attribute on the group that stores the membership information.
- 6
- The attribute that uniquely identifies a user on the LDAP server. You cannot specify
usersQueryfilters when using DN for userUIDAttribute. For fine-grained filtering, use the whitelist / blacklist method. - 7
- The attribute to use as the name of the user in the OpenShift Container Platform Group record.
To run sync with the rfc2307_config.yaml file:
$ oc adm groups sync --sync-config=rfc2307_config.yaml --confirm
OpenShift Container Platform creates the following Group record as a result of the above sync operation:
Example 13.6. OpenShift Container Platform Group Created Using rfc2307_config.yaml
apiVersion: user.openshift.io/v1
kind: Group
metadata:
annotations:
openshift.io/ldap.sync-time: 2015-10-13T10:08:38-0400 1
openshift.io/ldap.uid: cn=admins,ou=groups,dc=example,dc=com 2
openshift.io/ldap.url: LDAP_SERVER_IP:389 3
creationTimestamp:
name: admins 4
users: 5
- jane.smith@example.com
- jim.adams@example.com- 1
- The last time this Group was synchronized with the LDAP server, in ISO 6801 format.
- 2
- The unique identifier for the group on the LDAP server.
- 3
- The IP address and host of the LDAP server where this Group’s record is stored.
- 4
- The name of the Group as specified by the sync file.
- 5
- The users that are members of the Group, named as specified by the sync file.
13.5.1.1. RFC2307 with User-Defined Name Mappings
When syncing groups with user-defined name mappings, the configuration file changes to contain these mappings as shown below.
Example 13.7. LDAP Sync Configuration Using RFC 2307 Schema With User-Defined Name Mappings: rfc2307_config_user_defined.yaml
kind: LDAPSyncConfig apiVersion: v1 groupUIDNameMapping: "cn=admins,ou=groups,dc=example,dc=com": Administrators 1 rfc2307: groupsQuery: baseDN: "ou=groups,dc=example,dc=com" scope: sub derefAliases: never pageSize: 0 groupUIDAttribute: dn 2 groupNameAttributes: [ cn ] 3 groupMembershipAttributes: [ member ] usersQuery: baseDN: "ou=users,dc=example,dc=com" scope: sub derefAliases: never pageSize: 0 userUIDAttribute: dn 4 userNameAttributes: [ uid ] tolerateMemberNotFoundErrors: false tolerateMemberOutOfScopeErrors: false
- 1
- The user-defined name mapping.
- 2
- The unique identifier attribute that is used for the keys in the user-defined name mapping. You cannot specify
groupsQueryfilters when using DN for groupUIDAttribute. For fine-grained filtering, use the whitelist / blacklist method. - 3
- The attribute to name OpenShift Container Platform Groups with if their unique identifier is not in the user-defined name mapping.
- 4
- The attribute that uniquely identifies a user on the LDAP server. You cannot specify
usersQueryfilters when using DN for userUIDAttribute. For fine-grained filtering, use the whitelist / blacklist method.
To run sync with the rfc2307_config_user_defined.yaml file:
$ oc adm groups sync --sync-config=rfc2307_config_user_defined.yaml --confirm
OpenShift Container Platform creates the following Group record as a result of the above sync operation:
Example 13.8. OpenShift Container Platform Group Created Using rfc2307_config_user_defined.yaml
apiVersion: user.openshift.io/v1
kind: Group
metadata:
annotations:
openshift.io/ldap.sync-time: 2015-10-13T10:08:38-0400
openshift.io/ldap.uid: cn=admins,ou=groups,dc=example,dc=com
openshift.io/ldap.url: LDAP_SERVER_IP:389
creationTimestamp:
name: Administrators 1
users:
- jane.smith@example.com
- jim.adams@example.com- 1
- The name of the Group as specified by the user-defined name mapping.
13.5.2. RFC 2307 with User-Defined Error Tolerances
By default, if the groups being synced contain members whose entries are outside of the scope defined in the member query, the group sync fails with an error:
Error determining LDAP group membership for "<group>": membership lookup for user "<user>" in group "<group>" failed because of "search for entry with dn="<user-dn>" would search outside of the base dn specified (dn="<base-dn>")".
This often indicates a mis-configured baseDN in the usersQuery field. However, in cases where the baseDN intentionally does not contain some of the members of the group, setting tolerateMemberOutOfScopeErrors: true allows the group sync to continue. Out of scope members will be ignored.
Similarly, when the group sync process fails to locate a member for a group, it fails outright with errors:
Error determining LDAP group membership for "<group>": membership lookup for user "<user>" in group "<group>" failed because of "search for entry with base dn="<user-dn>" refers to a non-existent entry". Error determining LDAP group membership for "<group>": membership lookup for user "<user>" in group "<group>" failed because of "search for entry with base dn="<user-dn>" and filter "<filter>" did not return any results".
This often indicates a mis-configured usersQuery field. However, in cases where the group contains member entries that are known to be missing, setting tolerateMemberNotFoundErrors: true allows the group sync to continue. Problematic members will be ignored.
Enabling error tolerances for the LDAP group sync causes the sync process to ignore problematic member entries. If the LDAP group sync is not configured correctly, this could result in synced OpenShift Container Platform groups missing members.
Example 13.9. LDAP Entries Using RFC 2307 Schema With Problematic Group Membership: rfc2307_problematic_users.ldif
dn: ou=users,dc=example,dc=com objectClass: organizationalUnit ou: users dn: cn=Jane,ou=users,dc=example,dc=com objectClass: person objectClass: organizationalPerson objectClass: inetOrgPerson cn: Jane sn: Smith displayName: Jane Smith mail: jane.smith@example.com dn: cn=Jim,ou=users,dc=example,dc=com objectClass: person objectClass: organizationalPerson objectClass: inetOrgPerson cn: Jim sn: Adams displayName: Jim Adams mail: jim.adams@example.com dn: ou=groups,dc=example,dc=com objectClass: organizationalUnit ou: groups dn: cn=admins,ou=groups,dc=example,dc=com objectClass: groupOfNames cn: admins owner: cn=admin,dc=example,dc=com description: System Administrators member: cn=Jane,ou=users,dc=example,dc=com member: cn=Jim,ou=users,dc=example,dc=com member: cn=INVALID,ou=users,dc=example,dc=com 1 member: cn=Jim,ou=OUTOFSCOPE,dc=example,dc=com 2
In order to tolerate the errors in the above example, the following additions to your sync configuration file must be made:
Example 13.10. LDAP Sync Configuration Using RFC 2307 Schema Tolerating Errors: rfc2307_config_tolerating.yaml
kind: LDAPSyncConfig
apiVersion: v1
url: ldap://LDAP_SERVICE_IP:389
rfc2307:
groupsQuery:
baseDN: "ou=groups,dc=example,dc=com"
scope: sub
derefAliases: never
groupUIDAttribute: dn
groupNameAttributes: [ cn ]
groupMembershipAttributes: [ member ]
usersQuery:
baseDN: "ou=users,dc=example,dc=com"
scope: sub
derefAliases: never
userUIDAttribute: dn 1
userNameAttributes: [ uid ]
tolerateMemberNotFoundErrors: true 2
tolerateMemberOutOfScopeErrors: true 3- 2
- When
true, the sync job tolerates groups for which some members were not found, and members whose LDAP entries are not found are ignored. The default behavior for the sync job is to fail if a member of a group is not found. - 3
- When
true, the sync job tolerates groups for which some members are outside the user scope given in theusersQuerybase DN, and members outside the member query scope are ignored. The default behavior for the sync job is to fail if a member of a group is out of scope. - 1
- The attribute that uniquely identifies a user on the LDAP server. You cannot specify
usersQueryfilters when using DN for userUIDAttribute. For fine-grained filtering, use the whitelist / blacklist method.
To run sync with the rfc2307_config_tolerating.yaml file:
$ oc adm groups sync --sync-config=rfc2307_config_tolerating.yaml --confirm
OpenShift Container Platform creates the following group record as a result of the above sync operation:
Example 13.11. OpenShift Container Platform Group Created Using rfc2307_config.yaml
apiVersion: user.openshift.io/v1
kind: Group
metadata:
annotations:
openshift.io/ldap.sync-time: 2015-10-13T10:08:38-0400
openshift.io/ldap.uid: cn=admins,ou=groups,dc=example,dc=com
openshift.io/ldap.url: LDAP_SERVER_IP:389
creationTimestamp:
name: admins
users: 1
- jane.smith@example.com
- jim.adams@example.com- 1
- The users that are members of the group, as specified by the sync file. Members for which lookup encountered tolerated errors are absent.
13.5.3. Active Directory
In the Active Directory schema, both users (Jane and Jim) exist in the LDAP server as first-class entries, and group membership is stored in attributes on the user. The following snippet of ldif defines the users and group for this schema:
Example 13.12. LDAP Entries Using Active Directory Schema: active_directory.ldif
dn: ou=users,dc=example,dc=com
objectClass: organizationalUnit
ou: users
dn: cn=Jane,ou=users,dc=example,dc=com
objectClass: person
objectClass: organizationalPerson
objectClass: inetOrgPerson
objectClass: testPerson
cn: Jane
sn: Smith
displayName: Jane Smith
mail: jane.smith@example.com
memberOf: admins 1
dn: cn=Jim,ou=users,dc=example,dc=com
objectClass: person
objectClass: organizationalPerson
objectClass: inetOrgPerson
objectClass: testPerson
cn: Jim
sn: Adams
displayName: Jim Adams
mail: jim.adams@example.com
memberOf: admins- 1
- The user’s group memberships are listed as attributes on the user, and the group does not exist as an entry on the server. The
memberOfattribute does not have to be a literal attribute on the user; in some LDAP servers, it is created during search and returned to the client, but not committed to the database.
To sync this group, you must first create the configuration file. The Active Directory schema requires you to provide an LDAP query definition for user entries, as well as the attributes to represent them with in the internal OpenShift Container Platform Group records.
For clarity, the Group you create in OpenShift Container Platform should use attributes other than the distinguished name whenever possible for user- or administrator-facing fields. For example, identify the users of a Group by their e-mail, but define the name of the Group by the name of the group on the LDAP server. The following configuration file creates these relationships:
Example 13.13. LDAP Sync Configuration Using Active Directory Schema: active_directory_config.yaml
kind: LDAPSyncConfig
apiVersion: v1
url: ldap://LDAP_SERVICE_IP:389
activeDirectory:
usersQuery:
baseDN: "ou=users,dc=example,dc=com"
scope: sub
derefAliases: never
filter: (objectclass=inetOrgPerson)
pageSize: 0
userNameAttributes: [ uid ] 1
groupMembershipAttributes: [ memberOf ] 2To run sync with the active_directory_config.yaml file:
$ oc adm groups sync --sync-config=active_directory_config.yaml --confirm
OpenShift Container Platform creates the following Group record as a result of the above sync operation:
Example 13.14. OpenShift Container Platform Group Created Using active_directory_config.yaml
apiVersion: user.openshift.io/v1
kind: Group
metadata:
annotations:
openshift.io/ldap.sync-time: 2015-10-13T10:08:38-0400 1
openshift.io/ldap.uid: admins 2
openshift.io/ldap.url: LDAP_SERVER_IP:389 3
creationTimestamp:
name: admins 4
users: 5
- jane.smith@example.com
- jim.adams@example.com- 1
- The last time this Group was synchronized with the LDAP server, in ISO 6801 format.
- 2
- The unique identifier for the group on the LDAP server.
- 3
- The IP address and host of the LDAP server where this Group’s record is stored.
- 4
- The name of the group as listed in the LDAP server.
- 5
- The users that are members of the Group, named as specified by the sync file.
13.5.4. Augmented Active Directory
In the augmented Active Directory schema, both users (Jane and Jim) and groups exist in the LDAP server as first-class entries, and group membership is stored in attributes on the user. The following snippet of ldif defines the users and group for this schema:
Example 13.15. LDAP Entries Using Augmented Active Directory Schema: augmented_active_directory.ldif
dn: ou=users,dc=example,dc=com objectClass: organizationalUnit ou: users dn: cn=Jane,ou=users,dc=example,dc=com objectClass: person objectClass: organizationalPerson objectClass: inetOrgPerson objectClass: testPerson cn: Jane sn: Smith displayName: Jane Smith mail: jane.smith@example.com memberOf: cn=admins,ou=groups,dc=example,dc=com 1 dn: cn=Jim,ou=users,dc=example,dc=com objectClass: person objectClass: organizationalPerson objectClass: inetOrgPerson objectClass: testPerson cn: Jim sn: Adams displayName: Jim Adams mail: jim.adams@example.com memberOf: cn=admins,ou=groups,dc=example,dc=com dn: ou=groups,dc=example,dc=com objectClass: organizationalUnit ou: groups dn: cn=admins,ou=groups,dc=example,dc=com 2 objectClass: groupOfNames cn: admins owner: cn=admin,dc=example,dc=com description: System Administrators member: cn=Jane,ou=users,dc=example,dc=com member: cn=Jim,ou=users,dc=example,dc=com
To sync this group, you must first create the configuration file. The augmented Active Directory schema requires you to provide an LDAP query definition for both user entries and group entries, as well as the attributes with which to represent them in the internal OpenShift Container Platform Group records.
For clarity, the Group you create in OpenShift Container Platform should use attributes other than the distinguished name whenever possible for user- or administrator-facing fields. For example, identify the users of a Group by their e-mail, and use the name of the Group as the common name. The following configuration file creates these relationships.
Example 13.16. LDAP Sync Configuration Using Augmented Active Directory Schema: augmented_active_directory_config.yaml
kind: LDAPSyncConfig
apiVersion: v1
url: ldap://LDAP_SERVICE_IP:389
augmentedActiveDirectory:
groupsQuery:
baseDN: "ou=groups,dc=example,dc=com"
scope: sub
derefAliases: never
pageSize: 0
groupUIDAttribute: dn 1
groupNameAttributes: [ cn ] 2
usersQuery:
baseDN: "ou=users,dc=example,dc=com"
scope: sub
derefAliases: never
filter: (objectclass=inetOrgPerson)
pageSize: 0
userNameAttributes: [ uid ] 3
groupMembershipAttributes: [ memberOf ] 4- 1
- The attribute that uniquely identifies a group on the LDAP server. You cannot specify
groupsQueryfilters when using DN for groupUIDAttribute. For fine-grained filtering, use the whitelist / blacklist method. - 2
- The attribute to use as the name of the Group.
- 3
- The attribute to use as the name of the user in the OpenShift Container Platform Group record.
- 4
- The attribute on the user that stores the membership information.
To run sync with the augmented_active_directory_config.yaml file:
$ oc adm groups sync --sync-config=augmented_active_directory_config.yaml --confirm
OpenShift Container Platform creates the following Group record as a result of the above sync operation:
Example 13.17. OpenShift Group Created Using augmented_active_directory_config.yaml
apiVersion: user.openshift.io/v1
kind: Group
metadata:
annotations:
openshift.io/ldap.sync-time: 2015-10-13T10:08:38-0400 1
openshift.io/ldap.uid: cn=admins,ou=groups,dc=example,dc=com 2
openshift.io/ldap.url: LDAP_SERVER_IP:389 3
creationTimestamp:
name: admins 4
users: 5
- jane.smith@example.com
- jim.adams@example.com- 1
- The last time this Group was synchronized with the LDAP server, in ISO 6801 format.
- 2
- The unique identifier for the group on the LDAP server.
- 3
- The IP address and host of the LDAP server where this Group’s record is stored.
- 4
- The name of the Group as specified by the sync file.
- 5
- The users that are members of the Group, named as specified by the sync file.
13.6. Nested Membership Sync Example
Groups in OpenShift Container Platform do not nest. The LDAP server must flatten group membership before the data can be consumed. Microsoft’s Active Directory Server supports this feature via the LDAP_MATCHING_RULE_IN_CHAIN rule, which has the OID 1.2.840.113556.1.4.1941. Furthermore, only explicitly whitelisted groups can be synced when using this matching rule.
This section has an example for the augmented Active Directory schema, which synchronizes a group named admins that has one user Jane and one group otheradmins as members. The otheradmins group has one user member: Jim. This example explains:
- How the group and users are added to the LDAP server.
- What the LDAP sync configuration file looks like.
- What the resulting Group record in OpenShift Container Platform will be after synchronization.
In the augmented Active Directory schema, both users (Jane and Jim) and groups exist in the LDAP server as first-class entries, and group membership is stored in attributes on the user or the group. The following snippet of ldif defines the users and groups for this schema:
LDAP Entries Using Augmented Active Directory Schema With Nested Members: augmented_active_directory_nested.ldif
dn: ou=users,dc=example,dc=com objectClass: organizationalUnit ou: users dn: cn=Jane,ou=users,dc=example,dc=com objectClass: person objectClass: organizationalPerson objectClass: inetOrgPerson objectClass: testPerson cn: Jane sn: Smith displayName: Jane Smith mail: jane.smith@example.com memberOf: cn=admins,ou=groups,dc=example,dc=com 1 dn: cn=Jim,ou=users,dc=example,dc=com objectClass: person objectClass: organizationalPerson objectClass: inetOrgPerson objectClass: testPerson cn: Jim sn: Adams displayName: Jim Adams mail: jim.adams@example.com memberOf: cn=otheradmins,ou=groups,dc=example,dc=com 2 dn: ou=groups,dc=example,dc=com objectClass: organizationalUnit ou: groups dn: cn=admins,ou=groups,dc=example,dc=com 3 objectClass: group cn: admins owner: cn=admin,dc=example,dc=com description: System Administrators member: cn=Jane,ou=users,dc=example,dc=com member: cn=otheradmins,ou=groups,dc=example,dc=com dn: cn=otheradmins,ou=groups,dc=example,dc=com 4 objectClass: group cn: otheradmins owner: cn=admin,dc=example,dc=com description: Other System Administrators memberOf: cn=admins,ou=groups,dc=example,dc=com 5 6 member: cn=Jim,ou=users,dc=example,dc=com
To sync nested groups with Active Directory, you must provide an LDAP query definition for both user entries and group entries, as well as the attributes with which to represent them in the internal OpenShift Container Platform Group records. Furthermore, certain changes are required in this configuration:
-
The
oc adm groups synccommand must explicitly whitelist groups. -
The user’s
groupMembershipAttributesmust include"memberOf:1.2.840.113556.1.4.1941:"to comply with theLDAP_MATCHING_RULE_IN_CHAINrule. -
The
groupUIDAttributemust be set todn. The
groupsQuery:-
Must not set
filter. -
Must set a valid
derefAliases. -
Should not set
baseDNas that value is ignored. -
Should not set
scopeas that value is ignored.
-
Must not set
For clarity, the Group you create in OpenShift Container Platform should use attributes other than the distinguished name whenever possible for user- or administrator-facing fields. For example, identify the users of a Group by their e-mail, and use the name of the Group as the common name. The following configuration file creates these relationships:
LDAP Sync Configuration Using Augmented Active Directory Schema With Nested Members: augmented_active_directory_config_nested.yaml
kind: LDAPSyncConfig
apiVersion: v1
url: ldap://LDAP_SERVICE_IP:389
augmentedActiveDirectory:
groupsQuery: 1
derefAliases: never
pageSize: 0
groupUIDAttribute: dn 2
groupNameAttributes: [ cn ] 3
usersQuery:
baseDN: "ou=users,dc=example,dc=com"
scope: sub
derefAliases: never
filter: (objectclass=inetOrgPerson)
pageSize: 0
userNameAttributes: [ uid ] 4
groupMembershipAttributes: [ "memberOf:1.2.840.113556.1.4.1941:" ] 5
- 1
groupsQueryfilters cannot be specified. ThegroupsQuerybase DN and scope values are ignored.groupsQuerymust set a validderefAliases.- 2
- The attribute that uniquely identifies a group on the LDAP server. It must be set to
dn. - 3
- The attribute to use as the name of the Group.
- 4
- The attribute to use as the name of the user in the OpenShift Container Platform group record.
uidorsAMAccountNameare preferred choices in most installations. - 5
- The attribute on the user that stores the membership information. Note the use of
LDAP_MATCHING_RULE_IN_CHAIN.
To run sync with the augmented_active_directory_config_nested.yaml file:
$ oc adm groups sync \
'cn=admins,ou=groups,dc=example,dc=com' \
--sync-config=augmented_active_directory_config_nested.yaml \
--confirm
You must explicitly whitelist the cn=admins,ou=groups,dc=example,dc=com group.
OpenShift Container Platform creates the following Group record as a result of the above sync operation:
OpenShift Group Created Using augmented_active_directory_config_nested.yaml
apiVersion: user.openshift.io/v1
kind: Group
metadata:
annotations:
openshift.io/ldap.sync-time: 2015-10-13T10:08:38-0400 1
openshift.io/ldap.uid: cn=admins,ou=groups,dc=example,dc=com 2
openshift.io/ldap.url: LDAP_SERVER_IP:389 3
creationTimestamp:
name: admins 4
users: 5
- jane.smith@example.com
- jim.adams@example.com
- 1
- The last time this Group was synchronized with the LDAP server, in ISO 6801 format.
- 2
- The unique identifier for the group on the LDAP server.
- 3
- The IP address and host of the LDAP server where this Group’s record is stored.
- 4
- The name of the Group as specified by the sync file.
- 5
- The users that are members of the Group, named as specified by the sync file. Note that members of nested groups are included since the group membership was flattened by the Microsoft Active Directory Server.
13.7. LDAP Sync Configuration Specification
The object specification for the configuration file is below. Note that the different schema objects have different fields. For example, v1.ActiveDirectoryConfig has no groupsQuery field whereas v1.RFC2307Config and v1.AugmentedActiveDirectoryConfig both do.
There is no support for binary attributes. All attribute data coming from the LDAP server must be in the format of a UTF-8 encoded string. For example, never use a binary attribute, such as objectGUID, as an ID attribute. You must use string attributes, such as sAMAccountName or userPrincipalName, instead.
13.7.1. v1.LDAPSyncConfig
LDAPSyncConfig holds the necessary configuration options to define an LDAP group sync.
| Name | Description | Schema |
|---|---|---|
|
| String value representing the REST resource this object represents. Servers may infer this from the endpoint the client submits requests to. Cannot be updated. In CamelCase. More info: https://github.com/kubernetes/community/blob/master/contributors/devel/api-conventions.md#types-kinds | string |
|
| Defines the versioned schema of this representation of an object. Servers should convert recognized schemas to the latest internal value, and may reject unrecognized values. More info: https://github.com/kubernetes/community/blob/master/contributors/devel/api-conventions.md#resources | string |
|
|
Host is the scheme, host and port of the LDAP server to connect to: | string |
|
| Optional DN to bind to the LDAP server with. | string |
|
| Optional password to bind with during the search phase. | |
|
|
If | boolean |
|
| Optional trusted certificate authority bundle to use when making requests to the server. If empty, the default system roots are used. | string |
|
| Optional direct mapping of LDAP group UIDs to OpenShift Container Platform Group names. | object |
|
| Holds the configuration for extracting data from an LDAP server set up in a fashion similar to RFC2307: first-class group and user entries, with group membership determined by a multi-valued attribute on the group entry listing its members. | |
|
| Holds the configuration for extracting data from an LDAP server set up in a fashion similar to that used in Active Directory: first-class user entries, with group membership determined by a multi-valued attribute on members listing groups they are a member of. | |
|
| Holds the configuration for extracting data from an LDAP server set up in a fashion similar to that used in Active Directory as described above, with one addition: first-class group entries exist and are used to hold metadata but not group membership. |
13.7.2. v1.StringSource
StringSource allows specifying a string inline, or externally via environment variable or file. When it contains only a string value, it marshals to a simple JSON string.
| Name | Description | Schema |
|---|---|---|
|
|
Specifies the cleartext value, or an encrypted value if | string |
|
|
Specifies an environment variable containing the cleartext value, or an encrypted value if the | string |
|
|
References a file containing the cleartext value, or an encrypted value if a | string |
|
| References a file containing the key to use to decrypt the value. | string |
13.7.3. v1.LDAPQuery
LDAPQuery holds the options necessary to build an LDAP query.
| Name | Description | Schema |
|---|---|---|
|
| DN of the branch of the directory where all searches should start from. | string |
|
|
The (optional) scope of the search. Can be | string |
|
|
The (optional) behavior of the search with regards to alisases. Can be | string |
|
|
Holds the limit of time in seconds that any request to the server can remain outstanding before the wait for a response is given up. If this is | integer |
|
| A valid LDAP search filter that retrieves all relevant entries from the LDAP server with the base DN. | string |
|
|
Maximum preferred page size, measured in LDAP entries. A page size of | integer |
13.7.4. v1.RFC2307Config
RFC2307Config holds the necessary configuration options to define how an LDAP group sync interacts with an LDAP server using the RFC2307 schema.
| Name | Description | Schema |
|---|---|---|
|
| Holds the template for an LDAP query that returns group entries. | |
|
|
Defines which attribute on an LDAP group entry will be interpreted as its unique identifier. ( | string |
|
| Defines which attributes on an LDAP group entry will be interpreted as its name to use for an OpenShift Container Platform group. | string array |
|
|
Defines which attributes on an LDAP group entry will be interpreted as its members. The values contained in those attributes must be queryable by your | string array |
|
| Holds the template for an LDAP query that returns user entries. | |
|
|
Defines which attribute on an LDAP user entry will be interpreted as its unique identifier. It must correspond to values that will be found from the | string |
|
|
Defines which attributes on an LDAP user entry will be used, in order, as its OpenShift Container Platform user name. The first attribute with a non-empty value is used. This should match your | string array |
|
|
Determines the behavior of the LDAP sync job when missing user entries are encountered. If | boolean |
|
|
Determines the behavior of the LDAP sync job when out-of-scope user entries are encountered. If | boolean |
13.7.5. v1.ActiveDirectoryConfig
ActiveDirectoryConfig holds the necessary configuration options to define how an LDAP group sync interacts with an LDAP server using the Active Directory schema.
| Name | Description | Schema |
|---|---|---|
|
| Holds the template for an LDAP query that returns user entries. | |
|
|
Defines which attributes on an LDAP user entry will be interpreted as its OpenShift Container Platform user name. The attribute to use as the name of the user in the OpenShift Container Platform Group record. | string array |
|
| Defines which attributes on an LDAP user entry will be interpreted as the groups it is a member of. | string array |
13.7.6. v1.AugmentedActiveDirectoryConfig
AugmentedActiveDirectoryConfig holds the necessary configuration options to define how an LDAP group sync interacts with an LDAP server using the augmented Active Directory schema.
| Name | Description | Schema |
|---|---|---|
|
| Holds the template for an LDAP query that returns user entries. | |
|
|
Defines which attributes on an LDAP user entry will be interpreted as its OpenShift Container Platform user name. The attribute to use as the name of the user in the OpenShift Container Platform Group record. | string array |
|
| Defines which attributes on an LDAP user entry will be interpreted as the groups it is a member of. | string array |
|
| Holds the template for an LDAP query that returns group entries. | |
|
|
Defines which attribute on an LDAP group entry will be interpreted as its unique identifier. ( | string |
|
| Defines which attributes on an LDAP group entry will be interpreted as its name to use for an OpenShift Container Platform group. | string array |
Chapter 14. Configuring LDAP failover
OpenShift Container Platform provides an authentication provider for use with Lightweight Directory Access Protocol (LDAP) setups, but it can connect to only a single LDAP server. During OpenShift Container Platform installation, you can configure the System Security Services Daemon (SSSD) for LDAP failover to ensure access to your cluster if one LDAP server fails.
The setup for this configuration is advanced and requires a separate authentication server, also called an remote basic authentication server, for OpenShift Container Platform to communicate with. You configure this server to pass extra attributes, such as email addresses, to OpenShift Container Platform so it can display them in the web console.
This topic describes how to complete this set up on a dedicated physical or virtual machine (VM), but you can also configure SSSD in containers.
You must complete all sections of this topic.
14.1. Prerequisites for configuring basic remote authentication
Before starting setup, you need to know the following information about your LDAP server:
- Whether the directory server is powered by FreeIPA, Active Directory, or another LDAP solution.
- The Uniform Resource Identifier (URI) for the LDAP server, for example, ldap.example.com.
- The location of the CA certificate for the LDAP server.
- Whether the LDAP server corresponds to RFC 2307 or RFC2307bis for user groups.
Prepare the servers:
remote-basic.example.com: A VM to use as the remote basic authentication server.
- Select an operating system that includes SSSD version 1.12.0 for this server such as Red Hat Enterprise Linux 7.0 or later.
openshift.example.com: A new installation of OpenShift Container Platform.
- You must not have an authentication method configured for this cluster.
- Do not start OpenShift Container Platform on this cluster.
14.2. Generating and sharing certificates with the remote basic authentication server
Complete the following steps on the first master host listed in the Ansible host inventory file, by default /etc/ansible/hosts.
To ensure that communication between the remote basic authentication server and OpenShift Container Platform is trustworthy, create a set of Transport Layer Security (TLS) certificates to use during the other phases of this set up. Run the following command:
# openshift start \ --public-master=https://openshift.example.com:8443 \ --write-config=/etc/origin/The output inclues the /etc/origin/master/ca.crt and /etc/origin/master/ca.key signing certificates.
Use the signing certificate to generate keys to use on the remote basic authentication server:
# mkdir -p /etc/origin/remote-basic/ # oc adm ca create-server-cert \ --cert='/etc/origin/remote-basic/remote-basic.example.com.crt' \ --key='/etc/origin/remote-basic/remote-basic.example.com.key' \ --hostnames=remote-basic.example.com \ 1 --signer-cert='/etc/origin/master/ca.crt' \ --signer-key='/etc/origin/master/ca.key' \ --signer-serial='/etc/origin/master/ca.serial.txt'- 1
- A comma-separated list of all the host names and interface IP addresses that need to access the remote basic authentication server.
NoteThe certificate files that you generate are valid for two years. You can alter this period by changing the
--expire-daysand--signer-expire-daysvalues, but for security reasons, do not make them greater than 730.ImportantIf you do not list all host names and interface IP addresses that need to access the remote basic authentication server, the HTTPS connection will fail.
Copy the necessary certificates and key to the remote basic authentication server:
# scp /etc/origin/master/ca.crt \ root@remote-basic.example.com:/etc/pki/CA/certs/ # scp /etc/origin/remote-basic/remote-basic.example.com.crt \ root@remote-basic.example.com:/etc/pki/tls/certs/ # scp /etc/origin/remote-basic/remote-basic.example.com.key \ root@remote-basic.example.com:/etc/pki/tls/private/
14.3. Configuring SSSD for LDAP failover
Complete these steps on the remote basic authentication server.
You can configure the SSSD to retrieve attributes, such as email addresses and display names, and pass them to OpenShift Container Platform to display in the web interface. In the following steps, you configure the SSSD to provide email addresses to OpenShift Container Platform:
Install the required SSSD and the web server components:
# yum install -y sssd \ sssd-dbus \ realmd \ httpd \ mod_session \ mod_ssl \ mod_lookup_identity \ mod_authnz_pam \ php \ mod_phpSet up SSSD to authenticate this VM against the LDAP server. If the LDAP server is a FreeIPA or Active Directory environment, then use realmd to join this machine to the domain.
# realm join ldap.example.com
For more advanced cases, see the System-Level Authentication Guide
- To use SSSD to manage failover situations for LDAP, add more entries to the /etc/sssd/sssd.conf file on the ldap_uri line. Systems that are enrolled with FreeIPA can automatically handle failover by using DNS SRV records.
Modify the [domain/DOMAINNAME] section of the /etc/sssd/sssd.conf file and add this attribute:
[domain/example.com] ... ldap_user_extra_attrs = mail 1- 1
- Specify the correct attribute to retrieve email addresses for your LDAP solution. For IPA, specify
mail. Other LDAP solutions might use another attribute, such asemail.
Confirm that the domain parameter in the /etc/sssd/sssd.conf file contains only the domain name listed in the [domain/DOMAINNAME] section.
domains = example.com
Grant Apache permission to retrieve the email attribute. Add the following lines to the [ifp] section of the /etc/sssd/sssd.conf file:
[ifp] user_attributes = +mail allowed_uids = apache, root
To ensure that all of the changes are applied properly, restart SSSD:
$ systemctl restart sssd.service
Test that the user information can be retrieved properly:
$ getent passwd <username> username:*:12345:12345:Example User:/home/username:/usr/bin/bash
Confirm that the mail attribute you specified returns an email address from your domain:
# dbus-send --print-reply --system --dest=org.freedesktop.sssd.infopipe \ /org/freedesktop/sssd/infopipe org.freedesktop.sssd.infopipe.GetUserAttr \ string:username \ 1 array:string:mail 2 method return time=1528091855.672691 sender=:1.2787 -> destination=:1.2795 serial=13 reply_serial=2 array [ dict entry( string "mail" variant array [ string "username@example.com" ] ) ]- Attempt to log into the VM as an LDAP user and confirm that you can log in using LDAP credentials. You can use either the local console or a remote service like SSH to log in.
By default, all users can log into the remote basic authentication server by using their LDAP credentials. You can change this behavior:
- If you use IPA joined systems, configure host-based access control.
- If you use Active Directory joined systems, use a group policy object.
- For other cases, see the SSSD configuration documentation.
14.4. Configuring Apache to use SSSD
Create a /etc/pam.d/openshift file that contains the following contents:
auth required pam_sss.so account required pam_sss.so
This configuration enables PAM, the pluggable authentication module, to use pam_sss.so to determine authentication and access control when an authentication request is issued for the openshift stack.
Edit the /etc/httpd/conf.modules.d/55-authnz_pam.conf file and uncomment the following line:
LoadModule authnz_pam_module modules/mod_authnz_pam.so
To configure the Apache httpd.conf file for remote basic authentication, create the openshift-remote-basic-auth.conf file in the /etc/httpd/conf.d directory. Use the following template to provide your required settings and values:
ImportantCarefully review the template and customize its contents to fit your environment.
LoadModule request_module modules/mod_request.so LoadModule php7_module modules/libphp7.so # Nothing needs to be served over HTTP. This virtual host simply redirects to # HTTPS. <VirtualHost *:80> DocumentRoot /var/www/html RewriteEngine On RewriteRule ^(.*)$ https://%{HTTP_HOST}$1 [R,L] </VirtualHost> <VirtualHost *:443> # This needs to match the certificates you generated. See the CN and X509v3 # Subject Alternative Name in the output of: # openssl x509 -text -in /etc/pki/tls/certs/remote-basic.example.com.crt ServerName remote-basic.example.com DocumentRoot /var/www/html # Secure all connections with TLS SSLEngine on SSLCertificateFile /etc/pki/tls/certs/remote-basic.example.com.crt SSLCertificateKeyFile /etc/pki/tls/private/remote-basic.example.com.key SSLCACertificateFile /etc/pki/CA/certs/ca.crt # Require that TLS clients provide a valid certificate SSLVerifyClient require SSLVerifyDepth 10 # Other SSL options that may be useful # SSLCertificateChainFile ... # SSLCARevocationFile ... # Send logs to a specific location to make them easier to find ErrorLog logs/remote_basic_error_log TransferLog logs/remote_basic_access_log LogLevel warn # PHP script that turns the Apache REMOTE_USER env var # into a JSON formatted response that OpenShift understands <Location /check_user.php> # all requests not using SSL are denied SSLRequireSSL # denies access when SSLRequireSSL is applied SSLOptions +StrictRequire # Require both a valid basic auth user (so REMOTE_USER is always set) # and that the CN of the TLS client matches that of the OpenShift master <RequireAll> Require valid-user Require expr %{SSL_CLIENT_S_DN_CN} == 'system:openshift-master' </RequireAll> # Use basic auth since OpenShift will call this endpoint with a basic challenge AuthType Basic AuthName openshift AuthBasicProvider PAM AuthPAMService openshift # Store attributes in environment variables. Specify the email attribute that # you confirmed. LookupOutput Env LookupUserAttr mail REMOTE_USER_MAIL LookupUserGECOS REMOTE_USER_DISPLAY_NAME # Other options that might be useful # While REMOTE_USER is used as the sub field and serves as the immutable ID, # REMOTE_USER_PREFERRED_USERNAME could be used to have a different username # LookupUserAttr <attr_name> REMOTE_USER_PREFERRED_USERNAME # Group support may be added in a future release # LookupUserGroupsIter REMOTE_USER_GROUP </Location> # Deny everything else <Location ~ "^((?!\/check_user\.php).)*$"> Deny from all </Location> </VirtualHost>Create the check_user.php script in the /var/www/html directory. Include the following code:
<?php // Get the user based on the Apache var, this should always be // set because we 'Require valid-user' in the configuration $user = apache_getenv('REMOTE_USER'); // However, we assume it may not be set and // build an error response by default $data = array( 'error' => 'remote PAM authentication failed' ); // Build a success response if we have a user if (!empty($user)) { $data = array( 'sub' => $user ); // Map of optional environment variables to optional JSON fields $env_map = array( 'REMOTE_USER_MAIL' => 'email', 'REMOTE_USER_DISPLAY_NAME' => 'name', 'REMOTE_USER_PREFERRED_USERNAME' => 'preferred_username' ); // Add all non-empty environment variables to JSON data foreach ($env_map as $env_name => $json_name) { $env_data = apache_getenv($env_name); if (!empty($env_data)) { $data[$json_name] = $env_data; } } } // We always output JSON from this script header('Content-Type: application/json', true); // Write the response as JSON echo json_encode($data); ?>Enable Apache to load the module. Modify the /etc/httpd/conf.modules.d/55-lookup_identity.conf file and uncomment the following line:
LoadModule lookup_identity_module modules/mod_lookup_identity.so
Set an SELinux boolean so that SElinux allows Apache to connect to SSSD over D-BUS:
# setsebool -P httpd_dbus_sssd on
Set a boolean to tell SELinux that it is acceptable for Apache to contact the PAM subsystem:
# setsebool -P allow_httpd_mod_auth_pam on
Start Apache:
# systemctl start httpd.service
14.5. Configuring OpenShift Container Platform to use SSSD as the basic remote authentication server
Modify the default configuration of your cluster to use the new identity provider that you created. Complete the following steps on the first master host listed in the Ansible host inventory file.
- Open the /etc/origin/master/master-config.yaml file.
Locate the identityProviders section and replace it with the following code:
identityProviders: - name: sssd challenge: true login: true mappingMethod: claim provider: apiVersion: v1 kind: BasicAuthPasswordIdentityProvider url: https://remote-basic.example.com/check_user.php ca: /etc/origin/master/ca.crt certFile: /etc/origin/master/openshift-master.crt keyFile: /etc/origin/master/openshift-master.keyRestart OpenShift Container Platform with the updated configuration:
# systemctl restart atomic-openshift-master-api # systemctl restart atomic-openshift-master-controllers
Test a login by using the
ocCLI:$ oc login https://openshift.example.com:8443
You can log in only with valid LDAP credentials.
List the identities and confirm that an email address is displayed for each user name. Run the following command:
$ oc get identity -o yaml
Chapter 15. Configuring the SDN
15.1. Overview
The OpenShift SDN enables communication between pods across the OpenShift Container Platform cluster, establishing a pod network. Three SDN plug-ins are currently available (ovs-subnet, ovs-multitenant, and ovs-networkpolicy), which provide different methods for configuring the pod network.
15.2. Available SDN Providers
The upstream Kubernetes project does not come with a default network solution. Instead, Kubernetes has developed a Container Network Interface (CNI) to allow network providers for integration with their own SDN solutions.
There are several OpenShift SDN plug-ins available out of the box from Red Hat, as well as third-party plug-ins.
Red Hat has worked with a number of SDN providers to certify their SDN network solution on OpenShift Container Platform via the Kubernetes CNI interface, including a support process for their SDN plug-in through their product’s entitlement process. Should you open a support case with OpenShift, Red Hat can facilitate an exchange process so that both companies are involved in meeting your needs.
The following SDN solutions are validated and supported on OpenShift Container Platform directly by the third-party vendor:
- Cisco Contiv (™)
- Juniper Contrail (™)
- Nokia Nuage (™)
- Tigera Calico (™)
- VMware NSX-T (™)
Installing VMware NSX-T (™) on OpenShift Container Platform
VMware NSX-T (™) provides an SDN and security infrastructure to build cloud-native application environments. In addition to vSphere hypervisors (ESX), these environments include KVM and native public clouds.
The current integration requires a new install of both NSX-T and OpenShift Container Platform. Currently, NSX-T version 2.1 is supported, and only supports the use of ESX and KVM hypervisors at this time.
See the NSX-T Container Plug-in for OpenShift - Installation and Administration Guide for more information.
15.3. Configuring the Pod Network with Ansible
For initial advanced installations, the ovs-subnet plug-in is installed and configured by default, though it can be overridden during installation using the os_sdn_network_plugin_name parameter, which is configurable in the Ansible inventory file.
For example, to override the standard ovs-subnet plug-in and use the ovs-multitenant plug-in instead:
# Configure the multi-tenant SDN plugin (default is 'redhat/openshift-ovs-subnet') os_sdn_network_plugin_name='redhat/openshift-ovs-multitenant'
See Configuring Cluster Variables for descriptions of networking-related Ansible variables that can be set in your inventory file.
For initial quick installations, the ovs-subnet plug-in is installed and configured by default as well, and can be reconfigured post-installation using the networkConfig stanza of the master-config.yaml file.
15.4. Configuring the Pod Network on Masters
The cluster administrators can control pod network settings on master hosts by modifying parameters in the networkConfig section of the master configuration file (located at /etc/origin/master/master-config.yaml by default):
Configuring a pod network for a single CIDR
networkConfig: clusterNetworks: - cidr: 10.128.0.0/14 1 hostSubnetLength: 9 2 networkPluginName: "redhat/openshift-ovs-subnet" 3 serviceNetworkCIDR: 172.30.0.0/16 4
- 1
- Cluster network for node IP allocation
- 2
- Number of bits for pod IP allocation within a node
- 3
- Set to
redhat/openshift-ovs-subnetfor the ovs-subnet plug-in,redhat/openshift-ovs-multitenantfor the ovs-multitenant plug-in, orredhat/openshift-ovs-networkpolicyfor the ovs-networkpolicy plug-in - 4
- Service IP allocation for the cluster
Alternatively, you can create a pod network with multiple CIDR ranges by adding separate ranges into the clusterNetworks field with the range and the hostSubnetLength.
Multiple ranges can be used at once, and the range can be expanded or contracted. Nodes can be moved from one range to another by evacuating a node, then deleting and re-creating the node. See the Managing Nodes section for more information. Node allocations occur in the order listed, then when the range is full, move to the next on the list.
Configuring a pod network for multiple CIDRs
networkConfig: clusterNetworks: - cidr: 10.128.0.0/14 1 hostSubnetLength: 9 2 - cidr: 10.132.0.0/14 hostSubnetLength: 9 externalIPNetworkCIDRs: null hostSubnetLength: 9 ingressIPNetworkCIDR: 172.29.0.0/16 networkPluginName: redhat/openshift-ovs-multitenant 3 serviceNetworkCIDR: 172.30.0.0/16
You can add elements to the clusterNetworks value, or remove them if no node is using that CIDR range, but be sure to restart the atomic-openshift-master-api and atomic-openshift-master-controllers services for any changes to take effect.
The hostSubnetLength value cannot be changed after the cluster is first created, A cidr field can only be changed to be a larger network that still contains the original network if nodes are allocated within it’s range , and serviceNetworkCIDR can only be expanded. For example, given the default value of 10.128.0.0/14, you could change cidr to 10.128.0.0/9 (i.e., the entire upper half of net 10) but not to 10.64.0.0/16, because that does not overlap the original value.
You can change serviceNetworkCIDR from 172.30.0.0/16 to 172.30.0.0/15, but not to 172.28.0.0/14, because even though the original range is entirely inside the new range, the original range must be at the start of the CIDR.
15.5. Configuring the Pod Network on Nodes
The cluster administrators can control pod network settings on nodes by modifying parameters in the networkConfig section of the node configuration file (located at /etc/origin/node/node-config.yaml by default):
networkConfig: mtu: 1450 1 networkPluginName: "redhat/openshift-ovs-subnet" 2
You must change the MTU size on all masters and nodes that are part of the OpenShift Container Platform SDN. Also, the MTU size of the tun0 interface must be the same across all nodes that are part of the cluster.
15.6. Migrating Between SDN Plug-ins
If you are already using one SDN plug-in and want to switch to another:
-
Change the
networkPluginNameparameter on all masters and nodes in their configuration files. - Restart the atomic-openshift-master-api and atomic-openshift-master-controllers services on all masters.
- Stop the atomic-origin-node service on all masters and nodes.
- If you are switching between OpenShift SDN plug-ins, restart the openvswitch service on all masters and nodes.
- Restart the atomic-openshift-node service on all masters and nodes.
- If you are switching from an OpenShift SDN plug-in to a third-party plug-in, then clean up OpenShift SDN-specific artifacts:
$ oc delete clusternetwork --all $ oc delete hostsubnets --all $ oc delete netnamespaces --all
When switching from the ovs-subnet to the ovs-multitenant OpenShift SDN plug-in, all the existing projects in the cluster will be fully isolated (assigned unique VNIDs). The cluster administrators can choose to modify the project networks using the administrator CLI.
Check VNIDs by running:
$ oc get netnamespace
15.6.1. Migrating from ovs-multitenant to ovs-networkpolicy
The v1 NetworkPolicy features are available only in OpenShift Container Platform. This means that egress policy types, IPBlock, and combining podSelector and namespaceSelector are not available in OpenShift Container Platform.
Do not apply NetworkPolicy features on default OpenShift Container Platform projects, because they can disrupt communication with the cluster.
In addition to the generic plug-in migration steps above in the Migrating between SDN plug-ins section, there is one additional step when migrating from the ovs-multitenant plug-in to the ovs-networkpolicy plug-in; you must ensure that every namespace has a unique NetID. This means that if you have previously joined projects together or made projects global, you will need to undo that before switching to the ovs-networkpolicy plug-in, or the NetworkPolicy objects may not function correctly.
A helper script is available that fixes NetID’s, creates NetworkPolicy objects to isolate previously-isolated namespaces, and enables connections between previously-joined namespaces.
Use the following steps to migrate to the ovs-networkpolicy plug-in, by using this helper script, while still running the ovs-multitenant plug-in:
Download the script and add the execution file permission:
$ curl -O https://raw.githubusercontent.com/openshift/origin/master/contrib/migration/migrate-network-policy.sh $ chmod a+x migrate-network-policy.sh
Run the script (requires the cluster administrator role).
$ ./migrate-network-policy.sh
After running this script, every namespace is fully isolated from every other namespace, therefore connection attempts between pods in different namespaces will fail until you complete the migration to the ovs-networkpolicy plug-in.
If you want newly-created namespaces to also have the same policies by default, you can set default NetworkPolicy objects to be created matching the default-deny and allow-from-global-namespaces policies created by the migration script.
In case of script failures or other errors, or if you later decide you want to revert back to the ovs-multitenant plug-in, you can use the un-migration script. This script undoes the changes made by the migration script and re-joins previously-joined namespaces.
15.7. External Access to the Cluster Network
If a host that is external to OpenShift Container Platform requires access to the cluster network, you have two options:
- Configure the host as an OpenShift Container Platform node but mark it unschedulable so that the master does not schedule containers on it.
- Create a tunnel between your host and a host that is on the cluster network.
Both options are presented as part of a practical use-case in the documentation for configuring routing from an edge load-balancer to containers within OpenShift SDN.
15.8. Using Flannel
As an alternate to the default SDN, OpenShift Container Platform also provides Ansible playbooks for installing flannel-based networking. This is useful if running OpenShift Container Platform within a cloud provider platform that also relies on SDN, such as Red Hat OpenStack Platform, and you want to avoid encapsulating packets twice through both platforms.
Flannel uses a single IP network space for all of the containers allocating a contiguous subset of the space to each instance. Consequently, nothing prevents a container from attempting to contact any IP address in the same network space. This hinders multi-tenancy because the network cannot be used to isolate containers in one application from another.
Depending on whether you prefer mutli-tenancy isolation or performance, you should determine the appropriate choice when deciding between OpenShift SDN (multi-tenancy) and flannel (performance) for internal networks.
Flannel is only supported for OpenShift Container Platform on Red Hat OpenStack Platform.
The current version of Neutron enforces port security on ports by default. This prevents the port from sending or receiving packets with a MAC address different from that on the port itself. Flannel creates virtual MACs and IP addresses and must send and receive packets on the port, so port security must be disabled on the ports that carry flannel traffic.
To enable flannel within your OpenShift Container Platform cluster:
Neutron port security controls must be configured to be compatible with Flannel. The default configuration of Red Hat OpenStack Platform disables user control of
port_security. Configure Neutron to allow users to control theport_securitysetting on individual ports.On the Neutron servers, add the following to the /etc/neutron/plugins/ml2/ml2_conf.ini file:
[ml2] ... extension_drivers = port_security
Then, restart the Neutron services:
service neutron-dhcp-agent restart service neutron-ovs-cleanup restart service neutron-metadata-agentrestart service neutron-l3-agent restart service neutron-plugin-openvswitch-agent restart service neutron-vpn-agent restart service neutron-server restart
When creating the OpenShift Container Platform instances on Red Hat OpenStack Platform, disable both port security and security groups in the ports where the container network flannel interface will be:
neutron port-update $port --no-security-groups --port-security-enabled=False
NoteFlannel gather information from etcd to configure and assign the subnets in the nodes. Therefore, the security group attached to the etcd hosts should allow access from nodes to port 2379/tcp, and nodes security group should allow egress communication to that port on the etcd hosts.
Set the following variables in your Ansible inventory file before running the installation:
openshift_use_openshift_sdn=false 1 openshift_use_flannel=true 2 flannel_interface=eth0
Optionally, you can specify the interface to use for inter-host communication using the
flannel_interfacevariable. Without this variable, the OpenShift Container Platform installation uses the default interface.NoteCustom networking CIDR for pods and services using flannel will be supported in a future release. BZ#1473858
After the OpenShift Container Platform installation, add a set of iptables rules on every OpenShift Container Platform node:
iptables -A DOCKER -p all -j ACCEPT iptables -t nat -A POSTROUTING -o eth1 -j MASQUERADE
To persist those changes in the /etc/sysconfig/iptables use the following command on every node:
cp /etc/sysconfig/iptables{,.orig} sh -c "tac /etc/sysconfig/iptables.orig | sed -e '0,/:DOCKER -/ s/:DOCKER -/:DOCKER ACCEPT/' | awk '"\!"p && /POSTROUTING/{print \"-A POSTROUTING -o eth1 -j MASQUERADE\"; p=1} 1' | tac > /etc/sysconfig/iptables"NoteThe
iptables-savecommand saves all the current in memory iptables rules. However, because Docker, Kubernetes and OpenShift Container Platform create a high number of iptables rules (services, etc.) not designed to be persisted, saving these rules can become problematic.
To isolate container traffic from the rest of the OpenShift Container Platform traffic, Red Hat recommends creating an isolated tenant network and attaching all the nodes to it. If you are using a different network interface (eth1), remember to configure the interface to start at boot time through the /etc/sysconfig/network-scripts/ifcfg-eth1 file:
DEVICE=eth1 TYPE=Ethernet BOOTPROTO=dhcp ONBOOT=yes DEFTROUTE=no PEERDNS=no
Chapter 16. Configuring Nuage SDN
16.1. Nuage SDN and OpenShift Container Platform
Nuage Networks Virtualized Services Platform (VSP) provides virtual networking and software-defined networking (SDN) infrastructure to Docker container environments that simplifies IT operations and expands OpenShift Container Platform’s native networking capabilities.
Nuage Networks VSP supports Docker-based applications running on OpenShift Container Platform to accelerate the provisioning of virtual networks between pods and traditional workloads, and to enable security policies across the entire cloud infrastructure. VSP allows for the automation of security appliances to include granular security and microsegmentation policies for container applications.
Integrating VSP with the OpenShift Container Platform application workflow allows business applications to be quickly turned up and updated by removing the network lag faced by DevOps teams. VSP supports different workflows with OpenShift Container Platform in order to accommodate scenarios where users can choose ease-of-use or complete control using policy-based automation.
See Networking for more information on how VSP is integrated with OpenShift Container Platform.
16.2. Developer Workflow
This workflow is used in developer environments and requires little input from the developer in setting up the networking. In this workflow, nuage-openshift-monitor is responsible for creating the VSP constructs (Zone, Subnets, etc.) needed to provide appropriate policies and networking for pods created in an OpenShift Container Platform project. When a project is created, a default zone and default subnet for that project are created by nuage-openshift-monitor. When the default subnet created for a given project gets depleted, nuage-openshift-monitor dynamically creates additional subnets.
A separate VSP Zone is created for each OpenShift Container Platform project ensuring isolation amongst the projects.
16.3. Operations Workflow
This workflow is used by operations teams rolling out applications. In this workflow, the network and security policies are first configured on the VSD in accordance with the rules set by the organization to deploy applications. Administrative users can potentially create multiple zones and subnets and map them to the same project using labels. While spinning up the pods, the user can use the Nuage Labels to specify what network a pod needs to attach to and what network policies need to be applied to it. This allows for deployments where inter- and intra-project traffic can be controlled in a fine-grained manner. For example, inter-project communication is enabled on a project by project basis. This may be used to connect projects to common services that are deployed in a shared project.
16.4. Installation
The VSP integration with OpenShift Container Platform works for both virtual machines (VMs) and bare metal OpenShift Container Platform installations.
An environment with High Availability (HA) can be configured with multiple masters and multiple nodes.
Nuage VSP integration in multi-master mode only supports the native HA configuration method described in this section. This can be combined with any load balancing solution, the default being HAProxy. The inventory file contains three master hosts, the nodes, an etcd server, and a host that functions as the HAProxy to balance the master API on all master hosts. The HAProxy host is defined in the [lb] section of the inventory file enabling Ansible to automatically install and configure HAProxy as the load balancing solution.
In the Ansible nodes file, the following parameters need to be specified in order to setup Nuage VSP as the network plug-in:
# Create and OSEv3 group that contains masters, nodes, load-balancers, and etcd hosts
masters
nodes
etcd
lb
# Nuage specific parameters
openshift_use_openshift_sdn=False
openshift_use_nuage=True
os_sdn_network_plugin_name='nuage/vsp-openshift'
openshift_node_proxy_mode='userspace'
# VSP related parameters
vsd_api_url=https://192.168.103.200:8443
vsp_version=v4_0
enterprise=nuage
domain=openshift
vsc_active_ip=192.168.103.201
vsc_standby_ip=192.168.103.202
uplink_interface=eth0
# rpm locations
nuage_openshift_rpm=http://location_of_rpm_server/openshift/RPMS/x86_64/nuage-openshift-monitor-4.0.X.1830.el7.centos.x86_64.rpm
vrs_rpm=http://location_of_rpm_server/openshift/RPMS/x86_64/nuage-openvswitch-4.0.X.225.el7.x86_64.rpm
plugin_rpm=http://location_of_rpm_server/openshift/RPMS/x86_64/vsp-openshift-4.0.X1830.el7.centos.x86_64.rpm
# Required for Nuage Monitor REST server and HA
openshift_master_cluster_method=native
openshift_master_cluster_hostname=lb.nuageopenshift.com
openshift_master_cluster_public_hostname=lb.nuageopenshift.com
nuage_openshift_monitor_rest_server_port=9443
# Optional parameters
nuage_interface_mtu=1460
nuage_master_adminusername='admin's user-name'
nuage_master_adminuserpasswd='admin's password'
nuage_master_cspadminpasswd='csp admin password'
nuage_openshift_monitor_log_dir=/var/log/nuage-openshift-monitor
# Required for brownfield install (where a {product-title} cluster exists without Nuage as the networking plugin)
nuage_dockker_bridge=lbr0
# Specify master hosts
[masters]
fqdn_of_master_1
fqdn_of_master_2
fqdn_of_master_3
# Specify load balancer host
[lb]
fqdn_of_load_balancerChapter 17. Configuring for Amazon Web Services (AWS)
17.1. Overview
OpenShift Container Platform can be configured to access an AWS EC2 infrastructure, including using AWS volumes as persistent storage for application data. After you configure AWS, some additional configurations must be completed on the OpenShift Container Platform hosts.
17.2. Permissions
Configuring AWS for OpenShift Container Platform requires the following permissions:
| Elastic Compute Cloud(EC2) |
|
| Elastic Load Balancing |
|
| Elastic Compute Cloud(EC2) |
|
-
Every master host, node host, and subnet must have the
kubernetes.io/cluster/<clusterid>,Value=(owned|shared)tag. One security group, preferably the one linked to the nodes, must have the
kubernetes.io/cluster/<clusterid>,Value=(owned|shared)tag.-
Do not tag all security groups with the
kubernetes.io/cluster/<clusterid>,Value=(owned|shared)tag or the Elastic Load Balancing (ELB) will not be able to create a load balancer.
-
Do not tag all security groups with the
17.3. Configuring a Security Group
When installing OpenShift Container Platform on AWS, ensure that you set up the appropriate security groups.
These are some ports that you must have in your security groups, without which the installation fails. You may need more depending on the cluster configuration you want to install. For more information and to adjust your security groups accordingly, see Required Ports for more information.
| All OpenShift Container Platform Hosts |
|
| etcd Security Group |
|
| Master Security Group |
|
| Node Security Group |
|
| Infrastructure Nodes (ones that can host the OpenShift Container Platform router) |
|
| CRI-O |
If using CRIO, you must open tcp/10010 to allow |
If configuring external load-balancers (ELBs) for load balancing the masters and/or routers, you also need to configure Ingress and Egress security groups for the ELBs appropriately.
17.3.1. Overriding Detected IP Addresses and Host Names
In AWS, situations that require overriding the variables include:
| Variable | Usage |
|---|---|
|
|
The user is installing in a VPC that is not configured for both |
|
|
You have multiple network interfaces configured and want to use one other than the default. You must also set the |
|
|
|
|
|
|
If openshift_hostname is set to a value other than the metadata-provided private-dns-name value, the native cloud integration for those providers will no longer work.
For EC2 hosts in particular, they must be deployed in a VPC that has both DNS host names and DNS resolution enabled, and openshift_hostname should not be overridden.
17.4. Configuring AWS Variables
To set the required AWS variables, create a /etc/origin/cloudprovider/aws.conf file with the following contents on all of your OpenShift Container Platform hosts, both masters and nodes:
[Global]
Zone = us-east-1c 1- 1
- This is the Availability Zone of your AWS Instance and where your EBS Volume resides; this information is obtained from the AWS Management Console.
17.5. Configuring OpenShift Container Platform for AWS
You can set the AWS configuration on OpenShift Container Platform in two ways:
17.5.1. Configuring OpenShift Container Platform for AWS with Ansible
During advanced installations, AWS can be configured using the openshift_cloudprovider_aws_access_key, openshift_cloudprovider_aws_secret_key, openshift_cloudprovider_kind, openshift_clusterid parameters, which are configurable in the inventory file.
Example AWS Configuration with Ansible
# Cloud Provider Configuration
#
# Note: You may make use of environment variables rather than store
# sensitive configuration within the ansible inventory.
# For example:
#openshift_cloudprovider_aws_access_key="{{ lookup('env','AWS_ACCESS_KEY_ID') }}"
#openshift_cloudprovider_aws_secret_key="{{ lookup('env','AWS_SECRET_ACCESS_KEY') }}"
#
#openshift_clusterid=unique_identifier_per_availablility_zone
#
# AWS (Using API Credentials)
#openshift_cloudprovider_kind=aws
#openshift_cloudprovider_aws_access_key=aws_access_key_id
#openshift_cloudprovider_aws_secret_key=aws_secret_access_key
#
# AWS (Using IAM Profiles)
#openshift_cloudprovider_kind=aws
# Note: IAM roles must exist before launching the instances.
When Ansible configures AWS, it automatically makes the necessary changes to the following files:
- /etc/origin/cloudprovider/aws.conf
- /etc/origin/master/master-config.yaml
- /etc/origin/node/node-config.yaml
- /etc/sysconfig/atomic-openshift-master-api
- /etc/sysconfig/atomic-openshift-master-controllers
- /etc/sysconfig/atomic-openshift-node
17.5.2. Manually Configuring OpenShift Container Platform Masters for AWS
Edit or create the master configuration file on all masters (/etc/origin/master/master-config.yaml by default) and update the contents of the apiServerArguments and controllerArguments sections:
kubernetesMasterConfig:
...
apiServerArguments:
cloud-provider:
- "aws"
cloud-config:
- "/etc/origin/cloudprovider/aws.conf"
controllerArguments:
cloud-provider:
- "aws"
cloud-config:
- "/etc/origin/cloudprovider/aws.conf"
Currently, the nodeName must match the instance name in AWS in order for the cloud provider integration to work properly. The name must also be RFC1123 compliant.
When triggering a containerized installation, only the directories of /etc/origin and /var/lib/origin are mounted to the master and node container. Therefore, aws.conf should be in /etc/origin/ instead of /etc/.
17.5.3. Manually Configuring OpenShift Container Platform Nodes for AWS
Edit or create the node configuration file on all nodes (/etc/origin/node/node-config.yaml by default) and update the contents of the kubeletArguments section:
kubeletArguments:
cloud-provider:
- "aws"
cloud-config:
- "/etc/origin/cloudprovider/aws.conf"When triggering a containerized installation, only the directories of /etc/origin and /var/lib/origin are mounted to the master and node container. Therefore, aws.conf should be in /etc/origin/ instead of /etc/.
17.5.4. Manually Setting Key-Value Access Pairs
Make sure the following environment variables are set in the /etc/sysconfig/atomic-openshift-master-api file and /etc/sysconfig/atomic-openshift-master-controllers file on masters and the /etc/sysconfig/atomic-openshift-node file on nodes:
AWS_ACCESS_KEY_ID=<key_ID> AWS_SECRET_ACCESS_KEY=<secret_key>
Access keys are obtained when setting up your AWS IAM user.
17.6. Applying Configuration Changes
Start or restart OpenShift Container Platform services on all master and node hosts to apply your configuration changes, see Restarting OpenShift Container Platform services:
# systemctl restart atomic-openshift-master-api atomic-openshift-master-controllers # systemctl restart atomic-openshift-node
Switching from not using a cloud provider to using a cloud provider produces an error message. Adding the cloud provider tries to delete the node because the node switches from using the hostname as the externalID (which would have been the case when no cloud provider was being used) to using the cloud provider’s instance-id (which is what the cloud provider specifies). To resolve this issue:
- Log in to the CLI as a cluster administrator.
Check and back up existing node labels:
$ oc describe node <node_name> | grep -Poz '(?s)Labels.*\n.*(?=Taints)'
Delete the nodes:
$ oc delete node <node_name>
On each node host, restart the OpenShift Container Platform service.
# systemctl restart atomic-openshift-node
- Add back any labels on each node that you previously had.
17.7. Labeling Clusters for AWS
Starting with OpenShift Container Platform version 3.7 of the atomic-openshift-installer, if you configured AWS provider credentials, you must also ensure that all hosts are labeled.
To correctly identify which resources are associated with a cluster, tag resources with the key kubernetes.io/cluster/<clusterid>, where:
-
<clusterid>is a unique name for the cluster.
Set the corresponding value to owned if the node belongs exclusively to the cluster or to shared if it is a resource shared with other systems.
Tagging all resources with the kubernetes.io/cluster/<clusterid>,Value=(owned|shared) tag avoids potential issues with multiple zones or multiple clusters.
In versions prior to OpenShift Container Platform version 3.6, this was Key=KubernetesCluster,Value=clusterid.
See Pods and Services to learn more about labeling and tagging in OpenShift Container Platform.
17.7.1. Resources That Need Tags
There are four types of resources that need to be tagged:
- Instances
- Security Groups
- Load Balancers
- EBS Volumes
17.7.2. Tagging an Existing Cluster
A cluster uses the value of the kubernetes.io/cluster/<clusterid>,Value=(owned|shared) tag to determine which resources belong to the AWS cluster. This means that all relevant resources must be labeled with the kubernetes.io/cluster/<clusterid>,Value=(owned|shared) tag using the same values for that key. These resources include:
- All hosts.
- All relevant load balancers to be used in the AWS instances.
All EBS volumes. The EBS Volumes that need to be tagged can found with:
$ oc get pv -o json|jq '.items[].spec.awsElasticBlockStore.volumeID'
All relevant security groups to be used with the AWS instances.
NoteDo not tag all existing security groups with the
kubernetes.io/cluster/<name>,Value=<clusterid>tag, or the Elastic Load Balancing (ELB) will not be able to create a load balancer.
After tagging any resources, restart the master services on the master and the node service on all nodes. See the Applying Configuration Section.
Chapter 18. Configuring for OpenStack
18.1. Overview
When deployed on OpenStack, OpenShift Container Platform can be configured to access OpenStack infrastructure, including using OpenStack Cinder volumes as persistent storage for application data.
18.2. Permissions
Configuring OpenStack for OpenShift Container Platform requires the following role:
| member | For creating assets(instances, networking ports, floating ips, volumes, and so on.) you need the member role for the tenant. |
18.3. Configuring a Security Group
When installing OpenShift Container Platform on OpenStack, ensure that you set up the appropriate security groups.
These are some ports that you must have in your security groups, without which the installation fails. You may need more depending on the cluster configuration you want to install. For more information and to adjust your security groups accordingly, see Required Ports for more information.
| All OpenShift Container Platform Hosts |
|
| etcd Security Group |
|
| Master Security Group |
|
| Node Security Group |
|
| Infrastructure Nodes (ones that can host the OpenShift Container Platform router) |
|
| CRI-O |
If using CRIO, you must open tcp/10010 to allow |
If configuring external load-balancers (ELBs) for load balancing the masters and/or routers, you also need to configure Ingress and Egress security groups for the ELBs appropriately.
18.4. Configuring OpenStack Variables
To set the required OpenStack variables, create a /etc/cloud.conf file with the following contents on all of your OpenShift Container Platform hosts, both masters and nodes:
[Global] auth-url = <OS_AUTH_URL> username = <OS_USERNAME> password = <password> domain-id = <OS_USER_DOMAIN_ID> tenant-id = <OS_TENANT_ID> region = <OS_REGION_NAME> [LoadBalancer] subnet-id = <UUID of the load balancer subnet>
Consult your OpenStack administrators for values of the OS_ variables, which are commonly used in OpenStack configuration.
18.5. Configuring OpenShift Container Platform Masters for OpenStack
You can set an OpenStack configuration on your OpenShift Container Platform master and node hosts in two different ways:
- Using Ansible and the advanced installation tool
- Manually, by modifying the master-config.yaml and node-config.yaml files.
18.5.1. Configuring OpenShift Container Platform for OpenStack with Ansible
During advanced installations, OpenStack can be configured using the following parameters, which are configurable in the inventory file:
-
openshift_cloudprovider_kind -
openshift_cloudprovider_openstack_auth_url -
openshift_cloudprovider_openstack_username -
openshift_cloudprovider_openstack_password -
openshift_cloudprovider_openstack_domain_id -
openshift_cloudprovider_openstack_domain_name -
openshift_cloudprovider_openstack_tenant_id -
openshift_cloudprovider_openstack_tenant_name -
openshift_cloudprovider_openstack_region -
openshift_cloudprovider_openstack_lb_subnet_id
If a parameter value in the Ansible inventory file contains special characters, such as #, { or }, you must double-escape the value (that is enclose the value in both single and double quotation marks). For example, to use mypasswordwith###hashsigns as a value for the variable openshift_cloudprovider_openstack_password, declare it as openshift_cloudprovider_openstack_password='"mypasswordwith###hashsigns"' in the Ansible host inventory file.
Example 18.1. Example OpenStack Configuration with Ansible
# Cloud Provider Configuration
#
# Note: You may make use of environment variables rather than store
# sensitive configuration within the ansible inventory.
# For example:
#openshift_cloudprovider_openstack_username="{{ lookup('env','USERNAME') }}"
#openshift_cloudprovider_openstack_password="{{ lookup('env','PASSWORD') }}"
#
# Openstack
#openshift_cloudprovider_kind=openstack
#openshift_cloudprovider_openstack_auth_url=http://openstack.example.com:35357/v2.0/
#openshift_cloudprovider_openstack_username=username
#openshift_cloudprovider_openstack_password=password
#openshift_cloudprovider_openstack_domain_id=domain_id
#openshift_cloudprovider_openstack_domain_name=domain_name
#openshift_cloudprovider_openstack_tenant_id=tenant_id
#openshift_cloudprovider_openstack_tenant_name=tenant_name
#openshift_cloudprovider_openstack_region=region
#openshift_cloudprovider_openstack_lb_subnet_id=subnet_id18.5.2. Manually Configuring OpenShift Container Platform Masters for OpenStack
Edit or create the master configuration file on all masters (/etc/origin/master/master-config.yaml by default) and update the contents of the apiServerArguments and controllerArguments sections:
kubernetesMasterConfig:
...
apiServerArguments:
cloud-provider:
- "openstack"
cloud-config:
- "/etc/cloud.conf"
controllerArguments:
cloud-provider:
- "openstack"
cloud-config:
- "/etc/cloud.conf"When triggering a containerized installation, only the directories of /etc/origin and /var/lib/origin are mounted to the master and node container. Therefore, cloud.conf should be in /etc/origin/ instead of /etc/.
18.5.3. Manually Configuring OpenShift Container Platform Nodes for OpenStack
Edit or create the node configuration file on all nodes (/etc/origin/node/node-config.yaml by default) and update the contents of the kubeletArguments and nodeName sections:
nodeName:
<instance_name> 1
kubeletArguments:
cloud-provider:
- "openstack"
cloud-config:
- "/etc/cloud.conf"- 1
- Name of the OpenStack instance where the node runs (i.e., name of the virtual machine)
Currently, the nodeName must match the instance name in Openstack in order for the cloud provider integration to work properly. The name must also be RFC1123 compliant.
When triggering a containerized installation, only the directories of /etc/origin and /var/lib/origin are mounted to the master and node container. Therefore, cloud.conf should be in /etc/origin/ instead of /etc/.
18.5.4. Installing OpenShift Container Platform by Using an Ansible Playbook
The OpenStack installation playbook is a Technology Preview feature. Technology Preview features are not supported with Red Hat production service level agreements (SLAs), might not be functionally complete, and Red Hat does not recommend to use them for production. These features provide early access to upcoming product features, enabling customers to test functionality and provide feedback during the development process. For more information on Red Hat Technology Preview features support scope, see https://access.redhat.com/support/offerings/techpreview/.
To install OpenShift Container Platform on an existing OpenStack installation, use the OpenStack playbook. For more information about the playbook, including detailed prerequisites, see the OpenStack Provisioning readme file.
To run the playbook, run the following command:
$ ansible-playbook --user openshift \ -i openshift-ansible/playbooks/openstack/inventory.py \ -i inventory \ openshift-ansible/playbooks/openstack/openshift-cluster/provision_install.yml
18.6. Applying Configuration Changes
Start or restart OpenShift Container Platform services on all master and node hosts to apply your configuration changes, see Restarting OpenShift Container Platform services:
# systemctl restart atomic-openshift-master-api atomic-openshift-master-controllers # systemctl restart atomic-openshift-node
Switching from not using a cloud provider to using a cloud provider produces an error message. Adding the cloud provider tries to delete the node because the node switches from using the hostname as the externalID (which would have been the case when no cloud provider was being used) to using the cloud provider’s instance-id (which is what the cloud provider specifies). To resolve this issue:
- Log in to the CLI as a cluster administrator.
Check and back up existing node labels:
$ oc describe node <node_name> | grep -Poz '(?s)Labels.*\n.*(?=Taints)'
Delete the nodes:
$ oc delete node <node_name>
On each node host, restart the OpenShift Container Platform service.
# systemctl restart atomic-openshift-node
- Add back any labels on each node that you previously had.
Chapter 19. Configuring for GCE
19.1. Overview
OpenShift Container Platform can be configured to access a Google Compute Engine (GCE) infrastructure, including using GCE volumes as persistent storage for application data. After GCE is configured properly, some additional configurations will need to be completed on the OpenShift Container Platform hosts.
19.2. Permissions
Configuring GCE for OpenShift Container Platform requires the following role:
| roles/owner |
To create service accounts, cloud storage, instances, images, templates, Cloud DNS entries, and deploy load balancers and health checks. It is helpful to also have |
19.3. Configuring Masters
You can set the GCE configuration on your OpenShift Container Platform master hosts in two ways:
19.3.1. Configuring OpenShift Container Platform Masters for GCE with Ansible
During advanced installations, GCE can be configured using the openshift_cloudprovider_kind parameter, which is configurable in the inventory file.
-
When using GCE, the
openshift_gcp_projectandopenshift_gcp_prefixparameters must be defined. -
For running load balancer services using the Google compute platform, the nodes (Compute Engine VM instances) must be tagged with
<openshift_gcp_prefix>ocp(addocpsuffix). For example, if the value ofopenshift_gcp_prefixparameter is set tomycluster, the nodes must be tagged withmyclusterocp. See Adding and Removing Network Tags for more information on how to add network tags to Compute Engine VM instances.
Example GCE Configuration with Ansible
# Cloud Provider Configuration # openshift_cloudprovider_kind=gce # openshift_gcp_project=<projectid> 1 # openshift_gcp_prefix=<uid> 2 # openshift_gcp_multizone=False 3
When Ansible configures GCE, the following files are created for you:
- /etc/origin/cloudprovider/gce.conf
- /etc/origin/master/master-config.yaml
- /etc/origin/node/node-config.yaml
The advanced installation configures single-zone support by default. If you want multizone support, edit the /etc/origin/cloudprovider/gce.conf as shown in Configuring Multizone Support in a GCE Deployment.
19.3.2. Manually Configuring OpenShift Container Platform Masters for GCE
To configure the OpenShift Container Platform masters for GCE:
Edit or create the master configuration file (/etc/origin/master/master-config.yaml by default) on all masters and update the contents of the
apiServerArgumentsandcontrollerArgumentssections:kubernetesMasterConfig: ... apiServerArguments: cloud-provider: - "gce" cloud-config: - "/etc/origin/cloudprovider/gce.conf" controllerArguments: cloud-provider: - "gce" cloud-config: - "/etc/origin/cloudprovider/gce.conf"ImportantWhen triggering a containerized installation, only the directories of /etc/origin and /var/lib/origin are mounted to the master and node container. Therefore, master-config.yaml should be in /etc/origin/master instead of /etc/.
Start or restart the OpenShift Container Platform services:
# systemctl restart atomic-openshift-master-api atomic-openshift-master-controllers
19.4. Configuring Nodes
To configure the OpenShift Container Platform nodes for GCE:
Edit or create the node configuration file (/etc/origin/node/node-config.yaml by default) on all nodes and update the contents of the
kubeletArgumentssection:kubeletArguments: cloud-provider: - "gce" cloud-config: - "/etc/origin/cloudprovider/gce.conf"
Currently, the nodeName must match the instance name in GCE in order for the cloud provider integration to work properly. The name must also be RFC1123 compliant.
When triggering a containerized installation, only the directories of /etc/origin and /var/lib/origin are mounted to the master and node container. Therefore, node-config.yaml should be in /etc/origin/node instead of /etc/.
Start or restart the OpenShift Container Platform services all nodes.
# systemctl restart atomic-openshift-node
19.5. Configuring Multizone Support in a GCE Deployment
If manually congifuring GCE, multizone support is not configured by default.
The advanced installation configures single-zone support by default.
If you want multizone support:
- Edit or create a /etc/origin/cloudprovider/gce.conf file on all of your OpenShift Container Platform hosts, both masters and nodes.
Add the following contents:
[Global] project-id = <project-id> network-name = <network-name> node-tags = <node-tags> node-instance-prefix = <instance-prefix> multizone = true
To return to single-zone support, set the multizone value to false.
19.6. Applying Configuration Changes
Start or restart OpenShift Container Platform services on all master and node hosts to apply your configuration changes, see Restarting OpenShift Container Platform services:
# systemctl restart atomic-openshift-master-api atomic-openshift-master-controllers # systemctl restart atomic-openshift-node
Switching from not using a cloud provider to using a cloud provider produces an error message. Adding the cloud provider tries to delete the node because the node switches from using the hostname as the externalID (which would have been the case when no cloud provider was being used) to using the cloud provider’s instance-id (which is what the cloud provider specifies). To resolve this issue:
- Log in to the CLI as a cluster administrator.
Check and back up existing node labels:
$ oc describe node <node_name> | grep -Poz '(?s)Labels.*\n.*(?=Taints)'
Delete the nodes:
$ oc delete node <node_name>
On each node host, restart the OpenShift Container Platform service.
# systemctl restart atomic-openshift-node
- Add back any labels on each node that you previously had.
Chapter 20. Configuring for Azure
20.1. Overview
OpenShift Container Platform can be configured to access a Microsoft Azure infrastructure, including using Azure disk as persistent storage for application data. After Microsoft Azure is configured properly, some additional configurations need to be completed on the OpenShift Container Platform hosts.
20.2. Permissions
Configuring Microsoft Azure for OpenShift Container Platform requires the following role:
| Contributor | To create and manage all types of Microsoft Azure resources. |
For more information about adding administrator roles, see Add or change Azure subscription administrators.
20.3. Prerequisites
- If you are using Microsoft Azure Disk as a persistent volume on the OpenShift Container Platform version 3.5 or later, you must enable Azure Cloud Provider.
- All OpenShift Container Platform node virtual machines (VMs) running in Microsoft Azure must belong to a single resource group.
- Microsoft Azure VMs must be named the same as OpenShift Container Platform nodes and this cannot include capital letters.
If you plan to use Azure Managed Disks:
- OpenShift Container Platform version 3.7 or later is required.
- You must create VMs with Azure Managed Disks.
If you plan to use unmanaged disks:
- You must create VMs with unmanaged disks.
- If you are using a custom DNS configuration for your OpenShift Container Platform cluster or your cluster nodes are in different Microsoft Azure Virtual Networks (VNet), you must configure DNS so that each node in the cluster can resolve IP addresses for other nodes.
20.4. The Azure Configuration File
Configuring OpenShift Container Platform for Azure requires the /etc/azure/azure.conf file, on each node host.
If the file does not exist, create it, and add the following:
tenantId: <> 1 subscriptionId: <> 2 aadClientId: <> 3 aadClientSecret: <> 4 aadTenantId: <> 5 resourceGroup: <> 6 cloud: <> 7 location: <> 8 vnetName: <> 9 securityGroupName: <> 10 primaryAvailabilitySetName: <> 11
- 1
- The AAD tenant ID for the subscription that the cluster is deployed in.
- 2
- The Azure subscription ID that the cluster is deployed in.
- 3
- The client ID for an AAD application with RBAC access to talk to Azure RM APIs.
- 4
- The client secret for an AAD application with RBAC access to talk to Azure RM APIs.
- 5
- Ensure this is the same as tenant ID (optional).
- 6
- The Azure Resource Group name that the Azure VM belongs to.
- 7
- The specific cloud region. For example,
AzurePublicCloud. - 8
- The compact style Azure region. For example,
southeastasia(optional). - 9
- Virtual network containing instances and used when creating load balancers.
- 10
- Security group name associated with instances and load balancers.
- 11
- Availability set to use when creating resources such as load balancers (optional).
The NIC used for accessing the instance must have an internal-dns-name set or the node will not be able to rejoin the cluster, display build logs to the console, and will cause oc rsh to not work correctly.
20.5. Configuring Masters
Edit or create the master configuration file on all masters (/etc/origin/master/master-config.yaml by default) and update the contents of the apiServerArguments and controllerArguments sections:
kubernetesMasterConfig:
...
apiServerArguments:
cloud-provider:
- "azure"
cloud-config:
- "/etc/azure/azure.conf"
controllerArguments:
cloud-provider:
- "azure"
cloud-config:
- "/etc/azure/azure.conf"When triggering a containerized installation, only the /etc/origin and /var/lib/origin directories are mounted to the master and node container. Therefore, master-config.yaml should be in /etc/origin/master instead of /etc/.
20.6. Configuring Nodes
Edit or create the node configuration file on all nodes (/etc/origin/node/node-config.yaml by default) and update the contents of the
kubeletArgumentssection:kubeletArguments: cloud-provider: - "azure" cloud-config: - "/etc/azure/azure.conf"ImportantWhen triggering a containerized installation, only the /etc/origin and /var/lib/origin directories are mounted to the master and node container. Therefore, node-config.yaml should be in /etc/origin/node instead of /etc/.
20.7. Applying Configuration Changes
Start or restart OpenShift Container Platform services on all master and node hosts to apply your configuration changes, see Restarting OpenShift Container Platform services:
# systemctl restart atomic-openshift-master-api atomic-openshift-master-controllers # systemctl restart atomic-openshift-node
Switching from not using a cloud provider to using a cloud provider produces an error message. Adding the cloud provider tries to delete the node because the node switches from using the hostname as the externalID (which would have been the case when no cloud provider was being used) to using the cloud provider’s instance-id (which is what the cloud provider specifies). To resolve this issue:
- Log in to the CLI as a cluster administrator.
Check and back up existing node labels:
$ oc describe node <node_name> | grep -Poz '(?s)Labels.*\n.*(?=Taints)'
Delete the nodes:
$ oc delete node <node_name>
On each node host, restart the OpenShift Container Platform service.
# systemctl restart atomic-openshift-node
- Add back any labels on each node that you previously had.
Chapter 21. Configuring for VMware vSphere
21.1. Overview
You can configure OpenShift Container Platform to access VMware vSphere VMDK Volumes. This includes using VMware vSphere VMDK Volumes as persistent storage for application data.
The vSphere Cloud Provider allows using vSphere managed storage within OpenShift Container Platform and supports:
- Volumes
- Persistent Volumes
- Storage Classes and provisioning of volumes
21.2. Enabling VMware vSphere Cloud Provider
Enabling VMware vSphere requires installing the VMware Tools on each Node VM. See Installing VMware tools for more information.
To enable VMware vSphere cloud provider for OpenShift Container Platform:
- Create a VM folder and move OpenShift Container Platform Node VMs to this folder.
Verify that the Node VM names complies with the regex
[a-z](()?[0-9a-z])?(\.[a-z0-9](([-0-9a-z])?[0-9a-z])?)*.ImportantVM Names can not:
- begin with numbers.
- have any capital letters.
-
have any special characters except
-. - be shorter than three characters and longer than 63 characters.
Set the
disk.EnableUUIDparameter toTRUEfor each Node VM. This ensures that the VMDK always presents a consistent UUID to the VM, allowing the disk to be mounted properly. For every virtual machine node that will be participating in the cluster, follow the steps below using the GOVC tool:Set up the GOVC environment:
export GOVC_URL='vCenter IP OR FQDN' export GOVC_USERNAME='vCenter User' export GOVC_PASSWORD='vCenter Password' export GOVC_INSECURE=1
Find the Node VM paths:
govc ls /datacenter/vm/<vm-folder-name>
Set disk.EnableUUID to true for all VMs:
govc vm.change -e="disk.enableUUID=1" -vm='VM Path'
NoteIf OpenShift Container Platform node VMs are created from a template VM, then
disk.EnableUUID=1can be set on the template VM. VMs cloned from this template, inherit this property.
Create and assign roles to the vSphere Cloud Provider user and vSphere entities. vSphere Cloud Provider requires the following privileges to interact with vCenter. See the vSphere Documentation Center for steps to create a custom role, user and role assignment.
Roles Privileges Entities Propagate to Children manage-k8s-node-vms
Resource.AssignVMToPool System.Anonymous System.Read System.View VirtualMachine.Config.AddExistingDisk VirtualMachine.Config.AddNewDisk VirtualMachine.Config.AddRemoveDevice VirtualMachine.Config.RemoveDisk VirtualMachine.Inventory.Create VirtualMachine.Inventory.Delete
Cluster, Hosts, VM Folder
Yes
manage-k8s-volumes
Datastore.AllocateSpace Datastore.FileManagement System.Anonymous System.Read System.View
Datastore
No
k8s-system-read-and-spbm-profile-view
StorageProfile.View System.Anonymous System.Read System.View
vCenter
No
ReadOnly
System.Anonymous System.Read System.View
Datacenter, Datastore Cluster, Datastore Storage Folder
No
After enabling the vSphere Cloud Provider, node names are set to the VM names from the vCenter Inventory.
The openshift_hostname variable must match the virtual machine name and its host name. The openshift_hostname variable defines the nodeName value in the node-config.yaml file. This value is compared to the nodeName value determined by using the command uname -n. In case of a mismatch, the native cloud integration for those providers will not work.
21.3. Configuring OpenShift Container Platform for vSphere using Ansible
You can configure OpenShift Container Platform for VMware vSphere (VCP) by modifying the Ansible inventory file during installation or after installation.
Procedure
Add the following section to the Ansible inventory file:
[OSEv3:vars] openshift_cloudprovider_kind=vsphere openshift_cloudprovider_vsphere_username=administrator@vsphere.local 1 openshift_cloudprovider_vsphere_password=<password> openshift_cloudprovider_vsphere_host=10.x.y.32 2 openshift_cloudprovider_vsphere_datacenter=<Datacenter> 3 openshift_cloudprovider_vsphere_datastore=<Datastore> 4
21.4. The VMware vSphere Configuration File
Configuring OpenShift Container Platform for VMware vSphere requires the /etc/origin/cloudprovider/vsphere.conf file, on each node host.
If the file does not exist, create it, and add the following:
[Global] 1 user = "myusername" 2 password = "mypassword" 3 port = "443" 4 insecure-flag = "1" 5 datacenter = "mydatacenter" 6 [VirtualCenter "1.2.3.4"] 7 user = "myvCenterusername" password = "password" [VirtualCenter "1.2.3.5"] port = "448" insecure-flag = "0" [Workspace] 8 server = "10.10.0.2" 9 datacenter = "mydatacenter" folder = "path/to/file" 10 datastore = "mydatastore" 11 resourcepool-path = "myresourcepoolpath" 12 [Disk] scsicontrollertype = pvscsi [Network] public-network = "VM Network" 13
- 1
- Any properties set in the
[Global]section are used for all specified vcenters unless overridden by the settings in the individual[VirtualCenter]sections. - 2
- vCenter username for the vSphere cloud provider.
- 3
- vCenter password for the specified user.
- 4
- Optional. Port number for the vCenter server. Defaults to port
443. - 5
- Set to
1if the vCenter uses a self-signed cert. - 6
- Name of the data center on which Node VMs are deployed.
- 7
- Override specific
[Global]properties for this Virtual Center. Possible setting scan be[Port],[user],[insecure-flag],[datacenters]. Any settings not specified are pulled from the[Global]section. - 8
- Set any properties used for various vSphere Cloud Provider functionality. For example, dynamic provisioning, Storage Profile Based Volume provisioning, and others.
- 9
- IP Address or FQDN for the vCenter server.
- 10
- Path to the VM directory for node VMs.
- 11
- Set to the name of the datastore to use for provisioning volumes using the storage classes or dynamic provisioning. If the datastore is located in a storage directory or is a member of a datastore cluster, you must specify the full path.
- 12
- Optional. Set to the path to the resource pool where dummy VMs for Storage Profile Based volume provisioning should be created.
- 13
- Set to the network port group for vSphere to access the node, which is called VM Network by default. This is the node host’s ExternalIP that is registered with Kubernetes.
21.5. Configuring Masters
Edit or create the master configuration file on all masters (/etc/origin/master/master-config.yaml by default) and update the contents of the apiServerArguments and controllerArguments sections with the following:
kubernetesMasterConfig:
admissionConfig:
pluginConfig:
{}
apiServerArguments:
cloud-provider:
- "vsphere"
cloud-config:
- "/etc/origin/cloudprovider/vsphere.conf"
controllerArguments:
cloud-provider:
- "vsphere"
cloud-config:
- "/etc/origin/cloudprovider/vsphere.conf"When triggering a containerized installation, only the /etc/origin and /var/lib/origin directories are mounted to the master and node container. Therefore, master-config.yaml must be in /etc/origin/master rather than /etc/.
21.6. Configuring Nodes
Edit or create the node configuration file on all nodes (/etc/origin/node/node-config.yaml by default) and update the contents of the
kubeletArgumentssection:kubeletArguments: cloud-provider: - "vsphere" cloud-config: - "/etc/origin/cloudprovider/vsphere.conf"ImportantWhen triggering a containerized installation, only the /etc/origin and /var/lib/origin directories are mounted to the master and node container. Therefore, node-config.yaml must be in /etc/origin/node rather than /etc/.
21.7. Applying Configuration Changes
Start or restart OpenShift Container Platform services on all master and node hosts to apply your configuration changes, see Restarting OpenShift Container Platform services:
# systemctl restart atomic-openshift-master-api atomic-openshift-master-controllers # systemctl restart atomic-openshift-node
Switching from not using a cloud provider to using a cloud provider produces an error message. Adding the cloud provider tries to delete the node because the node switches from using the hostname as the externalID (which would have been the case when no cloud provider was being used) to using the cloud provider’s instance-id (which is what the cloud provider specifies). To resolve this issue:
- Log in to the CLI as a cluster administrator.
Check and back up existing node labels:
$ oc describe node <node_name> | grep -Poz '(?s)Labels.*\n.*(?=Taints)'
Delete the nodes:
$ oc delete node <node_name>
On each node host, restart the OpenShift Container Platform service.
# systemctl restart atomic-openshift-node
- Add back any labels on each node that you previously had.
21.8. Backup of Persistent Volumes
OpenShift Container Platform provisions new volumes as independent persistent disks to freely attach and detach the volume on any node in the cluster. As a consequence, it is not possible to back up volumes that use snapshots.
To create a backup of PVs:
- Stop the application using the PV.
- Clone the persistent disk.
- Restart the application.
- Create a backup of the cloned disk.
- Delete the cloned disk.
Chapter 22. Configuring for Local Volume
22.1. Overview
OpenShift Container Platform can be configured to access local volumes for application data.
Local volumes are persistent volumes (PV) representing locally-mounted file systems. In the future, they may be extended to raw block devices.
Local volumes are different from a hostPath. They have a special annotation that makes any pod that uses the PV to be scheduled on the same node where the local volume is mounted.
In addition, local volume includes a provisioner that automatically creates PVs for locally mounted devices. This provisioner is currently limited and it only scans pre-configured directories. It cannot dynamically provision volumes, which may be implemented in a future release.
The local volume provisioner allows using local storage within OpenShift Container Platform and supports:
- Volumes
- PVs
Local volumes is an alpha feature and may change in a future release of OpenShift Container Platform.
22.1.1. Enable Local Volumes
Enable the PersistentLocalVolumes feature gate on all masters and nodes.
Edit or create the master configuration file on all masters (/etc/origin/master/master-config.yaml by default) and add
PersistentLocalVolumes=trueunder theapiServerArgumentsandcontrollerArgumentssections:apiServerArguments: feature-gates: - PersistentLocalVolumes=true ... controllerArguments: feature-gates: - PersistentLocalVolumes=true ...
On all nodes, edit or create the node configuration file (/etc/origin/node/node-config.yaml by default) and add
PersistentLocalVolumes=truefeature gate underkubeletArguments:kubeletArguments: feature-gates: - PersistentLocalVolumes=true
22.1.2. Mount Local Volumes
All local volumes must be manually mounted before they can be consumed by OpenShift Container Platform as PVs.
All volumes must be mounted into the /mnt/local-storage/<storage-class-name>/<volume> path. The administrators are required to create the local devices as needed (by using any method such as a disk partition or an LVM), create suitable file systems on these devices, and mount them using a script or /etc/fstab entries.
Example /etc/fstab entries
# device name # mount point # FS # options # extra /dev/sdb1 /mnt/local-storage/ssd/disk1 ext4 defaults 1 2 /dev/sdb2 /mnt/local-storage/ssd/disk2 ext4 defaults 1 2 /dev/sdb3 /mnt/local-storage/ssd/disk3 ext4 defaults 1 2 /dev/sdc1 /mnt/local-storage/hdd/disk1 ext4 defaults 1 2 /dev/sdc2 /mnt/local-storage/hdd/disk2 ext4 defaults 1 2
All volumes must be accessible to processes running within Docker containers. Change the labels of mounted file systems to allow that:
$ chcon -R unconfined_u:object_r:svirt_sandbox_file_t:s0 /mnt/local-storage/
22.1.3. Configure Local Provisioner
OpenShift Container Platform depends on an external provisioner to create PVs for local devices and to clean them up when they are not needed (to enable reuse).
- The local volume provisioner is different from most provisioners and does not support dynamic provisioning.
- The local volume provisioner requires that the administrators preconfigure the local volumes on each node and mount them under discovery directories. The provisioner then manages the volumes by creating and cleaning up PVs for each volume.
This external provisioner should be configured using a ConfigMap to relate directories with StorageClasses. This configuration must be created before the provisioner is deployed.
(Optional) Create a standalone namespace for local volume provisioner and its configuration, for example: oc new-project local-storage
apiVersion: v1
kind: ConfigMap
metadata:
name: local-volume-config
data:
"local-ssd": | 1
{
"hostDir": "/mnt/local-storage/ssd", 2
"mountDir": "/mnt/local-storage/ssd" 3
}
"local-hdd": |
{
"hostDir": "/mnt/local-storage/hdd",
"mountDir": "/mnt/local-storage/hdd"
}With this configuration, the provisioner creates:
-
One PV with StorageClass
local-ssdfor every subdirectory in /mnt/local-storage/ssd. -
One PV with StorageClass
local-hddfor every subdirectory in /mnt/local-storage/hdd.
The LocalPersistentVolumes alpha feature now also requires the VolumeScheduling alpha feature. This is a breaking change, and the following changes are required:
-
The
VolumeSchedulingfeature gate must also be enabled on kube-scheduler and kube-controller-manager components. -
The
NoVolumeNodeConflictpredicate has been removed. For non-default schedulers, update your scheduler policy. -
The
CheckVolumeBindingpredicate must be enabled in non-default schedulers.
22.1.4. Deploy Local Provisioner
Before starting the provisioner, mount all local devices and create a ConfigMap with storage classes and their directories.
Install the local provisioner from the local-storage-provisioner-template.yaml file.
Create a service account that allows running pods as a root user, use hostPath volumes, and use any SELinux context to be able to monitor, manage, and clean local volumes:
$ oc create serviceaccount local-storage-admin $ oc adm policy add-scc-to-user privileged -z local-storage-admin
To allow the provisioner pod to delete content on local volumes created by any pod, root privileges and any SELinux context are required. hostPath is required to access the /mnt/local-storage path on the host.
Install the template:
$ oc create -f https://raw.githubusercontent.com/openshift/origin/master/examples/storage-examples/local-examples/local-storage-provisioner-template.yaml
Instantiate the template by specifying values for
configmap,account, andprovisioner_imageparameters:$ oc new-app -p CONFIGMAP=local-volume-config \ -p SERVICE_ACCOUNT=local-storage-admin \ -p NAMESPACE=local-storage \ -p PROVISIONER_IMAGE=registry.access.redhat.com/openshift3/local-storage-provisioner:v3.9 \ 1 local-storage-provisioner- 1
- Replace
v3.9with the right OpenShift Container Platform version.
Add the necessary storage classes:
oc create -f ./storage-class-ssd.yaml oc create -f ./storage-class-hdd.yaml
storage-class-ssd.yaml
apiVersion: storage.k8s.io/v1 kind: StorageClass metadata: name: local-ssd provisioner: kubernetes.io/no-provisioner volumeBindingMode: WaitForFirstConsumer
storage-class-hdd.yaml
apiVersion: storage.k8s.io/v1 kind: StorageClass metadata: name: local-hdd provisioner: kubernetes.io/no-provisioner volumeBindingMode: WaitForFirstConsumer
See the template for other configurable options. This template creates a DaemonSet that runs a pod on every node. The pod watches directories specified in the
ConfigMapand creates PVs for them automatically.The provisioner runs as root to be able to clean up the directories when a PV is released and all data needs to be removed.
22.1.5. Adding New Devices
Adding a new device requires several manual steps:
- Stop DaemonSet with the provisioner.
- Create a subdirectory in the right directory on the node with the new device and mount it there.
- Start the DaemonSet with the provisioner.
Omitting any of these steps may result in the wrong PV being created.
Chapter 23. Configuring Persistent Volume Claim Protection
23.1. Overview
OpenShift Container Platform can be configured to have the persistent volume claim (PVC) protection feature enabled. This feature ensures that PVCs in active use by a pod are not removed from the system, as this may result in data loss.
PVC protection is an alpha feature and may change in a future release of OpenShift Container Platform.
23.1.1. Enable PVC Protection
To enable the PVCProtection feature gate on all masters and nodes:
Edit or create the master configuration file on all masters (/etc/origin/master/master-config.yaml by default):
-
Add
PVCProtection=trueunder theapiServerArgumentsandcontrollerArgumentssections. Add
PVCProtectionadmission plugin configuration under theadmissionConfigsection.admissionConfig: pluginConfig: PVCProtection: configuration: apiVersion: v1 disable: false kind: DefaultAdmissionConfig ... kubernetesMasterConfig: ... apiServerArguments: feature-gates: - PVCProtection=true ... controllerArguments: feature-gates: - PVCProtection=true ...
-
Add
On all nodes, edit or create the node configuration file (/etc/origin/node/node-config.yaml by default), and add the
PVCProtection=truefeature gate underkubeletArguments:kubeletArguments: feature-gates: - PVCProtection=true
- On all masters and nodes, restart OpenShift Container Platform for the changes to take effect.
Chapter 24. Configuring Persistent Storage
24.1. Overview
The Kubernetes persistent volume framework allows you to provision an OpenShift Container Platform cluster with persistent storage using networked storage available in your environment. This can be done after completing the initial OpenShift Container Platform installation depending on your application needs, giving users a way to request those resources without having any knowledge of the underlying infrastructure.
These topics show how to configure persistent volumes in OpenShift Container Platform using the following supported volume plug-ins:
24.2. Persistent Storage Using NFS
24.2.1. Overview
OpenShift Container Platform clusters can be provisioned with persistent storage using NFS. Persistent volumes (PVs) and persistent volume claims (PVCs) provide a convenient method for sharing a volume across a project. While the NFS-specific information contained in a PV definition could also be defined directly in a pod definition, doing so does not create the volume as a distinct cluster resource, making the volume more susceptible to conflicts.
This topic covers the specifics of using the NFS persistent storage type. Some familiarity with OpenShift Container Platform and NFS is beneficial. See the Persistent Storage concept topic for details on the OpenShift Container Platform persistent volume (PV) framework in general.
24.2.2. Provisioning
Storage must exist in the underlying infrastructure before it can be mounted as a volume in OpenShift Container Platform. To provision NFS volumes, a list of NFS servers and export paths are all that is required.
You must first create an object definition for the PV:
Example 24.1. PV Object Definition Using NFS
apiVersion: v1 kind: PersistentVolume metadata: name: pv0001 1 spec: capacity: storage: 5Gi 2 accessModes: - ReadWriteOnce 3 nfs: 4 path: /tmp 5 server: 172.17.0.2 6 persistentVolumeReclaimPolicy: Recycle 7
- 1
- The name of the volume. This is the PV identity in various
oc <command> podcommands. - 2
- The amount of storage allocated to this volume.
- 3
- Though this appears to be related to controlling access to the volume, it is actually used similarly to labels and used to match a PVC to a PV. Currently, no access rules are enforced based on the
accessModes. - 4
- The volume type being used, in this case the nfs plug-in.
- 5
- The path that is exported by the NFS server.
- 6
- The host name or IP address of the NFS server.
- 7
- The reclaim policy for the PV. This defines what happens to a volume when released from its claim. Valid options are Retain (default) and Recycle. See Reclaiming Resources.
Each NFS volume must be mountable by all schedulable nodes in the cluster.
Save the definition to a file, for example nfs-pv.yaml, and create the PV:
$ oc create -f nfs-pv.yaml persistentvolume "pv0001" created
Verify that the PV was created:
# oc get pv NAME LABELS CAPACITY ACCESSMODES STATUS CLAIM REASON AGE pv0001 <none> 5368709120 RWO Available 31s
The next step can be to create a PVC, which binds to the new PV:
Example 24.2. PVC Object Definition
apiVersion: v1
kind: PersistentVolumeClaim
metadata:
name: nfs-claim1
spec:
accessModes:
- ReadWriteOnce 1
resources:
requests:
storage: 1Gi 2Save the definition to a file, for example nfs-claim.yaml, and create the PVC:
# oc create -f nfs-claim.yaml
24.2.3. Enforcing Disk Quotas
You can use disk partitions to enforce disk quotas and size constraints. Each partition can be its own export. Each export is one PV. OpenShift Container Platform enforces unique names for PVs, but the uniqueness of the NFS volume’s server and path is up to the administrator.
Enforcing quotas in this way allows the developer to request persistent storage by a specific amount (for example, 10Gi) and be matched with a corresponding volume of equal or greater capacity.
24.2.4. NFS Volume Security
This section covers NFS volume security, including matching permissions and SELinux considerations. The user is expected to understand the basics of POSIX permissions, process UIDs, supplemental groups, and SELinux.
See the full Volume Security topic before implementing NFS volumes.
Developers request NFS storage by referencing, in the volumes section of their pod definition, either a PVC by name or the NFS volume plug-in directly.
The /etc/exports file on the NFS server contains the accessible NFS directories. The target NFS directory has POSIX owner and group IDs. The OpenShift Container Platform NFS plug-in mounts the container’s NFS directory with the same POSIX ownership and permissions found on the exported NFS directory. However, the container is not run with its effective UID equal to the owner of the NFS mount, which is the desired behavior.
As an example, if the target NFS directory appears on the NFS server as:
# ls -lZ /opt/nfs -d drwxrws---. nfsnobody 5555 unconfined_u:object_r:usr_t:s0 /opt/nfs # id nfsnobody uid=65534(nfsnobody) gid=65534(nfsnobody) groups=65534(nfsnobody)
Then the container must match SELinux labels, and either run with a UID of 65534 (nfsnobody owner) or with 5555 in its supplemental groups in order to access the directory.
The owner ID of 65534 is used as an example. Even though NFS’s root_squash maps root (0) to nfsnobody (65534), NFS exports can have arbitrary owner IDs. Owner 65534 is not required for NFS exports.
24.2.4.1. Group IDs
The recommended way to handle NFS access (assuming it is not an option to change permissions on the NFS export) is to use supplemental groups. Supplemental groups in OpenShift Container Platform are used for shared storage, of which NFS is an example. In contrast, block storage, such as Ceph RBD or iSCSI, use the fsGroup SCC strategy and the fsGroup value in the pod’s securityContext.
It is generally preferable to use supplemental group IDs to gain access to persistent storage versus using user IDs. Supplemental groups are covered further in the full Volume Security topic.
Because the group ID on the example target NFS directory shown above is 5555, the pod can define that group ID using supplementalGroups under the pod-level securityContext definition. For example:
spec:
containers:
- name:
...
securityContext: 1
supplementalGroups: [5555] 2
Assuming there are no custom SCCs that might satisfy the pod’s requirements, the pod likely matches the restricted SCC. This SCC has the supplementalGroups strategy set to RunAsAny, meaning that any supplied group ID is accepted without range checking.
As a result, the above pod passes admissions and is launched. However, if group ID range checking is desired, a custom SCC, as described in pod security and custom SCCs, is the preferred solution. A custom SCC can be created such that minimum and maximum group IDs are defined, group ID range checking is enforced, and a group ID of 5555 is allowed.
To use a custom SCC, you must first add it to the appropriate service account. For example, use the default service account in the given project unless another has been specified on the pod specification. See Add an SCC to a User, Group, or Project for details.
24.2.4.2. User IDs
User IDs can be defined in the container image or in the pod definition. The full Volume Security topic covers controlling storage access based on user IDs, and should be read prior to setting up NFS persistent storage.
It is generally preferable to use supplemental group IDs to gain access to persistent storage versus using user IDs.
In the example target NFS directory shown above, the container needs its UID set to 65534 (ignoring group IDs for the moment), so the following can be added to the pod definition:
spec: containers: 1 - name: ... securityContext: runAsUser: 65534 2
Assuming the default project and the restricted SCC, the pod’s requested user ID of 65534 is not allowed, and therefore the pod fails. The pod fails for the following reasons:
- It requests 65534 as its user ID.
- All SCCs available to the pod are examined to see which SCC allows a user ID of 65534 (actually, all policies of the SCCs are checked but the focus here is on user ID).
-
Because all available SCCs use MustRunAsRange for their
runAsUserstrategy, UID range checking is required. - 65534 is not included in the SCC or project’s user ID range.
It is generally considered a good practice not to modify the predefined SCCs. The preferred way to fix this situation is to create a custom SCC, as described in the full Volume Security topic. A custom SCC can be created such that minimum and maximum user IDs are defined, UID range checking is still enforced, and the UID of 65534 is allowed.
To use a custom SCC, you must first add it to the appropriate service account. For example, use the default service account in the given project unless another has been specified on the pod specification. See Add an SCC to a User, Group, or Project for details.
24.2.4.3. SELinux
See the full Volume Security topic for information on controlling storage access in conjunction with using SELinux.
By default, SELinux does not allow writing from a pod to a remote NFS server. The NFS volume mounts correctly, but is read-only.
To enable writing to NFS volumes with SELinux enforcing on each node, run:
# setsebool -P virt_use_nfs 1
The -P option above makes the bool persistent between reboots.
The virt_use_nfs boolean is defined by the docker-selinux package. If an error is seen indicating that this bool is not defined, ensure this package has been installed.
24.2.4.4. Export Settings
In order to enable arbitrary container users to read and write the volume, each exported volume on the NFS server should conform to the following conditions:
Each export must be:
/<example_fs> *(rw,root_squash)
The firewall must be configured to allow traffic to the mount point.
For NFSv4, configure the default port
2049(nfs) and port111(portmapper).NFSv4
# iptables -I INPUT 1 -p tcp --dport 2049 -j ACCEPT # iptables -I INPUT 1 -p tcp --dport 111 -j ACCEPT
For NFSv3, there are three ports to configure:
2049(nfs),20048(mountd), and111(portmapper).NFSv3
# iptables -I INPUT 1 -p tcp --dport 2049 -j ACCEPT # iptables -I INPUT 1 -p tcp --dport 20048 -j ACCEPT # iptables -I INPUT 1 -p tcp --dport 111 -j ACCEPT
-
The NFS export and directory must be set up so that it is accessible by the target pods. Either set the export to be owned by the container’s primary UID, or supply the pod group access using
supplementalGroups, as shown in Group IDs above. See the full Volume Security topic for additional pod security information as well.
24.2.5. Reclaiming Resources
NFS implements the OpenShift Container Platform Recyclable plug-in interface. Automatic processes handle reclamation tasks based on policies set on each persistent volume.
By default, PVs are set to Retain. NFS volumes which are set to Recycle are scrubbed (i.e., rm -rf is run on the volume) after being released from their claim (i.e, after the user’s PersistentVolumeClaim bound to the volume is deleted). Once recycled, the NFS volume can be bound to a new claim.
Once claim to a PV is released (that is, the PVC is deleted), the PV object should not be re-used. Instead, a new PV should be created with the same basic volume details as the original.
For example, the administrator creates a PV named nfs1:
apiVersion: v1
kind: PersistentVolume
metadata:
name: nfs1
spec:
capacity:
storage: 1Mi
accessModes:
- ReadWriteMany
nfs:
server: 192.168.1.1
path: "/"
The user creates PVC1, which binds to nfs1. The user then deletes PVC1, releasing claim to nfs1, which causes nfs1 to be Released. If the administrator wishes to make the same NFS share available, they should create a new PV with the same NFS server details, but a different PV name:
apiVersion: v1
kind: PersistentVolume
metadata:
name: nfs2
spec:
capacity:
storage: 1Mi
accessModes:
- ReadWriteMany
nfs:
server: 192.168.1.1
path: "/"
Deleting the original PV and re-creating it with the same name is discouraged. Attempting to manually change the status of a PV from Released to Available causes errors and potential data loss.
A PV with retention policy of Recycle scrubs (rm -rf) the data and marks it as Available for claim. The Recycle retention policy is deprecated starting in OpenShift Container Platform 3.6 and should be avoided. Anyone using recycler should use dynamic provision and volume deletion instead.
24.2.6. Automation
Clusters can be provisioned with persistent storage using NFS in the following ways:
- Enforce storage quotas using disk partitions.
- Enforce security by restricting volumes to the project that has a claim to them.
- Configure reclamation of discarded resources for each PV.
They are many ways that you can use scripts to automate the above tasks. You can use an example Ansible playbook to help you get started.
24.2.7. Additional Configuration and Troubleshooting
Depending on what version of NFS is being used and how it is configured, there may be additional configuration steps needed for proper export and security mapping. The following are some that may apply:
| NFSv4 mount incorrectly shows all files with ownership of nobody:nobody |
|
| Disabling ID mapping on NFSv4 |
|
24.3. Persistent Storage Using Red Hat Gluster Storage
24.3.1. Overview
Red Hat Gluster Storage can be configured to provide persistent storage and dynamic provisioning for OpenShift Container Platform. It can be used both containerized within OpenShift Container Platform (Container-Native Storage) and non-containerized on its own nodes (Container-Ready Storage).
24.3.1.1. Container-Native Storage
With Container-Native Storage, Red Hat Gluster Storage runs containerized directly on OpenShift Container Platform nodes. This allows for compute and storage instances to be scheduled and run from the same set of hardware.
Figure 24.1. Architecture - Container-Native Storage
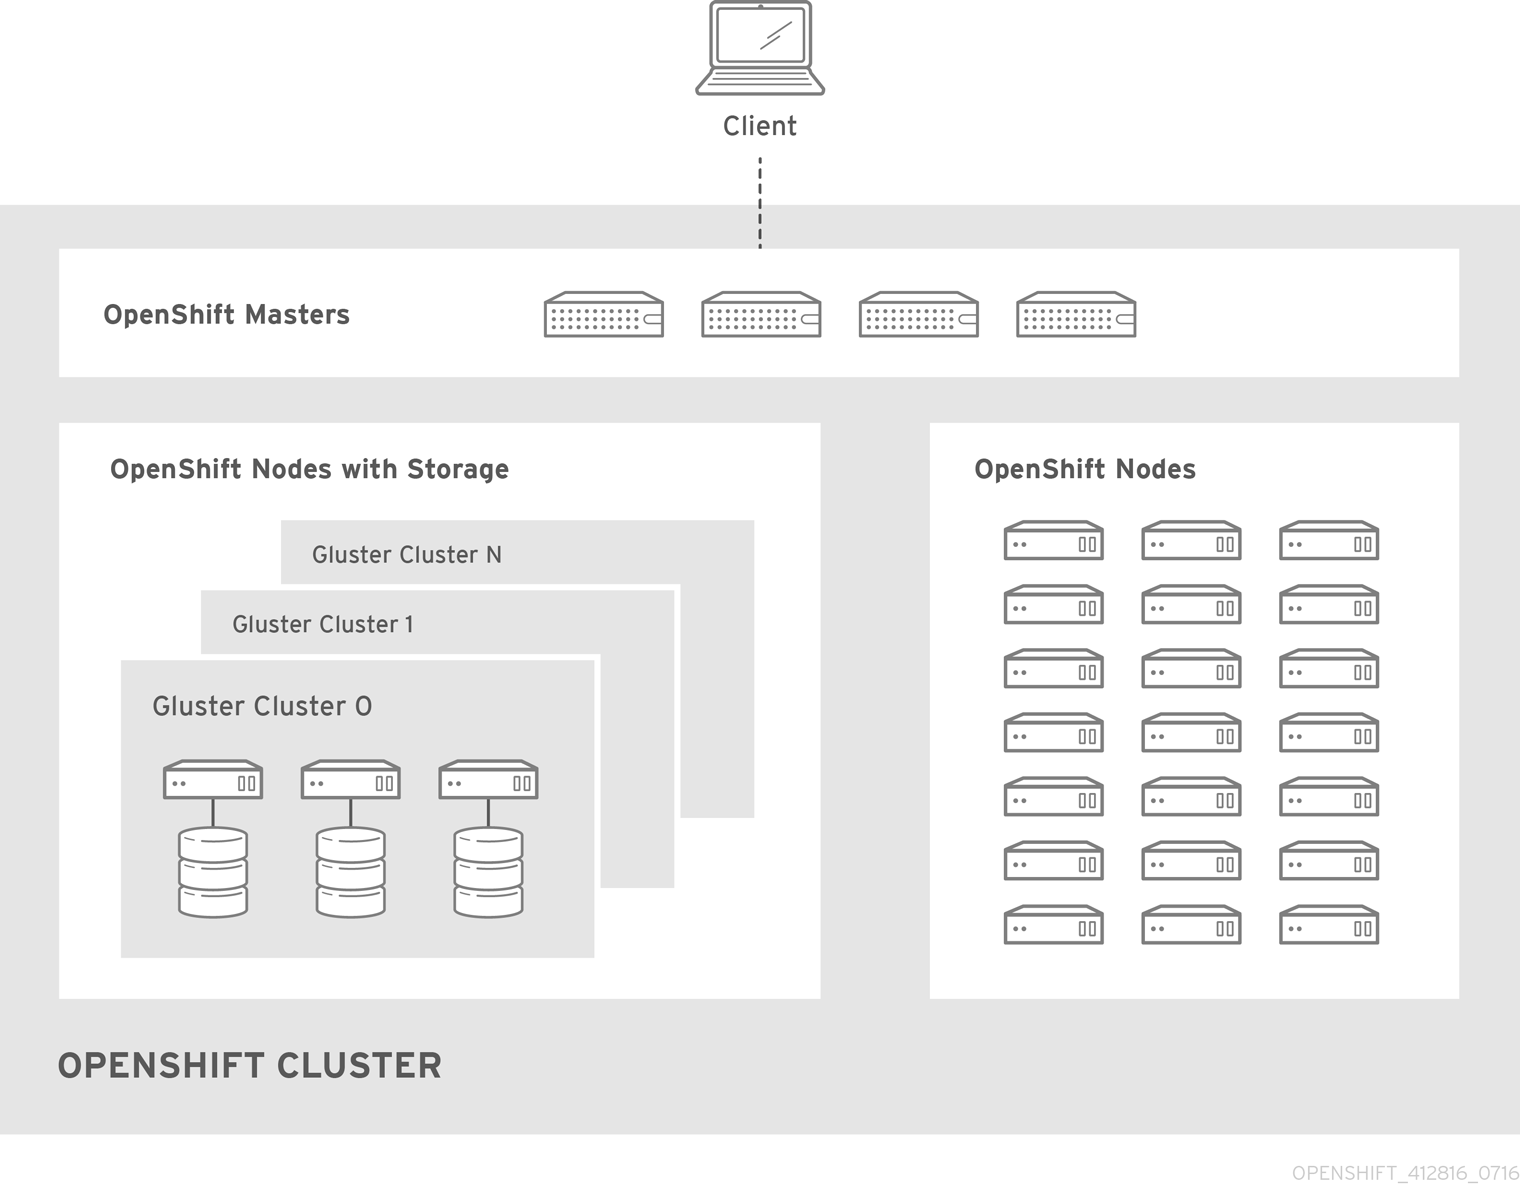
Container-Native Storage is available starting with Red Hat Gluster Storage 3.1 update 3. See Container-Native Storage for OpenShift Container Platform for additional documentation.
24.3.1.2. Container-Ready Storage
With Container-Ready Storage, Red Hat Gluster Storage runs on its own dedicated nodes and is managed by an instance of heketi, the GlusterFS volume management REST service. This heketi service can run either standalone or containerized. Containerization allows for an easy mechanism to provide high-availability to the service. This documentation will focus on the configuration where heketi is containerized.
24.3.1.3. Standalone Red Hat Gluster Storage
If you have a standalone Red Hat Gluster Storage cluster available in your environment, you can make use of volumes on that cluster using OpenShift Container Platform’s GlusterFS volume plug-in. This solution is a conventional deployment where applications run on dedicated compute nodes, an OpenShift Container Platform cluster, and storage is provided from its own dedicated nodes.
Figure 24.2. Architecture - Standalone Red Hat Gluster Storage Cluster Using OpenShift Container Platform's GlusterFS Volume Plug-in
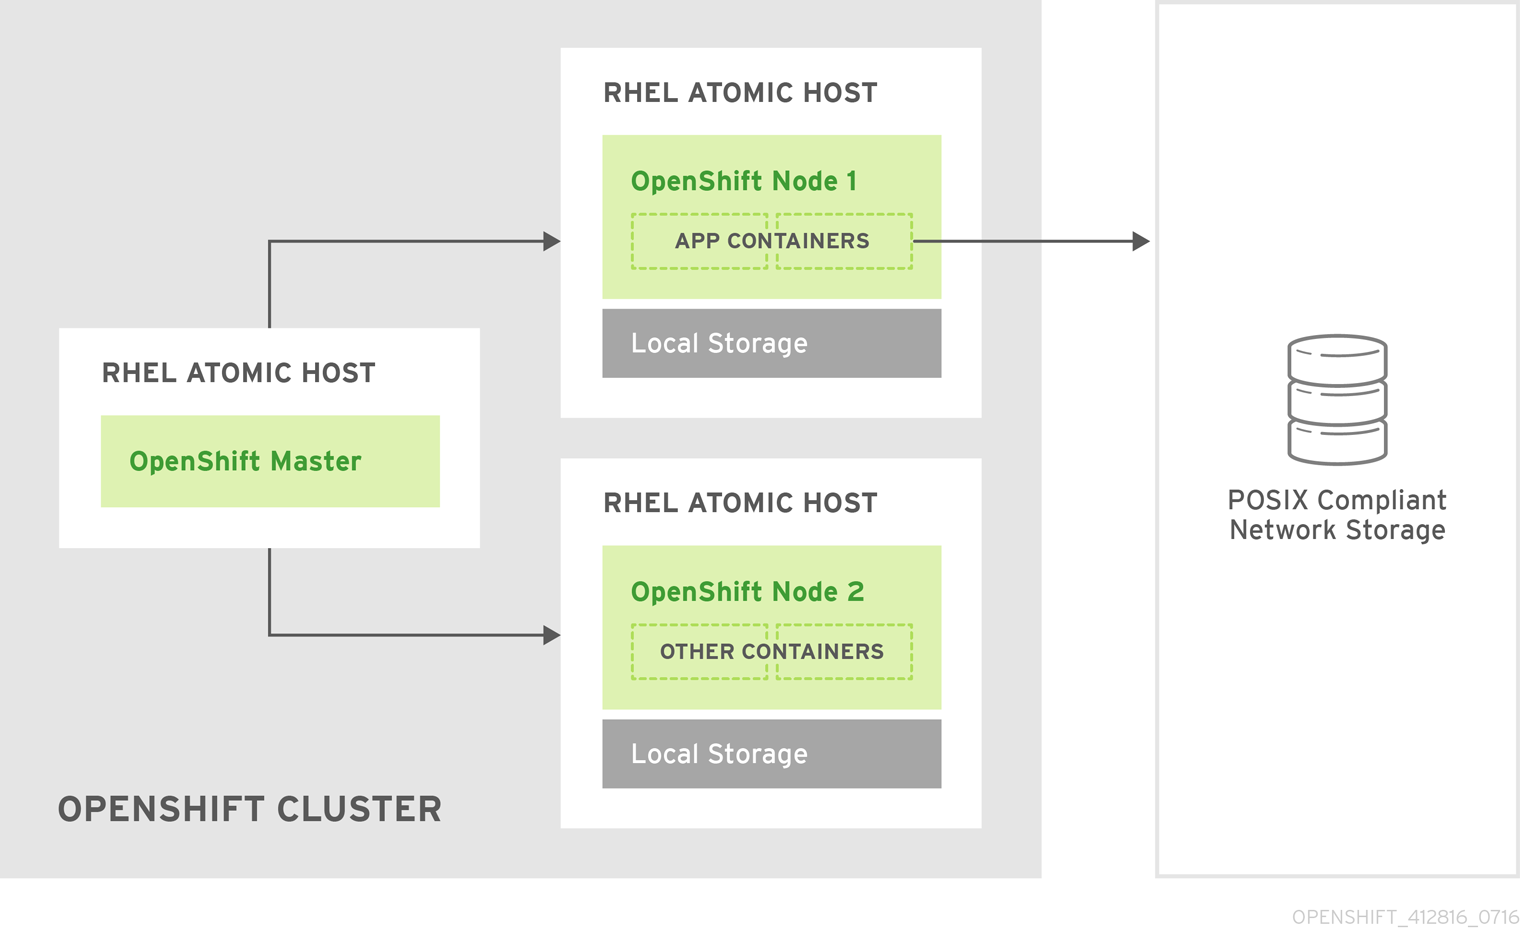
See the Red Hat Gluster Storage Installation Guide and the Red Hat Gluster Storage Administration Guide for more on Red Hat Gluster Storage.
High availability of storage in the infrastructure is left to the underlying storage provider.
24.3.1.4. GlusterFS Volumes
GlusterFS volumes present a POSIX-compliant filesystem and are comprised of one or more "bricks" across one or more nodes in their cluster. A brick is just a directory on a given storage node and is typically the mount point for a block storage device. GlusterFS handles distribution and replication of files across a given volume’s bricks per that volume’s configuration.
It is recommended to use heketi for most common volume management operations such as create, delete, and resize. OpenShift Container Platform expects heketi to be present when using the GlusterFS provisioner. heketi by default will create volumes that are three-ray replica, that is volumes where each file has three copies across three different nodes. As such it is recommended that any Red Hat Gluster Storage clusters which will be used by heketi have at least three nodes available.
There are many features available for GlusterFS volumes, but they are beyond the scope of this documentation.
24.3.1.5. gluster-block Volumes
gluster-block volumes are volumes that can be mounted over iSCSI. This is done by creating a file on an existing GlusterFS volume and then presenting that file as a block device via an iSCSI target. Such GlusterFS volumes are called block-hosting volumes.
gluster-block volumes present a sort of trade-off. Being consumed as iSCSI targets, gluster-block volumes can only be mounted by one node/client at a time which is in contrast to GlusterFS volumes which can be mounted by multiple nodes/clients. Being files on the backend, however, allows for operations which are typically costly on GlusterFS volumes (e.g. metadata lookups) to be converted to ones which are typically much faster on GlusterFS volumes (e.g. reads and writes). This leads to potentially substantial performance improvements for certain workloads.
At this time, it is recommended to only use gluster-block volumes for OpenShift Logging and OpenShift Metrics storage.
24.3.1.6. Gluster S3 Storage
The Gluster S3 service allows user applications to access GlusterFS storage via an S3 interface. The service binds to two GlusterFS volumes, one for object data and one for object metadata, and translates incoming S3 REST requests into filesystem operations on the volumes. It is recommended to run the service as a pod inside OpenShift Container Platform.
At this time, use and installation of the Gluster S3 service is in tech preview.
24.3.2. Considerations
This section covers a few topics that should be taken into consideration when using Red Hat Gluster Storage with OpenShift Container Platform.
24.3.2.1. Software Prerequisites
To access GlusterFS volumes, the mount.glusterfs command must be available on all schedulable nodes. For RPM-based systems, the glusterfs-fuse package must be installed:
# yum install glusterfs-fuse
This package comes installed on every RHEL system. However, it is recommended to update to the latest available version from Red Hat Gluster Storage. To do this, the following RPM repository must be enabled:
# subscription-manager repos --enable=rh-gluster-3-client-for-rhel-7-server-rpms
If glusterfs-fuse is already installed on the nodes, ensure that the latest version is installed:
# yum update glusterfs-fuse
24.3.2.2. Hardware Requirements
Any nodes used in a Container-Native Storage or Container-Ready Storage cluster are considered storage nodes. Storage nodes can be grouped into distinct cluster groups, though a single node can not be in multiple groups. For each group of storage nodes:
- A minimum of three storage nodes per group is required.
Each storage node must have a minimum of 8 GB of RAM. This is to allow running the Red Hat Gluster Storage pods, as well as other applications and the underlying operating system.
- Each GlusterFS volume also consumes memory on every storage node in its storage cluster, which is about 30 MB. The total amount of RAM should be determined based on how many concurrent volumes are desired or anticipated.
Each storage node must have at least one raw block device with no present data or metadata. These block devices will be used in their entirety for GlusterFS storage. Make sure the following are not present:
- Partition tables (GPT or MSDOS)
- Filesystems or residual filesystem signatures
- LVM2 signatures of former Volume Groups and Logical Volumes
- LVM2 metadata of LVM2 physical volumes
If in doubt,
wipefs -a <device>should clear any of the above.
It is recommended to plan for two clusters: one dedicated to storage for infrastructure applications (such as an OpenShift Container Registry) and one dedicated to storage for general applications. This would require a total of six storage nodes. This recommendation is made to avoid potential impacts on performance in I/O and volume creation.
24.3.2.3. Storage Sizing
Every GlusterFS cluster must be sized based on the needs of the anticipated applications that will use its storage. For example, there are sizing guides available for both OpenShift Logging and OpenShift Metrics.
Some additional things to consider are:
For each Container-Native Storage or Container-Ready Storage cluster, the default behavior is to create GlusterFS volumes with three-way replication. As such, the total storage to plan for should be the desired capacity times three.
-
As an example, each heketi instance creates a
heketidbstoragevolume that is 2 GB in size, requiring a total of 6 GB of raw storage across three nodes in the storage cluster. This capacity is always required and should be taken into consideration for sizing calculations. - Applications like an integrated OpenShift Container Registry share a single GlusterFS volume across multiple instances of the application.
-
As an example, each heketi instance creates a
gluster-block volumes require the presence of a GlusterFS block-hosting volume with enough capacity to hold the full size of any given block volume’s capacity.
- By default, if no such block-hosting volume exists, one will be automatically created at a set size. The default for this size is 100 GB. If there is not enough space in the cluster to create the new block-hosting volume, the creation of the block volume will fail. Both the auto-create behavior and the auto-created volume size are configurable.
- Applications with multiple instances that use gluster-block volumes, such as OpenShift Logging and OpenShift Metrics, will use one volume per instance.
- The Gluster S3 service binds to two GlusterFS volumes. In a default installation via the Advanced Installer, these volumes are 1 GB each, consuming a total of 6 GB of raw storage.
24.3.2.4. Volume Operation Behaviors
Volume operations, such as create and delete, can be impacted by a variety of environmental circumstances and can in turn affect applications as well.
If the application pod requests a dynamically provisioned GlusterFS persistent volume claim (PVC), then extra time might have to be considered for the volume to be created and bound to the corresponding PVC. This effects the startup time for an application pod.
NoteCreation time of GlusterFS volumes scales linearly depending on the number of volumes. As an example, given 100 volumes in a cluster using recommended hardware specifications, each volume took approximately 6 seconds to be created, allocated, and bound to a pod.
When a PVC is deleted, that action will trigger the deletion of the underlying GlusterFS volume. While PVCs will disappear immediately from the
oc get pvcoutput, this does not mean the volume has been fully deleted. A GlusterFS volume can only be considered deleted when it does not show up in the command-line outputs forheketi-cli volume listandgluster volume list.NoteThe time to delete the GlusterFS volume and recycle its storage depends on and scales linearly with the number of active GlusterFS volumes. While pending volume deletes do not affect running applications, storage administrators should be aware of and be able to estimate how long they will take, especially when tuning resource consumption at scale.
24.3.2.5. Volume Security
This section covers Red Hat Gluster Storage volume security, including Portable Operating System Interface [for Unix] (POSIX) permissions and SELinux considerations. Understanding the basics of Volume Security, POSIX permissions, and SELinux is presumed.
24.3.2.5.1. POSIX Permissions
Red Hat Gluster Storage volumes present POSIX-compliant file systems. As such, access permissions can be managed using standard command-line tools such as chmod and chown.
For Container-Native Storage and Container-Ready Storage, it is also possible to specify a group ID that will own the root of the volume at volume creation time. For static provisioning, this is specified as part of the heketi-cli volume creation command:
$ heketi-cli volume create --size=100 --gid=10001000
The PersistentVolume that will be associated with this volume must be annotated with the group ID so that pods consuming the PersistentVolume can have access to the file system. This annotation takes the form of:
pv.beta.kubernetes.io/gid: "<GID>" ---
For dynamic provisioning, the provisioner automatically generates and applies a group ID. It is possible to control the range from which this group ID is selected using the gidMin and gidMax StorageClass parameters (see Dynamic Provisioning). The provisioner also takes care of annotating the generated PersistentVolume with the group ID.
24.3.2.5.2. SELinux
By default, SELinux does not allow writing from a pod to a remote Red Hat Gluster Storage server. To enable writing to Red Hat Gluster Storage volumes with SELinux on, run the following on each node running GlusterFS:
$ sudo setsebool -P virt_sandbox_use_fusefs on 1
$ sudo setsebool -P virt_use_fusefs on- 1
- The
-Poption makes the boolean persistent between reboots.
The virt_sandbox_use_fusefs boolean is defined by the docker-selinux package. If you get an error saying it is not defined, ensure that this package is installed.
If you use Atomic Host, the SELinux booleans are cleared when you upgrade Atomic Host. When you upgrade Atomic Host, you must set these boolean values again.
24.3.3. Support Requirements
The following requirements must be met to create a supported integration of Red Hat Gluster Storage and OpenShift Container Platform.
For Container-Ready Storage or standalone Red Hat Gluster Storage:
- Minimum version: Red Hat Gluster Storage 3.1.3
- All Red Hat Gluster Storage nodes must have valid subscriptions to Red Hat Network channels and Subscription Manager repositories.
- Red Hat Gluster Storage nodes must adhere to the requirements specified in the Planning Red Hat Gluster Storage Installation.
- Red Hat Gluster Storage nodes must be completely up to date with the latest patches and upgrades. Refer to the Red Hat Gluster Storage Installation Guide to upgrade to the latest version.
- A fully-qualified domain name (FQDN) must be set for each Red Hat Gluster Storage node. Ensure that correct DNS records exist, and that the FQDN is resolvable via both forward and reverse DNS lookup.
24.3.4. Installation
For standalone Red Hat Gluster Storage, there is no component installation required to use it with OpenShift Container Platform. OpenShift Container Platform comes with a built-in GlusterFS volume driver, allowing it to make use of existing volumes on existing clusters. See provisioning for more on how to make use of existing volumes.
For Container-Native Storage and Container-Ready Storage, it is recommended to use the Advanced Installer to install the required components.
24.3.4.1. Container-Ready Storage: Installing Red Hat Gluster Storage Nodes
For Container-Ready Storage, each Red Hat Gluster Storage node must have the appropriate system configurations (e.g. firewall ports, kernel modules) and the Red Hat Gluster Storage services must be running. The services should not be further configured, and should not have formed a Trusted Storage Pool.
The installation of Red Hat Gluster Storage nodes is beyond the scope of this documentation. For more information, see Setting Up Container-Ready Storage.
24.3.4.2. Using the Advanced Installer
The Advanced Installer can be used to install one or both of two GlusterFS node groups:
-
glusterfs: A general storage cluster for use by user applications. -
glusterfs_registry: A dedicated storage cluster for use by infrastructure applications such as an integrated OpenShift Container Registry.
It is recommended to deploy both groups to avoid potential impacts on performance in I/O and volume creation. Both of these are defined in the inventory hosts file.
The definition of the clusters is done by including the relevant names in the [OSEv3:children] group, creating similarly named groups, and then populating the groups with the node information. The clusters can then be configured through a variety of variables in the [OSEv3:vars] group. glusterfs variables begin with openshift_storage_glusterfs_ and glusterfs_registry variables begin with openshift_storage_glusterfs_registry_. A few other variables, such as openshift_hosted_registry_storage_kind, interact with the GlusterFS clusters.
It is recommended to specify version tags for all containerized components. This is primarily to prevent components, particularly the Red Hat Gluster Storage pods, from upgrading after an outage which may lead to a cluster of widely disparate software versions. The relevant variables are:
-
openshift_storage_glusterfs_version -
openshift_storage_glusterfs_block_version -
openshift_storage_glusterfs_s3_version -
openshift_storage_glusterfs_heketi_version -
openshift_storage_glusterfs_registry_version -
openshift_storage_glusterfs_registry_block_version -
openshift_storage_glusterfs_registry_s3_version -
openshift_storage_glusterfs_registry_heketi_version
For a complete list of variables, see the GlusterFS role README on GitHub.
Once the variables are configured, there are several playbooks available depending on the circumstances of the installation:
The main playbook of the Advanced Installer can be used to deploy the GlusterFS clusters in tandem with an initial installation of OpenShift Container Platform.
- This includes deploying an integrated OpenShift Container Registry that uses GlusterFS storage.
- This does not include OpenShift Logging or OpenShift Metrics, as that is currently still a separate step. See Container-Native Storage for OpenShift Logging and Metrics for more information.
-
playbooks/openshift-glusterfs/config.ymlcan be used to deploy the clusters onto an existing OpenShift Container Platform installation. playbooks/openshift-glusterfs/registry.ymlcan be used to deploy the clusters onto an existing OpenShift Container Platform installation. In addition, this will deploy an integrated OpenShift Container Registry which uses GlusterFS storage.ImportantThere must not be a pre-existing registry in the OpenShift Container Platform cluster.
playbooks/openshift-glusterfs/uninstall.ymlcan be used to remove existing clusters matching the configuration in the inventory hosts file. This is useful for cleaning up the OpenShift Container Platform environment in the case of a failed deployment due to configuration errors.NoteThe GlusterFS playbooks are not guaranteed to be idempotent.
NoteRunning the playbooks more than once for a given installation is currently not supported without deleting the entire GlusterFS installation (including disk data) and starting over.
24.3.4.2.1. Example: Basic Container-Native Storage Installation
In your inventory file, add
glusterfsin the[OSEv3:children]section to enable the[glusterfs]group:[OSEv3:children] masters nodes glusterfs
Add a
[glusterfs]section with entries for each storage node that will host the GlusterFS storage. For each node, setglusterfs_devicesto a list of raw block devices that will be completely managed as part of a GlusterFS cluster. There must be at least one device listed. Each device must be bare, with no partitions or LVM PVs. Specifying the variable takes the form:<hostname_or_ip> glusterfs_devices='[ "</path/to/device1/>", "</path/to/device2>", ... ]'
For example:
[glusterfs] node11.example.com glusterfs_devices='[ "/dev/xvdc", "/dev/xvdd" ]' node12.example.com glusterfs_devices='[ "/dev/xvdc", "/dev/xvdd" ]' node13.example.com glusterfs_devices='[ "/dev/xvdc", "/dev/xvdd" ]'
Add the hosts listed under
[glusterfs]to the[nodes]group:[nodes] ... node11.example.com openshift_schedulable=True node12.example.com openshift_schedulable=True node13.example.com openshift_schedulable=True
24.3.4.2.2. Example: Basic Container-Ready Storage Installation
In your inventory file, add
glusterfsin the[OSEv3:children]section to enable the[glusterfs]group:[OSEv3:children] masters nodes glusterfs
Include the following variables in the
[OSEv3:vars]section, adjusting them as needed for your configuration:[OSEv3:vars] ... openshift_storage_glusterfs_is_native=false openshift_storage_glusterfs_storageclass=true openshift_storage_glusterfs_heketi_is_native=true openshift_storage_glusterfs_heketi_executor=ssh openshift_storage_glusterfs_heketi_ssh_port=22 openshift_storage_glusterfs_heketi_ssh_user=root openshift_storage_glusterfs_heketi_ssh_sudo=false openshift_storage_glusterfs_heketi_ssh_keyfile="/root/.ssh/id_rsa"
Add a
[glusterfs]section with entries for each storage node that will host the GlusterFS storage. For each node, setglusterfs_devicesto a list of raw block devices that will be completely managed as part of a GlusterFS cluster. There must be at least one device listed. Each device must be bare, with no partitions or LVM PVs. Also, setglusterfs_ipto the IP address of the node. Specifying the variable takes the form:<hostname_or_ip> glusterfs_ip=<ip_address> glusterfs_devices='[ "</path/to/device1/>", "</path/to/device2>", ... ]'
For example:
[glusterfs] gluster1.example.com glusterfs_ip=192.168.10.11 glusterfs_devices='[ "/dev/xvdc", "/dev/xvdd" ]' gluster2.example.com glusterfs_ip=192.168.10.12 glusterfs_devices='[ "/dev/xvdc", "/dev/xvdd" ]' gluster3.example.com glusterfs_ip=192.168.10.13 glusterfs_devices='[ "/dev/xvdc", "/dev/xvdd" ]'
24.3.4.2.3. Example: Container-Native Storage with an Integrated OpenShift Container Registry
In your inventory file, set the following variable under
[OSEv3:vars]:[OSEv3:vars] ... openshift_hosted_registry_storage_kind=glusterfs
Add
glusterfs_registryin the[OSEv3:children]section to enable the[glusterfs_registry]group:[OSEv3:children] masters nodes glusterfs_registry
Add a
[glusterfs_registry]section with entries for each storage node that will host the GlusterFS storage. For each node, setglusterfs_devicesto a list of raw block devices that will be completely managed as part of a GlusterFS cluster. There must be at least one device listed. Each device must be bare, with no partitions or LVM PVs. Specifying the variable takes the form:<hostname_or_ip> glusterfs_devices='[ "</path/to/device1/>", "</path/to/device2>", ... ]'
For example:
[glusterfs_registry] node11.example.com glusterfs_devices='[ "/dev/xvdc", "/dev/xvdd" ]' node12.example.com glusterfs_devices='[ "/dev/xvdc", "/dev/xvdd" ]' node13.example.com glusterfs_devices='[ "/dev/xvdc", "/dev/xvdd" ]'
Add the hosts listed under
[glusterfs_registry]to the[nodes]group:[nodes] ... node11.example.com openshift_schedulable=True node12.example.com openshift_schedulable=True node13.example.com openshift_schedulable=True
24.3.4.2.4. Example: Container-Native Storage for OpenShift Logging and Metrics
In your inventory file, set the following variables under
[OSEv3:vars]:[OSEv3:vars] ... openshift_metrics_hawkular_nodeselector={"role":"infra"} 1 openshift_metrics_cassandra_nodeselector={"role":"infra"} 2 openshift_metrics_heapster_nodeselector={"role":"infra"} 3 openshift_metrics_storage_kind=dynamic openshift_metrics_cassanda_pvc_storage_class_name="glusterfs-registry-block" 4 openshift_logging_es_nodeselector={"role":"infra"} 5 openshift_logging_kibana_nodeselector={"role":"infra"} 6 openshift_logging_curator_nodeselector={"role":"infra"} 7 openshift_logging_storage_kind=dynamic openshift_logging_es_pvc_size=10Gi 8 openshift_logging_elasticsearch_storage_type=pvc 9 openshift_logging_es_pvc_storage_class_name="glusterfs-registry-block" 10 openshift_storage_glusterfs_registry_block_deploy=true openshift_storage_glusterfs_registry_block_host_vol_size=50 openshift_storage_glusterfs_registry_block_storageclass=true openshift_storage_glusterfs_registry_block_storageclass_default=true openshift_storageclass_default=false- 1 2 3 5 6 7
- It is recommended to run the integrated OpenShift Container Registry, Logging, and Metrics on nodes dedicated to "infrastructure" applications, that is applications deployed by administrators to provide services for the OpenShift Container Platform cluster.
- 4 10
- Specify the StorageClass to be used for Logging and Metrics. This name is generated from the name of the target GlusterFS cluster (e.g.,
glusterfs-<name>-block). In this example, this defaults toregistry. - 8
- OpenShift Logging requires that a PVC size be specified. The supplied value is only an example, not a recommendation.
- 9
- If using Persistent Elasticsearch Storage, set the storage type to
pvc.
NoteSee the GlusterFS role README for details on these and other variables.
Add
glusterfs_registryin the[OSEv3:children]section to enable the[glusterfs_registry]group:[OSEv3:children] masters nodes glusterfs_registry
Add a
[glusterfs_registry]section with entries for each storage node that will host the GlusterFS storage. For each node, setglusterfs_devicesto a list of raw block devices that will be completely managed as part of a GlusterFS cluster. There must be at least one device listed. Each device must be bare, with no partitions or LVM PVs. Specifying the variable takes the form:<hostname_or_ip> glusterfs_devices='[ "</path/to/device1/>", "</path/to/device2>", ... ]'
For example:
[glusterfs_registry] node11.example.com glusterfs_devices='[ "/dev/xvdc", "/dev/xvdd" ]' node12.example.com glusterfs_devices='[ "/dev/xvdc", "/dev/xvdd" ]' node13.example.com glusterfs_devices='[ "/dev/xvdc", "/dev/xvdd" ]'
Add the hosts listed under
[glusterfs_registry]to the[nodes]group:[nodes] ... node11.example.com openshift_schedulable=True node12.example.com openshift_schedulable=True node13.example.com openshift_schedulable=True
Run the Advanced Installer. This can be either as part of an initial OpenShift Container Platform installation:
ansible-playbook -i <path_to_inventory_file> /usr/share/ansible/openshift-ansible/playbooks/prerequisites.yml ansible-playbook -i <path_to_inventory_file> /usr/share/ansible/openshift-ansible/playbooks/deploy_cluster.yml
or brownfield:
ansible-playbook -i <path_to_inventory_file> /usr/share/ansible/openshift-ansible/playbooks/openshift-glusterfs/config.yml
24.3.4.2.5. Example: Container-Native Storage for Applications, Registry, Logging, and Metrics
In your inventory file, set the following variables under
[OSEv3:vars]:[OSEv3:vars] ... openshift_registry_selector="role=infra" 1 openshift_hosted_registry_storage_kind=glusterfs openshift_metrics_hawkular_nodeselector={"role":"infra"} 2 openshift_metrics_cassandra_nodeselector={"role":"infra"} 3 openshift_metrics_heapster_nodeselector={"role":"infra"} 4 openshift_metrics_storage_kind=dynamic openshift_metrics_cassanda_pvc_storage_class_name="glusterfs-registry-block" 5 openshift_logging_es_nodeselector={"role":"infra"} 6 openshift_logging_kibana_nodeselector={"role":"infra"} 7 openshift_logging_curator_nodeselector={"role":"infra"} 8 openshift_logging_storage_kind=dynamic openshift_logging_es_pvc_size=10Gi 9 openshift_logging_elasticsearch_storage_type=pvc 10 openshift_logging_es_pvc_storage_class_name="glusterfs-registry-block" 11 openshift_storage_glusterfs_block_deploy=false openshift_storage_glusterfs_registry_block_deploy=true openshift_storage_glusterfs_registry_block_storageclass=true openshift_storage_glusterfs_registry_block_storageclass_default=false
- 1 2 3 4 6 7 8
- Running the integrated OpenShift Container Registry, Logging, and Metrics on infrastructure nodes is recommended. Infrastructure node are nodes dedicated to running applications deployed by administrators to provide services for the OpenShift Container Platform cluster.
- 5 11
- Specify the StorageClass to be used for Logging and Metrics. This name is generated from the name of the target GlusterFS cluster, for example
glusterfs-<name>-block. In this example,<name>defaults toregistry. - 9
- Specifying a PVC size is required for OpenShift Logging. The supplied value is only an example, not a recommendation.
- 10
- If using Persistent Elasticsearch Storage, set the storage type to
pvc.
Add
glusterfsandglusterfs_registryin the[OSEv3:children]section to enable the[glusterfs]and[glusterfs_registry]groups:[OSEv3:children] ... glusterfs glusterfs_registry
Add
[glusterfs]and[glusterfs_registry]sections with entries for each storage node that will host the GlusterFS storage. For each node, setglusterfs_devicesto a list of raw block devices that will be completely managed as part of a GlusterFS cluster. There must be at least one device listed. Each device must be bare, with no partitions or LVM PVs. Specifying the variable takes the form:<hostname_or_ip> glusterfs_devices='[ "</path/to/device1/>", "</path/to/device2>", ... ]'
For example:
[glusterfs] node11.example.com glusterfs_devices='[ "/dev/xvdc", "/dev/xvdd" ]' node12.example.com glusterfs_devices='[ "/dev/xvdc", "/dev/xvdd" ]' node13.example.com glusterfs_devices='[ "/dev/xvdc", "/dev/xvdd" ]' [glusterfs_registry] node14.example.com glusterfs_devices='[ "/dev/xvdc", "/dev/xvdd" ]' node15.example.com glusterfs_devices='[ "/dev/xvdc", "/dev/xvdd" ]' node16.example.com glusterfs_devices='[ "/dev/xvdc", "/dev/xvdd" ]'
Add the hosts listed under
[glusterfs]and[glusterfs_registry]to the[nodes]group:[nodes] ... node11.example.com openshift_schedulable=True openshift_node_labels="{'role': 'app'}" 1 node12.example.com openshift_schedulable=True openshift_node_labels="{'role': 'app'}" 2 node13.example.com openshift_schedulable=True openshift_node_labels="{'role': 'app'}" 3 node14.example.com openshift_schedulable=True openshift_node_labels="{'role': 'infra'}" 4 node15.example.com openshift_schedulable=True openshift_node_labels="{'role': 'infra'}" 5 node16.example.com openshift_schedulable=True openshift_node_labels="{'role': 'infra'}" 6Run the Advanced Installer.
For an initial OpenShift Container Platform installation:
ansible-playbook -i <path_to_inventory_file> /usr/share/ansible/openshift-ansible/playbooks/prerequisites.yml ansible-playbook -i <path_to_inventory_file> /usr/share/ansible/openshift-ansible/playbooks/deploy_cluster.yml
For a standalone installation onto an existing OpenShift Container Platform cluster:
ansible-playbook -i <path_to_inventory_file> /usr/share/ansible/openshift-ansible/playbooks/openshift-glusterfs/config.yml
24.3.4.2.6. Example: Container-Ready Storage for Applications, Registry, Logging, and Metrics
In your inventory file, set the following variables under
[OSEv3:vars]:[OSEv3:vars] ... openshift_registry_selector="role=infra" 1 openshift_hosted_registry_storage_kind=glusterfs openshift_metrics_hawkular_nodeselector={"role":"infra"} 2 openshift_metrics_cassandra_nodeselector={"role":"infra"} 3 openshift_metrics_heapster_nodeselector={"role":"infra"} 4 openshift_metrics_storage_kind=dynamic openshift_metrics_cassanda_pvc_storage_class_name="glusterfs-registry-block" 5 openshift_logging_es_nodeselector={"role":"infra"} 6 openshift_logging_kibana_nodeselector={"role":"infra"} 7 openshift_logging_curator_nodeselector={"role":"infra"} 8 openshift_logging_storage_kind=dynamic openshift_logging_es_pvc_size=10Gi 9 openshift_logging_elasticsearch_storage_type 10 openshift_logging_es_pvc_storage_class_name="glusterfs-registry-block" 11 openshift_storage_glusterfs_is_native=false openshift_storage_glusterfs_block_deploy=false openshift_storage_glusterfs_storageclass=true openshift_storage_glusterfs_heketi_is_native=true openshift_storage_glusterfs_heketi_executor=ssh openshift_storage_glusterfs_heketi_ssh_port=22 openshift_storage_glusterfs_heketi_ssh_user=root openshift_storage_glusterfs_heketi_ssh_sudo=false openshift_storage_glusterfs_heketi_ssh_keyfile="/root/.ssh/id_rsa" openshift_storage_glusterfs_is_native=false openshift_storage_glusterfs_registry_block_deploy=true openshift_storage_glusterfs_registry_block_storageclass=true openshift_storage_glusterfs_registry_block_storageclass_default=true openshift_storage_glusterfs_registry_heketi_is_native=true openshift_storage_glusterfs_registry_heketi_executor=ssh openshift_storage_glusterfs_registry_heketi_ssh_port=22 openshift_storage_glusterfs_registry_heketi_ssh_user=root openshift_storage_glusterfs_registry_heketi_ssh_sudo=false openshift_storage_glusterfs_registry_heketi_ssh_keyfile="/root/.ssh/id_rsa"
- 1 2 3 4 6 7 8
- It is recommended to run the integrated OpenShift Container Registry on nodes dedicated to "infrastructure" applications, that is applications deployed by administrators to provide services for the OpenShift Container Platform cluster. It is up to the administrator to select and label nodes for infrastructure applications.
- 5 11
- Specify the StorageClass to be used for Logging and Metrics. This name is generated from the name of the target GlusterFS cluster (e.g.,
glusterfs-<name>-block). In this example, this defaults toregistry. - 9
- OpenShift Logging requires that a PVC size be specified. The supplied value is only an example, not a recommendation.
- 10
- If using Persistent Elasticsearch Storage, set the storage type to
pvc.
Add
glusterfsandglusterfs_registryin the[OSEv3:children]section to enable the[glusterfs]and[glusterfs_registry]groups:[OSEv3:children] ... glusterfs glusterfs_registry
Add
[glusterfs]and[glusterfs_registry]sections with entries for each storage node that will host the GlusterFS storage. For each node, setglusterfs_devicesto a list of raw block devices that will be completely managed as part of a GlusterFS cluster. There must be at least one device listed. Each device must be bare, with no partitions or LVM PVs. Also, setglusterfs_ipto the IP address of the node. Specifying the variable takes the form:<hostname_or_ip> glusterfs_ip=<ip_address> glusterfs_devices='[ "</path/to/device1/>", "</path/to/device2>", ... ]'
For example:
[glusterfs] gluster1.example.com glusterfs_ip=192.168.10.11 glusterfs_devices='[ "/dev/xvdc", "/dev/xvdd" ]' gluster2.example.com glusterfs_ip=192.168.10.12 glusterfs_devices='[ "/dev/xvdc", "/dev/xvdd" ]' gluster3.example.com glusterfs_ip=192.168.10.13 glusterfs_devices='[ "/dev/xvdc", "/dev/xvdd" ]' [glusterfs_registry] gluster4.example.com glusterfs_ip=192.168.10.14 glusterfs_devices='[ "/dev/xvdc", "/dev/xvdd" ]' gluster5.example.com glusterfs_ip=192.168.10.15 glusterfs_devices='[ "/dev/xvdc", "/dev/xvdd" ]' gluster6.example.com glusterfs_ip=192.168.10.16 glusterfs_devices='[ "/dev/xvdc", "/dev/xvdd" ]'
Run the Advanced Installer. This can be either as part of an initial OpenShift Container Platform installation:
ansible-playbook -i <path_to_inventory_file> /usr/share/ansible/openshift-ansible/playbooks/prerequisites.yml ansible-playbook -i <path_to_inventory_file> /usr/share/ansible/openshift-ansible/playbooks/deploy_cluster.yml
or as a standalone operation onto an existing OpenShift Container Platform cluster:
ansible-playbook -i <path_to_inventory_file> /usr/share/ansible/openshift-ansible/playbooks/openshift-glusterfs/config.yml
24.3.5. Uninstall Container-Native Storage
For Container-Native Storage, an OpenShift Container Platform install comes with a playbook to uninstall all resources and artifacts from the cluster. To use the playbook, provide the original inventory file that was used to install the target instance of Container-Native Storage and run the following playbook:
# ansible-playbook -i <path_to_inventory_file> /usr/share/ansible/openshift-ansible/playbooks/openshift-glusterfs/uninstall.yml
In addition, the playbook supports the use of a variable called openshift_storage_glusterfs_wipe which, when enabled, destroys any data on the block devices that were used for Red Hat Gluster Storage backend storage. To use the openshift_storage_glusterfs_wipe variable:
# ansible-playbook -i <path_to_inventory_file> -e "openshift_storage_glusterfs_wipe=true" /usr/share/ansible/openshift-ansible/playbooks/openshift-glusterfs/uninstall.yml
This procedure destroys data. Proceed with caution.
24.3.6. Provisioning
GlusterFS volumes can be provisioned either statically or dynamically. Static provisioning is available with all configurations. Only Container-Native Storage and Container-Ready Storage support dynamic provisioning.
24.3.6.1. Static Provisioning
-
To enable static provisioning, first create a GlusterFS volume. See the Red Hat Gluster Storage Administration Guide for information on how to do this using the
glustercommand-line interface or the heketi project site for information on how to do this usingheketi-cli. For this example, the volume will be namedmyVol1. Define the following Service and Endpoints in
gluster-endpoints.yaml:--- apiVersion: v1 kind: Service metadata: name: glusterfs-cluster 1 spec: ports: - port: 1 --- apiVersion: v1 kind: Endpoints metadata: name: glusterfs-cluster 2 subsets: - addresses: - ip: 192.168.122.221 3 ports: - port: 1 4 - addresses: - ip: 192.168.122.222 5 ports: - port: 1 6 - addresses: - ip: 192.168.122.223 7 ports: - port: 1 8
From the OpenShift Container Platform master host, create the Service and Endpoints:
$ oc create -f gluster-endpoints.yaml service "glusterfs-cluster" created endpoints "glusterfs-cluster" created
Verify that the Service and Endpoints were created:
$ oc get services NAME CLUSTER_IP EXTERNAL_IP PORT(S) SELECTOR AGE glusterfs-cluster 172.30.205.34 <none> 1/TCP <none> 44s $ oc get endpoints NAME ENDPOINTS AGE docker-registry 10.1.0.3:5000 4h glusterfs-cluster 192.168.122.221:1,192.168.122.222:1,192.168.122.223:1 11s kubernetes 172.16.35.3:8443 4d
NoteEndpoints are unique per project. Each project accessing the GlusterFS volume needs its own Endpoints.
In order to access the volume, the container must run with either a user ID (UID) or group ID (GID) that has access to the file system on the volume. This information can be discovered in the following manner:
$ mkdir -p /mnt/glusterfs/myVol1 $ mount -t glusterfs 192.168.122.221:/myVol1 /mnt/glusterfs/myVol1 $ ls -lnZ /mnt/glusterfs/ drwxrwx---. 592 590 system_u:object_r:fusefs_t:s0 myVol1 1 2
Define the following PersistentVolume (PV) in
gluster-pv.yaml:apiVersion: v1 kind: PersistentVolume metadata: name: gluster-default-volume 1 annotations: pv.beta.kubernetes.io/gid: "590" 2 spec: capacity: storage: 2Gi 3 accessModes: 4 - ReadWriteMany glusterfs: endpoints: glusterfs-cluster 5 path: myVol1 6 readOnly: false persistentVolumeReclaimPolicy: Retain
- 1
- The name of the volume.
- 2
- The GID on the root of the GlusterFS volume.
- 3
- The amount of storage allocated to this volume.
- 4
accessModesare used as labels to match a PV and a PVC. They currently do not define any form of access control.- 5
- The Endpoints resource previously created.
- 6
- The GlusterFS volume that will be accessed.
From the OpenShift Container Platform master host, create the PV:
$ oc create -f gluster-pv.yaml
Verify that the PV was created:
$ oc get pv NAME LABELS CAPACITY ACCESSMODES STATUS CLAIM REASON AGE gluster-default-volume <none> 2147483648 RWX Available 2s
Create a PersistentVolumeClaim (PVC) that will bind to the new PV in
gluster-claim.yaml:apiVersion: v1 kind: PersistentVolumeClaim metadata: name: gluster-claim 1 spec: accessModes: - ReadWriteMany 2 resources: requests: storage: 1Gi 3
From the OpenShift Container Platform master host, create the PVC:
$ oc create -f gluster-claim.yaml
Verify that the PV and PVC are bound:
$ oc get pv NAME LABELS CAPACITY ACCESSMODES STATUS CLAIM REASON AGE gluster-pv <none> 1Gi RWX Available gluster-claim 37s $ oc get pvc NAME LABELS STATUS VOLUME CAPACITY ACCESSMODES AGE gluster-claim <none> Bound gluster-pv 1Gi RWX 24s
PVCs are unique per project. Each project accessing the GlusterFS volume needs its own PVC. PVs are not bound to a single project, so PVCs across multiple projects may refer to the same PV.
24.3.6.2. Dynamic Provisioning
To enable dynamic provisioning, first create a
StorageClassobject definition. The definition below is based on the minimum requirements needed for this example to work with OpenShift Container Platform. See Dynamic Provisioning and Creating Storage Classes for additional parameters and specification definitions.kind: StorageClass apiVersion: storage.k8s.io/v1 metadata: name: glusterfs provisioner: kubernetes.io/glusterfs parameters: resturl: "http://10.42.0.0:8080" 1 restauthenabled: "false" 2
From the OpenShift Container Platform master host, create the StorageClass:
# oc create -f gluster-storage-class.yaml storageclass "glusterfs" created
Create a PVC using the newly-created StorageClass. For example:
apiVersion: v1 kind: PersistentVolumeClaim metadata: name: gluster1 spec: accessModes: - ReadWriteMany resources: requests: storage: 30Gi storageClassName: glusterfsFrom the OpenShift Container Platform master host, create the PVC:
# oc create -f glusterfs-dyn-pvc.yaml persistentvolumeclaim "gluster1" created
View the PVC to see that the volume was dynamically created and bound to the PVC:
# oc get pvc NAME STATUS VOLUME CAPACITY ACCESSMODES STORAGECLASS AGE gluster1 Bound pvc-78852230-d8e2-11e6-a3fa-0800279cf26f 30Gi RWX glusterfs 42s
24.4. Persistent Storage Using OpenStack Cinder
24.4.1. Overview
You can provision your OpenShift Container Platform cluster with persistent storage using OpenStack Cinder. Some familiarity with Kubernetes and OpenStack is assumed.
Before you create persistent volumes (PVs) using Cinder, configured OpenShift Container Platform for OpenStack.
The Kubernetes persistent volume framework allows administrators to provision a cluster with persistent storage and gives users a way to request those resources without having any knowledge of the underlying infrastructure. You can provision OpenStack Cinder volumes dynamically.
Persistent volumes are not bound to a single project or namespace; they can be shared across the OpenShift Container Platform cluster. Persistent volume claims, however, are specific to a project or namespace and can be requested by users.
High-availability of storage in the infrastructure is left to the underlying storage provider.
24.4.2. Provisioning Cinder PVs
Storage must exist in the underlying infrastructure before it can be mounted as a volume in OpenShift Container Platform. After ensuring that OpenShift Container Platform is configured for OpenStack, all that is required for Cinder is a Cinder volume ID and the PersistentVolume API.
24.4.2.1. Creating the Persistent Volume
Cinder does not support the 'Recycle' reclaim policy.
You must define your PV in an object definition before creating it in OpenShift Container Platform:
Save your object definition to a file, for example cinder-pv.yaml:
apiVersion: "v1" kind: "PersistentVolume" metadata: name: "pv0001" 1 spec: capacity: storage: "5Gi" 2 accessModes: - "ReadWriteOnce" cinder: 3 fsType: "ext3" 4 volumeID: "f37a03aa-6212-4c62-a805-9ce139fab180" 5
ImportantDo not change the
fstypeparameter value after the volume is formatted and provisioned. Changing this value can result in data loss and pod failure.Create the persistent volume:
# oc create -f cinder-pv.yaml persistentvolume "pv0001" created
Verify that the persistent volume exists:
# oc get pv NAME LABELS CAPACITY ACCESSMODES STATUS CLAIM REASON AGE pv0001 <none> 5Gi RWO Available 2s
Users can then request storage using persistent volume claims, which can now utilize your new persistent volume.
Persistent volume claims exist only in the user’s namespace and can be referenced by a pod within that same namespace. Any attempt to access a persistent volume claim from a different namespace causes the pod to fail.
24.4.2.2. Cinder PV format
Before OpenShift Container Platform mounts the volume and passes it to a container, it checks that it contains a file system as specified by the fsType parameter in the persistent volume definition. If the device is not formatted with the file system, all data from the device is erased and the device is automatically formatted with the given file system.
This allows using unformatted Cinder volumes as persistent volumes, because OpenShift Container Platform formats them before the first use.
24.4.2.3. Cinder volume security
If you use Cinder PVs in your application, configure security for their deployment configurations.
Review the Volume Security information before implementing Cinder volumes.
-
Create an SCC that uses the appropriate
fsGroupstrategy. Create a service account and add it to the SCC:
[source,bash] $ oc create serviceaccount <service_account> $ oc adm policy add-scc-to-user <new_scc> -z <service_account> -n <project>
In your application’s deployment configuration, provide the service account name and
securityContext:apiVersion: v1 kind: ReplicationController metadata: name: frontend-1 spec: replicas: 1 1 selector: 2 name: frontend template: 3 metadata: labels: 4 name: frontend 5 spec: containers: - image: openshift/hello-openshift name: helloworld ports: - containerPort: 8080 protocol: TCP restartPolicy: Always serviceAccountName: <service_account> 6 securityContext: fsGroup: 7777 7
- 1
- The number of copies of the pod to run.
- 2
- The label selector of the pod to run.
- 3
- A template for the pod the controller creates.
- 4
- The labels on the pod must include labels from the label selector.
- 5
- The maximum name length after expanding any parameters is 63 characters.
- 6
- Specify the service account you created.
- 7
- Specify an
fsGroupfor the pods.
24.5. Persistent Storage Using Ceph Rados Block Device (RBD)
24.5.1. Overview
OpenShift Container Platform clusters can be provisioned with persistent storage using Ceph RBD.
Persistent volumes (PVs) and persistent volume claims (PVCs) can share volumes across a single project. While the Ceph RBD-specific information contained in a PV definition could also be defined directly in a pod definition, doing so does not create the volume as a distinct cluster resource, making the volume more susceptible to conflicts.
This topic presumes some familiarity with OpenShift Container Platform and Ceph RBD. See the Persistent Storage concept topic for details on the OpenShift Container Platform persistent volume (PV) framework in general.
Project and namespace are used interchangeably throughout this document. See Projects and Users for details on the relationship.
High-availability of storage in the infrastructure is left to the underlying storage provider.
24.5.2. Provisioning
To provision Ceph volumes, the following are required:
- An existing storage device in your underlying infrastructure.
- The Ceph key to be used in an OpenShift Container Platform secret object.
- The Ceph image name.
- The file system type on top of the block storage (e.g., ext4).
ceph-common installed on each schedulable OpenShift Container Platform node in your cluster:
# yum install ceph-common
24.5.2.1. Creating the Ceph Secret
Define the authorization key in a secret configuration, which is then converted to base64 for use by OpenShift Container Platform.
In order to use Ceph storage to back a persistent volume, the secret must be created in the same project as the PVC and pod. The secret cannot simply be in the default project.
Run
ceph auth get-keyon a Ceph MON node to display the key value for theclient.adminuser:apiVersion: v1 kind: Secret metadata: name: ceph-secret data: key: QVFBOFF2SlZheUJQRVJBQWgvS2cwT1laQUhPQno3akZwekxxdGc9PQ==
Save the secret definition to a file, for example ceph-secret.yaml, then create the secret:
$ oc create -f ceph-secret.yaml
Verify that the secret was created:
# oc get secret ceph-secret NAME TYPE DATA AGE ceph-secret Opaque 1 23d
24.5.2.2. Creating the Persistent Volume
Ceph RBD does not support the 'Recycle' reclaim policy.
Developers request Ceph RBD storage by referencing either a PVC, or the Gluster volume plug-in directly in the volumes section of a pod specification. A PVC exists only in the user’s namespace and can be referenced only by pods within that same namespace. Any attempt to access a PV from a different namespace causes the pod to fail.
Define the PV in an object definition before creating it in OpenShift Container Platform:
Example 24.3. Persistent Volume Object Definition Using Ceph RBD
apiVersion: v1 kind: PersistentVolume metadata: name: ceph-pv 1 spec: capacity: storage: 2Gi 2 accessModes: - ReadWriteOnce 3 rbd: 4 monitors: 5 - 192.168.122.133:6789 pool: rbd image: ceph-image user: admin secretRef: name: ceph-secret 6 fsType: ext4 7 readOnly: false persistentVolumeReclaimPolicy: Retain
- 1
- The name of the PV that is referenced in pod definitions or displayed in various
ocvolume commands. - 2
- The amount of storage allocated to this volume.
- 3
accessModesare used as labels to match a PV and a PVC. They currently do not define any form of access control. All block storage is defined to be single user (non-shared storage).- 4
- The volume type being used, in this case the rbd plug-in.
- 5
- An array of Ceph monitor IP addresses and ports.
- 6
- The Ceph secret used to create a secure connection from OpenShift Container Platform to the Ceph server.
- 7
- The file system type mounted on the Ceph RBD block device.
ImportantChanging the value of the
fstypeparameter after the volume has been formatted and provisioned can result in data loss and pod failure.Save your definition to a file, for example ceph-pv.yaml, and create the PV:
# oc create -f ceph-pv.yaml
Verify that the persistent volume was created:
# oc get pv NAME LABELS CAPACITY ACCESSMODES STATUS CLAIM REASON AGE ceph-pv <none> 2147483648 RWO Available 2s
Create a PVC that will bind to the new PV:
Example 24.4. PVC Object Definition
Save the definition to a file, for example ceph-claim.yaml, and create the PVC:
# oc create -f ceph-claim.yaml
24.5.3. Ceph Volume Security
See the full Volume Security topic before implementing Ceph RBD volumes.
A significant difference between shared volumes (NFS and GlusterFS) and block volumes (Ceph RBD, iSCSI, and most cloud storage), is that the user and group IDs defined in the pod definition or container image are applied to the target physical storage. This is referred to as managing ownership of the block device. For example, if the Ceph RBD mount has its owner set to 123 and its group ID set to 567, and if the pod defines its runAsUser set to 222 and its fsGroup to be 7777, then the Ceph RBD physical mount’s ownership will be changed to 222:7777.
Even if the user and group IDs are not defined in the pod specification, the resulting pod may have defaults defined for these IDs based on its matching SCC, or its project. See the full Volume Security topic which covers storage aspects of SCCs and defaults in greater detail.
A pod defines the group ownership of a Ceph RBD volume using the fsGroup stanza under the pod’s securityContext definition:
24.6. Persistent Storage Using AWS Elastic Block Store
24.6.1. Overview
OpenShift Container Platform supports AWS Elastic Block Store volumes (EBS). You can provision your OpenShift Container Platform cluster with persistent storage using AWS EC2. Some familiarity with Kubernetes and AWS is assumed.
Before creating persistent volumes using AWS, OpenShift Container Platform must first be properly configured for AWS ElasticBlockStore.
The Kubernetes persistent volume framework allows administrators to provision a cluster with persistent storage and gives users a way to request those resources without having any knowledge of the underlying infrastructure. AWS Elastic Block Store volumes can be provisioned dynamically. Persistent volumes are not bound to a single project or namespace; they can be shared across the OpenShift Container Platform cluster. Persistent volume claims, however, are specific to a project or namespace and can be requested by users.
High-availability of storage in the infrastructure is left to the underlying storage provider.
24.6.2. Provisioning
Storage must exist in the underlying infrastructure before it can be mounted as a volume in OpenShift Container Platform. After ensuring OpenShift is configured for AWS Elastic Block Store, all that is required for OpenShift and AWS is an AWS EBS volume ID and the PersistentVolume API.
24.6.2.1. Creating the Persistent Volume
AWS does not support the 'Recycle' reclaim policy.
You must define your persistent volume in an object definition before creating it in OpenShift Container Platform:
Example 24.5. Persistent Volume Object Definition Using AWS
apiVersion: "v1" kind: "PersistentVolume" metadata: name: "pv0001" 1 spec: capacity: storage: "5Gi" 2 accessModes: - "ReadWriteOnce" awsElasticBlockStore: 3 fsType: "ext4" 4 volumeID: "vol-f37a03aa" 5
- 1
- The name of the volume. This will be how it is identified via persistent volume claims or from pods.
- 2
- The amount of storage allocated to this volume.
- 3
- This defines the volume type being used, in this case the awsElasticBlockStore plug-in.
- 4
- File system type to mount.
- 5
- This is the AWS volume that will be used.
Changing the value of the fstype parameter after the volume has been formatted and provisioned can result in data loss and pod failure.
Save your definition to a file, for example aws-pv.yaml, and create the persistent volume:
# oc create -f aws-pv.yaml persistentvolume "pv0001" created
Verify that the persistent volume was created:
# oc get pv NAME LABELS CAPACITY ACCESSMODES STATUS CLAIM REASON AGE pv0001 <none> 5Gi RWO Available 2s
Users can then request storage using persistent volume claims, which can now utilize your new persistent volume.
Persistent volume claims only exist in the user’s namespace and can only be referenced by a pod within that same namespace. Any attempt to access a persistent volume from a different namespace causes the pod to fail.
24.6.2.2. Volume Format
Before OpenShift Container Platform mounts the volume and passes it to a container, it checks that it contains a file system as specified by the fsType parameter in the persistent volume definition. If the device is not formatted with the file system, all data from the device is erased and the device is automatically formatted with the given file system.
This allows using unformatted AWS volumes as persistent volumes, because OpenShift Container Platform formats them before the first use.
24.6.2.3. Maximum Number of EBS Volumes on a Node
By default, OpenShift Container Platform supports a maximum of 39 EBS volumes attached to one node. This limit is consistent with the AWS Volume Limits.
OpenShift Container Platform can be configured to have a higher limit by setting the environment variable KUBE_MAX_PD_VOLS. However, AWS requires a particular naming scheme (AWS Device Naming) for attached devices, which only supports a maximum of 52 volumes. This limits the number of volumes that can be attached to a node via OpenShift Container Platform to 52.
24.7. Persistent Storage Using GCE Persistent Disk
24.7.1. Overview
OpenShift Container Platform supports GCE Persistent Disk volumes (gcePD). You can provision your OpenShift Container Platform cluster with persistent storage using GCE. Some familiarity with Kubernetes and GCE is assumed.
Before creating persistent volumes using GCE, OpenShift Container Platform must first be properly configured for GCE Persistent Disk.
The Kubernetes persistent volume framework allows administrators to provision a cluster with persistent storage and gives users a way to request those resources without having any knowledge of the underlying infrastructure. GCE Persistent Disk volumes can be provisioned dynamically. Persistent volumes are not bound to a single project or namespace; they can be shared across the OpenShift Container Platform cluster. Persistent volume claims, however, are specific to a project or namespace and can be requested by users.
High-availability of storage in the infrastructure is left to the underlying storage provider.
24.7.2. Provisioning
Storage must exist in the underlying infrastructure before it can be mounted as a volume in OpenShift Container Platform. After ensuring OpenShift Container Platform is configured for GCE PersistentDisk, all that is required for OpenShift Container Platform and GCE is an GCE Persistent Disk volume ID and the PersistentVolume API.
24.7.2.1. Creating the Persistent Volume
GCE does not support the 'Recycle' reclaim policy.
You must define your persistent volume in an object definition before creating it in OpenShift Container Platform:
Example 24.6. Persistent Volume Object Definition Using GCE
apiVersion: "v1" kind: "PersistentVolume" metadata: name: "pv0001" 1 spec: capacity: storage: "5Gi" 2 accessModes: - "ReadWriteOnce" gcePersistentDisk: 3 fsType: "ext4" 4 pdName: "pd-disk-1" 5
- 1
- The name of the volume. This will be how it is identified via persistent volume claims or from pods.
- 2
- The amount of storage allocated to this volume.
- 3
- This defines the volume type being used, in this case the gcePersistentDisk plug-in.
- 4
- File system type to mount.
- 5
- This is the GCE Persistent Disk volume that will be used.
Changing the value of the fstype parameter after the volume has been formatted and provisioned can result in data loss and pod failure.
Save your definition to a file, for example gce-pv.yaml, and create the persistent volume:
# oc create -f gce-pv.yaml persistentvolume "pv0001" created
Verify that the persistent volume was created:
# oc get pv NAME LABELS CAPACITY ACCESSMODES STATUS CLAIM REASON AGE pv0001 <none> 5Gi RWO Available 2s
Users can then request storage using persistent volume claims, which can now utilize your new persistent volume.
Persistent volume claims only exist in the user’s namespace and can only be referenced by a pod within that same namespace. Any attempt to access a persistent volume from a different namespace causes the pod to fail.
24.7.2.2. Volume Format
Before OpenShift Container Platform mounts the volume and passes it to a container, it checks that it contains a file system as specified by the fsType parameter in the persistent volume definition. If the device is not formatted with the file system, all data from the device is erased and the device is automatically formatted with the given file system.
This allows using unformatted GCE volumes as persistent volumes, because OpenShift Container Platform formats them before the first use.
24.8. Persistent Storage Using iSCSI
24.8.1. Overview
You can provision your OpenShift Container Platform cluster with persistent storage using iSCSI. Some familiarity with Kubernetes and iSCSI is assumed.
The Kubernetes persistent volume framework allows administrators to provision a cluster with persistent storage and gives users a way to request those resources without having any knowledge of the underlying infrastructure.
High-availability of storage in the infrastructure is left to the underlying storage provider.
24.8.2. Provisioning
Verify that the storage exists in the underlying infrastructure before mounting it as a volume in OpenShift Container Platform. All that is required for the iSCSI is the iSCSI target portal, a valid iSCSI Qualified Name (IQN), a valid LUN number, the filesystem type, and the PersistentVolume API.
Optionally, multipath portals and Challenge Handshake Authentication Protocol (CHAP) configuration can be provided.
iSCSI does not support the 'Recycle' reclaim policy.
Example 24.7. Persistent Volume Object Definition
apiVersion: v1
kind: PersistentVolume
metadata:
name: iscsi-pv
spec:
capacity:
storage: 1Gi
accessModes:
- ReadWriteOnce
iscsi:
targetPortal: 10.16.154.81:3260
portals: ['10.16.154.82:3260', '10.16.154.83:3260']
iqn: iqn.2014-12.example.server:storage.target00
lun: 0
fsType: 'ext4'
readOnly: false
chapAuthDiscovery: true
chapAuthSession: true
secretRef:
name: chap-secret24.8.2.1. Enforcing Disk Quotas
Use LUN partitions to enforce disk quotas and size constraints. Each LUN is one persistent volume. Kubernetes enforces unique names for persistent volumes.
Enforcing quotas in this way allows the end user to request persistent storage by a specific amount (e.g, 10Gi) and be matched with a corresponding volume of equal or greater capacity.
24.8.2.2. iSCSI Volume Security
Users request storage with a PersistentVolumeClaim. This claim only lives in the user’s namespace and can only be referenced by a pod within that same namespace. Any attempt to access a persistent volume across a namespace causes the pod to fail.
Each iSCSI LUN must be accessible by all nodes in the cluster.
24.8.2.3. iSCSI Multipathing
For iSCSI-based storage, you can configure multiple paths by using the same IQN for more than one target portal IP address. Multipathing ensures access to the persistent volume when one or more of the components in a path fail.
To specify multi-paths in pod specification use the portals field. For example:
apiVersion: v1
kind: PersistentVolume
metadata:
name: iscsi_pv
spec:
capacity:
storage: 1Gi
accessModes:
- ReadWriteOnce
iscsi:
targetPortal: 10.0.0.1:3260
portals: ['10.0.2.16:3260', '10.0.2.17:3260', '10.0.2.18:3260'] 1
iqn: iqn.2016-04.test.com:storage.target00
lun: 0
fsType: ext4
readOnly: false- 1
- Add additional target portals using the
portalsfield.
24.8.2.4. iSCSI Custom Initiator IQN
Configure the custom initiator iSCSI Qualified Name (IQN) if the iSCSI targets are restricted to certain IQNs, but the nodes that the iSCSI PVs are attached to are not guaranteed to have these IQNs.
To specify custom initiator IQN, use initiatorName field.
apiVersion: v1
kind: PersistentVolume
metadata:
name: iscsi_pv
spec:
capacity:
storage: 1Gi
accessModes:
- ReadWriteOnce
iscsi:
targetPortal: 10.0.0.1:3260
portals: ['10.0.2.16:3260', '10.0.2.17:3260', '10.0.2.18:3260']
iqn: iqn.2016-04.test.com:storage.target00
lun: 0
initiatorName: iqn.2016-04.test.com:custom.iqn 1
fsType: ext4
readOnly: false- 1
- To add an additional custom initiator IQN, use
initiatorNamefield.
24.9. Persistent Storage Using Fibre Channel
24.9.1. Overview
You can provision your OpenShift Container Platform cluster with persistent storage using Fibre Channel. Some familiarity with Kubernetes and Fibre Channel is assumed.
The Kubernetes persistent volume framework allows administrators to provision a cluster with persistent storage and gives users a way to request those resources without having any knowledge of the underlying infrastructure.
High-availability of storage in the infrastructure is left to the underlying storage provider.
24.9.2. Provisioning
Storage must exist in the underlying infrastructure before it can be mounted as a volume in OpenShift Container Platform. All that is required for Fibre Channel persistent storage is the targetWWNs (array of Fibre Channel target’s World Wide Names), a valid LUN number, filesystem type, and the PersistentVolume API. Persistent volume and a LUN have one-to-one mapping between them.
Fibre Channel does not support the 'Recycle' reclaim policy.
Persistent Volumes Object Definition
apiVersion: v1
kind: PersistentVolume
metadata:
name: pv0001
spec:
capacity:
storage: 1Gi
accessModes:
- ReadWriteOnce
fc:
targetWWNs: ['500a0981891b8dc5', '500a0981991b8dc5'] 1
lun: 2
fsType: ext4
- 1
- Fibre Channel WWNs are identified as
/dev/disk/by-path/pci-<IDENTIFIER>-fc-0x<WWN>-lun-<LUN#>, but you do not need to provide any part of the path leading up to theWWN, including the0x, and anything after, including the-(hyphen).
Changing the value of the fstype parameter after the volume has been formatted and provisioned can result in data loss and pod failure.
24.9.2.1. Enforcing Disk Quotas
Use LUN partitions to enforce disk quotas and size constraints. Each LUN is one persistent volume. Kubernetes enforces unique names for persistent volumes.
Enforcing quotas in this way allows the end user to request persistent storage by a specific amount (e.g, 10Gi) and be matched with a corresponding volume of equal or greater capacity.
24.9.2.2. Fibre Channel Volume Security
Users request storage with a PersistentVolumeClaim. This claim only lives in the user’s namespace and can only be referenced by a pod within that same namespace. Any attempt to access a persistent volume across a namespace causes the pod to fail.
Each Fibre Channel LUN must be accessible by all nodes in the cluster.
24.10. Persistent Storage Using Azure Disk
24.10.1. Overview
OpenShift Container Platform supports Microsoft Azure Disk volumes. You can provision your OpenShift Container Platform cluster with persistent storage using Azure. Some familiarity with Kubernetes and Azure is assumed.
The Kubernetes persistent volume framework allows administrators to provision a cluster with persistent storage and gives users a way to request those resources without having any knowledge of the underlying infrastructure.
Azure Disk volumes can be provisioned dynamically. Persistent volumes are not bound to a single project or namespace; they can be shared across the OpenShift Container Platform cluster. Persistent volume claims, however, are specific to a project or namespace and can be requested by users.
High availability of storage in the infrastructure is left to the underlying storage provider.
24.10.2. Prerequisites
Before creating persistent volumes using Azure, ensure your OpenShift Container Platform cluster meets the following requirements:
- OpenShift Container Platform must first be configured for Azure Disk.
- Each node host in the infrastructure must match the Azure virtual machine name.
- Each node host must be in the same resource group.
24.10.3. Provisioning
Storage must exist in the underlying infrastructure before it can be mounted as a volume in OpenShift Container Platform. After ensuring OpenShift Container Platform is configured for Azure Disk, all that is required for OpenShift Container Platform and Azure is an Azure Disk Name and Disk URI and the PersistentVolume API.
24.10.4. Configuring Azure Disk for regional cloud
Azure has multiple regions on which to deploy an instance. To specify a desired region, add the following to the azure.conf file:
cloud: <region>
The region can be any of the following:
-
German cloud:
AZUREGERMANCLOUD -
China cloud:
AZURECHINACLOUD -
Public cloud:
AZUREPUBLICCLOUD -
US cloud:
AZUREUSGOVERNMENTCLOUD
24.10.4.1. Creating the Persistent Volume
Azure does not support the Recycle reclaim policy.
You must define your persistent volume in an object definition before creating it in OpenShift Container Platform:
Example 24.8. Persistent Volume Object Definition Using Azure
apiVersion: "v1" kind: "PersistentVolume" metadata: name: "pv0001" 1 spec: capacity: storage: "5Gi" 2 accessModes: - "ReadWriteOnce" azureDisk: 3 diskName: test2.vhd 4 diskURI: https://someacount.blob.core.windows.net/vhds/test2.vhd 5 cachingMode: ReadWrite 6 fsType: ext4 7 readOnly: false 8
- 1
- The name of the volume. This will be how it is identified via persistent volume claims or from pods.
- 2
- The amount of storage allocated to this volume.
- 3
- This defines the volume type being used (azureDisk plug-in, in this example).
- 4
- The name of the data disk in the blob storage.
- 5
- The URI of the data disk in the blob storage.
- 6
- Host caching mode: None, ReadOnly, or ReadWrite.
- 7
- File system type to mount (for example,
ext4,xfs, and so on). - 8
- Defaults to
false(read/write).ReadOnlyhere will force theReadOnlysetting inVolumeMounts.
Changing the value of the fsType parameter after the volume is formatted and provisioned can result in data loss and pod failure.
Save your definition to a file, for example azure-pv.yaml, and create the persistent volume:
# oc create -f azure-pv.yaml persistentvolume "pv0001" created
Verify that the persistent volume was created:
# oc get pv NAME LABELS CAPACITY ACCESSMODES STATUS CLAIM REASON AGE pv0001 <none> 5Gi RWO Available 2s
Now you can request storage using persistent volume claims, which can now use your new persistent volume.
For a pod that has a mounted volume through an Azure disk PVC, scheduling the pod to a new node takes a few minutes. Wait for two to three minutes to complete the Disk Detach operation, and then start a new deployment. If a new pod creation request is started before completing the Disk Detach operation, the Disk Attach operation initiated by the pod creation fails, resulting in pod creation failure.
Persistent volume claims only exist in the user’s namespace and can only be referenced by a pod within that same namespace. Any attempt to access a persistent volume from a different namespace causes the pod to fail.
24.10.4.2. Volume Format
Before OpenShift Container Platform mounts the volume and passes it to a container, it checks that it contains a file system as specified by the fsType parameter in the persistent volume definition. If the device is not formatted with the file system, all data from the device is erased and the device is automatically formatted with the given file system.
This allows unformatted Azure volumes to be used as persistent volumes because OpenShift Container Platform formats them before the first use.
24.11. Persistent Storage Using Azure File
24.11.1. Overview
OpenShift Container Platform supports Microsoft Azure File volumes. You can provision your OpenShift Container Platform cluster with persistent storage using Azure. Some familiarity with Kubernetes and Azure is assumed.
High availability of storage in the infrastructure is left to the underlying storage provider.
24.11.2. Before you begin
Install
samba-client,samba-common, andcifs-utilson all nodes:$ sudo yum install samba-client samba-common cifs-utils
Enable SELinux booleans on all nodes:
$ /usr/sbin/setsebool -P virt_use_samba on $ /usr/sbin/setsebool -P virt_sandbox_use_samba on
Run the
mountcommand to checkdir_modeandfile_modepermissions, for example:$ mount
If the dir_mode and file_mode permissions are set to 0755, change the default value 0755 to 0777 or 0775. This manual step is required because the default dir_mode and file_mode permissions changed from 0777 to 0755 in OpenShift Container Platform 3.9. The following examples show configuration files with the changed values.
Considerations when using Azure File
The following file system features are not supported by Azure File:
- Symlinks
- Hard links
- Extended attributes
- Sparse files
- Named pipes
Additionally, the owner user identifier (UID) of the Azure File mounted directory is different from the process UID of the container.
You might experience instability in your environment if you use any container images that use unsupported file system features. Containers for PostgreSQL and MySQL are known to have issues when used with Azure File.
Workaround for using MySQL with Azure File
If you use MySQL containers, you must modify the PV configuration as a workaround to a file ownership mismatch between the mounted directory UID and the container process UID. Make the following changes to your PV configuration file:
Specify the Azure File mounted directory UID in the
runAsUservariable in the PV configuration file:spec: containers: ... securityContext: runAsUser: <mounted_dir_uid>Specify the container process UID under
mountOptionsin the PV configuration file:mountOptions: - dir_mode=0700 - file_mode=0600 - uid=<container_process_uid> - gid=0
24.11.3. Example configuration files
The following example configuration file displays a PV configuration using Azure File:
PV configuration file example
apiVersion: "v1"
kind: "PersistentVolume"
metadata:
name: "azpv"
spec:
capacity:
storage: "1Gi"
accessModes:
- "ReadWriteMany"
azureFile:
secretName: azure-secret
shareName: azftest
readOnly: false
mountOptions:
- dir_mode=0777
- file_mode=0777
The following example configuration file displays a storage class using Azure File:
Storage class configuration file example
kind: StorageClass apiVersion: storage.k8s.io/v1 metadata: name: azurefile provisioner: kubernetes.io/azure-file mountOptions: - dir_mode=0777 - file_mode=0777 parameters: storageAccount: ocp39str location: centralus
24.11.4. Configuring Azure File for regional cloud
While Azure Disk is compatible with multiple regional clouds, Azure File supports only the Azure public cloud, because the endpoint is hard-coded.
24.11.5. Creating the PV
Azure File does not support the Recycle reclaim policy.
24.11.6. Creating the Azure Storage Account secret
Define the Azure Storage Account name and key in a secret configuration, which is then converted to base64 for use by OpenShift Container Platform.
Obtain an Azure Storage Account name and key and encode to base64:
apiVersion: v1 kind: Secret metadata: name: azure-secret type: Opaque data: azurestorageaccountname: azhzdGVzdA== azurestorageaccountkey: eElGMXpKYm5ub2pGTE1Ta0JwNTBteDAyckhzTUsyc2pVN21GdDRMMTNob0I3ZHJBYUo4akQ2K0E0NDNqSm9nVjd5MkZVT2hRQ1dQbU02WWFOSHk3cWc9PQ==
Save the secret definition to a file, for example azure-secret.yaml, then create the secret:
$ oc create -f azure-secret.yaml
Verify that the secret was created:
$ oc get secret azure-secret NAME TYPE DATA AGE azure-secret Opaque 1 23d
Define the PV in an object definition before creating it in OpenShift Container Platform:
PV object definition using Azure File example
apiVersion: "v1" kind: "PersistentVolume" metadata: name: "pv0001" 1 spec: capacity: storage: "5Gi" 2 accessModes: - "ReadWriteMany" azureFile: 3 secretName: azure-secret 4 shareName: example 5 readOnly: false 6
- 1
- The name of the volume. This is how it is identified via PV claims or from pods.
- 2
- The amount of storage allocated to this volume.
- 3
- This defines the volume type being used: azureFile plug-in.
- 4
- The name of the secret used.
- 5
- The name of the file share.
- 6
- Defaults to
false(read/write).ReadOnlyhere forces theReadOnlysetting inVolumeMounts.
Save your definition to a file, for example azure-file-pv.yaml, and create the PV:
$ oc create -f azure-file-pv.yaml persistentvolume "pv0001" created
Verify that the PV was created:
$ oc get pv NAME LABELS CAPACITY ACCESSMODES STATUS CLAIM REASON AGE pv0001 <none> 5Gi RWM Available 2s
You can now request storage using PV claims, which can now use your new PV.
PV claims only exist in the user’s namespace and can only be referenced by a pod within that same namespace. Any attempt to access a PV from a different namespace causes the pod to fail.
24.12. Persistent Storage Using FlexVolume Plug-ins
24.12.1. Overview
OpenShift Container Platform has built-in volume plug-ins to use different storage technologies. To use storage from a back-end that does not have a built-in plug-in, you can extend OpenShift Container Platform through FlexVolume drivers and provide persistent storage to applications.
24.12.2. FlexVolume drivers
A FlexVolume driver is an executable file that resides in a well-defined directory on all machines in the cluster, both masters and nodes. OpenShift Container Platform calls the FlexVolume driver whenever it needs to attach, detach, mount, or unmount a volume represented by a PersistentVolume with flexVolume as the source.
The first command-line argument of the driver is always an operation name. Other parameters are specific to each operation. Most of the operations take a JavaScript Object Notation (JSON) string as a parameter. This parameter is a complete JSON string, and not the name of a file with the JSON data.
The FlexVolume driver contains:
-
All
flexVolume.options. -
Some options from
flexVolumeprefixed bykubernetes.io/, such asfsTypeandreadwrite. -
The content of the referenced secret, if specified, prefixed by
kubernetes.io/secret/.
FlexVolume driver JSON input example
{
"fooServer": "192.168.0.1:1234", 1
"fooVolumeName": "bar",
"kubernetes.io/fsType": "ext4", 2
"kubernetes.io/readwrite": "ro", 3
"kubernetes.io/secret/<key name>": "<key value>", 4
"kubernetes.io/secret/<another key name>": "<another key value>",
}
OpenShift Container Platform expects JSON data on standard output of the driver. When not specified, the output describes the result of the operation.
FlexVolume Driver Default Output
{
"status": "<Success/Failure/Not supported>",
"message": "<Reason for success/failure>"
}
Exit code of the driver should be 0 for success and 1 for error.
Operations should be idempotent, which means that the attachment of an already attached volume or the mounting of an already mounted volume should result in a successful operation.
The FlexVolume driver can work in two modes:
- with the master-initated attach/detach operation, or
- without the master-initated attach/detach operation.
The attach/detach operation is used by the OpenShift Container Platform master to attach a volume to a node and to detach it from a node. This is useful when a node becomes unresponsive for any reason. Then, the master can kill all pods on the node, detach all volumes from it, and attach the volumes to other nodes to resume the applications while the original node is still not reachable.
Not all storage back-end supports master-initiated detachment of a volume from another machine.
24.12.2.1. FlexVolume drivers with master-initiated attach/detach
A FlexVolume driver that supports master-controlled attach/detach must implement the following operations:
initInitializes the driver. It is called during initialization of masters and nodes.
- Arguments: none
- Executed on: master, node
- Expected output: default JSON
getvolumenameReturns the unique name of the volume. This name must be consistent among all masters and nodes, because it is used in subsequent
detachcall as<volume-name>. Any/characters in the<volume-name>are automatically replaced by~.-
Arguments:
<json> - Executed on: master, node
Expected output: default JSON +
volumeName:{ "status": "Success", "message": "", "volumeName": "foo-volume-bar" 1 }- 1
- The unique name of the volume in storage back-end
foo.
-
Arguments:
attachAttaches a volume represented by the JSON to a given node. This operation should return the name of the device on the node if it is known, that is, if it has been assigned by the storage back-end before it runs. If the device is not known, the device must be found on the node by the subsequent
waitforattachoperation.-
Arguments:
<json><node-name> - Executed on: master
Expected output: default JSON +
device, if known:{ "status": "Success", "message": "", "device": "/dev/xvda" 1 }- 1
- The name of the device on the node, if known.
-
Arguments:
waitforattachWaits until a volume is fully attached to a node and its device emerges. If the previous
attachoperation has returned<device-name>, it is provided as an input parameter. Otherwise,<device-name>is empty and the operation must find the device on the node.-
Arguments:
<device-name><json> - Executed on: node
Expected output: default JSON +
device{ "status": "Success", "message": "", "device": "/dev/xvda" 1 }- 1
- The name of the device on the node.
-
Arguments:
detachDetaches the given volume from a node.
<volume-name>is the name of the device returned by thegetvolumenameoperation. Any/characters in the<volume-name>are automatically replaced by~.-
Arguments:
<volume-name><node-name> - Executed on: master
- Expected output: default JSON
-
Arguments:
isattachedChecks that a volume is attached to a node.
-
Arguments:
<json><node-name> - Executed on: master
Expected output: default JSON +
attached{ "status": "Success", "message": "", "attached": true 1 }- 1
- The status of attachment of the volume to the node.
-
Arguments:
mountdeviceMounts a volume’s device to a directory.
<device-name>is name of the device as returned by the previouswaitforattachoperation.-
Arguments:
<mount-dir><device-name><json> - Executed on: node
- Expected output: default JSON
-
Arguments:
unmountdeviceUnmounts a volume’s device from a directory.
-
Arguments:
<mount-dir> - Executed on: node
-
Arguments:
All other operations should return JSON with {"status": "Not supported"} and exit code 1.
Master-initiated attach/detach operations are enabled by default in OpenShift Container Platform 3.6. They may work in older versions, but must be explicitly enabled. See Enabling Controller-managed Attachment and Detachment. When not enabled, the attach/detach operations are initiated by a node where the volume should be attached to or detached from. Syntax and all parameters of FlexVolume driver invocations are the same in both cases.
24.12.2.2. FlexVolume drivers without master-initiated attach/detach
FlexVolume drivers that do not support master-controlled attach/detach are executed only on the node and must implement these operations:
initInitializes the driver. It is called during initialization of all nodes.
- Arguments: none
- Executed on: node
- Expected output: default JSON
mountMounts a volume to directory. This can include anything that is necessary to mount the volume, including attaching the volume to the node, finding the its device, and then mounting the device.
-
Arguments:
<mount-dir><json> - Executed on: node
- Expected output: default JSON
-
Arguments:
unmountUnmounts a volume from a directory. This can include anything that is necessary to clean up the volume after unmounting, such as detaching the volume from the node.
-
Arguments:
<mount-dir> - Executed on: node
- Expected output: default JSON
-
Arguments:
All other operations should return JSON with {"status": "Not supported"} and exit code 1.
24.12.3. Installing FlexVolume drivers
To install the FlexVolume driver:
- Ensure that the executable file exists on all masters and nodes in the cluster.
- Place the executable file at the volume plug-in path: /usr/libexec/kubernetes/kubelet-plugins/volume/exec/<vendor>~<driver>/<driver>.
For example, to install the FlexVolume driver for the storage foo, place the executable file at: /usr/libexec/kubernetes/kubelet-plugins/volume/exec/openshift.com~foo/foo.
24.12.4. Consuming storage using FlexVolume drivers
Use the PersistentVolume object to reference the installed storage. Each PersistentVolume object in OpenShift Container Platform represents one storage asset, typically a volume, in the storage back-end.
Persistent volume object definition using FlexVolume drivers example
apiVersion: v1 kind: PersistentVolume metadata: name: pv0001 1 spec: capacity: storage: 1Gi 2 accessModes: - ReadWriteOnce flexVolume: driver: openshift.com/foo 3 fsType: "ext4" 4 secretRef: foo-secret 5 readOnly: true 6 options: 7 fooServer: 192.168.0.1:1234 fooVolumeName: bar
- 1
- The name of the volume. This is how it is identified through persistent volume claims or from pods. This name can be different from the name of the volume on back-end storage.
- 2
- The amount of storage allocated to this volume.
- 3
- The name of the driver. This field is mandatory.
- 4
- The file system that is present on the volume. This field is optional.
- 5
- The reference to a secret. Keys and values from this secret are provided to the FlexVolume driver on invocation. This field is optional.
- 6
- The read-only flag. This field is optional.
- 7
- The additional options for the FlexVolume driver. In addition to the flags specified by the user in the
optionsfield, the following flags are also passed to the executable:
"fsType":"<FS type>", "readwrite":"<rw>", "secret/key1":"<secret1>" ... "secret/keyN":"<secretN>"
Secrets are passed only to mount/unmount call-outs.
24.13. Using VMware vSphere volumes for persistent storage
24.13.1. Overview
OpenShift Container Platform supports VMware vSphere’s Virtual Machine Disk (VMDK) volumes. You can provision your OpenShift Container Platform cluster with persistent storage using VMware vSphere. Some familiarity with Kubernetes and VMware vSphere is assumed.
The OpenShift Container Platform persistent volume (PV) framework allows administrators to provision a cluster with persistent storage and gives users a way to request those resources without having any knowledge of the underlying infrastructure. vSphere VMDK volumes can be provisioned dynamically.
PVs are not bound to a single project or namespace; they can be shared across the OpenShift Container Platform cluster. PV claims, however, are specific to a project or namespace and can be requested by users.
High availability of storage in the infrastructure is left to the underlying storage provider.
Prerequisites
Before creating PVs using vSphere, ensure your OpenShift Container Platform cluster meets the following requirements:
- OpenShift Container Platform must first be configured for vSphere.
- Each node host in the infrastructure must match the vSphere VM name.
- Each node host must be in the same resource group.
Create VMDK using one of the following methods before using them.
Create using
vmkfstools:Access ESX through Secure Shell (SSH) and then use following command to create a VMDK volume:
vmkfstools -c 2G /vmfs/volumes/DatastoreName/volumes/myDisk.vmdk
Create using
vmware-vdiskmanager:shell vmware-vdiskmanager -c -t 0 -s 40GB -a lsilogic myDisk.vmdk
24.13.2. Provisioning VMware vSphere volumes
Storage must exist in the underlying infrastructure before it can be mounted as a volume in OpenShift Container Platform. After ensuring OpenShift Container Platform is configured for vSphere, all that is required for OpenShift Container Platform and vSphere is a VM folder path, file system type, and the PersistentVolume API.
24.13.2.1. Creating persistent volumes
You must define your PV in an object definition before creating it in OpenShift Container Platform:
PV object definition using VMware vSphere example
apiVersion: v1 kind: PersistentVolume metadata: name: pv0001 1 spec: capacity: storage: 2Gi 2 accessModes: - ReadWriteOnce persistentVolumeReclaimPolicy: Retain vsphereVolume: 3 volumePath: "[datastore1] volumes/myDisk" 4 fsType: ext4 5
- 1
- The name of the volume. This must be how it is identified by PV claims or from pods.
- 2
- The amount of storage allocated to this volume.
- 3
- This defines the volume type being used (vsphereVolume plug-in, in this example). The
vsphereVolumelabel is used to mount a vSphere VMDK volume into pods. The contents of a volume are preserved when it is unmounted. The volume type supports VMFS and VSAN datastore. - 4
- This VMDK volume must exist, and you must include brackets ([]) in the volume definition.
- 5
- The file system type to mount (for example,
ext4,xfs, and other file-systems).
Changing the value of the fsType parameter after the volume is formatted and provisioned can result in data loss and pod failure.
To create persistent volumes:
Save your definition to a file, for example vsphere-pv.yaml, and create the PV:
$ oc create -f vsphere-pv.yaml persistentvolume "pv0001" created
Verify that the PV was created:
$ oc get pv NAME LABELS CAPACITY ACCESSMODES STATUS CLAIM REASON AGE pv0001 <none> 2Gi RWO Available 2s
Now you can request storage using PV claims, which can now use your PV.
PV claims only exist in the user’s namespace and can only be referenced by a pod within that same namespace. Any attempt to access a PV from a different namespace causes the pod to fail.
24.13.2.2. Formatting VMware vSphere volumes
Before OpenShift Container Platform mounts the volume and passes it to a container, it checks that the volume contains a file system as specified by the fsType parameter in the PV definition. If the device is not formatted with the file system, all data from the device is erased and the device is automatically formatted with the given file system.
This allows unformatted vSphere volumes to be used as PVs, because OpenShift Container Platform formats them before the first use.
24.14. Persistent Storage Using Local Volume
24.14.1. Overview
OpenShift Container Platform clusters can be provisioned with persistent storage by using local volumes. Local persistent volume allows you to access local storage devices such as a disk, partition or directory by using the standard PVC interface.
Local volumes can be used without manually scheduling pods to nodes, because the system is aware of the volume’s node constraints. However, local volumes are still subject to the availability of the underlying node and are not suitable for all applications.
Local volumes is an alpha feature and may change in a future release of OpenShift Container Platform. See Feature Status(Local Volume) section for details on known issues and workarounds.
Local volumes can only be used as a statically created Persistent Volume.
24.14.2. Provisioning
Storage must exist in the underlying infrastructure before it can be mounted as a volume in OpenShift Container Platform. Ensure that OpenShift Container Platform is configured for Local Volumes, before using the PersistentVolume API.
24.14.3. Creating Local Persistent Volume Claim
Define the persistent volume claim in an object definition.
kind: PersistentVolumeClaim
apiVersion: v1
metadata:
name: example-local-claim
spec:
accessModes:
- ReadWriteOnce
resources:
requests:
storage: 5Gi 1
storageClassName: local-storage 224.14.4. Feature Status
What Works:
- Creating a PV by specifying a directory with node affinity.
- A Pod using the PVC that is bound to the previously mentioned PV always get scheduled to that node.
- External static provisioner daemonset that discovers local directories, creates, cleans up and deletes PVs.
What does not work:
- Multiple local PVCs in a single pod.
PVC binding does not consider pod scheduling requirements and may make sub-optimal or incorrect decisions.
Workarounds:
- Run those pods first, which requires local volume.
- Give the pods high priority.
- Run a workaround controller that unbinds PVCs for pods that are stuck pending.
If mounts are added after the external provisioner is started, then external provisioner cannot detect the correct capcity of mounts.
Workarounds:
- Before adding any new mount points, first stop the daemonset, add the new mount points, and then start the daemonset.
-
fsgroupconflict occurs if multiple pods using the same PVC specify differentfsgroup's.
24.15. Dynamic provisioning and creating storage classes
24.15.1. Overview
The StorageClass resource object describes and classifies storage that can be requested, as well as provides a means for passing parameters for dynamically provisioned storage on demand. StorageClass objects can also serve as a management mechanism for controlling different levels of storage and access to the storage. Cluster Administrators (cluster-admin) or Storage Administrators (storage-admin) define and create the StorageClass objects that users can request without needing any intimate knowledge about the underlying storage volume sources.
The OpenShift Container Platform persistent volume framework enables this functionality and allows administrators to provision a cluster with persistent storage. The framework also gives users a way to request those resources without having any knowledge of the underlying infrastructure.
Many storage types are available for use as persistent volumes in OpenShift Container Platform. While all of them can be statically provisioned by an administrator, some types of storage are created dynamically using the built-in provider and plug-in APIs.
To enable dynamic provisioning, add the openshift_master_dynamic_provisioning_enabled variable to the [OSEv3:vars] section of the Ansible inventory file and set its value to True.
[OSEv3:vars] openshift_master_dynamic_provisioning_enabled=True
24.15.2. Available dynamically provisioned plug-ins
OpenShift Container Platform provides the following provisioner plug-ins, which have generic implementations for dynamic provisioning that use the cluster’s configured provider’s API to create new storage resources:
| Storage Type | Provisioner Plug-in Name | Required Configuration | Notes |
|---|---|---|---|
| OpenStack Cinder |
| ||
| AWS Elastic Block Store (EBS) |
|
For dynamic provisioning when using multiple clusters in different zones, tag each node with | |
| GCE Persistent Disk (gcePD) |
| In multi-zone configurations, it is advisable to run one Openshift cluster per GCE project to avoid PVs from getting created in zones where no node from current cluster exists. | |
| GlusterFS |
| ||
| Ceph RBD |
| ||
| Trident from NetApp |
| Storage orchestrator for NetApp ONTAP, SolidFire, and E-Series storage. | |
|
| |||
| Azure Disk |
|
Any chosen provisioner plug-in also requires configuration for the relevant cloud, host, or third-party provider as per the relevant documentation.
24.15.3. Defining a StorageClass
StorageClass objects are currently a globally scoped object and need to be created by cluster-admin or storage-admin users.
For GCE and AWS, a default StorageClass is created during OpenShift Container Platform installation. You can change the default StorageClass or delete it.
There are currently six plug-ins that are supported. The following sections describe the basic object definition for a StorageClass and specific examples for each of the supported plug-in types.
24.15.3.1. Basic StorageClass object definition
StorageClass Basic object definition
kind: StorageClass 1 apiVersion: storage.k8s.io/v1 2 metadata: name: foo 3 annotations: 4 ... provisioner: kubernetes.io/plug-in-type 5 parameters: 6 param1: value ... paramN: value
- 1
- (required) The API object type.
- 2
- (required) The current apiVersion.
- 3
- (required) The name of the StorageClass.
- 4
- (optional) Annotations for the StorageClass
- 5
- (required) The type of provisioner associated with this storage class.
- 6
- (optional) The parameters required for the specific provisioner, this will change from plug-in to plug-in.
24.15.3.2. StorageClass annotations
To set a StorageClass as the cluster-wide default:
storageclass.kubernetes.io/is-default-class: "true"
This enables any Persistent Volume Claim (PVC) that does not specify a specific volume to automatically be provisioned through the default StorageClass
Beta annotation storageclass.beta.kubernetes.io/is-default-class is still working. However it will be removed in a future release.
To set a StorageClass description:
kubernetes.io/description: My StorageClass Description
24.15.3.3. OpenStack Cinder object definition
cinder-storageclass.yaml
kind: StorageClass apiVersion: storage.k8s.io/v1 metadata: name: gold provisioner: kubernetes.io/cinder parameters: type: fast 1 availability: nova 2 fsType: ext4 3
- 1
- Volume type created in Cinder. Default is empty.
- 2
- Availability Zone. If not specified, volumes are generally round-robined across all active zones where the OpenShift Container Platform cluster has a node.
- 3
- File system that is created on dynamically provisioned volumes. This value is copied to the
fsTypefield of dynamically provisioned persistent volumes and the file system is created when the volume is mounted for the first time. The default value isext4.
24.15.3.4. AWS ElasticBlockStore (EBS) object definition
aws-ebs-storageclass.yaml
kind: StorageClass apiVersion: storage.k8s.io/v1 metadata: name: slow provisioner: kubernetes.io/aws-ebs parameters: type: io1 1 zone: us-east-1d 2 iopsPerGB: "10" 3 encrypted: "true" 4 kmsKeyId: keyvalue 5 fsType: ext4 6
- 1
- Select from
io1,gp2,sc1,st1. The default isgp2. See AWS documentation for valid Amazon Resource Name (ARN) values. - 2
- AWS zone. If no zone is specified, volumes are generally round-robined across all active zones where the OpenShift Container Platform cluster has a node. Zone and zones parameters must not be used at the same time.
- 3
- Only for io1 volumes. I/O operations per second per GiB. The AWS volume plug-in multiplies this with the size of the requested volume to compute IOPS of the volume. The value cap is 20,000 IOPS, which is the maximum supported by AWS. See AWS documentation for further details.
- 4
- Denotes whether to encrypt the EBS volume. Valid values are
trueorfalse. - 5
- Optional. The full ARN of the key to use when encrypting the volume. If none is supplied, but
encyptedis set totrue, then AWS generates a key. See AWS documentation for a valid ARN value. - 6
- File system that is created on dynamically provisioned volumes. This value is copied to the
fsTypefield of dynamically provisioned persistent volumes and the file system is created when the volume is mounted for the first time. The default value isext4.
24.15.3.5. GCE PersistentDisk (gcePD) object definition
gce-pd-storageclass.yaml
kind: StorageClass apiVersion: storage.k8s.io/v1 metadata: name: slow provisioner: kubernetes.io/gce-pd parameters: type: pd-standard 1 zone: us-central1-a 2 zones: us-central1-a, us-central1-b, us-east1-b 3 fsType: ext4 4
- 1
- Select either
pd-standardorpd-ssd. The default ispd-ssd. - 2
- GCE zone. If no zone is specified, volumes are generally round-robined across all active zones where the OpenShift Container Platform cluster has a node. Zone and zones parameters must not be used at the same time.
- 3
- A comma-separated list of GCE zone(s). If no zone is specified, volumes are generally round-robined across all active zones where the OpenShift Container Platform cluster has a node. Zone and zones parameters must not be used at the same time.
- 4
- File system that is created on dynamically provisioned volumes. This value is copied to the
fsTypefield of dynamically provisioned persistent volumes and the file system is created when the volume is mounted for the first time. The default value isext4.
24.15.3.6. GlusterFS object definition
glusterfs-storageclass.yaml
kind: StorageClass apiVersion: storage.k8s.io/v1 metadata: name: slow provisioner: kubernetes.io/glusterfs parameters: 1 resturl: http://127.0.0.1:8081 2 restuser: admin 3 secretName: heketi-secret 4 secretNamespace: default 5 gidMin: "40000" 6 gidMax: "50000" 7 volumeoptions: group metadata-cache, nl-cache on 8 volumetype: replicate:3 9 volumenameprefix: custom 10
- 1
- Listed are mandatory and a few optional parameters. Please refer to Registering a Storage Class for additional parameters.
- 2
- heketi (volume management REST service for Gluster) URL that provisions GlusterFS volumes on demand. The general format should be
{http/https}://{IPaddress}:{Port}. This is a mandatory parameter for the GlusterFS dynamic provisioner. If the heketi service is exposed as a routable service in the OpenShift Container Platform, it will have a resolvable fully qualified domain name (FQDN) and heketi service URL. - 3
- heketi user who has access to create volumes. Usually "admin".
- 4
- Identification of a Secret that contains a user password to use when talking to heketi. Optional; an empty password will be used when both
secretNamespaceandsecretNameare omitted. The provided secret must be of type"kubernetes.io/glusterfs". - 5
- The namespace of mentioned
secretName. Optional; an empty password will be used when bothsecretNamespaceandsecretNameare omitted. The provided secret must be of type"kubernetes.io/glusterfs". - 6
- Optional. The minimum value of the GID range for volumes of this StorageClass.
- 7
- Optional. The maximum value of the GID range for volumes of this StorageClass.
- 8
- Optional. Options for newly created volumes. It allows for performance tuning. See Tuning Volume Options for more GlusterFS volume options.
- 9
- Optional. The type of volume to use.
- 10
- Optional. Enables custom volume name support using the following format:
<volumenameprefix>_<namespace>_<claimname>_UUID. If you create a new PVC calledmyclaimin your projectproject1using this storageClass, the volume name will becustom-project1-myclaim-UUID.
When the gidMin and gidMax values are not specified, their defaults are 2000 and 2147483647, respectively. Each dynamically provisioned volume will be given a GID in this range (gidMin-gidMax). This GID is released from the pool when the respective volume is deleted. The GID pool is per StorageClass. If two or more storage classes have GID ranges that overlap there may be duplicate GIDs dispatched by the provisioner.
When heketi authentication is used, a Secret containing the admin key should also exist:
heketi-secret.yaml
apiVersion: v1
kind: Secret
metadata:
name: heketi-secret
namespace: default
data:
key: bXlwYXNzd29yZA== 1
type: kubernetes.io/glusterfs
- 1
- base64 encoded password, for example:
echo -n "mypassword" | base64
When the PVs are dynamically provisioned, the GlusterFS plug-in automatically creates an Endpoints and a headless Service named gluster-dynamic-<claimname>. When the PVC is deleted, these dynamic resources are deleted automatically.
24.15.3.7. Ceph RBD object definition
ceph-storageclass.yaml
apiVersion: storage.k8s.io/v1 kind: StorageClass metadata: name: fast provisioner: kubernetes.io/rbd parameters: monitors: 10.16.153.105:6789 1 adminId: admin 2 adminSecretName: ceph-secret 3 adminSecretNamespace: kube-system 4 pool: kube 5 userId: kube 6 userSecretName: ceph-secret-user 7 fsType: ext4 8
- 1
- Ceph monitors, comma-delimited. It is required.
- 2
- Ceph client ID that is capable of creating images in the pool. Default is "admin".
- 3
- Secret Name for
adminId. It is required. The provided secret must have type "kubernetes.io/rbd". - 4
- The namespace for
adminSecret. Default is "default". - 5
- Ceph RBD pool. Default is "rbd".
- 6
- Ceph client ID that is used to map the Ceph RBD image. Default is the same as
adminId. - 7
- The name of Ceph Secret for
userIdto map Ceph RBD image. It must exist in the same namespace as PVCs. It is required. - 8
- File system that is created on dynamically provisioned volumes. This value is copied to the
fsTypefield of dynamically provisioned persistent volumes and the file system is created when the volume is mounted for the first time. The default value isext4.
24.15.3.8. Trident object definition
trident.yaml
apiVersion: storage.k8s.io/v1 kind: StorageClass metadata: name: gold provisioner: netapp.io/trident 1 parameters: 2 media: "ssd" provisioningType: "thin" snapshots: "true"
Trident uses the parameters as selection criteria for the different pools of storage that are registered with it. Trident itself is configured separately.
- 1
- For more information about installing Trident with OpenShift Container Platform, see the Trident documentation.
- 2
- For more information about supported parameters, see the storage attributes section of the Trident documentation.
24.15.3.9. VMware vSphere object definition
vsphere-storageclass.yaml
kind: StorageClass apiVersion: storage.k8s.io/v1beta1 metadata: name: slow provisioner: kubernetes.io/vsphere-volume 1 parameters: diskformat: thin 2
- 1
- For more information about using VMWare vSphere with OpenShift Container Platform, see the VMWare vSphere documentation.
- 2
diskformat:thin,zeroedthickandeagerzeroedthick. See vSphere docs for details. Default:thin
24.15.3.10. Azure Disk object definition
azure-advanced-disk-storageclass.yaml
kind: StorageClass apiVersion: storage.k8s.io/v1 metadata: name: slow provisioner: kubernetes.io/azure-disk parameters: storageAccount: azure_storage_account_name 1 storageaccounttype: Standard_LRS 2 kind: Dedicated 3
- 1
- Azure storage account name. This must reside in the same resource group as the cluster. If a storage account is specified, the
locationis ignored. If a storage account is not specified, a new storage account gets created in the same resource group as the cluster. If you are specifying astorageAccount, the value forkindmust beDedicated. - 2
- Azure storage account SKU tier. Default is empty. Note: Premium VM can attach both Standard_LRS and Premium_LRS disks, Standard VM can only attach Standard_LRS disks, Managed VM can only attach managed disks, and unmanaged VM can only attach unmanaged disks.
- 3
- Possible values are
Shared(default),Dedicated, andManaged.-
If
kindis set toShared, Azure creates all unmanaged disks in a few shared storage accounts in the same resource group as the cluster. -
If
kindis set toManaged, Azure creates new managed disks. If
kindis set toDedicatedand astorageAccountis specified, Azure uses the specified storage account for the new unmanaged disk in the same resource group as the cluster. For this to work:- The specified storage account must be in the same region.
- Azure Cloud Provider must have a write access to the storage account.
-
If
kindis set toDedicatedand astorageAccountis not specified, Azure creates a new dedicated storage account for the new unmanaged disk in the same resource group as the cluster.
-
If
Azure StorageClass is revised in OpenShift Container Platform version 3.7. If you upgraded from a previous version, either:
-
specify the property
kind: dedicatedto continue using the Azure StorageClass created before the upgrade. Or, -
add the location parameter (for example,
"location": "southcentralus",) in the azure.conf file to use the default propertykind: shared. Doing this creates new storage accounts for future use.
24.15.4. Changing the default StorageClass
If you are using GCE and AWS, use the following process to change the default StorageClass:
List the StorageClass:
$ oc get storageclass NAME TYPE gp2 (default) kubernetes.io/aws-ebs 1 standard kubernetes.io/gce-pd- 1
(default)denotes the default StorageClass.
Change the value of the annotation
storageclass.kubernetes.io/is-default-classtofalsefor the default StorageClass:$ oc patch storageclass gp2 -p '{"metadata": {"annotations": \ {"storageclass.kubernetes.io/is-default-class": "false"}}}'Make another StorageClass the default by adding or modifying the annotation as
storageclass.kubernetes.io/is-default-class=true.$ oc patch storageclass standard -p '{"metadata": {"annotations": \ {"storageclass.kubernetes.io/is-default-class": "true"}}}'Verify the changes:
$ oc get storageclass NAME TYPE gp2 kubernetes.io/aws-ebs standard (default) kubernetes.io/gce-pd
24.15.5. Additional information and examples
24.16. Volume Security
24.16.1. Overview
This topic provides a general guide on pod security as it relates to volume security. For information on pod-level security in general, see Managing Security Context Constraints (SCC) and the Security Context Constraint concept topic. For information on the OpenShift Container Platform persistent volume (PV) framework in general, see the Persistent Storage concept topic.
Accessing persistent storage requires coordination between the cluster and/or storage administrator and the end developer. The cluster administrator creates PVs, which abstract the underlying physical storage. The developer creates pods and, optionally, PVCs, which bind to PVs, based on matching criteria, such as capacity.
Multiple persistent volume claims (PVCs) within the same project can bind to the same PV. However, once a PVC binds to a PV, that PV cannot be bound by a claim outside of the first claim’s project. If the underlying storage needs to be accessed by multiple projects, then each project needs its own PV, which can point to the same physical storage. In this sense, a bound PV is tied to a project. For a detailed PV and PVC example, see the guide for WordPress and MySQL using NFS.
For the cluster administrator, granting pods access to PVs involves:
- knowing the group ID and/or user ID assigned to the actual storage,
- understanding SELinux considerations, and
- ensuring that these IDs are allowed in the range of legal IDs defined for the project and/or the SCC that matches the requirements of the pod.
Group IDs, the user ID, and SELinux values are defined in the SecurityContext section in a pod definition. Group IDs are global to the pod and apply to all containers defined in the pod. User IDs can also be global, or specific to each container. Four sections control access to volumes:
24.16.2. SCCs, Defaults, and Allowed Ranges
SCCs influence whether or not a pod is given a default user ID, fsGroup ID, supplemental group ID, and SELinux label. They also influence whether or not IDs supplied in the pod definition (or in the image) will be validated against a range of allowable IDs. If validation is required and fails, then the pod will also fail.
SCCs define strategies, such as runAsUser, supplementalGroups, and fsGroup. These strategies help decide whether the pod is authorized. Strategy values set to RunAsAny are essentially stating that the pod can do what it wants regarding that strategy. Authorization is skipped for that strategy and no OpenShift Container Platform default is produced based on that strategy. Therefore, IDs and SELinux labels in the resulting container are based on container defaults instead of OpenShift Container Platform policies.
For a quick summary of RunAsAny:
- Any ID defined in the pod definition (or image) is allowed.
- Absence of an ID in the pod definition (and in the image) results in the container assigning an ID, which is root (0) for Docker.
- No SELinux labels are defined, so Docker will assign a unique label.
For these reasons, SCCs with RunAsAny for ID-related strategies should be protected so that ordinary developers do not have access to the SCC. On the other hand, SCC strategies set to MustRunAs or MustRunAsRange trigger ID validation (for ID-related strategies), and cause default values to be supplied by OpenShift Container Platform to the container when those values are not supplied directly in the pod definition or image.
Allowing access to SCCs with a RunAsAny FSGroup strategy can also prevent users from accessing their block devices. Pods need to specify an fsGroup in order to take over their block devices. Normally, this is done when the SCC FSGroup strategy is set to MustRunAs. If a user’s pod is assigned an SCC with a RunAsAny FSGroup strategy, then the user may face permission denied errors until they discover that they need to specify an fsGroup themselves.
SCCs may define the range of allowed IDs (user or groups). If range checking is required (for example, using MustRunAs) and the allowable range is not defined in the SCC, then the project determines the ID range. Therefore, projects support ranges of allowable ID. However, unlike SCCs, projects do not define strategies, such as runAsUser.
Allowable ranges are helpful not only because they define the boundaries for container IDs, but also because the minimum value in the range becomes the default value for the ID in question. For example, if the SCC ID strategy value is MustRunAs, the minimum value of an ID range is 100, and the ID is absent from the pod definition, then 100 is provided as the default for this ID.
As part of pod admission, the SCCs available to a pod are examined (roughly, in priority order followed by most restrictive) to best match the requests of the pod. Setting a SCC’s strategy type to RunAsAny is less restrictive, whereas a type of MustRunAs is more restrictive. All of these strategies are evaluated. To see which SCC was assigned to a pod, use the oc get pod command:
# oc get pod <pod_name> -o yaml
...
metadata:
annotations:
openshift.io/scc: nfs-scc 1
name: nfs-pod1 2
namespace: default 3
...- 1
- Name of the SCC that the pod used (in this case, a custom SCC).
- 2
- Name of the pod.
- 3
- Name of the project. "Namespace" is interchangeable with "project" in OpenShift Container Platform. See Projects and Users for details.
It may not be immediately obvious which SCC was matched by a pod, so the command above can be very useful in understanding the UID, supplemental groups, and SELinux relabeling in a live container.
Any SCC with a strategy set to RunAsAny allows specific values for that strategy to be defined in the pod definition (and/or image). When this applies to the user ID (runAsUser) it is prudent to restrict access to the SCC to prevent a container from being able to run as root.
Because pods often match the restricted SCC, it is worth knowing the security this entails. The restricted SCC has the following characteristics:
-
User IDs are constrained due to the
runAsUserstrategy being set to MustRunAsRange. This forces user ID validation. -
Because a range of allowable user IDs is not defined in the SCC (see
oc export scc restrictedfor more details), the project’sopenshift.io/sa.scc.uid-rangerange will be used for range checking and for a default ID, if needed. -
A default user ID is produced when a user ID is not specified in the pod definition and the matching SCC’s
runAsUseris set to MustRunAsRange. -
An SELinux label is required (
seLinuxContextset to MustRunAs), which uses the project’s default MCS label. -
fsGroupIDs are constrained to a single value due to theFSGroupstrategy being set to MustRunAs, which dictates that the value to use is the minimum value of the first range specified. -
Because a range of allowable
fsGroupIDs is not defined in the SCC, the minimum value of the project’sopenshift.io/sa.scc.supplemental-groupsrange (or the same range used for user IDs) will be used for validation and for a default ID, if needed. -
A default
fsGroupID is produced when afsGroupID is not specified in the pod and the matching SCC’sFSGroupis set to MustRunAs. -
Arbitrary supplemental group IDs are allowed because no range checking is required. This is a result of the
supplementalGroupsstrategy being set to RunAsAny. - Default supplemental groups are not produced for the running pod due to RunAsAny for the two group strategies above. Therefore, if no groups are defined in the pod definition (or in the image), the container(s) will have no supplemental groups predefined.
The following shows the default project and a custom SCC (my-custom-scc), which summarizes the interactions of the SCC and the project:
$ oc get project default -o yaml 1 ... metadata: annotations: 2 openshift.io/sa.scc.mcs: s0:c1,c0 3 openshift.io/sa.scc.supplemental-groups: 1000000000/10000 4 openshift.io/sa.scc.uid-range: 1000000000/10000 5 $ oc get scc my-custom-scc -o yaml ... fsGroup: type: MustRunAs 6 ranges: - min: 5000 max: 6000 runAsUser: type: MustRunAsRange 7 uidRangeMin: 1000100000 uidRangeMax: 1000100999 seLinuxContext: 8 type: MustRunAs SELinuxOptions: 9 user: <selinux-user-name> role: ... type: ... level: ... supplementalGroups: type: MustRunAs 10 ranges: - min: 5000 max: 6000
- 1
- default is the name of the project.
- 2
- Default values are only produced when the corresponding SCC strategy is not RunAsAny.
- 3
- SELinux default when not defined in the pod definition or in the SCC.
- 4
- Range of allowable group IDs. ID validation only occurs when the SCC strategy is RunAsAny. There can be more than one range specified, separated by commas. See below for supported formats.
- 5
- Same as <4> but for user IDs. Also, only a single range of user IDs is supported.
- 6 10
- MustRunAs enforces group ID range checking and provides the container’s groups default. Based on this SCC definition, the default is 5000 (the minimum ID value). If the range was omitted from the SCC, then the default would be 1000000000 (derived from the project). The other supported type, RunAsAny, does not perform range checking, thus allowing any group ID, and produces no default groups.
- 7
- MustRunAsRange enforces user ID range checking and provides a UID default. Based on this SCC, the default UID is 1000100000 (the minimum value). If the minimum and maximum range were omitted from the SCC, the default user ID would be 1000000000 (derived from the project). MustRunAsNonRoot and RunAsAny are the other supported types. The range of allowed IDs can be defined to include any user IDs required for the target storage.
- 8
- When set to MustRunAs, the container is created with the SCC’s SELinux options, or the MCS default defined in the project. A type of RunAsAny indicates that SELinux context is not required, and, if not defined in the pod, is not set in the container.
- 9
- The SELinux user name, role name, type, and labels can be defined here.
Two formats are supported for allowed ranges:
-
M/N, whereMis the starting ID andNis the count, so the range becomesMthrough (and including)M+N-1. -
M-N, whereMis again the starting ID andNis the ending ID. The default group ID is the starting ID in the first range, which is1000000000in this project. If the SCC did not define a minimum group ID, then the project’s default ID is applied.
24.16.3. Supplemental Groups
Read SCCs, Defaults, and Allowed Ranges before working with supplemental groups.
Supplemental groups are regular Linux groups. When a process runs in Linux, it has a UID, a GID, and one or more supplemental groups. These attributes can be set for a container’s main process. The supplementalGroups IDs are typically used for controlling access to shared storage, such as NFS and GlusterFS, whereas fsGroup is used for controlling access to block storage, such as Ceph RBD and iSCSI.
The OpenShift Container Platform shared storage plug-ins mount volumes such that the POSIX permissions on the mount match the permissions on the target storage. For example, if the target storage’s owner ID is 1234 and its group ID is 5678, then the mount on the host node and in the container will have those same IDs. Therefore, the container’s main process must match one or both of those IDs in order to access the volume.
For example, consider the following NFS export.
On an OpenShift Container Platform node:
showmount requires access to the ports used by rpcbind and rpc.mount on the NFS server
# showmount -e <nfs-server-ip-or-hostname> Export list for f21-nfs.vm: /opt/nfs *
On the NFS server:
# cat /etc/exports /opt/nfs *(rw,sync,root_squash) ... # ls -lZ /opt/nfs -d drwx------. 1000100001 5555 unconfined_u:object_r:usr_t:s0 /opt/nfs
The /opt/nfs/ export is accessible by UID 1000100001 and the group 5555. In general, containers should not run as root. So, in this NFS example, containers which are not run as UID 1000100001 and are not members the group 5555 will not have access to the NFS export.
Often, the SCC matching the pod does not allow a specific user ID to be specified, thus using supplemental groups is a more flexible way to grant storage access to a pod. For example, to grant NFS access to the export above, the group 5555 can be defined in the pod definition:
apiVersion: v1
kind: Pod
...
spec:
containers:
- name: ...
volumeMounts:
- name: nfs 1
mountPath: /usr/share/... 2
securityContext: 3
supplementalGroups: [5555] 4
volumes:
- name: nfs 5
nfs:
server: <nfs_server_ip_or_host>
path: /opt/nfs 6- 1
- Name of the volume mount. Must match the name in the
volumessection. - 2
- NFS export path as seen in the container.
- 3
- Pod global security context. Applies to all containers inside the pod. Each container can also define its
securityContext, however group IDs are global to the pod and cannot be defined for individual containers. - 4
- Supplemental groups, which is an array of IDs, is set to 5555. This grants group access to the export.
- 5
- Name of the volume. Must match the name in the
volumeMountssection. - 6
- Actual NFS export path on the NFS server.
All containers in the above pod (assuming the matching SCC or project allows the group 5555) will be members of the group 5555 and have access to the volume, regardless of the container’s user ID. However, the assumption above is critical. Sometimes, the SCC does not define a range of allowable group IDs but instead requires group ID validation (a result of supplementalGroups set to MustRunAs). Note that this is not the case for the restricted SCC. The project will not likely allow a group ID of 5555, unless the project has been customized to access this NFS export. So, in this scenario, the above pod will fail because its group ID of 5555 is not within the SCC’s or the project’s range of allowed group IDs.
Supplemental Groups and Custom SCCs
To remedy the situation in the previous example, a custom SCC can be created such that:
- a minimum and max group ID are defined,
- ID range checking is enforced, and
- the group ID of 5555 is allowed.
It is often better to create a new SCC rather than modifying a predefined SCC, or changing the range of allowed IDs in the predefined projects.
The easiest way to create a new SCC is to export an existing SCC and customize the YAML file to meet the requirements of the new SCC. For example:
Use the restricted SCC as a template for the new SCC:
$ oc export scc restricted > new-scc.yaml
- Edit the new-scc.yaml file to your desired specifications.
Create the new SCC:
$ oc create -f new-scc.yaml
The oc edit scc command can be used to modify an instantiated SCC.
Here is a fragment of a new SCC named nfs-scc:
$ oc export scc nfs-scc allowHostDirVolumePlugin: false 1 ... kind: SecurityContextConstraints metadata: ... name: nfs-scc 2 priority: 9 3 ... supplementalGroups: type: MustRunAs 4 ranges: - min: 5000 5 max: 6000 ...
- 1
- The
allowbooleans are the same as for the restricted SCC. - 2
- Name of the new SCC.
- 3
- Numerically larger numbers have greater priority. Nil or omitted is the lowest priority. Higher priority SCCs sort before lower priority SCCs and thus have a better chance of matching a new pod.
- 4
supplementalGroupsis a strategy and it is set to MustRunAs, which means group ID checking is required.- 5
- Multiple ranges are supported. The allowed group ID range here is 5000 through 5999, with the default supplemental group being 5000.
When the same pod shown earlier runs against this new SCC (assuming, of course, the pod matches the new SCC), it will start because the group 5555, supplied in the pod definition, is now allowed by the custom SCC.
24.16.4. fsGroup
Read SCCs, Defaults, and Allowed Ranges before working with supplemental groups.
It is generally preferable to use group IDs (supplemental or fsGroup) to gain access to persistent storage versus using user IDs.
fsGroup defines a pod’s "file system group" ID, which is added to the container’s supplemental groups. The supplementalGroups ID applies to shared storage, whereas the fsGroup ID is used for block storage.
Block storage, such as Ceph RBD, iSCSI, and various cloud storage, is typically dedicated to a single pod which has requested the block storage volume, either directly or using a PVC. Unlike shared storage, block storage is taken over by a pod, meaning that user and group IDs supplied in the pod definition (or image) are applied to the actual, physical block device. Typically, block storage is not shared.
A fsGroup definition is shown below in the following pod definition fragment:
kind: Pod ... spec: containers: - name: ... securityContext: 1 fsGroup: 5555 2 ...
As with supplementalGroups, all containers in the above pod (assuming the matching SCC or project allows the group 5555) will be members of the group 5555, and will have access to the block volume, regardless of the container’s user ID. If the pod matches the restricted SCC, whose fsGroup strategy is MustRunAs, then the pod will fail to run. However, if the SCC has its fsGroup strategy set to RunAsAny, then any fsGroup ID (including 5555) will be accepted. Note that if the SCC has its fsGroup strategy set to RunAsAny and no fsGroup ID is specified, the "taking over" of the block storage does not occur and permissions may be denied to the pod.
fsGroups and Custom SCCs
To remedy the situation in the previous example, a custom SCC can be created such that:
- a minimum and maximum group ID are defined,
- ID range checking is enforced, and
- the group ID of 5555 is allowed.
It is better to create new SCCs versus modifying a predefined SCC, or changing the range of allowed IDs in the predefined projects.
Consider the following fragment of a new SCC definition:
# oc export scc new-scc ... kind: SecurityContextConstraints ... fsGroup: type: MustRunAs 1 ranges: 2 - max: 6000 min: 5000 3 ...
- 1
- MustRunAs triggers group ID range checking, whereas RunAsAny does not require range checking.
- 2
- The range of allowed group IDs is 5000 through, and including, 5999. Multiple ranges are supported but not used. The allowed group ID range here is 5000 through 5999, with the default
fsGroupbeing 5000. - 3
- The minimum value (or the entire range) can be omitted from the SCC, and thus range checking and generating a default value will defer to the project’s
openshift.io/sa.scc.supplemental-groupsrange.fsGroupandsupplementalGroupsuse the same group field in the project; there is not a separate range forfsGroup.
When the pod shown above runs against this new SCC (assuming, of course, the pod matches the new SCC), it will start because the group 5555, supplied in the pod definition, is allowed by the custom SCC. Additionally, the pod will "take over" the block device, so when the block storage is viewed by a process outside of the pod, it will actually have 5555 as its group ID.
A list of volumes supporting block ownership include:
- AWS Elastic Block Store
- OpenStack Cinder
- Ceph RBD
- GCE Persistent Disk
- iSCSI
- emptyDir
- gitRepo
This list is potentially incomplete.
24.16.5. User IDs
Read SCCs, Defaults, and Allowed Ranges before working with supplemental groups.
It is generally preferable to use group IDs (supplemental or fsGroup) to gain access to persistent storage versus using user IDs.
User IDs can be defined in the container image or in the pod definition. In the pod definition, a single user ID can be defined globally to all containers, or specific to individual containers (or both). A user ID is supplied as shown in the pod definition fragment below:
spec:
containers:
- name: ...
securityContext:
runAsUser: 1000100001
ID 1000100001 in the above is container-specific and matches the owner ID on the export. If the NFS export’s owner ID was 54321, then that number would be used in the pod definition. Specifying securityContext outside of the container definition makes the ID global to all containers in the pod.
Similar to group IDs, user IDs may be validated according to policies set in the SCC and/or project. If the SCC’s runAsUser strategy is set to RunAsAny, then any user ID defined in the pod definition or in the image is allowed.
This means even a UID of 0 (root) is allowed.
If, instead, the runAsUser strategy is set to MustRunAsRange, then a supplied user ID will be validated against a range of allowed IDs. If the pod supplies no user ID, then the default ID is set to the minimum value of the range of allowable user IDs.
Returning to the earlier NFS example, the container needs its UID set to 1000100001, which is shown in the pod fragment above. Assuming the default project and the restricted SCC, the pod’s requested user ID of 1000100001 will not be allowed, and therefore the pod will fail. The pod fails because:
- it requests 1000100001 as its user ID,
-
all available SCCs use MustRunAsRange for their
runAsUserstrategy, so UID range checking is required, and - 1000100001 is not included in the SCC or in the project’s user ID range.
To remedy this situation, a new SCC can be created with the appropriate user ID range. A new project could also be created with the appropriate user ID range defined. There are also other, less-preferred options:
- The restricted SCC could be modified to include 1000100001 within its minimum and maximum user ID range. This is not recommended as you should avoid modifying the predefined SCCs if possible.
-
The restricted SCC could be modified to use RunAsAny for the
runAsUservalue, thus eliminating ID range checking. This is strongly not recommended, as containers could run as root. - The default project’s UID range could be changed to allow a user ID of 1000100001. This is not generally advisable because only a single range of user IDs can be specified, and thus other pods may not run if the range is altered.
User IDs and Custom SCCs
It is good practice to avoid modifying the predefined SCCs if possible. The preferred approach is to create a custom SCC that better fits an organization’s security needs, or create a new project that supports the desired user IDs.
To remedy the situation in the previous example, a custom SCC can be created such that:
- a minimum and maximum user ID is defined,
- UID range checking is still enforced, and
- the UID of 1000100001 is allowed.
For example:
$ oc export scc nfs-scc allowHostDirVolumePlugin: false 1 ... kind: SecurityContextConstraints metadata: ... name: nfs-scc 2 priority: 9 3 requiredDropCapabilities: null runAsUser: type: MustRunAsRange 4 uidRangeMax: 1000100001 5 uidRangeMin: 1000100001 ...
- 1
- The
allowXXbools are the same as for the restricted SCC. - 2
- The name of this new SCC is nfs-scc.
- 3
- Numerically larger numbers have greater priority. Nil or omitted is the lowest priority. Higher priority SCCs sort before lower priority SCCs, and thus have a better chance of matching a new pod.
- 4
- The
runAsUserstrategy is set to MustRunAsRange, which means UID range checking is enforced. - 5
- The UID range is 1000100001 through 1000100001 (a range of one value).
Now, with runAsUser: 1000100001 shown in the previous pod definition fragment, the pod matches the new nfs-scc and is able to run with a UID of 1000100001.
24.16.6. SELinux Options
All predefined SCCs, except for the privileged SCC, set the seLinuxContext to MustRunAs. So the SCCs most likely to match a pod’s requirements will force the pod to use an SELinux policy. The SELinux policy used by the pod can be defined in the pod itself, in the image, in the SCC, or in the project (which provides the default).
SELinux labels can be defined in a pod’s securityContext.seLinuxOptions section, and supports user, role, type, and level:
Level and MCS label are used interchangeably in this topic.
... securityContext: 1 seLinuxOptions: level: "s0:c123,c456" 2 ...
Here are fragments from an SCC and from the default project:
$ oc export scc scc-name ... seLinuxContext: type: MustRunAs 1 # oc export project default ... metadata: annotations: openshift.io/sa.scc.mcs: s0:c1,c0 2 ...
All predefined SCCs, except for the privileged SCC, set the seLinuxContext to MustRunAs. This forces pods to use MCS labels, which can be defined in the pod definition, the image, or provided as a default.
The SCC determines whether or not to require an SELinux label and can provide a default label. If the seLinuxContext strategy is set to MustRunAs and the pod (or image) does not define a label, OpenShift Container Platform defaults to a label chosen from the SCC itself or from the project.
If seLinuxContext is set to RunAsAny, then no default labels are provided, and the container determines the final label. In the case of Docker, the container will use a unique MCS label, which will not likely match the labeling on existing storage mounts. Volumes which support SELinux management will be relabeled so that they are accessible by the specified label and, depending on how exclusionary the label is, only that label.
This means two things for unprivileged containers:
-
The volume is given a type that is accessible by unprivileged containers. This type is usually
container_file_tin Red Hat Enterprise Linux (RHEL) version 7.5 and later. This type treats volumes as container content. In previous RHEL versions, RHEL 7.4, 7.3, and so forth, the volume is given thesvirt_sandbox_file_ttype. -
If a
levelis specified, the volume is labeled with the given MCS label.
For a volume to be accessible by a pod, the pod must have both categories of the volume. So a pod with s0:c1,c2 will be able to access a volume with s0:c1,c2. A volume with s0 will be accessible by all pods.
If pods fail authorization, or if the storage mount is failing due to permissions errors, then there is a possibility that SELinux enforcement is interfering. One way to check for this is to run:
# ausearch -m avc --start recent
This examines the log file for AVC (Access Vector Cache) errors.
24.17. Selector-Label Volume Binding
24.17.1. Overview
This guide provides the steps necessary to enable binding of persistent volume claims (PVCs) to persistent volumes (PVs) via selector and label attributes. By implementing selectors and labels, regular users are able to target provisioned storage by identifiers defined by a cluster administrator.
24.17.2. Motivation
In cases of statically provisioned storage, developers seeking persistent storage are required to know a handful identifying attributes of a PV in order to deploy and bind a PVC. This creates several problematic situations. Regular users might have to contact a cluster administrator to either deploy the PVC or provide the PV values. PV attributes alone do not convey the intended use of the storage volumes, nor do they provide methods by which volumes can be grouped.
Selector and label attributes can be used to abstract away PV details from the user while providing cluster administrators a way of identifying volumes by a descriptive and customizable tag. Through the selector-label method of binding, users are only required to know which labels are defined by the administrator.
The selector-label feature is currently only available for statically provisioned storage and is currently not implemented for storage provisioned dynamically.
24.17.3. Deployment
This section reviews how to define and deploy PVCs.
24.17.3.1. Prerequisites
- A running OpenShift Container Platform 3.3+ cluster
- A volume provided by a supported storage provider
- A user with a cluster-admin role binding
24.17.3.2. Define the Persistent Volume and Claim
As the cluser-admin user, define the PV. For this example, we will be using a GlusterFS volume. See the appropriate storage provider for your provider’s configuration.
Example 24.9. Persistent Volume with Labels
apiVersion: v1 kind: PersistentVolume metadata: name: gluster-volume labels: 1 volume-type: ssd aws-availability-zone: us-east-1 spec: capacity: storage: 2Gi accessModes: - ReadWriteMany glusterfs: endpoints: glusterfs-cluster path: myVol1 readOnly: false persistentVolumeReclaimPolicy: Recycle- 1
- A PVC whose selectors match all of a PV’s labels will be bound, assuming a PV is available.
Define the PVC:
Example 24.10. Persistent Volume Claim with Selectors
apiVersion: v1 kind: PersistentVolumeClaim metadata: name: gluster-claim spec: accessModes: - ReadWriteMany resources: requests: storage: 1Gi selector: 1 matchLabels: 2 volume-type: ssd aws-availability-zone: us-east-1
24.17.3.3. Deploy the Persistent Volume and Claim
As the cluster-admin user, create the persistent volume:
Example 24.11. Create the Persistent Volume
# oc create -f gluster-pv.yaml persistentVolume "gluster-volume" created # oc get pv NAME LABELS CAPACITY ACCESSMODES STATUS CLAIM REASON AGE gluster-volume map[] 2147483648 RWX Available 2s
Once the PV is created, any user whose selectors match all its labels can create their PVC.
Example 24.12. Create the Persistent Volume Claim
# oc create -f gluster-pvc.yaml persistentVolumeClaim "gluster-claim" created # oc get pvc NAME LABELS STATUS VOLUME gluster-claim Bound gluster-volume
24.18. Enabling Controller-managed Attachment and Detachment
24.18.1. Overview
As of OpenShift Container Platform 3.4, administrators can enable the controller running on the cluster’s master to manage volume attach and detach operations on behalf of a set of nodes, as opposed to letting them manage their own volume attach and detach operations.
Enabling controller-managed attachment and detachment has the following benefits:
- If a node is lost, volumes that were attached to it can be detached by the controller and reattached elsewhere.
- Credentials for attaching and detaching do not need to be made present on every node, improving security.
As of OpenShift Container Platform 3.6, controller-managed attachment and detachment is the default setting.
24.18.2. Determining What Is Managing Attachment and Detachment
If a node has set the annotation volumes.kubernetes.io/controller-managed-attach-detach on itself, then its attach and detach operations are being managed by the controller. The controller will automatically inspect all nodes for this annotation and act according to whether it is present or not. Therefore, you may inspect the node for this annotation to determine if it has enabled controller-managed attach and detach.
To further ensure that the node is opting for controller-managed attachment and detachment, its logs can be searched for the following line:
Setting node annotation to enable volume controller attach/detach
If the above line is not found, the logs should instead contain:
Controller attach/detach is disabled for this node; Kubelet will attach and detach volumes
To check from the controller’s end that it is managing a particular node’s attach and detach operations, the logging level must first be set to at least 4. Then, the following line should be found:
processVolumesInUse for node <node_hostname>
For information on how to view logs and configure logging levels, see Configuring Logging Levels.
24.18.3. Configuring Nodes to Enable Controller-managed Attachment and Detachment
Enabling controller-managed attachment and detachment is done by configuring individual nodes to opt in and disable their own node-level attachment and detachment management. See Node Configuration Files for information on what node configuration file to edit and add the following:
kubeletArguments: enable-controller-attach-detach: - "true"
Once a node is configured, it must be restarted for the setting to take effect.
24.19. Persistent Volume Snapshots
24.19.1. Overview
Persistent Volume Snapshots are a Technology Preview feature. Technology Preview features are not supported with Red Hat production service level agreements (SLAs), might not be functionally complete, and Red Hat does not recommend to use them for production. These features provide early access to upcoming product features, enabling customers to test functionality and provide feedback during the development process.
For more information on Red Hat Technology Preview features support scope, see https://access.redhat.com/support/offerings/techpreview/.
Many storage systems provide the ability to create "snapshots" of a persistent volume (PV) to protect against data loss. The external snapshot controller and provisioner provide means to use the feature in the OpenShift Container Platform cluster and handle volume snapshots through the OpenShift Container Platform API.
This document describes the current state of volume snapshot support in OpenShift Container Platform. Familiarity with PVs, persistent volume claims (PVCs), and dynamic provisioning is recommended.
24.19.2. Features
-
Create snapshot of a
PersistentVolumebound to aPersistentVolumeClaim -
List existing
VolumeSnapshots -
Delete existing
VolumeSnapshot -
Create a new
PersistentVolumefrom an existingVolumeSnapshot Supported
PersistentVolumetypes:- AWS Elastic Block Store (EBS)
- Google Compute Engine (GCE) Persistent Disk (PD)
24.19.3. Installation and Setup
The external controller and provisioner are the external components that provide volume snapshotting. These external components run in the cluster. The controller is responsible for creating, deleting, and reporting events on volume snapshots. The provisioner creates new PersistentVolumes from the volume snapshots. See Create Snapshot and Restore Snapshot for more information.
24.19.3.1. Starting the External Controller and Provisioner
The external controller and provisioner services are distributed as container images and can be run in the OpenShift Container Platform cluster as usual. There are also RPM versions for the controller and provisioner.
To allow the containers managing the API objects, the necessary role-based access control (RBAC) rules need to be configured by the administrator:
Create a
ServiceAccountandClusterRole:apiVersion: v1 kind: ServiceAccount metadata: name: snapshot-controller-runner kind: ClusterRole apiVersion: rbac.authorization.k8s.io/v1 metadata: name: snapshot-controller-role rules: - apiGroups: [""] resources: ["persistentvolumes"] verbs: ["get", "list", "watch", "create", "delete"] - apiGroups: [""] resources: ["persistentvolumeclaims"] verbs: ["get", "list", "watch", "update"] - apiGroups: ["storage.k8s.io"] resources: ["storageclasses"] verbs: ["get", "list", "watch"] - apiGroups: [""] resources: ["events"] verbs: ["list", "watch", "create", "update", "patch"] - apiGroups: ["apiextensions.k8s.io"] resources: ["customresourcedefinitions"] verbs: ["create", "list", "watch", "delete"] - apiGroups: ["volumesnapshot.external-storage.k8s.io"] resources: ["volumesnapshots"] verbs: ["get", "list", "watch", "create", "update", "patch", "delete"] - apiGroups: ["volumesnapshot.external-storage.k8s.io"] resources: ["volumesnapshotdatas"] verbs: ["get", "list", "watch", "create", "update", "patch", "delete"]Bind the rules via
ClusterRoleBinding:apiVersion: rbac.authorization.k8s.io/v1beta1 kind: ClusterRoleBinding metadata: name: snapshot-controller roleRef: apiGroup: rbac.authorization.k8s.io kind: ClusterRole name: snapshot-controller-role subjects: - kind: ServiceAccount name: snapshot-controller-runner namespace: default
If the external controller and provisioner are deployed in Amazon Web Services (AWS), they must be able to authenticate using the access key. To provide the credential to the pod, the administrator creates a new secret:
apiVersion: v1 kind: Secret metadata: name: awskeys type: Opaque data: access-key-id: <base64 encoded AWS_ACCESS_KEY_ID> secret-access-key: <base64 encoded AWS_SECRET_ACCESS_KEY>
The AWS deployment of the external controller and provisioner containers (note that both pod containers use the secret to access the AWS cloud provider API):
kind: Deployment
apiVersion: extensions/v1beta1
metadata:
name: snapshot-controller
spec:
replicas: 1
strategy:
type: Recreate
template:
metadata:
labels:
app: snapshot-controller
spec:
serviceAccountName: snapshot-controller-runner
containers:
- name: snapshot-controller
image: "registry.access.redhat.com/openshift3/snapshot-controller:latest"
imagePullPolicy: "IfNotPresent"
args: ["-cloudprovider", "aws"]
env:
- name: AWS_ACCESS_KEY_ID
valueFrom:
secretKeyRef:
name: awskeys
key: access-key-id
- name: AWS_SECRET_ACCESS_KEY
valueFrom:
secretKeyRef:
name: awskeys
key: secret-access-key
- name: snapshot-provisioner
image: "registry.access.redhat.com/openshift3/snapshot-provisioner:latest"
imagePullPolicy: "IfNotPresent"
args: ["-cloudprovider", "aws"]
env:
- name: AWS_ACCESS_KEY_ID
valueFrom:
secretKeyRef:
name: awskeys
key: access-key-id
- name: AWS_SECRET_ACCESS_KEY
valueFrom:
secretKeyRef:
name: awskeys
key: secret-access-keyFor GCE, there is no need to use secrets to access the GCE cloud provider API. The administrator can proceed with the deployment:
kind: Deployment
apiVersion: extensions/v1beta1
metadata:
name: snapshot-controller
spec:
replicas: 1
strategy:
type: Recreate
template:
metadata:
labels:
app: snapshot-controller
spec:
serviceAccountName: snapshot-controller-runner
containers:
- name: snapshot-controller
image: "registry.access.redhat.com/openshift3/snapshot-controller:latest"
imagePullPolicy: "IfNotPresent"
args: ["-cloudprovider", "gce"]
- name: snapshot-provisioner
image: "registry.access.redhat.com/openshift3/snapshot-provisioner:latest"
imagePullPolicy: "IfNotPresent"
args: ["-cloudprovider", "gce"]24.19.3.2. Managing Snapshot Users
Depending on the cluster configuration, it might be necessary to allow non-administrator users to manipulate the VolumeSnapshot objects on the API server. This can be done by creating a ClusterRole bound to a particular user or group.
For example, assume the user 'alice' needs to work with snapshots in the cluster. The cluster administrator completes the following steps:
Define a new
ClusterRole:apiVersion: v1 kind: ClusterRole metadata: name: volumesnapshot-admin rules: - apiGroups: - "volumesnapshot.external-storage.k8s.io" attributeRestrictions: null resources: - volumesnapshots verbs: - create - delete - deletecollection - get - list - patch - update - watch
Bind the cluster role to the user 'alice' by creating a
ClusterRoleBindingobject:apiVersion: rbac.authorization.k8s.io/v1beta1 kind: ClusterRoleBinding metadata: name: volumesnapshot-admin roleRef: apiGroup: rbac.authorization.k8s.io kind: ClusterRole name: volumesnapshot-admin subjects: - kind: User name: alice
This is only an example of API access configuration. The VolumeSnapshot objects behave similar to other OpenShift Container Platform API objects. See the API access control documentation for more information on managing the API RBAC.
24.19.4. Lifecycle of a Volume Snapshot and Volume Snapshot Data
24.19.4.1. Persistent Volume Claim and Persistent Volume
The PersistentVolumeClaim is bound to a PersistentVolume. The PersistentVolume type must be one of the snapshot supported persistent volume types.
24.19.4.1.1. Snapshot Promoter
To create a StorageClass:
kind: StorageClass apiVersion: storage.k8s.io/v1 metadata: name: snapshot-promoter provisioner: volumesnapshot.external-storage.k8s.io/snapshot-promoter
This StorageClass is necessary to restore a PersistentVolume from a VolumeSnapshot that was previously created.
24.19.4.2. Create Snapshot
To take a snapshot of a PV, create a new VolumeSnapshot object:
apiVersion: volumesnapshot.external-storage.k8s.io/v1 kind: VolumeSnapshot metadata: name: snapshot-demo spec: persistentVolumeClaimName: ebs-pvc
persistentVolumeClaimName is the name of the PersistentVolumeClaim bound to a PersistentVolume. This particular PV is snapshotted.
A VolumeSnapshotData object is then automatically created based on the VolumeSnapshot. The relationship between VolumeSnapshot and VolumeSnapshotData is similar to the relationship between PersistentVolumeClaim and PersistentVolume.
Depending on the PV type, the operation might go through several phases, which are reflected by the VolumeSnapshot status:
-
The new
VolumeSnapshotobject is created. -
The controller starts the snapshot operation. The snapshotted
PersistentVolumemight need to be frozen and the applications paused. -
The storage system finishes creating the snapshot (the snapshot is "cut") and the snapshotted
PersistentVolumemight return to normal operation. The snapshot itself is not yet ready. The last status condition is ofPendingtype with status valueTrue. A newVolumeSnapshotDataobject is created to represent the actual snapshot. -
The newly created snapshot is complete and ready to use. The last status condition is of
Readytype with status valueTrue.
It is the user’s responsibility to ensure data consistency (stop the pod/application, flush caches, freeze the file system, and so on).
In case of error, the VolumeSnapshot status is appended with an Error condition.
To display the VolumeSnapshot status:
$ oc get volumesnapshot -o yaml
The status is displayed.
apiVersion: volumesnapshot.external-storage.k8s.io/v1
kind: VolumeSnapshot
metadata:
clusterName: ""
creationTimestamp: 2017-09-19T13:58:28Z
generation: 0
labels:
Timestamp: "1505829508178510973"
name: snapshot-demo
namespace: default
resourceVersion: "780"
selfLink: /apis/volumesnapshot.external-storage.k8s.io/v1/namespaces/default/volumesnapshots/snapshot-demo
uid: 9cc5da57-9d42-11e7-9b25-90b11c132b3f
spec:
persistentVolumeClaimName: ebs-pvc
snapshotDataName: k8s-volume-snapshot-9cc8813e-9d42-11e7-8bed-90b11c132b3f
status:
conditions:
- lastTransitionTime: null
message: Snapshot created successfully
reason: ""
status: "True"
type: Ready
creationTimestamp: null24.19.4.3. Restore Snapshot
To restore a PV from a VolumeSnapshot, create a PVC:
apiVersion: v1
kind: PersistentVolumeClaim
metadata:
name: snapshot-pv-provisioning-demo
annotations:
snapshot.alpha.kubernetes.io/snapshot: snapshot-demo
spec:
storageClassName: snapshot-promoter
annotations: snapshot.alpha.kubernetes.io/snapshot is the name of the VolumeSnapshot to be restored. storageClassName: StorageClass is created by the administrator for restoring VolumeSnapshots.
A new PersistentVolume is created and bound to the PersistentVolumeClaim. The process may take several minutes depending on the PV type.
24.19.4.4. Delete Snapshot
To delete a snapshot-demo:
$ oc delete volumesnapshot/snapshot-demo
The VolumeSnapshotData bound to the VolumeSnapshot is automatically deleted.
Chapter 25. Persistent Storage Examples
25.1. Overview
The following sections provide detailed, comprehensive instructions on setting up and configuring common storage use cases. These examples cover both the administration of persistent volumes and their security, and how to claim against the volumes as a user of the system.
- Sharing an NFS PV Across Two Pods
- Ceph-RBD Block Storage Volume
- Shared Storage Using a GlusterFS Volume
- Dynamic Provisioning Storage Using GlusterFS
- Mounting a PV to Privileged Pods
- Backing Docker Registry with GlusterFS Storage
- Binding Persistent Volumes by Labels
- Using StorageClasses for Dynamic Provisioning
- Using StorageClasses for Existing Legacy Storage
- Configuring Azure Blob Storage for Integrated Docker Registry
25.3. Complete Example Using Ceph RBD
25.3.1. Overview
This topic provides an end-to-end example of using an existing Ceph cluster as an OpenShift Container Platform persistent store. It is assumed that a working Ceph cluster is already set up. If not, consult the Overview of Red Hat Ceph Storage.
Persistent Storage Using Ceph Rados Block Device provides an explanation of persistent volumes (PVs), persistent volume claims (PVCs), and using Ceph RBD as persistent storage.
All oc … commands are executed on the OpenShift Container Platform master host.
25.3.2. Installing the ceph-common Package
The ceph-common library must be installed on all schedulable OpenShift Container Platform nodes:
The OpenShift Container Platform all-in-one host is not often used to run pod workloads and, thus, is not included as a schedulable node.
# yum install -y ceph-common
25.3.3. Creating the Ceph Secret
The ceph auth get-key command is run on a Ceph MON node to display the key value for the client.admin user:
Example 25.5. Ceph Secret Definition
apiVersion: v1
kind: Secret
metadata:
name: ceph-secret
data:
key: QVFBOFF2SlZheUJQRVJBQWgvS2cwT1laQUhPQno3akZwekxxdGc9PQ== 1- 1
- This base64 key is generated on one of the Ceph MON nodes using the
ceph auth get-key client.admin | base64command, then copying the output and pasting it as the secret key’s value.
Save the secret definition to a file, for example ceph-secret.yaml, then create the secret:
$ oc create -f ceph-secret.yaml secret "ceph-secret" created
Verify that the secret was created:
# oc get secret ceph-secret NAME TYPE DATA AGE ceph-secret Opaque 1 23d
25.3.4. Creating the Persistent Volume
Next, before creating the PV object in OpenShift Container Platform, define the persistent volume file:
Example 25.6. Persistent Volume Object Definition Using Ceph RBD
apiVersion: v1 kind: PersistentVolume metadata: name: ceph-pv 1 spec: capacity: storage: 2Gi 2 accessModes: - ReadWriteOnce 3 rbd: 4 monitors: 5 - 192.168.122.133:6789 pool: rbd image: ceph-image user: admin secretRef: name: ceph-secret 6 fsType: ext4 7 readOnly: false persistentVolumeReclaimPolicy: Recycle
- 1
- The name of the PV, which is referenced in pod definitions or displayed in various
ocvolume commands. - 2
- The amount of storage allocated to this volume.
- 3
accessModesare used as labels to match a PV and a PVC. They currently do not define any form of access control. All block storage is defined to be single user (non-shared storage).- 4
- This defines the volume type being used. In this case, the rbd plug-in is defined.
- 5
- This is an array of Ceph monitor IP addresses and ports.
- 6
- This is the Ceph secret, defined above. It is used to create a secure connection from OpenShift Container Platform to the Ceph server.
- 7
- This is the file system type mounted on the Ceph RBD block device.
Save the PV definition to a file, for example ceph-pv.yaml, and create the persistent volume:
# oc create -f ceph-pv.yaml persistentvolume "ceph-pv" created
Verify that the persistent volume was created:
# oc get pv NAME LABELS CAPACITY ACCESSMODES STATUS CLAIM REASON AGE ceph-pv <none> 2147483648 RWO Available 2s
25.3.5. Creating the Persistent Volume Claim
A persistent volume claim (PVC) specifies the desired access mode and storage capacity. Currently, based on only these two attributes, a PVC is bound to a single PV. Once a PV is bound to a PVC, that PV is essentially tied to the PVC’s project and cannot be bound to by another PVC. There is a one-to-one mapping of PVs and PVCs. However, multiple pods in the same project can use the same PVC.
Example 25.7. PVC Object Definition
kind: PersistentVolumeClaim apiVersion: v1 metadata: name: ceph-claim spec: accessModes: 1 - ReadWriteOnce resources: requests: storage: 2Gi 2
Save the PVC definition to a file, for example ceph-claim.yaml, and create the PVC:
# oc create -f ceph-claim.yaml
persistentvolumeclaim "ceph-claim" created
#and verify the PVC was created and bound to the expected PV:
# oc get pvc
NAME LABELS STATUS VOLUME CAPACITY ACCESSMODES AGE
ceph-claim <none> Bound ceph-pv 1Gi RWX 21s
1- 1
- the claim was bound to the ceph-pv PV.
25.3.6. Creating the Pod
A pod definition file or a template file can be used to define a pod. Below is a pod specification that creates a single container and mounts the Ceph RBD volume for read-write access:
Example 25.8. Pod Object Definition
apiVersion: v1 kind: Pod metadata: name: ceph-pod1 1 spec: containers: - name: ceph-busybox image: busybox 2 command: ["sleep", "60000"] volumeMounts: - name: ceph-vol1 3 mountPath: /usr/share/busybox 4 readOnly: false volumes: - name: ceph-vol1 5 persistentVolumeClaim: claimName: ceph-claim 6
- 1
- The name of this pod as displayed by
oc get pod. - 2
- The image run by this pod. In this case, we are telling busybox to sleep.
- 3 5
- The name of the volume. This name must be the same in both the
containersandvolumessections. - 4
- The mount path as seen in the container.
- 6
- The PVC that is bound to the Ceph RBD cluster.
Save the pod definition to a file, for example ceph-pod1.yaml, and create the pod:
# oc create -f ceph-pod1.yaml
pod "ceph-pod1" created
#verify pod was created
# oc get pod
NAME READY STATUS RESTARTS AGE
ceph-pod1 1/1 Running 0 2m
1- 1
- After a minute or so, the pod will be in the Running state.
25.3.7. Defining Group and Owner IDs (Optional)
When using block storage, such as Ceph RBD, the physical block storage is managed by the pod. The group ID defined in the pod becomes the group ID of both the Ceph RBD mount inside the container, and the group ID of the actual storage itself. Thus, it is usually unnecessary to define a group ID in the pod specifiation. However, if a group ID is desired, it can be defined using fsGroup, as shown in the following pod definition fragment:
25.3.8. Setting ceph-user-secret as Default for Projects
If you would like to make the persistent storage available to every project you have to modify the default project template. You can read more on modifying the default project template. Read more on modifying the default project template. Adding this to your default project template allows every user who has access to create a project access to the Ceph cluster.
Example 25.10. Default Project Example
...
apiVersion: v1
kind: Template
metadata:
creationTimestamp: null
name: project-request
objects:
- apiVersion: v1
kind: Project
metadata:
annotations:
openshift.io/description: ${PROJECT_DESCRIPTION}
openshift.io/display-name: ${PROJECT_DISPLAYNAME}
openshift.io/requester: ${PROJECT_REQUESTING_USER}
creationTimestamp: null
name: ${PROJECT_NAME}
spec: {}
status: {}
- apiVersion: v1
kind: Secret
metadata:
name: ceph-user-secret
data:
key: yoursupersecretbase64keygoeshere 1
type:
kubernetes.io/rbd
...- 1
- Place your super secret Ceph user key here in base64 format. See Creating the Ceph Secret.
25.4. Using Ceph RBD for dynamic provisioning
25.4.1. Overview
This topic provides a complete example of using an existing Ceph cluster for OpenShift Container Platform persistent storage. It is assumed that a working Ceph cluster is already set up. If not, consult the Overview of Red Hat Ceph Storage.
Persistent Storage Using Ceph Rados Block Device provides an explanation of persistent volumes (PVs), persistent volume claims (PVCs), and how to use Ceph Rados Block Device (RBD) as persistent storage.
-
Run all
occommands on the OpenShift Container Platform master host. - The OpenShift Container Platform all-in-one host is not often used to run pod workloads and, thus, is not included as a schedulable node.
25.4.2. Creating a pool for dynamic volumes
Install the latest ceph-common package:
yum install -y ceph-common
NoteThe
ceph-commonlibrary must be installed onall schedulableOpenShift Container Platform nodes.From an administrator or MON node, create a new pool for dynamic volumes, for example:
$ ceph osd pool create kube 1024 $ ceph auth get-or-create client.kube mon 'allow r' osd 'allow class-read object_prefix rbd_children, allow rwx pool=kube' -o ceph.client.kube.keyring
NoteUsing the default pool of RBD is an option, but not recommended.
25.4.3. Using an existing Ceph cluster for dynamic persistent storage
To use an existing Ceph cluster for dynamic persistent storage:
Generate the client.admin base64-encoded key:
$ ceph auth get client.admin
Ceph secret definition example
apiVersion: v1 kind: Secret metadata: name: ceph-secret namespace: kube-system data: key: QVFBOFF2SlZheUJQRVJBQWgvS2cwT1laQUhPQno3akZwekxxdGc9PQ== 1 type: kubernetes.io/rbd 2
Create the Ceph secret for the client.admin:
$ oc create -f ceph-secret.yaml secret "ceph-secret" created
Verify that the secret was created:
$ oc get secret ceph-secret NAME TYPE DATA AGE ceph-secret kubernetes.io/rbd 1 5d
Create the storage class:
$ oc create -f ceph-storageclass.yaml storageclass "dynamic" created
Ceph storage class example
apiVersion: storage.k8s.io/v1beta1 kind: StorageClass metadata: name: dynamic annotations: storageclass.kubernetes.io/is-default-class: "true" provisioner: kubernetes.io/rbd parameters: monitors: 192.168.1.11:6789,192.168.1.12:6789,192.168.1.13:6789 1 adminId: admin 2 adminSecretName: ceph-secret 3 adminSecretNamespace: kube-system 4 pool: kube 5 userId: kube 6 userSecretName: ceph-user-secret 7- 1
- A comma-delimited list of IP addresses Ceph monitors. This value is required.
- 2
- The Ceph client ID that is capable of creating images in the pool. The default is
admin. - 3
- The secret name for
adminId. This value is required. The secret that you provide must havekubernetes.io/rbd. - 4
- The namespace for
adminSecret. The default isdefault. - 5
- The Ceph RBD pool. The default is
rbd, but this value is not recommended. - 6
- The Ceph client ID used to map the Ceph RBD image. The default is the same as the secret name for
adminId. - 7
- The name of the Ceph secret for
userIdto map the Ceph RBD image. It must exist in the same namespace as the PVCs. Unless you set the Ceph secret as the default in new projects, you must provide this parameter value.
Verify that the storage class was created:
$ oc get storageclasses NAME TYPE dynamic (default) kubernetes.io/rbd
Create the PVC object definition:
PVC object definition example
kind: PersistentVolumeClaim apiVersion: v1 metadata: name: ceph-claim-dynamic spec: accessModes: 1 - ReadWriteOnce resources: requests: storage: 2Gi 2
Create the PVC:
$ oc create -f ceph-pvc.yaml persistentvolumeclaim "ceph-claim-dynamic" created
Verify that the PVC was created and bound to the expected PV:
$ oc get pvc NAME STATUS VOLUME CAPACITY ACCESSMODES AGE ceph-claim Bound pvc-f548d663-3cac-11e7-9937-0024e8650c7a 2Gi RWO 1m
Create the pod object definition:
Pod object definition example
apiVersion: v1 kind: Pod metadata: name: ceph-pod1 1 spec: containers: - name: ceph-busybox image: busybox 2 command: ["sleep", "60000"] volumeMounts: - name: ceph-vol1 3 mountPath: /usr/share/busybox 4 readOnly: false volumes: - name: ceph-vol1 persistentVolumeClaim: claimName: ceph-claim-dynamic 5
- 1
- The name of this pod as displayed by
oc get pod. - 2
- The image run by this pod. In this case,
busyboxis set tosleep. - 3
- The name of the volume. This name must be the same in both the
containersandvolumessections. - 4
- The mount path in the container.
- 5
- The PVC that is bound to the Ceph RBD cluster.
Create the pod:
$ oc create -f ceph-pod1.yaml pod "ceph-pod1" created
Verify that the pod was created:
$ oc get pod NAME READY STATUS RESTARTS AGE ceph-pod1 1/1 Running 0 2m
After a minute or so, the pod status changes to Running.
25.4.4. Setting ceph-user-secret as the default for projects
To make persistent storage available to every project, you must modify the default project template. Adding this to your default project template allows every user who has access to create a project access to the Ceph cluster. See modifying the default project template for more information.
Default project example
...
apiVersion: v1
kind: Template
metadata:
creationTimestamp: null
name: project-request
objects:
- apiVersion: v1
kind: Project
metadata:
annotations:
openshift.io/description: ${PROJECT_DESCRIPTION}
openshift.io/display-name: ${PROJECT_DISPLAYNAME}
openshift.io/requester: ${PROJECT_REQUESTING_USER}
creationTimestamp: null
name: ${PROJECT_NAME}
spec: {}
status: {}
- apiVersion: v1
kind: Secret
metadata:
name: ceph-user-secret
data:
key: QVFCbEV4OVpmaGJtQ0JBQW55d2Z0NHZtcS96cE42SW1JVUQvekE9PQ== 1
type:
kubernetes.io/rbd
...
- 1
- Place your Ceph user key here in base64 format.
25.5. Complete Example Using GlusterFS
25.5.1. Overview
This topic provides an end-to-end example of how to use an existing Container-Native Storage, Container-Ready Storage, or standalone Red Hat Gluster Storage cluster as persistent storage for OpenShift Container Platform. It is assumed that a working Red Hat Gluster Storage cluster is already set up. For help installing Container-Native Storage or Container-Ready Storage, see Persistent Storage Using Red Hat Gluster Storage. For standalone Red Hat Gluster Storage, consult the Red Hat Gluster Storage Administration Guide.
For an end-to-end example of how to dynamically provision GlusterFS volumes, see Complete Example Using GlusterFS for Dynamic Provisioning.
All oc commands are executed on the OpenShift Container Platform master host.
25.5.2. Prerequisites
To access GlusterFS volumes, the mount.glusterfs command must be available on all schedulable nodes. For RPM-based systems, the glusterfs-fuse package must be installed:
# yum install glusterfs-fuse
This package comes installed on every RHEL system. However, it is recommended to update to the latest available version from Red Hat Gluster Storage. To do this, the following RPM repository must be enabled:
# subscription-manager repos --enable=rh-gluster-3-client-for-rhel-7-server-rpms
If glusterfs-fuse is already installed on the nodes, ensure that the latest version is installed:
# yum update glusterfs-fuse
By default, SELinux does not allow writing from a pod to a remote Red Hat Gluster Storage server. To enable writing to Red Hat Gluster Storage volumes with SELinux on, run the following on each node running GlusterFS:
$ sudo setsebool -P virt_sandbox_use_fusefs on 1
$ sudo setsebool -P virt_use_fusefs on- 1
- The
-Poption makes the boolean persistent between reboots.
The virt_sandbox_use_fusefs boolean is defined by the docker-selinux package. If you get an error saying it is not defined, ensure that this package is installed.
If you use Atomic Host, the SELinux booleans are cleared when you upgrade Atomic Host. When you upgrade Atomic Host, you must set these boolean values again.
25.5.3. Static Provisioning
-
To enable static provisioning, first create a GlusterFS volume. See the Red Hat Gluster Storage Administration Guide for information on how to do this using the
glustercommand-line interface or the heketi project site for information on how to do this usingheketi-cli. For this example, the volume will be namedmyVol1. Define the following Service and Endpoints in
gluster-endpoints.yaml:--- apiVersion: v1 kind: Service metadata: name: glusterfs-cluster 1 spec: ports: - port: 1 --- apiVersion: v1 kind: Endpoints metadata: name: glusterfs-cluster 2 subsets: - addresses: - ip: 192.168.122.221 3 ports: - port: 1 4 - addresses: - ip: 192.168.122.222 5 ports: - port: 1 6 - addresses: - ip: 192.168.122.223 7 ports: - port: 1 8
From the OpenShift Container Platform master host, create the Service and Endpoints:
$ oc create -f gluster-endpoints.yaml service "glusterfs-cluster" created endpoints "glusterfs-cluster" created
Verify that the Service and Endpoints were created:
$ oc get services NAME CLUSTER_IP EXTERNAL_IP PORT(S) SELECTOR AGE glusterfs-cluster 172.30.205.34 <none> 1/TCP <none> 44s $ oc get endpoints NAME ENDPOINTS AGE docker-registry 10.1.0.3:5000 4h glusterfs-cluster 192.168.122.221:1,192.168.122.222:1,192.168.122.223:1 11s kubernetes 172.16.35.3:8443 4d
NoteEndpoints are unique per project. Each project accessing the GlusterFS volume needs its own Endpoints.
In order to access the volume, the container must run with either a user ID (UID) or group ID (GID) that has access to the file system on the volume. This information can be discovered in the following manner:
$ mkdir -p /mnt/glusterfs/myVol1 $ mount -t glusterfs 192.168.122.221:/myVol1 /mnt/glusterfs/myVol1 $ ls -lnZ /mnt/glusterfs/ drwxrwx---. 592 590 system_u:object_r:fusefs_t:s0 myVol1 1 2
Define the following PersistentVolume (PV) in
gluster-pv.yaml:apiVersion: v1 kind: PersistentVolume metadata: name: gluster-default-volume 1 annotations: pv.beta.kubernetes.io/gid: "590" 2 spec: capacity: storage: 2Gi 3 accessModes: 4 - ReadWriteMany glusterfs: endpoints: glusterfs-cluster 5 path: myVol1 6 readOnly: false persistentVolumeReclaimPolicy: Retain
- 1
- The name of the volume.
- 2
- The GID on the root of the GlusterFS volume.
- 3
- The amount of storage allocated to this volume.
- 4
accessModesare used as labels to match a PV and a PVC. They currently do not define any form of access control.- 5
- The Endpoints resource previously created.
- 6
- The GlusterFS volume that will be accessed.
From the OpenShift Container Platform master host, create the PV:
$ oc create -f gluster-pv.yaml
Verify that the PV was created:
$ oc get pv NAME LABELS CAPACITY ACCESSMODES STATUS CLAIM REASON AGE gluster-default-volume <none> 2147483648 RWX Available 2s
Create a PersistentVolumeClaim (PVC) that will bind to the new PV in
gluster-claim.yaml:apiVersion: v1 kind: PersistentVolumeClaim metadata: name: gluster-claim 1 spec: accessModes: - ReadWriteMany 2 resources: requests: storage: 1Gi 3
From the OpenShift Container Platform master host, create the PVC:
$ oc create -f gluster-claim.yaml
Verify that the PV and PVC are bound:
$ oc get pv NAME LABELS CAPACITY ACCESSMODES STATUS CLAIM REASON AGE gluster-pv <none> 1Gi RWX Available gluster-claim 37s $ oc get pvc NAME LABELS STATUS VOLUME CAPACITY ACCESSMODES AGE gluster-claim <none> Bound gluster-pv 1Gi RWX 24s
PVCs are unique per project. Each project accessing the GlusterFS volume needs its own PVC. PVs are not bound to a single project, so PVCs across multiple projects may refer to the same PV.
25.5.4. Using the Storage
At this point, you have a dynamically created GlusterFS volume bound to a PVC. You can now utilize this PVC in a pod.
Create the pod object definition:
apiVersion: v1 kind: Pod metadata: name: hello-openshift-pod labels: name: hello-openshift-pod spec: containers: - name: hello-openshift-pod image: openshift/hello-openshift ports: - name: web containerPort: 80 volumeMounts: - name: gluster-vol1 mountPath: /usr/share/nginx/html readOnly: false volumes: - name: gluster-vol1 persistentVolumeClaim: claimName: gluster1 1- 1
- The name of the PVC created in the previous step.
From the OpenShift Container Platform master host, create the pod:
# oc create -f hello-openshift-pod.yaml pod "hello-openshift-pod" created
View the pod. Give it a few minutes, as it might need to download the image if it does not already exist:
# oc get pods -o wide NAME READY STATUS RESTARTS AGE IP NODE hello-openshift-pod 1/1 Running 0 9m 10.38.0.0 node1
oc execinto the container and create an index.html file in themountPathdefinition of the pod:$ oc exec -ti hello-openshift-pod /bin/sh $ cd /usr/share/nginx/html $ echo 'Hello OpenShift!!!' > index.html $ ls index.html $ exit
Now
curlthe URL of the pod:# curl http://10.38.0.0 Hello OpenShift!!!
Delete the pod, recreate it, and wait for it to come up:
# oc delete pod hello-openshift-pod pod "hello-openshift-pod" deleted # oc create -f hello-openshift-pod.yaml pod "hello-openshift-pod" created # oc get pods -o wide NAME READY STATUS RESTARTS AGE IP NODE hello-openshift-pod 1/1 Running 0 9m 10.37.0.0 node1
Now
curlthe pod again and it should still have the same data as before. Note that its IP address may have changed:# curl http://10.37.0.0 Hello OpenShift!!!
Check that the index.html file was written to GlusterFS storage by doing the following on any of the nodes:
$ mount | grep heketi /dev/mapper/VolGroup00-LogVol00 on /var/lib/heketi type xfs (rw,relatime,seclabel,attr2,inode64,noquota) /dev/mapper/vg_f92e09091f6b20ab12b02a2513e4ed90-brick_1e730a5462c352835055018e1874e578 on /var/lib/heketi/mounts/vg_f92e09091f6b20ab12b02a2513e4ed90/brick_1e730a5462c352835055018e1874e578 type xfs (rw,noatime,seclabel,nouuid,attr2,inode64,logbsize=256k,sunit=512,swidth=512,noquota) /dev/mapper/vg_f92e09091f6b20ab12b02a2513e4ed90-brick_d8c06e606ff4cc29ccb9d018c73ee292 on /var/lib/heketi/mounts/vg_f92e09091f6b20ab12b02a2513e4ed90/brick_d8c06e606ff4cc29ccb9d018c73ee292 type xfs (rw,noatime,seclabel,nouuid,attr2,inode64,logbsize=256k,sunit=512,swidth=512,noquota) $ cd /var/lib/heketi/mounts/vg_f92e09091f6b20ab12b02a2513e4ed90/brick_d8c06e606ff4cc29ccb9d018c73ee292/brick $ ls index.html $ cat index.html Hello OpenShift!!!
25.6. Complete Example Using GlusterFS for Dynamic Provisioning
25.6.1. Overview
This topic provides an end-to-end example of how to use an existing Container-Native Storage, Container-Ready Storage, or standalone Red Hat Gluster Storage cluster as dynamic persistent storage for OpenShift Container Platform. It is assumed that a working Red Hat Gluster Storage cluster is already set up. For help installing Container-Native Storage or Container-Ready Storage, see Persistent Storage Using Red Hat Gluster Storage. For standalone Red Hat Gluster Storage, consult the Red Hat Gluster Storage Administration Guide.
All oc commands are executed on the OpenShift Container Platform master host.
25.6.2. Prerequisites
To access GlusterFS volumes, the mount.glusterfs command must be available on all schedulable nodes. For RPM-based systems, the glusterfs-fuse package must be installed:
# yum install glusterfs-fuse
This package comes installed on every RHEL system. However, it is recommended to update to the latest available version from Red Hat Gluster Storage. To do this, the following RPM repository must be enabled:
# subscription-manager repos --enable=rh-gluster-3-client-for-rhel-7-server-rpms
If glusterfs-fuse is already installed on the nodes, ensure that the latest version is installed:
# yum update glusterfs-fuse
By default, SELinux does not allow writing from a pod to a remote Red Hat Gluster Storage server. To enable writing to Red Hat Gluster Storage volumes with SELinux on, run the following on each node running GlusterFS:
$ sudo setsebool -P virt_sandbox_use_fusefs on 1
$ sudo setsebool -P virt_use_fusefs on- 1
- The
-Poption makes the boolean persistent between reboots.
The virt_sandbox_use_fusefs boolean is defined by the docker-selinux package. If you get an error saying it is not defined, ensure that this package is installed.
If you use Atomic Host, the SELinux booleans are cleared when you upgrade Atomic Host. When you upgrade Atomic Host, you must set these boolean values again.
25.6.3. Dynamic Provisioning
To enable dynamic provisioning, first create a
StorageClassobject definition. The definition below is based on the minimum requirements needed for this example to work with OpenShift Container Platform. See Dynamic Provisioning and Creating Storage Classes for additional parameters and specification definitions.kind: StorageClass apiVersion: storage.k8s.io/v1 metadata: name: glusterfs provisioner: kubernetes.io/glusterfs parameters: resturl: "http://10.42.0.0:8080" 1 restauthenabled: "false" 2
From the OpenShift Container Platform master host, create the StorageClass:
# oc create -f gluster-storage-class.yaml storageclass "glusterfs" created
Create a PVC using the newly-created StorageClass. For example:
apiVersion: v1 kind: PersistentVolumeClaim metadata: name: gluster1 spec: accessModes: - ReadWriteMany resources: requests: storage: 30Gi storageClassName: glusterfsFrom the OpenShift Container Platform master host, create the PVC:
# oc create -f glusterfs-dyn-pvc.yaml persistentvolumeclaim "gluster1" created
View the PVC to see that the volume was dynamically created and bound to the PVC:
# oc get pvc NAME STATUS VOLUME CAPACITY ACCESSMODES STORAGECLASS AGE gluster1 Bound pvc-78852230-d8e2-11e6-a3fa-0800279cf26f 30Gi RWX glusterfs 42s
25.6.4. Using the Storage
At this point, you have a dynamically created GlusterFS volume bound to a PVC. You can now utilize this PVC in a pod.
Create the pod object definition:
apiVersion: v1 kind: Pod metadata: name: hello-openshift-pod labels: name: hello-openshift-pod spec: containers: - name: hello-openshift-pod image: openshift/hello-openshift ports: - name: web containerPort: 80 volumeMounts: - name: gluster-vol1 mountPath: /usr/share/nginx/html readOnly: false volumes: - name: gluster-vol1 persistentVolumeClaim: claimName: gluster1 1- 1
- The name of the PVC created in the previous step.
From the OpenShift Container Platform master host, create the pod:
# oc create -f hello-openshift-pod.yaml pod "hello-openshift-pod" created
View the pod. Give it a few minutes, as it might need to download the image if it does not already exist:
# oc get pods -o wide NAME READY STATUS RESTARTS AGE IP NODE hello-openshift-pod 1/1 Running 0 9m 10.38.0.0 node1
oc execinto the container and create an index.html file in themountPathdefinition of the pod:$ oc exec -ti hello-openshift-pod /bin/sh $ cd /usr/share/nginx/html $ echo 'Hello OpenShift!!!' > index.html $ ls index.html $ exit
Now
curlthe URL of the pod:# curl http://10.38.0.0 Hello OpenShift!!!
Delete the pod, recreate it, and wait for it to come up:
# oc delete pod hello-openshift-pod pod "hello-openshift-pod" deleted # oc create -f hello-openshift-pod.yaml pod "hello-openshift-pod" created # oc get pods -o wide NAME READY STATUS RESTARTS AGE IP NODE hello-openshift-pod 1/1 Running 0 9m 10.37.0.0 node1
Now
curlthe pod again and it should still have the same data as before. Note that its IP address may have changed:# curl http://10.37.0.0 Hello OpenShift!!!
Check that the index.html file was written to GlusterFS storage by doing the following on any of the nodes:
$ mount | grep heketi /dev/mapper/VolGroup00-LogVol00 on /var/lib/heketi type xfs (rw,relatime,seclabel,attr2,inode64,noquota) /dev/mapper/vg_f92e09091f6b20ab12b02a2513e4ed90-brick_1e730a5462c352835055018e1874e578 on /var/lib/heketi/mounts/vg_f92e09091f6b20ab12b02a2513e4ed90/brick_1e730a5462c352835055018e1874e578 type xfs (rw,noatime,seclabel,nouuid,attr2,inode64,logbsize=256k,sunit=512,swidth=512,noquota) /dev/mapper/vg_f92e09091f6b20ab12b02a2513e4ed90-brick_d8c06e606ff4cc29ccb9d018c73ee292 on /var/lib/heketi/mounts/vg_f92e09091f6b20ab12b02a2513e4ed90/brick_d8c06e606ff4cc29ccb9d018c73ee292 type xfs (rw,noatime,seclabel,nouuid,attr2,inode64,logbsize=256k,sunit=512,swidth=512,noquota) $ cd /var/lib/heketi/mounts/vg_f92e09091f6b20ab12b02a2513e4ed90/brick_d8c06e606ff4cc29ccb9d018c73ee292/brick $ ls index.html $ cat index.html Hello OpenShift!!!
25.7. Mounting Volumes on Privileged Pods
25.7.1. Overview
Persistent volumes can be mounted to pods with the privileged security context constraint (SCC) attached.
While this topic uses GlusterFS as a sample use-case for mounting volumes onto privileged pods, it can be adapted to use any supported storage plug-in.
25.7.2. Prerequisites
- An existing Gluster volume.
- glusterfs-fuse installed on all hosts.
Definitions for GlusterFS:
- Endpoints and services: gluster-endpoints-service.yaml and gluster-endpoints.yaml
- Persistent volumes: gluster-pv.yaml
- Persistent volume claims: gluster-pvc.yaml
- Privileged pods: gluster-S3-pod.yaml
-
A user with the cluster-admin role binding. For this guide, that user is called
admin.
25.7.3. Creating the Persistent Volume
Creating the PersistentVolume makes the storage accessible to users, regardless of projects.
As the admin, create the service, endpoint object, and persistent volume:
$ oc create -f gluster-endpoints-service.yaml $ oc create -f gluster-endpoints.yaml $ oc create -f gluster-pv.yaml
Verify that the objects were created:
$ oc get svc NAME CLUSTER_IP EXTERNAL_IP PORT(S) SELECTOR AGE gluster-cluster 172.30.151.58 <none> 1/TCP <none> 24s
$ oc get ep NAME ENDPOINTS AGE gluster-cluster 192.168.59.102:1,192.168.59.103:1 2m
$ oc get pv NAME LABELS CAPACITY ACCESSMODES STATUS CLAIM REASON AGE gluster-default-volume <none> 2Gi RWX Available 2d
25.7.4. Creating a Regular User
Adding a regular user to the privileged SCC (or to a group given access to the SCC) allows them to run privileged pods:
As the admin, add a user to the SCC:
$ oc adm policy add-scc-to-user privileged <username>
Log in as the regular user:
$ oc login -u <username> -p <password>
Then, create a new project:
$ oc new-project <project_name>
25.7.5. Creating the Persistent Volume Claim
As a regular user, create the PersistentVolumeClaim to access the volume:
$ oc create -f gluster-pvc.yaml -n <project_name>
Define your pod to access the claim:
Example 25.11. Pod Definition
apiVersion: v1 id: gluster-S3-pvc kind: Pod metadata: name: gluster-nginx-priv spec: containers: - name: gluster-nginx-priv image: fedora/nginx volumeMounts: - mountPath: /mnt/gluster 1 name: gluster-volume-claim securityContext: privileged: true volumes: - name: gluster-volume-claim persistentVolumeClaim: claimName: gluster-claim 2Upon pod creation, the mount directory is created and the volume is attached to that mount point.
As regular user, create a pod from the definition:
$ oc create -f gluster-S3-pod.yaml
Verify that the pod created successfully:
$ oc get pods NAME READY STATUS RESTARTS AGE gluster-S3-pod 1/1 Running 0 36m
It can take several minutes for the pod to create.
25.7.6. Verifying the Setup
25.7.6.1. Checking the Pod SCC
Export the pod configuration:
$ oc export pod <pod_name>
Examine the output. Check that
openshift.io/scchas the value ofprivileged:Example 25.12. Export Snippet
metadata: annotations: openshift.io/scc: privileged
25.7.6.2. Verifying the Mount
Access the pod and check that the volume is mounted:
$ oc rsh <pod_name> [root@gluster-S3-pvc /]# mount
Examine the output for the Gluster volume:
Example 25.13. Volume Mount
192.168.59.102:gv0 on /mnt/gluster type fuse.gluster (rw,relatime,user_id=0,group_id=0,default_permissions,allow_other,max_read=131072)
25.8. Switching an Integrated OpenShift Container Registry to GlusterFS
25.8.1. Overview
This topic reviews how to attach a GlusterFS volume to an integrated OpenShift Container Registry. This can be done with any of Container-Native Storage, Container-Ready Storage, or standalone Red Hat Gluster Storage. It is assumed that the registry has already been started and a volume has been created.
25.8.2. Prerequisites
- An existing registry deployed without configuring storage.
- An existing GlusterFS volume
- glusterfs-fuse installed on all schedulable nodes.
A user with the cluster-admin role binding.
- For this guide, that user is admin.
All oc commands are executed on the master node as the admin user.
25.8.3. Manually Provision the GlusterFS PersistentVolumeClaim
-
To enable static provisioning, first create a GlusterFS volume. See the Red Hat Gluster Storage Administration Guide for information on how to do this using the
glustercommand-line interface or the heketi project site for information on how to do this usingheketi-cli. For this example, the volume will be namedmyVol1. Define the following Service and Endpoints in
gluster-endpoints.yaml:--- apiVersion: v1 kind: Service metadata: name: glusterfs-cluster 1 spec: ports: - port: 1 --- apiVersion: v1 kind: Endpoints metadata: name: glusterfs-cluster 2 subsets: - addresses: - ip: 192.168.122.221 3 ports: - port: 1 4 - addresses: - ip: 192.168.122.222 5 ports: - port: 1 6 - addresses: - ip: 192.168.122.223 7 ports: - port: 1 8
From the OpenShift Container Platform master host, create the Service and Endpoints:
$ oc create -f gluster-endpoints.yaml service "glusterfs-cluster" created endpoints "glusterfs-cluster" created
Verify that the Service and Endpoints were created:
$ oc get services NAME CLUSTER_IP EXTERNAL_IP PORT(S) SELECTOR AGE glusterfs-cluster 172.30.205.34 <none> 1/TCP <none> 44s $ oc get endpoints NAME ENDPOINTS AGE docker-registry 10.1.0.3:5000 4h glusterfs-cluster 192.168.122.221:1,192.168.122.222:1,192.168.122.223:1 11s kubernetes 172.16.35.3:8443 4d
NoteEndpoints are unique per project. Each project accessing the GlusterFS volume needs its own Endpoints.
In order to access the volume, the container must run with either a user ID (UID) or group ID (GID) that has access to the file system on the volume. This information can be discovered in the following manner:
$ mkdir -p /mnt/glusterfs/myVol1 $ mount -t glusterfs 192.168.122.221:/myVol1 /mnt/glusterfs/myVol1 $ ls -lnZ /mnt/glusterfs/ drwxrwx---. 592 590 system_u:object_r:fusefs_t:s0 myVol1 1 2
Define the following PersistentVolume (PV) in
gluster-pv.yaml:apiVersion: v1 kind: PersistentVolume metadata: name: gluster-default-volume 1 annotations: pv.beta.kubernetes.io/gid: "590" 2 spec: capacity: storage: 2Gi 3 accessModes: 4 - ReadWriteMany glusterfs: endpoints: glusterfs-cluster 5 path: myVol1 6 readOnly: false persistentVolumeReclaimPolicy: Retain
- 1
- The name of the volume.
- 2
- The GID on the root of the GlusterFS volume.
- 3
- The amount of storage allocated to this volume.
- 4
accessModesare used as labels to match a PV and a PVC. They currently do not define any form of access control.- 5
- The Endpoints resource previously created.
- 6
- The GlusterFS volume that will be accessed.
From the OpenShift Container Platform master host, create the PV:
$ oc create -f gluster-pv.yaml
Verify that the PV was created:
$ oc get pv NAME LABELS CAPACITY ACCESSMODES STATUS CLAIM REASON AGE gluster-default-volume <none> 2147483648 RWX Available 2s
Create a PersistentVolumeClaim (PVC) that will bind to the new PV in
gluster-claim.yaml:apiVersion: v1 kind: PersistentVolumeClaim metadata: name: gluster-claim 1 spec: accessModes: - ReadWriteMany 2 resources: requests: storage: 1Gi 3
From the OpenShift Container Platform master host, create the PVC:
$ oc create -f gluster-claim.yaml
Verify that the PV and PVC are bound:
$ oc get pv NAME LABELS CAPACITY ACCESSMODES STATUS CLAIM REASON AGE gluster-pv <none> 1Gi RWX Available gluster-claim 37s $ oc get pvc NAME LABELS STATUS VOLUME CAPACITY ACCESSMODES AGE gluster-claim <none> Bound gluster-pv 1Gi RWX 24s
PVCs are unique per project. Each project accessing the GlusterFS volume needs its own PVC. PVs are not bound to a single project, so PVCs across multiple projects may refer to the same PV.
25.8.4. Attach the PersistentVolumeClaim to the Registry
Before moving forward, ensure that the docker-registry service is running.
$ oc get svc NAME CLUSTER_IP EXTERNAL_IP PORT(S) SELECTOR AGE docker-registry 172.30.167.194 <none> 5000/TCP docker-registry=default 18m
If either the docker-registry service or its associated pod is not running, refer back to the registry setup instructions for troubleshooting before continuing.
Then, attach the PVC:
$ oc volume deploymentconfigs/docker-registry --add --name=registry-storage -t pvc \
--claim-name=gluster-claim --overwriteSetting up the Registry provides more information on using an OpenShift Container Registry.
25.9. Binding Persistent Volumes by Labels
25.9.1. Overview
This topic provides an end-to-end example for binding persistent volume claims (PVCs) to persistent volumes (PVs), by defining labels in the PV and matching selectors in the PVC. This feature is available for all storage options. It is assumed that a OpenShift Container Platform cluster contains persistent storage resources which are available for binding by PVCs.
A Note on Labels and Selectors
Labels are an OpenShift Container Platform feature that support user-defined tags (key-value pairs) as part of an object’s specification. Their primary purpose is to enable the arbitrary grouping of objects by defining identical labels among them. These labels can then be targeted by selectors to match all objects with specified label values. It is this functionality we will take advantage of to enable our PVC to bind to our PV. For a more in-depth look at labels, see Pods and Services.
For this example, we will be using modified GlusterFS PV and PVC specifications. However, implementation of selectors and labels is generic across for all storage options. See the relevant storage option for your volume provider to learn more about its unique configuration.
25.9.1.1. Assumptions
It is assumed that you have:
- An existing OpenShift Container Platform cluster with at least one master and one node
- At least one supported storage volume
- A user with cluster-admin privileges
25.9.2. Defining Specifications
These specifications are tailored to GlusterFS. Consult the relevant storage option for your volume provider to learn more about its unique configuration.
25.9.2.1. Persistent Volume with Labels
Example 25.14. glusterfs-pv.yaml
apiVersion: v1 kind: PersistentVolume metadata: name: gluster-volume labels: 1 storage-tier: gold aws-availability-zone: us-east-1 spec: capacity: storage: 2Gi accessModes: - ReadWriteMany glusterfs: endpoints: glusterfs-cluster 2 path: myVol1 readOnly: false persistentVolumeReclaimPolicy: Retain
- 1
- Use labels to identify common attributes or characteristics shared among volumes. In this case, we defined the Gluster volume to have a custom attribute (key) named storage-tier with a value of gold assigned. A claim will be able to select a PV with
storage-tier=goldto match this PV. - 2
- Endpoints define the Gluster trusted pool and are discussed below.
25.9.2.2. Persistent Volume Claim with Selectors
A claim with a selector stanza (see example below) attempts to match existing, unclaimed, and non-prebound PVs. The existence of a PVC selector ignores a PV’s capacity. However, accessModes are still considered in the matching criteria.
It is important to note that a claim must match all of the key-value pairs included in its selector stanza. If no PV matches the claim, then the PVC will remain unbound (Pending). A PV can subsequently be created and the claim will automatically check for a label match.
Example 25.15. glusterfs-pvc.yaml
apiVersion: v1
kind: PersistentVolumeClaim
metadata:
name: gluster-claim
spec:
accessModes:
- ReadWriteMany
resources:
requests:
storage: 1Gi
selector: 1
matchLabels:
storage-tier: gold
aws-availability-zone: us-east-1- 1
- The selector stanza defines all labels necessary in a PV in order to match this claim.
25.9.2.3. Volume Endpoints
To attach the PV to the Gluster volume, endpoints should be configured before creating our objects.
Example 25.16. glusterfs-ep.yaml
apiVersion: v1
kind: Endpoints
metadata:
name: glusterfs-cluster
subsets:
- addresses:
- ip: 192.168.122.221
ports:
- port: 1
- addresses:
- ip: 192.168.122.222
ports:
- port: 125.9.2.4. Deploy the PV, PVC, and Endpoints
For this example, run the oc commands as a cluster-admin privileged user. In a production environment, cluster clients might be expected to define and create the PVC.
# oc create -f glusterfs-ep.yaml endpoints "glusterfs-cluster" created # oc create -f glusterfs-pv.yaml persistentvolume "gluster-volume" created # oc create -f glusterfs-pvc.yaml persistentvolumeclaim "gluster-claim" created
Lastly, confirm that the PV and PVC bound successfully.
# oc get pv,pvc NAME CAPACITY ACCESSMODES STATUS CLAIM REASON AGE gluster-volume 2Gi RWX Bound gfs-trial/gluster-claim 7s NAME STATUS VOLUME CAPACITY ACCESSMODES AGE gluster-claim Bound gluster-volume 2Gi RWX 7s
PVCs are local to a project, whereas PVs are a cluster-wide, global resource. Developers and non-administrator users may not have access to see all (or any) of the available PVs.
25.10. Using Storage Classes for Dynamic Provisioning
25.10.1. Overview
In these examples we will walk through a few scenarios of various configuratons of StorageClasses and Dynamic Provisioning using Google Cloud Platform Compute Engine (GCE). These examples assume some familiarity with Kubernetes, GCE and Persistent Disks and OpenShift Container Platform is installed and properly configured to use GCE.
25.10.2. Scenario 1: Basic Dynamic Provisioning with Two Types of StorageClasses
StorageClasses can be used to differentiate and delineate storage levels and usages. In this case, the cluster-admin or storage-admin sets up two distinct classes of storage in GCE.
-
slow: Cheap, efficient, and optimized for sequential data operations (slower reading and writing) -
fast: Optimized for higher rates of random IOPS and sustained throughput (faster reading and writing)
By creating these StorageClasses, the cluster-admin or storage-admin allows users to create claims requesting a particular level or service of StorageClass.
Example 25.17. StorageClass Slow Object Definitions
kind: StorageClass apiVersion: storage.k8s.io/v1 metadata: name: slow 1 provisioner: kubernetes.io/gce-pd 2 parameters: type: pd-standard 3 zone: us-east1-d 4
- 1
- Name of the StorageClass.
- 2
- The provisioner plug-in to be used. This is a required field for StorageClasses.
- 3
- PD type. This example uses
pd-standard, which has a slightly lower cost, rate of sustained IOPS, and throughput versuspd-ssd, which carries more sustained IOPS and throughput. - 4
- The zone is required.
Example 25.18. StorageClass Fast Object Definition
kind: StorageClass apiVersion: storage.k8s.io/v1 metadata: name: fast provisioner: kubernetes.io/gce-pd parameters: type: pd-ssd zone: us-east1-d
As a cluster-admin or storage-admin, save both definitions as YAML files. For example, slow-gce.yaml and fast-gce.yaml. Then create the StorageClasses.
# oc create -f slow-gce.yaml storageclass "slow" created # oc create -f fast-gce.yaml storageclass "fast" created # oc get storageclass NAME TYPE fast kubernetes.io/gce-pd slow kubernetes.io/gce-pd
cluster-admin or storage-admin users are responsible for relaying the correct StorageClass name to the correct users, groups, and projects.
As a regular user, create a new project:
# oc new-project rh-eng
Create the claim YAML definition, save it to a file (pvc-fast.yaml):
apiVersion: v1
kind: PersistentVolumeClaim
metadata:
name: pvc-engineering
spec:
accessModes:
- ReadWriteMany
resources:
requests:
storage: 10Gi
storageClassName: fast
Add the claim with the oc create command:
# oc create -f pvc-fast.yaml persistentvolumeclaim "pvc-engineering" created
Check to see if your claim is bound:
# oc get pvc NAME STATUS VOLUME CAPACITY ACCESSMODES AGE pvc-engineering Bound pvc-e9b4fef7-8bf7-11e6-9962-42010af00004 10Gi RWX 2m
Since this claim was created and bound in the rh-eng project, it can be shared by any user in the same project.
As a cluster-admin or storage-admin user, view the recent dynamically provisioned Persistent Volume (PV).
# oc get pv NAME CAPACITY ACCESSMODES RECLAIMPOLICY STATUS CLAIM REASON AGE pvc-e9b4fef7-8bf7-11e6-9962-42010af00004 10Gi RWX Delete Bound rh-eng/pvc-engineering 5m
Notice the RECLAIMPOLICY is Delete by default for all dynamically provisioned volumes. This means the volume only lasts as long as the claim still exists in the system. If you delete the claim, the volume is also deleted and all data on the volume is lost.
Finally, check the GCE console. The new disk has been created and is ready for use.
kubernetes-dynamic-pvc-e9b4fef7-8bf7-11e6-9962-42010af00004 SSD persistent disk 10 GB us-east1-d
Pods can now reference the persistent volume claim and start using the volume.
25.10.3. Scenario 2: How to enable Default StorageClass behavior for a Cluster
In this example, a cluster-admin or storage-admin enables a default storage class for all other users and projects that do not implicitly specify a StorageClass in their claim. This is useful for a cluster-admin or storage-admin to provide easy management of a storage volume without having to set up or communicate specialized StorageClasses across the cluster.
This example builds upon Section 25.10.2, “Scenario 1: Basic Dynamic Provisioning with Two Types of StorageClasses”. The cluster-admin or storage-admin will create another StorageClass for designation as the defaultStorageClass.
Example 25.19. Default StorageClass Object Definition
kind: StorageClass apiVersion: storage.k8s.io/v1 metadata: name: generic 1 annotations: storageclass.kubernetes.io/is-default-class: "true" 2 provisioner: kubernetes.io/gce-pd parameters: type: pd-standard zone: us-east1-d
As a cluster-admin or storage-admin save the definition to a YAML file (generic-gce.yaml), then create the StorageClasses:
# oc create -f generic-gce.yaml storageclass "generic" created # oc get storageclass NAME TYPE generic kubernetes.io/gce-pd fast kubernetes.io/gce-pd slow kubernetes.io/gce-pd
As a regular user, create a new claim definition without any StorageClass requirement and save it to a file (generic-pvc.yaml).
Example 25.20. default Storage Claim Object Definition
apiVersion: v1
kind: PersistentVolumeClaim
metadata:
name: pvc-engineering2
spec:
accessModes:
- ReadWriteMany
resources:
requests:
storage: 5GiExecute it and check the claim is bound:
# oc create -f generic-pvc.yaml
persistentvolumeclaim "pvc-engineering2" created
3s
# oc get pvc
NAME STATUS VOLUME CAPACITY ACCESSMODES AGE
pvc-engineering Bound pvc-e9b4fef7-8bf7-11e6-9962-42010af00004 10Gi RWX 41m
pvc-engineering2 Bound pvc-a9f70544-8bfd-11e6-9962-42010af00004 5Gi RWX 7s 1- 1
pvc-engineering2is bound to a dynamically provisioned Volume by default.
As a cluster-admin or storage-admin, view the Persistent Volumes defined so far:
# oc get pv NAME CAPACITY ACCESSMODES RECLAIMPOLICY STATUS CLAIM REASON AGE pvc-a9f70544-8bfd-11e6-9962-42010af00004 5Gi RWX Delete Bound rh-eng/pvc-engineering2 5m 1 pvc-ba4612ce-8b4d-11e6-9962-42010af00004 5Gi RWO Delete Bound mytest/gce-dyn-claim1 21h pvc-e9b4fef7-8bf7-11e6-9962-42010af00004 10Gi RWX Delete Bound rh-eng/pvc-engineering 46m 2
- 1
- This PV was bound to our default dynamic volume from the default StorageClass.
- 2
- This PV was bound to our first PVC from Section 25.10.2, “Scenario 1: Basic Dynamic Provisioning with Two Types of StorageClasses” with our fast StorageClass.
Create a manually provisioned disk using GCE (not dynamically provisioned). Then create a Persistent Volume that connects to the new GCE disk (pv-manual-gce.yaml).
Example 25.21. Manual PV Object Defition
apiVersion: v1 kind: PersistentVolume metadata: name: pv-manual-gce spec: capacity: storage: 35Gi accessModes: - ReadWriteMany gcePersistentDisk: readOnly: false pdName: the-newly-created-gce-PD fsType: ext4
Execute the object definition file:
# oc create -f pv-manual-gce.yaml
Now view the PVs again. Notice that a pv-manual-gce volume is Available.
# oc get pv NAME CAPACITY ACCESSMODES RECLAIMPOLICY STATUS CLAIM REASON AGE pv-manual-gce 35Gi RWX Retain Available 4s pvc-a9f70544-8bfd-11e6-9962-42010af00004 5Gi RWX Delete Bound rh-eng/pvc-engineering2 12m pvc-ba4612ce-8b4d-11e6-9962-42010af00004 5Gi RWO Delete Bound mytest/gce-dyn-claim1 21h pvc-e9b4fef7-8bf7-11e6-9962-42010af00004 10Gi RWX Delete Bound rh-eng/pvc-engineering 53m
Now create another claim identical to the generic-pvc.yaml PVC definition but change the name and do not set a storage class name.
Example 25.22. Claim Object Definition
apiVersion: v1
kind: PersistentVolumeClaim
metadata:
name: pvc-engineering3
spec:
accessModes:
- ReadWriteMany
resources:
requests:
storage: 15GiBecause default StorageClass is enabled in this instance, the manually created PV does not satisfy the claim request. The user receives a new dynamically provisioned Persistent Volume.
# oc get pvc NAME STATUS VOLUME CAPACITY ACCESSMODES AGE pvc-engineering Bound pvc-e9b4fef7-8bf7-11e6-9962-42010af00004 10Gi RWX 1h pvc-engineering2 Bound pvc-a9f70544-8bfd-11e6-9962-42010af00004 5Gi RWX 19m pvc-engineering3 Bound pvc-6fa8e73b-8c00-11e6-9962-42010af00004 15Gi RWX 6s
Since the default StorageClass is enabled on this system, for the manually created Persistent Volume to get bound by the above claim and not have a new dynamic provisioned volume be bound, the PV would need to have been created in the default StorageClass.
Since the default StorageClass is enabled on this system, you would need to create the PV in the default StorageClass for the manually created Persistent Volume to get bound to the above claim and not have a new dynamic provisioned volume bound to the claim.
To fix this, the cluster-admin or storage-admin user simply needs to create another GCE disk or delete the first manual PV and use a PV object definition that assigns a StorageClass name (pv-manual-gce2.yaml) if necessary:
Example 25.23. Manual PV Spec with default StorageClass name
apiVersion: v1
kind: PersistentVolume
metadata:
name: pv-manual-gce2
spec:
capacity:
storage: 35Gi
accessModes:
- ReadWriteMany
gcePersistentDisk:
readOnly: false
pdName: the-newly-created-gce-PD
fsType: ext4
storageClassName: generic 1- 1
- The name for previously created generic StorageClass.
Execute the object definition file:
# oc create -f pv-manual-gce2.yaml
List the PVs:
# oc get pv NAME CAPACITY ACCESSMODES RECLAIMPOLICY STATUS CLAIM REASON AGE pv-manual-gce 35Gi RWX Retain Available 4s 1 pv-manual-gce2 35Gi RWX Retain Bound rh-eng/pvc-engineering3 4s 2 pvc-a9f70544-8bfd-11e6-9962-42010af00004 5Gi RWX Delete Bound rh-eng/pvc-engineering2 12m pvc-ba4612ce-8b4d-11e6-9962-42010af00004 5Gi RWO Delete Bound mytest/gce-dyn-claim1 21h pvc-e9b4fef7-8bf7-11e6-9962-42010af00004 10Gi RWX Delete Bound rh-eng/pvc-engineering 53m
Notice that all dynamically provisioned volumes by default have a RECLAIMPOLICY of Delete. Once the PVC dynamically bound to the PV is deleted, the GCE volume is deleted and all data is lost. However, the manually created PV has a default RECLAIMPOLICY of Retain.
25.11. Using Storage Classes for Existing Legacy Storage
25.11.1. Overview
In this example, a legacy data volume exists and a cluster-admin or storage-admin needs to make it available for consumption in a particular project. Using StorageClasses decreases the likelihood of other users and projects gaining access to this volume from a claim because the claim would have to have an exact matching value for the StorageClass name. This example also disables dynamic provisioning. This example assumes:
- Some familiarity with OpenShift Container Platform, GCE, and Persistent Disks
- OpenShift Container Platform is properly configured to use GCE.
25.11.1.1. Scenario 1: Link StorageClass to existing Persistent Volume with Legacy Data
As a cluster-admin or storage-admin, define and create the StorageClass for historical financial data.
Example 25.24. StorageClass finance-history Object Definitions
kind: StorageClass apiVersion: storage.k8s.io/v1 metadata: name: finance-history 1 provisioner: no-provisioning 2 parameters: 3
Save the definitions to a YAML file (finance-history-storageclass.yaml) and create the StorageClass.
# oc create -f finance-history-storageclass.yaml storageclass "finance-history" created # oc get storageclass NAME TYPE finance-history no-provisioning
cluster-admin or storage-admin users are responsible for relaying the correct StorageClass name to the correct users, groups, and projects.
The StorageClass exists. A cluster-admin or storage-admin can create the Persistent Volume (PV) for use with the StorageClass. Create a manually provisioned disk using GCE (not dynamically provisioned) and a Persistent Volume that connects to the new GCE disk (gce-pv.yaml).
Example 25.25. Finance History PV Object
apiVersion: v1 kind: PersistentVolume metadata: name: pv-finance-history spec: capacity: storage: 35Gi accessModes: - ReadWriteMany gcePersistentDisk: readOnly: false pdName: the-existing-PD-volume-name-that-contains-the-valuable-data 1 fsType: ext4 storageClassName: finance-history 2
As a cluster-admin or storage-admin, create and view the PV.
# oc create -f gce-pv.yaml persistentvolume "pv-finance-history" created # oc get pv NAME CAPACITY ACCESSMODES RECLAIMPOLICY STATUS CLAIM REASON AGE pv-finance-history 35Gi RWX Retain Available 2d
Notice you have a pv-finance-history Available and ready for consumption.
As a user, create a Persistent Volume Claim (PVC) as a YAML file and specify the correct StorageClass name:
Example 25.26. Claim for finance-history Object Definition
apiVersion: v1
kind: PersistentVolumeClaim
metadata:
name: pvc-finance-history
spec:
accessModes:
- ReadWriteMany
resources:
requests:
storage: 20Gi
storageClassName: finance-history 1- 1
- The StorageClass name, that must match exactly or the claim will go unbound until it is deleted or another StorageClass is created that matches the name.
Create and view the PVC and PV to see if it is bound.
# oc create -f pvc-finance-history.yaml persistentvolumeclaim "pvc-finance-history" created # oc get pvc NAME STATUS VOLUME CAPACITY ACCESSMODES AGE pvc-finance-history Bound pv-finance-history 35Gi RWX 9m # oc get pv (cluster/storage-admin) NAME CAPACITY ACCESSMODES RECLAIMPOLICY STATUS CLAIM REASON AGE pv-finance-history 35Gi RWX Retain Bound default/pvc-finance-history 5m
You can use StorageClasses in the same cluster for both legacy data (no dynamic provisioning) and with dynamic provisioning.
25.12. Configuring Azure Blob Storage for Integrated Docker Registry
25.12.1. Overview
This topic reviews how to configure Microsoft Azure Blob Storage for OpenShift integrated Docker registry.
25.12.2. Before You Begin
- Create a storage container using Microsoft Azure Portal, Microsoft Azure CLI, or Microsoft Azure Storage Explorer. Keep a note of the storage account name, storage account key and container name.
- Deploy the integrated Docker registry if it is not deployed.
25.12.3. Overriding Registry Configuration
To create a new registry pod and replace the old pod automatically:
Create a new registry configuration file called registryconfig.yaml and add the following information:
version: 0.1 log: level: debug http: addr: :5000 storage: cache: blobdescriptor: inmemory delete: enabled: true azure: 1 accountname: azureblobacc accountkey: azureblobacckey container: azureblobname realm: core.windows.net 2 auth: openshift: realm: openshift middleware: registry: - name: openshift repository: - name: openshift options: acceptschema2: false pullthrough: true enforcequota: false projectcachettl: 1m blobrepositorycachettl: 10m storage: - name: openshiftCreate a new registry configuration:
$ oc create secret generic registry-config --from-file=config.yaml=registryconfig.yaml
Add the secret:
$ oc volume dc/docker-registry --add --type=secret \ --secret-name=registry-config -m /etc/docker/registry/Set the
REGISTRY_CONFIGURATION_PATHenvironment variable:$ oc set env dc/docker-registry \ REGISTRY_CONFIGURATION_PATH=/etc/docker/registry/config.yamlIf you already created a registry configuration:
Delete the secret:
$ oc delete secret registry-config
Create a new registry configuration:
$ oc create secret generic registry-config --from-file=config.yaml=registryconfig.yaml
Update the configuration by starting a new rollout:
$ oc rollout latest docker-registry
Chapter 26. Working with HTTP Proxies
26.1. Overview
Production environments can deny direct access to the Internet and instead have an HTTP or HTTPS proxy available. Configuring OpenShift Container Platform to use these proxies can be as simple as setting standard environment variables in configuration or JSON files. This can be done during an advanced installation or configured after installation.
The proxy configuration must be the same on each host in the cluster. Therefore, when setting up the proxy or modifying it, you must update the files on each OpenShift Container Platform host to the same values. Then, you must restart OpenShift Container Platform services on each host in the cluster.
The NO_PROXY, HTTP_PROXY, and HTTPS_PROXY environment variables are found in each host’s /etc/sysconfig/atomic-openshift-master-api or /etc/sysconfig/atomic-openshift-master-controllers files and /etc/sysconfig/atomic-openshift-node file.
26.2. Configuring NO_PROXY
The NO_PROXY environment variable lists all of the OpenShift Container Platform components and all IP addresses that are managed by OpenShift Container Platform.
On the OpenShift service accepting the CIDR, NO_PROXY accepts a comma-separated list of hosts, IP addresses, or IP ranges in CIDR format:
- For master hosts
- Node host name
- Master IP or host name
- IP address of etcd hosts
- For node hosts
- Master IP or host name
- For the Docker service
- Registry service IP and host name
-
Registry service URL
docker-registry.default.svc.cluster.local - Registry route host name (if created)
When using Docker, Docker accepts a comma-separated list of hosts, domain extensions, or IP addresses, but does not accept IP ranges in CIDR format, which are only accepted by OpenShift services. The `no_proxy' variable should contain a comma-separated list of domain extensions that the proxy should not be used for.
For example, if no_proxy is set to .school.edu, the proxy will not be used to retrieve documents from the specific school.
NO_PROXY also includes the SDN network and service IP addresses as found in the master-config.yaml file.
/etc/origin/master/master-config.yaml
networkConfig:
clusterNetworks:
- cidr: 10.1.0.0/16
hostSubnetLength: 9
serviceNetworkCIDR: 172.30.0.0/16
OpenShift Container Platform does not accept * as a wildcard attached to a domain suffix. For example, the following would be accepted:
NO_PROXY=.example.com
However, the following would not be:
NO_PROXY=*.example.com
The only wildcard NO_PROXY accepts is a single * character, which matches all hosts, and effectively disables the proxy.
Each name in this list is matched as either a domain which contains the host name as a suffix, or the host name itself.
When scaling up nodes, use a domain name rather than a list of hostnames.
For instance, example.com would match example.com, example.com:80, and www.example.com.
26.3. Configuring Hosts for Proxies
Edit the proxy environment variables in the OpenShift Container Platform control files. Ensure all of the files in the cluster are correct.
HTTP_PROXY=http://<user>:<password>@<ip_addr>:<port>/ HTTPS_PROXY=https://<user>:<password>@<ip_addr>:<port>/ NO_PROXY=master.hostname.example.com,10.1.0.0/16,172.30.0.0/16 1- 1
- Supports host names and CIDRs. Must include the SDN network and service IP ranges
10.1.0.0/16,172.30.0.0/16by default.
Restart the master or node host as appropriate:
# systemctl restart atomic-openshift-master-api atomic-openshift-master-controllers # systemctl restart atomic-openshift-node
For multi-master installations:
# systemctl restart atomic-openshift-master-controllers # systemctl restart atomic-openshift-master-api
26.4. Configuring Hosts for Proxies Using Ansible
During advanced installations, the NO_PROXY, HTTP_PROXY, and HTTPS_PROXY environment variables can be configured using the openshift_no_proxy, openshift_http_proxy, and openshift_https_proxy parameters, which are configurable in the inventory file.
Example Proxy Configuration with Ansible
# Global Proxy Configuration # These options configure HTTP_PROXY, HTTPS_PROXY, and NOPROXY environment # variables for docker and master services. openshift_http_proxy=http://<user>:<password>@<ip_addr>:<port> openshift_https_proxy=https://<user>:<password>@<ip_addr>:<port> openshift_no_proxy='.hosts.example.com,some-host.com' # # Most environments do not require a proxy between OpenShift masters, nodes, and # etcd hosts. So automatically add those host names to the openshift_no_proxy list. # If all of your hosts share a common domain you may wish to disable this and # specify that domain above. # openshift_generate_no_proxy_hosts=True
There are additional proxy settings that can be configured for builds using Ansible parameters. For example:
The openshift_builddefaults_git_http_proxy and openshift_builddefaults_git_https_proxy parameters allow you to use a proxy for Git cloning
The openshift_builddefaults_http_proxy and openshift_builddefaults_https_proxy parameters can make environment variables available to the Docker build strategy and Custom build strategy processes.
26.5. Proxying Docker Pull
OpenShift Container Platform node hosts need to perform push and pull operations to Docker registries. If you have a registry that does not need a proxy for nodes to access, include the NO_PROXY parameter with:
- the registry’s host name,
- the registry service’s IP address, and
- the service name.
This blacklists that registry, leaving the external HTTP proxy as the only option.
Retrieve the registry service’s IP address
docker_registy_ipby running:$ oc describe svc/docker-registry -n default Name: docker-registry Namespace: default Labels: docker-registry=default Selector: docker-registry=default Type: ClusterIP IP: 172.30.163.183 1 Port: 5000-tcp 5000/TCP Endpoints: 10.1.0.40:5000 Session Affinity: ClientIP No events.- 1
- Registry service IP.
Edit the /etc/sysconfig/docker file and add the
NO_PROXYvariables in shell format, replacing<docker_registry_ip>with the IP address from the previous step.HTTP_PROXY=http://<user>:<password>@<ip_addr>:<port>/ HTTPS_PROXY=https://<user>:<password>@<ip_addr>:<port>/ NO_PROXY=master.hostname.example.com,<docker_registry_ip>,docker-registry.default.svc.cluster.local
Restart the Docker service:
# systemctl restart docker
26.6. Using Maven Behind a Proxy
Using Maven with proxies requires using the HTTP_PROXY_NONPROXYHOSTS variable.
See the Red Hat JBoss Enterprise Application Platform for OpenShift documentation for information about configuring your OpenShift Container Platform environment for Red Hat JBoss Enterprise Application Platform, including the step for setting up Maven behind a proxy.
26.7. Configuring S2I Builds for Proxies
S2I builds fetch dependencies from various locations. You can use a .s2i/environment file to specify simple shell variables and OpenShift Container Platform will react accordingly when seeing build images.
The following are the supported proxy environment variables with example values:
HTTP_PROXY=http://USERNAME:PASSWORD@10.0.1.1:8080/ HTTPS_PROXY=https://USERNAME:PASSWORD@10.0.0.1:8080/ NO_PROXY=master.hostname.example.com
26.8. Configuring Default Templates for Proxies
The example templates available in OpenShift Container Platform by default do not include settings for HTTP proxies. For existing applications based on these templates, modify the source section of the application’s build configuration and add proxy settings:
...
source:
type: Git
git:
uri: https://github.com/openshift/ruby-hello-world
httpProxy: http://proxy.example.com
httpsProxy: https://proxy.example.com
noProxy: somedomain.com, otherdomain.com
...This is similar to the process for using proxies for Git cloning.
26.9. Setting Proxy Environment Variables in Pods
You can set the NO_PROXY, HTTP_PROXY, and HTTPS_PROXY environment variables in the templates.spec.containers stanza in a deployment configuration to pass proxy connection information. The same can be done for configuring a Pod’s proxy at runtime:
...
containers:
- env:
- name: "HTTP_PROXY"
value: "http://<user>:<password>@<ip_addr>:<port>"
...
You can also use the oc set env command to update an existing deployment configuration with a new environment variable:
$ oc set env dc/frontend HTTP_PROXY=http://<user>:<password>@<ip_addr>:<port>
If you have a ConfigChange trigger set up in your OpenShift Container Platform instance, the changes happen automatically. Otherwise, manually redeploy your application for the changes to take effect.
26.10. Git Repository Access
If your Git repository can only be accessed using a proxy, you can define the proxy to use in the source section of the BuildConfig. You can configure both a HTTP and HTTPS proxy to use. Both fields are optional. Domains for which no proxying should be performed can also be specified via the NoProxy field.
Your source URI must use the HTTP or HTTPS protocol for this to work.
source:
git:
uri: "https://github.com/openshift/ruby-hello-world"
httpProxy: http://proxy.example.com
httpsProxy: https://proxy.example.com
noProxy: somedomain.com, otherdomain.comChapter 27. Configuring Global Build Defaults and Overrides
27.1. Overview
Developers can define settings in specific build configurations within their projects, such as configuring a proxy for Git cloning. Rather than requiring developers to define certain settings in each build configuration, administrators can use admission control plug-ins to configure global build defaults and overrides that automatically use these settings in any build.
The settings from these plug-ins are used only during the build process but are not set in the build configurations or builds themselves. Configuring the settings through the plug-ins allows administrators to change the global configuration at any time, and any builds that are re-run from existing build configurations or builds are assigned the new settings.
-
The
BuildDefaultsadmission control plug-in allows administrators to set global defaults for settings such as the Git HTTP and HTTPS proxy, as well as default environment variables. These defaults do not overwrite values that have been configured for a specific build. However, if those values are not present on the build definition, they are set to the default value. The
BuildOverridesadmission control plug-in allows administrators to override a setting in a build, regardless of the value stored in the build. The plug-in currently supports overriding theforcePullflag on a build strategy to force refreshing the local image from the registry during a build. Refreshing ensures that users can build only with images that they are allowed to pull. The plug-in can also be configured to apply a set of image labels to every built image.For information on configuring the
BuildOverridesadmission control plug-in and the values you can override, see Manually Setting Global Build Overrides.
The default node selectors and the BuildDefaults or BuildOverride admission plug-ins work together as follows:
-
The default project node selector, defined in the
projectConfig.defaultNodeSelectorfield in the master configuration file, is applied to the pods created in all projects without a specifiednodeSelectorvalue. These settings are applied to builds withnodeSelector="null"on clusters where theBuildDefaultsorBuildOverridenodeselector is not set. -
The cluster-wide default build node selector,
admissionConfig.pluginConfig.BuildDefaults.configuration.nodeSelector, is applied only if thenodeSelector="null"parameter is set in the build configuration.nodeSelector=nullis the default setting. With a default project or cluster-wide node selector, the default setting is added as an AND to the build node selector, which is set by the
BuildDefaultsorBuildOverrideadmission plug-ins. These settings mean that the build will be scheduled only to nodes that satisfy theBuildOverridesnode selector AND the project default node selector.NoteYou can define a hard limit on how long build pods can run by using the RunOnceDuration plugin.
27.2. Setting Global Build Defaults
You can set global build defaults two ways:
27.2.1. Configuring Global Build Defaults with Ansible
During advanced installations, the BuildDefaults plug-in can be configured using the following parameters, which are configurable in the inventory file:
-
openshift_builddefaults_http_proxy -
openshift_builddefaults_https_proxy -
openshift_builddefaults_no_proxy -
openshift_builddefaults_git_http_proxy -
openshift_builddefaults_git_https_proxy -
openshift_builddefaults_git_no_proxy -
openshift_builddefaults_image_labels -
openshift_builddefaults_nodeselectors -
openshift_builddefaults_annotations -
openshift_builddefaults_resources_requests_cpu -
openshift_builddefaults_resources_requests_memory -
openshift_builddefaults_resources_limits_cpu -
openshift_builddefaults_resources_limits_memory
Example 27.1. Example Build Defaults Configuration with Ansible
# These options configure the BuildDefaults admission controller which injects
# configuration into Builds. Proxy related values will default to the global proxy
# config values. You only need to set these if they differ from the global proxy settings.
openshift_builddefaults_http_proxy=http://USER:PASSWORD@HOST:PORT
openshift_builddefaults_https_proxy=https://USER:PASSWORD@HOST:PORT
openshift_builddefaults_no_proxy=mycorp.com
openshift_builddefaults_git_http_proxy=http://USER:PASSWORD@HOST:PORT
openshift_builddefaults_git_https_proxy=https://USER:PASSWORD@HOST:PORT
openshift_builddefaults_git_no_proxy=mycorp.com
openshift_builddefaults_image_labels=[{'name':'imagelabelname1','value':'imagelabelvalue1'}]
openshift_builddefaults_nodeselectors={'nodelabel1':'nodelabelvalue1'}
openshift_builddefaults_annotations={'annotationkey1':'annotationvalue1'}
openshift_builddefaults_resources_requests_cpu=100m
openshift_builddefaults_resources_requests_memory=256Mi
openshift_builddefaults_resources_limits_cpu=1000m
openshift_builddefaults_resources_limits_memory=512Mi
# Or you may optionally define your own build defaults configuration serialized as json
#openshift_builddefaults_json='{"BuildDefaults":{"configuration":{"apiVersion":"v1","env":[{"name":"HTTP_PROXY","value":"http://proxy.example.com.redhat.com:3128"},{"name":"NO_PROXY","value":"ose3-master.example.com"}],"gitHTTPProxy":"http://proxy.example.com:3128","gitNoProxy":"ose3-master.example.com","kind":"BuildDefaultsConfig"}}}'27.2.2. Manually Setting Global Build Defaults
To configure the BuildDefaults plug-in:
Add a configuration for it in the /etc/origin/master/master-config.yaml file on the master nodes:
admissionConfig: pluginConfig: BuildDefaults: configuration: apiVersion: v1 kind: BuildDefaultsConfig gitHTTPProxy: http://my.proxy:8080 1 gitHTTPSProxy: https://my.proxy:8443 2 gitNoProxy: somedomain.com, otherdomain.com 3 env: - name: HTTP_PROXY 4 value: http://my.proxy:8080 - name: HTTPS_PROXY 5 value: https://my.proxy:8443 - name: BUILD_LOGLEVEL 6 value: 4 - name: CUSTOM_VAR 7 value: custom_value imageLabels: - name: url 8 value: https://containers.example.org - name: vendor value: ExampleCorp Ltd. nodeSelector: 9 key1: value1 key2: value2 annotations: 10 key1: value1 key2: value2 resources: 11 requests: cpu: "100m" memory: "256Mi" limits: cpu: "100m" memory: "256Mi"- 1
- Sets the HTTP proxy to use when cloning source code from a Git repository.
- 2
- Sets the HTTPS proxy to use when cloning source code from a Git repository.
- 3
- Sets the list of domains for which proxying should not be performed.
- 4
- Default environment variable that sets the HTTP proxy to use during the build. This can be used for downloading dependencies during the assemble and build phases.
- 5
- Default environment variable that sets the HTTPS proxy to use during the build. This can be used for downloading dependencies during the assemble and build phases.
- 6
- Default environment variable that sets the build log level during the build.
- 7
- Additional default environment variable that will be added to every build.
- 8
- Labels to be applied to every image built. Users can override these in their
BuildConfig. - 9
- Build pods will only run on nodes with the
key1=value2andkey2=value2labels. Users can define a different set ofnodeSelectorsfor their builds in which case these values will be ignored. - 10
- Build pods will have these annotations added to them.
- 11
- Sets the default resources to the build pod if the
BuildConfigdoes not have related resource defined.
Restart the master services for the changes to take effect:
# systemctl restart atomic-openshift-master-api atomic-openshift-master-controllers
27.3. Setting Global Build Overrides
You can set global build overrides two ways:
27.3.1. Configuring Global Build Overrides with Ansible
During advanced installations, the BuildOverrides plug-in can be configured using the following parameters, which are configurable in the inventory file:
-
openshift_buildoverrides_force_pull -
openshift_buildoverrides_image_labels -
openshift_buildoverrides_nodeselectors -
openshift_buildoverrides_annotations -
openshift_buildoverrides_tolerations
Example 27.2. Example Build Overrides Configuration with Ansible
# These options configure the BuildOverrides admission controller which injects
# configuration into Builds.
openshift_buildoverrides_force_pull=true
openshift_buildoverrides_image_labels=[{'name':'imagelabelname1','value':'imagelabelvalue1'}]
openshift_buildoverrides_nodeselectors={'nodelabel1':'nodelabelvalue1'}
openshift_buildoverrides_annotations={'annotationkey1':'annotationvalue1'}
openshift_buildoverrides_tolerations=[{'key':'mykey1','value':'myvalue1','effect':'NoSchedule','operator':'Equal'}]
# Or you may optionally define your own build overrides configuration serialized as json
#openshift_buildoverrides_json='{"BuildOverrides":{"configuration":{"apiVersion":"v1","kind":"BuildOverridesConfig","forcePull":"true","tolerations":[{'key':'mykey1','value':'myvalue1','effect':'NoSchedule','operator':'Equal'}]}}}'27.3.2. Manually Setting Global Build Overrides
To configure the BuildOverrides plug-in:
Add a configuration for it in the /etc/origin/master/master-config.yaml file on masters:
admissionConfig: pluginConfig: BuildOverrides: configuration: apiVersion: v1 kind: BuildOverridesConfig forcePull: true 1 imageLabels: - name: distribution-scope 2 value: private nodeSelector: 3 key1: value1 key2: value2 annotations: 4 key1: value1 key2: value2 tolerations: 5 - key: mykey1 value: myvalue1 effect: NoSchedule operator: Equal - key: mykey2 value: myvalue2 effect: NoExecute operator: Equal- 1
- Force all builds to pull their builder image and any source images before starting the build.
- 2
- Additional labels to be applied to every image built. Labels defined here take precedence over labels defined in
BuildConfig. - 3
- Build pods will only run on nodes with the
key1=value2andkey2=value2labels. Users can define additional key/value labels to further constrain the set of nodes a build runs on, but the node must have at least these labels. - 4
- Build pods will have these annotations added to them.
- 5
- Build pods will have any existing tolerations overridden by those listed here.
Restart the master services for the changes to take effect:
# systemctl restart atomic-openshift-master-api atomic-openshift-master-controllers
Chapter 28. Configuring Pipeline Execution
28.1. Overview
The first time a user creates a build configuration using the Pipeline build strategy, OpenShift Container Platform looks for a template named jenkins-ephemeral in the openshift namespace and instantiates it within the user’s project. The jenkins-ephemeral template that ships with OpenShift Container Platform creates, upon instantiation:
- a deployment configuration for Jenkins using the official OpenShift Container Platform Jenkins image
- a service and route for accessing the Jenkins deployment
- a new Jenkins service account
- rolebindings to grant the service account edit access to the project
Cluster administrators can control what is created by either modifying the content of the built-in template, or by editing the cluster configuration to direct the cluster to a different template location.
To modify the content of the default template:
$ oc edit template jenkins-ephemeral -n openshift
To use a different template, such as the jenkins-persistent template which uses persistent storage for Jenkins, add the following to your master configuration file:
jenkinsPipelineConfig: autoProvisionEnabled: true 1 templateNamespace: openshift 2 templateName: jenkins-persistent 3 serviceName: jenkins-persistent-svc 4 parameters: 5 key1: value1 key2: value2
- 1
- Defaults to
trueif unspecified. Iffalse, then no template will be instantiated. - 2
- Namespace containing the template to be instantiated.
- 3
- Name of the template to be instantiated.
- 4
- Name of the service to be created by the template upon instantiation.
- 5
- Optional values to pass to the template during instantiation.
When a Pipeline build configuration is created, OpenShift Container Platform looks for a Service matching serviceName. This means serviceName must be chosen such that it is unique in the project. If no Service is found, OpenShift Container Platform instantiates the jenkinsPipelineConfig template. If this is not desirable (if you would like to use a Jenkins server external to OpenShift Container Platform, for example), there are a few things you can do, depending on who you are.
-
If you are a cluster administrator, simply set
autoProvisionEnabledtofalse. This will disable autoprovisioning across the cluster. -
If you are an unpriviledged user, a Service must be created for OpenShift Container Platform to use. The service name must match the cluster configuration value of
serviceNamein thejenkinsPipelineConfig. The default value isjenkins. If you are disabling autoprovisioning because you are running a Jenkins server outside your project, it is recommended that you point this new service to your existing Jenkins server. See: Integrating External Services
The latter option could also be used to disable autoprovisioning in select projects only.
28.2. OpenShift Jenkins Client Plugin
The OpenShift Jenkins Client Plugin is a Jenkins plugin which aims to provide a readable, concise, comprehensive, and fluent Jenkins Pipeline syntax for rich interactions with an OpenShift API Server. The plugin leverages the OpenShift command line tool (oc) which must be available on the nodes executing the script.
For more information about installing and configuring the plugin, use the links provided below that reference the official documentation.
Are you a developer looking for information about using this plugin? If so, see OpenShift Pipeline Overview.
28.3. OpenShift Jenkins Sync Plugin
This Jenkins plugin keeps OpenShift BuildConfig and Build objects in sync with Jenkins Jobs and Builds.
The OpenShift jenkins Sync Plugin provides the following:
- Dynamic job/run creation in Jenkins.
- Dynamic creation of slave pod templates from ImageStreams, ImageStreamTags, or ConfigMaps.
- Injecting of environment variables.
- Pipeline visualization in the OpenShift web console.
- Integration with the Jenkins git plugin, which passes commit information from OpenShift builds to the Jenkins git plugin.
For more information about this plugin, see:
Chapter 29. Configuring Route Timeouts
After installing OpenShift Container Platform and deploying a router, you can configure the default timeouts for an existing route when you have services in need of a low timeout, as required for Service Level Availability (SLA) purposes, or a high timeout, for cases with a slow back end.
Using the oc annotate command, add the timeout to the route:
# oc annotate route <route_name> \
--overwrite haproxy.router.openshift.io/timeout=<timeout><time_unit>
For example, to set a route named myroute to a timeout of two seconds:
# oc annotate route myroute --overwrite haproxy.router.openshift.io/timeout=2s
Supported time units are microseconds (us), milliseconds (ms), seconds (s), minutes (m), hours (h), or days (d).
Chapter 30. Configuring Native Container Routing
30.1. Network Overview
The following describes a general network setup:
- 11.11.0.0/16 is the container network.
- The 11.11.x.0/24 subnet is reserved for each node and assigned to the Docker Linux bridge.
- Each node has a route to the router for reaching anything in the 11.11.0.0/16 range, except the local subnet.
- The router has routes for each node, so it can be directed to the right node.
- Existing nodes do not need any changes when new nodes are added, unless the network topology is modified.
- IP forwarding is enabled on each node.
The following diagram shows the container networking setup described in this topic. It uses one Linux node with two network interface cards serving as a router, two switches, and three nodes connected to these switches.
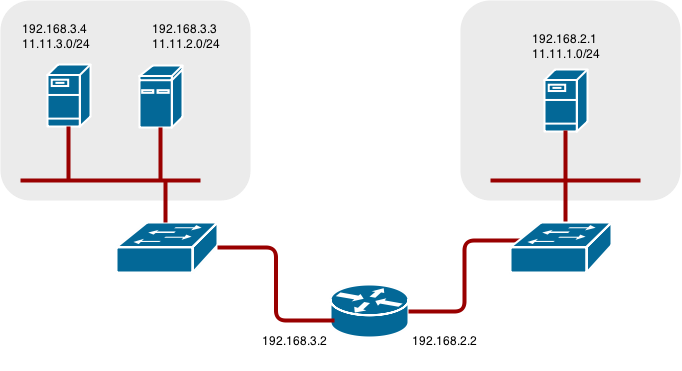
30.2. Configure Native Container Routing
You can set up container networking using existing switches and routers, and the kernel networking stack in Linux.
As a network administrator, you must modify, or create a script to modify, the router or routers when new nodes are added to the cluster.
You can adapt this process to use with any type of router.
30.3. Setting up a Node for Container Networking
Assign an unused 11.11.x.0/24 subnet IP address to the Linux bridge on the node:
# brctl addbr lbr0 # ip addr add 11.11.1.1/24 dev lbr0 # ip link set dev lbr0 up
Modify the Docker startup script to use the new bridge. By default, the startup script is the
/etc/sysconfig/dockerfile:# docker -d -b lbr0 --other-options
Add a route to the router for the 11.11.0.0/16 network:
# ip route add 11.11.0.0/16 via 192.168.2.2 dev p3p1
Enable IP forwarding on the node:
# sysctl -w net.ipv4.ip_forward=1
30.4. Setting up a Router for Container Networking
The following procedure assumes a Linux box with multiple NICs is used as a router. Modify the steps as required to use the syntax for a particular router:
Enable IP forwarding on the router:
# sysctl -w net.ipv4.ip_forward=1
Add a route for each node added to the cluster:
# ip route add <node_subnet> via <node_ip_address> dev <interface through which node is L2 accessible> # ip route add 11.11.1.0/24 via 192.168.2.1 dev p3p1 # ip route add 11.11.2.0/24 via 192.168.3.3 dev p3p2 # ip route add 11.11.3.0/24 via 192.168.3.4 dev p3p2
Chapter 31. Routing from Edge Load Balancers
31.1. Overview
Pods inside of an OpenShift Container Platform cluster are only reachable via their IP addresses on the cluster network. An edge load balancer can be used to accept traffic from outside networks and proxy the traffic to pods inside the OpenShift Container Platform cluster. In cases where the load balancer is not part of the cluster network, routing becomes a hurdle as the internal cluster network is not accessible to the edge load balancer.
To solve this problem where the OpenShift Container Platform cluster is using OpenShift Container Platform SDN as the cluster networking solution, there are two ways to achieve network access to the pods.
31.2. Including the Load Balancer in the SDN
If possible, run an OpenShift Container Platform node instance on the load balancer itself that uses OpenShift SDN as the networking plug-in. This way, the edge machine gets its own Open vSwitch bridge that the SDN automatically configures to provide access to the pods and nodes that reside in the cluster. The routing table is dynamically configured by the SDN as pods are created and deleted, and thus the routing software is able to reach the pods.
Mark the load balancer machine as an unschedulable node so that no pods end up on the load balancer itself:
$ oc adm manage-node <load_balancer_hostname> --schedulable=false
If the load balancer comes packaged as a container, then it is even easier to integrate with OpenShift Container Platform: Simply run the load balancer as a pod with the host port exposed. The pre-packaged HAProxy router in OpenShift Container Platform runs in precisely this fashion.
31.3. Establishing a Tunnel Using a Ramp Node
In some cases, the previous solution is not possible. For example, an F5 BIG-IP® host cannot run an OpenShift Container Platform node instance or the OpenShift Container Platform SDN because F5® uses a custom, incompatible Linux kernel and distribution.
Instead, to enable F5 BIG-IP® to reach pods, you can choose an existing node within the cluster network as a ramp node and establish a tunnel between the F5 BIG-IP® host and the designated ramp node. Because it is otherwise an ordinary OpenShift Container Platform node, the ramp node has the necessary configuration to route traffic to any pod on any node in the cluster network. The ramp node thus assumes the role of a gateway through which the F5 BIG-IP® host has access to the entire cluster network.
Following is an example of establishing an ipip tunnel between an F5 BIG-IP® host and a designated ramp node.
On the F5 BIG-IP® host:
Set the following variables:
# F5_IP=10.3.89.66 1 # RAMP_IP=10.3.89.89 2 # TUNNEL_IP1=10.3.91.216 3 # CLUSTER_NETWORK=10.128.0.0/14 4
- 1 2
- The
F5_IPandRAMP_IPvariables refer to the F5 BIG-IP® host’s and the ramp node’s IP addresses, respectively, on a shared, internal network. - 3
- An arbitrary, non-conflicting IP address for the F5® host’s end of the ipip tunnel.
- 4
- The overlay network CIDR range that the OpenShift SDN uses to assign addresses to pods.
Delete any old route, self, tunnel and SNAT pool:
# tmsh delete net route $CLUSTER_NETWORK || true # tmsh delete net self SDN || true # tmsh delete net tunnels tunnel SDN || true # tmsh delete ltm snatpool SDN_snatpool || true
Create the new tunnel, self, route and SNAT pool and use the SNAT pool in the virtual servers:
# tmsh create net tunnels tunnel SDN \ \{ description "OpenShift SDN" local-address \ $F5_IP profile ipip remote-address $RAMP_IP \} # tmsh create net self SDN \{ address \ ${TUNNEL_IP1}/24 allow-service all vlan SDN \} # tmsh create net route $CLUSTER_NETWORK interface SDN # tmsh create ltm snatpool SDN_snatpool members add { $TUNNEL_IP1 } # tmsh modify ltm virtual ose-vserver source-address-translation { type snat pool SDN_snatpool } # tmsh modify ltm virtual https-ose-vserver source-address-translation { type snat pool SDN_snatpool }
On the ramp node:
The following creates a configuration that is not persistent, meaning that when the ramp node or the openvswitch service is restarted, the settings disappear.
Set the following variables:
# F5_IP=10.3.89.66 # TUNNEL_IP1=10.3.91.216 # TUNNEL_IP2=10.3.91.217 1 # CLUSTER_NETWORK=10.128.0.0/14 2
Delete any old tunnel:
# ip tunnel del tun1 || true
Create the ipip tunnel on the ramp node, using a suitable L2-connected interface (e.g., eth0):
# ip tunnel add tun1 mode ipip \ remote $F5_IP dev eth0 # ip addr add $TUNNEL_IP2 dev tun1 # ip link set tun1 up # ip route add $TUNNEL_IP1 dev tun1 # ping -c 5 $TUNNEL_IP1SNAT the tunnel IP with an unused IP from the SDN subnet:
# source /run/openshift-sdn/config.env # tap1=$(ip -o -4 addr list tun0 | awk '{print $4}' | cut -d/ -f1 | head -n 1) # subaddr=$(echo ${OPENSHIFT_SDN_TAP1_ADDR:-"$tap1"} | cut -d "." -f 1,2,3) # export RAMP_SDN_IP=${subaddr}.254Assign this
RAMP_SDN_IPas an additional address to tun0 (the local SDN’s gateway):# ip addr add ${RAMP_SDN_IP} dev tun0Modify the OVS rules for SNAT:
# ipflowopts="cookie=0x999,ip" # arpflowopts="cookie=0x999, table=0, arp" # # ovs-ofctl -O OpenFlow13 add-flow br0 \ "${ipflowopts},nw_src=${TUNNEL_IP1},actions=mod_nw_src:${RAMP_SDN_IP},resubmit(,0)" # ovs-ofctl -O OpenFlow13 add-flow br0 \ "${ipflowopts},nw_dst=${RAMP_SDN_IP},actions=mod_nw_dst:${TUNNEL_IP1},resubmit(,0)" # ovs-ofctl -O OpenFlow13 add-flow br0 \ "${arpflowopts}, arp_tpa=${RAMP_SDN_IP}, actions=output:2" # ovs-ofctl -O OpenFlow13 add-flow br0 \ "${arpflowopts}, priority=200, in_port=2, arp_spa=${RAMP_SDN_IP}, arp_tpa=${CLUSTER_NETWORK}, actions=goto_table:30" # ovs-ofctl -O OpenFlow13 add-flow br0 \ "arp, table=5, priority=300, arp_tpa=${RAMP_SDN_IP}, actions=output:2" # ovs-ofctl -O OpenFlow13 add-flow br0 \ "ip,table=5,priority=300,nw_dst=${RAMP_SDN_IP},actions=output:2" # ovs-ofctl -O OpenFlow13 add-flow br0 "${ipflowopts},nw_dst=${TUNNEL_IP1},actions=output:2"Optionally, if you do not plan on configuring the ramp node to be highly available, mark the ramp node as unschedulable. Skip this step if you do plan to follow the next section and plan on creating a highly available ramp node.
$ oc adm manage-node <ramp_node_hostname> --schedulable=false
The F5 router plug-in integrates with F5 BIG-IP®.
31.3.1. Configuring a Highly-Available Ramp Node
You can use OpenShift Container Platform’s ipfailover feature, which uses keepalived internally, to make the ramp node highly available from F5 BIG-IP®'s point of view. To do so, first bring up two nodes, for example called ramp-node-1 and ramp-node-2, on the same L2 subnet.
Then, choose some unassigned IP address from within the same subnet to use for your virtual IP, or VIP. This will be set as the RAMP_IP variable with which you will configure your tunnel on F5 BIG-IP®.
For example, suppose you are using the 10.20.30.0/24 subnet for your ramp nodes, and you have assigned 10.20.30.2 to ramp-node-1 and 10.20.30.3 to ramp-node-2. For your VIP, choose some unassigned address from the same 10.20.30.0/24 subnet, for example 10.20.30.4. Then, to configure ipfailover, mark both nodes with a label, such as f5rampnode:
$ oc label node ramp-node-1 f5rampnode=true $ oc label node ramp-node-2 f5rampnode=true
Similar to instructions from the ipfailover documentation, you must now create a service account and add it to the privileged SCC. First, create the f5ipfailover service account:
$ oc create serviceaccount f5ipfailover -n default
Next, you can add the f5ipfailover service to the privileged SCC. To add the f5ipfailover in the default namespace to the privileged SCC, run:
$ oc adm policy add-scc-to-user privileged system:serviceaccount:default:f5ipfailover
Finally, configure ipfailover using your chosen VIP (the RAMP_IP variable) and the f5ipfailover service account, assigning the VIP to your two nodes using the f5rampnode label you set earlier:
# RAMP_IP=10.20.30.4
# IFNAME=eth0 1
# oc adm ipfailover <name-tag> \
--virtual-ips=$RAMP_IP \
--interface=$IFNAME \
--watch-port=0 \
--replicas=2 \
--service-account=f5ipfailover \
--selector='f5rampnode=true'- 1
- The interface where
RAMP_IPshould be configured.
With the above setup, the VIP (the RAMP_IP variable) is automatically re-assigned when the ramp node host that currently has it assigned fails.
Chapter 32. Aggregating Container Logs
32.1. Overview
As an OpenShift Container Platform cluster administrator, you can deploy the EFK stack to aggregate logs for a range of OpenShift Container Platform services. Application developers can view the logs of the projects for which they have view access. The EFK stack aggregates logs from hosts and applications, whether coming from multiple containers or even deleted pods.
The EFK stack is a modified version of the ELK stack and is comprised of:
- Elasticsearch (ES): An object store where all logs are stored.
- Fluentd: Gathers logs from nodes and feeds them to Elasticsearch.
- Kibana: A web UI for Elasticsearch.
After deployment in a cluster, the stack aggregates logs from all nodes and projects into Elasticsearch, and provides a Kibana UI to view any logs. Cluster administrators can view all logs, but application developers can only view logs for projects they have permission to view. The stack components communicate securely.
Managing Docker Container Logs discusses the use of json-file logging driver options to manage container logs and prevent filling node disks.
32.2. Pre-deployment Configuration
- An Ansible playbook is available to deploy and upgrade aggregated logging. You should familiarize yourself with the advanced installation and configuration section. This provides information for preparing to use Ansible and includes information about configuration. Parameters are added to the Ansible inventory file to configure various areas of the EFK stack.
- Review the sizing guidelines to determine how best to configure your deployment.
- Ensure that you have deployed a router for the cluster.
- Ensure that you have the necessary storage for Elasticsearch. Note that each Elasticsearch replica requires its own storage volume. See Elasticsearch for more information.
-
Determine if you need highly-available Elasticsearch. A highly-available environment requires multiple replicas of each shard. By default, OpenShift Container Platform creates one shard for each index and zero replicas of those shards. To create high availability, set the
openshift_logging_es_number_of_replicasAnsible variable to a value higher than1. High availability also requires at least three Elasticsearch nodes, each on a different host. See Elasticsearch for more information. Choose a project. Once deployed, the EFK stack collects logs for every project within your OpenShift Container Platform cluster. The examples in this section use the default project logging. The Ansible playbook creates the project for you if it does not already exist. You will only need to create a project if you want to specify a node-selector on it. Otherwise, the
openshift-loggingrole will create a project.$ oc adm new-project logging --node-selector="" $ oc project logging
NoteSpecifying an empty node selector on the project is recommended, as Fluentd should be deployed throughout the cluster and any selector would restrict where it is deployed. To control component placement, specify node selectors per component to be applied to their deployment configurations.
32.3. Specifying Logging Ansible Variables
Parameters for the EFK deployment may be specified to the inventory host file to override the default parameter values. Read the Elasticsearch and the Fluentd sections before choosing parameters:
By default the Elasticsearch service uses port 9300 for TCP communication between nodes in a cluster.
| Parameter | Description |
|---|---|
|
| The prefix for logging component images. For example, setting the prefix to registry.access.redhat.com/openshift3/ creates registry.access.redhat.com/openshift3/logging-fluentd:latest. |
|
| The version for logging component images. For example, setting the version to v3.9 creates registry.access.redhat.com/openshift3/logging-fluentd:v3.9. |
|
|
If set to |
|
| The URL for the Kubernetes master, this does not need to be public facing but should be accessible from within the cluster. For example, https://<PRIVATE-MASTER-URL>:8443. |
|
| The public facing URL for the Kubernetes master. This is used for Authentication redirection by the Kibana proxy. For example, https://<CONSOLE-PUBLIC-URL-MASTER>:8443. |
|
| The namespace where Aggregated Logging is deployed. |
|
|
Set to |
|
|
The common uninstall keeps PVC to prevent unwanted data loss during reinstalls. To ensure that the Ansible playbook completely and irreversibly removes all logging persistent data including PVC, set |
|
|
Coupled with |
|
|
The prefix for the eventrouter logging image. The default is set to |
|
| The image version for the logging eventrouter. The default is set to 'openshift_logging_image_version'. |
|
|
Select a sink for eventrouter, supported |
|
|
A map of labels, such as |
|
| The default is set to '1'. |
|
| The minimum amount of CPU to allocate to eventrouter. The default is set to '100m'. |
|
| The memory limit for eventrouter pods. The default is set to '128Mi'. |
|
| The project where eventrouter is deployed. The default is set to 'default'. Important
Do not set the project to anything other than |
|
| Specify the name of an existing pull secret to be used for pulling component images from an authenticated registry. |
|
| The default minimum age (in days) Curator uses for deleting log records. |
|
| The hour of the day Curator will run. |
|
| The minute of the hour Curator will run. |
|
|
The timezone Curator uses for figuring out its run time. Provide the timezone as a string in the tzselect(8) or timedatectl(1) "Region/Locality" format, for example |
|
| The script log level for Curator. |
|
| The log level for the Curator process. |
|
| The amount of CPU to allocate to Curator. |
|
| The amount of memory to allocate to Curator. |
|
| A node selector that specifies which nodes are eligible targets for deploying Curator instances. |
|
|
Equivalent to |
|
|
Equivalent to |
|
| The external host name for web clients to reach Kibana. |
|
| The amount of CPU to allocate to Kibana. |
|
| The amount of memory to allocate to Kibana. |
|
|
When |
|
| The amount of CPU to allocate to Kibana proxy. |
|
| The amount of memory to allocate to Kibana proxy. |
|
| The number of replicas to which Kibana should be scaled up. |
|
| A node selector that specifies which nodes are eligible targets for deploying Kibana instances. |
|
| A map of environment variables to add to the Kibana deployment configuration. For example, {"ELASTICSEARCH_REQUESTTIMEOUT":"30000"}. |
|
| The public facing key to use when creating the Kibana route. |
|
| The cert that matches the key when creating the Kibana route. |
|
| Optional. The CA to goes with the key and cert used when creating the Kibana route. |
|
|
Equivalent to |
|
|
Equivalent to |
|
|
Equivalent to |
|
|
Equivalent to |
|
|
Equivalent to |
|
|
Equivalent to |
|
|
Equivalent to |
|
|
Set to |
|
|
The external-facing hostname to use for the route and the TLS server certificate. The default is set to
For example, if |
|
| The location of the certificate Elasticsearch uses for the external TLS server cert. The default is a generated cert. |
|
| The location of the key Elasticsearch uses for the external TLS server cert. The default is a generated key. |
|
| The location of the CA cert Elasticsearch uses for the external TLS server cert. The default is the internal CA. |
|
|
Set to |
|
|
The external-facing hostname to use for the route and the TLS server certificate. The default is set to
For example, if |
|
| The location of the certificate Elasticsearch uses for the external TLS server cert. The default is a generated cert. |
|
| The location of the key Elasticsearch uses for the external TLS server cert. The default is a generated key. |
|
| The location of the CA cert Elasticsearch uses for the external TLS server cert. The default is the internal CA. |
|
| A node selector that specifies which nodes are eligible targets for deploying Fluentd instances. Any node where Fluentd should run (typically, all) must have this label before Fluentd is able to run and collect logs.
When scaling up the Aggregated Logging cluster after installation, the As part of the installation, it is recommended that you add the Fluentd node selector label to the list of persisted node labels. |
|
| The CPU limit for Fluentd pods. |
|
| The memory limit for Fluentd pods. |
|
|
Set to |
|
|
List of nodes that should be labeled for Fluentd to be deployed. The default is to label all nodes with ['--all']. The null value is |
|
|
When |
|
|
Location of audit log file. The default is |
|
|
Location of the Fluentd |
|
| The name of the Elasticsearch service where Fluentd should send logs. |
|
| The port for the Elasticsearch service where Fluentd should send logs. |
|
|
The location of the CA Fluentd uses to communicate with |
|
|
The location of the client certificate Fluentd uses for |
|
|
The location of the client key Fluentd uses for |
|
| Elasticsearch nodes to deploy. High availability requires at least three or more. |
|
| The amount of CPU limit for the Elasticsearch cluster. |
|
| Amount of RAM to reserve per Elasticsearch instance. It must be at least 512M. Possible suffixes are G,g,M,m. |
|
|
The number of replicas per primary shard for each new index. Defaults to '0'. A minimum of |
|
| The number of primary shards for every new index created in ES. Defaults to '1'. |
|
| A key/value map added to a PVC in order to select specific PVs. |
|
|
To dynamically provision the backing storage, set the parameter value to |
|
|
To use a non-default storage class, specify the storage class name, such as |
|
|
Size of the persistent volume claim to create per Elasticsearch instance. For example, 100G. If omitted, no PVCs are created and ephemeral volumes are used instead. If you set this parameter, the logging installer sets |
|
|
Sets the Elasticsearch storage type. If you are using Persistent Elasticsearch Storage, the logging installer sets this to |
|
|
Prefix for the names of persistent volume claims to be used as storage for Elasticsearch nodes. A number is appended per node, such as logging-es-1. If they do not already exist, they are created with size
When
|
|
| The amount of time Elasticsearch will wait before it tries to recover. |
|
| Number of a supplemental group ID for access to Elasticsearch storage volumes. Backing volumes should allow access by this group ID. |
|
|
A node selector specified as a map that determines which nodes are eligible targets for deploying Elasticsearch nodes. Use this map to place these instances on nodes that are reserved or optimized for running them. For example, the selector could be |
|
|
Set to |
|
|
Equivalent to |
|
|
Equivalent to |
|
|
Equivalent to |
|
|
Equivalent to |
|
|
Equivalent to |
|
|
Equivalent to |
|
|
Equivalent to |
|
|
Equivalent to |
|
|
Equivalent to |
|
|
Equivalent to |
|
|
Equivalent to |
|
|
Equivalent to |
|
|
Equivalent to |
|
|
Equivalent to |
|
|
A node selector that specifies which nodes are eligible targets for deploying Elasticsearch nodes. This can be used to place these instances on nodes reserved or optimized for running them. For example, the selector could be |
|
|
The default value,
You may also set the value |
|
|
Adjusts the time that the Ansible playbook waits for the Elasticsearch cluster to enter a green state after upgrading a given Elasticsearch node. Large shards, 50 GB or more, can take more than 60 minutes to initialize, causing the Ansible playbook to abort the upgrade procedure. The default is |
|
| A node selector that specifies which nodes are eligible targets for deploying Kibana instances. |
|
| A node selector that specifies which nodes are eligible targets for deploying Curator instances. |
Custom Certificates
You can specify custom certificates using the following inventory variables instead of relying on those generated during the deployment process. These certificates are used to encrypt and secure communication between a user’s browser and Kibana. The security-related files will be generated if they are not supplied.
| File Name | Description |
|---|---|
|
| A browser-facing certificate for the Kibana server. |
|
| A key to be used with the browser-facing Kibana certificate. |
|
| The absolute path on the control node to the CA file to use for the browser facing Kibana certs. |
|
| A browser-facing certificate for the Ops Kibana server. |
|
| A key to be used with the browser-facing Ops Kibana certificate. |
|
| The absolute path on the control node to the CA file to use for the browser facing ops Kibana certs. |
If you need to redeploy these certificates, see Redeploy EFK Certificates.
32.4. Deploying the EFK Stack
The EFK stack is deployed using an Ansible playbook to the EFK components. Run the playbook from the default OpenShift Ansible location using the default inventory file.
$ ansible-playbook [-i </path/to/inventory>] \
/usr/share/ansible/openshift-ansible/playbooks/openshift-logging/config.ymlRunning the playbook deploys all resources needed to support the stack; such as Secrets, ServiceAccounts, and DeploymentConfigs. The playbook waits to deploy the component pods until the stack is running. If the wait steps fail, the deployment could still be successful; it may be retrieving the component images from the registry which can take up to a few minutes. You can watch the process with:
$ oc get pods -w logging-curator-1541129400-l5h77 0/1 Running 0 11h 1 logging-es-data-master-ecu30lr4-1-deploy 0/1 Running 0 11h 2 logging-fluentd-2lgwn 1/1 Running 0 11h 3 logging-fluentd-lmvms 1/1 Running 0 11h logging-fluentd-p9nd7 1/1 Running 0 11h logging-kibana-1-zk94k 2/2 Running 0 11h 4
You can use the `oc get pods -o wide command to see the nodes where the Fluentd pod are deployed:
oc get pods -o wide NAME READY STATUS RESTARTS AGE IP NODE NOMINATED NODE logging-es-data-master-5av030lk-1-2x494 2/2 Running 0 38m 154.128.0.80 ip-153-12-8-6.wef.internal <none> logging-fluentd-lqdxg 1/1 Running 0 2m 154.128.0.85 ip-153-12-8-6.wef.internal <none> logging-kibana-1-gj5kc 2/2 Running 0 39m 154.128.0.77 ip-153-12-8-6.wef.internal <none>
They will eventually enter Running status. For additional details about the status of the pods during deployment by retrieving associated events:
$ oc describe pods/<pod_name>
Check the logs if the pods do not run successfully:
$ oc logs -f <pod_name>
32.5. Understanding and Adjusting the Deployment
This section describes adjustments that you can make to deployed components.
32.5.1. Ops Cluster
The logs for the default, openshift, and openshift-infra projects are automatically aggregated and grouped into the .operations item in the Kibana interface.
The project where you have deployed the EFK stack (logging, as documented here) is not aggregated into .operations and is found under its ID.
If you set openshift_logging_use_ops to true in your inventory file, Fluentd is configured to split logs between the main Elasticsearch cluster and another cluster reserved for operations logs, which are defined as node system logs and the projects default, openshift, and openshift-infra. Therefore, a separate Elasticsearch cluster, a separate Kibana, and a separate Curator are deployed to index, access, and manage operations logs. These deployments are set apart with names that include -ops. Keep these separate deployments in mind if you enable this option. Most of the following discussion also applies to the operations cluster if present, just with the names changed to include -ops.
32.5.2. Elasticsearch
Elasticsearch (ES) is an object store where all logs are stored.
Elasticsearch organizes the log data into datastores, each called an index. Elasticsearch subdivides each index into multiple pieces called shards, which it spreads across a set of Elasticsearch nodes in your cluster. You can configure Elasticsearch to make copies of the shards, called replicas. Elasticsearch also spreads replicas across the Elactisearch nodes. The combination of shards and replicas is intended to provide redundancy and resilience to failure. For example, if you configure three shards for the index with one replica, Elasticsearch generates a total of six shards for that index: three primary shards and three replicas as a backup.
The OpenShift Container Platform logging installer ensures each Elasticsearch node is deployed using a unique deployment configuration that includes its own storage volume. You can create an additional deployment configuration for each Elasticsearch node you add to the logging system. During installation, you can use the openshift_logging_es_cluster_size Ansible variable to specify the number of Elasticsearch nodes.
Alternatively, you can scale up your existing cluster by modifying the openshift_logging_es_cluster_size in the inventory file and re-running the logging playbook. Additional clustering parameters can be modified and are described in Specifying Logging Ansible Variables.
Refer to Elastic’s documentation for considerations involved in choosing storage and network location as directed below.
A highly-available Elasticsearch environment requires at least three Elasticsearch nodes, each on a different host, and setting the openshift_logging_es_number_of_replicas Ansible variable to a value of 1 or higher to create replicas.
Viewing all Elasticsearch Deployments
To view all current Elasticsearch deployments:
$ oc get dc --selector logging-infra=elasticsearch
Configuring Elasticsearch for High Availability
A highly-available Elasticsearch environment requires at least three Elasticsearch nodes, each on a different host, and setting the openshift_logging_es_number_of_replicas Ansible variable to a value of 1 or higher to create replicas.
Use the following scenarios as a guide for an OpenShift Container Platform cluster with three Elasticsearch nodes:
-
If you can tolerate one Elasticsearch node going down, set
openshift_logging_es_number_of_replicasto1. This ensures that two nodes have a copy of all of the Elasticsearch data in the cluster. -
If you must tolerate two Elasticsearch nodes going down, set
openshift_logging_es_number_of_replicasto2. This ensures that every node has a copy of all of the Elasticsearch data in the cluster.
Note that there is a trade-off between high availability and performance. For example, having openshift_logging_es_number_of_replicas=2 and openshift_logging_es_number_of_shards=3 requires Elasticsearch to spend significant resources replicating the shard data among the nodes in the cluster. Also, using a higher number of replicas requires doubling or tripling the data storage requirements on each node, so you must take that into account when planning persistent storage for Elasticsearch.
Considerations when Configuring the Number of Shards
For the openshift_logging_es_number_of_shards parameter, consider:
-
For higher performance, increase the number of shards. For example, in a three node cluster, set
openshift_logging_es_number_of_shards=3. This will cause each index to be split into three parts (shards), and the load for processing the index will be spread out over all 3 nodes. - If you have a large number of projects, you might see performance degradation if you have more than a few thousand shards in the cluster. Either reduce the number of shards or reduce the curation time.
-
If you have a small number of very large indices, you might want to configure
openshift_logging_es_number_of_shards=3or higher. Elasticsearch recommends using a maximum shard size of less than 50 GB.
Node Selector
Because Elasticsearch can use a lot of resources, all members of a cluster should have low latency network connections to each other and to any remote storage. Ensure this by directing the instances to dedicated nodes, or a dedicated region within your cluster, using a node selector.
To configure a node selector, specify the openshift_logging_es_nodeselector configuration option in the inventory file. This applies to all Elasticsearch deployments; if you need to individualize the node selectors, you must manually edit each deployment configuration after deployment. The node selector is specified as a python compatible dict. For example, {"node-type":"infra", "region":"east"}.
32.5.2.1. Persistent Elasticsearch Storage
By default, the openshift_logging Ansible role creates an ephemeral deployment in which all data in a pod is lost upon pod restart.
For production environments, each Elasticsearch deployment configuration requires a persistent storage volume. You can specify an existing persistent volume claim or allow OpenShift Container Platform to create one.
Use existing PVCs. If you create your own PVCs for the deployment, OpenShift Container Platform uses those PVCs.
Name the PVCs to match the
openshift_logging_es_pvc_prefixsetting, which defaults tologging-es. Assign each PVC a name with a sequence number added to it:logging-es-0,logging-es-1,logging-es-2, and so on.Allow OpenShift Container Platform to create a PVC. If a PVC for Elsaticsearch does not exist, OpenShift Container Platform creates the PVC based on parameters in the Ansible inventory file.
Parameter Description openshift_logging_es_pvc_sizeSpecify the size of the PVC request.
openshift_logging_elasticsearch_storage_typeSpecify the storage type as
pvc.NoteThis is an optional parameter. If you set the
openshift_logging_es_pvc_sizeparameter to a value greater than 0, the logging installer automatically sets this parameter topvcby default.openshift_logging_es_pvc_prefixOptionally, specify a custom prefix for the PVC.
For example:
openshift_logging_elasticsearch_storage_type=pvc openshift_logging_es_pvc_size=104802308Ki openshift_logging_es_pvc_prefix=es-logging
If using dynamically provisioned PVs, the OpenShift Container Platform logging installer creates PVCs that use the default storage class or the PVC specified with the openshift_logging_elasticsearch_pvc_storage_class_name parameter.
If using NFS storage, the OpenShift Container Platform installer creates the persistent volumes, based on the openshift_logging_storage_* parameters and the OpenShift Container Platform logging installer creates PVCs, using the openshift_logging_es_pvc_* paramters. Make sure you specify the correct parameters in order to use persistent volumes with EFK. Also set the openshift_enable_unsupported_configurations=true parameter in the Ansible inventory file, as the logging installer blocks the installation of NFS with core infrastructure by default.
Using NFS storage as a volume or a persistent volume, or using NAS such as Gluster, is not supported for Elasticsearch storage, as Lucene relies on file system behavior that NFS does not supply. Data corruption and other problems can occur.
If your environment requires NFS storage, use one of the following methods:
32.5.2.1.1. Using NFS as a persistent volume
You can deploy NFS as an automatically provisioned persistent volume or using a predefined NFS volume.
For more information, see Sharing an NFS mount across two persistent volume claims to leverage shared storage for use by two separate containers.
Using automatically provisioned NFS
To use NFS as a persistent volume where NFS is automatically provisioned:
Add the following lines to the Ansible inventory file to create an NFS auto-provisioned storage class and dynamically provision the backing storage:
openshift_logging_es_pvc_storage_class_name=$nfsclass openshift_logging_es_pvc_dynamic=true
Use the following command to deploy the NFS volume using the logging playbook:
ansible-playbook /usr/share/ansible/openshift-ansible/playbooks/openshift-logging/config.yml
Use the following steps to create a PVC:
Edit the Ansible inventory file to set the PVC size:
openshift_logging_es_pvc_size=50Gi
NoteThe logging playbook selects a volume based on size and might use an unexpected volume if any other persistent volume has same size.
Use the following command to rerun the Ansible deploy_cluster.yml playbook:
ansible-playbook /usr/share/ansible/openshift-ansible/playbooks/deploy_cluster.yml
The installer playbook creates the NFS volume based on the
openshift_logging_storagevariables.
Using a predefined NFS volume
To deploy logging alongside the OpenShift Container Platform cluster using an existing NFS volume:
Edit the Ansible inventory file to configure the NFS volume and set the PVC size:
openshift_logging_storage_kind=nfs openshift_enable_unsupported_configurations=true openshift_logging_storage_access_modes=["ReadWriteOnce"] openshift_logging_storage_nfs_directory=/srv/nfs openshift_logging_storage_nfs_options=*(rw,root_squash) openshift_logging_storage_volume_name=logging openshift_logging_storage_volume_size=100Gi openshift_logging_storage_labels={:storage=>"logging"} openshift_logging_install_logging=trueUse the following command to redeploy the EFK stack:
ansible-playbook /usr/share/ansible/openshift-ansible/playbooks/deploy_cluster.yml
32.5.2.1.2. Using NFS as local storage
You can allocate a large file on an NFS server and mount the file to the nodes. You can then use the file as a host path device.
$ mount -F nfs nfserver:/nfs/storage/elasticsearch-1 /usr/local/es-storage $ chown 1000:1000 /usr/local/es-storage
Then, use /usr/local/es-storage as a host-mount as described below. Use a different backing file as storage for each Elasticsearch replica.
This loopback must be maintained manually outside of OpenShift Container Platform, on the node. You must not maintain it from inside a container.
It is possible to use a local disk volume (if available) on each node host as storage for an Elasticsearch replica. Doing so requires some preparation as follows.
The relevant service account must be given the privilege to mount and edit a local volume:
$ oc adm policy add-scc-to-user privileged \ system:serviceaccount:logging:aggregated-logging-elasticsearch 1- 1
- Use the project you created earlier (for example, logging) when running the logging playbook.
Each Elasticsearch replica definition must be patched to claim that privilege, for example (change to
--selector component=es-opsfor Ops cluster):$ for dc in $(oc get deploymentconfig --selector component=es -o name); do oc scale $dc --replicas=0 oc patch $dc \ -p '{"spec":{"template":{"spec":{"containers":[{"name":"elasticsearch","securityContext":{"privileged": true}}]}}}}' doneThe Elasticsearch replicas must be located on the correct nodes to use the local storage, and should not move around even if those nodes are taken down for a period of time. This requires giving each Elasticsearch replica a node selector that is unique to a node where an administrator has allocated storage for it. To configure a node selector, edit each Elasticsearch deployment configuration and add or edit the nodeSelector section to specify a unique label that you have applied for each desired node:
apiVersion: v1 kind: DeploymentConfig spec: template: spec: nodeSelector: logging-es-node: "1" 1- 1
- This label should uniquely identify a replica with a single node that bears that label, in this case
logging-es-node=1. Use theoc labelcommand to apply labels to nodes as needed.
To automate applying the node selector you can instead use the oc patch command:
$ oc patch dc/logging-es-<suffix> \
-p '{"spec":{"template":{"spec":{"nodeSelector":{"logging-es-node":"1"}}}}}'Once these steps are taken, a local host mount can be applied to each replica as in this example (where we assume storage is mounted at the same path on each node) (change to
--selector component=es-opsfor Ops cluster):$ for dc in $(oc get deploymentconfig --selector component=es -o name); do oc set volume $dc \ --add --overwrite --name=elasticsearch-storage \ --type=hostPath --path=/usr/local/es-storage oc rollout latest $dc oc scale $dc --replicas=1 done
32.5.2.1.3. Changing the Scale of Elasticsearch
If you need to scale up the number of Elasticsearch nodes in your cluster, you can create a deployment configuration for each Elasticsearch node you want to add.
Due to the nature of persistent volumes and how Elasticsearch is configured to store its data and recover the cluster, you cannot simply increase the replicas in an Elasticsearch deployment configuration.
The simplest way to change the scale of Elasticsearch is to modify the inventory host file and re-run the logging playbook as described previously. If you have supplied persistent storage for the deployment, this should not be disruptive.
Resizing an Elasticsearch cluster using the logging playbook is only possible when the new openshift_logging_es_cluster_size value is higher than the current number of Elasticsearch nodes (scaled up) in the cluster.
32.5.2.1.4. Expose Elasticsearch as a Route
By default, Elasticsearch deployed with OpenShift aggregated logging is not accessible from outside the logging cluster. You can enable a route for external access to Elasticsearch for those tools that want to access its data.
You have access to Elasticsearch using your OpenShift token, and you can provide the external Elasticsearch and Elasticsearch Ops hostnames when creating the server certificate (similar to Kibana).
To access Elasticsearch as a reencrypt route, define the following variables:
openshift_logging_es_allow_external=True openshift_logging_es_hostname=elasticsearch.example.com
Run the following Ansible playbook:
$ ansible-playbook [-i </path/to/inventory>] \ /usr/share/ansible/openshift-ansible/playbooks/openshift-logging/config.ymlTo log in to Elasticsearch remotely, the request must contain three HTTP headers:
Authorization: Bearer $token X-Proxy-Remote-User: $username X-Forwarded-For: $ip_address
You must have access to the project in order to be able to access to the logs. For example:
$ oc login <user1> $ oc new-project <user1project> $ oc new-app <httpd-example>
You need to get the token of this ServiceAccount to be used in the request:
$ token=$(oc whoami -t)
Using the token previously configured, you should be able access Elasticsearch through the exposed route:
$ curl -k -H "Authorization: Bearer $token" -H "X-Proxy-Remote-User: $(oc whoami)" -H "X-Forwarded-For: 127.0.0.1" https://es.example.test/project.my-project.*/_search?q=level:err | python -mjson.tool
32.5.3. Fluentd
Fluentd is deployed as a DaemonSet that deploys replicas according to a node label selector, which you can specify with the inventory parameter openshift_logging_fluentd_nodeselector and the default is logging-infra-fluentd. As part of the OpenShift cluster installation, it is recommended that you add the Fluentd node selector to the list of persisted node labels.
Fluentd uses journald as the system log source. These are log messages from the operating system, the container runtime, and OpenShift.
Clean installations of OpenShift Container Platform 3.9 use json-file as the default log driver, but environments upgraded from OpenShift Container Platform 3.7 will maintain their existing journald log driver configuration. It is recommended to use the json-file log driver. See Changing the Aggregated Logging Driver for instructions to change your existing log driver configuration to json-file.
Viewing Fluentd Logs
How you view logs depends upon the LOGGING_FILE_PATH setting.
If
LOGGING_FILE_PATHpoints to a file, use the logs utility to print out the contents of Fluentd log files:oc exec <pod> logs 1- 1
- Specify the name of the Fluentd pod.
For example:
oc exec logging-fluentd-lmvms logs
The contents of log files are printed out, starting with the oldest log. Use
-foption to follow what is being written into the logs.If you are using
LOGGING_FILE_PATH=console, fluentd to write logs to STDOUT. You can retrieve the logs with theoc logs -f <pod_name>command.For example
oc logs -f /var/log/fluentd/fluentd.log
Configuring Fluentd Log Location
Fluentd writes logs to a specified file, by default /var/log/fluentd/fluentd.log, or to the console, based on the LOGGING_FILE_PATH environment variable.
To change the default output location for the Fluentd logs, use the LOGGING_FILE_PATH parameter in the default inventory file. You can specify a particular file or to STDOUT:
LOGGING_FILE_PATH=console 1 LOGGING_FILE_PATH=<path-to-log/fluentd.log> 2
After changing these parameters, re-run the logging installer playbook:
$ cd /usr/share/ansible/openshift-ansible
$ ansible-playbook [-i </path/to/inventory>] \
playbooks/openshift-logging/config.yml
How you view log data depends on the LOGGING_FILE_PATH setting, either`console` or file.
Configuring Fluentd Log Rotation
When the current Fluentd log file reaches a specified size, OpenShift Container Platform automatically renames the fluentd.log log file so that new logging data can be collected. Log rotation is enabled by default.
The following example shows logs in a cluster where the maximum log size is 1Mb and four logs should be retained. When the fluentd.log reaches 1Mb, OpenShift Container Platform deletes the current fluentd.log.4, renames the each of the Fluentd logs in turn, and creates a new fluentd.log.
fluentd.log 0b fluentd.log.1 1Mb fluentd.log.2 1Mb fluentd.log.3 1Mb fluentd.log.4 1Mb
You can control the size of the Fluentd log files and how many of the renamed files that OpenShift Container Platform retains using environment variables.
| Parameter | Description |
|---|---|
|
| The maximum size of a single Fluentd log file in Bytes. If the size of the flientd.log file exceeds this value, OpenShift Container Platform renames the fluentd.log.* files and creates a new fluentd.log. The default is 1024000 (1MB). |
|
|
The number of logs that Fluentd retains before deleting. The default value is |
For example:
$ oc set env ds/logging-fluentd LOGGING_FILE_AGE=30 LOGGING_FILE_SIZE=1024000"
Turn off log rotation by setting LOGGING_FILE_PATH=console. This causes Fluentd to write logs to STDOUT where they can be retrieved using the oc logs -f <pod_name> command.
Disabling JSON parsing of logs with MERGE_JSON_LOG
By default, Fluentd determines if a log message is in JSON format and merges the message into the JSON payload document posted to Elasticsearch.
When using JSON parsing you might experience:
- log loss due to Elasticsearch rejecting documents due to inconsistent type mappings;
- buffer storage leaks caused by rejected message cycling;
- overwritten data for fields with same names.
For information on how to mitigate some of these problems, see Configuring how the log collector normalizes logs.
You can disable JSON parsing to avoid these problems or if you do not need to parse JSON from your logs.
To disable JSON parsing:
Run the following command:
oc set env ds/logging-fluentd MERGE_JSON_LOG=false 1- 1
- Set this to
falseto disable this feature ortrueto enable this feature.
To ensure this setting is applied each time you run Ansible, add
openshift_logging_fluentd_merge_json_log="false"to your Ansible inventory.
Configuring how the log collector normalizes logs
Cluster Logging uses a specific data model, like a database schema, to store log records and their metadata in the logging store. There are some restrictions on the data:
-
There must be a
"message"field containing the actual log message. -
There must be a
"@timestamp"field containing the log record timestamp in RFC 3339 format, preferably millisecond or better resolution. -
There must be a
"level"field with the log level, such aserr,info,unknown, and so forth.
For more information on the data model, see Exported Fields.
Because of these requirements, conflicts and inconsistencies can arise with log data collected from different subsystems.
For example, if you use the MERGE_JSON_LOG feature (MERGE_JSON_LOG=true), it can be extremely useful to have your applications log their output in JSON, and have the log collector automatically parse and index the data in Elasticsearch. However, this leads to several problems, including:
- field names can be empty, or contain characters that are illegal in Elasticsearch;
- different applications in the same namespace might output the same field name with a different value data type;
- applications might emit too many fields;
- fields may conflict with the cluster logging built-in fields.
You can configure how cluster logging treats fields from disparate sources by editing the Fluentd log collector daemonset and setting environment variables in the table below.
Undefined fields. Fields unknown to the ViaQ data model are called undefined. Log data from disparate systems can contain undefined fields. The data model requires all top-level fields to be defined and described.
Use the parameters to configure how OpenShift Container Platform moves any undefined fields under a top-level field called
undefinedto avoid conflicting with the well known top-level fields. You can add undefined fields to the top-level fields and move others to anundefinedcontainer.You can also replace special characters in undefined fields and convert undefined fields to their JSON string representation. Converting to JSON string preserves the structure of the value, so that you can retrieve the value later and convert it back to a map or an array.
-
Simple scalar values like numbers and booleans are changed to a quoted string. For example:
10becomes"10",3.1415becomes"3.1415",falsebecomes"false". -
Map/dict values and array values are converted to their JSON string representation:
"mapfield":{"key":"value"}becomes"mapfield":"{\"key\":\"value\"}"and"arrayfield":[1,2,"three"]becomes"arrayfield":"[1,2,\"three\"]".
-
Simple scalar values like numbers and booleans are changed to a quoted string. For example:
Defined fields. Defined fields appear in the top levels of the logs. You can configure which fields are considered defined fields.
The default top-level fields, defined through the
CDM_DEFAULT_KEEP_FIELDSparameter, areCEE,time,@timestamp,aushape,ci_job,collectd,docker,fedora-ci,file,foreman,geoip,hostname,ipaddr4,ipaddr6,kubernetes,level,message,namespace_name,namespace_uuid,offset,openstack,ovirt,pid,pipeline_metadata,service,systemd,tags,testcase,tlog,viaq_msg_id.Any fields not included in
${CDM_DEFAULT_KEEP_FIELDS}or${CDM_EXTRA_KEEP_FIELDS}are moved to${CDM_UNDEFINED_NAME}ifCDM_USE_UNDEFINEDistrue. See the table below for more information on these parameters.NoteThe
CDM_DEFAULT_KEEP_FIELDSparameter is for only advanced users, or if you are instructed to do so by Red Hat support.- Empty fields. Empty fields have no data. You can determine which empty fields to retain from logs.
| Parameters | Definition | Example |
|---|---|---|
|
|
Specify an extra set of defined fields to be kept at the top level of the logs in addition to the |
|
|
| Specify fields to retain in CSV format even if empty. Empty defined fields not specified are dropped. The default is "message", keep empty messages. |
|
|
|
Set to |
|
|
|
Specify a name for the undefined top level field if using |
|
|
|
If the number of undefined fields is greater than this number, all undefined fields are converted to their JSON string representation and stored in the
NOTE: This parameter is honored even if |
|
|
|
Set to |
|
|
|
Specify a character to use in place of a dot character '.' in an undefined field. |
|
If you set the MERGE_JSON_LOG parameter in the Fluentd log collector daemonset and CDM_UNDEFINED_TO_STRING environment variables to true, you might receive an Elasticsearch 400 error. When MERGE_JSON_LOG=true, the log collector adds fields with data types other than string. If you set CDM_UNDEFINED_TO_STRING=true, the log collector attempts to add those fields as a string value resulting in the Elasticsearch 400 error. The error clears when the log collector rolls over the indices for the next day’s logs
When the log collector rolls over the indices, it creates a brand new index. The field definitions are updated and you will not get the 400 error. For more information, see Setting MERGE_JSON_LOG and CDM_UNDEFINED_TO_STRING.
To configure undefined and empty field processing, edit the logging-fluentd daemonset:
Configure how to process fields, as needed:
-
Specify the fields to move using
CDM_EXTRA_KEEP_FIELDS. -
Specify any empty fields to retain in the
CDM_KEEP_EMPTY_FIELDSparameter in CSV format.
-
Specify the fields to move using
Configure how to process undefined fields, as needed:
-
Set
CDM_USE_UNDEFINEDtotrueto move undefined fields to the top-levelundefinedfield: -
Specify a name for the undefined fields using the
CDM_UNDEFINED_NAMEparameter. -
Set
CDM_UNDEFINED_MAX_NUM_FIELDSto a value other than the default-1, to set an upper bound on the number of undefined fields in a single record.
-
Set
-
Specify
CDM_UNDEFINED_DOT_REPLACE_CHARto change any dot.characters in an undefined field name to another character. For example, ifCDM_UNDEFINED_DOT_REPLACE_CHAR=@@@and there is a field namedfoo.bar.bazthe field is transformed intofoo@@@bar@@@baz. -
Set
UNDEFINED_TO_STRINGtotrueto convert undefined fields to their JSON string representation.
If you configure the CDM_UNDEFINED_TO_STRING or CDM_UNDEFINED_MAX_NUM_FIELDS parameters, you use the CDM_UNDEFINED_NAME to change the undefined field name. This field is needed because CDM_UNDEFINED_TO_STRING or CDM_UNDEFINED_MAX_NUM_FIELDS could change the value type of the undefined field. When CDM_UNDEFINED_TO_STRING or CDM_UNDEFINED_MAX_NUM_FIELDS is set to true and there are more undefined fields in a log, the value type becomes string. Elasticsearch stops accepting records if the value type is changed, for example, from JSON to JSON string.
For example, when CDM_UNDEFINED_TO_STRING is false or CDM_UNDEFINED_MAX_NUM_FIELDS is the default, -1, the value type of the undefined field is json. If you change CDM_UNDEFINED_MAX_NUM_FIELDS to a value other than default and there are more undefined fields in a log, the value type becomes string (JSON string). Elasticsearch stops accepting records if the value type is changed.
Setting MERGE_JSON_LOG and CDM_UNDEFINED_TO_STRING
If you set the MERGE_JSON_LOG and CDM_UNDEFINED_TO_STRING enviroment variables to true, you might receive an Elasticsearch 400 error. When MERGE_JSON_LOG=true, the log collector adds fields with data types other than string. If you set CDM_UNDEFINED_TO_STRING=true, Fluentd attempts to add those fields as a string value resulting in the Elasticsearch 400 error. The error clears when the indices roll over for the next day.
When Fluentd rolls over the indices for the next day’s logs, it will create a brand new index. The field definitions are updated and you will not get the 400 error.
Records that have hard errors, such as schema violations, corrupted data, and so forth, cannot be retried. The log collector sends the records for error handling. If you add a <label @ERROR> section to your Fluentd config, as the last <label>, you can handle these records as needed.
For example:
data:
fluent.conf:
....
<label @ERROR>
<match **>
@type file
path /var/log/fluent/dlq
time_slice_format %Y%m%d
time_slice_wait 10m
time_format %Y%m%dT%H%M%S%z
compress gzip
</match>
</label>This section writes error records to the Elasticsearch dead letter queue (DLQ) file. See the fluentd documentation for more information about the file output.
Then you can edit the file to clean up the records manually, edit the file to use with the Elasticsearch /_bulk index API and use cURL to add those records. For more information on Elasticsearch Bulk API, see the Elasticsearch documentation.
Configuring Fluentd to Send Logs to an External Log Aggregator
You can configure Fluentd to send a copy of its logs to an external log aggregator, and not the default Elasticsearch, using the secure-forward plug-in. From there, you can further process log records after the locally hosted Fluentd has processed them.
The logging deployment provides a secure-forward.conf section in the Fluentd configmap for configuring the external aggregator:
<store>
@type secure_forward
self_hostname pod-${HOSTNAME}
shared_key thisisasharedkey
secure yes
enable_strict_verification yes
ca_cert_path /etc/fluent/keys/your_ca_cert
ca_private_key_path /etc/fluent/keys/your_private_key
ca_private_key_passphrase passphrase
<server>
host ose1.example.com
port 24284
</server>
<server>
host ose2.example.com
port 24284
standby
</server>
<server>
host ose3.example.com
port 24284
standby
</server>
</store>
This can be updated using the oc edit command:
$ oc edit configmap/logging-fluentd
Certificates to be used in secure-forward.conf can be added to the existing secret that is mounted on the Fluentd pods. The your_ca_cert and your_private_key values must match what is specified in secure-forward.conf in configmap/logging-fluentd:
$ oc patch secrets/logging-fluentd --type=json \
--patch "[{'op':'add','path':'/data/your_ca_cert','value':'$(base64 /path/to/your_ca_cert.pem)'}]"
$ oc patch secrets/logging-fluentd --type=json \
--patch "[{'op':'add','path':'/data/your_private_key','value':'$(base64 /path/to/your_private_key.pem)'}]"
Replace your_private_key with a generic name. This is a link to the JSON path, not a path on your host system.
When configuring the external aggregator, it must be able to accept messages securely from Fluentd.
If the external aggregator is another Fluentd server, it must have the fluent-plugin-secure-forward plug-in installed and make use of the input plug-in it provides:
<source>
@type secure_forward
self_hostname ${HOSTNAME}
bind 0.0.0.0
port 24284
shared_key thisisasharedkey
secure yes
cert_path /path/for/certificate/cert.pem
private_key_path /path/for/certificate/key.pem
private_key_passphrase secret_foo_bar_baz
</source>
Further explanation of how to set up the fluent-plugin-secure-forward plug-in can be found here.
Reducing the Number of Connections from Fluentd to the API Server
mux is a Technology Preview feature only. Technology Preview features are not supported with Red Hat production service level agreements (SLAs), might not be functionally complete, and Red Hat does not recommend to use them for production. These features provide early access to upcoming product features, enabling customers to test functionality and provide feedback during the development process.
For more information on Red Hat Technology Preview features support scope, see https://access.redhat.com/support/offerings/techpreview/.
mux is a Secure Forward listener service.
| Parameter | Description |
|---|---|
|
|
The default is set to |
|
|
Values for |
|
|
The default is set to |
|
|
The default is |
|
| 24284 |
|
| 500M |
|
| 1Gi |
|
|
The default is |
|
|
The default value is empty, allowing for additional namespaces to create for external |
Throttling logs in Fluentd
For projects that are especially verbose, an administrator can throttle down the rate at which the logs are read in by Fluentd before being processed.
Throttling can contribute to log aggregation falling behind for the configured projects; log entries can be lost if a pod is deleted before Fluentd catches up.
Throttling does not work when using the systemd journal as the log source. The throttling implementation depends on being able to throttle the reading of the individual log files for each project. When reading from the journal, there is only a single log source, no log files, so no file-based throttling is available. There is not a method of restricting the log entries that are read into the Fluentd process.
To tell Fluentd which projects it should be restricting, edit the throttle configuration in its ConfigMap after deployment:
$ oc edit configmap/logging-fluentd
The format of the throttle-config.yaml key is a YAML file that contains project names and the desired rate at which logs are read in on each node. The default is 1000 lines at a time per node. For example:
- Projects
project-name: read_lines_limit: 50 second-project-name: read_lines_limit: 100
- Logging
logging: read_lines_limit: 500 test-project: read_lines_limit: 10 .operations: read_lines_limit: 100
When you make changes to any part of the EFK stack, specifically Elasticsearch or Fluentd, you should first scale Elasticsearch down to zero and scale Fluentd so it does not match any other nodes. Then, make the changes and scale Elasticsearch and Fluentd back.
To scale Elasticsearch to zero:
$ oc scale --replicas=0 dc/<ELASTICSEARCH_DC>
Change nodeSelector in the daemonset configuration to match zero:
Get the Fluentd node selector:
$ oc get ds logging-fluentd -o yaml |grep -A 1 Selector
nodeSelector:
logging-infra-fluentd: "true"
Use the oc patch command to modify the daemonset nodeSelector:
$ oc patch ds logging-fluentd -p '{"spec":{"template":{"spec":{"nodeSelector":{"nonexistlabel":"true"}}}}}'
Get the Fluentd node selector:
$ oc get ds logging-fluentd -o yaml |grep -A 1 Selector
nodeSelector:
"nonexistlabel: "true"
Scale Elasticsearch back up from zero:
$ oc scale --replicas=# dc/<ELASTICSEARCH_DC>
Change nodeSelector in the daemonset configuration back to logging-infra-fluentd: "true".
Use the oc patch command to modify the daemonset nodeSelector:
oc patch ds logging-fluentd -p '{"spec":{"template":{"spec":{"nodeSelector":{"logging-infra-fluentd":"true"}}}}}'32.5.4. Kibana
To access the Kibana console from the OpenShift Container Platform web console, add the loggingPublicURL parameter in the master webconsole-config configmap file, with the URL of the Kibana console (the kibana-hostname parameter). The value must be an HTTPS URL:
... clusterInfo: ... loggingPublicURL: "https://kibana.example.com" ...
Setting the loggingPublicURL parameter creates a View Archive button on the OpenShift Container Platform web console under the Browse → Pods → <pod_name> → Logs tab. This links to the Kibana console.
You can scale the Kibana deployment as usual for redundancy:
$ oc scale dc/logging-kibana --replicas=2
To ensure the scale persists across multiple executions of the logging playbook, make sure to update the openshift_logging_kibana_replica_count in the inventory file.
You can see the user interface by visiting the site specified by the openshift_logging_kibana_hostname variable.
See the Kibana documentation for more information on Kibana.
Kibana Visualize
Kibana Visualize enables you to create visualizations and dashboards for monitoring container and pod logs allows administrator users (cluster-admin or cluster-reader) to view logs by deployment, namespace, pod, and container.
Kibana Visualize exists inside the Elasticsearch and ES-OPS pod, and must be run inside those pods. To load dashboards and other Kibana UI objects, you must first log into Kibana as the user you want to add the dashboards to, then log out. This will create the necessary per-user configuration that the next step relies on. Then, run:
$ oc exec <$espod> -- es_load_kibana_ui_objects <user-name>
Where $espod is the name of any one of your Elasticsearch pods.
32.5.5. Curator
Curator allows administrators to configure scheduled Elasticsearch maintenance operations to be performed automatically on a per-project basis. It is scheduled to perform actions daily based on its configuration. Only one Curator pod is recommended per Elasticsearch cluster. Curator is configured via a YAML configuration file with the following structure:
$PROJECT_NAME:
$ACTION:
$UNIT: $VALUE
$PROJECT_NAME:
$ACTION:
$UNIT: $VALUE
...The available parameters are:
| Variable Name | Description |
|---|---|
|
|
The actual name of a project, such as myapp-devel. For OpenShift Container Platform operations logs, use the name |
|
|
The action to take, currently only |
|
|
One of |
|
| An integer for the number of units. |
|
|
Use |
|
|
(Number) the hour of the day in 24-hour format at which to run the Curator jobs. For use with |
|
|
(Number) the minute of the hour at which to run the Curator jobs. For use with |
|
| (String) the tring in tzselect(8) or timedatectl(1) format. The default timezone is UTC. |
|
| The list of regular expressions that match project names. |
|
| The valid and properly escaped regular expression pattern enclosed by single quotation marks. |
For example, to configure Curator to:
-
delete indices in the myapp-dev project older than
1 day -
delete indices in the myapp-qe project older than
1 week -
delete operations logs older than
8 weeks -
delete all other projects indices after they are
31 daysold - run the Curator jobs at midnight every day
Use:
config.yaml: | # uncomment and use this to override the defaults from env vars #.defaults: 1 # delete: # days: 31 # runhour: 0 # runminute: 0 myapp-dev: 2 delete: days: 1 myapp-qe: 3 delete: weeks: 1 .operations: 4 delete: weeks: 8 .defaults: 5 delete: days: 31 runhour: 0 runminute: 0 timezone: America/New_York .regex: - pattern: '^project\..+\-dev\..*$' 6 delete: days: 1 - pattern: '^project\..+\-test\..*$' 7 delete: days: 2
- 1
- Optionally, change the default number of days between run and the run hour and run minute.
- 2
- Delete indices in the myapp-dev project older than
1 day - 3
- Delete indices in the myapp-qe project older than
1 week - 4
- Delete operations logs older than
8 weeks - 5
- Delete all other projects indices after they are
31 daysold - 6
- Delete indices older than 1 day that are matched by the '^project\..+\-dev.*$' regex
- 7
- Delete indices older than 2 days that are matched by the '^project\..+\-test.*$' regex
When you use month as the $UNIT for an operation, Curator starts counting at the first day of the current month, not the current day of the current month. For example, if today is April 15, and you want to delete indices that are 2 months older than today (delete: months: 2), Curator does not delete indices that are dated older than February 15; it deletes indices older than February 1. That is, it goes back to the first day of the current month, then goes back two whole months from that date. If you want to be exact with Curator, it is best to use days (for example, delete: days: 30).
32.5.5.1. Creating the Curator Configuration
The openshift_logging Ansible role provides a ConfigMap from which Curator reads its configuration. You may edit or replace this ConfigMap to reconfigure Curator. Currently the logging-curator ConfigMap is used to configure both your ops and non-ops Curator instances. Any .operations configurations are in the same location as your application logs configurations.
To edit the provided ConfigMap to configure your Curator instances:
$ oc edit configmap/logging-curator
To replace the provided ConfigMap instead:
$ create /path/to/mycuratorconfig.yaml $ oc create configmap logging-curator -o yaml \ --from-file=config.yaml=/path/to/mycuratorconfig.yaml | \ oc replace -f -
After you make your changes, redeploy Curator:
$ oc rollout latest dc/logging-curator $ oc rollout latest dc/logging-curator-ops
32.6. Cleanup
Remove everything generated during the deployment.
$ ansible-playbook [-i </path/to/inventory>] \
/usr/share/ansible/openshift-ansible/playbooks/openshift-logging/config.yml \
-e openshift_logging_install_logging=False32.7. Troubleshooting Kibana
Using the Kibana console with OpenShift Container Platform can cause problems that are easily solved, but are not accompanied with useful error messages. Check the following troubleshooting sections if you are experiencing any problems when deploying Kibana on OpenShift Container Platform:
Login Loop
The OAuth2 proxy on the Kibana console must share a secret with the master host’s OAuth2 server. If the secret is not identical on both servers, it can cause a login loop where you are continuously redirected back to the Kibana login page.
To fix this issue, delete the current OAuthClient, and use openshift-ansible to re-run the openshift_logging role:
$ oc delete oauthclient/kibana-proxy
$ ansible-playbook [-i </path/to/inventory>] \
/usr/share/ansible/openshift-ansible/playbooks/openshift-logging/config.ymlCryptic Error When Viewing the Console
When attempting to visit the Kibana console, you may receive a browser error instead:
{"error":"invalid_request","error_description":"The request is missing a required parameter,
includes an invalid parameter value, includes a parameter more than once, or is otherwise malformed."}This can be caused by a mismatch between the OAuth2 client and server. The return address for the client must be in a whitelist so the server can securely redirect back after logging in.
Fix this issue by replacing the OAuthClient entry:
$ oc delete oauthclient/kibana-proxy
$ ansible-playbook [-i </path/to/inventory>] \
/usr/share/ansible/openshift-ansible/playbooks/openshift-logging/config.ymlIf the problem persists, check that you are accessing Kibana at a URL listed in the OAuth client. This issue can be caused by accessing the URL at a forwarded port, such as 1443 instead of the standard 443 HTTPS port. You can adjust the server whitelist by editing the OAuth client:
$ oc edit oauthclient/kibana-proxy
503 Error When Viewing the Console
If you receive a proxy error when viewing the Kibana console, it could be caused by one of two issues.
First, Kibana may not be recognizing pods. If Elasticsearch is slow in starting up, Kibana may timeout trying to reach it. Check whether the relevant service has any endpoints:
$ oc describe service logging-kibana Name: logging-kibana [...] Endpoints: <none>
If any Kibana pods are live, endpoints are listed. If they are not, check the state of the Kibana pods and deployment. You may need to scale the deployment down and back up again.
The second possible issue may be caused if the route for accessing the Kibana service is masked. This can happen if you perform a test deployment in one project, then deploy in a different project without completely removing the first deployment. When multiple routes are sent to the same destination, the default router will only route to the first created. Check the problematic route to see if it is defined in multiple places:
$ oc get route --all-namespaces --selector logging-infra=support
F-5 Load Balancer and X-Forwarded-For Enabled
If you are attempting to use a F-5 load balancer in front of Kibana with X-Forwarded-For enabled, this can cause an issue in which the Elasticsearch Searchguard plug-in is unable to correctly accept connections from Kibana.
Example Kibana Error Message
Kibana: Unknown error while connecting to Elasticsearch Error: Unknown error while connecting to Elasticsearch Error: UnknownHostException[No trusted proxies]
To configure Searchguard to ignore the extra header:
- Scale down all Fluentd pods.
- Scale down Elasticsearch after the Fluentd pods have terminated.
Add
searchguard.http.xforwardedfor.header: DUMMYto the Elasticsearch configuration section.$ oc edit configmap/logging-elasticsearch 1- 1
- This approach requires that Elasticsearch’s configurations are within a ConfigMap.
- Scale Elasticsearch back up.
- Scale up all Fluentd pods.
32.8. Sending Logs to an External Elasticsearch Instance
Fluentd sends logs to the value of the ES_HOST, ES_PORT, OPS_HOST, and OPS_PORT environment variables of the Elasticsearch deployment configuration. The application logs are directed to the ES_HOST destination, and operations logs to OPS_HOST.
Sending logs directly to an AWS Elasticsearch instance is not supported. Use Fluentd Secure Forward to direct logs to an instance of Fluentd that you control and that is configured with the fluent-plugin-aws-elasticsearch-service plug-in.
To direct logs to a specific Elasticsearch instance, edit the deployment configuration and replace the value of the above variables with the desired instance:
$ oc edit ds/<daemon_set>
For an external Elasticsearch instance to contain both application and operations logs, you can set ES_HOST and OPS_HOST to the same destination, while ensuring that ES_PORT and OPS_PORT also have the same value.
If your externally hosted Elasticsearch instance does not use TLS, update the _CLIENT_CERT, _CLIENT_KEY, and _CA variables to be empty. If it does use TLS, but not mutual TLS, update the _CLIENT_CERT and _CLIENT_KEY variables to be empty and patch or recreate the logging-fluentd secret with the appropriate _CA value for communicating with your Elasticsearch instance. If it uses Mutual TLS as the provided Elasticsearch instance does, patch or recreate the logging-fluentd secret with your client key, client cert, and CA.
If you are not using the provided Kibana and Elasticsearch images, you will not have the same multi-tenant capabilities and your data will not be restricted by user access to a particular project.
32.9. Sending Logs to an External Syslog Server
Use the fluent-plugin-remote-syslog plug-in on the host to send logs to an external syslog server.
Set environment variables in the logging-fluentd or logging-mux deployment configurations:
- name: REMOTE_SYSLOG_HOST 1
value: host1
- name: REMOTE_SYSLOG_HOST_BACKUP
value: host2
- name: REMOTE_SYSLOG_PORT_BACKUP
value: 5555- 1
- The desired remote syslog host. Required for each host.
This will build two destinations. The syslog server on host1 will be receiving messages on the default port of 514, while host2 will be receiving the same messages on port 5555.
Alternatively, you can configure your own custom fluent.conf in the logging-fluentd or logging-mux ConfigMaps.
Fluentd Environment Variables
| Parameter | Description |
|---|---|
|
|
Defaults to |
|
| (Required) Hostname or IP address of the remote syslog server. |
|
|
Port number to connect on. Defaults to |
|
|
Set the syslog severity level. Defaults to |
|
|
Set the syslog facility. Defaults to |
|
|
Defaults to |
|
|
Removes the prefix from the tag, defaults to |
|
| If specified, uses this field as the key to look on the record, to set the tag on the syslog message. |
|
| If specified, uses this field as the key to look on the record, to set the payload on the syslog message. |
This implementation is insecure, and should only be used in environments where you can guarantee no snooping on the connection.
Fluentd Logging Ansible Variables
| Parameter | Description |
|---|---|
|
|
The default is set to |
|
| Hostname or IP address of the remote syslog server, this is mandatory. |
|
|
Port number to connect on, defaults to |
|
|
Set the syslog severity level, defaults to |
|
|
Set the syslog facility, defaults to |
|
|
The default is set to |
|
|
Removes the prefix from the tag, defaults to |
|
| If string is specified, uses this field as the key to look on the record, to set the tag on the syslog message. |
|
| If string is specified, uses this field as the key to look on the record, to set the payload on the syslog message. |
Mux Logging Ansible Variables
| Parameter | Description |
|---|---|
|
|
The default is set to |
|
| Hostname or IP address of the remote syslog server, this is mandatory. |
|
|
Port number to connect on, defaults to |
|
|
Set the syslog severity level, defaults to |
|
|
Set the syslog facility, defaults to |
|
|
The default is set to |
|
|
Removes the prefix from the tag, defaults to |
|
| If string is specified, uses this field as the key to look on the record, to set the tag on the syslog message. |
|
| If string is specified, uses this field as the key to look on the record, to set the payload on the syslog message. |
32.10. Performing Administrative Elasticsearch Operations
As of logging version 3.2.0, an administrator certificate, key, and CA that can be used to communicate with and perform administrative operations on Elasticsearch are provided within the logging-elasticsearch secret.
To confirm whether or not your EFK installation provides these, run:
$ oc describe secret logging-elasticsearch
If they are not available, refer to Manual Upgrades to ensure you are on the latest version first.
- Connect to an Elasticsearch pod that is in the cluster on which you are attempting to perform maintenance.
To find a pod in a cluster use either:
$ oc get pods -l component=es -o name | head -1 $ oc get pods -l component=es-ops -o name | head -1
Connect to a pod:
$ oc rsh <your_Elasticsearch_pod>
Once connected to an Elasticsearch container, you can use the certificates mounted from the secret to communicate with Elasticsearch per its Indices APIs documentation.
Fluentd sends its logs to Elasticsearch using the index format project.{project_name}.{project_uuid}.YYYY.MM.DD where YYYY.MM.DD is the date of the log record.
For example, to delete all logs for the logging project with uuid 3b3594fa-2ccd-11e6-acb7-0eb6b35eaee3 from June 15, 2016, we can run:
$ curl --key /etc/elasticsearch/secret/admin-key \ --cert /etc/elasticsearch/secret/admin-cert \ --cacert /etc/elasticsearch/secret/admin-ca -XDELETE \ "https://localhost:9200/project.logging.3b3594fa-2ccd-11e6-acb7-0eb6b35eaee3.2016.06.15"
32.11. Redeploying EFK Certificates
You can redeploy EFK certificates, if needed.
To redeploy EFK certificates:
Run the following command to delete the all certificate files:
$ rm -r /etc/origin/logging
- Verify that the Custom Certificate parameters are set in your inventory host file.
Use the Ansible playbook to redeploy the EFK stack:
$ cd /usr/share/ansible/openshift-ansible $ ansible-playbook [-i </path/to/inventory>] \ playbooks/openshift-logging/config.ymlThe command fails with an error message similar to the following:
RUNNING HANDLER [openshift_logging_elasticsearch : Checking current health for {{ _es_node }} cluster] *** Friday 14 December 2018 07:53:44 +0000 (0:00:01.571) 0:05:01.710 ******* [WARNING]: Consider using the get_url or uri module rather than running curl. If you need to use command because get_url or uri is insufficient you can add warn=False to this command task or set command_warnings=False in ansible.cfg to get rid of this message. fatal: [ec2-34-207-171-49.compute-1.amazonaws.com]: FAILED! => {"changed": true, "cmd": ["curl", "-s", "-k", "--cert", "/tmp/openshift-logging-ansible-3v1NOI/admin-cert", "--key", "/tmp/openshift-logging-ansible-3v1NOI/admin-key", "https://logging-es.openshift-logging.svc:9200/_cluster/health?pretty"], "delta": "0:00:01.024054", "end": "2018-12-14 02:53:33.467642", "msg": "non-zero return code", "rc": 7, "start": "2018-12-14 02:53:32.443588", "stderr": "", "stderr_lines": [], "stdout": "", "stdout_lines": []} RUNNING HANDLER [openshift_logging_elasticsearch : Set Logging message to manually restart] *** Friday 14 December 2018 07:53:46 +0000 (0:00:01.557) 0:05:03.268 *******Run the following command to delete all pods to refresh the secret:
$ oc delete pod --all -n openshift-logging
32.12. Changing the Aggregated Logging Driver
For aggregated logging, it is recommended to use the json-file log driver.
When using the json-file driver, ensure that you are using Docker version docker-1.12.6-55.gitc4618fb.el7_4 now or later.
Fluentd determines the driver Docker is using by checking the /etc/docker/daemon.json and /etc/sysconfig/docker files.
You can determine which driver Docker is using with the docker info command:
# docker info | grep Logging Logging Driver: journald
To change to json-file:
Modify either the /etc/sysconfig/docker or /etc/docker/daemon.json files.
For example:
# cat /etc/sysconfig/docker OPTIONS=' --selinux-enabled --log-driver=json-file --log-opt max-size=1M --log-opt max-file=3 --signature-verification=False' cat /etc/docker/daemon.json { "log-driver": "json-file", "log-opts": { "max-size": "1M", "max-file": "1" } }Restart the Docker service:
systemctl restart docker
Restart Fluentd.
WarningRestarting Fluentd on more than a dozen nodes at once will create a large load on the Kubernetes scheduler. Exercise caution when using the following the directions to restart Fluentd.
There are two methods for restarting Fluentd. You can restart the Fluentd on one node or a set of nodes, or on all nodes.
The following steps demonstrate how to restart Fluentd on one node or a set of nodes.
List the nodes where Fluentd is running:
$ oc get nodes -l logging-infra-fluentd=true
For each node, remove the label and turn off Fluentd:
$ oc label node $node logging-infra-fluentd-
Verify Fluentd is off:
$ oc get pods -l component=fluentd
For each node, restart Fluentd:
$ oc label node $node logging-infra-fluentd=true
The following steps demonstrate how to restart the Fluentd all nodes.
Turn off Fluentd on all nodes:
$ oc label node -l logging-infra-fluentd=true --overwrite logging-infra-fluentd=false
Verify Fluentd is off:
$ oc get pods -l component=fluentd
Restart Fluentd on all nodes:
$ oc label node -l logging-infra-fluentd=false --overwrite logging-infra-fluentd=true
Verify Fluentd is on:
$ oc get pods -l component=fluentd
32.13. Manual Elasticsearch Rollouts
As of OpenShift Container Platform 3.7 the Aggregated Logging stack updated the Elasticsearch Deployment Config object so that it no longer has a Config Change Trigger, meaning any changes to the dc will not result in an automatic rollout. This was to prevent unintended restarts happening in the Elasticsearch cluster, which could create excessive shard rebalancing as cluster members restart.
This section presents two restart procedures: rolling-restart and full-restart. Where a rolling restart applies appropriate changes to the Elasticsearch cluster without down time (provided three masters are configured) and a full restart safely applies major changes without risk to existing data.
32.13.1. Performing an Elasticsearch Rolling Cluster Restart
A rolling restart is recommended, when any of the following changes are made:
- nodes on which Elasticsearch pods run require a reboot
- logging-elasticsearch configmap
- logging-es-* deployment configuration
- new image deployment, or upgrade
This will be the recommended restart policy going forward.
Any action you do for an Elasticsearch cluster will need to be repeated for the ops cluster if openshift_logging_use_ops was configured to be True.
Prevent shard balancing when purposely bringing down nodes:
$ oc exec -c elasticsearch <any_es_pod_in_the_cluster> -- \ curl -s \ --cacert /etc/elasticsearch/secret/admin-ca \ --cert /etc/elasticsearch/secret/admin-cert \ --key /etc/elasticsearch/secret/admin-key \ -XPUT 'https://localhost:9200/_cluster/settings' \ -d '{ "transient": { "cluster.routing.allocation.enable" : "none" } }'Once complete, for each
dcyou have for an Elasticsearch cluster, runoc rollout latestto deploy the latest version of thedcobject:$ oc rollout latest <dc_name>
You will see a new pod deployed. Once the pod has two ready containers, you can move on to the next
dc.Once all `dc`s for the cluster have been rolled out, re-enable shard balancing:
$ oc exec -c elasticsearch <any_es_pod_in_the_cluster> -- \ curl -s \ --cacert /etc/elasticsearch/secret/admin-ca \ --cert /etc/elasticsearch/secret/admin-cert \ --key /etc/elasticsearch/secret/admin-key \ -XPUT 'https://localhost:9200/_cluster/settings' \ -d '{ "transient": { "cluster.routing.allocation.enable" : "all" } }'
32.13.2. Performing an Elasticsearch Full Cluster Restart
A full restart is recommended when changing major versions of Elasticsearch or other changes which might put data integrity a risk during the change process.
Any action you do for an Elasticsearch cluster will need to be repeated for the ops cluster if openshift_logging_use_ops was configured to be True.
When making changes to the logging-es-ops service use components "es-ops-blocked" and "es-ops" instead in the patch
Disable all external communications to the Elasticsearch cluster while it is down. Edit your non-cluster logging service (for example,
logging-es,logging-es-ops) to no longer match the Elasticsearch pods running:$ oc patch svc/logging-es -p '{"spec":{"selector":{"component":"es-blocked","provider":"openshift"}}}'Perform a shard synced flush to ensure there are no pending operations waiting to be written to disk prior to shutting down:
$ oc exec -c elasticsearch <any_es_pod_in_the_cluster> -- \ curl -s \ --cacert /etc/elasticsearch/secret/admin-ca \ --cert /etc/elasticsearch/secret/admin-cert \ --key /etc/elasticsearch/secret/admin-key \ -XPOST 'https://localhost:9200/_flush/synced'Prevent shard balancing when purposely bringing down nodes:
$ oc exec -c elasticsearch <any_es_pod_in_the_cluster> -- \ curl -s \ --cacert /etc/elasticsearch/secret/admin-ca \ --cert /etc/elasticsearch/secret/admin-cert \ --key /etc/elasticsearch/secret/admin-key \ -XPUT 'https://localhost:9200/_cluster/settings' \ -d '{ "transient": { "cluster.routing.allocation.enable" : "none" } }'Once complete, for each
dcyou have for an ES cluster, runoc rollout latestto deploy the latest version of thedcobject:$ oc rollout latest <dc_name>
You will see a new pod deployed. Once the pod has two ready containers, you can move on to the next
dc.Once the scale up is complete, enable all external communications to the ES cluster. Edit your non-cluster logging service (for example,
logging-es,logging-es-ops) to match the Elasticsearch pods running again:$ oc patch svc/logging-es -p '{"spec":{"selector":{"component":"es","provider":"openshift"}}}'
Chapter 33. Aggregate Logging Sizing Guidelines
33.1. Overview
The Elasticsearch, Fluentd, and Kibana (EFK) stack aggregates logs from nodes and applications running inside your OpenShift Container Platform installation. Once deployed it uses Fluentd to aggregate event logs from all nodes, projects, and pods into Elasticsearch (ES). It also provides a centralized Kibana web UI where users and administrators can create rich visualizations and dashboards with the aggregated data.
Fluentd bulk uploads logs to an index, in JSON format, then Elasticsearch routes your search requests to the appropriate shards.
33.2. Installation
The general procedure for installing an aggregate logging stack in OpenShift Container Platform is described in Aggregating Container Logs. There are some important things to keep in mind while going through the installation guide:
In order for the logging pods to spread evenly across your cluster, an empty node selector should be used.
$ oc adm new-project logging --node-selector=""
In conjunction with node labeling, which is done later, this controls pod placement across the logging project. You can now create the logging project.
$ oc project logging
Elasticsearch (ES) should be deployed with a cluster size of at least three for resiliency to node failures. This is specified by setting the openshift_logging_es_cluster_size parameter in the inventory host file.
Refer to Ansible Variables for a full list of parameters.
If you do not have an existing Kibana installation, you can use kibana.example.com as a value to openshift_logging_kibana_hostname.
Installation can take some time depending on whether the images were already retrieved from the registry or not, and on the size of your cluster.
Inside the logging project, you can check your deployment with oc get all.
$ oc get all NAME REVISION REPLICAS TRIGGERED BY logging-curator 1 1 logging-es-6cvk237t 1 1 logging-es-e5x4t4ai 1 1 logging-es-xmwvnorv 1 1 logging-kibana 1 1 NAME DESIRED CURRENT AGE logging-curator-1 1 1 3d logging-es-6cvk237t-1 1 1 3d logging-es-e5x4t4ai-1 1 1 3d logging-es-xmwvnorv-1 1 1 3d logging-kibana-1 1 1 3d NAME HOST/PORT PATH SERVICE TERMINATION LABELS logging-kibana kibana.example.com logging-kibana reencrypt component=support,logging-infra=support,provider=openshift logging-kibana-ops kibana-ops.example.com logging-kibana-ops reencrypt component=support,logging-infra=support,provider=openshift NAME CLUSTER-IP EXTERNAL-IP PORT(S) AGE logging-es 172.24.155.177 <none> 9200/TCP 3d logging-es-cluster None <none> 9300/TCP 3d logging-es-ops 172.27.197.57 <none> 9200/TCP 3d logging-es-ops-cluster None <none> 9300/TCP 3d logging-kibana 172.27.224.55 <none> 443/TCP 3d logging-kibana-ops 172.25.117.77 <none> 443/TCP 3d NAME READY STATUS RESTARTS AGE logging-curator-1-6s7wy 1/1 Running 0 3d logging-deployer-un6ut 0/1 Completed 0 3d logging-es-6cvk237t-1-cnpw3 1/1 Running 0 3d logging-es-e5x4t4ai-1-v933h 1/1 Running 0 3d logging-es-xmwvnorv-1-adr5x 1/1 Running 0 3d logging-fluentd-156xn 1/1 Running 0 3d logging-fluentd-40biz 1/1 Running 0 3d logging-fluentd-8k847 1/1 Running 0 3d
You should end up with a similar setup to the following.
$ oc get pods -o wide NAME READY STATUS RESTARTS AGE NODE logging-curator-1-6s7wy 1/1 Running 0 3d ip-172-31-24-239.us-west-2.compute.internal logging-deployer-un6ut 0/1 Completed 0 3d ip-172-31-6-152.us-west-2.compute.internal logging-es-6cvk237t-1-cnpw3 1/1 Running 0 3d ip-172-31-24-238.us-west-2.compute.internal logging-es-e5x4t4ai-1-v933h 1/1 Running 0 3d ip-172-31-24-235.us-west-2.compute.internal logging-es-xmwvnorv-1-adr5x 1/1 Running 0 3d ip-172-31-24-233.us-west-2.compute.internal logging-fluentd-156xn 1/1 Running 0 3d ip-172-31-24-241.us-west-2.compute.internal logging-fluentd-40biz 1/1 Running 0 3d ip-172-31-24-236.us-west-2.compute.internal logging-fluentd-8k847 1/1 Running 0 3d ip-172-31-24-237.us-west-2.compute.internal logging-fluentd-9a3qx 1/1 Running 0 3d ip-172-31-24-231.us-west-2.compute.internal logging-fluentd-abvgj 1/1 Running 0 3d ip-172-31-24-228.us-west-2.compute.internal logging-fluentd-bh74n 1/1 Running 0 3d ip-172-31-24-238.us-west-2.compute.internal ... ...
By default the amount of RAM allocated to each ES instance is 8GB. openshift_logging_es_memory_limit is the parameter used in the openshift-ansible host inventory file. Keep in mind that half of this value will be passed to the individual elasticsearch pods java processes heap size.
Learn more about installing EFK.
33.2.1. Large Clusters
At 100 nodes or more, it is recommended to first pre-pull the logging images from docker pull registry.access.redhat.com/openshift3/logging-fluentd:v3.9. After deploying the logging infrastructure pods (Elasticsearch, Kibana, and Curator), node labeling should be done in steps of 20 nodes at a time. For example:
Using a simple loop:
$ while read node; do oc label nodes $node logging-infra-fluentd=true; done < 20_fluentd.lst
The following also works:
$ oc label nodes 10.10.0.{100..119} logging-infra-fluentd=trueLabeling nodes in groups paces the DaemonSets used by OpenShift logging, helping to avoid contention on shared resources such as the image registry.
Check for the occurence of any "CrashLoopBackOff | ImagePullFailed | Error" issues. oc logs <pod>, oc describe pod <pod> and oc get event are helpful diagnostic commands.
33.3. Systemd-journald and rsyslog
Rate-limiting
In Red Hat Enterprise Linux (RHEL) 7 the systemd-journald.socket unit creates /dev/log during the boot process, and then passes input to systemd-journald.service. Every syslog() call goes to the journal.
Rsyslog uses the imjournal module as a default input mode for journal files. Refer to Interaction of rsyslog and journal for detailed information about this topic.
A simple test harness was developed, which uses logger across the cluster nodes to make entries of different sizes at different rates in the system log. During testing simulations under a default Red Hat Enterprise Linux (RHEL) 7 installation with systemd-219-19.el7.x86_64 at certain logging rates (approximately 40 log lines per second), we encountered the default rate limit of rsyslogd. After adjusting these limits, entries stopped being written to journald due to local journal file corruption. This issue is resolved in later versions of systemd.
Scaling up
As you scale up your project, the default logging environment might need some adjustments. After updating to systemd-219-22.el7.x86_64, we added:
$IMUXSockRateLimitInterval 0 $IMJournalRatelimitInterval 0
to /etc/rsyslog.conf and:
# Disable rate limiting RateLimitInterval=1s RateLimitBurst=10000 Storage=volatile Compress=no MaxRetentionSec=30s
to /etc/systemd/journald.conf.
Now, restart the services.
$ systemctl restart systemd-journald.service $ systemctl restart rsyslog.service
These settings account for the bursty nature of uploading in bulk.
After removing the rate limit, you may see increased CPU utilization on the system logging daemons as it processes any messages that would have previously been throttled.
Rsyslog is configured (see ratelimit.interval, ratelimit.burst) to rate-limit entries read from the journal at 10,000 messages in 300 seconds. A good rule of thumb is to ensure that the rsyslog rate-limits account for the systemd-journald rate-limits.
33.4. Scaling up EFK Logging
If you do not indicate the desired scale at first deployment, the least disruptive way of adjusting your cluster is by re-running the Ansible logging playbook after updating the inventory file with an updated openshift_logging_es_cluster_size value. parameter. Refer to the Performing Administrative Elasticsearch Operations section for more in-depth information.
A highly-available Elasticsearch environment requires at least three Elasticsearch nodes, each on a different host, and setting the openshift_logging_es_number_of_replicas Ansible variable to a value of 1 or higher to create replicas.
33.5. Storage Considerations
An Elasticsearch index is a collection of shards and their corresponding replicas. This is how ES implements high availability internally, therefore there is little need to use hardware based mirroring RAID variants. RAID 0 can still be used to increase overall disk performance.
Every search request needs to hit a copy of every shard in the index. Each ES instance requires its own individual storage, but an OpenShift Container Platform deployment can only provide volumes shared by all of its pods, which again means that Elasticsearch shouldn’t be implemented with a single node.
A persistent volume should be added to each Elasticsearch deployment configuration so that we have one volume per replica shard. On OpenShift Container Platform this is often achieved through Persistent Volume Claims
- 1 volume per shard
- 1 volume per replica shard
The PVCs must be named based on the openshift_logging_es_pvc_prefix setting. Refer to Persistent Elasticsearch Storage for more details.
Below are capacity planning guidelines for OpenShift Container Platform aggregate logging. Example scenario
Assumptions:
- Which application: Apache
- Bytes per line: 256
- Lines per second load on application: 1
- Raw text data → JSON
Baseline (256 characters per second → 15KB/min)
| Logging Infra Pods | Storage Throughput |
|---|---|
| 3 es 1 kibana 1 curator 1 fluentd | 6 pods total: 90000 x 1440 = 128,6 MB/day |
| 3 es 1 kibana 1 curator 11 fluentd | 16 pods total: 240000 x 1440 = 345,6 MB/day |
| 3 es 1 kibana 1 curator 20 fluentd | 25 pods total: 375000 x 1440 = 540 MB/day |
Calculating total logging throughput and disk space required for your logging environment requires knowledge of your application. For example, if one of your applications on average logs 10 lines-per-second, each 256 bytes-per-line, calculate per-application throughput and disk space as follows:
(bytes-per-line * (lines-per-second) = 2560 bytes per app per second (2560) * (number-of-pods-per-node,100) = 256,000 bytes per second per node 256k * (number-of-nodes) = total logging throughput per cluster
Fluentd ships any logs from systemd journal and /var/lib/docker/containers/ to Elasticsearch. Learn more.
Local SSD drives are recommended in order to achieve the best performance. In Red Hat Enterprise Linux (RHEL) 7, the deadline IO scheduler is the default for all block devices except SATA disks. For SATA disks, the default IO scheduler is cfq.
Sizing storage for ES is greatly dependent on how you optimize your indices. Therefore, consider how much data you need in advance and that you are aggregating application log data. Some Elasticsearch users have found that it is necessary to keep absolute storage consumption around 50% and below 70% at all times. This helps to avoid Elasticsearch becoming unresponsive during large merge operations.
Chapter 34. Enabling Cluster Metrics
34.1. Overview
The kubelet exposes metrics that can be collected and stored in back-ends by Heapster.
As an OpenShift Container Platform administrator, you can view a cluster’s metrics from all containers and components in one user interface. These metrics are also used by horizontal pod autoscalers in order to determine when and how to scale.
This topic describes using Hawkular Metrics as a metrics engine which stores the data persistently in a Cassandra database. When this is configured, CPU, memory and network-based metrics are viewable from the OpenShift Container Platform web console and are available for use by horizontal pod autoscalers.
Heapster retrieves a list of all nodes from the master server, then contacts each node individually through the /stats endpoint. From there, Heapster scrapes the metrics for CPU, memory and network usage, then exports them into Hawkular Metrics.
The storage volume metrics available on the kubelet are not available through the /stats endpoint, but are available through the /metrics endpoint. See OpenShift Container Platform via Prometheus for detailed information.
Browsing individual pods in the web console displays separate sparkline charts for memory and CPU. The time range displayed is selectable, and these charts automatically update every 30 seconds. If there are multiple containers on the pod, then you can select a specific container to display its metrics.
If resource limits are defined for your project, then you can also see a donut chart for each pod. The donut chart displays usage against the resource limit. For example: 145 Available of 200 MiB, with the donut chart showing 55 MiB Used.
34.2. Before You Begin
An Ansible playbook is available to deploy and upgrade cluster metrics. You should familiarize yourself with the Advanced Installation section. This provides information for preparing to use Ansible and includes information about configuration. Parameters are added to the Ansible inventory file to configure various areas of cluster metrics.
The following describe the various areas and the parameters that can be added to the Ansible inventory file in order to modify the defaults:
34.3. Metrics Project
The components for cluster metrics must be deployed to the openshift-infra project in order for autoscaling to work. Horizontal pod autoscalers specifically use this project to discover the Heapster service and use it to retrieve metrics. The metrics project can be changed by adding openshift_metrics_project to the inventory file.
34.4. Metrics Data Storage
You can store the metrics data to either persistent storage or to a temporary pod volume.
34.4.1. Persistent Storage
Running OpenShift Container Platform cluster metrics with persistent storage means that your metrics are stored to a persistent volume and are able to survive a pod being restarted or recreated. This is ideal if you require your metrics data to be guarded from data loss. For production environments it is highly recommended to configure persistent storage for your metrics pods.
The size requirement of the Cassandra storage is dependent on the number of pods. It is the administrator’s responsibility to ensure that the size requirements are sufficient for their setup and to monitor usage to ensure that the disk does not become full. The size of the persisted volume claim is specified with the openshift_metrics_cassandra_pvc_sizeansible variable which is set to 10 GB by default.
If you would like to use dynamically provisioned persistent volumes set the openshift_metrics_cassandra_storage_typevariable to dynamic in the inventory file.
34.4.2. Capacity Planning for Cluster Metrics
After running the openshift_metrics Ansible role, the output of oc get pods should resemble the following:
# oc get pods -n openshift-infra NAME READY STATUS RESTARTS AGE hawkular-cassandra-1-l5y4g 1/1 Running 0 17h hawkular-metrics-1t9so 1/1 Running 0 17h heapster-febru 1/1 Running 0 17h
OpenShift Container Platform metrics are stored using the Cassandra database, which is deployed with settings of openshift_metrics_cassandra_limits_memory: 2G; this value could be adjusted further based upon the available memory as determined by the Cassandra start script. This value should cover most OpenShift Container Platform metrics installations, but using environment variables you can modify the MAX_HEAP_SIZE along with heap new generation size, HEAP_NEWSIZE, in the Cassandra Dockerfile prior to deploying cluster metrics.
By default, metrics data is stored for seven days. After seven days, Cassandra begins to purge the oldest metrics data. Metrics data for deleted pods and projects is not automatically purged; it is only removed once the data is more than seven days old.
Example 34.1. Data Accumulated by 10 Nodes and 1000 Pods
In a test scenario including 10 nodes and 1000 pods, a 24 hour period accumulated 2.5 GB of metrics data. Therefore, the capacity planning formula for metrics data in this scenario is:
(((2.5 × 10⁹) ÷ 1000) ÷ 24) ÷ 106 = ~0.125 MB/hour per pod.
Example 34.2. Data Accumulated by 120 Nodes and 10000 Pods
In a test scenario including 120 nodes and 10000 pods, a 24 hour period accumulated 25 GB of metrics data. Therefore, the capacity planning formula for metrics data in this scenario is:
(((11.410 × 10⁹) ÷ 1000) ÷ 24) ÷ 106 = 0.475 MB/hour
| 1000 pods | 10000 pods | |
|---|---|---|
| Cassandra storage data accumulated over 24 hours (default metrics parameters) | 2.5 GB | 11.4 GB |
If the default value of 7 days for openshift_metrics_duration and 30 seconds for openshift_metrics_resolution are preserved, then weekly storage requirements for the Cassandra pod would be:
| 1000 pods | 10000 pods | |
|---|---|---|
| Cassandra storage data accumulated over seven days (default metrics parameters) | 20 GB | 90 GB |
In the previous table, an additional 10 percent was added to the expected storage space as a buffer for unexpected monitored pod usage.
If the Cassandra persisted volume runs out of sufficient space, then data loss occurs.
For cluster metrics to work with persistent storage, ensure that the persistent volume has the ReadWriteOnce access mode. If this mode is not active, then the persistent volume claim cannot locate the persistent volume, and Cassandra fails to start.
To use persistent storage with the metric components, ensure that a persistent volume of sufficient size is available. The creation of persistent volume claims is handled by the OpenShift Ansible openshift_metrics role.
OpenShift Container Platform metrics also supports dynamically-provisioned persistent volumes. To use this feature with OpenShift Container Platform metrics, it is necessary to set the value of openshift_metrics_cassandra_storage_type to dynamic. You can use EBS, GCE, and Cinder storage back-ends to dynamically provision persistent volumes.
For information on configuring the performance and scaling the cluster metrics pods, see the Scaling Cluster Metrics topic.
| Number of Nodes | Number of Pods | Cassandra Storage growth speed | Cassandra storage growth per day | Cassandra storage growth per week |
|---|---|---|---|---|
| 210 | 10500 | 500 MB per hour | 15 GB | 75 GB |
| 990 | 11000 | 1 GB per hour | 30 GB | 210 GB |
In the above calculation, approximately 20 percent of the expected size was added as overhead to ensure that the storage requirements do not exceed calculated value.
If the METRICS_DURATION and METRICS_RESOLUTION values are kept at the default (7 days and 15 seconds respectively), it is safe to plan Cassandra storage size requrements for week, as in the values above.
Because OpenShift Container Platform metrics uses the Cassandra database as a datastore for metrics data, if USE_PERSISTANT_STORAGE=true is set during the metrics set up process, PV will be on top in the network storage, with NFS as the default. However, using network storage in combination with Cassandra is not recommended, as per the Cassandra documentation.
Known Issues and Limitations
Testing found that the heapster metrics component is capable of handling up to 25,000 pods. If the amount of pods exceed that number, Heapster begins to fall behind in metrics processing, resulting in the possibility of metrics graphs no longer appearing. Work is ongoing to increase the number of pods that Heapster can gather metrics on, as well as upstream development of alternate metrics-gathering solutions.
34.4.3. Non-Persistent Storage
Running OpenShift Container Platform cluster metrics with non-persistent storage means that any stored metrics are deleted when the pod is deleted. While it is much easier to run cluster metrics with non-persistent data, running with non-persistent data does come with the risk of permanent data loss. However, metrics can still survive a container being restarted.
In order to use non-persistent storage, you must set the openshift_metrics_cassandra_storage_typevariable to emptydir in the inventory file.
When using non-persistent storage, metrics data is written to /var/lib/origin/openshift.local.volumes/pods on the node where the Cassandra pod runs Ensure /var has enough free space to accommodate metrics storage.
34.5. Metrics Ansible Role
The OpenShift Container Platform Ansible openshift_metrics role configures and deploys all of the metrics components using the variables from the Configuring Ansible inventory file.
34.5.1. Specifying Metrics Ansible Variables
The openshift_metrics role included with OpenShift Ansible defines the tasks to deploy cluster metrics. The following is a list of role variables that can be added to your inventory file if it is necessary to override them.
| Variable | Description |
|---|---|
|
|
Deploy metrics if |
|
| Start the metrics cluster after deploying the components. |
|
|
The prefix for the component images. With |
|
|
The version for the component images. For example, with |
|
| The time, in seconds, to wait until Hawkular Metrics and Heapster start up before attempting a restart. |
|
| The number of days to store metrics before they are purged. |
|
| The frequency that metrics are gathered. Defined as a number and time identifier: seconds (s), minutes (m), hours (h). |
|
| The persistent volume claim prefix created for Cassandra. A serial number is appended to the prefix starting from 1. |
|
| The persistent volume claim size for each of the Cassandra nodes. |
|
|
If you want to explicitly set the storage class, you must not set |
|
|
Use |
|
| The number of Cassandra nodes for the metrics stack. This value dictates the number of Cassandra replication controllers. |
|
|
The memory limit for the Cassandra pod. For example, a value of |
|
|
The CPU limit for the Cassandra pod. For example, a value of |
|
|
The amount of memory to request for Cassandra pod. For example, a value of |
|
|
The CPU request for the Cassandra pod. For example, a value of |
|
| The supplemental storage group to use for Cassandra. |
|
|
Set to the desired, existing node selector to ensure that pods are placed onto nodes with specific labels. For example, |
|
| An optional certificate authority (CA) file used to sign the Hawkular certificate. |
|
| The certificate file used for re-encrypting the route to Hawkular metrics. The certificate must contain the host name used by the route. If unspecified, the default router certificate is used. |
|
| The key file used with the Hawkular certificate. |
|
|
The amount of memory to limit the Hawkular pod. For example, a value of |
|
|
The CPU limit for the Hawkular pod. For example, a value of |
|
| The number of replicas for Hawkular metrics. |
|
|
The amount of memory to request for the Hawkular pod. For example, a value of |
|
|
The CPU request for the Hawkular pod. For example, a value of |
|
|
Set to the desired, existing node selector to ensure that pods are placed onto nodes with specific labels. For example, |
|
|
A comma-separated list of CN to accept. By default, this is set to allow the OpenShift service proxy to connect. Add |
|
|
The amount of memory to limit the Heapster pod. For example, a value of |
|
|
The CPU limit for the Heapster pod. For example, a value of |
|
|
The amount of memory to request for Heapster pod. For example, a value of |
|
|
The CPU request for the Heapster pod. For example, a value of |
|
| Deploy only Heapster, without the Hawkular Metrics and Cassandra components. |
|
|
Set to the desired, existing node selector to ensure that pods are placed onto nodes with specific labels. For example, |
|
|
Set to |
|
|
Set when executing the |
The Hawkular OpenShift Container Platform Agent on OpenShift Container Platform is a Technology Preview feature only. Technology Preview features are not supported with Red Hat production service level agreements (SLAs), might not be functionally complete, and Red Hat does not recommend to use them for production. These features provide early access to upcoming product features, enabling customers to test functionality and provide feedback during the development process.
For more information on Red Hat Technology Preview features support scope, see https://access.redhat.com/support/offerings/techpreview/.
See Compute Resources for further discussion on how to specify requests and limits.
If you are using persistent storage with Cassandra, it is the administrator’s responsibility to set a sufficient disk size for the cluster using the openshift_metrics_cassandra_pvc_size variable. It is also the administrator’s responsibility to monitor disk usage to make sure that it does not become full.
Data loss results if the Cassandra persisted volume runs out of sufficient space.
All of the other variables are optional and allow for greater customization. For instance, if you have a custom install in which the Kubernetes master is not available under https://kubernetes.default.svc:443 you can specify the value to use instead with the openshift_metrics_master_url parameter. To deploy a specific version of the metrics components, modify the openshift_metrics_image_version variable.
It is highly recommended to not use latest for the openshift_metrics_image_version. The latest version corresponds to the very latest version available and can cause issues if it brings in a newer version not meant to function on the version of OpenShift Container Platform you are currently running.
34.5.2. Using Secrets
The OpenShift Container Platform Ansible openshift_metrics role auto-generates self-signed certificates for use between its components and generates a re-encrypting route to expose the Hawkular Metrics service. This route is what allows the web console to access the Hawkular Metrics service.
In order for the browser running the web console to trust the connection through this route, it must trust the route’s certificate. This can be accomplished by providing your own certificates signed by a trusted Certificate Authority. The openshift_metrics role allows you to specify your own certificates, which it then uses when creating the route.
The router’s default certificate are used if you do not provide your own.
34.5.2.1. Providing Your Own Certificates
To provide your own certificate, which is used by the re-encrypting route, you can set the openshift_metrics_hawkular_cert, openshift_metrics_hawkular_key, and openshift_metrics_hawkular_cavariables in your inventory file.
The hawkular-metrics.pem value needs to contain the certificate in its .pem format. You may also need to provide the certificate for the Certificate Authority which signed this pem file via the hawkular-metrics-ca.cert secret.
For more information, see the re-encryption route documentation.
34.6. Deploying the Metric Components
Because deploying and configuring all the metric components is handled with OpenShift Container Platform Ansible, you can deploy everything in one step.
The following examples show you how to deploy metrics with and without persistent storage using the default parameters.
The host that you run the Ansible playbook on must have at least 75MiB of free memory per host in the inventory.
In accordance with upstream Kubernetes rules, metrics can be collected only on the default interface of eth0.
Example 34.3. Deploying with Persistent Storage
The following command sets the Hawkular Metrics route to use hawkular-metrics.example.com and is deployed using persistent storage.
You must have a persistent volume of sufficient size available.
$ ansible-playbook [-i </path/to/inventory>] <OPENSHIFT_ANSIBLE_DIR>/playbooks/openshift-metrics/config.yml \ -e openshift_metrics_install_metrics=True \ -e openshift_metrics_hawkular_hostname=hawkular-metrics.example.com \ -e openshift_metrics_cassandra_storage_type=pv
Example 34.4. Deploying without Persistent Storage
The following command sets the Hawkular Metrics route to use hawkular-metrics.example.com and deploy without persistent storage.
$ ansible-playbook [-i </path/to/inventory>] <OPENSHIFT_ANSIBLE_DIR>/playbooks/openshift-metrics/config.yml \ -e openshift_metrics_install_metrics=True \ -e openshift_metrics_hawkular_hostname=hawkular-metrics.example.com
Because this is being deployed without persistent storage, metric data loss can occur.
34.6.1. Metrics Diagnostics
The are some diagnostics for metrics to assist in evaluating the state of the metrics stack. To execute diagnostics for metrics:
$ oc adm diagnostics MetricsApiProxy
34.7. Setting the Metrics Public URL
The OpenShift Container Platform web console uses the data coming from the Hawkular Metrics service to display its graphs. The URL for accessing the Hawkular Metrics service must be configured with the metricsPublicURL option in the master webconsole-config configmap file. This URL corresponds to the route created with the openshift_metrics_hawkular_hostname inventory variable used during the deployment of the metrics components.
You must be able to resolve the openshift_metrics_hawkular_hostname from the browser accessing the console.
For example, if your openshift_metrics_hawkular_hostname corresponds to hawkular-metrics.example.com, then you must make the following change in the webconsole-config configmap file:
clusterInfo: ... metricsPublicURL: "https://hawkular-metrics.example.com/hawkular/metrics"
Once you have updated and saved the webconsole-config configmap file, you must restart your OpenShift Container Platform instance.
When your OpenShift Container Platform server is back up and running, metrics are displayed on the pod overview pages.
If you are using self-signed certificates, remember that the Hawkular Metrics service is hosted under a different host name and uses different certificates than the console. You may need to explicitly open a browser tab to the value specified in metricsPublicURL and accept that certificate.
To avoid this issue, use certificates which are configured to be acceptable by your browser.
34.8. Accessing Hawkular Metrics Directly
To access and manage metrics more directly, use the Hawkular Metrics API.
When accessing Hawkular Metrics from the API, you are only able to perform reads. Writing metrics is disabled by default. If you want individual users to also be able to write metrics, you must set the openshift_metrics_hawkular_user_write_accessvariable to true.
However, it is recommended to use the default configuration and only have metrics enter the system via Heapster. If write access is enabled, any user can write metrics to the system, which can affect performance and cause Cassandra disk usage to unpredictably increase.
The Hawkular Metrics documentation covers how to use the API, but there are a few differences when dealing with the version of Hawkular Metrics configured for use on OpenShift Container Platform:
34.8.1. OpenShift Container Platform Projects and Hawkular Tenants
Hawkular Metrics is a multi-tenanted application. It is configured so that a project in OpenShift Container Platform corresponds to a tenant in Hawkular Metrics.
As such, when accessing metrics for a project named MyProject you must set the Hawkular-Tenant header to MyProject.
There is also a special tenant named _system which contains system level metrics. This requires either a cluster-reader or cluster-admin level privileges to access.
34.8.2. Authorization
The Hawkular Metrics service authenticates the user against OpenShift Container Platform to determine if the user has access to the project it is trying to access.
Hawkular Metrics accepts a bearer token from the client and verifies that token with the OpenShift Container Platform server using a SubjectAccessReview. If the user has proper read privileges for the project, they are allowed to read the metrics for that project. For the _system tenant, the user requesting to read from this tenant must have cluster-reader permission.
When accessing the Hawkular Metrics API, you must pass a bearer token in the Authorization header.
34.9. Scaling OpenShift Container Platform Cluster Metrics Pods
Information about scaling cluster metrics capabilities is available in the Scaling and Performance Guide.
34.10. Integration with Aggregated Logging
Hawkular Alerts must be connected to the Aggregated Logging’s Elasticsearch to react on log events. By default, Hawkular tries to find Elasticsearch on its default place (namespace logging, pod logging-es) at every boot. If Aggregated Logging is installed after Hawkular, the Hawkular Metrics pod might need to be restarted in order to recognize the new Elasticsearch server. The Hawkular boot log provides a clear indication if the integration could not be properly configured, with messages like:
Failed to import the logging certificate into the store. Continuing, but the logging integration might fail.
or
Could not get the logging secret! Status code: 000. The Hawkular Alerts integration with Logging might not work properly.
This feature is available from version 3.7.0. You can confirm if logging is available by checking the log for an entry like:
Retrieving the Logging's CA and adding to the trust store, if Logging is available.
34.11. Cleanup
You can remove everything deployed by the OpenShift Container Platform Ansible openshift_metrics role by performing the following steps:
$ ansible-playbook [-i </path/to/inventory>] <OPENSHIFT_ANSIBLE_DIR>/playbooks/openshift-metrics/config.yml \ -e openshift_metrics_install_metrics=False
34.12. Prometheus on OpenShift Container Platform
Prometheus is a stand-alone, open source systems monitoring and alerting toolkit. You can use Prometheus to visualize metrics and alerts for OpenShift Container Platform system resources.
Prometheus on OpenShift Container Platform is a Technology Preview feature only. Technology Preview features are not supported with Red Hat production service level agreements (SLAs), might not be functionally complete, and Red Hat does not recommend to use them for production. These features provide early access to upcoming product features, enabling customers to test functionality and provide feedback during the development process.
For more information on Red Hat Technology Preview features support scope, see https://access.redhat.com/support/offerings/techpreview/.
34.12.1. Setting Prometheus Role Variables
The Prometheus role creates:
-
The
openshift-metricsnamespace. -
Prometheus
clusterrolebindingand service account. - Prometheus pod with Prometheus behind OAuth proxy, Alertmanager, and Alert Buffer as a stateful set.
-
Prometheus and
prometheus-alertsConfigMaps. - Prometheus and Prometheus Alerts services and direct routes.
Prometheus deployment is enabled by default, uninstall it by setting openshift_prometheus_state to absent. For example:
# openshift_prometheus_state=absent
Set the following role variables to install and configure Prometheus.
| Variable | Description |
|---|---|
|
|
The default value is |
|
|
Project namespace where the components are deployed. Default set to |
|
|
Selector for the nodes on which Prometheus is deployed. Default set to |
|
|
Set to create PV for Prometheus. For example, |
|
|
Set to create PV for Alertmanager. For example, |
|
|
Set to create PV for Alert Buffer. For example, |
|
|
Set to create PVC for Prometheus. For example, |
|
|
Set to create PVC for Alertmanager. For example, |
|
|
Set to create PVC for Alert Buffer. For example, |
|
|
Additional Prometheus rules file. Set to |
34.12.2. Deploying Prometheus Using Ansible Installer
The host that you run the Ansible playbook on must have at least 75MiB of free memory per host in the inventory.
The Ansible Installer is the default method of deploying Prometheus.
Run the playbook:
$ ansible-playbook -vvv -i ${INVENTORY_FILE} playbooks/openshift-prometheus/config.yml
Make sure you have nodes labeled with node-role.kubernetes.io/infra=true, which is the default value for openshift_prometheus_node_selector. If you want to use other node selectors, please see Deploy Using Node-Selector.
34.12.2.1. Additional Methods for Deploying Prometheus
Deploy Using Node-Selector
Label the node on which you want to deploy Prometheus:
# oc adm label node/$NODE ${KEY}=${VALUE}Deploy Prometheus with Ansible and container resources:
# Set node selector for prometheus
openshift_prometheus_node_selector={"${KEY}":"${VALUE}"}Run the playbook:
$ ansible-playbook -vvv -i ${INVENTORY_FILE} playbooks/openshift-prometheus/config.ymlDeploy Using a Non-default Namespace
Identify your namespace:
# Set non-default openshift_prometheus_namespace
openshift_prometheus_namespace=${USER_PROJECT}Run the playbook:
$ ansible-playbook -vvv -i ${INVENTORY_FILE} playbooks/openshift-prometheus/config.yml34.12.2.2. Accessing the Prometheus Web UI
The Prometheus server automatically exposes a Web UI at localhost:9090. You can access the Prometheus Web UI with the view role.
34.12.2.3. Configuring Prometheus for OpenShift Container Platform
Prometheus Storage Related Variables
With each Prometheus component (including Prometheus, Alertmanager, Alert Buffer, and OAuth proxy) you can set the PV claim by setting corresponding role variable, for example:
openshift_prometheus_storage_type: pvc openshift_prometheus_alertmanager_pvc_name: alertmanager openshift_prometheus_alertbuffer_pvc_size: 10G openshift_prometheus_pvc_access_modes: [ReadWriteOnce]
Prometheus Alert Rules File Variable
You can add an external file with alert rules by setting the path to an additional rules variable:
openshift_prometheus_additional_rules_file: <PATH>
The file must follow the Prometheus Alert rules format. The following example sets a rule to send an alert when one of the cluster nodes is down:
groups:
- name: example-rules
interval: 30s # defaults to global interval
rules:
- alert: Node Down
expr: up{job="kubernetes-nodes"} == 0
for: 10m 1
annotations:
miqTarget: "ContainerNode"
severity: "HIGH"
message: "{{ '{{' }}{{ '$labels.instance' }}{{ '}}' }} is down"- 1
- The optional
forvalue specifies the amount of time Prometheus waits before it sends an alert for this element. For example, if you set10m, Prometheus waits 10 minutes after it encounters this issue before sending an alert.
Prometheus Variables to Control Resource Limits
With each Prometheus component (including Prometheus, Alertmanager, Alert Buffer, and OAuth proxy) you can specify CPU, memory limits, and requests by setting the corresponding role variable, for example:
openshift_prometheus_alertmanager_limits_memory: 1Gi openshift_prometheus_oauth_proxy_cpu_requests: 100m
Once openshift_metrics_project: openshift-infra is installed, metrics can be gathered from the http://${POD_IP}:7575/metrics endpoint.
34.12.3. OpenShift Container Platform Metrics via Prometheus
The state of a system can be gauged by the metrics that it emits. This section describes current and proposed metrics that identify the health of the storage subsystem and cluster.
34.12.3.1. Current Metrics
This section describes the metrics currently emitted from Kubernetes’s storage subsystem.
Cloud Provider API Call Metrics
This metric reports the time and count of success and failures of all cloudprovider API calls. These metrics include aws_attach_time and aws_detach_time. The type of emitted metrics is a histogram, and hence, Prometheus also generates sum, count, and bucket metrics for these metrics.
Example summary of cloudprovider metrics from GCE:
cloudprovider_gce_api_request_duration_seconds { request = "instance_list"}
cloudprovider_gce_api_request_duration_seconds { request = "disk_insert"}
cloudprovider_gce_api_request_duration_seconds { request = "disk_delete"}
cloudprovider_gce_api_request_duration_seconds { request = "attach_disk"}
cloudprovider_gce_api_request_duration_seconds { request = "detach_disk"}
cloudprovider_gce_api_request_duration_seconds { request = "list_disk"}
Example summary of cloudprovider metrics from AWS:
cloudprovider_aws_api_request_duration_seconds { request = "attach_volume"}
cloudprovider_aws_api_request_duration_seconds { request = "detach_volume"}
cloudprovider_aws_api_request_duration_seconds { request = "create_tags"}
cloudprovider_aws_api_request_duration_seconds { request = "create_volume"}
cloudprovider_aws_api_request_duration_seconds { request = "delete_volume"}
cloudprovider_aws_api_request_duration_seconds { request = "describe_instance"}
cloudprovider_aws_api_request_duration_seconds { request = "describe_volume"}
See Cloud Provider (specifically GCE and AWS) metrics for Storage API calls for more information.
Volume Operation Metrics
These metrics report time taken by a storage operation once started. These metrics keep track of operation time at the plug-in level, but do not include time taken by goroutine to run or operation to be picked up from the internal queue. These metrics are a type of histogram.
Example summary of available volume operation metrics
storage_operation_duration_seconds { volume_plugin = "aws-ebs", operation_name = "volume_attach" }
storage_operation_duration_seconds { volume_plugin = "aws-ebs", operation_name = "volume_detach" }
storage_operation_duration_seconds { volume_plugin = "glusterfs", operation_name = "volume_provision" }
storage_operation_duration_seconds { volume_plugin = "gce-pd", operation_name = "volume_delete" }
storage_operation_duration_seconds { volume_plugin = "vsphere", operation_name = "volume_mount" }
storage_operation_duration_seconds { volume_plugin = "iscsi" , operation_name = "volume_unmount" }
storage_operation_duration_seconds { volume_plugin = "aws-ebs", operation_name = "unmount_device" }
storage_operation_duration_seconds { volume_plugin = "cinder" , operation_name = "verify_volumes_are_attached" }
storage_operation_duration_seconds { volume_plugin = "<n/a>" , operation_name = "verify_volumes_are_attached_per_node" }
See Volume operation metrics for more information.
Volume Stats Metrics
These metrics typically report usage stats of PVC (such as used space versus available space). The type of metrics emitted is gauge.
| Metric | Type | Labels/tags |
|---|---|---|
| volume_stats_capacityBytes | Gauge | namespace,persistentvolumeclaim,persistentvolume= |
| volume_stats_usedBytes | Gauge | namespace=<persistentvolumeclaim-namespace> persistentvolumeclaim=<persistentvolumeclaim-name> persistentvolume=<persistentvolume-name> |
| volume_stats_availableBytes | Gauge | namespace=<persistentvolumeclaim-namespace> persistentvolumeclaim=<persistentvolumeclaim-name> persistentvolume= |
| volume_stats_InodesFree | Gauge | namespace=<persistentvolumeclaim-namespace> persistentvolumeclaim=<persistentvolumeclaim-name> persistentvolume=<persistentvolume-name> |
| volume_stats_Inodes | Gauge | namespace=<persistentvolumeclaim-namespace> persistentvolumeclaim=<persistentvolumeclaim-name> persistentvolume=<persistentvolume-name> |
| volume_stats_InodesUsed | Gauge | namespace=<persistentvolumeclaim-namespace> persistentvolumeclaim=<persistentvolumeclaim-name> persistentvolume=<persistentvolume-name> |
34.12.4. Undeploying Prometheus
To undeploy Prometheus, run:
$ ansible-playbook -vvv -i ${INVENTORY_FILE} playbooks/openshift-prometheus/config.yml -e openshift_prometheus_state=absentChapter 35. Customizing the Web Console
35.1. Overview
Administrators can customize the web console using extensions, which let you run scripts and load custom stylesheets when the web console loads. Extension scripts allow you to override the default behavior of the web console and customize it for your needs.
For example, extension scripts can be used to add your own company’s branding or to add company-specific capabilities. A common use case for this is rebranding or white-labeling for different environments. You can use the same extension code, but provide settings that change the web console.
Take caution making extensive changes to the web console styles or behavior that are not documented below. While you add any scripts or stylesheets, significant customizations might need to be reworked on upgrades as the web console markup and behavior change in future versions.
35.2. Loading Extension Scripts and Stylesheets
As of OpenShift Container Platform 3.9, extension scripts and stylesheets can be hosted at any https:// URL as long as the URL is accessible from the browser. The files might be hosted from a pod on the platform using a publicly accessible route, or on another server outside of OpenShift Container Platform.
To add scripts and stylesheets, edit the webconsole-config ConfigMap in the openshift-web-console namespace. The web console configuration is available in the webconsole-config.yaml key of the ConfigMap.
$ oc edit configmap/webconsole-config -n openshift-web-console
To add scripts, update the extensions.scriptURLs property. The value is an array of URLs.
To add stylesheets, update the extensions.stylesheetURLs property. The value is an array of URLs.
Example extensions.stylesheetURLs Setting
apiVersion: v1
kind: ConfigMap
data:
webconsole-config.yaml: |
apiVersion: webconsole.config.openshift.io/v1
extensions:
scriptURLs:
- https://example.com/scripts/menu-customization.js
- https://example.com/scripts/nav-customization.js
stylesheetURLs:
- https://example.com/styles/logo.css
- https://example.com/styles/custom-styles.css
[...]
After saving the ConfigMap, the web console containers will be updated automatically for the new extension files within a few minutes.
Scripts and stylesheets must be served with the correct content type or they will not be run by the browser. Scripts must be served with Content-Type: application/javascript and stylesheets with Content-Type: text/css.
It is a best practice to wrap extension scripts in an Immediately Invoked Function Expression (IIFE). This ensures that you do not create global variables that conflict with the names used by the web console or by other extensions. For example:
(function() {
// Put your extension code here...
}());The examples in the following sections show common ways you can customize the web console.
Additional extension examples are available in the OpenShift Origin repository on GitHub.
35.2.1. Setting Extension Properties
If you have a specific extension, but want to use different text in it for each of the environments, you can define the environment in the web console configuration, and use the same extension script across environments.
To add extension properties, edit the webconsole-config ConfigMap in the openshift-web-console namespace. The web console configuration is available in the webconsole-config.yaml key of the ConfigMap.
$ oc edit configmap/webconsole-config -n openshift-web-console
Update the extensions.properties value, which is a map of key-value pairs.
apiVersion: v1
kind: ConfigMap
data:
webconsole-config.yaml: |
apiVersion: webconsole.config.openshift.io/v1
extensions:
[...]
properties:
doc_url: https://docs.openshift.com
key1: value1
key2: value2
[...]This results in a global variable that can be accessed by the extension, as if the following code was executed:
window.OPENSHIFT_EXTENSION_PROPERTIES = {
doc_url: "https://docs.openshift.com",
key1: "value1",
key2: "value2"
}35.3. Extension Option for External Logging Solutions
As of OpenShift Container Platform 3.6, there is an extension option to link to external logging solutions instead of using OpenShift Container Platform’s EFK logging stack:
'use strict';
angular.module("mylinkextensions", ['openshiftConsole'])
.run(function(extensionRegistry) {
extensionRegistry.add('log-links', _.spread(function(resource, options) {
return {
type: 'dom',
node: '<span><a href="https://extension-point.example.com">' + resource.metadata.name + '</a><span class="action-divider">|</span></span>'
};
}));
});
hawtioPluginLoader.addModule("mylinkextensions");Add the script as described in Loading Extension Scripts and Stylesheets.
35.4. Customizing and Disabling the Guided Tour
A guided tour will pop up the first time a user logs in on a particular browser. You can enable the auto_launch for new users:
window.OPENSHIFT_CONSTANTS.GUIDED_TOURS.landing_page_tour.auto_launch = true;
Add the script as described in Loading Extension Scripts and Stylesheets.
35.5. Customizing Documentation Links
Documentation links on the landing page are customizable. window.OPENSHIFT_CONSTANTS.CATALOG_HELP_RESOURCES is an array of objects containing a title and an href. These will be turned into links. You can completely override the array, push or pop additional links, or modify the attributes of existing links. For example:
window.OPENSHIFT_CONSTANTS.CATALOG_HELP_RESOURCES.links.push({
title: 'Blog',
href: 'https://blog.openshift.com'
});Add the script as described in Loading Extension Scripts and Stylesheets.
35.6. Customizing the Logo
The following style changes the logo in the web console header:
#header-logo {
background-image: url("https://www.example.com/images/logo.png");
width: 190px;
height: 20px;
}Replace the example.com URL with a URL to an actual image, and adjust the width and height. The ideal height is 20px.
Add the stylesheet as described in Loading Extension Scripts and Stylesheets.
35.7. Customizing the Membership Whitelist
The default whitelist in the membership page shows a subset of cluster roles, such as admin, basic-user, edit, and so on. It also shows custom roles defined within a project.
For example, to add your own set of custom cluster roles to the whitelist:
window.OPENSHIFT_CONSTANTS.MEMBERSHIP_WHITELIST = [ "admin", "basic-user", "edit", "system:deployer", "system:image-builder", "system:image-puller", "system:image-pusher", "view", "custom-role-1", "custom-role-2" ];
Add the script as described in Loading Extension Scripts and Stylesheets.
35.8. Changing Links to Documentation
Links to external documentation are shown in various sections of the web console. The following example changes the URL for two given links to the documentation:
window.OPENSHIFT_CONSTANTS.HELP['get_started_cli'] = "https://example.com/doc1.html"; window.OPENSHIFT_CONSTANTS.HELP['basic_cli_operations'] = "https://example.com/doc2.html";
Alternatively, you can change the base URL for all documentation links.
This example would result in the default help URL https://example.com/docs/welcome/index.html:
window.OPENSHIFT_CONSTANTS.HELP_BASE_URL = "https://example.com/docs/"; 1- 1
- The path must end in a
/.
Add the script as described in Loading Extension Scripts and Stylesheets.
35.9. Adding or Changing Links to Download the CLI
The About page in the web console provides download links for the command line interface (CLI) tools. These links can be configured by providing both the link text and URL, so that you can choose to point them directly to file packages, or to an external page that points to the actual packages.
For example, to point directly to packages that can be downloaded, where the link text is the package platform:
window.OPENSHIFT_CONSTANTS.CLI = {
"Linux (32 bits)": "https://<cdn>/openshift-client-tools-linux-32bit.tar.gz",
"Linux (64 bits)": "https://<cdn>/openshift-client-tools-linux-64bit.tar.gz",
"Windows": "https://<cdn>/openshift-client-tools-windows.zip",
"Mac OS X": "https://<cdn>/openshift-client-tools-mac.zip"
};Alternatively, to point to a page that links the actual download packages, with the Latest Release link text:
window.OPENSHIFT_CONSTANTS.CLI = {
"Latest Release": "https://<cdn>/openshift-client-tools/latest.html"
};Add the script as described in Loading Extension Scripts and Stylesheets.
35.9.1. Customizing the About Page
To provide a custom About page for the web console:
Write an extension that looks like:
angular .module('aboutPageExtension', ['openshiftConsole']) .config(function($routeProvider) { $routeProvider .when('/about', { templateUrl: 'https://example.com/extensions/about/about.html', controller: 'AboutController' }); } ); hawtioPluginLoader.addModule('aboutPageExtension');Write a customized template.
Start from the version of about.html from the OpenShift Container Platform release you are using. Within the template, there are two angular scope variables available:
version.master.openshiftandversion.master.kubernetes.Host the template at a URL with the correct Cross-Origin Resource Sharing (CORS) response headers for the web console.
-
Set
Access-Control-Allow-Originresponse to allow requests from the web console domain. -
Set
Access-Control-Allow-Methodsto includeGET. -
Set
Access-Control-Allow-Headersto includeContent-Type.
-
Set
Alternatively, you can include the template directly in your JavaScript using AngularJS $templateCache.
Add the script as described in Loading Extension Scripts and Stylesheets.
35.11. Configuring Featured Applications
The web console has an optional list of featured application links in its landing page catalog. These appear near the top of the page and can have an icon, a title, a short description, and a link.

// Add featured applications to the top of the catalog.
window.OPENSHIFT_CONSTANTS.SAAS_OFFERINGS = [{
title: "Dashboard", // The text label
icon: "fa fa-dashboard", // The icon you want to appear
url: "http://example.com/dashboard", // Where to go when this item is clicked
description: "Open application dashboard." // Short description
}, {
title: "System Status",
icon: "fa fa-heartbeat",
url: "http://example.com/status",
description: "View system alerts and outages."
}, {
title: "Manage Account",
icon: "pficon pficon-user",
url: "http://example.com/account",
description: "Update email address or password."
}];Add the script as described in Loading Extension Scripts and Stylesheets.
35.12. Configuring Catalog Categories
Catalog categories organize the display of items in the web console catalog landing page. Each category has one or more subcategories. A builder image, template, or service is grouped in a subcategory if it includes a tag listed in the matching subcategory tags, and an item can appear in more than one subcategory. Categories and subcategories only display if they contain at least one item.
Significant customizations to the catalog categories may affect the user experience and should be done with careful consideration. You may need to update this customization in future upgrades if you modify existing category items.
// Find the Languages category.
var category = _.find(window.OPENSHIFT_CONSTANTS.SERVICE_CATALOG_CATEGORIES,
{ id: 'languages' });
// Add Go as a new subcategory under Languages.
category.subCategories.splice(2,0,{ // Insert at the third spot.
// Required. Must be unique.
id: "go",
// Required.
label: "Go",
// Optional. If specified, defines a unique icon for this item.
icon: "icon-go-gopher",
// Required. Items matching any tag will appear in this subcategory.
tags: [
"go",
"golang"
]
});
// Add a Featured category as the first category tab.
window.OPENSHIFT_CONSTANTS.SERVICE_CATALOG_CATEGORIES.unshift({
// Required. Must be unique.
id: "featured",
// Required
label: "Featured",
subCategories: [
{
// Required. Must be unique.
id: "go",
// Required.
label: "Go",
// Optional. If specified, defines a unique icon for this item.
icon: "icon-go-gopher",
// Required. Items matching any tag will appear in this subcategory.
tags: [
"go",
"golang"
]
},
{
// Required. Must be unique.
id: "jenkins",
// Required.
label: "Jenkins",
// Optional. If specified, defines a unique icon for this item.
icon: "icon-jenkins",
// Required. Items matching any tag will appear in this subcategory.
tags: [
"jenkins"
]
}
]
});Add the script as described in Loading Extension Scripts and Stylesheets.
35.13. Configuring Quota Notification Messages
Whenever a user reaches a quota, a quota notification is put into the notification drawer. A custom quota notification message, per quota resource type, can be added to the notification. For example:
Your project is over quota. It is using 200% of 2 cores CPU (Limit). Upgrade to <a href='https://www.openshift.com'>OpenShift Online Pro</a> if you need additional resources.
The "Upgrade to…" part of the notification is the custom message and may contain HTML such as links to additional resources.
Since the quota message is HTML markup, any special characters need to be properly escaped for HTML.
Set the window.OPENSHIFT_CONSTANTS.QUOTA_NOTIFICATION_MESSAGE property in an extension script to customize the message for each resource.
// Set custom notification messages per quota type/key
window.OPENSHIFT_CONSTANTS.QUOTA_NOTIFICATION_MESSAGE = {
'pods': 'Upgrade to <a href="https://www.openshift.com">OpenShift Online Pro</a> if you need additional resources.',
'limits.memory': 'Upgrade to <a href="https://www.openshift.com">OpenShift Online Pro</a> if you need additional resources.'
};Add the script as described in Loading Extension Scripts and Stylesheets.
35.14. Configuring the Create From URL Namespace Whitelist
Create from URL only works with image streams or templates from namespaces that have been explicitly specified in OPENSHIFT_CONSTANTS.CREATE_FROM_URL_WHITELIST. To add namespaces to the whitelist, follow these steps:
openshift is included in the whitelist by default. Do not remove it.
// Add a namespace containing the image streams and/or templates window.OPENSHIFT_CONSTANTS.CREATE_FROM_URL_WHITELIST.push( 'shared-stuff' );
Add the script as described in Loading Extension Scripts and Stylesheets.
35.15. Disabling the Copy Login Command
The web console allows users to copy a login command, including the current access token, to the clipboard from the user menu and the Command Line Tools page. This function can be changed so that the user’s access token is not included in the copied command.
// Do not copy the user's access token in the copy login command. window.OPENSHIFT_CONSTANTS.DISABLE_COPY_LOGIN_COMMAND = true;
Add the script as described in Loading Extension Scripts and Stylesheets.
35.15.1. Enabling Wildcard Routes
If you enabled wildcard routes for a router, you can also enable wildcard routes in the web console. This lets users enter hostnames starting with an asterisk like *.example.com when creating a route. To enable wildcard routes:
window.OPENSHIFT_CONSTANTS.DISABLE_WILDCARD_ROUTES = false;
Add the script as described in Loading Extension Scripts and Stylesheets.
Learn how to configure HAProxy routers to allow wildcard routes.
35.16. Customizing the Login Page
You can also change the login page, and the login provider selection page for the web console. Run the following commands to create templates you can modify:
$ oc adm create-login-template > login-template.html $ oc adm create-provider-selection-template > provider-selection-template.html
Edit the file to change the styles or add content, but be careful not to remove any required parameters inside the curly brackets.
To use your custom login page or provider selection page, set the following options in the master configuration file:
oauthConfig:
...
templates:
login: /path/to/login-template.html
providerSelection: /path/to/provider-selection-template.htmlRelative paths are resolved relative to the master configuration file. You must restart the server after changing this configuration.
When there are multiple login providers configured or when the alwaysShowProviderSelection option in the master-config.yaml file is set to true, each time a user’s token to OpenShift Container Platform expires, the user is presented with this custom page before they can proceed with other tasks.
35.16.1. Example Usage
Custom login pages can be used to create Terms of Service information. They can also be helpful if you use a third-party login provider, like GitHub or Google, to show users a branded page that they trust and expect before being redirected to the authentication provider.
35.17. Customizing the OAuth Error Page
When errors occur during authentication, you can change the page shown.
Run the following command to create a template you can modify:
$ oc adm create-error-template > error-template.html
Edit the file to change the styles or add content.
You can use the
ErrorandErrorCodevariables in the template. To use your custom error page, set the following option in the master configuration file:oauthConfig: ... templates: error: /path/to/error-template.htmlRelative paths are resolved relative to the master configuration file.
- You must restart the server after changing this configuration.
35.18. Changing the Logout URL
You can change the location a console user is sent to when logging out of the console by modifying the clusterInfo.logoutPublicURL parameter in the webconsole-config ConfigMap.
$ oc edit configmap/webconsole-config -n openshift-web-console
Here is an example that changes the logout URL to https://www.example.com/logout:
apiVersion: v1
kind: ConfigMap
data:
webconsole-config.yaml: |
apiVersion: webconsole.config.openshift.io/v1
clusterInfo:
[...]
logoutPublicURL: "https://www.example.com/logout"
[...]This can be useful when authenticating with Request Header and OAuth or OpenID identity providers, which require visiting an external URL to destroy single sign-on sessions.
35.19. Configuring Web Console Customizations with Ansible
During advanced installations, many modifications to the web console can be configured using the following parameters, which are configurable in the inventory file:
Example Web Console Customization with Ansible
# Configure `clusterInfo.logoutPublicURL` in the web console configuration
# See: https://docs.openshift.com/enterprise/latest/install_config/web_console_customization.html#changing-the-logout-url
#openshift_master_logout_url=https://example.com/logout
# Configure extension scripts for web console customization
# See: https://docs.openshift.com/enterprise/latest/install_config/web_console_customization.html#loading-custom-scripts-and-stylesheets
#openshift_web_console_extension_script_urls=['https://example.com/scripts/menu-customization.js','https://example.com/scripts/nav-customization.js']
# Configure extension stylesheets for web console customization
# See: https://docs.openshift.com/enterprise/latest/install_config/web_console_customization.html#loading-custom-scripts-and-stylesheets
#openshift_web_console_extension_stylesheet_urls=['https://example.com/styles/logo.css','https://example.com/styles/custom-styles.css']
# Configure a custom login template in the master config
# See: https://docs.openshift.com/enterprise/latest/install_config/web_console_customization.html#customizing-the-login-page
#openshift_master_oauth_templates={'login': '/path/to/login-template.html'}
# Configure `clusterInfo.metricsPublicURL` in the web console configuration for cluster metrics. Ansible is also able to configure metrics for you.
# See: https://docs.openshift.com/enterprise/latest/install_config/cluster_metrics.html
#openshift_master_metrics_public_url=https://hawkular-metrics.example.com/hawkular/metrics
# Configure `clusterInfo.loggingPublicURL` in the web console configuration for aggregate logging. Ansible is also able to install logging for you.
# See: https://docs.openshift.com/enterprise/latest/install_config/aggregate_logging.html
#openshift_master_logging_public_url=https://kibana.example.com
35.20. Changing the Web Console URL Port and Certificates
To ensure your custom certificate is served when users access the web console URL, add the certificate and URL to the namedCertificates section of the master-config.yaml file. See Configuring Custom Certificates for the Web Console or CLI for more information.
To set or modify the redirect URL for the web console, modify the openshift-web-console oauthclient:
$ oc edit oauthclient openshift-web-console
To ensure users are correctly redirected, update the PublicUrls for the openshift-web-console configmap:
$ oc edit configmap/webconsole-config -n openshift-web-console
Then, update the value for consolePublicURL.
Chapter 36. Deploying External Persistent Volume Provisioners
36.1. Overview
The external provisioner for AWS EFS on OpenShift Container Platform is a Technology Preview feature. Technology Preview features are not supported with Red Hat production service-level agreements (SLAs) and might not be functionally complete, and Red Hat does not recommend using them for production. These features provide early access to upcoming product features, enabling customers to test functionality and provide feedback during the development process. For more information, see Red Hat Technology Preview Features Support Scope.
An external provisioner is an application that enables dynamic provisioning for a particular storage provider. External provisioners can run alongside the provisioner plug-ins provided by OpenShift Container Platform and are configured in a similar way as the StorageClass objects are configured, as described in the Dynamic Provisioning and Creating Storage Classes section. Since these provisioners are external, you can deploy and update them independently of OpenShift Container Platform.
36.2. Before You Begin
An Ansible Playbook is also available to deploy and upgrade external provisioners.
Before proceeding, familiarize yourself with the Configuring Cluster Metrics and the Configuring Cluster Logging sections.
36.2.1. External Provisioners Ansible Role
The OpenShift Ansible openshift_provisioners role configures and deploys external provisioners using the variables from the Ansible inventory file. You must specify which provisioners to install by overriding their respective install variables to true.
36.2.2. External Provisioners Ansible Variables
Following is a list of role variables that apply to all provisioners for which the install variable is true.
| Variable | Description |
|---|---|
|
|
If |
|
|
The prefix for the component images. For example, with |
|
|
The version for the component images. For example, with |
|
|
The project to deploy provisioners in. Defaults to |
36.2.3. AWS EFS Provisioner Ansible Variables
The AWS EFS provisioner dynamically provisions NFS PVs backed by dynamically created directories in a given EFS file system’s directory. You must satisfy the following requirements before the AWS EFS Provisioner Ansible variables can be configured:
- An IAM user assigned with the AmazonElasticFileSystemReadOnlyAccess policy (or better).
- An EFS file system in your cluster’s region.
- Mount targets and security groups such that any node (in any zone in the cluster’s region) can mount the EFS file system by its File system DNS name.
| Variable | Description |
|---|---|
|
|
The File system ID of the EFS file system, for example: |
|
| The Amazon EC2 region for the EFS file system. |
|
| The AWS access key of the IAM user (to check that the specified EFS file system exists). |
|
| The AWS secret access key of the IAM user (to check that the specified EFS file system exists). |
| Variable | Description |
|---|---|
|
|
If |
|
|
The path of the directory in the EFS file system, in which the EFS provisioner will create a directory to back each PV it creates. It must exist and be mountable by the EFS provisioner. Defaults to |
|
|
The |
|
|
A map of labels to select the nodes where the pod will land. For example: |
|
|
The supplemental group to give the pod, in case it is needed for permission to write to the EFS file system. Defaults to |
36.3. Deploying the Provisioners
You can deploy all provisioners at once or one provisioner at a time according to the configuration specified in the OpenShift Ansible variables. The following example shows you how to deploy a given provisioner and then create and configure a corresponding StorageClass.
36.3.1. Deploying the AWS EFS Provisioner
The following command sets the directory in the EFS volume to /data/persistentvolumes. This directory must exist in the file system and must be mountable and writeable by the provisioner pod.
$ ansible-playbook -v -i <inventory_file> \
/usr/share/ansible/openshift-ansible/playbooks/openshift-provisioners/config.yml \
-e openshift_provisioners_install_provisioners=True \
-e openshift_provisioners_efs=True \
-e openshift_provisioners_efs_fsid=fs-47a2c22e \
-e openshift_provisioners_efs_region=us-west-2 \
-e openshift_provisioners_efs_aws_access_key_id=AKIAIOSFODNN7EXAMPLE \
-e openshift_provisioners_efs_aws_secret_access_key=wJalrXUtnFEMI/K7MDENG/bPxRfiCYEXAMPLEKEY \
-e openshift_provisioners_efs_path=/data/persistentvolumes36.3.1.1. AWS EFS Object Definition
aws-efs-storageclass.yaml
kind: StorageClass apiVersion: storage.k8s.io/v1beta1 metadata: name: slow provisioner: openshift.org/aws-efs 1 parameters: gidMin: "40000" 2 gidMax: "50000" 3
Each dynamically provisioned volume’s corresponding NFS directory is assigned a unique GID owner from the range gidMin-gidMax. If it is not specified, gidMin defaults to 2000 and gidMax defaults to 2147483647. Any pod that consumes a provisioned volume via a claim automatically runs with the needed GID as a supplemental group and is able to read & write to the volume. Other mounters that do not have the supplemental group (and are not running as root) will not be able to read or write to the volume. For more information on using the supplemental groups to manage NFS access, see the Group IDs section of NFS Volume Security topic.
36.4. Cleanup
You can remove everything deployed by the OpenShift Ansible openshift_provisioners role by running the following command:
$ ansible-playbook -v -i <inventory_file> \
/usr/share/ansible/openshift-ansible/playbooks/openshift-provisioners/config.yml \
-e openshift_provisioners_install_provisioners=False
Legal Notice
Copyright © 2024 Red Hat, Inc.
OpenShift documentation is licensed under the Apache License 2.0 (https://www.apache.org/licenses/LICENSE-2.0).
Modified versions must remove all Red Hat trademarks.
Portions adapted from https://github.com/kubernetes-incubator/service-catalog/ with modifications by Red Hat.
Red Hat, Red Hat Enterprise Linux, the Red Hat logo, the Shadowman logo, JBoss, OpenShift, Fedora, the Infinity logo, and RHCE are trademarks of Red Hat, Inc., registered in the United States and other countries.
Linux® is the registered trademark of Linus Torvalds in the United States and other countries.
Java® is a registered trademark of Oracle and/or its affiliates.
XFS® is a trademark of Silicon Graphics International Corp. or its subsidiaries in the United States and/or other countries.
MySQL® is a registered trademark of MySQL AB in the United States, the European Union and other countries.
Node.js® is an official trademark of Joyent. Red Hat Software Collections is not formally related to or endorsed by the official Joyent Node.js open source or commercial project.
The OpenStack® Word Mark and OpenStack logo are either registered trademarks/service marks or trademarks/service marks of the OpenStack Foundation, in the United States and other countries and are used with the OpenStack Foundation’s permission. We are not affiliated with, endorsed or sponsored by the OpenStack Foundation, or the OpenStack community.
All other trademarks are the property of their respective owners.