System Administrator’s Guide
Deployment, configuration, and administration of RHEL 7
Abstract
Part I. Basic System Configuration
This part covers basic post-installation tasks and basic system administration tasks such as keyboard configuration, date and time configuration, managing users and groups, and gaining privileges.
Chapter 1. Getting Started
This chapter covers the basic tasks that you might need to perform just after you have installed Red Hat Enterprise Linux 7.
Note that these items may include tasks that are usually done already during the installation process, but they do not have to be done necessarily, such as the registration of the system. The subchapters dealing with such tasks provide a brief summary of how this can be achieved during the installation and links to related documentation in a special section.
For detailed information on Red Hat Enterprise Linux 7 installation, consult Red Hat Enterprise Linux 7 Installation Guide.
This chapter mentions some commands to be performed. The commands that need to be entered by the root user have # in the prompt, while the commands that can be performed by a regular user, have $ in their prompt.
For further information on common post-installation tasks, you can see also Red Hat Enterprise Linux 7 Installation Guide.
Although all post-installation tasks can be achieved through the command line, you can also use the web console tool to perform some of them.
What web console Is and Which Tasks It Can Be Used For
web console is a system administration tool that provides a user interface for monitoring and administering servers through a web browser.
web console enables to perform these tasks:
- Monitoring basic system features, such as hardware, internet connection, or performance characteristics
- Analyzing the content of the system log files
- Configuring basic networking features, such as interfaces, network logs, packet sizes
- Managing user accounts
- Monitoring and configuring system services
- Creating diagnostic reports
- Setting kernel dump configuration
- Configuring SELinux
- Managing system subscriptions
- Accessing the terminal
For more information on installing and using web console, see Managing systems using the RHEL 7 web console.
1.1. Basic Configuration of the Environment
Basic configuration of the environment includes:
- Date and Time
- System Locales
- Keyboard Layout
Setting of these items is normally a part of the installation process.
For more information, see the appropriate source according to the installation method:
When installing with the Anaconda installer, see:
Date&Time, Language Support and Keyboard Configuration in Red Hat Enterprise Linux 7 Installation Guide
When installing with the Kickstart file, consult:
Kickstart Commands and Options in Red Hat Enterprise Linux 7 Installation Guide.
If you need to reconfigure the basic characteristics of the environment after the installation, follow the instructions in this section.
1.1.1. Introduction to Configuring the Date and Time
Accurate time keeping is important for a number of reasons. In Red Hat Enterprise Linux 7, time keeping is ensured by the NTP protocol, which is implemented by a daemon running in user space. The user space daemon updates the system clock running in the kernel. The system clock can keep time by using various clock sources.
Red Hat Enterprise Linux 7 uses the following daemons to implement NTP:
chronydThe
chronyddaemon is used by default. It is available from the chrony package. For more information on configuring and usingNTPwithchronyd, see Chapter 18, Configuring NTP Using the chrony Suite.ntpdThe
ntpddaemon is available from the ntp package. For more information on configuring and usingNTPwithntpd, see Chapter 19, Configuring NTP Using ntpd.
If you want to use ntpd instead of default chronyd, you need to disable chronyd, install, enable and configure ntpd as shown in Chapter 19, Configuring NTP Using ntpd.
Displaying the Current Date and Time
To display the current date and time, use one of the following commands:
~]$ date~]$ timedatectl
Note that the timedatectl command provides more verbose output, including universal time, currently used time zone, the status of the Network Time Protocol (NTP) configuration, and some additional information.
For more information on configuring the date and time, see Chapter 3, Configuring the Date and Time.
1.1.2. Introduction to Configuring the System Locale
System-wide locale settings are stored in the /etc/locale.conf file, which is read at early boot by the systemd daemon. The locale settings configured in /etc/locale.conf are inherited by every service or user, unless individual programs or individual users override them.
Basic tasks to handle the system locales:
Listing available system locale settings:
~]$
localectl list-localesDisplaying current status of the system locales settings:
~]$
localectl statusSetting or changing the default system locale settings:
~]# localectl set-locale LANG=locale
For more information on configuring the system locale, see Chapter 2, System Locale and Keyboard Configuration.
1.1.3. Introduction to Configuring the Keyboard Layout
The keyboard layout settings control the layout used on the text console and graphical user interfaces.
Basic tasks to handle the keyboard layout include:
Listing available keymaps:
~]$
localectl list-keymapsDisplaying current status of keymap settings:
~]$
localectl statusSetting or changing the default system keymap:
~]# localectl set-keymap
For more information on configuring the keyboard layout, see Chapter 2, System Locale and Keyboard Configuration.
1.2. Configuring and Inspecting Network Access
The network access is usually configured during the installation process. However, the installation process does not prompt you to configure network interfaces on some common installation paths. Consequently, it is possible that the network access is not configured after the installation. If this happens, you can configure network access after installation.
For a quickstart to configuring network access during the installation, see Section 1.2.1, “Configuring Network Access During the Installation Process”. To configure network access after the installation, you can use either the nmcli command-line utility, described in Red Hat Enterprise Linux 7 Networking Guide or the nmtui text user interface utility, described in Red Hat Enterprise Linux 7 Networking Guide.
The nmcli and nmtui utilities also enable you to add one or more new network connections, as well as modify and inspect the existing connections. If you want to create and manage network connections with nmcli, see Section 1.2.2, “Managing Network Connections After the Installation Process Using nmcli”. If you want to create and manage network connections with nmtui, see Section 1.2.3, “Managing Network Connections After the Installation Process Using nmtui”.
1.2.1. Configuring Network Access During the Installation Process
Ways to configure network access during the installation proces:
- The menu at the Installation Summary screen in the graphical user interface of the Anaconda installation program
- The option in the text mode of the Anaconda installation program
- The Kickstart file
When the system boots for the first time after the installation has finished, any network interfaces which you configured during the installation are automatically activated.
For detailed information on configuration of network access during installation process, see Red Hat Enterprise Linux 7 Installation Guide.
1.2.2. Managing Network Connections After the Installation Process Using nmcli
Run the following commands as the root user to manage network connections using the nmcli utility.
To create a new connection:
~]# nmcli con add type type of the connection "con-name" connection name ifname ifname interface-name the name of the interface ipv4 address ipv4 address gw4 address gateway address
To modify the existing connection:
~]# nmcli con mod "con-name"
To display all connections:
~]# nmcli con show
To display the active connection:
~]# nmcli con show --active
To display all configuration settings of a particular connection:
~]# nmcli con show "con-name"
For more information on the nmcli command-line utility, see Red Hat Enterprise Linux 7 Networking Guide.
1.2.3. Managing Network Connections After the Installation Process Using nmtui
The NetworkManager text user interface (TUI) utility, nmtui, provides a text interface to configure networking by controlling NetworkManager.
For more information about installing and using the nmtui text interface tool, see Red Hat Enterprise Linux 7 Networking Guide.
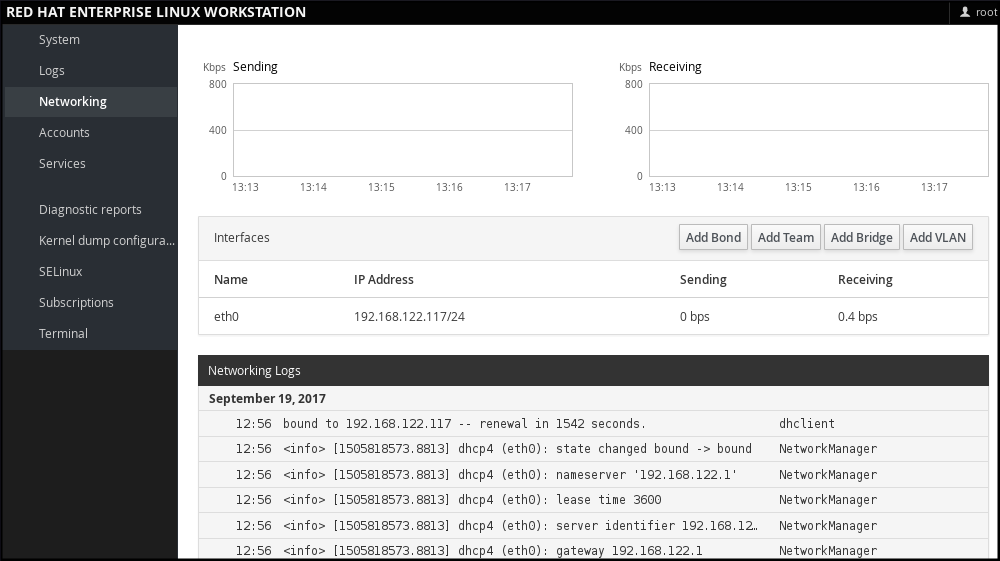
1.2.4. Managing Networking in web console
In web console, the menu enables you:
- To display currently received and sent packets
- To display the most important characteristics of available network interfaces
- To display content of the networking logs.
- To add various types of network interfaces (bond, team, bridge, VLAN)
Figure 1.1. Managing Networking in web console
1.3. The Basics of Registering the System and Managing Subscriptions
1.3.1. What Red Hat Subscriptions Are and Which Tasks They Can Be Used For
The products installed on Red Hat Enterprise Linux 7, including the operating system itself, are covered by subscriptions.
A subscription to Red Hat Content Delivery Network is used to track:
- Registered systems
- Products installed on those system
- Subscriptions attached to those product
1.3.2. Registering the System During the Installation
This section provides a brief summary of registering Red Hat Enterprise Linux 7 during the installation process. If your operating system is not registered after the installation, you can find what might have been missed during the installation by reading through this section. For detailed information, consult Red Hat Enterprise Linux 7 Installation Guide.
Basically, there are two ways to register the system during the installation:
- Normally, registration is a part of the Initial Setup configuration process. For more information, see Red Hat Enterprise Linux 7 Installation Guide.
- Another option is to run Subscription manager as a post-installation script, which performs the automatic registration at the moment when the installation is complete and before the system is rebooted for the first time. To ensure this, modify the %post section of the Kickstart file. For more detailed information on running Subscription manager as a post-installation script, see Red Hat Enterprise Linux 7 Installation Guide.
1.3.3. Registering the System after the Installation
If you have not registered your system during installation process, you can do it afterwards by applying the following procedure. Note that all commands in this procedure need to be performed as the root user.
Registering and Subscribing Your System
Register your system:
~]# subscription-manager register
The command will prompt you to enter your Red Hat Customer Portal user name and password.
Determine the pool ID of a subscription that you require:
~]# subscription-manager list --available
This command displays all available subscriptions for your Red Hat account. For every subscription, various characteristics are displayed, including the pool ID.
Attach the appropriate subscription to your system by replacing pool_id with the pool ID determined in the previous step:
~]# subscription-manager attach --pool=pool_id
For more information on registration of your system and attachment of the Red Hat Content Delivery Network subscriptions, see Chapter 7, Registering the System and Managing Subscriptions.
1.3.4. Registering a System to EUS Content
To access the Extended Update Support (EUS) content, register your system as follows:
Verify that EUS entitlements are available:
~]# subscription-manager list --available --matches="*Extended Update Support"
+-------------------------------------------+ Available Subscriptions +-------------------------------------------+ Subscription Name: Extended Update Support Provides: Red Hat Enterprise Linux High Availability for x86_64 - Extended Update Support Red Hat Enterprise Linux Resilient Storage for x86_64 - Extended Update Support Red Hat Enterprise Linux for x86_64 - Extended Update Support Red Hat EUCJP Support (for RHEL Server) - Extended Update Support RHEL for SAP - Extended Update Support Red Hat Enterprise Linux Load Balancer (for RHEL Server) - Extended Update Support Red Hat Enterprise Linux Scalable File System (for RHEL Server) - Extended Update Support Red Hat CodeReady Linux Builder for x86_64 - Extended Update Support RHEL for SAP HANA - Extended Update Support Red Hat Enterprise Linux High Performance Networking (for RHEL Server) - Extended Update Support Oracle Java (for RHEL Server) - Extended Update Support Red Hat S-JIS Support (for RHEL Server) - Extended Update Support SKU: RH00030 Contract: 12069074 Pool ID: 8a99f9ac7238188b01723d9c8a8a06a9 Provides Management: No Available: 8 Suggested: 0 Service Level: Layered Service Type: L1-L3 Subscription Type: Instance Based Starts: 05/22/2020 Ends: 05/21/2021 System Type: PhysicalAttach the applicable subscription using the Pool identifier:
~]# subscription-manager attach --pool 8a99f9ac7238188b01723d9c8a8a06a9Replace the default repositories enabled for the system with the EUS variants:
~]# subscription-manager repos --disable \*
Enable the repositories which represent the EUS content set for the RHEL revision in use:
~]# subscription-manager repos --enable rhel-7-server-eus-rpms
Select the required and supported release for the end system:
~]# subscription-manager release --set 7.6
For currently supported EUS releases, see Extended Update Support Add-on.
1.3.5. Registering a System to E4S Content
The following procedure describes how to register a system and utilize the E4S content.
Register your system using the following command:
~]# subscription-manager register
Verify that E4S entitlements are available:
~]# subscription-manager list --available --matches="*Update Services for SAP Solutions*"
+-------------------------------------------+ Available Subscriptions +-------------------------------------------+ Subscription Name: Red Hat Enterprise Linux for SAP Solutions, Standard (Physical or Virtual Nodes) Provides: dotNET on RHEL Beta (for RHEL Server) Red Hat CodeReady Linux Builder for x86_64 Red Hat Enterprise Linux for SAP HANA for x86_64 Red Hat Ansible Engine RHEL for SAP HANA - Update Services for SAP Solutions Red Hat Enterprise Linux Scalable File System (for RHEL Server) - Extended Update Support RHEL for SAP HANA - Extended Update Support Red Hat Enterprise Linux Atomic Host Beta Red Hat Beta Red Hat EUCJP Support (for RHEL Server) - Extended Update Support Red Hat Enterprise Linux High Availability for x86_64 Red Hat Enterprise Linux Load Balancer (for RHEL Server) - Extended Update Support dotNET on RHEL (for RHEL Server) Red Hat CodeReady Linux Builder for x86_64 - Extended Update Support Red Hat Enterprise Linux High Availability - Update Services for SAP Solutions Red Hat Enterprise Linux Resilient Storage for x86_64 - Extended Update Support Red Hat Enterprise Linux High Availability for x86_64 - Extended Update Support Oracle Java (for RHEL Server) Red Hat Enterprise Linux Server - Update Services for SAP Solutions Red Hat Software Collections (for RHEL Server) Red Hat Enterprise Linux Scalable File System (for RHEL Server) Red Hat Enterprise Linux High Performance Networking (for RHEL Server) - Extended Update Support RHEL for SAP - Update Services for SAP Solutions Oracle Java (for RHEL Server) - Extended Update Support Red Hat Enterprise Linux Atomic Host Red Hat Developer Tools (for RHEL Server) Red Hat Software Collections Beta (for RHEL Server) Red Hat Enterprise Linux Server Red Hat Enterprise Linux for SAP Applications for x86_64 Red Hat Developer Tools Beta (for RHEL Server) Red Hat Enterprise Linux for x86_64 Red Hat Enterprise Linux for x86_64 - Extended Update Support RHEL for SAP - Extended Update Support Red Hat Developer Toolset (for RHEL Server) Red Hat S-JIS Support (for RHEL Server) - Extended Update Support SKU: RH00764 Contract: 11977725 Pool ID: 8a85f99c6c4825eb016c4a30d3493064 Provides Management: Yes Available: 18 Suggested: 0 Service Level: Standard Service Type: L1-L3 Subscription Type: Instance Based Starts: 03/29/2020 Ends: 12/31/2021 System Type: PhysicalAttach the applicable subscription using the Pool identifier:
~]# subscription-manager attach --pool=#################
Replace the default repositories enabled for the system with the EUS variants:
~]# subscription-manager repos --disable="*"
Enable the repositories which represent the E4S content set for the RHEL revision in use:
~]# subscription-manager --enable=rhel-7-server-e4s-rpms
Clear the repository cache and release lock the system to a valid release for E4S which supports your SAP application:
~]# yum clean all && subscription-manager release --set=7.7
1.4. Installing Software
This section provides information to guide you through the basics of software installation on a Red Hat Enterprise Linux 7 system. It mentions the prerequisites that you need to fulfil to be able to install software in Section 1.4.1, “Prerequisites for Software Installation”, provides the basic information on software packaging and software repositories in Section 1.4.2, “Introduction to the System of Software Packaging and Software Repositories”, and references the ways to perform basic tasks related to software installation in Section 1.4.3, “Managing Basic Software Installation Tasks with Subscription Manager and Yum”.
1.4.1. Prerequisites for Software Installation
The Red Hat Content Delivery Network subscription service provides a mechanism to handle Red Hat software inventory and enables you to install additional software or update already installed packages. You can start installing software once you have registered your system and attached a subscription, as described in Section 1.3, “The Basics of Registering the System and Managing Subscriptions”.
1.4.2. Introduction to the System of Software Packaging and Software Repositories
All software on a Red Hat Enterprise Linux system is divided into RPM packages, which are stored in particular repositories. When a system is subscribed to the Red Hat Content Delivery Network, a repository file is created in the /etc/yum.repos.d/ directory.
Use the yum utility to manage package operations:
- Searching information about packages
- Installing packages
- Updating packages
- Removing packages
- Checking the list of currently available repositories
- Adding or removing a repository
- Enabling or disabling a repository
For information on basic tasks related to the installation of software, see Section 1.4.3, “Managing Basic Software Installation Tasks with Subscription Manager and Yum”. For further information on managing software repositories, see Section 7.2, “Managing Software Repositories”. For detailed information on using the yum utility, see Chapter 9, Yum.
1.4.3. Managing Basic Software Installation Tasks with Subscription Manager and Yum
The most basic software-installation tasks that you might need after the operating system has been installed include:
Listing all available repositories:
~]# subscription-manager repos --list
Listing all currently enabled repositories:
~]$
yum repolistEnabling or disabling a repository:
~]# subscription-manager repos --enable repository~]# subscription-manager repos --disable repositorySearching for packages matching a specific string:
~]$
yum searchstringInstalling a package:
~]# yum install package_nameUpdating all packages and their dependencies:
~]# yum update
Updating a package:
~]# yum update package_nameUninstalling a package and any packages that depend on it:
~]# yum remove package_nameListing information on all installed and available packages:
~]$
yum list allListing information on all installed packages:
~]$
yum list installed
1.5. Making systemd Services Start at Boot Time
Systemd is a system and service manager for Linux operating systems that introduces the concept of systemd units. For more information on systemd, see Section 10.1, “Introduction to systemd”.
This section provides the information on how to ensure that a service is enabled or disabled at boot time. It also explains how to manage the services through web console.
1.5.1. Enabling or Disabling the Services
You can determine services that are enabled or disabled at boot time already during the installation process, or you can enable or disable a service on an installed operating system.
To create the list of services enabled or disabled at boot time during the installation process, use the services option in the Kickstart file:
services [--disabled=list] [--enabled=list]
The list of disabled services is processed before the list of enabled services. Therefore, if a service appears on both lists, it will be enabled. The list of the services should be given in the comma separated format. Do not include spaces in the list of services. For detailed information, refer to Red Hat Enterprise Linux 7 Installation Guide.
To enable or disable a service on an already installed operating system:
~]# systemctl enableservice_name~]# systemctl disableservice_nameFor further details, see Section 10.2, “Managing System Services”.
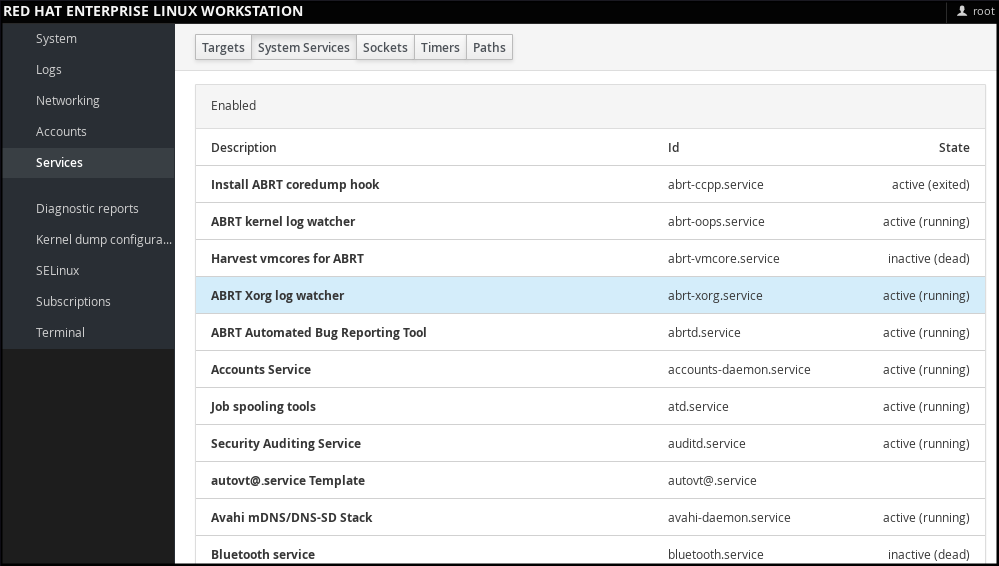
1.5.2. Managing Services in web console
In web console, select to manage systemd targets, services, sockets, timers and paths. There you can check their status, start or stop them, enable or disable them.
Figure 1.2. Managing Services in web console
1.5.3. Additional Resources on systemd Services
For more information on systemd, see Chapter 10, Managing Services with systemd.
1.6. Enhancing System Security with a Firewall, SELinux and SSH Logings
Computer security is the protection of computer systems from the theft or damage to their hardware, software, or information, as well as from disruption or misdirection of the services they provide. Ensuring computer security is therefore an essential task not only in the enterprises processing sensitive data or handling some business transactions.
Computer security includes a wide variety of features and tools. This section covers only the basic security features that you need to configure after you have installed the operating system. For detailed information on securing Red Hat Enterprise Linux 7, see Red Hat Enterprise Linux 7 Security Guide.
1.6.1. Ensuring the Firewall Is Enabled and Running
1.6.1.1. What a Firewall Is and How It Enhances System Security
A firewall is a network security system that monitors and controls the incoming and outgoing network traffic based on predetermined security rules. A firewall typically establishes a barrier between a trusted, secure internal network and another outside network.
On Red Hat Enterprise Linux 7, the firewall is provided by the firewalld service, which is automatically enabled during the installation of Red Hat Enterprise Linux. However, if you explicitly disabled the service, for example in the kickstart configuration, you can re-enable it, as described in Section 1.6.1.2, “Re-enabling the firewalld Service”. For overview of firewall setting options in the Kickstart file, see Red Hat Enterprise Linux 7 Installation Guide.
1.6.1.2. Re-enabling the firewalld Service
In case that the firewalld service is disabled after the installation, Red Hat recommends to consider re-enabling it.
You can display the current status of firewalld even as a regular user:
~]$ systemctl status firewalld
If firewalld is not enabled and running, switch to the root user, and change its status:
~]# systemctl start firewalld
~]# systemctl enable firewalld
For further information on post-installation procedures related to firewalld, see Red Hat Enterprise Linux 7 Security Guide. For detailed information on configuring and using firewall, see Red Hat Enterprise Linux 7 Security Guide
1.6.2. Ensuring the Appropriate State of SELinux
1.6.2.1. What SELinux Is and How It Enhances System Security
Security Enhanced Linux (SELinux) is an additional layer of system security that determines which process can access which files, directories, and ports.
SELinux States
SELinux has two possible states:
- Enabled
- Disabled
When SELinux is disabled, only Discretionary Access Control (DAC) rules are used.
SELinux Modes
When SELinux is enabled, it can run in one of the following modes:
- Enforcing
- Permissive
Enforcing mode means that SELinux policies is enforced. SELinux denies access based on SELinux policy rules, and enables only the interactions that are particularly allowed. Enforcing mode is the default mode after the installation and it is also the safest SELinux mode.
Permissive mode means that SELinux policies is not enforced. SELinux does not deny access, but denials are logged for actions that would have been denied if running in enforcing mode. Permissive mode is the default mode during the installation. Operating in permissive mode is also useful in some specific cases, for example if you require access to the Access Vector Cache (AVC) denials when troubleshooting problems.
For further information on SELinux in Red Hat Enterprise Linux 7, see Red Hat Enterprise Linux 7 SELinux User’s and Administrator’s Guide.
1.6.2.2. Ensuring the Required State of SELinux
By default, SELinux operates in permissive mode during the installation and in enforcing mode when the installation has finished.
However, in some specific situations, SELinux might be explicitly set to permissive mode or it might even be disabled on the installed operating system. This can be set for example in the kickstart configuration. For overview of SELinux setting options in the Kickstart file, see Red Hat Enterprise Linux 7 Installation Guide.
Red Hat recommends to keep your system in enforcing mode.
To display the current SELinux mode, and to set the mode as needed:
Ensuring the Required State of SELinux
Display the current SELinux mode in effect:
~]$
getenforceIf needed, switch between the SELinux modes.
The switch can be either temporary or permanent. A temporary switch is not persistent across reboots, while permanent switch is.
To temporary switch to either enforcing or permissive mode:
~]# setenforce Enforcing
~]# setenforce Permissive
To permanently set the SELinux mode, modify the SELINUX variable in the
/etc/selinux/configconfiguration file.For example, to switch SELinux to enforcing mode:
# This file controls the state of SELinux on the system. # SELINUX= can take one of these three values: # enforcing - SELinux security policy is enforced. # permissive - SELinux prints warnings instead of enforcing. # disabled - No SELinux policy is loaded. SELINUX=enforcing
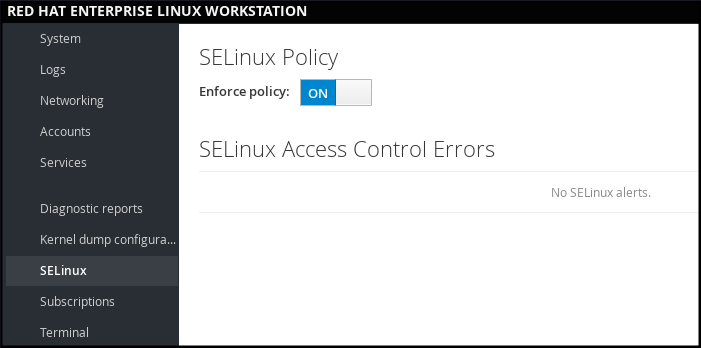
1.6.2.3. Managing SELinux in web console
In web console, use the option to turn SELinux enforcing policy on or off.
By default, SELinux enforcing policy in web console is on, and SELinux operates in enforcing mode. By turning it off, you can switch SELinux into permissive mode. Note that such deviation from the default configuration in the /etc/sysconfig/selinux file is automatically reverted on the next boot.
Figure 1.3. Managing SELinux in web console
1.6.3. Using SSH-based Authentication
1.6.3.1. What SSH-based Authentication Is and How It Enhances System Security
If you want to secure your communication with another computer, you can use SSH-based authentication.
Secure Shell (SSH) is a protocol which facilitates client-server communication and allows users to log in to any host system running SSH remotely. SSH encrypts the connection. The client transmits its authentication information to the server using encryption, and all data sent and received during a session are transferred under the encryption.
SSH enables its users to authenticate without a password. To do so, SSH uses a private-public key scheme.
For further information about SSH safeguards, see Section 12.1.2, “Main Features”.
1.6.3.2. Establishing an SSH Connection
To be able to use SSH connection, create a pair of two keys consisting of a public and a private key.
Creating the Key Files and Copying Them to the Server
Generate a public and a private key:
~]$
ssh-keygenBoth keys are stored in the
~/.ssh/directory:-
~/.ssh/id_rsa.pub- public key ~/.ssh/id_rsa- private keyThe public key does not need to be secret. It is used to verify the private key. The private key is secret. You can choose to protect the private key with the passphrase that you specify during the key generation process. With the passphrase, authentication is even more secure, but is no longer password-less. You can avoid this using the
ssh-agentcommand. In this case, you will enter the passphrase only once - at the beginning of a session. For more information onssh-agentconfiguration, see Section 12.2.4, “Using Key-based Authentication”.
-
Copy the most recently modified public key to a remote machine you want to log into:
~]# ssh-copy-id USER@hostname
As a result, you are now able to enter the system in a secure way, but without entering a password.
1.6.3.3. Disabling SSH Root Login
To increase system security, you can disable SSH access for the root user, which is enabled by default.
For more information on this topic, see Red Hat Enterprise Linux 7 Security Guide.
Disabling SSH Root Login
Access the
/etc/ssh/sshd_configfile:~]# vi /etc/ssh/sshd_config
Change the line that reads
#PermitRootLogin yesto:PermitRootLogin no
Restart the
sshdservice:~]# systemctl restart sshd
1.7. The Basics of Managing User Accounts
Red Hat Enterprise Linux 7 is a multi-user operating system, which enables multiple users on different computers to access a single system installed on one machine. Every user operates under its own account, and managing user accounts thus represents a core element of Red Hat Enterprise Linux system administration.
Normal and System Accounts
Normal accounts are created for users of a particular system. Such accounts can be added, removed, and modified during normal system administration.
System accounts represent a particular applications identifier on a system. Such accounts are generally added or manipulated only at software installation time, and they are not modified later.
System accounts are presumed to be available locally on a system. If these accounts are configured and provided remotely, such as in the instance of an LDAP configuration, system breakage and service start failures can occur.
For system accounts, user IDs below 1000 are reserved. For normal accounts, you can use IDs starting at 1000. However, the recommended practice is to assign IDs starting at 5000. See Section 4.1, “Introduction to Users and Groups” for more information. The guidelines for assigning IDs can be found in the /etc/login.defs file.
# Min/max values for automatic uid selection in useradd # UID_MIN 1000 UID_MAX 60000 # System accounts SYS_UID_MIN 201 SYS_UID_MAX 999
What Groups Are and Which Purposes They Can Be Used For
A group is an entity which ties together multiple user accounts for a common purpose, such as granting access to particular files.
1.7.1. The Most Basic Command-Line Tools to Manage User Accounts and Groups
The most basic tasks to manage user accounts and groups, and the appropriate command-line tools, include:
Displaying user and group IDs:
~]$
idCreating a new user account:
~]# useradd [options] user_nameAssigning a new password to a user account belonging to username:
~]# passwd user_nameAdding a user to a group:
~]# usermod -a -G group_name user_name
For detailed information on managing users and groups, see Chapter 4, Managing Users and Groups.
If you want to use graphical user interface to manage users and groups, see Section 4.2, “Managing Users in a Graphical Environment”.
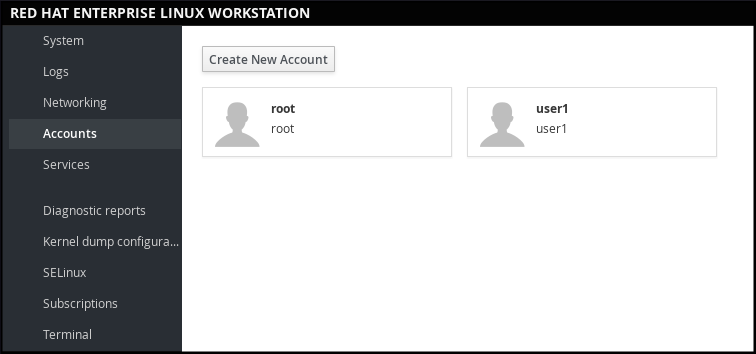
1.7.2. Managing User Accounts in web console
To manage accounts in web console, select the menu.
Figure 1.4. Managing User Accounts in web console
1.8. Dumping the Crashed Kernel Using the kdump Mechanism
This section provides an introduction to the Kernel crash dump mechanism, also called kdump, and briefly explains what kdump is used for in Section 1.8.1, “What kdump Is and Which Tasks It Can Be Used For”.
Activation of the kdump service is a part of the installation process, and by default, kdump was enabled during the installation. This section summarizes how to activate kdump during the installation in Section 1.8.2, “Enabling and Activating kdump During the Installation Process”, and how to manually enable the kdump service if it is disabled after the installation in Section 1.8.3, “Ensuring That kdump Is Installed and Enabled after the Installation Process”.
You can also use web console to configure kdump. See Section 1.8.4, “Configuring kdump in web console” for more information.
1.8.1. What kdump Is and Which Tasks It Can Be Used For
In case of a system crash, you can use the Kernel crash dump mechanism called kdump that enables you to save the content of the system’s memory for later analysis. The kdump mechanism relies on the kexec system call, which can be used to boot a Linux kernel from the context of another kernel, bypass BIOS, and preserve the contents of the first kernel’s memory that would otherwise be lost.
When kernel crash occurs, kdump uses kexec to boot into a second kernel (a capture kernel), which resides in a reserved part of the system memory that is inaccessible to the first kernel. The second kernel captures the contents of the crashed kernel’s memory (a crash dump) and saves it.
1.8.2. Enabling and Activating kdump During the Installation Process
During the installation, enablement and activation of kdump can be done either in the Anaconda installer or using the %addon com_redhat_kdump command in the Kickstart file.
For more information, see the appropriate source according to the installation method:
When installing with the Anaconda installer, see:
Installing Using Anaconda in Red Hat Enterprise Linux 7 Installation Guide.
When installing with the Kickstart file, see:
Kickstart Commands and Options in Red Hat Enterprise Linux 7 Installation Guide.
1.8.3. Ensuring That kdump Is Installed and Enabled after the Installation Process
To ensure that kdump is installed and to configure it:
Checking Whether kdump Is Installed and Configuring kdump
To check whether kdump is installed on your system:
~]$
rpm -q kexec-toolsIf not installed, to install kdump, enter as the
rootuser:~]# yum install kexec-tools
To configure kdump:
Use either the command line or graphical user interface.
Both options are described in detail in Red Hat Enterprise Linux 7 Kernel Crash Dump Guide.
If you need to install the graphical configuration tool:
~]# yum install system-config-kdump
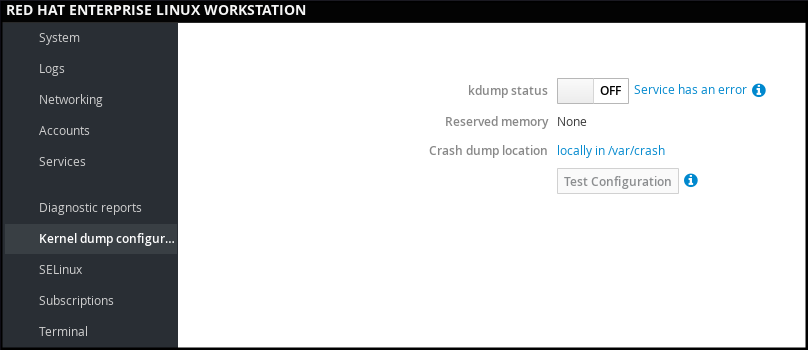
1.8.4. Configuring kdump in web console
In web console, select to verify:
- the kdump status
- the amount of memory reserved for kdump
- the location of the crash dump files
Figure 1.5. Configuring kdump in web console
1.8.5. Additional Resources on kdump
For more information on kdump, see Red Hat Enterprise Linux 7 Kernel Crash Dump Guide.
1.9. Performing System Rescue and Creating System Backup with ReaR
When a software or hardware failure breaks the operating system, you need a mechanism to rescue the system. It is also useful to have the system backup saved. Red Hat recommends using the Relax-and-Recover (ReaR) tool to fulfil both these needs.
1.9.1. What ReaR Is and Which Tasks It Can Be Used For
ReaR is a disaster recovery and system migration utility which enables you to create the complete rescue system. By default, this rescue system restores only the storage layout and the boot loader, but not the actual user and system files.
Additionally, certain backup software enables you to integrate ReaR for disaster recovery.
ReaR enables to perform the following tasks:
- Booting a rescue system on the new hardware
- Replicating the original storage layout
- Restoring user and system files
1.9.2. Quickstart to Installation and Configuration of ReaR
To install ReaR, enter as the root user:
~]# yum install rear
Use the settings in the /etc/rear/local.conf file to configure ReaR.
For further information see, Section 27.1, “Basic ReaR Usage”.
1.9.3. Quickstart to Creation of the Rescue System with ReaR
- To create the rescue system, perform the following command as the
rootuser
~]# rear mkrescue
For further information on creating the rescue system with ReaR, see Section 27.1.3, “Creating a Rescue System”.
1.9.4. Quickstart to Configuration of ReaR with the Backup Software
ReaR contains a fully-integrated built-in, or internal, backup method called NETFS.
To make ReaR use its internal backup method, add these lines to the /etc/rear/local.conf file:
BACKUP=NETFS BACKUP_URL=backup location
You can also configure ReaR to keep the previous backup archives when the new ones are created by adding the following line to /etc/rear/local.conf:
NETFS_KEEP_OLD_BACKUP_COPY=y
To make the backups incremental, meaning that only the changed files are backed up on each run, add this line to /etc/rear/local.conf:
BACKUP_TYPE=incremental
For detailed information about using the ReaR NETFS internal backup method, see Section 27.2.1, “The Built-in Backup Method”.
For information on supported external backup methods and unsupported backup methods, see Section 27.2.2, “Supported Backup Methods” and Section 27.2.3, “Unsupported Backup Methods”.
1.10. Using the Log Files to Troubleshoot Problems
When troubleshooting a problem, you may appreciate the log files that contain different information and messages about the operating system. The logging system in Red Hat Enterprise Linux 7 is based on the built-in syslog protocol. Particular programs use this system to record events and organize them into log files, which are useful when auditing the operating system and troubleshooting various problems.
For more information on log files, see Chapter 23, Viewing and Managing Log Files.
1.10.1. Services Handling the syslog Messages
The syslog messages are handled by two services:
-
the
systemd-journalddaemon - Collects messages from the kernel, the early stages of the boot process, standard output and error of daemons as they start up and run, and syslog, and forwards the messages to thersyslogservice for further processing. -
the
rsyslogservice - Sorts the syslog messages by type and priority, and writes them to the files in the/var/logdirectory, where the logs are persistently stored.
1.10.2. Subdirectories Storing the syslog Messages
The syslog messages are stored in various subdirectories under the /var/log directory according to what kind of messages and logs they contain:
-
var/log/messages- all syslog messages except those mentioned below -
var/log/secure- security and authentication-related messages and errors -
var/log/maillog- mail server-related messages and errors -
var/log/cron- log files related to periodically executed tasks -
var/log/boot.log- log files related to system startup
1.11. Accessing Red Hat Support
To obtain support from Red Hat, use the Red Hat Customer Portal, which provides access to everything available with your subscription.
This section describes:
- Obtaining Red Hat support, see Section 1.11.1, “Obtaining Red Hat Support Through Red Hat Customer Portal”
- Using the SOS report to troubleshoot problems, see Section 1.11.2, “Using the SOS Report to Troubleshoot Problems”
1.11.1. Obtaining Red Hat Support Through Red Hat Customer Portal
By using the Red Hat Customer Portal you can:
- Open a new support case
- Initiate a live chat with a Red Hat expert
- Contact a Red Hat expert by making a call or sending an email
To access the Red Hat Customer Portal, go to https://access.redhat.com..
To work with Red Hat Customer Portal services related to Red Hat support, you can use:
- Web browser
- Red Hat Support Tool
1.11.1.1. What the Red Hat Support Tool Is and Which Tasks It Can Be Used For
The Red Hat Support Tool is a command-line based tool which provides a text console interface to the subscription-based Red Hat access services. This tool is contained in the redhat-support-tool package.
The Red Hat Support Tool enables you to perform support-related tasks, such as:
- Opening or updating support cases
- Searching in the Red Hat knowledge base solutions
- Analyzing Python and Java errors
To start the tool in interactive mode:
~]$ redhat-support-tool
Welcome to the Red Hat Support Tool.
Command (? for help):In interactive mode, enter to display the available commands:
Command (? for help): ?
For more information about the installation and use of the Red Hat Support Tool, see Chapter 8, Accessing Support Using the Red Hat Support Tool, and the Red Hat Knowledgebase article Red Hat Access: Red Hat Support Tool.
1.11.2. Using the SOS Report to Troubleshoot Problems
The SOS report collects configuration details, system information and diagnostic information from a Red Hat Enterprise Linux system. Attach the report when you open a support case.
Note that the SOS report is provided in the sos package, which is not installed with the default minimal installation of Red Hat Enterprise Linux 7.
To install the sos package:
~]# yum install sos
To generate an SOS report:
~]# sosreport
To attach the sos report to your support case, see the Red Hat Knowledgebase article How can I attach a file to a Red Hat support case?. Note that you will be prompted to enter the number of the support case, when attaching the sos report.
For more information on SOS report, see the Red Hat Knowledgebase article What is a sosreport and how to create one in Red Hat Enterprise Linux 4.6 and later?.
Chapter 2. System Locale and Keyboard Configuration
The system locale specifies the language settings of system services and user interfaces. The keyboard layout settings control the layout used on the text console and graphical user interfaces.
These settings can be made by modifying the /etc/locale.conf configuration file or by using the localectl utility. Also, you can use the graphical user interface to perform the task; for a description of this method, see Red Hat Enterprise Linux 7 Installation Guide.
2.1. Setting the System Locale
System-wide locale settings are stored in the /etc/locale.conf file, which is read at early boot by the systemd daemon. The locale settings configured in /etc/locale.conf are inherited by every service or user, unless individual programs or individual users override them.
The basic file format of /etc/locale.conf is a newline-separated list of variable assignments. For example, German locale with English messages in /etc/locale.conf looks as follows:
LANG=de_DE.UTF-8 LC_MESSAGES=C
Here, the LC_MESSAGES option determines the locale used for diagnostic messages written to the standard error output. To further specify locale settings in /etc/locale.conf, you can use several other options, the most relevant are summarized in Table 2.1, “Options configurable in /etc/locale.conf”. See the locale(7) manual page for detailed information on these options. Note that the LC_ALL option, which represents all possible options, should not be configured in /etc/locale.conf.
| Option | Description |
|---|---|
| LANG | Provides a default value for the system locale. |
| LC_COLLATE | Changes the behavior of functions which compare strings in the local alphabet. |
| LC_CTYPE | Changes the behavior of the character handling and classification functions and the multibyte character functions. |
| LC_NUMERIC | Describes the way numbers are usually printed, with details such as decimal point versus decimal comma. |
| LC_TIME | Changes the display of the current time, 24-hour versus 12-hour clock. |
| LC_MESSAGES | Determines the locale used for diagnostic messages written to the standard error output. |
2.1.1. Displaying the Current Status
The localectl command can be used to query and change the system locale and keyboard layout settings. To show the current settings, use the status option:
localectlstatus
Example 2.1. Displaying the Current Status
The output of the previous command lists the currently set locale, keyboard layout configured for the console and for the X11 window system.
~]$ localectl status
System Locale: LANG=en_US.UTF-8
VC Keymap: us
X11 Layout: n/a2.1.2. Listing Available Locales
To list all locales available for your system, type:
localectllist-locales
Example 2.2. Listing Locales
Imagine you want to select a specific English locale, but you are not sure if it is available on the system. You can check that by listing all English locales with the following command:
~]$ localectl list-locales | grep en_
en_AG
en_AG.utf8
en_AU
en_AU.iso88591
en_AU.utf8
en_BW
en_BW.iso88591
en_BW.utf8
output truncated2.1.3. Setting the Locale
To set the default system locale, use the following command as root:
localectlset-localeLANG=locale
Replace locale with the locale name, found with the localectl list-locales command. The above syntax can also be used to configure parameters from Table 2.1, “Options configurable in /etc/locale.conf”.
Example 2.3. Changing the Default Locale
For example, if you want to set British English as your default locale, first find the name of this locale by using list-locales. Then, as root, type the command in the following form:
~]# localectl set-locale LANG=en_GB.utf82.1.4. Making System Locale Settings Permanent when Installing with Kickstart
When Red Hat Enterprise Linux is installed with the Red Hat Kickstart installation method, setting of the system locales might not be persistent after an upgrade of the operating system.
When the %packages section of the Kickstart file includes the --instLang option, the _install_langs RPM macro is set to the particular value for this installation, and the set of installed locales is adjusted accordingly. However, this adjustment affects only this installation, not subsequent upgrades. If an upgrade reinstalls the glibc package, the entire set of locales is upgraded instead of only the locales you requested during the installation.
To avoid this, make the choice of locales permanent. You have these options:
- If you have not started the Kickstart installation, modify the Kickstart file to include instructions for setting RPM macros globally by applying this procedure: Setting RPM macros during the Kickstart installation
- If you have already installed the system, set RPM macros globally on the system by applying this procedure: Setting RPM macros globally
Setting RPM macros during the Kickstart installation
Modify the
%postsection of the Kickstart file:LANG=en_US echo "%_install_langs $LANG" > /etc/rpm/macros.language-conf yum-config-manager --setopt=override_install_langs=$LANG --saveModify the
%packagessection of the Kickstart file:%packages yum-utils* %end
Setting RPM macros globally
Create the RPM configuration file at
/etc/rpm/macros.language-confwith the following contents:%_install_langs LANGLANG is the value of the
instLangoption.Update the
/etc/yum.conffile with:override_install_langs=LANG
2.2. Changing the Keyboard Layout
The keyboard layout settings enable the user to control the layout used on the text console and graphical user interfaces.
2.2.1. Displaying the Current Settings
As mentioned before, you can check your current keyboard layout configuration with the following command:
localectlstatus
Example 2.4. Displaying the Keyboard Settings
In the following output, you can see the keyboard layout configured for the virtual console and for the X11 window system.
~]$ localectl status
System Locale: LANG=en_US.utf8
VC Keymap: us
X11 Layout: us2.2.2. Listing Available Keymaps
To list all available keyboard layouts that can be configured on your system, type:
localectllist-keymaps
Example 2.5. Searching for a Particular Keymap
You can use grep to search the output of the previous command for a specific keymap name. There are often multiple keymaps compatible with your currently set locale. For example, to find available Czech keyboard layouts, type:
~]$localectllist-keymaps|grepczcz cz-cp1250 cz-lat2 cz-lat2-prog cz-qwerty cz-us-qwertz sunt5-cz-us sunt5-us-cz
2.2.3. Setting the Keymap
To set the default keyboard layout for your system, use the following command as root:
localectlset-keymapmap
Replace map with the name of the keymap taken from the output of the localectl list-keymaps command. Unless the --no-convert option is passed, the selected setting is also applied to the default keyboard mapping of the X11 window system, after converting it to the closest matching X11 keyboard mapping. This also applies in reverse, you can specify both keymaps with the following command as root:
localectlset-x11-keymapmap
If you want your X11 layout to differ from the console layout, use the --no-convert option.
localectl--no-convertset-x11-keymapmap
With this option, the X11 keymap is specified without changing the previous console layout setting.
Example 2.6. Setting the X11 Keymap Separately
Imagine you want to use German keyboard layout in the graphical interface, but for console operations you want to retain the US keymap. To do so, type as root:
~]# localectl --no-convert set-x11-keymap deThen you can verify if your setting was successful by checking the current status:
~]$ localectl status
System Locale: LANG=de_DE.UTF-8
VC Keymap: us
X11 Layout: deApart from keyboard layout (map), three other options can be specified:
localectlset-x11-keymapmap model variant options
Replace model with the keyboard model name, variant and options with keyboard variant and option components, which can be used to enhance the keyboard behavior. These options are not set by default. For more information on X11 Model, X11 Variant, and X11 Options see the kbd(4) man page.
2.3. Additional Resources
For more information on how to configure the keyboard layout on Red Hat Enterprise Linux, see the resources listed below:
Installed Documentation
-
localectl(1) — The manual page for thelocalectlcommand line utility documents how to use this tool to configure the system locale and keyboard layout. -
loadkeys(1) — The manual page for theloadkeyscommand provides more information on how to use this tool to change the keyboard layout in a virtual console.
See Also
-
Chapter 6, Gaining Privileges documents how to gain administrative privileges by using the
suandsudocommands. -
Chapter 10, Managing Services with systemd provides more information on
systemdand documents how to use thesystemctlcommand to manage system services.
Chapter 3. Configuring the Date and Time
Modern operating systems distinguish between the following two types of clocks:
- A real-time clock (RTC), commonly referred to as a hardware clock, (typically an integrated circuit on the system board) that is completely independent of the current state of the operating system and runs even when the computer is shut down.
- A system clock, also known as a software clock, that is maintained by the kernel and its initial value is based on the real-time clock. Once the system is booted and the system clock is initialized, the system clock is completely independent of the real-time clock.
The system time is always kept in Coordinated Universal Time (UTC) and converted in applications to local time as needed. Local time is the actual time in your current time zone, taking into account daylight saving time (DST). The real-time clock can use either UTC or local time. UTC is recommended.
Red Hat Enterprise Linux 7 offers three command line tools that can be used to configure and display information about the system date and time:
-
The
timedatectlutility, which is new in Red Hat Enterprise Linux 7 and is part ofsystemd. -
The traditional
datecommand. -
The
hwclockutility for accessing the hardware clock.
3.1. Using the timedatectl Command
The timedatectl utility is distributed as part of the systemd system and service manager and allows you to review and change the configuration of the system clock. You can use this tool to change the current date and time, set the time zone, or enable automatic synchronization of the system clock with a remote server.
For information on how to display the current date and time in a custom format, see also Section 3.2, “Using the date Command”.
3.1.1. Displaying the Current Date and Time
To display the current date and time along with detailed information about the configuration of the system and hardware clock, run the timedatectl command with no additional command line options:
timedatectl
This displays the local and universal time, the currently used time zone, the status of the Network Time Protocol (NTP) configuration, and additional information related to DST.
Example 3.1. Displaying the Current Date and Time
The following is an example output of the timedatectl command on a system that does not use NTP to synchronize the system clock with a remote server:
~]$ timedatectl
Local time: Mon 2016-09-16 19:30:24 CEST
Universal time: Mon 2016-09-16 17:30:24 UTC
Timezone: Europe/Prague (CEST, +0200)
NTP enabled: no
NTP synchronized: no
RTC in local TZ: no
DST active: yes
Last DST change: DST began at
Sun 2016-03-31 01:59:59 CET
Sun 2016-03-31 03:00:00 CEST
Next DST change: DST ends (the clock jumps one hour backwards) at
Sun 2016-10-27 02:59:59 CEST
Sun 2016-10-27 02:00:00 CET
Changes to the status of chrony or ntpd will not be immediately noticed by timedatectl. If changes to the configuration or status of these tools is made, enter the following command:
~]# systemctl restart systemd-timedated.service
3.1.2. Changing the Current Time
To change the current time, type the following at a shell prompt as root:
timedatectlset-timeHH:MM:SS
Replace HH with an hour, MM with a minute, and SS with a second, all typed in two-digit form.
This command updates both the system time and the hardware clock. The result it is similar to using both the date --set and hwclock --systohc commands.
The command will fail if an NTP service is enabled. See Section 3.1.5, “Synchronizing the System Clock with a Remote Server” to temporally disable the service.
Example 3.2. Changing the Current Time
To change the current time to 11:26 p.m., run the following command as root:
~]# timedatectl set-time 23:26:00
By default, the system is configured to use UTC. To configure your system to maintain the clock in the local time, run the timedatectl command with the set-local-rtc option as root:
timedatectlset-local-rtcboolean
To configure your system to maintain the clock in the local time, replace boolean with yes (or, alternatively, y, true, t, or 1). To configure the system to use UTC, replace boolean with no (or, alternatively, n, false, f, or 0). The default option is no.
3.1.3. Changing the Current Date
To change the current date, type the following at a shell prompt as root:
timedatectlset-timeYYYY-MM-DD
Replace YYYY with a four-digit year, MM with a two-digit month, and DD with a two-digit day of the month.
Note that changing the date without specifying the current time results in setting the time to 00:00:00.
Example 3.3. Changing the Current Date
To change the current date to 2 June 2017 and keep the current time (11:26 p.m.), run the following command as root:
~]# timedatectl set-time "2017-06-02 23:26:00"
3.1.4. Changing the Time Zone
To list all available time zones, type the following at a shell prompt:
timedatectllist-timezones
To change the currently used time zone, type as root:
timedatectl set-timezone time_zone
Replace time_zone with any of the values listed by the timedatectl list-timezones command.
Example 3.4. Changing the Time Zone
To identify which time zone is closest to your present location, use the timedatectl command with the list-timezones command line option. For example, to list all available time zones in Europe, type:
~]# timedatectl list-timezones | grep Europe
Europe/Amsterdam
Europe/Andorra
Europe/Athens
Europe/Belgrade
Europe/Berlin
Europe/Bratislava
…
To change the time zone to Europe/Prague, type as root:
~]# timedatectl set-timezone Europe/Prague
3.1.5. Synchronizing the System Clock with a Remote Server
As opposed to the manual adjustments described in the previous sections, the timedatectl command also allows you to enable automatic synchronization of your system clock with a group of remote servers using the NTP protocol. Enabling NTP enables the chronyd or ntpd service, depending on which of them is installed.
The NTP service can be enabled and disabled using a command as follows:
timedatectlset-ntpboolean
To enable your system to synchronize the system clock with a remote NTP server, replace boolean with yes (the default option). To disable this feature, replace boolean with no.
Example 3.5. Synchronizing the System Clock with a Remote Server
To enable automatic synchronization of the system clock with a remote server, type:
~]# timedatectl set-ntp yes
The command will fail if an NTP service is not installed. See Section 18.3.1, “Installing chrony” for more information.
3.2. Using the date Command
The date utility is available on all Linux systems and allows you to display and configure the current date and time. It is frequently used in scripts to display detailed information about the system clock in a custom format.
For information on how to change the time zone or enable automatic synchronization of the system clock with a remote server, see Section 3.1, “Using the timedatectl Command”.
3.2.1. Displaying the Current Date and Time
To display the current date and time, run the date command with no additional command line options:
dateThis displays the day of the week followed by the current date, local time, abbreviated time zone, and year.
By default, the date command displays the local time. To display the time in UTC, run the command with the --utc or -u command line option:
date--utc
You can also customize the format of the displayed information by providing the +"format" option on the command line:
date +"format"
Replace format with one or more supported control sequences as illustrated in Example 3.6, “Displaying the Current Date and Time”. See Table 3.1, “Commonly Used Control Sequences” for a list of the most frequently used formatting options, or the date(1) manual page for a complete list of these options.
| Control Sequence | Description |
|---|---|
|
|
The hour in the HH format (for example, |
|
|
The minute in the MM format (for example, |
|
|
The second in the SS format (for example, |
|
|
The day of the month in the DD format (for example, |
|
|
The month in the MM format (for example, |
|
|
The year in the YYYY format (for example, |
|
|
The time zone abbreviation (for example, |
|
|
The full date in the YYYY-MM-DD format (for example, |
|
|
The full time in the HH:MM:SS format (for example, 17:30:24). This option is equal to |
Example 3.6. Displaying the Current Date and Time
To display the current date and local time, type the following at a shell prompt:
~]$ date
Mon Sep 16 17:30:24 CEST 2016To display the current date and time in UTC, type the following at a shell prompt:
~]$ date --utc
Mon Sep 16 15:30:34 UTC 2016
To customize the output of the date command, type:
~]$ date +"%Y-%m-%d %H:%M" 2016-09-16 17:30
3.2.2. Changing the Current Time
To change the current time, run the date command with the --set or -s option as root:
date--setHH:MM:SS
Replace HH with an hour, MM with a minute, and SS with a second, all typed in two-digit form.
By default, the date command sets the system clock to the local time. To set the system clock in UTC, run the command with the --utc or -u command line option:
date--setHH:MM:SS--utc
Example 3.7. Changing the Current Time
To change the current time to 11:26 p.m., run the following command as root:
~]# date --set 23:26:00
3.2.3. Changing the Current Date
To change the current date, run the date command with the --set or -s option as root:
date--setYYYY-MM-DD
Replace YYYY with a four-digit year, MM with a two-digit month, and DD with a two-digit day of the month.
Note that changing the date without specifying the current time results in setting the time to 00:00:00.
Example 3.8. Changing the Current Date
To change the current date to 2 June 2017 and keep the current time (11:26 p.m.), run the following command as root:
~]# date --set "2017-06-02 23:26:00"
3.3. Using the hwclock Command
hwclock is a utility for accessing the hardware clock, also referred to as the Real Time Clock (RTC). The hardware clock is independent of the operating system you use and works even when the machine is shut down. This utility is used for displaying the time from the hardware clock. hwclock also contains facilities for compensating for systematic drift in the hardware clock.
The hardware clock stores the values of: year, month, day, hour, minute, and second. It is not able to store the time standard, local time or Coordinated Universal Time (UTC), nor set the Daylight Saving Time (DST).
The hwclock utility saves its settings in the /etc/adjtime file, which is created with the first change you make, for example, when you set the time manually or synchronize the hardware clock with the system time.
For the changes in the hwclock behaviour between Red Hat Enterprise Linux version 6 and 7, see Red Hat Enterprise Linux 7 Migration Planning Guide guide.
3.3.1. Displaying the Current Date and Time
Running hwclock with no command line options as the root user returns the date and time in local time to standard output.
hwclock
Note that using the --utc or --localtime options with the hwclock command does not mean you are displaying the hardware clock time in UTC or local time. These options are used for setting the hardware clock to keep time in either of them. The time is always displayed in local time. Additionally, using the hwclock --utc or hwclock --local commands does not change the record in the /etc/adjtime file. This command can be useful when you know that the setting saved in /etc/adjtime is incorrect but you do not want to change the setting. On the other hand, you may receive misleading information if you use the command an incorrect way. See the hwclock(8) manual page for more details.
Example 3.9. Displaying the Current Date and Time
To display the current date and the current local time from the hardware clock, run as root:
~]# hwclock Tue 15 Apr 2017 04:23:46 PM CEST -0.329272 seconds
CEST is a time zone abbreviation and stands for Central European Summer Time.
For information on how to change the time zone, see Section 3.1.4, “Changing the Time Zone”.
3.3.2. Setting the Date and Time
Besides displaying the date and time, you can manually set the hardware clock to a specific time.
When you need to change the hardware clock date and time, you can do so by appending the --set and --date options along with your specification:
hwclock --set --date "dd mmm yyyy HH:MM"Replace dd with a day (a two-digit number), mmm with a month (a three-letter abbreviation), yyyy with a year (a four-digit number), HH with an hour (a two-digit number), MM with a minute (a two-digit number).
At the same time, you can also set the hardware clock to keep the time in either UTC or local time by adding the --utc or --localtime options, respectively. In this case, UTC or LOCAL is recorded in the /etc/adjtime file.
Example 3.10. Setting the Hardware Clock to a Specific Date and Time
If you want to set the date and time to a specific value, for example, to "21:17, October 21, 2016", and keep the hardware clock in UTC, run the command as root in the following format:
~]# hwclock --set --date "21 Oct 2016 21:17" --utc
3.3.3. Synchronizing the Date and Time
You can synchronize the hardware clock and the current system time in both directions.
Either you can set the hardware clock to the current system time by using this command:
hwclock --systohcNote that if you use NTP, the hardware clock is automatically synchronized to the system clock every 11 minutes, and this command is useful only at boot time to get a reasonable initial system time.
Or, you can set the system time from the hardware clock by using the following command:
hwclock --hctosys
When you synchronize the hardware clock and the system time, you can also specify whether you want to keep the hardware clock in local time or UTC by adding the --utc or --localtime option. Similarly to using --set, UTC or LOCAL is recorded in the /etc/adjtime file.
The hwclock --systohc --utc command is functionally similar to timedatectl set-local-rtc false and the hwclock --systohc --local command is an alternative to timedatectl set-local-rtc true.
Example 3.11. Synchronizing the Hardware Clock with System Time
To set the hardware clock to the current system time and keep the hardware clock in local time, run the following command as root:
~]# hwclock --systohc --localtime
To avoid problems with time zone and DST switching, it is recommended to keep the hardware clock in UTC. The shown Example 3.11, “Synchronizing the Hardware Clock with System Time” is useful, for example, in case of a multi boot with a Windows system, which assumes the hardware clock runs in local time by default, and all other systems need to accommodate to it by using local time as well. It may also be needed with a virtual machine; if the virtual hardware clock provided by the host is running in local time, the guest system needs to be configured to use local time, too.
3.4. Additional Resources
For more information on how to configure the date and time in Red Hat Enterprise Linux 7, see the resources listed below.
Installed Documentation
-
timedatectl(1) — The manual page for thetimedatectlcommand line utility documents how to use this tool to query and change the system clock and its settings. -
date(1) — The manual page for thedatecommand provides a complete list of supported command line options. -
hwclock(8) — The manual page for thehwclockcommand provides a complete list of supported command line options.
See Also
- Chapter 2, System Locale and Keyboard Configuration documents how to configure the keyboard layout.
-
Chapter 6, Gaining Privileges documents how to gain administrative privileges by using the
suandsudocommands. -
Chapter 10, Managing Services with systemd provides more information on systemd and documents how to use the
systemctlcommand to manage system services.
Chapter 4. Managing Users and Groups
The control of users and groups is a core element of Red Hat Enterprise Linux system administration. This chapter explains how to add, manage, and delete users and groups in the graphical user interface and on the command line, and covers advanced topics, such as creating group directories.
4.1. Introduction to Users and Groups
While users can be either people (meaning accounts tied to physical users) or accounts that exist for specific applications to use, groups are logical expressions of organization, tying users together for a common purpose. Users within a group share the same permissions to read, write, or execute files owned by that group.
Each user is associated with a unique numerical identification number called a user ID (UID). Likewise, each group is associated with a group ID (GID). A user who creates a file is also the owner and group owner of that file. The file is assigned separate read, write, and execute permissions for the owner, the group, and everyone else. The file owner can be changed only by root, and access permissions can be changed by both the root user and file owner.
Additionally, Red Hat Enterprise Linux supports access control lists (ACLs) for files and directories which allow permissions for specific users outside of the owner to be set. For more information about this feature, see Chapter 5, Access Control Lists.
Reserved User and Group IDs
Red Hat Enterprise Linux reserves user and group IDs below 1000 for system users and groups. By default, the User Manager does not display the system users. Reserved user and group IDs are documented in the setup package. To view the documentation, use this command:
cat /usr/share/doc/setup*/uidgid
The recommended practice is to assign IDs starting at 5,000 that were not already reserved, as the reserved range can increase in the future. To make the IDs assigned to new users by default start at 5,000, change the UID_MIN and GID_MIN directives in the /etc/login.defs file:
[file contents truncated] UID_MIN 5000 [file contents truncated] GID_MIN 5000 [file contents truncated]
For users created before you changed UID_MIN and GID_MIN directives, UIDs will still start at the default 1000.
Even with new user and group IDs beginning with 5,000, it is recommended not to raise IDs reserved by the system above 1000 to avoid conflict with systems that retain the 1000 limit.
4.1.1. User Private Groups
Red Hat Enterprise Linux uses a user private group (UPG) scheme, which makes UNIX groups easier to manage. A user private group is created whenever a new user is added to the system. It has the same name as the user for which it was created and that user is the only member of the user private group.
User private groups make it safe to set default permissions for a newly created file or directory, allowing both the user and the group of that user to make modifications to the file or directory.
The setting which determines what permissions are applied to a newly created file or directory is called a umask and is configured in the /etc/bashrc file. Traditionally on UNIX-based systems, the umask is set to 022, which allows only the user who created the file or directory to make modifications. Under this scheme, all other users, including members of the creator’s group, are not allowed to make any modifications. However, under the UPG scheme, this "group protection" is not necessary since every user has their own private group. See Section 4.3.5, “Setting Default Permissions for New Files Using umask” for more information.
A list of all groups is stored in the /etc/group configuration file.
4.1.2. Shadow Passwords
In environments with multiple users, it is very important to use shadow passwords provided by the shadow-utils package to enhance the security of system authentication files. For this reason, the installation program enables shadow passwords by default.
The following is a list of the advantages shadow passwords have over the traditional way of storing passwords on UNIX-based systems:
-
Shadow passwords improve system security by moving encrypted password hashes from the world-readable
/etc/passwdfile to/etc/shadow, which is readable only by therootuser. - Shadow passwords store information about password aging.
-
Shadow passwords allow to enforce some of the security policies set in the
/etc/login.defsfile.
Most utilities provided by the shadow-utils package work properly whether or not shadow passwords are enabled. However, since password aging information is stored exclusively in the /etc/shadow file, some utilities and commands do not work without first enabling shadow passwords:
-
The
chageutility for setting password aging parameters. For details, see the Password Security section in the Red Hat Enterprise Linux 7 Security Guide. -
The
gpasswdutility for administrating the/etc/groupfile. -
The
usermodcommand with the-e, --expiredateor-f, --inactiveoption. -
The
useraddcommand with the-e, --expiredateor-f, --inactiveoption.
4.2. Managing Users in a Graphical Environment
The Users utility allows you to view, modify, add, and delete local users in the graphical user interface.
4.2.1. Using the Users Settings Tool
Press the Super key to enter the Activities Overview, type Users and then press Enter. The Users settings tool appears. The Super key appears in a variety of guises, depending on the keyboard and other hardware, but often as either the Windows or Command key, and typically to the left of the Space bar. Alternatively, you can open the Users utility from the Settings menu after clicking your user name in the top right corner of the screen.
To make changes to the user accounts, first select the button and authenticate yourself as indicated by the dialog box that appears. Note that unless you have superuser privileges, the application will prompt you to authenticate as root. To add and remove users, select the and button respectively. To add a user to the administrative group wheel, change the Account Type from Standard to Administrator. To edit a user’s language setting, select the language and a drop-down menu appears.
Figure 4.1. The Users Settings Tool

When a new user is created, the account is disabled until a password is set. The Password drop-down menu, shown in Figure 4.2, “The Password Menu”, contains the options to set a password by the administrator immediately, choose a password by the user at the first login, or create a guest account with no password required to log in. You can also disable or enable an account from this menu.
Figure 4.2. The Password Menu

4.3. Using Command-Line Tools
Apart from the Users settings tool described in Section 4.2, “Managing Users in a Graphical Environment”, which is designed for basic managing of users, you can use command line tools for managing users and groups that are listed in Table 4.1, “Command line utilities for managing users and groups”.
| Utilities | Description |
|---|---|
|
| Displays user and group IDs. |
|
| Standard utilities for adding, modifying, and deleting user accounts. |
|
| Standard utilities for adding, modifying, and deleting groups. |
|
|
Utility primarily used for modification of group password in the |
|
| Utilities that can be used for verification of the password, group, and associated shadow files. |
|
| Utilities that can be used for the conversion of passwords to shadow passwords, or back from shadow passwords to standard passwords. |
|
| Similar to the previous, these utilities can be used for conversion of shadowed information for group accounts. |
4.3.1. Adding a New User
To add a new user to the system, type the following at a shell prompt as root:
useradd options username…where options are command-line options as described in Table 4.2, “Common useradd command-line options”.
By default, the useradd command creates a locked user account. To unlock the account, run the following command as root to assign a password:
passwd usernameOptionally, you can set a password aging policy. See the Password Security section in the Red Hat Enterprise Linux 7 Security Guide.
| Option | |
|---|---|
|
| comment can be replaced with any string. This option is generally used to specify the full name of a user. |
|
|
Home directory to be used instead of default |
|
| Date for the account to be disabled in the format YYYY-MM-DD. |
|
|
Number of days after the password expires until the account is disabled. If |
|
| Group name or group number for the user’s default (primary) group. The group must exist prior to being specified here. |
|
| List of additional (supplementary, other than default) group names or group numbers, separated by commas, of which the user is a member. The groups must exist prior to being specified here. |
|
| Create the home directory if it does not exist. |
|
| Do not create the home directory. |
|
| Do not create a user private group for the user. |
|
|
The password encrypted with |
|
| Create a system account with a UID less than 1000 and without a home directory. |
|
|
User’s login shell, which defaults to |
|
| User ID for the user, which must be unique and greater than 999. |
The default range of IDs for system and normal users has been changed in Red Hat Enterprise Linux 7 from earlier releases. Previously, UID 1-499 was used for system users and values above for normal users. The default range for system users is now 1-999. This change might cause problems when migrating to Red Hat Enterprise Linux 7 with existing users having UIDs and GIDs between 500 and 999. The default ranges of UID and GID can be changed in the /etc/login.defs file.
Explaining the Process
The following steps illustrate what happens if the command useradd juan is issued on a system that has shadow passwords enabled:
A new line for
juanis created in/etc/passwd:juan:x:1001:1001::/home/juan:/bin/bash
The line has the following characteristics:
-
It begins with the user name
juan. -
There is an
xfor the password field indicating that the system is using shadow passwords. - A UID greater than 999 is created. Under Red Hat Enterprise Linux 7, UIDs below 1000 are reserved for system use and should not be assigned to users.
- A GID greater than 999 is created. Under Red Hat Enterprise Linux 7, GIDs below 1000 are reserved for system use and should not be assigned to users.
- The optional GECOS information is left blank. The GECOS field can be used to provide additional information about the user, such as their full name or phone number.
-
The home directory for
juanis set to/home/juan/. -
The default shell is set to
/bin/bash.
-
It begins with the user name
A new line for
juanis created in/etc/shadow:juan:!!:14798:0:99999:7:::
The line has the following characteristics:
-
It begins with the user name
juan. Two exclamation marks (
!!) appear in the password field of the/etc/shadowfile, which locks the account.NoteIf an encrypted password is passed using the
-pflag, it is placed in the/etc/shadowfile on the new line for the user.- The password is set to never expire.
-
It begins with the user name
A new line for a group named
juanis created in/etc/group:juan:x:1001:
A group with the same name as a user is called a user private group. For more information on user private groups, see Section 4.1.1, “User Private Groups”.
The line created in
/etc/grouphas the following characteristics:-
It begins with the group name
juan. -
An
xappears in the password field indicating that the system is using shadow group passwords. -
The GID matches the one listed for
juan's primary group in/etc/passwd.
-
It begins with the group name
A new line for a group named
juanis created in/etc/gshadow:juan:!::
The line has the following characteristics:
-
It begins with the group name
juan. -
An exclamation mark (
!) appears in the password field of the/etc/gshadowfile, which locks the group. - All other fields are blank.
-
It begins with the group name
A directory for user
juanis created in the/homedirectory:~]# ls -ld /home/juan drwx------. 4 juan juan 4096 Mar 3 18:23 /home/juan
This directory is owned by user
juanand groupjuan. It has read, write, and execute privileges only for the userjuan. All other permissions are denied.The files within the
/etc/skel/directory (which contain default user settings) are copied into the new/home/juan/directory:~]# ls -la /home/juan total 28 drwx------. 4 juan juan 4096 Mar 3 18:23 . drwxr-xr-x. 5 root root 4096 Mar 3 18:23 .. -rw-r--r--. 1 juan juan 18 Jun 22 2010 .bash_logout -rw-r--r--. 1 juan juan 176 Jun 22 2010 .bash_profile -rw-r--r--. 1 juan juan 124 Jun 22 2010 .bashrc drwxr-xr-x. 4 juan juan 4096 Nov 23 15:09 .mozilla
At this point, a locked account called juan exists on the system. To activate it, the administrator must next assign a password to the account using the passwd command and, optionally, set password aging guidelines (see the Password Security section in the Red Hat Enterprise Linux 7 Security Guide for details).
4.3.2. Adding a New Group
To add a new group to the system, type the following at a shell prompt as root:
groupadd options group_name
…where options are command-line options as described in Table 4.3, “Common groupadd command-line options”.
| Option | Description |
|---|---|
|
|
When used with |
|
| Group ID for the group, which must be unique and greater than 999. |
|
|
Override |
|
| Allows creating groups with duplicate GID. |
|
| Use this encrypted password for the new group. |
|
| Create a system group with a GID less than 1000. |
4.3.3. Adding an Existing User to an Existing Group
Use the usermod utility to add an already existing user to an already existing group.
Various options of usermod have different impact on user’s primary group and on his or her supplementary groups.
To override user’s primary group, run the following command as root:
~]# usermod -g group_name user_name
To override user’s supplementary groups, run the following command as root:
~]# usermod -G group_name1,group_name2,... user_name
Note that in this case all previous supplementary groups of the user are replaced by the new group or several new groups.
To add one or more groups to user’s supplementary groups, run one of the following commands as root:
~]# usermod -aG group_name1,group_name2,... user_name
~]# usermod --append -G group_name1,group_name2,... user_name
Note that in this case the new group is added to user’s current supplementary groups.
4.3.4. Creating Group Directories
System administrators usually like to create a group for each major project and assign people to the group when they need to access that project’s files. With this traditional scheme, file management is difficult; when someone creates a file, it is associated with the primary group to which they belong. When a single person works on multiple projects, it becomes difficult to associate the right files with the right group. However, with the UPG scheme, groups are automatically assigned to files created within a directory with the setgid bit set. The setgid bit makes managing group projects that share a common directory very simple because any files a user creates within the directory are owned by the group that owns the directory.
For example, a group of people need to work on files in the /opt/myproject/ directory. Some people are trusted to modify the contents of this directory, but not everyone.
As
root, create the/opt/myproject/directory by typing the following at a shell prompt:mkdir /opt/myprojectAdd the
myprojectgroup to the system:groupadd myprojectAssociate the contents of the
/opt/myproject/directory with themyprojectgroup:chown root:myproject /opt/myprojectAllow users in the group to create files within the directory and set the setgid bit:
chmod 2775 /opt/myprojectAt this point, all members of the
myprojectgroup can create and edit files in the/opt/myproject/directory without the administrator having to change file permissions every time users write new files. To verify that the permissions have been set correctly, run the following command:~]# ls -ld /opt/myproject drwxrwsr-x. 3 root myproject 4096 Mar 3 18:31 /opt/myproject
Add users to the
myprojectgroup:usermod -aG myproject username
4.3.5. Setting Default Permissions for New Files Using umask
When a process creates a file, the file has certain default permissions, for example, -rw-rw-r--. These initial permissions are partially defined by the file mode creation mask, also called file permission mask or umask. Every process has its own umask, for example, bash has umask 0022 by default. Process umask can be changed.
What umask consists of
A umask consists of bits corresponding to standard file permissions. For example, for umask 0137, the digits mean that:
-
0= no meaning, it is always0(umask does not affect special bits) -
1= for owner permissions, the execute bit is set -
3= for group permissions, the execute and write bits are set -
7= for others permissions, the execute, write, and read bits are set
Umasks can be represented in binary, octal, or symbolic notation. For example, the octal representation 0137 equals symbolic representation u=rw-,g=r--,o=---. Symbolic notation specification is the reverse of the octal notation specification: it shows the allowed permissions, not the prohibited permissions.
How umask works
Umask prohibits permissions from being set for a file:
- When a bit is set in umask, it is unset in the file.
- When a bit is not set in umask, it can be set in the file, depending on other factors.
The following figure shows how umask 0137 affects creating a new file.
Figure 4.3. Applying umask when creating a file

For security reasons, a regular file cannot have execute permissions by default. Therefore, even if umask is 0000, which does not prohibit any permissions, a new regular file still does not have execute permissions. However, directories can be created with execute permissions:
[john@server tmp]$ umask 0000 [john@server tmp]$ touch file [john@server tmp]$ mkdir directory [john@server tmp]$ ls -lh . total 0 drwxrwxrwx. 2 john john 40 Nov 2 13:17 directory -rw-rw-rw-. 1 john john 0 Nov 2 13:17 file
4.3.5.1. Managing umask in Shells
For popular shells, such as bash, ksh, zsh and tcsh, umask is managed using the umask shell builtin. Processes started from shell inherit its umask.
Displaying the current mask
To show the current umask in octal notation:
~]$ umask
0022To show the current umask in symbolic notation:
~]$ umask -S
u=rwx,g=rx,o=rxSetting mask in shell using umask
To set umask for the current shell session using octal notation run:
~]$ umask octal_mask
Substitute octal_mask with four or less digits from 0 to 7. When three or less digits are provided, permissions are set as if the command contained leading zeros. For example, umask 7 translates to 0007.
Example 4.1. Setting umask Using Octal Notation
To prohibit new files from having write and execute permissions for owner and group, and from having any permissions for others:
~]$ umask 0337Or simply:
~]$ umask 337To set umask for the current shell session using symbolic notation:
~]$ umask -S symbolic_mask
Example 4.2. Setting umask Using Symbolic Notation
To set umask 0337 using symbolic notation:
~]$ umask -S u=r,g=r,o=Working with the default shell umask
Shells usually have a configuration file where their default umask is set. For bash, it is /etc/bashrc. To show the default bash umask:
~]$ grep -i -B 1 umask /etc/bashrc
The output shows if umask is set, either using the umask command or the UMASK variable. In the following example, umask is set to 022 using the umask command:
~]$ grep -i -B 1 umask /etc/bashrc # By default, we want umask to get set. This sets it for non-login shell. -- if [ $UID -gt 199 ] && [ “id -gn” = “id -un” ]; then umask 002 else umask 022
To change the default umask for bash, change the umask command call or the UMASK variable assignment in /etc/bashrc. This example changes the default umask to 0227:
if [ $UID -gt 199 ] && [ “id -gn” = “id -un” ]; then
umask 002
else
umask 227Working with the default shell umask of a specific user
By default, bash umask of a new user defaults to the one defined in /etc/bashrc.
To change bash umaskfor a particular user, add a call to the umask command in $HOME/.bashrc file of that user. For example, to change bash umask of user john to 0227:
john@server ~]$ echo 'umask 227' >> /home/john/.bashrcSetting default permissions for newly created home directories
To change permissions with which user home directories are created, change the UMASK variable in the /etc/login.defs file:
# The permission mask is initialized to this value. If not specified,
# the permission mask will be initialized to 022.
UMASK 0774.4. Additional Resources
For more information on how to manage users and groups on Red Hat Enterprise Linux, see the resources listed below.
Installed Documentation
For information about various utilities for managing users and groups, see the following manual pages:
-
useradd(8) — The manual page for theuseraddcommand documents how to use it to create new users. -
userdel(8) — The manual page for theuserdelcommand documents how to use it to delete users. -
usermod(8) — The manual page for theusermodcommand documents how to use it to modify users. -
groupadd(8) — The manual page for thegroupaddcommand documents how to use it to create new groups. -
groupdel(8) — The manual page for thegroupdelcommand documents how to use it to delete groups. -
groupmod(8) — The manual page for thegroupmodcommand documents how to use it to modify group membership. -
gpasswd(1) — The manual page for thegpasswdcommand documents how to manage the/etc/groupfile. -
grpck(8) — The manual page for thegrpckcommand documents how to use it to verify the integrity of the/etc/groupfile. -
pwck(8) — The manual page for thepwckcommand documents how to use it to verify the integrity of the/etc/passwdand/etc/shadowfiles. -
pwconv(8) — The manual page for thepwconv,pwunconv,grpconv, andgrpunconvcommands documents how to convert shadowed information for passwords and groups. -
id(1) — The manual page for theidcommand documents how to display user and group IDs. -
umask(2) — The manual page for theumaskcommand documents how to work with the file mode creation mask.
For information about related configuration files, see:
-
group(5) — The manual page for the/etc/groupfile documents how to use this file to define system groups. -
passwd(5) — The manual page for the/etc/passwdfile documents how to use this file to define user information. -
shadow(5) — The manual page for the/etc/shadowfile documents how to use this file to set passwords and account expiration information for the system.
Online Documentation
- Red Hat Enterprise Linux 7 Security Guide — The Security Guide for Red Hat Enterprise Linux 7 provides additional information how to ensure password security and secure the workstation by enabling password aging and user account locking.
See Also
-
Chapter 6, Gaining Privileges documents how to gain administrative privileges by using the
suandsudocommands.
Chapter 5. Access Control Lists
Files and directories have permission sets for the owner of the file, the group associated with the file, and all other users for the system. However, these permission sets have limitations. For example, different permissions cannot be configured for different users. Thus, Access Control Lists (ACLs) were implemented.
The Red Hat Enterprise Linux kernel provides ACL support for the ext3 file system and NFS-exported file systems. ACLs are also recognized on ext3 file systems accessed via Samba.
Along with support in the kernel, the acl package is required to implement ACLs. It contains the utilities used to add, modify, remove, and retrieve ACL information.
The cp and mv commands copy or move any ACLs associated with files and directories.
5.1. Mounting File Systems
Before using ACLs for a file or directory, the partition for the file or directory must be mounted with ACL support. If it is a local ext3 file system, it can mounted with the following command:
mount -t ext3 -o acl device-name partition
For example:
mount -t ext3 -o acl /dev/VolGroup00/LogVol02 /work
Alternatively, if the partition is listed in the /etc/fstab file, the entry for the partition can include the acl option:
LABEL=/work /work ext3 acl 1 2
If an ext3 file system is accessed via Samba and ACLs have been enabled for it, the ACLs are recognized because Samba has been compiled with the --with-acl-support option. No special flags are required when accessing or mounting a Samba share.
5.1.1. NFS
By default, if the file system being exported by an NFS server supports ACLs and the NFS client can read ACLs, ACLs are utilized by the client system.
To disable ACLs on NFS shares when configuring the server, include the no_acl option in the /etc/exports file. To disable ACLs on an NFS share when mounting it on a client, mount it with the no_acl option via the command line or the /etc/fstab file.
5.2. Setting Access ACLs
There are two types of ACLs: access ACLs and default ACLs. An access ACL is the access control list for a specific file or directory. A default ACL can only be associated with a directory; if a file within the directory does not have an access ACL, it uses the rules of the default ACL for the directory. Default ACLs are optional.
ACLs can be configured:
- Per user
- Per group
- Via the effective rights mask
- For users not in the user group for the file
The setfacl utility sets ACLs for files and directories. Use the -m option to add or modify the ACL of a file or directory:
# setfacl -m rules files
Rules (rules) must be specified in the following formats. Multiple rules can be specified in the same command if they are separated by commas.
u:uid:perms- Sets the access ACL for a user. The user name or UID may be specified. The user may be any valid user on the system.
g:gid:perms- Sets the access ACL for a group. The group name or GID may be specified. The group may be any valid group on the system.
m:perms- Sets the effective rights mask. The mask is the union of all permissions of the owning group and all of the user and group entries.
o:perms- Sets the access ACL for users other than the ones in the group for the file.
Permissions (perms) must be a combination of the characters r, w, and x for read, write, and execute.
If a file or directory already has an ACL, and the setfacl command is used, the additional rules are added to the existing ACL or the existing rule is modified.
Example 5.1. Give read and write permissions
For example, to give read and write permissions to user andrius:
# setfacl -m u:andrius:rw /project/somefile
To remove all the permissions for a user, group, or others, use the -x option and do not specify any permissions:
# setfacl -x rules files
Example 5.2. Remove all permissions
For example, to remove all permissions from the user with UID 500:
# setfacl -x u:500 /project/somefile
5.3. Setting Default ACLs
To set a default ACL, add d: before the rule and specify a directory instead of a file name.
Example 5.3. Setting default ACLs
For example, to set the default ACL for the /share/ directory to read and execute for users not in the user group (an access ACL for an individual file can override it):
# setfacl -m d:o:rx /share
5.4. Retrieving ACLs
To determine the existing ACLs for a file or directory, use the getfacl command. In the example below, the getfacl is used to determine the existing ACLs for a file.
Example 5.4. Retrieving ACLs
# getfacl home/john/picture.png
The above command returns the following output:
# file: home/john/picture.png # owner: john # group: john user::rw- group::r-- other::r--
If a directory with a default ACL is specified, the default ACL is also displayed as illustrated below. For example, getfacl home/sales/ will display similar output:
# file: home/sales/ # owner: john # group: john user::rw- user:barryg:r-- group::r-- mask::r-- other::r-- default:user::rwx default:user:john:rwx default:group::r-x default:mask::rwx default:other::r-x
5.5. Archiving File Systems With ACLs
By default, the dump command now preserves ACLs during a backup operation. When archiving a file or file system with tar, use the --acls option to preserve ACLs. Similarly, when using cp to copy files with ACLs, include the --preserve=mode option to ensure that ACLs are copied across too. In addition, the -a option (equivalent to -dR --preserve=all) of cp also preserves ACLs during a backup along with other information such as timestamps, SELinux contexts, and the like. For more information about dump, tar, or cp, refer to their respective man pages.
The star utility is similar to the tar utility in that it can be used to generate archives of files; however, some of its options are different. Refer to Table 5.1, “Command Line Options for star” for a listing of more commonly used options. For all available options, refer to man star. The star package is required to use this utility.
| Option | Description |
|---|---|
|
| Creates an archive file. |
|
|
Do not extract the files; use in conjunction with |
|
| Replaces files in the archive. The files are written to the end of the archive file, replacing any files with the same path and file name. |
|
| Displays the contents of the archive file. |
|
| Updates the archive file. The files are written to the end of the archive if they do not exist in the archive, or if the files are newer than the files of the same name in the archive. This option only works if the archive is a file or an unblocked tape that may backspace. |
|
|
Extracts the files from the archive. If used with |
|
| Displays the most important options. |
|
| Displays the least important options. |
|
| Do not strip leading slashes from file names when extracting the files from an archive. By default, they are stripped when files are extracted. |
|
| When creating or extracting, archives or restores any ACLs associated with the files and directories. |
5.6. Compatibility with Older Systems
If an ACL has been set on any file on a given file system, that file system has the ext_attr attribute. This attribute can be seen using the following command:
# tune2fs -l filesystem-device
A file system that has acquired the ext_attr attribute can be mounted with older kernels, but those kernels do not enforce any ACLs which have been set.
Versions of the e2fsck utility included in version 1.22 and higher of the e2fsprogs package (including the versions in Red Hat Enterprise Linux 2.1 and 4) can check a file system with the ext_attr attribute. Older versions refuse to check it.
5.7. ACL References
Refer to the following man pages for more information.
-
man acl— Description of ACLs -
man getfacl— Discusses how to get file access control lists -
man setfacl— Explains how to set file access control lists -
man star— Explains more about thestarutility and its many options
Chapter 6. Gaining Privileges
System administrators, and in some cases users, need to perform certain tasks with administrative access. Accessing the system as the root user is potentially dangerous and can lead to widespread damage to the system and data. This chapter covers ways to gain administrative privileges using the setuid programs such as su and sudo. These programs allow specific users to perform tasks which would normally be available only to the root user while maintaining a higher level of control and system security.
See the Red Hat Enterprise Linux 7 Security Guide for more information on administrative controls, potential dangers and ways to prevent data loss resulting from improper use of privileged access.
6.1. Configuring Administrative Access Using the su Utility
When a user executes the su command, they are prompted for the root password and, after authentication, are given a root shell prompt.
Once logged in using the su command, the user is the root user and has absolute administrative access to the system. Note that this access is still subject to the restrictions imposed by SELinux, if it is enabled. In addition, once a user has become root, it is possible for them to use the su command to change to any other user on the system without being prompted for a password.
Because this program is so powerful, administrators within an organization may want to limit who has access to the command.
One of the simplest ways to do this is to add users to the special administrative group called wheel. To do this, type the following command as root:
~]# usermod -a -G wheel username
In the previous command, replace username with the user name you want to add to the wheel group.
You can also use the Users settings tool to modify group memberships, as follows. Note that you need administrator privileges to perform this procedure.
-
Press the Super key to enter the Activities Overview, type
Usersand then press Enter. The Users settings tool appears. The Super key appears in a variety of guises, depending on the keyboard and other hardware, but often as either the Windows or Command key, and typically to the left of the Spacebar. - To enable making changes, click the button, and enter a valid administrator password.
- Click a user icon in the left column to display the user’s properties in the right pane.
-
Change the Account Type from
StandardtoAdministrator. This will add the user to thewheelgroup.
See Section 4.2, “Managing Users in a Graphical Environment” for more information about the Users tool.
After you add the desired users to the wheel group, it is advisable to only allow these specific users to use the su command. To do this, edit the Pluggable Authentication Module (PAM) configuration file for su, /etc/pam.d/su. Open this file in a text editor and uncomment the following line by removing the # character:
#auth required pam_wheel.so use_uid
This change means that only members of the administrative group wheel can switch to another user using the su command.
6.2. Configuring Administrative Access Using the sudo Utility
The sudo command offers another approach to giving users administrative access. When trusted users precede an administrative command with sudo, they are prompted for their own password. Then, when they have been authenticated and assuming that the command is permitted, the administrative command is executed as if they were the root user.
The basic format of the sudo command is as follows:
sudo command
In the above example, command would be replaced by a command normally reserved for the root user, such as mount.
The sudo command allows for a high degree of flexibility. For instance, only users listed in the /etc/sudoers configuration file are allowed to use the sudo command and the command is executed in the user’s shell, not a root shell. This means the root shell can be completely disabled as shown in the Red Hat Enterprise Linux 7 Security Guide.
Each successful authentication using the sudo command is logged to the file /var/log/messages and the command issued along with the issuer’s user name is logged to the file /var/log/secure. If additional logging is required, use the pam_tty_audit module to enable TTY auditing for specified users by adding the following line to your /etc/pam.d/system-auth file:
session required pam_tty_audit.so disable=pattern enable=pattern
where pattern represents a comma-separated listing of users with an optional use of globs. For example, the following configuration will enable TTY auditing for the root user and disable it for all other users:
session required pam_tty_audit.so disable=* enable=root
Configuring the pam_tty_audit PAM module for TTY auditing records only TTY input. This means that, when the audited user logs in, pam_tty_audit records the exact keystrokes the user makes into the /var/log/audit/audit.log file. For more information, see the pam_tty_audit(8) manual page.
Another advantage of the sudo command is that an administrator can allow different users access to specific commands based on their needs.
Administrators wanting to edit the sudo configuration file, /etc/sudoers, should use the visudo command.
To give someone full administrative privileges, type visudo and add a line similar to the following in the user privilege specification section:
juan ALL=(ALL) ALL
This example states that the user, juan, can use sudo from any host and execute any command.
The example below illustrates the granularity possible when configuring sudo:
%users localhost=/usr/sbin/shutdown -h now
This example states that any member of the users system group can issue the command /sbin/shutdown -h now as long as it is issued from the console.
The man page for sudoers has a detailed listing of options for this file.
You can also configure sudo users who do not need to provide any password by using the NOPASSWD option in the /etc/sudoers file:
user_name ALL=(ALL) NOPASSWD: ALL
However, even for such users, sudo runs Pluggable Authentication Module (PAM) account management modules, which enables checking for restrictions imposed by PAM modules outside of the authentication phase. This ensures that PAM modules work properly. For example, in case of the pam_time module, the time-based account restriction does not fail.
Always include sudo in the list of allowed services in all PAM-based access control rules. Otherwise, users will receive a "permission denied" error message when they try to access sudo but access is forbidden based on current access control rules.
For more information, see the Red Hat Knowledgebase article After patching to Red Hat Enterprise Linux 7.6, sudo gives a permission denied error..
There are several potential risks to keep in mind when using the sudo command. You can avoid them by editing the /etc/sudoers configuration file using visudo as described above. Leaving the /etc/sudoers file in its default state gives every user in the wheel group unlimited root access.
By default,
sudostores the password for a five minute timeout period. Any subsequent uses of the command during this period will not prompt the user for a password. This could be exploited by an attacker if the user leaves his workstation unattended and unlocked while still being logged in. This behavior can be changed by adding the following line to the/etc/sudoersfile:Defaults timestamp_timeout=valuewhere value is the desired timeout length in minutes. Setting the value to 0 causes
sudoto require a password every time.If an account is compromised, an attacker can use
sudoto open a new shell with administrative privileges:sudo /bin/bashOpening a new shell as
rootin this or similar fashion gives the attacker administrative access for a theoretically unlimited amount of time, bypassing the timeout period specified in the/etc/sudoersfile and never requiring the attacker to input a password forsudoagain until the newly opened session is closed.
6.3. Additional Resources
While programs allowing users to gain administrative privileges are a potential security risk, security itself is beyond the scope of this particular book. You should therefore refer to the resources listed below for more information regarding security and privileged access.
Installed Documentation
-
su(1) — The manual page forsuprovides information regarding the options available with this command. -
sudo(8) — The manual page forsudoincludes a detailed description of this command and lists options available for customizing its behavior. -
pam(8) — The manual page describing the use of Pluggable Authentication Modules (PAM) for Linux.
Online Documentation
-
Red Hat Enterprise Linux 7 Security Guide — The Security Guide for Red Hat Enterprise Linux 7 provides a more detailed look at potential security issues pertaining to the
setuidprograms as well as techniques used to alleviate these risks.
See Also
- Chapter 4, Managing Users and Groups documents how to manage system users and groups in the graphical user interface and on the command line.
Part II. Subscription and Support
To receive updates to the software on a Red Hat Enterprise Linux system it must be subscribed to the Red Hat Content Delivery Network (CDN) and the appropriate repositories enabled. This part describes how to subscribe a system to the Red Hat Content Delivery Network.
Red Hat provides support via the Customer Portal, and you can access this support directly from the command line using the Red Hat Support Tool. This part describes the use of this command-line tool.
Chapter 7. Registering the System and Managing Subscriptions
The subscription service provides a mechanism to handle Red Hat software inventory and allows you to install additional software or update already installed programs to newer versions using the yum package manager. In Red Hat Enterprise Linux 7 the recommended way to register your system and attach subscriptions is to use Red Hat Subscription Management.
It is also possible to register the system and attach subscriptions after installation during the initial setup process. For detailed information about the initial setup see the Initial Setup chapter in the Installation Guide for Red Hat Enterprise Linux 7. Note that the Initial Setup application is only available on systems installed with the X Window System at the time of installation.
7.1. Registering the System and Attaching Subscriptions
Complete the following steps to register your system and attach one or more subscriptions using Red Hat Subscription Management. Note that all subscription-manager commands are supposed to be run as root.
Run the following command to register your system. You will be prompted to enter your user name and password. Note that the user name and password are the same as your login credentials for Red Hat Customer Portal.
subscription-manager registerDetermine the pool ID of a subscription that you require. To do so, type the following at a shell prompt to display a list of all subscriptions that are available for your system:
subscription-manager list --availableFor each available subscription, this command displays its name, unique identifier, expiration date, and other details related to your subscription. To list subscriptions for all architectures, add the
--alloption. The pool ID is listed on a line beginning withPool ID.Attach the appropriate subscription to your system by entering a command as follows:
subscription-manager attach --pool=pool_id
Replace pool_id with the pool ID you determined in the previous step.
To verify the list of subscriptions your system has currently attached, at any time, run:
subscription-manager list --consumed
For more details on how to register your system using Red Hat Subscription Management and associate it with subscriptions, see the designated solution article. For comprehensive information about subscriptions, see the Red Hat Subscription Management collection of guides.
7.2. Managing Software Repositories
When a system is subscribed to the Red Hat Content Delivery Network, a repository file is created in the /etc/yum.repos.d/ directory. To verify that, use yum to list all enabled repositories:
yum repolistRed Hat Subscription Management also allows you to manually enable or disable software repositories provided by Red Hat. To list all available repositories, use the following command:
subscription-manager repos --listThe repository names depend on the specific version of Red Hat Enterprise Linux you are using and are in the following format:
rhel-version-variant-rpms rhel-version-variant-debug-rpms rhel-version-variant-source-rpms
Where version is the Red Hat Enterprise Linux system version (6 or 7), and variant is the Red Hat Enterprise Linux system variant (server or workstation), for example:
rhel-7-server-rpms rhel-7-server-debug-rpms rhel-7-server-source-rpms
To enable a repository, enter a command as follows:
subscription-manager repos --enable repositoryReplace repository with the name of the repository to enable.
Similarly, to disable a repository, use the following command:
subscription-manager repos --disable repositorySection 9.5, “Configuring Yum and Yum Repositories” provides detailed information about managing software repositories using yum.
If you want to update the repositories automatically, you can use the yum-cron service. For more information, see Section 9.7, “Automatically Refreshing Package Database and Downloading Updates with Yum-cron”.
7.3. Removing Subscriptions
To remove a particular subscription, complete the following steps.
Determine the serial number of the subscription you want to remove by listing information about already attached subscriptions:
subscription-manager list --consumedThe serial number is the number listed as
serial. For instance,744993814251016831in the example below:SKU: ES0113909 Contract: 01234567 Account: 1234567 Serial: 744993814251016831 Pool ID: 8a85f9894bba16dc014bccdd905a5e23 Active: False Quantity Used: 1 Service Level: SELF-SUPPORT Service Type: L1-L3 Status Details: Subscription Type: Standard Starts: 02/27/2015 Ends: 02/27/2016 System Type: Virtual
Enter a command as follows to remove the selected subscription:
subscription-manager remove --serial=serial_number
Replace serial_number with the serial number you determined in the previous step.
To remove all subscriptions attached to the system, run the following command:
subscription-manager remove --all7.4. Additional Resources
For more information on how to register your system using Red Hat Subscription Management and associate it with subscriptions, see the resources listed below.
Installed Documentation
-
subscription-manager(8) — the manual page for Red Hat Subscription Management provides a complete list of supported options and commands.
Related Books
- Red Hat Subscription Management collection of guides — These guides contain detailed information how to use Red Hat Subscription Management.
- Installation Guide — see the Initial Setup chapter for detailed information on how to register during the initial setup process.
See Also
-
Chapter 6, Gaining Privileges documents how to gain administrative privileges by using the
suandsudocommands. - Chapter 9, Yum provides information about using the yum packages manager to install and update software.
Chapter 8. Accessing Support Using the Red Hat Support Tool
The Red Hat Support Tool, in the redhat-support-tool package, can function as both an interactive shell and as a single-execution program. It can be run over SSH or from any terminal. It enables, for example, searching the Red Hat Knowledgebase from the command line, copying solutions directly on the command line, opening and updating support cases, and sending files to Red Hat for analysis.
8.1. Installing the Red Hat Support Tool
The Red Hat Support Tool is installed by default on Red Hat Enterprise Linux. If required, to ensure that it is, enter the following command as root:
~]# yum install redhat-support-tool
8.2. Registering the Red Hat Support Tool Using the Command Line
To register the Red Hat Support Tool to the customer portal using the command line, run the following commands:
~]# redhat-support-tool config user username
Where username is the user name of the Red Hat Customer Portal account.
~]# redhat-support-tool config password
Please enter the password for username:8.3. Using the Red Hat Support Tool in Interactive Shell Mode
To start the tool in interactive mode, enter the following command:
~]$ redhat-support-tool
Welcome to the Red Hat Support Tool.
Command (? for help):
The tool can be run as an unprivileged user, with a consequently reduced set of commands, or as root.
The commands can be listed by entering the ? character. The program or menu selection can be exited by entering the q or e character. You will be prompted for your Red Hat Customer Portal user name and password when you first search the Knowledgebase or support cases. Alternately, set the user name and password for your Red Hat Customer Portal account using interactive mode, and optionally save it to the configuration file.
8.4. Configuring the Red Hat Support Tool
When in interactive mode, the configuration options can be listed by entering the command config --help:
~]# redhat-support-tool Welcome to the Red Hat Support Tool. Command (? for help): config --help Usage: config [options] config.option <new option value> Use the 'config' command to set or get configuration file values. Options: -h, --help show this help message and exit -g, --global Save configuration option in /etc/redhat-support-tool.conf. -u, --unset Unset configuration option. The configuration file options which can be set are: user : The Red Hat Customer Portal user. password : The Red Hat Customer Portal password. debug : CRITICAL, ERROR, WARNING, INFO, or DEBUG url : The support services URL. Default=https://api.access.redhat.com proxy_url : A proxy server URL. proxy_user: A proxy server user. proxy_password: A password for the proxy server user. ssl_ca : Path to certificate authorities to trust during communication. kern_debug_dir: Path to the directory where kernel debug symbols should be downloaded and cached. Default=/var/lib/redhat-support-tool/debugkernels Examples: - config user - config user my-rhn-username - config --unset user
Registering the Red Hat Support Tool Using Interactive Mode
To register the Red Hat Support Tool to the customer portal using interactive mode, proceed as follows:
Start the tool by entering the following command:
~]# redhat-support-tool
Enter your Red Hat Customer Portal user name:
Command (? for help):
config user usernameTo save your user name to the global configuration file, add the
-goption.Enter your Red Hat Customer Portal password:
Command (? for help):
config passwordPlease enter the password for username:
8.4.1. Saving Settings to the Configuration Files
The Red Hat Support Tool, unless otherwise directed, stores values and options locally in the home directory of the current user, using the ~/.redhat-support-tool/redhat-support-tool.conf configuration file. If required, it is recommended to save passwords to this file because it is only readable by that particular user. When the tool starts, it will read values from the global configuration file /etc/redhat-support-tool.conf and from the local configuration file. Locally stored values and options take precedence over globally stored settings.
It is recommended not to save passwords in the global /etc/redhat-support-tool.conf configuration file because the password is just base64 encoded and can easily be decoded. In addition, the file is world readable.
To save a value or option to the global configuration file, add the -g, --global option as follows:
Command (? for help): config setting -g value
In order to be able to save settings globally, using the -g, --global option, the Red Hat Support Tool must be run as root because normal users do not have the permissions required to write to /etc/redhat-support-tool.conf.
To remove a value or option from the local configuration file, add the -u, --unset option as follows:
Command (? for help): config setting -u valueThis will clear, unset, the parameter from the tool and fall back to the equivalent setting in the global configuration file, if available.
When running as an unprivileged user, values stored in the global configuration file cannot be removed using the -u, --unset option, but they can be cleared, unset, from the current running instance of the tool by using the -g, --global option simultaneously with the -u, --unset option. If running as root, values and options can be removed from the global configuration file using -g, --global simultaneously with the -u, --unset option.
8.5. Opening and Updating Support Cases Using Interactive Mode
Opening a New Support Case Using Interactive Mode
To open a new support case using interactive mode, proceed as follows:
Start the tool by entering the following command:
~]# redhat-support-tool
Enter the
opencasecommand:Command (? for help):
opencase- Follow the on screen prompts to select a product and then a version.
- Enter a summary of the case.
- Enter a description of the case and press Ctrl+D on an empty line when complete.
- Select a severity of the case.
- Optionally chose to see if there is a solution to this problem before opening a support case.
Confirm you would still like to open the support case.
Support case 0123456789 has successfully been opened- Optionally chose to attach an SOS report.
- Optionally chose to attach a file.
Viewing and Updating an Existing Support Case Using Interactive Mode
To view and update an existing support case using interactive mode, proceed as follows:
Start the tool by entering the following command:
~]# redhat-support-tool
Enter the
getcasecommand:Command (? for help):
getcase case-numberWhere case-number is the number of the case you want to view and update.
- Follow the on screen prompts to view the case, modify or add comments, and get or add attachments.
Modifying an Existing Support Case Using Interactive Mode
To modify the attributes of an existing support case using interactive mode, proceed as follows:
Start the tool by entering the following command:
~]# redhat-support-tool
Enter the
modifycasecommand:Command (? for help):
modifycase case-numberWhere case-number is the number of the case you want to view and update.
The modify selection list appears:
Type the number of the attribute to modify or 'e' to return to the previous menu. 1 Modify Type 2 Modify Severity 3 Modify Status 4 Modify Alternative-ID 5 Modify Product 6 Modify Version End of options.
Follow the on screen prompts to modify one or more of the options.
For example, to modify the status, enter
3:Selection: 3 1 Waiting on Customer 2 Waiting on Red Hat 3 Closed Please select a status (or 'q' to exit):
8.6. Viewing Support Cases on the Command Line
Viewing the contents of a case on the command line provides a quick and easy way to apply solutions from the command line.
To view an existing support case on the command line, enter a command as follows:
~]# redhat-support-tool getcase case-number
Where case-number is the number of the case you want to download.
8.7. Additional Resources
The Red Hat Knowledgebase article Red Hat Support Tool has additional information, examples, and video tutorials.
Part III. Installing and Managing Software
All software on a Red Hat Enterprise Linux system is divided into RPM packages, which can be installed, upgraded, or removed. This part describes how to manage packages on Red Hat Enterprise Linux using Yum.
Chapter 9. Yum
Yum is the Red Hat package manager that is able to query for information about available packages, fetch packages from repositories, install and uninstall them, and update an entire system to the latest available version. Yum performs automatic dependency resolution when updating, installing, or removing packages, and thus is able to automatically determine, fetch, and install all available dependent packages.
Yum can be configured with new, additional repositories, or package sources, and also provides many plug-ins which enhance and extend its capabilities. Yum is able to perform many of the same tasks that RPM can; additionally, many of the command-line options are similar. Yum enables easy and simple package management on a single machine or on groups of them.
The following sections assume your system was registered with Red Hat Subscription Management during installation as described in the Red Hat Enterprise Linux 7 Installation Guide. If your system is not subscribed, see Chapter 7, Registering the System and Managing Subscriptions.
Yum provides secure package management by enabling GPG (Gnu Privacy Guard; also known as GnuPG) signature verification on GPG-signed packages to be turned on for all package repositories (package sources), or for individual repositories. When signature verification is enabled, yum will refuse to install any packages not GPG-signed with the correct key for that repository. This means that you can trust that the RPM packages you download and install on your system are from a trusted source, such as Red Hat, and were not modified during transfer. See Section 9.5, “Configuring Yum and Yum Repositories” for details on enabling signature-checking with yum.
Yum also enables you to easily set up your own repositories of RPM packages for download and installation on other machines. When possible, yum uses parallel download of multiple packages and metadata to speed up downloading.
Learning yum is a worthwhile investment because it is often the fastest way to perform system administration tasks, and it provides capabilities beyond those provided by the PackageKit graphical package management tools.
You must have superuser privileges in order to use yum to install, update or remove packages on your system. All examples in this chapter assume that you have already obtained superuser privileges by using either the su or sudo command.
9.1. Checking For and Updating Packages
Yum enables you to check if your system has any updates waiting to be applied. You can list packages that need to be updated and update them as a whole, or you can update a selected individual package.
9.1.1. Checking For Updates
To see which installed packages on your system have updates available, use the following command:
yumcheck-update
Example 9.1. Example output of the yum check-update command
The output of yum check-update can look as follows:
~]# yum check-update Loaded plugins: product-id, search-disabled-repos, subscription-manager dracut.x86_64 033-360.el7_2 rhel-7-server-rpms dracut-config-rescue.x86_64 033-360.el7_2 rhel-7-server-rpms kernel.x86_64 3.10.0-327.el7 rhel-7-server-rpms rpm.x86_64 4.11.3-17.el7 rhel-7-server-rpms rpm-libs.x86_64 4.11.3-17.el7 rhel-7-server-rpms rpm-python.x86_64 4.11.3-17.el7 rhel-7-server-rpms yum.noarch 3.4.3-132.el7 rhel-7-server-rpms
The packages in the above output are listed as having updates available. The first package in the list is dracut. Each line in the example output consists of several rows, in case of dracut:
-
dracut— the name of the package, -
x86_64— the CPU architecture the package was built for, -
033— the version of the updated package to be installed, -
360.el7— the release of the updated package, -
_2— a build version, added as part of a z-stream update, -
rhel-7-server-rpms— the repository in which the updated package is located.
The output also shows that we can update the kernel (the kernel package), yum and RPM themselves (the yum and rpm packages), as well as their dependencies (such as the rpm-libs, and rpm-python packages), all using the yum command.
9.1.2. Updating Packages
You can choose to update a single package, multiple packages, or all packages at once. If any dependencies of the package or packages you update have updates available themselves, then they are updated too.
Updating a Single Package
To update a single package, run the following command as root:
yum update package_nameExample 9.2. Updating the rpm package
To update the rpm package, type:
~]# yum update rpm Loaded plugins: langpacks, product-id, subscription-manager Updating Red Hat repositories. INFO:rhsm-app.repolib:repos updated: 0 Setting up Update Process Resolving Dependencies --> Running transaction check ---> Package rpm.x86_64 0:4.11.1-3.el7 will be updated --> Processing Dependency: rpm = 4.11.1-3.el7 for package: rpm-libs-4.11.1-3.el7.x86_64 --> Processing Dependency: rpm = 4.11.1-3.el7 for package: rpm-python-4.11.1-3.el7.x86_64 --> Processing Dependency: rpm = 4.11.1-3.el7 for package: rpm-build-4.11.1-3.el7.x86_64 ---> Package rpm.x86_64 0:4.11.2-2.el7 will be an update --> Running transaction check ... --> Finished Dependency Resolution Dependencies Resolved ============================================================================= Package Arch Version Repository Size ============================================================================= Updating: rpm x86_64 4.11.2-2.el7 rhel 1.1 M Updating for dependencies: rpm-build x86_64 4.11.2-2.el7 rhel 139 k rpm-build-libs x86_64 4.11.2-2.el7 rhel 98 k rpm-libs x86_64 4.11.2-2.el7 rhel 261 k rpm-python x86_64 4.11.2-2.el7 rhel 74 k Transaction Summary ============================================================================= Upgrade 1 Package (+4 Dependent packages) Total size: 1.7 M Is this ok [y/d/N]:
This output contains several items of interest:
-
Loaded plugins: langpacks, product-id, subscription-manager— Yum always informs you which yum plug-ins are installed and enabled. See Section 9.6, “Yum Plug-ins” for general information on yum plug-ins, or Section 9.6.3, “Working with Yum Plug-ins” for descriptions of specific plug-ins. -
rpm.x86_64— you can download and install a new rpm package as well as its dependencies. Transaction check is performed for each of these packages. Yum presents the update information and then prompts you for confirmation of the update; yum runs interactively by default. If you already know which transactions the
yumcommand plans to perform, you can use the-yoption to automatically answeryesto any questions that yum asks (in which case it runs non-interactively). However, you should always examine which changes yum plans to make to the system so that you can easily troubleshoot any problems that might arise. You can also choose to download the package without installing it. To do so, select thedoption at the download prompt. This launches a background download of the selected package.If a transaction fails, you can view yum transaction history by using the
yum historycommand as described in Section 9.4, “Working with Transaction History”.
Yum always installs a new kernel regardless of whether you are using the yum update or yum install command.
When using RPM, on the other hand, it is important to use the rpm -i kernel command which installs a new kernel instead of rpm -u kernel which replaces the current kernel.
Similarly, it is possible to update a package group. Type as root:
yum group update group_nameHere, replace group_name with a name of the package group you want to update. For more information on package groups, see Section 9.3, “Working with Package Groups”.
Yum also offers the upgrade command that is equal to update with enabled obsoletes configuration option (see Section 9.5.1, “Setting [main] Options”). By default, obsoletes is turned on in /etc/yum.conf, which makes these two commands equivalent.
Updating All Packages and Their Dependencies
To update all packages and their dependencies, use the yum update command without any arguments:
yum updateUpdating Security-Related Packages
If packages have security updates available, you can update only these packages to their latest versions. Type as root:
yum update --security
You can also update packages only to versions containing the latest security updates. Type as root:
yum update-minimal --securityFor example, assume that:
- the kernel-3.10.0-1 package is installed on your system;
- the kernel-3.10.0-2 package was released as a security update;
- the kernel-3.10.0-3 package was released as a bug fix update.
Then yum update-minimal --security updates the package to kernel-3.10.0-2, and yum update --security updates the package to kernel-3.10.0-3.
Automating Package Updating
To refresh the package database and download updates automatically, you can use the yum-cron service. For more information, see Section 9.7, “Automatically Refreshing Package Database and Downloading Updates with Yum-cron”.
9.1.3. Upgrading the System Off-line with ISO and Yum
For systems that are disconnected from the Internet or Red Hat Network, using the yum update command with the Red Hat Enterprise Linux installation ISO image is an easy and quick way to upgrade systems to the latest minor version. The following steps illustrate the upgrading process:
Create a target directory to mount your ISO image. This directory is not automatically created when mounting, so create it before proceeding to the next step. As
root, type:mkdir mount_dirReplace mount_dir with a path to the mount directory. Typically, users create it as a subdirectory in the
/mediadirectory.Mount the Red Hat Enterprise Linux 7 installation ISO image to the previously created target directory. As
root, type:mount -o loop iso_name mount_dir
Replace iso_name with a path to your ISO image and mount_dir with a path to the target directory. Here, the
-oloopoption is required to mount the file as a block device.Copy the
media.repofile from the mount directory to the/etc/yum.repos.d/directory. Note that configuration files in this directory must have the .repo extension to function properly.cp
mount_dir/media.repo/etc/yum.repos.d/new.repoThis creates a configuration file for the yum repository. Replace new.repo with the filename, for example rhel7.repo.
Edit the new configuration file so that it points to the Red Hat Enterprise Linux installation ISO. Add the following line into the
/etc/yum.repos.d/new.repofile:baseurl=file:///mount_dirReplace mount_dir with a path to the mount point.
Update all yum repositories including
/etc/yum.repos.d/new.repocreated in previous steps. Asroot, type:yumupdateThis upgrades your system to the version provided by the mounted ISO image.
After successful upgrade, you can unmount the ISO image. As
root, type:umount mount_dirwhere mount_dir is a path to your mount directory. Also, you can remove the mount directory created in the first step. As
root, type:rmdir mount_dirIf you will not use the previously created configuration file for another installation or update, you can remove it. As
root, type:rm/etc/yum.repos.d/new.repo
Example 9.3. Upgrading from Red Hat Enterprise Linux 7.0 to 7.1
If required to upgrade a system without access to the Internet using an ISO image with the newer version of the system, called for example rhel-server-7.1-x86_64-dvd.iso, create a target directory for mounting, such as /media/rhel7/. As root, change into the directory with your ISO image and type:
~]# mount -o loop
rhel-server-7.1-x86_64-dvd.iso /media/rhel7/
Then set up a yum repository for your image by copying the media.repo file from the mount directory:
~]# cp/media/rhel7/media.repo/etc/yum.repos.d/rhel7.repo
To make yum recognize the mount point as a repository, add the following line into the /etc/yum.repos.d/rhel7.repo copied in the previous step:
baseurl=file:///media/rhel7/
Now, updating the yum repository will upgrade your system to a version provided by rhel-server-7.1-x86_64-dvd.iso. As root, execute:
~]# yum update
When your system is successfully upgraded, you can unmount the image, remove the target directory and the configuration file:
~]# umount /media/rhel7/~]# rmdir /media/rhel7/~]# rm
/etc/yum.repos.d/rhel7.repo9.2. Working with Packages
Yum enables you to perform a complete set of operations with software packages, including searching for packages, viewing information about them, installing and removing.
9.2.1. Searching Packages
You can search all RPM package names, descriptions and summaries by using the following command:
yumsearchterm…
Replace term with a package name you want to search.
Example 9.4. Searching for packages matching a specific string
To list all packages that match "vim", "gvim", or "emacs", type:
~]$ yum search vim gvim emacs Loaded plugins: langpacks, product-id, search-disabled-repos, subscription-manager ============================= N/S matched: vim ============================== vim-X11.x86_64 : The VIM version of the vi editor for the X Window System vim-common.x86_64 : The common files needed by any version of the VIM editor [output truncated] ============================ N/S matched: emacs ============================= emacs.x86_64 : GNU Emacs text editor emacs-auctex.noarch : Enhanced TeX modes for Emacs [output truncated] Name and summary matches mostly, use "search all" for everything. Warning: No matches found for: gvim
The yum search command is useful for searching for packages you do not know the name of, but for which you know a related term. Note that by default, yum search returns matches in package name and summary, which makes the search faster. Use the yum search all command for a more exhaustive but slower search.
Filtering the Results
All of yum’s list commands allow you to filter the results by appending one or more glob expressions as arguments. Glob expressions are normal strings of characters which contain one or more of the wildcard characters * (which expands to match any character subset) and ? (which expands to match any single character).
Be careful to escape the glob expressions when passing them as arguments to a yum command, otherwise the Bash shell will interpret these expressions as pathname expansions, and potentially pass all files in the current directory that match the global expressions to yum. To make sure the glob expressions are passed to yum as intended, use one of the following methods:
- escape the wildcard characters by preceding them with a backslash character
- double-quote or single-quote the entire glob expression.
Examples in the following section demonstrate usage of both these methods.
9.2.2. Listing Packages
To list information on all installed and available packages type the following at a shell prompt:
yumlistall
To list installed and available packages that match inserted glob expressions use the following command:
yum list glob_expression…
Example 9.5. Listing ABRT-related packages
Packages with various ABRT add-ons and plug-ins either begin with "abrt-addon-", or "abrt-plugin-". To list these packages, type the following command at a shell prompt. Note how the wildcard characters are escaped with a backslash character:
~]$ yum list abrt-addon\* abrt-plugin\* Loaded plugins: langpacks, product-id, search-disabled-repos, subscription-manager Installed Packages abrt-addon-ccpp.x86_64 2.1.11-35.el7 @rhel-7-server-rpms abrt-addon-kerneloops.x86_64 2.1.11-35.el7 @rhel-7-server-rpms abrt-addon-pstoreoops.x86_64 2.1.11-35.el7 @rhel-7-server-rpms abrt-addon-python.x86_64 2.1.11-35.el7 @rhel-7-server-rpms abrt-addon-vmcore.x86_64 2.1.11-35.el7 @rhel-7-server-rpms abrt-addon-xorg.x86_64 2.1.11-35.el7 @rhel-7-server-rpms
To list all packages installed on your system use the installed keyword. The rightmost column in the output lists the repository from which the package was retrieved.
yum list installed glob_expression…Example 9.6. Listing all installed versions of the krb package
The following example shows how to list all installed packages that begin with "krb" followed by exactly one character and a hyphen. This is useful when you want to list all versions of certain component as these are distinguished by numbers. The entire glob expression is quoted to ensure proper processing.
~]$ yum list installed "krb?-*" Loaded plugins: langpacks, product-id, search-disabled-repos, subscription-manager Installed Packages krb5-libs.x86_64 1.13.2-10.el7 @rhel-7-server-rpms
To list all packages in all enabled repositories that are available to install, use the command in the following form:
yum list available glob_expression…Example 9.7. Listing available gstreamer plug-ins
For instance, to list all available packages with names that contain "gstreamer" and then "plugin", run the following command:
~]$ yum list available gstreamer*plugin\* Loaded plugins: langpacks, product-id, search-disabled-repos, subscription-manager Available Packages gstreamer-plugins-bad-free.i686 0.10.23-20.el7 rhel-7-server-rpms gstreamer-plugins-base.i686 0.10.36-10.el7 rhel-7-server-rpms gstreamer-plugins-good.i686 0.10.31-11.el7 rhel-7-server-rpms gstreamer1-plugins-bad-free.i686 1.4.5-3.el7 rhel-7-server-rpms gstreamer1-plugins-base.i686 1.4.5-2.el7 rhel-7-server-rpms gstreamer1-plugins-base-devel.i686 1.4.5-2.el7 rhel-7-server-rpms gstreamer1-plugins-base-devel.x86_64 1.4.5-2.el7 rhel-7-server-rpms gstreamer1-plugins-good.i686 1.4.5-2.el7 rhel-7-server-rpms
Listing Repositories
To list the repository ID, name, and number of packages for each enabled repository on your system, use the following command:
yumrepolist
To list more information about these repositories, add the -v option. With this option enabled, information including the file name, overall size, date of the last update, and base URL are displayed for each listed repository. As an alternative, you can use the repoinfo command that produces the same output.
yumrepolist-v
yumrepoinfo
To list both enabled and disabled repositories use the following command. A status column is added to the output list to show which of the repositories are enabled.
yumrepolistall
By passing disabled as a first argument, you can reduce the command output to disabled repositories. For further specification you can pass the ID or name of repositories or related glob_expressions as arguments. Note that if there is an exact match between the repository ID or name and the inserted argument, this repository is listed even if it does not pass the enabled or disabled filter.
9.2.3. Displaying Package Information
To display information about one or more packages, use the following command (glob expressions are valid here as well):
yum info package_name…Replace package_name with the name of the package.
Example 9.8. Displaying information on the abrt package
To display information about the abrt package, type:
~]$ yum info abrt
Loaded plugins: langpacks, product-id, search-disabled-repos, subscription-manager
Installed Packages
Name : abrt
Arch : x86_64
Version : 2.1.11
Release : 35.el7
Size : 2.3 M
Repo : installed
From repo : rhel-7-server-rpms
Summary : Automatic bug detection and reporting tool
URL : https://fedorahosted.org/abrt/
License : GPLv2+
Description : abrt is a tool to help users to detect defects in applications and
: to create a bug report with all information needed by maintainer to fix
: it. It uses plugin system to extend its functionality.
The yum info package_name command is similar to the rpm -q --info package_name command, but provides as additional information the name of the yum repository the RPM package was installed from (look for the From repo: line in the output).
Using yumdb
You can also query the yum database for alternative and useful information about a package by using the following command:
yumdb info package_name
This command provides additional information about a package, including the check sum of the package (and the algorithm used to produce it, such as SHA-256), the command given on the command line that was invoked to install the package (if any), and the reason why the package is installed on the system (where user indicates it was installed by the user, and dep means it was brought in as a dependency).
Example 9.9. Querying yumdb for information on the yum package
To display additional information about the yum package, type:
~]$ yumdb info yum Loaded plugins: langpacks, product-id yum-3.4.3-132.el7.noarch changed_by = 1000 checksum_data = a9d0510e2ff0d04d04476c693c0313a11379053928efd29561f9a837b3d9eb02 checksum_type = sha256 command_line = upgrade from_repo = rhel-7-server-rpms from_repo_revision = 1449144806 from_repo_timestamp = 1449144805 installed_by = 4294967295 origin_url = https://cdn.redhat.com/content/dist/rhel/server/7/7Server/x86_64/os/Packages/yum-3.4.3-132.el7.noarch.rpm reason = user releasever = 7Server var_uuid = 147a7d49-b60a-429f-8d8f-3edb6ce6f4a1
For more information on the yumdb command, see the yumdb(8) manual page.
9.2.4. Installing Packages
To install a single package and all of its non-installed dependencies, enter a command in the following form as root:
yum install package_name
You can also install multiple packages simultaneously by appending their names as arguments. To do so, type as root:
yum install package_name package_name…
If you are installing packages on a multilib system, such as an AMD64 or Intel 64 machine, you can specify the architecture of the package (as long as it is available in an enabled repository) by appending .arch to the package name:
yum install package_name.arch
Example 9.10. Installing packages on multilib system
To install the sqlite package for the i686 architecture, type:
~]# yum install sqlite.i686
You can use glob expressions to quickly install multiple similarly named packages. Execute as root:
yum install glob_expression…Example 9.11. Installing all audacious plugins
Global expressions are useful when you want to install several packages with similar names. To install all audacious plug-ins, use the command in the following form:
~]# yum install audacious-plugins-\*
In addition to package names and glob expressions, you can also provide file names to yum install. If you know the name of the binary you want to install, but not its package name, you can give yum install the path name. As root, type:
yum install /usr/sbin/named
Yum then searches through its package lists, finds the package which provides /usr/sbin/named, if any, and prompts you as to whether you want to install it.
As you can see in the above examples, the yum install command does not require strictly defined arguments. It can process various formats of package names and glob expressions, which makes installation easier for users. On the other hand, it takes some time until yum parses the input correctly, especially if you specify a large number of packages. To optimize the package search, you can use the following commands to explicitly define how to parse the arguments:
yum install-n nameyum install-na name.architectureyum install-nevra name-epoch:version-release.architecture
With install-n, yum interprets name as the exact name of the package. The install-na command tells yum that the subsequent argument contains the package name and architecture divided by the dot character. With install-nevra, yum will expect an argument in the form name-epoch:version-release.architecture. Similarly, you can use yum remove-n, yum remove-na, and yum remove-nevra when searching for packages to be removed.
If you know you want to install the package that contains the named binary, but you do not know in which bin/ or sbin/ directory the file is installed, use the yum provides command with a glob expression:
~]# yum provides "*bin/named"
Loaded plugins: langpacks, product-id, search-disabled-repos, subscription-
: manager
32:bind-9.9.4-14.el7.x86_64 : The Berkeley Internet Name Domain (BIND) DNS
: (Domain Name System) server
Repo : rhel-7-server-rpms
Matched from:
Filename : /usr/sbin/named
yum provides "*/file_name" is a useful way to find the packages that contain file_name.
Example 9.12. Installation Process
The following example provides an overview of installation with use of yum. To download and install the latest version of the httpd package, execute as root:
~]# yum install httpd Loaded plugins: langpacks, product-id, subscription-manager Resolving Dependencies --> Running transaction check ---> Package httpd.x86_64 0:2.4.6-12.el7 will be updated ---> Package httpd.x86_64 0:2.4.6-13.el7 will be an update --> Processing Dependency: 2.4.6-13.el7 for package: httpd-2.4.6-13.el7.x86_64 --> Running transaction check ---> Package httpd-tools.x86_64 0:2.4.6-12.el7 will be updated ---> Package httpd-tools.x86_64 0:2.4.6-13.el7 will be an update --> Finished Dependency Resolution Dependencies Resolved
After executing the above command, yum loads the necessary plug-ins and runs the transaction check. In this case, httpd is already installed. Since the installed package is older than the latest currently available version, it will be updated. The same applies to the httpd-tools package that httpd depends on. Then, a transaction summary is displayed:
================================================================================ Package Arch Version Repository Size ================================================================================ Updating: httpd x86_64 2.4.6-13.el7 rhel-x86_64-server-7 1.2 M Updating for dependencies: httpd-tools x86_64 2.4.6-13.el7 rhel-x86_64-server-7 77 k Transaction Summary ================================================================================ Upgrade 1 Package (+1 Dependent package) Total size: 1.2 M Is this ok [y/d/N]:
In this step yum prompts you to confirm the installation. Apart from y (yes) and N (no) options, you can choose d (download only) to download the packages but not to install them directly. If you choose y, the installation proceeds with the following messages until it is finished successfully.
Downloading packages: Running transaction check Running transaction test Transaction test succeeded Running transaction Updating : httpd-tools-2.4.6-13.el7.x86_64 1/4 Updating : httpd-2.4.6-13.el7.x86_64 2/4 Cleanup : httpd-2.4.6-12.el7.x86_64 3/4 Cleanup : httpd-tools-2.4.6-12.el7.x86_64 4/4 Verifying : httpd-2.4.6-13.el7.x86_64 1/4 Verifying : httpd-tools-2.4.6-13.el7.x86_64 2/4 Verifying : httpd-tools-2.4.6-12.el7.x86_64 3/4 Verifying : httpd-2.4.6-12.el7.x86_64 4/4 Updated: httpd.x86_64 0:2.4.6-13.el7 Dependency Updated: httpd-tools.x86_64 0:2.4.6-13.el7 Complete!
To install a previously downloaded package from the local directory on your system, use the following command:
yum localinstall pathReplace path with the path to the package you want to install.
9.2.5. Downloading Packages
As shown in Example 9.12, “Installation Process”, at a certain point of installation process you are prompted to confirm the installation with the following message:
... Total size: 1.2 M Is this ok [y/d/N]: ...
With the d option, yum downloads the packages without installing them immediately. You can install these packages later offline with the yum localinstall command or you can share them with a different device. Downloaded packages are saved in one of the subdirectories of the cache directory, by default /var/cache/yum/$basearch/$releasever/packages/. The downloading proceeds in background mode so that you can use yum for other operations in parallel.
9.2.6. Removing Packages
Similarly to package installation, yum enables you to uninstall them. To uninstall a particular package, as well as any packages that depend on it, run the following command as root:
yum remove package_name…As when you install multiple packages, you can remove several at once by adding more package names to the command.
Example 9.13. Removing several packages
To remove totem, type the following at a shell prompt:
~]# yum remove totem
Similar to install, remove can take these arguments:
- package names
- glob expressions
- file lists
- package provides
Yum is not able to remove a package without also removing packages which depend on it. This type of operation, which can only be performed by RPM, is not advised, and can potentially leave your system in a non-functioning state or cause applications to not work correctly or crash.
9.3. Working with Package Groups
A package group is a collection of packages that serve a common purpose, for instance System Tools or Sound and Video. Installing a package group pulls a set of dependent packages, saving time considerably. The yum groups command is a top-level command that covers all the operations that act on package groups in yum.
9.3.1. Listing Package Groups
The summary option is used to view the number of installed groups, available groups, available environment groups, and both installed and available language groups:
yum groupssummary
Example 9.14. Example output of yum groups summary
~]$yumgroupssummaryLoaded plugins: langpacks, product-id, subscription-manager Available Environment Groups: 12 Installed Groups: 10 Available Groups: 12
To list all package groups from yum repositories add the list option. You can filter the command output by group names.
yum group list glob_expression…
Several optional arguments can be passed to this command, including hidden to list also groups not marked as user visible, and ids to list group IDs. You can add language, environment, installed, or available options to reduce the command output to a specific group type.
To list mandatory and optional packages contained in a particular group, use the following command:
yum group info glob_expression…Example 9.15. Viewing information on the LibreOffice package group
~]$ yum group info LibreOffice
Loaded plugins: langpacks, product-id, subscription-manager
Group: LibreOffice
Group-Id: libreoffice
Description: LibreOffice Productivity Suite
Mandatory Packages:
=libreoffice-calc
libreoffice-draw
-libreoffice-emailmerge
libreoffice-graphicfilter
=libreoffice-impress
=libreoffice-math
=libreoffice-writer
+libreoffice-xsltfilter
Optional Packages:
libreoffice-base
libreoffice-pyunoAs you can see in the above example, the packages included in the package group can have different states that are marked with the following symbols:
-
"
-" — Package is not installed and it will not be installed as a part of the package group. -
"
+" — Package is not installed but it will be installed on the nextyum upgradeoryum group upgrade. -
"
=" — Package is installed and it was installed as a part of the package group. -
no symbol — Package is installed but it was installed outside of the package group. This means that the
yum group removewill not remove these packages.
These distinctions take place only when the group_command configuration parameter is set to objects, which is the default setting. Set this parameter to a different value if you do not want yum to track if a package was installed as a part of the group or separately, which will make "no symbol" packages equivalent to "=" packages.
You can alter the above package states using the yum group mark command. For example, yum group mark packages marks any given installed packages as members of a specified group. To avoid installation of new packages on group update, use yum group mark blacklist. See the yum(8) man page for more information on capabilities of yum group mark.
You can identify an environmental group with use of the @^ prefix and a package group can be marked with @. When using yum group list, info, install, or remove, pass @group_name to specify a package group, @^group_name to specify an environmental group, or group_name to include both.
9.3.2. Installing a Package Group
Each package group has a name and a group ID (groupid). To list the names of all package groups, and their group IDs, which are displayed in parentheses, type:
yum group list idsExample 9.16. Finding name and groupid of a package group
To find the name or ID of a package group, for example a group related to the KDE desktop environment, type:
~]$ yum group list ids kde\* Available environment groups: KDE Plasma Workspaces (kde-desktop-environment) Done
Some groups are hidden by settings in the configured repositories. For example, on a server, make use of the hidden command option to list hidden groups too:
~]$ yum group list hidden ids kde\* Loaded plugins: product-id, subscription-manager Available Groups: KDE (kde-desktop) Done
You can install a package group by passing its full group name, without the groupid part, to the group install command. As root, type:
yumgroup install"group name"
You can also install by groupid. As root, execute the following command:
yumgroup installgroupid
You can pass the groupid or quoted group name to the install command if you prepend it with an @ symbol, which tells yum that you want to perform group install. As root, type:
yuminstall@group
Replace group with the groupid or quoted group name. The same logic applies to environmental groups:
yum install @^groupExample 9.17. Four equivalent ways of installing the KDE Desktop group
As mentioned before, you can use four alternative, but equivalent ways to install a package group. For KDE Desktop, the commands look as follows:
~]# yum group install "KDE Desktop" ~]# yum group install kde-desktop ~]# yum install @"KDE Desktop" ~]# yum install @kde-desktop
9.3.3. Removing a Package Group
You can remove a package group using syntax similar to the install syntax, with use of either name of the package group or its id. As root, type:
yum group remove group_nameyumgroup removegroupid
Also, you can pass the groupid or quoted name to the remove command if you prepend it with an @-symbol, which tells yum that you want to perform group remove. As root, type:
yumremove@group
Replace group with the groupid or quoted group name. Similarly, you can replace an environmental group:
yum remove @^groupExample 9.18. Four equivalent ways of removing the KDE Desktop group
Similarly to install, you can use four alternative, but equivalent ways to remove a package group. For KDE Desktop, the commands look as follows:
~]# yum group remove "KDE Desktop" ~]# yum group remove kde-desktop ~]# yum remove @"KDE Desktop" ~]# yum remove @kde-desktop
9.4. Working with Transaction History
The yum history command enables users to review information about a timeline of yum transactions, the dates and times they occurred, the number of packages affected, whether these transactions succeeded or were aborted, and if the RPM database was changed between transactions. Additionally, this command can be used to undo or redo certain transactions. All history data is stored in the history DB in the /var/lib/yum/history/ directory.
9.4.1. Listing Transactions
To display a list of the twenty most recent transactions, as root, either run yum history with no additional arguments, or type the following at a shell prompt:
yumhistorylist
To display all transactions, add the all keyword:
yumhistorylistall
To display only transactions in a given range, use the command in the following form:
yum history list start_id..end_id
You can also list only transactions regarding a particular package or packages. To do so, use the command with a package name or a glob expression:
yum history list glob_expression…Example 9.19. Listing the five oldest transactions
In the output of yum history list, the most recent transaction is displayed at the top of the list. To display information about the five oldest transactions stored in the history data base, type:
~]# yum history list 1..5 Loaded plugins: langpacks, product-id, subscription-manager ID | Login user | Date and time | Action(s) | Altered ------------------------------------------------------------------------------- 5 | User <user> | 2013-07-29 15:33 | Install | 1 4 | User <user> | 2013-07-21 15:10 | Install | 1 3 | User <user> | 2013-07-16 15:27 | I, U | 73 2 | System <unset> | 2013-07-16 15:19 | Update | 1 1 | System <unset> | 2013-07-16 14:38 | Install | 1106 history list
All forms of the yum history list command produce tabular output with each row consisting of the following columns:
-
ID— an integer value that identifies a particular transaction. -
Login user— the name of the user whose login session was used to initiate a transaction. This information is typically presented in theFull Name <username>form. For transactions that were not issued by a user (such as an automatic system update),System <unset>is used instead. -
Date and time— the date and time when a transaction was issued. -
Action(s)— a list of actions that were performed during a transaction as described in Table 9.1, “Possible values of the Action(s) field”. -
Altered— the number of packages that were affected by a transaction, possibly followed by additional information as described in Table 9.2, “Possible values of the Altered field”.
| Action | Abbreviation | Description |
|---|---|---|
|
|
| At least one package has been downgraded to an older version. |
|
|
| At least one package has been removed. |
|
|
| At least one new package has been installed. |
|
|
| At least one package has been marked as obsolete. |
|
|
| At least one package has been reinstalled. |
|
|
| At least one package has been updated to a newer version. |
| Symbol | Description |
|---|---|
|
|
Before the transaction finished, the |
|
|
After the transaction finished, the |
|
| The transaction failed to finish. |
|
| The transaction finished successfully, but yum returned a non-zero exit code. |
|
| The transaction finished successfully, but an error or a warning was displayed. |
|
|
The transaction finished successfully, but problems already existed in the |
|
|
The transaction finished successfully, but the |
To synchronize the rpmdb or yumdb database contents for any installed package with the currently used rpmdb or yumdb database, type the following:
yumhistorysync
To display some overall statistics about the currently used history database use the following command:
yumhistorystats
Example 9.20. Example output of yum history stats
~]# yum history stats Loaded plugins: langpacks, product-id, subscription-manager File : //var/lib/yum/history/history-2012-08-15.sqlite Size : 2,766,848 Transactions: 41 Begin time : Wed Aug 15 16:18:25 2012 End time : Wed Feb 27 14:52:30 2013 Counts : NEVRAC : 2,204 NEVRA : 2,204 NA : 1,759 NEVR : 2,204 rpm DB : 2,204 yum DB : 2,204 history stats
Yum also enables you to display a summary of all past transactions. To do so, run the command in the following form as root:
yumhistorysummary
To display only transactions in a given range, type:
yum history summary start_id..end_id
Similarly to the yum history list command, you can also display a summary of transactions regarding a certain package or packages by supplying a package name or a glob expression:
yum history summary glob_expression…Example 9.21. Summary of the five latest transactions
~]# yum history summary 1..5 Loaded plugins: langpacks, product-id, subscription-manager Login user | Time | Action(s) | Altered ------------------------------------------------------------------------------- Jaromir ... <jhradilek> | Last day | Install | 1 Jaromir ... <jhradilek> | Last week | Install | 1 Jaromir ... <jhradilek> | Last 2 weeks | I, U | 73 System <unset> | Last 2 weeks | I, U | 1107 history summary
All forms of the yum history summary command produce simplified tabular output similar to the output of yum history list.
As shown above, both yum history list and yum history summary are oriented towards transactions, and although they allow you to display only transactions related to a given package or packages, they lack important details, such as package versions. To list transactions from the perspective of a package, run the following command as root:
yum history package-list glob_expression…Example 9.22. Tracing the history of a package
For example, to trace the history of subscription-manager and related packages, type the following at a shell prompt:
~]# yum history package-list subscription-manager\* Loaded plugins: langpacks, product-id, search-disabled-repos, subscription-manager ID | Action(s) | Package ------------------------------------------------------------------------------- 2 | Updated | subscription-manager-1.13.22-1.el7.x86_64 EE 2 | Update | 1.15.9-15.el7.x86_64 EE 2 | Obsoleted | subscription-manager-firstboot-1.13.22-1.el7.x86_64 EE 2 | Updated | subscription-manager-gui-1.13.22-1.el7.x86_64 EE 2 | Update | 1.15.9-15.el7.x86_64 EE 2 | Obsoleting | subscription-manager-initial-setup-addon-1.15.9-15.el7.x86_64 EE 1 | Install | subscription-manager-1.13.22-1.el7.x86_64 1 | Install | subscription-manager-firstboot-1.13.22-1.el7.x86_64 1 | Install | subscription-manager-gui-1.13.22-1.el7.x86_64 history package-list
In this example, three packages were installed during the initial system installation: subscription-manager, subscription-manager-firstboot, and subscription-manager-gui. In the third transaction, all these packages were updated from version 1.10.11 to version 1.10.17.
9.4.2. Examining Transactions
To display the summary of a single transaction, as root, use the yum history summary command in the following form:
yumhistorysummaryid
Here, id stands for the ID of the transaction.
To examine a particular transaction or transactions in more detail, run the following command as root:
yumhistoryinfoid…
The id argument is optional and when you omit it, yum automatically uses the last transaction. Note that when specifying more than one transaction, you can also use a range:
yum history info start_id..end_id
Example 9.23. Example output of yum history info
The following is sample output for two transactions, each installing one new package:
~]# yum history info 4..5 Loaded plugins: langpacks, product-id, search-disabled-repos, subscription-manager Transaction ID : 4..5 Begin time : Mon Dec 7 16:51:07 2015 Begin rpmdb : 1252:d2b62b7b5768e855723954852fd7e55f641fbad9 End time : 17:18:49 2015 (27 minutes) End rpmdb : 1253:cf8449dc4c53fc0cbc0a4c48e496a6c50f3d43c5 User : Maxim Svistunov <msvistun> Return-Code : Success Command Line : install tigervnc-server.x86_64 Command Line : reinstall tigervnc-server Transaction performed with: Installed rpm-4.11.3-17.el7.x86_64 @rhel-7-server-rpms Installed subscription-manager-1.15.9-15.el7.x86_64 @rhel-7-server-rpms Installed yum-3.4.3-132.el7.noarch @rhel-7-server-rpms Packages Altered: Reinstall tigervnc-server-1.3.1-3.el7.x86_64 @rhel-7-server-rpms history info
You can also view additional information, such as what configuration options were used at the time of the transaction, or from what repository and why were certain packages installed. To determine what additional information is available for a certain transaction, type the following at a shell prompt as root:
yumhistoryaddon-infoid
Similarly to yum history info, when no id is provided, yum automatically uses the latest transaction. Another way to refer to the latest transaction is to use the last keyword:
yumhistoryaddon-infolast
Example 9.24. Example output of yum history addon-info
For the fourth transaction in the history, the yum history addon-info command provides the following output:
~]# yum history addon-info 4 Loaded plugins: langpacks, product-id, subscription-manager Transaction ID: 4 Available additional history information: config-main config-repos saved_tx history addon-info
In the output of the yum history addon-info command, three types of information are available:
-
config-main— global yum options that were in use during the transaction. See Section 9.5.1, “Setting [main] Options” for information on how to change global options. -
config-repos— options for individual yum repositories. See Section 9.5.2, “Setting [repository] Options” for information on how to change options for individual repositories. -
saved_tx— the data that can be used by theyum load-transactioncommand in order to repeat the transaction on another machine (see below).
To display a selected type of additional information, run the following command as root:
yumhistoryaddon-infoid information
9.4.3. Reverting and Repeating Transactions
Apart from reviewing the transaction history, the yum history command provides means to revert or repeat a selected transaction. To revert a transaction, type the following at a shell prompt as root:
yumhistoryundoid
To repeat a particular transaction, as root, run the following command:
yumhistoryredoid
Both commands also accept the last keyword to undo or repeat the latest transaction.
Note that both yum history undo and yum history redo commands only revert or repeat the steps that were performed during a transaction. If the transaction installed a new package, the yum history undo command will uninstall it, and if the transaction uninstalled a package the command will again install it. This command also attempts to downgrade all updated packages to their previous version, if these older packages are still available.
When managing several identical systems, yum also enables you to perform a transaction on one of them, store the transaction details in a file, and after a period of testing, repeat the same transaction on the remaining systems as well. To store the transaction details to a file, type the following at a shell prompt as root:
yum -q history addon-info id saved_tx > file_name
Once you copy this file to the target system, you can repeat the transaction by using the following command as root:
yum load-transaction file_name
You can configure load-transaction to ignore missing packages or rpmdb version. For more information on these configuration options see the yum.conf(5) man page.
9.4.4. Starting New Transaction History
Yum stores the transaction history in a single SQLite database file. To start new transaction history, run the following command as root:
yumhistorynew
This will create a new, empty database file in the /var/lib/yum/history/ directory. The old transaction history will be kept, but will not be accessible as long as a newer database file is present in the directory.
9.5. Configuring Yum and Yum Repositories
To expand your expertise, you might also be interested in the Red Hat System Administration III (RH254) and RHCSA Rapid Track (RH199) training courses.
The configuration information for yum and related utilities is located at /etc/yum.conf. This file contains one mandatory [main] section, which enables you to set yum options that have global effect, and can also contain one or more [repository] sections, which allow you to set repository-specific options. However, it is recommended to define individual repositories in new or existing .repo files in the /etc/yum.repos.d/ directory. The values you define in individual [repository] sections of the /etc/yum.conf file override values set in the [main] section.
This section shows you how to:
-
set global yum options by editing the
[main]section of the/etc/yum.confconfiguration file; -
set options for individual repositories by editing the
[repository]sections in/etc/yum.confand.repofiles in the/etc/yum.repos.d/directory; -
use yum variables in
/etc/yum.confand files in the/etc/yum.repos.d/directory so that dynamic version and architecture values are handled correctly; - add, enable, and disable yum repositories on the command line; and
- set up your own custom yum repository.
9.5.1. Setting [main] Options
The /etc/yum.conf configuration file contains exactly one [main] section, and while some of the key-value pairs in this section affect how yum operates, others affect how yum treats repositories.
You can add many additional options under the [main] section heading in /etc/yum.conf.
A sample /etc/yum.conf configuration file can look like this:
[main] cachedir=/var/cache/yum/$basearch/$releasever keepcache=0 debuglevel=2 logfile=/var/log/yum.log exactarch=1 obsoletes=1 gpgcheck=1 plugins=1 installonly_limit=3 [comments abridged] # PUT YOUR REPOS HERE OR IN separate files named file.repo # in /etc/yum.repos.d
The following are the most commonly used options in the [main] section:
assumeyes=valueThe
assumeyesoption determines whether or not yum prompts for confirmation of critical actions. Replace value with one of:0(default) — yum prompts for confirmation of critical actions it performs.1— Do not prompt for confirmation of criticalyumactions. Ifassumeyes=1is set, yum behaves in the same way as the command-line options-yand--assumeyes.cachedir=directoryUse this option to set the directory where yum stores its cache and database files. Replace directory with an absolute path to the directory. By default, yum’s cache directory is
/var/cache/yum/$basearch/$releasever/.See Section 9.5.3, “Using Yum Variables” for descriptions of the
$basearchand$releaseveryum variables.debuglevel=value-
This option specifies the detail of debugging output produced by yum. Here, value is an integer between
1and10. Setting a higherdebuglevelvalue causes yum to display more detailed debugging output.debuglevel=2is the default, whiledebuglevel=0disables debugging output. exactarch=valueWith this option, you can set yum to consider the exact architecture when updating already installed packages. Replace value with:
0— Do not take into account the exact architecture when updating packages.1(default) — Consider the exact architecture when updating packages. With this setting, yum does not install a package for 32-bit architecture to update a package already installed on the system with 64-bit architecture.exclude=package_name more_package_names-
The
excludeoption enables you to exclude packages by keyword during installation or system update. Listing multiple packages for exclusion can be accomplished by quoting a space-delimited list of packages. Shell glob expressions using wildcards (for example,*and?) are allowed. gpgcheck=valueUse the
gpgcheckoption to specify if yum should perform a GPG signature check on packages. Replace value with:0— Disable GPG signature-checking on packages in all repositories, including local package installation.1(default) — Enable checking of GPG signature on all packages in all repositories, including local package installation. Withgpgcheckenabled, all packages' signatures are checked.If this option is set in the
[main]section of the/etc/yum.conffile, it sets the GPG-checking rule for all repositories. However, you can also setgpgcheck=valuefor individual repositories instead; that is, you can enable GPG-checking on one repository while disabling it on another. Settinggpgcheck=valuefor an individual repository in its corresponding.repofile overrides the default if it is present in/etc/yum.conf.group_command=valueUse the
group_commandoption to specify how theyum group install,yum group upgrade, andyum group removecommands handle a package group. Replace value with on of:simple— Install all members of a package group. Upgrade only previously installed packages, but do not install packages that have been added to the group in the meantime.compat— Similar tosimplebutyum upgradealso installs packages that were added to the group since the previous upgrade.objects— (default.) With this option, yum keeps track of the previously installed groups and distinguishes between packages installed as a part of the group and packages installed separately. See Example 9.15, “Viewing information on the LibreOffice package group”group_package_types=package_type more_package_types-
Here you can specify which type of packages (optional, default or mandatory) is installed when the
yumgroupinstallcommand is called. The default and mandatory package types are chosen by default. history_record=valueWith this option, you can set yum to record transaction history. Replace value with one of:
0— yum should not record history entries for transactions.1(default) — yum should record history entries for transactions. This operation takes certain amount of disk space, and some extra time in the transactions, but it provides a lot of information about past operations, which can be displayed with theyumhistorycommand.history_record=1is the default.For more information on the
yumhistorycommand, see Section 9.4, “Working with Transaction History”.NoteYum uses history records to detect modifications to the
rpmdbdata base that have been done outside of yum. In such case, yum displays a warning and automatically searches for possible problems caused by alteringrpmdb. Withhistory_recordturned off, yum is not able to detect these changes and no automatic checks are performed.installonlypkgs=space separated list of packagesHere you can provide a space-separated list of packages which yum can install, but will never update. See the
yum.conf(5) manual page for the list of packages which are install-only by default.If you add the
installonlypkgsdirective to/etc/yum.conf, ensure that you list all of the packages that should be install-only, including any of those listed under theinstallonlypkgssection ofyum.conf(5). In particular, make sure that kernel packages are always listed ininstallonlypkgs(as they are by default), andinstallonly_limitis always set to a value greater than2so that a backup kernel is always available in case the default one fails to boot.
installonly_limit=valueThis option sets how many packages listed in the
installonlypkgsdirective can be installed at the same time. Replace value with an integer representing the maximum number of versions that can be installed simultaneously for any single package listed ininstallonlypkgs.The defaults for the
installonlypkgsdirective include several different kernel packages, so be aware that changing the value ofinstallonly_limitalso affects the maximum number of installed versions of any single kernel package. The default value listed in/etc/yum.confisinstallonly_limit=3, and the minimum possible value isinstallonly_limit=2.You cannot set
installonly_limit=1because that would make yum remove the running kernel, which is prohibited. Ifinstallonly_limit=1is used, yum fails.Using
installonly_limit=2ensures that one backup kernel is available. However, it is recommended to keep the default settinginstallonly_limit=3, so that you have two backup kernels available.keepcache=valueThe
keepcacheoption determines whether yum keeps the cache of headers and packages after successful installation. Here, value is one of:0(default) — Do not retain the cache of headers and packages after a successful installation.1— Retain the cache after a successful installation.logfile=file_name-
To specify the location for logging output, replace file_name with an absolute path to the file in which yum should write its logging output. By default, yum logs to
/var/log/yum.log. max_connenctions=number- Here value stands for the maximum number of simultaneous connections, default is 5.
multilib_policy=valueThe
multilib_policyoption sets the installation behavior if several architecture versions are available for package install. Here, value stands for:best— install the best-choice architecture for this system. For example, settingmultilib_policy=beston an AMD64 system causes yum to install the 64-bit versions of all packages.all— always install every possible architecture for every package. For example, withmultilib_policyset toallon an AMD64 system, yum would install both the i686 and AMD64 versions of a package, if both were available.obsoletes=valueThe
obsoletesoption enables the obsoletes process logic during updates.When one package declares in its spec file that it obsoletes another package, the latter package is replaced by the former package when the former package is installed. Obsoletes are declared, for example, when a package is renamed. Replace value with one of:0— Disable yum’s obsoletes processing logic when performing updates.1(default) — Enable yum’s obsoletes processing logic when performing updates.plugins=valueThis is a global switch to enable or disable yum plug-ins, value is one of:
0— Disable all yum plug-ins globally.ImportantDisabling all plug-ins is not advised because certain plug-ins provide important yum services. In particular, product-id and subscription-manager plug-ins provide support for the certificate-based
Content Delivery Network(CDN). Disabling plug-ins globally is provided as a convenience option, and is generally only recommended when diagnosing a potential problem with yum.1(default) — Enable all yum plug-ins globally. Withplugins=1, you can still disable a specific yum plug-in by settingenabled=0in that plug-in’s configuration file.For more information about various yum plug-ins, see Section 9.6, “Yum Plug-ins”. For further information on controlling plug-ins, see Section 9.6.1, “Enabling, Configuring, and Disabling Yum Plug-ins”.
reposdir=directory-
Here, directory is an absolute path to the directory where
.repofiles are located. All.repofiles contain repository information (similar to the[repository]sections of/etc/yum.conf). Yum collects all repository information from.repofiles and the[repository]section of the/etc/yum.conffile to create a master list of repositories to use for transactions. Ifreposdiris not set, yum uses the default directory/etc/yum.repos.d/. retries=value-
This option sets the number of times yum should attempt to retrieve a file before returning an error. value is an integer
0or greater. Setting value to0makes yum retry forever. The default value is10.
For a complete list of available [main] options, see the [main] OPTIONS section of the yum.conf(5) manual page.
9.5.2. Setting [repository] Options
The [repository] sections, where repository is a unique repository ID such as my_personal_repo (spaces are not permitted), allow you to define individual yum repositories. To avoid conflicts, custom repositories should not use names used by Red Hat repositories.
The following is a bare minimum example of the form a [repository] section takes:
[repository] name=repository_name baseurl=repository_url
Every [repository] section must contain the following directives:
name=repository_name- Here, repository_name is a human-readable string describing the repository.
baseurl=repository_urlReplace repository_url with a URL to the directory where the repodata directory of a repository is located:
-
If the repository is available over HTTP, use:
http://path/to/repo -
If the repository is available over FTP, use:
ftp://path/to/repo -
If the repository is local to the machine, use:
file:///path/to/local/repo If a specific online repository requires basic HTTP authentication, you can specify your user name and password by prepending it to the URL as
username:password@link. For example, if a repository on http://www.example.com/repo/ requires a user name of "user" and a password of "password", then thebaseurllink could be specified as http://user:password@www.example.com/repo/.Usually this URL is an HTTP link, such as:
baseurl=http://path/to/repo/releases/$releasever/server/$basearch/os/
Note that yum always expands the
$releasever,$arch, and$basearchvariables in URLs. For more information about yum variables, see Section 9.5.3, “Using Yum Variables”.
-
If the repository is available over HTTP, use:
Other useful [repository] directive are:
enabled=valueThis is a simple way to tell yum to use or ignore a particular repository, value is one of:
0— Do not include this repository as a package source when performing updates and installs. This is an easy way of quickly turning repositories on and off, which is useful when you desire a single package from a repository that you do not want to enable for updates or installs.1— Include this repository as a package source.Turning repositories on and off can also be performed by passing either the
--enablerepo=repo_nameor--disablerepo=repo_nameoption toyum, or through theAdd/Remove Softwarewindow of the PackageKit utility.async=valueControls parallel downloading of repository packages. Here, value is one of:
auto(default) — parallel downloading is used if possible, which means that yum automatically disables it for repositories created by plug-ins to avoid failures.on— parallel downloading is enabled for the repository.off— parallel downloading is disabled for the repository.
Many more [repository] options exist, part of them have the same form and function as certain [main] options. For a complete list, see the [repository] OPTIONS section of the yum.conf(5) manual page.
Example 9.25. A sample /etc/yum.repos.d/redhat.repo file
The following is a sample /etc/yum.repos.d/redhat.repo file:
# # Red Hat Repositories # Managed by (rhsm) subscription-manager # [red-hat-enterprise-linux-scalable-file-system-for-rhel-6-entitlement-rpms] name = Red Hat Enterprise Linux Scalable File System (for RHEL 6 Entitlement) (RPMs) baseurl = https://cdn.redhat.com/content/dist/rhel/entitlement-6/releases/$releasever/$basearch/scalablefilesystem/os enabled = 1 gpgcheck = 1 gpgkey = file:///etc/pki/rpm-gpg/RPM-GPG-KEY-redhat-release sslverify = 1 sslcacert = /etc/rhsm/ca/redhat-uep.pem sslclientkey = /etc/pki/entitlement/key.pem sslclientcert = /etc/pki/entitlement/11300387955690106.pem [red-hat-enterprise-linux-scalable-file-system-for-rhel-6-entitlement-source-rpms] name = Red Hat Enterprise Linux Scalable File System (for RHEL 6 Entitlement) (Source RPMs) baseurl = https://cdn.redhat.com/content/dist/rhel/entitlement-6/releases/$releasever/$basearch/scalablefilesystem/source/SRPMS enabled = 0 gpgcheck = 1 gpgkey = file:///etc/pki/rpm-gpg/RPM-GPG-KEY-redhat-release sslverify = 1 sslcacert = /etc/rhsm/ca/redhat-uep.pem sslclientkey = /etc/pki/entitlement/key.pem sslclientcert = /etc/pki/entitlement/11300387955690106.pem [red-hat-enterprise-linux-scalable-file-system-for-rhel-6-entitlement-debug-rpms] name = Red Hat Enterprise Linux Scalable File System (for RHEL 6 Entitlement) (Debug RPMs) baseurl = https://cdn.redhat.com/content/dist/rhel/entitlement-6/releases/$releasever/$basearch/scalablefilesystem/debug enabled = 0 gpgcheck = 1 gpgkey = file:///etc/pki/rpm-gpg/RPM-GPG-KEY-redhat-release sslverify = 1 sslcacert = /etc/rhsm/ca/redhat-uep.pem sslclientkey = /etc/pki/entitlement/key.pem sslclientcert = /etc/pki/entitlement/11300387955690106.pem
9.5.3. Using Yum Variables
You can use and reference the following built-in variables in yum commands and in all yum configuration files (that is, /etc/yum.conf and all .repo files in the /etc/yum.repos.d/ directory):
$releasever-
You can use this variable to reference the release version of Red Hat Enterprise Linux. Yum obtains the value of
$releaseverfrom thedistroverpkg=valueline in the/etc/yum.confconfiguration file. If there is no such line in/etc/yum.conf, then yum infers the correct value by deriving the version number from theredhat-releaseproductpackage that provides theredhat-releasefile. $arch-
You can use this variable to refer to the system’s CPU architecture as returned when calling Python’s
os.uname()function. Valid values for$archinclude:i586,i686andx86_64. $basearch-
You can use
$basearchto reference the base architecture of the system. For example, i686 and i586 machines both have a base architecture ofi386, and AMD64 and Intel 64 machines have a base architecture ofx86_64. $YUM0-9-
These ten variables are each replaced with the value of any shell environment variables with the same name. If one of these variables is referenced (in
/etc/yum.conffor example) and a shell environment variable with the same name does not exist, then the configuration file variable is not replaced.
To define a custom variable or to override the value of an existing one, create a file with the same name as the variable (without the "$" sign) in the /etc/yum/vars/ directory, and add the desired value on its first line.
For example, repository descriptions often include the operating system name. To define a new variable called $osname, create a new file with "Red Hat Enterprise Linux" on the first line and save it as /etc/yum/vars/osname:
~]# echo "Red Hat Enterprise Linux 7" > /etc/yum/vars/osname
Instead of "Red Hat Enterprise Linux 7", you can now use the following in the .repo files:
name=$osname $releasever
9.5.4. Viewing the Current Configuration
To display the current values of global yum options (that is, the options specified in the [main] section of the /etc/yum.conf file), execute the yum-config-manager command with no command-line options:
yum-config-managerTo list the content of a different configuration section or sections, use the command in the following form:
yum-config-manager section…You can also use a glob expression to display the configuration of all matching sections:
yum-config-manager glob_expression…Example 9.26. Viewing configuration of the main section
To list all configuration options and their corresponding values for the main section, type the following at a shell prompt:
~]$ yum-config-manager main \* Loaded plugins: langpacks, product-id, subscription-manager ================================== main =================================== [main] alwaysprompt = True assumeyes = False bandwith = 0 bugtracker_url = https://bugzilla.redhat.com/enter_bug.cgi?product=Red%20Hat%20Enterprise%20Linux%206&component=yum cache = 0 [output truncated]
9.5.5. Adding, Enabling, and Disabling a Yum Repository
To expand your expertise, you might also be interested in the Red Hat System Administration III (RH254) training course.
Section 9.5.2, “Setting [repository] Options” describes various options you can use to define a yum repository. This section explains how to add, enable, and disable a repository by using the yum-config-manager command.
When the system is registered with Red Hat Subscription Management to the certificate-based Content Delivery Network (CDN), the Red Hat Subscription Manager tools are used to manage repositories in the /etc/yum.repos.d/redhat.repo file.
Adding a Yum Repository
To define a new repository, you can either add a [repository] section to the /etc/yum.conf file, or to a .repo file in the /etc/yum.repos.d/ directory. All files with the .repo file extension in this directory are read by yum, and it is recommended to define your repositories here instead of in /etc/yum.conf.
Obtaining and installing software packages from unverified or untrusted software sources other than Red Hat’s certificate-based Content Delivery Network (CDN) constitutes a potential security risk, and could lead to security, stability, compatibility, and maintainability issues.
Yum repositories commonly provide their own .repo file. To add such a repository to your system and enable it, run the following command as root:
yum-config-manager --add-repo repository_url
…where repository_url is a link to the .repo file.
Example 9.27. Adding example.repo
To add a repository located at http://www.example.com/example.repo, type the following at a shell prompt:
~]# yum-config-manager --add-repo http://www.example.com/example.repo Loaded plugins: langpacks, product-id, subscription-manager adding repo from: http://www.example.com/example.repo grabbing file http://www.example.com/example.repo to /etc/yum.repos.d/example.repo example.repo | 413 B 00:00 repo saved to /etc/yum.repos.d/example.repo
Enabling a Yum Repository
To enable a particular repository or repositories, type the following at a shell prompt as root:
yum-config-manager--enablerepository…
…where repository is the unique repository ID (use yum repolist all to list available repository IDs). Alternatively, you can use a glob expression to enable all matching repositories:
yum-config-manager --enable glob_expression…Example 9.28. Enabling repositories defined in custom sections of /etc/yum.conf.
To enable repositories defined in the [example], [example-debuginfo], and [example-source]sections, type:
~]# yum-config-manager --enable example\* Loaded plugins: langpacks, product-id, subscription-manager ============================== repo: example ============================== [example] bandwidth = 0 base_persistdir = /var/lib/yum/repos/x86_64/7Server baseurl = http://www.example.com/repo/7Server/x86_64/ cache = 0 cachedir = /var/cache/yum/x86_64/7Server/example [output truncated]
Example 9.29. Enabling all repositories
To enable all repositories defined both in the /etc/yum.conf file and in the /etc/yum.repos.d/ directory, type:
~]# yum-config-manager --enable \* Loaded plugins: langpacks, product-id, subscription-manager ============================== repo: example ============================== [example] bandwidth = 0 base_persistdir = /var/lib/yum/repos/x86_64/7Server baseurl = http://www.example.com/repo/7Server/x86_64/ cache = 0 cachedir = /var/cache/yum/x86_64/7Server/example [output truncated]
When successful, the yum-config-manager --enable command displays the current repository configuration.
Disabling a Yum Repository
To disable a yum repository, run the following command as root:
yum-config-manager--disablerepository…
…where repository is the unique repository ID (use yum repolist all to list available repository IDs). Similarly to yum-config-manager --enable, you can use a glob expression to disable all matching repositories at the same time:
yum-config-manager --disable glob_expression…Example 9.30. Disabling all repositories
To disable all repositories defined both in the /etc/yum.conf file and in the /etc/yum.repos.d/ directory, type:
~]# yum-config-manager --disable \* Loaded plugins: langpacks, product-id, subscription-manager ============================== repo: example ============================== [example] bandwidth = 0 base_persistdir = /var/lib/yum/repos/x86_64/7Server baseurl = http://www.example.com/repo/7Server/x86_64/ cache = 0 cachedir = /var/cache/yum/x86_64/7Server/example [output truncated]
When successful, the yum-config-manager --disable command displays the current configuration.
9.5.6. Creating a Yum Repository
To set up a yum repository:
Install the createrepo package:
# yum install createrepo
Copy all packages for your new repository into one directory, such as
/tmp/local_repo/:cp /your/packages/*.rpm /tmp/local_repo/
To create the repository run:
createrepo /tmp/local_repo/
This creates the necessary metadata for the yum repository and places metadata in a newly created subdirectory
repodata.The repository is now ready to be consumed by yum. This repository can be shared over the HTTP or FTP protocol, or refered directly from the local machine. See the Section 9.5.2, “Setting [repository] Options” section for more details on how to configure a yum repository.
NoteWhen constructing the URL for a repository, refer to the
/mnt/local_reponot to/mnt/local_repo/repodata, as this directory contains only metadata. Actual yum packages are in/mnt/local_repo.
9.5.6.1. Adding packages to an already created yum repository
To add packages to an already created yum repository:
Copy the new packages to your repository directory, such as
/tmp/local_repo/:cp /your/packages/*.rpm /tmp/local_repo/
To reflect the newly added packages in the metadata, run:
createrepo --update /tmp/local_repo/
Optional: If you have already used any yum command with newly updated repository, run:
yum clean expire-cache
9.5.7. Adding the Optional and Supplementary Repositories
The Optional and Supplementary subscription channels provide additional software packages for Red Hat Enterprise Linux that cover open source licensed software (in the Optional channel) and proprietary licensed software (in the Supplementary channel).
Before subscribing to the Optional and Supplementary channels see the Scope of Coverage Details. If you decide to install packages from these channels, follow the steps documented in the article called How to access Optional and Supplementary channels, and -devel packages using Red Hat Subscription Manager (RHSM)? on the Red Hat Customer Portal.
9.6. Yum Plug-ins
Yum provides plug-ins that extend and enhance its operations. Certain plug-ins are installed by default. Yum always informs you which plug-ins, if any, are loaded and active whenever you call any yum command. For example:
~]# yum info yum Loaded plugins: langpacks, product-id, subscription-manager [output truncated]
Note that the plug-in names which follow Loaded plugins are the names you can provide to the --disableplugin=plugin_name option.
9.6.1. Enabling, Configuring, and Disabling Yum Plug-ins
To enable yum plug-ins, ensure that a line beginning with plugins= is present in the [main] section of /etc/yum.conf, and that its value is 1:
plugins=1
You can disable all plug-ins by changing this line to plugins=0.
Disabling all plug-ins is not advised because certain plug-ins provide important yum services. In particular, the product-id and subscription-manager plug-ins provide support for the certificate-based Content Delivery Network (CDN). Disabling plug-ins globally is provided as a convenience option, and is generally only recommended when diagnosing a potential problem with yum.
Every installed plug-in has its own configuration file in the /etc/yum/pluginconf.d/ directory. You can set plug-in specific options in these files. For example, here is the aliases plug-in’s aliases.conf configuration file:
[main] enabled=1
Similar to the /etc/yum.conf file, the plug-in configuration files always contain a [main] section where the enabled= option controls whether the plug-in is enabled when you run yum commands. If this option is missing, you can add it manually to the file.
If you disable all plug-ins by setting enabled=0 in /etc/yum.conf, then all plug-ins are disabled regardless of whether they are enabled in their individual configuration files.
If you merely want to disable all yum plug-ins for a single yum command, use the --noplugins option.
If you want to disable one or more yum plug-ins for a single yum command, add the --disableplugin=plugin_name option to the command. For example, to disable the aliases plug-in while updating a system, type:
~]# yum update --disableplugin=aliases
The plug-in names you provide to the --disableplugin= option are the same names listed after the Loaded plugins line in the output of any yum command. You can disable multiple plug-ins by separating their names with commas. In addition, you can match multiple plug-in names or shorten long ones by using glob expressions:
~]# yum update --disableplugin=aliases,lang*
9.6.2. Installing Additional Yum Plug-ins
Yum plug-ins usually adhere to the yum-plugin-plugin_name package-naming convention, but not always: the package which provides the kabi plug-in is named kabi-yum-plugins, for example. You can install a yum plug-in in the same way you install other packages. For instance, to install the yum-aliases plug-in, type the following at a shell prompt:
~]# yum install yum-plugin-aliases
9.6.3. Working with Yum Plug-ins
The following list provides descriptions and usage instructions for several useful yum plug-ins. Plug-ins are listed by names, brackets contain the name of the package.
- search-disabled-repos (subscription-manager)
The search-disabled-repos plug-in allows you to temporarily or permanently enable disabled repositories to help resolve dependencies. With this plug-in enabled, when Yum fails to install a package due to failed dependency resolution, it offers to temporarily enable disabled repositories and try again. If the installation succeeds, Yum also offers to enable the used repositories permanently. Note that the plug-in works only with the repositories that are managed by subscription-manager and not with custom repositories.
ImportantIf
yumis executed with the--assumeyesor-yoption, or if theassumeyesdirective is enabled in/etc/yum.conf, the plug-in enables disabled repositories, both temporarily and permanently, without prompting for confirmation. This may lead to problems, for example, enabling repositories that you do not want enabled.To configure the search-disabled-repos plug-in, edit the configuration file located in
/etc/yum/pluginconf.d/search-disabled-repos.conf. For the list of directives you can use in the[main]section, see the table below.Table 9.3. Supported search-disabled-repos.conf directives Directive Description enabled=valueAllows you to enable or disable the plug-in. The value must be either
1(enabled), or0(disabled). The plug-in is enabled by default.notify_only=valueAllows you to restrict the behavior of the plug-in to notifications only. The value must be either
1(notify only without modifying the behavior of Yum), or0(modify the behavior of Yum). By default the plug-in only notifies the user.ignored_repos=repositoriesAllows you to specify the repositories that will not be enabled by the plug-in.
- kabi (kabi-yum-plugins)
The kabi plug-in checks whether a driver update package conforms with the official Red Hat kernel Application Binary Interface (kABI). With this plug-in enabled, when a user attempts to install a package that uses kernel symbols which are not on a whitelist, a warning message is written to the system log. Additionally, configuring the plug-in to run in enforcing mode prevents such packages from being installed at all.
To configure the kabi plug-in, edit the configuration file located in
/etc/yum/pluginconf.d/kabi.conf. A list of directives that can be used in the[main]section is shown in the table below.Table 9.4. Supported kabi.conf directives Directive Description enabled=valueAllows you to enable or disable the plug-in. The value must be either
1(enabled), or0(disabled). When installed, the plug-in is enabled by default.whitelists=directoryAllows you to specify the directory in which the files with supported kernel symbols are located. By default, the kabi plug-in uses files provided by the kernel-abi-whitelists package (that is, the
/usr/lib/modules/kabi-rhel70/directory).enforce=valueAllows you to enable or disable enforcing mode. The value must be either
1(enabled), or0(disabled). By default, this option is commented out and the kabi plug-in only displays a warning message.- product-id (subscription-manager)
- The product-id plug-in manages product identity certificates for products installed from the Content Delivery Network. The product-id plug-in is installed by default.
- langpacks (yum-langpacks)
- The langpacks plug-in is used to search for locale packages of a selected language for every package that is installed. The langpacks plug-in is installed by default.
- aliases (yum-plugin-aliases)
-
The aliases plug-in adds the
aliascommand-line option which enables configuring and using aliases foryumcommands. - yum-changelog (yum-plugin-changelog)
-
The yum-changelog plug-in adds the
--changelogcommand-line option that enables viewing package change logs before and after updating. - yum-tmprepo (yum-plugin-tmprepo)
-
The yum-tmprepo plug-in adds the
--tmprepocommand-line option that takes the URL of a repository file, downloads and enables it for only one transaction. This plug-in tries to ensure the safe temporary usage of repositories. By default, it does not allow to disable the gpg check. - yum-verify (yum-plugin-verify)
-
The yum-verify plug-in adds the
verify,verify-rpm, andverify-allcommand-line options for viewing verification data on the system. - yum-versionlock (yum-plugin-versionlock)
-
The yum-versionlock plug-in excludes other versions of selected packages, which enables protecting packages from being updated by newer versions. With the
versionlockcommand-line option, you can view and edit the list of locked packages.
9.7. Automatically Refreshing Package Database and Downloading Updates with Yum-cron
The yum-cron service checks and downloads package updates automatically. The cron jobs provided by the yum-cron service are active immediately after installation of the yum-cron package. The yum-cron service can also automatically install downloaded updates.
With default settings, the yum-cron service:
- Updates the metadata in the yum cache once per hour.
- Downloads pending package updates to the yum cache once per day. If new packages are available in the repository, an email is sent. See chapter Section 9.7.2, “Setting up Optional Email Notifications” for more information.
The yum-cron service has two configuration files:
/etc/yum/yum-cron.conf- For daily tasks.
/etc/yum/yum-cron-hourly.conf- For hourly tasks.
9.7.1. Enabling Automatic Installation of Updates
To enable automatic installation of downloaded updates, edit the daily configuration file for daily installation or the hourly configuration file for hourly installation by setting the apply_updates option as follows:
apply_updates = yes
9.7.2. Setting up Optional Email Notifications
By default, the yum-cron service uses cron to send emails containing an output of the executed command. This email is sent according to cron configuration, typically to the local superuser and stored in the /var/spool/mail/root file.
You can use specific email configuration different from the settings which affect all cron jobs. However, this email configuration does not support TLS and overall email built-in logic is very basic.
To enable yum-cron built-in email notifications:
Open selected
yum-cronconfiguration file:/etc/yum/yum-cron.conf- For daily tasks.
/etc/yum/yum-cron-hourly.conf- For hourly tasks.
In the
[emitters]section, set the following option:emit_via = email
-
Set the
email_from,email_to,email_hostoptions as required
9.7.3. Enabling or Disabling Specific Repositories
The yum-cron does not support specific configuration of repositories. As a workaround for enabling or disabling specific repositories for yum-cron but not for yum in general follow the steps bellow:
- Create an empty repository configuration directory anywhere on the system.
-
Copy all configuration files from the
/etc/yum.repos.d/directory to this newly created directory. In the respective
.repoconfiguration file within the/etc/yum.repos.d/, set theenabledoption as follows:enabled = 1- To enable the repository.
enabled = 0- To disable the repository.
Add the following option, which points to the newly created repository directory, at the end of the selected
yum-cronconfiguration file:reposdir=/path/to/new/reposdir
9.7.4. Testing Yum-cron Settings
To test yum-cron settings without waiting for the next scheduled yum-cron task:
Open selected
yum-cronconfiguration file:/etc/yum/yum-cron.conf- For daily tasks.
/etc/yum/yum-cron-hourly.conf- For hourly tasks.
Set the
random_sleepoption in the selected configuration file as follows:random_sleep = 0
Run the configuration files:
# yum-cron /etc/yum/yum-cron.conf # yum-cron /etc/yum/yum-cron-hourly.conf
9.7.5. Disabling Yum-cron messages
The yum-cron messages cannot be entirely disabled, but can be limited to messages with critical priority only. To limit the messages:
Open selected
yum-cronconfiguration file:/etc/yum/yum-cron.conf- For daily tasks.
/etc/yum/yum-cron-hourly.conf- For hourly tasks.
Set the following option in the
[base]section of the configuration file:debuglevel = -4
9.7.6. Automatically Cleaning Packages
The yum-cron service does not support any configuration option for removing packages similar to the yum clean all command. To clean packages automatically, you can create a cron job as an executable shell script:
Create a shell script in the
/etc/cron.daily/directory containing:#!/bin/sh yum clean all
Make the script executable:
# chmod +x /etc/cron.daily/script-name.sh
9.8. Additional Resources
For more information on how to manage software packages on Red Hat Enterprise Linux, see the resources listed below.
Installed Documentation
-
yum(8) — The manual page for the yum command-line utility provides a complete list of supported options and commands. -
yumdb(8) — The manual page for theyumdbcommand-line utility documents how to use this tool to query and, if necessary, alter the yum database. -
yum.conf(5) — The manual page namedyum.confdocuments available yum configuration options. -
yum-utils(1) — The manual page namedyum-utilslists and briefly describes additional utilities for managing yum configuration, manipulating repositories, and working with yum database.
Online Resources
- Yum Guides — The Yum Guides page on the project home page provides links to further documentation.
- Red Hat Customer Portal Labs — The Red Hat Customer Portal Labs includes a "Yum Repository Configuration Helper".
See Also
-
Chapter 6, Gaining Privileges documents how to gain administrative privileges by using the
suandsudocommands.
Part IV. Infrastructure Services
This part provides information on how to configure services and daemons and enable remote access to a Red Hat Enterprise Linux machine.
Chapter 10. Managing Services with systemd
10.1. Introduction to systemd
Systemd is a system and service manager for Linux operating systems. It is designed to be backwards compatible with SysV init scripts, and provides a number of features such as parallel startup of system services at boot time, on-demand activation of daemons, or dependency-based service control logic. In Red Hat Enterprise Linux 7, systemd replaces Upstart as the default init system.
Systemd introduces the concept of systemd units. These units are represented by unit configuration files located in one of the directories listed in Table 10.2, “Systemd Unit Files Locations”, and encapsulate information about system services, listening sockets, and other objects that are relevant to the init system. For a complete list of available systemd unit types, see Table 10.1, “Available systemd Unit Types”.
| Unit Type | File Extension | Description |
|---|---|---|
| Service unit |
| A system service. |
| Target unit |
| A group of systemd units. |
| Automount unit |
| A file system automount point. |
| Device unit |
| A device file recognized by the kernel. |
| Mount unit |
| A file system mount point. |
| Path unit |
| A file or directory in a file system. |
| Scope unit |
| An externally created process. |
| Slice unit |
| A group of hierarchically organized units that manage system processes. |
| Snapshot unit |
| A saved state of the systemd manager. |
| Socket unit |
| An inter-process communication socket. |
| Swap unit |
| A swap device or a swap file. |
| Timer unit |
| A systemd timer. |
| Directory | Description |
|---|---|
|
| Systemd unit files distributed with installed RPM packages. |
|
| Systemd unit files created at run time. This directory takes precedence over the directory with installed service unit files. |
|
|
Systemd unit files created by |
Overriding the Default systemd Configuration Using system.conf
The default configuration of systemd is defined during the compilation and it can be found in systemd configuration file at /etc/systemd/system.conf. Use this file if you want to deviate from those defaults and override selected default values for systemd units globally.
For example, to override the default value of the timeout limit, which is set to 90 seconds, use the DefaultTimeoutStartSec parameter to input the required value in seconds.
DefaultTimeoutStartSec=required valueSee also Example 10.21, “Changing the timeout limit”.
10.1.1. Main Features
In Red Hat Enterprise Linux 7, the systemd system and service manager provides the following main features:
Socket-based activation — At boot time, systemd creates listening sockets for all system services that support this type of activation, and passes the sockets to these services as soon as they are started. This not only allows systemd to start services in parallel, but also makes it possible to restart a service without losing any message sent to it while it is unavailable: the corresponding socket remains accessible and all messages are queued.
Systemd uses socket units for socket-based activation.
- Bus-based activation — System services that use D-Bus for inter-process communication can be started on-demand the first time a client application attempts to communicate with them. Systemd uses D-Bus service files for bus-based activation.
- Device-based activation — System services that support device-based activation can be started on-demand when a particular type of hardware is plugged in or becomes available. Systemd uses device units for device-based activation.
- Path-based activation — System services that support path-based activation can be started on-demand when a particular file or directory changes its state. Systemd uses path units for path-based activation.
- Mount and automount point management — Systemd monitors and manages mount and automount points. Systemd uses mount units for mount points and automount units for automount points.
- Aggressive parallelization — Because of the use of socket-based activation, systemd can start system services in parallel as soon as all listening sockets are in place. In combination with system services that support on-demand activation, parallel activation significantly reduces the time required to boot the system.
- Transactional unit activation logic — Before activating or deactivating a unit, systemd calculates its dependencies, creates a temporary transaction, and verifies that this transaction is consistent. If a transaction is inconsistent, systemd automatically attempts to correct it and remove non-essential jobs from it before reporting an error.
- Backwards compatibility with SysV init — Systemd supports SysV init scripts as described in the Linux Standard Base Core Specification, which eases the upgrade path to systemd service units.
10.1.2. Compatibility Changes
The systemd system and service manager is designed to be mostly compatible with SysV init and Upstart. The following are the most notable compatibility changes with regards to the previous major release of the Red Hat Enterprise Linux system:
Systemd has only limited support for runlevels. It provides a number of target units that can be directly mapped to these runlevels and for compatibility reasons, it is also distributed with the earlier
runlevelcommand. Not all systemd targets can be directly mapped to runlevels, however, and as a consequence, this command might returnNto indicate an unknown runlevel. It is recommended that you avoid using therunlevelcommand if possible.For more information about systemd targets and their comparison with runlevels, see Section 10.3, “Working with systemd Targets”.
The
systemctlutility does not support custom commands. In addition to standard commands such asstart,stop, andstatus, authors of SysV init scripts could implement support for any number of arbitrary commands in order to provide additional functionality. For example, the init script foriptablesin Red Hat Enterprise Linux 6 could be executed with thepaniccommand, which immediately enabled panic mode and reconfigured the system to start dropping all incoming and outgoing packets. This is not supported in systemd and thesystemctlonly accepts documented commands.For more information about the
systemctlutility and its comparison with the earlierserviceutility, see Section 10.2, “Managing System Services”.-
The
systemctlutility does not communicate with services that have not been started by systemd. When systemd starts a system service, it stores the ID of its main process in order to keep track of it. Thesystemctlutility then uses this PID to query and manage the service. Consequently, if a user starts a particular daemon directly on the command line,systemctlis unable to determine its current status or stop it. -
Systemd stops only running services. Previously, when the shutdown sequence was initiated, Red Hat Enterprise Linux 6 and earlier releases of the system used symbolic links located in the
/etc/rc0.d/directory to stop all available system services regardless of their status. With systemd, only running services are stopped on shutdown. -
System services are unable to read from the standard input stream. When systemd starts a service, it connects its standard input to
/dev/nullto prevent any interaction with the user. -
System services do not inherit any context (such as the
HOMEandPATHenvironment variables) from the invoking user and their session. Each service runs in a clean execution context. - When loading a SysV init script, systemd reads dependency information encoded in the Linux Standard Base (LSB) header and interprets it at run time.
- All operations on service units are subject to a default timeout of 5 minutes to prevent a malfunctioning service from freezing the system. This value is hardcoded for services that are generated from initscripts and cannot be changed. However, individual configuration files can be used to specify a longer timeout value per service, see Example 10.21, “Changing the timeout limit”
For a detailed list of compatibility changes introduced with systemd, see the Migration Planning Guide for Red Hat Enterprise Linux 7.
10.2. Managing System Services
To expand your expertise, you might also be interested in the Red Hat System Administration II (RH134) training course.
Previous versions of Red Hat Enterprise Linux, which were distributed with SysV init or Upstart, used init scripts located in the /etc/rc.d/init.d/ directory. These init scripts were typically written in Bash, and allowed the system administrator to control the state of services and daemons in their system. In Red Hat Enterprise Linux 7, these init scripts have been replaced with service units.
Service units end with the .service file extension and serve a similar purpose as init scripts. To view, start, stop, restart, enable, or disable system services, use the systemctl command as described in Table 10.3, “Comparison of the service Utility with systemctl”, Table 10.4, “Comparison of the chkconfig Utility with systemctl”, and further in this section. The service and chkconfig commands are still available in the system and work as expected, but are only included for compatibility reasons and should be avoided.
| service | systemctl | Description |
|---|---|---|
|
|
| Starts a service. |
|
|
| Stops a service. |
|
|
| Restarts a service. |
|
|
| Restarts a service only if it is running. |
|
|
| Reloads configuration. |
|
|
| Checks if a service is running. |
|
|
| Displays the status of all services. |
| chkconfig | systemctl | Description |
|---|---|---|
|
|
| Enables a service. |
|
|
| Disables a service. |
|
|
| Checks if a service is enabled. |
|
|
| Lists all services and checks if they are enabled. |
|
|
| Lists services that are ordered to start before the specified unit. |
|
|
| Lists services that are ordered to start after the specified unit. |
Specifying Service Units
For clarity, all command examples in the rest of this section use full unit names with the .service file extension, for example:
~]# systemctl stop nfs-server.service
However, the file extension can be omitted, in which case the systemctl utility assumes the argument is a service unit. The following command is equivalent to the one above:
~]# systemctl stop nfs-server
Additionally, some units have alias names. Those names can have shorter names than units, which can be used instead of the actual unit names. To find all aliases that can be used for a particular unit, use:
~]# systemctl show nfs-server.service -p Names
Behavior of systemctl in a chroot Environment
If you change the root directory using the chroot command, most systemctl commands refuse to perform any action. The reason for this is that the systemd process and the user that used the chroot command do not have the same view of the filesystem. This happens, for example, when systemctl is invoked from a kickstart file.
The exception to this are unit file commands such as the systemctl enable and systemctl disable commands. These commands do not need a running system and do not affect running processes, but they do affect unit files. Therefore, you can run these commands even in chroot environment. For example, to enable the httpd service on a system under the /srv/website1/ directory:
~]# chroot /srv/website1 ~]# systemctl enable httpd.service Created symlink /etc/systemd/system/multi-user.target.wants/httpd.service, pointing to /usr/lib/systemd/system/httpd.service.
10.2.1. Listing Services
To list all currently loaded service units, type the following at a shell prompt:
systemctl list-units --type service
For each service unit file, this command displays its full name (UNIT) followed by a note whether the unit file has been loaded (LOAD), its high-level (ACTIVE) and low-level (SUB) unit file activation state, and a short description (DESCRIPTION).
By default, the systemctl list-units command displays only active units. If you want to list all loaded units regardless of their state, run this command with the --all or -a command line option:
systemctl list-units --type service --allYou can also list all available service units to see if they are enabled. To do so, type:
systemctl list-unit-files --type service
For each service unit, this command displays its full name (UNIT FILE) followed by information whether the service unit is enabled or not (STATE). For information on how to determine the status of individual service units, see Section 10.2.2, “Displaying Service Status”.
Example 10.1. Listing Services
To list all currently loaded service units, run the following command:
~]$ systemctl list-units --type service
UNIT LOAD ACTIVE SUB DESCRIPTION
abrt-ccpp.service loaded active exited Install ABRT coredump hook
abrt-oops.service loaded active running ABRT kernel log watcher
abrt-vmcore.service loaded active exited Harvest vmcores for ABRT
abrt-xorg.service loaded active running ABRT Xorg log watcher
abrtd.service loaded active running ABRT Automated Bug Reporting Tool
...
systemd-vconsole-setup.service loaded active exited Setup Virtual Console
tog-pegasus.service loaded active running OpenPegasus CIM Server
LOAD = Reflects whether the unit definition was properly loaded.
ACTIVE = The high-level unit activation state, i.e. generalization of SUB.
SUB = The low-level unit activation state, values depend on unit type.
46 loaded units listed. Pass --all to see loaded but inactive units, too.
To show all installed unit files use 'systemctl list-unit-files'To list all installed service unit files to determine if they are enabled, type:
~]$ systemctl list-unit-files --type service UNIT FILE STATE abrt-ccpp.service enabled abrt-oops.service enabled abrt-vmcore.service enabled abrt-xorg.service enabled abrtd.service enabled ... wpa_supplicant.service disabled ypbind.service disabled 208 unit files listed.
10.2.2. Displaying Service Status
To display detailed information about a service unit that corresponds to a system service, type the following at a shell prompt:
systemctl status name.service
Replace name with the name of the service unit you want to inspect (for example, gdm). This command displays the name of the selected service unit followed by its short description, one or more fields described in Table 10.5, “Available Service Unit Information”, and if it is executed by the root user, also the most recent log entries.
| Field | Description |
|---|---|
|
| Information whether the service unit has been loaded, the absolute path to the unit file, and a note whether the unit is enabled. |
|
| Information whether the service unit is running followed by a time stamp. |
|
| The PID of the corresponding system service followed by its name. |
|
| Additional information about the corresponding system service. |
|
| Additional information about related processes. |
|
| Additional information about related Control Groups (cgroups). |
To only verify that a particular service unit is running, run the following command:
systemctl is-active name.serviceSimilarly, to determine whether a particular service unit is enabled, type:
systemctl is-enabled name.service
Note that both systemctl is-active and systemctl is-enabled return an exit status of 0 if the specified service unit is running or enabled. For information on how to list all currently loaded service units, see Section 10.2.1, “Listing Services”.
Example 10.2. Displaying Service Status
The service unit for the GNOME Display Manager is named gdm.service. To determine the current status of this service unit, type the following at a shell prompt:
~]# systemctl status gdm.service
gdm.service - GNOME Display Manager
Loaded: loaded (/usr/lib/systemd/system/gdm.service; enabled)
Active: active (running) since Thu 2013-10-17 17:31:23 CEST; 5min ago
Main PID: 1029 (gdm)
CGroup: /system.slice/gdm.service
├─1029 /usr/sbin/gdm
├─1037 /usr/libexec/gdm-simple-slave --display-id /org/gno...
└─1047 /usr/bin/Xorg :0 -background none -verbose -auth /r...
Oct 17 17:31:23 localhost systemd[1]: Started GNOME Display Manager.Example 10.3. Displaying Services Ordered to Start Before a Service
To determine what services are ordered to start before the specified service, type the following at a shell prompt:
~]# systemctl list-dependencies --after gdm.service gdm.service ├─dbus.socket ├─getty@tty1.service ├─livesys.service ├─plymouth-quit.service ├─system.slice ├─systemd-journald.socket ├─systemd-user-sessions.service └─basic.target [output truncated]
Example 10.4. Displaying Services Ordered to Start After a Service
To determine what services are ordered to start after the specified service, type the following at a shell prompt:
~]# systemctl list-dependencies --before gdm.service gdm.service ├─dracut-shutdown.service ├─graphical.target │ ├─systemd-readahead-done.service │ ├─systemd-readahead-done.timer │ └─systemd-update-utmp-runlevel.service └─shutdown.target ├─systemd-reboot.service └─final.target └─systemd-reboot.service
10.2.3. Starting a Service
To start a service unit that corresponds to a system service, type the following at a shell prompt as root:
systemctl start name.service
Replace name with the name of the service unit you want to start (for example, gdm). This command starts the selected service unit in the current session. For information on how to enable a service unit to be started at boot time, see Section 10.2.6, “Enabling a Service”. For information on how to determine the status of a certain service unit, see Section 10.2.2, “Displaying Service Status”.
Example 10.5. Starting a Service
The service unit for the Apache HTTP Server is named httpd.service. To activate this service unit and start the httpd daemon in the current session, run the following command as root:
~]# systemctl start httpd.service
10.2.4. Stopping a Service
To stop a service unit that corresponds to a system service, type the following at a shell prompt as root:
systemctl stop name.service
Replace name with the name of the service unit you want to stop (for example, bluetooth). This command stops the selected service unit in the current session. For information on how to disable a service unit and prevent it from being started at boot time, see Section 10.2.7, “Disabling a Service”. For information on how to determine the status of a certain service unit, see Section 10.2.2, “Displaying Service Status”.
Example 10.6. Stopping a Service
The service unit for the bluetoothd daemon is named bluetooth.service. To deactivate this service unit and stop the bluetoothd daemon in the current session, run the following command as root:
~]# systemctl stop bluetooth.service
10.2.5. Restarting a Service
To restart a service unit that corresponds to a system service, type the following at a shell prompt as root:
systemctl restart name.service
Replace name with the name of the service unit you want to restart (for example, httpd). This command stops the selected service unit in the current session and immediately starts it again. Importantly, if the selected service unit is not running, this command starts it too. To tell systemd to restart a service unit only if the corresponding service is already running, run the following command as root:
systemctl try-restart name.service
Certain system services also allow you to reload their configuration without interrupting their execution. To do so, type as root:
systemctl reload name.service
Note that system services that do not support this feature ignore this command altogether. For convenience, the systemctl command also supports the reload-or-restart and reload-or-try-restart commands that restart such services instead. For information on how to determine the status of a certain service unit, see Section 10.2.2, “Displaying Service Status”.
Example 10.7. Restarting a Service
In order to prevent users from encountering unnecessary error messages or partially rendered web pages, the Apache HTTP Server allows you to edit and reload its configuration without the need to restart it and interrupt actively processed requests. To do so, type the following at a shell prompt as root:
~]# systemctl reload httpd.service
10.2.6. Enabling a Service
To configure a service unit that corresponds to a system service to be automatically started at boot time, type the following at a shell prompt as root:
systemctl enable name.service
Replace name with the name of the service unit you want to enable (for example, httpd). This command reads the [Install] section of the selected service unit and creates appropriate symbolic links to the /usr/lib/systemd/system/name.service file in the /etc/systemd/system/ directory and its subdirectories. This command does not, however, rewrite links that already exist. If you want to ensure that the symbolic links are re-created, use the following command as root:
systemctl reenable name.serviceThis command disables the selected service unit and immediately enables it again. For information on how to determine whether a certain service unit is enabled to start at boot time, see Section 10.2.2, “Displaying Service Status”. For information on how to start a service in the current session, see Section 10.2.3, “Starting a Service”.
Example 10.8. Enabling a Service
To configure the Apache HTTP Server to start automatically at boot time, run the following command as root:
~]# systemctl enable httpd.service Created symlink from /etc/systemd/system/multi-user.target.wants/httpd.service to /usr/lib/systemd/system/httpd.service.
10.2.7. Disabling a Service
To prevent a service unit that corresponds to a system service from being automatically started at boot time, type the following at a shell prompt as root:
systemctl disable name.service
Replace name with the name of the service unit you want to disable (for example, bluetooth). This command reads the [Install] section of the selected service unit and removes appropriate symbolic links to the /usr/lib/systemd/system/name.service file from the /etc/systemd/system/ directory and its subdirectories. In addition, you can mask any service unit to prevent it from being started manually or by another service. To do so, run the following command as root:
systemctl mask name.service
This command replaces the /etc/systemd/system/name.service file with a symbolic link to /dev/null, rendering the actual unit file inaccessible to systemd. To revert this action and unmask a service unit, type as root:
systemctl unmask name.serviceFor information on how to determine whether a certain service unit is enabled to start at boot time, see Section 10.2.2, “Displaying Service Status”. For information on how to stop a service in the current session, see Section 10.2.4, “Stopping a Service”.
Example 10.9. Disabling a Service
Example 10.6, “Stopping a Service” illustrates how to stop the bluetooth.service unit in the current session. To prevent this service unit from starting at boot time, type the following at a shell prompt as root:
~]# systemctl disable bluetooth.service Removed symlink /etc/systemd/system/bluetooth.target.wants/bluetooth.service. Removed symlink /etc/systemd/system/dbus-org.bluez.service.
10.2.8. Starting a Conflicting Service
In systemd, positive and negative dependencies between services exist. Starting particular service may require starting one or more other services (positive dependency) or stopping one or more services (negative dependency).
When you attempt to start a new service, systemd resolves all dependencies automatically. Note that this is done without explicit notification to the user. If you are already running a service, and you attempt to start another service with a negative dependency, the first service is automatically stopped.
For example, if you are running the postfix service, and you try to start the sendmail service, systemd first automatically stops postfix, because these two services are conflicting and cannot run on the same port.
10.3. Working with systemd Targets
Previous versions of Red Hat Enterprise Linux, which were distributed with SysV init or Upstart, implemented a predefined set of runlevels that represented specific modes of operation. These runlevels were numbered from 0 to 6 and were defined by a selection of system services to be run when a particular runlevel was enabled by the system administrator. In Red Hat Enterprise Linux 7, the concept of runlevels has been replaced with systemd targets.
Systemd targets are represented by target units. Target units end with the .target file extension and their only purpose is to group together other systemd units through a chain of dependencies. For example, the graphical.target unit, which is used to start a graphical session, starts system services such as the GNOME Display Manager (gdm.service) or Accounts Service (accounts-daemon.service) and also activates the multi-user.target unit. Similarly, the multi-user.target unit starts other essential system services such as NetworkManager (NetworkManager.service) or D-Bus (dbus.service) and activates another target unit named basic.target.
Red Hat Enterprise Linux 7 is distributed with a number of predefined targets that are more or less similar to the standard set of runlevels from the previous releases of this system. For compatibility reasons, it also provides aliases for these targets that directly map them to SysV runlevels. Table 10.6, “Comparison of SysV Runlevels with systemd Targets” provides a complete list of SysV runlevels and their corresponding systemd targets.
| Runlevel | Target Units | Description |
|---|---|---|
|
|
| Shut down and power off the system. |
|
|
| Set up a rescue shell. |
|
|
| Set up a non-graphical multi-user system. |
|
|
| Set up a non-graphical multi-user system. |
|
|
| Set up a non-graphical multi-user system. |
|
|
| Set up a graphical multi-user system. |
|
|
| Shut down and reboot the system. |
To view, change, or configure systemd targets, use the systemctl utility as described in Table 10.7, “Comparison of SysV init Commands with systemctl” and in the sections below. The runlevel and telinit commands are still available in the system and work as expected, but are only included for compatibility reasons and should be avoided.
| Old Command | New Command | Description |
|---|---|---|
|
|
| Lists currently loaded target units. |
|
|
| Changes the current target. |
10.3.1. Viewing the Default Target
To determine which target unit is used by default, run the following command:
systemctl get-default
This command resolves the symbolic link located at /etc/systemd/system/default.target and displays the result. For information on how to change the default target, see Section 10.3.3, “Changing the Default Target”. For information on how to list all currently loaded target units, see Section 10.3.2, “Viewing the Current Target”.
Example 10.10. Viewing the Default Target
To display the default target unit, type:
~]$ systemctl get-default
graphical.target10.3.2. Viewing the Current Target
To list all currently loaded target units, type the following command at a shell prompt:
systemctl list-units --type target
For each target unit, this commands displays its full name (UNIT) followed by a note whether the unit has been loaded (LOAD), its high-level (ACTIVE) and low-level (SUB) unit activation state, and a short description (DESCRIPTION).
By default, the systemctl list-units command displays only active units. If you want to list all loaded units regardless of their state, run this command with the --all or -a command line option:
systemctl list-units --type target --allSee Section 10.3.1, “Viewing the Default Target” for information on how to display the default target. For information on how to change the current target, see Section 10.3.4, “Changing the Current Target”.
Example 10.11. Viewing the Current Target
To list all currently loaded target units, run the following command:
~]$ systemctl list-units --type target
UNIT LOAD ACTIVE SUB DESCRIPTION
basic.target loaded active active Basic System
cryptsetup.target loaded active active Encrypted Volumes
getty.target loaded active active Login Prompts
graphical.target loaded active active Graphical Interface
local-fs-pre.target loaded active active Local File Systems (Pre)
local-fs.target loaded active active Local File Systems
multi-user.target loaded active active Multi-User System
network.target loaded active active Network
paths.target loaded active active Paths
remote-fs.target loaded active active Remote File Systems
sockets.target loaded active active Sockets
sound.target loaded active active Sound Card
spice-vdagentd.target loaded active active Agent daemon for Spice guests
swap.target loaded active active Swap
sysinit.target loaded active active System Initialization
time-sync.target loaded active active System Time Synchronized
timers.target loaded active active Timers
LOAD = Reflects whether the unit definition was properly loaded.
ACTIVE = The high-level unit activation state, i.e. generalization of SUB.
SUB = The low-level unit activation state, values depend on unit type.
17 loaded units listed. Pass --all to see loaded but inactive units, too.
To show all installed unit files use 'systemctl list-unit-files'.10.3.3. Changing the Default Target
To configure the system to use a different target unit by default, type the following at a shell prompt as root:
systemctl set-default name.target
Replace name with the name of the target unit you want to use by default (for example, multi-user). This command replaces the /etc/systemd/system/default.target file with a symbolic link to /usr/lib/systemd/system/name.target, where name is the name of the target unit you want to use. For information on how to change the current target, see Section 10.3.4, “Changing the Current Target”. For information on how to list all currently loaded target units, see Section 10.3.2, “Viewing the Current Target”.
Example 10.12. Changing the Default Target
To configure the system to use the multi-user.target unit by default, run the following command as root:
~]# systemctl set-default multi-user.target rm '/etc/systemd/system/default.target' ln -s '/usr/lib/systemd/system/multi-user.target' '/etc/systemd/system/default.target'
10.3.4. Changing the Current Target
To change to a different target unit in the current session, type the following at a shell prompt as root:
systemctl isolate name.target
Replace name with the name of the target unit you want to use (for example, multi-user). This command starts the target unit named name and all dependent units, and immediately stops all others. For information on how to change the default target, see Section 10.3.3, “Changing the Default Target”. For information on how to list all currently loaded target units, see Section 10.3.2, “Viewing the Current Target”.
Example 10.13. Changing the Current Target
To turn off the graphical user interface and change to the multi-user.target unit in the current session, run the following command as root:
~]# systemctl isolate multi-user.target
10.3.5. Changing to Rescue Mode
Rescue mode provides a convenient single-user environment and allows you to repair your system in situations when it is unable to complete a regular booting process. In rescue mode, the system attempts to mount all local file systems and start some important system services, but it does not activate network interfaces or allow more users to be logged into the system at the same time. In Red Hat Enterprise Linux 7, rescue mode is equivalent to single user mode and requires the root password.
To change the current target and enter rescue mode in the current session, type the following at a shell prompt as root:
systemctl rescue
This command is similar to systemctl isolate rescue.target, but it also sends an informative message to all users that are currently logged into the system. To prevent systemd from sending this message, run this command with the --no-wall command line option:
systemctl --no-wall rescueFor information on how to enter emergency mode, see Section 10.3.6, “Changing to Emergency Mode”.
Example 10.14. Changing to Rescue Mode
To enter rescue mode in the current session, run the following command as root:
~]# systemctl rescue Broadcast message from root@localhost on pts/0 (Fri 2013-10-25 18:23:15 CEST): The system is going down to rescue mode NOW!
10.3.6. Changing to Emergency Mode
Emergency mode provides the most minimal environment possible and allows you to repair your system even in situations when the system is unable to enter rescue mode. In emergency mode, the system mounts the root file system only for reading, does not attempt to mount any other local file systems, does not activate network interfaces, and only starts a few essential services. In Red Hat Enterprise Linux 7, emergency mode requires the root password.
To change the current target and enter emergency mode, type the following at a shell prompt as root:
systemctl emergency
This command is similar to systemctl isolate emergency.target, but it also sends an informative message to all users that are currently logged into the system. To prevent systemd from sending this message, run this command with the --no-wall command line option:
systemctl --no-wall emergencyFor information on how to enter rescue mode, see Section 10.3.5, “Changing to Rescue Mode”.
Example 10.15. Changing to Emergency Mode
To enter emergency mode without sending a message to all users that are currently logged into the system, run the following command as root:
~]# systemctl --no-wall emergency
10.4. Shutting Down, Suspending, and Hibernating the System
In Red Hat Enterprise Linux 7, the systemctl utility replaces a number of power management commands used in previous versions of the Red Hat Enterprise Linux system. The commands listed in Table 10.8, “Comparison of Power Management Commands with systemctl” are still available in the system for compatibility reasons, but it is advised that you use systemctl when possible.
| Old Command | New Command | Description |
|---|---|---|
|
|
| Halts the system. |
|
|
| Powers off the system. |
|
|
| Restarts the system. |
|
|
| Suspends the system. |
|
|
| Hibernates the system. |
|
|
| Hibernates and suspends the system. |
10.4.1. Shutting Down the System
The systemctl utility provides commands for shutting down the system, however the traditional shutdown command is also supported. Although the shutdown command will call the systemctl utility to perform the shutdown, it has an advantage in that it also supports a time argument. This is particularly useful for scheduled maintenance and to allow more time for users to react to the warning that a system shutdown has been scheduled. The option to cancel the shutdown can also be an advantage.
Using systemctl Commands
To shut down the system and power off the machine, type the following at a shell prompt as root:
systemctl poweroff
To shut down and halt the system without powering off the machine, run the following command as root:
systemctl halt
By default, running either of these commands causes systemd to send an informative message to all users that are currently logged into the system. To prevent systemd from sending this message, run the selected command with the --no-wall command line option, for example:
systemctl --no-wall poweroffUsing the shutdown Command
To shut down the system and power off the machine at a certain time, use a command in the following format as root:
shutdown --poweroff hh:mm
Where hh:mm is the time in 24 hour clock format. The /run/nologin file is created 5 minutes before system shutdown to prevent new logins. When a time argument is used, an optional message, the wall message, can be appended to the command.
To shut down and halt the system after a delay, without powering off the machine, use a command in the following format as root:
shutdown --halt +m
Where +m is the delay time in minutes. The now keyword is an alias for +0.
A pending shutdown can be canceled by the root user as follows:
shutdown -c
See the shutdown(8) manual page for further command options.
10.4.2. Restarting the System
To restart the system, run the following command as root:
systemctl reboot
By default, this command causes systemd to send an informative message to all users that are currently logged into the system. To prevent systemd from sending this message, run this command with the --no-wall command line option:
systemctl --no-wall reboot10.4.3. Suspending the System
To suspend the system, type the following at a shell prompt as root:
systemctl suspendThis command saves the system state in RAM and with the exception of the RAM module, powers off most of the devices in the machine. When you turn the machine back on, the system then restores its state from RAM without having to boot again. Because the system state is saved in RAM and not on the hard disk, restoring the system from suspend mode is significantly faster than restoring it from hibernation, but as a consequence, a suspended system state is also vulnerable to power outages.
For information on how to hibernate the system, see Section 10.4.4, “Hibernating the System”.
10.4.4. Hibernating the System
To hibernate the system, type the following at a shell prompt as root:
systemctl hibernateThis command saves the system state on the hard disk drive and powers off the machine. When you turn the machine back on, the system then restores its state from the saved data without having to boot again. Because the system state is saved on the hard disk and not in RAM, the machine does not have to maintain electrical power to the RAM module, but as a consequence, restoring the system from hibernation is significantly slower than restoring it from suspend mode.
To hibernate and suspend the system, run the following command as root:
systemctl hybrid-sleepFor information on how to suspend the system, see Section 10.4.3, “Suspending the System”.
10.5. Controlling systemd on a Remote Machine
In addition to controlling the systemd system and service manager locally, the systemctl utility also allows you to interact with systemd running on a remote machine over the SSH protocol. Provided that the sshd service on the remote machine is running, you can connect to this machine by running the systemctl command with the --host or -H command line option:
systemctl --host user_name@host_name command
Replace user_name with the name of the remote user, host_name with the machine’s host name, and command with any of the systemctl commands described above. Note that the remote machine must be configured to allow the selected user remote access over the SSH protocol. For more information on how to configure an SSH server, see Chapter 12, OpenSSH.
Example 10.16. Remote Management
To log in to a remote machine named server-01.example.com as the root user and determine the current status of the httpd.service unit, type the following at a shell prompt:
~]$ systemctl -H root@server-01.example.com status httpd.service
>>>>>>> systemd unit files -- update
root@server-01.example.com's password:
httpd.service - The Apache HTTP Server
Loaded: loaded (/usr/lib/systemd/system/httpd.service; enabled)
Active: active (running) since Fri 2013-11-01 13:58:56 CET; 2h 48min ago
Main PID: 649
Status: "Total requests: 0; Current requests/sec: 0; Current traffic: 0 B/sec"
CGroup: /system.slice/httpd.service10.6. Creating and Modifying systemd Unit Files
A unit file contains configuration directives that describe the unit and define its behavior. Several systemctl commands work with unit files in the background. To make finer adjustments, system administrator must edit or create unit files manually. Table 10.2, “Systemd Unit Files Locations” lists three main directories where unit files are stored on the system, the /etc/systemd/system/ directory is reserved for unit files created or customized by the system administrator.
Unit file names take the following form:
unit_name.type_extension
Here, unit_name stands for the name of the unit and type_extension identifies the unit type, see Table 10.1, “Available systemd Unit Types” for a complete list of unit types. For example, there usually is sshd.service as well as sshd.socket unit present on your system.
Unit files can be supplemented with a directory for additional configuration files. For example, to add custom configuration options to sshd.service, create the sshd.service.d/custom.conf file and insert additional directives there. For more information on configuration directories, see Section 10.6.4, “Modifying Existing Unit Files”.
Also, the sshd.service.wants/ and sshd.service.requires/ directories can be created. These directories contain symbolic links to unit files that are dependencies of the sshd service. The symbolic links are automatically created either during installation according to [Install] unit file options (see Table 10.11, “Important [Install] Section Options”) or at runtime based on [Unit] options (see Table 10.9, “Important [Unit] Section Options”). It is also possible to create these directories and symbolic links manually.
Many unit file options can be set using the so called unit specifiers – wildcard strings that are dynamically replaced with unit parameters when the unit file is loaded. This enables creation of generic unit files that serve as templates for generating instantiated units. See Section 10.6.5, “Working with Instantiated Units” for details.
10.6.1. Understanding the Unit File Structure
Unit files typically consist of three sections:
- [Unit] — contains generic options that are not dependent on the type of the unit. These options provide unit description, specify the unit’s behavior, and set dependencies to other units. For a list of most frequently used [Unit] options, see Table 10.9, “Important [Unit] Section Options”.
- [unit type] — if a unit has type-specific directives, these are grouped under a section named after the unit type. For example, service unit files contain the [Service] section, see Table 10.10, “Important [Service] Section Options” for most frequently used [Service] options.
-
[Install] — contains information about unit installation used by
systemctl enableanddisablecommands, see Table 10.11, “Important [Install] Section Options” for a list of [Install] options.
Option[a] section, see the systemd.unit(5) manual page.] | Description |
|---|---|
|
|
A meaningful description of the unit. This text is displayed for example in the output of the |
|
| Provides a list of URIs referencing documentation for the unit. |
|
|
Defines the order in which units are started. The unit starts only after the units specified in |
|
|
Configures dependencies on other units. The units listed in |
|
|
Configures weaker dependencies than |
|
|
Configures negative dependencies, an opposite to |
[a]
For a complete list of options configurable in the [Unit
[b]
In most cases, it is sufficient to set only the ordering dependencies with After and Before unit file options. If you also set a requirement dependency with Wants (recommended) or Requires, the ordering dependency still needs to be specified. That is because ordering and requirement dependencies work independently from each other.
| |
Option[a] section, see the systemd.service(5) manual page.] | Description |
|---|---|
|
|
Configures the unit process startup type that affects the functionality of
*
*
*
*
*
* |
|
|
Specifies commands or scripts to be executed when the unit is started. |
|
| Specifies commands or scripts to be executed when the unit is stopped. |
|
| Specifies commands or scripts to be executed when the unit is reloaded. |
|
|
With this option enabled, the service is restarted after its process exits, with the exception of a clean stop by the |
|
|
If set to True, the service is considered active even when all its processes exited. Default value is False. This option is especially useful if |
[a]
For a complete list of options configurable in the [Service
| |
Option[a] section, see the systemd.unit(5) manual page.] | Description |
|---|---|
|
|
Provides a space-separated list of additional names for the unit. Most |
|
|
A list of units that depend on the unit. When this unit is enabled, the units listed in |
|
|
A list of units that weakly depend on the unit. When this unit is enabled, the units listed in |
|
| Specifies a list of units to be installed or uninstalled along with the unit. |
|
| Limited to instantiated units, this option specifies the default instance for which the unit is enabled. See Section 10.6.5, “Working with Instantiated Units” |
[a]
For a complete list of options configurable in the [Install
| |
A whole range of options that can be used to fine tune the unit configuration, Example 10.17, “postfix.service Unit File” shows an example of a service unit installed on the system. Moreover, unit file options can be defined in a way that enables dynamic creation of units as described in Section 10.6.5, “Working with Instantiated Units”.
Example 10.17. postfix.service Unit File
What follows is the content of the /usr/lib/systemd/system/postfix.service unit file as currently provided by the postfix package:
[Unit] Description=Postfix Mail Transport Agent After=syslog.target network.target Conflicts=sendmail.service exim.service [Service] Type=forking PIDFile=/var/spool/postfix/pid/master.pid EnvironmentFile=-/etc/sysconfig/network ExecStartPre=-/usr/libexec/postfix/aliasesdb ExecStartPre=-/usr/libexec/postfix/chroot-update ExecStart=/usr/sbin/postfix start ExecReload=/usr/sbin/postfix reload ExecStop=/usr/sbin/postfix stop [Install] WantedBy=multi-user.target
The [Unit] section describes the service, specifies the ordering dependencies, as well as conflicting units. In [Service], a sequence of custom scripts is specified to be executed during unit activation, on stop, and on reload. EnvironmentFile points to the location where environment variables for the service are defined, PIDFile specifies a stable PID for the main process of the service. Finally, the [Install] section lists units that depend on the service.
10.6.2. Creating Custom Unit Files
There are several use cases for creating unit files from scratch: you could run a custom daemon, create a second instance of some existing service (as in Example 10.19, “Creating a second instance of the sshd service”), or import a SysV init script (more in Section 10.6.3, “Converting SysV Init Scripts to Unit Files”). On the other hand, if you intend just to modify or extend the behavior of an existing unit, use the instructions from Section 10.6.4, “Modifying Existing Unit Files”. The following procedure describes the general process of creating a custom service:
-
Prepare the executable file with the custom service. This can be a custom-created script, or an executable delivered by a software provider. If required, prepare a PID file to hold a constant PID for the main process of the custom service. It is also possible to include environment files to store shell variables for the service. Make sure the source script is executable (by executing the
chmod a+x) and is not interactive. Create a unit file in the
/etc/systemd/system/directory and make sure it has correct file permissions. Execute asroot:touch /etc/systemd/system/name.servicechmod 664 /etc/systemd/system/name.serviceReplace name with a name of the service to be created. Note that file does not need to be executable.
Open the
name.servicefile created in the previous step, and add the service configuration options. There is a variety of options that can be used depending on the type of service you wish to create, see Section 10.6.1, “Understanding the Unit File Structure”. The following is an example unit configuration for a network-related service:[Unit] Description=service_description After=network.target [Service] ExecStart=path_to_executable Type=forking PIDFile=path_to_pidfile [Install] WantedBy=default.target
Where:
-
service_description is an informative description that is displayed in journal log files and in the output of the
systemctl statuscommand. -
the
Aftersetting ensures that the service is started only after the network is running. Add a space-separated list of other relevant services or targets. - path_to_executable stands for the path to the actual service executable.
-
Type=forkingis used for daemons that make the fork system call. The main process of the service is created with the PID specified in path_to_pidfile. Find other startup types in Table 10.10, “Important [Service] Section Options”. -
WantedBystates the target or targets that the service should be started under. Think of these targets as of a replacement of the older concept of runlevels, see Section 10.3, “Working with systemd Targets” for details.
-
service_description is an informative description that is displayed in journal log files and in the output of the
Notify systemd that a new
name.servicefile exists by executing the following command asroot:systemctl daemon-reloadsystemctl start name.serviceWarningAlways run the
systemctl daemon-reloadcommand after creating new unit files or modifying existing unit files. Otherwise, thesystemctl startorsystemctl enablecommands could fail due to a mismatch between states of systemd and actual service unit files on disk.The name.service unit can now be managed as any other system service with commands described in Section 10.2, “Managing System Services”.
Example 10.18. Creating the emacs.service File
When using the Emacs text editor, it is often faster and more convenient to have it running in the background instead of starting a new instance of the program whenever editing a file. The following steps show how to create a unit file for Emacs, so that it can be handled like a service.
Create a unit file in the
/etc/systemd/system/directory and make sure it has the correct file permissions. Execute asroot:~]# touch /etc/systemd/system/emacs.service ~]# chmod 664 /etc/systemd/system/emacs.service
Add the following content to the file:
[Unit] Description=Emacs: the extensible, self-documenting text editor [Service] Type=forking ExecStart=/usr/bin/emacs --daemon ExecStop=/usr/bin/emacsclient --eval "(kill-emacs)" Environment=SSH_AUTH_SOCK=%t/keyring/ssh Restart=always [Install] WantedBy=default.target
With the above configuration, the
/usr/bin/emacsexecutable is started in daemon mode on service start. The SSH_AUTH_SOCK environment variable is set using the "%t" unit specifier that stands for the runtime directory. The service also restarts the emacs process if it exits unexpectedly.Execute the following commands to reload the configuration and start the custom service:
~]# systemctl daemon-reload ~]# systemctl start emacs.service
As the editor is now registered as a systemd service, you can use all standard systemctl commands. For example, run systemctl status emacs to display the editor’s status or systemctl enable emacs to make the editor start automatically on system boot.
Example 10.19. Creating a second instance of the sshd service
System Administrators often need to configure and run multiple instances of a service. This is done by creating copies of the original service configuration files and modifying certain parameters to avoid conflicts with the primary instance of the service. The following procedure shows how to create a second instance of the sshd service:
Create a copy of the
sshd_configfile that will be used by the second daemon:~]# cp /etc/ssh/sshd{,-second}_configEdit the
sshd-second_configfile created in the previous step to assign a different port number and PID file to the second daemon:Port 22220 PidFile /var/run/sshd-second.pid
See the
sshd_config(5) manual page for more information onPortandPidFileoptions. Make sure the port you choose is not in use by any other service. The PID file does not have to exist before running the service, it is generated automatically on service start.Create a copy of the systemd unit file for the
sshdservice:~]# cp /usr/lib/systemd/system/sshd.service /etc/systemd/system/sshd-second.service
Alter the
sshd-second.servicecreated in the previous step as follows:Modify the
Descriptionoption:Description=OpenSSH server second instance daemon
Add sshd.service to services specified in the
Afteroption, so that the second instance starts only after the first one has already started:After=syslog.target network.target auditd.service sshd.service
- The first instance of sshd includes key generation, therefore remove the ExecStartPre=/usr/sbin/sshd-keygen line.
Add the
-f /etc/ssh/sshd-second_configparameter to thesshdcommand, so that the alternative configuration file is used:ExecStart=/usr/sbin/sshd -D -f /etc/ssh/sshd-second_config $OPTIONS
After the above modifications, the sshd-second.service should look as follows:
[Unit] Description=OpenSSH server second instance daemon After=syslog.target network.target auditd.service sshd.service [Service] EnvironmentFile=/etc/sysconfig/sshd ExecStart=/usr/sbin/sshd -D -f /etc/ssh/sshd-second_config $OPTIONS ExecReload=/bin/kill -HUP $MAINPID KillMode=process Restart=on-failure RestartSec=42s [Install] WantedBy=multi-user.target
If using SELinux, add the port for the second instance of sshd to SSH ports, otherwise the second instance of sshd will be rejected to bind to the port:
~]# semanage port -a -t ssh_port_t -p tcp 22220
Enable sshd-second.service, so that it starts automatically upon boot:
~]# systemctl enable sshd-second.service
Verify if the sshd-second.service is running by using the
systemctl statuscommand. Also, verify if the port is enabled correctly by connecting to the service:~]$
ssh -p 22220 user@serverIf the firewall is in use, make sure that it is configured appropriately in order to allow connections to the second instance of sshd.
- To learn how to properly choose a target for ordering and dependencies of your custom unit files, see the following articles
Additional information with some real-world examples of cases triggered by the ordering and dependencies in a unit file is available in the following article: Is there any useful information about writing unit files?
If you want to set limits for services started by systemd, see the Red Hat Knowledgebase article How to set limits for services in RHEL 7 and systemd. These limits need to be set in the service’s unit file. Note that systemd ignores limits set in the /etc/security/limits.conf and /etc/security/limits.d/*.conf configuration files. The limits defined in these files are set by PAM when starting a login session, but daemons started by systemd do not use PAM login sessions.
10.6.3. Converting SysV Init Scripts to Unit Files
Before taking time to convert a SysV init script to a unit file, make sure that the conversion was not already done elsewhere. All core services installed on Red Hat Enterprise Linux 7 come with default unit files, and the same applies for many third-party software packages.
Converting an init script to a unit file requires analyzing the script and extracting the necessary information from it. Based on this data you can create a unit file as described in Section 10.6.2, “Creating Custom Unit Files”. As init scripts can vary greatly depending on the type of the service, you might need to employ more configuration options for translation than outlined in this chapter. Note that some levels of customization that were available with init scripts are no longer supported by systemd units, see Section 10.1.2, “Compatibility Changes”.
The majority of information needed for conversion is provided in the script’s header. The following example shows the opening section of the init script used to start the postfix service on Red Hat Enterprise Linux 6:
#!/bin/bash # # postfix Postfix Mail Transfer Agent # # chkconfig: 2345 80 30 # description: Postfix is a Mail Transport Agent, which is the program \ # that moves mail from one machine to another. # processname: master # pidfile: /var/spool/postfix/pid/master.pid # config: /etc/postfix/main.cf # config: /etc/postfix/master.cf ### BEGIN INIT INFO # Provides: postfix MTA # Required-Start: $local_fs $network $remote_fs # Required-Stop: $local_fs $network $remote_fs # Default-Start: 2 3 4 5 # Default-Stop: 0 1 6 # Short-Description: start and stop postfix # Description: Postfix is a Mail Transport Agent, which is the program that # moves mail from one machine to another. ### END INIT INFO
In the above example, only lines starting with # chkconfig and # description are mandatory, so you might not find the rest in different init files. The text enclosed between the # BEGIN INIT INFO and # END INIT INFO lines is called Linux Standard Base (LSB) header. If specified, LSB headers contain directives defining the service description, dependencies, and default runlevels. What follows is an overview of analytic tasks aiming to collect the data needed for a new unit file. The postfix init script is used as an example, see the resulting postfix unit file in Example 10.17, “postfix.service Unit File”.
Finding the Service Description
Find descriptive information about the script on the line starting with #description. Use this description together with the service name in the Description option in the [Unit] section of the unit file. The LSB header might contain similar data on the #Short-Description and #Description lines.
Finding Service Dependencies
The LSB header might contain several directives that form dependencies between services. Most of them are translatable to systemd unit options, see Table 10.12, “Dependency Options from the LSB Header”
| LSB Option | Description | Unit File Equivalent |
|---|---|---|
|
| Specifies the boot facility name of the service, that can be referenced in other init scripts (with the "$" prefix). This is no longer needed as unit files refer to other units by their file names. | – |
|
|
Contains boot facility names of required services. This is translated as an ordering dependency, boot facility names are replaced with unit file names of corresponding services or targets they belong to. For example, in case of |
|
|
| Constitutes weaker dependencies than Required-Start. Failed Should-Start dependencies do not affect the service startup. |
|
|
| Constitute negative dependencies. |
|
Finding Default Targets of the Service
The line starting with #chkconfig contains three numerical values. The most important is the first number that represents the default runlevels in which the service is started. Use Table 10.6, “Comparison of SysV Runlevels with systemd Targets” to map these runlevels to equivalent systemd targets. Then list these targets in the WantedBy option in the [Install] section of the unit file. For example, postfix was previously started in runlevels 2, 3, 4, and 5, which translates to multi-user.target and graphical.target on Red Hat Enterprise Linux 7. Note that the graphical.target depends on multiuser.target, therefore it is not necessary to specify both, as in Example 10.17, “postfix.service Unit File”. You might find information on default and forbidden runlevels also at #Default-Start and #Default-Stop lines in the LSB header.
The other two values specified on the #chkconfig line represent startup and shutdown priorities of the init script. These values are interpreted by systemd if it loads the init script, but there is no unit file equivalent.
Finding Files Used by the Service
Init scripts require loading a function library from a dedicated directory and allow importing configuration, environment, and PID files. Environment variables are specified on the line starting with #config in the init script header, which translates to the EnvironmentFile unit file option. The PID file specified on the #pidfile init script line is imported to the unit file with the PIDFile option.
The key information that is not included in the init script header is the path to the service executable, and potentially some other files required by the service. In previous versions of Red Hat Enterprise Linux, init scripts used a Bash case statement to define the behavior of the service on default actions, such as start, stop, or restart, as well as custom-defined actions. The following excerpt from the postfix init script shows the block of code to be executed at service start.
conf_check() {
[ -x /usr/sbin/postfix ] || exit 5
[ -d /etc/postfix ] || exit 6
[ -d /var/spool/postfix ] || exit 5
}
make_aliasesdb() {
if [ "$(/usr/sbin/postconf -h alias_database)" == "hash:/etc/aliases" ]
then
# /etc/aliases.db might be used by other MTA, make sure nothing
# has touched it since our last newaliases call
[ /etc/aliases -nt /etc/aliases.db ] ||
[ "$ALIASESDB_STAMP" -nt /etc/aliases.db ] ||
[ "$ALIASESDB_STAMP" -ot /etc/aliases.db ] || return
/usr/bin/newaliases
touch -r /etc/aliases.db "$ALIASESDB_STAMP"
else
/usr/bin/newaliases
fi
}
start() {
[ "$EUID" != "0" ] && exit 4
# Check that networking is up.
[ ${NETWORKING} = "no" ] && exit 1
conf_check
# Start daemons.
echo -n $"Starting postfix: "
make_aliasesdb >/dev/null 2>&1
[ -x $CHROOT_UPDATE ] && $CHROOT_UPDATE
/usr/sbin/postfix start 2>/dev/null 1>&2 && success || failure $"$prog start"
RETVAL=$?
[ $RETVAL -eq 0 ] && touch $lockfile
echo
return $RETVAL
}
The extensibility of the init script allowed specifying two custom functions, conf_check() and make_aliasesdb(), that are called from the start() function block. On closer look, several external files and directories are mentioned in the above code: the main service executable /usr/sbin/postfix, the /etc/postfix/ and /var/spool/postfix/ configuration directories, as well as the /usr/sbin/postconf/ directory.
Systemd supports only the predefined actions, but enables executing custom executables with ExecStart, ExecStartPre, ExecStartPost, ExecStop, and ExecReload options. In case of postfix on Red Hat Enterprise Linux 7, the /usr/sbin/postfix together with supporting scripts are executed on service start. Consult the postfix unit file at Example 10.17, “postfix.service Unit File”.
Converting complex init scripts requires understanding the purpose of every statement in the script. Some of the statements are specific to the operating system version, therefore you do not need to translate them. On the other hand, some adjustments might be needed in the new environment, both in unit file as well as in the service executable and supporting files.
10.6.4. Modifying Existing Unit Files
Services installed on the system come with default unit files that are stored in the /usr/lib/systemd/system/ directory. System Administrators should not modify these files directly, therefore any customization must be confined to configuration files in the /etc/systemd/system/ directory. Depending on the extent of the required changes, pick one of the following approaches:
-
Create a directory for supplementary configuration files at
/etc/systemd/system/unit.d/. This method is recommended for most use cases. It enables extending the default configuration with additional functionality, while still referring to the original unit file. Changes to the default unit introduced with a package upgrade are therefore applied automatically. See the section called “Extending the Default Unit Configuration” for more information. -
Create a copy of the original unit file
/usr/lib/systemd/system/in/etc/systemd/system/and make changes there. The copy overrides the original file, therefore changes introduced with the package update are not applied. This method is useful for making significant unit changes that should persist regardless of package updates. See the section called “Overriding the Default Unit Configuration” for details.
In order to return to the default configuration of the unit, just delete custom-created configuration files in /etc/systemd/system/. To apply changes to unit files without rebooting the system, execute:
systemctl daemon-reload
The daemon-reload option reloads all unit files and recreates the entire dependency tree, which is needed to immediately apply any change to a unit file. As an alternative, you can achieve the same result with the following command:
init qAlso, if the modified unit file belongs to a running service, this service must be restarted to accept new settings:
systemctl restart name.service
To modify properties, such as dependencies or timeouts, of a service that is handled by a SysV initscript, do not modify the initscript itself. Instead, create a systemd drop-in configuration file for the service as described in the section called “Extending the Default Unit Configuration” and the section called “Overriding the Default Unit Configuration”. Then manage this service in the same way as a normal systemd service.
For example, to extend the configuration of the network service, do not modify the /etc/rc.d/init.d/network initscript file. Instead, create new directory /etc/systemd/system/network.service.d/ and a systemd drop-in file /etc/systemd/system/network.service.d/my_config.conf. Then, put the modified values into the drop-in file. Note: systemd knows the network service as network.service, which is why the created directory must be called network.service.d
Extending the Default Unit Configuration
To extend the default unit file with additional configuration options, first create a configuration directory in /etc/systemd/system/. If extending a service unit, execute the following command as root:
mkdir /etc/systemd/system/name.service.d/Replace name with the name of the service you want to extend. The above syntax applies to all unit types.
Create a configuration file in the directory made in the previous step. Note that the file name must end with the .conf suffix. Type:
touch /etc/systemd/system/name.service.d/config_name.conf
Replace config_name with the name of the configuration file. This file adheres to the normal unit file structure, therefore all directives must be specified under appropriate sections, see Section 10.6.1, “Understanding the Unit File Structure”.
For example, to add a custom dependency, create a configuration file with the following content:
[Unit] Requires=new_dependency After=new_dependency
Where new_dependency stands for the unit to be marked as a dependency. Another example is a configuration file that restarts the service after its main process exited, with a delay of 30 seconds:
[Service] Restart=always RestartSec=30
It is recommended to create small configuration files focused only on one task. Such files can be easily moved or linked to configuration directories of other services.
To apply changes made to the unit, execute as root:
systemctl daemon-reloadsystemctl restart name.service
Example 10.20. Extending the httpd.service Configuration
To modify the httpd.service unit so that a custom shell script is automatically executed when starting the Apache service, perform the following steps. First, create a directory and a custom configuration file:
~]# mkdir /etc/systemd/system/httpd.service.d/ ~]# touch /etc/systemd/system/httpd.service.d/custom_script.conf
Provided that the script you want to start automatically with Apache is located at /usr/local/bin/custom.sh, insert the following text to the custom_script.conf file:
[Service] ExecStartPost=/usr/local/bin/custom.sh
To apply the unit changes, execute:
~]# systemctl daemon-reload ~]# systemctl restart httpd.service
The configuration files from configuration directories in /etc/systemd/system/ take precedence over unit files in /usr/lib/systemd/system/. Therefore, if the configuration files contain an option that can be specified only once, such as Description or ExecStart, the default value of this option is overridden. Note that in the output of the systemd-delta command, described in the section called “Monitoring Overriden Units”, such units are always marked as [EXTENDED], even though in sum, certain options are actually overridden.
Overriding the Default Unit Configuration
To make changes that will persist after updating the package that provides the unit file, first copy the file to the /etc/systemd/system/ directory. To do so, execute the following command as root:
cp /usr/lib/systemd/system/name.service /etc/systemd/system/name.serviceWhere name stands for the name of the service unit you wish to modify. The above syntax applies to all unit types.
Open the copied file with a text editor, and make the desired changes. To apply the unit changes, execute as root:
systemctl daemon-reloadsystemctl restart name.service
Example 10.21. Changing the timeout limit
You can specify a timeout value per service to prevent a malfunctioning service from freezing the system. Otherwise, timeout is set by default to 90 seconds for normal services and to 300 seconds for SysV-compatible services.
For example, to extend timeout limit for the httpd service:
Copy the
httpdunit file to the/etc/systemd/system/directory:cp /usr/lib/systemd/system/httpd.service /etc/systemd/system/httpd.serviceOpen file
/etc/systemd/system/httpd.serviceand specify theTimeoutStartSecvalue in the[Service]section:... [Service] ... PrivateTmp=true TimeoutStartSec=10 [Install] WantedBy=multi-user.target ...
Reload the
systemddaemon:systemctl daemon-reloadOptional. Verify the new timeout value:
systemctl show httpd -p TimeoutStartUSec
To change the timeout limit globally, input the DefaultTimeoutStartSec in the /etc/systemd/system.conf file. See Section 10.1, “Introduction to systemd”.
Monitoring Overriden Units
To display an overview of overridden or modified unit files, use the following command:
systemd-deltaFor example, the output of the above command can look as follows:
[EQUIVALENT] /etc/systemd/system/default.target → /usr/lib/systemd/system/default.target [OVERRIDDEN] /etc/systemd/system/autofs.service → /usr/lib/systemd/system/autofs.service --- /usr/lib/systemd/system/autofs.service 2014-10-16 21:30:39.000000000 -0400 +++ /etc/systemd/system/autofs.service 2014-11-21 10:00:58.513568275 -0500 @@ -8,7 +8,8 @@ EnvironmentFile=-/etc/sysconfig/autofs ExecStart=/usr/sbin/automount $OPTIONS --pid-file /run/autofs.pid ExecReload=/usr/bin/kill -HUP $MAINPID -TimeoutSec=180 +TimeoutSec=240 +Restart=Always [Install] WantedBy=multi-user.target [MASKED] /etc/systemd/system/cups.service → /usr/lib/systemd/system/cups.service [EXTENDED] /usr/lib/systemd/system/sssd.service → /etc/systemd/system/sssd.service.d/journal.conf 4 overridden configuration files found.
Table 10.13, “systemd-delta Difference Types” lists override types that can appear in the output of systemd-delta. Note that if a file is overridden, systemd-delta by default displays a summary of changes similar to the output of the diff command.
| Type | Description |
|---|---|
| [MASKED] | Masked unit files, see Section 10.2.7, “Disabling a Service” for description of unit masking. |
| [EQUIVALENT] | Unmodified copies that override the original files but do not differ in content, typically symbolic links. |
| [REDIRECTED] | Files that are redirected to another file. |
| [OVERRIDEN] | Overridden and changed files. |
| [EXTENDED] |
Files that are extended with .conf files in the |
| [UNCHANGED] |
Unmodified files are displayed only when the |
It is good practice to run systemd-delta after system update to check if there are any updates to the default units that are currently overridden by custom configuration. It is also possible to limit the output only to a certain difference type. For example, to view just the overridden units, execute:
systemd-delta --type=overridden10.6.5. Working with Instantiated Units
It is possible to instantiate multiple units from a single template configuration file at runtime. The "@" character is used to mark the template and to associate units with it. Instantiated units can be started from another unit file (using Requires or Wants options), or with the systemctl start command. Instantiated service units are named the following way:
template_name@instance_name.service
Where template_name stands for the name of the template configuration file. Replace instance_name with the name for the unit instance. Several instances can point to the same template file with configuration options common for all instances of the unit. Template unit name has the form of:
unit_name@.service
For example, the following Wants setting in a unit file:
Wants=getty@ttyA.service,getty@ttyB.service
first makes systemd search for given service units. If no such units are found, the part between "@" and the type suffix is ignored and systemd searches for the getty@.service file, reads the configuration from it, and starts the services.
Wildcard characters, called unit specifiers, can be used in any unit configuration file. Unit specifiers substitute certain unit parameters and are interpreted at runtime. Table 10.14, “Important Unit Specifiers” lists unit specifiers that are particularly useful for template units.
| Unit Specifier | Meaning | Description |
|---|---|---|
|
| Full unit name |
Stands for the full unit name including the type suffix. |
|
| Prefix name | Stands for a unit name with type suffix removed. For instantiated units %p stands for the part of the unit name before the "@" character. |
|
| Instance name |
Is the part of the instantiated unit name between the "@" character and the type suffix. |
|
| Host name | Stands for the hostname of the running system at the point in time the unit configuration is loaded. |
|
| Runtime directory |
Represents the runtime directory, which is either |
For a complete list of unit specifiers, see the systemd.unit(5) manual page.
For example, the getty@.service template contains the following directives:
[Unit] Description=Getty on %I ... [Service] ExecStart=-/sbin/agetty --noclear %I $TERM ...
When the getty@ttyA.service and getty@ttyB.service are instantiated form the above template, Description= is resolved as Getty on ttyA and Getty on ttyB.
10.7. Additional Considerations While Managing Services
During normal operation, systemd maintains an association between a unit abstraction and the underlying processes active on the system.
From: man systemd
Processes systemd spawns are placed in individual Linux control groups named after the unit which they belong to in the private systemd hierarchy. (see cgroups.txt[1] for more information about control groups, or short "cgroups"). systemd uses this to effectively keep track of processes. Control group information is maintained in the kernel, and is accessible via the file system hierarchy (beneath /sys/fs/cgroup/systemd/), or in tools such as ps(1) (ps xawf -eo pid,user,cgroup,args is particularly useful to list all processes and the systemd units they belong to).
The cgroup hierarchy is critical to systemd’s view of process and service health. When a process forks itself, it inherits the cgroup of the creating process. With this being the case, all processes associated with a given unit can be verified by reading the contents of the applicable cgroup.procs file, such as:
~]# cat /sys/fs/cgroup/systemd/system.slice/httpd.service/cgroup.procs 11854 11855 11856 11857 11858 11859
The output matches the CGroup information returned during a systemctl status unit operation:
~]# systemctl status httpd
● httpd.service - The Apache HTTP Server
Loaded: loaded (/usr/lib/systemd/system/httpd.service; disabled; vendor preset: disabled)
Active: active (running) since Wed 2019-05-29 12:08:16 EDT; 45s ago
Docs: man:httpd(8)
man:apachectl(8)
Main PID: 11854 (httpd)
Status: "Total requests: 0; Current requests/sec: 0; Current traffic: 0 B/sec"
CGroup: /system.slice/httpd.service
├─11854 /usr/sbin/httpd -DFOREGROUND
├─11855 /usr/sbin/httpd -DFOREGROUND
├─11856 /usr/sbin/httpd -DFOREGROUND
├─11857 /usr/sbin/httpd -DFOREGROUND
├─11858 /usr/sbin/httpd -DFOREGROUND
└─11859 /usr/sbin/httpd -DFOREGROUND
May 29 12:08:16 localhost systemd[1]: Starting The Apache HTTP Server...
May 29 12:08:16 localhost systemd[1]: Started The Apache HTTP Server.
To directly view these groupings of processes system-wide, the systemd-cgls utility can be used:
~]# systemd-cgls | head -17 ├─1 /usr/lib/systemd/systemd --switched-root --system --deserialize 22 ├─user.slice │ └─user-0.slice │ └─session-168.scope │ ├─ 3049 login -- root │ ├─11884 -bash │ ├─11943 systemd-cgls │ └─11944 head -17 └─system.slice ├─httpd.service │ ├─11854 /usr/sbin/httpd -DFOREGROUND │ ├─11855 /usr/sbin/httpd -DFOREGROUND │ ├─11856 /usr/sbin/httpd -DFOREGROUND │ ├─11857 /usr/sbin/httpd -DFOREGROUND │ ├─11858 /usr/sbin/httpd -DFOREGROUND │ └─11859 /usr/sbin/httpd -DFOREGROUND ├─rhnsd.service
In order for systemd to function properly, the service must be started or stopped through the systemd system to maintain the correct process to unit grouping. Any operation that takes external action results in the necessary cgroup structure not being created. This happens because systemd is not aware of the special nature of the processes being started.
As an example of the above constraint, stopping the httpd service and then issuing /usr/sbin/httpd directly results in the following:
~]# systemctl stop httpd ~]# /usr/sbin/httpd # systemd-cgls | head -17 ├─1 /usr/lib/systemd/systemd --switched-root --system --deserialize 22 ├─user.slice │ └─user-0.slice │ └─session-168.scope │ ├─ 3049 login -- root │ ├─11884 -bash │ ├─11957 /usr/sbin/httpd │ ├─11958 /usr/sbin/httpd │ ├─11959 /usr/sbin/httpd │ ├─11960 /usr/sbin/httpd │ ├─11961 /usr/sbin/httpd │ ├─11962 /usr/sbin/httpd │ ├─11963 systemd-cgls │ └─11964 head -17 └─system.slice ├─rhnsd.service │ └─3261 rhnsd
Note that the httpd process is now visible under the user-0.slice and a session-168.scope. This service is treated as a user started process, as opposed to a system service, that systemd should monitor and manage directly. Some failures that can occur due to this misalignment include, but are not limited to:
- Services are not properly shutdown during system shutdown or restart events.
- Unexpected signals are delivered during user logout such as SIGHUP and SIGTERM.
-
Processes that fail are not automatically restarted despite having a
Restart=directive
Non-graceful application shutdown events can result in a large number of subsequent application failures, such as client-side failures, data loss, and on-disk corruption.
10.8. Additional Resources
For more information on systemd and its usage on Red Hat Enterprise Linux 7, see the resources listed below.
Installed Documentation
-
systemctl(1) — The manual page for thesystemctlcommand line utility provides a complete list of supported options and commands. -
systemd(1) — The manual page for thesystemdsystem and service manager provides more information about its concepts and documents available command line options and environment variables, supported configuration files and directories, recognized signals, and available kernel options. -
systemd-delta(1) — The manual page for thesystemd-deltautility that allows to find extended and overridden configuration files. -
systemd.unit(5) — The manual page namedsystemd.unitprovides detailed information about systemd unit files and documents all available configuration options. -
systemd.service(5) — The manual page namedsystemd.servicedocuments the format of service unit files. -
systemd.target(5) — The manual page namedsystemd.targetdocuments the format of target unit files. -
systemd.kill(5) — The manual page namedsystemd.killdocuments the configuration of the process killing procedure.
Online Documentation
-
Red Hat Enterprise Linux 7 Networking Guide — The Networking Guide for Red Hat Enterprise Linux 7 documents relevant information regarding the configuration and administration of network interfaces, networks, and network services in this system. It provides an introduction to the
hostnamectlutility, explains how to use it to view and set host names on the command line, both locally and remotely, and provides important information about the selection of host names and domain names. -
Red Hat Enterprise Linux 7 Desktop Migration and Administration Guide — The Desktop Migration and Administration Guide for Red Hat Enterprise Linux 7 documents the migration planning, deployment, configuration, and administration of the GNOME 3 desktop on this system. It introduces the
logindservice, enumerates its most significant features, and explains how to use theloginctlutility to list active sessions and enable multi-seat support. - Red Hat Enterprise Linux 7 SELinux User’s and Administrator’s Guide — The SELinux User’s and Administrator’s Guide for Red Hat Enterprise Linux 7 describes the basic principles of SELinux and documents in detail how to configure and use SELinux with various services such as the Apache HTTP Server, Postfix, PostgreSQL, or OpenShift. It explains how to configure SELinux access permissions for system services managed by systemd.
- Red Hat Enterprise Linux 7 Installation Guide — The Installation Guide for Red Hat Enterprise Linux 7 documents how to install the system on AMD64 and Intel 64 systems, 64-bit IBM Power Systems servers, and IBM Z. It also covers advanced installation methods such as Kickstart installations, PXE installations, and installations over the VNC protocol. In addition, it describes common post-installation tasks and explains how to troubleshoot installation problems, including detailed instructions on how to boot into rescue mode or recover the root password.
- Red Hat Enterprise Linux 7 Security Guide — The Security Guide for Red Hat Enterprise Linux 7 assists users and administrators in learning the processes and practices of securing their workstations and servers against local and remote intrusion, exploitation, and malicious activity. It also explains how to secure critical system services.
- systemd Home Page — The project home page provides more information about systemd.
See Also
-
Chapter 2, System Locale and Keyboard Configuration documents how to manage the system locale and keyboard layouts. It explains how to use the
localectlutility to view the current locale, list available locales, and set the system locale on the command line, as well as to view the current keyboard layout, list available keymaps, and enable a particular keyboard layout on the command line. -
Chapter 3, Configuring the Date and Time documents how to manage the system date and time. It explains the difference between a real-time clock and system clock and describes how to use the
timedatectlutility to display the current settings of the system clock, configure the date and time, change the time zone, and synchronize the system clock with a remote server. -
Chapter 6, Gaining Privileges documents how to gain administrative privileges by using the
suandsudocommands. -
Chapter 12, OpenSSH describes how to configure an SSH server and how to use the
ssh,scp, andsftpclient utilities to access it. -
Chapter 23, Viewing and Managing Log Files provides an introduction to
journald. It describes the journal, introduces thejournaldservice, and documents how to use thejournalctlutility to view log entries, enter live view mode, and filter log entries. In addition, this chapter describes how to give non-root users access to system logs and enable persistent storage for log files.
Chapter 11. Configuring a System for Accessibility
Accessibility in Red Hat Enterprise Linux 7 is ensured by the Orca screen reader, which is included in the default installation of the operating system. This chapter explains how a system administrator can configure a system to support users with a visual impairment.
Orca reads information from the screen and communicates it to the user using:
- a speech synthesizer, which provides a speech output
- a braille display, which provides a tactile output
For more information on Orca settings, see its help page.
In order that Orca's communication outputs function properly, the system administrator needs to:
-
configure the
brlttyservice, as described in Section 11.1, “Configuring thebrlttyService” -
switch on the
Always Show Universal Access Menu, as described in Section 11.2, “Switch OnAlways Show Universal Access Menu” - enable the Festival speech synthesizer, as described in Section 11.3, “Enabling the Festival Speech Synthesis System”
11.1. Configuring the brltty Service
The Braille display uses the brltty service to provide tactile output for visually impaired users.
Enable the brltty Service
The braille display cannot work unless brltty is running. By default, brltty is disabled. Enable brltty to be started on boot:
~]# systemctl enable brltty.service
Authorize Users to Use the Braille Display
To set the users who are authorized to use the braille display, choose one of the following procedures, which have an equal effect. The procedure using the /etc/brltty.conf file is suitable even for the file systems where users or groups cannot be assigned to a file. The procedure using the /etc/brlapi.key file is suitable only for the file systems where users or groups can be assigned to a file.
Setting Access to Braille Display by Using /etc/brltty.conf
-
Open the
/etc/brltty.conffile, and find the section called Application Programming Interface Parameters. Specify the users.
To specify one or more individual users, list the users on the following line:
api-parameters Auth=user:
user_1, user_2, ...# Allow some local userTo specify a user group, enter its name on the following line:
api-parameters Auth=group:
group# Allow some local group
Setting Access to Braille Display by Using /etc/brlapi.key
Create the
/etc/brlapi.keyfile.~]# mcookie > /etc/brlapi.key
Change ownership of the
/etc/brlapi.keyto particular user or group.To specify an individual user:
~]# chown user_1 /etc/brlapi.key
To specify a group:
~]# chown group_1 /etc/brlapi.key
Adjust the content of
/etc/brltty.confto include this:api-parameters Auth=keyfile:
/etc/brlapi.key
Set the Braille Driver
The braille-driver directive in /etc/brltty.conf specifies a two-letter driver identification code of the driver for the braille display.
Setting the Braille Driver
Decide whether you want to use the autodetection for finding the appropriate braille driver.
If you want to use autodetection, leave
braille driverspecified toauto, which is the default option.braille-driver
auto# autodetectWarningAutodetection tries all drivers. Therefore, it might take a long time or even fail. For this reason, setting up a particular braille driver is recommended.
If you do not want to use the autodetection, specify the identification code of the required braille driver in the
braille-driverdirective.Choose the identification code of required braille driver from the list provided in
/etc/brltty.conf, for example:braille-driver
xw# XWindowYou can also set multiple drivers, separated by commas, and autodetection is then performed among them.
Set the Braille Device
The braille-device directive in /etc/brltty.conf specifies the device to which the braille display is connected. The following device types are supported (see Table 11.1, “Braille Device Types and the Corresponding Syntax”):
| Braille Device Type | Syntax of the Type |
|---|---|
| serial device | serial:path [a] |
| USB device | [serial-number] [b] |
| Bluetooth device | bluetooth:address |
[a]
Relative paths are at /dev.
[b]
The brackets here indicate optionality.
| |
Examples of settings for particular devices:
braille-deviceserial:ttyS0# First serial device braille-deviceusb:# First USB device matching braille driver braille-deviceusb:nnnnn# Specific USB device by serial number braille-devicebluetooth:xx:xx:xx:xx:xx:xx# Specific Bluetooth device by address
You can also set multiple devices, separated by commas, and each of them will be probed in turn.
If the device is connected by a serial-to-USB adapter, setting braille-device to usb: does not work. In this case, identify the virtual serial device that the kernel has created for the adapter. The virtual serial device can look like this:
serial:ttyUSB0
You can find the actual device name in the kernel messages on the device plug with the following command:
~]# dmesg | fgrep ttyUSB0
Set Specific Parameters for Particular Braille Displays
If you need to set specific parameters for particular braille displays, use the braille-parameters directive in /etc/brltty.conf. The braille-parameters directive passes non-generic parameters through to the braille driver. Choose the required parameters from the list in /etc/brltty.conf.
Set the Text Table
The text-table directive in /etc/brltty.conf specifies which text table is used to encode the symbols. Relative paths to text tables are in the /etc/brltty/Text/ directory.
Setting the Text Table
- Decide whether you want to use the autoselection for finding the appropriate text table.
If you want to use the autoselection, leave
text-tablespecified toauto, which is the default option.text-table
auto# locale-based autoselectionThis ensures that local-based autoselection with fallback to
en-nabccis performed.If you do not want to use the autoselection, choose the required
text-tablefrom the list in/etc/brltty.conf.For example, to use the text table for American English:
text-table
en_US# English (United States)
Set the Contraction Table
The contraction-table directive in /etc/brltty.conf specifies which table is used to encode the abbreviations. Relative paths to particular contraction tables are in the /etc/brltty/Contraction/ directory.
Choose the required contraction-table from the list in /etc/brltty.conf.
For example, to use the contraction table for American English, grade 2:
contraction-table en-us-g2 # English (US, grade 2)If not specified, no contraction table is used.
11.2. Switch On Always Show Universal Access Menu
To switch on the Orca screen reader, press the Super+Alt+S key combination. As a result, the Universal Access Menu icon is displayed on the top bar.

The icon disappears in case that the user switches off all of the provided options from the Universal Access Menu. Missing icon can cause difficulties to users with a visual impairment. System administrators can prevent the inaccessibility of the icon by switching on the Always Show Universal Access Menu. When the Always Show Universal Access Menu is switched on, the icon is displayed on the top bar even in the situation when all options from this menu are switched off.
Switching On Always Show Universal Access Menu
- Open the Gnome settings menu, and click .
Switch on
Always Show Universal Access Menu.
Optional: Verify that the Universal Access Menu icon is displayed on the top bar even if all options from this menu are switched off.
11.3. Enabling the Festival Speech Synthesis System
By default, Orca uses the eSpeak speech synthesizer, but it also supports the Festival Speech Synthesis System. Both eSpeak and Festival Speech Synthesis System (Festival) synthesize voice differently. Some users might prefer Festival to the default eSpeak synthesizer. To enable Festival, follow these steps:
Installing Festival and Making it Running on Boot
Install Festival:
~]# yum install festival festival-freebsoft-utils
Make Festival running on boot:
Create a new
systemdunit file:Create a file in the
/etc/systemd/system/directory and make it executable.~]# touch /etc/systemd/system/festival.service ~]# chmod 664 /etc/systemd/system/festival.service
Ensure that the script in the
/usr/bin/festival_serverfile is used to run Festival. Add the following content to the/etc/systemd/system/festival.servicefile:[Unit] Description=Festival speech synthesis server [Service] ExecStart=/usr/bin/festival_server Type=simple
Notify
systemdthat a newfestival.servicefile exists:~]# systemctl daemon-reload ~]# systemctl start festival.service
Enable
festival.service:~]# systemctl enable festival.service
Choose a Voice for Festival
Festival provides multiples voices.
To make a voice available, install the relevant package from the following list:
- festvox-awb-arctic-hts
- festvox-bdl-arctic-hts
- festvox-clb-arctic-hts
- festvox-kal-diphone
- festvox-ked-diphone
- festvox-rms-arctic-hts
- festvox-slt-arctic-hts
- hispavoces-pal-diphone
- hispavoces-sfl-diphone
To see detailed information about a particular voice:
~]# yum info package_name
To make the required voice available, install the package with this voice and then reboot:
~]# yum install package_name ~]# reboot
Chapter 12. OpenSSH
SSH (Secure Shell) is a protocol which facilitates secure communications between two systems using a client-server architecture and allows users to log in to server host systems remotely. Unlike other remote communication protocols, such as FTP or Telnet, SSH encrypts the login session, rendering the connection difficult for intruders to collect unencrypted passwords.
The ssh program is designed to replace older, less secure terminal applications used to log in to remote hosts, such as telnet or rsh. A related program called scp replaces older programs designed to copy files between hosts, such as rcp. Because these older applications do not encrypt passwords transmitted between the client and the server, avoid them whenever possible. Using secure methods to log in to remote systems decreases the risks for both the client system and the remote host.
Red Hat Enterprise Linux includes the general OpenSSH package, openssh, as well as the OpenSSH server, openssh-server, and client, openssh-clients, packages. Note, the OpenSSH packages require the OpenSSL package openssl-libs, which installs several important cryptographic libraries, enabling OpenSSH to provide encrypted communications.
12.1. The SSH Protocol
12.1.1. Why Use SSH?
Potential intruders have a variety of tools at their disposal enabling them to disrupt, intercept, and re-route network traffic in an effort to gain access to a system. In general terms, these threats can be categorized as follows:
- Interception of communication between two systems
The attacker can be somewhere on the network between the communicating parties, copying any information passed between them. He may intercept and keep the information, or alter the information and send it on to the intended recipient.
This attack is usually performed using a packet sniffer, a rather common network utility that captures each packet flowing through the network, and analyzes its content.
- Impersonation of a particular host
Attacker’s system is configured to pose as the intended recipient of a transmission. If this strategy works, the user’s system remains unaware that it is communicating with the wrong host.
This attack can be performed using a technique known as DNS poisoning, or via so-called IP spoofing. In the first case, the intruder uses a cracked DNS server to point client systems to a maliciously duplicated host. In the second case, the intruder sends falsified network packets that appear to be from a trusted host.
Both techniques intercept potentially sensitive information and, if the interception is made for hostile reasons, the results can be disastrous. If SSH is used for remote shell login and file copying, these security threats can be greatly diminished. This is because the SSH client and server use digital signatures to verify their identity. Additionally, all communication between the client and server systems is encrypted. Attempts to spoof the identity of either side of a communication does not work, since each packet is encrypted using a key known only by the local and remote systems.
12.1.2. Main Features
The SSH protocol provides the following safeguards:
- No one can pose as the intended server
- After an initial connection, the client can verify that it is connecting to the same server it had connected to previously.
- No one can capture the authentication information
- The client transmits its authentication information to the server using strong, 128-bit encryption.
- No one can intercept the communication
- All data sent and received during a session is transferred using 128-bit encryption, making intercepted transmissions extremely difficult to decrypt and read.
Additionally, it also offers the following options:
- It provides secure means to use graphical applications over a network
- Using a technique called X11 forwarding, the client can forward X11 (X Window System) applications from the server.
- It provides a way to secure otherwise insecure protocols
- The SSH protocol encrypts everything it sends and receives. Using a technique called port forwarding, an SSH server can become a conduit to securing otherwise insecure protocols, like POP, and increasing overall system and data security.
- It can be used to create a secure channel
- The OpenSSH server and client can be configured to create a tunnel similar to a virtual private network for traffic between server and client machines.
- It supports the Kerberos authentication
- OpenSSH servers and clients can be configured to authenticate using the GSSAPI (Generic Security Services Application Program Interface) implementation of the Kerberos network authentication protocol.
12.1.3. Protocol Versions
Two varieties of SSH currently exist: version 1, and newer version 2. The OpenSSH suite under Red Hat Enterprise Linux 7 uses SSH version 2, which has an enhanced key exchange algorithm not vulnerable to the known exploit in version 1. In Red Hat Enterprise Linux 7, the OpenSSH suite does not support version 1 connections.
12.1.4. Event Sequence of an SSH Connection
The following series of events help protect the integrity of SSH communication between two hosts.
- A cryptographic handshake is made so that the client can verify that it is communicating with the correct server.
- The transport layer of the connection between the client and remote host is encrypted using a symmetric cipher.
- The client authenticates itself to the server.
- The client interacts with the remote host over the encrypted connection.
12.1.4.1. Transport Layer
The primary role of the transport layer is to facilitate safe and secure communication between the two hosts at the time of authentication and during subsequent communication. The transport layer accomplishes this by handling the encryption and decryption of data, and by providing integrity protection of data packets as they are sent and received. The transport layer also provides compression, speeding the transfer of information.
Once an SSH client contacts a server, key information is exchanged so that the two systems can correctly construct the transport layer. The following steps occur during this exchange:
- Keys are exchanged
- The public key encryption algorithm is determined
- The symmetric encryption algorithm is determined
- The message authentication algorithm is determined
- The hash algorithm is determined
During the key exchange, the server identifies itself to the client with a unique host key. If the client has never communicated with this particular server before, the server’s host key is unknown to the client and it does not connect. OpenSSH gets around this problem by accepting the server’s host key. This is done after the user is notified and has both accepted and verified the new host key. In subsequent connections, the server’s host key is checked against the saved version on the client, providing confidence that the client is indeed communicating with the intended server. If, in the future, the host key no longer matches, the user must remove the client’s saved version before a connection can occur.
It is possible for an attacker to masquerade as an SSH server during the initial contact since the local system does not know the difference between the intended server and a false one set up by an attacker. To help prevent this, verify the integrity of a new SSH server by contacting the server administrator before connecting for the first time or in the event of a host key mismatch.
SSH is designed to work with almost any kind of public key algorithm or encoding format. After an initial key exchange creates a hash value used for exchanges and a shared secret value, the two systems immediately begin calculating new keys and algorithms to protect authentication and future data sent over the connection.
After a certain amount of data has been transmitted using a given key and algorithm (the exact amount depends on the SSH implementation), another key exchange occurs, generating another set of hash values and a new shared secret value. Even if an attacker is able to determine the hash and shared secret value, this information is only useful for a limited period of time.
12.1.4.2. Authentication
Once the transport layer has constructed a secure tunnel to pass information between the two systems, the server tells the client the different authentication methods supported, such as using a private key-encoded signature or typing a password. The client then tries to authenticate itself to the server using one of these supported methods.
SSH servers and clients can be configured to allow different types of authentication, which gives each side the optimal amount of control. The server can decide which encryption methods it supports based on its security model, and the client can choose the order of authentication methods to attempt from the available options.
12.1.4.3. Channels
After a successful authentication over the SSH transport layer, multiple channels are opened via a technique called multiplexing[1]. Each of these channels handles communication for different terminal sessions and for forwarded X11 sessions.
Both clients and servers can create a new channel. Each channel is then assigned a different number on each end of the connection. When the client attempts to open a new channel, the clients sends the channel number along with the request. This information is stored by the server and is used to direct communication to that channel. This is done so that different types of sessions do not affect one another and so that when a given session ends, its channel can be closed without disrupting the primary SSH connection.
Channels also support flow-control, which allows them to send and receive data in an orderly fashion. In this way, data is not sent over the channel until the client receives a message that the channel is open.
The client and server negotiate the characteristics of each channel automatically, depending on the type of service the client requests and the way the user is connected to the network. This allows great flexibility in handling different types of remote connections without having to change the basic infrastructure of the protocol.
12.2. Configuring OpenSSH
12.2.1. Configuration Files
There are two different sets of configuration files: those for client programs (that is, ssh, scp, and sftp), and those for the server (the sshd daemon).
System-wide SSH configuration information is stored in the /etc/ssh/ directory as described in Table 12.1, “System-wide configuration files”. User-specific SSH configuration information is stored in ~/.ssh/ within the user’s home directory as described in Table 12.2, “User-specific configuration files”.
| File | Description |
|---|---|
|
| Contains Diffie-Hellman groups used for the Diffie-Hellman key exchange which is critical for constructing a secure transport layer. When keys are exchanged at the beginning of an SSH session, a shared, secret value is created which cannot be determined by either party alone. This value is then used to provide host authentication. |
|
|
The default SSH client configuration file. Note that it is overridden by |
|
|
The configuration file for the |
|
|
The ECDSA private key used by the |
|
|
The ECDSA public key used by the |
|
|
The RSA private key used by the |
|
|
The RSA public key used by the |
|
|
The PAM configuration file for the |
|
|
Configuration file for the |
| File | Description |
|---|---|
|
| Holds a list of authorized public keys for servers. When the client connects to a server, the server authenticates the client by checking its signed public key stored within this file. |
|
| Contains the ECDSA private key of the user. |
|
| The ECDSA public key of the user. |
|
|
The RSA private key used by |
|
|
The RSA public key used by |
|
| Contains host keys of SSH servers accessed by the user. This file is very important for ensuring that the SSH client is connecting to the correct SSH server. |
If setting up an SSH server, do not turn off the Privilege Separation feature by using the UsePrivilegeSeparation no directive in the /etc/ssh/sshd_config file. Turning off Privilege Separation disables many security features and exposes the server to potential security vulnerabilities and targeted attacks. For more information about UsePrivilegeSeparation, see the sshd_config(5) manual page or the What is the significance of UsePrivilegeSeparation directive in /etc/ssh/sshd_config file and how to test it ? Red Hat Knowledgebase article.
For information concerning various directives that can be used in the SSH configuration files, see the ssh_config(5) and sshd_config(5) manual pages.
12.2.2. Starting an OpenSSH Server
In order to run an OpenSSH server, you must have the openssh-server package installed. For more information on how to install new packages, see Section 9.2.4, “Installing Packages”.
To start the sshd daemon in the current session, type the following at a shell prompt as root:
~]# systemctl start sshd.service
To stop the running sshd daemon in the current session, use the following command as root:
~]# systemctl stop sshd.service
If you want the daemon to start automatically at boot time, type as root:
~]# systemctl enable sshd.service Created symlink from /etc/systemd/system/multi-user.target.wants/sshd.service to /usr/lib/systemd/system/sshd.service.
The sshd daemon depends on the network.target target unit, which is sufficient for static configured network interfaces and for default ListenAddress 0.0.0.0 options. To specify different addresses in the ListenAddress directive and to use a slower dynamic network configuration, add dependency on the network-online.target target unit to the sshd.service unit file. To achieve this, create the /etc/systemd/system/sshd.service.d/local.conf file with the following options:
[Unit] Wants=network-online.targetAfter=network-online.target
After this, reload the systemd manager configuration using the following command:
~]# systemctl daemon-reload
For more information on how to manage system services in Red Hat Enterprise Linux, see Chapter 10, Managing Services with systemd.
Note that if you reinstall the system, a new set of identification keys will be created. As a result, clients who had connected to the system with any of the OpenSSH tools before the reinstall will see the following message:
@@@@@@@@@@@@@@@@@@@@@@@@@@@@@@@@@@@@@@@@@@@@@@@@@@@@@@@@@@@ @: REMOTE HOST IDENTIFICATION HAS CHANGED! @ @@@@@@@@@@@@@@@@@@@@@@@@@@@@@@@@@@@@@@@@@@@@@@@@@@@@@@@@@@@ IT IS POSSIBLE THAT SOMEONE IS DOING SOMETHING NASTY! Someone could be eavesdropping on you right now (man-in-the-middle attack)! It is also possible that the RSA host key has just been changed.
To prevent this, you can backup the relevant files from the /etc/ssh/ directory. See Table 12.1, “System-wide configuration files” for a complete list, and restore the files whenever you reinstall the system.
12.2.3. Requiring SSH for Remote Connections
For SSH to be truly effective, using insecure connection protocols should be prohibited. Otherwise, a user’s password may be protected using SSH for one session, only to be captured later while logging in using Telnet. Some services to disable include telnet, rsh, rlogin, and vsftpd.
For information on how to configure the vsftpd service, see Section 16.2, “FTP”. To learn how to manage system services in Red Hat Enterprise Linux 7, read Chapter 10, Managing Services with systemd.
12.2.4. Using Key-based Authentication
To improve the system security even further, generate SSH key pairs and then enforce key-based authentication by disabling password authentication. To do so, open the /etc/ssh/sshd_config configuration file in a text editor such as vi or nano, and change the PasswordAuthentication option as follows:
PasswordAuthentication no
If you are working on a system other than a new default installation, check that PubkeyAuthentication no has not been set. If connected remotely, not using console or out-of-band access, testing the key-based log in process before disabling password authentication is advised.
To be able to use ssh, scp, or sftp to connect to the server from a client machine, generate an authorization key pair by following the steps below. Note that keys must be generated for each user separately.
To use key-based authentication with NFS-mounted home directories, enable the use_nfs_home_dirs SELinux boolean first:
~]# setsebool -P use_nfs_home_dirs 1
Red Hat Enterprise Linux 7 uses SSH Protocol 2 and RSA keys by default (see Section 12.1.3, “Protocol Versions” for more information).
If you complete the steps as root, only root will be able to use the keys.
If you reinstall your system and want to keep previously generated key pairs, backup the ~/.ssh/ directory. After reinstalling, copy it back to your home directory. This process can be done for all users on your system, including root.
12.2.4.1. Generating Key Pairs
To generate an RSA key pair for version 2 of the SSH protocol, follow these steps:
Generate an RSA key pair by typing the following at a shell prompt:
~]$ ssh-keygen -t rsa Generating public/private rsa key pair. Enter file in which to save the key (/home/USER/.ssh/id_rsa):
-
Press Enter to confirm the default location,
~/.ssh/id_rsa, for the newly created key. Enter a passphrase, and confirm it by entering it again when prompted to do so. For security reasons, avoid using the same password as you use to log in to your account.
After this, you will be presented with a message similar to this:
Your identification has been saved in /home/USER/.ssh/id_rsa. Your public key has been saved in /home/USER/.ssh/id_rsa.pub. The key fingerprint is: SHA256:UNIgIT4wfhdQH/K7yqmjsbZnnyGDKiDviv492U5z78Y \USER@penguin.example.com The key's randomart image is: +---[RSA 2048]----+ |o ..==o+. | |.+ . .=oo | | .o. ..o | | ... .. | | .S | |o . . | |o+ o .o+ .. | |+.++=o*.o .E | |BBBo+Bo. oo | +----[SHA256]-----+
NoteTo get an MD5 key fingerprint, which was the default fingerprint in previous versions, use the
ssh-keygencommand with the-E md5option.By default, the permissions of the
~/.ssh/directory are set torwx------or700expressed in octal notation. This is to ensure that only the USER can view the contents. If required, this can be confirmed with the following command:~]$
ls -ld ~/.sshdrwx------. 2 USER USER 54 Nov 25 16:56 /home/USER/.ssh/To copy the public key to a remote machine, issue a command in the following format:
ssh-copy-id user@hostnameThis will copy the most recently modified
~/.ssh/id*.pubpublic key if it is not yet installed. Alternatively, specify the public key’s file name as follows:ssh-copy-id -i ~/.ssh/id_rsa.pub user@hostname
This will copy the content of
~/.ssh/id_rsa.pubinto the~/.ssh/authorized_keysfile on the machine to which you want to connect. If the file already exists, the keys are appended to its end.
To generate an ECDSA key pair for version 2 of the SSH protocol, follow these steps:
Generate an ECDSA key pair by typing the following at a shell prompt:
~]$ ssh-keygen -t ecdsa Generating public/private ecdsa key pair. Enter file in which to save the key (/home/USER/.ssh/id_ecdsa):
-
Press Enter to confirm the default location,
~/.ssh/id_ecdsa, for the newly created key. Enter a passphrase, and confirm it by entering it again when prompted to do so. For security reasons, avoid using the same password as you use to log in to your account.
After this, you will be presented with a message similar to this:
Your identification has been saved in /home/USER/.ssh/id_ecdsa. Your public key has been saved in /home/USER/.ssh/id_ecdsa.pub. The key fingerprint is: SHA256:8BhZageKrLXM99z5f/AM9aPo/KAUd8ZZFPcPFWqK6+M \USER@penguin.example.com The key's randomart image is: +---[ECDSA 256]---+ | . . +=| | . . . = o.o| | + . * . o...| | = . . * . + +..| |. + . . So o * ..| | . o . .+ = ..| | o oo ..=. .| | ooo...+ | | .E++oo | +----[SHA256]-----+
By default, the permissions of the
~/.ssh/directory are set torwx------or700expressed in octal notation. This is to ensure that only the USER can view the contents. If required, this can be confirmed with the following command:~]$
ls -ld ~/.ssh~]$ ls -ld ~/.ssh/ drwx------. 2 USER USER 54 Nov 25 16:56 /home/USER/.ssh/To copy the public key to a remote machine, issue a command in the following format:
ssh-copy-id USER@hostnameThis will copy the most recently modified
~/.ssh/id*.pubpublic key if it is not yet installed. Alternatively, specify the public key’s file name as follows:ssh-copy-id -i ~/.ssh/id_ecdsa.pub USER@hostname
This will copy the content of
~/.ssh/id_ecdsa.pubinto the~/.ssh/authorized_keyson the machine to which you want to connect. If the file already exists, the keys are appended to its end.
See Section 12.2.4.2, “Configuring ssh-agent” for information on how to set up your system to remember the passphrase.
The private key is for your personal use only, and it is important that you never give it to anyone.
12.2.4.2. Configuring ssh-agent
To store your passphrase so that you do not have to enter it each time you initiate a connection with a remote machine, you can use the ssh-agent authentication agent. If you are running GNOME, you can configure it to prompt you for your passphrase whenever you log in and remember it during the whole session. Otherwise you can store the passphrase for a certain shell prompt.
To save your passphrase during your GNOME session, follow these steps:
- Make sure you have the openssh-askpass package installed. If not, see Section 9.2.4, “Installing Packages” for more information on how to install new packages in Red Hat Enterprise Linux.
Press the Super key to enter the Activities Overview, type
Startup Applicationsand then press Enter. The Startup Applications Preferences tool appears. The tab containing a list of available startup programs will be shown by default. The Super key appears in a variety of guises, depending on the keyboard and other hardware, but often as either the Windows or Command key, and typically to the left of the Space bar.Figure 12.1. Startup Applications Preferences
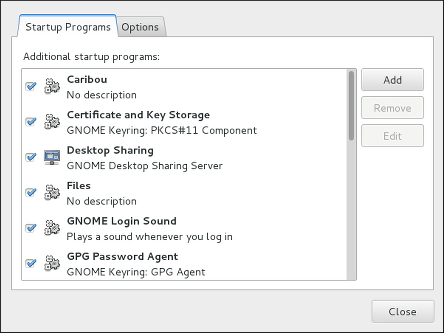
Click the button on the right, and enter
/usr/bin/ssh-addin theCommandfield.Figure 12.2. Adding new application
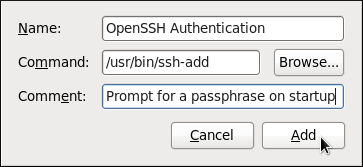
Click and make sure the checkbox next to the newly added item is selected.
Figure 12.3. Enabling the application
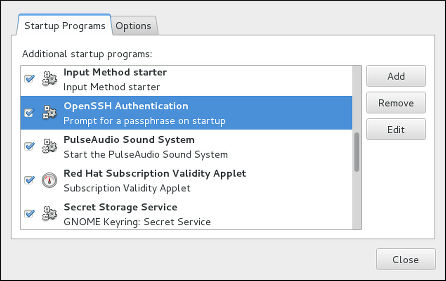
Log out and then log back in. A dialog box will appear prompting you for your passphrase. From this point on, you should not be prompted for a password by
ssh,scp, orsftp.Figure 12.4. Entering a passphrase
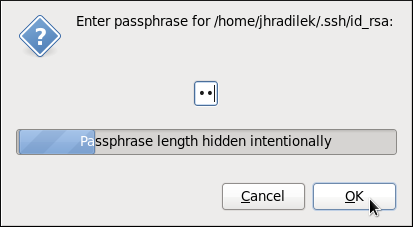
To save your passphrase for a certain shell prompt, use the following command:
~]$ ssh-add Enter passphrase for /home/USER/.ssh/id_rsa:
Note that when you log out, your passphrase will be forgotten. You must execute the command each time you log in to a virtual console or a terminal window.
12.3. OpenSSH Clients
To connect to an OpenSSH server from a client machine, you must have the openssh-clients package installed (see Section 9.2.4, “Installing Packages” for more information on how to install new packages in Red Hat Enterprise Linux).
12.3.1. Using the ssh Utility
The ssh utility allows you to log in to a remote machine and execute commands there. It is a secure replacement for the rlogin, rsh, and telnet programs.
Similarly to the telnet command, log in to a remote machine by using the following command:
ssh hostname
For example, to log in to a remote machine named penguin.example.com, type the following at a shell prompt:
~]$ ssh penguin.example.comThis will log you in with the same user name you are using on the local machine. If you want to specify a different user name, use a command in the following form:
ssh username@hostname
For example, to log in to penguin.example.com as USER, type:
~]$ ssh USER@penguin.example.comThe first time you initiate a connection, you will be presented with a message similar to this:
The authenticity of host 'penguin.example.com' can't be established. ECDSA key fingerprint is SHA256:vuGKK9dsW34zrZzwjl5g+vOE6EZQvHRQ8zObKYO2mW4. ECDSA key fingerprint is MD5:7e:15:c3:03:4d:e1:dd:ee:99:dc:3e:f4:b9:67:6b:62. Are you sure you want to continue connecting (yes/no)?
Users should always check if the fingerprint is correct before answering the question in this dialog. The user can ask the administrator of the server to confirm the key is correct. This should be done in a secure and previously agreed way. If the user has access to the server’s host keys, the fingerprint can be checked by using the ssh-keygen command as follows:
~]# ssh-keygen -l -f /etc/ssh/ssh_host_ecdsa_key.pub SHA256:vuGKK9dsW34zrZzwjl5g+vOE6EZQvHRQ8zObKYO2mW4
To get an MD5 key fingerprint, which was the default fingerprint in previous versions, use the ssh-keygen command with the -E md5 option, for example:
~]# ssh-keygen -l -f /etc/ssh/ssh_host_ecdsa_key.pub -EM md5 MD5:7e:15:c3:03:4d:e1:dd:ee:99:dc:3e:f4:b9:67:6b:62
Type yes to accept the key and confirm the connection. You will see a notice that the server has been added to the list of known hosts, and a prompt asking for your password:
Warning: Permanently added 'penguin.example.com' (ECDSA) to the list of known hosts. \USER@penguin.example.com's password:
If the SSH server’s host key changes, the client notifies the user that the connection cannot proceed until the server’s host key is deleted from the ~/.ssh/known_hosts file. Before doing this, however, contact the system administrator of the SSH server to verify the server is not compromised.
To remove a key from the ~/.ssh/known_hosts file, issue a command as follows:
~]# ssh-keygen -R penguin.example.com
# Host penguin.example.com found: line 15 type ECDSA
/home/USER/.ssh/known_hosts updated.
Original contents retained as /home/USER/.ssh/known_hosts.oldAfter entering the password, you will be provided with a shell prompt for the remote machine.
Alternatively, the ssh program can be used to execute a command on the remote machine without logging in to a shell prompt:
ssh username@hostname command
For example, the /etc/redhat-release file provides information about the Red Hat Enterprise Linux version. To view the contents of this file on penguin.example.com, type:
~]$ ssh USER@penguin.example.com cat /etc/redhat-release
USER@penguin.example.com's password:
Red Hat Enterprise Linux Server release 7.0 (Maipo)After you enter the correct password, the user name will be displayed, and you will return to your local shell prompt.
12.3.2. Using the scp Utility
scp can be used to transfer files between machines over a secure, encrypted connection. In its design, it is very similar to rcp.
To transfer a local file to a remote system, use a command in the following form:
scp localfile username@hostname:remotefile
For example, if you want to transfer taglist.vim to a remote machine named penguin.example.com, type the following at a shell prompt:
~]$ scp taglist.vim USER@penguin.example.com:.vim/plugin/taglist.vim
USER@penguin.example.com's password:
taglist.vim 100% 144KB 144.5KB/s 00:00
Multiple files can be specified at once. To transfer the contents of .vim/plugin/ to the same directory on the remote machine penguin.example.com, type the following command:
~]$ scp .vim/plugin/* \USER@penguin.example.com:.vim/plugin/ \USER@penguin.example.com's password: closetag.vim 100% 13KB 12.6KB/s 00:00 snippetsEmu.vim 100% 33KB 33.1KB/s 00:00 taglist.vim 100% 144KB 144.5KB/s 00:00
To transfer a remote file to the local system, use the following syntax:
scp username@hostname:remotefile localfile
For instance, to download the .vimrc configuration file from the remote machine, type:
~]$ scp USER@penguin.example.com:.vimrc .vimrc
USER@penguin.example.com's password:
.vimrc 100% 2233 2.2KB/s 00:0012.3.3. Using the sftp Utility
The sftp utility can be used to open a secure, interactive FTP session. In its design, it is similar to ftp except that it uses a secure, encrypted connection.
To connect to a remote system, use a command in the following form:
sftp username@hostname
For example, to log in to a remote machine named penguin.example.com with USER as a user name, type:
~]$ sftp USER@penguin.example.com
USER@penguin.example.com's password:
Connected to penguin.example.com.
sftp>
After you enter the correct password, you will be presented with a prompt. The sftp utility accepts a set of commands similar to those used by ftp (see Table 12.3, “A selection of available sftp commands”).
| Command | Description |
|---|---|
|
| List the content of a remote directory. If none is supplied, a current working directory is used by default. |
|
| Change the remote working directory to directory. |
|
| Create a remote directory. |
|
| Remove a remote directory. |
|
| Transfer localfile to a remote machine. |
|
| Transfer remotefile from a remote machine. |
For a complete list of available commands, see the sftp(1) manual page.
12.4. More Than a Secure Shell
A secure command-line interface is just the beginning of the many ways SSH can be used. Given the proper amount of bandwidth, X11 sessions can be directed over an SSH channel. Or, by using TCP/IP forwarding, previously insecure port connections between systems can be mapped to specific SSH channels.
12.4.1. X11 Forwarding
To open an X11 session over an SSH connection, use a command in the following form:
ssh -Y username@hostname
For example, to log in to a remote machine named penguin.example.com with USER as a user name, type:
~]$ ssh -Y USER@penguin.example.com
USER@penguin.example.com's password:When an X program is run from the secure shell prompt, the SSH client and server create a new secure channel, and the X program data is sent over that channel to the client machine transparently.
Note that the X Window system must be installed on the remote system before X11 forwarding can take place. Enter the following command as root to install the X11 package group:
~]# yum group install "X Window System"
For more information on package groups, see Section 9.3, “Working with Package Groups”.
X11 forwarding can be very useful. For example, X11 forwarding can be used to create a secure, interactive session of the Print Settings utility. To do this, connect to the server using ssh and type:
~]$ system-config-printer &The Print Settings tool will appear, allowing the remote user to safely configure printing on the remote system.
12.4.2. Port Forwarding
SSH can secure otherwise insecure TCP/IP protocols via port forwarding. When using this technique, the SSH server becomes an encrypted conduit to the SSH client.
Port forwarding works by mapping a local port on the client to a remote port on the server. SSH can map any port from the server to any port on the client. Port numbers do not need to match for this technique to work.
Setting up port forwarding to listen on ports below 1024 requires root level access.
To create a TCP/IP port forwarding channel which listens for connections on the localhost, use a command in the following form:
ssh -L local-port:remote-hostname:remote-port username@hostname
For example, to check email on a server called mail.example.com using POP3 through an encrypted connection, use the following command:
~]$ ssh -L 1100:mail.example.com:110 mail.example.com
Once the port forwarding channel is in place between the client machine and the mail server, direct a POP3 mail client to use port 1100 on the localhost to check for new email. Any requests sent to port 1100 on the client system will be directed securely to the mail.example.com server.
If mail.example.com is not running an SSH server, but another machine on the same network is, SSH can still be used to secure part of the connection. However, a slightly different command is necessary:
~]$ ssh -L 1100:mail.example.com:110 other.example.com
In this example, POP3 requests from port 1100 on the client machine are forwarded through the SSH connection on port 22 to the SSH server, other.example.com. Then, other.example.com connects to port 110 on mail.example.com to check for new email. Note that when using this technique, only the connection between the client system and other.example.com SSH server is secure.
The OpenSSH suite also provides local and remote port forwarding of UNIX domain sockets. To forward UNIX domain sockets over the network to another machine, use the ssh -L local-socket:remote-socket username@hostname command, for example:
~]$ ssh -L /var/mysql/mysql.sock:/var/mysql/mysql.sock username@hostnamePort forwarding can also be used to get information securely through network firewalls. If the firewall is configured to allow SSH traffic via its standard port (that is, port 22) but blocks access to other ports, a connection between two hosts using the blocked ports is still possible by redirecting their communication over an established SSH connection.
Using port forwarding to forward connections in this manner allows any user on the client system to connect to that service. If the client system becomes compromised, the attacker also has access to forwarded services.
System administrators concerned about port forwarding can disable this functionality on the server by specifying a No parameter for the AllowTcpForwarding line in /etc/ssh/sshd_config and restarting the sshd service.
12.5. Additional Resources
For more information on how to configure or connect to an OpenSSH server on Red Hat Enterprise Linux, see the resources listed below.
Installed Documentation
-
sshd(8) — The manual page for thesshddaemon documents available command line options and provides a complete list of supported configuration files and directories. -
ssh(1) — The manual page for thesshclient application provides a complete list of available command line options and supported configuration files and directories. -
scp(1) — The manual page for thescputility provides a more detailed description of this utility and its usage. -
sftp(1) — The manual page for thesftputility. -
ssh-keygen(1) — The manual page for thessh-keygenutility documents in detail how to use it to generate, manage, and convert authentication keys used byssh. -
ssh_config(5) — The manual page namedssh_configdocuments available SSH client configuration options. -
sshd_config(5) — The manual page namedsshd_configprovides a full description of available SSH daemon configuration options.
Online Documentation
- OpenSSH Home Page — The OpenSSH home page containing further documentation, frequently asked questions, links to the mailing lists, bug reports, and other useful resources.
- OpenSSL Home Page — The OpenSSL home page containing further documentation, frequently asked questions, links to the mailing lists, and other useful resources.
See Also
-
Chapter 6, Gaining Privileges documents how to gain administrative privileges by using the
suandsudocommands. -
Chapter 10, Managing Services with systemd provides more information on systemd and documents how to use the
systemctlcommand to manage system services.
Chapter 13. TigerVNC
TigerVNC (Tiger Virtual Network Computing) is a system for graphical desktop sharing which allows you to remotely control other computers.
TigerVNC works on the client-server principle: a server shares its output (vncserver) and a client (vncviewer) connects to the server.
Unlike in previous Red Hat Enterprise Linux distributions, TigerVNC in Red Hat Enterprise Linux 7 uses the systemd system management daemon for its configuration. The /etc/sysconfig/vncserver configuration file has been replaced by /etc/systemd/system/vncserver@.service.
13.1. VNC Server
vncserver is a utility which starts a VNC (Virtual Network Computing) desktop. It runs Xvnc with appropriate options and starts a window manager on the VNC desktop. vncserver allows users to run separate sessions in parallel on a machine which can then be accessed by any number of clients from anywhere.
13.1.1. Installing VNC Server
To install the TigerVNC server, issue the following command as root:
~]# yum install tigervnc-server
13.1.2. Configuring VNC Server
The VNC server can be configured to start a display for one or more users, provided that accounts for the users exist on the system, with optional parameters such as for display settings, network address and port, and security settings.
Configuring a VNC Display for a Single User
A configuration file named
/etc/systemd/system/vncserver@.serviceis required. To create this file, copy the/usr/lib/systemd/system/vncserver@.servicefile asroot:~]#
cp /usr/lib/systemd/system/vncserver@.service /etc/systemd/system/vncserver@.serviceThere is no need to include the display number in the file name because
systemdautomatically creates the appropriately named instance in memory on demand, replacing'%i'in the service file by the display number. For a single user it is not necessary to rename the file. For multiple users, a uniquely named service file for each user is required, for example, by adding the user name to the file name in some way. See Section 13.1.2.1, “Configuring VNC Server for Two Users” for details.Edit
/etc/systemd/system/vncserver@.serviceand in the following line, located in the [Services] section, replace USER with the user name for whom you want to set the VNC server. Leave the remaining lines of the file unmodified.ExecStart=/usr/bin/vncserver_wrapper <USER> %i
NoteThe default size of the VNC desktop is 1024x768.
A user’s VNC session can be further configured using the
~/.vnc/configfile.For example, to change the VNC window size, add the following line:
geometry= <WIDTH> x <HEIGHT>
- Save the changes.
To make the changes take effect immediately, issue the following command:
~]#
systemctl daemon-reloadSet the password for the user or users defined in the configuration file. Note that you need to switch from
rootto USER first.~]# su - USER ~]$
vncpasswdPassword: Verify:ImportantThe stored password is not encrypted; anyone who has access to the password file can find the plain-text password.
Proceed to Section 13.1.3, “Starting VNC Server”.
13.1.2.1. Configuring VNC Server for Two Users
If you want to configure more than one user on the same machine, create different template-type service files, one for each user.
-
Create two service files, for example
vncserver-USER_1@.serviceandvncserver-USER_2@.service. In both these files substitute USER with the correct user name. Set passwords for both users:
~]$ su - USER_1 ~]$
vncpasswdPassword: Verify: ~]$ su - USER_2 ~]$vncpasswdPassword: Verify:
13.1.3. Starting VNC Server
To start or enable the service, specify the display number directly in the command. The file configured above in Configuring a VNC Display for a Single User works as a template, in which %i is substituted with the display number by systemd. With a valid display number, execute the following command:
~]# systemctl start vncserver@:display_number.service
You can also enable the service to start automatically at system start. Then, when you log in, vncserver is automatically started. As root, issue a command as follows:
~]# systemctl enable vncserver@:display_number.service
At this point, other users are able to use a VNC viewer program to connect to the VNC server using the display number and password defined. Provided a graphical desktop is installed, an instance of that desktop will be displayed. It will not be the same instance as that currently displayed on the target machine.
13.1.3.1. Configuring VNC Server for Two Users and Two Different Displays
For the two configured VNC servers, vncserver-USER_1@.service and vncserver-USER_2@.service, you can enable different display numbers. For example, the following commands will cause a VNC server for USER_1 to start on display 3, and a VNC server for USER_2 to start on display 5:
~]# systemctl start vncserver-USER_1@:3.service ~]# systemctl start vncserver-USER_2@:5.service
13.1.4. VNC setup based on xinetd with XDMCP for GDM
VNC setup based on xinetd with X Display Manager Control Protocol (XDMCP) for GDM is a useful setup for client systems that consist mainly of thin clients. After the setup, clients are able to access the GDM login window and log in to any system account. The prerequisite for the setup is that the gdm, vnc, vnc-server & and xinetd packages are installed.
~]# yum install gdm tigervnc tigervnc-server xinetd
Service xinetd must be enabled.
~]# systemctl enable xinetd.service
System default target unit should be graphical.target. To get the currently set default target unit, use:
~]# systemctl get-default
The default target unit can be changed by using:
~]# systemctl set-default target_name
Accessing the GDM login window and logging in
Set up GDM to enable XDMCP by editing the
/etc/gdm/custom.confconfiguration file:[xdmcp] Enable=true
Create a file called
/etc/xinetd.d/xvncserverwith the following content:service service_name { disable = no protocol = tcp socket_type = stream wait = no user = nobody server = /usr/bin/Xvnc server_args = -inetd -query localhost -once -geometry selected_geometry -depth selected_depth securitytypes=none }
In the server_args section, the
-query localhostoption will make each Xvnc instance query localhost for an xdmcp session. The-depthoption specifies the pixel depth (in bits) of the VNC desktop to be created. Acceptable values are 8, 15, 16 and 24 - any other values are likely to cause unpredictable behavior of applications.Edit file
/etc/servicesto have the service defined. To do this, append the following snippet to the/etc/servicesfile:# VNC xinetd GDM base service_name 5950/tcpTo ensure that the configuration changes take effect, reboot the machine.
Alternatively, you can run the following. Change init levels to 3 and back to 5 to force gdm to reload.
# init 3 # init 5
Verify that gdm is listening on UDP port 177.
# netstat -anu|grep 177 udp 0 0 0.0.0.0:177 0.0.0.0:*
Restart the xinetd service.
~]# systemctl restart xinetd.service
Verify that the xinetd service has loaded the new services.
# netstat -anpt|grep 595 tcp 0 0 :::5950 :::* LISTEN 3119/xinetd
Test the setup using a vncviewer command:
# vncviewer localhost:5950
The command will launch a VNC session to the localhost where no password is asked. You will see a GDM login screen, and you will be able to log in to any user account on the system with a valid user name and password. Then you can run the same test on remote connections.
Configure firewall for the setup. Run the firewall configuration tool and add TCP port 5950 to allow incoming connections to the system.
~]# firewall-cmd --permanent --zone=public --add-port=5950/tcp ~]# firewall-cmd --reload
13.1.5. Terminating a VNC Session
Similarly to enabling the vncserver service, you can disable the automatic start of the service at system start:
~]# systemctl disable vncserver@:display_number.service
Or, when your system is running, you can stop the service by issuing the following command as root:
~]# systemctl stop vncserver@:display_number.service
13.2. Sharing an Existing Desktop
By default a logged in user has a desktop provided by X Server on display 0. A user can share their desktop using the TigerVNC server x0vncserver.
Sharing an X Desktop
To share the desktop of a logged in user, using the x0vncserver, proceed as follows:
Enter the following command as
root~]# yum install tigervnc-server
Set the VNC password for the user:
~]$
vncpasswdPassword: Verify:Enter the following command as that user:
~]$
x0vncserver -PasswordFile=.vnc/passwd -AlwaysShared=1
Provided the firewall is configured to allow connections to port 5900, the remote viewer can now connect to display 0, and view the logged in users desktop. See Section 13.3.2.1, “Configuring the Firewall for VNC” for information on how to configure the firewall.
13.3. VNC Viewer
vncviewer is a program which shows the graphical user interfaces and controls the vncserver remotely.
For operating the vncviewer, there is a pop-up menu containing entries which perform various actions such as switching in and out of full-screen mode or quitting the viewer. Alternatively, you can operate vncviewer through the terminal. Enter vncviewer -h on the command line to list vncviewer's parameters.
13.3.1. Installing VNC Viewer
To install the TigerVNC client, vncviewer, issue the following command as root:
~]# yum install tigervnc
13.3.2. Connecting to VNC Server
Once the VNC server is configured, you can connect to it from any VNC viewer.
Connecting to a VNC Server Using a GUI
-
Enter the
vncviewercommand with no arguments, theVNC Viewer: Connection Detailsutility appears. It prompts for a VNC server to connect to. If required, to prevent disconnecting any existing VNC connections to the same display, select the option to allow sharing of the desktop as follows:
- Select the button.
-
Select the
Misc.tab. -
Select the
Sharedbutton. - Press OK to return to the main menu.
Enter an address and display number to connect to:
address:display_number
- Press Connect to connect to the VNC server display.
You will be prompted to enter the VNC password. This will be the VNC password for the user corresponding to the display number unless a global default VNC password was set.
A window appears showing the VNC server desktop. Note that this is not the desktop the normal user sees, it is an Xvnc desktop.
Connecting to a VNC Server Using the CLI
Enter the
viewercommand with the address and display number as arguments:vncviewer address:display_number
Where address is an
IPaddress or host name.- Authenticate yourself by entering the VNC password. This will be the VNC password for the user corresponding to the display number unless a global default VNC password was set.
- A window appears showing the VNC server desktop. Note that this is not the desktop the normal user sees, it is the Xvnc desktop.
13.3.2.1. Configuring the Firewall for VNC
When using a non-encrypted connection, firewalld might block the connection. To allow firewalld to pass the VNC packets, you can open specific ports to TCP traffic. When using the -via option, traffic is redirected over SSH which is enabled by default in firewalld.
The default port of VNC server is 5900. To reach the port through which a remote desktop will be accessible, sum the default port and the user’s assigned display number. For example, for the second display: 2 + 5900 = 5902.
For displays 0 to 3, make use of firewalld's support for the VNC service by means of the service option as described below. Note that for display numbers greater than 3, the corresponding ports will have to be opened specifically as explained in Opening Ports in firewalld.
Enabling VNC Service in firewalld
Run the following command to see the information concerning
firewalldsettings:~]$ firewall-cmd --list-allTo allow all VNC connections from a specific address, use a command as follows:
~]# firewall-cmd --add-rich-rule='rule family="ipv4" source address="192.168.122.116" service name=vnc-server accept' success
Note that these changes will not persist after the next system start. To make permanent changes to the firewall, repeat the commands adding the
--permanentoption. See the Red Hat Enterprise Linux 7 Security Guide for more information on the use of firewall rich language commands.To verify the above settings, use a command as follows:
~]# firewall-cmd --list-all public (default, active) interfaces: bond0 bond0.192 sources: services: dhcpv6-client ssh ports: masquerade: no forward-ports: icmp-blocks: rich rules: rule family="ipv4" source address="192.168.122.116" service name="vnc-server" accept
To open a specific port or range of ports make use of the --add-port option to the firewall-cmd command Line tool. For example, VNC display 4 requires port 5904 to be opened for TCP traffic.
Opening Ports in firewalld
To open a port for
TCPtraffic in the public zone, issue a command asrootas follows:~]# firewall-cmd --zone=public --add-port=5904/tcp success
To view the ports that are currently open for the public zone, issue a command as follows:
~]# firewall-cmd --zone=public --list-ports 5904/tcp
A port can be removed using the firewall-cmd --zone=zone --remove-port=number/protocol command.
Note that these changes will not persist after the next system start. To make permanent changes to the firewall, repeat the commands adding the --permanent option. For more information on opening and closing ports in firewalld, see the Red Hat Enterprise Linux 7 Security Guide.
13.3.3. Connecting to VNC Server Using SSH
VNC is a clear text network protocol with no security against possible attacks on the communication. To make the communication secure, you can encrypt your server-client connection by using the -via option. This will create an SSH tunnel between the VNC server and the client.
The format of the command to encrypt a VNC server-client connection is as follows:
vncviewer -via user@host:display_number
Example 13.1. Using the -via Option
To connect to a VNC server using
SSH, enter a command as follows:~]$ vncviewer -via USER_2@192.168.2.101:3
- When you are prompted to, type the password, and confirm by pressing Enter.
- A window with a remote desktop appears on your screen.
Restricting VNC Access
If you prefer only encrypted connections, you can prevent unencrypted connections altogether by using the -localhost option in the systemd.service file, the ExecStart line:
ExecStart=/usr/sbin/runuser -l user -c "/usr/bin/vncserver -localhost %i"
This will stop vncserver from accepting connections from anything but the local host and port-forwarded connections sent using SSH as a result of the -via option.
For more information on using SSH, see Chapter 12, OpenSSH.
13.4. Additional Resources
For more information about TigerVNC, see the resources listed below.
Installed Documentation
-
vncserver(1)— The manual page for the VNC server utility. -
vncviewer(1)— The manual page for the VNC viewer. -
vncpasswd(1)— The manual page for the VNC password command. -
Xvnc(1)— The manual page for the Xvnc server configuration options. -
x0vncserver(1)— The manual page for theTigerVNCserver for sharing existing X servers.
Part V. Servers
This part discusses various topics related to servers such as how to set up a web server or share files and directories over a network.
Chapter 14. Web Servers
A web server is a network service that serves content to a client over the web. This typically means web pages, but any other documents can be served as well. Web servers are also known as HTTP servers, as they use the hypertext transport protocol (HTTP).
The web servers available in Red Hat Enterprise Linux 7 are:
- Apache HTTP Server
- nginx
Note that the nginx web server is available only as a Software Collection for Red Hat Enterprise Linux 7. See the Red Hat Software Collections Release Notes for information regarding getting access to nginx, usage of Software Collections, and other.
14.1. The Apache HTTP Server
This section focuses on the Apache HTTP Server 2.4, httpd, an open source web server developed by the Apache Software Foundation.
If you are upgrading from a previous release of Red Hat Enterprise Linux, you will need to update the httpd service configuration accordingly. This section reviews some of the newly added features, outlines important changes between Apache HTTP Server 2.4 and version 2.2, and guides you through the update of older configuration files.
14.1.1. Notable Changes
The Apache HTTP Server in Red Hat Enterprise Linux 7 has the following changes compared to Red Hat Enterprise Linux 6:
- httpd Service Control
With the migration away from SysV init scripts, server administrators should switch to using the
apachectlandsystemctlcommands to control the service, in place of theservicecommand. The following examples are specific to thehttpdservice.The command:
service httpd graceful
is replaced by
apachectl graceful
The
systemdunit file forhttpdhas different behavior from the init script as follows:- A graceful restart is used by default when the service is reloaded.
A graceful stop is used by default when the service is stopped.
The command:
service httpd configtest
is replaced by
apachectl configtest
- Private /tmp
-
To enhance system security, the
systemdunit file runs thehttpddaemon using a private/tmpdirectory, separate to the system/tmpdirectory. - Configuration Layout
Configuration files which load modules are now placed in the
/etc/httpd/conf.modules.d/directory. Packages that provide additional loadable modules forhttpd, such as php, will place a file in this directory. AnIncludedirective before the main section of the/etc/httpd/conf/httpd.conffile is used to include files within the/etc/httpd/conf.modules.d/directory. This means any configuration files withinconf.modules.d/are processed before the main body ofhttpd.conf. AnIncludeOptionaldirective for files within the/etc/httpd/conf.d/directory is placed at the end of thehttpd.conffile. This means the files within/etc/httpd/conf.d/are now processed after the main body ofhttpd.conf.Some additional configuration files are provided by the httpd package itself:
-
/etc/httpd/conf.d/autoindex.conf— This configures mod_autoindex directory indexing. -
/etc/httpd/conf.d/userdir.conf— This configures access to user directories, for example http://example.com/~username/; such access is disabled by default for security reasons. -
/etc/httpd/conf.d/welcome.conf— As in previous releases, this configures the welcome page displayed for http://localhost/ when no content is present.
-
- Default Configuration
-
A minimal
httpd.conffile is now provided by default. Many common configuration settings, such asTimeoutorKeepAliveare no longer explicitly configured in the default configuration; hard-coded settings will be used instead, by default. The hard-coded default settings for all configuration directives are specified in the manual. See the section called “Installable Documentation” for more information. - Incompatible Syntax Changes
-
If migrating an existing configuration from httpd 2.2 to httpd 2.4, a number of backwards-incompatible changes to the
httpdconfiguration syntax were made which will require changes. See the following Apache document for more information on upgrading http://httpd.apache.org/docs/2.4/upgrading.html - Processing Model
In previous releases of Red Hat Enterprise Linux, different multi-processing models (MPM) were made available as different
httpdbinaries: the forked model, "prefork", as/usr/sbin/httpd, and the thread-based model "worker" as/usr/sbin/httpd.worker.In Red Hat Enterprise Linux 7, only a single
httpdbinary is used, and three MPMs are available as loadable modules: worker, prefork (default), and event. Edit the configuration file/etc/httpd/conf.modules.d/00-mpm.confas required, by adding and removing the comment character#so that only one of the three MPM modules is loaded.- Packaging Changes
The LDAP authentication and authorization modules are now provided in a separate sub-package, mod_ldap. The new module mod_session and associated helper modules are provided in a new sub-package, mod_session. The new modules mod_proxy_html and mod_xml2enc are provided in a new sub-package, mod_proxy_html. These packages are all in the Optional channel.
NoteBefore subscribing to the Optional and Supplementary channels see the Scope of Coverage Details. If you decide to install packages from these channels, follow the steps documented in the article called How to access Optional and Supplementary channels, and -devel packages using Red Hat Subscription Manager (RHSM)? on the Red Hat Customer Portal.
- Packaging Filesystem Layout
The
/var/cache/mod_proxy/directory is no longer provided; instead, the/var/cache/httpd/directory is packaged with aproxyandsslsubdirectory.Packaged content provided with
httpdhas been moved from/var/www/to/usr/share/httpd/:-
/usr/share/httpd/icons/— The directory containing a set of icons used with directory indices, previously contained in/var/www/icons/, has moved to/usr/share/httpd/icons/. Available at http://localhost/icons/ in the default configuration; the location and the availability of the icons is configurable in the/etc/httpd/conf.d/autoindex.conffile. -
/usr/share/httpd/manual/— The/var/www/manual/has moved to/usr/share/httpd/manual/. This directory, contained in the httpd-manual package, contains the HTML version of the manual forhttpd. Available at http://localhost/manual/ if the package is installed, the location and the availability of the manual is configurable in the/etc/httpd/conf.d/manual.conffile. -
/usr/share/httpd/error/— The/var/www/error/has moved to/usr/share/httpd/error/. Custom multi-language HTTP error pages. Not configured by default, the example configuration file is provided at/usr/share/doc/httpd-VERSION/httpd-multilang-errordoc.conf.
-
- Authentication, Authorization and Access Control
-
The configuration directives used to control authentication, authorization and access control have changed significantly. Existing configuration files using the
Order,DenyandAllowdirectives should be adapted to use the newRequiresyntax. See the following Apache document for more information http://httpd.apache.org/docs/2.4/howto/auth.html - suexec
-
To improve system security, the suexec binary is no longer installed as if by the
rootuser; instead, it has file system capability bits set which allow a more restrictive set of permissions. In conjunction with this change, the suexec binary no longer uses the/var/log/httpd/suexec.loglogfile. Instead, log messages are sent to syslog; by default these will appear in the/var/log/securelog file. - Module Interface
Third-party binary modules built against httpd 2.2 are not compatible with httpd 2.4 due to changes to the
httpdmodule interface. Such modules will need to be adjusted as necessary for the httpd 2.4 module interface, and then rebuilt. A detailed list of the API changes in version2.4is available here: http://httpd.apache.org/docs/2.4/developer/new_api_2_4.html.The apxs binary used to build modules from source has moved from
/usr/sbin/apxsto/usr/bin/apxs.- Removed modules
List of
httpdmodules removed in Red Hat Enterprise Linux 7:- mod_auth_mysql, mod_auth_pgsql
- httpd 2.4 provides SQL database authentication support internally in the mod_authn_dbd module.
- mod_perl
- mod_perl is not officially supported with httpd 2.4 by upstream.
- mod_authz_ldap
- httpd 2.4 provides LDAP support in sub-package mod_ldap using mod_authnz_ldap.
14.1.2. Updating the Configuration
To update the configuration files from the Apache HTTP Server version 2.2, take the following steps:
-
Make sure all module names are correct, since they may have changed. Adjust the
LoadModuledirective for each module that has been renamed. - Recompile all third party modules before attempting to load them. This typically means authentication and authorization modules.
-
If you use the
mod_userdirmodule, make sure theUserDirdirective indicating a directory name (typicallypublic_html) is provided. - If you use the Apache HTTP Secure Server, see Section 14.1.8, “Enabling the mod_ssl Module” for important information on enabling the Secure Sockets Layer (SSL) protocol.
Note that you can check the configuration for possible errors by using the following command:
~]# apachectl configtest Syntax OK
For more information on upgrading the Apache HTTP Server configuration from version 2.2 to 2.4, see http://httpd.apache.org/docs/2.4/upgrading.html.
14.1.3. Running the httpd Service
This section describes how to start, stop, restart, and check the current status of the Apache HTTP Server. To be able to use the httpd service, make sure you have the httpd installed. You can do so by using the following command:
~]# yum install httpd
For more information on the concept of targets and how to manage system services in Red Hat Enterprise Linux in general, see Chapter 10, Managing Services with systemd.
14.1.3.1. Starting the Service
To run the httpd service, type the following at a shell prompt as root:
~]# systemctl start httpd.service
If you want the service to start automatically at boot time, use the following command:
~]# systemctl enable httpd.service Created symlink from /etc/systemd/system/multi-user.target.wants/httpd.service to /usr/lib/systemd/system/httpd.service.
If running the Apache HTTP Server as a secure server, a password may be required after the machine boots if using an encrypted private SSL key.
14.1.3.2. Stopping the Service
To stop the running httpd service, type the following at a shell prompt as root:
~]# systemctl stop httpd.service
To prevent the service from starting automatically at boot time, type:
~]# systemctl disable httpd.service Removed symlink /etc/systemd/system/multi-user.target.wants/httpd.service.
14.1.3.3. Restarting the Service
There are three different ways to restart a running httpd service:
To restart the service completely, enter the following command as
root:~]# systemctl restart httpd.service
This stops the running
httpdservice and immediately starts it again. Use this command after installing or removing a dynamically loaded module such as PHP.To only reload the configuration, as
root, type:~]# systemctl reload httpd.service
This causes the running
httpdservice to reload its configuration file. Any requests currently being processed will be interrupted, which may cause a client browser to display an error message or render a partial page.To reload the configuration without affecting active requests, enter the following command as
root:~]# apachectl graceful
This causes the running
httpdservice to reload its configuration file. Any requests currently being processed will continue to use the old configuration.
For more information on how to manage system services in Red Hat Enterprise Linux 7, see Chapter 10, Managing Services with systemd.
14.1.3.4. Verifying the Service Status
To verify that the httpd service is running, type the following at a shell prompt:
~]# systemctl is-active httpd.service active
14.1.4. Editing the Configuration Files
When the httpd service is started, by default, it reads the configuration from locations that are listed in Table 14.1, “The httpd service configuration files”.
| Path | Description |
|---|---|
|
| The main configuration file. |
|
| An auxiliary directory for configuration files that are included in the main configuration file. |
Although the default configuration should be suitable for most situations, it is a good idea to become at least familiar with some of the more important configuration options. Note that for any changes to take effect, the web server has to be restarted first. See Section 14.1.3.3, “Restarting the Service” for more information on how to restart the httpd service.
To check the configuration for possible errors, type the following at a shell prompt:
~]# apachectl configtest Syntax OK
To make the recovery from mistakes easier, it is recommended that you make a copy of the original file before editing it.
14.1.5. Working with Modules
Being a modular application, the httpd service is distributed along with a number of Dynamic Shared Objects (DSOs), which can be dynamically loaded or unloaded at runtime as necessary. On Red Hat Enterprise Linux 7, these modules are located in /usr/lib64/httpd/modules/.
14.1.5.1. Loading a Module
To load a particular DSO module, use the LoadModule directive. Note that modules provided by a separate package often have their own configuration file in the /etc/httpd/conf.d/ directory.
Example 14.1. Loading the mod_ssl DSO
LoadModule ssl_module modules/mod_ssl.so
Once you are finished, restart the web server to reload the configuration. See Section 14.1.3.3, “Restarting the Service” for more information on how to restart the httpd service.
14.1.5.2. Writing a Module
If you intend to create a new DSO module, make sure you have the httpd-devel package installed. To do so, enter the following command as root:
~]# yum install httpd-devel
This package contains the include files, the header files, and the APache eXtenSion (apxs) utility required to compile a module.
Once written, you can build the module with the following command:
~]# apxs -i -a -c module_name.c
If the build was successful, you should be able to load the module the same way as any other module that is distributed with the Apache HTTP Server.
14.1.6. Setting Up Virtual Hosts
The Apache HTTP Server’s built in virtual hosting allows the server to provide different information based on which IP address, host name, or port is being requested.
To create a name-based virtual host, copy the example configuration file /usr/share/doc/httpd-VERSION/httpd-vhosts.conf into the /etc/httpd/conf.d/ directory, and replace the @@Port@@ and @@ServerRoot@@ placeholder values. Customize the options according to your requirements as shown in Example 14.2, “Example virtual host configuration”.
Example 14.2. Example virtual host configuration
<VirtualHost *:80> ServerAdmin webmaster@penguin.example.com DocumentRoot "/www/docs/penguin.example.com" ServerName penguin.example.com ServerAlias www.penguin.example.com ErrorLog "/var/log/httpd/dummy-host.example.com-error_log" CustomLog "/var/log/httpd/dummy-host.example.com-access_log" common </VirtualHost>
Note that ServerName must be a valid DNS name assigned to the machine. The <VirtualHost> container is highly customizable, and accepts most of the directives available within the main server configuration. Directives that are not supported within this container include User and Group, which were replaced by SuexecUserGroup.
If you configure a virtual host to listen on a non-default port, make sure you update the Listen directive in the global settings section of the /etc/httpd/conf/httpd.conf file accordingly.
To activate a newly created virtual host, the web server has to be restarted first. See Section 14.1.3.3, “Restarting the Service” for more information on how to restart the httpd service.
14.1.7. Setting Up an SSL Server
Secure Sockets Layer (SSL) is a cryptographic protocol that allows a server and a client to communicate securely. Along with its extended and improved version called Transport Layer Security (TLS), it ensures both privacy and data integrity. The Apache HTTP Server in combination with mod_ssl, a module that uses the OpenSSL toolkit to provide the SSL/TLS support, is commonly referred to as the SSL server. Red Hat Enterprise Linux also supports the use of Mozilla NSS as the TLS implementation. Support for Mozilla NSS is provided by the mod_nss module.
Unlike an HTTP connection that can be read and possibly modified by anybody who is able to intercept it, the use of SSL/TLS over HTTP, referred to as HTTPS, prevents any inspection or modification of the transmitted content. This section provides basic information on how to enable this module in the Apache HTTP Server configuration, and guides you through the process of generating private keys and self-signed certificates.
14.1.7.1. An Overview of Certificates and Security
Secure communication is based on the use of keys. In conventional or symmetric cryptography, both ends of the transaction have the same key they can use to decode each other’s transmissions. On the other hand, in public or asymmetric cryptography, two keys co-exist: a private key that is kept a secret, and a public key that is usually shared with the public. While the data encoded with the public key can only be decoded with the private key, data encoded with the private key can in turn only be decoded with the public key.
To provide secure communications using SSL, an SSL server must use a digital certificate signed by a Certificate Authority (CA). The certificate lists various attributes of the server (that is, the server host name, the name of the company, its location, etc.), and the signature produced using the CA’s private key. This signature ensures that a particular certificate authority has signed the certificate, and that the certificate has not been modified in any way.
When a web browser establishes a new SSL connection, it checks the certificate provided by the web server. If the certificate does not have a signature from a trusted CA, or if the host name listed in the certificate does not match the host name used to establish the connection, it refuses to communicate with the server and usually presents a user with an appropriate error message.
By default, most web browsers are configured to trust a set of widely used certificate authorities. Because of this, an appropriate CA should be chosen when setting up a secure server, so that target users can trust the connection, otherwise they will be presented with an error message, and will have to accept the certificate manually. Since encouraging users to override certificate errors can allow an attacker to intercept the connection, you should use a trusted CA whenever possible. For more information on this, see Table 14.2, “Information about CA lists used by common web browsers”.
| Web Browser | Link |
|---|---|
| Mozilla Firefox | |
| Opera | |
| Internet Explorer | |
| Chromium | Information on root certificates used by the Chromium project. |
When setting up an SSL server, you need to generate a certificate request and a private key, and then send the certificate request, proof of the company’s identity, and payment to a certificate authority. Once the CA verifies the certificate request and your identity, it will send you a signed certificate you can use with your server. Alternatively, you can create a self-signed certificate that does not contain a CA signature, and thus should be used for testing purposes only.
14.1.8. Enabling the mod_ssl Module
If you intend to set up an SSL or HTTPS server using mod_ssl, you cannot have the another application or module, such as mod_nss configured to use the same port. Port 443 is the default port for HTTPS.
To set up an SSL server using the mod_ssl module and the OpenSSL toolkit, install the mod_ssl and openssl packages. Enter the following command as root:
~]# yum install mod_ssl openssl
This will create the mod_ssl configuration file at /etc/httpd/conf.d/ssl.conf, which is included in the main Apache HTTP Server configuration file by default. For the module to be loaded, restart the httpd service as described in Section 14.1.3.3, “Restarting the Service”.
Due to the vulnerability described in POODLE: SSLv3 vulnerability (CVE-2014-3566), Red Hat recommends disabling SSL and using only TLSv1.1 or TLSv1.2. Backwards compatibility can be achieved using TLSv1.0. Many products Red Hat supports have the ability to use SSLv2 or SSLv3 protocols, or enable them by default. However, the use of SSLv2 or SSLv3 is now strongly recommended against.
14.1.8.1. Enabling and Disabling SSL and TLS in mod_ssl
To disable and enable specific versions of the SSL and TLS protocol, either do it globally by adding the SSLProtocol directive in the "# SSL Global Context" section of the configuration file and removing it everywhere else, or edit the default entry under " SSL Protocol support" in all "VirtualHost" sections. If you do not specify it in the per-domain VirtualHost section then it will inherit the settings from the global section. To make sure that a protocol version is being disabled the administrator should either only specify SSLProtocol in the "SSL Global Context" section, or specify it in all per-domain VirtualHost sections.
Disable SSLv2 and SSLv3
To disable SSL version 2 and SSL version 3, which implies enabling everything except SSL version 2 and SSL version 3, in all VirtualHost sections, proceed as follows:
As
root, open the/etc/httpd/conf.d/ssl.conffile and search for all instances of theSSLProtocoldirective. By default, the configuration file contains one section that looks as follows:~]# vi /etc/httpd/conf.d/ssl.conf # SSL Protocol support: # List the enable protocol levels with which clients will be able to # connect. Disable SSLv2 access by default: SSLProtocol all -SSLv2
This section is within the VirtualHost section.
Edit the
SSLProtocolline as follows:# SSL Protocol support: # List the enable protocol levels with which clients will be able to # connect. Disable SSLv2 access by default: SSLProtocol all -SSLv2 -SSLv3
Repeat this action for all VirtualHost sections. Save and close the file.
Verify that all occurrences of the
SSLProtocoldirective have been changed as follows:~]# grep SSLProtocol /etc/httpd/conf.d/ssl.conf SSLProtocol all -SSLv2 -SSLv3This step is particularly important if you have more than the one default VirtualHost section.
Restart the Apache daemon as follows:
~]# systemctl restart httpd
Note that any sessions will be interrupted.
Disable All SSL and TLS Protocols Except TLS 1 and Up
To disable all SSL and TLS protocol versions except TLS version 1 and higher, proceed as follows:
As
root, open the/etc/httpd/conf.d/ssl.conffile and search for all instances ofSSLProtocoldirective. By default the file contains one section that looks as follows:~]# vi /etc/httpd/conf.d/ssl.conf # SSL Protocol support: # List the enable protocol levels with which clients will be able to # connect. Disable SSLv2 access by default: SSLProtocol all -SSLv2
Edit the
SSLProtocolline as follows:# SSL Protocol support: # List the enable protocol levels with which clients will be able to # connect. Disable SSLv2 access by default: SSLProtocol -all +TLSv1 +TLSv1.1 +TLSv1.2
Save and close the file.
Verify the change as follows:
~]# grep SSLProtocol /etc/httpd/conf.d/ssl.conf SSLProtocol -all +TLSv1 +TLSv1.1 +TLSv1.2Restart the Apache daemon as follows:
~]# systemctl restart httpd
Note that any sessions will be interrupted.
Testing the Status of SSL and TLS Protocols
To check which versions of SSL and TLS are enabled or disabled, make use of the openssl s_client -connect command. The command has the following form:
openssl s_client -connect hostname:port -protocol
Where port is the port to test and protocol is the protocol version to test for. To test the SSL server running locally, use localhost as the host name. For example, to test the default port for secure HTTPS connections, port 443 to see if SSLv3 is enabled, issue a command as follows:
~]# openssl s_client -connect localhost:443 -ssl3 CONNECTED(00000003) 139809943877536:error:14094410:SSL routines:SSL3_READ_BYTES:sslv3 alert handshake failure:s3_pkt.c:1257:SSL alert number 40 139809943877536:error:1409E0E5:SSL routines:SSL3_WRITE_BYTES:ssl handshake failure:s3_pkt.c:596: output omitted New, (NONE), Cipher is (NONE) Secure Renegotiation IS NOT supported Compression: NONE Expansion: NONE SSL-Session: Protocol : SSLv3 output truncated
The above output indicates that the handshake failed and therefore no cipher was negotiated.
~]$ openssl s_client -connect localhost:443 -tls1_2 CONNECTED(00000003) depth=0 C = --, ST = SomeState, L = SomeCity, O = SomeOrganization, OU = SomeOrganizationalUnit, CN = localhost.localdomain, emailAddress = root@localhost.localdomain output omitted New, TLSv1/SSLv3, Cipher is ECDHE-RSA-AES256-GCM-SHA384 Server public key is 2048 bit Secure Renegotiation IS supported Compression: NONE Expansion: NONE SSL-Session: Protocol : TLSv1.2 output truncated
The above output indicates that no failure of the handshake occurred and a set of ciphers was negotiated.
The openssl s_client command options are documented in the s_client(1) manual page.
For more information on the SSLv3 vulnerability and how to test for it, see the Red Hat Knowledgebase article POODLE: SSLv3 vulnerability (CVE-2014-3566).
14.1.9. Enabling the mod_nss Module
If you intend to set up an HTTPS server using mod_nss, you cannot have the mod_ssl package installed with its default settings as mod_ssl will use port 443 by default, however this is the default HTTPS port. If at all possible, remove the package.
To remove mod_ssl, enter the following command as root:
~]# yum remove mod_ssl
If mod_ssl is required for other purposes, modify the /etc/httpd/conf.d/ssl.conf file to use a port other than 443 to prevent mod_ssl conflicting with mod_nss when its port to listen on is changed to 443.
Only one module can own a port, therefore mod_nss and mod_ssl can only co-exist at the same time if they use unique ports. For this reason mod_nss by default uses 8443, but the default port for HTTPS is port 443. The port is specified by the Listen directive as well as in the VirtualHost name or address.
Everything in NSS is associated with a "token". The software token exists in the NSS database but you can also have a physical token containing certificates. With OpenSSL, discrete certificates and private keys are held in PEM files. With NSS, these are stored in a database. Each certificate and key is associated with a token and each token can have a password protecting it. This password is optional, but if a password is used then the Apache HTTP server needs a copy of it in order to open the database without user intervention at system start.
Configuring mod_nss
Install mod_nss as
root:~]# yum install mod_nss
This will create the
mod_nssconfiguration file at/etc/httpd/conf.d/nss.conf. The/etc/httpd/conf.d/directory is included in the main Apache HTTP Server configuration file by default. For the module to be loaded, restart thehttpdservice as described in Section 14.1.3.3, “Restarting the Service”.As
root, open the/etc/httpd/conf.d/nss.conffile and search for all instances of theListendirective.Edit the
Listen 8443line as follows:Listen 443
Port
443is the default port forHTTPS.Edit the default
VirtualHost default:8443line as follows:VirtualHost default:443Edit any other non-default virtual host sections if they exist. Save and close the file.
Mozilla NSS stores certificates in a server certificate database indicated by the
NSSCertificateDatabasedirective in the/etc/httpd/conf.d/nss.conffile. By default the path is set to/etc/httpd/alias, the NSS database created during installation.To view the default NSS database, issue a command as follows:
~]# certutil -L -d /etc/httpd/alias Certificate Nickname Trust Attributes SSL,S/MIME,JAR/XPI cacert CTu,Cu,Cu Server-Cert u,u,u alpha u,pu,uIn the above command output,
Server-Certis the defaultNSSNickname. The-Loption lists all the certificates, or displays information about a named certificate, in a certificate database. The-doption specifies the database directory containing the certificate and key database files. See thecertutil(1)man page for more command line options.To configure mod_nss to use another database, edit the
NSSCertificateDatabaseline in the/etc/httpd/conf.d/nss.conffile. The default file has the following lines within the VirtualHost section.# Server Certificate Database: # The NSS security database directory that holds the certificates and # keys. The database consists of 3 files: cert8.db, key3.db and secmod.db. # Provide the directory that these files exist. NSSCertificateDatabase /etc/httpd/alias
In the above command output,
aliasis the default NSS database directory,/etc/httpd/alias/.To apply a password to the default NSS certificate database, use the following command as
root:~]# certutil -W -d /etc/httpd/alias Enter Password or Pin for "NSS Certificate DB": Enter a password which will be used to encrypt your keys. The password should be at least 8 characters long, and should contain at least one non-alphabetic character. Enter new password: Re-enter password: Password changed successfully.
Before deploying the HTTPS server, create a new certificate database using a certificate signed by a certificate authority (CA).
Example 14.3. Adding a Certificate to the Mozilla NSS database
The
certutilcommand is used to add a CA certificate to the NSS database files:certutil -d
/etc/httpd/nss-db-directory/-A -n "CA_certificate" -tCT,,-a -icertificate.pemThe above command adds a CA certificate stored in a PEM-formatted file named certificate.pem. The
-doption specifies the NSS database directory containing the certificate and key database files, the-noption sets a name for the certificate,-tCT,,means that the certificate is trusted to be used in TLS clients and servers. The-Aoption adds an existing certificate to a certificate database. If the database does not exist it will be created. The-aoption allows the use of ASCII format for input or output, and the-ioption passes thecertificate.peminput file to the command.See the
certutil(1)man page for more command line options.The NSS database should be password protected to safeguard the private key.
Example 14.4. Setting a Password for a Mozilla NSS database
The
certutiltool can be used set a password for an NSS database as follows:certutil -W -d /etc/httpd/nss-db-directory/For example, for the default database, issue a command as
rootas follows:~]# certutil -W -d /etc/httpd/alias Enter Password or Pin for "NSS Certificate DB": Enter a password which will be used to encrypt your keys. The password should be at least 8 characters long, and should contain at least one non-alphabetic character. Enter new password: Re-enter password: Password changed successfully.
Configure
mod_nssto use the NSS internal software token by changing the line with theNSSPassPhraseDialogdirective as follows:~]# vi /etc/httpd/conf.d/nss.conf NSSPassPhraseDialog file:/etc/httpd/password.conf
This is to avoid manual password entry on system start. The software token exists in the NSS database but you can also have a physical token containing your certificates.
If the SSL Server Certificate contained in the NSS database is an RSA certificate, make certain that the
NSSNicknameparameter is uncommented and matches the nickname displayed in step 4 above:~]# vi /etc/httpd/conf.d/nss.conf NSSNickname Server-Cert
If the SSL Server Certificate contained in the NSS database is an ECC certificate, make certain that the
NSSECCNicknameparameter is uncommented and matches the nickname displayed in step 4 above:~]# vi /etc/httpd/conf.d/nss.conf NSSECCNickname Server-Cert
Make certain that the
NSSCertificateDatabaseparameter is uncommented and points to the NSS database directory displayed in step 4 or configured in step 5 above:~]# vi /etc/httpd/conf.d/nss.conf NSSCertificateDatabase /etc/httpd/alias
Replace
/etc/httpd/aliaswith the path to the certificate database to be used.Create the
/etc/httpd/password.conffile asroot:~]# vi /etc/httpd/password.conf
Add a line with the following form:
internal:passwordReplacing password with the password that was applied to the NSS security databases in step 6 above.
Apply the appropriate ownership and permissions to the
/etc/httpd/password.conffile:~]# chgrp apache /etc/httpd/password.conf ~]# chmod 640 /etc/httpd/password.conf ~]# ls -l /etc/httpd/password.conf -rw-r-----. 1 root apache 10 Dec 4 17:13 /etc/httpd/password.conf
To configure
mod_nssto use the NSS the software token in/etc/httpd/password.conf, edit/etc/httpd/conf.d/nss.confas follows:~]# vi /etc/httpd/conf.d/nss.conf
- Restart the Apache server for the changes to take effect as described in Section 14.1.3.3, “Restarting the Service”
Due to the vulnerability described in POODLE: SSLv3 vulnerability (CVE-2014-3566), Red Hat recommends disabling SSL and using only TLSv1.1 or TLSv1.2. Backwards compatibility can be achieved using TLSv1.0. Many products Red Hat supports have the ability to use SSLv2 or SSLv3 protocols, or enable them by default. However, the use of SSLv2 or SSLv3 is now strongly recommended against.
14.1.9.1. Enabling and Disabling SSL and TLS in mod_nss
To disable and enable specific versions of the SSL and TLS protocol, either do it globally by adding the NSSProtocol directive in the "# SSL Global Context" section of the configuration file and removing it everywhere else, or edit the default entry under " SSL Protocol" in all "VirtualHost" sections. If you do not specify it in the per-domain VirtualHost section then it will inherit the settings from the global section. To make sure that a protocol version is being disabled the administrator should either only specify NSSProtocol in the "SSL Global Context" section, or specify it in all per-domain VirtualHost sections.
Disable All SSL and TLS Protocols Except TLS 1 and Up in mod_nss
To disable all SSL and TLS protocol versions except TLS version 1 and higher, proceed as follows:
As
root, open the/etc/httpd/conf.d/nss.conffile and search for all instances of theNSSProtocoldirective. By default, the configuration file contains one section that looks as follows:~]# vi /etc/httpd/conf.d/nss.conf # SSL Protocol: output omitted # Since all protocol ranges are completely inclusive, and no protocol in the # middle of a range may be excluded, the entry "NSSProtocol SSLv3,TLSv1.1" # is identical to the entry "NSSProtocol SSLv3,TLSv1.0,TLSv1.1". NSSProtocol SSLv3,TLSv1.0,TLSv1.1This section is within the VirtualHost section.
Edit the
NSSProtocolline as follows:# SSL Protocol: NSSProtocol TLSv1.0,TLSv1.1
Repeat this action for all VirtualHost sections.
Edit the
Listen 8443line as follows:Listen 443
Edit the default
VirtualHost default:8443line as follows:VirtualHost default:443Edit any other non-default virtual host sections if they exist. Save and close the file.
Verify that all occurrences of the
NSSProtocoldirective have been changed as follows:~]# grep NSSProtocol /etc/httpd/conf.d/nss.conf # middle of a range may be excluded, the entry "NSSProtocol SSLv3,TLSv1.1" # is identical to the entry "NSSProtocol SSLv3,TLSv1.0,TLSv1.1". NSSProtocol TLSv1.0,TLSv1.1
This step is particularly important if you have more than one VirtualHost section.
Restart the Apache daemon as follows:
~]# service httpd restart
Note that any sessions will be interrupted.
Testing the Status of SSL and TLS Protocols in mod_nss
To check which versions of SSL and TLS are enabled or disabled in mod_nss, make use of the openssl s_client -connect command. Install the openssl package as root:
~]# yum install openssl
The openssl s_client -connect command has the following form:
openssl s_client -connect hostname:port -protocol
Where port is the port to test and protocol is the protocol version to test for. To test the SSL server running locally, use localhost as the host name. For example, to test the default port for secure HTTPS connections, port 443 to see if SSLv3 is enabled, issue a command as follows:
~]# openssl s_client -connect localhost:443 -ssl3 CONNECTED(00000003) 3077773036:error:1408F10B:SSL routines:SSL3_GET_RECORD:wrong version number:s3_pkt.c:337: output omitted New, (NONE), Cipher is (NONE) Secure Renegotiation IS NOT supported Compression: NONE Expansion: NONE SSL-Session: Protocol : SSLv3 output truncated
The above output indicates that the handshake failed and therefore no cipher was negotiated.
~]$ openssl s_client -connect localhost:443 -tls1 CONNECTED(00000003) depth=1 C = US, O = example.com, CN = Certificate Shack output omitted New, TLSv1/SSLv3, Cipher is AES128-SHA Server public key is 1024 bit Secure Renegotiation IS supported Compression: NONE Expansion: NONE SSL-Session: Protocol : TLSv1 output truncated
The above output indicates that no failure of the handshake occurred and a set of ciphers was negotiated.
The openssl s_client command options are documented in the s_client(1) manual page.
For more information on the SSLv3 vulnerability and how to test for it, see the Red Hat Knowledgebase article POODLE: SSLv3 vulnerability (CVE-2014-3566).
14.1.10. Using an Existing Key and Certificate
If you have a previously created key and certificate, you can configure the SSL server to use these files instead of generating new ones. There are only two situations where this is not possible:
You are changing the IP address or domain name.
Certificates are issued for a particular IP address and domain name pair. If one of these values changes, the certificate becomes invalid.
You have a certificate from VeriSign, and you are changing the server software.
VeriSign, a widely used certificate authority, issues certificates for a particular software product, IP address, and domain name. Changing the software product renders the certificate invalid.
In either of the above cases, you will need to obtain a new certificate. For more information on this topic, see Section 14.1.11, “Generating a New Key and Certificate”.
If you want to use an existing key and certificate, move the relevant files to the /etc/pki/tls/private/ and /etc/pki/tls/certs/ directories respectively. You can do so by issuing the following commands as root:
~]# mvkey_file.key/etc/pki/tls/private/hostname.key~]# mvcertificate.crt/etc/pki/tls/certs/hostname.crt
Then add the following lines to the /etc/httpd/conf.d/ssl.conf configuration file:
SSLCertificateFile /etc/pki/tls/certs/hostname.crt SSLCertificateKeyFile /etc/pki/tls/private/hostname.key
To load the updated configuration, restart the httpd service as described in Section 14.1.3.3, “Restarting the Service”.
Example 14.5. Using a key and certificate from the Red Hat Secure Web Server
~]# mv /etc/httpd/conf/httpsd.key /etc/pki/tls/private/penguin.example.com.key ~]# mv /etc/httpd/conf/httpsd.crt /etc/pki/tls/certs/penguin.example.com.crt
14.1.11. Generating a New Key and Certificate
In order to generate a new key and certificate pair, the crypto-utils package must be installed on the system. To install it, enter the following command as root:
~]# yum install crypto-utils
This package provides a set of tools to generate and manage SSL certificates and private keys, and includes genkey, the Red Hat Keypair Generation utility that will guide you through the key generation process.
If the server already has a valid certificate and you are replacing it with a new one, specify a different serial number. This ensures that client browsers are notified of this change, update to this new certificate as expected, and do not fail to access the page. To create a new certificate with a custom serial number, as root, use the following command instead of genkey:
~]# openssl req -x509 -new -set_serial number -key hostname.key -out hostname.crt
If there already is a key file for a particular host name in your system, genkey will refuse to start. In this case, remove the existing file using the following command as root:
~]# rm /etc/pki/tls/private/hostname.key
To run the utility enter the genkey command as root, followed by the appropriate host name (for example, penguin.example.com):
~]# genkey hostnameTo complete the key and certificate creation, take the following steps:
Review the target locations in which the key and certificate will be stored.
Figure 14.1. Running the genkey utility
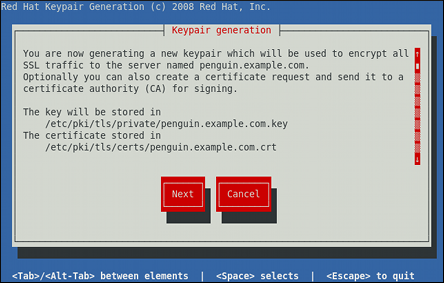
Use the Tab key to select the button, and press Enter to proceed to the next screen.
Using the up and down arrow keys, select a suitable key size. Note that while a larger key increases the security, it also increases the response time of your server. The NIST recommends using
2048 bits. See NIST Special Publication 800-131A.Figure 14.2. Selecting the key size
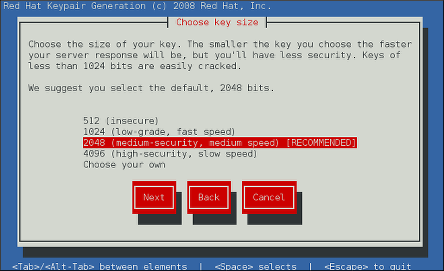
Once finished, use the Tab key to select the button, and press Enter to initiate the random bits generation process. Depending on the selected key size, this may take some time.
Decide whether you want to send a certificate request to a certificate authority.
Figure 14.3. Generating a certificate request
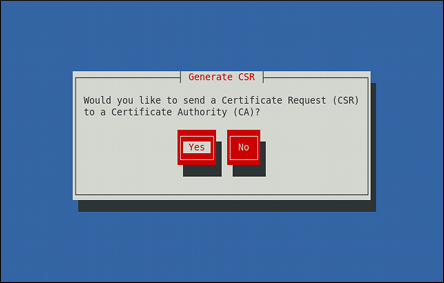
Use the Tab key to select to compose a certificate request, or to generate a self-signed certificate. Then press Enter to confirm your choice.
Using the Spacebar key, enable (
[*]) or disable ([ ]) the encryption of the private key.Figure 14.4. Encrypting the private key
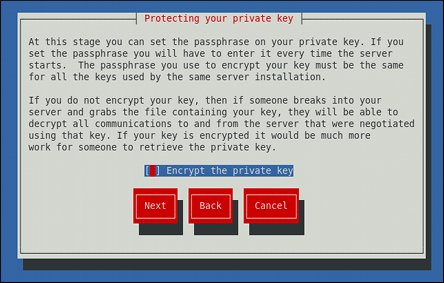
Use the Tab key to select the button, and press Enter to proceed to the next screen.
If you have enabled the private key encryption, enter an adequate passphrase. Note that for security reasons, it is not displayed as you type, and it must be at least five characters long.
Figure 14.5. Entering a passphrase

Use the Tab key to select the button, and press Enter to proceed to the next screen.
ImportantEntering the correct passphrase is required in order for the server to start. If you lose it, you will need to generate a new key and certificate.
Customize the certificate details.
Figure 14.6. Specifying certificate information
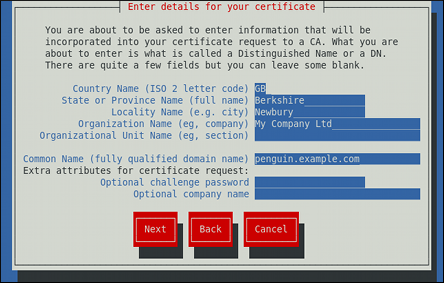
Use the Tab key to select the button, and press Enter to finish the key generation.
If you have previously enabled the certificate request generation, you will be prompted to send it to a certificate authority.
Figure 14.7. Instructions on how to send a certificate request
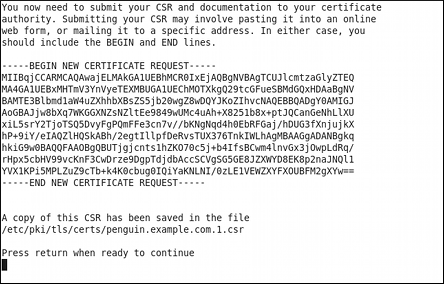
Press Enter to return to a shell prompt.
Once generated, add the key and certificate locations to the /etc/httpd/conf.d/ssl.conf configuration file:
SSLCertificateFile /etc/pki/tls/certs/hostname.crt SSLCertificateKeyFile /etc/pki/tls/private/hostname.key
Finally, restart the httpd service as described in Section 14.1.3.3, “Restarting the Service”, so that the updated configuration is loaded.
14.1.12. Configure the Firewall for HTTP and HTTPS Using the Command Line
Red Hat Enterprise Linux does not allow HTTP and HTTPS traffic by default. To enable the system to act as a web server, make use of firewalld's supported services to enable HTTP and HTTPS traffic to pass through the firewall as required.
To enable HTTP using the command line, issue the following command as root:
~]# firewall-cmd --add-service http success
To enable HTTPS using the command line, issue the following command as root:
~]# firewall-cmd --add-service https success
Note that these changes will not persist after the next system start. To make permanent changes to the firewall, repeat the commands adding the --permanent option.
14.1.12.1. Checking Network Access for Incoming HTTPS and HTTPS Using the Command Line
To check what services the firewall is configured to allow, using the command line, issue the following command as root:
~]# firewall-cmd --list-all
public (default, active)
interfaces: em1
sources:
services: dhcpv6-client ssh
output truncated
In this example taken from a default installation, the firewall is enabled but HTTP and HTTPS have not been allowed to pass through.
Once the HTTP and HTTP firewall services are enabled, the services line will appear similar to the following:
services: dhcpv6-client http https ssh
For more information on enabling firewall services, or opening and closing ports with firewalld, see the Red Hat Enterprise Linux 7 Security Guide.
14.1.13. Additional Resources
To learn more about the Apache HTTP Server, see the following resources.
Installed Documentation
-
httpd(8)— The manual page for thehttpdservice containing the complete list of its command-line options. -
genkey(1)— The manual page forgenkeyutility, provided by the crypto-utils package. -
apachectl(8)— The manual page for the Apache HTTP Server Control Interface.
Installable Documentation
http://localhost/manual/ — The official documentation for the Apache HTTP Server with the full description of its directives and available modules. Note that in order to access this documentation, you must have the httpd-manual package installed, and the web server must be running.
Before accessing the documentation, issue the following commands as
root:~] yum install httpd-manual ~] apachectl graceful
Online Documentation
- http://httpd.apache.org/ — The official website for the Apache HTTP Server with documentation on all the directives and default modules.
- http://www.openssl.org/ — The OpenSSL home page containing further documentation, frequently asked questions, links to the mailing lists, and other useful resources.
Chapter 15. Mail Servers
Red Hat Enterprise Linux offers many advanced applications to serve and access email. This chapter describes modern email protocols in use today, and some of the programs designed to send and receive email.
15.1. Email Protocols
Today, email is delivered using a client/server architecture. An email message is created using a mail client program. This program then sends the message to a server. The server then forwards the message to the recipient’s email server, where the message is then supplied to the recipient’s email client.
To enable this process, a variety of standard network protocols allow different machines, often running different operating systems and using different email programs, to send and receive email.
The following protocols discussed are the most commonly used in the transfer of email.
15.1.1. Mail Transport Protocols
Mail delivery from a client application to the server, and from an originating server to the destination server, is handled by the Simple Mail Transfer Protocol (SMTP).
15.1.1.1. SMTP
The primary purpose of SMTP is to transfer email between mail servers. However, it is critical for email clients as well. To send email, the client sends the message to an outgoing mail server, which in turn contacts the destination mail server for delivery. But more intermediate SMTP servers may be included in this chain. This concept is called a mail relaying. For this reason, it is necessary to specify an SMTP server when configuring an email client.
Under Red Hat Enterprise Linux, a user can configure an SMTP server on the local machine to handle mail delivery. However, it is also possible to configure remote SMTP servers for outgoing mail.
One important point to make about the SMTP protocol is that it does not require authentication. This allows anyone on the Internet to send email to anyone else or even to large groups of people. It is this characteristic of SMTP that makes junk email or spam possible. Imposing relay restrictions limits random users on the Internet from sending email through your SMTP server, to other servers on the internet. Servers that do not impose such restrictions are called open relay servers.
Red Hat Enterprise Linux 7 provides the Postfix and Sendmail SMTP programs.
15.1.2. Mail Access Protocols
There are two primary protocols used by email client applications to retrieve email from mail servers: the Post Office Protocol (POP) and the Internet Message Access Protocol (IMAP).
15.1.2.1. POP
The default POP server under Red Hat Enterprise Linux is Dovecot and is provided by the dovecot package.
To install Dovecot run the following command:
~]# yum install dovecot
For more information on installing packages with Yum, see Section 9.2.4, “Installing Packages”.
When using a POP server, email messages are downloaded by email client applications. By default, most POP email clients are automatically configured to delete the message on the email server after it has been successfully transferred, however this setting usually can be changed.
POP is fully compatible with important Internet messaging standards, such as Multipurpose Internet Mail Extensions (MIME), which allow for email attachments.
POP works best for users who have one system on which to read email. It also works well for users who do not have a persistent connection to the Internet or the network containing the mail server. Unfortunately for those with slow network connections, POP requires client programs upon authentication to download the entire content of each message. This can take a long time if any messages have large attachments.
The most current version of the standard POP protocol is POP3.
There are, however, a variety of lesser-used POP protocol variants:
-
APOP —
POP3withMD5authentication. An encoded hash of the user’s password is sent from the email client to the server rather than sending an unencrypted password. -
KPOP —
POP3with Kerberos authentication. -
RPOP —
POP3withRPOPauthentication. This uses a per-user ID, similar to a password, to authenticate POP requests. However, this ID is not encrypted, soRPOPis no more secure than standardPOP.
To improve security, you can use Secure Socket Layer (SSL) encryption for client authentication and data transfer sessions. To enable SSL encryption, use:
-
The
pop3sservice -
The
stunnelapplication -
The
starttlscommand
For more information on securing email communication, see Section 15.5.1, “Securing Communication”.
15.1.2.2. IMAP
The default IMAP server under Red Hat Enterprise Linux is Dovecot and is provided by the dovecot package. See Section 15.1.2.1, “POP” for information on how to install Dovecot.
When using an IMAP mail server, email messages remain on the server where users can read or delete them. IMAP also allows client applications to create, rename, or delete mail directories on the server to organize and store email.
IMAP is particularly useful for users who access their email using multiple machines. The protocol is also convenient for users connecting to the mail server via a slow connection, because only the email header information is downloaded for messages until opened, saving bandwidth. The user also has the ability to delete messages without viewing or downloading them.
For convenience, IMAP client applications are capable of caching copies of messages locally, so the user can browse previously read messages when not directly connected to the IMAP server.
IMAP, like POP, is fully compatible with important Internet messaging standards, such as MIME, which allow for email attachments.
For added security, it is possible to use SSL encryption for client authentication and data transfer sessions. This can be enabled by using the imaps service, or by using the stunnel program.
-
The
pop3sservice -
The
stunnelapplication -
The
starttlscommand
For more information on securing email communication, see Section 15.5.1, “Securing Communication”.
Other free, as well as commercial, IMAP clients and servers are available, many of which extend the IMAP protocol and provide additional functionality.
15.1.2.3. Dovecot
The imap-login and pop3-login processes which implement the IMAP and POP3 protocols are spawned by the master dovecot daemon included in the dovecot package. The use of IMAP and POP is configured through the /etc/dovecot/dovecot.conf configuration file; by default dovecot runs IMAP and POP3 together with their secure versions using SSL. To configure dovecot to use POP, complete the following steps:
Edit the
/etc/dovecot/dovecot.confconfiguration file to make sure theprotocolsvariable is uncommented (remove the hash sign (#) at the beginning of the line) and contains thepop3argument. For example:protocols = imap pop3 lmtp
When the
protocolsvariable is left commented out,dovecotwill use the default values as described above.Make the change operational for the current session by running the following command as
root:~]# systemctl restart dovecot
Make the change operational after the next reboot by running the command:
~]# systemctl enable dovecot Created symlink from /etc/systemd/system/multi-user.target.wants/dovecot.service to /usr/lib/systemd/system/dovecot.service.
NotePlease note that
dovecotonly reports that it started theIMAPserver, but also starts thePOP3server.
Unlike SMTP, both IMAP and POP3 require connecting clients to authenticate using a user name and password. By default, passwords for both protocols are passed over the network unencrypted.
To configure SSL on dovecot:
Edit the
/etc/dovecot/conf.d/10-ssl.confconfiguration to make sure thessl_protocolsvariable is uncommented and contains the!SSLv2 !SSLv3arguments:ssl_protocols = !SSLv2 !SSLv3
These values ensure that
dovecotavoids SSL versions 2 and also 3, which are both known to be insecure. This is due to the vulnerability described in POODLE: SSLv3 vulnerability (CVE-2014-3566). See Resolution for POODLE SSL 3.0 vulnerability (CVE-2014-3566) in Postfix and Dovecot for details.Make sure that
/etc/dovecot/conf.d/10-ssl.confcontains the following option:ssl=required
-
Edit the
/etc/pki/dovecot/dovecot-openssl.cnfconfiguration file as you prefer. However, in a typical installation, this file does not require modification. -
Rename, move or delete the files
/etc/pki/dovecot/certs/dovecot.pemand/etc/pki/dovecot/private/dovecot.pem. Execute the
/usr/libexec/dovecot/mkcert.shscript which creates thedovecotself signed certificates. These certificates are copied in the/etc/pki/dovecot/certsand/etc/pki/dovecot/privatedirectories. To implement the changes, restartdovecotby issuing the following command asroot:~]# systemctl restart dovecot
More details on dovecot can be found online at http://www.dovecot.org.
15.2. Email Program Classifications
In general, all email applications fall into at least one of three classifications. Each classification plays a specific role in the process of moving and managing email messages. While most users are only aware of the specific email program they use to receive and send messages, each one is important for ensuring that email arrives at the correct destination.
15.2.1. Mail Transport Agent
A Mail Transport Agent (MTA) transports email messages between hosts using SMTP. A message may involve several MTAs as it moves to its intended destination.
While the delivery of messages between machines may seem rather straightforward, the entire process of deciding if a particular MTA can or should accept a message for delivery is quite complicated. In addition, due to problems from spam, use of a particular MTA is usually restricted by the MTA’s configuration or the access configuration for the network on which the MTA resides.
Some email client programs, can act as an MTA when sending an email. However, such email client programs do not have the role of a true MTA, because they can only send outbound messages to an MTA they are authorized to use, but they cannot directly deliver the message to the intended recipient’s email server. This functionality is useful if host running the application does not have its own MTA.
Since Red Hat Enterprise Linux offers two MTAs, Postfix and Sendmail, email client programs are often not required to act as an MTA. Red Hat Enterprise Linux also includes a special purpose MTA called Fetchmail.
For more information on Postfix, Sendmail, and Fetchmail, see Section 15.3, “Mail Transport Agents”.
15.2.2. Mail Delivery Agent
A Mail Delivery Agent (MDA) is invoked by the MTA to file incoming email in the proper user’s mailbox. In many cases, the MDA is actually a Local Delivery Agent (LDA), such as mail or Procmail.
Any program that actually handles a message for delivery to the point where it can be read by an email client application can be considered an MDA. For this reason, some MTAs (such as Sendmail and Postfix) can fill the role of an MDA when they append new email messages to a local user’s mail spool file. In general, MDAs do not transport messages between systems nor do they provide a user interface; MDAs distribute and sort messages on the local machine for an email client application to access.
15.2.3. Mail User Agent
A Mail User Agent (MUA) is synonymous with an email client application. MUA is a program that, at a minimum, allows a user to read and compose email messages. MUAs can handle these tasks:
-
Retrieving messages via the
POPorIMAPprotocols - Setting up mailboxes to store messages.
- Sending outbound messages to an MTA.
MUAs may be graphical, such as Thunderbird, Evolution, or have simple text-based interfaces, such as mail or Mutt.
15.3. Mail Transport Agents
Red Hat Enterprise Linux 7 offers two primary MTAs: Postfix and Sendmail. Postfix is configured as the default MTA and Sendmail is considered deprecated. If required to switch the default MTA to Sendmail, you can either uninstall Postfix or use the following command as root to switch to Sendmail:
~]# alternatives --config mta
You can also use the following command to enable the desired service:
~]# systemctl enable service
Similarly, to disable the service, type the following at a shell prompt:
~]# systemctl disable service
For more information on how to manage system services in Red Hat Enterprise Linux 7, see Chapter 10, Managing Services with systemd.
15.3.1. Postfix
Originally developed at IBM by security expert and programmer Wietse Venema, Postfix is a Sendmail-compatible MTA that is designed to be secure, fast, and easy to configure.
To improve security, Postfix uses a modular design, where small processes with limited privileges are launched by a master daemon. The smaller, less privileged processes perform very specific tasks related to the various stages of mail delivery and run in a changed root environment to limit the effects of attacks.
Configuring Postfix to accept network connections from hosts other than the local computer takes only a few minor changes in its configuration file. Yet for those with more complex needs, Postfix provides a variety of configuration options, as well as third party add-ons that make it a very versatile and full-featured MTA.
The configuration files for Postfix are human readable and support upward of 250 directives. Unlike Sendmail, no macro processing is required for changes to take effect and the majority of the most commonly used options are described in the heavily commented files.
15.3.1.1. The Default Postfix Installation
The Postfix executable is postfix. This daemon launches all related processes needed to handle mail delivery.
Postfix stores its configuration files in the /etc/postfix/ directory. The following is a list of the more commonly used files:
-
access— Used for access control, this file specifies which hosts are allowed to connect to Postfix. -
main.cf— The global Postfix configuration file. The majority of configuration options are specified in this file. -
master.cf— Specifies how Postfix interacts with various processes to accomplish mail delivery. -
transport— Maps email addresses to relay hosts.
The aliases file can be found in the /etc directory. This file is shared between Postfix and Sendmail. It is a configurable list required by the mail protocol that describes user ID aliases.
The default /etc/postfix/main.cf file does not allow Postfix to accept network connections from a host other than the local computer. For instructions on configuring Postfix as a server for other clients, see Section 15.3.1.3, “Basic Postfix Configuration”.
Restart the postfix service after changing any options in the configuration files under the /etc/postfix/ directory in order for those changes to take effect. To do so, run the following command as root:
~]# systemctl restart postfix
15.3.1.2. Upgrading From a Previous Release
The following settings in Red Hat Enterprise Linux 7 are different to previous releases:
-
disable_vrfy_command = no— This is disabled by default, which is different to the default for Sendmail. If changed toyesit can prevent certain email address harvesting methods. -
allow_percent_hack = yes— This is enabled by default. It allows removing%characters in email addresses. The percent hack is an old workaround that allowed sender-controlled routing of email messages.DNSand mail routing are now much more reliable, but Postfix continues to support the hack. To turn off percent rewriting, setallow_percent_hacktono. -
smtpd_helo_required = no— This is disabled by default, as it is in Sendmail, because it can prevent some applications from sending mail. It can be changed toyesto require clients to send the HELO or EHLO commands before attempting to send the MAIL, FROM, or ETRN commands.
15.3.1.3. Basic Postfix Configuration
By default, Postfix does not accept network connections from any host other than the local host. Perform the following steps as root to enable mail delivery for other hosts on the network:
-
Edit the
/etc/postfix/main.cffile with a text editor, such asvi. -
Uncomment the
mydomainline by removing the hash sign (#), and replace domain.tld with the domain the mail server is servicing, such asexample.com. -
Uncomment the
myorigin = $mydomainline. -
Uncomment the
myhostnameline, and replace host.domain.tld with the host name for the machine. -
Uncomment the
mydestination = $myhostname, localhost.$mydomainline. -
Uncomment the
mynetworksline, and replace 168.100.189.0/28 with a valid network setting for hosts that can connect to the server. -
Uncomment the
inet_interfaces = allline. -
Comment the
inet_interfaces = localhostline. -
Restart the
postfixservice.
Once these steps are complete, the host accepts outside emails for delivery.
Postfix has a large assortment of configuration options. One of the best ways to learn how to configure Postfix is to read the comments within the /etc/postfix/main.cf configuration file. Additional resources including information about Postfix configuration, SpamAssassin integration, or detailed descriptions of the /etc/postfix/main.cf parameters are available online at http://www.postfix.org/.
Due to the vulnerability described in POODLE: SSLv3 vulnerability (CVE-2014-3566), Red Hat recommends disabling SSL and using only TLSv1.1 or TLSv1.2. See Resolution for POODLE SSL 3.0 vulnerability (CVE-2014-3566) in Postfix and Dovecot for details.
15.3.1.4. Using Postfix with LDAP
Postfix can use an LDAP directory as a source for various lookup tables (for example, aliases, virtual, canonical, and so on). This allows LDAP to store hierarchical user information and Postfix to only be given the result of LDAP queries when needed. By not storing this information locally, administrators can easily maintain it.
15.3.1.4.1. The /etc/aliases lookup example
The following is a basic example for using LDAP to look up the /etc/aliases file. Make sure your /etc/postfix/main.cf file contains the following:
alias_maps = hash:/etc/aliases, ldap:/etc/postfix/ldap-aliases.cf
Create a /etc/postfix/ldap-aliases.cf file if you do not have one already and make sure it contains the following:
server_host = ldap.example.com search_base = dc=example, dc=com
where ldap.example.com, example, and com are parameters that need to be replaced with specification of an existing available LDAP server.
The /etc/postfix/ldap-aliases.cf file can specify various parameters, including parameters that enable LDAP SSL and STARTTLS. For more information, see the ldap_table(5) man page.
For more information on LDAP, see OpenLDAP in the System-Level Authentication Guide.
15.3.2. Sendmail
Sendmail’s core purpose, like other MTAs, is to safely transfer email between hosts, usually using the SMTP protocol. Note that Sendmail is considered deprecated and administrators are encouraged to use Postfix when possible. See Section 15.3.1, “Postfix” for more information.
15.3.2.1. Purpose and Limitations
It is important to be aware of what Sendmail is and what it can do, as opposed to what it is not. In these days of monolithic applications that fulfill multiple roles, Sendmail may seem like the only application needed to run an email server within an organization. Technically, this is true, as Sendmail can spool mail to each users' directory and deliver outbound mail for users. However, most users actually require much more than simple email delivery. Users usually want to interact with their email using an MUA, that uses POP or IMAP, to download their messages to their local machine. Or, they may prefer a Web interface to gain access to their mailbox. These other applications can work in conjunction with Sendmail, but they actually exist for different reasons and can operate separately from one another.
It is beyond the scope of this section to go into all that Sendmail should or could be configured to do. With literally hundreds of different options and rule sets, entire volumes have been dedicated to helping explain everything that can be done and how to fix things that go wrong. See the Section 15.7, “Additional Resources” for a list of Sendmail resources.
This section reviews the files installed with Sendmail by default and reviews basic configuration changes, including how to stop unwanted email (spam) and how to extend Sendmail with the Lightweight Directory Access Protocol (LDAP).
15.3.2.2. The Default Sendmail Installation
In order to use Sendmail, first ensure the sendmail package is installed on your system by running, as root:
~]# yum install sendmail
In order to configure Sendmail, ensure the sendmail-cf package is installed on your system by running, as root:
~]# yum install sendmail-cf
For more information on installing packages with Yum, see Section 9.2.4, “Installing Packages”.
Before using Sendmail, the default MTA has to be switched from Postfix. For more information how to switch the default MTA refer to Section 15.3, “Mail Transport Agents”.
The Sendmail executable is sendmail.
Sendmail configuration file is located at /etc/mail/sendmail.cf. Avoid editing the sendmail.cf file directly. To make configuration changes to Sendmail, edit the /etc/mail/sendmail.mc file, back up the original /etc/mail/sendmail.cf file, and restart the sendmail service. As a part of the restart, the sendmail.cf file and all binary representations of the databases are rebuild:
# systemctl restart sendmail
More information on configuring Sendmail can be found in Section 15.3.2.3, “Common Sendmail Configuration Changes”.
Various Sendmail configuration files are installed in the /etc/mail/ directory including:
-
access— Specifies which systems can use Sendmail for outbound email. -
domaintable— Specifies domain name mapping. -
local-host-names— Specifies aliases for the host. -
mailertable— Specifies instructions that override routing for particular domains. -
virtusertable— Specifies a domain-specific form of aliasing, allowing multiple virtual domains to be hosted on one machine.
Several configuration files in the /etc/mail/ directory, such as access, domaintable, mailertable and virtusertable, store their information in database files before Sendmail can use any configuration changes.
To include any changes made to these configurations in their database files, run the following command:
# systemctl restart sendmail
15.3.2.3. Common Sendmail Configuration Changes
When altering the Sendmail configuration file, it is best not to edit an existing file, but to generate an entirely new /etc/mail/sendmail.cf file.
Before replacing or making any changes to the sendmail.cf file, create a backup copy.
To add the desired functionality to Sendmail, edit the /etc/mail/sendmail.mc file as root. Once you are finished, restart the sendmail service and, if the m4 package is installed, the m4 macro processor will automatically generate a new sendmail.cf configuration file:
~]# systemctl restart sendmail
The default sendmail.cf file does not allow Sendmail to accept network connections from any host other than the local computer. To configure Sendmail as a server for other clients, edit the /etc/mail/sendmail.mc file, and either change the address specified in the Addr= option of the DAEMON_OPTIONS directive from 127.0.0.1 to the IP address of an active network device or comment out the DAEMON_OPTIONS directive all together by placing dnl at the beginning of the line. When finished, regenerate /etc/mail/sendmail.cf by restarting the service:
~]# systemctl restart sendmail
The default configuration in Red Hat Enterprise Linux works for most SMTP-only sites.
Consult the /usr/share/sendmail-cf/README file before editing any files in the directories under the /usr/share/sendmail-cf/ directory, as they can affect the future configuration of the /etc/mail/sendmail.cf file.
15.3.2.4. Masquerading
One common Sendmail configuration is to have a single machine act as a mail gateway for all machines on the network. For example, a company may want to have a machine called mail.example.com that handles all of their email and assigns a consistent return address to all outgoing mail.
In this situation, the Sendmail server must masquerade the machine names on the company network so that their return address is user@example.com instead of user@host.example.com.
To do this, add the following lines to /etc/mail/sendmail.mc:
FEATURE(always_add_domain)dnl FEATURE(masquerade_entire_domain)dnl FEATURE(masquerade_envelope)dnl FEATURE(allmasquerade)dnl MASQUERADE_DOMAIN(`example.com.')dnl MASQUERADE_AS(`example.com')dnl
After generating a new sendmail.cf file from the changed configuration in sendmail.mc, restart the sendmail service by a following command:
# systemctl restart sendmail
Note that administrators of mail servers, DNS and DHCP servers, as well as any provisioning applications, should agree on the host name format used in an organization. See the Red Hat Enterprise Linux 7 Networking Guide for more information on recommended naming practices.
15.3.2.5. Stopping Spam
Email spam can be defined as unnecessary and unwanted email received by a user who never requested the communication. It is a disruptive, costly, and widespread abuse of Internet communication standards.
Sendmail makes it relatively easy to block new spamming techniques being employed to send junk email. It even blocks many of the more usual spamming methods by default. Main anti-spam features available in sendmail are header checks, relaying denial (default from version 8.9), access database and sender information checks.
For example, forwarding of SMTP messages, also called relaying, has been disabled by default since Sendmail version 8.9. Before this change occurred, Sendmail directed the mail host (x.edu) to accept messages from one party (y.com) and sent them to a different party (z.net). Now, however, Sendmail must be configured to permit any domain to relay mail through the server. To configure relay domains, edit the /etc/mail/relay-domains file and restart Sendmail
~]# systemctl restart sendmail
However, servers on the Internet can also send spam messages. In these instances, Sendmail’s access control features available through the /etc/mail/access file can be used to prevent connections from unwanted hosts. The following example illustrates how this file can be used to both block and specifically allow access to the Sendmail server:
badspammer.com ERROR:550 "Go away and do not spam us anymore" tux.badspammer.com OK 10.0 RELAY
This example shows that any email sent from badspammer.com is blocked with a 550 RFC-821 compliant error code, with a message sent back. Emails sent from the tux.badspammer.com sub-domain are accepted. The last line shows that any email sent from the 10.0.. network can be relayed through the mail server.
Because the /etc/mail/access.db file is a database, use the following command to update any changes:
# systemctl restart sendmail
The above examples only represent a small part of what Sendmail can do in terms of allowing or blocking access. See the /usr/share/sendmail-cf/README file for more information and examples.
Since Sendmail calls the Procmail MDA when delivering mail, it is also possible to use a spam filtering program, such as SpamAssassin, to identify and file spam for users. See Section 15.4.2.6, “Spam Filters” for more information about using SpamAssassin.
15.3.2.6. Using Sendmail with LDAP
Using LDAP is a very quick and powerful way to find specific information about a particular user from a much larger group. For example, an LDAP server can be used to look up a particular email address from a common corporate directory by the user’s last name. In this kind of implementation, LDAP is largely separate from Sendmail, with LDAP storing the hierarchical user information and Sendmail only being given the result of LDAP queries in pre-addressed email messages.
However, Sendmail supports a much greater integration with LDAP, where it uses LDAP to replace separately maintained files, such as /etc/aliases and /etc/mail/virtusertables, on different mail servers that work together to support a medium- to enterprise-level organization. In short, LDAP abstracts the mail routing level from Sendmail and its separate configuration files to a powerful LDAP cluster that can be leveraged by many different applications.
The current version of Sendmail contains support for LDAP. To extend the Sendmail server using LDAP, first get an LDAP server, such as OpenLDAP, running and properly configured. Then edit the /etc/mail/sendmail.mc to include the following:
LDAPROUTE_DOMAIN('yourdomain.com')dnl
FEATURE('ldap_routing')dnl
This is only for a very basic configuration of Sendmail with LDAP. The configuration can differ greatly from this depending on the implementation of LDAP, especially when configuring several Sendmail machines to use a common LDAP server.
Consult /usr/share/sendmail-cf/README for detailed LDAP routing configuration instructions and examples.
Next, recreate the /etc/mail/sendmail.cf file by running the m4 macro processor and again restarting Sendmail. See Section 15.3.2.3, “Common Sendmail Configuration Changes” for instructions.
For more information on LDAP, see OpenLDAP in the System-Level Authentication Guide.
15.3.3. Fetchmail
Fetchmail is an MTA which retrieves email from remote servers and delivers it to the local MTA. Many users appreciate the ability to separate the process of downloading their messages located on a remote server from the process of reading and organizing their email in an MUA. Designed with the needs of dial-up users in mind, Fetchmail connects and quickly downloads all of the email messages to the mail spool file using any number of protocols, including POP3 and IMAP. It can even forward email messages to an SMTP server, if necessary.
In order to use Fetchmail, first ensure the fetchmail package is installed on your system by running, as root:
~]# yum install fetchmail
For more information on installing packages with Yum, see Section 9.2.4, “Installing Packages”.
Fetchmail is configured for each user through the use of a .fetchmailrc file in the user’s home directory. If it does not already exist, create the .fetchmailrc file in your home directory
Using preferences in the .fetchmailrc file, Fetchmail checks for email on a remote server and downloads it. It then delivers it to port 25 on the local machine, using the local MTA to place the email in the correct user’s spool file. If Procmail is available, it is launched to filter the email and place it in a mailbox so that it can be read by an MUA.
15.3.3.1. Fetchmail Configuration Options
Although it is possible to pass all necessary options on the command line to check for email on a remote server when executing Fetchmail, using a .fetchmailrc file is much easier. Place any desired configuration options in the .fetchmailrc file for those options to be used each time the fetchmail command is issued. It is possible to override these at the time Fetchmail is run by specifying that option on the command line.
A user’s .fetchmailrc file contains three classes of configuration options:
- global options — Gives Fetchmail instructions that control the operation of the program or provide settings for every connection that checks for email.
- server options — Specifies necessary information about the server being polled, such as the host name, as well as preferences for specific email servers, such as the port to check or number of seconds to wait before timing out. These options affect every user using that server.
- user options — Contains information, such as user name and password, necessary to authenticate and check for email using a specified email server.
Global options appear at the top of the .fetchmailrc file, followed by one or more server options, each of which designate a different email server that Fetchmail should check. User options follow server options for each user account checking that email server. Like server options, multiple user options may be specified for use with a particular server as well as to check multiple email accounts on the same server.
Server options are called into service in the .fetchmailrc file by the use of a special option verb, poll or skip, that precedes any of the server information. The poll action tells Fetchmail to use this server option when it is run, which checks for email using the specified user options. Any server options after a skip action, however, are not checked unless this server’s host name is specified when Fetchmail is invoked. The skip option is useful when testing configurations in the .fetchmailrc file because it only checks skipped servers when specifically invoked, and does not affect any currently working configurations.
The following is an example of a .fetchmailrc file:
set postmaster "user1" set bouncemail poll pop.domain.com proto pop3 user 'user1' there with password 'secret' is user1 here poll mail.domain2.com user 'user5' there with password 'secret2' is user1 here user 'user7' there with password 'secret3' is user1 here
In this example, the global options specify that the user is sent email as a last resort (postmaster option) and all email errors are sent to the postmaster instead of the sender (bouncemail option). The set action tells Fetchmail that this line contains a global option. Then, two email servers are specified, one set to check using POP3, the other for trying various protocols to find one that works. Two users are checked using the second server option, but all email found for any user is sent to user1's mail spool. This allows multiple mailboxes to be checked on multiple servers, while appearing in a single MUA inbox. Each user’s specific information begins with the user action.
Users are not required to place their password in the .fetchmailrc file. Omitting the with password 'password' section causes Fetchmail to ask for a password when it is launched.
Fetchmail has numerous global, server, and local options. Many of these options are rarely used or only apply to very specific situations. The fetchmail man page explains each option in detail, but the most common ones are listed in the following three sections.
15.3.3.2. Global Options
Each global option should be placed on a single line after a set action.
-
daemon seconds— Specifies daemon-mode, where Fetchmail stays in the background. Replace seconds with the number of seconds Fetchmail is to wait before polling the server. -
postmaster— Specifies a local user to send mail to in case of delivery problems. -
syslog— Specifies the log file for errors and status messages. By default, this is/var/log/maillog.
15.3.3.3. Server Options
Server options must be placed on their own line in .fetchmailrc after a poll or skip action.
-
auth auth-type— Replace auth-type with the type of authentication to be used. By default,passwordauthentication is used, but some protocols support other types of authentication, includingkerberos_v5,kerberos_v4, andssh. If theanyauthentication type is used, Fetchmail first tries methods that do not require a password, then methods that mask the password, and finally attempts to send the password unencrypted to authenticate to the server. -
interval number— Polls the specified server everynumberof times that it checks for email on all configured servers. This option is generally used for email servers where the user rarely receives messages. -
port port-number— Replace port-number with the port number. This value overrides the default port number for the specified protocol. -
proto protocol— Replace protocol with the protocol, such aspop3orimap, to use when checking for messages on the server. -
timeout seconds— Replace seconds with the number of seconds of server inactivity after which Fetchmail gives up on a connection attempt. If this value is not set, a default of300seconds is used.
15.3.3.4. User Options
User options may be placed on their own lines beneath a server option or on the same line as the server option. In either case, the defined options must follow the user option (defined below).
-
fetchall— Orders Fetchmail to download all messages in the queue, including messages that have already been viewed. By default, Fetchmail only pulls down new messages. -
fetchlimit number— Replace number with the number of messages to be retrieved before stopping. -
flush— Deletes all previously viewed messages in the queue before retrieving new messages. -
limit max-number-bytes— Replace max-number-bytes with the maximum size in bytes that messages are allowed to be when retrieved by Fetchmail. This option is useful with slow network links, when a large message takes too long to download. -
password 'password'— Replace password with the user’s password. -
preconnect "command"— Replace command with a command to be executed before retrieving messages for the user. -
postconnect "command"— Replace command with a command to be executed after retrieving messages for the user. -
ssl— Activates SSL encryption. At the time of writing, the default action is to use the best available fromSSL2,SSL3,SSL23,TLS1,TLS1.1andTLS1.2. Note thatSSL2is considered obsolete and due to the POODLE: SSLv3 vulnerability (CVE-2014-3566),SSLv3should not be used. However there is no way to force the use of TLS1 or newer, therefore ensure the mail server being connected to is configured not to useSSLv2andSSLv3. Usestunnelwhere the server cannot be configured not to useSSLv2andSSLv3. -
sslproto— Defines allowed SSL or TLS protocols. Possible values areSSL2,SSL3,SSL23, andTLS1. The default value, ifsslprotois omitted, unset, or set to an invalid value, isSSL23. The default action is to use the best fromSSLv2,SSLv3,TLSv1,TLS1.1andTLS1.2. Note that setting any other value for SSL or TLS will disable all the other protocols. Due to the POODLE: SSLv3 vulnerability (CVE-2014-3566), it is recommend to omit this option, or set it toSSLv23, and configure the corresponding mail server not to useSSLv2andSSLv3. Usestunnelwhere the server cannot be configured not to useSSLv2andSSLv3. -
user "username"— Replace username with the user name used by Fetchmail to retrieve messages. This option must precede all other user options.
15.3.3.5. Fetchmail Command Options
Most Fetchmail options used on the command line when executing the fetchmail command mirror the .fetchmailrc configuration options. In this way, Fetchmail may be used with or without a configuration file. These options are not used on the command line by most users because it is easier to leave them in the .fetchmailrc file.
There may be times when it is desirable to run the fetchmail command with other options for a particular purpose. It is possible to issue command options to temporarily override a .fetchmailrc setting that is causing an error, as any options specified at the command line override configuration file options.
15.3.3.6. Informational or Debugging Options
Certain options used after the fetchmail command can supply important information.
-
--configdump— Displays every possible option based on information from.fetchmailrcand Fetchmail defaults. No email is retrieved for any users when using this option. -
-s— Executes Fetchmail in silent mode, preventing any messages, other than errors, from appearing after thefetchmailcommand. -
-v— Executes Fetchmail in verbose mode, displaying every communication between Fetchmail and remote email servers. -
-V— Displays detailed version information, lists its global options, and shows settings to be used with each user, including the email protocol and authentication method. No email is retrieved for any users when using this option.
15.3.3.7. Special Options
These options are occasionally useful for overriding defaults often found in the .fetchmailrc file.
-
-a— Fetchmail downloads all messages from the remote email server, whether new or previously viewed. By default, Fetchmail only downloads new messages. -
-k— Fetchmail leaves the messages on the remote email server after downloading them. This option overrides the default behavior of deleting messages after downloading them. -
-l max-number-bytes— Fetchmail does not download any messages over a particular size and leaves them on the remote email server. -
--quit— Quits the Fetchmail daemon process.
More commands and .fetchmailrc options can be found in the fetchmail man page.
15.3.4. Mail Transport Agent (MTA) Configuration
A Mail Transport Agent (MTA) is essential for sending email. A Mail User Agent (MUA) such as Evolution or Mutt, is used to read and compose email. When a user sends an email from an MUA, the message is handed off to the MTA, which sends the message through a series of MTAs until it reaches its destination.
Even if a user does not plan to send email from the system, some automated tasks or system programs might use the mail command to send email containing log messages to the root user of the local system.
Red Hat Enterprise Linux 7 provides two MTAs: Postfix and Sendmail. If both are installed, Postfix is the default MTA.
15.4. Mail Delivery Agents
Red Hat Enterprise Linux includes Procmail as primary MDA. Both applications are considered LDAs and both move email from the MTA’s spool file into the user’s mailbox. However, Procmail provides a robust filtering system.
This section details only Procmail. For information on the mail command, consult its man page (man mail).
Procmail delivers and filters email as it is placed in the mail spool file of the localhost. It is powerful, gentle on system resources, and widely used. Procmail can play a critical role in delivering email to be read by email client applications.
Procmail can be invoked in several different ways. Whenever an MTA places an email into the mail spool file, Procmail is launched. Procmail then filters and files the email for the MUA and quits. Alternatively, the MUA can be configured to execute Procmail any time a message is received so that messages are moved into their correct mailboxes. By default, the presence of /etc/procmailrc or of a ~/.procmailrc file (also called an rc file) in the user’s home directory invokes Procmail whenever an MTA receives a new message.
By default, no system-wide rc files exist in the /etc directory and no .procmailrc files exist in any user’s home directory. Therefore, to use Procmail, each user must construct a .procmailrc file with specific environment variables and rules.
Whether Procmail acts upon an email message depends upon whether the message matches a specified set of conditions or recipes in the rc file. If a message matches a recipe, then the email is placed in a specified file, is deleted, or is otherwise processed.
When Procmail starts, it reads the email message and separates the body from the header information. Next, Procmail looks for a /etc/procmailrc file and rc files in the /etc/procmailrcs/ directory for default, system-wide, Procmail environmental variables and recipes. Procmail then searches for a .procmailrc file in the user’s home directory. Many users also create additional rc files for Procmail that are referred to within the .procmailrc file in their home directory.
15.4.1. Procmail Configuration
The Procmail configuration file contains important environmental variables. These variables specify things such as which messages to sort and what to do with the messages that do not match any recipes.
These environmental variables usually appear at the beginning of the ~/.procmailrc file in the following format:
env-variable="value"
In this example, env-variable is the name of the variable and value defines the variable.
There are many environment variables not used by most Procmail users and many of the more important environment variables are already defined by a default value. Most of the time, the following variables are used:
DEFAULT— Sets the default mailbox where messages that do not match any recipes are placed.The default
DEFAULTvalue is the same as$ORGMAIL.INCLUDERC— Specifies additionalrcfiles containing more recipes for messages to be checked against. This breaks up the Procmail recipe lists into individual files that fulfill different roles, such as blocking spam and managing email lists, that can then be turned off or on by using comment characters in the user’s~/.procmailrcfile.For example, lines in a user’s
~/.procmailrcfile may look like this:MAILDIR=$HOME/Msgs INCLUDERC=$MAILDIR/lists.rc INCLUDERC=$MAILDIR/spam.rc
To turn off Procmail filtering of email lists but leaving spam control in place, comment out the first
INCLUDERCline with a hash sign (#). Note that it uses paths relative to the current directory.-
LOCKSLEEP— Sets the amount of time, in seconds, between attempts by Procmail to use a particular lockfile. The default is 8 seconds. -
LOCKTIMEOUT— Sets the amount of time, in seconds, that must pass after a lockfile was last modified before Procmail assumes that the lockfile is old and can be deleted. The default is 1024 seconds. -
LOGFILE— The file to which any Procmail information or error messages are written. -
MAILDIR— Sets the current working directory for Procmail. If set, all other Procmail paths are relative to this directory. ORGMAIL— Specifies the original mailbox, or another place to put the messages if they cannot be placed in the default or recipe-required location.By default, a value of
/var/spool/mail/$LOGNAMEis used.-
SUSPEND— Sets the amount of time, in seconds, that Procmail pauses if a necessary resource, such as swap space, is not available. -
SWITCHRC— Allows a user to specify an external file containing additional Procmail recipes, much like theINCLUDERCoption, except that recipe checking is actually stopped on the referring configuration file and only the recipes on theSWITCHRC-specified file are used. -
VERBOSE— Causes Procmail to log more information. This option is useful for debugging.
Other important environmental variables are pulled from the shell, such as LOGNAME, the login name; HOME, the location of the home directory; and SHELL, the default shell.
A comprehensive explanation of all environments variables, and their default values, is available in the procmailrc man page.
15.4.2. Procmail Recipes
New users often find the construction of recipes the most difficult part of learning to use Procmail. This difficulty is often attributed to recipes matching messages by using regular expressions which are used to specify qualifications for string matching. However, regular expressions are not very difficult to construct and even less difficult to understand when read. Additionally, the consistency of the way Procmail recipes are written, regardless of regular expressions, makes it easy to learn by example. To see example Procmail recipes, see Section 15.4.2.5, “Recipe Examples”.
Procmail recipes take the following form:
:0 flags : lockfile-name * condition_1_special-condition-character condition_1_regular_expression * condition_2_special-condition-character condition-2_regular_expression * condition_N_special-condition-character condition-N_regular_expression special-action-character action-to-perform
The first two characters in a Procmail recipe are a colon and a zero. Various flags can be placed after the zero to control how Procmail processes the recipe. A colon after the flags section specifies that a lockfile is created for this message. If a lockfile is created, the name can be specified by replacing lockfile-name.
A recipe can contain several conditions to match against the message. If it has no conditions, every message matches the recipe. Regular expressions are placed in some conditions to facilitate message matching. If multiple conditions are used, they must all match for the action to be performed. Conditions are checked based on the flags set in the recipe’s first line. Optional special characters placed after the asterisk character (*) can further control the condition.
The action-to-perform argument specifies the action taken when the message matches one of the conditions. There can only be one action per recipe. In many cases, the name of a mailbox is used here to direct matching messages into that file, effectively sorting the email. Special action characters may also be used before the action is specified. See Section 15.4.2.4, “Special Conditions and Actions” for more information.
15.4.2.1. Delivering vs. Non-Delivering Recipes
The action used if the recipe matches a particular message determines whether it is considered a delivering or non-delivering recipe. A delivering recipe contains an action that writes the message to a file, sends the message to another program, or forwards the message to another email address. A non-delivering recipe covers any other actions, such as a nesting block. A nesting block is a set of actions, contained in braces {}, that are performed on messages which match the recipe’s conditions. Nesting blocks can be nested inside one another, providing greater control for identifying and performing actions on messages.
When messages match a delivering recipe, Procmail performs the specified action and stops comparing the message against any other recipes. Messages that match non-delivering recipes continue to be compared against other recipes.
15.4.2.2. Flags
Flags are essential to determine how or if a recipe’s conditions are compared to a message. The egrep utility is used internally for matching of the conditions. The following flags are commonly used:
-
A— Specifies that this recipe is only used if the previous recipe without anAoraflag also matched this message. -
a— Specifies that this recipe is only used if the previous recipe with anAoraflag also matched this message and was successfully completed. -
B— Parses the body of the message and looks for matching conditions. -
b— Uses the body in any resulting action, such as writing the message to a file or forwarding it. This is the default behavior. -
c— Generates a carbon copy of the email. This is useful with delivering recipes, since the required action can be performed on the message and a copy of the message can continue being processed in thercfiles. -
D— Makes theegrepcomparison case-sensitive. By default, the comparison process is not case-sensitive. -
E— While similar to theAflag, the conditions in the recipe are only compared to the message if the immediately preceding recipe without anEflag did not match. This is comparable to anelseaction. -
e— The recipe is compared to the message only if the action specified in the immediately preceding recipe fails. -
f— Uses the pipe as a filter. -
H— Parses the header of the message and looks for matching conditions. This is the default behavior. -
h— Uses the header in a resulting action. This is the default behavior. -
w— Tells Procmail to wait for the specified filter or program to finish, and reports whether or not it was successful before considering the message filtered. -
W— Is identical towexcept that "Program failure" messages are suppressed.
For a detailed list of additional flags, see the procmailrc man page.
15.4.2.3. Specifying a Local Lockfile
Lockfiles are very useful with Procmail to ensure that more than one process does not try to alter a message simultaneously. Specify a local lockfile by placing a colon (:) after any flags on a recipe’s first line. This creates a local lockfile based on the destination file name plus whatever has been set in the LOCKEXT global environment variable.
Alternatively, specify the name of the local lockfile to be used with this recipe after the colon.
15.4.2.4. Special Conditions and Actions
Special characters used before Procmail recipe conditions and actions change the way they are interpreted.
The following characters may be used after the asterisk character (*) at the beginning of a recipe’s condition line:
-
!— In the condition line, this character inverts the condition, causing a match to occur only if the condition does not match the message. -
<— Checks if the message is under a specified number of bytes. -
>— Checks if the message is over a specified number of bytes.
The following characters are used to perform special actions:
-
!— In the action line, this character tells Procmail to forward the message to the specified email addresses. -
$— Refers to a variable set earlier in thercfile. This is often used to set a common mailbox that is referred to by various recipes. -
|— Starts a specified program to process the message. -
{and}— Constructs a nesting block, used to contain additional recipes to apply to matching messages.
If no special character is used at the beginning of the action line, Procmail assumes that the action line is specifying the mailbox in which to write the message.
15.4.2.5. Recipe Examples
Procmail is an extremely flexible program, but as a result of this flexibility, composing Procmail recipes from scratch can be difficult for new users.
The best way to develop the skills to build Procmail recipe conditions stems from a strong understanding of regular expressions combined with looking at many examples built by others. A thorough explanation of regular expressions is beyond the scope of this section. The structure of Procmail recipes and useful sample Procmail recipes can be found at various places on the Internet. The proper use and adaptation of regular expressions can be derived by viewing these recipe examples. In addition, introductory information about basic regular expression rules can be found in the grep(1) man page.
The following simple examples demonstrate the basic structure of Procmail recipes and can provide the foundation for more intricate constructions.
A basic recipe may not even contain conditions, as is illustrated in the following example:
:0: new-mail.spool
The first line specifies that a local lockfile is to be created but does not specify a name, so Procmail uses the destination file name and appends the value specified in the LOCKEXT environment variable. No condition is specified, so every message matches this recipe and is placed in the single spool file called new-mail.spool, located within the directory specified by the MAILDIR environment variable. An MUA can then view messages in this file.
A basic recipe, such as this, can be placed at the end of all rc files to direct messages to a default location.
The following example matched messages from a specific email address and throws them away.
:0 * ^From: spammer@domain.com /dev/null
With this example, any messages sent by spammer@domain.com are sent to the /dev/null device, deleting them.
Be certain that rules are working as intended before sending messages to /dev/null for permanent deletion. If a recipe inadvertently catches unintended messages, and those messages disappear, it becomes difficult to troubleshoot the rule.
A better solution is to point the recipe’s action to a special mailbox, which can be checked from time to time to look for false positives. Once satisfied that no messages are accidentally being matched, delete the mailbox and direct the action to send the messages to /dev/null.
The following recipe grabs email sent from a particular mailing list and places it in a specified folder.
:0: * ^(From|Cc|To).*tux-lug tuxlug
Any messages sent from the tux-lug@domain.com mailing list are placed in the tuxlug mailbox automatically for the MUA. Note that the condition in this example matches the message if it has the mailing list’s email address on the From, Cc, or To lines.
Consult the many Procmail online resources available in Section 15.7, “Additional Resources” for more detailed and powerful recipes.
15.4.2.6. Spam Filters
Because it is called by Sendmail, Postfix, and Fetchmail upon receiving new emails, Procmail can be used as a powerful tool for combating spam.
This is particularly true when Procmail is used in conjunction with SpamAssassin. When used together, these two applications can quickly identify spam emails, and sort or destroy them.
SpamAssassin uses header analysis, text analysis, blacklists, a spam-tracking database, and self-learning Bayesian spam analysis to quickly and accurately identify and tag spam.
In order to use SpamAssassin, first ensure the spamassassin package is installed on your system by running, as root:
~]# yum install spamassassin
For more information on installing packages with Yum, see Section 9.2.4, “Installing Packages”.
The easiest way for a local user to use SpamAssassin is to place the following line near the top of the ~/.procmailrc file:
INCLUDERC=/etc/mail/spamassassin/spamassassin-default.rc
The /etc/mail/spamassassin/spamassassin-default.rc contains a simple Procmail rule that activates SpamAssassin for all incoming email. If an email is determined to be spam, it is tagged in the header as such and the title is prepended with the following pattern:
*****SPAM*****
The message body of the email is also prepended with a running tally of what elements caused it to be diagnosed as spam.
To file email tagged as spam, a rule similar to the following can be used:
:0 Hw
* ^X-Spam-Status: Yes
spam
This rule files all email tagged in the header as spam into a mailbox called spam.
Since SpamAssassin is a Perl script, it may be necessary on busy servers to use the binary SpamAssassin daemon (spamd) and the client application (spamc). Configuring SpamAssassin this way, however, requires root access to the host.
To start the spamd daemon, type the following command:
~]# systemctl start spamassassin
To start the SpamAssassin daemon when the system is booted, run:
systemctl enable spamassassin.serviceSee Chapter 10, Managing Services with systemd for more information about starting and stopping services.
To configure Procmail to use the SpamAssassin client application instead of the Perl script, place the following line near the top of the ~/.procmailrc file. For a system-wide configuration, place it in /etc/procmailrc:
INCLUDERC=/etc/mail/spamassassin/spamassassin-spamc.rc15.5. Mail User Agents
Red Hat Enterprise Linux offers a variety of email programs, both graphical email client programs, such as Evolution, and text-based email programs such as mutt.
The remainder of this section focuses on securing communication between a client and a server.
15.5.1. Securing Communication
MUAs included with Red Hat Enterprise Linux, such as Thunderbird, Evolution and Mutt offer SSL-encrypted email sessions.
Like any other service that flows over a network unencrypted, important email information, such as user names, passwords, and entire messages, may be intercepted and viewed by users on the network. Additionally, since the standard POP and IMAP protocols pass authentication information unencrypted, it is possible for an attacker to gain access to user accounts by collecting user names and passwords as they are passed over the network.
15.5.1.1. Secure Email Clients
Most Linux MUAs designed to check email on remote servers support SSL encryption. To use SSL when retrieving email, it must be enabled on both the email client and the server.
SSL is easy to enable on the client-side, often done with the click of a button in the MUA’s configuration window or via an option in the MUA’s configuration file. Secure IMAP and POP have known port numbers (993 and 995, respectively) that the MUA uses to authenticate and download messages.
15.5.1.2. Securing Email Client Communications
Offering SSL encryption to IMAP and POP users on the email server is a simple matter.
First, create an SSL certificate. This can be done in two ways: by applying to a Certificate Authority (CA) for an SSL certificate or by creating a self-signed certificate.
Self-signed certificates should be used for testing purposes only. Any server used in a production environment should use an SSL certificate signed by a CA.
To create a self-signed SSL certificate for IMAP or POP, change to the /etc/pki/dovecot/ directory, edit the certificate parameters in the /etc/pki/dovecot/dovecot-openssl.cnf configuration file as you prefer, and type the following commands, as root:
dovecot]# rm -f certs/dovecot.pem private/dovecot.pem dovecot]# /usr/libexec/dovecot/mkcert.sh
Once finished, make sure you have the following configurations in your /etc/dovecot/conf.d/10-ssl.conf file:
ssl_cert = </etc/pki/dovecot/certs/dovecot.pem ssl_key = </etc/pki/dovecot/private/dovecot.pem
Issue the following command to restart the dovecot daemon:
~]# systemctl restart dovecot
Alternatively, the stunnel command can be used as an encryption wrapper around the standard, non-secure connections to IMAP or POP services.
The stunnel utility uses external OpenSSL libraries included with Red Hat Enterprise Linux to provide strong cryptography and to protect the network connections. It is recommended to apply to a CA to obtain an SSL certificate, but it is also possible to create a self-signed certificate.
See Using stunnel in the Red Hat Enterprise Linux 7 Security Guide for instructions on how to install stunnel and create its basic configuration. To configure stunnel as a wrapper for IMAPS and POP3S, add the following lines to the /etc/stunnel/stunnel.conf configuration file:
[pop3s] accept = 995 connect = 110 [imaps] accept = 993 connect = 143
The Security Guide also explains how to start and stop stunnel. Once you start it, it is possible to use an IMAP or a POP email client and connect to the email server using SSL encryption.
15.6. Configuring Mail Server with Antispam and Antivirus
Once your email delivery works, incoming emails may contain unsolicited messages also known as spam. These messages can also contain harmful viruses and malware, posing security risk and potential production loss on your systems.
To avoid these risks, you can filter the incoming messages and check them against viruses by using an antispam and antivirus solution.
15.6.1. Configuring Spam Filtering for Mail Transport Agent or Mail Delivery Agent
You can filter spam in a Mail Transport Agent (MTA), Mail Delivery Agent (MDA), or Mail User Agent (MUA). This chapter describes spam filtering in MTAs and MDAs.
15.6.1.1. Configuring Spam Filtering in a Mail Transport Agent
Red Hat Enterprise Linux 7 offers two primary MTAs: Postfix and Sendmail.
For details on how to install and configure an MTA, see Section 15.3, “Mail Transport Agents”.
Stopping spam in a MTA side is possible with the use of Sendmail, which has several anti-spam features: header checks, relaying denial, access database and sender information checks. Fore more information, see Section 15.3.2.5, “Stopping Spam”.
Moreover, both Postfix and Sendmail can work with third-party mail filters (milters) to filter spam and viruses in the mail-processing chain. In case of Postfix, the support for milters is included directly in the postfix package. In case of Sendmail, you need to install the sendmail-milter package, to be able to use milters.
15.6.1.2. Configuring Spam Filtering in a Mail Delivery Agent
Red Hat Enterprise Linux includes two primary MDAs, Procmail and the mail utility. See Section 15.2.2, “Mail Delivery Agent” for more information.
To stop spam in an MDA, users of Procmail can install third-party software named SpamAssassin available in the spamassassin package. SpamAssassin is a spam detection system that uses a variety of methods to identify spam in incoming mail. For further information on Spamassassin installation, configuration and deployment, see Section 15.4.2.6, “Spam Filters” or the How can I configure Spamassassin to filter all the incoming mail on my server? Red Hat Knowledgebase article. For additional information on SpamAssassin, see the SpamAssassin project website.
Note that SpamAssasin is a third-party software, and Red Hat does not support its use.
The spamassassin package is available only through the Extra Packages for Enterprise Linux (EPEL) repository. To learn more about using the EPEL repository, see Section 15.6.3, “Using the EPEL Repository to install Antispam and Antivirus Software”.
To learn more about how Red Hat handles the third party software and what level of support for it Red Hat provides, see How does Red Hat Global Support Services handle third-party software, drivers, and/or uncertified hardware/hypervisors or guest operating systems? Red Hat Knowledgebase article.
15.6.2. Configuring Antivirus Protection
To protect your system against viruses, you can install ClamAV, an open source antivirus engine for detecting trojans, viruses, malware, and other malicious software. For additional information about ClamAV, see the ClamAV project website.
Note that ClamAV is a third-party software, and Red Hat does not support its use.
The clamav, clamav-data, clamav-server and clamav-update packages are only available in the Extra Packages for Enterprise Linux (EPEL) repository. To learn more about using the EPEL repository, see Section 15.6.3, “Using the EPEL Repository to install Antispam and Antivirus Software”.
To learn more about how Red Hat handles the third party software and what level of support for it Red Hat provides, see How does Red Hat Global Support Services handle third-party software, drivers, and/or uncertified hardware/hypervisors or guest operating systems? Red Hat Knowledgebase article.
Once you have enabled the EPEL repository, install ClamAV by running the following command as the root user:
~]# yum install clamav clamav-data clamav-server clamav-update
15.6.3. Using the EPEL Repository to install Antispam and Antivirus Software
EPEL is a Fedora Special Interest Group that creates, maintains, and manages a high quality set of additional packages for Red Hat Enterprise Linux. For more information, see the Fedora EPEL website.
To use the EPEL repository, download the latest version of the epel-release package for Red Hat Enterprise Linux 7. You can also run the following command as the root user:
~]# yum install https://dl.fedoraproject.org/pub/epel/epel-release-latest-7.noarch.rpmzu
When using the EPEL repository for the first time, you need to authenticate with a public GPG key. For more information, see Fedora Package Signing Keys.
15.7. Additional Resources
The following is a list of additional documentation about email applications.
15.7.1. Installed Documentation
Information on configuring Sendmail is included with the sendmail and sendmail-cf packages.
/usr/share/sendmail-cf/README— Contains information on them4macro processor, file locations for Sendmail, supported mailers, how to access enhanced features, and more.In addition, the
sendmailandaliasesman pages contain helpful information covering various Sendmail options and the proper configuration of the Sendmail/etc/mail/aliasesfile.
-
/usr/share/doc/postfix-version-number/— Contains a large amount of information on how to configure Postfix. Replace version-number with the version number of Postfix. -
/usr/share/doc/fetchmail-version-number/— Contains a full list of Fetchmail features in theFEATURESfile and an introductoryFAQdocument. Replace version-number with the version number of Fetchmail. /usr/share/doc/procmail-version-number/— Contains aREADMEfile that provides an overview of Procmail, aFEATURESfile that explores every program feature, and anFAQfile with answers to many common configuration questions. Replace version-number with the version number of Procmail.When learning how Procmail works and creating new recipes, the following Procmail man pages are invaluable:
-
procmail— Provides an overview of how Procmail works and the steps involved with filtering email. -
procmailrc— Explains thercfile format used to construct recipes. -
procmailex— Gives a number of useful, real-world examples of Procmail recipes. -
procmailsc— Explains the weighted scoring technique used by Procmail to match a particular recipe to a message. -
/usr/share/doc/spamassassin-version-number/— Contains a large amount of information pertaining to SpamAssassin. Replace version-number with the version number of the spamassassin package.
-
15.7.2. Online Documentation
- How to configure postfix with TLS? — A Red Hat Knowledgebase article that describes configuring postfix to use TLS.
- How to configure a Sendmail Smart Host — A Red Hat Knowledgebase solution that describes configuring a sendmail Smart Host.
- http://www.sendmail.org/ — Offers a thorough technical breakdown of Sendmail features, documentation and configuration examples.
- http://www.sendmail.com/ — Contains news, interviews and articles concerning Sendmail, including an expanded view of the many options available.
- http://www.postfix.org/ — The Postfix project home page contains a wealth of information about Postfix. The mailing list is a particularly good place to look for information.
- http://www.fetchmail.info/fetchmail-FAQ.html — A thorough FAQ about Fetchmail.
- http://www.spamassassin.org/ — The official site of the SpamAssassin project.
Chapter 16. File and Print Servers
This chapter guides you through the installation and configuration of Samba, an open source implementation of the Server Message Block (SMB) and common Internet file system (CIFS) protocol, and vsftpd, the primary FTP server shipped with Red Hat Enterprise Linux. Additionally, it explains how to use the Print Settings tool to configure printers.
16.1. Samba
Samba implements the Server Message Block (SMB) protocol in Red Hat Enterprise Linux. The SMB protocol is used to access resources on a server, such as file shares and shared printers. Additionally, Samba implements the Distributed Computing Environment Remote Procedure Call (DCE RPC) protocol used by Microsoft Windows.
You can run Samba as:
- An Active Directory (AD) or NT4 domain member
- A standalone server
An NT4 Primary Domain Controller (PDC) or Backup Domain Controller (BDC)
NoteRed Hat supports these modes only in existing installations with Windows versions which support NT4 domains. Red Hat recommends not setting up a new Samba NT4 domain, because Microsoft operating systems later than Windows 7 and Windows Server 2008 R2 do not support NT4 domains.
Independently of the installation mode, you can optionally share directories and printers. This enables Samba to act as a file and print server.
Red Hat does not support running Samba as an AD domain controller (DC).
16.1.1. The Samba Services
Samba provides the following services:
smbdThis service provides file sharing and printing services using the SMB protocol. Additionally, the service is responsible for resource locking and for authenticating connecting users. The
smbsystemdservice starts and stops thesmbddaemon.To use the
smbdservice, install the samba package.nmbdThis service provides host name and IP resolution using the NetBIOS over IPv4 protocol. Additionally to the name resolution, the
nmbdservice enables browsing the SMB network to locate domains, work groups, hosts, file shares, and printers. For this, the service either reports this information directly to the broadcasting client or forwards it to a local or master browser. Thenmbsystemdservice starts and stops thenmbddaemon.Note that modern SMB networks use DNS to resolve clients and IP addresses.
To use the
nmbdservice, install the samba package.winbinddThe
winbinddservice provides an interface for the Name Service Switch (NSS) to use AD or NT4 domain users and groups on the local system. This enables, for example, domain users to authenticate to services hosted on a Samba server or to other local services. Thewinbindsystemdservice starts and stops thewinbindddaemon.If you set up Samba as a domain member,
winbinddmust be started before thesmbdservice. Otherwise, domain users and groups are not available to the local system.To use the
winbinddservice, install the samba-winbind package.ImportantRed Hat only supports running Samba as a server with the
winbinddservice to provide domain users and groups to the local system. Due to certain limitations, such as missing Windows access control list (ACL) support and NT LAN Manager (NTLM) fallback, use of the System Security Services Daemon (SSSD) with Samba is currently not supported for these use cases. For further details, see the Red Hat Knowledgebase article What is the support status for Samba file server running on IdM clients or directly enrolled AD clients where SSSD is used as the client daemon.
16.1.2. Verifying the smb.conf File by Using the testparm Utility
The testparm utility verifies that the Samba configuration in the /etc/samba/smb.conf file is correct. The utility detects invalid parameters and values, but also incorrect settings, such as for ID mapping. If testparm reports no problem, the Samba services will successfully load the /etc/samba/smb.conf file. Note that testparm cannot verify that the configured services will be available or work as expected.
Red Hat recommends that you verify the /etc/samba/smb.conf file by using testparm after each modification of this file.
To verify the /etc/samba/smb.conf file, run the testparm utility as the root user. If testparm reports incorrect parameters, values, or other errors in the configuration, fix the problem and run the utility again.
Example 16.1. Using testparm
The following output reports a non-existent parameter and an incorrect ID mapping configuration:
~]# testparm Load smb config files from /etc/samba/smb.conf rlimit_max: increasing rlimit_max (1024) to minimum Windows limit (16384) Unknown parameter encountered: "log levell" Processing section "[example_share]" Loaded services file OK. ERROR: The idmap range for the domain * (tdb) overlaps with the range of DOMAIN (ad)! Server role: ROLE_DOMAIN_MEMBER Press enter to see a dump of your service definitions # Global parameters [global] ... [example_share] ...
16.1.3. Understanding the Samba Security Modes
The security parameter in the [global] section in the /etc/samba/smb.conf file manages how Samba authenticates users that are connecting to the service. Depending on the mode you install Samba in, the parameter must be set to different values:
On an AD domain member, set
security=ads.In this mode, Samba uses Kerberos to authenticate AD users.
For details about setting up Samba as a domain member, see Section 16.1.5, “Setting up Samba as a Domain Member”.
On a standalone server, set
security=user.In this mode, Samba uses a local database to authenticate connecting users.
For details about setting up Samba as a standalone server, see Section 16.1.4, “Setting up Samba as a Standalone Server”.
On an NT4 PDC or BDC, set
security=user.In this mode, Samba authenticates users to a local or LDAP database.
On an NT4 domain member, set
security=domain.In this mode, Samba authenticates connecting users to an NT4 PDC or BDC. You cannot use this mode on AD domain members.
For details about setting up Samba as a domain member, see Section 16.1.5, “Setting up Samba as a Domain Member”.
For further details, see the description of the security parameter in the smb.conf(5) man page.
16.1.4. Setting up Samba as a Standalone Server
In certain situations, administrators want to set up a Samba server that is not a member of a domain. In this installation mode, Samba authenticates users to a local database instead of to a central DC. Additionally, you can enable guest access to allow users to connect to one or multiple services without authentication.
16.1.4.1. Setting up the Server Configuration for the Standalone Server
To set up Samba as a standalone server:
Setting up Samba as a Standalone Server
Install the samba package:
~]# yum install samba
Edit the
/etc/samba/smb.conffile and set the following parameters:[global] workgroup = Example-WG netbios name = Server security = user log file = /var/log/samba/%m.log log level = 1
This configuration defines a standalone server named
Serverwithin theExample-WGwork group. Additionally, this configuration enables logging on a minimal level (1) and log files will be stored in the/var/log/samba/directory. Samba will expand the%mmacro in thelog fileparameter to the NetBIOS name of connecting clients. This enables individual log files for each client.For further details, see the parameter descriptions in the smb.conf(5) man page.
Configure file or printer sharing. See:
Verify the
/etc/samba/smb.conffile:~]# testparm
For details, see Section 16.1.2, “Verifying the
smb.confFile by Using thetestparmUtility”.- If you set up shares that require authentication, create the user accounts. For details, see Section 16.1.4.2, “Creating and Enabling Local User Accounts”.
Open the required ports and reload the firewall configuration by using the
firewall-cmdutility:~]# firewall-cmd --permanent --add-port={139/tcp,445/tcp} ~]# firewall-cmd --reloadStart the
smbservice:~]# systemctl start smb
Optionally, enable the
smbservice to start automatically when the system boots:~]# systemctl enable smb
16.1.4.2. Creating and Enabling Local User Accounts
To enable users to authenticate when they connect to a share, you must create the accounts on the Samba host both in the operating system and in the Samba database. Samba requires the operating system account to validate the Access Control Lists (ACL) on file system objects and the Samba account to authenticate connecting users.
If you use the passdb backend = tdbsam default setting, Samba stores user accounts in the /var/lib/samba/private/passdb.tdb database.
For example, to create the example Samba user:
Creating a Samba User
Create the operating system account:
~]# useradd -M -s /sbin/nologin exampleThe previous command adds the
exampleaccount without creating a home directory. If the account is only used to authenticate to Samba, assign the/sbin/nologincommand as shell to prevent the account from logging in locally.Set a password to the operating system account to enable it:
~]# passwd example Enter new UNIX password: password Retype new UNIX password: password passwd: password updated successfully
Samba does not use the password set on the operating system account to authenticate. However, you need to set a password to enable the account. If an account is disabled, Samba denies access if this user connects.
Add the user to the Samba database and set a password to the account:
~]# smbpasswd -a example New SMB password: password Retype new SMB password: password Added user example.
Use this password to authenticate when using this account to connect to a Samba share.
Enable the Samba account:
~]# smbpasswd -e example Enabled user example.
16.1.5. Setting up Samba as a Domain Member
Administrators running an AD or NT4 domain often want to use Samba to join their Red Hat Enterprise Linux server as a member to the domain. This enables you to:
- Access domain resources on other domain members
-
Authenticate domain users to local services, such as
sshd - Share directories and printers hosted on the server to act as a file and print server
16.1.5.1. Joining a Domain
To join a Red Hat Enterprise Linux system to a domain:
Joining a Red Hat Enterprise Linux System to a Domain
Install the following packages:
~]# yum install realmd oddjob-mkhomedir oddjob samba-winbind-clients \ samba-winbind samba-common-toolsTo share directories or printers on the domain member, install the samba package:
~]# yum install samba
If you join an AD, additionally install the samba-winbind-krb5-locator package:
~]# yum install samba-winbind-krb5-locator
This plug-in enables Kerberos to locate the Key Distribution Center (KDC) based on AD sites using DNS service records.
Optionally, rename the existing
/etc/samba/smb.confSamba configuration file:~]# mv /etc/samba/smb.conf /etc/samba/smb.conf.old
Join the domain. For example, to join a domain named
ad.example.com~]# realm join --membership-software=samba --client-software=winbind ad.example.comUsing the previous command, the
realmutility automatically:-
Creates a
/etc/samba/smb.conffile for a membership in thead.example.comdomain -
Adds the
winbindmodule for user and group lookups to the/etc/nsswitch.conffile -
Updates the Pluggable Authentication Module (PAM) configuration files in the
/etc/pam.d/directory Starts the
winbindservice and enables the service to start when the system bootsFor further details about the
realmutility, see the realm(8) man page and the corresponding section in the Red Hat Windows Integration Guide.
-
Creates a
-
Optionally, set an alternative ID mapping back end or customized ID mapping settings in the
/etc/samba/smb.conffile. For details, see Section 16.1.5.3, “Understanding ID Mapping”. - Optionally, verify the configuration. See Section 16.1.5.2, “Verifying That Samba Was Correctly Joined As a Domain Member”.
Verify that the
winbinddis running:~]# systemctl status winbind
ImportantTo enable Samba to query domain user and group information, the
winbinddservice must be running before you startsmbd.If you installed the samba package to share directories and printers, start the
smbdservice:~]# systemctl start smb
16.1.5.2. Verifying That Samba Was Correctly Joined As a Domain Member
After you joined a Red Hat Enterprise Linux as a domain member, you can run different tests to verify that the join succeeded. See:
Verifying That the Operating System Can Retrieve Domain User Accounts and Groups
Use the getent utility to verify that the operating system can retrieve domain users and groups. For example:
To query the
administratoraccount in theADdomain:~]# getent passwd AD\\administrator AD\administrator:*:10000:10000::/home/administrator@AD:/bin/bash
To query the members of the
Domain Usersgroup in theADdomain:~]# getent group "AD\\Domain Users" AD\domain users:x:10000:user
If the command works correctly, verify that you can use domain users and groups when you set permissions on files and directories. For example, to set the owner of the /srv/samba/example.txt file to AD\administrator and the group to AD\Domain Users:
~]# chown "AD\administrator":"AD\Domain Users" /srv/samba/example.txt
Verifying If AD Domain Users Can Obtain a Kerberos Ticket
In an AD environment, users can obtain a Kerberos ticket from the DC. For example, to verify if the administrator user can obtain a Kerberos ticket:
To use the kinit and klist utilities, install the krb5-workstation package on the Samba domain member.
Obtaining a Kerberos Ticket
Obtain a ticket for the
administrator@AD.EXAMPLE.COMprincipal:~]# kinit administrator@AD.EXAMPLE.COM
Display the cached Kerberos ticket:
~]# klist Ticket cache: KEYRING:persistent:0:0 Default principal: administrator@AD.EXAMPLE.COM Valid starting Expires Service principal 11.09.2017 14:46:21 12.09.2017 00:46:21 krbtgt/AD.EXAMPLE.COM@AD.EXAMPLE.COM renew until 18.09.2017 14:46:19
Listing the Available Domains
To list all domains available through the winbindd service, enter:
~]# wbinfo --all-domains
If Samba was successfully joined as a domain member, the command displays the built-in and local host name, as well as the domain Samba is a member of including trusted domains.
Example 16.2. Displaying the Available Domains
~]# wbinfo --all-domains
BUILTIN
SAMBA-SERVER
AD16.1.5.3. Understanding ID Mapping
Windows domains distinguish users and groups by unique Security Identifiers (SID). However, Linux requires unique UIDs and GIDs for each user and group. If you run Samba as a domain member, the winbindd service is responsible for providing information about domain users and groups to the operating system.
To enable the winbindd service to provide unique IDs for users and groups to Linux, you must configure ID mapping in the /etc/samba/smb.conf file for:
- The local database (default domain)
- The AD or NT4 domain the Samba server is a member of
- Each trusted domain from which users must be able to access resources on this Samba server
16.1.5.3.1. Planning ID Ranges
Regardless of whether you store the Linux UIDs and GIDs in AD or if you configure Samba to generate them, each domain configuration requires a unique ID range that must not overlap with any of the other domains.
If you set overlapping ID ranges, Samba fails to work correctly.
Example 16.3. Unique ID Ranges
The following shows non-overlapping ID mapping ranges for the default (*), AD-DOM, and the TRUST-DOM domains.
[global] ... idmap config * : backend = tdb idmap config * : range = 10000-999999 idmap config AD-DOM:backend = rid idmap config AD-DOM:range = 2000000-2999999 idmap config TRUST-DOM:backend = rid idmap config TRUST-DOM:range = 4000000-4999999
You can only assign one range per domain. Therefore, leave enough space between the domains ranges. This enables you to extend the range later if your domain grows.
If you later assign a different range to a domain, the ownership of files and directories previously created by these users and groups will be lost.
16.1.5.3.2. The * Default Domain
In a domain environment, you add one ID mapping configuration for each of the following:
- The domain the Samba server is a member of
- Each trusted domain that should be able to access the Samba server
However, for all other objects, Samba assigns IDs from the default domain. This includes:
- Local Samba users and groups
-
Samba built-in accounts and groups, such as
BUILTIN\Administrators
You must configure the default domain as described in this section to enable Samba to operate correctly.
The default domain back end must be writable to permanently store the assigned IDs.
For the default domain, you can use one of the following back ends:
tdbWhen you configure the default domain to use the
tdbback end, set an ID range that is big enough to include objects that will be created in the future and that are not part of a defined domain ID mapping configuration.For example, set the following in the
[global]section in the/etc/samba/smb.conffile:idmap config * : backend = tdb idmap config * : range = 10000-999999
For further details, see Section 16.1.5.4.1, “Using the
tdbID Mapping Back End”.autoridWhen you configure the default domain to use the
autoridback end, adding additional ID mapping configurations for domains is optional.For example, set the following in the
[global]section in the/etc/samba/smb.conffile:idmap config * : backend = autorid idmap config * : range = 10000-999999
For further details, see Configuring the
autoridBack End.
16.1.5.4. The Different ID Mapping Back Ends
Samba provides different ID mapping back ends for specific configurations. The most frequently used back ends are:
| Back End | Use Case |
|---|---|
|
|
The |
|
| AD domains only |
|
| AD and NT4 domains |
|
|
AD, NT4, and the |
The following sections describe the benefits, recommended scenarios where to use the back end, and how to configure it.
16.1.5.4.1. Using the tdb ID Mapping Back End
The winbindd service uses the writable tdb ID mapping back end by default to store Security Identifier (SID), UID, and GID mapping tables. This includes local users, groups, and built-in principals.
Use this back end only for the * default domain. For example:
idmap config * : backend = tdb idmap config * : range = 10000-999999
For further details about the * default domain, see Section 16.1.5.3.2, “The * Default Domain”.
16.1.5.4.2. Using the ad ID Mapping Back End
The ad ID mapping back end implements a read-only API to read account and group information from AD. This provides the following benefits:
- All user and group settings are stored centrally in AD.
- User and group IDs are consistent on all Samba servers that use this back end.
- The IDs are not stored in a local database which can corrupt, and therefore file ownerships cannot be lost.
The ad back end reads the following attributes from AD:
| AD Attribute Name | Object Type | Mapped to |
|---|---|---|
|
| User and group | User or group name, depending on the object |
|
| User | User ID (UID) |
|
| Group | Group ID (GID) |
|
| User | Path to the shell of the user |
|
| User | Path to the home directory of the user |
|
| User | Primary group ID |
[a]
Samba only reads this attribute if you set idmap config DOMAIN:unix_nss_info = yes.
[b]
Samba only reads this attribute if you set idmap config DOMAIN:unix_primary_group = yes.
| ||
Prerequisites of the ad Back End
To use the ad ID mapping back end:
-
Both users and groups must have unique IDs set in AD, and the IDs must be within the range configured in the
/etc/samba/smb.conffile. Objects whose IDs are outside of the range will not be available on the Samba server. -
Users and groups must have all required attributes set in AD. If required attributes are missing, the user or group will not be available on the Samba server. The required attributes depend on your configuration. See Table 16.2, “Attributes the
adBack End Reads from User and Group Objects”.
Configuring the ad Back End
To configure a Samba AD member to use the ad ID mapping back end:
Configuring the ad Back End on a Domain Member
Edit the
[global]section in the/etc/samba/smb.conffile:Add an ID mapping configuration for the default domain (
*) if it does not exist. For example:idmap config * : backend = tdb idmap config * : range = 10000-999999
For further details about the default domain configuration, see Section 16.1.5.3.2, “The
*Default Domain”.Enable the
adID mapping back end for the AD domain:idmap config DOMAIN : backend = adSet the range of IDs that is assigned to users and groups in the AD domain. For example:
idmap config DOMAIN : range = 2000000-2999999ImportantThe range must not overlap with any other domain configuration on this server. Additionally, the range must be set big enough to include all IDs assigned in the future. For further details, see Section 16.1.5.3.1, “Planning ID Ranges”.
Set that Samba uses the RFC 2307 schema when reading attributes from AD:
idmap config DOMAIN : schema_mode = rfc2307To enable Samba to read the login shell and the path to the users home directory from the corresponding AD attribute, set:
idmap config DOMAIN : unix_nss_info = yesAlternatively, you can set a uniform domain-wide home directory path and login shell that is applied to all users. For example:
template shell = /bin/bash template homedir = /home/%U
For details about variable substitution, see the VARIABLE SUBSTITUTIONS section in the smb.conf(5) man page.
By default, Samba uses the
primaryGroupIDattribute of a user object as the user’s primary group on Linux. Alternatively, you can configure Samba to use the value set in thegidNumberattribute instead:idmap config DOMAIN : unix_primary_group = yes
Verify the
/etc/samba/smb.conffile:~]# testparm
For details, see Section 16.1.2, “Verifying the
smb.confFile by Using thetestparmUtility”.Reload the Samba configuration:
~]# smbcontrol all reload-config
- Verify that the settings work as expected. See the section called “Verifying That the Operating System Can Retrieve Domain User Accounts and Groups”.
For further details, see the smb.conf(5) and idmap_ad(8) man pages.
16.1.5.4.3. Using the rid ID Mapping Back End
Samba can use the relative identifier (RID) of a Windows SID to generate an ID on Red Hat Enterprise Linux.
The RID is the last part of a SID. For example, if the SID of a user is S-1-5-21-5421822485-1151247151-421485315-30014, then 30014 is the corresponding RID. For details, how Samba calculates the local ID, see the idmap_rid(8) man page.
The rid ID mapping back end implements a read-only API to calculate account and group information based on an algorithmic mapping scheme for AD and NT4 domains. When you configure the back end, you must set the lowest and highest RID in the idmap config DOMAIN : range parameter. Samba will not map users or groups with a lower or higher RID than set in this parameter.
As a read-only back end, rid cannot assign new IDs, such as for BUILTIN groups. Therefore, do not use this back end for the * default domain.
Benefits
- All domain users and groups that have an RID within the configured range are automatically available on the domain member.
- You do not need to manually assign IDs, home directories, and login shells.
Drawbacks
- All domain users get the same login shell and home directory assigned. However, you can use variables.
-
User and group IDs are only the same across Samba domain members if all use the
ridback end with the same ID range settings. - You cannot exclude individual users or groups from being available on the domain member. Only users and groups outside of the configured range are excluded.
-
Based on the formulas the
winbinddservice uses to calculate the IDs, duplicate IDs can occur in multi-domain environments if objects in different domains have the same RID.
Configuring the rid Back End
To configure a Samba domain member to use the rid ID mapping back end:
Configuring the rid Back End on a Domain Member
Edit the
[global]section in the/etc/samba/smb.conffile:Add an ID mapping configuration for the default domain (
*) if it does not exist. For example:idmap config * : backend = tdb idmap config * : range = 10000-999999
For further details about the default domain configuration, see Section 16.1.5.3.2, “The
*Default Domain”.Enable the
ridID mapping back end for the domain:idmap config DOMAIN : backend = ridSet a range that is big enough to include all RIDs that will be assigned in the future. For example:
idmap config DOMAIN : range = 2000000-2999999Samba ignores users and groups whose RIDs in this domain are not within the range.
ImportantThe range must not overlap with any other domain configuration on this server. For further details, see Section 16.1.5.3.1, “Planning ID Ranges”.
Set a shell and home directory path that will be assigned to all mapped users. For example:
template shell = /bin/bash template homedir = /home/%U
For details about variable substitution, see the VARIABLE SUBSTITUTIONS section in the smb.conf(5) man page.
Verify the
/etc/samba/smb.conffile:~]# testparm
For details, see Section 16.1.2, “Verifying the
smb.confFile by Using thetestparmUtility”.Reload the Samba configuration:
~]# smbcontrol all reload-config
- Verify that the settings work as expected. See the section called “Verifying That the Operating System Can Retrieve Domain User Accounts and Groups”.
16.1.5.4.4. Using the autorid ID Mapping Back End
The autorid back end works similar to the rid ID mapping back end, but can automatically assign IDs for different domains. This enables you to use the autorid back end in the following situations:
-
Only for the
*default domain. -
For the
*default domain and additional domains, without the need to create ID mapping configurations for each of the additional domains. - Only for specific domains.
Benefits
- All domain users and groups whose calculated UID and GID is within the configured range are automatically available on the domain member.
- You do not need to manually assign IDs, home directories, and login shells.
- No duplicate IDs, even if multiple objects in a multi-domain environment have the same RID.
Drawbacks
- User and group IDs are not the same across Samba domain members.
- All domain users get the same login shell and home directory assigned. However, you can use variables.
- You cannot exclude individual users or groups from being available on the domain member. Only users and groups whose calculated UID or GID is outside of the configured range are excluded.
Configuring the autorid Back End
To configure a Samba domain member to use the autorid ID mapping back end for the * default domain:
If you use autorid for the default domain, adding additional ID mapping configuration for domains is optional.
Configuring the autorid Back End on a Domain Member
Edit the
[global]section in the/etc/samba/smb.conffile:Enable the
autoridID mapping back end for the*default domain:idmap config * : backend = autorid
Set a range that is big enough to assign IDs for all existing and future objects. For example:
idmap config * : range = 10000-999999
Samba ignores users and groups whose calculated IDs in this domain are not within the range. For details about how the back end calculated IDs, see the THE MAPPING FORMULAS section in the idmap_autorid(8) man page.
WarningAfter you set the range and Samba starts using it, you can only increase the upper limit of the range. Any other change to the range can result in new ID assignments, and thus in loosing file ownerships.
Optionally, set a range size. For example:
idmap config * : rangesize = 200000
Samba assigns this number of continuous IDs for each domain’s object until all IDs from the range set in the
idmap config * : rangeparameter are taken. For further details, see therangesizeparameter description in the idmap_autorid(8) man page.Set a shell and home directory path that will be assigned to all mapped users. For example:
template shell = /bin/bash template homedir = /home/%U
For details about variable substitution, see the VARIABLE SUBSTITUTIONS section in the smb.conf(5) man page.
Optionally, add additional ID mapping configuration for domains. If no configuration for an individual domain is available, Samba calculates the ID using the
autoridback end settings in the previously configured*default domain.ImportantIf you configure additional back ends for individual domains, the ranges for all ID mapping configuration must not overlap. For further details, see Section 16.1.5.3.1, “Planning ID Ranges”.
Verify the
/etc/samba/smb.conffile:~]# testparm
For details, see Section 16.1.2, “Verifying the
smb.confFile by Using thetestparmUtility”.Reload the Samba configuration:
~]# smbcontrol all reload-config
- Verify that the settings work as expected. See the section called “Verifying That the Operating System Can Retrieve Domain User Accounts and Groups”.
16.1.7. Setting up a Samba Print Server
If you set up Samba as a print server, clients in your network can use Samba to print. Additionally, Windows clients can, if configured, download the driver from the Samba server.
Before you can share a printer, set up Samba:
16.1.7.1. The Samba spoolssd Service
The Samba spoolssd is a service that is integrated into the smbd service. Enable spoolssd in the Samba configuration to significantly increase the performance on print servers with a high number of jobs or printers.
Without spoolssd, Samba forks the smbd process and initializes the printcap cache for each print job. In case of a large number of printers, the smbd service can become unresponsive for multiple seconds while the cache is initialized. The spoolssd service enables you to start pre-forked smbd processes that are processing print jobs without any delays. The main spoolssd smbd process uses a low amount of memory, and forks and terminates child processes.
To enable the spoolssd service:
Enabling the spoolssd Service
Edit the
[global]section in the/etc/samba/smb.conffile:Add the following parameters:
rpc_server:spoolss = external rpc_daemon:spoolssd = fork
Optionally, you can set the following parameters:
Parameter Default Description spoolssd:prefork_min_children
5
Minimum number of child processes
spoolssd:prefork_max_children
25
Maximum number of child processes
spoolssd:prefork_spawn_rate
5
Samba forks the number of new child processes set in this parameter, up to the value set in
spoolssd:prefork_max_children, if a new connection is establishedspoolssd:prefork_max_allowed_clients
100
Number of clients, a child process serves
spoolssd:prefork_child_min_life
60
Minimum lifetime of a child process in seconds. 60 seconds is the minimum.
Verify the
/etc/samba/smb.conffile:~]# testparm
For details, see Section 16.1.2, “Verifying the
smb.confFile by Using thetestparmUtility”.Restart the
smbservice:~]# systemctl restart smb
After you restarted the service, Samba automatically starts smbd child processes:
~]# ps axf ... 30903 smbd 30912 \_ smbd 30913 \_ smbd 30914 \_ smbd 30915 \_ smbd ...
16.1.7.2. Enabling Print Server Support in Samba
To enable the print server support:
Enabling Print Server Support in Samba
On the Samba server, set up CUPS and add the printer to the CUPS back end. For details, see Section 16.3, “Print Settings”.
NoteSamba can only forward the print jobs to CUPS if CUPS is installed locally on the Samba print server.
Edit the
/etc/samba/smb.conffile:If you want to enable the
spoolssdservice, add the following parameters to the[global]section:rpc_server:spoolss = external rpc_daemon:spoolssd = fork
For further details, see Section 16.1.7.1, “The Samba
spoolssdService”.To configure the printing back end, add the
[printers]section:[printers] comment = All Printers path = /var/tmp/ printable = yes create mask = 0600
ImportantThe
printersshare name is hard-coded and cannot be changed.
Verify the
/etc/samba/smb.conffile:~]# testparm
For details, see Section 16.1.2, “Verifying the
smb.confFile by Using thetestparmUtility”.Open the required ports and reload the firewall configuration using the
firewall-cmdutility:~]# firewall-cmd --permanent --add-service=samba ~]# firewall-cmd --reload
Restart the
smbservice:~]# systemctl restart smb
After restarting the service, Samba automatically shares all printers that are configured in the CUPS back end. If you want to manually share only specific printers, see Section 16.1.7.3, “Manually Sharing Specific Printers”.
16.1.7.3. Manually Sharing Specific Printers
If you configured Samba as a print server, by default, Samba shares all printers that are configured in the CUPS back end. To share only specific printers:
Manually Sharing a Specific Printer
Edit the
/etc/samba/smb.conffile:In the
[global]section, disable automatic printer sharing by setting:load printers = no
Add a section for each printer you want to share. For example, to share the printer named
examplein the CUPS back end asExample-Printerin Samba, add the following section:[Example-Printer] path = /var/tmp/ printable = yes printer name = example
You do not need individual spool directories for each printer. You can set the same spool directory in the
pathparameter for the printer as you set in the[printers]section.
Verify the
/etc/samba/smb.conffile:~]# testparm
For details, see Section 16.1.2, “Verifying the
smb.confFile by Using thetestparmUtility”.Reload the Samba configuration:
~]# smbcontrol all reload-config
16.1.7.4. Setting up Automatic Printer Driver Downloads for Windows Clients
If you are running a Samba print server for Windows clients, you can upload drivers and preconfigure printers. If a user connects to a printer, Windows automatically downloads and installs the driver locally on the client. The user does not require local administrator permissions for the installation. Additionally, Windows applies preconfigured driver settings, such as the number of trays.
Before setting up automatic printer driver download, must configure Samba as a print server and share a printer. For details, see Section 16.1.7, “Setting up a Samba Print Server”.
16.1.7.4.1. Basic Information about Printer Drivers
This section provides general information about printer drivers.
Supported Driver Model Version
Samba only supports the printer driver model version 3 which is supported in Windows 2000 and later, and Windows Server 2000 and later. Samba does not support the driver model version 4, introduced in Windows 8 and Windows Server 2012. However, these and later Windows versions also support version 3 drivers.
Package-aware Drivers
Samba does not support package-aware drivers.
Preparing a Printer Driver for Being Uploaded
Before you can upload a driver to a Samba print server:
- Unpack the driver if it is provided in a compressed format.
Some drivers require to start a setup application that installs the driver locally on a Windows host. In certain situations, the installer extracts the individual files into the operating system’s temporary folder during the setup runs. To use the driver files for uploading:
- Start the installer.
- Copy the files from the temporary folder to a new location.
- Cancel the installation.
Ask your printer manufacturer for drivers that support uploading to a print server.
Providing 32-bit and 64-bit Drivers for a Printer to a Client
To provide the driver for a printer for both 32-bit and 64-bit Windows clients, you must upload a driver with exactly the same name for both architectures. For example, if you are uploading the 32-bit driver named Example PostScript and the 64-bit driver named Example PostScript (v1.0), the names do not match. Consequently, you can only assign one of the drivers to a printer and the driver will not be available for both architectures.
16.1.7.4.2. Enabling Users to Upload and Preconfigure Drivers
To be able to upload and preconfigure printer drivers, a user or a group needs to have the SePrintOperatorPrivilege privilege granted. A user must be added into the printadmin group. Red Hat Enterprise Linux creates this group automatically when you install the samba package. The printadmin group gets assigned the lowest available dynamic system GID that is lower than 1000.
To grant the SePrintOperatorPrivilege privilege to the printadmin group:
~]# net rpc rights grant "printadmin" SePrintOperatorPrivilege \
-U "DOMAIN\administrator"
Enter DOMAIN\administrator's password:
Successfully granted rights.
In a domain environment, grant SePrintOperatorPrivilege to a domain group. This enables you to centrally manage the privilege by updating a user’s group membership.
To list all users and groups having SePrintOperatorPrivilege granted:
~]# net rpc rights list privileges SePrintOperatorPrivilege \
-U "DOMAIN\administrator"
Enter administrator's password:
SePrintOperatorPrivilege:
BUILTIN\Administrators
DOMAIN\printadmin16.1.7.4.4. Creating a GPO to Enable Clients to Trust the Samba Print Server
For security reasons, recent Windows operating systems prevent clients from downloading non-package-aware printer drivers from an untrusted server. If your print server is a member in an AD, you can create a Group Policy Object (GPO) in your domain to trust the Samba server.
To create GPOs, the Windows computer you are using must have the Windows Remote Server Administration Tools (RSAT) installed. For details, see your Windows documentation.
Creating a GPO to Enable Clients to Trust the Samba Print Server
-
Log into a Windows computer using an account that is allowed to edit group policies, such as the AD domain
Administratoruser. - Open the Group Policy Management Console.
Right-click to your AD domain and select
Create a GPO in this domain, and Link it here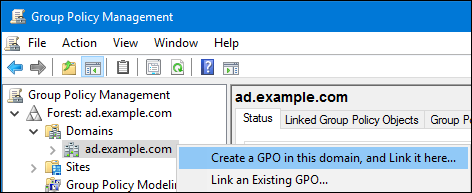
-
Enter a name for the GPO, such as
Legacy printer Driver Policyand click . The new GPO will be displayed under the domain entry. -
Right-click to the newly-created GPO and select
Editto open the Group Policy Management Editor. Navigate to → → → .

On the right side of the window, double-click
Point and Print Restrictionto edit the policy:Enable the policy and set the following options:
-
Select
Users can only point and print to these serversand enter the fully-qualified domain name (FQDN) of the Samba print server to the field next to this option. In both check boxes under
Security Prompts, selectDo not show warning or elevation prompt.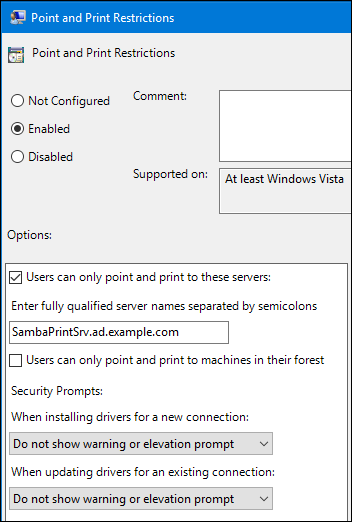
-
Select
- Click .
Double-click
Package Point and Print - Approved serversto edit the policy:- Enable the policy and click the button.
Enter the FQDN of the Samba print server.
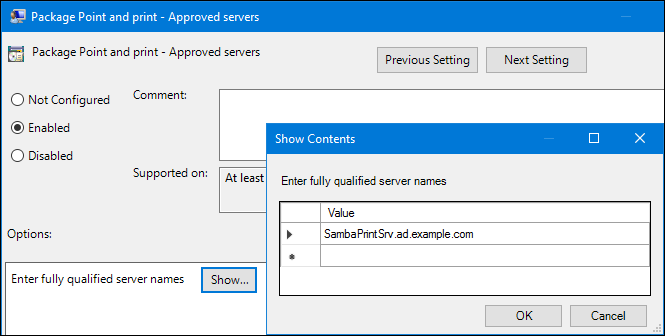
-
Close both the
Show Contentsand policy properties window by clicking .
- Close the Group Policy Management Editor.
- Close the Group Policy Management Console.
After the Windows domain members applied the group policy, printer drivers are automatically downloaded from the Samba server when a user connects to a printer.
For further details about using group policies, see your Windows documentation.
16.1.7.4.5. Uploading Drivers and Preconfiguring Printers
Use the Print Management application on a Windows client to upload drivers and preconfigure printers hosted on the Samba print server. For further details, see your Windows documentation.
16.1.8. Tuning the Performance of a Samba Server
This section describes what settings can improve the performance of Samba in certain situations, and which settings can have a negative performance impact.
16.1.8.1. Setting the SMB Protocol Version
Each new SMB version adds features and improves the performance of the protocol. The recent Windows and Windows Server operating systems always supports the latest protocol version. If Samba also uses the latest protocol version, Windows clients connecting to Samba benefit from the performance improvements. In Samba, the default value of the server max protocol is set to the latest supported stable SMB protocol version.
To always have the latest stable SMB protocol version enabled, do not set the server max protocol parameter. If you set the parameter manually, you will need to modify the setting with each new version of the SMB protocol, to have the latest protocol version enabled.
To unset, remove the server max protocol parameter from the [global] section in the /etc/samba/smb.conf file.
16.1.8.3. Settings That Can Have a Negative Performance Impact
By default, the kernel in Red Hat Enterprise Linux is tuned for high network performance. For example, the kernel uses an auto-tuning mechanism for buffer sizes. Setting the socket options parameter in the /etc/samba/smb.conf file overrides these kernel settings. As a result, setting this parameter decreases the Samba network performance in most cases.
To use the optimized settings from the Kernel, remove the socket options parameter from the [global] section in the /etc/samba/smb.conf.
16.1.9. Frequently Used Samba Command-line Utilities
This section describes frequently used commands when working with a Samba server.
16.1.9.1. Using the net Utility
The net utility enables you to perform several administration tasks on a Samba server. This section describes the most frequently used subcommands of the net utility.
For further details, see the net(8) man page.
16.1.9.1.1. Using the net ads join and net rpc join Commands
Using the join subcommand of the net utility, you can join Samba to an AD or NT4 domain. To join the domain, you must create the /etc/samba/smb.conf file manually, and optionally update additional configurations, such as PAM.
Red Hat recommends using the realm utility to join a domain. The realm utility automatically updates all involved configuration files. For details, see Section 16.1.5.1, “Joining a Domain”.
To join a domain using the net command:
Joining a Domain Using the net Command
Manually create the
/etc/samba/smb.conffile with the following settings:For an AD domain member:
[global] workgroup = domain_name security = ads passdb backend = tdbsam realm = AD_REALM
For an NT4 domain member:
[global] workgroup = domain_name security = user passdb backend = tdbsam
-
Add an ID mapping configuration for the
*default domain and for the domain you want to join to the[global]section in the/etc/samba/smb.conf. For details, see Section 16.1.5.3, “Understanding ID Mapping”. Verify the
/etc/samba/smb.conffile:~]# testparm
For details, see Section 16.1.2, “Verifying the
smb.confFile by Using thetestparmUtility”.Join the domain as the domain administrator:
To join an AD domain:
~]# net ads join -U "DOMAINpass:quotes[administrator]"
To join an NT4 domain:
~]# net rpc join -U "DOMAINpass:quotes[administrator]"
Append the
winbindsource to thepasswdandgroupdatabase entry in the/etc/nsswitch.conffile:passwd: files winbind group: files winbind
Enable and start the
winbindservice:~]# systemctl enable winbind ~]# systemctl start winbind
Optionally, configure PAM using the
authconfutility.For details, see the Using Pluggable Authentication Modules (PAM) section in the Red Hat System-Level Authentication Guide.
Optionally for AD environments, configure the Kerberos client.
For details, see the Configuring a Kerberos Client section in the Red Hat System-Level Authentication Guide.
16.1.9.1.2. Using the net rpc rights Command
In Windows, you can assign privileges to accounts and groups to perform special operations, such as setting ACLs on a share or upload printer drivers. On a Samba server, you can use the net rpc rights command to manage privileges.
Listing Privileges
To list all available privileges and their owners, use the net rpc rights list command. For example:
net rpc rights list -U "DOMAINpass:attributes[{blank}]administrator" Enter DOMAINpass:attributes[{blank}]administrator's password: SeMachineAccountPrivilege Add machines to domain SeTakeOwnershipPrivilege Take ownership of files or other objects SeBackupPrivilege Back up files and directories SeRestorePrivilege Restore files and directories SeRemoteShutdownPrivilege Force shutdown from a remote system SePrintOperatorPrivilege Manage printers SeAddUsersPrivilege Add users and groups to the domain SeDiskOperatorPrivilege Manage disk shares SeSecurityPrivilege System security
Granting Privileges
To grant a privilege to an account or group, use the net rpc rights grant command.
For example, grant the SePrintOperatorPrivilege privilege to the DOMAIN\printadmin group:
~]# net rpc rights grant "DOMAIN\printadmin" SePrintOperatorPrivilege \ -U "DOMAIN\administrator" Enter DOMAIN\administrator's password: Successfully granted rights.
Revoking Privileges
To revoke a privilege from an account or group, use the net rpc rights revoke.
For example, to revoke the SePrintOperatorPrivilege privilege from the DOMAIN\printadmin group:
~]# net rpc rights remoke "DOMAIN\printadmin" SePrintOperatorPrivilege \ -U "DOMAIN\administrator" Enter DOMAIN\administrator's password: Successfully revoked rights.
16.1.9.1.4. Using the net user Command
The net user command enables you to perform the following actions on an AD DC or NT4 PDC:
- List all user accounts
- Add users
- Remove Users
Specifying a connection method, such as ads for AD domains or rpc for NT4 domains, is only required when you list domain user accounts. Other user-related subcommands can auto-detect the connection method.
Pass the -U user_name parameter to the command to specify a user that is allowed to perform the requested action.
Listing Domain User Accounts
To list all users in an AD domain:
~]# net ads user -U "DOMAIN\administrator"To list all users in an NT4 domain:
~]# net rpc user -U "DOMAIN\administrator"Adding a User Account to the Domain
On a Samba domain member, you can use the net user add command to add a user account to the domain.
For example, add the user account to the domain:
Adding a User Account to the Domain
Add the account:
~]# net user add user password -U "DOMAIN\administrator" User user added
Optionally, use the remote procedure call (RPC) shell to enable the account on the AD DC or NT4 PDC. For example:
~]# net rpc shell -U DOMAIN\administrator -S DC_or_PDC_name Talking to domain DOMAIN (S-1-5-21-1424831554-512457234-5642315751) net rpc> user edit disabled user no Set user's disabled flag from [yes] to [no] net rpc> exit
Deleting a User Account from the Domain
On a Samba domain member, you can use the net user delete command to remove a user account from the domain.
For example, to remove the user account from the domain:
~]# net user delete user -U "DOMAIN\administrator" User user deleted
16.1.9.2. Using the rpcclient Utility
The rpcclient utility enables you to manually execute client-side Microsoft Remote Procedure Call (MS-RPC) functions on a local or remote SMB server. However, most of the features are integrated into separate utilities provided by Samba. Use rpcclient only for testing MS-PRC functions.
For example, you can use the utility to:
Manage the printer Spool Subsystem (SPOOLSS).
Example 16.9. Assigning a Driver to a Printer
~]# rpcclient server_name -U "DOMAINpass:quotes[administrator]" \ -c 'setdriver "printer_name" "driver_name"' Enter DOMAINpass:quotes[administrator]s password: Successfully set printer_name to driver driver_name.
Retrieve information about an SMB server.
Example 16.10. Listing all File Shares and Shared Printers
~]# rpcclient server_name -U "DOMAINpass:quotes[administrator]" -c 'netshareenum' Enter DOMAINpass:quotes[administrator]s password: netname: Example_Share remark: path: C:\srv\samba\example_share\ password: netname: Example_Printer remark: path: C:\var\spool\samba\ password:
Perform actions using the Security Account Manager Remote (SAMR) protocol.
Example 16.11. Listing Users on an SMB Server
~]# rpcclient server_name -U "DOMAINpass:quotes[administrator]" -c 'enumdomusers' Enter DOMAINpass:quotes[administrator]s password: user:[user1] rid:[0x3e8] user:[user2] rid:[0x3e9]
If you run the command against a standalone server or a domain member, it lists the users in the local database. Running the command against an AD DC or NT4 PDC lists the domain users.
For a complete list of supported subcommands, see COMMANDS section in the rpcclient(1) man page.
16.1.9.3. Using the samba-regedit Application
Certain settings, such as printer configurations, are stored in the registry on the Samba server. You can use the ncurses-based samba-regedit application to edit the registry of a Samba server.
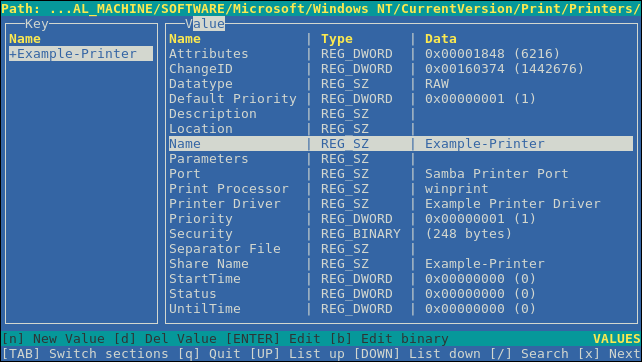
To start the application, enter:
~]# samba-regedit
Use the following keys:
- Cursor up and cursor down: Navigate through the registry tree and the values.
- Enter: Opens a key or edits a value.
-
Tab: Switches between the
KeyandValuepane. - Ctrl+C: Closes the application.
16.1.9.4. Using the smbcacls Utility
See Section 16.1.6.3, “Managing ACLs on an SMB Share Using smbcacls”.
16.1.9.5. Using the smbclient Utility
The smbclient utility enables you to access file shares on an SMB server, similarly to a command-line FTP client. You can use it, for example, to upload and download files to and from a share.
For example, to authenticate to the example share hosted on server using the DOMAIN\user account:
~]# smbclient -U "DOMAIN\user" //server/example Enter domain\user's password: Domain=[SERVER] OS=[Windows 6.1] Server=[Samba 4.6.2] smb: \>
After smbclient connected successfully to the share, the utility enters the interactive mode and shows the following prompt:
smb: \>
To display all available commands in the interactive shell, enter:
smb: \> help
To display the help for a specific command, enter:
smb: \> help command_nameFor further details and descriptions of the commands available in the interactive shell, see the smbclient(1) man page.
16.1.9.5.1. Using smbclient in Interactive Mode
If you use smbclient without the -c parameter, the utility enters the interactive mode.
The following procedure shows how to connect to an SMB share and download a file from a subdirectory:
Downloading a File from an SMB Share Using smbclient
Connect to the share:
~]# smbclient -U "DOMAINpass:quotes[user_name]" //server_name/share_name
Change into the
/example/directory:smb: \> cd /example/
List the files in the directory:
smb: \example\> ls . D 0 Mon Sep 1 10:00:00 2017 .. D 0 Mon Sep 1 10:00:00 2017 example.txt N 1048576 Mon Sep 1 10:00:00 2017 9950208 blocks of size 1024. 8247144 blocks availableDownload the
example.txtfile:smb: \example\> get example.txt getting file \directory\subdirectory\example.txt of size 1048576 as example.txt (511975,0 KiloBytes/sec) (average 170666,7 KiloBytes/sec)
Disconnect from the share:
smb: \example\> exit
16.1.9.5.2. Using smbclient in Scripting Mode
If you pass the -c commands parameter to smbclient, you can automatically execute the commands on the remote SMB share. This enables you to use smbclient in scripts.
The following command shows how to connect to an SMB share and download a file from a subdirectory:
~]# smbclient -U DOMAINpass:quotes[user_name] //server_name/share_name \ -c "cd /example/ ; get example.txt ; exit"
16.1.9.6. Using the smbcontrol Utility
The smbcontrol utility enables you to send command messages to the smbd, nmbd, winbindd, or all of these services. These control messages instruct the service, for example, to reload its configuration.
Example 16.12. Reloading the Configuration of the smbd, nmbd, and winbindd Service
For example, to reload the configuration of the smbd, nmbd, winbindd, send the reload-config message-type to the all destination:
~]# smbcontrol all reload-config
For further details and a list of available command message types, see the smbcontrol(1) man page.
16.1.9.7. Using the smbpasswd Utility
The smbpasswd utility manages user accounts and passwords in the local Samba database.
If you run the command as a user, smbpasswd changes the Samba password of the user. For example:
[user@server ~]$ smbpasswd New SMB password: Retype new SMB password:
If you run smbpasswd as the root user, you can use the utility, for example, to:
Create a new user:
[root@server ~]# smbpasswd -a user_name New SMB password: Retype new SMB password: Added user user_name.
NoteBefore you can add a user to the Samba database, you must create the account in the local operating system. See Section 4.3.1, “Adding a New User”
Enable a Samba user:
[root@server ~]# smbpasswd -e user_name Enabled user user_name.
Disable a Samba user:
[root@server ~]# smbpasswd -x user_name Disabled user user_name.
Delete a user:
[root@server ~]# smbpasswd -x user_name Deleted user user_name.
For further details, see the smbpasswd(8) man page.
16.1.9.8. Using the smbstatus Utility
The smbstatus utility reports on:
-
Connections per PID of each
smbddaemon to the Samba server. This report includes the user name, primary group, SMB protocol version, encryption, and signing information. -
Connections per Samba share. This report includes the PID of the
smbddaemon, the IP of the connecting machine, the time stamp when the connection was established, encryption, and signing information. - A list of locked files. The report entries include further details, such as opportunistic lock (oplock) types
Example 16.13. Output of the smbstatus Utility
~]# smbstatus Samba version 4.6.2 PID Username Group Machine Protocol Version Encryption Signing ----------------------------------------------------------------------------------------------------------------------------- 963 DOMAIN\administrator DOMAIN\domain users client-pc (ipv4:192.0.2.1:57786) SMB3_02 - AES-128-CMAC Service pid Machine Connected at Encryption Signing: ------------------------------------------------------------------------------- example 969 192.0.2.1 Mo Sep 1 10:00:00 2017 CEST - AES-128-CMAC Locked files: Pid Uid DenyMode Access R/W Oplock SharePath Name Time ------------------------------------------------------------------------------------------------------------ 969 10000 DENY_WRITE 0x120089 RDONLY LEASE(RWH) /srv/samba/example file.txt Mon Sep 1 10:00:00 2017
For further details, see the smbstatus(1) man page.
16.1.9.9. Using the smbtar Utility
The smbtar utility backs up the content of an SMB share or a subdirectory of it and stores the content in a tar archive. Alternatively, you can write the content to a tape device.
For example, to back up the content of the demo directory on the //server/example/ share and store the content in the /root/example.tar archive:
~]# smbtar -s server -x example -u user_name -p password -t /root/example.tar
For further details, see the smbtar(1) man page.
16.1.9.10. Using the testparm Utility
See Section 16.1.2, “Verifying the smb.conf File by Using the testparm Utility”.
16.1.9.11. Using the wbinfo Utility
The wbinfo utility queries and returns information created and used by the winbindd service.
The winbindd service must be configured and running to use wbinfo.
You can use wbinfo, for example, to:
List domain users:
~]# wbinfo -u AD\administrator AD\guest ...
List domain groups:
~]# wbinfo -g AD\domain computers AD\domain admins AD\domain users ...
Display the SID of a user:
~]# wbinfo --name-to-sid="AD\administrator" S-1-5-21-1762709870-351891212-3141221786-500 SID_USER (1)
Display information about domains and trusts:
~]# wbinfo --trusted-domains --verbose Domain Name DNS Domain Trust Type Transitive In Out BUILTIN None Yes Yes Yes server None Yes Yes Yes DOMAIN1 domain1.example.com None Yes Yes Yes DOMAIN2 domain2.example.com External No Yes Yes
For further details, see the wbinfo(1) man page.
16.1.10. Additional Resources
The Red Hat Samba packages include manual pages for all Samba commands and configuration files the package installs. For example, to display the man page of the
/etc/samba/smb.conffile that explains all configuration parameters you can set in this file:~]# man 5 smb.conf
-
/usr/share/docs/samba-version/: Contains general documentation, example scripts, and LDAP schema files, provided by the Samba project. - Red Hat Cluster Storage Administration Guide: Provides information about setting up Samba and the Clustered Trivial Database (CDTB) to share directories stored on an GlusterFS volume.
- The An active/active Samba Server in a Red Hat High Availability Cluster chapter in the Red Hat Enterprise Linux High Availability Add-on Administration guide describes how to up a Samba high-availability installation.
- For details about mounting an SMB share on Red Hat Enterprise Linux, see the corresponding section in the Red Hat Storage Administration Guide.
16.2. FTP
The File Transfer Protocol (FTP) is one of the oldest and most commonly used protocols found on the Internet today. Its purpose is to reliably transfer files between computer hosts on a network without requiring the user to log directly in to the remote host or to have knowledge of how to use the remote system. It allows users to access files on remote systems using a standard set of simple commands.
This section outlines the basics of the FTP protocol and introduces vsftpd, which is the preferred FTP server in Red Hat Enterprise Linux.
16.2.1. The File Transfer Protocol
FTP uses a client-server architecture to transfer files using the TCP network protocol. Because FTP is a rather old protocol, it uses unencrypted user name and password authentication. For this reason, it is considered an insecure protocol and should not be used unless absolutely necessary. However, because FTP is so prevalent on the Internet, it is often required for sharing files to the public. System administrators, therefore, should be aware of FTP's unique characteristics.
This section describes how to configure vsftpd to establish connections secured by TLS and how to secure an FTP server with the help of SELinux. A good substitute for FTP is sftp from the OpenSSH suite of tools. For information about configuring OpenSSH and about the SSH protocol in general, refer to Chapter 12, OpenSSH.
Unlike most protocols used on the Internet, FTP requires multiple network ports to work properly. When an FTP client application initiates a connection to an FTP server, it opens port 21 on the server — known as the command port. This port is used to issue all commands to the server. Any data requested from the server is returned to the client via a data port. The port number for data connections, and the way in which data connections are initialized, vary depending upon whether the client requests the data in active or passive mode.
The following defines these modes:
- active mode
-
Active mode is the original method used by the
FTPprotocol for transferring data to the client application. When an active-mode data transfer is initiated by theFTPclient, the server opens a connection from port 20 on the server to theIPaddress and a random, unprivileged port (greater than 1024) specified by the client. This arrangement means that the client machine must be allowed to accept connections over any port above 1024. With the growth of insecure networks, such as the Internet, the use of firewalls for protecting client machines is now prevalent. Because these client-side firewalls often deny incoming connections from active-modeFTPservers, passive mode was devised. - passive mode
Passive mode, like active mode, is initiated by the
FTPclient application. When requesting data from the server, theFTPclient indicates it wants to access the data in passive mode and the server provides theIPaddress and a random, unprivileged port (greater than 1024) on the server. The client then connects to that port on the server to download the requested information.While passive mode does resolve issues for client-side firewall interference with data connections, it can complicate administration of the server-side firewall. You can reduce the number of open ports on a server by limiting the range of unprivileged ports on the
FTPserver. This also simplifies the process of configuring firewall rules for the server.
16.2.2. The vsftpd Server
The Very Secure FTP Daemon (vsftpd) is designed from the ground up to be fast, stable, and, most importantly, secure. vsftpd is the only stand-alone FTP server distributed with Red Hat Enterprise Linux, due to its ability to handle large numbers of connections efficiently and securely.
The security model used by vsftpd has three primary aspects:
- Strong separation of privileged and non-privileged processes — Separate processes handle different tasks, and each of these processes runs with the minimal privileges required for the task.
-
Tasks requiring elevated privileges are handled by processes with the minimal privilege necessary — By taking advantage of compatibilities found in the
libcaplibrary, tasks that usually require full root privileges can be executed more safely from a less privileged process. -
Most processes run in a
chrootjail — Whenever possible, processes are change-rooted to the directory being shared; this directory is then considered achrootjail. For example, if the/var/ftp/directory is the primary shared directory,vsftpdreassigns/var/ftp/to the new root directory, known as/. This disallows any potential malicious hacker activities for any directories not contained in the new root directory.
Use of these security practices has the following effect on how vsftpd deals with requests:
-
The parent process runs with the least privileges required — The parent process dynamically calculates the level of privileges it requires to minimize the level of risk. Child processes handle direct interaction with the
FTPclients and run with as close to no privileges as possible. -
All operations requiring elevated privileges are handled by a small parent process — Much like the Apache
HTTPServer,vsftpdlaunches unprivileged child processes to handle incoming connections. This allows the privileged, parent process to be as small as possible and handle relatively few tasks. - All requests from unprivileged child processes are distrusted by the parent process — Communication with child processes is received over a socket, and the validity of any information from child processes is checked before being acted on.
-
Most interactions with
FTPclients are handled by unprivileged child processes in achrootjail — Because these child processes are unprivileged and only have access to the directory being shared, any crashed processes only allow the attacker access to the shared files.
16.2.2.1. Starting and Stopping vsftpd
To start the vsftpd service in the current session, type the following at a shell prompt as root:
~]# systemctl start vsftpd.service
To stop the service in the current session, type as root:
~]# systemctl stop vsftpd.service
To restart the vsftpd service, run the following command as root:
~]# systemctl restart vsftpd.service
This command stops and immediately starts the vsftpd service, which is the most efficient way to make configuration changes take effect after editing the configuration file for this FTP server. Alternatively, you can use the following command to restart the vsftpd service only if it is already running:
~]# systemctl try-restart vsftpd.service
By default, the vsftpd service does not start automatically at boot time. To configure the vsftpd service to start at boot time, type the following at a shell prompt as root:
~]# systemctl enable vsftpd.service Created symlink from /etc/systemd/system/multi-user.target.wants/vsftpd.service to /usr/lib/systemd/system/vsftpd.service.
For more information on how to manage system services in Red Hat Enterprise Linux 7, see Chapter 10, Managing Services with systemd.
16.2.2.2. Starting Multiple Copies of vsftpd
Sometimes, one computer is used to serve multiple FTP domains. This is a technique called multihoming. One way to multihome using vsftpd is by running multiple copies of the daemon, each with its own configuration file.
To do this, first assign all relevant IP addresses to network devices or alias network devices on the system. For more information about configuring network devices, device aliases, and additional information about network configuration scripts, see the Red Hat Enterprise Linux 7 Networking Guide.
Next, the DNS server for the FTP domains must be configured to reference the correct machine. For information about BIND, the DNS protocol implementation used in Red Hat Enterprise Linux, and its configuration files, see the Red Hat Enterprise Linux 7 Networking Guide.
For vsftpd to answer requests on different IP addresses, multiple copies of the daemon must be running. To facilitate launching multiple instances of the vsftpd daemon, a special systemd service unit (vsftpd@.service) for launching vsftpd as an instantiated service is supplied in the vsftpd package.
In order to make use of this service unit, a separate vsftpd configuration file for each required instance of the FTP server must be created and placed in the /etc/vsftpd/ directory. Note that each of these configuration files must have a unique name (such as /etc/vsftpd/vsftpd-site-2.conf) and must be readable and writable only by the root user.
Within each configuration file for each FTP server listening on an IPv4 network, the following directive must be unique:
listen_address=N.N.N.N
Replace N.N.N.N with a unique IP address for the FTP site being served. If the site is using IPv6, use the listen_address6 directive instead.
Once there are multiple configuration files present in the /etc/vsftpd/ directory, individual instances of the vsftpd daemon can be started by executing the following command as root:
~]# systemctl start vsftpd@configuration-file-name.service
In the above command, replace configuration-file-name with the unique name of the requested server’s configuration file, such as vsftpd-site-2. Note that the configuration file’s .conf extension should not be included in the command.
If you want to start several instances of the vsftpd daemon at once, you can make use of a systemd target unit file (vsftpd.target), which is supplied in the vsftpd package. This systemd target causes an independent vsftpd daemon to be launched for each available vsftpd configuration file in the /etc/vsftpd/ directory. Execute the following command as root to enable the target:
~]# systemctl enable vsftpd.target Created symlink from /etc/systemd/system/multi-user.target.wants/vsftpd.target to /usr/lib/systemd/system/vsftpd.target.
The above command configures the systemd service manager to launch the vsftpd service (along with the configured vsftpd server instances) at boot time. To start the service immediately, without rebooting the system, execute the following command as root:
~]# systemctl start vsftpd.target
See Section 10.3, “Working with systemd Targets” for more information on how to use systemd targets to manage services.
Other directives to consider altering on a per-server basis are:
-
anon_root -
local_root -
vsftpd_log_file -
xferlog_file
16.2.2.3. Encrypting vsftpd Connections Using TLS
In order to counter the inherently insecure nature of FTP, which transmits user names, passwords, and data without encryption by default, the vsftpd daemon can be configured to utilize the TLS protocol to authenticate connections and encrypt all transfers. Note that an FTP client that supports TLS is needed to communicate with vsftpd with TLS enabled.
SSL (Secure Sockets Layer) is the name of an older implementation of the security protocol. The new versions are called TLS (Transport Layer Security). Only the newer versions (TLS) should be used as SSL suffers from serious security vulnerabilities. The documentation included with the vsftpd server, as well as the configuration directives used in the vsftpd.conf file, use the SSL name when referring to security-related matters, but TLS is supported and used by default when the ssl_enable directive is set to YES.
Set the ssl_enable configuration directive in the vsftpd.conf file to YES to turn on TLS support. The default settings of other TLS-related directives that become automatically active when the ssl_enable option is enabled provide for a reasonably well-configured TLS set up. This includes, among other things, the requirement to only use the TLS v1 protocol for all connections (the use of the insecure SSL protocol versions is disabled by default) or forcing all non-anonymous logins to use TLS for sending passwords and data transfers.
Example 16.14. Configuring vsftpd to Use TLS
In this example, the configuration directives explicitly disable the older SSL versions of the security protocol in the vsftpd.conf file:
ssl_enable=YES ssl_tlsv1=YES ssl_sslv2=NO ssl_sslv3=NO
Restart the vsftpd service after you modify its configuration:
~]# systemctl restart vsftpd.service
See the vsftpd.conf(5) manual page for other TLS-related configuration directives for fine-tuning the use of TLS by vsftpd.
16.2.2.4. SELinux Policy for vsftpd
The SELinux policy governing the vsftpd daemon (as well as other ftpd processes), defines a mandatory access control, which, by default, is based on least access required. In order to allow the FTP daemon to access specific files or directories, appropriate labels need to be assigned to them.
For example, in order to be able to share files anonymously, the public_content_t label must be assigned to the files and directories to be shared. You can do this using the chcon command as root:
~]# chcon -R -t public_content_t /path/to/directory
In the above command, replace /path/to/directory with the path to the directory to which you want to assign the label. Similarly, if you want to set up a directory for uploading files, you need to assign that particular directory the public_content_rw_t label. In addition to that, the allow_ftpd_anon_write SELinux Boolean option must be set to 1. Use the setsebool command as root to do that:
~]# setsebool -P allow_ftpd_anon_write=1
If you want local users to be able to access their home directories through FTP, which is the default setting on Red Hat Enterprise Linux 7, the ftp_home_dir Boolean option needs to be set to 1. If vsftpd is to be allowed to run in standalone mode, which is also enabled by default on Red Hat Enterprise Linux 7, the ftpd_is_daemon option needs to be set to 1 as well.
See the ftpd_selinux(8) manual page for more information, including examples of other useful labels and Boolean options, on how to configure the SELinux policy pertaining to FTP. Also, see the Red Hat Enterprise Linux 7 SELinux User’s and Administrator’s Guide for more detailed information about SELinux in general.
16.2.3. Additional Resources
For more information about vsftpd, see the following resources.
16.2.3.1. Installed Documentation
-
The
/usr/share/doc/vsftpd-version-number/directory — Replace version-number with the installed version of the vsftpd package. This directory contains aREADMEfile with basic information about the software. TheTUNINGfile contains basic performance-tuning tips and theSECURITY/directory contains information about the security model employed byvsftpd. vsftpd-related manual pages — There are a number of manual pages for the daemon and the configuration files. The following lists some of the more important manual pages.- Server Applications
{blank}-
vsftpd(8) — Describes available command-line options for
vsftpd.
-
vsftpd(8) — Describes available command-line options for
- Configuration Files
{blank}-
vsftpd.conf(5) — Contains a detailed list of options available within the configuration file for
vsftpd. -
hosts_access(5) — Describes the format and options available within the
TCPwrappers configuration files:hosts.allowandhosts.deny.
-
vsftpd.conf(5) — Contains a detailed list of options available within the configuration file for
- Interaction with SELinux
{blank}-
ftpd_selinux(8) — Contains a description of the SELinux policy governing
ftpdprocesses as well as an explanation of the way SELinux labels need to be assigned and Booleans set.
-
ftpd_selinux(8) — Contains a description of the SELinux policy governing
16.2.3.2. Online Documentation
- About vsftpd and FTP in General
{blank}-
http://vsftpd.beasts.org/ — The
vsftpdproject page is a great place to locate the latest documentation and to contact the author of the software. -
http://slacksite.com/other/ftp.html — This website provides a concise explanation of the differences between active and passive-mode
FTP.
-
http://vsftpd.beasts.org/ — The
- Red Hat Enterprise Linux Documentation
{blank}-
Red Hat Enterprise Linux 7 Networking Guide — The Networking Guide for Red Hat Enterprise Linux 7 documents relevant information regarding the configuration and administration of network interfaces, networks, and network services in this system. It provides an introduction to the
hostnamectlutility and explains how to use it to view and set host names on the command line, both locally and remotely. -
Red Hat Enterprise Linux 7 SELinux User’s and Administrator’s Guide — The SELinux User’s and Administrator’s Guide for Red Hat Enterprise Linux 7 describes the basic principles of SELinux and documents in detail how to configure and use SELinux with various services such as the Apache HTTP Server, Postfix, PostgreSQL, or OpenShift. It explains how to configure SELinux access permissions for system services managed by
systemd. - Red Hat Enterprise Linux 7 Security Guide — The Security Guide for Red Hat Enterprise Linux 7 assists users and administrators in learning the processes and practices of securing their workstations and servers against local and remote intrusion, exploitation, and malicious activity. It also explains how to secure critical system services.
-
Red Hat Enterprise Linux 7 Networking Guide — The Networking Guide for Red Hat Enterprise Linux 7 documents relevant information regarding the configuration and administration of network interfaces, networks, and network services in this system. It provides an introduction to the
- Relevant RFC Documents
{blank}-
RFC 0959 — The original Request for Comments (RFC) of the
FTPprotocol from the IETF. -
RFC 1123 — The small
FTP-related section extends and clarifies RFC 0959. -
RFC 2228 —
FTPsecurity extensions. vsftpd implements the small subset needed to support TLS and SSL connections. -
RFC 2389 — Proposes
FEATandOPTScommands. -
RFC 2428 —
IPv6support.
-
RFC 0959 — The original Request for Comments (RFC) of the
16.3. Print Settings
The Print Settings tool serves for printer configuring, maintenance of printer configuration files, print spool directories and print filters, and printer classes management.
The tool is based on the Common Unix Printing System (CUPS). If you upgraded the system from a previous Red Hat Enterprise Linux version that used CUPS, the upgrade process preserved the configured printers.
The cupsd.conf man page documents configuration of a CUPS server. It includes directives for enabling SSL support. However, CUPS does not allow control of the protocol versions used. Due to the vulnerability described in Resolution for POODLE SSLv3.0 vulnerability (CVE-2014-3566) for components that do not allow SSLv3 to be disabled via configuration settings, Red Hat recommends that you do not rely on this for security. It is recommend that you use stunnel to provide a secure tunnel and disable SSLv3. For more information on using stunnel, see the Red Hat Enterprise Linux 7 Security Guide.
For ad-hoc secure connections to a remote system’s Print Settings tool, use X11 forwarding over SSH as described in Section 12.4.1, “X11 Forwarding”.
You can perform the same and additional operations on printers directly from the CUPS web application or command line. To access the application, in a web browser, go to http://localhost:631/. For CUPS manuals refer to the links on the Home tab of the web site.
16.3.1. Starting the Print Settings Configuration Tool
With the Print Settings configuration tool you can perform various operations on existing printers and set up new printers. You can also use CUPS directly (go to http://localhost:631/ to access the CUPS web application).
To start the Print Settings tool from the command line, type system-config-printer at a shell prompt. The Print Settings tool appears. Alternatively, if using the GNOME desktop, press the Super key to enter the Activities Overview, type Print Settings and then press Enter. The Print Settings tool appears. The Super key appears in a variety of guises, depending on the keyboard and other hardware, but often as either the Windows or Command key, and typically to the left of the Spacebar.
The Print Settings window depicted in Figure 16.1, “Print Settings window” appears.
Figure 16.1. Print Settings window
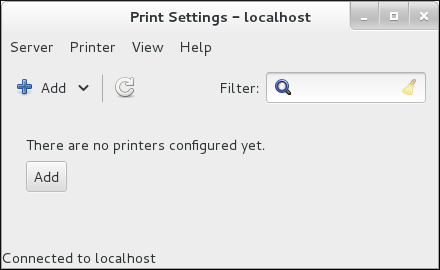
16.3.2. Starting Printer Setup
Printer setup process varies depending on the printer queue type.
If you are setting up a local printer connected with USB, the printer is discovered and added automatically. You will be prompted to confirm the packages to be installed and provide an administrator or the root user password. Local printers connected with other port types and network printers need to be set up manually.
Follow this procedure to start a manual printer setup:
- Start the Print Settings tool (refer to Section 16.3.1, “Starting the Print Settings Configuration Tool”).
- Go to → → .
-
In the
Authenticatedialog box, enter an administrator orrootuser password. If this is the first time you have configured a remote printer you will be prompted to authorize an adjustment to the firewall. - Select the printer connection type and provide its details in the area on the right.
16.3.3. Adding a Local Printer
Follow this procedure to add a local printer connected with other than a serial port:
-
Open the
Addprinter dialog (refer to Section 16.3.2, “Starting Printer Setup”). -
If the device does not appear automatically, select the port to which the printer is connected in the list on the left (such as
Serial Port #1orLPT #1). On the right, enter the connection properties:
- for
Other -
URI(for example file:/dev/lp0) - for
Serial Port Baud Rate
Parity
Data Bits
Flow Control
Figure 16.2. Adding a local printer
- for
- Click .
- Select the printer model. See Section 16.3.8, “Selecting the Printer Model and Finishing” for details.
16.3.4. Adding an AppSocket/HP JetDirect printer
Follow this procedure to add an AppSocket/HP JetDirect printer:
-
Open the
New Printerdialog (refer to Section 16.3.1, “Starting the Print Settings Configuration Tool”). - In the list on the left, select → .
On the right, enter the connection settings:
Hostname-
Printer host name or
IPaddress. Port NumberPrinter port listening for print jobs (
9100by default).Figure 16.3. Adding a JetDirect printer

- Click .
- Select the printer model. See Section 16.3.8, “Selecting the Printer Model and Finishing” for details.
16.3.5. Adding an IPP Printer
An IPP printer is a printer attached to a different system on the same TCP/IP network. The system this printer is attached to may either be running CUPS or simply configured to use IPP.
If a firewall is enabled on the printer server, then the firewall must be configured to allow incoming TCP connections on port 631. Note that the CUPS browsing protocol allows client machines to discover shared CUPS queues automatically. To enable this, the firewall on the client machine must be configured to allow incoming UDP packets on port 631.
Follow this procedure to add an IPP printer:
-
Open the
New Printerdialog (refer to Section 16.3.2, “Starting Printer Setup”). -
In the list of devices on the left, select Network Printer and
Internet Printing Protocol (ipp)orInternet Printing Protocol (https). On the right, enter the connection settings:
Host-
The host name of the
IPPprinter. QueueThe queue name to be given to the new queue (if the box is left empty, a name based on the device node will be used).
Figure 16.4. Adding an IPP printer
- Click to continue.
- Select the printer model. See Section 16.3.8, “Selecting the Printer Model and Finishing” for details.
16.3.6. Adding an LPD/LPR Host or Printer
Follow this procedure to add an LPD/LPR host or printer:
-
Open the
New Printerdialog (refer to Section 16.3.2, “Starting Printer Setup”). - In the list of devices on the left, select → .
On the right, enter the connection settings:
HostThe host name of the LPD/LPR printer or host.
Optionally, click to find queues on the LPD host.
QueueThe queue name to be given to the new queue (if the box is left empty, a name based on the device node will be used).
Figure 16.5. Adding an LPD/LPR printer
- Click to continue.
- Select the printer model. See Section 16.3.8, “Selecting the Printer Model and Finishing” for details.
16.3.7. Adding a Samba (SMB) printer
Follow this procedure to add a Samba printer:
Note that in order to add a Samba printer, you need to have the samba-client package installed. You can do so by running, as root:
yum install samba-clientFor more information on installing packages with Yum, refer to Section 9.2.4, “Installing Packages”.
-
Open the
New Printerdialog (refer to Section 16.3.2, “Starting Printer Setup”). - In the list on the left, select → .
Enter the SMB address in the
smb://field. Use the format computer name/printer share. In Figure 16.6, “Adding a SMB printer”, the computer name isdellboxand the printer share isr2.Figure 16.6. Adding a SMB printer
- Click to see the available workgroups/domains. To display only queues of a particular host, type in the host name (NetBios name) and click .
Select either of the options:
-
Prompt user if authentication is required: user name and password are collected from the user when printing a document. -
Set authentication details now: provide authentication information now so it is not required later. In theUsernamefield, enter the user name to access the printer. This user must exist on the SMB system, and the user must have permission to access the printer. The default user name is typicallyguestfor Windows servers, ornobodyfor Samba servers.
-
Enter the
Password(if required) for the user specified in theUsernamefield.WarningSamba printer user names and passwords are stored in the printer server as unencrypted files readable by
rootand the Linux Printing Daemon,lpd. Thus, other users that haverootaccess to the printer server can view the user name and password you use to access the Samba printer.Therefore, when you choose a user name and password to access a Samba printer, it is advisable that you choose a password that is different from what you use to access your local Red Hat Enterprise Linux system.
If there are files shared on the Samba print server, it is recommended that they also use a password different from what is used by the print queue.
- Click to test the connection. Upon successful verification, a dialog box appears confirming printer share accessibility.
- Click .
- Select the printer model. See Section 16.3.8, “Selecting the Printer Model and Finishing” for details.
16.3.8. Selecting the Printer Model and Finishing
Once you have properly selected a printer connection type, the system attempts to acquire a driver. If the process fails, you can locate or search for the driver resources manually.
Follow this procedure to provide the printer driver and finish the installation:
In the window displayed after the automatic driver detection has failed, select one of the following options:
-
Select a Printer from database— the system chooses a driver based on the selected make of your printer from the list ofMakes. If your printer model is not listed, chooseGeneric. -
Provide PPD file— the system uses the provided PostScript Printer Description (PPD) file for installation. A PPD file may also be delivered with your printer as being normally provided by the manufacturer. If the PPD file is available, you can choose this option and use the browser bar below the option description to select the PPD file. Search for a printer driver to download— enter the make and model of your printer into theMake and modelfield to search on OpenPrinting.org for the appropriate packages.Figure 16.7. Selecting a printer brand
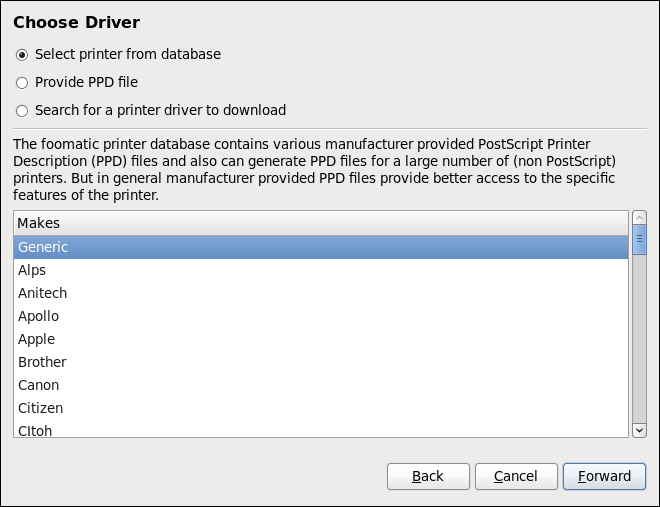
-
Depending on your previous choice provide details in the area displayed below:
-
Printer brand for the
Select printer from databaseoption. -
PPD file location for the
Provide PPD fileoption. -
Printer make and model for the
Search for a printer driver to downloadoption.
-
Printer brand for the
- Click to continue.
If applicable for your option, window shown in Figure 16.8, “Selecting a printer model” appears. Choose the corresponding model in the
Modelscolumn on the left.NoteOn the right, the recommended printer driver is automatically selected; however, you can select another available driver. The print driver processes the data that you want to print into a format the printer can understand. Since a local printer is attached directly to your computer, you need a printer driver to process the data that is sent to the printer.
Figure 16.8. Selecting a printer model
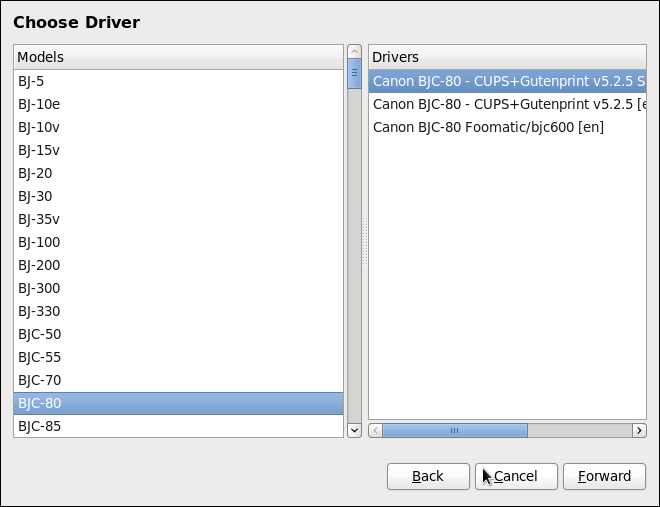
- Click .
Under the
Describe Printerenter a unique name for the printer in thePrinter Namefield. The printer name can contain letters, numbers, dashes (-), and underscores (); it _must not contain any spaces. You can also use theDescriptionandLocationfields to add further printer information. Both fields are optional, and may contain spaces.Figure 16.9. Printer setup

- Click to confirm your printer configuration and add the print queue if the settings are correct. Click to modify the printer configuration.
- After the changes are applied, a dialog box appears allowing you to print a test page. Click to print a test page now. Alternatively, you can print a test page later as described in Section 16.3.9, “Printing a Test Page”.
16.3.9. Printing a Test Page
After you have set up a printer or changed a printer configuration, print a test page to make sure the printer is functioning properly:
-
Right-click the printer in the
Printingwindow and clickProperties. -
In the Properties window, click
Settingson the left. -
On the displayed
Settingstab, click the button.
16.3.10. Modifying Existing Printers
To delete an existing printer, in the Print Settings window, select the printer and go to → . Confirm the printer deletion. Alternatively, press the Delete key.
To set the default printer, right-click the printer in the printer list and click the Set as Default button in the context menu.
16.3.10.1. The Settings Page
To change printer driver configuration, double-click the corresponding name in the Printer list and click the Settings label on the left to display the Settings page.
You can modify printer settings such as make and model, print a test page, change the device location (URI), and more.
Figure 16.10. Settings page

16.3.10.2. The Policies Page
Click the Policies button on the left to change settings in printer state and print output.
You can select the printer states, configure the Error Policy of the printer (you can decide to abort the print job, retry, or stop it if an error occurs).
You can also create a banner page (a page that describes aspects of the print job such as the originating printer, the user name from the which the job originated, and the security status of the document being printed): click the Starting Banner or Ending Banner drop-down menu and choose the option that best describes the nature of the print jobs (for example, confidential).
16.3.10.2.1. Sharing Printers
On the Policies page, you can mark a printer as shared: if a printer is shared, users published on the network can use it. To allow the sharing function for printers, go to → and select Publish shared printers connected to this system.
Figure 16.11. Policies page
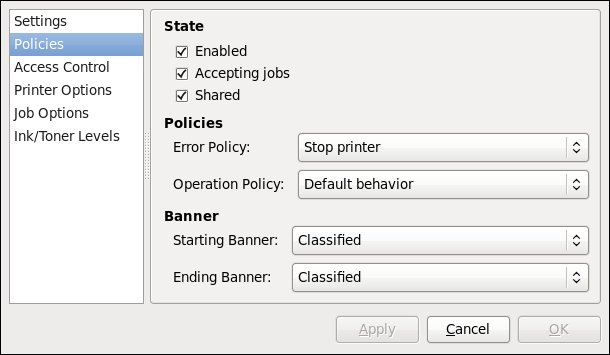
Make sure that the firewall allows incoming TCP connections to port 631, the port for the Network Printing Server (IPP) protocol. To allow IPP traffic through the firewall on Red Hat Enterprise Linux 7, make use of firewalld's IPP service. To do so, proceed as follows:
Enabling IPP Service in firewalld
To start the graphical firewall-config tool, press the Super key to enter the Activities Overview, type
firewalland then press Enter. TheFirewall Configurationwindow opens. You will be prompted for an administrator orrootpassword.Alternatively, to start the graphical firewall configuration tool using the command line, enter the following command as
rootuser:~]# firewall-config
The
Firewall Configurationwindow opens.Look for the word "Connected" in the lower left corner. This indicates that the firewall-config tool is connected to the user space daemon,
firewalld.To immediately change the current firewall settings, ensure the drop-down selection menu labeled
Configurationis set toRuntime. Alternatively, to edit the settings to be applied at the next system start, or firewall reload, selectPermanentfrom the drop-down list.-
Select the
Zonestab and then select the firewall zone to correspond with the network interface to be used. The default is thepubliczone. TheInterfacestab shows what interfaces have been assigned to a zone. -
Select the
Servicestab and then select theippservice to enable sharing. Theipp-clientservice is required for accessing network printers. - Close the firewall-config tool.
For more information on opening and closing ports in firewalld, see the Red Hat Enterprise Linux 7 Security Guide.
16.3.10.2.2. The Access Control Page
You can change user-level access to the configured printer on the Access Control page. Click the Access Control label on the left to display the page. Select either Allow printing for everyone except these users or Deny printing for everyone except these users and define the user set below: enter the user name in the text box and click the button to add the user to the user set.
Figure 16.12. Access Control page

16.3.10.2.3. The Printer Options Page
The Printer Options page contains various configuration options for the printer media and output, and its content may vary from printer to printer. It contains general printing, paper, quality, and printing size settings.
Figure 16.13. Printer Options page
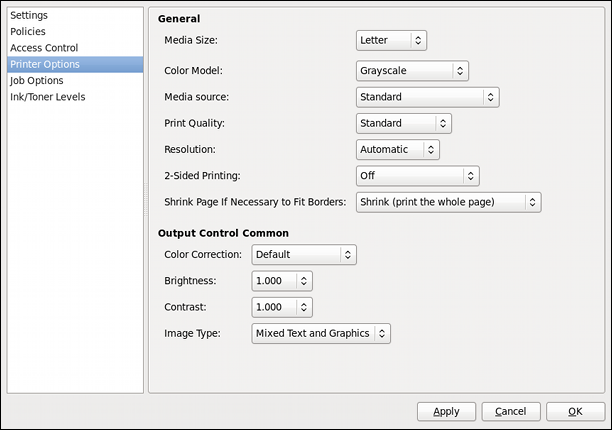
16.3.10.2.4. Job Options Page
On the Job Options page, you can detail the printer job options. Click the Job Options label on the left to display the page. Edit the default settings to apply custom job options, such as number of copies, orientation, pages per side, scaling (increase or decrease the size of the printable area, which can be used to fit an oversize print area onto a smaller physical sheet of print medium), detailed text options, and custom job options.
Figure 16.14. Job Options page
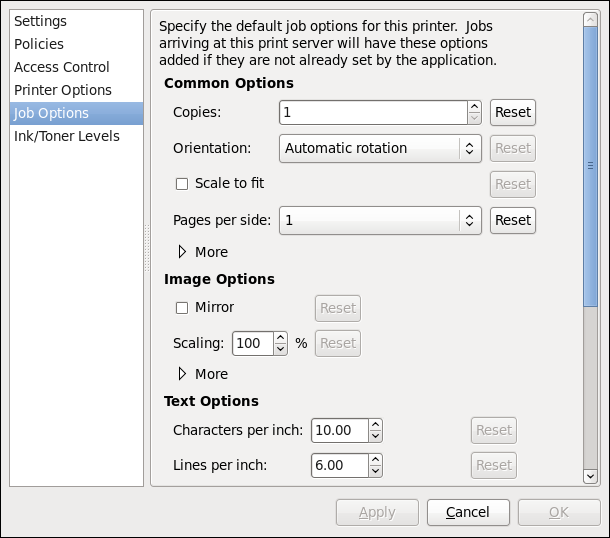
16.3.10.2.5. Ink/Toner Levels Page
The Ink/Toner Levels page contains details on toner status if available and printer status messages. Click the Ink/Toner Levels label on the left to display the page.
Figure 16.15. Ink/Toner Levels page
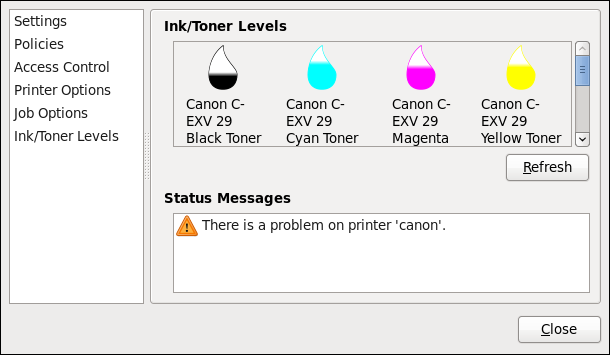
16.3.10.3. Managing Print Jobs
When you send a print job to the printer daemon, such as printing a text file from Emacs or printing an image from GIMP, the print job is added to the print spool queue. The print spool queue is a list of print jobs that have been sent to the printer and information about each print request, such as the status of the request, the job number, and more.
During the printing process, the Printer Status icon appears in the Notification Area on the panel. To check the status of a print job, click the Printer Status, which displays a window similar to Figure 16.16, “GNOME Print Status”.
Figure 16.16. GNOME Print Status
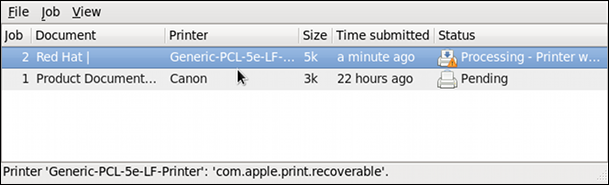
To cancel, hold, release, reprint or authenticate a print job, select the job in the GNOME Print Status and on the Job menu, click the respective command.
To view the list of print jobs in the print spool from a shell prompt, type the command lpstat -o. The last few lines look similar to the following:
Example 16.15. Example of lpstat -o output
$ lpstat -o
Charlie-60 twaugh 1024 Tue 08 Feb 2011 16:42:11 GMT
Aaron-61 twaugh 1024 Tue 08 Feb 2011 16:42:44 GMT
Ben-62 root 1024 Tue 08 Feb 2011 16:45:42 GMT
If you want to cancel a print job, find the job number of the request with the command lpstat -o and then use the command cancel job number. For example, cancel 60 would cancel the print job in Example 16.15, “Example of lpstat -o output”. You cannot cancel print jobs that were started by other users with the cancel command. However, you can enforce deletion of such job by issuing the cancel -U root job_number command. To prevent such canceling, change the printer operation policy to Authenticated to force root authentication.
You can also print a file directly from a shell prompt. For example, the command lp sample.txt prints the text file sample.txt. The print filter determines what type of file it is and converts it into a format the printer can understand.
16.3.11. Additional Resources
To learn more about printing on Red Hat Enterprise Linux, see the following resources.
Installed Documentation
-
lp(1)— The manual page for thelpcommand that allows you to print files from the command line. -
lpr(1)— The manual page for thelprcommand that allows you to print files from the command line. -
cancel(1)— The manual page for the command-line utility to remove print jobs from the print queue. -
mpage(1)— The manual page for the command-line utility to print multiple pages on one sheet of paper. -
cupsd(8)— The manual page for the CUPS printer daemon. -
cupsd.conf(5)— The manual page for the CUPS printer daemon configuration file. -
classes.conf(5)— The manual page for the class configuration file for CUPS. -
lpstat(1)— The manual page for thelpstatcommand, which displays status information about classes, jobs, and printers.
Online Documentation
- http://www.linuxprinting.org/ — The OpenPrinting group on the Linux Foundation website contains a large amount of information about printing in Linux.
- http://www.cups.org/ — The CUPS website provides documentation, FAQs, and newsgroups about CUPS.
Chapter 17. Database Servers
This chapter guides you through the installation and configuration of the MariaDB server, which is an open source fast and robust database server that is based on MySQL technology. The chapter also describes how to back up MariaDB data.
17.1. MariaDB
MariaDB is a relational database which converts data into structured information and provides an SQL interface for accessing data. It includes multiple storage engines and plug-ins, as well as geographic information system (GIS).
Red Hat Enterprise Linux 7 contains MariaDB 5.5 as the default implementation of a server from the MySQL databases family. Later versions of the MariaDB database server are available as Software Collections for Red Hat Enterprise Linux 6 and Red Hat Enterprise Linux 7. For more information about the latest versions, see the Release Notes for Red Hat Software Collections.
17.1.1. Installing the MariaDB server
To install the MariaDB server, follow this procedure:
Installing the MariaDB server
Ensure that the mariadb and mariadb-server packages are installed on the required server:
~]# yum install mariadb mariadb-server
Start the
mariadbservice:~]# systemctl start mariadb.service
Enable the
mariadbservice to start at boot:~]# systemctl enable mariadb.service
17.1.1.1. Improving MariaDB installation security
You can improve security when installing the MariaDB server by running the mysql_secure_installation command:
~]# mysql_secure_installation
This command launches a fully interactive script, which prompts for each step in the process. The script enables to improve security in the following ways:
- Setting a password for root accounts
- Removing anonymous users
- Disallowing remote (outside the local host) root logins
- Removing test database
17.1.2. Configuring the MariaDB server for networking
To configure the MariaDB server for networking, use the [mysqld] section of the /etc/my.cnf.d/server.cnf file, where you can set the following configuration directives:
bind-address
Bind-address is the address on which the server will listen.
Possible options are: a host name, an IPv4 address, or an IPv6 address.
skip-networking
Possible values are:
0 - to listen for all clients
1 - to listen for local clients only
port
The port on which MariaDB listens for TCP/IP connections.
17.1.3. Backing up MariaDB data
There are two main ways to back up data from a MariaDB database:
- Logical backup
- Physical backup
17.1.3.1. Logical back up
Logical backup consists of the SQL statements necessary to restore the data. This type of backup exports information and records in plain text files.
The main advantage of logical backup over physical backup is portability and flexibility. The data can be restored on other hardware configurations, MariaDB versions or Database Management System (DBMS), which is not possible with physical backups.
Logical backup can be performed only if the mariadb.service is running. Logical backup does not include log and configuration files.
17.1.3.2. Physical back up
Physical backup consists of copies of files and directories that store the content.
Physical backup has the following advantages compared to logical backup:
- Output is more compact.
- Backup is smaller in size.
- Backup and restore are faster.
- Backup includes log and configuration files.
Physical backup must be performed when the mariadb.service is not running or all tables in the database are locked to prevent changes during the backup.
Chapter 18. Configuring NTP Using the chrony Suite
Accurate time keeping is important for a number of reasons in IT. In networking for example, accurate time stamps in packets and logs are required. In Linux systems, the NTP protocol is implemented by a daemon running in user space.
The user space daemon updates the system clock running in the kernel. The system clock can keep time by using various clock sources. Usually, the Time Stamp Counter (TSC) is used. The TSC is a CPU register which counts the number of cycles since it was last reset. It is very fast, has a high resolution, and there are no interruptions.
There is a choice between the daemons ntpd and chronyd, available from the repositories in the ntp and chrony packages respectively.
This chapter describes the use of the chrony suite.
18.1. Introduction to the chrony Suite
Chrony is an implementation of the Network Time Protocol (NTP). You can use Chrony:
-
to synchronize the system clock with
NTPservers, - to synchronize the system clock with a reference clock, for example a GPS receiver,
- to synchronize the system clock with a manual time input,
-
as an
NTPv4(RFC 5905)server or peer to provide a time service to other computers in the network.
Chrony performs well in a wide range of conditions, including intermittent network connections, heavily congested networks, changing temperatures (ordinary computer clocks are sensitive to temperature), and systems that do not run continuously, or run on a virtual machine.
Typical accuracy between two machines synchronized over the Internet is within a few milliseconds, and for machines on a LAN within tens of microseconds. Hardware timestamping or a hardware reference clock may improve accuracy between two machines synchronized to a sub-microsecond level.
Chrony consists of chronyd, a daemon that runs in user space, and chronyc, a command line program which can be used to monitor the performance of chronyd and to change various operating parameters when it is running.
18.1.1. Differences Between ntpd and chronyd
Things chronyd can do better than ntpd:
-
chronydcan work well in an environment where access to the time reference is intermittent, whereasntpdneeds regular polling of time reference to work well. -
chronydcan perform well even when the network is congested for longer periods of time. -
chronydcan usually synchronize the clock faster and with better accuracy. -
chronydquickly adapts to sudden changes in the rate of the clock, for example, due to changes in the temperature of the crystal oscillator, whereasntpdmay need a long time to settle down again. -
In the default configuration,
chronydnever steps the time after the clock has been synchronized at system start, in order not to upset other running programs.ntpdcan be configured to never step the time too, but it has to use a different means of adjusting the clock, which has some disadvantages including negative effect on accuracy of the clock. -
chronydcan adjust the rate of the clock on a Linux system in a larger range, which allows it to operate even on machines with a broken or unstable clock. For example, on some virtual machines. -
chronydis smaller, it uses less memory and it wakes up the CPU only when necessary, which is better for power saving.
Things chronyd can do that ntpd cannot do:
-
chronydprovides support for isolated networks where the only method of time correction is manual entry. For example, by the administrator looking at a clock.chronydcan examine the errors corrected at different updates to estimate the rate at which the computer gains or loses time, and use this estimate to adjust the computer clock subsequently. -
chronydprovides support to work out the rate of gain or loss of the real-time clock, for example the clock that maintains the time when the computer is turned off. It can use this data when the system boots to set the system time using an adapted value of time taken from the real-time clock. These real-time clock facilities are currently only available on Linux systems. -
chronydsupports hardware timestamping on Linux, which allows extremely accurate synchronization on local networks.
Things ntpd can do that chronyd cannot do:
-
ntpdsupports all operating modes fromNTPversion 4 (RFC 5905), including broadcast, multicast and manycast clients and servers. Note that the broadcast and multicast modes are, even with authentication, inherently less accurate and less secure than the ordinary server and client mode, and should generally be avoided. -
ntpdsupports the Autokey protocol (RFC 5906) to authenticate servers with public-key cryptography. Note that the protocol has proven to be insecure and will be probably replaced with an implementation of the Network Time Security (NTS) specification. -
ntpdincludes drivers for many reference clocks, whereaschronydrelies on other programs, for example gpsd, to access the data from the reference clocks using shared memory (SHM) or Unix domain socket (SOCK).
18.1.2. Choosing Between NTP Daemons
Chrony should be preferred for all systems except for the systems that are managed or monitored by tools that do not support chrony, or the systems that have a hardware reference clock which cannot be used with chrony.
Systems which are required to perform authentication of packets with the Autokey protocol, can only be used with ntpd, because chronyd does not support this protocol. The Autokey protocol has serious security issues, and thus using this protocol should be avoided. Instead of Autokey, use authentication with symmetric keys, which is supported by both chronyd and ntpd. Chrony supports stronger hash functions like SHA256 and SHA512, while ntpd can use only MD5 and SHA1.
18.2. Understanding chrony and Its Configuration
18.2.1. Understanding chronyd and chronyc
The chrony daemon, chronyd, can be monitored and controlled by the command line utility chronyc. This utility provides a command prompt, which allows entering a number of commands to query the current state of chronyd and make changes to its configuration. By default, chronyd accepts only commands from a local instance of chronyc, but it can be configured to accept monitoring commands also from remote hosts. The remote access should be restricted.
18.2.2. Understanding the chrony Configuration Commands
The default configuration file for chronyd is /etc/chrony.conf. The -f option can be used to specify an alternate configuration file path. See the chronyd man page for further options.
Below is a selection of chronyd configuration options:
- Comments
- Comments should be preceded by #, %, ; or !
- allow
-
Optionally specify a host, subnet, or network from which to allow
NTPconnections to a machine acting asNTPserver. The default is not to allow connections.
Example 18.1. Granting access with the allow option:
Use this this command to grant access to an IPv4:
allow 192.0.2.0/24
Use this this command to grant access to an IPv6:
allow 2001:0db8:85a3::8a2e:0370:7334
The UDP port number 123 needs to be open in the firewall in order to allow the client access:
~]# firewall-cmd --zone=public --add-port=123/udp
If you want to open port 123 permanently, use the --permanent option:
~]# firewall-cmd --permanent --zone=public --add-port=123/udp
- cmdallow
-
This is similar to the
allowdirective (see sectionallow), except that it allows control access (rather thanNTPclient access) to a particular subnet or host. (By "control access" is meant that chronyc can be run on those hosts and successfully connect tochronydon this computer.) The syntax is identical. There is also acmddeny alldirective with similar behavior to thecmdallow alldirective. - dumpdir
-
Path to the directory to save the measurement history across restarts of
chronyd(assuming no changes are made to the system clock behavior whilst it is not running). If this capability is to be used (via thedumponexitcommand in the configuration file, or thedumpcommand in chronyc), thedumpdircommand should be used to define the directory where the measurement histories are saved. - dumponexit
-
If this command is present, it indicates that
chronydshould save the measurement history for each of its time sources recorded whenever the program exits. (See thedumpdircommand above). - hwtimestamp
-
The
hwtimestampdirective enables hardware timestamping for extremely accurate synchronization. For more details, seechrony.conf(5)manual page. - local
The
localkeyword is used to allowchronydto appear synchronized to real time from the viewpoint of clients polling it, even if it has no current synchronization source. This option is normally used on the "master" computer in an isolated network, where several computers are required to synchronize to one another, and the "master" is kept in line with real time by manual input.An example of the command is:
local stratum 10
A large value of 10 indicates that the clock is so many hops away from a reference clock that its time is unreliable. If the computer ever has access to another computer which is ultimately synchronized to a reference clock, it will almost certainly be at a stratum less than 10. Therefore, the choice of a high value like 10 for the
localcommand prevents the machine’s own time from ever being confused with real time, were it ever to leak out to clients that have visibility of real servers.- log
The
logcommand indicates that certain information is to be logged. It accepts the following options:- measurements
-
This option logs the raw
NTPmeasurements and related information to a file calledmeasurements.log. - statistics
-
This option logs information about the regression processing to a file called
statistics.log. - tracking
-
This option logs changes to the estimate of the system’s gain or loss rate, and any slews made, to a file called
tracking.log. - rtc
- This option logs information about the system’s real-time clock.
- refclocks
-
This option logs the raw and filtered reference clock measurements to a file called
refclocks.log. - tempcomp
This option logs the temperature measurements and system rate compensations to a file called
tempcomp.log.The log files are written to the directory specified by the
logdircommand.An example of the command is:
log measurements statistics tracking
- logdir
This directive allows the directory where log files are written to be specified.
An example of the use of this directive is:
logdir /var/log/chrony
- makestep
Normally
chronydwill cause the system to gradually correct any time offset, by slowing down or speeding up the clock as required. In certain situations, the system clock may be so far adrift that this slewing process would take a very long time to correct the system clock. This directive forceschronydto step system clock if the adjustment is larger than a threshold value, but only if there were no more clock updates sincechronydwas started than a specified limit (a negative value can be used to disable the limit). This is particularly useful when using reference clock, because theinitstepslewdirective only works withNTPsources.An example of the use of this directive is:
makestep 1000 10
This would step the system clock if the adjustment is larger than 1000 seconds, but only in the first ten clock updates.
- maxchange
This directive sets the maximum allowed offset corrected on a clock update. The check is performed only after the specified number of updates to allow a large initial adjustment of the system clock. When an offset larger than the specified maximum occurs, it will be ignored for the specified number of times and then
chronydwill give up and exit (a negative value can be used to never exit). In both cases a message is sent to syslog.An example of the use of this directive is:
maxchange 1000 1 2
After the first clock update,
chronydwill check the offset on every clock update, it will ignore two adjustments larger than 1000 seconds and exit on another one.- maxupdateskew
One of
chronyd's tasks is to work out how fast or slow the computer’s clock runs relative to its reference sources. In addition, it computes an estimate of the error bounds around the estimated value.If the range of error is too large, it indicates that the measurements have not settled down yet, and that the estimated gain or loss rate is not very reliable.
The
maxupdateskewparameter is the threshold for determining whether an estimate is too unreliable to be used. By default, the threshold is 1000 ppm.The format of the syntax is:
maxupdateskew skew-in-ppmTypical values for skew-in-ppm might be 100 for a dial-up connection to servers over a telephone line, and 5 or 10 for a computer on a LAN.
It should be noted that this is not the only means of protection against using unreliable estimates. At all times,
chronydkeeps track of both the estimated gain or loss rate, and the error bound on the estimate. When a new estimate is generated following another measurement from one of the sources, a weighted combination algorithm is used to update the master estimate. So ifchronydhas an existing highly-reliable master estimate and a new estimate is generated which has large error bounds, the existing master estimate will dominate in the new master estimate.- minsources
The
minsourcesdirective sets the minimum number of sources that need to be considered as selectable in the source selection algorithm before the local clock is updated.The format of the syntax is:
minsources number-of-sourcesBy default, number-of-sources is 1. Setting minsources to a larger number can be used to improve the reliability, because multiple sources will need to correspond with each other.
- noclientlog
- This directive, which takes no arguments, specifies that client accesses are not to be logged. Normally they are logged, allowing statistics to be reported using the clients command in chronyc.
- reselectdist
When
chronydselects synchronization source from available sources, it will prefer the one with minimum synchronization distance. However, to avoid frequent reselecting when there are sources with similar distance, a fixed distance is added to the distance for sources that are currently not selected. This can be set with thereselectdistoption. By default, the distance is 100 microseconds.The format of the syntax is:
reselectdist dist-in-seconds- stratumweight
The
stratumweightdirective sets how much distance should be added per stratum to the synchronization distance whenchronydselects the synchronization source from available sources.The format of the syntax is:
stratumweight dist-in-secondsBy default, dist-in-seconds is 1 millisecond. This means that sources with lower stratum are usually preferred to sources with higher stratum even when their distance is significantly worse. Setting
stratumweightto 0 makeschronydignore stratum when selecting the source.- rtcfile
The
rtcfiledirective defines the name of the file in whichchronydcan save parameters associated with tracking the accuracy of the system’s real-time clock (RTC).The format of the syntax is:
rtcfile /var/lib/chrony/rtc
chronydsaves information in this file when it exits and when thewritertccommand is issued in chronyc. The information saved is the RTC’s error at some epoch, that epoch (in seconds since January 1 1970), and the rate at which the RTC gains or loses time. Not all real-time clocks are supported as their code is system-specific. Note that if this directive is used then the real-time clock should not be manually adjusted as this would interfere with chrony's need to measure the rate at which the real-time clock drifts if it was adjusted at random intervals.- rtcsync
-
The
rtcsyncdirective is present in the/etc/chrony.conffile by default. This will inform the kernel the system clock is kept synchronized and the kernel will update the real-time clock every 11 minutes.
18.2.3. Security with chronyc
Chronyc can access chronyd in two ways:
- Internet Protocol (IPv4 or IPv6),
-
Unix domain socket, which is accessible locally by the
rootor chrony user.
By default, chronyc connects to the Unix domain socket. The default path is /var/run/chrony/chronyd.sock. If this connection fails, which can happen for example when chronyc is running under a non-root user, chronyc tries to connect to 127.0.0.1 and then ::1.
Only the following monitoring commands, which do not affect the behavior of chronyd, are allowed from the network:
- activity
- manual list
- rtcdata
- smoothing
- sources
- sourcestats
- tracking
- waitsync
The set of hosts from which chronyd accepts these commands can be configured with the cmdallow directive in the configuration file of chronyd, or the cmdallow command in chronyc. By default, the commands are accepted only from localhost (127.0.0.1 or ::1).
All other commands are allowed only through the Unix domain socket. When sent over the network, chronyd responds with a Not authorised error, even if it is from localhost.
Accessing chronyd remotely with chronyc
Allow access from both IPv4 and IPv6 addresses by adding the following to the
/etc/chrony.conffile:bindcmdaddress 0.0.0.0
or
bindcmdaddress :
Allow commands from the remote IP address, network, or subnet by using the
cmdallowdirective.Add the following content to the
/etc/chrony.conffile:cmdallow 192.168.1.0/24
Open port 323 in the firewall to connect from a remote system.
~]# firewall-cmd --zone=public --add-port=323/udp
If you want to open port 323 permanently, use the
--permanent.~]# firewall-cmd --permanent --zone=public --add-port=323/udp
Note that the allow directive is for NTP access whereas the cmdallow directive is to enable receiving of remote commands. It is possible to make these changes temporarily using chronyc running locally. Edit the configuration file to make permanent changes.
18.3. Using chrony
18.3.1. Installing chrony
The chrony suite is installed by default on some versions of Red Hat Enterprise Linux 7. If required, to ensure that it is, run the following command as root:
~]# yum install chrony
The default location for the chrony daemon is /usr/sbin/chronyd. The command line utility will be installed to /usr/bin/chronyc.
18.3.2. Checking the Status of chronyd
To check the status of chronyd, issue the following command:
~]$ systemctl status chronyd
chronyd.service - NTP client/server
Loaded: loaded (/usr/lib/systemd/system/chronyd.service; enabled)
Active: active (running) since Wed 2013-06-12 22:23:16 CEST; 11h ago18.3.3. Starting chronyd
To start chronyd, issue the following command as root:
~]# systemctl start chronyd
To ensure chronyd starts automatically at system start, issue the following command as root:
~]# systemctl enable chronyd
18.3.4. Stopping chronyd
To stop chronyd, issue the following command as root:
~]# systemctl stop chronyd
To prevent chronyd from starting automatically at system start, issue the following command as root:
~]# systemctl disable chronyd
18.3.5. Checking if chrony is Synchronized
To check if chrony is synchronized, make use of the tracking, sources, and sourcestats commands.
18.3.5.1. Checking chrony Tracking
To check chrony tracking, issue the following command:
~]$ chronyc tracking
Reference ID : CB00710F (foo.example.net)
Stratum : 3
Ref time (UTC) : Fri Jan 27 09:49:17 2017
System time : 0.000006523 seconds slow of NTP time
Last offset : -0.000006747 seconds
RMS offset : 0.000035822 seconds
Frequency : 3.225 ppm slow
Residual freq : 0.000 ppm
Skew : 0.129 ppm
Root delay : 0.013639022 seconds
Root dispersion : 0.001100737 seconds
Update interval : 64.2 seconds
Leap status : NormalThe fields are as follows:
- Reference ID
-
This is the reference ID and name (or
IPaddress) if available, of the server to which the computer is currently synchronized. Reference ID is a hexadecimal number to avoid confusion with IPv4 addresses. - Stratum
- The stratum indicates how many hops away from a computer with an attached reference clock we are. Such a computer is a stratum-1 computer, so the computer in the example is two hops away (that is to say, a.b.c is a stratum-2 and is synchronized from a stratum-1).
- Ref time
- This is the time (UTC) at which the last measurement from the reference source was processed.
- System time
-
In normal operation,
chronydnever steps the system clock, because any jump in the timescale can have adverse consequences for certain application programs. Instead, any error in the system clock is corrected by slightly speeding up or slowing down the system clock until the error has been removed, and then returning to the system clock’s normal speed. A consequence of this is that there will be a period when the system clock (as read by other programs using thegettimeofday()system call, or by the date command in the shell) will be different fromchronyd's estimate of the current true time (which it reports toNTPclients when it is operating in server mode). The value reported on this line is the difference due to this effect. - Last offset
- This is the estimated local offset on the last clock update.
- RMS offset
- This is a long-term average of the offset value.
- Frequency
-
The "frequency" is the rate by which the system’s clock would be wrong if
chronydwas not correcting it. It is expressed in ppm (parts per million). For example, a value of 1 ppm would mean that when the system’s clock thinks it has advanced 1 second, it has actually advanced by 1.000001 seconds relative to true time. - Residual freq
This shows the "residual frequency" for the currently selected reference source. This reflects any difference between what the measurements from the reference source indicate the frequency should be and the frequency currently being used.
The reason this is not always zero is that a smoothing procedure is applied to the frequency. Each time a measurement from the reference source is obtained and a new residual frequency computed, the estimated accuracy of this residual is compared with the estimated accuracy (see
skewnext) of the existing frequency value. A weighted average is computed for the new frequency, with weights depending on these accuracies. If the measurements from the reference source follow a consistent trend, the residual will be driven to zero over time.- Skew
- This is the estimated error bound on the frequency.
- Root delay
- This is the total of the network path delays to the stratum-1 computer from which the computer is ultimately synchronized. Root delay values are printed in nanosecond resolution. In certain extreme situations, this value can be negative. (This can arise in a symmetric peer arrangement where the computers’ frequencies are not tracking each other and the network delay is very short relative to the turn-around time at each computer.)
- Root dispersion
- This is the total dispersion accumulated through all the computers back to the stratum-1 computer from which the computer is ultimately synchronized. Dispersion is due to system clock resolution, statistical measurement variations etc. Root dispersion values are printed in nanosecond resolution.
- Leap status
- This is the leap status, which can be Normal, Insert second, Delete second or Not synchronized.
18.3.5.2. Checking chrony Sources
The sources command displays information about the current time sources that chronyd is accessing.
The optional argument -v can be specified, meaning verbose. In this case, extra caption lines are shown as a reminder of the meanings of the columns.
~]$ chronyc sources 210 Number of sources = 3 MS Name/IP address Stratum Poll Reach LastRx Last sample =============================================================================== #* GPS0 0 4 377 11 -479ns[ -621ns] +/- 134ns ^? a.b.c 2 6 377 23 -923us[ -924us] +/- 43ms ^+ d.e.f 1 6 377 21 -2629us[-2619us] +/- 86ms
The columns are as follows:
- M
-
This indicates the mode of the source.
^means a server,=means a peer and#indicates a locally connected reference clock. - S
-
This column indicates the state of the sources. "*" indicates the source to which
chronydis currently synchronized. "+" indicates acceptable sources which are combined with the selected source. "-" indicates acceptable sources which are excluded by the combining algorithm. "?" indicates sources to which connectivity has been lost or whose packets do not pass all tests. "x" indicates a clock whichchronydthinks is a falseticker (its time is inconsistent with a majority of other sources). "~" indicates a source whose time appears to have too much variability. The "?" condition is also shown at start-up, until at least 3 samples have been gathered from it. - Name/IP address
-
This shows the name or the
IPaddress of the source, or reference ID for reference clock. - Stratum
- This shows the stratum of the source, as reported in its most recently received sample. Stratum 1 indicates a computer with a locally attached reference clock. A computer that is synchronized to a stratum 1 computer is at stratum 2. A computer that is synchronized to a stratum 2 computer is at stratum 3, and so on.
- Poll
This shows the rate at which the source is being polled, as a base-2 logarithm of the interval in seconds. Thus, a value of 6 would indicate that a measurement is being made every 64 seconds.
chronydautomatically varies the polling rate in response to prevailing conditions.- Reach
- This shows the source’s reach register printed as an octal number. The register has 8 bits and is updated on every received or missed packet from the source. A value of 377 indicates that a valid reply was received for all of the last eight transmissions.
- LastRx
-
This column shows how long ago the last sample was received from the source. This is normally in seconds. The letters
m,h,doryindicate minutes, hours, days or years. A value of 10 years indicates there were no samples received from this source yet. - Last sample
-
This column shows the offset between the local clock and the source at the last measurement. The number in the square brackets shows the actual measured offset. This may be suffixed by
ns(indicating nanoseconds),us(indicating microseconds),ms(indicating milliseconds), ors(indicating seconds). The number to the left of the square brackets shows the original measurement, adjusted to allow for any slews applied to the local clock since. The number following the+/-indicator shows the margin of error in the measurement. Positive offsets indicate that the local clock is ahead of the source.
18.3.5.3. Checking chrony Source Statistics
The sourcestats command displays information about the drift rate and offset estimation process for each of the sources currently being examined by chronyd.
The optional argument -v can be specified, meaning verbose. In this case, extra caption lines are shown as a reminder of the meanings of the columns.
~]$ chronyc sourcestats
210 Number of sources = 1
Name/IP Address NP NR Span Frequency Freq Skew Offset Std Dev
===============================================================================
abc.def.ghi 11 5 46m -0.001 0.045 1us 25usThe columns are as follows:
- Name/IP address
-
This is the name or
IPaddress of theNTPserver (or peer) or reference ID of the reference clock to which the rest of the line relates. - NP
- This is the number of sample points currently being retained for the server. The drift rate and current offset are estimated by performing a linear regression through these points.
- NR
-
This is the number of runs of residuals having the same sign following the last regression. If this number starts to become too small relative to the number of samples, it indicates that a straight line is no longer a good fit to the data. If the number of runs is too low,
chronyddiscards older samples and re-runs the regression until the number of runs becomes acceptable. - Span
- This is the interval between the oldest and newest samples. If no unit is shown the value is in seconds. In the example, the interval is 46 minutes.
- Frequency
- This is the estimated residual frequency for the server, in parts per million. In this case, the computer’s clock is estimated to be running 1 part in 109 slow relative to the server.
- Freq Skew
- This is the estimated error bounds on Freq (again in parts per million).
- Offset
- This is the estimated offset of the source.
- Std Dev
- This is the estimated sample standard deviation.
18.3.6. Manually Adjusting the System Clock
To step the system clock immediately, bypassing any adjustments in progress by slewing, issue the following command as root:
~]# chronyc makestep
If the rtcfile directive is used, the real-time clock should not be manually adjusted. Random adjustments would interfere with chrony's need to measure the rate at which the real-time clock drifts.
18.4. Setting Up chrony for Different Environments
18.4.1. Setting Up chrony for a System in an Isolated Network
For a network that is never connected to the Internet, one computer is selected to be the master timeserver. The other computers are either direct clients of the master, or clients of clients. On the master, the drift file must be manually set with the average rate of drift of the system clock. If the master is rebooted, it will obtain the time from surrounding systems and calculate an average to set its system clock. Thereafter it resumes applying adjustments based on the drift file. The drift file will be updated automatically when the settime command is used.
On the system selected to be the master, using a text editor running as root, edit the /etc/chrony.conf as follows:
driftfile /var/lib/chrony/drift commandkey 1 keyfile /etc/chrony.keys initstepslew 10 client1 client3 client6 local stratum 8 manual allow 192.0.2.0
Where 192.0.2.0 is the network or subnet address from which the clients are allowed to connect.
On the systems selected to be direct clients of the master, using a text editor running as root, edit the /etc/chrony.conf as follows:
server master driftfile /var/lib/chrony/drift logdir /var/log/chrony log measurements statistics tracking keyfile /etc/chrony.keys commandkey 24 local stratum 10 initstepslew 20 master allow 192.0.2.123
Where 192.0.2.123 is the address of the master, and master is the host name of the master. Clients with this configuration will resynchronize the master if it restarts.
On the client systems which are not to be direct clients of the master, the /etc/chrony.conf file should be the same except that the local and allow directives should be omitted.
In an Isolated Network, you can also use the local directive that enables a local reference mode, which allows chronyd operating as an NTP server to appear synchronized to real time, even when it was never synchronized or the last update of the clock happened a long time ago.
To allow multiple servers in the network to use the same local configuration and to be synchronized to one another, without confusing clients that poll more than one server, use the orphan option of the local directive which enables the orphan mode. Each server needs to be configured to poll all other servers with local. This ensures that only the server with the smallest reference ID has the local reference active and other servers are synchronized to it. When the server fails, another one will take over.
18.5. Using chronyc
18.5.1. Using chronyc to Control chronyd
To make changes to the local instance of chronyd using the command line utility chronyc in interactive mode, enter the following command as root:
~]# chronyc
chronyc must run as root if some of the restricted commands are to be used.
The chronyc command prompt will be displayed as follows:
chronyc>
You can type help to list all of the commands.
The utility can also be invoked in non-interactive command mode if called together with a command as follows:
chronyc command
Changes made using chronyc are not permanent, they will be lost after a chronyd restart. For permanent changes, modify /etc/chrony.conf.
18.6. Chrony with HW timestamping
18.6.1. Understanding Hardware Timestamping
Hardware timestamping is a feature supported in some Network Interface Controller (NICs) which provides accurate timestamping of incoming and outgoing packets. NTP timestamps are usually created by the kernel and chronyd with the use of the system clock. However, when HW timestamping is enabled, the NIC uses its own clock to generate the timestamps when packets are entering or leaving the link layer or the physical layer. When used with NTP, hardware timestamping can significantly improve the accuracy of synchronization. For best accuracy, both NTP servers and NTP clients need to use hardware timestamping. Under ideal conditions, a sub-microsecond accuracy may be possible.
Another protocol for time synchronization that uses hardware timestamping is PTP. For further information about PTP, see Chapter 20, Configuring PTP Using ptp4l. Unlike NTP, PTP relies on assistance in network switches and routers. If you want to reach the best accuracy of synchronization, use PTP on networks that have switches and routers with PTP support, and prefer NTP on networks that do not have such switches and routers.
18.6.2. Verifying Support for Hardware Timestamping
To verify that hardware timestamping with NTP is supported by an interface, use the ethtool -T command. An interface can be used for hardware timestamping with NTP if ethtool lists the SOF_TIMESTAMPING_TX_HARDWARE and SOF_TIMESTAMPING_TX_SOFTWARE capabilities and also the HWTSTAMP_FILTER_ALL filter mode.
Example 18.2. Verifying Support for Hardware Timestamping on a Specific Interface
~]# ethtool -T eth0
Output:
Timestamping parameters for eth0:
Capabilities:
hardware-transmit (SOF_TIMESTAMPING_TX_HARDWARE)
software-transmit (SOF_TIMESTAMPING_TX_SOFTWARE)
hardware-receive (SOF_TIMESTAMPING_RX_HARDWARE)
software-receive (SOF_TIMESTAMPING_RX_SOFTWARE)
software-system-clock (SOF_TIMESTAMPING_SOFTWARE)
hardware-raw-clock (SOF_TIMESTAMPING_RAW_HARDWARE)
PTP Hardware Clock: 0
Hardware Transmit Timestamp Modes:
off (HWTSTAMP_TX_OFF)
on (HWTSTAMP_TX_ON)
Hardware Receive Filter Modes:
none (HWTSTAMP_FILTER_NONE)
all (HWTSTAMP_FILTER_ALL)
ptpv1-l4-sync (HWTSTAMP_FILTER_PTP_V1_L4_SYNC)
ptpv1-l4-delay-req (HWTSTAMP_FILTER_PTP_V1_L4_DELAY_REQ)
ptpv2-l4-sync (HWTSTAMP_FILTER_PTP_V2_L4_SYNC)
ptpv2-l4-delay-req (HWTSTAMP_FILTER_PTP_V2_L4_DELAY_REQ)
ptpv2-l2-sync (HWTSTAMP_FILTER_PTP_V2_L2_SYNC)
ptpv2-l2-delay-req (HWTSTAMP_FILTER_PTP_V2_L2_DELAY_REQ)
ptpv2-event (HWTSTAMP_FILTER_PTP_V2_EVENT)
ptpv2-sync (HWTSTAMP_FILTER_PTP_V2_SYNC)
ptpv2-delay-req (HWTSTAMP_FILTER_PTP_V2_DELAY_REQ)18.6.3. Enabling Hardware Timestamping
To enable hardware timestamping, use the hwtimestamp directive in the /etc/chrony.conf file. The directive can either specify a single interface, or a wildcard character () can be used to enable hardware timestamping on all interfaces that support it. Use the wildcard specification in case that no other application, like [application]*ptp4l from the linuxptp package, is using hardware timestamping on an interface. Multiple hwtimestamp directives are allowed in the chrony configuration file.
Example 18.3. Enabling Hardware Timestamping by Using the hwtimestamp Directive
hwtimestamp eth0 hwtimestamp eth1 hwtimestamp *
18.6.4. Configuring Client Polling Interval
The default range of a polling interval (64-1024 seconds) is recommended for servers on the Internet. For local servers and hardware timestamping, a shorter polling interval needs to be configured in order to minimize offset of the system clock.
The following directive in /etc/chrony.conf specifies a local NTP server using one second polling interval:
server ntp.local minpoll 0 maxpoll 0
18.6.5. Enabling Interleaved Mode
NTP servers that are not hardware NTP appliances, but rather general purpose computers running a software NTP implementation, like chrony, will get a hardware transmit timestamp only after sending a packet. This behavior prevents the server from saving the timestamp in the packet to which it corresponds. In order to enable NTP clients receiving transmit timestamps that were generated after the transmission, configure the clients to use the NTP interleaved mode by adding the xleave option to the server directive in /etc/chrony.conf:
server ntp.local minpoll 0 maxpoll 0 xleave
18.6.6. Configuring Server for Large Number of Clients
The default server configuration allows a few thousands of clients at most to use the interleaved mode concurrently. To configure the server for a larger number of clients, increase the clientloglimit directive in /etc/chrony.conf. This directive specifies the maximum size of memory allocated for logging of clients' access on the server:
clientloglimit 100000000
18.6.7. Verifying Hardware Timestamping
To verify that the interface has successfully enabled hardware timestamping, check the system log. The log should contain a message from chronyd for each interface with successfully enabled hardware timestamping.
Example 18.4. Log Messages for Interfaces with Enabled Hardware Timestamping
chronyd[4081]: Enabled HW timestamping on eth0 chronyd[4081]: Enabled HW timestamping on eth1
When chronyd is configured as an NTP client or peer, you can have the transmit and receive timestamping modes and the interleaved mode reported for each NTP source by the chronyc ntpdata command:
Example 18.5. Reporting the Transmit, Receive Timestamping and Interleaved Mode for Each NTP Source
~]# chronyc ntpdata
Output:
Remote address : 203.0.113.15 (CB00710F) Remote port : 123 Local address : 203.0.113.74 (CB00714A) Leap status : Normal Version : 4 Mode : Server Stratum : 1 Poll interval : 0 (1 seconds) Precision : -24 (0.000000060 seconds) Root delay : 0.000015 seconds Root dispersion : 0.000015 seconds Reference ID : 47505300 (GPS) Reference time : Wed May 03 13:47:45 2017 Offset : -0.000000134 seconds Peer delay : 0.000005396 seconds Peer dispersion : 0.000002329 seconds Response time : 0.000152073 seconds Jitter asymmetry: +0.00 NTP tests : 111 111 1111 Interleaved : Yes Authenticated : No TX timestamping : Hardware RX timestamping : Hardware Total TX : 27 Total RX : 27 Total valid RX : 27
Example 18.6. Reporting the Stability of NTP Measurements
# chronyc sourcestats
With hardware timestamping enabled, stability of NTP measurements should be in tens or hundreds of nanoseconds, under normal load. This stability is reported in the Std Dev column of the output of the chronyc sourcestats command:
Output:
210 Number of sources = 1 Name/IP Address NP NR Span Frequency Freq Skew Offset Std Dev ntp.local 12 7 11 +0.000 0.019 +0ns 49ns
18.6.8. Configuring PTP-NTP bridge
If a highly accurate Precision Time Protocol (PTP) grandmaster is available in a network that does not have switches or routers with PTP support, a computer may be dedicated to operate as a PTP slave and a stratum-1 NTP server. Such a computer needs to have two or more network interfaces, and be close to the grandmaster or have a direct connection to it. This will ensure highly accurate synchronization in the network.
Configure the ptp4l and phc2sys programs from the linuxptp packages to use one interface to synchronize the system clock using PTP. The configuration is described in the Chapter 20, Configuring PTP Using ptp4l. Configure chronyd to provide the system time using the other interface:
Example 18.7. Configuring chronyd to Provide the System Time Using the Other Interface
bindaddress 203.0.113.74 hwtimestamp eth1 local stratum 1
18.7. Additional Resources
The following sources of information provide additional resources regarding chrony.
18.7.1. Installed Documentation
-
chronyc(1)man page — Describes the chronyc command-line interface tool including commands and command options. -
chronyd(8)man page — Describes the chronyd daemon including commands and command options. -
chrony.conf(5)man page — Describes the chrony configuration file.
18.7.2. Online Documentation
For answers to FAQs, see http://chrony.tuxfamily.org/faq.html
Chapter 19. Configuring NTP Using ntpd
19.1. Introduction to NTP
The Network Time Protocol (NTP) enables the accurate dissemination of time and date information in order to keep the time clocks on networked computer systems synchronized to a common reference over the network or the Internet. Many standards bodies around the world have atomic clocks which may be made available as a reference. The satellites that make up the Global Position System contain more than one atomic clock, making their time signals potentially very accurate. Their signals can be deliberately degraded for military reasons. An ideal situation would be where each site has a server, with its own reference clock attached, to act as a site-wide time server. Many devices which obtain the time and date via low frequency radio transmissions or the Global Position System (GPS) exist. However for most situations, a range of publicly accessible time servers connected to the Internet at geographically dispersed locations can be used. These NTP servers provide "Coordinated Universal Time" (UTC). Information about these time servers can found at www.pool.ntp.org.
Accurate time keeping is important for a number of reasons in IT. In networking for example, accurate time stamps in packets and logs are required. Logs are used to investigate service and security issues and so time stamps made on different systems must be made by synchronized clocks to be of real value. As systems and networks become increasingly faster, there is a corresponding need for clocks with greater accuracy and resolution. In some countries there are legal obligations to keep accurately synchronized clocks. See www.ntp.org for more information. In Linux systems, NTP is implemented by a daemon running in user space. The default NTP user space daemon in Red Hat Enterprise Linux 7 is chronyd. It must be disabled if you want to use the ntpd daemon. See Chapter 18, Configuring NTP Using the chrony Suite for information on chrony.
The user space daemon updates the system clock, which is a software clock running in the kernel. Linux uses a software clock as its system clock for better resolution than the typical embedded hardware clock referred to as the "Real Time Clock" (RTC). See the rtc(4) and hwclock(8) man pages for information on hardware clocks. The system clock can keep time by using various clock sources. Usually, the Time Stamp Counter (TSC) is used. The TSC is a CPU register which counts the number of cycles since it was last reset. It is very fast, has a high resolution, and there are no interrupts. On system start, the system clock reads the time and date from the RTC. The time kept by the RTC will drift away from actual time by up to 5 minutes per month due to temperature variations. Hence the need for the system clock to be constantly synchronized with external time references. When the system clock is being synchronized by ntpd, the kernel will in turn update the RTC every 11 minutes automatically.
19.2. NTP Strata
NTP servers are classified according to their synchronization distance from the atomic clocks which are the source of the time signals. The servers are thought of as being arranged in layers, or strata, from 1 at the top down to 15. Hence the word stratum is used when referring to a specific layer. Atomic clocks are referred to as Stratum 0 as this is the source, but no Stratum 0 packet is sent on the Internet, all stratum 0 atomic clocks are attached to a server which is referred to as stratum 1. These servers send out packets marked as Stratum 1. A server which is synchronized by means of packets marked stratum n belongs to the next, lower, stratum and will mark its packets as stratum n+1. Servers of the same stratum can exchange packets with each other but are still designated as belonging to just the one stratum, the stratum one below the best reference they are synchronized to. The designation Stratum 16 is used to indicate that the server is not currently synchronized to a reliable time source.
Note that by default NTP clients act as servers for those systems in the stratum below them.
Here is a summary of the NTP Strata:
- Stratum 0
Atomic Clocks and their signals broadcast over Radio and GPS
- GPS (Global Positioning System)
- Mobile Phone Systems
Low Frequency Radio Broadcasts WWVB (Colorado, USA.), JJY-40 and JJY-60 (Japan), DCF77 (Germany), and MSF (United Kingdom)
These signals can be received by dedicated devices and are usually connected by RS-232 to a system used as an organizational or site-wide time server.
- Stratum 1
- Computer with radio clock, GPS clock, or atomic clock attached
- Stratum 2
- Reads from stratum 1; Serves to lower strata
- Stratum 3
- Reads from stratum 2; Serves to lower strata
- Stratum n+1
- Reads from stratum n; Serves to lower strata
- Stratum 15
- Reads from stratum 14; This is the lowest stratum.
This process continues down to Stratum 15 which is the lowest valid stratum. The label Stratum 16 is used to indicated an unsynchronized state.
19.3. Understanding NTP
The version of NTP used by Red Hat Enterprise Linux is as described in RFC 1305 Network Time Protocol (Version 3) Specification, Implementation and Analysis and RFC 5905 Network Time Protocol Version 4: Protocol and Algorithms Specification
This implementation of NTP enables sub-second accuracy to be achieved. Over the Internet, accuracy to 10s of milliseconds is normal. On a Local Area Network (LAN), 1 ms accuracy is possible under ideal conditions. This is because clock drift is now accounted and corrected for, which was not done in earlier, simpler, time protocol systems. A resolution of 233 picoseconds is provided by using 64-bit time stamps. The first 32-bits of the time stamp is used for seconds, the last 32-bits are used for fractions of seconds.
NTP represents the time as a count of the number of seconds since 00:00 (midnight) 1 January, 1900 GMT. As 32-bits is used to count the seconds, this means the time will "roll over" in 2036. However NTP works on the difference between time stamps so this does not present the same level of problem as other implementations of time protocols have done. If a hardware clock that is within 68 years of the correct time is available at boot time then NTP will correctly interpret the current date. The NTP4 specification provides for an "Era Number" and an "Era Offset" which can be used to make software more robust when dealing with time lengths of more than 68 years. Do not confuse this with the Unix Year 2038 problem.
The NTP protocol provides additional information to improve accuracy. Four time stamps are used to allow the calculation of round-trip time and server response time. In order for a system in its role as NTP client to synchronize with a reference time server, a packet is sent with an "originate time stamp". When the packet arrives, the time server adds a "receive time stamp". After processing the request for time and date information and just before returning the packet, it adds a "transmit time stamp". When the returning packet arrives at the NTP client, a "receive time stamp" is generated. The client can now calculate the total round trip time and by subtracting the processing time derive the actual traveling time. By assuming the outgoing and return trips take equal time, the single-trip delay in receiving the NTP data is calculated. The full NTP algorithm is much more complex than presented here.
When a packet containing time information is received it is not immediately responded to, but is first subject to validation checks and then processed together with several other time samples to arrive at an estimate of the time. This is then compared to the system clock to determine the time offset, the difference between the system clock’s time and what ntpd has determined the time should be. The system clock is adjusted slowly, at most at a rate of 0.5 ms per second, to reduce this offset by changing the frequency of the counter being used. It will take at least 2000 seconds to adjust the clock by 1 second using this method. This slow change is referred to as slewing and cannot go backwards. If the time offset of the clock is more than 128 ms (the default setting), ntpd can "step" the clock forwards or backwards. If the time offset at system start is greater than 1000 seconds then the user, or an installation script, should make a manual adjustment. See Chapter 3, Configuring the Date and Time. With the -g option to the ntpd command (used by default), any offset at system start will be corrected, but during normal operation only offsets of up to 1000 seconds will be corrected.
Some software may fail or produce an error if the time is changed backwards. For systems that are sensitive to step changes in the time, the threshold can be changed to 600 s instead of 128 ms using the -x option (unrelated to the -g option). Using the -x option to increase the stepping limit from 0.128 s to 600 s has a drawback because a different method of controlling the clock has to be used. It disables the kernel clock discipline and may have a negative impact on the clock accuracy. The -x option can be added to the /etc/sysconfig/ntpd configuration file.
19.4. Understanding the Drift File
The drift file is used to store the frequency offset between the system clock running at its nominal frequency and the frequency required to remain in synchronization with UTC. If present, the value contained in the drift file is read at system start and used to correct the clock source. Use of the drift file reduces the time required to achieve a stable and accurate time. The value is calculated, and the drift file replaced, once per hour by ntpd. The drift file is replaced, rather than just updated, and for this reason the drift file must be in a directory for which the ntpd has write permissions.
19.5. UTC, Timezones, and DST
As NTP is entirely in UTC (Universal Time, Coordinated), Timezones and DST (Daylight Saving Time) are applied locally by the system. The file /etc/localtime is a copy of, or symlink to, a zone information file from /usr/share/zoneinfo. The RTC may be in localtime or in UTC, as specified by the 3rd line of /etc/adjtime, which will be one of LOCAL or UTC to indicate how the RTC clock has been set. Users can easily change this setting using the checkbox System Clock Uses UTC in the Date and Time graphical configuration tool. See Chapter 3, Configuring the Date and Time for information on how to use that tool. Running the RTC in UTC is recommended to avoid various problems when daylight saving time is changed.
The operation of ntpd is explained in more detail in the man page ntpd(8). The resources section lists useful sources of information. See Section 19.20, “Additional Resources”.
19.6. Authentication Options for NTP
NTPv4 NTPv4 added support for the Autokey Security Architecture, which is based on public asymmetric cryptography while retaining support for symmetric key cryptography. The Autokey protocol is described in RFC 5906 Network Time Protocol Version 4: Autokey Specification. Unfortunately, it was found later that the protocol has serious security issues, and thus Red Hat strongly recommends to use symmetric keys instead. The man page ntp_auth(5) describes the authentication options and commands for ntpd.
An attacker on the network can attempt to disrupt a service by sending NTP packets with incorrect time information. On systems using the public pool of NTP servers, this risk is mitigated by having more than three NTP servers in the list of public NTP servers in /etc/ntp.conf. If only one time source is compromised or spoofed, ntpd will ignore that source. You should conduct a risk assessment and consider the impact of incorrect time on your applications and organization. If you have internal time sources you should consider steps to protect the network over which the NTP packets are distributed. If you conduct a risk assessment and conclude that the risk is acceptable, and the impact to your applications minimal, then you can choose not to use authentication.
The broadcast and multicast modes require authentication by default. If you have decided to trust the network then you can disable authentication by using disable auth directive in the ntp.conf file. Alternatively, authentication needs to be configured by using SHA1 or MD5 symmetric keys, or by public (asymmetric) key cryptography using the Autokey scheme. The Autokey scheme for asymmetric cryptography is explained in the ntp_auth(8) man page and the generation of keys is explained in ntp-keygen(8). To implement symmetric key cryptography, see Section 19.17.12, “Configuring Symmetric Authentication Using a Key” for an explanation of the key option.
19.7. Managing the Time on Virtual Machines
Virtual machines cannot access a real hardware clock and a virtual clock is not stable enough as the stability is dependent on the host systems work load. For this reason, para-virtualized clocks should be provided by the virtualization application in use. On Red Hat Enterprise Linux with KVM the default clock source is kvm-clock. See the KVM guest timing management chapter of the Red Hat Enterprise Linux 7 Virtualization Deployment and Administration Guide.
19.8. Understanding Leap Seconds
Greenwich Mean Time (GMT) was derived by measuring the solar day, which is dependent on the Earth’s rotation. When atomic clocks were first made, the potential for more accurate definitions of time became possible. In 1958, International Atomic Time (TAI) was introduced based on the more accurate and very stable atomic clocks. A more accurate astronomical time, Universal Time 1 (UT1), was also introduced to replace GMT. The atomic clocks are in fact far more stable than the rotation of the Earth and so the two times began to drift apart. For this reason UTC was introduced as a practical measure. It is kept within one second of UT1 but to avoid making many small trivial adjustments it was decided to introduce the concept of a leap second in order to reconcile the difference in a manageable way. The difference between UT1 and UTC is monitored until they drift apart by more than half a second. Then only is it deemed necessary to introduce a one second adjustment, forward or backward. Due to the erratic nature of the Earth’s rotational speed, the need for an adjustment cannot be predicted far into the future. The decision as to when to make an adjustment is made by the International Earth Rotation and Reference Systems Service (IERS). However, these announcements are important only to administrators of Stratum 1 servers because NTP transmits information about pending leap seconds and applies them automatically.
19.9. Understanding the ntpd Configuration File
The daemon, ntpd, reads the configuration file at system start or when the service is restarted. The default location for the file is /etc/ntp.conf and you can view the file by entering the following command:
~]$ less /etc/ntp.conf
The configuration commands are explained briefly later in this chapter, see Section 19.17, “Configure NTP”, and more verbosely in the ntp.conf(5) man page.
Here follows a brief explanation of the contents of the default configuration file:
- The driftfile entry
A path to the drift file is specified, the default entry on Red Hat Enterprise Linux is:
driftfile /var/lib/ntp/drift
If you change this be certain that the directory is writable by
ntpd. The file contains one value used to adjust the system clock frequency after every system or service start. See Understanding the Drift File for more information.- The access control entries
The following line sets the default access control restriction:
restrict default nomodify notrap nopeer noquery
-
The
nomodifyoptions prevents any changes to the configuration. -
The
notrapoption preventsntpdccontrol message protocol traps. -
The
nopeeroption prevents a peer association being formed. The
noqueryoption preventsntpqandntpdcqueries, but not time queries, from being answered.ImportantThe
ntpqandntpdcqueries can be used in amplification attacks, therefore do not remove thenoqueryoption from therestrict defaultcommand on publicly accessible systems.See CVE-2013-5211 for more details.
Addresses within the range
127.0.0.0/8are sometimes required by various processes or applications. As the "restrict default" line above prevents access to everything not explicitly allowed, access to the standard loopback address forIPv4andIPv6is permitted by means of the following lines:# the administrative functions. restrict 127.0.0.1 restrict ::1
Addresses can be added underneath if specifically required by another application.
Hosts on the local network are not permitted because of the "restrict default" line above. To change this, for example to allow hosts from the
192.0.2.0/24network to query the time and statistics but nothing more, a line in the following format is required:restrict 192.0.2.0 mask 255.255.255.0 nomodify notrap nopeer
To allow unrestricted access from a specific host, for example
192.0.2.250/32, a line in the following format is required:restrict 192.0.2.250
A mask of
255.255.255.255is applied if none is specified.The restrict commands are explained in the
ntp_acc(5)man page.
-
The
- The public servers entry
By default, the
ntp.conffile contains four public server entries:server 0.rhel.pool.ntp.org iburst server 1.rhel.pool.ntp.org iburst server 2.rhel.pool.ntp.org iburst server 3.rhel.pool.ntp.org iburst
- The broadcast multicast servers entry
-
By default, the
ntp.conffile contains some commented out examples. These are largely self explanatory. See Section 19.17, “Configure NTP” for the explanation of the specific commands. If required, add your commands just below the examples.
When the DHCP client program, dhclient, receives a list of NTP servers from the DHCP server, it adds them to ntp.conf and restarts the service. To disable that feature, add PEERNTP=no to /etc/sysconfig/network.
19.10. Understanding the ntpd Sysconfig File
The file will be read by the ntpd init script on service start. The default contents is as follows:
# Command line options for ntpd OPTIONS="-g"
The -g option enables ntpd to ignore the offset limit of 1000 s and attempt to synchronize the time even if the offset is larger than 1000 s, but only on system start. Without that option ntpd will exit if the time offset is greater than 1000 s. It will also exit after system start if the service is restarted and the offset is greater than 1000 s even with the -g option.
19.11. Disabling chrony
In order to use ntpd the default user space daemon, chronyd, must be stopped and disabled. Issue the following command as root:
~]# systemctl stop chronyd
To prevent it restarting at system start, issue the following command as root:
~]# systemctl disable chronyd
To check the status of chronyd, issue the following command:
~]$ systemctl status chronyd19.12. Checking if the NTP Daemon is Installed
To check if ntpd is installed, enter the following command as root:
~]# yum install ntp
NTP is implemented by means of the daemon or service ntpd, which is contained within the ntp package.
19.13. Installing the NTP Daemon (ntpd)
To install ntpd, enter the following command as root:
~]# yum install ntp
To enable ntpd at system start, enter the following command as root:
~]# systemctl enable ntpd
19.14. Checking the Status of NTP
To check if ntpd is running and configured to run at system start, issue the following command:
~]$ systemctl status ntpd
To obtain a brief status report from ntpd, issue the following command:
~]$ ntpstat
unsynchronised
time server re-starting
polling server every 64 s~]$ ntpstat
synchronised to NTP server (10.5.26.10) at stratum 2
time correct to within 52 ms
polling server every 1024 s19.15. Configure the Firewall to Allow Incoming NTP Packets
The NTP traffic consists of UDP packets on port 123 and needs to be permitted through network and host-based firewalls in order for NTP to function.
Check if the firewall is configured to allow incoming NTP traffic for clients using the graphical Firewall Configuration tool.
To start the graphical firewall-config tool, press the Super key to enter the Activities Overview, type firewall and then press Enter. The Firewall Configuration window opens. You will be prompted for your user password.
To start the graphical firewall configuration tool using the command line, enter the following command as root user:
~]# firewall-config
The Firewall Configuration window opens. Note, this command can be run as normal user but you will then be prompted for the root password from time to time.
Look for the word "Connected" in the lower left corner. This indicates that the firewall-config tool is connected to the user space daemon, firewalld.
19.15.1. Change the Firewall Settings
To immediately change the current firewall settings, ensure the drop-down selection menu labeled Configuration is set to Runtime. Alternatively, to edit the settings to be applied at the next system start, or firewall reload, select Permanent from the drop-down list.
When making changes to the firewall settings in Runtime mode, your selection takes immediate effect when you set or clear the check box associated with the service. You should keep this in mind when working on a system that may be in use by other users.
When making changes to the firewall settings in Permanent mode, your selection will only take effect when you reload the firewall or the system restarts. To reload the firewall, select the Options menu and select Reload Firewall.
19.15.2. Open Ports in the Firewall for NTP Packets
To permit traffic through the firewall to a certain port, start the firewall-config tool and select the network zone whose settings you want to change. Select the Ports tab and then click the button. The Port and Protocol window opens.
Enter the port number 123 and select udp from the drop-down list.
19.16. Configure ntpdate Servers
The purpose of the ntpdate service is to set the clock during system boot. This was used previously to ensure that the services started after ntpdate would have the correct time and not observe a jump in the clock. The use of ntpdate and the list of step-tickers is considered deprecated and so Red Hat Enterprise Linux 7 uses the -g option to the ntpd command and not ntpdate by default.
The ntpdate service in Red Hat Enterprise Linux 7 is beneficial if it is used without the ntpd service or when the -x option is specified for the ntpd command. If ntpd is used with -x but without the ntpdate service enabled, the clock is corrected by step only if the time difference is larger than 600 seconds. With a smaller offset than 600 seconds, the clock is adjusted slowly, approximately 2000 seconds for every corrected second.
To check if the ntpdate service is enabled to run at system start, issue the following command:
~]$ systemctl status ntpdate
To enable the service to run at system start, issue the following command as root:
~]# systemctl enable ntpdate
In Red Hat Enterprise Linux 7 the default /etc/ntp/step-tickers file contains 0.rhel.pool.ntp.org. To configure additional ntpdate servers, using a text editor running as root, edit /etc/ntp/step-tickers. The number of servers listed is not very important as ntpdate will only use this to obtain the date information once when the system is starting. If you have an internal time server then use that host name for the first line. An additional host on the second line as a backup is sensible. The selection of backup servers and whether the second host is internal or external depends on your risk assessment. For example, what is the chance of any problem affecting the first server also affecting the second server? Would connectivity to an external server be more likely to be available than connectivity to internal servers in the event of a network failure disrupting access to the first server?
19.17. Configure NTP
To change the default configuration of the NTP service, use a text editor running as root user to edit the /etc/ntp.conf file. This file is installed together with ntpd and is configured to use time servers from the Red Hat pool by default. The man page ntp.conf(5) describes the command options that can be used in the configuration file apart from the access and rate limiting commands which are explained in the ntp_acc(5) man page.
19.17.1. Configure Access Control to an NTP Service
To restrict or control access to the NTP service running on a system, make use of the restrict command in the ntp.conf file. See the commented out example:
# Hosts on local network are less restricted. #restrict 192.168.1.0 mask 255.255.255.0 nomodify notrap
The restrict command takes the following form:
restrict address [mask mask] optionwhere address and mask specify the IP addresses to which you want to apply the restriction, and option is one or more of:
-
ignore— All packets will be ignored, includingntpqandntpdcqueries. -
kod— a "Kiss-o'-death" packet is to be sent to reduce unwanted queries. -
limited— do not respond to time service requests if the packet violates the rate limit default values or those specified by thediscardcommand.ntpqandntpdcqueries are not affected. For more information on thediscardcommand and the default values, see Section 19.17.2, “Configure Rate Limiting Access to an NTP Service”. -
lowpriotrap— traps set by matching hosts to be low priority. -
nomodify— prevents any changes to the configuration. -
noquery— preventsntpqandntpdcqueries, but not time queries, from being answered. -
nopeer— prevents a peer association being formed. -
noserve— deny all packets exceptntpqandntpdcqueries. -
notrap— preventsntpdccontrol message protocol traps. -
notrust— deny packets that are not cryptographically authenticated. -
ntpport— modify the match algorithm to only apply the restriction if the source port is the standardNTPUDPport123. -
version— deny packets that do not match the currentNTPversion.
To configure rate limit access to not respond at all to a query, the respective restrict command has to have the limited option. If ntpd should reply with a KoD packet, the restrict command needs to have both limited and kod options.
The ntpq and ntpdc queries can be used in amplification attacks (see CVE-2013-5211 for more details), do not remove the noquery option from the restrict default command on publicly accessible systems.
19.17.2. Configure Rate Limiting Access to an NTP Service
To enable rate limiting access to the NTP service running on a system, add the limited option to the restrict command as explained in Section 19.17.1, “Configure Access Control to an NTP Service”. If you do not want to use the default discard parameters, then also use the discard command as explained here.
The discard command takes the following form:
discardaveragevalueminimumvaluemonitorvalue
-
average— specifies the minimum average packet spacing to be permitted, it accepts an argument in log2 seconds. The default value is 3 (23 equates to 8 seconds). -
minimum— specifies the minimum packet spacing to be permitted, it accepts an argument in log2 seconds. The default value is 1 (21 equates to 2 seconds). -
monitor— specifies the discard probability for packets once the permitted rate limits have been exceeded. The default value is 3000 seconds. This option is intended for servers that receive 1000 or more requests per second.
Examples of the discard command are as follows:
discard average 4
discard average 4 minimum 2
19.17.3. Adding a Peer Address
To add the address of a peer, that is to say, the address of a server running an NTP service of the same stratum, make use of the peer command in the ntp.conf file.
The peer command takes the following form:
peer address
where address is an IP unicast address or a DNS resolvable name. The address must only be that of a system known to be a member of the same stratum. Peers should have at least one time source that is different to each other. Peers are normally systems under the same administrative control.
19.17.4. Adding a Server Address
To add the address of a server, that is to say, the address of a server running an NTP service of a higher stratum, make use of the server command in the ntp.conf file.
The server command takes the following form:
server address
where address is an IP unicast address or a DNS resolvable name. The address of a remote reference server or local reference clock from which packets are to be received.
19.17.5. Adding a Broadcast or Multicast Server Address
To add a broadcast or multicast address for sending, that is to say, the address to broadcast or multicast NTP packets to, make use of the broadcast command in the ntp.conf file.
The broadcast and multicast modes require authentication by default. See Section 19.6, “Authentication Options for NTP”.
The broadcast command takes the following form:
broadcast address
where address is an IP broadcast or multicast address to which packets are sent.
This command configures a system to act as an NTP broadcast server. The address used must be a broadcast or a multicast address. Broadcast address implies the IPv4 address 255.255.255.255. By default, routers do not pass broadcast messages. The multicast address can be an IPv4 Class D address, or an IPv6 address. The IANA has assigned IPv4 multicast address 224.0.1.1 and IPv6 address FF05::101 (site local) to NTP. Administratively scoped IPv4 multicast addresses can also be used, as described in RFC 2365 Administratively Scoped IP Multicast.
19.17.6. Adding a Manycast Client Address
To add a manycast client address, that is to say, to configure a multicast address to be used for NTP server discovery, make use of the manycastclient command in the ntp.conf file.
The manycastclient command takes the following form:
manycastclient address
where address is an IP multicast address from which packets are to be received. The client will send a request to the address and select the best servers from the responses and ignore other servers. NTP communication then uses unicast associations, as if the discovered NTP servers were listed in ntp.conf.
This command configures a system to act as an NTP client. Systems can be both client and server at the same time.
19.17.7. Adding a Broadcast Client Address
To add a broadcast client address, that is to say, to configure a broadcast address to be monitored for broadcast NTP packets, make use of the broadcastclient command in the ntp.conf file.
The broadcastclient command takes the following form:
broadcastclientEnables the receiving of broadcast messages. Requires authentication by default. See Section 19.6, “Authentication Options for NTP”.
This command configures a system to act as an NTP client. Systems can be both client and server at the same time.
19.17.8. Adding a Manycast Server Address
To add a manycast server address, that is to say, to configure an address to allow the clients to discover the server by multicasting NTP packets, make use of the manycastserver command in the ntp.conf file.
The manycastserver command takes the following form:
manycastserver addressEnables the sending of multicast messages. Where address is the address to multicast to. This should be used together with authentication to prevent service disruption.
This command configures a system to act as an NTP server. Systems can be both client and server at the same time.
19.17.9. Adding a Multicast Client Address
To add a multicast client address, that is to say, to configure a multicast address to be monitored for multicast NTP packets, make use of the multicastclient command in the ntp.conf file.
The multicastclient command takes the following form:
multicastclient addressEnables the receiving of multicast messages. Where address is the address to subscribe to. This should be used together with authentication to prevent service disruption.
This command configures a system to act as an NTP client. Systems can be both client and server at the same time.
19.17.10. Configuring the Burst Option
Using the burst option against a public server is considered abuse. Do not use this option with public NTP servers. Use it only for applications within your own organization.
To increase the average quality of time offset statistics, add the following option to the end of a server command:
burst
At every poll interval, when the server responds, the system will send a burst of up to eight packets instead of the usual one packet. For use with the server command to improve the average quality of the time-offset calculations.
19.17.11. Configuring the iburst Option
To improve the time taken for initial synchronization, add the following option to the end of a server command:
iburst
When the server is unreachable, send a burst of eight packets instead of the usual one packet. The packet spacing is normally 2 s; however, the spacing between the first and second packets can be changed with the calldelay command to allow additional time for a modem or ISDN call to complete. For use with the server command to reduce the time taken for initial synchronization. This is now a default option in the configuration file.
19.17.12. Configuring Symmetric Authentication Using a Key
To configure symmetric authentication using a key, add the following option to the end of a server or peer command:
key number
where number is in the range 1 to 65534 inclusive. This option enables the use of a message authentication code (MAC) in packets. This option is for use with the peer, server, broadcast, and manycastclient commands.
The option can be used in the /etc/ntp.conf file as follows:
server 192.168.1.1 key 10 broadcast 192.168.1.255 key 20 manycastclient 239.255.254.254 key 30
19.17.13. Configuring the Poll Interval
To change the default poll interval, add the following options to the end of a server or peer command:
minpollvalue andmaxpollvalue
Options to change the default poll interval, where the interval in seconds will be calculated by raising 2 to the power of value, in other words, the interval is expressed in log2 seconds. The default minpoll value is 6, 26 equates to 64 s. The default value for maxpoll is 10, which equates to 1024 s. Allowed values are in the range 3 to 17 inclusive, which equates to 8 s to 36.4 h respectively. These options are for use with the peer or server. Setting a shorter maxpoll may improve clock accuracy.
19.17.14. Configuring Server Preference
To specify that a particular server should be preferred above others of similar statistical quality, add the following option to the end of a server or peer command:
prefer
Use this server for synchronization in preference to other servers of similar statistical quality. This option is for use with the peer or server commands.
19.17.15. Configuring the Time-to-Live for NTP Packets
To specify that a particular time-to-live (TTL) value should be used in place of the default, add the following option to the end of a server or peer command:
ttl value
Specify the time-to-live value to be used in packets sent by broadcast servers and multicast NTP servers. Specify the maximum time-to-live value to use for the "expanding ring search" by a manycast client. The default value is 127.
19.17.16. Configuring the NTP Version to Use
To specify that a particular version of NTP should be used in place of the default, add the following option to the end of a server or peer command:
version value
Specify the version of NTP set in created NTP packets. The value can be in the range 1 to 4. The default is 4.
19.18. Configuring the Hardware Clock Update
The system clock can be used to update the hardware clock, also known as the real-time clock (RTC). This section shows three approaches to the task:
- Instant one-time update
To perform an instant one-time update of the hardware clock, run this command as root:
~]# hwclock --systohc
- Update on every boot
To make the hardware clock update on every boot after executing the ntpdate synchronization utility, do the following:
Add the following line to the
/etc/sysconfig/ntpdatefile:SYNC_HWCLOCK=yes
Enable the
ntpdateservice as root:~]# systemctl enable ntpdate.service
Note that the
ntpdateservice uses the NTP servers defined in the/etc/ntp/step-tickersfile.NoteOn virtual machines, the hardware clock will be updated on the next boot of the host machine, not of the virtual machine.
- Update via NTP
You can make the hardware clock update every time the system clock is updated by the
ntpdorchronydservice:Start the
ntpdservice as root:~]# systemctl start ntpd.service
To make the behavior persistent across boots, make the service start automatically at the boot time:
~]# systemctl enable ntpd.service
or
Start the
chronydservice as root:~]# systemctl start chronyd.service
To make the behavior persistent across boots, make the service start automatically at the boot time:
~]# systemctl enable chronyd.service
As a result, every time the system clock is synchronized by
ntpdorchronyd, the kernel automatically updates the hardware clock in 11 minutes.WarningThis approach might not always work because the above mentioned 11-minute mode is not always enabled. As a consequence, the hardware clock does not necessarily get updated on the system clock update.
To check the synchronization of the software clock with the hardware clock, use the
ntpdc -c kerninfoor thentptimecommand asroot:~]# ntpdc -c kerninfo
The result may look like this:
pll offset: 0 s pll frequency: 0.000 ppm maximum error: 8.0185 s estimated error: 0 s
status: 2001 pll nanopll time constant: 6 precision: 1e-09 s frequency tolerance: 500 ppmor
~]# ntptime
The result may look like this:
ntp_gettime() returns code 0 (OK) time dcba5798.c3dfe2e0 Mon, May 8 2017 11:34:00.765, (.765135199), maximum error 8010000 us, estimated error 0 us, TAI offset 0 ntp_adjtime() returns code 0 (OK) modes 0x0 (), offset 0.000 us, frequency 0.000 ppm, interval 1 s, maximum error 8010000 us, estimated error 0 us, status 0x2001 (PLL,NANO), time constant 6, precision 0.001 us, tolerance 500 ppm,
To recognize whether the hardware clock is synchronized to the system clock, see the status line in the output. If the line contains the word
unsyncorUNSYNC, the hardware clock is not synchronized to the system clock.The hardware clock is synchronized to the system clock.
status 0x2001 (PLL,NANO)
The hardware clock is not synchronized to the system clock.
status 0x41 (PLL,UNSYNC)
19.19. Configuring Clock Sources
To list the available clock sources on your system, issue the following commands:
~]$ cd /sys/devices/system/clocksource/clocksource0/ clocksource0]$ cat available_clocksource kvm-clock tsc hpet acpi_pm clocksource0]$ cat current_clocksource kvm-clock
In the above example, the kernel is using kvm-clock. This was selected at boot time as this is a virtual machine. Note that the available clock source is architecture dependent.
To override the default clock source, append the clocksource directive to the end of the kernel’s GRUB 2 menu entry. Use the grubby tool to make the change. For example, to force the default kernel on a system to use the tsc clock source, enter a command as follows:
~]# grubby --args=clocksource=tsc --update-kernel=DEFAULT
The --update-kernel parameter also accepts the keyword ALL, or a comma separated list of kernel index numbers.
See Chapter 26, Working with GRUB 2 for more information on making changes to the GRUB 2 menu.
19.20. Additional Resources
The following sources of information provide additional resources regarding NTP and ntpd.
19.20.1. Installed Documentation
-
ntpd(8)man page — Describesntpdin detail, including the command-line options. -
ntp.conf(5)man page — Contains information on how to configure associations with servers and peers. -
ntpq(8)man page — Describes theNTPquery utility for monitoring and querying anNTPserver. -
ntpdc(8)man page — Describes thentpdutility for querying and changing the state ofntpd. -
ntp_auth(5)man page — Describes authentication options, commands, and key management forntpd. -
ntp_keygen(8)man page — Describes generating public and private keys forntpd. -
ntp_acc(5)man page — Describes access control options using therestrictcommand. -
ntp_mon(5)man page — Describes monitoring options for the gathering of statistics. -
ntp_clock(5)man page — Describes commands for configuring reference clocks. -
ntp_misc(5)man page — Describes miscellaneous options. -
ntp_decode(5)man page — Lists the status words, event messages and error codes used forntpdreporting and monitoring. -
ntpstat(8)man page — Describes a utility for reporting the synchronization state of theNTPdaemon running on the local machine. -
ntptime(8)man page — Describes a utility for reading and setting kernel time variables. -
tickadj(8)man page — Describes a utility for reading, and optionally setting, the length of the tick.
19.20.2. Useful Websites
- http://doc.ntp.org/
- The NTP Documentation Archive
- http://www.eecis.udel.edu/~mills/ntp.html
- Network Time Synchronization Research Project.
- http://www.eecis.udel.edu/~mills/ntp/html/manyopt.html
-
Information on Automatic Server Discovery in
NTPv4.
Chapter 20. Configuring PTP Using ptp4l
20.1. Introduction to PTP
The Precision Time Protocol (PTP) is a protocol used to synchronize clocks in a network. When used in conjunction with hardware support, PTP is capable of sub-microsecond accuracy, which is far better than is normally obtainable with NTP. PTP support is divided between the kernel and user space. The kernel in Red Hat Enterprise Linux includes support for PTP clocks, which are provided by network drivers. The actual implementation of the protocol is known as linuxptp, a PTPv2 implementation according to the IEEE standard 1588 for Linux.
The linuxptp package includes the ptp4l and phc2sys programs for clock synchronization. The ptp4l program implements the PTP boundary clock and ordinary clock. With hardware time stamping, it is used to synchronize the PTP hardware clock to the master clock, and with software time stamping it synchronizes the system clock to the master clock. The phc2sys program is needed only with hardware time stamping, for synchronizing the system clock to the PTP hardware clock on the network interface card (NIC).
20.1.1. Understanding PTP
The clocks synchronized by PTP are organized in a master-slave hierarchy. The slaves are synchronized to their masters which may be slaves to their own masters. The hierarchy is created and updated automatically by the best master clock (BMC) algorithm, which runs on every clock. When a clock has only one port, it can be master or slave, such a clock is called an ordinary clock (OC). A clock with multiple ports can be master on one port and slave on another, such a clock is called a boundary clock (BC). The top-level master is called the grandmaster clock, which can be synchronized by using a Global Positioning System (GPS) time source. By using a GPS-based time source, disparate networks can be synchronized with a high-degree of accuracy.
Figure 20.1. PTP grandmaster, boundary, and slave Clocks
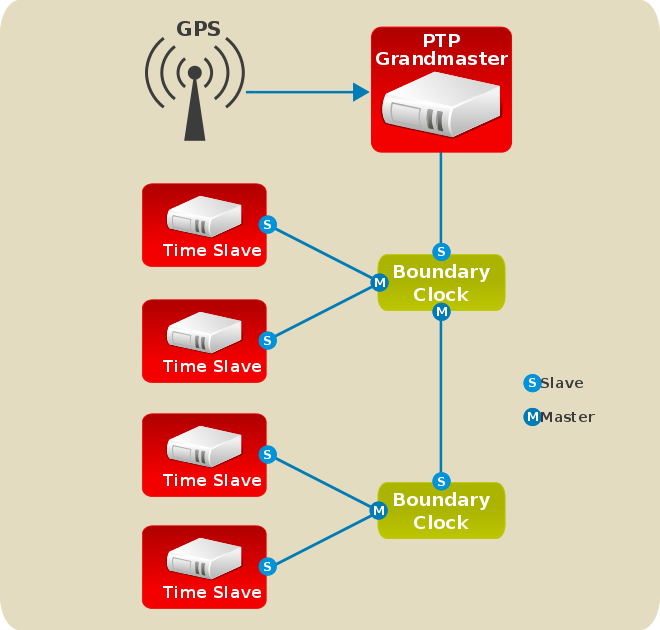
20.1.2. Advantages of PTP
One of the main advantages that PTP has over the Network Time Protocol (NTP) is hardware support present in various network interface controllers (NIC) and network switches. This specialized hardware allows PTP to account for delays in message transfer, and greatly improves the accuracy of time synchronization. While it is possible to use non-PTP enabled hardware components within the network, this will often cause an increase in jitter or introduce an asymmetry in the delay resulting in synchronization inaccuracies, which add up with multiple non-PTP aware components used in the communication path. To achieve the best possible accuracy, it is recommended that all networking components between PTP clocks are PTP hardware enabled. Time synchronization in larger networks where not all of the networking hardware supports PTP might be better suited for NTP.
With hardware PTP support, the NIC has its own on-board clock, which is used to time stamp the received and transmitted PTP messages. It is this on-board clock that is synchronized to the PTP master, and the computer’s system clock is synchronized to the PTP hardware clock on the NIC. With software PTP support, the system clock is used to time stamp the PTP messages and it is synchronized to the PTP master directly. Hardware PTP support provides better accuracy since the NIC can time stamp the PTP packets at the exact moment they are sent and received while software PTP support requires additional processing of the PTP packets by the operating system.
20.2. Using PTP
In order to use PTP, the kernel network driver for the intended interface has to support either software or hardware time stamping capabilities.
20.2.1. Checking for Driver and Hardware Support
In addition to hardware time stamping support being present in the driver, the NIC must also be capable of supporting this functionality in the physical hardware. The best way to verify the time stamping capabilities of a particular driver and NIC is to use the ethtool utility to query the interface. In this example, eth3 is the interface you want to check:
~]# ethtool -T eth3
Time stamping parameters for eth3:
Capabilities:
hardware-transmit (SOF_TIMESTAMPING_TX_HARDWARE)
software-transmit (SOF_TIMESTAMPING_TX_SOFTWARE)
hardware-receive (SOF_TIMESTAMPING_RX_HARDWARE)
software-receive (SOF_TIMESTAMPING_RX_SOFTWARE)
software-system-clock (SOF_TIMESTAMPING_SOFTWARE)
hardware-raw-clock (SOF_TIMESTAMPING_RAW_HARDWARE)
PTP Hardware Clock: 0
Hardware Transmit Timestamp Modes:
off (HWTSTAMP_TX_OFF)
on (HWTSTAMP_TX_ON)
Hardware Receive Filter Modes:
none (HWTSTAMP_FILTER_NONE)
all (HWTSTAMP_FILTER_ALL)
The PTP Hardware Clock value printed by ethtool is the index of the PTP hardware clock. It corresponds to the naming of the /dev/ptp* devices. The first PHC has an index of 0.
For software time stamping support, the parameters list should include:
-
SOF_TIMESTAMPING_SOFTWARE -
SOF_TIMESTAMPING_TX_SOFTWARE -
SOF_TIMESTAMPING_RX_SOFTWARE
For hardware time stamping support, the parameters list should include:
-
SOF_TIMESTAMPING_RAW_HARDWARE -
SOF_TIMESTAMPING_TX_HARDWARE -
SOF_TIMESTAMPING_RX_HARDWARE
20.2.2. Installing PTP
The kernel in Red Hat Enterprise Linux includes support for PTP. User space support is provided by the tools in the linuxptp package. To install linuxptp, issue the following command as root:
~]# yum install linuxptp
This will install ptp4l and phc2sys.
Do not run more than one service to set the system clock’s time at the same time. If you intend to serve PTP time using NTP, see Section 20.8, “Serving PTP Time with NTP”.
20.2.3. Starting ptp4l
The ptp4l program can be started from the command line or it can be started as a service. When running as a service, options are specified in the /etc/sysconfig/ptp4l file. Options required for use both by the service and on the command line should be specified in the /etc/ptp4l.conf file. The /etc/sysconfig/ptp4l file includes the -f /etc/ptp4l.conf command line option, which causes the ptp4l program to read the /etc/ptp4l.conf file and process the options it contains. The use of the /etc/ptp4l.conf is explained in Section 20.4, “Specifying a Configuration File”. More information on the different ptp4l options and the configuration file settings can be found in the ptp4l(8) man page.
Starting ptp4l as a Service
To start ptp4l as a service, issue the following command as root:
~]# systemctl start ptp4l
For more information on managing system services in Red Hat Enterprise Linux 7, see Chapter 10, Managing Services with systemd.
Using ptp4l From The Command Line
The ptp4l program tries to use hardware time stamping by default. To use ptp4l with hardware time stamping capable drivers and NICs, you must provide the network interface to use with the -i option. Enter the following command as root:
~]# ptp4l -i eth3 -m
Where eth3 is the interface you want to configure. Below is example output from ptp4l when the PTP clock on the NIC is synchronized to a master:
~]# ptp4l -i eth3 -m selected eth3 as PTP clock port 1: INITIALIZING to LISTENING on INITIALIZE port 0: INITIALIZING to LISTENING on INITIALIZE port 1: new foreign master 00a069.fffe.0b552d-1 selected best master clock 00a069.fffe.0b552d port 1: LISTENING to UNCALIBRATED on RS_SLAVE master offset -23947 s0 freq +0 path delay 11350 master offset -28867 s0 freq +0 path delay 11236 master offset -32801 s0 freq +0 path delay 10841 master offset -37203 s1 freq +0 path delay 10583 master offset -7275 s2 freq -30575 path delay 10583 port 1: UNCALIBRATED to SLAVE on MASTER_CLOCK_SELECTED master offset -4552 s2 freq -30035 path delay 10385
The master offset value is the measured offset from the master in nanoseconds. The s0, s1, s2 strings indicate the different clock servo states: s0 is unlocked, s1 is clock step and s2 is locked. Once the servo is in the locked state (s2), the clock will not be stepped (only slowly adjusted) unless the pi_offset_const option is set to a positive value in the configuration file (described in the ptp4l(8) man page). The adj value is the frequency adjustment of the clock in parts per billion (ppb). The path delay value is the estimated delay of the synchronization messages sent from the master in nanoseconds. Port 0 is a Unix domain socket used for local PTP management. Port 1 is the eth3 interface (based on the example above.) INITIALIZING, LISTENING, UNCALIBRATED and SLAVE are some of possible port states which change on the INITIALIZE, RS_SLAVE, MASTER_CLOCK_SELECTED events. In the last state change message, the port state changed from UNCALIBRATED to SLAVE indicating successful synchronization with a PTP master clock.
Logging Messages From ptp4l
By default, messages are sent to /var/log/messages. However, specifying the -m option enables logging to standard output which can be useful for debugging purposes.
To enable software time stamping, the -S option needs to be used as follows:
~]# ptp4l -i eth3 -m -S
20.2.3.1. Selecting a Delay Measurement Mechanism
There are two different delay measurement mechanisms and they can be selected by means of an option added to the ptp4l command as follows:
-PThe
-Pselects the peer-to-peer (P2P) delay measurement mechanism.The P2P mechanism is preferred as it reacts to changes in the network topology faster, and may be more accurate in measuring the delay, than other mechanisms. The P2P mechanism can only be used in topologies where each port exchanges PTP messages with at most one other P2P port. It must be supported and used by all hardware, including transparent clocks, on the communication path.
-EThe
-Eselects the end-to-end (E2E) delay measurement mechanism. This is the default.The E2E mechanism is also referred to as the delay "request-response" mechanism.
-AThe
-Aenables automatic selection of the delay measurement mechanism.The automatic option starts ptp4l in E2E mode. It will change to P2P mode if a peer delay request is received.
All clocks on a single PTP communication path must use the same mechanism to measure the delay. Warnings will be printed in the following circumstances:
- When a peer delay request is received on a port using the E2E mechanism.
- When a E2E delay request is received on a port using the P2P mechanism.
20.3. Using PTP with Multiple Interfaces
When using PTP with multiple interfaces in different networks, it is necessary to change the reverse path forwarding mode to loose mode. Red Hat Enterprise Linux 7 defaults to using Strict Reverse Path Forwarding following the Strict Reverse Path recommendation from RFC 3704, Ingress Filtering for Multihomed Networks. See the Reverse Path Forwarding section in the Red Hat Enterprise Linux 7 Security Guide for more details.
The sysctl utility is used to read and write values to tunables in the kernel. Changes to a running system can be made using sysctl commands directly on the command line and permanent changes can be made by adding lines to the /etc/sysctl.conf file.
To change to loose mode filtering globally, enter the following commands as
root:~]# sysctl -w net.ipv4.conf.default.rp_filter=2 ~]# sysctl -w net.ipv4.conf.all.rp_filter=2
To change the reverse path filtering mode per network interface, use the
net.ipv4.interface.rp_filtercommand on all PTP interfaces. For example, for an interface with device nameem1:~]# sysctl -w net.ipv4.conf.em1.rp_filter=2
To make these settings persistent across reboots, modify the /etc/sysctl.conf file. You can change the mode for all interfaces, or for a particular interface.
To change the mode for all interfaces, open the /etc/sysctl.conf file with an editor running as the root user and add a line as follows:
net.ipv4.conf.all.rp_filter=2
To change only certain interfaces, add multiple lines in the following format:
net.ipv4.conf.interface.rp_filter=2
When using the settings for all and particular interfaces as well, maximum value from conf/{all,interface}/rp_filter is used when doing source validation on each interface.
You can also change the mode by using the default setting, which means that it applies only to the newly created interfaces.
For more information on using the all, default, or a specific device settings in the sysctl parameters, see the Red Hat Knowledgebase article What is the difference between "all", "default" and a specific device in a sysctl parameter?.
Note that you might experience issues of two types due to the timing of the sysctl service run during the boot process:
Drivers are loaded before the
sysctlservice runs.In this case, affected network interfaces use the mode preset from the kernel, and
sysctldefaults are ignored.For solution of this problem, see the Red Hat Knowledgebase article What is the difference between "all", "default" and a specific device in a sysctl parameter?.
Drivers are loaded or reloaded after the
sysctlservice runs.In this case, it is possible that some
sysctl.confparameters are not used after reboot. These settings may not be available or they may return to defaults.For solution of this problem, see the Red Hat Knowledgebase article Some sysctl.conf parameters are not used after reboot, manually adjusting the settings works as expected.
20.4. Specifying a Configuration File
The command line options and other options, which cannot be set on the command line, can be set in an optional configuration file.
No configuration file is read by default, so it needs to be specified at runtime with the -f option. For example:
~]# ptp4l -f /etc/ptp4l.conf
A configuration file equivalent to the -i eth3 -m -S options shown above would look as follows:
~]# cat /etc/ptp4l.conf [global] verbose 1 time_stamping software [eth3]
20.5. Using the PTP Management Client
The PTP management client, pmc, can be used to obtain additional information from ptp4l as follows:
~]# pmc -u -b 0 'GET CURRENT_DATA_SET'
sending: GET CURRENT_DATA_SET
90e2ba.fffe.20c7f8-0 seq 0 RESPONSE MANAGMENT CURRENT_DATA_SET
stepsRemoved 1
offsetFromMaster -142.0
meanPathDelay 9310.0~]# pmc -u -b 0 'GET TIME_STATUS_NP'
sending: GET TIME_STATUS_NP
90e2ba.fffe.20c7f8-0 seq 0 RESPONSE MANAGMENT TIME_STATUS_NP
master_offset 310
ingress_time 1361545089345029441
cumulativeScaledRateOffset +1.000000000
scaledLastGmPhaseChange 0
gmTimeBaseIndicator 0
lastGmPhaseChange 0x0000'0000000000000000.0000
gmPresent true
gmIdentity 00a069.fffe.0b552d
Setting the -b option to zero limits the boundary to the locally running ptp4l instance. A larger boundary value will retrieve the information also from PTP nodes further from the local clock. The retrievable information includes:
-
stepsRemovedis the number of communication paths to the grandmaster clock. -
offsetFromMasterand master_offset is the last measured offset of the clock from the master in nanoseconds. -
meanPathDelayis the estimated delay of the synchronization messages sent from the master in nanoseconds. -
if
gmPresentis true, thePTPclock is synchronized to a master, the local clock is not the grandmaster clock. -
gmIdentityis the grandmaster’s identity.
For a full list of pmc commands, type the following as root:
~]# pmc help
Additional information is available in the pmc(8) man page.
20.6. Synchronizing the Clocks
The phc2sys program is used to synchronize the system clock to the PTP hardware clock (PHC) on the NIC. The phc2sys service is configured in the /etc/sysconfig/phc2sys configuration file. The default setting in the /etc/sysconfig/phc2sys file is as follows:
OPTIONS="-a -r"
The -a option causes phc2sys to read the clocks to be synchronized from the ptp4l application. It will follow changes in the PTP port states, adjusting the synchronization between the NIC hardware clocks accordingly. The system clock is not synchronized, unless the -r option is also specified. If you want the system clock to be eligible to become a time source, specify the -r option twice.
After making changes to /etc/sysconfig/phc2sys, restart the phc2sys service from the command line by issuing a command as root:
~]# systemctl restart phc2sys
Under normal circumstances, use systemctl commands to start, stop, and restart the phc2sys service.
When you do not want to start phc2sys as a service, you can start it from the command line. For example, enter the following command as root:
~]# phc2sys -a -r
The -a option causes phc2sys to read the clocks to be synchronized from the ptp4l application. If you want the system clock to be eligible to become a time source, specify the -r option twice.
Alternately, use the -s option to synchronize the system clock to a specific interface’s PTP hardware clock. For example:
~]# phc2sys -s eth3 -w
The -w option waits for the running ptp4l application to synchronize the PTP clock and then retrieves the TAI to UTC offset from ptp4l.
Normally, PTP operates in the International Atomic Time (TAI) timescale, while the system clock is kept in Coordinated Universal Time (UTC). The current offset between the TAI and UTC timescales is 36 seconds. The offset changes when leap seconds are inserted or deleted, which typically happens every few years. The -O option needs to be used to set this offset manually when the -w is not used, as follows:
~]# phc2sys -s eth3 -O -36
Once the phc2sys servo is in a locked state, the clock will not be stepped, unless the -S option is used. This means that the phc2sys program should be started after the ptp4l program has synchronized the PTP hardware clock. However, with -w, it is not necessary to start phc2sys after ptp4l as it will wait for it to synchronize the clock.
The phc2sys program can also be started as a service by running:
~]# systemctl start phc2sys
When running as a service, options are specified in the /etc/sysconfig/phc2sys file. More information on the different phc2sys options can be found in the phc2sys(8) man page.
Note that the examples in this section assume the command is run on a slave system or slave port.
20.7. Verifying Time Synchronization
When PTP time synchronization is working correctly, new messages with offsets and frequency adjustments are printed periodically to the ptp4l and phc2sys outputs if hardware time stamping is used. The output values converge shortly. You can see these messages in the /var/log/messages file.
The following examples of the ptp4l and the phc2sys output contain:
- offset (in nanoseconds)
- frequency offset (in parts per billion (ppb))
- path delay (in nanoseconds)
Example of the ptp4l output:
ptp4l[352.359]: selected /dev/ptp0 as PTP clock ptp4l[352.361]: port 1: INITIALIZING to LISTENING on INITIALIZE ptp4l[352.361]: port 0: INITIALIZING to LISTENING on INITIALIZE ptp4l[353.210]: port 1: new foreign master 00a069.fffe.0b552d-1 ptp4l[357.214]: selected best master clock 00a069.fffe.0b552d ptp4l[357.214]: port 1: LISTENING to UNCALIBRATED on RS_SLAVE ptp4l[359.224]: master offset 3304 s0 freq +0 path delay 9202 ptp4l[360.224]: master offset 3708 s1 freq -29492 path delay 9202 ptp4l[361.224]: master offset -3145 s2 freq -32637 path delay 9202 ptp4l[361.224]: port 1: UNCALIBRATED to SLAVE on MASTER_CLOCK_SELECTED ptp4l[362.223]: master offset -145 s2 freq -30580 path delay 9202 ptp4l[363.223]: master offset 1043 s2 freq -29436 path delay 8972 ptp4l[364.223]: master offset 266 s2 freq -29900 path delay 9153 ptp4l[365.223]: master offset 430 s2 freq -29656 path delay 9153 ptp4l[366.223]: master offset 615 s2 freq -29342 path delay 9169 ptp4l[367.222]: master offset -191 s2 freq -29964 path delay 9169 ptp4l[368.223]: master offset 466 s2 freq -29364 path delay 9170 ptp4l[369.235]: master offset 24 s2 freq -29666 path delay 9196 ptp4l[370.235]: master offset -375 s2 freq -30058 path delay 9238 ptp4l[371.235]: master offset 285 s2 freq -29511 path delay 9199 ptp4l[372.235]: master offset -78 s2 freq -29788 path delay 9204
Example of the phc2sys output:
phc2sys[526.527]: Waiting for ptp4l... phc2sys[527.528]: Waiting for ptp4l... phc2sys[528.528]: phc offset 55341 s0 freq +0 delay 2729 phc2sys[529.528]: phc offset 54658 s1 freq -37690 delay 2725 phc2sys[530.528]: phc offset 888 s2 freq -36802 delay 2756 phc2sys[531.528]: phc offset 1156 s2 freq -36268 delay 2766 phc2sys[532.528]: phc offset 411 s2 freq -36666 delay 2738 phc2sys[533.528]: phc offset -73 s2 freq -37026 delay 2764 phc2sys[534.528]: phc offset 39 s2 freq -36936 delay 2746 phc2sys[535.529]: phc offset 95 s2 freq -36869 delay 2733 phc2sys[536.529]: phc offset -359 s2 freq -37294 delay 2738 phc2sys[537.529]: phc offset -257 s2 freq -37300 delay 2753 phc2sys[538.529]: phc offset 119 s2 freq -37001 delay 2745 phc2sys[539.529]: phc offset 288 s2 freq -36796 delay 2766 phc2sys[540.529]: phc offset -149 s2 freq -37147 delay 2760 phc2sys[541.529]: phc offset -352 s2 freq -37395 delay 2771 phc2sys[542.529]: phc offset 166 s2 freq -36982 delay 2748 phc2sys[543.529]: phc offset 50 s2 freq -37048 delay 2756 phc2sys[544.530]: phc offset -31 s2 freq -37114 delay 2748 phc2sys[545.530]: phc offset -333 s2 freq -37426 delay 2747 phc2sys[546.530]: phc offset 194 s2 freq -36999 delay 2749
To reduce the ptp4l output and print only the values, use the summary_interval directive. The summary_interval directive is specified as 2 to the power of n in seconds. For example, to reduce the output to every 1024 seconds, add the following line to the /etc/ptp4l.conf file:
summary_interval 10
An example of the ptp4l output, with summary_interval set to 6:
ptp4l: [615.253] selected /dev/ptp0 as PTP clock ptp4l: [615.255] port 1: INITIALIZING to LISTENING on INITIALIZE ptp4l: [615.255] port 0: INITIALIZING to LISTENING on INITIALIZE ptp4l: [615.564] port 1: new foreign master 00a069.fffe.0b552d-1 ptp4l: [619.574] selected best master clock 00a069.fffe.0b552d ptp4l: [619.574] port 1: LISTENING to UNCALIBRATED on RS_SLAVE ptp4l: [623.573] port 1: UNCALIBRATED to SLAVE on MASTER_CLOCK_SELECTED ptp4l: [684.649] rms 669 max 3691 freq -29383 ± 3735 delay 9232 ± 122 ptp4l: [748.724] rms 253 max 588 freq -29787 ± 221 delay 9219 ± 158 ptp4l: [812.793] rms 287 max 673 freq -29802 ± 248 delay 9211 ± 183 ptp4l: [876.853] rms 226 max 534 freq -29795 ± 197 delay 9221 ± 138 ptp4l: [940.925] rms 250 max 562 freq -29801 ± 218 delay 9199 ± 148 ptp4l: [1004.988] rms 226 max 525 freq -29802 ± 196 delay 9228 ± 143 ptp4l: [1069.065] rms 300 max 646 freq -29802 ± 259 delay 9214 ± 176 ptp4l: [1133.125] rms 226 max 505 freq -29792 ± 197 delay 9225 ± 159 ptp4l: [1197.185] rms 244 max 688 freq -29790 ± 211 delay 9201 ± 162
By default, summary_interval is set to 0, so messages are printed once per second, which is the maximum frequency. The messages are logged at the LOG_INFO level. To disable messages, use the -l option to set the maximum log level to 5 or lower:
~]# phc2sys -l 5
You can use the -u option to reduce the phc2sys output:
~]# phc2sys -u summary-updates
Where summary-updates is the number of clock updates to include in summary statistics. An example follows:
~]# phc2sys -s eth3 -w -m -u 60 phc2sys[700.948]: rms 1837 max 10123 freq -36474 ± 4752 delay 2752 ± 16 phc2sys[760.954]: rms 194 max 457 freq -37084 ± 174 delay 2753 ± 12 phc2sys[820.963]: rms 211 max 487 freq -37085 ± 185 delay 2750 ± 19 phc2sys[880.968]: rms 183 max 440 freq -37102 ± 164 delay 2734 ± 91 phc2sys[940.973]: rms 244 max 584 freq -37095 ± 216 delay 2748 ± 16 phc2sys[1000.979]: rms 220 max 573 freq -36666 ± 182 delay 2747 ± 43 phc2sys[1060.984]: rms 266 max 675 freq -36759 ± 234 delay 2753 ± 17
When used with these options, the interval for updating the statistics is set to 60 seconds (-u), phc2sys waits until ptp4l is in synchronized state (-w), and messages are printed to the standard output (-m). For further details about the phc2sys options, see the phc2sys(5) man page.
The output includes:
- offset root mean square (rms)
- maximum absolute offset (max)
- frequency offset (freq): its mean, and standard deviation
- path delay (delay): its mean, and standard deviation
20.8. Serving PTP Time with NTP
The ntpd daemon can be configured to distribute the time from the system clock synchronized by ptp4l or phc2sys by using the LOCAL reference clock driver. To prevent ntpd from adjusting the system clock, the ntp.conf file must not specify any NTP servers. The following is a minimal example of ntp.conf:
~]# cat /etc/ntp.conf server 127.127.1.0 fudge 127.127.1.0 stratum 0
When the DHCP client program, dhclient, receives a list of NTP servers from the DHCP server, it adds them to ntp.conf and restarts the service. To disable that feature, add PEERNTP=no to /etc/sysconfig/network.
20.9. Serving NTP Time with PTP
NTP to PTP synchronization in the opposite direction is also possible. When ntpd is used to synchronize the system clock, ptp4l can be configured with the priority1 option (or other clock options included in the best master clock algorithm) to be the grandmaster clock and distribute the time from the system clock via PTP:
~]# cat /etc/ptp4l.conf [global] priority1 127 [eth3] # ptp4l -f /etc/ptp4l.conf
With hardware time stamping, phc2sys needs to be used to synchronize the PTP hardware clock to the system clock. If running phc2sys as a service, edit the /etc/sysconfig/phc2sys configuration file. The default setting in the /etc/sysconfig/phc2sys file is as follows:
OPTIONS="-a -r"
As root, edit that line as follows:
~]# vi /etc/sysconfig/phc2sys OPTIONS="-a -r -r"
The -r option is used twice here to allow synchronization of the PTP hardware clock on the NIC from the system clock. Restart the phc2sys service for the changes to take effect:
~]# systemctl restart phc2sys
To prevent quick changes in the PTP clock’s frequency, the synchronization to the system clock can be loosened by using smaller P (proportional) and I (integral) constants for the PI servo:
~]# phc2sys -a -r -r -P 0.01 -I 0.0001
20.10. Synchronize to PTP or NTP Time Using timemaster
When there are multiple PTP domains available on the network, or fallback to NTP is needed, the timemaster program can be used to synchronize the system clock to all available time sources. The PTP time is provided by phc2sys and ptp4l via shared memory driver (SHM reference clocks to chronyd or ntpd (depending on the NTP daemon that has been configured on the system). The NTP daemon can then compare all time sources, both PTP and NTP, and use the best sources to synchronize the system clock.
On start, timemaster reads a configuration file that specifies the NTP and PTP time sources, checks which network interfaces have their own or share a PTP hardware clock (PHC), generates configuration files for ptp4l and chronyd or ntpd, and starts the ptp4l, phc2sys, and chronyd or ntpd processes as needed. It will remove the generated configuration files on exit. It writes configuration files for chronyd, ntpd, and ptp4l to /var/run/timemaster/.
20.10.1. Starting timemaster as a Service
To start timemaster as a service, issue the following command as root:
~]# systemctl start timemaster
This will read the options in /etc/timemaster.conf. For more information on managing system services in Red Hat Enterprise Linux 7, see Chapter 10, Managing Services with systemd.
20.10.2. Understanding the timemaster Configuration File
Red Hat Enterprise Linux provides a default /etc/timemaster.conf file with a number of sections containing default options. The section headings are enclosed in brackets.
To view the default configuration, issue a command as follows:
~]$ less /etc/timemaster.conf # Configuration file for timemaster #[ntp_server ntp-server.local] #minpoll 4 #maxpoll 4 #[ptp_domain 0] #interfaces eth0 [timemaster] ntp_program chronyd [chrony.conf] include /etc/chrony.conf [ntp.conf] includefile /etc/ntp.conf [ptp4l.conf] [chronyd] path /usr/sbin/chronyd options -u chrony [ntpd] path /usr/sbin/ntpd options -u ntp:ntp -g [phc2sys] path /usr/sbin/phc2sys [ptp4l] path /usr/sbin/ptp4l
Notice the section named as follows:
[ntp_server address]
This is an example of an NTP server section, "ntp-server.local" is an example of a host name for an NTP server on the local LAN. Add more sections as required using a host name or IP address as part of the section name. Note that the short polling values in that example section are not suitable for a public server, see Chapter 19, Configuring NTP Using ntpd for an explanation of suitable minpoll and maxpoll values.
Notice the section named as follows:
[ptp_domain number]
A "PTP domain" is a group of one or more PTP clocks that synchronize to each other. They may or may not be synchronized to clocks in another domain. Clocks that are configured with the same domain number make up the domain. This includes a PTP grandmaster clock. The domain number in each "PTP domain" section needs to correspond to one of the PTP domains configured on the network.
An instance of ptp4l is started for every interface which has its own PTP clock and hardware time stamping is enabled automatically. Interfaces that support hardware time stamping have a PTP clock (PHC) attached, however it is possible for a group of interfaces on a NIC to share a PHC. A separate ptp4l instance will be started for each group of interfaces sharing the same PHC and for each interface that supports only software time stamping. All ptp4l instances are configured to run as a slave. If an interface with hardware time stamping is specified in more than one PTP domain, then only the first ptp4l instance created will have hardware time stamping enabled.
Notice the section named as follows:
[timemaster]
The default timemaster configuration includes the system ntpd and chrony configuration (/etc/ntp.conf or /etc/chronyd.conf) in order to include the configuration of access restrictions and authentication keys. That means any NTP servers specified there will be used with timemaster too.
The section headings are as follows:
-
[ntp_server ntp-server.local]— Specify polling intervals for this server. Create additional sections as required. Include the host name orIPaddress in the section heading. -
[ptp_domain 0]— Specify interfaces that havePTPclocks configured for this domain. Create additional sections with, the appropriate domain number, as required. -
[timemaster]— Specify theNTPdaemon to be used. Possible values arechronydandntpd. -
[chrony.conf]— Specify any additional settings to be copied to the configuration file generated forchronyd. -
[ntp.conf]— Specify any additional settings to be copied to the configuration file generated forntpd. -
[ptp4l.conf]— Specify options to be copied to the configuration file generated for ptp4l. -
[chronyd]— Specify any additional settings to be passed on the command line tochronyd. -
[ntpd]— Specify any additional settings to be passed on the command line tontpd. -
[phc2sys]— Specify any additional settings to be passed on the command line to phc2sys. -
[ptp4l]— Specify any additional settings to be passed on the command line to all instances of ptp4l.
The section headings and there contents are explained in detail in the timemaster(8) manual page.
20.10.3. Configuring timemaster Options
Editing the timemaster Configuration File
To change the default configuration, open the
/etc/timemaster.conffile for editing asroot:~]# vi /etc/timemaster.conf
-
For each
NTPserver you want to control using timemaster, create[ntp_server address]sections. Note that the short polling values in the example section are not suitable for a public server, see Chapter 19, Configuring NTP Using ntpd for an explanation of suitableminpollandmaxpollvalues. To add interfaces that should be used in a domain, edit the
#[ptp_domain 0]section and add the interfaces. Create additional domains as required. For example:[ptp_domain 0] interfaces eth0 [ptp_domain 1] interfaces eth1-
If required to use
ntpdas theNTPdaemon on this system, change the default entry in the[timemaster]section fromchronydtontpd. See Chapter 18, Configuring NTP Using the chrony Suite for information on the differences between ntpd and chronyd. -
If using
chronydas theNTPserver on this system, add any additional options below the defaultinclude /etc/chrony.confentry in the[chrony.conf]section. Edit the defaultincludeentry if the path to/etc/chrony.confis known to have changed. -
If using
ntpdas theNTPserver on this system, add any additional options below the defaultinclude /etc/ntp.confentry in the[ntp.conf]section. Edit the defaultincludeentry if the path to/etc/ntp.confis known to have changed. -
In the
[ptp4l.conf]section, add any options to be copied to the configuration file generated for ptp4l. This chapter documents common options and more information is available in theptp4l(8)manual page. -
In the
[chronyd]section, add any command line options to be passed tochronydwhen called by timemaster. See Chapter 18, Configuring NTP Using the chrony Suite for information on usingchronyd. -
In the
[ntpd]section, add any command line options to be passed tontpdwhen called by timemaster. See Chapter 19, Configuring NTP Using ntpd for information on usingntpd. -
In the
[phc2sys]section, add any command line options to be passed to phc2sys when called by timemaster. This chapter documents common options and more information is available in thephy2sys(8)manual page. -
In the
[ptp4l]section, add any command line options to be passed to ptp4l when called by timemaster. This chapter documents common options and more information is available in theptp4l(8)manual page. Save the configuration file and restart timemaster by issuing the following command as
root:~]# systemctl restart timemaster
20.11. Improving Accuracy
Previously, test results indicated that disabling the tickless kernel capability could significantly improve the stability of the system clock, and thus improve the PTP synchronization accuracy (at the cost of increased power consumption). The kernel tickless mode can be disabled by adding nohz=off to the kernel boot option parameters. However, recent improvements applied to kernel-3.10.0-197.el7 have greatly improved the stability of the system clock and the difference in stability of the clock with and without nohz=off should be much smaller now for most users.
The ptp4l and phc2sys applications can be configured to use a new adaptive servo. The advantage over the PI servo is that it does not require configuration of the PI constants to perform well. To make use of this for ptp4l, add the following line to the /etc/ptp4l.conf file:
clock_servo linreg
After making changes to /etc/ptp4l.conf, restart the ptp4l service from the command line by issuing the following command as root:
~]# systemctl restart ptp4l
To make use of this for phc2sys, add the following line to the /etc/sysconfig/phc2sys file:
-E linreg
After making changes to /etc/sysconfig/phc2sys, restart the phc2sys service from the command line by issuing the following command as root:
~]# systemctl restart phc2sys
20.12. Additional Resources
The following sources of information provide additional resources regarding PTP and the ptp4l tools.
20.12.1. Installed Documentation
-
ptp4l(8)man page — Describes ptp4l options including the format of the configuration file. -
pmc(8)man page — Describes thePTPmanagement client and its command options. -
phc2sys(8)man page — Describes a tool for synchronizing the system clock to aPTPhardware clock (PHC). -
timemaster(8)man page — Describes a program that uses ptp4l and phc2sys to synchronize the system clock usingchronydorntpd.
20.12.2. Useful Websites
- http://www.nist.gov/el/isd/ieee/ieee1588.cfm
- The IEEE 1588 Standard.
Part VI. Monitoring and Automation
This part describes various tools that allow system administrators to monitor system performance, automate system tasks, and report bugs.
Chapter 21. System Monitoring Tools
In order to configure the system, system administrators often need to determine the amount of free memory, how much free disk space is available, how the hard drive is partitioned, or what processes are running.
21.1. Viewing System Processes
21.1.1. Using the ps Command
The ps command allows you to display information about running processes. It produces a static list, that is, a snapshot of what is running when you execute the command. If you want a constantly updated list of running processes, use the top command or the System Monitor application instead.
To list all processes that are currently running on the system including processes owned by other users, type the following at a shell prompt:
psax
For each listed process, the ps ax command displays the process ID (PID), the terminal that is associated with it (TTY), the current status (STAT), the cumulated CPU time (TIME), and the name of the executable file (COMMAND). For example:
~]$ ps ax
PID TTY STAT TIME COMMAND
1 ? Ss 0:01 /usr/lib/systemd/systemd --switched-root --system --deserialize 23
2 ? S 0:00 [kthreadd]
3 ? S 0:00 [ksoftirqd/0]
5 ? S> 0:00 [kworker/0:0H]
[output truncated]To display the owner alongside each process, use the following command:
psaux
Apart from the information provided by the ps ax command, ps aux displays the effective user name of the process owner (USER), the percentage of the CPU (%CPU) and memory (%MEM) usage, the virtual memory size in kilobytes (VSZ), the non-swapped physical memory size in kilobytes (RSS), and the time or date the process was started. For example:
~]$ ps aux
USER PID %CPU %MEM VSZ RSS TTY STAT START TIME COMMAND
root 1 0.3 0.3 134776 6840 ? Ss 09:28 0:01 /usr/lib/systemd/systemd --switched-root --system --d
root 2 0.0 0.0 0 0 ? S 09:28 0:00 [kthreadd]
root 3 0.0 0.0 0 0 ? S 09:28 0:00 [ksoftirqd/0]
root 5 0.0 0.0 0 0 ? S> 09:28 0:00 [kworker/0:0H]
[output truncated]
You can also use the ps command in a combination with grep to see if a particular process is running. For example, to determine if Emacs is running, type:
~]$ ps ax | grep emacs 12056 pts/3 S+ 0:00 emacs 12060 pts/2 S+ 0:00 grep --color=auto emacs
For a complete list of available command line options, see the ps(1) manual page.
21.1.2. Using the top Command
The top command displays a real-time list of processes that are running on the system. It also displays additional information about the system uptime, current CPU and memory usage, or total number of running processes, and allows you to perform actions such as sorting the list or killing a process.
To run the top command, type the following at a shell prompt:
top
For each listed process, the top command displays the process ID (PID), the effective user name of the process owner (USER), the priority (PR), the nice value (NI), the amount of virtual memory the process uses (VIRT), the amount of non-swapped physical memory the process uses (RES), the amount of shared memory the process uses (SHR), the process status field S), the percentage of the CPU (%CPU) and memory (%MEM) usage, the cumulated CPU time (TIME+), and the name of the executable file (COMMAND). For example:
~]$ top top - 16:42:12 up 13 min, 2 users, load average: 0.67, 0.31, 0.19 Tasks: 165 total, 2 running, 163 sleeping, 0 stopped, 0 zombie %Cpu(s): 37.5 us, 3.0 sy, 0.0 ni, 59.5 id, 0.0 wa, 0.0 hi, 0.0 si, 0.0 st KiB Mem : 1016800 total, 77368 free, 728936 used, 210496 buff/cache KiB Swap: 839676 total, 776796 free, 62880 used. 122628 avail Mem PID USER PR NI VIRT RES SHR S %CPU %MEM TIME+ COMMAND 3168 sjw 20 0 1454628 143240 15016 S 20.3 14.1 0:22.53 gnome-shell 4006 sjw 20 0 1367832 298876 27856 S 13.0 29.4 0:15.58 firefox 1683 root 20 0 242204 50464 4268 S 6.0 5.0 0:07.76 Xorg 4125 sjw 20 0 555148 19820 12644 S 1.3 1.9 0:00.48 gnome-terminal- 10 root 20 0 0 0 0 S 0.3 0.0 0:00.39 rcu_sched 3091 sjw 20 0 37000 1468 904 S 0.3 0.1 0:00.31 dbus-daemon 3096 sjw 20 0 129688 2164 1492 S 0.3 0.2 0:00.14 at-spi2-registr 3925 root 20 0 0 0 0 S 0.3 0.0 0:00.05 kworker/0:0 1 root 20 0 126568 3884 1052 S 0.0 0.4 0:01.61 systemd 2 root 20 0 0 0 0 S 0.0 0.0 0:00.00 kthreadd 3 root 20 0 0 0 0 S 0.0 0.0 0:00.00 ksoftirqd/0 6 root 20 0 0 0 0 S 0.0 0.0 0:00.07 kworker/u2:0 [output truncated]
Table 21.1, “Interactive top commands” contains useful interactive commands that you can use with top. For more information, see the top(1) manual page.
| Command | Description |
|---|---|
| Enter, Space | Immediately refreshes the display. |
| h | Displays a help screen for interactive commands. |
| h, ? | Displays a help screen for windows and field groups. |
| k | Kills a process. You are prompted for the process ID and the signal to send to it. |
| n | Changes the number of displayed processes. You are prompted to enter the number. |
| u | Sorts the list by user. |
| M | Sorts the list by memory usage. |
| P | Sorts the list by CPU usage. |
| q | Terminates the utility and returns to the shell prompt. |
21.1.3. Using the System Monitor Tool
The Processes tab of the System Monitor tool allows you to view, search for, change the priority of, and kill processes from the graphical user interface.
To start the System Monitor tool from the command line, type gnome-system-monitor at a shell prompt. The System Monitor tool appears. Alternatively, if using the GNOME desktop, press the Super key to enter the Activities Overview, type System Monitor and then press Enter. The System Monitor tool appears. The Super key appears in a variety of guises, depending on the keyboard and other hardware, but often as either the Windows or Command key, and typically to the left of the Spacebar.
Click the Processes tab to view the list of running processes.
Figure 21.1. System Monitor — Processes
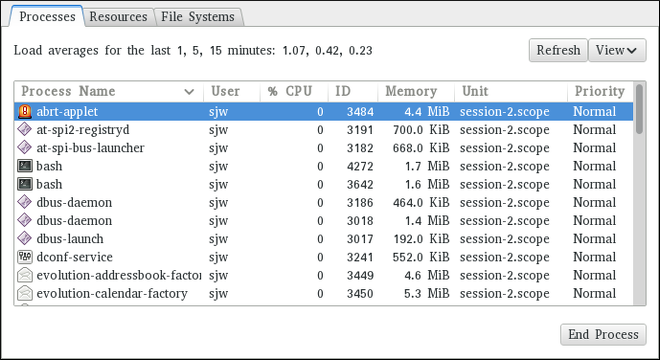
For each listed process, the System Monitor tool displays its name (Process Name), current status (Status), percentage of the CPU usage (% CPU), nice value (Nice), process ID (ID), memory usage (Memory), the channel the process is waiting in (Waiting Channel), and additional details about the session (Session). To sort the information by a specific column in ascending order, click the name of that column. Click the name of the column again to toggle the sort between ascending and descending order.
By default, the System Monitor tool displays a list of processes that are owned by the current user. Selecting various options from the View menu allows you to:
- view only active processes,
- view all processes,
- view your processes,
- view process dependencies,
Additionally, two buttons enable you to:
- refresh the list of processes,
- end a process by selecting it from the list and then clicking the button.
21.2. Viewing Memory Usage
21.2.1. Using the free Command
The free command allows you to display the amount of free and used memory on the system. To do so, type the following at a shell prompt:
free
The free command provides information about both the physical memory (Mem) and swap space (Swap). It displays the total amount of memory (total), as well as the amount of memory that is in use (used), free (free), shared (shared), sum of buffers and cached (buff/cache), and available (available). For example:
~]$ free
total used free shared buff/cache available
Mem: 1016800 727300 84684 3500 204816 124068
Swap: 839676 66920 772756
By default, free displays the values in kilobytes. To display the values in megabytes, supply the -m command line option:
free-m
For instance:
~]$ free -m
total used free shared buff/cache available
Mem: 992 711 81 3 200 120
Swap: 819 65 754For a complete list of available command line options, see the free(1) manual page.
21.2.2. Using the System Monitor Tool
The Resources tab of the System Monitor tool allows you to view the amount of free and used memory on the system.
To start the System Monitor tool from the command line, type gnome-system-monitor at a shell prompt. The System Monitor tool appears. Alternatively, if using the GNOME desktop, press the Super key to enter the Activities Overview, type System Monitor and then press Enter. The System Monitor tool appears. The Super key appears in a variety of guises, depending on the keyboard and other hardware, but often as either the Windows or Command key, and typically to the left of the Spacebar.
Click the Resources tab to view the system’s memory usage.
Figure 21.2. System Monitor — Resources
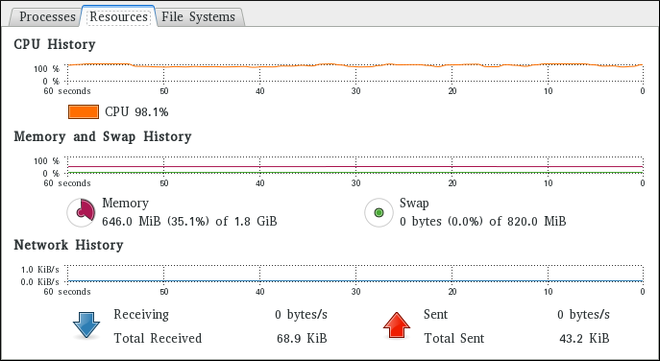
In the Memory and Swap History section, the System Monitor tool displays a graphical representation of the memory and swap usage history, as well as the total amount of the physical memory (Memory) and swap space (Swap) and how much of it is in use.
21.3. Viewing CPU Usage
21.3.1. Using the System Monitor Tool
The Resources tab of the System Monitor tool allows you to view the current CPU usage on the system.
To start the System Monitor tool from the command line, type gnome-system-monitor at a shell prompt. The System Monitor tool appears. Alternatively, if using the GNOME desktop, press the Super key to enter the Activities Overview, type System Monitor and then press Enter. The System Monitor tool appears. The Super key appears in a variety of guises, depending on the keyboard and other hardware, but often as either the Windows or Command key, and typically to the left of the Spacebar.
Click the Resources tab to view the system’s CPU usage.
In the CPU History section, the System Monitor tool displays a graphical representation of the CPU usage history and shows the percentage of how much CPU is currently in use.
21.4. Viewing Block Devices and File Systems
21.4.1. Using the lsblk Command
The lsblk command allows you to display a list of available block devices. It provides more information and better control on output formatting than the blkid command. It reads information from udev, therefore it is usable by non-root users. To display a list of block devices, type the following at a shell prompt:
lsblk
For each listed block device, the lsblk command displays the device name (NAME), major and minor device number (MAJ:MIN), if the device is removable (RM), its size (SIZE), if the device is read-only (RO), what type it is (TYPE), and where the device is mounted (MOUNTPOINT). For example:
~]$ lsblk NAME MAJ:MIN RM SIZE RO TYPE MOUNTPOINT sr0 11:0 1 1024M 0 rom vda 252:0 0 20G 0 rom |-vda1 252:1 0 500M 0 part /boot `-vda2 252:2 0 19.5G 0 part |-vg_kvm-lv_root (dm-0) 253:0 0 18G 0 lvm / `-vg_kvm-lv_swap (dm-1) 253:1 0 1.5G 0 lvm [SWAP]
By default, lsblk lists block devices in a tree-like format. To display the information as an ordinary list, add the -l command line option:
lsblk-l
For instance:
~]$ lsblk -l NAME MAJ:MIN RM SIZE RO TYPE MOUNTPOINT sr0 11:0 1 1024M 0 rom vda 252:0 0 20G 0 rom vda1 252:1 0 500M 0 part /boot vda2 252:2 0 19.5G 0 part vg_kvm-lv_root (dm-0) 253:0 0 18G 0 lvm / vg_kvm-lv_swap (dm-1) 253:1 0 1.5G 0 lvm [SWAP]
For a complete list of available command line options, see the lsblk(8) manual page.
21.4.2. Using the blkid Command
The blkid command allows you to display low-level information about available block devices. It requires root privileges, therefore non-root users should use the lsblk command. To do so, type the following at a shell prompt as root:
blkid
For each listed block device, the blkid command displays available attributes such as its universally unique identifier (UUID), file system type (TYPE), or volume label (LABEL). For example:
~]# blkid /dev/vda1: UUID="7fa9c421-0054-4555-b0ca-b470a97a3d84" TYPE="ext4" /dev/vda2: UUID="7IvYzk-TnnK-oPjf-ipdD-cofz-DXaJ-gPdgBW" TYPE="LVM2_member" /dev/mapper/vg_kvm-lv_root: UUID="a07b967c-71a0-4925-ab02-aebcad2ae824" TYPE="ext4" /dev/mapper/vg_kvm-lv_swap: UUID="d7ef54ca-9c41-4de4-ac1b-4193b0c1ddb6" TYPE="swap"
By default, the blkid command lists all available block devices. To display information about a particular device only, specify the device name on the command line:
blkid device_name
For instance, to display information about /dev/vda1, type as root:
~]# blkid /dev/vda1 /dev/vda1: UUID="7fa9c421-0054-4555-b0ca-b470a97a3d84" TYPE="ext4"
You can also use the above command with the -p and -o udev command line options to obtain more detailed information. Note that root privileges are required to run this command:
blkid -po udev device_nameFor example:
~]# blkid -po udev /dev/vda1 ID_FS_UUID=7fa9c421-0054-4555-b0ca-b470a97a3d84 ID_FS_UUID_ENC=7fa9c421-0054-4555-b0ca-b470a97a3d84 ID_FS_VERSION=1.0 ID_FS_TYPE=ext4 ID_FS_USAGE=filesystem
For a complete list of available command line options, see the blkid(8) manual page.
21.4.3. Using the findmnt Command
The findmnt command allows you to display a list of currently mounted file systems. To do so, type the following at a shell prompt:
findmnt
For each listed file system, the findmnt command displays the target mount point (TARGET), source device (SOURCE), file system type (FSTYPE), and relevant mount options (OPTIONS). For example:
~]$ findmnt
TARGET SOURCE FSTYPE OPTIONS
/ /dev/mapper/rhel-root
xfs rw,relatime,seclabel,attr2,inode64,noquota
├─/proc proc proc rw,nosuid,nodev,noexec,relatime
│ ├─/proc/sys/fs/binfmt_misc systemd-1 autofs rw,relatime,fd=32,pgrp=1,timeout=300,minproto=5,maxproto=5,direct
│ └─/proc/fs/nfsd sunrpc nfsd rw,relatime
├─/sys sysfs sysfs rw,nosuid,nodev,noexec,relatime,seclabel
│ ├─/sys/kernel/security securityfs securityfs rw,nosuid,nodev,noexec,relatime
│ ├─/sys/fs/cgroup tmpfs tmpfs rw,nosuid,nodev,noexec,seclabel,mode=755
[output truncated]
By default, findmnt lists file systems in a tree-like format. To display the information as an ordinary list, add the -l command line option:
findmnt-l
For instance:
~]$ findmnt -l TARGET SOURCE FSTYPE OPTIONS /proc proc proc rw,nosuid,nodev,noexec,relatime /sys sysfs sysfs rw,nosuid,nodev,noexec,relatime,seclabel /dev devtmpfs devtmpfs rw,nosuid,seclabel,size=933372k,nr_inodes=233343,mode=755 /sys/kernel/security securityfs securityfs rw,nosuid,nodev,noexec,relatime /dev/shm tmpfs tmpfs rw,nosuid,nodev,seclabel /dev/pts devpts devpts rw,nosuid,noexec,relatime,seclabel,gid=5,mode=620,ptmxmode=000 /run tmpfs tmpfs rw,nosuid,nodev,seclabel,mode=755 /sys/fs/cgroup tmpfs tmpfs rw,nosuid,nodev,noexec,seclabel,mode=755 [output truncated]
You can also choose to list only file systems of a particular type. To do so, add the -t command line option followed by a file system type:
findmnt-ttype
For example, to all list xfs file systems, type:
~]$ findmnt -t xfs
TARGET SOURCE FSTYPE OPTIONS
/ /dev/mapper/rhel-root xfs rw,relatime,seclabel,attr2,inode64,noquota
└─/boot /dev/vda1 xfs rw,relatime,seclabel,attr2,inode64,noquotaFor a complete list of available command line options, see the findmnt(8) manual page.
21.4.4. Using the df Command
The df command allows you to display a detailed report on the system’s disk space usage. To do so, type the following at a shell prompt:
df
For each listed file system, the df command displays its name (Filesystem), size (1K-blocks or Size), how much space is used (Used), how much space is still available (Available), the percentage of space usage (Use%), and where is the file system mounted (Mounted on). For example:
~]$ df Filesystem 1K-blocks Used Available Use% Mounted on /dev/mapper/vg_kvm-lv_root 18618236 4357360 13315112 25% / tmpfs 380376 288 380088 1% /dev/shm /dev/vda1 495844 77029 393215 17% /boot
By default, the df command shows the partition size in 1 kilobyte blocks and the amount of used and available disk space in kilobytes. To view the information in megabytes and gigabytes, supply the -h command line option, which causes df to display the values in a human-readable format:
df-h
For instance:
~]$ df -h Filesystem Size Used Avail Use% Mounted on /dev/mapper/vg_kvm-lv_root 18G 4.2G 13G 25% / tmpfs 372M 288K 372M 1% /dev/shm /dev/vda1 485M 76M 384M 17% /boot
For a complete list of available command line options, see the df(1) manual page.
21.4.5. Using the du Command
The du command allows you to displays the amount of space that is being used by files in a directory. To display the disk usage for each of the subdirectories in the current working directory, run the command with no additional command line options:
duFor example:
~]$ du
14972 ./Downloads
4 ./.mozilla/extensions
4 ./.mozilla/plugins
12 ./.mozilla
15004 .
By default, the du command displays the disk usage in kilobytes. To view the information in megabytes and gigabytes, supply the -h command line option, which causes the utility to display the values in a human-readable format:
du-h
For instance:
~]$ du -h
15M ./Downloads
4.0K ./.mozilla/extensions
4.0K ./.mozilla/plugins
12K ./.mozilla
15M .
At the end of the list, the du command always shows the grand total for the current directory. To display only this information, supply the -s command line option:
du-sh
For example:
~]$ du -sh
15M .For a complete list of available command line options, see the du(1) manual page.
21.4.6. Using the System Monitor Tool
The File Systems tab of the System Monitor tool allows you to view file systems and disk space usage in the graphical user interface.
To start the System Monitor tool from the command line, type gnome-system-monitor at a shell prompt. The System Monitor tool appears. Alternatively, if using the GNOME desktop, press the Super key to enter the Activities Overview, type System Monitor and then press Enter. The System Monitor tool appears. The Super key appears in a variety of guises, depending on the keyboard and other hardware, but often as either the Windows or Command key, and typically to the left of the Spacebar.
Click the File Systems tab to view a list of file systems.
Figure 21.3. System Monitor — File Systems
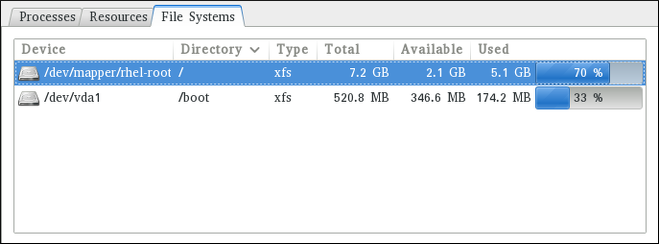
For each listed file system, the System Monitor tool displays the source device (Device), target mount point (Directory), and file system type (Type), as well as its size (Total), and how much space is available (Available), and used (Used).
21.5. Viewing Hardware Information
21.5.1. Using the lspci Command
The lspci command allows you to display information about PCI buses and devices that are attached to them. To list all PCI devices that are in the system, type the following at a shell prompt:
lspciThis displays a simple list of devices, for example:
~]$ lspci 00:00.0 Host bridge: Intel Corporation 82X38/X48 Express DRAM Controller 00:01.0 PCI bridge: Intel Corporation 82X38/X48 Express Host-Primary PCI Express Bridge 00:1a.0 USB Controller: Intel Corporation 82801I (ICH9 Family) USB UHCI Controller #4 (rev 02) 00:1a.1 USB Controller: Intel Corporation 82801I (ICH9 Family) USB UHCI Controller #5 (rev 02) 00:1a.2 USB Controller: Intel Corporation 82801I (ICH9 Family) USB UHCI Controller #6 (rev 02) [output truncated]
You can also use the -v command line option to display more verbose output, or -vv for very verbose output:
lspci-v|-vv
For instance, to determine the manufacturer, model, and memory size of a system’s video card, type:
~]$ lspci -v
[output truncated]
01:00.0 VGA compatible controller: nVidia Corporation G84 [Quadro FX 370] (rev a1) (prog-if 00 [VGA controller])
Subsystem: nVidia Corporation Device 0491
Physical Slot: 2
Flags: bus master, fast devsel, latency 0, IRQ 16
Memory at f2000000 (32-bit, non-prefetchable) [size=16M]
Memory at e0000000 (64-bit, prefetchable) [size=256M]
Memory at f0000000 (64-bit, non-prefetchable) [size=32M]
I/O ports at 1100 [size=128]
Expansion ROM at <unassigned> [disabled]
Capabilities: <access denied>
Kernel driver in use: nouveau
Kernel modules: nouveau, nvidiafb
[output truncated]For a complete list of available command line options, see the lspci(8) manual page.
21.5.2. Using the lsusb Command
The lsusb command allows you to display information about USB buses and devices that are attached to them. To list all USB devices that are in the system, type the following at a shell prompt:
lsusbThis displays a simple list of devices, for example:
~]$ lsusb
Bus 001 Device 001: ID 1d6b:0002 Linux Foundation 2.0 root hub
Bus 002 Device 001: ID 1d6b:0002 Linux Foundation 2.0 root hub
[output truncated]
Bus 001 Device 002: ID 0bda:0151 Realtek Semiconductor Corp. Mass Storage Device (Multicard Reader)
Bus 008 Device 002: ID 03f0:2c24 Hewlett-Packard Logitech M-UAL-96 Mouse
Bus 008 Device 003: ID 04b3:3025 IBM Corp.
You can also use the -v command line option to display more verbose output:
lsusb-v
For instance:
~]$ lsusb -v
[output truncated]
Bus 008 Device 002: ID 03f0:2c24 Hewlett-Packard Logitech M-UAL-96 Mouse
Device Descriptor:
bLength 18
bDescriptorType 1
bcdUSB 2.00
bDeviceClass 0 (Defined at Interface level)
bDeviceSubClass 0
bDeviceProtocol 0
bMaxPacketSize0 8
idVendor 0x03f0 Hewlett-Packard
idProduct 0x2c24 Logitech M-UAL-96 Mouse
bcdDevice 31.00
iManufacturer 1
iProduct 2
iSerial 0
bNumConfigurations 1
Configuration Descriptor:
bLength 9
bDescriptorType 2
[output truncated]For a complete list of available command line options, see the lsusb(8) manual page.
21.5.3. Using the lscpu Command
The lscpu command allows you to list information about CPUs that are present in the system, including the number of CPUs, their architecture, vendor, family, model, CPU caches, etc. To do so, type the following at a shell prompt:
lscpuFor example:
~]$ lscpu Architecture: x86_64 CPU op-mode(s): 32-bit, 64-bit Byte Order: Little Endian CPU(s): 4 On-line CPU(s) list: 0-3 Thread(s) per core: 1 Core(s) per socket: 4 Socket(s): 1 NUMA node(s): 1 Vendor ID: GenuineIntel CPU family: 6 Model: 23 Stepping: 7 CPU MHz: 1998.000 BogoMIPS: 4999.98 Virtualization: VT-x L1d cache: 32K L1i cache: 32K L2 cache: 3072K NUMA node0 CPU(s): 0-3
For a complete list of available command line options, see the lscpu(1) manual page.
21.6. Checking for Hardware Errors
Red Hat Enterprise Linux 7 introduced the new hardware event report mechanism (HERM.) This mechanism gathers system-reported memory errors as well as errors reported by the error detection and correction (EDAC) mechanism for dual in-line memory modules (DIMMs) and reports them to user space. The user-space daemon rasdaemon, catches and handles all reliability, availability, and serviceability (RAS) error events that come from the kernel tracing mechanism, and logs them. The functions previously provided by edac-utils are now replaced by rasdaemon.
To install rasdaemon, enter the following command as root:
~]# yum install rasdaemon
Start the service as follows:
~]# systemctl start rasdaemon
To make the service run at system start, enter the following command:
~]# systemctl enable rasdaemon
The ras-mc-ctl utility provides a means to work with EDAC drivers. Enter the following command to see a list of command options:
~]$ ras-mc-ctl --help
Usage: ras-mc-ctl [OPTIONS...]
--quiet Quiet operation.
--mainboard Print mainboard vendor and model for this hardware.
--status Print status of EDAC drivers.
output truncated
To view a summary of memory controller events, run as root:
~]# ras-mc-ctl --summary
Memory controller events summary:
Corrected on DIMM Label(s): 'CPU_SrcID#0_Ha#0_Chan#0_DIMM#0' location: 0:0:0:-1 errors: 1
No PCIe AER errors.
No Extlog errors.
MCE records summary:
1 MEMORY CONTROLLER RD_CHANNEL0_ERR Transaction: Memory read error errors
2 No Error errors
To view a list of errors reported by the memory controller, run as root:
~]# ras-mc-ctl --errors Memory controller events: 1 3172-02-17 00:47:01 -0500 1 Corrected error(s): memory read error at CPU_SrcID#0_Ha#0_Chan#0_DIMM#0 location: 0:0:0:-1, addr 65928, grain 7, syndrome 0 area:DRAM err_code:0001:0090 socket:0 ha:0 channel_mask:1 rank:0 No PCIe AER errors. No Extlog errors. MCE events: 1 3171-11-09 06:20:21 -0500 error: MEMORY CONTROLLER RD_CHANNEL0_ERR Transaction: Memory read error, mcg mcgstatus=0, mci Corrected_error, n_errors=1, mcgcap=0x01000c16, status=0x8c00004000010090, addr=0x1018893000, misc=0x15020a086, walltime=0x57e96780, cpuid=0x00050663, bank=0x00000007 2 3205-06-22 00:13:41 -0400 error: No Error, mcg mcgstatus=0, mci Corrected_error Error_enabled, mcgcap=0x01000c16, status=0x9400000000000000, addr=0x0000abcd, walltime=0x57e967ea, cpuid=0x00050663, bank=0x00000001 3 3205-06-22 00:13:41 -0400 error: No Error, mcg mcgstatus=0, mci Corrected_error Error_enabled, mcgcap=0x01000c16, status=0x9400000000000000, addr=0x00001234, walltime=0x57e967ea, cpu=0x00000001, cpuid=0x00050663, apicid=0x00000002, bank=0x00000002
These commands are also described in the ras-mc-ctl(8) manual page.
21.7. Monitoring Performance with Net-SNMP
Red Hat Enterprise Linux 7 includes the Net-SNMP software suite, which includes a flexible and extensible simple network management protocol (SNMP) agent. This agent and its associated utilities can be used to provide performance data from a large number of systems to a variety of tools which support polling over the SNMP protocol.
This section provides information on configuring the Net-SNMP agent to securely provide performance data over the network, retrieving the data using the SNMP protocol, and extending the SNMP agent to provide custom performance metrics.
21.7.1. Installing Net-SNMP
The Net-SNMP software suite is available as a set of RPM packages in the Red Hat Enterprise Linux software distribution. Table 21.2, “Available Net-SNMP packages” summarizes each of the packages and their contents.
| Package | Provides |
|---|---|
| net-snmp | The SNMP Agent Daemon and documentation. This package is required for exporting performance data. |
| net-snmp-libs |
The |
| net-snmp-utils |
SNMP clients such as |
| net-snmp-perl |
The |
| net-snmp-python | An SNMP client library for Python. Note that this package is provided by the Optional channel. See Section 9.5.7, “Adding the Optional and Supplementary Repositories” for more information on Red Hat additional channels. |
To install any of these packages, use the yum command in the following form:
yuminstallpackage…
For example, to install the SNMP Agent Daemon and SNMP clients used in the rest of this section, type the following at a shell prompt as root:
~]# yum install net-snmp net-snmp-libs net-snmp-utils
For more information on how to install new packages in Red Hat Enterprise Linux, see Section 9.2.4, “Installing Packages”.
21.7.2. Running the Net-SNMP Daemon
The net-snmp package contains snmpd, the SNMP Agent Daemon. This section provides information on how to start, stop, and restart the snmpd service. For more information on managing system services in Red Hat Enterprise Linux 7, see Chapter 10, Managing Services with systemd.
21.7.2.1. Starting the Service
To run the snmpd service in the current session, type the following at a shell prompt as root:
systemctl start snmpd.serviceTo configure the service to be automatically started at boot time, use the following command:
systemctl enable snmpd.service21.7.2.2. Stopping the Service
To stop the running snmpd service, type the following at a shell prompt as root:
systemctl stop snmpd.serviceTo disable starting the service at boot time, use the following command:
systemctl disable snmpd.service21.7.2.3. Restarting the Service
To restart the running snmpd service, type the following at a shell prompt:
systemctl restart snmpd.serviceThis command stops the service and starts it again in quick succession. To only reload the configuration without stopping the service, run the following command instead:
systemctl reload snmpd.service
This causes the running snmpd service to reload its configuration.
21.7.3. Configuring Net-SNMP
To change the Net-SNMP Agent Daemon configuration, edit the /etc/snmp/snmpd.conf configuration file. The default snmpd.conf file included with Red Hat Enterprise Linux 7 is heavily commented and serves as a good starting point for agent configuration.
This section focuses on two common tasks: setting system information and configuring authentication. For more information about available configuration directives, see the snmpd.conf(5) manual page. Additionally, there is a utility in the net-snmp package named snmpconf which can be used to interactively generate a valid agent configuration.
Note that the net-snmp-utils package must be installed in order to use the snmpwalk utility described in this section.
For any changes to the configuration file to take effect, force the snmpd service to re-read the configuration by running the following command as root:
systemctl reload snmpd.service21.7.3.1. Setting System Information
Net-SNMP provides some rudimentary system information via the system tree. For example, the following snmpwalk command shows the system tree with a default agent configuration.
~]# snmpwalk -v2c -c public localhost system SNMPv2-MIB::sysDescr.0 = STRING: Linux localhost.localdomain 3.10.0-123.el7.x86_64 #1 SMP Mon May 5 11:16:57 EDT 2014 x86_64 SNMPv2-MIB::sysObjectID.0 = OID: NET-SNMP-MIB::netSnmpAgentOIDs.10 DISMAN-EVENT-MIB::sysUpTimeInstance = Timeticks: (464) 0:00:04.64 SNMPv2-MIB::sysContact.0 = STRING: Root <root@localhost> (configure /etc/snmp/snmp.local.conf) [output truncated]
By default, the sysName object is set to the host name. The sysLocation and sysContact objects can be configured in the /etc/snmp/snmpd.conf file by changing the value of the syslocation and syscontact directives, for example:
syslocation Datacenter, Row 4, Rack 3 syscontact UNIX Admin <admin@example.com>
After making changes to the configuration file, reload the configuration and test it by running the snmpwalk command again:
~]# systemctl reload snmp.service ~]# snmpwalk -v2c -c public localhost system SNMPv2-MIB::sysDescr.0 = STRING: Linux localhost.localdomain 3.10.0-123.el7.x86_64 #1 SMP Mon May 5 11:16:57 EDT 2014 x86_64 SNMPv2-MIB::sysObjectID.0 = OID: NET-SNMP-MIB::netSnmpAgentOIDs.10 DISMAN-EVENT-MIB::sysUpTimeInstance = Timeticks: (35424) 0:05:54.24 SNMPv2-MIB::sysContact.0 = STRING: UNIX Admin <admin@example.com> SNMPv2-MIB::sysName.0 = STRING: localhost.localdomain SNMPv2-MIB::sysLocation.0 = STRING: Datacenter, Row 4, Rack 3 [output truncated]
21.7.3.2. Configuring Authentication
The Net-SNMP Agent Daemon supports all three versions of the SNMP protocol. The first two versions (1 and 2c) provide for simple authentication using a community string. This string is a shared secret between the agent and any client utilities. The string is passed in clear text over the network however and is not considered secure. Version 3 of the SNMP protocol supports user authentication and message encryption using a variety of protocols. The Net-SNMP agent also supports tunneling over SSH, and TLS authentication with X.509 certificates.
Configuring SNMP Version 2c Community
To configure an SNMP version 2c community, use either the rocommunity or rwcommunity directive in the /etc/snmp/snmpd.conf configuration file. The format of the directives is as follows:
directive community source OID
… where community is the community string to use, source is an IP address or subnet, and OID is the SNMP tree to provide access to. For example, the following directive provides read-only access to the system tree to a client using the community string "redhat" on the local machine:
rocommunity redhat 127.0.0.1 .1.3.6.1.2.1.1
To test the configuration, use the snmpwalk command with the -v and -c options.
~]# snmpwalk -v2c -c redhat localhost system SNMPv2-MIB::sysDescr.0 = STRING: Linux localhost.localdomain 3.10.0-123.el7.x86_64 #1 SMP Mon May 5 11:16:57 EDT 2014 x86_64 SNMPv2-MIB::sysObjectID.0 = OID: NET-SNMP-MIB::netSnmpAgentOIDs.10 DISMAN-EVENT-MIB::sysUpTimeInstance = Timeticks: (101376) 0:16:53.76 SNMPv2-MIB::sysContact.0 = STRING: UNIX Admin <admin@example.com> SNMPv2-MIB::sysName.0 = STRING: localhost.localdomain SNMPv2-MIB::sysLocation.0 = STRING: Datacenter, Row 4, Rack 3 [output truncated]
Configuring SNMP Version 3 User
To configure an SNMP version 3 user, use the net-snmp-create-v3-user command. This command adds entries to the /var/lib/net-snmp/snmpd.conf and /etc/snmp/snmpd.conf files which create the user and grant access to the user. Note that the net-snmp-create-v3-user command may only be run when the agent is not running. The following example creates the "admin" user with the password "redhatsnmp":
~]# systemctl stop snmpd.service ~]# net-snmp-create-v3-user Enter a SNMPv3 user name to create: admin Enter authentication pass-phrase: redhatsnmp Enter encryption pass-phrase: [press return to reuse the authentication pass-phrase] adding the following line to /var/lib/net-snmp/snmpd.conf: createUser admin MD5 "redhatsnmp" DES adding the following line to /etc/snmp/snmpd.conf: rwuser admin ~]# systemctl start snmpd.service
The rwuser directive (or rouser when the -ro command line option is supplied) that net-snmp-create-v3-user adds to /etc/snmp/snmpd.conf has a similar format to the rwcommunity and rocommunity directives:
directive usernoauth|auth|privOID
… where user is a user name and OID is the SNMP tree to provide access to. By default, the Net-SNMP Agent Daemon allows only authenticated requests (the auth option). The noauth option allows you to permit unauthenticated requests, and the priv option enforces the use of encryption. The authpriv option specifies that requests must be authenticated and replies should be encrypted.
For example, the following line grants the user "admin" read-write access to the entire tree:
rwuser admin authpriv .1
To test the configuration, create a .snmp/ directory in your user’s home directory and a configuration file named snmp.conf in that directory (~/.snmp/snmp.conf) with the following lines:
defVersion 3 defSecurityLevel authPriv defSecurityName admin defPassphrase redhatsnmp
The snmpwalk command will now use these authentication settings when querying the agent:
~]$ snmpwalk -v3 localhost system SNMPv2-MIB::sysDescr.0 = STRING: Linux localhost.localdomain 3.10.0-123.el7.x86_64 #1 SMP Mon May 5 11:16:57 EDT 2014 x86_64 [output truncated]
21.7.4. Retrieving Performance Data over SNMP
The Net-SNMP Agent in Red Hat Enterprise Linux provides a wide variety of performance information over the SNMP protocol. In addition, the agent can be queried for a listing of the installed RPM packages on the system, a listing of currently running processes on the system, or the network configuration of the system.
This section provides an overview of OIDs related to performance tuning available over SNMP. It assumes that the net-snmp-utils package is installed and that the user is granted access to the SNMP tree as described in Section 21.7.3.2, “Configuring Authentication”.
21.7.4.1. Hardware Configuration
The Host Resources MIB included with Net-SNMP presents information about the current hardware and software configuration of a host to a client utility. Table 21.3, “Available OIDs” summarizes the different OIDs available under that MIB.
| OID | Description |
|---|---|
|
| Contains general system information such as uptime, number of users, and number of running processes. |
|
| Contains data on memory and file system usage. |
|
| Contains a listing of all processors, network devices, and file systems. |
|
| Contains a listing of all running processes. |
|
| Contains memory and CPU statistics on the process table from HOST-RESOURCES-MIB::hrSWRun. |
|
| Contains a listing of the RPM database. |
There are also a number of SNMP tables available in the Host Resources MIB which can be used to retrieve a summary of the available information. The following example displays HOST-RESOURCES-MIB::hrFSTable:
~]$ snmptable -Cb localhost HOST-RESOURCES-MIB::hrFSTable
SNMP table: HOST-RESOURCES-MIB::hrFSTable
Index MountPoint RemoteMountPoint Type
Access Bootable StorageIndex LastFullBackupDate LastPartialBackupDate
1 "/" "" HOST-RESOURCES-TYPES::hrFSLinuxExt2
readWrite true 31 0-1-1,0:0:0.0 0-1-1,0:0:0.0
5 "/dev/shm" "" HOST-RESOURCES-TYPES::hrFSOther
readWrite false 35 0-1-1,0:0:0.0 0-1-1,0:0:0.0
6 "/boot" "" HOST-RESOURCES-TYPES::hrFSLinuxExt2
readWrite false 36 0-1-1,0:0:0.0 0-1-1,0:0:0.0
For more information about HOST-RESOURCES-MIB, see the /usr/share/snmp/mibs/HOST-RESOURCES-MIB.txt file.
21.7.4.2. CPU and Memory Information
Most system performance data is available in the UCD SNMP MIB. The systemStats OID provides a number of counters around processor usage:
~]$ snmpwalk localhost UCD-SNMP-MIB::systemStats
UCD-SNMP-MIB::ssIndex.0 = INTEGER: 1
UCD-SNMP-MIB::ssErrorName.0 = STRING: systemStats
UCD-SNMP-MIB::ssSwapIn.0 = INTEGER: 0 kB
UCD-SNMP-MIB::ssSwapOut.0 = INTEGER: 0 kB
UCD-SNMP-MIB::ssIOSent.0 = INTEGER: 0 blocks/s
UCD-SNMP-MIB::ssIOReceive.0 = INTEGER: 0 blocks/s
UCD-SNMP-MIB::ssSysInterrupts.0 = INTEGER: 29 interrupts/s
UCD-SNMP-MIB::ssSysContext.0 = INTEGER: 18 switches/s
UCD-SNMP-MIB::ssCpuUser.0 = INTEGER: 0
UCD-SNMP-MIB::ssCpuSystem.0 = INTEGER: 0
UCD-SNMP-MIB::ssCpuIdle.0 = INTEGER: 99
UCD-SNMP-MIB::ssCpuRawUser.0 = Counter32: 2278
UCD-SNMP-MIB::ssCpuRawNice.0 = Counter32: 1395
UCD-SNMP-MIB::ssCpuRawSystem.0 = Counter32: 6826
UCD-SNMP-MIB::ssCpuRawIdle.0 = Counter32: 3383736
UCD-SNMP-MIB::ssCpuRawWait.0 = Counter32: 7629
UCD-SNMP-MIB::ssCpuRawKernel.0 = Counter32: 0
UCD-SNMP-MIB::ssCpuRawInterrupt.0 = Counter32: 434
UCD-SNMP-MIB::ssIORawSent.0 = Counter32: 266770
UCD-SNMP-MIB::ssIORawReceived.0 = Counter32: 427302
UCD-SNMP-MIB::ssRawInterrupts.0 = Counter32: 743442
UCD-SNMP-MIB::ssRawContexts.0 = Counter32: 718557
UCD-SNMP-MIB::ssCpuRawSoftIRQ.0 = Counter32: 128
UCD-SNMP-MIB::ssRawSwapIn.0 = Counter32: 0
UCD-SNMP-MIB::ssRawSwapOut.0 = Counter32: 0
In particular, the ssCpuRawUser, ssCpuRawSystem, ssCpuRawWait, and ssCpuRawIdle OIDs provide counters which are helpful when determining whether a system is spending most of its processor time in kernel space, user space, or I/O. ssRawSwapIn and ssRawSwapOut can be helpful when determining whether a system is suffering from memory exhaustion.
More memory information is available under the UCD-SNMP-MIB::memory OID, which provides similar data to the free command:
~]$ snmpwalk localhost UCD-SNMP-MIB::memory
UCD-SNMP-MIB::memIndex.0 = INTEGER: 0
UCD-SNMP-MIB::memErrorName.0 = STRING: swap
UCD-SNMP-MIB::memTotalSwap.0 = INTEGER: 1023992 kB
UCD-SNMP-MIB::memAvailSwap.0 = INTEGER: 1023992 kB
UCD-SNMP-MIB::memTotalReal.0 = INTEGER: 1021588 kB
UCD-SNMP-MIB::memAvailReal.0 = INTEGER: 634260 kB
UCD-SNMP-MIB::memTotalFree.0 = INTEGER: 1658252 kB
UCD-SNMP-MIB::memMinimumSwap.0 = INTEGER: 16000 kB
UCD-SNMP-MIB::memBuffer.0 = INTEGER: 30760 kB
UCD-SNMP-MIB::memCached.0 = INTEGER: 216200 kB
UCD-SNMP-MIB::memSwapError.0 = INTEGER: noError(0)
UCD-SNMP-MIB::memSwapErrorMsg.0 = STRING:
Load averages are also available in the UCD SNMP MIB. The SNMP table UCD-SNMP-MIB::laTable has a listing of the 1, 5, and 15 minute load averages:
~]$ snmptable localhost UCD-SNMP-MIB::laTable
SNMP table: UCD-SNMP-MIB::laTable
laIndex laNames laLoad laConfig laLoadInt laLoadFloat laErrorFlag laErrMessage
1 Load-1 0.00 12.00 0 0.000000 noError
2 Load-5 0.00 12.00 0 0.000000 noError
3 Load-15 0.00 12.00 0 0.000000 noError21.7.4.3. File System and Disk Information
The Host Resources MIB provides information on file system size and usage. Each file system (and also each memory pool) has an entry in the HOST-RESOURCES-MIB::hrStorageTable table:
~]$ snmptable -Cb localhost HOST-RESOURCES-MIB::hrStorageTable
SNMP table: HOST-RESOURCES-MIB::hrStorageTable
Index Type Descr
AllocationUnits Size Used AllocationFailures
1 HOST-RESOURCES-TYPES::hrStorageRam Physical memory
1024 Bytes 1021588 388064 ?
3 HOST-RESOURCES-TYPES::hrStorageVirtualMemory Virtual memory
1024 Bytes 2045580 388064 ?
6 HOST-RESOURCES-TYPES::hrStorageOther Memory buffers
1024 Bytes 1021588 31048 ?
7 HOST-RESOURCES-TYPES::hrStorageOther Cached memory
1024 Bytes 216604 216604 ?
10 HOST-RESOURCES-TYPES::hrStorageVirtualMemory Swap space
1024 Bytes 1023992 0 ?
31 HOST-RESOURCES-TYPES::hrStorageFixedDisk /
4096 Bytes 2277614 250391 ?
35 HOST-RESOURCES-TYPES::hrStorageFixedDisk /dev/shm
4096 Bytes 127698 0 ?
36 HOST-RESOURCES-TYPES::hrStorageFixedDisk /boot
1024 Bytes 198337 26694 ?
The OIDs under HOST-RESOURCES-MIB::hrStorageSize and HOST-RESOURCES-MIB::hrStorageUsed can be used to calculate the remaining capacity of each mounted file system.
I/O data is available both in UCD-SNMP-MIB::systemStats (ssIORawSent.0 and ssIORawRecieved.0) and in UCD-DISKIO-MIB::diskIOTable. The latter provides much more granular data. Under this table are OIDs for diskIONReadX and diskIONWrittenX, which provide counters for the number of bytes read from and written to the block device in question since the system boot:
~]$ snmptable -Cb localhost UCD-DISKIO-MIB::diskIOTable
SNMP table: UCD-DISKIO-MIB::diskIOTable
Index Device NRead NWritten Reads Writes LA1 LA5 LA15 NReadX NWrittenX
...
25 sda 216886272 139109376 16409 4894 ? ? ? 216886272 139109376
26 sda1 2455552 5120 613 2 ? ? ? 2455552 5120
27 sda2 1486848 0 332 0 ? ? ? 1486848 0
28 sda3 212321280 139104256 15312 4871 ? ? ? 212321280 13910425621.7.4.4. Network Information
The Interfaces MIB provides information on network devices. IF-MIB::ifTable provides an SNMP table with an entry for each interface on the system, the configuration of the interface, and various packet counters for the interface. The following example shows the first few columns of ifTable on a system with two physical network interfaces:
~]$ snmptable -Cb localhost IF-MIB::ifTable
SNMP table: IF-MIB::ifTable
Index Descr Type Mtu Speed PhysAddress AdminStatus
1 lo softwareLoopback 16436 10000000 up
2 eth0 ethernetCsmacd 1500 0 52:54:0:c7:69:58 up
3 eth1 ethernetCsmacd 1500 0 52:54:0:a7:a3:24 down
Network traffic is available under the OIDs IF-MIB::ifOutOctets and IF-MIB::ifInOctets. The following SNMP queries will retrieve network traffic for each of the interfaces on this system:
~]$snmpwalk localhost IF-MIB::ifDescrIF-MIB::ifDescr.1 = STRING: lo IF-MIB::ifDescr.2 = STRING: eth0 IF-MIB::ifDescr.3 = STRING: eth1 ~]$snmpwalk localhost IF-MIB::ifOutOctetsIF-MIB::ifOutOctets.1 = Counter32: 10060699 IF-MIB::ifOutOctets.2 = Counter32: 650 IF-MIB::ifOutOctets.3 = Counter32: 0 ~]$snmpwalk localhost IF-MIB::ifInOctetsIF-MIB::ifInOctets.1 = Counter32: 10060699 IF-MIB::ifInOctets.2 = Counter32: 78650 IF-MIB::ifInOctets.3 = Counter32: 0
21.7.5. Extending Net-SNMP
The Net-SNMP Agent can be extended to provide application metrics in addition to raw system metrics. This allows for capacity planning as well as performance issue troubleshooting. For example, it may be helpful to know that an email system had a 5-minute load average of 15 while being tested, but it is more helpful to know that the email system has a load average of 15 while processing 80,000 messages a second. When application metrics are available via the same interface as the system metrics, this also allows for the visualization of the impact of different load scenarios on system performance (for example, each additional 10,000 messages increases the load average linearly until 100,000).
A number of the applications included in Red Hat Enterprise Linux extend the Net-SNMP Agent to provide application metrics over SNMP. There are several ways to extend the agent for custom applications as well. This section describes extending the agent with shell scripts and the Perl plug-ins from the Optional channel. It assumes that the net-snmp-utils and net-snmp-perl packages are installed, and that the user is granted access to the SNMP tree as described in Section 21.7.3.2, “Configuring Authentication”.
21.7.5.1. Extending Net-SNMP with Shell Scripts
The Net-SNMP Agent provides an extension MIB (NET-SNMP-EXTEND-MIB) that can be used to query arbitrary shell scripts. To specify the shell script to run, use the extend directive in the /etc/snmp/snmpd.conf file. Once defined, the Agent will provide the exit code and any output of the command over SNMP. The example below demonstrates this mechanism with a script which determines the number of httpd processes in the process table.
The Net-SNMP Agent also provides a built-in mechanism for checking the process table via the proc directive. See the snmpd.conf(5) manual page for more information.
The exit code of the following shell script is the number of httpd processes running on the system at a given point in time:
#!/bin/sh
NUMPIDS=pgrep httpd | wc -l
exit $NUMPIDS
To make this script available over SNMP, copy the script to a location on the system path, set the executable bit, and add an extend directive to the /etc/snmp/snmpd.conf file. The format of the extend directive is the following:
extend name prog args
… where name is an identifying string for the extension, prog is the program to run, and args are the arguments to give the program. For instance, if the above shell script is copied to /usr/local/bin/check_apache.sh, the following directive will add the script to the SNMP tree:
extend httpd_pids /bin/sh /usr/local/bin/check_apache.sh
The script can then be queried at NET-SNMP-EXTEND-MIB::nsExtendObjects:
~]$ snmpwalk localhost NET-SNMP-EXTEND-MIB::nsExtendObjects NET-SNMP-EXTEND-MIB::nsExtendNumEntries.0 = INTEGER: 1 NET-SNMP-EXTEND-MIB::nsExtendCommand."httpd_pids" = STRING: /bin/sh NET-SNMP-EXTEND-MIB::nsExtendArgs."httpd_pids" = STRING: /usr/local/bin/check_apache.sh NET-SNMP-EXTEND-MIB::nsExtendInput."httpd_pids" = STRING: NET-SNMP-EXTEND-MIB::nsExtendCacheTime."httpd_pids" = INTEGER: 5 NET-SNMP-EXTEND-MIB::nsExtendExecType."httpd_pids" = INTEGER: exec(1) NET-SNMP-EXTEND-MIB::nsExtendRunType."httpd_pids" = INTEGER: run-on-read(1) NET-SNMP-EXTEND-MIB::nsExtendStorage."httpd_pids" = INTEGER: permanent(4) NET-SNMP-EXTEND-MIB::nsExtendStatus."httpd_pids" = INTEGER: active(1) NET-SNMP-EXTEND-MIB::nsExtendOutput1Line."httpd_pids" = STRING: NET-SNMP-EXTEND-MIB::nsExtendOutputFull."httpd_pids" = STRING: NET-SNMP-EXTEND-MIB::nsExtendOutNumLines."httpd_pids" = INTEGER: 1 NET-SNMP-EXTEND-MIB::nsExtendResult."httpd_pids" = INTEGER: 8 NET-SNMP-EXTEND-MIB::nsExtendOutLine."httpd_pids".1 = STRING:
Note that the exit code ("8" in this example) is provided as an INTEGER type and any output is provided as a STRING type. To expose multiple metrics as integers, supply different arguments to the script using the extend directive. For example, the following shell script can be used to determine the number of processes matching an arbitrary string, and will also output a text string giving the number of processes:
#!/bin/sh
PATTERN=$1
NUMPIDS=pgrep $PATTERN | wc -l
echo "There are $NUMPIDS $PATTERN processes."
exit $NUMPIDS
The following /etc/snmp/snmpd.conf directives will give both the number of httpd PIDs as well as the number of snmpd PIDs when the above script is copied to /usr/local/bin/check_proc.sh:
extend httpd_pids /bin/sh /usr/local/bin/check_proc.sh httpd extend snmpd_pids /bin/sh /usr/local/bin/check_proc.sh snmpd
The following example shows the output of an snmpwalk of the nsExtendObjects OID:
~]$ snmpwalk localhost NET-SNMP-EXTEND-MIB::nsExtendObjects NET-SNMP-EXTEND-MIB::nsExtendNumEntries.0 = INTEGER: 2 NET-SNMP-EXTEND-MIB::nsExtendCommand."httpd_pids" = STRING: /bin/sh NET-SNMP-EXTEND-MIB::nsExtendCommand."snmpd_pids" = STRING: /bin/sh NET-SNMP-EXTEND-MIB::nsExtendArgs."httpd_pids" = STRING: /usr/local/bin/check_proc.sh httpd NET-SNMP-EXTEND-MIB::nsExtendArgs."snmpd_pids" = STRING: /usr/local/bin/check_proc.sh snmpd NET-SNMP-EXTEND-MIB::nsExtendInput."httpd_pids" = STRING: NET-SNMP-EXTEND-MIB::nsExtendInput."snmpd_pids" = STRING: ... NET-SNMP-EXTEND-MIB::nsExtendResult."httpd_pids" = INTEGER: 8 NET-SNMP-EXTEND-MIB::nsExtendResult."snmpd_pids" = INTEGER: 1 NET-SNMP-EXTEND-MIB::nsExtendOutLine."httpd_pids".1 = STRING: There are 8 httpd processes. NET-SNMP-EXTEND-MIB::nsExtendOutLine."snmpd_pids".1 = STRING: There are 1 snmpd processes.
Integer exit codes are limited to a range of 0–255. For values that are likely to exceed 256, either use the standard output of the script (which will be typed as a string) or a different method of extending the agent.
This last example shows a query for the free memory of the system and the number of httpd processes. This query could be used during a performance test to determine the impact of the number of processes on memory pressure:
~]$ snmpget localhost \ 'NET-SNMP-EXTEND-MIB::nsExtendResult."httpd_pids"' \ UCD-SNMP-MIB::memAvailReal.0 NET-SNMP-EXTEND-MIB::nsExtendResult."httpd_pids" = INTEGER: 8 UCD-SNMP-MIB::memAvailReal.0 = INTEGER: 799664 kB
21.7.5.2. Extending Net-SNMP with Perl
Executing shell scripts using the extend directive is a fairly limited method for exposing custom application metrics over SNMP. The Net-SNMP Agent also provides an embedded Perl interface for exposing custom objects. The net-snmp-perl package in the Optional channel provides the NetSNMP::agent Perl module that is used to write embedded Perl plug-ins on Red Hat Enterprise Linux.
Before subscribing to the Optional and Supplementary channels see the Scope of Coverage Details. If you decide to install packages from these channels, follow the steps documented in the article called How to access Optional and Supplementary channels, and -devel packages using Red Hat Subscription Manager (RHSM)? on the Red Hat Customer Portal.
The NetSNMP::agent Perl module provides an agent object which is used to handle requests for a part of the agent’s OID tree. The agent object’s constructor has options for running the agent as a sub-agent of snmpd or a standalone agent. No arguments are necessary to create an embedded agent:
use NetSNMP::agent (':all');
my $agent = new NetSNMP::agent();
The agent object has a register method which is used to register a callback function with a particular OID. The register function takes a name, OID, and pointer to the callback function. The following example will register a callback function named hello_handler with the SNMP Agent which will handle requests under the OID .1.3.6.1.4.1.8072.9999.9999:
$agent->register("hello_world", ".1.3.6.1.4.1.8072.9999.9999",
\&hello_handler);
The OID .1.3.6.1.4.1.8072.9999.9999 (NET-SNMP-MIB::netSnmpPlaypen) is typically used for demonstration purposes only. If your organization does not already have a root OID, you can obtain one by contacting an ISO Name Registration Authority (ANSI in the United States).
The handler function will be called with four parameters, HANDLER, REGISTRATION_INFO, REQUEST_INFO, and REQUESTS. The REQUESTS parameter contains a list of requests in the current call and should be iterated over and populated with data. The request objects in the list have get and set methods which allow for manipulating the OID and value of the request. For example, the following call will set the value of a request object to the string "hello world":
$request->setValue(ASN_OCTET_STR, "hello world");
The handler function should respond to two types of SNMP requests: the GET request and the GETNEXT request. The type of request is determined by calling the getMode method on the request_info object passed as the third parameter to the handler function. If the request is a GET request, the caller will expect the handler to set the value of the request object, depending on the OID of the request. If the request is a GETNEXT request, the caller will also expect the handler to set the OID of the request to the next available OID in the tree. This is illustrated in the following code example:
my $request;
my $string_value = "hello world";
my $integer_value = "8675309";
for($request = $requests; $request; $request = $request->next()) {
my $oid = $request->getOID();
if ($request_info->getMode() == MODE_GET) {
if ($oid == new NetSNMP::OID(".1.3.6.1.4.1.8072.9999.9999.1.0")) {
$request->setValue(ASN_OCTET_STR, $string_value);
}
elsif ($oid == new NetSNMP::OID(".1.3.6.1.4.1.8072.9999.9999.1.1")) {
$request->setValue(ASN_INTEGER, $integer_value);
}
} elsif ($request_info->getMode() == MODE_GETNEXT) {
if ($oid == new NetSNMP::OID(".1.3.6.1.4.1.8072.9999.9999.1.0")) {
$request->setOID(".1.3.6.1.4.1.8072.9999.9999.1.1");
$request->setValue(ASN_INTEGER, $integer_value);
}
elsif ($oid < new NetSNMP::OID(".1.3.6.1.4.1.8072.9999.9999.1.0")) {
$request->setOID(".1.3.6.1.4.1.8072.9999.9999.1.0");
$request->setValue(ASN_OCTET_STR, $string_value);
}
}
}
When getMode returns MODE_GET, the handler analyzes the value of the getOID call on the request object. The value of the request is set to either string_value if the OID ends in ".1.0", or set to integer_value if the OID ends in ".1.1". If the getMode returns MODE_GETNEXT, the handler determines whether the OID of the request is ".1.0", and then sets the OID and value for ".1.1". If the request is higher on the tree than ".1.0", the OID and value for ".1.0" is set. This in effect returns the "next" value in the tree so that a program like snmpwalk can traverse the tree without prior knowledge of the structure.
The type of the variable is set using constants from NetSNMP::ASN. See the perldoc for NetSNMP::ASN for a full list of available constants.
The entire code listing for this example Perl plug-in is as follows:
#!/usr/bin/perl
use NetSNMP::agent (':all');
use NetSNMP::ASN qw(ASN_OCTET_STR ASN_INTEGER);
sub hello_handler {
my ($handler, $registration_info, $request_info, $requests) = @_;
my $request;
my $string_value = "hello world";
my $integer_value = "8675309";
for($request = $requests; $request; $request = $request->next()) {
my $oid = $request->getOID();
if ($request_info->getMode() == MODE_GET) {
if ($oid == new NetSNMP::OID(".1.3.6.1.4.1.8072.9999.9999.1.0")) {
$request->setValue(ASN_OCTET_STR, $string_value);
}
elsif ($oid == new NetSNMP::OID(".1.3.6.1.4.1.8072.9999.9999.1.1")) {
$request->setValue(ASN_INTEGER, $integer_value);
}
} elsif ($request_info->getMode() == MODE_GETNEXT) {
if ($oid == new NetSNMP::OID(".1.3.6.1.4.1.8072.9999.9999.1.0")) {
$request->setOID(".1.3.6.1.4.1.8072.9999.9999.1.1");
$request->setValue(ASN_INTEGER, $integer_value);
}
elsif ($oid < new NetSNMP::OID(".1.3.6.1.4.1.8072.9999.9999.1.0")) {
$request->setOID(".1.3.6.1.4.1.8072.9999.9999.1.0");
$request->setValue(ASN_OCTET_STR, $string_value);
}
}
}
}
my $agent = new NetSNMP::agent();
$agent->register("hello_world", ".1.3.6.1.4.1.8072.9999.9999",
\&hello_handler);
To test the plug-in, copy the above program to /usr/share/snmp/hello_world.pl and add the following line to the /etc/snmp/snmpd.conf configuration file:
perl do "/usr/share/snmp/hello_world.pl"
The SNMP Agent Daemon will need to be restarted to load the new Perl plug-in. Once it has been restarted, an snmpwalk should return the new data:
~]$ snmpwalk localhost NET-SNMP-MIB::netSnmpPlaypen
NET-SNMP-MIB::netSnmpPlaypen.1.0 = STRING: "hello world"
NET-SNMP-MIB::netSnmpPlaypen.1.1 = INTEGER: 8675309
The snmpget should also be used to exercise the other mode of the handler:
~]$snmpget localhost \NET-SNMP-MIB::netSnmpPlaypen.1.0 \NET-SNMP-MIB::netSnmpPlaypen.1.1NET-SNMP-MIB::netSnmpPlaypen.1.0 = STRING: "hello world" NET-SNMP-MIB::netSnmpPlaypen.1.1 = INTEGER: 8675309
21.8. Additional Resources
To learn more about gathering system information, see the following resources.
21.8.1. Installed Documentation
-
lscpu(1) — The manual page for the
lscpucommand. -
lsusb(8) — The manual page for the
lsusbcommand. -
findmnt(8) — The manual page for the
findmntcommand. -
blkid(8) — The manual page for the
blkidcommand. -
lsblk(8) — The manual page for the
lsblkcommand. -
ps(1) — The manual page for the
pscommand. -
top(1) — The manual page for the
topcommand. -
free(1) — The manual page for the
freecommand. -
df(1) — The manual page for the
dfcommand. -
du(1) — The manual page for the
ducommand. -
lspci(8) — The manual page for the
lspcicommand. -
snmpd(8) — The manual page for the
snmpdservice. -
snmpd.conf(5) — The manual page for the
/etc/snmp/snmpd.conffile containing full documentation of available configuration directives.
Chapter 22. OpenLMI
The Open Linux Management Infrastructure, commonly abbreviated as OpenLMI, is a common infrastructure for the management of Linux systems. It builds on top of existing tools and serves as an abstraction layer in order to hide much of the complexity of the underlying system from system administrators. OpenLMI is distributed with a set of services that can be accessed locally or remotely and provides multiple language bindings, standard APIs, and standard scripting interfaces that can be used to manage and monitor hardware, operating systems, and system services.
22.1. About OpenLMI
OpenLMI is designed to provide a common management interface to production servers running the Red Hat Enterprise Linux system on both physical and virtual machines. It consists of the following three components:
- System management agents — these agents are installed on a managed system and implement an object model that is presented to a standard object broker. The initial agents implemented in OpenLMI include storage configuration and network configuration, but later work will address additional elements of system management. The system management agents are commonly referred to as Common Information Model providers or CIM providers.
- A standard object broker — the object broker manages system management agents and provides an interface to them. The standard object broker is also known as a CIM Object Monitor or CIMOM.
- Client applications and scripts — the client applications and scripts call the system management agents through the standard object broker.
The OpenLMI project complements existing management initiatives by providing a low-level interface that can be used by scripts or system management consoles. Interfaces distributed with OpenLMI include C, C++, Python, Java, and an interactive command line client, and all of them offer the same full access to the capabilities implemented in each agent. This ensures that you always have access to exactly the same capabilities no matter which programming interface you decide to use.
22.1.1. Main Features
The following are key benefits of installing and using OpenLMI on your system:
- OpenLMI provides a standard interface for configuration, management, and monitoring of your local and remote systems.
- It allows you to configure, manage, and monitor production servers running on both physical and virtual machines.
- It is distributed with a collection of CIM providers that allow you to configure, manage, and monitor storage devices and complex networks.
- It allows you to call system management functions from C, C++, Python, and Java programs, and includes LMIShell, which provides a command line interface.
- It is free software based on open industry standards.
22.1.2. Management Capabilities
Key capabilities of OpenLMI include the management of storage devices, networks, system services, user accounts, hardware and software configuration, power management, and interaction with Active Directory. For a complete list of CIM providers that are distributed with Red Hat Enterprise Linux 7, see Table 22.1, “Available CIM Providers”.
| Package Name | Description |
|---|---|
| openlmi-account | A CIM provider for managing user accounts. |
| openlmi-logicalfile | A CIM provider for reading files and directories. |
| openlmi-networking | A CIM provider for network management. |
| openlmi-powermanagement | A CIM provider for power management. |
| openlmi-service | A CIM provider for managing system services. |
| openlmi-storage | A CIM provider for storage management. |
| openlmi-fan | A CIM provider for controlling computer fans. |
| openlmi-hardware | A CIM provider for retrieving hardware information. |
| openlmi-realmd | A CIM provider for configuring realmd. |
| openlmi-software[a] | A CIM provider for software management. |
[a]
In Red Hat Enterprise Linux 7, the OpenLMI Software provider is included as a Technology Preview. This provider is fully functional, but has a known performance scaling issue where listing large numbers of software packages may consume excessive amount of memory and time. To work around this issue, adjust package searches to return as few packages as possible.
| |
22.2. Installing OpenLMI
OpenLMI is distributed as a collection of RPM packages that include the CIMOM, individual CIM providers, and client applications. This allows you distinguish between a managed and client system and install only those components you need.
22.2.1. Installing OpenLMI on a Managed System
A managed system is the system you intend to monitor and manage by using the OpenLMI client tools. To install OpenLMI on a managed system, complete the following steps:
Install the tog-pegasus package by typing the following at a shell prompt as
root:yum install tog-pegasusThis command installs the OpenPegasus CIMOM and all its dependencies to the system and creates a user account for the
pegasususer.Install required CIM providers by running the following command as
root:yum install openlmi-{storage,networking,service,account,powermanagement}This command installs the CIM providers for storage, network, service, account, and power management. For a complete list of CIM providers distributed with Red Hat Enterprise Linux 7, see Table 22.1, “Available CIM Providers”.
Edit the
/etc/Pegasus/access.confconfiguration file to customize the list of users that are allowed to connect to the OpenPegasus CIMOM. By default, only thepegasususer is allowed to access the CIMOM both remotely and locally. To activate this user account, run the following command asrootto set the user’s password:passwd pegasusStart the OpenPegasus CIMOM by activating the
tog-pegasus.serviceunit. To activate thetog-pegasus.serviceunit in the current session, type the following at a shell prompt asroot:systemctl start tog-pegasus.serviceTo configure the
tog-pegasus.serviceunit to start automatically at boot time, type asroot:systemctl enable tog-pegasus.serviceIf you intend to interact with the managed system from a remote machine, enable TCP communication on port
5989(wbem-https). To open this port in the current session, run the following command asroot:firewall-cmd --add-port 5989/tcpTo open port
5989for TCP communication permanently, type asroot:firewall-cmd --permanent --add-port 5989/tcp
You can now connect to the managed system and interact with it by using the OpenLMI client tools as described in Section 22.4, “Using LMIShell”. If you intend to perform OpenLMI operations directly on the managed system, also complete the steps described in Section 22.2.2, “Installing OpenLMI on a Client System”.
22.2.2. Installing OpenLMI on a Client System
A client system is the system from which you intend to interact with the managed system. In a typical scenario, the client system and the managed system are installed on two separate machines, but you can also install the client tools on the managed system and interact with it directly.
To install OpenLMI on a client system, complete the following steps:
Install the openlmi-tools package by typing the following at a shell prompt as
root:yum install openlmi-toolsThis command installs LMIShell, an interactive client and interpreter for accessing CIM objects provided by OpenPegasus, and all its dependencies to the system.
- Configure SSL certificates for OpenPegasus as described in Section 22.3, “Configuring SSL Certificates for OpenPegasus”.
You can now use the LMIShell client to interact with the managed system as described in Section 22.4, “Using LMIShell”.
22.3. Configuring SSL Certificates for OpenPegasus
OpenLMI uses the Web-Based Enterprise Management (WBEM) protocol that functions over an HTTP transport layer. Standard HTTP Basic authentication is performed in this protocol, which means that the user name and password are transmitted alongside the requests.
Configuring the OpenPegasus CIMOM to use HTTPS for communication is necessary to ensure secure authentication. A Secure Sockets Layer (SSL) or Transport Layer Security (TLS) certificate is required on the managed system to establish an encrypted channel.
There are two ways of managing SSL/TLS certificates on a system:
- Self-signed certificates require less infrastructure to use, but are more difficult to deploy to clients and manage securely.
- Authority-signed certificates are easier to deploy to clients once they are set up, but may require a greater initial investment.
When using an authority-signed certificate, it is necessary to configure a trusted certificate authority on the client systems. The authority can then be used for signing all of the managed systems' CIMOM certificates. Certificates can also be part of a certificate chain, so the certificate used for signing the managed systems' certificates may in turn be signed by another, higher authority (such as Verisign, CAcert, RSA and many others).
The default certificate and trust store locations on the file system are listed in Table 22.2, “Certificate and Trust Store Locations”.
| Configuration Option | Location | Description |
|---|---|---|
|
|
| Public certificate of the CIMOM. |
|
|
| Private key known only to the CIMOM. |
|
|
| The file or directory providing the list of trusted certificate authorities. |
If you modify any of the files mentioned in Table 22.2, “Certificate and Trust Store Locations”, restart the tog-pegasus service to make sure it recognizes the new certificates. To restart the service, type the following at a shell prompt as root:
systemctl restart tog-pegasus.serviceFor more information on how to manage system services in Red Hat Enterprise Linux 7, see Chapter 10, Managing Services with systemd.
22.3.1. Managing Self-signed Certificates
A self-signed certificate uses its own private key to sign itself and it is not connected to any chain of trust. On a managed system, if certificates have not been provided by the administrator prior to the first time that the tog-pegasus service is started, a set of self-signed certificates will be automatically generated using the system’s primary host name as the certificate subject.
The automatically generated self-signed certificates are valid by default for 10 years, but they have no automatic-renewal capability. Any modification to these certificates will require manually creating new certificates following guidelines provided by the OpenSSL or Mozilla NSS documentation on the subject.
To configure client systems to trust the self-signed certificate, complete the following steps:
Copy the
/etc/Pegasus/server.pemcertificate from the managed system to the/etc/pki/ca-trust/source/anchors/directory on the client system. To do so, type the following at a shell prompt asroot:scp root@hostname:/etc/Pegasus/server.pem /etc/pki/ca-trust/source/anchors/pegasus-hostname.pemReplace hostname with the host name of the managed system. Note that this command only works if the
sshdservice is running on the managed system and is configured to allow therootuser to log in to the system over the SSH protocol. For more information on how to install and configure thesshdservice and use thescpcommand to transfer files over the SSH protocol, see Chapter 12, OpenSSH.Verify the integrity of the certificate on the client system by comparing its check sum with the check sum of the original file. To calculate the check sum of the
/etc/Pegasus/server.pemfile on the managed system, run the following command asrooton that system:sha1sum /etc/Pegasus/server.pemTo calculate the check sum of the
/etc/pki/ca-trust/source/anchors/pegasus-hostname.pemfile on the client system, run the following command on this system:sha1sum /etc/pki/ca-trust/source/anchors/pegasus-hostname.pemReplace hostname with the host name of the managed system.
Update the trust store on the client system by running the following command as
root:update-ca-trust extract
22.3.2. Managing Authority-signed Certificates with Identity Management (Recommended)
The Identity Management feature of Red Hat Enterprise Linux provides a domain controller which simplifies the management of SSL certificates within systems joined to the domain. Among others, the Identity Management server provides an embedded Certificate Authority. See the Red Hat Enterprise Linux 7 Linux Domain Identity, Authentication, and Policy Guide or the FreeIPA documentation for information on how to join the client and managed systems to the domain.
It is necessary to register the managed system to Identity Management; for client systems the registration is optional.
The following steps are required on the managed system:
- Install the ipa-client package and register the system to Identity Management as described in the Red Hat Enterprise Linux 7 Linux Domain Identity, Authentication, and Policy Guide.
Copy the Identity Management signing certificate to the trusted store by typing the following command as
root:cp /etc/ipa/ca.crt /etc/pki/ca-trust/source/anchors/ipa.crtUpdate the trust store by running the following command as
root:update-ca-trust extractRegister Pegasus as a service in the Identity Management domain by running the following command as a privileged domain user:
ipa service-add CIMOM/hostnameReplace hostname with the host name of the managed system.
This command can be run from any system in the Identity Management domain that has the ipa-admintools package installed. It creates a service entry in Identity Management that can be used to generate signed SSL certificates.
-
Back up the PEM files located in the
/etc/Pegasus/directory (recommended). Retrieve the signed certificate by running the following command as
root:ipa-getcert request -f /etc/Pegasus/server.pem -k /etc/Pegasus/file.pem -N CN=hostname -K CIMOM/hostnameReplace hostname with the host name of the managed system.
The certificate and key files are now kept in proper locations. The
certmongerdaemon installed on the managed system by theipa-client-installscript ensures that the certificate is kept up-to-date and renewed as necessary.For more information, see the Red Hat Enterprise Linux 7 Linux Domain Identity, Authentication, and Policy Guide.
To register the client system and update the trust store, follow the steps below.
- Install the ipa-client package and register the system to Identity Management as described in the Red Hat Enterprise Linux 7 Linux Domain Identity, Authentication, and Policy Guide.
Copy the Identity Management signing certificate to the trusted store by typing the following command as
root:cp /etc/ipa/ca.crt /etc/pki/ca-trust/source/anchors/ipa.crtUpdate the trust store by running the following command as
root:update-ca-trust extract
If the client system is not meant to be registered in Identity Management, complete the following steps to update the trust store.
-
Copy the
/etc/ipa/ca.crtfile securely from any other system joined to the same Identity Management domain to the trusted store/etc/pki/ca-trust/source/anchors/directory asroot. Update the trust store by running the following command as
root:update-ca-trust extract
22.3.3. Managing Authority-signed Certificates Manually
Managing authority-signed certificates with other mechanisms than Identity Management requires more manual configuration.
It is necessary to ensure that all of the clients trust the certificate of the authority that will be signing the managed system certificates:
- If a certificate authority is trusted by default, it is not necessary to perform any particular steps to accomplish this.
If the certificate authority is not trusted by default, the certificate has to be imported on the client and managed systems.
Copy the certificate to the trusted store by typing the following command as
root:cp /path/to/ca.crt /etc/pki/ca-trust/source/anchors/ca.crtUpdate the trust store by running the following command as
root:update-ca-trust extract
On the managed system, complete the following steps:
Create a new SSL configuration file
/etc/Pegasus/ssl.cnfto store information about the certificate. The contents of this file must be similar to the following example:[ req ] distinguished_name = req_distinguished_name prompt = no [ req_distinguished_name ] C = US ST = Massachusetts L = Westford O = Fedora OU = Fedora OpenLMI CN = hostnameReplace hostname with the fully qualified domain name of the managed system.
Generate a private key on the managed system by using the following command as
root:openssl genrsa -out /etc/Pegasus/file.pem 1024Generate a certificate signing request (CSR) by running this command as
root:openssl req -config /etc/Pegasus/ssl.cnf -new -key /etc/Pegasus/file.pem -out /etc/Pegasus/server.csr-
Send the
/etc/Pegasus/server.csrfile to the certificate authority for signing. The detailed procedure of submitting the file depends on the particular certificate authority. -
When the signed certificate is received from the certificate authority, save it as
/etc/Pegasus/server.pem. Copy the certificate of the trusted authority to the Pegasus trust store to make sure that Pegasus is capable of trusting its own certificate by running as
root:cp /path/to/ca.crt /etc/Pegasus/client.pem
After accomplishing all the described steps, the clients that trust the signing authority are able to successfully communicate with the managed server’s CIMOM.
Unlike the Identity Management solution, if the certificate expires and needs to be renewed, all of the described manual steps have to be carried out again. It is recommended to renew the certificates before they expire.
22.4. Using LMIShell
LMIShell is an interactive client and non-interactive interpreter that can be used to access CIM objects provided by the OpenPegasus CIMOM. It is based on the Python interpreter, but also implements additional functions and classes for interacting with CIM objects.
22.4.1. Starting, Using, and Exiting LMIShell
Similarly to the Python interpreter, you can use LMIShell either as an interactive client, or as a non-interactive interpreter for LMIShell scripts.
Starting LMIShell in Interactive Mode
To start the LMIShell interpreter in interactive mode, run the lmishell command with no additional arguments:
lmishell
By default, when LMIShell attempts to establish a connection with a CIMOM, it validates the server-side certificate against the Certification Authorities trust store. To disable this validation, run the lmishell command with the --noverify or -n command line option:
lmishell --noverifyUsing Tab Completion
When running in interactive mode, the LMIShell interpreter allows you press the Tab key to complete basic programming structures and CIM objects, including namespaces, classes, methods, and object properties.
Browsing History
By default, LMIShell stores all commands you type at the interactive prompt in the ~/.lmishell_history file. This allows you to browse the command history and re-use already entered lines in interactive mode without the need to type them at the prompt again. To move backward in the command history, press the Up Arrow key or the Ctrl+p key combination. To move forward in the command history, press the Down Arrow key or the Ctrl+n key combination.
LMIShell also supports an incremental reverse search. To look for a particular line in the command history, press Ctrl+r and start typing any part of the command. For example:
> (reverse-i-search)`connect': c = connect("server.example.com", "pegasus")
To clear the command history, use the clear_history() function as follows:
clear_history()
You can configure the number of lines that are stored in the command history by changing the value of the history_length option in the ~/.lmishellrc configuration file. In addition, you can change the location of the history file by changing the value of the history_file option in this configuration file. For example, to set the location of the history file to ~/.lmishell_history and configure LMIShell to store the maximum of 1000 lines in it, add the following lines to the ~/.lmishellrc file:
history_file = "~/.lmishell_history" history_length = 1000
Handling Exceptions
By default, the LMIShell interpreter handles all exceptions and uses return values. To disable this behavior in order to handle all exceptions in the code, use the use_exceptions() function as follows:
use_exceptions()To re-enable the automatic exception handling, use:
use_exception(False)
You can permanently disable the exception handling by changing the value of the use_exceptions option in the ~/.lmishellrc configuration file to True:
use_exceptions = True
Configuring a Temporary Cache
With the default configuration, LMIShell connection objects use a temporary cache for storing CIM class names and CIM classes in order to reduce network communication. To clear this temporary cache, use the clear_cache() method as follows:
object_name.clear_cache()Replace object_name with the name of a connection object.
To disable the temporary cache for a particular connection object, use the use_cache() method as follows:
object_name.use_cache(False)
To enable it again, use:
object_name.use_cache(True)
You can permanently disable the temporary cache for connection objects by changing the value of the use_cache option in the ~/.lmishellrc configuration file to False:
use_cache = False
Exiting LMIShell
To terminate the LMIShell interpreter and return to the shell prompt, press the Ctrl+d key combination or issue the quit() function as follows:
> quit()
~]$Running an LMIShell Script
To run an LMIShell script, run the lmishell command as follows:
lmishell file_name
Replace file_name with the name of the script. To inspect an LMIShell script after its execution, also specify the --interact or -i command line option:
lmishell --interact file_name
The preferred file extension of LMIShell scripts is .lmi.
22.4.2. Connecting to a CIMOM
LMIShell allows you to connect to a CIMOM that is running either locally on the same system, or on a remote machine accessible over the network.
Connecting to a Remote CIMOM
To access CIM objects provided by a remote CIMOM, create a connection object by using the connect() function as follows:
connect(host_name, user_name, password)
Replace host_name with the host name of the managed system, user_name with the name of a user that is allowed to connect to the OpenPegasus CIMOM running on that system, and password with the user’s password. If the password is omitted, LMIShell prompts the user to enter it. The function returns an LMIConnection object.
Example 22.1. Connecting to a Remote CIMOM
To connect to the OpenPegasus CIMOM running on server.example.com as user pegasus, type the following at the interactive prompt:
> c = connect("server.example.com", "pegasus")
password:
>Connecting to a Local CIMOM
LMIShell allows you to connect to a local CIMOM by using a Unix socket. For this type of connection, you must run the LMIShell interpreter as the root user and the /var/run/tog-pegasus/cimxml.socket socket must exist.
To access CIM objects provided by a local CIMOM, create a connection object by using the connect() function as follows:
connect(host_name)
Replace host_name with localhost, 127.0.0.1, or ::1. The function returns an LMIConnection object or None.
Example 22.2. Connecting to a Local CIMOM
To connect to the OpenPegasus CIMOM running on localhost as the root user, type the following at the interactive prompt:
> c = connect("localhost")
>Verifying a Connection to a CIMOM
The connect() function returns either an LMIConnection object, or None if the connection could not be established. In addition, when the connect() function fails to establish a connection, it prints an error message to standard error output.
To verify that a connection to a CIMOM has been established successfully, use the isinstance() function as follows:
isinstance(object_name,LMIConnection)
Replace object_name with the name of the connection object. This function returns True if object_name is an LMIConnection object, or False otherwise.
Example 22.3. Verifying a Connection to a CIMOM
To verify that the c variable created in Example 22.1, “Connecting to a Remote CIMOM” contains an LMIConnection object, type the following at the interactive prompt:
> isinstance(c, LMIConnection)
True
>
Alternatively, you can verify that c is not None:
> c is None
False
>22.4.3. Working with Namespaces
LMIShell namespaces provide a natural means of organizing available classes and serve as a hierarchic access point to other namespaces and classes. The root namespace is the first entry point of a connection object.
Listing Available Namespaces
To list all available namespaces, use the print_namespaces() method as follows:
object_name.print_namespaces()Replace object_name with the name of the object to inspect. This method prints available namespaces to standard output.
To get a list of available namespaces, access the object attribute namespaces:
object_name.namespacesThis returns a list of strings.
Example 22.4. Listing Available Namespaces
To inspect the root namespace object of the c connection object created in Example 22.1, “Connecting to a Remote CIMOM” and list all available namespaces, type the following at the interactive prompt:
> c.root.print_namespaces() cimv2 interop PG_InterOp PG_Internal >
To assign a list of these namespaces to a variable named root_namespaces, type:
> root_namespaces = c.root.namespaces >
Accessing Namespace Objects
To access a particular namespace object, use the following syntax:
object_name.namespace_name
Replace object_name with the name of the object to inspect and namespace_name with the name of the namespace to access. This returns an LMINamespace object.
Example 22.5. Accessing Namespace Objects
To access the cimv2 namespace of the c connection object created in Example 22.1, “Connecting to a Remote CIMOM” and assign it to a variable named ns, type the following at the interactive prompt:
> ns = c.root.cimv2
>22.4.4. Working with Classes
LMIShell classes represent classes provided by a CIMOM. You can access and list their properties, methods, instances, instance names, and ValueMap properties, print their documentation strings, and create new instances and instance names.
Listing Available Classes
To list all available classes in a particular namespace, use the print_classes() method as follows:
namespace_object.print_classes()Replace namespace_object with the namespace object to inspect. This method prints available classes to standard output.
To get a list of available classes, use the classes() method:
namespace_object.classes()This method returns a list of strings.
Example 22.6. Listing Available Classes
To inspect the ns namespace object created in Example 22.5, “Accessing Namespace Objects” and list all available classes, type the following at the interactive prompt:
> ns.print_classes() CIM_CollectionInSystem CIM_ConcreteIdentity CIM_ControlledBy CIM_DeviceSAPImplementation CIM_MemberOfStatusCollection ... >
To assign a list of these classes to a variable named cimv2_classes, type:
> cimv2_classes = ns.classes() >
Accessing Class Objects
To access a particular class object that is provided by the CIMOM, use the following syntax:
namespace_object.class_name
Replace namespace_object with the name of the namespace object to inspect and class_name with the name of the class to access.
Example 22.7. Accessing Class Objects
To access the LMI_IPNetworkConnection class of the ns namespace object created in Example 22.5, “Accessing Namespace Objects” and assign it to a variable named cls, type the following at the interactive prompt:
> cls = ns.LMI_IPNetworkConnection >
Examining Class Objects
All class objects store information about their name and the namespace they belong to, as well as detailed class documentation. To get the name of a particular class object, use the following syntax:
class_object.classnameReplace class_object with the name of the class object to inspect. This returns a string representation of the object name.
To get information about the namespace a class object belongs to, use:
class_object.namespaceThis returns a string representation of the namespace.
To display detailed class documentation, use the doc() method as follows:
class_object.doc()Example 22.8. Examining Class Objects
To inspect the cls class object created in Example 22.7, “Accessing Class Objects” and display its name and corresponding namespace, type the following at the interactive prompt:
> cls.classname 'LMI_IPNetworkConnection' > cls.namespace 'root/cimv2' >
To access class documentation, type:
> cls.doc() Class: LMI_IPNetworkConnection SuperClass: CIM_IPNetworkConnection [qualifier] string UMLPackagePath: 'CIM::Network::IP' [qualifier] string Version: '0.1.0' ...
Listing Available Methods
To list all available methods of a particular class object, use the print_methods() method as follows:
class_object.print_methods()Replace class_object with the name of the class object to inspect. This method prints available methods to standard output.
To get a list of available methods, use the methods() method:
class_object.methods()This method returns a list of strings.
Example 22.9. Listing Available Methods
To inspect the cls class object created in Example 22.7, “Accessing Class Objects” and list all available methods, type the following at the interactive prompt:
> cls.print_methods() RequestStateChange >
To assign a list of these methods to a variable named service_methods, type:
> service_methods = cls.methods() >
Listing Available Properties
To list all available properties of a particular class object, use the print_properties() method as follows:
class_object.print_properties()Replace class_object with the name of the class object to inspect. This method prints available properties to standard output.
To get a list of available properties, use the properties() method:
class_object.properties()This method returns a list of strings.
Example 22.10. Listing Available Properties
To inspect the cls class object created in Example 22.7, “Accessing Class Objects” and list all available properties, type the following at the interactive prompt:
> cls.print_properties() RequestedState HealthState StatusDescriptions TransitioningToState Generation ... >
To assign a list of these classes to a variable named service_properties, type:
> service_properties = cls.properties() >
Listing and Viewing ValueMap Properties
CIM classes may contain ValueMap properties in their Managed Object Format (MOF) definition. ValueMap properties contain constant values, which may be useful when calling methods or checking returned values.
To list all available ValueMap properties of a particular class object, use the print_valuemap_properties() method as follows:
class_object.print_valuemap_properties()Replace class_object with the name of the class object to inspect. This method prints available ValueMap properties to standard output:
To get a list of available ValueMap properties, use the valuemap_properties() method:
class_object.valuemap_properties()This method returns a list of strings.
Example 22.11. Listing ValueMap Properties
To inspect the cls class object created in Example 22.7, “Accessing Class Objects” and list all available ValueMap properties, type the following at the interactive prompt:
> cls.print_valuemap_properties() RequestedState HealthState TransitioningToState DetailedStatus OperationalStatus ... >
To assign a list of these ValueMap properties to a variable named service_valuemap_properties, type:
> service_valuemap_properties = cls.valuemap_properties() >
To access a particular ValueMap property, use the following syntax:
class_object.valuemap_propertyValuesReplace valuemap_property with the name of the ValueMap property to access.
To list all available constant values, use the print_values() method as follows:
class_object.valuemap_propertyValues.print_values()
This method prints available named constant values to standard output. You can also get a list of available constant values by using the values() method:
class_object.valuemap_propertyValues.values()
This method returns a list of strings.
Example 22.12. Accessing ValueMap Properties
Example 22.11, “Listing ValueMap Properties” mentions a ValueMap property named RequestedState. To inspect this property and list available constant values, type the following at the interactive prompt:
> cls.RequestedStateValues.print_values() Reset NoChange NotApplicable Quiesce Unknown ... >
To assign a list of these constant values to a variable named requested_state_values, type:
> requested_state_values = cls.RequestedStateValues.values() >
To access a particular constant value, use the following syntax:
class_object.valuemap_propertyValues.constant_value_name
Replace constant_value_name with the name of the constant value. Alternatively, you can use the value() method as follows:
class_object.valuemap_propertyValues.value("constant_value_name")
To determine the name of a particular constant value, use the value_name() method:
class_object.valuemap_propertyValues.value_name("constant_value")
This method returns a string.
Example 22.13. Accessing Constant Values
Example 22.12, “Accessing ValueMap Properties” shows that the RequestedState property provides a constant value named Reset. To access this named constant value, type the following at the interactive prompt:
>cls.RequestedStateValues.Reset11 >cls.RequestedStateValues.value("Reset")11 >
To determine the name of this constant value, type:
> cls.RequestedStateValues.value_name(11) u'Reset' >
Fetching a CIMClass Object
Many class methods do not require access to a CIMClass object, which is why LMIShell only fetches this object from the CIMOM when a called method actually needs it. To fetch the CIMClass object manually, use the fetch() method as follows:
class_object.fetch()
Replace class_object with the name of the class object. Note that methods that require access to a CIMClass object fetch it automatically.
22.4.5. Working with Instances
LMIShell instances represent instances provided by a CIMOM. You can get and set their properties, list and call their methods, print their documentation strings, get a list of associated or association objects, push modified objects to the CIMOM, and delete individual instances from the CIMOM.
Accessing Instances
To get a list of all available instances of a particular class object, use the instances() method as follows:
class_object.instances()
Replace class_object with the name of the class object to inspect. This method returns a list of LMIInstance objects.
To access the first instance of a class object, use the first_instance() method:
class_object.first_instance()
This method returns an LMIInstance object.
In addition to listing all instances or returning the first one, both instances() and first_instance() support an optional argument to allow you to filter the results:
class_object.instances(criteria)class_object.first_instance(criteria)Replace criteria with a dictionary consisting of key-value pairs, where keys represent instance properties and values represent required values of these properties.
Example 22.14. Accessing Instances
To find the first instance of the cls class object created in Example 22.7, “Accessing Class Objects” that has the ElementName property equal to eth0 and assign it to a variable named device, type the following at the interactive prompt:
> device = cls.first_instance({"ElementName": "eth0"})
>Examining Instances
All instance objects store information about their class name and the namespace they belong to, as well as detailed documentation about their properties and values. In addition, instance objects allow you to retrieve a unique identification object.
To get the class name of a particular instance object, use the following syntax:
instance_object.classnameReplace instance_object with the name of the instance object to inspect. This returns a string representation of the class name.
To get information about the namespace an instance object belongs to, use:
instance_object.namespaceThis returns a string representation of the namespace.
To retrieve a unique identification object for an instance object, use:
instance_object.path
This returns an LMIInstanceName object.
Finally, to display detailed documentation, use the doc() method as follows:
instance_object.doc()Example 22.15. Examining Instances
To inspect the device instance object created in Example 22.14, “Accessing Instances” and display its class name and the corresponding namespace, type the following at the interactive prompt:
> device.classname u'LMI_IPNetworkConnection' > device.namespace 'root/cimv2' >
To access instance object documentation, type:
> device.doc() Instance of LMI_IPNetworkConnection [property] uint16 RequestedState = '12' [property] uint16 HealthState [property array] string [] StatusDescriptions ...
Creating New Instances
Certain CIM providers allow you to create new instances of specific classes objects. To create a new instance of a class object, use the create_instance() method as follows:
class_object.create_instance(properties)
Replace class_object with the name of the class object and properties with a dictionary that consists of key-value pairs, where keys represent instance properties and values represent property values. This method returns an LMIInstance object.
Example 22.16. Creating New Instances
The LMI_Group class represents system groups and the LMI_Account class represents user accounts on the managed system. To use the ns namespace object created in Example 22.5, “Accessing Namespace Objects”, create instances of these two classes for the system group named pegasus and the user named lmishell-user, and assign them to variables named group and user, type the following at the interactive prompt:
> group = ns.LMI_Group.first_instance({"Name" : "pegasus"})
> user = ns.LMI_Account.first_instance({"Name" : "lmishell-user"})
>
To get an instance of the LMI_Identity class for the lmishell-user user, type:
> identity = user.first_associator(ResultClass="LMI_Identity") >
The LMI_MemberOfGroup class represents system group membership. To use the LMI_MemberOfGroup class to add the lmishell-user to the pegasus group, create a new instance of this class as follows:
> ns.LMI_MemberOfGroup.create_instance({
... "Member" : identity.path,
... "Collection" : group.path})
LMIInstance(classname="LMI_MemberOfGroup", ...)
>Deleting Individual Instances
To delete a particular instance from the CIMOM, use the delete() method as follows:
instance_object.delete()Replace instance_object with the name of the instance object to delete. This method returns a boolean. Note that after deleting an instance, its properties and methods become inaccessible.
Example 22.17. Deleting Individual Instances
The LMI_Account class represents user accounts on the managed system. To use the ns namespace object created in Example 22.5, “Accessing Namespace Objects”, create an instance of the LMI_Account class for the user named lmishell-user, and assign it to a variable named user, type the following at the interactive prompt:
> user = ns.LMI_Account.first_instance({"Name" : "lmishell-user"})
>
To delete this instance and remove the lmishell-user from the system, type:
> user.delete()
True
>Listing and Accessing Available Properties
To list all available properties of a particular instance object, use the print_properties() method as follows:
instance_object.print_properties()Replace instance_object with the name of the instance object to inspect. This method prints available properties to standard output.
To get a list of available properties, use the properties() method:
instance_object.properties()This method returns a list of strings.
Example 22.18. Listing Available Properties
To inspect the device instance object created in Example 22.14, “Accessing Instances” and list all available properties, type the following at the interactive prompt:
> device.print_properties() RequestedState HealthState StatusDescriptions TransitioningToState Generation ... >
To assign a list of these properties to a variable named device_properties, type:
> device_properties = device.properties() >
To get the current value of a particular property, use the following syntax:
instance_object.property_name
Replace property_name with the name of the property to access.
To modify the value of a particular property, assign a value to it as follows:
instance_object.property_name = value
Replace value with the new value of the property. Note that in order to propagate the change to the CIMOM, you must also execute the push() method:
instance_object.push()This method returns a three-item tuple consisting of a return value, return value parameters, and an error string.
Example 22.19. Accessing Individual Properties
To inspect the device instance object created in Example 22.14, “Accessing Instances” and display the value of the property named SystemName, type the following at the interactive prompt:
> device.SystemName
u'server.example.com'
>Listing and Using Available Methods
To list all available methods of a particular instance object, use the print_methods() method as follows:
instance_object.print_methods()Replace instance_object with the name of the instance object to inspect. This method prints available methods to standard output.
To get a list of available methods, use the method() method:
instance_object.methods()This method returns a list of strings.
Example 22.20. Listing Available Methods
To inspect the device instance object created in Example 22.14, “Accessing Instances” and list all available methods, type the following at the interactive prompt:
> device.print_methods() RequestStateChange >
To assign a list of these methods to a variable named network_device_methods, type:
> network_device_methods = device.methods() >
To call a particular method, use the following syntax:
instance_object.method_name( parameter=value, ...)
Replace instance_object with the name of the instance object to use, method_name with the name of the method to call, parameter with the name of the parameter to set, and value with the value of this parameter. Methods return a three-item tuple consisting of a return value, return value parameters, and an error string.
LMIInstance objects do not automatically refresh their contents (properties, methods, qualifiers, and so on). To do so, use the refresh() method as described below.
Example 22.21. Using Methods
The PG_ComputerSystem class represents the system. To create an instance of this class by using the ns namespace object created in Example 22.5, “Accessing Namespace Objects” and assign it to a variable named sys, type the following at the interactive prompt:
> sys = ns.PG_ComputerSystem.first_instance() >
The LMI_AccountManagementService class implements methods that allow you to manage users and groups in the system. To create an instance of this class and assign it to a variable named acc, type:
> acc = ns.LMI_AccountManagementService.first_instance() >
To create a new user named lmishell-user in the system, use the CreateAccount() method as follows:
> acc.CreateAccount(Name="lmishell-user", System=sys)
LMIReturnValue(rval=0, rparams=NocaseDict({u'Account': LMIInstanceName(classname="LMI_Account"...), u'Identities': [LMIInstanceName(classname="LMI_Identity"...), LMIInstanceName(classname="LMI_Identity"...)]}), errorstr='')LMIShell support synchronous method calls: when you use a synchronous method, LMIShell waits for the corresponding Job object to change its state to "finished" and then returns the return parameters of this job. LMIShell is able to perform a synchronous method call if the given method returns an object of one of the following classes:
-
LMI_StorageJob -
LMI_SoftwareInstallationJob -
LMI_NetworkJob
LMIShell first tries to use indications as the waiting method. If it fails, it uses a polling method instead.
To perform a synchronous method call, use the following syntax:
instance_object.Syncmethod_name(
parameter=value,
...)
Replace instance_object with the name of the instance object to use, method_name with the name of the method to call, parameter with the name of the parameter to set, and value with the value of this parameter. All synchronous methods have the Sync prefix in their name and return a three-item tuple consisting of the job’s return value, job’s return value parameters, and job’s error string.
You can also force LMIShell to use only polling method. To do so, specify the PreferPolling parameter as follows:
instance_object.Syncmethod_name(PreferPolling=Trueparameter=value, ...)
Listing and Viewing ValueMap Parameters
CIM methods may contain ValueMap parameters in their Managed Object Format (MOF) definition. ValueMap parameters contain constant values.
To list all available ValueMap parameters of a particular method, use the print_valuemap_parameters() method as follows:
instance_object.method_name.print_valuemap_parameters()Replace instance_object with the name of the instance object and method_name with the name of the method to inspect. This method prints available ValueMap parameters to standard output.
To get a list of available ValueMap parameters, use the valuemap_parameters() method:
instance_object.method_name.valuemap_parameters()This method returns a list of strings.
Example 22.22. Listing ValueMap Parameters
To inspect the acc instance object created in Example 22.21, “Using Methods” and list all available ValueMap parameters of the CreateAccount() method, type the following at the interactive prompt:
> acc.CreateAccount.print_valuemap_parameters() CreateAccount >
To assign a list of these ValueMap parameters to a variable named create_account_parameters, type:
> create_account_parameters = acc.CreateAccount.valuemap_parameters() >
To access a particular ValueMap parameter, use the following syntax:
instance_object.method_name.valuemap_parameterValuesReplace valuemap_parameter with the name of the ValueMap parameter to access.
To list all available constant values, use the print_values() method as follows:
instance_object.method_name.valuemap_parameterValues.print_values()
This method prints available named constant values to standard output. You can also get a list of available constant values by using the values() method:
instance_object.method_name.valuemap_parameterValues.values()
This method returns a list of strings.
Example 22.23. Accessing ValueMap Parameters
Example 22.22, “Listing ValueMap Parameters” mentions a ValueMap parameter named CreateAccount. To inspect this parameter and list available constant values, type the following at the interactive prompt:
> acc.CreateAccount.CreateAccountValues.print_values() Operationunsupported Failed Unabletosetpasswordusercreated Unabletocreatehomedirectoryusercreatedandpasswordset Operationcompletedsuccessfully >
To assign a list of these constant values to a variable named create_account_values, type:
> create_account_values = acc.CreateAccount.CreateAccountValues.values() >
To access a particular constant value, use the following syntax:
instance_object.method_name.valuemap_parameterValues.constant_value_name
Replace constant_value_name with the name of the constant value. Alternatively, you can use the value() method as follows:
instance_object.method_name.valuemap_parameterValues.value("constant_value_name")
To determine the name of a particular constant value, use the value_name() method:
instance_object.method_name.valuemap_parameterValues.value_name("constant_value")
This method returns a string.
Example 22.24. Accessing Constant Values
Example 22.23, “Accessing ValueMap Parameters” shows that the CreateAccount ValueMap parameter provides a constant value named Failed. To access this named constant value, type the following at the interactive prompt:
>acc.CreateAccount.CreateAccountValues.Failed2 >acc.CreateAccount.CreateAccountValues.value("Failed")2 >
To determine the name of this constant value, type:
> acc.CreateAccount.CreateAccountValues.value_name(2) u'Failed' >
Refreshing Instance Objects
Local objects used by LMIShell, which represent CIM objects at CIMOM side, can get outdated, if such objects change while working with LMIShell’s ones. To update the properties and methods of a particular instance object, use the refresh() method as follows:
instance_object.refresh()Replace instance_object with the name of the object to refresh. This method returns a three-item tuple consisting of a return value, return value parameter, and an error string.
Example 22.25. Refreshing Instance Objects
To update the properties and methods of the device instance object created in Example 22.14, “Accessing Instances”, type the following at the interactive prompt:
> device.refresh()
LMIReturnValue(rval=True, rparams=NocaseDict({}), errorstr='')
>Displaying MOF Representation
To display the Managed Object Format (MOF) representation of an instance object, use the tomof() method as follows:
instance_object.tomof()Replace instance_object with the name of the instance object to inspect. This method prints the MOF representation of the object to standard output.
Example 22.26. Displaying MOF Representation
To display the MOF representation of the device instance object created in Example 22.14, “Accessing Instances”, type the following at the interactive prompt:
> device.tomof()
instance of LMI_IPNetworkConnection {
RequestedState = 12;
HealthState = NULL;
StatusDescriptions = NULL;
TransitioningToState = 12;
...22.4.6. Working with Instance Names
LMIShell instance names are objects that hold a set of primary keys and their values. This type of an object exactly identifies an instance.
Accessing Instance Names
CIMInstance objects are identified by CIMInstanceName objects. To get a list of all available instance name objects, use the instance_names() method as follows:
class_object.instance_names()
Replace class_object with the name of the class object to inspect. This method returns a list of LMIInstanceName objects.
To access the first instance name object of a class object, use the first_instance_name() method:
class_object.first_instance_name()
This method returns an LMIInstanceName object.
In addition to listing all instance name objects or returning the first one, both instance_names() and first_instance_name() support an optional argument to allow you to filter the results:
class_object.instance_names(criteria)class_object.first_instance_name(criteria)Replace criteria with a dictionary consisting of key-value pairs, where keys represent key properties and values represent required values of these key properties.
Example 22.27. Accessing Instance Names
To find the first instance name of the cls class object created in Example 22.7, “Accessing Class Objects” that has the Name key property equal to eth0 and assign it to a variable named device_name, type the following at the interactive prompt:
> device_name = cls.first_instance_name({"Name": "eth0"})
>Examining Instance Names
All instance name objects store information about their class name and the namespace they belong to.
To get the class name of a particular instance name object, use the following syntax:
instance_name_object.classnameReplace instance_name_object with the name of the instance name object to inspect. This returns a string representation of the class name.
To get information about the namespace an instance name object belongs to, use:
instance_name_object.namespaceThis returns a string representation of the namespace.
Example 22.28. Examining Instance Names
To inspect the device_name instance name object created in Example 22.27, “Accessing Instance Names” and display its class name and the corresponding namespace, type the following at the interactive prompt:
> device_name.classname u'LMI_IPNetworkConnection' > device_name.namespace 'root/cimv2' >
Creating New Instance Names
LMIShell allows you to create a new wrapped CIMInstanceName object if you know all primary keys of a remote object. This instance name object can then be used to retrieve the whole instance object.
To create a new instance name of a class object, use the new_instance_name() method as follows:
class_object.new_instance_name(key_properties)
Replace class_object with the name of the class object and key_properties with a dictionary that consists of key-value pairs, where keys represent key properties and values represent key property values. This method returns an LMIInstanceName object.
Example 22.29. Creating New Instance Names
The LMI_Account class represents user accounts on the managed system. To use the ns namespace object created in Example 22.5, “Accessing Namespace Objects” and create a new instance name of the LMI_Account class representing the lmishell-user user on the managed system, type the following at the interactive prompt:
> instance_name = ns.LMI_Account.new_instance_name({
... "CreationClassName" : "LMI_Account",
... "Name" : "lmishell-user",
... "SystemCreationClassName" : "PG_ComputerSystem",
... "SystemName" : "server"})
>Listing and Accessing Key Properties
To list all available key properties of a particular instance name object, use the print_key_properties() method as follows:
instance_name_object.print_key_properties()Replace instance_name_object with the name of the instance name object to inspect. This method prints available key properties to standard output.
To get a list of available key properties, use the key_properties() method:
instance_name_object.key_properties()This method returns a list of strings.
Example 22.30. Listing Available Key Properties
To inspect the device_name instance name object created in Example 22.27, “Accessing Instance Names” and list all available key properties, type the following at the interactive prompt:
> device_name.print_key_properties() CreationClassName SystemName Name SystemCreationClassName >
To assign a list of these key properties to a variable named device_name_properties, type:
> device_name_properties = device_name.key_properties() >
To get the current value of a particular key property, use the following syntax:
instance_name_object.key_property_name
Replace key_property_name with the name of the key property to access.
Example 22.31. Accessing Individual Key Properties
To inspect the device_name instance name object created in Example 22.27, “Accessing Instance Names” and display the value of the key property named SystemName, type the following at the interactive prompt:
> device_name.SystemName u'server.example.com' >
Converting Instance Names to Instances
Each instance name can be converted to an instance. To do so, use the to_instance() method as follows:
instance_name_object.to_instance()
Replace instance_name_object with the name of the instance name object to convert. This method returns an LMIInstance object.
Example 22.32. Converting Instance Names to Instances
To convert the device_name instance name object created in Example 22.27, “Accessing Instance Names” to an instance object and assign it to a variable named device, type the following at the interactive prompt:
> device = device_name.to_instance() >
22.4.7. Working with Associated Objects
The Common Information Model defines an association relationship between managed objects.
Accessing Associated Instances
To get a list of all objects associated with a particular instance object, use the associators() method as follows:
instance_object.associators(
AssocClass=class_name,
ResultClass=class_name,
ResultRole=role,
IncludeQualifiers=include_qualifiers,
IncludeClassOrigin=include_class_origin,
PropertyList=property_list)
To access the first object associated with a particular instance object, use the first_associator() method:
instance_object.first_associator(
AssocClass=class_name,
ResultClass=class_name,
ResultRole=role,
IncludeQualifiers=include_qualifiers,
IncludeClassOrigin=include_class_origin,
PropertyList=property_list)Replace instance_object with the name of the instance object to inspect. You can filter the results by specifying the following parameters:
-
AssocClass— Each returned object must be associated with the source object through an instance of this class or one of its subclasses. The default value isNone. -
ResultClass— Each returned object must be either an instance of this class or one of its subclasses, or it must be this class or one of its subclasses. The default value isNone. -
Role— Each returned object must be associated with the source object through an association in which the source object plays the specified role. The name of the property in the association class that refers to the source object must match the value of this parameter. The default value isNone. -
ResultRole— Each returned object must be associated with the source object through an association in which the returned object plays the specified role. The name of the property in the association class that refers to the returned object must match the value of this parameter. The default value isNone.
The remaining parameters refer to:
-
IncludeQualifiers— A boolean indicating whether all qualifiers of each object (including qualifiers on the object and on any returned properties) should be included as QUALIFIER elements in the response. The default value isFalse. -
IncludeClassOrigin— A boolean indicating whether the CLASSORIGIN attribute should be present on all appropriate elements in each returned object. The default value isFalse. -
PropertyList— The members of this list define one or more property names. Returned objects will not include elements for any properties missing from this list. IfPropertyListis an empty list, no properties are included in returned objects. If it isNone, no additional filtering is defined. The default value isNone.
Example 22.33. Accessing Associated Instances
The LMI_StorageExtent class represents block devices available in the system. To use the ns namespace object created in Example 22.5, “Accessing Namespace Objects”, create an instance of the LMI_StorageExtent class for the block device named /dev/vda, and assign it to a variable named vda, type the following at the interactive prompt:
> vda = ns.LMI_StorageExtent.first_instance({
... "DeviceID" : "/dev/vda"})
>
To get a list of all disk partitions on this block device and assign it to a variable named vda_partitions, use the associators() method as follows:
> vda_partitions = vda.associators(ResultClass="LMI_DiskPartition") >
Accessing Associated Instance Names
To get a list of all associated instance names of a particular instance object, use the associator_names() method as follows:
instance_object.associator_names(
AssocClass=class_name,
ResultClass=class_name,
Role=role,
ResultRole=role)
To access the first associated instance name of a particular instance object, use the first_associator_name() method:
instance_object.first_associator_name(
AssocClass=class_object,
ResultClass=class_object,
Role=role,
ResultRole=role)Replace instance_object with the name of the instance object to inspect. You can filter the results by specifying the following parameters:
-
AssocClass— Each returned name identifies an object that must be associated with the source object through an instance of this class or one of its subclasses. The default value isNone. -
ResultClass— Each returned name identifies an object that must be either an instance of this class or one of its subclasses, or it must be this class or one of its subclasses. The default value isNone. -
Role— Each returned name identifies an object that must be associated with the source object through an association in which the source object plays the specified role. The name of the property in the association class that refers to the source object must match the value of this parameter. The default value isNone. -
ResultRole— Each returned name identifies an object that must be associated with the source object through an association in which the returned named object plays the specified role. The name of the property in the association class that refers to the returned object must match the value of this parameter. The default value isNone.
Example 22.34. Accessing Associated Instance Names
To use the vda instance object created in Example 22.33, “Accessing Associated Instances”, get a list of its associated instance names, and assign it to a variable named vda_partitions, type:
> vda_partitions = vda.associator_names(ResultClass="LMI_DiskPartition") >
22.4.8. Working with Association Objects
The Common Information Model defines an association relationship between managed objects. Association objects define the relationship between two other objects.
Accessing Association Instances
To get a list of association objects that refer to a particular target object, use the references() method as follows:
instance_object.references(
ResultClass=class_name,
Role=role,
IncludeQualifiers=include_qualifiers,
IncludeClassOrigin=include_class_origin,
PropertyList=property_list)
To access the first association object that refers to a particular target object, use the first_reference() method:
instance_object.first_reference(
... ResultClass=class_name,
... Role=role,
... IncludeQualifiers=include_qualifiers,
... IncludeClassOrigin=include_class_origin,
... PropertyList=property_list)
>Replace instance_object with the name of the instance object to inspect. You can filter the results by specifying the following parameters:
-
ResultClass— Each returned object must be either an instance of this class or one of its subclasses, or it must be this class or one of its subclasses. The default value isNone. -
Role— Each returned object must refer to the target object through a property with a name that matches the value of this parameter. The default value isNone.
The remaining parameters refer to:
-
IncludeQualifiers— A boolean indicating whether each object (including qualifiers on the object and on any returned properties) should be included as a QUALIFIER element in the response. The default value isFalse. -
IncludeClassOrigin— A boolean indicating whether the CLASSORIGIN attribute should be present on all appropriate elements in each returned object. The default value isFalse. -
PropertyList— The members of this list define one or more property names. Returned objects will not include elements for any properties missing from this list. IfPropertyListis an empty list, no properties are included in returned objects. If it isNone, no additional filtering is defined. The default value isNone.
Example 22.35. Accessing Association Instances
The LMI_LANEndpoint class represents a communication endpoint associated with a certain network interface device. To use the ns namespace object created in Example 22.5, “Accessing Namespace Objects”, create an instance of the LMI_LANEndpoint class for the network interface device named eth0, and assign it to a variable named lan_endpoint, type the following at the interactive prompt:
> lan_endpoint = ns.LMI_LANEndpoint.first_instance({
... "Name" : "eth0"})
>
To access the first association object that refers to an LMI_BindsToLANEndpoint object and assign it to a variable named bind, type:
> bind = lan_endpoint.first_reference( ... ResultClass="LMI_BindsToLANEndpoint") >
You can now use the Dependent property to access the dependent LMI_IPProtocolEndpoint class that represents the IP address of the corresponding network interface device:
> ip = bind.Dependent.to_instance() > print ip.IPv4Address 192.168.122.1 >
Accessing Association Instance Names
To get a list of association instance names of a particular instance object, use the reference_names() method as follows:
instance_object.reference_names(
ResultClass=class_name,
Role=role)
To access the first association instance name of a particular instance object, use the first_reference_name() method:
instance_object.first_reference_name(
ResultClass=class_name,
Role=role)Replace instance_object with the name of the instance object to inspect. You can filter the results by specifying the following parameters:
-
ResultClass— Each returned object name identifies either an instance of this class or one of its subclasses, or this class or one of its subclasses. The default value isNone. -
Role— Each returned object identifies an object that refers to the target instance through a property with a name that matches the value of this parameter. The default value isNone.
Example 22.36. Accessing Association Instance Names
To use the lan_endpoint instance object created in Example 22.35, “Accessing Association Instances”, access the first association instance name that refers to an LMI_BindsToLANEndpoint object, and assign it to a variable named bind, type:
> bind = lan_endpoint.first_reference_name( ... ResultClass="LMI_BindsToLANEndpoint")
You can now use the Dependent property to access the dependent LMI_IPProtocolEndpoint class that represents the IP address of the corresponding network interface device:
> ip = bind.Dependent.to_instance() > print ip.IPv4Address 192.168.122.1 >
22.4.9. Working with Indications
Indication is a reaction to a specific event that occurs in response to a particular change in data. LMIShell can subscribe to an indication in order to receive such event responses.
Subscribing to Indications
To subscribe to an indication, use the subscribe_indication() method as follows:
connection_object.subscribe_indication( QueryLanguage="WQL", Query='SELECT * FROM CIM_InstModification', Name="cpu", CreationNamespace="root/interop", SubscriptionCreationClassName="CIM_IndicationSubscription", FilterCreationClassName="CIM_IndicationFilter", FilterSystemCreationClassName="CIM_ComputerSystem", FilterSourceNamespace="root/cimv2", HandlerCreationClassName="CIM_IndicationHandlerCIMXML", HandlerSystemCreationClassName="CIM_ComputerSystem", Destination="http://host_name:5988")
Alternatively, you can use a shorter version of the method call as follows:
connection_object.subscribe_indication( Query='SELECT * FROM CIM_InstModification', Name="cpu", Destination="http://host_name:5988")
Replace connection_object with a connection object and host_name with the host name of the system you want to deliver the indications to.
By default, all subscriptions created by the LMIShell interpreter are automatically deleted when the interpreter terminates. To change this behavior, pass the Permanent=True keyword parameter to the subscribe_indication() method call. This will prevent LMIShell from deleting the subscription.
Example 22.37. Subscribing to Indications
To use the c connection object created in Example 22.1, “Connecting to a Remote CIMOM” and subscribe to an indication named cpu, type the following at the interactive prompt:
> c.subscribe_indication(
... QueryLanguage="WQL",
... Query='SELECT * FROM CIM_InstModification',
... Name="cpu",
... CreationNamespace="root/interop",
... SubscriptionCreationClassName="CIM_IndicationSubscription",
... FilterCreationClassName="CIM_IndicationFilter",
... FilterSystemCreationClassName="CIM_ComputerSystem",
... FilterSourceNamespace="root/cimv2",
... HandlerCreationClassName="CIM_IndicationHandlerCIMXML",
... HandlerSystemCreationClassName="CIM_ComputerSystem",
... Destination="http://server.example.com:5988")
LMIReturnValue(rval=True, rparams=NocaseDict({}), errorstr='')
>Listing Subscribed Indications
To list all the subscribed indications, use the print_subscribed_indications() method as follows:
connection_object.print_subscribed_indications()Replace connection_object with the name of the connection object to inspect. This method prints subscribed indications to standard output.
To get a list of subscribed indications, use the subscribed_indications() method:
connection_object.subscribed_indications()This method returns a list of strings.
Example 22.38. Listing Subscribed Indications
To inspect the c connection object created in Example 22.1, “Connecting to a Remote CIMOM” and list all subscribed indications, type the following at the interactive prompt:
> c.print_subscribed_indications() >
To assign a list of these indications to a variable named indications, type:
> indications = c.subscribed_indications() >
Unsubscribing from Indications
By default, all subscriptions created by the LMIShell interpreter are automatically deleted when the interpreter terminates. To delete an individual subscription sooner, use the unsubscribe_indication() method as follows:
connection_object.unsubscribe_indication(indication_name)Replace connection_object with the name of the connection object and indication_name with the name of the indication to delete.
To delete all subscriptions, use the unsubscribe_all_indications() method:
connection_object.unsubscribe_all_indications()Example 22.39. Unsubscribing from Indications
To use the c connection object created in Example 22.1, “Connecting to a Remote CIMOM” and unsubscribe from the indication created in Example 22.37, “Subscribing to Indications”, type the following at the interactive prompt:
> c.unsubscribe_indication('cpu')
LMIReturnValue(rval=True, rparams=NocaseDict({}), errorstr='')
>Implementing an Indication Handler
The subscribe_indication() method allows you to specify the host name of the system you want to deliver the indications to. The following example shows how to implement an indication handler:
> def handler(ind, arg1, arg2, kwargs): ... exported_objects = ind.exported_objects() ... do_something_with(exported_objects) > listener = LmiIndicationListener("0.0.0.0", listening_port) > listener.add_handler("indication-name-XXXXXXXX", handler, arg1, arg2, kwargs)
> listener.start()
>
The first argument of the handler is an LmiIndication object, which contains a list of methods and objects exported by the indication. Other parameters are user specific: those arguments need to be specified when adding a handler to the listener.
In the example above, the add_handler() method call uses a special string with eight "X" characters. These characters are replaced with a random string that is generated by listeners in order to avoid a possible handler name collision. To use the random string, start the indication listener first and then subscribe to an indication so that the Destination property of the handler object contains the following value: schema://host_name/random_string.
Example 22.40. Implementing an Indication Handler
The following script illustrates how to write a handler that monitors a managed system located at 192.168.122.1 and calls the indication_callback() function whenever a new user account is created:
#!/usr/bin/lmishell
import sys
from time import sleep
from lmi.shell.LMIUtil import LMIPassByRef
from lmi.shell.LMIIndicationListener import LMIIndicationListener
# These are passed by reference to indication_callback
var1 = LMIPassByRef("some_value")
var2 = LMIPassByRef("some_other_value")
def indication_callback(ind, var1, var2):
# Do something with ind, var1 and var2
print ind.exported_objects()
print var1.value
print var2.value
c = connect("hostname", "username", "password")
listener = LMIIndicationListener("0.0.0.0", 65500)
unique_name = listener.add_handler(
"demo-XXXXXXXX", # Creates a unique name for me
indication_callback, # Callback to be called
var1, # Variable passed by ref
var2 # Variable passed by ref
)
listener.start()
print c.subscribe_indication(
Name=unique_name,
Query="SELECT * FROM LMI_AccountInstanceCreationIndication WHERE SOURCEINSTANCE ISA LMI_Account",
Destination="192.168.122.1:65500"
)
try:
while True:
sleep(60)
except KeyboardInterrupt:
sys.exit(0)22.4.10. Example Usage
This section provides a number of examples for various CIM providers distributed with the OpenLMI packages. All examples in this section use the following two variable definitions:
c = connect("host_name", "user_name", "password")
ns = c.root.cimv2Replace host_name with the host name of the managed system, user_name with the name of user that is allowed to connect to OpenPegasus CIMOM running on that system, and password with the user’s password.
Using the OpenLMI Service Provider
The openlmi-service package installs a CIM provider for managing system services. The examples below illustrate how to use this CIM provider to list available system services and how to start, stop, enable, and disable them.
Example 22.41. Listing Available Services
To list all available services on the managed machine along with information regarding whether the service has been started (TRUE) or stopped (FALSE) and the status string, use the following code snippet:
for service in ns.LMI_Service.instances(): print "%s:\t%s" % (service.Name, service.Status)
To list only the services that are enabled by default, use this code snippet:
cls = ns.LMI_Service
for service in cls.instances():
if service.EnabledDefault == cls.EnabledDefaultValues.Enabled:
print service.Name
Note that the value of the EnabledDefault property is equal to 2 for enabled services and 3 for disabled services.
To display information about the cups service, use the following:
cups = ns.LMI_Service.first_instance({"Name": "cups.service"})
cups.doc()Example 22.42. Starting and Stopping Services
To start and stop the cups service and to see its current status, use the following code snippet:
cups = ns.LMI_Service.first_instance({"Name": "cups.service"})
cups.StartService()
print cups.Status
cups.StopService()
print cups.StatusExample 22.43. Enabling and Disabling Services
To enable and disable the cups service and to display its EnabledDefault property, use the following code snippet:
cups = ns.LMI_Service.first_instance({"Name": "cups.service"})
cups.TurnServiceOff()
print cups.EnabledDefault
cups.TurnServiceOn()
print cups.EnabledDefaultUsing the OpenLMI Networking Provider
The openlmi-networking package installs a CIM provider for networking. The examples below illustrate how to use this CIM provider to list IP addresses associated with a certain port number, create a new connection, configure a static IP address, and activate a connection.
Example 22.44. Listing IP Addresses Associated with a Given Port Number
To list all IP addresses associated with the eth0 network interface, use the following code snippet:
device = ns.LMI_IPNetworkConnection.first_instance({'ElementName': 'eth0'})
for endpoint in device.associators(AssocClass="LMI_NetworkSAPSAPDependency", ResultClass="LMI_IPProtocolEndpoint"):
if endpoint.ProtocolIFType == ns.LMI_IPProtocolEndpoint.ProtocolIFTypeValues.IPv4:
print "IPv4: %s/%s" % (endpoint.IPv4Address, endpoint.SubnetMask)
elif endpoint.ProtocolIFType == ns.LMI_IPProtocolEndpoint.ProtocolIFTypeValues.IPv6:
print "IPv6: %s/%d" % (endpoint.IPv6Address, endpoint.IPv6SubnetPrefixLength)
This code snippet uses the LMI_IPProtocolEndpoint class associated with a given LMI_IPNetworkConnection class.
To display the default gateway, use this code snippet:
for rsap in device.associators(AssocClass="LMI_NetworkRemoteAccessAvailableToElement", ResultClass="LMI_NetworkRemoteServiceAccessPoint"):
if rsap.AccessContext == ns.LMI_NetworkRemoteServiceAccessPoint.AccessContextValues.DefaultGateway:
print "Default Gateway: %s" % rsap.AccessInfo
The default gateway is represented by an LMI_NetworkRemoteServiceAccessPoint instance with the AccessContext property equal to DefaultGateway.
To get a list of DNS servers, the object model needs to be traversed as follows:
-
Get the
LMI_IPProtocolEndpointinstances associated with a givenLMI_IPNetworkConnectionusingLMI_NetworkSAPSAPDependency. -
Use the same association for the
LMI_DNSProtocolEndpointinstances.
The LMI_NetworkRemoteServiceAccessPoint instances with the AccessContext property equal to the DNS Server associated through LMI_NetworkRemoteAccessAvailableToElement have the DNS server address in the AccessInfo property.
There can be more possible paths to get to the RemoteServiceAccessPath and entries can be duplicated. The following code snippet uses the set() function to remove duplicate entries from the list of DNS servers:
dnsservers = set()
for ipendpoint in device.associators(AssocClass="LMI_NetworkSAPSAPDependency", ResultClass="LMI_IPProtocolEndpoint"):
for dnsedpoint in ipendpoint.associators(AssocClass="LMI_NetworkSAPSAPDependency", ResultClass="LMI_DNSProtocolEndpoint"):
for rsap in dnsedpoint.associators(AssocClass="LMI_NetworkRemoteAccessAvailableToElement", ResultClass="LMI_NetworkRemoteServiceAccessPoint"):
if rsap.AccessContext == ns.LMI_NetworkRemoteServiceAccessPoint.AccessContextValues.DNSServer:
dnsservers.add(rsap.AccessInfo)
print "DNS:", ", ".join(dnsservers)Example 22.45. Creating a New Connection and Configuring a Static IP Address
To create a new setting with a static IPv4 and stateless IPv6 configuration for network interface eth0, use the following code snippet:
capability = ns.LMI_IPNetworkConnectionCapabilities.first_instance({ 'ElementName': 'eth0' })
result = capability.LMI_CreateIPSetting(Caption='eth0 Static',
IPv4Type=capability.LMI_CreateIPSetting.IPv4TypeValues.Static,
IPv6Type=capability.LMI_CreateIPSetting.IPv6TypeValues.Stateless)
setting = result.rparams["SettingData"].to_instance()
for settingData in setting.associators(AssocClass="LMI_OrderedIPAssignmentComponent"):
if setting.ProtocolIFType == ns.LMI_IPAssignmentSettingData.ProtocolIFTypeValues.IPv4:
# Set static IPv4 address
settingData.IPAddresses = ["192.168.1.100"]
settingData.SubnetMasks = ["255.255.0.0"]
settingData.GatewayAddresses = ["192.168.1.1"]
settingData.push()
This code snippet creates a new setting by calling the LMI_CreateIPSetting() method on the instance of LMI_IPNetworkConnectionCapabilities, which is associated with LMI_IPNetworkConnection through LMI_IPNetworkConnectionElementCapabilities. It also uses the push() method to modify the setting.
Example 22.46. Activating a Connection
To apply a setting to the network interface, call the ApplySettingToIPNetworkConnection() method of the LMI_IPConfigurationService class. This method is asynchronous and returns a job. The following code snippets illustrates how to call this method synchronously:
setting = ns.LMI_IPAssignmentSettingData.first_instance({ "Caption": "eth0 Static" })
port = ns.LMI_IPNetworkConnection.first_instance({ 'ElementName': 'ens8' })
service = ns.LMI_IPConfigurationService.first_instance()
service.SyncApplySettingToIPNetworkConnection(SettingData=setting, IPNetworkConnection=port, Mode=32768)
The Mode parameter affects how the setting is applied. The most commonly used values of this parameter are as follows:
-
1— apply the setting now and make it auto-activated. -
2— make the setting auto-activated and do not apply it now. -
4— disconnect and disable auto-activation. -
5— do not change the setting state, only disable auto-activation. -
32768— apply the setting. -
32769— disconnect.
Using the OpenLMI Storage Provider
The openlmi-storage package installs a CIM provider for storage management. The examples below illustrate how to use this CIM provider to create a volume group, create a logical volume, build a file system, mount a file system, and list block devices known to the system.
In addition to the c and ns variables, these examples use the following variable definitions:
MEGABYTE = 1024*1024 storage_service = ns.LMI_StorageConfigurationService.first_instance() filesystem_service = ns.LMI_FileSystemConfigurationService.first_instance()
Example 22.47. Creating a Volume Group
To create a new volume group located in /dev/myGroup/ that has three members and the default extent size of 4 MB, use the following code snippet:
# Find the devices to add to the volume group
# (filtering the CIM_StorageExtent.instances()
# call would be faster, but this is easier to read):
sda1 = ns.CIM_StorageExtent.first_instance({"Name": "/dev/sda1"})
sdb1 = ns.CIM_StorageExtent.first_instance({"Name": "/dev/sdb1"})
sdc1 = ns.CIM_StorageExtent.first_instance({"Name": "/dev/sdc1"})
# Create a new volume group:
(ret, outparams, err) = storage_service.SyncCreateOrModifyVG(
ElementName="myGroup",
InExtents=[sda1, sdb1, sdc1])
vg = outparams['Pool'].to_instance()
print "VG", vg.PoolID, \
"with extent size", vg.ExtentSize, \
"and", vg.RemainingExtents, "free extents created."Example 22.48. Creating a Logical Volume
To create two logical volumes with the size of 100 MB, use this code snippet:
# Find the volume group:
vg = ns.LMI_VGStoragePool.first_instance({"Name": "/dev/mapper/myGroup"})
# Create the first logical volume:
(ret, outparams, err) = storage_service.SyncCreateOrModifyLV(
ElementName="Vol1",
InPool=vg,
Size=100 * MEGABYTE)
lv = outparams['TheElement'].to_instance()
print "LV", lv.DeviceID, \
"with", lv.BlockSize * lv.NumberOfBlocks,\
"bytes created."
# Create the second logical volume:
(ret, outparams, err) = storage_service.SyncCreateOrModifyLV(
ElementName="Vol2",
InPool=vg,
Size=100 * MEGABYTE)
lv = outparams['TheElement'].to_instance()
print "LV", lv.DeviceID, \
"with", lv.BlockSize * lv.NumberOfBlocks, \
"bytes created."Example 22.49. Creating a File System
To create an ext3 file system on logical volume lv from Example 22.48, “Creating a Logical Volume”, use the following code snippet:
(ret, outparams, err) = filesystem_service.SyncLMI_CreateFileSystem(
FileSystemType=filesystem_service.LMI_CreateFileSystem.FileSystemTypeValues.EXT3,
InExtents=[lv])Example 22.50. Mounting a File System
To mount the file system created in Example 22.49, “Creating a File System”, use the following code snippet:
# Find the file system on the logical volume: fs = lv.first_associator(ResultClass="LMI_LocalFileSystem") mount_service = ns.LMI_MountConfigurationService.first_instance() (rc, out, err) = mount_service.SyncCreateMount( FileSystemType='ext3', Mode=32768, # just mount FileSystem=fs, MountPoint='/mnt/test', FileSystemSpec=lv.Name)
Example 22.51. Listing Block Devices
To list all block devices known to the system, use the following code snippet:
devices = ns.CIM_StorageExtent.instances()
for device in devices:
if lmi_isinstance(device, ns.CIM_Memory):
# Memory and CPU caches are StorageExtents too, do not print them
continue
print device.classname,
print device.DeviceID,
print device.Name,
print device.BlockSize*device.NumberOfBlocksUsing the OpenLMI Hardware Provider
The openlmi-hardware package installs a CIM provider for monitoring hardware. The examples below illustrate how to use this CIM provider to retrieve information about CPU, memory modules, PCI devices, and the manufacturer and model of the machine.
Example 22.52. Viewing CPU Information
To display basic CPU information such as the CPU name, the number of processor cores, and the number of hardware threads, use the following code snippet:
cpu = ns.LMI_Processor.first_instance() cpu_cap = cpu.associators(ResultClass="LMI_ProcessorCapabilities")[0] print cpu.Name print cpu_cap.NumberOfProcessorCores print cpu_cap.NumberOfHardwareThreads
Example 22.53. Viewing Memory Information
To display basic information about memory modules such as their individual sizes, use the following code snippet:
mem = ns.LMI_Memory.first_instance() for i in mem.associators(ResultClass="LMI_PhysicalMemory"): print i.Name
Example 22.54. Viewing Chassis Information
To display basic information about the machine such as its manufacturer or its model, use the following code snippet:
chassis = ns.LMI_Chassis.first_instance() print chassis.Manufacturer print chassis.Model
Example 22.55. Listing PCI Devices
To list all PCI devices known to the system, use the following code snippet:
for pci in ns.LMI_PCIDevice.instances(): print pci.Name
22.5. Using OpenLMI Scripts
The LMIShell interpreter is built on top of Python modules that can be used to develop custom management tools. The OpenLMI Scripts project provides a number of Python libraries for interfacing with OpenLMI providers. In addition, it is distributed with lmi, an extensible utility that can be used to interact with these libraries from the command line.
To install OpenLMI Scripts on your system, type the following at a shell prompt:
easy_install --user openlmi-scripts
This command installs the Python modules and the lmi utility in the ~/.local/ directory. To extend the functionality of the lmi utility, install additional OpenLMI modules by using the following command:
easy_install --user package_name
For a complete list of available modules, see the Python website. For more information about OpenLMI Scripts, see the official OpenLMI Scripts documentation.
22.6. Additional Resources
For more information about OpenLMI and system management in general, see the resources listed below.
Installed Documentation
-
lmishell(1) — The manual page for the
lmishellclient and interpreter provides detailed information about its execution and usage.
Online Documentation
- Red Hat Enterprise Linux 7 Networking Guide — The Networking Guide for Red Hat Enterprise Linux 7 documents relevant information regarding the configuration and administration of network interfaces and network services on the system.
- Red Hat Enterprise Linux 7 Storage Administration Guide — The Storage Administration Guide for Red Hat Enterprise Linux 7 provides instructions on how to manage storage devices and file systems on the system.
- Red Hat Enterprise Linux 7 Power Management Guide — The Power Management Guide for Red Hat Enterprise Linux 7 explains how to manage power consumption of the system effectively. It discusses different techniques that lower power consumption for both servers and laptops, and explains how each technique affects the overall performance of the system.
- Red Hat Enterprise Linux 7 Linux Domain Identity, Authentication, and Policy Guide — The Linux Domain Identity, Authentication, and Policy Guide for Red Hat Enterprise Linux 7 covers all aspects of installing, configuring, and managing IPA domains, including both servers and clients. The guide is intended for IT and systems administrators.
- FreeIPA Documentation — The FreeIPA Documentation serves as the primary user documentation for using the FreeIPA Identity Management project.
- OpenSSL Home Page — The OpenSSL home page provides an overview of the OpenSSL project.
- Mozilla NSS Documentation — The Mozilla NSS Documentation serves as the primary user documentation for using the Mozilla NSS project.
See Also
- Chapter 4, Managing Users and Groups documents how to manage system users and groups in the graphical user interface and on the command line.
- Chapter 9, Yum describes how to use the Yum package manager to search, install, update, and uninstall packages on the command line.
-
Chapter 10, Managing Services with systemd provides an introduction to
systemdand documents how to use thesystemctlcommand to manage system services, configure systemd targets, and execute power management commands. -
Chapter 12, OpenSSH describes how to configure an SSH server and how to use the
ssh,scp, andsftpclient utilities to access it.
Chapter 23. Viewing and Managing Log Files
Log files are files that contain messages about the system, including the kernel, services, and applications running on it. There are different log files for different information. For example, there is a default system log file, a log file just for security messages, and a log file for cron tasks.
Log files can be very useful when trying to troubleshoot a problem with the system such as trying to load a kernel driver or when looking for unauthorized login attempts to the system. This chapter discusses where to find log files, how to view log files, and what to look for in log files.
Some log files are controlled by a daemon called rsyslogd. The rsyslogd daemon is an enhanced replacement for sysklogd, and provides extended filtering, encryption protected relaying of messages, various configuration options, input and output modules, support for transportation via the TCP or UDP protocols. Note that rsyslog is compatible with sysklogd.
Log files can also be managed by the journald daemon – a component of systemd. The journald daemon captures Syslog messages, kernel log messages, initial RAM disk and early boot messages as well as messages written to standard output and standard error output of all services, indexes them and makes this available to the user. The native journal file format, which is a structured and indexed binary file, improves searching and provides faster operation, and it also stores meta data information like time stamps or user IDs. Log files produced by journald are by default not persistent, log files are stored only in memory or a small ring-buffer in the /run/log/journal/ directory. The amount of logged data depends on free memory, when you reach the capacity limit, the oldest entries are deleted. However, this setting can be altered – see Section 23.10.5, “Enabling Persistent Storage”. For more information on Journal see Section 23.10, “Using the Journal”.
By default, these two logging tools coexist on your system. The journald daemon is the primary tool for troubleshooting. It also provides additional data necessary for creating structured log messages. Data acquired by journald is forwarded into the /run/systemd/journal/syslog socket that may be used by rsyslogd to process the data further. However, rsyslog does the actual integration by default via the imjournal input module, thus avoiding the aforementioned socket. You can also transfer data in the opposite direction, from rsyslogd to journald with use of omjournal module. See Section 23.7, “Interaction of Rsyslog and Journal” for further information. The integration enables maintaining text-based logs in a consistent format to ensure compatibility with possible applications or configurations dependent on rsyslogd. Also, you can maintain rsyslog messages in a structured format (see Section 23.8, “Structured Logging with Rsyslog”).
23.1. Locating Log Files
A list of log files maintained by rsyslogd can be found in the /etc/rsyslog.conf configuration file. Most log files are located in the /var/log/ directory. Some applications such as httpd and samba have a directory within /var/log/ for their log files.
You may notice multiple files in the /var/log/ directory with numbers after them (for example, cron-20100906). These numbers represent a time stamp that has been added to a rotated log file. Log files are rotated so their file sizes do not become too large. The logrotate package contains a cron task that automatically rotates log files according to the /etc/logrotate.conf configuration file and the configuration files in the /etc/logrotate.d/ directory.
23.2. Basic Configuration of Rsyslog
The main configuration file for rsyslog is /etc/rsyslog.conf. Here, you can specify global directives, modules, and rules that consist of filter and action parts. Also, you can add comments in the form of text following a hash sign (#).
23.2.1. Filters
A rule is specified by a filter part, which selects a subset of syslog messages, and an action part, which specifies what to do with the selected messages. To define a rule in your /etc/rsyslog.conf configuration file, define both, a filter and an action, on one line and separate them with one or more spaces or tabs.
rsyslog offers various ways to filter syslog messages according to selected properties. The available filtering methods can be divided into Facility/Priority-based, Property-based, and Expression-based filters.
- Facility/Priority-based filters
The most used and well-known way to filter syslog messages is to use the facility/priority-based filters which filter syslog messages based on two conditions: facility and priority separated by a dot. To create a selector, use the following syntax:
FACILITY.PRIORITY
where:
-
FACILITY specifies the subsystem that produces a specific syslog message. For example, the
mailsubsystem handles all mail-related syslog messages. FACILITY can be represented by one of the following keywords (or by a numerical code):kern(0),user(1),mail(2),daemon(3),auth(4),syslog(5),lpr(6),news(7),cron(8),authpriv(9),ftp(10), andlocal0throughlocal7(16 - 23). PRIORITY specifies a priority of a syslog message. PRIORITY can be represented by one of the following keywords (or by a number):
debug(7),info(6),notice(5),warning(4),err(3),crit(2),alert(1), andemerg(0).The aforementioned syntax selects syslog messages with the defined or higher priority. By preceding any priority keyword with an equal sign (
=), you specify that only syslog messages with the specified priority will be selected. All other priorities will be ignored. Conversely, preceding a priority keyword with an exclamation mark (!) selects all syslog messages except those with the defined priority.In addition to the keywords specified above, you may also use an asterisk (
*) to define all facilities or priorities (depending on where you place the asterisk, before or after the comma). Specifying the priority keywordnoneserves for facilities with no given priorities. Both facility and priority conditions are case-insensitive.To define multiple facilities and priorities, separate them with a comma (
,). To define multiple selectors on one line, separate them with a semi-colon (;). Note that each selector in the selector field is capable of overwriting the preceding ones, which can exclude some priorities from the pattern.Example 23.1. Facility/Priority-based Filters
The following are a few examples of simple facility/priority-based filters that can be specified in
/etc/rsyslog.conf. To select all kernel syslog messages with any priority, add the following text into the configuration file:kern.*
To select all mail syslog messages with priority
critand higher, use this form:mail.crit
To select all cron syslog messages except those with the
infoordebugpriority, set the configuration in the following form:cron.!info,!debug
-
FACILITY specifies the subsystem that produces a specific syslog message. For example, the
- Property-based filters
Property-based filters let you filter syslog messages by any property, such as
timegeneratedorsyslogtag. For more information on properties, see the section called “Properties”. You can compare each of the specified properties to a particular value using one of the compare-operations listed in Table 23.1, “Property-based compare-operations”. Both property names and compare operations are case-sensitive.Property-based filter must start with a colon (
:). To define the filter, use the following syntax::PROPERTY, [!]COMPARE_OPERATION, "STRING"
where:
- The PROPERTY attribute specifies the desired property.
-
The optional exclamation point (
!) negates the output of the compare-operation. Other Boolean operators are currently not supported in property-based filters. - The COMPARE_OPERATION attribute specifies one of the compare-operations listed in Table 23.1, “Property-based compare-operations”.
The STRING attribute specifies the value that the text provided by the property is compared to. This value must be enclosed in quotation marks. To escape certain character inside the string (for example a quotation mark (
")), use the backslash character (\).Table 23.1. Property-based compare-operations Compare-operation Description containsChecks whether the provided string matches any part of the text provided by the property.
isequalCompares the provided string against all of the text provided by the property. These two values must be exactly equal to match.
startswithChecks whether the provided string is found exactly at the beginning of the text provided by the property.
regexCompares the provided POSIX BRE (Basic Regular Expression) against the text provided by the property.
ereregexCompares the provided POSIX ERE (Extended Regular Expression) regular expression against the text provided by the property.
isemptyChecks if the property is empty. The value is discarded. This is especially useful when working with normalized data, where some fields may be populated based on normalization result.
Example 23.2. Property-based Filters
The following are a few examples of property-based filters that can be specified in
/etc/rsyslog.conf. To select syslog messages which contain the stringerrorin their message text, use::msg, contains, "error"
The following filter selects syslog messages received from the host name
host1::hostname, isequal, "host1"
To select syslog messages which do not contain any mention of the words
fatalanderrorwith any or no text between them (for example,fatal lib error), type::msg, !regex, "fatal .* error"
- Expression-based filters
Expression-based filters select syslog messages according to defined arithmetic, Boolean or string operations. Expression-based filters use rsyslog's own scripting language called RainerScript to build complex filters.
The basic syntax of expression-based filter looks as follows:
if EXPRESSION then ACTION else ACTION
where:
The EXPRESSION attribute represents an expression to be evaluated, for example:
$msg startswith 'DEVNAME'or$syslogfacility-text == 'local0'. You can specify more than one expression in a single filter by usingandandoroperators.Note that rsyslog supports case-insensitive comparisons in expression-based filters. You can use
contains_iorstartswith_icompare-operations within the EXPRESSION attribute, for example:if $hostname startswith_i "<HOST_NAME>" then ACTION.-
The ACTION attribute represents an action to be performed if the expression returns the value
true. This can be a single action, or an arbitrary complex script enclosed in curly braces. Expression-based filters are indicated by the keyword if at the start of a new line. The then keyword separates the EXPRESSION from the ACTION. Optionally, you can employ the else keyword to specify what action is to be performed in case the condition is not met.
With expression-based filters, you can nest the conditions by using a script enclosed in curly braces as in Example 23.3, “Expression-based Filters”. The script allows you to use facility/priority-based filters inside the expression. On the other hand, property-based filters are not recommended here. RainerScript supports regular expressions with specialized functions
re_match()andre_extract().Example 23.3. Expression-based Filters
The following expression contains two nested conditions. The log files created by a program called prog1 are split into two files based on the presence of the "test" string in the message.
if $programname == 'prog1' then { action(type="omfile" file="/var/log/prog1.log") if $msg contains 'test' then action(type="omfile" file="/var/log/prog1test.log") else action(type="omfile" file="/var/log/prog1notest.log") }
See the section called “Online Documentation” for more examples of various expression-based filters. RainerScript is the basis for rsyslog's new configuration format, see Section 23.3, “Using the New Configuration Format”
23.2.2. Actions
Actions specify what is to be done with the messages filtered out by an already defined selector. The following are some of the actions you can define in your rule:
- Saving syslog messages to log files
The majority of actions specify to which log file a syslog message is saved. This is done by specifying a file path after your already-defined selector:
FILTER PATH
where FILTER stands for user-specified selector and PATH is a path of a target file.
For instance, the following rule is comprised of a selector that selects all cron syslog messages and an action that saves them into the
/var/log/cron.loglog file:cron.* /var/log/cron.log
By default, the log file is synchronized every time a syslog message is generated. Use a dash mark (
-) as a prefix of the file path you specified to omit syncing:FILTER -PATH
Note that you might lose information if the system terminates right after a write attempt. However, this setting can improve performance, especially if you run programs that produce very verbose log messages.
Your specified file path can be either static or dynamic. Static files are represented by a fixed file path as shown in the example above. Dynamic file paths can differ according to the received message. Dynamic file paths are represented by a template and a question mark (
?) prefix:FILTER ?DynamicFile
where DynamicFile is a name of a predefined template that modifies output paths. You can use the dash prefix (
-) to disable syncing, also you can use multiple templates separated by a colon (;). For more information on templates, see the section called “Generating Dynamic File Names”.If the file you specified is an existing terminal or
/dev/consoledevice, syslog messages are sent to standard output (using special terminal-handling) or your console (using special/dev/console-handling) when using the X Window System, respectively.- Sending syslog messages over the network
rsyslog allows you to send and receive syslog messages over the network. This feature allows you to administer syslog messages of multiple hosts on one machine. To forward syslog messages to a remote machine, use the following syntax:
@(
zNUMBER)HOST:PORTwhere:
-
The at sign (
@) indicates that the syslog messages are forwarded to a host using theUDPprotocol. To use theTCPprotocol, use two at signs with no space between them (@@). -
The optional
zNUMBERsetting enables zlib compression for syslog messages. The NUMBER attribute specifies the level of compression (from 1 – lowest to 9 – maximum). Compression gain is automatically checked byrsyslogd, messages are compressed only if there is any compression gain and messages below 60 bytes are never compressed. - The HOST attribute specifies the host which receives the selected syslog messages.
The PORT attribute specifies the host machine’s port.
When specifying an
IPv6address as the host, enclose the address in square brackets ([,]).Example 23.4. Sending syslog Messages over the Network
The following are some examples of actions that forward syslog messages over the network (note that all actions are preceded with a selector that selects all messages with any priority). To forward messages to
192.168.0.1via theUDPprotocol, type:. @192.168.0.1To forward messages to "example.com" using port 6514 and the
TCPprotocol, use:. @@example.com:6514The following compresses messages with zlib (level 9 compression) and forwards them to
2001:db8::1using theUDPprotocol. @(z9)[2001:db8::1]
-
The at sign (
- Output channels
Output channels are primarily used to specify the maximum size a log file can grow to. This is very useful for log file rotation (for more information see Section 23.2.5, “Log Rotation”). An output channel is basically a collection of information about the output action. Output channels are defined by the
$outchanneldirective. To define an output channel in/etc/rsyslog.conf, use the following syntax:$outchannel NAME, FILE_NAME, MAX_SIZE, ACTION
where:
- The NAME attribute specifies the name of the output channel.
- The FILE_NAME attribute specifies the name of the output file. Output channels can write only into files, not pipes, terminal, or other kind of output.
- The MAX_SIZE attribute represents the maximum size the specified file (in FILE_NAME) can grow to. This value is specified in bytes.
The ACTION attribute specifies the action that is taken when the maximum size, defined in MAX_SIZE, is hit.
To use the defined output channel as an action inside a rule, type:
FILTER :omfile:$NAME
Example 23.5. Output channel log rotation
The following output shows a simple log rotation through the use of an output channel. First, the output channel is defined via the
$outchanneldirective:$outchannel log_rotation, /var/log/test_log.log, 104857600, /home/joe/log_rotation_script
and then it is used in a rule that selects every syslog message with any priority and executes the previously-defined output channel on the acquired syslog messages:
. :omfile:$log_rotationOnce the limit (in the example 100 MB) is hit, the
/home/joe/log_rotation_scriptis executed. This script can contain anything from moving the file into a different folder, editing specific content out of it, or simply removing it.
- Sending syslog messages to specific users
-
rsyslog can send syslog messages to specific users by specifying a user name of the user you want to send the messages to (as in Example 23.7, “Specifying Multiple Actions”). To specify more than one user, separate each user name with a comma (
,). To send messages to every user that is currently logged on, use an asterisk (*). - Executing a program
rsyslog lets you execute a program for selected syslog messages and uses the
system()call to execute the program in shell. To specify a program to be executed, prefix it with a caret character (^). Consequently, specify a template that formats the received message and passes it to the specified executable as a one line parameter (for more information on templates, see Section 23.2.3, “Templates”).FILTER ^EXECUTABLE; TEMPLATE
Here an output of the FILTER condition is processed by a program represented by EXECUTABLE. This program can be any valid executable. Replace TEMPLATE with the name of the formatting template.
Example 23.6. Executing a Program
In the following example, any syslog message with any priority is selected, formatted with the
templatetemplate and passed as a parameter to the test-program program, which is then executed with the provided parameter:. ^test-program;templateWarningWhen accepting messages from any host, and using the shell execute action, you may be vulnerable to command injection. An attacker may try to inject and execute commands in the program you specified to be executed in your action. To avoid any possible security threats, thoroughly consider the use of the shell execute action.
- Storing syslog messages in a database
Selected syslog messages can be directly written into a database table using the database writer action. The database writer uses the following syntax:
:PLUGIN:DB_HOST,DB_NAME,DB_USER,DB_PASSWORD;TEMPLATE
where:
-
The PLUGIN calls the specified plug-in that handles the database writing (for example, the
ommysqlplug-in). - The DB_HOST attribute specifies the database host name.
- The DB_NAME attribute specifies the name of the database.
- The DB_USER attribute specifies the database user.
- The DB_PASSWORD attribute specifies the password used with the aforementioned database user.
The TEMPLATE attribute specifies an optional use of a template that modifies the syslog message. For more information on templates, see Section 23.2.3, “Templates”.
ImportantCurrently, rsyslog provides support for
MySQLandPostgreSQLdatabases only. In order to use theMySQLandPostgreSQLdatabase writer functionality, install the rsyslog-mysql and rsyslog-pgsql packages, respectively. Also, make sure you load the appropriate modules in your/etc/rsyslog.confconfiguration file:module(load=”ommysql”) # Output module for MySQL support module(load=”ompgsql”) # Output module for PostgreSQL support
For more information on rsyslog modules, see Section 23.6, “Using Rsyslog Modules”.
Alternatively, you may use a generic database interface provided by the
omlibdbmodule (supports: Firebird/Interbase, MS SQL, Sybase, SQLLite, Ingres, Oracle, mSQL).
-
The PLUGIN calls the specified plug-in that handles the database writing (for example, the
- Discarding syslog messages
To discard your selected messages, use
stop.The discard action is mostly used to filter out messages before carrying on any further processing. It can be effective if you want to omit some repeating messages that would otherwise fill the log files. The results of discard action depend on where in the configuration file it is specified, for the best results place these actions on top of the actions list. Please note that once a message has been discarded there is no way to retrieve it in later configuration file lines.
For instance, the following rule discards all messages that matches the
local5.*filter:local5.* stop
In the following example, any cron syslog messages are discarded:
cron.* stop
NoteWith versions prior to rsyslog 7, the tilde character (
~) was used instead ofstopto discard syslog messages.
Specifying Multiple Actions
For each selector, you are allowed to specify multiple actions. To specify multiple actions for one selector, write each action on a separate line and precede it with an ampersand (&) character:
FILTER ACTION & ACTION & ACTION
Specifying multiple actions improves the overall performance of the desired outcome since the specified selector has to be evaluated only once.
Example 23.7. Specifying Multiple Actions
In the following example, all kernel syslog messages with the critical priority (crit) are sent to user user1, processed by the template temp and passed on to the test-program executable, and forwarded to 192.168.0.1 via the UDP protocol.
kern.=crit user1 & ^test-program;temp & @192.168.0.1
Any action can be followed by a template that formats the message. To specify a template, suffix an action with a semicolon (;) and specify the name of the template. For more information on templates, see Section 23.2.3, “Templates”.
A template must be defined before it is used in an action, otherwise it is ignored. In other words, template definitions should always precede rule definitions in /etc/rsyslog.conf.
23.2.3. Templates
Any output that is generated by rsyslog can be modified and formatted according to your needs with the use of templates. To create a template use the following syntax in /etc/rsyslog.conf:
template(name=”TEMPLATE_NAME” type=”string” string="text %PROPERTY% more text" [option.OPTION="on"])
where:
-
template()is the directive introducing block defining a template. -
The
TEMPLATE_NAMEmandatory argument is used to refer to the template. Note thatTEMPLATE_NAMEshould be unique. -
The
typemandatory argument can acquire one of these values: “list”, “subtree”, “string” or “plugin”. -
The
stringargument is the actual template text. Within this text, special characters, such as \n for newline or \r for carriage return, can be used. Other characters, such as % or ", have to be escaped if you want to use those characters literally. Within this text, special characters, such as\nfor new line or\rfor carriage return, can be used. Other characters, such as%or", have to be escaped if you want to use those characters literally. -
The text specified between two percent signs (
%) specifies a property that allows you to access specific contents of a syslog message. For more information on properties, see the section called “Properties”. The
OPTIONattribute specifies any options that modify the template functionality. The currently supported template options aresqlandstdsql, which are used for formatting the text as an SQL query, or json which formats text to be suitable for JSON processing, andcasesensitivewhich sets case sensitiveness of property names.NoteNote that the database writer checks whether the
sqlorstdsqloptions are specified in the template. If they are not, the database writer does not perform any action. This is to prevent any possible security threats, such as SQL injection.See section Storing syslog messages in a database in Section 23.2.2, “Actions” for more information.
Generating Dynamic File Names
Templates can be used to generate dynamic file names. By specifying a property as a part of the file path, a new file will be created for each unique property, which is a convenient way to classify syslog messages.
For example, use the timegenerated property, which extracts a time stamp from the message, to generate a unique file name for each syslog message:
template(name=”DynamicFile” type=”list”) {
constant(value=”/var/log/test_logs/”)
property(name=”timegenerated”)
constant(value”-test.log”)
}
Keep in mind that the $template directive only specifies the template. You must use it inside a rule for it to take effect. In /etc/rsyslog.conf, use the question mark (?) in an action definition to mark the dynamic file name template:
. ?DynamicFileProperties
Properties defined inside a template (between two percent signs (%)) enable access various contents of a syslog message through the use of a property replacer. To define a property inside a template (between the two quotation marks (“…”)), use the following syntax:
%PROPERTY_NAME:FROM_CHAR:TO_CHAR:OPTION%
where:
-
The PROPERTY_NAME attribute specifies the name of a property. A list of all available properties and their detailed description can be found in the
rsyslog.conf(5)manual page under the section Available Properties. -
FROM_CHAR and TO_CHAR attributes denote a range of characters that the specified property will act upon. Alternatively, regular expressions can be used to specify a range of characters. To do so, set the letter
Ras the FROM_CHAR attribute and specify your desired regular expression as the TO_CHAR attribute. -
The OPTION attribute specifies any property options, such as the
lowercaseoption to convert the input to lowercase. A list of all available property options and their detailed description can be found in thersyslog.conf(5)manual page under the section Property Options.
The following are some examples of simple properties:
The following property obtains the whole message text of a syslog message:
%msg%
The following property obtains the first two characters of the message text of a syslog message:
%msg:1:2%
The following property obtains the whole message text of a syslog message and drops its last line feed character:
%msg:::drop-last-lf%
The following property obtains the first 10 characters of the time stamp that is generated when the syslog message is received and formats it according to the RFC 3999 date standard.
%timegenerated:1:10:date-rfc3339%
Template Examples
This section presents a few examples of rsyslog templates.
Example 23.8, “A verbose syslog message template” shows a template that formats a syslog message so that it outputs the message’s severity, facility, the time stamp of when the message was received, the host name, the message tag, the message text, and ends with a new line.
Example 23.8. A verbose syslog message template
template(name=”verbose” type=”list”) {
property(name="syslogseverity”)
property(name="syslogfacility”)
property(name="timegenerated”)
property(name="HOSTNAME”)
property(name="syslogtag”)
property(name="msg”)
constant(value=”\n")
}
Example 23.9, “A wall message template” shows a template that resembles a traditional wall message (a message that is send to every user that is logged in and has their mesg(1) permission set to yes). This template outputs the message text, along with a host name, message tag and a time stamp, on a new line (using \r and \n) and rings the bell (using \7).
Example 23.9. A wall message template
template(name=”wallmsg” type=”list”) {
constant(value="\r\n\7Message from syslogd@”)
property(name="HOSTNAME”)
constant(value=” at ")
property(name="timegenerated”)
constant(value=" ...\r\n ”)
property(name="syslogtag”)
constant(value=” “)
property(name="msg”)
constant(value=”\r\n”)
}
Example 23.10, “A database formatted message template” shows a template that formats a syslog message so that it can be used as a database query. Notice the use of the sql option at the end of the template specified as the template option. It tells the database writer to format the message as an MySQL SQL query.
Example 23.10. A database formatted message template
template(name="dbFormat" type="list" option.sql="on") {
constant(value="insert into SystemEvents (Message, Facility, FromHost, Priority, DeviceReportedTime, ReceivedAt, InfoUnitID, SysLogTag)")
constant(value=" values ('")
property(name="msg")
constant(value="', ")
property(name="syslogfacility")
constant(value=", '")
property(name="hostname")
constant(value="', ")
property(name="syslogpriority")
constant(value=", '")
property(name="timereported" dateFormat="mysql")
constant(value="', '")
property(name="timegenerated" dateFormat="mysql")
constant(value="', ")
property(name="iut")
constant(value=", '")
property(name="syslogtag")
constant(value="')")
}
rsyslog also contains a set of predefined templates identified by the RSYSLOG_ prefix. These are reserved for the syslog’s use and it is advisable to not create a template using this prefix to avoid conflicts. The following list shows these predefined templates along with their definitions.
RSYSLOG_DebugFormatA special format used for troubleshooting property problems.
template(name=”RSYSLOG_DebugFormat” type=”string” string="Debug line with all properties:\nFROMHOST: '%FROMHOST%', fromhost-ip: '%fromhost-ip%', HOSTNAME: '%HOSTNAME%', PRI: %PRI%,\nsyslogtag '%syslogtag%', programname: '%programname%', APP-NAME: '%APP-NAME%', PROCID: '%PROCID%', MSGID: '%MSGID%',\nTIMESTAMP: '%TIMESTAMP%', STRUCTURED-DATA: '%STRUCTURED-DATA%',\nmsg: '%msg%'\nescaped msg: '%msg:::drop-cc%'\nrawmsg: '%rawmsg%'\n\n")
RSYSLOG_SyslogProtocol23FormatThe format specified in IETF’s internet-draft ietf-syslog-protocol-23, which is assumed to become the new syslog standard RFC.
template(name=”RSYSLOG_SyslogProtocol23Format” type=”string” string="%PRI%1 %TIMESTAMP:::date-rfc3339% %HOSTNAME% %APP-NAME% %PROCID% %MSGID% %STRUCTURED-DATA% %msg%\n ")
RSYSLOG_FileFormatA modern-style logfile format similar to TraditionalFileFormat, but with high-precision time stamps and time zone information.
template(name="RSYSLOG_FileFormat" type="list") { property(name="timestamp" dateFormat="rfc3339") constant(value=" ") property(name="hostname") constant(value=" ") property(name="syslogtag") property(name="msg" spifno1stsp="on" ) property(name="msg" droplastlf="on" ) constant(value="\n") }RSYSLOG_TraditionalFileFormatThe older default log file format with low-precision time stamps.
template(name="RSYSLOG_TraditionalFileFormat" type="list") { property(name="timestamp") constant(value=" ") property(name="hostname") constant(value=" ") property(name="syslogtag") property(name="msg" spifno1stsp="on" ) property(name="msg" droplastlf="on" ) constant(value="\n") }RSYSLOG_ForwardFormatA forwarding format with high-precision time stamps and time zone information.
template(name="ForwardFormat" type="list") { constant(value="<") property(name="pri") constant(value=">") property(name="timestamp" dateFormat="rfc3339") constant(value=" ") property(name="hostname") constant(value=" ") property(name="syslogtag" position.from="1" position.to="32") property(name="msg" spifno1stsp="on" ) property(name="msg") }RSYSLOG_TraditionalForwardFormatThe traditional forwarding format with low-precision time stamps.
template(name="TraditionalForwardFormat" type="list") { constant(value="<") property(name="pri") constant(value=">") property(name="timestamp") constant(value=" ") property(name="hostname") constant(value=" ") property(name="syslogtag" position.from="1" position.to="32") property(name="msg" spifno1stsp="on" ) property(name="msg") }
23.2.4. Global Directives
Global directives are configuration options that apply to the rsyslogd daemon. They usually specify a value for a specific predefined variable that affects the behavior of the rsyslogd daemon or a rule that follows. All of the global directives are enclosed in a global configuration block. The following is an example of a global directive that specifies overriding local host name for log messages:
global(localHostname=”machineXY”)
You can define multiple directives in your /etc/rsyslog.conf configuration file. A directive affects the behavior of all configuration options until another occurrence of that same directive is detected. Global directives can be used to configure actions, queues and for debugging. A comprehensive list of all available configuration directives can be found in the section called “Online Documentation”. Currently, a new configuration format has been developed that replaces the $-based syntax (see Section 23.3, “Using the New Configuration Format”). However, classic global directives remain supported as a legacy format.
23.2.5. Log Rotation
The following is a sample /etc/logrotate.conf configuration file:
# rotate log files weekly weekly # keep 4 weeks worth of backlogs rotate 4 # uncomment this if you want your log files compressed compress
All of the lines in the sample configuration file define global options that apply to every log file. In our example, log files are rotated weekly, rotated log files are kept for four weeks, and all rotated log files are compressed by gzip into the .gz format. Any lines that begin with a hash sign (#) are comments and are not processed.
You may define configuration options for a specific log file and place it under the global options. However, it is advisable to create a separate configuration file for any specific log file in the /etc/logrotate.d/ directory and define any configuration options there.
The following is an example of a configuration file placed in the /etc/logrotate.d/ directory:
/var/log/messages {
rotate 5
weekly
postrotate
/usr/bin/killall -HUP syslogd
endscript
}
The configuration options in this file are specific for the /var/log/messages log file only. The settings specified here override the global settings where possible. Thus the rotated /var/log/messages log file will be kept for five weeks instead of four weeks as was defined in the global options.
The following is a list of some of the directives you can specify in your logrotate configuration file:
weekly— Specifies the rotation of log files to be done weekly. Similar directives include:-
daily -
monthly -
yearly
-
compress— Enables compression of rotated log files. Similar directives include:-
nocompress -
compresscmd— Specifies the command to be used for compressing. -
uncompresscmd -
compressext— Specifies what extension is to be used for compressing. -
compressoptions— Specifies any options to be passed to the compression program used. -
delaycompress— Postpones the compression of log files to the next rotation of log files.
-
-
rotate INTEGER— Specifies the number of rotations a log file undergoes before it is removed or mailed to a specific address. If the value 0 is specified, old log files are removed instead of rotated. mail ADDRESS— This option enables mailing of log files that have been rotated as many times as is defined by therotatedirective to the specified address. Similar directives include:-
nomail -
mailfirst— Specifies that the just-rotated log files are to be mailed, instead of the about-to-expire log files. -
maillast— Specifies that the about-to-expire log files are to be mailed, instead of the just-rotated log files. This is the default option whenmailis enabled.
-
For the full list of directives and various configuration options, see the logrotate(5) manual page.
23.2.6. Increasing the Limit of Open Files
Under certain circumstances the rsyslog exceeds the limit for a maximum number of open files. Consequently, the rsyslog cannot open new files.
To increase the limit of open files in the rsyslog:
Create the /etc/systemd/system/rsylog.service.d/increase_nofile_limit.conf file with the following content:
[Service] LimitNOFILE=16384
23.3. Using the New Configuration Format
In rsyslog version 7, installed by default for Red Hat Enterprise Linux 7 in the rsyslog package, a new configuration syntax is introduced. This new configuration format aims to be more powerful, more intuitive, and to prevent common mistakes by not permitting certain invalid constructs. The syntax enhancement is enabled by the new configuration processor that relies on RainerScript. The legacy format is still fully supported and it is used by default in the /etc/rsyslog.conf configuration file.
RainerScript is a scripting language designed for processing network events and configuring event processors such as rsyslog. RainerScript was first used to define expression-based filters, see Example 23.3, “Expression-based Filters”. The version of RainerScript in rsyslog version 7 implements the input() and ruleset() statements, which permit the /etc/rsyslog.conf configuration file to be written in the new syntax. The new syntax differs mainly in that it is much more structured; parameters are passed as arguments to statements, such as input, action, template, and module load. The scope of options is limited by blocks. This enhances readability and reduces the number of bugs caused by misconfiguration. There is also a significant performance gain. Some functionality is exposed in both syntaxes, some only in the new one.
Compare the configuration written with legacy-style parameters:
$InputFileName /tmp/inputfile $InputFileTag tag1: $InputFileStateFile inputfile-state $InputRunFileMonitor
and the same configuration with the use of the new format statement:
input(type="imfile" file="/tmp/inputfile" tag="tag1:" statefile="inputfile-state")
This significantly reduces the number of parameters used in configuration, improves readability, and also provides higher execution speed. For more information on RainerScript statements and parameters see the section called “Online Documentation”.
23.3.1. Rulesets
Leaving special directives aside, rsyslog handles messages as defined by rules that consist of a filter condition and an action to be performed if the condition is true. With a traditionally written /etc/rsyslog.conf file, all rules are evaluated in order of appearance for every input message. This process starts with the first rule and continues until all rules have been processed or until the message is discarded by one of the rules.
However, rules can be grouped into sequences called rulesets. With rulesets, you can limit the effect of certain rules only to selected inputs or enhance the performance of rsyslog by defining a distinct set of actions bound to a specific input. In other words, filter conditions that will be inevitably evaluated as false for certain types of messages can be skipped. The legacy ruleset definition in /etc/rsyslog.conf can look as follows:
$RuleSet rulesetname rule rule2
The rule ends when another rule is defined, or the default ruleset is called as follows:
$RuleSet RSYSLOG_DefaultRuleset
With the new configuration format in rsyslog 7, the input() and ruleset() statements are reserved for this operation. The new format ruleset definition in /etc/rsyslog.conf can look as follows:
ruleset(name="rulesetname") { rule rule2 call rulesetname2 … }
Replace rulesetname with an identifier for your ruleset. The ruleset name cannot start with RSYSLOG_ since this namespace is reserved for use by rsyslog. RSYSLOG_DefaultRuleset then defines the default set of rules to be performed if the message has no other ruleset assigned. With rule and rule2 you can define rules in filter-action format mentioned above. With the call parameter, you can nest rulesets by calling them from inside other ruleset blocks.
After creating a ruleset, you need to specify what input it will apply to:
input(type="input_type" port="port_num" ruleset="rulesetname");
Here you can identify an input message by input_type, which is an input module that gathered the message, or by port_num – the port number. Other parameters such as file or tag can be specified for input(). Replace rulesetname with a name of the ruleset to be evaluated against the message. In case an input message is not explicitly bound to a ruleset, the default ruleset is triggered.
You can also use the legacy format to define rulesets, for more information see the section called “Online Documentation”.
Example 23.11. Using rulesets
The following rulesets ensure different handling of remote messages coming from different ports. Add the following into /etc/rsyslog.conf:
ruleset(name="remote-6514") {
action(type="omfile" file="/var/log/remote-6514")
}
ruleset(name="remote-601") {
cron.* action(type="omfile" file="/var/log/remote-601-cron")
mail.* action(type="omfile" file="/var/log/remote-601-mail")
}
input(type="imtcp" port="6514" ruleset="remote-6514");
input(type="imtcp" port="601" ruleset="remote-601");
Rulesets shown in the above example define log destinations for the remote input from two ports, in case of port 601, messages are sorted according to the facility. Then, the TCP input is enabled and bound to rulesets. Note that you must load the required modules (imtcp) for this configuration to work.
23.3.2. Compatibility with sysklogd
The compatibility mode specified via the -c option exists in rsyslog version 5 but not in version 7. Also, the sysklogd-style command-line options are deprecated and configuring rsyslog through these command-line options should be avoided. However, you can use several templates and directives to configure rsyslogd to emulate sysklogd-like behavior.
For more information on various rsyslogd options, see the rsyslogd(8)manual page.
23.4. Working with Queues in Rsyslog
Queues are used to pass content, mostly syslog messages, between components of rsyslog. With queues, rsyslog is capable of processing multiple messages simultaneously and to apply several actions to a single message at once. The data flow inside rsyslog can be illustrated as follows:
Figure 23.1. Message Flow in Rsyslog

Whenever rsyslog receives a message, it passes this message to the preprocessor and then places it into the main message queue. Messages wait there to be dequeued and passed to the rule processor.
The rule processor is a parsing and filtering engine. Here, the rules defined in /etc/rsyslog.conf are applied. Based on these rules, the rule processor evaluates which actions are to be performed. Each action has its own action queue. Messages are passed through this queue to the respective action processor which creates the final output. Note that at this point, several actions can run simultaneously on one message. For this purpose, a message is duplicated and passed to multiple action processors.
Only one queue per action is possible. Depending on configuration, the messages can be sent right to the action processor without action queuing. This is the behavior of direct queues (see below). In case the output action fails, the action processor notifies the action queue, which then takes an unprocessed element back and after some time interval, the action is attempted again.
To sum up, there are two positions where queues stand in rsyslog: either in front of the rule processor as a single main message queue or in front of various types of output actions as action queues. Queues provide two main advantages that both lead to increased performance of message processing:
- they serve as buffers that decouple producers and consumers in the structure of rsyslog
- they allow for parallelization of actions performed on messages
Apart from this, queues can be configured with several directives to provide optimal performance for your system. These configuration options are covered in the following sections.
If an output plug-in is unable to deliver a message, it is stored in the preceding message queue. If the queue fills, the inputs block until it is no longer full. This will prevent new messages from being logged via the blocked queue. In the absence of separate action queues this can have severe consequences, such as preventing SSH logging, which in turn can prevent SSH access. Therefore it is advised to use dedicated action queues for outputs which are forwarded over a network or to a database.
23.4.1. Defining Queues
Based on where the messages are stored, there are several types of queues: direct, in-memory, disk, and disk-assisted in-memory queues that are most widely used. You can choose one of these types for the main message queue and also for action queues. Add the following into /etc/rsyslog.conf:
object(queue.type=”queue_type”)
By adding this you can apply the setting for:
-
main message queue: replace object with
main_queue -
an action queue: replace object with
action -
ruleset: replace object with
ruleset
Replace queue_type with one of direct, linkedlist or fixedarray (which are in-memory queues), or disk.
The default setting for a main message queue is the FixedArray queue with a limit of 10,000 messages. Action queues are by default set as Direct queues.
Direct Queues
For many simple operations, such as when writing output to a local file, building a queue in front of an action is not needed. To avoid queuing, use:
object(queue.type=”Direct”)
Replace object with main_queue, action or ruleset to use this option to the main message queue, an action queue or for the ruleset respectively. With direct queue, messages are passed directly and immediately from the producer to the consumer.
Disk Queues
Disk queues store messages strictly on a hard drive, which makes them highly reliable but also the slowest of all possible queuing modes. This mode can be used to prevent the loss of highly important log data. However, disk queues are not recommended in most use cases. To set a disk queue, type the following into /etc/rsyslog.conf:
object(queue.type=”Disk”)
Replace object with main_queue, action or ruleset to use this option to the main message queue, an action queue or for the ruleset respectively. The default size of a queue can be modified with the following configuration directive:
object(queue.size=”size”)
where size represents the specified size of disk queue part. The defined size limit is not restrictive, rsyslog always writes one complete queue entry, even if it violates the size limit. Each part of a disk queue matches with an individual file. The naming directive for these files looks as follows:
object(queue.filename=”name”)
This sets a name prefix for the file followed by a 7-digit number starting at one and incremented for each file.
object(queue.maxfilesize=”size”)
Disk queues are written in parts, with a default size 1 MB. Specify size to use a different value.
In-memory Queues
With in-memory queue, the enqueued messages are held in memory which makes the process very fast. The queued data is lost if the computer is power cycled or shut down. However, you can use the action (queue.saveonshutdown=”on”) setting to save the data before shutdown. There are two types of in-memory queues:
- FixedArray queue — the default mode for the main message queue, with a limit of 10,000 elements. This type of queue uses a fixed, pre-allocated array that holds pointers to queue elements. Due to these pointers, even if the queue is empty a certain amount of memory is consumed. However, FixedArray offers the best run time performance and is optimal when you expect a relatively low number of queued messages and high performance.
- LinkedList queue — here, all structures are dynamically allocated in a linked list, thus the memory is allocated only when needed. LinkedList queues handle occasional message bursts very well.
In general, use LinkedList queues when in doubt. Compared to FixedArray, it consumes less memory and lowers the processing overhead.
Use the following syntax to configure in-memory queues:
object(queue.type=”LinkedList”)
object(queue.type=”FixedArray”)
Replace object with main_queue, action or ruleset to use this option to the main message queue, an action queue or for the ruleset respectively.
Disk-Assisted In-memory Queues
Both disk and in-memory queues have their advantages and rsyslog lets you combine them in disk-assisted in-memory queues. To do so, configure a normal in-memory queue and then add the queue.filename=”file_name” directive to its block to define a file name for disk assistance. This queue then becomes disk-assisted, which means it couples an in-memory queue with a disk queue to work in tandem.
The disk queue is activated if the in-memory queue is full or needs to persist after shutdown. With a disk-assisted queue, you can set both disk-specific and in-memory specific configuration parameters. This type of queue is probably the most commonly used, it is especially useful for potentially long-running and unreliable actions.
To specify the functioning of a disk-assisted in-memory queue, use the so-called watermarks:
object(queue.highwatermark=”number”)
object(queue.lowwatermark=”number”)
Replace object with main_queue, action or ruleset to use this option to the main message queue, an action queue or for the ruleset respectively. Replace number with a number of enqueued messages. When an in-memory queue reaches the number defined by the high watermark, it starts writing messages to disk and continues until the in-memory queue size drops to the number defined with the low watermark. Correctly set watermarks minimize unnecessary disk writes, but also leave memory space for message bursts since writing to disk files is rather lengthy. Therefore, the high watermark must be lower than the whole queue capacity set with queue.size. The difference between the high watermark and the overall queue size is a spare memory buffer reserved for message bursts. On the other hand, setting the high watermark too low will turn on disk assistance unnecessarily often.
Example 23.12. Reliable Forwarding of Log Messages to a Server
Rsyslog is often used to maintain a centralized logging system, where log messages are forwarded to a server over the network. To avoid message loss when the server is not available, it is advisable to configure an action queue for the forwarding action. This way, messages that failed to be sent are stored locally until the server is reachable again. Note that such queues are not configurable for connections using the UDP protocol.
Forwarding To a Single Server
Suppose the task is to forward log messages from the system to a server with host name example.com, and to configure an action queue to buffer the messages in case of a server outage. To do so, perform the following steps:
Use the following configuration in
/etc/rsyslog.confor create a file with the following content in the/etc/rsyslog.d/directory:. action(type=”omfwd” queue.type=”LinkedList” queue.filename=”example_fwd” action.resumeRetryCount="-1" queue.saveonshutdown="on" Target="example.com" Port="6514" Protocol="tcp")Where:
-
queue.typeenables a LinkedList in-memory queue, -
queue.filenamedefines a disk storage, in this case the backup files are created in the/var/lib/rsyslog/directory with the example_fwd prefix, -
the
action.resumeRetryCount= “-1”setting prevents rsyslog from dropping messages when retrying to connect if server is not responding, -
enabled
queue.saveonshutdownsaves in-memory data if rsyslog shuts down, the last line forwards all received messages to the logging server using reliable TCP delivery, port specification is optional.
With the above configuration, rsyslog keeps messages in memory if the remote server is not reachable. A file on disk is created only if rsyslog runs out of the configured memory queue space or needs to shut down, which benefits the system performance.
-
Forwarding To Multiple Servers
The process of forwarding log messages to multiple servers is similar to the previous procedure:
Each destination server requires a separate forwarding rule, action queue specification, and backup file on disk. For example, use the following configuration in
/etc/rsyslog.confor create a file with the following content in the/etc/rsyslog.d/directory:. action(type=”omfwd” queue.type=”LinkedList” queue.filename=”example_fwd1” action.resumeRetryCount="-1" queue.saveonshutdown="on" Target="example1.com" Protocol="tcp") . action(type=”omfwd” queue.type=”LinkedList” queue.filename=”example_fwd2” action.resumeRetryCount="-1" queue.saveonshutdown="on" Target="example2.com" Protocol="tcp")
23.4.2. Creating a New Directory for rsyslog Log Files
Rsyslog runs as the syslogd daemon and is managed by SELinux. Therefore all files to which rsyslog is required to write to, must have the appropriate SELinux file context.
Creating a New Working Directory
If required to use a different directory to store working files, create a directory as follows:
~]# mkdir
/rsyslogInstall utilities to manage SELinux policy:
~]# yum install policycoreutils-python
Set the SELinux directory context type to be the same as the
/var/lib/rsyslog/directory:~]# semanage fcontext -a -t syslogd_var_lib_t /rsyslog
Apply the SELinux context:
~]# restorecon -R -v /rsyslog restorecon reset /rsyslog context unconfined_u:object_r:default_t:s0->unconfined_u:object_r:syslogd_var_lib_t:s0
If required, check the SELinux context as follows:
~]# ls -Zd /rsyslog drwxr-xr-x. root root system_u:object_r:syslogd_var_lib_t:s0 /rsyslog
Create subdirectories as required. For example:
~]# mkdir
/rsyslog/work/The subdirectories will be created with the same SELinux context as the parent directory.
Add the following line in
/etc/rsyslog.confimmediately before it is required to take effect:global(workDirectory=”/rsyslog/work”)
This setting will remain in effect until the next
WorkDirectorydirective is encountered while parsing the configuration files.
23.4.3. Managing Queues
All types of queues can be further configured to match your requirements. You can use several directives to modify both action queues and the main message queue. Currently, there are more than 20 queue parameters available, see the section called “Online Documentation”. Some of these settings are used commonly, others, such as worker thread management, provide closer control over the queue behavior and are reserved for advanced users. With advanced settings, you can optimize rsyslog's performance, schedule queuing, or modify the behavior of a queue on system shutdown.
Limiting Queue Size
You can limit the number of messages that queue can contain with the following setting:
object(queue.highwatermark=”number”)
Replace object with main_queue, action or ruleset to use this option to the main message queue, an action queue or for the ruleset respectively. Replace number with a number of enqueued messages. You can set the queue size only as the number of messages, not as their actual memory size. The default queue size is 10,000 messages for the main message queue and ruleset queues, and 1000 for action queues.
Disk assisted queues are unlimited by default and cannot be restricted with this directive, but you can reserve them physical disk space in bytes with the following settings:
object(queue.maxdiskspace=”number”)
Replace object with main_queue, action or ruleset. When the size limit specified by number is hit, messages are discarded until sufficient amount of space is freed by dequeued messages.
Discarding Messages
When a queue reaches a certain number of messages, you can discard less important messages in order to save space in the queue for entries of higher priority. The threshold that launches the discarding process can be set with the so-called discard mark:
object(queue.discardmark=”number”)
Replace object with MainMsg or with Action to use this option to the main message queue or for an action queue respectively. Here, number stands for a number of messages that have to be in the queue to start the discarding process. To define which messages to discard, use:
object(queue.discardseverity=”number”)
Replace number with one of the following numbers for respective priorities: 7 (debug), 6 (info), 5 (notice), 4 (warning), 3 (err), 2 (crit), 1 (alert), or 0 (emerg). With this setting, both newly incoming and already queued messages with lower than defined priority are erased from the queue immediately after the discard mark is reached.
Using Timeframes
You can configure rsyslog to process queues during a specific time period. With this option you can, for example, transfer some processing into off-peak hours. To define a time frame, use the following syntax:
object(queue.dequeuetimebegin=”hour”)
object(queue.dequeuetimeend=”hour”)
With hour you can specify hours that bound your time frame. Use the 24-hour format without minutes.
Configuring Worker Threads
A worker thread performs a specified action on the enqueued message. For example, in the main message queue, a worker task is to apply filter logic to each incoming message and enqueue them to the relevant action queues. When a message arrives, a worker thread is started automatically. When the number of messages reaches a certain number, another worker thread is turned on. To specify this number, use:
object(queue.workerthreadminimummessages=”number”)
Replace number with a number of messages that will trigger a supplemental worker thread. For example, with number set to 100, a new worker thread is started when more than 100 messages arrive. When more than 200 messages arrive, the third worker thread starts and so on. However, too many working threads running in parallel becomes ineffective, so you can limit the maximum number of them by using:
object(queue.workerthreads=”number”)
where number stands for a maximum number of working threads that can run in parallel. For the main message queue, the default limit is 1 thread. Once a working thread has been started, it keeps running until an inactivity timeout appears. To set the length of timeout, type:
object(queue.timeoutworkerthreadshutdown=”time”)
Replace time with the duration set in milliseconds. Specifies time without new messages after which the worker thread will be closed. Default setting is one minute.
Batch Dequeuing
To increase performance, you can configure rsyslog to dequeue multiple messages at once. To set the upper limit for such dequeueing, use:
$object(queue.DequeueBatchSize= ”number”)
Replace number with the maximum number of messages that can be dequeued at once. Note that a higher setting combined with a higher number of permitted working threads results in greater memory consumption.
Terminating Queues
When terminating a queue that still contains messages, you can try to minimize the data loss by specifying a time interval for worker threads to finish the queue processing:
object(queue.timeoutshutdown=”time”)
Specify time in milliseconds. If after that period there are still some enqueued messages, workers finish the current data element and then terminate. Unprocessed messages are therefore lost. Another time interval can be set for workers to finish the final element:
object(queue.timeoutactioncompletion=”time”)
In case this timeout expires, any remaining workers are shut down. To save data at shutdown, use:
object(queue.saveonshutdown=”on”)
If set, all queue elements are saved to disk before rsyslog terminates.
23.4.4. Using the New Syntax for rsyslog queues
In the new syntax available in rsyslog 7, queues are defined inside the action() object that can be used both separately or inside a ruleset in /etc/rsyslog.conf. The format of an action queue is as follows:
action(type="action_type "queue.size="queue_size" queue.type="queue_type" queue.filename="file_name"
Replace action_type with the name of the module that is to perform the action and replace queue_size with a maximum number of messages the queue can contain. For queue_type, choose disk or select from one of the in-memory queues: direct, linkedlist or fixedarray. For file_name specify only a file name, not a path. Note that if creating a new directory to hold log files, the SELinux context must be set. See Section 23.4.2, “Creating a New Directory for rsyslog Log Files” for an example.
Example 23.13. Defining an Action Queue
To configure the output action with an asynchronous linked-list based action queue which can hold a maximum of 10,000 messages, enter a command as follows:
action(type="omfile" queue.size="10000" queue.type="linkedlist" queue.filename="logfile")
The rsyslog 7 syntax for a direct action queues is as follows:
. action(type="omfile" file="/var/lib/rsyslog/log_file )
The rsyslog 7 syntax for an action queue with multiple parameters can be written as follows:
. action(type="omfile" queue.filename="log_file" queue.type="linkedlist" queue.size="10000" )
The default work directory, or the last work directory to be set, will be used. If required to use a different work directory, add a line as follows before the action queue:
global(workDirectory="/directory")Example 23.14. Forwarding To a Single Server Using the New Syntax
The following example is based on the procedure Forwarding To a Single Server in order to show the difference between the traditional sysntax and the rsyslog 7 syntax. The omfwd plug-in is used to provide forwarding over UDP or TCP. The default is UDP. As the plug-in is built in it does not have to be loaded.
Use the following configuration in /etc/rsyslog.conf or create a file with the following content in the /etc/rsyslog.d/ directory:
. action(type="omfwd"
queue.type="linkedlist"
queue.filename="example_fwd"
action.resumeRetryCount="-1"
queue.saveOnShutdown="on"
target="example.com" port="6514" protocol="tcp"
)Where:
-
queue.type="linkedlist"enables a LinkedList in-memory queue, -
queue.filenamedefines a disk storage. The backup files are created with the example_fwd prefix, in the working directory specified by the preceding globalworkDirectorydirective, -
the
action.resumeRetryCount -1setting prevents rsyslog from dropping messages when retrying to connect if server is not responding, -
enabled
queue.saveOnShutdown="on"saves in-memory data if rsyslog shuts down, - the last line forwards all received messages to the logging server, port specification is optional.
23.5. Configuring rsyslog on a Logging Server
The rsyslog service provides facilities both for running a logging server and for configuring individual systems to send their log files to the logging server. See Example 23.12, “Reliable Forwarding of Log Messages to a Server” for information on client rsyslog configuration.
The rsyslog service must be installed on the system that you intend to use as a logging server and all systems that will be configured to send logs to it. Rsyslog is installed by default in Red Hat Enterprise Linux 7. If required, to ensure that it is, enter the following command as root:
~]# yum install rsyslog
The default protocol and port for syslog traffic is UDP and 514, as listed in the /etc/services file. However, rsyslog defaults to using TCP on port 514. In the configuration file, /etc/rsyslog.conf, TCP is indicated by @@.
Other ports are sometimes used in examples, however SELinux is only configured to allow sending and receiving on the following ports by default:
~]# semanage port -l | grep syslog syslog_tls_port_t tcp 6514, 10514 syslog_tls_port_t udp 6514, 10514 syslogd_port_t tcp 601, 20514 syslogd_port_t udp 514, 601, 20514
The semanage utility is provided as part of the policycoreutils-python package. If required, install the package as follows:
~]# yum install policycoreutils-python
In addition, by default the SELinux type for rsyslog, rsyslogd_t, is configured to permit sending and receiving to the remote shell (rsh) port with SELinux type rsh_port_t, which defaults to TCP on port 514. Therefore it is not necessary to use semanage to explicitly permit TCP on port 514. For example, to check what SELinux is set to permit on port 514, enter a command as follows:
~]# semanage port -l | grep 514
output omitted
rsh_port_t tcp 514
syslogd_port_t tcp 6514, 601
syslogd_port_t udp 514, 6514, 601For more information on SELinux, see Red Hat Enterprise Linux 7 SELinux User’s and Administrator’s Guide.
Perform the steps in the following procedures on the system that you intend to use as your logging server. All steps in these procedure must be made as the root user.
Configure SELinux to Permit rsyslog Traffic on a Port
If required to use a new port for rsyslog traffic, follow this procedure on the logging server and the clients. For example, to send and receive TCP traffic on port 10514, proceed with the following sequence of commands:
Run the
semanage portcommand with the following parameters:~]# semanage port -a -t syslogd_port_t -p tcp 10514
Review the SELinux ports by entering the following command:
~]# semanage port -l | grep syslog
If the new port was already configured in
/etc/rsyslog.conf, restartrsyslognow for the change to take effect:~]# service rsyslog restart
Verify which ports
rsyslogis now listening to:~]# netstat -tnlp | grep rsyslog tcp 0 0 0.0.0.0:10514 0.0.0.0:* LISTEN 2528/rsyslogd tcp 0 0 :::10514 :::* LISTEN 2528/rsyslogd
See the semanage-port(8) manual page for more information on the semanage port command.
Configuring firewalld
Configure firewalld to allow incoming rsyslog traffic. For example, to allow TCP traffic on port 10514, proceed as follows:
~]# firewall-cmd --zone=zone --add-port=10514/tcp success
Where zone is the zone of the interface to use. Note that these changes will not persist after the next system start. To make permanent changes to the firewall, repeat the commands adding the --permanent option. For more information on opening and closing ports in firewalld, see the Red Hat Enterprise Linux 7 Security Guide.
To verify the above settings, use a command as follows:
~]# firewall-cmd --list-all public (default, active) interfaces: eth0 sources: services: dhcpv6-client ssh ports: 10514/tcp masquerade: no forward-ports: icmp-blocks: rich rules:
Configuring rsyslog to Receive and Sort Remote Log Messages
Open the
/etc/rsyslog.conffile in a text editor and proceed as follows:Add these lines below the modules section but above the
Provides UDP syslog receptionsection:# Define templates before the rules that use them # Per-Host Templates for Remote Systems # $template TmplAuthpriv, "/var/log/remote/auth/%HOSTNAME%/%PROGRAMNAME:::secpath-replace%.log" $template TmplMsg, "/var/log/remote/msg/%HOSTNAME%/%PROGRAMNAME:::secpath-replace%.log"Replace the default
Provides TCP syslog receptionsection with the following:# Provides TCP syslog reception $ModLoad imtcp # Adding this ruleset to process remote messages $RuleSet remote1 authpriv.* ?TmplAuthpriv *.info;mail.none;authpriv.none;cron.none ?TmplMsg $RuleSet RSYSLOG_DefaultRuleset #End the rule set by switching back to the default rule set $InputTCPServerBindRuleset remote1 #Define a new input and bind it to the "remote1" rule set $InputTCPServerRun 10514
Save the changes to the
/etc/rsyslog.conffile.
The
rsyslogservice must be running on both the logging server and the systems attempting to log to it.Use the
systemctlcommand to start thersyslogservice.~]#
systemctl start rsyslogTo ensure the
rsyslogservice starts automatically in future, enter the following command as root:~]#
systemctl enable rsyslog
Your log server is now configured to receive and store log files from the other systems in your environment.
23.5.1. Using The New Template Syntax on a Logging Server
Rsyslog 7 has a number of different templates styles. The string template most closely resembles the legacy format. Reproducing the templates from the example above using the string format would look as follows:
template(name="TmplAuthpriv" type="string"
string="/var/log/remote/auth/%HOSTNAME%/%PROGRAMNAME:::secpath-replace%.log"
)
template(name="TmplMsg" type="string"
string="/var/log/remote/msg/%HOSTNAME%/%PROGRAMNAME:::secpath-replace%.log"
)These templates can also be written in the list format as follows:
template(name="TmplAuthpriv" type="list") {
constant(value="/var/log/remote/auth/")
property(name="hostname")
constant(value="/")
property(name="programname" SecurePath="replace")
constant(value=".log")
}
template(name="TmplMsg" type="list") {
constant(value="/var/log/remote/msg/")
property(name="hostname")
constant(value="/")
property(name="programname" SecurePath="replace")
constant(value=".log")
}This template text format might be easier to read for those new to rsyslog and therefore can be easier to adapt as requirements change.
To complete the change to the new syntax, we need to reproduce the module load command, add a rule set, and then bind the rule set to the protocol, port, and ruleset:
module(load="imtcp")
ruleset(name="remote1"){
authpriv.* action(type="omfile" DynaFile="TmplAuthpriv")
*.info;mail.none;authpriv.none;cron.none action(type="omfile" DynaFile="TmplMsg")
}
input(type="imtcp" port="10514" ruleset="remote1")23.6. Using Rsyslog Modules
Due to its modular design, rsyslog offers a variety of modules which provide additional functionality. Note that modules can be written by third parties. Most modules provide additional inputs (see Input Modules below) or outputs (see Output Modules below). Other modules provide special functionality specific to each module. The modules may provide additional configuration directives that become available after a module is loaded. To load a module, use the following syntax:
module(load=”MODULE”)
where MODULE represents your desired module. For example, if you want to load the Text File Input Module (imfile) that enables rsyslog to convert any standard text files into syslog messages, specify the following line in the /etc/rsyslog.conf configuration file:
module(load=”imfile”)
rsyslog offers a number of modules which are split into the following main categories:
-
Input Modules — Input modules gather messages from various sources. The name of an input module always starts with the
imprefix, such asimfileandimjournal. -
Output Modules — Output modules provide a facility to issue message to various targets such as sending across a network, storing in a database, or encrypting. The name of an output module always starts with the
omprefix, such asomsnmp,omrelp, and so on. -
Parser Modules — These modules are useful in creating custom parsing rules or to parse malformed messages. With moderate knowledge of the C programming language, you can create your own message parser. The name of a parser module always starts with the
pmprefix, such aspmrfc5424,pmrfc3164, and so on. -
Message Modification Modules — Message modification modules change content of syslog messages. Names of these modules start with the
mmprefix. Message Modification Modules such asmmanon,mmnormalize, ormmjsonparseare used for anonymization or normalization of messages. -
String Generator Modules — String generator modules generate strings based on the message content and strongly cooperate with the template feature provided by rsyslog. For more information on templates, see Section 23.2.3, “Templates”. The name of a string generator module always starts with the
smprefix, such assmfileorsmtradfile. - Library Modules — Library modules provide functionality for other loadable modules. These modules are loaded automatically by rsyslog when needed and cannot be configured by the user.
A comprehensive list of all available modules and their detailed description can be found at http://www.rsyslog.com/doc/rsyslog_conf_modules.html.
Note that when rsyslog loads any modules, it provides them with access to some of its functions and data. This poses a possible security threat. To minimize security risks, use trustworthy modules only.
23.6.1. Importing Text Files
The Text File Input Module, abbreviated as imfile, enables rsyslog to convert any text file into a stream of syslog messages. You can use imfile to import log messages from applications that create their own text file logs. To load imfile, add the following into /etc/rsyslog.conf:
module(load=”imfile”
PollingInterval=”int”)
It is sufficient to load imfile once, even when importing multiple files. The PollingInterval module argument specifies how often rsyslog checks for changes in connected text files. The default interval is 10 seconds, to change it, replace int with a time interval specified in seconds.
To identify the text files to import, use the following syntax in /etc/rsyslog.conf:
# File 1 input(type="imfile" File="path_to_file" Tag="tag:" Severity="severity" Facility="facility") # File 2 input(type="imfile" File="path_to_file2") ...
Settings required to specify an input text file:
- replace path_to_file with a path to the text file.
- replace tag: with a tag name for this message.
Apart from the required directives, there are several other settings that can be applied on the text input. Set the severity of imported messages by replacing severity with an appropriate keyword. Replace facility with a keyword to define the subsystem that produced the message. The keywords for severity and facility are the same as those used in facility/priority-based filters, see Section 23.2.1, “Filters”.
Example 23.15. Importing Text Files
The Apache HTTP server creates log files in text format. To apply the processing capabilities of rsyslog to apache error messages, first use the imfile module to import the messages. Add the following into /etc/rsyslog.conf:
module(load=”imfile”) input(type="imfile" File="/var/log/httpd/error_log" Tag="apache-error:")
23.6.2. Exporting Messages to a Database
Processing of log data can be faster and more convenient when performed in a database rather than with text files. Based on the type of DBMS used, choose from various output modules such as ommysql, ompgsql, omoracle, or ommongodb. As an alternative, use the generic omlibdbi output module that relies on the libdbi library. The omlibdbi module supports database systems Firebird/Interbase, MS SQL, Sybase, SQLite, Ingres, Oracle, mSQL, MySQL, and PostgreSQL.
Example 23.16. Exporting Rsyslog Messages to a Database
To store the rsyslog messages in a MySQL database, add the following into /etc/rsyslog.conf:
module(load=”ommysql”)
. action(type”ommysql”
server=”database-server”
db=”database-name”
uid=”database-userid”
pwd=”database-password”
serverport=”1234”)First, the output module is loaded, then the communication port is specified. Additional information, such as name of the server and the database, and authentication data, is specified on the last line of the above example.
23.6.3. Enabling Encrypted Transport
Confidentiality and integrity in network transmissions can be provided by either the TLS or GSSAPI encryption protocol.
Transport Layer Security (TLS) is a cryptographic protocol designed to provide communication security over the network. When using TLS, rsyslog messages are encrypted before sending, and mutual authentication exists between the sender and receiver. For configuring TLS, see the section called “Configuring Encrypted Message Transfer with TLS”.
Generic Security Service API (GSSAPI) is an application programming interface for programs to access security services. To use it in connection with rsyslog you must have a functioning Kerberos environment. For configuring GSSAPI, see the section called “Configuring Encrypted Message Transfer with GSSAPI”.
Configuring Encrypted Message Transfer with TLS
To use encrypted transport through TLS, you need to configure both the server and the client.
- Create public key, private key and certificate file, see Section 14.1.11, “Generating a New Key and Certificate”.
On the server side, configure the following in the
/etc/rsyslog.confconfiguration file:Set the gtls netstream driver as the default driver:
global(defaultnetstreamdriver="gtls")
Provide paths to certificate files:
global(defaultnetstreamdrivercafile="path_ca.pem" defaultnetstreamdrivercertfile="path_cert.pem" defaultnetstreamdriverkeyfile="path_key.pem")
You can merge all global directives into single block if you prefer a less cluttered configuration file.
Replace:
- path_ca.pem with a path to your public key
- path_cert.pem with a path to the certificate file
- path_key.pem with a path to the private key
Load the imtcp moduleand set driver options:
module(load=”imtcp” StreamDriver.Mode=“number” StreamDriver.AuthMode=”anon”)
Start a server:
input(type="imtcp" port="port″)
Replace:
-
number to specify the driver mode. To enable TCP-only mode, use
1 port with the port number at which to start a listener, for example
10514The
anonsetting means that the client is not authenticated.
-
number to specify the driver mode. To enable TCP-only mode, use
On the client side, configure the following in the
/etc/rsyslog.confconfiguration file:Load the public key:
global(defaultnetstreamdrivercafile="path_ca.pem")
Replace path_ca.pem with a path to the public key.
Set the gtls netstream driver as the default driver:
global(defaultnetstreamdriver="gtls")
Configure the driver and specify what action will be performed:
module(load=”imtcp” streamdrivermode=”number” streamdriverauthmode=”anon”) input(type=”imtcp” address=”server.net” port=”port”)
Replace number, anon, and port with the same values as on the server.
On the last line in the above listing, an example action forwards messages from the server to the specified TCP port.
Configuring Encrypted Message Transfer with GSSAPI
In rsyslog, interaction with GSSAPI is provided by the imgssapi module. To turn on the GSSAPI transfer mode:
Put the following configuration in
/etc/rsyslog.conf:$ModLoad imgssapi
This directive loads the imgssapi module.
Specify the input as follows:
$InputGSSServerServiceName name $InputGSSServerPermitPlainTCP
on$InputGSSServerMaxSessions number $InputGSSServerRun port- Replace name with the name of the GSS server.
- Replace number to set the maximum number of sessions supported. This number is not limited by default.
Replace port with a selected port on which you want to start a GSS server.
The
$InputGSSServerPermitPlainTCP onsetting permits the server to receive also plain TCP messages on the same port. This is off by default.
The imgssapi module is initialized as soon as the configuration file reader encounters the $InputGSSServerRun directive in the /etc/rsyslog.conf configuration file. The supplementary options configured after $InputGSSServerRun are therefore ignored. For configuration to take effect, all imgssapi configuration options must be placed before $InputGSSServerRun.
Example 23.17. Using GSSAPI
The following configuration enables a GSS server on the port 1514 that also permits to receive plain tcp syslog messages on the same port.
$ModLoad imgssapi $InputGSSServerPermitPlainTCP on $InputGSSServerRun 1514
23.6.4. Using RELP
Reliable Event Logging Protocol (RELP) is a networking protocol for data logging in computer networks. It is designed to provide reliable delivery of event messages, which makes it useful in environments where message loss is not acceptable.
Configuring RELP
To configure RELP, you need to configure both the server and the client using the /etc/rsyslog.conf file.
To configure the client:
Load the required modules:
module(load="imuxsock") module(load="omrelp") module(load="imtcp")
Configure the TCP input as follows:
input(type="imtcp" port="port″)Replace port to start a listener at the required port.
Configure the transport settings:
action(type="omrelp" target="target_IP″ port="target_port″)
Replace target_IP and target_port with the IP address and port that identify the target server.
To configure the server:
Configure loading the module:
module(load="imuxsock") module(load="imrelp" ruleset="relp")
Configure the TCP input similarly to the client configuration:
input(type="imrelp" port="target_port″)Replace target_port with the same value as on the clients.
Configure the rules and choose an action to be performed. In the following example, log_path specifies the path for storing messages:
ruleset (name="relp") { action(type="omfile" file="log_path") }
Configuring RELP with TLS
To configure RELP with TLS, you need to configure authentication. Then, you need to configure both the server and the client using the /etc/rsyslog.conf file.
- Create public key, private key and certificate file. For instructions, see Section 14.1.11, “Generating a New Key and Certificate”.
To configure the client:
Load the required modules:
module(load="imuxsock") module(load="omrelp") module(load="imtcp")
Configure the TCP input as follows:
input(type="imtcp" port="port″)Replace port to start a listener at the required port.
Configure the transport settings:
action(type="omrelp" target="target_IP″ port="target_port″ tls="on" tls.caCert="path_ca.pem" tls.myCert="path_cert.pem" tls.myPrivKey="path_key.pem" tls.authmode="mode" tls.permittedpeer=["peer_name"] )
Replace:
- target_IP and target_port with the IP address and port that identify the target server.
- path_ca.pem, path_cert.pem, and path_key.pem with paths to the certification files
- mode with the authentication mode for the transaction. Use either "name" or "fingerprint"
peer_name with a certificate fingerprint of the permitted peer. If you specify this,
tls.permittedpeerrestricts connection to the selected group of peers.The tls="on" setting enables the TLS protocol.
To configure the server:
Configure loading the module:
module(load="imuxsock") module(load="imrelp" ruleset="relp")
Configure the TCP input similarly to the client configuration:
input(type="imrelp" port="target_port″ tls="on" tls.caCert="path_ca.pem" tls.myCert="path_cert.pem" tls.myPrivKey="path_key.pem" tls.authmode="name" tls.permittedpeer=["peer_name","peer_name1","peer_name2"] )
Replace the highlighted values with the same as on the client.
Configure the rules and choose an action to be performed. In the following example, log_path specifies the path for storing messages:
ruleset (name="relp") { action(type="omfile" file="log_path") }
23.7. Interaction of Rsyslog and Journal
As mentioned above, Rsyslog and Journal, the two logging applications present on your system, have several distinctive features that make them suitable for specific use cases. In many situations it is useful to combine their capabilities, for example to create structured messages and store them in a file database (see Section 23.8, “Structured Logging with Rsyslog”). A communication interface needed for this cooperation is provided by input and output modules on the side of Rsyslog and by the Journal's communication socket.
By default, rsyslogd uses the imjournal module as a default input mode for journal files. With this module, you import not only the messages but also the structured data provided by journald. Also, older data can be imported from journald (unless forbidden with the IgnorePreviousMessages option). See Section 23.8.1, “Importing Data from Journal” for basic configuration of imjournal.
As an alternative, configure rsyslogd to read from the socket provided by journal as an output for syslog-based applications. The path to the socket is /run/systemd/journal/syslog. Use this option when you want to maintain plain rsyslog messages. Compared to imjournal the socket input currently offers more features, such as ruleset binding or filtering. To import Journal data trough the socket, use the following configuration in /etc/rsyslog.conf:
module(load="imuxsock"
SysSock.Use="on"
SysSock.Name="/run/systemd/journal/syslog")
You can also output messages from Rsyslog to Journal with the omjournal module. Configure the output in /etc/rsyslog.conf as follows:
module(load="omjournal") action(type="omjournal")
For instance, the following configuration forwards all received messages on tcp port 10514 to the Journal:
module(load="imtcp")
module(load="omjournal")
ruleset(name="remote") {
action(type="omjournal")
}
input(type="imtcp" port="10514" ruleset="remote")23.8. Structured Logging with Rsyslog
On systems that produce large amounts of log data, it can be convenient to maintain log messages in a structured format. With structured messages, it is easier to search for particular information, to produce statistics and to cope with changes and inconsistencies in message structure. Rsyslog uses the JSON (JavaScript Object Notation) format to provide structure for log messages.
Compare the following unstructured log message:
Oct 25 10:20:37 localhost anacron[1395]: Jobs will be executed sequentially
with a structured one:
{"timestamp":"2013-10-25T10:20:37", "host":"localhost", "program":"anacron", "pid":"1395", "msg":"Jobs will be executed sequentially"}Searching structured data with use of key-value pairs is faster and more precise than searching text files with regular expressions. The structure also lets you to search for the same entry in messages produced by various applications. Also, JSON files can be stored in a document database such as MongoDB, which provides additional performance and analysis capabilities. On the other hand, a structured message requires more disk space than the unstructured one.
In rsyslog, log messages with meta data are pulled from Journal with use of the imjournal module. With the mmjsonparse module, you can parse data imported from Journal and from other sources and process them further, for example as a database output. For parsing to be successful, mmjsonparse requires input messages to be structured in a way that is defined by the Lumberjack project.
The Lumberjack project aims to add structured logging to rsyslog in a backward-compatible way. To identify a structured message, Lumberjack specifies the @cee: string that prepends the actual JSON structure. Also, Lumberjack defines the list of standard field names that should be used for entities in the JSON string. For more information on Lumberjack, see the section called “Online Documentation”.
The following is an example of a lumberjack-formatted message:
@cee: {"pid":17055, "uid":1000, "gid":1000, "appname":"logger", "msg":"Message text."}
To build this structure inside Rsyslog, a template is used, see Section 23.8.2, “Filtering Structured Messages”. Applications and servers can employ the libumberlog library to generate messages in the lumberjack-compliant form. For more information on libumberlog, see the section called “Online Documentation”.
23.8.1. Importing Data from Journal
The imjournal module is Rsyslog's input module to natively read the journal files (see Section 23.7, “Interaction of Rsyslog and Journal”). Journal messages are then logged in text format as other rsyslog messages. However, with further processing, it is possible to translate meta data provided by Journal into a structured message.
To import data from Journal to Rsyslog, use the following configuration in /etc/rsyslog.conf:
module(load=”imjournal” PersistStateInterval=”number_of_messages” StateFile=”path” ratelimit.interval=”seconds” ratelimit.burst=”burst_number” IgnorePreviousMessages=”off/on”)
- With number_of_messages, you can specify how often the journal data must be saved. This will happen each time the specified number of messages is reached.
- Replace path with a path to the state file. This file tracks the journal entry that was the last one processed.
- With seconds, you set the length of the rate limit interval. The number of messages processed during this interval cannot exceed the value specified in burst_number. The default setting is 20,000 messages per 600 seconds. Rsyslog discards messages that come after the maximum burst within the time frame specified.
-
With
IgnorePreviousMessagesyou can ignore messages that are currently in Journal and import only new messages, which is used when there is no state file specified. The default setting isoff. Please note that if this setting is off and there is no state file, all messages in the Journal are processed, even if they were already processed in a previous rsyslog session.
You can use imjournal simultaneously with imuxsock module that is the traditional system log input. However, to avoid message duplication, you must prevent imuxsock from reading the Journal’s system socket. To do so, use the SysSock.Use directive:
module(load”imjournal”) module(load”imuxsock” SysSock.Use=”off” Socket="/run/systemd/journal/syslog")
You can translate all data and meta data stored by Journal into structured messages. Some of these meta data entries are listed in Example 23.19, “Verbose journalctl Output”, for a complete list of journal fields see the systemd.journal-fields(7) manual page. For example, it is possible to focus on kernel journal fields, that are used by messages originating in the kernel.
23.8.2. Filtering Structured Messages
To create a lumberjack-formatted message that is required by rsyslog's parsing module, use the following template:
template(name="CEETemplate" type="string" string="%TIMESTAMP% %HOSTNAME% %syslogtag% @cee: %$!all-json%\n")
This template prepends the @cee: string to the JSON string and can be applied, for example, when creating an output file with omfile module. To access JSON field names, use the $! prefix. For example, the following filter condition searches for messages with specific hostname and UID:
($!hostname == "hostname" && $!UID== "UID")
23.8.3. Parsing JSON
The mmjsonparse module is used for parsing structured messages.
These messages can come from Journal or from other input sources, and must be formatted in a way defined by the Lumberjack project. These messages are identified by the presence of the @cee: string. Then, mmjsonparse checks if the JSON structure is valid and then the message is parsed.
To parse lumberjack-formatted JSON messages with mmjsonparse, use the following configuration in the /etc/rsyslog.conf:
module(load”mmjsonparse”)
. :mmjsonparse:
In this example, the mmjsonparse module is loaded on the first line, then all messages are forwarded to it. Currently, there are no configuration parameters available for mmjsonparse.
23.8.4. Storing Messages in the MongoDB
Rsyslog supports storing JSON logs in the MongoDB document database through the ommongodb output module.
To forward log messages into MongoDB, use the following syntax in the /etc/rsyslog.conf (configuration parameters for ommongodb are available only in the new configuration format; see Section 23.3, “Using the New Configuration Format”):
module(load”ommongodb”)
. action(type="ommongodb" server="DB_server" serverport="port" db="DB_name" collection="collection_name" uid="UID" pwd="password")-
Replace DB_server with the name or address of the MongoDB server. Specify port to select a non-standard port from the MongoDB server. The default port value is
0and usually there is no need to change this parameter. - With DB_name, you identify to which database on the MongoDB server you want to direct the output. Replace collection_name with the name of a collection in this database. In MongoDB, collection is a group of documents, the equivalent of an RDBMS table.
- You can set your login details by replacing UID and password.
You can shape the form of the final database output with use of templates. By default, rsyslog uses a template based on standard lumberjack field names.
23.9. Debugging Rsyslog
To run rsyslogd in debugging mode, use the following command:
rsyslogd-dn
With this command, rsyslogd produces debugging information and prints it to the standard output. The -n stands for "no fork". You can modify debugging with environmental variables, for example, you can store the debug output in a log file. Before starting rsyslogd, type the following on the command line:
export RSYSLOG_DEBUGLOG="path"
export RSYSLOG_DEBUG="Debug"
Replace path with a desired location for the file where the debugging information will be logged. For a complete list of options available for the RSYSLOG_DEBUG variable, see the related section in the rsyslogd(8) manual page.
To check if syntax used in the /etc/rsyslog.conf file is valid use:
rsyslogd-N1
Where 1 represents level of verbosity of the output message. This is a forward compatibility option because currently, only one level is provided. However, you must add this argument to run the validation.
23.10. Using the Journal
The Journal is a component of systemd that is responsible for viewing and management of log files. It can be used in parallel, or in place of a traditional syslog daemon, such as rsyslogd. The Journal was developed to address problems connected with traditional logging. It is closely integrated with the rest of the system, supports various logging technologies and access management for the log files.
Logging data is collected, stored, and processed by the Journal’s journald service. It creates and maintains binary files called journals based on logging information that is received from the kernel, from user processes, from standard output, and standard error output of system services or via its native API. These journals are structured and indexed, which provides relatively fast seek times. Journal entries can carry a unique identifier. The journald service collects numerous meta data fields for each log message. The actual journal files are secured, and therefore cannot be manually edited.
23.10.1. Viewing Log Files
To access the journal logs, use the journalctl tool. For a basic view of the logs type as root:
journalctl
An output of this command is a list of all log files generated on the system including messages generated by system components and by users. The structure of this output is similar to one used in /var/log/messages/ but with certain improvements:
- the priority of entries is marked visually. Lines of error priority and higher are highlighted with red color and a bold font is used for lines with notice and warning priority
- the time stamps are converted for the local time zone of your system
- all logged data is shown, including rotated logs
- the beginning of a boot is tagged with a special line
Example 23.18. Example Output of journalctl
The following is an example output provided by the journalctl tool. When called without parameters, the listed entries begin with a time stamp, then the host name and application that performed the operation is mentioned followed by the actual message. This example shows the first three entries in the journal log:
# journalctl -- Logs begin at Thu 2013-08-01 15:42:12 CEST, end at Thu 2013-08-01 15:48:48 CEST. -- Aug 01 15:42:12 localhost systemd-journal[54]: Allowing runtime journal files to grow to 49.7M. Aug 01 15:42:12 localhost kernel: Initializing cgroup subsys cpuset Aug 01 15:42:12 localhost kernel: Initializing cgroup subsys cpu [...]
In many cases, only the latest entries in the journal log are relevant. The simplest way to reduce journalctl output is to use the -n option that lists only the specified number of most recent log entries:
journalctl-nNumber
Replace Number with the number of lines to be shown. When no number is specified, journalctl displays the ten most recent entries.
The journalctl command allows controlling the form of the output with the following syntax:
journalctl-oform
Replace form with a keyword specifying a desired form of output. There are several options, such as verbose, which returns full-structured entry items with all fields, export, which creates a binary stream suitable for backups and network transfer, and json, which formats entries as JSON data structures. For the full list of keywords, see the journalctl(1) manual page.
Example 23.19. Verbose journalctl Output
To view full meta data about all entries, type:
# journalctl -o verbose
[...]
Fri 2013-08-02 14:41:22 CEST [s=e1021ca1b81e4fc688fad6a3ea21d35b;i=55c;b=78c81449c920439da57da7bd5c56a770;m=27cc
_BOOT_ID=78c81449c920439da57da7bd5c56a770
PRIORITY=5
SYSLOG_FACILITY=3
_TRANSPORT=syslog
_MACHINE_ID=69d27b356a94476da859461d3a3bc6fd
_HOSTNAME=localhost.localdomain
_PID=562
_COMM=dbus-daemon
_EXE=/usr/bin/dbus-daemon
_CMDLINE=/bin/dbus-daemon --system --address=systemd: --nofork --nopidfile --systemd-activation
_SYSTEMD_CGROUP=/system/dbus.service
_SYSTEMD_UNIT=dbus.service
SYSLOG_IDENTIFIER=dbus
SYSLOG_PID=562
_UID=81
_GID=81
_SELINUX_CONTEXT=system_u:system_r:system_dbusd_t:s0-s0:c0.c1023
MESSAGE=[system] Successfully activated service 'net.reactivated.Fprint'
_SOURCE_REALTIME_TIMESTAMP=1375447282839181
[...]
This example lists fields that identify a single log entry. These meta data can be used for message filtering as shown in the section called “Advanced Filtering”. For a complete description of all possible fields see the systemd.journal-fields(7) manual page.
23.10.2. Access Control
By default, Journal users without root privileges can only see log files generated by them. The system administrator can add selected users to the adm group, which grants them access to complete log files. To do so, type as root:
usermod-a-Gadm username
Here, replace username with a name of the user to be added to the adm group. This user then receives the same output of the journalctl command as the root user. Note that access control only works when persistent storage is enabled for Journal.
23.10.3. Using The Live View
When called without parameters, journalctl shows the full list of entries, starting with the oldest entry collected. With the live view, you can supervise the log messages in real time as new entries are continuously printed as they appear. To start journalctl in live view mode, type:
journalctl-f
This command returns a list of the ten most current log lines. The journalctl utility then stays running and waits for new changes to show them immediately.
23.10.4. Filtering Messages
The output of the journalctl command executed without parameters is often extensive, therefore you can use various filtering methods to extract information to meet your needs.
Filtering by Priority
Log messages are often used to track erroneous behavior on the system. To view only entries with a selected or higher priority, use the following syntax:
journalctl-ppriority
Here, replace priority with one of the following keywords (or with a number): debug (7), info (6), notice (5), warning (4), err (3), crit (2), alert (1), and emerg (0).
Example 23.20. Filtering by Priority
To view only entries with error or higher priority, use:
journalctl-p err
Filtering by Time
To view log entries only from the current boot, type:
journalctl-b
If you reboot your system just occasionally, the -b will not significantly reduce the output of journalctl. In such cases, time-based filtering is more helpful:
journalctl--since=value--until=value
With --since and --until, you can view only log messages created within a specified time range. You can pass values to these options in form of date or time or both as shown in the following example.
Example 23.21. Filtering by Time and Priority
Filtering options can be combined to reduce the set of results according to specific requests. For example, to view the warning or higher priority messages from a certain point in time, type:
journalctl-p warning--since="2013-3-16 23:59:59"
Advanced Filtering
Example 23.19, “Verbose journalctl Output” lists a set of fields that specify a log entry and can all be used for filtering. For a complete description of meta data that systemd can store, see the systemd.journal-fields(7) manual page. This meta data is collected for each log message, without user intervention. Values are usually text-based, but can take binary and large values; fields can have multiple values assigned though it is not very common.
To view a list of unique values that occur in a specified field, use the following syntax:
journalctl-Ffieldname
Replace fieldname with a name of a field you are interested in.
To show only log entries that fit a specific condition, use the following syntax:
journalctl fieldname=valueReplace fieldname with a name of a field and value with a specific value contained in that field. As a result, only lines that match this condition are returned.
As the number of meta data fields stored by systemd is quite large, it is easy to forget the exact name of the field of interest. When unsure, type:
journalctland press the Tab key two times. This shows a list of available field names. Tab completion based on context works on field names, so you can type a distinctive set of letters from a field name and then press Tab to complete the name automatically. Similarly, you can list unique values from a field. Type:
journalctl fieldname=
and press Tab two times. This serves as an alternative to journalctl -F fieldname.
You can specify multiple values for one field:
journalctl fieldname=value1 fieldname=value2 ...
Specifying two matches for the same field results in a logical OR combination of the matches. Entries matching value1 or value2 are displayed.
Also, you can specify multiple field-value pairs to further reduce the output set:
journalctl fieldname1=value fieldname2=value ...
If two matches for different field names are specified, they will be combined with a logical AND. Entries have to match both conditions to be shown.
With use of the + symbol, you can set a logical OR combination of matches for multiple fields:
journalctl fieldname1=value + fieldname2=value ...
This command returns entries that match at least one of the conditions, not only those that match both of them.
Example 23.22. Advanced filtering
To display entries created by avahi-daemon.service or crond.service under user with UID 70, use the following command:
journalctl_UID=70_SYSTEMD_UNIT=avahi-daemon.service_SYSTEMD_UNIT=crond.service
Since there are two values set for the _SYSTEMD_UNIT field, both results will be displayed, but only when matching the _UID=70 condition. This can be expressed simply as: (UID=70 and (avahi or cron)).
You can apply the aforementioned filtering also in the live-view mode to keep track of the latest changes in the selected group of log entries:
journalctl-ffieldname=value ...
23.10.5. Enabling Persistent Storage
By default, Journal stores log files only in memory or a small ring-buffer in the /run/log/journal/ directory. This is sufficient to show recent log history with journalctl. This directory is volatile, log data is not saved permanently. With the default configuration, syslog reads the journal logs and stores them in the /var/log/ directory. With persistent logging enabled, journal files are stored in /var/log/journal which means they persist after reboot. Journal can then replace rsyslog for some users (but see the chapter introduction).
Enabled persistent storage has the following advantages
- Richer data is recorded for troubleshooting in a longer period of time
- For immediate troubleshooting, richer data is available after a reboot
- Server console currently reads data from journal, not log files
Persistent storage has also certain disadvantages:
- Even with persistent storage the amount of data stored depends on free memory, there is no guarantee to cover a specific time span
- More disk space is needed for logs
To enable persistent storage for Journal, create the journal directory manually as shown in the following example. As root type:
mkdir-p/var/log/journal/
Then, restart journald to apply the change:
systemctlrestartsystemd-journald
23.11. Managing Log Files in a Graphical Environment
As an alternative to the aforementioned command-line utilities, Red Hat Enterprise Linux 7 provides an accessible GUI for managing log messages.
23.11.1. Viewing Log Files
Most log files are stored in plain text format. You can view them with any text editor such as Vi or Emacs. Some log files are readable by all users on the system; however, root privileges are required to read most log files.
To view system log files in an interactive, real-time application, use the System Log.
In order to use the System Log, first ensure the gnome-system-log package is installed on your system by running, as root:
~]# yum install gnome-system-log
For more information on installing packages with Yum, see Section 9.2.4, “Installing Packages”.
After you have installed the gnome-system-log package, open the System Log by clicking → → , or type the following command at a shell prompt:
~]$ gnome-system-logThe application only displays log files that exist; thus, the list might differ from the one shown in Figure 23.2, “System Log”.
Figure 23.2. System Log

The System Log application lets you filter any existing log file. Click on the button marked with the gear symbol to view the menu, select menu:[Filters > > Manage Filters] to define or edit the desired filter.
Figure 23.3. System Log - Filters

Adding or editing a filter lets you define its parameters as is shown in Figure 23.4, “System Log - defining a filter”.
Figure 23.4. System Log - defining a filter

When defining a filter, the following parameters can be edited:
-
Name— Specifies the name of the filter. -
Regular Expression— Specifies the regular expression that will be applied to the log file and will attempt to match any possible strings of text in it. Effect-
Highlight— If checked, the found results will be highlighted with the selected color. You may select whether to highlight the background or the foreground of the text. -
Hide— If checked, the found results will be hidden from the log file you are viewing.
-
When you have at least one filter defined, it can be selected from the Filters menu and it will automatically search for the strings you have defined in the filter and highlight or hide every successful match in the log file you are currently viewing.
Figure 23.5. System Log - enabling a filter

When you select the Show matches only option, only the matched strings will be shown in the log file you are currently viewing.
23.11.2. Adding a Log File
To add a log file you want to view in the list, select → → → . This will display the Open Log window where you can select the directory and file name of the log file you want to view. Figure 23.6, “System Log - adding a log file” illustrates the Open Log window.
Figure 23.6. System Log - adding a log file
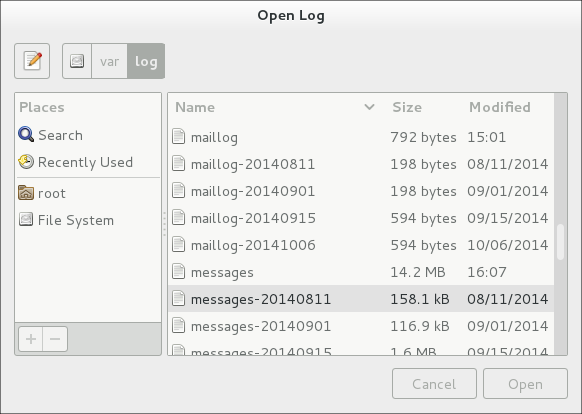
Click on the button to open the file. The file is immediately added to the viewing list where you can select it and view its contents.
The System Log also allows you to open log files zipped in the .gz format.
23.11.3. Monitoring Log Files
System Log monitors all opened logs by default. If a new line is added to a monitored log file, the log name appears in bold in the log list. If the log file is selected or displayed, the new lines appear in bold at the bottom of the log file. Figure 23.7, “System Log - new log alert” illustrates a new alert in the cron log file and in the messages log file. Clicking on the messages log file displays the logs in the file with the new lines in bold.
Figure 23.7. System Log - new log alert
23.12. Additional Resources
For more information on how to configure the rsyslog daemon and how to locate, view, and monitor log files, see the resources listed below.
Installed Documentation
-
rsyslogd(8) — The manual page for thersyslogddaemon documents its usage. -
rsyslog.conf(5) — The manual page namedrsyslog.confdocuments available configuration options. -
logrotate(8) — The manual page for the logrotate utility explains in greater detail how to configure and use it. -
journalctl(1) — The manual page for thejournalctldaemon documents its usage. -
journald.conf(5) — This manual page documents available configuration options. -
systemd.journal-fields(7) — This manual page lists special Journal fields.
Installable Documentation
/usr/share/doc/rsyslogversion/html/index.html — This file, which is provided by the rsyslog-doc package from the Optional channel, contains information on rsyslog. See Section 9.5.7, “Adding the Optional and Supplementary Repositories” for more information on Red Hat additional channels. Before accessing the documentation, you must run the following command as root:
~]# yum install rsyslog-doc
Online Documentation
The rsyslog home page offers additional documentation, configuration examples, and video tutorials. Make sure to consult the documents relevant to the version you are using:
- RainerScript documentation on the rsyslog Home Page — Commented summary of data types, expressions, and functions available in RainerScript.
- rsyslog version 7 documentation on the rsyslog home page — Version 7 of rsyslog is available for Red Hat Enterprise Linux 7 in the rsyslog package.
- Description of queues on the rsyslog Home Page — General information on various types of message queues and their usage.
See Also
-
Chapter 6, Gaining Privileges documents how to gain administrative privileges by using the
suandsudocommands. -
Chapter 10, Managing Services with systemd provides more information on systemd and documents how to use the
systemctlcommand to manage system services.
Chapter 24. Automating System Tasks
You can configure Red Hat Enterprise Linux to automatically run tasks, also known as jobs:
- regularly at specified time using cron, see Section 24.1, “Scheduling a Recurring Job Using Cron”
- asynchronously at certain days using anacron, see Section 24.2, “Scheduling a Recurring Asynchronous Job Using Anacron”
- once at a specific time using at, see Section 24.3, “Scheduling a Job to Run at a Specific Time Using at”
- once when system load average drops to a specified value using batch, see Section 24.4, “Scheduling a Job to Run on System Load Drop Using batch”
- once on the next boot, see Section 24.5, “Scheduling a Job to Run on Next Boot Using a systemd Unit File”
This chapter describes how to perform these tasks.
24.1. Scheduling a Recurring Job Using Cron
Cron is a service that enables you to schedule running a task, often called a job, at regular times. A cron job is only executed if the system is running on the scheduled time. For scheduling jobs that can postpone their execution to when the system boots up, so a job is not "lost" if the system is not running, see Section 24.3, “Scheduling a Job to Run at a Specific Time Using at”.
Users specify cron jobs in cron table files, also called crontab files. These files are then read by the crond service, which executes the jobs.
24.1.1. Prerequisites for Cron Jobs
Before scheduling a cron job:
Install the cronie package:
~]# yum install cronie
The
crondservice is enabled - made to start automatically at boot time - upon installation. If you disabled the service, enable it:~]# systemctl enable crond.service
Start the
crondservice for the current session:~]# systemctl start crond.service
(optional) Configure cron. For example, you can change:
- shell to be used when executing jobs
-
the
PATHenvironment variable mail addressee if a job sends emails.
See the crontab(5) manual page for information on configuring
cron.
24.1.2. Scheduling a Cron Job
Scheduling a Job as root User
The root user uses the cron table in /etc/crontab, or, preferably, creates a cron table file in /etc/cron.d/. Use this procedure to schedule a job as root:
Choose:
-
in which minutes of an hour to execute the job. For example, use
0,10,20,30,40,50or0/10to specify every 10 minutes of an hour. -
in which hours of a day to execute the job. For example, use
17-20to specify time from 17:00 to 20:59. -
in which days of a month to execute the job. For example, use
15to specify 15th day of a month. -
in which months of a year to execute the job. For example, use
Jun,Jul,Augor6,7,8to specify the summer months of the year. in which days of the week to execute the job. For example, use
*for the job to execute independently of the day of week.Combine the chosen values into the time specification. The above example values result into this specification:
0,10,20,30,40,50 17-20 15 Jun,Jul,Aug *
-
in which minutes of an hour to execute the job. For example, use
-
Specify the user. The job will execute as if run by this user. For example, use
root. -
Specify the command to execute. For example, use
/usr/local/bin/my-script.sh Put the above specifications into a single line:
0,10,20,30,40,50 17-20 15 Jun,Jul,Aug * root /usr/local/bin/my-script.sh
-
Add the resulting line to
/etc/crontab, or, preferably, create a cron table file in/etc/cron.d/and add the line there.
The job will now run as scheduled.
For full reference on how to specify a job, see the crontab(5) manual page. For basic information, see the beginning of the /etc/crontab file:
SHELL=/bin/bash PATH=/sbin:/bin:/usr/sbin:/usr/bin MAILTO=root # For details see man 4 crontabs # Example of job definition: # .---------------- minute (0 - 59) # | .------------- hour (0 - 23) # | | .---------- day of month (1 - 31) # | | | .------- month (1 - 12) OR jan,feb,mar,apr ... # | | | | .---- day of week (0 - 6) (Sunday=0 or 7) OR sun,mon,tue,wed,thu,fri,sat # | | | | | # * * * * * user-name command to be executed
Scheduling a Job as Non-root User
Non-root users can use the crontab utility to configure cron jobs. The jobs will run as if executed by that user.
To create a cron job as a specific user:
From the user’s shell, run:
[bob@localhost ~]$
crontab -eThis will start editing of the user’s own
crontabfile using the editor specified by theVISUALorEDITORenvironment variable.Specify the job in the same way as in the section called “Scheduling a Job as root User”, but leave out the field with user name. For example, instead of adding
0,10,20,30,40,50 17-20 15 Jun,Jul,Aug * bob /home/bob/bin/script.sh
add:
0,10,20,30,40,50 17-20 15 Jun,Jul,Aug * /home/bob/bin/script.sh
- Save the file and exit the editor.
(optional) To verify the new job, list the contents of the current user’s crontab file by running:
[bob@localhost ~]$
crontab -l@daily /home/bob/bin/script.sh
Scheduling Hourly, Daily, Weekly, and Monthly Jobs
To schedule an hourly, daily, weekly, or monthly job:
- Put the actions you want your job to execute into a shell script.
Put the shell script into one of the following directories:
-
/etc/cron.hourly/ -
/etc/cron.daily/ -
/etc/cron.weekly/ -
/etc/cron.monthly/
-
From now, your script will be executed - the crond service automatically executes any scripts present in /etc/cron.hourly, /etc/cron.daily, /etc/cron.weekly, and /etc/cron.monthly directories at their corresponding times.
24.2. Scheduling a Recurring Asynchronous Job Using Anacron
Anacron, like cron, is a service that enables you to schedule running a task, often called a job, at regular times. However, anacron differs from cron in two ways:
-
If the system is not running at the scheduled time, an
anacronjob is postponed until the system is running; -
An
anacronjob can run once per day at most.
Users specify anacron jobs in anacron table files, also called anacrontab files. These files are then read by the crond service, which executes the jobs.
24.2.1. Prerequisites for Anacrob Jobs
Before scheduling an anacron job:
Verify that you have the cronie-anacron package installed:
~]# rpm -q cronie-anacron
The cronie-anacron is likely to be installed already, because it is a sub-package of the cronie package. If it is not installed, use this command:
~]# yum install cronie-anacron
The
crondservice is enabled - made to start automatically at boot time - upon installation. If you disabled the service, enable it:~]# systemctl enable crond.service
Start the
crondservice for the current session:~]# systemctl start crond.service
(optional) Configure anacron. For example, you can change:
- shell to be used when executing jobs
-
the
PATHenvironment variable mail addressee if a job sends emails.
See the anacrontab(5) manual page for information on configuring
anacron.
By default, the anacron configuration includes a condition that prevents it from running if the computer is not plugged in. This setting ensures that the battery is not drained by running anacron jobs.
If you want to allow anacron to run even if the computer runs on battery power, open the /etc/cron.hourly/0anacron file and comment out the following part:
# Do not run jobs when on battery power
online=1
for psupply in AC ADP0 ; do
sysfile="/sys/class/power_supply/$psupply/online"
if [ -f $sysfile ] ; then
if [ `cat $sysfile 2>/dev/null`x = 1x ]; then
online=1
break
else
online=0
fi
fi
done24.2.2. Scheduling an Anacron Job
Scheduling an anacron Job as root User
The root user uses the anacron table in /etc/anacrontab. Use the following procedure to schedule a job as root.
Scheduling an anacron Job as root User
Choose:
-
Frequency of executing the job. For example, use
1to specify every day or3to specify once in 3 days. -
The delay of executing the job. For example, use
0to specify no delay or60to specify 1 hour of delay. -
The job identifier, which will be used for logging. For example, use
my.anacron.jobto log the job with themy.anacron.jobstring. The command to execute. For example, use
/usr/local/bin/my-script.shCombine the chosen values into the job specification. Here is an example specification:
3 60 cron.daily /usr/local/bin/my-script.sh
-
Frequency of executing the job. For example, use
-
Add the resulting line to
/etc/anacrontab.
The job will now run as scheduled.
For simple job examples, see the /etc/anacrontab file. For full reference on how to specify a job, see the anacrontab(5) manual page.
Scheduling Hourly, Daily, Weekly, and Monthly Jobs
You can schedule daily, weekly, and monthly jobs with anacron. See the section called “Scheduling Hourly, Daily, Weekly, and Monthly Jobs”.
24.3. Scheduling a Job to Run at a Specific Time Using at
To schedule a one-time task, also called a job, to run once at a specific time, use the at utility.
Users specify at jobs using the at utility. The jobs are then executed by the atd service.
24.3.1. Prerequisites for At Jobs
Before scheduling an at job:
Install the at package:
~]# yum install at
The
atdservice is enabled - made to start automatically at boot time - upon installation. If you disabled the service, enable it:~]# systemctl enable atd.service
Start the
atdservice for the current session:~]# systemctl start atd.service
24.3.2. Scheduling an At Job
A job is always run by some user. Log in as the desired user and run:
~]# at time
Replace time with the time specification.
For details on specifying time, see the at(1) manual page and the
/usr/share/doc/at/timespecfile.Example 24.1. Specifying Time for At
To execute the job at 15:00, run:
~]# at 15:00
If the specified time has passed, the job is executed at the same time the next day.
To execute the job on August 20 2017, run:
~]# at August 20 2017
or
~]# at 082017
To execute the job 5 days from now, run:
~]# now + 5 days
At the displayed
at>prompt, enter the command to execute and press Enter:~]# at 15:00 at> sh /usr/local/bin/my-script.sh at>
Repeat this step for every command you want to execute.
NoteThe
at>prompt shows which shell it will use:warning: commands will be executed using /bin/sh
The at utility uses the shell set in user’s SHELL environment variable, or the user’s login shell, or
/bin/sh, whichever is found first.- Press Ctrl+D on an empty line to finish specifying the job.
If the set of commands or the script tries to display information to standard output, the output is emailed to the user.
Viewing Pending Jobs
To view the list of pending jobs, use the atq command:
~]# atq 26 Thu Feb 23 15:00:00 2017 a root 28 Thu Feb 24 17:30:00 2017 a root
Each job is listed on a separate line in the following format:
job_number scheduled_date scheduled_hour job_class user_name
The job_queue column specifies whether a job is an at or a batch job. a stands for at, b stands for batch.
Non-root users only see their own jobs. The root user sees jobs for all users.
Deleting a Scheduled Job
To delete a scheduled job:
List pending jobs with the
atqcommand:~]# atq 26 Thu Feb 23 15:00:00 2017 a root 28 Thu Feb 24 17:30:00 2017 a root
- Find the job you want to delete by its scheduled time and the user.
Run the
atrmcommand, specifying the job by its number:~]# atrm 26
24.3.2.1. Controlling Access to At and Batch
You can restrict access to the at and batch commands for specific users. To do this, put user names into /etc/at.allow or /etc/at.deny according to these rules:
- Both access control files use the same format: one user name on each line.
- No white space is permitted in either file.
-
If the
at.allowfile exists, only users listed in the file are allowed to useatorbatch, and theat.denyfile is ignored. -
If
at.allowdoes not exist, users listed inat.denyare not allowed to useatorbatch. -
The
rootuser is not affected by the access control files and can always execute theatandbatchcommands.
The at daemon (atd) does not have to be restarted if the access control files are modified. The access control files are read each time a user tries to execute the at or batch commands.
24.4. Scheduling a Job to Run on System Load Drop Using batch
To schedule a one-time task, also called a job, to run when the system load average drops below the specified value, use the batch utility. This can be useful for performing resource-demanding tasks or for preventing the system from being idle.
Users specify batch jobs using the batch utility. The jobs are then executed by the atd service.
24.4.1. Prerequisites for Batch Jobs
The batch utility is provided in the at package, and batch jobs are managed by the atd service. Hence, the prerequisites for batch jobs are the same as for at jobs. See Section 24.3.1, “Prerequisites for At Jobs”.
24.4.2. Scheduling a Batch Job
A job is always run by some user. Log in as the desired user and run:
~]# batch
At the displayed
at>prompt, enter the command to execute and press Enter:~]# batch at> sh /usr/local/bin/my-script.sh
Repeat this step for every command you want to execute.
NoteThe
at>prompt shows which shell it will use:warning: commands will be executed using /bin/sh
The batch utility uses the shell set in user’s SHELL environment variable, or the user’s login shell, or
/bin/sh, whichever is found first.- Press Ctrl+D on an empty line to finish specifying the job.
If the set of commands or the script tries to display information to standard output, the output is emailed to the user.
Changing the Default System Load Average Limit
By default, batch jobs start when system load average drops below 0.8. This setting is kept in the atq service. To change the system load limit:
To the
/etc/sysconfig/atdfile, add this line:OPTS='-l x'Substitute x with the new load average. For example:
OPTS='-l 0.5'
Restart the
atqservice:# systemctl restart atq
Viewing Pending Jobs
To view the list of pending jobs, use the atq command. See the section called “Viewing Pending Jobs”.
Deleting a Scheduled Job
To delete a scheduled job, use the atrm command. See the section called “Deleting a Scheduled Job”.
Controlling Access to Batch
You can also restrict the usage of the batch utility. This is done for the batch and at utilities together. See Section 24.3.2.1, “Controlling Access to At and Batch”.
24.5. Scheduling a Job to Run on Next Boot Using a systemd Unit File
The cron, anacron, at, and batch utilities allow scheduling jobs for specific times or for when system workload reaches a certain level. It is also possible to create a job that will run during the next system boot. This is done by creating a systemd unit file that specifies the script to run and its dependencies.
To configure a script to run on the next boot:
Create the
systemdunit file that specifies at which stage of the boot process to run the script. This example shows a unit file with a reasonable set ofWants=andAfter=dependencies:~]# cat /etc/systemd/system/one-time.service [Unit] # The script needs to execute after: # network interfaces are configured Wants=network-online.target After=network-online.target # all remote filesystems (NFS/_netdev) are mounted After=remote-fs.target # name (DNS) and user resolution from remote databases (AD/LDAP) are available After=nss-user-lookup.target nss-lookup.target # the system clock has synchronized After=time-sync.target [Service] Type=oneshot ExecStart=/usr/local/bin/foobar.sh [Install] WantedBy=multi-user.target
If you use this example:
-
substitute
/usr/local/bin/foobar.shwith the name of your script modify the set of
After=entries if necessaryFor information on specifying the stage of boot, see Section 10.6, “Creating and Modifying systemd Unit Files”.
-
substitute
If you want the
systemdservice to stay active after executing the script, add theRemainAfterExit=yesline to the[Service]section:[Service] Type=oneshot RemainAfterExit=yes ExecStart=/usr/local/bin/foobar.shReload the
systemddaemon:~]# systemctl daemon-reload
Enable the
systemdservice:~]# systemctl enable one-time.service
Create the script to execute:
~]# cat /usr/local/bin/foobar.sh #!/bin/bash touch /root/test_file
If you want the script to run during the next boot only, and not on every boot, add a line that disables the
systemdunit:#!/bin/bash touch /root/test_file systemctl disable one-time.serviceMake the script executable:
~]# chmod +x /usr/local/bin/foobar.sh
24.6. Additional Resources
For more information on automating system tasks on Red Hat Enterprise Linux, see the resources listed below.
Installed Documentation
-
cron - The manual page for the crond daemon documents how
crondworks and how to change its behavior. - crontab - The manual page for the crontab utility provides a complete list of supported options.
-
crontab(5) - This section of the manual page for the crontab utility documents the format of
crontabfiles.
Chapter 25. Automatic Bug Reporting Tool (ABRT)
25.1. Introduction to ABRT
The Automatic Bug Reporting Tool, commonly abbreviated as ABRT, is a set of tools that is designed to help users detect and report application crashes. Its main purpose is to ease the process of reporting issues and finding solutions. In this context, the solution can be a Bugzilla ticket, a knowledge-base article, or a suggestion to update a package to a version containing a fix.
ABRT consists of the abrtd daemon and a number of system services and utilities for processing, analyzing, and reporting detected problems. The daemon runs silently in the background most of the time and springs into action when an application crashes or a kernel oops is detected. The daemon then collects the relevant problem data, such as a core file if there is one, the crashing application’s command line parameters, and other data of forensic utility.
ABRT currently supports the detection of crashes in applications written in the C, C++, Java, Python, and Ruby programming languages, as well as X.Org crashes, kernel oopses, and kernel panics. See Section 25.4, “Detecting Software Problems” for more detailed information on the types of failures and crashes supported, and the way the various types of crashes are detected.
The identified problems can be reported to a remote issue tracker, and the reporting can be configured to happen automatically whenever an issue is detected. Problem data can also be stored locally or on a dedicated system and reviewed, reported, and deleted manually by the user. The reporting tools can send problem data to a Bugzilla database or the Red Hat Technical Support (RHTSupport) website. The tools can also upload it using FTP or SCP, send it as an email, or write it to a file.
The ABRT component that handles existing problem data (as opposed to, for example, the creation of new problem data) is a part of a separate project, libreport. The libreport library provides a generic mechanism for analyzing and reporting problems, and it is used by applications other than ABRT as well. However, ABRT and libreport operation and configuration are closely integrated. They are, therefore, discussed as one in this document.
Note that ABRT report is generated only when core dump is generated. Core dump is generated only for some signals. For example, SIGKILL (-9) does not generate core dump, so ABRT cannot catch this fail. For more information about signals and core dump generating, see man 7 signal.
25.2. Installing ABRT and Starting its Services
In order to use ABRT, ensure that the abrt-desktop or the abrt-cli package is installed on your system. The abrt-desktop package provides a graphical user interface for ABRT, and the abrt-cli package contains a tool for using ABRT on the command line. You can also install both. The general workflow with both the ABRT GUI and the command line tool is procedurally similar and follows the same pattern.
Please note that installing the ABRT packages overwrites the /proc/sys/kernel/core_pattern file, which can contain a template used to name core-dump files. The content of this file will be overwritten to:
|/usr/libexec/abrt-hook-ccpp %s %c %p %u %g %t e
See Section 9.2.4, “Installing Packages” for general information on how to install packages using the Yum package manager.
25.2.1. Installing the ABRT GUI
The ABRT graphical user interface provides an easy-to-use front end for working in a desktop environment. You can install the required package by running the following command as the root user:
~]# yum install abrt-desktop
Upon installation, the ABRT notification applet is configured to start automatically when your graphical desktop session starts. You can verify that the ABRT applet is running by issuing the following command in a terminal:
~]$ ps -el | grep abrt-applet 0 S 500 2036 1824 0 80 0 - 61604 poll_s ? 00:00:00 abrt-applet
If the applet is not running, you can start it manually in your current desktop session by running the abrt-applet program:
~]$ abrt-applet &
[1] 226125.2.2. Installing ABRT for the Command Line
The command line interface is useful on headless machines, remote systems connected over a network, or in scripts. You can install the required package by running the following command as the root user:
~]# yum install abrt-cli
25.2.3. Installing Supplementary ABRT Tools
To receive email notifications about crashes detected by ABRT, you need to have the libreport-plugin-mailx package installed. You can install it by executing the following command as root:
~]# yum install libreport-plugin-mailx
By default, it sends notifications to the root user at the local machine. The email destination can be configured in the /etc/libreport/plugins/mailx.conf file.
To have notifications displayed in your console at login time, install the abrt-console-notification package as well.
ABRT can detect, analyze, and report various types of software failures. By default, ABRT is installed with support for the most common types of failures, such as crashes of C and C++ applications. Support for other types of failures is provided by independent packages. For example, to install support for detecting exceptions in applications written using the Java language, run the following command as root:
~]# yum install abrt-java-connector
See Section 25.4, “Detecting Software Problems” for a list of languages and software projects which ABRT supports. The section also includes a list of all corresponding packages that enable the detection of the various types of failures.
25.2.4. Starting the ABRT Services
The abrtd daemon requires the abrt user to exist for file system operations in the /var/spool/abrt directory. When the abrt package is installed, it automatically creates the abrt user whose UID and GID is 173, if such user does not already exist. Otherwise, the abrt user can be created manually. In that case, any UID and GID can be chosen, because abrtd does not require a specific UID and GID.
The abrtd daemon is configured to start at boot time. You can use the following command to verify its current status:
~]$ systemctl is-active abrtd.service
active
If systemctl returns inactive or unknown, the daemon is not running. You can start it for the current session by entering the following command as root:
~]# systemctl start abrtd.service
You can use the same commands to start or check status of related error-detection services. For example, make sure the abrt-ccpp service is running if you want ABRT to detect C or C++ crashes. See Section 25.4, “Detecting Software Problems” for a list of all available ABRT detection services and their respective packages.
With the exception of the abrt-vmcore and abrt-pstoreoops services, which are only started when a kernel panic or kernel oops occurs, all ABRT services are automatically enabled and started at boot time when their respective packages are installed. You can disable or enable any ABRT service by using the systemctl utility as described in Chapter 10, Managing Services with systemd.
25.2.5. Testing ABRT Crash Detection
To test that ABRT works properly, use the kill command to send the SEGV signal to terminate a process. For example, start a sleep process and terminate it with the kill command in the following way:
~]$sleep 100 &[1] 2823 ~]$kill -s SIGSEGV 2823
ABRT detects a crash shortly after executing the kill command, and, provided a graphical session is running, the user is notified of the detected problem by the GUI notification applet. On the command line, you can check that the crash was detected by running the abrt-cli list command or by examining the crash dump created in the /var/spool/abrt/ directory. See Section 25.5, “Handling Detected Problems” for more information on how to work with detected crashes.
25.3. Configuring ABRT
A problem life cycle is driven by events in ABRT. For example:
- Event #1 — a problem-data directory is created.
- Event #2 — problem data is analyzed.
- Event #3 — the problem is reported to Bugzilla.
Whenever a problem is detected, ABRT compares it with all existing problem data and determines whether that same problem has already been recorded. If it has, the existing problem data is updated, and the most recent (duplicate) problem is not recorded again. If the problem is not recognized by ABRT, a problem-data directory is created. A problem-data directory typically consists of files such as: analyzer, architecture, coredump, cmdline, executable, kernel, os_release, reason, time, and uid.
Other files, such as backtrace, can be created during the analysis of the problem, depending on which analyzer method is used and its configuration settings. Each of these files holds specific information about the system and the problem itself. For example, the kernel file records the version of a crashed kernel.
After the problem-data directory is created and problem data gathered, you can process the problem using either the ABRT GUI, or the abrt-cli utility for the command line. See Section 25.5, “Handling Detected Problems” for more information about the ABRT tools provided for working with recorded problems.
25.3.1. Configuring Events
ABRT events use plugins to carry out the actual reporting operations. Plugins are compact utilities that the events call to process the content of problem-data directories. Using plugins, ABRT is capable of reporting problems to various destinations, and almost every reporting destination requires some configuration. For instance, Bugzilla requires a user name, password, and a URL pointing to an instance of the Bugzilla service.
Some configuration details can have default values (such as a Bugzilla URL), but others cannot have sensible defaults (for example, a user name). ABRT looks for these settings in configuration files, such as report_Bugzilla.conf, in the /etc/libreport/events/ or $HOME/.cache/abrt/events/ directories for system-wide or user-specific settings respectively. The configuration files contain pairs of directives and values.
These files are the bare minimum necessary for running events and processing the problem-data directories. The gnome-abrt and abrt-cli tools read the configuration data from these files and pass it to the events they run.
Additional information about events (such as their description, names, types of parameters that can be passed to them as environment variables, and other properties) is stored in event_name.xml files in the /usr/share/libreport/events/ directory. These files are used by both gnome-abrt and abrt-cli to make the user interface more friendly. Do not edit these files unless you want to modify the standard installation. If you intend to do that, copy the file to be modified to the /etc/libreport/events/ directory and modify the new file. These files can contain the following information:
- a user-friendly event name and description (Bugzilla, Report to Bugzilla bug tracker),
- a list of items in a problem-data directory that are required for the event to succeed,
- a default and mandatory selection of items to send or not send,
- whether the GUI should prompt for data review,
- what configuration options exist, their types (string, Boolean, and so on), default value, prompt string, and so on; this lets the GUI build appropriate configuration dialogs.
For example, the report_Logger event accepts an output filename as a parameter. Using the respective event_name.xml file, the ABRT GUI determines which parameters can be specified for a selected event and allows the user to set the values for these parameters. The values are saved by the ABRT GUI and reused on subsequent invocations of these events. Note that the ABRT GUI saves configuration options using the GNOME Keyring tool and by passing them to events, it overrides data from text configuration files.
To open the graphical Configuration window, choose → → → → from within a running instance of the gnome-abrt application. This window shows a list of events that can be selected during the reporting process when using the GUI. When you select one of the configurable events, you can click the button and modify the settings for that event.
Figure 25.1. Configuring ABRT Events
All files in the /etc/libreport/ directory hierarchy are world-readable and are meant to be used as global settings. Thus, it is not advisable to store user names, passwords, or any other sensitive data in them. The per-user settings (set in the GUI application and readable by the owner of $HOME only) are safely stored in GNOME Keyring, or they can be stored in a text configuration file in $HOME/.abrt/ for use with abrt-cli.
The following table shows a selection of the default analyzing, collecting, and reporting events provided by the standard installation of ABRT. The table lists each event’s name, identifier, configuration file from the /etc/libreport/events.d/ directory, and a brief description. Note that while the configuration files use the event identifiers, the ABRT GUI refers to the individual events using their names. Note also that not all of the events can be set up using the GUI. For information on how to define a custom event, see Section 25.3.2, “Creating Custom Events”.
| Name | Identifier and Configuration File | Description |
|---|---|---|
| uReport | report_uReport | Uploads a μReport to the FAF server. |
| Mailx | report_Mailx
| Sends the problem report via the Mailx utility to a specified email address. |
| Bugzilla | report_Bugzilla
| Reports the problem to the specified installation of the Bugzilla bug tracker. |
| Red Hat Customer Support | report_RHTSupport
| Reports the problem to the Red Hat Technical Support system. |
| Analyze C or C++ Crash | analyze_CCpp
| Sends the core dump to a remote retrace server for analysis or performs a local analysis if the remote one fails. |
| Report uploader | report_Uploader
|
Uploads a tarball ( |
| Analyze VM core | analyze_VMcore
|
Runs the GDB (the GNU debugger) on the problem data of a kernel oops and generates a |
| Local GNU Debugger | analyze_LocalGDB
|
Runs GDB (the GNU debugger) on the problem data of an application and generates a |
| Collect .xsession-errors | analyze_xsession_errors
|
Saves relevant lines from the |
| Logger | report_Logger
| Creates a problem report and saves it to a specified local file. |
| Kerneloops.org | report_Kerneloops
| Sends a kernel problem to the oops tracker at kerneloops.org. |
25.3.2. Creating Custom Events
Each event is defined by one rule structure in a respective configuration file. The configuration files are typically stored in the /etc/libreport/events.d/ directory. These configuration files are loaded by the main configuration file, /etc/libreport/report_event.conf. There is no need to edit the default configuration files because abrt will run the scripts contained in /etc/libreport/events.d/. This file accepts shell metacharacters (for example, *, $, ?) and interprets relative paths relatively to its location.
Each rule starts with a line with a non-space leading character, and all subsequent lines starting with the space character or the tab character are considered a part of this rule. Each rule consists of two parts, a condition part and a program part. The condition part contains conditions in one of the following forms:
- VAR=VAL
- VAR!=VAL
- VAL~=REGEX
where:
-
VAR is either the EVENT key word or a name of a problem-data directory element (such as
executable,package,hostname, and so on), - VAL is either a name of an event or a problem-data element, and
- REGEX is a regular expression.
The program part consists of program names and shell-interpretable code. If all conditions in the condition part are valid, the program part is run in the shell. The following is an event example:
EVENT=post-create date > /tmp/dt
echo $HOSTNAME uname -r
This event would overwrite the contents of the /tmp/dt file with the current date and time and print the host name of the machine and its kernel version on the standard output.
Here is an example of a more complex event, which is actually one of the predefined events. It saves relevant lines from the ~/.xsession-errors file to the problem report of any problem for which the abrt-ccpp service has been used, provided the crashed application had any X11 libraries loaded at the time of the crash:
EVENT=analyze_xsession_errors analyzer=CCpp dso_list~=./libX11.
test -f ~/.xsession-errors || { echo "No ~/.xsession-errors"; exit 1; }
test -r ~/.xsession-errors || { echo "Can't read ~/.xsession-errors"; exit 1; }
executable=cat executable &&
base_executable=${executable##*/} &&
grep -F -e "$base_executable" ~/.xsession-errors | tail -999 >xsession_errors &&
echo "Element 'xsession_errors' saved"
The set of possible events is not definitive. System administrators can add events according to their need in the /etc/libreport/events.d/ directory.
Currently, the following event names are provided with the standard ABRT and libreport installations:
post-create-
This event is run by
abrtdto process newly created problem-data directories. When thepost-createevent is run,abrtdchecks whether the new problem data matches any of the already existing problem directories. If such a problem directory exists, it is updated and the new problem data is discarded. Note that if the script in any definition of thepost-createevent exits with a non-zero value,abrtdwill terminate the process and will drop the problem data. notify,notify-dup-
The
notifyevent is run following the completion ofpost-create. When the event is run, the user can be sure that the problem deserves their attention. Thenotify-dupis similar, except it is used for duplicate occurrences of the same problem. analyze_name_suffix-
where name_suffix is the replaceable part of the event name. This event is used to process collected data. For example, the
analyze_LocalGDBevent uses the GNU Debugger (GDB) utility to process the core dump of an application and produce a backtrace of the crash. collect_name_suffix{blank}…where name_suffix is the adjustable part of the event name. This event is used to collect additional information on problems.
report_name_suffix{blank}…where name_suffix is the adjustable part of the event name. This event is used to report a problem.
25.3.3. Setting Up Automatic Reporting
ABRT can be configured to send initial anonymous reports, or μReports, of any detected issues or crashes automatically without any user interaction. When automatic reporting is turned on, the so called μReport, which is normally sent at the beginning of the crash-reporting process, is sent immediately after a crash is detected. This prevents duplicate support cases based on identical crashes. To enable the autoreporting feature, issue the following command as root:
~]# abrt-auto-reporting enabled
The above command sets the AutoreportingEnabled directive in the /etc/abrt/abrt.conf configuration file to yes. This system-wide setting applies to all users of the system. Note that by enabling this option, automatic reporting will also be enabled in the graphical desktop environment. To only enable autoreporting in the ABRT GUI, switch the Automatically send uReport option to YES in the Problem Reporting Configuration window. To open this window, choose → → → → from within a running instance of the gnome-abrt application. To launch the application, go to → → → → → → .
Figure 25.2. Configuring ABRT Problem Reporting
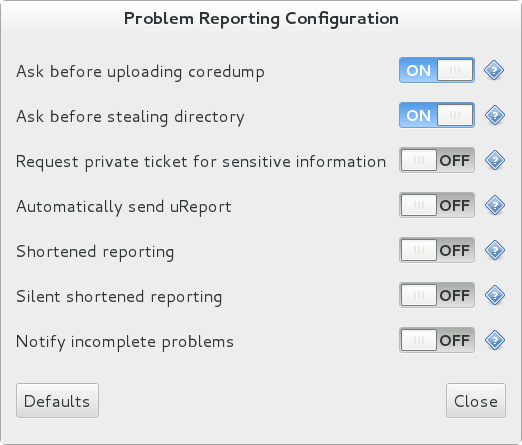
Upon detection of a crash, by default, ABRT submits a μReport with basic information about the problem to Red Hat’s ABRT server. The server determines whether the problem is known and either provides a short description of the problem along with a URL of the reported case if known, or invites the user to report it if not known.
A μReport (microreport) is a JSON object representing a problem, such as a binary crash or a kernel oops. These reports are designed to be brief, machine readable, and completely anonymous, which is why they can be used for automated reporting. The μReports make it possible to keep track of bug occurrences, but they usually do not provide enough information for engineers to fix the bug. A full bug report is needed for a support case to be opened.
To change the default behavior of the autoreporting facility from sending a μReport, modify the value of the AutoreportingEvent directive in the /etc/abrt/abrt.conf configuration file to point to a different ABRT event. See Table 25.1, “Standard ABRT Events” for an overview of the standard events.
25.4. Detecting Software Problems
ABRT is capable of detecting, analyzing, and processing crashes in applications written in a variety of different programming languages. Many of the packages that contain the support for detecting the various types of crashes are installed automatically when either one of the main ABRT packages (abrt-desktop, abrt-cli) is installed. See Section 25.2, “Installing ABRT and Starting its Services” for instructions on how to install ABRT. See the table below for a list of the supported types of crashes and the respective packages.
| Langauge/Project | Package |
|---|---|
| C or C++ | abrt-addon-ccpp |
| Python | abrt-addon-python |
| Ruby | rubygem-abrt |
| Java | abrt-java-connector |
| X.Org | abrt-addon-xorg |
| Linux (kernel oops) | abrt-addon-kerneloops |
| Linux (kernel panic) | abrt-addon-vmcore |
| Linux (persistent storage) | abrt-addon-pstoreoops |
25.4.1. Detecting C and C++ Crashes
The abrt-ccpp service installs its own core-dump handler, which, when started, overrides the default value of the kernel’s core_pattern variable, so that C and C++ crashes are handled by abrtd. If you stop the abrt-ccpp service, the previously specified value of core_pattern is reinstated.
By default, the /proc/sys/kernel/core_pattern file contains the string core, which means that the kernel produces files with the core. prefix in the current directory of the crashed process. The abrt-ccpp service overwrites the core_pattern file to contain the following command:
|/usr/libexec/abrt-hook-ccpp %s %c %p %u %g %t e
This command instructs the kernel to pipe the core dump to the abrt-hook-ccpp program, which stores it in ABRT's dump location and notifies the abrtd daemon of the new crash. It also stores the following files from the /proc/PID/ directory (where PID is the ID of the crashed process) for debugging purposes: maps, limits, cgroup, status. See proc(5) for a description of the format and the meaning of these files.
25.4.2. Detecting Python Exceptions
The abrt-addon-python package installs a custom exception handler for Python applications. The Python interpreter then automatically imports the abrt.pth file installed in /usr/lib64/python2.7/site-packages/, which in turn imports abrt_exception_handler.py. This overrides Python’s default sys.excepthook with a custom handler, which forwards unhandled exceptions to abrtd via its Socket API.
To disable the automatic import of site-specific modules, and thus prevent the ABRT custom exception handler from being used when running a Python application, pass the -S option to the Python interpreter:
~]$ python -S file.pyIn the above command, replace file.py with the name of the Python script you want to execute without the use of site-specific modules.
25.4.3. Detecting Ruby Exceptions
The rubygem-abrt package registers a custom handler using the at_exit feature, which is executed when a program ends. This allows for checking for possible unhandled exceptions. Every time an unhandled exception is captured, the ABRT handler prepares a bug report, which can be submitted to Red Hat Bugzilla using standard ABRT tools.
25.4.4. Detecting Java Exceptions
The ABRT Java Connector is a JVM agent that reports uncaught Java exceptions to abrtd. The agent registers several JVMTI event callbacks and has to be loaded into the JVM using the -agentlib command line parameter. Note that the processing of the registered callbacks negatively impacts the performance of the application. Use the following command to have ABRT catch exceptions from a Java class:
~]$ java -agentlib:abrt-java-connector=abrt=on $MyClass -platform.jvmtiSupported true
In the above command, replace $MyClass with the name of the Java class you want to test. By passing the abrt=on option to the connector, you ensure that the exceptions are handled by abrtd. In case you want to have the connector output the exceptions to standard output, omit this option.
25.4.5. Detecting X.Org Crashes
The abrt-xorg service collects and processes information about crashes of the X.Org server from the /var/log/Xorg.0.log file. Note that no report is generated if a blacklisted X.org module is loaded. Instead, a not-reportable file is created in the problem-data directory with an appropriate explanation. You can find the list of offending modules in the /etc/abrt/plugins/xorg.conf file. Only proprietary graphics-driver modules are blacklisted by default.
25.4.6. Detecting Kernel Oopses and Panics
By checking the output of kernel logs, ABRT is able to catch and process the so-called kernel oopses — non-fatal deviations from the correct behavior of the Linux kernel. This functionality is provided by the abrt-oops service.
ABRT can also detect and process kernel panics — fatal, non-recoverable errors that require a reboot, using the abrt-vmcore service. The service only starts when a vmcore file (a kernel-core dump) appears in the /var/crash/ directory. When a core-dump file is found, abrt-vmcore creates a new problem-data directory in the /var/spool/abrt/ directory and copies the core-dump file to the newly created problem-data directory. After the /var/crash/ directory is searched, the service is stopped.
For ABRT to be able to detect a kernel panic, the kdump service must be enabled on the system. The amount of memory that is reserved for the kdump kernel has to be set correctly. You can set it using the system-config-kdump graphical tool or by specifying the crashkernel parameter in the list of kernel options in the GRUB 2 menu. For details on how to enable and configure kdump, see the Red Hat Enterprise Linux 7 Kernel Crash Dump Guide. For information on making changes to the GRUB 2 menu see Chapter 26, Working with GRUB 2.
Using the abrt-pstoreoops service, ABRT is capable of collecting and processing information about kernel panics, which, on systems that support pstore, is stored in the automatically-mounted /sys/fs/pstore/ directory. The platform-dependent pstore interface (persistent storage) provides a mechanism for storing data across system reboots, thus allowing for preserving kernel panic information. The service starts automatically when kernel crash-dump files appear in the /sys/fs/pstore/ directory.
25.5. Handling Detected Problems
Problem data saved by abrtd can be viewed, reported, and deleted using either the command line tool, abrt-cli, or the graphical tool, gnome-abrt.
Note that ABRT identifies duplicate problems by comparing new problems with all locally saved problems. For a repeating crash, ABRT requires you to act upon it only once. However, if you delete the crash dump of that problem, the next time this specific problem occurs, ABRT will treat it as a new crash: ABRT will alert you about it, prompt you to fill in a description, and report it. To avoid having ABRT notifying you about a recurring problem, do not delete its problem data.
25.5.1. Using the Command Line Tool
In the command line environment, the user is notified of new crashes on login, provided they have the abrt-console-notification package installed. The console notification looks like the following:
ABRT has detected 1 problem(s). For more info run: abrt-cli list --since 1398783164
To view detected problems, enter the abrt-cli list command:
~]$ abrt-cli list
id 6734c6f1a1ed169500a7bfc8bd62aabaf039f9aa
Directory: /var/tmp/abrt/ccpp-2014-04-21-09:47:51-3430
count: 1
executable: /usr/bin/sleep
package: coreutils-8.22-11.el7
time: Mon 21 Apr 2014 09:47:51 AM EDT
uid: 1000
Run 'abrt-cli report /var/tmp/abrt/ccpp-2014-04-21-09:47:51-3430' for creating a case in Red Hat Customer Portal
Each crash listed in the output of the abrt-cli list command has a unique identifier and a directory that can be used for further manipulation using abrt-cli.
To view information about just one particular problem, use the abrt-cli info command:
abrt-cli info -d directory_or_id
To increase the amount of information displayed when using both the list and info sub-commands, pass them the -d (--detailed) option, which shows all stored information about the problems listed, including respective backtrace files if they have already been generated.
To analyze and report a certain problem, use the abrt-cli report command:
abrt-cli report directory_or_id
Upon invocation of the above command, you will be asked to provide your credentials for opening a support case with Red Hat Customer Support. Next, abrt-cli opens a text editor with the content of the report. You can see what is being reported, and you can fill in instructions on how to reproduce the crash and other comments. You should also check the backtrace because the backtrace might be sent to a public server and viewed by anyone, depending on the problem-reporter event settings.
You can choose which text editor is used to check the reports. abrt-cli uses the editor defined in the ABRT_EDITOR environment variable. If the variable is not defined, it checks the VISUAL and EDITOR variables. If none of these variables is set, the vi editor is used. You can set the preferred editor in your .bashrc configuration file. For example, if you prefer GNU Emacs, add the following line to the file:
exportVISUAL=emacs
When you are done with the report, save your changes and close the editor. If you have reported your problem to the Red Hat Customer Support database, a problem case is filed in the database. From now on, you will be informed about the problem-resolution progress via email you provided during the process of reporting. You can also monitor the problem case using the URL that is provided to you when the problem case is created or via emails received from Red Hat Support.
If you are certain that you do not want to report a particular problem, you can delete it. To delete a problem, so that ABRT does not keep information about it, use the command:
abrt-cli rm directory_or_id
To display help about a particular abrt-cli command, use the --help option:
abrt-cli command --help25.5.2. Using the GUI
The ABRT daemon broadcasts a D-Bus message whenever a problem report is created. If the ABRT applet is running in a graphical desktop environment, it catches this message and displays a notification dialog on the desktop. You can open the ABRT GUI using this dialog by clicking on the button. You can also open the ABRT GUI by selecting the → → → → → → menu item.
Alternatively, you can run the ABRT GUI from the command line as follows:
~]$ gnome-abrt &The ABRT GUI window displays a list of detected problems. Each problem entry consists of the name of the failing application, the reason why the application crashed, and the date of the last occurrence of the problem.
Figure 25.3. ABRT GUI

To access a detailed problem description, double-click on a problem-report line or click on the button while the respective problem line is selected. You can then follow the instructions to proceed with the process of describing the problem, determining how it should be analyzed, and where it should be reported. To discard a problem, click on the button.
25.6. Additional Resources
For more information about ABRT and related topics, see the resources listed below.
Installed Documentation
-
abrtd(8) — The manual page for the
abrtddaemon provides information about options that can be used with the daemon. -
abrt_event.conf(5) — The manual page for the
abrt_event.confconfiguration file describes the format of its directives and rules and provides reference information about event meta-data configuration in XML files.
Online Documentation
- Red Hat Enterprise Linux 7 Networking Guide — The Networking Guide for Red Hat Enterprise Linux 7 documents relevant information regarding the configuration and administration of network interfaces and network services on this system.
-
Red Hat Enterprise Linux 7 Kernel Crash Dump Guide — The Kernel Crash Dump Guide for Red Hat Enterprise Linux 7 documents how to configure, test, and use the
kdumpcrash recovery service and provides a brief overview of how to analyze the resulting core dump using the crash debugging utility.
See Also
-
Chapter 23, Viewing and Managing Log Files describes the configuration of the
rsyslogdaemon and the systemd journal and explains how to locate, view, and monitor system logs. - Chapter 9, Yum describes how to use the Yum package manager to search, install, update, and uninstall packages on the command line.
-
Chapter 10, Managing Services with systemd provides an introduction to
systemdand documents how to use thesystemctlcommand to manage system services, configure systemd targets, and execute power management commands.
Part VII. Kernel Customization with Bootloader
This part describes how to use the GRUB 2 bootloader to assist administrators with kernel customization.
Chapter 26. Working with GRUB 2
Red Hat Enterprise Linux 7 is distributed with version 2 of the GNU GRand Unified Bootloader (GRUB 2), which allows the user to select an operating system or kernel to be loaded at system boot time. GRUB 2 also allows the user to pass arguments to the kernel.
26.1. Introduction to GRUB 2
GRUB 2 reads its configuration from the /boot/grub2/grub.cfg file on traditional BIOS-based machines and from the /boot/efi/EFI/redhat/grub.cfg file on UEFI machines. This file contains menu information.
The GRUB 2 configuration file, grub.cfg, is generated during installation, or by invoking the /usr/sbin/grub2-mkconfig utility, and is automatically updated by grubby each time a new kernel is installed. When regenerated manually using grub2-mkconfig, the file is generated according to the template files located in /etc/grub.d/, and custom settings in the /etc/default/grub file. Edits of grub.cfg will be lost any time grub2-mkconfig is used to regenerate the file, so care must be taken to reflect any manual changes in /etc/default/grub as well.
Normal operations on grub.cfg, such as the removal and addition of new kernels, should be done using the grubby tool and, for scripts, using new-kernel-pkg tool. If you use grubby to modify the default kernel the changes will be inherited when new kernels are installed. For more information on grubby, see Section 26.4, “Making Persistent Changes to a GRUB 2 Menu Using the grubby Tool”.
The /etc/default/grub file is used by the grub2-mkconfig tool, which is used by anaconda when creating grub.cfg during the installation process, and can be used in the event of a system failure, for example if the boot loader configurations need to be recreated. In general, it is not recommended to replace the grub.cfg file by manually running grub2-mkconfig except as a last resort. Note that any manual changes to /etc/default/grub require rebuilding the grub.cfg file.
Menu Entries in grub.cfg
Among various code snippets and directives, the grub.cfg configuration file contains one or more menuentry blocks, each representing a single GRUB 2 boot menu entry. These blocks always start with the menuentry keyword followed by a title, list of options, and an opening curly bracket, and end with a closing curly bracket. Anything between the opening and closing bracket should be indented. For example, the following is a sample menuentry block for Red Hat Enterprise Linux 7 with Linux kernel 3.8.0-0.40.el7.x86_64:
menuentry 'Red Hat Enterprise Linux Server' --class red --class gnu-linux --class gnu --class os $menuentry_id_option 'gnulinux-simple-c60731dc-9046-4000-9182-64bdcce08616' {
load_video
set gfxpayload=keep
insmod gzio
insmod part_msdos
insmod xfs
set root='hd0,msdos1'
if [ x$feature_platform_search_hint = xy ]; then
search --no-floppy --fs-uuid --set=root --hint-bios=hd0,msdos1 --hint-efi=hd0,msdos1 --hint-baremetal=ahci0,msdos1 --hint='hd0,msdos1' 19d9e294-65f8-4e37-8e73-d41d6daa6e58
else
search --no-floppy --fs-uuid --set=root 19d9e294-65f8-4e37-8e73-d41d6daa6e58
fi
echo 'Loading Linux 3.8.0-0.40.el7.x86_64 ...'
linux16 /vmlinuz-3.8.0-0.40.el7.x86_64 root=/dev/mapper/rhel-root ro rd.md=0 rd.dm=0 rd.lvm.lv=rhel/swap crashkernel=auto rd.luks=0 vconsole.keymap=us rd.lvm.lv=rhel/root rhgb quiet
echo 'Loading initial ramdisk ...'
initrd /initramfs-3.8.0-0.40.el7.x86_64.img
}
Each menuentry block that represents an installed Linux kernel contains linux on 64-bit IBM POWER Series, linux16 on x86_64 BIOS-based systems, and linuxefi on UEFI-based systems. Then the initrd directives followed by the path to the kernel and the initramfs image respectively. If a separate /boot partition was created, the paths to the kernel and the initramfs image are relative to /boot. In the example above, the initrd /initramfs-3.8.0-0.40.el7.x86_64.img line means that the initramfs image is actually located at /boot/initramfs-3.8.0-0.40.el7.x86_64.img when the root file system is mounted, and likewise for the kernel path.
The kernel version number as given on the linux16 /vmlinuz-kernel_version line must match the version number of the initramfs image given on the initrd /initramfs-kernel_version.img line of each menuentry block. For more information on how to verify the initial RAM disk image, see see Red Hat Enterprise 7 Kernel Administration Guide.
In menuentry blocks, the initrd directive must point to the location (relative to the /boot/ directory if it is on a separate partition) of the initramfs file corresponding to the same kernel version. This directive is called initrd because the previous tool which created initial RAM disk images, mkinitrd, created what were known as initrd files. The grub.cfg directive remains initrd to maintain compatibility with other tools. The file-naming convention of systems using the dracut utility to create the initial RAM disk image is initramfs-kernel_version.img.
For information on using Dracut, see Red Hat Enterprise 7 Kernel Administration Guide.
26.2. Configuring GRUB 2
Changes to the GRUB 2 menu can be made temporarily at boot time, made persistent for a single system while the system is running, or as part of making a new GRUB 2 configuration file.
- To make non-persistent changes to the GRUB 2 menu, see Section 26.3, “Making Temporary Changes to a GRUB 2 Menu”.
- To make persistent changes to a running system, see Section 26.4, “Making Persistent Changes to a GRUB 2 Menu Using the grubby Tool”.
- For information on making and customizing a GRUB 2 configuration file, see Section 26.5, “Customizing the GRUB 2 Configuration File”.
26.3. Making Temporary Changes to a GRUB 2 Menu
Making Temporary Changes to a Kernel Menu Entry
To change kernel parameters only during a single boot process, proceed as follows:
- Start the system and, on the GRUB 2 boot screen, move the cursor to the menu entry you want to edit, and press the e key for edit.
-
Move the cursor down to find the kernel command line. The kernel command line starts with
linuxon 64-Bit IBM Power Series,linux16on x86-64 BIOS-based systems, orlinuxefion UEFI systems. Move the cursor to the end of the line.
Press Ctrl+a and Ctrl+e to jump to the start and end of the line, respectively. On some systems, Home and End might also work.
Edit the kernel parameters as required. For example, to run the system in emergency mode, add the emergency parameter at the end of the
linux16line:linux16 /vmlinuz-3.10.0-0.rc4.59.el7.x86_64 root=/dev/mapper/rhel-root ro rd.md=0 rd.dm=0 rd.lvm.lv=rhel/swap crashkernel=auto rd.luks=0 vconsole.keymap=us rd.lvm.lv=rhel/root rhgb quiet emergencyThe
rhgbandquietparameters can be removed in order to enable system messages.These settings are not persistent and apply only for a single boot. To make persistent changes to a menu entry on a system, use the
grubbytool. See the section called “Adding and Removing Arguments from a GRUB 2 Menu Entry” for more information on usinggrubby.
26.4. Making Persistent Changes to a GRUB 2 Menu Using the grubby Tool
The grubby tool can be used to read information from, and make persistent changes to, the grub.cfg file. It enables, for example, changing GRUB 2 menu entries to specify what arguments to pass to a kernel on system start and changing the default kernel.
In Red Hat Enterprise Linux 7, if grubby is invoked manually without specifying a GRUB 2 configuration file, it defaults to searching for /etc/grub2.cfg, which is a symbolic link to the grub.cfg file, whose location is architecture dependent. If that file cannot be found it will search for an architecture dependent default.
Listing the Default Kernel
To find out the file name of the default kernel, enter a command as follows:
~]# grubby --default-kernel /boot/vmlinuz-3.10.0-229.4.2.el7.x86_64
To find out the index number of the default kernel, enter a command as follows:
~]# grubby --default-index 0
Changing the Default Boot Entry
To make a persistent change in the kernel designated as the default kernel, use the grubby command as follows:
~]# grubby --set-default /boot/vmlinuz-3.10.0-229.4.2.el7.x86_64
Viewing the GRUB 2 Menu Entry for a Kernel
To list all the kernel menu entries, enter a command as follows:
~]$ grubby --info=ALL
On UEFI systems, all grubby commands must be entered as root.
To view the GRUB 2 menu entry for a specific kernel, enter a command as follows:
~]$ grubby --info /boot/vmlinuz-3.10.0-229.4.2.el7.x86_64 index=0 kernel=/boot/vmlinuz-3.10.0-229.4.2.el7.x86_64 args="ro rd.lvm.lv=rhel/root crashkernel=auto rd.lvm.lv=rhel/swap vconsole.font=latarcyrheb-sun16 vconsole.keymap=us rhgb quiet LANG=en_US.UTF-8" root=/dev/mapper/rhel-root initrd=/boot/initramfs-3.10.0-229.4.2.el7.x86_64.img title=Red Hat Enterprise Linux Server (3.10.0-229.4.2.el7.x86_64) 7.0 (Maipo)
Try tab completion to see the available kernels within the /boot/ directory.
Adding and Removing Arguments from a GRUB 2 Menu Entry
The --update-kernel option can be used to update a menu entry when used in combination with --args to add new arguments and --remove-arguments to remove existing arguments. These options accept a quoted space-separated list. The command to simultaneously add and remove arguments a from GRUB 2 menu entry has the follow format:
grubby --remove-args="argX argY" --args="argA argB" --update-kernel /boot/kernel
To add and remove arguments from a kernel’s GRUB 2 menu entry, use a command as follows:
~]# grubby --remove-args="rhgb quiet" --args=console=ttyS0,115200 --update-kernel /boot/vmlinuz-3.10.0-229.4.2.el7.x86_64
This command removes the Red Hat graphical boot argument, enables boot message to be seen, and adds a serial console. As the console arguments will be added at the end of the line, the new console will take precedence over any other consoles configured.
To review the changes, use the --info command option as follows:
~]# grubby --info /boot/vmlinuz-3.10.0-229.4.2.el7.x86_64
index=0
kernel=/boot/vmlinuz-3.10.0-229.4.2.el7.x86_64
args="ro rd.lvm.lv=rhel/root crashkernel=auto rd.lvm.lv=rhel/swap vconsole.font=latarcyrheb-sun16 vconsole.keymap=us LANG=en_US.UTF-8 ttyS0,115200"
root=/dev/mapper/rhel-root
initrd=/boot/initramfs-3.10.0-229.4.2.el7.x86_64.img
title=Red Hat Enterprise Linux Server (3.10.0-229.4.2.el7.x86_64) 7.0 (Maipo)Updating All Kernel Menus with the Same Arguments
To add the same kernel boot arguments to all the kernel menu entries, enter a command as follows:
~]# grubby --update-kernel=ALL --args=console=ttyS0,115200
The --update-kernel parameter also accepts DEFAULT or a comma separated list of kernel index numbers.
Changing a Kernel Argument
To change a value in an existing kernel argument, specify the argument again, changing the value as required. For example, to change the virtual console font size, use a command as follows:
~]# grubby --args=vconsole.font=latarcyrheb-sun32 --update-kernel /boot/vmlinuz-3.10.0-229.4.2.el7.x86_64
index=0
kernel=/boot/vmlinuz-3.10.0-229.4.2.el7.x86_64
args="ro rd.lvm.lv=rhel/root crashkernel=auto rd.lvm.lv=rhel/swap vconsole.font=latarcyrheb-sun32 vconsole.keymap=us LANG=en_US.UTF-8"
root=/dev/mapper/rhel-root
initrd=/boot/initramfs-3.10.0-229.4.2.el7.x86_64.img
title=Red Hat Enterprise Linux Server (3.10.0-229.4.2.el7.x86_64) 7.0 (Maipo)
See the grubby(8) manual page for more command options.
26.5. Customizing the GRUB 2 Configuration File
GRUB 2 scripts search the user’s computer and build a boot menu based on what operating systems the scripts find. To reflect the latest system boot options, the boot menu is rebuilt automatically when the kernel is updated or a new kernel is added.
However, users may want to build a menu containing specific entries or to have the entries in a specific order. GRUB 2 allows basic customization of the boot menu to give users control of what actually appears on the screen.
GRUB 2 uses a series of scripts to build the menu; these are located in the /etc/grub.d/ directory. The following files are included:
-
00_header, which loads GRUB 2 settings from the/etc/default/grubfile. -
01_users, which reads the superuser password from theuser.cfgfile. In Red Hat Enterprise Linux 7.0 and 7.1, this file was only created when boot password was defined in the kickstart file during installation, and it included the defined password in plain text. -
10_linux, which locates kernels in the default partition of Red Hat Enterprise Linux. -
30_os-prober, which builds entries for operating systems found on other partitions. -
40_custom, a template, which can be used to create additional menu entries.
Scripts from the /etc/grub.d/ directory are read in alphabetical order and can be therefore renamed to change the boot order of specific menu entries.
To hide the list of bootable kernels, do not set GRUB_TIMEOUT to 0 in /etc/default/grub. With such setting, the system always boots immediately on the default menu entry, and if the default kernel fails to boot, it is not possible to boot an older kernel.
Instead, to prevent GRUB 2 from displaying the list of bootable kernels when the system starts up, set the GRUB_TIMEOUT_STYLE option in the /etc/default/grub file as follows:
GRUB_TIMEOUT_STYLE=hidden
To display the list when booting, press and hold any alphanumeric key when the BIOS information is displayed using the keyboard or other serial console, and GRUB 2 will present you with the GRUB 2 menu.
26.5.1. Changing the Default Boot Entry
By default, the key for the GRUB_DEFAULT directive in the /etc/default/grub file is the word saved. This instructs GRUB 2 to load the kernel specified by the saved_entry directive in the GRUB 2 environment file, located at /boot/grub2/grubenv. You can set another GRUB 2 record to be the default, using the grub2-set-default command, which will update the GRUB 2 environment file.
By default, the saved_entry value is set to the name of latest installed kernel of package type kernel. This is defined in /etc/sysconfig/kernel by the UPDATEDEFAULT and DEFAULTKERNEL directives. The file can be viewed by the root user as follows:
~]# cat /etc/sysconfig/kernel # UPDATEDEFAULT specifies if new-kernel-pkg should make # new kernels the default UPDATEDEFAULT=yes # DEFAULTKERNEL specifies the default kernel package type DEFAULTKERNEL=kernel
The DEFAULTKERNEL directive specifies what package type will be used as the default. Installing a package of type kernel-debug will not change the default kernel while the DEFAULTKERNEL is set to package type kernel.
GRUB 2 supports using a numeric value as the key for the saved_entry directive to change the default order in which the operating systems are loaded. To specify which operating system should be loaded first, pass its number to the grub2-set-default command. For example:
~]# grub2-set-default 2Note that the position of a menu entry in the list is denoted by a number starting with zero; therefore, in the example above, the third entry will be loaded. This value will be overwritten by the name of the next kernel to be installed.
To force a system to always use a particular menu entry, use the menu entry name as the key to the GRUB_DEFAULT directive in the /etc/default/grub file. To list the available menu entries, run the following command as root:
~]# awk -F\' '$1=="menuentry " {print $2}' /etc/grub2.cfg
The file name /etc/grub2.cfg is a symbolic link to the grub.cfg file, whose location is architecture dependent. For reliability reasons, the symbolic link is not used in other examples in this chapter. It is better to use absolute paths when writing to a file, especially when repairing a system.
Changes to /etc/default/grub require rebuilding the grub.cfg file as follows:
On BIOS-based machines, issue the following command as
root:~]# grub2-mkconfig -o /boot/grub2/grub.cfg
On UEFI-based machines, issue the following command as
root:~]# grub2-mkconfig -o /boot/efi/EFI/redhat/grub.cfg
26.5.2. Editing a Menu Entry
If required to prepare a new GRUB 2 file with different parameters, edit the values of the GRUB_CMDLINE_LINUX key in the /etc/default/grub file. Note that you can specify multiple parameters for the GRUB_CMDLINE_LINUX key, similarly to adding the parameters in the GRUB 2 boot menu. For example:
GRUB_CMDLINE_LINUX="console=tty0 console=ttyS0,9600n8"
Where console=tty0 is the first virtual terminal and console=ttyS0 is the serial terminal to be used.
Changes to /etc/default/grub require rebuilding the grub.cfg file as follows:
On BIOS-based machines, issue the following command as
root:~]# grub2-mkconfig -o /boot/grub2/grub.cfg
On UEFI-based machines, issue the following command as
root:~]# grub2-mkconfig -o /boot/efi/EFI/redhat/grub.cfg
26.5.3. Adding a new Entry
When executing the grub2-mkconfig command, GRUB 2 searches for Linux kernels and other operating systems based on the files located in the /etc/grub.d/ directory. The /etc/grub.d/10_linux script searches for installed Linux kernels on the same partition. The /etc/grub.d/30_os-prober script searches for other operating systems. Menu entries are also automatically added to the boot menu when updating the kernel.
The 40_custom file located in the /etc/grub.d/ directory is a template for custom entries and looks as follows:
#!/bin/sh exec tail -n +3 $0 # This file provides an easy way to add custom menu entries. Simply type the # menu entries you want to add after this comment. Be careful not to change # the 'exec tail' line above.
This file can be edited or copied. Note that as a minimum, a valid menu entry must include at least the following:
menuentry "<Title>"{ <Data> }
26.5.4. Creating a Custom Menu
If you do not want menu entries to be updated automatically, you can create a custom menu.
Before proceeding, back up the contents of the /etc/grub.d/ directory in case you need to revert the changes later.
Note that modifying the /etc/default/grub file does not have any effect on creating custom menus.
-
On BIOS-based machines, copy the contents of
/boot/grub2/grub.cfg, or, on UEFI machines, copy the contents of/boot/efi/EFI/redhat/grub.cfg. Put the content of thegrub.cfginto the/etc/grub.d/40_customfile below the existing header lines. The executable part of the40_customscript has to be preserved. From the content put into the
/etc/grub.d/40_customfile, only themenuentryblocks are needed to create the custom menu. The/boot/grub2/grub.cfgand/boot/efi/EFI/redhat/grub.cfgfiles might contain function specifications and other content above and below themenuentryblocks. If you put these unnecessary lines into the40_customfile in the previous step, erase them.This is an example of a custom
40_customscript:#!/bin/sh exec tail -n +3 $0 # This file provides an easy way to add custom menu entries. Simply type the # menu entries you want to add after this comment. Be careful not to change # the 'exec tail' line above. menuentry 'First custom entry' --class red --class gnu-linux --class gnu --class os $menuentry_id_option 'gnulinux-3.10.0-67.el7.x86_64-advanced-32782dd0-4b47-4d56-a740-2076ab5e5976' { load_video set gfxpayload=keep insmod gzio insmod part_msdos insmod xfs set root='hd0,msdos1' if [ x$feature_platform_search_hint = xy ]; then search --no-floppy --fs-uuid --set=root --hint='hd0,msdos1' 7885bba1-8aa7-4e5d-a7ad-821f4f52170a else search --no-floppy --fs-uuid --set=root 7885bba1-8aa7-4e5d-a7ad-821f4f52170a fi linux16 /vmlinuz-3.10.0-67.el7.x86_64 root=/dev/mapper/rhel-root ro rd.lvm.lv=rhel/root vconsole.font=latarcyrheb-sun16 rd.lvm.lv=rhel/swap vconsole.keymap=us crashkernel=auto rhgb quiet LANG=en_US.UTF-8 initrd16 /initramfs-3.10.0-67.el7.x86_64.img } menuentry 'Second custom entry' --class red --class gnu-linux --class gnu --class os $menuentry_id_option 'gnulinux-0-rescue-07f43f20a54c4ce8ada8b70d33fd001c-advanced-32782dd0-4b47-4d56-a740-2076ab5e5976' { load_video insmod gzio insmod part_msdos insmod xfs set root='hd0,msdos1' if [ x$feature_platform_search_hint = xy ]; then search --no-floppy --fs-uuid --set=root --hint='hd0,msdos1' 7885bba1-8aa7-4e5d-a7ad-821f4f52170a else search --no-floppy --fs-uuid --set=root 7885bba1-8aa7-4e5d-a7ad-821f4f52170a fi linux16 /vmlinuz-0-rescue-07f43f20a54c4ce8ada8b70d33fd001c root=/dev/mapper/rhel-root ro rd.lvm.lv=rhel/root vconsole.font=latarcyrheb-sun16 rd.lvm.lv=rhel/swap vconsole.keymap=us crashkernel=auto rhgb quiet initrd16 /initramfs-0-rescue-07f43f20a54c4ce8ada8b70d33fd001c.img }Remove all files from the
/etc/grub.d/directory except the following:-
00_header, -
40_custom, -
01_users(if it exists), and
README.Alternatively, if you want to keep the files in the
/etc/grub2.d/directory, make them unexecutable by running thechmod a-x <file_name>command.
-
-
Edit, add, or remove menu entries in the
40_customfile as desired. Rebuild the
grub.cfgfile by running thegrub2-mkconfig -ocommand as follows:On BIOS-based machines, issue the following command as
root:~]# grub2-mkconfig -o /boot/grub2/grub.cfg
On UEFI-based machines, issue the following command as
root:~]# grub2-mkconfig -o /boot/efi/EFI/redhat/grub.cfg
26.6. Protecting GRUB 2 with a Password
GRUB 2 offers two types of password protection:
- Password is required for modifying menu entries but not for booting existing menu entries;
- Password is required for modifying menu entries and for booting one, several, or all menu entries.
Configuring GRUB 2 to Require a Password only for Modifying Entries
To require password authentication for modifying GRUB 2 entries, follow these steps:
Run the
grub2-setpasswordcommand as root:~]# grub2-setpassword
Enter and confirm the password:
Enter password: Confirm password:
Following this procedure creates a /boot/grub2/user.cfg file that contains the hash of the password. The user for this password, root, is defined in the /boot/grub2/grub.cfg file. With this change, modifying a boot entry during booting requires you to specify the root user name and your password.
Configuring GRUB 2 to Require a Password for Modifying and Booting Entries
Setting a password using the grub2-setpassword prevents menu entries from unauthorized modification but not from unauthorized booting. To also require password for booting an entry, follow these steps after setting the password with grub2-setpassword:
If you forget your GRUB 2 password, you will not be able to boot the entries you reconfigure in the following procedure.
-
Open the
/boot/grub2/grub.cfgfile. -
Find the boot entry that you want to protect with password by searching for lines beginning with
menuentry. Delete the
--unrestrictedparameter from the menu entry block, for example:[file contents truncated] menuentry 'Red Hat Enterprise Linux Server (3.10.0-327.18.2.rt56.223.el7_2.x86_64) 7.2 (Maipo)' --class red --class gnu-linux --class gnu --class os --unrestricted $menuentry_id_option 'gnulinux-3.10.0-327.el7.x86_64-advanced-c109825c-de2f-4340-a0ef-4f47d19fe4bf' { load_video set gfxpayload=keep [file contents truncated]- Save and close the file.
Now even booting the entry requires entering the root user name and password.
Manual changes to the /boot/grub2/grub.cfg persist when new kernel versions are installed, but are lost when re-generating grub.cfg using the grub2-mkconfig command. Therefore, to retain password protection, use the above procedure after every use of grub2-mkconfig.
If you delete the --unrestricted parameter from every menu entry in the /boot/grub2/grub.cfg file, all newly installed kernels will have menu entry created without --unrestricted and hence automatically inherit the password protection.
Passwords Set Before Updating to Red Hat Enterprise Linux 7.2
The grub2-setpassword tool was added in Red Hat Enterprise Linux 7.2 and is now the standard method of setting GRUB 2 passwords. This is in contrast to previous versions of Red Hat Enterprise Linux, where boot entries needed to be manually specified in the /etc/grub.d/40_custom file, and super users - in the /etc/grub.d/01_users file.
Additional GRUB 2 Users
Booting entries without the --unrestricted parameter requires the root password. However, GRUB 2 also enables creating additional non-root users that can boot such entries without providing a password. Modifying the entries still requires the root password. For information on creating such users, see the GRUB 2 Manual.
26.7. Reinstalling GRUB 2
Reinstalling GRUB 2 is a convenient way to fix certain problems usually caused by an incorrect installation of GRUB 2, missing files, or a broken system. Other reasons to reinstall GRUB 2 include the following:
- Upgrading from the previous version of GRUB.
- The user requires the GRUB 2 boot loader to control installed operating systems. However, some operating systems are installed with their own boot loaders. Reinstalling GRUB 2 returns control to the desired operating system.
- Adding the boot information to another drive.
26.7.1. Reinstalling GRUB 2 on BIOS-Based Machines
When using the grub2-install command, the boot information is updated and missing files are restored. Note that the files are restored only if they are not corrupted.
Use the grub2-install device command to reinstall GRUB 2 if the system is operating normally. For example, if sda is your device:
~]# grub2-install /dev/sda26.7.2. Reinstalling GRUB 2 on UEFI-Based Machines
When using the yum reinstall grub2-efi shim command, the boot information is updated and missing files are restored. Note that the files are restored only if they are not corrupted.
Use the yum reinstall grub2-efi shim command to reinstall GRUB 2 if the system is operating normally. For example:
~]# yum reinstall grub2-efi shim
26.7.3. Resetting and Reinstalling GRUB 2
This method completely removes all GRUB 2 configuration files and system settings. Apply this method to reset all configuration settings to their default values. Removing of the configuration files and subsequent reinstalling of GRUB 2 fixes failures caused by corrupted files and incorrect configuration. To do so, as root, follow these steps:
-
Run the
rm /etc/grub.d/*command; -
Run the
rm /etc/sysconfig/grubcommand; For EFI systems only, run the following command:
~]# yum reinstall grub2-efi shim grub2-tools
For BIOS and EFI systems, run this command:
~]# yum reinstall grub2-tools
Rebuild the
grub.cfgfile by running thegrub2-mkconfig -ocommand as follows:On BIOS-based machines, issue the following command as
root:~]# grub2-mkconfig -o /boot/grub2/grub.cfg
On UEFI-based machines, issue the following command as
root:~]# grub2-mkconfig -o /boot/efi/EFI/redhat/grub.cfg
-
Now follow the procedure in Section 26.7, “Reinstalling GRUB 2” to restore GRUB 2 on the
/boot/partition.
26.8. Upgrading from GRUB Legacy to GRUB 2
When you do an in-place upgrade of Red Hat Enterprise Linux (RHEL) from version 6 to 7, the upgrade from GRUB Legacy to GRUB 2 does not happen automatically, but it should be done manually. Perform the GRUB upgrade for these reasons:
-
In RHEL 7 and later versions,
GRUB Legacyis no longer maintained and does not receive updates. -
GRUB Legacyis unable to boot on systems without the/boot/directory. -
GRUB 2has more features and is more reliable. -
GRUB 2supports more hardware configurations, file systems, and drive layouts.
Upgrading from GRUB Legacy to GRUB 2 after the in-place upgrade of the operating system
Upgrading from GRUB Legacy to GRUB 2
Ensure that the GRUB Legacy package has been uninstalled by the Red Hat Upgrade Tool:
~]# yum remove grub
NoteUninstalling the grub2 package does not affect the installed GRUB Legacy bootloader.
Make sure that the grub2 package has been installed. If grub2 is not on the system after the upgrade to RHEL 7, you can install it manually by running:
~]# yum install grub2
If the system boots using EFI, install the following packages if they are missing:
~]# yum install grub2-efi-x64 shim-x64
Generating the GRUB 2 configuration files
This section describes how to add a GRUB 2 configuration without removing the original GRUB Legacy configuration. The procedure keeps the GRUB Legacy configuration in case that GRUB 2 does not work correctly.
Manually create the
/etc/default/grubfile by using one of the following options:-
Create the
/etc/default/grubfile. For details, see the How to re-create the missing /etc/default/grub file in Red Hat Enterprise Linux 7? article. -
Copy the
/etc/default/grubfile from a similar Red Hat Enterprise Linux 7 system, and adjust the file accordingly.
-
Create the
Depending on your bootloader:
If the system boots using the legacy BIOS, install
GRUB 2specifing the install device:~]# grub2-install /dev/<DEVICE_NAME> --grub-setup=/bin/true
The
grub2-installcommand installs GRUB images into the/boot/grubtarget directory.The
--grub-setup=/bin/trueoption ensures that the oldGRUB Legacyconfiguration is not deleted.If the system boots using EFI, create a boot entry for the shim bootloader and change the
BootOrdervariable to make the firmware boot GRUB 2 throughshim:~]# efibootmgr -c -L 'Red Hat Enterprise Linux 7' -d /dev/device_name -p 1 -l '\EFI\redhat\shimx64.efi'Substitute /dev/device_name with the bootable device file.
WarningNote the difference in the configuration file extensions:
-
.confis forGRUB -
.cfgis forGRUB 2
Do not overwrite the old
GRUBconfiguration file by mistake in the next step.Generate the
GRUB 2configuration file:If the system uses the legacy BIOS:
~]# grub2-mkconfig -o /boot/grub2/grub.cfg
If the system uses EFI:
~]# grub2-mkconfig -o /boot/efi/EFI/redhat/grub.cfg
NoteFor customizing the generated
GRUB 2configuration file, see Section 26.5, “Customizing the GRUB 2 Configuration File”. You should make changes in/etc/default/grub, not directly in/boot/grub2/grub.cfg. Otherwise, changes in/boot/grub2/grub.cfgare lost every time the file is re-generated.
Testing GRUB 2 with GRUB Legacy bootloader still installed
This section describes how to test GRUB 2 without removing the GRUB Legacy configuration. The GRUB Legacy configuration needs to stay until GRUB 2 configuration is verified; otherwise the system might become unbootable. To safely test GRUB 2 configuration, we will start GRUB 2 from GRUB Legacy.
This section applies only to the legacy BIOS booting. In case of EFI, boot entries exist for both the old and new bootloaders, and you can boot the old legacy GRUB by choosing the boot entry with the EFI firmware settings.
Add a new section into
/boot/grub/grub.conf.For systems with a separate
/bootpartition, use:title GRUB 2 Test root (hd0,0) kernel /grub2/i386-pc/core.img bootSubstitute (hd0,0) with the
GRUB Legacybootable device designation.For systems without a separate
/bootpartition, use:title GRUB 2 Test root (hd0,0) kernel /boot/grub2/i386-pc/core.img bootSubstitute (hd0,0) with the
GRUB Legacybootable device designation.- Reboot the system.
-
When presented with a
GRUB Legacymenu, select theGRUB 2 Testentry. -
When presented with a
GRUB 2menu, select a kernel to boot. -
If the above did not work, restart, and do not choose the
GRUB 2 Testentry on the next boot.
Replacing GRUB Legacy bootloader on systems that use BIOS
If GRUB 2 works successfully:
Replace the GRUB Legacy bootloader with the GRUB 2 bootloader:
~]# grub2-install /dev/sdX
Remove the old GRUB Legacy configuration file:
~]# rm /boot/grub/grub.conf
Reboot the system:
~]# reboot
Removing GRUB Legacy on systems that use EFI
If GRUB 2 works successfully:
Check the content of the
/boot/efi/EFI/redhat/directory and remove obsoleted files related only to the Legacy GRUB:~]# rm /boot/efi/EFI/redhat/grub.efi ~]# rm /boot/efi/EFI/redhat/grub.conf
If you performed an in-place upgrade from RHEL 6 to RHEL 7 using the Preupgrade Assistant and Red Hat Upgrade Tool utilities, remove also backup copies of the files mentioned above that end with the
.preupgsuffix:~]# rm /boot/efi/EFI/redhat/*.preupg
Find the old boot entry that refers to the
\EFI\redhat\grub.efifile using theefibootmgrcommand:~]# efibootmgr -v | grep '\\EFI\\redhat\\grub.efi'
Example output:
Boot0001* Linux HD(1,GPT,542e410f-cbf2-4cce-9f5d-61c4764a5d54,0x800,0x64000)/File(\EFI\redhat\grub.efi)
The entry number in this case is
0001.Remove the identified boot entry. The following command removes the boot entry from the example above:
~]# efibootmgr -Bb 0001
If you have more than one such boot entry, remove all identified old boot entries.
After upgrading to RHEL7 from an older release, such as RHEL6, the operating system is unsupported until manual upgrade of the GRUB Legacy bootloader to GRUB 2 has been successfully finished. This is due to the fact that installation of packages across major releases is not supported. In case of RHEL 7, only GRUB 2 is supported, developed, and tested; unlike GRUB Legacy from RHEL 6.
26.9. GRUB 2 over a Serial Console
This section describes how to configure GRUB 2 for serial communications on machines with no display or keyboard.
To access the GRUB 2 terminal over a serial connection, an additional option must be added to a kernel definition to make that particular kernel monitor a serial connection.
For example:
console=ttyS0,9600n8
Where console=ttyS0 is the serial terminal to be used, 9600 is the baud rate, n is for no parity, and 8 is the word length in bits. A much higher baud rate, for example 115200, is preferable for tasks such as following log files.
For more information on serial console settings, see the section called “Installable and External Documentation”
26.9.1. Configuring GRUB 2 for a single boot
To set the system to use a serial terminal only during a single boot process, when the GRUB 2 boot menu appears, move the cursor to the kernel you want to start, and press the e key to edit the kernel parameters. Remove the rhgb and quiet parameters and add console parameters at the end of the linux16 line as follows:
linux16 /vmlinuz-3.10.0-0.rc4.59.el7.x86_64 root=/dev/mapper/rhel-root ro rd.md=0 rd.dm=0 rd.lvm.lv=rhel/swap crashkernel=auto rd.luks=0 vconsole.keymap=us rd.lvm.lv=rhel/root console=ttyS0,9600These settings are not persistent and apply only for a single boot.
26.9.2. Configuring GRUB 2 for a persistent change
To make persistent changes to a menu entry on a system, use the grubby tool. For example, to update the entry for the default kernel, enter a command as follows:
~]# grubby --remove-args="rhgb quiet" --args=console=ttyS0,9600 --update-kernel=DEFAULT
The --update-kernel parameter also accepts the keyword ALL or a comma separated list of kernel index numbers. See the section called “Adding and Removing Arguments from a GRUB 2 Menu Entry” for more information on using grubby.
26.9.3. Configuring a new GRUB 2 file
If required to build a new GRUB 2 configuration file, add the following two lines in the /etc/default/grub file:
GRUB_TERMINAL="serial" GRUB_SERIAL_COMMAND="serial --speed=9600 --unit=0 --word=8 --parity=no --stop=1"
The first line disables the graphical terminal. Note that specifying the GRUB_TERMINAL key overrides values of GRUB_TERMINAL_INPUT and GRUB_TERMINAL_OUTPUT. On the second line, adjust the baud rate, parity, and other values to fit your environment and hardware. A much higher baud rate, for example 115200, is preferable for tasks such as following log files. Once you have completed the changes in the /etc/default/grub file, it is necessary to update the GRUB 2 configuration file.
Rebuild the grub.cfg file by running the grub2-mkconfig -o command as follows:
On BIOS-based machines, issue the following command as
root:~]# grub2-mkconfig -o /boot/grub2/grub.cfg
On UEFI-based machines, issue the following command as
root:~]# grub2-mkconfig -o /boot/efi/EFI/redhat/grub.cfg
26.9.4. Using screen to Connect to the Serial Console
The screen tool serves as a capable serial terminal. To install it, run as root:
~]# yum install screen
To connect to your machine using the serial console, use a command in the follow format:
screen /dev/console_port baud_rate
By default, if no option is specified, screen uses the standard 9600 baud rate. To set a higher baud rate, enter:
~]$ screen /dev/console_port 115200
Where console_port is ttyS0, or ttyUSB0, and so on.
To end the session in screen, press Ctrl+a, type :quit and press Enter.
See the screen(1) manual page for additional options and detailed information.
26.10. Terminal Menu Editing During Boot
Menu entries can be modified and arguments passed to the kernel on boot. This is done using the menu entry editor interface, which is triggered when pressing the e key on a selected menu entry in the boot loader menu. The Esc key discards any changes and reloads the standard menu interface. The c key loads the command line interface.
The command line interface is the most basic GRUB 2 interface, but it is also the one that grants the most control. The command line makes it possible to type any relevant GRUB 2 commands followed by the Enter key to execute them. This interface features some advanced features similar to shell, including Tab key completion based on context, and Ctrl+a to move to the beginning of a line and Ctrl+e to move to the end of a line. In addition, the arrow, Home, End, and Delete keys work as they do in the bash shell.
26.10.1. Booting to Rescue Mode
Rescue mode provides a convenient single-user environment and allows you to repair your system in situations when it is unable to complete a normal booting process. In rescue mode, the system attempts to mount all local file systems and start some important system services, but it does not activate network interfaces or allow more users to be logged into the system at the same time. In Red Hat Enterprise Linux 7, rescue mode is equivalent to single user mode and requires the root password.
- To enter rescue mode during boot, on the GRUB 2 boot screen, press the e key for edit.
Add the following parameter at the end of the
linuxline on 64-Bit IBM Power Series, thelinux16line on x86-64 BIOS-based systems, or thelinuxefiline on UEFI systems:systemd.unit=rescue.target
Press Ctrl+a and Ctrl+e to jump to the start and end of the line, respectively. On some systems, Home and End might also work.
Note that equivalent parameters,
1,s, andsingle, can be passed to the kernel as well.- Press Ctrl+x to boot the system with the parameter.
26.10.2. Booting to Emergency Mode
Emergency mode provides the most minimal environment possible and allows you to repair your system even in situations when the system is unable to enter rescue mode. In emergency mode, the system mounts the root file system only for reading, does not attempt to mount any other local file systems, does not activate network interfaces, and only starts few essential services. In Red Hat Enterprise Linux 7, emergency mode requires the root password.
- To enter emergency mode, on the GRUB 2 boot screen, press the e key for edit.
Add the following parameter at the end of the
linuxline on 64-Bit IBM Power Series, thelinux16line on x86-64 BIOS-based systems, or thelinuxefiline on UEFI systems:systemd.unit=emergency.target
Press Ctrl+a and Ctrl+e to jump to the start and end of the line, respectively. On some systems, Home and End might also work.
Note that equivalent parameters,
emergencyand-b, can be passed to the kernel as well.- Press Ctrl+x to boot the system with the parameter.
26.10.3. Booting to the Debug Shell
The systemd debug shell provides a shell very early in the startup process that can be used to diagnose systemd related boot-up problems. Once in the debug shell, systemctl commands such as systemctl list-jobs, and systemctl list-units can be used to look for the cause of boot problems. In addition, the debug option can be added to the kernel command line to increase the number of log messages. For systemd, the kernel command-line option debug is now a shortcut for systemd.log_level=debug.
Adding the Debug Shell Command
To activate the debug shell only for this session, proceed as follows:
- On the GRUB 2 boot screen, move the cursor to the menu entry you want to edit and press the e key for edit.
Add the following parameter at the end of the
linuxline on 64-Bit IBM Power Series, thelinux16line on x86-64 BIOS-based systems, or thelinuxefiline on UEFI systems:systemd.debug-shell
Optionally add the
debugoption.Press Ctrl+a and Ctrl+e to jump to the start and end of the line, respectively. On some systems, Home and End might also work.
- Press Ctrl+x to boot the system with the parameter.
If required, the debug shell can be set to start on every boot by enabling it with the systemctl enable debug-shell command. Alternatively, the grubby tool can be used to make persistent changes to the kernel command line in the GRUB 2 menu. See Section 26.4, “Making Persistent Changes to a GRUB 2 Menu Using the grubby Tool” for more information on using grubby.
Permanently enabling the debug shell is a security risk because no authentication is required to use it. Disable it when the debugging session has ended.
Connecting to the Debug Shell
During the boot process, the systemd-debug-generator will configure the debug shell on TTY9.
- Press Ctrl+Alt+F9 to connect to the debug shell. If working with a virtual machine, sending this key combination requires support from the virtualization application. For example, if using Virtual Machine Manager, select → from the menu.
-
The debug shell does not require authentication, therefore a prompt similar to the following should be seen on TTY9:
[root@localhost /]# If required, to verify you are in the debug shell, enter a command as follows:
/]# systemctl status $$ ● debug-shell.service - Early root shell on /dev/tty9 FOR DEBUGGING ONLY Loaded: loaded (/usr/lib/systemd/system/debug-shell.service; disabled; vendor preset: disabled) Active: active (running) since Wed 2015-08-05 11:01:48 EDT; 2min ago Docs: man:sushell(8) Main PID: 450 (bash) CGroup: /system.slice/debug-shell.service ├─ 450 /bin/bash └─1791 systemctl status 450- To return to the default shell, if the boot succeeded, press Ctrl+Alt+F1.
To diagnose start up problems, certain systemd units can be masked by adding systemd.mask=unit_name one or more times on the kernel command line. To start additional processes during the boot process, add systemd.wants=unit_name to the kernel command line. The systemd-debug-generator(8) manual page describes these options.
26.10.4. Changing and Resetting the Root Password
Setting up the root password is a mandatory part of the Red Hat Enterprise Linux 7 installation. If you forget or lose the root password it is possible to reset it, however users who are members of the wheel group can change the root password as follows:
~]$ sudo passwd root
Note that in GRUB 2, resetting the password is no longer performed in single-user mode as it was in GRUB included in Red Hat Enterprise Linux 6. The root password is now required to operate in single-user mode as well as in emergency mode.
Two procedures for resetting the root password are shown here:
- Resetting the Root Password Using an Installation Disk takes you to a shell prompt, without having to edit the GRUB 2 menu. It is the shorter of the two procedures and it is also the recommended method. You can use a boot disk or a normal Red Hat Enterprise Linux 7 installation disk.
-
Resetting the Root Password Using rd.break makes use of
rd.breakto interrupt the boot process before control is passed frominitramfstosystemd. The disadvantage of this method is that it requires more steps, includes having to edit the GRUB 2 menu, and involves choosing between a possibly time consuming SELinux file relabel or changing the SELinux enforcing mode and then restoring the SELinux security context for/etc/shadow/when the boot completes.
Resetting the Root Password Using an Installation Disk
- Start the system and when BIOS information is displayed, select the option for a boot menu and select to boot from the installation disk.
-
Choose
Troubleshooting. -
Choose
Rescue a Red Hat Enterprise Linux System. -
Choose
Continuewhich is the default option. At this point you will be promoted for a passphrase if an encrypted file system is found. - Press OK to acknowledge the information displayed until the shell prompt appears.
Change the file system
rootas follows:sh-4.2# chroot /mnt/sysimage
-
Enter the
passwdcommand and follow the instructions displayed on the command line to change therootpassword. Remove the
autorelablefile to prevent a time consuming SELinux relabel of the disk:sh-4.2# rm -f /.autorelabel
-
Enter the
exitcommand to exit thechrootenvironment. -
Enter the
exitcommand again to resume the initialization and finish the system boot.
Resetting the Root Password Using rd.break
- Start the system and, on the GRUB 2 boot screen, press the e key for edit.
Remove the
rhgbandquietparameters from the end, or near the end, of thelinux16line, orlinuxefion UEFI systems.Press Ctrl+a and Ctrl+e to jump to the start and end of the line, respectively. On some systems, Home and End might also work.
ImportantThe
rhgbandquietparameters must be removed in order to enable system messages.Add the following parameters at the end of the
linuxline on 64-Bit IBM Power Series, thelinux16line on x86-64 BIOS-based systems, or thelinuxefiline on UEFI systems:rd.break enforcing=0
Adding the
enforcing=0option enables omitting the time consuming SELinux relabeling process.The
initramfswill stop before passing control to the Linux kernel, enabling you to work with therootfile system.Note that the
initramfsprompt will appear on the last console specified on the Linux line.Press Ctrl+x to boot the system with the changed parameters.
With an encrypted file system, a password is required at this point. However the password prompt might not appear as it is obscured by logging messages. You can press the Backspace key to see the prompt. Release the key and enter the password for the encrypted file system, while ignoring the logging messages.
The
initramfsswitch_rootprompt appears.The file system is mounted read-only on
/sysroot/. You will not be allowed to change the password if the file system is not writable.Remount the file system as writable:
switch_root:/# mount -o remount,rw /sysroot
The file system is remounted with write enabled.
Change the file system’s
rootas follows:switch_root:/# chroot /sysroot
The prompt changes to
sh-4.2#.Enter the
passwdcommand and follow the instructions displayed on the command line to change therootpassword.Note that if the system is not writable, the passwd tool fails with the following error:
Authentication token manipulation error
Updating the password file results in a file with the incorrect SELinux security context. To relabel all files on next system boot, enter the following command:
sh-4.2# touch /.autorelabel
Alternatively, to save the time it takes to relabel a large disk, you can omit this step provided you included the
enforcing=0option in step 3.Remount the file system as read only:
sh-4.2# mount -o remount,ro /
-
Enter the
exitcommand to exit thechrootenvironment. Enter the
exitcommand again to resume the initialization and finish the system boot.With an encrypted file system, a pass word or phrase is required at this point. However the password prompt might not appear as it is obscured by logging messages. You can press and hold the Backspace key to see the prompt. Release the key and enter the password for the encrypted file system, while ignoring the logging messages.
NoteNote that the SELinux relabeling process can take a long time. A system reboot will occur automatically when the process is complete.
If you added the
enforcing=0option in step 3 and omitted thetouch /.autorelabelcommand in step 8, enter the following command to restore the/etc/shadowfile’s SELinux security context:~]# restorecon /etc/shadow
Enter the following commands to turn SELinux policy enforcement back on and verify that it is on:
~]# setenforce 1 ~]# getenforce Enforcing
26.11. Unified Extensible Firmware Interface (UEFI) Secure Boot
The Unified Extensible Firmware Interface (UEFI) Secure Boot technology ensures that the system firmware checks whether the system boot loader is signed with a cryptographic key authorized by a database of public keys contained in the firmware. With signature verification in the next-stage boot loader and kernel, it is possible to prevent the execution of kernel space code which has not been signed by a trusted key.
A chain of trust is established from the firmware to the signed drivers and kernel modules as follows. The first-stage boot loader, shim.efi, is signed by a UEFI private key and authenticated by a public key, signed by a certificate authority (CA), stored in the firmware database. The shim.efi contains the Red Hat public key, "Red Hat Secure Boot (CA key 1)", which is used to authenticate both the GRUB 2 boot loader, grubx64.efi, and the Red Hat kernel. The kernel in turn contains public keys to authenticate drivers and modules.
Secure Boot is the boot path validation component of the Unified Extensible Firmware Interface (UEFI) specification. The specification defines:
- a programming interface for cryptographically protected UEFI variables in non-volatile storage,
- how the trusted X.509 root certificates are stored in UEFI variables,
- validation of UEFI applications like boot loaders and drivers,
- procedures to revoke known-bad certificates and application hashes.
UEFI Secure Boot does not prevent the installation or removal of second-stage boot loaders, nor require explicit user confirmation of such changes. Signatures are verified during booting, not when the boot loader is installed or updated. Therefore, UEFI Secure Boot does not stop boot path manipulations, it helps in the detection of unauthorized changes. A new boot loader or kernel will work as long as it is signed by a key trusted by the system.
26.11.1. UEFI Secure Boot Support in Red Hat Enterprise Linux 7
Red Hat Enterprise Linux 7 includes support for the UEFI Secure Boot feature, which means that Red Hat Enterprise Linux 7 can be installed and run on systems where UEFI Secure Boot is enabled. On UEFI-based systems with the Secure Boot technology enabled, all drivers that are loaded must be signed with a trusted key, otherwise the system will not accept them. All drivers provided by Red Hat are signed by one of Red Hat’s private keys and authenticated by the corresponding Red Hat public key in the kernel.
If you want to load externally built drivers, drivers that are not provided on the Red Hat Enterprise Linux DVD, you must make sure these drivers are signed as well.
Information on signing custom drivers is available in Red Hat Enterprise Linux 7 Kernel Administration Guide.
Restrictions Imposed by UEFI Secure Boot
As UEFI Secure Boot support in Red Hat Enterprise Linux 7 is designed to ensure that the system only runs kernel mode code after its signature has been properly authenticated, certain restrictions exist.
GRUB 2 module loading is disabled as there is no infrastructure for signing and verification of GRUB 2 modules, which means allowing them to be loaded would constitute execution of untrusted code inside the security perimeter that Secure Boot defines. Instead, Red Hat provides a signed GRUB 2 binary that has all the modules supported on Red Hat Enterprise Linux 7 already included.
More detailed information is available in the Red Hat Knowledgebase article Restrictions Imposed by UEFI Secure Boot.
26.12. Additional Resources
Please see the following resources for more information on the GRUB 2 boot loader:
Installed Documentation
-
/usr/share/doc/grub2-tools-version-number/— This directory contains information about using and configuring GRUB 2. version-number corresponds to the version of the GRUB 2 package installed. -
info grub2— The GRUB 2 info page contains a tutorial, a user reference manual, a programmer reference manual, and a FAQ document about GRUB 2 and its usage. -
grubby(8)— The manual page for the command-line tool for configuring GRUB and GRUB 2. -
new-kernel-pkg(8)— The manual page for the tool to script kernel installation.
Installable and External Documentation
/usr/share/doc/kernel-doc-kernel_version/Documentation/serial-console.txt— This file, which is provided by the kernel-doc package, contains information on the serial console. Before accessing the kernel documentation, you must run the following command asroot:~]# yum install kernel-doc
- Red Hat Installation Guide — The Installation Guide provides basic information on GRUB 2, for example, installation, terminology, interfaces, and commands.
Part VIII. System Backup and Recovery
This part describes how to use the Relax-and-Recover (ReaR) disaster recovery and system migration utility.
Chapter 27. Relax-and-Recover (ReaR)
When a software or hardware failure breaks the system, the system administrator faces three tasks to restore it to the fully functioning state on a new hardware environment:
- booting a rescue system on the new hardware
- replicating the original storage layout
- restoring user and system files
Most backup software solves only the third problem. To solve the first and second problems, use Relax-and-Recover (ReaR), a disaster recovery and system migration utility.
Backup software creates backups. ReaR complements backup software by creating a rescue system. Booting the rescue system on a new hardware allows you to issue the rear recover command, which starts the recovery process. During this process, ReaR replicates the partition layout and filesystems, prompts for restoring user and system files from the backup created by backup software, and finally installs the boot loader. By default, the rescue system created by ReaR only restores the storage layout and the boot loader, but not the actual user and system files.
This chapter describes how to use ReaR.
27.1. Basic ReaR Usage
27.1.1. Installing ReaR
Install the rear package by running the following command as root:
~]# yum install rear
27.1.2. Configuring ReaR
ReaR is configured in the /etc/rear/local.conf file. Specify the rescue system configuration by adding these lines:
OUTPUT=output format OUTPUT_URL=output location
Substitute output format with rescue system format, for example, ISO for an ISO disk image or USB for a bootable USB.
Substitute output location with where it will be put, for example, file:///mnt/rescue_system/ for a local filesystem directory or sftp://backup:password@192.168.0.0/ for an SFTP directory.
Example 27.1. Configuring Rescue System Format and Location
To configure ReaR to output the rescue system as an ISO image into the /mnt/rescue_system/ directory, add these lines to the /etc/rear/local.conf file:
OUTPUT=ISO OUTPUT_URL=file:///mnt/rescue_system/
See section "Rescue Image Configuration" of the rear(8) man page for a list of all options.
ISO-specific Configuration
Using the configuration in Example 27.1, “Configuring Rescue System Format and Location” results into two equivalent output files in two locations:
-
/var/lib/rear/output/-rear's default output location -
/mnt/rescue_system/HOSTNAME/rear-localhost.iso- output location specified inOUTPUT_URL
However, usually you need only one ISO image. To make ReaR create an ISO image only in the directory specified by a user, add these lines to /etc/rear/local.conf:
OUTPUT=ISO
BACKUP=NETFS
OUTPUT_URL=null
BACKUP_URL="iso:///backup"
ISO_DIR="output location"Substitute output location with the desired location for the output.
27.1.3. Creating a Rescue System
The following example shows how to create a rescue system with verbose output:
~]# rear -v mkrescue Relax-and-Recover 1.17.2 / Git Using log file: /var/log/rear/rear-rhel7.log mkdir: created directory '/var/lib/rear/output' Creating disk layout Creating root filesystem layout TIP: To login as root via ssh you need to set up /root/.ssh/authorized_keys or SSH_ROOT_PASSWORD in your configuration file Copying files and directories Copying binaries and libraries Copying kernel modules Creating initramfs Making ISO image Wrote ISO image: /var/lib/rear/output/rear-rhel7.iso (124M) Copying resulting files to file location
With the configuration from Example 27.1, “Configuring Rescue System Format and Location”, ReaR prints the above output. The last two lines confirm that the rescue system has been successfully created and copied to the configured backup location /mnt/rescue_system/. Because the system’s host name is rhel7, the backup location now contains directory rhel7/ with the rescue system and auxiliary files:
~]# ls -lh /mnt/rescue_system/rhel7/ total 124M -rw-------. 1 root root 202 Jun 10 15:27 README -rw-------. 1 root root 166K Jun 10 15:27 rear.log -rw-------. 1 root root 124M Jun 10 15:27 rear-rhel7.iso -rw-------. 1 root root 274 Jun 10 15:27 VERSION
Transfer the rescue system to an external medium to not lose it in case of a disaster.
27.1.4. Scheduling ReaR
The /etc/cron.d/rear crontab file provided by the rear package runs the rear mkrescue command automatically daily at 1:30 AM to schedule the Relax-and-Recover (ReaR) utility for regularly creating a rescue system. The command only creates a rescue system and not the backup of the data. You still need to schedule a periodic backup of data by yourself. For example:
-
You can add another crontab that will schedule the
rear mkbackuponlycommand. -
You can also change the existing crontab to run the
rear mkbackupcommand instead of the default/usr/sbin/rear checklayout || /usr/sbin/rear mkrescurecommand. - You can schedule an external backup, if an external backup method is in use. The details depend on the backup method that you are using in ReaR. For more details, see Integrating ReaR with Backup Software.
The /etc/cron.d/rear crontab file provided in the rear package is deprecated because, by default, it is not sufficient to perform a backup. For details, see the corresponding Deprecated functionality shells and command line tools.
27.1.5. Performing a System Rescue
To perform a restore or migration:
- Boot the rescue system on the new hardware. For example, burn the ISO image to a DVD and boot from the DVD.
In the console interface, select the "Recover" option:
Figure 27.1. Rescue system: menu

You are taken to the prompt:
Figure 27.2. Rescue system: prompt
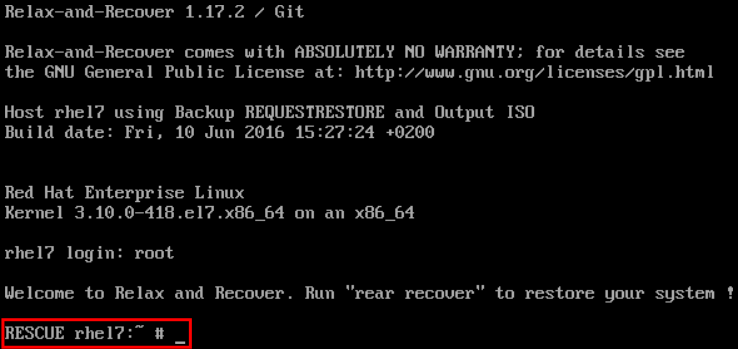 Warning
Once you have started recovery in the next step, it probably cannot be undone and you may lose anything stored on the physical disks of the system.
Run the
rear recovercommand to perform the restore or migration. The rescue system then recreates the partition layout and filesystems:Figure 27.3. Rescue system: running "rear recover"
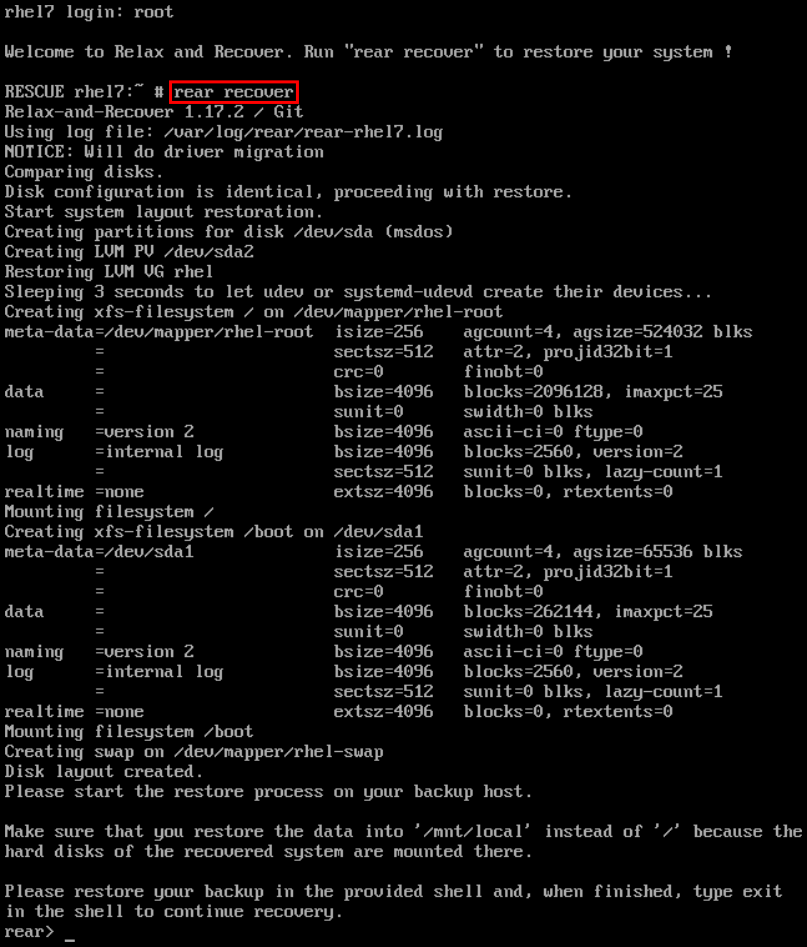
Restore user and system files from the backup into the
/mnt/local/directory.Example 27.2. Restoring User and System Files
In this example, the backup file is a tar archive created per instructions in Section 27.2.1.1, “Configuring the Internal Backup Method”. First, copy the archive from its storage, then unpack the files into
/mnt/local/, then delete the archive:~]# scp root@192.168.122.7:/srv/backup/rhel7/backup.tar.gz /mnt/local/ ~]# tar xf /mnt/local/backup.tar.gz -C /mnt/local/ ~]# rm -f /mnt/local/backup.tar.gz
The new storage has to have enough space both for the archive and the extracted files.
Verify that the files have been restored:
~]# ls /mnt/local/
Figure 27.4. Rescue system: restoring user and system files from the backup
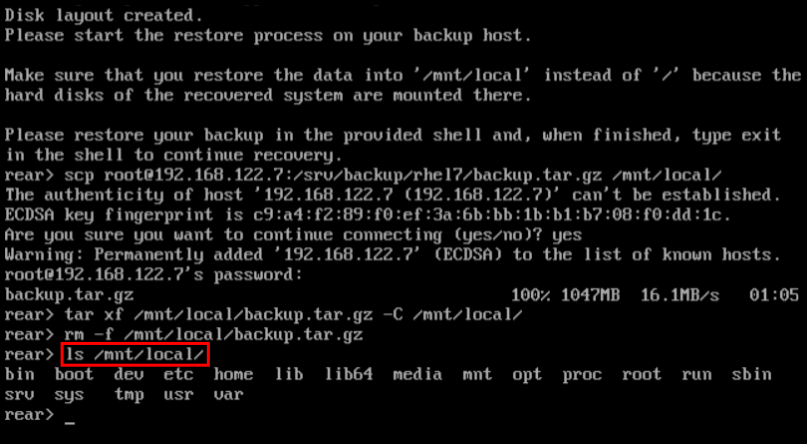
Ensure that SELinux relabels the files on the next boot:
~]# touch /mnt/local/.autorelabel
Otherwise you may be unable to log in the system, because the
/etc/passwdfile may have the incorrect SELinux context.Finish the recovery by entering
exit. ReaR will then reinstall the boot loader. After that, reboot the system:Figure 27.5. Rescue system: finishing recovery
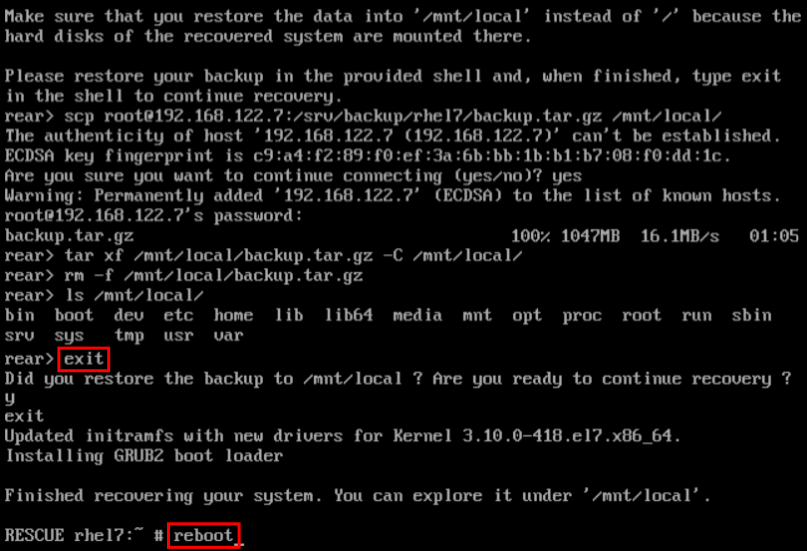
Upon reboot, SELinux will relabel the whole filesystem. Then you will be able to log in to the recovered system.
27.2. Integrating ReaR with Backup Software
The main purpose of ReaR is to produce a rescue system, but it can also be integrated with backup software. What integration means is different for the built-in, supported, and unsupported backup methods.
27.2.1. The Built-in Backup Method
ReaR includes a built-in, or internal, backup method. This method is fully integrated with ReaR, which has these advantages:
-
a rescue system and a full-system backup can be created using a single
rear mkbackupcommand - the rescue system restores files from the backup automatically
As a result, ReaR can cover the whole process of creating both the rescue system and the full-system backup.
27.2.1.1. Configuring the Internal Backup Method
To make ReaR use its internal backup method, add these lines to /etc/rear/local.conf:
BACKUP=NETFS
BACKUP_URL=backup location
These lines configure ReaR to create an archive with a full-system backup using the tar command. Substitute backup location with one of the options from the "Backup Software Integration" section of the rear(8) man page. Make sure that the backup location has enough space.
Example 27.3. Adding tar Backups
To expand the example in Section 27.1, “Basic ReaR Usage”, configure ReaR to also output a tar full-system backup into the /srv/backup/ directory:
OUTPUT=ISO OUTPUT_URL=file:///mnt/rescue_system/ BACKUP=NETFS BACKUP_URL=file:///srv/backup/
The internal backup method allows further configuration.
To keep old backup archives when new ones are created, add this line:
NETFS_KEEP_OLD_BACKUP_COPY=y
By default, ReaR creates a full backup on each run. To make the backups incremental, meaning that only the changed files are backed up on each run, add this line:
BACKUP_TYPE=incremental
This automatically sets
NETFS_KEEP_OLD_BACKUP_COPYtoy.To ensure that a full backup is done regularly in addition to incremental backups, add this line:
FULLBACKUPDAY="Day"Substitute "Day" with one of the "Mon", "Tue", "Wed", "Thu". "Fri", "Sat", "Sun".
ReaR can also include both the rescue system and the backup in the ISO image. To achieve this, set the
BACKUP_URLdirective toiso:///backup/:BACKUP_URL=iso:///backup/
This is the simplest method of full-system backup, because the rescue system does not need the user to fetch the backup during recovery. However, it needs more storage. Also, single-ISO backups cannot be incremental.
Example 27.4. Configuring Single-ISO Rescue System and Backups
This configuration creates a rescue system and a backup file as a single ISO image and puts it into the
/srv/backup/directory:OUTPUT=ISO OUTPUT_URL=file:///srv/backup/ BACKUP=NETFS BACKUP_URL=iso:///backup/
NoteThe ISO image might be large in this scenario. Therefore, Red Hat recommends creating only one ISO image, not two. For details, see the section called “ISO-specific Configuration”.
To use
rsyncinstead oftar, add this line:BACKUP_PROG=rsync
Note that incremental backups are only supported when using
tar.
27.2.1.2. Creating a Backup Using the Internal Backup Method
With BACKUP=NETFS set, ReaR can create either a rescue system, a backup file, or both.
To create a rescue system only, run:
rear mkrescue
To create a backup only, run:
rear mkbackuponly
To create a rescue system and a backup, run:
rear mkbackup
Note that triggering backup with ReaR is only possible if using the NETFS method. ReaR cannot trigger other backup methods.
When restoring, the rescue system created with the BACKUP=NETFS setting expects the backup to be present before executing rear recover. Hence, once the rescue system boots, copy the backup file into the directory specified in BACKUP_URL, unless using a single ISO image. Only then run rear recover.
To avoid recreating the rescue system unnecessarily, you can check whether storage layout has changed since the last rescue system was created using these commands:
~]# rear checklayout ~]# echo $?
Non-zero status indicates a change in disk layout. Non-zero status is also returned if ReaR configuration has changed.
The rear checklayout command does not check whether a rescue system is currently present in the output location, and can return 0 even if it is not there. So it does not guarantee that a rescue system is available, only that the layout has not changed since the last rescue system has been created.
Example 27.5. Using rear checklayout
To create a rescue system, but only if the layout has changed, use this command:
~]# rear checklayout || rear mkrescue
27.2.2. Supported Backup Methods
In addition to the NETFS internal backup method, ReaR supports several external backup methods. This means that the rescue system restores files from the backup automatically, but the backup creation cannot be triggered using ReaR.
For a list and configuration options of the supported external backup methods, see the "Backup Software Integration" section of the rear(8) man page.
27.2.3. Unsupported Backup Methods
With unsupported backup methods, there are two options:
- The rescue system prompts the user to manually restore the files. This scenario is the one described in "Basic ReaR Usage", except for the backup file format, which may take a different form than a tar archive.
-
ReaR executes the custom commands provided by the user. To configure this, set the
BACKUPdirective toEXTERNAL. Then specify the commands to be run during backing up and restoration using theEXTERNAL_BACKUPandEXTERNAL_RESTOREdirectives. Optionally, also specify theEXTERNAL_IGNORE_ERRORSandEXTERNAL_CHECKdirectives. See/usr/share/rear/conf/default.conffor an example configuration.
27.2.4. Creating Multiple Backups
With the version 2.00, ReaR supports creation of multiple backups. Backup methods that support this feature are:
-
BACKUP=NETFS(internal method) -
BACKUP=BORG(external method)
You can specify individual backups with the -C option of the rear command. The argument is a basename of the additional backup configuration file in the /etc/rear/ directory. The method, destination, and the options for each specific backup are defined in the specific configuration file, not in the main configuration file.
To perform the basic recovery of the system:
Basic recovery of the system
Create the ReaR recovery system ISO image together with a backup of the files of the basic system:
~]# rear -C basic_system mkbackup
Back the files up in the
/homedirectories:~]# rear -C home_backup mkbackuponly
Note that the specified configuration file should contain the directories needed for a basic recovery of the system, such as /boot, /root, and /usr.
Recovery of the system in the rear recovery shell
To recover the system in the rear recovery shell, use the following sequence of commands:
~]# rear -C basic_system recover
~]# rear -C home_backup restoreonly
Chapter 28. Red Hat Customer Portal Labs Relevant to System Administration
Red Hat Customer Portal Labs are tools designed to help you improve performance, troubleshoot issues, identify security problems, and optimize configuration. This appendix provides an overview of Red Hat Customer Portal relevant to system administration. All Red Hat Customer Portal Labs are available at Customer Portal Labs.
iSCSI Helper
The iSCSI Helper provides a block-level storage over Internet Protocol (IP) networks, and enables the use of storage pools within server virtualization.
Use the iSCSI Helper to generate a script that prepares the system for its role of an iSCSI target (server) or an iSCSI initiator (client) configured according to the settings that you provide.
NTP Configuration
Use the NTP (Network Time Protocol) Configuration to set up:
- servers running the NTP service
- clients synchronized with NTP servers
Samba Configuration Helper
The Samba Configuration Helper creates a configuration that provides basic file and printer sharing through Samba:
- Click to specify basic server settings.
- Click to add the directories that you want to share
- Click to add attached printers individually.
VNC Configurator
The VNC Configurator is designed to install and configure VNC (Virtual Network Computing) server on a Red Hat Enterprise Linux server.
Use the VNC Configurator to generate all-in-one script optimized to install and configure the VNC service on your Red Hat Enterprise Linux server.
Bridge Configuration
The Bridge Configuration is designed to configure a bridged network interface for applications such as KVM using Red Hat Enterprise Linux 5.4 or later.
Network Bonding Helper
The Network Bonding Helper allows administrators to bind multiple Network Interface Controllers together into a single channel using the bonding kernel module and the bonding network interface.
Use the Network Bonding Helper to enable two or more network interfaces to act as one bonding interface.
LVM RAID Calculator
The LVM RAID Calculator determines the optimal parameters for creating logical volumes (LVMs) on a given RAID storage after you specify storage options.
Use the LVM RAID Calculator to generate a sequence of commands that create LVMs on a given RAID storage.
NFS Helper
The NFS Helper simplifies configuring a new NFS server or client. Follow the steps to specify the export and mount options. Then, generate a downloadable NFS configuration script.
Load Balancer Configuration Tool
The Load Balancer Configuration Tool creates an optimal balance between apache-based load balancers and JBoss/Tomcat application servers.
Use the Load Balancer Configuration Tool to generate a configuration file and advice about how you can increase the performance of your environment.
Yum Repository Configuration Helper
The Yum Repository Configuration Helper is designed to set up a simple Yum repository.
Use the Yum Repository Configuration Helper to set up:
- a local Yum repository
- a HTTP/FTP-based Yum repository
File System Layout Calculator
The File System Layout Calculator determines the optimal parameters for creating ext3, ext4, and xfs file systems, after you provide storage options that describe your current or planned storage.
Use the File System Layout Calculator to generate a command that creates a file system with provided parameters on the specified RAID storage.
RHEL Backup and Restore Assistant
The RHEL Backup and Restore Assistant provides information on back-up and restore tools, and common scenarios of Linux usage.
Described tools:
-
dump and restore: for backing up the ext2, ext3, and ext4 file systems. -
tar and cpio: for archiving or restoring files and folders, especially when backing up the tape drives. -
rsync: for performing back-up operations and synchronizing files and directories between locations. -
dd: for copying files from a source to a destination block by block independently of the file systems or operating systems involved.
Described scenarios:
- Disaster recovery
- Hardware migration
- Partition table backup
- Important folder backup
- Incremental backup
- Differential backup
DNS Helper
The DNS Helper provides assistance with configuring different types of DNS servers.
Use the DNS Helper to generate a bash script to automatically create and configure the DNS server.
AD Integration Helper (Samba FS - winbind)
The AD Integration Helperr is used for connecting Samba File System server to an Active Directory (AD) server.
Use AD Integration Helper to generate a script based on basic AD server information supplied by the user. The generated script configures Samba, Name Service Switch (NSS) and Pluggable Authentication Module (PAM).
Red Hat Enterprise Linux Upgrade Helper
The Red Hat Enterprise Linux Upgrade Helper is designed to help you with upgrading Red Hat Enterprise Linux from version 6.5/6.6/6.7/6.8 to version 7.x.
Registration Assistant
The Registration Assistant is designed to help you choose the most suitable registration option for your Red Hat Enterprise Linux environment.
Rescue Mode Assistant
The Rescue Mode Assistant is designed to help you solve the following problems in the rescue mode of Red Hat Enterprise Linux:
- Reset root password
- Generate a SOS report
- Perform a Filesystem Check(fsck)
- Reinstall GRUB
- Rebuild the Initial Ramdisk Image
- Reduce the size of the root file system
Kernel Oops Analyzer
The Kernel Oops Analyzer is designed to help you with solving a kernel crash.
Use the Kernel Oops Analyzer to input a text or a file including one or more kernel oops messages and find a solution suitable for your case.
Kdump Helper
The Kdump Helper is designed to set up the Kdump mechanism.
Use the Kdump Helper to generate a script to set up Kdump to dump data in memory into a dump file called a vmcore.
SCSI decoder
The SCSI decoder is designed to decode SCSI error messages in the /log/* files or log file snippets, as these error messages can be hard to understand for the user.
Use the SCSI decoder to individually diagnose each SCSI error message and get solutions to resolve problems efficiently.
Red Hat Memory Analyzer
The Red Hat Memory Analyzer visualizes memory usage on your system based on information captured by the SAR utility.
Multipath Helper
The Multipath Helper creates an optimal configuration for multipath devices on Red Hat Enterprise Linux 5, 6, and 7.
Use the Multipath Helper to create advanced multipath configurations, such as custom aliases or device blacklists.
The Multipath Helper also provides the multipath.conf file for a review. When you achieve the required configuration, download the installation script to run on your server.
Multipath Configuration Visualizer
The Multipath Configuration Visualizer analyzes the files in a SOS report and provides a diagram that visualizes the multipath configuration. Use the Multipath Configuration Visualizer to display:
- Hosts components including Host Bus Adapters (HBAs), local devices, and iSCSI devices on the server side
- Storage components on the storage side
- Fabric or Ethernet components between the server and the storage
- Paths to all mentioned components
You can either upload a SOS report compressed in the .xz, .gz, or .bz2 format, or extract a SOS report in a directory that you then select as the source for a client-side analysis.
Red Hat I/O Usage Visualizer
The Red Hat I/O Usage Visualizer displays a visualization of the I/O device usage statistics captured by the SAR utility.
Storage / LVM configuration viewer
The Storage / LVM configuration viewer analyzes the files included in a SOS report and creates a diagram to visualize the Storage/LVM configuration.
Chapter 29. Revision History
0.14-26Mon Aug 05 2019, Marie Doleželová (mdolezel@redhat.com)
- Preparing document for 7.7 GA publication.
0.14-23Mon Aug 13 2018, Marie Doleželová (mdolezel@redhat.com)
- Preparing document for 7.6 Beta publication.
0.14-19Tue Mar 20 2018, Marie Doleželová (mdolezel@redhat.com)
- Preparing document for 7.5 GA publication.
0.14-17Tue Dec 5 2017, Marie Doleželová (mdolezel@redhat.com)
- Updated Samba section. Added section about Configuring RELP with TLS. Updated section on Upgrading from GRUB Legacy to GRUB 2.
0.14-16Mon Aug 8 2017, Marie Doleželová (mdolezel@redhat.com)
- Minor fixes throughout the guide, added links to articles dealing with choosing a target for ordering and dependencies of the custom unit files to the chapter "Creating Custom Unit Files".
0.14-14Thu Jul 27 2017, Marie Doleželová (mdolezel@redhat.com)
- Document version for 7.4 GA publication.
0.14-8Mon Nov 3 2016, Maxim Svistunov (msvistun@redhat.com)
- Version for 7.3 GA publication.
0.14-7Mon Jun 20 2016, Maxim Svistunov (msvistun@redhat.com)
- Added Relax-and-Recover (ReaR); made minor improvements.
0.14-6Thu Mar 10 2016, Maxim Svistunov (msvistun@redhat.com)
- Minor fixes and updates.
0.14-5Thu Jan 21 2016, Lenka Špačková (lspackova@redhat.com)
- Minor factual updates.
0.14-3Wed Nov 11 2015, Jana Heves (jheves@redhat.com)
- Version for 7.2 GA release.
0.14-1Mon Nov 9 2015, Jana Heves (jheves@redhat.com)
- Minor fixes, added links to RH training courses.
0.14-0.3Fri Apr 3 2015, Stephen Wadeley (swadeley@redhat.com)
- Added Registering the System and Managing Subscriptions, Accessing Support Using the Red Hat Support Tool, updated Viewing and Managing Log Files.
0.13-2Tue Feb 24 2015, Stephen Wadeley (swadeley@redhat.com)
- Version for 7.1 GA release.
0.12-0.6Tue Nov 18 2014, Stephen Wadeley (swadeley@redhat.com)
- Improved TigerVNC.
0.12-0.4Mon Nov 10 2014, Stephen Wadeley (swadeley@redhat.com)
- Improved Yum, Managing Services with systemd, OpenLDAP, Viewing and Managing Log Files, OProfile, and Working with the GRUB 2 Boot Loader.
0.12-0Tue 19 Aug 2014, Stephen Wadeley (swadeley@redhat.com)
- Red Hat Enterprise Linux 7.0 GA release of the System Administrator’s Guide.
29.1. Acknowledgments
Certain portions of this text first appeared in the Red Hat Enterprise Linux 6 Deployment Guide, copyright © 2010–2018 Red Hat, Inc., available at https://access.redhat.com/documentation/en-US/Red_Hat_Enterprise_Linux/6/html/Deployment_Guide/index.html.
Section 21.7, “Monitoring Performance with Net-SNMP” is based on an article written by Michael Solberg.