Chapter 16. Securing virtual machines
As an administrator of a RHEL 8 system with virtual machines (VMs), ensuring that your VMs are as secure as possible significantly lowers the risk of your guest and host OSs being infected by malicious software.
The following sections outline the mechanics of securing VMs on a RHEL 8 host and provides a list of methods to increase the security of your VMs.
16.1. How security works in virtual machines
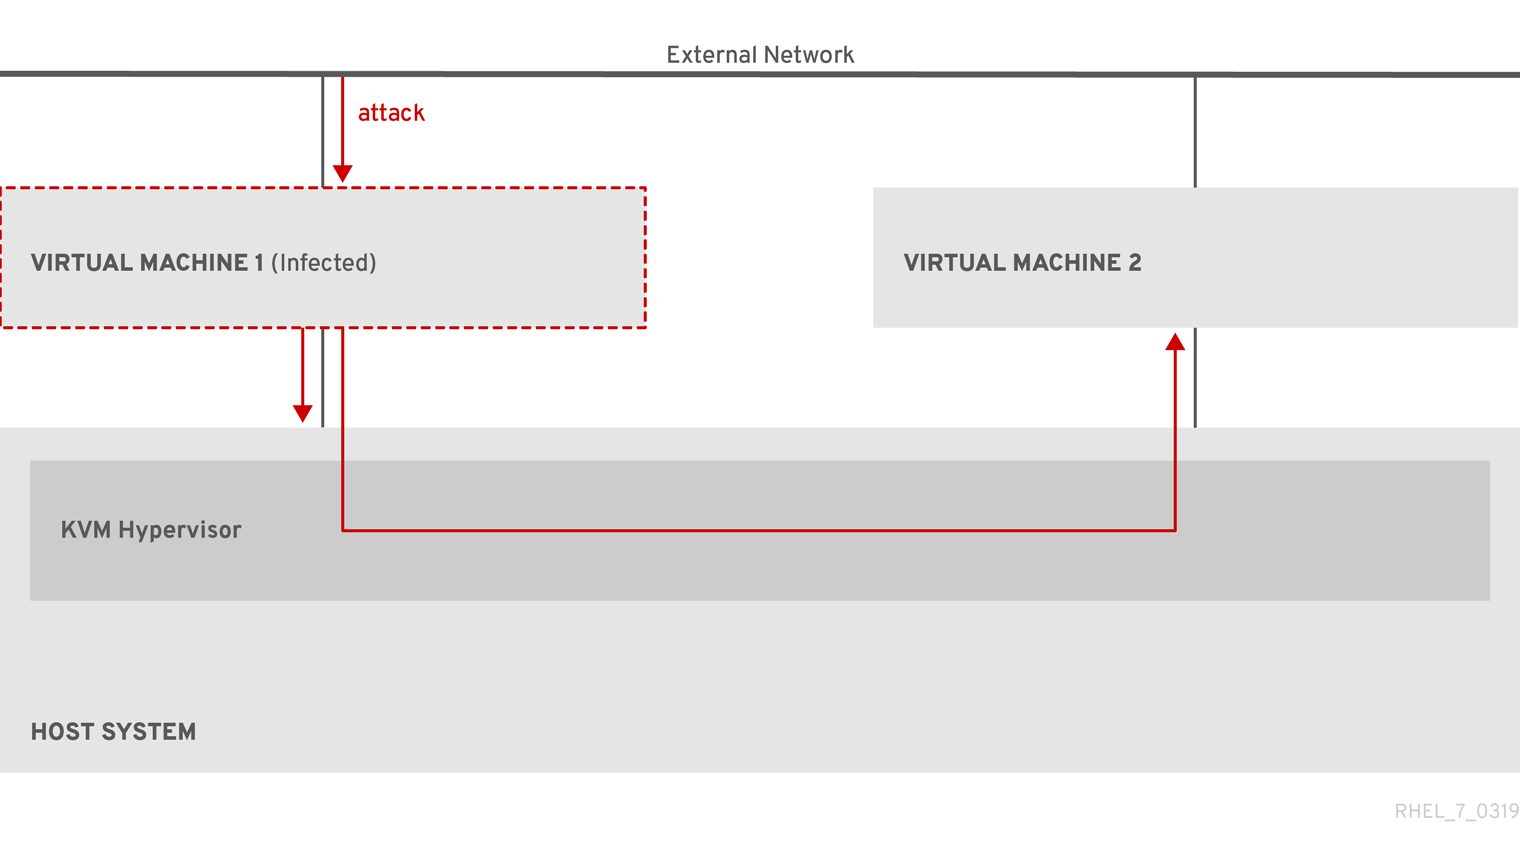
When using virtual machines (VMs), multiple operating systems can be housed within a single host machine. These systems are connected with the host through the hypervisor, and usually also through a virtual network. As a consequence, each VM can be used as a vector for attacking the host with malicious software, and the host can be used as a vector for attacking any of the VMs.
Figure 16.1. A potential malware attack vector on a virtualization host
Because the hypervisor uses the host kernel to manage VMs, services running on the VM’s operating system are frequently used for injecting malicious code into the host system. However, you can protect your system against such security threats by using a number of security features on your host and your guest systems.
These features, such as SELinux or QEMU sandboxing, provide various measures that make it more difficult for malicious code to attack the hypervisor and transfer between your host and your VMs.
Figure 16.2. Prevented malware attacks on a virtualization host

Many of the features that RHEL 8 provides for VM security are always active and do not have to be enabled or configured. For details, see Automatic features for virtual machine security.
In addition, you can adhere to a variety of best practices to minimize the vulnerability of your VMs and your hypervisor. For more information, see Best practices for securing virtual machines.
16.2. Best practices for securing virtual machines
Following the instructions below significantly decreases the risk of your virtual machines being infected with malicious code and used as attack vectors to infect your host system.
On the guest side:
Secure the virtual machine as if it was a physical machine. The specific methods available to enhance security depend on the guest OS.
If your VM is running RHEL 8, see Securing Red Hat Enterprise Linux 8 for detailed instructions on improving the security of your guest system.
On the host side:
- When managing VMs remotely, use cryptographic utilities such as SSH and network protocols such as SSL for connecting to the VMs.
Ensure SELinux is in Enforcing mode:
# getenforce
Enforcing
If SELinux is disabled or in Permissive mode, see the Using SELinux document for instructions on activating Enforcing mode.
NoteSELinux Enforcing mode also enables the sVirt RHEL 8 feature. This is a set of specialized SELinux booleans for virtualization, which can be manually adjusted for fine-grained VM security management.
Use VMs with SecureBoot:
SecureBoot is a feature that ensures that your VM is running a cryptographically signed OS. This prevents VMs whose OS has been altered by a malware attack from booting.
SecureBoot can only be applied when installing a Linux VM that uses OVMF firmware on an AMD64 or Intel 64 host. For instructions, see Creating a SecureBoot virtual machine.
Do not use
qemu-*commands, such asqemu-kvm.QEMU is an essential component of the virtualization architecture in RHEL 8, but it is difficult to manage manually, and improper QEMU configurations may cause security vulnerabilities. Therefore, using most
qemu-*commands is not supported by Red Hat. Instead, use libvirt utilities, such asvirsh,virt-install, andvirt-xml, as these orchestrate QEMU according to the best practices.Note, however, that the
qemu-imgutility is supported for management of virtual disk images.
Additional resources
16.3. Automatic features for virtual machine security
In addition to manual means of improving the security of your virtual machines listed in Best practices for securing virtual machines, a number of security features are provided by the libvirt software suite and are automatically enabled when using virtualization in RHEL 8. These include:
- System and session connections
To access all the available utilities for virtual machine management in RHEL 8, you need to use the system connection of libvirt (
qemu:///system). To do so, you must have root privileges on the system or be a part of the libvirt user group.Non-root users that are not in the libvirt group can only access a session connection of libvirt (
qemu:///session), which has to respect the access rights of the local user when accessing resources. For example, using the session connection, you cannot detect or access VMs created in the system connection or by other users. Also, available VM networking configuration options are significantly limited.NoteThe RHEL 8 documentation assumes you have system connection privileges.
- Virtual machine separation
- Individual VMs run as isolated processes on the host, and rely on security enforced by the host kernel. Therefore, a VM cannot read or access the memory or storage of other VMs on the same host.
- QEMU sandboxing
- A feature that prevents QEMU code from executing system calls that can compromise the security of the host.
- Kernel Address Space Randomization (KASLR)
- Enables randomizing the physical and virtual addresses at which the kernel image is decompressed. Thus, KASLR prevents guest security exploits based on the location of kernel objects.
16.4. Creating a SecureBoot virtual machine
You can create a Linux virtual machine (VM) that uses the SecureBoot feature, which ensures that your VM is running a cryptographically signed OS. This can be useful if the guest OS of a VM has been altered by malware. In such a scenario, SecureBoot prevents the VM from booting, which stops the potential spread of the malware to your host machine.
Prerequisites
- The VM is the Q35 machine type.
- Your host system uses the AMD64 or Intel 64 architecture.
The
edk2-OVMFpackages is installed:# yum install edk2-ovmfAn operating system (OS) installation source is available locally or on a network. This can be one of the following formats:
- An ISO image of an installation medium
A disk image of an existing VM installation
WarningInstalling from a host CD-ROM or DVD-ROM device is not possible in RHEL 8. If you select a CD-ROM or DVD-ROM as the installation source when using any VM installation method available in RHEL 8, the installation will fail. For more information, see the Red Hat Knowledgebase solution RHEL 7 or higher can’t install guest OS from CD/DVD-ROM.
- Optional: A Kickstart file can be provided for faster and easier configuration of the installation.
Procedure
Use the
virt-installcommand to create a VM as detailed in Creating virtual machines by using the command line. For the--bootoption, use theuefi,nvram_template=/usr/share/OVMF/OVMF_VARS.secboot.fdvalue. This uses theOVMF_VARS.secboot.fdandOVMF_CODE.secboot.fdfiles as templates for the VM’s non-volatile RAM (NVRAM) settings, which enables the SecureBoot feature.For example:
# virt-install --name rhel8sb --memory 4096 --vcpus 4 --os-variant rhel8.0 --boot uefi,nvram_template=/usr/share/OVMF/OVMF_VARS.secboot.fd --disk boot_order=2,size=10 --disk boot_order=1,device=cdrom,bus=scsi,path=/images/RHEL-8.0-installation.iso- Follow the OS installation procedure according to the instructions on the screen.
Verification
- After the guest OS is installed, access the VM’s command line by opening the terminal in the graphical guest console or connecting to the guest OS using SSH.
To confirm that SecureBoot has been enabled on the VM, use the
mokutil --sb-statecommand:# mokutil --sb-state SecureBoot enabled
Additional resources
16.5. Limiting what actions are available to virtual machine users
In some cases, actions that users of virtual machines (VMs) hosted on RHEL 8 can perform by default may pose a security risk. If that is the case, you can limit the actions available to VM users by configuring the libvirt daemons to use the polkit policy toolkit on the host machine.
Procedure
Optional: Ensure your system’s
polkitcontrol policies related tolibvirtare set up according to your preferences.Find all libvirt-related files in the
/usr/share/polkit-1/actions/and/usr/share/polkit-1/rules.d/directories.# ls /usr/share/polkit-1/actions | grep libvirt # ls /usr/share/polkit-1/rules.d | grep libvirt
Open the files and review the rule settings.
For information about reading the syntax of
polkitcontrol policies, useman polkit.Modify the
libvirtcontrol policies. To do so:-
Create a new
.rulesfile in the/etc/polkit-1/rules.d/directory. Add your custom policies to this file, and save it.
For further information and examples of
libvirtcontrol policies, see thelibvirtupstream documentation.
-
Create a new
Configure your VMs to use access policies determined by
polkit.To do so, uncomment the
access_drivers = [ "polkit" ]line in the/etc/libvirt/libvirtd.conffile.# sed -i 's/#access_drivers = \[ "polkit" \]/access_drivers = \[ "polkit" \]/' /etc/libvirt/libvirtd.confRestart the
libvirtdservice.# systemctl restart libvirtd
Verification
As a user whose VM actions you intended to limit, perform one of the restricted actions.
For example, if unprivileged users are restricted from viewing VMs created in the system session:
$ virsh -c qemu:///system list --all
Id   Name           State
-------------------------------
If this command does not list any VMs even though one or more VMs exist on your system,
polkitsuccessfully restricts the action for unprivileged users.
Troubleshooting
Currently, configuring
libvirtto usepolkitmakes it impossible to connect to VMs using the RHEL 8 web console, due to an incompatibility with thelibvirt-dbusservice.If you require fine-grained access control of VMs in the web console, create a custom D-Bus policy. For more information, see the Red Hat Knowledgebase solution How to configure fine-grained control of Virtual Machines in Cockpit.
Additional resources
-
The
man polkitcommand -
The
libvirtupstream information about polkit access control policies
include::module/virtualization/proc_
16.6. SELinux booleans for virtualization
RHEL 8 provides the sVirt feature, which is a set of specialized SELinux booleans that are automatically enabled on a host with SELinux in Enforcing mode.
For fine-grained configuration of virtual machines security on a RHEL 8 system, you can configure SELinux booleans on the host to ensure the hypervisor acts in a specific way.
To list all virtualization-related booleans and their statuses, use the getsebool -a | grep virt command:
$ getsebool -a | grep virt
[...]
virt_sandbox_use_netlink --> off
virt_sandbox_use_sys_admin --> off
virt_transition_userdomain --> off
virt_use_comm --> off
virt_use_execmem --> off
virt_use_fusefs --> off
[...]
To enable a specific boolean, use the setsebool -P boolean_name on command as root. To disable a boolean, use setsebool -P boolean_name off.
The following table lists virtualization-related booleans available in RHEL 8 and what they do when enabled:
| SELinux Boolean | Description |
|---|---|
| staff_use_svirt | Enables non-root users to create and transition VMs to sVirt. |
| unprivuser_use_svirt | Enables unprivileged users to create and transition VMs to sVirt. |
| virt_sandbox_use_audit | Enables sandbox containers to send audit messages. |
| virt_sandbox_use_netlink | Enables sandbox containers to use netlink system calls. |
| virt_sandbox_use_sys_admin | Enables sandbox containers to use sys_admin system calls, such as mount. |
| virt_transition_userdomain | Enables virtual processes to run as user domains. |
| virt_use_comm | Enables virt to use serial/parallel communication ports. |
| virt_use_execmem | Enables confined virtual guests to use executable memory and executable stack. |
| virt_use_fusefs | Enables virt to read FUSE mounted files. |
| virt_use_nfs | Enables virt to manage NFS mounted files. |
| virt_use_rawip | Enables virt to interact with rawip sockets. |
| virt_use_samba | Enables virt to manage CIFS mounted files. |
| virt_use_sanlock | Enables confined virtual guests to interact with the sanlock. |
| virt_use_usb | Enables virt to use USB devices. |
| virt_use_xserver | Enables virtual machine to interact with the X Window System. |
16.7. Setting up IBM Secure Execution on IBM Z
When using IBM Z hardware to run a RHEL 8 host, you can improve the security of your virtual machines (VMs) by configuring the IBM Secure Execution feature for the VMs.
IBM Secure Execution, also known as Protected Virtualization, prevents the host system from accessing a VM’s state and memory contents. As a result, even if the host is compromised, it cannot be used as a vector for attacking the guest operating system. In addition, Secure Execution can be used to prevent untrusted hosts from obtaining sensitive information from the VM.
You can convert an existing VM on an IBM Z host into a secured VM by enabling IBM Secure Execution.
For securing production environments, consult the IBM documentation on fully securing workloads with Secure Execution, which explains how to further secure your workloads.
Prerequisites
The system hardware is one of the following:
- IBM z15 or later
- IBM LinuxONE III or later
The Secure Execution feature is enabled for your system. To verify, use:
# grep facilities /proc/cpuinfo | grep 158If this command displays any output, your CPU is compatible with Secure Execution.
The kernel includes support for Secure Execution. To confirm, use:
# ls /sys/firmware | grep uvIf the command generates any output, your kernel supports Secure Execution.
The host CPU model contains the
unpackfacility. To confirm, use:# virsh domcapabilities | grep unpack <feature policy='require' name='unpack'/>If the command generates the above output, your CPU host model is compatible with Secure Execution.
The CPU mode of the VM is set to
host-model.# virsh dumpxml <vm_name> | grep "<cpu mode='host-model'/>"If the command generates any output, the VM’s CPU mode is set correctly.
The
guestfs-toolspackage is installed on the host in case you want to modify the VM image directly from the host.# yum install guestfs-tools- You have obtained and verified the IBM Z host key document. For details, see Verifying the host key document in IBM documentation.
Procedure
Do the following steps on your host:
Add the
prot_virt=1kernel parameter to the boot configuration of the host.# grubby --update-kernel=ALL --args="prot_virt=1"Update the boot menu:
# zipl
-
Use
virsh editto modify the XML configuration of the VM you want to secure. Add
<launchSecurity type="s390-pv"/>to the under the</devices>line. For example:[...] </memballoon> </devices> <launchSecurity type="s390-pv"/> </domain>-
If the
<devices>section of the configuration includes avirtio-rngdevice (<rng model="virtio">), remove all lines of the<rng> </rng>block.
Proceed with the steps in one of the following sections. You can either log in to the guest and configure it manually for Secure Execution or configure the guest image directly from the host by using a script and guestfs-tools.
Manually configuring the VM for Secure Execution
Do the following steps in the guest operating system of the VM you want to secure.
Create a parameter file. For example:
# touch ~/secure-parametersIn the
/boot/loader/entriesdirectory, identify the boot loader entry with the latest version:# ls /boot/loader/entries -l [...] -rw-r--r--. 1 root root 281 Oct 9 15:51 3ab27a195c2849429927b00679db15c1-4.18.0-240.el8.s390x.confRetrieve the kernel options line of the boot loader entry:
# cat /boot/loader/entries/3ab27a195c2849429927b00679db15c1-4.18.0-240.el8.s390x.conf | grep options
options root=/dev/mapper/rhel-root
crashkernel=auto
rd.lvm.lv=rhel/root rd.lvm.lv=rhel/swap
Add the content of the options line and
swiotlb=262144to the created parameters file.# echo "root=/dev/mapper/rhel-root crashkernel=auto rd.lvm.lv=rhel/root rd.lvm.lv=rhel/swap swiotlb=262144" > ~/secure-parametersGenerate a new IBM Secure Execution image.
For example, the following creates a
/boot/secure-imagesecured image based on the/boot/vmlinuz-4.18.0-240.el8.s390ximage, using thesecure-parametersfile, the/boot/initramfs-4.18.0-240.el8.s390x.imginitial RAM disk file, and theHKD-8651-000201C048.crthost key document.# genprotimg -i /boot/vmlinuz-4.18.0-240.el8.s390x -r /boot/initramfs-4.18.0-240.el8.s390x.img -p ~/secure-parameters -k HKD-8651-00020089A8.crt -o /boot/secure-imageBy using the
genprotimgutility creates the secure image, which contains the kernel parameters, initial RAM disk, and boot image.Update the VM’s boot menu to boot from the secure image. In addition, remove the lines starting with
initrdandoptions, as they are not needed.For example, in a RHEL 8.3 VM, the boot menu can be edited in the
/boot/loader/entries/directory:# cat /boot/loader/entries/3ab27a195c2849429927b00679db15c1-4.18.0-240.el8.s390x.conf title Red Hat Enterprise Linux 8.3 version 4.18.0-240.el8.s390x linux /boot/secure-image [...]Create the bootable disk image:
# zipl -VSecurely remove the original unprotected files. For example:
# shred /boot/vmlinuz-4.18.0-240.el8.s390x
# shred /boot/initramfs-4.18.0-240.el8.s390x.img
# shred secure-parameters
The original boot image, the initial RAM image, and the kernel parameter file are unprotected, and if they are not removed, VMs with Secure Execution enabled can still be vulnerable to hacking attempts or sensitive data mining.
Configuring the VM for Secure Execution directly from the host
You can use guestfs-tools to modify an existing image without manually booting it. However, use the following examples only in testing and development environments. For securing production environments, see the IBM documentation on fully securing workloads with Secure Execution.
Do the following steps on the host.
Create a script that contains the host key document and that configures the existing VM to use Secure Execution. For example:
#!/usr/bin/bash

echo "$(cat /proc/cmdline) swiotlb=262144" > parmfile

cat > ./HKD.crt << EOF
-----BEGIN CERTIFICATE-----
1234569901234569901234569901234569901234569901234569901234569900
1234569901234569901234569901234569901234569901234569901234569900
1234569901234569901234569901234569901234569901234569901234569900
1234569901234569901234569901234569901234569901234569901234569900
1234569901234569901234569901234569901234569901234569901234569900
1234569901234569901234569901234569901234569901234569901234569900
1234569901234569901234569901234569901234569901234569901234569900
1234569901234569901234569901234569901234569901234569901234569900
1234569901234569901234569901234569901234569901234569901234569900
1234569901234569901234569901234569901234569901234569901234569900
1234569901234569901234569901234569901234569901234569901234569900
1234569901234569901234569901234569901234569901234569901234569900
1234569901234569901234569901234569901234569901234569901234569900
1234569901234569901234569901234569901234569901234569901234569900
1234569901234569901234569901234569901234569901234569901234569900
1234569901234569901234569901234569901234569901234569901234569900
1234569901234569901234569901234569901234569901234569901234569900
1234569901234569901234569901234569901234569901234569901234569900
1234569901234569901234569901234569901234569901234569901234569900
1234569901234569901234569901234569901234569901234569901234569900
1234569901234569901234569901234569901234569901234569901234569900
1234569901234569901234569901234569901234569901234569901234569900
1234569901234569901234569901234569901234569901234569901234569900
1234569901234569901234569901234569901234569901234569901234569900
1234569901234569901234569901234569901234569901234569901234569900
xLPRGYwhmXzKDg==
-----END CERTIFICATE-----
EOF

version=$(uname -r)

kernel=/boot/vmlinuz-$version
initrd=/boot/initramfs-$version.img

genprotimg -k ./HKD.crt -p ./parmfile -i $kernel -r $initrd -o /boot/secure-linux --no-verify

cat >> /etc/zipl.conf<< EOF

[secure]
target=/boot
image=/boot/secure-linux
EOF

zipl -V

shutdown -h now
- Ensure the VM is shut-down.
Add the script to the existing VM image by using
guestfs-toolsand mark it to run on first boot.# virt-customize -a <vm_image_path> --selinux-relabel --firstboot <script_path>Boot the VM from the image with the added script.
The script runs on first boot, and then shuts down the VM again. As a result, the VM is now configured to run with Secure Execution on the host that has the corresponding host key.
Verification
On the host, use the
virsh dumpxmlutility to confirm the XML configuration of the secured VM. The configuration must include the<launchSecurity type="s390-pv"/>element, and no <rng model="virtio"> lines.# virsh dumpxml vm-name [...] <cpu mode='host-model'/> <devices> <disk type='file' device='disk'> <driver name='qemu' type='qcow2' cache='none' io='native'> <source file='/var/lib/libvirt/images/secure-guest.qcow2'/> <target dev='vda' bus='virtio'/> </disk> <interface type='network'> <source network='default'/> <model type='virtio'/> </interface> <console type='pty'/> <memballoon model='none'/> </devices> <launchSecurity type="s390-pv"/> </domain>
16.8. Attaching cryptographic coprocessors to virtual machines on IBM Z
To use hardware encryption in your virtual machine (VM) on an IBM Z host, create mediated devices from a cryptographic coprocessor device and assign them to the intended VMs. For detailed instructions, see below.
Prerequisites
- Your host is running on IBM Z hardware.
The cryptographic coprocessor is compatible with device assignment. To confirm this, ensure that the
typeof your coprocessor is listed asCEX4or later.# lszcrypt -V CARD.DOMAIN TYPE MODE STATUS REQUESTS PENDING HWTYPE QDEPTH FUNCTIONS DRIVER -------------------------------------------------------------------------------------------- 05 CEX5C CCA-Coproc online 1 0 11 08 S--D--N-- cex4card 05.0004 CEX5C CCA-Coproc online 1 0 11 08 S--D--N-- cex4queue 05.00ab CEX5C CCA-Coproc online 1 0 11 08 S--D--N-- cex4queue
The
vfio_apkernel module is loaded. To verify, use:# lsmod | grep vfio_ap vfio_ap 24576 0 [...]To load the module, use:
# modprobe vfio_apThe
s390utilsversion supportsaphandling:# lszdev --list-types ... ap Cryptographic Adjunct Processor (AP) device ...
Procedure
Obtain the decimal values for the devices that you want to assign to the VM. For example, for the devices
05.0004and05.00ab:# echo "obase=10; ibase=16; 04" | bc 4 # echo "obase=10; ibase=16; AB" | bc 171
On the host, reassign the devices to the
vfio-apdrivers:# chzdev -t ap apmask=-5 aqmask=-4,-171NoteTo assign the devices persistently, use the
-pflag.Verify that the cryptographic devices have been reassigned correctly.
# lszcrypt -V CARD.DOMAIN TYPE MODE STATUS REQUESTS PENDING HWTYPE QDEPTH FUNCTIONS DRIVER -------------------------------------------------------------------------------------------- 05 CEX5C CCA-Coproc - 1 0 11 08 S--D--N-- cex4card 05.0004 CEX5C CCA-Coproc - 1 0 11 08 S--D--N-- vfio_ap 05.00ab CEX5C CCA-Coproc - 1 0 11 08 S--D--N-- vfio_ap
If the DRIVER values of the domain queues changed to
vfio_ap, the reassignment succeeded.Create an XML snippet that defines a new mediated device.
The following example shows defining a persistent mediated device and assigning queues to it. Specifically, the
vfio_ap.xmlXML snippet in this example assigns a domain adapter0x05, domain queues0x0004and0x00ab, and a control domain0x00abto the mediated device.# vim vfio_ap.xml <device> <parent>ap_matrix</parent> <capability type="mdev"> <type id="vfio_ap-passthrough"/> <attr name='assign_adapter' value='0x05'/> <attr name='assign_domain' value='0x0004'/> <attr name='assign_domain' value='0x00ab'/> <attr name='assign_control_domain' value='0x00ab'/> </capability> </device>Create a new mediated device from the
vfio_ap.xmlXML snippet.# virsh nodedev-define vfio_ap.xml Node device 'mdev_8f9c4a73_1411_48d2_895d_34db9ac18f85_matrix' defined from 'vfio_ap.xml'Start the mediated device that you created in the previous step, in this case
mdev_8f9c4a73_1411_48d2_895d_34db9ac18f85_matrix.# virsh nodedev-start mdev_8f9c4a73_1411_48d2_895d_34db9ac18f85_matrix Device mdev_8f9c4a73_1411_48d2_895d_34db9ac18f85_matrix startedCheck that the configuration has been applied correctly
# cat /sys/devices/vfio_ap/matrix/mdev_supported_types/vfio_ap-passthrough/devices/669d9b23-fe1b-4ecb-be08-a2fabca99b71/matrix 05.0004 05.00abIf the output contains the numerical values of queues that you have previously assigned to
vfio-ap, the process was successful.Attach the mediated device to the VM.
Display the UUID of the mediated device that you created and save it for the next step.
# virsh nodedev-dumpxml mdev_8f9c4a73_1411_48d2_895d_34db9ac18f85_matrix <device> <name>mdev_8f9c4a73_1411_48d2_895d_34db9ac18f85_matrix</name> <parent>ap_matrix</parent> <capability type='mdev'> <type id='vfio_ap-passthrough'/> <uuid>8f9c4a73-1411-48d2-895d-34db9ac18f85</uuid> <iommuGroup number='0'/> <attr name='assign_adapter' value='0x05'/> <attr name='assign_domain' value='0x0004'/> <attr name='assign_domain' value='0x00ab'/> <attr name='assign_control_domain' value='0x00ab'/> </capability> </device>
Create and open an XML file for the cryptographic card mediated device. For example:
# vim crypto-dev.xmlAdd the following lines to the file and save it. Replace the
uuidvalue with the UUID you obtained in step a.<hostdev mode='subsystem' type='mdev' managed='no' model='vfio-ap'> <source> <address uuid='8f9c4a73-1411-48d2-895d-34db9ac18f85'/> </source> </hostdev>Use the XML file to attach the mediated device to the VM. For example, to permanently attach a device defined in the
crypto-dev.xmlfile to the runningtestguest1VM:# virsh attach-device testguest1 crypto-dev.xml --live --configThe
--liveoption attaches the device to a running VM only, without persistence between boots. The--configoption makes the configuration changes persistent. You can use the--configoption alone to attach the device to a shut-down VM.Note that each UUID can only be assigned to one VM at a time.
Verification
Ensure that the guest operating system detects the assigned cryptographic devices.
# lszcrypt -V

CARD.DOMAIN TYPE  MODE        STATUS  REQUESTS  PENDING HWTYPE QDEPTH FUNCTIONS  DRIVER
--------------------------------------------------------------------------------------------
05         CEX5C CCA-Coproc  online         1        0     11     08 S--D--N--  cex4card
05.0004    CEX5C CCA-Coproc  online         1        0     11     08 S--D--N--  cex4queue
05.00ab    CEX5C CCA-Coproc  online         1        0     11     08 S--D--N--  cex4queue
The output of this command in the guest operating system will be identical to that on a host logical partition with the same cryptographic coprocessor devices available.
In the guest operating system, confirm that a control domain has been successfully assigned to the cryptographic devices.
# lszcrypt -d C

DOMAIN 00 01 02 03 04 05 06 07 08 09 0a 0b 0c 0d 0e 0f
------------------------------------------------------
    00  .  .  .  .  U  .  .  .  .  .  .  .  .  .  .  .
    10  .  .  .  .  .  .  .  .  .  .  .  .  .  .  .  .
    20  .  .  .  .  .  .  .  .  .  .  .  .  .  .  .  .
    30  .  .  .  .  .  .  .  .  .  .  .  .  .  .  .  .
    40  .  .  .  .  .  .  .  .  .  .  .  .  .  .  .  .
    50  .  .  .  .  .  .  .  .  .  .  .  .  .  .  .  .
    60  .  .  .  .  .  .  .  .  .  .  .  .  .  .  .  .
    70  .  .  .  .  .  .  .  .  .  .  .  .  .  .  .  .
    80  .  .  .  .  .  .  .  .  .  .  .  .  .  .  .  .
    90  .  .  .  .  .  .  .  .  .  .  .  .  .  .  .  .
    a0  .  .  .  .  .  .  .  .  .  .  .  B  .  .  .  .
    b0  .  .  .  .  .  .  .  .  .  .  .  .  .  .  .  .
    c0  .  .  .  .  .  .  .  .  .  .  .  .  .  .  .  .
    d0  .  .  .  .  .  .  .  .  .  .  .  .  .  .  .  .
    e0  .  .  .  .  .  .  .  .  .  .  .  .  .  .  .  .
    f0  .  .  .  .  .  .  .  .  .  .  .  .  .  .  .  .
------------------------------------------------------
C: Control domain
U: Usage domain
B: Both (Control + Usage domain)
If
lszcrypt -d CdisplaysUandBintersections in the cryptographic device matrix, the control domain assignment was successful.
16.9. Enabling standard hardware security on Windows virtual machines
To secure Windows virtual machines (VMs), you can enable basic level security by using the standard hardware capabilities of the Windows device.
Prerequisites
- Make sure you have installed the latest WHQL certified VirtIO drivers.
- Make sure the VM’s firmware supports UEFI boot.
Install the
edk2-OVMFpackage on your host machine.# {PackageManagerCommand} install edk2-ovmfInstall the
vTPMpackages on your host machine.# {PackageManagerCommand} install swtpm libtpms- Make sure the VM is using the Q35 machine architecture.
- Make sure you have the Windows installation media.
Procedure
Enable TPM 2.0 by adding the following parameters to the
<devices>section in the VM’s XML configuration.<devices> [...] <tpm model='tpm-crb'> <backend type='emulator' version='2.0'/> </tpm> [...] </devices>- Install Windows in UEFI mode. For more information about how to do so, see Creating a SecureBoot virtual machine.
- Install the VirtIO drivers on the Windows VM. For more information about how to do so, see Installing virtio drivers on a Windows guest.
- In UEFI, enable Secure Boot. For more information about how to do so, see Secure Boot.
Verification
Ensure that the Device Security page on your Windows machine displays the following message:
Settings > Update & Security > Windows Security > Device Security
Your device meets the requirements for standard hardware security.