
Red Hat Training
A Red Hat training course is available for RHEL 8
Chapter 11. Managing storage for virtual machines
A virtual machine (VM), just like a physical machine, requires storage for data, program, and system files. As a VM administrator, you can assign physical or network-based storage to your VMs as virtual storage. You can also modify how the storage is presented to a VM regardless of the underlying hardware.
The following sections provide information about the different types of VM storage, how they work, and how you can manage them by using the CLI or the web console.
11.1. Understanding virtual machine storage
If you are new to virtual machine (VM) storage, or are unsure about how it works, the following sections provide a general overview about the various components of VM storage, how it works, management basics, and the supported solutions provided by Red Hat.
You can find information about:
11.1.1. Introduction to storage pools
A storage pool is a file, directory, or storage device, managed by libvirt to provide storage for virtual machines (VMs). You can divide storage pools into storage volumes, which store VM images or are attached to VMs as additional storage.
Furthermore, multiple VMs can share the same storage pool, allowing for better allocation of storage resources.
Storage pools can be persistent or transient:
-
A persistent storage pool survives a system restart of the host machine. You can use the
virsh pool-defineto create a persistent storage pool. -
A transient storage pool only exists until the host reboots. You can use the
virsh pool-createcommand to create a transient storage pool.
-
A persistent storage pool survives a system restart of the host machine. You can use the
Storage pool storage types
Storage pools can be either local or network-based (shared):
Local storage pools
Local storage pools are attached directly to the host server. They include local directories, directly attached disks, physical partitions, and Logical Volume Management (LVM) volume groups on local devices.
Local storage pools are useful for development, testing, and small deployments that do not require migration or have a large number of VMs.
Networked (shared) storage pools
Networked storage pools include storage devices shared over a network by using standard protocols.
11.1.2. Introduction to storage volumes
Storage pools are divided into storage volumes. Storage volumes are abstractions of physical partitions, LVM logical volumes, file-based disk images, and other storage types handled by libvirt. Storage volumes are presented to VMs as local storage devices, such as disks, regardless of the underlying hardware.
On the host machine, a storage volume is referred to by its name and an identifier for the storage pool from which it derives. On the virsh command line, this takes the form --pool storage_pool volume_name.
For example, to display information about a volume named firstimage in the guest_images pool.
# virsh vol-info --pool guest_images firstimage
  Name:             firstimage
  Type:             block
  Capacity:         20.00 GB
  Allocation:       20.00 GB
11.1.3. Storage management by using libvirt
By using the libvirt remote protocol, you can manage all aspects of VM storage. These operations can also be performed on a remote host. Consequently, a management application that uses libvirt, such as the RHEL web console, can be used to perform all the required tasks of configuring the storage of a VM.
You can use the libvirt API to query the list of volumes in a storage pool or to get information regarding the capacity, allocation, and available storage in that storage pool. For storage pools that support it, you can also use the libvirt API to create, clone, resize, and delete storage volumes. Furthermore, you can use the libvirt API to upload data to storage volumes, download data from storage volumes, or wipe data from storage volumes.
11.1.4. Overview of storage management
To illustrate the available options for managing storage, the following example talks about a sample NFS server that uses mount -t nfs nfs.example.com:/path/to/share /path/to/data.
As a storage administrator:
-
You can define an NFS storage pool on the virtualization host to describe the exported server path and the client target path. Consequently,
libvirtcan mount the storage either automatically whenlibvirtis started or as needed whilelibvirtis running. - You can simply add the storage pool and storage volume to a VM by name. You do not need to add the target path to the volume. Therefore, even if the target client path changes, it does not affect the VM.
-
You can configure storage pools to autostart. When you do so,
libvirtautomatically mounts the NFS shared disk on the directory which is specified whenlibvirtis started.libvirtmounts the share on the specified directory, similar to the commandmount nfs.example.com:/path/to/share /vmdata. -
You can query the storage volume paths by using the
libvirtAPI. These storage volumes are basically the files present in the NFS shared disk. You can then copy these paths into the section of a VM’s XML definition that describes the source storage for the VM’s block devices. In the case of NFS, you can use an application that uses the
libvirtAPI to create and delete storage volumes in the storage pool (files in the NFS share) up to the limit of the size of the pool (the storage capacity of the share).Note that, not all storage pool types support creating and deleting volumes.
-
You can stop a storage pool when no longer required. Stopping a storage pool (
pool-destroy) undoes the start operation, in this case, unmounting the NFS share. The data on the share is not modified by the destroy operation, despite what the name of the command suggests. For more information, seeman virsh.
11.1.5. Supported and unsupported storage pool types
Supported storage pool types
The following is a list of storage pool types supported by RHEL:
- Directory-based storage pools
- Disk-based storage pools
- Partition-based storage pools
- GlusterFS storage pools
- iSCSI-based storage pools
- LVM-based storage pools
- NFS-based storage pools
- SCSI-based storage pools with vHBA devices
- Multipath-based storage pools
- RBD-based storage pools
Unsupported storage pool types
The following is a list of libvirt storage pool types not supported by RHEL:
- Sheepdog-based storage pools
- Vstorage-based storage pools
- ZFS-based storage pools
11.2. Managing virtual machine storage pools by using the CLI
You can use the CLI to manage the following aspects of your storage pools to assign storage to your virtual machines (VMs):
- View storage pool information
Create storage pools
- Create directory-based storage pools by using the CLI
- Create disk-based storage pools by using the CLI
- Create filesystem-based storage pools by using the CLI
- Create GlusterFS-based storage pools by using the CLI
- Create iSCSI-based storage pools by using the CLI
- Create LVM-based storage pools by using the CLI
- Create NFS-based storage pools by using the CLI
- Create SCSI-based storage pools with vHBA devices by using the CLI
- Remove storage pools
11.2.1. Viewing storage pool information by using the CLI
By using the CLI, you can view a list of all storage pools with limited or full details about the storage pools. You can also filter the storage pools listed.
Procedure
Use the
virsh pool-listcommand to view storage pool information.# virsh pool-list --all --details Name State Autostart Persistent Capacity Allocation Available default running yes yes 48.97 GiB 23.93 GiB 25.03 GiB Downloads running yes yes 175.62 GiB 62.02 GiB 113.60 GiB RHEL-Storage-Pool running yes yes 214.62 GiB 93.02 GiB 168.60 GiB
Additional resources
-
The
virsh pool-list --helpcommand
11.2.2. Creating directory-based storage pools by using the CLI
A directory-based storage pool is based on a directory in an existing mounted file system. This is useful, for example, when you want to use the remaining space on the file system for other purposes. You can use the virsh utility to create directory-based storage pools.
Prerequisites
Ensure your hypervisor supports directory storage pools:
# virsh pool-capabilities | grep "'dir' supported='yes'"If the command displays any output, directory pools are supported.
Procedure
Create a storage pool
Use the
virsh pool-define-ascommand to define and create a directory-type storage pool. For example, to create a storage pool namedguest_images_dirthat uses the /guest_images directory:# virsh pool-define-as guest_images_dir dir --target "/guest_images" Pool guest_images_dir definedIf you already have an XML configuration of the storage pool you want to create, you can also define the pool based on the XML. For details, see Directory-based storage pool parameters.
Create the storage pool target path
Use the
virsh pool-buildcommand to create a storage pool target path for a pre-formatted file system storage pool, initialize the storage source device, and define the format of the data.# virsh pool-build guest_images_dir Pool guest_images_dir built # ls -la /guest_images total 8 drwx------. 2 root root 4096 May 31 19:38 . dr-xr-xr-x. 25 root root 4096 May 31 19:38 ..
Verify that the pool was created
Use the
virsh pool-listcommand to verify that the pool was created.# virsh pool-list --all Name State Autostart ----------------------------------------- default active yes guest_images_dir inactive noStart the storage pool
Use the
virsh pool-startcommand to mount the storage pool.# virsh pool-start guest_images_dir Pool guest_images_dir startedNoteThe
virsh pool-startcommand is only necessary for persistent storage pools. Transient storage pools are automatically started when they are created.[Optional] Turn on autostart
By default, a storage pool defined with the
virshcommand is not set to automatically start each time virtualization services start. Use thevirsh pool-autostartcommand to configure the storage pool to autostart.# virsh pool-autostart guest_images_dir Pool guest_images_dir marked as autostarted
Verification
Use the
virsh pool-infocommand to verify that the storage pool is in therunningstate. Check if the sizes reported are as expected and if autostart is configured correctly.# virsh pool-info guest_images_dir Name: guest_images_dir UUID: c7466869-e82a-a66c-2187-dc9d6f0877d0 State: running Persistent: yes Autostart: yes Capacity: 458.39 GB Allocation: 197.91 MB Available: 458.20 GB
11.2.3. Creating disk-based storage pools by using the CLI
In a disk-based storage pool, the pool is based on a disk partition. This is useful, for example, when you want to have an entire disk partition dedicated as virtual machine (VM) storage. You can use the virsh utility to create disk-based storage pools.
Prerequisites
Ensure your hypervisor supports disk-based storage pools:
# virsh pool-capabilities | grep "'disk' supported='yes'"If the command displays any output, disk-based pools are supported.
Prepare a device on which you will base the storage pool. For this purpose, prefer partitions (for example,
/dev/sdb1) or LVM volumes. If you provide a VM with write access to an entire disk or block device (for example,/dev/sdb), the VM will likely partition it or create its own LVM groups on it. This can result in system errors on the host.However, if you require using an entire block device for the storage pool, Red Hat recommends protecting any important partitions on the device from GRUB’s
os-proberfunction. To do so, edit the/etc/default/grubfile and apply one of the following configurations:Disable
os-prober.GRUB_DISABLE_OS_PROBER=true
Prevent
os-proberfrom discovering a specific partition. For example:GRUB_OS_PROBER_SKIP_LIST="5ef6313a-257c-4d43@/dev/sdb1"
-
Back up any data on the selected storage device before creating a storage pool. Depending on the version of
libvirtbeing used, dedicating a disk to a storage pool may reformat and erase all data currently stored on the disk device.
Procedure
Create a storage pool
Use the
virsh pool-define-ascommand to define and create a disk-type storage pool. The following example creates a storage pool namedguest_images_diskthat uses the /dev/sdb device and is mounted on the /dev directory.# virsh pool-define-as guest_images_disk disk --source-format=gpt --source-dev=/dev/sdb --target /dev Pool guest_images_disk definedIf you already have an XML configuration of the storage pool you want to create, you can also define the pool based on the XML. For details, see Disk-based storage pool parameters.
Create the storage pool target path
Use the
virsh pool-buildcommand to create a storage pool target path for a pre-formatted file-system storage pool, initialize the storage source device, and define the format of the data.# virsh pool-build guest_images_disk Pool guest_images_disk builtNoteBuilding the target path is only necessary for disk-based, file system-based, and logical storage pools. If
libvirtdetects that the source storage device’s data format differs from the selected storage pool type, the build fails, unless theoverwriteoption is specified.Verify that the pool was created
Use the
virsh pool-listcommand to verify that the pool was created.# virsh pool-list --all Name State Autostart ----------------------------------------- default active yes guest_images_disk inactive noStart the storage pool
Use the
virsh pool-startcommand to mount the storage pool.# virsh pool-start guest_images_disk Pool guest_images_disk startedNoteThe
virsh pool-startcommand is only necessary for persistent storage pools. Transient storage pools are automatically started when they are created.[Optional] Turn on autostart
By default, a storage pool defined with the
virshcommand is not set to automatically start each time virtualization services start. Use thevirsh pool-autostartcommand to configure the storage pool to autostart.# virsh pool-autostart guest_images_disk Pool guest_images_disk marked as autostarted
Verification
Use the
virsh pool-infocommand to verify that the storage pool is in therunningstate. Check if the sizes reported are as expected and if autostart is configured correctly.# virsh pool-info guest_images_disk Name: guest_images_disk UUID: c7466869-e82a-a66c-2187-dc9d6f0877d0 State: running Persistent: yes Autostart: yes Capacity: 458.39 GB Allocation: 197.91 MB Available: 458.20 GB
11.2.4. Creating filesystem-based storage pools by using the CLI
When you want to create a storage pool on a file system that is not mounted, use the filesystem-based storage pool. This storage pool is based on a given file-system mountpoint. You can use the virsh utility to create filesystem-based storage pools.
Prerequisites
Ensure your hypervisor supports filesystem-based storage pools:
# virsh pool-capabilities | grep "'fs' supported='yes'"If the command displays any output, file-based pools are supported.
Prepare a device on which you will base the storage pool. For this purpose, prefer partitions (for example,
/dev/sdb1) or LVM volumes. If you provide a VM with write access to an entire disk or block device (for example,/dev/sdb), the VM will likely partition it or create its own LVM groups on it. This can result in system errors on the host.However, if you require using an entire block device for the storage pool, Red Hat recommends protecting any important partitions on the device from GRUB’s
os-proberfunction. To do so, edit the/etc/default/grubfile and apply one of the following configurations:Disable
os-prober.GRUB_DISABLE_OS_PROBER=true
Prevent
os-proberfrom discovering a specific partition. For example:GRUB_OS_PROBER_SKIP_LIST="5ef6313a-257c-4d43@/dev/sdb1"
Procedure
Create a storage pool
Use the
virsh pool-define-ascommand to define and create a filesystem-type storage pool. For example, to create a storage pool namedguest_images_fsthat uses the /dev/sdc1 partition, and is mounted on the /guest_images directory:# virsh pool-define-as guest_images_fs fs --source-dev /dev/sdc1 --target /guest_images Pool guest_images_fs definedIf you already have an XML configuration of the storage pool you want to create, you can also define the pool based on the XML. For details, see Filesystem-based storage pool parameters.
Define the storage pool target path
Use the
virsh pool-buildcommand to create a storage pool target path for a pre-formatted file-system storage pool, initialize the storage source device, and define the format of the data.# virsh pool-build guest_images_fs Pool guest_images_fs built # ls -la /guest_images total 8 drwx------. 2 root root 4096 May 31 19:38 . dr-xr-xr-x. 25 root root 4096 May 31 19:38 ..
Verify that the pool was created
Use the
virsh pool-listcommand to verify that the pool was created.# virsh pool-list --all Name State Autostart ----------------------------------------- default active yes guest_images_fs inactive noStart the storage pool
Use the
virsh pool-startcommand to mount the storage pool.# virsh pool-start guest_images_fs Pool guest_images_fs startedNoteThe
virsh pool-startcommand is only necessary for persistent storage pools. Transient storage pools are automatically started when they are created.Optional: Turn on autostart
By default, a storage pool defined with the
virshcommand is not set to automatically start each time virtualization services start. Use thevirsh pool-autostartcommand to configure the storage pool to autostart.# virsh pool-autostart guest_images_fs Pool guest_images_fs marked as autostarted
Verification
Use the
virsh pool-infocommand to verify that the storage pool is in therunningstate. Check if the sizes reported are as expected and if autostart is configured correctly.# virsh pool-info guest_images_fs Name: guest_images_fs UUID: c7466869-e82a-a66c-2187-dc9d6f0877d0 State: running Persistent: yes Autostart: yes Capacity: 458.39 GB Allocation: 197.91 MB Available: 458.20 GBVerify there is a
lost+founddirectory in the target path on the file system, indicating that the device is mounted.# mount | grep /guest_images /dev/sdc1 on /guest_images type ext4 (rw) # ls -la /guest_images total 24 drwxr-xr-x. 3 root root 4096 May 31 19:47 . dr-xr-xr-x. 25 root root 4096 May 31 19:38 .. drwx------. 2 root root 16384 May 31 14:18 lost+found
11.2.5. Creating GlusterFS-based storage pools by using the CLI
GlusterFS is a user-space file system that uses the File System in Userspace (FUSE) software interface. If you want to have a storage pool on a Gluster server, you can use the virsh utility to create GlusterFS-based storage pools.
Prerequisites
Before you can create GlusterFS-based storage pool on a host, prepare a Gluster.
Obtain the IP address of the Gluster server by listing its status with the following command:
# gluster volume status Status of volume: gluster-vol1 Gluster process Port Online Pid ------------------------------------------------------------ Brick 222.111.222.111:/gluster-vol1 49155 Y 18634 Task Status of Volume gluster-vol1 ------------------------------------------------------------ There are no active volume tasks-
If not installed, install the
glusterfs-fusepackage. If not enabled, enable the
virt_use_fusefsboolean. Check that it is enabled.# setsebool virt_use_fusefs on # getsebool virt_use_fusefs virt_use_fusefs --> on
Ensure your hypervisor supports GlusterFS-based storage pools:
# virsh pool-capabilities | grep "'gluster' supported='yes'"If the command displays any output, GlusterFS-based pools are supported.
Procedure
Create a storage pool
Use the
virsh pool-define-ascommand to define and create a GlusterFS-based storage pool. For example, to create a storage pool namedguest_images_glusterfsthat uses a Gluster server namedgluster-vol1with IP111.222.111.222, and is mounted on the root directory of the Gluster server:# virsh pool-define-as --name guest_images_glusterfs --type gluster --source-host 111.222.111.222 --source-name gluster-vol1 --source-path / Pool guest_images_glusterfs definedIf you already have an XML configuration of the storage pool you want to create, you can also define the pool based on the XML. For details, see GlusterFS-based storage pool parameters.
Verify that the pool was created
Use the
virsh pool-listcommand to verify that the pool was created.# virsh pool-list --all Name State Autostart -------------------------------------------- default active yes guest_images_glusterfs inactive noStart the storage pool
Use the
virsh pool-startcommand to mount the storage pool.# virsh pool-start guest_images_glusterfs Pool guest_images_glusterfs startedNoteThe
virsh pool-startcommand is only necessary for persistent storage pools. Transient storage pools are automatically started when they are created.[Optional] Turn on autostart
By default, a storage pool defined with the
virshcommand is not set to automatically start each time virtualization services start. Use thevirsh pool-autostartcommand to configure the storage pool to autostart.# virsh pool-autostart guest_images_glusterfs Pool guest_images_glusterfs marked as autostarted
Verification
Use the
virsh pool-infocommand to verify that the storage pool is in therunningstate. Check if the sizes reported are as expected and if autostart is configured correctly.# virsh pool-info guest_images_glusterfs Name: guest_images_glusterfs UUID: c7466869-e82a-a66c-2187-dc9d6f0877d0 State: running Persistent: yes Autostart: yes Capacity: 458.39 GB Allocation: 197.91 MB Available: 458.20 GB
11.2.6. Creating iSCSI-based storage pools by using the CLI
Internet Small Computer Systems Interface (iSCSI) is an IP-based storage networking standard for linking data storage facilities. If you want to have a storage pool on an iSCSI server, you can use the virsh utility to create iSCSI-based storage pools.
Prerequisites
Ensure your hypervisor supports iSCSI-based storage pools:
# virsh pool-capabilities | grep "'iscsi' supported='yes'"If the command displays any output, iSCSI-based pools are supported.
Procedure
Create a storage pool
Use the
virsh pool-define-ascommand to define and create an iSCSI-type storage pool. For example, to create a storage pool namedguest_images_iscsithat uses theiqn.2010-05.com.example.server1:iscsirhel7guestIQN on theserver1.example.com, and is mounted on the/dev/disk/by-pathpath:# virsh pool-define-as --name guest_images_iscsi --type iscsi --source-host server1.example.com --source-dev iqn.2010-05.com.example.server1:iscsirhel7guest --target /dev/disk/by-path Pool guest_images_iscsi defined
If you already have an XML configuration of the storage pool you want to create, you can also define the pool based on the XML. For details, see iSCSI-based storage pool parameters.
Verify that the pool was created
Use the
virsh pool-listcommand to verify that the pool was created.# virsh pool-list --all Name State Autostart ----------------------------------------- default active yes guest_images_iscsi inactive noStart the storage pool
Use the
virsh pool-startcommand to mount the storage pool.# virsh pool-start guest_images_iscsi Pool guest_images_iscsi startedNoteThe
virsh pool-startcommand is only necessary for persistent storage pools. Transient storage pools are automatically started when they are created.[Optional] Turn on autostart
By default, a storage pool defined with the
virshcommand is not set to automatically start each time virtualization services start. Use thevirsh pool-autostartcommand to configure the storage pool to autostart.# virsh pool-autostart guest_images_iscsi Pool guest_images_iscsi marked as autostarted
Verification
Use the
virsh pool-infocommand to verify that the storage pool is in therunningstate. Check if the sizes reported are as expected and if autostart is configured correctly.# virsh pool-info guest_images_iscsi Name: guest_images_iscsi UUID: c7466869-e82a-a66c-2187-dc9d6f0877d0 State: running Persistent: yes Autostart: yes Capacity: 458.39 GB Allocation: 197.91 MB Available: 458.20 GB
11.2.7. Creating LVM-based storage pools by using the CLI
If you want to have a storage pool that is part of an LVM volume group, you can use the virsh utility to create LVM-based storage pools.
Recommendations
Be aware of the following before creating an LVM-based storage pool:
- LVM-based storage pools do not provide the full flexibility of LVM.
-
libvirtsupports thin logical volumes, but does not provide the features of thin storage pools. LVM-based storage pools are volume groups. You can create volume groups by using the
virshutility, but this way you can only have one device in the created volume group. To create a volume group with multiple devices, use the LVM utility instead, see How to create a volume group in Linux with LVM.For more detailed information about volume groups, refer to the Red Hat Enterprise Linux Logical Volume Manager Administration Guide.
-
LVM-based storage pools require a full disk partition. If you activate a new partition or device by using
virshcommands, the partition will be formatted and all data will be erased. If you are using a host’s existing volume group, as in these procedures, nothing will be erased.
Prerequisites
Ensure your hypervisor supports LVM-based storage pools:
# virsh pool-capabilities | grep "'logical' supported='yes'"If the command displays any output, LVM-based pools are supported.
Procedure
Create a storage pool
Use the
virsh pool-define-ascommand to define and create an LVM-type storage pool. For example, the following command creates a storage pool namedguest_images_lvmthat uses thelvm_vgvolume group and is mounted on the/dev/lvm_vgdirectory:# virsh pool-define-as guest_images_lvm logical --source-name lvm_vg --target /dev/lvm_vg Pool guest_images_lvm definedIf you already have an XML configuration of the storage pool you want to create, you can also define the pool based on the XML. For details, see LVM-based storage pool parameters.
Verify that the pool was created
Use the
virsh pool-listcommand to verify that the pool was created.# virsh pool-list --all Name State Autostart ------------------------------------------- default active yes guest_images_lvm inactive noStart the storage pool
Use the
virsh pool-startcommand to mount the storage pool.# virsh pool-start guest_images_lvm Pool guest_images_lvm startedNoteThe
virsh pool-startcommand is only necessary for persistent storage pools. Transient storage pools are automatically started when they are created.[Optional] Turn on autostart
By default, a storage pool defined with the
virshcommand is not set to automatically start each time virtualization services start. Use thevirsh pool-autostartcommand to configure the storage pool to autostart.# virsh pool-autostart guest_images_lvm Pool guest_images_lvm marked as autostarted
Verification
Use the
virsh pool-infocommand to verify that the storage pool is in therunningstate. Check if the sizes reported are as expected and if autostart is configured correctly.# virsh pool-info guest_images_lvm Name: guest_images_lvm UUID: c7466869-e82a-a66c-2187-dc9d6f0877d0 State: running Persistent: yes Autostart: yes Capacity: 458.39 GB Allocation: 197.91 MB Available: 458.20 GB
11.2.8. Creating NFS-based storage pools by using the CLI
If you want to have a storage pool on a Network File System (NFS) server, you can use the virsh utility to create NFS-based storage pools.
Prerequisites
Ensure your hypervisor supports NFS-based storage pools:
# virsh pool-capabilities | grep "<value>nfs</value>"If the command displays any output, NFS-based pools are supported.
Procedure
Create a storage pool
Use the virsh
pool-define-ascommand to define and create an NFS-type storage pool. For example, to create a storage pool namedguest_images_netfsthat uses a NFS server with IP111.222.111.222mounted on the server directory/home/net_mountby using the target directory/var/lib/libvirt/images/nfspool:# virsh pool-define-as --name guest_images_netfs --type netfs --source-host='111.222.111.222' --source-path='/home/net_mount' --source-format='nfs' --target='/var/lib/libvirt/images/nfspool'If you already have an XML configuration of the storage pool you want to create, you can also define the pool based on the XML. For details, see NFS-based storage pool parameters.
Verify that the pool was created
Use the
virsh pool-listcommand to verify that the pool was created.# virsh pool-list --all Name State Autostart ----------------------------------------- default active yes guest_images_netfs inactive noStart the storage pool
Use the
virsh pool-startcommand to mount the storage pool.# virsh pool-start guest_images_netfs Pool guest_images_netfs startedNoteThe
virsh pool-startcommand is only necessary for persistent storage pools. Transient storage pools are automatically started when they are created.[Optional] Turn on autostart
By default, a storage pool defined with the
virshcommand is not set to automatically start each time virtualization services start. Use thevirsh pool-autostartcommand to configure the storage pool to autostart.# virsh pool-autostart guest_images_netfs Pool guest_images_netfs marked as autostarted
Verification
Use the
virsh pool-infocommand to verify that the storage pool is in therunningstate. Check if the sizes reported are as expected and if autostart is configured correctly.# virsh pool-info guest_images_netfs Name: guest_images_netfs UUID: c7466869-e82a-a66c-2187-dc9d6f0877d0 State: running Persistent: yes Autostart: yes Capacity: 458.39 GB Allocation: 197.91 MB Available: 458.20 GB
11.2.9. Creating SCSI-based storage pools with vHBA devices by using the CLI
If you want to have a storage pool on a Small Computer System Interface (SCSI) device, your host must be able to connect to the SCSI device by using a virtual host bus adapter (vHBA). You can then use the virsh utility to create SCSI-based storage pools.
Prerequisites
Ensure your hypervisor supports SCSI-based storage pools:
# virsh pool-capabilities | grep "'scsi' supported='yes'"If the command displays any output, SCSI-based pools are supported.
- Before creating a SCSI-based storage pools with vHBA devices, create a vHBA. For more information, see Creating vHBAs.
Procedure
Create a storage pool
Use the
virsh pool-define-ascommand to define and create SCSI storage pool by using a vHBA. For example, the following creates a storage pool namedguest_images_vhbathat uses a vHBA identified by thescsi_host3parent adapter, world-wide port number5001a4ace3ee047d, and world-wide node number5001a4a93526d0a1. The storage pool is mounted on the/dev/disk/directory:# virsh pool-define-as guest_images_vhba scsi --adapter-parent scsi_host3 --adapter-wwnn 5001a4a93526d0a1 --adapter-wwpn 5001a4ace3ee047d --target /dev/disk/ Pool guest_images_vhba definedIf you already have an XML configuration of the storage pool you want to create, you can also define the pool based on the XML. For details, see Parameters for SCSI-based storage pools with vHBA devices.
Verify that the pool was created
Use the
virsh pool-listcommand to verify that the pool was created.# virsh pool-list --all Name State Autostart ----------------------------------------- default active yes guest_images_vhba inactive noStart the storage pool
Use the
virsh pool-startcommand to mount the storage pool.# virsh pool-start guest_images_vhba Pool guest_images_vhba startedNoteThe
virsh pool-startcommand is only necessary for persistent storage pools. Transient storage pools are automatically started when they are created.[Optional] Turn on autostart
By default, a storage pool defined with the
virshcommand is not set to automatically start each time virtualization services start. Use thevirsh pool-autostartcommand to configure the storage pool to autostart.# virsh pool-autostart guest_images_vhba Pool guest_images_vhba marked as autostarted
Verification
Use the
virsh pool-infocommand to verify that the storage pool is in therunningstate. Check if the sizes reported are as expected and if autostart is configured correctly.# virsh pool-info guest_images_vhba Name: guest_images_vhba UUID: c7466869-e82a-a66c-2187-dc9d6f0877d0 State: running Persistent: yes Autostart: yes Capacity: 458.39 GB Allocation: 197.91 MB Available: 458.20 GB
11.2.10. Deleting storage pools by using the CLI
To remove a storage pool from your host system, you must stop the pool and remove its XML definition.
Procedure
List the defined storage pools by using the
virsh pool-listcommand.# virsh pool-list --all Name State Autostart ------------------------------------------- default active yes Downloads active yes RHEL-Storage-Pool active yesStop the storage pool you want to delete by using the
virsh pool-destroycommand.# virsh pool-destroy Downloads Pool Downloads destroyedOptional: For some types of storage pools, you can remove the directory where the storage pool resides by using the
virsh pool-deletecommand. Note that to do so, the directory must be empty.# virsh pool-delete Downloads Pool Downloads deletedDelete the definition of the storage pool by using the
virsh pool-undefinecommand.# virsh pool-undefine Downloads Pool Downloads has been undefined
Verification
Confirm that the storage pool was deleted.
# virsh pool-list --all
Name                 State      Autostart
-------------------------------------------
default              active     yes
rhel-Storage-Pool   active     yes
11.3. Managing virtual machine storage pools by using the web console
By using the RHEL web console, you can manage the storage pools to assign storage to your virtual machines (VMs).
You can use the web console to:
- View storage pool information.
Create storage pools:
- Remove storage pools.
- Deactivate storage pools.
11.3.1. Viewing storage pool information by using the web console
By using the web console, you can view detailed information about storage pools available on your system. Storage pools can be used to create disk images for your virtual machines.
Prerequisites
- The web console VM plug-in is installed on your system.
Procedure
Click at the top of the interface.
The Storage pools window appears, showing a list of configured storage pools.

The information includes the following:
- Name - The name of the storage pool.
- Size - The current allocation and the total capacity of the storage pool.
- Connection - The connection used to access the storage pool.
- State - The state of the storage pool.
Click the arrow next to the storage pool whose information you want to see.
The row expands to reveal the Overview pane with detailed information about the selected storage pool.

The information includes:
-
Target path - The source for the types of storage pools backed by directories, such as
dirornetfs. - Persistent - Indicates whether or not the storage pool has a persistent configuration.
- Autostart - Indicates whether or not the storage pool starts automatically when the system boots up.
- Type - The type of the storage pool.
-
Target path - The source for the types of storage pools backed by directories, such as
To view a list of storage volumes associated with the storage pool, click .
The Storage Volumes pane appears, showing a list of configured storage volumes.

The information includes:
- Name - The name of the storage volume.
- Used by - The VM that is currently using the storage volume.
- Size - The size of the volume.
Additional resources
11.3.2. Creating directory-based storage pools by using the web console
A directory-based storage pool is based on a directory in an existing mounted file system. This is useful, for example, when you want to use the remaining space on the file system for other purposes.
Prerequisites
- The web console VM plug-in is installed on your system.
Procedure
In the RHEL web console, click in the Virtual Machines tab.
The Storage pools window appears, showing a list of configured storage pools, if any.
Click .
The Create storage pool dialog appears.
- Enter a name for the storage pool.
In the Type drop down menu, select Filesystem directory.
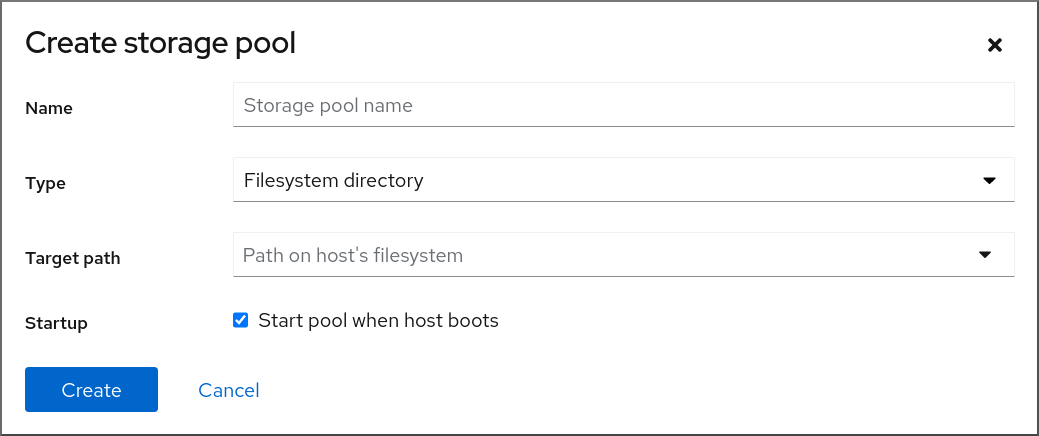 Note
NoteIf you do not see the Filesystem directory option in the drop down menu, then your hypervisor does not support directory-based storage pools.
Enter the following information:
-
Target path - The source for the types of storage pools backed by directories, such as
dirornetfs. - Startup - Whether or not the storage pool starts when the host boots.
-
Target path - The source for the types of storage pools backed by directories, such as
Click .
The storage pool is created, the Create Storage Pool dialog closes, and the new storage pool appears in the list of storage pools.
Additional resources
11.3.3. Creating NFS-based storage pools by using the web console
An NFS-based storage pool is based on a file system that is hosted on a server.
Prerequisites
- The web console VM plug-in is installed on your system.
Procedure
In the RHEL web console, click in the Virtual Machines tab.
The Storage pools window appears, showing a list of configured storage pools, if any.
Click .
The Create storage pool dialog appears.
- Enter a name for the storage pool.
In the Type drop down menu, select Network file system.
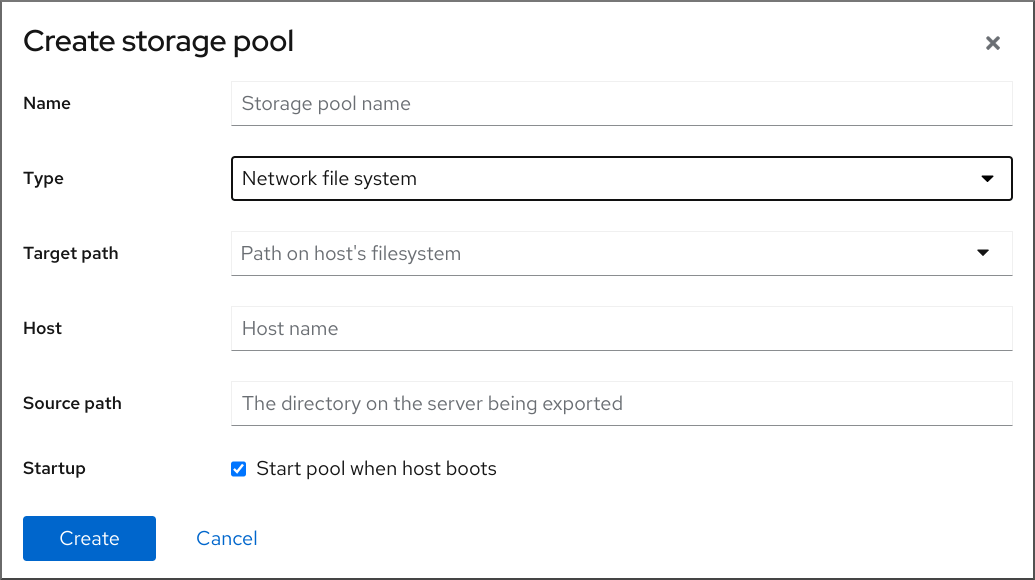 Note
NoteIf you do not see the Network file system option in the drop down menu, then your hypervisor does not support nfs-based storage pools.
Enter the rest of the information:
- Target path - The path specifying the target. This will be the path used for the storage pool.
- Host - The hostname of the network server where the mount point is located. This can be a hostname or an IP address.
- Source path - The directory used on the network server.
- Startup - Whether or not the storage pool starts when the host boots.
Click .
The storage pool is created. The Create storage pool dialog closes, and the new storage pool appears in the list of storage pools.
Additional resources
11.3.4. Creating iSCSI-based storage pools by using the web console
An iSCSI-based storage pool is based on the Internet Small Computer Systems Interface (iSCSI), an IP-based storage networking standard for linking data storage facilities.
Prerequisites
- The web console VM plug-in is installed on your system.
Procedure
In the RHEL web console, click in the Virtual Machines tab.
The Storage pools window appears, showing a list of configured storage pools, if any.
Click .
The Create storage pool dialog appears.
- Enter a name for the storage pool.
In the Type drop down menu, select iSCSI target.
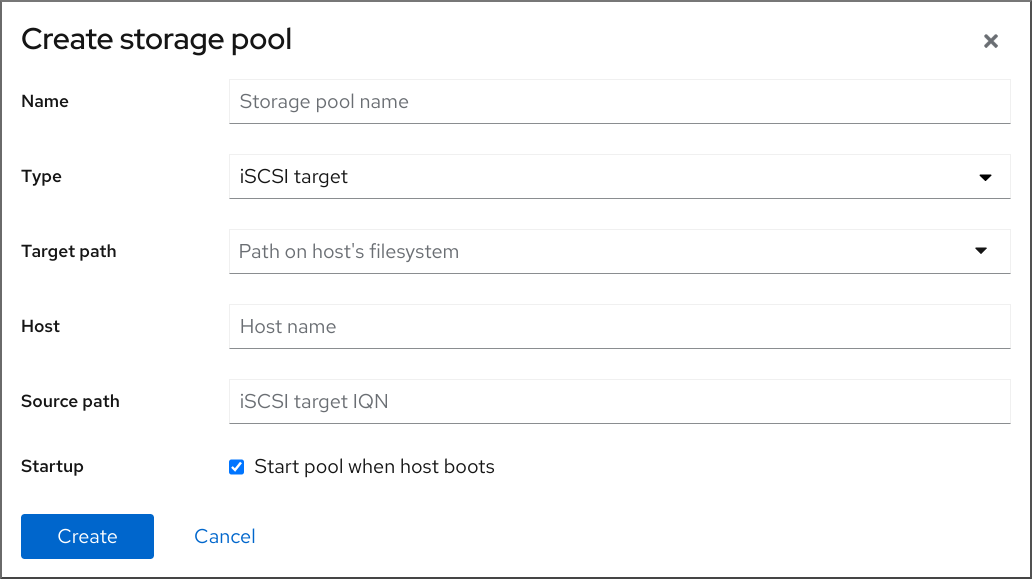
Enter the rest of the information:
- Target Path - The path specifying the target. This will be the path used for the storage pool.
- Host - The hostname or IP address of the ISCSI server.
- Source path - The unique iSCSI Qualified Name (IQN) of the iSCSI target.
- Startup - Whether or not the storage pool starts when the host boots.
Click .
The storage pool is created. The Create storage pool dialog closes, and the new storage pool appears in the list of storage pools.
Additional resources
11.3.5. Creating disk-based storage pools by using the web console
A disk-based storage pool uses entire disk partitions.
- Depending on the version of libvirt being used, dedicating a disk to a storage pool may reformat and erase all data currently stored on the disk device. It is strongly recommended that you back up the data on the storage device before creating a storage pool.
When whole disks or block devices are passed to the VM, the VM will likely partition it or create its own LVM groups on it. This can cause the host machine to detect these partitions or LVM groups and cause errors.
These errors can also occur when you manually create partitions or LVM groups and pass them to the VM.
To avoid theses errors, use file-based storage pools instead.
Prerequisites
- The web console VM plug-in is installed on your system.
Procedure
In the RHEL web console, click in the Virtual Machines tab.
The Storage pools window appears, showing a list of configured storage pools, if any.
Click .
The Create storage pool dialog appears.
- Enter a name for the storage pool.
In the Type drop down menu, select Physical disk device.
 Note
NoteIf you do not see the Physical disk device option in the drop down menu, then your hypervisor does not support disk-based storage pools.
Enter the rest of the information:
- Target Path - The path specifying the target device. This will be the path used for the storage pool.
-
Source path - The path specifying the storage device. For example,
/dev/sdb. - Format - The type of the partition table.
- Startup - Whether or not the storage pool starts when the host boots.
Click .
The storage pool is created. The Create storage pool dialog closes, and the new storage pool appears in the list of storage pools.
Additional resources
11.3.6. Creating LVM-based storage pools by using the web console
An LVM-based storage pool is based on volume groups, which you can manage by using the Logical Volume Manager (LVM). A volume group is a combination of multiple physical volumes that creates a single storage structure.
- LVM-based storage pools do not provide the full flexibility of LVM.
-
libvirtsupports thin logical volumes, but does not provide the features of thin storage pools. -
LVM-based storage pools require a full disk partition. If you activate a new partition or device by using
virshcommands, the partition will be formatted and all data will be erased. If you are using a host’s existing volume group, as in these procedures, nothing will be erased. To create a volume group with multiple devices, use the LVM utility instead, see How to create a volume group in Linux with LVM.
For more detailed information about volume groups, refer to the Red Hat Enterprise Linux Logical Volume Manager Administration Guide.
Prerequisites
- The web console VM plug-in is installed on your system.
Procedure
In the RHEL web console, click in the Virtual Machines tab.
The Storage pools window appears, showing a list of configured storage pools, if any.
Click .
The Create storage pool dialog appears.
- Enter a name for the storage pool.
In the Type drop down menu, select LVM volume group.
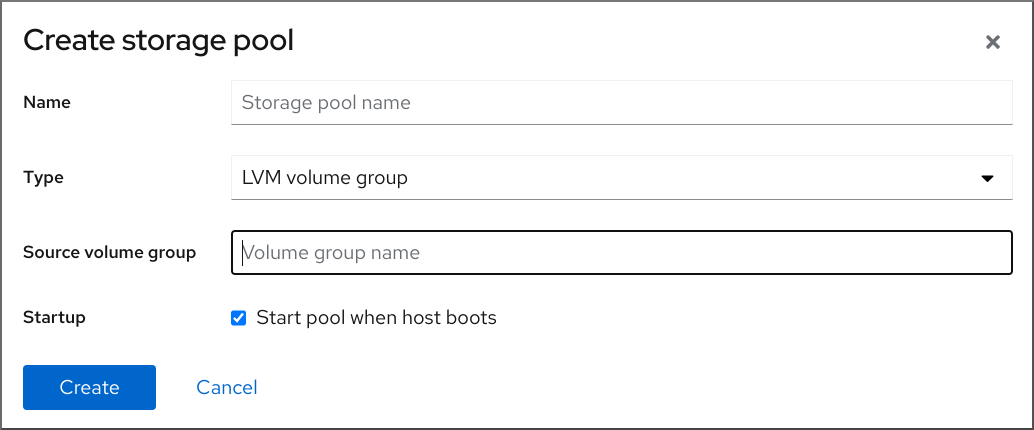 Note
NoteIf you do not see the LVM volume group option in the drop down menu, then your hypervisor does not support LVM-based storage pools.
Enter the rest of the information:
- Source volume group - The name of the LVM volume group that you wish to use.
- Startup - Whether or not the storage pool starts when the host boots.
Click .
The storage pool is created. The Create storage pool dialog closes, and the new storage pool appears in the list of storage pools.
Additional resources
11.3.7. Creating SCSI-based storage pools with vHBA devices by using the web console
An SCSI-based storage pool is based on a Small Computer System Interface (SCSI) device. In this configuration, your host must be able to connect to the SCSI device by using a virtual host bus adapter (vHBA).
Prerequisites
- Create a vHBA. For more information, see Creating vHBAs.
- The web console VM plug-in is installed on your system.
Procedure
In the RHEL web console, click in the Virtual Machines tab.
The Storage pools window appears, showing a list of configured storage pools, if any.
Click .
The Create storage pool dialog appears.
- Enter a name for the storage pool.
In the Type drop down menu, select iSCSI direct target.
 Note
NoteIf you do not see the iSCSI direct target option in the drop down menu, then your hypervisor does not support SCSI-based storage pools.
Enter the rest of the information:
- Host - The hostname of the network server where the mount point is located. This can be a hostname or an IP address.
- Source path - The unique iSCSI Qualified Name (IQN) of the iSCSI target.
- Initiator - The unique iSCSI Qualified Name (IQN) of the iSCSI initiator, the vHBA.
- Startup - Whether or not the storage pool starts when the host boots.
Click .
The storage pool is created. The Create storage pool dialog closes, and the new storage pool appears in the list of storage pools.
Additional resources
11.3.8. Removing storage pools by using the web console
You can remove storage pools to free up resources on the host or on the network to improve system performance. Deleting storage pools also frees up resources that can then be used by other virtual machines (VMs).
Unless explicitly specified, deleting a storage pool does not simultaneously delete the storage volumes inside that pool.
To temporarily deactivate a storage pool instead of deleting it, see Deactivating storage pools by using the web console
Prerequisites
- The web console VM plug-in is installed on your system.
- Detach the disk from the VM.
- If you want to delete the associated storage volumes along with the pool, activate the pool.
Procedure
Click on the Virtual Machines tab.
The Storage Pools window appears, showing a list of configured storage pools.
Click the Menu button of the storage pool you want to delete and click .
A confirmation dialog appears.
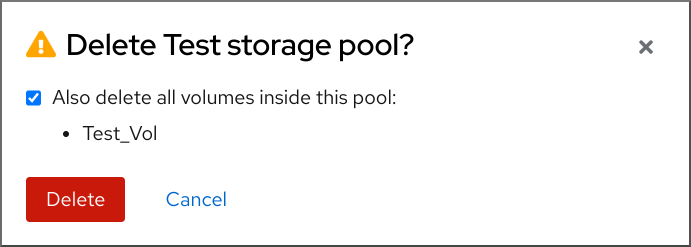
- Optional: To delete the storage volumes inside the pool, select the corresponding check boxes in the dialog.
Click .
The storage pool is deleted. If you had selected the checkbox in the previous step, the associated storage volumes are deleted as well.
Additional resources
11.3.9. Deactivating storage pools by using the web console
If you do not want to permanently delete a storage pool, you can temporarily deactivate it instead.
When you deactivate a storage pool, no new volumes can be created in that pool. However, any virtual machines (VMs) that have volumes in that pool will continue to run. This is useful for a number of reasons, for example, you can limit the number of volumes that can be created in a pool to increase system performance.
To deactivate a storage pool by using the RHEL web console, see the following procedure.
Prerequisites
- The web console VM plug-in is installed on your system.
Procedure
Click at the top of the Virtual Machines tab. The Storage Pools window appears, showing a list of configured storage pools.
Click on the storage pool row.
The storage pool is deactivated.
Additional resources
11.4. Parameters for creating storage pools
Based on the type of storage pool you require, you can modify its XML configuration file and define a specific type of storage pool. This section provides information about the XML parameters required for creating various types of storage pools along with examples.
11.4.1. Directory-based storage pool parameters
When you want to create or modify a directory-based storage pool by using an XML configuration file, you must include certain required parameters. See the following table for more information about these parameters.
You can use the virsh pool-define command to create a storage pool based on the XML configuration in a specified file. For example:
# virsh pool-define ~/guest_images.xml
  Pool defined from guest_images_dir
Parameters
The following table provides a list of required parameters for the XML file for a directory-based storage pool.
Table 11.1. Directory-based storage pool parameters
| Description | XML |
|---|---|
| The type of storage pool |
|
| The name of the storage pool |
|
| The path specifying the target. This will be the path used for the storage pool. |
|
Example
The following is an example of an XML file for a storage pool based on the /guest_images directory:
<pool type='dir'>
  <name>dirpool</name>
  <target>
    <path>/guest_images</path>
  </target>
</pool>
Additional resources
11.4.2. Disk-based storage pool parameters
When you want to create or modify a disk-based storage pool by using an XML configuration file, you must include certain required parameters. See the following table for more information about these parameters.
You can use the virsh pool-define command to create a storage pool based on the XML configuration in a specified file. For example:
# virsh pool-define ~/guest_images.xml
  Pool defined from guest_images_disk
Parameters
The following table provides a list of required parameters for the XML file for a disk-based storage pool.
Table 11.2. Disk-based storage pool parameters
| Description | XML |
|---|---|
| The type of storage pool |
|
| The name of the storage pool |
|
|
The path specifying the storage device. For example, |
|
| The path specifying the target device. This will be the path used for the storage pool. |
|
Example
The following is an example of an XML file for a disk-based storage pool:
<pool type='disk'>
  <name>phy_disk</name>
  <source>
    <device path='/dev/sdb'/>
    <format type='gpt'/>
  </source>
  <target>
    <path>/dev</path>
  </target>
</pool>
Additional resources
11.4.3. Filesystem-based storage pool parameters
When you want to create or modify a filesystem-based storage pool by using an XML configuration file, you must include certain required parameters. See the following table for more information about these parameters.
You can use the virsh pool-define command to create a storage pool based on the XML configuration in a specified file. For example:
# virsh pool-define ~/guest_images.xml
  Pool defined from guest_images_fs
Parameters
The following table provides a list of required parameters for the XML file for a filesystem-based storage pool.
Table 11.3. Filesystem-based storage pool parameters
| Description | XML |
|---|---|
| The type of storage pool |
|
| The name of the storage pool |
|
|
The path specifying the partition. For example, |
|
| The file system type, for example ext4. |
|
| The path specifying the target. This will be the path used for the storage pool. |
|
Example
The following is an example of an XML file for a storage pool based on the /dev/sdc1 partition:
<pool type='fs'>
  <name>guest_images_fs</name>
  <source>
    <device path='/dev/sdc1'/>
    <format type='auto'/>
  </source>
  <target>
    <path>/guest_images</path>
  </target>
</pool>
Additional resources
11.4.4. GlusterFS-based storage pool parameters
When you want to create or modify a GlusterFS-based storage pool by using an XML configuration file, you must include certain required parameters. See the following table for more information about these parameters.
You can use the virsh pool-define command to create a storage pool based on the XML configuration in a specified file. For example:
# virsh pool-define ~/guest_images.xml
  Pool defined from guest_images_glusterfs
Parameters
The following table provides a list of required parameters for the XML file for a GlusterFS-based storage pool.
Table 11.4. GlusterFS-based storage pool parameters
| Description | XML |
|---|---|
| The type of storage pool |
|
| The name of the storage pool |
|
| The hostname or IP address of the Gluster server |
|
| The path on the Gluster server used for the storage pool. |
|
Example
The following is an example of an XML file for a storage pool based on the Gluster file system at 111.222.111.222:
<pool type='gluster'>
  <name>Gluster_pool</name>
  <source>
    <host name='111.222.111.222'/>
    <dir path='/'/>
    <name>gluster-vol1</name>
  </source>
</pool>
Additional resources
11.4.5. iSCSI-based storage pool parameters
When you want to create or modify an iSCSI-based storage pool by using an XML configuration file, you must include certain required parameters. See the following table for more information about these parameters.
You can use the virsh pool-define command to create a storage pool based on the XML configuration in a specified file. For example:
# virsh pool-define ~/guest_images.xml
  Pool defined from guest_images_iscsi
Parameters
The following table provides a list of required parameters for the XML file for an iSCSI-based storage pool.
Table 11.5. iSCSI-based storage pool parameters
| Description | XML |
|---|---|
| The type of storage pool |
|
| The name of the storage pool |
|
| The name of the host |
|
| The iSCSI IQN |
|
| The path specifying the target. This will be the path used for the storage pool. |
|
| [Optional] The IQN of the iSCSI initiator. This is only needed when the ACL restricts the LUN to a particular initiator. |
|
The IQN of the iSCSI initiator can be determined by using the virsh find-storage-pool-sources-as iscsi command.
Example
The following is an example of an XML file for a storage pool based on the specified iSCSI device:
<pool type='iscsi'>
<name>iSCSI_pool</name>
<source>
<host name='server1.example.com'/>
<device path='iqn.2010-05.com.example.server1:iscsirhel7guest'/>
</source>
<target>
    <path>/dev/disk/by-path</path>
 </target>
</pool>Additional resources
11.4.6. LVM-based storage pool parameters
When you want to create or modify an LVM-based storage pool by using an XML configuration file, you must include certain required parameters. See the following table for more information about these parameters.
You can use the virsh pool-define command to create a storage pool based on the XML configuration in a specified file. For example:
# virsh pool-define ~/guest_images.xml
  Pool defined from guest_images_logical
Parameters
The following table provides a list of required parameters for the XML file for a LVM-based storage pool.
Table 11.6. LVM-based storage pool parameters
| Description | XML |
|---|---|
| The type of storage pool |
|
| The name of the storage pool |
|
| The path to the device for the storage pool |
|
| The name of the volume group |
|
| The virtual group format |
|
| The target path |
|
If the logical volume group is made of multiple disk partitions, there may be multiple source devices listed. For example:
<source>
  <device path='/dev/sda1'/>
  <device path='/dev/sdb3'/>
  <device path='/dev/sdc2'/>
  ...
</source>
Example
The following is an example of an XML file for a storage pool based on the specified LVM:
<pool type='logical'>
  <name>guest_images_lvm</name>
  <source>
    <device path='/dev/sdc'/>
    <name>libvirt_lvm</name>
    <format type='lvm2'/>
  </source>
  <target>
    <path>/dev/libvirt_lvm</path>
  </target>
</pool>
Additional resources
11.4.7. NFS-based storage pool parameters
When you want to create or modify an NFS-based storage pool by using an XML configuration file, you must include certain required parameters. See the following table for more information about these parameters.
You can use the virsh pool-define command to create a storage pool based on the XML configuration in a specified file. For example:
# virsh pool-define ~/guest_images.xml
  Pool defined from guest_images_netfs
Parameters
The following table provides a list of required parameters for the XML file for an NFS-based storage pool.
Table 11.7. NFS-based storage pool parameters
| Description | XML |
|---|---|
| The type of storage pool |
|
| The name of the storage pool |
|
| The hostname of the network server where the mount point is located. This can be a hostname or an IP address. |
|
| The format of the storage pool | One of the following:
|
| The directory used on the network server |
|
| The path specifying the target. This will be the path used for the storage pool. |
|
Example
The following is an example of an XML file for a storage pool based on the /home/net_mount directory of the file_server NFS server:
<pool type='netfs'>
  <name>nfspool</name>
  <source>
    <host name='file_server'/>
    <format type='nfs'/>
    <dir path='/home/net_mount'/>
  </source>
  <target>
    <path>/var/lib/libvirt/images/nfspool</path>
  </target>
</pool>
Additional resources
11.4.8. Parameters for SCSI-based storage pools with vHBA devices
To create or modify an XML configuration file for a SCSi-based storage pool that uses a virtual host adapter bus (vHBA) device, you must include certain required parameters in the XML configuration file. See the following table for more information about the required parameters.
You can use the virsh pool-define command to create a storage pool based on the XML configuration in a specified file. For example:
# virsh pool-define ~/guest_images.xml
  Pool defined from guest_images_vhba
Parameters
The following table provides a list of required parameters for the XML file for a SCSI-based storage pool with vHBA.
Table 11.8. Parameters for SCSI-based storage pools with vHBA devices
| Description | XML |
|---|---|
| The type of storage pool |
|
| The name of the storage pool |
|
|
The identifier of the vHBA. The |
|
| The target path. This will be the path used for the storage pool. |
|
When the <path> field is /dev/, libvirt generates a unique short device path for the volume device path. For example, /dev/sdc. Otherwise, the physical host path is used. For example, /dev/disk/by-path/pci-0000:10:00.0-fc-0x5006016044602198-lun-0. The unique short device path allows the same volume to be listed in multiple virtual machines (VMs) by multiple storage pools. If the physical host path is used by multiple VMs, duplicate device type warnings may occur.
The parent attribute can be used in the <adapter> field to identify the physical HBA parent from which the NPIV LUNs by varying paths can be used. This field, scsi_hostN, is combined with the vports and max_vports attributes to complete the parent identification. The parent, parent_wwnn, parent_wwpn, or parent_fabric_wwn attributes provide varying degrees of assurance that after the host reboots the same HBA is used.
-
If no
parentis specified,libvirtuses the firstscsi_hostNadapter that supports NPIV. -
If only the
parentis specified, problems can arise if additional SCSI host adapters are added to the configuration. -
If
parent_wwnnorparent_wwpnis specified, after the host reboots the same HBA is used. -
If
parent_fabric_wwnis used, after the host reboots an HBA on the same fabric is selected, regardless of thescsi_hostNused.
Examples
The following are examples of XML files for SCSI-based storage pools with vHBA.
A storage pool that is the only storage pool on the HBA:
<pool type='scsi'>
  <name>vhbapool_host3</name>
  <source>
    <adapter type='fc_host' wwnn='5001a4a93526d0a1' wwpn='5001a4ace3ee047d'/>
  </source>
  <target>
    <path>/dev/disk/by-path</path>
  </target>
</pool>
A storage pool that is one of several storage pools that use a single vHBA and uses the
parentattribute to identify the SCSI host device:<pool type='scsi'> <name>vhbapool_host3</name> <source> <adapter type='fc_host' parent='scsi_host3' wwnn='5001a4a93526d0a1' wwpn='5001a4ace3ee047d'/> </source> <target> <path>/dev/disk/by-path</path> </target> </pool>
Additional resources
11.5. Managing virtual machine storage volumes by using the CLI
You can use the CLI to manage the following aspects of your storage volumes to assign storage to your virtual machines (VMs):
11.5.1. Viewing storage volume information by using the CLI
By using the command line, you can view a list of all storage pools available on your host, as well as details about a specified storage pool
Procedure
Use the
virsh vol-listcommand to list the storage volumes in a specified storage pool.# virsh vol-list --pool RHEL-Storage-Pool --details Name Path Type Capacity Allocation --------------------------------------------------------------------------------------------- .bash_history /home/VirtualMachines/.bash_history file 18.70 KiB 20.00 KiB .bash_logout /home/VirtualMachines/.bash_logout file 18.00 B 4.00 KiB .bash_profile /home/VirtualMachines/.bash_profile file 193.00 B 4.00 KiB .bashrc /home/VirtualMachines/.bashrc file 1.29 KiB 4.00 KiB .git-prompt.sh /home/VirtualMachines/.git-prompt.sh file 15.84 KiB 16.00 KiB .gitconfig /home/VirtualMachines/.gitconfig file 167.00 B 4.00 KiB RHEL_Volume.qcow2 /home/VirtualMachines/RHEL8_Volume.qcow2 file 60.00 GiB 13.93 GiBUse the
virsh vol-infocommand to list the storage volumes in a specified storage pool.# vol-info --pool RHEL-Storage-Pool --vol RHEL_Volume.qcow2 Name: RHEL_Volume.qcow2 Type: file Capacity: 60.00 GiB Allocation: 13.93 GiB
11.5.2. Creating and assigning storage volumes by using the CLI
To obtain a disk image and attach it to a virtual machine (VM) as a virtual disk, create a storage volume and assign its XML configuration to a the VM.
Prerequisites
A storage pool with unallocated space is present on the host.
To verify, list the storage pools on the host:
# virsh pool-list --details Name State Autostart Persistent Capacity Allocation Available -------------------------------------------------------------------------------------------- default running yes yes 48.97 GiB 36.34 GiB 12.63 GiB Downloads running yes yes 175.92 GiB 121.20 GiB 54.72 GiB VM-disks running yes yes 175.92 GiB 121.20 GiB 54.72 GiB- If you do not have an existing storage pool, create one. For more information, see Managing storage for virtual machines.
Procedure
Create a storage volume by using the
virsh vol-create-ascommand. For example, to create a 20 GB qcow2 volume based on theguest-images-fsstorage pool:# virsh vol-create-as --pool guest-images-fs --name vm-disk1 --capacity 20 --format qcow2Important: Specific storage pool types do not support the
virsh vol-create-ascommand and instead require specific processes to create storage volumes:-
GlusterFS-based - Use the
qemu-imgcommand to create storage volumes. - iSCSI-based - Prepare the iSCSI LUNs in advance on the iSCSI server.
-
Multipath-based - Use the
multipathdcommand to prepare or manage the multipath. - vHBA-based - Prepare the fibre channel card in advance.
-
GlusterFS-based - Use the
Create an XML file, and add the following lines in it. This file will be used to add the storage volume as a disk to a VM.
<disk type='volume' device='disk'>
    <driver name='qemu' type='qcow2'/>
    <source pool='guest-images-fs' volume='vm-disk1'/>
    <target dev='hdk' bus='ide'/>
</disk>
This example specifies a virtual disk that uses the
vm-disk1volume, created in the previous step, and sets the volume to be set up as diskhdkon anidebus. Modify the respective parameters as appropriate for your environment.Important: With specific storage pool types, you must use different XML formats to describe a storage volume disk.
For GlusterFS-based pools:
  <disk type='network' device='disk'>
    <driver name='qemu' type='raw'/>
    <source protocol='gluster' name='Volume1/Image'>
      <host name='example.org' port='6000'/>
    </source>
    <target dev='vda' bus='virtio'/>
    <address type='pci' domain='0x0000' bus='0x00' slot='0x03' function='0x0'/>
  </disk>
For multipath-based pools:
<disk type='block' device='disk'>
<driver name='qemu' type='raw'/>
<source dev='/dev/mapper/mpatha' />
<target dev='sda' bus='scsi'/>
</disk>
For RBD-based storage pools:
  <disk type='network' device='disk'>
    <driver name='qemu' type='raw'/>
    <source protocol='rbd' name='pool/image'>
      <host name='mon1.example.org' port='6321'/>
    </source>
    <target dev='vdc' bus='virtio'/>
  </disk>
Use the XML file to assign the storage volume as a disk to a VM. For example, to assign a disk defined in
~/vm-disk1.xmlto thetestguest1VM, use the following command:# virsh attach-device --config testguest1 ~/vm-disk1.xml
Verification
- In the guest operating system of the VM, confirm that the disk image has become available as an un-formatted and un-allocated disk.
11.5.3. Deleting storage volumes by using the CLI
To remove a storage volume from your host system, you must stop the pool and remove its XML definition.
Prerequisites
- Any virtual machine that uses the storage volume you want to delete is shut down.
Procedure
Use the
virsh vol-listcommand to list the storage volumes in a specified storage pool.# virsh vol-list --pool RHEL-SP Name Path --------------------------------------------------------------- .bash_history /home/VirtualMachines/.bash_history .bash_logout /home/VirtualMachines/.bash_logout .bash_profile /home/VirtualMachines/.bash_profile .bashrc /home/VirtualMachines/.bashrc .git-prompt.sh /home/VirtualMachines/.git-prompt.sh .gitconfig /home/VirtualMachines/.gitconfig vm-disk1 /home/VirtualMachines/vm-disk1Optional: Use the
virsh vol-wipecommand to wipe a storage volume. For example, to wipe a storage volume namedvm-disk1associated with the storage poolRHEL-SP:# virsh vol-wipe --pool RHEL-SP vm-disk1 Vol vm-disk1 wipedUse the
virsh vol-deletecommand to delete a storage volume. For example, to delete a storage volume namedvm-disk1associated with the storage poolRHEL-SP:# virsh vol-delete --pool RHEL-SP vm-disk1 Vol vm-disk1 deleted
Verification
Use the
virsh vol-listcommand again to verify that the storage volume was deleted.# virsh vol-list --pool RHEL-SP Name Path --------------------------------------------------------------- .bash_history /home/VirtualMachines/.bash_history .bash_logout /home/VirtualMachines/.bash_logout .bash_profile /home/VirtualMachines/.bash_profile .bashrc /home/VirtualMachines/.bashrc .git-prompt.sh /home/VirtualMachines/.git-prompt.sh .gitconfig /home/VirtualMachines/.gitconfig
11.6. Managing virtual disk images by using the CLI
Virtual disk images are a type of virtual storage volumes and provide storage to virtual machines (VMs) in a similar way as hard drives provide storage for physical machines.
When creating a new VM , libvirt creates a new disk image automatically, unless you specify otherwise. However, depending on your use case, you might want to create and manage a disk image separately from the VM.
11.6.1. Creating a virtual disk image by using qemu-img
If you require creating a new virtual disk image separately from a new virtual machine (VM) and creating a storage volume is not viable for you, you can use the qemu-img command-line utility.
Procedure
Create a virtual disk image by using the
qemu-imgutility:# qemu-img create -f <format> <image-name> <size>For example, the following command creates a qcow2 disk image named test-image with the size of 30 gigabytes.
# qemu-img create -f qcow2 test-image 30G

Formatting 'test-img', fmt=qcow2 cluster_size=65536 extended_l2=off compression_type=zlib size=32212254720 lazy_refcounts=off refcount_bits=16
Verification
Display the information about the image you created and check that it has the required size and does not have any corruption:
# qemu-img info <test-img>
image: test-img
file format: qcow2
virtual size: 30 GiB (32212254720 bytes)
disk size: 196 KiB
cluster_size: 65536
Format specific information:
    compat: 1.1
    compression type: zlib
    lazy refcounts: false
    refcount bits: 16
    corrupt: false
    extended l2: false
Additional resources
11.6.2. Checking the consistency of a virtual disk image
Before attaching a disk image to a virtual machine (VM), ensure that the disk image does not have problems, such as corruption or high fragmentation. To do so, you can use the qemu-img check command.
If needed, you can also use this command to attempt repairing the disk image.
Prerequisites
- Any virtual machines (VMs) that use the disk image must be shut down.
Procedure
Use the
qemu-img checkcommand on the image you want to test. For example:# qemu-img check <test-name.qcow2> No errors were found on the image. 327434/327680 = 99.92% allocated, 0.00% fragmented, 0.00% compressed clusters Image end offset: 21478375424If the check finds problems on the disk image, the output of the command looks similar to the following:
167 errors were found on the image.
Data may be corrupted, or further writes to the image may corrupt it.

453368 leaked clusters were found on the image.
This means waste of disk space, but no harm to data.

259 internal errors have occurred during the check.
Image end offset: 21478375424
Repair them by using the
qemu-img checkcommand with the-r alloption. Note, however, that this might fix only some of the problems.WarningRepairing the disk image can cause data corruption or other issues. Back up the disk image before attempting the repair.
# qemu-img check -r all <test-name.qcow2>

[...]
122 errors were found on the image.
Data may be corrupted, or further writes to the image may corrupt it.

250 internal errors have occurred during the check.
Image end offset: 27071414272
This output indicates the number of problems found on the disk image after the repair.
-
If further disk image repairs are required, you can use various
libguestfstools in theguestfishshell.
Additional resources
-
The
qemu-imgman page -
The
guestfishman page
11.6.3. Resizing a virtual disk image
If an existing disk image requires additional space, you can use the qemu-img resize utility to change the size of the image to fit your use case.
Prerequisites
- You have created a back up of the disk image.
Any virtual machines (VMs) that use the disk image must be shutdown.
WarningResizing the disk image of a running VM can cause data corruption or other issues.
- The hard disk of the host has sufficient free space for the intended disk image size.
- Optional: You have ensured that the disk image does not have data corruption or similar problems. For instructions, see Checking the consistency of a virtual disk image.
Procedure
Determine the location of the disk image file for the VM you want to resize. For example:
# virsh domblklist <vm-name>

 Target   Source
----------------------------------------------------------
 vda      /home/username/disk-images/example-image.qcow2
Optional: Back up the current disk image.
# cp <example-image.qcow2> <example-image-backup.qcow2>Use the
qemu-img resizeutility to resize the image.For example, to increase the <example-image.qcow2> size by 10 gigabytes:
# qemu-img resize <example-image.qcow2> +10G- Resize the file system, partitions, or physical volumes inside the disk image to use the additional space. To do so in a RHEL guest operating system, use the instructions in Managing storage devices and Managing file systems.
Verification
Display information about the resized image and see if it has the intended size:
# qemu-img info <converted-image.qcow2>

image: converted-image.qcow2
file format: qcow2
virtual size: 30 GiB (32212254720 bytes)
disk size: 196 KiB
cluster_size: 65536
Format specific information:
    compat: 1.1
    compression type: zlib
    lazy refcounts: false
    refcount bits: 16
    corrupt: false
    extended l2: false
- Check the resized disk image for potential errors. For instructions, see Checking the consistency of a virtual disk image.
Additional resources
-
The
qemu-imgman page - Managing storage devices
- Managing file systems
11.6.4. Converting between virtual disk image formats
You can convert the virtual disk image to a different format by using the qemu-img convert command. For example, converting between virtual disk image formats might be necessary if you want to attach the disk image to a virtual machine (VM) running on a different hypervisor.
Prerequisites
- Any virtual machines (VMs) that use the disk image must be shut down.
Procedure
Use the
qemu-im convertcommand to convert an existing virtual disk image to a different format. For example, to convert a raw disk image to a QCOW2 disk image:# qemu-img convert -f raw <original-image.img> -O qcow2 <converted-image.qcow2>
Verification
Display information about the converted image and see if it has the intended format and size.
# qemu-img info <converted-image.qcow2> image: converted-image.qcow2 file format: qcow2 virtual size: 30 GiB (32212254720 bytes) disk size: 196 KiB cluster_size: 65536 Format specific information: compat: 1.1 compression type: zlib lazy refcounts: false refcount bits: 16 corrupt: false extended l2: false- Check the disk image for potential errors. for instructions, see Checking the consistency of a virtual disk image.
Additional resources
- Checking the consistency of a virtual disk image
-
The
qemu-imgman page
11.7. Managing virtual machine storage volumes by using the web console
By using the RHEL, you can manage the storage volumes used to allocate storage to your virtual machines (VMs).
You can use the RHEL web console to:
11.7.1. Creating storage volumes by using the web console
To create a functioning virtual machine (VM) you require a local storage device assigned to the VM that can store the VM image and VM-related data. You can create a storage volume in a storage pool and assign it to a VM as a storage disk.
To create storage volumes by using the web console, see the following procedure.
Prerequisites
- The web console VM plug-in is installed on your system.
Procedure
Click at the top of the Virtual Machines tab. The Storage Pools window appears, showing a list of configured storage pools.
In the window, click the storage pool from which you want to create a storage volume.
The row expands to reveal the Overview pane with basic information about the selected storage pool.
Click next to the Overview tab in the expanded row.
The Storage Volume tab appears with basic information about existing storage volumes, if any.

Click .
The Create storage volume dialog appears.

Enter the following information in the Create Storage Volume dialog:
- Name - The name of the storage volume.
- Size - The size of the storage volume in MiB or GiB.
-
Format - The format of the storage volume. The supported types are
qcow2andraw.
Click .
The storage volume is created, the Create Storage Volume dialog closes, and the new storage volume appears in the list of storage volumes.
11.7.2. Removing storage volumes by using the web console
You can remove storage volumes to free up space in the storage pool, or to remove storage items associated with defunct virtual machines (VMs).
To remove storage volumes by using the RHEL web console, see the following procedure.
Prerequisites
- The web console VM plug-in is installed on your system.
- Any virtual machine that uses the storage volume you want to delete is shut down.
Procedure
Click at the top of the Virtual Machines tab. The Storage Pools window appears, showing a list of configured storage pools.
In the window, click the storage pool from which you want to remove a storage volume.
The row expands to reveal the Overview pane with basic information about the selected storage pool.
Click next to the Overview tab in the expanded row.
The Storage Volume tab appears with basic information about existing storage volumes, if any.
Select the storage volume you want to remove.

- Click
Additional resources
11.8. Managing virtual machine storage disks by using the web console
By using RHEL, you can manage the storage disks that are attached to your virtual machines (VMs).
You can use the RHEL web console to:
11.8.1. Viewing virtual machine disk information in the web console
By using the web console, you can view detailed information about disks assigned to a selected virtual machine (VM).
Prerequisites
- The web console VM plug-in is installed on your system.
Procedure
Click the VM whose information you want to see.
A new page opens with an Overview section with basic information about the selected VM and a Console section to access the VM’s graphical interface.
Scroll to .
The Disks section displays information about the disks assigned to the VM as well as options to Add, Remove, or Edit disks.

The information includes the following:
- Device - The device type of the disk.
- Used - The amount of disk currently allocated.
- Capacity - The maximum size of the storage volume.
- Bus - The type of disk device that is emulated.
-
Access - Whether the disk is Writeable or Read-only. For
rawdisks, you can also set the access to Writeable and shared. - Source - The disk device or file.
Additional resources
11.8.2. Adding new disks to virtual machines by using the web console
You can add new disks to virtual machines (VMs) by creating a new storage volume and attaching it to a VM by using the RHEL 8 web console.
Prerequisites
- The web console VM plug-in is installed on your system.
Procedure
In the interface, click the VM for which you want to create and attach a new disk.
A new page opens with an Overview section with basic information about the selected VM and a Console section to access the VM’s graphical interface.
Scroll to .
The Disks section displays information about the disks assigned to the VM as well as options to Add, Remove, or Edit disks.
Click .
The Add Disk dialog appears.
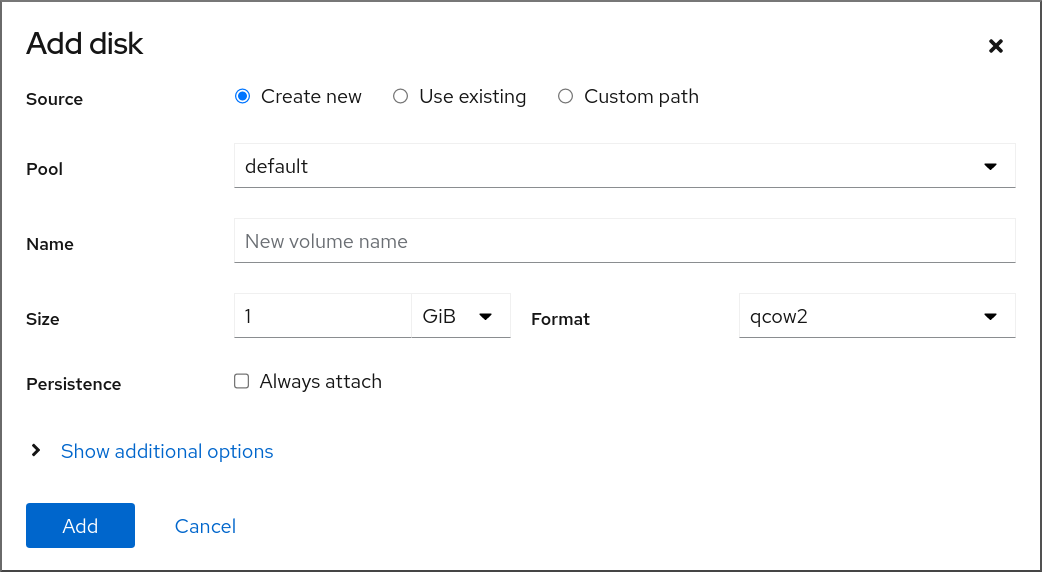
- Select the Create New option.
Configure the new disk.
- Pool - Select the storage pool from which the virtual disk will be created.
- Name - Enter a name for the virtual disk that will be created.
- Size - Enter the size and select the unit (MiB or GiB) of the virtual disk that will be created.
-
Format - Select the format for the virtual disk that will be created. The supported types are
qcow2andraw. Persistence - If checked, the virtual disk is persistent. If not checked, the virtual disk is transient.
NoteTransient disks can only be added to VMs that are running.
Additional Options - Set additional configurations for the virtual disk.
- Cache - Select the cache mechanism.
- Bus - Select the type of disk device to emulate.
Click .
The virtual disk is created and connected to the VM.
11.8.3. Attaching existing disks to virtual machines by using the web console
By using the web console, you can attach existing storage volumes as disks to a virtual machine (VM).
Prerequisites
- The web console VM plug-in is installed on your system.
Procedure
In the interface, click the VM for which you want to create and attach a new disk.
A new page opens with an Overview section with basic information about the selected VM and a Console section to access the VM’s graphical interface.
Scroll to .
The Disks section displays information about the disks assigned to the VM as well as options to Add, Remove, or Edit disks.
Click .
The Add Disk dialog appears.
Click the Use Existing radio button.
The appropriate configuration fields appear in the Add Disk dialog.

Configure the disk for the VM.
- Pool - Select the storage pool from which the virtual disk will be attached.
- Volume - Select the storage volume that will be attached.
- Persistence - Available when the VM is running. Select the Always attach checkbox to make the virtual disk persistent. Clear the checkbox to make the virtual disk transient.
Additional Options - Set additional configurations for the virtual disk.
- Cache - Select the cache mechanism.
- Bus - Select the type of disk device to emulate.
Click
The selected virtual disk is attached to the VM.
11.8.4. Detaching disks from virtual machines by using the web console
By using the web console, you can detach disks from virtual machines (VMs).
Prerequisites
- The web console VM plug-in is installed on your system.
Procedure
In the interface, click the VM from which you want to detach a disk.
A new page opens with an Overview section with basic information about the selected VM and a Console section to access the VM’s graphical interface.
Scroll to .
The Disks section displays information about the disks assigned to the VM as well as options to Add, Remove, or Edit disks.
-
Click the button next to the disk you want to detach from the VM. A
Remove Diskconfirmation dialog box appears. In the confirmation dialog box, click .
The virtual disk is detached from the VM.
11.9. Securing iSCSI storage pools with libvirt secrets
Username and password parameters can be configured with virsh to secure an iSCSI storage pool. You can configure this before or after you define the pool, but the pool must be started for the authentication settings to take effect.
The following provides instructions for securing iSCSI-based storage pools with libvirt secrets.
This procedure is required if a user_ID and password were defined when creating the iSCSI target.
Prerequisites
- Ensure that you have created an iSCSI-based storage pool. For more information, see Creating iSCSI-based storage pools by using the CLI.
Procedure
Create a libvirt secret file with a challenge-handshake authentication protocol (CHAP) user name. For example:
<secret ephemeral='no' private='yes'>
    <description>Passphrase for the iSCSI example.com server</description>
    <usage type='iscsi'>
        <target>iscsirhel7secret</target>
    </usage>
</secret>
Define the libvirt secret with the
virsh secret-definecommand:# virsh secret-define secret.xmlVerify the UUID with the
virsh secret-listcommand:# virsh secret-list UUID Usage -------------------------------------------------------------- 2d7891af-20be-4e5e-af83-190e8a922360 iscsi iscsirhel7secretAssign a secret to the UUID in the output of the previous step using the
virsh secret-set-valuecommand. This ensures that the CHAP username and password are in a libvirt-controlled secret list. For example:# virsh secret-set-value --interactive 2d7891af-20be-4e5e-af83-190e8a922360 Enter new value for secret: Secret value setAdd an authentication entry in the storage pool’s XML file using the
virsh editcommand, and add an<auth>element, specifyingauthentication type,username, andsecret usage. For example:<pool type='iscsi'> <name>iscsirhel7pool</name> <source> <host name='192.0.2.1'/> <device path='iqn.2010-05.com.example.server1:iscsirhel7guest'/> <auth type='chap' username='_example-user_'> <secret usage='iscsirhel7secret'/> </auth> </source> <target> <path>/dev/disk/by-path</path> </target> </pool>NoteThe
<auth>sub-element exists in different locations within the virtual machine’s<pool>and<disk>XML elements. For a<pool>,<auth>is specified within the<source>element, as this describes where to find the pool sources, since authentication is a property of some pool sources (iSCSI and RBD). For a<disk>, which is a sub-element of a domain, the authentication to the iSCSI or RBD disk is a property of the disk. In addition, the<auth>sub-element for a disk differs from that of a storage pool.<auth username='redhat'> <secret type='iscsi' usage='iscsirhel7secret'/> </auth>
To activate the changes, activate the storage pool. If the pool has already been started, stop and restart the storage pool:
# virsh pool-destroy iscsirhel7pool
# virsh pool-start iscsirhel7pool
11.10. Creating vHBAs
A virtual host bus adapter (vHBA) device connects the host system to an SCSI device and is required for creating an SCSI-based storage pool.
You can create a vHBA device by defining it in an XML configuration file.
Procedure
Locate the HBAs on your host system, by using the
virsh nodedev-list --cap vportscommand.The following example shows a host that has two HBAs that support vHBA:
# virsh nodedev-list --cap vports
scsi_host3
scsi_host4
View the HBA’s details, by using the
virsh nodedev-dumpxml HBA_devicecommand.# virsh nodedev-dumpxml scsi_host3The output from the command lists the
<name>,<wwnn>, and<wwpn>fields, which are used to create a vHBA.<max_vports>shows the maximum number of supported vHBAs. For example:<device> <name>scsi_host3</name> <path>/sys/devices/pci0000:00/0000:00:04.0/0000:10:00.0/host3</path> <parent>pci_0000_10_00_0</parent> <capability type='scsi_host'> <host>3</host> <unique_id>0</unique_id> <capability type='fc_host'> <wwnn>20000000c9848140</wwnn> <wwpn>10000000c9848140</wwpn> <fabric_wwn>2002000573de9a81</fabric_wwn> </capability> <capability type='vport_ops'> <max_vports>127</max_vports> <vports>0</vports> </capability> </capability> </device>In this example, the
<max_vports>value shows there are a total 127 virtual ports available for use in the HBA configuration. The<vports>value shows the number of virtual ports currently being used. These values update after creating a vHBA.Create an XML file similar to one of the following for the vHBA host. In these examples, the file is named
vhba_host3.xml.This example uses
scsi_host3to describe the parent vHBA.<device> <parent>scsi_host3</parent> <capability type='scsi_host'> <capability type='fc_host'> </capability> </capability> </device>This example uses a WWNN/WWPN pair to describe the parent vHBA.
<device> <name>vhba</name> <parent wwnn='20000000c9848140' wwpn='10000000c9848140'/> <capability type='scsi_host'> <capability type='fc_host'> </capability> </capability> </device>NoteThe WWNN and WWPN values must match those in the HBA details seen in the previous step.
The
<parent>field specifies the HBA device to associate with this vHBA device. The details in the<device>tag are used in the next step to create a new vHBA device for the host. For more information about thenodedevXML format, see the libvirt upstream pages.NoteThe
virshcommand does not provide a way to define theparent_wwnn,parent_wwpn, orparent_fabric_wwnattributes.Create a VHBA based on the XML file created in the previous step by using the
virsh nodev-createcommand.# virsh nodedev-create vhba_host3 Node device scsi_host5 created from vhba_host3.xml
Verification
Verify the new vHBA’s details (scsi_host5) by using the
virsh nodedev-dumpxmlcommand:# virsh nodedev-dumpxml scsi_host5 <device> <name>scsi_host5</name> <path>/sys/devices/pci0000:00/0000:00:04.0/0000:10:00.0/host3/vport-3:0-0/host5</path> <parent>scsi_host3</parent> <capability type='scsi_host'> <host>5</host> <unique_id>2</unique_id> <capability type='fc_host'> <wwnn>5001a4a93526d0a1</wwnn> <wwpn>5001a4ace3ee047d</wwpn> <fabric_wwn>2002000573de9a81</fabric_wwn> </capability> </capability> </device>
Additional resources