Chapter 2. Getting started with virtualization
To start using virtualization in RHEL 8, follow the steps below. The default method for this is using the command line (CLI), but for user convenience, some of the steps can be completed in the web console GUI.
- Enable the virtualization module and install the virtualization packages - see Enabling virtualization.
Create a virtual machine (VM):
Start the VM:
- For CLI, see Starting a virtual machine by using the command line.
- For GUI, see Starting virtual machines by using the web console.
Connect to the VM:
The web console currently provides only a subset of VM management functions, so using the command line is recommended for advanced use of virtualization in RHEL 8.
2.1. Enabling virtualization
To use virtualization in RHEL 8, you must enable the virtualization module, install virtualization packages, and ensure your system is configured to host virtual machines (VMs).
Prerequisites
- RHEL 8 is installed and registered on your host machine.
Your system meets the following hardware requirements to work as a virtualization host:
The following minimum system resources are available:
- 6 GB free disk space for the host, plus another 6 GB for each intended VM.
- 2 GB of RAM for the host, plus another 2 GB for each intended VM.
- 4 CPUs on the host. VMs can generally run with a single assigned vCPU, but Red Hat recommends assigning 2 or more vCPUs per VM to avoid VMs becoming unresponsive during high load.
The architecture of your host machine supports KVM virtualization.
- Notably, RHEL 8 does not support virtualization on the 64-bit ARM architecture (ARM 64).
The procedure below applies to the AMD64 and Intel 64 architecture (x86_64). To enable virtualization on a host with a different supported architecture, see one of the following sections:
Procedure
Install the packages in the RHEL 8 virtualization module:
# yum module install virtInstall the
virt-installandvirt-viewerpackages:# yum install virt-install virt-viewerStart the
libvirtdservice:# systemctl start libvirtd
Verification
Verify that your system is prepared to be a virtualization host:
# virt-host-validate
[...]
QEMU: Checking for device assignment IOMMU support       : PASS
QEMU: Checking if IOMMU is enabled by kernel             : WARN (IOMMU appears to be disabled in kernel. Add intel_iommu=on to kernel cmdline arguments)
LXC: Checking for Linux >= 2.6.26                        : PASS
[...]
LXC: Checking for cgroup 'blkio' controller mount-point  : PASS
LXC: Checking if device /sys/fs/fuse/connections exists  : FAIL (Load the 'fuse' module to enable /proc/ overrides)
Review the return values of
virt-host-validatechecks and take appropriate actions:-
If all
virt-host-validatechecks return thePASSvalue, your system is prepared for creating VMs. -
If any of the checks return a
FAILvalue, follow the displayed instructions to fix the problem. -
If any of the checks return a
WARNvalue, consider following the displayed instructions to improve virtualization capabilities
-
If all
Troubleshooting
If KVM virtualization is not supported by your host CPU,
virt-host-validategenerates the following output:QEMU: Checking for hardware virtualization: FAIL (Only emulated CPUs are available, performance will be significantly limited)
However, VMs on such a host system will fail to boot, rather than have performance problems.
To work around this, you can change the
<domain type>value in the XML configuration of the VM toqemu. Note, however, that Red Hat does not support VMs that use theqemudomain type, and setting this is highly discouraged in production environments.
2.2. Creating virtual machines
To create a virtual machine (VM) in RHEL 8, use the command line or the RHEL 8 web console.
2.2.1. Creating virtual machines by using the command line
To create a virtual machine (VM) on your RHEL 8 by using the command line, use the virt-install utility.
Prerequisites
- Virtualization is enabled on your host system.
- You have a sufficient amount of system resources to allocate to your VMs, such as disk space, RAM, or CPUs. The recommended values may vary significantly depending on the intended tasks and workload of the VMs.
An operating system (OS) installation source is available locally or on a network. This can be one of the following:
- An ISO image of an installation medium
A disk image of an existing VM installation
WarningInstalling from a host CD-ROM or DVD-ROM device is not possible in RHEL 8. If you select a CD-ROM or DVD-ROM as the installation source when using any VM installation method available in RHEL 8, the installation will fail. For more information, see the Red Hat Knowledgebase solution RHEL 7 or higher can’t install guest OS from CD/DVD-ROM.
Also note that Red Hat provides support only for a limited set of guest operating systems.
- Optional: A Kickstart file can be provided for faster and easier configuration of the installation.
Procedure
To create a VM and start its OS installation, use the virt-install command, along with the following mandatory arguments:
-
--name: the name of the new machine -
--memory: the amount of allocated memory -
--vcpus: the number of allocated virtual CPUs -
--disk: the type and size of the allocated storage -
--cdromor--location: the type and location of the OS installation source
Based on the chosen installation method, the necessary options and values can vary. See the commands below for examples:
The listed commands use the VNC remote display protocol instead of the default SPICE protocol. VNC currently does not have some of the features that SPICE does, but is fully supported on RHEL 9. As a result, VMs that use VNC will not stop working if you migrate your host to RHEL 9. For more information, see Considerations in adopting RHEL 9.
The following command creates a VM named demo-guest1 that installs the Windows 10 OS from an ISO image locally stored in the /home/username/Downloads/Win10install.iso file. This VM is also allocated with 2048 MiB of RAM and 2 vCPUs, and an 80 GiB qcow2 virtual disk is automatically configured for the VM.
# virt-install \
    --graphics vnc \
    --name demo-guest1 --memory 2048 \
    --vcpus 2 --disk size=80 --os-variant win10 \
    --cdrom /home/username/Downloads/Win10install.iso
The following command creates a VM named demo-guest2 that uses the /home/username/Downloads/rhel8.iso image to run a RHEL 8 OS from a live CD. No disk space is assigned to this VM, so changes made during the session will not be preserved. In addition, the VM is allocated with 4096 MiB of RAM and 4 vCPUs.
# virt-install \
    --graphics vnc \
    --name demo-guest2 --memory 4096 --vcpus 4 \
    --disk none --livecd --os-variant rhel8.0 \
    --cdrom /home/username/Downloads/rhel8.iso
The following command creates a RHEL 8 VM named demo-guest3 that connects to an existing disk image, /home/username/backup/disk.qcow2. This is similar to physically moving a hard drive between machines, so the OS and data available to demo-guest3 are determined by how the image was handled previously. In addition, this VM is allocated with 2048 MiB of RAM and 2 vCPUs.
# virt-install \
    --graphics vnc \
    --name demo-guest3 --memory 2048 --vcpus 2 \
    --os-variant rhel8.0 --import \
    --disk /home/username/backup/disk.qcow2
Note that the
--os-variantoption is highly recommended when importing a disk image. If it is not provided, the performance of the created VM will be negatively affected.The following command creates a VM named demo-guest4 that installs from the
http://example.com/OS-installURL. For the installation to start successfully, the URL must contain a working OS installation tree. In addition, the OS is automatically configured by using the /home/username/ks.cfg kickstart file. This VM is also allocated with 2048 MiB of RAM, 2 vCPUs, and a 160 GiB qcow2 virtual disk.# virt-install \ --graphics vnc \ --name demo-guest4 --memory 2048 --vcpus 2 --disk size=160 \ --os-variant rhel8.0 --location http://example.com/OS-install \ --initrd-inject /home/username/ks.cfg --extra-args="inst.ks=file:/ks.cfg console=tty0 console=ttyS0,115200n8"
The following command creates a VM named demo-guest5 that installs from a
RHEL8.isoimage file in text-only mode, without graphics. It connects the guest console to the serial console. The VM has 16384 MiB of memory, 16 vCPUs, and 280 GiB disk. This kind of installation is useful when connecting to a host over a slow network link.# virt-install \ --name demo-guest5 --memory 16384 --vcpus 16 --disk size=280 \ --os-variant rhel8.0 --location RHEL8.iso \ --graphics none --extra-args='console=ttyS0'
The following command creates a VM named demo-guest6, which has the same configuration as demo-guest5, but resides on the 192.0.2.1 remote host.
# virt-install \
    --connect qemu+ssh://root@192.0.2.1/system --name demo-guest6 --memory 16384 \
    --vcpus 16 --disk size=280 --os-variant rhel8.0 --location RHEL8.iso \
    --graphics none --extra-args='console=ttyS0'
Verification
- If the VM is created successfully, a virt-viewer window opens with a graphical console of the VM and starts the guest OS installation.
Troubleshooting
If
virt-installfails with acannot find default networkerror:Ensure that the
libvirt-daemon-config-networkpackage is installed:# {PackageManagerCommand} info libvirt-daemon-config-network Installed Packages Name : libvirt-daemon-config-network [...]Verify that the
libvirtdefault network is active and configured to start automatically:# virsh net-list --all Name State Autostart Persistent -------------------------------------------- default active yes yesIf it is not, activate the default network and set it to auto-start:
# virsh net-autostart default
Network default marked as autostarted

# virsh net-start default
Network default started
If activating the default network fails with the following error, the
libvirt-daemon-config-networkpackage has not been installed correctly.error: failed to get network 'default' error: Network not found: no network with matching name 'default'
To fix this, re-install
libvirt-daemon-config-network:# {PackageManagerCommand} reinstall libvirt-daemon-config-networkIf activating the default network fails with an error similar to the following, a conflict has occurred between the default network’s subnet and an existing interface on the host.
error: Failed to start network default
error: internal error: Network is already in use by interface ens2
To fix this, use the
virsh net-edit defaultcommand and change the192.0.2.*values in the configuration to a subnet not already in use on the host.
Additional resources
-
virt-install (1)man page on your system - Creating virtual machines and installing guest operating systems by using the web console
- Cloning virtual machines
2.2.2. Creating virtual machines and installing guest operating systems by using the web console
To manage virtual machines (VMs) in a GUI on a RHEL 8 host, use the web console. The following sections provide information about how to use the RHEL 8 web console to create VMs and install guest operating systems on them.
VMs created by using the web console currently use the SPICE remote desktop protocol by default. However, SPICE is unsupported on RHEL 9, so if you upgrade your host to RHEL 9, the VM will stop working. For more information, see Considerations in adopting RHEL 9.
To create a VM that uses the VNC protocol, which will work correctly on RHEL 9, use the command line.
2.2.2.1. Creating virtual machines by using the web console
To create a virtual machine (VM) on a host machine to which your RHEL 8 web console is connected, use the instructions below.
Prerequisites
- You have installed the RHEL 8 web console.
- You have enabled the cockpit service.
Your user account is allowed to log in to the web console.
For instructions, see Installing and enabling the web console.
- Virtualization is enabled on your host system.
- The web console VM plug-in is installed on your host system.
- You have a sufficient amount of system resources to allocate to your VMs, such as disk space, RAM, or CPUs. The recommended values might vary significantly depending on the intended tasks and workload of the VMs.
Procedure
In the Virtual Machines interface of the web console, click .
The Create new virtual machine dialog appears.

Enter the basic configuration of the VM you want to create.
- Name - The name of the VM.
- Connection - The level of privileges granted to the session. For more details, expand the associated dialog box in the web console.
- Installation type - The installation can use a local installation medium, a URL, a PXE network boot, a cloud base image, or download an operating system from a limited set of operating systems.
Operating system - The guest operating system running on the VM. Note that Red Hat provides support only for a limited set of guest operating systems.
NoteTo download and install Red Hat Enterprise Linux directly from web console, you must add an offline token in the Offline token field.
- Storage - The type of storage.
- Storage Limit - The amount of storage space.
- Memory - The amount of memory.
Create the VM:
- If you want the VM to automatically install the operating system, click .
- If you want to edit the VM before the operating system is installed, click .
Additional resources
2.2.2.2. Creating virtual machines by importing disk images by using the web console
You can create a virtual machine (VM) by importing a disk image of an existing VM installation in the RHEL 8 web console.
Prerequisites
- You have installed the RHEL 8 web console.
- You have enabled the cockpit service.
Your user account is allowed to log in to the web console.
For instructions, see Installing and enabling the web console.
- The web console VM plug-in is installed on your system.
- You have a sufficient amount of system resources to allocate to your VMs, such as disk space, RAM, or CPUs. The recommended values can vary significantly depending on the intended tasks and workload of the VMs.
- You have downloaded a disk image of an existing VM installation.
Procedure
In the Virtual Machines interface of the web console, click .
The Import a virtual machine dialog appears.

Enter the basic configuration of the VM you want to create:
- Name - The name of the VM.
- Disk image - The path to the existing disk image of a VM on the host system.
- Operating system - The operating system running on a VM disk. Note that Red Hat provides support only for a limited set of guest operating systems.
- Memory - The amount of memory to allocate for use by the VM.
Import the VM:
- To install the operating system on the VM without additional edits to the VM settings, click .
- To edit the VM settings before the installation of the operating system, click .
2.2.2.3. Installing guest operating systems by using the web console
When a virtual machine (VM) boots for the first time, you must install an operating system on the VM.
If you click or while creating a new VM, the installation routine for the operating system starts automatically when the VM is created.
Prerequisites
- You have installed the RHEL 8 web console.
- You have enabled the cockpit service.
Your user account is allowed to log in to the web console.
For instructions, see Installing and enabling the web console.
- The web console VM plug-in is installed on your host system.
Procedure
Log in to the RHEL 8 web console.
For details, see Logging in to the web console.
In the Virtual Machines interface, click the VM on which you want to install a guest OS.
A new page opens with basic information about the selected VM and controls for managing various aspects of the VM.
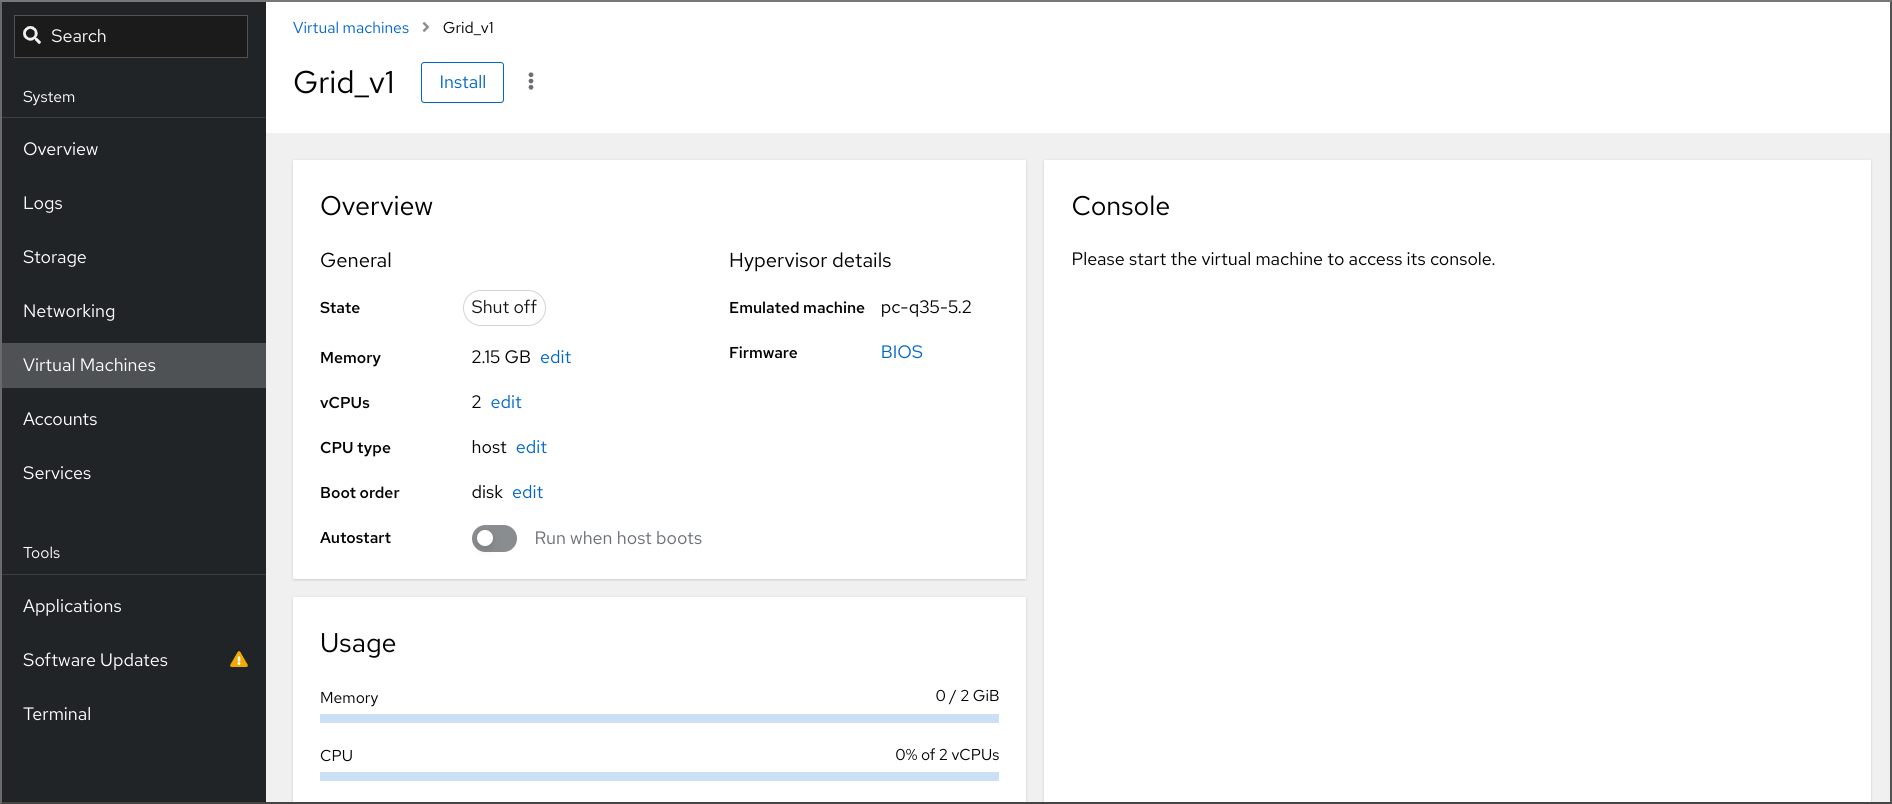
Optional: Change the firmware.
NoteYou can change the firmware only if you selected or while creating a new VM and if the OS is not already installed on the VM.
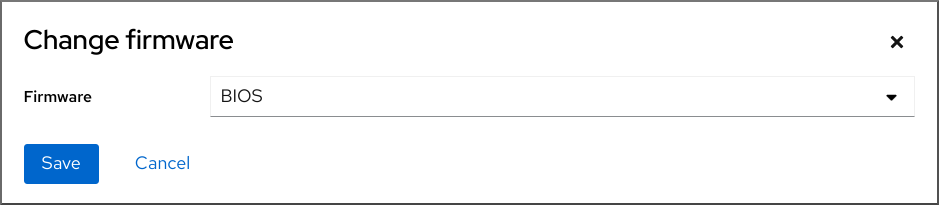
- Click the firmware.
- In the Change Firmware window, select the required firmware.
- Click .
Click .
The installation routine of the operating system runs in the VM console.
Troubleshooting
- If the installation routine fails, delete and recreate the VM before starting the installation again.
2.2.3. Creating virtual machines with cloud image authentication by using the web console
By default, distro cloud images have no login accounts. However, by using the RHEL web console, you can now create a virtual machine (VM) and specify the root and user account login credentials, which are then passed to cloud-init.
Prerequisites
- You have installed the RHEL 8 web console.
- You have enabled the cockpit service.
Your user account is allowed to log in to the web console.
For instructions, see Installing and enabling the web console.
- The web console VM plug-in is installed on your system.
- Virtualization is enabled on your host system.
- You have a sufficient amount of system resources to allocate to your VMs, such as disk space, RAM, or CPUs. The recommended values may vary significantly depending on the intended tasks and workload of the VMs.
Procedure
Log in to the RHEL 8 web console.
For details, see Logging in to the web console.
In the interface of the web console, click .
The Create new virtual machine dialog appears.
- In the Name field, enter a name for the VM.
On the Details tab, in the Installation type field, select Cloud base image.

- In the Installation source field, set the path to the image file on your host system.
Enter the configuration for the VM that you want to create.
- Operating system - The VM’s operating system. Note that Red Hat provides support only for a limited set of guest operating systems.
- Storage - The type of storage with which to configure the VM.
- Storage Limit - The amount of storage space with which to configure the VM.
- Memory - The amount of memory with which to configure the VM.
Click on the Automation tab.
Set your cloud authentication credentials.
- Root password - Enter a root password for your VM. Leave the field blank if you do not wish to set a root password.
- User login - Enter a cloud-init user login. Leave this field blank if you do not wish to create a user account.
User password - Enter a password. Leave this field blank if you do not wish to create a user account.
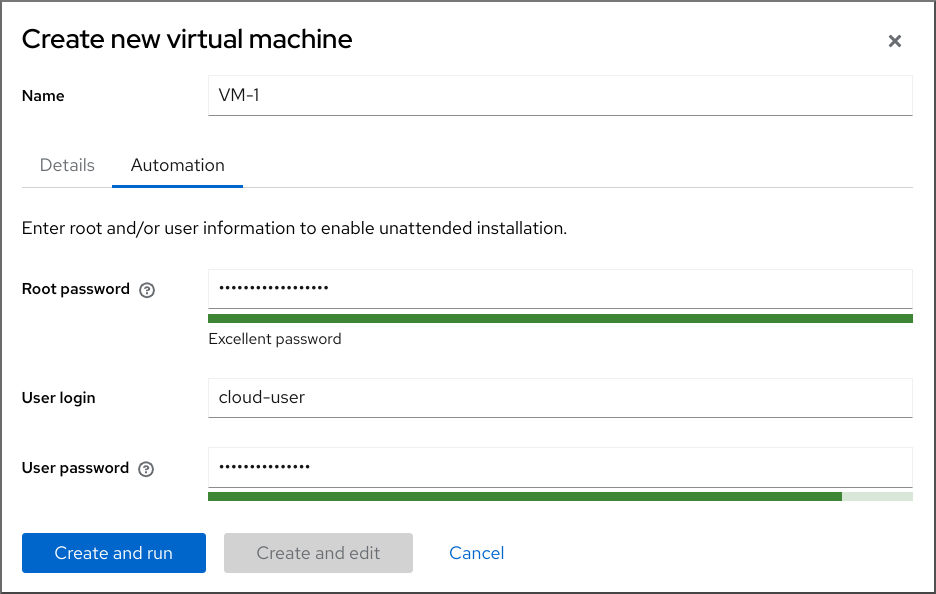
Click .
The VM is created.
Additional resources
2.3. Starting virtual machines
To start a virtual machine (VM) in RHEL 8, you can use the command line or the web console GUI.
Prerequisites
- Before a VM can be started, it must be created and, ideally, also installed with an OS. For instruction to do so, see Creating virtual machines.
2.3.1. Starting a virtual machine by using the command line
You can use the command line (CLI) to start a shut-down virtual machine (VM) or restore a saved VM. By using the CLI, you can start both local and remote VMs.
Prerequisites
- An inactive VM that is already defined.
- The name of the VM.
For remote VMs:
- The IP address of the host where the VM is located.
- Root access privileges to the host.
Procedure
For a local VM, use the
virsh startutility.For example, the following command starts the demo-guest1 VM.
# virsh start demo-guest1
Domain 'demo-guest1' started
For a VM located on a remote host, use the
virsh startutility along with the QEMU+SSH connection to the host.For example, the following command starts the demo-guest1 VM on the 192.0.2.1 host.
# virsh -c qemu+ssh://root@192.0.2.1/system start demo-guest1

root@192.0.2.1's password:

Domain 'demo-guest1' started
Additional resources
-
The
virsh start --helpcommand - Setting up easy access to remote virtualization hosts
- Starting virtual machines automatically when the host starts
2.3.2. Starting virtual machines by using the web console
If a virtual machine (VM) is in the shut off state, you can start it by using the RHEL 8 web console. You can also configure the VM to be started automatically when the host starts.
Prerequisites
- You have installed the RHEL 8 web console.
- You have enabled the cockpit service.
Your user account is allowed to log in to the web console.
For instructions, see Installing and enabling the web console.
- The web console VM plug-in is installed on your system.
- An inactive VM that is already defined.
- The name of the VM.
Procedure
In the interface, click the VM you want to start.
A new page opens with detailed information about the selected VM and controls for shutting down and deleting the VM.
Click .
The VM starts, and you can connect to its console or graphical output.
Optional: To configure the VM to start automatically when the host starts, toggle the
Autostartcheckbox in the Overview section.If you use network interfaces that are not managed by libvirt, you must also make additional changes to the systemd configuration. Otherwise, the affected VMs might fail to start, see starting virtual machines automatically when the host starts.
2.3.3. Starting virtual machines automatically when the host starts
When a host with a running virtual machine (VM) restarts, the VM is shut down, and must be started again manually by default. To ensure a VM is active whenever its host is running, you can configure the VM to be started automatically.
Prerequisites
Procedure
Use the
virsh autostartutility to configure the VM to start automatically when the host starts.For example, the following command configures the demo-guest1 VM to start automatically.
# virsh autostart demo-guest1
Domain 'demo-guest1' marked as autostarted
If you use network interfaces that are not managed by
libvirt, you must also make additional changes to the systemd configuration. Otherwise, the affected VMs might fail to start.NoteThese interfaces include for example:
-
Bridge devices created by
NetworkManager -
Networks configured to use
<forward mode='bridge'/>
In the systemd configuration directory tree, create a
libvirtd.service.ddirectory if it does not exist yet.# mkdir -p /etc/systemd/system/libvirtd.service.d/Create a
10-network-online.confsystemd unit override file in the previously created directory. The content of this file overrides the default systemd configuration for the libvirtd service.# touch /etc/systemd/system/libvirtd.service.d/10-network-online.confAdd the following lines to the
10-network-online.conffile. This configuration change ensures systemd starts thelibvirtdservice only after the network on the host is ready.[Unit] After=network-online.target
-
Bridge devices created by
Verification
View the VM configuration, and check that the autostart option is enabled.
For example, the following command displays basic information about the demo-guest1 VM, including the autostart option.
# virsh dominfo demo-guest1
Id:             2
Name:           demo-guest1
UUID:           e46bc81c-74e2-406e-bd7a-67042bae80d1
OS Type:        hvm
State:          running
CPU(s):         2
CPU time:       385.9s
Max memory:     4194304 KiB
Used memory:    4194304 KiB
Persistent:     yes
Autostart:      enable
Managed save:   no
Security model: selinux
Security DOI:   0
Security label: system_u:system_r:svirt_t:s0:c873,c919 (enforcing)
If you use network interfaces that are not managed by libvirt, check if the content of the
10-network-online.conffile matches the following output.$ cat /etc/systemd/system/libvirtd.service.d/10-network-online.conf [Unit] After=network-online.target
Additional resources
-
The
virsh autostart --helpcommand - Starting virtual machines by using the web console.
2.4. Connecting to virtual machines
To interact with a virtual machine (VM) in RHEL 8, you need to connect to it by doing one of the following:
- When using the web console interface, use the Virtual Machines pane in the web console interface. For more information, see Interacting with virtual machines by using the web console.
- If you need to interact with a VM graphical display without using the web console, use the Virt Viewer application. For details, see Opening a virtual machine graphical console by using Virt Viewer.
- When a graphical display is not possible or not necessary, use an SSH terminal connection.
- When the virtual machine is not reachable from your system by using a network, use the virsh console.
If the VMs to which you are connecting are on a remote host rather than a local one, you can optionally configure your system for more convenient access to remote hosts.
2.4.1. Interacting with virtual machines by using the web console
To interact with a virtual machine (VM) in the RHEL 8 web console, you need to connect to the VM’s console. These include both graphical and serial consoles.
- To interact with the VM’s graphical interface in the web console, use the graphical console.
- To interact with the VM’s graphical interface in a remote viewer, use the graphical console in remote viewers.
- To interact with the VM’s CLI in the web console, use the serial console.
2.4.1.1. Viewing the virtual machine graphical console in the web console
By using the virtual machine (VM) console interface, you can view the graphical output of a selected VM in the RHEL 8 web console.
Prerequisites
- You have installed the RHEL 8 web console.
- You have enabled the cockpit service.
Your user account is allowed to log in to the web console.
For instructions, see Installing and enabling the web console.
- The web console VM plug-in is installed on your system.
- Ensure that both the host and the VM support a graphical interface.
Procedure
Log in to the RHEL 8 web console.
For details, see Logging in to the web console.
In the interface, click the VM whose graphical console you want to view.
A new page opens with an Overview and a Console section for the VM.
Select in the console drop down menu.
The VNC console appears below the menu in the web interface.
The graphical console appears in the web interface.
Click
You can now interact with the VM console by using the mouse and keyboard in the same manner you interact with a real machine. The display in the VM console reflects the activities being performed on the VM.
The host on which the web console is running may intercept specific key combinations, such as Ctrl+Alt+Del, preventing them from being sent to the VM.
To send such key combinations, click the menu and select the key sequence to send.
For example, to send the Ctrl+Alt+Del combination to the VM, click the and select the menu entry.
Troubleshooting
- If clicking in the graphical console does not have any effect, expand the console to full screen. This is a known issue with the mouse cursor offset.
2.4.1.2. Viewing the graphical console in a remote viewer by using the web console
By using the web console interface, you can display the graphical console of a selected virtual machine (VM) in a remote viewer, such as Virt Viewer.
You can launch Virt Viewer from within the web console. Other VNC and SPICE remote viewers can be launched manually.
Prerequisites
- You have installed the RHEL 8 web console.
- You have enabled the cockpit service.
Your user account is allowed to log in to the web console.
For instructions, see Installing and enabling the web console.
- The web console VM plug-in is installed on your system.
- Ensure that both the host and the VM support a graphical interface.
Before you can view the graphical console in Virt Viewer, you must install Virt Viewer on the machine to which the web console is connected.
Click .
The virt viewer,
.vv, file downloads.- Open the file to launch Virt Viewer.
Remote Viewer is available on most operating systems. However, some browser extensions and plug-ins do not allow the web console to open Virt Viewer.
Procedure
Log in to the RHEL 8 web console.
For details, see Logging in to the web console.
In the interface, click the VM whose graphical console you want to view.
A new page opens with an Overview and a Console section for the VM.
Select in the console drop down menu.
Click .
The graphical console opens in Virt Viewer.
You can interact with the VM console by using the mouse and keyboard in the same manner in which you interact with a real machine. The display in the VM console reflects the activities being performed on the VM.
The server on which the web console is running can intercept specific key combinations, such as Ctrl+Alt+Del, preventing them from being sent to the VM.
To send such key combinations, click the menu and select the key sequence to send.
For example, to send the Ctrl+Alt+Del combination to the VM, click the menu and select the menu entry.
Troubleshooting
- If clicking in the graphical console does not have any effect, expand the console to full screen. This is a known issue with the mouse cursor offset.
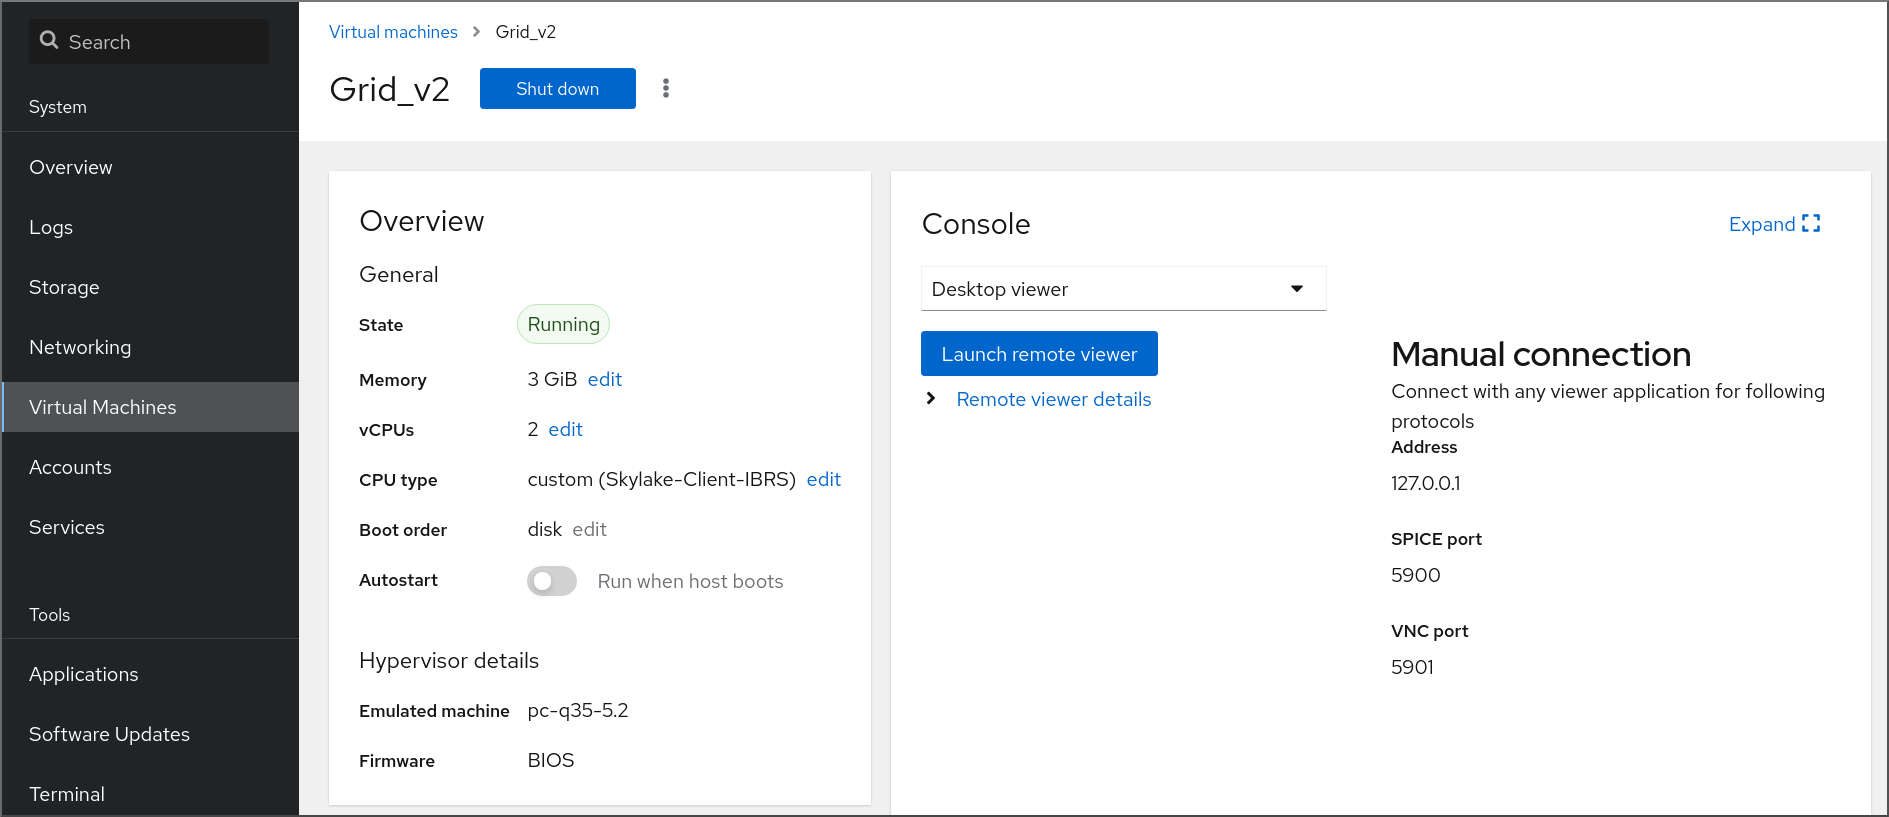
If launching the Remote Viewer in the web console does not work or is not optimal, you can manually connect with any viewer application by using the following protocols:
-
Address - The default address is
127.0.0.1. You can modify thevnc_listenor thespice_listenparameter in/etc/libvirt/qemu.confto change it to the host’s IP address. - SPICE port - 5900
- VNC port - 5901
-
Address - The default address is
2.4.1.3. Viewing the virtual machine serial console in the web console
You can view the serial console of a selected virtual machine (VM) in the RHEL 8 web console. This is useful when the host machine or the VM is not configured with a graphical interface.
For more information about the serial console, see Opening a virtual machine serial console.
Prerequisites
- You have installed the RHEL 8 web console.
- You have enabled the cockpit service.
Your user account is allowed to log in to the web console.
For instructions, see Installing and enabling the web console.
- The web console VM plug-in is installed on your system.
Procedure
Log in to the RHEL 8 web console.
For details, see Logging in to the web console.
In the pane, click the VM whose serial console you want to view.
A new page opens with an Overview and a Console section for the VM.
Select in the console drop down menu.
The graphical console appears in the web interface.
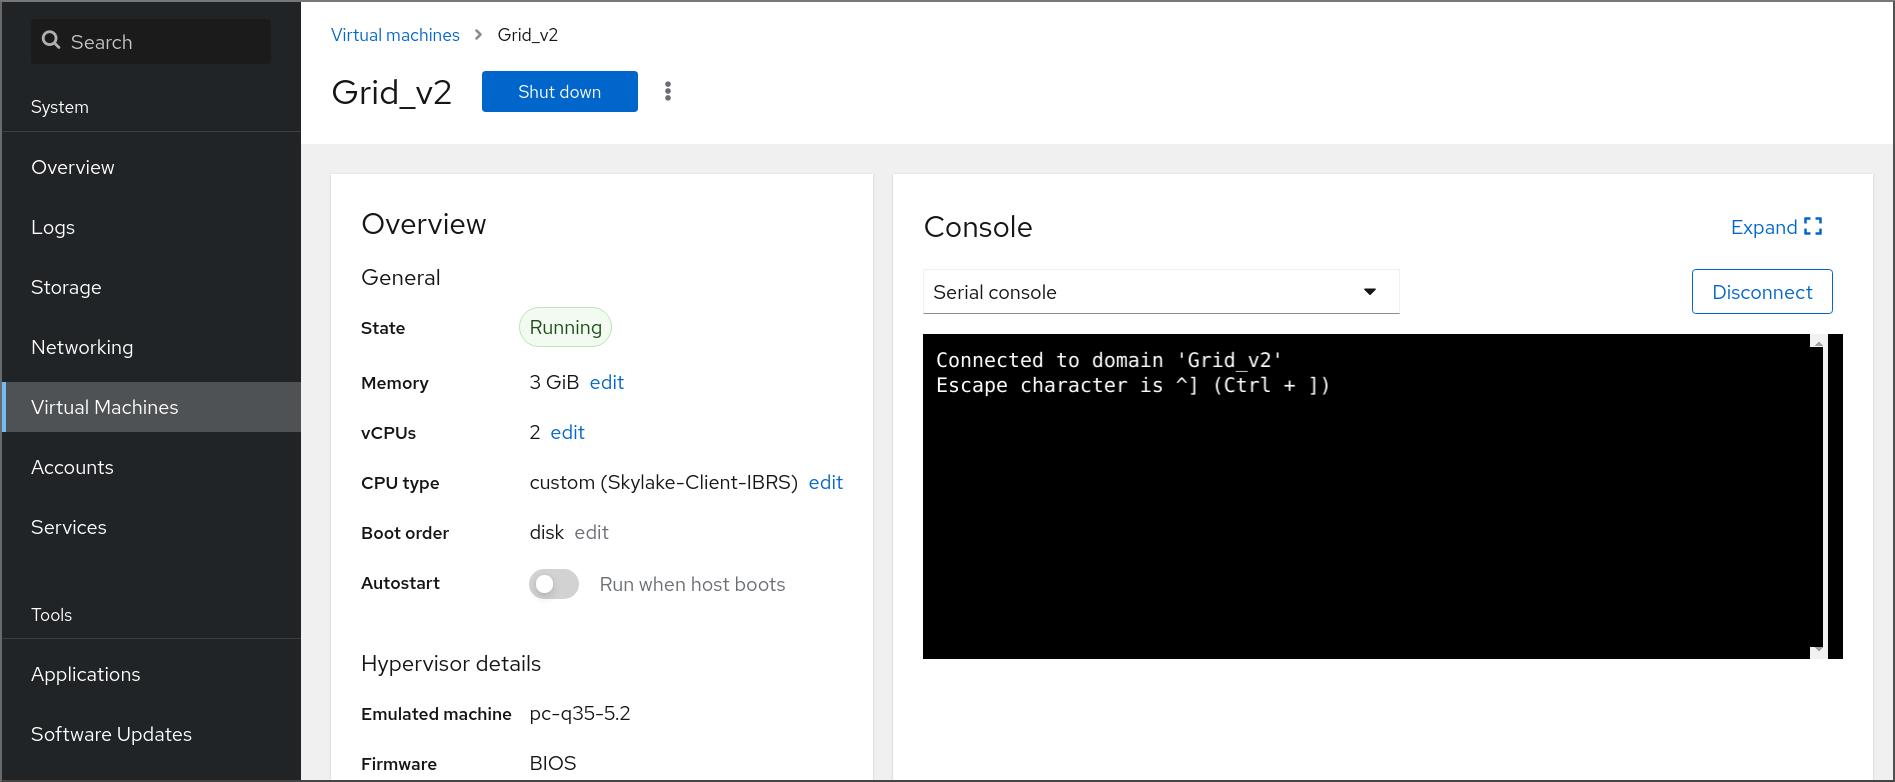
You can disconnect and reconnect the serial console from the VM.
- To disconnect the serial console from the VM, click .
- To reconnect the serial console to the VM, click .
2.4.1.4. Replacing the SPICE remote display protocol with VNC in the web console
The SPICE remote display protocol is deprecated in RHEL 8 and will be removed in RHEL 9. If you have a virtual machine (VM) that is configured to use the SPICE protocol, you can replace the SPICE protocol with the VNC protocol by using the web console. However, certain SPICE devices, such as audio and USB passthrough, will be removed from the VM because they do not have a suitable replacement in the VNC protocol.
By default, RHEL 8 VMs are configured to use the SPICE protocol. These VMs fail to migrate to RHEL 9, unless you switch from SPICE to VNC.
Prerequisites
- The web console VM plug-in is installed on your system.
- You have an existing VM that is configured to use the SPICE remote display protocol and is already shut-down.
Procedure
In the Virtual Machines interface of the web console, click the Menu button of the VM that is configured to use the SPICE protocol.
A drop down menu opens with controls for various VM operations.
Click .
The Replace SPICE devices dialog opens.
NoteIf you have multiple existing VMs that use the SPICE protocol, they are listed in this dialog. Here, you can select multiple VMs to convert from using SPICE to VNC in a single step.
Click .
A confirmation of the successful operation appears.
2.4.2. Opening a virtual machine graphical console by using Virt Viewer
To connect to a graphical console of a KVM virtual machine (VM) and open it in the Virt Viewer desktop application, follow the procedure below.
Prerequisites
- Your system, as well as the VM you are connecting to, must support graphical displays.
- If the target VM is located on a remote host, connection and root access privileges to the host are needed.
- Optional: If the target VM is located on a remote host, set up your libvirt and SSH for more convenient access to remote hosts.
Procedure
To connect to a local VM, use the following command and replace guest-name with the name of the VM you want to connect to:
# virt-viewer guest-nameTo connect to a remote VM, use the
virt-viewercommand with the SSH protocol. For example, the following command connects as root to a VM called guest-name, located on remote system 192.0.2.1. The connection also requires root authentication for 192.0.2.1.# virt-viewer --direct --connect qemu+ssh://root@192.0.2.1/system guest-name root@192.0.2.1's password:
Verification
If the connection works correctly, the VM display is shown in the Virt Viewer window.
You can interact with the VM console by using the mouse and keyboard in the same manner you interact with a real machine. The display in the VM console reflects the activities being performed on the VM.
Troubleshooting
- If clicking in the graphical console does not have any effect, expand the console to full screen. This is a known issue with the mouse cursor offset.
Additional resources
-
virt-viewerman page on your system - Setting up easy access to remote virtualization hosts
- Interacting with virtual machines by using the web console
2.4.3. Connecting to a virtual machine by using SSH
To interact with the terminal of a virtual machine (VM) by using the SSH connection protocol, follow the procedure below.
Prerequisites
- You have network connection and root access privileges to the target VM.
- If the target VM is located on a remote host, you also have connection and root access privileges to that host.
Your VM network assigns IP addresses by
dnsmasqgenerated bylibvirt. This is the case for example inlibvirtNAT networks.Notably, if your VM is using one of the following network configurations, you cannot connect to the VM by using SSH:
-
hostdevinterfaces - Direct interfaces
- Bridge interaces
-
The
libvirt-nsscomponent is installed and enabled on the VM’s host. If it is not, do the following:Install the
libvirt-nsspackage:# yum install libvirt-nssEdit the
/etc/nsswitch.conffile and addlibvirt_guestto thehostsline:... passwd: compat shadow: compat group: compat hosts: files libvirt_guest dns ...
Procedure
When connecting to a remote VM, SSH into its physical host first. The following example demonstrates connecting to a host machine
192.0.2.1by using its root credentials:# ssh root@192.0.2.1 root@192.0.2.1's password: Last login: Mon Sep 24 12:05:36 2021 root~#Use the VM’s name and user access credentials to connect to it. For example, the following connects to the
testguest1VM by using its root credentials:# ssh root@testguest1 root@testguest1's password: Last login: Wed Sep 12 12:05:36 2018 root~]#
Troubleshooting
If you do not know the VM’s name, you can list all VMs available on the host by using the
virsh list --allcommand:# virsh list --all Id Name State ---------------------------------------------------- 2 testguest1 running - testguest2 shut off
Additional resources
2.4.4. Opening a virtual machine serial console
By using the virsh console command, it is possible to connect to the serial console of a virtual machine (VM).
This is useful when the VM:
- Does not provide VNC or SPICE protocols, and thus does not offer video display for GUI tools.
- Does not have a network connection, and thus cannot be interacted with using SSH.
Prerequisites
The GRUB boot loader on your host must be configured to use serial console. To verify, check that the
/etc/default/grubfile on your host contains theGRUB_TERMINAL=serialparameter.$ sudo grep GRUB_TERMINAL /etc/default/grub GRUB_TERMINAL=serialThe VM must have a serial console device configured, such as
console type='pty'. To verify, do the following:# virsh dumpxml vm-name | grep console <console type='pty' tty='/dev/pts/2'> </console>The VM must have the serial console configured in its kernel command line. To verify this, the
cat /proc/cmdlinecommand output on the VM should include console=<console-name>, where <console-name> is architecture-specific:For AMD64 and Intel 64:
ttyS0NoteThe following commands in this procedure use
ttyS0.# cat /proc/cmdline BOOT_IMAGE=/vmlinuz-3.10.0-948.el7.x86_64 root=/dev/mapper/rhel-root ro console=tty0 console=ttyS0,9600n8 rd.lvm.lv=rhel/root rd.lvm.lv=rhel/swap rhgb
If the serial console is not set up properly on a VM, using virsh console to connect to the VM connects you to an unresponsive guest console. However, you can still exit the unresponsive console by using the Ctrl+] shortcut.
To set up serial console on the VM, do the following:
On the VM, enable the
console=ttyS0kernel option:# grubby --update-kernel=ALL --args="console=ttyS0"Clear the kernel options that might prevent your changes from taking effect.
# grub2-editenv - unset kernelopts- Reboot the VM.
The
serial-getty@<console-name>service must be enabled. For example, on AMD64 and Intel 64:# systemctl status serial-getty@ttyS0.service ○ serial-getty@ttyS0.service - Serial Getty on ttyS0 Loaded: loaded (/usr/lib/systemd/system/serial-getty@.service; enabled; preset: enabled)
Procedure
On your host system, use the
virsh consolecommand. The following example connects to the guest1 VM, if the libvirt driver supports safe console handling:# virsh console guest1 --safe Connected to domain 'guest1' Escape character is ^] Subscription-name Kernel 3.10.0-948.el7.x86_64 on an x86_64 localhost login:
- You can interact with the virsh console in the same way as with a standard command-line interface.
Additional resources
-
virshman page on your system - Configuring Serial Console Logs on a VM (video)
2.4.5. Setting up easy access to remote virtualization hosts
When managing VMs on a remote host system by using libvirt utilities, it is recommended to use the -c qemu+ssh://root@hostname/system syntax. For example, to use the virsh list command as root on the 192.0.2.1 host:
# virsh -c qemu+ssh://root@192.0.2.1/system list
root@192.0.2.1's password:

Id   Name              State
---------------------------------
1    remote-guest      running
However, you can remove the need to specify the connection details in full by modifying your SSH and libvirt configuration. For example:
# virsh -c remote-host list
root@192.0.2.1's password:

Id   Name              State
---------------------------------
1    remote-guest      running
To enable this improvement, follow the instructions below.
Procedure
Edit the
~/.ssh/configfile with the following details, where host-alias is a shortened name associated with a specific remote host and an alias for root@192.0.2.1, and hosturl is the URL address of the host :# vi ~/.ssh/config Host example-host-alias User root Hostname 192.0.2.1
Edit the
/etc/libvirt/libvirt.conffile with the following details, the example-qemu-host-alias is a host alias that QEMU and libvirt utilities will associate forqemu+ssh://192.0.2.1/systemwith the intended host example-host-alias :# vi /etc/libvirt/libvirt.conf uri_aliases = [ "example-qemu-host-alias=qemu+ssh://example-host-alias/system", ]
Verification
Confirm that you can manage remote VMs by using libvirt-based utilities on the local system with an added
-c qemu-host-aliasparameter. This automatically performs the commands over SSH on the remote host.For example, verify that the following lists VMs on the 192.0.2.1 remote host, the connection to which was set up as example-qemu-host-alias in the previous steps:
# virsh -c example-qemu-host-alias list root@192.0.2.1's password: Id Name State ---------------------------------------- 1 example-remote-guest runningNoteIn addition to
virsh, the-c(or--connect) option and the remote host access configuration described above can be used by the following utilities:
Next steps
If you want to use libvirt utilities exclusively on a single remote host, you can also set a specific connection as the default target for libvirt-based utilities. However, this is not recommended if you also want to manage VMs on your local host or on different remote hosts.
You can edit the
/etc/libvirt/libvirt.conffile and set the value of theuri_defaultparameter to example-qemu-host-alias as a default libvirt target.# These can be used in cases when no URI is supplied by the application # (@uri_default also prevents probing of the hypervisor driver). # uri_default = "example-qemu-host-alias"
As a result, all libvirt-based commands will automatically be performed on the specified remote host.
$ virsh list
root@192.0.2.1's password:

Id   Name              State
---------------------------------
1   example-remote-guest      running
When connecting to a remote host, you can avoid providing the root password to the remote system. To do so, use one or more of the following methods:
- Set up key-based SSH access to the remote host
- Use SSH connection multiplexing to connect to the remote system
- Kerberos authentication in Identity Management
-
The
-c(or--connect) option can be used to run thevirt-install,
virt-viewer, virsh and virt-manager commands on a remote host.
2.4.6. Configuring VNC passwords
To manage access to the graphical output of a virtual machine (VM), you can configure a password for the VNC console of the VM.
With a VNC password configured on a VM, users of the VMs must enter the password when attempting to view or interact with the VNC graphical console of the VMs, for example by using the virt-viewer utility.
VNC passwords are not a sufficient measure for ensuring the security of a VM environment. For details, see QEMU documentation on VNC security.
In addition, the VNC password is saved in plain text in the configuration of the VM, so for the password to be effective, the user must not be able to display the VM configuration.
Prerequisites
The VM that you want to protect with a VNC password has VNC graphics configured.
To ensure that this is the case, use the
virsh dumpxmlcommand as follows:# virsh dumpxml <vm-name> | grep graphics <graphics type='vnc' ports='-1' autoport=
yeslisten=127.0.0.1> </graphics>
Procedure
Open the configuration of the VM that you want to assign a VNC password to.
# virsh edit <vm-name>On the
<graphics>line of the configuration, add thepasswdattribute and the password string. The password must be 8 characters or fewer.<graphics type='vnc' ports='-1' autoport=
yeslisten=127.0.0.1passwd='<password>'>Optional: In addition, define a date and time when the password will expire.
<graphics type='vnc' ports='-1' autoport=
yeslisten=127.0.0.1passwd='<password>' passwdValidTo='2025-02-01T15:30:00'>In this example, the password will expire on February 1st 2025, at 15:30 UTC.
- Save the configuration.
Verification
Start the modified VM.
# virsh start <vm-name>Open a graphical console of the VM, for example by using the
virt-viewerutility:# virt-viewer <vm-name>If the VNC password has been configured properly, a dialogue window appears that requests you to enter the password.
2.5. Shutting down virtual machines
To shut down a running virtual machine hosted on RHEL 8, use the command line or the web console GUI.
2.5.1. Shutting down a virtual machine by using the command line
Shutting down a virtual machine (VM) requires different steps based on whether the VM is reponsive.
Shutting down a responsive VM
If you are connected to the guest, use a shutdown command or a GUI element appropriate to the guest operating system.
NoteIn some environments, such as in Linux guests that use the GNOME Desktop, using the GUI power button for suspending or hibernating the guest might instead shut down the VM.
Alternatively, use the
virsh shutdowncommand on the host:If the VM is on a local host:
# virsh shutdown demo-guest1
Domain 'demo-guest1' is being shutdown
If the VM is on a remote host, in this example 192.0.2.1:
# virsh -c qemu+ssh://root@192.0.2.1/system shutdown demo-guest1

root@192.0.2.1's password:
Domain 'demo-guest1' is being shutdown
Shutting down an unresponsive VM
To force a VM to shut down, for example if it has become unresponsive, use the virsh destroy command on the host:
# virsh destroy demo-guest1
Domain 'demo-guest1' destroyed
The virsh destroy command does not actually delete or remove the VM configuration or disk images. It only terminates the running instance of the VM, similarly to pulling the power cord from a physical machine.
In rare cases, virsh destroy may cause corruption of the VM’s file system, so using this command is only recommended if all other shutdown methods have failed.
Verification
On the host, display the list of your VMs to see their status.
# virsh list --all

 Id    Name                 State
------------------------------------------
 1     demo-guest1          shut off
2.5.2. Shutting down and restarting virtual machines by using the web console
Using the RHEL 8 web console, you can shut down or restart running virtual machines. You can also send a non-maskable interrupt to an unresponsive virtual machine.
2.5.2.1. Shutting down virtual machines in the web console
If a virtual machine (VM) is in the running state, you can shut it down by using the RHEL 8 web console.
Prerequisites
- You have installed the RHEL 8 web console.
- You have enabled the cockpit service.
Your user account is allowed to log in to the web console.
For instructions, see Installing and enabling the web console.
- The web console VM plug-in is installed on your system.
Procedure
- In the interface, find the row of the VM you want to shut down.
On the right side of the row, click .
The VM shuts down.
Troubleshooting
- If the VM does not shut down, click the Menu button next to the button and select .
- To shut down an unresponsive VM, you can also send a non-maskable interrupt.
2.5.2.2. Restarting virtual machines by using the web console
If a virtual machine (VM) is in the running state, you can restart it by using the RHEL 8 web console.
Prerequisites
- You have installed the RHEL 8 web console.
- You have enabled the cockpit service.
Your user account is allowed to log in to the web console.
For instructions, see Installing and enabling the web console.
- The web console VM plug-in is installed on your system.
Procedure
- In the interface, find the row of the VM you want to restart.
On the right side of the row, click the Menu button .
A drop-down menu of actions appears.
In the drop-down menu, click .
The VM shuts down and restarts.
Troubleshooting
- If the VM does not restart, click the Menu button next to the button and select .
- To shut down an unresponsive VM, you can also send a non-maskable interrupt.
2.5.2.3. Sending non-maskable interrupts to VMs by using the web console
Sending a non-maskable interrupt (NMI) may cause an unresponsive running virtual machine (VM) to respond or shut down. For example, you can send the Ctrl+Alt+Del NMI to a VM that is not responding to standard input.
Prerequisites
- You have installed the RHEL 8 web console.
- You have enabled the cockpit service.
Your user account is allowed to log in to the web console.
For instructions, see Installing and enabling the web console.
- The web console VM plug-in is installed on your system.
Procedure
Log in to the RHEL 8 web console.
For details, see Logging in to the web console.
- In the interface, find the row of the VM to which you want to send an NMI.
On the right side of the row, click the Menu button .
A drop-down menu of actions appears.
In the drop-down menu, click .
An NMI is sent to the VM.
2.6. Deleting virtual machines
To delete virtual machines in RHEL 8, use the command line or the web console GUI.
2.6.1. Deleting virtual machines by using the command line
To delete a virtual machine (VM), you can remove its XML configuration and associated storage files from the host by using the command line. Follow the procedure below:
Prerequisites
- Back up important data from the VM.
- Shut down the VM.
- Make sure no other VMs use the same associated storage.
Procedure
Use the
virsh undefineutility.For example, the following command removes the guest1 VM, its associated storage volumes, and non-volatile RAM, if any.
# virsh undefine guest1 --remove-all-storage --nvram
Domain 'guest1' has been undefined
Volume 'vda'(/home/images/guest1.qcow2) removed.
Additional resources
-
virsh undefine --helpcommand -
virshman page on your system
2.6.2. Deleting virtual machines by using the web console
To delete a virtual machine (VM) and its associated storage files from the host to which the RHEL 8 web console is connected with, follow the procedure below:
Prerequisites
- You have installed the RHEL 8 web console.
- You have enabled the cockpit service.
Your user account is allowed to log in to the web console.
For instructions, see Installing and enabling the web console.
- You have installed the RHEL 8 web console.
- You have enabled the cockpit service.
Your user account is allowed to log in to the web console.
For instructions, see Installing and enabling the web console.
- The web console VM plug-in is installed on your system.
- Back up important data from the VM.
- Make sure no other VM uses the same associated storage.
- Optional: Shut down the VM.
Procedure
Log in to the RHEL 8 web console.
For details, see Logging in to the web console.
In the interface, click the Menu button of the VM that you want to delete.
A drop down menu appears with controls for various VM operations.
Click .
A confirmation dialog appears.
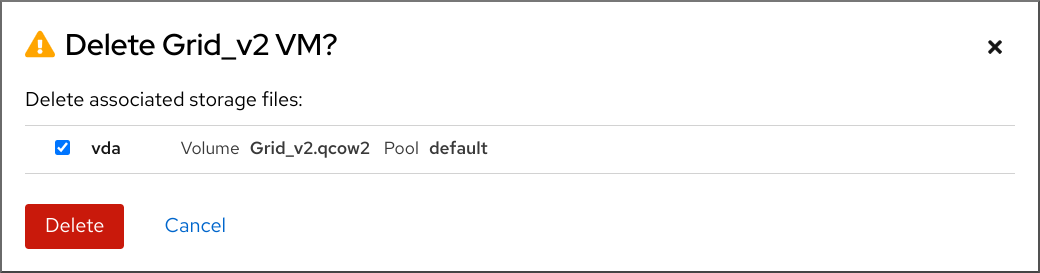
- Optional: To delete all or some of the storage files associated with the VM, select the checkboxes next to the storage files you want to delete.
Click .
The VM and any selected storage files are deleted.