Chapter 10. Migrating virtual machines
If the current host of a virtual machine (VM) becomes unsuitable or cannot be used anymore, or if you want to redistribute the hosting workload, you can migrate the VM to another KVM host.
10.1. How migrating virtual machines works
You can migrate a running virtual machine (VM) without interrupting the workload, with only a small downtime, by using a live migration. By default, the migrated VM is transient on the destination host, and remains defined also on the source host. The essential part of a live migration is transferring the state of the VM’s memory and of any attached virtualized devices to a destination host. For the VM to remain functional on the destination host, the VM’s disk images must remain available to it.
To migrate a shut-off VM, you must use an offline migration, which copies the VM’s configuration to the destination host. For details, see the following table.
| Migration type | Description | Use case | Storage requirements |
|---|---|---|---|
| Live migration | The VM continues to run on the source host machine while KVM is transferring the VM’s memory pages to the destination host. When the migration is nearly complete, KVM very briefly suspends the VM, and resumes it on the destination host. | Useful for VMs that require constant uptime. However, for VMs that modify memory pages faster than KVM can transfer them, such as VMs under heavy I/O load, the live migration might fail. (1) | The VM’s disk images must be accessible both to the source host and the destination host during the migration. (2) |
| Offline migration | Moves the VM’s configuration to the destination host | Recommended for shut-off VMs and in situations when shutting down the VM does not disrupt your workloads. | The VM’s disk images do not have to be accessible to the source or destination host during migration, and can be copied or moved manually to the destination host instead. |
(1) For possible solutions, see: Additional virsh migrate options for live migrations
(2) To achieve this, use one of the following:
- Storage located on a shared network
-
The
--copy-storage-allparameter for thevirsh migratecommand, which copies disk image contents from the source to the destination over the network. - Storage area network (SAN) logical units (LUNs).
- Ceph storage clusters
For easier management of large-scale migrations, explore other Red Hat products, such as:
10.2. Benefits of migrating virtual machines
Migrating virtual machines (VMs) can be useful for:
- Load balancing
- VMs can be moved to host machines with lower usage if their host becomes overloaded, or if another host is under-utilized.
- Hardware independence
- When you need to upgrade, add, or remove hardware devices on the host machine, you can safely relocate VMs to other hosts. This means that VMs do not experience any downtime for hardware improvements.
- Energy saving
- VMs can be redistributed to other hosts, and the unloaded host systems can thus be powered off to save energy and cut costs during low usage periods.
- Geographic migration
- VMs can be moved to another physical location for lower latency or when required for other reasons.
10.3. Limitations for migrating virtual machines
Before migrating virtual machines (VMs) in RHEL 8, ensure you are aware of the migration’s limitations.
- Live storage migration cannot be performed on RHEL 8, but you can migrate storage while the VM is powered down. Note that live storage migration is available on Red Hat Virtualization.
VMs that use certain features and configurations will not work correctly if migrated, or the migration will fail. Such features include:
- Device passthrough
- SR-IOV device assignment
- Mediated devices, such as vGPUs
- A migration between hosts that use Non-Uniform Memory Access (NUMA) pinning works only if the hosts have similar topology. However, the performance on running workloads might be negatively affected by the migration.
- Both the source and destination hosts use specific RHEL versions that are supported for VM migration, see Supported hosts for virtual machine migration
The physical CPUs, both on the source VM and the destination VM, must be identical, otherwise the migration might fail. Any differences between the VMs in the following CPU related areas can cause problems with the migration:
CPU model
- Migrating between an Intel 64 host and an AMD64 host is unsupported, even though they share the x86-64 instruction set.
- For steps to ensure that a VM will work correctly after migrating to a host with a different CPU model, see Verifying host CPU compatibility for virtual machine migration.
- Physical machine firmware versions and settings
10.4. Migrating a virtual machine by using the command line
If the current host of a virtual machine (VM) becomes unsuitable or cannot be used anymore, or if you want to redistribute the hosting workload, you can migrate the VM to another KVM host. You can perform a live migration or an offline migration. For differences between the two scenarios, see How migrating virtual machines works.
Prerequisites
- Hypervisor: The source host and the destination host both use the KVM hypervisor.
-
Network connection: The source host and the destination host are able to reach each other over the network. Use the
pingutility to verify this. Open ports: Ensure the following ports are open on the destination host.
- Port 22 is needed for connecting to the destination host by using SSH.
- Port 16509 is needed for connecting to the destination host by using TLS.
- Port 16514 is needed for connecting to the destination host by using TCP.
- Ports 49152-49215 are needed by QEMU for transferring the memory and disk migration data.
- Hosts: For the migration to be supportable by Red Hat, the source host and destination host must be using specific operating systems and machine types. To ensure this is the case, see Supported hosts for virtual machine migration.
- CPU: The VM must be compatible with the CPU features of the destination host. To ensure this is the case, see Verifying host CPU compatibility for virtual machine migration.
Storage: The disk images of VMs that will be migrated are accessible to both the source host and the destination host. This is optional for offline migration, but required for migrating a running VM. To ensure storage accessibility for both hosts, one of the following must apply:
- You are using storage area network (SAN) logical units (LUNs).
- You are using a Ceph storage clusters.
-
You have created a disk image with the same format and size as the source VM disk and you will use the
--copy-storage-allparameter when migrating the VM. - The disk image is located on a separate networked location. For instructions to set up such shared VM storage, see Sharing virtual machine disk images with other hosts.
Network bandwidth: When migrating a running VM, your network bandwidth must be higher than the rate in which the VM generates dirty memory pages.
To obtain the dirty page rate of your VM before you start the live migration, do the following:
Monitor the rate of dirty page generation of the VM for a short period of time.
# virsh domdirtyrate-calc <example_VM> 30After the monitoring finishes, obtain its results:
# virsh domstats <example_VM> --dirtyrate
Domain: 'example-VM'
  dirtyrate.calc_status=2
  dirtyrate.calc_start_time=200942
  dirtyrate.calc_period=30
  dirtyrate.megabytes_per_second=2
In this example, the VM is generating 2 MB of dirty memory pages per second. Attempting to live-migrate such a VM on a network with a bandwidth of 2 MB/s or less will cause the live migration not to progress if you do not pause the VM or lower its workload.
To ensure that the live migration finishes successfully, Red Hat recommends that your network bandwidth is significantly greater than the VM’s dirty page generation rate.
NoteThe value of the
calc_periodoption might differ based on the workload and dirty page rate. You can experiment with severalcalc_periodvalues to determine the most suitable period that aligns with the dirty page rate in your environment.
- Bridge tap network specifics: When migrating an existing VM in a public bridge tap network, the source and destination hosts must be located on the same network. Otherwise, the VM network will not work after migration.
libvirtd: Ensure that the
libvirtdservice is enabled and running.# systemctl enable --now libvirtd.service
Procedure
To migrate a VM from one host to another, use the virsh migrate command.
Offline migration
The following command migrates a shut-off
example-VMVM from your local host to the system connection of theexample-destinationhost by using an SSH tunnel.# virsh migrate --offline --persistent <example_VM> qemu+ssh://example-destination/system
Live migration
The following command migrates the
example-VMVM from your local host to the system connection of theexample-destinationhost by using an SSH tunnel. The VM keeps running during the migration.# virsh migrate --live --persistent <example_VM> qemu+ssh://example-destination/systemWait for the migration to complete. The process might take some time depending on network bandwidth, system load, and the size of the VM. If the
--verboseoption is not used forvirsh migrate, the CLI does not display any progress indicators except errors.When the migration is in progress, you can use the
virsh domjobinfoutility to display the migration statistics.
Multi-FD live migration
You can use multiple parallel connections to the destination host during the live migration. This is also known as multiple file descriptors (multi-FD) migration. With multi-FD migration, you can speed up the migration by utilizing all of the available network bandwidth for the migration process.
# virsh migrate --live --persistent --parallel --parallel-connections 4 <example_VM> qemu+ssh://<example-destination>/systemThis example uses 4 multi-FD channels to migrate the <example_VM> VM. It is recommended to use one channel for each 10 Gbps of available network bandwidth. The default value is 2 channels.
Live migration with an increased downtime limit
To improve the reliability of a live migration, you can set the
maxdowntimeparameter, which specifies the maximum amount of time, in milliseconds, the VM can be paused during live migration. Setting a larger downtime can help to ensure the migration completes successfully.# virsh migrate-setmaxdowntime <example_VM> <time_interval_in_milliseconds>
Post-copy migration
If your VM has a large memory footprint, you can perform a post-copy migration, which transfers the source VM’s CPU state first and immediately starts the migrated VM on the destination host. The source VM’s memory pages are transferred after the migrated VM is already running on the destination host. Because of this, a post-copy migration can result in a smaller downtime of the migrated VM.
However, the running VM on the destination host might try to access memory pages that have not yet been transferred, which causes a page fault. If too many page faults occur during the migration, the performance of the migrated VM can be severely degraded.
Given the potential complications of a post-copy migration, it is recommended to use the following command that starts a standard live migration and switches to a post-copy migration if the live migration cannot be finished in a specified amount of time.
# virsh migrate --live --persistent --postcopy --timeout <time_interval_in_seconds> --timeout-postcopy <example_VM> qemu+ssh://<example-destination>/system
Auto-converged live migration
If your VM is under a heavy memory workload, you can use the
--auto-convergeoption. This option automatically slows down the execution speed of the VM’s CPU. As a consequence, this CPU throttling can help to slow down memory writes, which means the live migration might succeed even in VMs with a heavy memory workload.However, the CPU throttling does not help to resolve workloads where memory writes are not directly related to CPU execution speed, and it can negatively impact the performance of the VM during a live migration.
# virsh migrate --live --persistent --auto-converge <example_VM> qemu+ssh://<example-destination>/system
Verification
For offline migration:
On the destination host, list the available VMs to verify that the VM was migrated successfully.
# virsh list --all
Id      Name             State
----------------------------------
10    example-VM-1      shut off
For live migration:
On the destination host, list the available VMs to verify the state of the destination VM:
# virsh list --all
Id      Name             State
----------------------------------
10    example-VM-1      running
If the state of the VM is listed as
running, it means that the migration is finished. However, if the live migration is still in progress, the state of the destination VM will be listed aspaused.
For post-copy migration:
On the source host, list the available VMs to verify the state of the source VM.
# virsh list --all
Id      Name             State
----------------------------------
10    example-VM-1      shut off
On the destination host, list the available VMs to verify the state of the destination VM.
# virsh list --all
Id      Name             State
----------------------------------
10    example-VM-1      running
If the state of the source VM is listed as
shut offand the state of the destination VM is listed asrunning, it means that the migration is finished.
Additional resources
-
virsh migrate --helpcommand -
virsh (1)man page on your system
10.5. Live migrating a virtual machine by using the web console
If you want to migrate a virtual machine (VM) that is performing tasks which require it to be constantly running, you can migrate that VM to another KVM host without shutting it down. This is also known as live migration. The following instructions explain how to do so by using the web console.
Prerequisites
- You have installed the RHEL 8 web console.
- You have enabled the cockpit service.
Your user account is allowed to log in to the web console.
For instructions, see Installing and enabling the web console.
- The web console VM plugin is installed on your system.
- Hypervisor: The source host and the destination host both use the KVM hypervisor.
- Hosts: The source and destination hosts are running.
Open ports: Ensure the following ports are open on the destination host.
- Port 22 is needed for connecting to the destination host by using SSH.
- Port 16509 is needed for connecting to the destination host by using TLS.
- Port 16514 is needed for connecting to the destination host by using TCP.
- Ports 49152-49215 are needed by QEMU for transfering the memory and disk migration data.
- CPU: The VM must be compatible with the CPU features of the destination host. To ensure this is the case, see Verifying host CPU compatibility for virtual machine migration.
Storage: The disk images of VMs that will be migrated are accessible to both the source host and the destination host. This is optional for offline migration, but required for migrating a running VM. To ensure storage accessibility for both hosts, one of the following must apply:
- You are using storage area network (SAN) logical units (LUNs).
- You are using a Ceph storage clusters.
-
You have created a disk image with the same format and size as the source VM disk and you will use the
--copy-storage-allparameter when migrating the VM. - The disk image is located on a separate networked location. For instructions to set up such shared VM storage, see Sharing virtual machine disk images with other hosts.
Network bandwidth: When migrating a running VM, your network bandwidth must be higher than the rate in which the VM generates dirty memory pages.
To obtain the dirty page rate of your VM before you start the live migration, do the following on the command line:
Monitor the rate of dirty page generation of the VM for a short period of time.
# virsh domdirtyrate-calc vm-name 30After the monitoring finishes, obtain its results:
# virsh domstats vm-name --dirtyrate
Domain: 'vm-name'
  dirtyrate.calc_status=2
  dirtyrate.calc_start_time=200942
  dirtyrate.calc_period=30
  dirtyrate.megabytes_per_second=2
In this example, the VM is generating 2 MB of dirty memory pages per second. Attempting to live-migrate such a VM on a network with a bandwidth of 2 MB/s or less will cause the live migration not to progress if you do not pause the VM or lower its workload.
To ensure that the live migration finishes successfully, Red Hat recommends that your network bandwidth is significantly greater than the VM’s dirty page generation rate.
NoteThe value of the
calc_periodoption might differ based on the workload and dirty page rate. You can experiment with severalcalc_periodvalues to determine the most suitable period that aligns with the dirty page rate in your environment.
- Bridge tap network specifics: When migrating an existing VM in a public bridge tap network, the source and destination hosts must be located on the same network. Otherwise, the VM network will not work after migration.
Procedure
In the Virtual Machines interface of the web console, click the Menu button of the VM that you want to migrate.
A drop down menu appears with controls for various VM operations.
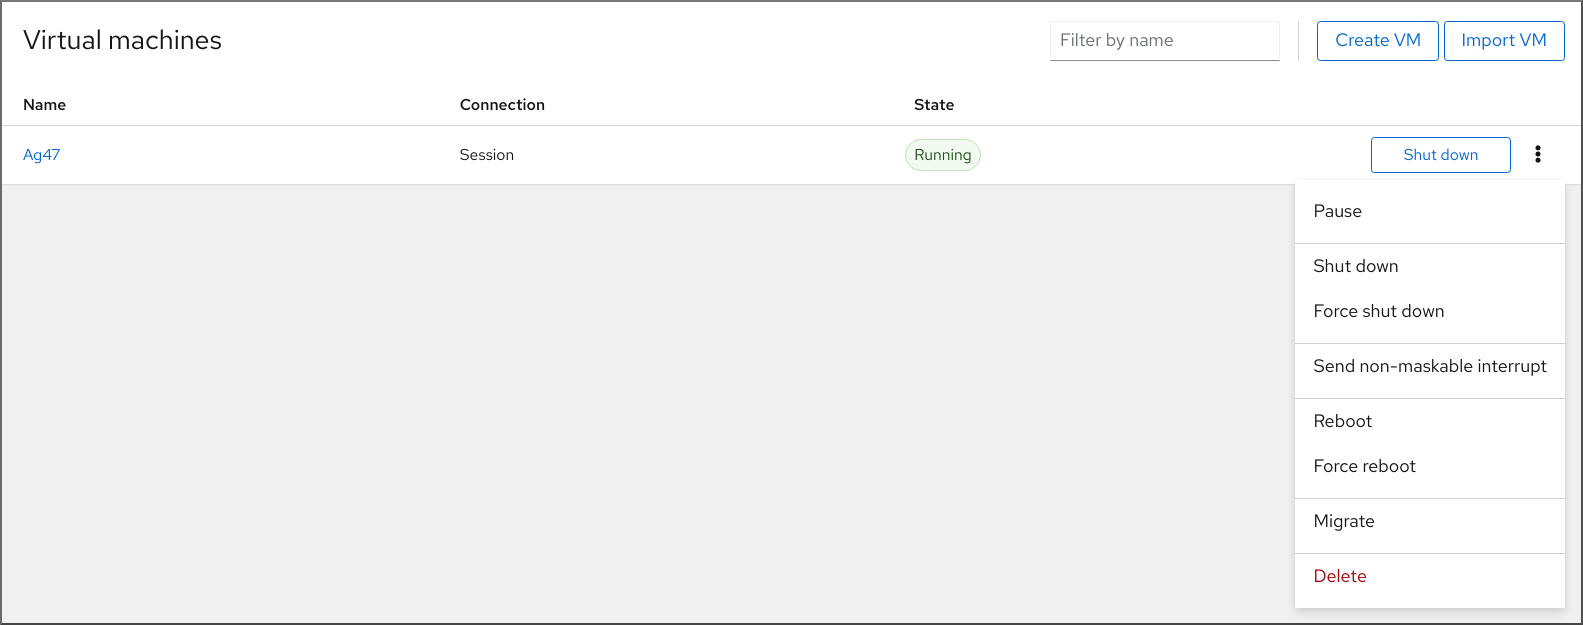
Click
The Migrate VM to another host dialog appears.
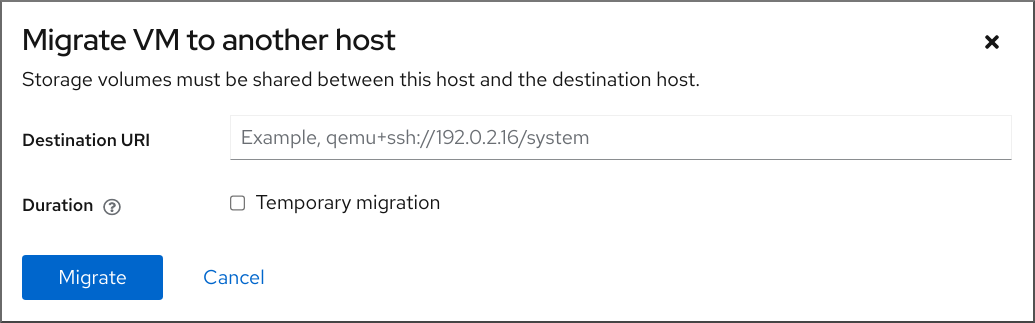
- Enter the URI of the destination host.
Configure the duration of the migration:
- Permanent - Do not check the box if you want to migrate the VM permanently. Permanent migration completely removes the VM configuration from the source host.
- Temporary - Temporary migration migrates a copy of the VM to the destination host. This copy is deleted from the destination host when the VM is shut down. The original VM remains on the source host.
Click
Your VM is migrated to the destination host.
Verification
To verify whether the VM has been successfully migrated and is working correctly:
- Confirm whether the VM appears in the list of VMs available on the destination host.
- Start the migrated VM and observe if it boots up.
10.6. Sharing virtual machine disk images with other hosts
To perform a live migration of a virtual machine (VM) between supported KVM hosts, you must also migrate the storage of the running VM in a way that makes it possible for the VM to read from and write to the storage during the migration process.
One of the methods to do this is using shared VM storage. The following procedure provides instructions for sharing a locally stored VM image with the source host and the destination host by using the NFS protocol.
Prerequisites
- The VM intended for migration is shut down.
- Optional: A host system is available for hosting the storage that is not the source or destination host, but both the source and the destination host can reach it through the network. This is the optimal solution for shared storage and is recommended by Red Hat.
- Make sure that NFS file locking is not used as it is not supported in KVM.
- The NFS protocol is installed and enabled on the source and destination hosts. See Deploying an NFS server.
The
virt_use_nfsSELinux boolean is set toon.# setsebool virt_use_nfs 1
Procedure
Connect to the host that will provide shared storage. In this example, it is the
example-shared-storagehost:# ssh root@example-shared-storage root@example-shared-storage's password: Last login: Mon Sep 24 12:05:36 2019 root~#Create a directory on the
example-shared-storagehost that will hold the disk image and that will be shared with the migration hosts:# mkdir /var/lib/libvirt/shared-imagesCopy the disk image of the VM from the source host to the newly created directory. The following example copies the disk image
example-disk-1of the VM to the/var/lib/libvirt/shared-images/directory of theexample-shared-storagehost:# scp /var/lib/libvirt/images/example-disk-1.qcow2 root@example-shared-storage:/var/lib/libvirt/shared-images/example-disk-1.qcow2On the host that you want to use for sharing the storage, add the sharing directory to the
/etc/exportsfile. The following example shares the/var/lib/libvirt/shared-imagesdirectory with theexample-source-machineandexample-destination-machinehosts:# /var/lib/libvirt/shared-images example-source-machine(rw,no_root_squash) example-destination-machine(rw,no\_root_squash)Run the
exportfs -acommand for the changes in the/etc/exportsfile to take effect.# exportfs -aOn both the source and destination host, mount the shared directory in the
/var/lib/libvirt/imagesdirectory:# mount example-shared-storage:/var/lib/libvirt/shared-images /var/lib/libvirt/images
Verification
- Start the VM on the source host and observe if it boots successfully.
Additional resources
10.7. Verifying host CPU compatibility for virtual machine migration
For migrated virtual machines (VMs) to work correctly on the destination host, the CPUs on the source and the destination hosts must be compatible. To ensure that this is the case, calculate a common CPU baseline before you begin the migration.
The instructions in this section use an example migration scenario with the following host CPUs:
- Source host: Intel Core i7-8650U
- Destination hosts: Intel Xeon CPU E5-2620 v2
Prerequisites
- Virtualization is installed and enabled on your system.
- You have administrator access to the source host and the destination host for the migration.
Procedure
On the source host, obtain its CPU features and paste them into a new XML file, such as
domCaps-CPUs.xml.# virsh domcapabilities | xmllint --xpath "//cpu/mode[@name='host-model']" - > domCaps-CPUs.xml-
In the XML file, replace the
<mode> </mode>tags with<cpu> </cpu>. Optional: Verify that the content of the
domCaps-CPUs.xmlfile looks similar to the following:# cat domCaps-CPUs.xml <cpu> <model fallback="forbid">Skylake-Client-IBRS</model> <vendor>Intel</vendor> <feature policy="require" name="ss"/> <feature policy="require" name="vmx"/> <feature policy="require" name="pdcm"/> <feature policy="require" name="hypervisor"/> <feature policy="require" name="tsc_adjust"/> <feature policy="require" name="clflushopt"/> <feature policy="require" name="umip"/> <feature policy="require" name="md-clear"/> <feature policy="require" name="stibp"/> <feature policy="require" name="arch-capabilities"/> <feature policy="require" name="ssbd"/> <feature policy="require" name="xsaves"/> <feature policy="require" name="pdpe1gb"/> <feature policy="require" name="invtsc"/> <feature policy="require" name="ibpb"/> <feature policy="require" name="ibrs"/> <feature policy="require" name="amd-stibp"/> <feature policy="require" name="amd-ssbd"/> <feature policy="require" name="rsba"/> <feature policy="require" name="skip-l1dfl-vmentry"/> <feature policy="require" name="pschange-mc-no"/> <feature policy="disable" name="hle"/> <feature policy="disable" name="rtm"/> </cpu>On the destination host, use the following command to obtain its CPU features:
# virsh domcapabilities | xmllint --xpath "//cpu/mode[@name='host-model']" - <mode name="host-model" supported="yes"> <model fallback="forbid">IvyBridge-IBRS</model> <vendor>Intel</vendor> <feature policy="require" name="ss"/> <feature policy="require" name="vmx"/> <feature policy="require" name="pdcm"/> <feature policy="require" name="pcid"/> <feature policy="require" name="hypervisor"/> <feature policy="require" name="arat"/> <feature policy="require" name="tsc_adjust"/> <feature policy="require" name="umip"/> <feature policy="require" name="md-clear"/> <feature policy="require" name="stibp"/> <feature policy="require" name="arch-capabilities"/> <feature policy="require" name="ssbd"/> <feature policy="require" name="xsaveopt"/> <feature policy="require" name="pdpe1gb"/> <feature policy="require" name="invtsc"/> <feature policy="require" name="ibpb"/> <feature policy="require" name="amd-ssbd"/> <feature policy="require" name="skip-l1dfl-vmentry"/> <feature policy="require" name="pschange-mc-no"/> </mode>-
Add the obtained CPU features from the destination host to the
domCaps-CPUs.xmlfile on the source host. Again, replace the<mode> </mode>tags with<cpu> </cpu>and save the file. Optional: Verify that the XML file now contains the CPU features from both hosts.
# cat domCaps-CPUs.xml <cpu> <model fallback="forbid">Skylake-Client-IBRS</model> <vendor>Intel</vendor> <feature policy="require" name="ss"/> <feature policy="require" name="vmx"/> <feature policy="require" name="pdcm"/> <feature policy="require" name="hypervisor"/> <feature policy="require" name="tsc_adjust"/> <feature policy="require" name="clflushopt"/> <feature policy="require" name="umip"/> <feature policy="require" name="md-clear"/> <feature policy="require" name="stibp"/> <feature policy="require" name="arch-capabilities"/> <feature policy="require" name="ssbd"/> <feature policy="require" name="xsaves"/> <feature policy="require" name="pdpe1gb"/> <feature policy="require" name="invtsc"/> <feature policy="require" name="ibpb"/> <feature policy="require" name="ibrs"/> <feature policy="require" name="amd-stibp"/> <feature policy="require" name="amd-ssbd"/> <feature policy="require" name="rsba"/> <feature policy="require" name="skip-l1dfl-vmentry"/> <feature policy="require" name="pschange-mc-no"/> <feature policy="disable" name="hle"/> <feature policy="disable" name="rtm"/> </cpu> <cpu> <model fallback="forbid">IvyBridge-IBRS</model> <vendor>Intel</vendor> <feature policy="require" name="ss"/> <feature policy="require" name="vmx"/> <feature policy="require" name="pdcm"/> <feature policy="require" name="pcid"/> <feature policy="require" name="hypervisor"/> <feature policy="require" name="arat"/> <feature policy="require" name="tsc_adjust"/> <feature policy="require" name="umip"/> <feature policy="require" name="md-clear"/> <feature policy="require" name="stibp"/> <feature policy="require" name="arch-capabilities"/> <feature policy="require" name="ssbd"/> <feature policy="require" name="xsaveopt"/> <feature policy="require" name="pdpe1gb"/> <feature policy="require" name="invtsc"/> <feature policy="require" name="ibpb"/> <feature policy="require" name="amd-ssbd"/> <feature policy="require" name="skip-l1dfl-vmentry"/> <feature policy="require" name="pschange-mc-no"/> </cpu>Use the XML file to calculate the CPU feature baseline for the VM you intend to migrate.
# virsh hypervisor-cpu-baseline domCaps-CPUs.xml

    <cpu mode='custom' match='exact'>
      <model fallback='forbid'>IvyBridge-IBRS</model>
      <vendor>Intel</vendor>
      <feature policy='require' name='ss'/>
      <feature policy='require' name='vmx'/>
      <feature policy='require' name='pdcm'/>
      <feature policy='require' name='pcid'/>
      <feature policy='require' name='hypervisor'/>
      <feature policy='require' name='arat'/>
      <feature policy='require' name='tsc_adjust'/>
      <feature policy='require' name='umip'/>
      <feature policy='require' name='md-clear'/>
      <feature policy='require' name='stibp'/>
      <feature policy='require' name='arch-capabilities'/>
      <feature policy='require' name='ssbd'/>
      <feature policy='require' name='xsaveopt'/>
      <feature policy='require' name='pdpe1gb'/>
      <feature policy='require' name='invtsc'/>
      <feature policy='require' name='ibpb'/>
      <feature policy='require' name='amd-ssbd'/>
      <feature policy='require' name='skip-l1dfl-vmentry'/>
      <feature policy='require' name='pschange-mc-no'/>
    </cpu>
Open the XML configuration of the VM you intend to migrate, and replace the contents of the
<cpu>section with the settings obtained in the previous step.# virsh edit <vm_name>If the VM is running, shut down the VM and start it again.
# virsh shutdown <vm_name>

# virsh start <vm_name>
10.8. Supported hosts for virtual machine migration
For the virtual machine (VM) migration to work properly and be supported by Red Hat, the source and destination hosts must be specific RHEL versions and machine types. The following table shows supported VM migration paths.
| Migration method | Release type | Example | Support status |
|---|---|---|---|
| Forward | Major release |
7.6+ | On supported RHEL 7 systems: machine types i440fx and q35 |
| Backward | Major release |
8.1 | On supported RHEL 8 systems: machine types i440fx and q35 |
| Forward | Minor release |
8.0.1+ | On supported RHEL 7 systems: machine types i440fx and q35 on RHEL 7.6.0 and later. On supported RHEL 8 systems: machine type q35. |
| Backward | Minor release |
8.1 | On supported RHEL 7 systems. Fully supported for machine types i440fx and q35. On supported RHEL 8 systems: machine type q35. |
Additional resources