Chapter 9. Managing identities and authorizations
This section describes different aspects of managing identities and authorizations of Red Hat CodeReady Workspaces.
9.1. Authenticating users
This document covers all aspects of user authentication in Red Hat CodeReady Workspaces, both on the CodeReady Workspaces server and in workspaces. This includes securing all REST API endpoints, WebSocket or JSON RPC connections, and some web resources.
All authentication types use the JWT open standard as a container for transferring user identity information. In addition, CodeReady Workspaces server authentication is based on the OpenID Connect protocol implementation, which is provided by default by RH-SSO.
Authentication in workspaces implies the issuance of self-signed per-workspace JWT tokens and their verification on a dedicated service based on JWTProxy.
9.1.1. Authenticating to the CodeReady Workspaces server
9.1.1.1. Authenticating to the CodeReady Workspaces server using OpenID
OpenID authentication on the CodeReady Workspaces server implies the presence of an external OpenID Connect provider and has the following main steps:
- Authenticate the user through a JWT token that is retrieved from an HTTP request or, in case of a missing or invalid token, redirect the user to the RH-SSO login page.
- Send authentication tokens in an Authorization header. In limited cases, when it is impossible to use the Authorization header, the token can be sent in the token query parameter. Example: OAuth authentication initialization.
-
Compose an internal
subjectobject that represents the current user inside the CodeReady Workspaces server code.
The only supported and tested OpenID provider is RH-SSO.
Procedure
To authenticate to the CodeReady Workspaces server using OpenID authentication:
-
Request the OpenID settings service where clients can find all the necessary URLs and properties of the OpenId provider, such as
jwks.endpoint,token.endpoint,logout.endpoint,realm.name, orclient_idreturned in the JSON format. The service URL is
\https://codeready-<openshift_deployment_name>.<domain_name>/api/keycloak/settings, and it is only available in the CodeReady Workspaces multiuser mode. The presence of the service in the URL confirms that the authentication is enabled in the current deployment.Example output:
{
    "che.keycloak.token.endpoint": "http://172.19.20.9:5050/auth/realms/che/protocol/openid-connect/token",
    "che.keycloak.profile.endpoint": "http://172.19.20.9:5050/auth/realms/che/account",
    "che.keycloak.client_id": "che-public",
    "che.keycloak.auth_server_url": "http://172.19.20.9:5050/auth",
    "che.keycloak.password.endpoint": "http://172.19.20.9:5050/auth/realms/che/account/password",
    "che.keycloak.logout.endpoint": "http://172.19.20.9:5050/auth/realms/che/protocol/openid-connect/logout",
    "che.keycloak.realm": "che"
}
The service allows downloading the JavaScript client library to interact with the provider using the
\https://codeready-<openshift_deployment_name>.<domain_name>/api/keycloak/OIDCKeycloak.jsURL.-
Redirect the user to the appropriate provider’s login page with all the necessary parameters, including
client_idand the return redirection path. This can be done with any client library (JS or Java). -
When the user is logged in to the provider, the client side-code is obtained, and the JWT token has validated the token, the creation of the
subjectbegins.
The verification of the token signature occurs in two main steps:
Authentication: The token is extracted from the Authorization header or from the
tokenquery parameter and is parsed using the public key retrieved from the provider. In case of expired, invalid, or malformed tokens, a403error is sent to the user. The minimal use of the query parameter is recommended, due to its support limitations or complete removal in upcoming versions.If the validation is successful, the parsed form of the token is passed to the environment initialization step:
Environment initialization: The filter extracts data from the JWT token claims, creates the user in the local database if it is not yet available, and constructs the
subjectobject and sets it into the per-request EnvironmentContext object, which is statically accessible everywhere.If the request was made using only a JWT token, the following single authentication filter is used:
org.eclipse.che.multiuser.machine.authentication.server.MachineLoginFilter: The filter finds the user that the
userIdtoken belongs to, retrieves the user instance, and sets the principal to the session. The CodeReady Workspaces server-to-server requests are performed using a dedicated request factory that signs every request with the current subject token obtained from theEnvironmentContextobject.
Providing user-specific data
Since RH-SSO may store user-specific information (first and last name, phone number, job title), there is a special implementation of the ProfileDao that can provide this data to consumers. The implementation is read-only, so users cannot perform create and update operations.
9.1.1.1.1. Obtaining the token from credentials through RH-SSO
Clients that cannot run JavaScript or other clients (such as command-line clients or Selenium tests) must request the authorization token directly from RH-SSO.
To obtain the token, send a request to the token endpoint with the username and password credentials. This request can be schematically described as the following cURL request:
$ curl --insecure --data "grant_type=password&client_id=codeready-public&username=<USERNAME>&password=<PASSWORD>" \ 1 2
https://<keyckloak_host>/auth/realms/codeready/protocol/openid-connect/token 3
The CodeReady Workspaces dashboard uses a customized RH-SSO login page and an authentication mechanism based on grant_type=authorization_code. It is a two-step authentication process:
- Logging in and obtaining the authorization code.
- Obtaining the token using this authorization code.
9.1.1.1.2. Obtaining the token from the OpenShift token through RH-SSO
When CodeReady Workspaces was installed on OpenShift using the Operator, and the OpenShift OAuth integration is enabled, as it is by default, the user’s CodeReady Workspaces authentication token can be retrieved from the user’s OpenShift token.
To retrieve the authentication token from the OpenShift token, send a schematically described cURL request to the OpenShift token endpoint:
$ curl --insecure -X POST  \
-d "client_id=codeready-public" \
-d "subject_token=<USER_OPENSHIFT_TOKEN>" \ 1
-d "subject_issuer=<OPENSHIFT_IDENTITY_PROVIDER_NAME>" \ 2
--data-urlencode "grant_type=urn:ietf:params:oauth:grant-type:token-exchange" \
--data-urlencode "subject_token_type=urn:ietf:params:oauth:token-type:access_token" \
https://<KEYCKLOAK_HOST>/auth/realms/codeready/protocol/openid-connect/token 3
Before using this token exchange feature, it is required for an end user to be interactively logged in at least once to the CodeReady Workspaces Dashboard using the OpenShift login page. This step is needed to link the OpenShift and RH-SSO user accounts properly and set the required user profile information.
9.1.1.2. Authenticating to the CodeReady Workspaces server using other authentication implementations
This procedure describes how to use an OpenID Connect (OIDC) authentication implementation other than RH-SSO.
Procedure
-
Update the authentication configuration parameters that are stored in the
multiuser.propertiesfile (such as client ID, authentication URL, realm name). -
Write a single filter or a chain of filters to validate tokens, create the user in the CodeReady Workspaces dashboard, and compose the
subjectobject. - If the new authorization provider supports the OpenID protocol, use the OIDC JS client library available at the settings endpoint because it is decoupled from specific implementations.
- If the selected provider stores additional data about the user (first and last name, job title), it is recommended to write a provider-specific ProfileDao implementation that provides this information.
9.1.1.3. Authenticating to the CodeReady Workspaces server using OAuth
For easy user interaction with third-party services, the CodeReady Workspaces server supports OAuth authentication. OAuth tokens are also used for GitHub-related plug-ins.
OAuth authentication has two main flows:
- delegated
- Default. Delegates OAuth authentication to RH-SSO server.
- embedded
- Uses built-in CodeReady Workspaces server mechanism to communicate with OAuth providers.
To switch between the two implementations, use the che.oauth.service_mode=<embedded|delegated> configuration property.
The main REST endpoint in the OAuth API is /api/oauth, which contains:
-
An authentication method,
/authenticate, that the OAuth authentication flow can start with. -
A callback method,
/callback, to process callbacks from the provider. -
A token GET method,
/token, to retrieve the current user’s OAuth token. -
A token DELETE method,
/token, to invalidated the current user’s OAuth token. -
A GET method,
/, to get the list of configured identity providers.
9.1.1.4. Using Swagger or REST clients to execute queries
The user’s RH-SSO token is used to execute queries to the secured API on the user’s behalf through REST clients. A valid token must be attached as the Request header or the ?token=$token query parameter.
Access the CodeReady Workspaces Swagger interface at \https://codeready-<openshift_deployment_name>.<domain_name>/swagger. The user must be signed in through RH-SSO, so that the access token is included in the Request header.
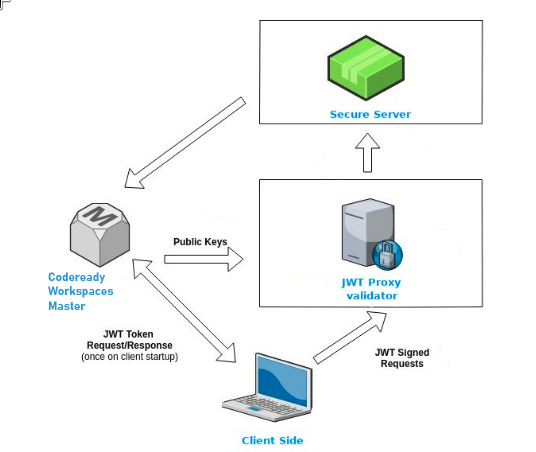
9.1.2. Authenticating in a CodeReady Workspaces workspace
Workspace containers may contain services that must be protected with authentication. Such protected services are called secure. To secure these services, use a machine authentication mechanism.
JWT tokens avoid the need to pass RH-SSO tokens to workspace containers (which can be insecure). Also, RH-SSO tokens may have a relatively shorter lifetime and require periodic renewals or refreshes, which is difficult to manage and keep in sync with the same user session tokens on clients.
Figure 9.1. Authentication inside a workspace
9.1.2.1. Creating secure servers
To create secure servers in CodeReady Workspaces workspaces, set the secure attribute of the endpoint to true in the dockerimage type component in the devfile.
Devfile snippet for a secure server
components:
  - type: dockerimage
    endpoints:
      - attributes:
          secure: 'true'
9.1.2.2. Workspace JWT token
Workspace tokens are JSON web tokens (JWT) that contain the following information in their claims:
-
uid: The ID of the user who owns this token -
uname: The name of the user who owns this token -
wsid: The ID of a workspace which can be queried with this token
Every user is provided with a unique personal token for each workspace. The structure of a token and the signature are different than they are in RH-SSO. The following is an example token view:
# Header
{
  "alg": "RS512",
  "kind": "machine_token"
}
# Payload
{
  "wsid": "workspacekrh99xjenek3h571",
  "uid": "b07e3a58-ed50-4a6e-be17-fcf49ff8b242",
  "uname": "john",
  "jti": "06c73349-2242-45f8-a94c-722e081bb6fd"
}
# Signature
{
  "value": "RSASHA256(base64UrlEncode(header) + . +  base64UrlEncode(payload))"
}
The SHA-256 cipher with the RSA algorithm is used for signing JWT tokens. It is not configurable. Also, there is no public service that distributes the public part of the key pair with which the token is signed.
9.1.2.3. Machine token validation
The validation of machine tokens (JWT tokens) is performed using a dedicated per-workspace service with JWTProxy running on it in a separate Pod. When the workspace starts, this service receives the public part of the SHA key from the CodeReady Workspaces server. A separate verification endpoint is created for each secure server. When traffic comes to that endpoint, JWTProxy tries to extract the token from the cookies or headers and validates it using the public-key part.
To query the CodeReady Workspaces server, a workspace server can use the machine token provided in the CHE_MACHINE_TOKEN environment variable. This token is the user’s who starts the workspace. The scope of such requests is restricted to the current workspace only. The list of allowed operations is also strictly limited.
9.2. Authorizing users
User authorization in CodeReady Workspaces is based on the permissions model. Permissions are used to control the allowed actions of users and establish a security model. Every request is verified for the presence of the required permission in the current user subject after it passes authentication. You can control resources managed by CodeReady Workspaces and allow certain actions by assigning permissions to users.
Permissions can be applied to the following entities:
- Workspace
- System
All permissions can be managed using the provided REST API. The APIs are documented using Swagger at \https://codeready-<openshift_deployment_name>.<domain_name>/swagger/#!/permissions.
9.2.1. CodeReady Workspaces workspace permissions
The user who creates a workspace is the workspace owner. By default, the workspace owner has the following permissions: read, use, run, configure, setPermissions, and delete. Workspace owners can invite users into the workspace and control workspace permissions for other users.
The following permissions are associated with workspaces:
| Permission | Description |
|---|---|
| read | Allows reading the workspace configuration. |
| use | Allows using a workspace and interacting with it. |
| run | Allows starting and stopping a workspace. |
| configure | Allows defining and changing the workspace configuration. |
| setPermissions | Allows updating the workspace permissions for other users. |
| delete | Allows deleting the workspace. |
9.2.2. CodeReady Workspaces system permissions
CodeReady Workspaces system permissions control aspects of the whole CodeReady Workspaces installation. The following permissions are applicable to the system:
| Permission | Description |
|---|---|
| manageSystem | Allows control of the system and workspaces. |
| setPermissions | Allows updating the permissions for users on the system. |
| manageUsers | Allows creating and managing users. |
| monitorSystem | Allows accessing endpoints used for monitoring the state of the server. |
All system permissions are granted to the administrative user who is configured in the CHE_SYSTEM_ADMIN__NAME property (the default is admin). The system permissions are granted when the CodeReady Workspaces server starts. If the user is not present in the CodeReady Workspaces user database, it happens after the first user’s login.
9.2.3. manageSystem permission
Users with the manageSystem permission have access to the following services:
| Path | HTTP Method | Description |
|---|---|---|
| /resource/free/ | GET | Get free resource limits. |
| /resource/free/{accountId} | GET | Get free resource limits for the given account. |
| /resource/free/{accountId} | POST | Edit free resource limit for the given account. |
| /resource/free/{accountId} | DELETE | Remove free resource limit for the given account. |
| /installer/ | POST | Add installer to the registry. |
| /installer/{key} | PUT | Update installer in the registry. |
| /installer/{key} | DELETE | Remove installer from the registry. |
| /logger/ | GET | Get logging configurations in the CodeReady Workspaces server. |
| /logger/{name} | GET | Get configurations of logger by its name in the CodeReady Workspaces server. |
| /logger/{name} | PUT | Create logger in the CodeReady Workspaces server. |
| /logger/{name} | POST | Edit logger in the CodeReady Workspaces server. |
| /resource/{accountId}/details | GET | Get detailed information about resources for the given account. |
| /system/stop | POST | Shutdown all system services, prepare CodeReady Workspaces to stop. |
9.2.4. monitorSystem permission
Users with the monitorSystem permission have access to the following services.
| Path | HTTP Method | Description |
|---|---|---|
| /activity | GET | Get workspaces in a certain state for a certain amount of time. |
9.2.5. Listing CodeReady Workspaces permissions
To list CodeReady Workspaces permissions that apply to a specific resource, perform the GET /permissions request.
To list the permissions that apply to a user, perform the GET /permissions/{domain} request.
To list the permissions that apply to all users, perform the GET /permissions/{domain}/all request. The user must have manageSystem permissions to see this information.
The suitable domain values are:
- system
- organization
- workspace
The domain is optional. If no domain is specified, the API returns all possible permissions for all the domains.
9.2.6. Assigning CodeReady Workspaces permissions
To assign permissions to a resource, perform the POST /permissions request. The suitable domain values are:
- system
- organization
- workspace
The following is a message body that requests permissions for a user with a userId to a workspace with a workspaceID:
Requesting CodeReady Workspaces user permissions
{
  "actions": [
    "read",
    "use",
    "run",
    "configure",
    "setPermissions"
  ],
  "userId": "userID",          1
  "domainId": "workspace",
  "instanceId": "workspaceID"  2
}
9.2.7. Sharing CodeReady Workspaces permissions
A user with setPermissions privileges can share a workspace and grant read, use, run, configure, or setPermissions privileges for other users.
Procedure
To share workspace permissions:
- Select a workspace in the user dashboard.
- Navigate to the Share tab and enter the email IDs of the users. Use commas or spaces as separators for multiple emails.
9.3. Configuring authorization
9.3.1. Authorization and user management
Red Hat CodeReady Workspaces uses RH-SSO to create, import, manage, delete, and authenticate users. RH-SSO uses built-in authentication mechanisms and user storage. It can use third-party identity management systems to create and authenticate users. Red Hat CodeReady Workspaces requires a RH-SSO token when you request access to CodeReady Workspaces resources.
Local users and imported federation users must have an email address in their profile.
The default RH-SSO credentials are admin:admin. You can use the admin:admin credentials when logging into Red Hat CodeReady Workspaces for the first time. It has system privileges.
Identifying the RH-SSO URL
Go to the OpenShift web console and to the RH-SSO project.
9.3.2. Configuring CodeReady Workspaces to work with RH-SSO
The deployment script configures RH-SSO. It creates a codeready-public client with the following fields:
- Valid Redirect URIs: Use this URL to access CodeReady Workspaces.
- Web Origins
The following are common errors when configuring CodeReady Workspaces to work with RH-SSO:
- Invalid
redirectURIerror -
Occurs when you access CodeReady Workspaces at
myhost, which is an alias, and your originalCHE_HOSTis1.1.1.1. If this error occurs, go to the RH-SSO administration console and ensure that the valid redirect URIs are configured. - CORS error
- Occurs when you have an invalid web origin.
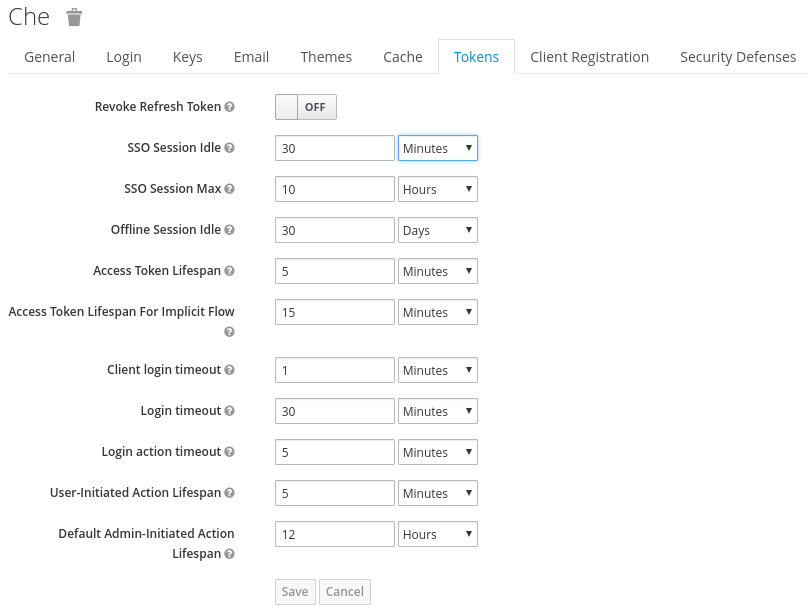
9.3.3. Configuring RH-SSO tokens
A user token expires after 30 minutes by default.
You can change the following RH-SSO token settings:
9.3.4. Setting up user federation
RH-SSO federates external user databases and supports LDAP and Active Directory. You can test the connection and authenticate users before choosing a storage provider.
See the User storage federation page in RH-SSO documentation to learn how to add a provider.
See the LDAP and Active Directory page in RH-SSO documentation to specify multiple LDAP servers.
9.3.5. Enabling authentication with social accounts and brokering
RH-SSO provides built-in support for GitHub, OpenShift, and most common social networks such as Facebook and Twitter. See RH-SSO documentation to learn how to enable Login with GitHub.
9.3.5.1. Configuring GitHub OAuth
OAuth for GitHub allows for automatic SSH key upload to GitHub.
Prerequisites
-
The
octool is available.
Procedure
Create a OAuth application in GitHub using CodeReady Workspaces URL as the value for the application
Homepage URLand RH-SSO GitHub endpoint URL as the value for Authorization callback URL. The default values arehttps://codeready-openshift-workspaces.<DOMAIN>/andhttps://keycloak-openshift-workspaces.<DOMAIN>/auth/realms/codeready/broker/github/endpointrespectively, where<DOMAIN>is OpenShift cluster domain.Create a new secret in the project where CodeReady Workspaces is deployed.
$ oc apply -f - <<EOF
kind: Secret
apiVersion: v1
metadata:
  name: github-oauth-config
  namespace: <...> 1
  labels:
    app.kubernetes.io/part-of: che.eclipse.org
    app.kubernetes.io/component: oauth-scm-configuration
  annotations:
    che.eclipse.org/oauth-scm-server: github
type: Opaque
data:
  id: <...> 2
  secret: <...> 3
EOF
- If CodeReady Workspaces was already installed wait until rollout of RH-SSO component finishes.
9.3.5.2. Configuring Bitbucket Server OAuth 1
This procedure describes how to activate OAuth 1 for Bitbucket Server to:
- Use devfiles hosted on a Bitbucket Server.
- https://access.redhat.com/documentation/en-us/red_hat_codeready_workspaces/2.7/html-single/end-user_guide/index#configuring_bitbucket_authentication_crw.
It enables CodeReady Workspaces to obtain and renew Bitbucket Server Personal access tokens.
Prerequisites
-
The
octool is available. - Bitbucket Server is available from CodeReady Workspaces server.
Procedure
Generate a RSA key pair and a stripped down version of the public key:
openssl genrsa -out <private.pem> 2048
openssl rsa -in <private.pem> -pubout > <public.pub>
openssl pkcs8 -topk8 -inform pem -outform pem -nocrypt -in <private.pem> -out <privatepkcs8.pem>
cat <public.pub> | sed 's/-----BEGIN PUBLIC KEY-----//g' | sed 's/-----END PUBLIC KEY-----//g' | tr -d '\n' > <public-stripped.pub>
Generate a consumer key and a shared secret.
openssl rand -base64 24 > <bitbucket_server_consumer_key>
openssl rand -base64 24 > <bitbucket_shared_secret>
Create a Kubernetes Secret in CodeReady Workspaces namespace containing the consumer and private keys.
$ oc apply -f - <<EOF
kind: Secret
apiVersion: v1
metadata:
  name: bitbucket-oauth-config
  namespace: <...> 1
  labels:
    app.kubernetes.io/part-of: che.eclipse.org
    app.kubernetes.io/component: oauth-scm-configuration
  annotations:
    che.eclipse.org/oauth-scm-server: bitbucket
    che.eclipse.org/scm-server-endpoint: <...> 2
type: Opaque
data:
  private.key: <...> 3
  consumer.key: <...> 4
EOF
Configure an Application Link in Bitbucket to enable the communication from CodeReady Workspaces to Bitbucket Server.
- In Bitbucket Server, click the cog in the top navigation bar to navigate to Administration > Application Links.
<<<<<<< HEAD .. Enter the application URL: <{prod-url-secure}/dashboard/> and click the button.
-
Enter the application URL:
\https://codeready-<openshift_deployment_name>.<domain_name>and click the button. >>>>>>> 6dd3fd4d… Fix leftover of prod-url-secure attribute (#1897)
- On the warning message stating "No response was received from the URL" click the button.
Fill-in the Link Applications form and click the button.
- Application Name
-
<CodeReady Workspaces> - Application Type
- Generic Application.
- Service Provider Name
-
<CodeReady Workspaces> - Consumer Key
-
Paste the content of the
<bitbucket_server_consumer_key>file. - Shared secret
-
Paste the content of the
<bitbucket_shared_secret>file. - Request Token URL
-
<Bitbucket Server URL>/plugins/servlet/oauth/request-token - Access token URL
-
<Bitbucket Server URL>/plugins/servlet/oauth/access-token - Authorize URL
-
<Bitbucket Server URL>/plugins/servlet/oauth/access-token - Create incoming link
- Enabled.
Fill-in the Link Applications form and click the button.
- Consumer Key
-
Paste the content of the
<bitbucket_server_consumer_key>file. - Consumer name
-
<CodeReady Workspaces> - Public Key
-
Paste the content of the
<public-stripped.pub>file.
Additional resources
- Bitbucket Server overview
- Download Bitbucket Server
- Bitbucket Server Personal access tokens
- How to generate public key to application link 3rd party applications
- Using AppLinks to link to other applications
- https://access.redhat.com/documentation/en-us/red_hat_codeready_workspaces/2.7/html-single/end-user_guide/index#configuring_bitbucket_authentication_crw.
= Using protocol-based providers
RH-SSO supports SAML v2.0 and OpenID Connect v1.0 protocols.
= Managing users using RH-SSO
You can add, delete, and edit users in the user interface. See RH-SSO User Management for more information.
= Configuring CodeReady Workspaces to use an external RH-SSO installation
By default, CodeReady Workspaces installation includes the deployment of a dedicated RH-SSO instance. However, using an external RH-SSO is also possible. This option is useful when a user has an existing RH-SSO instance with already-defined users, for example, a company-wide RH-SSO server used by several applications.
|
| Identity provider realm name intended for use by CodeReady Workspaces |
|
|
Name of the |
|
| Base URL of the external RH-SSO server |
Prerequisites
In the administration console of the external installation of RH-SSO, define a realm containing the users intended to connect to CodeReady Workspaces:
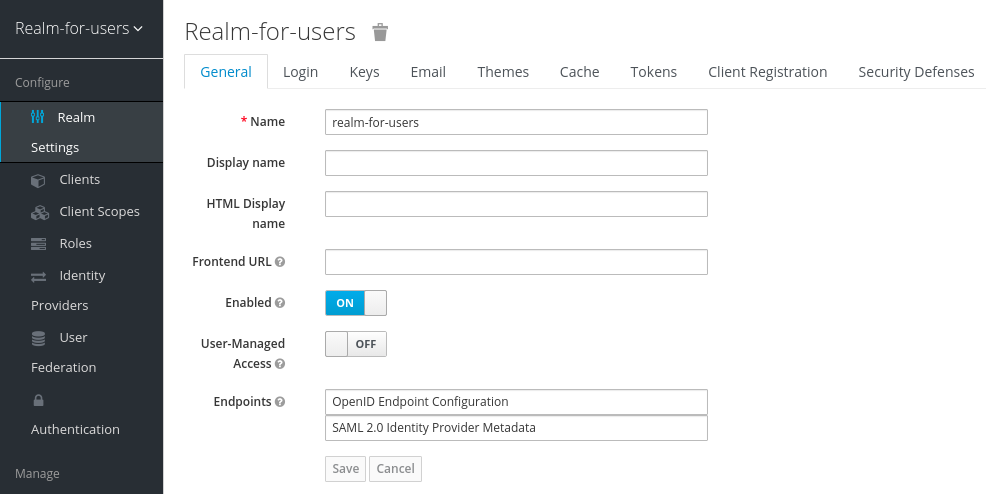
In this
realm, define an OIDC client that CodeReady Workspaces will use to authenticate the users. This is an example of such a client with the correct settings: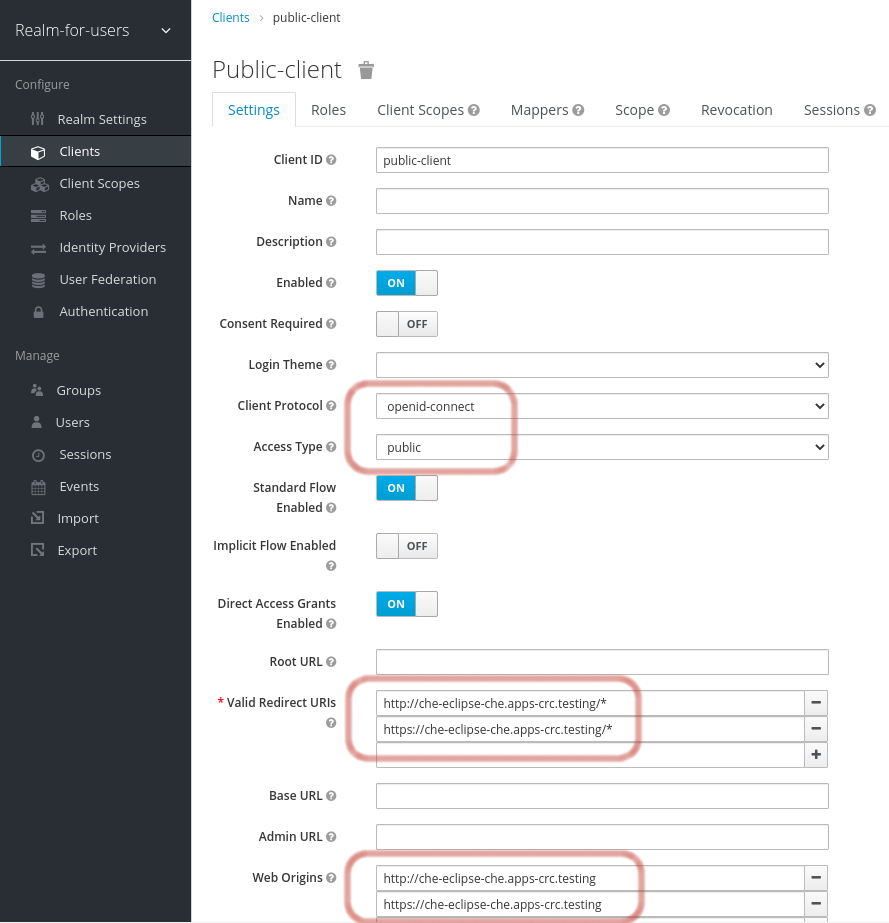 Note
Note-
Client Protocol must be
openid-connect. -
Access Type must be
public. CodeReady Workspaces only supports thepublicaccess type. -
Valid Redirect URIs must contain at least two URIs related to the CodeReady Workspaces server, one using the
httpprotocol and the otherhttps. These URIs must contain the base URL of the CodeReady Workspaces server, followed by/*wildcards. Web Origins must contain at least two URIs related to the CodeReady Workspaces server, one using the
httpprotocol and the otherhttps. These URIs must contain the base URL of the CodeReady Workspaces server, without any path after the host.The number of URIs depends on the number of installed product tools.
-
Client Protocol must be
With CodeReady Workspaces that uses the default OpenShift OAuth support, user authentication relies on the integration of RH-SSO with OpenShift OAuth. This allows users to log in to CodeReady Workspaces with their OpenShift login and have their workspaces created under personal OpenShift projects.
This requires setting up an OpenShift identity provider ins RH-SSO. When using an external RH-SSO, set up the identity provider manually. For instructions, see the appropriate RH-SSO documentations for either link:OpenShift 3[OpenShift 3] or link:OpenShift 4[OpenShift 4].
- The configured identity provider has the options Store Tokens and Stored Tokens Readable enabled.
Procedure
Set the following properties in the
CheClusterCustom Resource (CR):spec: auth: externalIdentityProvider: true identityProviderURL: <auth-base-url> identityProviderRealm: <provider-realm-name> identityProviderClientId: <oidc-client-name>When installing CodeReady Workspaces with OpenShift OAuth support enabled, set the following properties in the
CheClusterCustom Resource (CR):spec: auth: openShiftoAuth: true # Note: only if the OpenShift identity provider alias is different from 'openshift-v3' or 'openshift-v4' server: customCheProperties: CHE_INFRA_OPENSHIFT_OAUTH__IDENTITY__PROVIDER: <OpenShift identity provider alias>
= Configuring SMTP and email notifications
Red Hat CodeReady Workspaces does not provide any pre-configured MTP servers.
To enable SMTP servers in RH-SSO:
-
Go to
che realm settings > Email. - Specify the host, port, username, and password.
Red Hat CodeReady Workspaces uses the default theme for email templates for registration, email confirmation, password recovery, and failed login.
= Enabling self-registration
Self-registration allows users to register themselves in a CodeReady Workspaces instance by accessing the CodeReady Workspaces server URL.
For CodeReady Workspaces installed without OpenShift OAuth support, self-registration is disabled by default, therefore the option to register a new user is not available on the login page.
Prerequisites
- You are logged in as an administrator.
Procedure
To enable self-registration of users:
- Navigate to the Realm Settings menu on the left and open the Login tab.
- Set User registration option to On.
= Configuring OpenShift OAuth
For users to interact with OpenShift, they must first authenticate to the OpenShift cluster. OpenShift OAuth is a process in which users prove themselves to a cluster through an API with obtained OAuth access tokens.
Authentication with the https://access.redhat.com/documentation/en-us/red_hat_codeready_workspaces/2.7/html-single/end-user_guide/index#openshift-connector-overview_crw is a possible way for CodeReady Workspaces users to authenticate with an OpenShift cluster.
The following section describes the OpenShift OAuth configuration options and its use with a CodeReady Workspaces.
= Configuring OpenShift OAuth with initial user
Prerequisites
-
The
octool is available. -
crwctlmanagement tool is available. See https://access.redhat.com/documentation/en-us/red_hat_codeready_workspaces/2.7/html-single/installation_guide/index#using-the-crwctl-management-tool_crw.
Procedure
Configure OpenShift identity providers on the cluster. See the Understanding identity provider configuration.
When a user skips the Configuring step of OpenShift identity providers, and the OpenShift cluster does not already contain configured identity providers, CodeReady Workspaces creates an initial OpenShift user for the
HTPasswdidentity provider. Credentials of this user are stored in theopenshift-oauth-user-credentialssecret, located in the openshift-workspaces namespace.Obtain the credentials for logging in to an OpenShift cluster and CodeReady Workspaces instance:
Obtain OpenShift user name:
$ oc get secret openshift-oauth-user-credentials -n openshift-workspaces -o json | jq -r '.data.user' | base64 -d
Obtain OpenShift user password:
$ oc get secret openshift-oauth-user-credentials -n openshift-workspaces -o json | jq -r '.data.password' | base64 -d
-
Deploy CodeReady Workspaces using OperatorHub or the crwctl, see the
crwctl server:deployspecification chapter. OpenShift OAuth will be enabled by default.
= Configuring OpenShift OAuth without provisioning OpenShift initial OAuth user
The following procedure describes how to configure OpenShift OAuth without provisioning OpenShift initial OAuth user.
Prerequisites
-
crwctlmanagement tool is available. See https://access.redhat.com/documentation/en-us/red_hat_codeready_workspaces/2.7/html-single/installation_guide/index#using-the-crwctl-management-tool_crw.
Procedure
Deploy and update CodeReady Workspaces instance using OperatorHub and wait for the process to finish:
$ crwctl server:deploy --che-operator-cr-patch-yaml=patch.yaml ...
patch.yamlmust contain the following:spec: auth: openShiftoAuth: true initialOpenShiftOAuthUser: ''Set the following values in codeready-workspaces Custom Resource (CR):
spec:
  auth:
    openShiftoAuth: true
    initialOpenShiftOAuthUser: ''
= Removing OpenShift initial OAuth user
The following procedure describes how to remove OpenShift initial OAuth user provisioned by Red Hat CodeReady Workspaces.
Prerequisites
-
The
octool installed. - An instance of Red Hat CodeReady Workspaces running on OpenShift.
-
Logged in to OpenShift cluster using the
octool.
Procedure
Update codeready-workspaces custom resource:
$ oc patch checluster codeready-workspaces -n openshift-workspaces --type=json -p \
'[{"op": "replace", "path": "/spec/auth/initialOpenShiftOAuthUser", "value": false}]'
= Removing user data
== Removing user data according to GDPR
The General Data Protection Regulation (GDPR) law enforces the right for individuals to have personal data erased.
The following procedure describes how to remove a user’s data from a cluster and the RH-SSO database.
The following commands use the default OpenShift project, openshift-workspaces, as a user’s example for the -n option.
Prerequisites
A user or an administrator authorization token. To delete any other data except the data bound to a user account,
adminprivileges are required. Theadminis a special CodeReady Workspaces administrator account pre-created and enabled using theCHE_SYSTEM_ADMIN__NAMEandCHE_SYSTEM_SUPER__PRIVILEGED__MODE = trueCustom Resource definitions.spec: server: customCheProperties: CHE_SYSTEM_SUPER__PRIVILEGED__MODE: 'true' CHE_SYSTEM_ADMIN__NAME: '<admin-name>'If needed, use commands below for creating the
adminuser:$ oc patch checluster codeready-workspaces \ --type merge \ -p '{ "spec": { "server": {"customCheProperties": {"CHE_SYSTEM_SUPER__PRIVILEGED__MODE": "true"} } }}' \ -n openshift-workspaces$ oc patch checluster codeready-workspaces \ --type merge \ -p '{ "spec": { "server": {"customCheProperties": {"CHE_SYSTEM_ADMIN__NAME": "<admin-name>"} } }}' \ -n openshift-workspacesNoteAll system permissions are granted to the administrative user who is configured in the
CHE_SYSTEM_ADMIN__NAMEproperty (the default isadmin). The system permissions are granted when the CodeReady Workspaces server starts. If the user is not present in the CodeReady Workspaces user database, it happens after the first user’s login.Authorization token privileges:
-
admin- Can delete all personal data of all users -
user- Can delete only the data related to the user
-
- A user or an administrator is logged in the OpenShift cluster with deployed CodeReady Workspaces.
A user ID is obtained. Get the user ID using the commands below:
For the current user:
$ curl -X GET \
  --header 'Authorization: Bearer <user-token>' \
  'https://<codeready-<openshift_deployment_name>.<domain_name>>/api/user'
To find a user by name:
$ curl -X GET \
  --header 'Authorization: Bearer <user-token>' \
  'https://<codeready-<openshift_deployment_name>.<domain_name>>/api/user/find?name=<username>'
To find a user by email:
$ curl -X GET \
  --header 'Authorization: Bearer <user-token>' \
  'https://<codeready-<openshift_deployment_name>.<domain_name>>/api/user/find?email=<email>'
Example of obtaining a user ID
This example uses
vparfonoas a local user name.$ curl -X GET \ --header 'Authorization: Bearer <user-token>' \ 'https://che-vp-che.apps.che-dev.x6e0.p1.openshiftapps.com/api/user/find?name=vparfono'The user ID is at the bottom of the curl command output.
{
 "name": "vparfono",
 "links": [
   {
.
.
.
   }
 ],
 "email": "vparfono@redhat.com",
 "id": "921b6f33-2657-407e-93a6-fb14cf2329ce"
}
Procedure
Update the
codeready-workspacesCheCluster CustomResource (CR) definition to permit the removal of a user’s data from the RH-SSO database:$ oc patch checluster/codeready-workspaces \ --patch "{\"spec\":{\"server\":{\"customCheProperties\": {\"CHE_KEYCLOAK_CASCADE__USER__REMOVAL__ENABLED\": \"true\"}}}}" \ --type=merge -n openshift-workspacesRemove the data using the API:
$ curl -i -X DELETE \
  --header 'Authorization: Bearer <user-token>' \
  https://<codeready-<openshift_deployment_name>.<domain_name>>/api/user/<user-id>
Verification
Running the following command returns code 204 as the API response:
$ curl -i -X DELETE \
  --header 'Authorization: Bearer <user-token>' \
  https://<codeready-<openshift_deployment_name>.<domain_name>>/api/user/<user-id>
Additional resources
To remove the data of all users, follow the instructions for https://access.redhat.com/documentation/en-us/red_hat_codeready_workspaces/2.7/html-single/installation_guide/index#uninstalling-codeready-workspaces_crw.