21.2. Optimisation des machines virtuelles Windows
Lors de l'utilisation de Microsoft Windows en tant que système d'exploitation invité dans une machine virtuelle (VM) hébergée dans RHEL 9, les performances de l'invité peuvent être affectées négativement.
Par conséquent, Red Hat recommande d'optimiser vos VM Windows en effectuant une combinaison des actions suivantes :
- Utilisation de pilotes paravirtualisés. Pour plus d'informations, voir Installation des pilotes KVM paravirtualisés pour les machines virtuelles Windows.
- Activation des extensions Hyper-V. Pour plus d'informations, voir Activation des extensions Hyper-V.
- Configuration des paramètres du pilote NetKVM. Pour plus d'informations, voir Configuration des paramètres du pilote NetKVM.
- Optimiser ou désactiver les processus d'arrière-plan de Windows. Pour plus d'informations, voir Optimisation des processus d'arrière-plan sur les machines virtuelles Windows.
21.2.1. Installation des pilotes KVM paravirtualisés pour les machines virtuelles Windows
La principale méthode pour améliorer les performances de vos machines virtuelles (VM) Windows consiste à installer des pilotes KVM paravirtualisés (virtio) pour Windows sur le système d'exploitation invité.
Les pilotes virtio-win sont certifiés (WHQL) pour les dernières versions de Windows 10 et 11, disponibles au moment de la publication de virtio-win. Cependant, les pilotes virtio-win sont généralement testés et devraient fonctionner correctement sur les versions précédentes de Windows 10 et 11.
Pour installer les pilotes sur une VM Windows, effectuez les opérations suivantes :
- Préparez le support d'installation sur la machine hôte. Pour plus d'informations, voir Préparation du support d'installation du pilote virtio sur une machine hôte.
- Attachez le support d'installation à une VM Windows existante ou attachez-le lors de la création d'une nouvelle VM Windows. Pour plus d'informations, voir Installation de machines virtuelles Windows sur RHEL.
-
Installez les pilotes
virtiosur le système d'exploitation invité Windows. Pour plus d'informations, voir Installation des pilotes virtio sur un invité Windows. -
Installez le site
QEMU Guest Agentsur le système d'exploitation invité Windows. Pour plus d'informations, voir Installation de l'agent invité QEMU sur un invité Windows.
21.2.1.1. Fonctionnement des pilotes Windows virtio
Les pilotes paravirtualisés améliorent les performances des machines virtuelles (VM) en réduisant la latence des E/S et en augmentant le débit à des niveaux proches de ceux d'une machine nue. Red Hat vous recommande d'utiliser des pilotes paravirtualisés pour les machines virtuelles qui exécutent des tâches et des applications à forte charge d'E/S.
virtio sont des pilotes de périphériques paravirtualisés de KVM, disponibles pour les machines virtuelles Windows fonctionnant sur des hôtes KVM. Ces pilotes sont fournis par le paquetage virtio-win, qui comprend des pilotes pour :
- Dispositifs de bloc (stockage)
- Contrôleurs d'interface réseau
- Contrôleurs vidéo
- Dispositif de gonflage de la mémoire
- Dispositif de port série paravirtuel
- Dispositif de source d'entropie
- Dispositif de panique paravirtuel
- Dispositifs d'entrée, tels que souris, claviers ou tablettes
- Un petit ensemble de dispositifs émulés
Pour plus d'informations sur les périphériques émulés, virtio et attribués, reportez-vous à la section Gestion des périphériques virtuels.
En utilisant les pilotes KVM virtio, les versions suivantes de Microsoft Windows devraient fonctionner de la même manière que les systèmes physiques :
- Versions de Windows Server : Voir Systèmes d'exploitation invités certifiés pour Red Hat Enterprise Linux avec KVM dans la base de connaissances de Red Hat.
Versions Windows Desktop (non serveur) :
- Windows 10 (versions 32 bits et 64 bits)
- Windows 11 (64-bit)
21.2.1.2. Préparation du support d'installation du pilote virtio sur une machine hôte
Pour installer ou mettre à jour les pilotes KVM virtio sur une machine virtuelle (VM) Windows, vous devez d'abord préparer le support d'installation du pilote virtio sur la machine hôte. Pour ce faire, attachez le fichier .iso, fourni par le paquet virtio-win, en tant que périphérique de stockage à la VM Windows.
Conditions préalables
- Assurez-vous que la virtualisation est activée dans votre système hôte RHEL 9. Pour plus d'informations, voir Activation de la virtualisation.
- Assurez-vous que vous disposez des privilèges d'accès root à la VM.
Procédure
Actualisez vos données d'abonnement :
# subscription-manager refresh
All local data refreshed
Obtenir la dernière version du paquet
virtio-win.Si
virtio-winn'est pas installé :# dnf install -y virtio-winSi
virtio-winest installé :# dnf upgrade -y virtio-winSi l'installation réussit, les fichiers du pilote
virtio-winsont disponibles dans le répertoire/usr/share/virtio-win/. Ceux-ci comprennent les fichiersISOet un répertoiredriverscontenant les fichiers des pilotes dans des répertoires, un pour chaque architecture et chaque version de Windows prise en charge.# ls /usr/share/virtio-win/ drivers/ guest-agent/ virtio-win-1.9.9.iso virtio-win.iso
Attachez le fichier
virtio-win.isocomme périphérique de stockage à la VM Windows.-
Lors de la création d'une nouvelle VM Windows, joignez le fichier en utilisant les options de la commande
virt-install. Lors de l'installation des pilotes sur une VM Windows existante, attachez le fichier en tant que CD-ROM en utilisant l'utilitaire
virt-xml:# virt-xml WindowsVM --add-device --disk virtio-win.iso,device=cdrom Domain 'WindowsVM' defined successfully.
-
Lors de la création d'une nouvelle VM Windows, joignez le fichier en utilisant les options de la commande
Ressources supplémentaires
21.2.1.3. Installation des pilotes virtio sur un invité Windows
Pour installer les pilotes KVM virtio sur un système d'exploitation invité Windows, vous devez ajouter une unité de stockage contenant les pilotes (soit lors de la création de la machine virtuelle (VM), soit ultérieurement) et installer les pilotes dans le système d'exploitation invité Windows.
Cette procédure fournit des instructions pour installer les pilotes à l'aide de l'interface graphique. Vous pouvez également utiliser l'interface de ligne de commande Microsoft Windows Installer (MSI).
Conditions préalables
-
Un support d'installation contenant les pilotes KVM
virtiodoit être attaché à la VM. Pour obtenir des instructions sur la préparation du support, voir Préparation du support d'installation du pilote virtio sur une machine hôte.
Procédure
-
Dans le système d'exploitation invité Windows, ouvrez l'application
File Explorer. -
Cliquez sur
This PC. -
Dans le volet
Devices and drives, ouvrez le supportvirtio-win. En fonction du système d'exploitation installé sur la VM, exécutez l'un des programmes d'installation :
-
Si vous utilisez un système d'exploitation 32 bits, exécutez le programme d'installation
virtio-win-gt-x86.msi. -
Si vous utilisez un système d'exploitation 64 bits, exécutez le programme d'installation
virtio-win-gt-x64.msi.
-
Si vous utilisez un système d'exploitation 32 bits, exécutez le programme d'installation
Dans l'assistant de configuration
Virtio-win-driver-installerqui s'ouvre, suivez les instructions affichées jusqu'à l'étapeCustom Setup.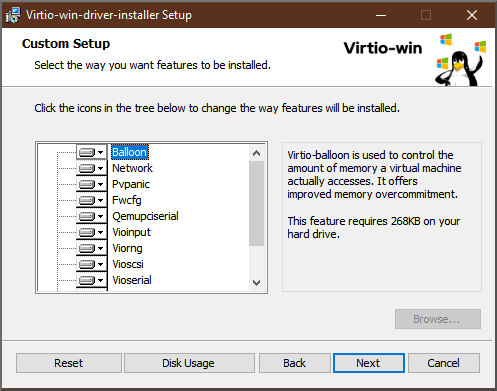
- Dans la fenêtre Installation personnalisée, sélectionnez les pilotes de périphériques que vous souhaitez installer. Le jeu de pilotes recommandé est sélectionné automatiquement et les descriptions des pilotes sont affichées à droite de la liste.
- Cliquez sur , puis sur .
- Une fois l'installation terminée, cliquez sur .
- Redémarrez la VM pour terminer l'installation du pilote.
Vérification
Sur votre VM Windows, accédez à l'adresse Device Manager:
- Cliquez sur Démarrer
- Rechercher Device Manager
Assurez-vous que les périphériques utilisent les bons pilotes :
- Cliquez sur un appareil pour ouvrir la fenêtre Driver Properties.
- Naviguez jusqu'à l'onglet Driver.
- Cliquez sur Driver Details.
Prochaines étapes
- Si vous avez installé le pilote NetKVM, il se peut que vous deviez également configurer les paramètres de mise en réseau de l'invité Windows. Pour plus d'informations, voir Configuration des paramètres du pilote NetKVM.
21.2.1.4. Mise à jour des pilotes virtio sur un invité Windows
Pour mettre à jour les pilotes KVM virtio sur un système d'exploitation invité (SE) Windows, vous pouvez utiliser le service Windows Update, si la version du SE Windows le prend en charge. Si ce n'est pas le cas, réinstallez les pilotes à partir du support d'installation virtio joint à la machine virtuelle (VM) Windows.
Conditions préalables
- Un système d'exploitation invité Windows avec des pilotes virtio installés.
-
Si vous n'utilisez pas
Windows Update, un support d'installation contenant des pilotes KVMvirtioà jour doit être attaché à la VM Windows. Pour obtenir des instructions sur la préparation du support, voir Préparation du support d'installation des pilotes virtio sur une machine hôte.
Procédure 1 : Mise à jour des pilotes à l'aide de Windows Update
Sur Windows 10, Windows Server 2016 et les systèmes d'exploitation ultérieurs, vérifiez si les mises à jour des pilotes sont disponibles en utilisant l'interface graphique Windows Update:
- Démarrez la VM Windows et connectez-vous à son système d'exploitation invité.
Naviguez jusqu'à la page Optional updates:
Settings
Windows Update Advanced options Optional updates - Installer toutes les mises à jour à partir de Red Hat, Inc.
Procédure 2 : Mise à jour des pilotes en les réinstallant
Sur les systèmes d'exploitation antérieurs à Windows 10 et Windows Server 2016, ou si le système d'exploitation n'a pas accès à Windows Update, réinstallez les pilotes. Cette opération permet de restaurer la configuration réseau du système d'exploitation invité Windows par défaut (DHCP). Si vous souhaitez préserver une configuration réseau personnalisée, vous devez également créer une sauvegarde et la restaurer à l'aide de l'utilitaire netsh:
- Démarrez la VM Windows et connectez-vous à son système d'exploitation invité.
Ouvrez l'invite de commande Windows :
- Utiliser le Super+R pour le raccourci clavier.
-
Dans la fenêtre qui apparaît, tapez
cmdet appuyez sur Ctrl+Shift+Entrée pour être exécuté en tant qu'administrateur.
Sauvegardez la configuration réseau du système d'exploitation à l'aide de l'invite de commande Windows :
C:\WINDOWS\system32\netsh dump > backup.txtRéinstallez les pilotes KVM
virtioà partir du support d'installation joint. Effectuez l'une des opérations suivantes :Réinstallez les pilotes à l'aide de l'invite de commande Windows, où X est la lettre du lecteur du support d'installation. Les commandes suivantes installent tous les pilotes
virtio.Si vous utilisez une vCPU 64 bits :
C:\WINDOWS\system32\msiexec.exe /i X:\virtio-win-gt-x64.msi /passive /norestartSi vous utilisez une vCPU 32 bits :
C:\WINDOWS\system32\msiexec.exe /i X:\virtio-win-gt-x86.msi /passive /norestart
- Réinstallez les pilotes à l'aide de l'interface graphique sans redémarrer la VM.
Restaurer la configuration réseau du système d'exploitation à l'aide de l'invite de commande Windows :
C:\WINDOWS\system32\netsh -f backup.txt- Redémarrez la VM pour terminer l'installation du pilote.
Ressources supplémentaires
21.2.1.5. Activation de QEMU Guest Agent sur les invités Windows
Pour permettre à un hôte RHEL d'effectuer un certain sous-ensemble d'opérations sur une machine virtuelle (VM) Windows, vous devez activer l'agent invité QEMU (GA). Pour ce faire, ajoutez un périphérique de stockage contenant le programme d'installation de l'agent invité QEMU à une machine virtuelle existante ou lors de la création d'une nouvelle machine virtuelle, et installez les pilotes sur le système d'exploitation invité Windows.
Pour installer l'agent invité (GA) à l'aide de l'interface graphique, voir la procédure ci-dessous. Pour installer l'AG dans une interface de ligne de commande, utilisez le programme d'installation Microsoft Windows (MSI).
Conditions préalables
- Un support d'installation contenant l'agent invité est attaché à la VM. Pour obtenir des instructions sur la préparation du support, voir Préparation du support d'installation du pilote virtio sur une machine hôte.
Procédure
-
Dans le système d'exploitation invité Windows, ouvrez l'application
File Explorer. -
Cliquez sur
This PC. -
Dans le volet
Devices and drives, ouvrez le supportvirtio-win. -
Ouvrez le dossier
guest-agent. En fonction du système d'exploitation installé sur la VM, exécutez l'un des programmes d'installation suivants :
-
Si vous utilisez un système d'exploitation 32 bits, exécutez le programme d'installation
qemu-ga-i386.msi. -
Si vous utilisez un système d'exploitation 64 bits, exécutez le programme d'installation
qemu-ga-x86_64.msi.
-
Si vous utilisez un système d'exploitation 32 bits, exécutez le programme d'installation
-
Optional: Si vous souhaitez utiliser le pilote série para-virtualisé (
virtio-serial) comme interface de communication entre l'hôte et l'invité Windows, vérifiez que le pilotevirtio-serialest installé sur l'invité Windows. Pour plus d'informations sur l'installation des pilotesvirtio, voir : Installation des pilotes virtio sur un invité Windows.
Vérification
Sur votre VM Windows, accédez à la fenêtre Services.
Computer Management > Services
-
Assurez-vous que l'état du service
QEMU Guest AgentestRunning.
Ressources supplémentaires
21.2.2. Activation des éclairages Hyper-V
Les améliorations apportées à Hyper-V permettent à KVM d'émuler l'hyperviseur Hyper-V de Microsoft. Cela permet d'améliorer les performances des machines virtuelles Windows.
Les sections suivantes fournissent des informations sur les améliorations Hyper-V prises en charge et sur la manière de les activer.
21.2.2.1. Activation des éclairages Hyper-V sur une machine virtuelle Windows
Les améliorations Hyper-V permettent d'améliorer les performances d'une machine virtuelle (VM) Windows exécutée sur un hôte RHEL 9. Pour savoir comment les activer, voir ce qui suit.
Procédure
Utilisez la commande
virsh editpour ouvrir la configuration XML de la VM. Par exemple :# virsh edit windows-vmAjouter la sous-section
<hyperv>suivante à la section<features>du XML :<features> [...] <hyperv> <relaxed state='on'/> <vapic state='on'/> <spinlocks state='on' retries='8191'/> <vpindex state='on'/> <runtime state='on' /> <synic state='on'/> <stimer state='on'> <direct state='on'/> </stimer> <frequencies state='on'/> <reset state='on'/> <relaxed state='on'/> <time state='on'/> <tlbflush state='on'/> <reenlightenment state='on'/> <stimer state='on'> <direct state='on'/> </stimer> <ipi state='on'/> <crash state='on'/> <evmcs state='on'/> </hyperv> [...] </features>Si le XML contient déjà une sous-section
<hyperv>, modifiez-la comme indiqué ci-dessus.Modifiez la section
clockde la configuration comme suit :<clock offset='localtime'> ... <timer name='hypervclock' present='yes'/> </clock>
- Sauvegarder et quitter la configuration XML.
- Si la VM est en cours d'exécution, redémarrez-la.
Vérification
Utilisez la commande
virsh dumpxmlpour afficher la configuration XML de la VM en cours d'exécution. Si elle comprend les segments suivants, les améliorations Hyper-V sont activées sur la VM.<hyperv> <relaxed state='on'/> <vapic state='on'/> <spinlocks state='on' retries='8191'/> <vpindex state='on'/> <runtime state='on' /> <synic state='on'/> <stimer state='on'/> <frequencies state='on'/> <reset state='on'/> <relaxed state='on'/> <time state='on'/> <tlbflush state='on'/> <reenlightenment state='on'/> <stimer state='on'> <direct state='on'/> </stimer> <ipi state='on'/> <crash state='on'/> <evmcs state='on'/> </hyperv> <clock offset='localtime'> ... <timer name='hypervclock' present='yes'/> </clock>
21.2.2.2. Éclairages configurables pour Hyper-V
Vous pouvez configurer certaines fonctions Hyper-V pour optimiser les machines virtuelles Windows. Le tableau suivant fournit des informations sur ces fonctionnalités configurables d'Hyper-V et leurs valeurs.
| L'illumination | Description | Valeurs |
|---|---|---|
| accident | Fournit des MSR aux VM qui peuvent être utilisés pour stocker des informations et des journaux si une VM tombe en panne. Les informations sont disponibles dans le journal QEMU. Note Si l'option hv_crash est activée, les données de crash de Windows ne sont pas créées. | marche, arrêt |
| evmcs | Implémente un protocole paravirtualisé entre les hyperviseurs L0 (KVM) et L1 (Hyper-V), ce qui permet des sorties L2 plus rapides vers l'hyperviseur. Note Cette fonction est exclusive aux processeurs Intel. | marche, arrêt |
| fréquences | Active les registres spécifiques à la machine (MSR) de la fréquence Hyper-V. | marche, arrêt |
| ipi | Active la prise en charge des interruptions interprocesseurs (IPI) paravirtualisées. | marche, arrêt |
| partage des cœurs sans hiérarchisation | Notifie au système d'exploitation invité que les processeurs virtuels ne partageront jamais un cœur physique à moins qu'ils ne soient signalés comme des threads SMT frères. Cette information est requise par les invités Windows et Hyper-V pour atténuer correctement les vulnérabilités liées au multithreading simultané (SMT) du processeur. | marche, arrêt, auto |
| ré-éclaircissement | Notifie le changement de fréquence du compteur d'horodatage (TSC), qui ne se produit que lors de la migration. Il permet également à l'invité de continuer à utiliser l'ancienne fréquence jusqu'à ce qu'il soit prêt à passer à la nouvelle. | marche, arrêt |
| détendu | Désactive un contrôle d'intégrité de Windows qui provoque souvent un BSOD lorsque la VM s'exécute sur un hôte très chargé. Cette option est similaire à l'option no_timer_check du noyau Linux, qui est automatiquement activée lorsque Linux est exécuté sur KVM. | marche, arrêt |
| durée d'exécution | Définit le temps que le processeur consacre à l'exécution du code invité et au nom du code invité. | marche, arrêt |
| spinlocks |
| marche, arrêt |
| stimer | Active les temporisateurs synthétiques pour les processeurs virtuels. Notez que certaines versions de Windows reviennent à l'utilisation de HPET (ou même de RTC lorsque HPET n'est pas disponible) lorsque cet éclaircissement n'est pas fourni, ce qui peut entraîner une consommation importante du CPU, même lorsque le CPU virtuel est inactif. | marche, arrêt |
| stimer-direct | Active les temporisateurs synthétiques lorsqu'un événement d'expiration est délivré par une interruption normale. | on, off. |
| synique | Avec stimer, active la minuterie synthétique. Windows 8 utilise cette fonction en mode périodique. | marche, arrêt |
| temps | Active les sources d'horloge suivantes, spécifiques à Hyper-V, disponibles pour la VM,
| marche, arrêt |
| tlbflush | Vide la TLB des processeurs virtuels. | marche, arrêt |
| vapic | Active l'APIC virtuel, qui fournit un accès MSR accéléré aux registres du contrôleur d'interruption programmable avancé (APIC) à forte utilisation et à mémoire mappée. | marche, arrêt |
| iD_vendeur | Définit l'identifiant du fournisseur Hyper-V. |
|
| vpindex | Active l'index des processeurs virtuels. | marche, arrêt |
21.2.3. Configuration des paramètres du pilote NetKVM
Une fois le pilote NetKVM installé, vous pouvez le configurer pour mieux l'adapter à votre environnement. Les paramètres énumérés dans la procédure suivante peuvent être configurés à l'aide du gestionnaire de périphériques de Windows (devmgmt.msc).
La modification des paramètres du pilote oblige Windows à recharger ce pilote. Cela interrompt l'activité du réseau en cours.
Conditions préalables
Le pilote NetKVM est installé sur la machine virtuelle.
Pour plus d'informations, voir Installation des pilotes KVM paravirtualisés pour les machines virtuelles Windows.
Procédure
Ouvrez le gestionnaire de périphériques de Windows.
Pour plus d'informations sur l'ouverture du Gestionnaire de périphériques, reportez-vous à la documentation de Windows.
Localisez le site Red Hat VirtIO Ethernet Adapter.
- Dans la fenêtre Gestionnaire de périphériques, cliquez sur en regard de Adaptateurs réseau.
Sous la liste des adaptateurs réseau, double-cliquez sur Red Hat VirtIO Ethernet Adapter.
La fenêtre Properties de l'appareil s'ouvre.
Visualiser les paramètres de l'appareil.
Dans la fenêtre Properties, cliquez sur l'onglet Advanced.
Modifier les paramètres de l'appareil.
Cliquez sur le paramètre que vous souhaitez modifier.
Les options relatives à ce paramètre s'affichent.
Modifiez les options si nécessaire.
Pour plus d'informations sur les options des paramètres NetKVM, reportez-vous à la section Paramètres du pilote NetKVM.
- Cliquez sur pour enregistrer les modifications.
21.2.4. Paramètres du pilote NetKVM
Le tableau suivant fournit des informations sur les paramètres de journalisation configurables du pilote NetKVM.
| Paramètres | Description 2 |
|---|---|
| Logging.Enable | Valeur booléenne qui détermine si la journalisation est activée. La valeur par défaut est Enabled. |
| Niveau de journalisation | Un nombre entier qui définit le niveau de journalisation. Plus l'entier augmente, plus la verbosité du journal augmente.
Note Des niveaux de journalisation élevés ralentiront votre machine virtuelle. |
Le tableau suivant fournit des informations sur les paramètres initiaux configurables du pilote NetKVM.
| Paramètres | Description |
|---|---|
| Attribuer un MAC | Chaîne définissant l'adresse MAC administrée localement pour le NIC paravirtualisé. Cette adresse n'est pas définie par défaut. |
| Init.Do802.1PQ | Valeur booléenne qui active la prise en charge de la population et de la suppression des balises Priority/VLAN. La valeur par défaut est Enabled. |
| Init.MaxTxBuffers | Un entier qui représente le nombre de descripteurs d'anneau TX qui seront alloués. La valeur est limitée par la taille de la file d'attente Tx de QEMU. La valeur par défaut est 1024. Les valeurs valides sont : 16, 32, 64, 128, 256, 512 et 1024. |
| Init.MaxRxBuffers | Un entier qui représente le nombre de descripteurs d'anneaux RX qui seront alloués. La valeur est limitée par la taille de la file d'attente Tx de QEMU. La valeur par défaut est 1024. Les valeurs valides sont : 16, 32, 64, 128, 256, 512, 1024, 2048 et 4096. |
| Somme de contrôle offload.Tx.Tx | Spécifie la capacité de délestage de la somme de contrôle TX. Dans Red Hat Enterprise Linux 9, les valeurs valides pour ce paramètre sont les suivantes :
|
| Somme de contrôle Offload.Rx | Spécifie la capacité de délestage de la somme de contrôle RX. Dans Red Hat Enterprise Linux 9, les valeurs valides pour ce paramètre sont les suivantes :
|
| Offload.Tx.LSO | Spécifie la capacité de délestage des grands segments (LSO) du TX. Dans Red Hat Enterprise Linux 9, les valeurs valides pour ce paramètre sont les suivantes :
|
| MinRxBufferPercent | Spécifie la quantité minimale de tampons disponibles dans la file d'attente RX en pourcentage de la quantité totale de tampons RX. Si le nombre réel de tampons disponibles est inférieur à cette valeur, le pilote NetKVM indique au système d'exploitation que les ressources sont faibles (en lui demandant de renvoyer les tampons RX dès que possible)
Valeur minimale (par défaut) -
Valeur maximale - |
Ressources supplémentaires
21.2.5. Optimisation des processus d'arrière-plan sur les machines virtuelles Windows
Pour optimiser les performances d'une machine virtuelle (VM) exécutant un système d'exploitation Windows, vous pouvez configurer ou désactiver divers processus Windows.
Certains processus peuvent ne pas fonctionner comme prévu si vous modifiez leur configuration.
Procédure
Vous pouvez optimiser vos machines virtuelles Windows en effectuant une combinaison des opérations suivantes :
- Retirez les périphériques inutilisés, tels que les USB ou les CD-ROM, et désactivez les ports.
- Désactiver les services d'arrière-plan, tels que SuperFetch et Windows Search. Pour plus d'informations sur l'arrêt des services, voir Désactivation des services système ou Stop-Service.
Désactiver
useplatformclock. Pour ce faire, exécutez la commande suivante,# bcdedit /set useplatformclock No- Examinez et désactivez les tâches planifiées inutiles, telles que la défragmentation planifiée du disque. Pour plus d'informations sur la procédure à suivre, voir Désactiver les tâches planifiées.
- Assurez-vous que les disques ne sont pas cryptés.
- Réduire l'activité périodique des applications serveur. Vous pouvez le faire en modifiant les minuteries correspondantes. Pour plus d'informations, voir Minuteries multimédias.
- Fermez l'application Gestionnaire de serveur sur la VM.
- Désactivez le logiciel antivirus. Notez que la désactivation de l'antivirus peut compromettre la sécurité de la VM.
- Désactive l'économiseur d'écran.
- Laissez le système d'exploitation Windows sur l'écran d'ouverture de session lorsqu'il n'est pas utilisé.