Configuring basic system settings
Set up the essential functions of your system and customize your system environment
Abstract
Providing feedback on Red Hat documentation
We appreciate your feedback on our documentation. Let us know how we can improve it.
Submitting feedback through Jira (account required)
- Log in to the Jira website.
- Click Create in the top navigation bar
- Enter a descriptive title in the Summary field.
- Enter your suggestion for improvement in the Description field. Include links to the relevant parts of the documentation.
- Click Create at the bottom of the dialogue.
Chapter 1. Configuring and managing basic network access
NetworkManager creates a connection profile for each Ethernet adapter that is installed in a host. By default, this profile uses DHCP for both IPv4 and IPv6 connections. Modify this automatically-created profile or add a new one in the following cases:
- The network requires custom settings, such as a static IP address configuration.
- You require multiple profiles because the host roams among different networks.
Red Hat Enterprise Linux provides administrators different options to configure Ethernet connections. For example:
- Use nmcli to configure connections on the command line.
- Use nmtui to configure connections in a text-based user interface.
- Use the GNOME Settings menu or nm-connection-editor application to configure connections in a graphical interface.
- Use nmstatectl to configure connections through the Nmstate API.
- Use RHEL system roles to automate the configuration of connections on one or multiple hosts.
1.1. Configuring the network and host name in the graphical installation mode
Follow the steps in this procedure to configure your network and host name.
Procedure
- From the Installation Summary window, click .
- From the list in the left-hand pane, select an interface. The details are displayed in the right-hand pane.
Toggle the switch to enable or disable the selected interface.
You cannot add or remove interfaces manually.
- Click to add a virtual network interface, which can be either: Team (deprecated), Bond, Bridge, or VLAN.
- Click to remove a virtual interface.
- Click to change settings such as IP addresses, DNS servers, or routing configuration for an existing interface (both virtual and physical).
Type a host name for your system in the Host Name field.
The host name can either be a fully qualified domain name (FQDN) in the format
hostname.domainname, or a short host name without the domain. Many networks have a Dynamic Host Configuration Protocol (DHCP) service that automatically supplies connected systems with a domain name. To allow the DHCP service to assign the domain name to this system, specify only the short host name.Host names can only contain alphanumeric characters and
-or.. Host name should be equal to or less than 64 characters. Host names cannot start or end with-and.. To be compliant with DNS, each part of a FQDN should be equal to or less than 63 characters and the FQDN total length, including dots, should not exceed 255 characters.The value
localhostmeans that no specific static host name for the target system is configured, and the actual host name of the installed system is configured during the processing of the network configuration, for example, by NetworkManager using DHCP or DNS.When using static IP and host name configuration, it depends on the planned system use case whether to use a short name or FQDN. Red Hat Identity Management configures FQDN during provisioning but some 3rd party software products may require a short name. In either case, to ensure availability of both forms in all situations, add an entry for the host in
/etc/hostsin the formatIP FQDN short-alias.- Click to apply the host name to the installer environment.
- Alternatively, in the Network and Hostname window, you can choose the Wireless option. Click in the right-hand pane to select your wifi connection, enter the password if required, and click .
Additional resources
- Automatically installing RHEL
- For more information about network device naming standards, see Configuring and managing networking.
1.2. Configuring an Ethernet connection by using nmcli
If you connect a host to the network over Ethernet, you can manage the connection’s settings on the command line by using the nmcli utility.
Prerequisites
- A physical or virtual Ethernet Network Interface Controller (NIC) exists in the server’s configuration.
Procedure
List the NetworkManager connection profiles:
# nmcli connection show
NAME                UUID                                  TYPE      DEVICE
Wired connection 1  a5eb6490-cc20-3668-81f8-0314a27f3f75  ethernet  enp1s0
By default, NetworkManager creates a profile for each NIC in the host. If you plan to connect this NIC only to a specific network, adapt the automatically-created profile. If you plan to connect this NIC to networks with different settings, create individual profiles for each network.
If you want to create an additional connection profile, enter:
# nmcli connection add con-name <connection-name> ifname <device-name> type ethernetSkip this step to modify an existing profile.
Optional: Rename the connection profile:
# nmcli connection modify "Wired connection 1" connection.id "Internal-LAN"On hosts with multiple profiles, a meaningful name makes it easier to identify the purpose of a profile.
Display the current settings of the connection profile:
# nmcli connection show Internal-LAN
...
connection.interface-name:     enp1s0
connection.autoconnect:        yes
ipv4.method:                   auto
ipv6.method:                   auto
...
Configure the IPv4 settings:
To use DHCP, enter:
# nmcli connection modify Internal-LAN ipv4.method autoSkip this step if
ipv4.methodis already set toauto(default).To set a static IPv4 address, network mask, default gateway, DNS servers, and search domain, enter:
# nmcli connection modify Internal-LAN ipv4.method manual ipv4.addresses 192.0.2.1/24 ipv4.gateway 192.0.2.254 ipv4.dns 192.0.2.200 ipv4.dns-search example.com
Configure the IPv6 settings:
To use stateless address autoconfiguration (SLAAC), enter:
# nmcli connection modify Internal-LAN ipv6.method autoSkip this step if
ipv6.methodis already set toauto(default).To set a static IPv6 address, network mask, default gateway, DNS servers, and search domain, enter:
# nmcli connection modify Internal-LAN ipv6.method manual ipv6.addresses 2001:db8:1::fffe/64 ipv6.gateway 2001:db8:1::fffe ipv6.dns 2001:db8:1::ffbb ipv6.dns-search example.com
To customize other settings in the profile, use the following command:
# nmcli connection modify <connection-name> <setting> <value>Enclose values with spaces or semicolons in quotes.
Activate the profile:
# nmcli connection up Internal-LAN
Verification
Display the IP settings of the NIC:
# ip address show enp1s0
2: enp1s0: <BROADCAST,MULTICAST,UP,LOWER_UP> mtu 1500 qdisc fq_codel state UP group default qlen 1000
    link/ether 52:54:00:17:b8:b6 brd ff:ff:ff:ff:ff:ff
    inet 192.0.2.1/24 brd 192.0.2.255 scope global noprefixroute enp1s0
       valid_lft forever preferred_lft forever
    inet6 2001:db8:1::fffe/64 scope global noprefixroute
       valid_lft forever preferred_lft forever
Display the IPv4 default gateway:
# ip route show default
default via 192.0.2.254 dev enp1s0 proto static metric 102
Display the IPv6 default gateway:
# ip -6 route show default
default via 2001:db8:1::ffee dev enp1s0 proto static metric 102 pref medium
Display the DNS settings:
# cat /etc/resolv.conf
search example.com
nameserver 192.0.2.200
nameserver 2001:db8:1::ffbb
If multiple connection profiles are active at the same time, the order of
nameserverentries depend on the DNS priority values in these profiles and the connection types.Use the
pingutility to verify that this host can send packets to other hosts:# ping <host-name-or-IP-address>
Troubleshooting
- Verify that the network cable is plugged-in to the host and a switch.
- Check whether the link failure exists only on this host or also on other hosts connected to the same switch.
- Verify that the network cable and the network interface are working as expected. Perform hardware diagnosis steps and replace defective cables and network interface cards.
- If the configuration on the disk does not match the configuration on the device, starting or restarting NetworkManager creates an in-memory connection that reflects the configuration of the device. For further details and how to avoid this problem, see the Red Hat Knowledgebase solution NetworkManager duplicates a connection after restart of NetworkManager service.
Additional resources
-
nm-settings(5)man page on your system
1.3. Configuring an Ethernet connection by using nmtui
If you connect a host to the network over Ethernet, you can manage the connection’s settings in a text-based user interface by using the nmtui application. Use nmtui to create new profiles and to update existing ones on a host without a graphical interface.
In nmtui:
- Navigate by using the cursor keys.
- Press a button by selecting it and hitting Enter.
- Select and clear checkboxes by using Space.
- To return to the previous screen, use ESC.
Prerequisites
- A physical or virtual Ethernet Network Interface Controller (NIC) exists in the server’s configuration.
Procedure
If you do not know the network device name you want to use in the connection, display the available devices:
# nmcli device status
DEVICE     TYPE      STATE                   CONNECTION
enp1s0     ethernet  unavailable             --
...
Start
nmtui:# nmtui- Select Edit a connection, and press Enter.
Choose whether to add a new connection profile or to modify an existing one:
To create a new profile:
- Press Add.
- Select Ethernet from the list of network types, and press Enter.
- To modify an existing profile, select the profile from the list, and press Enter.
Optional: Update the name of the connection profile.
On hosts with multiple profiles, a meaningful name makes it easier to identify the purpose of a profile.
- If you create a new connection profile, enter the network device name into the Device field.
Depending on your environment, configure the IP address settings in the
IPv4 configurationandIPv6 configurationareas accordingly. For this, press the button next to these areas, and select:- Disabled, if this connection does not require an IP address.
- Automatic, if a DHCP server dynamically assigns an IP address to this NIC.
Manual, if the network requires static IP address settings. In this case, you must fill further fields:
- Press Show next to the protocol you want to configure to display additional fields.
Press Add next to Addresses, and enter the IP address and the subnet mask in Classless Inter-Domain Routing (CIDR) format.
If you do not specify a subnet mask, NetworkManager sets a
/32subnet mask for IPv4 addresses and/64for IPv6 addresses.- Enter the address of the default gateway.
- Press Add next to DNS servers, and enter the DNS server address.
- Press Add next to Search domains, and enter the DNS search domain.
Figure 1.1. Example of an Ethernet connection with static IP address settings

- Press OK to create and automatically activate the new connection.
- Press Back to return to the main menu.
-
Select Quit, and press Enter to close the
nmtuiapplication.
Verification
Display the IP settings of the NIC:
# ip address show enp1s0
2: enp1s0: <BROADCAST,MULTICAST,UP,LOWER_UP> mtu 1500 qdisc fq_codel state UP group default qlen 1000
    link/ether 52:54:00:17:b8:b6 brd ff:ff:ff:ff:ff:ff
    inet 192.0.2.1/24 brd 192.0.2.255 scope global noprefixroute enp1s0
       valid_lft forever preferred_lft forever
    inet6 2001:db8:1::fffe/64 scope global noprefixroute
       valid_lft forever preferred_lft forever
Display the IPv4 default gateway:
# ip route show default
default via 192.0.2.254 dev enp1s0 proto static metric 102
Display the IPv6 default gateway:
# ip -6 route show default
default via 2001:db8:1::ffee dev enp1s0 proto static metric 102 pref medium
Display the DNS settings:
# cat /etc/resolv.conf
search example.com
nameserver 192.0.2.200
nameserver 2001:db8:1::ffbb
If multiple connection profiles are active at the same time, the order of
nameserverentries depend on the DNS priority values in these profiles and the connection types.Use the
pingutility to verify that this host can send packets to other hosts:# ping <host-name-or-IP-address>
Troubleshooting
- Verify that the network cable is plugged-in to the host and a switch.
- Check whether the link failure exists only on this host or also on other hosts connected to the same switch.
- Verify that the network cable and the network interface are working as expected. Perform hardware diagnosis steps and replace defective cables and network interface cards.
- If the configuration on the disk does not match the configuration on the device, starting or restarting NetworkManager creates an in-memory connection that reflects the configuration of the device. For further details and how to avoid this problem, see the Red Hat Knowledgebase solution NetworkManager duplicates a connection after restart of NetworkManager service.
1.4. Configuring an Ethernet connection with a dynamic IP address by using the network RHEL system role with an interface name
To connect a Red Hat Enterprise Linux host to an Ethernet network, create a NetworkManager connection profile for the network device. By using Ansible and the network RHEL system role, you can automate this process and remotely configure connection profiles on the hosts defined in a playbook.
You can use the network RHEL system role to configure an Ethernet connection that retrieves its IP addresses, gateways, and DNS settings from a DHCP server and IPv6 stateless address autoconfiguration (SLAAC). With this role you can assign the connection profile to the specified interface name.
Prerequisites
- You have prepared the control node and the managed nodes
- You are logged in to the control node as a user who can run playbooks on the managed nodes.
-
The account you use to connect to the managed nodes has
sudopermissions on them. - A physical or virtual Ethernet device exists in the servers' configuration.
- A DHCP server and SLAAC are available in the network.
- The managed nodes use the NetworkManager service to configure the network.
Procedure
Create a playbook file, for example
~/playbook.yml, with the following content:--- - name: Configure the network hosts: managed-node-01.example.com tasks: - name: Ethernet connection profile with dynamic IP address settings ansible.builtin.include_role: name: rhel-system-roles.network vars: network_connections: - name: enp1s0 interface_name: enp1s0 type: ethernet autoconnect: yes ip: dhcp4: yes auto6: yes state: upThe settings specified in the example playbook include the following:
dhcp4: yes- Enables automatic IPv4 address assignment from DHCP, PPP, or similar services.
auto6: yes-
Enables IPv6 auto-configuration. By default, NetworkManager uses Router Advertisements. If the router announces the
managedflag, NetworkManager requests an IPv6 address and prefix from a DHCPv6 server.
For details about all variables used in the playbook, see the
/usr/share/ansible/roles/rhel-system-roles.network/README.mdfile on the control node.Validate the playbook syntax:
$ ansible-playbook --syntax-check ~/playbook.ymlNote that this command only validates the syntax and does not protect against a wrong but valid configuration.
Run the playbook:
$ ansible-playbook ~/playbook.yml
Verification
Query the Ansible facts of the managed node and verify that the interface received IP addresses and DNS settings:
# ansible managed-node-01.example.com -m ansible.builtin.setup
...
        "ansible_default_ipv4": {
            "address": "192.0.2.1",
            "alias": "enp1s0",
            "broadcast": "192.0.2.255",
            "gateway": "192.0.2.254",
            "interface": "enp1s0",
            "macaddress": "52:54:00:17:b8:b6",
            "mtu": 1500,
            "netmask": "255.255.255.0",
            "network": "192.0.2.0",
            "prefix": "24",
            "type": "ether"
        },
        "ansible_default_ipv6": {
            "address": "2001:db8:1::1",
            "gateway": "2001:db8:1::fffe",
            "interface": "enp1s0",
            "macaddress": "52:54:00:17:b8:b6",
            "mtu": 1500,
            "prefix": "64",
            "scope": "global",
            "type": "ether"
        },
        ...
        "ansible_dns": {
            "nameservers": [
                "192.0.2.1",
                "2001:db8:1::ffbb"
            ],
            "search": [
                "example.com"
            ]
        },
...
Additional resources
-
/usr/share/ansible/roles/rhel-system-roles.network/README.mdfile -
/usr/share/doc/rhel-system-roles/network/directory
1.5. Additional resources
Chapter 2. Registering the system and managing subscriptions
Subscriptions cover products installed on Red Hat Enterprise Linux, including the operating system itself. If you have not registered the system, you have no access to the RHEL repositories. You cannot install software updates such as security, bug fixes. Even if you have a self-support subscription, it grants access to the knowledge base while more resources remain unavailable in the lack of subscriptions. By purchasing subscriptions and using Red Hat Content Delivery Network (CDN), you can track:
- Registered systems
- Products installed on registered systems
- Subscriptions attached to the installed products
2.1. Registering a system by using the command line
Subscriptions cover products installed on Red Hat Enterprise Linux, including the operating system itself. If you have not registered the system, you have no access to the RHEL repositories. You cannot install software updates such as security, bug fixes. Even if you have a self-support subscription, it grants access to the knowledge base while more resources remain unavailable in the lack of subscriptions. You need register the system to activate and manage Red Hat Enterprise Linux subscription for your Red Hat account.
To register the system with Red Hat Insights, you can use the rhc connect utility. For details, see Setting up remote host configuration.
Prerequisites
- You have an active subscription of the Red Hat Enterprise Linux system.
Procedure
Register and subscribe the system:
# subscription-manager register
Registering to:                      subscription.rhsm.redhat.com:443/subscription
Username: <example_username>
Password: <example_password>
The system has been registered with ID: 37to907c-ece6-49ea-9174-20b87ajk9ee7
The registered system name is:          client1.example.com
The command prompts you to enter username and password of Red Hat Customer Portal account.
If the registration process fails, you can register the system with a specific pool. For details, proceed with the following steps:
Determine the pool ID of a subscription:
# subscription-manager list --available --allThis command displays all available subscriptions for your Red Hat account. For every subscription, various characteristics are displayed, including the pool ID.
Attach the appropriate subscription to your system by replacing <example_pool_id> with the pool ID determined in the previous step:
# subscription-manager attach --pool=<example_pool_id>
Verification
- Verify the system under → in the Hybrid Cloud Console.
2.2. Registering a system by using the web console
Subscriptions cover products installed on Red Hat Enterprise Linux, including the operating system itself. If you have not registered the system, you have no access to the RHEL repositories. You cannot install software updates such as security, bug fixes. Even if you have a self-support subscription, it grants access to the knowledge base while more resources remain unavailable in the lack of subscriptions. You can register a newly installed Red Hat Enterprise Linux with account credentials in the Red Hat web console.
Prerequisites
- You have an active subscription of the RHEL system.
- You have installed the RHEL 9 web console.
- You have enabled the cockpit service.
Your user account is allowed to log in to the web console.
For instructions, see Installing and enabling the web console.
Procedure
- Open https://<ip_address_or_hostname>:9090 in a browser, and log in to the web console.
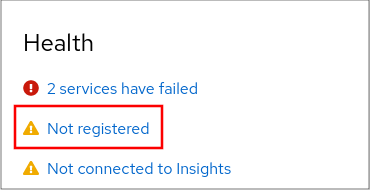
In the Health field on the Overview page, click the Not registered warning, or click Subscriptions in the main menu to move to page with your subscription information.
- In the Overview field, click .
In the Register system dialog, select the registration method.
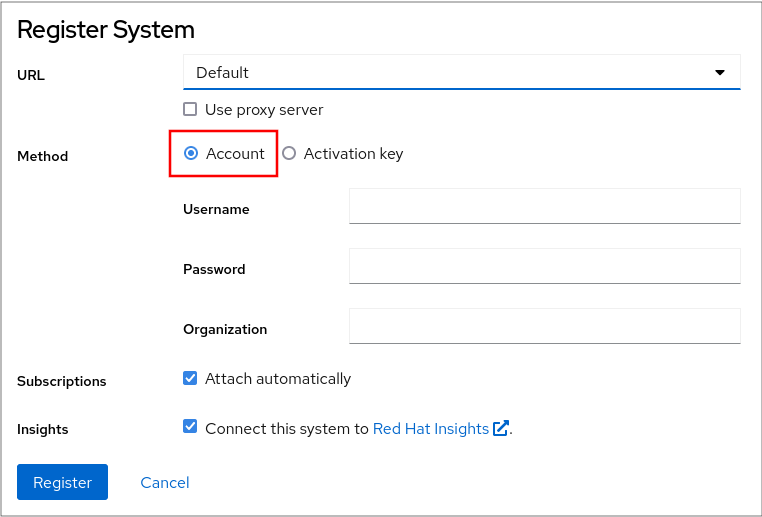
Optional: Enter your organization’s name or ID. If your account belongs to more than one organization on the Red Hat Customer Portal, you must add the organization name or ID. To get the organization ID, check with your Technical Account Manager at Red Hat.
- If you do not want to connect your system to Red Hat Insights, clear the Insights checkbox.
- Click .
Verification
- Check details of your subscription in the Hybrid Cloud Console.
2.3. Registering a system in the GNOME desktop environment
Subscriptions cover products installed on Red Hat Enterprise Linux, including the operating system itself. If you have not registered the system, you have no access to the RHEL repositories. You can not install software updates such as security, bug fixes. Even if you have a self-support subscription, it grants access to the knowledge base while more resources remain unavailable in the lack of subscriptions. Follow the steps in this procedure to enroll the system with your Red Hat account.
Prerequisites
- You have created a Red Hat account.
- You are a root user and logged in to the GNOME desktop environment. For details, see Register and subscribe RHEL system to Red Hat Subscription Manager.
Procedure
Open the system menu, which is accessible from the upper-right screen corner, and click Settings.

- Go to → .
If you want to register the System through Red Hat Satellite:
- In the Registration Server section, select Custom Address.
- Enter the server address in the URL field.
- In the Registration Type section, select your preferred registration method.
- Fill the Registration Details section.
- Click .
Chapter 3. Accessing the Red Hat Support
If you require help with troubleshooting a problem, you can contact Red Hat Support.
Procedure
Log in to the Red Hat Support web site and choose one of the following options:
- Open a new support case.
- Initiate a live chat with a Red Hat expert.
- Contact a Red Hat expert by making a call or sending an email.
3.1. Using the sosreport utility to collect daignostic information about a system to attach it to a support ticket
The sosreport command collects configuration details, system information and diagnostic information from a Red Hat Enterprise Linux system.
The following section describes how to use the sosreport command to produce reports for your support cases.
Prerequisites
- A valid user account on the Red Hat Customer Portal. See Create a Red Hat Login.
- An active subscription for the RHEL system.
- A support-case number.
Procedure
Install the
sospackage:# dnf install sosGenerate a report:
# sosreportOptionally, pass the
–uploadoption to the command to automatically upload and attach the report to a support case. This requires internet access and your Customer Portal credentials.Optional: Manually attach the report to your support case.
See the Red Hat Knowledgebase solution How can I attach a file to a Red Hat support case? for more information.
Additional resources
- What is an sosreport and how to create one in Red Hat Enterprise Linux? (Red Hat Knowledgebase)
Chapter 4. Changing basic environment settings
Configuration of basic environment settings is a part of the installation process. The following sections guide you when you change them later. The basic configuration of the environment includes:
- Date and time
- System locales
- Keyboard layout
- Language
4.1. Configuring the date and time
Accurate timekeeping is important for several reasons. In Red Hat Enterprise Linux, timekeeping is ensured by the NTP protocol, which is implemented by a daemon running in user space. The user-space daemon updates the system clock running in the kernel. The system clock can keep time by using various clock sources.
Red Hat Enterprise Linux 9 and later versions use the chronyd daemon to implement NTP. chronyd is available from the chrony package. For more information, see Using the chrony suite to configure NTP.
4.1.1. Manually configuring the date, time, and timezone settings
To display the current date and time, use either of these steps.
Procedure
Optional: List the timezones:
# timedatectl list-timezones

  Europe/Berlin
Set the time zone:
# timedatectl set-timezone <time_zone>
Set the date and time:
# timedatectl set-time <YYYY-mm-dd HH:MM-SS>
Verification
Display the date, time, and timezone:
# date
Mon Mar 30 16:02:59 CEST 2020
To see more details, use the timedatectl command:
# timedatectl

Local time: Mon 2020-03-30 16:04:42 CEST
Universal time: Mon 2020-03-30 14:04:42 UTC
RTC time: Mon 2020-03-30 14:04:41
Time zone: Europe/Prague (CEST, +0200)
System clock synchronized: yes
NTP service: active
RTC in local TZ: no
Additional resources
-
date(1)andtimedatectl(1)man pages
4.2. Configuring time settings by using the web console
You can set a time zone and synchronize the system time with a Network Time Protocol (NTP) server in the RHEL web console.
Prerequisites
- You have installed the RHEL 9 web console.
- You have enabled the cockpit service.
Your user account is allowed to log in to the web console.
For instructions, see Installing and enabling the web console.
Procedure
Log in to the RHEL 9 web console.
For details, see Logging in to the web console.
Click the current system time in Overview.

- Click System time.
- In the Change System Time dialog box, change the time zone if necessary.
In the Set Time drop-down menu, select one of the following:
- Manually
- Use this option if you need to set the time manually, without an NTP server.
- Automatically using NTP server
- This is a default option, which synchronizes time automatically with the preset NTP servers.
- Automatically using specific NTP servers
- Use this option only if you need to synchronize the system with a specific NTP server. Specify the DNS name or the IP address of the server.
Click Change.

Verification
- Check the system time displayed in the System tab.
Additional resources
4.3. Configuring the system locale
System-wide locale settings are stored in the /etc/locale.conf file that is read at early boot by the systemd daemon. Every service or user inherits the locale settings configured in /etc/locale.conf, unless individual programs or individual users override them.
Procedure
Optional: Display the current system locales settings:
# localectl status
System Locale: LANG=en_US.UTF-8
	VC Keymap: de-nodeadkeys
   X11 Layout: de
  X11 Variant: nodeadkeys
List available system locale settings:
$ localectl list-locales C.UTF-8 ... en_US.UTF-8 en_ZA.UTF-8 en_ZW.UTF-8 ...- Update the syste locale setting:
For example:
+
# localectl set-locale LANG=en_US.UTF-8The GNOME Terminal does not support non-UTF8 system locales. For more information, see the Red Hat Knowledgebase solution The gnome-terminal application fails to start when the system locale is set to non-UTF8.
Additional resources
-
man localectl(1),man locale(7), andman locale.conf(5)
4.4. Configuring the keyboard layout
The keyboard layout settings control the layout used on the text console and graphical user interfaces.
Procedure
To list available keymaps:
$ localectl list-keymaps
ANSI-dvorak
al
al-plisi
amiga-de
amiga-us
...
To display the current status of keymaps settings:
$ localectl status
...
VC Keymap: us
...
To set or change the default system keymap. For example:
# localectl set-keymap us
Additional resources
-
man localectl(1),man locale(7), andman locale.conf(5)man pages
4.5. Changing the font size in text console mode
You can change the font size in the virtual console.
Procedure
Display the currently-used font file:
# cat /etc/vconsole.conf

FONT="eurlatgr"
List the available font files:
# ls -1 /usr/lib/kbd/consolefonts/*.psfu.gz

/usr/lib/kbd/consolefonts/eurlatgr.psfu.gz
/usr/lib/kbd/consolefonts/LatArCyrHeb-08.psfu.gz
/usr/lib/kbd/consolefonts/LatArCyrHeb-14.psfu.gz
/usr/lib/kbd/consolefonts/LatArCyrHeb-16.psfu.gz
/usr/lib/kbd/consolefonts/LatArCyrHeb-16+.psfu.gz
/usr/lib/kbd/consolefonts/LatArCyrHeb-19.psfu.gz
Select a font file that supports your character set and code page.
Optional: To test a font file, load it temporarily:
# setfont LatArCyrHeb-16.psfu.gz
The
setfontutility applies the font file immediately and terminals use the new and font size until you reboot or apply a different font file.-
To return to the font file defined in
/etc/vconsole.conf, entersetfontwithout any parameters. Edit the
/etc/vconsole.conffile and set theFONTvariable to the font file RHEL should load at boot time, for example:FONT=LatArCyrHeb-16
Reboot the host
# reboot
Chapter 5. Using secure communications between two systems with OpenSSH
SSH (Secure Shell) is a protocol which provides secure communications between two systems using a client-server architecture and allows users to log in to server host systems remotely. Unlike other remote communication protocols, such as FTP or Telnet, SSH encrypts the login session, which prevents intruders from collecting unencrypted passwords from the connection.
5.1. Generating SSH key pairs
You can log in to an OpenSSH server without entering a password by generating an SSH key pair on a local system and copying the generated public key to the OpenSSH server. Each user who wants to create a key must run this procedure.
To preserve previously generated key pairs after you reinstall the system, back up the ~/.ssh/ directory before you create new keys. After reinstalling, copy it back to your home directory. You can do this for all users on your system, including root.
Prerequisites
- You are logged in as a user who wants to connect to the OpenSSH server by using keys.
- The OpenSSH server is configured to allow key-based authentication.
Procedure
Generate an ECDSA key pair:
$ ssh-keygen -t ecdsa
Generating public/private ecdsa key pair.
Enter file in which to save the key (/home/<username>/.ssh/id_ecdsa):
Enter passphrase (empty for no passphrase): <password>
Enter same passphrase again: <password>
Your identification has been saved in /home/<username>/.ssh/id_ecdsa.
Your public key has been saved in /home/<username>/.ssh/id_ecdsa.pub.
The key fingerprint is:
SHA256:Q/x+qms4j7PCQ0qFd09iZEFHA+SqwBKRNaU72oZfaCI <username>@<localhost.example.com>
The key's randomart image is:
+---[ECDSA 256]---+
|.oo..o=++        |
|.. o .oo .       |
|. .. o. o        |
|....o.+...       |
|o.oo.o +S .      |
|.=.+.   .o       |
|E.*+.  .  . .    |
|.=..+ +..  o     |
|  .  oo*+o.      |
+----[SHA256]-----+
You can also generate an RSA key pair by using the
ssh-keygencommand without any parameter or an Ed25519 key pair by entering thessh-keygen -t ed25519command. Note that the Ed25519 algorithm is not FIPS-140-compliant, and OpenSSH does not work with Ed25519 keys in FIPS mode.Copy the public key to a remote machine:
$ ssh-copy-id <username>@<ssh-server-example.com>
/usr/bin/ssh-copy-id: INFO: attempting to log in with the new key(s), to filter out any that are already installed
<username>@<ssh-server-example.com>'s password:
…
Number of key(s) added: 1

Now try logging into the machine, with: "ssh '<username>@<ssh-server-example.com>'" and check to make sure that only the key(s) you wanted were added.
Replace
<username>@<ssh-server-example.com>with your credentials.If you do not use the
ssh-agentprogram in your session, the previous command copies the most recently modified~/.ssh/id*.pubpublic key if it is not yet installed. To specify another public-key file or to prioritize keys in files over keys cached in memory byssh-agent, use thessh-copy-idcommand with the-ioption.
Verification
Log in to the OpenSSH server by using the key file:
$ ssh -o PreferredAuthentications=publickey <username>@<ssh-server-example.com>
Additional resources
-
ssh-keygen(1)andssh-copy-id(1)man pages on your system
5.2. Setting key-based authentication as the only method on an OpenSSH server
To improve system security, enforce key-based authentication by disabling password authentication on your OpenSSH server.
Prerequisites
-
The
openssh-serverpackage is installed. -
The
sshddaemon is running on the server. You can already connect to the OpenSSH server by using a key.
See the Generating SSH key pairs section for details.
Procedure
Open the
/etc/ssh/sshd_configconfiguration in a text editor, for example:# vi /etc/ssh/sshd_configChange the
PasswordAuthenticationoption tono:PasswordAuthentication no
-
On a system other than a new default installation, check that the
PubkeyAuthenticationparameter is either not set or set toyes. Set the
KbdInteractiveAuthenticationdirective tono.Note that the corresponding entry is commented out in the configuration file and the default value is
yes.To use key-based authentication with NFS-mounted home directories, enable the
use_nfs_home_dirsSELinux boolean:# setsebool -P use_nfs_home_dirs 1- If you are connected remotely, not using console or out-of-band access, test the key-based login process before disabling password authentication.
Reload the
sshddaemon to apply the changes:# systemctl reload sshd
Additional resources
-
sshd_config(5)andsetsebool(8)man pages on your system
5.3. Caching your SSH credentials by using ssh-agent
To avoid entering a passphrase each time you initiate an SSH connection, you can use the ssh-agent utility to cache the private SSH key for a login session. If the agent is running and your keys are unlocked, you can log in to SSH servers by using these keys but without having to enter the key’s password again. The private key and the passphrase remain secure.
Prerequisites
- You have a remote host with the SSH daemon running and reachable through the network.
- You know the IP address or hostname and credentials to log in to the remote host.
You have generated an SSH key pair with a passphrase and transferred the public key to the remote machine.
See the Generating SSH key pairs section for details.
Procedure
Add the command for automatically starting
ssh-agentin your session to the~/.bashrcfile:Open
~/.bashrcin a text editor of your choice, for example:$ vi ~/.bashrcAdd the following line to the file:
eval $(ssh-agent)
- Save the changes, and quit the editor.
Add the following line to the
~/.ssh/configfile:AddKeysToAgent yes
With this option and
ssh-agentstarted in your session, the agent prompts for a password only for the first time when you connect to a host.
Verification
Log in to a host which uses the corresponding public key of the cached private key in the agent, for example:
$ ssh <example.user>@<ssh-server@example.com>Note that you did not have to enter the passphrase.
5.4. Authenticating by SSH keys stored on a smart card
You can create and store ECDSA and RSA keys on a smart card and authenticate by the smart card on an OpenSSH client. Smart-card authentication replaces the default password authentication.
Prerequisites
-
On the client side, the
openscpackage is installed and thepcscdservice is running.
Procedure
List all keys provided by the OpenSC PKCS #11 module including their PKCS #11 URIs and save the output to the
keys.pubfile:$ ssh-keygen -D pkcs11: > keys.pubTransfer the public key to the remote server. Use the
ssh-copy-idcommand with thekeys.pubfile created in the previous step:$ ssh-copy-id -f -i keys.pub <username@ssh-server-example.com>Connect to <ssh-server-example.com> by using the ECDSA key. You can use just a subset of the URI, which uniquely references your key, for example:
$ ssh -i "pkcs11:id=%01?module-path=/usr/lib64/pkcs11/opensc-pkcs11.so" <ssh-server-example.com>
Enter PIN for 'SSH key':
[ssh-server-example.com] $
Because OpenSSH uses the
p11-kit-proxywrapper and the OpenSC PKCS #11 module is registered to thep11-kittool, you can simplify the previous command:$ ssh -i "pkcs11:id=%01" <ssh-server-example.com> Enter PIN for 'SSH key': [ssh-server-example.com] $If you skip the
id=part of a PKCS #11 URI, OpenSSH loads all keys that are available in the proxy module. This can reduce the amount of typing required:$ ssh -i pkcs11: <ssh-server-example.com> Enter PIN for 'SSH key': [ssh-server-example.com] $Optional: You can use the same URI string in the
~/.ssh/configfile to make the configuration permanent:$ cat ~/.ssh/config IdentityFile "pkcs11:id=%01?module-path=/usr/lib64/pkcs11/opensc-pkcs11.so" $ ssh <ssh-server-example.com> Enter PIN for 'SSH key': [ssh-server-example.com] $
The
sshclient utility now automatically uses this URI and the key from the smart card.
Additional resources
-
p11-kit(8),opensc.conf(5),pcscd(8),ssh(1), andssh-keygen(1)man pages on your system
5.5. Additional resources
-
sshd(8),ssh(1),scp(1),sftp(1),ssh-keygen(1),ssh-copy-id(1),ssh_config(5),sshd_config(5),update-crypto-policies(8), andcrypto-policies(7)man pages on your system - Configuring SELinux for applications and services with non-standard configurations
- Controlling network traffic using firewalld
Chapter 6. Configuring basic system security
Computer security is the protection of computer systems and their hardware, software, information, and services from theft, damage, disruption, and misdirection. Ensuring computer security is an essential task, in particular in enterprises that process sensitive data and handle business transactions.
This section covers only the basic security features that you can configure after installation of the operating system.
6.1. Enabling the firewalld service
A firewall is a network security system that monitors and controls incoming and outgoing network traffic according to configured security rules. A firewall typically establishes a barrier between a trusted secure internal network and another outside network.
The firewalld service, which provides a firewall in Red Hat Enterprise Linux, is automatically enabled during installation.
To enable the firewalld service, follow this procedure.
Procedure
Display the current status of
firewalld:$ systemctl status firewalld ● firewalld.service - firewalld - dynamic firewall daemon Loaded: loaded (/usr/lib/systemd/system/firewalld.service; disabled; vendor preset: enabled) Active: inactive (dead) ...If
firewalldis not enabled and running, switch to therootuser, and start thefirewalldservice and enable to start it automatically after the system restarts:# systemctl enable --now firewalld
Verification
Check that
firewalldis running and enabled:$ systemctl status firewalld ● firewalld.service - firewalld - dynamic firewall daemon Loaded: loaded (/usr/lib/systemd/system/firewalld.service; enabled; vendor preset: enabled) Active: active (running) ...
Additional resources
- Using and configuring firewalld
-
man firewalld(1)
6.2. Managing basic SELinux settings
Security-Enhanced Linux (SELinux) is an additional layer of system security that determines which processes can access which files, directories, and ports. These permissions are defined in SELinux policies. A policy is a set of rules that guide the SELinux security engine.
SELinux has two possible states:
- Disabled
- Enabled
When SELinux is enabled, it runs in one of the following modes:
Enabled
- Enforcing
- Permissive
In enforcing mode, SELinux enforces the loaded policies. SELinux denies access based on SELinux policy rules and enables only the interactions that are explicitly allowed. Enforcing mode is the safest SELinux mode and is the default mode after installation.
In permissive mode, SELinux does not enforce the loaded policies. SELinux does not deny access, but reports actions that break the rules to the /var/log/audit/audit.log log. Permissive mode is the default mode during installation. Permissive mode is also useful in some specific cases, for example when troubleshooting problems.
Additional resources
6.3. Additional resources
Chapter 7. Introduction to RHEL system roles
By using RHEL system roles, you can remotely manage the system configurations of multiple RHEL systems across major versions of RHEL.
Important terms and concepts
The following describes important terms and concepts in an Ansible environment:
- Control node
- A control node is the system from which you run Ansible commands and playbooks. Your control node can be an Ansible Automation Platform, Red Hat Satellite, or a RHEL 9, 8, or 7 host. For more information, see Preparing a control node on RHEL 9.
- Managed node
- Managed nodes are the servers and network devices that you manage with Ansible. Managed nodes are also sometimes called hosts. Ansible does not have to be installed on managed nodes. For more information, see Preparing a managed node.
- Ansible playbook
- In a playbook, you define the configuration you want to achieve on your managed nodes or a set of steps for the system on the managed node to perform. Playbooks are Ansible’s configuration, deployment, and orchestration language.
- Inventory
- In an inventory file, you list the managed nodes and specify information such as IP address for each managed node. In the inventory, you can also organize the managed nodes by creating and nesting groups for easier scaling. An inventory file is also sometimes called a hostfile.
Available roles on a Red Hat Enterprise Linux 9 control node
On a Red Hat Enterprise Linux 9 control node, the rhel-system-roles package provides the following roles:
| Role name | Role description | Chapter title |
|---|---|---|
|
| Certificate Issuance and Renewal | Requesting certificates by using RHEL system roles |
|
| Web console | Installing and configuring web console with the cockpit RHEL system role |
|
| System-wide cryptographic policies | Setting a custom cryptographic policy across systems |
|
| Firewalld | Configuring firewalld by using system roles |
|
| HA Cluster | Configuring a high-availability cluster by using system roles |
|
| Kernel Dumps | Configuring kdump by using RHEL system roles |
|
| Kernel Settings | Using Ansible roles to permanently configure kernel parameters |
|
| Logging | Using the logging system role |
|
| Metrics (PCP) | Monitoring performance by using RHEL system roles |
|
| Networking | Using the network RHEL system role to manage InfiniBand connections |
|
| Network Bound Disk Encryption client | Using the nbde_client and nbde_server system roles |
|
| Network Bound Disk Encryption server | Using the nbde_client and nbde_server system roles |
|
| Postfix | Variables of the postfix role in system roles |
|
| PostgreSQL | Installing and configuring PostgreSQL by using the postgresql RHEL system role |
|
| SELinux | Configuring SELinux by using system roles |
|
| SSH client | Configuring secure communication with the ssh system roles |
|
| SSH server | Configuring secure communication with the ssh system roles |
|
| Storage | Managing local storage by using RHEL system roles |
|
| Terminal Session Recording | Configuring a system for session recording by using the tlog RHEL system role |
|
| Time Synchronization | Configuring time synchronization by using RHEL system roles |
|
| VPN | Configuring VPN connections with IPsec by using the vpn RHEL system role |
Additional resources
- Automating system administration by using RHEL system roles
- Red Hat Enterprise Linux (RHEL) system roles
-
/usr/share/ansible/roles/rhel-system-roles.<role_name>/README.mdfile -
/usr/share/doc/rhel-system-roles/<role_name>/directory
Chapter 8. Troubleshooting problems by using log files
Log files contain messages about the system, including the kernel, services, and applications running on it. These contain information that helps troubleshoot issues or monitor system functions. The logging system in Red Hat Enterprise Linux is based on the built-in syslog protocol. Particular programs use this system to record events and organize them into log files, which are useful when auditing the operating system and troubleshooting various problems.
8.1. Services handling syslog messages
The following two services handle syslog messages:
-
The
systemd-journalddaemon
The systemd-journald daemon collects messages from various sources and forwards them to Rsyslog for further processing. The systemd-journald daemon collects messages from the following sources:
- Kernel
- Early stages of the boot process
- Standard and error output of daemons as they start up and run
-
Syslog -
The
Rsyslogservice
The Rsyslog service sorts the syslog messages by type and priority and writes them to the files in the /var/log directory. The /var/log directory persistently stores the log messages.
8.2. Log files storing syslog messages
The following log files under the /var/log directory store syslog messages.
-
/var/log/messages- allsyslogmessages except the following -
/var/log/secure- security and authentication-related messages and errors -
/var/log/maillog- mail server-related messages and errors -
/var/log/cron- log files related to periodically executed tasks -
/var/log/boot.log- log files related to system startup
The above mentioned list contains only some files and the actual list of files in the /var/log/ directory depends on which services and applications log in to this directory.
8.3. Viewing logs using the command line
The Journal is a component of systemd that helps to view and manage log files. It addresses problems connected with traditional logging, closely integrated with the rest of the system, and supports various logging technologies and access management for log entries.
You can use the journalctl command to view messages in the system journal using the command line.
| Command | Description |
|---|---|
|
| Shows all collected journal entries. |
|
|
Shows logs related to a specific file. For example, the |
|
| Shows logs for the current boot. |
|
| Shows kernel logs for the current boot. |
| Command | Description |
|---|---|
|
|
Filters log to show entries matching the |
|
|
Combines matches. For example, this command shows logs for |
|
|
The plus sign (+) separator combines two expressions in a logical OR. For example, this command shows all messages from the |
|
|
This command shows all entries matching either expression, referring to the same field. Here, this command shows logs matching a systemd-unit |
| Command | Description |
|---|---|
|
| Shows a tabular list of boot numbers, their IDs, and the timestamps of the first and last message pertaining to the boot. You can use the ID in the next command to view detailed information. |
|
| Shows information about the specified boot ID. |
8.4. Reviewing logs in the web console
Learn how to access, review and filter logs in the RHEL web console.
8.4.1. Reviewing logs in the web console
The RHEL 9 web console Logs section is a UI for the journalctl utility. You can access system logs in the web console interface.
Prerequisites
- You have installed the RHEL 9 web console.
- You have enabled the cockpit service.
Your user account is allowed to log in to the web console.
For instructions, see Installing and enabling the web console.
Procedure
Log in to the RHEL 9 web console.
For details, see Logging in to the web console.
Click Logs.
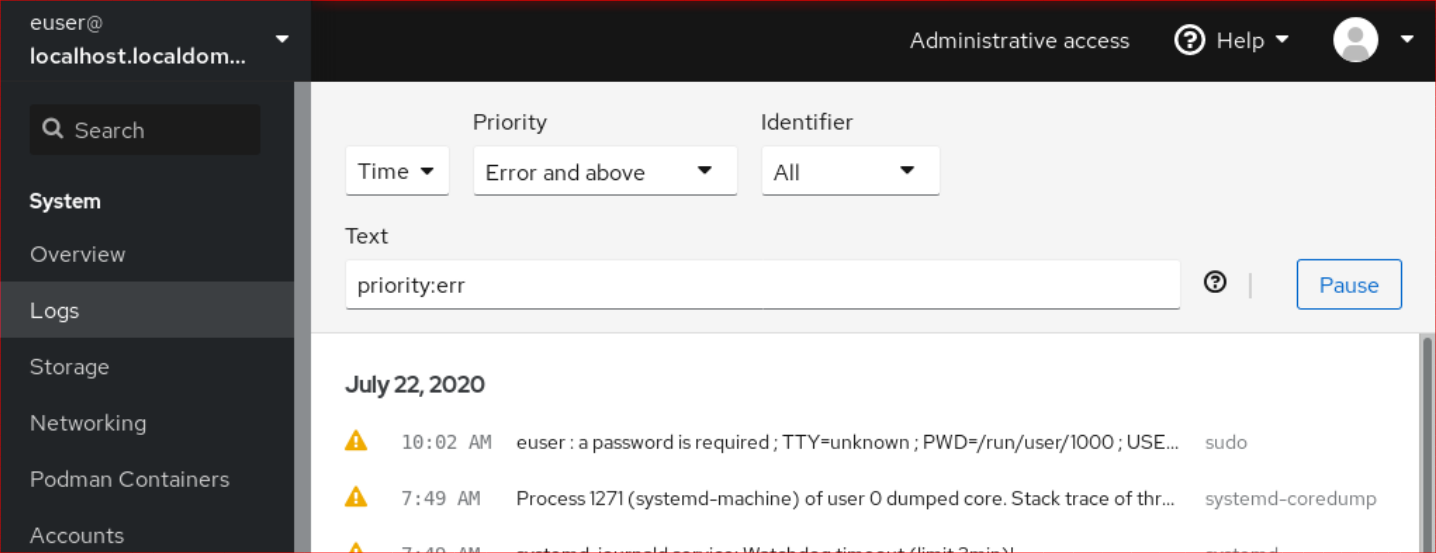
- Open log entry details by clicking on your selected log entry in the list.
You can use the button to pause new log entries from appearing. Once you resume new log entries, the web console will load all log entries that were reported after you used the button.
You can filter the logs by time, priority or identifier. For more information, see Filtering logs in the web console.
8.4.2. Filtering logs in the web console
You can filter log entries in the web console.
Prerequisites
- You have installed the RHEL 9 web console.
- You have enabled the cockpit service.
Your user account is allowed to log in to the web console.
For instructions, see Installing and enabling the web console.
Procedure
Log in to the RHEL 9 web console.
For details, see Logging in to the web console.
- Click Logs.
By default, web console shows the latest log entries. To filter by a specific time range, click the Time drop-down menu and choose a preferred option.
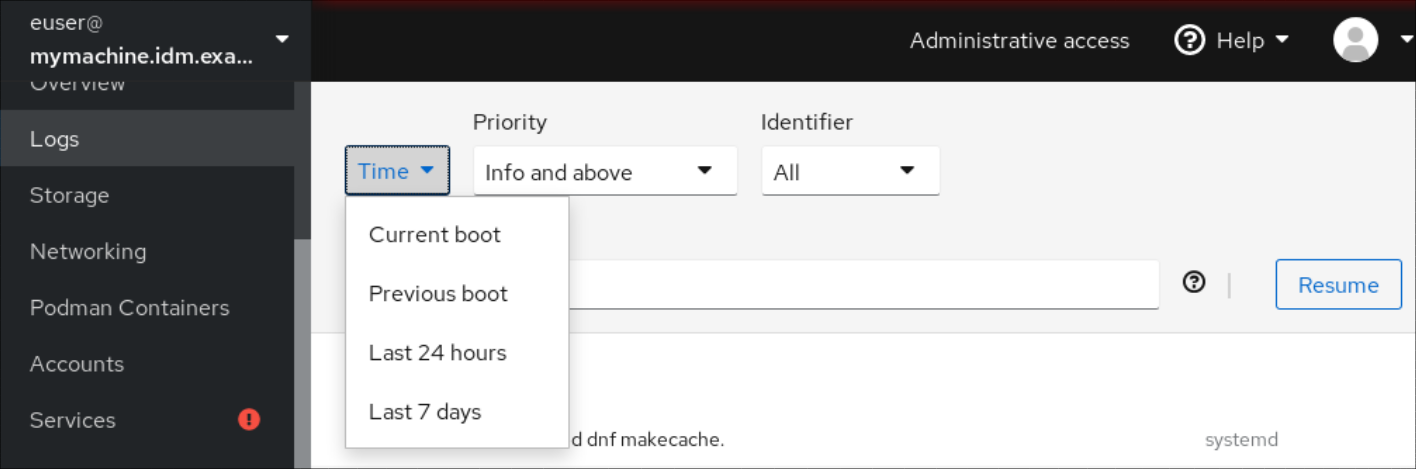
Error and above severity logs list is shown by default. To filter by different priority, click the Error and above drop-down menu and choose a preferred priority.

By default, web console shows logs for all identifiers. To filter logs for a particular identifier, click the All drop-down menu and select an identifier.

- To open a log entry, click on a selected log.
8.4.3. Text search options for filtering logs in the web console
The text search option functionality provides a big variety of options for filtering logs. If you decide to filter logs by using the text search, you can use the predefined options that are defined in the three drop-down menus, or you can type the whole search yourself.
Drop-down menus
There are three drop-down menus that you can use to specify the main parameters of your search:
- Time: This drop-down menu contains predefined searches for different time ranges of your search.
-
Priority: This drop-down menu provides options for different priority levels. It corresponds to the
journalctl --priorityoption. The default priority value is Error and above. It is set every time you do not specify any other priority. -
Identifier: In this drop-down menu, you can select an identifier that you want to filter. Corresponds to the
journalctl --identifieroption.
Quantifiers
There are six quantifiers that you can use to specify your search. They are covered in the Options for filtering logs table.
Log fields
If you want to search for a specific log field, it is possible to specify the field together with its content.
Free-form text search in logs messages
You can filter any text string of your choice in the logs messages. The string can also be in the form of a regular expressions.
Advanced logs filtering I
Filter all log messages identified by 'systemd' that happened since October 22, 2020 midnight and journal field 'JOB_TYPE' is either 'start' or 'restart.
-
Type
identifier:systemd since:2020-10-22 JOB_TYPE=start,restartto search field. Check the results.

Advanced logs filtering II
Filter all log messages that come from 'cockpit.service' systemd unit that happened in the boot before last and the message body contains either "error" or "fail".
-
Type
service:cockpit boot:-1 error|failto the search field. Check the results.

8.4.4. Using a text search box to filter logs in the web console
You can filter logs according to different parameters by using the text search box in the web console. The search combines usage of the filtering drop-down menus, quantifiers, log fields, and free-form string search.
Prerequisites
- You have installed the RHEL 9 web console.
- You have enabled the cockpit service.
Your user account is allowed to log in to the web console.
For instructions, see Installing and enabling the web console.
Procedure
Log in to the RHEL web console.
For details, see Logging in to the web console.
- Click Logs.
Use the drop-down menus to specify the three main quantifiers - time range, priority, and identifier(s) - you want to filter.
The Priority quantifier always has to have a value. If you do not specify it, it automatically filters the Error and above priority. Notice that the options you set reflect in the text search box.
Specify the log field you want to filter.
You can add several log fields.
- You can use a free-form string to search for anything else. The search box also accepts regular expressions.
8.4.5. Options for logs filtering
There are several journalctl options, which you can use for filtering logs in the web console, that may be useful. Some of these are already covered as part of the drop-down menus in the web console interface.
| Option name | Usage | Notes |
|---|---|---|
|
| Filter output by message priorities. Takes a single numeric or textual log level. The log levels are the usual syslog log levels. If a single log level is specified, all messages with this log level or a lower (therefore more important) log level are shown. | Covered in the Priority drop-down menu. |
|
| Show messages for the specified syslog identifier SYSLOG_IDENTIFIER. Can be specified multiple times. | Covered in the Identifier drop-down menu. |
|
| Shows only the most recent journal entries, and continuously prints new entries as they are appended to the journal. | Not covered in a drop-down. |
|
|
Show messages for the specified |
Is not covered in a drop-down. Corresponds to the |
|
| Show messages from a specific boot. A positive integer will look up the boots starting from the beginning of the journal, and an equal-or-less-than zero integer will look up boots starting from the end of the journal. Therefore, 1 means the first boot found in the journal in chronological order, 2 the second and so on; while -0 is the last boot, -1 the boot before last, and so on. | Covered only as Current boot or Previous boot in the Time drop-down menu. Other options need to be written manually. |
|
| Start showing entries on or newer than the specified date, or on or older than the specified date, respectively. Date specifications should be of the format "2012-10-30 18:17:16". If the time part is omitted, "00:00:00" is assumed. If only the seconds component is omitted, ":00" is assumed. If the date component is omitted, the current day is assumed. Alternatively the strings "yesterday", "today", "tomorrow" are understood, which refer to 00:00:00 of the day before the current day, the current day, or the day after the current day, respectively. "now" refers to the current time. Finally, relative times may be specified, prefixed with "-" or "+", referring to times before or after the current time, respectively. | Not covered in a drop-down. |
8.5. Additional resources
-
journalctl(1)man page on your system - Configuring a remote logging solution
Chapter 9. Managing users and groups
Preventing unauthorized access to files and processes requires accurate user and group management. If you do not manage accounts centrally or you require a user account or group only on a specific system, you can create them locally on a host.
9.1. Introduction to managing user and group accounts
The control of users and groups is a core element of Red Hat Enterprise Linux (RHEL) system administration. Each RHEL user has distinct login credentials and can be assigned to various groups to customize their system privileges.
9.1.1. Introduction to users and groups
A user who creates a file is the owner of that file and the group owner of that file. The file is assigned separate read, write, and execute permissions for the owner, the group, and those outside that group. The file owner can be changed only by the root user. Access permissions to the file can be changed by both the root user and the file owner. A regular user can change group ownership of a file they own to a group of which they are a member of.
Each user is associated with a unique numerical identification number called user ID (UID). Each group is associated with a group ID (GID). Users within a group share the same permissions to read, write, and execute files owned by that group.
9.1.2. Configuring reserved user and group IDs
By default, RHEL reserves user and group IDs below 1000 for system users and groups. You can find the reserved user and group IDs in the setup package. The UID’s and GID’s of users and groups created before you changed the UID_MIN and GID_MIN values do not change. The reserved user and group IDs are documented in the:
/usr/share/doc/setup/uidgid
To assign IDs to the new users and groups starting at 5000, as the reserved range can increase in the future.
Modify the UID_MIN and GID_MIN parameters in the /etc/login.defs file to define a start ID other than the defaults (1000).
Do not raise IDs reserved by the system above 1000 by changing SYS_UID_MAX to avoid conflict with systems that retain the 1000 limit.
Procedure
-
Open the
/etc/login.defsfile in an editor. Set the
UID_MINvariable, for example:# Min/max values for automatic uid selection in useradd # UID_MIN 5000Set the
GID_MINvariable, for example:# Min/max values for automatic gid selection in groupadd # GID_MIN 5000The dynamically assigned UIDs and GIDs for the regular users now start at 5000.
9.1.3. User private groups
RHEL uses the user private group (UPG) system configuration, which makes Linux groups easier to manage. A user private group is created whenever a new user is added to the system. The user private group has the same name as the user for which it was created and that user is the only member of the user private group.
UPGs simplify the collaboration on a project between multiple users. In addition, UPG system configuration makes it safe to set default permissions for a newly created file or directory, as it allows both the user, and the group this user is a part of, to make modifications to the file or directory.
A list of all local groups is stored in the /etc/group configuration file.
9.2. Getting started with managing user accounts
Red Hat Enterprise Linux is a multi-user operating system, which enables multiple users on different computers to access a single system installed on one machine. Every user operates under its own account, and managing user accounts thus represents a core element of Red Hat Enterprise Linux system administration.
The following are the different types of user accounts:
Normal user accounts:
Normal accounts are created for users of a particular system. Such accounts can be added, removed, and modified during normal system administration.
System user accounts:
System user accounts represent a particular applications identifier on a system. Such accounts are generally added or manipulated only at software installation time, and they are not modified later.
WarningSystem accounts are presumed to be available locally on a system. If these accounts are configured and provided remotely, such as in the instance of an LDAP configuration, system breakage and service start failures can occur.
For system accounts, user IDs below 1000 are reserved. For normal accounts, you can use IDs starting at 1000. To define the min/max IDs for users and groups, system users and system groups, see the
/etc/login.defsfile.Group:
A group is an entity which ties together multiple user accounts for a common purpose, such as granting access to particular files.
9.2.1. Managing accounts and groups using command line tools
Use the following basic command-line tools to manage user accounts and groups.
Procedure
Create a new user account:
# useradd example.userAssign a new password to a user account belonging to example.user:
# passwd example.userAdd a user to a group:
# usermod -a -G example.group example.user
Additional resources
-
useradd(8),passwd(1), andusermod(8)man pages
9.3. Managing users from the command line
You can manage users and groups using the command-line interface (CLI). This enables you to add, remove, and modify users and user groups in Red Hat Enterprise Linux environment.
9.3.1. Adding a new user from the command line
You can use the useradd utility to add a new user.
Prerequisites
-
You have
Rootaccess
Procedure
Add a new user, use:
# useradd <options> <username>Replace options with the command-line options for the
useraddcommand, and replace username with the name of the user.Example 9.1. Adding a new user
To add the user
sarahwith user ID5000, use:# useradd -u 5000 sarah
Verification
To verify the new user is added, use the
idutility.# id sarahThe command returns:
uid=5000(sarah) gid=5000(sarah) groups=5000(sarah)
Additional resources
-
useraddman page
9.3.2. Adding a new group from the command line
You can use the groupadd utility to add a new group.
Prerequisites
-
You have
Rootaccess
Procedure
To add a new group, use:
# groupadd options group-nameReplace options with the command-line options for the
groupaddcommand, and replace group-name with the name of the group.Example 9.2. Adding a new group
To add the group
sysadminswith group ID5000, use:# groupadd -g 5000 sysadmins
Verification
To verify the new group is added, use the
tailutility.# getent group sysadminThe command returns:
sysadmins:x:5000:
Additional resources
-
groupaddman page
9.3.3. Adding a user to a supplementary group from the command line
You can add a user to a supplementary group to manage permissions or enable access to certain files or devices.
Prerequisites
-
You have
rootaccess
Procedure
To add a group to the supplementary groups of the user, use:
# usermod --append -G <group_name> <username>
Verification
To verify the new groups is added to the supplementary groups of the user
sysadmin, use:# groups <username>
9.3.4. Creating a group directory
Under the UPG system configuration, you can apply the set-group identification permission (setgid bit) to a directory. The setgid bit makes managing group projects that share a directory simpler. When you apply the setgid bit to a directory, files created within that directory are automatically assigned to a group that owns the directory. Any user that has the permission to write and execute within this group can now create, modify, and delete files in the directory.
Prerequisites
-
You have
Rootaccess
Procedure
Create a directory:
# mkdir <directory-name>Create a group:
# groupadd <group-name>Add users to the group:
# usermod --append -G <group_name> <username>Associate the user and group ownership of the directory with the group-name group:
# chgrp <group_name> <directory>Set the write permissions to allow the users to create and modify files and directories and set the
setgidbit to make this permission be applied within the directory:# chmod g+rwxs <directory>
Verification
To verify the correctness of set permissions, use:
# ls -ld <directory>The command returns:
*drwx__rws__r-x.* 2 root _group-name_ 6 Nov 25 08:45 _directory-name_
9.3.5. Removing a user on the command line
You can remove a user account by using the command line. In addition, below mentioned are the commands to remove the user account, and optionally remove the user data and metadata, such as their home directory and configuration files.
-
You have
rootaccess. - The user currently exists.
Ensure that the user is logged out:
# loginctl terminate-user user-nameTo only remove the user account, and not the user data:
# userdel user-nameTo remove the user, the data, and the metadata:
Remove the user, their home directory, their mail spool, and their SELinux user mapping:
# userdel --remove --selinux-user user-nameRemove additional user metadata:
# rm -rf /var/lib/AccountsService/users/user-nameThis directory stores information that the system needs about the user before the home directory is available. Depending on the system configuration, the home directory might not be available until the user authenticates at the login screen.
ImportantIf you do not remove this directory and you later recreate the same user, the recreated user will still use certain settings inherited from the removed user.
Additional resources
-
userdel(8)man page
9.4. Managing user accounts in the web console
The RHEL web console provides a graphical interface for adding, editing, and removing system user accounts.
You can also set password expiration and terminate user sessions in the web console.
9.4.1. Adding new accounts by using the web console
You can add user accounts to the system and set administration rights to the accounts through the RHEL web console.
Prerequisites
- You have installed the RHEL 9 web console.
- You have enabled the cockpit service.
Your user account is allowed to log in to the web console.
For instructions, see Installing and enabling the web console.
Procedure
Log in to the RHEL 9 web console.
For details, see Logging in to the web console.
- Click .
- Click .
In the Full Name field, enter the full name of the user.
The RHEL web console automatically suggests a user name from the full name and fills it in the User Name field. If you do not want to use the original naming convention consisting of the first letter of the first name and the whole surname, update the suggestion.
In the Password/Confirm fields, enter the password and retype it for verification that your password is correct.
The color bar below the fields shows you the security level of the entered password, which does not allow you to create a user with a weak password.
- Click to save the settings and close the dialog box.
- Select the newly created account.
In the Groups drop-down menu, select the groups that you want to add to the new account.

Verification
- You can see the new account in the Accounts settings and you can use its credentials to connect to the system.
9.4.2. Enforcing password expiration in the web console
By default, user accounts have set passwords to never expire. You can set system passwords to expire after a defined number of days. When the password expires, the user must change its password at the next login attempt before the user can access the system.
Prerequisites
- You have installed the RHEL 9 web console.
- You have enabled the cockpit service.
Your user account is allowed to log in to the web console.
For instructions, see Installing and enabling the web console.
Procedure
- Log in to the RHEL 9 web console.
- Click .
- Select the user account for which you want to enforce password expiration.
Click on the Password line.

- In the Password expiration dialog box, select Require password change every … days and enter a positive whole number representing the number of days after which the password expires.
Click .
The web console immediately shows the date of the future password change request on the Password line.
9.5. Editing user groups using the command line
A user belongs to a certain set of groups that allow a logical collection of users with a similar access to files and folders. You can edit the primary and supplementary user groups from the command line to change the user’s permissions.
9.5.1. Primary and supplementary user groups
A group is an entity which ties together multiple user accounts for a common purpose, such as granting access to particular files.
On RHEL, user groups can act as primary or supplementary. Primary and supplementary groups have the following properties:
- Primary group
- Every user has just one primary group at all times.
- You can change the user’s primary group.
- Supplementary groups
- You can add an existing user to an existing supplementary group to manage users with the same security and access privileges within the group.
- Users can be members of zero, one, or multiple supplementary groups.
9.5.2. Listing the primary and supplementary groups of a user
You can list the groups of users to see which primary and supplementary groups they belong to.
Procedure
Display the names of the primary and any supplementary group of a user:
$ groups user-nameIf you do not provide a user name, the command displays the group membership for the current user. The first group is the primary group followed by the optional supplementary groups.
Example 9.3. Listing of groups for user sarah:
$ groups sarahThe output displays:
sarah : sarah wheel developer
User
sarahhas a primary groupsarahand is a member of supplementary groupswheelanddeveloper.
9.5.3. Changing the primary group of a user
You can change the primary group of an existing user to a new group.
Prerequisites:
-
rootaccess - The new group must exist
Procedure
Change the primary group of a user:
# usermod -g <group-name> <user-name>NoteWhen you change a user’s primary group, the command also automatically changes the group ownership of all files in the user’s home directory to the new primary group. You must fix the group ownership of files outside of the user’s home directory manually.
Verify that you changed the primary group of the user:
$ groups <username>
9.5.4. Adding a user to a supplementary group from the command line
You can add a user to a supplementary group to manage permissions or enable access to certain files or devices.
Prerequisites
-
You have
rootaccess
Procedure
To add a group to the supplementary groups of the user, use:
# usermod --append -G <group_name> <username>
Verification
To verify the new groups is added to the supplementary groups of the user
sysadmin, use:# groups <username>
9.5.5. Removing a user from a supplementary group
You can remove an existing user from a supplementary group to limit their permissions or access to files and devices.
Prerequisites
-
You have
rootaccess
Procedure
Remove a user from a supplementary group:
# gpasswd -d <user-name> <group-name>
Verification
Verify that you removed the user sarah from the secondary group developers:
$ groups <username>
9.5.6. Changing all of the supplementary groups of a user
You can overwrite the list of supplementary groups that you want the user to remain a member of.
Prerequisites
-
You have
rootaccess. - The supplementary groups must exist.
Procedure
Overwrite a list of user’s supplementary groups:
# usermod -G <group-names> <username>To add the user to several supplementary groups at once, separate the group names using commas and no intervening spaces. For example:
wheel,developer.ImportantIf the user is currently a member of a group that you do not specify, the command removes the user from the group.
Verification
Verify that you set the list of the supplementary groups correct:
# groups <username>
9.6. Changing and resetting the root password
If the existing root password is no longer satisfactory, you can change it both as the root user and a non-root user.
9.6.1. Changing the root password as the root user
You can use the passwd command to change the root password as the root user.
Prerequisites
-
You have
Rootaccess
Procedure
To change the
rootpassword, use:# passwdYou are prompted to enter your current password before you can change it.
9.6.2. Changing or resetting the forgotten root password as a non-root user
You can use the passwd command to change or reset the forgotten root password as a non-root user.
Prerequisites
- You are able to log in as a non-root user.
-
You have permissions to execute commands as root by using
sudo.
Procedure
To change or reset the
rootpassword as a non-root user that belongs to thewheelgroup, use:$ sudo passwd rootYou are prompted to enter your current non-root password before you can change the
rootpassword.
9.6.3. Resetting the root password
If you are unable to log in as root user and have no non-root user with sudo permissions, you can reset the root password or do not belong to the administrative wheel group, you can reset the root password by booting the system into the special mode. In this mode, the boot process stops before the system hands over the control from the initramfs to the actual system.
Procedure
Reboot the system and, on the GRUB boot screen, press the key to interrupt the boot process.
The kernel boot parameters appear.
load_video
set gfx_payload=keep
insmod gzio
linux ($root)/vmlinuz-5.14.0-70.22.1.e19_0.x86_64 root=/dev/mapper/rhel-root ro crash\
kernel=auto resume=/dev/mapper/rhel-swap rd.lvm.lv/swap rhgb quiet
initrd ($root)/initramfs-5.14.0-70.22.1.e19_0.x86_64.img $tuned_initrd
- Set the cursor to the end of the line that starts with linux.
-
Append
rd.breakto the end of the line that starts withlinux. Press to start the system with the changed parameters.
The
switch_rootprompt appears.Remount the file system as writable:
# mount -o remount,rw /sysrootBy default, the file system is mounted as read-only in the
/sysrootdirectory. Remounting the file system as writable allows you to change the password.Enter the
chrootenvironment:# chroot /sysrootReset the
rootpassword:# passwdFollow the instructions displayed by the command line to finalize the change of the
rootpassword.Enable the SELinux relabeling process on the next system boot:
# touch /.autorelabelExit the
chrootenvironment:# exitExit the
switch_rootprompt, to reboot the system:exit- Wait until the SELinux relabeling process is finished. Note that relabeling a large disk can take a long time. The system reboots automatically when the process is complete.
Verification
-
Log in as the
rootuser by using the new root password. Optional: Display the user name associated with the current effective user ID:
# whoami
Chapter 10. Managing sudo access
System administrators can grant sudo access to allow non-root users to execute administrative commands that are normally reserved for the root user. As a result, non-root users can execute such commands without logging in to the root user account.
10.1. User authorizations in sudoers
The /etc/sudoers file and, by default, drop-in files in the /etc/sudoers.d/ directory specify which users can use the sudo command to execute commands as other user. The rules can apply to individual users and user groups. You can also define rules for groups of hosts, commands, and even users more easily by using aliases.
When a user enters a command with sudo for which the user does not have authorization, the system records a message that contains the string <username> : user NOT in sudoers to the journal log.
The default /etc/sudoers file provides information and examples of authorizations. You can activate a specific example rule by uncommenting the corresponding line. The section with user authorizations is marked with the following introduction:
## Next comes the main part: which users can run what software on
## which machines  (the sudoers file can be shared between multiple
## systems).
You can create new sudoers authorizations and modify existing authorizations by using the following format:
<username> <hostname.example.com>=(<run_as_user>:<run_as_group>) <path/to/command>
Where:
-
<username>is the user that enters the command, for example,user1. If the value starts with%, it defines a group, for example,%group1. -
<hostname.example.com>is the name of the host on which the rule applies. -
The section
(<run_as_user>:<run_as_group>)defines the user or group as which the command is executed. If you omit this section,<username>can execute the command as root. -
<path/to/command>is the complete absolute path to the command. You can also limit the user to only performing a command with specific options and arguments by adding those options after the command path. If you do not specify any options, the user can use the command with all options.
You can apply the rule to all users, hosts, or commands by replacing any of these variables with ALL.
By using ALL in some or multiple segments of a rule, can cause serious security risks.
You can negate the arguments by using the ! operator. For example, !root specifies all users except root. Note that allowing specific users, groups, and commands is more secure than disallowing specific users, groups, and commands. This is because allow rules also block new unauthorized users or groups.
Avoid using negative rules for commands because users can overcome such rules by renaming commands with the alias command.
The system reads the /etc/sudoers file from beginning to end. Therefore, if the file contains multiple entries for a user, the entries are applied in order. In case of conflicting values, the system uses the last match, even if it is not the most specific match.
To preserve the rules during system updates and for easier fixing of errors, enter new rules by creating new files in the /etc/sudoers.d/ directory instead of entering rules directly to the /etc/sudoers file. The system reads the files in the /etc/sudoers.d directory when it reaches the following line in the /etc/sudoers file:
#includedir /etc/sudoers.d
Note that the number sign (#) at the beginning of this line is part of the syntax and does not mean the line is a comment. The names of files in that directory must not contain a period and must not end with a tilde (~).
Additional resources
-
sudoers(5)man page
10.2. Adding a sudo rule to allow members of a group to execute commands as root
System administrators can allow non-root users to execute administrative commands by granting them sudo access. The sudo command provides users with administrative access without using the password of the root user.
When users need to perform an administrative command, they can precede that command with sudo. If the user has authorization for the command, the command is executed as if they were root.
Be aware of the following limitations:
-
Only users listed in the sudoers configuration file can use the
sudocommand. -
The command is executed in the shell of the user, not in the root shell. However, there are some exceptions such as when full
sudoprivileges are granted to any user. In such cases, users can switch to and run the commands in root shell. For example: -
sudo -i -
sudo su -
Prerequisites
- You have root access to the system.
Procedure
As root, open the
/etc/sudoersfile.# visudoThe
/etc/sudoersfile defines the policies applied by thesudocommand.In the
/etc/sudoersfile, find the lines that grantsudoaccess to users in the administrativewheelgroup.## Allows people in group wheel to run all commands %wheel ALL=(ALL) ALL
-
Make sure the line that starts with
%wheelis not commented out with the number sign (#). - Save any changes, and exit the editor.
Add users you want to grant
sudoaccess to into the administrativewheelgroup.# usermod --append -G wheel <username>Replace
<username>with the name of the user.
Verification
Log in as a member of the
wheelgroup and run:# sudo whoami root
Additional resources
-
sudo(8),sudoers(5)andvisudo(8)man pages
10.3. Enabling unprivileged users to run certain commands
As an administrator, you can allow unprivileged users to enter certain commands on specific workstations by configuring a policy in the /etc/sudoers.d/ directory. This is more secure than granting full sudo access to a user or giving someone the root password for the following reasons:
- More granular control over privileged actions. You can allow a user to perform certain actions on specific hosts instead of giving them full administrative access.
-
Better logging. When a user performs an action through
sudo, the action is logged with their user name and not just root. -
Transparent control. You can set email notifications for every time the user attempts to use
sudoprivileges.
Prerequisites
- You have root access to the system.
Procedure
Create a new file in the
/etc/sudoers.ddirectory:# visudo -f /etc/sudoers.d/<filename>The file opens automatically in an editor.
Add the following line to the
/etc/sudoers.d/<filename>file:<username> <hostname.example.com> = (<run_as_user>:<run_as_group>) <path/to/command>
-
Replace
<username>with the name of the user. -
Replace
<hostname.example.com>with the URL of the host. -
Replace
(<run_as_user>:<run_as_group>)with the user or group as to which the command can be executed. If you omit this section,<username>can execute the command as root. -
Replace
<path/to/command>with the complete absolute path to the command. You can also limit the user to only performing a command with specific options and arguments by adding those options after the command path. If you do not specify any options, the user can use the command with all options. - To allow two and more commands on the same host on one line, you can list them separated by a comma followed by a space.
-
Replace
For example, to allow user1 to execute the dnf and reboot commands on host1.example.com, enter:
user1 host1.example.com = /bin/dnf, /sbin/reboot
Optional: To receive email notifications every time a user attempts to use
sudoprivileges, add the following lines to the file:Defaults mail_always Defaults mailto="<email@example.com>"- Save the changes, and exit the editor.
Verification
To verify if a user can run a command with
sudoprivileges, switch the account:# su <username> -As the user, enter the command with the
sudocommand:$ sudo whoami [sudo] password for
<username>:Enter the user’s
sudopassword.If the privileges are configured correctly, sudo executes the command as the configured user. For example, with the
dnfcommand, it shows the following output:... usage: dnf [options] COMMAND ...
If the system returns the following error message, the user is not allowed to run commands with sudo.
<username> is not in the sudoers file. This incident will be reported.
+ If the system returns the following error message, the configuration was not completed correctly.
<username> is not allowed to run sudo on <host.example.com>.
+ If the system returns the following error message, the command is not correctly defined in the rule for the user.
`Sorry, user _<username>_ is not allowed to execute '_<path/to/command>_' as root on _<host.example.com>_.`
Additional resources
-
visudo(8), andsudoers(5)man pages
10.4. Applying custom sudoers configuration by using RHEL system roles
You can use the sudo RHEL system role to apply custom sudoers configuration on your managed nodes. That way, you can define which users can run which commands on which hosts, with better configuration efficiency and more granular control.
Prerequisites
- You have prepared the control node and the managed nodes
- You are logged in to the control node as a user who can run playbooks on the managed nodes.
-
The account you use to connect to the managed nodes has
sudopermissions on them.
Procedure
Create a playbook file, for example
~/playbook.yml, with the following content:--- - name: "Configure sudo" hosts: managed-node-01.example.com tasks: - name: "Apply custom /etc/sudoers configuration" ansible.builtin.include_role: name: rhel-system-roles.sudo vars: sudo_sudoers_files: - path: "/etc/sudoers" user_specifications: - users: - <user_name> hosts: - <host_name> commands: - <path_to_command_binary>The settings specified in the playbook include the following:
users- The list of users that the rule applies to.
hosts-
The list of hosts that the rule applies to. You can use
ALLfor all hosts. commandsThe list of commands that the rule applies to. You can use
ALLfor all commands.For details about all variables used in the playbook, see the
/usr/share/ansible/roles/rhel-system-roles.sudo/README.mdfile on the control node.
Validate the playbook syntax:
$ ansible-playbook --syntax-check ~/playbook.ymlNote that this command only validates the syntax and does not protect against a wrong but valid configuration.
Run the playbook:
$ ansible-playbook ~/playbook.yml
Verification
On the managed node, verify that the playbook applied the new rules.
# cat /etc/sudoers | tail -n1
<user_name> <host_name>= <path_to_command_binary>
Additional resources
-
/usr/share/ansible/roles/rhel-system-roles.sudo/README.mdfile -
/usr/share/doc/rhel-system-roles.sudo/sudo/directory
Chapter 11. Managing file system permissions
File system permissions control the ability of user and group accounts to read, modify, and execute the contents of the files and to enter directories. Set permissions carefully to protect your data against unauthorized access.
11.1. Managing file permissions
Every file or directory has three levels of ownership:
- User owner (u).
- Group owner (g).
- Others (o).
Each level of ownership can be assigned the following permissions:
- Read (r).
- Write (w).
- Execute (x).
Note that the execute permission for a file allows you to execute that file. The execute permission for a directory allows you to access the contents of the directory, but not execute it.
When a new file or directory is created, the default set of permissions are automatically assigned to it. The default permissions for a file or directory are based on two factors:
- Base permission.
- The user file-creation mode mask (umask).
11.1.1. Base file permissions
Whenever a new file or directory is created, a base permission is automatically assigned to it. Base permissions for a file or directory can be expressed in symbolic or octal values.
| Permission | Symbolic value | Octal value |
| No permission | --- | 0 |
| Execute | --x | 1 |
| Write | -w- | 2 |
| Write and execute | -wx | 3 |
| Read | r-- | 4 |
| Read and execute | r-x | 5 |
| Read and write | rw- | 6 |
| Read, write, execute | rwx | 7 |
The base permission for a directory is 777 (drwxrwxrwx), which grants everyone the permissions to read, write, and execute. This means that the directory owner, the group, and others can list the contents of the directory, create, delete, and edit items within the directory, and descend into it.
Note that individual files within a directory can have their own permission that might prevent you from editing them, despite having unrestricted access to the directory.
The base permission for a file is 666 (-rw-rw-rw-), which grants everyone the permissions to read and write. This means that the file owner, the group, and others can read and edit the file.
Example 11.1. Permissions for a file
If a file has the following permissions:
$ ls -l
-rwxrw----. 1 sysadmins sysadmins 2 Mar 2 08:43 file
-
-indicates it is a file. -
rwxindicates that the file owner has permissions to read, write, and execute the file. -
rw-indicates that the group has permissions to read and write, but not execute the file. -
---indicates that other users have no permission to read, write, or execute the file. -
.indicates that the SELinux security context is set for the file.
Example 11.2. Permissions for a directory
If a directory has the following permissions:
$ ls -dl directory
drwxr-----. 1 sysadmins sysadmins 2 Mar 2 08:43 directory
-
dindicates it is a directory. rwxindicates that the directory owner has the permissions to read, write, and access the contents of the directory.As a directory owner, you can list the items (files, subdirectories) within the directory, access the content of those items, and modify them.
-
r-xindicates that the group has permissions to read the content of the directory, but not write - create new entries or delete files. Thexpermission means that you can also access the directory using thecdcommand. ---indicates that other users have no permission to read, write, or access the contents of the directory.As someone who is not a user owner, or as a group, you cannot list the items within the directory, access information about those items, or modify them.
-
.indicates that the SELinux security context is set for the directory.
The base permission that is automatically assigned to a file or directory is not the default permission the file or directory ends up with. When you create a file or directory, the base permission is altered by the umask. The combination of the base permission and the umask creates the default permission for files and directories.
11.1.2. User file-creation mode mask
The user file-creation mode mask (umask) is variable that controls how file permissions are set for newly created files and directories. The umask automatically removes permissions from the base permission value to increase the overall security of a Linux system. The umask can be expressed in symbolic or octal values.
| Permission | Symbolic value | Octal value |
| Read, write, and execute | rwx | 0 |
| Read and write | rw- | 1 |
| Read and execute | r-x | 2 |
| Read | r-- | 3 |
| Write and execute | -wx | 4 |
| Write | -w- | 5 |
| Execute | --x | 6 |
| No permissions | --- | 7 |
The default umask for both a standard user and for a root user is 0022.
The first digit of the umask represents special permissions (sticky bit, ). The last three digits of the umask represent the permissions that are removed from the user owner (u), group owner (g), and others (o) respectively.
Example 11.3. Applying the umask when creating a file
The following example illustrates how the umask with an octal value of 0137 is applied to the file with the base permission of 777, to create the file with the default permission of 640.
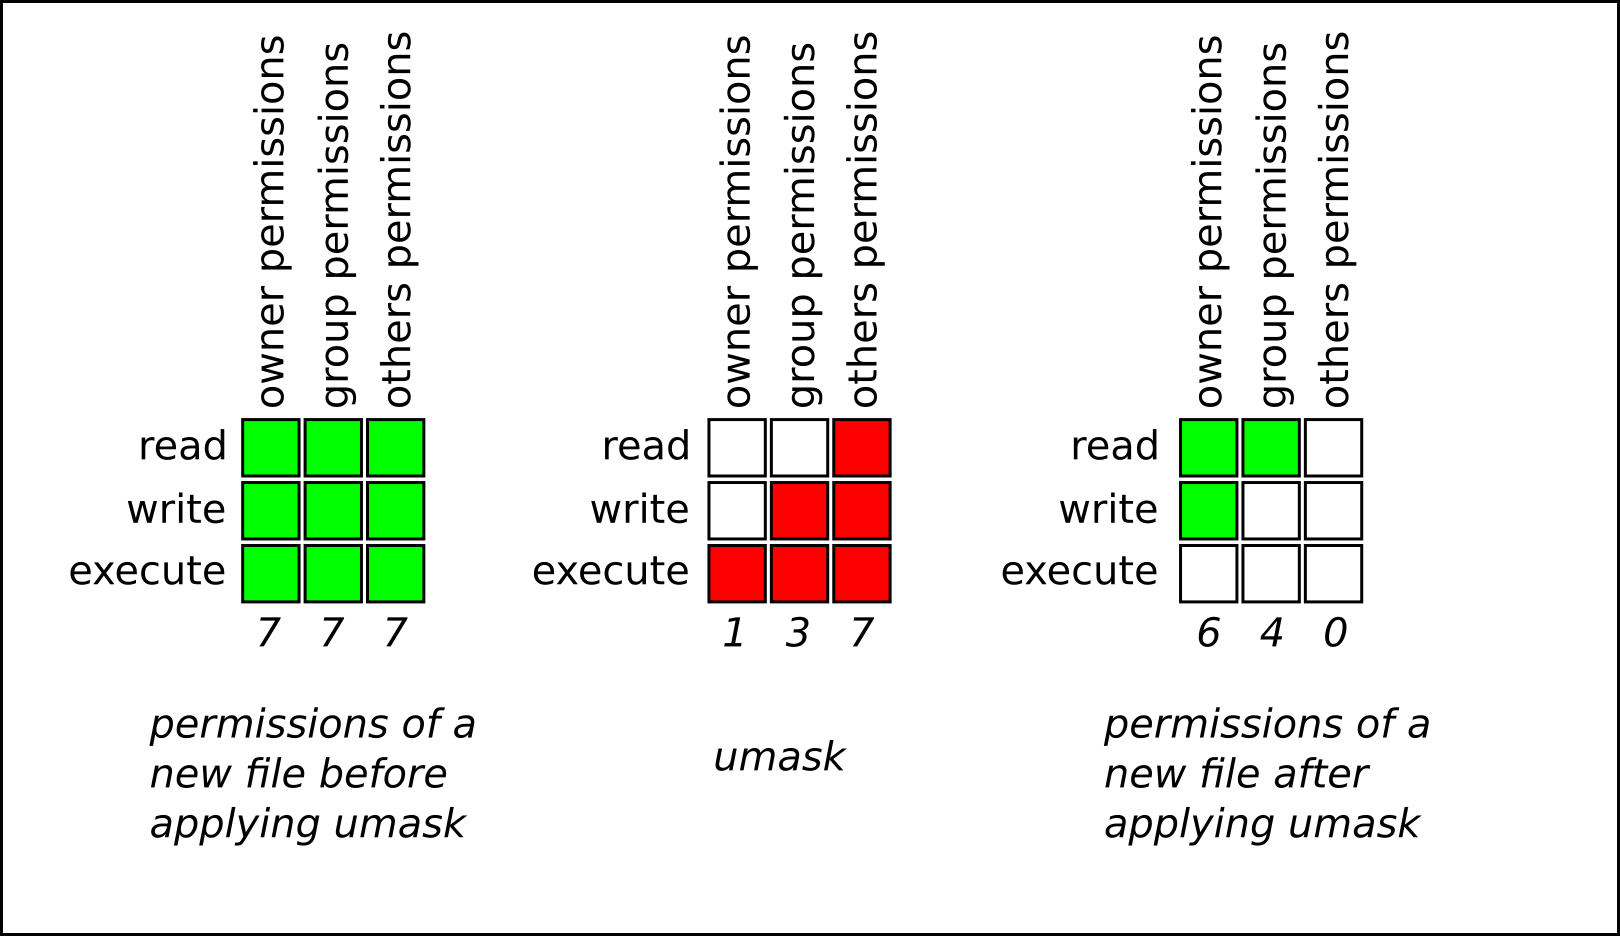
11.1.3. Default file permissions
The default permissions are set automatically for all newly created files and directories. The value of the default permissions is determined by applying the umask to the base permission.
Example 11.4. Default permissions for a directory
When a standard user or a root user creates a new directory, the umask is set to 022 (rwxr-xr-x), and the base permissions for a directory are set to 777 (rwxrwxrwx). This brings the default permissions to 755 (rwxr-xr-x).
| Symbolic value | Octal value | |
| Base permission | rwxrwxrwx | 777 |
| Umask | rwxr-xr-x | 022 |
| Default permission | rwxr-xr-x | 755 |
This means that the directory owner can list the contents of the directory, create, delete, and edit items within the directory, and descend into it. The group and others can only list the contents of the directory and descend into it.
Example 11.5. Default permissions for a file
When a standard user or a root user creates a new file, the umask is set to 022 (rwxr-xr-x), and the base permissions for a file are set to 666 (rw-rw-rw-). This brings the default permissions to 644 (-rw-r—r--).
| Symbolic value | Octal value | |
| Base permission | rw-rw-rw- | 666 |
| Umask | rwxr-xr-x | 022 |
| Default permission | rw-r—r-- | 644 |
This means that the file owner can read and edit the file, while the group and others can only read the file.
For security reasons, regular files cannot have execute permissions by default, even if the umask is set to 000 (rwxrwxrwx). However, directories can be created with execute permissions.
11.1.4. Changing file permissions using symbolic values
You can use the chmod utility with symbolic values (a combination of letters and signs) to change file permissions for a file or directory.
You can assign the following permissions:
- Read (r)
- Write (w)
- Execute (x)
Permissions can be assigned to the following levels of ownership:
- User owner (u)
- Group owner (g)
- Other (o)
- All (a)
To add or remove permissions you can use the following signs:
-
+to add the permissions on top of the existing permissions -
-to remove the permissions from the existing permission -
=to remove the existing permissions and explicitly define the new ones
Procedure
To change the permissions for a file or directory, use:
$ chmod <level><operation><permission> file-nameReplace
<level>with the level of ownership you want to set the permissions for. Replace<operation>with one of the signs. Replace<permission>with the permissions you want to assign. Replace file-name with the name of the file or directory. For example, to grant everyone the permissions to read, write, and execute (rwx)my-script.sh, use thechmod a=rwx my-script.shcommand.See Base file permissions for more details.
Verification
To see the permissions for a particular file, use:
$ ls -l file-nameReplace file-name with the name of the file.
To see the permissions for a particular directory, use:
$ ls -dl directory-nameReplace directory-name with the name of the directory.
To see the permissions for all the files within a particular directory, use:
$ ls -l directory-nameReplace directory-name with the name of the directory.
Example 11.6. Changing permissions for files and directories
To change file permissions for
my-file.txtfrom-rw-rw-r--to-rw------, use:Display the current permissions for
my-file.txt:$ ls -l my-file.txt -rw-rw-r--. 1 username username 0 Feb 24 17:56 my-file.txtRemove the permissions to read, write, and execute (
rwx) the file from group owner (g) and others (o):$ chmod go= my-file.txtNote that any permission that is not specified after the equals sign (
=) is automatically prohibited.Verify that the permissions for
my-file.txtwere set correctly:$ ls -l my-file.txt -rw-------. 1 username username 0 Feb 24 17:56 my-file.txt
To change file permissions for
my-directoryfromdrwxrwx---todrwxrwxr-x, use:Display the current permissions for
my-directory:$ ls -dl my-directory drwxrwx---. 2 username username 4096 Feb 24 18:12 my-directoryAdd the read and execute (
r-x) access for all users (a):$ chmod o+rx my-directoryVerify that the permissions for
my-directoryand its content were set correctly:$ ls -dl my-directory drwxrwxr-x. 2 username username 4096 Feb 24 18:12 my-directory
11.1.5. Changing file permissions using octal values
You can use the chmod utility with octal values (numbers) to change file permissions for a file or directory.
Procedure
To change the file permissions for an existing file or directory, use:
$ chmod octal_value file-nameReplace file-name with the name of the file or directory. Replace octal_value with an octal value. See Base file permissions for more details.
11.2. Managing the Access Control List
Each file and directory can only have one user owner and one group owner at a time. If you want to grant a user permissions to access specific files or directories that belong to a different user or group while keeping other files and directories private, you can utilize Linux Access Control Lists (ACLs).
11.2.1. Setting the Access Control List
You can use the setfacl utility to set the ACL for a file or directory.
Prerequisites
-
You have the
rootaccess.
Procedure
To display the current ACL for a particular file or directory, run:
$ getfacl file-nameReplace file-name with the name of the file or directory.
- To set the ACL for a file or directory, use:
# setfacl -m u:username:symbolic_value file-name
Replace username with the name of the user, symbolic_value with a symbolic value, and file-name with the name of the file or directory. For more information see the setfacl man page on your system.
Example 11.7. Modifying permissions for a group project
The following example describes how to modify permissions for the group-project file owned by the root user that belongs to the root group so that this file is:
- Not executable by anyone.
-
The user
andrewhas therw-permissions. -
The user
susanhas the---permissions. -
Other users have the
r--permissions.
Procedure
# setfacl -m u:andrew:rw- group-project
# setfacl -m u:susan:--- group-project
Verification
To verify that the user
andrewhas therw-permission, the usersusanhas the---permission, and other users have ther--permission, use:$ getfacl group-projectThe output returns:
# file: group-project
# owner: root
# group: root
user:andrew:rw-
user:susan:---
group::r--
mask::rw-
other::r--
11.3. Managing the umask
You can use the umask utility to display, set, or change the current or default value of the umask.
11.3.1. Displaying the current value of the umask
You can use the umask utility to display the current value of the umask in symbolic or octal mode.
Procedure
To display the current value of the umask in symbolic mode, use:
$ umask -STo display the current value of the umask in the octal mode, use:
$ umaskNoteWhen displaying the umask in octal mode, you may notice it displayed as a four digit number (
0002or0022). The first digit of the umask represents a special bit (sticky bit, SGID bit, or SUID bit). If the first digit is set to0, the special bit is not set.
11.3.2. Setting the umask using symbolic values
You can use the umask utility with symbolic values (a combination letters and signs) to set the umask for the current shell session
You can assign the following permissions:
- Read (r)
- Write (w)
- Execute (x)
Permissions can be assigned to the following levels of ownership:
- User owner (u)
- Group owner (g)
- Other (o)
- All (a)
To add or remove permissions you can use the following signs:
-
+to add the permissions on top of the existing permissions -
-to remove the permissions from the existing permission =to remove the existing permissions and explicitly define the new onesNoteAny permission that is not specified after the equals sign (
=) is automatically prohibited.
Procedure
To set the umask for the current shell session, use:
$ umask -S <level><operation><permission>Replace
<level>with the level of ownership you want to set the umask for. Replace<operation>with one of the signs. Replace<permission>with the permissions you want to assign. For example, to set the umask tou=rwx,g=rwx,o=rwx, useumask -S a=rwx.See User file-creation mode for more details.
NoteThe umask is only valid for the current shell session.
11.3.3. Setting the umask using octal values
You can use the umask utility with octal values (numbers) to set the umask for the current shell session.
Procedure
To set the umask for the current shell session, use:
$ umask octal_valueReplace octal_value with an octal value. See User file-creation mode mask for more details.
NoteThe umask is only valid for the current shell session.
11.3.4. Changing the default umask for the non-login shell
You can change the default bash umask for standard users by modifying the /etc/bashrc file.
Prerequisites
-
You have the
rootaccess.
Procedure
-
Open the
/etc/bashrcfile in the editor.
Replace the default octal value of the umask (002) with another octal value. See User file-creation mode mask for more details.
- Save the changes and exit the editor.
11.3.5. Changing the default umask for the login shell
You can change the default bash umask for the root user by modifying the /etc/login.defs file.
Prerequisites
-
rootaccess
Procedure
-
As
root, open the/etc/login.defsfile in the editor. Modify the following sections to set a new default
bashumask:# Default initial "umask" value used by login(1) on non-PAM enabled systems. # Default "umask" value for pam_umask(8) on PAM enabled systems. # UMASK is also used by useradd(8) and newusers(8) to set the mode for new # home directories if HOME_MODE is not set. # 022 is the default value, but 027, or even 077, could be considered # for increased privacy. There is no One True Answer here: each sysadmin # must make up their mind. UMASK 022
Replace the default octal value of the umask (
022) with another octal value. See User file-creation mode mask for more details.- Save the changes and exit the editor.
11.3.6. Changing the default umask for a specific user
You can change the default umask for a specific user by modifying the .bashrc for that user.
Procedure
Append the line that specifies the octal value of the umask into the
.bashrcfile for the particular user.$ echo 'umask octal_value' >> /home/username/.bashrcReplace octal_value with an octal value and replace username with the name of the user. See User file-creation mode mask for more details.
11.3.7. Setting default permissions for newly created home directories
You can change the permission modes for home directories of newly created users by modifying the /etc/login.defs file.
Procedure
-
As
root, open the/etc/login.defsfile in the editor. Modify the following section to set a new default HOME_MODE:
# HOME_MODE is used by useradd(8) and newusers(8) to set the mode for new # home directories. # If HOME_MODE is not set, the value of UMASK is used to create the mode. HOME_MODE 0700
Replace the default octal value (
0700) with another octal value. The selected mode will be used to create the permissions for the home directory.- If HOME_MODE is set, save the changes and exit the editor.
If HOME_MODE is not set, modify the UMASK to set the mode for the newly created home directories:
# Default initial "umask" value used by login(1) on non-PAM enabled systems.
# Default "umask" value for pam_umask(8) on PAM enabled systems.
# UMASK is also used by useradd(8) and newusers(8) to set the mode for new
# home directories if HOME_MODE is not set.
# 022 is the default value, but 027, or even 077, could be considered
# for increased privacy. There is no One True Answer here: each sysadmin
# must make up their mind.

UMASK           022
Replace the default octal value (
022) with another octal value. See User file-creation mode mask for more details.- Save the changes and exit the editor.
Chapter 12. Managing systemd
As a system administrator, you can manage critical aspects of your system with systemd. Serving as a system and service manager for Linux operating systems, systemd software suite provides tools and services for controlling, reporting, and system initialization. Key features of systemd include:
- Parallel start of system services during boot
- On-demand activation of daemons
- Dependency-based service control logic
The basic object that systemd manages is a systemd unit, a representation of system resources and services. A systemd unit consists of a name, type and a configuration file that defines and manages a particular task. You can use unit files to configure system behavior. See the following examples of various systemd unit types:
- Service
- Controls and manages individual system services.
- Target
- Represents a group of units that define system states.
- Device
- Manages hardware devices and their availability.
- Mount
- Handles file system mounting.
- Timer
- Schedules tasks to run at specific intervals.
12.1. Systemd unit files locations
You can find the unit configuration files in one of the following directories:
| Directory | Description |
|---|---|
|
|
|
|
|
|
|
|
|
The default configuration of systemd is defined during the compilation and you can find the configuration in the /etc/systemd/system.conf file. By editing this file, you can modify the default configuration by overriding values for systemd units globally.
For example, to override the default value of the timeout limit, which is set to 90 seconds, use the DefaultTimeoutStartSec parameter to input the required value in seconds.
DefaultTimeoutStartSec=required value12.2. Managing system services with systemctl
As a system administrator, you can manage system services by using the systemctl utility. You can perform various tasks, such as starting, stopping, restarting running services, enabling and disabling services to start at boot, listing available services, and displaying system services statuses.
12.2.1. Listing system services
You can list all currently loaded service units and display the status of all available service units.
Procedure
Use the systemctl command to perform any of the following tasks:
List all currently loaded service units:
$ systemctl list-units --type service
UNIT                     LOAD   ACTIVE SUB     DESCRIPTION
abrt-ccpp.service        loaded active exited  Install ABRT coredump hook
abrt-oops.service        loaded active running ABRT kernel log watcher
abrtd.service            loaded active running ABRT Automated Bug Reporting Tool
...
systemd-vconsole-setup.service loaded active exited  Setup Virtual Console
tog-pegasus.service            loaded active running OpenPegasus CIM Server

LOAD   = Reflects whether the unit definition was properly loaded.
ACTIVE = The high-level unit activation state, or a generalization of SUB.
SUB    = The low-level unit activation state, values depend on unit type.

46 loaded units listed. Pass --all to see loaded but inactive units, too.
To show all installed unit files use 'systemctl list-unit-files'
By default, the
systemctl list-unitscommand displays only active units. For each service unit file, the command provides an overview of the following parameters:UNIT- The full name of the service unit
LOAD- The load state of the configuration file
ACTIVEorSUB- The current high-level and low-level unit file activation state
DESCRIPTION- A short description of the unit’s purpose and functionality
List all loaded units regardless of their state, by using the following command with the
--allor-acommand line option:$ systemctl list-units --type service --allList the status (enabled or disabled) of all available service units:
$ systemctl list-unit-files --type service
UNIT FILE                               STATE
abrt-ccpp.service                       enabled
abrt-oops.service                       enabled
abrtd.service                           enabled
...
wpa_supplicant.service                  disabled
ypbind.service                          disabled

208 unit files listed.
For each service unit, this command displays:
UNIT FILE- The full name of the service unit
STATE- The information whether the service unit is enabled or disabled to start automatically during boot
Additional resources
12.2.2. Displaying system service status
You can inspect any service unit to get detailed information and verify the state of the service, whether it is enabled to start during boot or currently running. You can also view services that are ordered to start after or before a particular service unit.
Procedure
Display detailed information about a service unit that corresponds to a system service:
$ systemctl status <name>.serviceReplace
<name>with the name of the service unit you want to inspect (for example,gdm).This command displays the following information:
- The name of the selected service unit followed by a short description
- One or more fields described in Available service unit information
-
The execution of the service unit: if the unit is executed by the
rootuser The most recent log entries
Table 12.2. Available service unit information Field Description LoadedInformation whether the service unit has been loaded, the absolute path to the unit file, and a note whether the unit is enabled to start during boot.
ActiveInformation whether the service unit is running followed by a time stamp.
Main PIDThe process ID and the name of the corresponding system service.
StatusAdditional information about the corresponding system service.
ProcessAdditional information about related processes.
CGroupAdditional information about related control groups (
cgroups).
Verify that a particular service unit is running:
$ systemctl is-active <name>.serviceDetermine whether a particular service unit is enabled to start during boot:
$ systemctl is-enabled <name>.serviceNoteBoth
systemctl is-activeandsystemctl is-enabledcommands return an exit status of0if the specified service unit is running or enabled.Check what services
systemdorders to start before the specified service unit# systemctl list-dependencies --after <name>.serviceFor example, to view the list of services ordered to start before
gdm, enter:# systemctl list-dependencies --after gdm.service gdm.service ├─dbus.socket ├─getty@tty1.service ├─livesys.service ├─plymouth-quit.service ├─system.slice ├─systemd-journald.socket ├─systemd-user-sessions.service └─basic.target [output truncated]Check what services
systemdorders to start after the specified service unit:# systemctl list-dependencies --before <name>.serviceFor example, to view the list of services
systemdorders to start aftergdm, enter:# systemctl list-dependencies --before gdm.service gdm.service ├─dracut-shutdown.service ├─graphical.target │ ├─systemd-readahead-done.service │ ├─systemd-readahead-done.timer │ └─systemd-update-utmp-runlevel.service └─shutdown.target ├─systemd-reboot.service └─final.target └─systemd-reboot.service
Additional resources
12.2.3. Starting and stopping a systemd unit
You can start system service in the current session by using the systemctl start command.
Prerequisites
- You have the Root access.
Procedure
Start a system service in the current session:
# *systemctl start <systemd_unit> *
Replace
<systemd_unit>with the name of the service unit you want to start (for example,httpd.service).NoteIn
systemd, positive and negative dependencies between services exist. Starting a particular service may require starting one or more other services (positive dependency) or stopping one or more services (negative dependency).When you attempt to start a new service,
systemdresolves all dependencies automatically, without explicit notification to the user. This means that if you are already running a service, and you attempt to start another service with a negative dependency, the first service is automatically stopped.For example, if you are running the
sendmailservice, and you attempt to start thepostfixservice,systemdfirst automatically stopssendmail, because these two services are conflicting and cannot run on the same port.
Additional resources
-
systemctl(1)man page on your system - Enabling a system service to start at boot
- Displaying system service status
12.2.4. Stopping a system service
If you want to stop a system service in the current session, use the systemctl stop command.
Prerequisites
- Root access
Procedure
Stop a system service:
# systemctl stop <name>.serviceReplace
<name>with the name of the service unit you want to stop (for example,bluetooth).
Additional resources
-
systemctl(1)man page on your system - Disabling a system service to start at boot
- Displaying system service status
12.2.5. Restarting and Reload a system service
You can restart system service in the current session using the restart command to perform the following actions:
- Stop the selected service unit in the current session and immediately start it again.
- Restart a service unit only if the corresponding service is already running.
- Reload configuration of a system service without interrupting its execution.
Prerequisites
- You have the Root access.
Procedure
Restart a system service:
# systemctl restart <name>.serviceReplace
<name>with the name of the service unit you want to restart (for example,httpd).If the selected service unit is not running, this command starts it.
Restart a service unit only if the corresponding service is already running:
# systemctl try-restart <name>.serviceReload the configuration without interrupting service execution:
# systemctl reload <name>.serviceNoteSystem services that do not support this feature, ignore this command. To restart such services, use the
reload-or-restartandreload-or-try-restartcommands instead.
Additional resources
-
systemctlman page on your system - Displaying system service status
12.2.6. Enabling a system service to start at boot
You can enable a service to start automatically at boot, these changes apply with the next reboot.
Prerequisites
- You have Root access.
Procedure
Verify whether the unit is masked:
# systemctl status <systemd_unit>If the unit is masked, unmask it first:
# systemctl unmask <systemd_unit>Enable a service to start at boot time:
# systemctl enable <systemd_unit>Replace
<systemd_unit>with the name of the service unit you want to enable (for example,httpd).
Optionally, pass the --now option to the command to also start the unit right now.
Additional resources
-
systemctl (1)man page on your system - Displaying system service status
- Starting a system service
12.2.7. Disabling a system service to start at boot
You can prevent a service unit from starting automatically at boot time. If you disable a service, it will not start at boot, but you can start it manually. You can also mask a service, so that it cannot be started manually. Masking is a way of disabling a service that makes the service permanently unusable until it is unmasked again.
Prerequisites
- You have Root access.
Procedure
Disable a service to start at boot:
# systemctl disable <name>.serviceReplace
<name>with the name of the service unit you want to disable (for example,bluetooth). Optionally, pass the–-nowcommand to also stop the service if it is currently running.Optional: To prevent that the unit can be accidentally started by an administrator or as a dependency of other units, mask the service:
# systemctl mask <name>.service
Additional resources
-
systemctl (1)man page on your system - Displaying system service status
- Stopping a system service
12.3. Booting into a target system state
As a system administrator, you can control the boot process of your system, and define the state you want your system to boot into. This is called a systemd target, and it is a set of systemd units that your system starts to reach a certain level of functionality. While working with systemd targets, you can view the default target, select a target at runtime, change the default boot target, boot into emergency or rescue target.
12.3.1. Target unit files
Targets in systemd are groups of related units that act as synchronization points during the start of your system. Target unit files, which end with the .target file extension, represent the systemd targets. The purpose of target units is to group together various systemd units through a chain of dependencies.
Consider the following example:
-
Similarly, the
multi-user.targetunit starts other essential system services such as NetworkManager (NetworkManager.service) or D-Bus (dbus.service) and activates another target unit namedbasic.target.
You can set the following systemd targets as default or current targets:
| rescue | unit target that pulls in the base system and spawns a rescue shell |
|---|---|
| multi-user | unit target for setting up a multi-user system |
| graphical | unit target for setting up a graphical login screen |
| emergency | unit target that starts an emergency shell on the main console |
Additional resources
-
systemd.special(7)andsystemd.target(5)man pages on your system
12.3.2. Changing the default target to boot into
The default.target symbolic link refers to the systemd target that the system should boot into. When the system starts, systemd resolves this link and boots into the defined target. You can find the currently selected default target unit in the /etc/systemd/system/default.target file. Each target represents a certain level of functionality and is used for grouping other units. Additionally, target units serve as synchronization points during boot. You can change the default target your system boots into. When you set a default target unit, the current target remains unchanged until the next reboot.
Prerequisites
- You have Root access.
Procedure
Determine the current default target unit
systemduses to start the system:# systemctl get-default graphical.targetList the currently loaded targets:
# systemctl list-units --type targetConfigure the system to use a different target unit by default:
# systemctl set-default <name>.targetReplace
<name>with the name of the target unit you want to use by default.Example: # systemctl set-default multi-user.target Removed /etc/systemd/system/default.target Created symlink /etc/systemd/system/default.target -> /usr/lib/systemd/system/multi-user.targetVerify the default target unit:
# systemctl get-default
multi-user.target
Optional: Switch to the new default target:
# systemctl isolate default.targetAlternatively, reboot the system.
Additional resources
-
systemctl(1),systemd.special(7), andbootup(7)man pages on your system
12.3.3. Changing the current target
On a running system, you can change the target unit in the current boot without reboot. If you switch to a different target, systemd starts all services and their dependencies that this target requires, and stops all services that the new target does not enable. Manually switching to a different target is only a temporary operation. When you reboot the host, systemd boots again into the default target.
Procedure
Optional: Display the list of targets you can select:
# systemctl list-units --type targetNoteYou can only isolate targets that have the
AllowIsolate=yesoption set in the unit files.Change to a different target unit in the current boot:
# systemctl isolate <name>.targetReplace <name> with the name of the target unit you want to use in the current boot.
Example:
# systemctl isolate multi-user.target
This command starts the target unit named
multi-userand all dependent units, and immediately stops all other unit.
Additional resources
-
systemctl(1)man page on your system
12.3.4. Booting to rescue mode
You can boot to the rescue mode that provides a single-user environment for troubleshooting or repair if the system cannot get to a later target, and the regular booting process fails. In rescue mode, the system attempts to mount all local file systems and start certain important system services, but it does not activate network interfaces.
Prerequisites
- Root access
Procedure
To enter the rescue mode, change the current target in the current session:
# systemctl rescue Broadcast message from root@localhost on pts/0 (Fri 2023-03-24 18:23:15 CEST): The system is going down to rescue mode NOW!NoteThis command is similar to
systemctl isolate rescue.target, but it also sends an informative message to all users that are currently logged into the system.To prevent
systemdfrom sending a message, enter the following command with the--no-wallcommand-line option:# systemctl --no-wall rescue
Troubleshooting
If your system is not able to enter the rescue mode, you can boot to emergency mode, which provides the most minimal environment possible. In emergency mode, the system mounts the root file system only for reading, does not attempt to mount any other local file systems, does not activate network interfaces, and only starts a few essential services.
12.3.5. Troubleshooting the boot process
As a system administrator, you can select a non-default target at boot time to troubleshoot the boot process. Changing the target at boot time affects only a single boot. You can boot to emergency mode, which provides the most minimal environment possible.
Procedure
- Reboot the system, and interrupt the boot loader menu countdown by pressing any key except the Enter key, which would initiate a normal boot.
- Move the cursor to the kernel entry that you want to start.
- Press the E key to edit the current entry.
Move to the end of the line that starts with
linuxand press Ctrl+E to jump to the end of the line:linux ($root)/vmlinuz-5.14.0-70.22.1.e19_0.x86_64 root=/dev/mapper/rhel-root ro crash\ kernel=auto resume=/dev/mapper/rhel-swap rd.lvm.lv/swap rhgb quiet
To choose an alternate boot target, append the
systemd.unit=parameter to the end of the line that starts withlinux:linux ($root)/vmlinuz-5.14.0-70.22.1.e19_0.x86_64 root=/dev/mapper/rhel-root ro crash\ kernel=auto resume=/dev/mapper/rhel-swap rd.lvm.lv/swap rhgb quiet systemd.unit=<name>.targetReplace
<name>with the name of the target unit you want to use. For example,systemd.unit=emergency.target- Press Ctrl+X to boot with these settings.
12.4. Shutting down, suspending, and hibernating the system
As a system administrator, you can use different power management options to manage power consumption, perform a proper shutdown to ensure that all data is saved, or restart the system to apply changes and updates.
12.4.1. System shutdown
To shut down the system, you can either use the systemctl utility directly, or call this utility through the shutdown command.
Using the shutdown utility has the following advantages:
-
In RHEL 8, you can schedule a shutdown by using the
timeargument. This also gives users warning that a system shutdown has been scheduled.
12.4.2. Scheduling a system shutdown
As a system administrator, you can schedule a delayed shutdown to give users time to save their work and log off the system. Use the shutdown command to perform the following operations:
Shut down the system and power off the machine at a certain time:
# shutdown --poweroff hh:mmWhere
hh:mmis the time in the 24-hour time notation. To prevent new logins, the/run/nologinfile is created 5 minutes before system shutdown.When you use the time argument, you can notify users logged in to the system of the planned shutdown by specifying an optional wall message, for example
shutdown --poweroff 13:59 "Attention. The system will shut down at 13:59".Shut down and halt the system after a delay, without powering off the machine:
# shutdown --halt +mWhere
+mis the delay time in minutes. You can use thenowkeyword as an alias for+0.Cancel a pending shutdown
# shutdown -c
Additional resources
-
shutdown(8)manual page - Shutting down the system using the systemctl command
12.4.3. Shutting down the system using the systemctl command
As a system administrator, you can shut down the system and power off the machine or shut down and halt the system without powering off the machine by using the systemctl command.
Prerequisites
- Root access
Procedure
Use the systemctl command to perform any of the following tasks:
Shut down the system and power off the machine:
# systemctl poweroffShut down and halt the system without powering off the machine:
# systemctl halt
By default, running either of these commands causes systemd to send an informative message to all users that are currently logged into the system. To prevent systemd from sending this message, run the selected command with the --no-wall command line option.
12.4.4. Restarting the system
When you restart the system, systemd stops all running programs and services, the system shuts down, and then immediately starts again.
Prerequisites
- You have Root access.
Procedure
Restart the system:
# systemctl reboot
By default, when you use this command, systemd sends an informative message to all users that are currently logged into the system. To prevent systemd from sending this message, run this command with the --no-wall option.
12.4.5. Optimizing power consumption by suspending and hibernating the system
As a system administrator, you can manage power consumption, save energy on your systems, and preserve the current state of your system. To do so, apply one of the following modes:
- Suspend
- Suspending saves the system state in RAM and with the exception of the RAM module, powers off most of the devices in the machine. When you turn the machine back on, the system then restores its state from RAM without having to boot again. Because the system state is saved in RAM and not on the hard disk, restoring the system from suspend mode is significantly faster than from hibernation. However, the suspended system state is also vulnerable to power outages.
- Hibernate
- Hibernating saves the system state on the hard disk drive and powers off the machine. When you turn the machine back on, the system then restores its state from the saved data without having to boot again. Because the system state is saved on the hard disk and not in RAM, the machine does not have to maintain electrical power to the RAM module. However, as a consequence, restoring the system from hibernation is significantly slower than restoring it from suspend mode.
- Hybrid sleep
- This combines elements of both hibernation and suspending. The system first saves the current state on the the hard disk drive, and enters a low-power state similar to suspending, which allows the system to resume more quickly. The benefit of hybrid sleep is that if the system loses power during the sleep state, it can still recover the previous state from the saved image on the hard disk, similar to hibernation.
- Suspend-then-hibernate
-
This mode first suspends the system, which results in saving the current system state to RAM and putting the system in a low-power mode. The system hibernates if it remains suspended for a specific period of time that you can define in the
HibernateDelaySecparameter. Hibernation saves the system state to the hard disk drive and shuts down the system completely. The suspend-then-hibernate mode provides the benefit of conserving battery power while you are still able to quickly resume work. Additionally, this mode ensures that your data is saved in case of a power failure.
Prerequisites
- Root access
Procedure
Choose the appropriate method for power saving:
Suspend the system:
# systemctl suspendHibernate the system:
# systemctl hibernateHibernate and suspend the system:
# systemctl hybrid-sleepSuspend and then hibernate the system:
# systemctl suspend-then-hibernate
12.4.6. Changing the power button behavior
When you press the power button on your computer, it suspends or shuts down the system by default. You can customize this behavior according to your preferences.
12.4.6.1. Changing the behavior of the power button when pressing the button and GNOME is not running
When you press the power button in a non-graphical systemd target, it shuts down the system by default. You can customize this behavior according to your preferences.
Prerequisites
- Administrative access.
Procedure
Edit the
/etc/systemd/logind.confconfiguration file and set theHandlePowerKey=poweroffvariable to one of the following options:poweroff- Shut down the computer.
reboot- Reboot the system.
halt- Initiate a system halt.
kexec-
Initiate a
kexecreboot. suspend- Suspend the system.
hibernate- Initiate system hibernation.
ignore- Do nothing.
For example, to reboot the system upon pressing the power button, use this setting:
HandlePowerKey=reboot
12.4.6.2. Changing the behavior of the power button when pressing the button and GNOME is running
On the graphical login screen or in the graphical user session, pressing the power button suspends the machine by default. This happens both in cases when the user presses the power button physically or when pressing a virtual power button from a remote console. You can select a different power button behavior.
Procedure
Create a local database for system-wide settings in the
/etc/dconf/db/local.d/01-powerfile with the following content:[org/gnome/settings-daemon/plugins/power] power-button-action=<value>
Replace
<value>with one of the following power button actions:nothing- Does nothing .
suspend- Suspends the system.
hibernate- Hibernates the system.
interactiveShows a pop-up query asking the user what to do.
With interactive mode, the system powers off automatically after 60 seconds when pressing the power button. However, you can choose a different behavior from the pop-up query.
Optional: Override the user’s setting, and prevent the user from changing it. Enter the following configuration in the
/etc/dconf/db/local.d/locks/01-powerfile:/org/gnome/settings-daemon/plugins/power/power-button-action
Update the system databases:
# dconf update
- Log out and back in again for the system-wide settings to take effect.
Chapter 13. Configuring time synchronization
Accurate timekeeping in an IT environment is important. A consistent time across all network devices improves the traceability of log files and certain protocols rely on synchronized clocks. For example, Kerberos uses time stamps to prevent replay attacks. The user space daemon updates the system clock running in the kernel. Starting with Red Hat Enterprise Linux 8, the NTP protocol is implemented by the chronyd daemon, available from the repositories in the chrony package.
13.1. Introduction to chrony suite
The implementation of the Network Time Protocol (NTP) is chrony. You can use chrony:
-
To synchronize the system clock with
NTPservers - To synchronize the system clock with a reference clock, for example a GPS receiver
- To synchronize the system clock with a manual time input
-
As an
NTPv4(RFC 5905)server or peer to provide a time service to other computers in the network
chrony performs well in a wide range of conditions:
- including intermittent network connections
- heavily congested networks
- changing temperatures (ordinary computer clocks are sensitive to temperature)
- systems that do not run continuously, or run on a virtual machine.
Typical accuracy between two machines synchronized over the Internet is within a few milliseconds, and for machines on a LAN within tens of microseconds. Hardware timestamping or a hardware reference clock may improve accuracy between two machines synchronized to a sub-microsecond level.
chrony consists of chronyd, a daemon that runs in user space, and chronyc, a command line program which can be used to monitor the performance of chronyd and to change various operating parameters when it is running.
The chronyd daemon can be monitored and controlled by the command line utility chronyc. This utility provides a command prompt which allows entering a number of commands to query the current state of chronyd and make changes to its configuration. By default, chronyd accepts only commands from a local instance of chronyc, but it can be configured to accept monitoring commands also from remote hosts. The remote access should be restricted.
13.2. Using chronyc to control chronyd
You can control chronyd by using the chronyc command line utility.
Procedure
To make changes to the local instance of
chronydusing the command line utility chronyc in interactive mode, enter the following command asroot:# chronycchronyc must run as
rootif some of the restricted commands are to be used.The chronyc command prompt will be displayed as follows:
chronyc>
-
To list all of the commands, type
help. Alternatively, the utility can also be invoked in non-interactive command mode if called together with a command as follows:
chronyc command
Changes made using chronyc are not permanent, they will be lost after a chronyd restart. For permanent changes, modify /etc/chrony.conf.
13.3. Using Chrony
The following sections describe how to start, and stop chronyd, and how to check if chrony is synchronized. Sections also describe how to manually adjust System Clock.
13.3.1. Managing chrony
You can start, stop, and check the status of chronyd.
The chrony suite is installed by default on Red Hat Enterprise Linux. To ensure that it is, run the following command as
root:# dnf install chronyThe default location for the chrony daemon is
/usr/sbin/chronyd. The command line utility will be installed to/usr/bin/chronyc.To check the status of
chronyd, issue the following command:$ systemctl status chronyd chronyd.service - NTP client/server Loaded: loaded (/usr/lib/systemd/system/chronyd.service; enabled) Active: active (running) since Wed 2013-06-12 22:23:16 CEST; 11h agoTo start
chronyd, issue the following command asroot:# systemctl start chronydTo ensure
chronydstarts automatically at system start, issue the following command asroot:# systemctl enable chronydTo stop
chronyd, issue the following command asroot:# systemctl stop chronydTo prevent
chronydfrom starting automatically at system start, issue the following command asroot:# systemctl disable chronyd
13.3.2. Checking if chrony is synchronized
You can check if chrony is synchronized with the use of the tracking, sources, and sourcestats commands.
Procedure
To check chrony tracking, enter:
$  chronyc tracking
Reference ID    : CB00710F (ntp-server.example.net)
Stratum         : 3
Ref time (UTC)  : Fri Jan 27 09:49:17 2017
System time     :  0.000006523 seconds slow of NTP time
Last offset     : -0.000006747 seconds
RMS offset      : 0.000035822 seconds
Frequency       : 3.225 ppm slow
Residual freq   : 0.000 ppm
Skew            : 0.129 ppm
Root delay      : 0.013639022 seconds
Root dispersion : 0.001100737 seconds
Update interval : 64.2 seconds
Leap status     : Normal
The
chronycsources command displays information about the current time sources thatchronydis accessing.$ chronyc sources 210 Number of sources = 3 MS Name/IP address Stratum Poll Reach LastRx Last sample =============================================================================== #* GPS0 0 4 377 11 -479ns[ -621ns] /- 134ns ^? a.b.c 2 6 377 23 -923us[ -924us] +/- 43ms ^ d.e.f 1 6 377 21 -2629us[-2619us] +/- 86msYou can specify the optional
-vargument to print more verbose information. In this case, extra caption lines are shown as a reminder of the meanings of the columns.The
sourcestatscommand displays information about the drift rate and offset estimation process for each of the sources currently being examined bychronyd. To check chrony source statistics, issue the following command:$ chronyc sourcestats 210 Number of sources = 1 Name/IP Address NP NR Span Frequency Freq Skew Offset Std Dev =============================================================================== abc.def.ghi 11 5 46m -0.001 0.045 1us 25usThe optional argument
-vcan be specified, meaning verbose. In this case, extra caption lines are shown as a reminder of the meanings of the columns.
Additional resources
-
chronyc(1)man page on your system
13.3.3. Manually adjusting the System Clock
You can manually adjust the System Clock.
Procedure
To step the system clock immediately, bypassing any adjustments in progress by slewing, enter:
# chronyc makestep
If the rtcfile directive is used, the real-time clock should not be manually adjusted. Random adjustments would interfere with chrony's need to measure the rate at which the real-time clock drifts.
13.3.4. Disabling a chrony dispatcher script
The chrony dispatcher script manages the online and offline state of the NTP servers. As a system administrator, you can disable the dispatcher script to keep chronyd polling the servers constantly.
The NetworkManager executes the chrony dispatcher script during interface reconfiguration, stop or start operations. However, if you configure certain interfaces or routes outside of NetworkManager, you can encounter the following situation:
- The dispatcher script might run when no route to the NTP servers exists, causing the NTP servers to switch to the offline state.
- If you establish the route later, the script does not run again by default, and the NTP servers remain in the offline state.
To ensure that chronyd can synchronize with your NTP servers, which have separately managed interfaces, disable the dispatcher script.
Procedure
To disable the
chronydispatcher script, create a symlink to/dev/null:# ln -f -s /dev/null /etc/NetworkManager/dispatcher.d/20-chrony-onofflineNoteAfter this change, the NTP servers remain in the online state at all times.
13.3.5. Setting up chrony in an isolated network
For a network that is never connected to the Internet, one computer is selected to be the primary timeserver. The other computers are either direct clients of the server, or clients of clients. On the server, the drift file must be manually set with the average rate of drift of the system clock. If the server is rebooted, it will obtain the time from surrounding systems and calculate an average to set its system clock. Thereafter it resumes applying adjustments based on the drift file. The drift file will be updated automatically when the settime command is used.
To set up chrony for a system in an isolated network, follow the steps mentioned below:
Procedure
On the system selected to be the server, edit
/etc/chrony.confas follows:driftfile /var/lib/chrony/drift commandkey 1 keyfile /etc/chrony.keys initstepslew 10 client1 client3 client6 local stratum 8 manual allow <subnet>
Where
<subnet>is the network from which the clients are allowed to connect. Use Classless Inter-Domain Routing (CIDR) notation to specify the subnet.On the systems selected to be direct clients of the server, edit the
/etc/chrony.confas follows:server <server_fqdn> driftfile /var/lib/chrony/drift logdir /var/log/chrony log measurements statistics tracking keyfile /etc/chrony.keys commandkey 24 local stratum 10 initstepslew 20 ntp1.example.net allow <server_ip_address>
Where
<server_fqdn>is the host name of the server, and<server_ip_address>is the address of the server . Clients with this configuration will resynchronize with the server if it restarts.
On the client systems which are not to be direct clients of the server, the /etc/chrony.conf file should be the same except that the local and allow directives should be omitted.
In an isolated network, you can also use the local directive that enables a local reference mode, which allows chronyd operating as an NTP server to appear synchronized to real time, even when it was never synchronized or the last update of the clock happened a long time ago.
To allow multiple servers in the network to use the same local configuration and to be synchronized to one another, without confusing clients that poll more than one server, use the orphan option of the local directive which enables the orphan mode. Each server needs to be configured to poll all other servers with local. This ensures that only the server with the smallest reference ID has the local reference active and other servers are synchronized to it. When the server fails, another one will take over.
13.3.6. Configuring remote monitoring access
The chronyc utility can access chronyd by using the following methods:
- IPv4 or IPv6.
-
A domain socket, which is accessible locally by the
rootandchronyuser.
By default, chronyc connects to the Unix domain socket. The default path is /var/run/chrony/chronyd.sock. If this connection fails, chronyc tries to connect to 127.0.0.1 and then ::1.
Only the following monitoring commands, which do not affect the behavior of chronyd, are allowed from the network:
- activity
- manual list
- rtcdata
- smoothing
- sources
- sourcestats
- tracking
- waitsync
The set of hosts from which chronyd accepts these commands can be configured by using the following methods:
-
You can use the
cmdallowdirective in the configuration file ofchronyd. -
Run the
cmdallowcommand in chronyc.
By default, the commands are accepted only from localhost (127.0.0.1 or ::1).
All other commands are allowed only through the Unix domain socket. When sent over the network, chronyd responds with a Not authorised error, even if it is from localhost.
The following procedure describes how to access chronyd remotely with chronyc.
Procedure
Configure
chronyto listen on local interface by adding the following to the/etc/chrony.conffile:bindcmdaddress 0.0.0.0
and
bindcmdaddress ::
Allow commands from remote IP addresses, networks, and subnet:
Add the following content to the
/etc/chrony.conffile:cmdallow 192.168.1.0/24
cmdallow 2001:db8::/64
Open port 323 in the firewall to allow connections from remote systems:
# firewall-cmd --permanent --add-port=323/udpReload the firewall configuration:
# firewall-cmd --reload
Additional resources
-
chrony.conf(5)man page on your system
13.3.7. Managing time synchronization using RHEL system roles
You can manage time synchronization on multiple target machines using the timesync role. The timesync role installs and configures an NTP or PTP implementation to operate as an NTP or PTP client to synchronize the system clock.
The timesync role replaces the configuration of the given or detected provider service on the managed host. Previous settings are lost, even if they are not specified in the role variables. The only preserved setting is the choice of provider if the timesync_ntp_provider variable is not defined.
The following example shows how to apply the timesync role in a situation with just one pool of servers.
Example 13.1. An example playbook applying the timesync role for a single pool of servers
---
- hosts: timesync-test
  vars:
    timesync_ntp_servers:
      - hostname: 2.rhel.pool.ntp.org
        pool: yes
        iburst: yes
  roles:
    - rhel-system-roles.timesync
For a detailed reference on timesync role variables, install the rhel-system-roles package, and see the README.md or README.html files in the /usr/share/doc/rhel-system-roles/timesync directory.
Additional resources
13.3.8. Additional resources
-
chronyc(1)andchronyd(8)man pages on your system - Frequently Asked Questions
13.4. Chrony with HW timestamping
Hardware timestamping (HW) in some Network Interface Controller (NICs) provides accurate timestamping of incoming and outgoing packets. NTP timestamps are usually created by the kernel and chronyd with the use of the system clock. However, when HW timestamping is enabled, the NIC uses its own clock to generate the timestamps when packets are entering or leaving the link layer or the physical layer. When used with NTP, hardware timestamping can significantly improve the accuracy of synchronization. For best accuracy, both NTP servers and NTP clients need to use hardware timestamping. Under ideal conditions, a sub-microsecond accuracy may be possible.
Another protocol for time synchronization that uses hardware timestamping is PTP.
Unlike NTP, PTP relies on assistance in network switches and routers. If you want to achieve the best accuracy of synchronization, use PTP on networks that have switches and routers with PTP support, and prefer NTP on networks that do not have such switches and routers.
13.4.1. Verifying support for hardware timestamping
To verify that hardware timestamping with NTP is supported by an interface, use the ethtool -T command. An interface can be used for hardware timestamping with NTP if ethtool lists the SOF_TIMESTAMPING_TX_HARDWARE and SOF_TIMESTAMPING_TX_SOFTWARE capabilities and also the HWTSTAMP_FILTER_ALL filter mode.
Procedure
- Display a device’s time stamping capabilities and associated PTP hardware clock:
# ethtool -T enp1s013.4.2. Enabling hardware timestamping
You can enable hardware timestamping on one or multiple interfaces by using the hwtimestamp directive in the /etc/chrony.conf file. The directive can either specify a single interface, or a wildcard character can be used to enable hardware timestamping on all interfaces that support it.
Procedure
Edit the
/etc/chrony.conffile and make the following changes:Add the
hwtimestampsetting for interfaces which support hardware timestamping. For example:hwtimestamp enp1s0 hwtimestamp eno*
You can use the * wildcard if no other application, such as
ptp4luses hardware timestamping.Configure a short client polling interval by appending the
minpollandmaxpolloptions to the server setting, for example:server ntp.example.comlocal minpoll 0 maxpoll 0
For hardware timestamping, you must configure a shorter polling interval than the default range (64-1024 seconds) to minimize the offset of the system clock.
Enable the NTP interleaved mode by appending the
xleaveoption to the server setting:server ntp.example.comlocal minpoll 0 maxpoll 0 xleave
With this setting, chrony gets the hardware transmit timestamp only after sending a packet. This behavior prevents the serever from saving the timestamp in packets to which it responds. With the
xleaveoption, chrony can receive transmit timestamps that were generated after the transmission.Optional: Increase the maximum size of memory allocated for logging of client’s access on the server, for example:
clientloglimit 100000000
The default server configuration allows a few thousands of clients to use the interleaved mode concurrently. By increasing the value of the
clientloglimitsetting, you can configure the server for a large number of clients.
Restart the chronyd service:
# systemctrl restart chronyd
Verification
Optional: Verify in the
/var/log/messageslog file that hardware timesamping is enabled:chronyd[4081]: Enabled HW timestamping on enp1s0 chronyd[4081]: Enabled HW timestamping on eno1
If chronyd is configured as an NTP client or peer, display the transmit and receive timestamping modes and the interleaved mode:
# chronyc ntpdata

Output:

[literal,subs="+quotes,verbatim,normal"]


Remote address  : 203.0.113.15 (CB00710F)
Remote port     : 123
Local address   : 203.0.113.74 (CB00714A)
Leap status     : Normal
Version         : 4
Mode            : Server
Stratum         : 1
Poll interval   : 0 (1 seconds)
Precision       : -24 (0.000000060 seconds)
Root delay      : 0.000015 seconds
Root dispersion : 0.000015 seconds
Reference ID    : 47505300 (GPS)
Reference time  : Wed May 03 13:47:45 2017
Offset          : -0.000000134 seconds
Peer delay      : 0.000005396 seconds
Peer dispersion : 0.000002329 seconds
Response time   : 0.000152073 seconds
Jitter asymmetry: +0.00
NTP tests       : 111 111 1111
Interleaved     : Yes
Authenticated   : No
TX timestamping : Hardware
RX timestamping : Hardware
Total TX        : 27
Total RX        : 27
Total valid RX  : 27
Report the stability of NTP measurements:
# chronyc sourcestats

Output:

[literal,subs="+quotes,verbatim,normal"]
....

210 Number of sources = 1
Name/IP Address            NP  NR  Span  Frequency  Freq Skew  Offset  Std Dev
ntp.local                  12   7    11     +0.000      0.019     +0ns    49ns
....
This stability is reported in the Std Dev column. With hardware timestamping enabled, stability of NTP measurements should be in tens or hundreds of nanoseconds, under normal load.
13.4.3. Configuring PTP-NTP bridge
If a highly accurate Precision Time Protocol (PTP) primary timeserver is available in a network that does not have switches or routers with PTP support, a computer may be dedicated to operate as a PTP client and a stratum-1 NTP server. Such a computer needs to have two or more network interfaces, and be close to the primary timeserver or have a direct connection to it. This will ensure highly accurate synchronization in the network.
Procedure
-
Configure the ptp4l and phc2sys programs from the
linuxptppackages to use one interface to synchronize the system clock usingPTP.
Configure
chronydto provide the system time using the other interface:bindaddress 203.0.113.74 hwtimestamp enp1s0 local stratum 1
Restart the chronyd service:
# systemctrl restart chronyd
13.5. Overview of Network Time Security (NTS) in chrony
Network Time Security (NTS) is an authentication mechanism for Network Time Protocol (NTP), designed to scale substantial clients. It verifies that the packets received from the server machines are unaltered while moving to the client machine. Network Time Security (NTS) includes a Key Establishment (NTS-KE) protocol that automatically creates the encryption keys used between the server and its clients.
NTS is not compatible with the FIPS and OSPP profile. When you enable the FIPS and OSPP profile, chronyd that is configured with NTS can abort with a fatal message. You can disable the OSPP profile and FIPS mode for chronyd service by adding the GNUTLS_FORCE_FIPS_MODE=0 setting to the /etc/sysconfig/chronyd file.
13.5.1. Enabling Network Time Security (NTS) on a client
By default, Network Time Security (NTS) is not enabled. You can enable NTS in the /etc/chrony.conf. For that, perform the following steps:
Prerequisites
- The time server supports NTS.
Procedure
Edit the /etc/crony.conf file, and make the following changes:
Specify the server with the
ntsoption in addition to the recommendediburstoption.For example: server time.example.com iburst nts server nts.netnod.se iburst nts server ptbtime1.ptb.de iburst ntsAdd the following setting to avoid repeating the Network Time Security-Key Establishment (NTS-KE) session during system boot:
ntsdumpdir /var/lib/chrony
If present, comment out or remove the following setting to disable synchronization with Network Time Protocol (NTP) servers provided by
DHCP:sourcedir /run/chrony-dhcp
Restart the
chronydservice:systemctl restart chronyd
Verification
Verify if the
NTSkeys were successfully established:# chronyc -N authdata Name/IP address Mode KeyID Type KLen Last Atmp NAK Cook CLen ================================================================ time.example.com NTS 1 15 256 33m 0 0 8 100 nts.netnod.se NTS 1 15 256 33m 0 0 8 100 ptbtime1.ptb.de NTS 1 15 256 33m 0 0 8 100
The
KeyID,Type, andKLenshould have non-zero values. If the value is zero, check the system log for error messages fromchronyd.Verify the client is making NTP measurements:
# chronyc -N sources

MS Name/IP address Stratum Poll Reach LastRx Last sample
=========================================================
time.example.com   3        6   377    45   +355us[ +375us] +/-   11ms
nts.netnod.se   1        6   377    44   +237us[ +237us] +/-   23ms
ptbtime1.ptb.de    1        6   377    44   -170us[ -170us] +/-   22ms
The
Reachcolumn should have a non-zero value; ideally 377. If the value rarely gets 377 or never gets to 377, it indicates that NTP requests or responses are getting lost in the network.
Additional resources
-
chrony.conf(5)man page on your system
13.5.2. Enabling Network Time Security (NTS) on a time server
If you run your own Network Time Protocol (NTP) server, you can enable the server Network Time Security (NTS) support to facilitate its clients to synchronize securely.
If the NTP server is a client of other servers, that is, it is not a Stratum 1 server, it should use NTS or symmetric key for its synchronization.
Prerequisites
-
Server private key in
PEMformat -
Server certificate with required intermediate certificates in
PEMformat
Procedure
Edit the
/etc/chrony.conffile, and make the following changes:ntsserverkey /etc/pki/tls/private/<ntp-server.example.net>.key ntsservercert /etc/pki/tls/certs/<ntp-server.example.net>.crt
Set permissions on both the private key and the certificate file that allow the chrony user to read the files, for example
# chown root:chrony /etc/pki/tls/private/<ntp-server.example.net>.key /etc/pki/tls/certs/<ntp-server.example.net>.crt

# chmod 644 /etc/pki/tls/private/<ntp-server.example.net>.key /etc/pki/tls/certs/<ntp-server.example.net>.crt
-
Ensure that the
ntsdumpdir /var/lib/chronysetting is present. Open the required ports in firewalld:
# firewall-cmd –permannent --add-port={323/udp,4460/tcp}
# firewall-cmd --reload
Restart the
chronydservice:# systemctl restart chronyd
Verification
Perform a test from a client machine:
$ chronyd -Q -t 3 'server

ntp-server.example.net iburst nts maxsamples 1'
2021-09-15T13:45:26Z chronyd version 4.1 starting (+CMDMON +NTP +REFCLOCK +RTC +PRIVDROP +SCFILTER +SIGND +ASYNCDNS +NTS +SECHASH +IPV6 +DEBUG)
2021-09-15T13:45:26Z Disabled control of system clock
2021-09-15T13:45:28Z System clock wrong by 0.002205 seconds (ignored)
2021-09-15T13:45:28Z chronyd exiting
The
System clock wrongmessage indicates the NTP server is accepting NTS-KE connections and responding with NTS-protected NTP messages.Verify the NTS-KE connections and authenticated NTP packets observed on the server:
# chronyc serverstats

NTP packets received       : 7
NTP packets dropped        : 0
Command packets received   : 22
Command packets dropped    : 0
Client log records dropped : 0
NTS-KE connections accepted: 1
NTS-KE connections dropped : 0
Authenticated NTP packets: 7
If the value of the
NTS-KE connections acceptedandAuthenticated NTP packetsfield is a non-zero value, it means that at least one client was able to connect to the NTS-KE port and send an authenticated NTP request.
Chapter 14. Recovering and restoring a system
To recover and restore a system using an existing backup, Red Hat Enterprise Linux provides the Relax-and-Recover (ReaR) utility.
You can use the utility as a disaster recovery solution and also for system migration.
The utility enables you to perform the following tasks:
- Produce a bootable image and restore the system from an existing backup, using the image.
- Replicate the original storage layout.
- Restore user and system files.
- Restore the system to a different hardware.
Additionally, for disaster recovery, you can also integrate certain backup software with ReaR.
14.1. Setting up ReaR and manually creating a backup
Use the following steps to install the package for using the Relax-and-Recover (ReaR) utility, create a rescue system, configure and generate a backup.
Prerequisites
Necessary configurations as per the backup restore plan are ready.
Note that you can use the
NETFSbackup method, a fully-integrated and built-in method with ReaR.
Procedure
Install the ReaR utility:
# dnf install rearModify the ReaR configuration file in an editor of your choice, for example:
# vi /etc/rear/local.confAdd the backup setting details to
/etc/rear/local.conf. For example, in the case of theNETFSbackup method, add the following lines:BACKUP=NETFS BACKUP_URL=backup.locationReplace backup.location by the URL of your backup location.
To configure ReaR to keep the previous backup archive when the new one is created, also add the following line to the configuration file:
NETFS_KEEP_OLD_BACKUP_COPY=y
To make the backups incremental, meaning that only the changed files are backed up on each run, add the following line:
BACKUP_TYPE=incremental
Create a rescue system:
# rear mkrescueCreate a backup as per the restore plan. For example, in the case of the
NETFSbackup method, run the following command:# rear mkbackuponlyAlternatively, you can create the rescue system and the backup in a single step by running the following command:
# rear mkbackupThis command combines the functionality of the
rear mkrescueandrear mkbackuponlycommands.
14.2. Using a ReaR rescue image on the 64-bit IBM Z architecture
Basic Relax and Recover (ReaR) functionality is now available on the 64-bit IBM Z architecture and is fully supported since RHEL 9.2. You can create a ReaR rescue image on IBM Z only in the z/VM environment. Backing up and recovering logical partitions (LPARs) has not been tested.
ReaR on the 64-bit IBM Z architecture is supported only with the rear package version 2.6-17.el9 or later. Earlier versions are available as a Technology Preview feature only. For more information about the support scope of Red Hat Technology Preview features, see https://access.redhat.com/support/offerings/techpreview.
The only output method currently available is Initial Program Load (IPL). IPL produces a kernel and an initial RAM disk (initrd) that can be used with the zIPL boot loader.
Prerequisites
ReaR is installed.
-
To install ReaR, run the
dnf install rearcommand
-
To install ReaR, run the
Procedure
Add the following variables to the /etc/rear/local.conf to configure ReaR for producing a rescue image on the 64-bit IBM Z architecture:
-
To configure the
IPLoutput method, addOUTPUT=IPL. To configure the backup method and destination, add
BACKUPandBACKUP_URLvariables. For example:BACKUP=NETFS BACKUP_URL=nfs://<nfsserver name>/<share path>
ImportantThe local backup storage is currently not supported on the 64-bit IBM Z architecture.
-
Optional: You can also configure the
OUTPUT_URLvariable to save the kernel andinitrdfiles. By default, theOUTPUT_URLis aligned withBACKUP_URL. To perform backup and rescue image creation:
# rear mkbackup-
This creates the kernel and initrd files at the location specified by the
BACKUP_URLorOUTPUT_URL(if set) variable, and a backup using the specified backup method. -
To recover the system, use the ReaR kernel and initrd files created in step 3, and boot from a Direct Attached Storage Device (DASD) or a Fibre Channel Protocol (FCP)-attached SCSI device prepared with the
ziplboot loader, kernel, andinitrd. For more information, see Using a Prepared DASD. -
When the rescue kernel and
initrdget booted, it starts the ReaR rescue environment. Proceed with system recovery.
Currently, the rescue process reformats all the DASDs (Direct Attached Storage Devices) connected to the system. Do not attempt a system recovery if there is any valuable data present on the system storage devices. This also includes the device prepared with the zipl boot loader, ReaR kernel, and initrd that were used to boot into the rescue environment. Ensure to keep a copy.
Additional resources