This documentation is for a release that is no longer maintained
See documentation for the latest supported version 3 or the latest supported version 4.Serverless applications
OpenShift Serverless installation, usage, and release notes
Abstract
Chapter 1. OpenShift Serverless Release Notes
For an overview of OpenShift Serverless functionality, see Getting started with OpenShift Serverless.
Knative Eventing is a Technology Preview feature only. Technology Preview features are not supported with Red Hat production service level agreements (SLAs) and might not be functionally complete. Red Hat does not recommend using them in production. These features provide early access to upcoming product features, enabling customers to test functionality and provide feedback during the development process.
For more information about the support scope of Red Hat Technology Preview features, see https://access.redhat.com/support/offerings/techpreview/.
1.1. Release Notes for Red Hat OpenShift Serverless 1.7.2
This release of OpenShift Serverless addresses Common Vulnerabilities and Exposures (CVEs) and bug fixes.
1.1.1. Fixed issues
-
In previous versions of OpenShift Serverless, KnativeServing custom resources show a status of
Ready, even if Kourier does not deploy. This bug is fixed in OpenShift Serverless 1.7.2.
1.2. Release Notes for Red Hat OpenShift Serverless 1.7.1
1.2.1. New features
- OpenShift Serverless now uses Knative Serving 0.13.3.
- OpenShift Serverless now uses Knative Serving Operator 0.13.3.
-
OpenShift Serverless now uses Knative
knCLI 0.13.2. - OpenShift Serverless uses Knative Eventing 0.13.0.
- OpenShift Serverless now uses Knative Eventing Operator 0.13.3.
1.2.2. Fixed issues
- In OpenShift Serverless 1.7.0, routes were reconciled continuously when this was not required. This bug is fixed in OpenShift Serverless 1.7.1.
1.3. Release Notes for Red Hat OpenShift Serverless 1.7.0
1.3.1. New features
- OpenShift Serverless 1.7.0 is now Generally Available (GA) on OpenShift Container Platform 4.3 and newer versions. In previous versions, OpenShift Serverless was a Technology Preview.
- OpenShift Serverless now uses Knative Serving 0.13.2.
- OpenShift Serverless now uses Knative Serving Operator 0.13.2.
-
OpenShift Serverless now uses Knative
knCLI 0.13.2. -
Knative
knCLI downloads now support disconnected, or restricted network installations. -
Knative
knCLI libraries are now signed by Red Hat. - Knative Eventing is now available as a Technology Preview with OpenShift Serverless. OpenShift Serverless uses Knative Eventing 0.13.2.
Before upgrading to the latest Serverless release, you must remove the community Knative Eventing Operator if you have previously installed it. Having the Knative Eventing Operator installed will prevent you from being able to install the latest Technology Preview version of Knative Eventing that is included with OpenShift Serverless 1.7.0.
High availability (HA) is now enabled by default for the
autoscaler-hpa,controller,activator,kourier-control, andkourier-gatewaycomponents.If you have installed a previous version of OpenShift Serverless, after the KnativeServing custom resource (CR) is updated, the deployment will default to a HA configuration with
KnativeServing.spec.high-availability.replicas = 2.You can disable HA for these components by completing the procedure in the Configuring high availability components documentation.
-
OpenShift Serverless now supports the
trustedCAsetting in OpenShift Container Platform’s cluster-wide proxy, and is now fully compatible with OpenShift Container Platform’s proxy settings. -
OpenShift Serverless now supports HTTPS using the wildcard certificate that is registered for OpenShift Container Platform routes. For more information on
httpandhttpson Knative Serving, see the documentation on Verifying your serverless application deployment.
1.3.2. Fixed issues
-
In previous versions, requesting KnativeServing custom resources (CRs) without specifying an API group, for example,
oc get knativeserving -n knative-serving, occasionally caused errors. This issue is fixed in OpenShift Serverless 1.7.0. In previous versions, the Knative Serving controller was not notified when a new service CA certificate was generated due to service CA certificate rotation. New revisions created after a service CA certificate rotation were failing with the error:
Revision "foo-1" failed with message: Unable to fetch image "image-registry.openshift-image-registry.svc:5000/eap/eap-app": failed to resolve image to digest: failed to fetch image information: Get https://image-registry.openshift-image-registry.svc:5000/v2/: x509: certificate signed by unknown authority.
The OpenShift Serverless Operator now restarts the Knative Serving controller whenever a new service CA certificate is generated, which ensures that the controller is always configured to use the current service CA certificate. For more information, see the OpenShift Container Platform documentation on Securing service traffic using service serving certificate secrets under Authentication.
1.3.3. Known issues
- When upgrading from OpenShift Serverless 1.6.0 to 1.7.0, support for HTTPS requires a change to the format of routes. Knative services created on OpenShift Serverless 1.6.0 are no longer reachable at the old format URLs. You must retrieve the new URL for each service after upgrading OpenShift Serverless. For more information, see the documentation on Upgrading OpenShift Serverless.
-
If you are using Knative Eventing on an Azure cluster, it is possible that the
imc-dispatcherpod may not start. This is due to the pod’s defaultresourcessettings. As a work-around, you can remove theresourcessettings. If you have 1000 Knative services on a cluster, and then perform a reinstall or upgrade of Knative Serving, there will be a delay when you create the first new service after KnativeServing becomes Ready.
3scale-kourier-controlreconciles all previous Knative services before processing the creation of a new service, which causes the new service to spend approximately 800 seconds in anIngressNotConfiguredorUnknownstate before the state will update toReady.
1.4. Release Notes for Red Hat OpenShift Serverless Technology Preview 1.6.0
1.4.1. New features
- OpenShift Serverless 1.6.0 is available on OpenShift Container Platform 4.3 and newer versions.
- OpenShift Serverless now uses Knative Serving 0.13.1.
-
OpenShift Serverless now uses Knative
knCLI 0.13.1. - OpenShift Serverless now uses Knative Serving Operator 0.13.1.
The
serving.knative.devAPI group has now been fully deprecated and is replaced by theoperator.knative.devAPI group.You must complete the steps that are described in the OpenShift Serverless 1.4.0 release notes, that replace the
serving.knative.devAPI group with theoperator.knative.devAPI group, before you can upgrade to the latest version of OpenShift Serverless.ImportantThis change causes commands without a fully qualified APIGroup and kind, such as
oc get knativeserving, to become unreliable and not always work correctly.After upgrading to OpenShift Serverless 1.6.0, you must remove the old CRD to fix this issue. You can remove the old CRD by entering the following command:
$ oc delete crd knativeservings.serving.knative.dev
The Subscription Update Channel for new OpenShift Serverless releases was updated from
techpreviewtopreview-4.3.ImportantYou must update your channel by following the upgrade documentation to use the latest OpenShift Serverless version.
-
OpenShift Serverless now supports the use of
HTTP_PROXY. OpenShift Serverless now supports
HTTPS_PROXYcluster-proxy settings.NoteThis
HTTP_PROXYsupport does not include using custom certificates.-
The
KnativeServingCRD is now hidden from the Developer Catalog by default so that only users with cluster administrator permissions can view it. -
Parts of the
KnativeServingcontrol plane and data plane are now deployed as highly available (HA) by default. - Kourier is now actively watched and reconciles changes automatically.
- OpenShift Serverless now supports use on OpenShift Container Platform nightly builds.
1.4.2. Fixed issues
-
In previous versions, the
oc explaincommand did not work correctly. The structural schema of theKnativeServingCRD was updated in OpenShift Serverless 1.6.0 so that theoc explaincommand now works correctly. -
In previous versions, it was possible to create more than one
KnativeServingCR. MultipleKnativeServingCRs are now prevented synchronously in OpenShift Serverless 1.6.0. Attempting to create more than oneKnativeServingCR now results in an error. - In previous versions, OpenShift Serverless was not compatible with OpenShift Container Platform deployments on GCP. This issue was fixed in OpenShift Serverless 1.6.0.
- In previous releases, the Knative Serving webhook crashed with an out of memory error if the cluster had more than 170 namespaces. This issue was fixed in OpenShift Serverless 1.6.0.
- In previous releases, OpenShift Serverless did not automatically fix an OpenShift Container Platform route that it created if the route was changed by another component. This issue was fixed in OpenShift Serverless 1.6.0.
-
In previous versions, deleting a
KnativeServingCR occasionally caused the system to hang. This issue was fixed in OpenShift Serverless 1.6.0. - Due to the ingress migration from Service Mesh to Kourier that occured in OpenShift Serverless 1.5.0, orphaned VirtualServices sometimes remained on the system. In OpenShift Serverless 1.6.0, orphaned VirtualServices are automatically removed.
1.4.3. Known issues
In OpenShift Serverless 1.6.0, if a cluster administrator uninstalls OpenShift Serverless by following the uninstall procedure provided in the documentation, the Serverless dropdown is still be visible in the Administrator perspective of the OpenShift Container Platform web console, and the Knative Service resource is still be visible in the Developer perspective of the OpenShift Container Platform web console. Although you can create Knative services by using this option, these Knative services do not work.
To prevent OpenShift Serverless from being visible in the OpenShift Container Platform web console, the cluster administrator must delete additional CRDs from the deployment after removing the Knative Serving CR.
Cluster administrators can remove these CRDs by entering the following command:
$ oc get crd -oname | grep -E '(serving|internal).knative.dev' | xargs oc delete
1.5. Release Notes for Red Hat OpenShift Serverless Technology Preview 1.5.0
1.5.1. New features
- OpenShift Serverless 1.5.0 is available on OpenShift Container Platform 4.3 and newer versions.
- OpenShift Serverless now uses Knative Serving 0.12.1.
-
OpenShift Serverless now uses Knative
knCLI 0.12.0. - OpenShift Serverless now uses Knative Serving Operator 0.12.1.
- OpenShift Serverless ingress implementation was updated to use Kourier in place of Service Mesh. No user intervention is necessary, as this change is automatic when the OpenShift Serverless Operator is upgraded to 1.5.0.
1.5.2. Fixed issues
- In previous releases, OpenShift Container Platform scale from zero latency caused a delay of approximately 10 seconds when creating pods. This issue was fixed in the OpenShift Container Platform 4.3.5 bug fix update.
1.5.3. Known issues
-
Deleting
KnativeServing.operator.knative.devfrom theknative-servingnamespace may cause the deletion process to hang. This is due to a race condition between deletion of the CRD andknative-openshift-ingressremoving finalizers.
1.6. Additional resources
OpenShift Serverless is based on the open source Knative project.
- For details about the latest Knative Serving release, see the Knative Serving releases page.
- For details about the latest Knative Serving Operator release, see the Knative Serving Operator releases page.
- For details about the latest Knative CLI release, see the Knative CLI releases page.
- For details about the latest Knative Eventing release, see the Knative Eventing releases page.
Chapter 2. OpenShift Serverless support
2.1. Getting support
If you experience difficulty with a procedure described in this documentation, visit the Red Hat Customer Portal at http://access.redhat.com. Through the customer portal, you can:
- Search or browse through the Red Hat Knowledgebase of technical support articles about Red Hat products
- Submit a support case to Red Hat Global Support Services (GSS)
- Access other product documentation
If you have a suggestion for improving this guide or have found an error, please submit a Bugzilla report at http://bugzilla.redhat.com against Product for the Documentation component. Please provide specific details, such as the section number, guide name, and OpenShift Serverless version so we can easily locate the content.
2.2. Gathering diagnostic information for support
When opening a support case, it is helpful to provide debugging information about your cluster to Red Hat Support.
The must-gather tool enables you to collect diagnostic information about your OpenShift Container Platform cluster, including data related to OpenShift Serverless.
For prompt support, supply diagnostic information for both OpenShift Container Platform and OpenShift Serverless.
2.2.1. About the must-gather tool
The oc adm must-gather CLI command collects the information from your cluster that is most likely needed for debugging issues, such as:
- Resource definitions
- Audit logs
- Service logs
You can specify one or more images when you run the command by including the --image argument. When you specify an image, the tool collects data related to that feature or product.
When you run oc adm must-gather, a new Pod is created on the cluster. The data is collected on that Pod and saved in a new directory that starts with must-gather.local. This directory is created in the current working directory.
2.2.2. About collecting OpenShift Serverless data
You can use the oc adm must-gather CLI command to collect information about your cluster, including features and objects associated with OpenShift Serverless.
To collect OpenShift Serverless data with must-gather, you must specify the OpenShift Serverless image.
Procedure
Enter the command:
$ oc adm must-gather --image=registry.redhat.io/openshift-serverless-1/svls-must-gather-rhel8
Chapter 3. Architecture
3.1. Knative Serving architecture
Knative Serving on OpenShift Container Platform enables developers to write cloud-native applications using serverless architecture. Serverless is a cloud computing model where application developers don’t need to provision servers or manage scaling for their applications. These routine tasks are abstracted away by the platform, allowing developers to push code to production much faster than in traditional models.
Knative Serving supports deploying and managing cloud-native applications by providing a set of objects as Kubernetes Custom Resource Definitions (CRDs) that define and control the behavior of serverless workloads on an OpenShift Container Platform cluster. For more information about CRDs, see Extending the Kubernetes API with Custom Resource Definitions.
Developers use these CRDs to create custom resource (CR) instances that can be used as building blocks to address complex use cases. For example:
- Rapidly deploying serverless containers.
- Automatically scaling pods.
For more information about CRs, see Managing resources from Custom Resource Definitions.
3.1.1. Knative Serving CRDs
- Service
-
The
service.serving.knative.devCRD automatically manages the life cycle of your workload to ensure that the application is deployed and reachable through the network. It creates a Route, a Configuration, and a new Revision for each change to a user created Service, or custom resource. Most developer interactions in Knative are carried out by modifying Services. - Revision
-
The
revision.serving.knative.devCRD is a point-in-time snapshot of the code and configuration for each modification made to the workload. Revisions are immutable objects and can be retained for as long as necessary. - Route
-
The
route.serving.knative.devCRD maps a network endpoint to one or more Revisions. You can manage the traffic in several ways, including fractional traffic and named routes. - Configuration
-
The
configuration.serving.knative.devCRD maintains the desired state for your deployment. It provides a clean separation between code and configuration. Modifying a configuration creates a new Revision.
3.2. Knative Eventing architecture
Knative Eventing on OpenShift Container Platform enables developers to use an event-driven architecture with serverless applications. An event-driven architecture is based on the concept of decoupled relationships between event producers that create events, and event sinks, or consumers, that receive them.
Knative Eventing uses standard HTTP POST requests to send and receive events between event producers and consumers. These events conform to the CloudEvents specifications, which enables creating, parsing, sending, and receiving events in any programming language.
You can propagate an event from an event source to multiple event sinks by using:
The Channel and Broker implementations manage delivery of events to event sinks, by using Subscriptions and Triggers. Events are buffered if the destination sink is unavailable. Knative Eventing supports the following scenarios:
- Publish an event without creating a consumer
- You can send events to a Broker as an HTTP POST, and use a SinkBinding to decouple the destination configuration from your application that is producing events.
- Consume an event without creating a publisher
- You can use a Trigger to consume events from a Broker based on event attributes. Your application will receive events as an HTTP POST.
3.2.1. Event sinks
To enable delivery to multiple types of sinks, Knative Eventing defines the following generic interfaces that can be implemented by multiple Kubernetes resources:
- Addressable objects
-
Able to receive and acknowledge an Event delivered over HTTP to an address defined in the Event’s
status.address.urlfield. The Kubernetes Service object also satisfies the addressable interface. - Callable objects
- Able to receive an Event delivered over HTTP and transform it, returning 0 or 1 new Events in the HTTP response payload. These returned Events may be further processed in the same way that Events from an external event source are processed.
Chapter 4. Getting started with OpenShift Serverless
OpenShift Serverless simplifies the process of delivering code from development into production by reducing the need for infrastructure set up or back-end development by developers.
4.1. How OpenShift Serverless works
Developers on OpenShift Serverless can use the provided Kubernetes native APIs, as well as familiar languages and frameworks, to deploy applications and container workloads.
OpenShift Serverless on OpenShift Container Platform enables stateless serverless workloads to all run on a single multi-cloud container platform with automated operations. Developers can use a single platform for hosting their microservices, legacy, and serverless applications.
OpenShift Serverless is based on the open source Knative project, which provides portability and consistency across hybrid and multi-cloud environments by enabling an enterprise-grade serverless platform.
4.2. Supported Configurations
The set of supported features, configurations, and integrations for OpenShift Serverless, current and past versions, are available at the Supported Configurations page.
Knative Eventing is a Technology Preview feature only. Technology Preview features are not supported with Red Hat production service level agreements (SLAs) and might not be functionally complete. Red Hat does not recommend using them in production. These features provide early access to upcoming product features, enabling customers to test functionality and provide feedback during the development process.
For more information about the support scope of Red Hat Technology Preview features, see https://access.redhat.com/support/offerings/techpreview/.
4.3. Next steps
- Install the OpenShift Serverless Operator on your OpenShift Container Platform cluster to get started.
- View the OpenShift Serverless release notes.
- Create an application by following the documentation on Creating and managing serverless applications.
Chapter 5. Installing OpenShift Serverless
5.1. Installing OpenShift Serverless
This guide walks cluster administrators through installing the OpenShift Serverless Operator to an OpenShift Container Platform cluster.
OpenShift Serverless is supported for installation in a restricted network environment. For more information, see Using Operator Lifecycle Manager on restricted networks.
5.1.1. Cluster sizing requirements
To run OpenShift Serverless, the OpenShift Container Platform cluster must be sized correctly. The minimum requirement to use OpenShift Serverless is a cluster with 10 CPUs and 40GB memory.
The total size requirements to run OpenShift Serverless are dependent on the applications deployed. By default, each pod requests ~400m of CPU, so the minimum requirements are based on this value.
In the size requirement provided, an application can scale up to 10 replicas. Lowering the actual CPU request of applications can increase the number of possible replicas.
You can use the MachineSet API to manually scale your cluster up to the desired size. The minimum requirements usually mean that you must scale up one of the default MachineSets by two additional machines.
For more information on using the MachineSet API, see the documentation on Creating MachineSets.
For more information on scaling a MachineSet manually, see the documentation on manually scaling MachineSets.
The requirements provided relate only to the pool of worker machines of the OpenShift Container Platform cluster. Master nodes are not used for general scheduling and are omitted from the requirements.
The following limitations apply to all OpenShift Serverless deployments:
- Maximum number of Knative services: 1000
- Maximum number of Knative revisions: 1000
5.1.1.1. Additional requirements for advanced use-cases
For more advanced use-cases such as logging or metering on OpenShift Container Platform, you must deploy more resources. Recommended requirements for such use-cases are 24 CPUs and 96GB of memory.
If you have high availability (HA) enabled on your cluster, this requires between 0.5 - 1.5 cores and between 200MB - 2GB of memory for each replica of the Knative Serving control plane. HA is enabled for some Knative Serving components by default. You can disable HA by following the documentation on Configuring high availability replicas on OpenShift Serverless.
Before upgrading to the latest Serverless release, you must remove the community Knative Eventing operator if you have previously installed it. Having the Knative Eventing operator installed will prevent you from being able to install the latest Technology Preview version of Knative Eventing using the OpenShift Serverless Operator.
5.1.2. Installing the OpenShift Serverless Operator
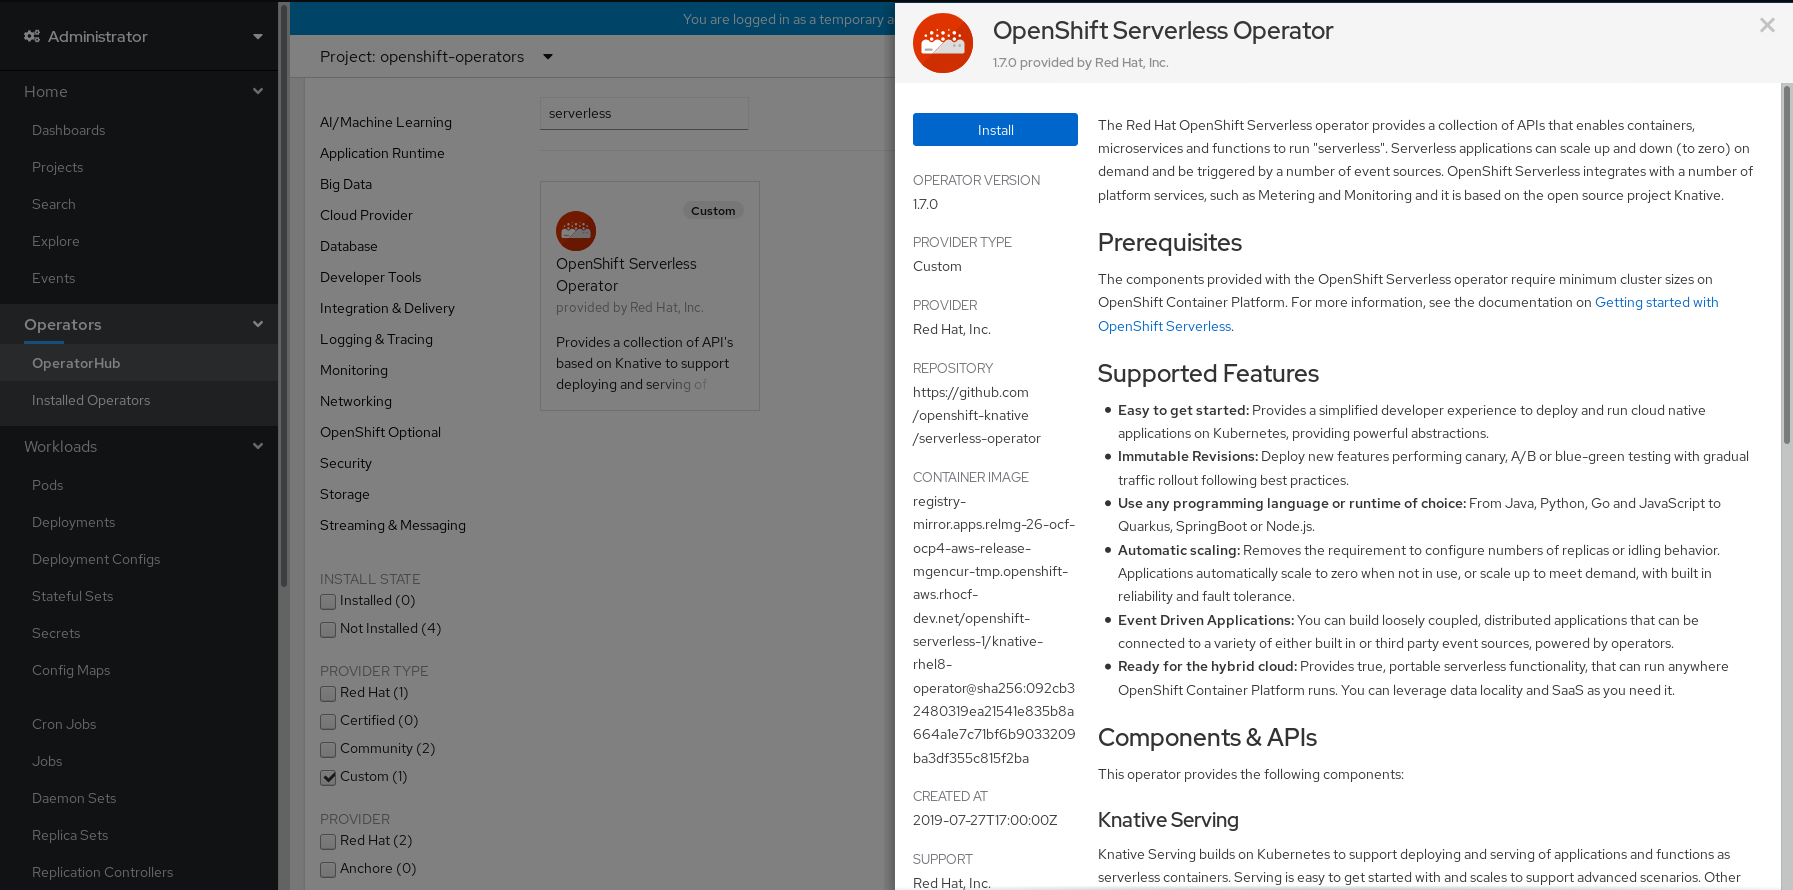
This procedure describes how to install and subscribe to the OpenShift Serverless Operator from the OperatorHub using the OpenShift Container Platform web console.
Procedure
- In the OpenShift Container Platform web console, navigate to the Operators → OperatorHub page.
Scroll, or type they keyword Serverless into the Filter by keyword box to find the OpenShift Serverless Operator.

Review the information about the Operator and click Install.
On the Create Operator Subscription page:
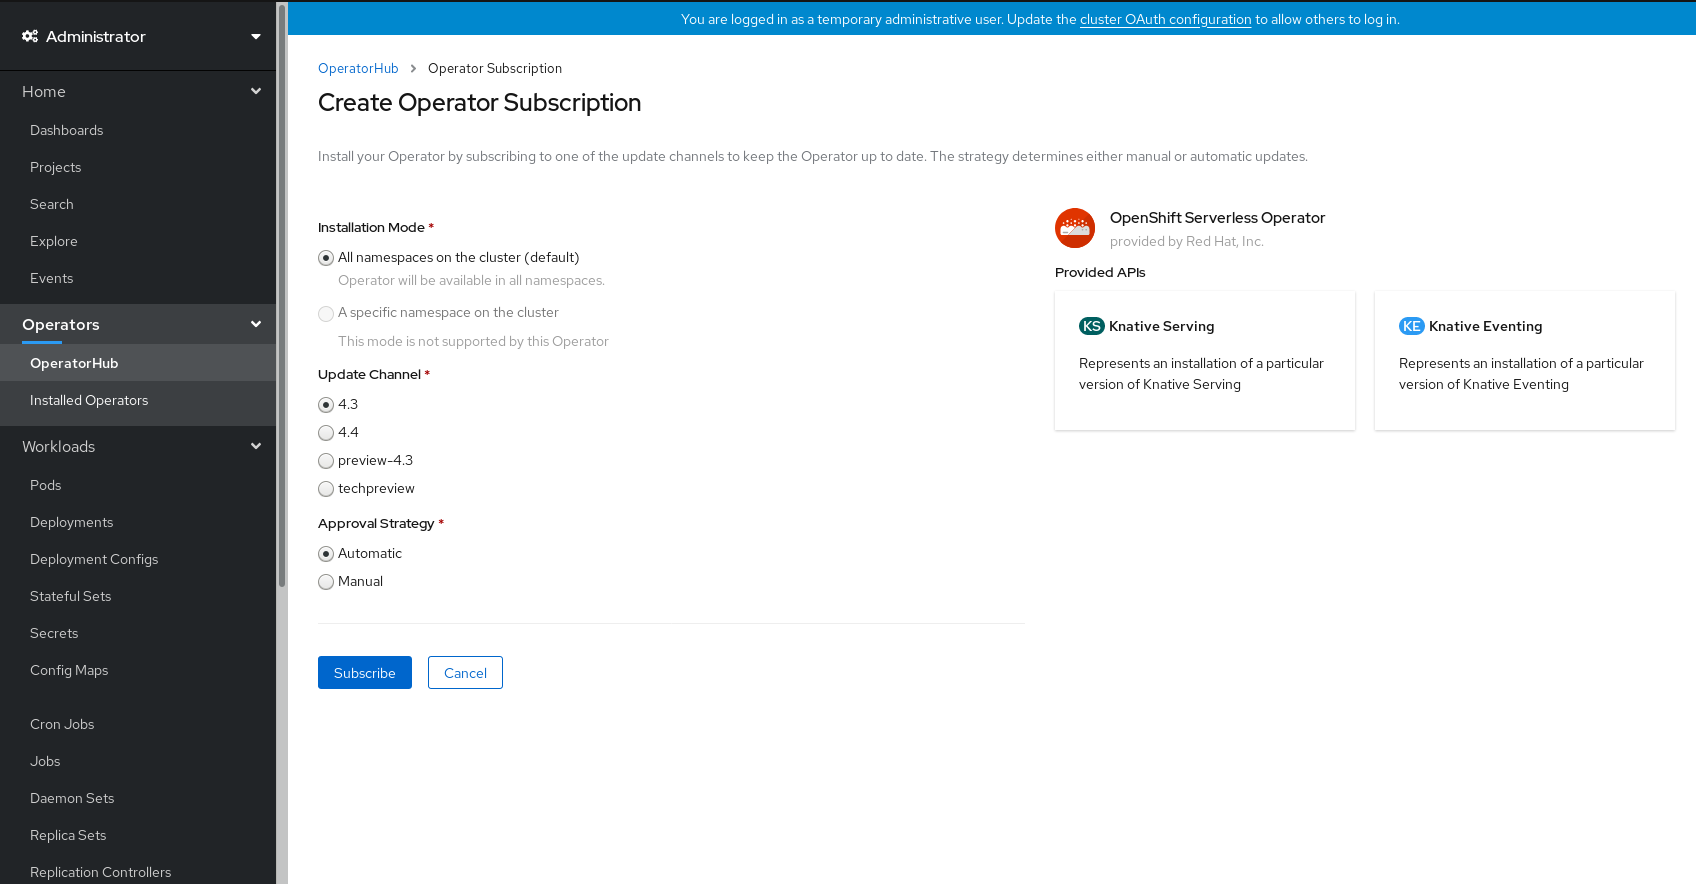
-
The Installation Mode is All namespaces on the cluster (default). This mode installs the Operator in the default
openshift-operatorsnamespace to watch and be made available to all namespaces in the cluster. -
The Installed Namespace will be
openshift-operators. - Select 4.3 as the Update Channel.
- Select Automatic or Manual approval strategy.
-
The Installation Mode is All namespaces on the cluster (default). This mode installs the Operator in the default
- Click Subscribe to make the Operator available to the selected namespaces on this OpenShift Container Platform cluster.
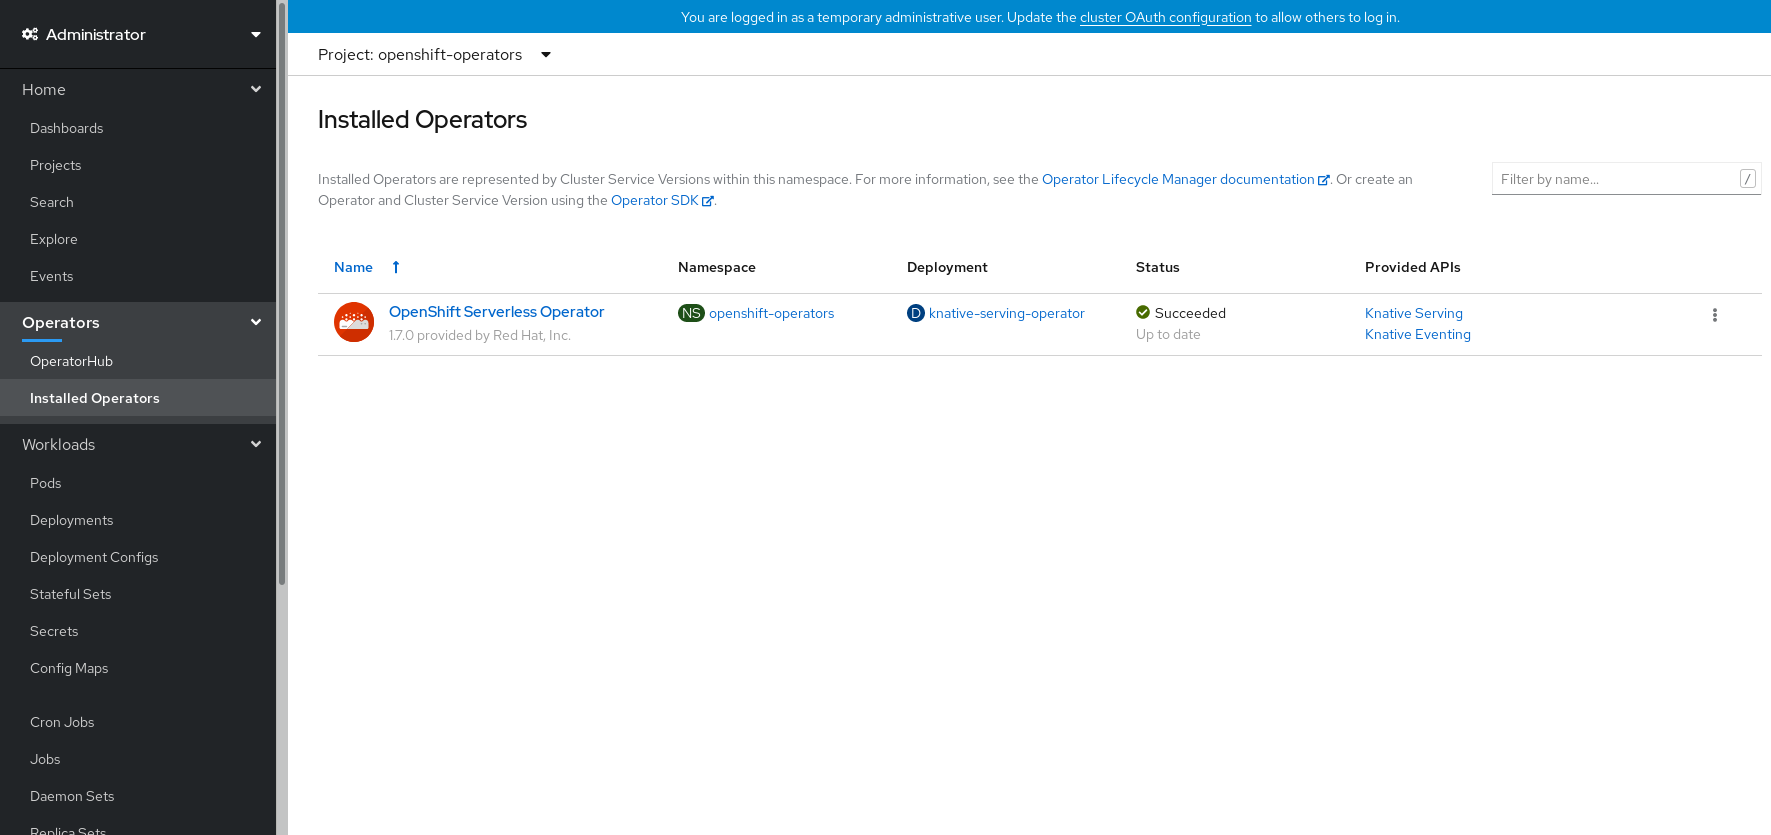
From the Catalog → Operator Management page, you can monitor the OpenShift Serverless Operator subscription’s installation and upgrade progress.
- If you selected a Manual approval strategy, the subscription’s upgrade status will remain Upgrading until you review and approve its install plan. After approving on the Install Plan page, the subscription upgrade status moves to Up to date.
- If you selected an Automatic approval strategy, the upgrade status should resolve to Up to date without intervention.
Verification steps
After the Subscription’s upgrade status is Up to date, select Catalog → Installed Operators to verify that the OpenShift Serverless Operator eventually shows up and its Status ultimately resolves to InstallSucceeded in the relevant namespace.
If it does not:
- Switch to the Catalog → Operator Management page and inspect the Operator Subscriptions and Install Plans tabs for any failure or errors under Status.
-
Check the logs in any pods in the
openshift-operatorsproject on the Workloads → Pods page that are reporting issues to troubleshoot further.
Additional resources
- For more information on installing Operators, see the OpenShift Container Platform documentation on Adding Operators to a cluster.
5.1.3. Next steps
- After the OpenShift Serverless Operator is installed, you can install the Knative Serving component. See the documentation on Installing Knative Serving.
- After the OpenShift Serverless Operator is installed, you can install the Knative Eventing component. See the documentation on Installing Knative Eventing.
5.2. Installing Knative Serving
After you install the OpenShift Serverless Operator, you can install Knative Serving by following the procedures described in this guide.
This guide provides information about installing Knative Serving using the default settings. However, you can configure more advanced settings in the KnativeServing custom resource definition.
For more information about configuration options for the KnativeServing custom resource definition, see Advanced installation configuration options.
5.2.1. Creating the knative-serving namespace
When you create the knative-serving namespace, a knative-serving project will also be created.
You must complete this procedure before installing Knative Serving.
If the KnativeServing object created during Knative Serving’s installation is not created in the knative-serving namespace, it will be ignored.
Prerequisites
- An OpenShift Container Platform account with cluster administrator access
- Installed OpenShift Serverless Operator
5.2.1.1. Creating the knative-serving namespace using the web console
Procedure
In the OpenShift Container Platform web console, navigate to Administration → Namespaces.

Enter
knative-servingas the Name for the project. The other fields are optional.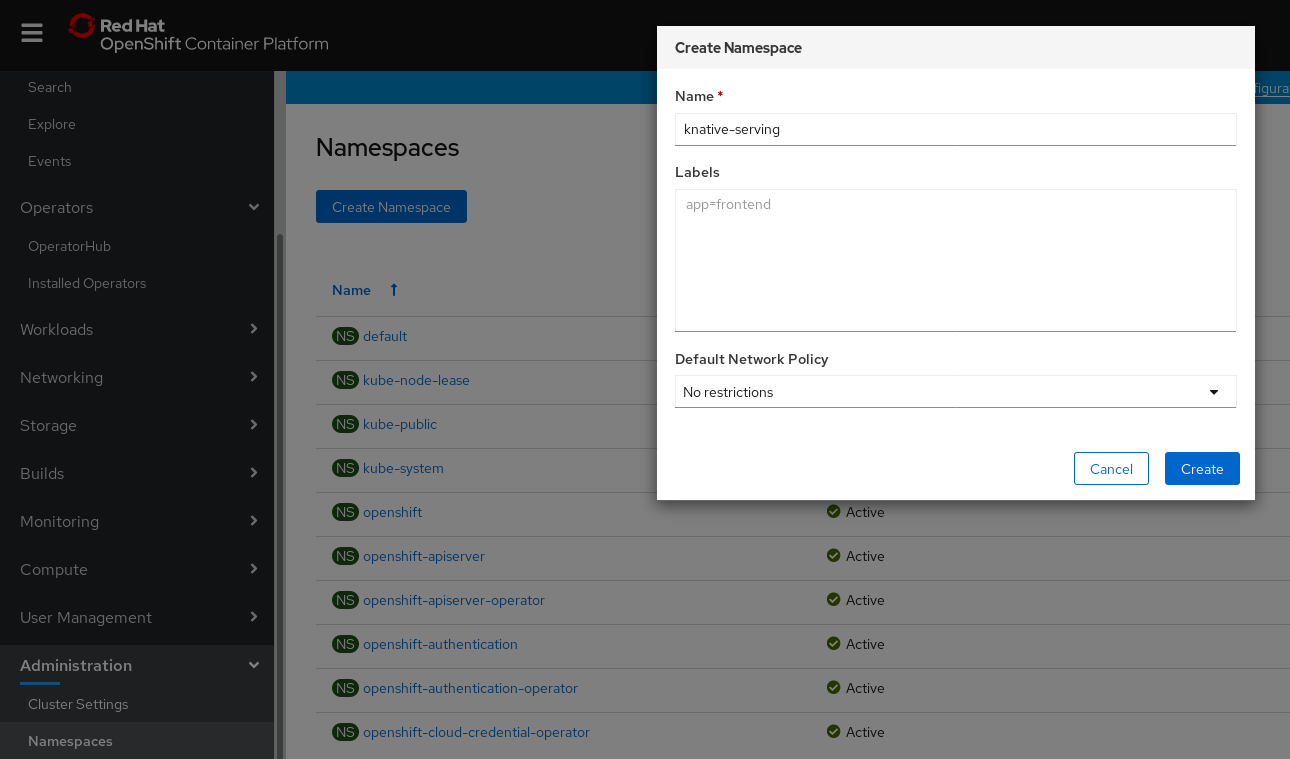
- Click Create.
5.2.1.2. Creating the knative-serving namespace using the CLI
Procedure
Create the
knative-servingnamespace:$ oc create namespace knative-serving
5.2.2. Prerequisites
- An OpenShift Container Platform account with cluster administrator access.
- Installed OpenShift Serverless Operator.
-
Created the
knative-servingnamespace.
5.2.3. Installing Knative Serving using the web console
Procedure
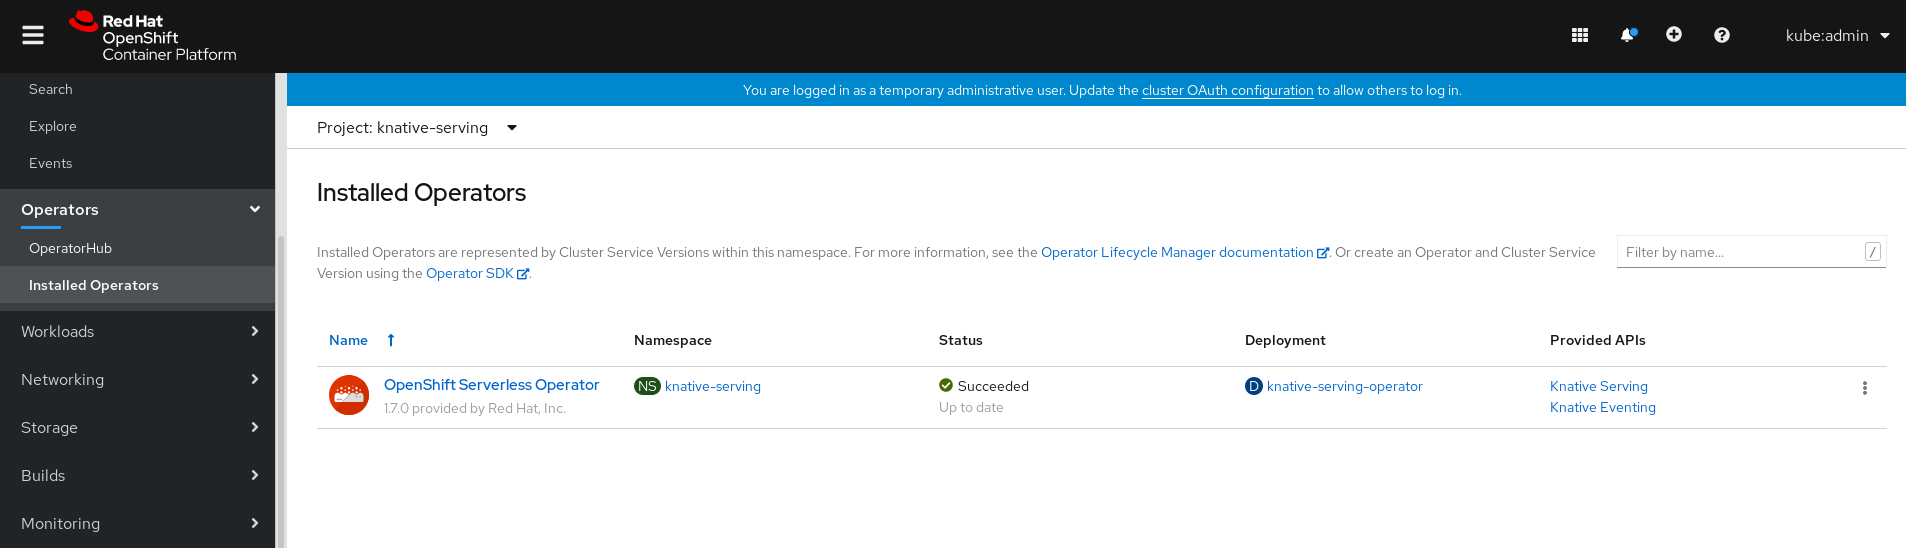
- In the Administrator perspective of the OpenShift Container Platform web console, navigate to Operators → Installed Operators.
- Check that the Project dropdown at the top of the page is set to Project: knative-serving.
Click Knative Serving in the list of Provided APIs for the OpenShift Serverless Operator to go to the Knative Serving tab.
Click the Create Knative Serving button.
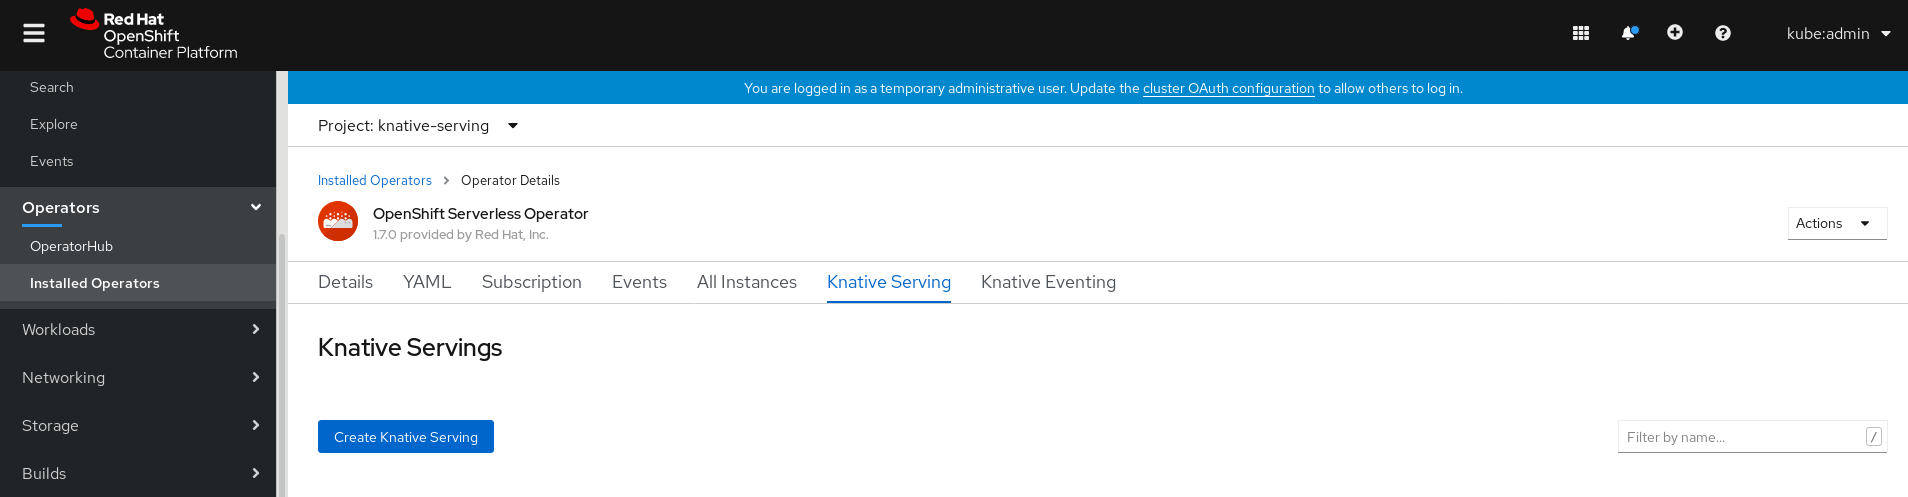
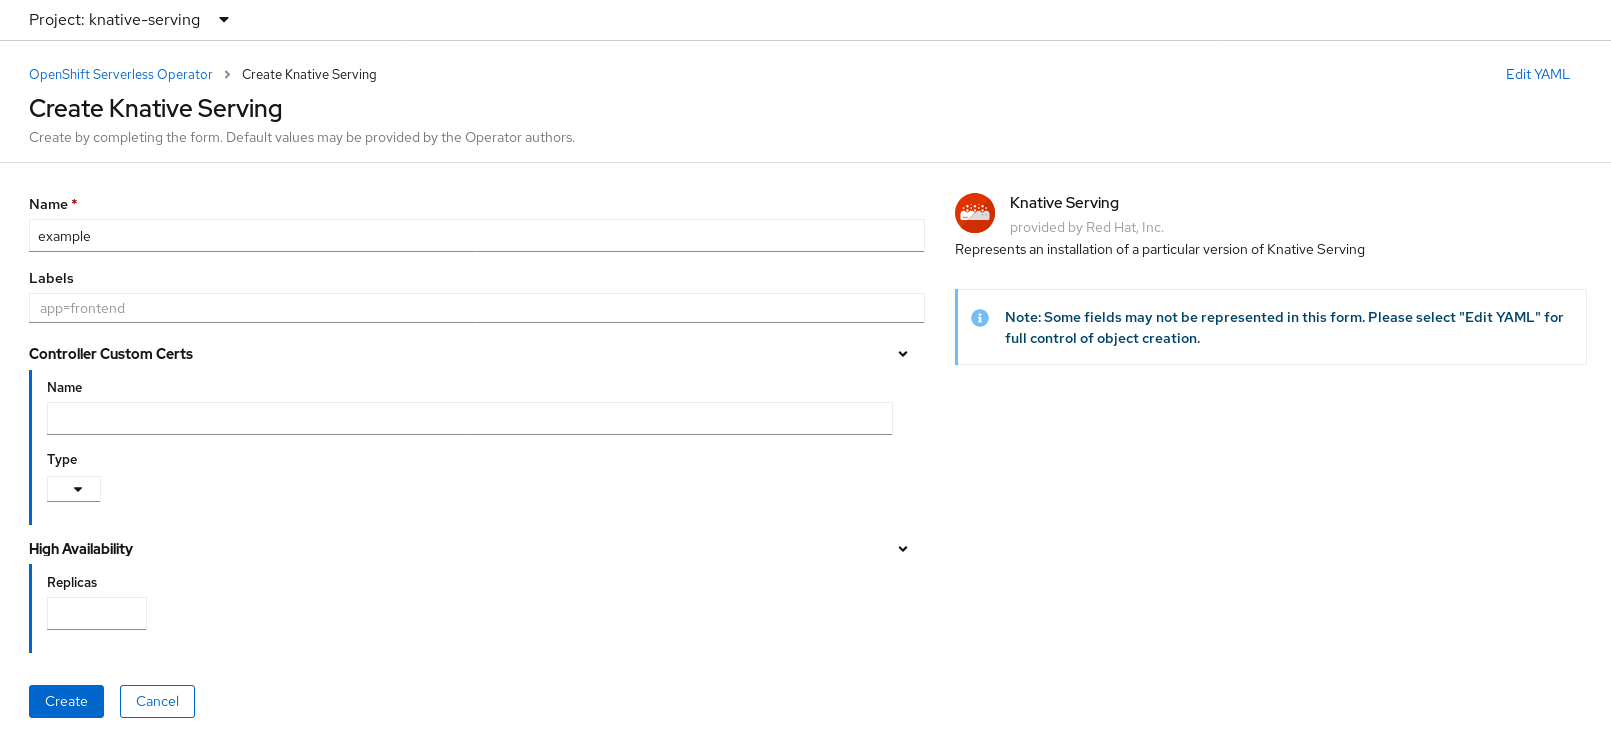
In the Create Knative Serving page, you can install Knative Serving using the default settings by clicking Create.
You can also modify settings for the Knative Serving installation by editing the
KnativeServingobject using either the form provided, or by editing the YAML.-
Using the form is recommended for simpler configurations that do not require full control of
KnativeServingobject creation. Editing the YAML is recommended for more complex configurations that require full control of
KnativeServingobject creation. You can access the YAML by clicking the edit YAML link in the top right of the Create Knative Serving page.After you complete the form, or have finished modifying the YAML, click Create.
NoteFor more information about configuration options for the KnativeServing custom resource definition, see the documentation on Advanced installation configuration options.

-
Using the form is recommended for simpler configurations that do not require full control of
After you have installed Knative Serving, the
KnativeServingobject is created, and you will be automically directed to the Knative Serving tab.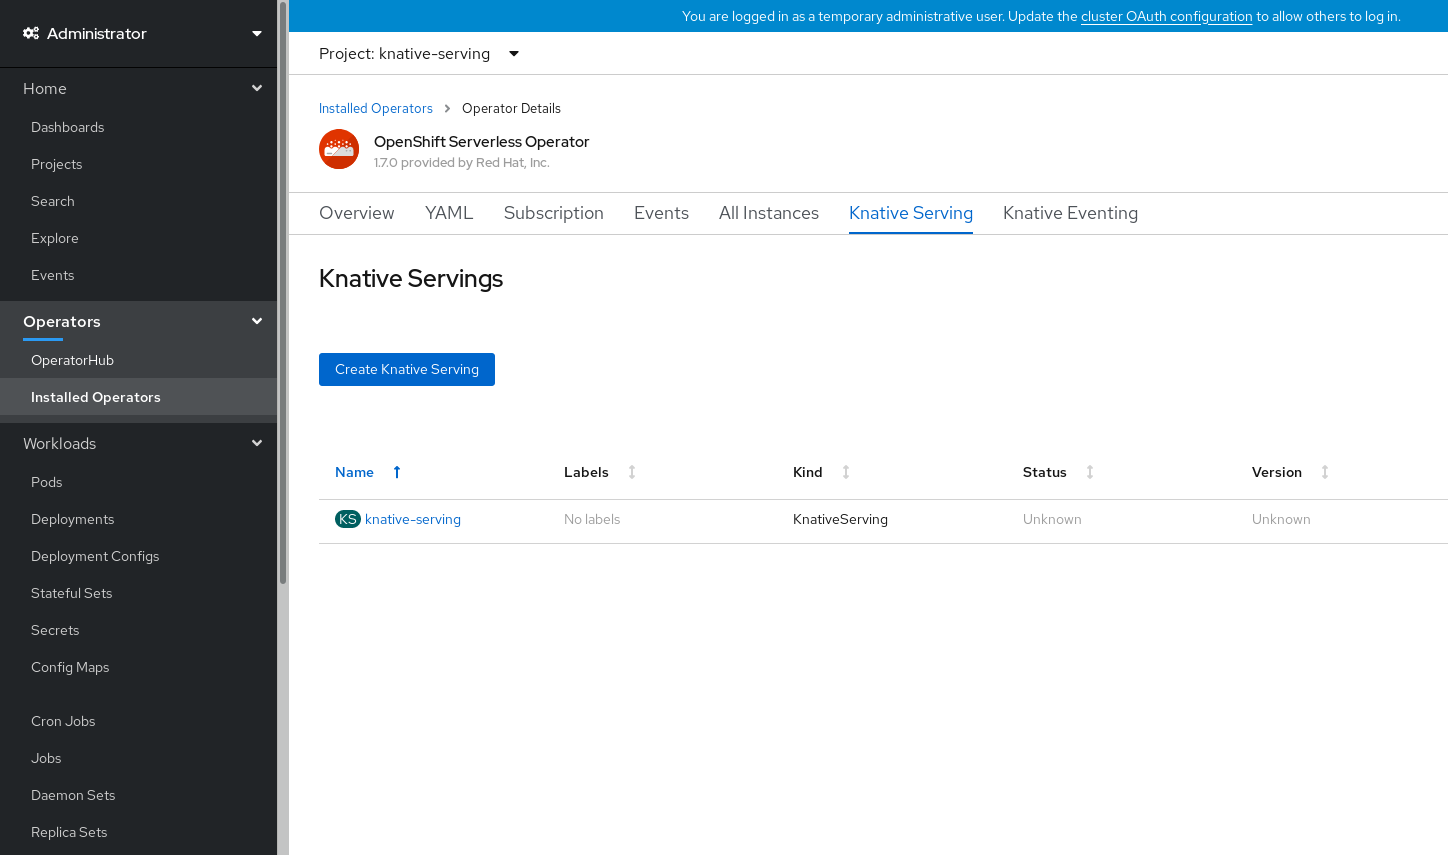
You will see
knative-servingin the list of resources.
Verification steps
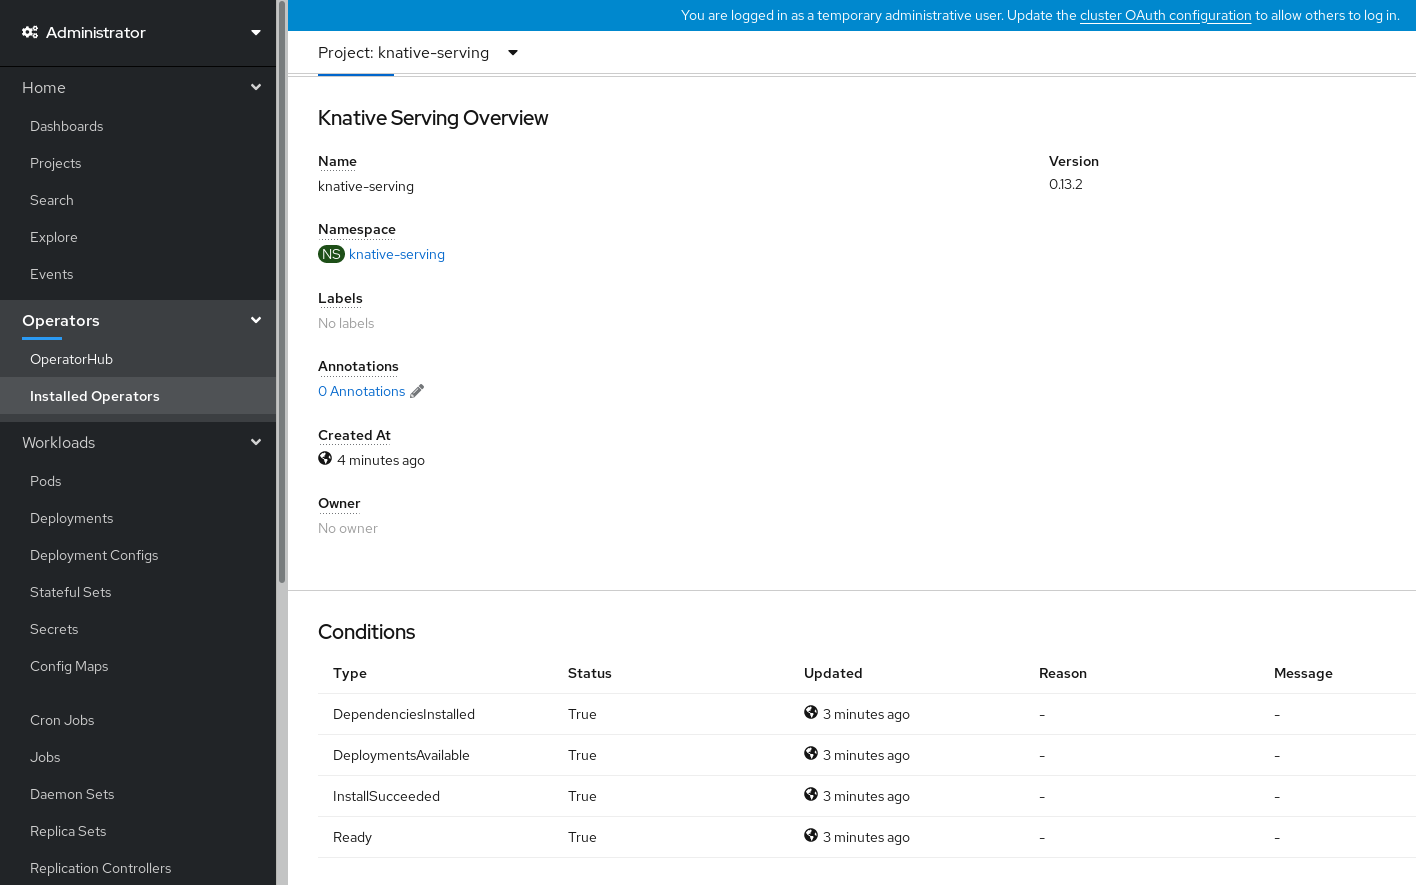
-
Click on
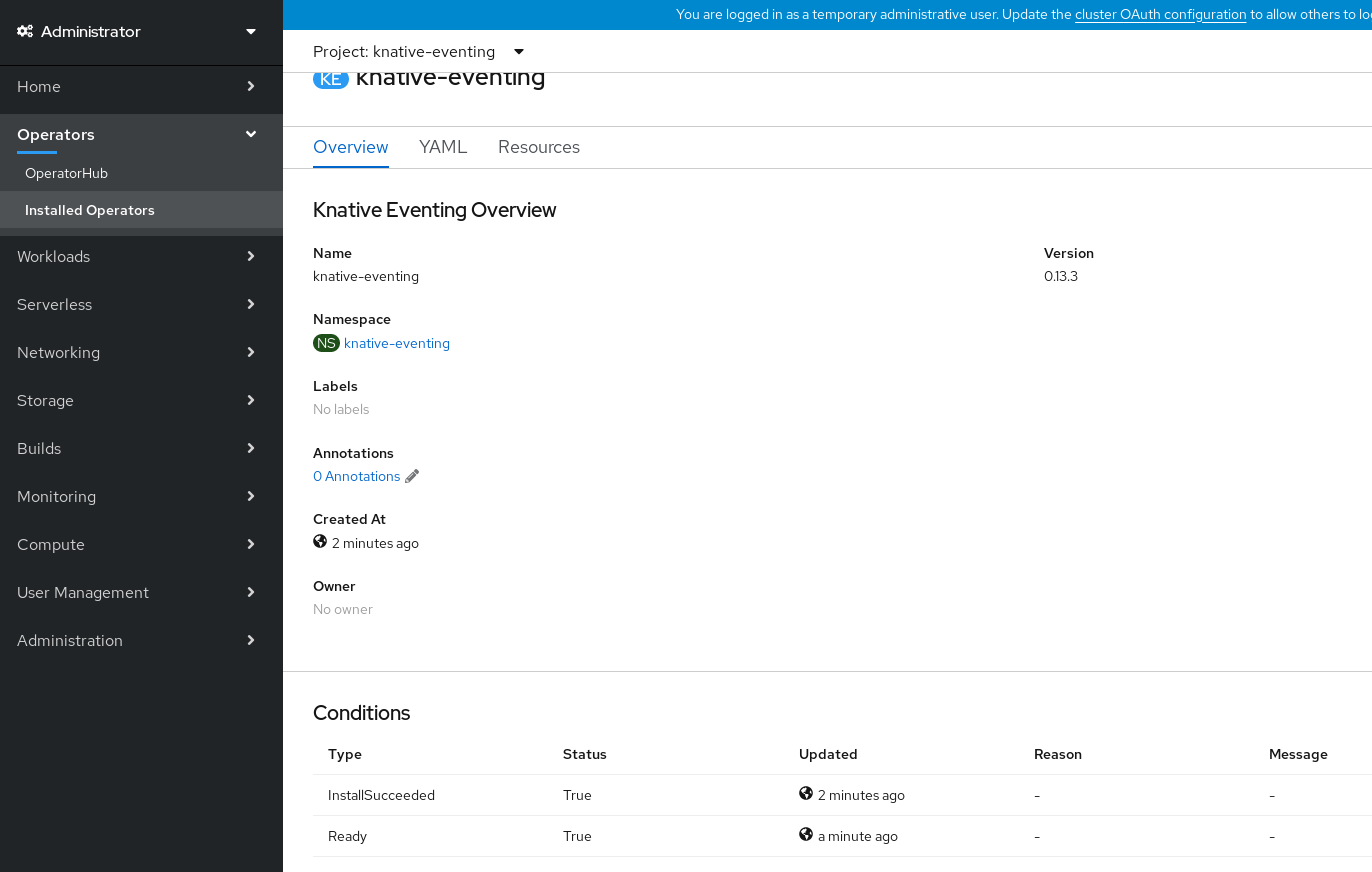
knative-servingin the Knative Serving tab. You will be automatically directed to the Knative Serving Overview page.
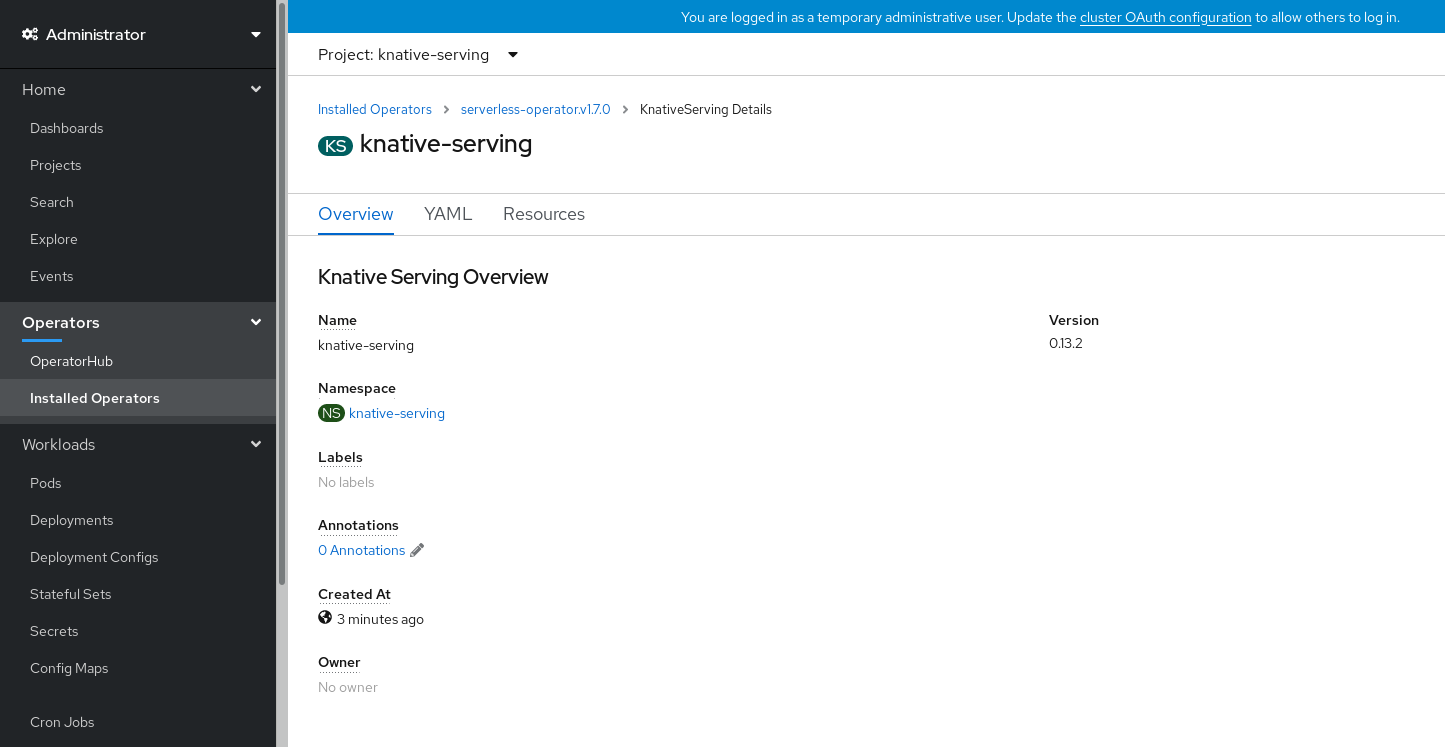
- Scroll down to look at the list of Conditions.
You should see a list of conditions with a status of True, as shown in the example image.
 Note
NoteIt may take a few seconds for the Knative Serving resources to be created. You can check their status in the Resources tab.
- If the conditions have a status of Unknown or False, wait a few moments and then check again after you have confirmed that the resources have been created.
5.2.4. Installing Knative Serving using YAML
Procedure
-
Create a file named
serving.yaml. Copy the following sample YAML into
serving.yaml:apiVersion: operator.knative.dev/v1alpha1 kind: KnativeServing metadata: name: knative-serving namespace: knative-servingApply the
serving.yamlfile:$ oc apply -f serving.yaml
Verification steps
Verify that the installation is complete:
$ oc get knativeserving.operator.knative.dev/knative-serving -n knative-serving --template='{{range .status.conditions}}{{printf "%s=%s\n" .type .status}}{{end}}'Example output
DependenciesInstalled=True DeploymentsAvailable=True InstallSucceeded=True Ready=True
NoteIt may take a few seconds for the Knative Serving resources to be created.
-
If the conditions have a status of
UnknownorFalse, wait a few moments and then check again after you have confirmed that the resources have been created. Check that the Knative Serving resources have been created by entering:
$ oc get pods -n knative-serving
Example output
NAME READY STATUS RESTARTS AGE activator-5c596cf8d6-5l86c 1/1 Running 0 9m37s activator-5c596cf8d6-gkn5k 1/1 Running 0 9m22s autoscaler-5854f586f6-gj597 1/1 Running 0 9m36s autoscaler-hpa-78665569b8-qmlmn 1/1 Running 0 9m26s autoscaler-hpa-78665569b8-tqwvw 1/1 Running 0 9m26s controller-7fd5655f49-9gxz5 1/1 Running 0 9m32s controller-7fd5655f49-pncv5 1/1 Running 0 9m14s kn-cli-downloads-8c65d4cbf-mt4t7 1/1 Running 0 9m42s webhook-5c7d878c7c-n267j 1/1 Running 0 9m35s
5.2.5. Next steps
- For cloud events functionality on OpenShift Serverless, you can install the Knative Eventing component. See the documentation on Installing Knative Eventing.
-
Install the Knative CLI to use
kncommands with Knative Serving. For example,kn servicecommands. See the documentation on Installing the Knative CLI (kn).
5.3. Installing Knative Eventing
After you install the OpenShift Serverless Operator, you can install Knative Eventing by following the procedures described in this guide.
Knative Eventing is a Technology Preview feature only. Technology Preview features are not supported with Red Hat production service level agreements (SLAs) and might not be functionally complete. Red Hat does not recommend using them in production. These features provide early access to upcoming product features, enabling customers to test functionality and provide feedback during the development process.
For more information about the support scope of Red Hat Technology Preview features, see https://access.redhat.com/support/offerings/techpreview/.
This guide provides information about installing Knative Eventing using the default settings.
5.3.1. Creating the knative-eventing namespace
When you create the knative-eventing namespace, a knative-eventing project will also be created.
You must complete this procedure before installing Knative Eventing.
If the KnativeEventing object created during Knative Eventing’s installation is not created in the knative-eventing namespace, it will be ignored.
Prerequisites
- An OpenShift Container Platform account with cluster administrator access
- Installed OpenShift Serverless Operator
5.3.1.1. Creating the knative-eventing namespace using the web console
Procedure
- In the OpenShift Container Platform web console, navigate to Administration → Namespaces.
Click Create Namespace.
Enter
knative-eventingas the Name for the project. The other fields are optional.
- Click Create.
5.3.1.2. Creating the knative-eventing namespace using the CLI
Procedure
Create the
knative-eventingnamespace:$ oc create namespace knative-eventing
5.3.2. Prerequisites
- An OpenShift Container Platform account with cluster administrator access
- Installed OpenShift Serverless Operator
-
Created the
knative-eventingnamespace
5.3.3. Installing Knative Eventing using the web console
Procedure
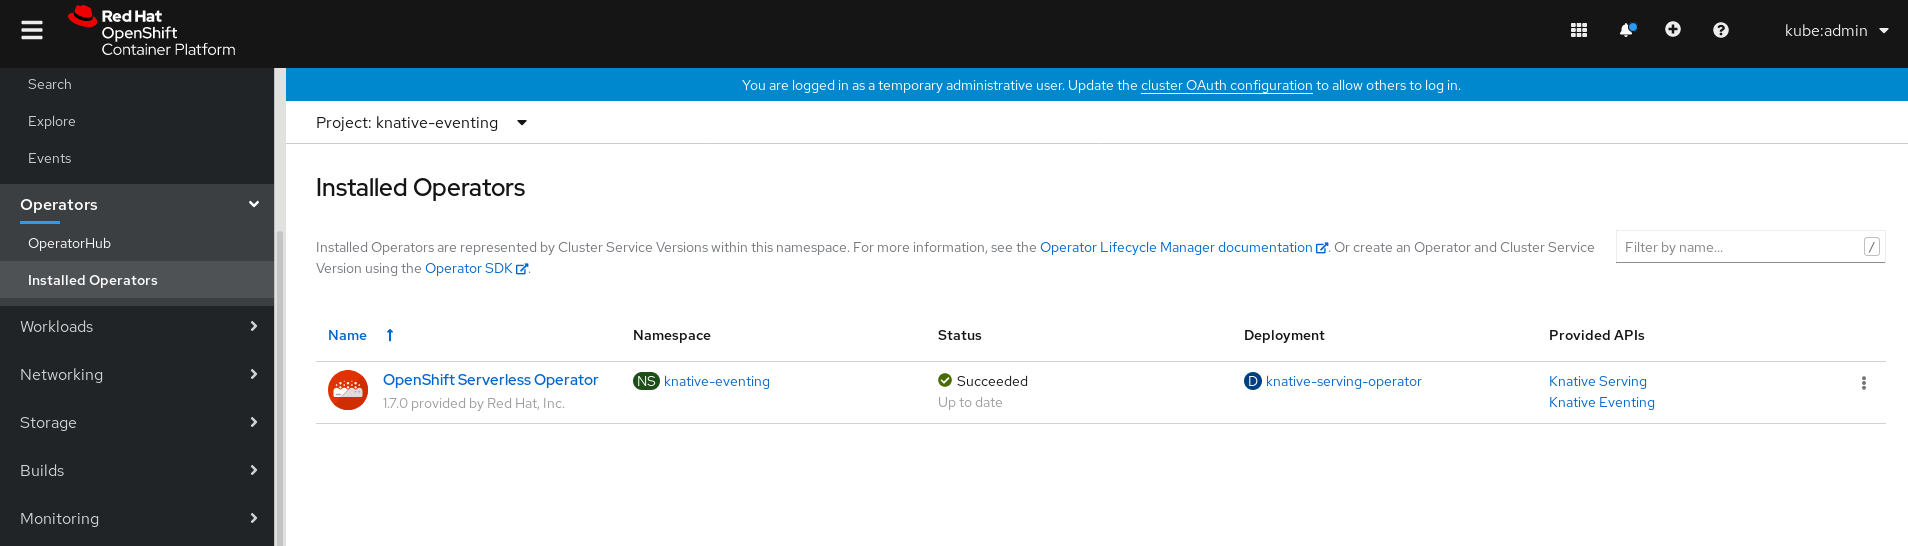
- In the Administrator perspective of the OpenShift Container Platform web console, navigate to Operators → Installed Operators.
- Check that the Project dropdown at the top of the page is set to Project: knative-eventing.
Click Knative Eventing in the list of Provided APIs for the OpenShift Serverless Operator to go to the Knative Eventing tab.
Click the Create Knative Eventing button.
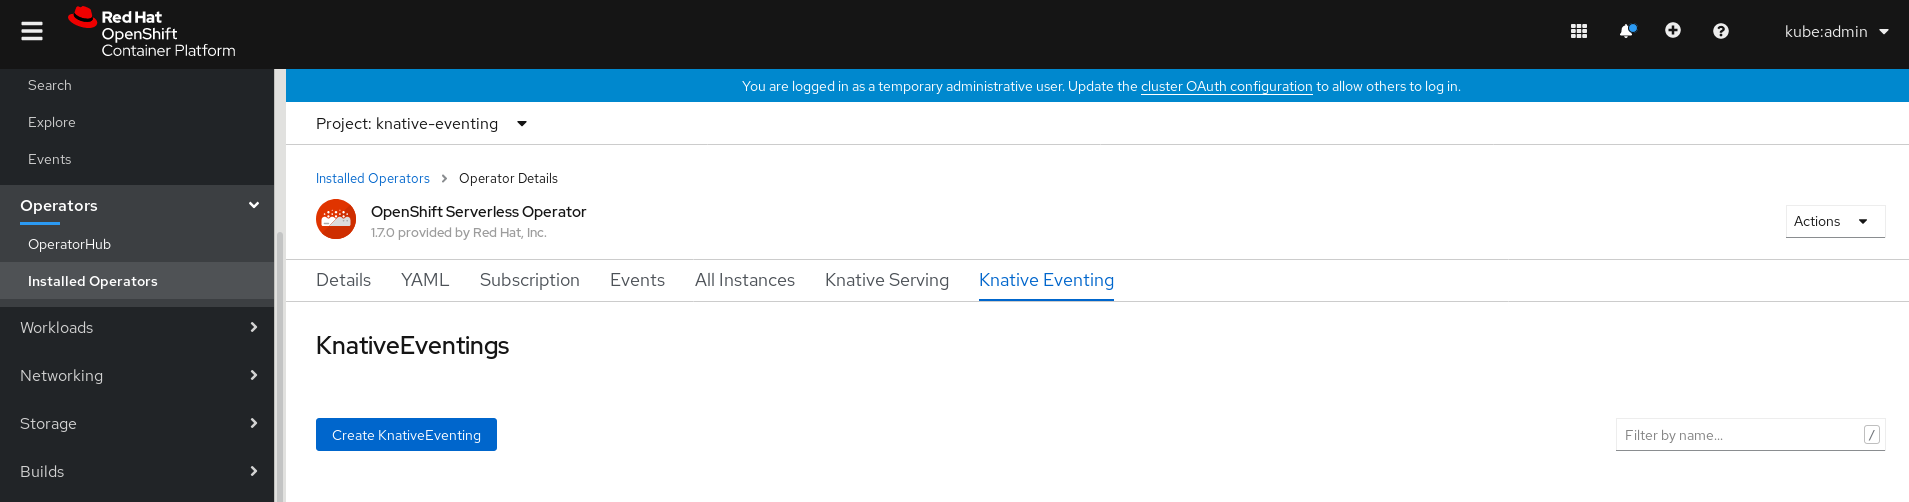
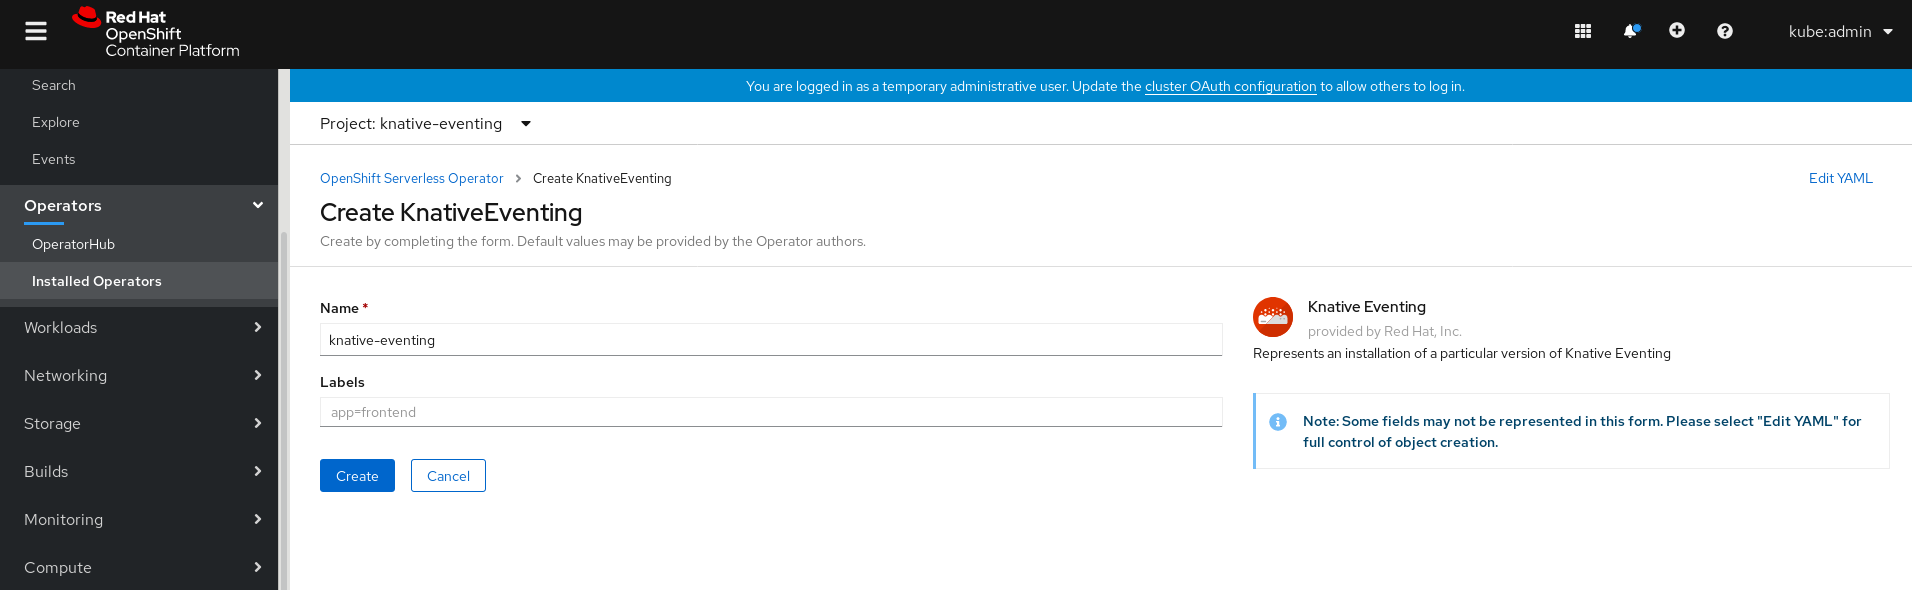
In the Create Knative Eventing page, you can choose to configure the
KnativeEventingobject by using either the default form provided, or by editing the YAML.Using the form is recommended for simpler configurations that do not require full control of
KnativeEventingobject creation.Optional. If you are configuring the
KnativeEventingobject using the form, make any changes that you want to implement for your Knative Eventing deployment.
Click Create.
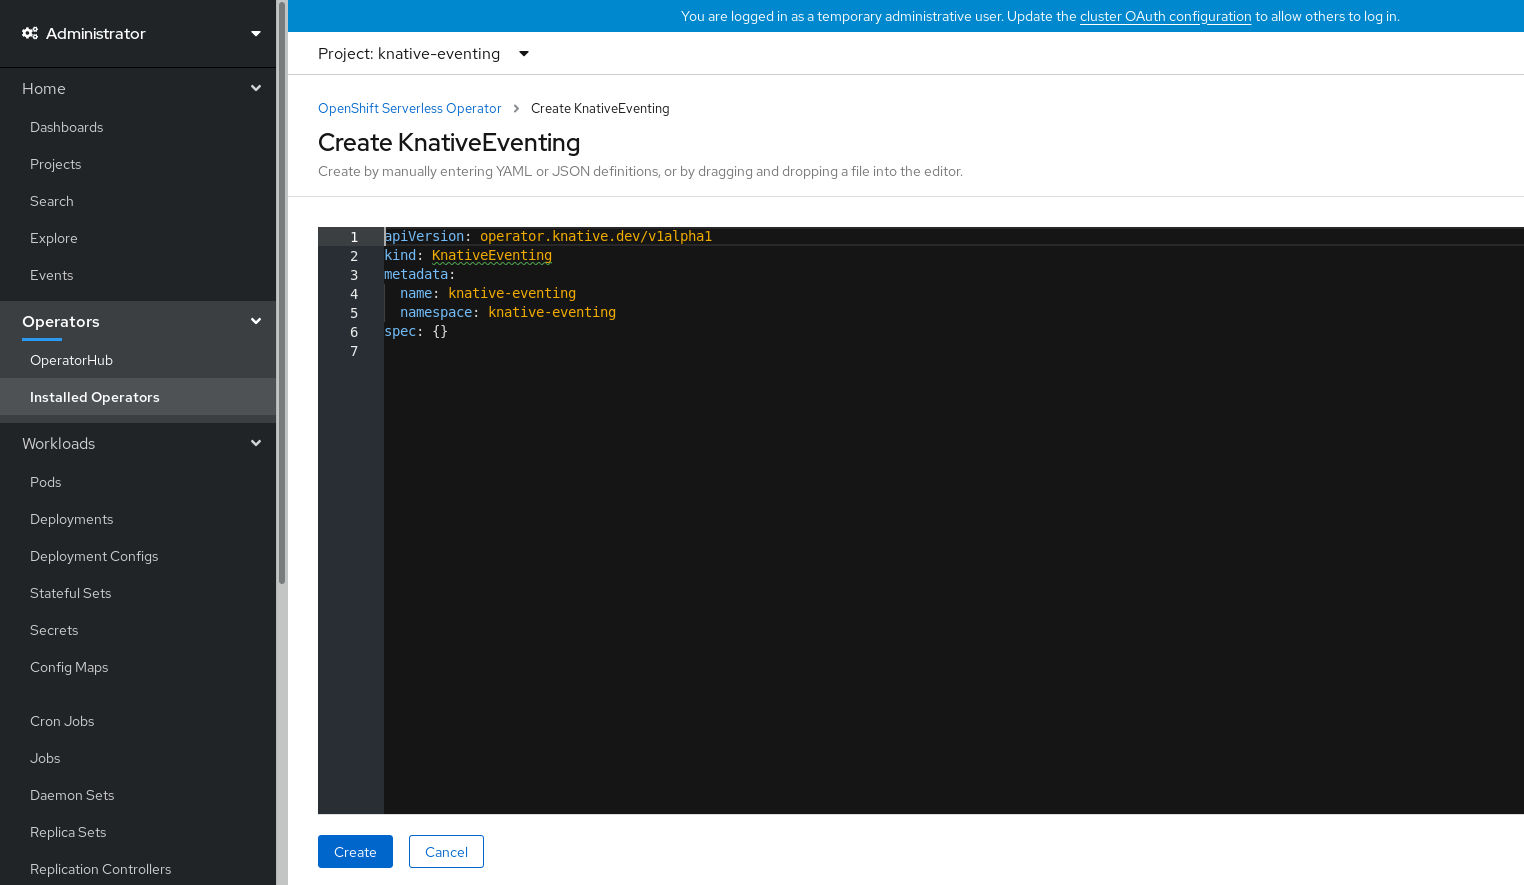
Editing the YAML is recommended for more complex configurations that require full control of
KnativeEventingobject creation. You can access the YAML by clicking the edit YAML link in the top right of the Create Knative Eventing page.Optional. If you are configuring the
KnativeEventingobject by editing the YAML, make any changes to the YAML that you want to implement for your Knative Eventing deployment.
Click Create.
After you have installed Knative Eventing, the
KnativeEventingobject is created, and you will be automically directed to the Knative Eventing tab.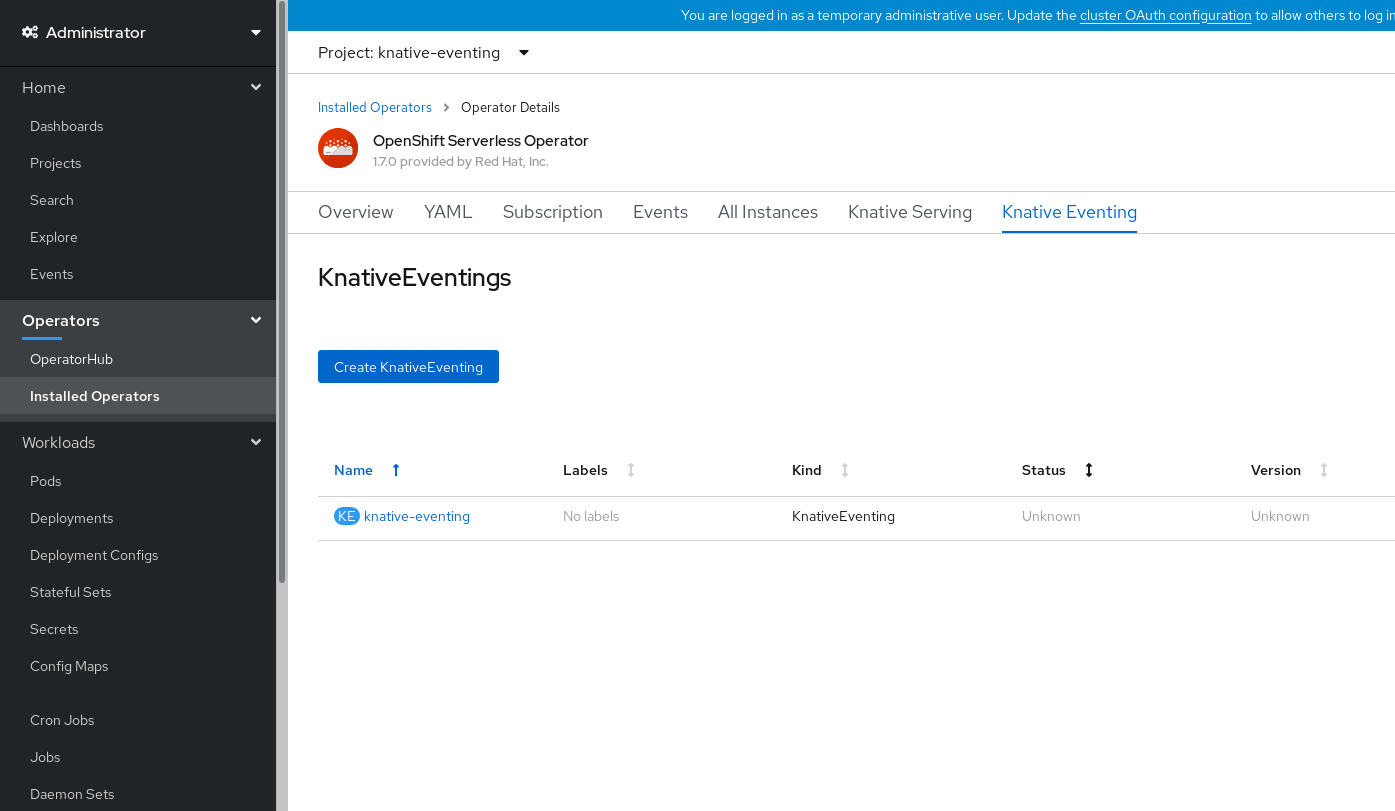
You will see
knative-eventingin the list of resources.
Verification steps
-
Click on
knative-eventingin the Knative Eventing tab. You will be automatically directed to the Knative Eventing Overview page.
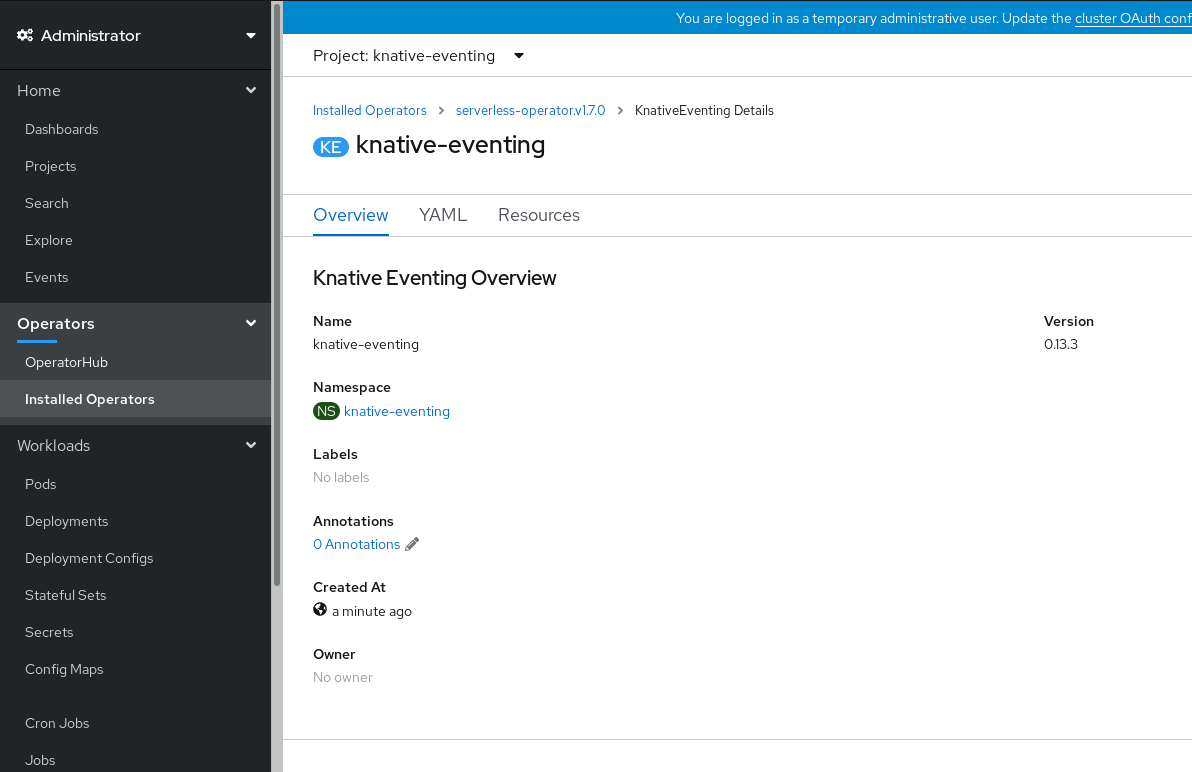
- Scroll down to look at the list of Conditions.
You should see a list of conditions with a status of True, as shown in the example image.
 Note
NoteIt may take a few seconds for the Knative Eventing resources to be created. You can check their status in the Resources tab.
- If the conditions have a status of Unknown or False, wait a few moments and then check again after you have confirmed that the resources have been created.
5.3.4. Installing Knative Eventing using YAML
Procedure
-
Create a file named
eventing.yaml. Copy the following sample YAML into
eventing.yaml:apiVersion: operator.knative.dev/v1alpha1 kind: KnativeEventing metadata: name: knative-eventing namespace: knative-eventing- Optional. Make any changes to the YAML that you want to implement for your Knative Eventing deployment.
Apply the
eventing.yamlfile by entering:$ oc apply -f eventing.yaml
Verification steps
Verify that the installation is complete:
$ oc get knativeeventing.operator.knative.dev/knative-eventing \ -n knative-eventing \ --template='{{range .status.conditions}}{{printf "%s=%s\n" .type .status}}{{end}}'Example output
InstallSucceeded=True Ready=True
NoteIt may take a few seconds for the Knative Eventing resources to be created.
-
If the conditions have a status of
UnknownorFalse, wait a few moments and then check again after you have confirmed that the resources have been created. Check that the Knative Eventing resources have been created:
$ oc get pods -n knative-eventing
Example output
NAME READY STATUS RESTARTS AGE broker-controller-58765d9d49-g9zp6 1/1 Running 0 7m21s eventing-controller-65fdd66b54-jw7bh 1/1 Running 0 7m31s eventing-webhook-57fd74b5bd-kvhlz 1/1 Running 0 7m31s imc-controller-5b75d458fc-ptvm2 1/1 Running 0 7m19s imc-dispatcher-64f6d5fccb-kkc4c 1/1 Running 0 7m18s
5.3.5. Next steps
- For services and serving functionality on OpenShift Serverless, you can install the Knative Serving component. See the documentation on Installing Knative Serving.
-
Install the Knative CLI to use
kncommands with Knative Eventing. For example,kn sourcecommands. See the documentation on Installing the Knative CLI (kn).
5.4. Advanced installation configuration options
This guide provides information for cluster administrators about advanced installation configuration options for OpenShift Serverless components.
5.4.1. Knative Serving supported installation configuration options
This guide provides information for cluster administrators about advanced installation configuration options for Knative Serving.
Do not modify any YAML contained inside the config field. Some of the configuration values in this field are injected by the OpenShift Serverless Operator, and modifying them will cause your deployment to become unsupported.
5.4.1.1. Controller Custom Certs
If your registry uses a self-signed certificate, you must enable tag-to-digest resolution by creating a ConfigMap or Secret. The OpenShift Serverless Operator then automatically configures Knative Serving controller access to the registry.
To enable tag-to-digest resolution, the Knative Serving controller requires access to the container registry.
The ConfigMap or Secret must reside in the same namespace as the Knative Serving CustomResourceDefinition (CRD).
The following example triggers the OpenShift Serverless Operator to:
- Create and mount a volume containing the certificate in the controller.
- Set the required environment variable properly.
Example YAML
apiVersion: operator.knative.dev/v1alpha1
kind: KnativeServing
metadata:
    name: knative-serving
    namespace: knative-serving
spec:
controller-custom-certs:
name: certs
type: ConfigMap
The following example uses a certificate in a ConfigMap named certs in the knative-serving namespace.
The supported types are ConfigMap and Secret.
If no controller custom cert is specified, this defaults to the config-service-ca ConfigMap.
Example default YAML
spec:
  controller-custom-certs:
    name: config-service-ca
    type: ConfigMap
5.4.1.2. High availability
High availability (HA) defaults to 2 replicas per controller if no number of replicas is specified.
You can set this to 1 to disable HA, or add more replicas by setting a higher integer.
Example YAML
spec:
  high-availability:
    replicas: 2
5.4.2. Additional resources
- For more information about configuring high availability, see High availability on OpenShift Serverless.
5.5. Upgrading OpenShift Serverless
If you have previously installed a Technology Preview version of OpenShift Serverless, follow the instructions in this guide to upgrade to the latest version.
Before upgrading to the latest Serverless release, you must remove the community Knative Eventing operator if you have previously installed it. Having the Knative Eventing operator installed will prevent you from being able to install the latest Technology Preview version of Knative Eventing.
5.5.1. Updating Knative services URL formats
When upgrading from older versions of OpenShift Serverless to 1.7.0, support for HTTPS requires a change to the format of routes. Knative services created on OpenShift Serverless 1.6.0 or older versions are no longer reachable at the old format URLs. You must retrieve the new URL for each service after upgrading OpenShift Serverless.
For more information on retrieving Knative services URLs, see Verifying your serverless application deployment.
5.5.2. Upgrading the Subscription Channel
To upgrade to the latest version of OpenShift Serverless on OpenShift Container Platform 4.3, you must update the channel to 4.3.
If you are upgrading from OpenShift Serverless version 1.5.0, or earlier, to version 1.7.0, you must complete the following steps:
-
Upgrade to OpenShift Serverless version 1.5.0, by selecting the
techpreviewchannel. -
After you have upgraded to 1.5.0, upgrade to 1.6.0 by selecting the
preview-4.3channel. -
Finally, after you have upgraded to 1.6.0, upgrade to the latest version by selecting the
4.3channel.
After each channel change, wait for the pods in the knative-serving namespace to get upgraded before changing the channel again.
Prerequisites
You have installed a previous version of OpenShift Serverless Operator, and have selected Automatic updates during the installation process.
NoteIf you have selected Manual updates, you will need to complete additional steps after updating the channel as described in this guide. The Subscription’s upgrade status will remain Upgrading until you review and approve its Install Plan. Information about the Install Plan can be found in the OpenShift Container Platform Operators documentation.
- You have logged in to the OpenShift Container Platform web console.
Procedure
-
Select the
openshift-operatorsnamespace in the OpenShift Container Platform web console. - Navigate to the Operators → Installed Operators page.
- Select the OpenShift Serverless Operator Operator.
- Click Subscription → Channel.
-
In the Change Subscription Update Channel window, select
4.3, and then click Save. -
Wait until all pods have been upgraded in the
knative-servingnamespace and the KnativeServing custom resource reports the latest Knative Serving version.
Verification steps
To verify that the upgrade has been successful, you can check the status of pods in the knative-serving namespace, and the version of the KnativeServing CR.
Check the status of the pods:
$ oc get knativeserving.operator.knative.dev knative-serving -n knative-serving -o=jsonpath='{.status.conditions[?(@.type=="Ready")].status}'The previous command should return a status of
True.Check the version of the KnativeServing CR:
$ oc get knativeserving.operator.knative.dev knative-serving -n knative-serving -o=jsonpath='{.status.version}'This command should return the latest version of Knative Serving. You can check the latest version in the OpenShift Serverless Operator release notes.
5.6. Removing OpenShift Serverless
This guide provides details of how to remove the OpenShift Serverless Operator and other OpenShift Serverless components.
Before you can remove the OpenShift Serverless Operator, you must remove Knative Serving and Knative Eventing.
5.6.1. Uninstalling Knative Serving
To uninstall Knative Serving, you must remove its custom resource and delete the knative-serving namespace.
Procedure
Delete the
knative-servingcustom resource:$ oc delete knativeservings.operator.knative.dev knative-serving -n knative-serving
After the command has completed and all pods have been removed from the
knative-servingnamespace, delete the namespace:$ oc delete namespace knative-serving
5.6.2. Uninstalling Knative Eventing
To uninstall Knative Eventing, you must remove its custom resource and delete the knative-eventing namespace.
Procedure
Delete the
knative-eventingcustom resource:$ oc delete knativeeventings.operator.knative.dev knative-eventing -n knative-eventing
After the command has completed and all pods have been removed from the
knative-eventingnamespace, delete the namespace:$ oc delete namespace knative-eventing
5.6.3. Removing the OpenShift Serverless Operator
You can remove the OpenShift Serverless Operator from the host cluster by following the documentation on deleting Operators from a cluster.
5.6.4. Deleting OpenShift Serverless CRDs
After uninstalling the OpenShift Serverless, the Operator and API CRDs remain on the cluster. You can use the following procedure to remove the remaining CRDs.
Removing the Operator and API CRDs also removes all resources that were defined using them, including Knative services.
5.6.5. Prerequisites
- You uninstalled Knative Serving and removed the OpenShift Serverless Operator.
Procedure
To delete the remaining OpenShift Serverless CRDs, enter the following command:
$ oc get crd -oname | grep 'knative.dev' | xargs oc delete
5.7. Installing the Knative CLI (kn)
kn does not have its own login mechanism. To log in to the cluster, you must install the oc CLI and use oc login.
Installation options for the oc CLI will vary depending on your operating system.
For more information on installing the oc CLI for your operating system and logging in with oc, see the CLI getting started documentation.
5.7.1. Installing the kn CLI using the OpenShift Container Platform web console
Once the OpenShift Serverless Operator is installed, you will see a link to download the kn CLI for Linux, macOS and Windows from the Command Line Tools page in the OpenShift Container Platform web console.
You can access the Command Line Tools page by clicking the
 icon in the top right corner of the web console and selecting Command Line Tools in the drop down menu.
Procedure
-
Download the
knCLI from the Command Line Tools page. Unpack the archive:
$ tar -xf <file>
-
Move the
knbinary to a directory on your PATH. Check your path:
$ echo $PATH
NoteIf you do not use RHEL or Fedora, ensure that libc is installed in a directory on your library path. If libc is not available, you might see the following error when you run CLI commands:
$ kn: No such file or directory
5.7.2. Installing the kn CLI for Linux using an RPM
For Red Hat Enterprise Linux (RHEL), you can install kn as an RPM if you have an active OpenShift Container Platform subscription on your Red Hat account.
Procedure
Enter the command:
# subscription-manager register
Enter the command:
# subscription-manager refresh
Enter the command:
# subscription-manager attach --pool=<pool_id> 1- 1
- Pool ID for an active OpenShift Container Platform subscription
Enter the command:
# subscription-manager repos --enable="openshift-serverless-1-for-rhel-8-x86_64-rpms"
Enter the command:
# yum install openshift-serverless-clients
5.7.3. Installing the kn CLI for Linux
For Linux distributions, you can download the CLI directly as a tar.gz archive.
Procedure
- Download the CLI.
Unpack the archive:
$ tar -xf <file>
-
Move the
knbinary to a directory on your PATH. Check your path:
$ echo $PATH
NoteIf you do not use RHEL or Fedora, ensure that libc is installed in a directory on your library path. If libc is not available, you might see the following error when you run CLI commands:
$ kn: No such file or directory
5.7.4. Installing the kn CLI for macOS
kn for macOS is provided as a tar.gz archive.
Procedure
- Download the CLI.
- Unpack and unzip the archive.
-
Move the
knbinary to a directory on your PATH. Check your path:
$ echo $PATH
5.7.5. Installing the kn CLI for Windows
The CLI for Windows is provided as a zip archive.
Procedure
- Download the CLI.
- Unzip the archive with a ZIP program.
-
Move the
knbinary to a directory on your PATH. To check your PATH, open the Command Prompt and enter:
C:\> path
Chapter 6. Creating and managing serverless applications
6.1. Serverless applications using Knative services
To deploy a serverless application using OpenShift Serverless, you must create a Knative service. Knative services are Kubernetes services, defined by a route and a configuration, and contained in a YAML file.
Example Knative service YAML
apiVersion: serving.knative.dev/v1
kind: Service
metadata:
  name: hello 1
  namespace: default 2
spec:
  template:
    spec:
      containers:
        - image: docker.io/openshift/hello-openshift 3
          env:
            - name: RESPONSE 4
              value: "Hello Serverless!"
You can create a serverless application by using one of the following methods:
- Create a Knative service from the OpenShift Container Platform web console.
-
Create a Knative service using the
knCLI. - Create and apply a YAML file.
6.2. Creating serverless applications using the OpenShift Container Platform web console
You can create a serverless application using either the Developer or Administrator perspective in the OpenShift Container Platform web console.
6.2.1. Creating serverless applications using the Administrator perspective
Prerequisites
To create serverless applications using the Administrator perspective, ensure that you have completed the following steps.
- The OpenShift Serverless Operator and Knative Serving are installed.
- You have logged in to the web console and are in the Administrator perspective.
Procedure
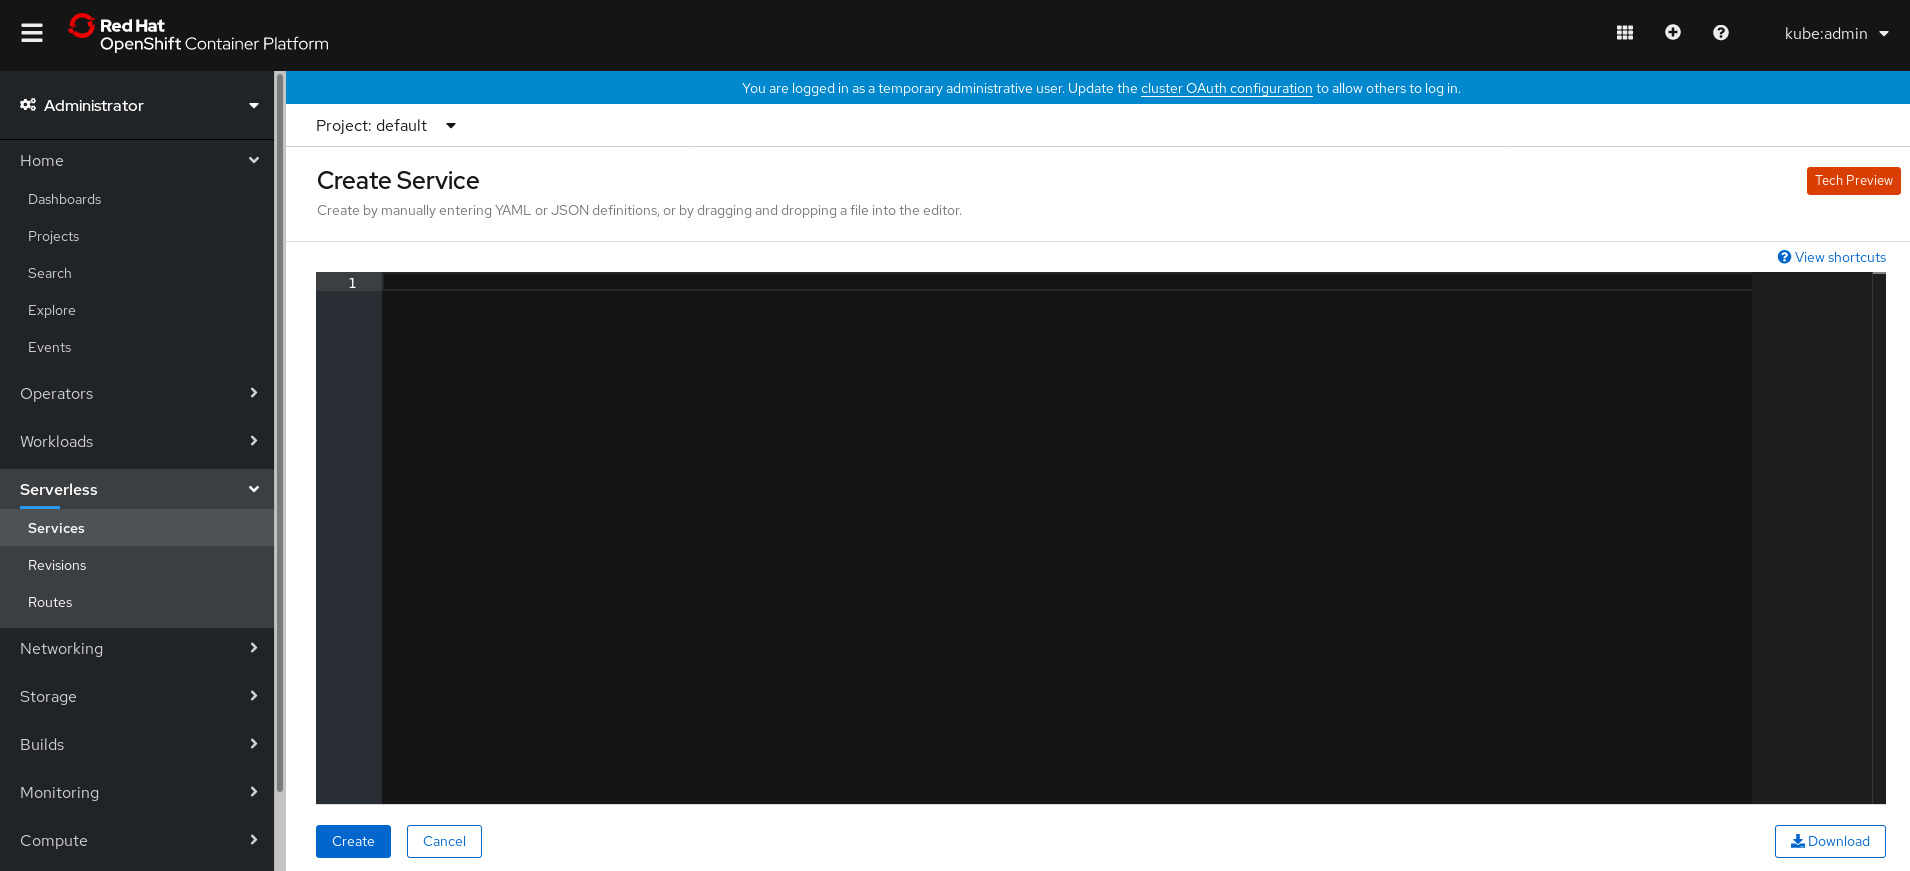
Navigate to the Serverless → Services page.
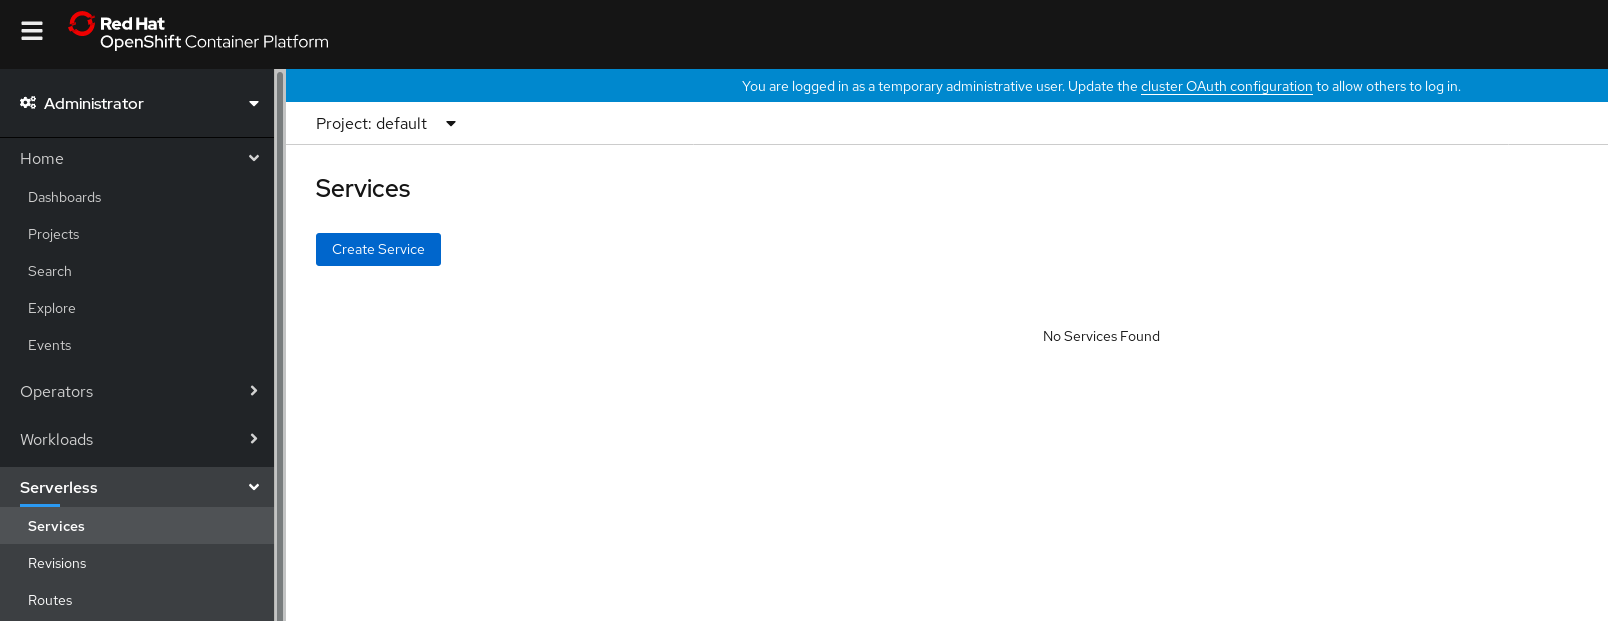
- Click Create Service.
Manually enter YAML or JSON definitions, or by dragging and dropping a file into the editor.
- Click Create.
6.2.2. Creating serverless applications using the Developer perspective
For more information about creating applications using the Developer perspective in OpenShift Container Platform, see the documentation on Creating applications using the Developer perspective.
6.3. Creating serverless applications using the kn CLI
The following procedure describes how you can create a basic serverless application using the kn CLI.
Prerequisites
- OpenShift Serverless Operator and Knative Serving are installed on your cluster.
-
You have installed
knCLI.
Procedure
Create a Knative service:
$ kn service create <service_name> --image <image> --env <key=value>
Example command
$ kn service create hello --image quay.io/openshift-knative/knative-eventing-sources-event-display:latest --env RESPONSE="Hello Serverless!"
Example output
Creating service 'hello' in namespace 'default':

  0.271s The Route is still working to reflect the latest desired specification.
  0.580s Configuration "hello" is waiting for a Revision to become ready.
  3.857s ...
  3.861s Ingress has not yet been reconciled.
  4.270s Ready to serve.

Service 'hello' created with latest revision 'hello-bxshg-1' and URL:
http://hello-default.apps-crc.testing
6.4. Creating serverless applications using YAML
To create a serverless application, you can create a YAML file and apply it using oc apply.
You can create a YAML file by copying the following example:
Example Knative service YAML
apiVersion: serving.knative.dev/v1
kind: Service
metadata:
  name: hello
  namespace: default
spec:
  template:
    spec:
      containers:
        - image: docker.io/openshift/hello-openshift
          env:
            - name: RESPONSE
              value: "Hello Serverless!"
In this example, the YAML file is named hello-service.yaml.
Procedure
Navigate to the directory where the
hello-service.yamlfile is contained, and deploy the application by applying the YAML file:$ oc apply --filename hello-service.yaml
After the service has been created and the application has been deployed, Knative will create a new immutable revision for this version of the application.
Knative will also perform network programming to create a route, ingress, service, and load balancer for your application, and will automatically scale your pods up and down based on traffic, including inactive Pods.
6.5. Verifying your serverless application deployment
To verify that your serverless application has been deployed successfully, you must get the application URL created by Knative, and then send a request to that URL and observe the output.
OpenShift Serverless supports the use of both HTTP and HTTPS URLs, however the output from oc get ksvc will always print URLs using the http:// format.
Procedure
Find the application URL:
$ oc get ksvc <service_name>
Example output
NAME            URL                                        LATESTCREATED         LATESTREADY           READY   REASON
hello   http://hello-default.example.com   hello-4wsd2   hello-4wsd2   True
Make a request to your cluster and observe the output:
Example HTTP request
$ curl http://hello-default.example.com
Example output
Hello Serverless!
Example HTTPS request
$ curl https://hello-default.example.com
Example output
Hello Serverless!
Optional. If you receive an error relating to a self-signed certificate in the certificate chain, you can add the
--insecureflag to the curl command to ignore the error:$ curl https://hello-default.example.com --insecure
ImportantSelf-signed certificates must not be used in a production deployment. This method is only for testing purposes.
Optional. If your OpenShift Container Platform cluster is configured with a certificate that is signed by a certificate authority (CA) but not yet globally configured for your system, you can specify this with the curl command.
The path to the certificate can be passed to the curl command by using the
--cacertflag:$ curl https://hello-default.example.com --cacert <file>
6.6. Interacting with a serverless application using HTTP2 / gRPC
OpenShift Container Platform routes do not support HTTP2, and therefore do not support gRPC as this is transported by HTTP2. If you use these protocols in your application, you must call the application using the ingress gateway directly. To do this you must find the ingress gateway’s public address and the application’s specific host.
Procedure
- Find the application host. See the instructions in Verifying your serverless application deployment.
The ingress gateway’s public address can be determined using this command:
$ oc -n knative-serving-ingress get svc kourier
Example output
NAME                   TYPE           CLUSTER-IP      EXTERNAL-IP                                                             PORT(S)                                                                                                                                      AGE
kourier   LoadBalancer   172.30.51.103   a83e86291bcdd11e993af02b7a65e514-33544245.us-east-1.elb.amazonaws.com   80:31380/TCP,443:31390/TCP   67m
The public address is surfaced in the
EXTERNAL-IPfield, and in this case isa83e86291bcdd11e993af02b7a65e514-33544245.us-east-1.elb.amazonaws.com.Manually set the host header of your HTTP request to the application’s host, but direct the request itself against the public address of the ingress gateway.
Here is an example, using the information obtained from the steps in Verifying your serverless application deployment:
$ curl -H "Host: hello-default.example.com" a83e86291bcdd11e993af02b7a65e514-33544245.us-east-1.elb.amazonaws.com
Example output
Hello Serverless!
You can also make a gRPC request by setting the authority to the application’s host, while directing the request against the ingress gateway directly.
Here is an example of what that looks like in the Golang gRPC client:
grpc.Dial( "a83e86291bcdd11e993af02b7a65e514-33544245.us-east-1.elb.amazonaws.com:80", grpc.WithAuthority("hello-default.example.com:80"), grpc.WithInsecure(), )NoteEnsure that you append the respective port (80 by default) to both hosts as shown in the example.
Chapter 7. High availability on OpenShift Serverless
High availability (HA) is a standard feature of Kubernetes APIs that helps to ensure that APIs stay operational if a disruption occurs. In an HA deployment, if an active controller crashes or is deleted, another controller is available to take over processing of the APIs that were being serviced by the controller that is now unavailable.
HA in OpenShift Serverless is available through leader election, which is enabled by default after the Knative Serving control plane is installed.
When using a leader election HA pattern, instances of controllers are already scheduled and running inside the cluster before they are required. These controller instances compete to use a shared resource, known as the leader election lock. The instance of the controller that has access to the leader election lock resource at any given time is referred to as the leader.
7.1. Configuring high availability replicas on OpenShift Serverless
High availability (HA) functionality is available by default on OpenShift Serverless for the autoscaler-hpa, controller, activator , kourier-control, and kourier-gateway components. These components are configured with two replicas by default.
You modify the number of replicas that are created per controller by changing the configuration of KnativeServing.spec.highAvailability in the KnativeServing custom resource definition.
Prerequisites
- An OpenShift Container Platform account with cluster administrator access.
- Installed the OpenShift Serverless Operator and Knative Serving.
Procedure
In the OpenShift Container Platform web console Administrator perspective, navigate to OperatorHub → Installed Operators.
-
Select the
knative-servingnamespace. Click Knative Serving in the list of Provided APIs for the OpenShift Serverless Operator to go to the Knative Serving tab.
Click knative-serving, then go to the YAML tab in the knative-serving page.

Edit the custom resource definition YAML:
Example YAML
spec: high-availability: replicas: 3ImportantDo not modify any YAML contained inside the
configfield. Some of the configuration values in this field are injected by the OpenShift Serverless Operator, and modifying them will cause your deployment to become unsupported.-
The default
replicasvalue is2. -
Changing the value to
1will disable HA, or you can increase the number of replicas as required. The example configuration shown specifies a replica count of3for all HA controllers.
-
The default
Chapter 8. Tracing requests using Jaeger
Using Jaeger with OpenShift Serverless allows you to enable distributed tracing for your serverless applications on OpenShift Container Platform.
Distributed tracing records the path of a request through the various services that make up an application.
It is used to tie information about different units of work together, to understand a whole chain of events in a distributed transaction. The units of work might be executed in different processes or hosts.
Developers can visualize call flows in large architectures with distributed tracing. which is useful for understanding serialization, parallelism, and sources of latency.
For more information about Jaeger, see Jaeger architecture and Installing Jaeger.
8.1. Configuring Jaeger for use with OpenShift Serverless
Prerequisites
To configure Jaeger for use with OpenShift Serverless, you will need:
- Cluster administrator permissions on an OpenShift Container Platform cluster.
- A current installation of OpenShift Serverless Operator and Knative Serving.
- A current installation of the Jaeger Operator.
Procedure
Create and apply a Jaeger custom resource YAML file that contains the following sample YAML:
Jaeger custom resource YAML
apiVersion: jaegertracing.io/v1
kind: Jaeger
metadata:
  name: jaeger
  namespace: default
Enable tracing for Knative Serving, by editing the
KnativeServingresource and adding a YAML configuration for tracing.Tracing YAML example
apiVersion: operator.knative.dev/v1alpha1 kind: KnativeServing metadata: name: knative-serving namespace: knative-serving spec: config: tracing: sample-rate: "0.1" 1 backend: zipkin 2 zipkin-endpoint: http://jaeger-collector.default.svc.cluster.local:9411/api/v2/spans 3 debug: "false" 4- 1
- The
sample-ratedefines sampling probability. Usingsample-rate: "0.1"means that 1 in 10 traces will be sampled. - 2
backendmust be set tozipkin.- 3
- The
zipkin-endpointmust point to yourjaeger-collectorservice endpoint. To get this endpoint, substitute the namespace where the Jaeger custom resource is applied. - 4
- Debugging should be set to
false. Enabling debug mode by settingdebug: "true"allows all spans to be sent to the server, bypassing sampling.
Verification steps
Access the Jaeger web console to see tracing data. You can access the Jaeger web console by using the jaeger route.
Get the
jaegerroute’s hostname by entering the following command:$ oc get route jaeger
Example output
NAME     HOST/PORT                         PATH   SERVICES       PORT    TERMINATION   WILDCARD
jaeger   jaeger-default.apps.example.com          jaeger-query   <all>   reencrypt     None
- Open the endpoint address in your browser to view the console.
Chapter 9. Knative Serving
9.1. Using kn to complete Serving tasks
The Knative CLI (kn) extends the functionality of the oc or kubectl tools to enable interaction with Knative components on OpenShift Container Platform. kn allows developers to deploy and manage applications without editing YAML files directly.
9.1.1. Basic workflow using kn
The following basic workflow deploys a simple hello service that reads the environment variable RESPONSE and prints its output.
You can use this guide as a reference to perform create, read, update, and delete (CRUD) operations on a service.
Procedure
Create a service in the
defaultnamespace from an image:$ kn service create hello --image docker.io/openshift/hello-openshift --env RESPONSE="Hello Serverless!"
Example output
Creating service 'hello' in namespace 'default':

  0.085s The Route is still working to reflect the latest desired specification.
  0.101s Configuration "hello" is waiting for a Revision to become ready.
 11.590s ...
 11.650s Ingress has not yet been reconciled.
 11.726s Ready to serve.

Service 'hello' created with latest revision 'hello-gsdks-1' and URL:
http://hello-default.apps-crc.testing
List the service:
$ kn service list
Example output
NAME    URL                                     LATEST          AGE     CONDITIONS   READY   REASON
hello   http://hello-default.apps-crc.testing   hello-gsdks-1   8m35s   3 OK / 3     True
Check if the service is working by using the
curlservice endpoint command:$ curl http://hello-default.apps-crc.testing
Example output
Hello Serverless!
Update the service:
$ kn service update hello --env RESPONSE="Hello OpenShift!"
Example output
Updating Service 'hello' in namespace 'default':

 10.136s Traffic is not yet migrated to the latest revision.
 10.175s Ingress has not yet been reconciled.
 10.348s Ready to serve.

Service 'hello' updated with latest revision 'hello-dghll-2' and URL:
http://hello-default.apps-crc.testing
The service’s environment variable
RESPONSEis now set to "Hello OpenShift!".Describe the service.
$ kn service describe hello
Example output
Name:       hello
Namespace:  default
Age:        13m
URL:        http://hello-default.apps-crc.testing

Revisions:
  100%  @latest (hello-dghll-2) [2] (1m)
        Image:  docker.io/openshift/hello-openshift (pinned to 5ea96b)

Conditions:
  OK TYPE                   AGE REASON
  ++ Ready                   1m
  ++ ConfigurationsReady     1m
  ++ RoutesReady             1m
Delete the service:
$ kn service delete hello
Example output
Service 'hello' successfully deleted in namespace 'default'.
Verify that the
helloservice is deleted by attempting tolistit:$ kn service list hello
Example output
No services found.
9.1.2. Autoscaling workflow using kn
You can access autoscaling capabilities by using kn to modify Knative services without editing YAML files directly.
Use the service create and service update commands with the appropriate flags to configure the autoscaling behavior.
| Flag | Description |
|---|---|
|
| Hard limit of concurrent requests to be processed by a single replica. |
|
|
Recommendation for when to scale up based on the concurrent number of incoming requests. Defaults to |
|
| Maximum number of replicas. |
|
| Minimum number of replicas. |
9.1.3. Traffic splitting using kn
kn helps you control which revisions get routed traffic on your Knative service.
Knative service allows for traffic mapping, which is the mapping of revisions of the service to an allocated portion of traffic. It offers the option to create unique URLs for particular revisions and has the ability to assign traffic to the latest revision.
With every update to the configuration of the service, a new revision is created with the service route pointing all the traffic to the latest ready revision by default.
You can change this behavior by defining which revision gets a portion of the traffic.
Procedure
-
Use the
kn service updatecommand with the--trafficflag to update the traffic.
--traffic RevisionName=Percent uses the following syntax:
-
The
--trafficflag requires two values separated by separated by an equals sign (=). -
The
RevisionNamestring refers to the name of the revision. -
Percentinteger denotes the traffic portion assigned to the revision. -
Use identifier
@latestfor the RevisionName to refer to the latest ready revision of the service. You can use this identifier only once with the--trafficflag. -
If the
service updatecommand updates the configuration values for the service along with traffic flags, the@latestreference will point to the created revision to which the updates are applied. -
--trafficflag can be specified multiple times and is valid only if the sum of thePercentvalues in all flags totals 100.
For example, to route 10% of traffic to your new revision before putting all traffic on, use the following command:
$ kn service update svc --traffic @latest=10 --traffic svc-vwxyz=90
9.1.3.1. Assigning tag revisions
A tag in a traffic block of service creates a custom URL, which points to a referenced revision. A user can define a unique tag for an available revision of a service which creates a custom URL by using the format http(s)://TAG-SERVICE.DOMAIN.
A given tag must be unique to its traffic block of the service. kn supports assigning and unassigning custom tags for revisions of services as part of the kn service update command.
If you have assigned a tag to a particular revision, a user can reference the revision by its tag in the --traffic flag as --traffic Tag=Percent.
Procedure
Enter the command:
$ kn service update svc --tag @latest=candidate --tag svc-vwxyz=current
--tag RevisionName=Tag uses the following syntax:
-
--tagflag requires two values separated by a=. -
RevisionNamestring refers to name of theRevision. -
Tagstring denotes the custom tag to be given for this Revision. -
Use the identifier
@latestfor the RevisionName to refer to the latest ready revision of the service. You can use this identifier only once with the--tagflag. -
If the
service updatecommand is updating the configuration values for the Service (along with tag flags),@latestreference will be pointed to the created Revision after applying the update. -
--tagflag can be specified multiple times. -
--tagflag may assign different tags to the same revision.
9.1.3.2. Unassigning tag revisions
Tags assigned to revisions in a traffic block can be unassigned. Unassigning tags removes the custom URLs.
If a revision is untagged and it is assigned 0% of the traffic, it is removed from the traffic block entirely.
Procedure
Unassign a tag:
$ kn service update svc --untag candidate
--untag Tag uses the following syntax:
-
The
--untagflag requires one value. -
The
tagstring denotes the unique tag in the traffic block of the service which needs to be unassigned. This also removes the respective custom URL. -
The
--untagflag can be specified multiple times.
9.1.3.3. Traffic flag operation precedence
All traffic-related flags can be specified using a single kn service update command. kn defines the precedence of these flags. The order of the flags specified when using the command is not taken into account.
The precedence of the flags as they are evaluated by kn are:
-
--untag: All the referenced revisions with this flag are removed from the traffic block. -
--tag: Revisions are tagged as specified in the traffic block. -
--traffic: The referenced revisions are assigned a portion of the traffic split.
9.1.3.4. Traffic splitting flags
kn supports traffic operations on the traffic block of a service as part of the kn service update command.
The following table displays a summary of traffic splitting flags, value formats, and the operation the flag performs. The "Repetition" column denotes whether repeating the particular value of flag is allowed in a kn service update command.
| Flag | Value(s) | Operation | Repetition |
|---|---|---|---|
|
|
|
Gives | Yes |
|
|
|
Gives | Yes |
|
|
|
Gives | No |
|
|
|
Gives | Yes |
|
|
|
Gives | No |
|
|
|
Removes | Yes |
9.2. Configuring Knative Serving autoscaling
OpenShift Serverless provides capabilities for automatic Pod scaling, including scaling inactive Pods to zero, by enabling the Knative Serving autoscaling system in an OpenShift Container Platform cluster.
To enable autoscaling for Knative Serving, you must configure concurrency and scale bounds in the revision template.
Any limits or targets set in the revision template are measured against a single instance of your application. For example, setting the target annotation to 50 will configure the autoscaler to scale the application so that each instance of it will handle 50 requests at a time.
9.2.1. Configuring concurrent requests for Knative Serving autoscaling
You can specify the number of concurrent requests that should be handled by each instance of a revision container, or application, by adding the target annotation or the containerConcurrency field in the revision template.
Example revision template YAML using target annotation
apiVersion: serving.knative.dev/v1
kind: Service
metadata:
  name: myapp
spec:
  template:
    metadata:
      annotations:
        autoscaling.knative.dev/target: 50
    spec:
      containers:
      - image: myimage
Example revision template YAML using containerConcurrency annotation
apiVersion: serving.knative.dev/v1
kind: Service
metadata:
  name: myapp
spec:
  template:
    metadata:
      annotations:
    spec:
      containerConcurrency: 100
      containers:
      - image: myimage
Adding a value for both target and containerConcurrency will target the target number of concurrent requests, but impose a hard limit of the containerConcurrency number of requests.
For example, if the target value is 50 and the containerConcurrency value is 100, the targeted number of requests will be 50, but the hard limit will be 100.
If the containerConcurrency value is less than the target value, the target value will be tuned down, since there is no need to target more requests than the number that can actually be handled.
containerConcurrency should only be used if there is a clear need to limit how many requests reach the application at a given time. Using containerConcurrency is only advised if the application needs to have an enforced constraint of concurrency.
9.2.1.1. Configuring concurrent requests using the target annotation
The default target for the number of concurrent requests is 100, but you can override this value by adding or modifying the autoscaling.knative.dev/target annotation value in the revision template.
Here is an example of how this annotation is used in the revision template to set the target to 50:
autoscaling.knative.dev/target: 50
9.2.1.2. Configuring concurrent requests using the containerConcurrency field
containerConcurrency sets a hard limit on the number of concurrent requests handled.
containerConcurrency: 0 | 1 | 2-N
- 0
- allows unlimited concurrent requests.
- 1
- guarantees that only one request is handled at a time by a given instance of the revision container.
- 2 or more
- will limit request concurrency to that value.
If there is no target annotation, autoscaling is configured as if target is equal to the value of containerConcurrency.
9.2.2. Configuring scale bounds Knative Serving autoscaling
The minScale and maxScale annotations can be used to configure the minimum and maximum number of Pods that can serve applications. These annotations can be used to prevent cold starts or to help control computing costs.
- minScale
-
If the
minScaleannotation is not set, Pods will scale to zero (or to 1 if enable-scale-to-zero is false per theConfigMap). - maxScale
-
If the
maxScaleannotation is not set, there will be no upper limit for the number of Pods created.
minScale and maxScale can be configured as follows in the revision template:
spec:
  template:
    metadata:
      annotations:
        autoscaling.knative.dev/minScale: "2"
        autoscaling.knative.dev/maxScale: "10"
Using these annotations in the revision template will propagate this confguration to PodAutoscaler objects.
These annotations apply for the full lifetime of a revision. Even when a revision is not referenced by any route, the minimal Pod count specified by minScale will still be provided. Keep in mind that non-routeable revisions may be garbage collected, which enables Knative to reclaim the resources.
9.3. Cluster logging with OpenShift Serverless
9.3.1. Cluster logging
OpenShift Container Platform cluster administrators can deploy cluster logging using a few CLI commands and the OpenShift Container Platform web console to install the Elasticsearch Operator and Cluster Logging Operator. When the operators are installed, create a Cluster Logging Custom Resource (CR) to schedule cluster logging pods and other resources necessary to support cluster logging. The operators are responsible for deploying, upgrading, and maintaining cluster logging.
You can configure cluster logging by modifying the Cluster Logging Custom Resource (CR), named instance. The CR defines a complete cluster logging deployment that includes all the components of the logging stack to collect, store and visualize logs. The Cluster Logging Operator watches the ClusterLogging Custom Resource and adjusts the logging deployment accordingly.
Administrators and application developers can view the logs of the projects for which they have view access.
9.3.2. About deploying and configuring cluster logging
OpenShift Container Platform cluster logging is designed to be used with the default configuration, which is tuned for small to medium sized OpenShift Container Platform clusters.
The installation instructions that follow include a sample Cluster Logging Custom Resource (CR), which you can use to create a cluster logging instance and configure your cluster logging deployment.
If you want to use the default cluster logging install, you can use the sample CR directly.
If you want to customize your deployment, make changes to the sample CR as needed. The following describes the configurations you can make when installing your cluster logging instance or modify after installation. See the Configuring sections for more information on working with each component, including modifications you can make outside of the Cluster Logging Custom Resource.
9.3.2.1. Configuring and Tuning Cluster Logging
You can configure your cluster logging environment by modifying the Cluster Logging Custom Resource deployed in the openshift-logging project.
You can modify any of the following components upon install or after install:
- Memory and CPU
-
You can adjust both the CPU and memory limits for each component by modifying the
resourcesblock with valid memory and CPU values:
spec:
  logStore:
    elasticsearch:
      resources:
        limits:
          cpu:
          memory: 16Gi
        requests:
          cpu: 500m
          memory: 16Gi
      type: "elasticsearch"
  collection:
    logs:
      fluentd:
        resources:
          limits:
            cpu:
            memory:
          requests:
            cpu:
            memory:
        type: "fluentd"
  visualization:
    kibana:
      resources:
        limits:
          cpu:
          memory:
        requests:
          cpu:
          memory:
     type: kibana
  curation:
    curator:
      resources:
        limits:
          memory: 200Mi
        requests:
          cpu: 200m
          memory: 200Mi
type: "curator"- Elasticsearch storage
-
You can configure a persistent storage class and size for the Elasticsearch cluster using the
storageClassnameandsizeparameters. The Cluster Logging Operator creates aPersistentVolumeClaimfor each data node in the Elasticsearch cluster based on these parameters.
  spec:
    logStore:
      type: "elasticsearch"
      elasticsearch:
        nodeCount: 3
        storage:
          storageClassName: "gp2"
          size: "200G"
This example specifies each data node in the cluster will be bound to a PersistentVolumeClaim that requests "200G" of "gp2" storage. Each primary shard will be backed by a single replica.
Omitting the storage block results in a deployment that includes ephemeral storage only.
  spec:
    logStore:
      type: "elasticsearch"
      elasticsearch:
        nodeCount: 3
storage: {}- Elasticsearch replication policy
You can set the policy that defines how Elasticsearch shards are replicated across data nodes in the cluster:
-
FullRedundancy. The shards for each index are fully replicated to every data node. -
MultipleRedundancy. The shards for each index are spread over half of the data nodes. -
SingleRedundancy. A single copy of each shard. Logs are always available and recoverable as long as at least two data nodes exist. -
ZeroRedundancy. No copies of any shards. Logs may be unavailable (or lost) in the event a node is down or fails.
-
- Curator schedule
- You specify the schedule for Curator in the cron format.
  spec:
    curation:
    type: "curator"
    resources:
    curator:
      schedule: "30 3 * * *"
9.3.2.2. Sample modified Cluster Logging Custom Resource
The following is an example of a Cluster Logging Custom Resource modified using the options previously described.
Sample modified Cluster Logging Custom Resource
apiVersion: "logging.openshift.io/v1"
kind: "ClusterLogging"
metadata:
  name: "instance"
  namespace: "openshift-logging"
spec:
  managementState: "Managed"
  logStore:
    type: "elasticsearch"
    elasticsearch:
      nodeCount: 3
      resources:
        limits:
          memory: 32Gi
        requests:
          cpu: 3
          memory: 32Gi
      storage: {}
      redundancyPolicy: "SingleRedundancy"
  visualization:
    type: "kibana"
    kibana:
      resources:
        limits:
          memory: 1Gi
        requests:
          cpu: 500m
          memory: 1Gi
      replicas: 1
  curation:
    type: "curator"
    curator:
      resources:
        limits:
          memory: 200Mi
        requests:
          cpu: 200m
          memory: 200Mi
      schedule: "*/5 * * * *"
  collection:
    logs:
      type: "fluentd"
      fluentd:
        resources:
          limits:
            memory: 1Gi
          requests:
            cpu: 200m
            memory: 1Gi
9.3.3. Using cluster logging to find logs for Knative Serving components
Procedure
Get the Kibana route:
$ oc -n openshift-logging get route kibana
- Use the route’s URL to navigate to the Kibana dashboard and log in.
- Ensure the index is set to .all. If the index is not set to .all, only the OpenShift system logs will be listed.
You can filter the logs by using the
knative-servingnamespace. Enterkubernetes.namespace_name:knative-servingin the search box to filter results.NoteKnative Serving uses structured logging by default. You can enable the parsing of these logs by customizing the cluster logging Fluentd settings. This makes the logs more searchable and enables filtering on the log level to quickly identify issues.
9.3.4. Using cluster logging to find logs for services deployed with Knative Serving
With OpenShift Cluster Logging, the logs that your applications write to the console are collected in Elasticsearch. The following procedure outlines how to apply these capabilities to applications deployed by using Knative Serving.
Procedure
Get the Kibana URL:
$ oc -n cluster-logging get route kibana`
- Enter the URL in your browser to open the Kibana UI.
- Ensure the index is set to .all. If the index is not set to .all, only the OpenShift system logs will be listed.
Filter the logs by using the Kubernetes namespace your service is deployed in. Add a filter to identify the service itself:
kubernetes.namespace_name:default AND kubernetes.labels.serving_knative_dev\/service:{SERVICE_NAME}.NoteYou can also filter by using
/configurationor/revision.You can narrow your search by using
kubernetes.container_name:<user-container>to only display the logs generated by your application. Otherwise, you will see logs from the queue-proxy.NoteUse JSON-based structured logging in your application to allow for the quick filtering of these logs in production environments.
9.4. Splitting traffic between revisions
9.4.1. Splitting traffic between revisions using the Developer perspective
After you create a serverless application, the serverless application is displayed in the Topology view of the Developer perspective. The application revision is represented by the node and the serverless resource service is indicated by a quadrilateral around the node.
Any new change in the code or the service configuration triggers a revision, a snapshot of the code at a given time. For a service, you can manage the traffic between the revisions of the service by splitting and routing it to the different revisions as required.
Procedure
To split traffic between multiple revisions of an application in the Topology view:
- Click the serverless resource service, indicated by the quadrilateral, to see its overview in the side panel.
Click the Resources tab, to see a list of Revisions and Routes for the service.
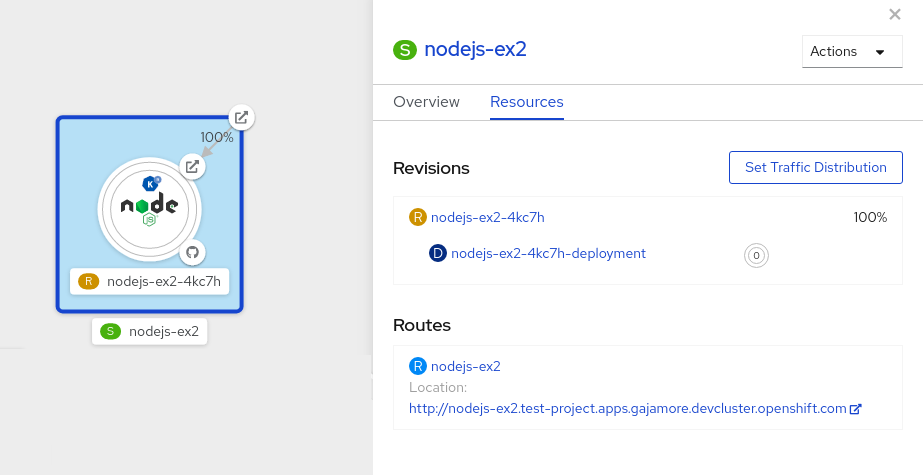
- Click the service, indicated by the S icon at the top of the side panel, to see an overview of the service details.
-
Click the YAML tab and modify the service configuration in the YAML editor, and click Save. For example, change the
timeoutsecondsfrom 300 to 301 . This change in the configuration triggers a new revision. In the Topology view, the latest revision is displayed and the Resources tab for the service now displays the two revisions. In the Resources tab, click the button to see the traffic distribution dialog box:
- Add the split traffic percentage portion for the two revisions in the Splits field.
- Add tags to create custom URLs for the two revisions.
Click Save to see two nodes representing the two revisions in the Topology view.
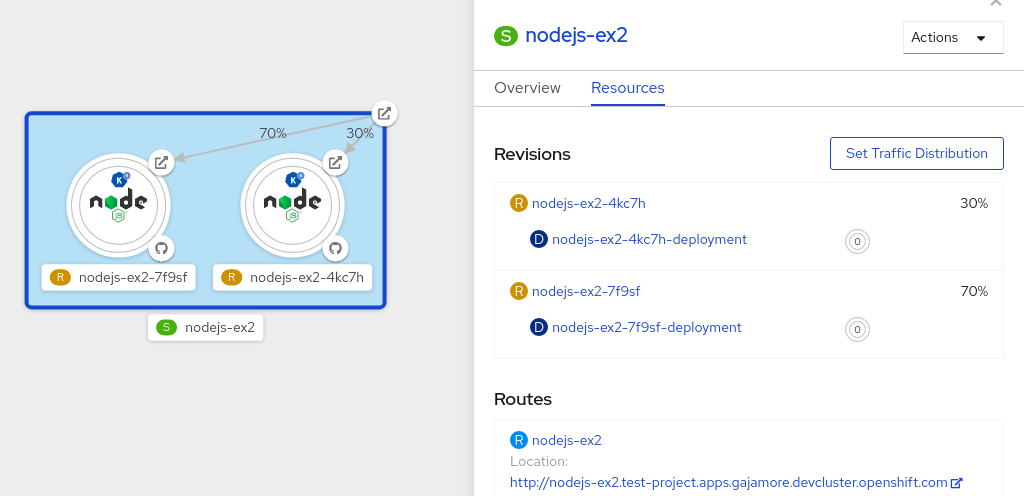
Chapter 10. Knative Eventing
10.1. Using brokers with Knative Eventing
Knative Eventing uses the default broker unless otherwise specified.
If you have cluster administrator permissions, you can create the default broker automatically using namespace annotation.
All other users must create a broker using the manual process as described in this guide.
10.1.1. Creating a broker manually
To create a broker, you must create a service account for each namespace, and give that service account the required RBAC permissions.
Prerequisites
-
Knative Eventing installed, which includes the
ClusterRole.
Procedure
Create the
ServiceAccountobjects.Create the
eventing-broker-ingressobject by entering the following command:$ oc -n <namespace> create serviceaccount eventing-broker-ingress
Create the
eventing-broker-filterobject by entering the following command:$ oc -n <namespace> create serviceaccount eventing-broker-filter
Give the objects that you have created RBAC permissions:
$ oc -n default create rolebinding eventing-broker-ingress \
  --clusterrole=eventing-broker-ingress \
  --serviceaccount=default:eventing-broker-ingress
$ oc -n default create rolebinding eventing-broker-filter \
  --clusterrole=eventing-broker-filter \
  --serviceaccount=default:eventing-broker-filter
Create a broker by creating and applying a YAML file containing the following:
apiVersion: eventing.knative.dev/v1beta1 kind: Broker metadata: namespace: default name: default 1- 1
- This example uses the name
default, but you can replace this with any other valid name.
10.1.2. Creating a broker automatically using namespace annotation
If you have cluster administrator permissions, you can create a broker automatically by annotating a namespace.
Prerequisites
- Knative Eventing installed.
- Cluster administrator permissions for OpenShift Container Platform.
Procedure
Annotate your namespace by entering the following commands:
$ oc label namespace default knative-eventing-injection=enabled 1 $ oc -n default get broker default- 1
- Replace
defaultwith the desired namespace.
The line shown in this example will automatically create a broker named
defaultin thedefaultnamespace.
Brokers created due to annotation will not be removed if you remove the annotation. You must manually delete them.
10.1.3. Deleting a broker that was created using namespace annotation
Delete the injected broker from the selected namespace (in this example, the
defaultnamespace):$ oc -n default delete broker default
10.2. Using channels
It is possible to sink events from an event source to a Knative Eventing channel. Channels are custom resources (CRs) that define a single event-forwarding and persistence layer. After events have been sent to a channel, these events can be sent to multiple Knative services by using a subscription.
The default configuration for channel instances is defined in the default-ch-webhook ConfigMap. However, developers can still create their own channels directly by instantiating a supported channel object.
10.2.1. Supported channel types
Currently, OpenShift Serverless only supports the use of InMemoryChannel type channels as part of the Knative Eventing Technology Preview.
10.2.2. Using the default InMemoryChannel configuration
InMemoryChannels are for development use only, and should not be used in a production environment.
The following are limitations of InMemoryChannel type channels:
- No event persistence is available. If a Pod goes down, events on that Pod are lost.
- InMemoryChannel type channels do not implement event ordering, so two events that are received in the channel at the same time can be delivered to a subscriber in any order.
-
If a subscriber rejects an event, there are no re-delivery attempts. Instead, the rejected event is sent to a
deadLetterSinkif this sink exists, or is otherwise dropped. For more information about configuring event delivery anddeadLetterSinksettings for a channel, see Using subscriptions to send events from a channel to a sink.
When you install Knative Eventing, the following custom resource definition (CRD) is created automatically:
apiVersion: v1
kind: ConfigMap
metadata:
  namespace: knative-eventing
  name: config-br-default-channel
data:
  channelTemplateSpec: |
    apiVersion: messaging.knative.dev/v1
    kind: InMemoryChannel
Creating a channel using the cluster default configuration
Create a generic Channel custom object.
apiVersion: messaging.knative.dev/v1
kind: Channel
metadata:
  name: example-channel
  namespace: default
When the Channel object is created, a mutating admission webhook adds a set of
spec.channelTemplateproperties for the Channel object based on the default channel implementation.apiVersion: messaging.knative.dev/v1 kind: Channel metadata: name: example-channel namespace: default spec: channelTemplate: apiVersion: messaging.knative.dev/v1 kind: InMemoryChannel
The channel controller then creates the backing channel instance based on that spec.channelTemplate configuration. The spec.channelTemplate properties cannot be changed after creation, because they are set by the default channel mechanism rather than by the user.
When this mechanism is used, two objects are created: a generic channel, and an InMemoryChannel type channel.
The generic channel acts as a proxy that copies its subscriptions to the InMemoryChannel, and sets its status to reflect the status of the backing InMemoryChannel type channel.
Because the channel in this example is created in the default namespace, the channel uses the cluster default, which is InMemoryChannel.
10.3. Using subscriptions to send events from a channel to a sink
Subscriptions deliver events to event sinks from a Channel.
10.3.1. Creating a subscription
You can create a subscription to connect a service or other event sink to a channel.
Knative Eventing is a Technology Preview feature. The InMemoryChannel type is provided for development use only, and should not be used in a production environment.
Prerequisites
- You must have a current installation of OpenShift Serverless, including Knative Serving and Eventing, in your OpenShift Container Platform cluster. This can be installed by a cluster administrator.
- If you do not have an existing sink that you wish to use, create a Service to use as a sink by following the documentation on Creating and managing serverless applications.
- You must have a channel to connect your subscription to. See Using channels with Knative Eventing.
Procedure
Create a Subscription object to connect a channel to a service, by creating a YAML file containing the following:
apiVersion: messaging.knative.dev/v1beta1
kind: Subscription
metadata:
  name: my-subscription 1
  namespace: default
spec:
  channel: 2
    apiVersion: messaging.knative.dev/v1beta1
    kind: Channel
    name: example-channel
  delivery: 3
    deadLetterSink:
      ref:
        apiVersion: serving.knative.dev/v1
        kind: Service
        name: error-handler
  subscriber: 4
    ref:
      apiVersion: serving.knative.dev/v1
      kind: Service
      name: event-display
- 1
- Name of the subscription.
- 2
- Configuration settings for the channel that the subscription connects to.
- 3
- Configuration settings for event delivery. This tells the subscription what happens to events that cannot be delivered to the subscriber. When this is configured, events that failed to be consumed are sent to the
deadLetterSink. The event is dropped, no re-delivery of the event is attempted, and an error is logged in the system. ThedeadLetterSinkvalue must be a Destination. - 4
- Configuration settings for the subscriber. This is the event sink that events are delivered to from the channel.
Apply the YAML file by entering:
$ oc apply -f <filename>
10.4. Using triggers
All events which are sent to a channel or broker will be sent to all subscribers of that channel or broker by default.
Using triggers allows you to filter events from a channel or broker, so that subscribers will only receive a subset of events based on your defined criteria.
The Knative CLI provides a set of kn trigger commands that can be used to create and manage triggers.
10.4.1. Prerequisites
Before you can use triggers, you will need:
-
Knative Eventing and
kninstalled. An available broker, either the
defaultbroker or one that you have created.You can create the
defaultbroker either by following the instructions on Using brokers with Knative Eventing, or by using the--inject-brokerflag while creating a trigger. Use of this flag is described in the procedure below.- An available event consumer, for example, a Knative service.
10.4.2. Creating a trigger using kn
Procedure
Create a trigger:
$ kn trigger create <trigger_name> --broker <broker_name> --filter <key=value> --sink <sink_name>
To create a trigger and also create the
defaultbroker using broker injection, enter the following command:$ kn trigger create <TRIGGER-NAME> --inject-broker --filter <KEY=VALUE> --sink <SINK>
Example trigger YAML:
apiVersion: eventing.knative.dev/v1alpha1
kind: Trigger
metadata:
  name: trigger-example 1
spec:
 broker: default 2
 subscriber:
    ref:
      apiVersion: serving.knative.dev/v1
      kind: Service
      name: my-service 3
10.4.3. Listing triggers using kn
The kn trigger list command prints a list of available triggers.
Procedure
Print a list of available triggers:
$ kn trigger list
Example output
NAME    BROKER    SINK           AGE   CONDITIONS   READY   REASON
email   default   svc:edisplay   4s    5 OK / 5     True
ping    default   svc:edisplay   32s   5 OK / 5     True
10.4.4. Listing triggers using kn in JSON format
Procedure
Print a list of triggers in JSON format:
$ kn trigger list -o json
10.4.5. Describing a trigger using kn
The kn trigger describe command prints information about a trigger.
Procedure
Enter the command:
$ kn trigger describe <trigger_name>
Example output
Name:         ping
Namespace:    default
Labels:       eventing.knative.dev/broker=default
Annotations:  eventing.knative.dev/creator=kube:admin, eventing.knative.dev/lastModifier=kube:admin
Age:          2m
Broker:       default
Filter:
  type:       dev.knative.event

Sink:
  Name:       edisplay
  Namespace:  default
  Resource:   Service (serving.knative.dev/v1)

Conditions:
  OK TYPE                  AGE REASON
  ++ Ready                  2m
  ++ BrokerReady            2m
  ++ DependencyReady        2m
  ++ Subscribed             2m
  ++ SubscriberResolved     2m
10.4.6. Deleting a trigger using kn
Procedure
- Delete a trigger:
$ kn trigger delete <trigger_name>
10.4.7. Updating a trigger using kn
You can use the kn trigger update command with certain flags to update attributes for a trigger.
Example
Update a trigger to filter exact event attributes that match incoming events, such as
type=knative.dev.event:$ kn trigger update <trigger_name> --filter type=knative.dev.event
Remove the filter attribute with key
type:$ kn trigger update mytrigger --filter type-
Update the sink of a trigger to use a service named
event-display:$ kn trigger update <trigger_name> --sink svc:event-display
10.4.8. Filtering events using triggers
In the following trigger example, only events with the attribute type: dev.knative.samples.helloworld will reach the event sink.
$ kn trigger create <trigger_name> --broker <broker_name> --filter type=dev.knative.samples.helloworld --sink svc:<service_name>
You can also filter events using multiple attributes. The following example shows how to filter events using the type, source, and extension attributes.
$ kn trigger create <trigger_name> --broker <broker_name> --sink svc:<service_name> \
--filter type=dev.knative.samples.helloworld \
--filter source=dev.knative.samples/helloworldsource \
--filter myextension=my-extension-value
10.5. Using SinkBinding
SinkBinding is used to connect event producers, or event sources, to an event consumer, or event sink, for example, a Knative service or application.
Both of the following procedures require you to create YAML files.
If you change the names of the YAML files from those used in the examples, you must ensure that you also update the corresponding CLI commands.
10.5.1. Using SinkBinding with the Knative CLI (kn)
This guide describes the steps required to create, manage, and delete a SinkBinding instance using kn commands.
Prerequisites
- You have Knative Serving and Eventing installed.
-
You have the
knCLI installed.
Procedure
To check that SinkBinding is set up correctly, create a Knative event display service, or event sink, that dumps incoming messages to its log:
$ kn service create event-display --image quay.io/openshift-knative/knative-eventing-sources-event-display:latest
Create a SinkBinding that directs events to the service:
$ kn source binding create bind-heartbeat --subject Job:batch/v1:app=heartbeat-cron --sink svc:event-display
Create a CronJob.
Create a file named
heartbeats-cronjob.yamland copy the following sample code into it:apiVersion: batch/v1beta1 kind: CronJob metadata: name: heartbeat-cron spec: spec: # Run every minute schedule: "* * * * *" jobTemplate: metadata: labels: app: heartbeat-cron spec: template: spec: restartPolicy: Never containers: - name: single-heartbeat image: quay.io/openshift-knative/knative-eventing-sources-heartbeats:latest args: - --period=1 env: - name: ONE_SHOT value: "true" - name: POD_NAME valueFrom: fieldRef: fieldPath: metadata.name - name: POD_NAMESPACE valueFrom: fieldRef: fieldPath: metadata.namespaceAfter you have created the
heartbeats-cronjob.yamlfile, apply it by entering:$ oc apply -f heartbeats-cronjob.yaml
Check that the controller is mapped correctly by entering the following command and inspecting the output:
$ kn source binding describe bind-heartbeat
Example output
Name:         bind-heartbeat
Namespace:    demo-2
Annotations:  sources.knative.dev/creator=minikube-user, sources.knative.dev/lastModifier=minikub ...
Age:          2m
Subject:
  Resource:   job (batch/v1)
  Selector:
    app:      heartbeat-cron
Sink:
  Name:       event-display
  Resource:   Service (serving.knative.dev/v1)

Conditions:
  OK TYPE     AGE REASON
  ++ Ready     2m
Verification steps
You can verify that the Kubernetes events were sent to the Knative event sink by looking at the message dumper function logs.
View the message dumper function logs by entering the following commands:
$ oc get pods
$ oc logs $(oc get pod -o name | grep event-display) -c user-container
Example output
☁️  cloudevents.Event
Validation: valid
Context Attributes,
  specversion: 1.0
  type: dev.knative.eventing.samples.heartbeat
  source: https://knative.dev/eventing-contrib/cmd/heartbeats/#event-test/mypod
  id: 2b72d7bf-c38f-4a98-a433-608fbcdd2596
  time: 2019-10-18T15:23:20.809775386Z
  contenttype: application/json
Extensions,
  beats: true
  heart: yes
  the: 42
Data,
  {
    "id": 1,
    "label": ""
  }
10.5.2. Using SinkBinding with the YAML method
This guide describes the steps required to create, manage, and delete a SinkBinding instance using YAML files.
Prerequisites
- You have Knative Serving and Eventing installed.
Procedure
To check that SinkBinding is set up correctly, create a Knative event display service, or event sink, that dumps incoming messages to its log.
Copy the following sample YAML into a file named
service.yaml:apiVersion: serving.knative.dev/v1 kind: Service metadata: name: event-display spec: template: spec: containers: - image: quay.io/openshift-knative/knative-eventing-sources-event-display:latestAfter you have created the
service.yamlfile, apply it by entering:$ oc apply -f service.yaml
Create a SinkBinding that directs events to the service.
Create a file named
sinkbinding.yamland copy the following sample code into it:apiVersion: sources.knative.dev/v1alpha1 kind: SinkBinding metadata: name: bind-heartbeat spec: subject: apiVersion: batch/v1 kind: Job 1 selector: matchLabels: app: heartbeat-cron sink: ref: apiVersion: serving.knative.dev/v1 kind: Service name: event-display- 1
- In this example, any Job with the label
app: heartbeat-cronwill be bound to the event sink.
After you have created the
sinkbinding.yamlfile, apply it by entering:$ oc apply -f sinkbinding.yaml
Create a CronJob.
Create a file named
heartbeats-cronjob.yamland copy the following sample code into it:apiVersion: batch/v1beta1 kind: CronJob metadata: name: heartbeat-cron spec: spec: # Run every minute schedule: "* * * * *" jobTemplate: metadata: labels: app: heartbeat-cron spec: template: spec: restartPolicy: Never containers: - name: single-heartbeat image: quay.io/openshift-knative/knative-eventing-sources-heartbeats:latest args: - --period=1 env: - name: ONE_SHOT value: "true" - name: POD_NAME valueFrom: fieldRef: fieldPath: metadata.name - name: POD_NAMESPACE valueFrom: fieldRef: fieldPath: metadata.namespaceAfter you have created the
heartbeats-cronjob.yamlfile, apply it by entering:$ oc apply -f heartbeats-cronjob.yaml
Check that the controller is mapped correctly by entering the following command and inspecting the output:
$ oc get sinkbindings.sources.knative.dev bind-heartbeat -oyaml
Example output
spec:
  sink:
    ref:
      apiVersion: serving.knative.dev/v1
      kind: Service
      name: event-display
      namespace: default
  subject:
    apiVersion: batch/v1
    kind: Job
    namespace: default
    selector:
      matchLabels:
        app: heartbeat-cron
Verification steps
You can verify that the Kubernetes events were sent to the Knative event sink by looking at the message dumper function logs.
Enter the command:
$ oc get pods
Enter the command:
$ oc logs $(oc get pod -o name | grep event-display) -c user-container
Example output
☁️  cloudevents.Event
Validation: valid
Context Attributes,
  specversion: 1.0
  type: dev.knative.eventing.samples.heartbeat
  source: https://knative.dev/eventing-contrib/cmd/heartbeats/#event-test/mypod
  id: 2b72d7bf-c38f-4a98-a433-608fbcdd2596
  time: 2019-10-18T15:23:20.809775386Z
  contenttype: application/json
Extensions,
  beats: true
  heart: yes
  the: 42
Data,
  {
    "id": 1,
    "label": ""
  }
Chapter 11. Event sources
11.1. Getting started with event sources
An event source is an object that links an event producer with an event sink, or consumer. A sink can be a Knative Service, Channel, or Broker that receives events from an event source.
Currently, OpenShift Serverless supports the following event source types:
- ApiServerSource
- Connects a sink to the Kubernetes API server.
- PingSource
- Periodically sends ping Events with a constant payload. It can be used as a timer.
SinkBinding is also supported, which allows you to connect core Kubernetes resources such as Deployment, Job, or StatefulSet with a sink.
You can create and manage Knative event sources using the Developer perspective in the OpenShift Container Platform web console, the kn CLI, or by applying YAML files.
11.1.1. Prerequisites
- You must have a current installation of OpenShift Serverless, including Knative Serving and Eventing, in your OpenShift Container Platform cluster. This can be installed by a cluster administrator.
11.1.2. Creating event sources
- Create an ApiServerSource.
- Create an PingSource.
11.1.3. Additional resources
- For more information about eventing workflows using OpenShift Serverless, see Knative Eventing architecture.
11.2. Using the kn CLI to list event sources and event source types
You can use the kn CLI to list and manage available event sources or event source types for use with Knative Eventing.
Currently, kn supports management of the following event source types:
ApiServerSource- Connects a sink to the Kubernetes API server.
PingSource- Periodically sends ping events with a constant payload. It can be used as a timer.
11.2.1. Listing available event source types using kn
Procedure
List the available event source types in the terminal:
$ kn source list-types
Example output
TYPE              NAME                                            DESCRIPTION
ApiServerSource   apiserversources.sources.knative.dev            Watch and send Kubernetes API events to a sink
PingSource        pingsources.sources.knative.dev                 Periodically send ping events to a sink
SinkBinding       sinkbindings.sources.knative.dev                Binding for connecting a PodSpecable to a sink
You can also list available event source types in YAML format:
$ kn source list-types -o yaml
11.2.2. Listing available event sources using kn
List available event sources by entering the following command:
$ kn source list
Example output
NAME   TYPE              RESOURCE                               SINK         READY
a1     ApiServerSource   apiserversources.sources.knative.dev   svc:eshow2   True
b1     SinkBinding       sinkbindings.sources.knative.dev       svc:eshow3   False
p1     PingSource        pingsources.sources.knative.dev        svc:eshow1   True
11.2.2.1. Listing event sources of a specific type only
You can list event sources of a specific type only, by using the --type flag.
List available event sources of type
PingSourceby entering the following command:$ kn source list --type PingSource
Example output
NAME   TYPE              RESOURCE                               SINK         READY
p1     PingSource        pingsources.sources.knative.dev        svc:eshow1   True
11.2.3. Next steps
- See the documentation on Using ApiServerSource.
- See the documentation on Using PingSource.
11.3. Using ApiServerSource
ApiServerSource is an event source that can be used to connect an event sink, such as a Knative service, to the Kubernetes API server. ApiServerSource watches for Kubernetes events and forwards them to the Knative Eventing broker.
Both of the following procedures require you to create YAML files.
If you change the names of the YAML files from those used in the examples, you must ensure that you also update the corresponding CLI commands.
11.3.1. Using the ApiServerSource with the Knative CLI (kn)
This section describes the steps required to create an ApiServerSource using kn commands.
Prerequisites
-
You must have OpenShift Serverless, the Knative Serving and Eventing components, and the
knCLI installed.
Procedure
Create a service account, role, and role binding for the ApiServerSource.
You can do this by creating a file named
authentication.yamland copying the following sample code into it:apiVersion: v1 kind: ServiceAccount metadata: name: events-sa namespace: default 1 --- apiVersion: rbac.authorization.k8s.io/v1 kind: Role metadata: name: event-watcher namespace: default 2 rules: - apiGroups: - "" resources: - events verbs: - get - list - watch --- apiVersion: rbac.authorization.k8s.io/v1 kind: RoleBinding metadata: name: k8s-ra-event-watcher namespace: default 3 roleRef: apiGroup: rbac.authorization.k8s.io kind: Role name: event-watcher subjects: - kind: ServiceAccount name: events-sa namespace: default 4
NoteIf you want to re-use an existing service account with the appropriate permissions, you must modify the
authentication.yamlfor that service account.Create the service account, role binding and cluster binding:
$ oc apply -f authentication.yaml
Create an ApiServerSource that uses a broker as an event sink:
$ kn source apiserver create <event_source_name> --sink broker:<broker_name> --resource "event:v1" --service-account <service_account_name> --mode Resource
To check that the ApiServerSource is set up correctly, create a Knative service that dumps incoming messages to its log:
$ kn service create <service_name> --image quay.io/openshift-knative/knative-eventing-sources-event-display:latest
Create a trigger to filter events from the
defaultbroker to the service:$ kn trigger create <trigger_name> --sink svc:<service_name>
Create events by launching a Pod in the default namespace:
$ oc create deployment hello-node --image quay.io/openshift-knative/knative-eventing-sources-event-display:latest
Check that the controller is mapped correctly by inspecting the output generated by the following command:
$ kn source apiserver describe <source_name>
Example output
Name:                mysource
Namespace:           default
Annotations:         sources.knative.dev/creator=developer, sources.knative.dev/lastModifier=developer
Age:                 3m
ServiceAccountName:  events-sa
Mode:                Resource
Sink:
  Name:       default
  Namespace:  default
  Kind:       Broker (eventing.knative.dev/v1alpha1)
Resources:
  Kind:        event (v1)
  Controller:  false
Conditions:
  OK TYPE                     AGE REASON
  ++ Ready                     3m
  ++ Deployed                  3m
  ++ SinkProvided              3m
  ++ SufficientPermissions     3m
  ++ EventTypesProvided        3m
Verification steps
You can verify that the Kubernetes events were sent to Knative by looking at the message dumper function logs.
Get the Pods:
$ oc get pods
View the message dumper function logs for the Pods:
$ oc logs $(oc get pod -o name | grep event-display) -c user-container
Example output
☁️  cloudevents.Event
Validation: valid
Context Attributes,
  specversion: 1.0
  type: dev.knative.apiserver.resource.update
  datacontenttype: application/json
  ...
Data,
  {
    "apiVersion": "v1",
    "involvedObject": {
      "apiVersion": "v1",
      "fieldPath": "spec.containers{hello-node}",
      "kind": "Pod",
      "name": "hello-node",
      "namespace": "default",
       .....
    },
    "kind": "Event",
    "message": "Started container",
    "metadata": {
      "name": "hello-node.159d7608e3a3572c",
      "namespace": "default",
      ....
    },
    "reason": "Started",
    ...
  }
11.3.2. Deleting the ApiServerSource using the Knative CLI (kn)
This section describes the steps used to delete the ApiServerSource, trigger, service, service account, cluster role, and cluster binding using kn and oc commands.
Prerequisites
-
You must have the
knCLI installed.
Procedure
Delete the trigger:
$ kn trigger delete <trigger_name>
Delete the service:
$ kn service delete <service_name>
Delete the event source:
$ kn source apiserver delete <source_name>
- Delete the service account, cluster role, and cluster binding:
$ oc delete -f authentication.yaml
11.3.3. Using the ApiServerSource with the YAML method
This guide describes the steps required to create an ApiServerSource using YAML files.
Prerequisites
- You will need to have a Knative Serving and Eventing installation.
-
You will need to have created the
defaultbroker in the same namespace as the one defined in the ApiServerSource YAML file.
Procedure
To create a service account, role, and role binding for the ApiServerSource, create a file named
authentication.yamland copy the following sample code into it:apiVersion: v1 kind: ServiceAccount metadata: name: events-sa namespace: default 1 --- apiVersion: rbac.authorization.k8s.io/v1 kind: Role metadata: name: event-watcher namespace: default 2 rules: - apiGroups: - "" resources: - events verbs: - get - list - watch --- apiVersion: rbac.authorization.k8s.io/v1 kind: RoleBinding metadata: name: k8s-ra-event-watcher namespace: default 3 roleRef: apiGroup: rbac.authorization.k8s.io kind: Role name: event-watcher subjects: - kind: ServiceAccount name: events-sa namespace: default 4
NoteIf you want to re-use an existing service account with the appropriate permissions, you must modify the
authentication.yamlfor that service account.After you have created the
authentication.yamlfile, apply it:$ oc apply -f authentication.yaml
To create an ApiServerSource event source, create a file named
k8s-events.yamland copy the following sample code into it:apiVersion: sources.knative.dev/v1alpha1 kind: ApiServerSource metadata: name: testevents spec: serviceAccountName: events-sa mode: Resource resources: - apiVersion: v1 kind: Event sink: ref: apiVersion: eventing.knative.dev/v1beta1 kind: Broker name: defaultAfter you have created the
k8s-events.yamlfile, apply it:$ oc apply -f k8s-events.yaml
To check that the ApiServerSource is set up correctly, create a Knative service that dumps incoming messages to its log.
Copy the following sample YAML into a file named
service.yaml:apiVersion: serving.knative.dev/v1 kind: Service metadata: name: event-display namespace: default spec: template: spec: containers: - image: quay.io/openshift-knative/knative-eventing-sources-event-display:v0.13.2After you have created the
service.yamlfile, apply it:$ oc apply -f service.yaml
To create a trigger from the
defaultbroker that filters events to the service created in the previous step, create a file namedtrigger.yamland copy the following sample code into it:apiVersion: eventing.knative.dev/v1alpha1 kind: Trigger metadata: name: event-display-trigger namespace: default spec: subscriber: ref: apiVersion: serving.knative.dev/v1 kind: Service name: event-displayAfter you have created the
trigger.yamlfile, apply it:$ oc apply -f trigger.yaml
To create events, launch a Pod in the default namespace:
$ oc create deployment hello-node --image=quay.io/openshift-knative/knative-eventing-sources-event-display
To check that the controller is mapped correctly, enter the following command and inspect the output:
$ oc get apiserversource.sources.knative.dev testevents -o yaml
Example output
apiVersion: sources.knative.dev/v1alpha1
kind: ApiServerSource
metadata:
  annotations:
  creationTimestamp: "2020-04-07T17:24:54Z"
  generation: 1
  name: testevents
  namespace: default
  resourceVersion: "62868"
  selfLink: /apis/sources.knative.dev/v1alpha1/namespaces/default/apiserversources/testevents2
  uid: 1603d863-bb06-4d1c-b371-f580b4db99fa
spec:
  mode: Resource
  resources:
  - apiVersion: v1
    controller: false
    controllerSelector:
      apiVersion: ""
      kind: ""
      name: ""
      uid: ""
    kind: Event
    labelSelector: {}
  serviceAccountName: events-sa
  sink:
    ref:
      apiVersion: eventing.knative.dev/v1beta1
      kind: Broker
      name: default
Verification steps
To verify that the Kubernetes events were sent to Knative, you can look at the message dumper function logs.
Get the Pods:
$ oc get pods
View the message dumper function logs for the Pods:
$ oc logs $(oc get pod -o name | grep event-display) -c user-container
Example output
☁️  cloudevents.Event
Validation: valid
Context Attributes,
  specversion: 1.0
  type: dev.knative.apiserver.resource.update
  datacontenttype: application/json
  ...
Data,
  {
    "apiVersion": "v1",
    "involvedObject": {
      "apiVersion": "v1",
      "fieldPath": "spec.containers{hello-node}",
      "kind": "Pod",
      "name": "hello-node",
      "namespace": "default",
       .....
    },
    "kind": "Event",
    "message": "Started container",
    "metadata": {
      "name": "hello-node.159d7608e3a3572c",
      "namespace": "default",
      ....
    },
    "reason": "Started",
    ...
  }
11.3.4. Deleting the ApiServerSource
This section describes how to delete the ApiServerSource, trigger, service, service account, cluster role, and cluster binding by deleting their YAML files.
Procedure
Delete the trigger:
$ oc delete -f trigger.yaml
Delete the service:
$ oc delete -f service.yaml
Delete the event source:
$ oc delete -f k8s-events.yaml
Delete the service account, cluster role, and cluster binding:
$ oc delete -f authentication.yaml
11.4. Using a PingSource
A PingSource is used to periodically send ping events with a constant payload to an event consumer, and can be used to schedule sending events, similar to a timer.
Example PingSource YAML
apiVersion: sources.knative.dev/v1alpha2
kind: PingSource
metadata:
  name: test-ping-source
spec:
  schedule: "*/2 * * * *" 1
  jsonData: '{"message": "Hello world!"}' 2
  sink: 3
    ref:
      apiVersion: serving.knative.dev/v1
      kind: Service
      name: event-display
- 1
- The schedule of the event specified using CRON expression.
- 2
- The event message body expressed as a JSON encoded data string.
- 3
- These are the details of the event consumer. In this example, we are using a Knative service named
event-display.
11.4.1. Using a PingSource with the kn CLI
The following sections describe how to create, verify and remove a basic PingSource using the kn CLI.
Prerequisites
- You have Knative Serving and Eventing installed.
-
You have the
knCLI installed.
Procedure
To verify that the PingSource is working, create a simple Knative service that dumps incoming messages to the service’s logs:
$ kn service create event-display \
    --image quay.io/openshift-knative/knative-eventing-sources-event-display:latest
For each set of ping events that you want to request, create a PingSource in the same namespace as the event consumer:
$ kn source ping create test-ping-source \
    --schedule "*/2 * * * *" \
    --data '{"message": "Hello world!"}' \
    --sink svc:event-display
Check that the controller is mapped correctly by entering the following command and inspecting the output:
$ kn source ping describe test-ping-source
Example output
Name:         test-ping-source
Namespace:    default
Annotations:  sources.knative.dev/creator=developer, sources.knative.dev/lastModifier=developer
Age:          15s
Schedule:     */2 * * * *
Data:         {"message": "Hello world!"}

Sink:
  Name:       event-display
  Namespace:  default
  Resource:   Service (serving.knative.dev/v1)

Conditions:
  OK TYPE                 AGE REASON
  ++ Ready                 8s
  ++ Deployed              8s
  ++ SinkProvided         15s
  ++ ValidSchedule        15s
  ++ EventTypeProvided    15s
  ++ ResourcesCorrect     15s
Verfication steps
You can verify that the Kubernetes events were sent to the Knative event sink by looking at the sink pod’s logs.
By default, Knative services terminate their pods if no traffic is received within a 60 second period. The example shown in this guide creates a PingSource that sends a message every 2 minutes, so each message should be observed in a newly created pod.
Watch for new pods created:
$ watch oc get pods
Cancel watching the pods using Ctrl+C, then look at the logs of the created pod:
$ oc logs $(oc get pod -o name | grep event-display) -c user-container
Example output
☁️  cloudevents.Event
Validation: valid
Context Attributes,
  specversion: 1.0
  type: dev.knative.sources.ping
  source: /apis/v1/namespaces/default/pingsources/test-ping-source
  id: 99e4f4f6-08ff-4bff-acf1-47f61ded68c9
  time: 2020-04-07T16:16:00.000601161Z
  datacontenttype: application/json
Data,
  {
    "message": "Hello world!"
  }
11.4.1.1. Remove the PingSource
Delete the PingSource:
$ kn delete pingsources.sources.knative.dev test-ping-source
Delete the
event-displayservice:$ kn delete service.serving.knative.dev event-display
11.4.2. Using a PingSource with YAML
The following sections describe how to create, verify and remove a basic PingSource using YAML files.
Prerequisites
- You have Knative Serving and Eventing installed.
The following procedure requires you to create YAML files.
If you change the names of the YAML files from those used in the examples, you must ensure that you also update the corresponding CLI commands.
Procedure
To verify that the PingSource is working, create a simple Knative service that dumps incoming messages to the service’s logs.
Copy the example YAML into a file named
service.yaml:apiVersion: serving.knative.dev/v1 kind: Service metadata: name: event-display spec: template: spec: containers: - image: quay.io/openshift-knative/knative-eventing-sources-event-display:latestCreate the service:
$ oc apply --filename service.yaml
For each set of ping events that you want to request, create a PingSource in the same namespace as the event consumer.
Copy the example YAML into a file named
ping-source.yaml:apiVersion: sources.knative.dev/v1alpha2 kind: PingSource metadata: name: test-ping-source spec: schedule: "*/2 * * * *" jsonData: '{"message": "Hello world!"}' sink: ref: apiVersion: serving.knative.dev/v1 kind: Service name: event-displayCreate the PingSource:
$ oc apply --filename ping-source.yaml
Check that the controller is mapped correctly by entering the following command:
$ oc get pingsource.sources.knative.dev test-ping-source -oyaml
Example output
apiVersion: sources.knative.dev/v1alpha2
kind: PingSource
metadata:
  annotations:
    sources.knative.dev/creator: developer
    sources.knative.dev/lastModifier: developer
  creationTimestamp: "2020-04-07T16:11:14Z"
  generation: 1
  name: test-ping-source
  namespace: default
  resourceVersion: "55257"
  selfLink: /apis/sources.knative.dev/v1alpha2/namespaces/default/pingsources/test-ping-source
  uid: 3d80d50b-f8c7-4c1b-99f7-3ec00e0a8164
spec:
  jsonData: '{ value: "hello" }'
  schedule: '*/2 * * * *'
  sink:
    ref:
      apiVersion: serving.knative.dev/v1
      kind: Service
      name: event-display
      namespace: default
Verfication steps
You can verify that the Kubernetes events were sent to the Knative event sink by looking at the sink pod’s logs.
By default, Knative services terminate their pods if no traffic is received within a 60 second period. The example shown in this guide creates a PingSource that sends a message every 2 minutes, so each message should be observed in a newly created pod.
Watch for new pods created:
$ watch oc get pods
Cancel watching the pods using Ctrl+C, then look at the logs of the created pod:
$ oc logs $(oc get pod -o name | grep event-display) -c user-container
Example output
☁️  cloudevents.Event
Validation: valid
Context Attributes,
  specversion: 1.0
  type: dev.knative.sources.ping
  source: /apis/v1/namespaces/default/pingsources/test-ping-source
  id: 042ff529-240e-45ee-b40c-3a908129853e
  time: 2020-04-07T16:22:00.000791674Z
  datacontenttype: application/json
Data,
  {
    "message": "Hello world!"
  }
11.4.2.1. Remove the PingSource
Delete the service by entering the following command:
$ oc delete --filename service.yaml
Delete the PingSource by entering the following command:
$ oc delete --filename ping-source.yaml
Chapter 12. Using metering with OpenShift Serverless
As a cluster administrator, you can use metering to analyze what is happening in your OpenShift Serverless cluster.
For more information about metering on OpenShift Container Platform, see About metering.
12.1. Installing metering
For information about installing metering on OpenShift Container Platform, see Installing Metering.
12.2. Datasources for Knative Serving metering
The following ReportDataSources are examples of how Knative Serving can be used with OpenShift Container Platform metering.
12.2.1. Datasource for CPU usage in Knative Serving
This datasource provides the accumulated CPU seconds used per Knative service over the report time period.
Example YAML file
apiVersion: metering.openshift.io/v1
kind: ReportDataSource
metadata:
  name: knative-service-cpu-usage
spec:
  prometheusMetricsImporter:
    query: >
      sum
          by(namespace,
             label_serving_knative_dev_service,
             label_serving_knative_dev_revision)
          (
            label_replace(rate(container_cpu_usage_seconds_total{container!="POD",container!="",pod!=""}[1m]), "pod", "$1", "pod", "(.*)")
            *
            on(pod, namespace)
            group_left(label_serving_knative_dev_service, label_serving_knative_dev_revision)
            kube_pod_labels{label_serving_knative_dev_service!=""}
          )
12.2.2. Datasource for memory usage in Knative Serving
This datasource provides the average memory consumption per Knative service over the report time period.
Example YAML file
apiVersion: metering.openshift.io/v1
kind: ReportDataSource
metadata:
  name: knative-service-memory-usage
spec:
  prometheusMetricsImporter:
    query: >
      sum
          by(namespace,
             label_serving_knative_dev_service,
             label_serving_knative_dev_revision)
          (
            label_replace(container_memory_usage_bytes{container!="POD", container!="",pod!=""}, "pod", "$1", "pod", "(.*)")
            *
            on(pod, namespace)
            group_left(label_serving_knative_dev_service, label_serving_knative_dev_revision)
            kube_pod_labels{label_serving_knative_dev_service!=""}
          )
12.2.3. Applying Datasources for Knative Serving metering
-
Apply the
ReportDataSources:
$ oc apply -f <datasource_name>
12.3. Queries for Knative Serving metering
The following ReportQuery resources reference the example DataSources provided.
12.3.1. Query for CPU usage in Knative Serving
YAML file
apiVersion: metering.openshift.io/v1
kind: ReportQuery
metadata:
  name: knative-service-cpu-usage
spec:
  inputs:
  - name: ReportingStart
    type: time
  - name: ReportingEnd
    type: time
  - default: knative-service-cpu-usage
    name: KnativeServiceCpuUsageDataSource
    type: ReportDataSource
  columns:
  - name: period_start
    type: timestamp
    unit: date
  - name: period_end
    type: timestamp
    unit: date
  - name: namespace
    type: varchar
    unit: kubernetes_namespace
  - name: service
    type: varchar
  - name: data_start
    type: timestamp
    unit: date
  - name: data_end
    type: timestamp
    unit: date
  - name: service_cpu_seconds
    type: double
    unit: cpu_core_seconds
  query: |
    SELECT
      timestamp '{| default .Report.ReportingStart .Report.Inputs.ReportingStart| prestoTimestamp |}' AS period_start,
      timestamp '{| default .Report.ReportingEnd .Report.Inputs.ReportingEnd | prestoTimestamp |}' AS period_end,
      labels['namespace'] as project,
      labels['label_serving_knative_dev_service'] as service,
      min("timestamp") as data_start,
      max("timestamp") as data_end,
      sum(amount * "timeprecision") AS service_cpu_seconds
    FROM {| dataSourceTableName .Report.Inputs.KnativeServiceCpuUsageDataSource |}
    WHERE "timestamp" >= timestamp '{| default .Report.ReportingStart .Report.Inputs.ReportingStart | prestoTimestamp |}'
    AND "timestamp" < timestamp '{| default .Report.ReportingEnd .Report.Inputs.ReportingEnd | prestoTimestamp |}'
    GROUP BY labels['namespace'],labels['label_serving_knative_dev_service']
12.3.2. Query for memory usage in Knative Serving
YAML file
apiVersion: metering.openshift.io/v1
kind: ReportQuery
metadata:
  name: knative-service-memory-usage
spec:
  inputs:
  - name: ReportingStart
    type: time
  - name: ReportingEnd
    type: time
  - default: knative-service-memory-usage
    name: KnativeServiceMemoryUsageDataSource
    type: ReportDataSource
  columns:
  - name: period_start
    type: timestamp
    unit: date
  - name: period_end
    type: timestamp
    unit: date
  - name: namespace
    type: varchar
    unit: kubernetes_namespace
  - name: service
    type: varchar
  - name: data_start
    type: timestamp
    unit: date
  - name: data_end
    type: timestamp
    unit: date
  - name: service_usage_memory_byte_seconds
    type: double
    unit: byte_seconds
  query: |
    SELECT
      timestamp '{| default .Report.ReportingStart .Report.Inputs.ReportingStart| prestoTimestamp |}' AS period_start,
      timestamp '{| default .Report.ReportingEnd .Report.Inputs.ReportingEnd | prestoTimestamp |}' AS period_end,
      labels['namespace'] as project,
      labels['label_serving_knative_dev_service'] as service,
      min("timestamp") as data_start,
      max("timestamp") as data_end,
      sum(amount * "timeprecision") AS service_usage_memory_byte_seconds
    FROM {| dataSourceTableName .Report.Inputs.KnativeServiceMemoryUsageDataSource |}
    WHERE "timestamp" >= timestamp '{| default .Report.ReportingStart .Report.Inputs.ReportingStart | prestoTimestamp |}'
    AND "timestamp" < timestamp '{| default .Report.ReportingEnd .Report.Inputs.ReportingEnd | prestoTimestamp |}'
    GROUP BY labels['namespace'],labels['label_serving_knative_dev_service']
12.3.3. Applying Queries for Knative Serving metering
Apply the
ReportQueryby entering the following command:$ oc apply -f <query-name>.yaml
Example command
$ oc apply -f knative-service-memory-usage.yaml
12.4. Metering reports for Knative Serving
You can run metering reports against Knative Serving by creating Report resources. Before you run a report, you must modify the input parameter within the Report resource to specify the start and end dates of the reporting period.
YAML file
apiVersion: metering.openshift.io/v1
kind: Report
metadata:
  name: knative-service-cpu-usage
spec:
  reportingStart: '2019-06-01T00:00:00Z' 1
  reportingEnd: '2019-06-30T23:59:59Z' 2
  query: knative-service-cpu-usage 3
runImmediately: true
12.4.1. Running a metering report
Run the report by entering the following command:
$ oc apply -f <report-name>.yml
You can then check the report by entering the following command:
$ oc get report
Example output
NAME                        QUERY                       SCHEDULE   RUNNING    FAILED   LAST REPORT TIME       AGE
knative-service-cpu-usage   knative-service-cpu-usage              Finished            2019-06-30T23:59:59Z   10h
Legal Notice
Copyright © 2024 Red Hat, Inc.
OpenShift documentation is licensed under the Apache License 2.0 (https://www.apache.org/licenses/LICENSE-2.0).
Modified versions must remove all Red Hat trademarks.
Portions adapted from https://github.com/kubernetes-incubator/service-catalog/ with modifications by Red Hat.
Red Hat, Red Hat Enterprise Linux, the Red Hat logo, the Shadowman logo, JBoss, OpenShift, Fedora, the Infinity logo, and RHCE are trademarks of Red Hat, Inc., registered in the United States and other countries.
Linux® is the registered trademark of Linus Torvalds in the United States and other countries.
Java® is a registered trademark of Oracle and/or its affiliates.
XFS® is a trademark of Silicon Graphics International Corp. or its subsidiaries in the United States and/or other countries.
MySQL® is a registered trademark of MySQL AB in the United States, the European Union and other countries.
Node.js® is an official trademark of Joyent. Red Hat Software Collections is not formally related to or endorsed by the official Joyent Node.js open source or commercial project.
The OpenStack® Word Mark and OpenStack logo are either registered trademarks/service marks or trademarks/service marks of the OpenStack Foundation, in the United States and other countries and are used with the OpenStack Foundation’s permission. We are not affiliated with, endorsed or sponsored by the OpenStack Foundation, or the OpenStack community.
All other trademarks are the property of their respective owners.