Disaster Recovery Guide
Configure Red Hat Virtualization 4.4 for Disaster Recovery
Abstract
Chapter 1. Disaster Recovery Solutions
Red Hat Virtualization supports two types of disaster recovery solutions to ensure that environments can recover when a site outage occurs. Both solutions support two sites, and both require replicated storage.
Active-Active Disaster Recovery
This solution is implemented using a stretch cluster configuration. This means that there is a single RHV environment with a cluster that contains hosts capable of running the required virtual machines in the primary and secondary site. Virtual machines automatically migrate to hosts in the secondary site if an outage occurs. However, the environment must meet latency and networking requirements. See Active-Active Overview for more information.
Active-Passive Disaster Recovery
Also referred to as site-to-site failover, this disaster recovery solution is implemented by configuring two separate RHV environments: the active primary environment, and the passive secondary (backup) environment. Failover and failback between sites must be manually executed, and is managed by Ansible. See Active-Passive Overview for more information.
Chapter 2. Active-Active Disaster Recovery
2.1. Active-Active Overview
The active-active disaster recovery failover configuration can span two sites. Both sites are active, and if the primary site becomes unavailable, the Red Hat Virtualization environment continues to operate in the secondary site to ensure business continuity.
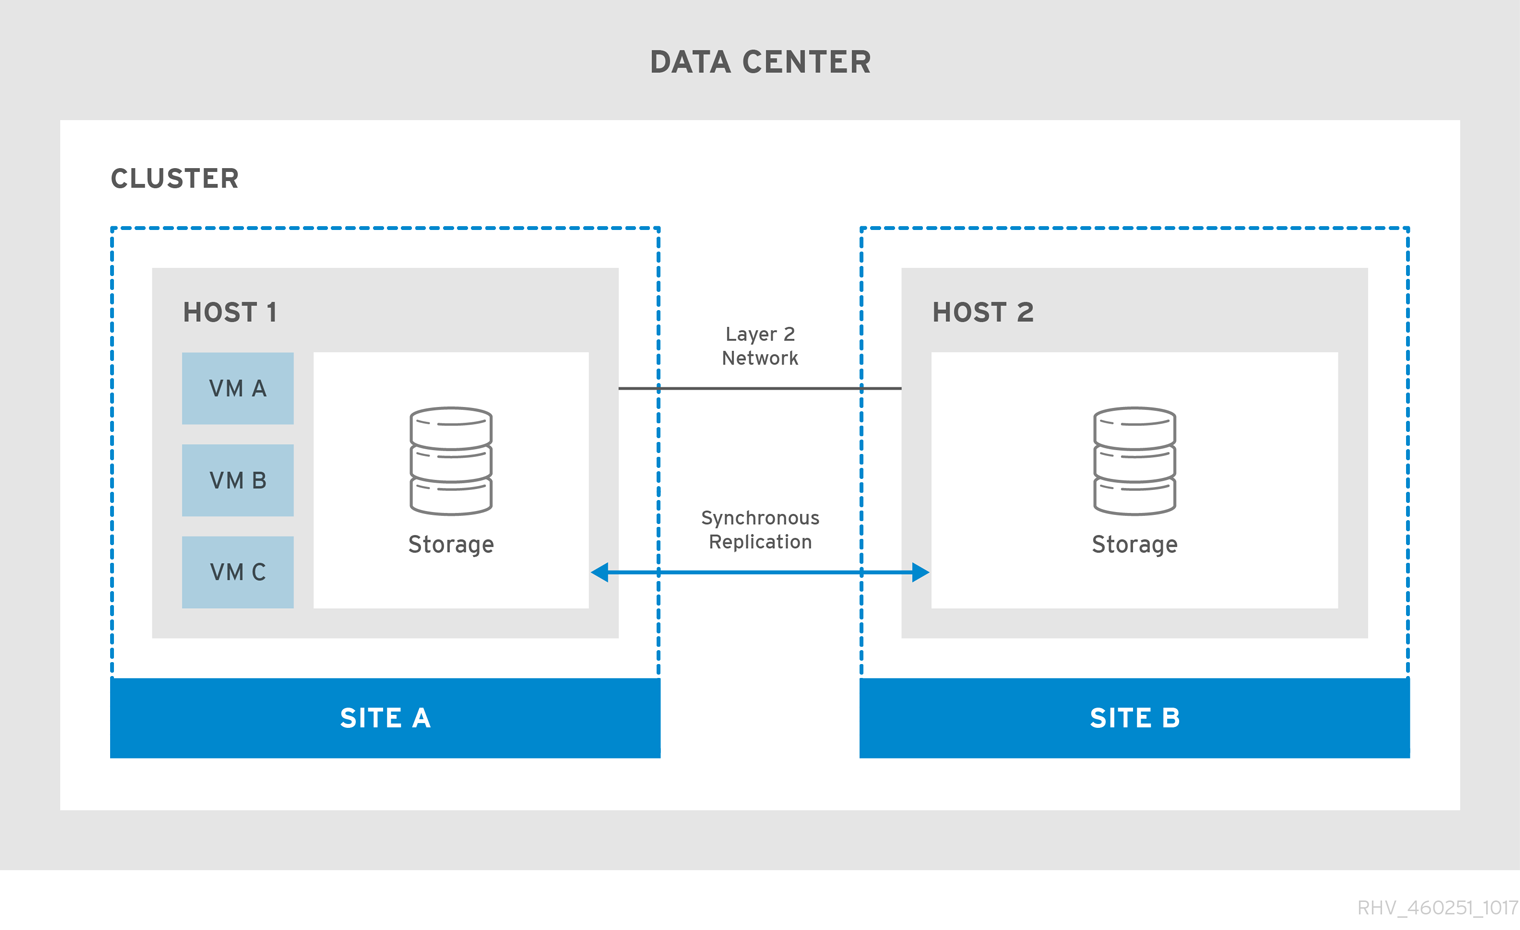
The active-active failover configuration includes a stretch cluster in which hosts capable of running the virtual machines are located in both the primary and secondary sites. All the hosts belong to the same Red Hat Virtualization cluster.
This configuration requires replicated storage that is writeable on both sites so virtual machines can migrate between the two sites and continue running on both sites' storage.
Figure 2.1. Stretch Cluster Configuration
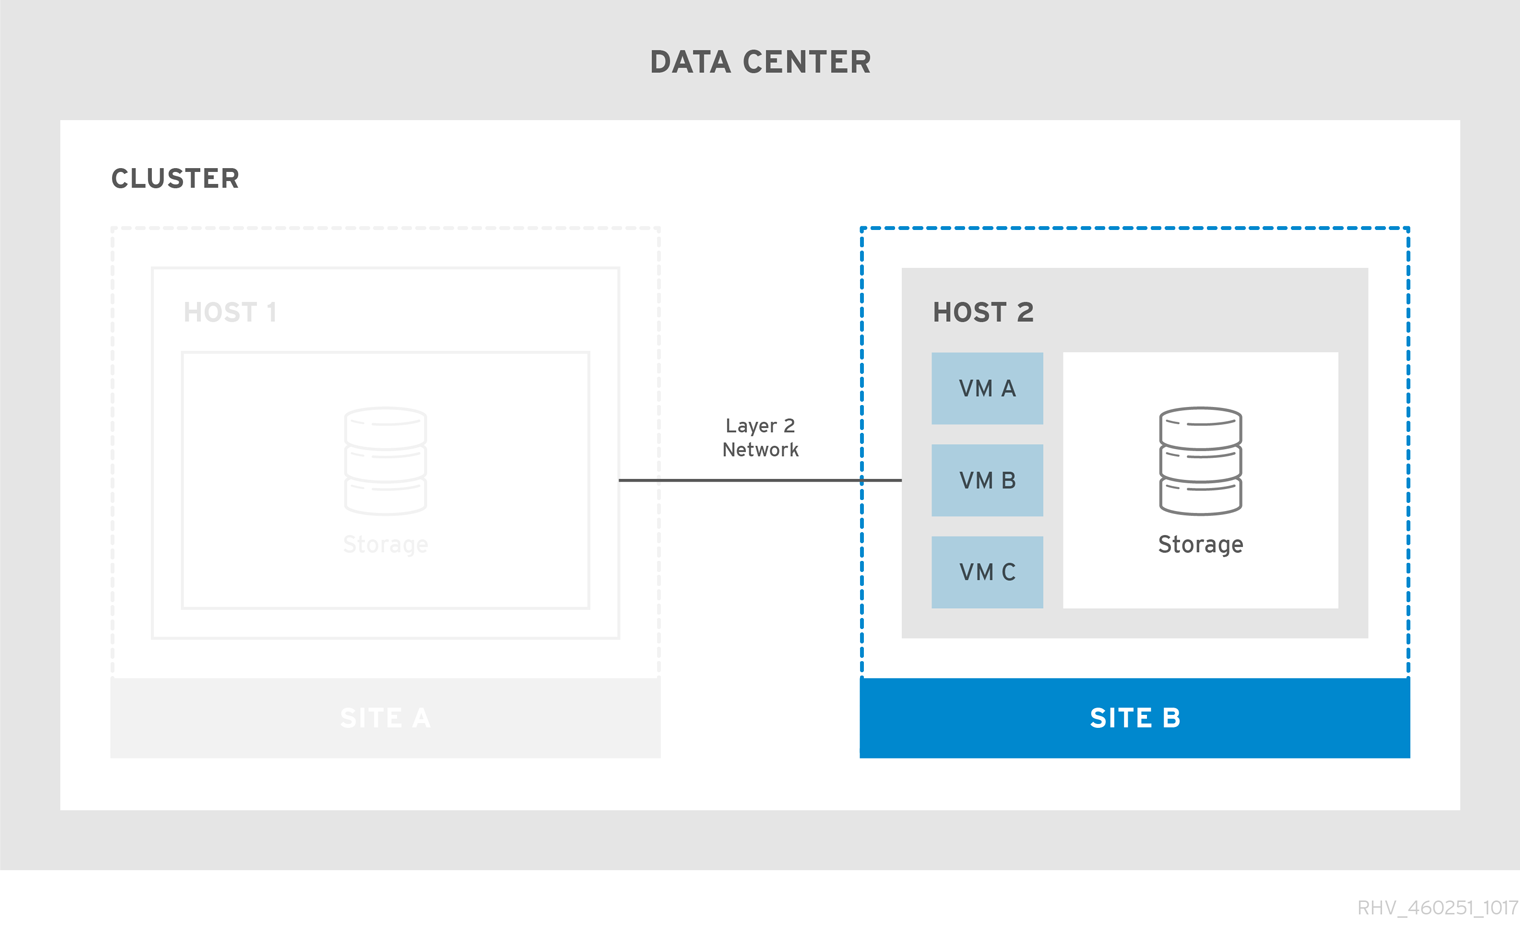
Virtual machines migrate to the secondary site if the primary site becomes unavailable. The virtual machines automatically failback to the primary site when the site becomes available and the storage is replicated in both sites.
Figure 2.2. Failed Over Stretch Cluster
To ensure virtual machine failover and failback works:
- Virtual machines must be configured to be highly available, and each virtual machine must have a lease on a target storage domain to ensure the virtual machine can start even without power management.
- Soft enforced virtual machine to host affinity must be configured to ensure the virtual machines only start on the selected hosts.
For more information see Improving Uptime with Virtual Machine High Availability and Affinity Groups in the Virtual Machine Management Guide.
The stretched cluster configuration can be implemented using a self-hosted engine environment, or a standalone Manager environment. For more information about the different types of deployments see Red Hat Virtualization Architecture in the Product Guide.
2.2. Network Considerations
All hosts in the cluster must be on the same broadcast domain over an L2 network. So connectivity between the two sites must be L2.
The maximum latency requirements between the sites across the L2 network differ for the two setups. The standalone Manager environment requires a maximum latency of 100ms, while the self-hosted engine environment requires a maximum latency of 7ms.
2.3. Storage Considerations
The storage domain for Red Hat Virtualization can comprise either block devices (SAN - iSCSI or FCP) or a file system (NAS - NFS, GlusterFS, or other POSIX compliant file systems). For more information about Red Hat Virtualization storage, see Storage in the Administration Guide.
GlusterFS Storage is deprecated, and will no longer be supported in future releases.
The sites require synchronously replicated storage that is writeable on both sites with shared layer 2 (L2) network connectivity. The replicated storage is required to allow virtual machines to migrate between sites and continue running on the site’s storage. All storage replication options supported by Red Hat Enterprise Linux 7 and later can be used in the stretch cluster.
If you have a custom multipath configuration that is recommended by the storage vendor, see the instructions and important limitations in Customizing Multipath Configurations for SAN Vendors.
Set the SPM role on a host at the primary site to have precedence. To do so, configure SPM priority as high in the primary site hosts and SPM priority as low on secondary site hosts. If you have a primary site failure that impacts network devices inside the primary site, preventing the fencing device for the SPM host from being reachable, such as power loss, the hosts in the seconday site are not able to take over the SPM role.
In such a scenario virtual machines do a failover, but operations that require the SPM role in place cannot be executed, including adding new disks, extending existing disks, and exporting virtual machines.
To restore full functionality, detect the actual nature of the disaster and after fixing the root cause and rebooting the SPM host, select Confirm 'Host has been Rebooted' for the SPM host.
Additional resources
Manually Fencing or Isolating a Non-Responsive Host in the Administration Guide.
2.4. Configuring a Self-hosted Engine Stretch Cluster Environment
This procedure provides instructions to configure a stretch cluster using a self-hosted engine deployment.
Prerequisites
- A writable storage server in both sites with L2 network connectivity.
- Real-time storage replication service to duplicate the storage.
Limitations
- Maximum 7ms latency between sites.
Configuring the Self-hosted Engine Stretch Cluster
- Deploy the self-hosted engine. See Installing Red Hat Virtualization as a self-hosted engine using the command line.
- Install additional self-hosted engine nodes in each site and add them to your cluster. See Adding Self-hosted Engine Nodes to the Red Hat Virtualization Manager in Installing Red Hat Virtualization as a self-hosted engine using the command line.
- Optionally, install additional standard hosts. See Adding Standard Hosts to the Red Hat Virtualization Manager in Installing Red Hat Virtualization as a self-hosted engine using the command line.
- Configure the SPM priority to be higher on all hosts in the primary site to ensure SPM failover to the secondary site occurs only when all hosts in the primary site are unavailable. See SPM Priority in the Administration Guide.
- Configure all virtual machines that must failover as highly available, and ensure that the virtual machine has a lease on the target storage domain. See Configuring a Highly Available Virtual Machine in the Virtual Machine Management Guide.
- Configure virtual machine to host soft affinity and define the behavior you expect from the affinity group. See Affinity Groups in the Virtual Machine Management Guide and Scheduling Policies in the Administration Guide.
The active-active failover can be manually performed by placing the main site’s hosts into maintenance mode.
2.5. Configuring a Standalone Manager Stretch Cluster Environment
This procedure provides instructions to configure a stretch cluster using a standalone Manager deployment.
Prerequisites
- A writable storage server in both sites with L2 network connectivity.
- Real-time storage replication service to duplicate the storage.
Limitations
- Maximum 100ms latency between sites.
The Manager must be highly available for virtual machines to failover and failback between sites. If the Manager goes down with the site, the virtual machines will not failover.
The standalone Manager is only highly available when managed externally. For example:
- Using Red Hat’s High Availability Add-On.
- As a highly available virtual machine in a separate virtualization environment.
- Using Red Hat Enterprise Linux Cluster Suite.
- In a public cloud.
Procedure
- Install and configure the Red Hat Virtualization Manager. See Installing Red Hat Virtualization as a standalone Manager with local databases.
- Install the hosts in each site and add them to the cluster. See Installing Hosts for Red Hat Virtualization in Installing Red Hat Virtualization as a standalone Manager with local databases.
- Configure the SPM priority to be higher on all hosts in the primary site to ensure SPM failover to the secondary site occurs only when all hosts in the primary site are unavailable. See SPM Priority in the Administration Guide.
- Configure all virtual machines that must failover as highly available, and ensure that the virtual machine has a lease on the target storage domain. See Configuring a Highly Available Virtual Machine in the Virtual Machine Management Guide.
- Configure virtual machine to host soft affinity and define the behavior you expect from the affinity group. See Affinity Groups in the Virtual Machine Management Guide and Scheduling Policies in the Administration Guide.
The active-active failover can be manually performed by placing the main site’s hosts into maintenance mode.
Chapter 3. Active-Passive Disaster Recovery
3.1. Active-Passive Overview
Red Hat Virtualization supports an active-passive disaster recovery solution that can span two sites. If the primary site becomes unavailable, the Red Hat Virtualization environment can be forced to fail over to the secondary (backup) site.
The failover is achieved by configuring a Red Hat Virtualization environment in the secondary site, which requires:
- An active Red Hat Virtualization Manager.
- A data center and clusters.
- Networks with the same general connectivity as the primary site.
- Active hosts capable of running critical virtual machines after failover.
You must ensure that the secondary environment has enough resources to run the failed over virtual machines, and that both the primary and secondary environments have identical Manager versions, data center and cluster compatibility levels, and PostgreSQL versions. The minimum supported compatibility level is 4.2.
Storage domains that contain virtual machine disks and templates in the primary site must be replicated. These replicated storage domains must not be attached to the secondary site.
The failover and failback process must be executed manually. To do this you must create Ansible playbooks to map entities between the sites, and to manage the failover and failback processes. The mapping file instructs the Red Hat Virtualization components where to fail over or fail back to on the target site.
The following diagram describes an active-passive setup where the machine running Red Hat Ansible Engine is highly available, and has access to the oVirt.disaster-recovery Ansible role, configured playbooks, and mapping file. The storage domains that store the virtual machine disks in Site A is replicated. Site B has no virtual machines or attached storage domains.
Figure 3.1. Active-Passive Configuration
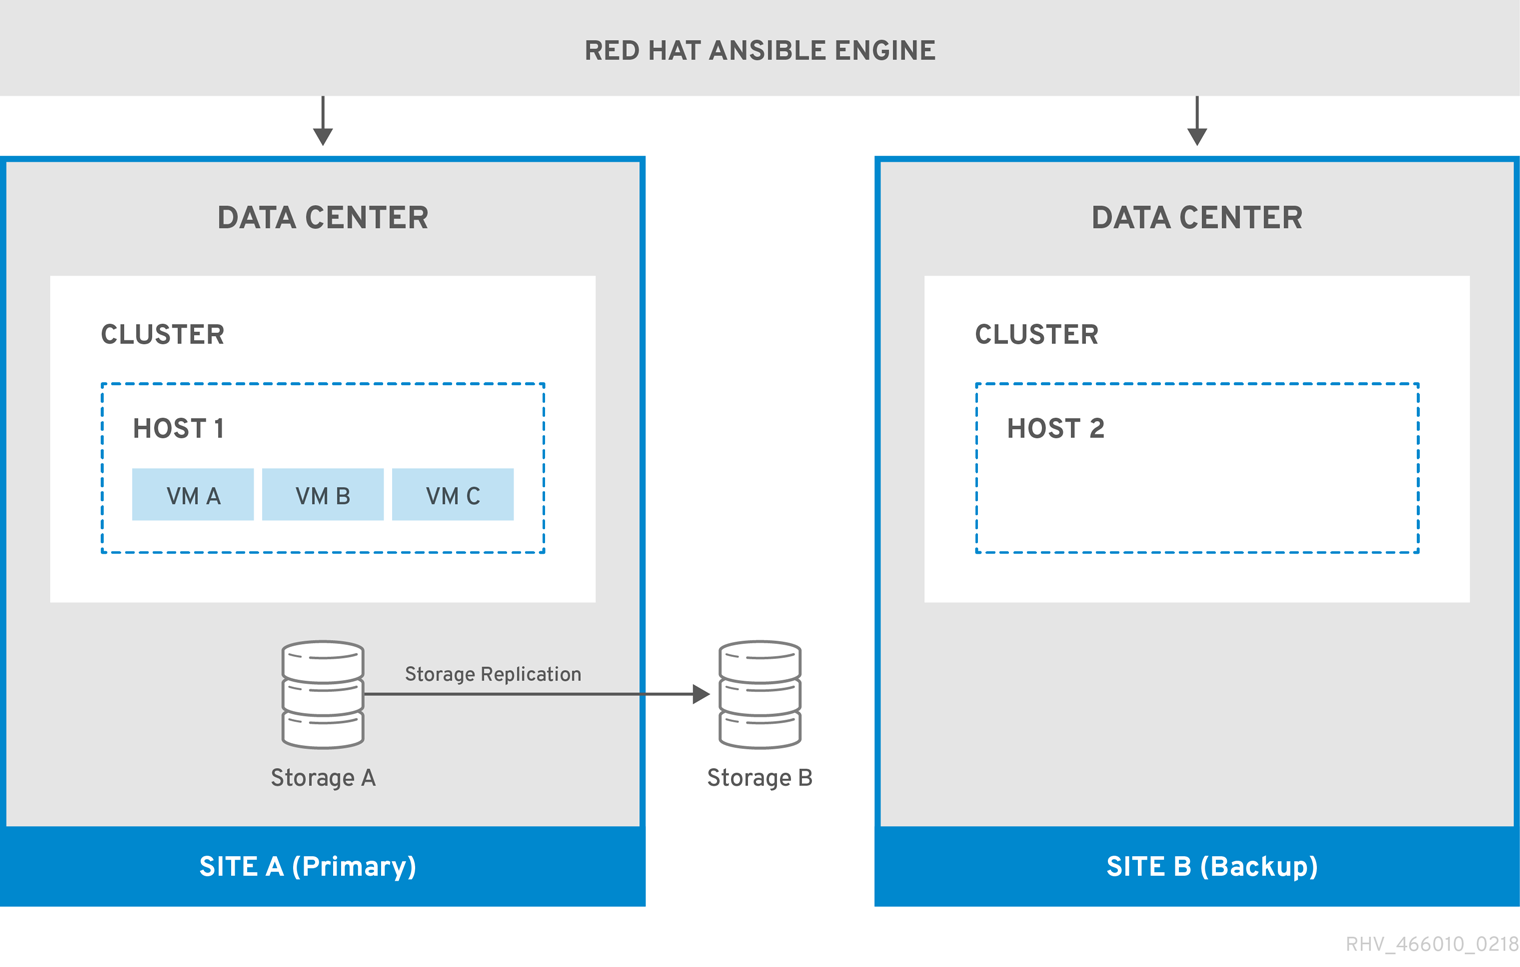
When the environment fails over to Site B, the storage domains are first attached and activated in Site B’s data center, and then the virtual machines are registered. Highly available virtual machines will fail over first.
Figure 3.2. Failover to Backup Site
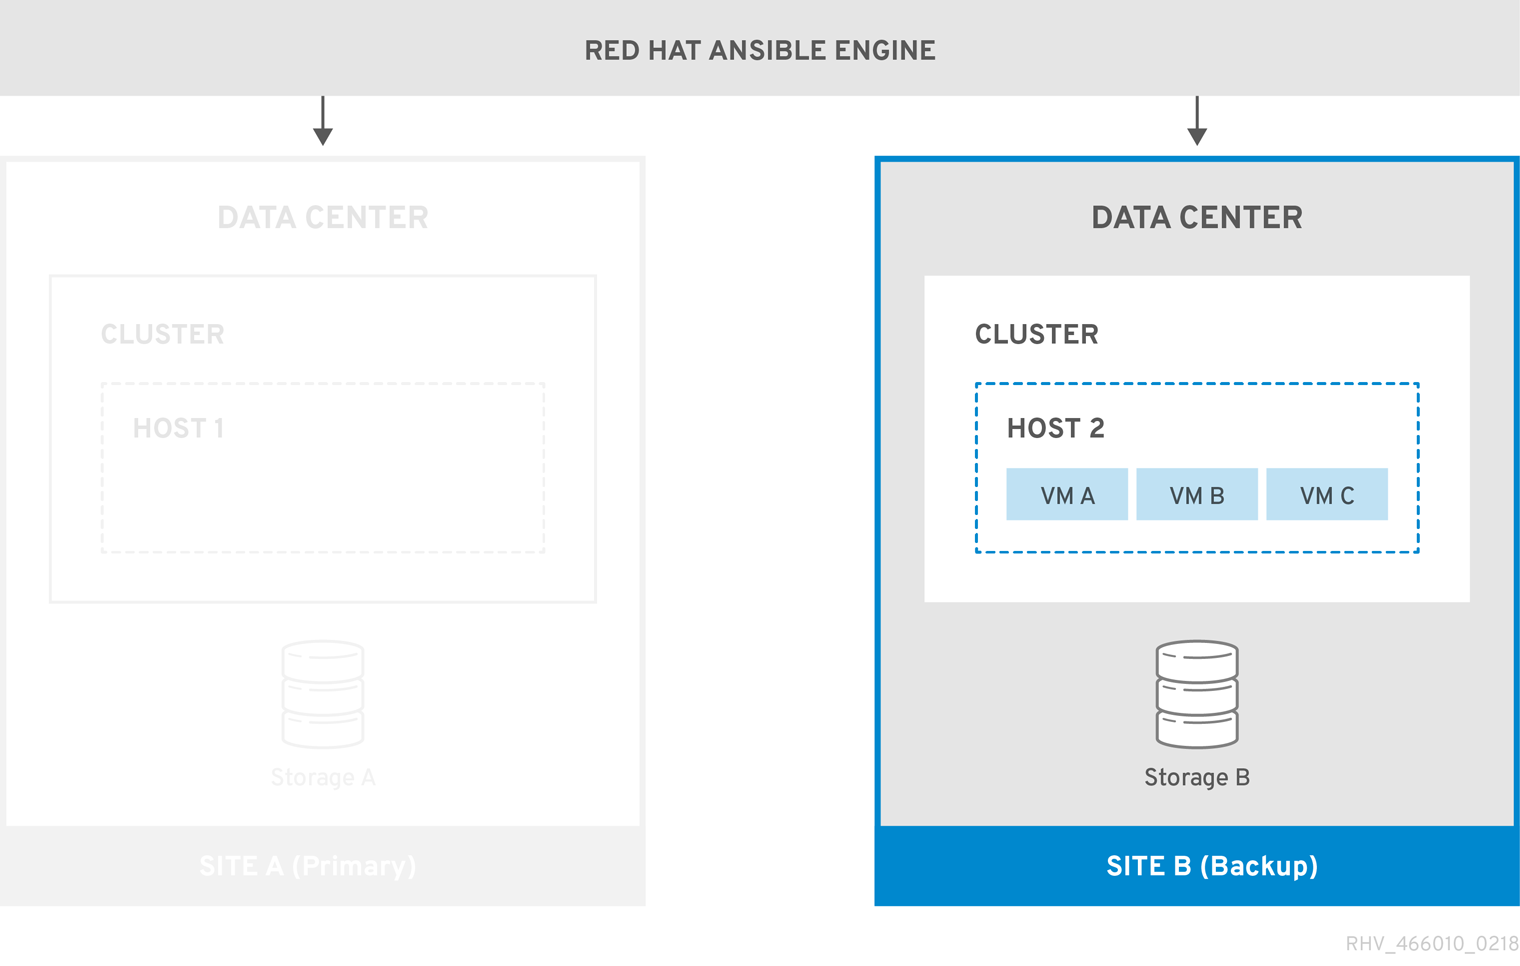
You must manually fail back to the primary site (Site A) when it is running again.
3.2. Network Considerations
You must ensure that the same general connectivity exists in the primary and secondary sites.
If you have multiple networks or multiple data centers then you must use an empty network mapping in the mapping file to ensure that all entities register on the target during failover. See Mapping File Attributes for more information.
3.3. Storage Considerations
The storage domain for Red Hat Virtualization can comprise either block devices (SAN - iSCSI or FCP) or a file system (NAS - NFS, GlusterFS, or other POSIX compliant file systems). For more information about Red Hat Virtualization storage see Storage in the Administration Guide.
GlusterFS Storage is deprecated, and will no longer be supported in future releases.
Local storage domains are unsupported for disaster recovery.
A primary and secondary storage replica is required. The primary storage domain’s block devices or shares that contain virtual machine disks or templates must be replicated. The secondary storage must not be attached to any data center, and will be added to the backup site’s data center during failover.
If you are implementing disaster recovery using a self-hosted engine, ensure that the storage domain used by the Manager virtual machine does not contain virtual machine disks because in such a case the storage domain will not be failed over.
All storage solutions that have replication options that are supported by Red Hat Enterprise Linux 7 and later can be used.
3.4. Create the Required Ansible Playbooks
Ansible is used to initiate and manage the disaster recovery failover and failback. So you must create Ansible playbooks to facilitate this. For more information about creating Ansible playbooks, see the Ansible documentation.
Prerequisites
- Fully functioning Red Hat Virtualization environment in the primary site.
A backup environment in the secondary site with the same data center and cluster compatibility level as the primary environment. The backup environment must have:
- A Red Hat Virtualization Manager.
- Active hosts capable of running the virtual machines and connecting to the replicated storage domains.
- A data center with clusters.
- Networks with the same general connectivity as the primary site.
Replicated storage. See Storage Considerations for more information.
NoteThe replicated storage that contains virtual machines and templates must not be attached to the secondary site.
-
The
oVirt.disaster-recoverypackage must be installed on the highly available Red Hat Ansible Engine machine that will automate the failover and failback. - The machine running Red Hat Ansible Engine must be able to use SSH to connect to the Manager in the primary and secondary site.
It is also recommended to create environment properties that exist in the primary site, such as affinity groups, affinity labels, users, on the secondary site.
The default behaviour of the Ansible playbooks can be configured in the /usr/share/ansible/roles/oVirt.disaster-recovery/defaults/main.yml file.
The following playbooks must be created:
- The playbook that creates the file to map entities on the primary and secondary site.
- The failover playbook.
- The failback playbook.
You can also create an optional playbook to clean the primary site before failing back.
Create the playbooks and associated files in /usr/share/ansible/roles/oVirt.disaster-recovery/ on the Ansible machine that is managing the failover and failback. If you have multiple Ansible machines that can manage it, ensure that you copy the files to all of them.
You can test the configuration using one or more of the testing procedures in Testing the Active-Passive Configuration.
3.4.1. The ovirt-dr Script for Ansible Tasks
The ovirt-dr script simplifies the following Ansible tasks:
-
Generating a
varmapping file of the primary and secondary sites for failover and fallback -
Validating the
varmapping file - Executing failover on a target site
- Executing failback from a target site to a source site
This script is located in /usr/share/ansible/roles/oVirt.disaster-recovery/files
Usage
# ./ovirt-dr generate/validate/failover/failback
              [--conf-file=dr.conf]
              [--log-file=ovirt-dr-log_number.log]
              [--log-level=DEBUG/INFO/WARNING/ERROR]
You can set the parameters for the script’s actions in the configuration file, /usr/share/ansible/roles/oVirt.disaster-recovery/files/dr.conf.
You can change the location of the configuration file with the --conf-file option.
You can set the location and level of logging detail with the --log-file and --log-level options.
3.4.2. Creating the Playbook to Generate the Mapping File
The Ansible playbook used to generate the mapping file will prepopulate the file with the target (primary) site’s entities. You then must manually add the backup site’s entities, such as IP addresses, cluster, affinity groups, affinity label, external LUN disks, authorization domains, roles, and vNIC profiles, to the file.
The mapping file generation will fail if you have any virtual machine disks on the self-hosted engine’s storage domain. Also, the mapping file will not contain an attribute for this storage domain because it must not be failed over.
In this example the Ansible playbook is named dr-rhv-setup.yml, and is executed on the Manager machine in the primary site.
Procedure
Create an Ansible playbook to generate the mapping file. For example:
--- - name: Generate mapping hosts: localhost connection: local vars: site: https://example.engine.redhat.com/ovirt-engine/api username: admin@internal password: my_password ca: /etc/pki/ovirt-engine/ca.pem var_file: disaster_recovery_vars.yml roles: - oVirt.disaster-recoveryNoteFor extra security, you can encrypt your Manager password in a
.ymlfile. See Using Ansible Roles to Configure Red Hat Virtualization in the Administration Guide for more information.Run the Ansible command to generate the mapping file. The primary site’s configuration will be prepopulated.
# ansible-playbook dr-rhv-setup.yml --tags "generate_mapping"
-
Configure the mapping file (
disaster_recovery_vars.ymlin this case) with the backup site’s configuration. See Mapping File Attributes for more information about the mapping file’s attributes.
If you have multiple Ansible machines that can perform the failover and failback, then copy the mapping file to all relevant machines.
3.4.3. Create the Failover and Failback Playbooks
Ensure that you have the mapping file that you created and configured, in this case disaster_recovery_vars.yml, because this must be added to the playbooks.
You can define a password file (for example passwords.yml) to store the Manager passwords of the primary and secondary site. For example:
---
# This file is in plain text, if you want to
# encrypt this file, please execute following command:
#
# $ ansible-vault encrypt passwords.yml
#
# It will ask you for a password, which you must then pass to
# ansible interactively when executing the playbook.
#
# $ ansible-playbook myplaybook.yml --ask-vault-pass
#
dr_sites_primary_password: primary_password
dr_sites_secondary_password: secondary_password
For extra security you can encrypt the password file. However, you must use the --ask-vault-pass parameter when running the playbook. See Using Ansible Roles to Configure Red Hat Virtualization in the Administration Guide for more information.
In these examples the Ansible playbooks to fail over and fail back are named dr-rhv-failover.yml and dr-rhv-failback.yml.
Create the following Ansible playbook to failover the environment:
---
- name: Failover RHV
  hosts: localhost
  connection: local
  vars:
    dr_target_host: secondary
    dr_source_map: primary
  vars_files:
    - disaster_recovery_vars.yml
    - passwords.yml
  roles:
    - oVirt.disaster-recovery
Create the following Ansible playbook to failback the environment:
---
- name: Failback RHV
  hosts: localhost
  connection: local
  vars:
    dr_target_host: primary
    dr_source_map: secondary
  vars_files:
    - disaster_recovery_vars.yml
    - passwords.yml
  roles:
    - oVirt.disaster-recovery
3.4.4. Create the Playbook to Clean the Primary Site
Before you fail back to the primary site, you must ensure that the primary site is cleaned of all storage domains to be imported. You can do so manually on the Manager, or optionally you can create an Ansible playbook to do it for you.
The Ansible playbook to clean the primary site is named dr-cleanup.yml in this example, and it uses the mapping file generated by another Ansible playbook:
---
- name: clean RHV
  hosts: localhost
  connection: local
  vars:
    dr_source_map: primary
  vars_files:
    - disaster_recovery_vars.yml
  roles:
    - oVirt.disaster-recovery
3.5. Executing a Failover
Prerequisites
- The Manager and hosts in the secondary site are running.
- Replicated storage domains are in read/write mode.
- No replicated storage domains are attached to the secondary site.
A machine running Red Hat Ansible Engine that can connect via SSH to the Manager in the primary and secondary site, with the required packages and files:
-
The
oVirt.disaster-recoverypackage. - The mapping file and required failover playbook.
-
The
Sanlock must release all storage locks from the replicated storage domains before the failover process starts. These locks should be released automatically approximately 80 seconds after the disaster occurs.
This example uses the dr-rhv-failover.yml playbook created earlier.
Procedure
Run the failover playbook with the following command:
# ansible-playbook dr-rhv-failover.yml --tags "fail_over"
- When the primary site becomes active, ensure that you clean the environment before failing back. See Cleaning the Primary Site for more information.
3.6. Cleaning the Primary Site
After you fail over, you must clean the environment in the primary site before failing back to it:
- Reboot all hosts in the primary site.
- Ensure the secondary site’s storage domains are in read/write mode and the primary site’s storage domains are in read only mode.
- Synchronize the replication from the secondary site’s storage domains to the primary site’s storage domains.
- Clean the primary site of all storage domains to be imported. This can be done manually in the Manager, or by creating and running an Ansible playbook. See Detaching a Storage Domain in the Administration Guide for manual instructions, or Create the Playbook to Clean the Primary Site for information to create the Ansible playbook.
This example uses the dr-cleanup.yml playbook created earlier to clean the environment.
Procedure
Clean up the primary site with the following command:
# ansible-playbook dr-cleanup.yml --tags "clean_engine"
- You can now failback the environment to the primary site. See Executing a Failback for more information.
3.7. Executing a Failback
Once you fail over, you can fail back to the primary site when it is active and you have performed the necessary steps to clean the environment.
Prerequisites
- The environment in the primary site is running and has been cleaned, see Cleaning the Primary Site for more information.
- The environment in the secondary site is running, and has active storage domains.
A machine running Red Hat Ansible Engine that can connect via SSH to the Manager in the primary and secondary site, with the required packages and files:
-
The
oVirt.disaster-recoverypackage. - The mapping file and required failback playbook.
-
The
This example uses the dr-rhv-failback.yml playbook created earlier.
Procedure
Run the failback playbook with the following command:
# ansible-playbook dr-rhv-failback.yml --tags "fail_back"
- Enable replication from the primary storage domains to the secondary storage domains.
Appendix A. Mapping File Attributes
The following table describes the attributes in the mapping file that is used to fail over and fail back between the two sites in an active-passive disaster recovery solution.
| Mapping File Section | Description |
|---|---|
| Site details | These attributes map the Manager details in the primary and secondary site. For example: dr_sites_primary_url: https://manager1.example.redhat.com/ovirt-engine/api dr_sites_primary_username: admin@internal dr_sites_primary_ca_file: /etc/pki/ovirt-engine/ca.pem # Please fill in the following properties for the secondary site: dr_sites_secondary_url: https://manager2.example.redhat.com/ovirt-engine/api dr_sites_secondary_username: admin@internal dr_sites_secondary_ca_file: /etc/pki/ovirt-engine/ca.pem |
| Storage domain details | These attributes map the storage domain details between the primary and secondary site. For example: dr_import_storages: - dr_domain_type: nfs dr_primary_name: DATA dr_master_domain: True dr_wipe_after_delete: False dr_backup: False dr_critical_space_action_blocker: 5 dr_warning_low_space: 10 dr_primary_dc_name: Default dr_discard_after_delete: False dr_primary_path: /storage/data dr_primary_address: 10.64.100.xxx # Fill in the empty properties related to the secondary site dr_secondary_dc_name: Default dr_secondary_path: /storage/data2 dr_secondary_address:10.64.90.xxx dr_secondary_name: DATA |
| Cluster details | These attributes map the cluster names between the primary and secondary site. For example: dr_cluster_mappings:
- primary_name: cluster_prod
secondary_name: cluster_recovery
- primary_name: fc_cluster
secondary_name: recovery_fc_cluster
|
| Affinity group details | These attributes map the affinity groups that virtual machines belong to. For example: dr_affinity_group_mappings: - primary_name: affinity_prod secondary_name: affinity_recovery |
| Affinity label details | These attributes map the affinity labels that virtual machines belong to. For example: dr_affinity_label_mappings: - primary_name: affinity_label_prod secondary_name: affinity_label_recovery |
| Domain AAA details | The domain Authentication, Authorization and Accounting (AAA) attributes map authorization details between the primary and secondary site. For example: dr_domain_mappings: - primary_name: internal-authz secondary_name: recovery-authz - primary_name: external-authz secondary_name: recovery2-authz |
| Role details |
The Role attributes provide mapping for specific roles. For example, if a virtual machine is registered with a user with a dr_role_mappings: - primary_name: VmCreator Secondary_name: NewVmCreator |
| Network details | The network attributes map the vNIC details between the primary and secondary site. For example: dr_network_mappings: - primary_network_name: ovirtmgmt primary_profile_name: ovirtmgmt primary_profile_id: 0000000a-000a-000a-000a-000000000398 # Fill in the correlated vnic profile properties in the secondary site for profile 'ovirtmgmt' secondary_network_name: ovirtmgmt secondary_profile_name: ovirtmgmt secondary_profile_id: 0000000a-000a-000a-000a-000000000410 If you have multiple networks or multiple data centers then you must use an empty network mapping in the mapping file to ensure that all entities register on the target during failover. For example: dr_network_mappings: # No mapping should be here |
| External LUN disk details | The external LUN attributes allow virtual machines to be registered with the appropriate external LUN disk after failover and failback. For example: dr_lun_mappings: - primary_logical_unit_id: 460014069b2be431c0fd46c4bdce29b66 primary_logical_unit_alias: Fedora_Disk primary_wipe_after_delete: False primary_shareable: False primary_logical_unit_description: 2b66 primary_storage_type: iscsi primary_logical_unit_address: 10.35.xx.xxx primary_logical_unit_port: 3260 primary_logical_unit_portal: 1 primary_logical_unit_target: iqn.2017-12.com.prod.example:444 secondary_storage_type: iscsi secondary_wipe_after_delete: False secondary_shareable: False secondary_logical_unit_id: 460014069b2be431c0fd46c4bdce29b66 secondary_logical_unit_address: 10.35.x.xxx secondary_logical_unit_port: 3260 secondary_logical_unit_portal: 1 secondary_logical_unit_target: iqn.2017-12.com.recovery.example:444 |
Appendix B. Testing the Active-Passive Configuration
You must test your disaster recovery solution after configuring it. This section provides multiple options to test the active-passive disaster recovery configuration.
- Test failover while the primary site remains active and without interfering with virtual machines on the primary site’s storage domains. See Discreet Failover Test.
- Test failover and failback using specific storage domains attached to the the primary site, therefore allowing the primary site to remain active. See Discreet Failover and Failback Test.
- Test failover and failback for an impending disaster where you have a grace period to failover to the secondary site, or an unplanned shutdown of the primary site. See Full Failover and Failback test.
Ensure that you completed all the steps to configure your active-passive configuration before running any of these tests.
B.1. Discreet Failover Test
This test simulates a failover while the primary site and all its storage domains remain active, allowing users to continue working in the primary site. To enable this scenario, you must disable replication between the primary storage domains and the replicated (secondary) storage domains. During this test the primary site is unaware of the failover activities on the secondary site.
This test will not allow you to test the failback functionality.
Ensure that no production tasks are performed after the failover. For example, ensure that email systems are blocked from sending emails to real users, or redirect emails elsewhere. If systems are used to directly manage other systems, prohibit access to the systems or ensure that they access parallel systems in the secondary site.
Performing the discreet failover test:
- Disable storage replication between the primary and replicated storage domains, and ensure that all replicated storage domains are in read/write mode.
Run the command to fail over to the secondary site:
# ansible-playbook playbook --tags "fail_over"For more information, see Executing a Failback.
- Verify that all relevant storage domains, virtual machines, and templates are registered and running successfully.
Restoring the environment to its active-passive state:
- Detach the storage domains from the secondary site.
- Enable storage replication between the primary and secondary storage domains.
B.2. Discreet Failover and Failback Test
For this test you must define testable storage domains that will be used specifically for testing the failover and failback. These storage domains must be replicated so that the replicated storage can be attached to the secondary site. This allows you to test the failover while users continue to work in the primary site.
You should define the testable storage domains on a separate storage server that can be offline without affecting the primary storage domains used for production in the primary site.
For more information about failing over the environment, cleaning the environment, and performing the failback, see Executing a Failover, Cleaning the Primary Site, and Executing a Failback.
Procedure: Discreet failover test:
- Stop the test storage domains in the primary site. You can do this by, for example, shutting down the server host or blocking it with a firewall rule.
- Disable the storage replication between the testable storage domains and ensure that all replicated storage domains used for the test are in read/write mode.
- Place the test primary storage domains into read-only mode.
Run the command to fail over to the secondary site:
# ansible-playbook playbook --tags "fail_over"- Verify that all relevant storage domains, virtual machines, and templates are registered and running successfully.
Procedure: Discreet failback test*
Run the command to clean the primary site and remove all inactive storage domains and related virtual machines and templates:
# ansible-playbook playbook --tags "clean_engine"Run the failback command:
# ansible-playbook playbook --tags "fail_back"- Enable replication from the primary storage domains to the secondary storage domains.
- Verify that all relevant storage domains, virtual machines, and templates are registered and running successfully.
B.3. Full Failover and Failback test
This test performs a full failover and failback between the primary and secondary site. You can simulate the disaster by shutting down the primary site’s hosts or by adding firewall rules to block writing to the storage domains.
For more information about failing over the environment, cleaning the environment, and performing the failback, see Executing a Failover, Cleaning the Primary Site, and Executing a Failback.
Procedure: Failover test
- Disable storage replication between the primary and replicated storage domains and ensure that all replicated storage domains are in read/write mode.
Run the command to fail over to the secondary site:
# ansible-playbook playbook --tags "fail_over"- Verify that all relevant storage domains, virtual machines, and templates are registered and running successfully.
Procedure: Failback test
- Synchronize replication between the secondary site’s storage domains and the primary site’s storage domains. The secondary site’s storage domains must be in read/write mode and the primary site’s storage domains must be in read-only mode.
Run the command to clean the primary site and remove all inactive storage domains and related virtual machines and templates:
# ansible-playbook playbook --tags "clean_engine"Run the failback command:
# ansible-playbook playbook --tags "fail_back"- Enable replication from the primary storage domains to the secondary storage domains.
- Verify that all relevant storage domains, virtual machines, and templates are registered and running successfully.
Appendix C. Legal notice
Copyright © 2022 Red Hat, Inc.
Licensed under the (Creative Commons Attribution–ShareAlike 4.0 International License). Derived from documentation for the (oVirt Project). If you distribute this document or an adaptation of it, you must provide the URL for the original version.
Modified versions must remove all Red Hat trademarks.
Red Hat, Red Hat Enterprise Linux, the Red Hat logo, the Shadowman logo, JBoss, OpenShift, Fedora, the Infinity logo, and RHCE are trademarks of Red Hat, Inc., registered in the United States and other countries.
Linux® is the registered trademark of Linus Torvalds in the United States and other countries.
Java® is a registered trademark of Oracle and/or its affiliates.
XFS® is a trademark of Silicon Graphics International Corp. or its subsidiaries in the United States and/or other countries.
MySQL® is a registered trademark of MySQL AB in the United States, the European Union and other countries.
Node.js® is an official trademark of Joyent. Red Hat Software Collections is not formally related to or endorsed by the official Joyent Node.js open source or commercial project.
The OpenStack® Word Mark and OpenStack logo are either registered trademarks/service marks or trademarks/service marks of the OpenStack Foundation, in the United States and other countries and are used with the OpenStack Foundation’s permission. We are not affiliated with, endorsed or sponsored by the OpenStack Foundation, or the OpenStack community.
All other trademarks are the property of their respective owners.