Getting Started with Service Registry
Service Registry 1.0
Abstract
Chapter 1. Introduction to Service Registry
This chapter introduces Service Registry concepts and features and provides details on the supported artifact types that are stored in the registry:
- Section 1.1, “Service Registry overview”
- Section 1.2, “Service Registry artifacts”
- Section 1.3, “Service Registry web console”
- Section 1.4, “Registry REST API”
- Section 1.5, “Storage options”
- Section 1.6, “Kafka client serializers/deserializers”
- Section 1.7, “Kafka Connect converters”
- Section 1.8, “Registry demonstration examples”
- Section 1.9, “Available distributions”
1.1. Service Registry overview
Service Registry is a datastore for sharing standard event schemas and API designs across API and event-driven architectures. You can use Service Registry to decouple the structure of your data from your client applications, and to share and manage your data types and API descriptions at runtime using a REST interface.
For example, client applications can dynamically push or pull the latest schema updates to or from Service Registry at runtime without needing to redeploy. Developer teams can query the registry for existing schemas required for services already deployed in production, and can register new schemas required for new services in development.
You can enable client applications to use schemas and API designs stored in Service Registry by specifying the registry URL in your client application code. For example, the registry can store schemas used to serialize and deserialize messages, which can then be referenced from your client applications to ensure that the messages that they send and receive are compatible with those schemas.
Using Service Registry to decouple your data structure from your applications reduces costs by decreasing overall message size, and creates efficiencies by increasing consistent reuse of schemas and API designs across your organization. Service Registry provides a web console to make it easy for developers and administrators to manage registry content.
In addition, you can configure optional rules to govern the evolution of your registry content. For example, these include rules to ensure that uploaded content is syntactically and semantically valid, or is backwards and forwards compatible with other versions. Any configured rules must pass before new versions can be uploaded to the registry, which ensures that time is not wasted on invalid or incompatible schemas or API designs.
Service Registry is based on the Apicurio Registry open source community project. For details, see https://github.com/apicurio/apicurio-registry.
Service Registry features
Service Registry provides the following main features:
- Support for multiple payload formats for standard event schemas and API specifications
- Pluggable storage options including AMQ Streams, embedded Infinispan, or PostgreSQL database
- Registry content management using a web console, REST API command, Maven plug-in, or Java client
- Rules for content validation and version compatibility to govern how registry content evolves over time
- Full Apache Kafka schema registry support, including integration with Kafka Connect for external systems
- Client serializers/deserializers (Serdes) to validate Kafka and other message types at runtime
- Cloud-native Quarkus Java runtime for low memory footprint and fast deployment times
- Compatibility with existing Confluent schema registry client applications
- Operator-based installation of Service Registry on OpenShift
1.2. Service Registry artifacts
The items stored in Service Registry, such as event schemas and API specifications, are known as registry artifacts. The following shows an example of an Apache Avro schema artifact in JSON format for a simple share price application:
{
   "type": "record",
   "name": "price",
   "namespace": "com.example",
   "fields": [
       {
           "name": "symbol",
           "type": "string"
       },
       {
           "name": "price",
           "type": "string"
       }
   ]
}
When a schema or API contract is added as an artifact in the registry, client applications can then use that schema or API contract to validate that client messages conform to the correct data structure at runtime.
Service Registry supports a wide range of message payload formats for standard event schemas and API specifications. For example, supported formats include Apache Avro, Google protocol buffers, GraphQL, AsyncAPI, OpenAPI, and others. For more details, see Section 8.1, “Service Registry artifact types”.
1.3. Service Registry web console
You can use the Service Registry web console to browse and search the artifacts stored in the registry, and to upload new artifacts and artifact versions. You can search for artifacts by label, name, and description. You can also view an artifact’s content, view all of its available versions, or download an artifact file locally.
You can also use the Service Registry web console to configure optional rules for registry content, both globally and for each artifact. These optional rules for content validation and compatibility are applied when new artifacts or artifact versions are uploaded to the registry. For more details, see Section 2.1, “Rules for registry content”.
Figure 1.1. Service Registry web console
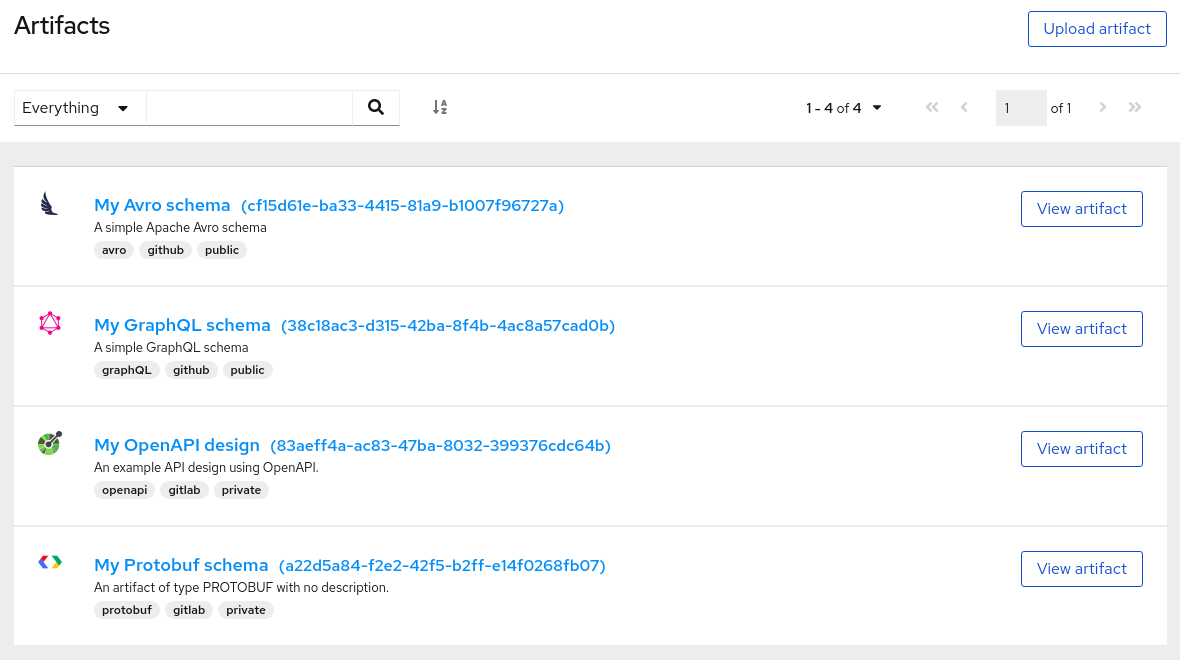
The Service Registry web console is available from the main endpoint of your Service Registry deployment, for example, on http://MY-REGISTRY-URL/ui. For more details, see Chapter 5, Managing Service Registry content using the web console.
1.4. Registry REST API
Using the Registry REST API, client applications can manage the artifacts in Service Registry. This API provides create, read, update, and delete operations for:
- Artifacts
- Manage the schema and API design artifacts stored in the registry. This also includes browse or search for artifacts, for example, by name, ID, description, or label. You can also manage the lifecycle state of an artifact: enabled, disabled, or deprecated.
- Artifact versions
- Manage the versions that are created when artifact content is updated. This also includes browse or search for versions, for example, by name, ID, description, or label. You can also manage the lifecycle state of a version: enabled, disabled, or deprecated.
- Artifact metadata
- Manage details about artifacts such as when an artifact was created or modified, its current state, and so on. Users can edit some metadata, and some is read-only. For example, editable metadata includes artifact name, description, or label, but when the artifact was created and modified are read-only.
- Global rules
- Configure rules to govern the content evolution of all artifacts to prevent invalid or incompatible content from being added to the registry. Global rules are applied only if an artifact does not have its own specific artifact rules configured.
- Artifact rules
- Configure rules to govern the content evolution of a specific artifact to prevent invalid or incompatible content from being added to the registry. Artifact rules override any global rules configured.
Compatibility with other schema registries
The Registry REST API is compatible with the Confluent schema registry REST API, which includes support for Apache Avro, Google Protocol buffers, and JSON Schema artifact types. Applications using Confluent client libraries can use Service Registry as a drop-in replacement instead. For more details, see Replacing Confluent Schema Registry with Red Hat Integration Service Registry.
Additional resources
- For detailed information, see the Apicurio Registry REST API documentation.
-
The Registry REST API documentation is also available from the main endpoint of your Service Registry deployment, for example, on
http://MY-REGISTRY-URL/api.
1.5. Storage options
Service Registry provides the following underlying storage implementations for registry artifacts:
| Storage option | Release |
|---|---|
| Kafka Streams-based storage in AMQ Streams 1.5 | General Availability |
| Cache-based storage in embedded Infinispan 10 | Technical Preview only |
| Java Persistence API-based storage in PostgreSQL 12 database | Technical Preview only |
Service Registry storage in Infinispan or PostgreSQL is a Technology Preview feature only. Technology Preview features are not supported with Red Hat production service level agreements (SLAs) and might not be functionally complete. Red Hat does not recommend using them in production.
These features provide early access to upcoming product features, enabling customers to test functionality and provide feedback during the development process. For more information about the support scope of Red Hat Technology Preview features, see https://access.redhat.com/support/offerings/techpreview.
Additional resources
- For details on how to install into your preferred storage option, see Chapter 3, Installing Service Registry on OpenShift.
1.6. Kafka client serializers/deserializers
Kafka producer applications can use serializers to encode messages that conform to a specific event schema. Kafka consumer applications can then use deserializers to validate that messages have been serialized using the correct schema, based on a specific schema ID.
Figure 1.2. Service Registry and Kafka client serializer/deserializer architecture
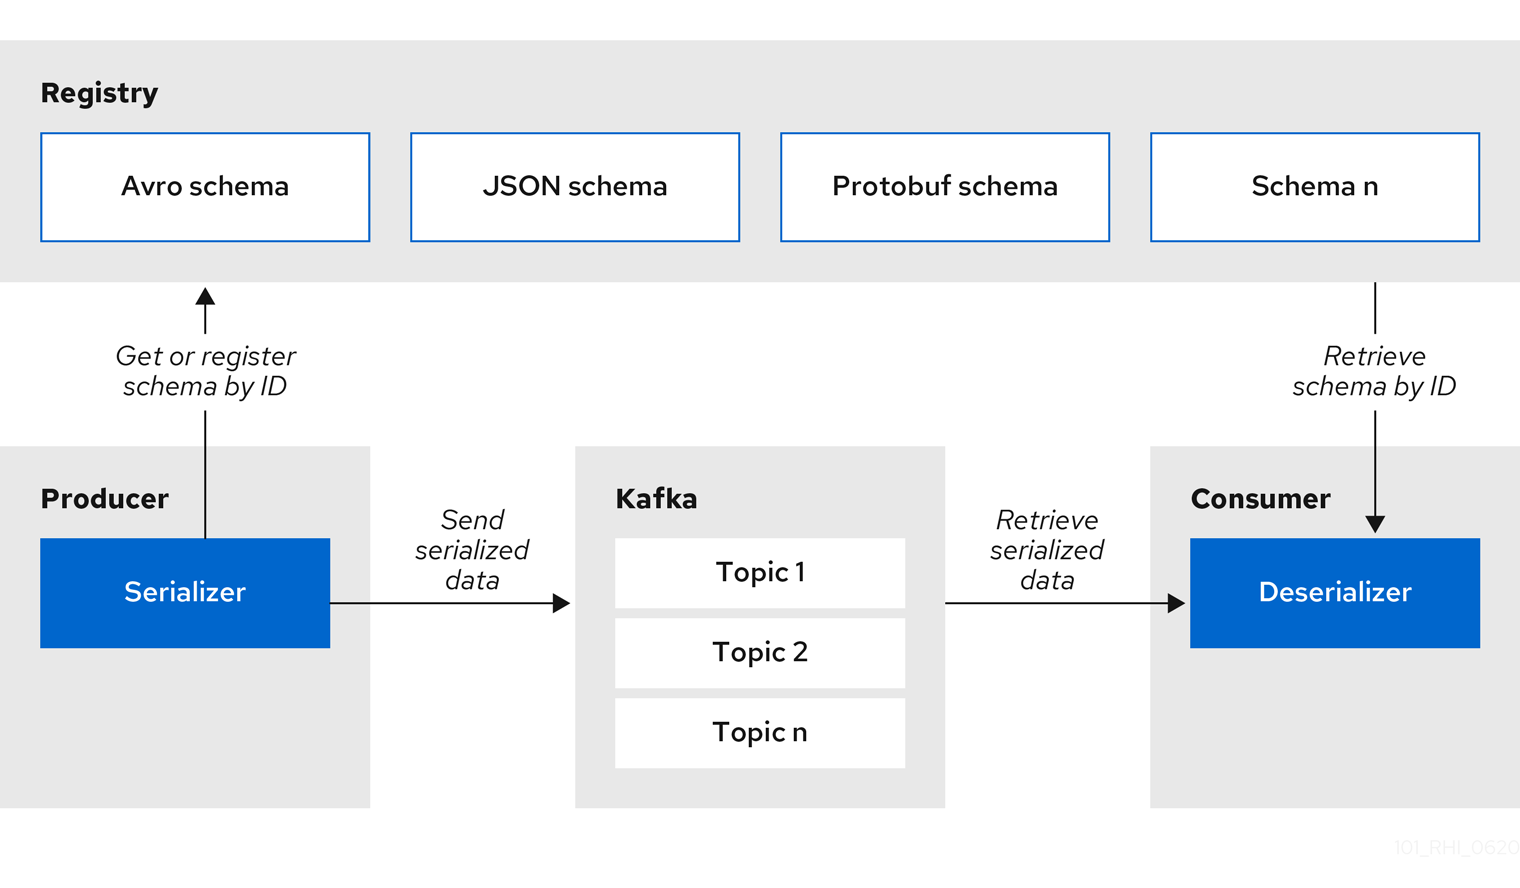
Service Registry provides Kafka client serializers/deserializers (Serdes) to validate the following message types at runtime:
- Apache Avro
- Google protocol buffers
- JSON Schema
The Service Registry Maven repository and source code distributions include the Kafka serializer/deserializer implementations for these message types, which Kafka client developers can use to integrate with the registry. These implementations include custom io.apicurio.registry.utils.serde Java classes for each supported message type, which client applications can use to pull schemas from the registry at runtime for validation.
Additional resources
- For instructions on how to use the Service Registry Kafka client serializer/deserializer for Apache Avro in AMQ Streams producer and consumer applications, see Using AMQ Streams on Openshift.
1.7. Kafka Connect converters
You can use Service Registry with Apache Kafka Connect to stream data between Kafka and external systems. Using Kafka Connect, you can define connectors for different systems to move large volumes of data into and out of Kafka-based systems.
Figure 1.3. Service Registry and Kafka Connect architecture
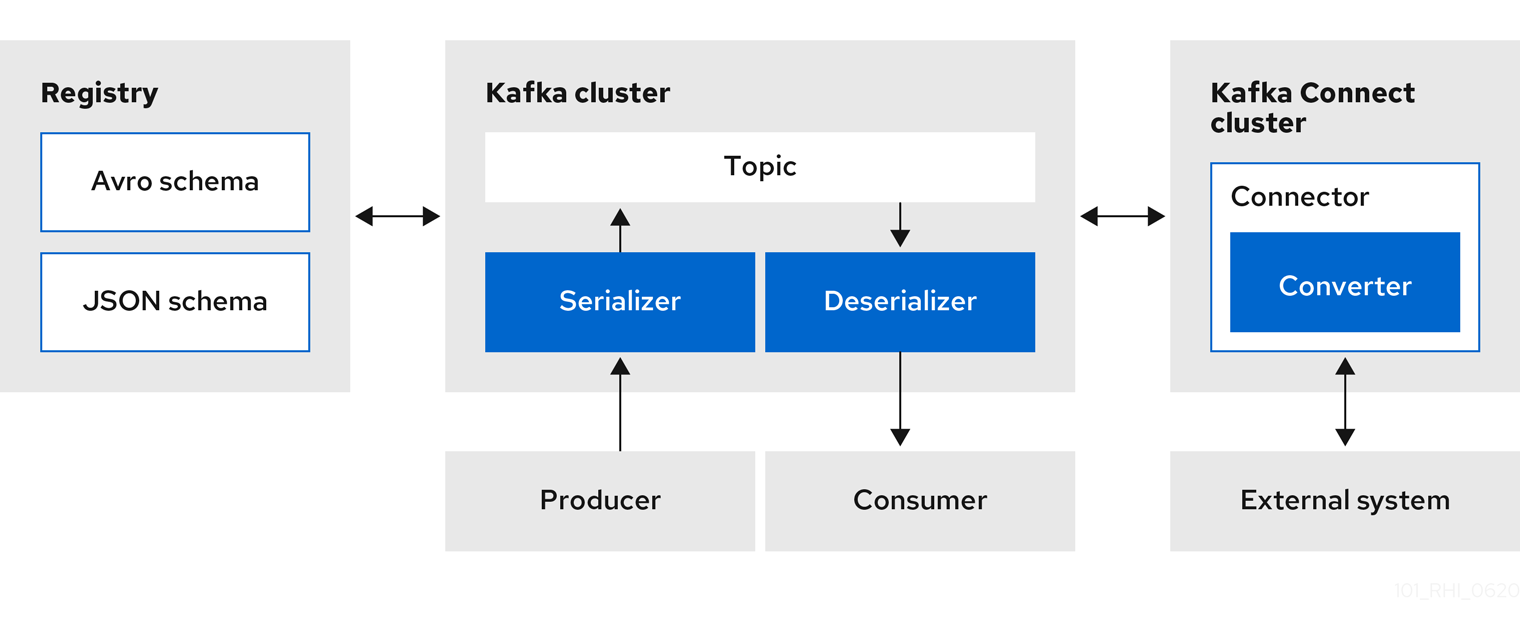
Service Registry provides the following features for Kafka Connect:
- Storage for Kafka Connect schemas
- Kafka Connect converters for Apache Avro and JSON Schema
- Registry REST API to manage schemas
You can use the Avro and JSON Schema converters to map Kafka Connect schemas into Avro or JSON schemas. Those schemas can then serialize message keys and values into the compact Avro binary format or human-readable JSON format. The converted JSON is also less verbose because the messages do not contain the schema information, only the schema ID.
Service Registry can manage and track the Avro and JSON schemas used in the Kafka topics. Because the schemas are stored in Service Registry and decoupled from the message content, each message must only include a tiny schema identifier. For an I/O bound system like Kafka, this means more total throughput for producers and consumers.
The Avro and JSON Schema serializers and deserializers (Serdes) provided by Service Registry are also used by Kafka producers and consumers in this use case. Kafka consumer applications that you write to consume change events can use the Avro or JSON Serdes to deserialize these change events. You can install these Serdes into any Kafka-based system and use them along with Kafka Connect, or with Kafka Connect-based systems such as Debezium and Camel Kafka Connector.
1.8. Registry demonstration examples
Service Registry provides an open source demonstration example of Apache Avro serialization/deserialization with storage in Apache Kafka Streams. This example shows how the serializer/deserializer obtains the Avro schema from the registry at runtime and uses it to serialize and deserialize Kafka messages. For more details, see https://github.com/Apicurio/apicurio-registry-demo.
This demonstration also provides simple examples of both Avro and JSON Schema serialization/deserialization with storage in Apache Kafka.
For another open source demonstration example with detailed instructions on Avro serialization/deserialization with storage in Apache Kafka, see the Red Hat Developer article on Getting Started with Red Hat Integration Service Registry.
1.9. Available distributions
Service Registry includes the following distributions:
| Distribution | Location | Release |
|---|---|---|
| Service Registry Operator | OpenShift web console under Operators → OperatorHub | General Availability |
| Container image for Service Registry Operator | General Availability | |
| Container image for Kafka storage in AMQ Streams | General Availability | |
| Container image for embedded Infinispan storage | Technical Preview only | |
| Container image for JPA storage in PostgreSQL | Technical Preview only |
Service Registry storage in Infinispan or PostgreSQL is a Technology Preview feature only. Technology Preview features are not supported with Red Hat production service level agreements (SLAs) and might not be functionally complete. Red Hat does not recommend using them in production.
These features provide early access to upcoming product features, enabling customers to test functionality and provide feedback during the development process. For more information about the support scope of Red Hat Technology Preview features, see https://access.redhat.com/support/offerings/techpreview.
| Distribution | Location | Release |
|---|---|---|
| Example custom resource definitions for installation | General Availability and Technical Preview | |
| Kafka Connect converters | General Availability | |
| Maven repository | General Availability | |
| Source code | General Availability |
You must have a subscription for Red Hat Integration and be logged into the Red Hat Customer Portal to access the available Service Registry distributions.
Chapter 2. Introduction to Service Registry rules
This chapter introduces the optional rules used to govern registry content and provides details on the available rule types:
2.1. Rules for registry content
To govern the evolution of registry content, you can configure optional rules for artifact content added to the registry. All configured global rules or artifact rules must pass before a new artifact version can be uploaded to the registry. Configured artifact rules override any configured global rules.
The goal of these rules is to prevent invalid content from being added to the registry. For example, content can be invalid for the following reasons:
-
Invalid syntax for a given artifact type (for example,
AVROorPROTOBUF) - Valid syntax, but semantics violate a specification
- Incompatibility, when new content includes breaking changes relative to the current artifact version
You can add these optional content rules using the Service Registry web console, REST API commands, or a Java client application.
2.2. When rules are applied
Rules are applied only when content is added to the registry. This includes the following REST operations:
- Adding an artifact
- Updating an artifact
- Adding an artifact version
If a rule is violated, Service Registry returns an HTTP error. The response body includes the violated rule and a message showing what went wrong.
If no rules are configured for an artifact, the set of currently configured global rules are applied, if any.
2.3. How rules work
Each rule has a name and optional configuration information. The registry storage maintains the list of rules for each artifact and the list of global rules. Each rule in the list consists of a name and a set of configuration properties, which are specific to the rule implementation.
A rule is provided with the content of the current version of the artifact (if one exists) and the new version of the artifact being added. The rule implementation returns true or false depending on whether the artifact passes the rule. If not, the registry reports the reason why in an HTTP error response. Some rules might not use the previous version of the content. For example, compatibility rules use previous versions, but syntax or semantic validity rules do not.
Additional resources
For more details, see Section 8.2, “Service Registry content rule types”.
Chapter 3. Installing Service Registry on OpenShift
This chapter explains how to first install Service Registry and then how to set up your chosen registry storage option: AMQ Streams, embedded Infinispan, or PostgreSQL database.
Prerequisites
Service Registry installation
AMQ Streams storage
Embedded Infinispan storage (Technology Preview)
PostgreSQL database storage (Technology Preview)
Service Registry storage in Infinispan or PostgreSQL is a Technology Preview feature only. Technology Preview features are not supported with Red Hat production service level agreements (SLAs) and might not be functionally complete. Red Hat does not recommend using them in production.
These features provide early access to upcoming product features, enabling customers to test functionality and provide feedback during the development process. For more information about the support scope of Red Hat Technology Preview features, see https://access.redhat.com/support/offerings/techpreview.
You can install more than one instance of Service Registry depending on your environment. The number of instances depends on your storage option, for example, your Kafka, Infinispan, or database cluster configuration, and on the number and type of artifacts stored in Service Registry.
3.1. Installing Service Registry from the OpenShift OperatorHub
You can install the Service Registry Operator on your OpenShift cluster from the OperatorHub. The OperatorHub is available from the OpenShift Container Platform web console and provides an interface for cluster administrators to discover and install Operators. For more details, see the OpenShift documentation.
Prerequisites
- You must have cluster administrator access to an OpenShift cluster.
Procedure
- In the OpenShift Container Platform web console, log in using an account with cluster administrator privileges.
Create a new OpenShift project:
- In the left navigation menu, click Home > Project > Create Project.
-
Enter a project name, for example,
my-project, and click Create.
- In the left navigation menu, click Catalog > OperatorHub.
-
In the Filter by keyword text box, enter
Registryto find the Red Hat Integration - Service Registry Operator. - Read the information about the Operator, and click Install. This displays the Create Operator Subscription page.
Select your subscription settings, for example:
- Installation Mode > A specific namespace on the cluster > my-project
- Update Channel > serviceregistry-1.0
- Approval Strategy > Manual
- Click Subscribe. This displays the Operators > Installed Operators page.
- Wait a few moments until the Status for the Service Registry Operator displays Succeeded and the subscription is Up to Date.
Additional resources
3.2. Installing AMQ Streams from the OpenShift OperatorHub
If you do not already have AMQ Streams installed, you can install the AMQ Streams Operator on your OpenShift cluster from the OperatorHub. The OperatorHub is available from the OpenShift Container Platform web console and provides an interface for cluster administrators to discover and install Operators. For more details, see the OpenShift documentation.
Prerequisites
- You must have cluster administrator access to an OpenShift cluster
- See Using AMQ Streams on OpenShift for detailed information on installing AMQ Streams. This section shows a simple example of installing using the OpenShift OperatorHub.
Procedure
- In the OpenShift Container Platform web console, log in using an account with cluster administrator privileges.
-
Change to the OpenShift project in which Service Registry is installed. For example, from the Project drop-down, select
my-project. - In the left navigation menu, click Catalog > OperatorHub.
-
In the Filter by keyword text box, enter
AMQto find the Red Hat Integration - AMQ Streams Operator. - Read the information about the Operator, and click Install. This displays the Create Operator Subscription page.
Select your subscription settings, for example:
- Installation Mode > A specific namespace on the cluster > my-project
- Update Channel > amq-streams-1.5.x
- Approval Strategy > Manual
- Click Subscribe. This displays the Operators > Installed Operators page.
- Wait a few moments until the Status for the AMQ Streams Operator displays Succeeded and the subscription is Up to Date.
Additional resources
3.3. Configuring Service Registry with AMQ Streams storage on OpenShift
This section explains how to configure Kafka-based storage for Service Registry using AMQ Streams on OpenShift. This storage option is suitable for production environments when persistent storage is configured for the Kafka cluster on OpenShift. You can install Service Registry in an existing Kafka cluster or create a new Kafka cluster, depending on your environment.
Prerequisites
- You must have an OpenShift cluster with cluster administrator access.
- You must have already installed Service Registry. See Section 3.1, “Installing Service Registry from the OpenShift OperatorHub”.
- You must have already installed AMQ Streams. See Section 3.2, “Installing AMQ Streams from the OpenShift OperatorHub”.
Procedure
- In the OpenShift Container Platform web console, log in using an account with cluster administrator privileges.
If you do not already have a Kafka cluster configured, create a new Kafka cluster using AMQ Streams. For example, in the OpenShift OperatorHub:
- Click Installed Operators > Red Hat Integration - AMQ Streams.
- Under Provided APIs > Kafka, click Create Instance to create a new Kafka cluster.
Edit the custom resource definition as appropriate, and click Create.
WarningThe default example creates a cluster with 3 Zookeeper nodes and 3 Kafka nodes with
ephemeralstorage. This temporary storage is suitable for development and testing only, and not for production. For more details, see Using AMQ Streams on OpenShift.
- After the cluster is ready, click Provided APIs > Kafka > my-cluster > YAML.
In the
statusblock, make a copy of thebootstrapServersvalue, which you will use later to deploy Service Registry. For example:status: conditions: ... listeners: - addresses: - host: my-cluster-kafka-bootstrap.my-project.svc port: 9092 bootstrapServers: 'my-cluster-kafka-bootstrap.my-project.svc:9092' type: plain ...Create a Kafka topic to store the Service Registry artifacts:
- Under Provided APIs > Kafka Topic, click Create topic.
-
Change the default topic name from
my-topicto the requiredstorage-topic.
Create a Kafka topic to store the Service Registry global IDs:
- Under Provided APIs > Kafka Topic, click Create topic.
-
Change the default topic name from
my-topicto the requiredglobal-id-topic.
- Click Installed Operators > Red Hat Integration - Service Registry > ApicurioRegistry > Create ApicurioRegistry.
Paste in the following custom resource definition, but use your
bootstrapServersvalue that you copied earlier:apiVersion: apicur.io/v1alpha1 kind: ApicurioRegistry metadata: name: example-apicurioregistry spec: configuration: persistence: "streams" streams: bootstrapServers: "my-cluster-kafka-bootstrap.my-project.svc:9092"- Click Create and wait for the Service Registry route to be created on OpenShift.
Click Networking > Route to access the new route for the Service Registry web console. For example:
http://example-apicurioregistry.my-project.my-domain-name.com/
Additional resources
- For more details on creating Kafka clusters and topics using AMQ Streams, see Using AMQ Streams on OpenShift.
3.4. Configuring Service Registry with embedded Infinispan storage on OpenShift
This section explains how to configure Infinispan cache-based storage for Service Registry on OpenShift. This storage option is based on Infinispan community Java libraries embedded in the Quarkus-based Service Registry server. You do not need to install a separate Infinispan server using this storage option. This option is suitable for development or demonstration only, and is not suitable for production environments.
Service Registry storage in Infinispan is a Technology Preview feature only. Technology Preview features are not supported with Red Hat production service level agreements (SLAs) and might not be functionally complete. Red Hat does not recommend using them in production.
These features provide early access to upcoming product features, enabling customers to test functionality and provide feedback during the development process. For more information about the support scope of Red Hat Technology Preview features, see https://access.redhat.com/support/offerings/techpreview.
Prerequisites
- You must have an OpenShift cluster with cluster administrator access.
- You must have already installed Service Registry. See Section 3.1, “Installing Service Registry from the OpenShift OperatorHub”.
Procedure
- In the OpenShift Container Platform web console, log in using an account with cluster administrator privileges.
- Click Installed Operators > Red Hat Integration - Service Registry > ApicurioRegistry > Create ApicurioRegistry.
Paste in the following custom resource definition:
apiVersion: apicur.io/v1alpha1 kind: ApicurioRegistry metadata: name: example-apicurioregistry spec: configuration: persistence: "infinispan" infinispan: # Currently uses embedded version of Infinispan clusterName: "example-apicurioregistry" # ^ Optional- Click Create and wait for the Service Registry route to be created on OpenShift.
Click Networking > Route to access the new route for the Service Registry web console. For example:
http://example-apicurioregistry.my-project.my-domain-name.com/
Additional resources
- For more details on configuring Infinispan clusters, see the example custom resources available from the Apicurio Registry demonstration.
- For more details on Infinispan, see https://infinispan.org/
3.5. Installing a PostgreSQL database from the OpenShift OperatorHub
If you do not already have a PostgreSQL database Operator installed, you can install a PostgreSQL Operator on your OpenShift cluster from the OperatorHub. The OperatorHub is available from the OpenShift Container Platform web console and provides an interface for cluster administrators to discover and install Operators. For more details, see the OpenShift documentation.
Service Registry storage in a PostgreSQL database is a Technology Preview feature only. Technology Preview features are not supported with Red Hat production service level agreements (SLAs) and might not be functionally complete. Red Hat does not recommend using them in production.
These features provide early access to upcoming product features, enabling customers to test functionality and provide feedback during the development process. For more information about the support scope of Red Hat Technology Preview features, see https://access.redhat.com/support/offerings/techpreview.
Prerequisites
- You must have cluster administrator access to an OpenShift cluster.
Procedure
- In the OpenShift Container Platform web console, log in using an account with cluster administrator privileges.
-
Change to the OpenShift project in which Service Registry is installed. For example, from the Project drop-down, select
my-project. - In the left navigation menu, click Catalog > OperatorHub.
-
In the Filter by keyword text box, enter
PostgreSQLto find an Operator suitable for your environment, for example, Crunchy PostgreSQL for OpenShift or PostgreSQL Operator by Dev4Ddevs.com. - Read the information about the Operator, and click Install. This displays the Create Operator Subscription page.
Select your subscription settings, for example:
- Installation Mode > A specific namespace on the cluster > my-project
- Update Channel > stable
- Approval Strategy > Manual
- Click Subscribe. This displays the Operators > Installed Operators page.
Wait a few moments until the Status for the PostgreSQL Operator displays Succeeded and the subscription is Up to Date.
ImportantYou must read the documentation from your chosen PostgreSQL Operator for details on how to create and manage your database.
Additional resources
3.6. Configuring Service Registry with PostgreSQL database storage on OpenShift
This section explains how to configure Java Persistence API-based storage for Service Registry on OpenShift using a PostgreSQL database Operator. You can install Service Registry in an existing database or create a new database, depending on your environment. This section shows a simple example using the PostgreSQL Operator by Dev4Ddevs.com.
Service Registry storage in a PostgreSQL database is a Technology Preview feature only. Technology Preview features are not supported with Red Hat production service level agreements (SLAs) and might not be functionally complete. Red Hat does not recommend using them in production.
These features provide early access to upcoming product features, enabling customers to test functionality and provide feedback during the development process. For more information about the support scope of Red Hat Technology Preview features, see https://access.redhat.com/support/offerings/techpreview.
Prerequisites
- You must have an OpenShift cluster with cluster administrator access.
- You must have already installed Service Registry. See Section 3.1, “Installing Service Registry from the OpenShift OperatorHub”.
- You must have already installed a PostgreSQL Operator on OpenShift. For examaple, see Section 3.5, “Installing a PostgreSQL database from the OpenShift OperatorHub”.
Procedure
- In the OpenShift Container Platform web console, log in using an account with cluster administrator privileges.
-
Change to the OpenShift project in which Service Registry and your PostgreSQL Operator are installed. For example, from the Project drop-down, select
my-project. - Create a PostgreSQL database for your Service Registry storage. For example, click Installed Operators > PostgreSQL Operator by Dev4Ddevs.com > Create database > YAML.
Edit the database settings as follows:
-
name: Change the value toregistry -
image: Change the value tocentos/postgresql-10-centos7
-
Edit any other database settings as needed depending on your environment, for example:
apiVersion: postgresql.dev4devs.com/v1alpha1
kind: Database
metadata:
  name: registry
  namespace: my-project
spec:
  databaseCpu: 30m
  databaseCpuLimit: 60m
  databaseMemoryLimit: 512Mi
  databaseMemoryRequest: 128Mi
  databaseName: example
  databaseNameKeyEnvVar: POSTGRESQL_DATABASE
  databasePassword: postgres
  databasePasswordKeyEnvVar: POSTGRESQL_PASSWORD
  databaseStorageRequest: 1Gi
  databaseUser: postgres
  databaseUserKeyEnvVar: POSTGRESQL_USER
  image: centos/postgresql-10-centos7
  size: 1
- Click Create Database, and wait until the database is created.
- Click Installed Operators > Red Hat Integration - Service Registry > ApicurioRegistry > Create ApicurioRegistry.
Paste in the following custom resource definition, and edit the values for the database
urland credentials to match your environment:apiVersion: apicur.io/v1alpha1 kind: ApicurioRegistry metadata: name: example-apicurioregistry spec: configuration: persistence: "jpa" dataSource: url: "jdbc:postgresql://SERVICE_NAME.NAMESPACE.svc:5432/" # e.g. url: "jdbc:postgresql://acid-minimal-cluster.my-project.svc:5432/" userName: "postgres" password: "PASSWORD" # ^ Optional- Click Create and wait for the Service Registry route to be created on OpenShift.
Click Networking > Route to access the new route for the Service Registry web console. For example:
http://example-apicurioregistry.my-project.my-domain-name.com/
Additional resources
Chapter 4. Configuring Service Registry on OpenShift
This chapter explains how to configure optional settings for Service Registry health checks on OpenShift:
4.1. Configuring Service Registry health checks on OpenShift
You can configure optional environment variables for liveness and readiness probes to monitor the health of the Service Registry server on OpenShift:
- Liveness probes test if the application can make progress. If the application cannot make progress, OpenShift automatically restarts the failing Pod.
- Readiness probes test if the application is ready to process requests. If the application is not ready, it can become overwhelmed by requests, and OpenShift stops sending requests for the time that the probe fails. If other Pods are OK, they continue to receive requests.
The default values of the liveness and readiness environment variables are designed for most cases and should only be changed if required by your environment. Any changes to the defaults depend on your hardware, network, and amount of data stored. These values should be kept as low as possible to avoid unnecessary overhead.
Prerequisites
- You must have an OpenShift cluster with cluster administrator access.
- You must have already installed Service Registry. See Section 3.1, “Installing Service Registry from the OpenShift OperatorHub”.
- You must have already installed and configured your chosen Service Registry storage in AMQ Streams, embedded Infinispan, or PostgreSQL.
Procedure
- In the OpenShift Container Platform web console, log in using an account with cluster administrator privileges.
- Click Installed Operators > Red Hat Integration - Service Registry.
- On the ApicurioRegistry tab, click the Operator custom resource for your deployment, for example, example-apicurioregistry.
-
In the main overview page, find the Deployment Name section and the corresponding
DeploymentConfigname for your Service Registry deployment, for example, example-apicurioregistry. -
In the left navigation menu, click Workloads > Deployment Configs, and select your
DeploymentConfigname. Click the Environment tab, and enter your environment variables in the Single values env section, for example:
-
NAME:
LIVENESS_STATUS_RESET -
VALUE:
350
-
NAME:
Click Save at the bottom.
Alternatively, you can perform these steps using the OpenShift
occommand. For more details, see the OpenShift CLI documentation.
4.2. Environment variables for Service Registry health checks
This section describes the available environment variables for Service Registry health checks on OpenShift. These include liveness and readiness probes to monitor the health of the Service Registry server on OpenShift. For an example procedure, see Section 4.1, “Configuring Service Registry health checks on OpenShift”.
The following environment variables are provided for reference only. The default values are designed for most cases and should only be changed if required by your environment. Any changes to the defaults depend on your hardware, network, and amount of data stored. These values should be kept as low as possible to avoid unnecessary overhead.
Liveness environment variables
| Name | Description | Type | Default |
|---|---|---|---|
|
| Number of liveness issues or errors that can occur before the liveness probe fails. | Integer |
|
|
| Period in which the threshold number of errors must occur. For example, if this value is 60 and the threshold is 1, the check fails after two errors occur in 1 minute | Seconds |
|
|
| Number of seconds that must elapse without any more errors for the liveness probe to reset to OK status. | Seconds |
|
|
| Comma-separated list of ignored liveness exceptions. | String |
|
Because OpenShift automatically restarts a Pod that fails a liveness check, the liveness settings, unlike readiness settings, do not directly affect behavior of Service Registry on OpenShift.
Readiness environment variables
| Name | Description | Type | Default |
|---|---|---|---|
|
| Number of readiness issues or errors that can occur before the readiness probe fails. | Integer |
|
|
| Period in which the threshold number of errors must occur. For example, if this value is 60 and the threshold is 1, the check fails after two errors occur in 1 minute. | Seconds |
|
|
| Number of seconds that must elapse without any more errors for the liveness probe to reset to OK status. In this case, this means how long the Pod stays not ready, until it returns to normal operation. | Seconds |
|
|
| Readiness tracks the timeout of two operations:
If these operations take more time than the configured timeout, this is counted as a readiness issue or error. This value controls the timeouts for both operations. | Seconds |
|
Chapter 5. Managing Service Registry content using the web console
This chapter explains how to manage artifacts stored in the registry using the Service Registry web console. This includes uploading and browsing registry content, and configuring optional rules:
5.1. Adding artifacts using the Service Registry web console
You can use the Service Registry web console to upload event schema and API design artifacts to the registry. For more details on the artifact types that you can upload, see Section 8.1, “Service Registry artifact types”. This section shows simple examples of uploading Service Registry artifacts, applying artifact rules, and adding new artifact versions.
Prerequisites
- Service Registry must be installed and running in your environment. For details, see Chapter 3, Installing Service Registry on OpenShift.
Procedure
Connect to the Service Registry web console on:
http://MY_REGISTRY_URL/uiClick Upload Artifact, and specify the following:
- ID: Use the default empty setting to automatically generate an ID, or enter a specific artifact ID.
Type: Use the default Auto-Detect setting to automatically detect the artifact type, or select the artifact type from the drop-down, for example, Avro Schema or OpenAPI.
NoteThe Service Registry server cannot automatically detect the JSON Schema artifact type. You must manually select this artifact type.
-
Artifact: Drag and drop or click Browse to upload a file, for example,
my-schema.jsonormy-openapi.json.
Click Upload and view the Artifact Details:
Figure 5.1. Artifact Details in Service Registry web console
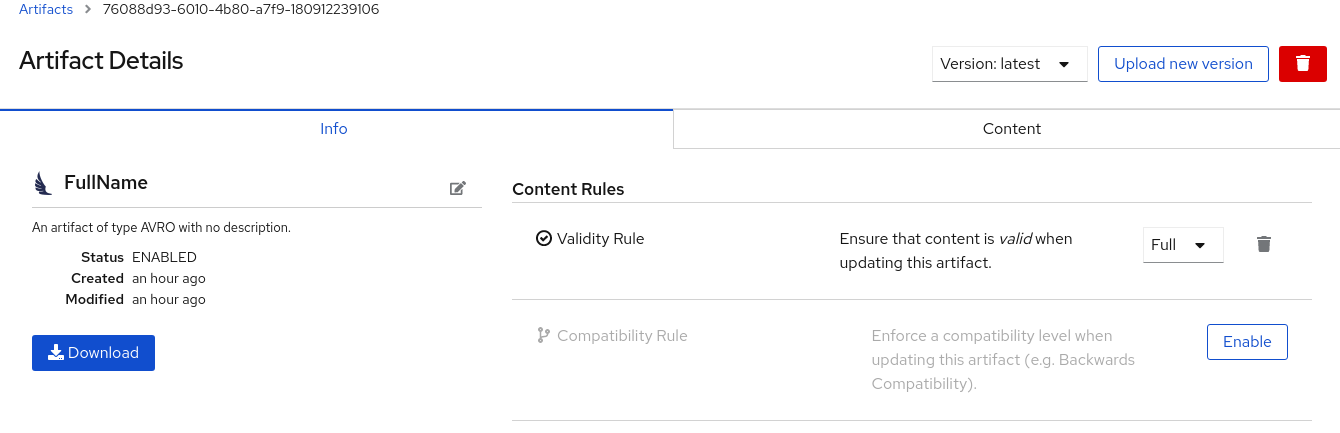
- Info: Displays the artifact name, description, lifecycle status, when created, and last modified. You can click the Edit Artifact Metadata pencil icon to edit the artifact name and description or add labels, and click Download to download the artifact file locally. Also displays artifact Content Rules that you can enable and configure.
- Documentation (OpenAPI only): Displays automatically-generated REST API documentation.
- Content: Displays a read-only view of the full artifact content.
- In Content Rules, click Enable to configure a Validity Rule or Compatibility Rule, and select the appropriate rule configuration from the drop-down. For more details, see Section 8.2, “Service Registry content rule types”.
-
Click Upload new version to add a new artifact version, and drag and drop or click Browse to upload the file, for example,
my-schema.jsonormy-openapi.json. To delete an artifact, click the trash icon next to Upload new version.
WarningDeleting an artifact deletes the artifact and all of its versions, and cannot be undone. Artifact versions are immutable and cannot be deleted individually.
5.2. Viewing artifacts using the Service Registry web console
You can use the Service Registry web console to browse the event schema and API design artifacts stored in the registry. This section shows simple examples of viewing Service Registry artifacts, versions, and artifact rules. For more details on the artifact types stored in the registry, see Section 8.1, “Service Registry artifact types”.
Prerequisites
- Service Registry must be installed and running in your environment. For details, see Chapter 3, Installing Service Registry on OpenShift.
- Artifacts must have been added to the registry using the Service Registry web console, REST API commands, Maven plug-in, or a Java client application.
Procedure
Connect to the Service Registry web console on:
http://MY_REGISTRY_URL/uiBrowse the list of artifacts stored in the registry, or enter a search string to find an artifact. You can select to search by a specific Name, Description, Label, or Everything.
Figure 5.2. Browse artifacts in Service Registry web console
Click View artifact to view the Artifact Details:
- Info: Displays the artifact name, description, lifecycle status, when created, and last modified. You can click the Edit Artifact Metadata pencil icon to edit the artifact name and description or add labels, and click Download to download the artifact file locally. Also displays artifact Content Rules that you can enable and configure.
- Documentation (OpenAPI only): Displays automatically-generated REST API documentation.
- Content: Displays a read-only view of the full artifact content.
- Select to view a different artifact Version from the drop-down, if additional versions have been added.
5.3. Configuring content rules using the Service Registry web console
You can use the Service Registry web console to configure optional rules to prevent invalid content from being added to the registry. All configured artifact rules or global rules must pass before a new artifact version can be uploaded to the registry. Configured artifact rules override any configured global rules. For more details, see Section 2.1, “Rules for registry content”.
This section shows a simple example of configuring global and artifact rules. For details on the different rule types and associated configuration settings that you can select, see Section 8.2, “Service Registry content rule types”.
Prerequisites
- Service Registry must be installed and running in your environment. For details, see Chapter 3, Installing Service Registry on OpenShift.
- For artifact rules, artifacts must have been added to the registry using the Service Registry web console, REST API commands, Maven plug-in, or a Java client application.
Procedure
Connect to the Service Registry web console on:
http://MY_REGISTRY_URL/ui- For artifact rules, browse the list of artifacts stored in the registry, or enter a search string to find an artifact. You can select to search by a specific artifact Name, Description, Label, or Everything.
- Click View artifact to view the Artifact Details.
In Content Rules, click Enable to configure an artifact Validity Rule or Compatibility Rule, and select the appropriate rule configuration from the drop-down. For more details, see Section 8.2, “Service Registry content rule types”.
Figure 5.3. Configure content rules in Service Registry web console
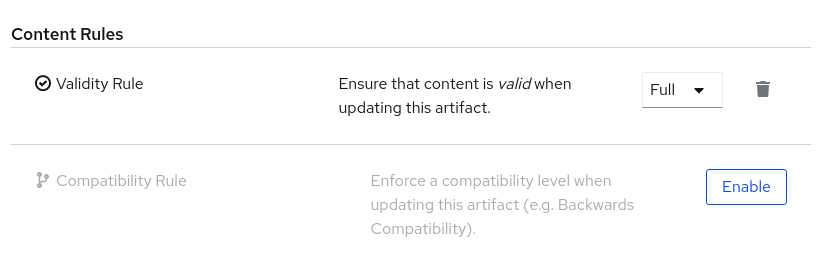
- For global rules, click the Settings cog icon at the top right of the toolbar, and click Enable to configure a global Validity Rule or Compatibility Rule, and select the appropriate rule configuration from the drop-down. For more details, see Section 8.2, “Service Registry content rule types”.
- To disable an artifact rule or global rule, click the trash icon next to the rule.
Additional resources
Chapter 6. Managing Service Registry content using the REST API
This chapter explains how to manage artifacts stored in the registry using the Registry REST API. This includes using Registry REST API commands, a Maven plug-in, or a Java client application:
6.1. Managing artifacts using Registry REST API commands
Client applications can use Registry REST API commands to manage artifacts in Service Registry, for example, in a CI/CD pipeline deployed in production. The Registry REST API provides create, read, update, and delete operations for artifacts, versions, metadata, and rules stored in the registry. For detailed information, see the Apicurio Registry REST API documentation.
This section shows a simple curl-based example of using the Registry REST API to add and retrieve an Apache Avro schema artifact in the registry.
When adding artifacts in Service Registry using the REST API, if you do not specify a unique artifact ID, Service Registry generates one automatically as a UUID.
Prerequisites
- See Section 1.4, “Registry REST API”.
- Service Registry must be installed and running in your environment. For details, see Chapter 3, Installing Service Registry on OpenShift.
Procedure
Add an artifact in the registry using the
/artifactsoperation. The following examplecurlcommand adds a simple artifact for a share price application:$ curl -X POST -H "Content-type: application/json; artifactType=AVRO" -H "X-Registry-ArtifactId: share-price" --data '{"type":"record","name":"price","namespace":"com.example","fields":[{"name":"symbol","type":"string"},{"name":"price","type":"string"}]}' http://MY-REGISTRY-HOST/api/artifactsThis example shows adding an Avro schema artifact with an artifact ID of
share-price.MY-REGISTRY-HOSTis the host name on which Service Registry is deployed. For example:my-cluster-service-registry-myproject.example.com.Verify that the response includes the expected JSON body to confirm that the artifact was added. For example:
{"createdOn":1578310374517,"modifiedOn":1578310374517,"id":"share-price","version":1,"type":"AVRO","globalId":8}Retrieve the artifact from the registry using its artifact ID. For example, in this case the specified ID is
share-price:$ curl http://MY-REGISTRY-URL/api/artifacts/share-price '{"type":"record","name":"price","namespace":"com.example","fields":[{"name":"symbol","type":"string"},{"name":"price","type":"string"}]}
Additional resources
- For more REST API sample requests, see the Registry REST API documentation.
6.2. Managing artifacts using the Service Registry Maven plug-in
Service Registry provides a Maven plug-in to enable you to upload or download registry artifacts as part of your development build. For example, this plug-in is useful for testing and validating that your schema updates are compatible with client applications.
Prerequisites
- Service Registry must be installed and running in your environment
- Maven must be installed and configured in your environment
Procedure
Update your Maven
pom.xmlfile to use theapicurio-registry-maven-pluginto upload an artifact to Service Registry. The following example shows registering an Apache Avro schema artifact:<plugin> <groupId>io.apicurio</groupId> <artifactId>apicurio-registry-maven-plugin</artifactId> <version>${registry.version}</version> <executions> <execution> <phase>generate-sources</phase> <goals> <goal>register</goal> 1 </goals> <configuration> <registryUrl>http://my-cluster-service-registry-myproject.example.com/api</registryUrl> 2 <artifactType>AVRO</artifactType> <artifacts> <schema1>${project.basedir}/schemas/schema1.avsc</schema1> 3 </artifacts> </configuration> </execution> </executions> </plugin>You can also update your Maven
pom.xmlfile to download a previously registered artifact from Service Registry:<plugin> <groupId>io.apicurio</groupId> <artifactId>apicurio-registry-maven-plugin</artifactId> <version>${registry.version}</version> <executions> <execution> <phase>generate-sources</phase> <goals> <goal>download</goal> 1 </goals> <configuration> <registryUrl>http://my-cluster-service-registry-myproject.example.com/api</registryUrl> 2 <ids> <param1>schema1</param1> 3 </ids> <outputDirectory>${project.build.directory}</outputDirectory> </configuration> </execution> </executions> </plugin>
Additional resources
- For more details on the Maven plug-in, see https://github.com/Apicurio/apicurio-registry-demo.
6.3. Managing artifacts using a Service Registry client application
You can also manage artifacts stored in Service Registry using a Java client application. You create, read, update, or delete artifacts stored in the registry using the Service Registry Java client classes.
Prerequisites
- See Section 1.6, “Kafka client serializers/deserializers”
-
You must have implemented a client application in Java that imports the Service Registry client classes:
io.apicurio.registry.client.RegistryClient - Service Registry must be installed and running in your environment
Procedure
Update your client application to add a new artifact in the registry. The following example shows adding an Apache Avro schema artifact from a Kafka producer client application:
String registryUrl_node1 = PropertiesUtil.property(clientProperties, "registry.url.node1",
  "http://my-cluster-service-registry-myproject.example.com/api"); 1
   try (RegistryService service = RegistryClient.create(registryUrl_node1))
   {
    String artifactId = ApplicationImpl.INPUT_TOPIC + "-value";
    try {
     service.getArtifactMetaData(artifactId); 2
    }
    catch (WebApplicationException e) {
     CompletionStage < ArtifactMetaData > csa = service.createArtifact( 3
        ArtifactType.AVRO,
        artifactId,
         new ByteArrayInputStream(LogInput.SCHEMA$.toString().getBytes())
        );
    csa.toCompletableFuture().get();
    }
 }
- 1
- Configure the client application with the Service Registry URL in the client properties. You must specify the Service Registry URL with the
/apiendpoint. You can create properties for more than one registry node. - 2
- Check to see if the schema artifact already exists in the registry based on the artifact ID.
- 3
- Add the new schema artifact in the registry.
Additional resources
- For an example Java client application, see https://github.com/Apicurio/apicurio-registry-demo.
- For details on how to use the Service Registry Kafka client serializer/deserializer for Apache Avro in AMQ Streams producer and consumer applications, see Using AMQ Streams on Openshift.
Chapter 7. Using Kafka client serializers/deserializers
Service Registry provides Kafka client serializers/deserializers for Kafka producer and consumer applications. Kafka producer applications use serializers to encode messages that conform to a specific event schema. Kafka consumer applications then use deserializers to validate that the messages have been serialized using the correct schema, based on a specific schema ID. This ensures consistent schema use and helps to prevent data errors at runtime.
This chapter provides instructions on how to use the Kafka client serializer and deserializer for Apache Avro in your AMQ Streams producer and consumer client applications:
- Section 7.1, “Kafka client applications and Service Registry”
- Section 7.4, “Strategies to lookup a schema”
- Section 7.5, “Service Registry constants”
- Section 7.6, “Registering a schema to Service Registry”
- Section 7.7, “Using a Service Registry schema from a consumer client”
- Section 7.8, “Using a Service Registry schema from a producer client”
Prerequisites
- You must read Section 1.6, “Kafka client serializers/deserializers”
- You must have installed Service Registry. See Chapter 3, Installing Service Registry on OpenShift.
- You must have created AMQ Streams producer and consumer client applications. See Using AMQ Streams on Openshift.
7.1. Kafka client applications and Service Registry
Using Service Registry decouples the process of managing schemas from the configuration of client applications. You enable an application to use a schema from the registry by specifying its URL in the client code.
For example, the schemas to serialize and deserialize messages can be stored in the registry, which are then referenced from the applications that use them to ensure that the messages that they send and receive are compatible with those schemas.
Kafka client applications can push or pull their schemas from Service Registry at runtime.
Schemas can evolve, so you can define rules in Service Registry, for example, to ensure that changes to a schema are valid and do not break previous versions used by applications. Service Registry checks for compatibility by comparing a modified schema with previous versions of schemas.
Service Registry provides full schema registry support for Avro schemas, which are used by client applications through Kafka client serializer/deserializer (SerDe) services provided by Service Registry.
7.2. Producer schema configuration
A producer client application uses a serializer to put the messages it sends to a specific broker topic into the correct data format.
To enable a producer to use Service Registry for serialization, you:
- Define and register your schema with Service Registry
Configure the producer client code with the:
- URL of Service Registry
- Service Registry serializer services to use with the messages
- Strategy to look up the schema used for serialization in Service Registry
After registering your schema, when you start Kafka and Service Registry, you can access the schema to format messages sent to the Kafka broker topic by the producer.
If a schema already exists, you can create a new version through the REST API based on compatibility rules defined in Service Registry. Versions are used for compatibility checking as a schema evolves. An artifact ID and schema version represents a unique tuple that identifies a schema.
7.3. Consumer schema configuration
A consumer client application uses a deserializer to get the messages it consumes from a specific broker topic into the correct data format.
To enable a consumer to use Service Registry for deserialization, you:
- Define and register your schema with Service Registry
Configure the consumer client code with the:
- URL of Service Registry
- Service Registry deserializer service to use with the messages
- Input data stream for deserialization
The schema is then retrieved by the deserializer using a global ID written into the message being consumed. The message received must, therefore, include a global ID as well as the message data.
For example:
# ...
[MAGIC_BYTE]
[GLOBAL_ID]
[MESSAGE DATA]
Now, when you start Kafka and Service Registry, you can access the schema in order to format messages received from the Kafka broker topic.
7.4. Strategies to lookup a schema
A Service Registry strategy is used by the Kafka client serializer/deserializer to determine the artifact ID or global ID under which the message schema is registered in Service Registry.
For a given topic and message, you can use implementations of the following Java classes:
-
ArtifactIdStrategyto return an artifact ID -
GlobalIdStrategyto return a global ID
The artifact ID returned depends on whether the key or value in the message is being serialized.
The classes for each strategy are organized in the io.apicurio.registry.utils.serde.strategy package.
The default strategy is TopicIdStrategy, which looks for Service Registry artifacts with the same name as the Kafka topic receiving messages.
For example:
public String artifactId(String topic, boolean isKey, T schema) {
    return String.format("%s-%s", topic, isKey ? "key" : "value");
}-
The
topicparameter is the name of the Kafka topic receiving the message. -
The
isKeyparameter is true when the message key is being serialized, and false when the message value is being serialized. -
The
schemaparameter is the schema of the message being serialized/deserialized. -
The
artifactIDreturned is the ID under which the schema is registered in Service Registry.
What lookup strategy you use depends on how and where you store your schema. For example, you might use a strategy that uses a record ID if you have different Kafka topics with the same Avro message type.
Strategies to return an artifact ID
Strategies to return an artifact ID based on an implementation of ArtifactIdStrategy.
RecordIdStrategy- Avro-specific strategy that uses the full name of the schema.
TopicRecordIdStrategy- Avro-specific strategy that uses the topic name and the full name of the schema.
TopicIdStrategy-
(Default) strategy that uses the topic name and
keyorvaluesuffix. SimpleTopicIdStrategy- Simple strategy that only uses the topic name.
Strategies to return a global ID
Strategies to return a global ID based on an implementation of GlobalIdStrategy.
FindLatestIdStrategy- Strategy that returns the global ID of the latest schema version, based on an artifact ID.
FindBySchemaIdStrategy- Strategy that matches schema content, based on an artifact ID, to return a global ID.
GetOrCreateIdStrategy- Strategy that tries to get the latest schema, based on an artifact ID, and if it does not exist, it creates a new schema.
AutoRegisterIdStrategy- Strategy that updates the schema, and uses the global ID of the updated schema.
7.5. Service Registry constants
You can configure specific client SerDe services and schema lookup strategies directly into a client using the constants outlined here.
Alternatively, you can use specify the constants in a properties file, or a properties instance.
Constants for serializer/deserializer (SerDe) services
public abstract class AbstractKafkaSerDe<T extends AbstractKafkaSerDe<T>> implements AutoCloseable {
      protected final Logger log = LoggerFactory.getLogger(getClass());

      public static final String REGISTRY_URL_CONFIG_PARAM = "apicurio.registry.url"; 1
      public static final String REGISTRY_CACHED_CONFIG_PARAM = "apicurio.registry.cached"; 2
      public static final String REGISTRY_ID_HANDLER_CONFIG_PARAM = "apicurio.registry.id-handler"; 3
public static final String REGISTRY_CONFLUENT_ID_HANDLER_CONFIG_PARAM = "apicurio.registry.as-confluent"; 4- 1
- (Required) The URL of Service Registry.
- 2
- Allows the client to make the request and look up the information from a cache of previous results, to improve processing time. If the cache is empty, the lookup is performed from Service Registry.
- 3
- Extends ID handling to support other ID formats and make them compatible with Service Registry SerDe services. For example, changing the ID format from
LongtoIntegersupports the Confluent ID format. - 4
- A flag to simplify the handling of Confluent IDs. If set to
true, anIntegeris used for the global ID lookup.
Constants for lookup strategies
public abstract class AbstractKafkaStrategyAwareSerDe<T, S extends AbstractKafkaStrategyAwareSerDe<T, S>> extends AbstractKafkaSerDe<S> {
      public static final String REGISTRY_ARTIFACT_ID_STRATEGY_CONFIG_PARAM = "apicurio.registry.artifact-id"; 1
public static final String REGISTRY_GLOBAL_ID_STRATEGY_CONFIG_PARAM = "apicurio.registry.global-id"; 2Constants for converters
public class SchemalessConverter<T> extends AbstractKafkaSerDe<SchemalessConverter<T>> implements Converter {
      public static final String REGISTRY_CONVERTER_SERIALIZER_PARAM = "apicurio.registry.converter.serializer"; 1
public static final String REGISTRY_CONVERTER_DESERIALIZER_PARAM = "apicurio.registry.converter.deserializer"; 2Constants for Avro data providers
public interface AvroDatumProvider<T> {
      String REGISTRY_AVRO_DATUM_PROVIDER_CONFIG_PARAM = "apicurio.registry.avro-datum-provider"; 1
String REGISTRY_USE_SPECIFIC_AVRO_READER_CONFIG_PARAM = "apicurio.registry.use-specific-avro-reader"; 2DefaultAvroDatumProvider (io.apicurio.registry.utils.serde.avro) 1 ReflectAvroDatumProvider (io.apicurio.registry.utils.serde.avro) 2
7.6. Registering a schema to Service Registry
After you have defined a schema in the appropriate format, such as Apache Avro, you can add the schema to Service Registry.
You can add the schema through:
- The Service Registry web console
- A curl command using the Service Registry API
- A Maven plugin supplied with Service Registry
- Schema configuration added to your client code
Client applications cannot use Service Registry until you have registered your schemas.
Service Registry web console
Having installed Service Registry, you connect to the web console from the ui endpoint:
http://MY-REGISTRY-URL/ui
From the console, you can add, view and configure schemas. You can also create the rules that prevent invalid content being added to the registry.
For more information on using the Service Registry web console, see the Chapter 3, Installing Service Registry on OpenShift.
Curl example
curl -X POST -H "Content-type: application/json; artifactType=AVRO" \
  -H "X-Registry-ArtifactId: prices-value" \
  --data '{ 1
      "type":"record",
      "name":"price",
      "namespace":"com.redhat",
      "fields":[{"name":"symbol","type":"string"},
      {"name":"price","type":"string"}]
    }'
https://my-cluster-service-registry-myproject.example.com/api/artifacts -s 2Plugin example
<plugin>
<groupId>io.apicurio</groupId>
<artifactId>apicurio-registry-maven-plugin</artifactId>
<version>${registry.version}</version>
<executions>
  <execution>
    <phase>generate-sources</phase>
    <goals>
      <goal>register</goal>
    </goals>
    <configuration>
      <registryUrl>https://my-cluster-service-registry-myproject.example.com/api</registryUrl>
      <artifactType>AVRO</artifactType>
      <artifacts>
        <schema1>${project.basedir}/schemas/schema1.avsc</schema1>
      </artifacts>
    </configuration>
  </execution>
</executions>
</plugin>
Configuration through a (producer) client example
String registryUrl_node1 = PropertiesUtil.property(clientProperties, "registry.url.node1", 1
    "https://my-cluster-service-registry-myproject.example.com/api");
try (RegistryService service = RegistryClient.create(registryUrl_node1)) {
    String artifactId = ApplicationImpl.INPUT_TOPIC + "-value";
    try {
        service.getArtifactMetaData(artifactId); 2
    } catch (WebApplicationException e) {
        CompletionStage <ArtifactMetaData> csa = service.createArtifact(
            ArtifactType.AVRO,
            artifactId,
            new ByteArrayInputStream(LogInput.SCHEMA$.toString().getBytes())
        );
        csa.toCompletableFuture().get();
    }
}
7.7. Using a Service Registry schema from a consumer client
This procedure describes how to configure a Java consumer client to use a schema from Service Registry.
Procedure
Configure the client with the URL of Service Registry.
For example:
String registryUrl_node1 = PropertiesUtil.property(clientProperties, "registry.url.node1",
    "https://my-cluster-service-registry-myproject.example.com/api");
RegistryService service = RegistryClient.cached(registryUrl);
Configure the client with the Service Registry deserializer service.
For example:
Deserializer<LogInput> deserializer = new AvroKafkaDeserializer <> ( 1
    service,
    new DefaultAvroDatumProvider<LogInput>().setUseSpecificAvroReader(true)
);
Serde<LogInput> logSerde = Serdes.serdeFrom( 2
    new AvroKafkaSerializer<>(service),
    deserializer
);
KStream<String, LogInput> input = builder.stream( 3
    INPUT_TOPIC,
    Consumed.with(Serdes.String(), logSerde)
);
7.8. Using a Service Registry schema from a producer client
This procedure describes how to configure a Java producer client to use a schema from Service Registry.
Procedure
Configure the client with the URL of Service Registry.
For example:
String registryUrl_node1 = PropertiesUtil.property(clientProperties, "registry.url.node1",
    "https://my-cluster-service-registry-myproject.example.com/api");
RegistryService service = RegistryClient.cached(registryUrl);
Configure the client with the serializer services, and the strategy to look up the schema in Service Registry.
For example:
String registryUrl_node1 = PropertiesUtil.property(clientProperties, "registry.url.node1", "https://my-cluster-service-registry-myproject.example.com/api"); clientProperties.put(CommonClientConfigs.BOOTSTRAP_SERVERS_CONFIG, property(clientProperties, CommonClientConfigs.BOOTSTRAP_SERVERS_CONFIG, "my-cluster-kafka-bootstrap:9092")); clientProperties.put(AbstractKafkaSerDe.REGISTRY_URL_CONFIG_PARAM, registryUrl_node1); 1 clientProperties.put(ProducerConfig.KEY_SERIALIZER_CLASS_CONFIG, StringSerializer.class.getName()); 2 clientProperties.put(ProducerConfig.VALUE_SERIALIZER_CLASS_CONFIG, AvroKafkaSerializer.class.getName()); 3 clientProperties.put(AbstractKafkaSerializer.REGISTRY_GLOBAL_ID_STRATEGY_CONFIG_PARAM, FindLatestIdStrategy.class.getName()); 4- 1
- The Service Registry URL.
- 2
- The serializer service for the message key provided by Service Registry.
- 3
- The serializer service for the message value provided by Service Registry.
- 4
- Lookup strategy to find the global ID for the schema. Matches the schema of the message against its global ID (artifact ID and schema version) in Service Registry.
Chapter 8. Service Registry reference
This chapter lists the supported artifact types and content rule types that are stored in Service Registry.
Additional resources
- For more detailed information on artifact and rule types, see the Apicurio Registry REST API documentation
8.1. Service Registry artifact types
You can store and manage the following artifact types in Service Registry:
| Type | Description |
|---|---|
|
| AsyncAPI specification |
|
| Apache Avro schema |
|
| GraphQL schema |
|
| JSON Schema |
|
| Apache Kafka Connect schema |
|
| OpenAPI specification |
|
| Google protocol buffers schema |
|
| Google protocol buffers file descriptor |
|
| Web Services Definition Language |
|
| XML Schema Definition |
8.2. Service Registry content rule types
You can specify the following rule types to govern content evolution in Service Registry:
| Type | Description |
|---|---|
|
| Validate data before adding it to the registry. The possible configuration values for this rule are:
|
|
| Ensure that newly added artifacts are compatible with previously added versions. The possible configuration values for this rule are:
|
Appendix A. Using your subscription
Service Registry is provided through a software subscription. To manage your subscriptions, access your account at the Red Hat Customer Portal.
Accessing your account
- Go to access.redhat.com.
- If you do not already have an account, create one.
- Log in to your account.
Activating a subscription
- Go to access.redhat.com.
- Navigate to My Subscriptions.
- Navigate to Activate a subscription and enter your 16-digit activation number.
Downloading ZIP and TAR files
To access ZIP or TAR files, use the customer portal to find the relevant files for download. If you are using RPM packages, this step is not required.
- Open a browser and log in to the Red Hat Customer Portal Product Downloads page at access.redhat.com/downloads.
- Locate the Red Hat Integration entries in the Integration and Automation category.
- Select the desired Service Registry product. The Software Downloads page opens.
- Click the Download link for your component.
Registering your system for packages
To install RPM packages on Red Hat Enterprise Linux, your system must be registered. If you are using ZIP or TAR files, this step is not required.
- Go to access.redhat.com.
- Navigate to Registration Assistant.
- Select your OS version and continue to the next page.
- Use the listed command in your system terminal to complete the registration.
To learn more see How to Register and Subscribe a System to the Red Hat Customer Portal.