Chapter 5. Configuring an AMQ Streams on RHEL deployment
Use the Kafka and ZooKeeper properties files to configure AMQ Streams.
- ZooKeeper
-
/kafka/config/zookeeper.properties - Kafka
-
/kafka/config/server.properties
The properties files are in the Java format, with each property on separate line in the following format:
<option> = <value>
Lines starting with # or ! will be treated as comments and will be ignored by AMQ Streams components.
# This is a comment
Values can be split into multiple lines by using \ directly before the newline / carriage return.
sasl.jaas.config=org.apache.kafka.common.security.plain.PlainLoginModule required \
    username="bob" \
    password="bobs-password";
After you save the changes in the properties files, you need to restart the Kafka broker or ZooKeeper. In a multi-node environment, you will need to repeat the process on each node in the cluster.
5.1. Using standard Kafka configuration properties
Use standard Kafka configuration properties to configure Kafka components.
The properties provide options to control and tune the configuration of the following Kafka components:
- Brokers
- Topics
- Clients (producers and consumers)
- Admin client
- Kafka Connect
- Kafka Streams
Broker and client parameters include options to configure authorization, authentication and encryption.
For AMQ Streams on OpenShift, some configuration properties are managed entirely by AMQ Streams and cannot be changed.
For further information on Kafka configuration properties and how to use the properties to tune your deployment, see the following guides:
5.2. Loading configuration values from environment variables
Use the Environment Variables Configuration Provider plugin to load configuration data from environment variables. You can use the Environment Variables Configuration Provider, for example, to load certificates or JAAS configuration from environment variables.
You can use the provider to load configuration data for all Kafka components, including producers and consumers. Use the provider, for example, to provide the credentials for Kafka Connect connector configuration.
Prerequisites
- AMQ Streams is downloaded and installed on the host
Environment Variables Configuration Provider JAR file
The JAR file is available from the AMQ Streams archive
Procedure
-
Add the Environment Variables Configuration Provider JAR file to the Kafka
libsdirectory. Initialize the Environment Variables Configuration Provider in the configuration properties file of the Kafka component. For example, to initialize the provider for Kafka, add the configuration to the
server.propertiesfile.Configuration to enable the Environment Variables Configuration Provider
config.providers=env
config.providers.env.class=io.strimzi.kafka.EnvVarConfigProvider
Add configuration to the properties file to load data from environment variables.
Configuration to load data from an environment variable
option=${env:<MY_ENV_VAR_NAME>}Use capitalized or upper-case environment variable naming conventions, such as
MY_ENV_VAR_NAME.- Save the changes.
Restart the Kafka component.
For information on restarting brokers in a multi-node cluster, see Section 3.3, “Performing a graceful rolling restart of Kafka brokers”.
5.3. Configuring ZooKeeper
Kafka uses ZooKeeper to store configuration data and for cluster coordination. It is strongly recommended to run a cluster of replicated ZooKeeper instances.
5.3.1. Basic configuration
The most important ZooKeeper configuration options are:
tickTime- ZooKeeper’s basic time unit in milliseconds. It is used for heartbeats and session timeouts. For example, minimum session timeout will be two ticks.
dataDir-
The directory where ZooKeeper stores its transaction logs and snapshots of its in-memory database. This should be set to the
/var/lib/zookeeper/directory that was created during installation. clientPort-
Port number where clients can connect. Defaults to
2181.
An example ZooKeeper configuration file named config/zookeeper.properties is located in the AMQ Streams installation directory. It is recommended to place the dataDir directory on a separate disk device to minimize the latency in ZooKeeper.
ZooKeeper configuration file should be located in /opt/kafka/config/zookeeper.properties. A basic example of the configuration file can be found below. The configuration file has to be readable by the kafka user.
tickTime=2000
dataDir=/var/lib/zookeeper/
clientPort=2181
5.3.2. ZooKeeper cluster configuration
In most production environments, we recommend you deploy a cluster of replicated ZooKeeper instances. A stable and highly available ZooKeeper cluster is important for running for a reliable ZooKeeper service. ZooKeeper clusters are also referred to as ensembles.
ZooKeeper clusters usually consist of an odd number of nodes. ZooKeeper requires that a majority of the nodes in the cluster are up and running. For example:
- In a cluster with three nodes, at least two of the nodes must be up and running. This means it can tolerate one node being down.
- In a cluster consisting of five nodes, at least three nodes must be available. This means it can tolerate two nodes being down.
- In a cluster consisting of seven nodes, at least four nodes must be available. This means it can tolerate three nodes being down.
Having more nodes in the ZooKeeper cluster delivers better resiliency and reliability of the whole cluster.
ZooKeeper can run in clusters with an even number of nodes. The additional node, however, does not increase the resiliency of the cluster. A cluster with four nodes requires at least three nodes to be available and can tolerate only one node being down. Therefore it has exactly the same resiliency as a cluster with only three nodes.
Ideally, the different ZooKeeper nodes should be located in different data centers or network segments. Increasing the number of ZooKeeper nodes increases the workload spent on cluster synchronization. For most Kafka use cases, a ZooKeeper cluster with 3, 5 or 7 nodes should be sufficient.
A ZooKeeper cluster with 3 nodes can tolerate only 1 unavailable node. This means that if a cluster node crashes while you are doing maintenance on another node your ZooKeeper cluster will be unavailable.
Replicated ZooKeeper configuration supports all configuration options supported by the standalone configuration. Additional options are added for the clustering configuration:
initLimit-
Amount of time to allow followers to connect and sync to the cluster leader. The time is specified as a number of ticks (see the
tickTimeoption for more details). syncLimit-
Amount of time for which followers can be behind the leader. The time is specified as a number of ticks (see the
tickTimeoption for more details). reconfigEnabled- Enables or disables dynamic reconfiguration. Must be enabled in order to add or remove servers to a ZooKeeper cluster.
standaloneEnabled- Enables or disables standalone mode, where ZooKeeper runs with only one server.
In addition to the options above, every configuration file should contain a list of servers which should be members of the ZooKeeper cluster. The server records should be specified in the format server.id=hostname:port1:port2, where:
id- The ID of the ZooKeeper cluster node.
hostname- The hostname or IP address where the node listens for connections.
port1- The port number used for intra-cluster communication.
port2- The port number used for leader election.
The following is an example configuration file of a ZooKeeper cluster with three nodes:
tickTime=2000
dataDir=/var/lib/zookeeper/
initLimit=5
syncLimit=2
reconfigEnabled=true
standaloneEnabled=false

server.1=172.17.0.1:2888:3888:participant;172.17.0.1:2181
server.2=172.17.0.2:2888:3888:participant;172.17.0.2:2181
server.3=172.17.0.3:2888:3888:participant;172.17.0.3:2181
To use four letter word commands, specify 4lw.commands.whitelist=* in zookeeper.properties.
myid files
Each node in the ZooKeeper cluster must be assigned a unique ID. Each node’s ID must be configured in a myid file and stored in the dataDir folder, like /var/lib/zookeeper/. The myid files should contain only a single line with the written ID as text. The ID can be any integer from 1 to 255. You must manually create this file on each cluster node. Using this file, each ZooKeeper instance will use the configuration from the corresponding server. line in the configuration file to configure its listeners. It will also use all other server. lines to identify other cluster members.
In the above example, there are three nodes, so each one will have a different myid with values 1, 2, and 3 respectively.
5.3.3. Authentication
By default, ZooKeeper does not use any form of authentication and allows anonymous connections. However, it supports Java Authentication and Authorization Service (JAAS) which can be used to set up authentication using Simple Authentication and Security Layer (SASL). ZooKeeper supports authentication using the DIGEST-MD5 SASL mechanism with locally stored credentials.
5.3.3.1. Authentication with SASL
JAAS is configured using a separate configuration file. It is recommended to place the JAAS configuration file in the same directory as the ZooKeeper configuration (/opt/kafka/config/). The recommended file name is zookeeper-jaas.conf. When using a ZooKeeper cluster with multiple nodes, the JAAS configuration file has to be created on all cluster nodes.
JAAS is configured using contexts. Separate parts such as the server and client are always configured with a separate context. The context is a configuration option and has the following format:
ContextName {
       param1
       param2;
};
SASL Authentication is configured separately for server-to-server communication (communication between ZooKeeper instances) and client-to-server communication (communication between Kafka and ZooKeeper). Server-to-server authentication is relevant only for ZooKeeper clusters with multiple nodes.
Server-to-Server authentication
For server-to-server authentication, the JAAS configuration file contains two parts:
- The server configuration
- The client configuration
When using DIGEST-MD5 SASL mechanism, the QuorumServer context is used to configure the authentication server. It must contain all the usernames to be allowed to connect together with their passwords in an unencrypted form. The second context, QuorumLearner, has to be configured for the client which is built into ZooKeeper. It also contains the password in an unencrypted form. An example of the JAAS configuration file for DIGEST-MD5 mechanism can be found below:
QuorumServer {
       org.apache.zookeeper.server.auth.DigestLoginModule required
       user_zookeeper="123456";
};

QuorumLearner {
       org.apache.zookeeper.server.auth.DigestLoginModule required
       username="zookeeper"
       password="123456";
};
In addition to the JAAS configuration file, you must enable the server-to-server authentication in the regular ZooKeeper configuration file by specifying the following options:
quorum.auth.enableSasl=true
quorum.auth.learnerRequireSasl=true
quorum.auth.serverRequireSasl=true
quorum.auth.learner.loginContext=QuorumLearner
quorum.auth.server.loginContext=QuorumServer
quorum.cnxn.threads.size=20
Use the KAFKA_OPTS environment variable to pass the JAAS configuration file to the ZooKeeper server as a Java property:
su - kafka
export KAFKA_OPTS="-Djava.security.auth.login.config=/opt/kafka/config/zookeeper-jaas.conf"; /opt/kafka/bin/zookeeper-server-start.sh -daemon /opt/kafka/config/zookeeper.properties
For more information about server-to-server authentication, see ZooKeeper wiki.
Client-to-Server authentication
Client-to-server authentication is configured in the same JAAS file as the server-to-server authentication. However, unlike the server-to-server authentication, it contains only the server configuration. The client part of the configuration has to be done in the client. For information on how to configure a Kafka broker to connect to ZooKeeper using authentication, see the Kafka installation section.
Add the Server context to the JAAS configuration file to configure client-to-server authentication. For DIGEST-MD5 mechanism it configures all usernames and passwords:
Server {
    org.apache.zookeeper.server.auth.DigestLoginModule required
    user_super="123456"
    user_kafka="123456"
    user_someoneelse="123456";
};
After configuring the JAAS context, enable the client-to-server authentication in the ZooKeeper configuration file by adding the following line:
requireClientAuthScheme=sasl
authProvider.1=org.apache.zookeeper.server.auth.SASLAuthenticationProvider
authProvider.2=org.apache.zookeeper.server.auth.SASLAuthenticationProvider
authProvider.3=org.apache.zookeeper.server.auth.SASLAuthenticationProvider
You must add the authProvider.<ID> property for every server that is part of the ZooKeeper cluster.
Use the KAFKA_OPTS environment variable to pass the JAAS configuration file to the ZooKeeper server as a Java property:
su - kafka
export KAFKA_OPTS="-Djava.security.auth.login.config=/opt/kafka/config/zookeeper-jaas.conf"; /opt/kafka/bin/zookeeper-server-start.sh -daemon /opt/kafka/config/zookeeper.properties
For more information about configuring ZooKeeper authentication in Kafka brokers, see Section 5.4.5, “ZooKeeper authentication”.
5.3.3.2. Enabling server-to-server authentication using DIGEST-MD5
This procedure describes how to enable authentication using the SASL DIGEST-MD5 mechanism between the nodes of the ZooKeeper cluster.
Prerequisites
- AMQ Streams is installed on the host
- ZooKeeper cluster is configured with multiple nodes.
Enabling SASL DIGEST-MD5 authentication
On all ZooKeeper nodes, create or edit the
/opt/kafka/config/zookeeper-jaas.confJAAS configuration file and add the following contexts:QuorumServer { org.apache.zookeeper.server.auth.DigestLoginModule required user_<Username>="<Password>"; }; QuorumLearner { org.apache.zookeeper.server.auth.DigestLoginModule required username="<Username>" password="<Password>"; };The username and password must be the same in both JAAS contexts. For example:
QuorumServer {
       org.apache.zookeeper.server.auth.DigestLoginModule required
       user_zookeeper="123456";
};

QuorumLearner {
       org.apache.zookeeper.server.auth.DigestLoginModule required
       username="zookeeper"
       password="123456";
};
On all ZooKeeper nodes, edit the
/opt/kafka/config/zookeeper.propertiesZooKeeper configuration file and set the following options:quorum.auth.enableSasl=true quorum.auth.learnerRequireSasl=true quorum.auth.serverRequireSasl=true quorum.auth.learner.loginContext=QuorumLearner quorum.auth.server.loginContext=QuorumServer quorum.cnxn.threads.size=20
Restart all ZooKeeper nodes one by one. To pass the JAAS configuration to ZooKeeper, use the
KAFKA_OPTSenvironment variable.su - kafka export KAFKA_OPTS="-Djava.security.auth.login.config=/opt/kafka/config/zookeeper-jaas.conf"; /opt/kafka/bin/zookeeper-server-start.sh -daemon /opt/kafka/config/zookeeper.properties
5.3.3.3. Enabling Client-to-server authentication using DIGEST-MD5
This procedure describes how to enable authentication using the SASL DIGEST-MD5 mechanism between ZooKeeper clients and ZooKeeper.
Prerequisites
- AMQ Streams is installed on the host
- ZooKeeper cluster is configured and running.
Enabling SASL DIGEST-MD5 authentication
On all ZooKeeper nodes, create or edit the
/opt/kafka/config/zookeeper-jaas.confJAAS configuration file and add the following context:Server { org.apache.zookeeper.server.auth.DigestLoginModule required user_super="<SuperUserPassword>" user<Username1>_="<Password1>" user<USername2>_="<Password2>"; };The
superautomatically has administrator priviledges. The file can contain multiple users, but only one additional user is required by the Kafka brokers. The recommended name for the Kafka user iskafka.The following example shows the
Servercontext for client-to-server authentication:Server { org.apache.zookeeper.server.auth.DigestLoginModule required user_super="123456" user_kafka="123456"; };On all ZooKeeper nodes, edit the
/opt/kafka/config/zookeeper.propertiesZooKeeper configuration file and set the following options:requireClientAuthScheme=sasl authProvider.<IdOfBroker1>=org.apache.zookeeper.server.auth.SASLAuthenticationProvider authProvider.<IdOfBroker2>=org.apache.zookeeper.server.auth.SASLAuthenticationProvider authProvider.<IdOfBroker3>=org.apache.zookeeper.server.auth.SASLAuthenticationProvider
The
authProvider.<ID>property has to be added for every node which is part of the ZooKeeper cluster. An example three-node ZooKeeper cluster configuration must look like the following:requireClientAuthScheme=sasl authProvider.1=org.apache.zookeeper.server.auth.SASLAuthenticationProvider authProvider.2=org.apache.zookeeper.server.auth.SASLAuthenticationProvider authProvider.3=org.apache.zookeeper.server.auth.SASLAuthenticationProvider
Restart all ZooKeeper nodes one by one. To pass the JAAS configuration to ZooKeeper, use the
KAFKA_OPTSenvironment variable.su - kafka export KAFKA_OPTS="-Djava.security.auth.login.config=/opt/kafka/config/zookeeper-jaas.conf"; /opt/kafka/bin/zookeeper-server-start.sh -daemon /opt/kafka/config/zookeeper.properties
5.3.4. Authorization
ZooKeeper supports access control lists (ACLs) to protect data stored inside it. Kafka brokers can automatically configure the ACL rights for all ZooKeeper records they create so no other ZooKeeper user can modify them.
For more information about enabling ZooKeeper ACLs in Kafka brokers, see Section 5.4.7, “ZooKeeper authorization”.
5.3.5. TLS
ZooKeeper supports TLS for encryption or authentication.
5.3.6. Additional configuration options
You can set the following additional ZooKeeper configuration options based on your use case:
maxClientCnxns- The maximum number of concurrent client connections to a single member of the ZooKeeper cluster.
autopurge.snapRetainCount-
Number of snapshots of ZooKeeper’s in-memory database which will be retained. Default value is
3. autopurge.purgeInterval-
The time interval in hours for purging snapshots. The default value is
0and this option is disabled.
All available configuration options can be found in the ZooKeeper documentation.
5.3.7. Logging
ZooKeeper is using log4j as their logging infrastructure. Logging configuration is by default read from the log4j.properties configuration file which should be placed either in the /opt/kafka/config/ directory or in the classpath. The location and name of the configuration file can be changed using the Java property log4j.configuration which can be passed to ZooKeeper using the KAFKA_LOG4J_OPTS environment variable:
su - kafka
export KAFKA_LOG4J_OPTS="-Dlog4j.configuration=file:/my/path/to/log4j.properties"; /opt/kafka/bin/zookeeper-server-start.sh -daemon /opt/kafka/config/zookeeper.properties
For more information about Log4j configurations, see Log4j documentation.
5.4. Configuring Kafka
Kafka uses a properties file to store static configuration. The recommended location for the configuration file is /opt/kafka/config/server.properties. The configuration file has to be readable by the kafka user.
AMQ Streams ships an example configuration file that highlights various basic and advanced features of the product. It can be found under config/server.properties in the AMQ Streams installation directory.
This chapter explains the most important configuration options.
5.4.1. ZooKeeper
Kafka brokers need ZooKeeper to store some parts of their configuration as well as to coordinate the cluster (for example to decide which node is a leader for which partition). Connection details for the ZooKeeper cluster are stored in the configuration file. The field zookeeper.connect contains a comma-separated list of hostnames and ports of members of the zookeeper cluster.
For example:
zookeeper.connect=zoo1.my-domain.com:2181,zoo2.my-domain.com:2181,zoo3.my-domain.com:2181
Kafka will use these addresses to connect to the ZooKeeper cluster. With this configuration, all Kafka znodes will be created directly in the root of ZooKeeper database. Therefore, such a ZooKeeper cluster could be used only for a single Kafka cluster. To configure multiple Kafka clusters to use single ZooKeeper cluster, specify a base (prefix) path at the end of the ZooKeeper connection string in the Kafka configuration file:
zookeeper.connect=zoo1.my-domain.com:2181,zoo2.my-domain.com:2181,zoo3.my-domain.com:2181/my-cluster-1
5.4.2. Listeners
Listeners are used to connect to Kafka brokers. Each Kafka broker can be configured to use multiple listeners. Each listener requires a different configuration so it can listen on a different port or network interface.
To configure listeners, edit the listeners property in the configuration file (/opt/kafka/config/server.properties). Add listeners to the listeners property as a comma-separated list. Configure each property as follows:
<listenerName>://<hostname>:<port>
If <hostname> is empty, Kafka uses the java.net.InetAddress.getCanonicalHostName() class as the hostname.
Example configuration for multiple listeners
listeners=internal-1://:9092,internal-2://:9093,replication://:9094
When a Kafka client wants to connect to a Kafka cluster, it first connects to the bootstrap server, which is one of the cluster nodes. The bootstrap server provides the client with a list of all the brokers in the cluster, and the client connects to each one individually. The list of brokers is based on the configured listeners.
Advertised listeners
Optionally, you can use the advertised.listeners property to provide the client with a different set of listener addresses than those given in the listeners property. This is useful if additional network infrastructure, such as a proxy, is between the client and the broker, or an external DNS name is being used instead of an IP address.
The advertised.listeners property is formatted in the same way as the listeners property.
Example configuration for advertised listeners
listeners=internal-1://:9092,internal-2://:9093
advertised.listeners=internal-1://my-broker-1.my-domain.com:1234,internal-2://my-broker-1.my-domain.com:1235
The names of the advertised listeners must match those listed in the listeners property.
Inter-broker listeners
Inter-broker listeners are used for communication between Kafka brokers. Inter-broker communication is required for:
- Coordinating workloads between different brokers
- Replicating messages between partitions stored on different brokers
- Handling administrative tasks from the controller, such as partition leadership changes
The inter-broker listener can be assigned to a port of your choice. When multiple listeners are configured, you can define the name of the inter-broker listener in the inter.broker.listener.name property.
Here, the inter-broker listener is named as REPLICATION:
listeners=REPLICATION://0.0.0.0:9091
inter.broker.listener.name=REPLICATION
Control plane listeners
By default, communication between the controller and other brokers uses the inter-broker listener. The controller is responsible for coordinating administrative tasks, such as partition leadership changes.
You can enable a dedicated control plane listener for controller connections. The control plane listener can be assigned to a port of your choice.
To enable the control plane listener, configure the control.plane.listener.name property with a listener name:
listeners=CONTROLLER://0.0.0.0:9090,REPLICATION://0.0.0.0:9091
...
control.plane.listener.name=CONTROLLER
Enabling the control plane listener might improve cluster performance because controller communications are not delayed by data replication across brokers. Data replication continues through the inter-broker listener.
If control.plane.listener is not configured, controller connections use the inter-broker listener.
5.4.3. Commit logs
Apache Kafka stores all records it receives from producers in commit logs. The commit logs contain the actual data, in the form of records, that Kafka needs to deliver. These are not the application log files which record what the broker is doing.
Log directories
You can configure log directories using the log.dirs property file to store commit logs in one or multiple log directories. It should be set to /var/lib/kafka directory created during installation:
log.dirs=/var/lib/kafka
For performance reasons, you can configure log.dirs to multiple directories and place each of them on a different physical device to improve disk I/O performance. For example:
log.dirs=/var/lib/kafka1,/var/lib/kafka2,/var/lib/kafka3
5.4.4. Broker ID
Broker ID is a unique identifier for each broker in the cluster. You can assign an integer greater than or equal to 0 as broker ID. The broker ID is used to identify the brokers after restarts or crashes and it is therefore important that the id is stable and does not change over time. The broker ID is configured in the broker properties file:
broker.id=1
5.4.5. ZooKeeper authentication
By default, connections between ZooKeeper and Kafka are not authenticated. However, Kafka and ZooKeeper support Java Authentication and Authorization Service (JAAS) which can be used to set up authentication using Simple Authentication and Security Layer (SASL). ZooKeeper supports authentication using the DIGEST-MD5 SASL mechanism with locally stored credentials.
5.4.5.1. JAAS Configuration
SASL authentication for ZooKeeper connections has to be configured in the JAAS configuration file. By default, Kafka will use the JAAS context named Client for connecting to ZooKeeper. The Client context should be configured in the /opt/kafka/config/jass.conf file. The context has to enable the PLAIN SASL authentication, as in the following example:
Client {
    org.apache.kafka.common.security.plain.PlainLoginModule required
    username="kafka"
    password="123456";
};
5.4.5.2. Enabling ZooKeeper authentication
This procedure describes how to enable authentication using the SASL DIGEST-MD5 mechanism when connecting to ZooKeeper.
Prerequisites
- Client-to-server authentication is enabled in ZooKeeper
Enabling SASL DIGEST-MD5 authentication
On all Kafka broker nodes, create or edit the
/opt/kafka/config/jaas.confJAAS configuration file and add the following context:Client { org.apache.kafka.common.security.plain.PlainLoginModule required username="<Username>" password="<Password>"; };The username and password should be the same as configured in ZooKeeper.
Following example shows the
Clientcontext:Client { org.apache.kafka.common.security.plain.PlainLoginModule required username="kafka" password="123456"; };Restart all Kafka broker nodes one by one. To pass the JAAS configuration to Kafka brokers, use the
KAFKA_OPTSenvironment variable.su - kafka export KAFKA_OPTS="-Djava.security.auth.login.config=/opt/kafka/config/jaas.conf"; /opt/kafka/bin/kafka-server-start.sh -daemon /opt/kafka/config/server.properties
For information on restarting brokers in a multi-node cluster, see Section 3.3, “Performing a graceful rolling restart of Kafka brokers”.
Additional resources
5.4.6. Authorization
Authorization in Kafka brokers is implemented using authorizer plugins.
In this section we describe how to use the AclAuthorizer plugin provided with Kafka.
Alternatively, you can use your own authorization plugins. For example, if you are using OAuth 2.0 token-based authentication, you can use OAuth 2.0 authorization.
5.4.6.1. Simple ACL authorizer
Authorizer plugins, including AclAuthorizer, are enabled through the authorizer.class.name property:
authorizer.class.name=kafka.security.auth.AclAuthorizer
A fully-qualified name is required for the chosen authorizer. For AclAuthorizer, the fully-qualified name is kafka.security.auth.AclAuthorizer.
5.4.6.1.1. ACL rules
AclAuthorizer uses ACL rules to manage access to Kafka brokers.
ACL rules are defined in the format:
Principal P is allowed / denied operation O on Kafka resource R from host H
For example, a rule might be set so that user:
John can view the topic comments from host 127.0.0.1
Host is the IP address of the machine that John is connecting from.
In most cases, the user is a producer or consumer application:
Consumer01 can write to the consumer group accounts from host 127.0.0.1
If ACL rules are not present
If ACL rules are not present for a given resource, all actions are denied. This behavior can be changed by setting the property allow.everyone.if.no.acl.found to true in the Kafka configuration file /opt/kafka/config/server.properties.
5.4.6.1.2. Principals
A principal represents the identity of a user. The format of the ID depends on the authentication mechanism used by clients to connect to Kafka:
-
User:ANONYMOUSwhen connected without authentication. User:<username>when connected using simple authentication mechanisms, such as PLAIN or SCRAM.For example
User:adminorUser:user1.User:<DistinguishedName>when connected using TLS client authentication.For example
User:CN=user1,O=MyCompany,L=Prague,C=CZ.-
User:<Kerberos username>when connected using Kerberos.
The DistinguishedName is the distinguished name from the client certificate.
The Kerberos username is the primary part of the Kerberos principal, which is used by default when connecting using Kerberos. You can use the sasl.kerberos.principal.to.local.rules property to configure how the Kafka principal is built from the Kerberos principal.
5.4.6.1.3. Authentication of users
To use authorization, you need to have authentication enabled and used by your clients. Otherwise, all connections will have the principal User:ANONYMOUS.
For more information on methods of authentication, see Encryption and authentication.
5.4.6.1.4. Super users
Super users are allowed to take all actions regardless of the ACL rules.
Super users are defined in the Kafka configuration file using the property super.users.
For example:
super.users=User:admin,User:operator
5.4.6.1.5. Replica broker authentication
When authorization is enabled, it is applied to all listeners and all connections. This includes the inter-broker connections used for replication of data between brokers. If enabling authorization, therefore, ensure that you use authentication for inter-broker connections and give the users used by the brokers sufficient rights. For example, if authentication between brokers uses the kafka-broker user, then super user configuration must include the username super.users=User:kafka-broker.
5.4.6.1.6. Supported resources
You can apply Kafka ACLs to these types of resource:
- Topics
- Consumer groups
- The cluster
- TransactionId
- DelegationToken
5.4.6.1.7. Supported operations
AclAuthorizer authorizes operations on resources.
Fields with X in the following table mark the supported operations for each resource.
| Topics | Consumer Groups | Cluster | |
|---|---|---|---|
| Read | X | X | |
| Write | X | ||
| Create | X | ||
| Delete | X | ||
| Alter | X | ||
| Describe | X | X | X |
| ClusterAction | X | ||
| All | X | X | X |
5.4.6.1.8. ACL management options
ACL rules are managed using the bin/kafka-acls.sh utility, which is provided as part of the Kafka distribution package.
Use kafka-acls.sh parameter options to add, list and remove ACL rules, and perform other functions.
The parameters require a double-hyphen convention, such as --add.
| Option | Type | Description | Default |
|---|---|---|---|
|
| Action | Add ACL rule. | |
|
| Action | Remove ACL rule. | |
|
| Action | List ACL rules. | |
|
| Action | Fully-qualified class name of the authorizer. |
|
|
| Configuration | Key/value pairs passed to the authorizer for initialization.
For | |
|
| Resource | Host/port pairs to connect to the Kafka cluster. |
Use this option or the |
|
| Resource |
Configuration property file to pass to the Admin Client, which is used in conjunction with the | |
|
| Resource | Specifies a cluster as an ACL resource. | |
|
| Resource | Specifies a topic name as an ACL resource.
An asterisk (
A single command can specify multiple | |
|
| Resource | Specifies a consumer group name as an ACL resource.
A single command can specify multiple | |
|
| Resource | Specifies a transactional ID as an ACL resource. Transactional delivery means that all messages sent by a producer to multiple partitions must be successfully delivered or none of them.
An asterisk ( | |
|
| Resource | Specifies a delegation token as an ACL resource.
An asterisk ( | |
|
| Configuration |
Specifies a type of resource pattern for the
Use
Use |
|
|
| Principal | Principal added to an allow ACL rule.
A single command can specify multiple | |
|
| Principal | Principal added to a deny ACL rule.
A single command can specify multiple | |
|
| Principal |
Principal name used with the
A single command can specify multiple | |
|
| Host |
IP address that allows access to the principals listed in Hostnames or CIDR ranges are not supported. |
If |
|
| Host |
IP address that denies access to the principals listed in Hostnames or CIDR ranges are not supported. |
if |
|
| Operation | Allows or denies an operation.
A single command can specify multipleMultiple | All |
|
| Shortcut | A shortcut to allow or deny all operations needed by a message producer (WRITE and DESCRIBE on topic, CREATE on cluster). | |
|
| Shortcut | A shortcut to allow or deny all operations needed by a message consumer (READ and DESCRIBE on topic, READ on consumer group). | |
|
| Shortcut |
A shortcut to enable idempotence when used with the Idepmotence is enabled automatically if the producer is authorized to send messages based on a specific transactional ID. | |
|
| Shortcut | A shortcut to accept all queries and do not prompt. |
5.4.6.2. Enabling authorization
This procedure describes how to enable the AclAuthorizer plugin for authorization in Kafka brokers.
Prerequisites
- AMQ Streams is installed on all hosts used as Kafka brokers.
Procedure
Edit the
/opt/kafka/config/server.propertiesKafka configuration file to use theAclAuthorizer.authorizer.class.name=kafka.security.auth.AclAuthorizer
- (Re)start the Kafka brokers.
5.4.6.3. Adding ACL rules
AclAuthorizer uses Access Control Lists (ACLs), which define a set of rules describing what users can and cannot do.
This procedure describes how to add ACL rules when using the AclAuthorizer plugin in Kafka brokers.
Rules are added using the kafka-acls.sh utility and stored in ZooKeeper.
Prerequisites
- AMQ Streams is installed on all hosts used as Kafka brokers.
- Authorization is enabled in Kafka brokers.
Procedure
Run
kafka-acls.shwith the--addoption.Examples:
Allow
user1anduser2access to read frommyTopicusing theMyConsumerGroupconsumer group.bin/kafka-acls.sh --authorizer-properties zookeeper.connect=zoo1.my-domain.com:2181 --add --operation Read --topic myTopic --allow-principal User:user1 --allow-principal User:user2 bin/kafka-acls.sh --authorizer-properties zookeeper.connect=zoo1.my-domain.com:2181 --add --operation Describe --topic myTopic --allow-principal User:user1 --allow-principal User:user2 bin/kafka-acls.sh --authorizer-properties zookeeper.connect=zoo1.my-domain.com:2181 --add --operation Read --operation Describe --group MyConsumerGroup --allow-principal User:user1 --allow-principal User:user2
Deny
user1access to readmyTopicfrom IP address host127.0.0.1.bin/kafka-acls.sh --authorizer-properties zookeeper.connect=zoo1.my-domain.com:2181 --add --operation Describe --operation Read --topic myTopic --group MyConsumerGroup --deny-principal User:user1 --deny-host 127.0.0.1
Add
user1as the consumer ofmyTopicwithMyConsumerGroup.bin/kafka-acls.sh --authorizer-properties zookeeper.connect=zoo1.my-domain.com:2181 --add --consumer --topic myTopic --group MyConsumerGroup --allow-principal User:user1
Additional resources
5.4.6.4. Listing ACL rules
This procedure describes how to list existing ACL rules when using the AclAuthorizer plugin in Kafka brokers.
Rules are listed using the kafka-acls.sh utility.
Prerequisites
- AMQ Streams is installed on all hosts used as Kafka brokers.
- Authorization is enabled in Kafka brokers
- ACLs have been added.
Procedure
Run
kafka-acls.shwith the--listoption.For example:
$ bin/kafka-acls.sh --authorizer-properties zookeeper.connect=zoo1.my-domain.com:2181 --list --topic myTopic Current ACLs for resource `Topic:myTopic`: User:user1 has Allow permission for operations: Read from hosts: * User:user2 has Allow permission for operations: Read from hosts: * User:user2 has Deny permission for operations: Read from hosts: 127.0.0.1 User:user1 has Allow permission for operations: Describe from hosts: * User:user2 has Allow permission for operations: Describe from hosts: * User:user2 has Deny permission for operations: Describe from hosts: 127.0.0.1
Additional resources
5.4.6.5. Removing ACL rules
This procedure describes how to remove ACL rules when using the AclAuthorizer plugin in Kafka brokers.
Rules are removed using the kafka-acls.sh utility.
Prerequisites
- AMQ Streams is installed on all hosts used as Kafka brokers.
- Authorization is enabled in Kafka brokers.
- ACLs have been added.
Procedure
Run
kafka-acls.shwith the--removeoption.Examples:
Remove the ACL allowing Allow
user1anduser2access to read frommyTopicusing theMyConsumerGroupconsumer group.bin/kafka-acls.sh --authorizer-properties zookeeper.connect=zoo1.my-domain.com:2181 --remove --operation Read --topic myTopic --allow-principal User:user1 --allow-principal User:user2 bin/kafka-acls.sh --authorizer-properties zookeeper.connect=zoo1.my-domain.com:2181 --remove --operation Describe --topic myTopic --allow-principal User:user1 --allow-principal User:user2 bin/kafka-acls.sh --authorizer-properties zookeeper.connect=zoo1.my-domain.com:2181 --remove --operation Read --operation Describe --group MyConsumerGroup --allow-principal User:user1 --allow-principal User:user2
Remove the ACL adding
user1as the consumer ofmyTopicwithMyConsumerGroup.bin/kafka-acls.sh --authorizer-properties zookeeper.connect=zoo1.my-domain.com:2181 --remove --consumer --topic myTopic --group MyConsumerGroup --allow-principal User:user1
Remove the ACL denying
user1access to readmyTopicfrom IP address host127.0.0.1.bin/kafka-acls.sh --authorizer-properties zookeeper.connect=zoo1.my-domain.com:2181 --remove --operation Describe --operation Read --topic myTopic --group MyConsumerGroup --deny-principal User:user1 --deny-host 127.0.0.1
Additional resources
5.4.7. ZooKeeper authorization
When authentication is enabled between Kafka and ZooKeeper, you can use ZooKeeper Access Control List (ACL) rules to automatically control access to Kafka’s metadata stored in ZooKeeper.
5.4.7.1. ACL Configuration
Enforcement of ZooKeeper ACL rules is controlled by the zookeeper.set.acl property in the config/server.properties Kafka configuration file.
The property is disabled by default and enabled by setting to true:
zookeeper.set.acl=true
If ACL rules are enabled, when a znode is created in ZooKeeper only the Kafka user who created it can modify or delete it. All other users have read-only access.
Kafka sets ACL rules only for newly created ZooKeeper znodes. If the ACLs are only enabled after the first start of the cluster, the zookeeper-security-migration.sh tool can set ACLs on all existing znodes.
Confidentiality of data in ZooKeeper
Data stored in ZooKeeper includes:
- Topic names and their configuration
- Salted and hashed user credentials when SASL SCRAM authentication is used.
But ZooKeeper does not store any records sent and received using Kafka. The data stored in ZooKeeper is assumed to be non-confidential.
If the data is to be regarded as confidential (for example because topic names contain customer IDs), the only option available for protection is isolating ZooKeeper on the network level and allowing access only to Kafka brokers.
5.4.7.2. Enabling ZooKeeper ACLs for a new Kafka cluster
This procedure describes how to enable ZooKeeper ACLs in Kafka configuration for a new Kafka cluster. Use this procedure only before the first start of the Kafka cluster. For enabling ZooKeeper ACLs in a cluster that is already running, see Section 5.4.7.3, “Enabling ZooKeeper ACLs in an existing Kafka cluster”.
Prerequisites
- AMQ Streams is installed on all hosts which will be used as Kafka brokers.
- ZooKeeper cluster is configured and running.
- Client-to-server authentication is enabled in ZooKeeper.
- ZooKeeper authentication is enabled in the Kafka brokers.
- Kafka brokers have not yet been started.
Procedure
Edit the
/opt/kafka/config/server.propertiesKafka configuration file to set thezookeeper.set.aclfield totrueon all cluster nodes.zookeeper.set.acl=true
- Start the Kafka brokers.
5.4.7.3. Enabling ZooKeeper ACLs in an existing Kafka cluster
This procedure describes how to enable ZooKeeper ACLs in Kafka configuration for a Kafka cluster that is running. Use the zookeeper-security-migration.sh tool to set ZooKeeper ACLs on all existing znodes. The zookeeper-security-migration.sh is available as part of AMQ Streams, and can be found in the bin directory.
Prerequisites
- Kafka cluster is configured and running.
Enabling the ZooKeeper ACLs
Edit the
/opt/kafka/config/server.propertiesKafka configuration file to set thezookeeper.set.aclfield totrueon all cluster nodes.zookeeper.set.acl=true
Restart all Kafka brokers one by one.
For information on restarting brokers in a multi-node cluster, see Section 3.3, “Performing a graceful rolling restart of Kafka brokers”.
Set the ACLs on all existing ZooKeeper
znodesusing thezookeeper-security-migration.shtool.su - kafka cd /opt/kafka KAFKA_OPTS="-Djava.security.auth.login.config=./config/jaas.conf"; ./bin/zookeeper-security-migration.sh --zookeeper.acl=secure --zookeeper.connect=<ZooKeeperURL> exitFor example:
su - kafka cd /opt/kafka KAFKA_OPTS="-Djava.security.auth.login.config=./config/jaas.conf"; ./bin/zookeeper-security-migration.sh --zookeeper.acl=secure --zookeeper.connect=zoo1.my-domain.com:2181 exit
5.4.8. Encryption and authentication
AMQ Streams supports encryption and authentication, which is configured as part of the listener configuration.
5.4.8.1. Listener configuration
Encryption and authentication in Kafka brokers is configured per listener. For more information about Kafka listener configuration, see Section 5.4.2, “Listeners”.
Each listener in the Kafka broker is configured with its own security protocol. The configuration property listener.security.protocol.map defines which listener uses which security protocol. It maps each listener name to its security protocol. Supported security protocols are:
PLAINTEXT- Listener without any encryption or authentication.
SSL- Listener using TLS encryption and, optionally, authentication using TLS client certificates.
SASL_PLAINTEXT- Listener without encryption but with SASL-based authentication.
SASL_SSL- Listener with TLS-based encryption and SASL-based authentication.
Given the following listeners configuration:
listeners=INT1://:9092,INT2://:9093,REPLICATION://:9094
the listener.security.protocol.map might look like this:
listener.security.protocol.map=INT1:SASL_PLAINTEXT,INT2:SASL_SSL,REPLICATION:SSL
This would configure the listener INT1 to use unencrypted connections with SASL authentication, the listener INT2 to use encrypted connections with SASL authentication and the REPLICATION interface to use TLS encryption (possibly with TLS client authentication). The same security protocol can be used multiple times. The following example is also a valid configuration:
listener.security.protocol.map=INT1:SSL,INT2:SSL,REPLICATION:SSL
Such a configuration would use TLS encryption and TLS authentication for all interfaces. The following chapters will explain in more detail how to configure TLS and SASL.
5.4.8.2. TLS Encryption
Kafka supports TLS for encrypting communication with Kafka clients.
In order to use TLS encryption and server authentication, a keystore containing private and public keys has to be provided. This is usually done using a file in the Java Keystore (JKS) format. A path to this file is set in the ssl.keystore.location property. The ssl.keystore.password property should be used to set the password protecting the keystore. For example:
ssl.keystore.location=/path/to/keystore/server-1.jks ssl.keystore.password=123456
In some cases, an additional password is used to protect the private key. Any such password can be set using the ssl.key.password property.
Kafka is able to use keys signed by certification authorities as well as self-signed keys. Using keys signed by certification authorities should always be the preferred method. In order to allow clients to verify the identity of the Kafka broker they are connecting to, the certificate should always contain the advertised hostname(s) as its Common Name (CN) or in the Subject Alternative Names (SAN).
It is possible to use different SSL configurations for different listeners. All options starting with ssl. can be prefixed with listener.name.<NameOfTheListener>., where the name of the listener has to be always in lower case. This will override the default SSL configuration for that specific listener. The following example shows how to use different SSL configurations for different listeners:
listeners=INT1://:9092,INT2://:9093,REPLICATION://:9094 listener.security.protocol.map=INT1:SSL,INT2:SSL,REPLICATION:SSL # Default configuration - will be used for listeners INT1 and INT2 ssl.keystore.location=/path/to/keystore/server-1.jks ssl.keystore.password=123456 # Different configuration for listener REPLICATION listener.name.replication.ssl.keystore.location=/path/to/keystore/server-1.jks listener.name.replication.ssl.keystore.password=123456
Additional TLS configuration options
In addition to the main TLS configuration options described above, Kafka supports many options for fine-tuning the TLS configuration. For example, to enable or disable TLS / SSL protocols or cipher suites:
ssl.cipher.suites- List of enabled cipher suites. Each cipher suite is a combination of authentication, encryption, MAC and key exchange algorithms used for the TLS connection. By default, all available cipher suites are enabled.
ssl.enabled.protocols-
List of enabled TLS / SSL protocols. Defaults to
TLSv1.2,TLSv1.1,TLSv1.
5.4.8.3. Enabling TLS encryption
This procedure describes how to enable encryption in Kafka brokers.
Prerequisites
- AMQ Streams is installed on all hosts which will be used as Kafka brokers.
Procedure
- Generate TLS certificates for all Kafka brokers in your cluster. The certificates should have their advertised and bootstrap addresses in their Common Name or Subject Alternative Name.
Edit the
/opt/kafka/config/server.propertiesKafka configuration file on all cluster nodes for the following:-
Change the
listener.security.protocol.mapfield to specify theSSLprotocol for the listener where you want to use TLS encryption. -
Set the
ssl.keystore.locationoption to the path to the JKS keystore with the broker certificate. Set the
ssl.keystore.passwordoption to the password you used to protect the keystore.For example:
listeners=UNENCRYPTED://:9092,ENCRYPTED://:9093,REPLICATION://:9094 listener.security.protocol.map=UNENCRYPTED:PLAINTEXT,ENCRYPTED:SSL,REPLICATION:PLAINTEXT ssl.keystore.location=/path/to/keystore/server-1.jks ssl.keystore.password=123456
-
Change the
- (Re)start the Kafka brokers
5.4.8.4. Authentication
For authentication, you can use:
- TLS client authentication based on X.509 certificates on encrypted connections
- A supported Kafka SASL (Simple Authentication and Security Layer) mechanism
- OAuth 2.0 token based authentication
5.4.8.4.1. TLS client authentication
TLS client authentication can be used only on connections which are already using TLS encryption. To use TLS client authentication, a truststore with public keys can be provided to the broker. These keys can be used to authenticate clients connecting to the broker. The truststore should be provided in Java Keystore (JKS) format and should contain public keys of the certification authorities. All clients with public and private keys signed by one of the certification authorities included in the truststore will be authenticated. The location of the truststore is set using field ssl.truststore.location. In case the truststore is password protected, the password should be set in the ssl.truststore.password property. For example:
ssl.truststore.location=/path/to/keystore/server-1.jks ssl.truststore.password=123456
Once the truststore is configured, TLS client authentication has to be enabled using the ssl.client.auth property. This property can be set to one of three different values:
none- TLS client authentication is switched off. (Default value)
requested- TLS client authentication is optional. Clients will be asked to authenticate using TLS client certificate but they can choose not to.
required- Clients are required to authenticate using TLS client certificate.
When a client authenticates using TLS client authentication, the authenticated principal name is the distinguished name from the authenticated client certificate. For example, a user with a certificate which has a distinguished name CN=someuser will be authenticated with the following principal CN=someuser,OU=Unknown,O=Unknown,L=Unknown,ST=Unknown,C=Unknown. When TLS client authentication is not used and SASL is disabled, the principal name will be ANONYMOUS.
5.4.8.4.2. SASL authentication
SASL authentication is configured using Java Authentication and Authorization Service (JAAS). JAAS is also used for authentication of connections between Kafka and ZooKeeper. JAAS uses its own configuration file. The recommended location for this file is /opt/kafka/config/jaas.conf. The file has to be readable by the kafka user. When running Kafka, the location of this file is specified using Java system property java.security.auth.login.config. This property has to be passed to Kafka when starting the broker nodes:
KAFKA_OPTS="-Djava.security.auth.login.config=/path/to/my/jaas.config"; bin/kafka-server-start.sh
SASL authentication is supported both through plain unencrypted connections as well as through TLS connections. SASL can be enabled individually for each listener. To enable it, the security protocol in listener.security.protocol.map has to be either SASL_PLAINTEXT or SASL_SSL.
SASL authentication in Kafka supports several different mechanisms:
PLAIN- Implements authentication based on username and passwords. Usernames and passwords are stored locally in Kafka configuration.
SCRAM-SHA-256andSCRAM-SHA-512- Implements authentication using Salted Challenge Response Authentication Mechanism (SCRAM). SCRAM credentials are stored centrally in ZooKeeper. SCRAM can be used in situations where ZooKeeper cluster nodes are running isolated in a private network.
GSSAPI- Implements authentication against a Kerberos server.
The PLAIN mechanism sends the username and password over the network in an unencrypted format. It should be therefore only be used in combination with TLS encryption.
The SASL mechanisms are configured via the JAAS configuration file. Kafka uses the JAAS context named KafkaServer. After they are configured in JAAS, the SASL mechanisms have to be enabled in the Kafka configuration. This is done using the sasl.enabled.mechanisms property. This property contains a comma-separated list of enabled mechanisms:
sasl.enabled.mechanisms=PLAIN,SCRAM-SHA-256,SCRAM-SHA-512
In case the listener used for inter-broker communication is using SASL, the property sasl.mechanism.inter.broker.protocol has to be used to specify the SASL mechanism which it should use. For example:
sasl.mechanism.inter.broker.protocol=PLAIN
The username and password which will be used for the inter-broker communication has to be specified in the KafkaServer JAAS context using the field username and password.
SASL PLAIN
To use the PLAIN mechanism, the usernames and password which are allowed to connect are specified directly in the JAAS context. The following example shows the context configured for SASL PLAIN authentication. The example configures three different users:
-
admin -
user1 -
user2
KafkaServer {
org.apache.kafka.common.security.plain.PlainLoginModule required
user_admin="123456"
user_user1="123456"
user_user2="123456";
};The JAAS configuration file with the user database should be kept in sync on all Kafka brokers.
When SASL PLAIN is also used for inter-broker authentication, the username and password properties should be included in the JAAS context:
KafkaServer {
org.apache.kafka.common.security.plain.PlainLoginModule required
username="admin"
password="123456"
user_admin="123456"
user_user1="123456"
user_user2="123456";
};SASL SCRAM
SCRAM authentication in Kafka consists of two mechanisms: SCRAM-SHA-256 and SCRAM-SHA-512. These mechanisms differ only in the hashing algorithm used - SHA-256 versus stronger SHA-512. To enable SCRAM authentication, the JAAS configuration file has to include the following configuration:
KafkaServer {
org.apache.kafka.common.security.scram.ScramLoginModule required;
};When enabling SASL authentication in the Kafka configuration file, both SCRAM mechanisms can be listed. However, only one of them can be chosen for the inter-broker communication. For example:
sasl.enabled.mechanisms=SCRAM-SHA-256,SCRAM-SHA-512 sasl.mechanism.inter.broker.protocol=SCRAM-SHA-512
User credentials for the SCRAM mechanism are stored in ZooKeeper. The kafka-configs.sh tool can be used to manage them. For example, run the following command to add user user1 with password 123456:
bin/kafka-configs.sh --bootstrap-server localhost:9092 --alter --add-config 'SCRAM-SHA-256=[password=123456],SCRAM-SHA-512=[password=123456]' --entity-type users --entity-name user1
To delete a user credential use:
bin/kafka-configs.sh --bootstrap-server localhost:9092 --alter --delete-config 'SCRAM-SHA-512' --entity-type users --entity-name user1
SASL GSSAPI
The SASL mechanism used for authentication using Kerberos is called GSSAPI. To configure Kerberos SASL authentication, the following configuration should be added to the JAAS configuration file:
KafkaServer {
com.sun.security.auth.module.Krb5LoginModule required
useKeyTab=true
storeKey=true
keyTab="/etc/security/keytabs/kafka_server.keytab"
principal="kafka/kafka1.hostname.com@EXAMPLE.COM";
};The domain name in the Kerberos principal has to be always in upper case.
In addition to the JAAS configuration, the Kerberos service name needs to be specified in the sasl.kerberos.service.name property in the Kafka configuration:
sasl.enabled.mechanisms=GSSAPI sasl.mechanism.inter.broker.protocol=GSSAPI sasl.kerberos.service.name=kafka
Multiple SASL mechanisms
Kafka can use multiple SASL mechanisms at the same time. The different JAAS configurations can be all added to the same context:
KafkaServer {
org.apache.kafka.common.security.plain.PlainLoginModule required
user_admin="123456"
user_user1="123456"
user_user2="123456";
com.sun.security.auth.module.Krb5LoginModule required
useKeyTab=true
storeKey=true
keyTab="/etc/security/keytabs/kafka_server.keytab"
principal="kafka/kafka1.hostname.com@EXAMPLE.COM";
org.apache.kafka.common.security.scram.ScramLoginModule required;
};When multiple mechanisms are enabled, clients will be able to choose the mechanism which they want to use.
5.4.8.5. Enabling TLS client authentication
This procedure describes how to enable TLS client authentication in Kafka brokers.
Prerequisites
Procedure
- Prepare a JKS truststore containing the public key of the certification authority used to sign the user certificates.
Edit the
/opt/kafka/config/server.propertiesKafka configuration file on all cluster nodes for the following:-
Set the
ssl.truststore.locationoption to the path to the JKS truststore with the certification authority of the user certificates. -
Set the
ssl.truststore.passwordoption to the password you used to protect the truststore. Set the
ssl.client.authoption torequired.For example:
ssl.truststore.location=/path/to/truststore.jks ssl.truststore.password=123456 ssl.client.auth=required
-
Set the
- (Re)start the Kafka brokers
5.4.8.6. Enabling SASL PLAIN authentication
This procedure describes how to enable SASL PLAIN authentication in Kafka brokers.
Prerequisites
- AMQ Streams is installed on all hosts which will be used as Kafka brokers.
Procedure
Edit or create the
/opt/kafka/config/jaas.confJAAS configuration file. This file should contain all your users and their passwords. Make sure this file is the same on all Kafka brokers.For example:
KafkaServer { org.apache.kafka.common.security.plain.PlainLoginModule required user_admin="123456" user_user1="123456" user_user2="123456"; };Edit the
/opt/kafka/config/server.propertiesKafka configuration file on all cluster nodes for the following:-
Change the
listener.security.protocol.mapfield to specify theSASL_PLAINTEXTorSASL_SSLprotocol for the listener where you want to use SASL PLAIN authentication. Set the
sasl.enabled.mechanismsoption toPLAIN.For example:
listeners=INSECURE://:9092,AUTHENTICATED://:9093,REPLICATION://:9094 listener.security.protocol.map=INSECURE:PLAINTEXT,AUTHENTICATED:SASL_PLAINTEXT,REPLICATION:PLAINTEXT sasl.enabled.mechanisms=PLAIN
-
Change the
(Re)start the Kafka brokers using the KAFKA_OPTS environment variable to pass the JAAS configuration to Kafka brokers.
su - kafka
export KAFKA_OPTS="-Djava.security.auth.login.config=/opt/kafka/config/jaas.conf"; /opt/kafka/bin/kafka-server-start.sh -daemon /opt/kafka/config/server.properties
5.4.8.7. Enabling SASL SCRAM authentication
This procedure describes how to enable SASL SCRAM authentication in Kafka brokers.
Prerequisites
- AMQ Streams is installed on all hosts which will be used as Kafka brokers.
Procedure
Edit or create the
/opt/kafka/config/jaas.confJAAS configuration file. Enable theScramLoginModulefor theKafkaServercontext. Make sure this file is the same on all Kafka brokers.For example:
KafkaServer { org.apache.kafka.common.security.scram.ScramLoginModule required; };Edit the
/opt/kafka/config/server.propertiesKafka configuration file on all cluster nodes for the following:-
Change the
listener.security.protocol.mapfield to specify theSASL_PLAINTEXTorSASL_SSLprotocol for the listener where you want to use SASL SCRAM authentication. Set the
sasl.enabled.mechanismsoption toSCRAM-SHA-256orSCRAM-SHA-512.For example:
listeners=INSECURE://:9092,AUTHENTICATED://:9093,REPLICATION://:9094 listener.security.protocol.map=INSECURE:PLAINTEXT,AUTHENTICATED:SASL_PLAINTEXT,REPLICATION:PLAINTEXT sasl.enabled.mechanisms=SCRAM-SHA-512
-
Change the
(Re)start the Kafka brokers using the KAFKA_OPTS environment variable to pass the JAAS configuration to Kafka brokers.
su - kafka
export KAFKA_OPTS="-Djava.security.auth.login.config=/opt/kafka/config/jaas.conf"; /opt/kafka/bin/kafka-server-start.sh -daemon /opt/kafka/config/server.properties
Additional resources
5.4.8.8. Adding SASL SCRAM users
This procedure describes how to add new users for authentication using SASL SCRAM.
Prerequisites
Procedure
Use the
kafka-configs.shtool to add new SASL SCRAM users.bin/kafka-configs.sh --bootstrap-server <broker_address> --alter --add-config 'SCRAM-SHA-512=[password=<Password>]' --entity-type users --entity-name <Username>
For example:
bin/kafka-configs.sh --bootstrap-server localhost:9092 --alter --add-config 'SCRAM-SHA-512=[password=123456]' --entity-type users --entity-name user1
5.4.8.9. Deleting SASL SCRAM users
This procedure describes how to remove users when using SASL SCRAM authentication.
Prerequisites
Procedure
Use the
kafka-configs.shtool to delete SASL SCRAM users./opt/kafka/bin/kafka-configs.sh --bootstrap-server <broker_address> --alter --delete-config 'SCRAM-SHA-512' --entity-type users --entity-name <Username>
For example:
/opt/kafka/bin/kafka-configs.sh --bootstrap-server localhost:9092 --alter --delete-config 'SCRAM-SHA-512' --entity-type users --entity-name user1
5.4.9. Using OAuth 2.0 token-based authentication
AMQ Streams supports the use of OAuth 2.0 authentication using the OAUTHBEARER and PLAIN mechanisms.
OAuth 2.0 enables standardized token-based authentication and authorization between applications, using a central authorization server to issue tokens that grant limited access to resources.
You can configure OAuth 2.0 authentication, then OAuth 2.0 authorization.
Kafka brokers and clients both need to be configured to use OAuth 2.0. OAuth 2.0 authentication can also be used in conjunction with simple or OPA-based Kafka authorization.
Using OAuth 2.0 authentication, application clients can access resources on application servers (called resource servers) without exposing account credentials.
The application client passes an access token as a means of authenticating, which application servers can also use to determine the level of access to grant. The authorization server handles the granting of access and inquiries about access.
In the context of AMQ Streams:
- Kafka brokers act as OAuth 2.0 resource servers
- Kafka clients act as OAuth 2.0 application clients
Kafka clients authenticate to Kafka brokers. The brokers and clients communicate with the OAuth 2.0 authorization server, as necessary, to obtain or validate access tokens.
For a deployment of AMQ Streams, OAuth 2.0 integration provides:
- Server-side OAuth 2.0 support for Kafka brokers
- Client-side OAuth 2.0 support for Kafka MirrorMaker, Kafka Connect, and the Kafka Bridge
AMQ Streams on RHEL includes two OAuth 2.0 libraries:
kafka-oauth-client-
Provides a custom login callback handler class named
io.strimzi.kafka.oauth.client.JaasClientOauthLoginCallbackHandler. To handle theOAUTHBEARERauthentication mechanism, use the login callback handler with theOAuthBearerLoginModuleprovided by Apache Kafka. kafka-oauth-common-
A helper library that provides some of the functionality needed by the
kafka-oauth-clientlibrary.
The provided client libraries also have dependencies on some additional third-party libraries, such as: keycloak-core, jackson-databind, and slf4j-api.
We recommend using a Maven project to package your client to ensure that all the dependency libraries are included. Dependency libraries might change in future versions.
Additional resources
5.4.9.1. OAuth 2.0 authentication mechanisms
AMQ Streams supports the OAUTHBEARER and PLAIN mechanisms for OAuth 2.0 authentication. Both mechanisms allow Kafka clients to establish authenticated sessions with Kafka brokers. The authentication flow between clients, the authorization server, and Kafka brokers is different for each mechanism.
We recommend that you configure clients to use OAUTHBEARER whenever possible. OAUTHBEARER provides a higher level of security than PLAIN because client credentials are never shared with Kafka brokers. Consider using PLAIN only with Kafka clients that do not support OAUTHBEARER.
You configure Kafka broker listeners to use OAuth 2.0 authentication for connecting clients. If necessary, you can use the OAUTHBEARER and PLAIN mechanisms on the same oauth listener. The properties to support each mechanism must be explicitly specified in the oauth listener configuration.
OAUTHBEARER overview
To use OAUTHBEARER, set sasl.enabled.mechanisms to OAUTHBEARER in the OAuth authentication listener configuration for the Kafka broker. For detailed configuration, see Section 5.4.9.2, “OAuth 2.0 Kafka broker configuration”.
listener.name.client.sasl.enabled.mechanisms=OAUTHBEARER
Many Kafka client tools use libraries that provide basic support for OAUTHBEARER at the protocol level. To support application development, AMQ Streams provides an OAuth callback handler for the upstream Kafka Client Java libraries (but not for other libraries). Therefore, you do not need to write your own callback handlers. An application client can use the callback handler to provide the access token. Clients written in other languages, such as Go, must use custom code to connect to the authorization server and obtain the access token.
With OAUTHBEARER, the client initiates a session with the Kafka broker for credentials exchange, where credentials take the form of a bearer token provided by the callback handler. Using the callbacks, you can configure token provision in one of three ways:
- Client ID and Secret (by using the OAuth 2.0 client credentials mechanism)
- A long-lived access token, obtained manually at configuration time
- A long-lived refresh token, obtained manually at configuration time
OAUTHBEARER authentication can only be used by Kafka clients that support the OAUTHBEARER mechanism at the protocol level.
PLAIN overview
To use PLAIN, add PLAIN to the value of sasl.enabled.mechanisms.
listener.name.client.sasl.enabled.mechanisms=OAUTHBEARER,PLAIN
PLAIN is a simple authentication mechanism used by all Kafka client tools. To enable PLAIN to be used with OAuth 2.0 authentication, AMQ Streams provides OAuth 2.0 over PLAIN server-side callbacks.
With the AMQ Streams implementation of PLAIN, the client credentials are not stored in ZooKeeper. Instead, client credentials are handled centrally behind a compliant authorization server, similar to when OAUTHBEARER authentication is used.
When used with the OAuth 2.0 over PLAIN callbacks, Kafka clients authenticate with Kafka brokers using either of the following methods:
- Client ID and secret (by using the OAuth 2.0 client credentials mechanism)
- A long-lived access token, obtained manually at configuration time
For both methods, the client must provide the PLAIN username and password properties to pass credentials to the Kafka broker. The client uses these properties to pass a client ID and secret or username and access token.
Client IDs and secrets are used to obtain access tokens.
Access tokens are passed as password property values. You pass the access token with or without an $accessToken: prefix.
-
If you configure a token endpoint (
oauth.token.endpoint.uri) in the listener configuration, you need the prefix. -
If you don’t configure a token endpoint (
oauth.token.endpoint.uri) in the listener configuration, you don’t need the prefix. The Kafka broker interprets the password as a raw access token.
If the password is set as the access token, the username must be set to the same principal name that the Kafka broker obtains from the access token. You can specify username extraction options in your listener using the oauth.username.claim, oauth.fallback.username.claim, oauth.fallback.username.prefix, and oauth.userinfo.endpoint.uri properties. The username extraction process also depends on your authorization server; in particular, how it maps client IDs to account names.
OAuth over PLAIN does not support passing a username and password (password grants) using the (deprecated) OAuth 2.0 password grant mechanism.
5.4.9.1.1. Configuring OAuth 2.0 with properties or variables
You can configure OAuth 2.0 settings using Java Authentication and Authorization Service (JAAS) properties or environment variables.
-
JAAS properties are configured in the
server.propertiesconfiguration file, and passed as key-values pairs of thelistener.name.LISTENER-NAME.oauthbearer.sasl.jaas.configproperty. If using environment variables, you still need to provide the
listener.name.LISTENER-NAME.oauthbearer.sasl.jaas.configproperty in theserver.propertiesfile, but you can omit the other JAAS properties.You can use capitalized or upper-case environment variable naming conventions.
The AMQ Streams OAuth 2.0 libraries use properties that start with:
-
oauth.to configure authentication -
strimzi.to configure OAuth 2.0 authorization
Additional resources
5.4.9.2. OAuth 2.0 Kafka broker configuration
Kafka broker configuration for OAuth 2.0 authentication involves:
- Creating the OAuth 2.0 client in the authorization server
- Configuring OAuth 2.0 authentication in the Kafka cluster
In relation to the authorization server, Kafka brokers and Kafka clients are both regarded as OAuth 2.0 clients.
5.4.9.2.1. OAuth 2.0 client configuration on an authorization server
To configure a Kafka broker to validate the token received during session initiation, the recommended approach is to create an OAuth 2.0 client definition in an authorization server, configured as confidential, with the following client credentials enabled:
-
Client ID of
kafka-broker(for example) - Client ID and secret as the authentication mechanism
You only need to use a client ID and secret when using a non-public introspection endpoint of the authorization server. The credentials are not typically required when using public authorization server endpoints, as with fast local JWT token validation.
5.4.9.2.2. OAuth 2.0 authentication configuration in the Kafka cluster
To use OAuth 2.0 authentication in the Kafka cluster, you enable an OAuth authentication listener configuration for your Kafka cluster, in the Kafka server.properties file. A minimum configuration is required. You can also configure a TLS listener, where TLS is used for inter-broker communication.
You can configure the broker for token validation by the authorization server using one of the following methods:
- Fast local token validation: a JWKS endpoint in combination with signed JWT-formatted access tokens
- Introspection endpoint
You can configure OAUTHBEARER or PLAIN authentication, or both.
The following example shows a minimum configuration that applies a global listener configuration, which means that inter-broker communication goes through the same listener as application clients.
The example also shows an OAuth 2.0 configuration for a specific listener, where you specify listener.name.LISTENER-NAME.sasl.enabled.mechanisms instead of sasl.enabled.mechanisms. LISTENER-NAME is the case-insensitive name of the listener. Here, we name the listener CLIENT, so the property name is listener.name.client.sasl.enabled.mechanisms.
The example uses OAUTHBEARER authentication.
Example: Minimum listener configuration for OAuth 2.0 authentication using a JWKS endpoint
sasl.enabled.mechanisms=OAUTHBEARER 1
listeners=CLIENT://0.0.0.0:9092 2
listener.security.protocol.map=CLIENT:SASL_PLAINTEXT 3
listener.name.client.sasl.enabled.mechanisms=OAUTHBEARER 4
sasl.mechanism.inter.broker.protocol=OAUTHBEARER 5
inter.broker.listener.name=CLIENT 6
listener.name.client.oauthbearer.sasl.server.callback.handler.class=io.strimzi.kafka.oauth.server.JaasServerOauthValidatorCallbackHandler 7
listener.name.client.oauthbearer.sasl.jaas.config=org.apache.kafka.common.security.oauthbearer.OAuthBearerLoginModule required \ 8
  oauth.valid.issuer.uri="https://AUTH-SERVER-ADDRESS" \ 9
  oauth.jwks.endpoint.uri="https://AUTH-SERVER-ADDRESS/jwks" \ 10
  oauth.username.claim="preferred_username"  \ 11
  oauth.client.id="kafka-broker" \ 12
  oauth.client.secret="kafka-secret" \ 13
  oauth.token.endpoint.uri="https://AUTH-SERVER-ADDRESS/token" ; 14
listener.name.client.oauthbearer.sasl.login.callback.handler.class=io.strimzi.kafka.oauth.client.JaasClientOauthLoginCallbackHandler 15
listener.name.client.oauthbearer.connections.max.reauth.ms=3600000 16
- 1
- Enables the OAUTHBEARER mechanism for credentials exchange over SASL.
- 2
- Configures a listener for client applications to connect to. The system
hostnameis used as an advertised hostname, which clients must resolve in order to reconnect. The listener is namedCLIENTin this example. - 3
- Specifies the channel protocol for the listener.
SASL_SSLis for TLS.SASL_PLAINTEXTis used for an unencrypted connection (no TLS), but there is risk of eavesdropping and interception at the TCP connection layer. - 4
- Specifies the OAUTHBEARER mechanism for the CLIENT listener. The client name (
CLIENT) is usually specified in uppercase in thelistenersproperty, in lowercase forlistener.nameproperties (listener.name.client), and in lowercase when part of alistener.name.client.*property. - 5
- Specifies the OAUTHBEARER mechanism for inter-broker communication.
- 6
- Specifies the listener for inter-broker communication. The specification is required for the configuration to be valid.
- 7
- Configures OAuth 2.0 authentication on the client listener.
- 8
- Configures authentication settings for client and inter-broker communication. The
oauth.client.id,oauth.client.secret, andauth.token.endpoint.uriproperties relate to inter-broker configuration. - 9
- A valid issuer URI. Only access tokens issued by this issuer will be accepted. For example, https://AUTH-SERVER-ADDRESS/auth/realms/REALM-NAME.
- 10
- The JWKS endpoint URL. For example, https://AUTH-SERVER-ADDRESS/auth/realms/REALM-NAME/protocol/openid-connect/certs.
- 11
- The token claim (or key) that contains the actual user name in the token. The user name is the principal used to identify the user. The value will depend on the authentication flow and the authorization server used.
- 12
- Client ID of the Kafka broker, which is the same for all brokers. This is the client registered with the authorization server as
kafka-broker. - 13
- Secret for the Kafka broker, which is the same for all brokers.
- 14
- The OAuth 2.0 token endpoint URL to your authorization server. For production, always use
https://urls. For example, https://AUTH-SERVER-ADDRESS/auth/realms/REALM-NAME/protocol/openid-connect/token. - 15
- Enables (and is only required for) OAuth 2.0 authentication for inter-broker communication.
- 16
- (Optional) Enforces session expiry when a token expires, and also activates the Kafka re-authentication mechanism. If the specified value is less than the time left for the access token to expire, then the client will have to re-authenticate before the actual token expiry. By default, the session does not expire when the access token expires, and the client does not attempt re-authentication.
The following example shows a minimum configuration for a TLS listener, where TLS is used for inter-broker communication.
Example: TLS listener configuration for OAuth 2.0 authentication
listeners=REPLICATION://kafka:9091,CLIENT://kafka:9092 1
listener.security.protocol.map=REPLICATION:SSL,CLIENT:SASL_PLAINTEXT 2
listener.name.client.sasl.enabled.mechanisms=OAUTHBEARER
inter.broker.listener.name=REPLICATION
listener.name.replication.ssl.keystore.password=KEYSTORE-PASSWORD 3
listener.name.replication.ssl.truststore.password=TRUSTSTORE-PASSWORD
listener.name.replication.ssl.keystore.type=JKS
listener.name.replication.ssl.truststore.type=JKS
listener.name.replication.ssl.endpoint.identification.algorithm=HTTPS 4
listener.name.replication.ssl.secure.random.implementation=SHA1PRNG 5
listener.name.replication.ssl.keystore.location=PATH-TO-KEYSTORE 6
listener.name.replication.ssl.truststore.location=PATH-TO-TRUSTSTORE 7
listener.name.replication.ssl.client.auth=required 8
listener.name.client.oauthbearer.sasl.server.callback.handler.class=io.strimzi.kafka.oauth.server.JaasServerOauthValidatorCallbackHandler
listener.name.client.oauthbearer.sasl.jaas.config=org.apache.kafka.common.security.oauthbearer.OAuthBearerLoginModule required \
  oauth.valid.issuer.uri="https://AUTH-SERVER-ADDRESS" \
  oauth.jwks.endpoint.uri="https://AUTH-SERVER-ADDRESS/jwks" \
  oauth.username.claim="preferred_username" ; 9
- 1
- Separate configurations are required for inter-broker communication and client applications.
- 2
- Configures the REPLICATION listener to use TLS, and the CLIENT listener to use SASL over an unencrypted channel. The client could use an encrypted channel (
SASL_SSL) in a production environment. - 3
- The
ssl.properties define the TLS configuration. - 4
- Random number generator implementation. If not set, the Java platform SDK default is used.
- 5
- Hostname verification. If set to an empty string, the hostname verification is turned off. If not set, the default value is HTTPS, which enforces hostname verification for server certificates.
- 6
- Path to the keystore for the listener.
- 7
- Path to the truststore for the listener.
- 8
- Specifies that clients of the REPLICATION listener have to authenticate with a client certificate when establishing a TLS connection (used for inter-broker connectivity).
- 9
- Configures the CLIENT listener for OAuth 2.0. Connectivity with the authorization server should use secure HTTPS connections.
The following example shows a minimum configuration for OAuth 2.0 authentication using the PLAIN authentication mechanism for credentials exchange over SASL. Fast local token validation is used.
Example: Minimum listener configuration for PLAIN authentication
listeners=CLIENT://0.0.0.0:9092 1
listener.security.protocol.map=CLIENT:SASL_PLAINTEXT 2
listener.name.client.sasl.enabled.mechanisms=OAUTHBEARER,PLAIN 3
sasl.mechanism.inter.broker.protocol=OAUTHBEARER 4
inter.broker.listener.name=CLIENT 5
listener.name.client.oauthbearer.sasl.server.callback.handler.class=io.strimzi.kafka.oauth.server.JaasServerOauthValidatorCallbackHandler 6
listener.name.client.oauthbearer.sasl.jaas.config=org.apache.kafka.common.security.oauthbearer.OAuthBearerLoginModule required \ 7
  oauth.valid.issuer.uri="http://AUTH_SERVER/auth/realms/REALM" \ 8
  oauth.jwks.endpoint.uri="https://AUTH_SERVER/auth/realms/REALM/protocol/openid-connect/certs" \ 9
  oauth.username.claim="preferred_username"  \ 10
  oauth.client.id="kafka-broker" \ 11
  oauth.client.secret="kafka-secret" \ 12
  oauth.token.endpoint.uri="https://AUTH-SERVER-ADDRESS/token" ; 13
listener.name.client.oauthbearer.sasl.login.callback.handler.class=io.strimzi.kafka.oauth.client.JaasClientOauthLoginCallbackHandler 14
listener.name.client.plain.sasl.server.callback.handler.class=io.strimzi.kafka.oauth.server.plain.JaasServerOauthOverPlainValidatorCallbackHandler 15
listener.name.client.plain.sasl.jaas.config=org.apache.kafka.common.security.plain.PlainLoginModule required \ 16
  oauth.valid.issuer.uri="https://AUTH-SERVER-ADDRESS" \ 17
  oauth.jwks.endpoint.uri="https://AUTH-SERVER-ADDRESS/jwks" \ 18
  oauth.username.claim="preferred_username"  \ 19
  oauth.token.endpoint.uri="http://AUTH_SERVER/auth/realms/REALM/protocol/openid-connect/token" ; 20
connections.max.reauth.ms=3600000 21
- 1
- Configures a listener (named
CLIENTin this example) for client applications to connect to. The systemhostnameis used as an advertised hostname, which clients must resolve in order to reconnect. Because this is the only configured listener, it is also used for inter-broker communication. - 2
- Configures the example
CLIENTlistener to use SASL over an unencrypted channel. In a production environment, the client should use an encrypted channel (SASL_SSL) in order to guard against eavesdropping and interception at the TCP connection layer. - 3
- Enables the PLAIN authentication mechanism for credentials exchange over SASL as well as OAUTHBEARER. OAUTHBEARER is also specified because it is required for inter-broker communication. Kafka clients can choose which mechanism to use to connect.
- 4
- Specifies the OAUTHBEARER authentication mechanism for inter-broker communication.
- 5
- Specifies the listener (named
CLIENTin this example) for inter-broker communication. Required for the configuration to be valid. - 6
- Configures the server callback handler for the OAUTHBEARER mechanism.
- 7
- Configures authentication settings for client and inter-broker communication using the OAUTHBEARER mechanism. The
oauth.client.id,oauth.client.secret, andoauth.token.endpoint.uriproperties relate to inter-broker configuration. - 8
- A valid issuer URI. Only access tokens from this issuer are accepted. For example, https://AUTH-SERVER-ADDRESS/auth/realms/REALM-NAME
- 9
- The JWKS endpoint URL. For example, https://AUTH-SERVER-ADDRESS/auth/realms/REALM-NAME/protocol/openid-connect/certs
- 10
- The token claim (or key) that contains the actual user name in the token. The user name is the principal that identifies the user. The value depends on the authentication flow and the authorization server that is used.
- 11
- Client ID of the Kafka broker, which is the same for all brokers. This is the client registered with the authorization server as
kafka-broker. - 12
- Secret for the Kafka broker (the same for all brokers).
- 13
- The OAuth 2.0 token endpoint URL to your authorization server. For production, always use
https://urls. For example, https://AUTH-SERVER-ADDRESS/auth/realms/REALM-NAME/protocol/openid-connect/token - 14
- Enables OAuth 2.0 authentication for inter-broker communication.
- 15
- Configures the server callback handler for PLAIN authentication.
- 16
- Configures authentication settings for client communication using PLAIN authentication.
oauth.token.endpoint.uriis an optional property that enables OAuth 2.0 over PLAIN using the OAuth 2.0 client credentials mechanism. - 17
- A valid issuer URI. Only access tokens from this issuer are accepted. For example, https://AUTH-SERVER-ADDRESS/auth/realms/REALM-NAME
- 18
- The JWKS endpoint URL. For example, https://AUTH-SERVER-ADDRESS/auth/realms/REALM-NAME/protocol/openid-connect/certs
- 19
- The token claim (or key) that contains the actual user name in the token. The user name is the principal that identifies the user. The value depends on the authentication flow and the authorization server used.
- 20
- The OAuth 2.0 token endpoint URL to your authorization server. Additional configuration for the PLAIN mechanism. If specified, clients can authenticate over PLAIN by passing an access token as the
passwordusing an$accessToken:prefix.For production, always use
https://urls. For example, https://AUTH-SERVER-ADDRESS/auth/realms/REALM-NAME/protocol/openid-connect/token. - 21
- (Optional) Enforces session expiry when a token expires, and also activates the Kafka re-authentication mechanism. If the specified value is less than the time left for the access token to expire, then the client will have to re-authenticate before the actual token expiry. By default, the session does not expire when the access token expires, and the client does not attempt re-authentication.
5.4.9.2.3. Fast local JWT token validation configuration
Fast local JWT token validation checks a JWT token signature locally.
The local check ensures that a token:
-
Conforms to type by containing a (typ) claim value of
Bearerfor an access token - Is valid (not expired)
-
Has an issuer that matches a
validIssuerURI
You specify a valid issuer URI when you configure the listener, so that any tokens not issued by the authorization server are rejected.
The authorization server does not need to be contacted during fast local JWT token validation. You activate fast local JWT token validation by specifying a JWKs endpoint URI exposed by the OAuth 2.0 authorization server. The endpoint contains the public keys used to validate signed JWT tokens, which are sent as credentials by Kafka clients.
All communication with the authorization server should be performed using HTTPS.
For a TLS listener, you can configure a certificate truststore and point to the truststore file.
Example properties for fast local JWT token validation
listener.name.client.oauthbearer.sasl.jaas.config=org.apache.kafka.common.security.oauthbearer.OAuthBearerLoginModule required \
  oauth.valid.issuer.uri="https://AUTH-SERVER-ADDRESS" \ 1
  oauth.jwks.endpoint.uri="https://AUTH-SERVER-ADDRESS/jwks" \ 2
  oauth.jwks.refresh.seconds="300" \ 3
  oauth.jwks.refresh.min.pause.seconds="1" \ 4
  oauth.jwks.expiry.seconds="360" \ 5
  oauth.username.claim="preferred_username" \ 6
  oauth.ssl.truststore.location="PATH-TO-TRUSTSTORE-P12-FILE" \ 7
  oauth.ssl.truststore.password="TRUSTSTORE-PASSWORD" \ 8
  oauth.ssl.truststore.type="PKCS12" ; 9
- 1
- A valid issuer URI. Only access tokens issued by this issuer will be accepted. For example, https://AUTH-SERVER-ADDRESS/auth/realms/REALM-NAME.
- 2
- The JWKS endpoint URL. For example, https://AUTH-SERVER-ADDRESS/auth/realms/REALM-NAME/protocol/openid-connect/certs.
- 3
- The period between endpoint refreshes (default 300).
- 4
- The minimum pause in seconds between consecutive attempts to refresh JWKS public keys. When an unknown signing key is encountered, the JWKS keys refresh is scheduled outside the regular periodic schedule with at least the specified pause since the last refresh attempt. The refreshing of keys follows the rule of exponential backoff, retrying on unsuccessful refreshes with ever increasing pause, until it reaches
oauth.jwks.refresh.seconds. The default value is 1. - 5
- The duration the JWKs certificates are considered valid before they expire. Default is
360seconds. If you specify a longer time, consider the risk of allowing access to revoked certificates. - 6
- The token claim (or key) that contains the actual user name in the token. The user name is the principal used to identify the user. The value will depend on the authentication flow and the authorization server used.
- 7
- The location of the truststore used in the TLS configuration.
- 8
- Password to access the truststore.
- 9
- The truststore type in PKCS #12 format.
5.4.9.2.4. OAuth 2.0 introspection endpoint configuration
Token validation using an OAuth 2.0 introspection endpoint treats a received access token as opaque. The Kafka broker sends an access token to the introspection endpoint, which responds with the token information necessary for validation. Importantly, it returns up-to-date information if the specific access token is valid, and also information about when the token expires.
To configure OAuth 2.0 introspection-based validation, you specify an introspection endpoint URI rather than the JWKs endpoint URI specified for fast local JWT token validation. Depending on the authorization server, you typically have to specify a client ID and client secret, because the introspection endpoint is usually protected.
Example properties for an introspection endpoint
listener.name.client.oauthbearer.sasl.jaas.config=org.apache.kafka.common.security.oauthbearer.OAuthBearerLoginModule required \
  oauth.introspection.endpoint.uri="https://AUTH-SERVER-ADDRESS/introspection" \ 1
  oauth.client.id="kafka-broker" \ 2
  oauth.client.secret="kafka-broker-secret" \ 3
  oauth.ssl.truststore.location="PATH-TO-TRUSTSTORE-P12-FILE" \ 4
  oauth.ssl.truststore.password="TRUSTSTORE-PASSWORD" \ 5
  oauth.ssl.truststore.type="PKCS12" \ 6
  oauth.username.claim="preferred_username" ; 7
- 1
- The OAuth 2.0 introspection endpoint URI. For example, https://AUTH-SERVER-ADDRESS/auth/realms/REALM-NAME/protocol/openid-connect/token/introspect.
- 2
- Client ID of the Kafka broker.
- 3
- Secret for the Kafka broker.
- 4
- The location of the truststore used in the TLS configuration.
- 5
- Password to access the truststore.
- 6
- The truststore type in PKCS #12 format.
- 7
- The token claim (or key) that contains the actual user name in the token. The user name is the principal used to identify the user. The value of
oauth.username.claimdepends on the authorization server used.
5.4.9.3. Session re-authentication for Kafka brokers
You can configure OAuth listeners to use Kafka session re-authentication for OAuth 2.0 sessions between Kafka clients and Kafka brokers. This mechanism enforces the expiry of an authenticated session between the client and the broker after a defined period of time. When a session expires, the client immediately starts a new session by reusing the existing connection rather than dropping it.
Session re-authentication is disabled by default. You can enable it in the server.properties file. Set the connections.max.reauth.ms property for a TLS listener with OAUTHBEARER or PLAIN enabled as the SASL mechanism.
You can specify session re-authentication per listener. For example:
listener.name.client.oauthbearer.connections.max.reauth.ms=3600000
Session re-authentication must be supported by the Kafka client libraries used by the client.
Session re-authentication can be used with fast local JWT or introspection endpoint token validation.
Client re-authentication
When the broker’s authenticated session expires, the client must re-authenticate to the existing session by sending a new, valid access token to the broker, without dropping the connection.
If token validation is successful, a new client session is started using the existing connection. If the client fails to re-authenticate, the broker will close the connection if further attempts are made to send or receive messages. Java clients that use Kafka client library 2.2 or later automatically re-authenticate if the re-authentication mechanism is enabled on the broker.
Session re-authentication also applies to refresh tokens, if used. When the session expires, the client refreshes the access token by using its refresh token. The client then uses the new access token to re-authenticate over the existing connection.
Session expiry for OAUTHBEARER and PLAIN
When session re-authentication is configured, session expiry works differently for OAUTHBEARER and PLAIN authentication.
For OAUTHBEARER and PLAIN, using the client ID and secret method:
-
The broker’s authenticated session will expire at the configured
connections.max.reauth.ms. - The session will expire earlier if the access token expires before the configured time.
For PLAIN using the long-lived access token method:
-
The broker’s authenticated session will expire at the configured
connections.max.reauth.ms. - Re-authentication will fail if the access token expires before the configured time. Although session re-authentication is attempted, PLAIN has no mechanism for refreshing tokens.
If connections.max.reauth.ms is not configured, OAUTHBEARER and PLAIN clients can remain connected to brokers indefinitely, without needing to re-authenticate. Authenticated sessions do not end with access token expiry. However, this can be considered when configuring authorization, for example, by using keycloak authorization or installing a custom authorizer.
5.4.9.4. OAuth 2.0 Kafka client configuration
A Kafka client is configured with either:
- The credentials required to obtain a valid access token from an authorization server (client ID and Secret)
- A valid long-lived access token or refresh token, obtained using tools provided by an authorization server
The only information ever sent to the Kafka broker is an access token. The credentials used to authenticate with the authorization server to obtain the access token are never sent to the broker.
When a client obtains an access token, no further communication with the authorization server is needed.
The simplest mechanism is authentication with a client ID and Secret. Using a long-lived access token, or a long-lived refresh token, adds more complexity because there is an additional dependency on authorization server tools.
If you are using long-lived access tokens, you may need to configure the client in the authorization server to increase the maximum lifetime of the token.
If the Kafka client is not configured with an access token directly, the client exchanges credentials for an access token during Kafka session initiation by contacting the authorization server. The Kafka client exchanges either:
- Client ID and Secret
- Client ID, refresh token, and (optionally) a secret
- Username and password, with client ID and (optionally) a secret
5.4.9.5. OAuth 2.0 client authentication flows
OAuth 2.0 authentication flows depend on the underlying Kafka client and Kafka broker configuration. The flows must also be supported by the authorization server used.
The Kafka broker listener configuration determines how clients authenticate using an access token. The client can pass a client ID and secret to request an access token.
If a listener is configured to use PLAIN authentication, the client can authenticate with a client ID and secret or username and access token. These values are passed as the username and password properties of the PLAIN mechanism.
Listener configuration supports the following token validation options:
- You can use fast local token validation based on JWT signature checking and local token introspection, without contacting an authorization server. The authorization server provides a JWKS endpoint with public certificates that are used to validate signatures on the tokens.
- You can use a call to a token introspection endpoint provided by an authorization server. Each time a new Kafka broker connection is established, the broker passes the access token received from the client to the authorization server. The Kafka broker checks the response to confirm whether or not the token is valid.
An authorization server might only allow the use of opaque access tokens, which means that local token validation is not possible.
Kafka client credentials can also be configured for the following types of authentication:
- Direct local access using a previously generated long-lived access token
- Contact with the authorization server for a new access token to be issued (using a client ID and a secret, or a refresh token, or a username and a password)
5.4.9.5.1. Example client authentication flows using the SASL OAUTHBEARER mechanism
You can use the following communication flows for Kafka authentication using the SASL OAUTHBEARER mechanism.
- Client using client ID and secret, with broker delegating validation to authorization server
- Client using client ID and secret, with broker performing fast local token validation
- Client using long-lived access token, with broker delegating validation to authorization server
- Client using long-lived access token, with broker performing fast local validation
Client using client ID and secret, with broker delegating validation to authorization server

- The Kafka client requests an access token from the authorization server using a client ID and secret, and optionally a refresh token. Alternatively, the client may authenticate using a username and a password.
- The authorization server generates a new access token.
- The Kafka client authenticates with the Kafka broker using the SASL OAUTHBEARER mechanism to pass the access token.
- The Kafka broker validates the access token by calling a token introspection endpoint on the authorization server using its own client ID and secret.
- A Kafka client session is established if the token is valid.
Client using client ID and secret, with broker performing fast local token validation

- The Kafka client authenticates with the authorization server from the token endpoint, using a client ID and secret, and optionally a refresh token. Alternatively, the client may authenticate using a username and a password.
- The authorization server generates a new access token.
- The Kafka client authenticates with the Kafka broker using the SASL OAUTHBEARER mechanism to pass the access token.
- The Kafka broker validates the access token locally using a JWT token signature check, and local token introspection.
Client using long-lived access token, with broker delegating validation to authorization server
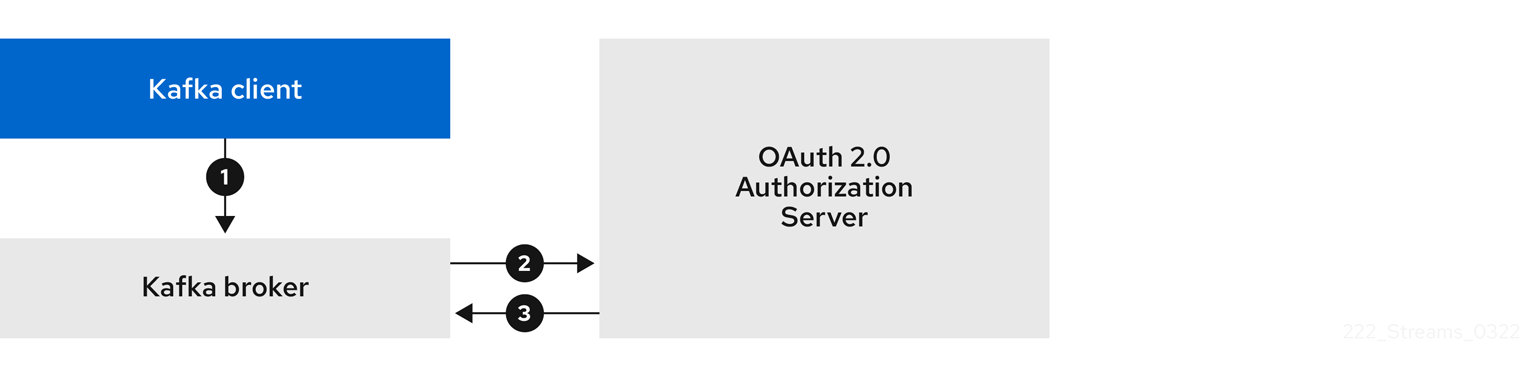
- The Kafka client authenticates with the Kafka broker using the SASL OAUTHBEARER mechanism to pass the long-lived access token.
- The Kafka broker validates the access token by calling a token introspection endpoint on the authorization server, using its own client ID and secret.
- A Kafka client session is established if the token is valid.
Client using long-lived access token, with broker performing fast local validation

- The Kafka client authenticates with the Kafka broker using the SASL OAUTHBEARER mechanism to pass the long-lived access token.
- The Kafka broker validates the access token locally using a JWT token signature check and local token introspection.
Fast local JWT token signature validation is suitable only for short-lived tokens as there is no check with the authorization server if a token has been revoked. Token expiration is written into the token, but revocation can happen at any time, so cannot be accounted for without contacting the authorization server. Any issued token would be considered valid until it expires.
5.4.9.5.2. Example client authentication flows using the SASL PLAIN mechanism
You can use the following communication flows for Kafka authentication using the OAuth PLAIN mechanism.
Client using a client ID and secret, with the broker obtaining the access token for the client

-
The Kafka client passes a
clientIdas a username and asecretas a password. -
The Kafka broker uses a token endpoint to pass the
clientIdandsecretto the authorization server. - The authorization server returns a fresh access token or an error if the client credentials are not valid.
The Kafka broker validates the token in one of the following ways:
- If a token introspection endpoint is specified, the Kafka broker validates the access token by calling the endpoint on the authorization server. A session is established if the token validation is successful.
- If local token introspection is used, a request is not made to the authorization server. The Kafka broker validates the access token locally using a JWT token signature check.
Client using a long-lived access token without a client ID and secret
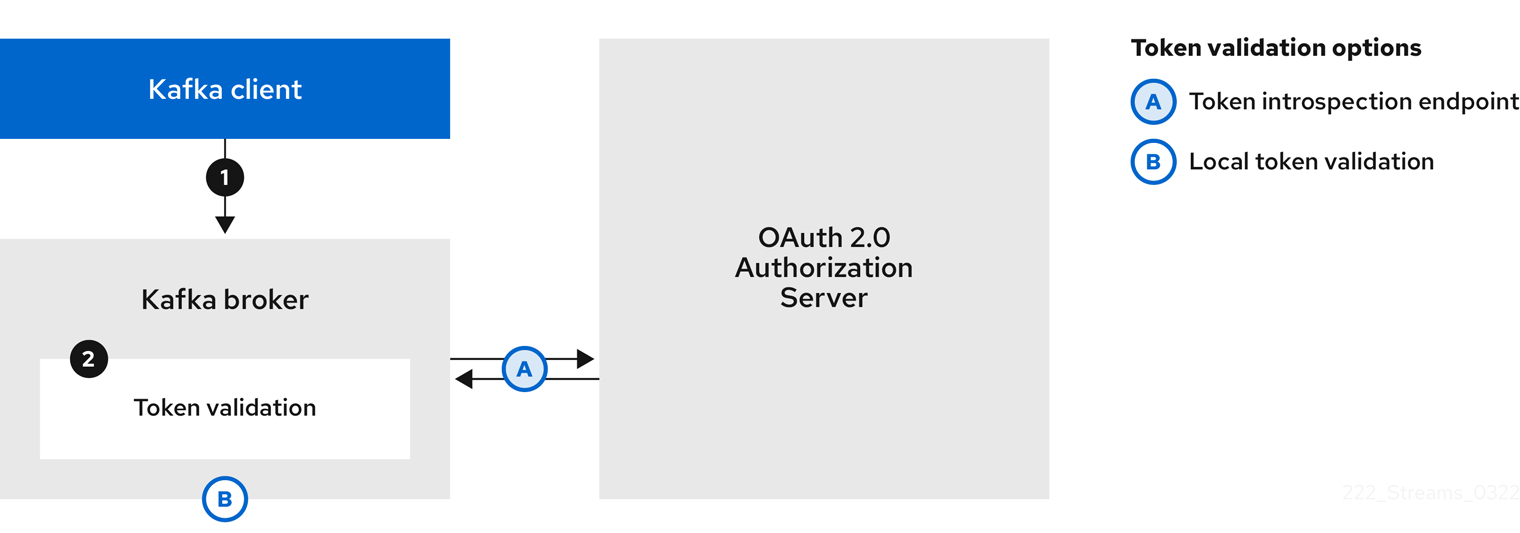
- The Kafka client passes a username and password. The password provides the value of an access token that was obtained manually and configured before running the client.
The password is passed with or without an
$accessToken:string prefix depending on whether or not the Kafka broker listener is configured with a token endpoint for authentication.-
If the token endpoint is configured, the password should be prefixed by
$accessToken:to let the broker know that the password parameter contains an access token rather than a client secret. The Kafka broker interprets the username as the account username. -
If the token endpoint is not configured on the Kafka broker listener (enforcing a
no-client-credentials mode), the password should provide the access token without the prefix. The Kafka broker interprets the username as the account username. In this mode, the client doesn’t use a client ID and secret, and thepasswordparameter is always interpreted as a raw access token.
-
If the token endpoint is configured, the password should be prefixed by
The Kafka broker validates the token in one of the following ways:
- If a token introspection endpoint is specified, the Kafka broker validates the access token by calling the endpoint on the authorization server. A session is established if token validation is successful.
- If local token introspection is used, there is no request made to the authorization server. Kafka broker validates the access token locally using a JWT token signature check.
5.4.9.6. Configuring OAuth 2.0 authentication
OAuth 2.0 is used for interaction between Kafka clients and AMQ Streams components.
In order to use OAuth 2.0 for AMQ Streams, you must:
5.4.9.6.1. Configuring Red Hat Single Sign-On as an OAuth 2.0 authorization server
This procedure describes how to deploy Red Hat Single Sign-On as an authorization server and configure it for integration with AMQ Streams.
The authorization server provides a central point for authentication and authorization, and management of users, clients, and permissions. Red Hat Single Sign-On has a concept of realms where a realm represents a separate set of users, clients, permissions, and other configuration. You can use a default master realm, or create a new one. Each realm exposes its own OAuth 2.0 endpoints, which means that application clients and application servers all need to use the same realm.
To use OAuth 2.0 with AMQ Streams, you use a deployment of Red Hat Single Sign-On to create and manage authentication realms.
If you already have Red Hat Single Sign-On deployed, you can skip the deployment step and use your current deployment.
Before you begin
You will need to be familiar with using Red Hat Single Sign-On.
For installation and administration instructions, see:
Prerequisites
- AMQ Streams and Kafka are running
For the Red Hat Single Sign-On deployment:
Procedure
Install Red Hat Single Sign-On.
You can install from a ZIP file or by using an RPM.
Log in to the Red Hat Single Sign-On Admin Console to create the OAuth 2.0 policies for AMQ Streams.
Login details are provided when you deploy Red Hat Single Sign-On.
Create and enable a realm.
You can use an existing master realm.
- Adjust the session and token timeouts for the realm, if required.
-
Create a client called
kafka-broker. From the Settings tab, set:
-
Access Type to
Confidential -
Standard Flow Enabled to
OFFto disable web login for this client -
Service Accounts Enabled to
ONto allow this client to authenticate in its own name
-
Access Type to
- Click Save before continuing.
- From the tab, take a note of the secret for using in your AMQ Streams Kafka cluster configuration.
Repeat the client creation steps for any application client that will connect to your Kafka brokers.
Create a definition for each new client.
You will use the names as client IDs in your configuration.
What to do next
After deploying and configuring the authorization server, configure the Kafka brokers to use OAuth 2.0.
5.4.9.6.2. Configuring OAuth 2.0 support for Kafka brokers
This procedure describes how to configure Kafka brokers so that the broker listeners are enabled to use OAuth 2.0 authentication using an authorization server.
We advise use of OAuth 2.0 over an encrypted interface through configuration of TLS listeners. Plain listeners are not recommended.
Configure the Kafka brokers using properties that support your chosen authorization server, and the type of authorization you are implementing.
Before you start
For more information on the configuration and authentication of Kafka broker listeners, see:
For a description of the properties used in the listener configuration, see:
Prerequisites
- AMQ Streams and Kafka are running
- An OAuth 2.0 authorization server is deployed
Procedure
Configure the Kafka broker listener configuration in the
server.propertiesfile.For example, using the OAUTHBEARER mechanism:
sasl.enabled.mechanisms=OAUTHBEARER
listeners=CLIENT://0.0.0.0:9092
listener.security.protocol.map=CLIENT:SASL_PLAINTEXT
listener.name.client.sasl.enabled.mechanisms=OAUTHBEARER
sasl.mechanism.inter.broker.protocol=OAUTHBEARER
inter.broker.listener.name=CLIENT
listener.name.client.oauthbearer.sasl.server.callback.handler.class=io.strimzi.kafka.oauth.server.JaasServerOauthValidatorCallbackHandler
listener.name.client.oauthbearer.sasl.jaas.config=org.apache.kafka.common.security.oauthbearer.OAuthBearerLoginModule required ;
listener.name.client.oauthbearer.sasl.login.callback.handler.class=io.strimzi.kafka.oauth.client.JaasClientOauthLoginCallbackHandler
Configure broker connection settings as part of the
listener.name.client.oauthbearer.sasl.jaas.config.The examples here show connection configuration options.
Example 1: Local token validation using a JWKS endpoint configuration
listener.name.client.oauthbearer.sasl.jaas.config=org.apache.kafka.common.security.oauthbearer.OAuthBearerLoginModule required \
  oauth.valid.issuer.uri="https://AUTH-SERVER-ADDRESS/auth/realms/REALM-NAME" \
  oauth.jwks.endpoint.uri="https://AUTH-SERVER-ADDRESS/auth/realms/REALM-NAME/protocol/openid-connect/certs" \
  oauth.jwks.refresh.seconds="300" \
  oauth.jwks.refresh.min.pause.seconds="1" \
  oauth.jwks.expiry.seconds="360" \
  oauth.username.claim="preferred_username" \
  oauth.ssl.truststore.location="PATH-TO-TRUSTSTORE-P12-FILE" \
  oauth.ssl.truststore.password="TRUSTSTORE-PASSWORD" \
  oauth.ssl.truststore.type="PKCS12" ;
listener.name.client.oauthbearer.connections.max.reauth.ms=3600000
Example 2: Delegating token validation to the authorization server through the OAuth 2.0 introspection endpoint
listener.name.client.oauthbearer.sasl.jaas.config=org.apache.kafka.common.security.oauthbearer.OAuthBearerLoginModule required \
  oauth.introspection.endpoint.uri="https://AUTH-SERVER-ADDRESS/auth/realms/REALM-NAME/protocol/openid-connect/introspection" \
  # ...
If required, configure access to the authorization server.
This step is normally required for a production environment, unless a technology like service mesh is used to configure secure channels outside containers.
Provide a custom truststore for connecting to a secured authorization server. SSL is always required for access to the authorization server.
Set properties to configure the truststore.
For example:
listener.name.client.oauthbearer.sasl.jaas.config=org.apache.kafka.common.security.oauthbearer.OAuthBearerLoginModule required \
  # ...
  oauth.client.id="kafka-broker" \
  oauth.client.secret="kafka-broker-secret" \
  oauth.ssl.truststore.location="PATH-TO-TRUSTSTORE-P12-FILE" \
  oauth.ssl.truststore.password="TRUSTSTORE-PASSWORD" \
  oauth.ssl.truststore.type="PKCS12" ;
If the certificate hostname does not match the access URL hostname, you can turn off certificate hostname validation:
oauth.ssl.endpoint.identification.algorithm=""
The check ensures that client connection to the authorization server is authentic. You may wish to turn off the validation in a non-production environment.
Configure additional properties according to your chosen authentication flow.
listener.name.client.oauthbearer.sasl.jaas.config=org.apache.kafka.common.security.oauthbearer.OAuthBearerLoginModule required \
  # ...
  oauth.token.endpoint.uri="https://AUTH-SERVER-ADDRESS/auth/realms/REALM-NAME/protocol/openid-connect/token" \ 1
  oauth.custom.claim.check="@.custom == 'custom-value'" \ 2
  oauth.scope="SCOPE" \ 3
  oauth.check.audience="true" \ 4
  oauth.audience="AUDIENCE" \ 5
  oauth.valid.issuer.uri="https://https://AUTH-SERVER-ADDRESS/auth/REALM-NAME" \ 6
  oauth.client.id="kafka-broker" \ 7
  oauth.client.secret="kafka-broker-secret" \ 8
  oauth.connect.timeout.seconds=60 \ 9
  oauth.read.timeout.seconds=60 \ 10
  oauth.groups.claim="$.groups" \ 11
  oauth.groups.claim.delimiter="," ; 12
- 1
- The OAuth 2.0 token endpoint URL to your authorization server. For production, always use
https://urls. Required whenKeycloakRBACAuthorizeris used, or an OAuth 2.0 enabled listener is used for inter-broker communication. - 2
- (Optional) Custom claim checking. A JsonPath filter query that applies additional custom rules to the JWT access token during validation. If the access token does not contain the necessary data, it is rejected. When using the introspection endpoint method, the custom check is applied to the introspection endpoint response JSON.
- 3
- (Optional) A
scopeparameter passed to the token endpoint. A scope is used when obtaining an access token for inter-broker authentication. It is also used in the name of a client for OAuth 2.0 over PLAIN client authentication using aclientIdandsecret. This only affects the ability to obtain the token, and the content of the token, depending on the authorization server. It does not affect token validation rules by the listener. - 4
- (Optional) Audience checking. If your authorization server provides an
aud(audience) claim, and you want to enforce an audience check, setouath.check.audiencetotrue. Audience checks identify the intended recipients of tokens. As a result, the Kafka broker will reject tokens that do not have itsclientIdin theiraudclaims. Default isfalse. - 5
- (Optional) An
audienceparameter passed to the token endpoint. An audience is used when obtaining an access token for inter-broker authentication. It is also used in the name of a client for OAuth 2.0 over PLAIN client authentication using aclientIdandsecret. This only affects the ability to obtain the token, and the content of the token, depending on the authorization server. It does not affect token validation rules by the listener. - 6
- A valid issuer URI. Only access tokens issued by this issuer will be accepted. (Always required.)
- 7
- The configured client ID of the Kafka broker, which is the same for all brokers. This is the client registered with the authorization server as
kafka-broker. Required when an introspection endpoint is used for token validation, or whenKeycloakRBACAuthorizeris used. - 8
- The configured secret for the Kafka broker, which is the same for all brokers. When the broker must authenticate to the authorization server, either a client secret, access token or a refresh token has to be specified.
- 9
- (Optional) The connect timeout in seconds when connecting to the authorization server. The default value is 60.
- 10
- (Optional) The read timeout in seconds when connecting to the authorization server. The default value is 60.
- 11
- A JsonPath query used to extract groups information from JWT token or introspection endpoint response. Not set by default. This can be used by a custom authorizer to make authorization decisions based on user groups.
- 12
- A delimiter used to parse groups information when returned as a single delimited string. The default value is ',' (comma).
Depending on how you apply OAuth 2.0 authentication, and the type of authorization server being used, add additional configuration settings:
listener.name.client.oauthbearer.sasl.jaas.config=org.apache.kafka.common.security.oauthbearer.OAuthBearerLoginModule required \
  # ...
  oauth.check.issuer=false \ 1
  oauth.fallback.username.claim="CLIENT-ID" \ 2
  oauth.fallback.username.prefix="CLIENT-ACCOUNT" \ 3
  oauth.valid.token.type="bearer" \ 4
  oauth.userinfo.endpoint.uri="https://AUTH-SERVER-ADDRESS/auth/realms/REALM-NAME/protocol/openid-connect/userinfo" ; 5
- 1
- If your authorization server does not provide an
issclaim, it is not possible to perform an issuer check. In this situation, setoauth.check.issuertofalseand do not specify aoauth.valid.issuer.uri. Default istrue. - 2
- An authorization server may not provide a single attribute to identify both regular users and clients. When a client authenticates in its own name, the server might provide a client ID. When a user authenticates using a username and password, to obtain a refresh token or an access token, the server might provide a username attribute in addition to a client ID. Use this fallback option to specify the username claim (attribute) to use if a primary user ID attribute is not available.
- 3
- In situations where
oauth.fallback.username.claimis applicable, it may also be necessary to prevent name collisions between the values of the username claim, and those of the fallback username claim. Consider a situation where a client calledproducerexists, but also a regular user calledproducerexists. In order to differentiate between the two, you can use this property to add a prefix to the user ID of the client. - 4
- (Only applicable when using
oauth.introspection.endpoint.uri) Depending on the authorization server you are using, the introspection endpoint may or may not return the token type attribute, or it may contain different values. You can specify a valid token type value that the response from the introspection endpoint has to contain. - 5
- (Only applicable when using
oauth.introspection.endpoint.uri) The authorization server may be configured or implemented in such a way to not provide any identifiable information in an introspection endpoint response. In order to obtain the user ID, you can configure the URI of theuserinfoendpoint as a fallback. Theoauth.fallback.username.claim,oauth.fallback.username.claim, andoauth.fallback.username.prefixsettings are applied to the response of theuserinfoendpoint.
What to do next
5.4.9.6.3. Configuring Kafka Java clients to use OAuth 2.0
Configure Kafka producer and consumer APIs to use OAuth 2.0 for interaction with Kafka brokers. Add a callback plugin to your client pom.xml file, then configure your client for OAuth 2.0.
Specify the following in your client configuration:
A SASL (Simple Authentication and Security Layer) security protocol:
-
SASL_SSLfor authentication over TLS encrypted connections SASL_PLAINTEXTfor authentication over unencrypted connectionsUse
SASL_SSLfor production andSASL_PLAINTEXTfor local development only. When usingSASL_SSL, additionalssl.truststoreconfiguration is needed. The truststore configuration is required for secure connection (https://) to the OAuth 2.0 authorization server. To verify the OAuth 2.0 authorization server, add the CA certificate for the authorization server to the truststore in your client configuration. You can configure a truststore in PEM or PKCS #12 format.
-
A Kafka SASL mechanism:
-
OAUTHBEARERfor credentials exchange using a bearer token -
PLAINto pass client credentials (clientId + secret) or an access token
-
A JAAS (Java Authentication and Authorization Service) module that implements the SASL mechanism:
-
org.apache.kafka.common.security.oauthbearer.OAuthBearerLoginModuleimplements the OAUTHBEARER mechanism -
org.apache.kafka.common.security.plain.PlainLoginModuleimplements the PLAIN mechanism
-
SASL authentication properties, which support the following authentication methods:
- OAuth 2.0 client credentials
- OAuth 2.0 password grant (deprecated)
- Access token
- Refresh token
Add the SASL authentication properties as JAAS configuration (sasl.jaas.config). How you configure the authentication properties depends on the authentication method you are using to access the OAuth 2.0 authorization server. In this procedure, the properties are specified in a properties file, then loaded into the client configuration.
You can also specify authentication properties as environment variables, or as Java system properties. For Java system properties, you can set them using setProperty and pass them on the command line using the -D option.
Prerequisites
- AMQ Streams and Kafka are running
- An OAuth 2.0 authorization server is deployed and configured for OAuth access to Kafka brokers
- Kafka brokers are configured for OAuth 2.0
Procedure
Add the client library with OAuth 2.0 support to the
pom.xmlfile for the Kafka client:<dependency> <groupId>io.strimzi</groupId> <artifactId>kafka-oauth-client</artifactId> <version>0.11.0.redhat-00003</version> </dependency>
Configure the client properties by specifying the following configuration in a properties file:
- The security protocol
- The SASL mechanism
The JAAS module and authentication properties according to the method being used
For example, we can add the following to a
client.propertiesfile:Client credentials mechanism properties
security.protocol=SASL_SSL 1
sasl.mechanism=OAUTHBEARER 2
ssl.truststore.location=/tmp/truststore.p12 3
ssl.truststore.password=$STOREPASS
ssl.truststore.type=PKCS12
sasl.jaas.config=org.apache.kafka.common.security.oauthbearer.OAuthBearerLoginModule required \
  oauth.token.endpoint.uri="<token_endpoint_url>" \ 4
  oauth.client.id="<client_id>" \ 5
  oauth.client.secret="<client_secret>" \ 6
  oauth.ssl.truststore.location="/tmp/oauth-truststore.p12" \ 7
  oauth.ssl.truststore.password="$STOREPASS" \ 8
  oauth.ssl.truststore.type="PKCS12" \ 9
  oauth.scope="<scope>" \ 10
  oauth.audience="<audience>" ; 11
- 1
SASL_SSLsecurity protocol for TLS-encrypted connections. UseSASL_PLAINTEXTover unencrypted connections for local development only.- 2
- The SASL mechanism specified as
OAUTHBEARERorPLAIN. - 3
- The truststore configuration for secure access to the Kafka cluster.
- 4
- URI of the authorization server token endpoint.
- 5
- Client ID, which is the name used when creating the client in the authorization server.
- 6
- Client secret created when creating the client in the authorization server.
- 7
- The location contains the public key certificate (
truststore.p12) for the authorization server. - 8
- The password for accessing the truststore.
- 9
- The truststore type.
- 10
- (Optional) The
scopefor requesting the token from the token endpoint. An authorization server may require a client to specify the scope. - 11
- (Optional) The
audiencefor requesting the token from the token endpoint. An authorization server may require a client to specify the audience.
Password grants mechanism properties
security.protocol=SASL_SSL
sasl.mechanism=OAUTHBEARER
ssl.truststore.location=/tmp/truststore.p12
ssl.truststore.password=$STOREPASS
ssl.truststore.type=PKCS12
sasl.jaas.config=org.apache.kafka.common.security.oauthbearer.OAuthBearerLoginModule required \
  oauth.token.endpoint.uri="<token_endpoint_url>" \
  oauth.client.id="<client_id>" \ 1
  oauth.client.secret="<client_secret>" \ 2
  oauth.password.grant.username="<username>" \ 3
  oauth.password.grant.password="<password>" \ 4
  oauth.ssl.truststore.location="/tmp/oauth-truststore.p12" \
  oauth.ssl.truststore.password="$STOREPASS" \
  oauth.ssl.truststore.type="PKCS12" \
  oauth.scope="<scope>" \
  oauth.audience="<audience>" ;
- 1
- Client ID, which is the name used when creating the client in the authorization server.
- 2
- (Optional) Client secret created when creating the client in the authorization server.
- 3
- Username for password grant authentication. OAuth password grant configuration (username and password) uses the OAuth 2.0 password grant method. To use password grants, create a user account for a client on your authorization server with limited permissions. The account should act like a service account. Use in environments where user accounts are required for authentication, but consider using a refresh token first.
- 4
- Password for password grant authentication.Note
SASL PLAIN does not support passing a username and password (password grants) using the OAuth 2.0 password grant method.
Access token properties
security.protocol=SASL_SSL
sasl.mechanism=OAUTHBEARER
ssl.truststore.location=/tmp/truststore.p12
ssl.truststore.password=$STOREPASS
ssl.truststore.type=PKCS12
sasl.jaas.config=org.apache.kafka.common.security.oauthbearer.OAuthBearerLoginModule required \
  oauth.token.endpoint.uri="<token_endpoint_url>" \
  oauth.access.token="<access_token>" ; 1
  oauth.ssl.truststore.location="/tmp/oauth-truststore.p12" \
  oauth.ssl.truststore.password="$STOREPASS" \
  oauth.ssl.truststore.type="PKCS12" \
- 1
- Long-lived access token for Kafka clients.
Refresh token properties
security.protocol=SASL_SSL
sasl.mechanism=OAUTHBEARER
ssl.truststore.location=/tmp/truststore.p12
ssl.truststore.password=$STOREPASS
ssl.truststore.type=PKCS12
sasl.jaas.config=org.apache.kafka.common.security.oauthbearer.OAuthBearerLoginModule required \
  oauth.token.endpoint.uri="<token_endpoint_url>" \
  oauth.client.id="<client_id>" \ 1
  oauth.client.secret="<client_secret>" \ 2
  oauth.refresh.token="<refresh_token>" ; 3
  oauth.ssl.truststore.location="/tmp/oauth-truststore.p12" \
  oauth.ssl.truststore.password="$STOREPASS" \
  oauth.ssl.truststore.type="PKCS12" \
Input the client properties for OAUTH 2.0 authentication into the Java client code.
Example showing input of client properties
Properties props = new Properties(); try (FileReader reader = new FileReader("client.properties", StandardCharsets.UTF_8)) { props.load(reader); }- Verify that the Kafka client can access the Kafka brokers.
5.4.10. Using OAuth 2.0 token-based authorization
AMQ Streams supports the use of OAuth 2.0 token-based authorization through Red Hat Single Sign-On Authorization Services, which allows you to manage security policies and permissions centrally.
Security policies and permissions defined in Red Hat Single Sign-On are used to grant access to resources on Kafka brokers. Users and clients are matched against policies that permit access to perform specific actions on Kafka brokers.
Kafka allows all users full access to brokers by default, and also provides the AclAuthorizer plugin to configure authorization based on Access Control Lists (ACLs).
ZooKeeper stores ACL rules that grant or deny access to resources based on username. However, OAuth 2.0 token-based authorization with Red Hat Single Sign-On offers far greater flexibility on how you wish to implement access control to Kafka brokers. In addition, you can configure your Kafka brokers to use OAuth 2.0 authorization and ACLs.
Additional resources
5.4.10.1. OAuth 2.0 authorization mechanism
OAuth 2.0 authorization in AMQ Streams uses Red Hat Single Sign-On server Authorization Services REST endpoints to extend token-based authentication with Red Hat Single Sign-On by applying defined security policies on a particular user, and providing a list of permissions granted on different resources for that user. Policies use roles and groups to match permissions to users. OAuth 2.0 authorization enforces permissions locally based on the received list of grants for the user from Red Hat Single Sign-On Authorization Services.
5.4.10.1.1. Kafka broker custom authorizer
A Red Hat Single Sign-On authorizer (KeycloakRBACAuthorizer) is provided with AMQ Streams. To be able to use the Red Hat Single Sign-On REST endpoints for Authorization Services provided by Red Hat Single Sign-On, you configure a custom authorizer on the Kafka broker.
The authorizer fetches a list of granted permissions from the authorization server as needed, and enforces authorization locally on the Kafka Broker, making rapid authorization decisions for each client request.
5.4.10.2. Configuring OAuth 2.0 authorization support
This procedure describes how to configure Kafka brokers to use OAuth 2.0 authorization using Red Hat Single Sign-On Authorization Services.
Before you begin
Consider the access you require or want to limit for certain users. You can use a combination of Red Hat Single Sign-On groups, roles, clients, and users to configure access in Red Hat Single Sign-On.
Typically, groups are used to match users based on organizational departments or geographical locations. And roles are used to match users based on their function.
With Red Hat Single Sign-On, you can store users and groups in LDAP, whereas clients and roles cannot be stored this way. Storage and access to user data may be a factor in how you choose to configure authorization policies.
Super users always have unconstrained access to a Kafka broker regardless of the authorization implemented on the Kafka broker.
Prerequisites
- AMQ Streams must be configured to use OAuth 2.0 with Red Hat Single Sign-On for token-based authentication. You use the same Red Hat Single Sign-On server endpoint when you set up authorization.
- You need to understand how to manage policies and permissions for Red Hat Single Sign-On Authorization Services, as described in the Red Hat Single Sign-On documentation.
Procedure
- Access the Red Hat Single Sign-On Admin Console or use the Red Hat Single Sign-On Admin CLI to enable Authorization Services for the Kafka broker client you created when setting up OAuth 2.0 authentication.
- Use Authorization Services to define resources, authorization scopes, policies, and permissions for the client.
- Bind the permissions to users and clients by assigning them roles and groups.
Configure the Kafka brokers to use Red Hat Single Sign-On authorization.
Add the following to the Kafka
server.propertiesconfiguration file to install the authorizer in Kafka:authorizer.class.name=io.strimzi.kafka.oauth.server.authorizer.KeycloakRBACAuthorizer principal.builder.class=io.strimzi.kafka.oauth.server.authorizer.JwtKafkaPrincipalBuilder
Add configuration for the Kafka brokers to access the authorization server and Authorization Services.
Here we show example configuration added as additional properties to
server.properties, but you can also define them as environment variables using capitalized or upper-case naming conventions.strimzi.authorization.token.endpoint.uri="https://AUTH-SERVER-ADDRESS/auth/realms/REALM-NAME/protocol/openid-connect/token" 1 strimzi.authorization.client.id="kafka" 2
(Optional) Add configuration for specific Kafka clusters.
For example:
strimzi.authorization.kafka.cluster.name="kafka-cluster" 1- 1
- The name of a specific Kafka cluster. Names are used to target permissions, making it possible to manage multiple clusters within the same Red Hat Single Sign-On realm. The default value is
kafka-cluster.
(Optional) Delegate to simple authorization.
For example:
strimzi.authorization.delegate.to.kafka.acl="false" 1- 1
- Delegate authorization to Kafka
AclAuthorizerif access is denied by Red Hat Single Sign-On Authorization Services policies. The default isfalse.
(Optional) Add configuration for TLS connection to the authorization server.
For example:
strimzi.authorization.ssl.truststore.location=<path-to-truststore> 1
strimzi.authorization.ssl.truststore.password=<my-truststore-password> 2
strimzi.authorization.ssl.truststore.type=JKS 3
strimzi.authorization.ssl.secure.random.implementation=SHA1PRNG 4
strimzi.authorization.ssl.endpoint.identification.algorithm=HTTPS 5
- 1
- The path to the truststore that contain the certificates.
- 2
- The password for the truststore.
- 3
- The truststore type. If not set, the default Java keystore type is used.
- 4
- Random number generator implementation. If not set, the Java platform SDK default is used.
- 5
- Hostname verification. If set to an empty string, the hostname verification is turned off. If not set, the default value is
HTTPS, which enforces hostname verification for server certificates.
(Optional) Configure the refresh of grants from the authorization server. The grants refresh job works by enumerating the active tokens and requesting the latest grants for each.
For example:
strimzi.authorization.grants.refresh.period.seconds="120" 1
strimzi.authorization.grants.refresh.pool.size="10" 2
- 1
- Specifies how often the list of grants from the authorization server is refreshed (once per minute by default). To turn grants refresh off for debugging purposes, set to
"0". - 2
- Specifies the size of the thread pool (the degree of parallelism) used by the grants refresh job. The default value is
"5".
- Verify the configured permissions by accessing Kafka brokers as clients or users with specific roles, making sure they have the necessary access, or do not have the access they are not supposed to have.
5.4.11. Using OPA policy-based authorization
Open Policy Agent (OPA) is an open-source policy engine. You can integrate OPA with AMQ Streams to act as a policy-based authorization mechanism for permitting client operations on Kafka brokers.
When a request is made from a client, OPA will evaluate the request against policies defined for Kafka access, then allow or deny the request.
Red Hat does not support the OPA server.
Additional resources
5.4.11.1. Defining OPA policies
Before integrating OPA with AMQ Streams, consider how you will define policies to provide fine-grained access controls.
You can define access control for Kafka clusters, consumer groups and topics. For instance, you can define an authorization policy that allows write access from a producer client to a specific broker topic.
For this, the policy might specify the:
- User principal and host address associated with the producer client
- Operations allowed for the client
-
Resource type (
topic) and resource name the policy applies to
Allow and deny decisions are written into the policy, and a response is provided based on the request and client identification data provided.
In our example the producer client would have to satisfy the policy to be allowed to write to the topic.
5.4.11.2. Connecting to the OPA
To enable Kafka to access the OPA policy engine to query access control policies, , you configure a custom OPA authorizer plugin (kafka-authorizer-opa-VERSION.jar) in your Kafka server.properties file.
When a request is made by a client, the OPA policy engine is queried by the plugin using a specified URL address and a REST endpoint, which must be the name of the defined policy.
The plugin provides the details of the client request — user principal, operation, and resource — in JSON format to be checked against the policy. The details will include the unique identity of the client; for example, taking the distinguished name from the client certificate if TLS authentication is used.
OPA uses the data to provide a response — either true or false — to the plugin to allow or deny the request.
5.4.11.3. Configuring OPA authorization support
This procedure describes how to configure Kafka brokers to use OPA authorization.
Before you begin
Consider the access you require or want to limit for certain users. You can use a combination of users and Kafka resources to define OPA policies.
It is possible to set up OPA to load user information from an LDAP data source.
Super users always have unconstrained access to a Kafka broker regardless of the authorization implemented on the Kafka broker.
Prerequisites
- An OPA server must be available for connection.
- OPA authorizer plugin for Kafka
Procedure
Write the OPA policies required for authorizing client requests to perform operations on the Kafka brokers.
Now configure the Kafka brokers to use OPA.
Install the OPA authorizer plugin for Kafka.
Make sure that the plugin files are included in the Kafka classpath.
Add the following to the Kafka
server.propertiesconfiguration file to enable the OPA plugin:authorizer.class.name: com.bisnode.kafka.authorization.OpaAuthorizer
Add further configuration to
server.propertiesfor the Kafka brokers to access the OPA policy engine and policies.For example:
opa.authorizer.url=https://OPA-ADDRESS/allow 1
opa.authorizer.allow.on.error=false 2
opa.authorizer.cache.initial.capacity=50000 3
opa.authorizer.cache.maximum.size=50000 4
opa.authorizer.cache.expire.after.seconds=600000 5
super.users=User:alice;User:bob 6
- 1
- (Required) The OAuth 2.0 token endpoint URL for the policy the authorizer plugin will query. In this example, the policy is called
allow. - 2
- Flag to specify whether a client is allowed or denied access by default if the authorizer plugin fails to connect with the OPA policy engine.
- 3
- Initial capacity in bytes of the local cache. The cache is used so that the plugin does not have to query the OPA policy engine for every request.
- 4
- Maximum capacity in bytes of the local cache.
- 5
- Time in milliseconds that the local cache is refreshed by reloading from the OPA policy engine.
- 6
- A list of user principals treated as super users, so that they are always allowed without querying the Open Policy Agent policy.
Refer to the Open Policy Agent website for information on authentication and authorization options.
- Verify the configured permissions by accessing Kafka brokers using clients that have and do not have the correct authorization.
5.4.12. Logging
Kafka brokers use Log4j as their logging infrastructure. By default, the logging configuration is read from the log4j.properties configuration file, which should be placed either in the /opt/kafka/config/ directory or on the classpath. The location and name of the configuration file can be changed using the Java property log4j.configuration, which can be passed to Kafka by using the KAFKA_LOG4J_OPTS environment variable:
su - kafka
export KAFKA_LOG4J_OPTS="-Dlog4j.configuration=file:/my/path/to/log4j.config"; /opt/kafka/bin/kafka-server-start.sh /opt/kafka/config/server.properties
For more information about Log4j configurations, see the Log4j manual.
5.4.12.1. Dynamically change logging levels for Kafka broker loggers
Kafka broker logging is provided by multiple broker loggers in each broker. You can dynamically change the logging level for broker loggers without having to restart the broker. Increasing the level of detail returned in logs—by changing from INFO to DEBUG, for example—is useful for investigating performance issues in a Kafka cluster.
Broker loggers can also be dynamically reset to their default logging levels.
Procedure
Switch to the
kafkauser:su - kafka
List all the broker loggers for a broker by using the
kafka-configs.shtool:/opt/kafka/bin/kafka-configs.sh --bootstrap-server <broker_address> --describe --entity-type broker-loggers --entity-name BROKER-ID
For example, for broker
0:/opt/kafka/bin/kafka-configs.sh --bootstrap-server localhost:9092 --describe --entity-type broker-loggers --entity-name 0
This returns the logging level for each logger:
TRACE,DEBUG,INFO,WARN,ERROR, orFATAL. For example:#... kafka.controller.ControllerChannelManager=INFO sensitive=false synonyms={} kafka.log.TimeIndex=INFO sensitive=false synonyms={}Change the logging level for one or more broker loggers. Use the
--alterand--add-configoptions and specify each logger and its level as a comma-separated list in double quotes./opt/kafka/bin/kafka-configs.sh --bootstrap-server <broker_address> --alter --add-config "LOGGER-ONE=NEW-LEVEL,LOGGER-TWO=NEW-LEVEL" --entity-type broker-loggers --entity-name BROKER-ID
For example, for broker
0:/opt/kafka/bin/kafka-configs.sh --bootstrap-server localhost:9092 --alter --add-config "kafka.controller.ControllerChannelManager=WARN,kafka.log.TimeIndex=WARN" --entity-type broker-loggers --entity-name 0
If successful this returns:
Completed updating config for broker: 0.
Resetting a broker logger
You can reset one or more broker loggers to their default logging levels by using the kafka-configs.sh tool. Use the --alter and --delete-config options and specify each broker logger as a comma-separated list in double quotes:
/opt/kafka/bin/kafka-configs.sh --bootstrap-server localhost:9092 --alter --delete-config "LOGGER-ONE,LOGGER-TWO" --entity-type broker-loggers --entity-name BROKER-ID
Additional resources
- Updating Broker Configs in the Apache Kafka documentation