Installing 3scale
Install and configure 3scale API Management.
Abstract
Preface
This guide will help you to install and configure 3scale
Making open source more inclusive
Red Hat is committed to replacing problematic language in our code, documentation, and web properties. We are beginning with these four terms: master, slave, blacklist, and whitelist. Because of the enormity of this endeavor, these changes will be implemented gradually over several upcoming releases. For more details, see our CTO Chris Wright’s message.
Chapter 1. Registry service accounts for 3scale
To use container images from registry.redhat.io in a shared environment with Red Hat 3scale API Management 2.13, you must use a Registry Service Account instead of an individual user’s Customer Portal credentials.
Before deploying 3scale on OpenShift via the operator, follow the steps outlined in this chapter, as the deployment uses registry authentication.
To create and modify a registry service account, perform the steps outlined in the following sections:
1.1. Creating a registry service account
To create a registry service account, follow the procedure below.
Procedure
- Navigate to the Registry Service Accounts page and log in.
- Click New Service Account.
Fill in the form on the Create a New Registry Service Account page.
Add a name for the service account.
Note: You will see a fixed-length, randomly generated numerical string before the form field.
- Enter a Description.
- Click Create.
- Navigate back to your Service Accounts.
- Click the Service Account you created.
-
Make a note of the username, including the prefix string, for example 12345678|username, and your password. This username and password will be used to log in to
registry.redhat.io.
There are tabs available on the Token Information page that show you how to use the authentication token. For example, the Token Information tab shows the username in the format 12345678|username and the password string below it.
1.2. Configuring container registry authentication
As a 3scale administrator, configure authentication with registry.redhat.io before you deploy 3scale on OpenShift.
Prerequisites
- A Red Hat OpenShift Container Platform (OCP) account with administrator credentials.
-
OpenShift
occlient tool is installed. For more details, see the OpenShift CLI documentation.
Procedure
Log into your OpenShift cluster as administrator:
$ oc login -u <admin_username>
Open the project in which you want to deploy 3scale:
$ oc project your-openshift-project
Create a
docker-registrysecret using your Red Hat Customer Portal account, replacingthreescale-registry-authwith the secret to create:$ oc create secret docker-registry threescale-registry-auth \ --docker-server=registry.redhat.io \ --docker-username="customer_portal_username" \ --docker-password="customer_portal_password" \ --docker-email="email_address"
You will see the following output:
secret/threescale-registry-auth created
Link the secret to your service account to use the secret for pulling images. The service account name must match the name that the OpenShift pod uses. This example uses the
defaultservice account:$ oc secrets link default threescale-registry-auth --for=pull
Link the secret to the
builderservice account to use the secret for pushing and pulling build images:$ oc secrets link builder threescale-registry-auth
Additional resources
For more details on authenticating with Red Hat for container images:
1.3. Modifying a registry service account
You can edit or delete service accounts from the Registry Service Account page, by using the pop-up menu to the right of each authentication token in the table.
The regeneration or removal of service accounts will impact systems that are using the token to authenticate and retrieve content from registry.redhat.io.
A description for each function is as follows:
Regenerate token: Allows an authorized user to reset the password associated with the Service Account.
Note: You cannot modify the username for the Service Account.
- Update Description: Allows an authorized user to update the description for the Service Account.
- Delete Account: Allows an authorized user to remove the Service Account.
1.4. Additional resources
Chapter 2. Installing 3scale on OpenShift
This section walks you through steps to deploy Red Hat 3scale API Management 2.13 on OpenShift.
The 3scale solution for on-premises deployment is composed of:
- Two API gateways: embedded APIcast
- One 3scale Admin Portal and Developer Portal with persistent storage
- When deploying 3scale, you must first configure registry authentication to the Red Hat container registry. See Configuring container registry authentication.
- The 3scale Istio Adapter is available as an optional adapter that allows labeling a service running within the Red Hat OpenShift Service Mesh, and integrate that service with 3scale. Refer to 3scale adapter documentation for more information.
Prerequisites
- You must configure 3scale servers for UTC (Coordinated Universal Time).
- Create user credentials using the step in Creating a registry service account.
To install 3scale on OpenShift, perform the steps outlined in the following sections:
- System requirements for installing 3scale on OpenShift
- Deploying 3scale using the operator
- External databases for 3scale using the operator
- Deployment configuration options for 3scale on OpenShift using the operator
- Installing 3scale with the operator using Oracle as the system database
- Troubleshooting common 3scale installation issues
2.1. System requirements for installing 3scale on OpenShift
This section lists the system requirements for installing 3scale on OpenShift.
2.1.1. Environment requirements
Red Hat 3scale API Management requires an environment specified in supported configurations.
The requirements for persistent volumes vary between different deployment types. When deploying with external databases, persistent volumes are not necessary. For some deployment types, an Amazon S3 bucket can serve as a substitute for persistent volumes. If you use local file system storage, consider the specific deployment type and its associated requirements for persistent volumes.
Persistent volumes
- 3 RWO (ReadWriteOnce) persistent volumes for Redis and MySQL persistence
- 1 RWX (ReadWriteMany) persistent volume for Developer Portal content and System-app Assets
Configure the RWX persistent volume to be group writable. For a list of persistent volume types that support the required access modes, see the OpenShift documentation.
Network File System (NFS) is supported on 3scale for the RWX volume only.
For IBM Power (ppc64le) and IBM Z (s390x), provision local storage using the following:
Storage
- NFS
If you are using an Amazon Simple Storage Service (Amazon S3) bucket for content management system (CMS) storage:
Persistent volumes
- 3 RWO (ReadWriteOnce) persistent volumes for Redis and MySQL persistence
Storage
- 1 Amazon S3 bucket
- NFS
2.1.2. Hardware requirements
Hardware requirements depend on your usage needs. Red Hat recommends that you test and configure your environment to meet your specific requirements. The following are the recommendations when configuring your environment for 3scale on OpenShift:
- Compute optimized nodes for deployments on cloud environments (AWS c4.2xlarge or Azure Standard_F8).
- Very large installations may require a separate node (AWS M4 series or Azure Av2 series) for Redis if memory requirements exceed your current node’s available RAM.
- Separate nodes between routing and compute tasks.
- Dedicated computing nodes for 3scale specific tasks.
Additional resources
2.2. Installing the 3scale Operator on OpenShift
3scale supports the last two general availability (GA) releases of OpenShift Container Platform (OCP). For more information, see the Red Hat 3scale API Management Supported Configurations page.
This documentation shows you how to:
- Create a new project.
- Deploy a Red Hat 3scale API Management instance.
- Install the 3scale operator through Operator Lifecycle Manager (OLM).
- Deploy the custom resources once the operator has been deployed.
Prerequisites
Access to a supported version of an OpenShift Container Platform 4 cluster using an account with administrator privileges.
- For more information about supported configurations, see the Red Hat 3scale API Management Supported Configurations page.
Deploy the 3scale operator and custom resource definitions (CRDs) in a separate newly created, empty project. If you deploy them in an existing project containing infrastructure, it could alter or delete existing elements.
To install the 3scale operator on OpenShift, perform the steps outlined in the following sections:
2.2.1. Creating a new OpenShift project
This procedure explains how to create a new OpenShift project named 3scale-project. Replace this project name with your own.
Procedure
To create a new OpenShift project:
Indicate a valid name using alphanumeric characters and dashes. As an example, run the command below to create
3scale-project:$ oc new-project 3scale-project
This creates the new OpenShift project where the operator, the APIManager custom resource (CR), and the Capabilities custom resources will be installed. The operator manages the custom resources through OLM in that project.
2.2.2. Installing and configuring the 3scale operator using the OLM
Use Operator Lifecycle Manager (OLM) to install the 3scale operator on an OpenShift Container Platform (OCP) 4.8 (or above) cluster through the OperatorHub in the OCP console. You can install the 3scale operator using the following installation modes:
- Cluster-wide in which the operator is available in all namespaces on the cluster.
- A specific namespace on the cluster
If you are using the OpenShift Container Platform on a restricted network or a disconnected cluster, the Operator Lifecycle Manager can no longer use the OperatorHub. Follow the instructions for setting up and using the OLM in the guide titled Using Operator Lifecycle Manager on restricted networks.
Prerequisites
- You must install and deploy the 3scale operator in the project that you defined in Creating a new OpenShift project.
Procedure
In the OpenShift Container Platform console, log in using an account with administrator privileges.
NoteThe menu structure depends on the version of OpenShift you are using:
- Click Operators > OperatorHub
- In the Filter by keyword box, type 3scale operator to find Red Hat Integration - 3scale.
- Click Red Hat Integration - 3scale. Information about the operator is displayed.
- Read the information about the operator and click Install. The Install Operator page opens.
- On the Install Operator page, select the desired channel to update in the Update channel section.
In the Installation mode section, select where to install the operator.
- All namespaces on the cluster (default) - The operator will be available in all namespaces on the cluster.
- A specific namespace on the cluster - The operator will only be available in the specific single namespace on the cluster that you have selected.
- Click Install.
- After the installation is complete, the system displays a confirmation message indicating that the operator is ready for use.
Verify that the 3scale operator ClusterServiceVersion (CSV) is correctly installed. Also check if it reports that the installation of the operator has been successful:
- Click Operators > Installed Operators.
- Click on the Red Hat Integration - 3scale operator.
- In the Details tab, scroll down to the Conditions section, where the Succeeded condition should read InstallSucceeded under the Reason column.
Besides the indicated procedure, create a list of the allowed domains you intend to use in the 3scale Developer Portal while using OCP on restricted networks. Consider the following examples:
- Any link you intend to add to the Developer Portal.
- SSO integrations through third party SSO providers such as GitHub.
- Billing.
- Webhooks that trigger an external URL.
2.2.2.1. Restrictions in disconnected environments
The following list outlines current restrictions in a disconnected environment for 3scale 2.13:
- The GitHub login to the Developer Portal is not available.
- Support links are not operational.
- Links to external documentation are not operational.
- The validator for the OpenAPI Specification (OAS) in the Developer Portal is not operational, affecting links to external services.
In the product Overview page in ActiveDocs, links to OAS are not operational.
- It is also necessary to check the option Skip swagger validations when you create a new ActiveDocs specification.
Additional resources
- For troubleshooting information, see the OpenShift Container Platform documentation.
- For more information about using the OLM on retricted networks, see Using Operator Lifecycle Manager on restricted networks.
- For more information about preparing your installation on restricted networks, see Mirroring images for a disconnected installation.
- For more information about supported configurations, see the Red Hat 3scale API Management Supported Configurations page.
2.2.3. Upgrading the 3scale operator using the OLM
To upgrade the 3scale operator from a single namespace to a cluster-wide installation in all namespaces on an operator-based deployment, you must remove the 3scale operator from the namespace and then reinstall the operator on the cluster.
Cluster administrators can delete installed operators from a selected namespace by using the web console. Uninstalling the operator does not uninstall an existing 3scale instance.
After the 3scale operator is uninstalled from the namespace, you can use OLM to install the operator in the cluster-wide mode.
Prerequisites
- 3scale administrator permissions or an OpenShift role that has delete permissions for the namespace.
Procedure
In the OpenShift Container Platform console, log in using an account with administrator privileges.
NoteThe menu structure depends on the version of OpenShift you are using:
- Click Operators > OperatorHub. The installed Operators page is displayed.
- Enter 3scale into the Filter by name to find the Operator and click on it.
- On the Operator Details page, select Uninstall Operator from the Actions drop-down menu to remove it from a specific namespace.
An Uninstall Operator? dialog box is displayed, reminding you that:
Removing the operator will not remove any of its custom resource definitions or managed resources. If your operator has deployed applications on the cluster or configured off-cluster resources, these will continue to run and need to be cleaned up manually.
This action removes the operator as well as the Operator deployments and pods, if any. Any operands and resources managed by the operator, including CRDs and CRs, are not removed. The web console enables dashboards and navigation items for some operators. To remove these after uninstalling the operator, you might need to manually delete the operator CRDs.
- Select Uninstall. This operator stops running and no longer receives updates.
- In the OpenShift Container Platform console click Operators > OperatorHub.
- In the Filter by keyword box, type 3scale operator to find Red Hat Integration - 3scale.
- Click Red Hat Integration - 3scale. Information about the operator is displayed.
- Click Install. The Install Operator page opens.
- On the Install Operator page, select the desired channel to update in the Update channel section.
- In the Installation mode section, select All namespaces on the cluster (default). The operator will be available in all namespaces on the cluster.
- Click Subscribe. The 3scale operator details page is displayed and you can see the Subscription Overview.
- Confirm that the subscription Upgrade Status is displayed as Up to date.
- Verify that the 3scale operator ClusterServiceVersion (CSV) is displayed.
Additional Resources
- For more information about installing the 3scale operator, see Install and configure 3scale API Management.
2.2.3.1. Configuring automated application of micro releases
To get automatic updates, the 3scale operator must have its approval strategy set to Automatic. This allows it to apply micro release updates automatically. The following describes the differences between Automatic and Manual settings, and outlines the steps in a procedure to change from one to the other.
Automatic and manual:
- During installation, the Automatic setting is the selected option by default. Installation of new updates occur as they become available. You can change this during the install or at any time afterwards.
- If you select the Manual option during installation or at any time afterwards, you will receive updates when they are available. Next, you must approve the Install Plan and apply it yourself.
Procedure
- Click Operators > Installed Operators.
- Click 3scale API Management from the list of Installed Operators.
- Click the Subscription tab. Under the Subscription Details heading, you will see the subheading Approval.
- Click the link below Approval. The link is set to Automatic by default. A modal with the heading Change Update Approval Strategy will pop up.
- Choose the option of your preference: Automatic (default) or Manual, and then click Save.
Additional resources
- See Approval Strategy under Installing Operators in your namespace.
2.3. Installing the APIcast operator on OpenShift
This guide provides steps for installing the APIcast operator through the OpenShift Container Platform (OCP) console.
Prerequisites
- OCP 4.x or later with administrator privileges.
Procedure
-
Create new project
operator-testin Projects > Create Project. - Click Operators > OperatorHub
- In the Filter by keyword box, type apicast operator to find Red Hat Integration - 3scale APIcast gateway.
- Click Red Hat Integration - 3scale APIcast gateway. Information about the APIcast operator is displayed
- Click Install. The Create Operator Subscription page opens.
Click Install to accept all of the default selections on the Create Operator Subscription page.
NoteYou can select different operator versions and installation modes, such as cluster-wide or namespace-specific options. There can only be one cluster-wide installation per cluster.
- The subscription upgrade status is shown as Up to date.
-
Click Operators > Installed Operators to verify that the APIcast operator ClusterServiceVersion (CSV) status displays to InstallSucceeded in the
operator-testproject.
2.4. Deploying 3scale using the operator
This section takes you through installing and deploying the 3scale solution via the 3scale operator, using the APIManager CR.
Wildcard routes have been removed since 3scale 2.6.
- This functionality is handled by Zync in the background.
- When API providers are created, updated, or deleted, routes automatically reflect those changes.
Prerequisites
- Configuring container registry authentication
- To make sure you receive automatic updates of micro releases for 3scale, you must have enabled the automatic approval functionality in the 3scale operator. Automatic is the default approval setting. To change this at any time based on your specific needs, use the steps for Configuring automated application of micro releases.
- Deploying 3scale using the operator first requires that you follow the steps in Installing the 3scale Operator on OpenShift
OpenShift Container Platform 4
- A user account with administrator privileges in the OpenShift cluster.
- For more information about supported configurations, see the Red Hat 3scale API Management Supported Configurations page.
Follow these procedures to deploy 3scale using the operator:
2.4.1. Deploying the APIManager custom resource
If you decide to use Amazon Simple Storage Service (Amazon S3), see Amazon Simple Storage Service 3scale FileStorage installation.
The operator watches for APIManager CRs and deploys your required 3Scale solution as specified in the APIManager CR.
Procedure
Click Operators > Installed Operators.
- From the list of Installed Operators, click Red Hat Integration - 3scale.
- Click the API Manager tab.
- Click Create APIManager.
Clear the sample content and add the following YAML definitions to the editor, then click Create.
Before 3scale 2.8, you could configure the automatic addition of replicas by setting the
highAvailabilityfield totrue. From 3scale 2.8, the addition of replicas is controlled through the replicas field in the APIManager CR as shown in the following example.NoteThe value of the wildcardDomain parameter must be a valid domain name that resolves to the address of your OpenShift Container Platform (OCP) router. For example,
apps.mycluster.example.com.APIManager CR with minimum requirements:
apiVersion: apps.3scale.net/v1alpha1
kind: APIManager
metadata:
  name: apimanager-sample
spec:
  wildcardDomain: example.com
APIManager CR with replicas configured:
apiVersion: apps.3scale.net/v1alpha1
kind: APIManager
metadata:
  name: apimanager-sample
spec:
  system:
    appSpec:
      replicas: 1
    sidekiqSpec:
      replicas: 1
  zync:
    appSpec:
      replicas: 1
    queSpec:
      replicas: 1
  backend:
    cronSpec:
      replicas: 1
    listenerSpec:
      replicas: 1
    workerSpec:
      replicas: 1
  apicast:
    productionSpec:
      replicas: 1
    stagingSpec:
      replicas: 1
  wildcardDomain: example.com
2.4.2. Getting the Admin Portal URL
When you deploy 3scale using the operator, a default tenant is created, with a fixed URL: 3scale-admin.${wildcardDomain}
The 3scale Dashboard shows the new portal URL of the tenant. As an example, if the <wildCardDomain> is 3scale-project.example.com, the Admin Portal URL is: https://3scale-admin.3scale-project.example.com.
The wildcardDomain is the <wildCardDomain> parameter you provided during installation. Open this unique URL in a browser using the this command:
xdg-open https://3scale-admin.3scale-project.example.com
Optionally, you can create new tenants on the MASTER portal URL: master.${wildcardDomain}.
2.4.3. Getting the APIManager Admin Portal and Master Admin Portal credentials
To log in to either the 3scale Admin Portal or Master Admin Portal after the operator-based deployment, you need the credentials for each separate portal. To get these credentials:
Run the following commands to get the Admin Portal credentials:
oc get secret system-seed -o json | jq -r .data.ADMIN_USER | base64 -d
oc get secret system-seed -o json | jq -r .data.ADMIN_PASSWORD | base64 -d
- Log in as the Admin Portal administrator to verify these credentials are working.
Run the following commands to get the Master Admin Portal credentials:
oc get secret system-seed -o json | jq -r .data.MASTER_USER | base64 -d
oc get secret system-seed -o json | jq -r .data.MASTER_PASSWORD | base64 -d
- Log in as the Master Admin Portal administrator to verify these credentials are working.
Additional resources
For more information about the APIManager fields, refer to the Reference documentation.
2.4.4. External databases for 3scale using the operator
When you externalize databases from a Red Hat 3scale API Management deployment, this means to provide isolation from the application and resilience against service disruptions at the database level. The resilience to service disruptions depends on the service level agreements (SLAs) provided by the infrastructure or platform provider where you host the databases. This is not offered by 3scale. For more details on externalizing of databases offered by your chosen deployment, see the associated documentation.
When you use an external databases for 3scale using the operator, the aim is to provide uninterrupted uptime if, for example, one or more databases were to fail.
If you use external databases in your 3scale operator-based deployment, note the following:
- Configure and deploy 3scale critical databases externally. Critical databases include the system database, system redis, and backend redis components. Ensure that you deploy and configure these components in a way that makes them highly available.
Specify the connection endpoints to those components for 3scale by creating their corresponding Kubernetes secrets before deploying 3scale.
- See External databases installation for more information.
- See Enabling Pod Disruption Budgets for more information about non-database deployment configurations.
In the APIManager CR, set the
.spec.externalComponentsattribute to specify that system database, system redis, and backend redis are external:externalComponents: backend: redis: true system: database: true redis: true zync: database: true
Additionally, if you want the zync database to be highly available to avoid zync potentially losing queue jobs data on restart, note the following:
- Deploy and configure the zync database externally. Make sure you deploy and configure the database in a way that it is highly available.
Specify the connection endpoint to the zync database for 3scale by creating its corresponding Kubernetes secret before deploying 3scale.
- See Zync database secret.
-
Configure 3scale by setting the
.spec.externalComponents.zync.databaseattribute in theAPIManagerCR totrueto specify that the zync database is an external database.
2.5. Deployment configuration options for 3scale on OpenShift using the operator
This section provides information about the deployment configuration options for Red Hat 3scale API Management on OpenShift using the operator.
Prerequisites
- Configuring container registry authentication
- Deploying 3scale using the operator first requires that you follow the steps in Installing the 3scale Operator on OpenShift
OpenShift Container Platform 4.x
- A user account with administrator privileges in the OpenShift cluster.
2.5.1. Configuring proxy parameters for embedded APIcast
As a 3scale administrator, you can configure proxy parameters for embedded APIcast staging and production. This section provides reference information for specifying proxy parameters in an APIManager custom resource (CR). In other words, you are using the 3scale operator, an APIManager CR to deploy 3scale on OpenShift.
You can specify these parameters when you deploy an APIManager CR for the first time or you can update a deployed APIManager CR and the operator will reconcile the update. See Deploying the APIManager custom resource.
There are four proxy-related configuration parameters for embedded APIcast:
-
allProxy -
httpProxy -
httpsProxy -
noProxy
allProxy
The allProxy parameter specifies an HTTP or HTTPS proxy to be used for connecting to services when a request does not specify a protocol-specific proxy.
After you set up a proxy, configure APIcast by setting the allProxy parameter to the address of the proxy. Authentication is not supported for the proxy. In other words, APIcast does not send authenticated requests to the proxy.
The value of the allProxy parameter is a string, there is no default, and the parameter is not required. Use this format to set the spec.apicast.productionSpec.allProxy parameter or the spec.apicast.stagingSpec.allProxy parameter:
<scheme>://<host>:<port>
For example:
apiVersion: apps.3scale.net/v1alpha1
kind: APIManager
metadata:
   name: example-apimanager
spec:
   apicast:
      productionSpec:
         allProxy: http://forward-proxy:80
      stagingSpec:
         allProxy: http://forward-proxy:81
httpProxy
The httpProxy parameter specifies an HTTP proxy to be used for connecting to HTTP services.
After you set up a proxy, configure APIcast by setting the httpProxy parameter to the address of the proxy. Authentication is not supported for the proxy. In other words, APIcast does not send authenticated requests to the proxy.
The value of the httpProxy parameter is a string, there is no default, and the parameter is not required. Use this format to set the spec.apicast.productionSpec.httpProxy parameter or the spec.apicast.stagingSpec.httpProxy parameter:
http://<host>:<port>
For example:
apiVersion: apps.3scale.net/v1alpha1
kind: APIManager
metadata:
   name: example-apimanager
spec:
   apicast:
      productionSpec:
         httpProxy: http://forward-proxy:80
      stagingSpec:
         httpProxy: http://forward-proxy:81
httpsProxy
The httpsProxy parameter specifies an HTTPS proxy to be used for connecting to services.
After you set up a proxy, configure APIcast by setting the httpsProxy parameter to the address of the proxy. Authentication is not supported for the proxy. In other words, APIcast does not send authenticated requests to the proxy.
The value of the httpsProxy parameter is a string, there is no default, and the parameter is not required. Use this format to set the spec.apicast.productionSpec.httpsProxy parameter or the spec.apicast.stagingSpec.httpsProxy parameter:
https://<host>:<port>
For example:
apiVersion: apps.3scale.net/v1alpha1
kind: APIManager
metadata:
   name: example-apimanager
spec:
   apicast:
      productionSpec:
         httpsProxy: https://forward-proxy:80
      stagingSpec:
         httpsProxy: https://forward-proxy:81
noProxy
The noProxy parameter specifies a comma-separated list of hostnames and domain names. When a request contains one of these names, APIcast does not proxy the request.
If you need to stop access to the proxy, for example during maintenance operations, set the noProxy parameter to an asterisk (*). This matches all hosts specified in all requests and effectively disables any proxies.
The value of the noProxy parameter is a string, there is no default, and the parameter is not required. Specify a comma-separated string to set the spec.apicast.productionSpec.noProxy parameter or the spec.apicast.stagingSpec.noProxy parameter. For example:
apiVersion: apps.3scale.net/v1alpha1
kind: APIManager
metadata:
   name: example-apimanager
spec:
   apicast:
      productionSpec:
         noProxy: theStore,company.com,big.red.com
      stagingSpec:
noProxy: foo,bar.com,.extra.dot.com2.5.2. Injecting custom environments with the 3scale operator
In a 3scale installation that uses embedded APIcast, you can use the 3scale operator to inject custom environments. Embedded APIcast is also referred to as managed or hosted APIcast. A custom environment defines behavior that APIcast applies to all upstream APIs that the gateway serves. To create a custom environment, define a global configuration in Lua code.
You can inject a custom environment before or after 3scale installation. After injecting a custom environment and after 3scale installation, you can remove a custom environment. The 3scale operator reconciles the changes.
Prerequisites
- The 3scale operator is installed.
Procedure
Write Lua code that defines the custom environment that you want to inject. For example, the following
env1.luafile shows a custom logging policy that the 3scale operator loads for all services.local cjson = require('cjson') local PolicyChain = require('apicast.policy_chain') local policy_chain = context.policy_chain local logging_policy_config = cjson.decode([[ { "enable_access_logs": false, "custom_logging": "\"{{request}}\" to service {{service.id}} and {{service.name}}" } ]]) policy_chain:insert( PolicyChain.load_policy('logging', 'builtin', logging_policy_config), 1) return { policy_chain = policy_chain, port = { metrics = 9421 }, }Create a secret from the Lua file that defines the custom environment. For example:
$ oc create secret generic custom-env-1 --from-file=./env1.lua
A secret can contain multiple custom environments. Specify the
`–from-fileoption for each file that defines a custom environment. The operator loads each custom environment.Define an APIManager custom resource (CR) that references the secret you just created. The following example shows only content relative to referencing the secret that defines the custom environment.
apiVersion: apps.3scale.net/v1alpha1
kind: APIManager
metadata:
  name: apimanager-apicast-custom-environment
spec:
  wildcardDomain: <desired-domain>
  apicast:
    productionSpec:
      customEnvironments:
        - secretRef:
            name: custom-env-1
    stagingSpec:
      customEnvironments:
        - secretRef:
            name: custom-env-1
An APIManager CR can reference multiple secrets that define custom environments. The operator loads each custom environment.
Create the APIManager CR that adds the custom environment. For example:
$ oc apply -f apimanager.yaml
Next steps
You cannot update the content of a secret that defines a custom environment. If you need to update the custom environment you can do either of the following:
-
The recommended option is to create a secret with a different name and update the APIManager (CR) field,
customEnvironments[].secretRef.name. The operator triggers a rolling update and loads the updated custom environment. -
Alternatively, you can update the existing secret, redeploy APIcast by setting
spec.apicast.productionSpec.replicasorspec.apicast.stagingSpec.replicasto 0, and then redploy APIcast again by settingspec.apicast.productionSpec.replicasorspec.apicast.stagingSpec.replicasback to its previous value.
2.5.3. Injecting custom policies with the 3scale operator
In a 3scale installation that uses embedded APIcast, you can use the 3scale operator to inject custom policies. Embedded APIcast is also referred to as managed or hosted APIcast. Injecting a custom policy adds the policy code to APIcast. You can then use either of the following to add the custom policy to an API product’s policy chain:
- 3scale API
-
Productcustom resource (CR)
To use the 3scale Admin Portal to add the custom policy to a product’s policy chain, you must also register the custom policy’s schema with a CustomPolicyDefinition CR. Custom policy registration is a requirement only when you want to use the Admin Portal to configure a product’s policy chain.
You can inject a custom policy as part of or after 3scale installation. After injecting a custom policy and after 3scale installation, you can remove a custom policy by removing its specification from the APIManager CR. The 3scale operator reconciles the changes.
Prerequisites
- You are installing or you previously installed the 3scale operator.
-
You have defined a custom policy as described in Write your own policy. That is, you have already created, for example, the
my-policy.lua,apicast-policy.json, andinit.luafiles that define a custom policy,
Procedure
Create a secret from the files that define one custom policy. For example:
$ oc create secret generic my-first-custom-policy-secret \
 --from-file=./apicast-policy.json \
 --from-file=./init.lua \
 --from-file=./my-first-custom-policy.lua
If you have more than one custom policy, create a secret for each custom policy. A secret can contain only one custom policy.
Define an APIManager CR that references each secret that contains a custom policy. You can specify the same secret for APIcast staging and APIcast production. The following example shows only content relative to referencing secrets that contain custom policies.
apiVersion: apps.3scale.net/v1alpha1
kind: APIManager
metadata:
  name: apimanager-apicast-custom-policy
spec:
  apicast:
    stagingSpec:
      customPolicies:
        - name: my-first-custom-policy
          version: "0.1"
          secretRef:
            name: my-first-custom-policy-secret
        - name: my-second-custom-policy
          version: "0.1"
          secretRef:
            name: my-second-custom-policy-secret
    productionSpec:
      customPolicies:
        - name: my-first-custom-policy
          version: "0.1"
          secretRef:
            name: my-first-custom-policy-secret
        - name: my-second-custom-policy
          version: "0.1"
          secretRef:
            name: my-second-custom-policy-secret
An APIManager CR can reference multiple secrets that define different custom policies. The operator loads each custom policy.
Create the APIManager CR that references the secrets that contain the custom policies. For example:
$ oc apply -f apimanager.yaml
Next steps
You cannot update the content of a secret that defines a custom policy. If you need to update the custom policy you can do either of the following:
-
The recommended option is to create a secret with a different name and update the APIManager CR
customPoliciessection to refer to the new secret. The operator triggers a rolling update and loads the updated custom policy. -
Alternatively, you can update the existing secret, redeploy APIcast by setting
spec.apicast.productionSpec.replicasorspec.apicast.stagingSpec.replicasto 0, and then redploy APIcast again by settingspec.apicast.productionSpec.replicasorspec.apicast.stagingSpec.replicasback to its previous value.
2.5.4. Configuring OpenTracing with the 3scale operator
In a 3scale installation that uses embedded APIcast, you can use the 3scale operator to configure OpenTracing. You can configure OpenTracing in the staging or production environments or both environments. By enabling OpenTracing, you get more insight and better observability on the APIcast instance.
Prerequisites
- The 3scale operator is installed or you are in the process of installing it.
- Prerequisites listed in Configuring APIcast to use OpenTracing.
- Jaeger is installed.
Procedure
Define a secret that contains your OpenTracing configuration details in
stringData.config. This is the only valid value for the attribute that contains your OpenTracing configuration details. Any other specification prevents APIcast from receiving your OpenTracing configuration details. The folowing example shows a valid secret definition:apiVersion: v1 kind: Secret metadata: name: myjaeger stringData: config: |- { "service_name": "apicast", "disabled": false, "sampler": { "type": "const", "param": 1 }, "reporter": { "queueSize": 100, "bufferFlushInterval": 10, "logSpans": false, "localAgentHostPort": "jaeger-all-in-one-inmemory-agent:6831" }, "headers": { "jaegerDebugHeader": "debug-id", "jaegerBaggageHeader": "baggage", "TraceContextHeaderName": "uber-trace-id", "traceBaggageHeaderPrefix": "testctx-" }, "baggage_restrictions": { "denyBaggageOnInitializationFailure": false, "hostPort": "127.0.0.1:5778", "refreshInterval": 60 } } type: OpaqueCreate the secret. For example, if you saved the previous secret definition in the
myjaeger.yamlfile, you would run the following command:$ oc create -f myjaeger.yaml
Define an APIManager custom resource (CR) that specifies
OpenTracingattributes. In the CR definition, set theopenTracing.tracingConfigSecretRef.nameattribute to the name of the secret that contains your OpenTracing configuration details. The following example shows only content relative to configuring OpenTracing.apiVersion: apps.3scale.net/v1alpha1 kind: APIManager metadata: name: apimanager1 spec: apicast: stagingSpec: ... openTracing: enabled: true tracingLibrary: jaeger tracingConfigSecretRef: name: myjaeger productionSpec: ... openTracing: enabled: true tracingLibrary: jaeger tracingConfigSecretRef: name: myjaegerCreate the APIManager CR that configures OpenTracing. For example, if you saved the APIManager CR in the
apimanager1.yamlfile, you would run the following command:$ oc apply -f apimanager1.yaml
Next steps
Depending on how OpenTracing is installed, you should see the traces in the Jaeger service user interface.
Additional resource
2.5.5. Enabling TLS at the pod level with the 3scale operator
3scale deploys two APIcast instances, one for production and the other for staging. TLS can be enabled for only production or only staging, or for both instances.
Prerequisites
- A valid certificate for enabling TLS.
Procedure
Create a secret from your valid certificate, for example:
$ oc create secret tls mycertsecret --cert=server.crt --key=server.key
The configuration exposes secret references in the APIManager custom resource (CR). You create the secret and then reference the name of the secret in the APIManager CR as follows:
-
Production: The APIManager CR exposes the certificate in the
.spec.apicast.productionSpec.httpsCertificateSecretReffield. Staging: The APIManager CR exposes the certificate in the
.spec.apicast.stagingSpec.httpsCertificateSecretReffield.Optionally, you can configure the following:
-
httpsPortindicates which port APIcast should start listening on for HTTPS connections. If this clashes with the HTTP port APIcast uses this port for HTTPS only. httpsVerifyDepthdefines the maximum length of the client certificate chain.NoteProvide a valid certificate and reference from the APIManager CR. If the configuration can access
httpsPortbut nothttpsCertificateSecretRef, APIcast uses an embedded self-signed certificate. This is not recommended.
-
Production: The APIManager CR exposes the certificate in the
- Click Operators > Installed Operators.
- From the list of Installed Operators, click 3scale Operator.
- Click the API Manager tab.
- Click Create APIManager.
Add the following YAML definitions to the editor.
If enabling for production, configure the following YAML defintions:
spec:
  apicast:
    productionSpec:
      httpsPort: 8443
      httpsVerifyDepth: 1
      httpsCertificateSecretRef:
        name: mycertsecret
If enabling for staging, configure the following YAML defintions:
spec:
  apicast:
    stagingSpec:
      httpsPort: 8443
      httpsVerifyDepth: 1
      httpsCertificateSecretRef:
        name: mycertsecret
- Click Create.
2.5.6. Proof of concept for evaluation deployment
The following sections describe the configuration options applicable to the proof of concept for an evaluation deployment of 3scale. This deployment uses internal databases as default.
The configuration for external databases is the standard deployment option for production environments.
2.5.6.1. Default deployment configuration
Containers will have Kubernetes resource limits and requests.
- This ensures a minimum performance level.
- It limits resources to allow external services and allocation of solutions.
- Deployment of internal databases.
File storage will be based on Persistence Volumes (PV).
- One will require read, write, execute (RWX) access mode.
- OpenShift configured to provide them upon request.
- Deploy MySQL as the internal relational database.
The default configuration option is suitable for proof of concept (PoC) or evaluation by a customer.
One, many, or all of the default configuration options can be overridden with specific field values in the APIManager CR. The 3scale operator allows all available combinations.
2.5.6.2. Evaluation installation
For and evaluation installation, containers will not have kubernetes resource limits and requests specified. For example:
- Small memory footprint
- Fast startup
- Runnable on laptop
- Suitable for presale/sales demos
apiVersion: apps.3scale.net/v1alpha1
kind: APIManager
metadata:
  name: example-apimanager
spec:
  wildcardDomain: lvh.me
  resourceRequirementsEnabled: false
Additional resources
- See APIManager CR for more information.
2.5.7. External databases installation
When you externalize databases from a Red Hat 3scale API Management deployment, this means to provide isolation from the application and resilience against service disruptions at the database level. The resilience to service disruptions depends on the service level agreements (SLAs) provided by the infrastructure or platform provider where you host the databases. This is not offered by 3scale. For more details on externalizing of databases offered by your chosen deployment, see the associated documentation.
An external databases installation is suitable for production where you want to provide uninterrupted uptime or where you plan to reuse your own databases.
When enabling the 3scale external databases installation mode, you can configure one or more of the following databases as external to 3scale:
-
backend-redis -
system-redis -
system-database(mysql,postgresql, ororacle) -
zync-database
Before creating an APIManager CR to deploy 3scale, you must provide the following connection settings for the external databases by using OpenShift secrets.
Additional resources
2.5.7.1. Backend Redis secret
Deploy two external Redis instances and fill in the connection settings as shown in the following example:
apiVersion: v1
kind: Secret
metadata:
  name: backend-redis
stringData:
  REDIS_STORAGE_URL: "redis://backend-redis-storage"
  REDIS_STORAGE_SENTINEL_HOSTS: "redis://sentinel-0.example.com:26379,redis://sentinel-1.example.com:26379, redis://sentinel-2.example.com:26379"
  REDIS_STORAGE_SENTINEL_ROLE: "master"
  REDIS_QUEUES_URL: "redis://backend-redis-queues"
  REDIS_QUEUES_SENTINEL_HOSTS: "redis://sentinel-0.example.com:26379,redis://sentinel-1.example.com:26379, redis://sentinel-2.example.com:26379"
  REDIS_QUEUES_SENTINEL_ROLE: "master"
type: Opaque
The Secret name must be backend-redis.
2.5.7.2. System Redis secret
Deploy two external Redis instances and fill in the connection settings as shown in the following example:
apiVersion: v1
kind: Secret
metadata:
  name: system-redis
stringData:
  URL: "redis://system-redis"
  SENTINEL_HOSTS: "redis://sentinel-0.example.com:26379,redis://sentinel-1.example.com:26379, redis://sentinel-2.example.com:26379"
  SENTINEL_ROLE: "master"
  NAMESPACE: ""
type: Opaque
The Secret name must be system-redis.
2.5.7.3. System database secret
-
The Secret name must be
system-database.
When you are deploying 3scale, you have three alternatives for your system database. Configure different attributes and values for each alternative’s related secret.
- MySQL
- PostgreSQL
- Oracle Database
To deploy a MySQL, PostgreSQL, or an Oracle Database system database secret, fill in the connection settings as shown in the following examples:
MySQL system database secret
apiVersion: v1
kind: Secret
metadata:
  name: system-database
stringData:
  URL: "mysql2://{DB_USER}:{DB_PASSWORD}@{DB_HOST}:{DB_PORT}/{DB_NAME}"
type: Opaque
If you use MySQL 8.0 with 3scale 2.12, you must set the authentication plugin to mysql_native_password. Add the following to the MySQL configuration file:
[mysqld]
default_authentication_plugin=mysql_native_password
PostgreSQL system database secret
apiVersion: v1
kind: Secret
metadata:
  name: system-database
stringData:
  URL: "postgresql://{DB_USER}:{DB_PASSWORD}@{DB_HOST}:{DB_PORT}/{DB_NAME}"
type: Opaque
Oracle system database secret
apiVersion: v1
kind: Secret
metadata:
  name: system-database
stringData:
  URL: "oracle-enhanced://{DB_USER}:{DB_PASSWORD}@{DB_HOST}:{DB_PORT}/{DB_NAME}"
  ORACLE_SYSTEM_PASSWORD: "{SYSTEM_PASSWORD}"
type: Opaque
-
{DB_USER}and{DB_PASSWORD}are the username and password of the regular non-system user. -
{DB_NAME}is the Oracle Database service name. -
ORACLE_SYSTEM_PASSWORDis optional, see Configure a database user.
2.5.7.4. Zync database secret
In a zync database setup, when the spec.externalComponents.zync.database field is set to true, you must create a secret named zync before you deploy 3scale. In this secret, set the DATABASE_URL and DATABASE_PASSWORD fields to the values that point to your external zync database, for example:
apiVersion: v1
kind: Secret
metadata:
  name: zync
stringData:
  DATABASE_URL: postgresql://<zync-db-user>:<zync-db-password>@<zync-db-host>:<zync-db-port>/zync_production
  ZYNC_DATABASE_PASSWORD: <zync-db-password>
type: Opaque
The zync database must be in high-availability mode.
2.5.7.5. APIManager custom resources to deploy 3scale
-
When you enable external components, you must create a secret for each external component (
backend-redis,system-redis,system-database,zync) before you deploy 3scale. -
For an external
system-database, choose only one type of database to externalize.
Configuration of the APIManager custom resource (CR) depends on whether or not your choice of database is external to your 3scale deployment.
If backend-redis, system-redis, or system-database is external to 3scale, populate the APIManager CR externalComponents object as shown in the following example:
apiVersion: apps.3scale.net/v1alpha1
kind: APIManager
metadata:
  name: example-apimanager
spec:
  wildcardDomain: lvh.me
  externalComponents:
    system:
      database: true
Additional resources
2.5.8. Eabling pod affinity in the 3scale operator
You can enable pod affinities in the 3scale operator for every component. This ensures distribution of pod replicas from each deploymentConfig across different nodes of the cluster, so they will be evenly balanced across different availability zones (AZ).
2.5.8.1. Customizing node affinity and tolerations at component level
Customize kubernetes affinity and tolerations in your 3scale solution through the APIManager CR attributes. You can then customize to schedule different 3scale components onto kubernetes nodes.
For example, to set a custom node affinity for backend-listener and custom tolerations for system-memcached, do the following:
Custom affinity and tolerations
apiVersion: apps.3scale.net/v1alpha1
kind: APIManager
metadata:
  name: example-apimanager
spec:
  backend:
    listenerSpec:
      affinity:
        nodeAffinity:
          requiredDuringSchedulingIgnoredDuringExecution:
            nodeSelectorTerms:
            - matchExpressions:
              - key: "kubernetes.io/hostname"
                operator: In
                values:
                - ip-10-96-1-105
              - key: "beta.kubernetes.io/arch"
                operator: In
                values:
                - amd64
  system:
    memcachedTolerations:
    - key: key1
      value: value1
      operator: Equal
      effect: NoSchedule
    - key: key2
      value: value2
      operator: Equal
      effect: NoSchedule
Add the following affinity block to apicastProductionSpec or to any non-database deploymentConfig. This adds a soft podAntiAffinity configuration using preferredDuringSchedulingIgnoredDuringExecution. The scheduler will try to run this set of apicast-production pods in different hosts from different AZs. If it is not possible, then allow them to run elsewhere:
Soft podAntiAffinity
affinity:
        podAntiAffinity:
          preferredDuringSchedulingIgnoredDuringExecution:
            - weight: 100
              podAffinityTerm:
                labelSelector:
                  matchLabels:
                    deploymentConfig: apicast-production
                topologyKey: kubernetes.io/hostname
            - weight: 99
              podAffinityTerm:
                labelSelector:
                  matchLabels:
                    deploymentConfig: apicast-production
                topologyKey: topology.kubernetes.io/zone
In the following example, a hard podAntiAffinity configuration is set using requiredDuringSchedulingIgnoredDuringExecution. Conditions must be met to schedule a pod onto a node. A risk exists, for example, that you will not be able to schedule new pods on a cluster with low free resources:
Hard podAntiAffinity
affinity:
        podAntiAffinity:
          requiredDuringSchedulingIgnoredDuringExecution:
            - weight: 100
              podAffinityTerm:
                labelSelector:
                  matchLabels:
                    deploymentConfig: apicast-production
                topologyKey: kubernetes.io/hostname
            - weight: 99
              podAffinityTerm:
                labelSelector:
                  matchLabels:
                    deploymentConfig: apicast-production
                topologyKey: topology.kubernetes.io/zone
Additional resources
See APIManager CDR reference for a full list of attributes related to affinity and tolerations.
2.5.9. Multiple clusters in multiple availability zones
In case of failure, bringing a passive cluster into active mode disrupts the provision of the service until the procedure finishes. Due to this disruption, be sure to have a maintenance window.
This documentation focuses on deployment using Amazon Web Services (AWS). The same configuration options apply to other public cloud vendors where the provider’s managed database services offer, for example, support for multiple availability zones and multiple regions.
When you want to install 3scale on several OpenShift clusters and high availability (HA) zones, there are options available which you can refer to here.
In multiple cluster installation options, clusters work in an active/passive configuration, with the failover procedure involving a few manual steps.
2.5.9.1. Prerequisites for multiple clusters installations
Use the following in 3scale installations that involve using several OpenShift clusters:
-
Use pod affinities with both
kubernetes.io/hostnameandtopology.kubernetes.io/zonerules in the APIManager custom resource (CR). - Use pod disruption budgets in the APIManager CR.
- A 3scale installation over multiple clusters must use the same shared wildcardDomain attribute specifications in the APIManager CR. The use of a different domain for each cluster is not allowed in this installation mode, as the information stored in the database would be conflicting.
You must manually deploy the secrets containing credentials, such as tokens and passwords, in all clusters with the same values. The 3scale operator creates them with secure random values on every cluster. In this case, you need to have the same credentials in both clusters. You will find the list of secrets and how to configure them in the 3scale operator documentation. The following is the list of secrets you must mirror in both clusters:
-
backend-internal-api -
system-app -
system-events-hook -
system-master-apicast system-seedYou must manually deploy secrets with the database connection strings for
backend-redis,system-redis,system-databaseandzync. See External databases installation.- Databases shared among clusters must use the same values on all clusters.
- If each cluster have their own databases, they must use different values on each cluster.
-
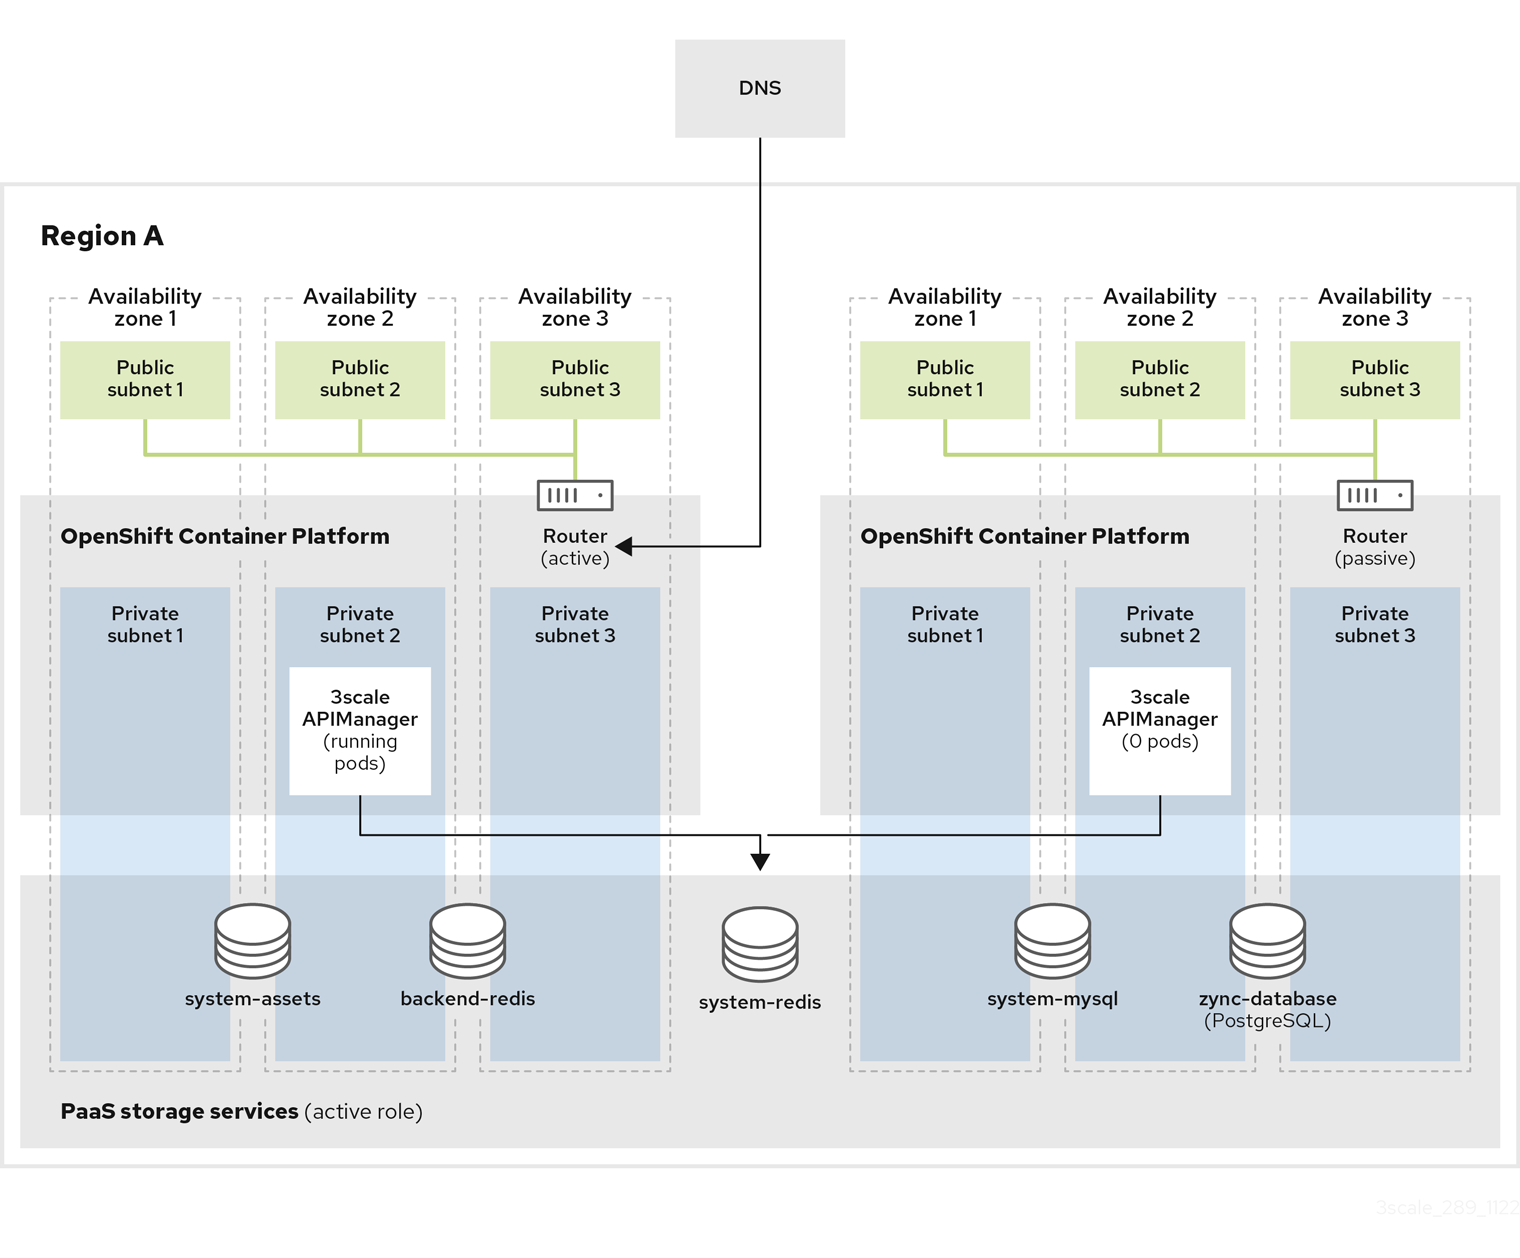
2.5.9.2. Active-passive clusters on the same region with shared databases
This setup consists of having two or more clusters in the same region and deploying 3scale in active-passive mode. One cluster is active, receiving traffic, the others are in standby mode without receiving traffic, therefore passive, but prepared to assume the active role in case there is a failure in the active cluster.
In this installation option, only a single region is in use and databases will be shared among all clusters.
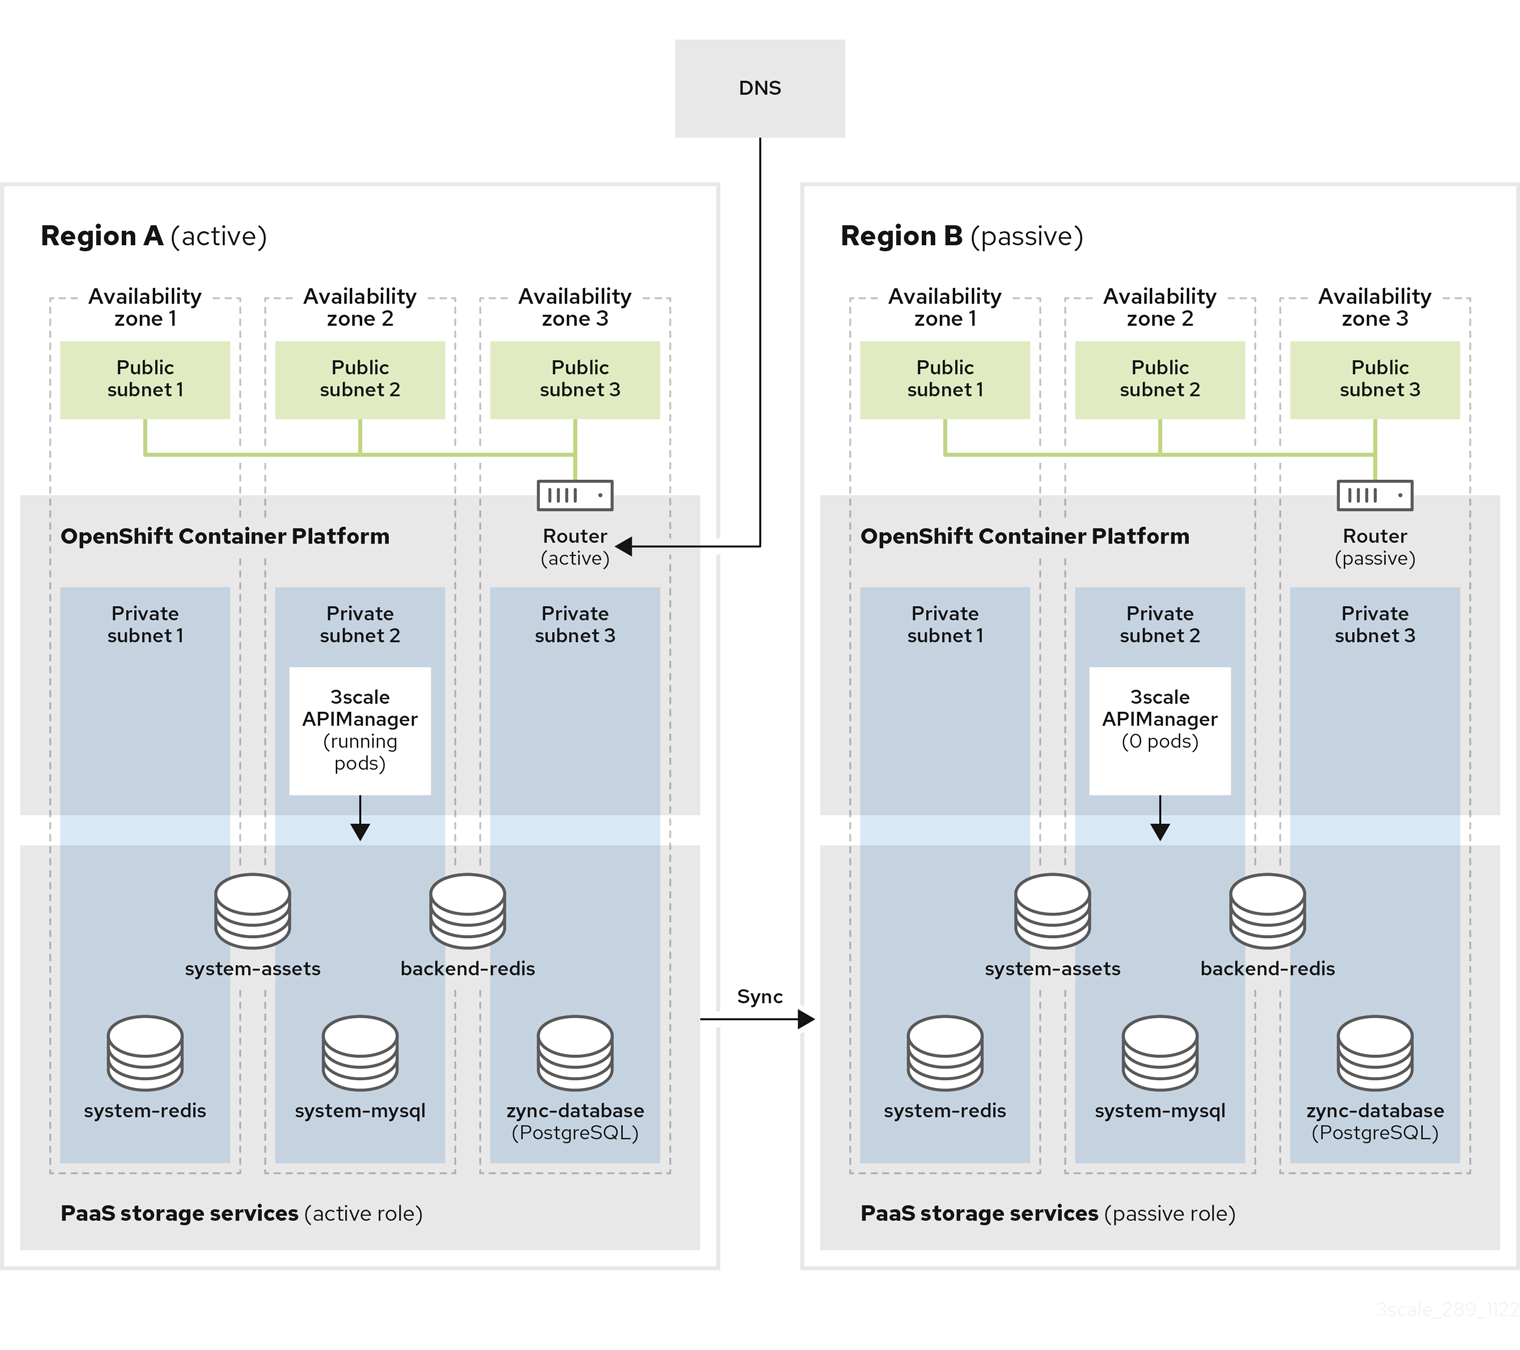
2.5.9.5. Active-passive clusters on different regions with synced databases
This setup consists of having two or more clusters in different regions and deploying 3scale in active-passive mode. One cluster is active, receiving traffic, the others are in standby mode without receiving traffic, therefore passive, but prepared to assume the active role in case there is a failure in the active cluster.
To ensure good database access latency, each cluster has its own database instances. The databases from the active 3scale installation are replicated to the read-replica databases of the 3scale passive installations so the data is available and up to date in all regions for a possible failover.
2.5.9.6. Configuring and installing synced databases
Procedure
- Create two or more OpenShift clusters in different regions using different availability zones. A minimum of three zones is recommended.
Create all required AWS ElastiCache instances with Amazon RDS Multi-AZ enabled on every region:
- Two AWS EC for Backend Redis database: one per region.
- Two AWS EC for System Redis database: one per region.
- Use the cross-region replication with the Global Datastore feature enabled, so the databases from passive regions are read-replicas from the master databases at the active region.
Create all required AWS RDS instances with Amazon RDS Multi-AZ enabled on every region:
- Two AWS RDS for the System database.
- Two AWS RDS for Zync database.
- Use cross-region replication, so the databases from passive regions are read-replicas from the master databases at the active region.
- Configure a AWS S3 bucket for the system assets on every region using cross-region replication.
- Create a custom domain in AWS Route53 or your DNS provider and point it to the OpenShift Router of the active cluster. This must coincide with the wildcardDomain attribute from APIManager CR.
Install 3scale in the passive cluster. The APIManager CR should be identical to the one used in the previous step. When all pods are running, change the APIManager to deploy 0 replicas for all the
backend,system,zync, andAPIcastpods.- Set replicas to 0 to avoid consuming jobs from active database. Deployment will fail due to pod dependencies if each replica is set to 0 at first. For example, pods checking that others are running. First deploy as normal, then set replicas to 0.
2.5.9.7. Manual failover synced databases
Procedure
Do steps 1, 2 and 3 from Manual Failover shared databases.
- Every cluster has its own independent databases: read-replicas from the master at the active region.
- You must manually execute a failover on every database to select the new master on the passive region, which then becomes the active region.
Manual failovers of the databases to execute are:
- AWS RDS: System and Zync.
- AWS ElastiCaches: Backend and System.
- Do step 4 from Manual Failover shared databases.
2.5.10. Amazon Simple Storage Service 3scale fileStorage installation
Before creating APIManager custom resource (CR) to deploy 3scale, provide connection settings for the Amazon Simple Storage Service (Amazon S3) service by using an OpenShift secret.
- Skip this section if you are deploying 3scale with the local filesystem storage.
- The name you choose for a secret can be any name as long as it is not an existing secret name and it will be referenced in the APIManager CR.
-
If
AWS_REGIONis not provided for S3 compatible storage, usedefaultor the deployment will fail. - Disclaimer: Links contained herein to external website(s) are provided for convenience only. Red Hat has not reviewed the links and is not responsible for the content or its availability. The inclusion of any link to an external website does not imply endorsement by Red Hat of the website or their entities, products or services. You agree that Red Hat is not responsible or liable for any loss or expenses that may result due to your use of (or reliance on) the external site or content.
2.5.10.1. Amazon S3 bucket creation
Prerequisites
- You must have an Amazon Web Services (AWS) account.
Procedure
- Create a bucket for storing the system assets.
- Disable the public access blocker of S3 when using the Logo feature of the Developer Portal.
Create an Identity and Access Management (IAM) policy with the following minimum permissions:
{ "Version": "2012-10-17", "Statement": [ { "Effect": "Allow", "Action": "s3:ListAllMyBuckets", "Resource": "arn:aws:s3:::*" }, { "Effect": "Allow", "Action": "s3:*", "Resource": [ "arn:aws:s3:::<target_bucket_name>", 1 "arn:aws:s3:::<target_bucket_name>/*" 2 ] } ] }Create a CORS configuration with the following rules:
<?xml version="1.0" encoding="UTF-8"?>
<CORSConfiguration xmlns="http://s3.amazonaws.com/doc/2006-03-01/">
<CORSRule>
    <AllowedOrigin>https://*</AllowedOrigin>
    <AllowedMethod>GET</AllowedMethod>
</CORSRule>
</CORSConfiguration>
2.5.10.2. Create an OpenShift secret
The following examples show 3scale fileStorage using Amazon S3 instead of persistent volume claim (PVC).
AN AWS S3 compatible provider can be configured in the S3 secret with AWS_HOSTNAME, AWS_PATH_STYLE, and AWS_PROTOCOL optional keys. See the fileStorage S3 credentials secret fields table for more details.
In the following example, Secret name can be anything, as it is be referenced in the APIManager CR.
apiVersion: v1
kind: Secret
metadata:
  creationTimestamp: null
  name: aws-auth
stringData:
  AWS_ACCESS_KEY_ID: <ID_123456>
  AWS_SECRET_ACCESS_KEY: <ID_98765544>
  AWS_BUCKET: <mybucket.example.com>
  AWS_REGION: eu-west-1
type: Opaque
Lastly, create the APIManager CR to deploy 3scale.
apiVersion: apps.3scale.net/v1alpha1
kind: APIManager
metadata:
  name: <example_apimanager>
  namespace: <3scale_test>
spec:
  wildcardDomain: lvh.me
  system:
    fileStorage:
      simpleStorageService:
        configurationSecretRef:
          name: aws-auth
Check APIManager SystemS3Spec.
The following table shows the fileStorage Amazon S3 credentials secret field requirements for Identity and Access Management (IAM) and Security Token Service (STS) settings:
- The S3 authentication method using Secure Token Service (STS) is for short-term, limited-privilege security credentials.
- S3 Identity and Access Management (IAM) is for long-term privilege security credentials.
| Field | Description | Required for IAM | Required for STS |
|---|---|---|---|
| AWS_ACCESS_KEY_ID |
AWS Access Key ID to use in S3 Storage for system’s | Yes | No |
| AWS_SECRET_ACCESS_KEY |
AWS Access Key Secret to use in S3 Storage for system’s | Yes | No |
| AWS_BUCKET |
The S3 bucket to be used as system’s | Yes | Yes |
| AWS_REGION |
The region of the S3 bucket to be used as system’s | Yes | Yes |
| AWS_HOSTNAME | Default: Amazon endpoints - An AWS S3 compatible provider endpoint hostname | No | No |
| AWS_PROTOCOL |
Default: | No | No |
| AWS_PATH_STYLE |
Default: | No | No |
| AWS_ROLE_ARN | ARN of the Role which has a policy attached to authenticate using AWS STS | No | Yes |
| AWS_WEB_IDENTITY_TOKEN_FILE |
Path to mounted token file location. For example: | No | Yes |
Additional resources
2.5.11. PostgreSQL installation
A MySQL internal relational database is the default deployment. This deployment configuration can be overridden to use PostgreSQL instead.
apiVersion: apps.3scale.net/v1alpha1
kind: APIManager
metadata:
  name: example-apimanager
spec:
  wildcardDomain: lvh.me
  system:
    database:
      postgresql: {}
Additional resources
- See APIManager DatabaseSpec for more information.
2.5.12. Configuring SMTP variables (optional)
3scale uses email to send notifications and invite new users. If you intend to use these features, you must provide your own SMTP server and configure SMTP variables in the system-smtp secret.
Perform the following steps to configure the SMTP variables in the system-smtp secret.
Procedure
If you are not already logged in, log in to OpenShift:
$ oc login
Using the
oc patchcommand, specify the secret type wheresystem-smtpis the name of the secret, followed by the-poption, and write the new values in JSON for the following variables:Table 2.2. system-smtp Field Description Default value addressThis is the address (hostname or IP) of the remote mail server to use. If this is set to a value different than
"", system will use the mail server to send mails related to events that happen in the API management solution.""portThis is the port of the remote mail server to use.
""domainUse
domainif the mail server requires a HELO domain.""authenticationUse if the mail server requires authentication. Set the authentication types:
plainto send the password in the clear,loginto send password Base64 encoded, orcram_md5to combine a challenge/response mechanism based on the HMAC-MD5 algorithm.""usernameUse
usernameif the mail server requires authentication and the authentication type requires it.""passwordUse
passwordif the mail server requires authentication and the authentication type requires it.""openssl.verify.modeWhen using TLS, you can set how OpenSSL checks the certificate. This is useful if you need to validate a self-signed and/or a wildcard certificate. You can use the name of an OpenSSL verify constant:
noneorpeer.""from_addressfromaddress value for the no-reply mail.""Examples
$ oc patch secret system-smtp -p '{"stringData":{"address":"<your_address>"}}'
$ oc patch secret system-smtp -p '{"stringData":{"username":"<your_username>"}}'
$ oc patch secret system-smtp -p '{"stringData":{"password":"<your_password>"}}'
After you have set the secret variables, redeploy the
system-appandsystem-sidekiqpods:$ oc rollout latest dc/system-app $ oc rollout latest dc/system-sidekiq
Check the status of the rollout to ensure it has finished:
$ oc rollout status dc/system-app
$ oc rollout status dc/system-sidekiq
2.5.13. Customizing compute resource requirements at component level
Customize Kubernetes Compute Resource Requirements in your 3scale solution through the APIManager custom resource (CR) attributes. Do this to customize compute resource requirements, which is CPU and memory, assigned to a specific APIManager component.
The following example outlines how to customize compute resource requirements for the system-master’s system-provider container, for the backend-listener and for the zync-database:
apiVersion: apps.3scale.net/v1alpha1
kind: APIManager
metadata:
  name: example-apimanager
spec:
  backend:
    listenerSpec:
      resources:
        requests:
          memory: "150Mi"
          cpu: "300m"
        limits:
          memory: "500Mi"
          cpu: "1000m"
  system:
    appSpec:
      providerContainerResources:
        requests:
          memory: "111Mi"
          cpu: "222m"
        limits:
          memory: "333Mi"
          cpu: "444m"
  zync:
    databaseResources:
      requests:
        memory: "111Mi"
        cpu: "222m"
      limits:
        memory: "333Mi"
        cpu: "444m"
Additional resources
See APIManager CRD reference for more information about how to specify component-level CR requirements.
2.5.13.1. Default APIManager components compute resources
When you configure the APIManager spec.resourceRequirementsEnabled attribute as true, the default compute resources are set for the APIManager components.
The specific compute resources default values that are set for the APIManager components are shown in the following table.
2.5.13.1.1. CPU and memory units
The following list explains the units you will find mentioned in the compute resources default values table. For more information on CPU and memory units, see Managing Resources for Containers.
Resource units explanation
- m - milliCPU or millicore
- Mi - mebibytes
- Gi - gibibyte
- G - gigabyte
| Component | CPU requests | CPU limits | Memory requests | Memory limits |
|---|---|---|---|---|
| system-app’s system-master | 50m | 1000m | 600Mi | 800Mi |
| system-app’s system-provider | 50m | 1000m | 600Mi | 800Mi |
| system-app’s system-developer | 50m | 1000m | 600Mi | 800Mi |
| system-sidekiq | 100m | 1000m | 500Mi | 2Gi |
| system-sphinx | 80m | 1000m | 250Mi | 512Mi |
| system-redis | 150m | 500m | 256Mi | 32Gi |
| system-mysql | 250m | No limit | 512Mi | 2Gi |
| system-postgresql | 250m | No limit | 512Mi | 2Gi |
| backend-listener | 500m | 1000m | 550Mi | 700Mi |
| backend-worker | 150m | 1000m | 50Mi | 300Mi |
| backend-cron | 50m | 150m | 40Mi | 80Mi |
| backend-redis | 1000m | 2000m | 1024Mi | 32Gi |
| apicast-production | 500m | 1000m | 64Mi | 128Mi |
| apicast-staging | 50m | 100m | 64Mi | 128Mi |
| zync | 150m | 1 | 250M | 512Mi |
| zync-que | 250m | 1 | 250M | 512Mi |
| zync-database | 50m | 250m | 250M | 2G |
2.5.14. Customizing node affinity and tolerations at component level
Customize Kubernetes Affinity and Tolerations in your Red Hat 3scale API Management solution through the APIManager CR attributes to customize where and how the different 3scale components of an installation are scheduled onto Kubernetes Nodes.
The following example sets a custom node affinity for the backend. It also sets listener and custom tolerations for the system-memcached:
apiVersion: apps.3scale.net/v1alpha1
kind: APIManager
metadata:
  name: example-apimanager
spec:
  backend:
    listenerSpec:
      affinity:
        nodeAffinity:
          requiredDuringSchedulingIgnoredDuringExecution:
            nodeSelectorTerms:
            - matchExpressions:
              - key: "kubernetes.io/hostname"
                operator: In
                values:
                - ip-10-96-1-105
              - key: "beta.kubernetes.io/arch"
                operator: In
                values:
                - amd64
  system:
    memcachedTolerations:
    - key: key1
      value: value1
      operator: Equal
      effect: NoSchedule
    - key: key2
      value: value2
      operator: Equal
      effect: NoSchedule
Additional resources
See APIManager CRD reference for a full list of attributes related to affinity and tolerations.
2.5.15. Reconciliation
Once 3scale has been installed, the 3scale operator enables updating a given set of parameters from the custom resource (CR) to modify system configuration options. Modifications are made by hot swapping, that is, without stopping or shutting down the system.
Not all the parameters of the APIManager custom resource definitions (CRDs) are reconcilable.
The following is a list of reconcilable parameters:
2.5.15.1. Resources
Resource limits and requests for all 3scale components.
apiVersion: apps.3scale.net/v1alpha1
kind: APIManager
metadata:
  name: example-apimanager
spec:
  resourceRequirementsEnabled: true/false
2.5.15.2. Backend replicas
Backend components pod count.
apiVersion: apps.3scale.net/v1alpha1
kind: APIManager
metadata:
  name: example-apimanager
spec:
  backend:
    listenerSpec:
      replicas: X
    workerSpec:
      replicas: Y
    cronSpec:
      replicas: Z
2.5.15.3. APIcast replicas
APIcast staging and production components pod count.
apiVersion: apps.3scale.net/v1alpha1
kind: APIManager
metadata:
  name: example-apimanager
spec:
  apicast:
    productionSpec:
      replicas: X
    stagingSpec:
      replicas: Z
2.5.15.4. System replicas
System app and system sidekiq components pod count
apiVersion: apps.3scale.net/v1alpha1
kind: APIManager
metadata:
  name: example-apimanager
spec:
  system:
    appSpec:
      replicas: X
    sidekiqSpec:
      replicas: Z
2.5.15.5. Zync replicas
Zync app and que components pod count
apiVersion: apps.3scale.net/v1alpha1
kind: APIManager
metadata:
  name: example-apimanager
spec:
  zync:
    appSpec:
      replicas: X
    queSpec:
      replicas: Z
2.6. Installing 3scale with the operator using Oracle as the system database
As a Red Hat 3scale API Management administrator, you can install the 3scale with the operator using the Oracle Database. By default, 3scale 2.13 has a component called system that stores configuration data in a MySQL database. You can override the default database and store your information in an external Oracle Database.
- The Oracle Database is not supported with OpenShift Container Platform (OCP) versions 4.2 and 4.3 when you are performing an operator-only installation of 3scale. For more information, refer to the Red Hat 3scale API Management Supported Configurations page.
-
In this documentation
myregistry.example.comis used as an example of the registry URL. Replace it with your registry URL. - Disclaimer: Links contained herein to external website(s) are provided for convenience only. Red Hat has not reviewed the links and is not responsible for the content or its availability. The inclusion of any link to an external website does not imply endorsement by Red Hat of the website or their entities, products or services. You agree that Red Hat is not responsible or liable for any loss or expenses that may result due to your use of (or reliance on) the external site or content.
Prerequisites
- A container registry to push container images, accessible by the OCP cluster where 3scale installed.
An installation of the 3scale operator.
- Do not install the APIManager CR, as it will be created in the following procedure.
- A Registry service account for 3scale.
- A supported version of the Oracle Database accessible from your OpenShift cluster.
-
Access to the Oracle Database
SYSTEMuser for installation procedures.
To install 3scale with the operator using Oracle as the system database, use the following steps:
2.6.1. Preparing the Oracle Database
As a 3scale administrator, you must fully prepare the Oracle Database for your 3scale installation when you decide to use it for the System component.
Procedure
- Create a new database.
Apply the following settings:
ALTER SYSTEM SET max_string_size=extended SCOPE=SPFILE;
Configure a database user
There are two options for setting up Oracle Database integration in 3scale: with or without providing the Oracle
SYSTEMuser password.3scale uses the
SYSTEMuser only for the initial setup, which consist in creating a regular user and granting it the required privileges. The following SQL commands will set up a regular user with proper permissions. ({DB_USER}and{DB_PASSWORD}are placeholders that need to be replaced with actual values):CREATE USER {DB_USER} IDENTIFIED BY {DB_PASSWORD}; GRANT unlimited tablespace TO {DB_USER}; GRANT create session TO {DB_USER}; GRANT create table TO {DB_USER}; GRANT create view TO {DB_USER}; GRANT create sequence TO {DB_USER}; GRANT create trigger TO {DB_USER}; GRANT create procedure TO {DB_USER};Using the
SYSTEMuser:-
Provide the
SYSTEMuser password inORACLE_SYSTEM_PASSWORDfield of thesystem-databasesecret. - The regular user does not need to exist before the installation. It will be created by the 3scale initialization script.
-
Provide the desired username and password for the regular user in the connection string (e.g.
oracle-enhanced://{DB_USER}:{DB_PASSWORD}@{DB_HOST}:{DB_PORT}/{DB_NAME}) in theURLfield of thesystem-databasesecret. -
The password for the regular Oracle Database non-system user must be unique and not match the
SYSTEMuser password. If the user with the specified username already exists, the 3scale initialization script will attempt to update the password using the following command:
ALTER USER {DB_USER} IDENTIFIED BY {DB_PASSWORD}Your database configuration might prevent this command from completing successfully if the parameters
PASSWORD_REUSE_TIMEandPASSWORD_REUSE_MAXare set in a way that restricts reusing the same password.
-
Provide the
Manual setup of the regular database user:
-
You don’t need to provide the
ORACLE_SYSTEM_PASSWORDin thesystem-databasesecret. -
The regular database user (not
SYSTEM) specified in the connection string in theURLfield of thesystem-databasesecret needs to exist prior to the 3scale installation. - The regular user used for the installation must have all the privileges listed above.
-
You don’t need to provide the
Additional resources
- For information on creating a new database, see the Oracle Database 19c documentation.
2.6.2. Building a custom system container image
Procedure
Download 3scale OpenShift templates from the GitHub repository and extract the archive:
tar -xzf 3scale-2.13.0-GA.tar.gz
From the Instant Client Downloads page, download:
- A client: It can be either basic-lite or basic.
- The ODBC driver.
The SDK for Oracle Database 19c.
- For 3scale, use Instant Client Downloads for Linux x86-64 (64-bit)
- For ppc64le and 3scale, use Oracle Instant Client Downloads for Linux on Power Little Endian (64-bit)
Check the table for the following Oracle software component versions:
- Oracle Instant Client Package: Basic or Basic Light
- Oracle Instant Client Package: SDK
Oracle Instant Client Package: ODBC
Table 2.4. Oracle 19c example packages for 3scale Oracle 19c package name Compressed file name Basic
instantclient-basic-linux.x64-19.8.0.0.0dbru.zip
Basic Light
instantclient-basiclite-linux.x64-19.8.0.0.0dbru.zip
SDK
instantclient-sdk-linux.x64-19.8.0.0.0dbru.zip
ODBC
instantclient-odbc-linux.x64-19.8.0.0.0dbru.zip
Table 2.5. Oracle 19c example packages for ppc64le and 3scale Oracle 19c package name Compressed file name Basic
instantclient-basic-linux.leppc64.c64-19.3.0.0.0dbru.zip
Basic Light
instantclient-basiclite-linux.leppc64.c64-19.3.0.0.0dbru.zip
SDK
instantclient-sdk-linux.leppc64.c64-19.3.0.0.0dbru.zip
ODBC
instantclient-odbc-linux.leppc64.c64-19.3.0.0.0dbru.zip
NoteIf the client packages versions downloaded and stored locally do not match with the ones 3scale expects, 3scale will automatically download and use the appropriate ones in the following steps.
-
Place your Oracle Database Instant Client Package files into the
system-oracle-3scale-2.13.0-GA/oracle-client-filesdirectory. Login to your
registry.redhat.ioaccount using the credentials you created in Creating a Registry Service Account.$ docker login registry.redhat.io
Build the custom system Oracle-based image. The image tag must be a fixed image tag as in the following example:
$ docker build . --tag myregistry.example.com/system-oracle:2.13.0-1
Push the system Oracle-based image to a container registry accessible by the OCP cluster. This container registry is where your 3scale solution is going to be installed:
$ docker push myregistry.example.com/system-oracle:2.13.0-1
2.6.3. Installing 3scale with Oracle using the operator
Procedure
-
Set up the Oracle Database URL connection string and Oracle Database system password by creating the
system-databasesecret with the corresponding fields. See, External databases installation for the Oracle Database. Install your 3scale solution by creating an APIManager CR. Follow the instructions in Deploying 3scale using the operator.
The APIManager CR must specify the
.spec.system.imagefield set to the system’s Oracle-based image you previous built:apiVersion: apps.3scale.net/v1alpha1 kind: APIManager metadata: name: example-apimanager spec: imagePullSecrets: - name: threescale-registry-auth - name: custom-registry-auth system: image: "myregistry.example.com/system-oracle:2.13.0-1" externalComponents: system: database: true
2.7. Troubleshooting common 3scale installation issues
This section contains a list of common installation issues and provides guidance for their resolution.
- Previous deployment leaving dirty persistent volume claims
- Wrong or missing credentials of the authenticated image registry
- Incorrectly pulling from the Docker registry
- Permission issues for MySQL when persistent volumes are mounted locally
- Unable to upload logo or images
- Test calls not working on OpenShift
- APIcast on a different project from 3scale failing to deploy
2.7.1. Previous deployment leaving dirty persistent volume claims
Problem
A previous deployment attempt leaves a dirty Persistent Volume Claim (PVC) causing the MySQL container to fail to start.
Cause
Deleting a project in OpenShift does not clean the PVCs associated with it.
Solution
Procedure
Find the PVC containing the erroneous MySQL data with the
oc get pvccommand:# oc get pvc NAME STATUS VOLUME CAPACITY ACCESSMODES AGE backend-redis-storage Bound vol003 100Gi RWO,RWX 4d mysql-storage Bound vol006 100Gi RWO,RWX 4d system-redis-storage Bound vol008 100Gi RWO,RWX 4d system-storage Bound vol004 100Gi RWO,RWX 4d
-
Stop the deployment of the system-mysql pod by clicking
cancel deploymentin the OpenShift UI. - Delete everything under the MySQL path to clean the volume.
-
Start a new
system-mysqldeployment.
2.7.2. Wrong or missing credentials of the authenticated image registry
Problem
Pods are not starting. ImageStreams show the following error:
! error: Import failed (InternalError): ...unauthorized: Please login to the Red Hat Registry
Cause
While installing 3scale on OpenShift 4.x, OpenShift fails to start pods because ImageStreams cannot pull the images they reference. This happens because the pods cannot authenticate against the registries they point to.
Solution
Procedure
Type the following command to verify the configuration of your container registry authentication:
$ oc get secret
If your secret exists, you will see the following output in the terminal:
threescale-registry-auth kubernetes.io/dockerconfigjson 1 4m9s
- However, if you do not see the output, you must do the following:
- Use the credentials you previously set up while Creating a registry service account to create your secret.
-
Use the steps in Configuring registry authentication in OpenShift, replacing
<your-registry-service-account-username>and<your-registry-service-account-password>in theoc create secretcommand provided. Generate the
threescale-registry-authsecret in the same namespace as the APIManager resource. You must run the following inside the<project-name>:$ oc project <project-name> $ oc create secret docker-registry threescale-registry-auth \ --docker-server=registry.redhat.io \ --docker-username="<your-registry-service-account-username>" \ --docker-password="<your-registry-service-account-password>" --docker-email="<email-address>"
Delete and recreate the APIManager resource:
$ oc delete -f apimanager.yaml
apimanager.apps.3scale.net "example-apimanager" deleted

$ oc create -f apimanager.yaml
apimanager.apps.3scale.net/example-apimanager created
Verification
Type the following command to confirm that deployments have a status of
StartingorReady. The pods then begin to spawn:$ oc describe apimanager (...) Status: Deployments: Ready: apicast-staging system-memcache system-mysql system-redis zync zync-database zync-que Starting: apicast-production backend-cron backend-worker system-sidekiq system-sphinx Stopped: backend-listener backend-redis system-appType the following command to see the status of each pod:
$ oc get pods
NAME                               READY   STATUS             RESTARTS   AGE
3scale-operator-66cc6d857b-sxhgm   1/1     Running            0          17h
apicast-production-1-deploy        1/1     Running            0          17m
apicast-production-1-pxkqm         0/1     Pending            0          17m
apicast-staging-1-dbwcw            1/1     Running            0          17m
apicast-staging-1-deploy           0/1     Completed          0          17m
backend-cron-1-deploy              1/1     Running            0          17m
2.7.3. Incorrectly pulling from the Docker registry
Problem
The following error occurs during installation:
svc/system-redis - 1EX.AMP.LE.IP:6379
  dc/system-redis deploys docker.io/rhscl/redis-32-rhel7:3.2-5.3
    deployment #1 failed 13 minutes ago: config change
Cause
OpenShift searches for and pulls container images by issuing the docker command. This command refers to the docker.io Docker registry instead of the registry.redhat.io Red Hat Ecosystem Catalog.
This occurs when the system contains an unexpected version of the Docker containerized environment.
Solution
Procedure
Use the appropriate version of the Docker containerized environment.
2.7.4. Permission issues for MySQL when persistent volumes are mounted locally
Problem
The system-msql pod crashes and does not deploy causing other systems dependant on it to fail deployment. The pod log displays the following error:
[ERROR] Cannot start server : on unix socket: Permission denied
[ERROR] Do you already have another mysqld server running on socket: /var/lib/mysql/mysql.sock ?
[ERROR] Aborting
Cause
The MySQL process is started with inappropriate user permissions.
Solution
Procedure
The directories used for the persistent volumes MUST have the write permissions for the root group. Having read-write permissions for the root user is not enough as the MySQL service runs as a different user in the root group. Execute the following command as the root user:
chmod -R g+w /path/for/pvs
Execute the following command to prevent SElinux from blocking access:
chcon -Rt svirt_sandbox_file_t /path/for/pvs
2.7.5. Unable to upload logo or images
Problem
Unable to upload a logo - system-app logs display the following error:
Errno::EACCES (Permission denied @ dir_s_mkdir - /opt/system/public//system/provider-name/2
Cause
Persistent volumes are not writable by OpenShift.
Solution
Procedure
Ensure your persistent volume is writable by OpenShift. It should be owned by root group and be group writable.
2.7.6. Test calls not working on OpenShift
Problem
Test calls do not work after creation of a new service and routes on OpenShift. Direct calls via curl also fail, stating: service not available.
Cause
3scale requires HTTPS routes by default, and OpenShift routes are not secured.
Solution
Procedure
Ensure the secure route checkbox is clicked in your OpenShift router settings.
2.7.7. APIcast on a different project from 3scale failing to deploy
Problem
APIcast deploy fails (pod does not turn blue). You see the following error in the logs:
update acceptor rejected apicast-3: pods for deployment "apicast-3" took longer than 600 seconds to become ready
You see the following error in the pod:
Error synching pod, skipping: failed to "StartContainer" for "apicast" with RunContainerError: "GenerateRunContainerOptions: secrets \"apicast-configuration-url-secret\" not found"
Cause
The secret was not properly set up.
Solution
Procedure
When creating a secret with APIcast v3, specify apicast-configuration-url-secret:
oc create secret generic apicast-configuration-url-secret --from-literal=password=https://<ACCESS_TOKEN>@<TENANT_NAME>-admin.<WILDCARD_DOMAIN>
2.8. Additional resources
Chapter 3. Installing APIcast
APIcast is an NGINX based API gateway used to integrate your internal and external API services with the Red Hat 3scale API Management Platform. APIcast does load balancing by using round-robin.
In this guide you will learn about deployment options, environments provided, and how to get started.
Prerequisites
APIcast is not a standalone API gateway. It needs connection to 3scale API Manager.
- A working 3scale On-Premises instance.
To install APIcast, perform the steps outlined in the following sections:
3.1. APIcast deployment options
You can use hosted or self-managed APIcast. In both cases, APIcast must be connected to the rest of the 3scale API Management platform:
- Embedded APIcast: A 3scale API Management installation includes two default APIcast gateways, staging and production. These gateways come preconfigured and ready for immediate use.
Self-managed APIcast: You can deploy APIcast wherever you want. Here is one of the recommended option to deploy APIcast:
- Running APIcast on Red Hat OpenShift: Run APIcast on a supported version of OpenShift. You can connect self-managed APIcasts to a 3scale On-premises installation or to a 3scale Hosted (SaaS) account. For this, deploy an APIcast gateway self-managed solution using the operator.
3.2. APIcast environments
By default, when you create a 3scale account, you get embedded APIcast in two different environments:
- Staging: Intended to be used only while configuring and testing your API integration. When you have confirmed that your setup is working as expected, then you can choose to deploy it to the production environment.
-
Production: This environment is intended for production use. The following parameters are set for the Production APIcast in the OpenShift template:
APICAST_CONFIGURATION_LOADER: boot,APICAST_CONFIGURATION_CACHE: 300. This means that the configuration will be fully loaded when APIcast is started, and will be cached for 300 seconds (5 minutes). After 5 minutes the configuration will be reloaded. This means that when you promote the configuration to production, it may take up to 5 minutes to be applied, unless you trigger a new deployment of APIcast.
3.3. Configuring the integration settings
As a 3scale administrator, configure the integration settings for the environment you require 3scale to run in.
Prerequisites
A 3scale account with administrator privileges.
Procedure
- Navigate to [Your_product_name] > Integration > Settings.
Under Deployment, the default options are as follows:
- Deployment Option: APIcast 3scale managed
- Authentication mode: API key.
- Change to your preferred option.
- To save your changes, click Update Product.
3.4. Configuring your product
You must declare your API back-end in the Private Base URL field, which is the endpoint host of your API back-end. APIcast will redirect all traffic to your API back-end after all authentication, authorization, rate limits and statistics have been processed.
This section will guide you through configuring your product:
3.4.1. Declaring the API backend
Typically, the Private Base URL of your API will be something like https://api-backend.yourdomain.com:443, on the domain that you manage (yourdomain.com). For instance, if you were integrating with the Twitter API the Private Base URL would be https://api.twitter.com/.
In this example, you will use the Echo API hosted by 3scale, a simple API that accepts any path and returns information about the request (path, request parameters, headers, etc.). Its Private Base URL is https://echo-api.3scale.net:443.
Procedure
Test your private (unmanaged) API is working. For example, for the Echo API you can make the following call with
curlcommand:$ curl "https://echo-api.3scale.net:443"
You will get the following response:
{
    "method": "GET",
    "path": "/",
    "args": "",
    "body": "",
    "headers": {
      "HTTP_VERSION": "HTTP/1.1",
      "HTTP_HOST": "echo-api.3scale.net",
      "HTTP_ACCEPT": "*/*",
      "HTTP_USER_AGENT": "curl/7.51.0",
      "HTTP_X_FORWARDED_FOR": "2.139.235.79, 10.0.103.58",
      "HTTP_X_FORWARDED_HOST": "echo-api.3scale.net",
      "HTTP_X_FORWARDED_PORT": "443",
      "HTTP_X_FORWARDED_PROTO": "https",
      "HTTP_FORWARDED": "for=10.0.103.58;host=echo-api.3scale.net;proto=https"
    },
    "uuid": "ee626b70-e928-4cb1-a1a4-348b8e361733"
  }
3.4.2. Configuring the authentication settings
You can configure authentication settings for your API in the AUTHENTICATION section under [Your_product_name] > Integration > Settings.
| Field | Description |
|---|---|
| Auth user key | Set the user key associated with the credentials location. |
| Credentials location | Define whether credentials are passed as HTTP headers, query parameters or as HTTP basic authentication. |
| Host Header | Define a custom Host request header. This is required if your API backend only accepts traffic from a specific host. |
| Secret Token | Used to block direct developer requests to your API backend. Set the value of the header here, and ensure your backend only allows calls with this secret header. |
Furthermore, you can configure the GATEWAY RESPONSE error codes under [Your_product_name] > Integration > Settings. Define the Response Code, Content-type, and Response Body for the errors: Authentication failed, Authentication missing, and No match.
| Response code | Response body |
|---|---|
| 403 | Authentication failed |
| 403 | Authentication parameters missing |
| 404 | No Mapping Rule matched |
| 429 | Usage limit exceeded |
3.4.3. Configuring the API test call
Configuring the API involves testing the backends with a product and promoting the APIcast configuration to staging and production environments to make tests based on request calls.
For each product, requests get redirected to their corresponding backend according to the path. This path is configured when you add the backend to the product. For example, if you have two backends added to a product, each backend has its own path.
Prerequisites
- One or more backends added to a product.
- A mapping rule for each backend added to a product.
- An application plan to define the access policies.
- An application that subscribes to the application plan.
Procedure
- Promote an APIcast configuration to Staging, by navigating to [Your_product_name] > Integration > Configuration.
Under APIcast Configuration, you will see the mapping rules for each backend added to the product. Click Promote v.[n] to Staging APIcast.
- v.[n] indicates the version number to be promoted.
Once promoted to staging, you can promote to Production. Under Staging APIcast, click Promote v.[n] to Production APIcast.
- v.[n] indicates the version number to be promoted.
To test requests to your API in the command line, use the command provided in Example curl for testing.
- The curl command example is based on the first mapping rule in the product.
When testing requests to your API, you can modify the mapping rules by adding methods and metrics.
Every time you modify the configuration and before making calls to your API, make sure you promote to the Staging and Production environments. When there are pending changes to be promoted to the Staging environment, you will see an exclamation mark in the Admin Portal, next to the Integration menu item.
3scale Hosted APIcast gateway does the validation of the credentials and applies the rate limits that you defined for the application plan of your API. If you make a call without credentials, or with invalid credentials, you will see the error message, Authentication failed.
3.4.4. Deploying APIcast on Podman
This is a step-by-step guide for deploying APIcast on a Pod Manager (Podman) container environment to be used as a Red Hat 3scale API Management API gateway.
When deploying APIcast on a Podman container environment, the supported versions of Red Hat Enterprise Linux (RHEL) and Podman are as follows:
- RHEL 8.x/9.x
- Podman 4.2.0/4.1.1
Prerequisites
- You must configure APIcast in your 3scale Admin Portal as per Chapter 3, Installing APIcast.
Access to the Red Hat Ecosystem Catalog.
- To create a registry service account, see Creating and modifying registry service accounts.
To deploy APIcast on the Podman container environment, perform the steps outlined in the following sections:
3.4.4.1. Installing the Podman container environment
This guide covers the steps to set up the Podman container environment on RHEL 8.x. Docker is not included in RHEL 8.x, therefore, use Podman for working with containers.
For more details about Podman with RHEL 8.x, see the Container command-line reference.
Procedure
Install the Podman container environment package:
$ sudo dnf install podman
Additional resources
For other operating systems, refer to the following Podman documentation:
- Podman Installation Instructions
3.4.4.2. Running the Podman environment
To run the Podman container environment, follow the procedure below.
Procedure
Download a ready to use Podman container image from the Red Hat registry:
$ podman pull registry.redhat.io/3scale-amp2/apicast-gateway-rhel8:3scale2.13
Run APIcast in a Podman:
$ podman run --name apicast --rm -p 8080:8080 -e THREESCALE_PORTAL_ENDPOINT=https://<access_token>@<domain>-admin.3scale.net registry.redhat.io/3scale-amp2/apicast-gateway-rhel8:3scale2.13
Here,
<access_token>is the Access Token for the 3scale Account Management API. You can use the Provider Key instead of the access token.<domain>-admin.3scale.netis the URL of your 3scale Admin Portal.
This command runs a Podman container engine called "apicast" on port 8080 and fetches the JSON configuration file from your 3scale Admin Portal. For other configuration options, see Installing APIcast.
3.4.4.2.1. Testing APIcast with Podman
The preceding steps ensure that your Podman container engine is running with your own configuration file and the Podman container image from the 3scale registry. You can test calls through APIcast on port 8080 and provide the correct authentication credentials, which you can get from your 3scale account.
Test calls will not only verify that APIcast is running correctly but also that authentication and reporting is being handled successfully.
Ensure that the host you use for the calls is the same as the one configured in the Public Base URL field on the Integration page.
3.4.4.3. The podman command options
You can use the following option examples with the podman command:
-
-d: Runs the container in detached mode and prints the container ID. When it is not specified, the container runs in the foreground mode and you can stop it usingCTRL + c. When started in the detached mode, you can reattach to the container with thepodman attachcommand, for example,podman attach apicast. -
psand-a: Podmanpsis used to list creating and running containers. Adding-ato thepscommand will show all containers, both running and stopped, for example,podman ps -a. -
inspectand-l: Inspect a running container. For example, useinspectto see the ID that was assigned to the container. Use-lto get the details for the latest container, for example,podman inspect -l | grep Id\":.
3.4.4.4. Additional resources
3.5. Deploying an APIcast gateway self-managed solution using the operator
This guide provides steps for deploying an APIcast gateway self-managed solution using the APIcast operator via the Openshift Container Platform console.
The default settings are for production environment when you deploy APIcast. You can always adjust these settings for deploying a staging environment. For example, use the following oc command:
$ oc patch apicast/{apicast_name} --type=merge -p '{"spec":{"deploymentEnvironment":"staging","configurationLoadMode":"lazy"}}'For more information, see the: APIcast Custom Resource reference
Prerequisites
- OpenShift Container Platform (OCP) 4.x or later with administrator privileges.
- You followed the steps in Installing the APIcast operator on OpenShift.
Procedure
- Log in to the OCP console using an account with administrator privileges.
- Click Operators > Installed Operators.
- Click the APIcast Operator from the list of Installed Operators.
- Click APIcast > Create APIcast.
3.5.1. APICast deployment and configuration options
You can deploy and configure an APIcast gateway self-managed solution using two approaches:
See also:
3.5.1.1. Providing a 3scale system endpoint
Procedure
Create an OpenShift secret that contains 3scale System Admin Portal endpoint information:
$ oc create secret generic ${SOME_SECRET_NAME} --from-literal=AdminPortalURL=${MY_3SCALE_URL}-
${SOME_SECRET_NAME}is the name of the secret and can be any name you want as long as it does not conflict with an existing secret. ${MY_3SCALE_URL}is the URI that includes your 3scale access token and 3scale System portal endpoint. For more details, seeTHREESCALE_PORTAL_ENDPOINTExample
$ oc create secret generic 3scaleportal --from-literal=AdminPortalURL=https://access-token@account-admin.3scale.net
For more information about the contents of the secret see the Admin portal configuration secret reference.
-
Create the OpenShift object for APIcast
apiVersion: apps.3scale.net/v1alpha1
kind: APIcast
metadata:
  name: example-apicast
spec:
  adminPortalCredentialsRef:
    name: SOME_SECRET_NAME
The
spec.adminPortalCredentialsRef.namemust be the name of the existing OpenShift secret that contains the 3scale system Admin Portal endpoint information.Verify the APIcast pod is running and ready, by confirming that the
readyReplicasfield of the OpenShift Deployment associated with the APIcast object is 1. Alternatively, wait until the field is set with:$ echo $(oc get deployment apicast-example-apicast -o jsonpath='{.status.readyReplicas}') 1
3.5.1.1.1. Verifying the APIcast gateway is running and available
Procedure
Ensure the OpenShift Service APIcast is exposed to your local machine, and perform a test request. Do this by port-forwarding the APIcast OpenShift Service to
localhost:8080:$ oc port-forward svc/apicast-example-apicast 8080
Make a request to a configured 3scale service to verify a successful HTTP response. Use the domain name configured in
Staging Public Base URLorProduction Public Base URLsettings of your service. For example:$ curl 127.0.0.1:8080/test -H "Host: localhost" { "method": "GET", "path": "/test", "args": "", "body": "", "headers": { "HTTP_VERSION": "HTTP/1.1", "HTTP_HOST": "echo-api.3scale.net", "HTTP_ACCEPT": "*/*", "HTTP_USER_AGENT": "curl/7.65.3", "HTTP_X_REAL_IP": "127.0.0.1", "HTTP_X_FORWARDED_FOR": ... "HTTP_X_FORWARDED_HOST": "echo-api.3scale.net", "HTTP_X_FORWARDED_PORT": "80", "HTTP_X_FORWARDED_PROTO": "http", "HTTP_FORWARDED": "for=10.0.101.216;host=echo-api.3scale.net;proto=http" }, "uuid": "603ba118-8f2e-4991-98c0-a9edd061f0f0"
3.5.1.1.2. Exposing APIcast externally via a Kubernetes Ingress
To expose APIcast externally via a Kubernetes Ingress, set and configure the exposedHost section. When the host field in the exposedHost section is set, this creates a Kubernetes Ingress object. The Kubernetes Ingress object can then be used by a previously installed and existing Kubernetes Ingress Controller to make APIcast accessible externally.
To learn what Ingress Controllers are available to make APIcast externally accessible and how they are configured see the Kubernetes Ingress Controllers documentation.
The following example to expose APIcast with the hostname myhostname.com:
apiVersion: apps.3scale.net/v1alpha1
kind: APIcast
metadata:
  name: example-apicast
spec:
  ...
  exposedHost:
    host: "myhostname.com"
  ...
The example creates a Kubernetes Ingress object on the port 80 using HTTP. When the APIcast deployment is in an OpenShift environment, the OpenShift default Ingress Controller will create a Route object using the Ingress object APIcast creates which allows external access to the APIcast installation.
You may also configure TLS for the exposedHost section. Details about the available fields in the following table:
| json/yaml field | Type | Required | Default value | Description |
|---|---|---|---|---|
|
| string | Yes | N/A | Domain name being routed to the gateway |
|
| []networkv1.IngressTLS | No | N/A | Array of ingress TLS objects. See more on TLS. |
3.5.1.2. Providing a configuration secret
Procedure
Create a secret with the configuration file:
$ curl https://raw.githubusercontent.com/3scale/APIcast/master/examples/configuration/echo.json -o $PWD/config.json

$ oc create secret generic apicast-echo-api-conf-secret --from-file=$PWD/config.json
The configuration file must be called
config.json. This is an APIcast CRD reference requirement.For more information about the contents of the secret see the Admin portal configuration secret reference.
Create an APIcast custom resource:
$ cat my-echo-apicast.yaml
apiVersion: apps.3scale.net/v1alpha1
kind: APIcast
metadata:
  name: my-echo-apicast
spec:
  exposedHost:
    host: YOUR DOMAIN
  embeddedConfigurationSecretRef:
    name: apicast-echo-api-conf-secret

$ oc apply -f my-echo-apicast.yaml
The following is an example of an embedded configuration secret:
apiVersion: v1
kind: Secret
metadata:
  name: SOME_SECRET_NAME
type: Opaque
stringData:
  config.json: |
    {
      "services": [
        {
          "proxy": {
            "policy_chain": [
              { "name": "apicast.policy.upstream",
                "configuration": {
                  "rules": [{
                    "regex": "/",
                    "url": "http://echo-api.3scale.net"
                  }]
                }
              }
            ]
          }
        }
      ]
    }
Set the following content when creating the APIcast object:
apiVersion: apps.3scale.net/v1alpha1
kind: APIcast
metadata:
  name: example-apicast
spec:
  embeddedConfigurationSecretRef:
    name: SOME_SECRET_NAME
The
spec.embeddedConfigurationSecretRef.namemust be the name of the existing OpenShift secret that contains the configuration of the gateway.Verify the APIcast pod is running and ready, by confirming that the
readyReplicasfield of the OpenShift Deployment associated with the APIcast object is 1. Alternatively, wait until the field is set with:$ echo $(oc get deployment apicast-example-apicast -o jsonpath='{.status.readyReplicas}') 1
3.5.1.2.1. Verifying APIcast gateway is running and available
Procedure
Ensure the OpenShift Service APIcast is exposed to your local machine, and perform a test request. Do this by port-forwarding the APIcast OpenShift Service to
localhost:8080:$ oc port-forward svc/apicast-example-apicast 8080
3.5.1.3. Injecting custom environments with the APIcast operator
In a 3scale installation that uses self-managed APIcast, you can use the APIcast operator to inject custom environments. A custom environment defines behavior that APIcast applies to all upstream APIs that the gateway serves. To create a custom environment, define a global configuration in Lua code.
You can inject a custom environment as part of or after APIcast installation. After injecting a custom environment, you can remove it and the APIcast operator reconciles the changes.
Prerequisites
- The APIcast operator is installed.
Procedure
Write Lua code that defines the custom environment that you want to inject. For example, the following
env1.luafile shows a custom logging policy that theAPIcastoperator loads for all services.local cjson = require('cjson') local PolicyChain = require('apicast.policy_chain') local policy_chain = context.policy_chain local logging_policy_config = cjson.decode([[ { "enable_access_logs": false, "custom_logging": "\"{{request}}\" to service {{service.id}} and {{service.name}}" } ]]) policy_chain:insert( PolicyChain.load_policy('logging', 'builtin', logging_policy_config), 1) return { policy_chain = policy_chain, port = { metrics = 9421 }, }Create a secret from the Lua file that defines the custom environment. For example:
$ oc create secret generic custom-env-1 --from-file=./env1.lua
A secret can contain multiple custom environments. Specify the
–from-fileoption for each file that defines a custom environment. The operator loads each custom environment.Define an
APIcastcustom resource that references the secret you just created. The following example shows only content relative to referencing the secret that defines the custom environment.apiVersion: apps.3scale.net/v1alpha1 kind: APIcast metadata: name: apicast1 spec: customEnvironments: - secretRef: name: custom-env-1An
APIcastcustom resource can reference multiple secrets that define custom environments. The operator loads each custom environment.Create the
APIcastcustom resource that adds the custom environment. For example, if you saved theAPIcastcustom resource in theapicast.yamlfile, run the following command:$ oc apply -f apicast.yaml
Next steps
If you update your custom environment be sure to re-create its secret so the secret contains the update. The APIcast operator watches for updates and automatically redeploys when it finds an update.
3.5.1.4. Injecting custom policies with the APIcast operator
In a 3scale installation that uses self-managed APIcast, you can use the APIcast operator to inject custom policies. Injecting a custom policy adds the policy code to APIcast. You can then use either of the following to add the custom policy to an API product’s policy chain:
- 3scale API
-
Productcustom resource
To use the 3scale Admin Portal to add the custom policy to a product’s policy chain, you must also register the custom policy’s schema with a CustomPolicyDefinition custom resource. Custom policy registration is a requirement only when you want to use the Admin Portal to configure a product’s policy chain.
You can inject a custom policy as part of or after APIcast installation. After injecting a custom policy, you can remove it and the APIcast operator reconciles the changes.
Prerequisites
- The APIcast operator is installed or you are in the process of installing it.
-
You have defined a custom policy as described in Write your own policy. That is, you have already created, for example, the
my-first-custom-policy.lua,apicast-policy.json, andinit.luafiles that define a custom policy,
Procedure
Create a secret from the files that define one custom policy. For example:
$ oc create secret generic my-first-custom-policy-secret \
 --from-file=./apicast-policy.json \
 --from-file=./init.lua \
 --from-file=./my-first-custom-policy.lua
If you have more than one custom policy, create a secret for each custom policy. A secret can contain only one custom policy.
Define an
APIcastcustom resource that references the secret you just created. The following example shows only content relative to referencing the secret that defines the custom policy.apiVersion: apps.3scale.net/v1alpha1 kind: APIcast metadata: name: apicast1 spec: customPolicies: - name: my-first-custom-policy version: "0.1" secretRef: name: my-first-custom-policy-secretAn
APIcastcustom resource can reference multiple secrets that define custom policies. The operator loads each custom policy.Create the
APIcastcustom resource that adds the custom policy. For example, if you saved theAPIcastcustom resource in theapicast.yamlfile, run the following command:$ oc apply -f apicast.yaml
Next steps
If you update your custom policy be sure to re-create its secret so the secret contains the update. The APIcast operator watches for updates and automatically redeploys when it finds an update.
Additional resources
3.5.1.5. Configuring OpenTracing with the APIcast operator
In a 3scale installation that uses self-managed APIcast, you can use the APIcast operator to configure OpenTracing. By enabling OpenTracing, you get more insight and better observability on the APIcast instance.
Prerequisites
-
The
APIcastoperator is installed or you are in the process of installing it. - Prerequisites listed in Configuring APIcast to use OpenTracing.
- Jaeger is installed.
Procedure
Define a secret that contains your OpenTracing configuration details in
stringData.config. This is the only valid value for the attribute that contains your OpenTracing configuration details. Any other specification prevents APIcast from receiving your OpenTracing configuration details. The folowing example shows a valid secret definition:apiVersion: v1 kind: Secret metadata: name: myjaeger stringData: config: |- { "service_name": "apicast", "disabled": false, "sampler": { "type": "const", "param": 1 }, "reporter": { "queueSize": 100, "bufferFlushInterval": 10, "logSpans": false, "localAgentHostPort": "jaeger-all-in-one-inmemory-agent:6831" }, "headers": { "jaegerDebugHeader": "debug-id", "jaegerBaggageHeader": "baggage", "TraceContextHeaderName": "uber-trace-id", "traceBaggageHeaderPrefix": "testctx-" }, "baggage_restrictions": { "denyBaggageOnInitializationFailure": false, "hostPort": "127.0.0.1:5778", "refreshInterval": 60 } } type: OpaqueCreate the secret. For example, if you saved the previous secret definition in the
myjaeger.yamlfile, you would run the following command:$ oc create -f myjaeger.yaml
Define an
APIcastcustom resource that specifies theOpenTracingattributes. In the CR definition, set thespec.tracingConfigSecretRef.nameattribute to the name of the secret that contains your OpenTracing configuration details. The following example shows only content relative to configuring OpenTracing.apiVersion: apps.3scale.net/v1alpha1 kind: APIcast metadata: name: apicast1 spec: ... openTracing: enabled: true tracingConfigSecretRef: name: myjaeger tracingLibrary: jaeger ...Create the
APIcastcustom resource that configures OpenTracing. For example, if you saved theAPIcastcustom resource in theapicast1.yamlfile, you would run the following command:$ oc apply -f apicast1.yaml
Next steps
Depending on how OpenTracing is installed, you should see the traces in the Jaeger service user interface.
Additional resource
3.6. Additional resources
To get information about the latest released and supported version of APIcast, see the articles:
Chapter 4. External Redis database configuration for high availability support in 3scale
Red Hat supports 3scale configurations that use an external Redis database. However, does not officially support setting up Redis for zero downtime, configuring back-end components for 3scale, or Redis database replication and sharding. The content is for reference only. Additionally, Redis cluster mode is not supported in 3scale.
High availability (HA) is provided for most components by the OpenShift Container Platform (OCP).
When you externalize databases from a Red Hat 3scale API Management deployment, this means to provide isolation from the application and resilience against service disruptions at the database level. The resilience to service disruptions depends on the service level agreements (SLAs) provided by the infrastructure or platform provider where you host the databases. This is not offered by 3scale. For more details on externalizing of databases offered by your chosen deployment, see the associated documentation.
The external database components for HA in Red Hat 3scale API Management include:
-
backend-redis: used for statistics storage and temporary job storage. -
system-redis: provides temporary storage for background jobs for 3scale and is also used as a message bus for Ruby processes ofsystem-apppods.
Both backend-redis and system-redis work with supported Redis high availability variants for Redis Sentinel and Redis Enterprise.
If the Redis pod comes to a stop, or if the OpenShift Container Platform stops it, a new pod is automatically created. Persistent storage will restore the data so the pod continues to work. In these scenarios, there will be a small amount of downtime while the new pod starts. This is due to a limitation in Redis that does not support a multi-master setup. You can reduce downtime by preinstalling the Redis images onto all nodes that have Redis deployed to them. This will speed up the pod restart time.
Set up Redis for zero downtime and configure back-end components for 3scale:
Prerequisites
- A 3scale account with an administrator role.
4.1. Setting up Redis for zero downtime
As a 3scale administrator, configure Redis outside of OCP if you require zero downtime. There are several ways to set it up using the configuration options of 3scale pods:
- Set up your own self-managed Redis
- Use Redis Sentinel: Reference Redis Sentinel Documentation
Redis provided as a service:
For example by:
- Amazon ElastiCache
- Redis Labs
Red Hat does not provide support for the above mentioned services. The mention of any such services does not imply endorsement by Red Hat of the products or services. You agree that Red Hat is not responsible or liable for any loss or expenses that may result due to your use of (or reliance on) any external content.
4.2. Configuring back-end components for 3scale
As a 3scale administrator, configure Redis HA (failover) for the back-end component environment variables in the following deployment configurations: backend-cron, backend-listener, and backend-worker. These configurations are necessary for Redis HA in 3scale.
If you want to use Redis with sentinels, you must provide sentinel configuration in either backend-redis, system-redis, or both secrets.
4.2.1. Creating backend-redis and system-redis secrets
Follow these steps to create backend-redis and system-redis secrets accordingly:
4.2.2. Deploying a fresh installation of 3scale for HA
Procedure
Create the
backend-redisandsystem-redissecrets with the fields below:backend-redis
REDIS_QUEUES_SENTINEL_HOSTS
REDIS_QUEUES_SENTINEL_ROLE
REDIS_QUEUES_URL
REDIS_STORAGE_SENTINEL_HOSTS
REDIS_STORAGE_SENTINEL_ROLE
REDIS_STORAGE_URL
system-redis
NAMESPACE
SENTINEL_HOSTS
SENTINEL_ROLE
URL
When configuring for Redis with sentinels, the corresponding
URLfields inbackend-redisandsystem-redisrefer to the Redis group in the formatredis://[:redis-password@]redis-group[/db], where [x] denotes optional element x andredis-password,redis-group, anddbare variables to be replaced accordingly:Example
redis://:redispwd@mymaster/5
The
SENTINEL_HOSTSfields are comma-separated lists of sentinel connection strings in the following format:redis://:sentinel-password@sentinel-hostname-or-ip:port
For each element of the list, [x] denotes optional element x and
sentinel-password,sentinel-hostname-or-ip, andportare variables to be replaced accordingly:Example
:sentinelpwd@123.45.67.009:2711,:sentinelpwd@other-sentinel:2722
-
The
SENTINEL_ROLEfields are eithermasterorslave.
Deploy 3scale as indicated in Deploying 3scale using the operator.
-
Ignore the errors due to
backend-redisandsystem-redisalready present.
-
Ignore the errors due to
4.2.3. Migrating a non-HA deployment of 3scale to HA
-
Edit the
backend-redisandsystem-redissecrets with all fields as shown in Deploying a fresh installation of 3scale for HA. Make sure the following
backend-redisenvironment variables are defined for the back-end pods.name: BACKEND_REDIS_SENTINEL_HOSTS valueFrom: secretKeyRef: key: REDIS_STORAGE_SENTINEL_HOSTS name: backend-redis name: BACKEND_REDIS_SENTINEL_ROLE valueFrom: secretKeyRef: key: REDIS_STORAGE_SENTINEL_ROLE name: backend-redisMake sure the following
system-redisenvironment variables are defined for thesystem-(app|sidekiq|sphinx)pods.name: REDIS_SENTINEL_HOSTS valueFrom: secretKeyRef: key: SENTINEL_HOSTS name: system-redis name: REDIS_SENTINEL_ROLE valueFrom: secretKeyRef: key: SENTINEL_ROLE name: system-redis- Proceed with instructions to continue Upgrading 3scale using templates.
4.2.3.1. Using Redis Enterprise
Use Redis Enterprise deployed in OpenShift, with three different
redis-enterpriseinstances:Edit
system-redissecret:-
Set the system redis database in
system-redistoURL.
-
Set the system redis database in
-
Set the back-end database in
backend-redistoREDIS_QUEUES_URL. -
Set the third database to
REDIS_STORAGE_URLforbackend-redis.
4.2.3.2. Using Redis Sentinel
You can optionally apply Redis Sentinels to any of the databases. However, Red Hat recommends that you apply Redis Sentinels to all of them for HA.
Backend redis for statistics: update
backend-redissecret and provide values for:-
REDIS_STORAGE_URL -
REDIS_STORAGE_SENTINEL_ROLE REDIS_STORAGE_SENTINEL_HOSTSSet
REDIS_STORAGE_SENTINEL_ROLEto a comma-separated list of sentinels hosts and ports, for example::sentinelpwd@123.45.67.009:2711,:sentinelpwd@other-sentinel:2722
-
Backend redis for queue: update
backend-redissecret and provide values for:-
REDIS_QUEUES_URL -
REDIS_QUEUES_SENTINEL_ROLE REDIS_QUEUES_SENTINEL_HOSTSSet
REDIS_QUEUES_SENTINEL_ROLEto a comma-separated list of sentinels hosts and ports, for example::sentinelpwd@123.45.67.009:2711,:sentinelpwd@other-sentinel:2722
-
- Use Redis Sentinel, with these Redis databases:
System redis for data: update
system-redissecret and provide values for:NoteEdit
system-redissecret:URL-
SENTINEL_ROLE -
NAMESPACE -
URL SENTINEL_HOSTSSet
SENTINEL_HOSTSto a comma-separated list of sentinels hosts and ports, for example::sentinelpwd@123.45.67.009:2711,:sentinelpwd@other-sentinel:2722
-
Notes
The system-app and system-sidekiq components connect directly to
back-endRedis for retrieving statistics.-
As of 3scale 2.7, these system components can also connect to
back-endRedis (storage) when using sentinels.
-
As of 3scale 2.7, these system components can also connect to
The system-app and system-sidekiq components uses only
backend-redisstorage, notbackend-redisqueues.-
Changes made to the system components support
backend-redisstorage with sentinels.
-
Changes made to the system components support
4.3. Redis database sharding and replication
Sharding, sometimes referred to as partitioning, separates large databases in to smaller databases called shards. With replication, your database is set up with copies of the same dataset hosted on separate machines.
Sharding
Sharding facilitates adding more leader instances, which is also useful when you have so much data that it does not fit in a single database, or when the CPU load is close to 100%.
With Redis HA for 3scale, the following two reasons are why sharding is important:
- Spliting and scaling large volumes of data and adjusting the number of shards for a particular index to help avoid bottlenecks.
- Distributing operations across different node, therefore increasing performance, for example, when multiple machines are working on the same query.
The three main solutions for Redis database sharding with cluster mode disabled are:
- Amazon ElastiCache
- Standard Redis via Redis sentinels
- Redis Enterprise
Replication
Redis database replication ensures redundancy by having your dataset replicated across different machines. Using replication allows you to keep Redis working when the leader goes down. Data is then pulled from a single instance, the leader, ensuring high availability.
With Redis HA for 3scale, database replication ensures high availability replicas of a primary shard. The principles of operation involve:
- When the primary shard fails, the replica shard will automatically be promoted to the new primary shard.
- Upon recovery of the original primary shard, it automatically becomes the replica shard of the new primary shard.
The three main solutions for Redis database replication are:
- Redis Enterprise
- Amazon ElastiCache
- Standard Redis via Redis sentinels
Sharding with twemproxy
For Amazon ElastiCache and Standard Redis, sharding involves splitting data up based on keys. You need a proxy component that given a particular key knows which shard to find, for example twemproxy. Also known as nutcracker, twemproxy is a lightweight proxy solution for Redis protocols that finds shards based on specific keys or server maps assigned to them. Adding sharding capabilities to your Amazon ElastiCache or Standard Redis instance with twemproxy, has the following advantages:
- The capability of sharding data automatically across multiple servers.
- Support of multiple hashing modes and consistent hashing and distribution.
- The capability to run in multiple instances, which allows clients to connect to the first available proxy server.
- Reduce the number of connections to the caching servers on the backend.
Redis Enterprise uses its own proxy, so it does not need twemproxy.
Additional resources
4.4. Additional information
- For more information about 3scale and Redis database support, see Red Hat 3scale API Management Supported Configurations.
- For more information about Amazon ElastiCache for Redis, see the official Amazon ElastiCache Documentation.
- For more information about Redis Enterprise, see the latest Documentation.
Chapter 5. Configuring an external MySQL database
When you externalize databases from a Red Hat 3scale API Management deployment, this means to provide isolation from the application and resilience against service disruptions at the database level. The resilience to service disruptions depends on the service level agreements (SLAs) provided by the infrastructure or platform provider where you host the databases. This is not offered by 3scale. For more details on externalizing of databases offered by your chosen deployment, see the associated documentation.
Red Hat supports 3scale configurations that use an external MySQL database. However, the database itself is not within the scope of support.
This guide provides information for externalizing the MySQL database. This is useful where there are several infrastructure issues, such as network or filesystem, using the default system-mysql pod.
Prerequisites
- Access to an OpenShift Container Platform 4.x cluster using an account with administrator privileges.
- A 3scale instance installation on the OpenShift cluster. See Installing 3scale on OpenShift.
To configure an external MySQL database, perform the steps outlined in the following sections:
5.1. External MySQL database limitations
There are limitations with the process of externalizing your MySQL database:
3scale On-premises versions
It has only been tested and verified on the 2.5 On-premises and 2.6 On-premises versions from 3scale.
MySQL database user
The URL must be in the following format:
<database_scheme>://<admin_user>:<admin_password>@<database_host>/<database_name>
An <admin_user> must be an existing user in the external database with full permissions on the <database_name> logical database. The <database_name> must be an already existing logical database in the external database.
MySQL host
Use the IP address from the external MySQL database instead of the hostname or it will not resolve. For example, use 1.1.1.1 instead of mysql.mydomain.com.
5.2. Externalizing the MySQL database
Use the following steps to fully externalize the MySQL database.
This will cause downtime in the environment while the process is ongoing.
Procedure
Login to the OpenShift node where your 3scale On-premises instance is hosted and change to its project:
$ oc login -u <user> <url>
$ oc project <3scale-project>
Replace
<user>,<url>, and<3scale-project>with your own credentials and the project name.Follow the steps below in the order shown to scale down all the pods. This will avoid loss of data.
Stop 3scale On-premises
From the OpenShift web console or from the command line interface (CLI), scale down all the deployment configurations to zero replicas in the following order:
-
apicast-wildcard-routerandzyncfor versions before 3scale 2.6 orzync-queandzyncfor 3scale 2.6 and above. -
apicast-stagingandapicast-production. system-sidekiq,backend-cron, andsystem-sphinx.-
3scale 2.3 includes
system-resque.
-
3scale 2.3 includes
-
system-app. -
backend-listenerandbackend-worker. backend-redis,system-memcache,system-mysql,system-redis, andzync-database.The following example shows how to perform this in the CLI for
apicast-wildcard-routerandzync:$ oc scale dc/apicast-wildcard-router --replicas=0 $ oc scale dc/zync --replicas=0
NoteThe deployment configuration for each step can be scaled down at the same time. For example, you could scale down
apicast-wildcard-routerandzynctogether. However, it is better to wait for the pods from each step to terminate before scaling down the ones that follow. The 3scale instance will be completely inaccessible until it is fully started again.
-
To confirm that no pods are running on the 3scale project use the following command:
oc get pods -n <3scale_namespace>
The command should return No resources found.
Scale up the database level pods again using the following command:
$ oc scale dc/{backend-redis,system-memcache,system-mysql,system-redis,zync-database} --replicas=1Ensure that you are able to login to the external MySQL database through the
system-mysqlpod before proceeding with the next steps:$ oc rsh system-mysql-<system_mysql_pod_id> mysql -u root -p -h <host>
- <system_mysql_pod_id>: The identifier of the system-mysql pod.
The user should always be root. For more information see External MySQL database limitations.
-
The CLI will now display
mysql>. Type exit, then press return. Type exit again at the next prompt to go back to the OpenShift node console.
-
The CLI will now display
Perform a full MySQL dump using the following command:
$ oc rsh system-mysql-<system_mysql_pod_id> /bin/bash -c "mysqldump -u root --single-transaction --routines --triggers --all-databases" > system-mysql-dump.sql
-
Replace <system_mysql_pod_id> with your unique
system-mysqlpod ID . Validate that the file
system-mysql-dump.sqlcontains a valid MySQL level dump as in the following example:$ head -n 10 system-mysql-dump.sql -- MySQL dump 10.13 Distrib 8.0, for Linux (x86_64) -- -- Host: localhost Database: -- ------------------------------------------------------ -- Server version 8.0 /*!40101 SET @OLD_CHARACTER_SET_CLIENT=@@CHARACTER_SET_CLIENT */; /*!40101 SET @OLD_CHARACTER_SET_RESULTS=@@CHARACTER_SET_RESULTS */; /*!40101 SET @OLD_COLLATION_CONNECTION=@@COLLATION_CONNECTION */; /*!40101 SET NAMES utf8 */;
-
Replace <system_mysql_pod_id> with your unique
Scale down the
system-mysqlpod and leave it with 0 (zero) replicas:$ oc scale dc/system-mysql --replicas=0
Find the base64 equivalent of the URL
mysql2://root:<password>@<host>/system, replacing <password> and <host> accordingly:$ echo "mysql2://root:<password>@<host>/system" | base64
Create a default 'user'@'%' on the remote MySQL database. It only needs to have SELECT privileges. Also find its base64 equivalents:
$ echo "user" | base64
$ echo "<password>" | base64
- Replace <password> with the password for 'user'@'%'.
Perform a backup and edit the OpenShift secret
system-database:$ oc get secret system-database -o yaml > system-database-orig.bkp.yml $ oc edit secret system-database
- URL: Replace it with the value from [step-8].
- DB_USER and DB_PASSWORD: Use the values from the previous step for both.
-
Send
system-mysql-dump.sqlto the remote database server and import the dump into it. Use the command to import it: Use the command below to send
system-mysql-dump.sqlto the remote database server and import the dump into the server:mysql -u root -p < system-mysql-dump.sql
Ensure that a new database called system was created:
mysql -u root -p -se "SHOW DATABASES"
Use the following instructions to Start 3scale On-premises, which scales up all the pods in the correct order.
Start 3scale On-premises
-
backend-redis,system-memcache,system-mysql,system-redis, andzync-database. -
backend-listenerandbackend-worker. -
system-app. system-sidekiq,backend-cron, andsystem-sphinx-
3scale 2.3 includes
system-resque.
-
3scale 2.3 includes
-
apicast-stagingandapicast-production. apicast-wildcard-routerandzyncfor versions before 3scale 2.6 orzync-queandzyncfor 3scale 2.6 and above.The following example shows how to perform this in the CLI for
backend-redis,system-memcache,system-mysql,system-redis, andzync-database:$ oc scale dc/backend-redis --replicas=1 $ oc scale dc/system-memcache --replicas=1 $ oc scale dc/system-mysql --replicas=1 $ oc scale dc/system-redis --replicas=1 $ oc scale dc/zync-database --replicas=1
The
system-apppod should now be up and running without any issues.
-
- After validation, scale back up the other pods in the order shown.
-
Backup the
system-mysqlDeploymentConfig object. You may delete after a few days once you are sure everything is running properly. Deletingsystem-mysqlDeploymentConfig avoids any future confusion if this procedure is done again in the future.
5.3. Rolling back
Perform a rollback procedure if the system-app pod is not fully back online and the root cause for it could not be determined or addressed after following step 14.
Edit the secret
system-databaseusing the original values fromsystem-database-orig.bkp.yml. See [step-10]:$ oc edit secret system-database
Replace URL, DB_USER, and DB_PASSWORD with their original values.
Scale down all the pods and then scale them back up again, including
system-mysql. Thesystem-apppod and the other pods to be started after it should be up and running again. Run the following command to confirm all pods are back up and running:$ oc get pods -n <3scale-project>
5.4. Additional information
- For more information about 3scale and MySQL database support, see Red Hat 3scale API Management Supported Configurations.