Authorization Services Guide
For Use with Red Hat Single Sign-On 7.4
Abstract
Making open source more inclusive
Red Hat is committed to replacing problematic language in our code, documentation, and web properties. We are beginning with these four terms: master, slave, blacklist, and whitelist. Because of the enormity of this endeavor, these changes will be implemented gradually over several upcoming releases. For more details, see our CTO Chris Wright’s message.
Chapter 1. Overview
Red Hat Single Sign-On supports fine-grained authorization policies and is able to combine different access control mechanisms such as:
- Attribute-based access control (ABAC)
- Role-based access control (RBAC)
- User-based access control (UBAC)
- Context-based access control (CBAC)
Rule-based access control
- Using JavaScript
- Time-based access control
- Support for custom access control mechanisms (ACMs) through a Policy Provider Service Provider Interface (SPI)
Red Hat Single Sign-On is based on a set of administrative UIs and a RESTful API, and provides the necessary means to create permissions for your protected resources and scopes, associate those permissions with authorization policies, and enforce authorization decisions in your applications and services.
Resource servers (applications or services serving protected resources) usually rely on some kind of information to decide if access should be granted to a protected resource. For RESTful-based resource servers, that information is usually obtained from a security token, usually sent as a bearer token on every request to the server. For web applications that rely on a session to authenticate users, that information is usually stored in a user’s session and retrieved from there for each request.
Frequently, resource servers only perform authorization decisions based on role-based access control (RBAC), where the roles granted to the user trying to access protected resources are checked against the roles mapped to these same resources. While roles are very useful and used by applications, they also have a few limitations:
- Resources and roles are tightly coupled and changes to roles (such as adding, removing, or changing an access context) can impact multiple resources
- Changes to your security requirements can imply deep changes to application code to reflect these changes
- Depending on your application size, role management might become difficult and error-prone
- It is not the most flexible access control mechanism. Roles do not represent who you are and lack contextual information. If you have been granted a role, you have at least some access.
Considering that today we need to consider heterogeneous environments where users are distributed across different regions, with different local policies, using different devices, and with a high demand for information sharing, Red Hat Single Sign-On Authorization Services can help you improve the authorization capabilities of your applications and services by providing:
- Resource protection using fine-grained authorization policies and different access control mechanisms
- Centralized Resource, Permission, and Policy Management
- Centralized Policy Decision Point
- REST security based on a set of REST-based authorization services
- Authorization workflows and User-Managed Access
- The infrastructure to help avoid code replication across projects (and redeploys) and quickly adapt to changes in your security requirements.
1.1. Architecture
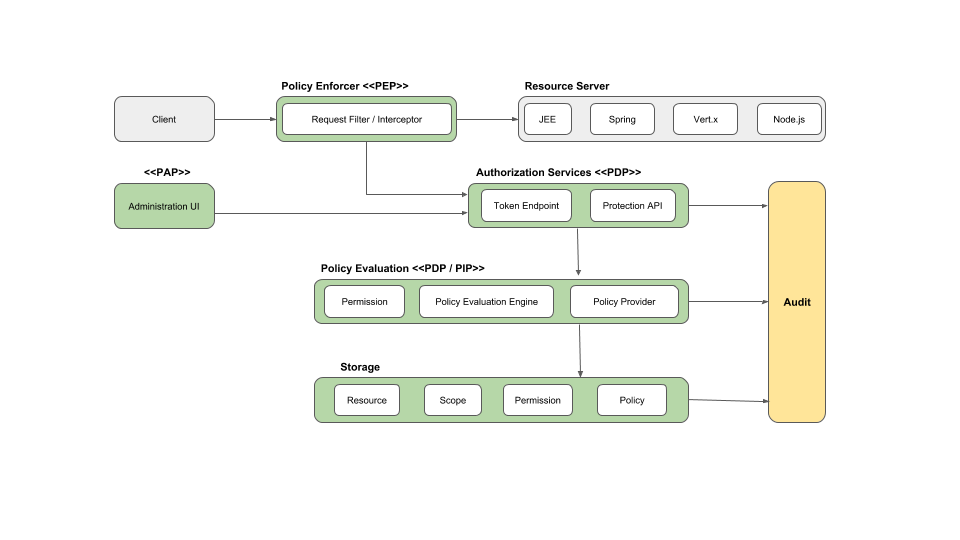
From a design perspective, Authorization Services is based on a well-defined set of authorization patterns providing these capabilities:
Policy Administration Point (PAP)
Provides a set of UIs based on the Red Hat Single Sign-On Administration Console to manage resource servers, resources, scopes, permissions, and policies. Part of this is also accomplished remotely through the use of the Protection API.
Policy Decision Point (PDP)
Provides a distributable policy decision point to where authorization requests are sent and policies are evaluated accordingly with the permissions being requested. For more information, see Obtaining Permissions.
Policy Enforcement Point (PEP)
Provides implementations for different environments to actually enforce authorization decisions at the resource server side. Red Hat Single Sign-On provides some built-in Policy Enforcers.
Policy Information Point (PIP)
Being based on Red Hat Single Sign-On Authentication Server, you can obtain attributes from identities and runtime environment during the evaluation of authorization policies.
1.1.1. The Authorization Process
Three main processes define the necessary steps to understand how to use Red Hat Single Sign-On to enable fine-grained authorization to your applications:
- Resource Management
- Permission and Policy Management
- Policy Enforcement
1.1.1.1. Resource Management
Resource Management involves all the necessary steps to define what is being protected.

First, you need to specify Red Hat Single Sign-On what are you looking to protect, which usually represents a web application or a set of one or more services. For more information on resource servers see Terminology.
Resource servers are managed using the Red Hat Single Sign-On Administration Console. There you can enable any registered client application as a resource server and start managing the resources and scopes you want to protect.

A resource can be a web page, a RESTFul resource, a file in your file system, an EJB, and so on. They can represent a group of resources (just like a Class in Java) or they can represent a single and specific resource.
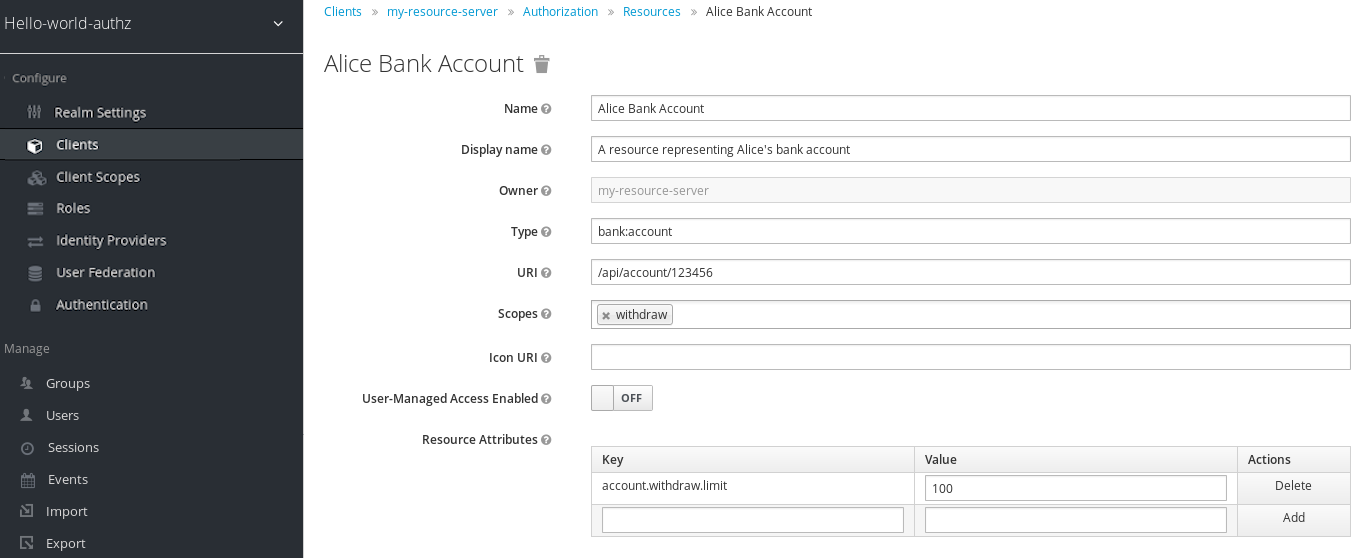
For instance, you might have a Bank Account resource that represents all banking accounts and use it to define the authorization policies that are common to all banking accounts. However, you might want to define specific policies for Alice Account (a resource instance that belongs to a customer), where only the owner is allowed to access some information or perform an operation.
Resources can be managed using the Red Hat Single Sign-On Administration Console or the Protection API. In the latter case, resource servers are able to manage their resources remotely.
Scopes usually represent the actions that can be performed on a resource, but they are not limited to that. You can also use scopes to represent one or more attributes within a resource.
1.1.1.2. Permission and Policy Management
Once you have defined your resource server and all the resources you want to protect, you must set up permissions and policies.
This process involves all the necessary steps to actually define the security and access requirements that govern your resources.

Policies define the conditions that must be satisfied to access or perform operations on something (resource or scope), but they are not tied to what they are protecting. They are generic and can be reused to build permissions or even more complex policies.
For instance,to allow access to a group of resources only for users granted with a role "User Premium", you can use RBAC (Role-based Access Control).
Red Hat Single Sign-On provides a few built-in policy types (and their respective policy providers) covering the most common access control mechanisms. You can even create policies based on rules written using JavaScript.
Once you have your policies defined, you can start defining your permissions. Permissions are coupled with the resource they are protecting. Here you specify what you want to protect (resource or scope) and the policies that must be satisfied to grant or deny permission.
1.1.1.3. Policy Enforcement
Policy Enforcement involves the necessary steps to actually enforce authorization decisions to a resource server. This is achieved by enabling a Policy Enforcement Point or PEP at the resource server that is capable of communicating with the authorization server, ask for authorization data and control access to protected resources based on the decisions and permissions returned by the server.

Red Hat Single Sign-On provides some built-in Policy Enforcers implementations that you can use to protect your applications depending on the platform they are running on.
1.1.2. Authorization Services
Authorization services consist of the following RESTFul endpoints:
- Token Endpoint
- Resource Management Endpoint
- Permission Management Endpoint
Each of these services provides a specific API covering the different steps involved in the authorization process.
1.1.2.1. Token Endpoint
OAuth2 clients (such as front end applications) can obtain access tokens from the server using the token endpoint and use these same tokens to access resources protected by a resource server (such as back end services). In the same way, Red Hat Single Sign-On Authorization Services provide extensions to OAuth2 to allow access tokens to be issued based on the processing of all policies associated with the resource(s) or scope(s) being requested. This means that resource servers can enforce access to their protected resources based on the permissions granted by the server and held by an access token. In Red Hat Single Sign-On Authorization Services the access token with permissions is called a Requesting Party Token or RPT for short.
For more information, see Obtaining Permissions.
1.1.2.2. Protection API
The Protection API is a set of UMA-compliant endpoint-providing operations for resource servers to help them manage their resources, scopes, permissions, and policies associated with them. Only resource servers are allowed to access this API, which also requires a uma_protection scope.
The operations provided by the Protection API can be organized in two main groups:
Resource Management
- Create Resource
- Delete Resource
- Find by Id
- Query
Permission Management
- Issue Permission Tickets
By default, Remote Resource Management is enabled. You can change that using the Red Hat Single Sign-On Administration Console and only allow resource management through the console.
When using the UMA protocol, the issuance of Permission Tickets by the Protection API is an important part of the whole authorization process. As described in a subsequent section, they represent the permissions being requested by the client and that are sent to the server to obtain a final token with all permissions granted during the evaluation of the permissions and policies associated with the resources and scopes being requested.
For more information, see Protection API.
1.2. Terminology
Before going further, it is important to understand these terms and concepts introduced by Red Hat Single Sign-On Authorization Services.
1.2.1. Resource Server
Per OAuth2 terminology, a resource server is the server hosting the protected resources and capable of accepting and responding to protected resource requests.
Resource servers usually rely on some kind of information to decide whether access to a protected resource should be granted. For RESTful-based resource servers, that information is usually carried in a security token, typically sent as a bearer token along with every request to the server. Web applications that rely on a session to authenticate users usually store that information in the user’s session and retrieve it from there for each request.
In Red Hat Single Sign-On, any confidential client application can act as a resource server. This client’s resources and their respective scopes are protected and governed by a set of authorization policies.
1.2.2. Resource
A resource is part of the assets of an application and the organization. It can be a set of one or more endpoints, a classic web resource such as an HTML page, and so on. In authorization policy terminology, a resource is the object being protected.
Every resource has a unique identifier that can represent a single resource or a set of resources. For instance, you can manage a Banking Account Resource that represents and defines a set of authorization policies for all banking accounts. But you can also have a different resource named Alice’s Banking Account, which represents a single resource owned by a single customer, which can have its own set of authorization policies.
1.2.3. Scope
A resource’s scope is a bounded extent of access that is possible to perform on a resource. In authorization policy terminology, a scope is one of the potentially many verbs that can logically apply to a resource.
It usually indicates what can be done with a given resource. Example of scopes are view, edit, delete, and so on. However, scope can also be related to specific information provided by a resource. In this case, you can have a project resource and a cost scope, where the cost scope is used to define specific policies and permissions for users to access a project’s cost.
1.2.4. Permission
Consider this simple and very common permission:
A permission associates the object being protected with the policies that must be evaluated to determine whether access is granted.
X CAN DO Y ON RESOURCE Z
where …
- X represents one or more users, roles, or groups, or a combination of them. You can also use claims and context here.
- Y represents an action to be performed, for example, write, view, and so on.
- Z represents a protected resource, for example, "/accounts".
Red Hat Single Sign-On provides a rich platform for building a range of permission strategies ranging from simple to very complex, rule-based dynamic permissions. It provides flexibility and helps to:
- Reduce code refactoring and permission management costs
- Support a more flexible security model, helping you to easily adapt to changes in your security requirements
- Make changes at runtime; applications are only concerned about the resources and scopes being protected and not how they are protected.
1.2.5. Policy
A policy defines the conditions that must be satisfied to grant access to an object. Unlike permissions, you do not specify the object being protected but rather the conditions that must be satisfied for access to a given object (for example, resource, scope, or both). Policies are strongly related to the different access control mechanisms (ACMs) that you can use to protect your resources. With policies, you can implement strategies for attribute-based access control (ABAC), role-based access control (RBAC), context-based access control, or any combination of these.
Red Hat Single Sign-On leverages the concept of policies and how you define them by providing the concept of aggregated policies, where you can build a "policy of policies" and still control the behavior of the evaluation. Instead of writing one large policy with all the conditions that must be satisfied for access to a given resource, the policies implementation in Red Hat Single Sign-On Authorization Services follows the divide-and-conquer technique. That is, you can create individual policies, then reuse them with different permissions and build more complex policies by combining individual policies.
1.2.6. Policy Provider
Policy providers are implementations of specific policy types. Red Hat Single Sign-On provides built-in policies, backed by their corresponding policy providers, and you can create your own policy types to support your specific requirements.
Red Hat Single Sign-On provides a SPI (Service Provider Interface) that you can use to plug in your own policy provider implementations.
1.2.7. Permission Ticket
A permission ticket is a special type of token defined by the User-Managed Access (UMA) specification that provides an opaque structure whose form is determined by the authorization server. This structure represents the resources and/or scopes being requested by a client, the access context, as well as the policies that must be applied to a request for authorization data (requesting party token [RPT]).
In UMA, permission tickets are crucial to support person-to-person sharing and also person-to-organization sharing. Using permission tickets for authorization workflows enables a range of scenarios from simple to complex, where resource owners and resource servers have complete control over their resources based on fine-grained policies that govern the access to these resources.
In the UMA workflow, permission tickets are issued by the authorization server to a resource server, which returns the permission ticket to the client trying to access a protected resource. Once the client receives the ticket, it can make a request for an RPT (a final token holding authorization data) by sending the ticket back to the authorization server.
For more information on permission tickets, see User-Managed Access and the UMA specification.
Chapter 2. Getting Started
Before you can use this tutorial, you need to complete the installation of Red Hat Single Sign-On and create the initial admin user as shown in the Getting Started Guide tutorial. There is one caveat to this. You have to run a separate JBoss EAP instance on the same machine as Red Hat Single Sign-On Server. This separate instance will run your Java Servlet application. Because of this you will have to run the Red Hat Single Sign-On under a different port so that there are no port conflicts when running on the same machine. Use the jboss.socket.binding.port-offset system property on the command line. The value of this property is a number that will be added to the base value of every port opened by Red Hat Single Sign-On Server.
To boot Red Hat Single Sign-On Server:
Linux/Unix
$ .../bin/standalone.sh -Djboss.socket.binding.port-offset=100
Windows
> ...\bin\standalone.bat -Djboss.socket.binding.port-offset=100
For more details about how to install and configure a JBoss EAP, please follow the steps on the Securing Applications and Services Guide tutorial.
After installing and booting both servers you should be able to access Red Hat Single Sign-On Admin Console at http://localhost:8180/auth/admin/ and also the JBoss EAP instance at http://localhost:8080.
2.1. Securing a Servlet Application
The purpose of this getting started guide is to get you up and running as quickly as possible so that you can experiment with and test various authorization features provided by Red Hat Single Sign-On. This quick tour relies heavily on the default database and server configurations and does not cover complex deployment options. For more information on features or configuration options, see the appropriate sections in this documentation.
This guide explains key concepts about Red Hat Single Sign-On Authorization Services:
- Enabling fine-grained authorization for a client application
- Configuring a client application to be a resource server, with protected resources
- Defining permissions and authorization policies to govern access to protected resources
- Enabling policy enforcement in your applications.
2.2. Creating a Realm and a User
The first step in this tutorial is to create a realm and a user in that realm. Then, within the realm we will create a single client application, which then becomes a resource server for which you need to enable authorization services.
To create a realm and a user complete the following steps:
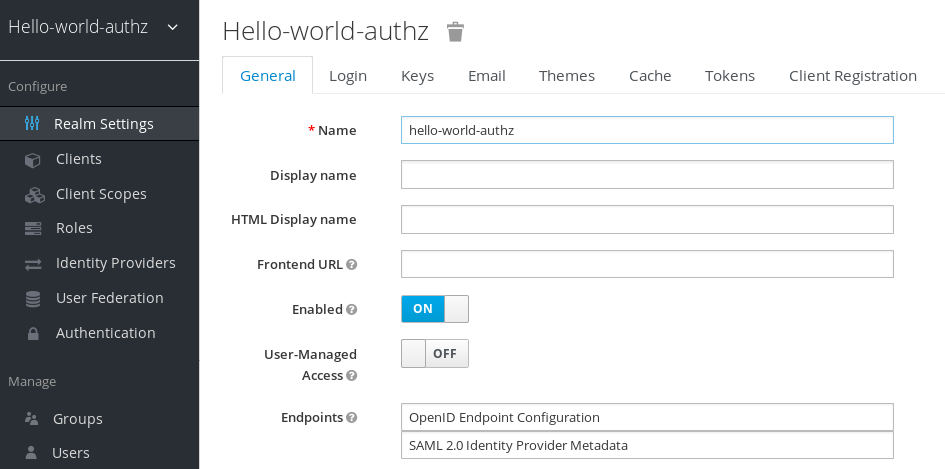
Create a realm with a name hello-world-authz. Once created, a page similar to the following is displayed:
Realm hello-world-authz
- Create a user for your newly created realm. Click Users. The user list page opens.
- On the right side of the empty user list, click Add User.
To create a new user, complete the Username, Email, First Name, and Last Name fields. Click the User Enabled switch to On, and then click Save.
Add User

Set a password for the user by clicking the Credentials tab.
Set User Password

- Complete the New Password and Password Confirmation fields with a password and click the Temporary switch to OFF.
- Click Set Password to set the user’s password.
2.3. Enabling Authorization Services
You can enable authorization services in an existing client application configured to use the OpenID Connect Protocol. You can also create a new client.
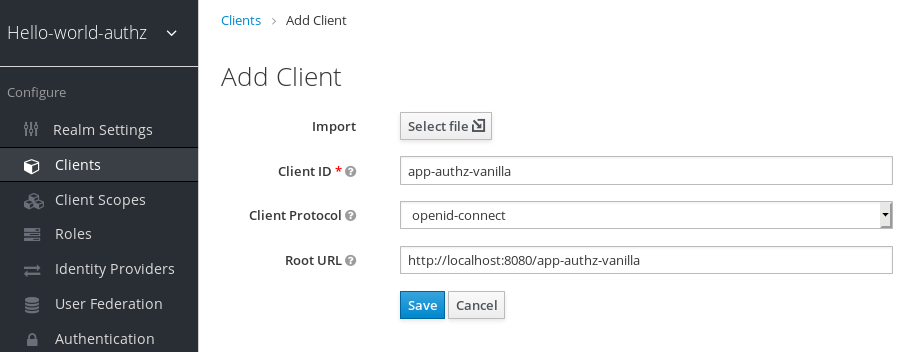
To create a new client, complete the following steps:
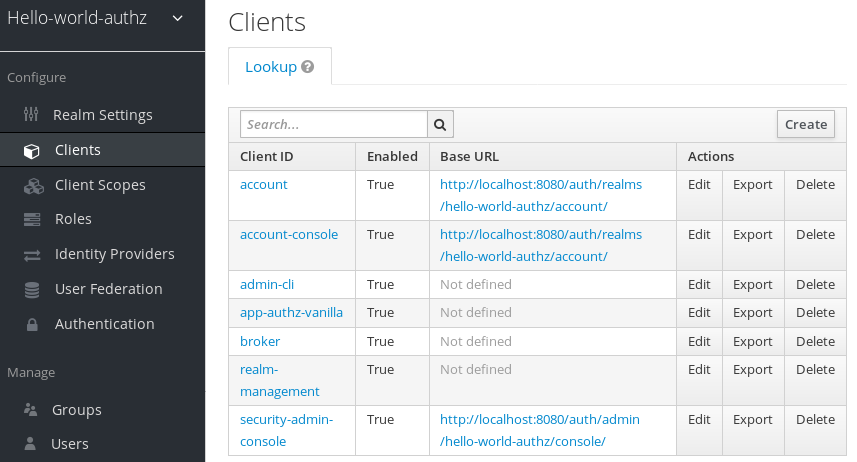
Click Clients to start creating a new client application and fill in the Client ID, Client Protocol, and Root URL fields.
Create Client Application
- Click Save. The Client Details page is displayed.
On the Client Details page, select confidential in the Access Type field, change the Authorization Enabled switch to ON, and then click Save. A new Authorization tab is displayed for the client.
Client Details

Click the Authorization tab and an Authorization Settings page similar to the following is displayed:
Authorization Settings

When you enable authorization services for a client application, Red Hat Single Sign-On automatically creates several default settings for your client authorization configuration.
For more information about authorization configuration, see Enabling Authorization Services.
2.4. Build, Deploy, and Test Your Application
Now that the app-authz-vanilla resource server (or client) is properly configured and authorization services are enabled, it can be deployed to the server.
The project and code for the application you are going to deploy is available in Red Hat Single Sign-On Quickstarts Repository. You will need the following installed on your machine and available in your PATH before you can continue:
- Java JDK 8
- Apache Maven 3.1.1 or higher
- Git
You can obtain the code by cloning the repository at https://github.com/redhat-developer/redhat-sso-quickstarts. Use the branch matching the version of Red Hat Single Sign-On in use.
Follow these steps to download the code.
Clone Project
$ git clone https://github.com/redhat-developer/redhat-sso-quickstarts
The application we are about to build and deploy is located at
$ cd redhat-sso-quickstarts/app-authz-jee-vanilla
2.4.1. Obtaining the Adapter Configuration
You must first obtain the adapter configuration before building and deploying the application.
To obtain the adapter configuration from the Red Hat Single Sign-On Administration Console, complete the following steps.
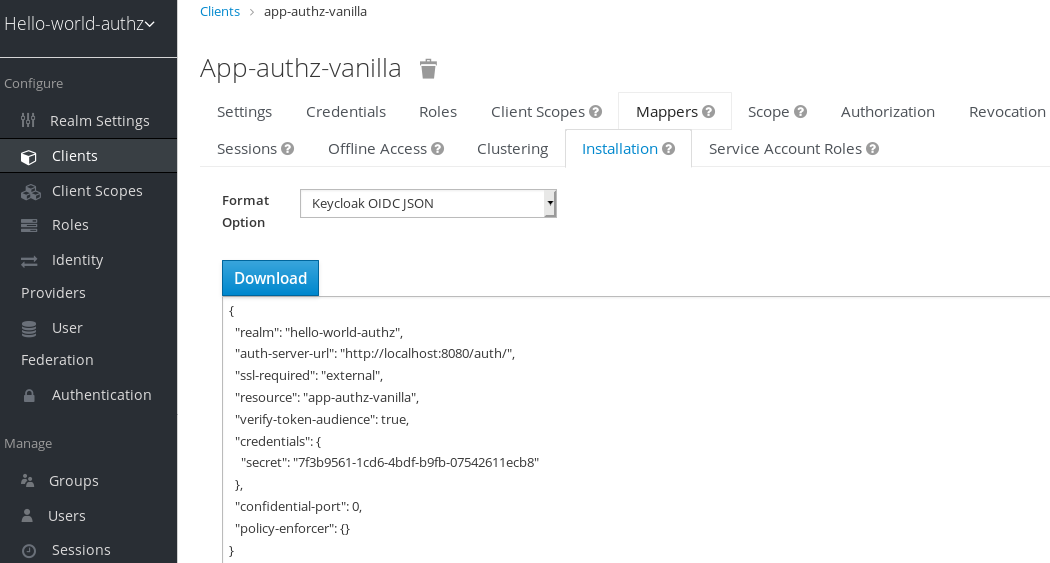
Click Clients. In the client listing, click the app-authz-vanilla client application. The Client Details page opens.
Client Details
Click the Installation tab. From the Format Option dropdown list, select Keycloak OIDC JSON. The adapter configuration is displayed in JSON format. Click Download.
Adapter Configuration
-
Move the file
keycloak.jsonto theapp-authz-jee-vanilla/configdirectory. (optional) By default, the policy enforcer responds with a
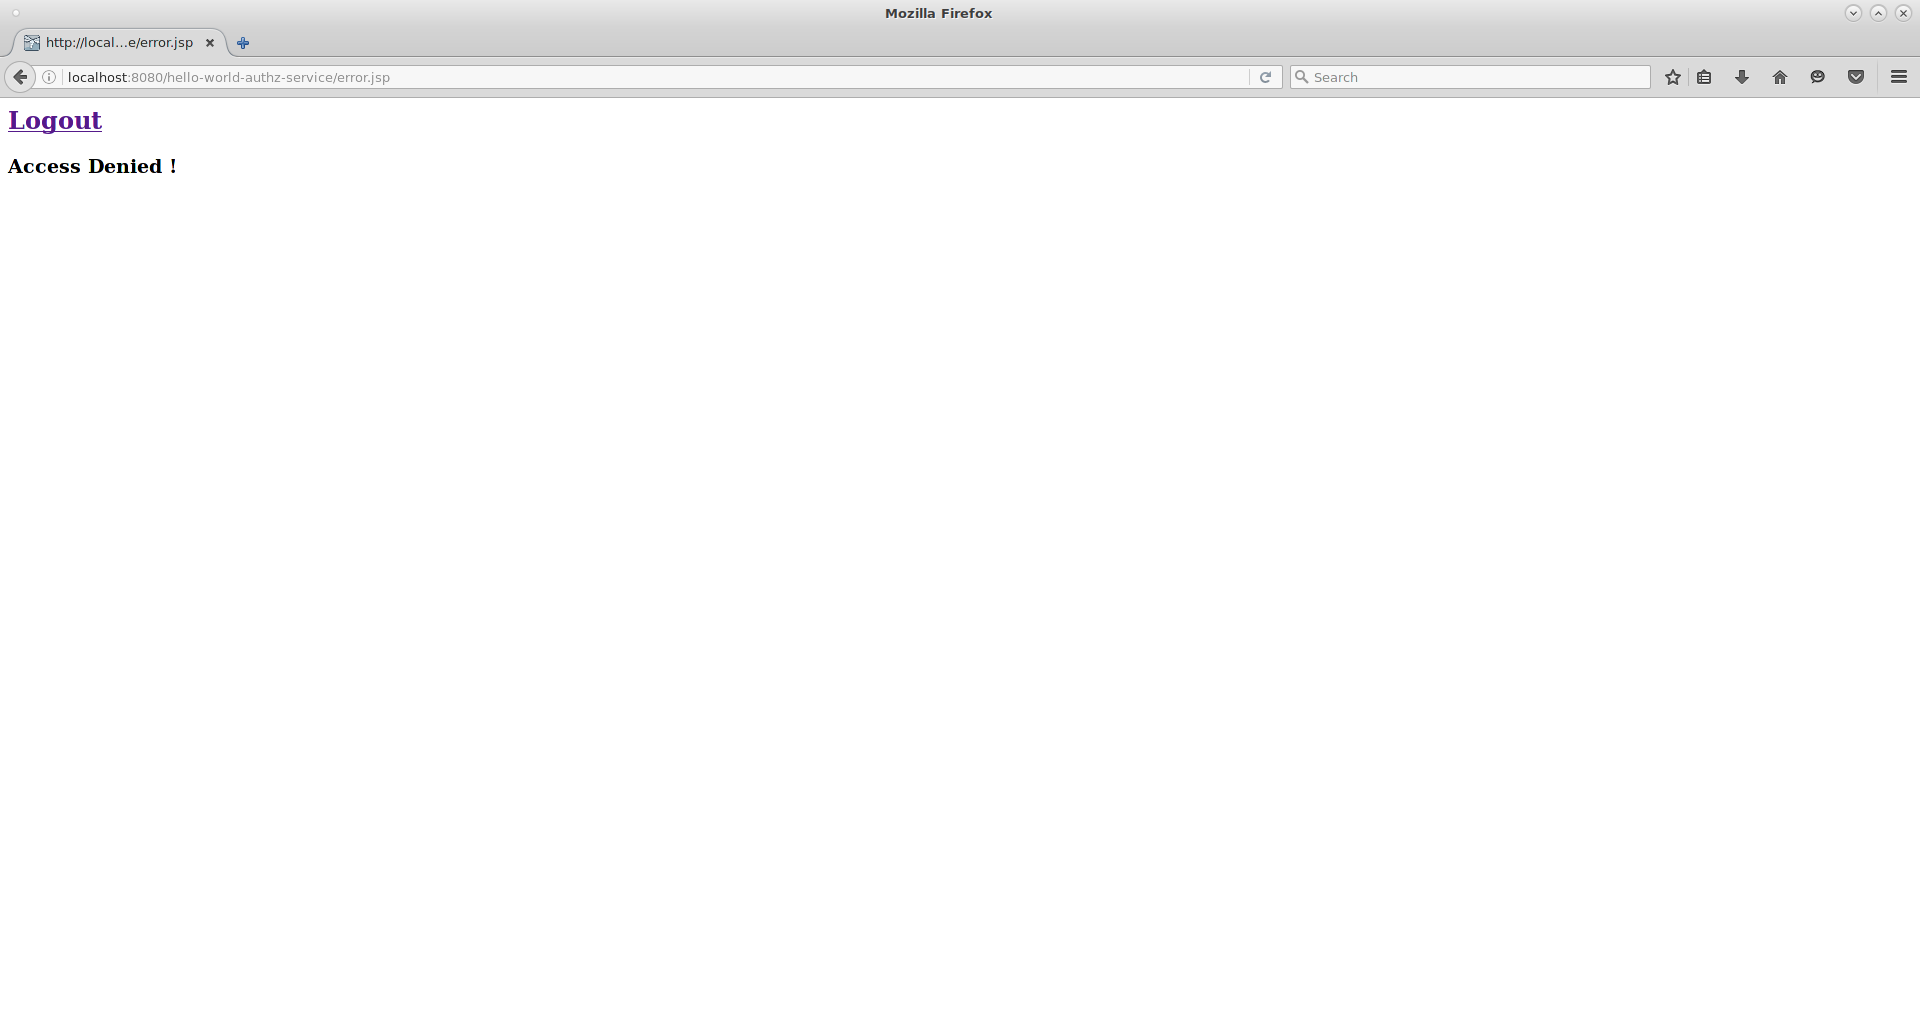
403status code when the user lacks permission to access protected resources on the resource server. However, you can also specify a redirection URL for unauthorized users. To specify a redirection URL, edit the keycloak.json file you updated in step 3 and replace thepolicy-enforcerconfiguration with the following:"policy-enforcer": { "on-deny-redirect-to" : "/app-authz-vanilla/error.jsp" }This change specifies to the policy enforcer to redirect users to a
/app-authz-vanilla/error.jsppage if a user does not have the necessary permissions to access a protected resource, rather than an unhelpful403 Unauthorizedmessage.
2.4.2. Building and Deploying the Application
To build and deploy the application execute the following command:
$ cd redhat-sso-quickstarts/app-authz-jee-vanilla
$ mvn clean package wildfly:deploy
2.4.3. Testing the Application
If your application was successfully deployed you can access it at http://localhost:8080/app-authz-vanilla. The Red Hat Single Sign-On Login page opens.
Login Page
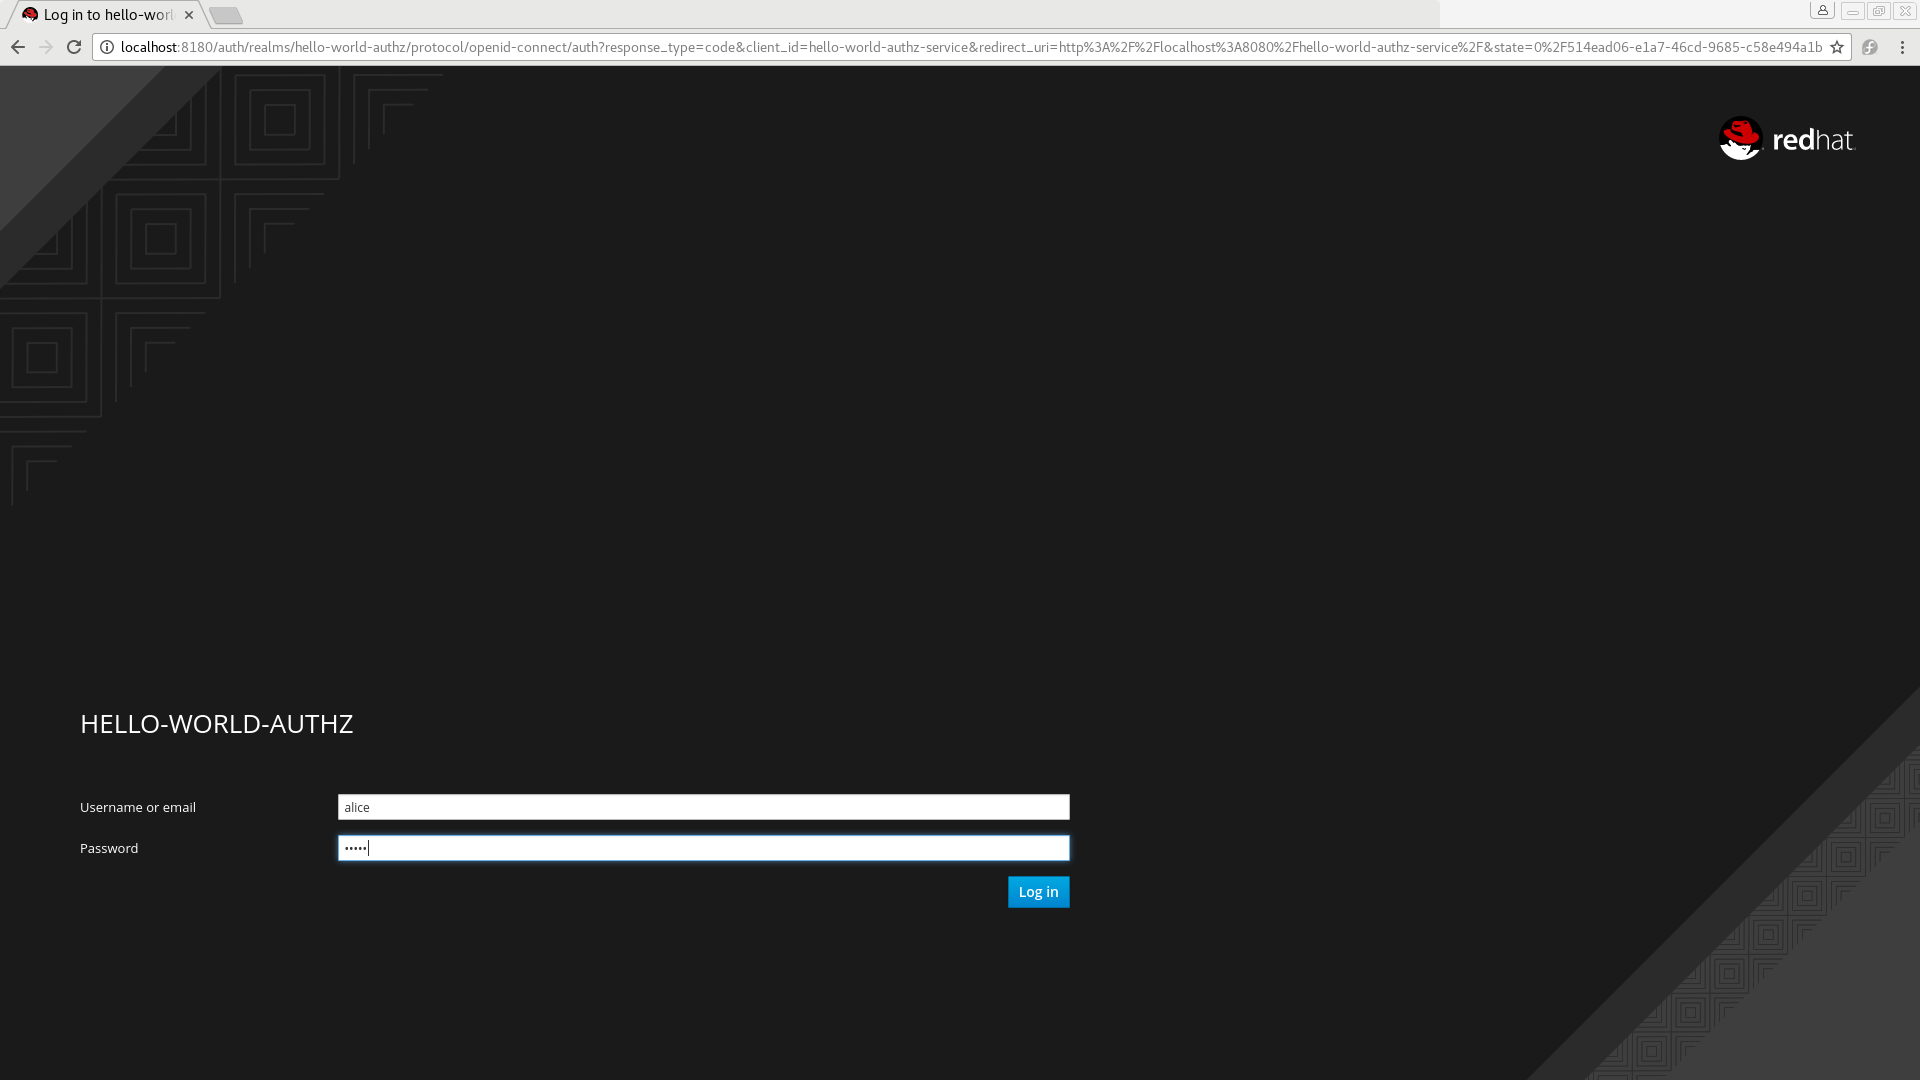
Log in as alice using the password you specified for that user. After authenticating, the following page is displayed:
Hello World Authz Main Page

The default settings defined by Red Hat Single Sign-On when you enable authorization services for a client application provide a simple policy that always grants access to the resources protected by this policy.
You can start by changing the default permissions and policies and test how your application responds, or even create new policies using the different policy types provided by Red Hat Single Sign-On.
There are a plenty of things you can do now to test this application. For example, you can change the default policy by clicking the Authorization tab for the client, then Policies tab, then click on Default Policy in the list to allow you to change it as follows:
// The default value is $evaluation.grant(),
// let's see what happens when we change it to $evaluation.deny()
$evaluation.deny();
Now, log out of the demo application and log in again. You can no longer access the application.
Let’s fix that now, but instead of changing the Default Policy code we are going to change the Logic to Negative using the dropdown list below the policy code text area. That re-enables access to the application as we are negating the result of that policy, which is by default denying all requests for access. Again, before testing this change, be sure to log out and log in again.
2.4.4. Next Steps
There are additional things you can do, such as:
- Create a scope, define a policy and permission for it, and test it on the application side. Can the user perform an action (or anything else represented by the scope you created)?
-
Create different types of policies such as JavaScript-based, and associate these policies with the
Default Permission. -
Apply multiple policies to the
Default Permissionand test the behavior. For example, combine multiple policies and change theDecision Strategyaccordingly. - For more information about how to view and test permissions inside your application see Obtaining the Authorization Context.
2.5. Authorization Quickstarts
In addition to the app-authz-jee-vanilla quickstart that was used as a sample application in the previous section, the Red Hat Single Sign-On Quickstarts Repository contains other applications that make use of the authorization services described in this documentation.
The authorization quickstarts have been designed so that authorization services are displayed in different scenarios and using different technologies and integrations. It is not meant as a comprehensive set of all the possible use cases involving authorization but they should provide a starting point for users interested in understanding how the authorization services can be used in their own applications.
Each quickstart has a README file with instructions on how to build, deploy, and test the sample application. The following table provides a brief description of the available authorization quickstarts:
| Name | Description |
|---|---|
| Demonstrates how to enable fine-grained authorization to a Java EE application in order to protect specific resources and build a dynamic menu based on the permissions obtained from a Keycloak Server. | |
| Demonstrates how to enable fine-grained authorization to a Java EE application and use the default authorization settings to protect all resources in the application. | |
| Demonstrates how to protect a SpringBoot REST service using Keycloak Authorization Services. | |
| Demonstrates how to write a SpringBoot Web application where both authentication and authorization aspects are managed by Keycloak. | |
| A simple application based on HTML5+AngularJS+JAX-RS that demonstrates how to enable User-Managed Access to your application and let users to manage permissions for their resources. |
Chapter 3. Managing Resource Servers
According to the OAuth2 specification, a resource server is a server hosting the protected resources and capable of accepting and responding to protected resource requests.
In Red Hat Single Sign-On, resource servers are provided with a rich platform for enabling fine-grained authorization for their protected resources, where authorization decisions can be made based on different access control mechanisms.
Any client application can be configured to support fine-grained permissions. In doing so, you are conceptually turning the client application into a resource server.
3.1. Creating a Client Application
The first step to enable Red Hat Single Sign-On Authorization Services is to create the client application that you want to turn into a resource server.
To create a client application, complete the following steps:
Click Clients.
Clients
On this page, click Create.
Create Client
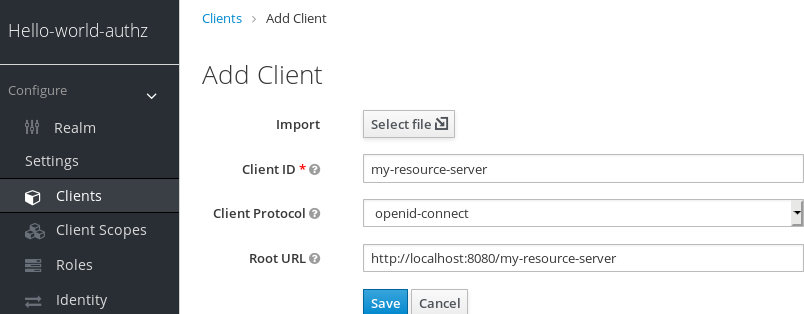
-
Type the
Client IDof the client. For example, my-resource-server. Type the
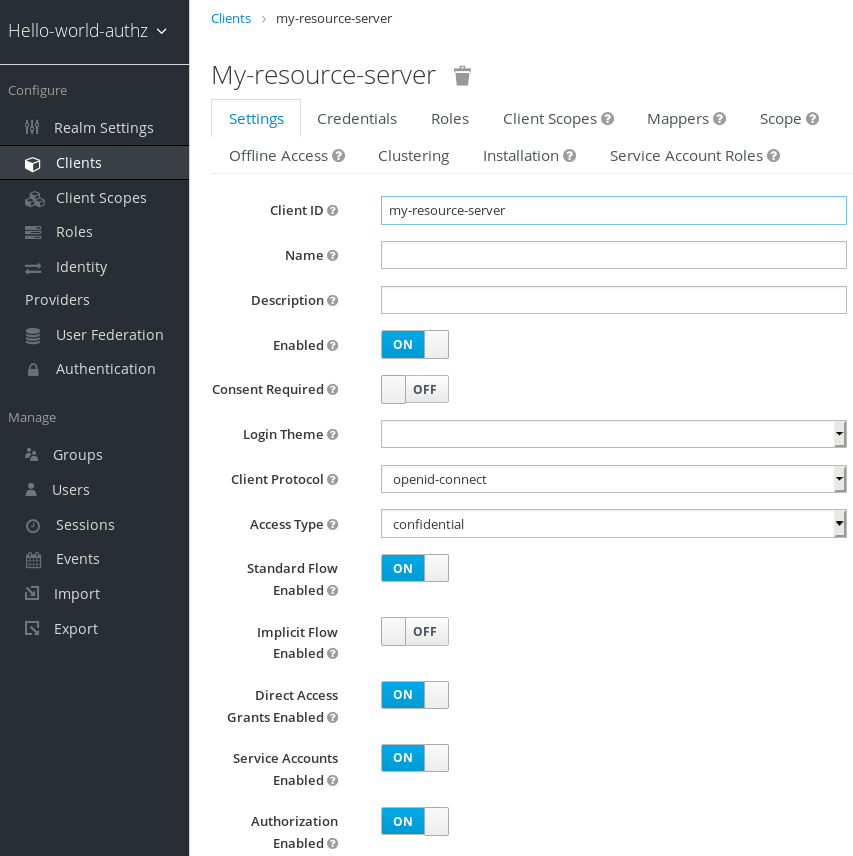
Root URLfor your application. For example:http://${host}:${port}/my-resource-serverClick Save. The client is created and the client Settings page opens. A page similar to the following is displayed:
Client Settings
3.2. Enabling Authorization Services
To turn your OIDC Client Application into a resource server and enable fine-grained authorization, select Access type confidential and click the Authorization Enabled switch to ON then click Save.
Enabling Authorization Services
A new Authorization tab is displayed for this client. Click the Authorization tab and a page similar to the following is displayed:
Resource Server Settings
The Authorization tab contains additional sub-tabs covering the different steps that you must follow to actually protect your application’s resources. Each tab is covered separately by a specific topic in this documentation. But here is a quick description about each one:
Settings
General settings for your resource server. For more details about this page see the Resource Server Settings section.
Resource
From this page, you can manage your application’s resources.
Authorization Scopes
From this page, you can manage scopes.
Policies
From this page, you can manage authorization policies and define the conditions that must be met to grant a permission.
Permissions
From this page, you can manage the permissions for your protected resources and scopes by linking them with the policies you created.
Evaluate
From this page, you can simulate authorization requests and view the result of the evaluation of the permissions and authorization policies you have defined.
Export Settings
From this page, you can export the authorization settings to a JSON file.
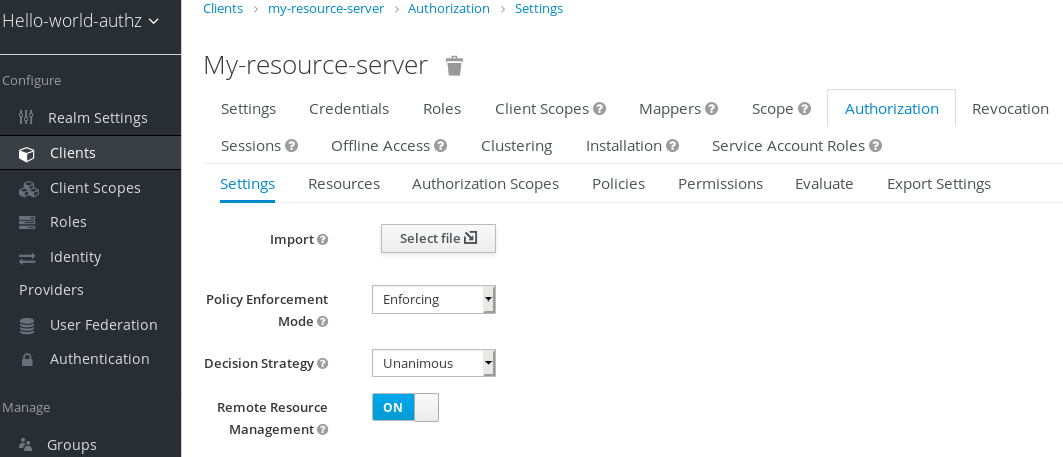
3.2.1. Resource Server Settings
On the Resource Server Settings page, you can configure the policy enforcement mode, allow remote resource management, and export the authorization configuration settings.
Policy Enforcement Mode
Specifies how policies are enforced when processing authorization requests sent to the server.
Enforcing
(default mode) Requests are denied by default even when there is no policy associated with a given resource.
Permissive
Requests are allowed even when there is no policy associated with a given resource.
Disabled
Disables the evaluation of all policies and allows access to all resources.
Decision Strategy
This configurations changes how the policy evaluation engine decides whether or not a resource or scope should be granted based on the outcome from all evaluated permissions.
Affirmativemeans that at least one permission must evaluate to a positive decision in order grant access to a resource and its scopes.Unanimousmeans that all permissions must evaluate to a positive decision in order for the final decision to be also positive. As an example, if two permissions for a same resource or scope are in conflict (one of them is granting access and the other is denying access), the permission to the resource or scope will be granted if the choosen strategy isAffirmative. Otherwise, a single deny from any permission will also deny access to the resource or scope.Remote Resource Management
Specifies whether resources can be managed remotely by the resource server. If false, resources can be managed only from the administration console.
3.3. Default Configuration
When you create a resource server, Red Hat Single Sign-On creates a default configuration for your newly created resource server.
The default configuration consists of:
- A default protected resource representing all resources in your application.
- A policy that always grants access to the resources protected by this policy.
- A permission that governs access to all resources based on the default policy.
The default protected resource is referred to as the default resource and you can view it if you navigate to the Resources tab.
Default Resource
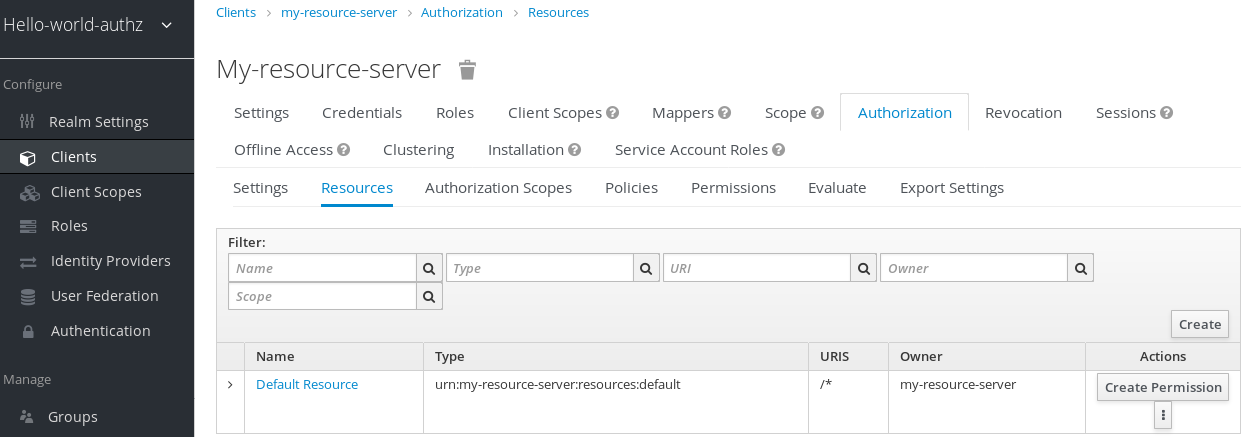
This resource defines a Type, namely urn:my-resource-server:resources:default and a URI /*. Here, the URI field defines a wildcard pattern that indicates to Red Hat Single Sign-On that this resource represents all the paths in your application. In other words, when enabling policy enforcement for your application, all the permissions associated with the resource will be examined before granting access.
The Type mentioned previously defines a value that can be used to create typed resource permissions that must be applied to the default resource or any other resource you create using the same type.
The default policy is referred to as the only from realm policy and you can view it if you navigate to the Policies tab.
Default Policy
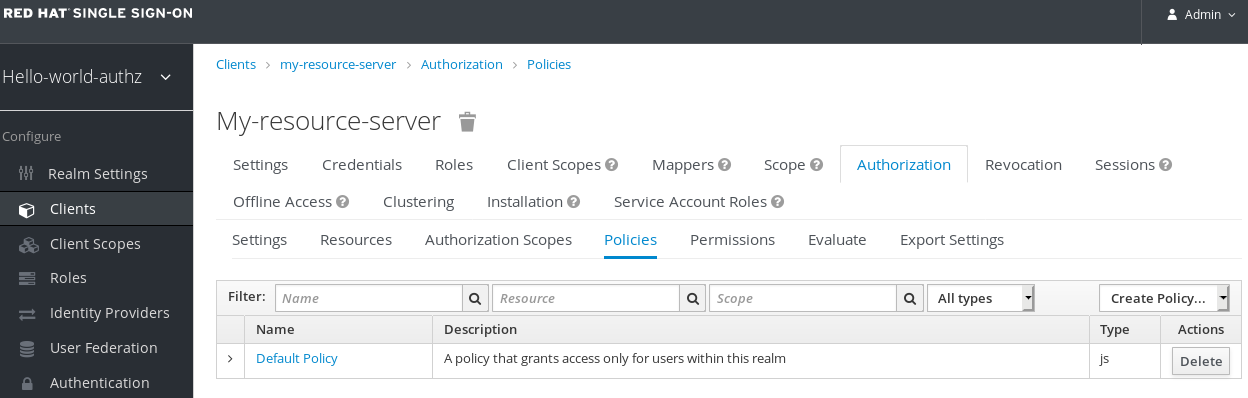
This policy is a JavaScript-based policy defining a condition that always grants access to the resources protected by this policy. If you click this policy you can see that it defines a rule as follows:
// by default, grants any permission associated with this policy
$evaluation.grant();
Lastly, the default permission is referred to as the default permission and you can view it if you navigate to the Permissions tab.
Default Permission

This permission is a resource-based permission, defining a set of one or more policies that are applied to all resources with a given type.
3.3.1. Changing the Default Configuration
You can change the default configuration by removing the default resource, policy, or permission definitions and creating your own.
The default resource is created with an URI that maps to any resource or path in your application using a /* pattern. Before creating your own resources, permissions and policies, make sure the default configuration doesn’t conflict with your own settings.
The default configuration defines a resource that maps to all paths in your application. If you are about to write permissions to your own resources, be sure to remove the Default Resource or change its URIS
3.4. Export and Import Authorization Configuration
The configuration settings for a resource server (or client) can be exported and downloaded. You can also import an existing configuration file for a resource server. Importing and exporting a configuration file is helpful when you want to create an initial configuration for a resource server or to update an existing configuration. The configuration file contains definitions for:
- Protected resources and scopes
- Policies
- Permissions
3.4.1. Exporting a Configuration File
To export a configuration file, complete the following steps:
- Navigate to the Resource Server Settings page.
- Click the Export Settings tab.
On this page, click Export.
Export Settings

The configuration file is exported in JSON format and displayed in a text area, from which you can copy and paste. You can also click Download to download the configuration file and save it.
3.4.2. Importing a Configuration File
To import a configuration file, complete the following steps:
Navigate to the Resource Server Settings page.
Import Settings
To import a configuration file for a resource server, click Select file to select a file containing the configuration you want to import.
Chapter 4. Managing Resources and Scopes
Resource management is straightforward and generic. After creating a resource server, you can start creating the resources and scopes that you want to protect. Resources and scopes can be managed by navigating to the Resource and Scope tabs, respectively.
4.1. Viewing Resources
On the Resource page, you see a list of the resources associated with a resource server.
Resources

The resource list provides information about the protected resources, such as:
- Type
- URIS
- Owner
- Associated scopes, if any
- Associated permissions
From this list, you can also directly create a permission by clicking Create Permission for the resource for which you want to create the permission.
Before creating permissions for your resources, be sure you have already defined the policies that you want to associate with the permission.
4.2. Creating Resources
Creating a resource is straightforward and generic. Your main concern is the granularity of the resources you create. In other words, resources can be created to represent a set of one or more resources and the way you define them is crucial to managing permissions.
To create a new resource, click Create in the right upper corner of the resource listing.
Add Resource
In Red Hat Single Sign-On, a resource defines a small set of information that is common to different types of resources, such as:
Name
A human-readable and unique string describing this resource.
Type
A string uniquely identifying the type of a set of one or more resources. The type is a string used to group different resource instances. For example, the default type for the default resource that is automatically created is
urn:resource-server-name:resources:default
URIS
URIS that provides the locations/addresses for the resource. For HTTP resources, the URIS are usually the relative paths used to serve these resources.
Scopes
One or more scopes to associate with the resource.
4.2.1. Resource Attributes
Resources may have attributes associated with them. These attributes can be used to provide additional information about a resource and to provide additional information to policies when evaluating permissions associated with a resource.
Each attribute is a key and value pair where the value can be a set of one or many strings. Multiple values can be defined for an attribute by separating each value with a comma.
4.2.2. Typed Resources
The type field of a resource can be used to group different resources together, so they can be protected using a common set of permissions.
4.2.3. Resource Owners
Resources also have an owner. By default, resources are owned by the resource server.
However, resources can also be associated with users, so you can create permissions based on the resource owner. For example, only the resource owner is allowed to delete or update a given resource.
4.2.4. Managing Resources Remotely
Resource management is also exposed through the Protection API to allow resource servers to remotely manage their resources.
When using the Protection API, resource servers can be implemented to manage resources owned by their users. In this case, you can specify the user identifier to configure a resource as belonging to a specific user.
Red Hat Single Sign-On provides resource servers complete control over their resources. In the future, we should be able to allow users to control their own resources as well as approve authorization requests and manage permissions, especially when using the UMA protocol.
Chapter 5. Managing Policies
As mentioned previously, policies define the conditions that must be satisfied before granting access to an object.
You can view all policies associated with a resource server by clicking the Policy tab when editing a resource server.
Policies
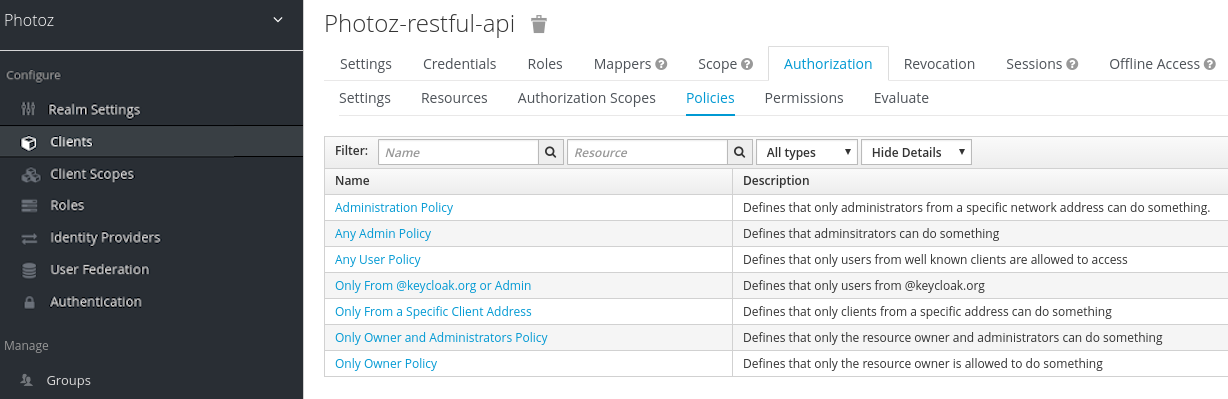
On this tab, you can view the list of previously created policies as well as create and edit a policy.
To create a new policy, in the upper right corner of the policy list, select a policy type from the Create policy dropdown list. Details about each policy type are described in this section.
5.1. User-Based Policy
You can use this type of policy to define conditions for your permissions where a set of one or more users is permitted to access an object.
To create a new user-based policy, select User in the dropdown list in the upper right corner of the policy listing.
Add a User-Based Policy

5.1.1. Configuration
Name
A human-readable and unique string identifying the policy. A best practice is to use names that are closely related to your business and security requirements, so you can identify them more easily.
Description
A string containing details about this policy.
Users
Specifies which users are given access by this policy.
Logic
The Logic of this policy to apply after the other conditions have been evaluated.
5.2. Role-Based Policy
You can use this type of policy to define conditions for your permissions where a set of one or more roles is permitted to access an object.
By default, roles added to this policy are not specified as required and the policy will grant access if the user requesting access has been granted any of these roles. However, you can specify a specific role as required if you want to enforce a specific role. You can also combine required and non-required roles, regardless of whether they are realm or client roles.
Role policies can be useful when you need more restricted role-based access control (RBAC), where specific roles must be enforced to grant access to an object. For instance, you can enforce that a user must consent to allowing a client application (which is acting on the user’s behalf) to access the user’s resources. You can use Red Hat Single Sign-On Client Scope Mapping to enable consent pages or even enforce clients to explicitly provide a scope when obtaining access tokens from a Red Hat Single Sign-On server.
To create a new role-based policy, select Role in the dropdown list in the upper right corner of the policy listing.
Add Role-Based Policy

5.2.1. Configuration
Name
A human-readable and unique string describing the policy. A best practice is to use names that are closely related to your business and security requirements, so you can identify them more easily.
Description
A string containing details about this policy.
Realm Roles
Specifies which realm roles are permitted by this policy.
Client Roles
Specifies which client roles are permitted by this policy. To enable this field must first select a
Client.Logic
The Logic of this policy to apply after the other conditions have been evaluated.
5.2.2. Defining a Role as Required
When creating a role-based policy, you can specify a specific role as Required. When you do that, the policy will grant access only if the user requesting access has been granted all the required roles. Both realm and client roles can be configured as such.
Example of Required Role
To specify a role as required, select the Required checkbox for the role you want to configure as required.
Required roles can be useful when your policy defines multiple roles but only a subset of them are mandatory. In this case, you can combine realm and client roles to enable an even more fine-grained role-based access control (RBAC) model for your application. For example, you can have policies specific for a client and require a specific client role associated with that client. Or you can enforce that access is granted only in the presence of a specific realm role. You can also combine both approaches within the same policy.
5.3. JavaScript-Based Policy
You can use this type of policy to define conditions for your permissions using JavaScript. It is one of the rule-based policy types supported by Red Hat Single Sign-On, and provides flexibility to write any policy based on the Evaluation API.
To create a new JavaScript-based policy, select JavaScript in the dropdown list in the upper right corner of the policy listing.
By default, JavaScript Policies can not be uploaded to the server. You should prefer deploying your JS Policies directly to the server as described in JavaScript Providers. If you still want to use the Red Hat Single Sign-On Administration Console to manage your JS policies you should enable the Upload Scripts feature.
Add JavaScript Policy

5.3.1. Configuration
Name
A human-readable and unique string describing the policy. A best practice is to use names that are closely related to your business and security requirements, so you can identify them more easily.
Description
A string containing details about this policy.
Code
The JavaScript code providing the conditions for this policy.
Logic
The Logic of this policy to apply after the other conditions have been evaluated.
5.3.2. Creating a JS Policy from a Deployed JAR File
Red Hat Single Sign-On allows you to deploy a JAR file in order to deploy scripts to the server. Please, take a look at JavaScript Providers for more details.
Once you have your scripts deployed, you should be able to select the scripts you deployed from the list of available policy providers.
5.3.3. Examples
5.3.3.1. Checking for attributes from the evaluation context
Here is a simple example of a JavaScript-based policy that uses attribute-based access control (ABAC) to define a condition based on an attribute obtained from the execution context:
var context = $evaluation.getContext();
var contextAttributes = context.getAttributes();

if (contextAttributes.containsValue('kc.client.network.ip_address', '127.0.0.1')) {
    $evaluation.grant();
}
5.3.3.2. Checking for attributes from the current identity
Here is a simple example of a JavaScript-based policy that uses attribute-based access control (ABAC) to define a condition based on an attribute obtained associated with the current identity:
var context = $evaluation.getContext();
var identity = context.getIdentity();
var attributes = identity.getAttributes();
var email = attributes.getValue('email').asString(0);

if (email.endsWith('@keycloak.org')) {
    $evaluation.grant();
}
Where these attributes are mapped from whatever claim is defined in the token that was used in the authorization request.
5.3.3.3. Checking for roles granted to the current identity
You can also use Role-Based Access Control (RBAC) in your policies. In the example below, we check if a user is granted with a keycloak_user realm role:
var context = $evaluation.getContext();
var identity = context.getIdentity();

if (identity.hasRealmRole('keycloak_user')) {
    $evaluation.grant();
}
Or you can check if a user is granted with a my-client-role client role, where my-client is the client id of the client application:
var context = $evaluation.getContext();
var identity = context.getIdentity();

if (identity.hasClientRole('my-client', 'my-client-role')) {
    $evaluation.grant();
}
5.3.3.4. Checking for roles granted to an user
To check for realm roles granted to an user:
var realm = $evaluation.getRealm();

if (realm.isUserInRealmRole('marta', 'role-a')) {
    $evaluation.grant();
}
Or for client roles granted to an user:
var realm = $evaluation.getRealm();

if (realm.isUserInClientRole('marta', 'my-client', 'some-client-role')) {
    $evaluation.grant();
}
5.3.3.5. Checking for roles granted to a group
To check for realm roles granted to a group:
var realm = $evaluation.getRealm();

if (realm.isGroupInRole('/Group A/Group D', 'role-a')) {
    $evaluation.grant();
}
5.3.3.6. Pushing arbitrary claims to the resource server
To push arbitrary claims to the resource server in order to provide additional information on how permissions should be enforced:
var permission = $evaluation.getPermission();

// decide if permission should be granted

if (granted) {
    permission.addClaim('claim-a', 'claim-a');
    permission.addClaim('claim-a', 'claim-a1');
    permission.addClaim('claim-b', 'claim-b');
}
5.3.3.7. Checking for group membership
var realm = $evaluation.getRealm();

if (realm.isUserInGroup('marta', '/Group A/Group B')) {
    $evaluation.grant();
}
5.3.3.8. Mixing different access control mechanisms
You can also use a combination of several access control mechanisms. The example below shows how roles(RBAC) and claims/attributes(ABAC) checks can be used within the same policy. In this case we check if user is granted with admin role or has an e-mail from keycloak.org domain:
var context = $evaluation.getContext();
var identity = context.getIdentity();
var attributes = identity.getAttributes();
var email = attributes.getValue('email').asString(0);

if (identity.hasRealmRole('admin') || email.endsWith('@keycloak.org')) {
    $evaluation.grant();
}When writing your own rules, keep in mind that the $evaluation object is an object implementing org.keycloak.authorization.policy.evaluation.Evaluation. For more information about what you can access from this interface, see the Evaluation API.
5.4. Time-Based Policy
You can use this type of policy to define time conditions for your permissions.
To create a new time-based policy, select Time in the dropdown list in the upper right corner of the policy listing.
Add Time Policy

5.4.1. Configuration
Name
A human-readable and unique string describing the policy. A best practice is to use names that are closely related to your business and security requirements, so you can identify them more easily.
Description
A string containing details about this policy.
Not Before
Defines the time before which access must not be granted. Permission is granted only if the current date/time is later than or equal to this value.
Not On or After
Defines the time after which access must not be granted. Permission is granted only if the current date/time is earlier than or equal to this value.
Day of Month
Defines the day of month that access must be granted. You can also specify a range of dates. In this case, permission is granted only if the current day of the month is between or equal to the two values specified.
Month
Defines the month that access must be granted. You can also specify a range of months. In this case, permission is granted only if the current month is between or equal to the two values specified.
Year
Defines the year that access must be granted. You can also specify a range of years. In this case, permission is granted only if the current year is between or equal to the two values specified.
Hour
Defines the hour that access must be granted. You can also specify a range of hours. In this case, permission is granted only if current hour is between or equal to the two values specified.
Minute
Defines the minute that access must be granted. You can also specify a range of minutes. In this case, permission is granted only if the current minute is between or equal to the two values specified.
Logic
The Logic of this policy to apply after the other conditions have been evaluated.
Access is only granted if all conditions are satisfied. Red Hat Single Sign-On will perform an AND based on the outcome of each condition.
5.5. Aggregated Policy
As mentioned previously, Red Hat Single Sign-On allows you to build a policy of policies, a concept referred to as policy aggregation. You can use policy aggregation to reuse existing policies to build more complex ones and keep your permissions even more decoupled from the policies that are evaluated during the processing of authorization requests.
To create a new aggregated policy, select Aggregated in the dropdown list located in the right upper corner of the policy listing.
Add an Aggregated Policy
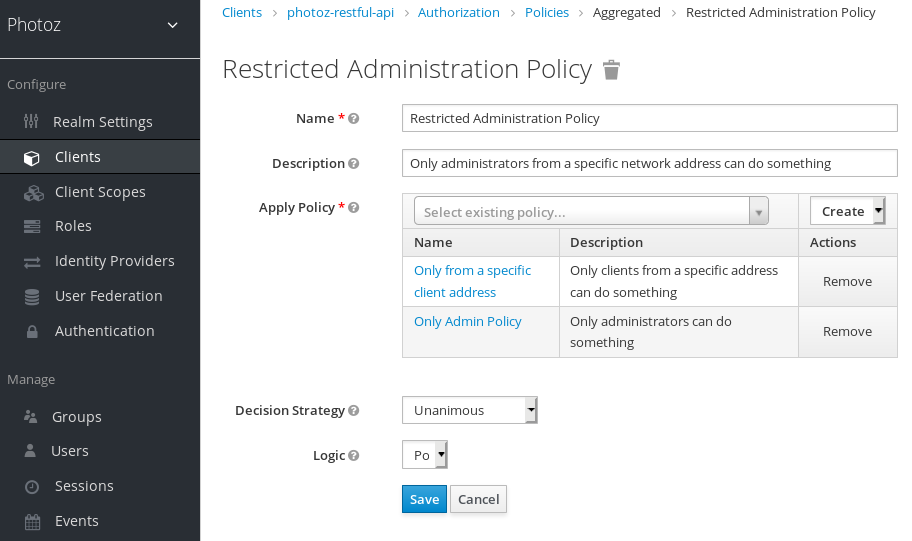
Let’s suppose you have a resource called Confidential Resource that can be accessed only by users from the keycloak.org domain and from a certain range of IP addresses. You can create a single policy with both conditions. However, you want to reuse the domain part of this policy to apply to permissions that operates regardless of the originating network.
You can create separate policies for both domain and network conditions and create a third policy based on the combination of these two policies. With an aggregated policy, you can freely combine other policies and then apply the new aggregated policy to any permission you want.
When creating aggregated policies, be mindful that you are not introducing a circular reference or dependency between policies. If a circular dependency is detected, you cannot create or update the policy.
5.5.1. Configuration
Name
A human-readable and unique string describing the policy. We strongly suggest that you use names that are closely related with your business and security requirements, so you can identify them more easily and also know what they mean.
Description
A string with more details about this policy.
Apply Policy
Defines a set of one or more policies to associate with the aggregated policy. To associate a policy you can either select an existing policy or create a new one by selecting the type of the policy you want to create.
Decision Strategy
The decision strategy for this permission.
Logic
The Logic of this policy to apply after the other conditions have been evaluated.
5.5.2. Decision Strategy for Aggregated Policies
When creating aggregated policies, you can also define the decision strategy that will be used to determine the final decision based on the outcome from each policy.
Unanimous
The default strategy if none is provided. In this case, all policies must evaluate to a positive decision for the final decision to be also positive.
Affirmative
In this case, at least one policy must evaluate to a positive decision in order for the final decision to be also positive.
Consensus
In this case, the number of positive decisions must be greater than the number of negative decisions. If the number of positive and negative decisions is the same, the final decision will be negative.
5.6. Client-Based Policy
You can use this type of policy to define conditions for your permissions where a set of one or more clients is permitted to access an object.
To create a new client-based policy, select Client in the dropdown list in the upper right corner of the policy listing.
Add a Client-Based Policy

5.6.1. Configuration
Name
A human-readable and unique string identifying the policy. A best practice is to use names that are closely related to your business and security requirements, so you can identify them more easily.
Description
A string containing details about this policy.
Clients
Specifies which clients are given access by this policy.
Logic
The Logic of this policy to apply after the other conditions have been evaluated.
5.7. Group-Based Policy
You can use this type of policy to define conditions for your permissions where a set of one or more groups (and their hierarchies) is permitted to access an object.
To create a new group-based policy, select Group in the dropdown list in the upper right corner of the policy listing.
Add Group-Based Policy
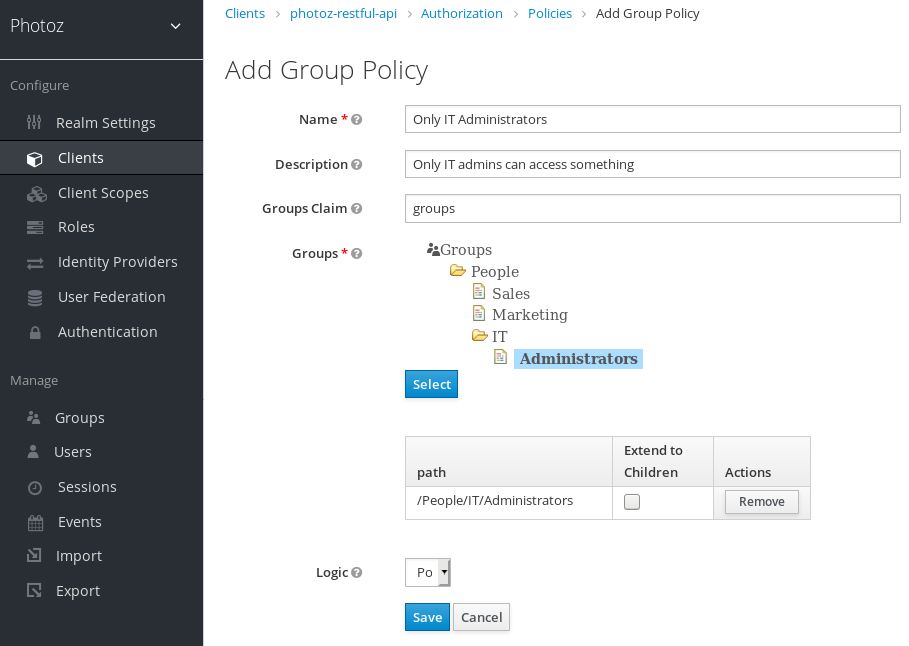
5.7.1. Configuration
Name
A human-readable and unique string describing the policy. A best practice is to use names that are closely related to your business and security requirements, so you can identify them more easily.
Description
A string containing details about this policy.
Groups Claim
Specifies the name of the claim in the token holding the group names and/or paths. Usually, authorization requests are processed based on an ID Token or Access Token previously issued to a client acting on behalf of some user. If defined, the token must include a claim from where this policy is going to obtain the groups the user is a member of. If not defined, user’s groups are obtained from your realm configuration.
Groups
Allows you to select the groups that should be enforced by this policy when evaluating permissions. After adding a group, you can extend access to children of the group by marking the checkbox Extend to Children. If left unmarked, access restrictions only applies to the selected group.
Logic
The Logic of this policy to apply after the other conditions have been evaluated.
5.7.2. Extending Access to Child Groups
By default, when you add a group to this policy, access restrictions will only apply to members of the selected group.
Under some circumstances, it might be necessary to allow access not only to the group itself but to any child group in the hierarchy. For any group added you can mark a checkbox Extend to Children in order to extend access to child groups.
Extending Access to Child Groups

In the example above, the policy is granting access for any user member of IT or any of its children.
5.8. Positive and Negative Logic
Policies can be configured with positive or negative logic. Briefly, you can use this option to define whether the policy result should be kept as it is or be negated.
For example, suppose you want to create a policy where only users not granted with a specific role should be given access. In this case, you can create a role-based policy using that role and set its Logic field to Negative. If you keep Positive, which is the default behavior, the policy result will be kept as it is.
5.9. Policy Evaluation API
When writing rule-based policies using JavaScript, Red Hat Single Sign-On provides an Evaluation API that provides useful information to help determine whether a permission should be granted.
This API consists of a few interfaces that provide you access to information, such as
- The permission being evaluated, representing both the resource and scopes being requested.
- The attributes associated with the resource being requested
- Runtime environment and any other attribute associated with the execution context
- Information about users such as group membership and roles
The main interface is org.keycloak.authorization.policy.evaluation.Evaluation, which defines the following contract:
public interface Evaluation {

    /**
     * Returns the {@link ResourcePermission} to be evaluated.
     *
     * @return the permission to be evaluated
     */
    ResourcePermission getPermission();

    /**
     * Returns the {@link EvaluationContext}. Which provides access to the whole evaluation runtime context.
     *
     * @return the evaluation context
     */
    EvaluationContext getContext();

    /**
     * Returns a {@link Realm} that can be used by policies to query information.
     *
     * @return a {@link Realm} instance
     */
    Realm getRealm();

    /**
     * Grants the requested permission to the caller.
     */
    void grant();

    /**
     * Denies the requested permission.
     */
    void deny();
}
When processing an authorization request, Red Hat Single Sign-On creates an Evaluation instance before evaluating any policy. This instance is then passed to each policy to determine whether access is GRANT or DENY.
Policies determine this by invoking the grant() or deny() methods on an Evaluation instance. By default, the state of the Evaluation instance is denied, which means that your policies must explicitly invoke the grant() method to indicate to the policy evaluation engine that permission should be granted.
For more information about the Evaluation API see the JavaDocs.
5.9.1. The Evaluation Context
The evaluation context provides useful information to policies during their evaluation.
public interface EvaluationContext {

    /**
     * Returns the {@link Identity} that represents an entity (person or non-person) to which the permissions must be granted, or not.
     *
     * @return the identity to which the permissions must be granted, or not
     */
    Identity getIdentity();

    /**
     * Returns all attributes within the current execution and runtime environment.
     *
     * @return the attributes within the current execution and runtime environment
     */
    Attributes getAttributes();
}
From this interface, policies can obtain:
-
The authenticated
Identity - Information about the execution context and runtime environment
The Identity is built based on the OAuth2 Access Token that was sent along with the authorization request, and this construct has access to all claims extracted from the original token. For example, if you are using a Protocol Mapper to include a custom claim in an OAuth2 Access Token you can also access this claim from a policy and use it to build your conditions.
The EvaluationContext also gives you access to attributes related to both the execution and runtime environments. For now, there only a few built-in attributes.
| Name | Description | Type |
|---|---|---|
| kc.time.date_time | Current date and time |
String. Format |
| kc.client.network.ip_address | IPv4 address of the client | String |
| kc.client.network.host | Client’s host name | String |
| kc.client.id | The client id | String |
| kc.client.user_agent | The value of the 'User-Agent' HTTP header | String[] |
| kc.realm.name | The name of the realm | String |
Chapter 6. Managing Permissions
A permission associates the object being protected and the policies that must be evaluated to decide whether access should be granted.
After creating the resources you want to protect and the policies you want to use to protect these resources, you can start managing permissions. To manage permissions, click the Permissions tab when editing a resource server.
Permissions

Permissions can be created to protect two main types of objects:
- Resources
- Scopes
To create a permission, select the permission type you want to create from the dropdown list in the upper right corner of the permission listing. The following sections describe these two types of objects in more detail.
6.1. Creating Resource-Based Permissions
A resource-based permission defines a set of one or more resources to protect using a set of one or more authorization policies.
To create a new resource-based permission, select Resource-based in the dropdown list in the upper right corner of the permission listing.
Add Resource-Based Permission
6.1.1. Configuration
Name
A human-readable and unique string describing the permission. A best practice is to use names that are closely related to your business and security requirements, so you can identify them more easily.
Description
A string containing details about this permission.
Apply To Resource Type
Specifies if the permission is applied to all resources with a given type. When selecting this field, you are prompted to enter the resource type to protect.
Resource Type
Defines the resource type to protect. When defined, this permission is evaluated for all resources matching that type.
Resources
Defines a set of one or more resources to protect.
Apply Policy
Defines a set of one or more policies to associate with a permission. To associate a policy you can either select an existing policy or create a new one by selecting the type of the policy you want to create.
Decision Strategy
The Decision Strategy for this permission.
6.1.2. Typed Resource Permission
Resource permissions can also be used to define policies that are to be applied to all resources with a given type. This form of resource-based permission can be useful when you have resources sharing common access requirements and constraints.
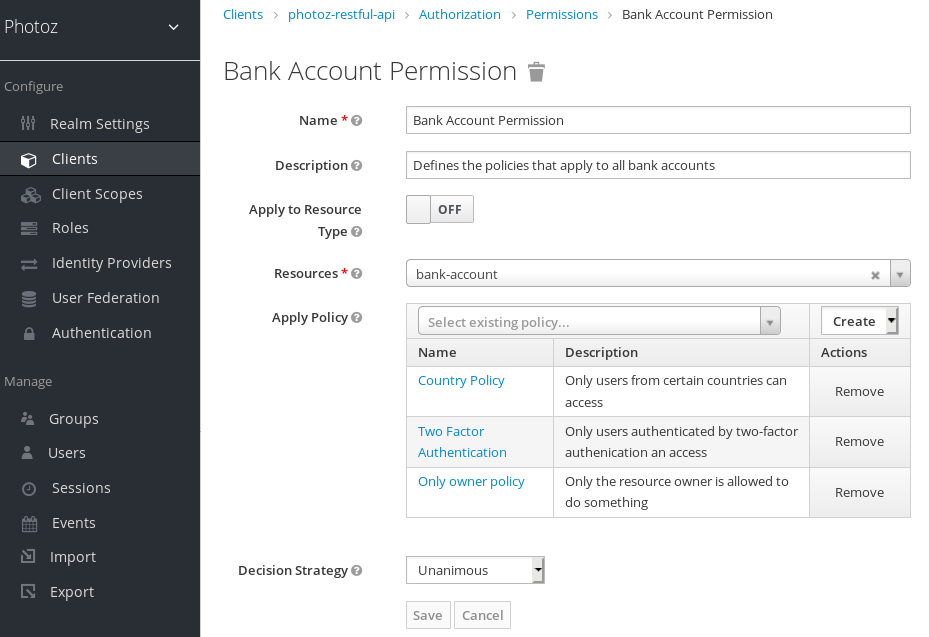
Frequently, resources within an application can be categorized (or typed) based on the data they encapsulate or the functionality they provide. For example, a financial application can manage different banking accounts where each one belongs to a specific customer. Although they are different banking accounts, they share common security requirements and constraints that are globally defined by the banking organization. With typed resource permissions, you can define common policies to apply to all banking accounts, such as:
- Only the owner can manage his account
- Only allow access from the owner’s country and/or region
- Enforce a specific authentication method
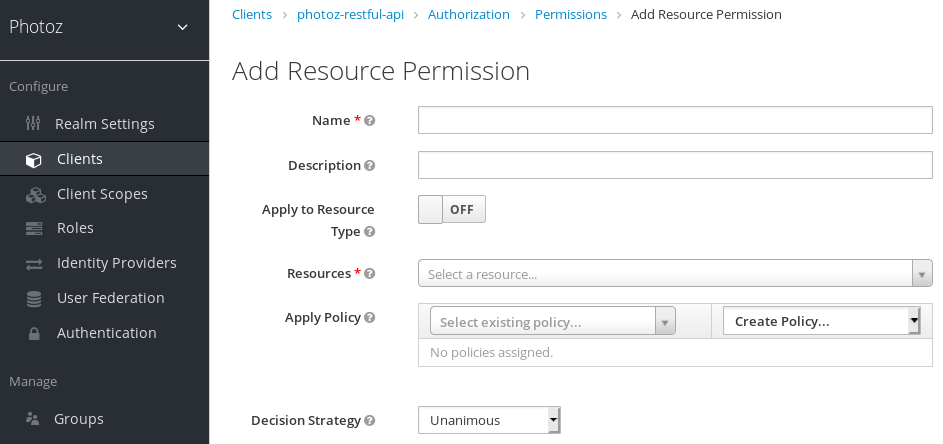
To create a typed resource permission, click Apply to Resource Type when creating a new resource-based permission. With Apply to Resource Type set to On, you can specify the type that you want to protect as well as the policies that are to be applied to govern access to all resources with type you have specified.
Example of a Typed Resource Permission
6.2. Creating Scope-Based Permissions
A scope-based permission defines a set of one or more scopes to protect using a set of one or more authorization policies. Unlike resource-based permissions, you can use this permission type to create permissions not only for a resource, but also for the scopes associated with it, providing more granularity when defining the permissions that govern your resources and the actions that can be performed on them.
To create a new scope-based permission, select Scope-based in the dropdown list in the upper right corner of the permission listing.
Add Scope-Based Permission
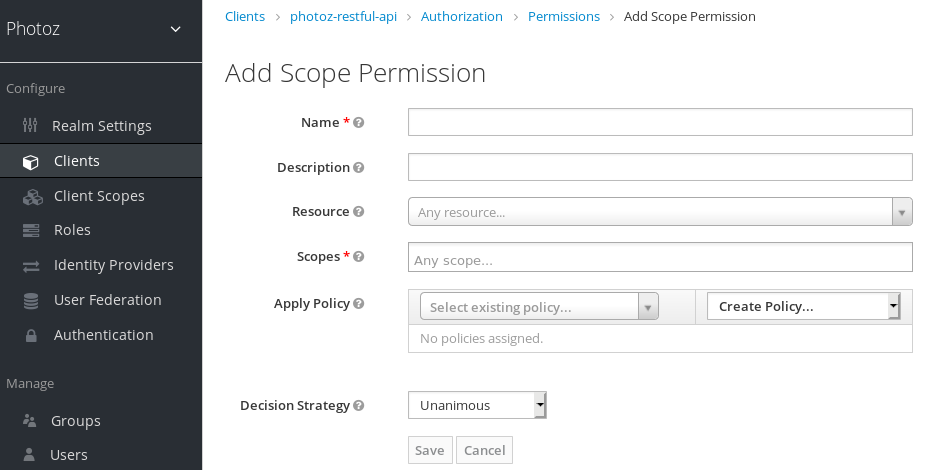
6.2.1. Configuration
Name
A human-readable and unique string describing the permission. A best practice is to use names that are closely related to your business and security requirements, so you can identify them more easily.
Description
A string containing details about this permission.
Resource
Restricts the scopes to those associated with the selected resource. If none is selected, all scopes are available.
Scopes
Defines a set of one or more scopes to protect.
Apply Policy
Defines a set of one or more policies to associate with a permission. To associate a policy you can either select an existing policy or create a new one by selecting the type of the policy you want to create.
Decision Strategy
The Decision Strategy for this permission.
6.3. Policy Decision Strategies
When associating policies with a permission, you can also define a decision strategy to specify how to evaluate the outcome of the associated policies to determine access.
Unanimous
The default strategy if none is provided. In this case, all policies must evaluate to a positive decision for the final decision to be also positive.
Affirmative
In this case, at least one policy must evaluate to a positive decision for the final decision to be also positive.
Consensus
In this case, the number of positive decisions must be greater than the number of negative decisions. If the number of positive and negative decisions is equal, the final decision will be negative.
Chapter 7. Evaluating and Testing Policies
When designing your policies, you can simulate authorization requests to test how your policies are being evaluated.
You can access the Policy Evaluation Tool by clicking the Evaluate tab when editing a resource server. There you can specify different inputs to simulate real authorization requests and test the effect of your policies.

7.1. Providing Identity Information
The Identity Information filters can be used to specify the user requesting permissions.
7.2. Providing Contextual Information
The Contextual Information filters can be used to define additional attributes to the evaluation context, so that policies can obtain these same attributes.
7.3. Providing the Permissions
The Permissions filters can be used to build an authorization request. You can request permissions for a set of one or more resources and scopes. If you want to simulate authorization requests based on all protected resources and scopes, click Add without specifying any Resources or Scopes.
When you’ve specified your desired values, click Evaluate.
Chapter 8. Authorization Services
Red Hat Single Sign-On Authorization Services are built on top of well-known standards such as the OAuth2 and User-Managed Access specifications.
OAuth2 clients (such as front end applications) can obtain access tokens from the server using the token endpoint and use these same tokens to access resources protected by a resource server (such as back end services). In the same way, Red Hat Single Sign-On Authorization Services provide extensions to OAuth2 to allow access tokens to be issued based on the processing of all policies associated with the resource(s) or scope(s) being requested. This means that resource servers can enforce access to their protected resources based on the permissions granted by the server and held by an access token. In Red Hat Single Sign-On Authorization Services the access token with permissions is called a Requesting Party Token or RPT for short.
In addition to the issuance of RPTs, Red Hat Single Sign-On Authorization Services also provides a set of RESTful endpoints that allow resources servers to manage their protected resources, scopes, permissions and policies, helping developers to extend or integrate these capabilities into their applications in order to support fine-grained authorization.
8.1. Discovering Authorization Services Endpoints and Metadata
Red Hat Single Sign-On provides a discovery document from which clients can obtain all necessary information to interact with Red Hat Single Sign-On Authorization Services, including endpoint locations and capabilities.
The discovery document can be obtained from:
curl -X GET \
  http://${host}:${port}/auth/realms/${realm}/.well-known/uma2-configuration
Where ${host}:${port} is the hostname (or IP address) and port where Red Hat Single Sign-On is running and ${realm} is the name of a realm in Red Hat Single Sign-On.
As a result, you should get a response as follows:
{

    // some claims are expected here

    // these are the main claims in the discovery document about Authorization Services endpoints location
    "token_endpoint": "http://${host}:${port}/auth/realms/${realm}/protocol/openid-connect/token",
    "token_introspection_endpoint": "http://${host}:${port}/auth/realms/${realm}/protocol/openid-connect/token/introspect",
    "resource_registration_endpoint": "http://${host}:${port}/auth/realms/${realm}/authz/protection/resource_set",
    "permission_endpoint": "http://${host}:${port}/auth/realms/${realm}/authz/protection/permission",
    "policy_endpoint": "http://${host}:${port}/auth/realms/${realm}/authz/protection/uma-policy"
}
Each of these endpoints expose a specific set of capabilities:
token_endpoint
A OAuth2-compliant Token Endpoint that supports the
urn:ietf:params:oauth:grant-type:uma-ticketgrant type. Through this endpoint clients can send authorization requests and obtain an RPT with all permissions granted by Red Hat Single Sign-On.token_introspection_endpoint
A OAuth2-compliant Token Introspection Endpoint which clients can use to query the server to determine the active state of an RPT and to determine any other information associated with the token, such as the permissions granted by Red Hat Single Sign-On.
resource_registration_endpoint
A UMA-compliant Resource Registration Endpoint which resource servers can use to manage their protected resources and scopes. This endpoint provides operations create, read, update and delete resources and scopes in Red Hat Single Sign-On.
permission_endpoint
A UMA-compliant Permission Endpoint which resource servers can use to manage permission tickets. This endpoint provides operations create, read, update, and delete permission tickets in Red Hat Single Sign-On.
8.2. Obtaining Permissions
To obtain permissions from Red Hat Single Sign-On you send an authorization request to the token endpoint. As a result, Red Hat Single Sign-On will evaluate all policies associated with the resource(s) and scope(s) being requested and issue an RPT with all permissions granted by the server.
Clients are allowed to send authorization requests to the token endpoint using the following parameters:
grant_type
This parameter is required. Must be
urn:ietf:params:oauth:grant-type:uma-ticket.ticket
This parameter is optional. The most recent permission ticket received by the client as part of the UMA authorization process.
claim_token
This parameter is optional. A string representing additional claims that should be considered by the server when evaluating permissions for the resource(s) and scope(s) being requested. This parameter allows clients to push claims to Red Hat Single Sign-On. For more details about all supported token formats see
claim_token_formatparameter.claim_token_format
This parameter is optional. A string indicating the format of the token specified in the
claim_tokenparameter. Red Hat Single Sign-On supports two token formats:urn:ietf:params:oauth:token-type:jwtandhttps://openid.net/specs/openid-connect-core-1_0.html#IDToken. Theurn:ietf:params:oauth:token-type:jwtformat indicates that theclaim_tokenparameter references an access token. Thehttps://openid.net/specs/openid-connect-core-1_0.html#IDTokenindicates that theclaim_tokenparameter references an OpenID Connect ID Token.rpt
This parameter is optional. A previously issued RPT which permissions should also be evaluated and added in a new one. This parameter allows clients in possession of an RPT to perform incremental authorization where permissions are added on demand.
permission
This parameter is optional. A string representing a set of one or more resources and scopes the client is seeking access. This parameter can be defined multiple times in order to request permission for multiple resource and scopes. This parameter is an extension to
urn:ietf:params:oauth:grant-type:uma-ticketgrant type in order to allow clients to send authorization requests without a permission ticket. The format of the string must be:RESOURCE_ID#SCOPE_ID. For instance:Resource A#Scope A,Resource A#Scope A, Scope B, Scope C,Resource A,#Scope A.audience
This parameter is optional. The client identifier of the resource server to which the client is seeking access. This parameter is mandatory in case the
permissionparameter is defined. It serves as a hint to Red Hat Single Sign-On to indicate the context in which permissions should be evaluated.response_include_resource_name
This parameter is optional. A boolean value indicating to the server whether resource names should be included in the RPT’s permissions. If false, only the resource identifier is included.
response_permissions_limit
This parameter is optional. An integer N that defines a limit for the amount of permissions an RPT can have. When used together with
rptparameter, only the last N requested permissions will be kept in the RPT.submit_request
This parameter is optional. A boolean value indicating whether the server should create permission requests to the resources and scopes referenced by a permission ticket. This parameter only have effect if used together with the
ticketparameter as part of a UMA authorization process.response_mode
This parameter is optional. A string value indicating how the server should respond to authorization requests. This parameter is specially useful when you are mainly interested in either the overall decision or the permissions granted by the server, instead of a standard OAuth2 response. Possible values are:
decisionIndicates that responses from the server should only represent the overall decision by returning a JSON with the following format:
{
    'result': true
}
If the authorization request does not map to any permission, a
403HTTP status code is returned instead.permissionsIndicates that responses from the server should contain any permission granted by the server by returning a JSON with the following format:
[
    {
        'rsid': 'My Resource'
        'scopes': ['view', 'update']
    },

    ...
]
If the authorization request does not map to any permission, a
403HTTP status code is returned instead.
Example of a authorization request when a client is seeking access to two resources protected by a resource server.
curl -X POST \
  http://${host}:${port}/auth/realms/${realm}/protocol/openid-connect/token \
  -H "Authorization: Bearer ${access_token}" \
  --data "grant_type=urn:ietf:params:oauth:grant-type:uma-ticket" \
  --data "audience={resource_server_client_id}" \
  --data "permission=Resource A#Scope A" \
  --data "permission=Resource B#Scope B"
Example of a authorization request when a client is seeking access to any resource and scope protected by a resource server.
curl -X POST \
  http://${host}:${port}/auth/realms/${realm}/protocol/openid-connect/token \
  -H "Authorization: Bearer ${access_token}" \
  --data "grant_type=urn:ietf:params:oauth:grant-type:uma-ticket" \
  --data "audience={resource_server_client_id}"
Example of an authorization request when a client is seeking access to a UMA protected resource after receiving a permission ticket from the resource server as part of the authorization process:
curl -X POST \
  http://${host}:${port}/auth/realms/${realm}/protocol/openid-connect/token \
  -H "Authorization: Bearer ${access_token}" \
  --data "grant_type=urn:ietf:params:oauth:grant-type:uma-ticket" \
  --data "ticket=${permission_ticket}
If Red Hat Single Sign-On assessment process results in issuance of permissions, it issues the RPT with which it has associated the permissions:
Red Hat Single Sign-On responds to the client with the RPT
HTTP/1.1 200 OK
Content-Type: application/json
...
{
    "access_token": "${rpt}",
}
The response from the server is just like any other response from the token endpoint when using some other grant type. The RPT can be obtained from the access_token response parameter. If the client is not authorized, Red Hat Single Sign-On responds with a 403 HTTP status code:
Red Hat Single Sign-On denies the authorization request
HTTP/1.1 403 Forbidden
Content-Type: application/json
...
{
    "error": "access_denied",
    "error_description": "request_denied"
}
8.2.1. Client Authentication Methods
Clients need to authenticate to the token endpoint in order to obtain an RPT. When using the urn:ietf:params:oauth:grant-type:uma-ticket grant type, clients can use any of these authentication methods:
Bearer Token
Clients should send an access token as a Bearer credential in an HTTP Authorization header to the token endpoint.
Example: an authorization request using an access token to authenticate to the token endpoint
curl -X POST \
  http://${host}:${port}/auth/realms/${realm}/protocol/openid-connect/token \
  -H "Authorization: Bearer ${access_token}" \
  --data "grant_type=urn:ietf:params:oauth:grant-type:uma-ticket"
This method is especially useful when the client is acting on behalf of a user. In this case, the bearer token is an access token previously issued by Red Hat Single Sign-On to some client acting on behalf of a user (or on behalf of itself). Permissions will be evaluated considering the access context represented by the access token. For instance, if the access token was issued to Client A acting on behalf of User A, permissions will be granted depending on the resources and scopes to which User A has access.
Client Credentials
Client can use any of the client authentication methods supported by Red Hat Single Sign-On. For instance, client_id/client_secret or JWT.
Example: an authorization request using client id and client secret to authenticate to the token endpoint
curl -X POST \
  http://${host}:${port}/auth/realms/${realm}/protocol/openid-connect/token \
  -H "Authorization: Basic cGhvdGg6L7Jl13RmfWgtkk==pOnNlY3JldA==" \
  --data "grant_type=urn:ietf:params:oauth:grant-type:uma-ticket"
8.2.2. Pushing Claims
When obtaining permissions from the server you can push arbitrary claims in order to have these claims available to your policies when evaluating permissions.
If you are obtaining permissions from the server without using a permission ticket (UMA flow), you can send an authorization request to the token endpoint as follows:
curl -X POST \
  http://${host}:${port}/auth/realms/${realm}/protocol/openid-connect/token \
  --data "grant_type=urn:ietf:params:oauth:grant-type:uma-ticket" \
  --data "claim_token=ewogICAib3JnYW5pemF0aW9uIjogWyJhY21lIl0KfQ==" \
  --data "claim_token_format=urn:ietf:params:oauth:token-type:jwt" \
  --data "client_id={resource_server_client_id}" \
  --data "client_secret={resource_server_client_secret}" \
  --data "audience={resource_server_client_id}"
The claim_token parameter expects a BASE64 encoded JSON with a format similar to the example below:
{
    "organization" : ["acme"]
}
The format expects one or more claims where the value for each claim must be an array of strings.
8.2.2.1. Pushing Claims Using UMA
For more details about how to push claims when using UMA and permission tickets, please take a look at Permission API
8.3. User-Managed Access
Red Hat Single Sign-On Authorization Services is based on User-Managed Access or UMA for short. UMA is a specification that enhances OAuth2 capabilities in the following ways:
Privacy
Nowadays, user privacy is becoming a huge concern, as more and more data and devices are available and connected to the cloud. With UMA and Red Hat Single Sign-On, resource servers can enhance their capabilities in order to improve how their resources are protected in respect to user privacy where permissions are granted based on policies defined by the user.
Party-to-Party Authorization
Resource owners (e.g.: regular end-users) can manage access to their resources and authorize other parties (e.g: regular end-users) to access these resources. This is different than OAuth2 where consent is given to a client application acting on behalf of a user, with UMA resource owners are allowed to consent access to other users, in a completely asynchronous manner.
Resource Sharing
Resource owners are allowed to manage permissions to their resources and decide who can access a particular resource and how. Red Hat Single Sign-On can then act as a sharing management service from which resource owners can manage their resources.
Red Hat Single Sign-On is a UMA 2.0 compliant authorization server that provides most UMA capabilities.
As an example, consider a user Alice (resource owner) using an Internet Banking Service (resource server) to manage his Bank Account (resource). One day, Alice decides to open her bank account to Bob (requesting party), a accounting professional. However, Bob should only have access to view (scope) Alice’s account.
As a resource server, the Internet Banking Service must be able to protect Alice’s Bank Account. For that, it relies on Red Hat Single Sign-On Resource Registration Endpoint to create a resource in the server representing Alice’s Bank Account.
At this moment, if Bob tries to access Alice’s Bank Account, access will be denied. The Internet Banking Service defines a few default policies for banking accounts. One of them is that only the owner, in this case Alice, is allowed to access her bank account.
However, Internet Banking Service in respect to Alice’s privacy also allows her to change specific policies for the banking account. One of these policies that she can change is to define which people are allowed to view her bank account. For that, Internet Banking Service relies on Red Hat Single Sign-On to provide to Alice a space where she can select individuals and the operations (or data) they are allowed to access. At any time, Alice can revoke access or grant additional permissions to Bob.
8.3.1. Authorization Process
In UMA, the authorization process starts when a client tries to access a UMA protected resource server.
A UMA protected resource server expects a bearer token in the request where the token is an RPT. When a client requests a resource at the resource server without a permission ticket:
Client requests a protected resource without sending an RPT
curl -X GET \
  http://${host}:${port}/my-resource-server/resource/1bfdfe78-a4e1-4c2d-b142-fc92b75b986f
The resource server sends a response back to the client with a permission ticket and a as_uri parameter with the location of a Red Hat Single Sign-On server to where the ticket should be sent in order to obtain an RPT.
Resource server responds with a permission ticket
HTTP/1.1 401 Unauthorized
WWW-Authenticate: UMA realm="${realm}",
    as_uri="https://${host}:${port}/auth/realms/${realm}",
    ticket="016f84e8-f9b9-11e0-bd6f-0021cc6004de"
The permission ticket is a special type of token issued by Red Hat Single Sign-On Permission API. They represent the permissions being requested (e.g.: resources and scopes) as well any other information associated with the request. Only resource servers are allowed to create those tokens.
Now that the client has a permission ticket and also the location of a Red Hat Single Sign-On server, the client can use the discovery document to obtain the location of the token endpoint and send an authorization request.
Client sends an authorization request to the token endpoint to obtain an RPT
curl -X POST \
  http://${host}:${port}/auth/realms/${realm}/protocol/openid-connect/token \
  -H "Authorization: Bearer ${access_token}" \
  --data "grant_type=urn:ietf:params:oauth:grant-type:uma-ticket" \
  --data "ticket=${permission_ticket}
If Red Hat Single Sign-On assessment process results in issuance of permissions, it issues the RPT with which it has associated the permissions:
Red Hat Single Sign-On responds to the client with the RPT
HTTP/1.1 200 OK
Content-Type: application/json
...
{
    "access_token": "${rpt}",
}
The response from the server is just like any other response from the token endpoint when using some other grant type. The RPT can be obtained from the access_token response parameter. In case the client is not authorized to have permissions Red Hat Single Sign-On responds with a 403 HTTP status code:
Red Hat Single Sign-On denies the authorization request
HTTP/1.1 403 Forbidden
Content-Type: application/json
...
{
    "error": "access_denied",
    "error_description": "request_denied"
}
8.3.2. Submitting Permission Requests
As part of the authorization process, clients need first to obtain a permission ticket from a UMA protected resource server in order to exchange it with an RPT at the Red Hat Single Sign-On Token Endpoint.
By default, Red Hat Single Sign-On responds with a 403 HTTP status code and a request_denied error in case the client can not be issued with an RPT.
Red Hat Single Sign-On denies the authorization request
HTTP/1.1 403 Forbidden
Content-Type: application/json
...
{
    "error": "access_denied",
    "error_description": "request_denied"
}
Such response implies that Red Hat Single Sign-On could not issue an RPT with the permissions represented by a permission ticket.
In some situations, client applications may want to start an asynchronous authorization flow and let the owner of the resources being requested decide whether or not access should be granted. For that, clients can use the submit_request request parameter along with an authorization request to the token endpoint:
curl -X POST \
  http://${host}:${port}/auth/realms/${realm}/protocol/openid-connect/token \
  -H "Authorization: Bearer ${access_token}" \
  --data "grant_type=urn:ietf:params:oauth:grant-type:uma-ticket" \
  --data "ticket=${permission_ticket} \
  --data "submit_request=true"
When using the submit_request parameter, Red Hat Single Sign-On will persist a permission request for each resource to which access was denied. Once created, resource owners can check their account and manage their permissions requests.
You can think about this functionality as a Request Access button in your application, where users can ask other users for access to their resources.
8.3.3. Managing Access to Users Resources
Users can manage access to their resources using the Red Hat Single Sign-On User Account Service. To enable this functionality, you must first enable User-Managed Access for your realm. To do so, open the realm settings page in Red Hat Single Sign-On Administration Console and enable the User-Managed Access switch.
On the left side menu, the My Resources option leads to a page where users are able to:
Manage Permission Requests that Need my approval
This section contains a list of all permission requests awaiting approval. These requests are connected to the parties (users) requesting access to a particular resource. Users are allowed to approve or deny these requests.
Manage My resources
This section contains a list of all resources owned by the user. Users can click on a resource for more details and share the resource with others.
Manage Resources shared with me
This section contains a list of all resources shared with the user.
Manage Your requests waiting approval
This section contains a list of permission requests sent by the user that are waiting for the approval of another user or resource owner.
When the user choose to detail own of his resources by clicking on any resource in the "My resources" listing, he is redirected to a page as follows:
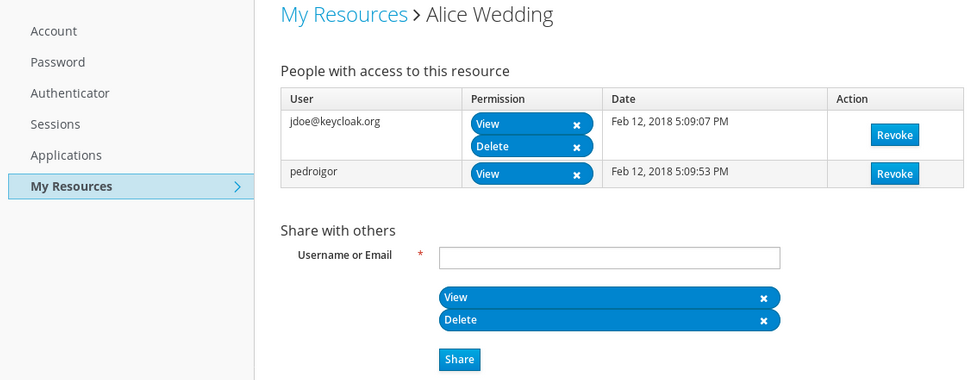
From this page the users are able to:
Manage People with access to this resource
This section contains a list of people with access to this resource. Users are allowed to revoke access by clicking on the
Revokebutton or by removing a specificPermission.Share the resource with others
By typing the username or e-mail of another user, the user is able to share the resource and select the permissions he wants to grant access.
8.4. Protection API
The Protection API provides a UMA-compliant set of endpoints providing:
Resource Management
With this endpoint, resource servers can manage their resources remotely and enable policy enforcers to query the server for the resources that need protection.
Permission Management
In the UMA protocol, resource servers access this endpoint to create permission tickets. Red Hat Single Sign-On also provides endpoints to manage the state of permissions and query permissions.
Policy API
Red Hat Single Sign-On leverages the UMA Protection API to allow resource servers to manage permissions for their users. In addition to the Resource and Permission APIs, Red Hat Single Sign-On provides a Policy API from where permissions can be set to resources by resource servers on behalf of their users.
An important requirement for this API is that only resource servers are allowed to access its endpoints using a special OAuth2 access token called a protection API token (PAT). In UMA, a PAT is a token with the scope uma_protection.
8.4.1. What is a PAT and How to Obtain It
A protection API token (PAT) is a special OAuth2 access token with a scope defined as uma_protection. When you create a resource server, Red Hat Single Sign-On automatically creates a role, uma_protection, for the corresponding client application and associates it with the client’s service account.
Service Account granted with uma_protection role
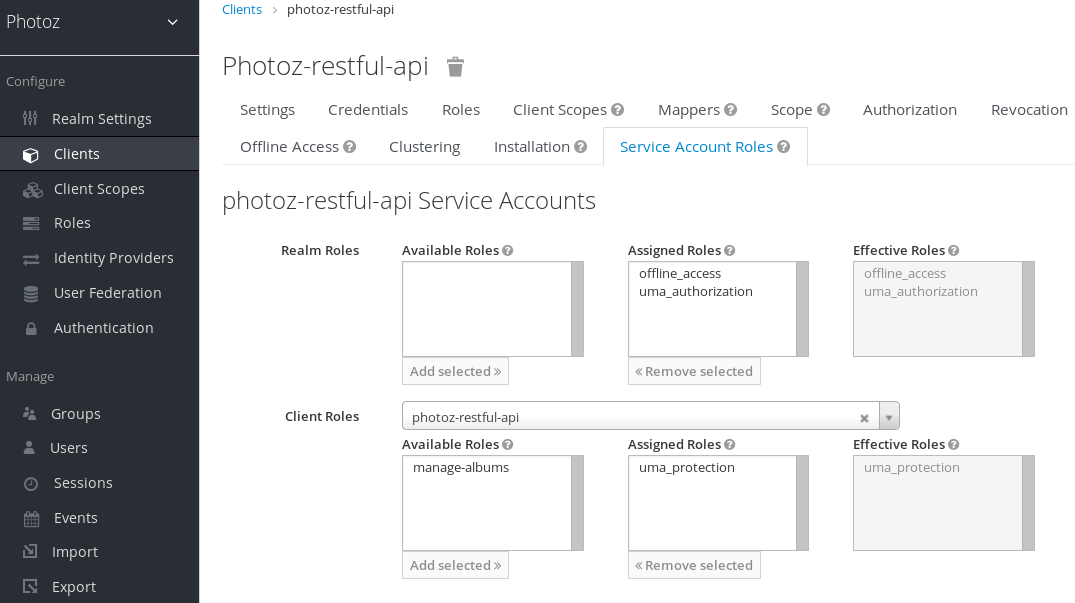
Resource servers can obtain a PAT from Red Hat Single Sign-On like any other OAuth2 access token. For example, using curl:
curl -X POST \
    -H "Content-Type: application/x-www-form-urlencoded" \
    -d 'grant_type=client_credentials&client_id=${client_id}&client_secret=${client_secret}' \
    "http://localhost:8080/auth/realms/${realm_name}/protocol/openid-connect/token"
The example above is using the client_credentials grant type to obtain a PAT from the server. As a result, the server returns a response similar to the following:
{
  "access_token": ${PAT},
  "expires_in": 300,
  "refresh_expires_in": 1800,
  "refresh_token": ${refresh_token},
  "token_type": "bearer",
  "id_token": ${id_token},
  "not-before-policy": 0,
  "session_state": "ccea4a55-9aec-4024-b11c-44f6f168439e"
}Red Hat Single Sign-On can authenticate your client application in different ways. For simplicity, the client_credentials grant type is used here, which requires a client_id and a client_secret. You can choose to use any supported authentication method.
8.4.2. Managing Resources
Resource servers can manage their resources remotely using a UMA-compliant endpoint.
http://${host}:${port}/auth/realms/${realm_name}/authz/protection/resource_setThis endpoint provides operations outlined as follows (entire path omitted for clarity):
- Create resource set description: POST /resource_set
- Read resource set description: GET /resource_set/{_id}
- Update resource set description: PUT /resource_set/{_id}
- Delete resource set description: DELETE /resource_set/{_id}
- List resource set descriptions: GET /resource_set
For more information about the contract for each of these operations, see UMA Resource Registration API.
8.4.2.1. Creating a Resource
To create a resource you must send an HTTP POST request as follows:
curl -v -X POST \
  http://${host}:${port}/auth/realms/${realm_name}/authz/protection/resource_set \
  -H 'Authorization: Bearer '$pat \
  -H 'Content-Type: application/json' \
  -d '{
     "name":"Tweedl Social Service",
     "type":"http://www.example.com/rsrcs/socialstream/140-compatible",
     "icon_uri":"http://www.example.com/icons/sharesocial.png",
     "resource_scopes":[
         "read-public",
         "post-updates",
         "read-private",
         "http://www.example.com/scopes/all"
      ]
  }'
By default, the owner of a resource is the resource server. If you want to define a different owner, such as an specific user, you can send a request as follows:
curl -v -X POST \
  http://${host}:${port}/auth/realms/${realm_name}/authz/protection/resource_set \
  -H 'Authorization: Bearer '$pat \
  -H 'Content-Type: application/json' \
  -d '{
     "name":"Alice Resource",
     "owner": "alice"
  }'
Where the property owner can be set with the username or the identifier of the user.
8.4.2.2. Creating User-Managed Resources
By default, resources created via Protection API can not be managed by resource owners through the User Account Service.
To create resources and allow resource owners to manage these resources, you must set ownerManagedAccess property as follows:
curl -v -X POST \
  http://${host}:${port}/auth/realms/${realm_name}/authz/protection/resource_set \
  -H 'Authorization: Bearer '$pat \
  -H 'Content-Type: application/json' \
  -d '{
     "name":"Alice Resource",
     "owner": "alice",
     "ownerManagedAccess": true
  }'
8.4.2.3. Updating Resources
To update an existing resource, send an HTTP PUT request as follows:
curl -v -X PUT \
  http://${host}:${port}/auth/realms/${realm_name}/authz/protection/resource_set/{resource_id} \
  -H 'Authorization: Bearer '$pat \
  -H 'Content-Type: application/json' \
  -d '{
     "_id": "Alice Resource",
     "name":"Alice Resource",
     "resource_scopes": [
        "read"
     ]
  }'
8.4.2.4. Deleting Resources
To delete an existing resource, send an HTTP DELETE request as follows:
curl -v -X DELETE \
  http://${host}:${port}/auth/realms/${realm_name}/authz/protection/resource_set/{resource_id} \
  -H 'Authorization: Bearer '$pat
8.4.2.5. Querying Resources
To query the resources by id, send an HTTP GET request as follows:
http://${host}:${port}/auth/realms/${realm_name}/authz/protection/resource_set/{resource_id}
To query resources given a name, send an HTTP GET request as follows:
http://${host}:${port}/auth/realms/${realm_name}/authz/protection/resource_set?name=Alice Resource
To query resources given an uri, send an HTTP GET request as follows:
http://${host}:${port}/auth/realms/${realm_name}/authz/protection/resource_set?uri=/api/alice
To query resources given an owner, send an HTTP GET request as follows:
http://${host}:${port}/auth/realms/${realm_name}/authz/protection/resource_set?owner=alice
To query resources given an type, send an HTTP GET request as follows:
http://${host}:${port}/auth/realms/${realm_name}/authz/protection/resource_set?type=albums
To query resources given an scope, send an HTTP GET request as follows:
http://${host}:${port}/auth/realms/${realm_name}/authz/protection/resource_set?scope=read
When querying the server for permissions use parameters first and max results to limit the result.
8.4.3. Managing Permission Requests
Resource servers using the UMA protocol can use a specific endpoint to manage permission requests. This endpoint provides a UMA-compliant flow for registering permission requests and obtaining a permission ticket.
http://${host}:${port}/auth/realms/${realm_name}/authz/protection/permissionA permission ticket is a special security token type representing a permission request. Per the UMA specification, a permission ticket is:
A correlation handle that is conveyed from an authorization server to a resource server, from a resource server to a client, and ultimately from a client back to an authorization server, to enable the authorization server to assess the correct policies to apply to a request for authorization data.
In most cases, you won’t need to deal with this endpoint directly. Red Hat Single Sign-On provides a policy enforcer that enables UMA for your resource server so it can obtain a permission ticket from the authorization server, return this ticket to client application, and enforce authorization decisions based on a final requesting party token (RPT).
The process of obtaining permission tickets from Red Hat Single Sign-On is performed by resource servers and not regular client applications, where permission tickets are obtained when a client tries to access a protected resource without the necessary grants to access the resource. The issuance of permission tickets is an important aspects when using UMA as it allows resource servers to:
- Abstract from clients the data associated with the resources protected by the resource server
- Register in the Red Hat Single Sign-On authorization requests which in turn can be used later in workflows to grant access based on the resource’s owner consent
- Decouple resource servers from authorization servers and allow them to protect and manage their resources using different authorization servers
Client wise, a permission ticket has also important aspects that its worthy to highlight:
- Clients don’t need to know about how authorization data is associated with protected resources. A permission ticket is completely opaque to clients.
- Clients can have access to resources on different resource servers and protected by different authorization servers
These are just some of the benefits brought by UMA where other aspects of UMA are strongly based on permission tickets, specially regarding privacy and user controlled access to their resources.
8.4.3.1. Creating Permission Ticket
To create a permission ticket, send an HTTP POST request as follows:
curl -X POST \
  http://${host}:${port}/auth/realms/${realm_name}/authz/protection/permission \
  -H 'Authorization: Bearer '$pat \
  -H 'Content-Type: application/json' \
  -d '[
  {
    "resource_id": "{resource_id}",
    "resource_scopes": [
      "view"
    ]
  }
]'
When creating tickets you can also push arbitrary claims and associate these claims with the ticket:
curl -X POST \
  http://${host}:${port}/auth/realms/${realm_name}/authz/protection/permission \
  -H 'Authorization: Bearer '$pat \
  -H 'Content-Type: application/json' \
  -d '[
  {
    "resource_id": "{resource_id}",
    "resource_scopes": [
      "view"
    ],
    "claims": {
        "organization": ["acme"]
    }
  }
]'
Where these claims will be available to your policies when evaluating permissions for the resource and scope(s) associated with the permission ticket.
8.4.3.2. Other non UMA-compliant endpoints
8.4.3.2.1. Creating permission ticket
To grant permissions for a specific resource with id {resource_id} to a user with id {user_id}, as an owner of the resource send an HTTP POST request as follows:
curl -X POST \
     http://${host}:${port}/auth/realms/${realm_name}/authz/protection/permission/ticket \
     -H 'Authorization: Bearer '$access_token \
     -H 'Content-Type: application/json' \
     -d '{
       "resource": "{resource_id}",
       "requester": "{user_id}",
       "granted": true,
       "scopeName": "view"
     }'
8.4.3.2.2. Getting permission tickets
curl http://${host}:${port}/auth/realms/${realm_name}/authz/protection/permission/ticket \
     -H 'Authorization: Bearer '$access_token
You can use any of these query parameters:
-
scopeId -
resourceId -
owner -
requester -
granted -
returnNames -
first -
max
8.4.3.2.3. Updating permission ticket
curl -X PUT \
     http://${host}:${port}/auth/realms/${realm_name}/authz/protection/permission/ticket \
     -H 'Authorization: Bearer '$access_token \
     -H 'Content-Type: application/json' \
     -d '{
       "id": "{ticket_id}"
       "resource": "{resource_id}",
       "requester": "{user_id}",
       "granted": false,
       "scopeName": "view"
     }'
8.4.3.2.4. Deleting permission ticket
curl -X DELETE http://${host}:${port}/auth/realms/${realm_name}/authz/protection/permission/ticket/{ticket_id} \
     -H 'Authorization: Bearer '$access_token
8.4.4. Managing Resource Permissions using the Policy API
Red Hat Single Sign-On leverages the UMA Protection API to allow resource servers to manage permissions for their users. In addition to the Resource and Permission APIs, Red Hat Single Sign-On provides a Policy API from where permissions can be set to resources by resource servers on behalf of their users.
The Policy API is available at:
http://${host}:${port}/auth/realms/${realm_name}/authz/protection/uma-policy/{resource_id}This API is protected by a bearer token that must represent a consent granted by the user to the resource server to manage permissions on his behalf. The bearer token can be a regular access token obtained from the token endpoint using:
- Resource Owner Password Credentials Grant Type
- Token Exchange, in order to exchange an access token granted to some client (public client) for a token where audience is the resource server
8.4.4.1. Associating a Permission with a Resource
To associate a permission with a specific resource you must send a HTTP POST request as follows:
curl -X POST \
  http://localhost:8180/auth/realms/photoz/authz/protection/uma-policy/{resource_id} \
  -H 'Authorization: Bearer '$access_token \
  -H 'Cache-Control: no-cache' \
  -H 'Content-Type: application/json' \
  -d '{
	"name": "Any people manager",
	"description": "Allow access to any people manager",
	"scopes": ["read"],
	"roles": ["people-manager"]
}'
In the example above we are creating and associating a new permission to a resource represented by resource_id where any user with a role people-manager should be granted with the read scope.
You can also create policies using other access control mechanisms, such as using groups:
curl -X POST \
  http://localhost:8180/auth/realms/photoz/authz/protection/uma-policy/{resource_id} \
  -H 'Authorization: Bearer '$access_token \
  -H 'Cache-Control: no-cache' \
  -H 'Content-Type: application/json' \
  -d '{
	"name": "Any people manager",
	"description": "Allow access to any people manager",
	"scopes": ["read"],
	"groups": ["/Managers/People Managers"]
}'
Or a specific client:
curl -X POST \
  http://localhost:8180/auth/realms/photoz/authz/protection/uma-policy/{resource_id} \
  -H 'Authorization: Bearer '$access_token \
  -H 'Cache-Control: no-cache' \
  -H 'Content-Type: application/json' \
  -d '{
	"name": "Any people manager",
	"description": "Allow access to any people manager",
	"scopes": ["read"],
	"clients": ["my-client"]
}'
Or even using a custom policy using JavaScript:
Upload Scripts is Deprecated and will be removed in future releases. This feature is disabled by default.
To enable start the server with -Dkeycloak.profile.feature.upload_scripts=enabled . For more details see Profiles.
curl -X POST \
  http://localhost:8180/auth/realms/photoz/authz/protection/uma-policy/{resource_id} \
  -H 'Authorization: Bearer '$access_token \
  -H 'Cache-Control: no-cache' \
  -H 'Content-Type: application/json' \
  -d '{
	"name": "Any people manager",
	"description": "Allow access to any people manager",
	"scopes": ["read"],
	"condition": "if (isPeopleManager()) {$evaluation.grant()}"
}'
It is also possible to set any combination of these access control mechanisms.
To update an existing permission, send an HTTP PUT request as follows:
curl -X PUT \
  http://localhost:8180/auth/realms/photoz/authz/protection/uma-policy/{permission_id} \
  -H 'Authorization: Bearer '$access_token \
  -H 'Content-Type: application/json' \
  -d '{
    "id": "21eb3fed-02d7-4b5a-9102-29f3f09b6de2",
    "name": "Any people manager",
    "description": "Allow access to any people manager",
    "type": "uma",
    "scopes": [
        "album:view"
    ],
    "logic": "POSITIVE",
    "decisionStrategy": "UNANIMOUS",
    "owner": "7e22131a-aa57-4f5f-b1db-6e82babcd322",
    "roles": [
        "user"
    ]
}'
8.4.4.2. Removing a Permission
To remove a permission associated with a resource, send an HTTP DELETE request as follows:
curl -X DELETE \
  http://localhost:8180/auth/realms/photoz/authz/protection/uma-policy/{permission_id} \
  -H 'Authorization: Bearer '$access_token
8.4.4.3. Querying Permission
To query the permissions associated with a resource, send an HTTP GET request as follows:
http://${host}:${port}/auth/realms/${realm}/authz/protection/uma-policy?resource={resource_id}To query the permissions given its name, send an HTTP GET request as follows:
http://${host}:${port}/auth/realms/${realm}/authz/protection/uma-policy?name=Any people managerTo query the permissions associated with a specific scope, send an HTTP GET request as follows:
http://${host}:${port}/auth/realms/${realm}/authz/protection/uma-policy?scope=readTo query all permissions, send an HTTP GET request as follows:
http://${host}:${port}/auth/realms/${realm}/authz/protection/uma-policy
When querying the server for permissions use parameters first and max results to limit the result.
8.5. Requesting Party Token
A requesting party token (RPT) is a JSON web token (JWT) digitally signed using JSON web signature (JWS). The token is built based on the OAuth2 access token previously issued by Red Hat Single Sign-On to a specific client acting on behalf of a user or on its own behalf.
When you decode an RPT, you see a payload similar to the following:
{
  "authorization": {
      "permissions": [
        {
          "resource_set_id": "d2fe9843-6462-4bfc-baba-b5787bb6e0e7",
          "resource_set_name": "Hello World Resource"
        }
      ]
  },
  "jti": "d6109a09-78fd-4998-bf89-95730dfd0892-1464906679405",
  "exp": 1464906971,
  "nbf": 0,
  "iat": 1464906671,
  "sub": "f1888f4d-5172-4359-be0c-af338505d86c",
  "typ": "kc_ett",
  "azp": "hello-world-authz-service"
}
From this token you can obtain all permissions granted by the server from the permissions claim.
Also note that permissions are directly related with the resources/scopes you are protecting and completely decoupled from the access control methods that were used to actually grant and issue these same permissions.
8.5.1. Introspecting a Requesting Party Token
Sometimes you might want to introspect a requesting party token (RPT) to check its validity or obtain the permissions within the token to enforce authorization decisions on the resource server side.
There are two main use cases where token introspection can help you:
- When client applications need to query the token validity to obtain a new one with the same or additional permissions
- When enforcing authorization decisions at the resource server side, especially when none of the built-in policy enforcers fits your application
8.5.2. Obtaining Information about an RPT
The token introspection is essentially a OAuth2 token introspection-compliant endpoint from which you can obtain information about an RPT.
http://${host}:${port}/auth/realms/${realm_name}/protocol/openid-connect/token/introspectTo introspect an RPT using this endpoint, you can send a request to the server as follows:
curl -X POST \
    -H "Authorization: Basic aGVsbG8td29ybGQtYXV0aHotc2VydmljZTpzZWNyZXQ=" \
    -H "Content-Type: application/x-www-form-urlencoded" \
    -d 'token_type_hint=requesting_party_token&token=${RPT}' \
"http://localhost:8080/auth/realms/hello-world-authz/protocol/openid-connect/token/introspect"The request above is using HTTP BASIC and passing the client’s credentials (client ID and secret) to authenticate the client attempting to introspect the token, but you can use any other client authentication method supported by Red Hat Single Sign-On.
The introspection endpoint expects two parameters:
token_type_hint
Use requesting_party_token as the value for this parameter, which indicates that you want to introspect an RPT.
token
Use the token string as it was returned by the server during the authorization process as the value for this parameter.
As a result, the server response is:
{
  "permissions": [
    {
      "resource_id": "90ccc6fc-b296-4cd1-881e-089e1ee15957",
      "resource_name": "Hello World Resource"
    }
  ],
  "exp": 1465314139,
  "nbf": 0,
  "iat": 1465313839,
  "aud": "hello-world-authz-service",
  "active": true
}
If the RPT is not active, this response is returned instead:
{
  "active": false
}
8.5.3. Do I Need to Invoke the Server Every Time I Want to Introspect an RPT?
No. Just like a regular access token issued by a Red Hat Single Sign-On server, RPTs also use the JSON web token (JWT) specification as the default format.
If you want to validate these tokens without a call to the remote introspection endpoint, you can decode the RPT and query for its validity locally. Once you decode the token, you can also use the permissions within the token to enforce authorization decisions.
This is essentially what the policy enforcers do. Be sure to:
- Validate the signature of the RPT (based on the realm’s public key)
- Query for token validity based on its exp, iat, and aud claims
8.6. Authorization Client Java API
Depending on your requirements, a resource server should be able to manage resources remotely or even check for permissions programmatically. If you are using Java, you can access the Red Hat Single Sign-On Authorization Services using the Authorization Client API.
It is targeted for resource servers that want to access the different endpoints provided by the server such as the Token Endpoint, Resource, and Permission management endpoints.
8.6.1. Maven Dependency
<dependencies>
    <dependency>
        <groupId>org.keycloak</groupId>
        <artifactId>keycloak-authz-client</artifactId>
        <version>${KEYCLOAK_VERSION}</version>
    </dependency>
</dependencies>
8.6.2. Configuration
The client configuration is defined in a keycloak.json file as follows:
{
  "realm": "hello-world-authz",
  "auth-server-url" : "http://localhost:8080/auth",
  "resource" : "hello-world-authz-service",
  "credentials": {
    "secret": "secret"
  }
}
realm (required)
The name of the realm.
auth-server-url (required)
The base URL of the Red Hat Single Sign-On server. All other Red Hat Single Sign-On pages and REST service endpoints are derived from this. It is usually in the form https://host:port/auth.
resource (required)
The client-id of the application. Each application has a client-id that is used to identify the application.
credentials (required)
Specifies the credentials of the application. This is an object notation where the key is the credential type and the value is the value of the credential type.
The configuration file is usually located in your application’s classpath, the default location from where the client is going to try to find a keycloak.json
8.6.3. Creating the Authorization Client
Considering you have a keycloak.jsonAuthzClient
    // create a new instance based on the configuration defined in a keycloak.json located in your classpath
    AuthzClient authzClient = AuthzClient.create();
8.6.4. Obtaining User Entitlements
Here is an example illustrating how to obtain user entitlements:
// create a new instance based on the configuration defined in keycloak.json
AuthzClient authzClient = AuthzClient.create();

// create an authorization request
AuthorizationRequest request = new AuthorizationRequest();

// send the entitlement request to the server in order to
// obtain an RPT with all permissions granted to the user
AuthorizationResponse response = authzClient.authorization("alice", "alice").authorize(request);
String rpt = response.getToken();

System.out.println("You got an RPT: " + rpt);

// now you can use the RPT to access protected resources on the resource server
Here is an example illustrating how to obtain user entitlements for a set of one or more resources:
// create a new instance based on the configuration defined in keycloak.json
AuthzClient authzClient = AuthzClient.create();

// create an authorization request
AuthorizationRequest request = new AuthorizationRequest();

// add permissions to the request based on the resources and scopes you want to check access
request.addPermission("Default Resource");

// send the entitlement request to the server in order to
// obtain an RPT with permissions for a single resource
AuthorizationResponse response = authzClient.authorization("alice", "alice").authorize(request);
String rpt = response.getToken();

System.out.println("You got an RPT: " + rpt);

// now you can use the RPT to access protected resources on the resource server
8.6.5. Creating a Resource Using the Protection API
// create a new instance based on the configuration defined in keycloak.json
AuthzClient authzClient = AuthzClient.create();

// create a new resource representation with the information we want
ResourceRepresentation newResource = new ResourceRepresentation();

newResource.setName("New Resource");
newResource.setType("urn:hello-world-authz:resources:example");

newResource.addScope(new ScopeRepresentation("urn:hello-world-authz:scopes:view"));

ProtectedResource resourceClient = authzClient.protection().resource();
ResourceRepresentation existingResource = resourceClient.findByName(newResource.getName());

if (existingResource != null) {
    resourceClient.delete(existingResource.getId());
}

// create the resource on the server
ResourceRepresentation response = resourceClient.create(newResource);
String resourceId = response.getId();

// query the resource using its newly generated id
ResourceRepresentation resource = resourceClient.findById(resourceId);

System.out.println(resource);
8.6.6. Introspecting an RPT
// create a new instance based on the configuration defined in keycloak.json
AuthzClient authzClient = AuthzClient.create();

// send the authorization request to the server in order to
// obtain an RPT with all permissions granted to the user
AuthorizationResponse response = authzClient.authorization("alice", "alice").authorize();
String rpt = response.getToken();

// introspect the token
TokenIntrospectionResponse requestingPartyToken = authzClient.protection().introspectRequestingPartyToken(rpt);

System.out.println("Token status is: " + requestingPartyToken.getActive());
System.out.println("Permissions granted by the server: ");

for (Permission granted : requestingPartyToken.getPermissions()) {
    System.out.println(granted);
}
Chapter 9. Policy Enforcers
Policy Enforcement Point (PEP) is a design pattern and as such you can implement it in different ways. Red Hat Single Sign-On provides all the necessary means to implement PEPs for different platforms, environments, and programming languages. Red Hat Single Sign-On Authorization Services presents a RESTful API, and leverages OAuth2 authorization capabilities for fine-grained authorization using a centralized authorization server.
A PEP is responsible for enforcing access decisions from the Red Hat Single Sign-On server where these decisions are taken by evaluating the policies associated with a protected resource. It acts as a filter or interceptor in your application in order to check whether or not a particular request to a protected resource can be fulfilled based on the permissions granted by these decisions.
Permissions are enforced depending on the protocol you are using. When using UMA, the policy enforcer always expects an RPT as a bearer token in order to decide whether or not a request can be served. That means clients should first obtain an RPT from Red Hat Single Sign-On before sending requests to the resource server.
However, if you are not using UMA, you can also send regular access tokens to the resource server. In this case, the policy enforcer will try to obtain permissions directly from the server.
If you are using any of the Red Hat Single Sign-On OIDC adapters, you can easily enable the policy enforcer by adding the following property to your keycloak.json file:
keycloak.json
{
 "policy-enforcer": {}
}
When you enable the policy enforcer all requests sent your application are intercepted and access to protected resources will be granted depending on the permissions granted by Red Hat Single Sign-On to the identity making the request.
Policy enforcement is strongly linked to your application’s paths and the resources you created for a resource server using the Red Hat Single Sign-On Administration Console. By default, when you create a resource server, Red Hat Single Sign-On creates a default configuration for your resource server so you can enable policy enforcement quickly.
9.1. Configuration
To enable policy enforcement for your application, add the following property to your keycloak.json file:
keycloak.json
{
  "policy-enforcer": {}
}
Or a little more verbose if you want to manually define the resources being protected:
{
  "policy-enforcer": {
    "user-managed-access" : {},
    "enforcement-mode" : "ENFORCING"
    "paths": [
      {
        "path" : "/someUri/*",
        "methods" : [
          {
            "method": "GET",
            "scopes" : ["urn:app.com:scopes:view"]
          },
          {
            "method": "POST",
            "scopes" : ["urn:app.com:scopes:create"]
          }
        ]
      },
      {
        "name" : "Some Resource",
        "path" : "/usingPattern/{id}",
        "methods" : [
          {
            "method": "DELETE",
            "scopes" : ["urn:app.com:scopes:delete"]
          }
        ]
      },
      {
        "path" : "/exactMatch"
      },
      {
        "name" : "Admin Resources",
        "path" : "/usingWildCards/*"
      }
    ]
  }
}
Here is a description of each configuration option:
policy-enforcer
Specifies the configuration options that define how policies are actually enforced and optionally the paths you want to protect. If not specified, the policy enforcer queries the server for all resources associated with the resource server being protected. In this case, you need to ensure the resources are properly configured with a URIS property that matches the paths you want to protect.
user-managed-access
Specifies that the adapter uses the UMA protocol. If specified, the adapter queries the server for permission tickets and returns them to clients according to the UMA specification. If not specified, the policy enforcer will be able to enforce permissions based on regular access tokens or RPTs. In this case, before denying access to the resource when the token lacks permission, the policy enforcer will try to obtain permissions directly from the server.
enforcement-mode
Specifies how policies are enforced.
ENFORCING
(default mode) Requests are denied by default even when there is no policy associated with a given resource.
PERMISSIVE
Requests are allowed even when there is no policy associated with a given resource.
DISABLED
Completely disables the evaluation of policies and allows access to any resource. When
enforcement-modeisDISABLEDapplications are still able to obtain all permissions granted by Red Hat Single Sign-On through the Authorization Context
on-deny-redirect-to
Defines a URL where a client request is redirected when an "access denied" message is obtained from the server. By default, the adapter responds with a 403 HTTP status code.
path-cache
Defines how the policy enforcer should track associations between paths in your application and resources defined in Red Hat Single Sign-On. The cache is needed to avoid unnecessary requests to a Red Hat Single Sign-On server by caching associations between paths and protected resources.
lifespan
Defines the time in milliseconds when the entry should be expired. If not provided, default value is 3000. A value less than or equal to 0 can be set to completely disable the cache.
max-entries
Defines the limit of entries that should be kept in the cache. If not provided, default value is 1000.
paths
Specifies the paths to protect. This configuration is optional. If not defined, the policy enforcer will discover all paths by fetching the resources you defined to your application in Red Hat Single Sign-On, where these resources are defined with
URISrepresenting some paths in your application.name
The name of a resource on the server that is to be associated with a given path. When used in conjunction with a path, the policy enforcer ignores the resource’s URIS property and uses the path you provided instead.
path
(required) A URI relative to the application’s context path. If this option is specified, the policy enforcer queries the server for a resource with a URI with the same value. Currently a very basic logic for path matching is supported. Examples of valid paths are:
-
Wildcards:
/* -
Suffix:
/*.html -
Sub-paths:
/path/* - Path parameters: /resource/{id}
- Exact match: /resource
- Patterns: /{version}/resource, /api/{version}/resource, /api/{version}/resource/*
-
Wildcards:
methods
The HTTP methods (for example, GET, POST, PATCH) to protect and how they are associated with the scopes for a given resource in the server.
method
The name of the HTTP method.
scopes
An array of strings with the scopes associated with the method. When you associate scopes with a specific method, the client trying to access a protected resource (or path) must provide an RPT that grants permission to all scopes specified in the list. For example, if you define a method POST with a scope create, the RPT must contain a permission granting access to the create scope when performing a POST to the path.
scopes-enforcement-mode
A string referencing the enforcement mode for the scopes associated with a method. Values can be ALL or ANY. If ALL, all defined scopes must be granted in order to access the resource using that method. If ANY, at least one scope should be granted in order to gain access to the resource using that method. By default, enforcement mode is set to ALL.
enforcement-mode
Specifies how policies are enforced.
ENFORCING
(default mode) Requests are denied by default even when there is no policy associated with a given resource.
- DISABLED
claim-information-point
Defines a set of one or more claims that must be resolved and pushed to the Red Hat Single Sign-On server in order to make these claims available to policies. See Claim Information Point for more details.
lazy-load-paths
Specifies how the adapter should fetch the server for resources associated with paths in your application. If true, the policy enforcer is going to fetch resources on-demand accordingly with the path being requested. This configuration is specially useful when you don’t want to fetch all resources from the server during deployment (in case you have provided no
paths) or in case you have defined only a sub set ofpathsand want to fetch others on-demand.http-method-as-scope
Specifies how scopes should be mapped to HTTP methods. If set to true, the policy enforcer will use the HTTP method from the current request to check whether or not access should be granted. When enabled, make sure your resources in Red Hat Single Sign-On are associated with scopes representing each HTTP method you are protecting.
claim-information-point
Defines a set of one or more global claims that must be resolved and pushed to the Red Hat Single Sign-On server in order to make these claims available to policies. See Claim Information Point for more details.
9.2. Claim Information Point
A Claim Information Point (CIP) is responsible for resolving claims and pushing these claims to the Red Hat Single Sign-On server in order to provide more information about the access context to policies. They can be defined as a configuration option to the policy-enforcer in order to resolve claims from different sources, such as:
- HTTP Request (parameters, headers, body, etc)
- External HTTP Service
- Static values defined in configuration
- Any other source by implementing the Claim Information Provider SPI
When pushing claims to the Red Hat Single Sign-On server, policies can base decisions not only on who a user is but also by taking context and contents into account, based on who, what, why, when, where, and which for a given transaction. It is all about Contextual-based Authorization and how to use runtime information in order to support fine-grained authorization decisions.
9.2.1. Obtaining information from the HTTP Request
Here are several examples showing how you can extract claims from an HTTP request:
keycloak.json
"policy-enforcer": {
    "paths": [
      {
        "path": "/protected/resource",
        "claim-information-point": {
          "claims": {
            "claim-from-request-parameter": "{request.parameter['a']}",
            "claim-from-header": "{request.header['b']}",
            "claim-from-cookie": "{request.cookie['c']}",
            "claim-from-remoteAddr": "{request.remoteAddr}",
            "claim-from-method": "{request.method}",
            "claim-from-uri": "{request.uri}",
            "claim-from-relativePath": "{request.relativePath}",
            "claim-from-secure": "{request.secure}",
            "claim-from-json-body-object": "{request.body['/a/b/c']}",
            "claim-from-json-body-array": "{request.body['/d/1']}",
            "claim-from-body": "{request.body}",
            "claim-from-static-value": "static value",
            "claim-from-multiple-static-value": ["static", "value"],
            "param-replace-multiple-placeholder": "Test {keycloak.access_token['/custom_claim/0']} and {request.parameter['a']} "
          }
        }
      }
    ]
  }
9.2.2. Obtaining information from an External HTTP Service
Here are several examples showing how you can extract claims from an external HTTP Service:
keycloak.json
"policy-enforcer": {
    "paths": [
      {
        "path": "/protected/resource",
        "claim-information-point": {
          "http": {
            "claims": {
              "claim-a": "/a",
              "claim-d": "/d",
              "claim-d0": "/d/0",
              "claim-d-all": ["/d/0", "/d/1"]
            },
            "url": "http://mycompany/claim-provider",
            "method": "POST",
            "headers": {
              "Content-Type": "application/x-www-form-urlencoded",
              "header-b": ["header-b-value1", "header-b-value2"],
              "Authorization": "Bearer {keycloak.access_token}"
            },
            "parameters": {
              "param-a": ["param-a-value1", "param-a-value2"],
              "param-subject": "{keycloak.access_token['/sub']}",
              "param-user-name": "{keycloak.access_token['/preferred_username']}",
              "param-other-claims": "{keycloak.access_token['/custom_claim']}"
            }
          }
        }
      }
    ]
  }
9.2.3. Static Claims
keycloak.json
"policy-enforcer": {
    "paths": [
      {
        "path": "/protected/resource",
        "claim-information-point": {
          "claims": {
            "claim-from-static-value": "static value",
            "claim-from-multiple-static-value": ["static", "value"],
          }
        }
      }
    ]
  }
9.2.4. Claim Information Provider SPI
The Claim Information Provider SPI can be used by developers to support different claim information points in case none of the built-ins providers are enough to address their requirements.
For example, to implement a new CIP provider you need to implement org.keycloak.adapters.authorization.ClaimInformationPointProviderFactory and ClaimInformationPointProvider and also provide the file META-INF/services/org.keycloak.adapters.authorization.ClaimInformationPointProviderFactory in your application`s classpath.
Example of org.keycloak.adapters.authorization.ClaimInformationPointProviderFactory:
public class MyClaimInformationPointProviderFactory implements ClaimInformationPointProviderFactory<MyClaimInformationPointProvider> {

    @Override
    public String getName() {
        return "my-claims";
    }

    @Override
    public void init(PolicyEnforcer policyEnforcer) {

    }

    @Override
    public MyClaimInformationPointProvider create(Map<String, Object> config) {
        return new MyClaimInformationPointProvider(config);
    }
}
Every CIP provider must be associated with a name, as defined above in the MyClaimInformationPointProviderFactory.getName method. The name will be used to map the configuration from the claim-information-point section in the policy-enforcer configuration to the implementation.
When processing requests, the policy enforcer will call the MyClaimInformationPointProviderFactory.create method in order to obtain an instance of MyClaimInformationPointProvider. When called, any configuration defined for this particular CIP provider (via claim-information-point) is passed as a map.
Example of ClaimInformationPointProvider:
public class MyClaimInformationPointProvider implements ClaimInformationPointProvider {

    private final Map<String, Object> config;

    public ClaimsInformationPointProvider(Map<String, Object> config) {
        this.config = config;
    }

    @Override
    public Map<String, List<String>> resolve(HttpFacade httpFacade) {
        Map<String, List<String>> claims = new HashMap<>();

        // put whatever claim you want into the map

        return claims;
    }
}
9.3. Obtaining the Authorization Context
When policy enforcement is enabled, the permissions obtained from the server are available through org.keycloak.AuthorizationContext. This class provides several methods you can use to obtain permissions and ascertain whether a permission was granted for a particular resource or scope.
Obtaining the Authorization Context in a Servlet Container
    HttpServletRequest request = ... // obtain javax.servlet.http.HttpServletRequest
    KeycloakSecurityContext keycloakSecurityContext =
        (KeycloakSecurityContext) request
            .getAttribute(KeycloakSecurityContext.class.getName());
    AuthorizationContext authzContext =
        keycloakSecurityContext.getAuthorizationContext();
For more details about how you can obtain a KeycloakSecurityContext consult the adapter configuration. The example above should be sufficient to obtain the context when running an application using any of the servlet containers supported by Red Hat Single Sign-On.
The authorization context helps give you more control over the decisions made and returned by the server. For example, you can use it to build a dynamic menu where items are hidden or shown depending on the permissions associated with a resource or scope.
if (authzContext.hasResourcePermission("Project Resource")) {
    // user can access the Project Resource
}

if (authzContext.hasResourcePermission("Admin Resource")) {
    // user can access administration resources
}

if (authzContext.hasScopePermission("urn:project.com:project:create")) {
    // user can create new projects
}
The AuthorizationContext represents one of the main capabilities of Red Hat Single Sign-On Authorization Services. From the examples above, you can see that the protected resource is not directly associated with the policies that govern them.
Consider some similar code using role-based access control (RBAC):
if (User.hasRole('user')) {
    // user can access the Project Resource
}

if (User.hasRole('admin')) {
    // user can access administration resources
}

if (User.hasRole('project-manager')) {
    // user can create new projects
}
Although both examples address the same requirements, they do so in different ways. In RBAC, roles only implicitly define access for their resources. With Red Hat Single Sign-On you gain the capability to create more manageable code that focuses directly on your resources whether you are using RBAC, attribute-based access control (ABAC), or any other BAC variant. Either you have the permission for a given resource or scope, or you don’t.
Now, suppose your security requirements have changed and in addition to project managers, PMOs can also create new projects.
Security requirements change, but with Red Hat Single Sign-On there is no need to change your application code to address the new requirements. Once your application is based on the resource and scope identifier, you need only change the configuration of the permissions or policies associated with a particular resource in the authorization server. In this case, the permissions and policies associated with the Project Resource and/or the scope urn:project.com:project:create would be changed.
9.4. Using the AuthorizationContext to obtain an Authorization Client Instance
The AuthorizationContext
    ClientAuthorizationContext clientContext = ClientAuthorizationContext.class.cast(authzContext);
    AuthzClient authzClient = clientContext.getClient();
In some cases, resource servers protected by the policy enforcer need to access the APIs provided by the authorization server. With an AuthzClient
9.5. JavaScript Integration
The Red Hat Single Sign-On Server comes with a JavaScript library you can use to interact with a resource server protected by a policy enforcer. This library is based on the Red Hat Single Sign-On JavaScript adapter, which can be integrated to allow your client to obtain permissions from a Red Hat Single Sign-On Server.
You can obtain this library from a running a Red Hat Single Sign-On Server instance by including the following script tag in your web page:
<script src="http://.../auth/js/keycloak-authz.js"></script>
Once you do that, you can create a KeycloakAuthorization instance as follows:
var keycloak = ... // obtain a Keycloak instance from keycloak.js library
var authorization = new KeycloakAuthorization(keycloak);
The keycloak-authz.js library provides two main features:
- Obtain permissions from the server using a permission ticket, if you are accessing a UMA protected resource server.
- Obtain permissions from the server by sending the resources and scopes the application wants to access.
In both cases, the library allows you to easily interact with both resource server and Red Hat Single Sign-On Authorization Services to obtain tokens with permissions your client can use as bearer tokens to access the protected resources on a resource server.
9.5.1. Handling Authorization Responses from a UMA-Protected Resource Server
If a resource server is protected by a policy enforcer, it responds to client requests based on the permissions carried along with a bearer token. Typically, when you try to access a resource server with a bearer token that is lacking permissions to access a protected resource, the resource server responds with a 401 status code and a WWW-Authenticate header.
HTTP/1.1 401 Unauthorized
WWW-Authenticate: UMA realm="${realm}",
    as_uri="https://${host}:${port}/auth/realms/${realm}",
    ticket="016f84e8-f9b9-11e0-bd6f-0021cc6004de"
See UMA Authorization Process for more information.
What your client needs to do is extract the permission ticket from the WWW-Authenticate
// prepare a authorization request with the permission ticket
var authorizationRequest = {};
authorizationRequest.ticket = ticket;

// send the authorization request, if successful retry the request
Identity.authorization.authorize(authorizationRequest).then(function (rpt) {
    // onGrant
}, function () {
    // onDeny
}, function () {
    // onError
});
The authorize function is completely asynchronous and supports a few callback functions to receive notifications from the server:
-
onGrant: The first argument of the function. If authorization was successful and the server returned an RPT with the requested permissions, the callback receives the RPT. -
onDeny: The second argument of the function. Only called if the server has denied the authorization request. -
onError: The third argument of the function. Only called if the server responds unexpectedly.
Most applications should use the onGrant callback to retry a request after a 401 response. Subsequent requests should include the RPT as a bearer token for retries.
9.5.2. Obtaining Entitlements
The keycloak-authz.jsentitlement function that you can use to obtain an RPT from the server by providing the resources and scopes your client wants to access.
Example about how to obtain an RPT with permissions for all resources and scopes the user can access
authorization.entitlement('my-resource-server-id').then(function (rpt) {
    // onGrant callback function.
    // If authorization was successful you'll receive an RPT
    // with the necessary permissions to access the resource server
});
Example about how to obtain an RPT with permissions for specific resources and scopes
authorization.entitlement('my-resource-server', {
    "permissions": [
        {
            "id" : "Some Resource"
        }
    ]
}).then(function (rpt) {
    // onGrant
});
When using the entitlement function, you must provide the client_id of the resource server you want to access.
The entitlement function is completely asynchronous and supports a few callback functions to receive notifications from the server:
-
onGrant: The first argument of the function. If authorization was successful and the server returned an RPT with the requested permissions, the callback receives the RPT. -
onDeny: The second argument of the function. Only called if the server has denied the authorization request. -
onError: The third argument of the function. Only called if the server responds unexpectedly.
9.5.3. Authorization Request
Both authorizeentitlement
permissions
An array of objects representing the resource and scopes. For instance:
var authorizationRequest = {
   "permissions": [
       {
           "id" : "Some Resource",
           "scopes" : ["view", "edit"]
       }
   ]
}
metadata
An object where its properties define how the authorization request should be processed by the server.
response_include_resource_name
A boolean value indicating to the server if resource names should be included in the RPT’s permissions. If false, only the resource identifier is included.
response_permissions_limit
An integer N that defines a limit for the amount of permissions an RPT can have. When used together with
rptparameter, only the last N requested permissions will be kept in the RPT
submit_request
A boolean value indicating whether the server should create permission requests to the resources and scopes referenced by a permission ticket. This parameter will only take effect when used together with the
ticketparameter as part of a UMA authorization process.
9.5.4. Obtaining the RPT
If you have already obtained an RPT using any of the authorization functions provided by the library, you can always obtain the RPT as follows from the authorization object (assuming that it has been initialized by one of the techniques shown earlier):
var rpt = authorization.rpt;
9.6. Setting Up TLS/HTTPS
When the server is using HTTPS, ensure your adapter is configured as follows:
keycloak.json
{
  "truststore": "path_to_your_trust_store",
  "truststore-password": "trust_store_password"
}
The configuration above enables TLS/HTTPS to the Authorization Client, making possible to access a Red Hat Single Sign-On Server remotely using the HTTPS scheme.
It is strongly recommended that you enable TLS/HTTPS when accessing the Red Hat Single Sign-On Server endpoints.