Use Red Hat Quay
Preface
Whether you deployed your own Red Hat Quay service or are using the Quay.io registry, follow descriptions here to start using your Quay repository to store and work with images.
Chapter 1. Creating a repository
There are two ways to create a repository in Quay: via a docker push and via the Quay UI. These are essentially the same, whether you are using Quay.io or your own instance of Red Hat Quay.
1.1. Creating an image repository via the UI
To create a repository in the Quay UI, click the + icon in the top right of the header on any Quay page and choose New Repository. Select Container Image Repository on the next page, choose a namespace (only applies to organizations), enter a repository name and then click the Create Repository button. The repository will start out empty unless a Dockerfile is uploaded as well.
1.2. Creating an image repository via docker
First, tag the repository. Here are examples for pushing images to Quay.io or your own Red Hat Quay setup (for example, reg.example.com).
# docker tag 0u123imageid quay.io/namespace/repo_name
# docker tag 0u123imageid reg.example.com/namespace/repo_name
Then push to the appropriate Quay registry. For example:
# docker push quay.io/namespace/repo_name
# docker push reg.example.com/namespace/repo_name
1.3. Creating an application repository via the UI
To create a repository in the Quay UI, click the + icon in the top right of the header on any Quay page and choose New Repository. Select Application Repository on the next page, choose a namespace (only applies to organizations), enter a repository name and then click the Create Repository button. The repository will start out empty.
Chapter 2. Working with tags
Tags provide a way to identify the version of an image, as well as offering a means of naming the same image in different ways. Besides an image’s version, an image tag can identify its uses (such as devel, testing, or prod) or the fact that it is the most recent version (latest).
From the Tags tab of an image repository, you can view, modify, add, move, delete, and see the history of tags. You also can fetch command-lines you can use to download (pull) a specific image (based on its name and tag) using different commands.
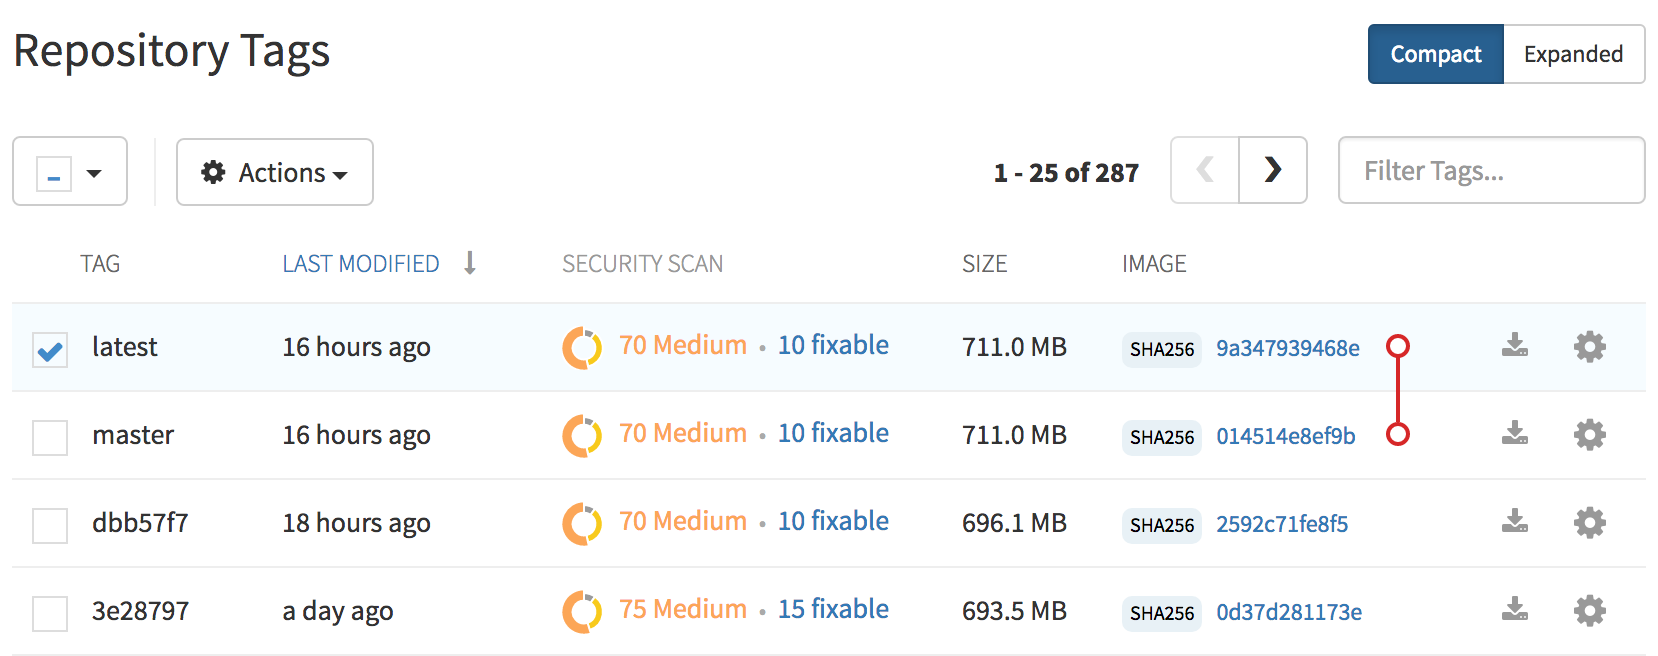
2.1. Viewing and modifying tags
The tags of a repository can be viewed and modified in the tags panel of the repository page, found by clicking on the Tags tab.
2.1.1. Adding a new tag to a tagged image
A new tag can be added to a tagged image by clicking on the gear icon next to the tag and choosing Add New Tag. Quay.io will confirm the addition of the new tag to the image.
2.1.2. Moving a tag
Moving a tag to a different image is accomplished by performing the same operation as adding a new tag, but giving an existing tag name. Quay.io will confirm that you want the tag moved, rather than added.
2.1.3. Deleting a tag
A specific tag and all its images can be deleted by clicking on the tag’s gear icon and choosing Delete Tag. This will delete the tag and any images unique to it. Images will not be deleted until no tag references them either directly or indirectly through a parent child relationship.
2.1.4. Viewing tag history and going back in time
2.1.4.1. Viewing tag history
To view the image history for a tag, click on the View Tags History menu item located under the Actions menu. The page shown will display each image to which the tag pointed in the past and when it pointed to that image.
2.1.4.2. Going back in time
To revert the tag to a previous image, find the history line where your desired image was overwritten, and click on the Restore link.
2.1.5. Fetching an image by tag or digest
From the Tags tab, you can view different ways of pulling images from the clients that are ready to use those images.
- Select a particular repository/image
- Select Tags in the left column
- Select the Fetch Tag icon for a particular image/tag combination
- When the Fetch Tag pop-up appears, select the Image format box to see a drop-down menu that shows different ways that are available to pull the image. The selections offer full command lines for pulling a specific container image to the local system:

You can select to pull a regular of an image by tag name or by digest name using the docker command. You can pull a squashed version of the image with docker by selecting Squashed Docker Image. There is also an example for pulling the image using the rkt command. . Choose the type of pull you want, then select Copy Command. The full command-line is copied into your clipboard. These two commands show a docker pull by tag and by digest:
docker pull quay.io/cnegus/whatever:latest
docker pull quay.io/cnegus/whatever@sha256:e02231a6aa8ba7f5da3859a359f99d77e371cb47e643ce78e101958782581fb9
Paste the command into a command-line shell on a system that has the docker command and service available, and press Enter. At this point, the container image is ready to run on your local system.
On most Red Hat systems, you can substitute podman for docker to pull and run the selected image.
2.2. Security scanning
By clicking the on the vulnerability or fixable count next to a tab you can jump into the security scanning information for that tag. There you can find which CVEs your image is susceptible to, and what remediation options you may have available.
Chapter 3. Setting up a Custom Git Trigger
A Custom Git Trigger is a generic way for any git server to act as a build trigger. It relies solely on SSH keys and webhook endpoints; everything else is left to the user to implement.
3.1. Creating a Trigger
Creating a Custom Git Trigger is similar to the creation of any other trigger with a few subtle differences:
- It is not possible for Quay to automatically detect the proper robot account to use with the trigger. This must be done manually in the creation process.
- There are extra steps after the creation of the trigger that must be done in order to use the trigger. These steps are detailed below.
3.2. Post trigger-creation setup
Once a trigger has been created, there are 2 additional steps required before the trigger can be used:
- Provide read access to the SSH public key generated when creating the trigger.
- Setup a webhook that POSTs to the Quay endpoint to trigger a build.
The key and the URL are both available at all times by selecting View Credentials from the gear located in the trigger listing.
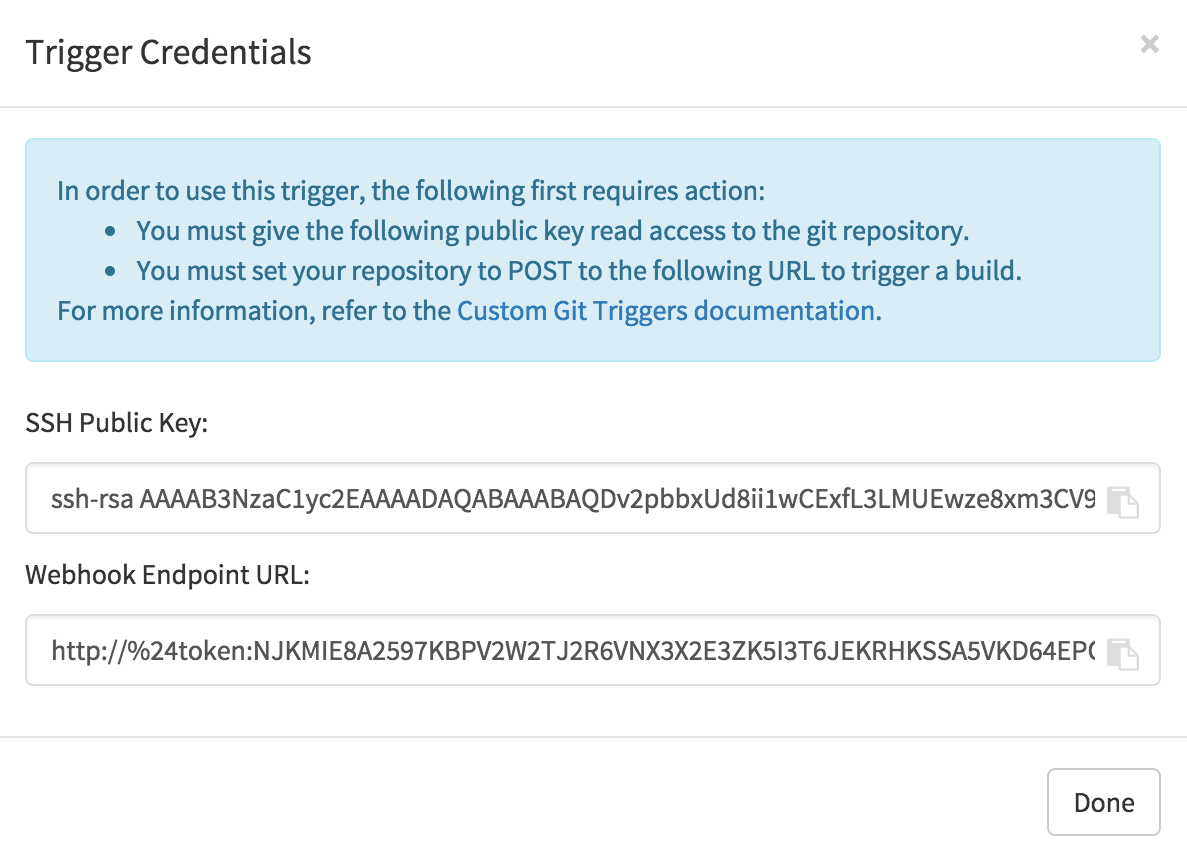
3.2.1. SSH public key access
Depending on the Git server setup, there are various ways to install the SSH public key that Quay generates for a custom git trigger. For example, Git documentation describes a small server setup in which simply adding the key to $HOME/.ssh/authorize_keys would provide access for builders to clone the repository. For any git repository management software that isn’t officially supported, there is usually a location to input the key often labeled as Deploy Keys.
3.2.2. Webhook
In order to automatically trigger a build, one must POST a JSON payload to the webhook URL with the following format:
{
  "commit": "1c002dd",                                   // required
  "ref": "refs/heads/master",                            // required
  "default_branch": "master",                            // required
  "commit_info": {                                       // optional
    "url": "gitsoftware.com/repository/commits/1234567", // required
    "message": "initial commit",                         // required
    "date": "timestamp",                                 // required
    "author": {                                          // optional
      "username": "user",                                // required
      "avatar_url": "gravatar.com/user.png",             // required
      "url": "gitsoftware.com/users/user"                // required
    },
    "committer": {                                       // optional
      "username": "user",                                // required
      "avatar_url": "gravatar.com/user.png",             // required
      "url": "gitsoftware.com/users/user"                // required
    }
  }
}
This request requires a Content-Type header containing application/json in order to be valid.
Once again, this can be accomplished in various ways depending on the server setup, but for most cases can be done via a post-receive git hook.
Chapter 4. Skipping a source control-triggered build
To specify that a commit should be ignored by the Quay build system, add the text [skip build] or [build skip] anywhere in the commit message.
Chapter 5. Repository Notifications
Quay supports adding notifications to a repository for various events that occur in the repository’s lifecycle. To add notifications, click the Settings tab while viewing a repository and select Create Notification. From the When this event occurs field, select the items for which you want to receive notifications:
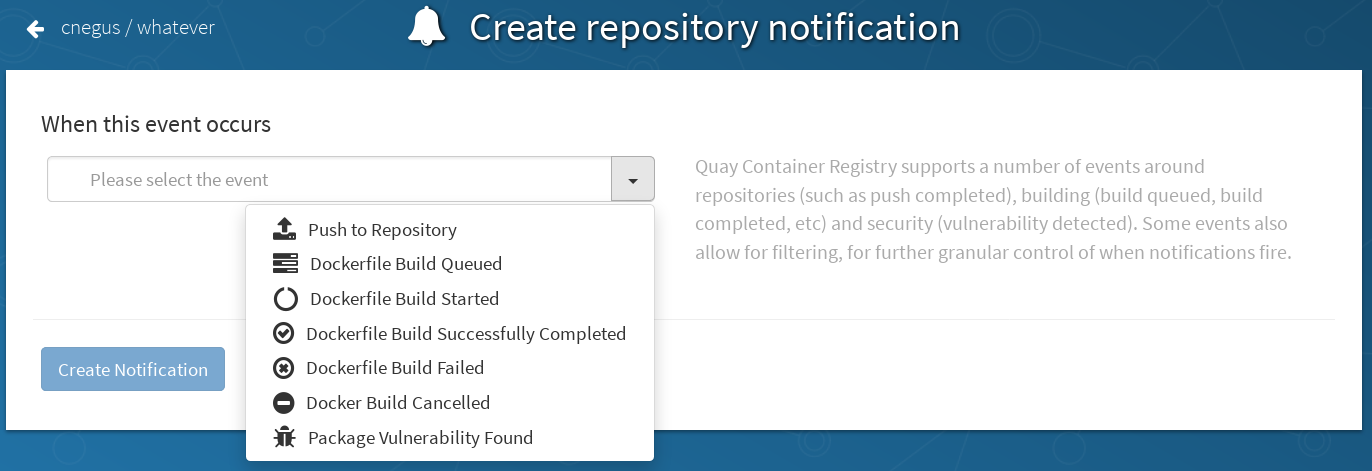
After selecting an event, further configure it by adding how you will be notified of that event.
Adding notifications requires repository admin permission.
The following are examples of repository events.
5.1. Repository Events
5.1.1. Repository Push
A successful push of one or more images was made to the repository:
{
  "name": "repository",
  "repository": "dgangaia/test",
  "namespace": "dgangaia",
  "docker_url": "quay.io/dgangaia/test",
  "homepage": "https://quay.io/repository/dgangaia/repository",
  "updated_tags": [
    "latest"
  ]
}
5.1.2. Dockerfile Build Queued
A Dockerfile build has been queued into the build system:
{
  "build_id": "296ec063-5f86-4706-a469-f0a400bf9df2",
  "trigger_kind": "github",
  "name": "test",
  "repository": "dgangaia/test",
  "namespace": "dgangaia",
  "docker_url": "quay.io/dgangaia/test",
  "trigger_id": "38b6e180-9521-4ff7-9844-acf371340b9e",
  "docker_tags": [
    "master",
    "latest"
  ],
  "repo": "test",
  "trigger_metadata": {
    "default_branch": "master",
    "commit": "b7f7d2b948aacbe844ee465122a85a9368b2b735",
    "ref": "refs/heads/master",
    "git_url": "git@github.com:dgangaia/test.git",
    "commit_info": {
      "url": "https://github.com/dgangaia/test/commit/b7f7d2b948aacbe844ee465122a85a9368b2b735",
      "date": "2019-03-06T12:48:24+11:00",
      "message": "adding 5",
      "author": {
        "username": "dgangaia",
        "url": "https://github.com/dgangaia",
        "avatar_url": "https://avatars1.githubusercontent.com/u/43594254?v=4"
      },
      "committer": {
        "username": "web-flow",
        "url": "https://github.com/web-flow",
        "avatar_url": "https://avatars3.githubusercontent.com/u/19864447?v=4"
      }
    }
  },
  "is_manual": false,
  "manual_user": null,
  "homepage": "https://quay.io/repository/dgangaia/test/build/296ec063-5f86-4706-a469-f0a400bf9df2"
}
5.1.3. Dockerfile Build Started
A Dockerfile build has been started by the build system
{
  "build_id": "a8cc247a-a662-4fee-8dcb-7d7e822b71ba",
  "trigger_kind": "github",
  "name": "test",
  "repository": "dgangaia/test",
  "namespace": "dgangaia",
  "docker_url": "quay.io/dgangaia/test",
  "trigger_id": "38b6e180-9521-4ff7-9844-acf371340b9e",
  "docker_tags": [
    "master",
    "latest"
  ],
  "build_name": "50bc599",
  "trigger_metadata": {
    "commit": "50bc5996d4587fd4b2d8edc4af652d4cec293c42",
    "ref": "refs/heads/master",
    "default_branch": "master",
    "git_url": "git@github.com:dgangaia/test.git",
    "commit_info": {
      "url": "https://github.com/dgangaia/test/commit/50bc5996d4587fd4b2d8edc4af652d4cec293c42",
      "date": "2019-03-06T14:10:14+11:00",
      "message": "test build",
      "committer": {
        "username": "web-flow",
        "url": "https://github.com/web-flow",
        "avatar_url": "https://avatars3.githubusercontent.com/u/19864447?v=4"
      },
      "author": {
        "username": "dgangaia",
        "url": "https://github.com/dgangaia",
        "avatar_url": "https://avatars1.githubusercontent.com/u/43594254?v=4"
      }
    }
  },
  "homepage": "https://quay.io/repository/dgangaia/test/build/a8cc247a-a662-4fee-8dcb-7d7e822b71ba"
}
5.1.4. Dockerfile Build Successfully Completed
A Dockerfile build has been successfully completed by the build system
This event will occur simultaneously with a Repository Push event for the built image(s)
{
  "build_id": "296ec063-5f86-4706-a469-f0a400bf9df2",
  "trigger_kind": "github",
  "name": "test",
  "repository": "dgangaia/test",
  "namespace": "dgangaia",
  "docker_url": "quay.io/dgangaia/test",
  "trigger_id": "38b6e180-9521-4ff7-9844-acf371340b9e",
  "docker_tags": [
    "master",
    "latest"
  ],
  "build_name": "b7f7d2b",
  "image_id": "sha256:0339f178f26ae24930e9ad32751d6839015109eabdf1c25b3b0f2abf8934f6cb",
  "trigger_metadata": {
    "commit": "b7f7d2b948aacbe844ee465122a85a9368b2b735",
    "ref": "refs/heads/master",
    "default_branch": "master",
    "git_url": "git@github.com:dgangaia/test.git",
    "commit_info": {
      "url": "https://github.com/dgangaia/test/commit/b7f7d2b948aacbe844ee465122a85a9368b2b735",
      "date": "2019-03-06T12:48:24+11:00",
      "message": "adding 5",
      "committer": {
        "username": "web-flow",
        "url": "https://github.com/web-flow",
        "avatar_url": "https://avatars3.githubusercontent.com/u/19864447?v=4"
      },
      "author": {
        "username": "dgangaia",
        "url": "https://github.com/dgangaia",
        "avatar_url": "https://avatars1.githubusercontent.com/u/43594254?v=4"
      }
    }
  },
  "homepage": "https://quay.io/repository/dgangaia/test/build/296ec063-5f86-4706-a469-f0a400bf9df2",
  "manifest_digests": [
    "quay.io/dgangaia/test@sha256:2a7af5265344cc3704d5d47c4604b1efcbd227a7a6a6ff73d6e4e08a27fd7d99",
    "quay.io/dgangaia/test@sha256:569e7db1a867069835e8e97d50c96eccafde65f08ea3e0d5debaf16e2545d9d1"
  ]
}
5.1.5. Dockerfile Build Failed
A Dockerfile build has failed
{
  "build_id": "5346a21d-3434-4764-85be-5be1296f293c",
  "trigger_kind": "github",
  "name": "test",
  "repository": "dgangaia/test",
  "docker_url": "quay.io/dgangaia/test",
  "error_message": "Could not find or parse Dockerfile: unknown instruction: GIT",
  "namespace": "dgangaia",
  "trigger_id": "38b6e180-9521-4ff7-9844-acf371340b9e",
  "docker_tags": [
    "master",
    "latest"
  ],
  "build_name": "6ae9a86",
  "trigger_metadata": {
    "commit": "6ae9a86930fc73dd07b02e4c5bf63ee60be180ad",
    "ref": "refs/heads/master",
    "default_branch": "master",
    "git_url": "git@github.com:dgangaia/test.git",
    "commit_info": {
      "url": "https://github.com/dgangaia/test/commit/6ae9a86930fc73dd07b02e4c5bf63ee60be180ad",
      "date": "2019-03-06T14:18:16+11:00",
      "message": "failed build test",
      "committer": {
        "username": "web-flow",
        "url": "https://github.com/web-flow",
        "avatar_url": "https://avatars3.githubusercontent.com/u/19864447?v=4"
      },
      "author": {
        "username": "dgangaia",
        "url": "https://github.com/dgangaia",
        "avatar_url": "https://avatars1.githubusercontent.com/u/43594254?v=4"
      }
    }
  },
  "homepage": "https://quay.io/repository/dgangaia/test/build/5346a21d-3434-4764-85be-5be1296f293c"
}
5.1.6. Dockerfile Build Cancelled
A Dockerfile build was cancelled
{
  "build_id": "cbd534c5-f1c0-4816-b4e3-55446b851e70",
  "trigger_kind": "github",
  "name": "test",
  "repository": "dgangaia/test",
  "namespace": "dgangaia",
  "docker_url": "quay.io/dgangaia/test",
  "trigger_id": "38b6e180-9521-4ff7-9844-acf371340b9e",
  "docker_tags": [
    "master",
    "latest"
  ],
  "build_name": "cbce83c",
  "trigger_metadata": {
    "commit": "cbce83c04bfb59734fc42a83aab738704ba7ec41",
    "ref": "refs/heads/master",
    "default_branch": "master",
    "git_url": "git@github.com:dgangaia/test.git",
    "commit_info": {
      "url": "https://github.com/dgangaia/test/commit/cbce83c04bfb59734fc42a83aab738704ba7ec41",
      "date": "2019-03-06T14:27:53+11:00",
      "message": "testing cancel build",
      "committer": {
        "username": "web-flow",
        "url": "https://github.com/web-flow",
        "avatar_url": "https://avatars3.githubusercontent.com/u/19864447?v=4"
      },
      "author": {
        "username": "dgangaia",
        "url": "https://github.com/dgangaia",
        "avatar_url": "https://avatars1.githubusercontent.com/u/43594254?v=4"
      }
    }
  },
  "homepage": "https://quay.io/repository/dgangaia/test/build/cbd534c5-f1c0-4816-b4e3-55446b851e70"
}
5.1.7. Vulnerability Detected
A vulnerability was detected in the repository
{
  "repository": "dgangaia/repository",
  "namespace": "dgangaia",
  "name": "repository",
  "docker_url": "quay.io/dgangaia/repository",
  "homepage": "https://quay.io/repository/dgangaia/repository",

  "tags": ["latest", "othertag"],

  "vulnerability": {
    "id": "CVE-1234-5678",
    "description": "This is a bad vulnerability",
    "link": "http://url/to/vuln/info",
    "priority": "Critical",
    "has_fix": true
  }
}
5.2. Notification Actions
5.2.1. Quay Notification
A notification will be added to the Quay.io notification area. The notification area can be found by clicking on the bell icon in the top right of any Quay.io page.
Quay.io notifications can be setup to be sent to a User, Team, or the organization as a whole.
5.2.2. E-mail
An e-mail will be sent to the specified address describing the event that occurred.
All e-mail addresses will have to be verified on a per-repository basis
5.2.3. Webhook POST
An HTTP POST call will be made to the specified URL with the event’s data (see above for each event’s data format).
When the URL is HTTPS, the call will have an SSL client certificate set from Quay.io. Verification of this certificate will prove the call originated from Quay.io. Responses with status codes in the 2xx range are considered successful. Responses with any other status codes will be considered failures and result in a retry of the webhook notification.
5.2.4. Flowdock Notification
Posts a message to Flowdock.
5.2.5. Hipchat Notification
Posts a message to HipChat.
5.2.6. Slack Notification
Posts a message to Slack.
Chapter 6. Building Dockerfiles
Quay.io supports the ability to build Dockerfiles on our build fleet and push the resulting image to the repository.
6.1. Viewing and managing builds
Repository Builds can be viewed and managed by clicking the Builds tab in the Repository View.
6.2. Manually starting a build
To manually start a repository build, click the + icon in the top right of the header on any repository page and choose New Dockerfile Build. An uploaded Dockerfile, .tar.gz, or an HTTP URL to either can be used for the build.
You will not be able to specify the Docker build context when manually starting a build.
6.3. Build Triggers
Repository builds can also be automatically triggered by events such as a push to an SCM (GitHub, BitBucket or GitLab) or via a call to a webhook.
6.3.1. Creating a new build trigger
To setup a build trigger, click the Create Build Trigger button on the Builds view page and follow the instructions of the dialog. You will need to grant Quay.io access to your repositories in order to setup the trigger and your account requires admin access on the SCM repository.
6.3.2. Manually triggering a build trigger
To trigger a build trigger manually, click the icon next to the build trigger and choose Run Now.
6.3.3. Build Contexts
When building an image with Docker, a directory is specified to become the build context. This holds true for both manual builds and build triggers because the builds conducted by Quay.io are no different from running docker build on your own machine.
Quay.io build contexts are always the specified subdirectory from the build setup and fallback to the root of the build source if none is specified. When a build is triggered, Quay.io build workers clone the git repository to the worker machine and enter the build context before conducting a build.
For builds based on tar archives, build workers extract the archive and enter the build context. For example:
example
├── .git
├── Dockerfile
├── file
└── subdir
    └── Dockerfile
Imagine the example above is the directory structure for a GitHub repository called "example". If no subdirectory is specified in the build trigger setup or while manually starting a build, the build will operate in the example directory.
If subdir is specified to be the subdirectory in the build trigger setup, only the Dockerfile within it is visible to the build. This means that you cannot use the ADD command in the Dockerfile to add file, because it is outside of the build context.
Unlike the Docker Hub, the Dockerfile is part of the build context on Quay. Thus, it must not appear in the .dockerignore file.
Chapter 7. Set up GitHub build triggers
Red Hat Quay supports using GitHub or GitHub Enterprise as a trigger to building images.
- Initial setup: If you have not yet done so, please enable build support in Red Hat Quay.
Create an OAuth application in GitHub: Following the instructions at Create a GitHub Application.
NoteThis application must be different from that used for GitHub Authentication.
- Visit the Red Hat Quay config UI: Start up the Red Hat Quay config UI.
Enable GitHub triggers:
-
Scroll down to the section entitled GitHub (Enterprise) Build Triggers.
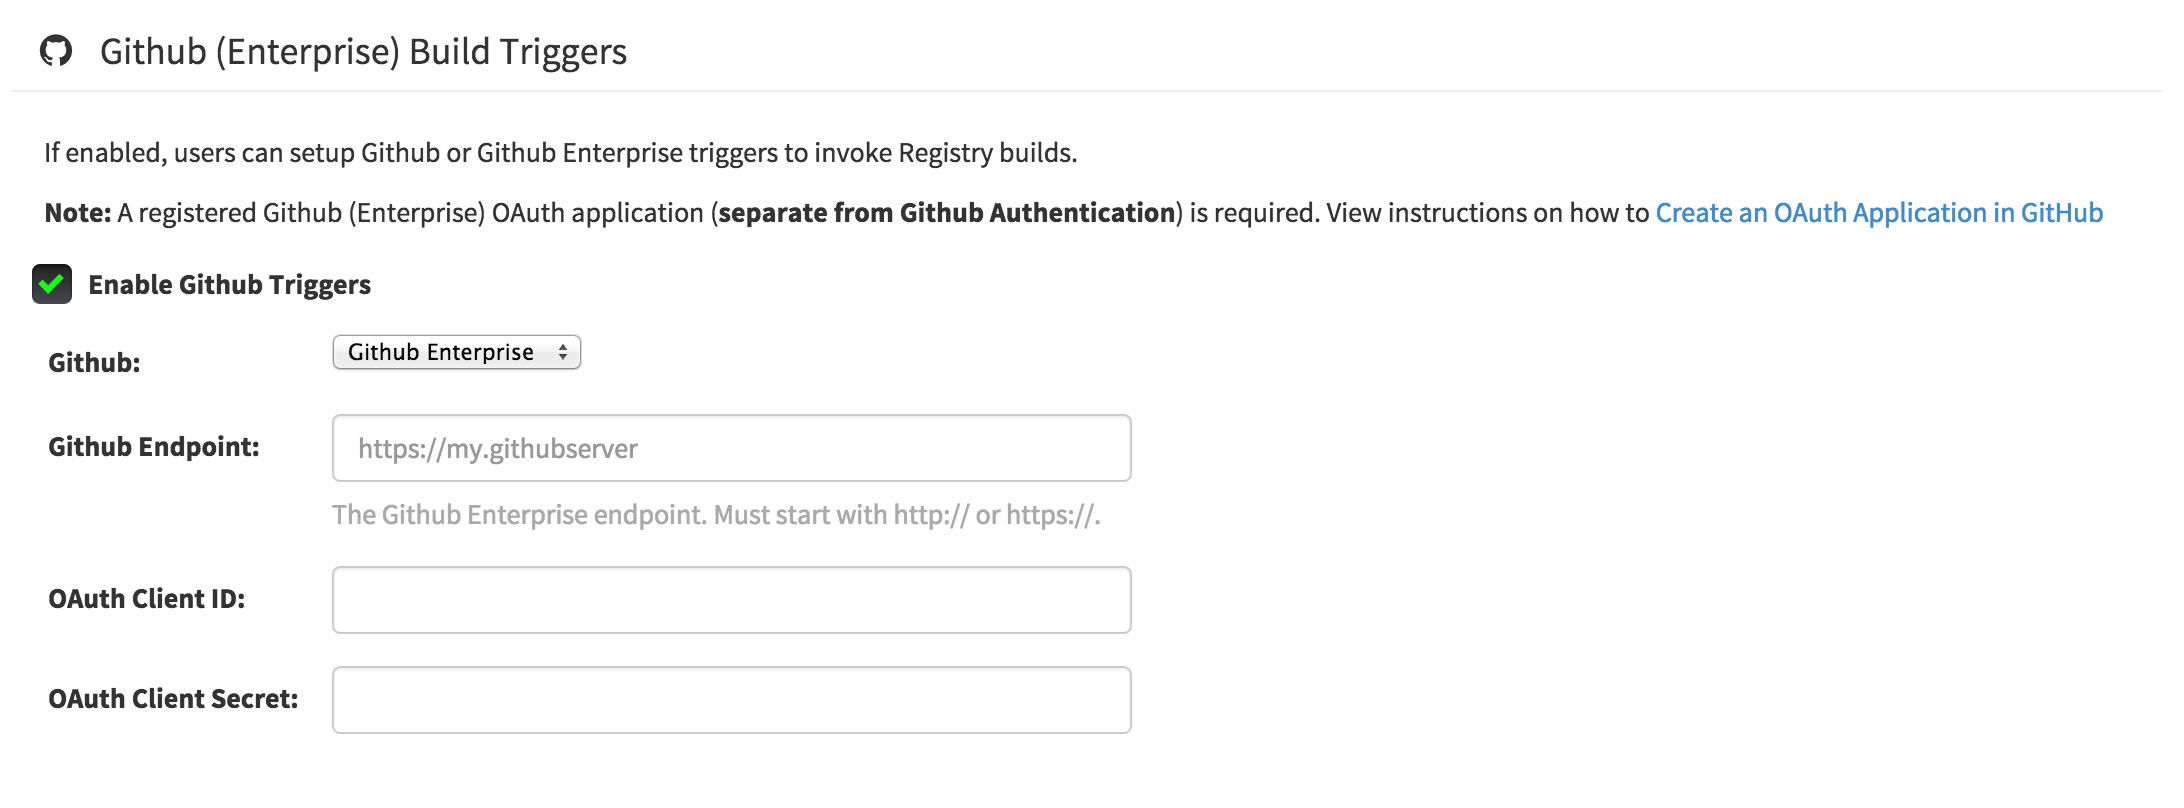
- Check the "Enable GitHub Triggers" box
- Fill in the credentials from the application created above
- Click "Save Configuration Changes"
- Deploy the changes to your Red Hat Quay application.
-
Scroll down to the section entitled GitHub (Enterprise) Build Triggers.
Chapter 8. Automatially build Dockerfiles with build workers
Red Hat Quay supports building Dockerfiles using a set of worker nodes. Build triggers, such as GitHub webhooks (Setup Instructions), can be configured to automatically build new versions of your repositories when new code is committed. This document will walk you through enabling the feature flag and setting up multiple build workers to enable this feature.
8.1. Enable building
-
Visit the management panel: Sign in to a superuser account and visit
http://yourregister/superuserto view the management panel: Enable Dockerfile Build Support:
-
Click the configuration tab and scroll down to the section entitled Dockerfile Build Support.

- Check the "Enable Dockerfile Build" box
- Click "Save Configuration Changes"
- Restart the container (you will be prompted)
-
Click the configuration tab and scroll down to the section entitled Dockerfile Build Support.
8.2. Set up the build workers

One or more build workers will communicate with Red Hat Quay to build new containers when triggered. The machines must have Docker installed and must not be used for any other work. The following procedure needs to be done every time a new worker needs to be added, but it can be automated fairly easily.
8.2.1. Pull the build worker image
Pull down the latest copy of the image. Make sure to pull the version tagged matching your Red Hat Quay version.
# docker pull quay.io/coreos/quay-builder:v2.9.5
8.2.2. Run the build worker image
Run this container on each build worker. Since the worker will be orchestrating docker builds, we need to mount in the docker socket. This orchestration will use a large amount of CPU and need to manipulate the docker images on disk — we recommend that dedicated machines be used for this task.
Use the environment variable SERVER to tell the worker the hostname at which Red Hat Quay is accessible:
| Security | Websocket Address |
|---|---|
| Using SSL | wss://your.quayenterprise.dnsname |
| Without SSL | ws://your.quayenterprise.dnsname |
Here’s what the full command looks like:
# docker run --restart on-failure \
  -e SERVER=ws://myquayenterprise \
  -v /var/run/docker.sock:/var/run/docker.sock \
  quay.io/coreos/quay-builder:v2.9.5
When the container starts, each build worker will auto-register and start building containers once a job is triggered and it is assigned to a worker.
If Quay is setup to use a SSL certificate that is not globally trusted, for example a self-signed certificate, Quay’s public SSL certificates must be mounted onto the quay-builder container’s SSL trust store. An example command to mount a certificate found at the host’s /path/to/ssl/rootCA.pem looks like:
# docker run --restart on-failure \
  -e SERVER=wss://myquayenterprise \
  -v /path/to/ssl/rootCA.pem:/usr/local/share/ca-certificates/rootCA.pem \
  -v /var/run/docker.sock:/var/run/docker.sock \
  --entrypoint /bin/sh \
  quay.io/coreos/quay-builder:v2.9.3 \
  -c '/usr/sbin/update-ca-certificates && quay-builder'
8.3. Set up GitHub build (optional)
If your organization plans to have builds be conducted via pushes to GitHub (or GitHub Enterprise), please continue with the Setting up GitHub Build.
Chapter 9. Creating an OAuth application in GitHub
You can authorize your registry to access a GitHub account and its repositories by registering it as a GitHub OAuth application.
9.1. Create new GitHub application
- Log into GitHub (Enterprise)
- Visit the Applications page under your organization’s settings.
-
Click Register New Application. The
Register a new OAuth applicationconfiguration screen is displayed:
Set Homepage URL: Enter the Quay Enterprise URL as the
Homepage URLNoteIf using public GitHub, the Homepage URL entered must be accessible by your users. It can still be an internal URL.
- Set Authorization callback URL: Enter https://{$RED_HAT_QUAY_URL}/oauth2/github/callback as the Authorization callback URL.
- Save your settings by clicking the Register application button. The new new application’s summary is shown:
- Record the Client ID and Client Secret shown for the new application.
Chapter 10. Downloading Squashed Docker Images
Docker images are composed of image layers which include all of the intermediary data used to reach their current state. When iterating on a solution locally on a developer’s machine, layers provide an efficient workflow.
There are scenarios, however, in which the layers cease to be efficient. For example, when deploying software to an ephemeral machine, that machine doesn’t care about the whole layer history, it just needs the end state of the image. This is why Quay.io supports Squashed Images.
10.1. Downloading a Squashed Image
To download a squashed image:
-
Navigate to the
Tagstab of a QuayRepository View. For an organization namedabcsalesand a repo namedmyweb, the URL would behttps://quay.io/repository/abcsales/myweb?tab=tags) on Quay.io. For a Red Hat Quay registry, replacequay.iowith your registry name. - On the left side of the table, click on the Fetch Tag icon for the tag you want to download. A modal dialog appears with a dropdown for specifying the desired format of the download.
-
Select
Squashed Docker Imagefrom the dropdown and then select a robot that has read permission to be able to pull the repository.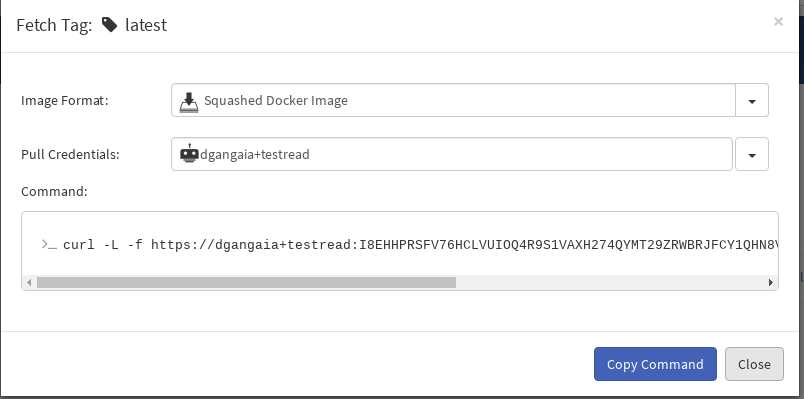
-
Click on the
Copy Commandbutton. - Paste this command into a shell on the machine where you have a Docker service running.
-
Type
docker imagesto see that the image is loaded and read to use.
10.2. Caveats & Warnings
10.2.1. Prime the cache!
When the first pull of a squashed image occurs, the registry streams the image as it is being flattened in real time. Afterwards, the end result is cached and served directly. Thus, it is recommended to pull the first squashed image on a developer machine before deploying, so that all of the production machines can pull the cached result.
10.2.2. Isn’t piping curl insecure?
You may be familiar with installers that pipe curl into bash (curl website.com/installer | /bin/bash). These scripts are insecure because they allow arbitrary code execution. The Quay script to download squashed images uses curl to download a tarball that is streamed into docker load. This is just as secure as running docker pull because it never executes anything we’ve downloaded from the internet.