Introduction to ROSA
An overview of Red Hat OpenShift Service on AWS architecture
Abstract
Chapter 1. Understanding ROSA
Learn about Red Hat OpenShift Service on AWS (ROSA), interacting with ROSA by using Red Hat OpenShift Cluster Manager and command line interface (CLI) tools, consumption experience, and integration with Amazon Web Services (AWS) services.
1.1. About ROSA
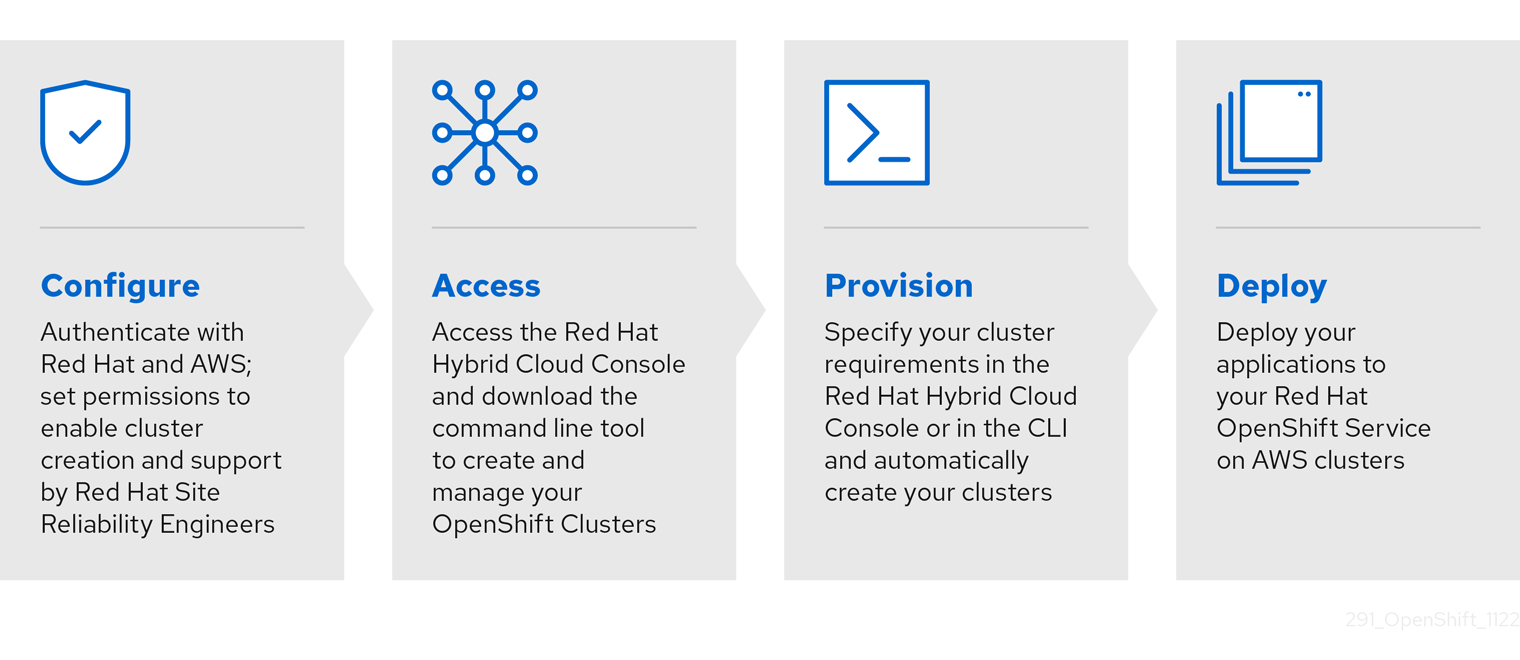
ROSA is a fully-managed, turnkey application platform that allows you to focus on delivering value to your customers by building and deploying applications. Red Hat site reliability engineering (SRE) experts manage the underlying platform so you do not have to worry about the complexity of infrastructure management. ROSA provides seamless integration with Amazon CloudWatch, AWS Identity and Access Management (IAM), Amazon Virtual Private Cloud (VPC), and a wide range of additional AWS services to further accelerate the building and delivering of differentiating experiences to your customers.
You subscribe to the service directly from your AWS account. After you create clusters, you can operate your clusters with the OpenShift web console, the ROSA CLI, or through Red Hat OpenShift Cluster Manager.
You receive OpenShift updates with new feature releases and a shared, common source for alignment with OpenShift Container Platform. ROSA supports the same versions of OpenShift as Red Hat OpenShift Dedicated and OpenShift Container Platform to achieve version consistency.
For additional information about ROSA installation, see Installing Red Hat OpenShift Service on AWS (ROSA) interactive walkthrough.
1.2. Billing and pricing
Red Hat OpenShift Service on AWS is billed directly to your Amazon Web Services (AWS) account. ROSA pricing is consumption based, with annual commitments or three-year commitments for greater discounting. The total cost of ROSA consists of two components:
- ROSA service fees
- AWS infrastructure fees
Visit the Red Hat OpenShift Service on AWS Pricing page on the AWS website for more details.
1.3. Getting started
To get started with deploying your cluster, ensure your AWS account has met the prerequisites, you have a Red Hat account ready, and follow the procedures outlined in Getting started with Red Hat OpenShift Service on AWS.
Additional resources
Chapter 2. Policies and service definition
2.1. About availability for Red Hat OpenShift Service on AWS
Availability and disaster avoidance are extremely important aspects of any application platform. Although Red Hat OpenShift Service on AWS (ROSA) provides many protections against failures at several levels, customer-deployed applications must be appropriately configured for high availability. To account for outages that might occur with cloud providers, additional options are available such as deploying a cluster across multiple availability zones and maintaining multiple clusters with failover mechanisms.
2.1.1. Potential points of failure
Red Hat OpenShift Service on AWS (ROSA) provides many features and options for protecting your workloads against downtime, but applications must be architected appropriately to take advantage of these features.
ROSA can help further protect you against many common Kubernetes issues by adding Red Hat site reliability engineering (SRE) support and the option to deploy a multiple availability zone cluster, but there are several ways in which a container or infrastructure can still fail. By understanding potential points of failure, you can understand risks and appropriately architect both your applications and your clusters to be as resilient as necessary at each specific level.
An outage can occur at several different levels of infrastructure and cluster components.
2.1.1.1. Container or pod failure
By design, pods are meant to exist for a short time. Appropriately scaling services so that multiple instances of your application pods are running can protect against issues with any individual pod or container. The OpenShift node scheduler can also make sure these workloads are distributed across different worker nodes to further improve resiliency.
When accounting for possible pod failures, it is also important to understand how storage is attached to your applications. Single persistent volumes attached to single pods cannot leverage the full benefits of pod scaling, whereas replicated databases, database services, or shared storage can.
To avoid disruption to your applications during planned maintenance, such as upgrades, it is important to define a Pod Disruption Budget. These are part of the Kubernetes API and can be managed with oc commands such as other object types. They allow for the specification of safety constraints on pods during operations, such as draining a node for maintenance.
2.1.1.2. Worker node failure
Worker nodes are the virtual machines that contain your application pods. By default, a ROSA cluster has a minimum of two worker nodes for a single availability-zone cluster. In the event of a worker node failure, pods are relocated to functioning worker nodes, as long as there is enough capacity, until any issue with an existing node is resolved or the node is replaced. More worker nodes means more protection against single-node outages, and ensures proper cluster capacity for rescheduled pods in the event of a node failure.
When accounting for possible node failures, it is also important to understand how storage is affected. EFS volumes are not affected by node failure. However, EBS volumes are not accessible if they are connected to a node that fails.
2.1.1.3. Cluster failure
Single-AZ ROSA clusters have at least three control plane and two infrastructure nodes in the same availability zone (AZ) in the private subnet.
Multi-AZ ROSA clusters have at least three control plane nodes and three infrastructure nodes that are preconfigured for high availability, either in a single zone or across multiple zones, depending on the type of cluster you have selected. Control plane and infrastructure nodes have the same resiliency as worker nodes, with the added benefit of being managed completely by Red Hat.
In the event of a complete control plane outage, the OpenShift APIs will not function, and existing worker node pods are unaffected. However, if there is also a pod or node outage at the same time, the control planes must recover before new pods or nodes can be added or scheduled.
All services running on infrastructure nodes are configured by Red Hat to be highly available and distributed across infrastructure nodes. In case of a complete infrastructure outage, these services are unavailable until these nodes have been recovered.
2.1.1.4. Zone failure
A zone failure from AWS affects all virtual components, such as worker nodes, block or shared storage, and load balancers that are specific to a single availability zone. To protect against a zone failure, ROSA provides the option for clusters that are distributed across three availability zones, known as multiple availability zone clusters. Existing stateless workloads are redistributed to unaffected zones in the event of an outage, as long as there is enough capacity.
2.1.1.5. Storage failure
If you have deployed a stateful application, then storage is a critical component and must be accounted for when thinking about high availability. A single block storage PV is unable to withstand outages even at the pod level. The best ways to maintain availability of storage are to use replicated storage solutions, shared storage that is unaffected by outages, or a database service that is independent of the cluster.
2.2. Overview of responsibilities for Red Hat OpenShift Service on AWS
This documentation outlines Red Hat, Amazon Web Services (AWS), and customer responsibilities for the Red Hat OpenShift Service on AWS (ROSA) managed service.
2.2.1. Shared responsibilities for Red Hat OpenShift Service on AWS
While Red Hat and Amazon Web Services (AWS) manage the Red Hat OpenShift Service on AWS services, the customer shares certain responsibilities. The Red Hat OpenShift Service on AWS services are accessed remotely, hosted on public cloud resources, created in customer-owned AWS accounts, and have underlying platform and data security that is owned by Red Hat.
If the cluster-admin role is added to a user, see the responsibilities and exclusion notes in the Red Hat Enterprise Agreement Appendix 4 (Online Subscription Services).
| Resource | Incident and operations management | Change management | Access and identity authorization | Security and regulation compliance | Disaster recovery |
|---|---|---|---|---|---|
| Customer data | Customer | Customer | Customer | Customer | Customer |
| Customer applications | Customer | Customer | Customer | Customer | Customer |
| Developer services | Customer | Customer | Customer | Customer | Customer |
| Platform monitoring | Red Hat | Red Hat | Red Hat | Red Hat | Red Hat |
| Logging | Red Hat | Red Hat and Customer | Red Hat and Customer | Red Hat and Customer | Red Hat |
| Application networking | Red Hat and Customer | Red Hat and Customer | Red Hat and Customer | Red Hat | Red Hat |
| Cluster networking | Red Hat [1] | Red Hat and Customer [2] | Red Hat and Customer | Red Hat [1] | Red Hat [1] |
| Virtual networking management | Red Hat and Customer | Red Hat and Customer | Red Hat and Customer | Red Hat and Customer | Red Hat and Customer |
| Virtual compute management (control plane, infrastructure and worker nodes) | Red Hat | Red Hat | Red Hat | Red Hat | Red Hat |
| Cluster version | Red Hat | Red Hat and Customer | Red Hat | Red Hat | Red Hat |
| Capacity management | Red Hat | Red Hat and Customer | Red Hat | Red Hat | Red Hat |
| Virtual storage management | Red Hat | Red Hat | Red Hat | Red Hat | Red Hat |
| AWS software (public AWS services) | AWS | AWS | AWS | AWS | AWS |
| Hardware/AWS global infrastructure | AWS | AWS | AWS | AWS | AWS |
- If the customer chooses to use their own CNI plugin, the responsibility shifts to the customer.
- The customer must configure their firewall to grant access to the required OpenShift and AWS domains and ports before the cluster is provisioned. For more information, see "AWS firewall prerequisites".
Additional resources
2.2.3. Review and action cluster notifications
Cluster notifications are messages about the status, health, or performance of your cluster.
Cluster notifications are the primary way that Red Hat Site Reliability Engineering (SRE) communicates with you about the health of your managed cluster. SRE may also use cluster notifications to prompt you to perform an action in order to resolve or prevent an issue with your cluster.
Cluster owners and administrators must regularly review and action cluster notifications to ensure clusters remain healthy and supported.
You can view cluster notifications in the Red Hat Hybrid Cloud Console, in the Cluster history tab for your cluster. By default, only the cluster owner receives cluster notifications as emails. If other users need to receive cluster notification emails, add each user as a notification contact for your cluster.
2.2.3.1. Cluster notification policy
Cluster notifications are designed to keep you informed about the health of your cluster and high impact events that affect it.
Most cluster notifications are generated and sent automatically to ensure that you are immediately informed of problems or important changes to the state of your cluster.
In certain situations, Red Hat Site Reliability Engineering (SRE) creates and sends cluster notifications to provide additional context and guidance for a complex issue.
Cluster notifications are not sent for low-impact events, low-risk security updates, routine operations and maintenance, or minor, transient issues that are quickly resolved by SRE.
Red Hat services automatically send notifications when:
- Remote health monitoring or environment verification checks detect an issue in your cluster, for example, when a worker node has low disk space.
- Significant cluster life cycle events occur, for example, when scheduled maintenance or upgrades begin, or cluster operations are impacted by an event, but do not require customer intervention.
- Significant cluster management changes occur, for example, when cluster ownership or administrative control is transferred from one user to another.
- Your cluster subscription is changed or updated, for example, when Red Hat makes updates to subscription terms or features available to your cluster.
SRE creates and sends notifications when:
- An incident results in a degradation or outage that impacts your cluster’s availability or performance, for example, your cloud provider has a regional outage. SRE sends subsequent notifications to inform you of incident resolution progress, and when the incident is resolved.
- A security vulnerability, security breach, or unusual activity is detected on your cluster.
- Red Hat detects that changes you have made are creating or may result in cluster instability.
- Red Hat detects that your workloads are causing performance degradation or instability in your cluster.
2.2.4. Incident and operations management
Red Hat is responsible for overseeing the service components required for default platform networking. AWS is responsible for protecting the hardware infrastructure that runs all of the services offered in the AWS Cloud. The customer is responsible for incident and operations management of customer application data and any custom networking the customer has configured for the cluster network or virtual network.
| Resource | Service responsibilities | Customer responsibilities |
|---|---|---|
| Application networking | Red Hat
|
|
| Cluster networking | Red Hat
|
|
| Virtual networking management | Red Hat
|
|
| Virtual storage management | Red Hat
|
|
| Platform monitoring | Red Hat
| |
| Incident management | Red Hat
|
|
| Infrastructure and data resiliency | Red Hat
|
|
| Cluster capacity | Red Hat
| |
| AWS software (public AWS services) | AWS
|
|
| Hardware/AWS global infrastructure | AWS
|
|
2.2.4.1. Platform monitoring
Platform audit logs are securely forwarded to a centralized security information and event monitoring (SIEM) system, where they may trigger configured alerts to the SRE team and are also subject to manual review. Audit logs are retained in the SIEM system for one year. Audit logs for a given cluster are not deleted at the time the cluster is deleted.
2.2.4.2. Incident management
An incident is an event that results in a degradation or outage of one or more Red Hat services. An incident can be raised by a customer or a Customer Experience and Engagement (CEE) member through a support case, directly by the centralized monitoring and alerting system, or directly by a member of the SRE team.
Depending on the impact on the service and customer, the incident is categorized in terms of severity.
When managing a new incident, Red Hat uses the following general workflow:
- An SRE first responder is alerted to a new incident and begins an initial investigation.
- After the initial investigation, the incident is assigned an incident lead, who coordinates the recovery efforts.
- An incident lead manages all communication and coordination around recovery, including any relevant notifications and support case updates.
- The incident is recovered.
- The incident is documented and a root cause analysis (RCA) is performed within 5 business days of the incident.
- An RCA draft document will be shared with the customer within 7 business days of the incident.
Red Hat also assists with customer incidents raised through support cases. Red Hat can assist with activities including but not limited to:
- Forensic gathering, including isolating virtual compute
- Guiding compute image collection
- Providing collected audit logs
2.2.4.3. Cluster capacity
The impact of a cluster upgrade on capacity is evaluated as part of the upgrade testing process to ensure that capacity is not negatively impacted by new additions to the cluster. During a cluster upgrade, additional worker nodes are added to make sure that total cluster capacity is maintained during the upgrade process.
Capacity evaluations by the Red Hat SRE staff also happen in response to alerts from the cluster, after usage thresholds are exceeded for a certain period of time. Such alerts can also result in a notification to the customer.
2.2.5. Change management
This section describes the policies about how cluster and configuration changes, patches, and releases are managed.
Red Hat is responsible for enabling changes to the cluster infrastructure and services that the customer will control, as well as maintaining versions for the control plane nodes, infrastructure nodes and services, and worker nodes. AWS is responsible for protecting the hardware infrastructure that runs all of the services offered in the AWS Cloud. The customer is responsible for initiating infrastructure change requests and installing and maintaining optional services and networking configurations on the cluster, as well as all changes to customer data and customer applications.
2.2.5.1. Customer-initiated changes
You can initiate changes using self-service capabilities such as cluster deployment, worker node scaling, or cluster deletion.
Change history is captured in the Cluster History section in the OpenShift Cluster Manager Overview tab, and is available for you to view. The change history includes, but is not limited to, logs from the following changes:
- Adding or removing identity providers
-
Adding or removing users to or from the
dedicated-adminsgroup - Scaling the cluster compute nodes
- Scaling the cluster load balancer
- Scaling the cluster persistent storage
- Upgrading the cluster
You can implement a maintenance exclusion by avoiding changes in OpenShift Cluster Manager for the following components:
- Deleting a cluster
- Adding, modifying, or removing identity providers
- Adding, modifying, or removing a user from an elevated group
- Installing or removing add-ons
- Modifying cluster networking configurations
- Adding, modifying, or removing machine pools
- Enabling or disabling user workload monitoring
- Initiating an upgrade
To enforce the maintenance exclusion, ensure machine pool autoscaling or automatic upgrade policies have been disabled. After the maintenance exclusion has been lifted, proceed with enabling machine pool autoscaling or automatic upgrade policies as desired.
2.2.5.2. Red Hat-initiated changes
Red Hat site reliability engineering (SRE) manages the infrastructure, code, and configuration of Red Hat OpenShift Service on AWS using a GitOps workflow and fully automated CI/CD pipelines. This process ensures that Red Hat can safely introduce service improvements on a continuous basis without negatively impacting customers.
Every proposed change undergoes a series of automated verifications immediately upon check-in. Changes are then deployed to a staging environment where they undergo automated integration testing. Finally, changes are deployed to the production environment. Each step is fully automated.
An authorized SRE reviewer must approve advancement to each step. The reviewer cannot be the same individual who proposed the change. All changes and approvals are fully auditable as part of the GitOps workflow.
Some changes are released to production incrementally, using feature flags to control availability of new features to specified clusters or customers.
2.2.5.3. Patch management
OpenShift Container Platform software and the underlying immutable Red Hat CoreOS (RHCOS) operating system image are patched for bugs and vulnerabilities in regular z-stream upgrades. Read more about RHCOS architecture in the OpenShift Container Platform documentation.
2.2.5.4. Release management
Red Hat does not automatically upgrade your clusters. You can schedule to upgrade the clusters at regular intervals (recurring upgrade) or just once (individual upgrade) using the OpenShift Cluster Manager web console. Red Hat might forcefully upgrade a cluster to a new z-stream version only if the cluster is affected by a critical impact CVE.
Because the required permissions can change between y-stream releases, the policies might have to be updated before an upgrade can be performed. Therefore, you cannot schedule a recurring upgrade on ROSA clusters with STS.
You can review the history of all cluster upgrade events in the OpenShift Cluster Manager web console. For more information about releases, see the Life Cycle policy.
| Resource | Service responsibilities | Customer responsibilities |
|---|---|---|
| Logging | Red Hat
|
|
| Application networking | Red Hat
|
|
| Cluster networking | Red Hat
|
|
| Virtual networking management | Red Hat
|
|
| Virtual compute management | Red Hat
|
|
| Cluster version | Red Hat
|
|
| Capacity management | Red Hat
|
|
| Virtual storage management | Red Hat
|
|
| AWS software (public AWS services) | AWS Compute: Provide the Amazon EC2 service, used for ROSA control plane, infrastructure, and worker nodes. Storage: Provide Amazon EBS, used by ROSA to provision local node storage and persistent volume storage for the cluster. Storage: Provide Amazon S3, used for the ROSA service’s built-in image registry. Networking: Provide the following AWS Cloud services, used by ROSA to satisfy virtual networking infrastructure needs:
Networking: Provide the following AWS services, which customers can optionally integrate with ROSA:
|
|
| Hardware/AWS global infrastructure | AWS
|
|
Additional resources
2.2.6. Security and regulation compliance
The following table outlines the the responsibilities in regards to security and regulation compliance:
| Resource | Service responsibilities | Customer responsibilities |
|---|---|---|
| Logging | Red Hat
|
|
| Virtual networking management | Red Hat
|
|
| Virtual storage management | Red Hat
|
|
| Virtual compute management | Red Hat
|
|
| AWS software (public AWS services) | AWS Compute: Secure Amazon EC2, used for ROSA control plane, infrastructure, and worker nodes. For more information, see Infrastructure security in Amazon EC2 in the Amazon EC2 User Guide. Storage: Secure Amazon Elastic Block Store (EBS), used for ROSA control plane, infrastructure, and worker node volumes, as well as Kubernetes persistent volumes. For more information, see Data protection in Amazon EC2 in the Amazon EC2 User Guide. Storage: Provide AWS KMS, which ROSA uses to encrypt control plane, infrastructure, and worker node volumes and persistent volumes. For more information, see Amazon EBS encryption in the Amazon EC2 User Guide. Storage: Secure Amazon S3, used for the ROSA service’s built-in container image registry. For more information, see Amazon S3 security in the S3 User Guide. Networking: Provide security capabilities and services to increase privacy and control network access on AWS global infrastructure, including network firewalls built into Amazon VPC, private or dedicated network connections, and automatic encryption of all traffic on the AWS global and regional networks between AWS secured facilities. For more information, see the AWS Shared Responsibility Model and Infrastructure security in the Introduction to AWS Security whitepaper. |
|
| Hardware/AWS global infrastructure | AWS
|
|
2.2.7. Disaster recovery
Disaster recovery includes data and configuration backup, replicating data and configuration to the disaster recovery environment, and failover on disaster events.
Red Hat OpenShift Service on AWS (ROSA) provides disaster recovery for failures that occur at the pod, worker node, infrastructure node, control plane node, and availability zone levels.
All disaster recovery requires that the customer use best practices for deploying highly available applications, storage, and cluster architecture, such as single-zone deployment or multi-zone deployment, to account for the level of desired availability.
One single-zone cluster will not provide disaster avoidance or recovery in the event of an availability zone or region outage. Multiple single-zone clusters with customer-maintained failover can account for outages at the zone or at the regional level.
One multi-zone cluster will not provide disaster avoidance or recovery in the event of a full region outage. Multiple multi-zone clusters with customer-maintained failover can account for outages at the regional level.
| Resource | Service responsibilities | Customer responsibilities |
|---|---|---|
| Virtual networking management | Red Hat
|
|
| Virtual Storage management | Red Hat
|
|
| Virtual compute management | Red Hat
|
|
| AWS software (public AWS services) | AWS Compute: Provide Amazon EC2 features that support data resiliency such as Amazon EBS snapshots and Amazon EC2 Auto Scaling. For more information, see Resilience in Amazon EC2 in the EC2 User Guide. Storage: Provide the ability for the ROSA service and customers to back up the Amazon EBS volume on the cluster through Amazon EBS volume snapshots. Storage: For information about Amazon S3 features that support data resiliency, see Resilience in Amazon S3. Networking: For information about Amazon VPC features that support data resiliency, see Resilience in Amazon Virtual Private Cloud in the Amazon VPC User Guide. |
|
| Hardware/AWS global infrastructure | AWS
|
|
Additional resources
2.2.8. Additional customer responsibilities for data and applications
The customer is responsible for the applications, workloads, and data that they deploy to Red Hat OpenShift Service on AWS. However, Red Hat and AWS provide various tools to help the customer manage data and applications on the platform.
| Resource | Red Hat and AWS | Customer responsibilities |
|---|---|---|
| Customer data | Red Hat
AWS
|
|
| Customer applications | Red Hat
AWS
|
|
2.3. Red Hat OpenShift Service on AWS service definition
This documentation outlines the service definition for the Red Hat OpenShift Service on AWS (ROSA) managed service.
2.3.1. Account management
This section provides information about the service definition for Red Hat OpenShift Service on AWS account management.
2.3.1.1. Billing and pricing
Red Hat OpenShift Service on AWS is billed directly to your Amazon Web Services (AWS) account. ROSA pricing is consumption based, with annual commitments or three-year commitments for greater discounting. The total cost of ROSA consists of two components:
- ROSA service fees
- AWS infrastructure fees
Visit the Red Hat OpenShift Service on AWS Pricing page on the AWS website for more details.
2.3.1.2. Cluster self-service
Customers can self-service their clusters, including, but not limited to:
- Create a cluster
- Delete a cluster
- Add or remove an identity provider
- Add or remove a user from an elevated group
- Configure cluster privacy
- Add or remove machine pools and configure autoscaling
- Define upgrade policies
You can perform these self-service tasks using the Red Hat OpenShift Service on AWS (ROSA) CLI, rosa.
Additional resources
2.3.1.3. Instance types
Single availability zone clusters require a minimum of 3 control plane nodes, 2 infrastructure nodes, and 2 worker nodes deployed to a single availability zone.
Multiple availability zone clusters require a minimum of 3 control plane nodes, 3 infrastructure nodes, and 3 worker nodes.
Consider the following limitations when deploying and managing workloads:
- You must deploy workloads on worker nodes that exist in the cluster by using Red Hat OpenShift Service on AWS machine pools.
- Run workloads that you consider essential on the control plane and infrastructure nodes as daemonsets.
- You must ensure that any workloads running on these nodes are secure, scalable, and compatible with a version of Red Hat OpenShift Service on AWS, so that the Service Level Agreement (SLA) for API server availability is not impacted.
Red Hat might notify you and resize the control plane or infrastructure nodes if the Red Hat OpenShift Service on AWS components are impacted.
Control plane and infrastructure nodes are deployed and managed by Red Hat. These nodes are automatically resized based on the resource use. If you need to resize these nodes to meet cluster demands, open a support case.
Shutting down the underlying infrastructure through the cloud provider console is unsupported and can lead to data loss.
See the following Red Hat Operator support section for more information about Red Hat workloads that must be deployed on worker nodes.
Approximately one vCPU core and 1 GiB of memory are reserved on each worker node and removed from allocatable resources. This reservation of resources is necessary to run processes required by the underlying platform. These processes include system daemons such as udev, kubelet, and container runtime among others. The reserved resources also account for kernel reservations.
OpenShift Container Platform core systems such as audit log aggregation, metrics collection, DNS, image registry, SDN, and others might consume additional allocatable resources to maintain the stability and maintainability of the cluster. The additional resources consumed might vary based on usage.
For additional information, see the Kubernetes documentation.
Additional resources
2.3.1.4. Regions and availability zones
The following AWS regions are currently available for Red Hat OpenShift 4 and are supported for Red Hat OpenShift Service on AWS.
Regions in China are not supported, regardless of their support on OpenShift 4.
For GovCloud (US) regions, you must submit an Access request for Red Hat OpenShift Service on AWS (ROSA) FedRAMP.
GovCloud (US) regions are only supported on ROSA Classic clusters.
Example 2.1. AWS Regions
- us-east-1 (N. Virginia)
- us-east-2 (Ohio)
- us-west-1 (N. California)
- us-west-2 (Oregon)
- af-south-1 (Cape Town, AWS opt-in required)
- ap-east-1 (Hong Kong, AWS opt-in required)
- ap-south-2 (Hyderabad, AWS opt-in required)
- ap-southeast-3 (Jakarta, AWS opt-in required)
- ap-southeast-4 (Melbourne, AWS opt-in required)
- ap-south-1 (Mumbai)
- ap-northeast-3 (Osaka)
- ap-northeast-2 (Seoul)
- ap-southeast-1 (Singapore)
- ap-southeast-2 (Sydney)
- ap-northeast-1 (Tokyo)
- ca-central-1 (Central Canada)
- eu-central-1 (Frankfurt)
- eu-north-1 (Stockholm)
- eu-west-1 (Ireland)
- eu-west-2 (London)
- eu-south-1 (Milan, AWS opt-in required)
- eu-west-3 (Paris)
- eu-south-2 (Spain)
- eu-central-2 (Zurich, AWS opt-in required)
- me-south-1 (Bahrain, AWS opt-in required)
- me-central-1 (UAE, AWS opt-in required)
- sa-east-1 (São Paulo)
- us-gov-east-1 (AWS GovCloud - US-East)
- us-gov-west-1 (AWS GovCloud - US-West)
Multiple availability zone clusters can only be deployed in regions with at least 3 availability zones. For more information, see the Regions and Availability Zones section in the AWS documentation.
Each new Red Hat OpenShift Service on AWS cluster is installed within an installer-created or preexisting Virtual Private Cloud (VPC) in a single region, with the option to deploy into a single availability zone (Single-AZ) or across multiple availability zones (Multi-AZ). This provides cluster-level network and resource isolation, and enables cloud-provider VPC settings, such as VPN connections and VPC Peering. Persistent volumes (PVs) are backed by Amazon Elastic Block Storage (Amazon EBS), and are specific to the availability zone in which they are provisioned. Persistent volume claims (PVCs) do not bind to a volume until the associated pod resource is assigned into a specific availability zone to prevent unschedulable pods. Availability zone-specific resources are only usable by resources in the same availability zone.
The region and the choice of single or multiple availability zone cannot be changed after a cluster has been deployed.
Additional resources
2.3.1.5. Local Zones
Red Hat OpenShift Service on AWS supports the use of AWS Local Zones, which are metropolis-centralized availability zones where customers can place latency-sensitive application workloads. Local Zones are extensions of AWS Regions that have their own internet connection. For more information about AWS Local Zones, see the AWS documentation How Local Zones work.
2.3.1.6. Service Level Agreement (SLA)
Any SLAs for the service itself are defined in Appendix 4 of the Red Hat Enterprise Agreement Appendix 4 (Online Subscription Services).
2.3.1.7. Limited support status
When a cluster transitions to a Limited Support status, Red Hat no longer proactively monitors the cluster, the SLA is no longer applicable, and credits requested against the SLA are denied. It does not mean that you no longer have product support. In some cases, the cluster can return to a fully-supported status if you remediate the violating factors. However, in other cases, you might have to delete and recreate the cluster.
A cluster might move to a Limited Support status for many reasons, including the following scenarios:
- If you do not upgrade a cluster to a supported version before the end-of-life date
Red Hat does not make any runtime or SLA guarantees for versions after their end-of-life date. To receive continued support, upgrade the cluster to a supported version prior to the end-of-life date. If you do not upgrade the cluster prior to the end-of-life date, the cluster transitions to a Limited Support status until it is upgraded to a supported version.
Red Hat provides commercially reasonable support to upgrade from an unsupported version to a supported version. However, if a supported upgrade path is no longer available, you might have to create a new cluster and migrate your workloads.
- If you remove or replace any native Red Hat OpenShift Service on AWS components or any other component that is installed and managed by Red Hat
- If cluster administrator permissions were used, Red Hat is not responsible for any of your or your authorized users’ actions, including those that affect infrastructure services, service availability, or data loss. If Red Hat detects any such actions, the cluster might transition to a Limited Support status. Red Hat notifies you of the status change and you should either revert the action or create a support case to explore remediation steps that might require you to delete and recreate the cluster.
If you have questions about a specific action that might cause a cluster to move to a Limited Support status or need further assistance, open a support ticket.
2.3.1.8. Support
Red Hat OpenShift Service on AWS includes Red Hat Premium Support, which can be accessed by using the Red Hat Customer Portal.
See the Red Hat Production Support Terms of Service for support response times.
AWS support is subject to a customer’s existing support contract with AWS.
2.3.2. Logging
Red Hat OpenShift Service on AWS provides optional integrated log forwarding to Amazon (AWS) CloudWatch.
2.3.2.1. Cluster audit logging
Cluster audit logs are available through AWS CloudWatch, if the integration is enabled. If the integration is not enabled, you can request the audit logs by opening a support case.
2.3.2.2. Application logging
Application logs sent to STDOUT are collected by Fluentd and forwarded to AWS CloudWatch through the cluster logging stack, if it is installed.
2.3.3. Monitoring
This section provides information about the service definition for Red Hat OpenShift Service on AWS monitoring.
2.3.3.1. Cluster metrics
Red Hat OpenShift Service on AWS clusters come with an integrated Prometheus stack for cluster monitoring including CPU, memory, and network-based metrics. This is accessible through the web console. These metrics also allow for horizontal pod autoscaling based on CPU or memory metrics provided by an Red Hat OpenShift Service on AWS user.
2.3.3.2. Cluster notifications
Cluster notifications are messages about the status, health, or performance of your cluster.
Cluster notifications are the primary way that Red Hat Site Reliability Engineering (SRE) communicates with you about the health of your managed cluster. SRE may also use cluster notifications to prompt you to perform an action in order to resolve or prevent an issue with your cluster.
Cluster owners and administrators must regularly review and action cluster notifications to ensure clusters remain healthy and supported.
You can view cluster notifications in the Red Hat Hybrid Cloud Console, in the Cluster history tab for your cluster. By default, only the cluster owner receives cluster notifications as emails. If other users need to receive cluster notification emails, add each user as a notification contact for your cluster.
2.3.4. Networking
This section provides information about the service definition for Red Hat OpenShift Service on AWS networking.
2.3.4.1. Custom domains for applications
Starting with Red Hat OpenShift Service on AWS 4.14, the Custom Domain Operator is deprecated. To manage Ingress in Red Hat OpenShift Service on AWS 4.14 or later, use the Ingress Operator. The functionality is unchanged for Red Hat OpenShift Service on AWS 4.13 and earlier versions.
To use a custom hostname for a route, you must update your DNS provider by creating a canonical name (CNAME) record. Your CNAME record should map the OpenShift canonical router hostname to your custom domain. The OpenShift canonical router hostname is shown on the Route Details page after a route is created. Alternatively, a wildcard CNAME record can be created once to route all subdomains for a given hostname to the cluster’s router.
2.3.4.2. Domain validated certificates
Red Hat OpenShift Service on AWS includes TLS security certificates needed for both internal and external services on the cluster. For external routes, there are two separate TLS wildcard certificates that are provided and installed on each cluster: one is for the web console and route default hostnames, and the other is for the API endpoint. Let’s Encrypt is the certificate authority used for certificates. Routes within the cluster, such as the internal API endpoint, use TLS certificates signed by the cluster’s built-in certificate authority and require the CA bundle available in every pod for trusting the TLS certificate.
2.3.4.3. Custom certificate authorities for builds
Red Hat OpenShift Service on AWS supports the use of custom certificate authorities to be trusted by builds when pulling images from an image registry.
2.3.4.4. Load balancers
Red Hat OpenShift Service on AWS uses up to five different load balancers:
- An internal control plane load balancer that is internal to the cluster and used to balance traffic for internal cluster communications.
- An external control plane load balancer that is used for accessing the OpenShift and Kubernetes APIs. This load balancer can be disabled in OpenShift Cluster Manager. If this load balancer is disabled, Red Hat reconfigures the API DNS to point to the internal control plane load balancer.
- An external control plane load balancer for Red Hat that is reserved for cluster management by Red Hat. Access is strictly controlled, and communication is only possible from whitelisted bastion hosts.
-
A default external router/ingress load balancer that is the default application load balancer, denoted by
appsin the URL. The default load balancer can be configured in OpenShift Cluster Manager to be either publicly accessible over the Internet or only privately accessible over a pre-existing private connection. All application routes on the cluster are exposed on this default router load balancer, including cluster services such as the logging UI, metrics API, and registry. -
Optional: A secondary router/ingress load balancer that is a secondary application load balancer, denoted by
apps2in the URL. The secondary load balancer can be configured in OpenShift Cluster Manager to be either publicly accessible over the Internet or only privately accessible over a pre-existing private connection. If aLabel matchis configured for this router load balancer, then only application routes matching this label are exposed on this router load balancer; otherwise, all application routes are also exposed on this router load balancer. - Optional: Load balancers for services. Enable non-HTTP/SNI traffic and non-standard ports for services. These load balancers can be mapped to a service running on Red Hat OpenShift Service on AWS to enable advanced ingress features, such as non-HTTP/SNI traffic or the use of non-standard ports. Each AWS account has a quota which limits the number of Classic Load Balancers that can be used within each cluster.
2.3.4.5. Cluster ingress
Project administrators can add route annotations for many different purposes, including ingress control through IP allow-listing.
Ingress policies can also be changed by using NetworkPolicy objects, which leverage the ovs-networkpolicy plugin. This allows for full control over the ingress network policy down to the pod level, including between pods on the same cluster and even in the same namespace.
All cluster ingress traffic will go through the defined load balancers. Direct access to all nodes is blocked by cloud configuration.
2.3.4.6. Cluster egress
Pod egress traffic control through EgressNetworkPolicy objects can be used to prevent or limit outbound traffic in Red Hat OpenShift Service on AWS.
Public outbound traffic from the control plane and infrastructure nodes is required and necessary to maintain cluster image security and cluster monitoring. This requires that the 0.0.0.0/0 route belongs only to the Internet gateway; it is not possible to route this range over private connections.
OpenShift 4 clusters use NAT gateways to present a public, static IP for any public outbound traffic leaving the cluster. Each availability zone a cluster is deployed into receives a distinct NAT gateway, therefore up to 3 unique static IP addresses can exist for cluster egress traffic. Any traffic that remains inside the cluster, or that does not go out to the public Internet, will not pass through the NAT gateway and will have a source IP address belonging to the node that the traffic originated from. Node IP addresses are dynamic; therefore, a customer must not rely on whitelisting individual IP addresses when accessing private resources.
Customers can determine their public static IP addresses by running a pod on the cluster and then querying an external service. For example:
$ oc run ip-lookup --image=busybox -i -t --restart=Never --rm -- /bin/sh -c "/bin/nslookup -type=a myip.opendns.com resolver1.opendns.com | grep -E 'Address: [0-9.]+'"
2.3.4.7. Cloud network configuration
Red Hat OpenShift Service on AWS allows for the configuration of a private network connection through AWS-managed technologies, such as:
- VPN connections
- VPC peering
- Transit Gateway
- Direct Connect
Red Hat site reliability engineers (SREs) do not monitor private network connections. Monitoring these connections is the responsibility of the customer.
2.3.4.8. DNS forwarding
For Red Hat OpenShift Service on AWS clusters that have a private cloud network configuration, a customer can specify internal DNS servers available on that private connection, that should be queried for explicitly provided domains.
2.3.4.9. Network verification
Network verification checks run automatically when you deploy a Red Hat OpenShift Service on AWS cluster into an existing Virtual Private Cloud (VPC) or create an additional machine pool with a subnet that is new to your cluster. The checks validate your network configuration and highlight errors, enabling you to resolve configuration issues prior to deployment.
You can also run the network verification checks manually to validate the configuration for an existing cluster.
Additional resources
- For more information about the network verification checks, see Network verification.
2.3.5. Storage
This section provides information about the service definition for Red Hat OpenShift Service on AWS storage.
2.3.5.1. Encrypted-at-rest OS and node storage
Control plane, infrastructure, and worker nodes use encrypted-at-rest Amazon Elastic Block Store (Amazon EBS) storage.
2.3.5.2. Encrypted-at-rest PV
EBS volumes that are used for PVs are encrypted-at-rest by default.
2.3.5.3. Block storage (RWO)
Persistent volumes (PVs) are backed by Amazon Elastic Block Store (Amazon EBS), which is Read-Write-Once.
PVs can be attached only to a single node at a time and are specific to the availability zone in which they were provisioned. However, PVs can be attached to any node in the availability zone.
Each cloud provider has its own limits for how many PVs can be attached to a single node. See AWS instance type limits for details.
2.3.6. Platform
This section provides information about the service definition for the Red Hat OpenShift Service on AWS (ROSA) platform.
2.3.6.1. Autoscaling
Node autoscaling is available on Red Hat OpenShift Service on AWS. You can configure the autoscaler option to automatically scale the number of machines in a cluster.
2.3.6.2. Daemonsets
Customers can create and run daemonsets on Red Hat OpenShift Service on AWS. To restrict daemonsets to only running on worker nodes, use the following nodeSelector:
spec:
  nodeSelector:
    role: worker
2.3.6.3. Multiple availability zone
In a multiple availability zone cluster, control plane nodes are distributed across availability zones and at least one worker node is required in each availability zone.
2.3.6.4. Node labels
Custom node labels are created by Red Hat during node creation and cannot be changed on Red Hat OpenShift Service on AWS clusters at this time. However, custom labels are supported when creating new machine pools.
2.3.6.5. Cluster backup policy
Red Hat does not provide a backup method for ROSA clusters that use STS. It is critical that customers have a backup plan for their applications and application data.
Application and application data backups are not a part of the Red Hat OpenShift Service on AWS service.
The table below only applies to non-STS clusters. The following components are used by Red Hat in extenuating circumstances.
| Component | Snapshot frequency | Retention | Notes |
|---|---|---|---|
| Full object store backup | Daily | 7 days | This is a full backup of all Kubernetes objects like etcd. No persistent volumes (PVs) are backed up in this backup schedule. |
| Weekly | 30 days | ||
| Full object store backup | Hourly | 24 hour | This is a full backup of all Kubernetes objects like etcd. No PVs are backed up in this backup schedule. |
| Node root volume | Never | N/A | Nodes are considered to be short-term. Nothing critical should be stored on a node’s root volume. |
2.3.6.6. OpenShift version
Red Hat OpenShift Service on AWS is run as a service and is kept up to date with the latest OpenShift Container Platform version. Upgrade scheduling to the latest version is available.
2.3.6.7. Upgrades
Upgrades can be scheduled using the ROSA CLI, rosa, or through OpenShift Cluster Manager.
See the Red Hat OpenShift Service on AWS Life Cycle for more information on the upgrade policy and procedures.
2.3.6.8. Windows Containers
Red Hat OpenShift support for Windows Containers is not available on Red Hat OpenShift Service on AWS at this time.
2.3.6.9. Container engine
Red Hat OpenShift Service on AWS runs on OpenShift 4 and uses CRI-O as the only available container engine.
2.3.6.10. Operating system
Red Hat OpenShift Service on AWS runs on OpenShift 4 and uses Red Hat CoreOS as the operating system for all control plane and worker nodes.
2.3.6.11. Red Hat Operator support
Red Hat workloads typically refer to Red Hat-provided Operators made available through Operator Hub. Red Hat workloads are not managed by the Red Hat SRE team, and must be deployed on worker nodes. These Operators may require additional Red Hat subscriptions, and may incur additional cloud infrastructure costs. Examples of these Red Hat-provided Operators are:
- Red Hat Quay
- Red Hat Advanced Cluster Management
- Red Hat Advanced Cluster Security
- Red Hat OpenShift Service Mesh
- OpenShift Serverless
- Red Hat OpenShift Logging
- Red Hat OpenShift Pipelines
2.3.6.12. Kubernetes Operator support
All Operators listed in the OperatorHub marketplace should be available for installation. These Operators are considered customer workloads, and are not monitored by Red Hat SRE.
2.3.7. Security
This section provides information about the service definition for Red Hat OpenShift Service on AWS security.
2.3.7.1. Authentication provider
Authentication for the cluster can be configured using either OpenShift Cluster Manager or cluster creation process or using the ROSA CLI, rosa. ROSA is not an identity provider, and all access to the cluster must be managed by the customer as part of their integrated solution. The use of multiple identity providers provisioned at the same time is supported. The following identity providers are supported:
- GitHub or GitHub Enterprise
- GitLab
- LDAP
- OpenID Connect
- htpasswd
2.3.7.2. Privileged containers
Privileged containers are available for users with the cluster-admin role. Usage of privileged containers as cluster-admin is subject to the responsibilities and exclusion notes in the Red Hat Enterprise Agreement Appendix 4 (Online Subscription Services).
2.3.7.3. Customer administrator user
In addition to normal users, Red Hat OpenShift Service on AWS provides access to an ROSA-specific group called dedicated-admin. Any users on the cluster that are members of the dedicated-admin group:
- Have administrator access to all customer-created projects on the cluster.
- Can manage resource quotas and limits on the cluster.
-
Can add and manage
NetworkPolicyobjects. - Are able to view information about specific nodes and PVs in the cluster, including scheduler information.
-
Can access the reserved
dedicated-adminproject on the cluster, which allows for the creation of service accounts with elevated privileges and also gives the ability to update default limits and quotas for projects on the cluster. -
Can install Operators from OperatorHub and perform all verbs in all
*.operators.coreos.comAPI groups.
2.3.7.4. Cluster administration role
The administrator of Red Hat OpenShift Service on AWS has default access to the cluster-admin role for your organization’s cluster. While logged into an account with the cluster-admin role, users have increased permissions to run privileged security contexts.
2.3.7.5. Project self-service
By default, all users have the ability to create, update, and delete their projects. This can be restricted if a member of the dedicated-admin group removes the self-provisioner role from authenticated users:
$ oc adm policy remove-cluster-role-from-group self-provisioner system:authenticated:oauth
Restrictions can be reverted by applying:
$ oc adm policy add-cluster-role-to-group self-provisioner system:authenticated:oauth
2.3.7.6. Regulatory compliance
See the Compliance table in Understanding process and security for ROSA for the latest compliance information.
2.3.7.7. Network security
With Red Hat OpenShift Service on AWS, AWS provides a standard DDoS protection on all load balancers, called AWS Shield. This provides 95% protection against most commonly used level 3 and 4 attacks on all the public facing load balancers used for Red Hat OpenShift Service on AWS. A 10-second timeout is added for HTTP requests coming to the haproxy router to receive a response or the connection is closed to provide additional protection.
2.3.7.8. etcd encryption
In Red Hat OpenShift Service on AWS, the control plane storage is encrypted at rest by default and this includes encryption of the etcd volumes. This storage-level encryption is provided through the storage layer of the cloud provider.
You can also enable etcd encryption, which encrypts the key values in etcd, but not the keys. If you enable etcd encryption, the following Kubernetes API server and OpenShift API server resources are encrypted:
- Secrets
- Config maps
- Routes
- OAuth access tokens
- OAuth authorize tokens
The etcd encryption feature is not enabled by default and it can be enabled only at cluster installation time. Even with etcd encryption enabled, the etcd key values are accessible to anyone with access to the control plane nodes or cluster-admin privileges.
By enabling etcd encryption for the key values in etcd, you will incur a performance overhead of approximately 20%. The overhead is a result of introducing this second layer of encryption, in addition to the default control plane storage encryption that encrypts the etcd volumes. Red Hat recommends that you enable etcd encryption only if you specifically require it for your use case.
2.3.8. Additional resources
2.4. Red Hat OpenShift Service on AWS instance types
Red Hat OpenShift Service on AWS offers the following worker node instance types and sizes:
2.4.1. AWS x86-based instance types
Example 2.2. General purpose
- m5.xlarge (4 vCPU, 16 GiB)
- m5.2xlarge (8 vCPU, 32 GiB)
- m5.4xlarge (16 vCPU, 64 GiB)
- m5.8xlarge (32 vCPU, 128 GiB)
- m5.12xlarge (48 vCPU, 192 GiB)
- m5.16xlarge (64 vCPU, 256 GiB)
- m5.24xlarge (96 vCPU, 384 GiB)
- m5.metal (96† vCPU, 384 GiB)
- m5a.xlarge (4 vCPU, 16 GiB)
- m5a.2xlarge (8 vCPU, 32 GiB)
- m5a.4xlarge (16 vCPU, 64 GiB)
- m5a.8xlarge (32 vCPU, 128 GiB)
- m5a.12xlarge (48 vCPU, 192 GiB)
- m5a.16xlarge (64 vCPU, 256 GiB)
- m5a.24xlarge (96 vCPU, 384 GiB)
- m5dn.metal (96 vCPU, 384 GiB)
- m5zn.metal (48 vCPU, 192 GiB)
- m5d.metal (96† vCPU, 384 GiB)
- m5n.metal (96 vCPU, 384 GiB)
- m6a.xlarge (4 vCPU, 16 GiB)
- m6a.2xlarge (8 vCPU, 32 GiB)
- m6a.4xlarge (16 vCPU, 64 GiB)
- m6a.8xlarge (32 vCPU, 128 GiB)
- m6a.12xlarge (48 vCPU, 192 GiB)
- m6a.16xlarge (64 vCPU, 256 GiB)
- m6a.24xlarge (96 vCPU, 384 GiB)
- m6a.32xlarge (128 vCPU, 512 GiB)
- m6a.48xlarge (192 vCPU, 768 GiB)
- m6a.metal (192 vCPU, 768 GiB)
- m6i.xlarge (4 vCPU, 16 GiB)
- m6i.2xlarge (8 vCPU, 32 GiB)
- m6i.4xlarge (16 vCPU, 64 GiB)
- m6i.8xlarge (32 vCPU, 128 GiB)
- m6i.12xlarge (48 vCPU, 192 GiB)
- m6i.16xlarge (64 vCPU, 256 GiB)
- m6i.24xlarge (96 vCPU, 384 GiB)
- m6i.32xlarge (128 vCPU, 512 GiB)
- m6i.metal (128 vCPU, 512 GiB)
- m6id.xlarge (4 vCPU, 16 GiB)
- m6id.2xlarge (8 vCPU, 32 GiB)
- m6id.4xlarge (16 vCPU, 64 GiB)
- m6id.8xlarge (32 vCPU, 128 GiB)
- m6id.12xlarge (48 vCPU, 192 GiB)
- m6id.16xlarge (64 vCPU, 256 GiB)
- m6id.24xlarge (96 vCPU, 384 GiB)
- m6id.32xlarge (128 vCPU, 512 GiB)
- m6id.metal (128 vCPU, 512 GiB)
- m6idn.xlarge (4 vCPU, 16 GiB)
- m6idn.2xlarge (8 vCPU, 32 GiB)
- m6idn.4xlarge (16 vCPU, 64 GiB)
- m6idn.8xlarge (32 vCPU, 128 GiB)
- m6idn.12xlarge (48 vCPU, 192 GiB)
- m6idn.16xlarge (64 vCPU, 256 GiB)
- m6idn.24xlarge (96 vCPU, 384 GiB)
- m6idn.32xlarge (128 vCPU, 512 GiB)
- m6in.xlarge (4 vCPU, 16 GiB)
- m6in.2xlarge (8 vCPU, 32 GiB)
- m6in.4xlarge (16 vCPU, 64 GiB)
- m6in.8xlarge (32 vCPU, 128 GiB)
- m6in.12xlarge (48 vCPU, 192 GiB)
- m6in.16xlarge (64 vCPU, 256 GiB)
- m6in.24xlarge (96 vCPU, 384 GiB)
- m6in.32xlarge (128 vCPU, 512 GiB)
- m7a.xlarge (4 vCPU, 16 GiB)
- m7a.2xlarge (8 vCPU, 32 GiB)
- m7a.4xlarge (16 vCPU, 64 GiB)
- m7a.8xlarge (32 vCPU, 128 GiB)
- m7a.12xlarge (48 vCPU, 192 GiB)
- m7a.16xlarge (64 vCPU, 256 GiB)
- m7a.24xlarge (96 vCPU, 384 GiB)
- m7a.32xlarge (128 vCPU, 512 GiB)
- m7a.48xlarge (192 vCPU, 768 GiB)
- m7a.metal-48xl (192 vCPU, 768 GiB)
- m7i-flex.2xlarge (8 vCPU, 32 GiB)
- m7i-flex.4xlarge (16 vCPU, 64 GiB)
- m7i-flex.8xlarge (32 vCPU, 128 GiB)
- m7i-flex.xlarge (4 vCPU, 16 GiB)
- m7i.xlarge (4 vCPU, 16 GiB)
- m7i.2xlarge (8 vCPU, 32 GiB)
- m7i.4xlarge (16 vCPU, 64 GiB)
- m7i.8xlarge (32 vCPU, 128 GiB)
- m7i.12xlarge (48 vCPU, 192 GiB)
- m7i.16xlarge (64 vCPU, 256 GiB)
- m7i.24xlarge (96 vCPU, 384 GiB)
- m7i.48xlarge (192 vCPU, 768 GiB)
- m7i.metal-24xl (96 vCPU, 384 GiB)
- m7i.metal-48xl (192 vCPU, 768 GiB)
† These instance types offer 96 logical processors on 48 physical cores. They run on single servers with two physical Intel sockets.
Example 2.3. Burstable general purpose
- t3.xlarge (4 vCPU, 16 GiB)
- t3.2xlarge (8 vCPU, 32 GiB)
- t3a.xlarge (4 vCPU, 16 GiB)
- t3a.2xlarge (8 vCPU, 32 GiB)
Example 2.4. Memory intensive
- x1.16xlarge (64 vCPU, 976 GiB)
- x1.32xlarge (128 vCPU, 1,952 GiB)
- x1e.xlarge (4 vCPU, 122 GiB)
- x1e.2xlarge (8 vCPU, 244 GiB)
- x1e.4xlarge (16 vCPU, 488 GiB)
- x1e.8xlarge (32 vCPU, 976 GiB)
- x1e.16xlarge (64 vCPU, 1,952 GiB)
- x1e.32xlarge (128 vCPU, 3,904 GiB)
- x2idn.16xlarge (64 vCPU, 1,024 GiB)
- x2idn.24xlarge (96 vCPU, 1,536 GiB)
- x2idn.32xlarge (128 vCPU, 2,048 GiB)
- x2iedn.xlarge (4 vCPU, 128 GiB)
- x2iedn.2xlarge (8 vCPU, 256 GiB)
- x2iedn.4xlarge (16 vCPU, 512 GiB)
- x2iedn.8xlarge (32 vCPU, 1,024 GiB)
- x2iedn.16xlarge (64 vCPU, 2,048 GiB)
- x2iedn.24xlarge (96 vCPU, 3,072 GiB)
- x2iedn.32xlarge (128 vCPU, 4,096 GiB)
- x2iezn.2xlarge (8 vCPU, 256 GiB)
- x2iezn.4xlarge (16vCPU, 512 GiB)
- x2iezn.6xlarge (24vCPU, 768 GiB)
- x2iezn.8xlarge (32vCPU, 1,024 GiB)
- x2iezn.12xlarge (48vCPU, 1,536 GiB)
- x2iezn.metal (48 vCPU, 1,536 GiB)
- x2idn.metal (128vCPU, 2,048 GiB)
- x2iedn.metal (128vCPU, 4,096 GiB)
Example 2.5. Memory optimized
- r4.xlarge (4 vCPU, 30.5 GiB)
- r4.2xlarge (8 vCPU, 61 GiB)
- r4.4xlarge (16 vCPU, 122 GiB)
- r4.8xlarge (32 vCPU, 244 GiB)
- r4.16xlarge (64 vCPU, 488 GiB)
- r5.xlarge (4 vCPU, 32 GiB)
- r5.2xlarge (8 vCPU, 64 GiB)
- r5.4xlarge (16 vCPU, 128 GiB)
- r5.8xlarge (32 vCPU, 256 GiB)
- r5.12xlarge (48 vCPU, 384 GiB)
- r5.16xlarge (64 vCPU, 512 GiB)
- r5.24xlarge (96 vCPU, 768 GiB)
- r5.metal (96† vCPU, 768 GiB)
- r5a.xlarge (4 vCPU, 32 GiB)
- r5a.2xlarge (8 vCPU, 64 GiB)
- r5a.4xlarge (16 vCPU, 128 GiB)
- r5a.8xlarge (32 vCPU, 256 GiB)
- r5a.12xlarge (48 vCPU, 384 GiB)
- r5a.16xlarge (64 vCPU, 512 GiB)
- r5a.24xlarge (96 vCPU, 768 GiB)
- r5ad.xlarge (4 vCPU, 32 GiB)
- r5ad.2xlarge (8 vCPU, 64 GiB)
- r5ad.4xlarge (16 vCPU, 128 GiB)
- r5ad.8xlarge (32 vCPU, 256 GiB)
- r5ad.12xlarge (48 vCPU, 384 GiB)
- r5ad.16xlarge (64 vCPU, 512 GiB)
- r5ad.24xlarge (96 vCPU, 768 GiB)
- r5b.xlarge (4 vCPU, 32 GiB)
- r5b.2xlarge (8 vCPU, 364 GiB)
- r5b.4xlarge (16 vCPU, 3,128 GiB)
- r5b.8xlarge (32 vCPU, 3,256 GiB)
- r5b.12xlarge (48 vCPU, 3,384 GiB)
- r5b.16xlarge (64 vCPU, 3,512 GiB)
- r5b.24xlarge (96 vCPU, 3,768 GiB)
- r5b.metal (96 768 GiB)
- r5d.xlarge (4 vCPU, 32 GiB)
- r5d.2xlarge (8 vCPU, 64 GiB)
- r5d.4xlarge (16 vCPU, 128 GiB)
- r5d.8xlarge (32 vCPU, 256 GiB)
- r5d.12xlarge (48 vCPU, 384 GiB)
- r5d.16xlarge (64 vCPU, 512 GiB)
- r5d.24xlarge (96 vCPU, 768 GiB)
- r5d.metal (96† vCPU, 768 GiB)
- r5n.xlarge (4 vCPU, 32 GiB)
- r5n.2xlarge (8 vCPU, 64 GiB)
- r5n.4xlarge (16 vCPU, 128 GiB)
- r5n.8xlarge (32 vCPU, 256 GiB)
- r5n.12xlarge (48 vCPU, 384 GiB)
- r5n.16xlarge (64 vCPU, 512 GiB)
- r5n.24xlarge (96 vCPU, 768 GiB)
- r5n.metal (96 vCPU, 768 GiB)
- r5dn.xlarge (4 vCPU, 32 GiB)
- r5dn.2xlarge (8 vCPU, 64 GiB)
- r5dn.4xlarge (16 vCPU, 128 GiB)
- r5dn.8xlarge (32 vCPU, 256 GiB)
- r5dn.12xlarge (48 vCPU, 384 GiB)
- r5dn.16xlarge (64 vCPU, 512 GiB)
- r5dn.24xlarge (96 vCPU, 768 GiB)
- r5dn.metal (96 vCPU, 768 GiB)
- r6a.xlarge (4 vCPU, 32 GiB)
- r6a.2xlarge (8 vCPU, 64 GiB)
- r6a.4xlarge (16 vCPU, 128 GiB)
- r6a.8xlarge (32 vCPU, 256 GiB)
- r6a.12xlarge (48 vCPU, 384 GiB)
- r6a.16xlarge (64 vCPU, 512 GiB)
- r6a.24xlarge (96 vCPU, 768 GiB)
- r6a.32xlarge (128 vCPU, 1,024 GiB)
- r6a.48xlarge (192 vCPU, 1,536 GiB)
- r6i.xlarge (4 vCPU, 32 GiB)
- r6i.2xlarge (8 vCPU, 64 GiB)
- r6i.4xlarge (16 vCPU, 128 GiB)
- r6i.8xlarge (32 vCPU, 256 GiB)
- r6i.12xlarge (48 vCPU, 384 GiB)
- r6i.16xlarge (64 vCPU, 512 GiB)
- r6i.24xlarge (96 vCPU, 768 GiB)
- r6i.32xlarge (128 vCPU, 1,024 GiB)
- r6i.metal (128 vCPU, 1,024 GiB)
- r6id.xlarge (4 vCPU, 32 GiB)
- r6id.2xlarge (8 vCPU, 64 GiB)
- r6id.4xlarge (16 vCPU, 128 GiB)
- r6id.8xlarge (32 vCPU, 256 GiB)
- r6id.12xlarge (48 vCPU, 384 GiB)
- r6id.16xlarge (64 vCPU, 512 GiB)
- r6id.24xlarge (96 vCPU, 768 GiB)
- r6id.32xlarge (128 vCPU, 1,024 GiB)
- r6id.metal (128 vCPU, 1,024 GiB)
- r6idn.12xlarge (48 vCPU, 384 GiB)
- r6idn.16xlarge (64 vCPU, 512 GiB)
- r6idn.24xlarge (96 vCPU, 768 GiB)
- r6idn.2xlarge (8 vCPU, 64 GiB)
- r6idn.32xlarge (128 vCPU, 1,024 GiB)
- r6idn.4xlarge (16 vCPU, 128 GiB)
- r6idn.8xlarge (32 vCPU, 256 GiB)
- r6idn.xlarge (4 vCPU, 32 GiB)
- r6in.12xlarge (48 vCPU, 384 GiB)
- r6in.16xlarge (64 vCPU, 512 GiB)
- r6in.24xlarge (96 vCPU, 768 GiB)
- r6in.2xlarge (8 vCPU, 64 GiB)
- r6in.32xlarge (128 vCPU, 1,024 GiB)
- r6in.4xlarge (16 vCPU, 128 GiB)
- r6in.8xlarge (32 vCPU, 256 GiB)
- r6in.xlarge (4 vCPU, 32 GiB)
- r7a.xlarge (4 vCPU, 32 GiB)
- r7a.2xlarge (8 vCPU, 64 GiB)
- r7a.4xlarge (16 vCPU, 128 GiB)
- r7a.8xlarge (32 vCPU, 256 GiB)
- r7a.12xlarge (48 vCPU, 384 GiB)
- r7a.16xlarge (64 vCPU, 512 GiB)
- r7a.24xlarge (96 vCPU, 768 GiB)
- r7a.32xlarge (128 vCPU, 1024 GiB)
- r7a.48xlarge (192 vCPU, 1536 GiB)
- r7a.metal-48xl (192 vCPU, 1536 GiB)
- r7i.xlarge (4 vCPU, 32 GiB)
- r7i.2xlarge (8 vCPU, 64 GiB)
- r7i.4xlarge (16 vCPU, 128 GiB)
- r7i.8xlarge (32 vCPU, 256 GiB)
- r7i.12xlarge (48 vCPU, 384 GiB)
- r7i.16xlarge (64 vCPU, 512 GiB)
- r7i.24xlarge (96 vCPU, 768 GiB)
- r7i.metal-24xl (96 vCPU, 768 GiB)
- r7iz.xlarge (4 vCPU, 32 GiB)
- r7iz.2xlarge (8 vCPU, 64 GiB)
- r7iz.4xlarge (16 vCPU, 128 GiB)
- r7iz.8xlarge (32 vCPU, 256 GiB)
- r7iz.12xlarge (48 vCPU, 384 GiB)
- r7iz.16xlarge (64 vCPU, 512 GiB)
- r7iz.32xlarge (128 vCPU, 1024 GiB)
- r7iz.metal-16xl (64 vCPU, 512 GiB)
- r7iz.metal-32xl (128 vCPU, 1,024 GiB)
- z1d.xlarge (4 vCPU, 32 GiB)
- z1d.2xlarge (8 vCPU, 64 GiB)
- z1d.3xlarge (12 vCPU, 96 GiB)
- z1d.6xlarge (24 vCPU, 192 GiB)
- z1d.12xlarge (48 vCPU, 384 GiB)
- z1d.metal (48 vCPU, 384 GiB)
† These instance types offer 96 logical processors on 48 physical cores. They run on single servers with two physical Intel sockets.
This instance type offers 48 logical processors on 24 physical cores.
Example 2.6. Accelerated computing
- p3.2xlarge (8 vCPU, 61 GiB)
- p3.8xlarge (32 vCPU, 244 GiB)
- p3.16xlarge (64 vCPU, 488 GiB)
- p3dn.24xlarge (96 vCPU, 768 GiB)
- p4d.24xlarge (96 vCPU, 1,152 GiB)
- p4de.24xlarge (96 vCPU, 1,152 GiB)
- p5.48xlarge (192 vCPU, 2,048 GiB)
- g4ad.xlarge (4 vCPU, 16 GiB)
- g4ad.2xlarge (8 vCPU, 32 GiB)
- g4ad.4xlarge (16 vCPU, 64 GiB)
- g4ad.8xlarge (32 vCPU, 128 GiB)
- g4ad.16xlarge (64 vCPU, 256 GiB)
- g4dn.xlarge (4 vCPU, 16 GiB)
- g4dn.2xlarge (8 vCPU, 32 GiB)
- g4dn.4xlarge (16 vCPU, 64 GiB)
- g4dn.8xlarge (32 vCPU, 128 GiB)
- g4dn.12xlarge (48 vCPU, 192 GiB)
- g4dn.16xlarge (64 vCPU, 256 GiB)
- g4dn.metal (96 vCPU, 384 GiB)
- g5.xlarge (4 vCPU, 16 GiB)
- g5.2xlarge (8 vCPU, 32 GiB)
- g5.4xlarge (16 vCPU, 64 GiB)
- g5.8xlarge (32 vCPU, 128 GiB)
- g5.16xlarge (64 vCPU, 256 GiB)
- g5.12xlarge (48 vCPU, 192 GiB)
- g5.24xlarge (96 vCPU, 384 GiB)
- g5.48xlarge (192 vCPU, 768 GiB)
- dl1.24xlarge (96 vCPU, 768 GiB)†
- g6.xlarge (4 vCPU, 16 GiB)
- g6.2xlarge (8 vCPU, 32 GiB)
- g6.4xlarge (16 vCPU, 64 GiB)
- g6.8xlarge (32 vCPU, 128 GiB)
- g6.12xlarge (48 vCPU, 192 GiB)
- g6.16xlarge (64 vCPU, 256 GiB)
- g6.24xlarge (96 vCPU, 384 GiB)
- g6.48xlarge (192 vCPU, 768 GiB)
- g6e.xlarge (4 vCPU, 32 GiB)
- g6e.2xlarge (8 vCPU, 64 GiB)
- g6e.4xlarge (16 vCPU, 128 GiB)
- g6e.8xlarge (32 vCPU, 256 GiB)
- g6e.12xlarge (48 vCPU, 384 GiB)
- g6e.16xlarge (64 vCPU, 512 GiB)
- g6e.24xlarge (96 vCPU, 768 GiB)
- g6e.48xlarge (192 vCPU, 1,536 GiB)
- gr6.4xlarge (16 vCPU, 128 GiB)
- gr6.8xlarge (32 vCPU, 256 GiB)
† Intel specific; not covered by Nvidia
Support for the GPU instance type software stack is provided by AWS. Ensure that your AWS service quotas can accommodate the desired GPU instance types.
Example 2.7. Compute optimized
- c5.xlarge (4 vCPU, 8 GiB)
- c5.2xlarge (8 vCPU, 16 GiB)
- c5.4xlarge (16 vCPU, 32 GiB)
- c5.9xlarge (36 vCPU, 72 GiB)
- c5.12xlarge (48 vCPU, 96 GiB)
- c5.18xlarge (72 vCPU, 144 GiB)
- c5.24xlarge (96 vCPU, 192 GiB)
- c5.metal (96 vCPU, 192 GiB)
- c5d.xlarge (4 vCPU, 8 GiB)
- c5d.2xlarge (8 vCPU, 16 GiB)
- c5d.4xlarge (16 vCPU, 32 GiB)
- c5d.9xlarge (36 vCPU, 72 GiB)
- c5d.12xlarge (48 vCPU, 96 GiB)
- c5d.18xlarge (72 vCPU, 144 GiB)
- c5d.24xlarge (96 vCPU, 192 GiB)
- c5d.metal (96 vCPU, 192 GiB)
- c5a.xlarge (4 vCPU, 8 GiB)
- c5a.2xlarge (8 vCPU, 16 GiB)
- c5a.4xlarge (16 vCPU, 32 GiB)
- c5a.8xlarge (32 vCPU, 64 GiB)
- c5a.12xlarge (48 vCPU, 96 GiB)
- c5a.16xlarge (64 vCPU, 128 GiB)
- c5a.24xlarge (96 vCPU, 192 GiB)
- c5ad.xlarge (4 vCPU, 8 GiB)
- c5ad.2xlarge (8 vCPU, 16 GiB)
- c5ad.4xlarge (16 vCPU, 32 GiB)
- c5ad.8xlarge (32 vCPU, 64 GiB)
- c5ad.12xlarge (48 vCPU, 96 GiB)
- c5ad.16xlarge (64 vCPU, 128 GiB)
- c5ad.24xlarge (96 vCPU, 192 GiB)
- c5n.xlarge (4 vCPU, 10.5 GiB)
- c5n.2xlarge (8 vCPU, 21 GiB)
- c5n.4xlarge (16 vCPU, 42 GiB)
- c5n.9xlarge (36 vCPU, 96 GiB)
- c5n.18xlarge (72 vCPU, 192 GiB)
- c5n.metal (72 vCPU, 192 GiB)
- c6a.xlarge (4 vCPU, 8 GiB)
- c6a.2xlarge (8 vCPU, 16 GiB)
- c6a.4xlarge (16 vCPU, 32 GiB)
- c6a.8xlarge (32 vCPU, 64 GiB)
- c6a.12xlarge (48 vCPU, 96 GiB)
- c6a.16xlarge (64 vCPU, 128 GiB)
- c6a.24xlarge (96 vCPU, 192 GiB)
- c6a.32xlarge (128 vCPU, 256 GiB)
- c6a.48xlarge (192 vCPU, 384 GiB)
- c6i.xlarge (4 vCPU, 8 GiB)
- c6i.2xlarge (8 vCPU, 16 GiB)
- c6i.4xlarge (16 vCPU, 32 GiB)
- c6i.8xlarge (32 vCPU, 64 GiB)
- c6i.12xlarge (48 vCPU, 96 GiB)
- c6i.16xlarge (64 vCPU, 128 GiB)
- c6i.24xlarge (96 vCPU, 192 GiB)
- c6i.32xlarge (128 vCPU, 256 GiB)
- c6i.metal (128 vCPU, 256 GiB)
- c6id.xlarge (4 vCPU, 8 GiB)
- c6id.2xlarge (8 vCPU, 16 GiB)
- c6id.4xlarge (16 vCPU, 32 GiB)
- c6id.8xlarge (32 vCPU, 64 GiB)
- c6id.12xlarge (48 vCPU, 96 GiB)
- c6id.16xlarge (64 vCPU, 128 GiB)
- c6id.24xlarge (96 vCPU, 192 GiB)
- c6id.32xlarge (128 vCPU, 256 GiB)
- c6id.metal (128 vCPU, 256 GiB)
- c6in.12xlarge (48 vCPU, 96 GiB)
- c6in.16xlarge (64 vCPU, 128 GiB)
- c6in.24xlarge (96 vCPU, 192 GiB)
- c6in.2xlarge (8 vCPU, 16 GiB)
- c6in.32xlarge (128 vCPU, 256 GiB)
- c6in.4xlarge (16 vCPU, 32 GiB)
- c6in.8xlarge (32 vCPU, 64 GiB)
- c6in.xlarge (4 vCPU, 8 GiB)
- c7a.xlarge (4 vCPU, 8 GiB)
- c7a.2xlarge (8 vCPU, 16 GiB)
- c7a.4xlarge (16 vCPU, 32 GiB)
- c7a.8xlarge (32 vCPU, 64 GiB)
- c7a.12xlarge (48 vCPU, 96 GiB)
- c7a.16xlarge (64 vCPU, 128 GiB)
- c7a.24xlarge (96 vCPU, 192 GiB)
- c7a.32xlarge (128 vCPU, 256 GiB)
- c7a.48xlarge (192 vCPU, 384 GiB)
- c7a.metal-48xl (192 vCPU, 384 GiB)
- c7i.xlarge (4 vCPU, 8 GiB)
- c7i.2xlarge (8 vCPU, 16 GiB)
- c7i.4xlarge (16 vCPU, 32 GiB)
- c7i.8xlarge (32 vCPU, 64 GiB)
- c7i.12xlarge (48 vCPU, 96 GiB)
- c7i.16xlarge (64 vCPU, 128 GiB)
- c7i.24xlarge (96 vCPU, 192 GiB)
- c7i.48xlarge (192 vCPU, 384 GiB)
- c7i.metal-24xl (96 vCPU, 192 GiB)
- c7i.metal-48xl (192 vCPU, 384 GiB)
- hpc6a.48xlarge (96 vCPU, 384 GiB)
- hpc6id.32xlarge (64 vCPU, 1024 GiB)
- hpc7a.12xlarge (24 vCPU, 768 GiB)
- hpc7a.24xlarge (48 vCPU, 768 GiB)
- hpc7a.48xlarge (96 vCPU, 768 GiB)
- hpc7a.96xlarge (192 vCPU, 768 GiB)
- m5zn.12xlarge (48 vCPU, 192 GiB)
- m5zn.2xlarge (8 vCPU, 32 GiB)
- m5zn.3xlarge (16 vCPU, 48 GiB)
- m5zn.6xlarge (32 vCPU, 96 GiB)
- m5zn.xlarge (4 vCPU, 16 GiB)
Example 2.8. Storage optimized
- c5ad.12xlarge (48 vCPU, 96 GiB)
- c5ad.16xlarge (64 vCPU, 128 GiB)
- c5ad.24xlarge (96 vCPU, 192 GiB)
- c5ad.2xlarge (8 vCPU, 16 GiB)
- c5ad.4xlarge (16 vCPU, 32 GiB)
- c5ad.8xlarge (32 vCPU, 64 GiB)
- c5ad.xlarge (4 vCPU, 8 GiB)
- i3.xlarge (4 vCPU, 30.5 GiB)
- i3.2xlarge (8 vCPU, 61 GiB)
- i3.4xlarge (16 vCPU, 122 GiB)
- i3.8xlarge (32 vCPU, 244 GiB)
- i3.16xlarge (64 vCPU, 488 GiB)
- i3.metal (72† vCPU, 512 GiB)
- i3en.xlarge (4 vCPU, 32 GiB)
- i3en.2xlarge (8 vCPU, 64 GiB)
- i3en.3xlarge (12 vCPU, 96 GiB)
- i3en.6xlarge (24 vCPU, 192 GiB)
- i3en.12xlarge (48 vCPU, 384 GiB)
- i3en.24xlarge (96 vCPU, 768 GiB)
- i3en.metal (96 vCPU, 768 GiB)
- i4i.xlarge (4 vCPU, 32 GiB)
- i4i.2xlarge (8 vCPU, 64 GiB)
- i4i.4xlarge (16 vCPU, 128 GiB)
- i4i.8xlarge (32 vCPU, 256 GiB)
- i4i.12xlarge (48 vCPU, 384 GiB)
- i4i.16xlarge (64 vCPU, 512 GiB)
- i4i.24xlarge (96 vCPU, 768 GiB)
- i4i.32xlarge (128 vCPU, 1,024 GiB)
- i4i.metal (128 vCPU, 1,024 GiB)
- m5ad.xlarge (4 vCPU, 16 GiB)
- m5ad.2xlarge (8 vCPU, 32 GiB)
- m5ad.4xlarge (16 vCPU, 64 GiB)
- m5ad.8xlarge (32 vCPU, 128 GiB)
- m5ad.12xlarge (48 vCPU, 192 GiB)
- m5ad.16xlarge (64 vCPU, 256 GiB)
- m5ad.24xlarge (96 vCPU, 384 GiB)
- m5d.xlarge (4 vCPU, 16 GiB)
- m5d.2xlarge (8 vCPU, 32 GiB)
- m5d.4xlarge (16 vCPU, 64 GiB)
- m5d.8xlarge (32 vCPU, 28 GiB)
- m5d.12xlarge (48 vCPU, 192 GiB)
- m5d.16xlarge (64 vCPU, 256 GiB)
- m5d.24xlarge (96 vCPU, 384 GiB)
† This instance type offers 72 logical processors on 36 physical cores.
Virtual instance types initialize faster than ".metal" instance types.
Example 2.9. High memory
- u-3tb1.56xlarge (224 vCPU, 3,072 GiB)
- u-6tb1.56xlarge (224 vCPU, 6,144 GiB)
- u-6tb1.112xlarge (448 vCPU, 6,144 GiB)
- u-6tb1.metal (448 vCPU, 6,144 GiB)
- u-9tb1.112xlarge (448 vCPU, 9,216 GiB)
- u-9tb1.metal (448 vCPU, 9,216 GiB)
- u-12tb1.112xlarge (448 vCPU, 12,288 GiB)
- u-12tb1.metal (448 vCPU, 12,288 GiB)
- u-18tb1.metal (448 vCPU, 18,432 GiB)
- u-24tb1.metal (448 vCPU, 24,576 GiB)
- u-24tb1.112xlarge (448 vCPU, 24,576 GiB)
Example 2.10. Network Optimized
- c5n.xlarge (4 vCPU, 10.5 GiB)
- c5n.2xlarge (8 vCPU, 21 GiB)
- c5n.4xlarge (16 vCPU, 42 GiB)
- c5n.9xlarge (36 vCPU, 96 GiB)
- c5n.18xlarge (72 vCPU, 192 GiB)
- m5dn.xlarge (4 vCPU, 16 GiB)
- m5dn.2xlarge (8 vCPU, 32 GiB)
- m5dn.4xlarge (16 vCPU, 64 GiB)
- m5dn.8xlarge (32 vCPU, 128 GiB)
- m5dn.12xlarge (48 vCPU, 192 GiB)
- m5dn.16xlarge (64 vCPU, 256 GiB)
- m5dn.24xlarge (96 vCPU, 384 GiB)
- m5n.12xlarge (48 vCPU, 192 GiB)
- m5n.16xlarge (64 vCPU, 256 GiB)
- m5n.24xlarge (96 vCPU, 384 GiB)
- m5n.xlarge (4 vCPU, 16 GiB)
- m5n.2xlarge (8 vCPU, 32 GiB)
- m5n.4xlarge (16 vCPU, 64 GiB)
- m5n.8xlarge (32 vCPU, 128 GiB)
Additional resources
2.5. Red Hat OpenShift Service on AWS update life cycle
2.5.1. Overview
Red Hat provides a published product life cycle for Red Hat OpenShift Service on AWS in order for customers and partners to effectively plan, deploy, and support their applications running on the platform. Red Hat publishes this life cycle to provide as much transparency as possible and might make exceptions from these policies as conflicts arise.
Red Hat OpenShift Service on AWS is a managed instance of Red Hat OpenShift and maintains an independent release schedule. More details about the managed offering can be found in the Red Hat OpenShift Service on AWS service definition. The availability of Security Advisories and Bug Fix Advisories for a specific version are dependent upon the Red Hat OpenShift Container Platform life cycle policy and subject to the Red Hat OpenShift Service on AWS maintenance schedule.
Additional resources
2.5.2. Definitions
| Version format | Major | Minor | Patch | Major.minor.patch |
|---|---|---|---|---|
| x | y | z | x.y.z | |
| Example | 4 | 5 | 21 | 4.5.21 |
- Major releases or X-releases
Referred to only as major releases or X-releases (X.y.z).
Examples
- "Major release 5" → 5.y.z
- "Major release 4" → 4.y.z
- "Major release 3" → 3.y.z
- Minor releases or Y-releases
Referred to only as minor releases or Y-releases (x.Y.z).
Examples
- "Minor release 4" → 4.4.z
- "Minor release 5" → 4.5.z
- "Minor release 6" → 4.6.z
- Patch releases or Z-releases
Referred to only as patch releases or Z-releases (x.y.Z).
Examples
- "Patch release 14 of minor release 5" → 4.5.14
- "Patch release 25 of minor release 5" → 4.5.25
- "Patch release 26 of minor release 6" → 4.6.26
2.5.3. Major versions (X.y.z)
Major versions of Red Hat OpenShift Service on AWS, for example version 4, are supported for one year following the release of a subsequent major version or the retirement of the product.
Example
- If version 5 were made available on Red Hat OpenShift Service on AWS on January 1, version 4 would be allowed to continue running on managed clusters for 12 months, until December 31. After this time, clusters would need to be upgraded or migrated to version 5.
2.5.4. Minor versions (x.Y.z)
Starting with the 4.8 OpenShift Container Platform minor version, Red Hat supports all minor versions for at least a 16 month period following general availability of the given minor version. Patch versions are not affected by the support period.
Customers are notified 60, 30, and 15 days before the end of the support period. Clusters must be upgraded to the latest patch version of the oldest supported minor version before the end of the support period, or the cluster will enter a "Limited Support" status.
Example
- A customer’s cluster is currently running on 4.13.8. The 4.13 minor version became generally available on May 17, 2023.
- On July 19, August 16, and September 2, 2024, the customer is notified that their cluster will enter "Limited Support" status on September 17, 2024 if the cluster has not already been upgraded to a supported minor version.
- The cluster must be upgraded to 4.14 or later by September 17, 2024.
- If the upgrade has not been performed, the cluster will be flagged as being in a "Limited Support" status.
Additional resources
2.5.5. Patch versions (x.y.Z)
During the period in which a minor version is supported, Red Hat supports all OpenShift Container Platform patch versions unless otherwise specified.
For reasons of platform security and stability, a patch release may be deprecated, which would prevent installations of that release and trigger mandatory upgrades off that release.
Example
- 4.7.6 is found to contain a critical CVE.
- Any releases impacted by the CVE will be removed from the supported patch release list. In addition, any clusters running 4.7.6 will be scheduled for automatic upgrades within 48 hours.
2.5.6. Limited support status
When a cluster transitions to a Limited Support status, Red Hat no longer proactively monitors the cluster, the SLA is no longer applicable, and credits requested against the SLA are denied. It does not mean that you no longer have product support. In some cases, the cluster can return to a fully-supported status if you remediate the violating factors. However, in other cases, you might have to delete and recreate the cluster.
A cluster might transition to a Limited Support status for many reasons, including the following scenarios:
- If you do not upgrade a cluster to a supported version before the end-of-life date
Red Hat does not make any runtime or SLA guarantees for versions after their end-of-life date. To receive continued support, upgrade the cluster to a supported version before the end-of-life date. If you do not upgrade the cluster before the end-of-life date, the cluster transitions to a Limited Support status until it is upgraded to a supported version.
Red Hat provides commercially reasonable support to upgrade from an unsupported version to a supported version. However, if a supported upgrade path is no longer available, you might have to create a new cluster and migrate your workloads.
- If you remove or replace any native Red Hat OpenShift Service on AWS components or any other component that is installed and managed by Red Hat
- If cluster administrator permissions were used, Red Hat is not responsible for any of your or your authorized users’ actions, including those that affect infrastructure services, service availability, or data loss. If Red Hat detects any such actions, the cluster might transition to a Limited Support status. Red Hat notifies you of the status change and you should either revert the action or create a support case to explore remediation steps that might require you to delete and recreate the cluster.
If you have questions about a specific action that might cause a cluster to transition to a Limited Support status or need further assistance, open a support ticket.
2.5.7. Supported versions exception policy
Red Hat reserves the right to add or remove new or existing versions, or delay upcoming minor release versions, that have been identified to have one or more critical production impacting bugs or security issues without advance notice.
2.5.8. Installation policy
While Red Hat recommends installation of the latest support release, Red Hat OpenShift Service on AWS supports installation of any supported release as covered by the preceding policy.
2.5.9. Mandatory upgrades
If a critical or important CVE, or other bug identified by Red Hat, significantly impacts the security or stability of the cluster, the customer must upgrade to the next supported patch release within two business days.
In extreme circumstances and based on Red Hat’s assessment of the CVE criticality to the environment, Red Hat will notify customers that they have two business days to schedule or manually update their cluster to the latest, secure patch release. In the case that an update is not performed after two business days, Red Hat will automatically update the cluster to the latest, secure patch release to mitigate potential security breach(es) or instability. Red Hat might, at its own discretion, temporarily delay an automated update if requested by a customer through a support case.
2.5.10. Life cycle dates
| Version | General availability | End of life |
|---|---|---|
| 4.17 | Oct 14, 2024 | Feb 14, 2026 |
| 4.16 | Jul 2, 2024 | Nov 2, 2025 |
| 4.15 | Feb 27, 2024 | Jun 30, 2025 |
| 4.14 | Oct 31, 2023 | May 1, 2025 |
| 4.13 | May 17, 2023 | Sep 17, 2024 |
| 4.12 | Jan 17, 2023 | Jul 17, 2024 |
| 4.11 | Aug 10, 2022 | Dec 10, 2023 |
| 4.10 | Mar 10, 2022 | Sep 10, 2023 |
| 4.9 | Oct 18, 2021 | Dec 18, 2022 |
| 4.8 | Jul 27, 2021 | Sep 27, 2022 |
2.6. Red Hat OpenShift Service on AWS (ROSA) with hosted control planes (HCP) service definition
This documentation outlines the service definition for the Red Hat OpenShift Service on AWS (ROSA) with hosted control planes (HCP) managed service.
2.6.1. Account management
This section provides information about the service definition for Red Hat OpenShift Service on AWS account management.
2.6.1.1. Billing and pricing
Red Hat OpenShift Service on AWS is billed directly to your Amazon Web Services (AWS) account. ROSA pricing is consumption based, with annual commitments or three-year commitments for greater discounting. The total cost of ROSA consists of two components:
- ROSA service fees
- AWS infrastructure fees
Visit the Red Hat OpenShift Service on AWS Pricing page on the AWS website for more details.
2.6.1.2. Cluster self-service
Customers can self-service their clusters, including, but not limited to:
- Create a cluster
- Delete a cluster
- Add or remove an identity provider
- Add or remove a user from an elevated group
- Configure cluster privacy
- Add or remove machine pools and configure autoscaling
- Define upgrade policies
You can perform these self-service tasks using the Red Hat OpenShift Service on AWS (ROSA) CLI, rosa.
Additional resources
2.6.1.3. Instance types
All ROSA with HCP clusters require a minimum of 2 worker nodes. Shutting down the underlying infrastructure through the cloud provider console is unsupported and can lead to data loss.
Approximately one vCPU core and 1 GiB of memory are reserved on each worker node and removed from allocatable resources. This reservation of resources is necessary to run processes required by the underlying platform. These processes include system daemons such as udev, kubelet, and container runtime among others. The reserved resources also account for kernel reservations.
OpenShift Container Platform core systems such as audit log aggregation, metrics collection, DNS, image registry, SDN, and others might consume additional allocatable resources to maintain the stability and maintainability of the cluster. The additional resources consumed might vary based on usage.
For additional information, see the Kubernetes documentation.
Additional resources
For a detailed listing of supported instance types, see ROSA with HCP instance types.
2.6.1.4. Regions and availability zones
The following AWS regions are currently available for ROSA with HCP.
Regions in China are not supported, regardless of their support on OpenShift 4.
For GovCloud (US) regions, you must submit an Access request for Red Hat OpenShift Service on AWS (ROSA) FedRAMP.
GovCloud (US) regions are only supported on ROSA Classic clusters.
Example 2.11. AWS Regions
- us-east-1 (N. Virginia)
- us-east-2 (Ohio)
- us-west-2 (Oregon)
- af-south-1 (Cape Town, AWS opt-in required)
- ap-east-1 (Hong Kong, AWS opt-in required)
- ap-south-2 (Hyderabad, AWS opt-in required)
- ap-southeast-3 (Jakarta, AWS opt-in required)
- ap-southeast-4 (Melbourne, AWS opt-in required)
- ap-south-1 (Mumbai)
- ap-northeast-3 (Osaka)
- ap-northeast-2 (Seoul)
- ap-southeast-1 (Singapore)
- ap-southeast-2 (Sydney)
- ap-northeast-1 (Tokyo)
- ca-central-1 (Central Canada)
- eu-central-1 (Frankfurt)
- eu-north-1 (Stockholm)
- eu-west-1 (Ireland)
- eu-west-2 (London)
- eu-south-1 (Milan, AWS opt-in required)
- eu-west-3 (Paris)
- eu-south-2 (Spain)
- eu-central-2 (Zurich, AWS opt-in required)
- me-south-1 (Bahrain, AWS opt-in required)
- me-central-1 (UAE, AWS opt-in required)
- sa-east-1 (São Paulo)
Multiple availability zone clusters can only be deployed in regions with at least 3 availability zones. For more information, see the Regions and Availability Zones section in the AWS documentation.
Each new ROSA with HCP cluster is installed within a preexisting Virtual Private Cloud (VPC) in a single region, with the option to deploy up to the total number of availability zones for the given region. This provides cluster-level network and resource isolation, and enables cloud-provider VPC settings, such as VPN connections and VPC Peering. Persistent volumes (PVs) are backed by Amazon Elastic Block Storage (Amazon EBS), and are specific to the availability zone in which they are provisioned. Persistent volume claims (PVCs) do not bind to a volume until the associated pod resource is assigned into a specific availability zone to prevent unschedulable pods. Availability zone-specific resources are only usable by resources in the same availability zone.
The region cannot be changed after a cluster has been deployed.
Additional resources
2.6.1.5. Local Zones
Red Hat OpenShift Service on AWS (ROSA) with hosted control planes (HCP) does not support the use of AWS Local Zones.
2.6.1.6. Service Level Agreement (SLA)
Any SLAs for the service itself are defined in Appendix 4 of the Red Hat Enterprise Agreement Appendix 4 (Online Subscription Services).
2.6.1.7. Limited support status
When a cluster transitions to a Limited Support status, Red Hat no longer proactively monitors the cluster, the SLA is no longer applicable, and credits requested against the SLA are denied. It does not mean that you no longer have product support. In some cases, the cluster can return to a fully-supported status if you remediate the violating factors. However, in other cases, you might have to delete and recreate the cluster.
A cluster might move to a Limited Support status for many reasons, including the following scenarios:
- If you remove or replace any native Red Hat OpenShift Service on AWS components or any other component that is installed and managed by Red Hat
- If cluster administrator permissions were used, Red Hat is not responsible for any of your or your authorized users’ actions, including those that affect infrastructure services, service availability, or data loss. If Red Hat detects any such actions, the cluster might transition to a Limited Support status. Red Hat notifies you of the status change and you should either revert the action or create a support case to explore remediation steps that might require you to delete and recreate the cluster.
If you have questions about a specific action that might cause a cluster to move to a Limited Support status or need further assistance, open a support ticket.
2.6.1.8. Support
Red Hat OpenShift Service on AWS includes Red Hat Premium Support, which can be accessed by using the Red Hat Customer Portal.
See the Red Hat Production Support Terms of Service for support response times.
AWS support is subject to a customer’s existing support contract with AWS.
2.6.2. Logging
Red Hat OpenShift Service on AWS provides optional integrated log forwarding to Amazon (AWS) CloudWatch.
2.6.2.1. Cluster audit logging
Cluster audit logs are available through AWS CloudWatch, if the integration is enabled. If the integration is not enabled, you can request the audit logs by opening a support case.
2.6.2.2. Application logging
Application logs sent to STDOUT are collected by Fluentd and forwarded to AWS CloudWatch through the cluster logging stack, if it is installed.
2.6.3. Monitoring
This section provides information about the service definition for Red Hat OpenShift Service on AWS monitoring.
2.6.3.1. Cluster metrics
Red Hat OpenShift Service on AWS clusters come with an integrated Prometheus stack for cluster monitoring including CPU, memory, and network-based metrics. This is accessible through the web console. These metrics also allow for horizontal pod autoscaling based on CPU or memory metrics provided by an Red Hat OpenShift Service on AWS user.
2.6.3.2. Cluster notifications
Cluster notifications are messages about the status, health, or performance of your cluster.
Cluster notifications are the primary way that Red Hat Site Reliability Engineering (SRE) communicates with you about the health of your managed cluster. SRE may also use cluster notifications to prompt you to perform an action in order to resolve or prevent an issue with your cluster.
Cluster owners and administrators must regularly review and action cluster notifications to ensure clusters remain healthy and supported.
You can view cluster notifications in the Red Hat Hybrid Cloud Console, in the Cluster history tab for your cluster. By default, only the cluster owner receives cluster notifications as emails. If other users need to receive cluster notification emails, add each user as a notification contact for your cluster.
2.6.4. Networking
This section provides information about the service definition for Red Hat OpenShift Service on AWS networking.
2.6.4.1. Custom domains for applications
Starting with Red Hat OpenShift Service on AWS 4.14, the Custom Domain Operator is deprecated. To manage Ingress in Red Hat OpenShift Service on AWS 4.14 or later, use the Ingress Operator. The functionality is unchanged for Red Hat OpenShift Service on AWS 4.13 and earlier versions.
To use a custom hostname for a route, you must update your DNS provider by creating a canonical name (CNAME) record. Your CNAME record should map the OpenShift canonical router hostname to your custom domain. The OpenShift canonical router hostname is shown on the Route Details page after a route is created. Alternatively, a wildcard CNAME record can be created once to route all subdomains for a given hostname to the cluster’s router.
2.6.4.2. Domain validated certificates
Red Hat OpenShift Service on AWS includes TLS security certificates needed for both internal and external services on the cluster. For external routes, there are two separate TLS wildcard certificates that are provided and installed on each cluster: one is for the web console and route default hostnames, and the other is for the API endpoint. Let’s Encrypt is the certificate authority used for certificates. Routes within the cluster, such as the internal API endpoint, use TLS certificates signed by the cluster’s built-in certificate authority and require the CA bundle available in every pod for trusting the TLS certificate.
2.6.4.3. Custom certificate authorities for builds
Red Hat OpenShift Service on AWS supports the use of custom certificate authorities to be trusted by builds when pulling images from an image registry.
2.6.4.4. Load balancers
Red Hat OpenShift Service on AWS (ROSA) with hosted control planes (HCP) only deploys load balancers from the default ingress controller. All other load balancers can be optionally deployed by a customer for secondary ingress controllers or Service load balancers.
2.6.4.5. Cluster ingress
Project administrators can add route annotations for many different purposes, including ingress control through IP allow-listing.
Ingress policies can also be changed by using NetworkPolicy objects, which leverage the ovs-networkpolicy plugin. This allows for full control over the ingress network policy down to the pod level, including between pods on the same cluster and even in the same namespace.
All cluster ingress traffic will go through the defined load balancers. Direct access to all nodes is blocked by cloud configuration.
2.6.4.6. Cluster egress
Pod egress traffic control through EgressNetworkPolicy objects can be used to prevent or limit outbound traffic in Red Hat OpenShift Service on AWS (ROSA) with hosted control planes (HCP).
2.6.4.7. Cloud network configuration
Red Hat OpenShift Service on AWS allows for the configuration of a private network connection through AWS-managed technologies, such as:
- VPN connections
- VPC peering
- Transit Gateway
- Direct Connect
Red Hat site reliability engineers (SREs) do not monitor private network connections. Monitoring these connections is the responsibility of the customer.
2.6.4.8. DNS forwarding
For Red Hat OpenShift Service on AWS clusters that have a private cloud network configuration, a customer can specify internal DNS servers available on that private connection, that should be queried for explicitly provided domains.
2.6.4.9. Network verification
Network verification checks run automatically when you deploy a Red Hat OpenShift Service on AWS cluster into an existing Virtual Private Cloud (VPC) or create an additional machine pool with a subnet that is new to your cluster. The checks validate your network configuration and highlight errors, enabling you to resolve configuration issues prior to deployment.
You can also run the network verification checks manually to validate the configuration for an existing cluster. :!rosa-with-hcp:
Additional resources
- For more information about the network verification checks, see Network verification.
2.6.5. Storage
This section provides information about the service definition for Red Hat OpenShift Service on AWS (ROSA) with hosted control planes (HCP) storage.
2.6.5.1. Encrypted-at-rest OS and node storage
Worker nodes use encrypted-at-rest Amazon Elastic Block Store (Amazon EBS) storage.
2.6.5.2. Encrypted-at-rest PV
EBS volumes that are used for PVs are encrypted-at-rest by default.
2.6.5.3. Block storage (RWO)
Persistent volumes (PVs) are backed by Amazon Elastic Block Store (Amazon EBS), which is Read-Write-Once.
PVs can be attached only to a single node at a time and are specific to the availability zone in which they were provisioned. However, PVs can be attached to any node in the availability zone.
Each cloud provider has its own limits for how many PVs can be attached to a single node. See AWS instance type limits for details.
2.6.6. Platform
This section provides information about the service definition for the Red Hat OpenShift Service on AWS (ROSA) platform.
2.6.6.1. Autoscaling
Node autoscaling is available on Red Hat OpenShift Service on AWS. You can configure the autoscaler option to automatically scale the number of machines in a cluster.
2.6.6.2. Daemonsets
Customers can create and run daemonsets on Red Hat OpenShift Service on AWS. To restrict daemonsets to only running on worker nodes, use the following nodeSelector:
spec:
  nodeSelector:
    role: worker
2.6.6.3. Multiple availability zone
In a multiple availability zone cluster, control plane nodes are distributed across availability zones and at least one worker node is required in each availability zone.
2.6.6.4. Node labels
Custom node labels are created by Red Hat during node creation and cannot be changed on Red Hat OpenShift Service on AWS clusters at this time. However, custom labels are supported when creating new machine pools.
2.6.6.5. Cluster backup policy
Red Hat does not provide a backup method for ROSA clusters that use STS. It is critical that customers have a backup plan for their applications and application data.
Application and application data backups are not a part of the Red Hat OpenShift Service on AWS service.
The table below only applies to non-STS clusters. The following components are used by Red Hat in extenuating circumstances.
| Component | Snapshot frequency | Retention | Notes |
|---|---|---|---|
| Full object store backup | Daily | 7 days | This is a full backup of all Kubernetes objects like etcd. No persistent volumes (PVs) are backed up in this backup schedule. |
| Weekly | 30 days | ||
| Full object store backup | Hourly | 24 hour | This is a full backup of all Kubernetes objects like etcd. No PVs are backed up in this backup schedule. |
| Node root volume | Never | N/A | Nodes are considered to be short-term. Nothing critical should be stored on a node’s root volume. |
2.6.6.6. OpenShift version
Red Hat OpenShift Service on AWS is run as a service and is kept up to date with the latest OpenShift Container Platform version. Upgrade scheduling to the latest version is available.
2.6.6.7. Upgrades
Upgrades can be scheduled using the ROSA CLI, rosa, or through OpenShift Cluster Manager.
See the Red Hat OpenShift Service on AWS Life Cycle for more information on the upgrade policy and procedures.
2.6.6.8. Windows Containers
Red Hat OpenShift support for Windows Containers is not available on Red Hat OpenShift Service on AWS at this time.
2.6.6.9. Container engine
Red Hat OpenShift Service on AWS runs on OpenShift 4 and uses CRI-O as the only available container engine.
2.6.6.10. Operating system
Red Hat OpenShift Service on AWS runs on OpenShift 4 and uses Red Hat CoreOS as the operating system for all control plane and worker nodes.
2.6.6.11. Red Hat Operator support
Red Hat workloads typically refer to Red Hat-provided Operators made available through Operator Hub. Red Hat workloads are not managed by the Red Hat SRE team, and must be deployed on worker nodes. These Operators may require additional Red Hat subscriptions, and may incur additional cloud infrastructure costs. Examples of these Red Hat-provided Operators are:
- Red Hat Quay
- Red Hat Advanced Cluster Management
- Red Hat Advanced Cluster Security
- Red Hat OpenShift Service Mesh
- OpenShift Serverless
- Red Hat OpenShift Logging
- Red Hat OpenShift Pipelines
2.6.6.12. Kubernetes Operator support
All Operators listed in the OperatorHub marketplace should be available for installation. These Operators are considered customer workloads, and are not monitored by Red Hat SRE.
2.6.7. Security
This section provides information about the service definition for Red Hat OpenShift Service on AWS (ROSA) with hosted control planes (HCP) security.
2.6.7.1. Authentication provider
Authentication for the cluster can be configured using either OpenShift Cluster Manager or cluster creation process or using the ROSA CLI, rosa. ROSA is not an identity provider, and all access to the cluster must be managed by the customer as part of their integrated solution. The use of multiple identity providers provisioned at the same time is supported. The following identity providers are supported:
- GitHub or GitHub Enterprise
- GitLab
- LDAP
- OpenID Connect
- htpasswd
2.6.7.2. Privileged containers
Privileged containers are available for users with the cluster-admin role. Usage of privileged containers as cluster-admin is subject to the responsibilities and exclusion notes in the Red Hat Enterprise Agreement Appendix 4 (Online Subscription Services).
2.6.7.3. Customer administrator user
In addition to normal users, Red Hat OpenShift Service on AWS (ROSA) with hosted control planes (HCP) provides access to an ROSA with HCP-specific group called dedicated-admin. Any users on the cluster that are members of the dedicated-admin group:
- Have administrator access to all customer-created projects on the cluster.
- Can manage resource quotas and limits on the cluster.
-
Can add and manage
NetworkPolicyobjects. - Are able to view information about specific nodes and PVs in the cluster, including scheduler information.
-
Can access the reserved
dedicated-adminproject on the cluster, which allows for the creation of service accounts with elevated privileges and also gives the ability to update default limits and quotas for projects on the cluster. -
Can install Operators from OperatorHub and perform all verbs in all
*.operators.coreos.comAPI groups.
2.6.7.4. Cluster administration role
The administrator of Red Hat OpenShift Service on AWS (ROSA) with hosted control planes (HCP) has default access to the cluster-admin role for your organization’s cluster. While logged into an account with the cluster-admin role, users have increased permissions to run privileged security contexts.
2.6.7.5. Project self-service
By default, all users have the ability to create, update, and delete their projects. This can be restricted if a member of the dedicated-admin group removes the self-provisioner role from authenticated users:
$ oc adm policy remove-cluster-role-from-group self-provisioner system:authenticated:oauth
Restrictions can be reverted by applying:
$ oc adm policy add-cluster-role-to-group self-provisioner system:authenticated:oauth
2.6.7.6. Regulatory compliance
See the Compliance table in Understanding process and security for ROSA for the latest compliance information.
2.6.7.7. Network security
With Red Hat OpenShift Service on AWS, AWS provides a standard DDoS protection on all load balancers, called AWS Shield. This provides 95% protection against most commonly used level 3 and 4 attacks on all the public facing load balancers used for Red Hat OpenShift Service on AWS. A 10-second timeout is added for HTTP requests coming to the haproxy router to receive a response or the connection is closed to provide additional protection.
2.6.7.8. etcd encryption
In Red Hat OpenShift Service on AWS (ROSA) with hosted control planes (HCP), the control plane storage is encrypted at rest by default and this includes encryption of the etcd volumes. This storage-level encryption is provided through the storage layer of the cloud provider.
The etcd database is always encrypted by default. Customers might opt to provide their own custom AWS KMS keys for the purpose of encrypting the etcd database.
Etcd encryption will encrypt the following Kubernetes API server and OpenShift API server resources:
- Secrets
- Config maps
- Routes
- OAuth access tokens
- OAuth authorize tokens
2.6.8. Additional resources
- See ROSA life cycle
2.7. Red Hat OpenShift Service on AWS (ROSA) with hosted control planes (HCP) instance types
ROSA with HCP offers the following worker node instance types and sizes:
Currently, ROSA with HCP supports a maximum of 500 worker nodes.
2.7.1. AWS x86-based instance types
Example 2.12. General purpose
- m5.xlarge (4 vCPU, 16 GiB)
- m5.2xlarge (8 vCPU, 32 GiB)
- m5.4xlarge (16 vCPU, 64 GiB)
- m5.8xlarge (32 vCPU, 128 GiB)
- m5.12xlarge (48 vCPU, 192 GiB)
- m5.16xlarge (64 vCPU, 256 GiB)
- m5.24xlarge (96 vCPU, 384 GiB)
- m5.metal (96† vCPU, 384 GiB)
- m5a.xlarge (4 vCPU, 16 GiB)
- m5a.2xlarge (8 vCPU, 32 GiB)
- m5a.4xlarge (16 vCPU, 64 GiB)
- m5a.8xlarge (32 vCPU, 128 GiB)
- m5a.12xlarge (48 vCPU, 192 GiB)
- m5a.16xlarge (64 vCPU, 256 GiB)
- m5a.24xlarge (96 vCPU, 384 GiB)
- m5dn.metal (96 vCPU, 384 GiB)
- m5zn.metal (48 vCPU, 192 GiB)
- m5d.metal (96† vCPU, 384 GiB)
- m5n.metal (96 vCPU, 384 GiB)
- m6a.xlarge (4 vCPU, 16 GiB)
- m6a.2xlarge (8 vCPU, 32 GiB)
- m6a.4xlarge (16 vCPU, 64 GiB)
- m6a.8xlarge (32 vCPU, 128 GiB)
- m6a.12xlarge (48 vCPU, 192 GiB)
- m6a.16xlarge (64 vCPU, 256 GiB)
- m6a.24xlarge (96 vCPU, 384 GiB)
- m6a.32xlarge (128 vCPU, 512 GiB)
- m6a.48xlarge (192 vCPU, 768 GiB)
- m6a.metal (192 vCPU, 768 GiB)
- m6i.xlarge (4 vCPU, 16 GiB)
- m6i.2xlarge (8 vCPU, 32 GiB)
- m6i.4xlarge (16 vCPU, 64 GiB)
- m6i.8xlarge (32 vCPU, 128 GiB)
- m6i.12xlarge (48 vCPU, 192 GiB)
- m6i.16xlarge (64 vCPU, 256 GiB)
- m6i.24xlarge (96 vCPU, 384 GiB)
- m6i.32xlarge (128 vCPU, 512 GiB)
- m6i.metal (128 vCPU, 512 GiB)
- m6id.xlarge (4 vCPU, 16 GiB)
- m6id.2xlarge (8 vCPU, 32 GiB)
- m6id.4xlarge (16 vCPU, 64 GiB)
- m6id.8xlarge (32 vCPU, 128 GiB)
- m6id.12xlarge (48 vCPU, 192 GiB)
- m6id.16xlarge (64 vCPU, 256 GiB)
- m6id.24xlarge (96 vCPU, 384 GiB)
- m6id.32xlarge (128 vCPU, 512 GiB)
- m6id.metal (128 vCPU, 512 GiB)
- m6idn.xlarge (4 vCPU, 16 GiB)
- m6idn.2xlarge (8 vCPU, 32 GiB)
- m6idn.4xlarge (16 vCPU, 64 GiB)
- m6idn.8xlarge (32 vCPU, 128 GiB)
- m6idn.12xlarge (48 vCPU, 192 GiB)
- m6idn.16xlarge (64 vCPU, 256 GiB)
- m6idn.24xlarge (96 vCPU, 384 GiB)
- m6idn.32xlarge (128 vCPU, 512 GiB)
- m6in.xlarge (4 vCPU, 16 GiB)
- m6in.2xlarge (8 vCPU, 32 GiB)
- m6in.4xlarge (16 vCPU, 64 GiB)
- m6in.8xlarge (32 vCPU, 128 GiB)
- m6in.12xlarge (48 vCPU, 192 GiB)
- m6in.16xlarge (64 vCPU, 256 GiB)
- m6in.24xlarge (96 vCPU, 384 GiB)
- m6in.32xlarge (128 vCPU, 512 GiB)
- m7a.xlarge (4 vCPU, 16 GiB)
- m7a.2xlarge (8 vCPU, 32 GiB)
- m7a.4xlarge (16 vCPU, 64 GiB)
- m7a.8xlarge (32 vCPU, 128 GiB)
- m7a.12xlarge (48 vCPU, 192 GiB)
- m7a.16xlarge (64 vCPU, 256 GiB)
- m7a.24xlarge (96 vCPU, 384 GiB)
- m7a.32xlarge (128 vCPU, 512 GiB)
- m7a.48xlarge (192 vCPU, 768 GiB)
- m7a.metal-48xl (192 vCPU, 768 GiB)
- m7i-flex.2xlarge (8 vCPU, 32 GiB)
- m7i-flex.4xlarge (16 vCPU, 64 GiB)
- m7i-flex.8xlarge (32 vCPU, 128 GiB)
- m7i-flex.xlarge (4 vCPU, 16 GiB)
- m7i.xlarge (4 vCPU, 16 GiB)
- m7i.2xlarge (8 vCPU, 32 GiB)
- m7i.4xlarge (16 vCPU, 64 GiB)
- m7i.8xlarge (32 vCPU, 128 GiB)
- m7i.12xlarge (48 vCPU, 192 GiB)
- m7i.16xlarge (64 vCPU, 256 GiB)
- m7i.24xlarge (96 vCPU, 384 GiB)
- m7i.48xlarge (192 vCPU, 768 GiB)
- m7i.metal-24xl (96 vCPU, 384 GiB)
- m7i.metal-48xl (192 vCPU, 768 GiB)
† These instance types offer 96 logical processors on 48 physical cores. They run on single servers with two physical Intel sockets.
Example 2.13. Burstable general purpose
- t3.xlarge (4 vCPU, 16 GiB)
- t3.2xlarge (8 vCPU, 32 GiB)
- t3a.xlarge (4 vCPU, 16 GiB)
- t3a.2xlarge (8 vCPU, 32 GiB)
Example 2.14. Memory intensive
- x1.16xlarge (64 vCPU, 976 GiB)
- x1.32xlarge (128 vCPU, 1,952 GiB)
- x1e.xlarge (4 vCPU, 122 GiB)
- x1e.2xlarge (8 vCPU, 244 GiB)
- x1e.4xlarge (16 vCPU, 488 GiB)
- x1e.8xlarge (32 vCPU, 976 GiB)
- x1e.16xlarge (64 vCPU, 1,952 GiB)
- x1e.32xlarge (128 vCPU, 3,904 GiB)
- x2idn.16xlarge (64 vCPU, 1,024 GiB)
- x2idn.24xlarge (96 vCPU, 1,536 GiB)
- x2idn.32xlarge (128 vCPU, 2,048 GiB)
- x2iedn.xlarge (4 vCPU, 128 GiB)
- x2iedn.2xlarge (8 vCPU, 256 GiB)
- x2iedn.4xlarge (16 vCPU, 512 GiB)
- x2iedn.8xlarge (32 vCPU, 1,024 GiB)
- x2iedn.16xlarge (64 vCPU, 2,048 GiB)
- x2iedn.24xlarge (96 vCPU, 3,072 GiB)
- x2iedn.32xlarge (128 vCPU, 4,096 GiB)
- x2iezn.2xlarge (8 vCPU, 256 GiB)
- x2iezn.4xlarge (16vCPU, 512 GiB)
- x2iezn.6xlarge (24vCPU, 768 GiB)
- x2iezn.8xlarge (32vCPU, 1,024 GiB)
- x2iezn.12xlarge (48vCPU, 1,536 GiB)
- x2iezn.metal (48 vCPU, 1,536 GiB)
- x2idn.metal (128vCPU, 2,048 GiB)
- x2iedn.metal (128vCPU, 4,096 GiB)
Example 2.15. Memory optimized
- r4.xlarge (4 vCPU, 30.5 GiB)
- r4.2xlarge (8 vCPU, 61 GiB)
- r4.4xlarge (16 vCPU, 122 GiB)
- r4.8xlarge (32 vCPU, 244 GiB)
- r4.16xlarge (64 vCPU, 488 GiB)
- r5.xlarge (4 vCPU, 32 GiB)
- r5.2xlarge (8 vCPU, 64 GiB)
- r5.4xlarge (16 vCPU, 128 GiB)
- r5.8xlarge (32 vCPU, 256 GiB)
- r5.12xlarge (48 vCPU, 384 GiB)
- r5.16xlarge (64 vCPU, 512 GiB)
- r5.24xlarge (96 vCPU, 768 GiB)
- r5.metal (96† vCPU, 768 GiB)
- r5a.xlarge (4 vCPU, 32 GiB)
- r5a.2xlarge (8 vCPU, 64 GiB)
- r5a.4xlarge (16 vCPU, 128 GiB)
- r5a.8xlarge (32 vCPU, 256 GiB)
- r5a.12xlarge (48 vCPU, 384 GiB)
- r5a.16xlarge (64 vCPU, 512 GiB)
- r5a.24xlarge (96 vCPU, 768 GiB)
- r5ad.xlarge (4 vCPU, 32 GiB)
- r5ad.2xlarge (8 vCPU, 64 GiB)
- r5ad.4xlarge (16 vCPU, 128 GiB)
- r5ad.8xlarge (32 vCPU, 256 GiB)
- r5ad.12xlarge (48 vCPU, 384 GiB)
- r5ad.16xlarge (64 vCPU, 512 GiB)
- r5ad.24xlarge (96 vCPU, 768 GiB)
- r5b.xlarge (4 vCPU, 32 GiB)
- r5b.2xlarge (8 vCPU, 364 GiB)
- r5b.4xlarge (16 vCPU, 3,128 GiB)
- r5b.8xlarge (32 vCPU, 3,256 GiB)
- r5b.12xlarge (48 vCPU, 3,384 GiB)
- r5b.16xlarge (64 vCPU, 3,512 GiB)
- r5b.24xlarge (96 vCPU, 3,768 GiB)
- r5b.metal (96 768 GiB)
- r5d.xlarge (4 vCPU, 32 GiB)
- r5d.2xlarge (8 vCPU, 64 GiB)
- r5d.4xlarge (16 vCPU, 128 GiB)
- r5d.8xlarge (32 vCPU, 256 GiB)
- r5d.12xlarge (48 vCPU, 384 GiB)
- r5d.16xlarge (64 vCPU, 512 GiB)
- r5d.24xlarge (96 vCPU, 768 GiB)
- r5d.metal (96† vCPU, 768 GiB)
- r5n.xlarge (4 vCPU, 32 GiB)
- r5n.2xlarge (8 vCPU, 64 GiB)
- r5n.4xlarge (16 vCPU, 128 GiB)
- r5n.8xlarge (32 vCPU, 256 GiB)
- r5n.12xlarge (48 vCPU, 384 GiB)
- r5n.16xlarge (64 vCPU, 512 GiB)
- r5n.24xlarge (96 vCPU, 768 GiB)
- r5n.metal (96 vCPU, 768 GiB)
- r5dn.xlarge (4 vCPU, 32 GiB)
- r5dn.2xlarge (8 vCPU, 64 GiB)
- r5dn.4xlarge (16 vCPU, 128 GiB)
- r5dn.8xlarge (32 vCPU, 256 GiB)
- r5dn.12xlarge (48 vCPU, 384 GiB)
- r5dn.16xlarge (64 vCPU, 512 GiB)
- r5dn.24xlarge (96 vCPU, 768 GiB)
- r5dn.metal (96 vCPU, 768 GiB)
- r6a.xlarge (4 vCPU, 32 GiB)
- r6a.2xlarge (8 vCPU, 64 GiB)
- r6a.4xlarge (16 vCPU, 128 GiB)
- r6a.8xlarge (32 vCPU, 256 GiB)
- r6a.12xlarge (48 vCPU, 384 GiB)
- r6a.16xlarge (64 vCPU, 512 GiB)
- r6a.24xlarge (96 vCPU, 768 GiB)
- r6a.32xlarge (128 vCPU, 1,024 GiB)
- r6a.48xlarge (192 vCPU, 1,536 GiB)
- r6i.xlarge (4 vCPU, 32 GiB)
- r6i.2xlarge (8 vCPU, 64 GiB)
- r6i.4xlarge (16 vCPU, 128 GiB)
- r6i.8xlarge (32 vCPU, 256 GiB)
- r6i.12xlarge (48 vCPU, 384 GiB)
- r6i.16xlarge (64 vCPU, 512 GiB)
- r6i.24xlarge (96 vCPU, 768 GiB)
- r6i.32xlarge (128 vCPU, 1,024 GiB)
- r6i.metal (128 vCPU, 1,024 GiB)
- r6id.xlarge (4 vCPU, 32 GiB)
- r6id.2xlarge (8 vCPU, 64 GiB)
- r6id.4xlarge (16 vCPU, 128 GiB)
- r6id.8xlarge (32 vCPU, 256 GiB)
- r6id.12xlarge (48 vCPU, 384 GiB)
- r6id.16xlarge (64 vCPU, 512 GiB)
- r6id.24xlarge (96 vCPU, 768 GiB)
- r6id.32xlarge (128 vCPU, 1,024 GiB)
- r6id.metal (128 vCPU, 1,024 GiB)
- r6idn.12xlarge (48 vCPU, 384 GiB)
- r6idn.16xlarge (64 vCPU, 512 GiB)
- r6idn.24xlarge (96 vCPU, 768 GiB)
- r6idn.2xlarge (8 vCPU, 64 GiB)
- r6idn.32xlarge (128 vCPU, 1,024 GiB)
- r6idn.4xlarge (16 vCPU, 128 GiB)
- r6idn.8xlarge (32 vCPU, 256 GiB)
- r6idn.xlarge (4 vCPU, 32 GiB)
- r6in.12xlarge (48 vCPU, 384 GiB)
- r6in.16xlarge (64 vCPU, 512 GiB)
- r6in.24xlarge (96 vCPU, 768 GiB)
- r6in.2xlarge (8 vCPU, 64 GiB)
- r6in.32xlarge (128 vCPU, 1,024 GiB)
- r6in.4xlarge (16 vCPU, 128 GiB)
- r6in.8xlarge (32 vCPU, 256 GiB)
- r6in.xlarge (4 vCPU, 32 GiB)
- r7a.xlarge (4 vCPU, 32 GiB)
- r7a.2xlarge (8 vCPU, 64 GiB)
- r7a.4xlarge (16 vCPU, 128 GiB)
- r7a.8xlarge (32 vCPU, 256 GiB)
- r7a.12xlarge (48 vCPU, 384 GiB)
- r7a.16xlarge (64 vCPU, 512 GiB)
- r7a.24xlarge (96 vCPU, 768 GiB)
- r7a.32xlarge (128 vCPU, 1024 GiB)
- r7a.48xlarge (192 vCPU, 1536 GiB)
- r7a.metal-48xl (192 vCPU, 1536 GiB)
- r7i.xlarge (4 vCPU, 32 GiB)
- r7i.2xlarge (8 vCPU, 64 GiB)
- r7i.4xlarge (16 vCPU, 128 GiB)
- r7i.8xlarge (32 vCPU, 256 GiB)
- r7i.12xlarge (48 vCPU, 384 GiB)
- r7i.16xlarge (64 vCPU, 512 GiB)
- r7i.24xlarge (96 vCPU, 768 GiB)
- r7i.metal-24xl (96 vCPU, 768 GiB)
- r7iz.xlarge (4 vCPU, 32 GiB)
- r7iz.2xlarge (8 vCPU, 64 GiB)
- r7iz.4xlarge (16 vCPU, 128 GiB)
- r7iz.8xlarge (32 vCPU, 256 GiB)
- r7iz.12xlarge (48 vCPU, 384 GiB)
- r7iz.16xlarge (64 vCPU, 512 GiB)
- r7iz.32xlarge (128 vCPU, 1024 GiB)
- r7iz.metal-16xl (64 vCPU, 512 GiB)
- r7iz.metal-32xl (128 vCPU, 1,024 GiB)
- z1d.xlarge (4 vCPU, 32 GiB)
- z1d.2xlarge (8 vCPU, 64 GiB)
- z1d.3xlarge (12 vCPU, 96 GiB)
- z1d.6xlarge (24 vCPU, 192 GiB)
- z1d.12xlarge (48 vCPU, 384 GiB)
- z1d.metal (48 vCPU, 384 GiB)
† These instance types offer 96 logical processors on 48 physical cores. They run on single servers with two physical Intel sockets.
This instance type offers 48 logical processors on 24 physical cores.
Example 2.16. Accelerated computing
- p3.2xlarge (8 vCPU, 61 GiB)
- p3.8xlarge (32 vCPU, 244 GiB)
- p3.16xlarge (64 vCPU, 488 GiB)
- p3dn.24xlarge (96 vCPU, 768 GiB)
- p4d.24xlarge (96 vCPU, 1,152 GiB)
- p4de.24xlarge (96 vCPU, 1,152 GiB)
- p5.48xlarge (192 vCPU, 2,048 GiB)
- g4ad.xlarge (4 vCPU, 16 GiB)
- g4ad.2xlarge (8 vCPU, 32 GiB)
- g4ad.4xlarge (16 vCPU, 64 GiB)
- g4ad.8xlarge (32 vCPU, 128 GiB)
- g4ad.16xlarge (64 vCPU, 256 GiB)
- g4dn.xlarge (4 vCPU, 16 GiB)
- g4dn.2xlarge (8 vCPU, 32 GiB)
- g4dn.4xlarge (16 vCPU, 64 GiB)
- g4dn.8xlarge (32 vCPU, 128 GiB)
- g4dn.12xlarge (48 vCPU, 192 GiB)
- g4dn.16xlarge (64 vCPU, 256 GiB)
- g4dn.metal (96 vCPU, 384 GiB)
- g5.xlarge (4 vCPU, 16 GiB)
- g5.2xlarge (8 vCPU, 32 GiB)
- g5.4xlarge (16 vCPU, 64 GiB)
- g5.8xlarge (32 vCPU, 128 GiB)
- g5.16xlarge (64 vCPU, 256 GiB)
- g5.12xlarge (48 vCPU, 192 GiB)
- g5.24xlarge (96 vCPU, 384 GiB)
- g5.48xlarge (192 vCPU, 768 GiB)
- dl1.24xlarge (96 vCPU, 768 GiB)†
- g6.xlarge (4 vCPU, 16 GiB)
- g6.2xlarge (8 vCPU, 32 GiB)
- g6.4xlarge (16 vCPU, 64 GiB)
- g6.8xlarge (32 vCPU, 128 GiB)
- g6.12xlarge (48 vCPU, 192 GiB)
- g6.16xlarge (64 vCPU, 256 GiB)
- g6.24xlarge (96 vCPU, 384 GiB)
- g6.48xlarge (192 vCPU, 768 GiB)
- g6e.xlarge (4 vCPU, 32 GiB)
- g6e.2xlarge (8 vCPU, 64 GiB)
- g6e.4xlarge (16 vCPU, 128 GiB)
- g6e.8xlarge (32 vCPU, 256 GiB)
- g6e.12xlarge (48 vCPU, 384 GiB)
- g6e.16xlarge (64 vCPU, 512 GiB)
- g6e.24xlarge (96 vCPU, 768 GiB)
- g6e.48xlarge (192 vCPU, 1,536 GiB)
- gr6.4xlarge (16 vCPU, 128 GiB)
- gr6.8xlarge (32 vCPU, 256 GiB)
† Intel specific; not covered by Nvidia
Support for the GPU instance type software stack is provided by AWS. Ensure that your AWS service quotas can accommodate the desired GPU instance types.
Example 2.17. Compute optimized
- c5.xlarge (4 vCPU, 8 GiB)
- c5.2xlarge (8 vCPU, 16 GiB)
- c5.4xlarge (16 vCPU, 32 GiB)
- c5.9xlarge (36 vCPU, 72 GiB)
- c5.12xlarge (48 vCPU, 96 GiB)
- c5.18xlarge (72 vCPU, 144 GiB)
- c5.24xlarge (96 vCPU, 192 GiB)
- c5.metal (96 vCPU, 192 GiB)
- c5d.xlarge (4 vCPU, 8 GiB)
- c5d.2xlarge (8 vCPU, 16 GiB)
- c5d.4xlarge (16 vCPU, 32 GiB)
- c5d.9xlarge (36 vCPU, 72 GiB)
- c5d.12xlarge (48 vCPU, 96 GiB)
- c5d.18xlarge (72 vCPU, 144 GiB)
- c5d.24xlarge (96 vCPU, 192 GiB)
- c5d.metal (96 vCPU, 192 GiB)
- c5a.xlarge (4 vCPU, 8 GiB)
- c5a.2xlarge (8 vCPU, 16 GiB)
- c5a.4xlarge (16 vCPU, 32 GiB)
- c5a.8xlarge (32 vCPU, 64 GiB)
- c5a.12xlarge (48 vCPU, 96 GiB)
- c5a.16xlarge (64 vCPU, 128 GiB)
- c5a.24xlarge (96 vCPU, 192 GiB)
- c5ad.xlarge (4 vCPU, 8 GiB)
- c5ad.2xlarge (8 vCPU, 16 GiB)
- c5ad.4xlarge (16 vCPU, 32 GiB)
- c5ad.8xlarge (32 vCPU, 64 GiB)
- c5ad.12xlarge (48 vCPU, 96 GiB)
- c5ad.16xlarge (64 vCPU, 128 GiB)
- c5ad.24xlarge (96 vCPU, 192 GiB)
- c5n.xlarge (4 vCPU, 10.5 GiB)
- c5n.2xlarge (8 vCPU, 21 GiB)
- c5n.4xlarge (16 vCPU, 42 GiB)
- c5n.9xlarge (36 vCPU, 96 GiB)
- c5n.18xlarge (72 vCPU, 192 GiB)
- c5n.metal (72 vCPU, 192 GiB)
- c6a.xlarge (4 vCPU, 8 GiB)
- c6a.2xlarge (8 vCPU, 16 GiB)
- c6a.4xlarge (16 vCPU, 32 GiB)
- c6a.8xlarge (32 vCPU, 64 GiB)
- c6a.12xlarge (48 vCPU, 96 GiB)
- c6a.16xlarge (64 vCPU, 128 GiB)
- c6a.24xlarge (96 vCPU, 192 GiB)
- c6a.32xlarge (128 vCPU, 256 GiB)
- c6a.48xlarge (192 vCPU, 384 GiB)
- c6i.xlarge (4 vCPU, 8 GiB)
- c6i.2xlarge (8 vCPU, 16 GiB)
- c6i.4xlarge (16 vCPU, 32 GiB)
- c6i.8xlarge (32 vCPU, 64 GiB)
- c6i.12xlarge (48 vCPU, 96 GiB)
- c6i.16xlarge (64 vCPU, 128 GiB)
- c6i.24xlarge (96 vCPU, 192 GiB)
- c6i.32xlarge (128 vCPU, 256 GiB)
- c6i.metal (128 vCPU, 256 GiB)
- c6id.xlarge (4 vCPU, 8 GiB)
- c6id.2xlarge (8 vCPU, 16 GiB)
- c6id.4xlarge (16 vCPU, 32 GiB)
- c6id.8xlarge (32 vCPU, 64 GiB)
- c6id.12xlarge (48 vCPU, 96 GiB)
- c6id.16xlarge (64 vCPU, 128 GiB)
- c6id.24xlarge (96 vCPU, 192 GiB)
- c6id.32xlarge (128 vCPU, 256 GiB)
- c6id.metal (128 vCPU, 256 GiB)
- c6in.12xlarge (48 vCPU, 96 GiB)
- c6in.16xlarge (64 vCPU, 128 GiB)
- c6in.24xlarge (96 vCPU, 192 GiB)
- c6in.2xlarge (8 vCPU, 16 GiB)
- c6in.32xlarge (128 vCPU, 256 GiB)
- c6in.4xlarge (16 vCPU, 32 GiB)
- c6in.8xlarge (32 vCPU, 64 GiB)
- c6in.xlarge (4 vCPU, 8 GiB)
- c7a.xlarge (4 vCPU, 8 GiB)
- c7a.2xlarge (8 vCPU, 16 GiB)
- c7a.4xlarge (16 vCPU, 32 GiB)
- c7a.8xlarge (32 vCPU, 64 GiB)
- c7a.12xlarge (48 vCPU, 96 GiB)
- c7a.16xlarge (64 vCPU, 128 GiB)
- c7a.24xlarge (96 vCPU, 192 GiB)
- c7a.32xlarge (128 vCPU, 256 GiB)
- c7a.48xlarge (192 vCPU, 384 GiB)
- c7a.metal-48xl (192 vCPU, 384 GiB)
- c7i.xlarge (4 vCPU, 8 GiB)
- c7i.2xlarge (8 vCPU, 16 GiB)
- c7i.4xlarge (16 vCPU, 32 GiB)
- c7i.8xlarge (32 vCPU, 64 GiB)
- c7i.12xlarge (48 vCPU, 96 GiB)
- c7i.16xlarge (64 vCPU, 128 GiB)
- c7i.24xlarge (96 vCPU, 192 GiB)
- c7i.48xlarge (192 vCPU, 384 GiB)
- c7i.metal-24xl (96 vCPU, 192 GiB)
- c7i.metal-48xl (192 vCPU, 384 GiB)
- hpc6a.48xlarge (96 vCPU, 384 GiB)
- hpc6id.32xlarge (64 vCPU, 1024 GiB)
- hpc7a.12xlarge (24 vCPU, 768 GiB)
- hpc7a.24xlarge (48 vCPU, 768 GiB)
- hpc7a.48xlarge (96 vCPU, 768 GiB)
- hpc7a.96xlarge (192 vCPU, 768 GiB)
- m5zn.12xlarge (48 vCPU, 192 GiB)
- m5zn.2xlarge (8 vCPU, 32 GiB)
- m5zn.3xlarge (16 vCPU, 48 GiB)
- m5zn.6xlarge (32 vCPU, 96 GiB)
- m5zn.xlarge (4 vCPU, 16 GiB)
Example 2.18. Storage optimized
- c5ad.12xlarge (48 vCPU, 96 GiB)
- c5ad.16xlarge (64 vCPU, 128 GiB)
- c5ad.24xlarge (96 vCPU, 192 GiB)
- c5ad.2xlarge (8 vCPU, 16 GiB)
- c5ad.4xlarge (16 vCPU, 32 GiB)
- c5ad.8xlarge (32 vCPU, 64 GiB)
- c5ad.xlarge (4 vCPU, 8 GiB)
- i3.xlarge (4 vCPU, 30.5 GiB)
- i3.2xlarge (8 vCPU, 61 GiB)
- i3.4xlarge (16 vCPU, 122 GiB)
- i3.8xlarge (32 vCPU, 244 GiB)
- i3.16xlarge (64 vCPU, 488 GiB)
- i3.metal (72† vCPU, 512 GiB)
- i3en.xlarge (4 vCPU, 32 GiB)
- i3en.2xlarge (8 vCPU, 64 GiB)
- i3en.3xlarge (12 vCPU, 96 GiB)
- i3en.6xlarge (24 vCPU, 192 GiB)
- i3en.12xlarge (48 vCPU, 384 GiB)
- i3en.24xlarge (96 vCPU, 768 GiB)
- i3en.metal (96 vCPU, 768 GiB)
- i4i.xlarge (4 vCPU, 32 GiB)
- i4i.2xlarge (8 vCPU, 64 GiB)
- i4i.4xlarge (16 vCPU, 128 GiB)
- i4i.8xlarge (32 vCPU, 256 GiB)
- i4i.12xlarge (48 vCPU, 384 GiB)
- i4i.16xlarge (64 vCPU, 512 GiB)
- i4i.24xlarge (96 vCPU, 768 GiB)
- i4i.32xlarge (128 vCPU, 1,024 GiB)
- i4i.metal (128 vCPU, 1,024 GiB)
- m5ad.xlarge (4 vCPU, 16 GiB)
- m5ad.2xlarge (8 vCPU, 32 GiB)
- m5ad.4xlarge (16 vCPU, 64 GiB)
- m5ad.8xlarge (32 vCPU, 128 GiB)
- m5ad.12xlarge (48 vCPU, 192 GiB)
- m5ad.16xlarge (64 vCPU, 256 GiB)
- m5ad.24xlarge (96 vCPU, 384 GiB)
- m5d.xlarge (4 vCPU, 16 GiB)
- m5d.2xlarge (8 vCPU, 32 GiB)
- m5d.4xlarge (16 vCPU, 64 GiB)
- m5d.8xlarge (32 vCPU, 28 GiB)
- m5d.12xlarge (48 vCPU, 192 GiB)
- m5d.16xlarge (64 vCPU, 256 GiB)
- m5d.24xlarge (96 vCPU, 384 GiB)
† This instance type offers 72 logical processors on 36 physical cores.
Virtual instance types initialize faster than ".metal" instance types.
Example 2.19. High memory
- u-3tb1.56xlarge (224 vCPU, 3,072 GiB)
- u-6tb1.56xlarge (224 vCPU, 6,144 GiB)
- u-6tb1.112xlarge (448 vCPU, 6,144 GiB)
- u-6tb1.metal (448 vCPU, 6,144 GiB)
- u-9tb1.112xlarge (448 vCPU, 9,216 GiB)
- u-9tb1.metal (448 vCPU, 9,216 GiB)
- u-12tb1.112xlarge (448 vCPU, 12,288 GiB)
- u-12tb1.metal (448 vCPU, 12,288 GiB)
- u-18tb1.metal (448 vCPU, 18,432 GiB)
- u-24tb1.metal (448 vCPU, 24,576 GiB)
- u-24tb1.112xlarge (448 vCPU, 24,576 GiB)
Example 2.20. Network Optimized
- c5n.xlarge (4 vCPU, 10.5 GiB)
- c5n.2xlarge (8 vCPU, 21 GiB)
- c5n.4xlarge (16 vCPU, 42 GiB)
- c5n.9xlarge (36 vCPU, 96 GiB)
- c5n.18xlarge (72 vCPU, 192 GiB)
- m5dn.xlarge (4 vCPU, 16 GiB)
- m5dn.2xlarge (8 vCPU, 32 GiB)
- m5dn.4xlarge (16 vCPU, 64 GiB)
- m5dn.8xlarge (32 vCPU, 128 GiB)
- m5dn.12xlarge (48 vCPU, 192 GiB)
- m5dn.16xlarge (64 vCPU, 256 GiB)
- m5dn.24xlarge (96 vCPU, 384 GiB)
- m5n.12xlarge (48 vCPU, 192 GiB)
- m5n.16xlarge (64 vCPU, 256 GiB)
- m5n.24xlarge (96 vCPU, 384 GiB)
- m5n.xlarge (4 vCPU, 16 GiB)
- m5n.2xlarge (8 vCPU, 32 GiB)
- m5n.4xlarge (16 vCPU, 64 GiB)
- m5n.8xlarge (32 vCPU, 128 GiB)
2.7.2. AWS Arm-based Graviton instance types
In addition to x86-based architecture, ROSA with HCP offers the following Arm-based Graviton worker node instance types and sizes:
Graviton instance types are only available for new clusters created after 24 July, 2024.
Example 2.21. General purpose
- a1.xlarge (2 vCPU, 4 GiB)
- a1.2xlarge (4 vCPU, 8 GiB)
- a1.4xlarge (8 vCPU, 16 GiB)
- a1.metal (16 vCPU, 32 GiB)
- m6g.xlarge (2 vCPU, 8 GiB)
- m6g.2xlarge (4 vCPU, 16 GiB)
- m6g.4xlarge (8 vCPU, 32 GiB)
- m6g.8xlarge (32 vCPU, 128 GiB)
- m6g.12xlarge (48 vCPU, 192 GiB)
- m6g.16xlarge (64 vCPU, 256 GiB)
- m6g.metal (64 vCPU, 256 GiB)
- m6gd.xlarge (2 vCPU, 8 GiB)
- m6gd.2xlarge (4 vCPU, 16 GiB)
- m6gd.4xlarge (8 vCPU, 32 GiB)
- m6gd.8xlarge (32 vCPU, 128 GiB)
- m6gd.12xlarge (48 vCPU, 192 GiB)
- m6gd.16xlarge (64 vCPU, 256 GiB)
- m6gd.metal (64 vCPU, 256 GiB)
- m7g.xlarge (2 vCPU, 8 GiB)
- m7g.2xlarge (4 vCPU, 16 GiB)
- m7g.4xlarge (8 vCPU, 32 GiB)
- m7g.8xlarge (32 vCPU, 128 GiB)
- m7g.12xlarge (48 vCPU, 192 GiB)
- m7g.16xlarge (64 vCPU, 256 GiB)
- m7g.metal (64 vCPU, 256 GiB)
- m7gd.2xlarge (4 vCPU, 16 GiB)
- m7gd.4xlarge (8 vCPU, 32 GiB)
- m7gd.8xlarge (32 vCPU, 128 GiB)
- m7gd.12xlarge (48 vCPU, 192 GiB)
- m7gd.16xlarge (64 vCPU, 256 GiB)
- m7gd.xlarge (2 vCPU, 8 GiB)
- m7gd.metal (64 vCPU, 256 GiB)
Example 2.22. Burstable general purpose
- t4g.xlarge (4 vCPU, 16 GiB)
- t4g.2xlarge (8 vCPU, 32 GiB)
Example 2.23. Memory intensive
- x2gd.xlarge (2 vCPU, 64 GiB)
- x2gd.2xlarge (4 vCPU, 128 GiB)
- x2gd.4xlarge (8 vCPU, 256 GiB)
- x2gd.8xlarge (16 vCPU, 512 GiB)
- x2gd.12xlarge (32 vCPU, 768 GiB)
- x2gd.16xlarge (64 vCPU, 1,024 GiB)
- x2gd.metal (64 vCPU, 1,024 GiB)
- x8g.xlarge (4 vCPU, 64 GiB)
- x8g.2xlarge (8 vCPU, 128 GiB)
- x8g.4xlarge (16 vCPU, 256 GiB)
- x8g.8xlarge (32 vCPU, 512 GiB)
- x8g.12xlarge (48 vCPU, 768 GiB)
- x8g.16xlarge (64 vCPU, 1,024 GiB)
- x8g.24xlarge (96 vCPU, 1,536 GiB)
- x8g.48xlarge (192 vCPU, 3,072 GiB)
- x8g.metal-24xl (96 vCPU, 1,536 GiB)
- x8g.metal-48xl (192 vCPU, 3,072 GiB)
Example 2.24. Memory optimized
- r6g.xlarge (4 vCPU, 32 GiB)
- r6g.2xlarge (8 vCPU, 64 GiB)
- r6g.4xlarge (16 vCPU, 128 GiB)
- r6g.8xlarge (32 vCPU, 256 GiB)
- r6g.12xlarge (48 vCPU, 384 GiB)
- r6g.16xlarge (64 vCPU, 512 GiB)
- r6g.metal (64 vCPU, 512 GiB)
- r6gd.xlarge (4 vCPU, 32 GiB)
- r6gd.2xlarge (8 vCPU, 64 GiB)
- r6gd.4xlarge (16 vCPU, 128 GiB)
- r6gd.8xlarge (32 vCPU, 256 GiB)
- r6gd.12xlarge (48 vCPU, 384 GiB)
- r6gd.16xlarge (64 vCPU, 512 GiB)
- r6gd.metal (64 vCPU, 512 GiB)
- r7g.xlarge (4 vCPU, 32 GiB)
- r7g.2xlarge (8 vCPU, 64 GiB)
- r7g.4xlarge (16 vCPU, 128 GiB)
- r7g.8xlarge (32 vCPU, 256 GiB)
- r7g.12xlarge (48 vCPU, 384 GiB)
- r7g.16xlarge (64 vCPU, 512 GiB)
- r7g.metal (64 vCPU, 512 GiB)
- r7gd.xlarge (4 vCPU, 32 GiB)
- r7gd.2xlarge (8 vCPU, 64 GiB)
- r7gd.4xlarge (16 vCPU, 128 GiB)
- r7gd.8xlarge (32 vCPU, 256 GiB)
- r7gd.12xlarge (48 vCPU, 384 GiB)
- r7gd.16xlarge (64 vCPU, 512 GiB)
- r7gd.metal (64 vCPU, 512 GiB)
- r8g.xlarge (4 vCPU, 32 GiB)
- r8g.2xlarge (8 vCPU, 64 GiB)
- r8g.4xlarge (16 vCPU, 128 GiB)
- r8g.8xlarge (32 vCPU, 256 GiB)
- r8g.12xlarge (48 vCPU, 384 GiB)
- r8g.16xlarge (64 vCPU, 512 GiB)
- r8g.24xlarge (96 vCPU, 768 GiB)
- r8g.48xlarge (192 vCPU, 1,536 GiB)
- r8g.metal-24xl (96 vCPU, 768 GiB)
- r8g.metal-48xl (192 vCPU, 1,536 GiB)
Example 2.25. Accelerated computing
- g5g.xlarge (4 vCPU, 8 GiB)
- g5g.2xlarge (8 vCPU, 16 GiB)
- g5g.4xlarge (16 vCPU, 32 GiB)
- g5g.8xlarge (32 vCPU, 64 GiB)
- g5g.16xlarge (64 vCPU, 128 GiB)
- g5g.metal (64 vCPU, 128 GiB)
Example 2.26. Compute optimized
- c6g.xlarge (4 vCPU, 8 GiB)
- c6g.2xlarge (8 vCPU, 16 GiB)
- c6g.4xlarge (16 vCPU, 32 GiB)
- c6g.8xlarge (32 vCPU, 64 GiB)
- c6g.12xlarge (48 vCPU, 96 GiB)
- c6g.16xlarge (64 vCPU, 128 GiB)
- c6g.metal (64 vCPU, 128 GiB)
- c6gd.xlarge (4 vCPU, 8 GiB)
- c6gd.2xlarge (8 vCPU, 16 GiB)
- c6gd.4xlarge (16 vCPU, 32 GiB)
- c6gd.8xlarge (32 vCPU, 64 GiB)
- c6gd.12xlarge (48 vCPU, 96 GiB)
- c6gd.16xlarge (64 vCPU, 128 GiB)
- c6gd.metal (64 vCPU, 128 GiB)
- c6gn.xlarge (4 vCPU, 8 GiB)
- c6gn.2xlarge (8 vCPU, 16 GiB)
- c6gn.4xlarge (16 vCPU, 32 GiB)
- c6gn.8xlarge (32 vCPU, 64 GiB)
- c6gn.12xlarge (48 vCPU, 96 GiB)
- c6gn.16xlarge (64 vCPU, 128 GiB)
- c7g.xlarge (4 vCPU, 8 GiB)
- c7g.2xlarge (4 vCPU, 8 GiB)
- c7g.4xlarge (16 vCPU, 32 GiB)
- c7g.8xlarge (32 vCPU, 64 GiB)
- c7g.12xlarge (48 vCPU, 96 GiB)
- c7g.16xlarge (64 vCPU, 128 GiB)
- c7g.metal (64 vCPU, 128 GiB)
- c7gd.xlarge (4 vCPU, 8 GiB)
- c7gd.2xlarge (4 vCPU, 8 GiB)
- c7gd.4xlarge (16 vCPU, 32 GiB)
- c7gd.8xlarge (32 vCPU, 64 GiB)
- c7gd.12xlarge (48 vCPU, 96 GiB)
- c7gd.16xlarge (64 vCPU, 128 GiB)
- c7gd.metal (64 vCPU, 128 GiB)
- c7gn.xlarge (4 vCPU, 8 GiB)
- c7gn.2xlarge (8 vCPU, 16 GiB)
- c7gn.4xlarge (16 vCPU, 32 GiB)
- c7gn.8xlarge (32 vCPU, 64 GiB)
- c7gn.12xlarge (48 vCPU, 96 GiB)
- c7gn.16xlarge (64 vCPU, 128 GiB)
- c7gn.metal (64 vCPU, 128 GiB)
Example 2.27. Storage optimized
- i4g.xlarge (4 vCPU, 32 GiB)
- i4g.2xlarge (8 vCPU, 64 GiB)
- i4g.4xlarge (16 vCPU, 128 GiB)
- i4g.8xlarge (32 vCPU, 256 GiB)
- i4g.16xlarge (64 vCPU, 512 GiB)
- is4gen.xlarge (4 vCPU, 16 GiB)
- is4gen.2xlarge (8 vCPU, 32 GiB)
- is4gen.4xlarge (16 vCPU, 64 GiB)
- is4gen.8xlarge (32 vCPU, 128 GiB)
- im4gn.xlarge (4 vCPU, 16 GiB)
- im4gn.2xlarge (8 vCPU, 32 GiB)
- im4gn.4xlarge (16 vCPU, 64 GiB)
- im4gn.8xlarge (32 vCPU, 128 GiB)
- im4gn.16xlarge (64 vCPU, 256 GiB)
Example 2.28. High performance computing (HPC)
- hpc7g.4xlarge (16 vCPU, 128 GiB)
- hpc7g.8xlarge (32 vCPU, 128 GiB)
- hpc7g.16xlarge (64 vCPU, 128 GiB)
Additional resources
2.8. ROSA with HCP update life cycle
2.8.1. Overview
Red Hat provides a published product life cycle for Red Hat OpenShift Service on AWS in order for customers and partners to effectively plan, deploy, and support their applications running on the platform. Red Hat publishes this life cycle to provide as much transparency as possible and might make exceptions from these policies as conflicts arise.
Red Hat OpenShift Service on AWS is a managed instance of Red Hat OpenShift and maintains an independent release schedule. More details about the managed offering can be found in the Red Hat OpenShift Service on AWS service definition. The availability of Security Advisories and Bug Fix Advisories for a specific version are dependent upon the Red Hat OpenShift Container Platform life cycle policy and subject to the Red Hat OpenShift Service on AWS maintenance schedule.
Additional resources
2.8.2. Definitions
| Version format | Major | Minor | Patch | Major.minor.patch |
|---|---|---|---|---|
| x | y | z | x.y.z | |
| Example | 4 | 5 | 21 | 4.5.21 |
- Major releases or X-releases
Referred to only as major releases or X-releases (X.y.z).
Examples
- "Major release 5" → 5.y.z
- "Major release 4" → 4.y.z
- "Major release 3" → 3.y.z
- Minor releases or Y-releases
Referred to only as minor releases or Y-releases (x.Y.z).
Examples
- "Minor release 4" → 4.4.z
- "Minor release 5" → 4.5.z
- "Minor release 6" → 4.6.z
- Patch releases or Z-releases
Referred to only as patch releases or Z-releases (x.y.Z).
Examples
- "Patch release 14 of minor release 5" → 4.5.14
- "Patch release 25 of minor release 5" → 4.5.25
- "Patch release 26 of minor release 6" → 4.6.26
2.8.3. Major versions (X.y.z)
Major versions of Red Hat OpenShift Service on AWS, for example version 4, are supported for one year following the release of a subsequent major version or the retirement of the product.
Example
- If version 5 were made available on Red Hat OpenShift Service on AWS on January 1, version 4 would be allowed to continue running on managed clusters for 12 months, until December 31. After this time, clusters would need to be upgraded or migrated to version 5.
2.8.4. Minor versions (x.Y.z)
Starting with the 4.8 OpenShift Container Platform minor version, Red Hat supports all minor versions for at least a 16 month period following general availability of the given minor version. Patch versions are not affected by the support period.
Customers are notified 60, 30, and 15 days before the end of the support period. Clusters must be upgraded to the latest patch version of the oldest supported minor version before the end of the support period, or Red Hat will automatically upgrade the control plane to the next supported minor version.
Example
- A customer’s cluster is currently running on 4.13.8. The 4.13 minor version became generally available on May 17, 2023.
- On July 19, August 16, and September 2, 2024, the customer is notified that their cluster will enter "Limited Support" status on September 17, 2024 if the cluster has not already been upgraded to a supported minor version.
- The cluster must be upgraded to 4.14 or later by September 17, 2024.
- If the upgrade has not been performed, the cluster’s control plane will be automatically upgraded to 4.14.26, and there will be no automatic upgrades to the cluster’s worker nodes.
Additional resources
2.8.5. Patch versions (x.y.Z)
During the period in which a minor version is supported, Red Hat supports all OpenShift Container Platform patch versions unless otherwise specified.
For reasons of platform security and stability, a patch release may be deprecated, which would prevent installations of that release and trigger mandatory upgrades off that release.
Example
- 4.7.6 is found to contain a critical CVE.
- Any releases impacted by the CVE will be removed from the supported patch release list. In addition, any clusters running 4.7.6 will be scheduled for automatic upgrades within 48 hours.
2.8.6. Limited support status
When a cluster transitions to a Limited Support status, Red Hat no longer proactively monitors the cluster, the SLA is no longer applicable, and credits requested against the SLA are denied. It does not mean that you no longer have product support. In some cases, the cluster can return to a fully-supported status if you remediate the violating factors. However, in other cases, you might have to delete and recreate the cluster.
A cluster might transition to a Limited Support status for many reasons, including the following scenarios:
- If you remove or replace any native Red Hat OpenShift Service on AWS components or any other component that is installed and managed by Red Hat
- If cluster administrator permissions were used, Red Hat is not responsible for any of your or your authorized users’ actions, including those that affect infrastructure services, service availability, or data loss. If Red Hat detects any such actions, the cluster might transition to a Limited Support status. Red Hat notifies you of the status change and you should either revert the action or create a support case to explore remediation steps that might require you to delete and recreate the cluster.
If you have questions about a specific action that might cause a cluster to transition to a Limited Support status or need further assistance, open a support ticket.
2.8.7. Supported versions exception policy
Red Hat reserves the right to add or remove new or existing versions, or delay upcoming minor release versions, that have been identified to have one or more critical production impacting bugs or security issues without advance notice.
2.8.8. Installation policy
While Red Hat recommends installation of the latest support release, Red Hat OpenShift Service on AWS supports installation of any supported release as covered by the preceding policy.
2.8.9. Mandatory upgrades
If a critical or important CVE, or other bug identified by Red Hat, significantly impacts the security or stability of the cluster, the customer must upgrade to the next supported patch release within two business days.
In extreme circumstances and based on Red Hat’s assessment of the CVE criticality to the environment, Red Hat will notify customers that they have two business days to schedule or manually update their cluster to the latest, secure patch release. In the case that an update is not performed after two business days, Red Hat will automatically update the cluster’s control plane to the latest, secure patch release to mitigate potential security breach(es) or instability. Red Hat might, at its own discretion, temporarily delay an automated update if requested by a customer through a support case.
2.8.10. Life cycle dates
| Version | General availability | End of life |
|---|---|---|
| 4.17 | Oct 14, 2024 | Feb 14, 2026 |
| 4.16 | Jul 2, 2024 | Nov 2, 2025 |
| 4.15 | Feb 27, 2024 | Jun 30, 2025 |
| 4.14 | Dec 4, 2023 | May 1, 2025 |
2.9. Understanding security for Red Hat OpenShift Service on AWS
This document details the Red Hat, Amazon Web Services (AWS), and customer security responsibilities for the managed Red Hat OpenShift Service on AWS (ROSA).
Acronyms and terms
- AWS - Amazon Web Services
- CEE - Customer Experience and Engagement (Red Hat Support)
- CI/CD - Continuous Integration / Continuous Delivery
- CVE - Common Vulnerabilities and Exposures
- PVs - Persistent Volumes
- ROSA - Red Hat OpenShift Service on AWS
- SRE - Red Hat Site Reliability Engineering
- VPC - Virtual Private Cloud
2.9.1. Security and regulation compliance
Security and regulation compliance includes tasks such as the implementation of security controls and compliance certification.
2.9.1.1. Data classification
Red Hat defines and follows a data classification standard to determine the sensitivity of data and highlight inherent risk to the confidentiality and integrity of that data while it is collected, used, transmitted, stored, and processed. Customer-owned data is classified at the highest level of sensitivity and handling requirements.
2.9.1.2. Data management
Red Hat OpenShift Service on AWS (ROSA) uses AWS Key Management Service (KMS) to help securely manage keys for encrypted data. These keys are used for control plane, infrastructure, and worker data volumes that are encrypted by default. Persistent volumes (PVs) for customer applications also use AWS KMS for key management.
When a customer deletes their ROSA cluster, all cluster data is permanently deleted, including control plane data volumes and customer application data volumes, such as persistent volumes (PV).
2.9.1.3. Vulnerability management
Red Hat performs periodic vulnerability scanning of ROSA using industry standard tools. Identified vulnerabilities are tracked to their remediation according to timelines based on severity. Vulnerability scanning and remediation activities are documented for verification by third-party assessors in the course of compliance certification audits.
2.9.1.4. Network security
2.9.1.4.1. Firewall and DDoS protection
Each ROSA cluster is protected by a secure network configuration using firewall rules for AWS Security Groups. ROSA customers are also protected against DDoS attacks with AWS Shield Standard.
2.9.1.4.2. Private clusters and network connectivity
Customers can optionally configure their ROSA cluster endpoints, such as web console, API, and application router, to be made private so that the cluster control plane and applications are not accessible from the Internet. Red Hat SRE still requires Internet-accessible endpoints that are protected with IP allow-lists.
AWS customers can configure a private network connection to their ROSA cluster through technologies such as AWS VPC peering, AWS VPN, or AWS Direct Connect.
2.9.1.4.3. Cluster network access controls
Fine-grained network access control rules can be configured by customers, on a per-project basis, using NetworkPolicy objects and the OpenShift SDN.
2.9.1.5. Penetration testing
Red Hat performs periodic penetration tests against ROSA. Tests are performed by an independent internal team by using industry standard tools and best practices.
Any issues that may be discovered are prioritized based on severity. Any issues found belonging to open source projects are shared with the community for resolution.
2.9.1.6. Compliance
Red Hat OpenShift Service on AWS follows common industry best practices for security and controls. The certifications are outlined in the following table.
| Compliance | Red Hat OpenShift Service on AWS (ROSA) | Red Hat OpenShift Service on AWS (ROSA) with hosted control planes (HCP) |
|---|---|---|
| HIPAA Qualified[1] | Yes | Yes |
| ISO 27001 | Yes | Yes |
| ISO 27017 | Yes | Yes |
| ISO 27018 | Yes | Yes |
| PCI DSS 4.0 | Yes | Yes |
| SOC 1 Type 2 | Yes | Yes |
| SOC 2 Type 2 | Yes | Yes |
| SOC 3 | Yes | Yes |
| FedRAMP High[2] | Yes (GovCloud requisite) | No |
- For more information about Red Hat’s HIPAA Qualified ROSA offerings, see the HIPAA Overview.
- For more information about ROSA on GovCloud, see the FedRAMP Marketplace ROSA Agency and ROSA JAB listings.
Additional resources
- See Red Hat Subprocessor List for information on SRE residency.
- For more information about customer or shared responsibilities, see the ROSA Responsibilities document.
- For more information about ROSA and its components, see the ROSA Service Definition.
2.10. SRE and service account access
Red Hat site reliability engineering (SRE) access to Red Hat OpenShift Service on AWS (ROSA) clusters is outlined through identity and access management.
2.10.1. Identity and access management
Most access by Red Hat SRE teams is done by using cluster Operators through automated configuration management.
Subprocessors
For a list of the available subprocessors, see the Red Hat Subprocessor List on the Red Hat Customer Portal.
2.10.2. SRE cluster access
SRE access to Red Hat OpenShift Service on AWS (ROSA) clusters is controlled through several layers of required authentication, all of which are managed by strict company policy. All authentication attempts to access a cluster and changes made within a cluster are recorded within audit logs, along with the specific account identity of the SRE responsible for those actions. These audit logs help ensure that all changes made by SREs to a customer’s cluster adhere to the strict policies and procedures that make up Red Hat’s managed services guidelines.
The information presented below is an overview of the process an SRE must perform to access a customer’s cluster.
- SRE requests a refreshed ID token from the Red Hat SSO (Cloud Services). This request is authenticated. The token is valid for fifteen minutes. After the token expires, you can refresh the token again and receive a new token. The ability to refresh to a new token is indefinite; however, the ability to refresh to a new token is revoked after 30 days of inactivity.
- SRE connects to the Red Hat VPN. The authentication to the VPN is completed by the Red Hat Corporate Identity and Access Management system (RH IAM). With RH IAM, SREs are multifactor and can be managed internally per organization by groups and existing onboarding and offboarding processes. After an SRE is authenticated and connected, the SRE can access the cloud services fleet management plane. Changes to the cloud services fleet management plane require many layers of approval and are maintained by strict company policy.
- After authorization is complete, the SRE logs into the fleet management plane and receives a service account token that the fleet management plane created. The token is valid for 15 minutes. After the token is no longer valid, it is deleted.
With access granted to the fleet management plane, SRE uses various methods to access clusters, depending on network configuration.
- Accessing a private or public cluster: Request is sent through a specific Network Load Balancer (NLB) by using an encrypted HTTP connection on port 6443.
- Accessing a PrivateLink cluster: Request is sent to the Red Hat Transit Gateway, which then connects to a Red Hat VPC per region. The VPC that receives the request will be dependent on the target private cluster’s region. Within the VPC, there is a private subnet that contains the PrivateLink endpoint to the customer’s PrivateLink cluster.
SREs access ROSA clusters through the web console or command line interface (CLI) tools. Authentication requires multi-factor authentication (MFA) with industry-standard requirements for password complexity and account lockouts. SREs must authenticate as individuals to ensure auditability. All authentication attempts are logged to a Security Information and Event Management (SIEM) system.
SREs access private clusters using an encrypted HTTP connection. Connections are permitted only from a secured Red Hat network using either an IP allowlist or a private cloud provider link.
Figure 2.1. SRE access to ROSA clusters
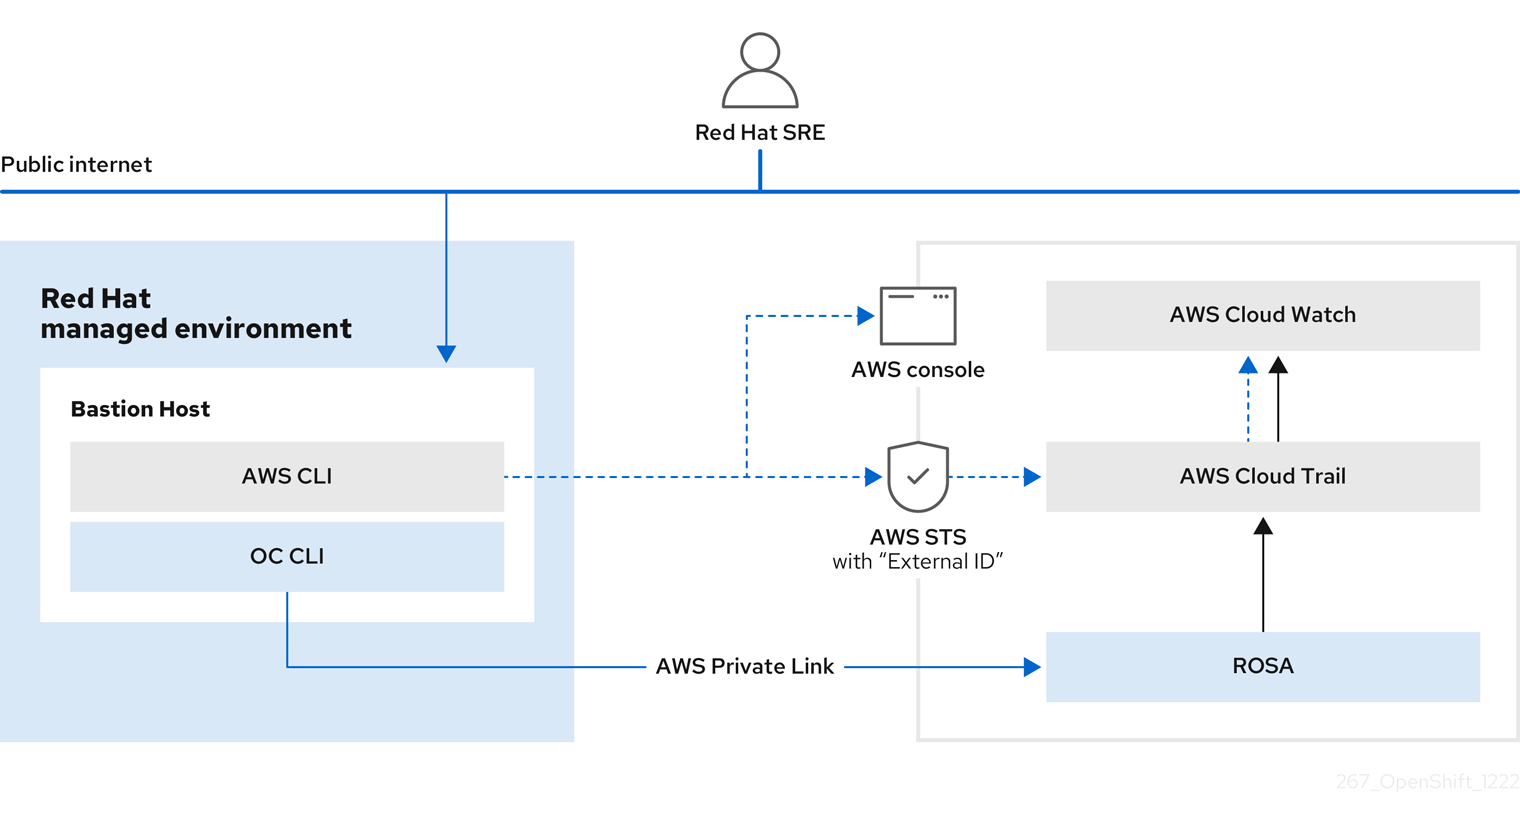
2.10.2.1. Privileged access controls in ROSA
SRE adheres to the principle of least privilege when accessing ROSA and AWS components. There are four basic categories of manual SRE access:
- SRE admin access through the Red Hat Portal with normal two-factor authentication and no privileged elevation.
- SRE admin access through the Red Hat corporate SSO with normal two-factor authentication and no privileged elevation.
- OpenShift elevation, which is a manual elevation using Red Hat SSO. Access is limited to 2 hours, is fully audited, and requires management approval.
- AWS access or elevation, which is a manual elevation for AWS console or CLI access. Access is limited to 60 minutes and is fully audited.
Each of these access types have different levels of access to components:
| Component | Typical SRE admin access (Red Hat Portal) | Typical SRE admin access (Red Hat SSO) | OpenShift elevation | Cloud provider access or elevation |
|---|---|---|---|---|
| OpenShift Cluster Manager | R/W | No access | No access | No access |
| OpenShift console | No access | R/W | R/W | No access |
| Node operating system | No access | A specific list of elevated OS and network permissions. | A specific list of elevated OS and network permissions. | No access |
| AWS Console | No access | No access, but this is the account used to request cloud provider access. | No access | All cloud provider permissions using the SRE identity. |
2.10.2.2. SRE access to AWS accounts
Red Hat personnel do not access AWS accounts in the course of routine Red Hat OpenShift Service on AWS operations. For emergency troubleshooting purposes, the SREs have well-defined and auditable procedures to access cloud infrastructure accounts.
In the isolated backplane flow, SREs request access to a customer’s support role. This request is just-in-time (JIT) processed by the backplane API which dynamically updates the organization role’s permissions to a specific SRE personnel’s account. This SRE’s account is given access to a specific Red Hat customer’s environment. SRE access to a Red Hat customer’s environment is a temporary, short-lived access that is only established at the time of the access request.
Access to the STS token is audit-logged and traceable back to individual users. Both STS and non-STS clusters use the AWS STS service for SRE access. Access control uses the unified backplane flow when the ManagedOpenShift-Technical-Support-Role has the ManagedOpenShift-Support-Access policy attached, and this role is used for administration. Access control uses the isolated backplane flow when the ManagedOpenShift-Support-Role has the ManagedOpenShift-Technical-Support-<org_id> policy attached. See the KCS article Updating Trust Policies for ROSA clusters for more information.
2.10.2.3. SRE STS view of AWS accounts
When SREs are on a VPN through two-factor authentication, they and Red Hat Support can assume the ManagedOpenShift-Support-Role in your AWS account. The ManagedOpenShift-Support-Role has all the permissions necessary for SREs to directly troubleshoot and manage AWS resources. Upon assumption of the ManagedOpenShift-Support-Role, SREs use a AWS Security Token Service (STS) to generate a unique, time-expiring URL to the customer’s AWS web UI for their account. SREs can then perform multiple troubleshooting actions, which include:
- Viewing CloudTrail logs
- Shutting down a faulty EC2 Instance
All activities performed by SREs arrive from Red Hat IP addresses and are logged to CloudTrail to allow you to audit and review all activity. This role is only used in cases where access to AWS services is required to assist you. The majority of permissions are read-only. However, a select few permissions have more access, including the ability to reboot an instance or spin up a new instance. SRE access is limited to the policy permissions attached to the ManagedOpenShift-Support-Role.
For a full list of permissions, see sts_support_permission_policy.json in the About IAM resources user guide.
2.10.2.4. SRE access through PrivateLink VPC endpoint service
PrivateLink VPC endpoint service is created as part of the ROSA cluster creation.
When you have a PrivateLink ROSA cluster, its Kubernetes API Server is exposed through a load balancer that can only be accessed from within the VPC by default. Red Hat site reliability engineering (SRE) can connect to this load balancer through a VPC Endpoint Service that has an associated VPC Endpoint in a Red Hat-owned AWS account. This endpoint service contains the name of the cluster, which is also in the ARN.
Under the Allow principals tab, a Red Hat-owned AWS account is listed. This specific user ensures that other entities cannot create VPC Endpoint connections to the PrivateLink cluster’s Kubernetes API Server.
When Red Hat SREs access the API, this fleet management plane can connect to the internal API through the VPC endpoint service.
2.10.3. Red Hat support access
Members of the Red Hat Customer Experience and Engagement (CEE) team typically have read-only access to parts of the cluster. Specifically, CEE has limited access to the core and product namespaces and does not have access to the customer namespaces.
| Role | Core namespace | Layered product namespace | Customer namespace | AWS account* |
|---|---|---|---|---|
| OpenShift SRE - Normal operations [1] | Read: All Write: Very limited | Read: All Write: None | Read: None Write: None | Read: None Write: None |
| OpenShift SRE - Elevated Access [2] (Gated by Approved Access) | Read: All Write: All | Read: All Write: All | Read: All Write: All | Read: All Write: All |
| CEE | Read: All Write: None | Read: All Write: None | Read: None Write: None | Read: None Write: None |
| Customer administrator | Read: None Write: None | Read: None Write: None | Read: All Write: All | Read: All Write: All |
| Customer user | Read: None Write: None | Read: None Write: None | Read: Limited [3] Write: Limited [3] | Read: None Write: None |
| Everybody else | Read: None Write: None | Read: None Write: None | Read: None Write: None | Read: None Write: None |
- Limited to addressing common use cases such as failing deployments, upgrading a cluster, and replacing bad worker nodes.
-
Elevated access gives SRE the access levels of a
cluster-adminrole and is gated by Approved Access. For more information, see "Default cluster roles" and "Approved Access". - Limited to what is granted through RBAC by the Customer Administrator and namespaces created by the user.
Additional resources
2.10.4. Customer access
Customer access is limited to namespaces created by the customer and permissions that are granted using RBAC by the Customer Administrator role. Access to the underlying infrastructure or product namespaces is generally not permitted without cluster-admin access. For more information about customer access and authentication, see the "Understanding Authentication" section of the documentation.
2.10.5. Access approval and review
New SRE user access requires management approval. Separated or transferred SRE accounts are removed as authorized users through an automated process. Additionally, the SRE performs periodic access review, including management sign-off of authorized user lists.
The access and identity authorization table includes responsibilities for managing authorized access to clusters, applications, and infrastructure resources. This includes tasks such as providing access control mechanisms, authentication, authorization, and managing access to resources.
| Resource | Service responsibilities | Customer responsibilities |
|---|---|---|
| Logging | Red Hat
|
|
| Application networking | Red Hat
|
|
| Cluster networking | Red Hat
|
|
| Virtual networking management | Red Hat
|
|
| Virtual storage management | Red Hat
|
|
| Virtual compute management | Red Hat
|
|
| AWS software (public AWS services) | AWS Compute: Provide the Amazon EC2 service, used for ROSA control plane, infrastructure, and worker nodes. Storage: Provide Amazon EBS, used to allow ROSA to provision local node storage and persistent volume storage for the cluster. Storage: Provide Amazon S3, used for the service’s built-in image registry. Networking: Provide AWS Identity and Access Management (IAM), used by customers to control access to ROSA resources running on customer accounts. |
|
| Hardware and AWS global infrastructure | AWS
|
|
2.10.6. How service accounts assume AWS IAM roles in SRE owned projects
When you install a Red Hat OpenShift Service on AWS cluster that uses the AWS Security Token Service (STS), cluster-specific Operator AWS Identity and Access Management (IAM) roles are created. These IAM roles permit the Red Hat OpenShift Service on AWS cluster Operators to run core OpenShift functionality.
Cluster Operators use service accounts to assume IAM roles. When a service account assumes an IAM role, temporary STS credentials are provided for the service account to use in the cluster Operator’s pod. If the assumed role has the necessary AWS privileges, the service account can run AWS SDK operations in the pod.
Workflow for assuming AWS IAM roles in SRE owned projects
The following diagram illustrates the workflow for assuming AWS IAM roles in SRE owned projects:
Figure 2.2. Workflow for assuming AWS IAM roles in SRE owned projects
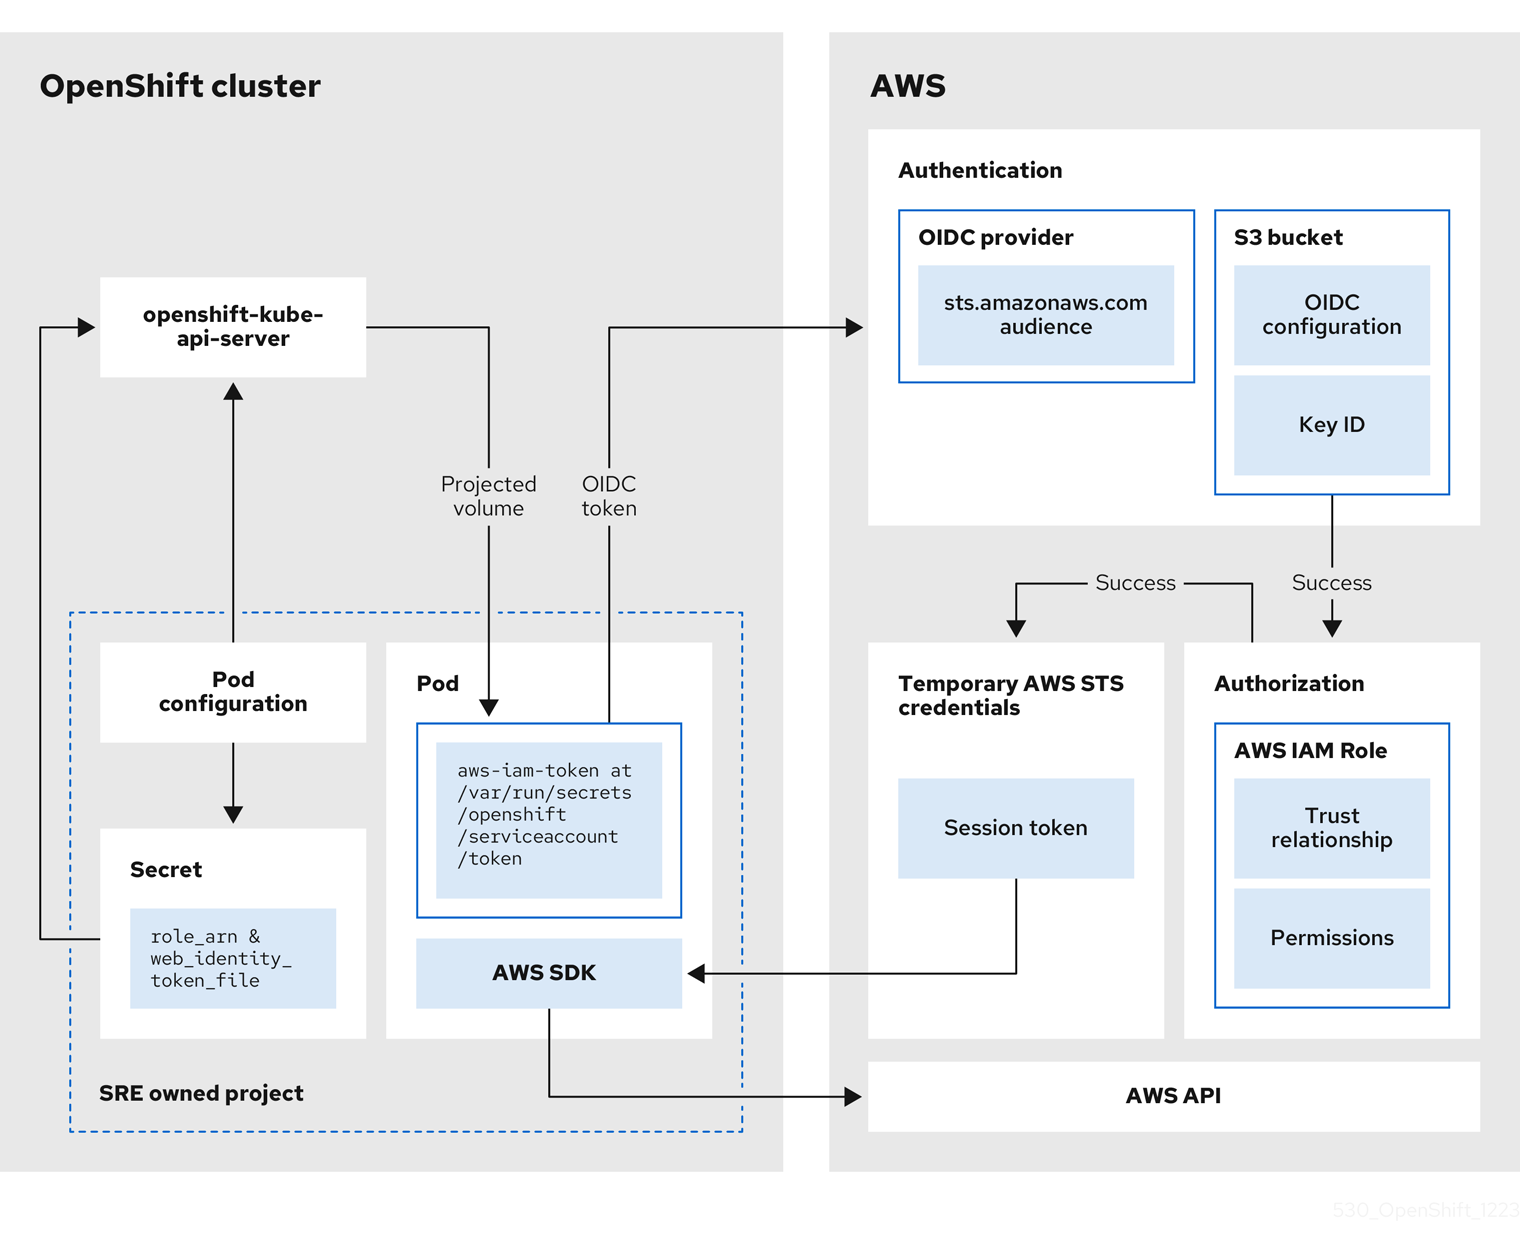
The workflow has the following stages:
Within each project that a cluster Operator runs, the Operator’s deployment spec has a volume mount for the projected service account token, and a secret containing AWS credential configuration for the pod. The token is audience-bound and time-bound. Every hour, Red Hat OpenShift Service on AWS generates a new token, and the AWS SDK reads the mounted secret containing the AWS credential configuration. This configuration has a path to the mounted token and the AWS IAM Role ARN. The secret’s credential configuration includes the following:
-
An
$AWS_ARN_ROLEvariable that has the ARN for the IAM role that has the permissions required to run AWS SDK operations. -
An
$AWS_WEB_IDENTITY_TOKEN_FILEvariable that has the full path in the pod to the OpenID Connect (OIDC) token for the service account. The full path is/var/run/secrets/openshift/serviceaccount/token.
-
An
-
When a cluster Operator needs to assume an AWS IAM role to access an AWS service (such as EC2), the AWS SDK client code running on the Operator invokes the
AssumeRoleWithWebIdentityAPI call. The OIDC token is passed from the pod to the OIDC provider. The provider authenticates the service account identity if the following requirements are met:
- The identity signature is valid and signed by the private key.
The
sts.amazonaws.comaudience is listed in the OIDC token and matches the audience configured in the OIDC provider.NoteIn Red Hat OpenShift Service on AWS with STS clusters, the OIDC provider is created during install and set as the service account issuer by default. The
sts.amazonaws.comaudience is set by default in the OIDC provider.- The OIDC token has not expired.
- The issuer value in the token has the URL for the OIDC provider.
- If the project and service account are in the scope of the trust policy for the IAM role that is being assumed, then authorization succeeds.
- After successful authentication and authorization, temporary AWS STS credentials in the form of an AWS access token, secret key, and session token are passed to the pod for use by the service account. By using the credentials, the service account is temporarily granted the AWS permissions enabled in the IAM role.
- When the cluster Operator runs, the Operator that is using the AWS SDK in the pod consumes the secret that has the path to the projected service account and AWS IAM Role ARN to authenticate against the OIDC provider. The OIDC provider returns temporary STS credentials for authentication against the AWS API.
Additional resources
- For more information about the AWS IAM roles used by the cluster Operators, see Cluster-specific Operator IAM role reference.
- For more information about the policies and permissions that the cluster Operators require, see Methods of account-wide role creation.
Chapter 3. Required IAM resources for STS clusters
To deploy a Red Hat OpenShift Service on AWS (ROSA) cluster that uses the AWS Security Token Service (STS), you must create the following AWS Identity Access Management (IAM) resources:
- Specific account-wide IAM roles and policies that provide the STS permissions required for ROSA support, installation, control plane, and compute functionality. This includes account-wide Operator policies.
- Cluster-specific Operator IAM roles that permit the ROSA cluster Operators to carry out core OpenShift functionality.
- An OpenID Connect (OIDC) provider that the cluster Operators use to authenticate.
If you deploy and manage your cluster using OpenShift Cluster Manager, you must create the following additional resources:
- An OpenShift Cluster Manager IAM role to complete the installation on your cluster.
- A user role without any permissions to verify your AWS account identity.
This document provides reference information about the IAM resources that you must deploy when you create a ROSA cluster that uses STS. It also includes the aws CLI commands that are generated when you use manual mode with the rosa create command.
Additional resources
3.1. OpenShift Cluster Manager roles and permissions
If you create ROSA clusters by using OpenShift Cluster Manager, you must have the following AWS IAM roles linked to your AWS account to create and manage the clusters. For more information about linking your IAM roles to your AWS account, see Associating your AWS account.
These AWS IAM roles are as follows:
-
The ROSA user role (
user-role) is an AWS role used by Red Hat to verify the customer’s AWS identity. This role has no additional permissions, and the role has a trust relationship with the Red Hat installer account. An
ocm-roleresource grants the required permissions for installation of ROSA clusters in OpenShift Cluster Manager. You can apply basic or administrative permissions to theocm-roleresource. If you create an administrativeocm-roleresource, OpenShift Cluster Manager can create the needed AWS Operator roles and OpenID Connect (OIDC) provider. This IAM role also creates a trust relationship with the Red Hat installer account as well.NoteThe
ocm-roleIAM resource refers to the combination of the IAM role and the necessary policies created with it.
You must create this user role as well as an administrative ocm-role resource, if you want to use the auto mode in OpenShift Cluster Manager to create your Operator role policies and OIDC provider.
3.1.1. Understanding the OpenShift Cluster Manager role
Creating ROSA clusters in OpenShift Cluster Manager require an ocm-role IAM role. The basic ocm-role IAM role permissions let you to perform cluster maintenance within OpenShift Cluster Manager. To automatically create the operator roles and OpenID Connect (OIDC) provider, you must add the --admin option to the rosa create command. This command creates an ocm-role resource with additional permissions needed for administrative tasks.
This elevated IAM role allows OpenShift Cluster Manager to automatically create the cluster-specific Operator roles and OIDC provider during cluster creation. For more information about this automatic role and policy creation, see the "Methods of account-wide role creation" link in Additional resources.
3.1.1.1. Understanding the user role
In addition to an ocm-role IAM role, you must create a user role so that Red Hat OpenShift Service on AWS can verify your AWS identity. This role has no permissions, and it is only used to create a trust relationship between the installer account and your ocm-role resources.
The following tables show the associated basic and administrative permissions for the ocm-role resource.
| Resource | Description |
|---|---|
|
| This permission allows the basic role to retrieve information about the specified OpenID Connect (OIDC) provider. |
|
| This permission allows the basic role to retrieve any information for a specified role. Some of the data returned include the role’s path, GUID, ARN, and the role’s trust policy that grants permission to assume the role. |
|
| This permission allows the basic role to list the roles within a path prefix. |
|
| This permission allows the basic role to list the tags on a specified role. |
|
| This permission allows the basic role to return information about all of the enabled regions on your account. |
|
| This permission allows the basic role to return information about all of your route tables. |
|
| This permission allows the basic role to return information about all of your subnets. |
|
| This permission allows the basic role to return information about all of your virtual private clouds (VPCs). |
|
| This permission allows the basic role to retrieve temporary security credentials to access AWS resources that are beyond its normal permissions. |
|
| This permission allows the basic role to retrieve temporary security credentials for users authenticated their account with a web identity provider. |
| Resource | Description |
|---|---|
|
| This permission allows the admin role to attach a specified policy to the desired IAM role. |
|
| This permission creates a resource that describes an identity provider, which supports OpenID Connect (OIDC). When you create an OIDC provider with this permission, this provider establishes a trust relationship between the provider and AWS. |
|
| This permission allows the admin role to create a role for your AWS account. |
|
| This permission allows the admin role to list any policies associated with your AWS account. |
|
| This permission allows the admin role to list any tags on a designated policy. |
|
| This permission allows the admin role to change the permissions boundary for a user based on a specified policy. |
|
| This permission allows the admin role to add tags to an IAM role. |
Additional resources
Creating an ocm-role IAM role
You create your ocm-role IAM roles by using the command-line interface (CLI).
Prerequisites
- You have an AWS account.
- You have Red Hat Organization Administrator privileges in the OpenShift Cluster Manager organization.
- You have the permissions required to install AWS account-wide roles.
-
You have installed and configured the latest Red Hat OpenShift Service on AWS (ROSA) CLI,
rosa, on your installation host.
Procedure
To create an ocm-role IAM role with basic privileges, run the following command:
$ rosa create ocm-role
To create an ocm-role IAM role with admin privileges, run the following command:
$ rosa create ocm-role --admin
This command allows you to create the role by specifying specific attributes. The following example output shows the "auto mode" selected, which lets the ROSA CLI (
rosa) create your Operator roles and policies. See "Methods of account-wide role creation" for more information.
Example output
I: Creating ocm role
? Role prefix: ManagedOpenShift 1
? Enable admin capabilities for the OCM role (optional): No 2
? Permissions boundary ARN (optional): 3
? Role Path (optional): 4
? Role creation mode: auto 5
I: Creating role using 'arn:aws:iam::<ARN>:user/<UserName>'
? Create the 'ManagedOpenShift-OCM-Role-182' role? Yes 6
I: Created role 'ManagedOpenShift-OCM-Role-182' with ARN  'arn:aws:iam::<ARN>:role/ManagedOpenShift-OCM-Role-182'
I: Linking OCM role
? OCM Role ARN: arn:aws:iam::<ARN>:role/ManagedOpenShift-OCM-Role-182 7
? Link the 'arn:aws:iam::<ARN>:role/ManagedOpenShift-OCM-Role-182' role with organization '<AWS ARN>'? Yes 8
I: Successfully linked role-arn 'arn:aws:iam::<ARN>:role/ManagedOpenShift-OCM-Role-182' with organization account '<AWS ARN>'
- 1
- A prefix value for all of the created AWS resources. In this example,
ManagedOpenShiftprepends all of the AWS resources. - 2
- Choose if you want this role to have the additional admin permissions.Note
You do not see this prompt if you used the
--adminoption. - 3
- The Amazon Resource Name (ARN) of the policy to set permission boundaries.
- 4
- Specify an IAM path for the user name.
- 5
- Choose the method to create your AWS roles. Using
auto, the ROSA CLI generates and links the roles and policies. In theautomode, you receive some different prompts to create the AWS roles. - 6
- The
automethod asks if you want to create a specificocm-roleusing your prefix. - 7
- Confirm that you want to associate your IAM role with your OpenShift Cluster Manager.
- 8
- Links the created role with your AWS organization.
AWS IAM roles link to your AWS account to create and manage the clusters. For more information about linking your IAM roles to your AWS account, see Associating your AWS account.
3.2. Account-wide IAM role and policy reference
This section provides details about the account-wide IAM roles and policies that are required for ROSA deployments that use STS, including the Operator policies. It also includes the JSON files that define the policies.
The account-wide roles and policies are specific to an Red Hat OpenShift Service on AWS minor release version, for example Red Hat OpenShift Service on AWS 4, and are compatible with earlier versions. You can minimize the required STS resources by reusing the account-wide roles and policies for multiple clusters of the same minor version, regardless of their patch version.
3.2.1. Methods of account-wide role creation
You can create account-wide roles by using the Red Hat OpenShift Service on AWS (ROSA) CLI, rosa, or the OpenShift Cluster Manager guided installation. You can create the roles manually or by using an automatic process that uses predefined names for these roles and policies.
Manual ocm-role resource creation
You can use the manual creation method if you have the necessary CLI access to create these roles on your system. You can run this option in your desired CLI tool or from OpenShift Cluster Manager. After you start the manual creation process, the CLI presents a series of commands for you to run that create the roles and link them to the needed policies.
Automatic ocm-role resource creation
If you created an ocm-role resource with administrative permissions, you can use the automatic creation method from OpenShift Cluster Manager. The ROSA CLI does not require that you have this admin ocm-role IAM resource to automatically create these roles and policies. Selecting this method creates the roles and policies that uses the default names.
If you use the ROSA guided installation on OpenShift Cluster Manager, you must have created an ocm-role resource with administrative permissions in the first step of the guided cluster installation. Without this role, you cannot use the automatic Operator role and policy creation option, but you can still create the cluster and its roles and policies with the manual process.
The account number present in the sts_installer_trust_policy.json and sts_support_trust_policy.json samples represents the Red Hat account that is allowed to assume the required roles.
| Resource | Description |
|---|---|
|
| An IAM role used by the ROSA installer. |
|
| An IAM policy that provides the ROSA installer with the permissions required to complete cluster installation tasks. |
Example 3.1. sts_installer_trust_policy.json
{
    "Version": "2012-10-17",
    "Statement": [
        {
            "Effect": "Allow",
            "Principal": {
                "AWS": [
                    "arn:aws:iam::%{aws_account_id}:role/RH-Managed-OpenShift-Installer"
                ]
            },
            "Action": [
                "sts:AssumeRole"
            ]
        }
    ]
}
Example 3.2. sts_installer_permission_policy.json
{
    "Version": "2012-10-17",
    "Statement": [
        {
            "Effect": "Allow",
            "Action": [
                "autoscaling:DescribeAutoScalingGroups",
                "ec2:AllocateAddress",
                "ec2:AssociateAddress",
                "ec2:AssociateDhcpOptions",
                "ec2:AssociateRouteTable",
                "ec2:AttachInternetGateway",
                "ec2:AttachNetworkInterface",
                "ec2:AuthorizeSecurityGroupEgress",
                "ec2:AuthorizeSecurityGroupIngress",
                "ec2:CopyImage",
                "ec2:CreateDhcpOptions",
                "ec2:CreateInternetGateway",
                "ec2:CreateNatGateway",
                "ec2:CreateNetworkInterface",
                "ec2:CreateRoute",
                "ec2:CreateRouteTable",
                "ec2:CreateSecurityGroup",
                "ec2:CreateSubnet",
                "ec2:CreateTags",
                "ec2:CreateVolume",
                "ec2:CreateVpc",
                "ec2:CreateVpcEndpoint",
                "ec2:DeleteDhcpOptions",
                "ec2:DeleteInternetGateway",
                "ec2:DeleteNatGateway",
                "ec2:DeleteNetworkInterface",
                "ec2:DeleteRoute",
                "ec2:DeleteRouteTable",
                "ec2:DeleteSecurityGroup",
                "ec2:DeleteSnapshot",
                "ec2:DeleteSubnet",
                "ec2:DeleteTags",
                "ec2:DeleteVolume",
                "ec2:DeleteVpc",
                "ec2:DeleteVpcEndpoints",
                "ec2:DeregisterImage",
                "ec2:DescribeAccountAttributes",
                "ec2:DescribeAddresses",
                "ec2:DescribeAvailabilityZones",
                "ec2:DescribeDhcpOptions",
                "ec2:DescribeImages",
                "ec2:DescribeInstanceAttribute",
                "ec2:DescribeInstanceCreditSpecifications",
                "ec2:DescribeInstances",
                "ec2:DescribeInstanceStatus",
                "ec2:DescribeInstanceTypeOfferings",
                "ec2:DescribeInstanceTypes",
                "ec2:DescribeInternetGateways",
                "ec2:DescribeKeyPairs",
                "ec2:DescribeNatGateways",
                "ec2:DescribeNetworkAcls",
                "ec2:DescribeNetworkInterfaces",
                "ec2:DescribePrefixLists",
                "ec2:DescribeRegions",
                "ec2:DescribeReservedInstancesOfferings",
                "ec2:DescribeRouteTables",
                "ec2:DescribeSecurityGroups",
                "ec2:DescribeSecurityGroupRules",
                "ec2:DescribeSubnets",
                "ec2:DescribeTags",
                "ec2:DescribeVolumes",
                "ec2:DescribeVpcAttribute",
                "ec2:DescribeVpcClassicLink",
                "ec2:DescribeVpcClassicLinkDnsSupport",
                "ec2:DescribeVpcEndpoints",
                "ec2:DescribeVpcs",
                "ec2:DetachInternetGateway",
                "ec2:DisassociateRouteTable",
                "ec2:GetConsoleOutput",
                "ec2:GetEbsDefaultKmsKeyId",
                "ec2:ModifyInstanceAttribute",
                "ec2:ModifyNetworkInterfaceAttribute",
                "ec2:ModifySubnetAttribute",
                "ec2:ModifyVpcAttribute",
                "ec2:ReleaseAddress",
                "ec2:ReplaceRouteTableAssociation",
                "ec2:RevokeSecurityGroupEgress",
                "ec2:RevokeSecurityGroupIngress",
                "ec2:RunInstances",
                "ec2:StartInstances",
                "ec2:StopInstances",
                "ec2:TerminateInstances",
                "elasticloadbalancing:AddTags",
                "elasticloadbalancing:ApplySecurityGroupsToLoadBalancer",
                "elasticloadbalancing:AttachLoadBalancerToSubnets",
                "elasticloadbalancing:ConfigureHealthCheck",
                "elasticloadbalancing:CreateListener",
                "elasticloadbalancing:CreateLoadBalancer",
                "elasticloadbalancing:CreateLoadBalancerListeners",
                "elasticloadbalancing:CreateTargetGroup",
                "elasticloadbalancing:DeleteLoadBalancer",
                "elasticloadbalancing:DeleteTargetGroup",
                "elasticloadbalancing:DeregisterInstancesFromLoadBalancer",
                "elasticloadbalancing:DeregisterTargets",
                "elasticloadbalancing:DescribeAccountLimits",
                "elasticloadbalancing:DescribeInstanceHealth",
                "elasticloadbalancing:DescribeListeners",
                "elasticloadbalancing:DescribeLoadBalancerAttributes",
                "elasticloadbalancing:DescribeLoadBalancers",
                "elasticloadbalancing:DescribeTags",
                "elasticloadbalancing:DescribeTargetGroupAttributes",
                "elasticloadbalancing:DescribeTargetGroups",
                "elasticloadbalancing:DescribeTargetHealth",
                "elasticloadbalancing:ModifyLoadBalancerAttributes",
                "elasticloadbalancing:ModifyTargetGroup",
                "elasticloadbalancing:ModifyTargetGroupAttributes",
                "elasticloadbalancing:RegisterInstancesWithLoadBalancer",
                "elasticloadbalancing:RegisterTargets",
                "elasticloadbalancing:SetLoadBalancerPoliciesOfListener",
                "elasticloadbalancing:SetSecurityGroups",
                "iam:AddRoleToInstanceProfile",
                "iam:CreateInstanceProfile",
                "iam:DeleteInstanceProfile",
                "iam:GetInstanceProfile",
                "iam:TagInstanceProfile",
                "iam:GetRole",
                "iam:GetRolePolicy",
                "iam:GetUser",
                "iam:ListAttachedRolePolicies",
                "iam:ListInstanceProfiles",
                "iam:ListInstanceProfilesForRole",
                "iam:ListRolePolicies",
                "iam:ListRoles",
                "iam:ListUserPolicies",
                "iam:ListUsers",
                "iam:PassRole",
                "iam:RemoveRoleFromInstanceProfile",
                "iam:SimulatePrincipalPolicy",
                "iam:TagRole",
                "iam:UntagRole",
                "route53:ChangeResourceRecordSets",
                "route53:ChangeTagsForResource",
                "route53:CreateHostedZone",
                "route53:DeleteHostedZone",
                "route53:GetAccountLimit",
                "route53:GetChange",
                "route53:GetHostedZone",
                "route53:ListHostedZones",
                "route53:ListHostedZonesByName",
                "route53:ListResourceRecordSets",
                "route53:ListTagsForResource",
                "route53:UpdateHostedZoneComment",
                "s3:CreateBucket",
                "s3:DeleteBucket",
                "s3:DeleteObject",
                "s3:DeleteObjectVersion",
                "s3:GetAccelerateConfiguration",
                "s3:GetBucketAcl",
                "s3:GetBucketCORS",
                "s3:GetBucketLocation",
                "s3:GetBucketLogging",
                "s3:GetBucketObjectLockConfiguration",
                "s3:GetBucketPolicy",
                "s3:GetBucketRequestPayment",
                "s3:GetBucketTagging",
                "s3:GetBucketVersioning",
                "s3:GetBucketWebsite",
                "s3:GetEncryptionConfiguration",
                "s3:GetLifecycleConfiguration",
                "s3:GetObject",
                "s3:GetObjectAcl",
                "s3:GetObjectTagging",
                "s3:GetObjectVersion",
                "s3:GetReplicationConfiguration",
                "s3:ListBucket",
                "s3:ListBucketVersions",
                "s3:PutBucketAcl",
                "s3:PutBucketPolicy",
                "s3:PutBucketTagging",
                "s3:PutBucketVersioning",
                "s3:PutEncryptionConfiguration",
                "s3:PutObject",
                "s3:PutObjectAcl",
                "s3:PutObjectTagging",
                "servicequotas:GetServiceQuota",
                "servicequotas:ListAWSDefaultServiceQuotas",
                "sts:AssumeRole",
                "sts:AssumeRoleWithWebIdentity",
                "sts:GetCallerIdentity",
                "tag:GetResources",
                "tag:UntagResources",
                "ec2:CreateVpcEndpointServiceConfiguration",
                "ec2:DeleteVpcEndpointServiceConfigurations",
                "ec2:DescribeVpcEndpointServiceConfigurations",
                "ec2:DescribeVpcEndpointServicePermissions",
                "ec2:DescribeVpcEndpointServices",
                "ec2:ModifyVpcEndpointServicePermissions",
                "kms:DescribeKey",
                "cloudwatch:GetMetricData"
            ],
            "Resource": "*"
        },
        {
            "Effect": "Allow",
            "Action": [
                "secretsmanager:GetSecretValue"
            ],
            "Resource": "*",
            "Condition": {
                "StringEquals": {
                    "aws:ResourceTag/red-hat-managed": "true"
                }
            }
        }
    ]
}| Resource | Description |
|---|---|
|
| An IAM role used by the ROSA control plane. |
|
| An IAM policy that provides the ROSA control plane with the permissions required to manage its components. |
Example 3.3. sts_instance_controlplane_trust_policy.json
{
    "Version": "2012-10-17",
    "Statement": [
        {
            "Effect": "Allow",
            "Principal": {
                "Service": [
                    "ec2.amazonaws.com"
                ]
            },
            "Action": [
                "sts:AssumeRole"
            ]
        }
    ]
}
Example 3.4. sts_instance_controlplane_permission_policy.json
{
    "Version": "2012-10-17",
    "Statement": [
        {
            "Sid": "ReadPermissions",
            "Effect": "Allow",
            "Action": [
                "ec2:DescribeAvailabilityZones",
                "ec2:DescribeInstances",
                "ec2:DescribeRouteTables",
                "ec2:DescribeSecurityGroups",
                "ec2:DescribeSubnets",
                "ec2:DescribeVpcs",
                "elasticloadbalancing:DescribeLoadBalancers",
                "elasticloadbalancing:DescribeLoadBalancerAttributes",
                "elasticloadbalancing:DescribeListeners",
                "elasticloadbalancing:DescribeTargetGroups",
                "elasticloadbalancing:DescribeTargetHealth",
                "elasticloadbalancing:DescribeLoadBalancerPolicies"
            ],
            "Resource": [
                "*"
            ]
        },
        {
          "Sid": "KMSDescribeKey",
          "Effect": "Allow",
          "Action": [
              "kms:DescribeKey"
          ],
          "Resource": [
              "*"
          ],
          "Condition": {
              "StringEquals": {
                  "aws:ResourceTag/red-hat": "true"
              }
          }
        },
        {
            "Effect": "Allow",
            "Action": [
                "ec2:AttachVolume",
                "ec2:AuthorizeSecurityGroupIngress",
                "ec2:CreateSecurityGroup",
                "ec2:CreateTags",
                "ec2:CreateVolume",
                "ec2:DeleteSecurityGroup",
                "ec2:DeleteVolume",
                "ec2:DetachVolume",
                "ec2:ModifyInstanceAttribute",
                "ec2:ModifyVolume",
                "ec2:RevokeSecurityGroupIngress",
                "elasticloadbalancing:AddTags",
                "elasticloadbalancing:AttachLoadBalancerToSubnets",
                "elasticloadbalancing:ApplySecurityGroupsToLoadBalancer",
                "elasticloadbalancing:CreateListener",
                "elasticloadbalancing:CreateLoadBalancer",
                "elasticloadbalancing:CreateLoadBalancerPolicy",
                "elasticloadbalancing:CreateLoadBalancerListeners",
                "elasticloadbalancing:CreateTargetGroup",
                "elasticloadbalancing:ConfigureHealthCheck",
                "elasticloadbalancing:DeleteListener",
                "elasticloadbalancing:DeleteLoadBalancer",
                "elasticloadbalancing:DeleteLoadBalancerListeners",
                "elasticloadbalancing:DeleteTargetGroup",
                "elasticloadbalancing:DeregisterInstancesFromLoadBalancer",
                "elasticloadbalancing:DeregisterTargets",
                "elasticloadbalancing:DetachLoadBalancerFromSubnets",
                "elasticloadbalancing:ModifyListener",
                "elasticloadbalancing:ModifyLoadBalancerAttributes",
                "elasticloadbalancing:ModifyTargetGroup",
                "elasticloadbalancing:ModifyTargetGroupAttributes",
                "elasticloadbalancing:RegisterInstancesWithLoadBalancer",
                "elasticloadbalancing:RegisterTargets",
                "elasticloadbalancing:SetLoadBalancerPoliciesForBackendServer",
                "elasticloadbalancing:SetLoadBalancerPoliciesOfListener"
            ],
            "Resource": "*"
        }
    ]
}| Resource | Description |
|---|---|
|
| An IAM role used by the ROSA compute instances. |
|
| An IAM policy that provides the ROSA compute instances with the permissions required to manage their components. |
Example 3.5. sts_instance_worker_trust_policy.json
{
    "Version": "2012-10-17",
    "Statement": [
        {
            "Effect": "Allow",
            "Principal": {
                "Service": [
                    "ec2.amazonaws.com"
                ]
            },
            "Action": [
                "sts:AssumeRole"
            ]
        }
    ]
}
Example 3.6. sts_instance_worker_permission_policy.json
{
    "Version": "2012-10-17",
    "Statement": [
        {
            "Effect": "Allow",
            "Action": [
                "ec2:DescribeInstances",
                "ec2:DescribeRegions"
            ],
            "Resource": "*"
        }
    ]
}| Resource | Description |
|---|---|
|
| An IAM role used by the Red Hat Site Reliability Engineering (SRE) support team. |
|
| An IAM policy that provides the Red Hat SRE support team with the permissions required to support ROSA clusters. |
Example 3.7. sts_support_trust_policy.json
{
    "Version": "2012-10-17",
    "Statement": [
        {
            "Effect": "Allow",
            "Principal": {
                "AWS": [
                    "arn:aws:iam::%{aws_account_id}:role/RH-Technical-Support-Access"
                ]
            },
            "Action": [
                "sts:AssumeRole"
            ]
        }
    ]
}
Example 3.8. sts_support_permission_policy.json
{
    "Version": "2012-10-17",
    "Statement": [
        {
            "Effect": "Allow",
            "Action": [
                "cloudtrail:DescribeTrails",
                "cloudtrail:LookupEvents",
                "cloudwatch:GetMetricData",
                "cloudwatch:GetMetricStatistics",
                "cloudwatch:ListMetrics",
                "ec2-instance-connect:SendSerialConsoleSSHPublicKey",
                "ec2:CopySnapshot",
                "ec2:CreateNetworkInsightsPath",
                "ec2:CreateSnapshot",
                "ec2:CreateSnapshots",
                "ec2:CreateTags",
                "ec2:DeleteNetworkInsightsAnalysis",
                "ec2:DeleteNetworkInsightsPath",
                "ec2:DeleteTags",
                "ec2:DescribeAccountAttributes",
                "ec2:DescribeAddresses",
                "ec2:DescribeAddressesAttribute",
                "ec2:DescribeAggregateIdFormat",
                "ec2:DescribeAvailabilityZones",
                "ec2:DescribeByoipCidrs",
                "ec2:DescribeCapacityReservations",
                "ec2:DescribeCarrierGateways",
                "ec2:DescribeClassicLinkInstances",
                "ec2:DescribeClientVpnAuthorizationRules",
                "ec2:DescribeClientVpnConnections",
                "ec2:DescribeClientVpnEndpoints",
                "ec2:DescribeClientVpnRoutes",
                "ec2:DescribeClientVpnTargetNetworks",
                "ec2:DescribeCoipPools",
                "ec2:DescribeCustomerGateways",
                "ec2:DescribeDhcpOptions",
                "ec2:DescribeEgressOnlyInternetGateways",
                "ec2:DescribeIamInstanceProfileAssociations",
                "ec2:DescribeIdentityIdFormat",
                "ec2:DescribeIdFormat",
                "ec2:DescribeImageAttribute",
                "ec2:DescribeImages",
                "ec2:DescribeInstanceAttribute",
                "ec2:DescribeInstances",
                "ec2:DescribeInstanceStatus",
                "ec2:DescribeInstanceTypeOfferings",
                "ec2:DescribeInstanceTypes",
                "ec2:DescribeInternetGateways",
                "ec2:DescribeIpv6Pools",
                "ec2:DescribeKeyPairs",
                "ec2:DescribeLaunchTemplates",
                "ec2:DescribeLocalGatewayRouteTables",
                "ec2:DescribeLocalGatewayRouteTableVirtualInterfaceGroupAssociations",
                "ec2:DescribeLocalGatewayRouteTableVpcAssociations",
                "ec2:DescribeLocalGateways",
                "ec2:DescribeLocalGatewayVirtualInterfaceGroups",
                "ec2:DescribeLocalGatewayVirtualInterfaces",
                "ec2:DescribeManagedPrefixLists",
                "ec2:DescribeNatGateways",
                "ec2:DescribeNetworkAcls",
                "ec2:DescribeNetworkInsightsAnalyses",
                "ec2:DescribeNetworkInsightsPaths",
                "ec2:DescribeNetworkInterfaces",
                "ec2:DescribePlacementGroups",
                "ec2:DescribePrefixLists",
                "ec2:DescribePrincipalIdFormat",
                "ec2:DescribePublicIpv4Pools",
                "ec2:DescribeRegions",
                "ec2:DescribeReservedInstances",
                "ec2:DescribeRouteTables",
                "ec2:DescribeScheduledInstances",
                "ec2:DescribeSecurityGroupReferences",
                "ec2:DescribeSecurityGroupRules",
                "ec2:DescribeSecurityGroups",
                "ec2:DescribeSnapshotAttribute",
                "ec2:DescribeSnapshots",
                "ec2:DescribeSpotFleetInstances",
                "ec2:DescribeStaleSecurityGroups",
                "ec2:DescribeSubnets",
                "ec2:DescribeTags",
                "ec2:DescribeTransitGatewayAttachments",
                "ec2:DescribeTransitGatewayConnectPeers",
                "ec2:DescribeTransitGatewayConnects",
                "ec2:DescribeTransitGatewayMulticastDomains",
                "ec2:DescribeTransitGatewayPeeringAttachments",
                "ec2:DescribeTransitGatewayRouteTables",
                "ec2:DescribeTransitGateways",
                "ec2:DescribeTransitGatewayVpcAttachments",
                "ec2:DescribeVolumeAttribute",
                "ec2:DescribeVolumes",
                "ec2:DescribeVolumesModifications",
                "ec2:DescribeVolumeStatus",
                "ec2:DescribeVpcAttribute",
                "ec2:DescribeVpcClassicLink",
                "ec2:DescribeVpcClassicLinkDnsSupport",
                "ec2:DescribeVpcEndpointConnectionNotifications",
                "ec2:DescribeVpcEndpointConnections",
                "ec2:DescribeVpcEndpoints",
                "ec2:DescribeVpcEndpointServiceConfigurations",
                "ec2:DescribeVpcEndpointServicePermissions",
                "ec2:DescribeVpcEndpointServices",
                "ec2:DescribeVpcPeeringConnections",
                "ec2:DescribeVpcs",
                "ec2:DescribeVpnConnections",
                "ec2:DescribeVpnGateways",
                "ec2:GetAssociatedIpv6PoolCidrs",
                "ec2:GetConsoleOutput",
                "ec2:GetManagedPrefixListEntries",
                "ec2:GetSerialConsoleAccessStatus",
                "ec2:GetTransitGatewayAttachmentPropagations",
                "ec2:GetTransitGatewayMulticastDomainAssociations",
                "ec2:GetTransitGatewayPrefixListReferences",
                "ec2:GetTransitGatewayRouteTableAssociations",
                "ec2:GetTransitGatewayRouteTablePropagations",
                "ec2:ModifyInstanceAttribute",
                "ec2:RebootInstances",
                "ec2:RunInstances",
                "ec2:SearchLocalGatewayRoutes",
                "ec2:SearchTransitGatewayMulticastGroups",
                "ec2:SearchTransitGatewayRoutes",
                "ec2:StartInstances",
                "ec2:StartNetworkInsightsAnalysis",
                "ec2:StopInstances",
                "ec2:TerminateInstances",
                "elasticloadbalancing:ConfigureHealthCheck",
                "elasticloadbalancing:DescribeAccountLimits",
                "elasticloadbalancing:DescribeInstanceHealth",
                "elasticloadbalancing:DescribeListenerCertificates",
                "elasticloadbalancing:DescribeListeners",
                "elasticloadbalancing:DescribeLoadBalancerAttributes",
                "elasticloadbalancing:DescribeLoadBalancerPolicies",
                "elasticloadbalancing:DescribeLoadBalancerPolicyTypes",
                "elasticloadbalancing:DescribeLoadBalancers",
                "elasticloadbalancing:DescribeRules",
                "elasticloadbalancing:DescribeSSLPolicies",
                "elasticloadbalancing:DescribeTags",
                "elasticloadbalancing:DescribeTargetGroupAttributes",
                "elasticloadbalancing:DescribeTargetGroups",
                "elasticloadbalancing:DescribeTargetHealth",
                "iam:GetRole",
                "iam:ListRoles",
                "kms:CreateGrant",
                "route53:GetHostedZone",
                "route53:GetHostedZoneCount",
                "route53:ListHostedZones",
                "route53:ListHostedZonesByName",
                "route53:ListResourceRecordSets",
                "s3:GetBucketTagging",
                "s3:GetObjectAcl",
                "s3:GetObjectTagging",
                "s3:ListAllMyBuckets",
                "sts:DecodeAuthorizationMessage",
                "tiros:CreateQuery",
                "tiros:GetQueryAnswer",
                "tiros:GetQueryExplanation"
            ],
            "Resource": "*"
        },
        {
            "Effect": "Allow",
            "Action": [
                "s3:ListBucket"
            ],
            "Resource": [
                "arn:aws:s3:::managed-velero*",
                "arn:aws:s3:::*image-registry*"
            ]
        }
    ]
}| Resource | Description |
|---|---|
|
| You use this IAM role to create and maintain ROSA clusters in OpenShift Cluster Manager. |
Example 3.9. sts_ocm_role_trust_policy.json
{
  "Version": "2012-10-17",
  "Statement": [
    {
      "Effect": "Allow",
      "Principal": {
        "AWS": [
          "arn:aws:iam::%{aws_account_id}:role/RH-Managed-OpenShift-Installer"
        ]
      },
      "Action": [
        "sts:AssumeRole"
      ],
      "Condition": {"StringEquals": {"sts:ExternalId": "%{ocm_organization_id}"}}
    }
  ]
}| Resource | Description |
|---|---|
|
| An IAM role used by Red Hat to verify the customer’s AWS identity. |
Example 3.10. sts_user_role_trust_policy.json
{
    "Version": "2012-10-17",
    "Statement": [
        {
            "Effect": "Allow",
            "Principal": {
                "AWS": [
                    "arn:aws:iam::%{aws_account_id}:role/RH-Managed-OpenShift-Installer"
                ]
            },
            "Action": [
                "sts:AssumeRole"
            ]
        }
    ]
}
Example CLI output for policies attached to a role
When a policy is attached to a role, the ROSA CLI displays a confirmation output. The output depends on the type of policy.
If the policy is a trust policy, the ROSA CLI outputs the role name and the content of the policy.
For the target role with policy attached, ROSA CLI outputs the role name and the console URL of the target role.
Target role with policy attached example output
I: Attached trust policy to role 'testrole-Worker-Role(https://console.aws.amazon.com/iam/home?#/roles/testrole-Worker-Role)': ******************
If the attached policy is a trust policy, the ROSA CLI outputs the content of this policy.
Trust policy example output
I: Attached trust policy to role 'test-Support-Role': {"Version": "2012-10-17", "Statement": [{"Action": ["sts:AssumeRole"], "Effect": "Allow", "Principal": {"AWS": ["arn:aws:iam::000000000000:role/RH-Technical-Support-00000000"]}}]}
If the policy is a permission policy, the ROSA CLI outputs the name and public link of this policy or the ARN depending on whether or not the policy is an AWS managed policy or customer-managed policy.
If the attached policy is an AWS managed policy, the ROSA CLI outputs the name and public link of this policy and the role it is attached to.
AWS managed policy example output
I: Attached policy 'ROSASRESupportPolicy(https://docs.aws.amazon.com/aws-managed-policy/latest/reference/ROSASRESupportPolicy)' to role 'test-HCP-ROSA-Support-Role(https://console.aws.amazon.com/iam/home?#/roles/test-HCP-ROSA-Support-Role)'
If the attached policy is an AWS managed policy, the ROSA CLI outputs the name and public link of this policy and the role it is attached to.
Customer-managed policy example output
I: Attached policy 'arn:aws:iam::000000000000:policy/testrole-Worker-Role-Policy' to role 'testrole-Worker-Role(https://console.aws.amazon.com/iam/home?#/roles/testrole-Worker-Role)'
| Resource | Description |
|---|---|
|
| An IAM policy that provides the ROSA Ingress Operator with the permissions required to manage external access to a cluster. |
Example 3.11. openshift_ingress_operator_cloud_credentials_policy.json
{
  "Version": "2012-10-17",
  "Statement": [
    {
      "Effect": "Allow",
      "Action": [
        "elasticloadbalancing:DescribeLoadBalancers",
        "route53:ListHostedZones",
        "route53:ListTagsForResources",
        "route53:ChangeResourceRecordSets",
        "tag:GetResources"
      ],
      "Resource": "*"
    }
  ]
}| Resource | Description |
|---|---|
|
| An IAM policy required by ROSA to manage back-end storage through the Container Storage Interface (CSI). |
Example 3.12. openshift_cluster_csi_drivers_ebs_cloud_credentials_policy.json
{
  "Version": "2012-10-17",
  "Statement": [
    {
      "Effect": "Allow",
      "Action": [
        "ec2:AttachVolume",
        "ec2:CreateSnapshot",
        "ec2:CreateTags",
        "ec2:CreateVolume",
        "ec2:DeleteSnapshot",
        "ec2:DeleteTags",
        "ec2:DeleteVolume",
        "ec2:DescribeAvailabilityZones",
        "ec2:DescribeInstances",
        "ec2:DescribeSnapshots",
        "ec2:DescribeTags",
        "ec2:DescribeVolumes",
        "ec2:DescribeVolumesModifications",
        "ec2:DetachVolume",
        "ec2:EnableFastSnapshotRestores",
        "ec2:ModifyVolume"
      ],
      "Resource": "*"
    }
  ]
}| Resource | Description |
|---|---|
|
| An IAM policy that provides the ROSA Machine Config Operator with the permissions required to perform core cluster functionality. |
Example 3.13. openshift_machine_api_aws_cloud_credentials_policy.json
{
  "Version": "2012-10-17",
  "Statement": [
    {
      "Effect": "Allow",
      "Action": [
        "ec2:CreateTags",
        "ec2:DescribeAvailabilityZones",
        "ec2:DescribeDhcpOptions",
        "ec2:DescribeImages",
        "ec2:DescribeInstances",
        "ec2:DescribeInternetGateways",
        "ec2:DescribeInstanceTypes",
        "ec2:DescribeSecurityGroups",
        "ec2:DescribeRegions",
        "ec2:DescribeSubnets",
        "ec2:DescribeVpcs",
        "ec2:RunInstances",
        "ec2:TerminateInstances",
        "elasticloadbalancing:DescribeLoadBalancers",
        "elasticloadbalancing:DescribeTargetGroups",
        "elasticloadbalancing:DescribeTargetHealth",
        "elasticloadbalancing:RegisterInstancesWithLoadBalancer",
        "elasticloadbalancing:RegisterTargets",
        "elasticloadbalancing:DeregisterTargets",
        "iam:PassRole",
        "iam:CreateServiceLinkedRole"
      ],
      "Resource": "*"
    },
    {
      "Effect": "Allow",
      "Action": [
        "kms:Decrypt",
        "kms:Encrypt",
        "kms:GenerateDataKey",
        "kms:GenerateDataKeyWithoutPlainText",
        "kms:DescribeKey"
      ],
      "Resource": "*"
    },
    {
      "Effect": "Allow",
      "Action": [
        "kms:RevokeGrant",
        "kms:CreateGrant",
        "kms:ListGrants"
      ],
      "Resource": "*",
      "Condition": {
        "Bool": {
          "kms:GrantIsForAWSResource": true
        }
      }
    }
  ]
}| Resource | Description |
|---|---|
|
| An IAM policy that provides the ROSA Cloud Credential Operator with the permissions required to manage cloud provider credentials. |
Example 3.14. openshift_cloud_credential_operator_cloud_credential_operator_iam_ro_creds_policy.json
{
  "Version": "2012-10-17",
  "Statement": [
    {
      "Effect": "Allow",
      "Action": [
        "iam:GetUser",
        "iam:GetUserPolicy",
        "iam:ListAccessKeys"
      ],
      "Resource": "*"
    }
  ]
}| Resource | Description |
|---|---|
|
| An IAM policy that provides the ROSA Image Registry Operator with the permissions required to manage the OpenShift image registry storage in AWS S3 for a cluster. |
Example 3.15. openshift_image_registry_installer_cloud_credentials_policy.json
{
  "Version": "2012-10-17",
  "Statement": [
    {
      "Effect": "Allow",
      "Action": [
        "s3:CreateBucket",
        "s3:DeleteBucket",
        "s3:PutBucketTagging",
        "s3:GetBucketTagging",
        "s3:PutBucketPublicAccessBlock",
        "s3:GetBucketPublicAccessBlock",
        "s3:PutEncryptionConfiguration",
        "s3:GetEncryptionConfiguration",
        "s3:PutLifecycleConfiguration",
        "s3:GetLifecycleConfiguration",
        "s3:GetBucketLocation",
        "s3:ListBucket",
        "s3:GetObject",
        "s3:PutObject",
        "s3:DeleteObject",
        "s3:ListBucketMultipartUploads",
        "s3:AbortMultipartUpload",
        "s3:ListMultipartUploadParts"
      ],
      "Resource": "*"
    }
  ]
}
Additional resources
3.2.2. Account-wide IAM role and policy AWS CLI reference
This section lists the aws CLI commands that the rosa command generates in the terminal. You can run the command in either manual or automatic mode.
Using manual mode for account role creation
The manual role creation mode generates the aws commands for you to review and run. The following command starts that process, where <openshift_version> refers to your version of Red Hat OpenShift Service on AWS (ROSA), such as 4.
$ rosa create account-roles --mode manual
The provided command examples include the ManagedOpenShift prefix. The ManagedOpenShift prefix is the default value, if you do not specify a custom prefix by using the --prefix option.
Command output
aws iam create-role \
	--role-name ManagedOpenShift-Installer-Role \
	--assume-role-policy-document file://sts_installer_trust_policy.json \
	--tags Key=rosa_openshift_version,Value=<openshift_version> Key=rosa_role_prefix,Value=ManagedOpenShift Key=rosa_role_type,Value=installer

aws iam put-role-policy \
	--role-name ManagedOpenShift-Installer-Role \
	--policy-name ManagedOpenShift-Installer-Role-Policy \
	--policy-document file://sts_installer_permission_policy.json

aws iam create-role \
	--role-name ManagedOpenShift-ControlPlane-Role \
	--assume-role-policy-document file://sts_instance_controlplane_trust_policy.json \
	--tags Key=rosa_openshift_version,Value=<openshift_version> Key=rosa_role_prefix,Value=ManagedOpenShift Key=rosa_role_type,Value=instance_controlplane

aws iam put-role-policy \
	--role-name ManagedOpenShift-ControlPlane-Role \
	--policy-name ManagedOpenShift-ControlPlane-Role-Policy \
	--policy-document file://sts_instance_controlplane_permission_policy.json

aws iam create-role \
	--role-name ManagedOpenShift-Worker-Role \
	--assume-role-policy-document file://sts_instance_worker_trust_policy.json \
	--tags Key=rosa_openshift_version,Value=<openshift_version> Key=rosa_role_prefix,Value=ManagedOpenShift Key=rosa_role_type,Value=instance_worker

aws iam put-role-policy \
	--role-name ManagedOpenShift-Worker-Role \
	--policy-name ManagedOpenShift-Worker-Role-Policy \
	--policy-document file://sts_instance_worker_permission_policy.json

aws iam create-role \
	--role-name ManagedOpenShift-Support-Role \
	--assume-role-policy-document file://sts_support_trust_policy.json \
	--tags Key=rosa_openshift_version,Value=<openshift_version> Key=rosa_role_prefix,Value=ManagedOpenShift Key=rosa_role_type,Value=support

aws iam put-role-policy \
	--role-name ManagedOpenShift-Support-Role \
	--policy-name ManagedOpenShift-Support-Role-Policy \
	--policy-document file://sts_support_permission_policy.json

aws iam create-policy \
	--policy-name ManagedOpenShift-openshift-ingress-operator-cloud-credentials \
	--policy-document file://openshift_ingress_operator_cloud_credentials_policy.json \
	--tags Key=rosa_openshift_version,Value=<openshift_version> Key=rosa_role_prefix,Value=ManagedOpenShift Key=operator_namespace,Value=openshift-ingress-operator Key=operator_name,Value=cloud-credentials

aws iam create-policy \
	--policy-name ManagedOpenShift-openshift-cluster-csi-drivers-ebs-cloud-credent \
	--policy-document file://openshift_cluster_csi_drivers_ebs_cloud_credentials_policy.json \
	--tags Key=rosa_openshift_version,Value=<openshift_version> Key=rosa_role_prefix,Value=ManagedOpenShift Key=operator_namespace,Value=openshift-cluster-csi-drivers Key=operator_name,Value=ebs-cloud-credentials

aws iam create-policy \
	--policy-name ManagedOpenShift-openshift-machine-api-aws-cloud-credentials \
	--policy-document file://openshift_machine_api_aws_cloud_credentials_policy.json \
	--tags Key=rosa_openshift_version,Value=<openshift_version> Key=rosa_role_prefix,Value=ManagedOpenShift Key=operator_namespace,Value=openshift-machine-api Key=operator_name,Value=aws-cloud-credentials

aws iam create-policy \
	--policy-name ManagedOpenShift-openshift-cloud-credential-operator-cloud-crede \
	--policy-document file://openshift_cloud_credential_operator_cloud_credential_operator_iam_ro_creds_policy.json \
	--tags Key=rosa_openshift_version,Value=<openshift_version> Key=rosa_role_prefix,Value=ManagedOpenShift Key=operator_namespace,Value=openshift-cloud-credential-operator Key=operator_name,Value=cloud-credential-operator-iam-ro-creds

aws iam create-policy \
	--policy-name ManagedOpenShift-openshift-image-registry-installer-cloud-creden \
	--policy-document file://openshift_image_registry_installer_cloud_credentials_policy.json \
	--tags Key=rosa_openshift_version,Value=<openshift_version> Key=rosa_role_prefix,Value=ManagedOpenShift Key=operator_namespace,Value=openshift-image-registry Key=operator_name,Value=installer-cloud-credentials
Using auto mode for role creation
When you add the --mode auto argument, the Red Hat OpenShift Service on AWS (ROSA) CLI, rosa, creates your roles and policies. The following command starts that process:
$ rosa create account-roles --mode auto
The provided command examples include the ManagedOpenShift prefix. The ManagedOpenShift prefix is the default value, if you do not specify a custom prefix by using the --prefix option.
Command output
I: Creating roles using 'arn:aws:iam::<ARN>:user/<UserID>'
? Create the 'ManagedOpenShift-Installer-Role' role? Yes
I: Created role 'ManagedOpenShift-Installer-Role' with ARN 'arn:aws:iam::<ARN>:role/ManagedOpenShift-Installer-Role'
? Create the 'ManagedOpenShift-ControlPlane-Role' role? Yes
I: Created role 'ManagedOpenShift-ControlPlane-Role' with ARN 'arn:aws:iam::<ARN>:role/ManagedOpenShift-ControlPlane-Role'
? Create the 'ManagedOpenShift-Worker-Role' role? Yes
I: Created role 'ManagedOpenShift-Worker-Role' with ARN 'arn:aws:iam::<ARN>:role/ManagedOpenShift-Worker-Role'
? Create the 'ManagedOpenShift-Support-Role' role? Yes
I: Created role 'ManagedOpenShift-Support-Role' with ARN 'arn:aws:iam::<ARN>:role/ManagedOpenShift-Support-Role'
? Create the operator policies? Yes
I: Created policy with ARN 'arn:aws:iam::<ARN>:policy/ManagedOpenShift-openshift-machine-api-aws-cloud-credentials'
I: Created policy with ARN 'arn:aws:iam::<ARN>:policy/ManagedOpenShift-openshift-cloud-credential-operator-cloud-crede'
I: Created policy with ARN 'arn:aws:iam::<ARN>:policy/ManagedOpenShift-openshift-image-registry-installer-cloud-creden'
I: Created policy with ARN 'arn:aws:iam::<ARN>:policy/ManagedOpenShift-openshift-ingress-operator-cloud-credentials'
I: Created policy with ARN 'arn:aws:iam::<ARN>:policy/ManagedOpenShift-openshift-cluster-csi-drivers-ebs-cloud-credent'
I: Created policy with ARN 'arn:aws:iam::<ARN>:policy/ManagedOpenShift-openshift-cloud-network-config-controller-cloud'
I: To create a cluster with these roles, run the following command:
rosa create cluster --sts
3.3. Permission boundaries for the installer role
You can apply a policy as a permissions boundary on an installer role. You can use an AWS-managed policy or a customer-managed policy to set the boundary for an Amazon Web Services (AWS) Identity and Access Management (IAM) entity (user or role). The combination of policy and boundary policy limits the maximum permissions for the user or role. ROSA includes a set of three prepared permission boundary policy files, with which you can restrict permissions for the installer role since changing the installer policy itself is not supported.
This feature is only supported on Red Hat OpenShift Service on AWS (classic architecture) clusters.
The permission boundary policy files are as follows:
- The Core boundary policy file contains the minimum permissions needed for ROSA (classic architecture) installer to install an Red Hat OpenShift Service on AWS cluster. The installer does not have permissions to create a virtual private cloud (VPC) or PrivateLink (PL). A VPC needs to be provided.
- The VPC boundary policy file contains the minimum permissions needed for ROSA (classic architecture) installer to create/manage the VPC. It does not include permissions for PL or core installation. If you need to install a cluster with enough permissions for the installer to install the cluster and create/manage the VPC, but you do not need to set up PL, then use the core and VPC boundary files together with the installer role.
- The PrivateLink (PL) boundary policy file contains the minimum permissions needed for ROSA (classic architecture) installer to create the AWS PL with a cluster. It does not include permissions for VPC or core installation. Provide a pre-created VPC for all PL clusters during installation.
When using the permission boundary policy files, the following combinations apply:
- No permission boundary policies means that the full installer policy permissions apply to your cluster.
Core only sets the most restricted permissions for the installer role. The VPC and PL permissions are not included in the Core only boundary policy.
- Installer cannot create or manage the VPC or PL.
- You must have a customer-provided VPC, and PrivateLink (PL) is not available.
Core + VPC sets the core and VPC permissions for the installer role.
- Installer cannot create or manage the PL.
- Assumes you are not using custom/BYO-VPC.
- Assumes the installer will create and manage the VPC.
Core + PrivateLink (PL) means the installer can provision the PL infrastructure.
- You must have a customer-provided VPC.
- This is for a private cluster with PL.
This example procedure is applicable for an installer role and policy with the most restriction of permissions, using only the core installer permission boundary policy for ROSA. You can complete this with the AWS console or the AWS CLI. This example uses the AWS CLI and the following policy:
Example 3.16. sts_installer_core_permission_boundary_policy.json
{
    "Version": "2012-10-17",
    "Statement": [
        {
            "Effect": "Allow",
            "Action": [
		    "autoscaling:DescribeAutoScalingGroups",
		    "ec2:AllocateAddress",
		    "ec2:AssociateAddress",
		    "ec2:AttachNetworkInterface",
		    "ec2:AuthorizeSecurityGroupEgress",
		    "ec2:AuthorizeSecurityGroupIngress",
		    "ec2:CopyImage",
		    "ec2:CreateNetworkInterface",
		    "ec2:CreateSecurityGroup",
		    "ec2:CreateTags",
		    "ec2:CreateVolume",
		    "ec2:DeleteNetworkInterface",
		    "ec2:DeleteSecurityGroup",
		    "ec2:DeleteSnapshot",
		    "ec2:DeleteTags",
		    "ec2:DeleteVolume",
		    "ec2:DeregisterImage",
		    "ec2:DescribeAccountAttributes",
		    "ec2:DescribeAddresses",
		    "ec2:DescribeAvailabilityZones",
		    "ec2:DescribeDhcpOptions",
		    "ec2:DescribeImages",
		    "ec2:DescribeInstanceAttribute",
		    "ec2:DescribeInstanceCreditSpecifications",
		    "ec2:DescribeInstances",
		    "ec2:DescribeInstanceStatus",
		    "ec2:DescribeInstanceTypeOfferings",
		    "ec2:DescribeInstanceTypes",
		    "ec2:DescribeInternetGateways",
		    "ec2:DescribeKeyPairs",
		    "ec2:DescribeNatGateways",
		    "ec2:DescribeNetworkAcls",
		    "ec2:DescribeNetworkInterfaces",
		    "ec2:DescribePrefixLists",
		    "ec2:DescribeRegions",
		    "ec2:DescribeReservedInstancesOfferings",
		    "ec2:DescribeRouteTables",
		    "ec2:DescribeSecurityGroups",
		    "ec2:DescribeSecurityGroupRules",
		    "ec2:DescribeSubnets",
		    "ec2:DescribeTags",
		    "ec2:DescribeVolumes",
		    "ec2:DescribeVpcAttribute",
		    "ec2:DescribeVpcClassicLink",
		    "ec2:DescribeVpcClassicLinkDnsSupport",
		    "ec2:DescribeVpcEndpoints",
		    "ec2:DescribeVpcs",
		    "ec2:GetConsoleOutput",
		    "ec2:GetEbsDefaultKmsKeyId",
		    "ec2:ModifyInstanceAttribute",
		    "ec2:ModifyNetworkInterfaceAttribute",
		    "ec2:ReleaseAddress",
		    "ec2:RevokeSecurityGroupEgress",
		    "ec2:RevokeSecurityGroupIngress",
		    "ec2:RunInstances",
		    "ec2:StartInstances",
		    "ec2:StopInstances",
		    "ec2:TerminateInstances",
		    "elasticloadbalancing:AddTags",
		    "elasticloadbalancing:ApplySecurityGroupsToLoadBalancer",
		    "elasticloadbalancing:AttachLoadBalancerToSubnets",
		    "elasticloadbalancing:ConfigureHealthCheck",
		    "elasticloadbalancing:CreateListener",
		    "elasticloadbalancing:CreateLoadBalancer",
		    "elasticloadbalancing:CreateLoadBalancerListeners",
		    "elasticloadbalancing:CreateTargetGroup",
		    "elasticloadbalancing:DeleteLoadBalancer",
		    "elasticloadbalancing:DeleteTargetGroup",
		    "elasticloadbalancing:DeregisterInstancesFromLoadBalancer",
		    "elasticloadbalancing:DeregisterTargets",
		    "elasticloadbalancing:DescribeInstanceHealth",
		    "elasticloadbalancing:DescribeListeners",
		    "elasticloadbalancing:DescribeLoadBalancerAttributes",
		    "elasticloadbalancing:DescribeLoadBalancers",
		    "elasticloadbalancing:DescribeTags",
		    "elasticloadbalancing:DescribeTargetGroupAttributes",
		    "elasticloadbalancing:DescribeTargetGroups",
		    "elasticloadbalancing:DescribeTargetHealth",
		    "elasticloadbalancing:ModifyLoadBalancerAttributes",
		    "elasticloadbalancing:ModifyTargetGroup",
		    "elasticloadbalancing:ModifyTargetGroupAttributes",
		    "elasticloadbalancing:RegisterInstancesWithLoadBalancer",
		    "elasticloadbalancing:RegisterTargets",
		    "elasticloadbalancing:SetLoadBalancerPoliciesOfListener",
		    "elasticloadbalancing:SetSecurityGroups",
		    "iam:AddRoleToInstanceProfile",
		    "iam:CreateInstanceProfile",
		    "iam:DeleteInstanceProfile",
		    "iam:GetInstanceProfile",
		    "iam:TagInstanceProfile",
		    "iam:GetRole",
		    "iam:GetRolePolicy",
		    "iam:GetUser",
		    "iam:ListAttachedRolePolicies",
		    "iam:ListInstanceProfiles",
		    "iam:ListInstanceProfilesForRole",
		    "iam:ListRolePolicies",
		    "iam:ListRoles",
		    "iam:ListUserPolicies",
		    "iam:ListUsers",
		    "iam:PassRole",
		    "iam:RemoveRoleFromInstanceProfile",
		    "iam:SimulatePrincipalPolicy",
		    "iam:TagRole",
		    "iam:UntagRole",
		    "route53:ChangeResourceRecordSets",
		    "route53:ChangeTagsForResource",
		    "route53:CreateHostedZone",
		    "route53:DeleteHostedZone",
		    "route53:GetAccountLimit",
		    "route53:GetChange",
		    "route53:GetHostedZone",
		    "route53:ListHostedZones",
		    "route53:ListHostedZonesByName",
		    "route53:ListResourceRecordSets",
		    "route53:ListTagsForResource",
		    "route53:UpdateHostedZoneComment",
		    "s3:CreateBucket",
		    "s3:DeleteBucket",
		    "s3:DeleteObject",
		    "s3:GetAccelerateConfiguration",
		    "s3:GetBucketAcl",
		    "s3:GetBucketCORS",
		    "s3:GetBucketLocation",
		    "s3:GetBucketLogging",
		    "s3:GetBucketObjectLockConfiguration",
		    "s3:GetBucketPolicy",
		    "s3:GetBucketRequestPayment",
		    "s3:GetBucketTagging",
		    "s3:GetBucketVersioning",
		    "s3:GetBucketWebsite",
		    "s3:GetEncryptionConfiguration",
		    "s3:GetLifecycleConfiguration",
		    "s3:GetObject",
		    "s3:GetObjectAcl",
		    "s3:GetObjectTagging",
		    "s3:GetObjectVersion",
		    "s3:GetReplicationConfiguration",
		    "s3:ListBucket",
		    "s3:ListBucketVersions",
		    "s3:PutBucketAcl",
		    "s3:PutBucketPolicy",
		    "s3:PutBucketTagging",
		    "s3:PutEncryptionConfiguration",
		    "s3:PutObject",
		    "s3:PutObjectAcl",
		    "s3:PutObjectTagging",
		    "servicequotas:GetServiceQuota",
		    "servicequotas:ListAWSDefaultServiceQuotas",
		    "sts:AssumeRole",
		    "sts:AssumeRoleWithWebIdentity",
		    "sts:GetCallerIdentity",
		    "tag:GetResources",
		    "tag:UntagResources",
		    "kms:DescribeKey",
		    "cloudwatch:GetMetricData",
		    "ec2:CreateRoute",
		    "ec2:DeleteRoute",
		    "ec2:CreateVpcEndpoint",
		    "ec2:DeleteVpcEndpoints",
		    "ec2:CreateVpcEndpointServiceConfiguration",
		    "ec2:DeleteVpcEndpointServiceConfigurations",
		    "ec2:DescribeVpcEndpointServiceConfigurations",
		    "ec2:DescribeVpcEndpointServicePermissions",
		    "ec2:DescribeVpcEndpointServices",
		    "ec2:ModifyVpcEndpointServicePermissions"
            ],
            "Resource": "*"
        },
        {
            "Effect": "Allow",
            "Action": [
                "secretsmanager:GetSecretValue"
            ],
            "Resource": "*",
            "Condition": {
                "StringEquals": {
                    "aws:ResourceTag/red-hat-managed": "true"
                }
            }
        }
    ]
}
To use the permission boundaries, you will need to prepare the permission boundary policy and add it to your relevant installer role in AWS IAM. While the ROSA (rosa) CLI offers a permission boundary function, it applies to all roles and not just the installer role, which means it does not work with the provided permission boundary policies (which are only for the installer role).
Prerequisites
- You have an AWS account.
- You have the permissions required to administer AWS roles and policies.
-
You have installed and configured the latest AWS (
aws) and ROSA (rosa) CLIs on your workstation. - You have already prepared your ROSA account-wide roles, includes the installer role, and the corresponding policies. If these do not exist in your AWS account, see "Creating the account-wide STS roles and policies" in Additional resources.
Procedure
Prepare the policy file by entering the following command in the
rosaCLI:$ curl -o ./rosa-installer-core.json https://raw.githubusercontent.com/openshift/managed-cluster-config/master/resources/sts/4.18/sts_installer_core_permission_boundary_policy.json
Create the policy in AWS and gather its Amazon Resource Name (ARN) by entering the following command:
$ aws iam create-policy \
--policy-name rosa-core-permissions-boundary-policy \
--policy-document file://./rosa-installer-core.json \
--description "ROSA installer core permission boundary policy, the minimum permission set, allows BYO-VPC, disallows PrivateLink"
Example output
{
    "Policy": {
        "PolicyName": "rosa-core-permissions-boundary-policy",
        "PolicyId": "<Policy ID>",
        "Arn": "arn:aws:iam::<account ID>:policy/rosa-core-permissions-boundary-policy",
        "Path": "/",
        "DefaultVersionId": "v1",
        "AttachmentCount": 0,
        "PermissionsBoundaryUsageCount": 0,
        "IsAttachable": true,
        "CreateDate": "<CreateDate>",
        "UpdateDate": "<UpdateDate>"
    }
}
Add the permission boundary policy to the installer role you want to restrict by entering the following command:
$ aws iam put-role-permissions-boundary \
--role-name ManagedOpenShift-Installer-Role \
--permissions-boundary arn:aws:iam::<account ID>:policy/rosa-core-permissions-boundary-policy
Display the installer role to validate attached policies (including permissions boundary) by entering the following command in the
rosaCLI:$ aws iam get-role --role-name ManagedOpenShift-Installer-Role \ --output text | grep PERMISSIONSBOUNDARY
Example output
PERMISSIONSBOUNDARY arn:aws:iam::<account ID>:policy/rosa-core-permissions-boundary-policy Policy
For more examples of PL and VPC permission boundary policies see:
Example 3.17.
sts_installer_privatelink_permission_boundary_policy.json{ "Version": "2012-10-17", "Statement": [ { "Effect": "Allow", "Action": [ "ec2:ModifyVpcEndpointServiceConfiguration", "route53:ListHostedZonesByVPC", "route53:CreateVPCAssociationAuthorization", "route53:AssociateVPCWithHostedZone", "route53:DeleteVPCAssociationAuthorization", "route53:DisassociateVPCFromHostedZone", "route53:ChangeResourceRecordSets" ], "Resource": "*" } ] }Example 3.18.
sts_installer_vpc_permission_boundary_policy.json{ "Version": "2012-10-17", "Statement": [ { "Effect": "Allow", "Action": [ "ec2:AssociateDhcpOptions", "ec2:AssociateRouteTable", "ec2:AttachInternetGateway", "ec2:CreateDhcpOptions", "ec2:CreateInternetGateway", "ec2:CreateNatGateway", "ec2:CreateRouteTable", "ec2:CreateSubnet", "ec2:CreateVpc", "ec2:DeleteDhcpOptions", "ec2:DeleteInternetGateway", "ec2:DeleteNatGateway", "ec2:DeleteRouteTable", "ec2:DeleteSubnet", "ec2:DeleteVpc", "ec2:DetachInternetGateway", "ec2:DisassociateRouteTable", "ec2:ModifySubnetAttribute", "ec2:ModifyVpcAttribute", "ec2:ReplaceRouteTableAssociation" ], "Resource": "*" } ] }
Additional resources
3.4. Cluster-specific Operator IAM role reference
This section provides details about the Operator IAM roles that are required for Red Hat OpenShift Service on AWS (ROSA) deployments that use STS. The cluster Operators use the Operator roles to obtain the temporary permissions required to carry out cluster operations, such as managing back-end storage, cloud provider credentials, and external access to a cluster.
When you create the Operator roles, the account-wide Operator policies for the matching cluster version are attached to the roles. The Operator policies are tagged with the Operator and version they are compatible with. The correct policy for an Operator role is determined by using the tags.
If more than one matching policy is available in your account for an Operator role, an interactive list of options is provided when you create the Operator.
| Resource | Description |
|---|---|
|
| An IAM role required by ROSA to manage back-end storage through the Container Storage Interface (CSI). |
|
| An IAM role required by the ROSA Machine Config Operator to perform core cluster functionality. |
|
| An IAM role required by the ROSA Cloud Credential Operator to manage cloud provider credentials. |
|
| An IAM role required by the cloud network config controller to manage cloud network configuration for a cluster. |
|
| An IAM role required by the ROSA Image Registry Operator to manage the OpenShift image registry storage in AWS S3 for a cluster. |
|
| An IAM role required by the ROSA Ingress Operator to manage external access to a cluster. |
|
| An IAM role required by the cloud network config controller to manage cloud network credentials for a cluster. |
3.4.1. Operator IAM role AWS CLI reference
This section lists the aws CLI commands that are shown in the terminal when you run the following rosa command using manual mode:
$ rosa create operator-roles --mode manual --cluster <cluster_name>
When using manual mode, the aws commands are printed to the terminal for your review. After reviewing the aws commands, you must run them manually. Alternatively, you can specify --mode auto with the rosa create command to run the aws commands immediately.
Command output
aws iam create-role \
	--role-name <cluster_name>-<hash>-openshift-cluster-csi-drivers-ebs-cloud-credent \
	--assume-role-policy-document file://operator_cluster_csi_drivers_ebs_cloud_credentials_policy.json \
	--tags Key=rosa_cluster_id,Value=<id> Key=rosa_openshift_version,Value=<openshift_version> Key=rosa_role_prefix,Value= Key=operator_namespace,Value=openshift-cluster-csi-drivers Key=operator_name,Value=ebs-cloud-credentials

aws iam attach-role-policy \
	--role-name <cluster_name>-<hash>-openshift-cluster-csi-drivers-ebs-cloud-credent \
	--policy-arn arn:aws:iam::<aws_account_id>:policy/ManagedOpenShift-openshift-cluster-csi-drivers-ebs-cloud-credent

aws iam create-role \
	--role-name <cluster_name>-<hash>-openshift-machine-api-aws-cloud-credentials \
	--assume-role-policy-document file://operator_machine_api_aws_cloud_credentials_policy.json \
	--tags Key=rosa_cluster_id,Value=<id> Key=rosa_openshift_version,Value=<openshift_version> Key=rosa_role_prefix,Value= Key=operator_namespace,Value=openshift-machine-api Key=operator_name,Value=aws-cloud-credentials

aws iam attach-role-policy \
	--role-name <cluster_name>-<hash>-openshift-machine-api-aws-cloud-credentials \
	--policy-arn arn:aws:iam::<aws_account_id>:policy/ManagedOpenShift-openshift-machine-api-aws-cloud-credentials

aws iam create-role \
	--role-name <cluster_name>-<hash>-openshift-cloud-credential-operator-cloud-crede \
	--assume-role-policy-document file://operator_cloud_credential_operator_cloud_credential_operator_iam_ro_creds_policy.json \
	--tags Key=rosa_cluster_id,Value=<id> Key=rosa_openshift_version,Value=<openshift_version> Key=rosa_role_prefix,Value= Key=operator_namespace,Value=openshift-cloud-credential-operator Key=operator_name,Value=cloud-credential-operator-iam-ro-creds

aws iam attach-role-policy \
	--role-name <cluster_name>-<hash>-openshift-cloud-credential-operator-cloud-crede \
	--policy-arn arn:aws:iam::<aws_account_id>:policy/ManagedOpenShift-openshift-cloud-credential-operator-cloud-crede

aws iam create-role \
	--role-name <cluster_name>-<hash>-openshift-image-registry-installer-cloud-creden \
	--assume-role-policy-document file://operator_image_registry_installer_cloud_credentials_policy.json \
	--tags Key=rosa_cluster_id,Value=<id> Key=rosa_openshift_version,Value=<openshift_version> Key=rosa_role_prefix,Value= Key=operator_namespace,Value=openshift-image-registry Key=operator_name,Value=installer-cloud-credentials

aws iam attach-role-policy \
	--role-name <cluster_name>-<hash>-openshift-image-registry-installer-cloud-creden \
	--policy-arn arn:aws:iam::<aws_account_id>:policy/ManagedOpenShift-openshift-image-registry-installer-cloud-creden

aws iam create-role \
	--role-name <cluster_name>-<hash>-openshift-ingress-operator-cloud-credentials \
	--assume-role-policy-document file://operator_ingress_operator_cloud_credentials_policy.json \
	--tags Key=rosa_cluster_id,Value=<id> Key=rosa_openshift_version,Value=<openshift_version> Key=rosa_role_prefix,Value= Key=operator_namespace,Value=openshift-ingress-operator Key=operator_name,Value=cloud-credentials

aws iam attach-role-policy \
	--role-name <cluster_name>-<hash>-openshift-ingress-operator-cloud-credentials \
	--policy-arn arn:aws:iam::<aws_account_id>:policy/ManagedOpenShift-openshift-ingress-operator-cloud-credentials
The command examples provided in the table include Operator roles that use the ManagedOpenShift prefix. If you defined a custom prefix when you created the account-wide roles and policies, including the Operator policies, you must reference it by using the --prefix <prefix_name> option when you create the Operator roles.
3.4.2. About custom Operator IAM role prefixes
Each Red Hat OpenShift Service on AWS (ROSA) cluster that uses the AWS Security Token Service (STS) requires cluster-specific Operator IAM roles.
By default, the Operator role names are prefixed with the cluster name and a random 4-digit hash. For example, the Cloud Credential Operator IAM role for a cluster named mycluster has the default name mycluster-<hash>-openshift-cloud-credential-operator-cloud-credentials, where <hash> is a random 4-digit string.
This default naming convention enables you to easily identify the Operator IAM roles for a cluster in your AWS account.
When you create the Operator roles for a cluster, you can optionally specify a custom prefix to use instead of <cluster_name>-<hash>. By using a custom prefix, you can prepend logical identifiers to your Operator role names to meet the requirements of your environment. For example, you might prefix the cluster name and the environment type, such as mycluster-dev. In that example, the Cloud Credential Operator role name with the custom prefix is mycluster-dev-openshift-cloud-credential-operator-cloud-credenti.
The role names are truncated to 64 characters.
3.5. Open ID Connect (OIDC) requirements for Operator authentication
For ROSA installations that use STS, you must create a cluster-specific OIDC provider that is used by the cluster Operators to authenticate or create your own OIDC configuration for your own OIDC provider.
3.5.1. Creating an OIDC provider using the CLI
You can create an OIDC provider that is hosted in your AWS account with the Red Hat OpenShift Service on AWS (ROSA) CLI, rosa.
Prerequisites
- You have installed the latest version of the ROSA CLI.
Procedure
To create an OIDC provider, by using an unregistered or a registered OIDC configuration.
Unregistered OIDC configurations require you to create the OIDC provider through the cluster. Run the following to create the OIDC provider:
$ rosa create oidc-provider --mode manual --cluster <cluster_name>
NoteWhen using
manualmode, theawscommand is printed to the terminal for your review. After reviewing theawscommand, you must run it manually. Alternatively, you can specify--mode autowith therosa createcommand to run theawscommand immediately.Command output
aws iam create-open-id-connect-provider \
	--url https://oidc.op1.openshiftapps.com/<oidc_config_id> \1
	--client-id-list openshift sts.<aws_region>.amazonaws.com \
	--thumbprint-list <thumbprint> 2
- 1
- The URL used to reach the OpenID Connect (OIDC) identity provider after the cluster is created.
- 2
- The thumbprint is generated automatically when you run the
rosa create oidc-providercommand. For more information about using thumbprints with AWS Identity and Access Management (IAM) OIDC identity providers, see the AWS documentation.
Registered OIDC configurations use an OIDC configuration ID. Run the following command with your OIDC configuration ID:
$ rosa create oidc-provider --oidc-config-id <oidc_config_id> --mode auto -y
Command output
I: Creating OIDC provider using 'arn:aws:iam::4540112244:user/userName'
I: Created OIDC provider with ARN 'arn:aws:iam::4540112244:oidc-provider/dvbwgdztaeq9o.cloudfront.net/241rh9ql5gpu99d7leokhvkp8icnalpf'
3.5.2. Creating an OpenID Connect Configuration
When using a cluster hosted by Red Hat, you can create a managed or unmanaged OpenID Connect (OIDC) configuration by using the Red Hat OpenShift Service on AWS (ROSA) CLI, rosa. A managed OIDC configuration is stored within Red Hat’s AWS account, while a generated unmanaged OIDC configuration is stored within your AWS account. The OIDC configuration is registered to be used with OpenShift Cluster Manager. When creating an unmanaged OIDC configuration, the CLI provides the private key for you.
Creating an OpenID Connect configuration
When using a Red Hat OpenShift Service on AWS cluster, you can create the OpenID Connect (OIDC) configuration prior to creating your cluster. This configuration is registered to be used with OpenShift Cluster Manager.
Prerequisites
- You have completed the AWS prerequisites for Red Hat OpenShift Service on AWS.
-
You have installed and configured the latest Red Hat OpenShift Service on AWS (ROSA) CLI,
rosa, on your installation host.
Procedure
To create your OIDC configuration alongside the AWS resources, run the following command:
$ rosa create oidc-config --mode=auto --yes
This command returns the following information.
Example output
? Would you like to create a Managed (Red Hat hosted) OIDC Configuration Yes
I: Setting up managed OIDC configuration
I: To create Operator Roles for this OIDC Configuration, run the following command and remember to replace <user-defined> with a prefix of your choice:
	rosa create operator-roles --prefix <user-defined> --oidc-config-id 13cdr6b
If you are going to create a Hosted Control Plane cluster please include '--hosted-cp'
I: Creating OIDC provider using 'arn:aws:iam::4540112244:user/userName'
? Create the OIDC provider? Yes
I: Created OIDC provider with ARN 'arn:aws:iam::4540112244:oidc-provider/dvbwgdztaeq9o.cloudfront.net/13cdr6b'
When creating your cluster, you must supply the OIDC config ID. The CLI output provides this value for
--mode auto, otherwise you must determine these values based onawsCLI output for--mode manual.Optional: you can save the OIDC configuration ID as a variable to use later. Run the following command to save the variable:
$ export OIDC_ID=<oidc_config_id>1- 1
- In the example output above, the OIDC configuration ID is 13cdr6b.
View the value of the variable by running the following command:
$ echo $OIDC_ID
Example output
13cdr6b
Verification
You can list the possible OIDC configurations available for your clusters that are associated with your user organization. Run the following command:
$ rosa list oidc-config
Example output
ID                                MANAGED  ISSUER URL                                                             SECRET ARN
2330dbs0n8m3chkkr25gkkcd8pnj3lk2  true     https://dvbwgdztaeq9o.cloudfront.net/2330dbs0n8m3chkkr25gkkcd8pnj3lk2
233hvnrjoqu14jltk6lhbhf2tj11f8un  false    https://oidc-r7u1.s3.us-east-1.amazonaws.com                           aws:secretsmanager:us-east-1:242819244:secret:rosa-private-key-oidc-r7u1-tM3MDN
Parameter options for creating your own OpenID Connect configuration
The following options may be added to the rosa create oidc-config command. All of these parameters are optional. Running the rosa create oidc-config command without parameters creates an unmanaged OIDC configuration.
You are required to register the unmanaged OIDC configuration by posting a request to /oidc_configs through OpenShift Cluster Manager. You receive an ID in the response. Use this ID to create a cluster.
raw-files
Allows you to provide raw files for the private RSA key. This key is named rosa-private-key-oidc-<random_label_of_length_4>.key. You also receive a discovery document, named discovery-document-oidc-<random_label_of_length_4>.json, and a JSON Web Key Set, named jwks-oidc-<random_label_of_length_4>.json.
You use these files to set up the endpoint. This endpoint responds to /.well-known/openid-configuration with the discovery document and on keys.json with the JSON Web Key Set. The private key is stored in Amazon Web Services (AWS) Secrets Manager Service (SMS) as plaintext.
Example
$ rosa create oidc-config --raw-files
mode
Allows you to specify the mode to create your OIDC configuration. With the manual option, you receive AWS commands that set up the OIDC configuration in an S3 bucket. This option stores the private key in the Secrets Manager. With the manual option, the OIDC Endpoint URL is the URL for the S3 bucket. You must retrieve the Secrets Manager ARN to register the OIDC configuration with OpenShift Cluster Manager.
You receive the same OIDC configuration and AWS resources as the manual mode when using the auto option. A significant difference between the two options is that when using the auto option, ROSA calls AWS, so you do not need to take any further actions. The OIDC Endpoint URL is the URL for the S3 bucket. The CLI retrieves the Secrets Manager ARN, registers the OIDC configuration with OpenShift Cluster Manager, and reports the second rosa command that the user can run to continue with the creation of the STS cluster.
Example
$ rosa create oidc-config --mode=<auto|manual>
managed
Creates an OIDC configuration that is hosted under Red Hat’s AWS account. This command creates a private key that responds directly with an OIDC Config ID for you to use when creating the STS cluster.
Example
$ rosa create oidc-config --managed
Example output
W: For a managed OIDC Config only auto mode is supported. However, you may choose the provider creation mode
? OIDC Provider creation mode: auto
I: Setting up managed OIDC configuration
I: Please run the following command to create a cluster with this oidc config
rosa create cluster --sts --oidc-config-id 233jnu62i9aphpucsj9kueqlkr1vcgra
I: Creating OIDC provider using 'arn:aws:iam::242819244:user/userName'
? Create the OIDC provider? Yes
I: Created OIDC provider with ARN 'arn:aws:iam::242819244:oidc-provider/dvbwgdztaeq9o.cloudfront.net/233jnu62i9aphpucsj9kueqlkr1vcgra'
3.6. Minimum set of effective permissions for service control policies (SCP)
Service control policies (SCP) are a type of organization policy that manages permissions within your organization. SCPs ensure that accounts within your organization stay within your defined access control guidelines. These policies are maintained in AWS Organizations and control the services that are available within the attached AWS accounts. SCP management is the responsibility of the customer.
When using AWS Security Token Service (STS), you must ensure that the service control policy does not block the following resources:
-
ec2:{} -
iam:{} -
tag:*
Verify that your service control policy (SCP) does not restrict any of these required permissions.
| Service | Actions | Effect | |
|---|---|---|---|
| Required | Amazon EC2 | All | Allow |
| Amazon EC2 Auto Scaling | All | Allow | |
| Amazon S3 | All | Allow | |
| Identity And Access Management | All | Allow | |
| Elastic Load Balancing | All | Allow | |
| Elastic Load Balancing V2 | All | Allow | |
| Amazon CloudWatch | All | Allow | |
| Amazon CloudWatch Events | All | Allow | |
| Amazon CloudWatch Logs | All | Allow | |
| AWS EC2 Instance Connect | SendSerialConsoleSSHPublicKey | Allow | |
| AWS Support | All | Allow | |
| AWS Key Management Service | All | Allow | |
| AWS Security Token Service | All | Allow | |
| AWS Tiro | CreateQuery GetQueryAnswer GetQueryExplanation | Allow | |
| AWS Marketplace | Subscribe Unsubscribe View Subscriptions | Allow | |
| AWS Resource Tagging | All | Allow | |
| AWS Route53 DNS | All | Allow | |
| AWS Service Quotas | ListServices GetRequestedServiceQuotaChange GetServiceQuota RequestServiceQuotaIncrease ListServiceQuotas | Allow | |
| Optional | AWS Billing | ViewAccount Viewbilling ViewUsage | Allow |
| AWS Cost and Usage Report | All | Allow | |
| AWS Cost Explorer Services | All | Allow |
Additional resources
3.7. Customer-managed policies
Red Hat OpenShift Service on AWS (ROSA) users are able to attach customer-managed policies to the IAM roles required to run and maintain ROSA clusters. This capability is not uncommon with AWS IAM roles. The ability to attach these policies to ROSA-specific IAM roles extends a ROSA cluster’s permission capabilities; for example, as a way to allow cluster components to access additional AWS resources that are otherwise not part of the ROSA-specific IAM policies.
To ensure that any critical customer applications that rely on customer-managed policies are not modified in any way during cluster or role upgrades, ROSA utilizes the ListAttachedRolesPolicies permission to retrieve the list of permission policies from roles and the ListRolePolicies permission to retrieve the list of policies from ROSA-specific roles. This information ensures that customer-managed policies are not impacted during cluster events, and allows Red Hat SREs to monitor both ROSA and customer-managed policies attached to ROSA-specific IAM roles, enhancing their ability to troubleshoot any cluster issues more effectively.
Attaching permission boundary policies to IAM roles that restrict ROSA-specific policies is not supported, as these policies could interrupt the functionality of the basic permissions necessary to successfully run and maintain your ROSA cluster. There are prepared permissions boundary policies for the ROSA (classic architecture) installer role. See the Additional resources section for more information.
Additional resources
Chapter 4. OpenID Connect Overview
OpenID Connect (OIDC) uses Security Token Service (STS) to allow clients to provide a web identity token to gain access to multiple services. When a client signs into a service using STS, the token is validated against the OIDC identity provider.
The OIDC protocol uses a configuration URL that contains the necessary information to authenticate a client’s identity. The protocol responds to the provider with the credentials needed for the provider to validate the client and sign them in.
Red Hat OpenShift Service on AWS clusters use STS and OIDC to grant the in-cluster operators access to necessary AWS resources.
4.1. Understanding the OIDC verification options
You can configure the following types of OIDC verification:
Unregistered, managed OIDC configuration
An unregistered, managed OIDC configuration is created for you during the cluster installation process. The configuration is hosted under Red Hat’s AWS account. This option does not give you the ID that links to the OIDC configuration, so you can only use this type of OIDC configuration on a single cluster.
Registered, managed OIDC configuration
You create a registered, managed OIDC configuration before you start creating your clusters. This configuration is hosted under Red Hat’s AWS account like the unregistered managed OIDC configuration. When you use this option for your OIDC configuration, you receive an ID that links to the OIDC configuration. Red Hat uses this ID to identify the issuer URL and private key. You can then use this URL and private key to create an identity provider and Operator roles. These resources are created under your AWS account by using Identity and Access Management (IAM) AWS services. You can also use the OIDC configuration ID during the cluster creation process.
Registered, unmanaged OIDC configuration
You can create a registered, unmanaged OIDC configuration before you start creating your clusters. This configuration is hosted under your AWS account. When you use this option, you are responsible for managing the private key. You can register the configuration with Red Hat OpenShift Cluster Manager by storing the private key in an AWS secrets file by using the AWS Secrets Manager (SM) service and the issuer URL which hosts the configuration. You can use the Red Hat OpenShift Service on AWS (ROSA) CLI,
rosa, to create a registered, unmanaged OIDC configuration with therosa create oidc-config --managed=falsecommand. This command creates and hosts the configuration under your account and creates the necessary files and private secret key. This command also registers the configuration with OpenShift Cluster Manager.
The registered options can be used to create the required IAM resources before you start creating a cluster. This option results in faster install times since there is a waiting period during cluster creation where the installation pauses until you create an OIDC provider and Operator roles.
For ROSA Classic, you may use any of the OIDC configuration options. If you are using ROSA with HCP, you must create registered OIDC configuration, either as managed or unmanaged. You can share the registered OIDC configurations with other clusters. This ability to share the configuration also allows you to share the provider and Operator roles.
Reusing the OIDC configurations, OIDC provider, and Operator roles between clusters is not recommended for production clusters since the authentication verification is used throughout all of these clusters. Red Hat recommends only reusing resources between non-production test environments.
4.2. Creating an OpenID Connect Configuration
When using a cluster hosted by Red Hat, you can create a managed or unmanaged OpenID Connect (OIDC) configuration by using the Red Hat OpenShift Service on AWS (ROSA) CLI, rosa. A managed OIDC configuration is stored within Red Hat’s AWS account, while a generated unmanaged OIDC configuration is stored within your AWS account. The OIDC configuration is registered to be used with OpenShift Cluster Manager. When creating an unmanaged OIDC configuration, the CLI provides the private key for you.
Creating an OpenID Connect configuration
When using a Red Hat OpenShift Service on AWS cluster, you can create the OpenID Connect (OIDC) configuration prior to creating your cluster. This configuration is registered to be used with OpenShift Cluster Manager.
Prerequisites
- You have completed the AWS prerequisites for Red Hat OpenShift Service on AWS.
-
You have installed and configured the latest Red Hat OpenShift Service on AWS (ROSA) CLI,
rosa, on your installation host.
Procedure
To create your OIDC configuration alongside the AWS resources, run the following command:
$ rosa create oidc-config --mode=auto --yes
This command returns the following information.
Example output
? Would you like to create a Managed (Red Hat hosted) OIDC Configuration Yes
I: Setting up managed OIDC configuration
I: To create Operator Roles for this OIDC Configuration, run the following command and remember to replace <user-defined> with a prefix of your choice:
	rosa create operator-roles --prefix <user-defined> --oidc-config-id 13cdr6b
If you are going to create a Hosted Control Plane cluster please include '--hosted-cp'
I: Creating OIDC provider using 'arn:aws:iam::4540112244:user/userName'
? Create the OIDC provider? Yes
I: Created OIDC provider with ARN 'arn:aws:iam::4540112244:oidc-provider/dvbwgdztaeq9o.cloudfront.net/13cdr6b'
When creating your cluster, you must supply the OIDC config ID. The CLI output provides this value for
--mode auto, otherwise you must determine these values based onawsCLI output for--mode manual.Optional: you can save the OIDC configuration ID as a variable to use later. Run the following command to save the variable:
$ export OIDC_ID=<oidc_config_id>1- 1
- In the example output above, the OIDC configuration ID is 13cdr6b.
View the value of the variable by running the following command:
$ echo $OIDC_ID
Example output
13cdr6b
Verification
You can list the possible OIDC configurations available for your clusters that are associated with your user organization. Run the following command:
$ rosa list oidc-config
Example output
ID                                MANAGED  ISSUER URL                                                             SECRET ARN
2330dbs0n8m3chkkr25gkkcd8pnj3lk2  true     https://dvbwgdztaeq9o.cloudfront.net/2330dbs0n8m3chkkr25gkkcd8pnj3lk2
233hvnrjoqu14jltk6lhbhf2tj11f8un  false    https://oidc-r7u1.s3.us-east-1.amazonaws.com                           aws:secretsmanager:us-east-1:242819244:secret:rosa-private-key-oidc-r7u1-tM3MDN
Parameter options for creating your own OpenID Connect configuration
The following options may be added to the rosa create oidc-config command. All of these parameters are optional. Running the rosa create oidc-config command without parameters creates an unmanaged OIDC configuration.
You are required to register the unmanaged OIDC configuration by posting a request to /oidc_configs through OpenShift Cluster Manager. You receive an ID in the response. Use this ID to create a cluster.
raw-files
Allows you to provide raw files for the private RSA key. This key is named rosa-private-key-oidc-<random_label_of_length_4>.key. You also receive a discovery document, named discovery-document-oidc-<random_label_of_length_4>.json, and a JSON Web Key Set, named jwks-oidc-<random_label_of_length_4>.json.
You use these files to set up the endpoint. This endpoint responds to /.well-known/openid-configuration with the discovery document and on keys.json with the JSON Web Key Set. The private key is stored in Amazon Web Services (AWS) Secrets Manager Service (SMS) as plaintext.
Example
$ rosa create oidc-config --raw-files
mode
Allows you to specify the mode to create your OIDC configuration. With the manual option, you receive AWS commands that set up the OIDC configuration in an S3 bucket. This option stores the private key in the Secrets Manager. With the manual option, the OIDC Endpoint URL is the URL for the S3 bucket. You must retrieve the Secrets Manager ARN to register the OIDC configuration with OpenShift Cluster Manager.
You receive the same OIDC configuration and AWS resources as the manual mode when using the auto option. A significant difference between the two options is that when using the auto option, ROSA calls AWS, so you do not need to take any further actions. The OIDC Endpoint URL is the URL for the S3 bucket. The CLI retrieves the Secrets Manager ARN, registers the OIDC configuration with OpenShift Cluster Manager, and reports the second rosa command that the user can run to continue with the creation of the STS cluster.
Example
$ rosa create oidc-config --mode=<auto|manual>
managed
Creates an OIDC configuration that is hosted under Red Hat’s AWS account. This command creates a private key that responds directly with an OIDC Config ID for you to use when creating the STS cluster.
Example
$ rosa create oidc-config --managed
Example output
W: For a managed OIDC Config only auto mode is supported. However, you may choose the provider creation mode
? OIDC Provider creation mode: auto
I: Setting up managed OIDC configuration
I: Please run the following command to create a cluster with this oidc config
rosa create cluster --sts --oidc-config-id 233jnu62i9aphpucsj9kueqlkr1vcgra
I: Creating OIDC provider using 'arn:aws:iam::242819244:user/userName'
? Create the OIDC provider? Yes
I: Created OIDC provider with ARN 'arn:aws:iam::242819244:oidc-provider/dvbwgdztaeq9o.cloudfront.net/233jnu62i9aphpucsj9kueqlkr1vcgra'
4.3. Creating an OIDC provider using the CLI
You can create an OIDC provider that is hosted in your AWS account with the Red Hat OpenShift Service on AWS (ROSA) CLI, rosa.
Prerequisites
- You have installed the latest version of the ROSA CLI.
Procedure
To create an OIDC provider, by using an unregistered or a registered OIDC configuration.
Unregistered OIDC configurations require you to create the OIDC provider through the cluster. Run the following to create the OIDC provider:
$ rosa create oidc-provider --mode manual --cluster <cluster_name>
NoteWhen using
manualmode, theawscommand is printed to the terminal for your review. After reviewing theawscommand, you must run it manually. Alternatively, you can specify--mode autowith therosa createcommand to run theawscommand immediately.Command output
aws iam create-open-id-connect-provider \
	--url https://oidc.op1.openshiftapps.com/<oidc_config_id> \1
	--client-id-list openshift sts.<aws_region>.amazonaws.com \
	--thumbprint-list <thumbprint> 2
- 1
- The URL used to reach the OpenID Connect (OIDC) identity provider after the cluster is created.
- 2
- The thumbprint is generated automatically when you run the
rosa create oidc-providercommand. For more information about using thumbprints with AWS Identity and Access Management (IAM) OIDC identity providers, see the AWS documentation.
Registered OIDC configurations use an OIDC configuration ID. Run the following command with your OIDC configuration ID:
$ rosa create oidc-provider --oidc-config-id <oidc_config_id> --mode auto -y
Command output
I: Creating OIDC provider using 'arn:aws:iam::4540112244:user/userName'
I: Created OIDC provider with ARN 'arn:aws:iam::4540112244:oidc-provider/dvbwgdztaeq9o.cloudfront.net/241rh9ql5gpu99d7leokhvkp8icnalpf'
4.4. Additional resources
- See Creating an OpenID Connect Configuration for the ROSA Classic instructions.
- See Creating an OpenID Connect Configuration for the ROSA with HCP instructions.
Legal Notice
Copyright © 2024 Red Hat, Inc.
OpenShift documentation is licensed under the Apache License 2.0 (https://www.apache.org/licenses/LICENSE-2.0).
Modified versions must remove all Red Hat trademarks.
Portions adapted from https://github.com/kubernetes-incubator/service-catalog/ with modifications by Red Hat.
Red Hat, Red Hat Enterprise Linux, the Red Hat logo, the Shadowman logo, JBoss, OpenShift, Fedora, the Infinity logo, and RHCE are trademarks of Red Hat, Inc., registered in the United States and other countries.
Linux® is the registered trademark of Linus Torvalds in the United States and other countries.
Java® is a registered trademark of Oracle and/or its affiliates.
XFS® is a trademark of Silicon Graphics International Corp. or its subsidiaries in the United States and/or other countries.
MySQL® is a registered trademark of MySQL AB in the United States, the European Union and other countries.
Node.js® is an official trademark of Joyent. Red Hat Software Collections is not formally related to or endorsed by the official Joyent Node.js open source or commercial project.
The OpenStack® Word Mark and OpenStack logo are either registered trademarks/service marks or trademarks/service marks of the OpenStack Foundation, in the United States and other countries and are used with the OpenStack Foundation’s permission. We are not affiliated with, endorsed or sponsored by the OpenStack Foundation, or the OpenStack community.
All other trademarks are the property of their respective owners.