Chapter 2. Ceph network configuration
As a storage administrator, you must understand the network environment that the Red Hat Ceph Storage cluster will operate in, and configure the Red Hat Ceph Storage accordingly. Understanding and configuring the Ceph network options will ensure optimal performance and reliability of the overall storage cluster.
2.1. Prerequisites
- Network connectivity.
- Installation of the Red Hat Ceph Storage software.
2.2. Network configuration for Ceph
Network configuration is critical for building a high performance Red Hat Ceph Storage cluster. The Ceph storage cluster does not perform request routing or dispatching on behalf of the Ceph client. Instead, Ceph clients make requests directly to Ceph OSD daemons. Ceph OSDs perform data replication on behalf of Ceph clients, which means replication and other factors impose additional loads on the networks of Ceph storage clusters.
Ceph has one network configuration requirement that applies to all daemons. The Ceph configuration file must specify the host for each daemon.
Some deployment utilities, such as cephadm creates a configuration file for you. Do not set these values if the deployment utility does it for you.
The host option is the short name of the node, not its FQDN. It is not an IP address.
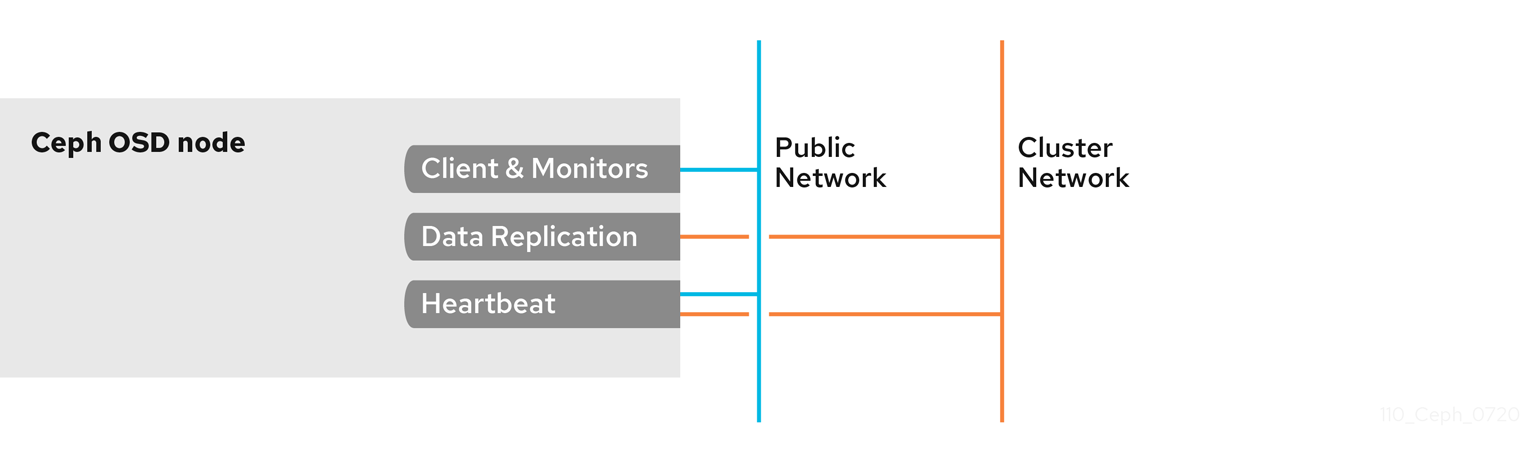
All Ceph clusters must use a public network. However, unless you specify an internal cluster network, Ceph assumes a single public network. Ceph can function with a public network only, but for large storage clusters, you will see significant performance improvement with a second private network for carrying only cluster-related traffic.
Red Hat recommends running a Ceph storage cluster with two networks. One public network and one private network.
To support two networks, each Ceph Node will need to have more than one network interface card (NIC).

There are several reasons to consider operating two separate networks:
- Performance: Ceph OSDs handle data replication for the Ceph clients. When Ceph OSDs replicate data more than once, the network load between Ceph OSDs easily dwarfs the network load between Ceph clients and the Ceph storage cluster. This can introduce latency and create a performance problem. Recovery and rebalancing can also introduce significant latency on the public network.
-
Security: While most people are generally civil, some actors will engage in what is known as a Denial of Service (DoS) attack. When traffic between Ceph OSDs gets disrupted, peering may fail and placement groups may no longer reflect an
active + cleanstate, which may prevent users from reading and writing data. A great way to defeat this type of attack is to maintain a completely separate cluster network that does not connect directly to the internet.
Network configuration settings are not required. Ceph can function with a public network only, assuming a public network is configured on all hosts running a Ceph daemon. However, Ceph allows you to establish much more specific criteria, including multiple IP networks and subnet masks for your public network. You can also establish a separate cluster network to handle OSD heartbeat, object replication, and recovery traffic.
Do not confuse the IP addresses you set in the configuration with the public-facing IP addresses network clients might use to access your service. Typical internal IP networks are often 192.168.0.0 or 10.0.0.0.
Ceph uses CIDR notation for subnets, for example, 10.0.0.0/24.
If you specify more than one IP address and subnet mask for either the public or the private network, the subnets within the network must be capable of routing to each other. Additionally, make sure you include each IP address and subnet in your IP tables and open ports for them as necessary.
When you configured the networks, you can restart the cluster or restart each daemon. Ceph daemons bind dynamically, so you do not have to restart the entire cluster at once if you change the network configuration.
Additional Resources
- See the common options in Red Hat Ceph Storage Configuration Guide, Appendix B for specific option descriptions and usage.
2.3. Ceph network messenger
Messenger is the Ceph network layer implementation. Red Hat supports two messenger types:
-
simple -
async
In Red Hat Ceph Storage 4 and higher, async is the default messenger type. To change the messenger type, specify the ms_type configuration setting in the [global] section of the Ceph configuration file.
For the async messenger, Red Hat supports the posix transport type, but does not currently support rdma or dpdk. By default, the ms_type setting in Red Hat Ceph Storage 4 or higher reflects async+posix, where async is the messenger type and posix is the transport type.
SimpleMessenger
The SimpleMessenger implementation uses TCP sockets with two threads per socket. Ceph associates each logical session with a connection. A pipe handles the connection, including the input and output of each message. While SimpleMessenger is effective for the posix transport type, it is not effective for other transport types such as rdma or dpdk.
AsyncMessenger
Consequently, AsyncMessenger is the default messenger type for Red Hat Ceph Storage 4 or higher. For Red Hat Ceph Storage 4 or higher, the AsyncMessenger implementation uses TCP sockets with a fixed-size thread pool for connections, which should be equal to the highest number of replicas or erasure-code chunks. The thread count can be set to a lower value if performance degrades due to a low CPU count or a high number of OSDs per server.
Red Hat does not support other transport types such as rdma or dpdk at this time.
Additional Resources
- See the AsyncMessenger options in Red Hat Ceph Storage Configuration Guide, Appendix B for specific option descriptions and usage.
- See the Red Hat Ceph Storage Architecture Guide for details about using on-wire encryption with the Ceph messenger version 2 protocol.
2.4. Configuring a public network
To configure Ceph networks, use the config set command within the cephadm shell. Note that the IP addresses you set in your network configuration are different from the public-facing IP addresses that network clients might use to access your service.
Ceph functions perfectly well with only a public network. However, Ceph allows you to establish much more specific criteria, including multiple IP networks for your public network.
You can also establish a separate, private cluster network to handle OSD heartbeat, object replication, and recovery traffic. For more information about the private network, see Configuring a private network.
Ceph uses CIDR notation for subnets, for example, 10.0.0.0/24. Typical internal IP networks are often 192.168.0.0/24 or 10.0.0.0/24.
If you specify more than one IP address for either the public or the cluster network, the subnets within the network must be capable of routing to each other. In addition, make sure you include each IP address in your IP tables, and open ports for them as necessary.
The public network configuration allows you specifically define IP addresses and subnets for the public network.
Prerequisites
- Installation of the Red Hat Ceph Storage software.
Procedure
Log in to the
cephadmshell:Example
[root@host01 ~]# cephadm shell
Configure the public network with the subnet:
Syntax
ceph config set mon public_network IP_ADDRESS_WITH_SUBNETExample
[ceph: root@host01 /]# ceph config set mon public_network 192.168.0.0/24
Get the list of services in the storage cluster:
Example
[ceph: root@host01 /]# ceph orch ls
Restart the daemons. Ceph daemons bind dynamically, so you do not have to restart the entire cluster at once if you change the network configuration for a specific daemon.
Example
[ceph: root@host01 /]# ceph orch restart mon
Optional: If you want to restart the cluster, on the admin node as a root user, run
systemctlcommand:Syntax
systemctl restart ceph-FSID_OF_CLUSTER.targetExample
[root@host01 ~]# systemctl restart ceph-1ca9f6a8-d036-11ec-8263-fa163ee967ad.target
Additional Resources
- See the common options in Red Hat Ceph Storage Configuration Guide, Appendix B for specific option descriptions and usage.
2.5. Configuring multiple public networks to the cluster
When the user wants to place the Ceph Monitor daemons on hosts belonging to multiple network subnets, configuring multiple public networks to the cluster is necessary. An example of usage is a stretch cluster mode used for Advanced Cluster Management (ACM) in Metro DR for OpenShift Data Foundation.
You can configure multiple public networks to the cluster during bootstrap and once bootstrap is complete.
Prerequisites
- Before adding a host be sure that you have a running Red Hat Ceph Storage cluster.
Procedure
Bootstrap a Ceph cluster configured with multiple public networks.
Prepare a
ceph.conffile containing amonpublic network section:ImportantAt least one of the provided public networks must be configured on the current host used for bootstrap.
Syntax
[mon]
public_network = PUBLIC_NETWORK1, PUBLIC_NETWORK2
Example
[mon]
public_network = 10.40.0.0/24, 10.41.0.0/24, 10.42.0.0/24
This is an example with three public networks to be provided for bootstrap.
Bootstrap the cluster by providing the
ceph.conffile as input:NoteDuring the bootstrap you can include any other arguments that you want to provide.
Syntax
cephadm --image IMAGE_URL bootstrap --mon-ip MONITOR_IP -c PATH_TO_CEPH_CONF
NoteAlternatively, an
IMAGE_ID(such as,13ea90216d0be03003d12d7869f72ad9de5cec9e54a27fd308e01e467c0d4a0a) can be used instead ofIMAGE_URL.Example
[root@host01 ~]# cephadm –image cp.icr.io/cp/ibm-ceph/ceph-5-rhel8:latest bootstrap –mon-ip 10.40.0.0/24 -c /etc/ceph/ceph.conf
Add new hosts to the subnets:
NoteThe host being added must be reachable from the host that the active manager is running on.
Install the cluster’s public SSH key in the new host’s root user’s
authorized_keysfile:Syntax
ssh-copy-id -f -i /etc/ceph/ceph.pub root@NEW_HOSTExample
[root@host01 ~]# ssh-copy-id -f -i /etc/ceph/ceph.pub root@host02
[root@host01 ~]# ssh-copy-id -f -i /etc/ceph/ceph.pub root@host03
Log into
cephadmshell:Example
[root@host01 ~]# cephadm shell
Add the new host to the Ceph cluster:
Syntax
ceph orch host add NEW_HOST IP [LABEL1 ...]
Example
[root@host01 ~]# ceph orch host add host02 10.10.0.102 label1
[root@host01 ~]# ceph orch host add host03 10.10.0.103 label2
Note- It is best to explicitly provide the host IP address. If an IP is not provided, then the host name is immediately resolved via DNS and that IP is used.
-
One or more labels can also be included to immediately label the new host. For example, by default the
_adminlabel makes cephadm maintain a copy of theceph.conffile and aclient.adminkeyring file in/etc/cephdirectory.
Add the networks configurations for the public network parameters to a running cluster. Be sure that the subnets are separated by commas and that the subnets are listed in subnet/mask format.
Syntax
ceph config set mon public_network "SUBNET_1,SUBNET_2, ..."
Example
[root@host01 ~]# ceph config set mon public_network "192.168.0.0/24, 10.42.0.0/24, ..."
If necessary, update the
monspecifications to place themondaemons on hosts within the specified subnets.
Additional Resources
- See Adding hosts for more details about adding hosts in the Red Hat Ceph Storage Installation Guide.
- See Stretch clusters for Ceph storage for more details about stretch clusters in the Red Hat Ceph Storage Administration Guide.
2.6. Configuring a private network
Network configuration settings are not required. Ceph assumes a public network with all hosts operating on it, unless you specifically configure a cluster network, also known as a private network.
If you create a cluster network, OSDs routes heartbeat, object replication, and recovery traffic over the cluster network. This can improve performance, compared to using a single network.
For added security, the cluster network should not be reachable from the public network or the Internet.
To assign a cluster network, use the --cluster-network option with the cephadm bootstrap command. The cluster network that you specify must define a subnet in CIDR notation (for example, 10.90.90.0/24 or fe80::/64).
You can also configure the cluster_network after boostrap.
Prerequisites
- Access to the Ceph software repository.
- Root-level access to all nodes in the storage cluster.
Procedure
Run the
cephadm bootstrap commandfrom the initial node that you want to use as the Monitor node in the storage cluster. Include the--cluster-networkoption in the command.Syntax
cephadm bootstrap --mon-ip IP-ADDRESS --registry-url registry.redhat.io --registry-username USER_NAME --registry-password PASSWORD --cluster-network NETWORK-IP-ADDRESS
Example
[root@host01 ~]# cephadm bootstrap --mon-ip 10.10.128.68 --registry-url registry.redhat.io --registry-username myuser1 --registry-password mypassword1 --cluster-network 10.10.0.0/24
To configure the
cluster_networkafter bootstrap, run theconfig setcommand and redeploy the daemons:Log in to the
cephadmshell:Example
[root@host01 ~]# cephadm shell
Configure the cluster network with the subnet:
Syntax
ceph config set global cluster_network IP_ADDRESS_WITH_SUBNETExample
[ceph: root@host01 /]# ceph config set global cluster_network 10.10.0.0/24
Get the list of services in the storage cluster:
Example
[ceph: root@host01 /]# ceph orch ls
Restart the daemons. Ceph daemons bind dynamically, so you do not have to restart the entire cluster at once if you change the network configuration for a specific daemon.
Example
[ceph: root@host01 /]# ceph orch restart mon
Optional: If you want to restart the cluster, on the admin node as a root user, run
systemctlcommand:Syntax
systemctl restart ceph-FSID_OF_CLUSTER.targetExample
[root@host01 ~]# systemctl restart ceph-1ca9f6a8-d036-11ec-8263-fa163ee967ad.target
Additional Resources
-
For more information about invoking
cephadm bootstrap, see the Bootstrapping a new storage cluster section in the Red Hat Ceph Storage Installation Guide.
2.7. Verifying firewall rules are configured for default Ceph ports
By default, Red Hat Ceph Storage daemons use TCP ports 6800—7100 to communicate with other hosts in the cluster. You can verify that the host’s firewall allows connection on these ports.
If your network has a dedicated firewall, you might need to verify its configuration in addition to following this procedure. See the firewall’s documentation for more information.
See the firewall’s documentation for more information.
Prerequisites
- Root-level access to the host.
Procedure
Verify the host’s
iptablesconfiguration:List active rules:
[root@host1 ~]# iptables -L
Verify the absence of rules that restrict connectivity on TCP ports 6800—7100.
Example
REJECT all -- anywhere anywhere reject-with icmp-host-prohibited
Verify the host’s
firewalldconfiguration:List ports open on the host:
Syntax
firewall-cmd --zone ZONE --list-portsExample
[root@host1 ~]# firewall-cmd --zone default --list-ports
- Verify the range is inclusive of TCP ports 6800—7100.
2.8. Firewall settings for Ceph Monitor node
You can enable encryption for all Ceph traffic over the network with the introduction of the messenger version 2 protocol. The secure mode setting for messenger v2 encrypts communication between Ceph daemons and Ceph clients, giving you end-to-end encryption.
Messenger v2 Protocol
The second version of Ceph’s on-wire protocol, msgr2, includes several new features:
- A secure mode encrypts all data moving through the network.
- Encapsulation improvement of authentication payloads.
- Improvements to feature advertisement and negotiation.
The Ceph daemons bind to multiple ports allowing both the legacy, v1-compatible, and the new, v2-compatible, Ceph clients to connect to the same storage cluster. Ceph clients or other Ceph daemons connecting to the Ceph Monitor daemon will try to use the v2 protocol first, if possible, but if not, then the legacy v1 protocol will be used. By default, both messenger protocols, v1 and v2, are enabled. The new v2 port is 3300, and the legacy v1 port is 6789, by default.
Prerequisites
- A running Red Hat Ceph Storage cluster.
- Access to the Ceph software repository.
- Root-level access to the Ceph Monitor node.
Procedure
Add rules using the following example:
[root@mon ~]# sudo iptables -A INPUT -i IFACE -p tcp -s IP-ADDRESS/NETMASK --dport 6789 -j ACCEPT
[root@mon ~]# sudo iptables -A INPUT -i IFACE -p tcp -s IP-ADDRESS/NETMASK --dport 3300 -j ACCEPT
-
Replace
IFACEwith the public network interface (for example,eth0,eth1, and so on). -
Replace
IP-ADDRESSwith the IP address of the public network andNETMASKwith the netmask for the public network.
-
Replace
For the
firewallddaemon, execute the following commands:[root@mon ~]# firewall-cmd --zone=public --add-port=6789/tcp [root@mon ~]# firewall-cmd --zone=public --add-port=6789/tcp --permanent [root@mon ~]# firewall-cmd --zone=public --add-port=3300/tcp [root@mon ~]# firewall-cmd --zone=public --add-port=3300/tcp --permanent
2.9. Firewall settings for Ceph OSDs
By default, Ceph OSDs bind to the first available ports on a Ceph node beginning at port 6800. Ensure to open at least four ports beginning at port 6800 for each OSD that runs on the node:
- One for talking to clients and monitors on the public network.
- One for sending data to other OSDs on the cluster network.
- Two for sending heartbeat packets on the cluster network.
Ports are node-specific. However, you might need to open more ports than the number of ports needed by Ceph daemons running on that Ceph node in the event that processes get restarted and the bound ports do not get released. Consider opening a few additional ports in case a daemon fails and restarts without releasing the port such that the restarted daemon binds to a new port. Also, consider opening the port range of 6800—7300 on each OSD node.
If you set separate public and cluster networks, you must add rules for both the public network and the cluster network, because clients will connect using the public network and other Ceph OSD Daemons will connect using the cluster network.
Prerequisites
- A running Red Hat Ceph Storage cluster.
- Access to the Ceph software repository.
- Root-level access to the Ceph OSD nodes.
Procedure
Add rules using the following example:
[root@mon ~]# sudo iptables -A INPUT -i IFACE -m multiport -p tcp -s IP-ADDRESS/NETMASK --dports 6800:7300 -j ACCEPT
-
Replace
IFACEwith the public network interface (for example,eth0,eth1, and so on). -
Replace
IP-ADDRESSwith the IP address of the public network andNETMASKwith the netmask for the public network.
-
Replace
For the
firewallddaemon, execute the following:[root@mon ~] # firewall-cmd --zone=public --add-port=6800-7300/tcp [root@mon ~] # firewall-cmd --zone=public --add-port=6800-7300/tcp --permanent
If you put the cluster network into another zone, open the ports within that zone as appropriate.
2.10. Additional Resources
- See the Red Hat Ceph Storage network configuration options in Appendix B for specific option descriptions and usage.
- See the Red Hat Ceph Storage Architecture Guide for details about using on-wire encryption with the Ceph messenger version 2 protocol.