Deploying AMQ Broker on OpenShift
For Use with AMQ Broker 7.8
Abstract
Chapter 1. Introduction to AMQ Broker on OpenShift Container Platform
Red Hat AMQ Broker 7.8 is available as a containerized image for use with OpenShift Container Platform (OCP) 3.11 and 4.5 and 4.6.
AMQ Broker is based on Apache ActiveMQ Artemis. It provides a message broker that is JMS-compliant. After you have set up the initial broker pod, you can quickly deploy duplicates by using OpenShift Container Platform features.
1.1. Version compatibility and support
For details about OpenShift Container Platform image version compatibility, see:
1.2. Unsupported features
Master-slave-based high availability
High availability (HA) achieved by configuring master and slave pairs is not supported. Instead, when pods are scaled down, HA is provided in OpenShift by using the scaledown controller, which enables message migration.
External Clients that connect to a cluster of brokers, either through the OpenShift proxy or by using bind ports, may need to be configured for HA accordingly. In a clustered scenario, a broker will inform certain clients of the addresses of all the broker’s host and port information. Since these are only accessible internally, certain client features either will not work or will need to be disabled.
Client Configuration Core JMS Client
Because external Core Protocol JMS clients do not support HA or any type of failover, the connection factories must be configured with
useTopologyForLoadBalancing=false.AMQP Clients
AMQP clients do not support failover lists
Durable subscriptions in a cluster
When a durable subscription is created, this is represented as a durable queue on the broker to which a client has connected. When a cluster is running within OpenShift the client does not know on which broker the durable subscription queue has been created. If the subscription is durable and the client reconnects there is currently no method for the load balancer to reconnect it to the same node. When this happens, it is possible that the client will connect to a different broker and create a duplicate subscription queue. For this reason, using durable subscriptions with a cluster of brokers is not recommended.
Chapter 2. Planning a deployment of AMQ Broker on OpenShift Container Platform
2.1. Comparison of deployment methods
There are two ways to deploy AMQ Broker on OpenShift Container Platform:
- Using the AMQ Broker Operator (recommended)
- Using application templates
This section describes each of these deployment methods.
- Deployment using the AMQ Broker Operator (recommended)
Operators are programs that enable you to package, deploy, and manage OpenShift applications. Often, Operators automate common or complex tasks. Commonly, Operators are intended to provide:
- Consistent, repeatable installations
- Health checks of system components
- Over-the-air (OTA) updates
- Managed upgrades
The AMQ Broker Operator is the recommended way to create broker deployments on OpenShift Container Platform. Operators enable you to make changes while your broker instances are running, because they are always listening for changes to the Custom Resource (CR) instances that you used to configure your deployment. When you make changes to a CR, the Operator reconciles the changes with the existing broker deployment and updates the deployment to reflect the changes. In addition, the Operator provides a message migration capability, which ensures the integrity of messaging data. When a broker in a clustered deployment shuts down due to failure or intentional scaledown of the deployment, this capability migrates messages to a broker Pod that is still running in the same broker cluster.
- Deployment using application templates
- Important
Starting in 7.8, the use of application templates for deploying AMQ Broker on OpenShift Container Platform is a deprecated feature. This feature will be removed in a future release. Red Hat continues to support existing deployments that are based on application templates. However, Red Hat does not recommend using application templates for new deployments. For new deployments, Red Hat recommends using the AMQ Broker Operator.
A template is a way to describe objects that can be parameterized and processed for creation by OpenShift Container Platform. You can use a template to describe anything that you have permission to create within an OpenShift project, for example, Services or build configurations. AMQ Broker has some sample application templates that enable you to create various types of broker deployments as DeploymentConfig- or StatefulSet-based applications. You configure your broker deployments by specifying values for the environment variables included in the application templates. A limitation of templates is that while they are effective for creating an initial broker deployment, they do not provide a mechanism for updating the deployment. In addition, because AMQ Broker does not provide a message migration capability for template-based deployments, templates are not recommended for use in a production environment.
Additional resources
- To learn how to use the AMQ Broker Operator to create a broker deployment, see Chapter 3, Deploying AMQ Broker on OpenShift Container Platform using the AMQ Broker Operator.
- For more information about message migration using the Operator, see Section 4.8, “High availability and message migration”.
2.2. Overview of the AMQ Broker Operator Custom Resource Definitions
In general, a Custom Resource Definition (CRD) is a schema of configuration items that you can modify for a custom OpenShift object deployed with an Operator. By creating a corresponding Custom Resource (CR) instance, you can specify values for configuration items in the CRD. If you are an Operator developer, what you expose through a CRD essentially becomes the API for how a deployed object is configured and used. You can directly access the CRD through regular HTTP curl commands, because the CRD gets exposed automatically through Kubernetes.
You can install the AMQ Broker Operator using either the OpenShift command-line interface (CLI), or the Operator Lifecycle Manager, through the OperatorHub graphical interface. In either case, the AMQ Broker Operator includes the CRDs described below.
- Main broker CRD
You deploy a CR instance based on this CRD to create and configure a broker deployment.
Based on how you install the Operator, this CRD is:
-
The
broker_activemqartemis_crdfile in thecrdsdirectory of the Operator installation archive (OpenShift CLI installation method) -
The
ActiveMQArtemisCRD in theCustom Resource Definitionssection of the OpenShift Container Platform web console (OperatorHub installation method)
-
The
- Address CRD
You deploy a CR instance based on this CRD to create addresses and queues for a broker deployment.
Based on how you install the Operator, this CRD is:
-
The
broker_activemqartemisaddress_crdfile in thecrdsdirectory of the Operator installation archive (OpenShift CLI installation method) -
The
ActiveMQArtemisAddresssCRD in theCustom Resource Definitionssection of the OpenShift Container Platform web console (OperatorHub installation method)
-
The
- Scaledown CRD
The Operator automatically creates a CR instance based on this CRD when instantiating a scaledown controller for message migration.
Based on how you install the Operator, this CRD is:
-
The
broker_activemqartemisscaledown_crdfile in thecrdsdirectory of the Operator installation archive (OpenShift CLI installation method) -
The
ActiveMQArtemisScaledownCRD in theCustom Resource Definitionssection of the OpenShift Container Platform web console (OperatorHub installation method).
-
The
Additional resources
To learn how to install the AMQ Broker Operator (and all included CRDs) using:
- The OpenShift CLI, see Section 3.2, “Installing the Operator using the CLI”
- The Operator Lifecycle Manager and OperatorHub graphical interface, see Section 3.3, “Installing the Operator using OperatorHub”.
For complete configuration references to use when creating CR instances based on the main broker and address CRDs, see:
2.3. Overview of the AMQ Broker Operator sample Custom Resources
The AMQ Broker Operator archive that you download and extract during installation includes sample Custom Resource (CR) files in the deploy/crs directory. These sample CR files enable you to:
- Deploy a minimal broker without SSL or clustering.
- Define addresses.
The broker Operator archive that you download and extract also includes CRs for example deployments in the deploy/examples directory, as listed below.
artemis-basic-deployment.yaml- Basic broker deployment.
artemis-persistence-deployment.yaml- Broker deployment with persistent storage.
artemis-cluster-deployment.yaml- Deployment of clustered brokers.
artemis-persistence-cluster-deployment.yaml- Deployment of clustered brokers with persistent storage.
artemis-ssl-deployment.yaml- Broker deployment with SSL security.
artemis-ssl-persistence-deployment.yaml- Broker deployment with SSL security and persistent storage.
artemis-aio-journal.yaml- Use of asynchronous I/O (AIO) with the broker journal.
address-queue-create.yaml- Address and queue creation.
2.4. How the Operator chooses container images
When you create a Custom Resource (CR) instance for a broker deployment based on at least version 7.8.5-opr-2 of the Operator, you do not need to explicitly specify broker or Init Container image names in the CR. By default, if you deploy a CR and do not explicitly specify container image values, the Operator automatically chooses the appropriate container images to use.
If you install the Operator using the OpenShift command-line interface, the Operator installation archive includes a sample CR file called broker_activemqartemis_cr.yaml. In the sample CR, the spec.deploymentPlan.image property is included and set to its default value of placeholder. This value indicates that the Operator does not choose a broker container image until you deploy the CR.
The spec.deploymentPlan.initImage property, which specifies the Init Container image, is not included in the broker_activemqartemis_cr.yaml sample CR file. If you do not explicitly include the spec.deploymentPlan.initImage property in your CR and specify a value, the Operator chooses an appropriate built-in Init Container image to use when you deploy the CR.
How the Operator chooses these images is described in this section.
To choose broker and Init Container images, the Operator first determines an AMQ Broker version to which the images should correspond. The Operator determines the version as follows:
-
If the
spec.upgrades.enabledproperty in the main CR is already set totrueand thespec.versionproperty specifies7.7.0,7.8.0,7.8.1, or7.8.2, the Operator uses that specified version. -
If
spec.upgrades.enabledis not set totrue, orspec.versionis set to an AMQ Broker version earlier than7.7.0, the Operator uses the latest version of AMQ Broker (that is,7.8.5).
Note: For IBM Z and IBM Power Systems, 7.8.1 and 7.8.2 are the only valid value for spec.version.
The Operator then detects your container platform. The AMQ Broker Operator can run on the following container platforms:
- OpenShift Container Platform (x86_64)
- OpenShift Container Platform on IBM Z (s390x)
- OpenShift Container Platform on IBM Power Systems (ppc64le)
Based on the version of AMQ Broker and your container platform, the Operator then references two sets of environment variables in the operator.yaml configuration file. These sets of environment variables specify broker and Init Container images for various versions of AMQ Broker, as described in the following sub-sections.
2.4.1. Environment variables for broker container images
The environment variables included in the operator.yaml configuration file for broker container images have the following naming convention:
- OpenShift Container Platform
-
RELATED_IMAGE_ActiveMQ_Artemis_Broker_Kubernetes_<AMQ_Broker_version_identifier> - OpenShift Container Platform on IBM Z
-
RELATED_IMAGE_ActiveMQ_Artemis_Broker_Kubernetes_<AMQ_Broker_version_identifier>_s390x - OpenShift Container Platform on IBM Power Systems
-
RELATED_IMAGE_ActiveMQ_Artemis_Broker_Kubernetes_<AMQ_Broker_version_identifier>_ppc64le
Environment variable names for each supported container platform and specific AMQ Broker versions are shown in the table.
| Container platform | Environment variable names |
|---|---|
| OpenShift Container Platform |
|
| OpenShift Container Platform on IBM Z |
|
| OpenShift Container Platform on IBM Power Systems |
|
The value of each environment variable specifies a broker container image that is available from Red Hat. For example:
- name: RELATED_IMAGE_ActiveMQ_Artemis_Broker_Kubernetes_787
  #value: registry.redhat.io/amq7/amq-broker:7.8-33
  value: registry.redhat.io/amq7/amq-broker@sha256:4d60775cd384067147ab105f41855b5a7af855c4d9cbef1d4dea566cbe214558
Therefore, based on an AMQ Broker version and your container platform, the Operator determines the applicable environment variable name. The Operator uses the corresponding image value when starting the broker container.
In the operator.yaml file, the Operator uses an image that is represented by a Secure Hash Algorithm (SHA) value. The comment line, which begins with a number sign (#) symbol, denotes that the SHA value corresponds to a specific container image tag.
2.4.2. Environment variables for Init Container images
The environment variables included in the operator.yaml configuration file for Init Container images have the following naming convention:
- OpenShift Container Platform
-
RELATED_IMAGE_ActiveMQ_Artemis_Broker_Init_<AMQ_Broker_version_identifier> - OpenShift Container Platform on IBM Z
-
RELATED_IMAGE_ActiveMQ_Artemis_Broker_Init_s390x_<AMQ_Broker_version_identifier> - OpenShift Container Platform on IBM Power Systems
-
RELATED_IMAGE_ActiveMQ_Artemis_Broker_Init_ppc64le_<AMQ_Broker_version_identifier>
Environment variable names for each supported container platform and specific AMQ Broker versions are shown in the table.
| Container platform | Environment variable names |
|---|---|
| OpenShift Container Platform |
|
| OpenShift Container Platform on IBM Z |
|
| OpenShift Container Platform on IBM Power Systems |
|
The value of each environment variable specifies an Init Container image that is available from Red Hat. For example:
- name: RELATED_IMAGE_ActiveMQ_Artemis_Broker_Init_787
  #value: registry.redhat.io/amq7/amq-broker-init-rhel7:7.8-1
  value: registry.redhat.io/amq7/amq-broker-init-rhel7@sha256:f7482d07ecaa78d34c37981447536e6f73d4013ec0c64ff787161a75e4ca3567
Therefore, based on an AMQ Broker version and your container platform, the Operator determines the applicable environment variable name. The Operator uses the corresponding image value when starting the Init Container.
As shown in the example, the Operator uses an image that is represented by a Secure Hash Algorithm (SHA) value. The comment line, which begins with a number sign (#) symbol, denotes that the SHA value corresponds to a specific container image tag. Observe that the corresponding container image tag is not a floating tag in the form of 0.2. This means that the container image used by the Operator remains fixed. The Operator does not automatically pull and use a new micro image version (that is, 0.2-n, where n is the latest micro version) when it becomes available from Red Hat.
Additional resources
- To learn how to use the AMQ Broker Operator to create a broker deployment, see Chapter 3, Deploying AMQ Broker on OpenShift Container Platform using the AMQ Broker Operator.
- For more information about how the Operator uses an Init Container to generate the broker configuration, see Section 4.1, “How the Operator generates the broker configuration”.
- To learn how to build and specify a custom Init Container image, see Section 4.5, “Specifying a custom Init Container image”.
2.5. Operator deployment notes
This section describes some important considerations when planning an Operator-based deployment
- Deploying the Custom Resource Definitions (CRDs) that accompany the AMQ Broker Operator requires cluster administrator privileges for your OpenShift cluster. When the Operator is deployed, non-administrator users can create broker instances via corresponding Custom Resources (CRs). To enable regular users to deploy CRs, the cluster administrator must first assign roles and permissions to the CRDs. For more information, see Creating cluster roles for Custom Resource Definitions in the OpenShift Container Platform documentation.
- When you update your cluster with the CRDs for the latest Operator version, this update affects all projects in the cluster. Any broker Pods deployed from previous versions of the Operator might become unable to update their status. When you click the Logs tab of a running broker Pod in the OpenShift Container Platform web console, you see messages indicating that 'UpdatePodStatus' has failed. However, the broker Pods and Operator in that project continue to work as expected. To fix this issue for an affected project, you must also upgrade that project to use the latest version of the Operator.
- You cannot create more than one broker deployment in a given OpenShift project by deploying multiple broker Custom Resource (CR) instances. However, when you have created a broker deployment in a project, you can deploy multiple CR instances for addresses.
If you intend to deploy brokers with persistent storage and do not have container-native storage in your OpenShift cluster, you need to manually provision Persistent Volumes (PVs) and ensure that these are available to be claimed by the Operator. For example, if you want to create a cluster of two brokers with persistent storage (that is, by setting
persistenceEnabled=truein your CR), you need to have two persistent volumes available. By default, each broker instance requires storage of 2 GiB.If you specify
persistenceEnabled=falsein your CR, the deployed brokers uses ephemeral storage. Ephemeral storage means that that every time you restart the broker Pods, any existing data is lost.For more information about provisioning persistent storage in OpenShift Container Platform, see:
- Understanding persistent storage (OpenShift Container Platform 4.5)
- Persistent Storage (OpenShift Container Platform 3.11).
You must add configuration for the items listed below to the main broker CR instance before deploying the CR for the first time. You cannot add configuration for these items to a broker deployment that is already running.
The procedures in the next section show you how to install the Operator and use Custom Resources (CRs) to create broker deployments on OpenShift Container Platform. When you have successfully completed the procedures, you will have the Operator running in an individual Pod. Each broker instance that you create will run as an individual Pod in a StatefulSet in the same project as the Operator. Later, you will you will see how to use a dedicated addressing CR to define addresses in your broker deployment.
Chapter 3. Deploying AMQ Broker on OpenShift Container Platform using the AMQ Broker Operator
3.1. Prerequisites
- Before you install the Operator and use it to create a broker deployment, you should consult the Operator deployment notes in Section 2.5, “Operator deployment notes”.
3.2. Installing the Operator using the CLI
Each Operator release requires that you download the latest AMQ Broker 7.8.5 .3 Operator Installation and Example Files as described below.
The procedures in this section show how to use the OpenShift command-line interface (CLI) to install and deploy the latest version of the Operator for AMQ Broker 7.8 in a given OpenShift project. In subsequent procedures, you use this Operator to deploy some broker instances.
- For an alternative method of installing the AMQ Broker Operator that uses the OperatorHub graphical interface, see Section 3.3, “Installing the Operator using OperatorHub”.
- To learn about upgrading existing Operator-based broker deployments, see Chapter 6, Upgrading an Operator-based broker deployment.
3.2.1. Getting the Operator code
This procedure shows how to access and prepare the code you need to install the latest version of the Operator for AMQ Broker 7.8.
Procedure
- In your web browser, navigate to the Software Downloads page for AMQ Broker 7.8.5 patches.
-
Ensure that the value of the Version drop-down list is set to
7.8.5and the Patches tab is selected. Next to AMQ Broker 7.8.5 .3 Operator Installation and Example Files, click Download.
Download of the
amq-broker-operator-7.8.5-ocp-install-examples.zipcompressed archive automatically begins.When the download has completed, move the archive to your chosen installation directory. The following example moves the archive to a directory called
~/broker/operator.$ mkdir ~/broker/operator $ mv amq-broker-operator-7.8.5-ocp-install-examples.zip ~/broker/operator
In your chosen installation directory, extract the contents of the archive. For example:
$ cd ~/broker/operator
$ unzip amq-broker-operator-7.8.5-ocp-install-examples.zip
Switch to the directory that was created when you extracted the archive. For example:
$ cd amq-broker-operator-7.8.5-ocp-install-examples
Log in to OpenShift Container Platform as a cluster administrator. For example:
$ oc login -u system:admin
Specify the project in which you want to install the Operator. You can create a new project or switch to an existing one.
Create a new project:
$ oc new-project <project-name>Or, switch to an existing project:
$ oc project <project-name>
Specify a service account to use with the Operator.
-
In the
deploydirectory of the Operator archive that you extracted, open theservice_account.yamlfile. -
Ensure that the
kindelement is set toServiceAccount. -
In the
metadatasection, assign a custom name to the service account, or use the default name. The default name isamq-broker-operator. Create the service account in your project.
$ oc create -f deploy/service_account.yaml
-
In the
Specify a role name for the Operator.
-
Open the
role.yamlfile. This file specifies the resources that the Operator can use and modify. -
Ensure that the
kindelement is set toRole. -
In the
metadatasection, assign a custom name to the role, or use the default name. The default name isamq-broker-operator. Create the role in your project.
$ oc create -f deploy/role.yaml
-
Open the
Specify a role binding for the Operator. The role binding binds the previously-created service account to the Operator role, based on the names you specified.
Open the
role_binding.yamlfile. Ensure that thenamevalues forServiceAccountandRolematch those specified in theservice_account.yamlandrole.yamlfiles. For example:metadata: name: amq-broker-operator subjects: kind: ServiceAccount name: amq-broker-operator roleRef: kind: Role name: amq-broker-operatorCreate the role binding in your project.
$ oc create -f deploy/role_binding.yaml
In the procedure that follows, you deploy the Operator in your project.
3.2.2. Deploying the Operator using the CLI
The procedure in this section shows how to use the OpenShift command-line interface (CLI) to deploy the latest version of the Operator for AMQ Broker 7.8 in your OpenShift project.
Prerequisites
- You must have already prepared your OpenShift project for the Operator deployment. See Section 3.2.1, “Getting the Operator code”.
- Starting in AMQ Broker 7.3, you use a new version of the Red Hat Ecosystem Catalog to access container images. This new version of the registry requires you to become an authenticated user before you can access images. Before you can follow the procedure in this section, you must first complete the steps described in Red Hat Container Registry Authentication.
If you intend to deploy brokers with persistent storage and do not have container-native storage in your OpenShift cluster, you need to manually provision Persistent Volumes (PVs) and ensure that they are available to be claimed by the Operator. For example, if you want to create a cluster of two brokers with persistent storage (that is, by setting
persistenceEnabled=truein your Custom Resource), you need to have two PVs available. By default, each broker instance requires storage of 2 GiB.If you specify
persistenceEnabled=falsein your Custom Resource, the deployed brokers uses ephemeral storage. Ephemeral storage means that that every time you restart the broker Pods, any existing data is lost.For more information about provisioning persistent storage, see:
- Understanding persistent storage (OpenShift Container Platform 4.5)
- Persistent Storage (OpenShift Container Platform 3.11)
Procedure
In the OpenShift command-line interface (CLI), log in to OpenShift as a cluster administrator. For example:
$ oc login -u system:admin
Switch to the project that you previously prepared for the Operator deployment. For example:
$ oc project <project_name>Switch to the directory that was created when you previously extracted the Operator installation archive. For example:
$ cd ~/broker/operator/amq-broker-operator-7.8.5-ocp-install-examples
Deploy the CRDs that are included with the Operator. You must install the CRDs in your OpenShift cluster before deploying and starting the Operator.
Deploy the main broker CRD.
$ oc create -f deploy/crds/broker_activemqartemis_crd.yaml
Deploy the address CRD.
$ oc create -f deploy/crds/broker_activemqartemisaddress_crd.yaml
Deploy the scaledown controller CRD.
$ oc create -f deploy/crds/broker_activemqartemisscaledown_crd.yaml
Link the pull secret associated with the account used for authentication in the Red Hat Ecosystem Catalog with the
default,deployer, andbuilderservice accounts for your OpenShift project.$ oc secrets link --for=pull default <secret_name> $ oc secrets link --for=pull deployer <secret_name> $ oc secrets link --for=pull builder <secret_name>
In the
deploydirectory of the Operator archive that you downloaded and extracted, open theoperator.yamlfile.NoteIn the
operator.yamlfile, the Operator uses an image that is represented by a Secure Hash Algorithm (SHA) value. The comment line, which begins with a number sign (#) symbol, denotes that the SHA value corresponds to a specific container image tag.Deploy the Operator.
$ oc create -f deploy/operator.yaml
In your OpenShift project, the Operator starts in a new Pod.
In the OpenShift Container Platform web console, the information on the Events tab of the Operator Pod confirms that OpenShift has deployed the Operator image that you specified, has assigned a new container to a node in your OpenShift cluster, and has started the new container.
In addition, if you click the Logs tab within the Pod, the output should include lines resembling the following:
...
{"level":"info","ts":1553619035.8302743,"logger":"kubebuilder.controller","msg":"Starting Controller","controller":"activemqartemisaddress-controller"}
{"level":"info","ts":1553619035.830541,"logger":"kubebuilder.controller","msg":"Starting Controller","controller":"activemqartemis-controller"}
{"level":"info","ts":1553619035.9306898,"logger":"kubebuilder.controller","msg":"Starting workers","controller":"activemqartemisaddress-controller","worker count":1}
{"level":"info","ts":1553619035.9311671,"logger":"kubebuilder.controller","msg":"Starting workers","controller":"activemqartemis-controller","worker count":1}
The preceding output confirms that the newly-deployed Operator is communicating with Kubernetes, that the controllers for the broker and addressing are running, and that these controllers have started some workers.
It is recommended that you deploy only a single instance of the AMQ Broker Operator in a given OpenShift project. Setting the spec.replicas property of your Operator deployment to a value greater than 1, or deploying the Operator more than once in the same project is not recommended.
Additional resources
- For an alternative method of installing the AMQ Broker Operator that uses the OperatorHub graphical interface, see Section 3.3, “Installing the Operator using OperatorHub”.
3.3. Installing the Operator using OperatorHub
3.3.1. Overview of the Operator Lifecycle Manager
In OpenShift Container Platform 4.5 and later, the Operator Lifecycle Manager (OLM) helps users install, update, and generally manage the lifecycle of all Operators and their associated services running across their clusters. It is part of the Operator Framework, an open source toolkit designed to manage Kubernetes-native applications (Operators) in an effective, automated, and scalable way.
The OLM runs by default in OpenShift Container Platform 4.5 and later, which aids cluster administrators in installing, upgrading, and granting access to Operators running on their cluster. The OpenShift Container Platform web console provides management screens for cluster administrators to install Operators, as well as grant specific projects access to use the catalog of Operators available on the cluster.
OperatorHub is the graphical interface that OpenShift cluster administrators use to discover, install, and upgrade Operators using the OLM. With one click, these Operators can be pulled from OperatorHub, installed on the cluster, and managed by the OLM, ready for engineering teams to self-service manage the software in development, test, and production environments.
When you have deployed the Operator, you can use Custom Resource (CR) instances to create broker deployments such as standalone and clustered brokers.
3.3.2. Installing the Operator in OperatorHub
In OperatorHub, the name of the Operator for AMQ Broker 7.8 is Red Hat Integration - AMQ Broker. You should see the Operator automatically available in OperatorHub. However, if you do not see it, follow this procedure to manually install the Operator in OperatorHub.
This section describes how to install the RHEL 7 Operator. There is also an Operator for RHEL 8 that provides RHEL 8 images.
To determine which Operator to choose, see the Red Hat Enterprise Linux Container Compatibility Matrix.
Procedure
- In your web browser, navigate to the Software Downloads page for AMQ Broker 7.8.5 releases.
-
Ensure that the value of the Version drop-down list is set to
7.8.5and the Releases tab is selected. Next to AMQ Broker 7.8.5 .3 Operator Installation and Example Files, click Download.
Download of the
amq-broker-operator-7.8.5-ocp-install-examples.zipcompressed archive automatically begins.When the download has completed, move the archive to your chosen installation directory. The following example moves the archive to a directory called
~/broker/operator.mkdir ~/broker/operator mv amq-broker-operator-7.8.5-ocp-install-examples.zip ~/broker/operator
In your chosen installation directory, extract the contents of the archive. For example:
cd ~/broker/operator
unzip amq-broker-operator-7.8.5-ocp-install-examples.zip
Switch to the directory for the Operator archive that you extracted. For example:
cd amq-broker-operator-7.8.5-ocp-install-examples
Log in to OpenShift Container Platform as a cluster administrator. For example:
$ oc login -u system:admin
Install the Operator in OperatorHub.
$ oc create -f deploy/catalog_resources/activemq-artemis-operatorsource.yaml
After a few minutes, the Operator for AMQ Broker 7.8 is available in the OperatorHub section of the OpenShift Container Platform web console. The name of the Operator is
Red Hat Integration - AMQ Broker.
3.3.3. Deploying the Operator from OperatorHub
This procedure shows how to use OperatorHub to deploy the latest version of the Operator for AMQ Broker to a specified OpenShift project.
Deploying the Operator using OperatorHub requires cluster administrator privileges.
Prerequisites
-
The
Red Hat Integration - AMQ BrokerOperator must be available in OperatorHub. If you do not see the Operator automatically available, see Section 3.3.2, “Installing the Operator in OperatorHub” for instructions on manually installing the Operator in OperatorHub.
Procedure
- Log in to the OpenShift Container Platform web console as a cluster administrator.
- In left navigation menu, click → .
- On the Project drop-down menu at the top of the OperatorHub page, select the project in which you want to deploy the Operator.
On the OperatorHub page, use the Filter by keyword… box to find the
Red Hat Integration - AMQ BrokerOperator.NoteIn OperatorHub, you might find more than one Operator than includes
AMQ Brokerin its name. Ensure that you click theRed Hat Integration - AMQ BrokerOperator. When you click this Operator, review the information pane that opens. For AMQ Broker 7.8, the latest minor version tag of this Operator is7.8.5-opr-2.The Operator for RHEL 8 that provides RHEL 8 images is named
Red Hat Integration - AMQ Broker for RHEL 8and has the version7.8.5-opr-2.To determine which Operator to choose, see the Red Hat Enterprise Linux Container Compatibility Matrix.
-
Click the
Red Hat Integration - AMQ BrokerOperator. On the dialog box that appears, click Install. On the Install Operator page:
Under Update Channel, specify the channel used to track and receive updates for the Operator by selecting one of the following radio buttons:
-
7.x- This channel will update to7.9when available. -
7.8.x- This is the Long Term Support (LTS) channel.
-
- Under Installation Mode, ensure that the radio button entitled A specific namespace on the cluster is selected.
- From the Installed Namespace drop-down menu, select the project in which you want to install the Operator.
-
Under Approval Strategy, ensure that the radio button entitled
Automaticis selected. This option specifies that updates to the Operator do not require manual approval for installation to take place. - Click Install.
When the Operator installation is complete, the Installed Operators page opens. You should see that the Red Hat Integration - AMQ Broker Operator is installed in the project namespace that you specified.
Additional resources
- To learn how to create a broker deployment in a project that has the Operator for AMQ Broker installed, see Section 3.4.1, “Deploying a basic broker instance”.
3.4. Creating Operator-based broker deployments
3.4.1. Deploying a basic broker instance
The following procedure shows how to use a Custom Resource (CR) instance to create a basic broker deployment.
- You cannot create more than one broker deployment in a given OpenShift project by deploying multiple Custom Resource (CR) instances. However, when you have created a broker deployment in a project, you can deploy multiple CR instances for addresses.
In AMQ Broker 7.8, if you want to configure the following items, you must add the appropriate configuration to the main broker CR instance before deploying the CR for the first time.
Prerequisites
You must have already installed the AMQ Broker Operator.
- To use the OpenShift command-line interface (CLI) to install the AMQ Broker Operator, see Section 3.2, “Installing the Operator using the CLI”.
- To use the OperatorHub graphical interface to install the AMQ Broker Operator, see Section 3.3, “Installing the Operator using OperatorHub”.
- You should understand how the Operator chooses a broker container image to use for your broker deployment. For more information, see Section 2.4, “How the Operator chooses container images”.
- Starting in AMQ Broker 7.3, you use a new version of the Red Hat Ecosystem Catalog to access container images. This new version of the registry requires you to become an authenticated user before you can access images. Before you can follow the procedure in this section, you must first complete the steps described in Red Hat Container Registry Authentication.
Procedure
When you have successfully installed the Operator, the Operator is running and listening for changes related to your CRs. This example procedure shows how to use a CR instance to deploy a basic broker in your project.
Start configuring a Custom Resource (CR) instance for the broker deployment.
Using the OpenShift command-line interface:
Log in to OpenShift as a user that has privileges to deploy CRs in the project in which you are creating the deployment.
oc login -u <user> -p <password> --server=<host:port>
-
Open the sample CR file called
broker_activemqartemis_cr.yamlthat was included in thedeploy/crsdirectory of the Operator installation archive that you downloaded and extracted.
Using the OpenShift Container Platform web console:
- Log in to the console as a user that has privileges to deploy CRs in the project in which you are creating the deployment.
- Start a new CR instance based on the main broker CRD. In the left pane, click → .
- Click the ActiveMQArtemis CRD.
- Click the Instances tab.
Click Create ActiveMQArtemis.
Within the console, a YAML editor opens, enabling you to configure a CR instance.
For a basic broker deployment, a configuration might resemble that shown below. This configuration is the default content of the
broker_activemqartemis_cr.yamlsample CR file.apiVersion: broker.amq.io/v2alpha4 kind: ActiveMQArtemis metadata: name: ex-aao application: ex-aao-app spec: version: 7.8.5 deploymentPlan: size: 1 image: placeholder requireLogin: false persistenceEnabled: true journalType: nio messageMigration: trueObserve that in the
broker_activemqartemis_cr.yamlsample CR file, theimageproperty is set to a default value ofplaceholder. This value indicates that, by default, theimageproperty does not specify a broker container image to use for the deployment. To learn how the Operator determines the appropriate broker container image to use, see Section 2.4, “How the Operator chooses container images”.NoteIn the
metadatasection, you need to include thenamespaceproperty and specify a value only if you are using the OpenShift Container Platform web console to create your CR instance. The value that you should specify is the name of the OpenShift project for your broker deployment.NoteThe
broker_activemqartemis_cr.yamlsample CR uses a naming convention ofex-aao. This naming convention denotes that the CR is an example resource for the AMQ Broker Operator. AMQ Broker is based on the ActiveMQ Artemis project. When you deploy this sample CR, the resulting StatefulSet uses the nameex-aao-ss. Furthermore, broker Pods in the deployment are directly based on the StatefulSet name, for example,ex-aao-ss-0,ex-aao-ss-1, and so on. The application name in the CR appears in the deployment as a label on the StatefulSet. You might use this label in a Pod selector, for example.-
The
sizeproperty specifies the number of brokers to deploy. A value of2or greater specifies a clustered broker deployment. However, to deploy a single broker instance, ensure that the value is set to1. Deploy the CR instance.
Using the OpenShift command-line interface:
- Save the CR file.
Switch to the project in which you are creating the broker deployment.
$ oc project <project_name>Create the CR instance.
$ oc create -f <path/to/custom_resource_instance>.yaml
Using the OpenShift web console:
- When you have finished configuring the CR, click Create.
In the OpenShift Container Platform web console, click → (OpenShift Container Platform 4.5 or later) or → (OpenShift Container Platform 3.11). You see a new StatefulSet called
ex-aao-ss.- Click the ex-aao-ss StatefulSet. You see that there is one Pod, corresponding to the single broker that you defined in the CR.
- Within the StatefulSet, click the Pods tab. Click the ex-aao-ss Pod. On the Events tab of the running Pod, you see that the broker container has started. The Logs tab shows that the broker itself is running.
To test that the broker is running normally, access a shell on the broker Pod to send some test messages.
Using the OpenShift Container Platform web console:
- Click → (OpenShift Container Platform 4.5 or later) or → (OpenShift Container Platform 3.11).
- Click the ex-aao-ss Pod.
- Click the Terminal tab.
Using the OpenShift command-line interface:
Get the Pod names and internal IP addresses for your project.
$ oc get pods -o wide

NAME                          STATUS   IP
amq-broker-operator-54d996c   Running  10.129.2.14
ex-aao-ss-0                   Running  10.129.2.15
Access the shell for the broker Pod.
$ oc rsh ex-aao-ss-0
From the shell, use the
artemiscommand to send some test messages. Specify the internal IP address of the broker Pod in the URL. For example:sh-4.2$ ./amq-broker/bin/artemis producer --url tcp://10.129.2.15:61616 --destination queue://demoQueue
The preceding command automatically creates a queue called
demoQueueon the broker and sends a default quantity of 1000 messages to the queue.You should see output that resembles the following:
Connection brokerURL = tcp://10.129.2.15:61616
Producer ActiveMQQueue[demoQueue], thread=0 Started to calculate elapsed time ...

Producer ActiveMQQueue[demoQueue], thread=0 Produced: 1000 messages
Producer ActiveMQQueue[demoQueue], thread=0 Elapsed time in second : 3 s
Producer ActiveMQQueue[demoQueue], thread=0 Elapsed time in milli second : 3492 milli seconds
Additional resources
- For a complete configuration reference for the main broker Custom Resource (CR), see Section 11.1, “Custom Resource configuration reference”.
- To learn how to connect a running broker to AMQ Management Console, see Chapter 5, Connecting to AMQ Management Console for an Operator-based broker deployment.
3.4.2. Deploying clustered brokers
If there are two or more broker Pods running in your project, the Pods automatically form a broker cluster. A clustered configuration enables brokers to connect to each other and redistribute messages as needed, for load balancing.
The following procedure shows you how to deploy clustered brokers. By default, the brokers in this deployment use on demand load balancing, meaning that brokers will forward messages only to other brokers that have matching consumers.
Prerequisites
- A basic broker instance is already deployed. See Section 3.4.1, “Deploying a basic broker instance”.
Procedure
- Open the CR file that you used for your basic broker deployment.
For a clustered deployment, ensure that the value of
deploymentPlan.sizeis2or greater. For example:apiVersion: broker.amq.io/v2alpha4 kind: ActiveMQArtemis metadata: name: ex-aao application: ex-aao-app spec: version: 7.8.5 deploymentPlan: size: 4 image: placeholder ...NoteIn the
metadatasection, you need to include thenamespaceproperty and specify a value only if you are using the OpenShift Container Platform web console to create your CR instance. The value that you should specify is the name of the OpenShift project for your broker deployment.- Save the modified CR file.
Log in to OpenShift as a user that has privileges to deploy CRs in the project in which you previously created your basic broker deployment.
$ oc login -u <user> -p <password> --server=<host:port>
Switch to the project in which you previously created your basic broker deployment.
$ oc project <project_name>At the command line, apply the change:
$ oc apply -f <path/to/custom_resource_instance>.yamlIn the OpenShift Container Platform web console, additional broker Pods starts in your project, according to the number specified in your CR. By default, the brokers running in the project are clustered.
Open the Logs tab of each Pod. The logs show that OpenShift has established a cluster connection bridge on each broker. Specifically, the log output includes a line like the following:
targetConnector=ServerLocatorImpl (identity=(Cluster-connection-bridge::ClusterConnectionBridge@6f13fb88
3.4.3. Applying Custom Resource changes to running broker deployments
The following are some important things to note about applying Custom Resource (CR) changes to running broker deployments:
-
You cannot dynamically update the
persistenceEnabledattribute in your CR. To change this attribute, scale your cluster down to zero brokers. Delete the existing CR. Then, recreate and redeploy the CR with your changes, also specifying a deployment size. -
The value of the
deploymentPlan.sizeattribute in your CR overrides any change you make to size of your broker deployment via theoc scalecommand. For example, suppose you useoc scaleto change the size of a deployment from three brokers to two, but the value ofdeploymentPlan.sizein your CR is still3. In this case, OpenShift initially scales the deployment down to two brokers. However, when the scaledown operation is complete, the Operator restores the deployment to three brokers, as specified in the CR. -
As described in Section 3.2.2, “Deploying the Operator using the CLI”, if you create a broker deployment with persistent storage (that is, by setting
persistenceEnabled=truein your CR), you might need to provision Persistent Volumes (PVs) for the AMQ Broker Operator to claim for your broker Pods. If you scale down the size of your broker deployment, the Operator releases any PVs that it previously claimed for the broker Pods that are now shut down. However, if you remove your broker deployment by deleting your CR, AMQ Broker Operator does not release Persistent Volume Claims (PVCs) for any broker Pods that are still in the deployment when you remove it. In addition, these unreleased PVs are unavailable to any new deployment. In this case, you need to manually release the volumes. For more information, see Release a persistent volume in the OpenShift documentation. In AMQ Broker 7.8, if you want to configure the following items, you must add the appropriate configuration to the main CR instance before deploying the CR for the first time.
- During an active scaling event, any further changes that you apply are queued by the Operator and executed only when scaling is complete. For example, suppose that you scale the size of your deployment down from four brokers to one. Then, while scaledown is taking place, you also change the values of the broker administrator user name and password. In this case, the Operator queues the user name and password changes until the deployment is running with one active broker.
-
All CR changes – apart from changing the size of your deployment, or changing the value of the
exposeattribute for acceptors, connectors, or the console – cause existing brokers to be restarted. If you have multiple brokers in your deployment, only one broker restarts at a time.
Chapter 4. Configuring Operator-based broker deployments
4.1. How the Operator generates the broker configuration
Before you use Custom Resource (CR) instances to configure your broker deployment, you should understand how the Operator generates the broker configuration.
When you create an Operator-based broker deployment, a Pod for each broker runs in a StatefulSet in your OpenShift project. An application container for the broker runs within each Pod.
The Operator runs a type of container called an Init Container when initializing each Pod. In OpenShift Container Platform, Init Containers are specialized containers that run before application containers. Init Containers can include utilities or setup scripts that are not present in the application image.
By default, the AMQ Broker Operator uses a built-in Init Container. The Init Container uses the main CR instance for your deployment to generate the configuration used by each broker application container.
If you have specified address settings in the CR, the Operator generates a default configuration and then merges or replaces that configuration with the configuration specified in the CR. This process is described in the section that follows.
4.1.1. How the Operator generates the address settings configuration
If you have included an address settings configuration in the main Custom Resource (CR) instance for your deployment, the Operator generates the address settings configuration for each broker as described below.
The Operator runs the Init Container before the broker application container. The Init Container generates a default address settings configuration. The default address settings configuration is shown below.
<address-settings> <!-- if you define auto-create on certain queues, management has to be auto-create --> <address-setting match="activemq.management#"> <dead-letter-address>DLQ</dead-letter-address> <expiry-address>ExpiryQueue</expiry-address> <redelivery-delay>0</redelivery-delay> <!-- with -1 only the global-max-size is in use for limiting --> <max-size-bytes>-1</max-size-bytes> <message-counter-history-day-limit>10</message-counter-history-day-limit> <address-full-policy>PAGE</address-full-policy> <auto-create-queues>true</auto-create-queues> <auto-create-addresses>true</auto-create-addresses> <auto-create-jms-queues>true</auto-create-jms-queues> <auto-create-jms-topics>true</auto-create-jms-topics> </address-setting> <!-- default for catch all --> <address-setting match="#"> <dead-letter-address>DLQ</dead-letter-address> <expiry-address>ExpiryQueue</expiry-address> <redelivery-delay>0</redelivery-delay> <!-- with -1 only the global-max-size is in use for limiting --> <max-size-bytes>-1</max-size-bytes> <message-counter-history-day-limit>10</message-counter-history-day-limit> <address-full-policy>PAGE</address-full-policy> <auto-create-queues>true</auto-create-queues> <auto-create-addresses>true</auto-create-addresses> <auto-create-jms-queues>true</auto-create-jms-queues> <auto-create-jms-topics>true</auto-create-jms-topics> </address-setting> <address-settings>- If you have also specified an address settings configuration in your Custom Resource (CR) instance, the Init Container processes that configuration and converts it to XML.
-
Based on the value of the
applyRuleproperty in the CR, the Init Container merges or replaces the default address settings configuration shown above with the configuration that you have specified in the CR. The result of this merge or replacement is the final address settings configuration that the broker will use. -
When the Init Container has finished generating the broker configuration (including address settings), the broker application container starts. When starting, the broker container copies its configuration from the installation directory previously used by the Init Container. You can inspect the address settings configuration in the
broker.xmlconfiguration file. For a running broker, this file is located in the/home/jboss/amq-broker/etcdirectory.
Additional resources
-
For an example of using the
applyRuleproperty in a CR, see Section 4.2.3, “Matching address settings to configured addresses in an Operator-based broker deployment”.
4.1.2. Directory structure of a broker Pod
When you create an Operator-based broker deployment, a Pod for each broker runs in a StatefulSet in your OpenShift project. An application container for the broker runs within each Pod.
The Operator runs a type of container called an Init Container when initializing each Pod. In OpenShift Container Platform, Init Containers are specialized containers that run before application containers. Init Containers can include utilities or setup scripts that are not present in the application image.
When generating the configuration for a broker instance, the Init Container uses files contained in a default installation directory. This installation directory is on a volume that the Operator mounts to the broker Pod and which the Init Container and broker container share. The path that the Init Container uses to mount the shared volume is defined in an environment variable called CONFIG_INSTANCE_DIR. The default value of CONFIG_INSTANCE_DIR is /amq/init/config. In the documentation, this directory is referred to as <install_dir>.
You cannot change the value of the CONFIG_INSTANCE_DIR environment variable.
By default, the installation directory has the following sub-directories:
| Sub-directory | Contents |
|---|---|
|
| Binaries and scripts needed to run the broker. |
|
| Configuration files. |
|
| The broker journal. |
|
| JARs and libraries needed to run the broker. |
|
| Broker log files. |
|
| Temporary web application files. |
When the Init Container has finished generating the broker configuration, the broker application container starts. When starting, the broker container copies its configuration from the installation directory previously used by the Init Container. When the broker Pod is initialized and running, the broker configuration is located in the /home/jboss/amq-broker directory (and subdirectories) of the broker.
Additional resources
- For more information about how the Operator chooses a container image for the built-in Init Container, see Section 2.4, “How the Operator chooses container images”.
- To learn how to build and specify a custom Init Container image, see Section 4.5, “Specifying a custom Init Container image”.
4.2. Configuring addresses and queues for Operator-based broker deployments
For an Operator-based broker deployment, you use two separate Custom Resource (CR) instances to configure address and queues and their associated settings.
To create address and queues on your brokers, you deploy a CR instance based on the address Custom Resource Definition (CRD).
-
If you used the OpenShift command-line interface (CLI) to install the Operator, the address CRD is the
broker_activemqartemisaddress_crd.yamlfile that was included in thedeploy/crdsof the Operator installation archive that you downloaded and extracted. -
If you used OperatorHub to install the Operator, the address CRD is the
ActiveMQAretmisAddressCRD listed under → in the OpenShift Container Platform web console.
-
If you used the OpenShift command-line interface (CLI) to install the Operator, the address CRD is the
To configure address and queue settings that you then match to specific addresses, you include configuration in the main Custom Resource (CR) instance used to create your broker deployment .
-
If you used the OpenShift CLI to install the Operator, the main broker CRD is the
broker_activemqartemis_crd.yamlfile that was included in thedeploy/crdsof the Operator installation archive that you downloaded and extracted. -
If you used OperatorHub to install the Operator, the main broker CRD is the
ActiveMQAretmisCRD listed under → in the OpenShift Container Platform web console.
NoteTo configure address settings for an Operator-based deployment, you must be using at least the latest version of the Operator for AMQ Broker 7.7 (that is, version 0.17). To learn how to upgrade the Operator to the latest version for AMQ Broker 7.8, see Chapter 6, Upgrading an Operator-based broker deployment.
In general, the address and queue settings that you can configure for a broker deployment on OpenShift Container Platform are fully equivalent to those of standalone broker deployments on Linux or Windows. However, you should be aware of some differences in how those settings are configured. Those differences are described in the following sub-section.
-
If you used the OpenShift CLI to install the Operator, the main broker CRD is the
4.2.1. Differences in configuration of address and queue settings between OpenShift and standalone broker deployments
-
To configure address and queue settings for broker deployments on OpenShift Container Platform, you add configuration to an
addressSettingssection of the main Custom Resource (CR) instance for the broker deployment. This contrasts with standalone deployments on Linux or Windows, for which you add configuration to anaddress-settingselement in thebroker.xmlconfiguration file. The format used for the names of configuration items differs between OpenShift Container Platform and standalone broker deployments. For OpenShift Container Platform deployments, configuration item names are in camel case, for example,
defaultQueueRoutingType. By contrast, configuration item names for standalone deployments are in lower case and use a dash (-) separator, for example,default-queue-routing-type.The following table shows some further examples of this naming difference.
Configuration item for standalone broker deployment Configuration item for OpenShift broker deployment address-full-policy
addressFullPolicy
auto-create-queues
autoCreateQueues
default-queue-routing-type
defaultQueueRoutingType
last-value-queue
lastValueQueue
Additional resources
For examples of creating addresses and queues and matching settings for OpenShift Container Platform broker deployments, see:
- To learn about all of the configuration options for addresses, queues, and address settings for OpenShift Container Platform broker deployments, see Section 11.1, “Custom Resource configuration reference”.
- For comprehensive information about configuring addresses, queues, and associated address settings for standalone broker deployments, see Addresses, Queues, and Topics in Configuring AMQ Broker. You can use this information to create equivalent configurations for broker deployments on OpenShift Container Platform.
4.2.2. Creating addresses and queues for an Operator-based broker deployment
The following procedure shows how to use a Custom Resource (CR) instance to add an address and associated queue to an Operator-based broker deployment.
To create multiple addresses and/or queues in your broker deployment, you need to create separate CR files and deploy them individually, specifying new address and/or queue names in each case. In addition, the name attribute of each CR instance must be unique.
Prerequisites
You must have already installed the AMQ Broker Operator, including the dedicated Custom Resource Definition (CRD) required to create addresses and queues on your brokers. For information on two alternative ways to install the Operator, see:
- You should be familiar with how to use a CR instance to create a basic broker deployment. For more information, see Section 3.4.1, “Deploying a basic broker instance”.
Procedure
Start configuring a Custom Resource (CR) instance to define addresses and queues for the broker deployment.
Using the OpenShift command-line interface:
Log in to OpenShift as a user that has privileges to deploy CRs in the project for the broker deployment.
oc login -u <user> -p <password> --server=<host:port>
-
Open the sample CR file called
broker_activemqartemisaddress_cr.yamlthat was included in thedeploy/crsdirectory of the Operator installation archive that you downloaded and extracted.
Using the OpenShift Container Platform web console:
- Log in to the console as a user that has privileges to deploy CRs in the project for the broker deployment.
- Start a new CR instance based on the address CRD. In the left pane, click → .
- Click the ActiveMQArtemisAddresss CRD.
- Click the Instances tab.
Click Create ActiveMQArtemisAddress.
Within the console, a YAML editor opens, enabling you to configure a CR instance.
In the
specsection of the CR, add lines to define an address, queue, and routing type. For example:apiVersion: broker.amq.io/v2alpha2 kind: ActiveMQArtemisAddress metadata: name: myAddressDeployment0 namespace: myProject spec: ... addressName: myAddress0 queueName: myQueue0 routingType: anycast ...The preceding configuration defines an address named
myAddress0with a queue namedmyQueue0and ananycastrouting type.NoteIn the
metadatasection, you need to include thenamespaceproperty and specify a value only if you are using the OpenShift Container Platform web console to create your CR instance. The value that you should specify is the name of the OpenShift project for your broker deployment.Deploy the CR instance.
Using the OpenShift command-line interface:
- Save the CR file.
Switch to the project for the broker deployment.
$ oc project <project_name>Create the CR instance.
$ oc create -f <path/to/address_custom_resource_instance>.yaml
Using the OpenShift web console:
- When you have finished configuring the CR, click Create.
(Optional) To delete an address and queue previously added to your deployment using a CR instance, use the following command:
$ oc delete -f <path/to/address_custom_resource_instance>.yaml
4.2.3. Matching address settings to configured addresses in an Operator-based broker deployment
If delivery of a message to a client is unsuccessful, you might not want the broker to make ongoing attempts to deliver the message. To prevent infinite delivery attempts, you can define a dead letter address and an associated dead letter queue. After a specified number of delivery attempts, the broker removes an undelivered message from its original queue and sends the message to the configured dead letter address. A system administrator can later consume undelivered messages from a dead letter queue to inspect the messages.
The following example shows how to configure a dead letter address and queue for an Operator-based broker deployment. The example demonstrates how to:
-
Use the
addressSettingsection of the main broker Custom Resource (CR) instance to configure address settings. - Match those address settings to addresses in your broker deployment.
Prerequisites
- You must be using the latest version of the Operator for AMQ Broker 7.8 (that is, version 7.8.5-opr-2). To learn how to upgrade the Operator to the latest version, see Chapter 6, Upgrading an Operator-based broker deployment.
- You should be familiar with how to use a CR instance to create a basic broker deployment. For more information, see Section 3.4.1, “Deploying a basic broker instance”.
- You should be familiar with the default address settings configuration that the Operator merges or replaces with the configuration specified in your CR instance. For more information, see Section 4.1.1, “How the Operator generates the address settings configuration”.
Procedure
Start configuring a CR instance to add a dead letter address and queue to receive undelivered messages for each broker in the deployment.
Using the OpenShift command-line interface:
Log in to OpenShift as a user that has privileges to deploy CRs in the project for the broker deployment.
oc login -u <user> -p <password> --server=<host:port>
-
Open the sample CR file called
broker_activemqartemisaddress_cr.yamlthat was included in thedeploy/crsdirectory of the Operator installation archive that you downloaded and extracted.
Using the OpenShift Container Platform web console:
- Log in to the console as a user that has privileges to deploy CRs in the project for the broker deployment.
- Start a new CR instance based on the address CRD. In the left pane, click → .
- Click the ActiveMQArtemisAddresss CRD.
- Click the Instances tab.
Click Create ActiveMQArtemisAddress.
Within the console, a YAML editor opens, enabling you to configure a CR instance.
In the
specsection of the CR, add lines to specify a dead letter address and queue to receive undelivered messages. For example:apiVersion: broker.amq.io/v2alpha2 kind: ActiveMQArtemisAddress metadata: name: ex-aaoaddress spec: ... addressName: myDeadLetterAddress queueName: myDeadLetterQueue routingType: anycast ...The preceding configuration defines a dead letter address named
myDeadLetterAddresswith a dead letter queue namedmyDeadLetterQueueand ananycastrouting type.NoteIn the
metadatasection, you need to include thenamespaceproperty and specify a value only if you are using the OpenShift Container Platform web console to create your CR instance. The value that you should specify is the name of the OpenShift project for your broker deployment.Deploy the address CR instance.
Using the OpenShift command-line interface:
- Save the CR file.
Switch to the project for the broker deployment.
$ oc project <project_name>Create the address CR.
$ oc create -f <path/to/address_custom_resource_instance>.yaml
Using the OpenShift web console:
- When you have finished configuring the CR, click Create.
Start configuring a Custom Resource (CR) instance for a broker deployment.
From a sample CR file:
-
Open the sample CR file called
broker_activemqartemis_cr.yamlthat was included in thedeploy/crsdirectory of the Operator installation archive that you downloaded and extracted.
-
Open the sample CR file called
Using the OpenShift Container Platform web console:
- Start a new CR instance based on the main broker CRD. In the left pane, click → .
- Click the ActiveMQArtemis CRD.
- Click the Instances tab.
Click Create ActiveMQArtemis.
Within the console, a YAML editor opens, enabling you to configure a CR instance.
For a basic broker deployment, a configuration might resemble that shown below. This configuration is the default content of the
broker_activemqartemis_cr.yamlsample CR file.apiVersion: broker.amq.io/v2alpha4 kind: ActiveMQArtemis metadata: name: ex-aao application: ex-aao-app spec: version: 7.8.5 deploymentPlan: size: 1 image: placeholder requireLogin: false persistenceEnabled: true journalType: nio messageMigration: trueObserve that in the
broker_activemqartemis_cr.yamlsample CR file, theimageproperty is set to a default value ofplaceholder. This value indicates that, by default, theimageproperty does not specify a broker container image to use for the deployment. To learn how the Operator determines the appropriate broker container image to use, see Section 2.4, “How the Operator chooses container images”.NoteIn the
metadatasection, you need to include thenamespaceproperty and specify a value only if you are using the OpenShift Container Platform web console to create your CR instance. The value that you should specify is the name of the OpenShift project for your broker deployment.In the
deploymentPlansection of the CR, add a newaddressSettingssection that contains a singleaddressSettingsection, as shown below.spec: version: 7.8.5 deploymentPlan: size: 1 image: placeholder requireLogin: false persistenceEnabled: true journalType: nio messageMigration: true addressSettings: addressSetting:Add a single instance of the
matchproperty to theaddressSettingblock. Specify an address-matching expression. For example:spec: version: 7.8.5 deploymentPlan: size: 1 image: placeholder requireLogin: false persistenceEnabled: true journalType: nio messageMigration: true addressSettings: addressSetting: - match: myAddressmatch-
Specifies the address, or set of address to which the broker applies the configuration that follows. In this example, the value of the
matchproperty corresponds to a single address calledmyAddress.
Add properties related to undelivered messages and specify values. For example:
spec: version: 7.8.5 deploymentPlan: size: 1 image: placeholder requireLogin: false persistenceEnabled: true journalType: nio messageMigration: true addressSettings: addressSetting: - match: myAddress deadLetterAddress: myDeadLetterAddress maxDeliveryAttempts: 5deadLetterAddress- Address to which the broker sends undelivered messages.
maxDeliveryAttemptsMaximum number of delivery attempts that a broker makes before moving a message to the configured dead letter address.
In the preceding example, if the broker makes five unsuccessful attempts to deliver a message to an address that begins with
myAddress, the broker moves the message to the specified dead letter address,myDeadLetterAddress.
(Optional) Apply similar configuration to another address or set of addresses. For example:
spec: version: 7.8.5 deploymentPlan: size: 1 image: placeholder requireLogin: false persistenceEnabled: true journalType: nio messageMigration: true addressSettings: addressSetting: - match: myAddress deadLetterAddress: myDeadLetterAddress maxDeliveryAttempts: 5 - match: 'myOtherAddresses*' deadLetterAddress: myDeadLetterAddress maxDeliveryAttempts: 3In this example, the value of the second
matchproperty includes an asterisk wildcard character. The wildcard character means that the preceding configuration is applied to any address that begins with the stringmyOtherAddresses.NoteIf you use a wildcard expression as a value for the
matchproperty, you must enclose the value in single quotation marks, for example,'myOtherAddresses*'.At the beginning of the
addressSettingssection, add theapplyRuleproperty and specify a value. For example:spec: version: 7.8.5 deploymentPlan: size: 1 image: placeholder requireLogin: false persistenceEnabled: true journalType: nio messageMigration: true addressSettings: applyRule: merge_all addressSetting: - match: myAddress deadLetterAddress: myDeadLetterAddress maxDeliveryAttempts: 5 - match: 'myOtherAddresses*' deadLetterAddress: myDeadLetterAddress maxDeliveryAttempts: 3The
applyRuleproperty specifies how the Operator applies the configuration that you add to the CR for each matching address or set of addresses. The values that you can specify are:merge_allFor address settings specified in both the CR and the default configuration that match the same address or set of addresses:
- Replace any property values specified in the default configuration with those specified in the CR.
- Keep any property values that are specified uniquely in the CR or the default configuration. Include each of these in the final, merged configuration.
- For address settings specified in either the CR or the default configuration that uniquely match a particular address or set of addresses, include these in the final, merged configuration.
merge_replace- For address settings specified in both the CR and the default configuration that match the same address or set of addresses, include the settings specified in the CR in the final, merged configuration. Do not include any properties specified in the default configuration, even if these are not specified in the CR.
- For address settings specified in either the CR or the default configuration that uniquely match a particular address or set of addresses, include these in the final, merged configuration.
replace_all- Replace all address settings specified in the default configuration with those specified in the CR. The final, merged configuration corresponds exactly to that specified in the CR.
NoteIf you do not explicitly include the
applyRuleproperty in your CR, the Operator uses a default value ofmerge_all.Deploy the broker CR instance.
Using the OpenShift command-line interface:
- Save the CR file.
Create the CR instance.
$ oc create -f <path/to/broker_custom_resource_instance>.yaml
Using the OpenShift web console:
- When you have finished configuring the CR, click Create.
Additional resources
- To learn about all of the configuration options for addresses, queues, and address settings for OpenShift Container Platform broker deployments, see Section 11.1, “Custom Resource configuration reference”.
If you installed the AMQ Broker Operator using the OpenShift command-line interface (CLI), the installation archive that you downloaded and extracted contains some additional examples of configuring address settings. In the
deploy/examplesfolder of the installation archive, see:-
artemis-basic-address-settings-deployment.yaml -
artemis-merge-replace-address-settings-deployment.yaml -
artemis-replace-address-settings-deployment.yaml
-
- For comprehensive information about configuring addresses, queues, and associated address settings for standalone broker deployments, see Addresses, Queues, and Topics in Configuring AMQ Broker. You can use this information to create equivalent configurations for broker deployments on OpenShift Container Platform.
For more information about Init Containers in OpenShift Container Platform, see:
- Using Init Containers to perform tasks before a pod is deployed (OpenShift Container Platform 4.1 and later)
- Init Containers (OpenShift Container Platform 3.11)
4.3. Configuring broker storage requirements
To use persistent storage in an Operator-based broker deployment, you set persistenceEnabled to true in the Custom Resource (CR) instance used to create the deployment. If you do not have container-native storage in your OpenShift cluster, you need to manually provision Persistent Volumes (PVs) and ensure that these are available to be claimed by the Operator using a Persistent Volume Claim (PVC). If you want to create a cluster of two brokers with persistent storage, for example, then you need to have two PVs available. By default, each broker in your deployment requires storage of 2 GiB. However, you can configure the CR for your broker deployment to specify the size of PVC required by each broker.
- To configure the size of the PVC required by the brokers in an Operator-based deployment, you must be using at least the latest version of the Operator for AMQ Broker 7.7 (that is, version 0.17). To learn how to upgrade the Operator to the latest version for AMQ Broker 7.8, see Chapter 6, Upgrading an Operator-based broker deployment.
- You must add the configuration for broker storage size to the main CR for your broker deployment before deploying the CR for the first time. You cannot add the configuration to a broker deployment that is already running.
4.3.1. Configuring broker storage size
The following procedure shows how to configure the Custom Resource (CR) instance for your broker deployment to specify the size of the Persistent Volume Claim (PVC) required by each broker for persistent message storage.
You must add the configuration for broker storage size to the main CR for your broker deployment before deploying the CR for the first time. You cannot add the configuration to a broker deployment that is already running.
Prerequisites
- You must be using at least the latest version of the Operator for AMQ Broker 7.7 (that is, version 0.17). To learn how to upgrade the Operator to the latest version for AMQ Broker 7.8, see Chapter 6, Upgrading an Operator-based broker deployment.
- You should be familiar with how to use a CR instance to create a basic broker deployment. See Section 3.4.1, “Deploying a basic broker instance”.
You must have already provisioned Persistent Volumes (PVs) and made these available to be claimed by the Operator. For example, if you want to create a cluster of two brokers with persistent storage, you need to have two PVs available.
For more information about provisioning persistent storage, see:
- Understanding persistent storage (OpenShift Container Platform 4.5)
- Persistent Storage (OpenShift Container Platform 3.11).
Procedure
Start configuring a Custom Resource (CR) instance for the broker deployment.
Using the OpenShift command-line interface:
Log in to OpenShift as a user that has privileges to deploy CRs in the project in which you are creating the deployment.
oc login -u <user> -p <password> --server=<host:port>
-
Open the sample CR file called
broker_activemqartemis_cr.yamlthat was included in thedeploy/crsdirectory of the Operator installation archive that you downloaded and extracted.
Using the OpenShift Container Platform web console:
- Log in to the console as a user that has privileges to deploy CRs in the project in which you are creating the deployment.
- Start a new CR instance based on the main broker CRD. In the left pane, click → .
- Click the ActiveMQArtemis CRD.
- Click the Instances tab.
Click Create ActiveMQArtemis.
Within the console, a YAML editor opens, enabling you to configure a CR instance.
For a basic broker deployment, a configuration might resemble that shown below. This configuration is the default content of the
broker_activemqartemis_cr.yamlsample CR file.apiVersion: broker.amq.io/v2alpha4 kind: ActiveMQArtemis metadata: name: ex-aao application: ex-aao-app spec: version: 7.8.5 deploymentPlan: size: 1 image: placeholder requireLogin: false persistenceEnabled: true journalType: nio messageMigration: trueObserve that in the
broker_activemqartemis_cr.yamlsample CR file, theimageproperty is set to a default value ofplaceholder. This value indicates that, by default, theimageproperty does not specify a broker container image to use for the deployment. To learn how the Operator determines the appropriate broker container image to use, see Section 2.4, “How the Operator chooses container images”.NoteIn the
metadatasection, you need to include thenamespaceproperty and specify a value only if you are using the OpenShift Container Platform web console to create your CR instance. The value that you should specify is the name of the OpenShift project for your broker deployment.To specify broker storage requirements, in the
deploymentPlansection of the CR, add astoragesection. Add asizeproperty and specify a value. For example:spec: version: 7.8.5 deploymentPlan: size: 1 image: placeholder requireLogin: false persistenceEnabled: true journalType: nio messageMigration: true storage: size: 4Gistorage.size-
Size, in bytes, of the Persistent Volume Claim (PVC) that each broker Pod requires for persistent storage. This property applies only when
persistenceEnabledis set totrue. The value that you specify must include a unit. Supports byte notation (for example, K, M, G), or the binary equivalents (Ki, Mi, Gi).
Deploy the CR instance.
Using the OpenShift command-line interface:
- Save the CR file.
Switch to the project in which you are creating the broker deployment.
$ oc project <project_name>Create the CR instance.
$ oc create -f <path/to/custom_resource_instance>.yaml
Using the OpenShift web console:
- When you have finished configuring the CR, click Create.
4.4. Configuring resource limits and requests for Operator-based broker deployments
When you create an Operator-based broker deployment, the broker Pods in the deployment run in a StatefulSet on a node in your OpenShift cluster. You can configure the Custom Resource (CR) instance for the deployment to specify the host-node compute resources used by the broker container that runs in each Pod. By specifying limit and request values for CPU and memory (RAM), you can ensure satisfactory performance of the broker Pods.
- To configure resource limits and requests for the brokers in an Operator-based deployment, you must be using at least the latest version of the Operator for AMQ Broker 7.7 (that is, version 0.17). To learn how to upgrade the Operator to the latest version for AMQ Broker 7.8, see Chapter 6, Upgrading an Operator-based broker deployment.
- You must add configuration for limits and requests to the CR instance for your broker deployment before deploying the CR for the first time. You cannot add the configuration to a broker deployment that is already running.
- It is not possible for Red Hat to recommend values for limits and requests because these are based on your specific messaging system use-cases and the resulting architecture that you have implemented. However, it is recommended that you test and tune these values in a development environment before configuring them for your production environment.
- The Operator runs a type of container called an Init Container when initializing each broker Pod. Any resource limits and requests that you configure for each broker container also apply to each Init Container. For more information about the use of Init Containers in broker deployments, see Section 4.1, “How the Operator generates the broker configuration”.
You can specify the following limit and request values:
CPU limit- For each broker container running in a Pod, this value is the maximum amount of host-node CPU that the container can consume. If a broker container attempts to exceed the specified CPU limit, OpenShift throttles the container. This ensures that containers have consistent performance, regardless of the number of Pods running on a node.
Memory limit- For each broker container running in a Pod, this value is the maximum amount of host-node memory that the container can consume. If a broker container attempts to exceed the specified memory limit, OpenShift terminates the container. The broker Pod restarts.
CPU requestFor each broker container running in a Pod, this value is the amount of host-node CPU that the container requests. The OpenShift scheduler considers the CPU request value during Pod placement, to bind the broker Pod to a node with sufficient compute resources.
The CPU request value is the minimum amount of CPU that the broker container requires to run. However, if there is no contention for CPU on the node, the container can use all available CPU. If you have specified a CPU limit, the container cannot exceed that amount of CPU usage. If there is CPU contention on the node, CPU request values provide a way for OpenShift to weigh CPU usage across all containers.
Memory requestFor each broker container running in a Pod, this value is the amount of host-node memory that the container requests. The OpenShift scheduler considers the memory request value during Pod placement, to bind the broker Pod to a node with sufficient compute resources.
The memory request value is the minimum amount of memory that the broker container requires to run. However, the container can consume as much available memory as possible. If you have specified a memory limit, the broker container cannot exceed that amount of memory usage.
CPU is measured in units called millicores. Each node in an OpenShift cluster inspects the operating system to determine the number of CPU cores on the node. Then, the node multiplies that value by 1000 to express the total capacity. For example, if a node has two cores, the CPU capacity of the node is expressed as 2000m. Therefore, if you want to use one-tenth of a single core, you specify a value of 100m.
Memory is measured in bytes. You can specify the value using byte notation (E, P, T, G, M, K) or the binary equivalents (Ei, Pi, Ti, Gi, Mi, Ki). The value that you specify must include a unit.
4.4.1. Configuring broker resource limits and requests
The following example shows how to configure the main Custom Resource (CR) instance for your broker deployment to set limits and requests for CPU and memory for each broker container that runs in a Pod in the deployment.
- You must add configuration for limits and requests to the CR instance for your broker deployment before deploying the CR for the first time. You cannot add the configuration to a broker deployment that is already running.
- It is not possible for Red Hat to recommend values for limits and requests because these are based on your specific messaging system use-cases and the resulting architecture that you have implemented. However, it is recommended that you test and tune these values in a development environment before configuring them for your production environment.
Prerequisites
- You must be using at least the latest version of the Operator for AMQ Broker 7.7 (that is, version 0.17). To learn how to upgrade the Operator to the latest version for AMQ Broker 7.8, see Chapter 6, Upgrading an Operator-based broker deployment.
- You should be familiar with how to use a CR instance to create a basic broker deployment. See Section 3.4.1, “Deploying a basic broker instance”.
Procedure
Start configuring a Custom Resource (CR) instance for the broker deployment.
Using the OpenShift command-line interface:
Log in to OpenShift as a user that has privileges to deploy CRs in the project in which you are creating the deployment.
oc login -u <user> -p <password> --server=<host:port>
-
Open the sample CR file called
broker_activemqartemis_cr.yamlthat was included in thedeploy/crsdirectory of the Operator installation archive that you downloaded and extracted.
Using the OpenShift Container Platform web console:
- Log in to the console as a user that has privileges to deploy CRs in the project in which you are creating the deployment.
- Start a new CR instance based on the main broker CRD. In the left pane, click → .
- Click the ActiveMQArtemis CRD.
- Click the Instances tab.
Click Create ActiveMQArtemis.
Within the console, a YAML editor opens, enabling you to configure a CR instance.
For a basic broker deployment, a configuration might resemble that shown below. This configuration is the default content of the
broker_activemqartemis_cr.yamlsample CR file.apiVersion: broker.amq.io/v2alpha4 kind: ActiveMQArtemis metadata: name: ex-aao application: ex-aao-app spec: version: 7.8.5 deploymentPlan: size: 1 image: placeholder requireLogin: false persistenceEnabled: true journalType: nio messageMigration: trueObserve that in the
broker_activemqartemis_cr.yamlsample CR file, theimageproperty is set to a default value ofplaceholder. This value indicates that, by default, theimageproperty does not specify a broker container image to use for the deployment. To learn how the Operator determines the appropriate broker container image to use, see Section 2.4, “How the Operator chooses container images”.NoteIn the
metadatasection, you need to include thenamespaceproperty and specify a value only if you are using the OpenShift Container Platform web console to create your CR instance. The value that you should specify is the name of the OpenShift project for your broker deployment.In the
deploymentPlansection of the CR, add aresourcessection. Addlimitsandrequestssub-sections. In each sub-section, add acpuandmemoryproperty and specify values. For example:spec: version: 7.8.5 deploymentPlan: size: 1 image: placeholder requireLogin: false persistenceEnabled: true journalType: nio messageMigration: true resources: limits: cpu: "500m" memory: "1024M" requests: cpu: "250m" memory: "512M"limits.cpu- Each broker container running in a Pod in the deployment cannot exceed this amount of host-node CPU usage.
limits.memory- Each broker container running in a Pod in the deployment cannot exceed this amount of host-node memory usage.
requests.cpu- Each broker container running in a Pod in the deployment requests this amount of host-node CPU. This value is the minimum amount of CPU required for the broker container to run.
requests.memory- Each broker container running in a Pod in the deployment requests this amount of host-node memory. This value is the minimum amount of memory required for the broker container to run.
Deploy the CR instance.
Using the OpenShift command-line interface:
- Save the CR file.
Switch to the project in which you are creating the broker deployment.
$ oc project <project_name>Create the CR instance.
$ oc create -f <path/to/custom_resource_instance>.yaml
Using the OpenShift web console:
- When you have finished configuring the CR, click Create.
4.5. Specifying a custom Init Container image
As described in Section 4.1, “How the Operator generates the broker configuration”, the AMQ Broker Operator uses a default, built-in Init Container to generate the broker configuration. To generate the configuration, the Init Container uses the main Custom Resource (CR) instance for your deployment. The only items that you can specify in the CR are those that are exposed in the main broker Custom Resource Definition (CRD).
However, there might a case where you need to include configuration that is not exposed in the CRD. In this case, in your main CR instance, you can specify a custom Init Container. The custom Init Container can modify or add to the configuration that has already been created by the Operator. For example, you might use a custom Init Container to modify the broker logging settings. Or, you might use a custom Init Container to include extra runtime dependencies (that is, .jar files) in the broker installation directory.
When you build a custom Init Container image, you must follow these important guidelines:
In the build script (for example, a Docker Dockerfile or Podman Containerfile) that you create for the custom image, the
FROMinstruction must specify the latest version of the AMQ Broker Operator built-in Init Container as the base image. In your script, include the following line:FROM registry.redhat.io/amq7/amq-broker-init-rhel7:0.2-13
-
The custom image must include a script called
post-config.shthat you include in a directory called/amq/scripts. Thepost-config.shscript is where you can modify or add to the initial configuration that the Operator generates. When you specify a custom Init Container, the Operator runs thepost-config.shscript after it uses your CR instance to generate a configuration, but before it starts the broker application container. -
As described in Section 4.1.2, “Directory structure of a broker Pod”, the path to the installation directory used by the Init Container is defined in an environment variable called
CONFIG_INSTANCE_DIR. Thepost-config.shscript should use this environment variable name when referencing the installation directory (for example,${CONFIG_INSTANCE_DIR}/lib) and not the actual value of this variable (for example,/amq/init/config/lib). -
If you want to include additional resources (for example,
.xmlor.jarfiles) in your custom broker configuration, you must ensure that these are included in the custom image and accessible to thepost-config.shscript.
The following procedure describes how to specify a custom Init Container image.
Prerequisites
- You must be using at least version 7.8.5-opr-2 of the Operator. To learn how to upgrade to the latest Operator version, see Chapter 6, Upgrading an Operator-based broker deployment.
- You must have built a custom Init Container image that meets the guidelines described above. For a complete example of building and specifying a custom Init Container image for the ArtemisCloud Operator, see custom Init Container image for JDBC-based persistence.
- To provide a custom Init Container image for the AMQ Broker Operator, you need to be able to add the image to a repository in a container registry such as the Quay container registry.
- You should understand how the Operator uses an Init Container to generate the broker configuration. For more information, see Section 4.1, “How the Operator generates the broker configuration”.
- You should be familiar with how to use a CR to create a broker deployment. For more information, see Section 3.4, “Creating Operator-based broker deployments”.
Procedure
Start configuring a Custom Resource (CR) instance for the broker deployment.
Using the OpenShift command-line interface:
Log in to OpenShift as a user that has privileges to deploy CRs in the project in which you are creating the deployment.
oc login -u <user> -p <password> --server=<host:port>
-
Open the sample CR file called
broker_activemqartemis_cr.yamlthat was included in thedeploy/crsdirectory of the Operator installation archive that you downloaded and extracted.
Using the OpenShift Container Platform web console:
- Log in to the console as a user that has privileges to deploy CRs in the project in which you are creating the deployment.
- Start a new CR instance based on the main broker CRD. In the left pane, click → .
- Click the ActiveMQArtemis CRD.
- Click the Instances tab.
Click Create ActiveMQArtemis.
Within the console, a YAML editor opens, enabling you to configure a CR instance.
For a basic broker deployment, a configuration might resemble that shown below. This configuration is the default content of the
broker_activemqartemis_cr.yamlsample CR file.apiVersion: broker.amq.io/v2alpha4 kind: ActiveMQArtemis metadata: name: ex-aao application: ex-aao-app spec: version: 7.8.5 deploymentPlan: size: 1 image: placeholder requireLogin: false persistenceEnabled: true journalType: nio messageMigration: trueObserve that in the
broker_activemqartemis_cr.yamlsample CR file, theimageproperty is set to a default value ofplaceholder. This value indicates that, by default, theimageproperty does not specify a broker container image to use for the deployment. To learn how the Operator determines the appropriate broker container image to use, see Section 2.4, “How the Operator chooses container images”.NoteIn the
metadatasection, you need to include thenamespaceproperty and specify a value only if you are using the OpenShift Container Platform web console to create your CR instance. The value that you should specify is the name of the OpenShift project for your broker deployment.In the
deploymentPlansection of the CR, add theinitImageproperty.apiVersion: broker.amq.io/v2alpha4 kind: ActiveMQArtemis metadata: name: ex-aao application: ex-aao-app spec: version: 7.8.5 deploymentPlan: size: 1 image: placeholder initImage: requireLogin: false persistenceEnabled: true journalType: nio messageMigration: trueSet the value of the
initImageproperty to the URL of your custom Init Container image.apiVersion: broker.amq.io/v2alpha4 kind: ActiveMQArtemis metadata: name: ex-aao application: ex-aao-app spec: version: 7.8.5 deploymentPlan: size: 1 image: placeholder initImage: <custom_init_container_image_url> requireLogin: false persistenceEnabled: true journalType: nio messageMigration: trueinitImage- Specifies the full URL for your custom Init Container image, which you must have added to repository in a container registry.
Deploy the CR instance.
Using the OpenShift command-line interface:
- Save the CR file.
Switch to the project in which you are creating the broker deployment.
$ oc project <project_name>Create the CR instance.
$ oc create -f <path/to/custom_resource_instance>.yaml
Using the OpenShift web console:
- When you have finished configuring the CR, click Create.
Additional resources
- For a complete example of building and specifying a custom Init Container image for the ArtemisCloud Operator, see custom Init Container image for JDBC-based persistence.
4.6. Configuring Operator-based broker deployments for client connections
4.6.1. Configuring acceptors
To enable client connections to broker Pods in your OpenShift deployment, you define acceptors for your deployment. Acceptors define how a broker Pod accepts connections. You define acceptors in the main Custom Resource (CR) used for your broker deployment. When you create an acceptor, you specify information such as the messaging protocols to enable on the acceptor, and the port on the broker Pod to use for these protocols.
The following procedure shows how to define a new acceptor in the CR for your broker deployment.
Prerequisites
- To configure acceptors, your broker deployment must be based on version 0.9 or greater of the AMQ Broker Operator. For more information about installing the latest version of the Operator, see Section 3.2, “Installing the Operator using the CLI”.
- The information in this section applies only to broker deployments based on the AMQ Broker Operator. If you used application templates to create your broker deployment, you cannot define individual protocol-specific acceptors. For more information about configuring this type of deployment for client connections, see Chapter 6, "Connecting external clients to template-based broker deployments".
Procedure
-
In the
deploy/crsdirectory of the Operator archive that you downloaded and extracted during your initial installation, open thebroker_activemqartemis_cr.yamlCustom Resource (CR) file. In the
acceptorselement, add a named acceptor. Add theprotocolsandportparameters. Set values to specify the messaging protocols to be used by the acceptor and the port on each broker Pod to expose for those protocols. For example:spec: ... acceptors: - name: my-acceptor protocols: amqp port: 5672 ...The configured acceptor exposes port 5672 to AMQP clients. The full set of values that you can specify for the
protocolsparameter is shown in the table.Protocol Value Core Protocol
coreAMQP
amqpOpenWire
openwireMQTT
mqttSTOMP
stompAll supported protocols
allNote- For each broker Pod in your deployment, the Operator also creates a default acceptor that uses port 61616. This default acceptor is required for broker clustering and has Core Protocol enabled.
- By default, the AMQ Broker management console uses port 8161 on the broker Pod. Each broker Pod in your deployment has a dedicated Service that provides access to the console. For more information, see Chapter 5, Connecting to AMQ Management Console for an Operator-based broker deployment.
To use another protocol on the same acceptor, modify the
protocolsparameter. Specify a comma-separated list of protocols. For example:spec: ... acceptors: - name: my-acceptor protocols: amqp,openwire port: 5672 ...The configured acceptor now exposes port 5672 to AMQP and OpenWire clients.
To specify the number of concurrent client connections that the acceptor allows, add the
connectionsAllowedparameter and set a value. For example:spec: ... acceptors: - name: my-acceptor protocols: amqp,openwire port: 5672 connectionsAllowed: 5 ...By default, an acceptor is exposed only to clients in the same OpenShift cluster as the broker deployment. To also expose the acceptor to clients outside OpenShift, add the
exposeparameter and set the value totrue.In addition, to enable secure connections to the acceptor from clients outside OpenShift, add the
sslEnabledparameter and set the value totrue.spec: ... acceptors: - name: my-acceptor protocols: amqp,openwire port: 5672 connectionsAllowed: 5 expose: true sslEnabled: true ... ...When you enable SSL (that is, Secure Sockets Layer) security on an acceptor (or connector), you can add related configuration, such as:
- The secret name used to store authentication credentials in your OpenShift cluster. A secret is required when you enable SSL on the acceptor. For more information on generating this secret, see Section 4.6.2, “Securing broker-client connections”.
-
The Transport Layer Security (TLS) protocols to use for secure network communication. TLS is an updated, more secure version of SSL. You specify the TLS protocols in the
enabledProtocolsparameter. -
Whether the acceptor uses two-way TLS, also known as mutual authentication, between the broker and the client. You specify this by setting the value of the
needClientAuthparameter totrue.
Additional resources
- To learn how to configure TLS to secure broker-client connections, including generating a secret to store authentication credentials, see Section 4.6.2, “Securing broker-client connections”.
- For a complete Custom Resource configuration reference, including configuration of acceptors and connectors, see Section 11.1, “Custom Resource configuration reference”.
4.6.2. Securing broker-client connections
If you have enabled security on your acceptor or connector (that is, by setting sslEnabled to true), you must configure Transport Layer Security (TLS) to allow certificate-based authentication between the broker and clients. TLS is an updated, more secure version of SSL. There are two primary TLS configurations:
- One-way TLS
- Only the broker presents a certificate. The certificate is used by the client to authenticate the broker. This is the most common configuration.
- Two-way TLS
- Both the broker and the client present certificates. This is sometimes called mutual authentication.
The sections that follow describe:
For both one-way and two-way TLS, you complete the configuration by generating a secret that stores the credentials required for a successful TLS handshake between the broker and the client. This is the secret name that you must specify in the sslSecret parameter of your secured acceptor or connector. The secret must contain a Base64-encoded broker key store (both one-way and two-way TLS), a Base64-encoded broker trust store (two-way TLS only), and the corresponding passwords for these files, also Base64-encoded. The one-way and two-way TLS configuration procedures show how to generate this secret.
If you do not explicitly specify a secret name in the sslSecret parameter of a secured acceptor or connector, the acceptor or connector assumes a default secret name. The default secret name uses the format <CustomResourceName>-<AcceptorName>-secret or <CustomResourceName>-<ConnectorName>-secret. For example, my-broker-deployment-my-acceptor-secret.
Even if the acceptor or connector assumes a default secrete name, you must still generate this secret yourself. It is not automatically created.
4.6.2.1. Configuring a broker certificate for host name verification
This section describes some requirements for the broker certificate that you must generate when configuring one-way or two-way TLS.
When a client tries to connect to a broker Pod in your deployment, the verifyHost option in the client connection URL determines whether the client compares the Common Name (CN) of the broker’s certificate to its host name, to verify that they match. The client performs this verification if you specify verifyHost=true or similar in the client connection URL.
You might omit this verification in rare cases where you have no concerns about the security of the connection, for example, if the brokers are deployed on an OpenShift cluster in an isolated network. Otherwise, for a secure connection, it is advisable for a client to perform this verification. In this case, correct configuration of the broker key store certificate is essential to ensure successful client connections.
In general, when a client is using host verification, the CN that you specify when generating the broker certificate must match the full host name for the Route on the broker Pod that the client is connecting to. For example, if you have a deployment with a single broker Pod, the CN might look like the following:
CN=my-broker-deployment-0-svc-rte-my-openshift-project.my-openshift-domain
To ensure that the CN can resolve to any broker Pod in a deployment with multiple brokers, you can specify an asterisk (*) wildcard character in place of the ordinal of the broker Pod. For example:
CN=my-broker-deployment-*-svc-rte-my-openshift-project.my-openshift-domain
The CN shown in the preceding example successfully resolves to any broker Pod in the my-broker-deployment deployment.
In addition, the Subject Alternative Name (SAN) that you specify when generating the broker certificate must individually list all broker Pods in the deployment, as a comma-separated list. For example:
"SAN=DNS:my-broker-deployment-0-svc-rte-my-openshift-project.my-openshift-domain,DNS:my-broker-deployment-1-svc-rte-my-openshift-project.my-openshift-domain,..."
4.6.2.2. Configuring one-way TLS
The procedure in this section shows how to configure one-way Transport Layer Security (TLS) to secure a broker-client connection.
In one-way TLS, only the broker presents a certificate. This certificate is used by the client to authenticate the broker.
Prerequisites
- You should understand the requirements for broker certificate generation when clients use host name verification. For more information, see Section 4.6.2.1, “Configuring a broker certificate for host name verification”.
Procedure
Generate a self-signed certificate for the broker key store.
$ keytool -genkey -alias broker -keyalg RSA -keystore ~/broker.ks
Export the certificate from the broker key store, so that it can be shared with clients. Export the certificate in the Base64-encoded
.pemformat. For example:$ keytool -export -alias broker -keystore ~/broker.ks -file ~/broker_cert.pem
On the client, create a client trust store that imports the broker certificate.
$ keytool -import -alias broker -keystore ~/client.ts -file ~/broker_cert.pem
Log in to OpenShift Container Platform as an administrator. For example:
$ oc login -u system:admin
Switch to the project that contains your broker deployment. For example:
$ oc project my-openshift-project
Create a secret to store the TLS credentials. For example:
$ oc create secret generic my-tls-secret \
--from-file=broker.ks=~/broker.ks \
--from-file=client.ts=~/broker.ks \
--from-literal=keyStorePassword=<password> \
--from-literal=trustStorePassword=<password>
NoteWhen generating a secret, OpenShift requires you to specify both a key store and a trust store. The trust store key is generically named
client.ts. For one-way TLS between the broker and a client, a trust store is not actually required. However, to successfully generate the secret, you need to specify some valid store file as a value forclient.ts. The preceding step provides a "dummy" value forclient.tsby reusing the previously-generated broker key store file. This is sufficient to generate a secret with all of the credentials required for one-way TLS.Link the secret to the service account that you created when installing the Operator. For example:
$ oc secrets link sa/amq-broker-operator secret/my-tls-secret
Specify the secret name in the
sslSecretparameter of your secured acceptor or connector. For example:spec: ... acceptors: - name: my-acceptor protocols: amqp,openwire port: 5672 sslEnabled: true sslSecret: my-tls-secret expose: true connectionsAllowed: 5 ...
4.6.2.3. Configuring two-way TLS
The procedure in this section shows how to configure two-way Transport Layer Security (TLS) to secure a broker-client connection.
In two-way TLS, both the broker and client presents certificates. The broker and client use these certificates to authenticate each other in a process sometimes called mutual authentication.
Prerequisites
- You should understand the requirements for broker certificate generation when clients use host name verification. For more information, see Section 4.6.2.1, “Configuring a broker certificate for host name verification”.
Procedure
Generate a self-signed certificate for the broker key store.
$ keytool -genkey -alias broker -keyalg RSA -keystore ~/broker.ks
Export the certificate from the broker key store, so that it can be shared with clients. Export the certificate in the Base64-encoded
.pemformat. For example:$ keytool -export -alias broker -keystore ~/broker.ks -file ~/broker_cert.pem
On the client, create a client trust store that imports the broker certificate.
$ keytool -import -alias broker -keystore ~/client.ts -file ~/broker_cert.pem
On the client, generate a self-signed certificate for the client key store.
$ keytool -genkey -alias broker -keyalg RSA -keystore ~/client.ks
On the client, export the certificate from the client key store, so that it can be shared with the broker. Export the certificate in the Base64-encoded
.pemformat. For example:$ keytool -export -alias broker -keystore ~/client.ks -file ~/client_cert.pem
Create a broker trust store that imports the client certificate.
$ keytool -import -alias broker -keystore ~/broker.ts -file ~/client_cert.pem
Log in to OpenShift Container Platform as an administrator. For example:
$ oc login -u system:admin
Switch to the project that contains your broker deployment. For example:
$ oc project my-openshift-project
Create a secret to store the TLS credentials. For example:
$ oc create secret generic my-tls-secret \
--from-file=broker.ks=~/broker.ks \
--from-file=client.ts=~/broker.ts \
--from-literal=keyStorePassword=<password> \
--from-literal=trustStorePassword=<password>
NoteWhen generating a secret, OpenShift requires you to specify both a key store and a trust store. The trust store key is generically named
client.ts. For two-way TLS between the broker and a client, you must generate a secret that includes the broker trust store, because this holds the client certificate. Therefore, in the preceding step, the value that you specify for theclient.tskey is actually the broker trust store file.Link the secret to the service account that you created when installing the Operator. For example:
$ oc secrets link sa/amq-broker-operator secret/my-tls-secret
Specify the secret name in the
sslSecretparameter of your secured acceptor or connector. For example:spec: ... acceptors: - name: my-acceptor protocols: amqp,openwire port: 5672 sslEnabled: true sslSecret: my-tls-secret expose: true connectionsAllowed: 5 ...
4.6.3. Networking Services in your broker deployments
On the Networking pane of the OpenShift Container Platform web console for your broker deployment, there are two running Services; a headless Service and a ping Service. The default name of the headless Service uses the format <Custom Resource name>-hdls-svc, for example, my-broker-deployment-hdls-svc. The default name of the ping Service uses a format of <Custom Resource name>-ping-svc, for example, `my-broker-deployment-ping-svc.
The headless Service provides access to ports 8161 and 61616 on each broker Pod. Port 8161 is used by the broker management console, and port 61616 is used for broker clustering. You can also use the headless Service to connect to a broker Pod from an internal client (that is, a client inside the same OpenShift cluster as the broker deployment).
The ping Service is used by the brokers for discovery, and enables brokers to form a cluster within the OpenShift environment. Internally, this Service exposes port 8888.
Additional resources
- To learn about using the headless Service to connect to a broker Pod from an internal client, see Section 4.6.4.1, “Connecting to the broker from internal clients”.
4.6.4. Connecting to the broker from internal and external clients
The examples in this section show how to connect to the broker from internal clients (that is, clients in the same OpenShift cluster as the broker deployment) and external clients (that is, clients outside the OpenShift cluster).
4.6.4.1. Connecting to the broker from internal clients
An internal client can connect to the broker Pod using the headless Service that is running for the broker deployment.
To connect to a broker Pod using the headless Service, specify an address in the format <Protocol>://<PodName>.<HeadlessServiceName>.<ProjectName>.svc.cluster.local. For example:
$ tcp://my-broker-deployment-0.my-broker-deployment-hdls-svc.my-openshift-project.svc.cluster.local
OpenShift DNS successfully resolves addresses in this format because the StatefulSets created by Operator-based broker deployments provide stable Pod names.
Additional resources
- For more information about the headless Service that runs by a default in a broker deployment, see Section 4.6.3, “Networking Services in your broker deployments”.
4.6.4.2. Connecting to the broker from external clients
When you expose an acceptor to external clients (that is, by setting the value of the expose parameter to true), a dedicated Service and Route are automatically created for each broker Pod in the deployment. To see the Routes configured on a given broker Pod, select the Pod in the OpenShift Container Platform web console and click the Routes tab.
An external client can connect to the broker by specifying the full host name of the Route created for the the broker Pod. You can use a basic curl command to test external access to this full host name. For example:
$ curl https://my-broker-deployment-0-svc-rte-my-openshift-project.my-openshift-domain
The full host name for the Route must resolve to the node that’s hosting the OpenShift router. The OpenShift router uses the host name to determine where to send the traffic inside the OpenShift internal network.
By default, the OpenShift router listens to port 80 for non-secured (that is, non-SSL) traffic and port 443 for secured (that is, SSL-encrypted) traffic. For an HTTP connection, the router automatically directs traffic to port 443 if you specify a secure connection URL (that is, https), or to port 80 if you specify a non-secure connection URL (that is, http).
For non-HTTP connections:
- Clients must explicitly specify the port number (for example, port 443) as part of the connection URL.
- For one-way TLS, the client must specify the path to its trust store and the corresponding password, as part of the connection URL.
- For two-way TLS, the client must also specify the path to its key store and the corresponding password, as part of the connection URL.
Some example client connection URLs, for supported messaging protcols, are shown below.
External Core client, using one-way TLS
tcp://my-broker-deployment-0-svc-rte-my-openshift-project.my-openshift-domain:443?useTopologyForLoadBalancing=false&sslEnabled=true \
&trustStorePath=~/client.ts&trustStorePassword=<password>
The useTopologyForLoadBalancing key is explicitly set to false in the connection URL because an external Core client cannot use topology information returned by the broker. If this key is set to true or you do not specify a value, it results in a DEBUG log message.
External Core client, using two-way TLS
tcp://my-broker-deployment-0-svc-rte-my-openshift-project.my-openshift-domain:443?useTopologyForLoadBalancing=false&sslEnabled=true \
&keyStorePath=~/client.ks&keyStorePassword=<password> \
&trustStorePath=~/client.ts&trustStorePassword=<password>
External OpenWire client, using one-way TLS
ssl://my-broker-deployment-0-svc-rte-my-openshift-project.my-openshift-domain:443"

# Also, specify the following JVM flags
-Djavax.net.ssl.trustStore=~/client.ts -Djavax.net.ssl.trustStorePassword=<password>
External OpenWire client, using two-way TLS
ssl://my-broker-deployment-0-svc-rte-my-openshift-project.my-openshift-domain:443"

# Also, specify the following JVM flags
-Djavax.net.ssl.keyStore=~/client.ks -Djavax.net.ssl.keyStorePassword=<password> \
-Djavax.net.ssl.trustStore=~/client.ts -Djavax.net.ssl.trustStorePassword=<password>
External AMQP client, using one-way TLS
amqps://my-broker-deployment-0-svc-rte-my-openshift-project.my-openshift-domain:443?transport.verifyHost=true \
&transport.trustStoreLocation=~/client.ts&transport.trustStorePassword=<password>
External AMQP client, using two-way TLS
amqps://my-broker-deployment-0-svc-rte-my-openshift-project.my-openshift-domain:443?transport.verifyHost=true \
&transport.keyStoreLocation=~/client.ks&transport.keyStorePassword=<password> \
&transport.trustStoreLocation=~/client.ts&transport.trustStorePassword=<password>
4.6.4.3. Connecting to the Broker using a NodePort
As an alternative to using a Route, an OpenShift administrator can configure a NodePort to connect to a broker Pod from a client outside OpenShift. The NodePort should map to one of the protocol-specifc ports specified by the acceptors configured for the broker.
By default, NodePorts are in the range 30000 to 32767, which means that a NodePort typically does not match the intended port on the broker Pod.
To connect from a client outside OpenShift to the broker via a NodePort, you specify a URL in the format <Protocol>://<OCPNodeIP>:<NodePortNumber>.
Additional resources
For more information about using methods such as Routes and NodePorts for communicating from outside an OpenShift cluster with services running in the cluster, see:
- Configuring ingress cluster traffic overview (OpenShift Container Platform 4.1 and later)
- Getting Traffic into a Cluster (OpenShift Container Platform 3.11)
4.7. Configuring large message handling for AMQP messages
Clients might send large AMQP messages that can exceed the size of the broker’s internal buffer, causing unexpected errors. To prevent this situation, you can configure the broker to store messages as files when the messages are larger than a specified minimum value. Handling large messages in this way means that the broker does not hold the messages in memory. Instead, the broker stores the messages in a dedicated directory used for storing large message files.
For a broker deployment on OpenShift Container Platform, the large messages directory is /opt/<custom-resource-name>/data/large-messages on the Persistent Volume (PV) used by the broker for message storage. When the broker stores a message as a large message, the queue retains a reference to the file in the large messages directory.
- To configure large message handling for AMQP messages, you must be using at least the latest version of the Operator for AMQ Broker 7.7 (that is, version 0.17). To learn how to upgrade the Operator to the latest version for AMQ Broker 7.8, see Chapter 6, Upgrading an Operator-based broker deployment.
- For Operator-based broker deployments in AMQ Broker 7.8, large message handling is available only for the AMQP protocol.
4.7.1. Configuring AMQP acceptors for large message handling
The following procedure shows how to configure an acceptor to handle an AMQP message larger than a specified size as a large message.
Prerequisites
- You must be using at least the latest version of the Operator for AMQ Broker 7.7 (that is, version 0.17). To learn how to upgrade the Operator to the latest version for AMQ Broker 7.8, see Chapter 6, Upgrading an Operator-based broker deployment.
- You should be familiar with how to configure acceptors for Operator-based broker deployments. See Section 4.6.1, “Configuring acceptors”.
To store large AMQP messages in a dedicated large messages directory, your broker deployment must be using persistent storage (that is,
persistenceEnabledis set totruein the Custom Resource (CR) instance used to create the deployment). For more information about configuring persistent storage, see:
Procedure
Open the Custom Resource (CR) instance in which you previously defined an AMQP acceptor.
Using the OpenShift command-line interface:
$ oc edit -f <path/to/custom-resource-instance>.yamlUsing the OpenShift Container Platform web console:
- In the left navigation menu, click →
-
Click the
ActiveMQArtemisCRD. -
Click the
Instancestab. - Locate the CR instance that corresponds to your project namespace.
A previously-configured AMQP acceptor might resemble the following:
spec:
...
  acceptors:
  - name: my-acceptor
    protocols: amqp
    port: 5672
    connectionsAllowed: 5
    expose: true
    sslEnabled: true
...
Specify the minimum size, in bytes, of an AMQP message that the broker handles as a large message. For example:
spec:
...
  acceptors:
  - name: my-acceptor
    protocols: amqp
    port: 5672
    connectionsAllowed: 5
    expose: true
    sslEnabled: true
    amqpMinLargeMessageSize: 204800
    ...
...
In the preceding example, the broker is configured to accept AMQP messages on port 5672. Based on the value of
amqpMinLargeMessageSize, if the acceptor receives an AMQP message with a body larger than or equal to 204800 bytes (that is, 200 kilobytes), the broker stores the message as a large message.The broker stores the message in the large messages directory (
/opt/<custom-resource-name>/data/large-messages, by default) on the persistent volume (PV) used by the broker for message storage.If you do not explicitly specify a value for the
amqpMinLargeMessageSizeproperty, the broker uses a default value of 102400 (that is, 100 kilobytes).If you set
amqpMinLargeMessageSizeto a value of-1, large message handling for AMQP messages is disabled.
4.8. High availability and message migration
4.8.1. High availability
The term high availability refers to a system that can remain operational even when part of that system fails or is shut down. For AMQ Broker on OpenShift Container Platform, this means ensuring the integrity and availability of messaging data if a broker Pod fails, or shuts down due to intentional scaledown of your deployment.
To allow high availability for AMQ Broker on OpenShift Container Platform, you run multiple broker Pods in a broker cluster. Each broker Pod writes its message data to an available Persistent Volume (PV) that you have claimed for use with a Persistent Volume Claim (PVC). If a broker Pod fails or is shut down, the message data stored in the PV is migrated to another available broker Pod in the broker cluster. The other broker Pod stores the message data in its own PV.
Message migration is available only for deployments based on the AMQ Broker Operator. Deployments based on application templates do not have a message migration capability.
The following figure shows a StatefulSet-based broker deployment. In this case, the two broker Pods in the broker cluster are still running.
When a broker Pod shuts down, the AMQ Broker Operator automatically starts a scaledown controller that performs the migration of messages to an another broker Pod that is still running in the broker cluster. This message migration process is also known as Pod draining. The section that follows describes message migration.
4.8.2. Message migration
Message migration is how you ensure the integrity of messaging data when a broker in a clustered deployment shuts down due to failure or intentional scaledown of the deployment. Also known as Pod draining, this process refers to removal and redistribution of messages from a broker Pod that has shut down.
- Message migration is available only for deployments based on the AMQ Broker Operator. Deployments based on application templates do not have a message migration capability.
- The scaledown controller that performs message migration can operate only within a single OpenShift project. The controller cannot migrate messages between brokers in separate projects.
- To use message migration, you must have a minimum of two brokers in your deployment. A broker with two or more brokers is clustered by default.
For an Operator-based broker deployment, you enable message migration by setting messageMigration to true in the main broker Custom Resource for your deployment.
The message migration process follows these steps:
- When a broker Pod in the deployment shuts down due to failure or intentional scaledown of the deployment, the Operator automatically starts a scaledown controller to prepare for message migration. The scaledown controller runs in the same OpenShift project name as the broker cluster.
- The scaledown controller registers itself and listens for Kubernetes events that are related to Persistent Volume Claims (PVCs) in the project.
To check for Persistent Volumes (PVs) that have been orphaned, the scaledown controller looks at the ordinal on the volume claim. The controller compares the ordinal on the volume claim to that of the broker Pods that are still running in the StatefulSet (that is, the broker cluster) in the project.
If the ordinal on the volume claim is higher than the ordinal on any of the broker Pods still running in the broker cluster, the scaledown controller determines that the broker Pod at that ordinal has been shut down and that messaging data must be migrated to another broker Pod.
The scaledown controller starts a drainer Pod. The drainer Pod runs the broker and executes the message migration. Then, the drainer Pod identifies an alternative broker Pod to which the orphaned messages can be migrated.
NoteThere must be at least one broker Pod still running in your deployment for message migration to occur.
The following figure illustrates how the scaledown controller (also known as a drain controller) migrates messages to a running broker Pod.
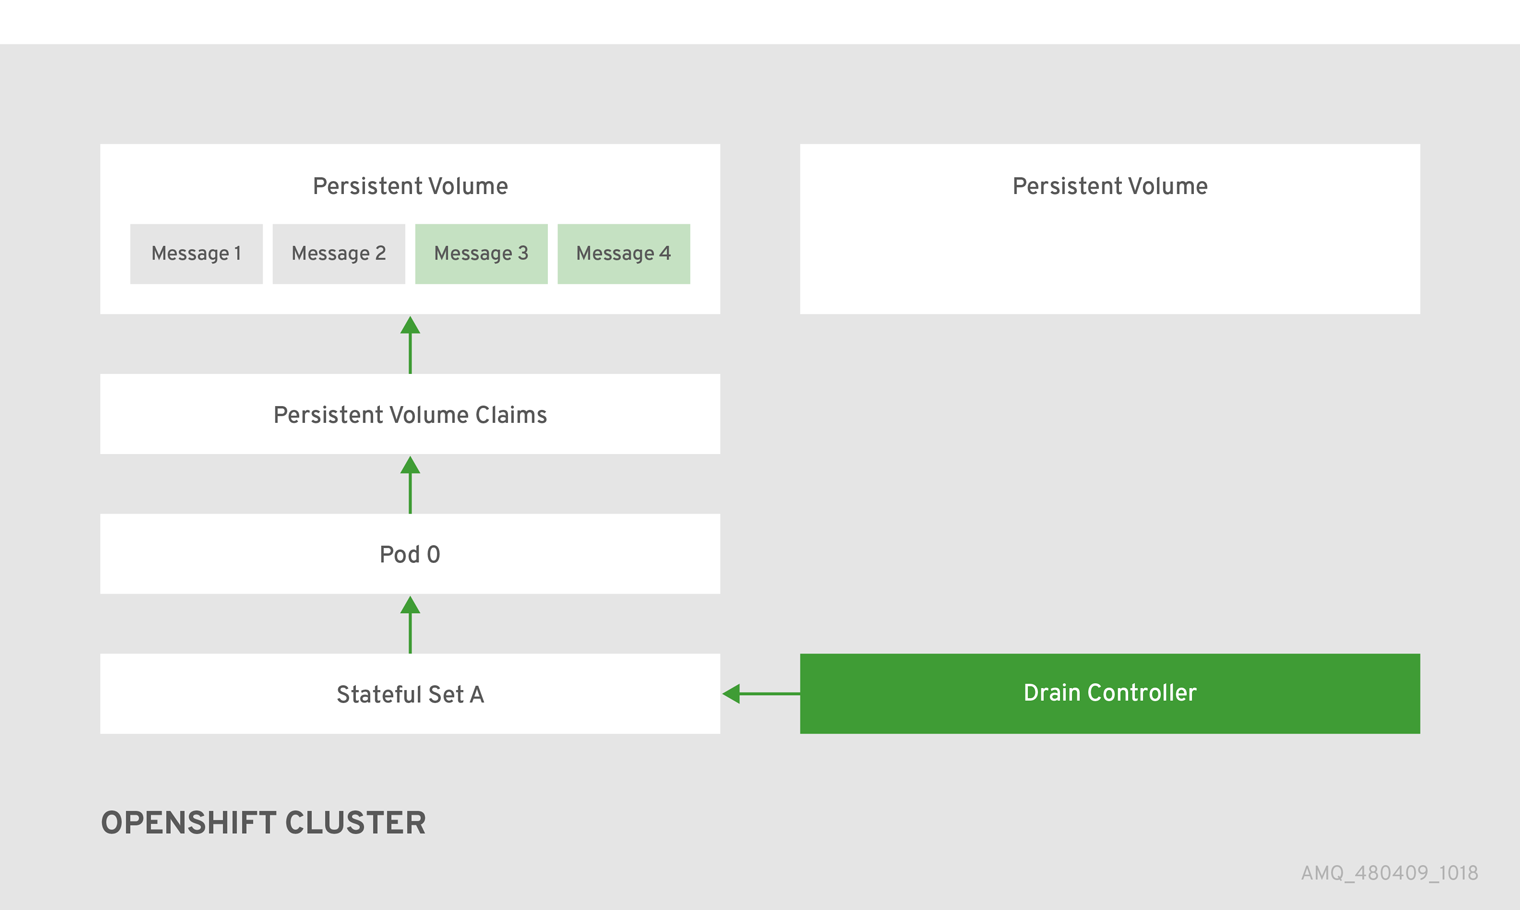
After the messages are successfully migrated to an operational broker Pod, the drainer Pod shuts down and the scaledown controller removes the PVC for the orphaned PV. The PV is returned to a "Released" state.
If you scale a broker deployment down to 0 (zero), message migration does not occur, since there is no running broker Pod to which messaging data can be migrated. However, if you scale a deployment down to zero and then back up to a size that is smaller than the original deployment, drainer Pods are started for the brokers that remain shut down.
Additional resources
- For an example of message migration when you scale down a broker deployment, see Migrating messages upon scaledown.
4.8.3. Migrating messages upon scaledown
To migrate messages upon scaledown of your broker deployment, use the main broker Custom Resource (CR) to enable message migration. The AMQ Broker Operator automatically runs a dedicated scaledown controller to execute message migration when you scale down a clustered broker deployment.
With message migration enabled, the scaledown controller within the Operator detects shutdown of a broker Pod and starts a drainer Pod to execute message migration. The drainer Pod connects to one of the other live broker Pods in the cluster and migrates messages to that live broker Pod. After migration is complete, the scaledown controller shuts down.
- A scaledown controller operates only within a single OpenShift project. The controller cannot migrate messages between brokers in separate projects.
- If you scale a broker deployment down to 0 (zero), message migration does not occur, since there is no running broker Pod to which the messaging data can be migrated. However, if you scale a deployment down to zero brokers and then back up to only some of the brokers that were in the original deployment, drainer Pods are started for the brokers that remain shut down.
The following example procedure shows the behavior of the scaledown controller.
Prerequisites
- You already have a basic broker deployment. See Section 3.4.1, “Deploying a basic broker instance”.
- You should understand how message migration works. For more information, see Section 4.8.2, “Message migration”.
Procedure
-
In the
deploy/crsdirectory of the Operator repository that you originally downloaded and extracted, open the main broker CR,broker_activemqartemis_cr.yaml. In the main broker CR set
messageMigrationandpersistenceEnabledtotrue.These settings mean that when you later scale down the size of your clustered broker deployment, the Operator automatically starts a scaledown controller and migrates messages to a broker Pod that is still running.
In your existing broker deployment, verify which Pods are running.
$ oc get pods
You see output that looks like the following.
activemq-artemis-operator-8566d9bf58-9g25l   1/1   Running   0   3m38s
ex-aao-ss-0                                  1/1   Running   0   112s
ex-aao-ss-1                                  1/1   Running   0   8s
The preceding output shows that there are three Pods running; one for the broker Operator itself, and a separate Pod for each broker in the deployment.
Log into each Pod and send some messages to each broker.
Supposing that Pod
ex-aao-ss-0has a cluster IP address of172.17.0.6, run the following command:$ /opt/amq-broker/bin/artemis producer --url tcp://172.17.0.6:61616 --user admin --password admin
Supposing that Pod
ex-aao-ss-1has a cluster IP address of172.17.0.7, run the following command:$ /opt/amq-broker/bin/artemis producer --url tcp://172.17.0.7:61616 --user admin --password admin
The preceding commands create a queue called
TESTon each broker and add 1000 messages to each queue.
Scale the cluster down from two brokers to one.
-
Open the main broker CR,
broker_activemqartemis_cr.yaml. -
In the CR, set
deploymentPlan.sizeto1. At the command line, apply the change:
$ oc apply -f deploy/crs/broker_activemqartemis_cr.yaml
You see that the Pod
ex-aao-ss-1starts to shut down. The scaledown controller starts a new drainer Pod of the same name. This drainer Pod also shuts down after it migrates all messages from broker Podex-aao-ss-1to the other broker Pod in the cluster,ex-aao-ss-0.
-
Open the main broker CR,
-
When the drainer Pod is shut down, check the message count on the
TESTqueue of broker Podex-aao-ss-0. You see that the number of messages in the queue is 2000, indicating that the drainer Pod successfully migrated 1000 messages from the broker Pod that shut down.
Chapter 5. Connecting to AMQ Management Console for an Operator-based broker deployment
Each broker Pod in an Operator-based deployment hosts its own instance of AMQ Management Console at port 8161. To provide access to the console for each broker, you can configure the Custom Resource (CR) instance for the broker deployment to instruct the Operator to automatically create a dedicated Service and Route for each broker Pod.
The following procedures describe how to connect to AMQ Management Console for a deployed broker.
Prerequisites
- You must have created a broker deployment using the AMQ Broker Operator. For example, to learn how to use a sample CR to create a basic broker deployment, see Section 3.4.1, “Deploying a basic broker instance”.
-
To instruct the Operator to automatically create a Service and Route for each broker Pod in a deployment for console access, you must set the value of the
console.exposeproperty totruein the Custom Resource (CR) instance used to create the deployment. The default value of this property isfalse. For a complete Custom Resource configuration reference, including configuration of theconsolesection of the CR, see Section 11.1, “Custom Resource configuration reference”.
5.1. Connecting to AMQ Management Console
When you set the value of the console.expose property to true in the Custom Resource (CR) instance used to create a broker deployment, the Operator automatically creates a dedicated Service and Route for each broker Pod, to provide access to AMQ Management Console.
The default name of the automatically-created Service is in the form <custom-resource-name>-wconsj-<broker-pod-ordinal>-svc. For example, my-broker-deployment-wconsj-0-svc. The default name of the automatically-created Route is in the form <custom-resource-name>-wconsj-<broker-pod-ordinal>-svc-rte. For example, my-broker-deployment-wconsj-0-svc-rte.
This procedure shows you how to access the console for a running broker Pod.
Procedure
In the OpenShift Container Platform web console, click → (OpenShift Container Platform 4.5 or later) or → (OpenShift Container Platform 3.11).
On the Routes page, identify the
wconsjRoute for the given broker Pod. For example,my-broker-deployment-wconsj-0-svc-rte.Under Location (OpenShift Container Platform 4.5 or later) or Hostname (OpenShift Container Platform 3.11), click the link that corresponds to the Route.
A new tab opens in your web browser.
Click the Management Console link.
The AMQ Management Console login page opens.
To log in to the console, enter the values specified for the
adminUserandadminPasswordproperties in the Custom Resource (CR) instance used to create your broker deployment.If there are no values explicitly specified for
adminUserandadminPasswordin the CR, follow the instructions in Section 5.2, “Accessing AMQ Management Console login credentials” to retrieve the credentials required to log in to the console.NoteValues for
adminUserandadminPasswordare required to log in to the console only if therequireLoginproperty of the CR is set totrue. This property specifies whether login credentials are required to log in to the broker and the console. IfrequireLoginis set tofalse, any user with administrator privileges for the OpenShift project can log in to the console.
5.2. Accessing AMQ Management Console login credentials
If you do not specify a value for adminUser and adminPassword in the Custom Resource (CR) instance used for your broker deployment, the Operator automatically generates these credentials and stores them in a secret. The default secret name is in the form <custom-resource-name>-credentials-secret, for example, my-broker-deployment-credentials-secret.
Values for adminUser and adminPassword are required to log in to the management console only if the requireLogin parameter of the CR is set to true. If requireLogin is set to false, any user with administrator privileges for the OpenShift project can log in to the console.
This procedure shows how to access the login credentials.
Procedure
See the complete list of secrets in your OpenShift project.
- From the OpenShift Container Platform web console, click → (OpenShift Container Platform 4.5 or later) or → (OpenShift Container Platform 3.11).
From the command line:
$ oc get secrets
Open the appropriate secret to reveal the Base64-encoded console login credentials.
- From the OpenShift Container Platform web console, click the secret that includes your broker Custom Resource instance in its name. Click the YAML tab (OpenShift Container Platform 4.5 or later) or → (OpenShift Container Platform 3.11).
From the command line:
$ oc edit secret <my-broker-deployment-credentials-secret>
To decode a value in the secret, use a command such as the following:
$ echo 'dXNlcl9uYW1l' | base64 --decode
console_admin
Additional resources
- To learn more about using AMQ Management Console to view and manage brokers, see Managing brokers using AMQ Management Console in Managing AMQ Broker
Chapter 6. Upgrading an Operator-based broker deployment
The procedures in this section show how to upgrade:
- The AMQ Broker Operator version, using both the OpenShift command-line interface (CLI) and OperatorHub
- The broker container image for an Operator-based broker deployment
6.1. Before you begin
This section describes some important considerations before you upgrade the Operator and broker container images for an Operator-based broker deployment.
- To upgrade an Operator-based broker deployment running on OpenShift Container Platform 3.11 to run on OpenShift Container Platform 4.5 or later, you must first upgrade your OpenShift Container Platform installation. Then, you must create a new Operator-based broker deployment that matches your existing deployment. To learn how to create a new Operator-based broker deployment, see Chapter 3, Deploying AMQ Broker on OpenShift Container Platform using the AMQ Broker Operator.
- Upgrading the Operator using either the OpenShift command-line interface (CLI) or OperatorHub requires cluster administrator privileges for your OpenShift cluster.
If you originally used the CLI to install the Operator, you should also use the CLI to upgrade the Operator. If you originally used OperatorHub to install the Operator (that is, it appears under → for your project in the OpenShift Container Platform web console), you should also use OperatorHub to upgrade the Operator. For more information about these upgrade methods, see:
6.2. Upgrading the Operator using the CLI
The procedures in this section show how to use the OpenShift command-line interface (CLI) to upgrade different versions of the Operator to the latest version available for AMQ Broker 7.8.
6.2.1. Prerequisites
- You should use the CLI to upgrade the Operator only if you originally used the CLI to install the Operator. If you originally used OperatorHub to install the Operator (that is, the Operator appears under → for your project in the OpenShift Container Platform web console), you should use OperatorHub to upgrade the Operator. To learn how to upgrade the Operator using OperatorHub, see Section 6.3, “Upgrading the Operator using OperatorHub”.
6.2.2. Upgrading version 0.19 of the Operator
This procedure shows to how to use the OpenShift command-line interface (CLI) to upgrade version 0.19 of the Operator to the latest version for AMQ Broker 7.8.
Procedure
- In your web browser, navigate to the Software Downloads page for AMQ Broker 7.8.5 patches.
-
Ensure that the value of the Version drop-down list is set to
7.8.5and the Patches tab is selected. Next to AMQ Broker 7.8.5 .3 Operator Installation and Example Files, click Download.
Download of the
amq-broker-operator-7.8.5-ocp-install-examples.zipcompressed archive automatically begins.When the download has completed, move the archive to your chosen installation directory. The following example moves the archive to a directory called
~/broker/operator.mkdir ~/broker/operator mv amq-broker-operator-7.8.5-ocp-install-examples.zip ~/broker/operator
In your chosen installation directory, extract the contents of the archive. For example:
cd ~/broker/operator
unzip amq-broker-operator-7.8.5-ocp-install-examples.zip
Log in to OpenShift Container Platform as an administrator for the project that contains your existing Operator deployment.
$ oc login -u <user>Switch to the OpenShift project in which you want to upgrade your Operator version.
$ oc project <project-name>In the
deploydirectory of the latest Operator archive that you downloaded and extracted, open theoperator.yamlfile.NoteIn the
operator.yamlfile, the Operator uses an image that is represented by a Secure Hash Algorithm (SHA) value. The comment line, which begins with a number sign (#) symbol, denotes that the SHA value corresponds to a specific container image tag.-
Open the
operator.yamlfile for your previous Operator deployment. Check that any non-default values that you specified in your previous configuration are replicated in the newoperator.yamlconfiguration file. -
If you have made any updates to the new
operator.yamlfile, save the file. Apply the updated Operator configuration.
$ oc apply -f deploy/operator.yaml
OpenShift updates your project to use the latest Operator version.
-
To recreate your previous broker deployment, create a new CR yaml file to match the purpose of your original CR and apply it. Section 3.4.1, “Deploying a basic broker instance”. describes how to apply the
deploy/crs/broker_activemqartemis_cr.yamlfile in the Operator installation archive, you can use that file as a basis for your new CR yaml file.
6.2.3. Upgrading version 0.18 of the Operator
This procedure shows to how to use the OpenShift command-line interface (CLI) to upgrade version 0.18 of the Operator (that is, the first version available for AMQ Broker 7.8) to the latest version for AMQ Broker 7.8.
Procedure
- In your web browser, navigate to the Software Downloads page for AMQ Broker 7.8.5 patches.
-
Ensure that the value of the Version drop-down list is set to
7.8.5and the Patches tab is selected. Next to AMQ Broker 7.8.5 .3 Operator Installation and Example Files, click Download.
Download of the
amq-broker-operator-7.8.5-ocp-install-examples.zipcompressed archive automatically begins.When the download has completed, move the archive to your chosen installation directory. The following example moves the archive to a directory called
~/broker/operator.mkdir ~/broker/operator mv amq-broker-operator-7.8.5-ocp-install-examples.zip ~/broker/operator
In your chosen installation directory, extract the contents of the archive. For example:
cd ~/broker/operator
unzip amq-broker-operator-7.8.5-ocp-install-examples.zip
Log in to OpenShift Container Platform as an administrator for the project that contains your existing Operator deployment.
$ oc login -u <user>Switch to the OpenShift project in which you want to upgrade your Operator version.
$ oc project <project-name>In the
deploydirectory of the latest Operator archive that you downloaded and extracted, open theoperator.yamlfile.NoteIn the
operator.yamlfile, the Operator uses an image that is represented by a Secure Hash Algorithm (SHA) value. The comment line, which begins with a number sign (#) symbol, denotes that the SHA value corresponds to a specific container image tag.Open the
operator.yamlfile for your previous Operator deployment. Check that any non-default values that you specified in your previous configuration are replicated in the newoperator.yamlconfiguration file.NoteThe
operator.yamlfile for version 0.18 of the Operator includes environment variables whose names begin withBROKER_IMAGE. Do not replicate these environment variables in your new configuration. The latest version of the Operator for AMQ Broker 7.8 no longer uses these environment variables.-
If you have made any updates to the new
operator.yamlfile, save the file. Apply the updated Operator configuration.
$ oc apply -f deploy/operator.yaml
OpenShift updates your project to use the latest Operator version.
-
To recreate your previous broker deployment, create a new CR yaml file to match the purpose of your original CR and apply it. Section 3.4.1, “Deploying a basic broker instance”. describes how to apply the
deploy/crs/broker_activemqartemis_cr.yamlfile in the Operator installation archive, you can use that file as a basis for your new CR yaml file.
6.2.4. Upgrading version 0.17 of the Operator
This procedure shows to how to use the OpenShift command-line interface (CLI) to upgrade version 0.17 of the Operator (that is, the latest version available for AMQ Broker 7.7) to the latest version for AMQ Broker 7.8.
Procedure
- In your web browser, navigate to the Software Downloads page for AMQ Broker 7.8.5 patches.
-
Ensure that the value of the Version drop-down list is set to
7.8.5and the Patches tab is selected. Next to AMQ Broker 7.8.5 .3 Operator Installation and Example Files, click Download.
Download of the
amq-broker-operator-7.8.5-ocp-install-examples.zipcompressed archive automatically begins.When the download has completed, move the archive to your chosen installation directory. The following example moves the archive to a directory called
~/broker/operator.mkdir ~/broker/operator mv amq-broker-operator-7.8.5-ocp-install-examples.zip ~/broker/operator
In your chosen installation directory, extract the contents of the archive. For example:
cd ~/broker/operator
unzip amq-broker-operator-7.8.5-ocp-install-examples.zip
Log in to OpenShift Container Platform as a cluster administrator. For example:
$ oc login -u system:admin
Switch to the OpenShift project in which you want to upgrade your Operator version.
$ oc project <project-name>Delete the main broker Custom Resource (CR) instance in your project. This also deletes the broker deployment. For example:
$ oc delete -f deploy/crs/broker_activemqartemis_cr.yaml
Update the main broker Custom Resource Definition (CRD) in your OpenShift cluster to the latest version.
$ oc apply -f deploy/crds/broker_activemqartemis_crd.yaml
NoteYou do not need to update your cluster with the latest versions of the CRDs for addressing or the scaledown controller. These CRDs are fully compatible with the ones included with the previous Operator version.
In the
deploydirectory of the latest Operator archive that you downloaded and extracted, open theoperator.yamlfile.NoteIn the
operator.yamlfile, the Operator uses an image that is represented by a Secure Hash Algorithm (SHA) value. The comment line, which begins with a number sign (#) symbol, denotes that the SHA value corresponds to a specific container image tag.Open the
operator.yamlfile for your previous Operator deployment. Check that any non-default values that you specified in your previous configuration are replicated in the newoperator.yamlconfiguration file.NoteThe
operator.yamlfile for version 0.17 of the Operator includes environment variables whose names begin withBROKER_IMAGE. Do not replicate these environment variables in your new configuration. The latest version of the Operator for AMQ Broker 7.8 no longer uses these environment variables.-
If you have made any updates to the new
operator.yamlfile, save the file. Apply the updated Operator configuration.
$ oc apply -f deploy/operator.yaml
OpenShift updates your project to use the latest Operator version.
-
To recreate your previous broker deployment, create a new CR yaml file to match the purpose of your original CR and apply it. Section 3.4.1, “Deploying a basic broker instance”. describes how to apply the
deploy/crs/broker_activemqartemis_cr.yamlfile in the Operator installation archive, you can use that file as a basis for your new CR yaml file.
6.2.5. Upgrading version 0.15 of the Operator
This procedure shows to how to use the OpenShift command-line interface (CLI) to upgrade version 0.15 of the Operator (that is, the first version available for AMQ Broker 7.7) to the latest version for AMQ Broker 7.8.
Procedure
- In your web browser, navigate to the Software Downloads page for AMQ Broker 7.8.5 patches.
-
Ensure that the value of the Version drop-down list is set to
7.8.5and the Patches tab is selected. Next to AMQ Broker 7.8.5 .3 Operator Installation and Example Files, click Download.
Download of the
amq-broker-operator-7.8.5-ocp-install-examples.zipcompressed archive automatically begins.When the download has completed, move the archive to your chosen installation directory. The following example moves the archive to a directory called
~/broker/operator.mkdir ~/broker/operator mv amq-broker-operator-7.8.5-ocp-install-examples.zip ~/broker/operator
In your chosen installation directory, extract the contents of the archive. For example:
cd ~/broker/operator
unzip amq-broker-operator-7.8.5-ocp-install-examples.zip
Log in to OpenShift Container Platform as a cluster administrator. For example:
$ oc login -u system:admin
Switch to the OpenShift project in which you want to upgrade your Operator version.
$ oc project <project-name>Delete the main broker Custom Resource (CR) instance in your project. This also deletes the broker deployment. For example:
$ oc delete -f deploy/crs/broker_activemqartemis_cr.yaml
Update the main broker Custom Resource Definition (CRD) in your OpenShift cluster to the latest version.
$ oc apply -f deploy/crds/broker_activemqartemis_crd.yaml
NoteYou do not need to update your cluster with the latest versions of the CRDs for addressing or the scaledown controller. These CRDs are fully compatible with the ones included with the previous Operator version.
In the
deploydirectory of the latest Operator archive that you downloaded and extracted, open theoperator.yamlfile.NoteIn the
operator.yamlfile, the Operator uses an image that is represented by a Secure Hash Algorithm (SHA) value. The comment line, which begins with a number sign (#) symbol, denotes that the SHA value corresponds to a specific container image tag.Open the
operator.yamlfile for your previous Operator deployment. Check that any non-default values that you specified in your previous configuration are replicated in the newoperator.yamlconfiguration file.NoteThe
operator.yamlfile for version 0.15 of the Operator includes environment variables whose names begin withBROKER_IMAGE. Do not replicate these environment variables in your new configuration. The latest version of the Operator for AMQ Broker 7.8 no longer uses these environment variables.-
If you have made any updates to the new
operator.yamlfile, save the file. Apply the updated Operator configuration.
$ oc apply -f deploy/operator.yaml
OpenShift updates your project to use the latest Operator version.
-
To recreate your previous broker deployment, create a new CR yaml file to match the purpose of your original CR and apply it. Section 3.4.1, “Deploying a basic broker instance”. describes how to apply the
deploy/crs/broker_activemqartemis_cr.yamlfile in the Operator installation archive, you can use that file as a basis for your new CR yaml file.
6.2.6. Upgrading version 0.13 of the Operator
This procedure shows to how to use the OpenShift command-line interface (CLI) to upgrade version 0.13 of the Operator (that is, the version available for AMQ Broker 7.6) to the latest version for AMQ Broker 7.8.
Procedure
- In your web browser, navigate to the Software Downloads page for AMQ Broker 7.8.5 patches.
-
Ensure that the value of the Version drop-down list is set to
7.8.5and the Patches tab is selected. Next to AMQ Broker 7.8.5 .3 Operator Installation and Example Files, click Download.
Download of the
amq-broker-operator-7.8.5-ocp-install-examples.zipcompressed archive automatically begins.When the download has completed, move the archive to your chosen installation directory. The following example moves the archive to a directory called
~/broker/operator.mkdir ~/broker/operator mv amq-broker-operator-7.8.5-ocp-install-examples.zip ~/broker/operator
In your chosen installation directory, extract the contents of the archive. For example:
cd ~/broker/operator
unzip amq-broker-operator-7.8.5-ocp-install-examples.zip
Log in to OpenShift Container Platform as a cluster administrator. For example:
$ oc login -u system:admin
Switch to the OpenShift project in which you want to upgrade your Operator version.
$ oc project <project-name>Delete the main broker Custom Resource (CR) instance in your project. This also deletes the broker deployment. For example:
$ oc delete -f deploy/crs/broker_activemqartemis_cr.yaml
Update the main broker Custom Resource Definition (CRD) in your OpenShift cluster to the latest version.
$ oc apply -f deploy/crds/broker_activemqartemis_crd.yaml
Update the address CRD in your OpenShift cluster to the latest version included with AMQ Broker 7.8.
$ oc apply -f deploy/crds/broker_activemqartemisaddress_crd.yaml
NoteYou do not need to update your cluster with the latest version of the CRD for the scaledown controller. In AMQ Broker 7.8, this CRD is fully compatible with the one that was included with the Operator for AMQ Broker 7.6.
In the
deploydirectory of the latest Operator archive that you downloaded and extracted, open theoperator.yamlfile.NoteIn the
operator.yamlfile, the Operator uses an image that is represented by a Secure Hash Algorithm (SHA) value. The comment line, which begins with a number sign (#) symbol, denotes that the SHA value corresponds to a specific container image tag.-
Open the
operator.yamlfile for your previous Operator deployment. Check that any non-default values that you specified in your previous configuration are replicated in the newoperator.yamlconfiguration file. -
If you have made any updates to the new
operator.yamlfile, save the file. Apply the updated Operator configuration.
$ oc apply -f deploy/operator.yaml
OpenShift updates your project to use the latest Operator version.
6.2.7. Upgrading version 0.9 of the Operator
The following procedure shows how to use the OpenShift command-line interface (CLI) to upgrade version 0.9 of the Operator (that is, the version available for AMQ Broker 7.5 or the Long Term Support version available for AMQ Broker 7.4) to the latest version for AMQ Broker 7.8.
Procedure
- In your web browser, navigate to the Software Downloads page for AMQ Broker 7.8.5 patches.
-
Ensure that the value of the Version drop-down list is set to
7.8.5and the Patches tab is selected. Next to AMQ Broker 7.8.5 .3 Operator Installation and Example Files, click Download.
Download of the
amq-broker-operator-7.8.5-ocp-install-examples.zipcompressed archive automatically begins.When the download has completed, move the archive to your chosen installation directory. The following example moves the archive to a directory called
~/broker/operator.mkdir ~/broker/operator mv amq-broker-operator-7.8.5-ocp-install-examples.zip ~/broker/operator
In your chosen installation directory, extract the contents of the archive. For example:
cd ~/broker/operator
unzip amq-broker-operator-7.8.5-ocp-install-examples.zip
Log in to OpenShift Container Platform as a cluster administrator. For example:
$ oc login -u system:admin
Switch to the OpenShift project in which you want to upgrade your Operator version.
$ oc project <project-name>Delete the main broker Custom Resource (CR) instance in your project. This also deletes the broker deployment. For example:
$ oc delete -f deploy/crs/broker_v2alpha1_activemqartemis_cr.yaml
Update the main broker Custom Resource Definition (CRD) in your OpenShift cluster to the latest version included with AMQ Broker 7.8.
$ oc apply -f deploy/crds/broker_activemqartemis_crd.yaml
Update the address CRD in your OpenShift cluster to the latest version included with AMQ Broker 7.8.
$ oc apply -f deploy/crds/broker_activemqartemisaddress_crd.yaml
NoteYou do not need to update your cluster with the latest version of the CRD for the scaledown controller. In AMQ Broker 7.8, this CRD is fully compatible with the one included with the previous Operator version.
In the
deploydirectory of the latest Operator archive that you downloaded and extracted, open theoperator.yamlfile.NoteIn the
operator.yamlfile, the Operator uses an image that is represented by a Secure Hash Algorithm (SHA) value. The comment line, which begins with a number sign (#) symbol, denotes that the SHA value corresponds to a specific container image tag.-
Open the
operator.yamlfile for your previous Operator deployment. Check that any non-default values that you specified in your previous configuration are replicated in the newoperator.yamlconfiguration file. -
If you have made any updates to the new
operator.yamlfile, save the file. Apply the updated Operator configuration.
$ oc apply -f deploy/operator.yaml
OpenShift updates your project to use the latest Operator version.
-
To recreate your previous broker deployment, create a new CR yaml file to match the purpose of your original CR and apply it. Section 3.4.1, “Deploying a basic broker instance”. describes how to apply the
deploy/crs/broker_activemqartemis_cr.yamlfile in the Operator installation archive, you can use that file as a basis for your new CR yaml file.
6.3. Upgrading the Operator using OperatorHub
This section describes how to use OperatorHub to upgrade different versions of the Operator to the latest version available for AMQ Broker 7.8.
6.3.1. Prerequisites
- You should use OperatorHub to upgrade the Operator only if you originally used OperatorHub to install the Operator (that is, the Operator appears under → for your project in the OpenShift Container Platform web console). By contrast, if you originally used the OpenShift command-line interface (CLI) to install the Operator, you should also use the CLI to upgrade the Operator. To learn how to upgrade the Operator using the CLI, see Section 6.2, “Upgrading the Operator using the CLI”.
- Upgrading the AMQ Broker Operator using OperatorHub requires cluster administrator privileges for your OpenShift cluster.
6.3.2. Before you begin
This section describes some important considerations before you use OperatorHub to upgrade an instance of the AMQ Broker Operator.
- The Operator Lifecycle Manager automatically updates the CRDs in your OpenShift cluster when you install the latest Operator version from OperatorHub. You do not need to remove existing CRDs.
- When you update your cluster with the CRDs for the latest Operator version, this update affects all projects in the cluster. Any broker Pods deployed from previous versions of the Operator might become unable to update their status in the OpenShift Container Platform web console. When you click the Logs tab of a running broker Pod, you see messages indicating that 'UpdatePodStatus' has failed. However, the broker Pods and Operator in that project continue to work as expected. To fix this issue for an affected project, you must also upgrade that project to use the latest version of the Operator.
6.3.3. Upgrading the Operator using OperatorHub
This procedure shows how to use OperatorHub to upgrade an instance of the AMQ Broker Operator.
Procedure
- Log in to the OpenShift Container Platform web console as a cluster administrator.
Delete the main Custom Resource (CR) instance for the broker deployment in your project. This action deletes the broker deployment.
- In the left navigation menu, click → .
- On the Custom Resource Definitions page, click the ActiveMQArtemis CRD.
- Click the Instances tab.
- Locate the CR instance that corresponds to your project namespace.
- For your CR instance, click the More Options icon (three vertical dots) on the right-hand side. Select Delete ActiveMQArtemis.
Uninstall the existing AMQ Broker Operator from your project.
- In the left navigation menu, click → .
- From the Project drop-down menu at the top of the page, select the project in which you want to uninstall the Operator.
- Locate the Red Hat Integration - AMQ Broker instance that you want to uninstall.
- For your Operator instance, click the More Options icon (three vertical dots) on the right-hand side. Select Uninstall Operator.
- On the confirmation dialog box, click Uninstall.
- Use OperatorHub to install the latest version of the Operator for AMQ Broker 7.8. For more information, see Section 3.3.3, “Deploying the Operator from OperatorHub”.
-
To recreate your previous broker deployment, create a new CR yaml file to match the purpose of your original CR and apply it. Section 3.4.1, “Deploying a basic broker instance”. describes how to apply the
deploy/crs/broker_activemqartemis_cr.yamlfile in the Operator installation archive, you can use that file as a basis for your new CR yaml file.
6.4. Upgrading the broker container image by specifying an AMQ Broker version
The following procedure shows how to upgrade the broker container image for an Operator-based broker deployment by specifying an AMQ Broker version. You might do this, for example, if you upgrade the Operator to the latest version for AMQ Broker 7.8.5 but the spec.upgrades.enabled property in your CR is already set to true and the spec.version property specifies 7.7.0 or 7.8.0. To upgrade the broker container image, you need to manually specify a new AMQ Broker version (for example, 7.8.5). When you specify a new version of AMQ Broker, the Operator automatically chooses the broker container image that corresponds to this version.
Prerequisites
You must be using the latest version of the Operator for 7.8.5. To learn how to upgrade the Operator to the latest version, see:
- As described in Section 2.4, “How the Operator chooses container images”, if you deploy a CR and do not explicitly specify a broker container image, the Operator automatically chooses the appropriate container image to use. To use the upgrade process described in this section, you must use this default behavior. If you override the default behavior by directly specifying a broker container image in your CR, the Operator cannot automatically upgrade the broker container image to correspond to an AMQ Broker version as described below.
Procedure
Edit the main broker CR instance for the broker deployment.
Using the OpenShift command-line interface:
Log in to OpenShift as a user that has privileges to edit and deploy CRs in the project for the broker deployment.
$ oc login -u <user> -p <password> --server=<host:port>
-
In a text editor, open the CR file that you used for your broker deployment. For example, this might be the
broker_activemqartemis_cr.yamlfile that was included in thedeploy/crsdirectory of the Operator installation archive that you previously downloaded and extracted.
Using the OpenShift Container Platform web console:
- Log in to the console as a user that has privileges to edit and deploy CRs in the project for the broker deployment.
- In the left pane, click → .
- Click the ActiveMQArtemis CRD.
- Click the Instances tab.
- Locate the CR instance that corresponds to your project namespace.
For your CR instance, click the More Options icon (three vertical dots) on the right-hand side. Select Edit ActiveMQArtemis.
Within the console, a YAML editor opens, enabling you to edit the CR instance.
To specify a version of AMQ Broker to which to upgrade the broker container image, set a value for the
spec.versionproperty of the CR. For example:spec: version: 7.8.5 ...In the
specsection of the CR, locate theupgradessection. If this section is not already included in the CR, add it.spec: version: 7.8.5 ... upgrades:Ensure that the
upgradessection includes theenabledandminorproperties.spec: version: 7.8.5 ... upgrades: enabled: minor:To enable an upgrade of the broker container image based on a specified version of AMQ Broker, set the value of the
enabledproperty totrue.spec: version: 7.8.5 ... upgrades: enabled: true minor:To define the upgrade behavior of the broker, set a value for the
minorproperty.To allow upgrades between minor AMQ Broker versions, set the value of
minortotrue.spec: version: 7.8.5 ... upgrades: enabled: true minor: trueFor example, suppose that the current broker container image corresponds to
7.7.0, and a new image, corresponding to the7.8.5version specified forspec.version, is available. In this case, the Operator determines that there is an available upgrade between the7.7and7.8minor versions. Based on the preceding settings, which allow upgrades between minor versions, the Operator upgrades the broker container image.By contrast, suppose that the current broker container image corresponds to
7.8.0, and a new image, corresponding to the7.8.5version specified forspec.version, is available. In this case, the Operator determines that there is an available upgrade between7.8.0and7.8.5micro versions. Based on the preceding settings, which allow upgrades only between minor versions, the Operator does not upgrade the broker container image.To allow upgrades between micro AMQ Broker versions, set the value of
minortofalse.spec: version: 7.8.5 ... upgrades: enabled: true minor: falseFor example, suppose that the current broker container image corresponds to
7.7.0, and a new image, corresponding to the7.8.5version specified forspec.version, is available. In this case, the Operator determines that there is an available upgrade between the7.7and7.8minor versions. Based on the preceding settings, which do not allow upgrades between minor versions (that is, only between micro versions), the Operator does not upgrade the broker container image.By contrast, suppose that the current broker container image corresponds to
7.8.0, and a new image, corresponding to the7.8.5version specified forspec.version, is available. In this case, the Operator determines that there is an available upgrade between7.8.0and7.8.5micro versions. Based on the preceding settings, which allow upgrades between micro versions, the Operator upgrades the broker container image.
Apply the changes to the CR.
Using the OpenShift command-line interface:
- Save the CR file.
Switch to the project for the broker deployment.
$ oc project <project_name>Apply the CR.
$ oc apply -f <path/to/broker_custom_resource_instance>.yaml
Using the OpenShift web console:
- When you have finished editing the CR, click Save.
When you apply the CR change, the Operator first validates that an upgrade to the AMQ Broker version specified for
spec.versionis available for your existing deployment. If you have specified an invalid version of AMQ Broker to which to upgrade (for example, a version that is not yet available), the Operator logs a warning message, and takes no further action.However, if an upgrade to the specified version is available, and the values specified for
upgrades.enabledandupgrades.minorallow the upgrade, then the Operator upgrades each broker in the deployment to use the broker container image that corresponds to the new AMQ Broker version.The broker container image that the Operator uses is defined in an environment variable in the
operator.yamlconfiguration file of the Operator deployment. The environment variable name includes an identifier for the AMQ Broker version. For example, the environment variableRELATED_IMAGE_ActiveMQ_Artemis_Broker_Kubernetes_781corresponds to AMQ Broker 7.8.1.When the Operator has applied the CR change, it restarts each broker Pod in your deployment so that each Pod uses the specified image version. If you have multiple brokers in your deployment, only one broker Pod shuts down and restarts at a time.
Additional resources
- To learn how the Operator uses environment variables to choose a broker container image, see Section 2.4, “How the Operator chooses container images”.
Chapter 7. Deploying AMQ Broker on OpenShift Container Platform using application templates
Starting in 7.8, the use of application templates for deploying AMQ Broker on OpenShift Container Platform is a deprecated feature. This feature will be removed in a future release. Red Hat continues to support existing deployments that are based on application templates. However, Red Hat does not recommend using application templates for new deployments. For new deployments, Red Hat recommends using the AMQ Broker Operator. For information on installing and deploying the Operator, see Chapter 3, Deploying AMQ Broker on OpenShift Container Platform using the AMQ Broker Operator.
The procedures in this section show:
- How to install the AMQ Broker image streams and application templates
- How to prepare a template-based broker deployment
- An example of using the OpenShift Container Platform web console to deploy a basic broker instance using an application template. For examples of deploying other broker configurations using templates, see template-based broker deployment examples.
7.1. Prerequisites
- You should have read the comparison of methods for deploying AMQ Broker on OpenShift Container Platform. For new deployments, Red Hat recommends using the AMQ Broker Operator. For more information, see Chapter 2, Planning a deployment of AMQ Broker on OpenShift Container Platform.
7.2. Installing the image streams and application templates
The AMQ Broker on OpenShift Container Platform image streams and application templates are not available in OpenShift Container Platform by default. You must manually install them using the procedure in this section. When you have completed the manual installation, you can then instantiate a template that enables you to deploy a chosen broker configuration on your OpenShift cluster. For examples of creating various broker configurations in this way, see Deploying AMQ Broker on OpenShift Container Platform using application templates and template-based broker deployment examples.
Procedure
At the command line, log in to OpenShift as a cluster administrator (or as a user that has namespace-specific administrator access for the global
openshiftproject namespace), for example:$ oc login -u system:admin $ oc project openshift
Using the
openshiftproject makes the image stream and application templates that you install later in this procedure globally available to all projects in your OpenShift cluster. If you want to explicitly specify that image streams and application templates are imported to theopenshiftproject, you can also add-n openshiftas an optional parameter with theoc replacecommands that you use later in the procedure.As an alternative to using the
openshiftproject (e.g., if a cluster administrator is unavailable), you can log in to a specific OpenShift project to which you have administrator access and in which you want to create a broker deployment, for example:$ oc login -u <USERNAME> $ oc project <PROJECT_NAME>
Logging into a specific project makes the image stream and templates that you install later in this procedure available only in that project’s namespace.
NoteAMQ Broker on OpenShift Container Platform uses StatefulSet resources with all
*-persistence*.yamltemplates. For templates that are not*-persistence*.yaml, AMQ Broker uses Deployments resources. Both types of resources are Kubernetes-native resources that can consume image streams only from the same project namespace in which the template will be instantiated.At the command line, run the following commands to import the broker image streams to your project namespace. Using the
--forceoption with theoc replacecommand updates the resources, or creates them if they don’t already exist.$ oc replace --force -f \ https://raw.githubusercontent.com/jboss-container-images/jboss-amq-7-broker-openshift-image/78-7.8.5.GA/amq-broker-7-image-streams.yaml
Run the following command to update the AMQ Broker application templates.
$ for template in amq-broker-78-basic.yaml \
amq-broker-78-ssl.yaml \
amq-broker-78-custom.yaml \
amq-broker-78-persistence.yaml \
amq-broker-78-persistence-ssl.yaml \
amq-broker-78-persistence-clustered.yaml \
amq-broker-78-persistence-clustered-ssl.yaml;
 do
 oc replace --force -f \
https://raw.githubusercontent.com/jboss-container-images/jboss-amq-7-broker-openshift-image/78-7.8.5.GA/templates/${template}
 done
7.3. Preparing a template-based broker deployment
Prerequisites
- Before deploying a broker instance on OpenShift Container Platform, you must have installed the AMQ Broker image streams and application templates. For more information, see Installing the image streams and application templates.
-
The following procedure assumes that the broker image stream and application templates you installed are available in the global
openshiftproject. If you installed the image and application templates in a specific project namespace, then continue to use that project instead of creating a new project such asamq-demo.
Procedure
Use the command prompt to create a new project:
$ oc new-project amq-demo
Create a service account to be used for the AMQ Broker deployment:
$ echo '{"kind": "ServiceAccount", "apiVersion": "v1", "metadata": {"name": "amq-service-account"}}' | oc create -f -Add the view role to the service account. The view role enables the service account to view all the resources in the amq-demo namespace, which is necessary for managing the cluster when using the OpenShift dns-ping protocol for discovering the broker cluster endpoints.
$ oc policy add-role-to-user view system:serviceaccount:amq-demo:amq-service-account
AMQ Broker requires a broker keystore, a client keystore, and a client truststore that includes the broker keystore. This example uses Java Keytool, a package included with the Java Development Kit, to generate dummy credentials for use with the AMQ Broker installation.
Generate a self-signed certificate for the broker keystore:
$ keytool -genkey -alias broker -keyalg RSA -keystore broker.ks
Export the certificate so that it can be shared with clients:
$ keytool -export -alias broker -keystore broker.ks -file broker_cert
Generate a self-signed certificate for the client keystore:
$ keytool -genkey -alias client -keyalg RSA -keystore client.ks
Create a client truststore that imports the broker certificate:
$ keytool -import -alias broker -keystore client.ts -file broker_cert
Use the broker keystore file to create the AMQ Broker secret:
$ oc create secret generic amq-app-secret --from-file=broker.ks
Link the secret to the service account created earlier:
$ oc secrets link sa/amq-service-account secret/amq-app-secret
7.4. Deploying a basic broker
The procedure in this section shows you how to deploy a basic broker that is ephemeral and does not support SSL.
This broker does not support SSL and is not accessible to external clients. Only clients running internally on the OpenShift cluster can connect to the broker. For examples of creating broker configurations that support SSL, see template-based broker deployment examples.
Prerequisites
- You have already prepared the broker deployment. See Preparing a template-based broker deployment.
-
The following procedure assumes that the broker image stream and application templates you installed in Installing the image streams and application templates are available in the global
openshiftproject. If you installed the image and application templates in a specific project namespace, then continue to use that project instead of creating a new project such asamq-demo. - Starting in AMQ Broker 7.3, you use a new version of the Red Hat Ecosystem Catalog to access container images. This new version of the registry requires you to become an authenticated user before you can access images and pull them into an OpenShift project. Before following the procedure in this section, you must first complete the steps described in Red Hat Container Registry Authentication.
7.4.1. Creating the broker application
Procedure
Log in to the
amq-demoproject space, or another, existing project in which you want to deploy a broker.$ oc login -u <USER_NAME> $ oc project <PROJECT_NAME>
Create a new broker application, based on the template for a basic broker. The broker created by this template is ephemeral and does not support SSL.
$ oc new-app --template=amq-broker-78-basic \
   -p AMQ_PROTOCOL=openwire,amqp,stomp,mqtt,hornetq \
   -p AMQ_QUEUES=demoQueue \
   -p AMQ_ADDRESSES=demoTopic \
   -p AMQ_USER=amq-demo-user \
   -p AMQ_PASSWORD=password \
The basic broker application template sets the environment variables shown in the following table.
Table 7.1. Basic broker application template Environment variable Display Name Value Description AMQ_PROTOCOL
AMQ Protocols
openwire,amqp,stomp,mqtt,hornetq
The protocols to be accepted by the broker
AMQ_QUEUES
Queues
demoQueue
Creates an anycast queue called demoQueue
AMQ_ADDRESSES
Addresses
demoTopic
Creates an address (or topic) called demoTopic. By default, this address has no assigned routing type.
AMQ_USER
AMQ Username
amq-demo-user
User name that the client uses to connect to the broker
AMQ_PASSWORD
AMQ Password
password
Password that the client uses with the user name to connect to the broker
7.4.2. About sensitive credentials
In the AMQ Broker application templates, the values of the following environment variables are stored in a secret:
- AMQ_USER
- AMQ_PASSWORD
- AMQ_CLUSTER_USER (clustered broker deployments)
- AMQ_CLUSTER_PASSWORD (clustered broker deployments)
- AMQ_TRUSTSTORE_PASSWORD (SSL-enabled broker deployments)
- AMQ_KEYSTORE_PASSWORD (SSL-enabled broker deployments)
To retrieve and use the values for these environment variables, the AMQ Broker application templates access the secret specified in the AMQ_CREDENTIAL_SECRET environment variable. By default, the secret name specified in this environment variable is amq-credential-secret. Even if you specify a custom value for any of these variables when deploying a template, OpenShift Container Platform uses the value currently stored in the named secret. Furthermore, the application templates always use the default values stored in amq-credential-secret unless you edit the secret to change the values, or create and specify a new secret with new values. You can edit a secret using the OpenShift command-line interface, as shown in this example:
$ oc edit secrets amq-credential-secret
Values in the amq-credential-secret use base64 encoding. To decode a value in the secret, use a command that looks like this:
$ echo 'dXNlcl9uYW1l' | base64 --decode
user_name
7.4.3. Deploying and starting the broker application
After the broker application is created, you need to deploy it. Deploying the application creates a Pod for the broker to run in.
Procedure
- Click Deployments in the OpenShift Container Platform web console.
- Click the broker-amq application.
Click Deploy.
NoteIf the application does not deploy, you can check the configuration by clicking the Events tab. If something is incorrect, edit the deployment configuration by clicking the Actions button.
After you deploy the broker application, inspect the current state of the broker Pod.
- Click DeploymentConfigs.
Click the broker-amq Pod and then click the Logs tab to verify the state of the broker. You should see the queue previously created via the application template.
If the logs show that:
- The broker is running, skip to step 9 of this procedure.
-
The broker logs have not loaded, and the Pod status shows
ErrImagePullorImagePullBackOff, your deployment configuration was not able to directly pull the specified broker image from the Red Hat Container Registry. In this case, continue to step 5 of this procedure.
To prepare the Pod for installation of the broker container image, scale the number of running brokers to
0.- Click → .
- Click → .
-
In the deployment config
.yamlfile, set the value of thereplicasattribute to0. -
Click
Save. - The pod restarts, with zero broker instances running.
Install the latest broker container image.
- In your web browser, navigate to the Red Hat Container Catalog.
-
In the search box, enter
AMQ Broker. Click Search. Choose an image repository based on the information in the following table.
Platform (Architecture) Container image name Repository name OpenShift Container Platform (amd64)
AMQ Broker or AMQ Broker for RHEL 8
amq7/amq-broker or amq7/amq-broker-rhel8
OpenShift Container Platform on IBM Z (s390x)
AMQ Broker for RHEL 8 on OpenJDK 11
amq7/amq-broker-openjdk-11-rhel8
OpenShift Container Platform on IBM Power Systems (ppc64le)
AMQ Broker for RHEL 8 on OpenJDK 11
amq7/amq-broker-openjdk-11-rhel8
For example, for the OpenShift Container Platform broker container image, click AMQ Broker. The
amq7/amq-brokerrepository opens, with the most recent image version automatically selected. If you want to change to an earlier image version, click the Tags tab and choose another version tag.- Click the Get This Image tab.
Under Authentication with registry tokens, review the on-page instructions in the Using OpenShift secrets section. The instructions describe how to add references to the broker image and the image pull secret name associated with the account used for authentication in the Red Hat Container Registry to your Pod deployment configuration file.
For example, to reference the broker image and pull secret in the
broker-amqdeployment configuration in theamq-demoproject namespace, include lines that look like the following:apiVersion: apps.openshift.io/v1 kind: DeploymentConfig .. metadata: name: broker-amq namespace: amq-demo .. spec: containers: name: broker-amq image: 'registry.redhat.io/amq7/amq-broker:7.8' .. imagePullSecrets: - name: {PULL-SECRET-NAME}- Click Save.
Import the latest broker image version to your project namespace. For example:
$ oc import-image amq7/amq-broker:7.8 --from=registry.redhat.io/amq7/amq-broker --confirm
Edit the
broker-amqdeployment config again, as previously described. Set the value of thereplicasattribute back to its original value.The broker Pod restarts, with all running brokers referencing the new broker image.
Click the Terminal tab to access a shell where you can start the broker and use the CLI to test sending and consuming messages.
sh-4.2$ ./broker/bin/artemis run
sh-4.2$ ./broker/bin/artemis producer --destination queue://demoQueue
Producer ActiveMQQueue[demoQueue], thread=0 Started to calculate elapsed time ...

Producer ActiveMQQueue[demoQueue], thread=0 Produced: 1000 messages
Producer ActiveMQQueue[demoQueue], thread=0 Elapsed time in second : 4 s
Producer ActiveMQQueue[demoQueue], thread=0 Elapsed time in milli second : 4584 milli seconds
sh-4.2$ ./broker/bin/artemis consumer --destination queue://demoQueue
Consumer:: filter = null
Consumer ActiveMQQueue[demoQueue], thread=0 wait until 1000 messages are consumed
Received 1000
Consumer ActiveMQQueue[demoQueue], thread=0 Consumed: 1000 messages
Consumer ActiveMQQueue[demoQueue], thread=0 Consumer thread finished
Alternatively, use the OpenShift client to access the shell using the Pod name, as shown in the following example.
// Get the Pod names and internal IP Addresses
$ oc get pods -o wide

// Access a broker Pod by name
$ oc rsh <broker-pod-name>
7.5. Connecting external clients to template-based broker deployments
This section describes how to configure SSL to enable connections from clients outside OpenShift Container Platform to brokers deployed using application templates.
7.5.1. Configuring SSL
For a minimal SSL configuration to allow connections outside of OpenShift Container Platform, AMQ Broker requires a broker keystore, a client keystore, and a client truststore that includes the broker keystore. The broker keystore is also used to create a secret for the AMQ Broker on OpenShift Container Platform image, which is added to the service account.
The following example commands use Java KeyTool, a package included with the Java Development Kit, to generate the necessary certificates and stores.
For a more complete example of deploying a broker instance that supports SSL, see Deploying a basic broker with SSL.
Procedure
Generate a self-signed certificate for the broker keystore:
$ keytool -genkey -alias broker -keyalg RSA -keystore broker.ks
Export the certificate so that it can be shared with clients:
$ keytool -export -alias broker -keystore broker.ks -file broker_cert
Generate a self-signed certificate for the client keystore:
$ keytool -genkey -alias client -keyalg RSA -keystore client.ks
Create a client truststore that imports the broker certificate:
$ keytool -import -alias broker -keystore client.ts -file broker_cert
Export the client’s certificate from the keystore:
$ keytool -export -alias client -keystore client.ks -file client_cert
Import the client’s exported certificate into a broker SERVER truststore:
$ keytool -import -alias client -keystore broker.ts -file client_cert
7.5.2. Generating the AMQ Broker secret
The broker keystore can be used to generate a secret for the namespace, which is also added to the service account so that the applications can be authorized.
Procedure
At the command line, run the following commands:
$ oc create secret generic <secret-name> --from-file=<broker-keystore> --from-file=<broker-truststore>
$ oc secrets link sa/<service-account-name> secret/<secret-name>
7.5.3. Creating an SSL Route
To enable client applications outside your OpenShift cluster to connnect to a broker, you need to create an SSL Route for the broker Pod. You can expose only SSL-enabled Routes to external clients because the OpenShift router requires Server Name Indication (SNI) to send traffic to the correct Service.
When you use an application template to deploy a broker on OpenShift Container Platform, you use the AMQ_PROTOCOL template parameter to specify the messaging protocols that the broker uses, in a comma-separated list. Available options are amqp, mqtt, openwire, stomp, and hornetq. If you do not specify any protocols, all protocols are made available.
For each messaging protocol that the broker uses, OpenShift exposes a dedicated port on the broker Pod. In addition, OpenShift automatically creates a multiplexed, all protocols port. Client applications outside OpenShift always use the multiplexed, all protocols port to connect to the broker, regardless of which of the supported protocols they are using.
Connections to the all protocols port are via a Service that OpenShift automatically creates, and an SSL Route that you create. A headless service within the broker Pod provides access to the other protocol-specific ports, which do not have their own Services and Routes that clients can access directly.
The ports that OpenShift exposes for the various AMQ Broker transport protocols are shown in the following table. Brokers listen on the non-SSL ports for traffic within the OpenShift cluster. Brokers listen on the SSL-enabled ports for traffic from clients outside OpenShift, if you created your deployment using an SSL-based (that is, *-ssl.yaml) template.
| AMQ Broker transport protocol | Default port |
|---|---|
| All protocols (OpenWire, AMQP, STOMP, MQTT, and HornetQ) | 61616 |
| All protocols -SSL (OpenWire AMQP, STOMP, MQTT, and HornetQ) | 61617 |
| AMQP | 5672 |
| AMQP (SSL) | 5671 |
| MQTT | 1883 |
| MQTT (SSL) | 8883 |
| STOMP | 61613 |
| STOMP (SSL) | 61612 |
Below are some other things to note when creating an SSL Route on your broker Pod:
When you create a Route, setting TLS Termination to Passthrough relays all communication to AMQ Broker without the OpenShift router decrypting and resending it.
NoteRegular HTTP traffic does not require a TLS passthrough Route because the OpenShift router uses
HAProxy, which is an HTTP proxy.External broker clients must specify the OpenShift router port (443, by default) when setting the broker URL for SSL connections. When a client connection specifies the OpenShift router port, the router determines the appropriate port on the broker Pod to which the client traffic should be directed.
NoteBy default, the OpenShift router uses port 443. However, the router might be configured to use a different port number, based on the value specified for the
ROUTER_SERVICE_HTTPS_PORTenvironment variable. For more information, see OpenShift Container Platform Routes.Including the failover protocol in the broker URL preserves the client connection in case the Pod is restarted or upgraded, or a disruption occurs on the router.
Both of the previous settings are shown in the example below.
...
factory.setBrokerURL("failover://ssl://<broker-pod-route-name>:443");
...
Additional resources
- For a complete example of deploying a broker that supports SSL and of creating an SSL Route to enable external client access, see Deploying a basic broker with SSL.
- For an example of creating Routes for clustered brokers to connect to their own instances of the AMQ Broker management console, see Creating routes for the AMQ Broker management console.
Chapter 8. Template-based broker deployment examples
Prerequisites
- These procedures assume an OpenShift Container Platform instance similar to that created in OpenShift Container Platform Getting Started.
- In the AMQ Broker application templates, the values of the AMQ_USER, AMQ_PASSWORD, AMQ_CLUSTER_USER, AMQ_CLUSTER_PASSWORD, AMQ_TRUSTSTORE_PASSWORD, and AMQ_KEYSTORE_PASSWORD environment variables are stored in a secret. To learn more about using and modifying these environment variables when you deploy a template in any of tutorials that follow, see About sensitive credentials.
The following procedures example how to use application templates to create various deployments of brokers.
8.1. Deploying a basic broker with SSL
Deploy a basic broker that is ephemeral and supports SSL.
8.1.1. Deploying the image and template
Prerequisites
- This tutorial builds upon Preparing a template-based broker deployment.
- Completion of the Deploying a basic broker tutorial is recommended.
Procedure
- Navigate to the OpenShift web console and log in.
-
Select the
amq-demoproject space. - Click Add to Project > Browse Catalog to list all of the default image streams and templates.
-
Use the Filter search bar to limit the list to those that match
amq. You might need to click See all to show the desired application template. -
Select the
amq-broker-78-ssltemplate which is labeledRed Hat AMQ Broker 7.8 (Ephemeral, with SSL). Set the following values in the configuration and click Create.
Table 8.1. Example template Environment variable Display Name Value Description AMQ_PROTOCOL
AMQ Protocols
openwire,amqp,stomp,mqtt,hornetq
The protocols to be accepted by the broker
AMQ_QUEUES
Queues
demoQueue
Creates an anycast queue called demoQueue
AMQ_ADDRESSES
Addresses
demoTopic
Creates an address (or topic) called demoTopic. By default, this address has no assigned routing type.
AMQ_USER
AMQ Username
amq-demo-user
The username the client uses
AMQ_PASSWORD
AMQ Password
password
The password the client uses with the username
AMQ_TRUSTSTORE
Trust Store Filename
broker.ts
The SSL truststore file name
AMQ_TRUSTSTORE_PASSWORD
Truststore Password
password
The password used when creating the Truststore
AMQ_KEYSTORE
AMQ Keystore Filename
broker.ks
The SSL keystore file name
AMQ_KEYSTORE_PASSWORD
AMQ Keystore Password
password
The password used when creating the Keystore
8.1.2. Deploying the application
After creating the application, deploy it to create a Pod and start the broker.
Procedure
- Click Deployments in the OpenShift Container Platform web console.
- Click the broker-amq deployment.
- Click Deploy to deploy the application.
Click the broker Pod and then click the Logs tab to verify the state of the broker.
If the broker logs have not loaded, and the Pod status shows
ErrImagePullorImagePullBackOff, your deployment configuration was not able to directly pull the specified broker image from the Red Hat Container Registry. In this case, edit your deployment configuration to reference the correct broker image name and the image pull secret name associated with the account used for authentication in the Red Hat Container Registry. Then, you can import the broker image and start the broker. To do this, complete steps similar to those in Deploying and starting the broker application.
8.1.3. Creating a Route
Create a Route for the broker so that clients outside of OpenShift Container Platform can connect using SSL. By default, the secured broker protocols are available through the 61617/TCP port. In addition, there are SSL and non-SSL ports exposed on the broker Pod for each messaging protocol that the broker supports. However, external client cannot connect directly to these ports on the broker. Instead, external clients connect to OpenShift via the Openshift router, which determines how to forward traffic to the appropriate port on the broker Pod.
If you scale your deployment up to multiple brokers in a cluster, you must manually create a Service and a Route for each broker, and then use each Service-and-Route combination to direct a given client to a given broker, or broker list. For an example of configuring multiple Services and Routes to connect clustered brokers to their own instances of the AMQ Broker management console, see Creating Routes for the AMQ Broker management console.
Prerequisites
- Before creating an SSL Route, you should understand how external clients use this Route to connect to the broker. For more information, see Creating an SSL Route.
Procedure
- Click → .
- Click → .
- To display the TLS parameters, select the Secure route check box.
- From the TLS Termination drop-down menu, choose Passthrough. This selection relays all communication to AMQ Broker without the OpenShift router decrypting and resending it.
To view the Route, click Routes. For example:
https://broker-amq-tcp-amq-demo.router.default.svc.cluster.local
This hostname will be used by external clients to connect to the broker using SSL with SNI.
Additional resources
- For more information about creating SSL Routes, see Creating an SSL Route.
- For more information on Routes in the OpenShift Container Platform, see Routes.
8.2. Deploying a basic broker with persistence and SSL
Deploy a persistent broker that supports SSL. When a broker needs persistence, the broker is deployed as a StatefulSet and stores messaging data on a persistent volume associated with the broker Pod via a persistent volume claim. When a broker Pod is created, it uses storage that remains in the event that you shut down the Pod, or if the Pod shuts down unexpectedly. This configuration means that messages are not lost, as they would be with a standard deployment.
Prerequisites
- This tutorial builds upon Preparing a template-based broker deployment.
- Completion of the Deploying a basic broker tutorial is recommended.
- You must have sufficient persistent storage provisioned to your OpenShift cluster to associate with your broker Pod via a persistent volume claim. For more information, see Understanding persistent storage (OpenShift Container Platform 4.5)
8.2.1. Deploy the image and template
Procedure
- Navigate to the OpenShift web console and log in.
-
Select the
amq-demoproject space. - Click → to list all of the default image streams and templates.
-
Use the Filter search bar to limit the list to those that match
amq. You might need to click See all to show the desired application template. -
Select the
amq-broker-78-persistence-ssltemplate, which is labelledRed Hat AMQ Broker 7.8 (Persistence, with SSL). Set the following values in the configuration and click create.
Table 8.2. Example template Environment variable Display Name Value Description AMQ_PROTOCOL
AMQ Protocols
openwire,amqp,stomp,mqtt,hornetq
The protocols to be accepted by the broker
AMQ_QUEUES
Queues
demoQueue
Creates an anycast queue called demoQueue
AMQ_ADDRESSES
Addresses
demoTopic
Creates an address (or topic) called demoTopic. By default, this address has no assigned routing type.
VOLUME_CAPACITY
AMQ Volume Size
1Gi
The persistent volume size created for the journal
AMQ_USER
AMQ Username
amq-demo-user
The username the client uses
AMQ_PASSWORD
AMQ Password
password
The password the client uses with the username
AMQ_TRUSTSTORE
Trust Store Filename
broker.ts
The SSL truststore file name
AMQ_TRUSTSTORE_PASSWORD
Truststore Password
password
The password used when creating the Truststore
AMQ_KEYSTORE
AMQ Keystore Filename
broker.ks
The SSL keystore file name
AMQ_KEYSTORE_PASSWORD
AMQ Keystore Password
password
The password used when creating the Keystore
8.2.2. Deploy the application
Once the application has been created it needs to be deployed. Deploying the application creates a Pod and starts the broker.
Procedure
- Click StatefulSets in the OpenShift Container Platform web console.
- Click the broker-amq deployment.
- Click Deploy to deploy the application.
Click the broker Pod and then click the Logs tab to verify the state of the broker. You should see the queue created via the template.
If the broker logs have not loaded, and the Pod status shows
ErrImagePullorImagePullBackOff, your configuration was not able to directly pull the specified broker image from the Red Hat Container Registry. In this case, edit your deployment configuration to reference the correct broker image name and the image pull secret name associated with the account used for authentication in the Red Hat Container Registry. Then, you can import the broker image and start the broker. To do this, complete steps similar to those in Deploying and starting the broker application.Click the Terminal tab to access a shell where you can use the CLI to send some messages.
sh-4.2$ ./broker/bin/artemis producer --destination queue://demoQueue
Producer ActiveMQQueue[demoQueue], thread=0 Started to calculate elapsed time ...

Producer ActiveMQQueue[demoQueue], thread=0 Produced: 1000 messages
Producer ActiveMQQueue[demoQueue], thread=0 Elapsed time in second : 4 s
Producer ActiveMQQueue[demoQueue], thread=0 Elapsed time in milli second : 4584 milli seconds

sh-4.2$ ./broker/bin/artemis consumer  --destination queue://demoQueue
Consumer:: filter = null
Consumer ActiveMQQueue[demoQueue], thread=0 wait until 1000 messages are consumed
Received 1000
Consumer ActiveMQQueue[demoQueue], thread=0 Consumed: 1000 messages
Consumer ActiveMQQueue[demoQueue], thread=0 Consumer thread finished
Alternatively, use the OpenShift client to access the shell using the Pod name, as shown in the following example.
// Get the Pod names and internal IP Addresses
oc get pods -o wide

// Access a broker Pod by name
oc rsh <broker-pod-name>
Now scale down the broker using the oc command.
$ oc scale statefulset broker-amq --replicas=0
statefulset "broker-amq" scaled
You can use the console to check that the Pod count is 0
Now scale the broker back up to
1.$ oc scale statefulset broker-amq --replicas=1 statefulset "broker-amq" scaled
Consume the messages again by using the terminal. For example:
sh-4.2$ broker/bin/artemis consumer --destination queue://demoQueue
Consumer:: filter = null
Consumer ActiveMQQueue[demoQueue], thread=0 wait until 1000 messages are consumed
Received 1000
Consumer ActiveMQQueue[demoQueue], thread=0 Consumed: 1000 messages
Consumer ActiveMQQueue[demoQueue], thread=0 Consumer thread finished
Additional resources
- For more information on managing stateful applications, see StatefulSets (external).
8.2.3. Creating a Route
Create a Route for the broker so that clients outside of OpenShift Container Platform can connect using SSL. By default, the broker protocols are available through the 61617/TCP port.
If you scale your deployment up to multiple brokers in a cluster, you must manually create a Service and a Route for each broker, and then use each Service-and-Route combination to direct a given client to a given broker, or broker list. For an example of configuring multiple Services and Routes to connect clustered brokers to their own instances of the AMQ Broker management console, see Creating Routes for the AMQ Broker management console.
Prerequisites
- Before creating an SSL Route, you should understand how external clients use this Route to connect to the broker. For more information, see Creating an SSL Route.
Procedure
- Click → .
- Click → .
- To display the TLS parameters, select the Secure route check box.
- From the TLS Termination drop-down menu, choose Passthrough. This selection relays all communication to AMQ Broker without the OpenShift router decrypting and resending it.
To view the Route, click Routes. For example:
https://broker-amq-tcp-amq-demo.router.default.svc.cluster.local
This hostname will be used by external clients to connect to the broker using SSL with SNI.
Additional resources
- For more information on Routes in the OpenShift Container Platform, see Routes.
8.3. Deploying a set of clustered brokers
Deploy a clustered set of brokers where each broker runs in its own Pod.
8.3.1. Distributing messages
Message distribution is configured to use ON_DEMAND. This means that when messages arrive at a clustered broker, the messages are distributed in a round-robin fashion to any broker that has consumers.
This message distribution policy safeguards against messages getting stuck on a specific broker while a consumer, connected either directly or through the OpenShift router, is connected to a different broker.
The redistribution delay is zero by default. If a message is on a queue that has no consumers, it will be redistributed to another broker.
When redistribution is enabled, messages can be delivered out of order.
8.3.2. Deploy the image and template
Prerequisites
- This procedure builds upon Preparing a template-based broker deployment.
- Completion of the Deploying a basic broker tutorial is recommended.
Procedure
- Navigate to the OpenShift web console and log in.
-
Select the
amq-demoproject space. - Click Add to Project > Browse catalog to list all of the default image streams and templates
-
Use the Filter search bar to limit the list to those that match
amq. Click See all to show the desired application template. -
Select the
amq-broker-78-persistence-clusteredtemplate which is labeledRed Hat AMQ Broker 7.8 (no SSL, clustered). Set the following values in the configuration and click create.
Table 8.3. Example template Environment variable Display Name Value Description AMQ_PROTOCOL
AMQ Protocols
openwire,amqp,stomp,mqtt,hornetq
The protocols to be accepted by the broker
AMQ_QUEUES
Queues
demoQueue
Creates an anycast queue called demoQueue
AMQ_ADDRESSES
Addresses
demoTopic
Creates an address (or topic) called demoTopic. By default, this address has no assigned routing type.
VOLUME_CAPACITY
AMQ Volume Size
1Gi
The persistent volume size created for the journal
AMQ_CLUSTERED
Clustered
true
This needs to be true to ensure the brokers cluster
AMQ_CLUSTER_USER
cluster user
generated
The username the brokers use to connect with each other
AMQ_CLUSTER_PASSWORD
cluster password
generated
The password the brokers use to connect with each other
AMQ_USER
AMQ Username
amq-demo-user
The username the client uses
AMQ_PASSWORD
AMQ Password
password
The password the client uses with the username
8.3.3. Deploying the application
Once the application has been created it needs to be deployed. Deploying the application creates a Pod and starts the broker.
Procedure
- Click StatefulSets in the OpenShift Container Platform web console.
- Click the broker-amq deployment.
Click Deploy to deploy the application.
NoteThe default number of replicas for a clustered template is 0. You should not see any Pods.
Scale up the Pods to three to create a cluster of brokers.
$ oc scale statefulset broker-amq --replicas=3
statefulset "broker-amq" scaled
Check that there are three Pods running.
$ oc get pods
NAME           READY     STATUS    RESTARTS   AGE
broker-amq-0   1/1       Running   0          33m
broker-amq-1   1/1       Running   0          33m
broker-amq-2   1/1       Running   0          29m
-
If the Pod status shows
ErrImagePullorImagePullBackOff, your deployment was not able to directly pull the specified broker image from the Red Hat Container Registry. In this case, edit your StatefulSet to reference the correct broker image name and the image pull secret name associated with the account used for authentication in the Red Hat Container Registry. Then, you can import the broker image and start the brokers. To do this, complete steps similar to those in Deploying and starting the broker application. Verify that the brokers have clustered with the new Pod by checking the logs.
$ oc logs broker-amq-2
This shows the logs of the new broker and an entry for a clustered bridge created between the brokers:
2018-08-29 07:43:55,779 INFO [org.apache.activemq.artemis.core.server] AMQ221027: Bridge ClusterConnectionBridge@1b0e9e9d [name=$.artemis.internal.sf.my-cluster.4333c830-ab5f-11e8-afb8-0a580a82006e, queue=QueueImpl[name=$.artemis.internal.sf.my-cluster.4333c830-ab5f-11e8-afb8-0a580a82006e, postOffice=PostOfficeImpl [server=ActiveMQServerImpl::serverUUID=9cedb69d-ab5e-11e8-87a4-0a580a82006c], temp=false]@5e0c0398 targetConnector=ServerLocatorImpl (identity=(Cluster-connection-bridge::ClusterConnectionBridge@1b0e9e9d [name=$.artemis.internal.sf.my-cluster.4333c830-ab5f-11e8-afb8-0a580a82006e, queue=QueueImpl[name=$.artemis.internal.sf.my-cluster.4333c830-ab5f-11e8-afb8-0a580a82006e, postOffice=PostOfficeImpl [server=ActiveMQServerImpl::serverUUID=9cedb69d-ab5e-11e8-87a4-0a580a82006c], temp=false]@5e0c0398 targetConnector=ServerLocatorImpl [initialConnectors=[TransportConfiguration(name=artemis, factory=org-apache-activemq-artemis-core-remoting-impl-netty-NettyConnectorFactory) ?port=61616&host=10-130-0-110], discoveryGroupConfiguration=null]]::ClusterConnectionImpl@806813022[nodeUUID=9cedb69d-ab5e-11e8-87a4-0a580a82006c, connector=TransportConfiguration(name=artemis, factory=org-apache-activemq-artemis-core-remoting-impl-netty-NettyConnectorFactory) ?port=61616&host=10-130-0-108, address=, server=ActiveMQServerImpl::serverUUID=9cedb69d-ab5e-11e8-87a4-0a580a82006c])) [initialConnectors=[TransportConfiguration(name=artemis, factory=org-apache-activemq-artemis-core-remoting-impl-netty-NettyConnectorFactory) ?port=61616&host=10-130-0-110], discoveryGroupConfiguration=null]] is connected
8.3.4. Creating Routes for the AMQ Broker management console
The clustering templates do not expose the AMQ Broker management console by default. This is because the OpenShift proxy performs load balancing across each broker in the cluster and it would not be possible to control which broker console is connected at a given time.
The following example procedure shows how to configure each broker in the cluster to connect to its own management console instance. You do this by creating a dedicated Service-and-Route combination for each broker Pod in the cluster.
Prerequisites
- You have already deployed a clustered set of brokers, where each broker runs in its own Pod. See Deploying a set of clustered brokers.
Procedure
Create a regular Service for each Pod in the cluster, using a StatefulSet selector to select between Pods. To do this, deploy a Service template, in
.yamlformat, that looks like the following:apiVersion: v1 kind: Service metadata: annotations: description: 'Service for the management console of broker pod XXXX' labels: app: application2 application: application2 template: amq-broker-78-persistence-clustered name: amq2-amq-console-XXXX namespace: amq75-p-c-ssl-2 spec: ports: - name: console-jolokia port: 8161 protocol: TCP targetPort: 8161 selector: deploymentConfig: application2-amq statefulset.kubernetes.io/pod-name: application2-amq-XXXX type: ClusterIPIn the preceding template, replace
XXXXwith the ordinal value of the broker Pod you want to associate with the Service. For example, to associate the Service with the first Pod in the cluster, setXXXXto0. To associate the Service with the second Pod, setXXXXto1, and so on.Save and deploy an instance of the template for each broker Pod in your cluster.
NoteIn the example template shown above, the selector uses the Kubernetes-defined Pod name.
Create a Route for each broker Pod, so that the AMQ Broker management console can connect to the Pod.
Click → .
The Edit Route page opens.
-
In the Services drop-down menu, select the previously created broker Service that you want to associate the Route with, for example,
amq2-amq-console-0. -
Set Target Port to
8161, to enable access for the AMQ Broker management console. To display the TLS parameters, select the Secure route check box.
From the TLS Termination drop-down menu, choose Passthrough.
This selection relays all communication to AMQ Broker without the OpenShift router decrypting and resending it.
Click Create.
When you create a Route associated with one of broker Pods, the resulting
.yamlfile includes lines that look like the following:spec: host: amq2-amq-console-0-amq75-p-c-2.apps-ocp311.example.com port: targetPort: console-jolokia tls: termination: passthrough to: kind: Service name: amq2-amq-console-0 weight: 100 wildcardPolicy: None
-
In the Services drop-down menu, select the previously created broker Service that you want to associate the Route with, for example,
- To access the management console for a specific broker instance, copy the host URL shown above to a web browser.
Additional resources
- For more information on the clustering of brokers see Configuring message redistribution.
8.4. Deploying a set of clustered SSL brokers
Deploy a clustered set of brokers, where each broker runs in its own Pod and the broker is configured to accept connections using SSL.
8.4.1. Distributing messages
Message distribution is configured to use ON_DEMAND. This means that when messages arrive at a clustered broker, the messages are distributed in a round-robin fashion to any broker that has consumers.
This message distribution policy safeguards against messages getting stuck on a specific broker while a consumer, connected either directly or through the OpenShift router, is connected to a different broker.
The redistribution delay is non-zero by default. If a message is on a queue that has no consumers, it will be redistributed to another broker.
When redistribution is enabled, messages can be delivered out of order.
8.4.2. Deploying the image and template
Prerequisites
- This procedure builds upon Preparing a template-based broker deployment.
- Completion of the Deploying a basic broker example is recommended.
Procedure
- Navigate to the OpenShift web console and log in.
-
Select the
amq-demoproject space. - Click Add to Project > Browse catalog to list all of the default image streams and templates.
-
Use the Filter search bar to limit the list to those that match
amq. Click See all to show the desired application template. -
Select the
amq-broker-78-persistence-clustered-ssltemplate which is labeledRed Hat AMQ Broker 7.8 (SSL, clustered). Set the following values in the configuration and click create.
Table 8.4. Example template Environment variable Display Name Value Description AMQ_PROTOCOL
AMQ Protocols
openwire,amqp,stomp,mqtt,hornetq
The protocols to be accepted by the broker
AMQ_QUEUES
Queues
demoQueue
Creates an anycast queue called demoQueue
AMQ_ADDRESSES
Addresses
demoTopic
Creates an address (or topic) called demoTopic. By default, this address has no assigned routing type.
VOLUME_CAPACITY
AMQ Volume Size
1Gi
The persistent volume size created for the journal
AMQ_CLUSTERED
Clustered
true
This needs to be true to ensure the brokers cluster
AMQ_CLUSTER_USER
cluster user
generated
The username the brokers use to connect with each other
AMQ_CLUSTER_PASSWORD
cluster password
generated
The password the brokers use to connect with each other
AMQ_USER
AMQ Username
amq-demo-user
The username the client uses
AMQ_PASSWORD
AMQ Password
password
The password the client uses with the username
AMQ_TRUSTSTORE
Trust Store Filename
broker.ts
The SSL truststore file name
AMQ_TRUSTSTORE_PASSWORD
Truststore Password
password
The password used when creating the Truststore
AMQ_KEYSTORE
AMQ Keystore Filename
broker.ks
The SSL keystore file name
AMQ_KEYSTORE_PASSWORD
AMQ Keystore Password
password
The password used when creating the Keystore
8.4.3. Deploying the application
Deploy after creating the application. Deploying the application creates a Pod and starts the broker.
Procedure
- Click StatefulSets in the OpenShift Container Platform web console.
- Click the broker-amq deployment.
Click Deploy to deploy the application.
NoteThe default number of replicas for a clustered template is
0, so you will not see any Pods.Scale up the Pods to three to create a cluster of brokers.
$ oc scale statefulset broker-amq --replicas=3
statefulset "broker-amq" scaled
Check that there are three Pods running.
$ oc get pods
NAME           READY     STATUS    RESTARTS   AGE
broker-amq-0   1/1       Running   0          33m
broker-amq-1   1/1       Running   0          33m
broker-amq-2   1/1       Running   0          29m
-
If the Pod status shows
ErrImagePullorImagePullBackOff, your deployment was not able to directly pull the specified broker image from the Red Hat Container Registry. In this case, edit your StatefulSet to reference the correct broker image name and the image pull secret name associated with the account used for authentication in the Red Hat Container Registry. Then, you can import the broker image and start the brokers. To do this, complete steps similar to those in Deploy and start the broker application. Verify the brokers have clustered with the new Pod by checking the logs.
$ oc logs broker-amq-2
This shows all the logs of the new broker and an entry for a clustered bridge created between the brokers, for example:
2018-08-29 07:43:55,779 INFO [org.apache.activemq.artemis.core.server] AMQ221027: Bridge ClusterConnectionBridge@1b0e9e9d [name=$.artemis.internal.sf.my-cluster.4333c830-ab5f-11e8-afb8-0a580a82006e, queue=QueueImpl[name=$.artemis.internal.sf.my-cluster.4333c830-ab5f-11e8-afb8-0a580a82006e, postOffice=PostOfficeImpl [server=ActiveMQServerImpl::serverUUID=9cedb69d-ab5e-11e8-87a4-0a580a82006c], temp=false]@5e0c0398 targetConnector=ServerLocatorImpl (identity=(Cluster-connection-bridge::ClusterConnectionBridge@1b0e9e9d [name=$.artemis.internal.sf.my-cluster.4333c830-ab5f-11e8-afb8-0a580a82006e, queue=QueueImpl[name=$.artemis.internal.sf.my-cluster.4333c830-ab5f-11e8-afb8-0a580a82006e, postOffice=PostOfficeImpl [server=ActiveMQServerImpl::serverUUID=9cedb69d-ab5e-11e8-87a4-0a580a82006c], temp=false]@5e0c0398 targetConnector=ServerLocatorImpl [initialConnectors=[TransportConfiguration(name=artemis, factory=org-apache-activemq-artemis-core-remoting-impl-netty-NettyConnectorFactory) ?port=61616&host=10-130-0-110], discoveryGroupConfiguration=null]]::ClusterConnectionImpl@806813022[nodeUUID=9cedb69d-ab5e-11e8-87a4-0a580a82006c, connector=TransportConfiguration(name=artemis, factory=org-apache-activemq-artemis-core-remoting-impl-netty-NettyConnectorFactory) ?port=61616&host=10-130-0-108, address=, server=ActiveMQServerImpl::serverUUID=9cedb69d-ab5e-11e8-87a4-0a580a82006c])) [initialConnectors=[TransportConfiguration(name=artemis, factory=org-apache-activemq-artemis-core-remoting-impl-netty-NettyConnectorFactory) ?port=61616&host=10-130-0-110], discoveryGroupConfiguration=null]] is connected
Additional resources
- To learn how to configure each broker in the cluster to connect to its own management console instance, see Creating Routes for the AMQ Broker management console.
- For more information about messaging in a broker cluster, see Enabling Message Redistribution.
8.5. Deploying a broker with custom configuration
Deploy a broker with custom configuration. Although functionality can be obtained by using templates, broker configuration can be customized if needed.
Prerequisites
- This tutorial builds upon Preparing a template-based broker deployment.
- Completion of the Deploying a basic broker tutorial is recommended.
8.5.1. Deploy the image and template
Procedure
- Navigate to the OpenShift web console and log in.
-
Select the
amq-demoproject space. - Click Add to Project > Browse catalog to list all of the default image streams and templates.
-
Use the Filter search bar to limit results to those that match
amq. Click See all to show the desired application template. -
Select the
amq-broker-78-customtemplate which is labeledRed Hat AMQ Broker 7.8(Ephemeral, no SSL). In the configuration, update
broker.xmlwith the custom configuration you would like to use. Click Create.NoteUse a text editor to create the broker’s XML configuration. Then, cut and paste confguration details into the
broker.xmlfield.NoteOpenShift Container Platform does not use a
ConfigMapobject to store the custom configuration that you specify in thebroker.xmlfield, as is common for many applications deployed on this platform. Instead, OpenShift temporarily stores the specified configuration in an environment variable, before transferring the configuration to a standalone file when the broker container starts.
8.5.2. Deploy the application
Once the application has been created it needs to be deployed. Deploying the application creates a Pod and starts the broker.
Procedure
- Click Deployments in the OpenShift Container Platform web console.
- Click the broker-amq deployment
- Click Deploy to deploy the application.
8.6. Basic SSL client example
Implement a client that sends and receives messages from a broker configured to use SSL, using the Qpid JMS client.
Prerequisites
- This tutorial builds upon Preparing a template-based broker deployment.
- Completion of the Deploying a basic broker with SSL tutorial is recommended.
- AMQ JMS Examples
8.6.1. Configuring the client
Create a sample client that can be updated to connect to the SSL broker. The following procedure builds upon AMQ JMS Examples.
Procedure
Add an entry into your /etc/hosts file to map the route name onto the IP address of the OpenShift cluster:
10.0.0.1 broker-amq-tcp-amq-demo.router.default.svc.cluster.local
Update the jndi.properties configuration file to use the route, truststore and keystore created previously, for example:
connectionfactory.myFactoryLookup = amqps://broker-amq-tcp-amq-demo.router.default.svc.cluster.local:8443?transport.keyStoreLocation=<keystore-path>client.ks&transport.keyStorePassword=password&transport.trustStoreLocation=<truststore-path>/client.ts&transport.trustStorePassword=password&transport.verifyHost=false
Update the jndi.properties configuration file to use the queue created earlier.
queue.myDestinationLookup = demoQueue
- Execute the sender client to send a text message.
Execute the receiver client to receive the text message. You should see:
Received message: Message Text!
8.7. External clients using sub-domains example
Expose a clustered set of brokers through a node port and connect to it using the core JMS client. This enables clients to connect to a set of brokers which are configured using the amq-broker-78-persistence-clustered-ssl template.
8.7.1. Exposing the brokers
Configure the brokers so that the cluster of brokers are externally available and can be connected to directly, bypassing the OpenShift router. This is done by creating a route that exposes each pod using its own hostname.
Prerequisites
Procedure
- Choose import YAML/JSON from Add to Project drop down
Enter the following and click create.
apiVersion: v1 kind: Route metadata: labels: app: broker-amq application: broker-amq name: tcp-ssl spec: port: targetPort: ow-multi-ssl tls: termination: passthrough to: kind: Service name: broker-amq-headless weight: 100 wildcardPolicy: Subdomain host: star.broker-ssl-amq-headless.amq-demo.svcNoteThe important configuration here is the wildcard policy of
Subdomain. This allows each broker to be accessible through its own hostname.
8.7.2. Connecting the clients
Create a sample client that can be updated to connect to the SSL broker. The steps in this procedure build upon the AMQ JMS Examples.
Procedure
Add entries into the /etc/hosts file to map the route name onto the actual IP addresses of the brokers:
10.0.0.1 broker-amq-0.broker-ssl-amq-headless.amq-demo.svc broker-amq-1.broker-ssl-amq-headless.amq-demo.svc broker-amq-2.broker-ssl-amq-headless.amq-demo.svc
Update the jndi.properties configuration file to use the route, truststore, and keystore created previously, for example:
connectionfactory.myFactoryLookup = amqps://broker-amq-0.broker-ssl-amq-headless.amq-demo.svc:443?transport.keyStoreLocation=/home/ataylor/projects/jboss-amq-7-broker-openshift-image/client.ks&transport.keyStorePassword=password&transport.trustStoreLocation=/home/ataylor/projects/jboss-amq-7-broker-openshift-image/client.ts&transport.trustStorePassword=password&transport.verifyHost=false
Update the jndi.properties configuration file to use the queue created earlier.
queue.myDestinationLookup = demoQueue
- Execute the sender client code to send a text message.
Execute the receiver client code to receive the text message. You should see:
Received message: Message Text!
Additional resources
- For more information on using the AMQ JMS client, see AMQ JMS Examples.
8.8. External clients using port binding example
Expose a clustered set of brokers through a NodePort and connect to it using the core JMS client. This enables clients that do not support SNI or SSL. It is used with clusters configured using the amq-broker-78-persistence-clustered template.
8.8.1. Exposing the brokers
Configure the brokers so that the cluster of brokers are externally available and can be connected to directly, bypassing the OpenShift router. This is done by creating a service that uses a NodePort to load balance around the clusters.
Prerequisites
Procedure
- Choose import YAML/JSON from Add to Project drop down.
Enter the following and click create.
apiVersion: v1 kind: Service metadata: annotations: description: The broker's OpenWire port. service.alpha.openshift.io/dependencies: >- [{"name": "broker-amq-amqp", "kind": "Service"},{"name": "broker-amq-mqtt", "kind": "Service"},{"name": "broker-amq-stomp", "kind": "Service"}] creationTimestamp: '2018-08-29T14:46:33Z' labels: application: broker template: amq-broker-78-statefulset-clustered name: broker-external-tcp namespace: amq-demo resourceVersion: '2450312' selfLink: /api/v1/namespaces/amq-demo/services/broker-amq-tcp uid: 52631fa0-ab9a-11e8-9380-c280f77be0d0 spec: externalTrafficPolicy: Cluster ports: - nodePort: 30001 port: 61616 protocol: TCP targetPort: 61616 selector: deploymentConfig: broker-amq sessionAffinity: None type: NodePort status: loadBalancer: {}NoteThe NodePort configuration is important. The NodePort is the port in which the client will access the brokers and the type is NodePort.
8.8.2. Connecting the clients
Create consumers that are round-robinned around the brokers in the cluster using the AMQ broker CLI.
Procedure
In a terminal create a consumer and attach it to the IP address where OpenShift is running.
artemis consumer --url tcp://<IP_ADDRESS>:30001 --message-count 100 --destination queue://demoQueue
Repeat step 1 twice to start another two consumers.
NoteYou should now have three consumers load balanced across the three brokers.
Create a producer to send messages.
artemis producer --url tcp://<IP_ADDRESS>:30001 --message-count 300 --destination queue://demoQueue
Verify each consumer receives messages.
Consumer:: filter = null
Consumer ActiveMQQueue[demoQueue], thread=0 wait until 100 messages are consumed
Consumer ActiveMQQueue[demoQueue], thread=0 Consumed: 100 messages
Consumer ActiveMQQueue[demoQueue], thread=0 Consumer thread finished
Chapter 9. Upgrading a template-based broker deployment
The following procedures show how to upgrade the broker container image for a deployment that is based on application templates.
To upgrade an existing AMQ Broker deployment on OpenShift Container Platform 3.11 to run on OpenShift Container Platform 4.5 or later, you must first upgrade your OpenShift Container Platform installation, before performing a clean installation of AMQ Broker that matches your existing deployment. To perform a clean AMQ Broker installation, use one of these methods:
The procedures show how to manually upgrade your image specifications between minor versions (for example, from
7.xto7.y). If you use a floating tag such as7.yin your image specification, your deployment automatically pulls and uses new micro image versions (that is,7.y-z) when they become available from Red Hat, provided that theimagePullPolicyattribute in your StatefulSet or DeploymentConfig is set toAlways.For example, suppose that the
imageattribute of your deployment specifies a floating tag of7.8. If the deployment currently uses minor version7.8-5, and a newer minor version,7.8-6, becomes available in the registry, then your deployment automatically pulls and uses the new minor version. To use the new image, each broker Pod in the deployment is restarted. If you have multiple brokers in your deployment, brokers Pods are restarted one at a time.
9.1. Upgrading non-persistent broker deployments
This procedure shows you how to upgrade a non-persistent broker deployment. The non-persistent broker templates in the OpenShift Container Platform service catalog have labels that resemble the following:
- Red Hat AMQ Broker 7.x (Ephemeral, no SSL)
- Red Hat AMQ Broker 7.x (Ephemeral, with SSL)
- Red Hat AMQ Broker 7.x (Custom Config, Ephemeral, no SSL)
Prerequisites
- Starting in AMQ Broker 7.3, you use a new version of the Red Hat Ecosystem Catalog to access container images. This new version of the registry requires you to become an authenticated user before you can access images and pull them into an OpenShift project. Before following the procedure in this section, you must first complete the steps described in Red Hat Container Registry Authentication.
Procedure
- Navigate to the OpenShift Container Platform web console and log in.
- Click the project in which you want to upgrade a non-persistent broker deployment.
Select the DeploymentConfig (DC) corresponding to your broker deployment.
- In OpenShift Container Platform 4.5 or later, click → .
- In OpenShift Container Platform 3.11, click → . Within your broker deployment, click the Configuration tab.
From the Actions menu, click Edit DeploymentConfig (OpenShift Container Platform 4.5 or later) or Edit YAML (OpenShift Container Platform 3.11).
The YAML tab of the DeploymentConfig opens, with the
.yamlfile in an editable mode.-
Edit the
imageattribute to specify the latest AMQ Broker 7.8 container image,registry.redhat.io/amq7/amq-broker:7.8. Add the
imagePullSecretsattribute to specify the image pull secret associated with the account used for authentication in the Red Hat Container Registry.Changes based on the previous two steps are shown in the example below:
... spec: containers: image: 'registry.redhat.io/amq7/amq-broker:7.8' .. imagePullSecrets: - name: {PULL-SECRET-NAME}NoteIn AMQ Broker, container image tags increment by
1for each new version of the container image added to the Red Hat image registry, for example, 7.8-1, 7.8-2, and so on. If you specify a tag name without a final digit (7.8, for example), this tag is known as a floating tag. When you specify a floating tag, OpenShift Container Platform automatically identifies the most recent available image (that is, the image tag with the highest final number) and uses this image to upgrade your broker deployment.Click Save.
If a newer broker image than the one currently installed is available from Red Hat, OpenShift Container Platform upgrades your broker deployment. To do this, OpenShift Container Platform stops the existing broker Pod and then starts a new Pod that uses the new image.
9.2. Upgrading persistent broker deployments
This procedure shows you how to upgrade a persistent broker deployment. The persistent broker templates in the OpenShift Container Platform service catalog have labels that resemble the following:
- Red Hat AMQ Broker 7.x (Persistence, clustered, no SSL)
- Red Hat AMQ Broker 7.x (Persistence, clustered, with SSL)
- Red Hat AMQ Broker 7.x (Persistence, with SSL)
Prerequisites
- Starting in AMQ Broker 7.3, you use a new version of the Red Hat Ecosystem Catalog to access container images. This new version of the registry requires you to become an authenticated user before you can access images and pull them into an OpenShift project. Before following the procedure in this section, you must first complete the steps described in Red Hat Container Registry Authentication.
Procedure
- Navigate to the OpenShift Container Platform web console and log in.
- Click the project in which you want to upgrade a persistent broker deployment.
Select the StatefulSet (SS) corresponding to your broker deployment.
- In OpenShift Container Platform 4.5 or later, click → .
- In OpenShift Container Platform 3.11, click → .
From the Actions menu, click Edit StatefulSet (OpenShift Container Platform 4.5 or later) or Edit YAML (OpenShift Container Platform 3.11).
The YAML tab of the StatefulSet opens, with the
.yamlfile in an editable mode.To prepare your broker deployment for upgrade, scale the deployment down to zero brokers.
-
If the
replicasattribute is currently set to1or greater, set it to0. - Click Save.
-
If the
-
When all broker Pods have shut down, edit the StatefulSet
.yamlfile again. Edit theimageattribute to specify the latest AMQ Broker 7.8 container image,registry.redhat.io/amq7/amq-broker:7.8. Add the
imagePullSecretsattribute to specify the image pull secret associated with the account used for authentication in the Red Hat Container Registry.Changes based on the previous two steps are shown in the example below:
... spec: containers: image: 'registry.redhat.io/amq7/amq-broker:7.8' .. imagePullSecrets: - name: {PULL-SECRET-NAME}-
Set the
replicasattribute back to the original value. Click Save.
If a newer broker image than the one currently installed is available from Red Hat, OpenShift Container Platform upgrades your broker deployment. To do this, OpenShift Container Platform restarts the broker Pod.
Chapter 10. Monitoring your brokers
10.1. Viewing brokers in Fuse Console
You can configure an Operator-based broker deployment to use Fuse Console for OpenShift instead of the AMQ Management Console. When you have configured your broker deployment appropriately, Fuse Console discovers the brokers and displays them on a dedicated Artemis tab. You can view the same broker runtime data that you do in the AMQ Management Console. You can also perform the same basic management operations, such as creating addresses and queues.
The following procedure describes how to configure the Custom Resource (CR) instance for a broker deployment to enable Fuse Console for OpenShift to discover and display brokers in the deployment.
Viewing brokers from Fuse Console is a Technology Preview feature only. Technology Preview features are not supported with Red Hat production service level agreements (SLAs) and might not be functionally complete. Red Hat does not recommend using them in production. These features provide early access to upcoming product features, enabling customers to test functionality and provide feedback during the development process. For more information about the support scope of Red Hat Technology Preview features, see Technology Preview Features Support Scope.
Prerequisites
- Fuse Console for OpenShift must be deployed to an OCP cluster, or to a specific namespace on that cluster. If you have deployed the console to a specific namespace, your broker deployment must be in the same namespace, to enable the console to discover the brokers. Otherwise, it is sufficient for Fuse Console and the brokers to be deployed on the same OCP cluster. For more information on installing Fuse Online on OCP, see Installing and Operating Fuse Online on OpenShift Container Platform.
- You must have already created a broker deployment. For example, to learn how to use a Custom Resource (CR) instance to create a basic Operator-based deployment, see Section 3.4.1, “Deploying a basic broker instance”.
Procedure
Open the CR instance that you used for your broker deployment. For example, the CR for a basic deployment might resemble the following:
apiVersion: broker.amq.io/v2alpha4
kind: ActiveMQArtemis
metadata:
  name: ex-aao
  application: ex-aao-app
spec:
    version: 7.8.0
    deploymentPlan:
        size: 4
        image: registry.redhat.io/amq7/amq-broker:7.8
        ...
In the
deploymentPlansection, add thejolokiaAgentEnabledandmanagementRBACEnabledproperties and specify values, as shown below.apiVersion: broker.amq.io/v2alpha4 kind: ActiveMQArtemis metadata: name: ex-aao application: ex-aao-app spec: version: 7.8.0 deploymentPlan: size: 4 image: registry.redhat.io/amq7/amq-broker:7.8 ... jolokiaAgentEnabled: true managementRBACEnabled: false- jolokiaAgentEnabled
-
Specifies whether Fuse Console can discover and display runtime data for the brokers in the deployment. To use Fuse Console, set the value to
true. - managementRBACEnabled
Specifies whether role-based access control (RBAC) is enabled for the brokers in the deployment. You must set the value to
falseto use Fuse Console because Fuse Console uses its own role-based access control.ImportantIf you set the value of
managementRBACEnabledtofalseto enable use of Fuse Console, management MBeans for the brokers no longer require authorization. You should not use the AMQ management console whilemanagementRBACEnabledis set tofalsebecause this potentially exposes all management operations on the brokers to unauthorized use.
- Save the CR instance.
Switch to the project in which you previously created your broker deployment.
$ oc project <project-name>At the command line, apply the change.
$ oc apply -f <path/to/custom-resource-instance>.yaml- In Fuse Console, to view Fuse applications, click the Online tab. To view running brokers, in the left navigation menu, click Artemis.
Additional resources
- For more information about using Fuse Console for OpenShift, see Monitoring and managing Red Hat Fuse applications on OpenShift.
- To learn about using AMQ Management Console to view and manage brokers in the same way that you can in Fuse Console, see Managing brokers using AMQ Management Console.
10.2. Monitoring broker runtime metrics using Prometheus
The sections that follow describe how to configure the Prometheus metrics plugin for AMQ Broker on OpenShift Container Platform. You can use the plugin to monitor and store broker runtime metrics. You might also use a graphical tool such as Grafana to configure more advanced visualizations and dashboards of the data that the Prometheus plugin collects.
The Prometheus metrics plugin enables you to collect and export broker metrics in Prometheus format. However, Red Hat does not provide support for installation or configuration of Prometheus itself, nor of visualization tools such as Grafana. If you require support with installing, configuring, or running Prometheus or Grafana, visit the product websites for resources such as community support and documentation.
10.2.1. Metrics overview
To monitor the health and performance of your broker instances, you can use the Prometheus plugin for AMQ Broker to monitor and store broker runtime metrics. The AMQ Broker Prometheus plugin exports the broker runtime metrics to Prometheus format, enabling you to use Prometheus itself to visualize and run queries on the data.
You can also use a graphical tool, such as Grafana, to configure more advanced visualizations and dashboards for the metrics that the Prometheus plugin collects.
The metrics that the plugin exports to Prometheus format are described below.
Broker metrics
artemis_address_memory_usage- Number of bytes used by all addresses on this broker for in-memory messages.
artemis_address_memory_usage_percentage-
Memory used by all the addresses on this broker as a percentage of the
global-max-sizeparameter. artemis_connection_count- Number of clients connected to this broker.
artemis_total_connection_count- Number of clients that have connected to this broker since it was started.
Address metrics
artemis_routed_message_count- Number of messages routed to one or more queue bindings.
artemis_unrouted_message_count- Number of messages not routed to any queue bindings.
Queue metrics
artemis_consumer_count- Number of clients consuming messages from a given queue.
artemis_delivering_durable_message_count- Number of durable messages that a given queue is currently delivering to consumers.
artemis_delivering_durable_persistent_size- Persistent size of durable messages that a given queue is currently delivering to consumers.
artemis_delivering_message_count- Number of messages that a given queue is currently delivering to consumers.
artemis_delivering_persistent_size- Persistent size of messages that a given queue is currently delivering to consumers.
artemis_durable_message_count- Number of durable messages currently in a given queue. This includes scheduled, paged, and in-delivery messages.
artemis_durable_persistent_size- Persistent size of durable messages currently in a given queue. This includes scheduled, paged, and in-delivery messages.
artemis_messages_acknowledged- Number of messages acknowledged from a given queue since the queue was created.
artemis_messages_added- Number of messages added to a given queue since the queue was created.
artemis_message_count- Number of messages currently in a given queue. This includes scheduled, paged, and in-delivery messages.
artemis_messages_killed- Number of messages removed from a given queue since the queue was created. The broker kills a message when the message exceeds the configured maximum number of delivery attempts.
artemis_messages_expired- Number of messages expired from a given queue since the queue was created.
artemis_persistent_size- Persistent size of all messages (both durable and non-durable) currently in a given queue. This includes scheduled, paged, and in-delivery messages.
artemis_scheduled_durable_message_count- Number of durable, scheduled messages in a given queue.
artemis_scheduled_durable_persistent_size- Persistent size of durable, scheduled messages in a given queue.
artemis_scheduled_message_count- Number of scheduled messages in a given queue.
artemis_scheduled_persistent_size- Persistent size of scheduled messages in a given queue.
For higher-level broker metrics that are not listed above, you can calculate these by aggregating lower-level metrics. For example, to calculate total message count, you can aggregate the artemis_message_count metrics from all queues in your broker deployment.
For an on-premise deployment of AMQ Broker, metrics for the Java Virtual Machine (JVM) hosting the broker are also exported to Prometheus format. This does not apply to a deployment of AMQ Broker on OpenShift Container Platform.
10.2.2. Enabling the Prometheus plugin for a running broker deployment
This procedure shows how to enable the Prometheus plugin for a broker Pod in a given deployment.
Prerequisites
- You can enable the Prometheus plugin for a broker Pod created with application templates or with the AMQ Broker Operator. However, your deployed broker must use the broker container image for AMQ Broker 7.5 or later. For more information about ensuring that your broker deployment uses the latest broker container image, see Chapter 9, Upgrading a template-based broker deployment.
Procedure
- Log in to the OpenShift Container Platform web console with administrator privileges for the project that contains your broker deployment.
- In the web console, click → (OpenShift Container Platform 4.5 or later) or the drop-down list in the top-left corner (OpenShift Container Platform 3.11). Choose the project that contains your broker deployment.
To see the StatefulSets or DeploymentConfigs in your project, click:
- → or → (OpenShift Container Platform 4.5 or later).
- → or → (OpenShift Container Platform 3.11).
- Click the StatefulSet or DeploymentConfig that corresponds to your broker deployment.
- To access the environment variables for your broker deployment, click the Environment tab.
Add a new environment variable,
AMQ_ENABLE_METRICS_PLUGIN. Set the value of the variable totrue.When you set the
AMQ_ENABLE_METRICS_PLUGINenvironment variable, OpenShift restarts each broker Pod in the StatefulSet or DeploymentConfig. When there are multiple Pods in the deployment, OpenShift restarts each Pod in turn. When each broker Pod restarts, the Prometheus plugin for that broker starts to gather broker runtime metrics.
The AMQ_ENABLE_METRICS_PLUGIN environment variable is included by default in the application templates for AMQ Broker 7.5 or later. To enable the plugin for each broker in a new template-based deployment, ensure that the value of AMQ_ENABLE_METRICS_PLUGIN is set to true when deploying the application template.
Additional resources
- For information about installing the latest application templates, see Section 7.2, “Installing the image streams and application templates”
10.2.3. Accessing Prometheus metrics for a running broker Pod
This procedure shows how to access Prometheus metrics for a running broker Pod.
Prerequisites
- You must have already enabled the Prometheus plugin for your broker Pod. See Section 10.2.2, “Enabling the Prometheus plugin for a running broker deployment”.
Procedure
For the broker Pod whose metrics you want to access, you need to identify the Route you previously created to connect the Pod to the AMQ Broker management console. The Route name forms part of the URL needed to access the metrics.
- Click → (OpenShift Container Platform 4.5 or later) or → (OpenShift Container Platform 3.11).
For your chosen broker Pod, identify the Route created to connect the Pod to the AMQ Broker management console. Under Hostname, note the complete URL that is shown. For example:
http://rte-console-access-pod1.openshiftdomain
To access Prometheus metrics, in a web browser, enter the previously noted Route name appended with
“/metrics”. For example:http://rte-console-access-pod1.openshiftdomain/metrics
If your console configuration does not use SSL, specify http in the URL. In this case, DNS resolution of the host name directs traffic to port 80 of the OpenShift router. If your console configuration uses SSL, specify https in the URL. In this case, your browser defaults to port 443 of the OpenShift router. This enables a successful connection to the console if the OpenShift router also uses port 443 for SSL traffic, which the router does by default.
10.3. Monitoring broker runtime data using JMX
This example shows how to monitor a broker using the Jolokia REST interface to JMX.
Prerequisites
- This example builds upon Preparing a template-based broker deployment.
- Completion of Deploying a basic broker is recommended.
Procedure
Get the list of running pods:
$ oc get pods

NAME                 READY     STATUS    RESTARTS   AGE
broker-amq-1-ftqmk   1/1       Running   0          14d
Run the
oc logscommand:$ oc logs -f broker-amq-1-ftqmk Running /amq-broker-71-openshift image, version 1.3-5 INFO: Loading '/opt/amq/bin/env' INFO: Using java '/usr/lib/jvm/java-1.8.0/bin/java' INFO: Starting in foreground, this is just for debugging purposes (stop process by pressing CTRL+C) ... INFO | Listening for connections at: tcp://broker-amq-1-ftqmk:61616?maximumConnections=1000&wireFormat.maxFrameSize=104857600 INFO | Connector openwire started INFO | Starting OpenShift discovery agent for service broker-amq-tcp transport type tcp INFO | Network Connector DiscoveryNetworkConnector:NC:BrokerService[broker-amq-1-ftqmk] started INFO | Apache ActiveMQ 5.11.0.redhat-621084 (broker-amq-1-ftqmk, ID:broker-amq-1-ftqmk-41433-1491445582960-0:1) started INFO | For help or more information please see: http://activemq.apache.org WARN | Store limit is 102400 mb (current store usage is 0 mb). The data directory: /opt/amq/data/kahadb only has 9684 mb of usable space - resetting to maximum available disk space: 9684 mb WARN | Temporary Store limit is 51200 mb, whilst the temporary data directory: /opt/amq/data/broker-amq-1-ftqmk/tmp_storage only has 9684 mb of usable space - resetting to maximum available 9684 mb.
Run your query to monitor your broker for
MaxConsumers:$ curl -k -u admin:admin http://console-broker.amq-demo.apps.example.com/console/jolokia/read/org.apache.activemq.artemis:broker=%22broker%22,component=addresses,address=%22TESTQUEUE%22,subcomponent=queues,routing-type=%22anycast%22,queue=%22TESTQUEUE%22/MaxConsumers {"request":{"mbean":"org.apache.activemq.artemis:address=\"TESTQUEUE\",broker=\"broker\",component=addresses,queue=\"TESTQUEUE\",routing-type=\"anycast\",subcomponent=queues","attribute":"MaxConsumers","type":"read"},"value":-1,"timestamp":1528297825,"status":200}
Chapter 11. Reference
11.1. Custom Resource configuration reference
A Custom Resource Definition (CRD) is a schema of configuration items for a custom OpenShift object deployed with an Operator. By deploying a corresponding Custom Resource (CR) instance, you specify values for configuration items shown in the CRD.
The following sub-sections detail the configuration items that you can set in Custom Resource instances based on the main broker and addressing CRDs.
11.1.1. Broker Custom Resource configuration reference
A CR instance based on the main broker CRD enables you to configure brokers for deployment in an OpenShift project. The following table describes the items that you can configure in the CR instance.
Configuration items marked with an asterisk (*) are required in any corresponding Custom Resource (CR) that you deploy. If you do not explicitly specify a value for a non-required item, the configuration uses the default value.
| Entry | Sub-entry | Description and usage |
|---|---|---|
|
| Administrator user name required for connecting to the broker and management console.
If you do not specify a value, the value is automatically generated and stored in a secret. The default secret name has a format of Type: string Example: my-user Default value: Automatically-generated, random value | |
|
| Administrator password required for connecting to the broker and management console.
If you do not specify a value, the value is automatically generated and stored in a secret. The default secret name has a format of Type: string Example: my-password Default value: Automatically-generated, random value | |
|
| Broker deployment configuration | |
|
| Full path of the broker container image used for each broker in the deployment.
You do not need to explicitly specify a value for To learn how the Operator chooses a broker container image to use, see Section 2.4, “How the Operator chooses container images”. Type: string Example: registry.redhat.io/amq7/amq-broker@sha256:4d60775cd384067147ab105f41855b5a7af855c4d9cbef1d4dea566cbe214558 Default value: placeholder | |
|
| Number of broker Pods to create in the deployment.
If you specify a value of 2 or greater, your broker deployment is clustered by default. The cluster user name and password are automatically generated and stored in the same secret as Type: int Example: 1 Default value: 2 | |
|
| Specify whether login credentials are required to connect to the broker. Type: Boolean Example: false Default value: true | |
|
|
Specify whether to use journal storage for each broker Pod in the deployment. If set to Type: Boolean Example: false Default value: true | |
|
| Init Container image used to configure the broker.
You do not need to explicitly specify a value for To learn how the Operator chooses a built-in Init Container image to use, see Section 2.4, “How the Operator chooses container images”. To learn how to specify a custom Init Container image, see Section 4.5, “Specifying a custom Init Container image”. Type: string Example: registry.redhat.io/amq7/amq-broker-init-rhel7@sha256:f7482d07ecaa78d34c37981447536e6f73d4013ec0c64ff787161a75e4ca3567 Default value: Not specified | |
|
| Specify whether to use asynchronous I/O (AIO) or non-blocking I/O (NIO). Type: string Example: aio Default value: nio | |
|
| When a broker Pod shuts down due to a failure or intentional scaledown of the broker deployment, specify whether to migrate messages to another broker Pod that is still running in the broker cluster. Type: Boolean Example: false Default value: true | |
|
| Maximum amount of host-node CPU, in millicores, that each broker container running in a Pod in a deployment can consume. Type: string Example: "500m" Default value: Uses the same default value that your version of OpenShift Container Platform uses. Consult a cluster administrator. | |
|
| Maximum amount of host-node memory, in bytes, that each broker container running in a Pod in a deployment can consume. Supports byte notation (for example, K, M, G), or the binary equivalents (Ki, Mi, Gi). Type: string Example: "1024M" Default value: Uses the same default value that your version of OpenShift Container Platform uses. Consult a cluster administrator. | |
|
| Amount of host-node CPU, in millicores, that each broker container running in a Pod in a deployment explicitly requests. Type: string Example: "250m" Default value: Uses the same default value that your version of OpenShift Container Platform uses. Consult a cluster administrator. | |
|
| Amount of host-node memory, in bytes, that each broker container running in a Pod in a deployment explicitly requests. Supports byte notation (for example, K, M, G), or the binary equivalents (Ki, Mi, Gi). Type: string Example: "512M" Default value: Uses the same default value that your version of OpenShift Container Platform uses. Consult a cluster administrator. | |
|
|
Size, in bytes, of the Persistent Volume Claim (PVC) that each broker in a deployment requires for persistent storage. This property applies only when Type: string Example: 4Gi Default value: 2Gi | |
|
|
Specifies whether the Jolokia JVM Agent is enabled for the brokers in the deployment. If the value of this property is set to Type: Boolean Example: true Default value: false | |
|
|
Specifies whether role-based access control (RBAC) is enabled for the brokers in the deployment. To use Fuse Console, you must set the value to Type: Boolean Example: false Default value: true | |
|
| Configuration of broker management console. | |
|
| Specify whether to expose the management console port for each broker in a deployment. Type: Boolean Example: true Default value: false | |
|
| Specify whether to use SSL on the management console port. Type: Boolean Example: true Default value: false | |
|
|
Secret where broker key store, trust store, and their corresponding passwords (all Base64-encoded) are stored. If you do not specify a value for Type: string Example: my-broker-deployment-console-secret Default value: Not specified | |
|
| Specify whether the management console requires client authorization. Type: Boolean Example: true Default value: false | |
|
| A single acceptor configuration instance. | |
|
| Name of acceptor. Type: string Example: my-acceptor Default value: Not applicable | |
|
| Port number to use for the acceptor instance. Type: int Example: 5672 Default value: 61626 for the first acceptor that you define. The default value then increments by 10 for every subsequent acceptor that you define. | |
|
| Messaging protocols to be enabled on the acceptor instance. Type: string Example: amqp,core Default value: all | |
|
|
Specify whether SSL is enabled on the acceptor port. If set to Type: Boolean Example: true Default value: false | |
|
| Secret where broker key store, trust store, and their corresponding passwords (all Base64-encoded) are stored.
If you do not specify a custom secret name for You must always create this secret yourself, even when the acceptor assumes a default name. Type: string Example: my-broker-deployment-my-acceptor-secret Default value: <custom_resource_name>-<acceptor_name>-secret | |
|
| Comma-separated list of cipher suites to use for TLS/SSL communication.
Specify the most secure cipher suite(s) supported by your client application. If you use a comma-separated list to specify a set of cipher suites that is common to both the broker and the client, or you do not specify any cipher suites, the broker and client mutually negotiate a cipher suite to use. If you do not know which cipher suites to specify, it is recommended that you first establish a broker-client connection with your client running in debug mode, to verify the cipher suites that are common to both the broker and the client. Then, configure Type: string Default value: Not specified | |
|
| Comma-separated list of protocols to use for TLS/SSL communication. Type: string Example: TLSv1,TLSv1.1,TLSv1.2 Default value: Not specified | |
|
|
Specify whether the broker informs clients that two-way TLS is required on the acceptor. This property overrides Type: Boolean Example: true Default value: Not specified | |
|
|
Specify whether the broker informs clients that two-way TLS is requested on the acceptor, but not required. This property is overridden by Type: Boolean Example: true Default value: Not specified | |
|
| Specify whether to compare the Common Name (CN) of a client’s certificate to its host name, to verify that they match. This option applies only when two-way TLS is used. Type: Boolean Example: true Default value: Not specified | |
|
| Specify whether the SSL provider is JDK or OPENSSL. Type: string Example: OPENSSL Default value: JDK | |
|
|
Regular expression to match against the Type: string Example: some_regular_expression Default value: Not specified | |
|
| Specify whether to expose the acceptor to clients outside OpenShift Container Platform. When you expose an acceptor to clients outside OpenShift, the Operator automatically creates a dedicated Service and Route for each broker Pod in the deployment. Type: Boolean Example: true Default value: false | |
|
|
Prefix used by a client to specify that the Type: string Example: jms.queue Default value: Not specified | |
|
|
Prefix used by a client to specify that the Type: string Example: /topic/ Default value: Not specified | |
|
| Number of connections allowed on the acceptor. When this limit is reached, a DEBUG message is issued to the log, and the connection is refused. The type of client in use determines what happens when the connection is refused. Type: integer Example: 2 Default value: 0 (unlimited connections) | |
|
|
Minimum message size, in bytes, required for the broker to handle an AMQP message as a large message. If the size of an AMQP message is equal or greater to this value, the broker stores the message in a large messages directory ( Type: integer Example: 204800 Default value: 102400 (100 KB) | |
|
| A single connector configuration instance. | |
|
| Name of connector. Type: string Example: my-connector Default value: Not applicable | |
|
|
The type of connector to create; Type: string Example: vm Default value: tcp | |
|
| Host name or IP address to connect to. Type: string Example: 192.168.0.58 Default value: Not specified | |
|
| Port number to be used for the connector instance. Type: int Example: 22222 Default value: Not specified | |
|
|
Specify whether SSL is enabled on the connector port. If set to Type: Boolean Example: true Default value: false | |
|
| Secret where broker key store, trust store, and their corresponding passwords (all Base64-encoded) are stored.
If you do not specify a custom secret name for You must always create this secret yourself, even when the connector assumes a default name. Type: string Example: my-broker-deployment-my-connector-secret Default value: <custom_resource_name>-<connector_name>-secret | |
|
| Comma-separated list of cipher suites to use for TLS/SSL communication. Type: string NOTE: For a connector, it is recommended that you do not specify a list of cipher suites. Default value: Not specified | |
|
| Comma-separated list of protocols to use for TLS/SSL communication. Type: string Example: TLSv1,TLSv1.1,TLSv1.2 Default value: Not specified | |
|
|
Specify whether the broker informs clients that two-way TLS is required on the connector. This property overrides Type: Boolean Example: true Default value: Not specified | |
|
|
Specify whether the broker informs clients that two-way TLS is requested on the connector, but not required. This property is overridden by Type: Boolean Example: true Default value: Not specified | |
|
| Specify whether to compare the Common Name (CN) of client’s certificate to its host name, to verify that they match. This option applies only when two-way TLS is used. Type: Boolean Example: true Default value: Not specified | |
|
|
Specify whether the SSL provider is Type: string Example: OPENSSL Default value: JDK | |
|
|
Regular expression to match against the Type: string Example: some_regular_expression Default value: Not specified | |
|
| Specify whether to expose the connector to clients outside OpenShift Container Platform. Type: Boolean Example: true Default value: false | |
|
| Specifies how the Operator applies the configuration that you add to the CR for each matching address or set of addresses. The values that you can specify are:
Type: string Example: replace_all Default value: merge_all | |
|
| Address settings for a matching address or set of addresses. | |
|
|
Specify what happens when an address configured with
Type: string Example: DROP Default value: PAGE | |
|
| Specify whether the broker automatically creates an address when a client sends a message to, or attempts to consume a message from, a queue that is bound to an address that does not exist. Type: Boolean Example: false Default value: true | |
|
| Specify whether the broker automatically creates a dead letter address and queue to receive undelivered messages.
If the parameter is set to Type: Boolean Example: true Default value: false | |
|
| Specify whether the broker automatically creates an address and queue to receive expired messages.
If the parameter is set to Type: Boolean Example: true Default value: false | |
|
|
This property is deprecated. Use | |
|
|
This property is deprecated. Use | |
|
| Specify whether the broker automatically creates a queue when a client sends a message to, or attempts to consume a message from, a queue that does not yet exist. Type: Boolean Example: false Default value: true | |
|
| Specify whether the broker automatically deletes automatically-created addresses when the broker no longer has any queues. Type: Boolean Example: false Default value: true | |
|
| Time, in milliseconds, that the broker waits before automatically deleting an automatically-created address when the address has no queues. Type: integer Example: 100 Default value: 0 | |
|
|
This property is deprecated. Use | |
|
|
This property is deprecated. Use | |
|
| Specify whether the broker automatically deletes an automatically-created queue when the queue has no consumers and no messages. Type: Boolean Example: false Default value: true | |
|
| Specify whether the broker automatically deletes a manually-created queue when the queue has no consumers and no messages. Type: Boolean Example: true Default value: false | |
|
| Time, in milliseconds, that the broker waits before automatically deleting an automatically-created queue when the queue has no consumers. Type: integer Example: 10 Default value: 0 | |
|
| Maximum number of messages that can be in a queue before the broker evaluates whether the queue can be automatically deleted. Type: integer Example: 5 Default value: 0 | |
|
| When the configuration file is reloaded, this parameter specifies how to handle an address (and its queues) that has been deleted from the configuration file. You can specify the following values:
Type: string Example: FORCE Default value: OFF | |
|
| When the configuration file is reloaded, this setting specifies how the broker handles queues that have been deleted from the configuration file. You can specify the following values:
Type: string Example: FORCE Default value: OFF | |
|
| The address to which the broker sends dead (that is, undelivered) messages. Type: string Example: DLA Default value: None | |
|
| Prefix that the broker applies to the name of an automatically-created dead letter queue. Type: string Example: myDLQ. Default value: DLQ. | |
|
| Suffix that the broker applies to an automatically-created dead letter queue. Type: string Example: .DLQ Default value: None | |
|
| Routing type used on automatically-created addresses. Type: string Example: ANYCAST Default value: MULTICAST | |
|
| Number of consumers needed before message dispatch can begin for queues on an address. Type: integer Example: 5 Default value: 0 | |
|
| Default window size, in bytes, for a consumer. Type: integer Example: 300000 Default value: 1048576 (1024*1024) | |
|
|
Default time, in milliseconds, that the broker waits before dispatching messages if the value specified for Type: integer Example: 5 Default value: -1 (no delay) | |
|
| Specifies whether all queues on an address are exclusive queues by default. Type: Boolean Example: true Default value: false | |
|
| Number of buckets to use for message grouping. Type: integer Example: 0 (message grouping disabled) Default value: -1 (no limit) | |
|
| Key used to indicate to a consumer which message in a group is first. Type: string Example: firstMessageKey Default value: None | |
|
| Specifies whether to rebalance groups when a new consumer connects to the broker. Type: Boolean Example: true Default value: false | |
|
| Specifies whether to pause message dispatch while the broker is rebalancing groups. Type: Boolean Example: true Default value: false | |
|
| Specifies whether all queues on an address are last value queues by default. Type: Boolean Example: true Default value: false | |
|
| Default key to use for a last value queue. Type: string Example: stock_ticker Default value: None | |
|
| Maximum number of consumers allowed on a queue at any time. Type: integer Example: 100 Default value: -1 (no limit) | |
|
| Specifies whether all queues on an address are non-destructive by default. Type: Boolean Example: true Default value: false | |
|
| Specifies whether the broker purges the contents of a queue once there are no consumers. Type: Boolean Example: true Default value: false | |
|
|
Routing type used on automatically-created queues. The default value is Type: string Example: ANYCAST Default value: MULTICAST | |
|
| Default ring size for a matching queue that does not have a ring size explicitly set. Type: integer Example: 3 Default value: -1 (no size limit) | |
|
| Specifies whether a configured metrics plugin such as the Prometheus plugin collects metrics for a matching address or set of addresses. Type: Boolean Example: false Default value: true | |
|
| Address that receives expired messages. Type: string Example: myExpiryAddress Default value: None | |
|
| Expiration time, in milliseconds, applied to messages that are using the default expiration time. Type: integer Example: 100 Default value: -1 (no expiration time applied) | |
|
| Prefix that the broker applies to the name of an automatically-created expiry queue. Type: string Example: myExp. Default value: EXP. | |
|
| Suffix that the broker applies to the name of an automatically-created expiry queue. Type: string Example: .EXP Default value: None | |
|
| Specify whether a queue uses only last values or not. Type: Boolean Example: true Default value: false | |
|
| Specify how many messages a management resource can browse. Type: integer Example: 100 Default value: 200 | |
|
| String that matches address settings to addresses configured on the broker. You can specify an exact address name or use a wildcard expression to match the address settings to a set of addresses.
If you use a wildcard expression as a value for the Type: string Example: 'myAddresses*' Default value: None | |
|
| Specifies how many times the broker attempts to deliver a message before sending the message to the configured dead letter address. Type: integer Example: 20 Default value: 10 | |
|
| Expiration time, in milliseconds, applied to messages that are using an expiration time greater than this value. Type: integer Example: 20 Default value: -1 (no maximum expiration time applied) | |
|
| Maximum value, in milliseconds, between message redelivery attempts made by the broker. Type: integer Example: 100
Default value: The default value is ten times the value of | |
|
|
Maximum memory size, in bytes, for an address. Used when Type: string Example: 10Mb Default value: -1 (no limit) | |
|
|
Maximum size, in bytes, that an address can reach before the broker begins to reject messages. Used when the Type: integer Example: 500 Default value: -1 (no maximum size) | |
|
| Number of days for which a broker keeps a message counter history for an address. Type: integer Example: 5 Default value: 0 | |
|
| Expiration time, in milliseconds, applied to messages that are using an expiration time lower than this value. Type: integer Example: 20 Default value: -1 (no minimum expiration time applied) | |
|
| Number of page files to keep in memory to optimize I/O during paging navigation. Type: integer Example: 10 Default value: 5 | |
|
|
Paging size in bytes. Also supports byte notation such as Type: string Example: 20971520 Default value: 10485760 (approximately 10.5 MB) | |
|
| Time, in milliseconds, that the broker waits before redelivering a cancelled message. Type: integer Example: 100 Default value: 0 | |
|
|
Multiplying factor to apply to the value of Type: number Example: 5 Default value: 1 | |
|
|
Multiplying factor to apply to the value of Type: number Example: 1.1 Default value: 0 | |
|
| Time, in milliseconds, that the broker waits after the last consumer is closed on a queue before redistributing any remaining messages. Type: integer Example: 100 Default value: -1 (not set) | |
|
| Number of messages to keep for future queues created on an address. Type: integer Example: 100 Default value: 0 | |
|
| Specify whether a message will be sent to the configured dead letter address if it cannot be routed to any queues. Type: Boolean Example: true Default value: false | |
|
| How often, in seconds, that the broker checks for slow consumers. Type: integer Example: 15 Default value: 5 | |
|
|
Specifies what happens when a slow consumer is identified. Valid options are Type: string Example: KILL Default value: NOTIFY | |
|
| Minimum rate of message consumption, in messages per second, before a consumer is considered slow. Type: integer Example: 100 Default value: -1 (not set) | |
|
| ||
|
|
When you update the value of Type: Boolean Example: true Default value: false | |
|
|
Specify whether to allow the Operator to automatically update the Type: Boolean Example: true Default value: false | |
|
|
Specify a target minor version of AMQ Broker for which you want the Operator to automatically update the CR to use a corresponding broker container image. For example, if you change the value of Type: string Example: 7.7.0 Default value: Current version of AMQ Broker |
11.1.2. Address Custom Resource configuration reference
A CR instance based on the address CRD enables you to define addresses and queues for the brokers in your deployment. The following table details the items that you can configure.
Configuration items marked with an asterisk (*) are required in any corresponding Custom Resource (CR) that you deploy. If you do not explicitly specify a value for a non-required item, the configuration uses the default value.
| Entry | Description and usage |
|---|---|
|
| Address name to be created on broker. Type: string Example: address0 Default value: Not specified |
|
| Queue name to be created on broker. Type: string Example: queue0 Default value: Not specified |
|
|
Specify whether the Operator removes existing addresses for all brokers in a deployment when you remove the address CR instance for that deployment. The default value is Type: Boolean Example: true Default value: false |
|
|
Routing type to be used; Type: string Example: anycast Default value: Not specified |
11.2. Application template parameters
Configuration of the AMQ Broker on OpenShift Container Platform image is performed by specifying values of application template parameters. You can configure the following parameters:
| Parameter | Description |
|---|---|
|
| Specifies the addresses available by default on the broker on its startup, in a comma-separated list. |
|
| Specifies the anycast prefix applied to the multiplexed protocol ports 61616 and 61617. |
|
| Enables clustering. |
|
| Specifies the password to use for clustering. The AMQ Broker application templates use the value of this parameter stored in the secret named in AMQ_CREDENTIAL_SECRET. |
|
| Specifies the cluster user to use for clustering. The AMQ Broker application templates use the value of this parameter stored in the secret named in AMQ_CREDENTIAL_SECRET. |
|
| Specifies the secret in which sensitive credentials such as broker user name/password, cluster user name/password, and truststore and keystore passwords are stored. |
|
| Specifies the directory for the data. Used in StatefulSets. |
|
| Specifies the directory for the data directory logging. |
|
|
Specifies additional arguments to pass to |
|
| Specifies the maximum amount of memory that message data can consume. If no value is specified, half of the system’s memory is allocated. |
|
| Specifies the SSL keystore file name. If no value is specified, a random password is generated but SSL will not be configured. |
|
| (Optional) Specifies the password used to decrypt the SSL keystore. The AMQ Broker application templates use the value of this parameter stored in the secret named in AMQ_CREDENTIAL_SECRET. |
|
|
Specifies the directory where the secrets are mounted. The default value is |
|
| For SSL only, specifies the maximum number of connections that an acceptor will accept. |
|
| Specifies the multicast prefix applied to the multiplexed protocol ports 61616 and 61617. |
|
|
Specifies the name of the broker instance. The default value is |
|
| Specifies the password used for authentication to the broker. The AMQ Broker application templates use the value of this parameter stored in the secret named in AMQ_CREDENTIAL_SECRET. |
|
|
Specifies the messaging protocols used by the broker in a comma-separated list. Available options are |
|
| Specifies the queues available by default on the broker on its startup, in a comma-separated list. |
|
|
If set to |
|
|
Specifies the name for the role created. The default value is |
|
| Specifies the SSL truststore file name. If no value is specified, a random password is generated but SSL will not be configured. |
|
| (Optional) Specifies the password used to decrypt the SSL truststore. The AMQ Broker application templates use the value of this parameter stored in the secret named in AMQ_CREDENTIAL_SECRET. |
|
| Specifies the user name used for authentication to the broker. The AMQ Broker application templates use the value of this parameter stored in the secret named in AMQ_CREDENTIAL_SECRET. |
|
| Specifies the name of the application used internally within OpenShift. It is used in names of services, pods, and other objects within the application. |
|
|
Specifies the image. Used in the |
|
|
Specifies the image stream name space. Used in the |
|
| Specifies the port number for the OpenShift DNS ping service. |
|
|
Specifies the name of the OpenShift DNS ping service. The default value is |
|
| Specifies the size of the persistent storage for database volumes. |
If you use broker.xml for a custom configuration, any values specified in that file for the following parameters will override values specified for the same parameters in the your application templates.
- AMQ_NAME
- AMQ_ROLE
- AMQ_CLUSTER_USER
- AMQ_CLUSTER_PASSWORD
11.3. Logging
In addition to viewing the OpenShift logs, you can troubleshoot a running AMQ Broker on OpenShift Container Platform image by viewing the AMQ logs that are output to the container’s console.
Procedure
- At the command line, run the following command:
$ oc logs -f <pass:quotes[<pod-name>]> <pass:quotes[<container-name>]>
Revised on 2022-08-19 13:14:15 UTC